

Page 1

TM
MicroFlip
100x–250x Zoom
Pocket Microscope
Instructions for Use
PDF: www.carson.com/MP250guide
English / Français / Español / Deutsch /日本語
MP-250
Page 2

Table of Contents
Right Side Diagram ....................................2
Left Side Diagram .......................................3
Installing the Battery
Using the microscope to view:
Objects Directly ...........................................4
Using the microscope to view:
Specimen Slides
Adjusting Zoom & Focus ..........................6
UV Light ..........................................................6
Using the Adapter Clip .............................7
Multiple-Lens Camera Phone.................8
Storage/Safety
Customer Service ........................................8
.................................3
..........................................5
formation ....................8
In
Carson Optical
2070 5th Avenue
Ronkonkoma, NY 11779
2
Right Side
UV light switch
Zooming dial
Battery door
Base plate
LED
Objective lens
UV light
Page 3
Left Side
Adapt
er clip
Eyepiece
LED switch
Focusing ring
Installing the battery
Fig.1
Slide open the battery door.
Fig.2
Install 1 (one) AA alkaline
battery with the correct
polarity.
Fig.3
Attach the batter y door.
3
Page 4

Using the microscope to view:
OBJECTS DIRECTLY
Fig.4 Fig.5 Fig.6
Press the LED switch to turn on the LED. Make sure the base plate sits behind the
WARNING
Do not look directly at
4
LED light.
batter y door in the upright position.
Place the viewing object direc tly below
the objective lens.
Page 5

Using the microscope to view:
SPECIMEN SLIDES
Fig.7 Fig.8 Fig.9
Press the LED switch to turn on the LED. Flip the b ase plate down so that it sits on
the base of the microscop e.
Insert the specimen slide (included) into
the slot between the objective lens and
the base plate.
5
Page 6

Adjusting zoom & focus UV light
Fig.10 Fi g.11 Fig.12
Adjust the zooming dial to the desired
level of magnication.
6
Rotate the fo cusing ring until the image is
sharp and clear.
Press and hold the UV light switch to
activate the UV light.
NOTE: The UV light i s deactivated when the
base plate is ip ped down to the base of the
microscope.
WARNING
Do not look directly at UV light.
Page 7

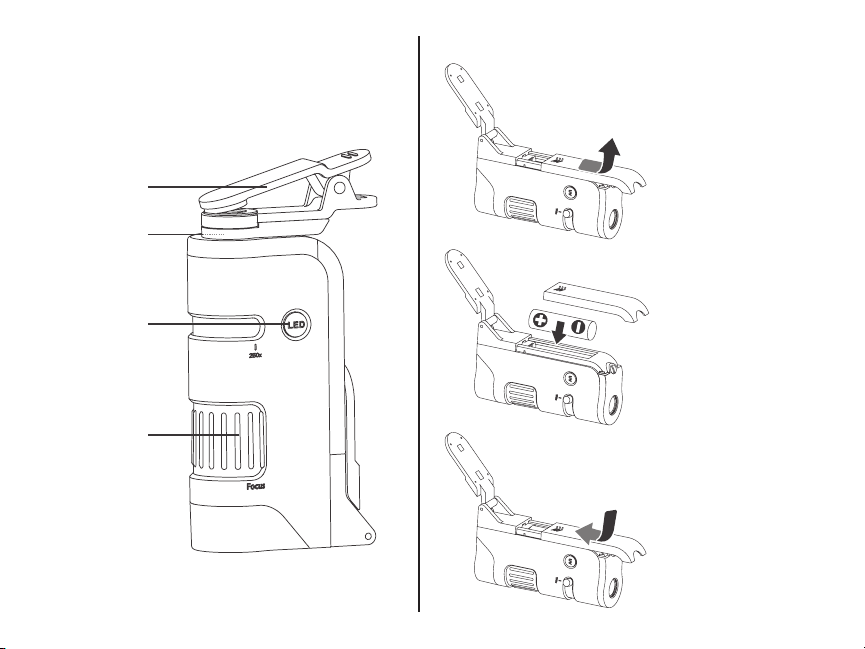
Using the adapter clipUV light
Fig.13
lign the camera of the
A
the center of the circular hole of
the adapter clip.
phone to
Fig.14
Attach the adapter clip to the
top of the microscope as
shown in Fig. 14 and turn on
camera. Refer to pages 4-5
for procedures of using the
microscope.
If viewing image is not
centered or is not a complete
round image, adjust adapter
clip making sure it is
centered over camera.
WARNING:
Always hold the phone securely during use. If
you release the phone while it is attached to the
microscope it may fall and damage the phone.
Fig.15
To maximize your image,
pinch screen to enlarge.
For best results, use in
video mode.
7
Page 8

MULTIPLE-LENS CAMERA PHONE: If there is more than one rear-facing camera, use the primary one. Typically,
the primary is a 1x wide-angle color camera, and the other camera(s) are secondary.
For Apple dual camera phones, the primary camera is the one closest to the corner. Use photo or video mode
only.
For Android, the primary camera can be determined by which does not show an image in your app while blocking
the individual camera.
For the latest instructions on multiple camera phones, please visit www.carson.com/multicam.
Storage/Safety Information:
•
Turn off the LED at the end of the observatio
•
Remove the battery before storing
•
To avoid possible permanent eye damage, do not look at the sun or bright objects with the microscope, nor
place the lighted microscope directly upon human eye.
The device may get warm after extended period of use. This is normal and should not be considered a defect.
•
•
Inspect all batteries for signs of corrosion or leakage. Do not expose to fire or excessive heat. Use alkaline
batteries only, rechargeable batteries are not recommended.
the microscope for an extended period.
n by pressing the LED switch.
Customer Service:
If you experience any difficulties, please contact us and we will be happy to help you.
In the U.S.A.
Phone: 1-800-967-8427
Email: info@carson.com
For warranty information, visit www.carson.com/warranty
Phone: +44 (0) 1938 557440
Email: uksupport@carson.com
In the U.K.
In the E.U.
Phone: +44 (0) 1938 557440
Email: eusupport@carson.com
8
MP-250 / ©2018
 Loading...