

Page 1

CARSON Helikopter MARINES HM-38 50 050 7025
Instruction Manual Page 2 - 24
쮕 Betriebsanleitung Seite 25 - 47
Mode d‘emploi Page 48 - 70
Instrucciones Página 71 - 93
Istruzioni d‘uso Pagina 94 - 115
RADIO CONTROLLED DOUBLE KOAXIAL HELICOPTER RTF
Page 2
2
GB
CARSON Helikopter MARINES HM-38 50 050 7025
Dear Customer
We congratulate you for buying this CARSON RC model
helicopter, which is designed using state of the art technology.
According to our policy of steady development and
improvement of our products we reserve the right to make
changes in specifications concerning equipment, materials and
design of this product at any time without notice.
Specifications or designs of the actual product may vary from
those shown in this manual or on the box.
The manual forms part of this product. Should you ignore the
operating and safety instructions, the warranty will be void.
Keep this guide for future reference.
Limited Warranty
This product is warranted by CARSON against manufacturing
defects in materials and workmanship under normal use for 24
months from the date of purchase from authorised franchisees
and dealers. In the event of a product defect during the
warranty period, return the product along with your receipt as
proof of purchase to any CARSON store. CARSON will, at its
option, unless otherwise provided by law:
(a) Correct the defect by repairing the product without charging
for parts and labour
(b) replace the product with one of the same or similar design;
or
(c) refund the purchase price.
All replaced parts and products, and products on which a
refund is made, become the property of CARSON. New or
reconditioned parts and products may be used in the
performance of warranty services. Repaired or replaced parts
and products are warranted for the remainder of the original
warranty period. You will be charged for repair or replacement
of the product made after the expiration of the warranty period.
The Warranty does not cover:
• damage or failure caused by or attributable to acts of God,
abuse, accident, misuse, improper or abnormal usage,
failure to follow instructions, improper installation or
maintenance, alteration, lightning or other incidence of
excess voltage or current;
• damage caused by losing control of your model;
• any repairs other than those provided by a CARSON
Authorised Service Facility;
• consumables such as fuses or batteries;
• cosmetic damage;
• transportation, shipping or insurance costs; or
• costs of product removal, installation, set-up service
adjustment or reinstallation
This warranty gives you specific legal rights, and you may also
have other rights which may vary according to the country of
purchase.
Declaration of conformity
Dickie-TAMIYA GmbH&Co KG hereby declares that this model
kit with radio, motor, battery and charger is in accordance with
the basic requirements of the following European directives:
98/37EG and 89/336/EWG and other relevant regulations of
guideline 1999/5/EG (R&TTE). The original declaration of
conformity can be obtained from the following address in
Germany:
Dickie-Tamiya GmbH&Co. KG • Werkstraße l • D-90765 Fürth •
Germany
Tel.: +49/ (0)911/ 9765-03
The product you have purchased is powered by a
rechargeable lithium-polymer, NiCd or NiMH battery.
The battery is recyclable. At the end of its useful life,
under various national / state and local laws, it may
be illegal to dispose of this battery into the
municipal waste stream.
Check with your local solid waste officials for details
in your area for recycling options or proper disposal.
We wish you good luck and a lot of fun with your CARSON
model helicopter!
Before driving your new model carefully read these instructions!
Page 3

3CARSON Helikopter MARINES HM-38 50 050 7025
GB
Contents
Included items
• Model built ready-to-fly
• Cabin hood, already mounted
• 4-channel remote control transmitter 2.4 GHz
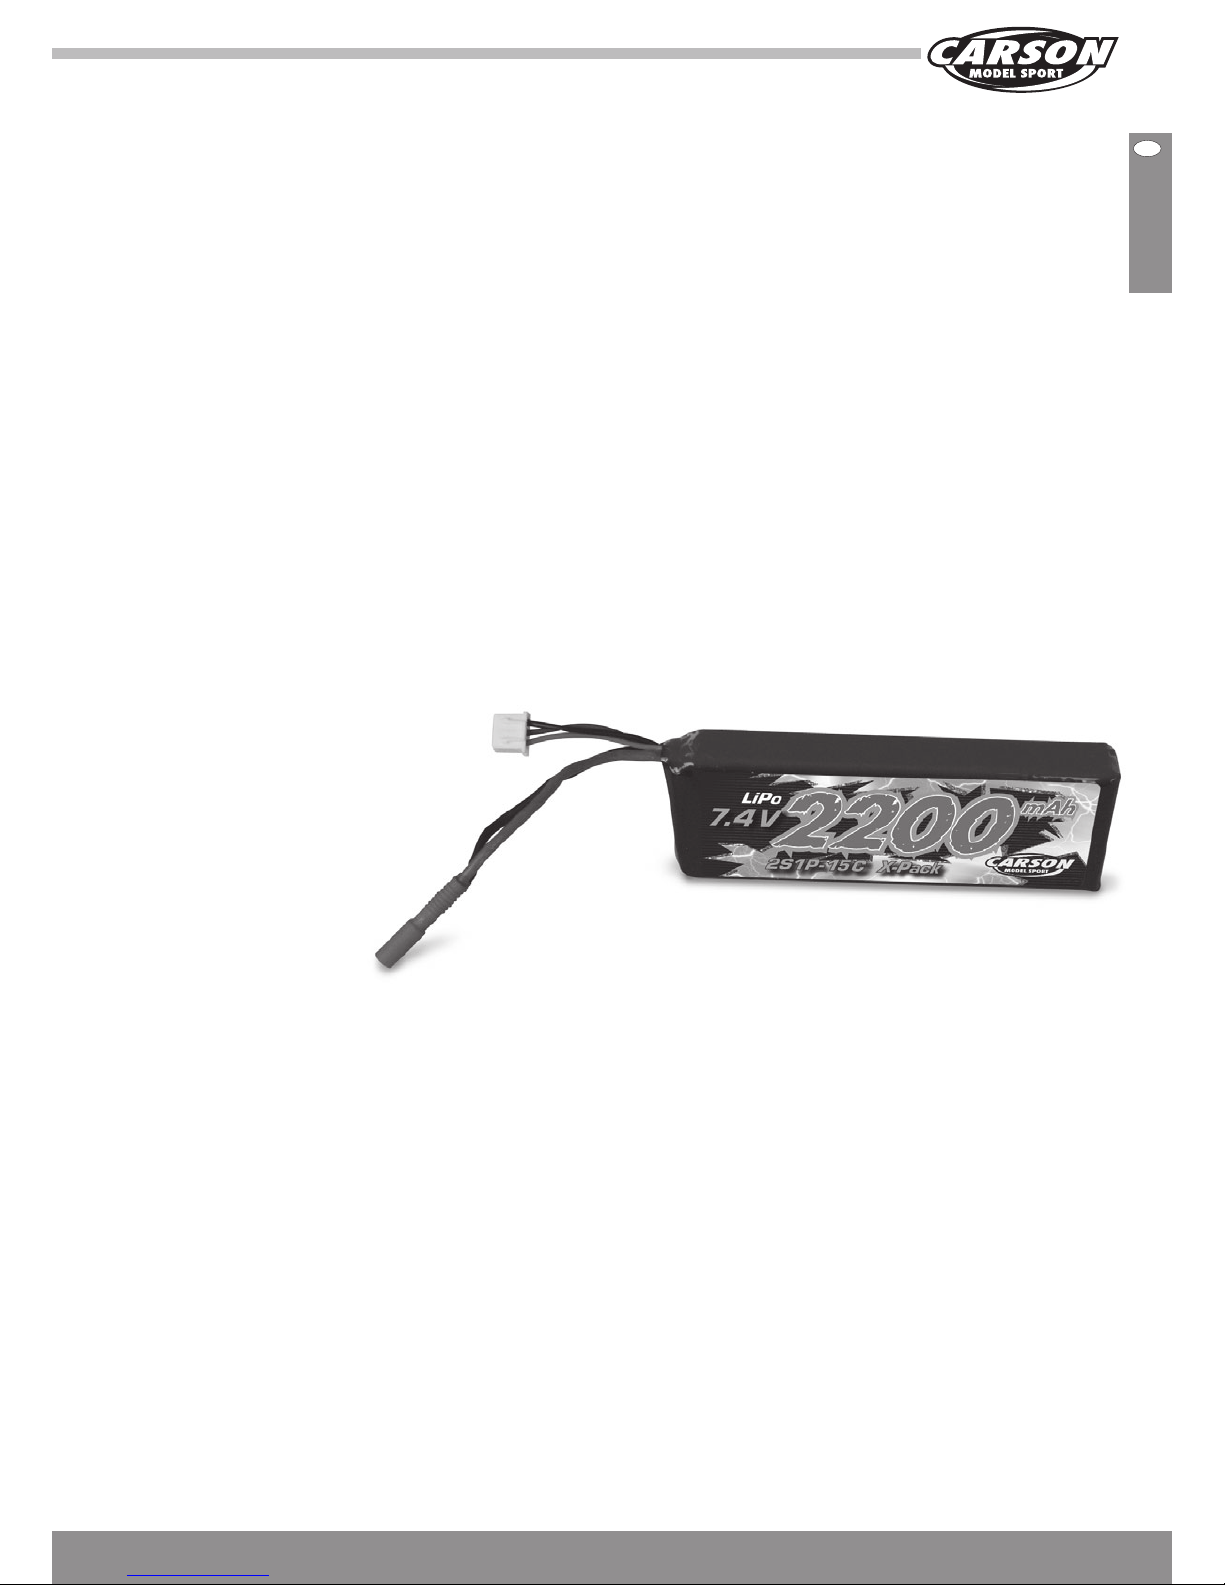
• Lipo battery 7.4 V/ 2200 mAh
• LiPo-Balance charger with power supply
• 2 servos, already installed
• Gyro, integrated into the receiver
• Operating Manual
• 8 Spare rotor blades
Preface .......................................................................................... 2
Included items .............................................................................. 3
Safety precautions ....................................................................... 4
a. The helicopter with more functions! ...................................... 9
b. RC functions of the helicopter .............................................. 10
c. Four channel remote control transmitter .............................. 11
d. Receiver Identification ........................................................... 12
e. Flight Mode ............................................................................ 13
f. Switch Between Mode 1 and Mode 2 ................................... 14
g. Switch Between Mode 2 and Mode 1 ................................... 15
h. Battery mounting ................................................................... 16
i. CARSON Balance charger ..................................................... 16
j. Preparations ........................................................................... 17
k. Swashplate Adjustment ......................................................... 18
l. Flybar set assembly ............................................................... 20
m. Flight operation ..................................................................... 20
n. Ground Effect ......................................................................... 22
o. Free flying training ................................................................. 23
p. Troubleshooting ..................................................................... 24
Spare parts ............................................................................... 117
Page 4

4
GB
CARSON Helikopter MARINES HM-38 50 050 7025
Safety Precautions
This model is not a toy!
• This radio controlled model is not a toy. Learning how to
control it correctly is a gradual process.
• Children under 14 years of age should be supervised by an
adult.
Operating a radio controlled model is a fascinating hobby.
However, it has to be practised with the necessary caution and
respect.
A radio controlled model can cause damage and injury and the
user is liable for any such incident.
Make sure that you have sufficient insurance cover when
practising your hobby.
Only a well maintained model will function in a correct manner.
Only use approved spare parts and never improvise with any
unsuitable items.
It is the user’s responsibility to ensure that the model is
functioning correctly and that all nuts, bolts and screws are
properly tightened.
General
• Read the Operating Manual carefully and keep it for future
reference.
• Make yourself familiar with all the instructions for flight
operation.
Preparations
Never start flying before you have made
sure of the following points:
• Pay attention to visible damage on the model, remote
control, battery charger, and lithium-polymer battery.
• Ensure that the model is functioning correctly and that all
nuts, bolts and screws are properly tightened
• Batteries for transmitter and receiver are well charged and of
the correct voltage
• Fully extend the transmitter antenna and make sure that
nobody in your environment controls a model with the same
frequency (number on the crystal) and that there is no
discernable interference.
• Make sure that all servos respond correctly to the signals of
the transmitter.
• Always check the radio operation before starting the
helicopter.
Flight operation
The model is primarily conceived for indoor flights since its
own slight weight and instable flight position resulting from the
construction type make it very susceptible to air movements.
Moreover the components are not dust- and moisture-proof.
Do not fly any longer than one battery
charging!
Afterwards the motor must cool down for at least 5 minutes.
Then recharge the battery. Avoid low discharge in any case.
Lay the antenna wire in such a way that it cannot get into
movable parts. Ensure for traction relief by fixing the wire to a
location on the fuselage with adhesive tape.
Page 5

5CARSON Helikopter MARINES HM-38 50 050 7025
GB
It is best to fly only
in closed rooms
• with a free space of at
least 3 m in all directions
• on a smooth foundation
• without standing (furniture)
or moving obstacles
(persons, animals)
• in rooms without air
draught
If you want to fly
outdoors, do this
• only when there is no wind,
• at a distance of at least
3 km from the next official
model airplane flying site,
otherwise you must make an
agreement about frequency usage.
Do not fly
• if you are overtired or your reactivity is impaired in any way.
• at wind-force 1 or greater
• Keep your model away from high voltage cables or radio
masts.
• Never use the model when lightning is present. Atmospheric
disturbances can affect the signals of your remote
controlling transmitter.
• Choose a sufficiently open & large area; it should be free of
obstacles.
• Always avoid running radio control models in restricted,
confined or populated areas.
• Keep away from roads, highways, people and animals.
Page 6

6
GB
CARSON Helikopter MARINES HM-38 50 050 7025
Rotor
• Damaged rotor blades must be exchanged! Refrain from
attempts at repair!
• Keep away from the rotors, as soon as the battery is
connected.
• Avoid presence in the plane of rotation of the rotors.
Do not operate the model while seated, so that you can rapidly
get out of the hazardous area if necessary.
Tighten the retaining bolts of the rotor blades only so much that
in flight these can orient themselves by 180° to each other only
with centrifugal force.
Battery charger
Employ exclusively the enclosed battery
charger.
• Operate the battery charger only on fire resistant surfaces
and
• also place the battery on a non-inflammable surface while
charging.
• Ensure for sufficient ventilation of the battery charger while
charging.
• Never leave the battery charger unattended during the
charging process.
• Never mix fully charged batteries and batteries which have
already run low, or batteries of a different capacity at
the same time.
• When charging the batteries pay attention to the correct
polarity.
Never subject the battery charger, the
batteries and the model to adverse local
conditions!
These are for instance:
• Wetness, too high air humidity (> 75% rel., condensing).
Do not touch the battery charger with wet hands.
• Never operate the battery charger right after it has been
brought from cold into warm surroundings. The resulting
condensation water can destroy the device. Permit the
device to attain the ambient temperature while
unconnected.
• Dust and inflammable gases, vapours or solvents, benzene
• too high ambient temperatures (> about +40 °C), direct solar
radiation
• open fire, ignition sources
• mechanical stresses such as shocks, vibrations
• strong contamination
• strong electromagnetic fields (motors or transformers) or
electrostatic fields (charges)
• transmitters (radio telephones, transmitters for model
building etc.). The transmitter radiation can lead to the
malfunction of the charging operation or to the destruction
of the battery charger and thereby also of the batteries.
Permit the battery charger to cool down
between charging operations. Disconnect
the battery charger from the power when
the charging operation is finished.
A defective battery charger may no longer be employed.
If it is assumed that the device is defective, i.e. if
• the device shows visible damage,
• the device no longer works and
• after longer storage under unfavourable conditions or
• after severe transportation stress, then it should be made
inoperative without delay and secured against unintentional
operation.
Dispose of the unusable (irreparable) battery charger according
to the prevailing statutory regulations.
For safety and registration reasons (CE), the arbitrary
reconstruction and/or modification of the battery charger is not
permitted.
Page 7
7CARSON Helikopter MARINES HM-38 50 050 7025
GB
Lithium-Polymer battery
Employ the enclosed battery exclusively for this model.
Only employ an original part as the replacement battery.
• Load the battery exclusively outside of the model and away
from easily flammable materials! It is normal that the battery
warms up when charging.
• Do not overload or exhaustively discharge the battery!
• Pay attention to the charge indicators on your transmitter.
• Ensure that the batteries for the radio and receiver are fully
charged and of the correct voltage. When the batteries are
running low you might loose control of your model.
• Charge the LiPo battery at least every six months in order to
avoid low discharging.
• Remove the charged battery from the battery charger in
order to avoid self-discharging. If not using the model for a
longer time, the rechargeable battery has to be removed.
At the end of its useful life, under various national / state and
local laws, it may be illegal to dispose of this battery into the
municipal waste stream. Check with your local solid waste
officials for details in your area for recycling options or proper
disposal.
The batteries must not
• Be immersed in liquid,
• Be thrown in the fire or subjected to high temperatures or
• Mechanical stresses or
• Be taken apart or damaged
• Or be short-circuited.
If during operation or while charging or storing the battery you
perceive a noticeable smell, a discolouration, excessive heating
or deformation or any other abnormality:
• Disconnect the battery from the battery charger
• Separate the battery from the consumer
• No longer employ the battery.
If electrolyte drains out:
• Avoid contact with eyes and skin!
• Wash the affected locations immediately with clear water
and
• Consult a physician.
Page 8

8
GB
CARSON Helikopter MARINES HM-38 50 050 7025
Li-Polymer battery Safety Instruction
1. Do not disassemble or reconstruct battery.
2. Do not short circuit battery.
3. Do not use or leave battery nearby fire, stove or heated
place (more than 80 degrees centigrade).
4. Do not immerse the battery in the water and sea water, or
get it wet.
5. Do not charge battery nearby the fire or under the blazing
sun.
6. Do use the specified charger and observe charging
requirement (under 1 A).
7. Do not drive a nail into the battery. Strike it by hammer, or
tread it.
8. Do not give battery impact or fling it.
9. Do not use the battery with conspicuous damage or
deformation.
10. Do not make the direct soldering on battery.
11. Do not reverse charge or overdischarge the cell.
12. Do not reverse-charge or reverse-connect.
13. Do not connect battery to the plug socket or car-cigaretteplug.
14. Do not use battery for unspecified equipment.
15. Do not touch a leaked battery directly.
16. Do not use Lithium ion battery in mixture.
17. Keep the battery away from babies.
18. Do not continue to charge battery over specified time.
19. Do not get into a microwave or high pressure container.
20. Do not use a leaked battery nearby fire.
21. Do not use or leave the battery under the blazing sun (or
heated car by sunshine).
22. Do not use nearby the place where generates static
electricity (more than 64 V) which give damage to the
protection circuit.
23. Charging temperature range is regulated 0 degrees
centigrade and 45 degrees centigrade. Do not charge the
battery out of recommended temperature range.
24. When the battery has rust, bad smell or something
abnormal at first-time-using, do not use the equipment and
go to bring the battery to the shop which it was bought.
25. In case children use the battery, their parents teach how
to use batteries according the manual with care. And also,
when children are using the batteries, pay attention to
according to that or not.
26. Keep the battery out of the reach of children. And also,
using the battery, pay attention to be taken out from the
charger or equipment by little children.
27. If the skin or cloth is smeared with liquid from the battery,
wash with fresh water. It may cause the skin inflammation.
28. Never discharge the battery at a rate of more than 5c nor
allow the voltage to go below 6 V, as this damages the
battery.
29. Never charge the battery on a carpeted floor as this may
cause a fire.
30. Do not use the battery for equipment that is not specified
nor for any other purposes.
31. Do not touch the battery if it is leaking. If you do touch the
battery, you should wash your hands immediately.
32. Do not charge your battery for longer than specified.
33. Do not use any batteries that have swelled up or are
damaged.
34. Do not use the battery anywhere where static charges
exceeding 64 volts might build up.
Page 9
9CARSON Helikopter MARINES HM-38 50 050 7025
GB
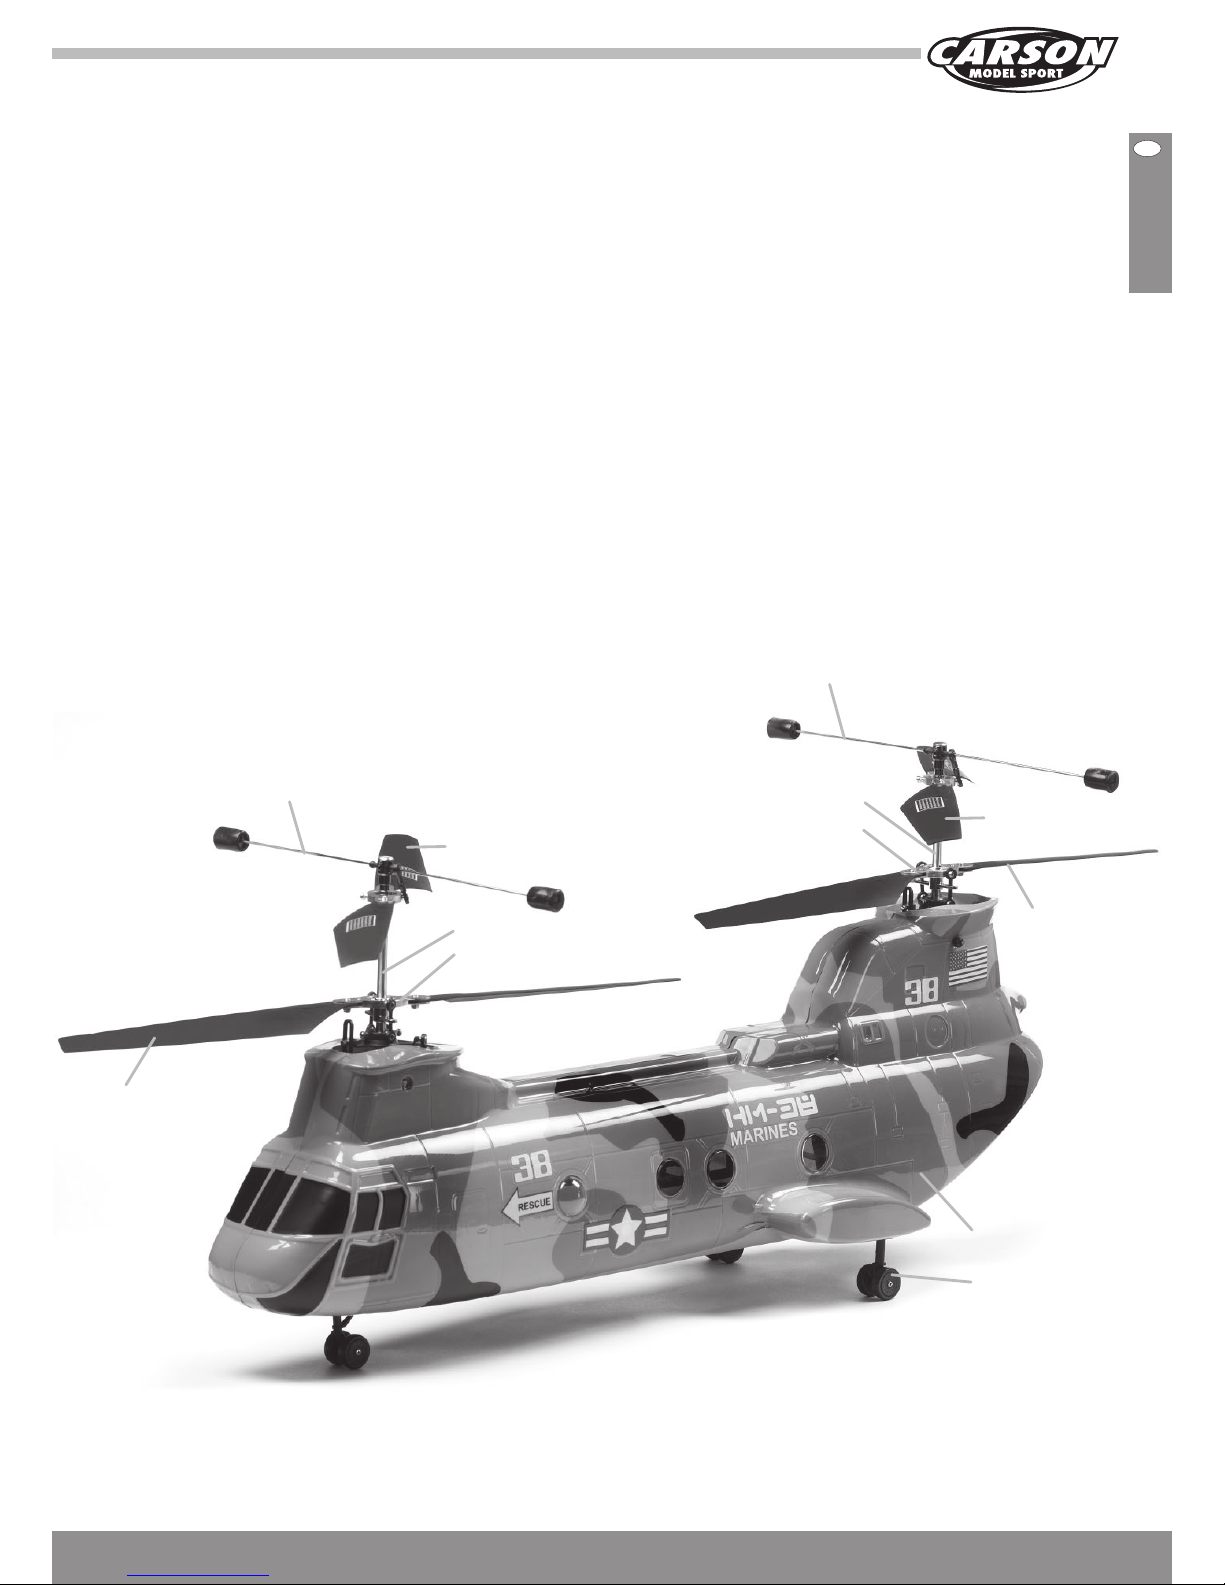
Completely preassembled, no construction required! Fun
straight out of the box! With only a little training, you will soon
be a real helicopter pilot!
Control your helicopter using all four functions. The twin rotor
design (coaxial) means that the model is extremely stable.
This model is intended for indoor use (free of obstacles) or
outdoors if there is no wind present. Approximate flight times of
8 – 10 minutes are possible with the enclosed Lithium polymer
battery.
Features:
• Extremely stable flight behaviour
• Completely assembled Ready To Fly
• Including professional 4-channel 2.4 GHz radio control
• + GYRO (stabilizing function)
• With lipo battery 7.4 V/ 2200 mAh and lipo “balance” charger
• Fuselage from dyed Lexan
RTF helicopter with 4-channel radio
control 2.4 GHz, lipo battery
7.4 V/ 2200 mAh, 230 V plug charger and
spare rotor blades.
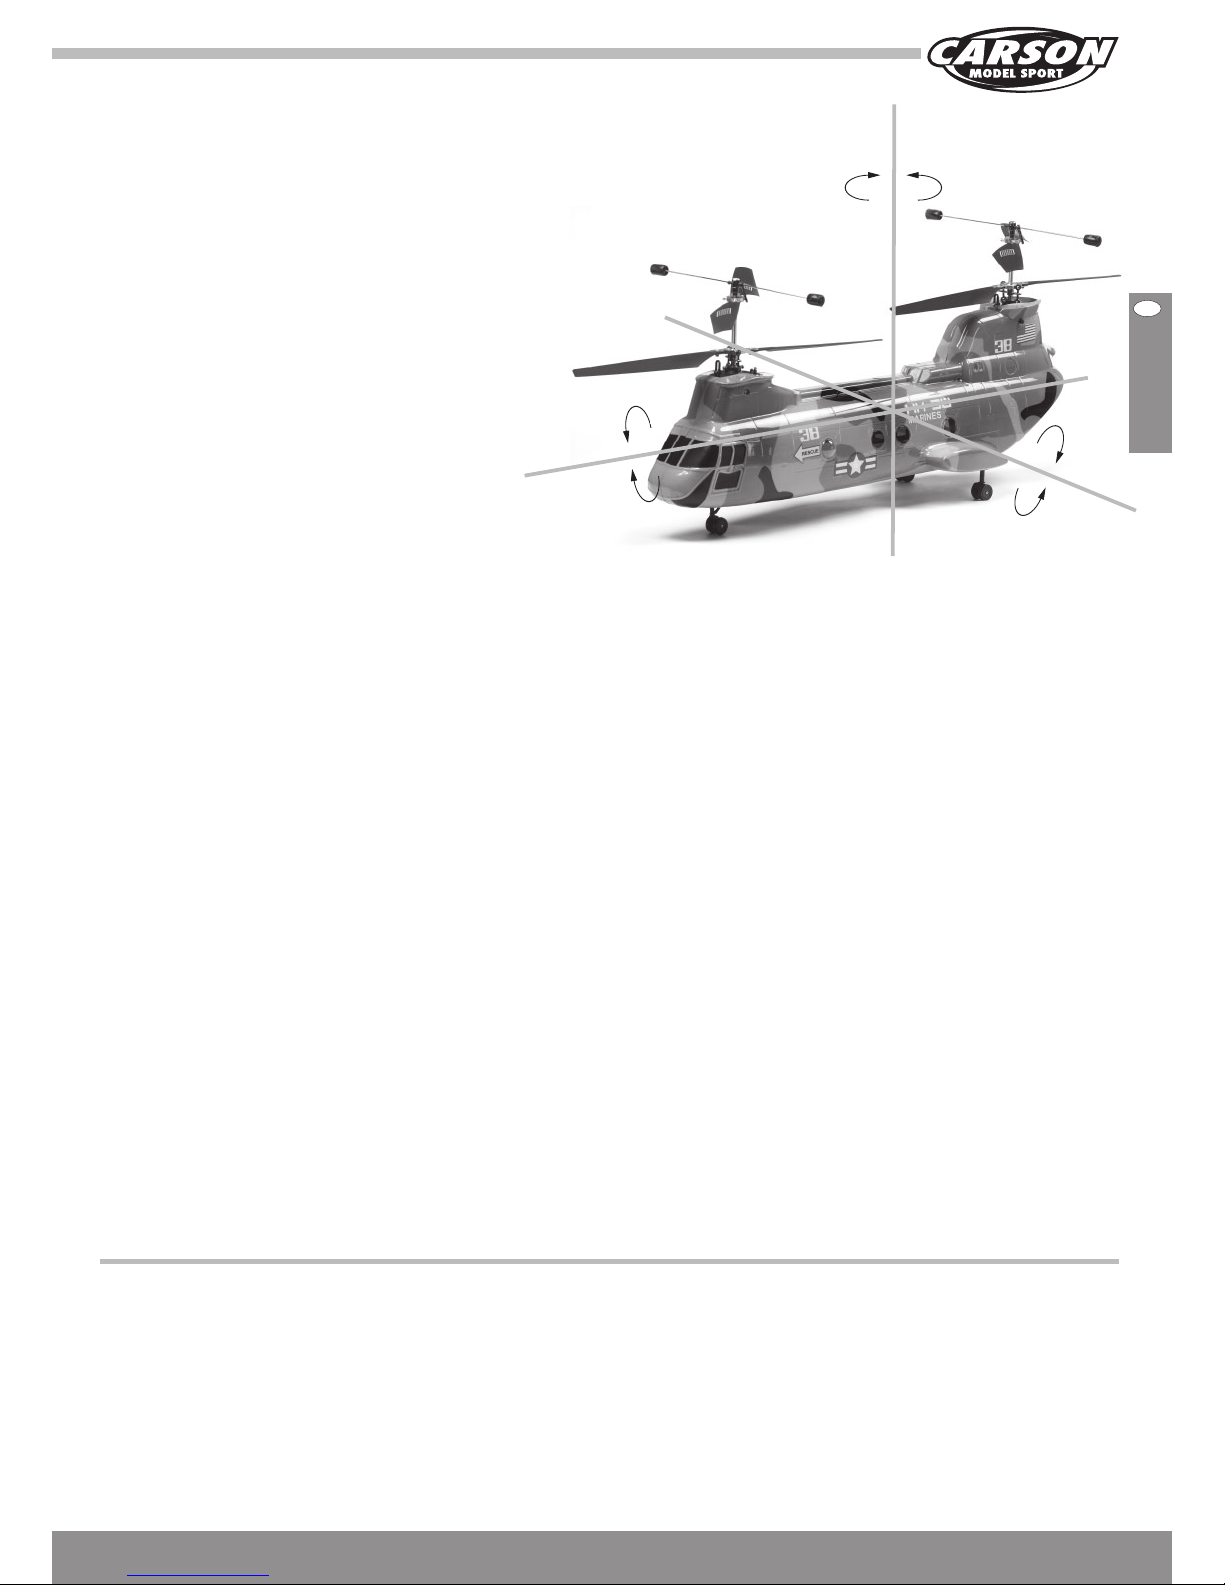
a. The helicopter with more functions!
Paddle bar 1
Paddle bar 2
Steering rotor
Steering rotor
Bearing rotor
Bearing rotor
Rotor shaft 1
Rotorblade holder
Rotor shaft 2
Rotorblade holder
Body
Landing gear
Page 10

10GBCARSON Helikopter MARINES HM-38 50 050 7025
Horizontal axis
(Roll)
Vertical axis
(Tail)
Transverse axis
(Nick)
The following functions are controlled
with the two remote control levers of
the portable transmitter.
For every control function there is a trim slider on the
remote control transmitter which permits minor
corrections of the neutral position.
Pitch function
(ascend / descend)
The pitch function controls the flying height of this
model helicopter over a common variation in speed
of the two rotors. The control takes place with the
left control lever. To do this, move it forwards and
backwards in a continuously variable fashion.
Contrary to the other control functions this lever
does not spring back into the middle position. If the control
lever is totally drawn towards the back, then the motors
are off and the rotors stand still. If the control lever is pushed
forward then the motor starts running and the rotors run with
increasing speed depending on the lever position.
In the middle position of the control lever, the helicopter should
hover at a fixed height.
Tail function
(Rudder function)
The tail function causes a rotation of the model around the
vertical axis. Since the helicopter has two opposed rotors, no
torque ensues around the vertical axis at the same speed of
the rotors (rotor shaft). The helicopter also therefore requires
no tail rotor for stabilization. In order for the model to be able to
rotate around the vertical axis (rotor shaft), the rotors must run
at slightly different speeds. The resulting torque introduces the
rotation.
At less speed of the steering rotor compared to the bearing
rotor, the torque of the bearing rotor is greater, the helicopter
turns around the vertical axis in the direction of rotation of the
steering rotor. At higher speed of the steering rotor, the torque
of the
bearing rotor is less than that of the steering rotor and the
helicopter turns in the direction of the bearing rotor.
The tail function is controlled with the right control lever. If the
lever is moved to the left, the tip of the fuselage turns to the
left. If you move the lever to the right, the tip of the fuselage
likewise turns to the right.
Roll function
(Aileron function)
The roll function causes the lateral flight of the helicopter.
The control takes place with the right control lever.
If the lever is moved to the left, then the model hovers laterally
to the left. Moving the lever to the right makes the model move
laterally to the right.
Nick function
(Elevator function)
The nick function causes forwards and backwards flight of the
helicopter. The lower rotor rotation tips slightly downwards
and the model tilts around the transverse axis. When the nose
drops downwards, a part of the lift is transferred into forwards
thrust.
If conversely the nose is raised, then the model flies backward.
the control takes place with the right control lever.
Press the lever forward to introduce forwards flight, pull back to
have the model fly backwards.
b. RC functions of the helicopter
Technical data
Principal rotor diameter A 450 mm
Principal rotor diameter B 450 mm
Length 575 mm
Height 285 mm
Weight 650 g
Battery charger „Lipo Balance“
Input: 15 - 18 V/ 1000 mAz
Output: 7,4 V und 11,1 V/ 750 mA
Page 11
11CARSON Helikopter MARINES HM-38 50 050 7025
GB
Included in the scope of delivery is a remote control
transmitter with two remote control levers, which are assigned
the two respective functions.
These functions are activated by the movements forwards /
backwards and right / left.
AA X 8 batteries are required for the
transmitter (not included)
Put the charged batteries in the battery compartment of the
transmitter.
Pay attention to the correct polarity!
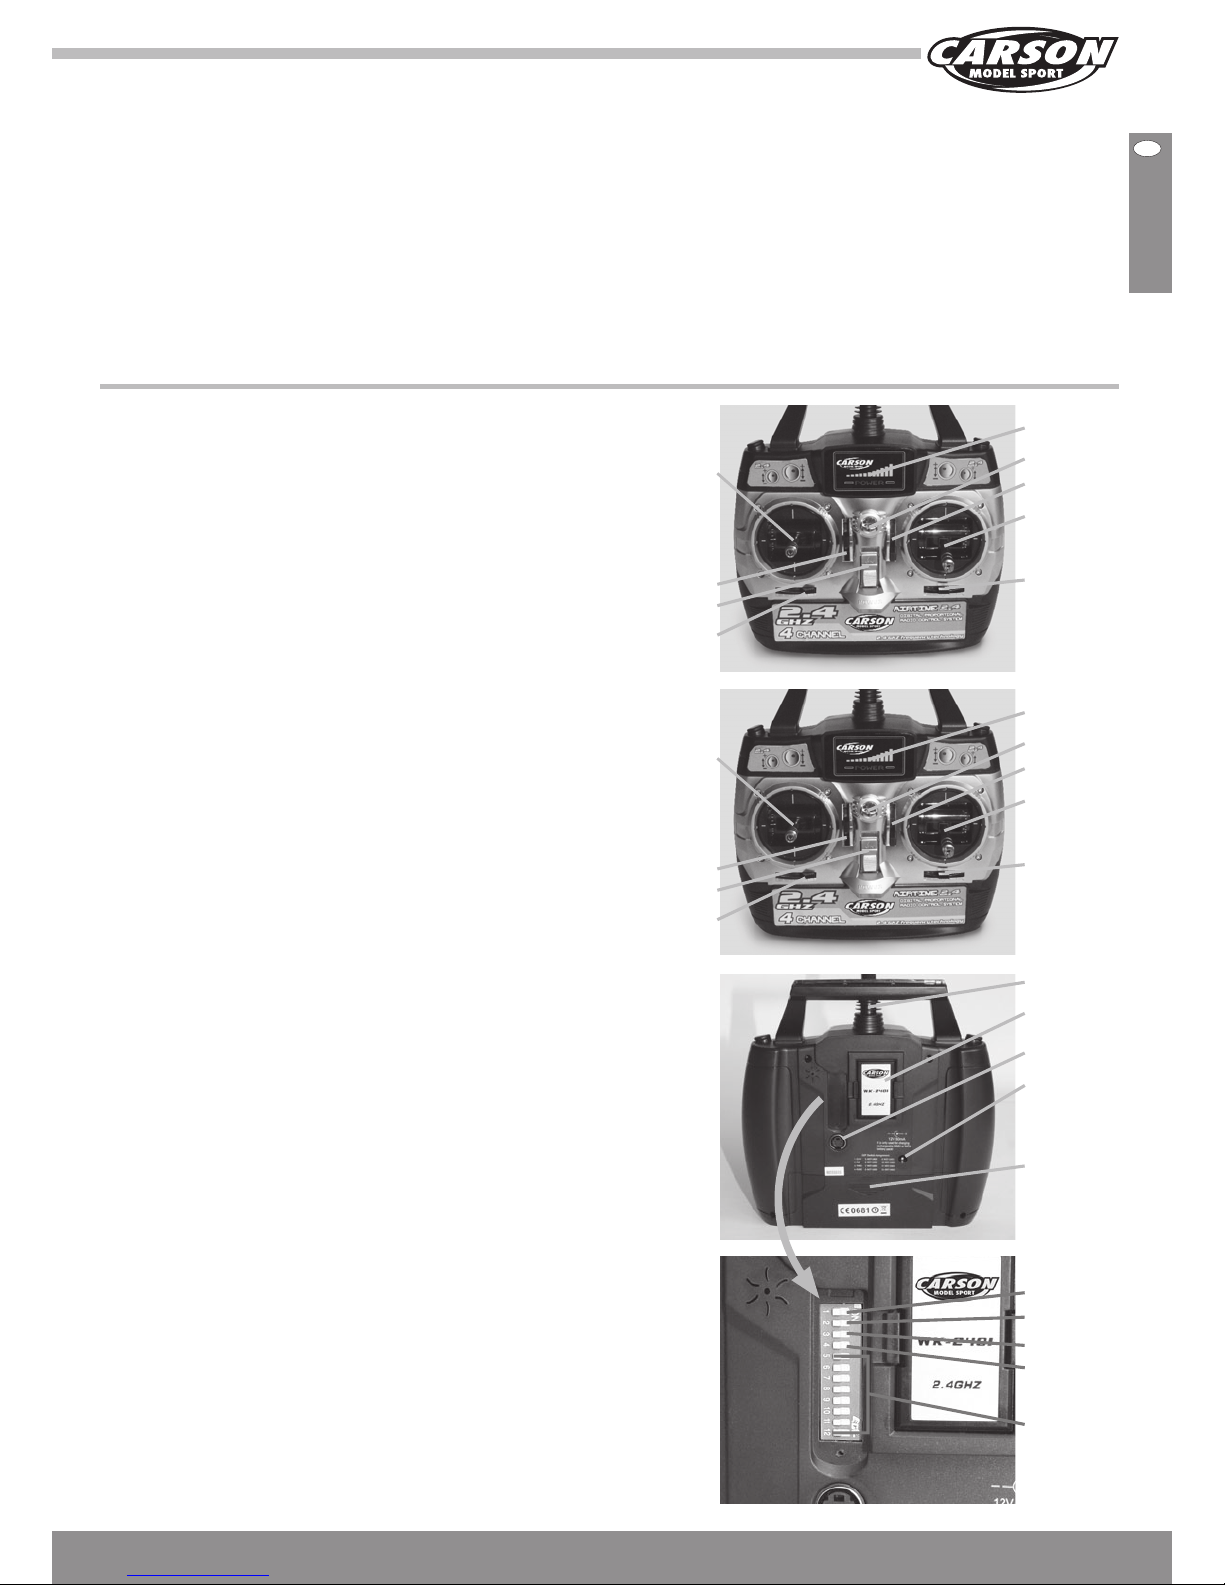
c. Four channel remote control transmitter
Mode 1
Mode 2
Fig. 1
Fig. 2
Power
indicator
Hook
Throttle trim
Right stick/
throttle
Aileron trim
Power
indicator
Hook
Elevator trim
Right stick/
rudder
Aileron trim
Antenna
Ornament
cover
Training jack
Charge jack
Cover of the
battery box
Elevator
Aileron
Throttle
Rudder
Not used
Left stick/
rudder
Elevator trim
Power switch
Rudder trim
Left stick/
throttle
Throttle trim
Power switch
Rudder trim
4-CH Transmitter Features:
1. The usage of 2.4 GHz technology, which features automatic
code pairing and ID allocating, is prompter in reaction, more
sensitive in operation, and stronger in anti-interference.
2. 4-channel micro-computer as the encoder;
output power: ≤ 10 mW
current drain: 50 mA
power source: 1.2 V x8 NiMH battery (9.6 V) or
1.5 V x8 AA dry cell battery
3. The DIP switches are available for various servos. It can
perform the flight actions such as ascending, descending,
forward, backward, leftward, rightward and so on.
4. Free to switch between left-hand and right-hand throttles
(Mode 1 and Mode 2).
Controll identification and function:
MODE 1
1. Left stick/ rudder.
It controls your helicopter forward, backward, left, and right.
Push up to fly your helicopter forward, pull down to fly backward, push leftward to fly left, and push rightward to fly right.
2. Right stick/ Throttle.
It controls your helicopter ascending, descending, left
moving and right moving. Push up to ascend your helicopter;
pull down to descend, push leftward to move your helicopter
left, and push rightward to move right.
MODE 2
1. Left stick/ throttIe.
It controls your helicopter ascending, descending, left, and
right. Push up to ascend your helicopter, pull down to
descend, push leftward to fly left, and push rightward to fly
right.
2. RIght stick/ rudder.
It controls your helicopter forward, backward, left moving
and right moving. Push up to fly your helicopter forward, pull
down to fly backward, push leftward to move your helicopter
left, and push rightward to move right.
3. Power Indicator.
The indicator is consisted of three colours: red, yellow, and
green.
Green LED on means the electricity is enough to fly;
Green LED off and yellow LED on indicate the power is not
enough and stop flying;
Yellow LED off and red LED on show the power is in extreme
shortage, and please stop flying at once.
Page 12
12GBCARSON Helikopter MARINES HM-38 50 050 7025
4. Elevator trim.
It controls and modifies your helicopter forward and
backward. Push up to fly forward, and pull down to fly
backward.
5. Rudder trim.
The trim controls and modifies your helicopter leftward and
rightward. Move the trim left to fly leftward, and move right
to fly rightward.
6. Throttle trim.
The throttle trim controls your helicopter to ascend and
descend. Push up the trimm to ascend, and pull down to
descend.
7. Aileron trim.
The aileron trim controls your helicopter leftward and
rightward. Push the trim left and fly left, and push the trim
rightward and fly right.
8. Power swltch.
Turn on or off the power of the transmitter. Push up the
switch to turn on the power, and push down to turn off.
9. Hook.
Connect to the neck strap.
10 .
Antenna.
Transmit the signals.
11.
Charge Jack.
Charge the rechargeable battery pack at current 50 mA,
voltage < 12 V.
Notice: the charge jack is forbidden to use for nonrechargeable battery pack.
12.
Training jack.
Connect to computer with simulator cable.
13.
Battery box.
Please note the polarities while inserting the batteries.
14.
Battery box cover:
Protects the transmitter battery. Please open the box
according to the arrow direction when replace the battery.
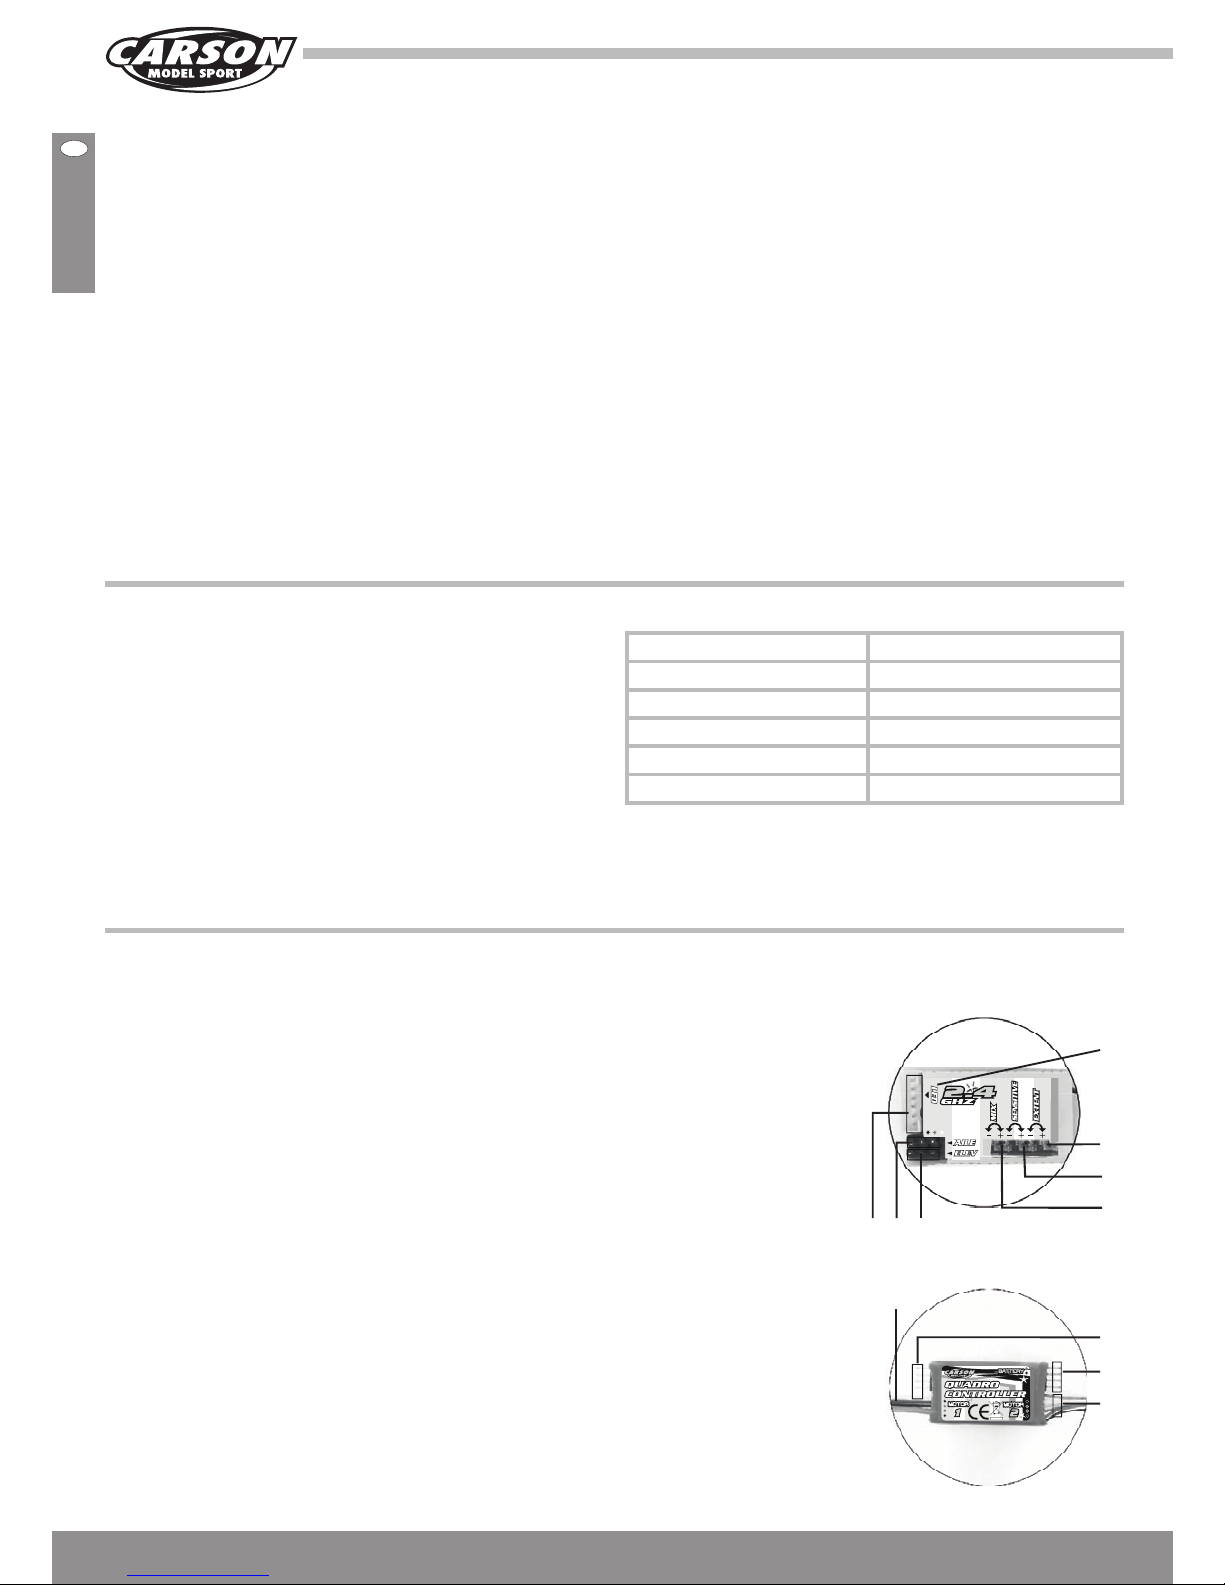
DIP Switches Identification
1. Elevator.
Reverse the direction of elevator servo.
2. Aileron.
Reverse the direction of aileron servo.
3. Throttle.
Reverse the throttle stick direction.
Note: ascertain the throttle stick to work in a correct way
before flight.
4. Rudder.
Reverse the rudder stick direction.
5-12. Not used.
The factory default settings:
CHANNEL ON/OFF
1ON
2ON
3 OFF
4 OFF
5-12 NOT USED
1. Mixing ratio:
Adjust the mixing ratio of main motor and tail motor.
Clockwise adjustment increases the mixing ratio and
counterclockwise decreases the mixing ratio.
2. EXTENT (Servo extent adjustment):
EXTENT knob is used to set up the servo travel. Clockwise
adjustment increases the servo travel, and counterclockwise
adjustment decreases the servo travel.
3. Gyro sensivity adjustment (SENSITlVE).
Adjust the sensitivity according to the flight performance.
Clockwise adjustment increases the sensitivity and
counterclockwise adjustment decreases the sensitivity.
4. AILE:
Aileron, connect to the aileron servo.
5. ELEV:
Elevator, connect to the elevator servo.
6. ESC signal wire:
Connect to ESC signal wire.
7. LED.
LED indicates the receiving status. Quick flash means the
signal is being received; LED on means the signal has been
received; slow flash means the signal fails to be received.
8. Front motor.
Connect to the front motor.
9. Back motor.
Connect to the back motor.
10. Power cable.
Connect to the battery.
d. Receiver Identification
➆
➀
➁
➂
➇
➈
➅
➅ ➄ ➃
➉
Page 13

13CARSON Helikopter MARINES HM-38 50 050 7025
GB
e. Flight Mode
Mode 1 Mode 2
Ascending Throttle pushing up
Descending Throttle pulling down
Head turning left Rudder stick
moving left
Head turning right Rudder stick
moving right
Head forward Elevator stick
pushing up
Head backward Elevator stick
pulling down
Helicopter
moving left
Aileron stick
moving left
Helicopter
moving right
Aileron stick
moving right
Page 14
14GBCARSON Helikopter MARINES HM-38 50 050 7025
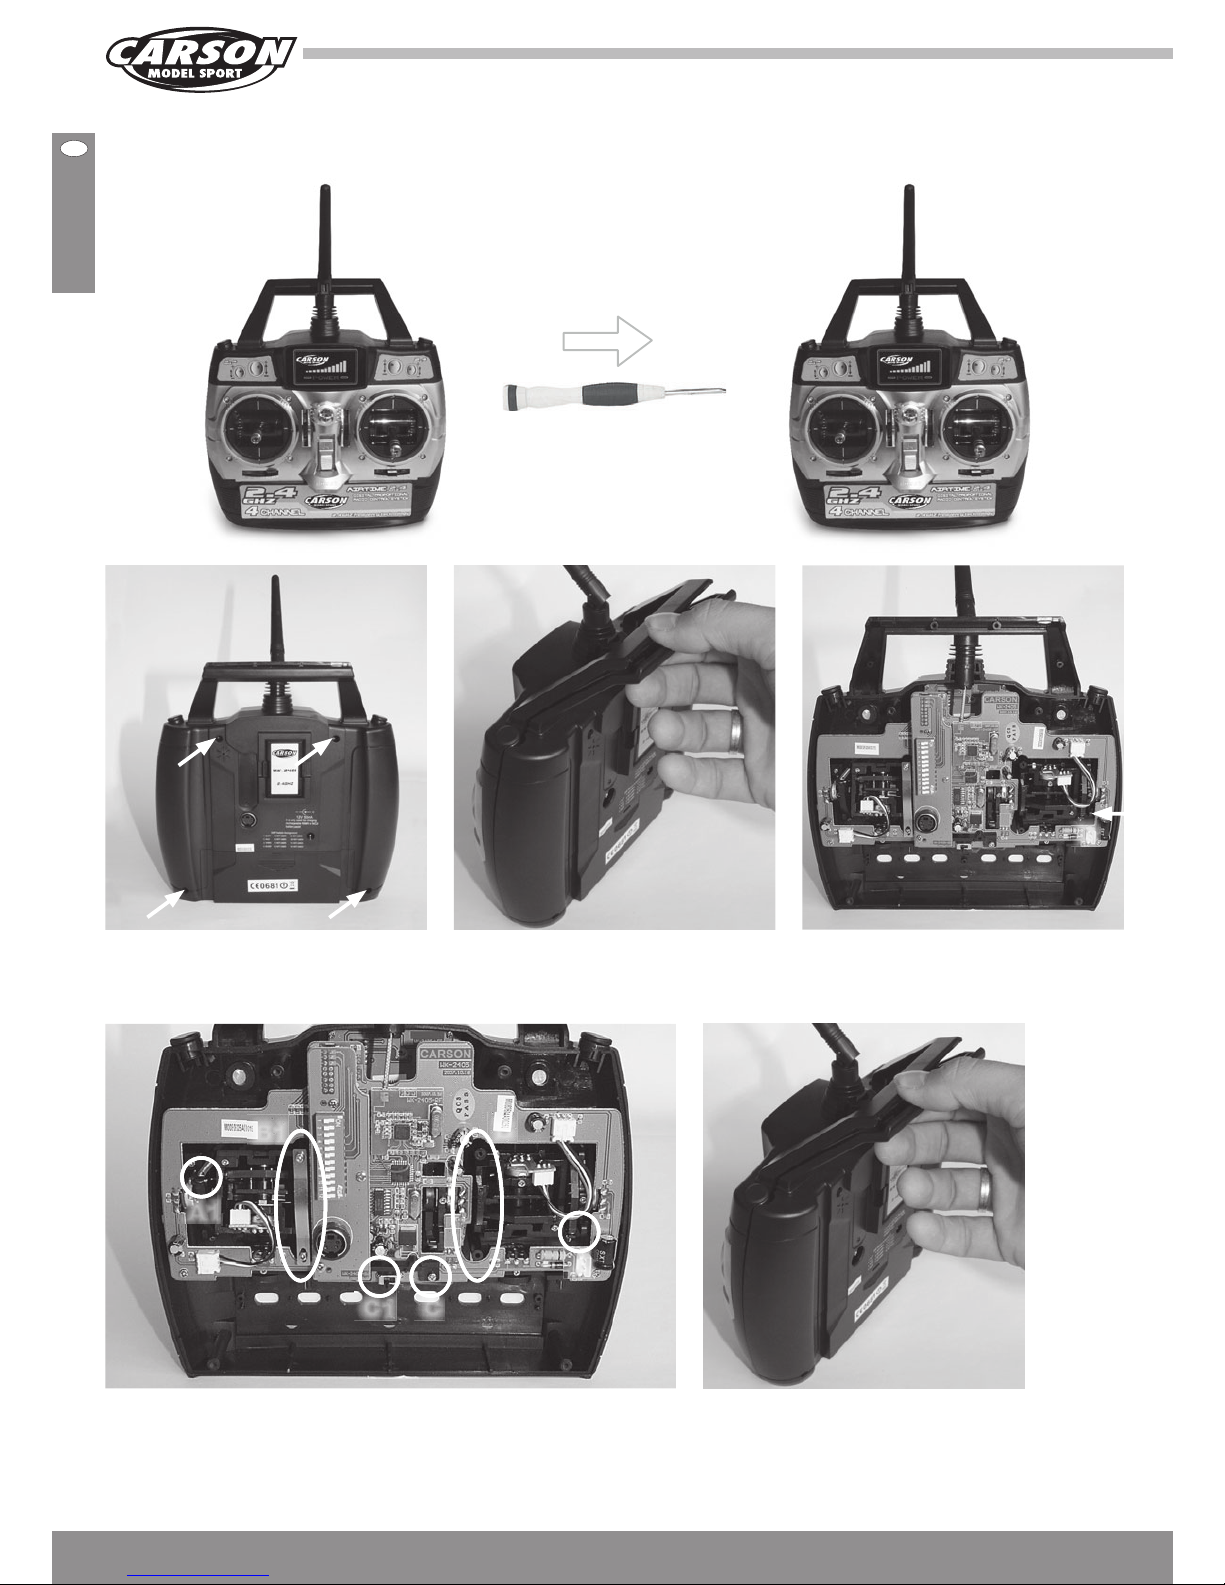
f. Switch Between Mode 1 and Mode 2
Tool
Unscrew the screws in the transmitter
cover, shown as the picture.
Slightly separate the rear cover from the
front one of the transmitter.
Pull out the pin D, as shown the picture.
• Pull out the screw in A and mount it in A1.
• Pull out the spring in B and then mount it in B1.
• Switch from C to C1.
Pull in the pin D. Mount the rear cover and tighten
the screws, and move the throttle trim to the lowest
position. the switch process is finished.
1. 2. 3.
4. 5.
B
A
D
CC1
A1
B1
Page 15

15CARSON Helikopter MARINES HM-38 50 050 7025
GB
g. Switch Between Mode 2 and Mode 1
Tool
Unscrew the screws in the transmitter
cover, shown as the picture.
Slightly separate the rear cover from the
front one of the transmitter.
Pull out the pin D, as shown the picture.
• Pull out the screw in A1 and mount it in A.
• Pull out the spring in B1 and then mount it in B.
• Switch from C1 to C.
Pull in the pin D. Mount the rear cover and tighten
the screws, and move the throttle trim to the lowest
position. the switch process is finished.
1. 2. 3.
4. 5.
B
A
D
CC1
A1
B1
Page 16

16GBCARSON Helikopter MARINES HM-38 50 050 7025
Place the battery pack in the correct
position of your helicopter.
h. Battery mounting
Battery pack location
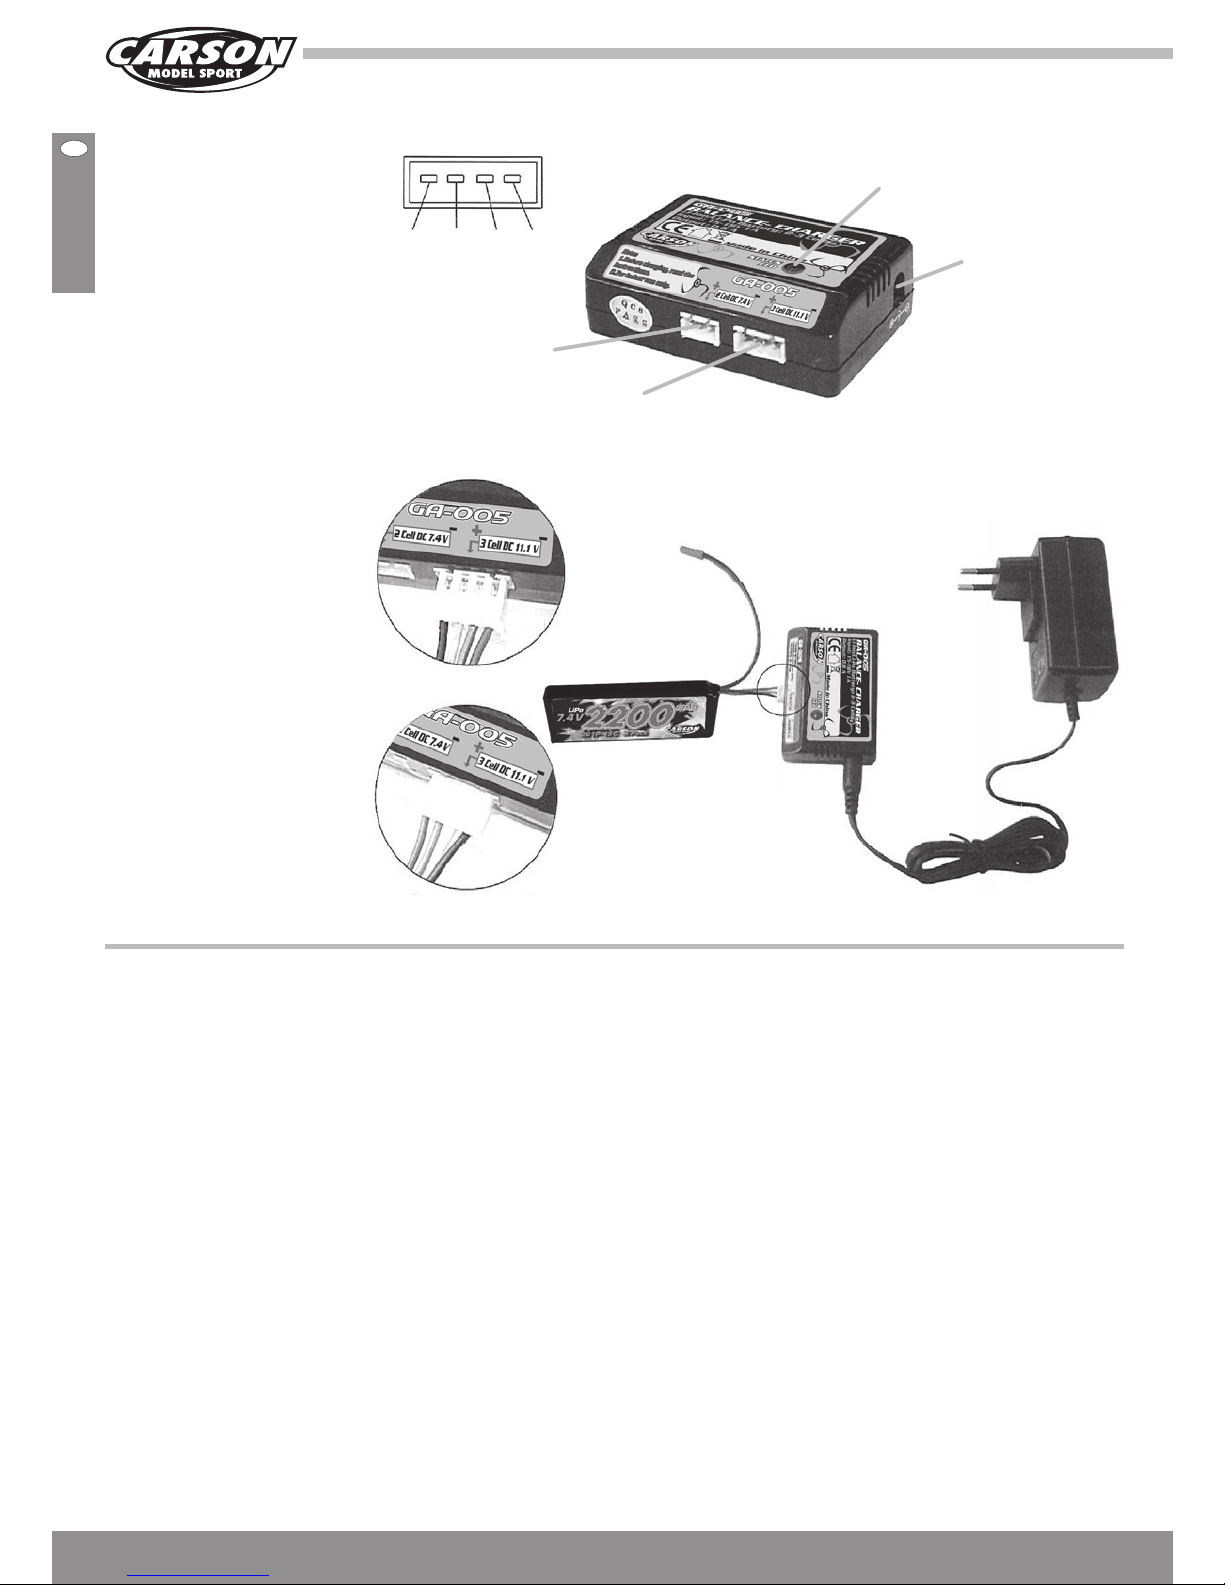
Technical Features
1. The GA-005, whose whole charging process is controlled by
micro computer, is more accurate, safe and reliable.
2. GA-005 is suitable for 7.4 V/ 11.1 V Li-ion or Li-Polymer
battery pack.
3. Automatically inspect charging status which is shown by
LED.
4. Automatic function of detected compensating voltage
effectively utilizes the maximal capacity of your battery pack.
5. Input jack: DC 15 - 18 V/ 1000 mA
i. CARSON Balance charger
Matters Needing Attention
1. This charger is suitable for 2 - 3 cell Li-ion or Li-polymer
battery pack. Don‘t dissemble, refit or use for other
purposes.
2. Never charge it as soon as the battery pack is just finished
flight and its surface temperature doesn‘t cool down.
Otherwise, the battery pack will be damaged or accident will
be taken place.
3. It is forbidden to be charged when the shape of battery pack
is distorted or the battery pack is swollen, because damaged
battery pack may result in short circuit, burn, or explosion.
4. Never close to heat source or electronic equipment. Never
charge your battery under direct sun shine.
5. Never wet the charger or use under moist situation in order
to avoid short circuit and other unpredictable accidents.
6. Liquid or sundries are forbidden to enter the charger.
Otherwise, immediately turn off the power supply and
disconnect the battery pack, and then send to your local
dealer or our company for maintenance.
7. Put the GA-005 at a flat place and avoid dropping or
bumping.
8. Before connecting a battery to GA-005, please assure that
the polarities of the battery and GA-005 are correct in order
not to damage your battery and charger.
Page 17

17CARSON Helikopter MARINES HM-38 50 050 7025
GB
j. Preparations
General remarks
• If you have no or little experience with airplane models, you
should first practice with a Flight simulation program.
• Seek advice from an experienced R/C user for the first few
attempts.
• Acquaint yourself with the control functions of the
transmitter.
• Begin your flight experiments standing behind the model,
the line of sight in the flight direction. In this case, the control
reaction is the same as the direction of control.
Furthermore acquaint yourself with the control of the model as
it comes towards you (side-inverted reaction to the direction of
control)!
Charging and installation of the airplane
batteries
Always charge the battery outside the model on a fire-proof
surface.
1. Connect the battery charger with the battery adapter.
2. Plug the plug battery charger in a power socket.
3. Put the battery in a metal bowl and connect the battery with
the battery charger.
4. Make sure that the connector is inserted correctly to avoid a
short circuit.
5. Do not cover the battery!
The temperature of the battery should not exceed 60 °C during
the charging process.
The charging process is finished when the green LED on the
balance charger lights up.
Identification for GA-005
1. Plug in a 15 - 18 V/ 1000 mA DC power at the input jack
(notice the polarity). The status LED is lighting in red.
2. When charging a 7.4 V Li-ion or Li-polymer battery pack,
plug the pin of your battery into the 2 CELL jack of your
GA-005 in a certain direction. Then the charging LED will
become red and flashing, and this means the battery has
entered charging status. When your battery is fully charged,
the LED will become green.
3. When charging a 11.1 V Li-ion or Li-polymer battery pack,
plug the pin of your battery into the 3 CELL jack of your
GA-005 in a certain direction. Then the charging LED will
become red and flashing, and this means the battery has
entered charging status. When your battery is fully charged,
the LED will become green.
Notice:
Every time only one group of battery pack can be charged. It
is forbidden to charge two groups; otherwise your charger or
battery will be damaged or burnt.
When the LED flash twice and then don‘t light circularly, that
means the battery pack were broken.
Technical Specification
Output current: 750 mA
Input voltage: DC 15 - 18 V/ 1000 mA
Output Voltage:
2 cell DC 7.4 V Jack 3 cell DC 11.1 V Jack
8.4 V 12.6 V
Page 18
18GBCARSON Helikopter MARINES HM-38 50 050 7025
k. Swashplate Adjustment
1. Swashplate Inspection
Tum on the transmitter. Pull down the throttle stick and throttle
trim to the lowest position, and put the elevator trim and
aileron trim in the neutral position (MODE 1). Then re-connect
the power cable of the helicopter to check whether or not the
swashplate is in a horizontal level after the reposition of the
elevator and aileron servos.
2. Swashplate adjustment
If the swashplate is not horizontal, you can adjust through the
following two steps:
1. Servo adjustment. Unscrew the screw in the round ballcrank
and take the round ballcrank out. Re-connect the power
of your tandem helicopter. After the servos are initialized,
adjust the angles to 90° between I-shape ballcrank and its
servo pulling rod, L-shape ballcrank and its servo pulling
rod, respectively. Then assemble the round ballcrank and
tighten the screw.
2. Servo linkage rod adjustment. Adjust the length of the servo
linkage rod to make the swashplate horizontal.
Connection Diagram
Polarity Assignment Diagram
Charging jack for
7.4 V battery pack
Charging jack for
11.1 V battery pack
12.6 V 8.4 V 4.2 V O V
Status LED
Input jack
Wrong method
Correct method
Battery
Charger
Power adapter
Page 19

19CARSON Helikopter MARINES HM-38 50 050 7025
GB
Horizontal level
of the swashplate
Horizontal level
of the swashplate
Servo
pulling rod
Servo
pulling rod
Servo
pulling rod
I-shape
ballcrank
Aileron
servo
Elevator
servo
Round ballcrank
L-shape
ballcrank
L-shape
ballcrank
I-shape
ballcrank
Fastening the rotor blades
The rotor blades must be able to align themselves 180° to each
other solely by the centrifugal force.
1. Main rotor blade Inspection.
a. Check whether the fixing screws of the main rotor blades
are too loose or tight.
b. Check the tracking problem.
2. Main rotor blade adjustment.
a. If the fixing screws are too loose, tighten to some
extent; otherwise, unscrew to some extent.
b. If there exists a tracking problem, adjust long or short the
steering linkage.
Steering linkage
Fixing screw
Page 20

20GBCARSON Helikopter MARINES HM-38 50 050 7025
Flybar block sleeve
l. Flybar set assembly
1. Let the location notch of the flybar block aim at the flybar,
and press the flybar block till the flybar reaches the end of
the notch; insert one end of the flybar through the hole 1.
2. Let the location notch of the flybar block aim at the inner
location mast of the flybar block sleeve, and press the flybar
block along the inner location mast into the sleeve.
3. Counterclockwise rotate 90° the flybar block sleeve, let the
hole 1 of the flybar block sleeve aim at the hook of the flybar,
and then push the flybar block set outside and make the
hook completely insert into hole 2.
Note:
The flybar set will be thrown off at high speed in flying when it
is mounted improperly. A serious damage to people or property
may be taken place.
Flybar block Flybar block sleeve
➀
➁
90°
Flybar
Location notch
Switching on the model
Ensure sufficient space in order to undertake the first flight
experiments. Even if the helicopter can later be flown in the
smallest quarters, it requires about 3m free space in all
directions.
• Set the model on a smooth and level surface, so that the
helicopter can freely glide and lift off.
• Set the helicopter about 2 m in front of yourself on the
ground, the tail pointing towards you. This way the direction
of reaction of the helicopter conforms to the direction of
control.
• Pull the left remote control lever (pitch) totally back
(also trim).
• Switch the transmitter on.
• The battery indicator starts to flash.
• Now connect the charged airplane battery to the receiver.
m. Flight operation
2 m
Page 21
21CARSON Helikopter MARINES HM-38 50 050 7025
GB
The model may now not be moved!
When the process is concluded and the receiver is receiving
correct signals the LED lights up continuously.
If the LED blinks slowly, then the battery voltage is too low.
Recharge the battery or replace it with an original replacement
battery!
• Move the left control lever slightly forward, until the model
just lifts off from the ground.
• Pull the control lever slowly back again, so that the model
gently alights.
Move the control extremely delicately!
Check the effective range of the remote
control transmitter
Before every first start or after a crash, check the function and
effective range of the RC equipment! In the neutral position of
the control lever of nick and roll, the wobble plates should also
be in neutral position.
If this is not the case, correct the position with the trim levers of
the respective control channel on the transmitter.
• Move slowly away from the model (motor is not running!).
• Consecutively press the remote control levers nick and roll
and observe the reactions of the model.
The RC equipment works faultlessly if from about 30 m
distance the model still correctly responds to the remote
control signals.
Never drive the model if the remote control does not work
properly! A malfunction of the radio may cause damage to the
model, property and/or serious injury.
If the remote control does not work correct, please test the
charge condition of the sender battery first.
Trimming the helicopters
Already shortly before the helicopter takes off, you can
recognize whether it wants to turn or glide in a particular
direction.
Correct the deviations from the vertical ascent with the trim
slider of the tail function.
Tip of the fuselage turns to the right:
• Reduce speed and push the trim slider of the tail function on
the left remote control lever stepwise to the left.
• Push the pitch-lever forward again and check whether the
correction was sufficient, if necessary shift the trim further to
the left.
• Repeat the process until the helicopter no longer shows a
tendency to turn to the right.
Tip of the fuselage turns to the left:
• Proceed as described above, but push the trim slider of the
tail function stepwise to the right.
Model slips (drifts) or tilts to the right:
• Reduce the speed and push the trim slider of the rollfunction of the right remote control lever stepwise to the left.
• Push the pitch-lever forward again and check whether the
correction was sufficient, if necessary shift the trim further to
the left.
• Repeat the process until the helicopter no longer shows a
tendency to drift to the right.
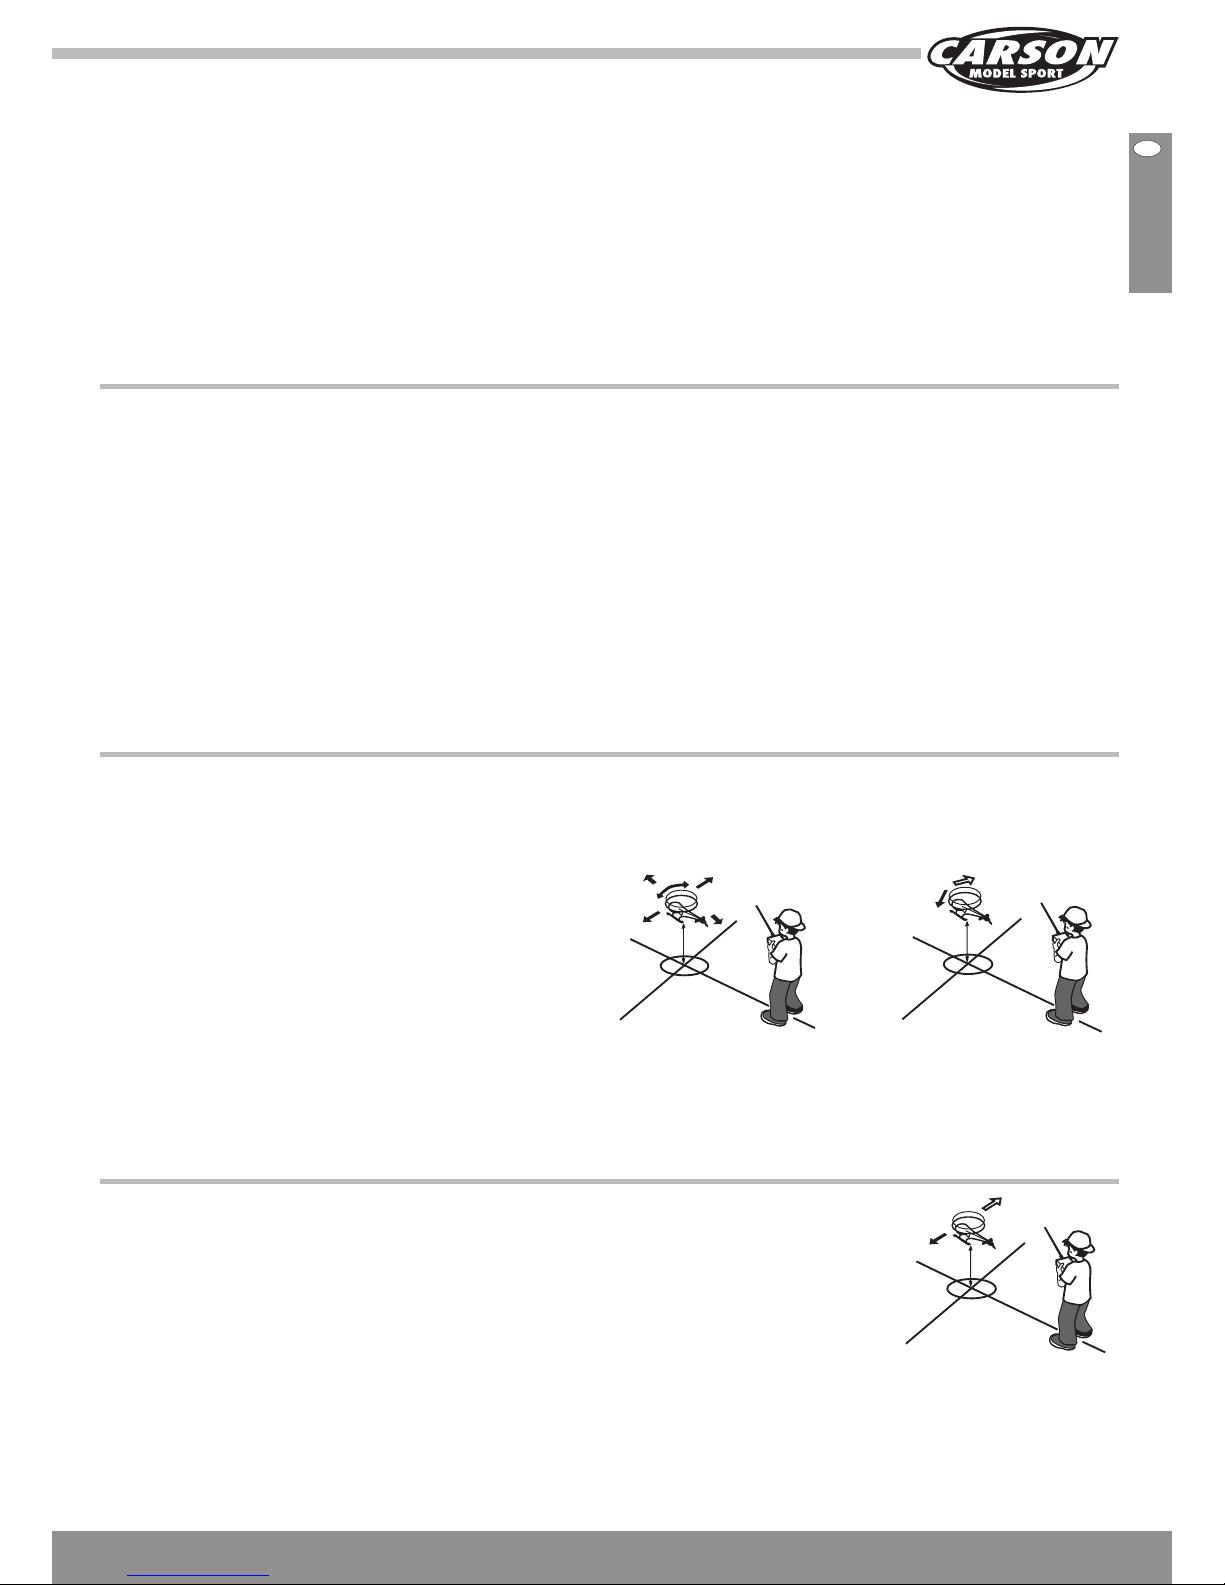
Model slips (drifts) or
tilts to the right:
• Proceed as described above,
but push the trim slider of the tail
function stepwise to the
right.
Page 22

22GBCARSON Helikopter MARINES HM-38 50 050 7025
Model slips (drifts) forward:
• Reduce the speed and push the trim slider of the nick
function on the right remote control lever stepwise
backwards.
• Push the pitch lever forward again and check whether this
was sufficient for correction, if necessary shift the trim
further to the left.
• Repeat the process until the helicopter no longer shows a
tendency to drift forwards.
Model slips (drifts)
backwards:
• Proceed as described above, but
push the trim slider of the nick
function stepwise forward.
Hover flight
Hover flight means maintaining the helicopter in a stable
position in the air. Hover flight is only possible with a helicopter
and must be thoroughly practiced as a fundamental flight
formation. Acquaint yourself with the control functions of your
remote control transmitter so that this procedure gets you’re
your “flesh and blood”.
• Then set the helicopter about 2 m in front of you on the
ground, with the tail facing you.
• Leave the helicopter on the ground and first deliberately
move it slightly sidewise, forwards and backwards.
• When you have mastered control on the ground, give
somewhat more lift and permit it to hover above the ground,
without allowing the tip of the fuselage to turn or the
helicopter to drift away.
• The best procedure is to mark a position on the ground from
which you start the model.
• Attempt to hold the helicopter above this position and also
to land again on this position.
• Do not move the control lever too jerkily, because otherwise
especially the touchdown can be very hard.
• Develop a feeling for the controls by repeatedly lifting off,
floating and landing again.
• If you notice irregularities in the control or an imbalance in
the rotor,
• Land
immediately and correct the necessary settings.
• Increase the flying height gradually by degrees.
ATTENTION!
Up to a height of about 30 cm, the model
is in the area of influence of the air
turbulence caused by its own rotors.
On one hand, this “ground effect” facilitates the lift off of the
helicopter since the air pressed downwards by the rotors of the
helicopter helps lift the aircraft from the ground.
But in the immediate area this effect is reversed, since the
air flowing away laterally from the helicopter creates an
underpressure and the model is actually sucked back down
towards the ground. This can lead to an ungentle landing.
For this reason the
flight behaviour of
the model at low
heights is rather
unstable. If the
restless flight
behaviour causes
difficulties for you,
increase the flying
height by degrees.
n. Ground Effect
Page 23

23CARSON Helikopter MARINES HM-38 50 050 7025
GB
The helicopter is no longer in the area of influence of the air
turbulence from its own rotors as of a flying height of about 2 m
and the flight situation is more stable.
o. Free flying training
If you have mastered hover flight, begin
with simple flying formations:
• Train your command of the model, allow it to ascend and
descend, hover and move forwards and backward in the air
as well as execute turns.
• When you feel secure, stand laterally to the model and
practice control from this angle of view or
• allow the model to fly toward you and control it in the
opposite direction
• Avoid jerky load variation. since otherwise the upper and
lower rotor could touch and cause the model to crash.
• Always fly the model in front of you or allow it to circle above
you. If you allow the model to fly behind your back, you
could lose your orientation and thereby the control over the
helicopter.
Never attempt to catch the model in mid
flight!
Page 24

24GBCARSON Helikopter MARINES HM-38 50 050 7025
p. Troubleshooting
Please read this before something happens.
Problem Cause Reparation
The model does not
move
1. Check whether the transmitter and the receiver are
switched on
Switch transmitter and/or receiver on
2. Check the battery voltage of transmitter and
receiver
Employ completely charged batteries
3. The trim slider of the pitch-function stands on the
upper stop
Ensure that the trim slider of the pitch
function is in neutral position or somewhat
below.
Motor does not turn 1. Motor is defective Exchange the motor
2. Connection of controller and motor is loose Connect the connector
The model reacts
incorrectly to the control
commands or flies
choppily
Check the state of the transmitter and receiver battery
charges
Employ completely charged batteries
The model does not take
off
1. Rotor blades are twisted Exchange the rotor blades
2. Motor is too hot Allow the motor to cool down
3. Batteries are empty Charge the batteries or exchange them
The rotors do not allow
shut down
1. Trim is not correctly adjusted Correct the trim on the pitch controller
The model moves
forwards/backward and
sidewise, but does not
hover
Check whether the helicopter is exposed to a draught,
e.g. by an opened window or an air conditioner. Hover
flight is not possible when there is a draught.
Close the window / door, switch off the air
conditioner or select a more suitable room
The model vibrates
severely
1. Check whether the principal rotors run true Possibly balance the rotor blades
2. Check whether the model is correctly balanced Possibly balance the rotor blades
The tail does not permit
stabilizing
1. One or more rotor blades are defective Replace one or both rotor blades
2. Lower and upper rotor revolution run with different
friction on the rotor shaft
Ensure that both rotor revolutions allow for
easy rotation
3. The velocity of rotation of the upper and lower rotor
revolution is uneven;
Correct the trim on the transmitter
Page 25
25CARSON Helikopter MARINES HM-38 50 050 7025
GB
Sehr geehrter Kunde
Wir beglückwünschen Sie zum Kauf Ihres CARSON RC-Modellhubschraubers, welcher nach dem heutigen Stand der Technik
gefertigt wurde.
Da wir stets um Weiterentwicklung und Verbesserung unserer
Produkte bemüht sind, behalten wir uns eine Änderung in technischer Hinsicht und in Bezug auf Ausstattung, Materialien und
Design jederzeit und ohne Ankündigung vor.
Aus geringfügigen Abweichungen des Ihnen vorliegenden
Produktes gegenüber Daten und Abbildungen dieser Anleitung
können daher keinerlei Ansprüche abgeleitet werden.
Diese Bedienungsanleitung ist Bestandteil des Produkts. Bei
Nichtbeachtung der Bedienungsanleitung und der enthaltenen
Sicherheitsanweisungen erlischt der Garantieanspruch.
Bewahren Sie diese Anleitung zum Nachlesen auf und für die
eventuelle Weitergabe des Modells an Dritte.
Garantiebedingungen
Für dieses Produkt leistet CARSON eine Garantie von 24
Monaten betreffend Fehler bei der Herstellung in Bezug auf
Material und Fertigung bei normalem Gebrauch ab dem Kauf
beim autorisierten Fachhändler. Im Falle eines Defekts während
der Garantiezeit bringen Sie das Modell zusammen mit dem
Kaufbeleg zu Ihrem Fachhändler.
CARSON wird nach eigener Entscheidung, falls nicht anders im
Gesetz vorgesehen:
(a) den Defekt durch Reparatur kostenlos in Bezug auf Material
und Arbeit beheben;
(b) das Produkt durch ein gleichartiges oder im Aufbau
ähnliches ersetzen; oder
(c) den Kaufpreis erstatten.
Alle ersetzten Teile und Produkte, für die Ersatz geleistet wird,
werden zum Eigentum von CARSON. Im Rahmen der Garantieleistungen dürfen neue oder wiederaufbereitete Teile verwendet
werden.
Auf reparierte oder ersetzte Teile gilt eine Garantie für die
Restlaufzeit der ursprünglichen Garantiefrist. Nach Ablauf
der Garantiefrist vorgenommene Reparaturen oder gelieferte
Ersatzteile werden in Rechnung gestellt.
Von der Garantie ausgeschlossen sind:
• Beschädigung oder Ausfall durch Nichtbeachten der Sicherheitsanweisungen oder der Bedienungsanleitung, höhere
Gewalt, Unfall, fehlerhafte oder außergewöhnliche
Beanspruchung, fehlerhafte Handhabung, eigenmächtige
Veränderungen, Blitzschlag oder anderer Einfluss von
Hochspannung oder Strom.
• Schäden, die durch den Verlust der Kontrolle über Ihr Fahrzeug entstehen.
• Reparaturen, die nicht durch einen autorisierten CARSON
Service durchgeführt wurden
• Verschleißteile wie etwa Sicherungen und Batterien
• rein optische Beeinträchtigungen
• Transport-, Versand- oder Versicherungskosten
• Kosten für die Entsorgung des Produkts sowie Einrichten
und vom Service vorgenommene Einstell- und Wiedereinrichtungsarbeiten.
Durch diese Garantie erhalten Sie spezielle Rechte, darüber
hinaus ist auch eine von Land zu Land verschiedene Geltendmachung anderer Ansprüche denkbar.
Konformitätserklärung
Hiermit erklärt CARSON MODEL-SPORT, dass sich dieses
Modell einschließlich Fernsteueranlage in Übereinstimmung mit
den grundlegenden Anforderungen und den anderen relevanten
Vorschriften der Richtlinie 1999/5/EG (R&TTE) befindet.
Die Original-Konformitätserklärung kann angefordert werden:
Dickie-Tamiya GmbH&Co. KG • Werkstraße l • D-90765 Fürth •
Tel.: +49/(0)911/9765-03
Im Lieferumfang enthalten ist ein wiederaufladbarer
Lithium-Polymer, NiCd oder ein NiMH Akku.
Dieser Akku ist recyclebar.
Defekte / nicht mehr aufladbare Akkus sind dem
Sondermüll (Sammelstellen) zuzuführen.
Eine Entsorgung über den Hausmüll ist untersagt!
Wir wünschen Ihnen viel Spaß mit Ihrem CARSON Modellhubschrauber und jederzeit guten Flug!
Vor dem Gebrauch Ihres neuen Modells lesen Sie bitte dieses Handbuch
sorgfältig durch!
D
Page 26

26DCARSON Helikopter MARINES HM-38 50 050 7025
Inhalt
Lieferumfang
• Flugfertig aufgebautes Modell
• Kabinenhaube, bereits montiert
• 4-Kanal-Handsender 2,4 GHz
• Lipo Akku 7,4 V/ 2200 mAh
• Lipo-Balance Ladegerät mit Netzteil
• 2 Servos, bereits eingebaut
• Gyro, im Empfänger integriert
• Bedienungsanleitung
• 8 Ersatzrotorblätter
Vorwort ........................................................................................ 25
Lieferumfang ............................................................................... 26
Sicherheitsanweisungen ............................................................ 27
a. Der Helikopter mit mehr Funktionen ..................................... 32
b. RC-Funktionen des Helikopters ............................................ 33
c. Ihr 4-Kanal Fernsteuersender ................................................ 34
d. Empfänger/Reglereinheit ....................................................... 35
e. Flugmodus ............................................................................. 36
f. Umbauanleitung von Mode 1 auf Mode 2 ............................ 37
g. Umbauanleitung von Mode 2 auf Mode 1 ............................ 38
h. Akku einlegen ......................................................................... 39
i. CARSON Balance-Ladegerät ................................................ 39
j. Vorbereitungen ....................................................................... 40
k. Einstellung der Taumelscheibe ............................................. 41
l. Paddelstangengewichte ........................................................ 43
m. Flugbetrieb ............................................................................. 43
n. Ground Effect ......................................................................... 45
o. Freiflugtraining ....................................................................... 46
p. Problembehandlung .............................................................. 47
Ersatzteile ................................................................................. 117
Page 27

27
D
CARSON Helikopter MARINES HM-38 50 050 7025
Sicherheitsanweisungen
Dieses Modell ist kein Spielzeug!
• Funkferngesteuerte Modelle sind kein Spielzeug, Ihre
Bedienung muss schrittweise erlernt werden.
• Kinder unter 14 Jahren sollten das Modell nur unter Aufsicht
von Erwachsenen in Betrieb nehmen.
Wenn Sie noch über keine Erfahrungen mit Flugmodellen verfügen, wenden Sie sich an einen erfahrenen Modellpiloten oder
an einen Modellbau-Club für die ersten Flugversuche.
Das Fliegen von ferngesteuerten Modellhubschraubern ist ein
faszinierendes Hobby, das jedoch mit der nötigen Vorsicht und
Rücksichtnahme betrieben werden muss.
Ein ferngesteuerter Modellhubschrauber kann in einem unkontrollierten Flugzustand erhebliche Beschädigungen und Verletzungen verursachen, für die Sie als Betreiber haftbar sind.
Als Hersteller und Vertreiber des Modells haben wir keinen
Einfluss auf den korrekten Umgang und die korrekte Bedienung
des Modells.
Vergewissern Sie sich bei Ihrer Versicherung, ob Sie beim
Ausüben Ihres Hobbys versichert sind, bzw. schließen Sie eine
spezielle Modellflugversicherung ab.
Kontaktadresse ist hierfür der Deutsche Modellfliegerverband
e.V. Rochusstr. 104 – 106, 53123 Bonn.
Bewahren Sie das Modell außerhalb der Reichweite von Kleinkindern auf. Diese könnten das Modell unabsichtlich in Betrieb
setzen und sich so Verletzungen zufügen oder Akkus und Kleinteile in den Mund nehmen und verschlucken.
Vorbereitungen
Fliegen Sie niemals, ohne die folgenden
Punkte geprüft zu haben:
• Achten Sie auf sichtbare Beschädigungen an Modell, Fernsteuerung, Ladegerät, und Lithium-Polymer Akku.
• Prüfen Sie alle Schraub- und Steckverbindungen auf exakten
und festen Sitz.
• Die Akkus müssen vollständig geladen sein.
• Achten Sie darauf, dass die Senderantenne fest eingeschraubt und auf volle Länge ausgezogen ist. Bei nicht
vollständig herausgezogener Antenne verringert sich die
Reichweite der Fernsteuerung.
• Überprüfen Sie das ordnungsgemäße Ansprechen der Servos auf die Steuersignale.
• Überprüfen Sie vor dem Start die Funkreichweite
Allgemein
• Lesen Sie die Bedienungsanleitung sorgfältig durch und
bewahren Sie sie zum Nachlesen auf.
• Machen Sie sich insbesondere mit den Hinweisen zum
Flugbetrieb vertraut.
Flugbetrieb
Das Modell ist hauptsächlich für Indoor-Flüge konzipiert, da
das geringe Eigengewicht und die bauartbedingt unstabile
Fluglage das Modell sehr empfindlich gegen Luftbewegungen
machen.
Zudem sind die Komponenten nicht staub- und feuchtigkeitsgeschützt.
Fliegen Sie nicht länger als eine
Akkuladung!
Danach müssen Sie den Motor mindestens 5 Minuten abkühlen
lassen.
Laden Sie dann den Akku nach. Tiefentladung ist unbedingt zu
vermeiden.
Verlegen Sie den Antennendraht so, dass er nicht in bewegliche Teile gelangen kann. Sorgen Sie für eine Zugentlastung,
indem Sie den Draht an einer Stelle mit Klebestreifen am Rumpf
fixieren.
Page 28

28DCARSON Helikopter MARINES HM-38 50 050 7025
Fliegen Sie am
besten nur in
geschlossenen
Räumen
• mit einem Freiraum von
mindestens 3m in alle
Richtungen
• auf glattem Untergrund
• ohne stehende (Möbel)
oder bewegte Hindernisse
(Personen, Tiere)
• in Räumen ohne Zugluft
Wenn Sie im Freien
fliegen wollen,
tun Sie dies
• nur bei Windstille,
• mindestens 3 km von dem nächsten offiziellen Modellflugplatz entfernt, andernfalls müssen Sie eine Frequenzabsprache treffen.
Fliegen Sie nicht
• wenn Sie übermüdet oder anderweitig in Ihrer Reaktionsfähigkeit beeinträchtigt sind.
• bei Windstärke 1 oder höher
• in der Nähe von Hochspannungsleitungen oder Funkmasten,
oder bei Gewitter! Atmosphärische Störungen können die
Signale Ihres Fernsteuersenders beeinflussen.
• in der Nähe von Hindernissen wie Gebäuden, Möbeln,
Personen und Tieren
• auf öffentlichen Verkehrsflächen
Page 29

29
D
CARSON Helikopter MARINES HM-38 50 050 7025
Rotor
• Beschädigte Rotorblätter müssen ausgetauscht werden!
Unterlassen Sie Reparaturversuche!
• Halten Sie sich von den Rotoren fern, sobald der Akku angeschlossen ist.
• Vermeiden Sie den Aufenthalt in der Rotationsebene der
Rotoren.
Betreiben Sie das Modell nicht im Sitzen, um bei Bedarf schnell
aus dem Gefahrenbereich gelangen zu können.
Ziehen Sie die Halteschrauben der Rotorblätter nur so fest an,
dass diese sich im Betrieb durch die Fliehkraft von selbst um
180° zueinander ausrichten können.
Ladegerät
Verwenden Sie ausschließlich das
beigefügte Ladegerät.
• Betreiben Sie das Ladegerät nur auf schwer entflammbaren
Untergründen und
• legen Sie auch den Akku während des Ladens auf eine nicht
entflammbare Unterlage
• Sorgen Sie für ausreichende Belüftung des Ladegerätes
während des Ladens.
• Lassen Sie das Ladegerät während des Ladevorganges
niemals unbeaufsichtigt.
• Laden Sie nur Akkus gleicher Bauart und Kapazität.
• Achten Sie beim Laden der Akkus auf die richtige Polarität.
Setzen Sie das Ladegerät, die Akkus und
das Modell niemals widrigen Umgebungsbedingungen aus!
Diese sind z. B.:
• Nässe, zu hohe Luftfeuchtigkeit (> 75 % rel., kondensierend)
Fassen Sie das Ladegerät auch nicht mit nassen Händen an.
• Betreiben Sie das Ladegerät niemals gleich dann, wenn es
von einer kalten in eine warme Umgebung gebracht wird.
Das dabei entstehende Kondenswasser kann das Gerät zerstören. Lassen Sie das Gerät unverbunden auf Temperatur
kommen.
• Staub und brennbare Gase, Dämpfe oder Lösungsmittel,
Benzine
• zu hohe Umgebungstemperaturen (> ca. +40 °C), direkte
Sonneneinstrahlung
• offenes Feuer, Zündquellen
• mechanische Belastungen wie Stöße,Vibrationen
• starke Verschmutzung
• starke elektromagnetische Felder (Motoren oder
Transformatoren) bzw. elektrostatische Feldern (Aufladungen)
• Sendeanlagen (Funktelefone, Sendeanlagen für Modellbau
usw.) Die einfallende Senderabstrahlung kann zur Störung
des Ladebetriebs bzw. zur Zerstörung des Ladegerätes und
damit auch des Akkus führen.
Lassen Sie das Ladegerät zwischen den
Ladevorgängen abkühlen. Trennen Sie das
Ladegerät vom Netz, wenn der Ladevorgang beendet ist.
Ein defektes Ladegerät darf nicht mehr verwendet werden.
Wenn anzunehmen ist, daß das Gerät defekt ist, also wenn
• das Gerät sichtbare Beschädigungen aufweist,
• das Gerät nicht mehr arbeitet und
• nach längerer Lagerung unter ungünstigen Verhältnissen
oder
• nach schweren Transportbeanspruchungen, dann ist es umgehend außer Betrieb zu setzen und gegen unbeabsichtigten
Betrieb zu sichern.
Entsorgen Sie das unbrauchbar gewordene (irreparable) Ladegerät gemäß den geltenden gesetzlichen Vorschriften.
Aus Sicherheits- und Zulassungsgründen (CE) ist das eigenmächtige Umbauen und/oder Verändern des Ladegerätes nicht
gestattet.
Page 30

30DCARSON Helikopter MARINES HM-38 50 050 7025
Lithium-Polymer Akku
Verwenden Sie den beigefügten Akku ausschließlich für dieses
Modell.
Verwenden Sie auch als Ersatzakku nur ein Originalteil.
• Laden Sie den Akku ausschließlich außerhalb des Modells
und fern von leicht entflammbaren Materialien! Es ist normal,
dass sich der Akku beim Laden erwärmt.
• Akku nicht überladen oder tiefentladen! Beides kann zum
Austreten von Elektrolyten und zur Selbstentzündung führen
• Mischen Sie niemals volle mit halbleeren Akkus / Batterien
oder Akkus unterschiedlicher Kapazität.
• Laden Sie den LiPo-Akku mindestens alle 6 Monate, um
Tiefentladung zu verhindern.
• Ziehen Sie den geladenen Akku vom Ladegerät ab, um eine
Selbstentladung zu vermeiden.
• Entfernen sie den Akku, wenn Sie das Modell längere Zeit
nicht benutzen wollen.
Defekte / nicht mehr aufladbare Akkus sind dem Sondermüll
(Sammelstellen) zuzuführen.
Eine Entsorgung über den Hausmüll ist untersagt!
Die Akkus dürfen nicht
• in Flüssigkeit getaucht,
• ins Feuer geworfen oder hohen Temperaturen sowie
• mechanischen Belastungen ausgesetzt oder
• auseinandergenommen / beschädigt werden
• kurzgeschlossen werden
Wenn Sie während des Gebrauchs, der Ladung, oder der Lage-
rung des Akkus einen Geruch wahrnehmen, eine Verfärbung,
übermäßige Erhitzung, eine Deformation oder andere Auffälligkeiten bemerken:
• stecken Sie den Akku vom Ladegerät ab
• trennen Sie den Akku vom Verbraucher
• benutzen Sie den Akku nicht mehr.
Wenn Elektrolyt ausläuft:
• Vermeiden Sie den Kontakt mit Augen und Haut!
• Waschen Sie die betroffenen Stellen sofort mit klarem Wasser ab und
• suchen Sie einen Arzt auf.
Page 31

31
D
CARSON Helikopter MARINES HM-38 50 050 7025
Sicherheitshinweise für
Lithium-Polymer-Akkumulatoren
1. Der Akku darf weder auseinandergebaut noch umgebaut
werden.
2. Der Akku darf nicht kurzgeschlossen werden.
3. Verwenden Sie den Akku nicht in der Nähe von Feuer, Öfen
oder anderen beheizten Stellen (über 80 °C).
4. Tauchen Sie den Akku nicht in Wasser, Meerwasser oder
setzen ihn anderer Feuchtigkeit aus.
5. Laden Sie den Akku nicht in der Nähe von Feuer oder unter
direkter Sonneneinstrahlung auf.
6. Verwenden Sie nur das spezifizierte Ladegerät und befolgen
Sie die Ladehinweise (unter 1 A).
7. Treiben Sie keine Nägel in den Akku, traktieren ihn mit
einem Hammer oder treten auf ihn.
8. Setzen Sie den Akku keinem äußeren Druck aus oder
werfen ihn.
9.
Verwenden Sie keine beschädigten oder deformierten Akkus.
10. Löten Sie nicht direkt am Akku.
11. Den Akku weder verpolen noch zu stark entladen.
12.
Achten Sie beim Laden und Entladen auf die richtige Polarität.
13. Verbinden Sie den Akku nicht mit einer Steckdose oder dem
Zigarettenanzünder im Auto.
14. Verwenden Sie den Akku nur für Geräte, die auch dafür
vorgesehen sind.
15. Vermeiden Sie direkten Kontakt mit undichten Akkus.
16. Verwenden Sie den Akku nicht zusammen mit Lithiumbatterien.
17. Halten Sie den Akku von Kleinkindern fern.
18. Laden Sie den Akku nicht länger als angegeben auf.
19. Platzieren Sie den Akku nicht in einer Mikrowelle oder
einem Druckbehälter.
20. Verwenden Sie keine undichten Akkus in der Nähe von
offenen Feuerstellen.
21. Setzen Sie den Akku keiner direkten Sonneneinstrahlung
aus oder verwenden ihn unter dieser (oder im erhitzten
Auto).
22. Verwenden Sie den Akku nicht in Umgebungen, in denen
sich statische Elektrizität bildet oder bilden kann (mehr als
64 V), da dadurch der Schutzkreislauf beschädigt werden
kann.
23. Der Akku kann innerhalb einer Temperaturspanne von
0 °C bis 45 °C geladen werden. Vermeiden Sie einen
Lade vorgang außerhalb der vorgegebenen Spanne.
24. Sollte der Akku vor dem ersten Gebrauch Rost aufweisen,
verdächtig riechen oder auf andere Weise ungewöhnlich
erscheinen, verwenden Sie ihn nicht und bringen Sie ihn
zurück in das Geschäft, in dem Sie ihn gekauft haben.
25. Wenn Kinder den Akku verwenden, sollten sie vorab von
ihren Eltern über den richtigen Gebrauch laut Bedienungsanleitung belehrt werden. Achten Sie darauf, dass sich die
Kinder an Ihre Anweisungen halten.
26. Halten Sie den Akku von Kindern fern und achten Sie
darauf, dass diese den Akku nicht aus dem Ladegerät
entfernen können.
27. Sollte etwas von der im Akku enthaltenen Chemikalie auf
Haut oder Kleidung kommen, waschen Sie diese umgehend
mit klarem Wasser ab, um Hautreizungen zu vermeiden.
28. Entladen Sie den Akku niemals mit mehr als 5c und lassen
Sie die Spannung auf weniger als 6 V sinken, da dies den
Akku beschädigt.
29. Laden Sie den Akku niemals auf einem Teppichboden, da
dies zu Bränden führen kann.
30. Verwenden Sie den Akku nicht für nicht spezifiziertes
Equipment oder andere Zwecke.
31. Berühren Sie den Akku nicht, wenn dieser undicht ist.
Wenn Sie den Akku anfassen, sollten Sie Ihre Hände sofort
waschen.
32. Laden Sie Ihren Akku nicht länger als vorgegeben.
33. Verwenden Sie keine Akkus, die aufgequollen oder
beschädigt sind.
34. Verwenden Sie den Akku nicht an Stellen, an denen
statische Ladungen von mehr als 64 Volt entstehen können.
Page 32

32DCARSON Helikopter MARINES HM-38 50 050 7025
Kein Schrauben und Basteln mehr!!! Der Spaß beginnt sofort
aus der Packung. Schon nach kurzer Zeit wird aus dir ein
richtiger Heli-Pilot!
Steuere deinen Helikopter vorbildsgetreu über alle 4 Funktionen. Durch die Doppelrotor-Funktion (koaxial) fliegt das
Modell extrem eigenstabil.
Der Betrieb des Helis ist ausschließlich für geschlossene
Räume ausgelegt. Bei absoluter Windstille kann auch draußen
geflogen werden. Mit dem mitgelieferten Lithium Polymer Akku
sind Flugzeiten von 8 – 10 Minuten zu erreichen.
Features:
• Extrem stabile Flugeigenschaften
• komplett flugfertig aufgebaut
• mit professioneller 4-Kanal 2,4 GHz Fernsteueranlage
• inkl. Gyro (Stabilisations-Funktion)
• inkl. Lipo Akku 7,4 V/ 2200 mAh und „Lipo Balance“
Ladegerät
• Rumpf aus eingefärbtem Lexan
Flugfertiger Helikopter mit 4 Kanal
Fernsteueranlage 2,4 GHz, Lipo Akku
7,4 V/ 2200 mAh, 230 V Lipo-Balancer
Ladegerät.
a. Der Helikopter mit mehr Funktionen
Paddelstange 1
Paddelstange 2
Rotorblatt B
Rotorblatt B
Rotorblatt A
Rotorblatt A
Rotorwelle 1
Rotorblatthalter
Rotorwelle 2
Rotorblatthalter
Rumpf
Fahrwerk
Page 33
33
D
CARSON Helikopter MARINES HM-38 50 050 7025
Die folgenden Funktionen werden
über die zwei Fernsteuerhebel des
Hand senders kontrolliert.
Zu jeder Steuerfunktion gibt es am Fernsteuersender einen
Trimmschieber, der leichte Korrekturen der Neutralstellung
erlaubt.
Pitch-Funktion
(Steigen / Sinken)
Die Pitch-Funktion steuert die Flughöhe dieses
Modellhubschraubers über eine gemeinsame
Drehzahländerung der beiden Rotoren. Die
Steuerung erfolgt mit dem linken Steuer hebel. Dazu
wird dieser stufenlos nach vorne und hinten bewegt.
Im Gegensatz zur anderen Steuerfunk tionen federt
dieser Hebel nicht wieder in die Mittelstellung zurück. Ist
der Steuerknüppel ganz nach hinten gezogen, sind die
Motoren aus und die Rotoren stehen. Wenn der Steuerhebel
nach vorne geschoben wird, laufen die Motoren an und die
Rotoren laufen je nach Hebelstellung mit gleicher, zunehmender
Drehzahl.
In der Mittelstellung des Steuerhebels sollte der Hubschrauber
auf einer Höhe schweben.
Heck-Funktion
(Seitenruderfunktion)
Die Heck-Funktion bewirkt eine Drehung des Modells um die
Hochachse. Da der Hubschrauber zwei gegenläufige Rotoren
besitzt, entsteht bei gleicher Drehzahl der Rotoren kein Drehmoment um die Hochachse (Rotorwelle). Der Hubschrauber
benötigt daher auch keinen Heckrotor zur Stabilisierung. Um
das Modell um die Hochachse (Rotorwelle) drehen zu können,
müssen die Rotoren mit leicht unterschiedlichen Drehzahlen
laufen. Das resultierende Drehmoment leitet die Drehung ein.
Bei geringerer Drehzahl des Steuerrotors gegenüber dem
Tragrotor ist das Drehmoment des Tragrotors höher, der Heli
dreht sich in Drehrichtung des Steuerrotors um die Hochachse.
Bei höherer Drehzahl des Steuerrotors ist das Drehmoment des
Tragrotors geringer als das des Steuerrotors, der Heli dreht in
Richtung des Tragrotors.
Die Steuerung der Heck-Funktion erfolgt mit dem rechten
Steuerhebel. Wird der Hebel nach links bewegt, dreht sich die
Rumpfspitze nach links. Steuern Sie nach rechts, dreht sich die
Rumpfspitze ebenfalls nach rechts.
Roll-Funktion
(Querruderfunktion)
Die Roll-Funktion bewirkt den Seitwärtsflug des Helikopters.
Die Steuerung erfolgt mit dem rechten Steuerhebel.
Wird der Hebel nach links bewegt, schwebt das Modell seitlich
nach links. Der Hebelausschlag nach rechts steuert das Modell
seitwärts nach rechts.
Nick-Funktion
(Höhenruderfunktion)
Die Nick-Funktion bewirkt den Vorwärts- und Rückwärtsflug
des Helikopters. Dabei neigt sich der untere Rotorkreis vorne
leicht nach unten, das Modell kippt um die Querachse.
Senkt sich die Nase nach unten, wird ein Teil des Auftriebes in
Vortrieb umgesetzt.
Wird umgekehrt die Nase angehoben, fliegt das Modell rückwärts. Die Steuerung erfolgt mit dem rechten Steuerhebel.
Drücken nach vorne leitet den Vorwärtsflug ein, ziehen nach
hinten lässt das Modell rückwärts fliegen.
b. RC-Funktionen des Helikopters
Technische Daten
Hauptrotordurchmesser A 450 mm
Hauptrotordurchmesser B 450 mm
Länge 575 mm
Höhe 285 mm
Gewicht 650 g
Ladegerät „Lipo Balance“
Eingang: 15 - 18 V/ 1000 mA
Ausgang: 7,4 V und 11,1 V/ 750 mA
Längsachse
(Roll)
Hochachse
(Heck)
Querachse
(Nick)
Page 34

34DCARSON Helikopter MARINES HM-38 50 050 7025
Im Lieferumfang enthalten ist ein Handsender mit zwei Fernsteuerhebeln, die mit jeweils zwei Funktionen belegt sind.
Diese Funktionen werden über die Bewegungen vorwärts /
rückwärts und rechts / links angesteuert.
Für den Sender werden 8 Stück AA
Batterien / Akkus benötigt (nicht
im Lieferumfang)
Legen Sie die geladenen Akkus in das Akkufach des Senders
ein.
Achten Sie dabei auf die richtige Polarität!
c. Ihr 4-Kanal Fernsteuersender
Mode 1
Mode 2
Abb. 1
Abb. 2
Stromanzeige
Öse
Pitch-
Trimmung
Rechter
Hebel/
Gashebel
RollTrimmung
Stromanzeige
Öse
Pitch-
Trimmung
Rechter
Hebel/ Seitenruderfunktion
RollTrimmung
Antenne
Ornament
Abdeckung
Trainings-
buchse
Ladebuchse
Batteriefachabdeckung
Höhenruderfunktion
Querruderfunktion
Schubregler
Seitenruder
Nicht
verwendet
Linker Hebel/
Seitenruder-
funktion
Nick-Trimmung
ON/OFF Schalter
Heckrotorfunk-
tion-Trimmung
Linker Hebel/
Gashebel
Nick-Trimmung
ON/OFF Schalter
Heckrotorfunk-
tion-Trimmung
Funktionen der 4-Kanal Fernsteuerung:
1. Die 2,4 GHz-Technologie sucht sich automatische eine
freie Frequenz. Sie zeichnet sich durch eine schnellere
Reaktion, einen steuerungsgenaueren Betrieb und eine
geringe Störanfälligkeit aus.
2. 4-Kanal Mikrocomputer Fernsteuerung
Ausgangsleistung: ≤ 10 mW
Stromverbrauch: 50 mA
Stromquelle: 1,2 V x8 NiMH Batterie (9,6 V) oder
1,5 V x8 AA Anodenbatterie
3. Die Knüppel am Sender, steuern die verschiedenen Servos/
Funktionen. Damit können Flugaktionen wie steigen, sinken,
vorwärts, rückwärts, nach links, nach rechts usw. durchgeführt werden.
4. Senderumbau für Mode 1 auf Mode 2 möglich. (Mode 1/Gas
rechts und Mode 2/ Gas links).
Steuerung und Funktion:
MODE 1
1. Linker Hebel/ Seitenruderfunktion.
Hiermit steuern Sie Ihren Helikopter vorwärts, rückwärts,
nach links und nach rechts. Schieben Sie ihn nach vorne,
damit Ihr Helikopter vorwärts fliegt, ziehen Sie den Hebel
nach hinten, um rückwärts zu fliegen, drücken Sie ihn nach
links, um nach links zu fliegen und drücken Sie den Hebel
nach rechts, um nach rechts zu fliegen.
2. Rechter Hebel/ Gashebel.
Hiermit steuern Sie Ihren Helikopter nach oben, unten, links
und rechts. Schieben Sie den Hebel nach vorne, damit Ihr
Helikopter steigt, ziehen Sie den Hebel nach hinten, damit er
sinkt. Drücken Sie ihn nach links, um Ihren Helikopter nach
links zu drehen und drücken Sie den Hebel nach rechts, um
nach rechts zu drehen.
MODE 2
1. Linker Hebel/ Gashebel.
Hiermit steuern Sie Ihren Helikopter nach oben, unten, links
und rechts. Schieben Sie den Hebel nach vorne, damit Ihr
Helikopter steigt, ziehen Sie den Hebel nach hinten, damit er
sinkt, drücken Sie ihn nach links, um Ihren Helikopter nach
links zu drehen und drücken Sie den Hebel nach rechts, um
nach rechts zu drehen.
2. Rechter Hebel/ Seitenruderfunktion.
Hiermit steuern Sie Ihren Helikopter vorwärts, rückwärts,
nach links und nach rechts. Schieben Sie ihn nach vorne,
damit Ihr Helikopter vorwärts fliegt, ziehen Sie den Hebel
nach hinten, um rückwärts zu fliegen, drücken Sie ihn nach
links, um nach links zu fliegen und drücken Sie den Hebel
nach rechts, um nach rechts zu fliegen.
3. Stromanzeige.
Die Anzeige besteht aus drei Farben: rot, gelb und grün.
Die grüne LED bedeutet, dass der Strom zum Fliegen ausreicht.
Wenn die grüne LED aus ist und die gelbe LED leuchtet, be-
Page 35
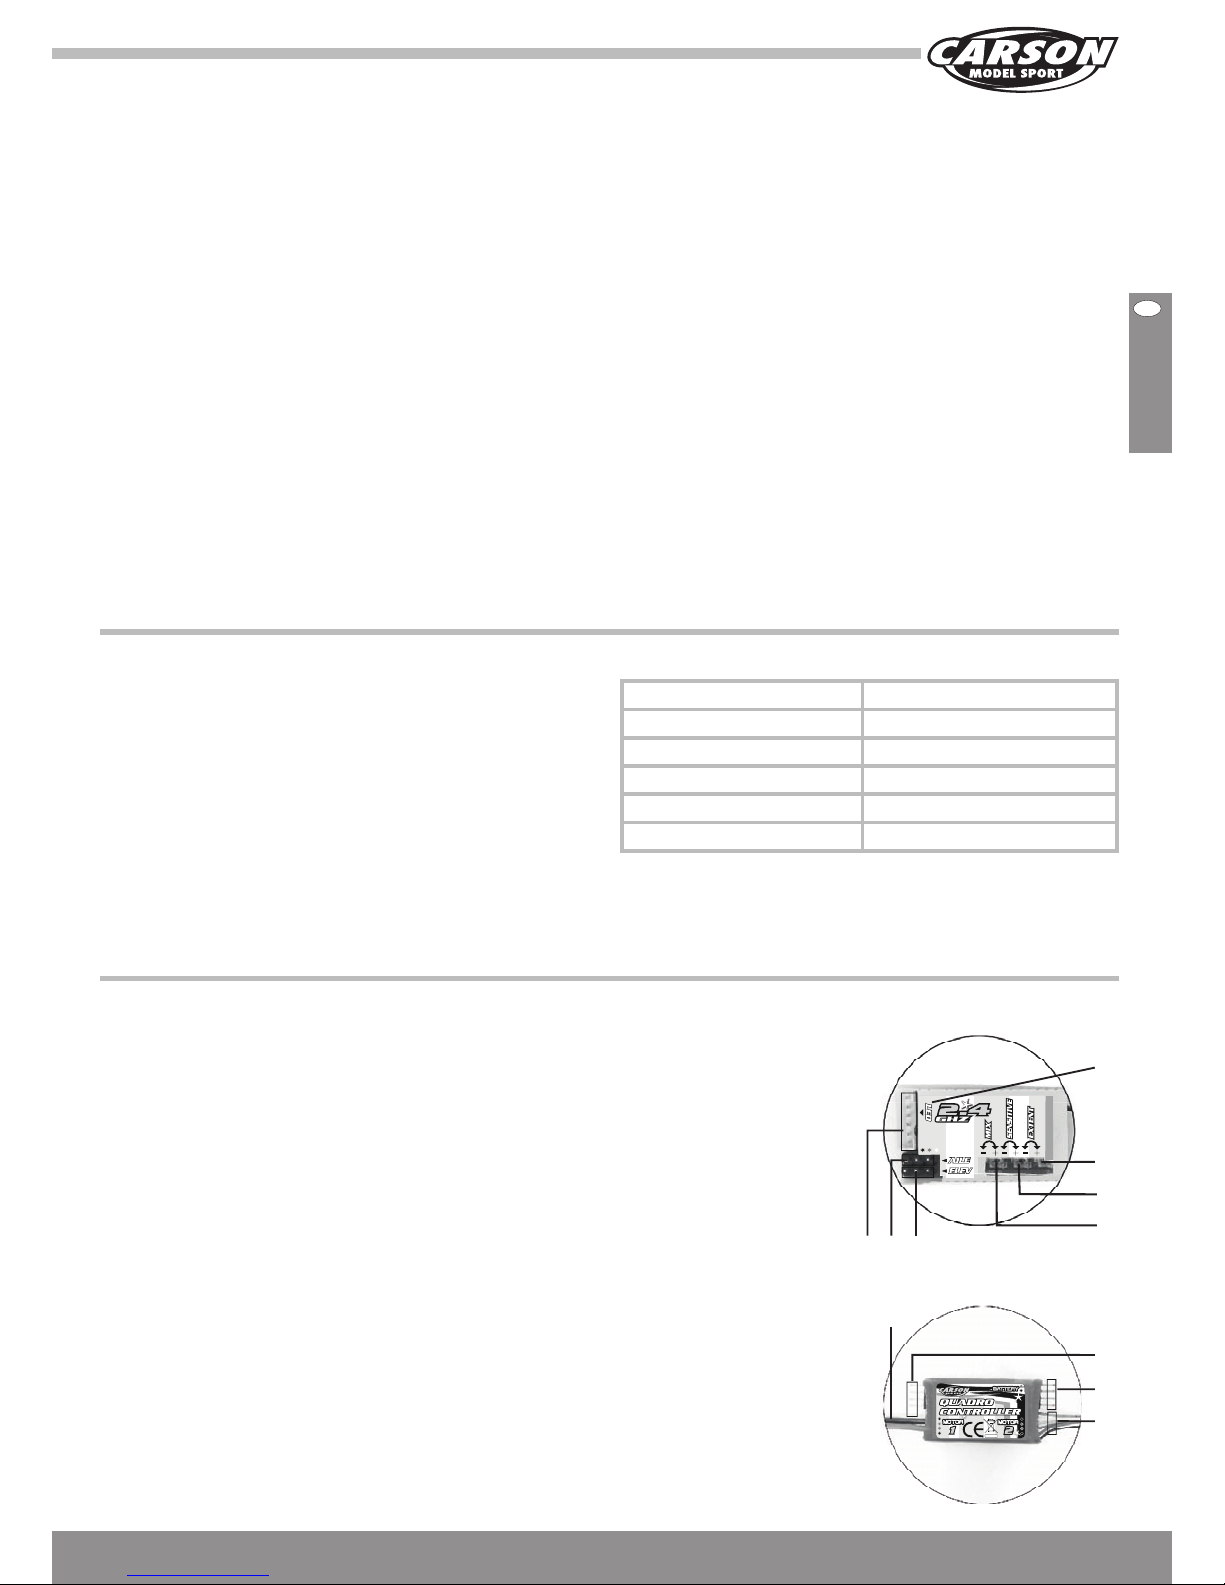
35
D
CARSON Helikopter MARINES HM-38 50 050 7025
deutet dies, dass der Strom nicht ausreicht und Sie den Flug
beenden müssen.
Wenn die gelbe LED aus ist und die rote LED leuchtet, ist die
Spannung viel zu niedrig. Beenden Sie sofort den Flug.
4. Höhenruderfunktion/ Nick-Trimmung.
Hiermit können Sie den Vorwärts/Rückwärtsflug austrimmen.
Drücken Sie den Trimm-Regler nach vorne um den Heli mehr
nach vorne fliegen zu lassen. Ziehen Sie den Trimmregler
nach hinten um den Heli mehr Rückwärtsfliegen zu lassen.
5. Seitenruderfunktion/ Heckrotorfunktion-Trimmung.
Hiermit können Sie den Links/ Rechtsflug austrimmen.
Drücken Sie den Trimmregler nach links, um den Heli mehr
nach links drehen zu lassen. Bewegen Sie den Trimmregler
nach rechts, um den Heli mehr nach rechts drehen zu lassen.
6. Schubregler/ Pitch-Trimmung.
Hiermit können Sie den Steig/ Sinkflug austrimmen. Drücken
Sie den Trimm-Regler nach vorne um den Heli mehr steigen
zu lassen. Ziehen Sie den Trimmregler nach hinten um den
Heli mehr Sinken zu lassen.
7. Querruderfunktion/ Roll-Trimmung.
Hiermit können Sie den Links/ Rechtsflug austrimmen.
Drücken Sie den Trimmregler nach links, um den Heli mehr
nach links fliegen zu lassen. Bewegen Sie den Trimmregler
nach rechts, um den Heli mehr nach rechts fliegen zu lassen.
8. ON/OFF Schalter.
Schalten Sie die Stromversorgung der Fernsteuerung ein
oder aus. Drücken Sie den Schalter nach vorne, um den
Sender einzuschalten, und ziehen Sie den Schalter nach
hinten, um den Sender auszuschalten.
9. Öse. Zum Befestigen des Sendertragegurts.
10.
Antenne. Überträgt die Sendesignale
11.
Ladebuchse.
Laden Sie die wieder aufladbaren Mignon-Akkus mit nicht
mehr als 50 mA und einer Spannung von < 12 V auf.
Hinweis: Die Ladebuchse darf nicht bei Batterien verwendet
werden, die nicht wieder aufladbar sind.
12.
Trainingsbuchse. Ohne Funktion
13.
Batterie/ Akkufach. Bitte beachten Sie beim Einlegen die
Polarität der Batterien/Akkus.
14.
Batteriefachabdeckung: Schützt die Fernsteuerungsbatterien/ Akkus. Öffnen Sie das Fach in Pfeilrichtung, wenn
Sie die Batterien/Akkus austauschen möchten.
DIP-Schalter
1. Höhenruderfunktion/ Nick.
Kehren Sie die Drehrichtung des Nick-Servos um.
2. Querruderfunktion/ Roll.
Kehren Sie die Drehrichtung des Roll-Servos um.
3. Schubregler.
Kehren Sie die Funktion der Pitch/ Gasfunktion um.
Hinweis: Stellen Sie vor dem Flug sicher, dass der
Schubregler richtig funktioniert.
4. Seitenruder/ Heckrotorfunktion.
Kehren Sie die Wirkrichtung der Heckrotorfunktion um.
5-12. Nicht verwendet.
Die Werkseinstellungen:
KANAL Ein/ Aus
1an
2an
3 aus
4 aus
5-12 Nicht verwendet
1. MIX/ Mischverhältnis:
Stellen Sie das Mischverhältnis der vorderen- und hintern
Rotors/ Heckrotorfunktion ein.
Eine Einstellung im Uhrzeigersinn lässt den Helikopter mehr
in eine Richtung drehen, gegen den Uhrzeigersinn in die
Gegengesetze Richtung.
2. EXTENT/ Servoausschlag:
Der EXTENT-Schalter wird zur Einstellung des Servoausschlags verwendet. Eine Einstellung im Uhrzeigersinn erhöht
den Servoauschlag, gegen den Uhrzeigersinn verringert den
Servoausschlag.
3. Sensitive/ Einstellung Gyro-Empfindlichkeit:
Stellen Sie die Empfindlichkeit entsprechend dem Flugverhalten ein. Eine Einstellung im Uhrzeigersinn erhöht die
Empfindlichkeit, gegen den Uhrzeigersinn wird die Empfindlichkeit verringert.
4. AILE:
Querruder/Rollservo, Roll-Servo anschließen.
5. ELEV:
Höhenruder/Nickservo, Nick-Servo anschließen.
6. Flugregler-Kabelanschluss:
Das Flugregler-Kabel
anschließen.
7. LED:
Die LED zeigt den
Empfangsstatus an. Ein
schnelles Blinken bedeutet,
dass das Signal empfangen
wird. Eine leuchtende LED
bedeutet, dass das Signal
empfangen wurde und ein
langsames Blinken bedeutet, dass das Signal nicht
empfangen wurde.
8. Vordere Motoren:
Die Frontmotoren
anschließen.
9. Hintere Motoren:
Die Heckmotoren
anschließen.
10.
Akkuanschlusskabel:
Am Flugakku anschließen.
d. Empfänger/Reglereinheit
➆
➀
➁
➂
➇
➈
➅
➅ ➄ ➃
➉
Page 36
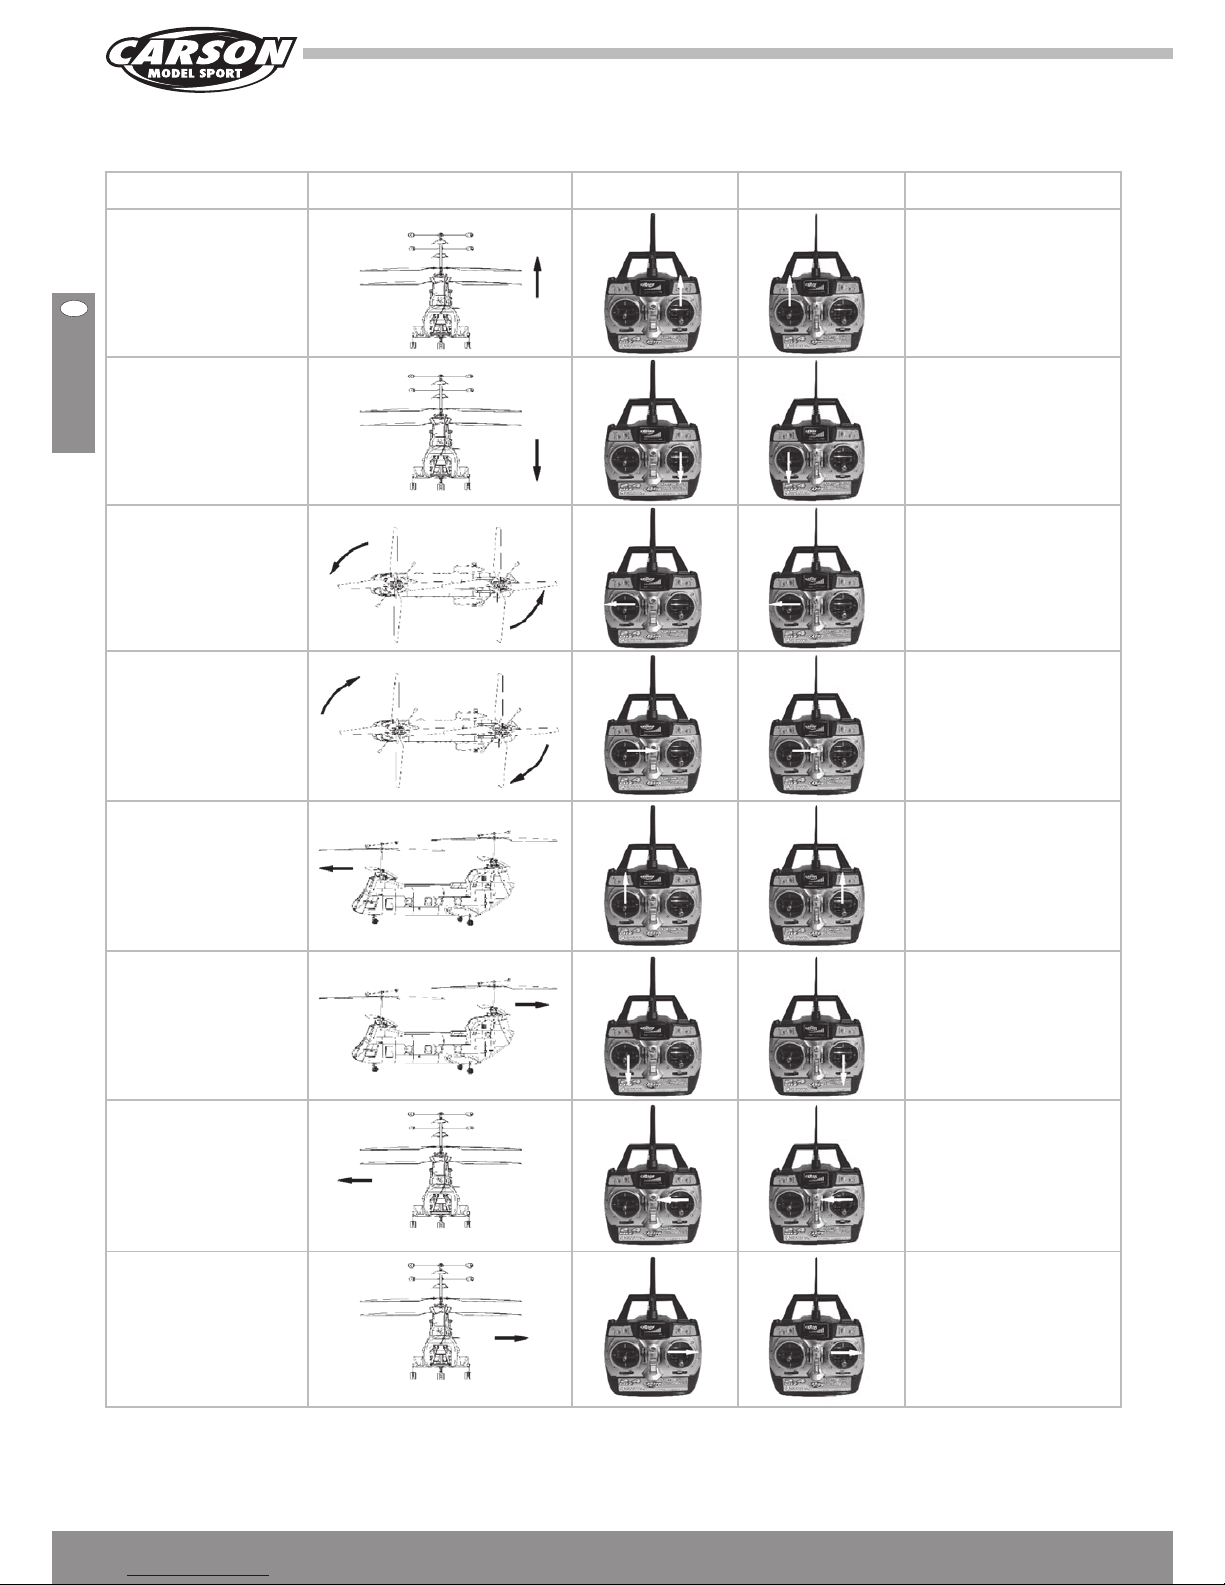
36DCARSON Helikopter MARINES HM-38 50 050 7025
e. Flugmodus
Mode 1 Mode 2
Hoch Gashebel nach oben
Runter Gashebel nach unten
Nase nach links Heckrotorhebel
nach links
Nase nach rechts Heckrotorhebel
nach rechts
Nase nach vorne Nickhebel
nach oben
Nase nach hinten Nickhebel
nach unten
Nach links rollen Rollhebel
nach links
Nach rechts rollen Rollhebel
nach rechts
Page 37
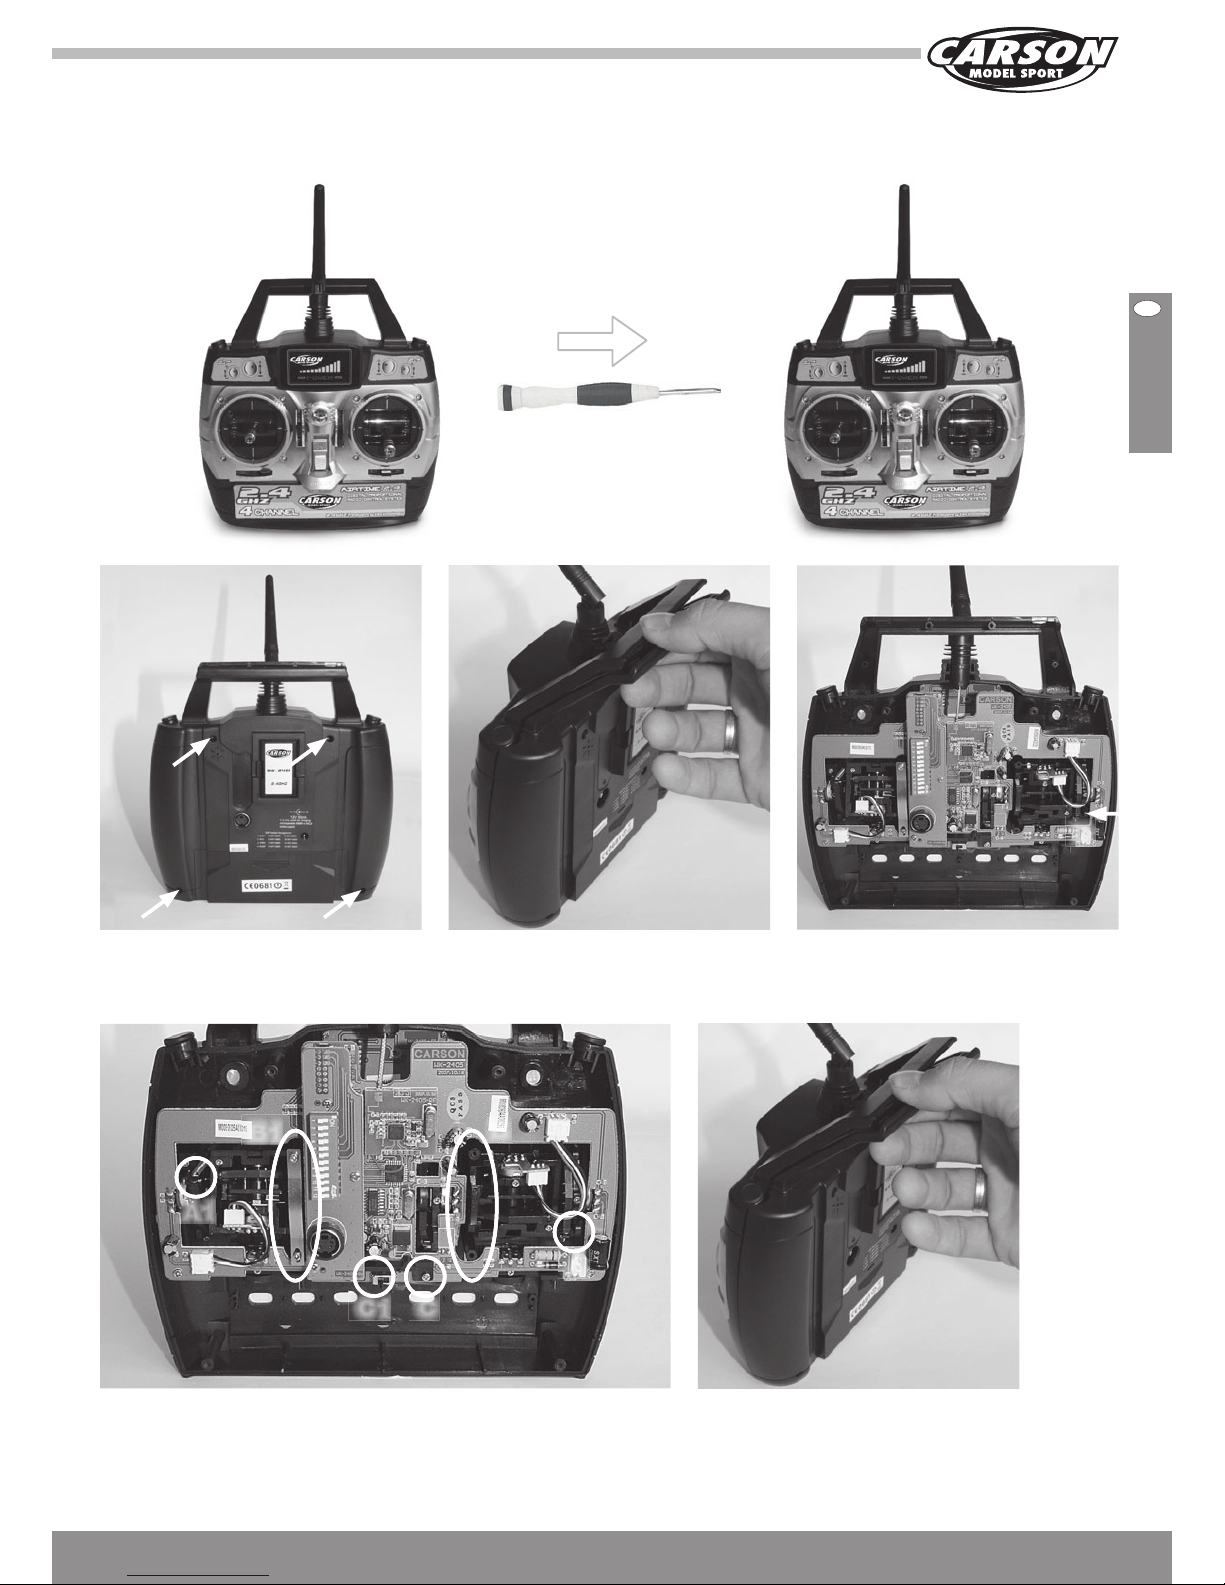
37
D
CARSON Helikopter MARINES HM-38 50 050 7025
f. Umbauanleitung von Mode 1 auf Mode 2
Kreuz-Schraubenzieher
Lösen Sie wie auf dem Bild dargestellt
die Schrauben am Gehäuse des Senders.
Trennen Sie das vordere und hintere
Gehäuse des Senders voneinander.
Ziehen Sie den Stift D wie auf dem Bild
dargestellt heraus.
• Lösen Sie die Schraube aus A heraus und schrauben Sie sie in A1.
• Ziehen Sie die Feder aus B heraus und montieren Sie diese in B1.
• Legen Sie den Schalter von C auf C1 um.
Befestigen Sie den Stift D. Befestigen Sie die
Rückabdeckung und ziehen Sie die Schrauben an.
Bewegen Sie den Schubregler in die niedrigste
Position. Damit ist der Umbau abgeschlossen.
1. 2. 3.
4. 5.
B
A
D
CC1
A1
B1
Page 38
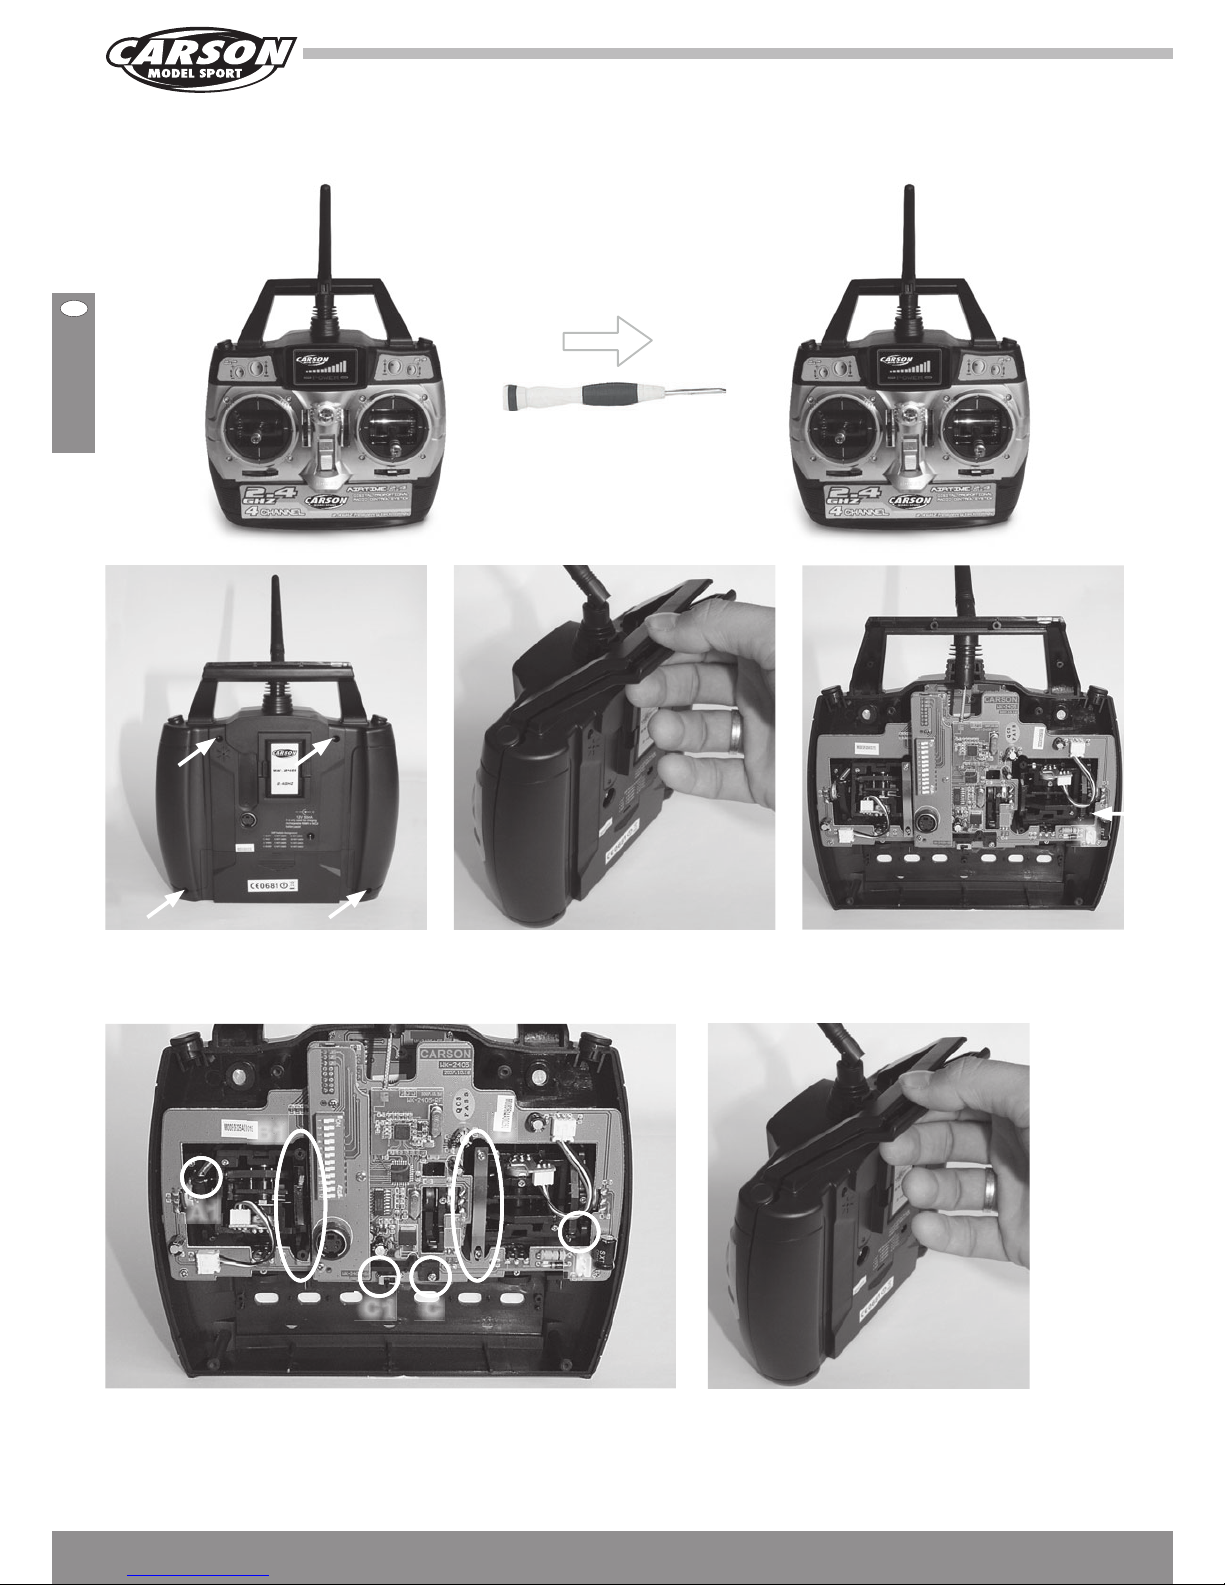
38DCARSON Helikopter MARINES HM-38 50 050 7025
g. Umbauanleitung von Mode 2 auf Mode 1
Kreuz-Schraubenzieher
Lösen Sie wie auf dem Bild dargestellt
die Schrauben am Gehäuse des Senders.
Trennen Sie das vordere und hintere
Gehäuse des Senders voneinander.
Ziehen Sie den Stift D wie auf dem Bild
dargestellt heraus.
• Lösen Sie die Schraube aus A1 heraus und schrauben Sie sie in A.
• Ziehen Sie die Feder aus B1 heraus und montieren Sie diese in B.
• Legen Sie den Schalter von C1 auf C um.
Befestigen Sie den Stift D. Befestigen Sie die
Rückabdeckung und ziehen Sie die Schrauben an.
Bewegen Sie den Schubregler in die niedrigste
Position. Damit ist der Umbau abgeschlossen.
1. 2. 3.
4. 5.
B
A
D
CC1
A1
B1
Page 39

39
D
CARSON Helikopter MARINES HM-38 50 050 7025
Legen Sie den Flugakku wie auf dem Bild
gezeigt in Ihrem Helikopter ein.
h. Akku einlegen
Position des Akkupacks
Technische Eigenschaften
1. Das Balance Ladegerät, dessen gesamter Ladevorgang von
einem Mikrocomputer gesteuert wird, ist genauer, sicherer
und zuverlässiger.
2. Der Lader eignet sich für 7,4 V/ 11,1 V Li-Ion oder
Li-Polymer-Akkus.
3. Überwachen Sie den Stand des automatischen
Ladevorgangs mittels der LED.
4. Die automatische Funktion zur Erkennung der Ausgleichsspannung schöpft die maximale Kapazität Ihrer Lipo-Akkus
effektiv aus.
5. Anschlussbuchse: Gleichstrom 15 - 18 V/ 1000 mA
i. CARSON Balance-Ladegerät
Bitte beachten
1. Dieses Ladegerät eignet sich für Li-Ion oder Li-PolymerAkkus mit 2 - 3 Zellen. Nicht zerlegen, umbauen oder für
andere Zwecke verwenden.
2. Niemals laden, wenn der Akku gerade für einen Flug
verwendet wurde und noch nicht abgekühlt ist.
Andernfalls kann die Batterie beschädigt werden. Außerdem
besteht die Gefahr eines Unfalls.
3. Es ist nicht gestattet, die Akkus zu laden, wenn die Zellen
deformiert oder aufgequollen sind, da ein beschädigter Akku
zu einem Kurzschluss, Feuer oder einer Explosion führen
kann.
4. Niemals in der Nähe von Wärmequellen oder elektronischen
Geräten aufbewahren. Laden Sie die Akkus niemals unter
direkter Sonneneinstrahlung.
5. Setzen Sie das Ladegerät niemals Feuchtigkeit aus und
verwenden Sie es nicht in feuchter Umgebung, um einen
Kurzschluss und andere unvorhersehbare Zwischenfälle zu
vermeiden.
6. Flüssigkeiten oder andere Dinge dürfen nicht in das Ladegerät gelangen.
Schalten Sie ansonsten sofort die Stromversorgung ab
und entfernen Sie die Batterie. Schicken Sie das Ladegerät
dann zur Überprüfung Ihrem Händler vor Ort oder an unsere
Service-Abteilung.
7. Stellen Sie das Ladegerät auf eine ebene Fläche und
vermeiden Sie ein Herunterfallen oder Stöße.
8. Bevor Sie einen Akku am Ladegerät anschließen, sollten
Sie sich vergewissern, dass die Pole der Batterie und des
Balanceladegerätes übereinstimmen, damit Ihr Akku und das
Ladegerät nicht beschädigt werden.
Page 40

40DCARSON Helikopter MARINES HM-38 50 050 7025
Bezeichnung Lipo Balance-Ladegerät
1. Stecken Sie das mitgelieferte Netzteil in die Anschlussbuchse des Laders (Pole beachten). Der Status der LED ist
rot.
2. Wenn Sie einen 7,4 V Li-Ion oder Li-Polymer-Akku laden,
stecken Sie den Balance-Stecker Ihres Akkus in den 2
ZELLEN-Anschluss ihres Balance-Laders. Dann leuchtet die
Lade-LED rot und beginnt zu blinken. Dies bedeutet, dass
die Batterie nun geladen wird. Wenn Ihre Batterie vollständig
geladen ist, leuchtet die LED grün.
3. Wenn Sie eine 11,1 V Li-Ion oder Li-Polymer-Akku laden,
stecken Sie den Balance-stecker Ihres Akkus in den 3
ZELLEN-Anschluss ihres Balance-Laders. Dann leuchtet die
Lade-LED rot und beginnt zu blinken. Dies bedeutet, dass
der Akku nun geladen wird. Wenn Ihr Akku vollständig
geladen ist, leuchtet die LED grün.
Hinweis:
Es kann nur ein Akkupack gleichzeitig geladen werden. Laden
Sie niemals zwei Packs gleichzeitig, da ansonsten Ihr Ladegerät oder Ihr Akku beschädigt werden könnten oder es zu einem
Brand kommen könnte.
Falls die LED zweimal blinkt und dann nicht periodisch
leuchtet, ist Ihre Batterie beschädigt.
Technische Eigenschaften
Stromausgabe: 750 mA
Eingangsspannung: Gleichstrom 15 - 18 V/ 1000 mA
Ausgangsspannung:
2 Zellen Gleichstrom
7,4 V-Buchse
3 Zellen Gleichstrom
11,1 V-Buchse
8,4 V 12,6 V
j. Vorbereitungen
Allgemeine Hinweise
• Wenn Sie keine oder wenig Erfahrungen mit Flugmodellen
haben, sollten Sie diese zuerst mit einem Flugsimulationsprogramm sammeln.
• Holen Sie sich für die Feineinstellungen des Helikopters und
der Steuerung Rat bei erfahrenen Modellpiloten.
• Machen Sie sich mit den Steuerfunktionen des Senders vertraut.
• Beginnen Sie Ihre Flugversuche hinter dem Modell stehend,
die Blickrichtung in Flugrichtung. In diesem Fall ist die
Steuerreaktion gleich der Steuerrichtung.
Machen Sie sich außerdem mit der Steuerung des Modells
vertraut, wenn es auf Sie zufliegt (seitenverkehrte
Reaktion auf die Steuerrichtung)!
Laden des Lipo-Flugakkus
Laden Sie den Akku stets außerhalb des Modells in/auf einer
feuerfesten Unterlage.
1. Verbinden Sie das Netzteil mit dem Lipo-Balance Ladegerät.
2. Stecken Sie das Netzteil-Kabel in eine Netzsteckdose.
3. Verbinden Sie den weißen Stecker des Lipo-Akkus mit der
Buchse des Lipo-Balance Ladegeräts.
4. Achten Sie auf sicheren Kontakt der Steckverbindungen, um
einen Kurzschluß zu vermeiden.
5. Akku auf keinen Fall abdecken.
Die Temperatur des Akkus darf während des Ladevorgangs
60 C° nicht überschreiten.
Der Ladevorgang ist abgeschlossen wenn die grüne LED am
Balance-Ladegerät aufleuchtet.
Page 41

41
D
CARSON Helikopter MARINES HM-38 50 050 7025
Anschlussdiagramm
k. Einstellung der Taumelscheibe
1. Überprüfung der Taumelscheibe
Schalten Sie die Fernsteuerung ein. Bringen Sie den Gashebel und den Gashebel-Trimmung in die niedrigste Position
und bringen Sie den Nick- sowie den Roll-Steuerhebel in die
neutrale Position (MODE 1). Schließen Sie dann das Akkuanschlusskabel des Helikopters wieder an, um zu überprüfen,
ob sich die Taumelscheibe nach der Neupositionierung des
Nick- und Roll-Servos in einer horizontalen Ebene befindet.
2. Einstellung Taumelscheibe
Wenn sich die Taumelscheibe nicht in einer horizontalen
Position befindet, können Sie diese mit den beiden folgenden
Schritten einstellen:
1. Servo-Einstellung. Lösen Sie die Schraube am Servo und
entfernen Sie das runde Servohorn. Stellen Sie die Stromversorgung Ihres Tandem-Helikopters wieder her. Nachdem die
Servos initialisiert sind, stellen Sie die Winkel zwischen dem
L-förmigen Umlenkhebel und dem I-förmigen Umlenkhebel
jeweils auf 90 Grad ein. Befestigen Sie dann wieder das
Servohorn am Servo und ziehen Sie die Schraube wieder an.
2. Einstellung Servo-Gestänges. Stellen Sie die Länge des
Servo-Gestänges ein, um die Taumelscheibe in eine horizontale Position zu bringen.
Polzuweisungsdiagramm
Ladebuchse für
7,4 V Akkus
Ladebuchse für
11,1 V Akkus
12.6 V 8.4 V 4.2 V O V
Status LED
Eingangsbuchse
Falsch
Richtig
Lipo-Akku
Balanceladegerät
Netzteil
Page 42

42DCARSON Helikopter MARINES HM-38 50 050 7025
Horizontale Position
der Taumelscheibe
Horizontale Position
der Taumelscheibe
ServoGestänge
ServoGestänge
ServoGestänge
I-förmiger
Umlenkhebel
RollServo
NickServo
Rundes Servohorn
L-förmiger
Umlenkhebel
L-förmiger
Umlenkhebel
I-förmiger
Umlenkhebel
Befestigung der Rotorblätter
Die Rotorblätter müssen sich durch die Fliehkraft von selbst um
180° zueinander ausrichten können.
1. Überprüfung der Hauptrotorblätter
a. Kontrollieren Sie, ob die Befestigungsschrauben der
Hauptrotorblätter zu lose oder zu fest sind.
b. Überprüfen Sie den Spurlauf.
2. Einstellung der Hauptrotorblätter
a. Wenn die Befestigungsschrauben zu lose sind, sollten Sie
diese etwas anziehen. Wenn sie zu fest sind, lösen Sie
die Schrauben etwas.
b. Falls ein Problem mit dem Rotorblattspurlauf besteht,
sollten Sie die Länge der Gewindestangen zum Rotorblatt
so zurecht drehen das der Spurlauf wieder hergestellt ist.
Gewindestange
Befestigungsschrauben
Page 43

43
D
CARSON Helikopter MARINES HM-38 50 050 7025
Paddelstangenhülse
l. Paddelstangengewichte
1. Drücken Sie das Fliehgewicht auf die Paddelstange bis zum
Ende der Öffnung.
2. Richten Sie das Paddelstangengewicht nach der Öffnung der
Hülse aus und drücken das Gewicht in die Hülse.
3. Drehen Sie die Hülse gegen den Uhrzeigersinn um 90° und
führen Sie dann den Haken (Ende der Paddelstange) vollständig in Loch 2.
Hinweis:
Die Paddelstangengewichte können bei hohen Geschwindigkeiten während des Flugs abfliegen, wenn diese nicht richtig
befestigt wurden. Hierdurch können Personen oder Gegenstände ernsthaft beschädigt werden.
Paddelstangengewicht Paddelstangenhülse
➀
➁
90°
Paddelstange
Öffnung
Einschalten des Modells
Sorgen Sie für ausreichend Platz, um erste Flugversuche zu
unternehmen. Auch wenn der Heli später auf engstem Raum
geflogen werden kann, benötigen Sie ca. 3 m freien Raum in
allen Richtungen um sich herum.
• Stellen Sie das Modell auf einen glatten und ebenen Untergrund, damit der Helikopter ungehindert gleiten und abheben kann.
• Stellen Sie den Hubschrauber ca. 2 m vor sich auf den
Boden, das Heck zeigt in Ihre Richtung. Auf diese Weise
entspricht die Reaktionsrichtung des Helikopters der Steuerrichtung.
• Nehmen Sie den linken Fernsteuerhebel (Pitch) ganz
zurück (auch die Trimmung).
• Schalten Sie den Sender ein.
• Die Batterieanzeige beginnt zu blinken.
• Schließen Sie jetzt den frisch geladenen Flugakku an den
Empfänger an.
m. Flugbetrieb
2 m
Page 44

44DCARSON Helikopter MARINES HM-38 50 050 7025
Das Modell darf jetzt nicht bewegt
werden!
Wenn der Vorgang abgeschlossen ist und der Empfänger
korrekte Signale empfängt, leuchtet die LED dauerhaft.
Wenn die LED langsam blinkt, ist die Akkuspannung zu niedrig. Laden Sie den Akku neu oder ersetzen Sie ihn durch einen
Original-Ersatzakku!
• Bewegen Sie den linken Steuerhebel leicht nach vorne, bis
das Modell gerade vom Boden abhebt.
• Ziehen Sie den Steuerhebel wieder langsam zurück, so dass
das Modell sanft wieder landet.
Bewegen Sie die Steuerung äußerst
feinfühlig!
Überprüfung der Reichweite des
Fernsteuersenders
Überprüfen Sie vor jedem ersten Start oder nach einem Crash
die Funktion und Reichweite der RC-Anlage! In der Neutralstellung der Steuerhebel von Nick und Roll sollten auch die
Taumelscheiben in Neutralstellung stehen.
Ist dies nicht der Fall, korrigieren Sie die Stellung mit den Trimhebeln des jeweiligen Steuerkanals am Sender.
• Entfernen Sie sich langsam von dem Modell (Motor läuft
nicht!).
• Betätigen Sie nacheinander die Fernsteuerhebel Nick und
Roll und beobachten Sie dabei die Reaktionen des Modells.
Die RC-Anlage arbeitet einwandfrei, wenn das Modell aus
ca. 30 m Entfernung noch korrekt auf die Fernsteuersignale
anspricht.
Fliegen Sie das Modell niemals mit fehlerhaft arbeitender Fernsteuerung! Im günstigsten Fall erleidet „nur“ das Modell einen
Schaden.
Wenn die Fernsteuerung nicht einwandfrei funktioniert, prüfen
Sie als erstes den Ladezustand der Senderakkus.
Austrimmen des Helikopters
Bereits kurz bevor sich der Helikopter vom Boden löst können
Sie erkennen, ob er in eine bestimmte Richtung drehen will.
Korrigieren Sie die Abweichungen vom senkrechten Steigflug
mit dem Trimmschieber der Heck-Funktion.
Rumpfspitze dreht sich nach rechts:
• Nehmen Sie die Drehzahl (Pitch) heraus und schieben
Sie den Trimmschieber der Heck-Funktion am rechten Fernsteuerhebel schrittweise nach links.
• Schieben Sie den Pitch-Hebel wieder nach vorne und prüfen
Sie, ob die Korrektur ausreichend war, ggf. verschieben Sie
die Trimmung weiter nach links.
• Wiederholen Sie den Vorgang so lange, bis der Helikopter
keinerlei Tendenz mehr zeigt, nach rechts zu drehen.
Rumpfspitze dreht sich nach links:
• Verfahren Sie wie oben beschrieben, aber schieben Sie den
Trimmschieber der Heck-Funktion schrittweise nach rechts.
Modell gleitet (driftet) oder kippt nach
rechts:
• Nehmen Sie die Drehzahl heraus und schieben Sie den
Trimmschieber der Roll-Funktion am rechten Fernsteuerhebelschrittweise nach links.
• Schieben Sie den Pitch-Hebel wieder nach vorne und prüfen
Sie, ob die Korrektur ausreichend war, ggf. verschieben Sie
die Trimmung weiter nach links.
• Wiederholen Sie den Vorgang so lange, bis der Helikopter
keinerlei Tendenz mehr zeigt, nach rechts zu driften.
Modell gleitet (driftet)
oder kippt nach links:
• Verfahren Sie wie oben beschrieben, aber schieben Sie den
Trimmschieber der Roll-Funktion
schrittweise nach rechts.
Page 45

45
D
CARSON Helikopter MARINES HM-38 50 050 7025
Modell gleitet (driftet) nach vorne:
• Nehmen Sie die Drehzahl heraus und schieben Sie den
Trimmschieber der Nick-Funktion am rechten Fernsteuerhebel schrittweise nach hinten.
• Schieben Sie den Pitch-Hebel wieder nach vorne und prüfen
Sie, ob die Korrektur ausreichend war, ggf. verschieben Sie
die Trimmung weiter nach hinten.
• Wiederholen Sie den Vorgang so lange, bis der Helikopter
keinerlei Tendenz mehr zeigt, nach vorne zu driften.
Modell gleitet (driftet)
nach hinten:
• Verfahren Sie wie oben beschrieben, aber schieben Sie den
Trimmschieber der Nick-Funktion
schrittweise nach vorne.
Schwebeflug
Schwebeflug heißt, den Helikopter stabil auf einer Stelle in
der Luft zu halten. Schwebeflug ist nur mit einem Helikopter
möglich und muss als grundlegende Flugfigur intensiv geübt
werden.
Machen Sie sich dazu mit den Steuerfunktionen Ihres Fernsteuersenders vertraut, so dass diese „in Fleisch und Blut“
übergehen.
• Stellen Sie dann den Hubschrauber ca. 2 m vor sich auf den
Boden, mit dem Heck in Ihre Richtung.
• Lassen Sie den Helikopter noch am Boden und bewegen Sie
ihn erst gezielt leicht seitwärts, vorwärts und rückwärts.
• Wenn Sie die Steuerung am Boden beherrschen, geben Sie
etwas mehr Auftrieb und lassen Sie ihn über dem Boden
schweben, ohne dass sich die Rumpfspitze dreht oder der
Helikopter wegdriftet..
• Markieren Sie am besten einen Punkt auf dem Boden, von
dem aus Sie das Modell starten.
Versuchen Sie, den Helikopter über diesem Punkt zu halten
und auch auf diesem Punkt wieder zu landen.
• Bewegen Sie die Steuerhebel nicht zu ruckartig, da sonst
insbesondere die Landung sehr hart ausfallen kann.
Entwickeln Sie ein Gespür für die Steuerung, indem Sie
wiederholt abheben, schweben und wieder aufsetzen.
• Wenn Sie dabei Unstimmigkeiten in der Steuerung oder eine
Unwucht im Rotor bemerken, landen Sie
sofort und korrigieren Sie die notwendigen Einstellungen.
• Steigern Sie die Flughöhe allmählich.
ACHTUNG!
Bis zu einer Höhe von ca. 30 cm befindet
sich das Modell im Einflussbereich der
Luftverwirbelungen durch die eigenen
Rotoren.
Dieser „Ground Effect“ erleichtert zum Einen das Abheben des
Helikopters, da die von den Rotoren nach unten gedrückte Luft
den Helikopter vom Boden abstößt.
In unmittelbarer Bodennähe kehrt sich dieser Effekt aber um,
da nun die seitlich vom Helikopter wegströmende Luft einen
Unterdruck erzeugt und das Modell sich förmlich am Boden
ansaugt. Dies kann
zu einem unsanften
Aufsetzen führen.
Aus diesem Grund
ist das Flugverhalten des Modells in
geringer Höhe eher
instabil. Wenn Ihnen
das unruhige Flugverhalten Schwierigkeiten bereitet, steigern
Sie die Flughöhe allmählich.
n. Ground Effect
Page 46

46DCARSON Helikopter MARINES HM-38 50 050 7025
Ab einer Flughöhe von ca. 2 m befindet sich der Heli nicht mehr
im Einflussbereich der Luftverwirbelungen aus den eigenen
Rotoren und die Fluglage wird stabiler.
o. Freiflugtraining
Wenn Sie den Schwebeflug beherrschen,
fangen Sie mit einfachen Flugfiguren an:
• Trainieren Sie die Beherrschung des Modells, lassen Sie es
schweben, steigen, sinken, fliegen Sie vorwärts und rückwärts und fliegen Sie Kurven.
• Wenn Sie sich sicher fühlen, stellen Sie sich seitlich zum
Modell und üben Sie die Steuerung aus diesem Blickwinkel
• bzw. lassen Sie das Modell auf sich zu fliegen und steuern
Sie in umgekehrter Richtung.
• Vermeiden Sie ruckartige Lastwechsel. da sich sonst oberer
und unterer Rotor berühren könnten und das Modell abstürzt.
• Fliegen Sie das Modell immer vor sich oder lassen Sie es
über sich kreisen. Wenn Sie das Modell hinter Ihrem Rücken
fliegen lassen, könnten Sie die Orientierung verlieren und
damit die Kontrolle über den Heli.
Versuchen Sie niemals, das Modell aus
dem Flug zu fangen!
Page 47

47
D
CARSON Helikopter MARINES HM-38 50 050 7025
p. Problembehandlung
Lesen Sie dies, schon bevor es passiert.
Problem Ursache Behebung
Das Modell bewegt sich
nicht
1. Prüfen Sie, ob der Sender und der Empfänger eingeschaltet sind
Schalten Sie Sender und/oder Empfänger
ein
2. Prüfen Sie die Akkuspannung von Sender und
Empfänger
Setzen Sie vollständig geladene Akkus ein
3. Der Trimmschieber der Pitch-Funktion steht am
oberen Anschlag
Stellen Sie sicher, dass der Trimmschieber
der Pitch-Funktion in Neutralstellung oder
etwas darunter steht.
Motor dreht nicht 1. Motor ist defekt Tauschen Sie den Motor aus
2. Verbindung von Controller und Motor ist lose Verbinden Sie den Stecker
Das Modell reagiert
falsch auf die Steuerbefehle oder fliegt unruhig
Überprüfen Sie den Ladezustand von Sender- und
Empfängerakkus
Setzen Sie vollständig geladene Akkus ein
Das Modell steigt nicht
auf
1. Rotorblätter sind verbogen Tauschen Sie die Rotorblätter aus
2. Motor wird zu heiß Lassen Sie den Motor abkühlen
3. Akkus sind leer Laden Sie die Akkus oder tauschen Sie sie
aus
Die Rotoren lassen sich
nicht abstellen
1. Trimmung ist nicht korrekt eingestellt Korrigieren Sie die Trimmung am PitchRegler
Das Modell bewegt sich
vorwärts/rückwärts und
seitwärts,
schwebt
aber nicht
Überprüfen Sie, ob der Helikopter einem Luftzug, z.
B. durch ein geöffnetes Fenster oder eine Klimaanlage ausgesetzt ist. Bei Zugluft ist Schwebeflug nicht
möglich
Schließen Sie das Fenster / die Tür, schalten Sie die Klimaanlage ab oder wählen Sie
einen besser geeigneten Raum
Das Modell vibriert heftig 1. Prüfen Sie, ob die Hauptrotoren rund laufen Wuchten Sie die Rotorblätter ggf. aus
2. Prüfen Sie, ob das Modell korrekt ausbalanciert ist Wuchten Sie die Rotorblätter ggf. aus
Das Heck lässt sich nicht
stabilisieren
1. Ein oder mehrere Rotorblätter sind defekt Ersetzen Sie ein oder beide Rotorblätter
2. Unterer und oberer Rotorkreis laufen mit unter-
schiedlicher Reibung auf der Rotorwelle
Stellen Sie sicher, dass sich beide Rotorkreise leicht drehen lassen
3. Die Rotationsgeschwindigkeit des oberen und
unteren Rotorkreises ist ungleichmäßig
Tauschen Sie den Motor aus. Korrigieren Sie
die Trimmung am Sender
Page 48

48FCARSON Helikopter MARINES HM-38 50 050 7025
Conditions de garantie
CARSON vous garantit pour 24 mois à partir de la date d‘achat
(pièces justificatives à l‘appui) que le modèle est exempte de
tout défaut. L‘utilisation inappropriée, l‘usure des éléments au
cours de l‘utilisation, les transformations de votre propre chef,
l‘application ou l‘utilisation incorrecte, l‘endommagement des
batteries ou d‘autres équipements au cours de l‘utilisation ou
l‘emploi abusif un l‘endommagement causé par le transport,
n‘est pas couvert par la responsabilité civile. Notre garantie se
limite à la réparation ou à l‘échange des appareils dans l‘état
original et à la hauteur du prix d‘achat. L‘utilisateur du modèle
assume tous les risques en rapport avec l‘utilisation du
modèle. Nous nous réservons le droit de modifier ces
conditions de garantie à tout moment et sans préavis. En cas
de réclamation veuillez contacter votre revendeur spécialisé.
La garantie ne couvre pas:
• tout dommage ou défaillance causé par force majeure,
abus, accident, utilisation abusive, erronée ou anormale, non
respect des instructions, mauvaise mise en route ou
maintenance insuffisante, altération, éclair ou tout autre
conséquence d‘une surtension ou d‘un courant excessif ;
• tout dommage provoqué par la perte de contrôle du
modèle ;
• toute réparation autre que celles réalisées par un organisme
agrée par CARSON ;
• les consommables tels que les fusibles et les batteries ;
• des dommages esthétiques ;
• le transport, l‘expédition et les frais d‘assurance ; et
• les frais de retour, d‘installation, de mise au point et de
remise en route du produit
Cette garantie vous attribue des droits spécifiques, vous
pouvez par ailleurs également prétendre à d‘autres droits en
fonction du pays d‘achat.
Lire attentivement ces instructions avant d‘utiliser ce nouveau modèle réduit.
Cher client
Touts nos félicitations pour l’achat de votre hélicoptère radiocommandé CARSON, modèle réduit construit à la pointe de la
technologie.
Comme nous travaillons continuellement au développement
et à l’amélioration de nos produits, nous nous réservons la
possibilité d’effectuer des modifications techniques sans
préavis pour ce qui est de l’équipement, des matériaux et de la
conception.
De légères différences entre le modèle acheté et celui décrit
dans les données et illustrations du présent manuel ne
sauraient donc ouvrir la voie à de quelconques réclamations.
Le présent mode d’emploi fait partie intégrante du produit. Tout
non-respect du mode d’emploi et des consignes de sécurité
s’y trouvant annule automatiquement tout effet de garantie.
Veuillez conserver le présent mode d’emploi pour consultation
ultérieure et pour la transmission éventuelle du modèle réduit à
un tiers.
Déclaration de conformité
Par la présente, CARSON MODEL-SPORT déclare que ce
modèle réduit, y compris sa radiocommande, est conforme aux
exigences de base et aux autres prescriptions significatives de
la directive 1999/5/CE (R&TTE).
La déclaration originale est disponible sur demande :
Dickie-Tamiya GmbH&Co. KG • Werkstraße l • D-90765 Fürth •
ALLEMAGNE
Tel.: +49 / (0) 911 / 9765-03
Le produit que vous avez acheté est entraîné par une
batterie rechargeable lithium-polymer, NiCd ou NiMH.
Cette batterie est recyclable.
Les batteries défectueuses ou qui ne sont plus
rechargeables sont à déposer aux points de collecte
spécifiques.
Ne pas jeter parmi les ordures ménagères !
Nous vous souhaitons beaucoup de plaisir avec votre
hélicoptère CARSON et surtout bon vol !
Page 49
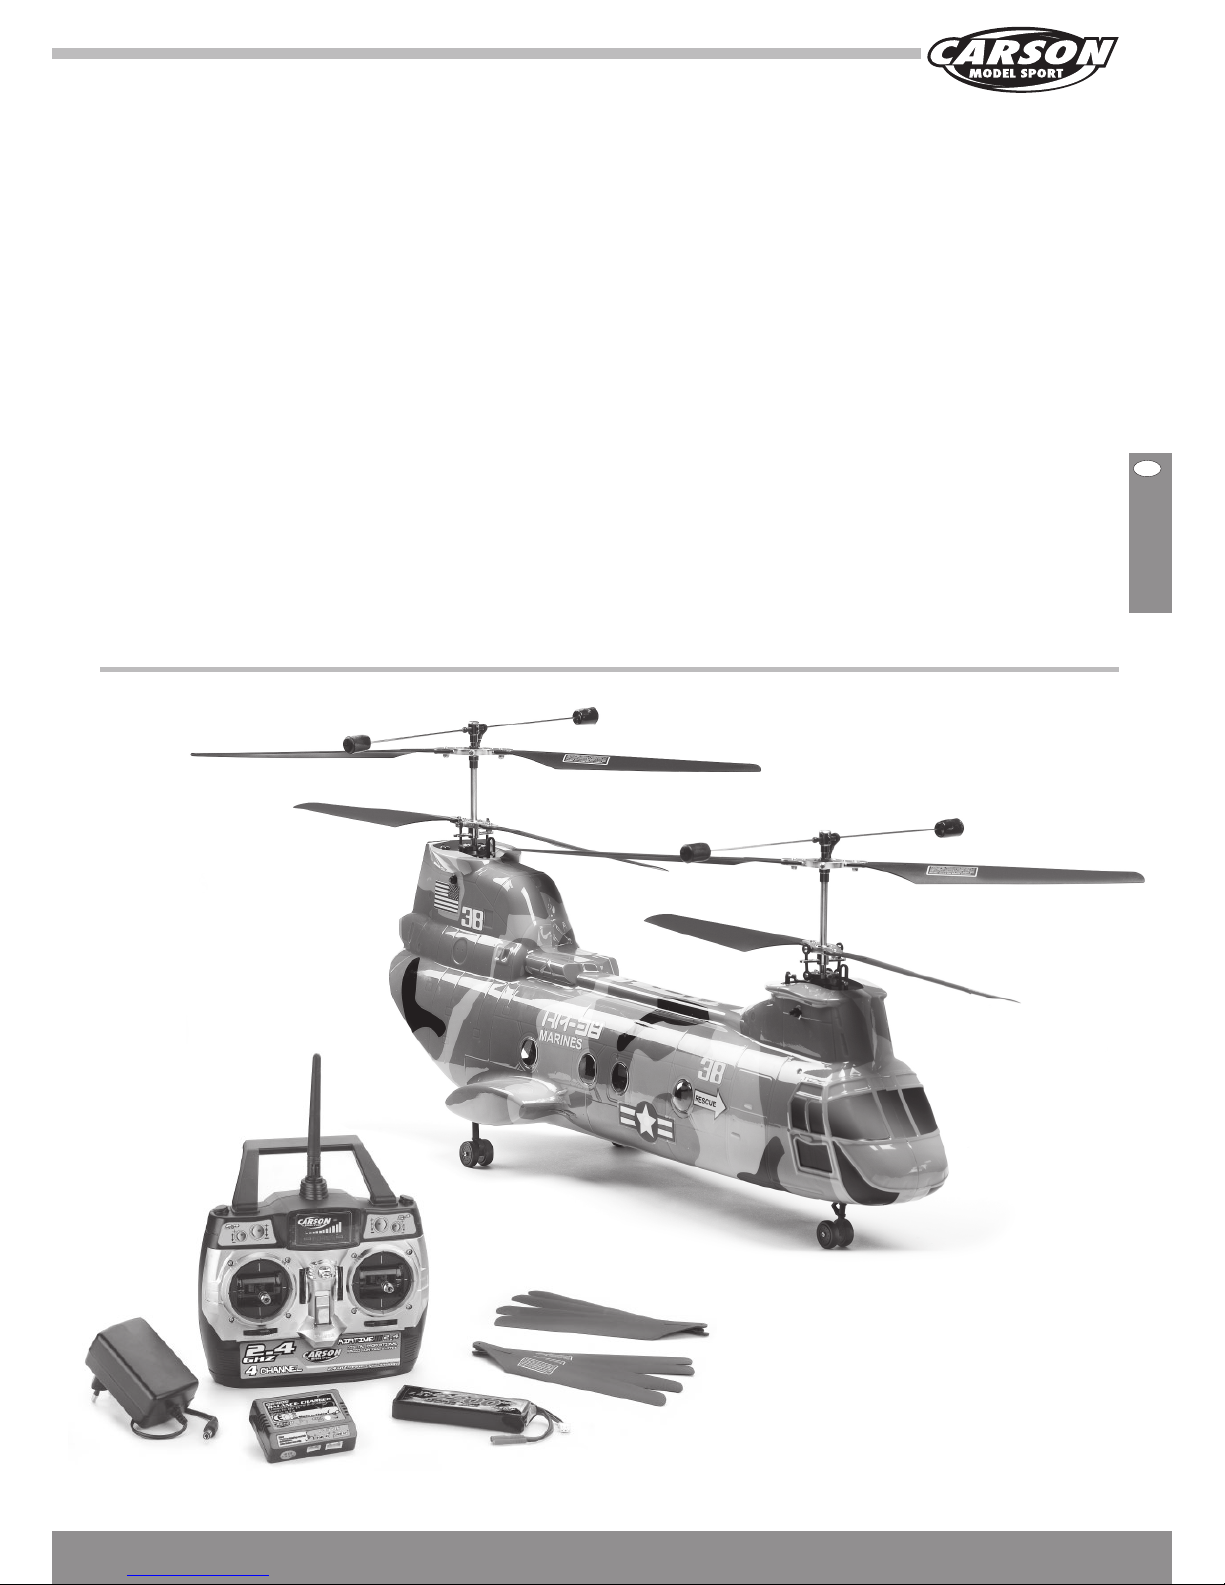
49
F
CARSON Helikopter MARINES HM-38 50 050 7025
Contenu
Périmètre de livraison
• Modèle monté, prêt à voler
• Capot de cabine, monté
• Emetteur à main, 4 canaux, 2,4 GHz
• Batterie Li-Po 7,4 V / 2200 mAh
•
Chargeur „LiPo-Balance“ avec alimentation
stabilisée incluse
• 2 servos, montés
• Gyroscope, monté dans le récepteur
• Mode d’emploi
• 8 Pales de rotor de remplacement
Préface ........................................................................................ 48
Périmètre de livraison ................................................................ 49
Consignes de sécurité ............................................................... 50
a. Le hélicoptère avec plus de fonctions .................................. 55
b. Fonctions de base de l‘hélicoptère ....................................... 56
c. Radiocommande 4 canaux .................................................... 57
d. Récepteur/unité de régulation .............................................. 58
e. Mode de vol ........................................................................... 59
f.
Instructions pour la conversion du mode 1 vers le mode 2
.... 60
g.
Instructions pour la conversion du mode 2 vers le mode 1
.... 61
h. Alimantation ........................................................................... 62
i. Chargeur équilibreur CARSON .............................................. 62
j. Préparatifs .............................................................................. 63
k. Réglage du plateau cyclique ................................................. 64
l. Poids de la barre de Bell ....................................................... 66
m. Vol ........................................................................................... 66
n. Effet de sol ............................................................................. 68
o. Entraînement au vol libre ....................................................... 69
p. Elimination des erreurs .......................................................... 70
Pièces détachées ..................................................................... 117
Page 50

50FCARSON Helikopter MARINES HM-38 50 050 7025
Consignes de sécurité
Ce modèle n‘est pas un jouet
• Un modèle télécommandé n‘est pas un jouet, sa
manipulation doit être apprise progressivement.
• Les enfants de moins de 14 ans ne doivent pas conduire le
modèle sans être accompagnés d‘un adulte.
La conduite d‘un modèle radiocommandé est une activité
passionnante. Elle doit toutefois être exercée avec la prudence
et l‘attention nécessaires.
Un modèle radiocommandé peut provoquer des dommages et
des blessures si elle n‘est pas conduite de manière
contrôlée, l‘utilisateur est responsable de sa conduite.
Assurez-vous de disposer d‘une couverture d‘assurance
suffisante pour pratiquer cette activité.
Seul un modèle bien entretenu fonctionnera de manière
correcte. N‘utiliser que des pièces détachées homologuées
et ne jamais improviser de réparations avec des éléments
inadaptés.
L‘utilisateur est responsable du bon fonctionnement du
modèle et du bon serrage de tous les écrous, boulons et vis.
Préparatifs
Ne jamais voler avant d’avoir vérifié les
points suivants :
• Rechercher des endommagements visibles sur le modèle, la
commande, le chargeur ou la batterie lithium-polymère.
• Vérifier la bonne tenue de tous les vissages et
branchements.
• Les batteries doivent être entièrement chargées.
• Veiller à ce que l’antenne de l’émetteur soit correctement
vissée et entièrement sortie. Une antenne non entièrement
sortie diminue la portée de la radiocommande.
• Vérifier la bonne réponse des servos aux signaux de
commande.
• Vérifier avant le décollage la portée de l’émetteur.
Généralités
• Lire le présent mode d’emploi avec attention et le conserver
pour consultation ultérieure.
• Il est important de se familiariser avec les indications
concernant le vol.
Vol
Le modèle est principalement conçu pour des vols indoor,
car son poids propre et l’instabilité intrinsèque de son
comportement en vol en font un aéronef très sensible aux
courants d’air.
Les composants ne sont par ailleurs pas protégés contre la
poussière et l’humidité.
Ne pas voler plus d’un chargement de
batterie.
Laisser ensuite le moteur refroidir au moins 5 minutes.
Recharger ensuite la batterie. Eviter impérativement les
décharges profondes.
Positionner l’antenne de telle manière qu’elle ne puisse pas
entrer en contact avec des pièces mobiles. La soulager en
traction en fixant le fil à la carlingue avec une bande de ruban
adhésif.
Page 51
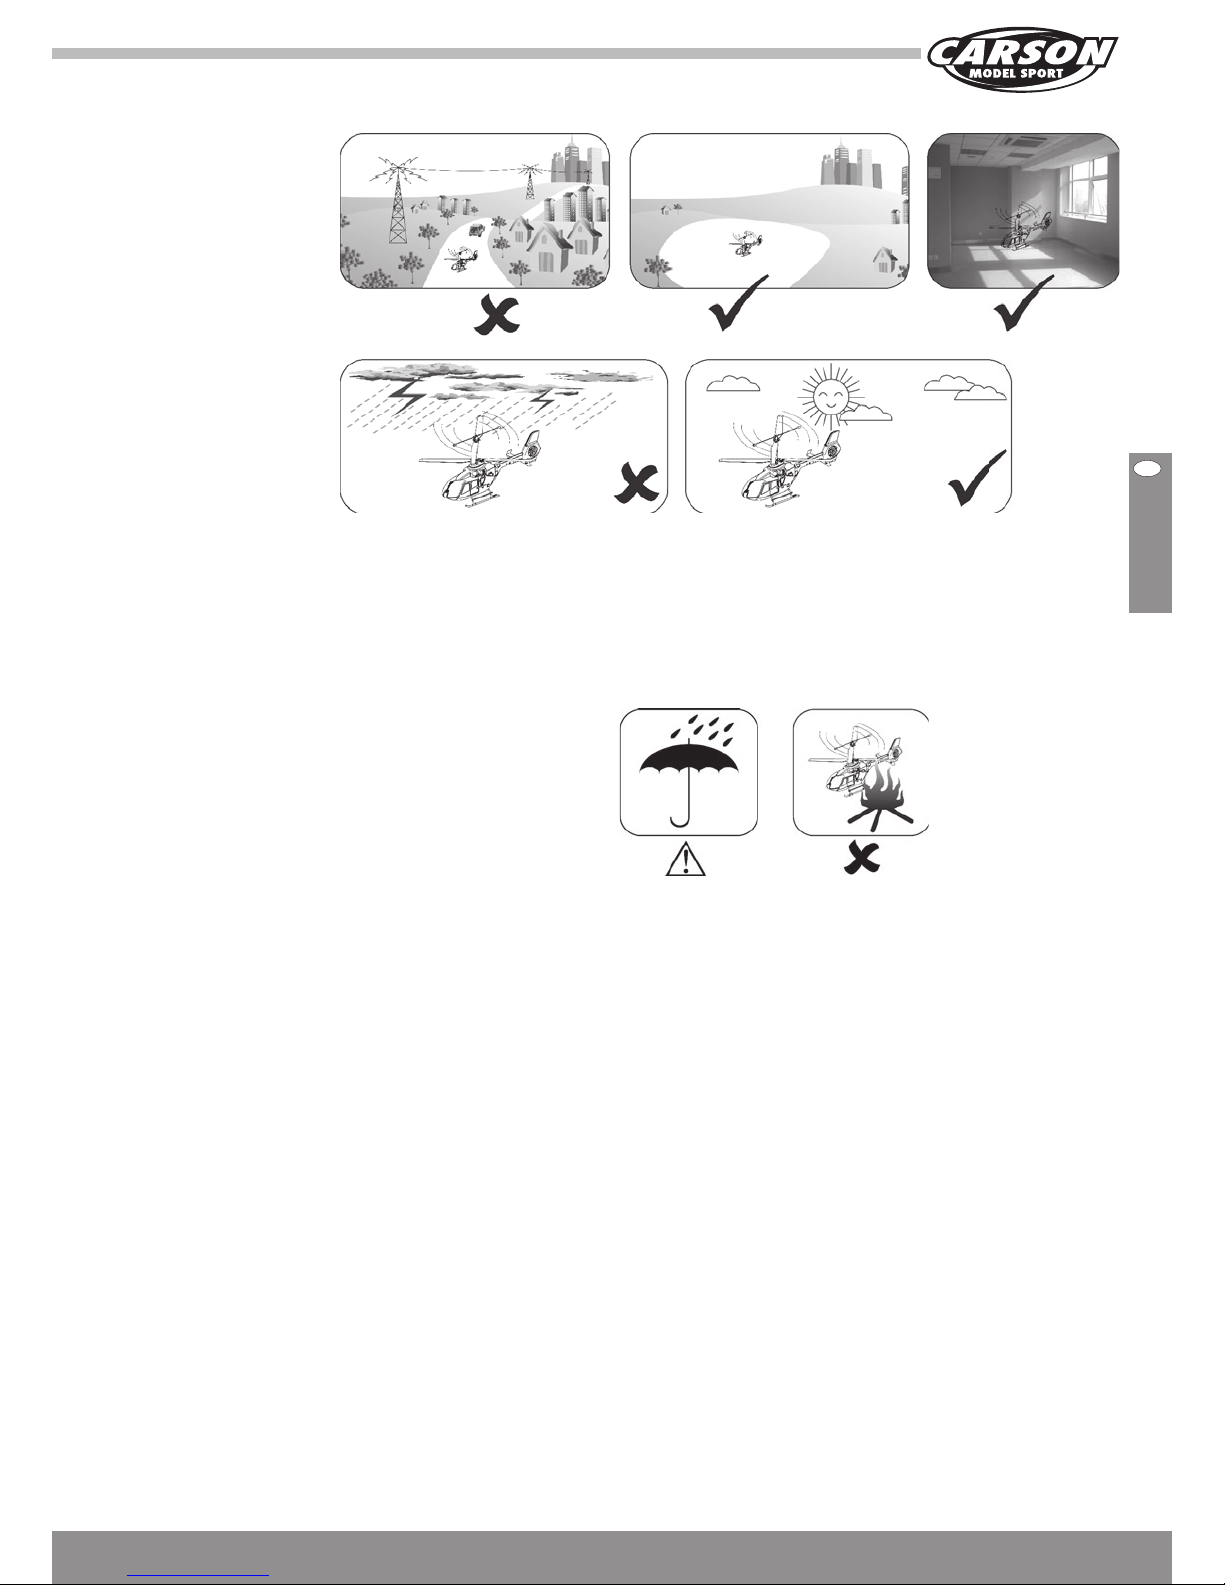
51
F
CARSON Helikopter MARINES HM-38 50 050 7025
Il est préférable de
ne voler que dans
des espaces
fermés :
• avec un champ libre d’au
moins 3 m dans chaque
direction
• sur un sol lisse
• sans obstacles fixes
(meubles) ou mobiles
(personnes, animaux)
• dans des locaux sans
courant d’air
Si l’on souhaite
voler en extérieur,
le faire de préférence :
• uniquement par vent nul,
• à au moins 3 km du prochain terrain d’aéromodélisme
officiel, il est autrement nécessaire de s’accorder sur les
fréquences de radiocommande.
Ne pas voler :
• lorsqu’on est fatigué ou avec une capacité de réaction
entamée,
• avec un vent de force supérieure à 1 Beaufort,
• à proximité de lignes électriques à haute tension, de mâts de
télécommunication ou par temps orageux. Les perturbations
atmosphériques peuvent interférer avec les signaux de la
radiocommande.
• à proximité d’obstacles comme des bâtiments, des meubles,
des personnes ou des animaux,
• sur des surfaces de circulation publiques.
Page 52
52FCARSON Helikopter MARINES HM-38 50 050 7025
Rotor
• Les pales de rotor endommagées doivent être remplacées !
Ne pas tenter d’essais de réparations !
• Rester à distance du rotor dès que la batterie est branchée.
• Eviter de demeurer dans le plan de rotation des rotors.
Ne pas utiliser le modèle réduit en position assise afin de
pouvoir rapidement s’échapper d’une zone dangereuse.
Ne serrer les vis de serrage des pales du rotor qu’avec un
couple tel, qu’en service, elles puissent se positionner
d’elles-mêmes à 180° l’une de l’autre à l’aide de la force
centrifuge.
Chargeur
N’utiliser que le chargeur joint.
• Ne faire fonctionner le chargeur que sur des supports
difficilement inflammables.
• Egalement poser la batterie en cours de charge sur un
support ininflammable.
• Durant la charge, le chargeur doit être dans un local
suffisamment ventilé.
• Ne jamais laisser le chargeur sans surveillance durant la
charge.
• Ne charger que des batteries de même modèle et capacité.
• Lors de la charge, veiller à la bonne polarité.
Ne jamais exposer le chargeur, les
batteries et le modèle réduit à des
conditions environnantes défavorables.
Il s’agit p.ex. de :
• Humidité, hygrométrie trop élevée (> 75% relative,
condensation). Ne pas saisir le chargeur avec des mains
mouillées.
• Ne pas faire fonctionner le chargeur quand il vient d’un
environnement chaud ou froid. La condensation qui peut
alors se former peut détruire l’appareil. Laisser l’appareil se
mettre à la température sans raccordement.
• Poussières et gaz inflammables, vapeurs ou solvants,
essences
• Températures ambiantes trop élevées (env. > 40 °C),
ensoleillement direct
• Flamme ouverte, sources d’ignition
• Contraintes mécaniques comme des chocs ou vibrations
• Encrassement important
• Champs électromagnétiques intenses (moteurs ou
transformateurs). Le cas échéant champs électrostatiques
(charges).
• Emetteurs (téléphones portables, émetteurs de
radio commandes, etc.). Le rayonnement incident de
l’émetteur peut entraîner des perturbations au niveau de la
charge voire un endommagement du chargeur et donc aussi
des batteries.
Laisser le chargeur refroidir entre deux
charges. A la fin de la charge, isoler le
chargeur du secteur.
Un chargeur défectueux ne doit plus être utilisé.
Quand l’appareil est visiblement défectueux, c’est-à-dire
quand :
• l’appareil présente des dommages visuels,
• l’appareil ne fonctionne plus et,
• après une inutilisation prolongée dans des conditions
défavorables ou
• après un transport dans des conditions difficiles, il doit être
mis hors services sans tarder afin de ne pas être utilisé par
erreur.
Eliminer le chargeur devenu irréparable selon les prescriptions
réglementaires en vigueur.
Pour des raisons de sécurité et d’autorisation (CE), les
transformations unilatérales ou les modifications maison des
chargeurs ne sont pas autorisées.
Page 53
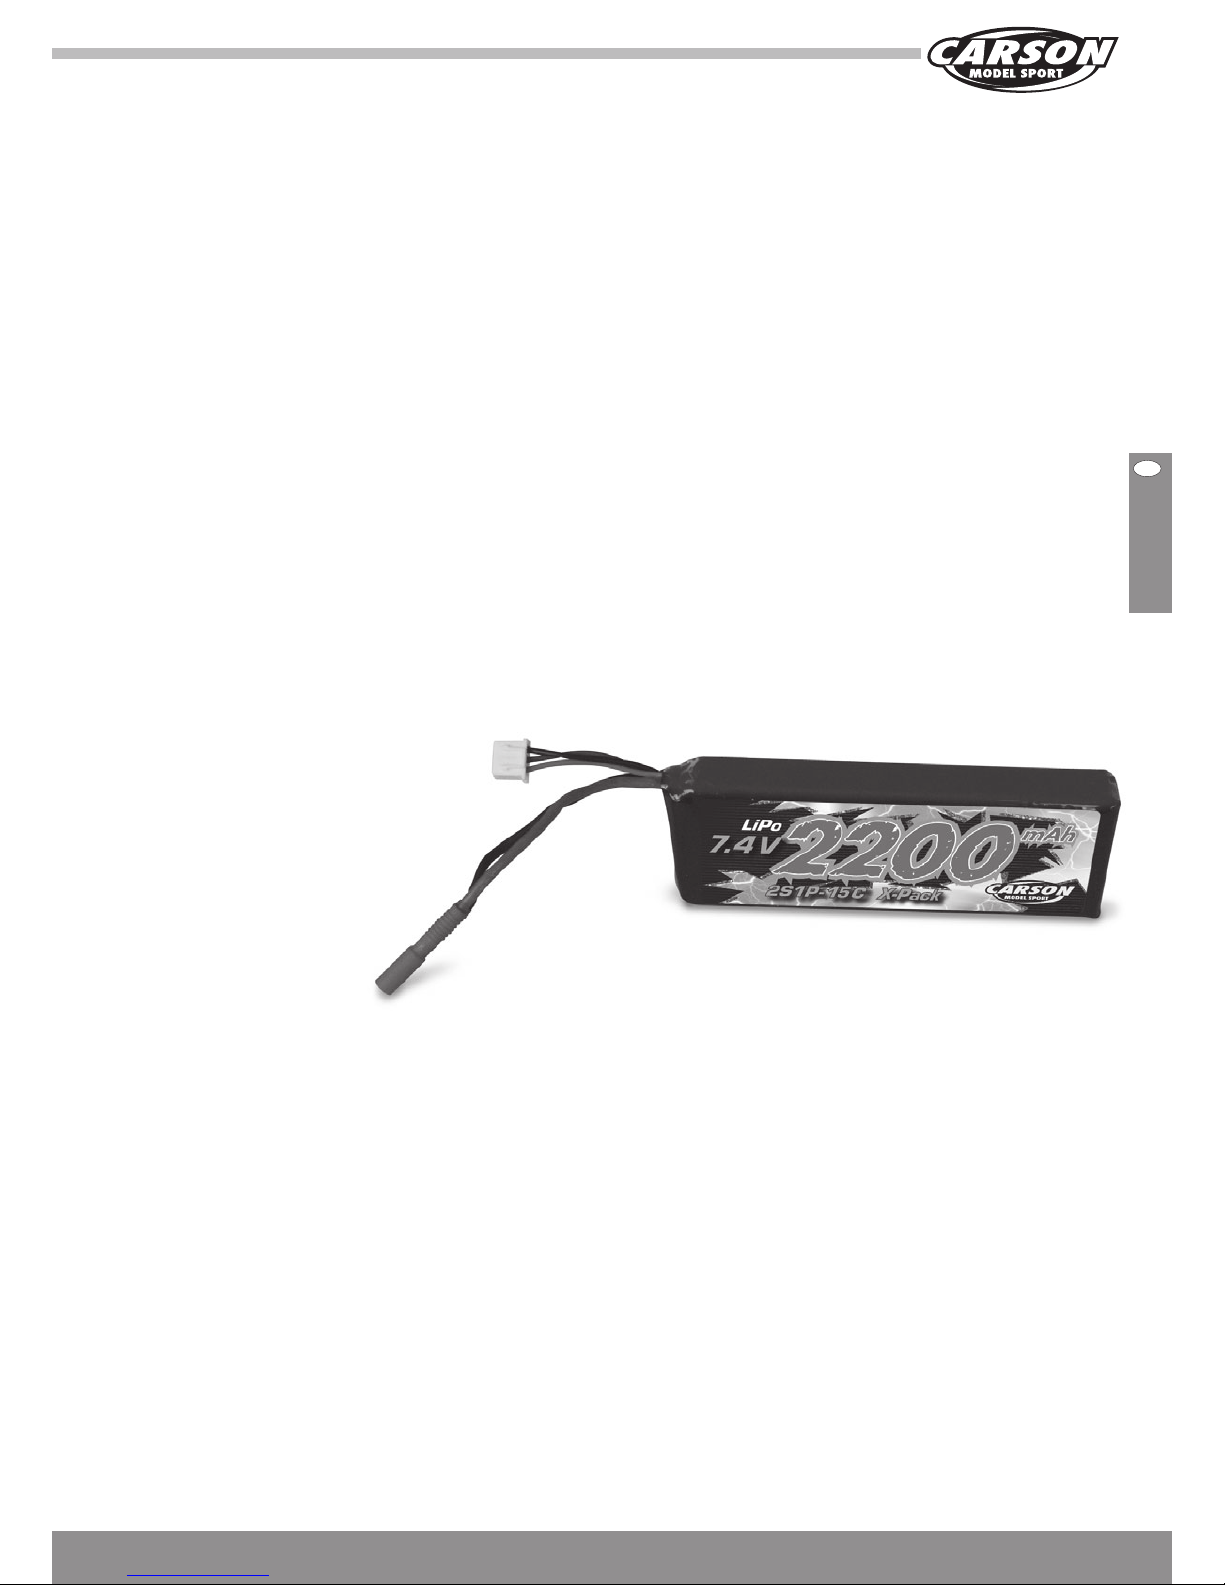
53
F
CARSON Helikopter MARINES HM-38 50 050 7025
Batterie lithium-polymère
N’utiliser les batteries fournies que pour ce modèle réduit.
Prendre également pour batterie de rechange une pièce d’origine.
• Ne charger la batterie qu’en dehors du modèle réduit et à
distance de matériaux facilement inflammables ! Un
échauffement de la batterie durant la charge est normal.
• Ne pas surcharger ou décharger profondément une
batterie. Les deux peuvent entraîner des fuites de
l’électrolyte et l’auto-ignition de la batterie.
• Recharger la batterie Li-Po au moins tous les 6 mois afin
d’éviter une décharge profonde.
• Retirer la batterie du chargeur pour éviter une autodécharge.
• Retirez l’accu du récepteur si vous n’utilisez pas le modèle
pour une longue durée.
Les batteries défectueuses ou qui ne sont plus rechargeables
sont à déposer aux points de collecte spécifiques.
Ne pas jeter parmi les ordures ménagères !
Les batteries ne doivent pas :
• être plongées dans un liquide,
• être jetées dans le feu ou exposées à une température
élevée,
• exposées à des sollicitations mécaniques importantes,
• démontées / endommagées,
• court-circuitées.
Si au cours de l’utilisation, de la charge ou du stockage de
la batterie, vous percevez une odeur, une coloration, un
échauffement particulier, une déformation ou tout autre
phénomène :
• déconnecter la batterie du chargeur,
• déconnecter la batterie de son appareil,
• ne plus utiliser cette batterie.
Si de l’électrolyte s’écoule :
• éviter tout contact avec les yeux et la peau,
• rincer sans tarder les zones touchées à l’eau pure,
• faire appel à un médecin.
Page 54

54FCARSON Helikopter MARINES HM-38 50 050 7025
Instructions de sécurité pour les batteries
Li-Po
1. Ne pas désassembler ou réassembler la batterie.
2. Ne pas court-circuiter la batterie.
3. Ne pas utiliser ou laisser la batterie à proximité d‘une
flamme ou d‘une source de chaleur (plus de 80 °C).
4. Ne pas plonger la batterie dans l‘eau ou l‘eau de mer, ne
pas la mouiller.
5. Ne pas remplacer la batterie à proximité d‘une source de
chaleur ou en plein soleil.
6. Utiliser le chargeur spécifié et respecter les consignes de
chargement (voir 1 A).
7. Ne pas introduire de pointe dans la batterie. Ne pas la
frapper avec un objet contendant ou la piétiner.
8. Ne pas faire subir d‘impact à la batterie ou la lancer.
9. Ne pas utiliser la batterie avec des dommages ou
déformations visibles.
10. Ne pas effectuer de brasages directement sur la batterie.
11. Ne pas inverser la charge ou sur-décharger la cellule.
12. Ne pas inverser la charge ou le raccordement.
13. Ne pas raccorder la batterie à une prise électrique ou à
l‘allume-cigare de le modèle.
14. Ne pas utiliser la batterie pour des équipements non
indiqués.
15. Ne pas toucher directement une batterie présentant des
fuites.
16. Ne pas mélanger avec des batteries Li-ion.
17. Maintenir la batterie à distance des petits enfants.
18. Ne pas continuer à charger la batterie au-delà du temps
indiqué.
19. Ne pas déposer la batterie dans un four à micro-ondes ou
un conteneur en surpression.
20. Ne pas utiliser de batterie avec une fuite à proximité d‘une
flamme.
21. Ne pas utiliser ou laisser la batterie en plein soleil (ou dans
un véhicule au soleil).
22. Ne pas utiliser dans des milieux générant de l‘électricité
statique (plus de 64 V) qui pourraient endommager le circuit
de protection. La plage de température de chargement va
de 0 °C à 45 °C.
23. Ne pas charger la batterie en dehors de cette plage.
24. Si lors de la première utilisation, la batterie est corrodée,
dégage une mauvaise odeur ou a un comportement
anormal, ne pas l‘utiliser mais la rapporter chez le
revendeur.
25. Dans le cas où des enfants souhaitent utiliser la batterie,
il est nécessaire que les parents leur montrent comment
l‘utiliser en respectant scrupuleusement le manuel. Veiller
par la suite lors de leur utilisation qu‘ils se conforment bien
aux instructions.
26. Maintenir la batterie hors de portée des petits enfants.
Lors de l‘utilisation, veiller à ce que la batterie ne soit pas
déconnectée du chargeur ou de son équipement par des
petits enfants.
27. Rincer abondamment la peau ou des habits souillés par
du liquide provenant de la batterie. Il peut entraîner des
irritations cutanées.
28. Ne jamais décharger la batterie de plus de 5c et abaisser la
tension de façon à ce qu‘elle soit inférieure à 6 V, car cela
endommagerait la batterie.
29. Ne jamais charger la batterie sur la moquette, car cela peut
déclencher des incendies.
30. Ne pas utiliser la batterie pour des équipements non
spécifiés, ni pour des usages autres que l‘usage prévu.
31. Ne jamais toucher la batterie si celle-ci n‘est pas étanche.
Si l‘on a touché la batterie, se laver les mains immédiatement après.
32. Ne pas charger la batterie pendant plus longtemps que la
durée spécifiée.
33. Ne jamais utiliser de batteries gonflées ou endommagées.
34. Ne pas utiliser la batterie à des endroits exposés à des
risques de décharges électrostatiques supérieures à
64 volts.
Page 55

55
F
CARSON Helikopter MARINES HM-38 50 050 7025
Plus de vis, ni de bricolage !!! Le plaisir commence dès
l‘ouverture de l‘emballage. En un rien de temps, tu deviens un
pro de l‘hélicoptère !
Pilote ton hélicoptère comme un vrai à l‘aide des 4 fonctions.
Grâce au double rotor (coaxial), le modèle réduit a un vol
extrêmement stable.
L‘hélicoptère est exclusivement conçu pour le vol en intérieur.
En l‘absence de vent, il peut aussi voler à l‘extérieur. Les
batteries lithium-polymère fournies permettent une autonomie
de vol de 8 - 10 minutes.
Caractéristiques :
• Comportement en vol extrêmement stable
• Entièrement monté, prêt à voler
• Avec radiocommande pro 4 canaux 2,4 GHz
• Gyroscope inclus (fonction de stabilisation)
• Batteries Li-Po 7,4 V / 2200 mAh et chargeur Li-Po
« balance » fournis
• Fuselage en Lexan teinté
Hélicoptère prêt à voler avec
radiocommande 4 canaux 2,4 GHz,
batterie Li-Po 7,4 V / 2200 mAh, chargeur
230 V et pales de rotor de rechange
a. Le hélicoptère avec plus de fonctions
Barre de bell 1
Barre de bell 2
Pales inférieures
Pales inférieures
Pales superieures
Pales superieures
Axe rotor principal 1
Tete de rotor
Axe rotor principal 2
Tete de rotor
Fuselage
Train d‘attérissage
Page 56
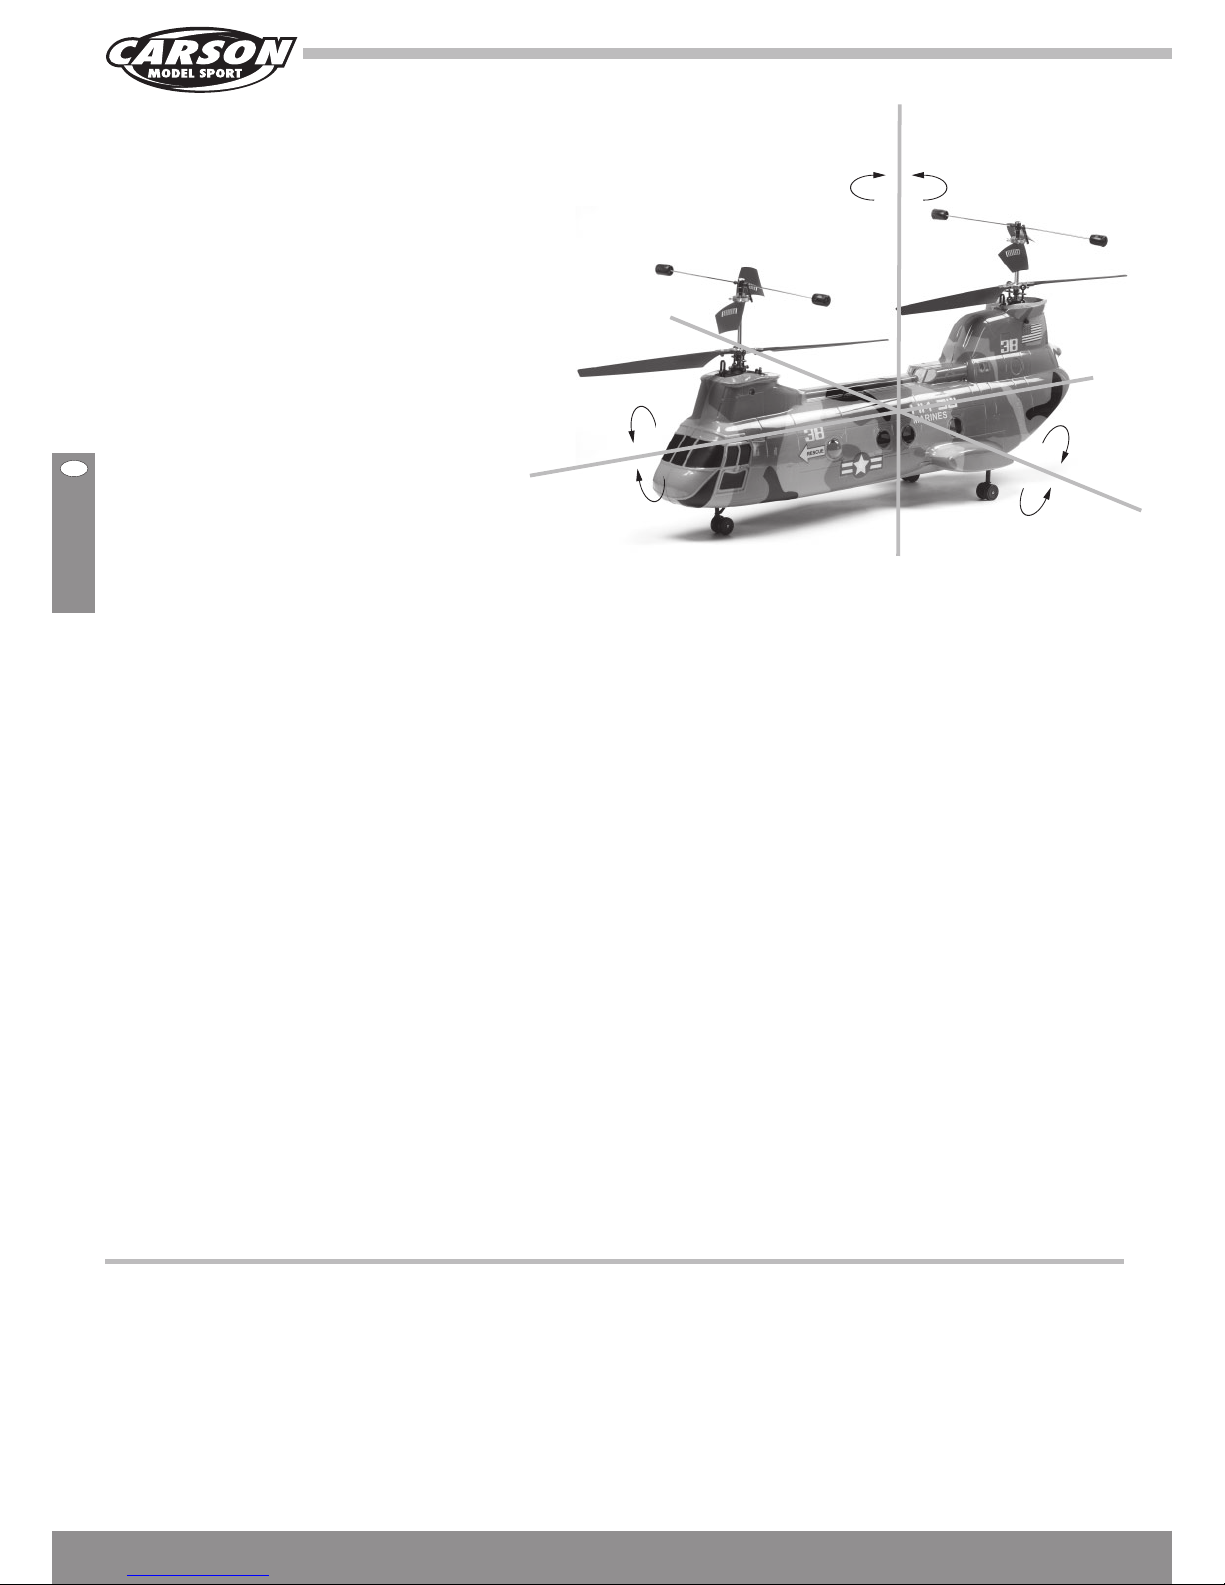
56FCARSON Helikopter MARINES HM-38 50 050 7025
Axe
longitudinal
Axe de
lacet
Axe
transversal
Les fonctions suivantes sont
commandées via les manettes de
commande de l’émetteur à main.
Pour chaque fonction de commande se trouve sur
l’émetteur un correcteur, qui permet de légers décalages
de la position neutre.
Fonction de l’angle de pas
La fonction de l’angle de pas dirige la hauteur de
vol de cet hélicoptère à l’aide de la modification
conjointe des vitesses de rotation des deux rotors.
La commande se fait avec la manette de gauche.
Elle se déplace pour ce faire progressivement vers
l’avant ou l’arrière. Contrairement aux autres
fonctions de commande, cette manette ne revient
pas automatiquement en position neutre. Si la manette est
en butée à l’arrière, les deux moteurs sont coupés et les
rotors sont à l’arrêt. Si la manette est poussée vers l’avant, les
moteurs se mettent en route et les pales se mettent à tourner
de plus en plus vite à mesure que la manette avance.
En position au milieu, l’hélicoptère doit se trouver en vol
stationnaire.
Fonction de direction
La fonction de direction entraîne une rotation du modèle réduit
autour de son axe de lacet. Comme l’hélicoptère possède deux
rotors contrarotatifs, quand ils tournent à la même vitesse de
rotation, il ne se crée pas de couple de rotation autour de l’axe
de lacet. C’est pourquoi l’hélicoptère ne nécessite pas de rotor
anticouple pour se stabiliser. Pour permettre au modèle réduit
de tourner autour de son axe de lacet, les rotors doivent donc
tourner avec des vitesses de rotation légèrement différentes. Le
couple de rotation qui en résulte fait tourner l’hélicoptère.
Quand le rotor de commande tourne légèrement moins vite par
rapport au rotor de sustentation, le couple de rotation du rotor
de sustentation est supérieur, l’hélicoptère tourne en direction
de la rotation du rotor de commande autour de l’axe de lacet.
En cas de vitesse de rotation du rotor de commande
supérieure, le couple de rotation du rotor de sustentation est
inférieur à celui du rotor de commande, l’hélicoptère tourne en
direction de la rotation du rotor de sustentation.
La commande de la fonction de direction se fait avec la
manette de droite. Quand la manette est déplacée vers la
gauche, l’avant du fuselage se tourne vers la gauche. Quand
la manette est déplacée vers la gauche, il se tourne vers la
gauche.
Fonction de roulis
La fonction de roulis entraîne un vol latéral de l’hélicoptère.
La commande se fait avec la manette de droite.
Si la manette est déplacée vers la gauche, le modèle réduit se
décale vers la gauche. Si la manette est déplacée vers la droite,
il se décale vers la droite.
Fonction
de tangage
La fonction de tangage entraîne un vol avant et arrière de
l’hélicoptère. Le cercle de giration du rotor inférieur se penche
ici à l’avant légèrement vers le bas, le modèle réduit bascule
autour de l’axe transversal. Si le nez plonge un peu, une partie
de la force de sustentation est convertie en propulsion.
Si de manière inverse le nez est soulevé, le modèle réduit vole
en reculant. La commande se fait avec la manette de droite.
En appuyant vers l’avant, le vol se fait en avançant, en tirant la
manette vers l’arrière, l’hélicoptère recule.
b. Fonctions de base de l‘hélicoptère
Caractéristiques techniques
Diamètre du rotor principal A 450 mm
Diamètre du rotor principal B 450 mm
Longeur 575 mm
Hauteur 285 mm
Poids 650 g
Chargeur avec adaptateur enfichable
Entrée : 15 - 18 V / 1000 mA
Sortie : 7,4 V und 11,1 V / 750 mA
Page 57
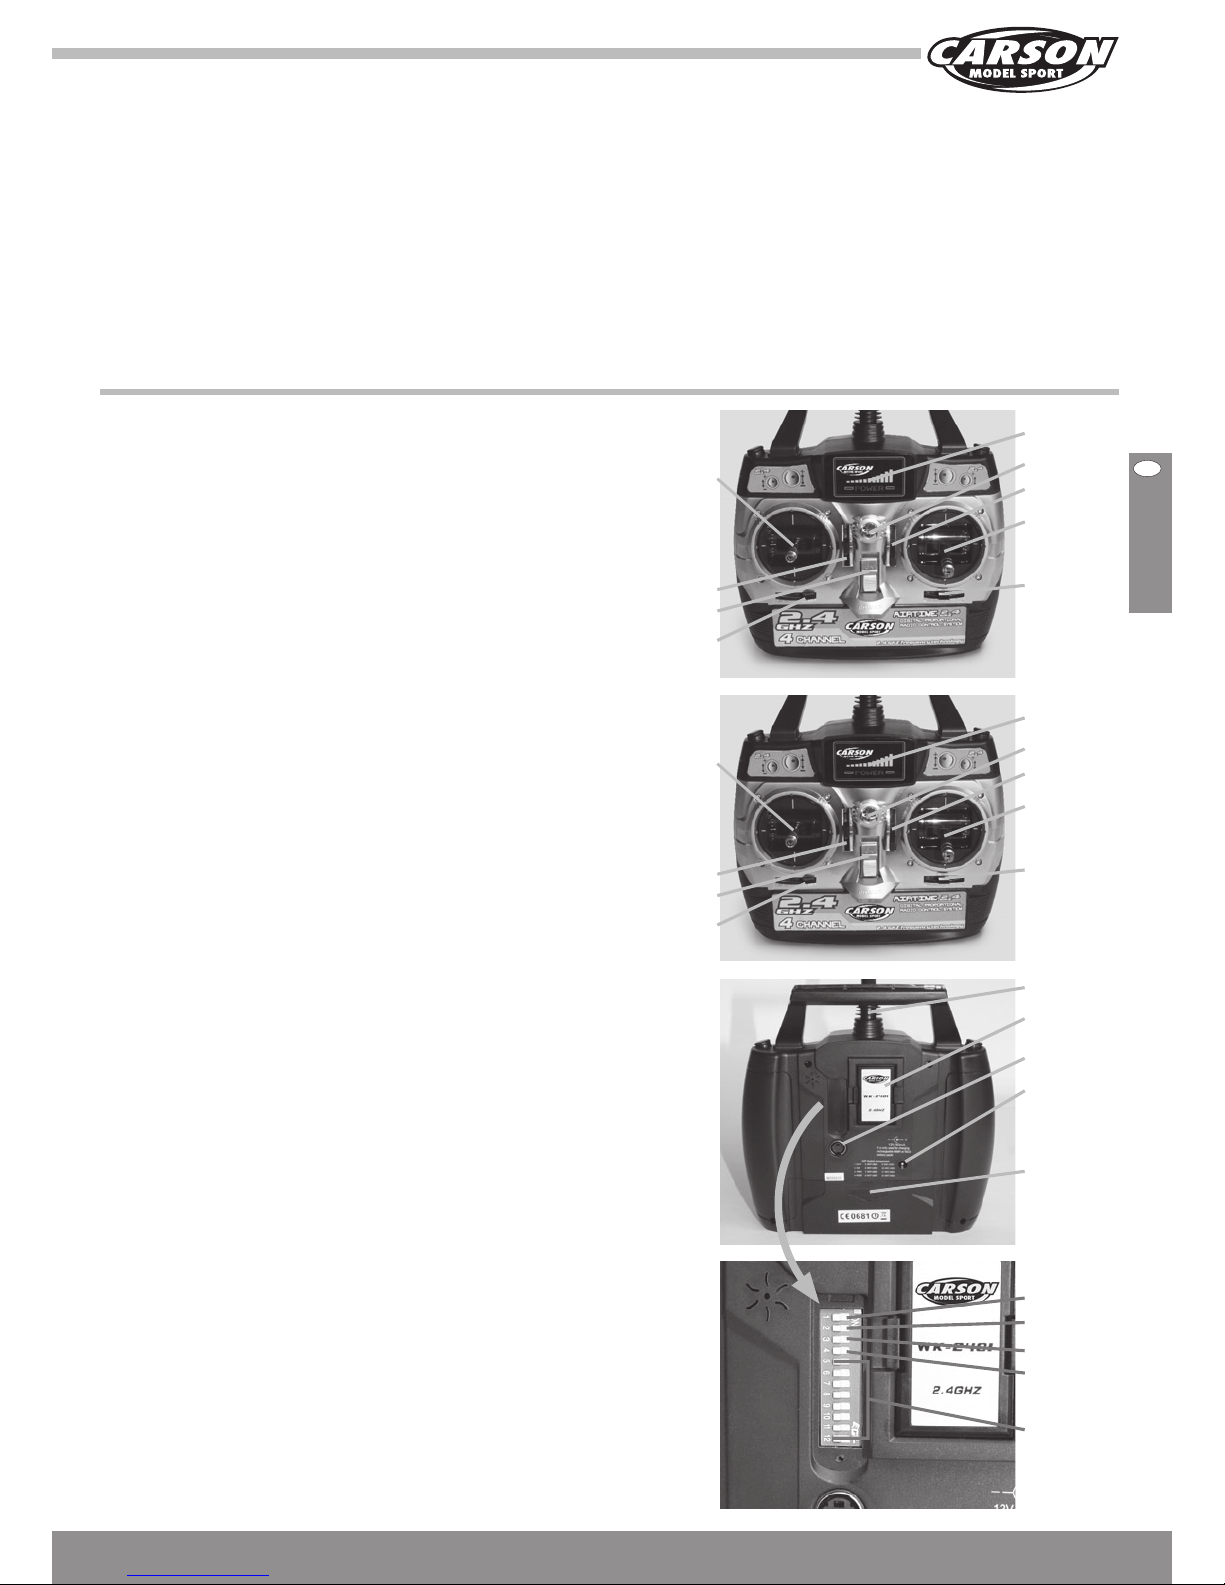
57
F
CARSON Helikopter MARINES HM-38 50 050 7025
Un émetteur à main avec deux manettes de commande –
chacune équipée de deux fonctions – est compris dans le
périmètre de livraison.
Ces fonctions se commandent via les mouvements avant/
arrière et droite/gauche.
L’émetteur nécessite 8 piles AA ou
batteries (non comprises dans
le périmètre de livraison).
Monter les batteries chargées dans le logement de l’émetteur.
S’assurer de la bonne polarité.
c. Radiocommande 4 canaux
Mode 1
Mode 2
Fig. 1
Fig. 2
Indicateur
d’alimentation
Boucle
Èquilibrage
Levier droit
/ gaz
Trim d’aileron
Indicateur
d’alimentation
Boucle
Èquilibrage
Levier droit /
direction
Trim d’aileron
Antenne
Couvercle
ornement
Prise pour
simulation
Prise de
chargement
Couvercle du
compartiment
pour batteries
Èquilibrage
Aileron
Gaz
Direction
Non utilisés
Levier gauche /
direction
Èquilibrage
Interrupteur
Compensateur
de direction
Levier droit /
gaz
Trim de gaz
Interrupteur
Compensateur
de direction
Fonctions de l’émetteur 4 canaux :
1. La technologie 2,4 GHz cherche automatiquement une
fréquence libre. Elle est plus rapide à réagir, permet un
contrôle plus précis et est moins sensible au brouillage.
2. Télécommande microordinateur 4 canaux
Puissance de sortie : ≤ 10 mW
Consommation de courant : 50 mA
Alimentation :
1,2 V x 8 batteries NiMH (9,6 V) ou
1,5 V x 8 batteries sèches AA
3. Les leviers de l’émetteur permettent de commander les
différents servomoteurs / les différentes fonctions. Ils
peuvent déclencher l’exécution de mouvements de vol
comme l’ascension, la descente, l’avance, le recul, le virage
à gauche, le virage à droite, etc.
4. Conversion possible entre les Modes 1 et 2 (Mode 1 : gaz à
droite, Mode 2 : gaz à gauche).
Commandes et fonctionnement :
MODE 1
1. Levier gauche / direction.
Pour le contrôle de votre hélicoptère vers l’avant, vers
l’arrière, vers la gauche et vers la droite. Poussez vers le
haut pour faire avancer l’hélico, vers le bas pour le faire
reculer, vers la gauche pour virer à gauche et vers la droite
pour virer à droite.
2. Levier droit / gaz.
Pour le contrôle de votre hélicoptère vers le haut, vers le
bas, vers la gauche et vers la droite. Poussez vers le haut
pour faire monter l’hélico, vers le bas pour le faire
descendre, vers la gauche pour un déplacement à gauche
et vers la droite pour un déplacement à droite.
MODE 2
1. Levier gauche / gaz.
Pour le contrôle de votre hélicoptère vers le haut, vers le
bas, vers la gauche et vers la droite. Poussez vers le haut
pour faire monter l’hélico, vers le bas pour le faire
descendre, vers la gauche pour virer à gauche et vers la
droite pour virer à droite.
2. Levier droit / direction.
Pour le contrôle de votre hélicoptère vers l’avant, vers
l’arrière, vers la gauche et vers la droite. Poussez vers le
haut pour faire avancer l’hélico, vers le bas pour le faire
reculer, vers la gauche pour un déplacement à gauche et
vers la droite pour un déplacement à droite.
3. Indicateur d’alimentation.
L’indicateur comporte trois couleurs : rouge, jaune et vert.
Diode verte allumée : la batterie est suffisamment chargée
pour voler ;
Diode verte éteinte et diode jaune allumée : la batterie n’est
Page 58

58FCARSON Helikopter MARINES HM-38 50 050 7025
pas suffisamment chargée, il faut interrompre le vol.
Diode jaune éteinte et diode rouge allumée : le niveau
de la batterie est très bas, il faut interrompre le vol
immédiatement.
4. Compensateur de profondeur / équilibrage.
Il permet d’équilibrer le vol de votre hélicoptère vers l’avant
et vers l’arrière. Poussez vers le haut pour voler plus vers
l’avant et vers le bas pour voler plus vers l’arrière.
5. Compensateur de direction / rotor arrière.
Il permet d’équilibrer le vol de votre hélicoptère vers la
gauche et vers la droite. Poussez le compensateur à gauche
pour virer plus à gauche et à droite pour virer plus à droite.
6. Trim de gaz / tangage.
Il permet de contrôler l’ascension et la descente de votre
hélicoptère. Pour faire monter l’hélico, poussez le trim vers le
haut, pour le faire descendre, poussez-le vers le bas.
7. Trim d’aileron / roulis.
Il permet de contrôler les mouvements de votre hélicoptère
vers la gauche et vers la droite. Poussez le trim à gauche
pour virer plus à gauche, à droite pour virer plus à droite.
8. Interrupteur Marche / Arrêt.
Allume ou éteint la télécommande. Poussez l’interrupteur
vers l’avant pour allumer l’émetteur, tirez-le vers l’arrière
pour l’éteindre.
9. Boucle. Pour accrocher le cordon de l’émetteur.
10.
Antenne. Pour la transmission des signaux.
11.
Prise de chargement.
Les batteries Mignon doivent être rechargées avec un
courant ne dépassant pas 50 mA, et une tension < 12 V.
Remarque : la prise de chargement ne doit pas être utilisée
en cas de batteries non rechargeables.
12.
Prise pour simulation. Aucune fonction.
13.
Compartiment pour piles / batteries.
Veuillez tenir compte de la polarité lors de l’insertion des
batteries.
14.
Couvercle du compartiment pour batteries.
Protège les piles/batteries de la télécommande. Lors du
remplacement des piles/batteries, veuillez ouvrir le
compartiment dans le sens de la flèche.
Commutateurs DIP
1. Profondeur / tangage.
Inverse la direction du servo de profondeur.
2. Aileron / roulis.
Inverse la direction du servo d’aileron.
3. Manette des gaz.
Inverse la direction de la fonction des gaz.
Remarque : assurez-vous du bon fonctionnement de la
manette des gaz avant le vol.
4. Direction/rotor arrière.
Inverse la direction de la fonction de rotor arrière.
5-12. Non utilisés.
Les paramètres usine :
CANAL ON/OFF
1 marche
2 marche
3 arrêt
4 arrêt
5-12 Non utilisés
1. MIX / rapport de mixage :
Ajuste le rapport de mixage du rotor principal et du rotor
arrière.
Pour augmenter le rapport du mixage, tourner dans le sens
des aiguilles d’une montre ; pour le diminuer, tourner dans le
sens contraire des aiguilles d’une montre.
2. EXTENT / réaction du servo :
Le bouton EXTENT est utilisé pour régler la réaction du
servo. Pour augmenter la réaction du servo, tourner dans le
sens des aiguilles d’une montre ; pour la diminuer, tourner
dans le sens contraire des aiguilles d’une montre.
3. Sensitive / réglage de la sensibilité du gyroscope.
Règle la sensibilité en fonction de la performance de vol.
Pour augmenter la sensibilité, tourner dans le sens des
aiguilles d’une montre ; pour la diminuer, tourner dans le
sens contraire des aiguilles d’une montre.
4. AILE :
Aileron / servo de roulis, connexion avec le servo de roulis.
5. ELEV :
Profondeur / servo de tangage, connexion avec le servo de
tangage.
6. Prise pour fil de pilote automatique :
Connexion avec le fil de pilote automatique
7. LED.
La diode indique le statut
de réception. Un
clignotement rapide
indique que le signal est
en cours de réception ; la
diode allumée indique que
le signal a été reçu ; un
clignotement lent indique
que le signal n’a pas été
reçu.
8. Moteurs avant.
Connexion avec les
moteurs avant.
9. Moteur arrière.
Connexion avec les
moteurs arrière.
10.
Câble d’alimentation.
Connexion avec la batterie
de vol.
d. Récepteur/unité de régulation
➆
➀
➁
➂
➇
➈
➅
➅ ➄ ➃
➉
Page 59

59
F
CARSON Helikopter MARINES HM-38 50 050 7025
e. Mode de vol
Mode 1 Mode 2
Vol ascendant Gaz vers le haut
Vol descendant Gaz vers le bas
Rotation à gauche Manche de direction
vers la gauche
Rotation à droite Manche de direction
vers la droite
Abaisser le nez Manche de profondeur
vers le haut
Relever le nez Manche de profondeur
vers le bas
Roulis à gauche Manche d’aileron
vers la gauche
Roulis à droite Manche d’aileron
vers la droite
Page 60

60FCARSON Helikopter MARINES HM-38 50 050 7025
f. Instructions pour la conversion du mode 1
vers le mode 2
Tournevis cruciforme
Desserrez les vis du boîtier de l’émetteur,
comme indiqué sur la photo.
Séparez légèrement la partie arrière de la
partie avant de l’émetteur.
Retirez la goupille D, comme indiqué sur
la photo.
• Retirez la vis placée en A et replacez-la en A1.
• Retirez le ressort situé en B et replacez-le en B1.
• Faites passer l’interrupteur de la position C à la position C1.
Remettez la goupille D. Remettez la partie arrière et
serrez les vis, puis placez la manette des gaz dans la
position la plus basse. Le changement de mode est
terminé.
1. 2. 3.
4. 5.
B
A
D
CC1
A1
B1
Page 61

61
F
CARSON Helikopter MARINES HM-38 50 050 7025
g. Instructions pour la conversion du mode 2
vers le mode 1
Tournevis cruciforme
Desserrez les vis du boîtier de l’émetteur,
comme indiqué sur la photo.
Séparez légèrement la partie arrière de la
partie avant de l’émetteur.
Retirez la goupille D, comme indiqué sur
la photo.
• Retirez la vis placée en A1 et replacez-la en A.
• Retirez le ressort situé en B1 et replacez-le en B.
• Faites passer l’interrupteur de la position C1 à la position C.
Remettez la goupille D. Remettez la partie arrière et
serrez les vis, puis placez la manette des gaz dans la
position la plus basse. Le changement de mode est
terminé.
1. 2. 3.
4. 5.
B
A
D
CC1
A1
B1
Page 62

62FCARSON Helikopter MARINES HM-38 50 050 7025
Placez la batterie de vol dans votre
hélicoptère, dans la position indiquée.
h. Alimentation
Position de la batterie
Caractéristiques techniques
1. Le processus de chargement du chargeur équilibreur est
entièrement contrôlé par microordinateur ; ce chargeur est
plus précis, plus sûr et plus fiable.
2. Ce chargeur convient pour des batteries Li-ion ou
Li-Polymer 7,4 V / 11,1 V.
3. Vous pouvez surveiller l’état du processus de chargement
automatique au moyen de la diode LED.
4. La fonction automatique de détection de la tension de
compensation permet d’utiliser avec efficacité la capacité
maximum de votre batterie LiPo.
5. Prise d’entrée : 15-18 V / 1000 mA
i. Chargeur équilibreur CARSON
Attention !
1. Ce chargeur convient pour des batteries Li-ion ou LiPolymer avec deux ou trois batteries. Ne pas démonter,
réparer ou utiliser dans un autre but.
2. Ne pas recharger la batterie immédiatement après un vol, ni
tant qu’elle n’a pas refroidi.
Cela pourrait l’endommager, ou provoquer un accident.
3. Il est interdit de procéder au chargement lorsque la batterie
est déformée ou gonflée : une batterie endommagée peut
provoquer un court-circuit, un incendie ou une explosion.
4. Ne jamais placer à proximité d’une source de chaleur ou
d’appareils électroniques. Ne jamais recharger votre batterie
avec exposition directe aux rayons du soleil.
5. Ne jamais mouiller le chargeur, ni l’utiliser dans des
conditions humides, afin d’éviter les courts-circuits et
d’autres incidents imprévisibles.
6. Il faut éviter de faire pénétrer des liquides ou des objets
divers dans le chargeur.
Si cela se produit, il faut immédiatement éteindre l’appareil
et débrancher la batterie ; faites-le ensuite parvenir à votre
revendeur local ou à notre service après-vente, pour le faire
contrôler.
7. Le chargeur doit être placé dans un endroit plat ; il faut éviter
de le faire tomber ou de le cogner.
8. Avant de brancher une batterie sur le chargeur, s’assurer
que les polarités de la batterie et du chargeur équilibreur
sont correctement positionnées, afin de n’endommager ni la
batterie, ni le chargeur.
Page 63

63
F
CARSON Helikopter MARINES HM-38 50 050 7025
j. Préparatifs
Consignes générales
• Dans le cas d’une expérience faible ou nulle en
aéromodélisme, nous conseillons d’en acquérir tout d’abord
avec un logiciel de simulateur de vol.
• Consulter des pilotes chevronnés pour des conseils de
réglages fins et de pilotage de l’hélicoptère.
• Bien prendre en main les fonctions de commande de
l’émetteur.
• Commencer les essais en vol debout derrière le modèle
réduit, en regardant dans le sens du vol. Dans ce cas, les
réactions de pilotage sont les mêmes que les directions de
pilotage.
Il est de plus nécessaire de prendre en main le pilotage de
l’hélicoptère quand il vient sur le pilote (inversion apparente
des gouvernes de directions).
Chargement et montage de la batterie de vol
Chargez toujours l’accu en dehors de la maquette en le plaçant
sur un support non inflammable.
1. Raccorder le chargeur à l’adaptateur de la batterie.
2. Brancher le chargeur enfichable dans la prise.
3. Monter la batterie dans la gaine métallique.
4. Raccorder la batterie au chargeur. Veiller à un contact sûr
avec le raccordement par prise pour éviter tout court-circuit.
5. Ne pas recouvrir la batterie !
La température de la batterie de doit pas dépasser 60 °C lors
de la charge.
La recharge est achevée quand le voyant vert du chargeur
Balance s’allume.
Désignation chargeur équilibreur LiPo
1. Brancher le bloc-secteur compris dans la livraison sur la
prise d’entrée du chargeur (respecter la polarité). La diode
d’état s’allume en rouge.
2. Lorsque vous rechargez une batterie 7,4 V Li-ion ou LiPolymer, branchez la prise équilibrage de votre batterie
dans la prise deux piles de votre chargeur. La diode de
chargement s’allume alors en rouge et commence à
clignoter, indiquant que la batterie se trouve en état de
chargement. Lorsque votre batterie est entièrement chargée,
la diode passe au vert.
3. Lorsque vous rechargez une batterie 11,1 V Li-ion ou LiPolymer, branchez la prise équilibrage de votre batterie
dans la prise trois piles de votre chargeur. La diode de
chargement s’allume alors en rouge et commence à
clignoter, indiquant que la batterie se trouve en état de
chargement. Lorsque votre batterie est entièrement chargée,
la diode passe au vert.
Remarque :
Il n’est possible de ne charger qu’une seule batterie
d’accumulateurs à la fois. Il est interdit de charger simultanément deux batteries ; cela pourrait endommager votre chargeur
ou votre batterie, ou provoquer un incendie.
Lorsque la diode clignote deux fois puis s’arrête, cela signifie
que votre batterie est défectueuse.
Caractéristiques techniques
Courant de sortie : 750 mA
Tension d’entrée : 15-18 V CC / 1000 mA
Tension de sortie :
Prise deux piles 7,4 V CC Prise trois piles 11,1 V CC
8.4 V 12.6 V
Page 64

64FCARSON Helikopter MARINES HM-38 50 050 7025
k. Réglage du plateau cyclique
1. Examen du plateau cyclique
Allumez la télécommande. Abaissez la manette de gaz et le trim
de gaz dans la position la plus basse, et positionnez la manette
de tangage et la manette de roulis en position neutre (MODE
1). Ensuite, reconnectez le câble d’alimentation de l’hélicoptère
pour vérifier si le plateau cyclique est horizontal, après avoir
repositionné les servos de tangage et de roulis.
2. Réglage du plateau cyclique
Si le plateau cyclique n’est pas horizontal, vous pouvez le
régler de la manière suivante :
1. Réglage des servos : desserrez la vis sur le servo et retirez
le bras de servo circulaire. Reconnectez l’alimentation de
votre hélicoptère tandem. Après l’initialisation des servos,
réglez à 90° les angles avec le renvoi en I et le renvoi en L,
respectivement. Remontez ensuite le bras de servo circulaire
sur le servo et resserrez la vis.
2. Réglage de la tige de servo : régler la longueur de la tige
de servo pour que le plateau cyclique soit en position
horizontale.
Schéma des
connexions
Diagramme d’attribution de polarité
Prise de chargement
pour batteries 7,4 V
Prise de chargement
pour batteries 11,1 V
12.6 V 8.4 V 4.2 V O V
Diode d’état
Prise d’entrée
Incorrect
Correct
Batterie
Chargeur équilibreur
Bloc-secteur
Page 65
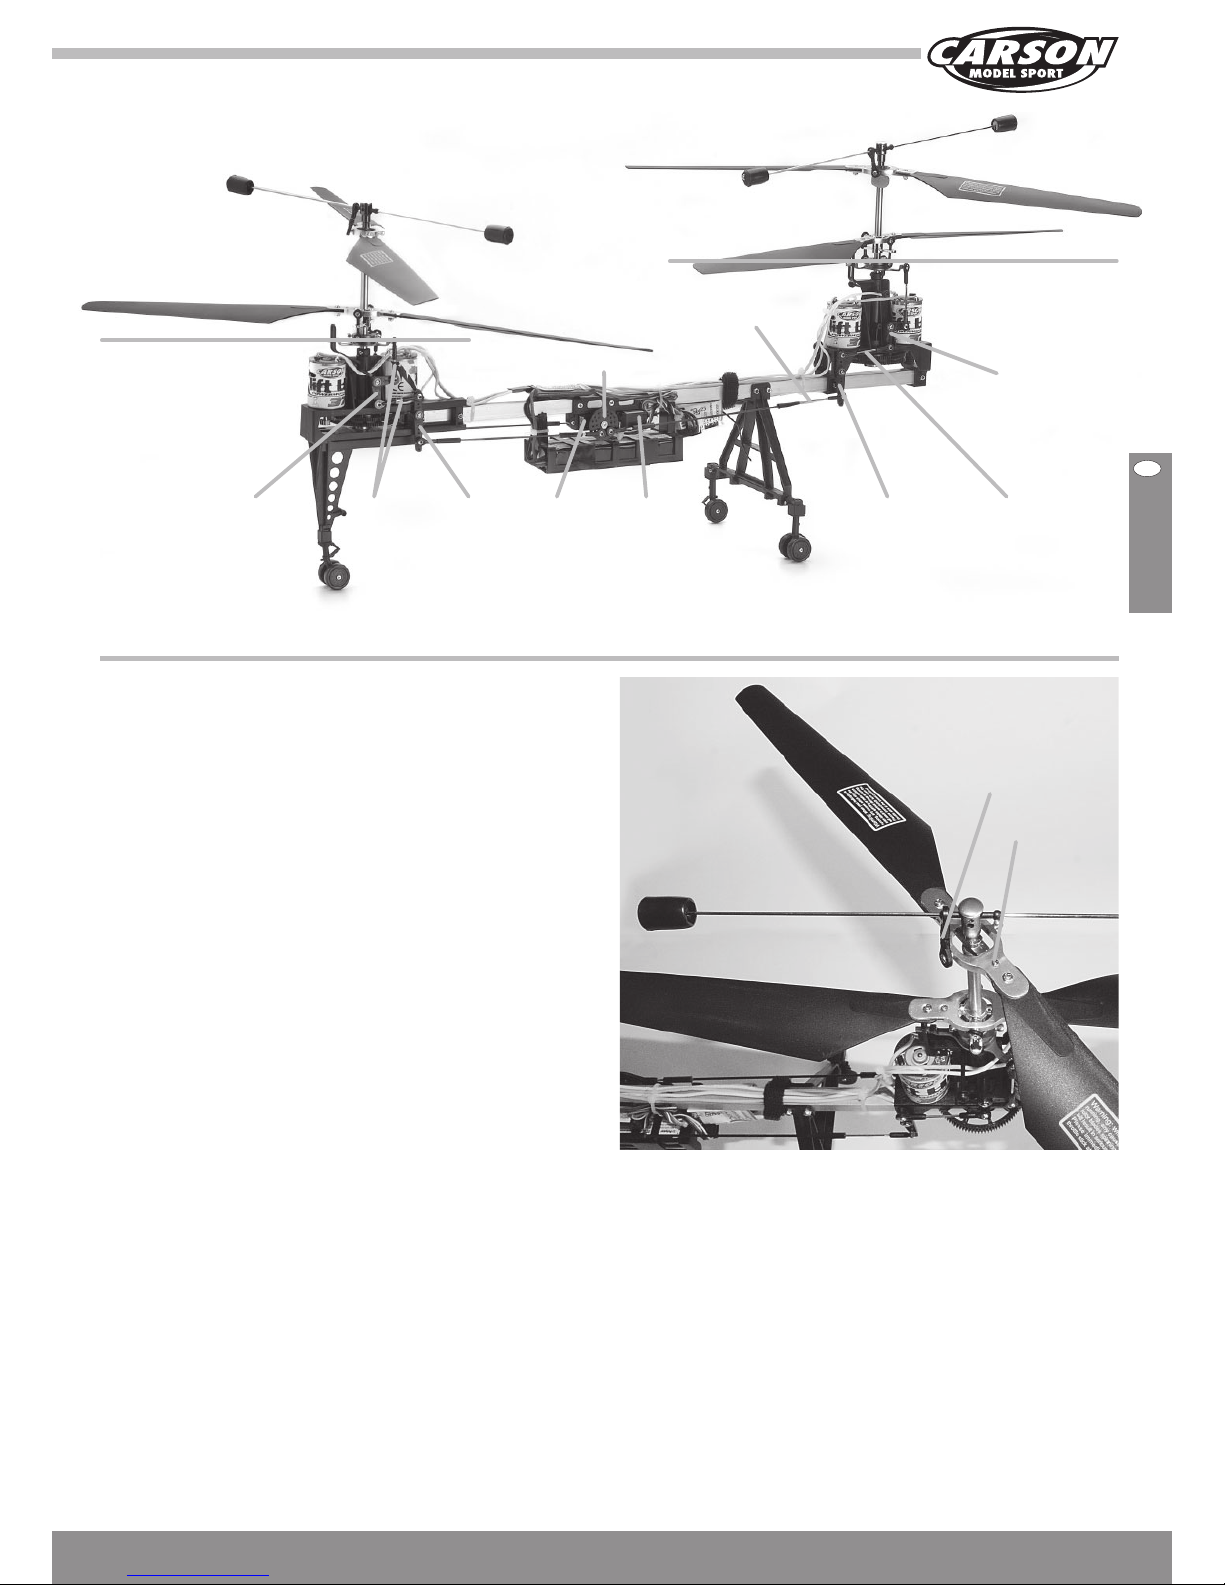
65
F
CARSON Helikopter MARINES HM-38 50 050 7025
Position horizontale du
plateau cyclique
Position horizontale du
plateau cyclique
Tige de
servo
Tige de
servo
Tige de
servo
Renvoi
en I
Servo de
tangage
Servo de
roulis
Bras de servo circulaire
Renvoi en L
Renvoi en L
Renvoi en I
Fixation des pales du rotor
Les pales du rotor doivent se positionner à 180° l’une de l’autre
d’elles mêmes à l’aide de la force centrifuge.
1. Inspection des pales de rotor principales
a. S’assurer que les vis de fixation des pales de rotor
principales ne sont ni trop serrées, ni pas assez.
b. Vérifier l’alignement.
2. Réglage des pales de rotor principales
a. Si les vis de fixation ne sont pas assez serrées, les serrer
un peu ; dans le cas contraire, les desserrer un peu.
b. Si l’alignement n’est pas correct, réglez la longueur
de la tige filetée vers la pale de rotor de telle sorte que
l’alignement soit réajusté.
Tige filetée
Vis de fixation
Page 66
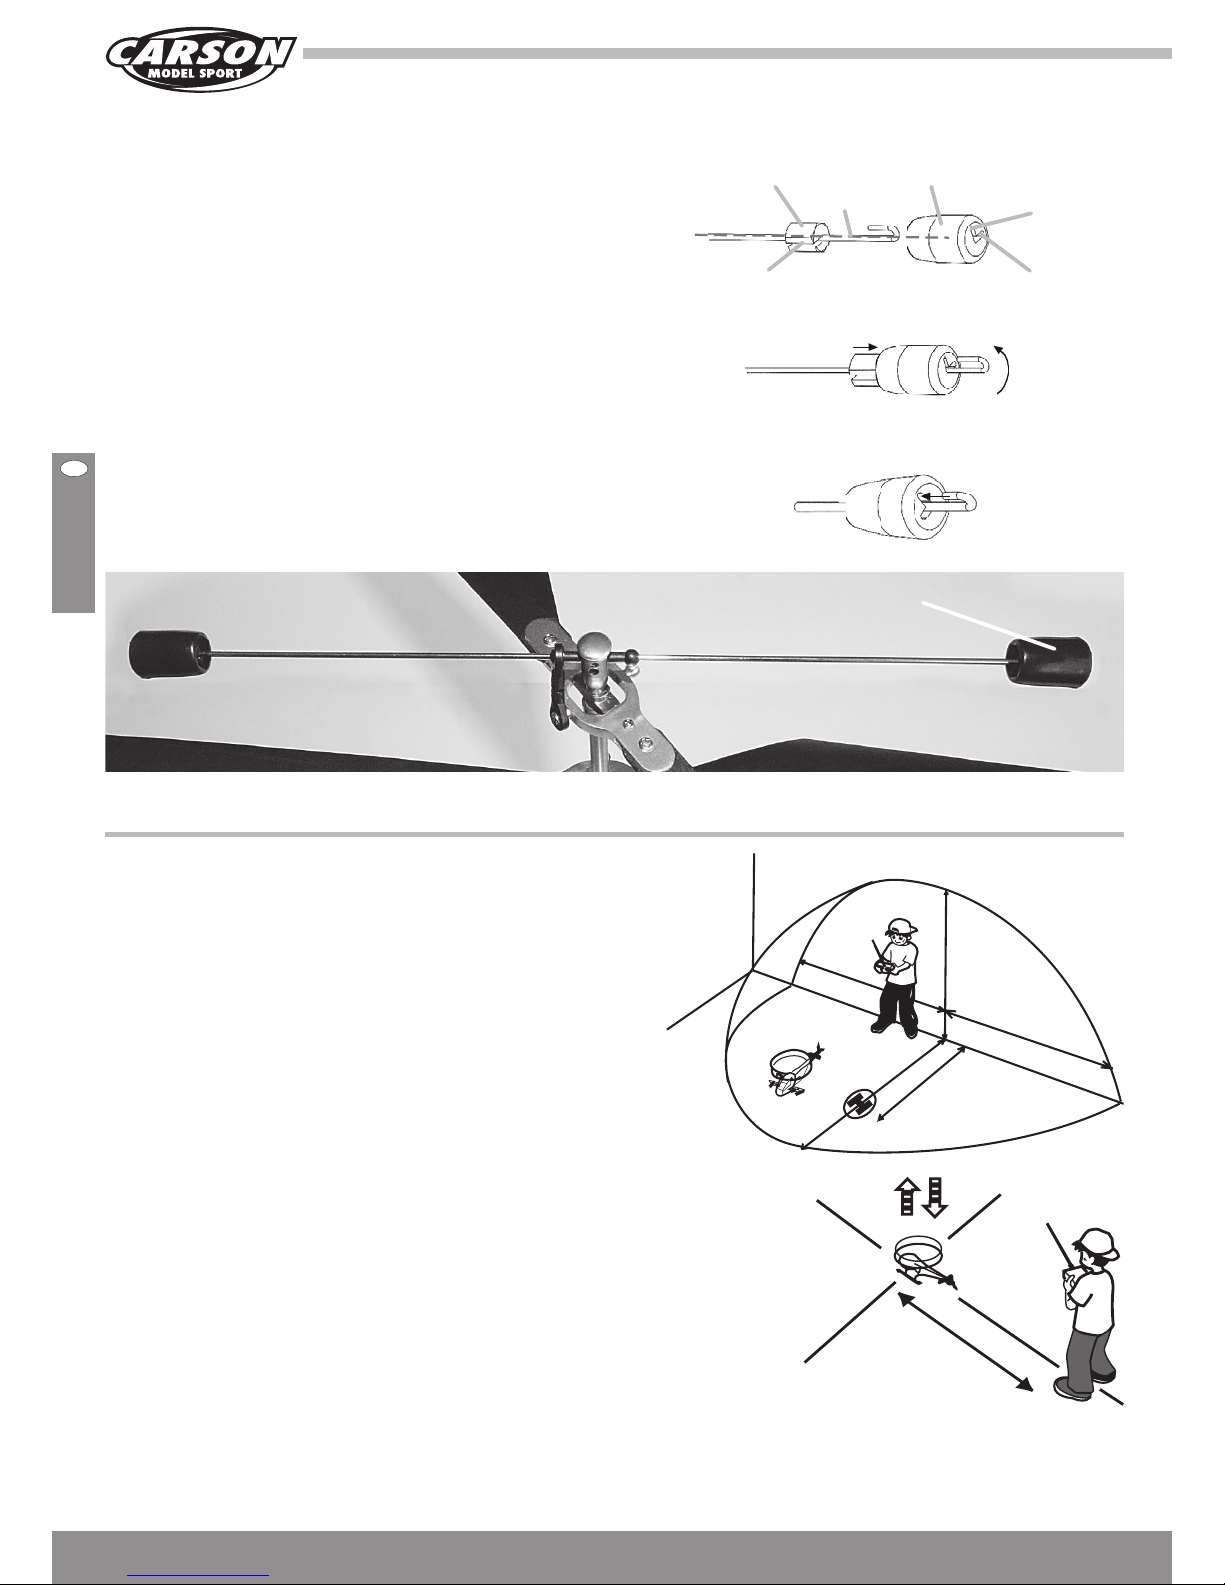
66FCARSON Helikopter MARINES HM-38 50 050 7025
Capuchon de barre
l. Poids de la barre de Bell
1. Enfoncez la masselotte sur la barre de Bell, jusqu’au fond de
l’encoche.
2. Orientez le poids de barre de Bell en direction de l’ouverture
du capuchon et enfoncez le poids dans le capuchon.
3. Faites pivoter le capuchon à 90º dans le sens contraire
des aiguilles d’une montre, puis enfoncez complètement le
crochet (l’extrémité de la barre de Bell) dans le trou 2.
Remarque :
À vitesse élevée, les poids de la barre de Bell peuvent être
projetés au loin s’ils ne sont pas montés correctement. Ceci
peut entraîner des dommages importants sur des personnes ou
sur des objets.
Poids de barre de Bell Capuchon de barre
➀
➁
90°
Barre de Bell
Encoche
Mise en route du modèle réduit
Pour les premiers vols et les vols d’exercice, choisir si
possible une grande salle libre. Même s’il est ensuite possible
de faire voler l’hélicoptère sur un espace extrêmement réduit,
vous avez besoin d’un espace libre de 3 mètres environ dans
toutes les directions.
• Poser le modèle réduit sur une surface lisse et plane.
• Placez l’hélicoptère sur le sol à 2 mètres environ devant
vous, la queue tournée dans votre direction. De cette
manière, le sens de réaction de l’hélicoptère correspond au
sens de la commande.
• Veiller à ce que le correcteur de la fonction de l’angle de pas
se trouve environ au milieu (également la compensation).
• Mettre l’émetteur en marche.
• Le voyant de la pile se met à clignoter.
• Raccorder à ce moment-là la batterie de vol chargée au
récepteur.
m. Vol
2 m
Page 67
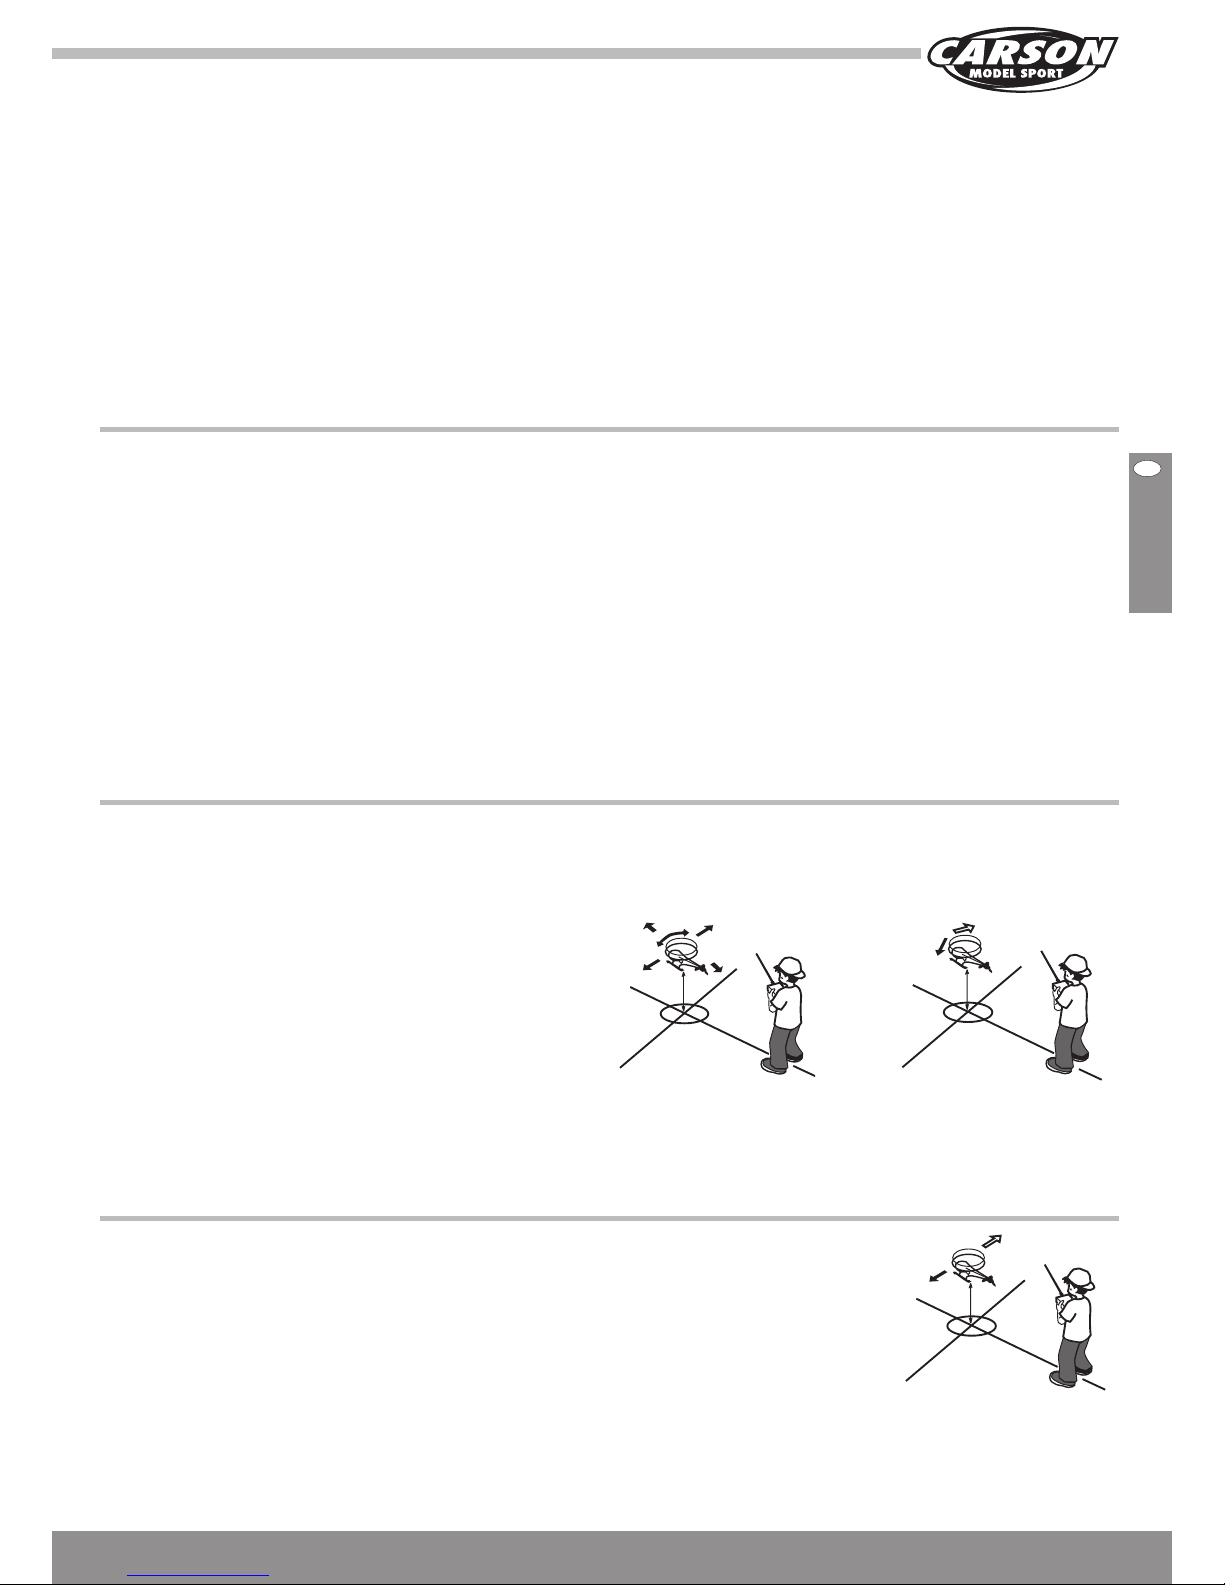
67
F
CARSON Helikopter MARINES HM-38 50 050 7025
Le modèle réduit ne doit pas être déplacé
à ce moment là !
Une fois cette procédure terminée et que le récepteur reçoit
des signaux corrects, la LED est allumée en continu.
Si la LED clignote lentement, la tension de la batterie est trop
faible. Recharger la batterie ou la remplacer par une autre batterie d’origine.
• Avancer la manette gauche légèrement vers l‘avant, jusqu‘à
ce que le modèle réduit se soulève lentement.
• Tirer la manette de nouveau lentement en arrière, afin que le
modèle réduit se pose doucement.
Manier les manettes avec
beaucoup de doigté !
Vérification de la portée de la
radiocommande
Vérifier avant chaque premier départ ou après tout accident le
fonctionnement et la portée de la radiocommande.
Quand la manette de tangage et roulis est en position neutre,
les plateaux cyclique doitent également se trouver en position
neutre (horizontal).
Si tel n’est pas le cas, corriger la position avec les correcteurs
du canal de commande spécifique sur l’émetteur.
• S’éloigner lentement du modèle réduit (moteur à l’arrêt).
• Actionner l’une après l’autre la manette de tangage et de
roulis. Observer ce faisant les réactions du modèle réduit.
La radiocommande fonctionne parfaitement si à une distance
de 30 m, le modèle réduit réagit correctement aux signaux de
l’émetteur.
Ne jamais voler avec une radiocommande défectueuse ! Dans
le meilleur des cas, il n’y aura des dégâts « que » pour le
modèle réduit.
Si la télécommande ne fonctionne pas parfaitement,
commencez par vérifier l’état de charge des accus de
l’émetteur.
Equilibrage de compensation de l’hélicoptère
Juste avant que l’hélicoptère ne quitte le sol, il est possible de
distinguer s’il souhaite tourner ou glisser dans une direction
particulière.
Corriger ces écarts du vol ascendant vertical avec les
correcteurs des différentes fonctions de commande.
Le nez tourne vers la droite :
• Baisser le régime et glisser le correcteur de la fonction de
direction sur la manette de gauche progressivement vers la
gauche.
• Pousser de nouveau la manette d’angle de pas vers l’avant
et vérifier si la correction suffit, le cas échéant glisser le
correcteur encore un peu plus vers la gauche.
• Répéter cette procédure jusqu’à ce que l’hélicoptère ne
tourne plus vers la droite.
Le nez tourne vers la gauche :
• Procéder comme décrit ci-dessus mais en poussant le
correcteur de la fonction de direction progressivement vers
la droite.
Le modèle réduit glisse (dérive) ou
bascule vers la droite :
• Baisser le régime et glisser le correcteur de la fonction de
roulis sur la manette de droite progressivement vers la
gauche.
• Pousser de nouveau la manette d’angle de pas vers l’avant
et vérifier si la correction suffit, le cas échéant glisser le
correcteur encore un peu plus vers la gauche.
• Répéter cette procédure jusqu’à ce que l’hélicoptère ne
dérive plus vers la droite.
Le modèle réduit glisse
(dérive) ou bascule vers
la gauche :
• Procéder comme décrit cidessus mais en poussant le
correcteur de la fonction de roulis
progressivement vers la droite.
Page 68
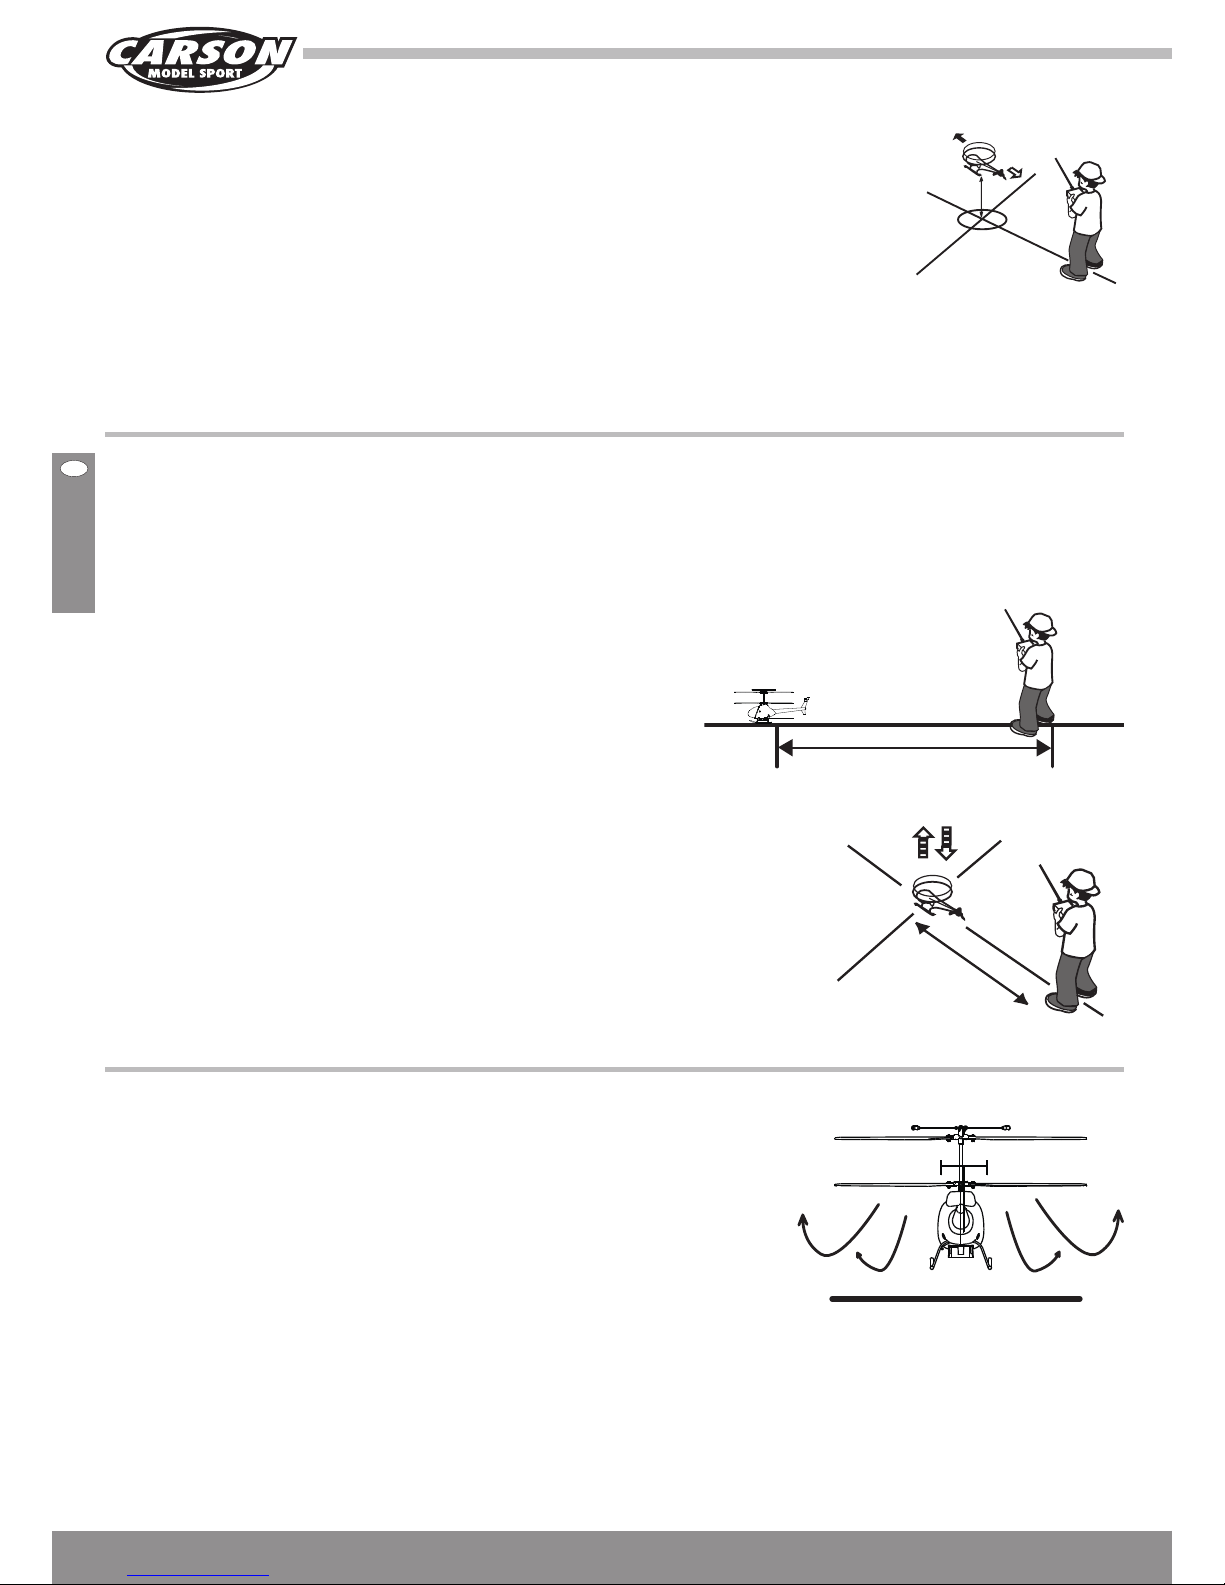
68FCARSON Helikopter MARINES HM-38 50 050 7025
ATTENTION !
Jusqu’à une hauteur d’environ 30 cm, le
modèle réduit est soumis aux turbulences
provoquées par ses propres rotors.
Cet «effet de sol» facilite certes le décollage de l’hélicoptère car
l’air poussé vers le bas par les rotors repousse l’hélicoptère loin
du sol.
Mais à proximité immédiate du sol, cet effet se retourne, car
l’air repoussé latéralement de l’hélicoptère provoque une
sous-pression qui plaque littéralement le modèle réduit au sol.
Ceci peut entraîner un atterrissage brutal.
C’est pourquoi le
comportement en
vol d’un hélicoptère
est plutôt instable à
basse altitude.
En cas de difficultés
avec ce comportement en vol instable,
il est préférable
de monter
progressivement.
n. Effet de sol
Le modèle réduit glisse (dérive) vers
l’avant :
• Baisser le régime et glisser le correcteur de la fonction de
tangage sur la manette de droite progressivement vers
l’arrière.
• Pousser de nouveau la manette d’angle de pas vers l’avant
et vérifier si la correction suffit, le cas échéant glisser le
correcteur encore un peu plus vers l’arrière.
• Répéter cette procédure jusqu’à ce que l’hélicoptère ne
dérive plus vers l’avant.
Le modèle réduit glisse
(dérive) vers l’arrière :
• Procéder comme décrit cidessus mais en poussant le
correcteur de la fonction de
tangage progressivement vers
l’avant.
Vol stationnaire
Le vol stationnaire consiste à maintenir l’hélicoptère en l’air
en un endroit fixe. Le vol stationnaire n’est possible qu’avec un
hélicoptère, c’est un exercice de base qui doit être
minutieusement travaillé.
Il faut pour cela bien prendre en main les fonctions de
commande de l’émetteur, de sorte à pouvoir les maîtriser
«d’instinct».
• Poser l’hélicoptère à 2 m du pilote, la queue montrant dans
sa direction.
• Laisser tout d’abord l’hélicoptère au sol et le déplacer de
manière ciblée légèrement sur le côté, vers l’avant et vers
l’arrière.
• Une fois que la commande au sol est maîtrisée, mettre un
peu plus de gaz et laisser l’hélicoptère voler au-dessus du
sol sans que le nez ne tourne ou que l’hélicoptère ne dérive.
• Il est préférable de marquer au sol l’endroit d’où a décollé
l’hélicoptère. Essayer de maintenir l’hélicoptère au dessus
de ce point et de le faire à nouveau atterrir sur ce point.
• Ne pas actionner les manettes de manière trop brusque,
l’atterrissage peut autrement s’avérer brutal. Bien s’habituer
aux différents mouvements en répétant plusieurs fois le
décollage et l’atterrissage.
• En cas d’incohérences au niveau de la commande ou d’un
balourd au niveau d’un rotor :
Atterrir
immédiatement et corriger les réglages
correspondants.
• Augmenter progressivement la hauteur de vol.
Page 69
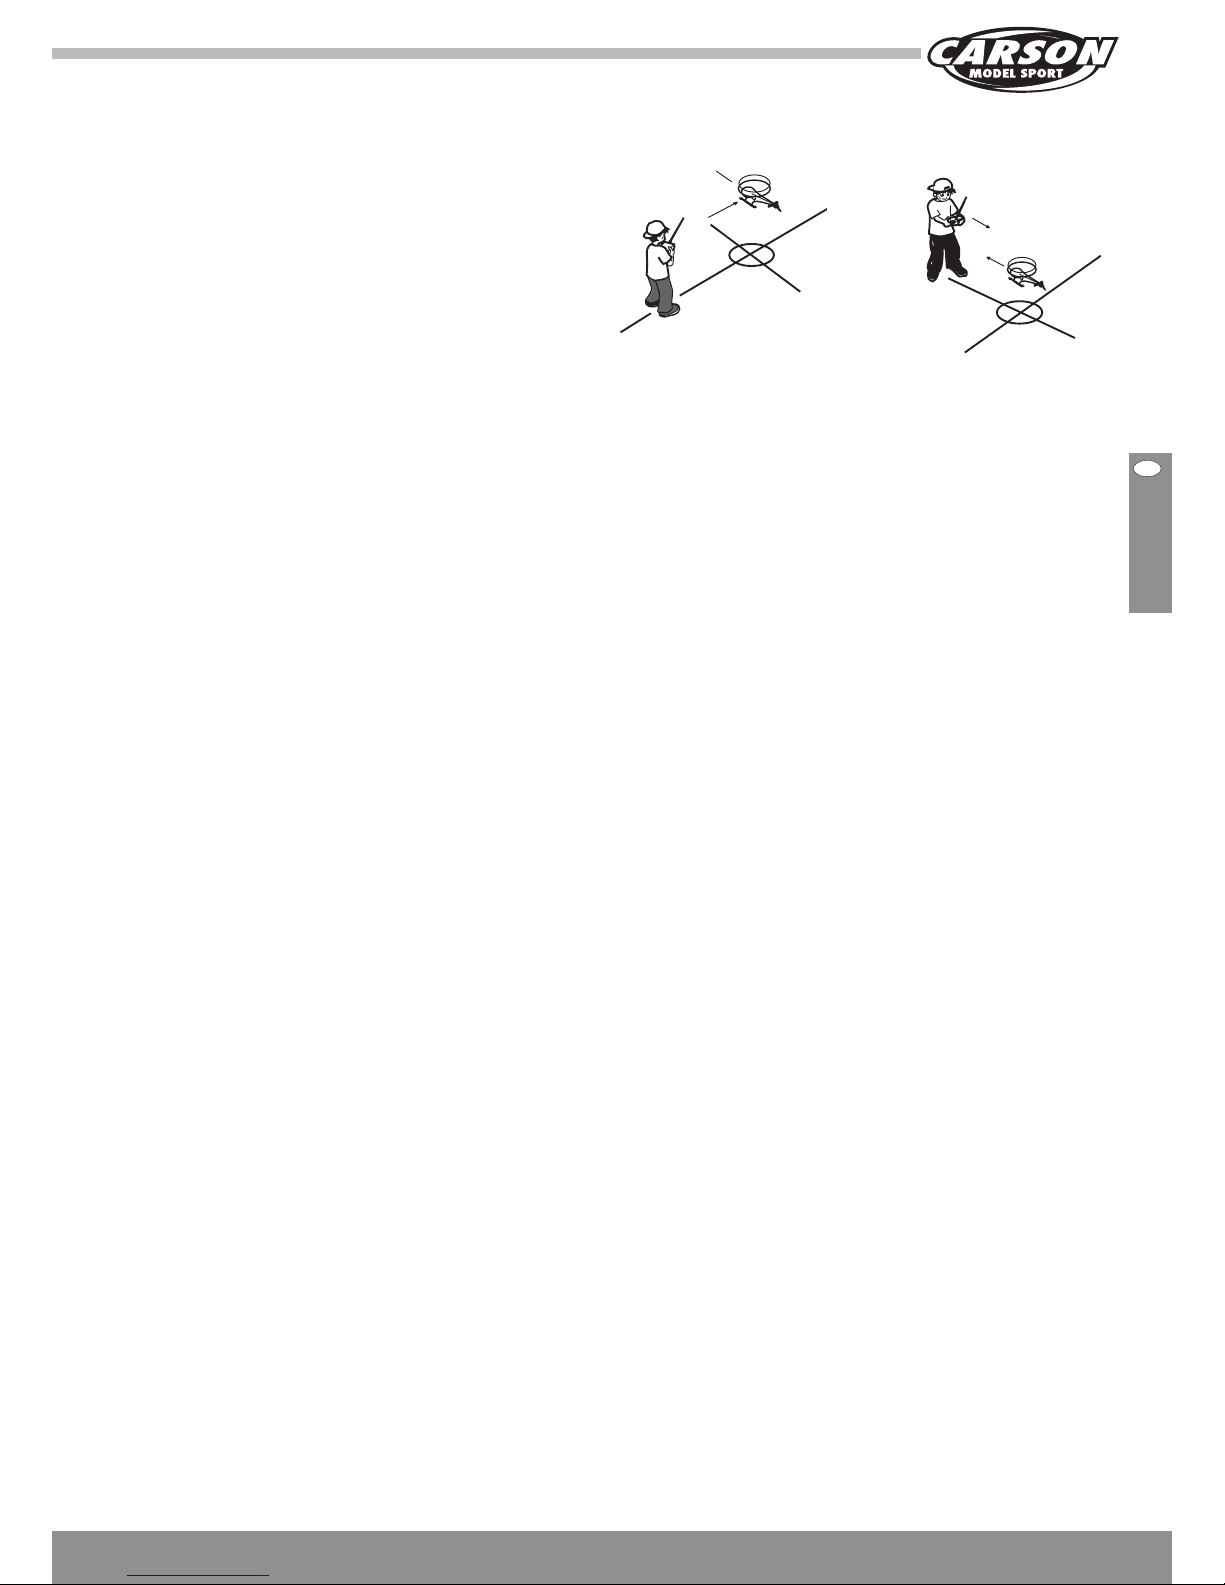
69
F
CARSON Helikopter MARINES HM-38 50 050 7025
A partir d’une altitude d’environ 2 m, l’hélicoptère ne se trouve
plus dans la zone de turbulences provoquées par les propres
rotors et le comportement en vol devient plus stable.
o. Entraînement au vol libre
Une fois que le vol stationnaire est
maîtrisé, il est possible de commencer
avec des figures de vol simples :
• S’entraîner à la maîtrise du modèle réduit, le faire monter,
descendre, avancer et reculer, voler en virage.
• Une fois une certaine assurance acquise, il est possible
de se positionner sur le côté de son modèle réduit et de
s’entraîner à partir de cet angle de vue,
• ou de laisser le modèle réduit venir à soi et d’essayer les
commandes inversées.
• Eviter les changements de charge brusques. Les rotors haut
et bas peuvent autrement s’entrechoquer et l’hélicoptère
s’écraser.
• Toujours piloter avec le modèle réduit devant soi ou le faire
tourner en rond au-dessus de soi. Avec le modèle réduit
derrière soi, il est possible de perdre son orientation et donc
le contrôle sur l’hélicoptère.
Ne jamais tenter d’attraper le modèle
réduit en vol !
Page 70

70FCARSON Helikopter MARINES HM-38 50 050 7025
p. Elimination des erreurs
Il est conseillé de lire ces informations avant la survenue de la
première panne !
Problème Cause Solution
Le modèle réduit ne se
déplace pas
1. Vérifier si l’émetteur et le récepteur sont allumés Mettre en marche l’émetteur / le récepteur
2. Vérifier la tension des batteries de l’émetteur et du
récepteur
Monter des batteries entièrement chargées
3. Le correcteur de la fonction de l’angle de pas se
trouve en butée en haut
S’assurer que le correcteur de la fonction de
l’angle de pas se trouve en position neutre
ou un peu en dessous.
Le moteur ne tourne pas 1. Moteur défectueux Remplacer le moteur
2. La transmission entre le contrôleur et la tête du
rotor est détachée
Brancher le connecteur
Le modèle réduit réagit
de manière erronée aux
commandes ou vole de
manière erratique
Vérifier l’état de charge de la batterie l’émetteur et du
récepteur
Monter des batteries entièrement chargées
Le modèle réduit ne
monte pas
1. Pales de rotor pliées Remplacer les pales de rotor
2. Le moteur chauffe trop Laisser le moteur refroidir
3. Les batteries sont déchargées Recharger les batteries ou les remplacer
Les rotors ne peuvent
être corrigés
1. La compensation n’est pas correctement effectuée Corriger cette compensation avec le
correcteur d’angle de pas
Le modèle réduit avance/
recule et se déplace
latéralement, mais ne
vole pas en
stationnaire
Vérifier que l’hélicoptère n’est pas exposé à un
courant d’ait, p.ex. fenêtre ouverte, climatiseur. Le
courant d’air rend le vol stationnaire impossible.
Fermer la fenêtre / porte, couper la
climatisation ou choisir une salle mieux
adaptée.
Le modèle réduit vibre
fortement
1. Vérifier si les rotors principaux tournent
correctement
Equilibrer le cas échéant les pales de rotor
2. Vérifier que le modèle réduit est correctement
équilibré
Equilibrer le cas échéant les pales de rotor
La queue est instable 1. Une ou plusieurs pales de rotor défectueuses Remplacer une ou deux pales
2. Les rotors supérieur et inférieur tournent avec un
frottement différent sur l’arbre rotor
S’assurer que les deux rotors tournent
librement
3. La vitesse de rotation des rotors supérieur et
inférieur est irrégulière
Remplacer le moteur. Corriger l’équilibrage
sur l’émetteur
Page 71
71
F
CARSON Helikopter MARINES HM-38 50 050 7025
Estimado cliente
Le felicitamos por la adquisición de su modelo radio controlado
CARSON, que ha sido fabricado con tecnología de actualidad.
De acuerdo con nuestra política de constante desarrollo y
mejora de nuestros productos, nos reservamos el derecho de
efectuar cambios en las especificaciones relativas a equipo,
material y diseño de este producto en cualquier momento sin
noticia previa.
Las especificaciones o diseños del producto real podrían variar
de los mostrados en el manual o envase.
Este manual es componente del producto. No cumplir las
instrucciones operativas y de seguridad incluidas invalidará la
garantía. Conserve esta guía como recordatorio o para caso de
pasar el modelo a una tercera persona.
Condiciones de la garantía
Este producto está garantizado por CARSON contra defectos
de fabricación en materiales o mano de obra bajo utilización
normal por un período de 24 meses desde la fecha de
adquisición en comercios autorizados.
En caso de defecto del producto durante el período de
garantía, lleve el producto y el ticket o recibo de venta como
prueba de adquisición a cualquier tienda autorizada CARSON.
CARSON podrá a su elección y salvo que las leyes dispongan
otra cosa:
(a) Corregir el defecto mediante la reparación del producto sin
cargo de piezas o mano de obra;
(b) Reemplazar el producto por otro del mismo o similar diseño;
o
(c) Devolver el importe de adquisición del producto.
Todas las piezas y productos reemplazados, así como los
productos cuyo importe haya sido devuelto, pasan a ser
propiedad de CARSON. Se podrán utilizar piezas nuevas o
reacondicionadas para la prestación del servicio de garantía.
Las piezas y productos reparados o reemplazados estarán
garantizados por el período restante al vencimiento de la
garantía. Cualquierreparación o sustitución del producto tras
vencer el período de garantía será abonada por usted.
Esta garantía no cubre:
• Daños o fallos causados o atribuibles a fuerzas de la
naturaleza, abuso, accidente, uso incorrecto, impropio o
anormal, falta de seguimiento de las instrucciones,
mantenimiento o instalaciones inadecuadas, alteraciones,
Relámpago u otros incidentes causados por exceso de
voltaje o corriente;
• Cualquier reparación no efectuada por un servicio de
reparaciones autorizado CARSON;
• Consumibles como fusibles o baterías;
• Daños estéticos;
• Transportes, embarques y / o costos de seguros; o
Costos de retirada del producto, instalaciones, servicio de
ajuste o reinstalación. Esta garantía le da a usted derechos
legales específicos, y usted también podría tener otros
derechos que variarían de estado en estado.
Declaración de conformidad
Dickie-TAMIYA GmbH&Co KG por la presente declara que
este kit do modelo con radio, motor, batería y cargador está
en concordancia con los requerimientos básicos: 98/37EG Y
89/336/EWG y otras normas pertinentes de la directiva 1999/5/
EG (R&TTE).
Dickie-Tamiya GmbH&Co. KG • Werkstraße l • D-90765 Fürth •
Germany
Tel.: +49/ (0)911/ 9765-03
El producto que ha adquirido funciona mediante una
batería recargable de Litio-Polímero, Ni-Cd o Ni-MH.
La batería es reciclable. Al final de su vida útil, bajo
varias leyes nacionales / estatales y locales, puede
ser ilegal tirar esta batería en los contenedores de
basura normal.
Pregunte a las autoridades locales responsables
sobre las opciones adecuadas de reciclado o
deshecho.
Le deseamos buena suerte y mucha diversión conduciendo su
modelo radio controlado CARSON!
Antes de utilizar su nuevo modelo lea estas instrucciones
cuidadosamente!
E
Page 72
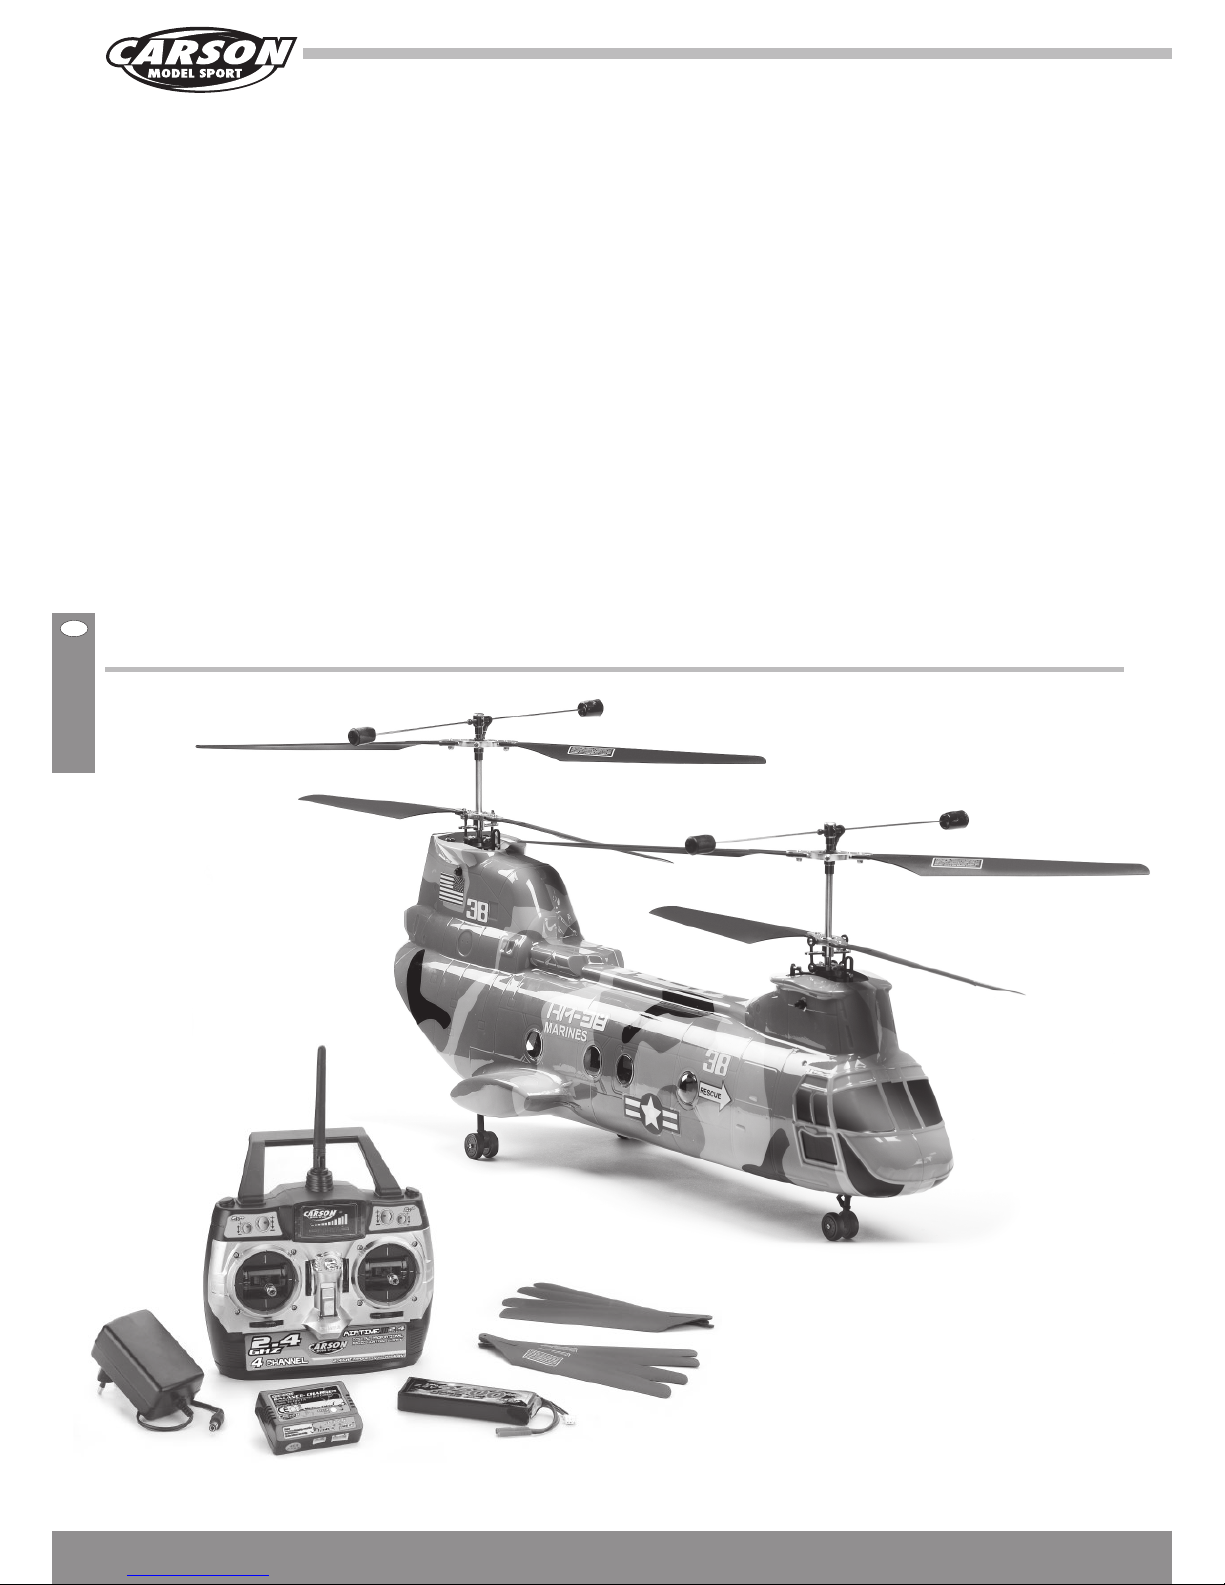
72ECARSON Helikopter MARINES HM-38 50 050 7025
Indice de
contenidos
Contenido del kit
• Modelo construido listo para volar
• Cubierta de la cabina, ya montada
• Emisora manual de 4 canales 2,4 GHz
• Batería recargable LiPo 7,4 V/ 2200 mAh
• Cargador LiPo con equilibrador y fuente de
alimentación
• 2 servos, ya ensamblados
• Giroscopio, con receptor integrado
• Instrucciones
• 8 Repuestos de palas de rotor
Prólogo ....................................................................................... 71
Contenido del kit ........................................................................ 72
Precauciones de seguridad ....................................................... 73
a. El helicóptero con más funciones ......................................... 78
b. Funciones RC del helicóptero ............................................... 79
c. Emisora de mando a distancia de cuatro canales ............... 80
d. Identificación del receptor ..................................................... 81
e. Modo de vuelo ....................................................................... 82
f. Instrucciones de conversión de modo 1 a modo 2 .............. 83
g. Instrucciones de conversión de modo 2 a modo 1 .............. 84
h. Enchúfelo ............................................................................... 85
i. Cargador CASRSON .............................................................. 85
j. Preparativos ........................................................................... 86
k. Ajuste de las hojas ................................................................. 87
l. Montaje de la varilla de vuelo ................................................ 89
m. Operación de vuelo ................................................................ 89
n. Ground Effect ......................................................................... 91
o. Entrenamiento de vuelo libre ................................................. 92
p. Guía de problemas ................................................................. 93
Recambios ................................................................................ 117
Page 73

73
E
CARSON Helikopter MARINES HM-38 50 050 7025
Precauciones de seguridad
¡Este modelo no es un juguete!
• Los modelos radio controlados no son juguetes, su manejo
debe ser aprendido paso a paso
• Los niños menores de 14 años sólo deberían manejar este
modelo bajo supervisión adulta.
La conducción de modelos radio controlados es un fascinante
hobby que debe ser practicado con la necesaria precaución
y respeto. Un modelo radio-controlado que tiene un peso
considerable y capaz de desarrollar velocidades muy altas
puede causar daños y lesiones en caso de conducción
incontrolada, siendo el usuario legalmente responsable de ello.
Compruebe que dispone de un seguro con la suficiente
cobertura contra los daños que pueda causar cuando
practique su hobby.
Sólo un vehículo montado correctamente funcionará y
reaccionará de la manera esperada.
Nunca improvise en las reparaciones y utilice únicamente los
recambios originales si fuese necesario. Igualmente y ante un
modelo premontado, deberá repasar todas las conexiones y
tortillería para asegurarse que están correctamente apretados
ajustados.
Preparativos
Nunca comience a conducir sin haberse
asegurado de los siguientes puntos:
• Fíjese si existen deterioros en el modelo, el mando a
distancia, cargador, o las baterías recargables polímeras de
Litio.
• Todos los componentes operativos están en buenas
condiciones y se ha comprobado su correcto
funcionamiento.
• Verificado que todos los tornillos estén correctamente
apretados.
• Asegúrese que las baterías de la emisora y el receptor están
completamente cargadas y tienen el voltaje correcto. Con
baterías medio gastadas podría perder el control de su
modelo.
• Extienda completamente la antena de la emisora y
asegúrese que no hay ninguna otra emisora R/C o similar
cercana que pueda causar interferencias.
• La emisora y el receptor están conectados, y se ha
comprobado el buen funcionamiento de todas sus
funciones.
• Compruebe siempre el funcionamiento del sistema de radio
antes de utilizar el modelo
Generalidades
• Lea todo este manual de instrucciones detalladamente y
guárdelo para lecturas posteriores.
• Familiarícese sobre todo con las indicaciones para la
operación de vuelo.
Operación de vuelo
El modelo está concebido sobre todo para vuelos en interiores,
ya que el reducido peso propio y la inestable posición de vuelo
de su construcción hacen que este modelo sea muy sensible a
los cambios de viento.
Además, los componentes no están protegidos ante polvo o
humedad.
¡No vuele por periodos superiores a una
carga de la batería recargable!
Después, debe dejar que el motor se enfríe por lo menos
5 minutos.
Recargue después la batería recargable. Se debe de evitar
absolutamente una descarga total.
Coloque el alambre de la antena de tal manera que no entre
en contacto con piezas móviles. Para lograr una descarga de
tracción, debe sujetar el alambre al fuselaje en con cinta
adhesiva.
Page 74

74ECARSON Helikopter MARINES HM-38 50 050 7025
Trate de volar,
de ser posible,
solamente en
espacios cerrados
• con un espacio libre de
por lo menos 3 m. en
todas las direcciones
• sobre bases lisas
• sin obstáculos que
sobresalgan (muebles) o
estén en movimiento
(personas, animales)
• en espacios sin corrientes
de aire
Si desea volar al
aire libre, hágalo
• sólo en caso que no haya viento,
• al menos a 3 Km. de distancia del emplazamiento más
próximo oficial de aeromodelismo, de no ser así, debe llegar
a un acuerdo sobre la frecuencia.
No realice vuelos
• No conduzca si está cansado o si su capacidad de reacción
está mermada de algún modo.
• En caso de velocidad de viento 1 (brisa) o superior
• ¡No conduzca bajo líneas de alta tensión, radio mástiles o
durante tormentas eléctricas! Las perturbaciones
atmosféricas pueden afectar las señales de su emisora de
radio.
• Nunca utilice el modelo en presencia de rayos.
• En las cercanías de edificios, muebles, personas y animales
• en superficies de transporte público.
Page 75

75
E
CARSON Helikopter MARINES HM-38 50 050 7025
Rotor
• ¡Las palas dañadas de los rotores deben ser reemplazadas!
¡Absténgase de intentar realizar reparaciones!
• Manténgase alejado de los rotores mientras las baterías
recargables estén conectadas.
• Evite estar en los niveles de rotación de los rotores.
No esté sentado cuando haga funcionar el modelo, para poder
así, de ser necesario, salir rápidamente de la zona de peligro.
Ajuste los tornillos de sujeción de las palas de rotor sólo lo
suficiente hasta que éstas, durante la operación, por la fuerza
centrífuga, queden por sí solas en posición de 180° la una
contra la otra.
Cargador
Utilice únicamente el cargador que va
adjunto.
• Utilice el cargador solamente sobre bases que no sean
fácilmente inflamables y
• coloque también la batería recargable durante la carga en
una base no inflamable
• Preocúpese de preservar que el cargador reciba suficiente
ventilación durante la carga.
• Nunca permita que el cargador quede sin vigilancia durante
la carga.
• Preste atención a la correcta polaridad de las baterías
recargables durante la carga.
¡Nunca someta al cargador, las baterías
recargables y modelo a condiciones de
entorno adversas!
Éstas son, por ejemplo:
• Humedad, demasiada humedad atmosférica (> 75 % rel.,
condensada). Nunca toque el cargador con las manos
húmedas.
• Nunca utilice el cargador inmediatamente después de
haber pasado de un entorno frío a uno cálido. El agua de
condensación originada puede destruir su equipo. Deje que
el equipo alcance una temperatura adecuada por sí solo.
• El polvo y los gases inflamables, los vapores o disolventes,
gasolina
• temperaturas demasiado elevadas (> aprox. +40 °C),
exposición luz solar directa
• fuego al aire libre, fuentes de encendido
• cargas mecánicas tales como sacudidas, vibraciones
• suciedad intensa
• fuertes campos electromagnéticos (motores o
transformadores) o campos electroestáticos (sobrecargas)
• Estaciones emisoras (radiotelefonía, estaciones emisoras
de aeromodelismo, etc.). Las emisiones de estaciones
entrantes pueden conducir a una avería en el
funcionamiento del cargador o a la destrucción del cargador
y en consecuencia de la batería recargable.
Permita que el cargador se enfríe entre
las cargas. Desenchufe el cargador de la
red cuando haya concluido el proceso de
carga.
No se debe volver a emplear un cargador defectuoso.
Si supone que el equipo tiene defectos, es decir,
• cuando el equipo muestra desperfectos visibles,
• el equipo ya no funciona y
• después de un almacenamiento prolongado en condiciones
desfavorables o
• después de un intenso desgastes por transporte, entonces,
se debe poner inmediatamente fuera de funcionamiento y
asegurar no se ponga en marcha sin intención.
Deseche los cargadores inutilizables (irreparablemente)
respetando a las normativas legales vigentes.
Por razones de seguridad y autorizaciones (CE), no está
permitida la remodelación y/o modificación por cuenta propia
del cargador.
Page 76

76ECARSON Helikopter MARINES HM-38 50 050 7025
Baterías recargables litio-polímeras
Utilice la batería recargable adjunta solamente con este
modelo.
También utilice como batería recargable de repuesto solamente
piezas originales.
• Es normal que la batería recargable se recaliente durante la
carga.
• ¡No sobrecargar o descargar totalmente la batería
recargable! Ambas situaciones pueden conducir a fugas de
electrolitos y a ignición espontánea
• Asegúrese que las baterías de la emisora y el receptor están
completamente cargadas y tienen el voltaje correcto. Con
baterías medio gastadas podría perder el control de su
modelo.
• Nunca mezcle baterías recargables/baterías medio llenas
con vacías, o baterías recargables de diferente
capacidad.
• Retire la batería recargable cargada del cargador para evitar
una descarga autónoma.
• Si no utiliza el modelo por algún tiempo, la batería
recargable debe ser retirada.
Al final de su vida útil, bajo varias leyes nacionales /
estatales y locales, puede ser ilegal tirar esta batería en los
contenedores de basura normal. Pregunte a las autoridades
locales responsables sobre las opciones adecuadas de
reciclado o deshecho.
Las baterías recargables no deben
• ser sumergidas en líquidos,
• tirarse al fuego o ser expuestas a altas temperaturas ni
• a cargas mecánicas
• ni ser desmontadas / averiadas
• ni recibir corto-circuitos
En caso que durante la utilización, la carga, o el
almacenamiento de la batería recargable usted note un olor,
decoloración, sobrecalentamiento, deformación u otra
anomalía:
• retire la batería recargable del cargador
• retire la batería recargable del equipo usado
• no vuelva a utilizar la batería recargable.
En caso de fuga de electrolitos:
• ¡evite el contacto con los ojos o la piel!
• lave inmediatamente los lugares afectados con agua limpia y
• busque un médico.
Page 77

77
E
CARSON Helikopter MARINES HM-38 50 050 7025
Instrucción de seguridad para batería
Li-Po.
1. No desmontar ni reconstruir battería
2. No haga corto circuito a la battería
3. No utilice ni deje la batería cerca de fuego, cocina o lugar
caliente (más de 80 grados centígrados)
4. No sumerja la batería en agua o en agua de mar, ni deje
que se moje
5. No cargar la batería cerca de un fuego ni bajo rayos de sol
6. Utilice el cargador especificado y observe los requisitos
para la carga (bajo 1 A)
7. No introduzca clavos en la batería. No la golpe con un
martillo, ni la perfore
8. No permita que la batería sufra impacto o tirones
9. No utilice baterías con deformaciones o daños manifiestos
10. No realice el soldado directo en la batería
11. No invierta la carga ni sobrecargue la pila
12. No cargue de forma inversa ni la conecte de forma
inversa
13. No conecte la batería al soquete de enchufe ni al
interruptor de cigarrillos del automóvil
14. No utilice la batería para equipamiento no especificado
15. No toque directamente una batería que presente fuga
16. No utilice baterías de Litio ion mezcladas
17. Mantenga las baterías alejadas de los bebés
18. No siga utilizando la batería después del tiempo
especificado
19. Impida que entre en un microondas o un contenedor de
alta presión
20. No utilice una batería con fuga cerca de un fuego
21. No utilice o deje la batería bajo los rayos solares (ni en un
modelo recalentado por la luz solar)
22. No debe utilizarse cerca de un lugar que genere electricidad estática (más de 64 V) y que pudiera dañar el circuito
de protección.
23. El ámbito de la temperatura de carga está regulado entre
0° grados centígrados y 45° grados centígrados. No cargue
la batería fuera del ámbito de temperatura recomendada.
24. Cuando la batería tenga herrumbre, huela mal o presente
alguna anomalía al usarla por primera vez, no utilice el
equipo y devuelva la batería a la tienda donde la compró.
25. En caso de que sean niños quienes utilicen la batería, sus
padres deben enseñarles cuidadosamente cómo utilizar las
baterías de acuerdo con el manual de instrucciones.
Y además, cuando los niños utilizan las baterías, prestar
atención dependiendo de a esto.
26. Mantenga la batería fuera del alcance los niños. Y además,
cuando utilice la batería, preste atención en caso que sean
retiradas del cargador o equipos por niños pequeños.
27. Si la piel o alguna tela se mancha con el líquido de la
batería, debe lavarse con agua fresca. Podría causar
irritación cutánea.
28. Nunca cargue el acumulador con más de 5C ni deje que
la tensión se reduzca a menos de 6 V, ya que esto podrá
causar daños en el acumulador.
29. Nunca cargue el acumulador sobre una moqueta puesto
que pueden surgir incendios.
30. No use el acumulador para un equipo no especificado u
otros fines.
31. No toque el acumulador en caso de que éste no sea
estanco. Si usted toca el acumulador, lávese, por favor, las
manos inmediatamente.
32. No lave el acumulador por un tiempo mayor al indicado.
33. No utilice acumuladores que estén dañados o hinchados
34. No use el acumulador en lugares en que puedan surgir
cargas estáticas de más de 64 V.
Page 78

78ECARSON Helikopter MARINES HM-38 50 050 7025
¡Sin atornillar ni montar! La diversión comienza con el
desempaquetado. ¡Con sólo un poco de entrenamiento, pronto
será un auténtico piloto de helicópteros!
Controle su helicóptero utilizando las cuatro funciones.
Gracias a la función de doble rotor (coaxial) el modelo vuela
extremadamente estable.
Su uso está concebido para interiores, pero cuando no hay
viento el modelo también puede ser volado en exteriores. Con
la batería de Litio-Polímero incluída, son posibles vuelos de
8 – 10 minutos.
Características:
• Comportamiento de vuelo extremadamente estable
• Totalmente montado, listo para volar
• Con radio profesional de 4 canales 2,4 GHz.
• Incluye giróscopo 8función estabilizadora)
• Incluye batería LiPo 7.4 V/ 2200 mAh y cargador “balance”
• Cuerpo de lexan coloreado
Helicóptero listo para volar con radio de
4 canales 2,4 GHz , batería LiPo
7,4 V/ 2200 mAh, cargador de red 230 V y
palas de rotor de recambio.
a. El helicóptero con más funciones
Vara de palas 1
Vara de palas 2
Rotor de mando
Rotor de mando
Rotor de impulso
Rotor de impulso
Eje de rotor 1
Soporte de palas
Eje de rotor 2
Soporte de palas
Fuselaje
Tren de aterrizaje
Page 79

79
E
CARSON Helikopter MARINES HM-38 50 050 7025
Eje longitudinal
(Roll)
Eje alto
Eje transversal
(Nick)
Las siguientes funciones se controlan a través de dos
palancas de mando a distancia de la emisora de mano.
Para cada función de mando, en la emisora de mando a
distancia existe una guía compensadora que permite
realizar leves correcciones a la posición neutral.
Función de inclinación o pitch
(Ascenso/ descenso)
La función de inclinación regula la altura de vuelo de este
helicóptero de aeromodelismo mediante una modificación
de las revoluciones conjunta de ambos rotores. El
control se realiza mediante la palanca de mando
izquierda. Para lo cual, se mueve sin etapas hacia
adelante y atrás. A diferencia de las otras funciones
de mando, esta palanca no regresa elásticamente
a la posición intermedia. Si la palanca de mando se
tira totalmente hacia atrás, se apagan los motores
y se paran los rotores. Si se empuja la palanca de mando
totalmente hacia adelante, se encienden los motores, y los
rotores empiezan a funcionar con mayores revoluciones
dependiendo de la posición de la palanca.
En la posición intermedia de la palanca de mando, el
helicóptero debería poder flotar a una altura.
Función trasera (Timón de dirección)
La función trasera provoca un giro del modelo en el eje
vertical. Debido a que el helicóptero cuenta con dos rotores
contrarrotativos, con las mismas revoluciones de los rotores
no se produce un par de movimiento en el eje vertical (árbol
de rotor). Por esta razón, el helicóptero tampoco necesita un
rotor trasero para la estabilización. Para poder girar el modelo
en su eje vertical (árbol de rotor), se debe hacer que los rotores
funciones con una mínima diferencia en las revoluciones. El par
de movimiento resultante provoca el giro.
En caso de que el rotor de mando tenga menos revoluciones
que el rotor de soporte, el par de movimiento del rotor de
impulso es mayor, y el helicóptero gira sobre su eje vertical en
dirección del rotor de mando. Si el rotor de mando tiene
mayores revoluciones, el par de movimiento del rotor de
impulso es menor que el del rotor de mando y el helicóptero
gira en
sentido del rotor de impulso.
El control de la función trasera se realiza mediante la palanca
de mando derecha. Si se mueva la palanca hacia la izquierda,
la punta de proa del fuselaje gira hacia la izquierda. Si se
mueve hacia la derecha, la punta de proa del fuselaje también
gira hacia la derecha.
Función de giro
(Función de alerón)
La función de giro provoca un vuelo lateral del helicóptero.
Se controla mediante la palanca de mando derecha.
Si se mueva la palanca hacia la izquierda, el modelo flota
hacia la izquierda. La palanca hacia la derecha lleva al modelo
lateralmente hacia la derecha.
Función de
cabeceo (función de timón de altura)
La función de cabeceo provoca un vuelo hacia delante o hacia
atrás del helicóptero. El circuito de rotor inferior delantero se
inclina ligeramente hacia abajo, el modelo se inclina en el eje
trasversal. Si la proa se inclina hacia abajo, una parte de la
fuerza ascensional se transforma en fuerza de avance.
Si por el contrario, la proa se eleva, el modelo vuela hacia
atrás. El control se realiza mediante la palanca de mando
derecha.
Empujándose hacia adelante se genera un vuelo hacia delante;
si se empuja hacia atrás, el modelo vuela hacia atrás.
b. Funciones RC del helicóptero
Datos técnicos
Diámetro del rotor principal A 450 mm
Diámetro del rotor principal B 450 mm
Longitude 575 mm
Alto 285 mm
Peso 650 g
Entrada: 15 - 18 V/ 1000 mA
Salida: 7,4 V und 11,1 V/ 750 mA
del cargador con adaptador de enchufe
Page 80
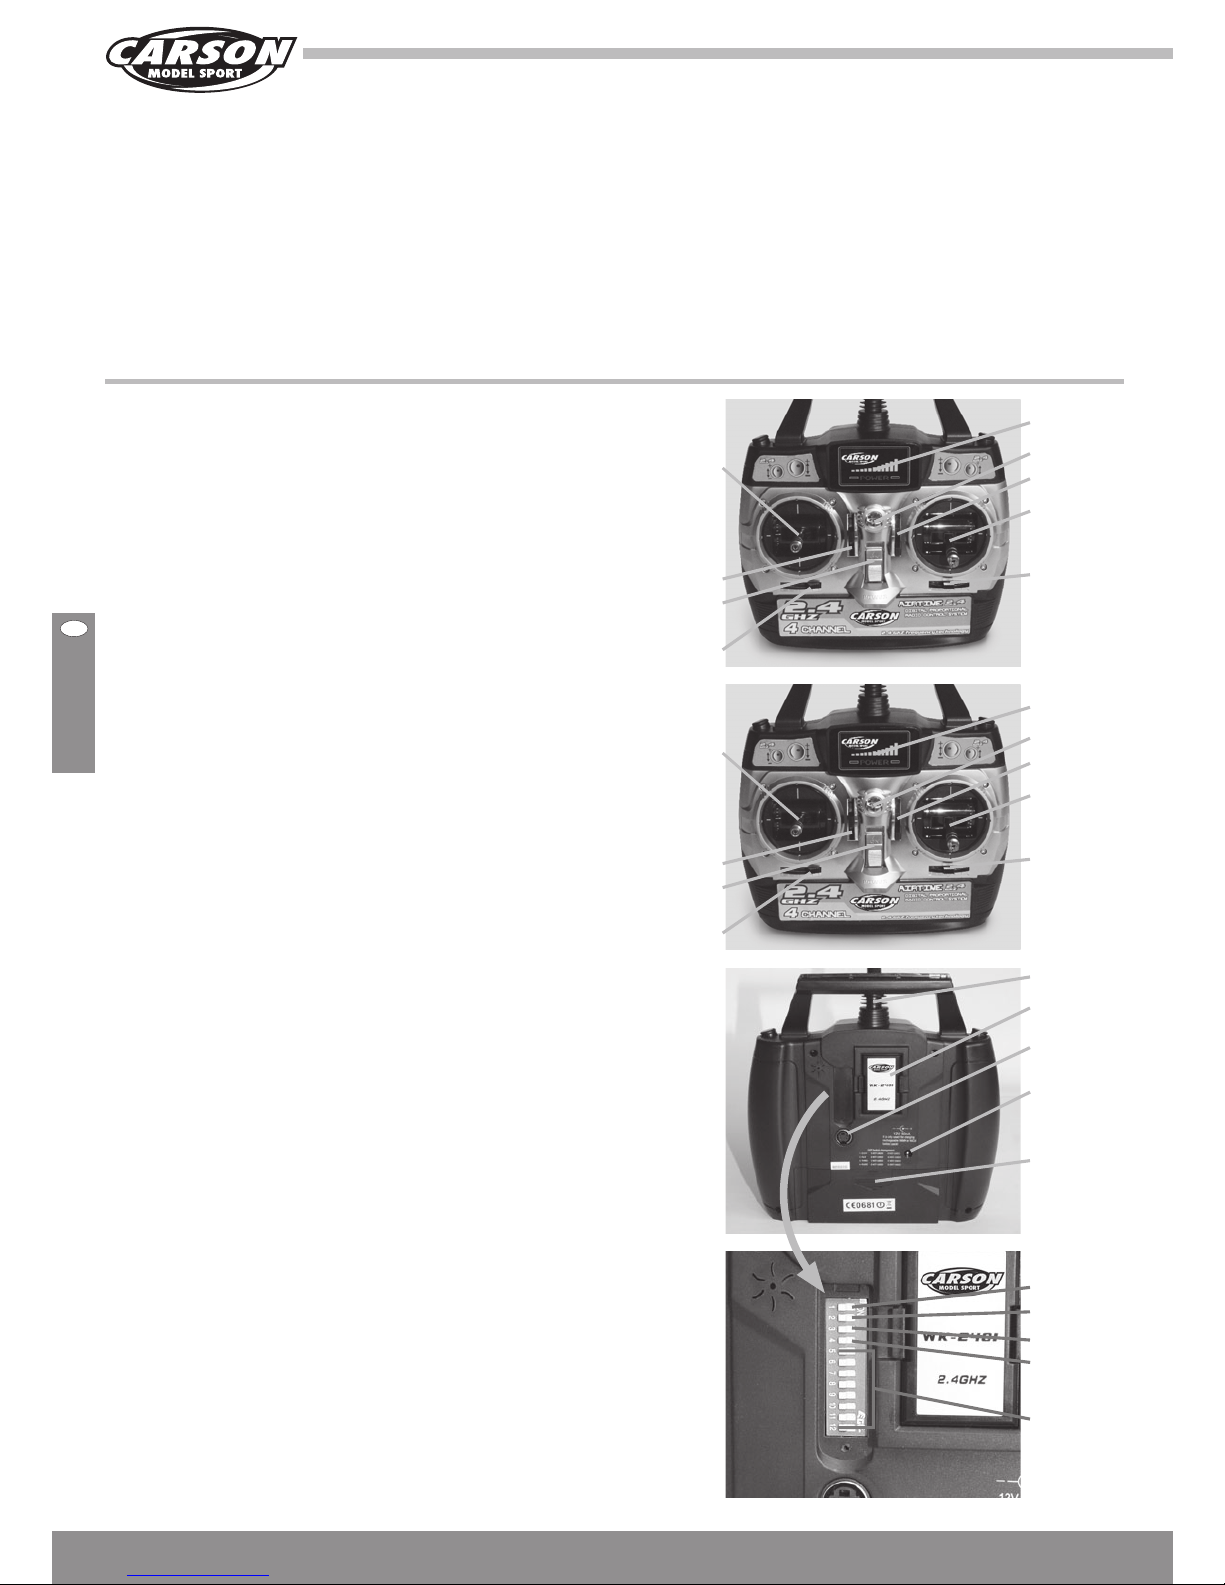
80ECARSON Helikopter MARINES HM-38 50 050 7025
En el envío está incluida una emisora de mano con dos
palancas de mando a distancia, con respectivamente dos
funciones.
Estas funciones se regulan con movimientos hacia adelante /
atrás y a la derecha / izquierda.
Se requieren 8 baterías AA para la
emisora (no incluidas)
Coloque las baterías recargables cargadas en el
compartimiento para baterías recargables del emisor.
¡Cerciórese de usar la polaridad correcta!
c.
Emisora de mando a distancia de cuatro canales
Mode 1
Mode 2
Fig. 1
Fig. 2
Indicador de
tensión
Corchete
Palanca
Mando
derecho/
palanca
Alerón
Indicador de
tensión
Corchete
Elevador
Mando
derecho/
timón
Alerón
Antenna
Tapa
ornamento
Conector de
simulación
Conector de
carga
Tapa del
alojamiento
de las baterías
Elevador
Alerón
Palanca
Timón
No se emplea
Mando
izquierdo/
timón
Elevador
Interruptor
de ON/OFF
Timón
Mando
izquierdo/
palanca
Palanca
Interruptor
de ON/OFF
Timón
Características del transmisor de 4 canales:
1. La tecnología de 2,4 GHz busca automáticamente la
frecuencia que esté libre. Es rápida en la reacción, más
precisa en el mando y más resistente a los fallos por
interferencias.
2. Microprocesador de 4 canales (codificador);
potencia de salida: ≤ 10 mW
intensidad de corriente: 50 mA
alimentador: 1,2 V x8 baterías de NiMH (9,6 V) o
1,5 V x8 baterías secas AA
3. Los interruptores DIP están disponibles para varios servos,
que permiten actividades de vuelo tales como el ascenso, el
descenso, el avance, el retroceso, el vuelo a la izquierda, a la
derecha, etc.
4. Libertad para conmutar entre los mandos de la izquierda y la
derecha (Modo 1 y Modo 2).
Identificación del mando y funcionamiento:
MODO 1
1. Mando izquierdo/ timón.
Comanda el avance, el retroceso y el vuelo hacia la izquierda
y hacia la derecha del helicóptero. Empujar hacia arriba para
hacer avanzar el helicóptero, empujar hacia abajo para hacer
retroceder el helicóptero, empujar a la izquierda para hacer
volar el helicóptero a la izquierda y empujar a la derecha,
para hacerlo volar a la derecha.
2. Mando derecho/palanca.
Comanda el ascenso, el descenso y el desplazamiento a la
izquierda y a la derecha. Empujar hacia arriba para hacer
ascender el helicóptero, empujar hacia abajo para hacerlo descender, empujar a la izquierda para desplazarlo a la
izquierda y hacia la derecha, para desplazarlo a la derecha.
MODO 2
1. Mando izquierdo/palanca.
Comanda el ascenso, el descenso y la marcha hacia la
izquierda y hacia la derecha del helicóptero. Empujar hacia
arriba para hacer ascender el helicóptero, hacia abajo para
hacerlo descender, hacia la izquierda para que vuele a la
izquierda y hacia la derecha para que vuele hacia la derecha.
2. Mando derecho/timón.
Comanda la marcha del helicóptero hacia adelante, hacia
atrás, hacia la izquierda y hacia la derecha. Empujar hacia
arriba para hacer avanzar el helicóptero, empujar hacia
abajo para hacerlo retroceder, empujar hacia la izquierda
para desplazarlo a la izquierda y empujar a la derecha para
desplazarlo a la derecha.
3. Indicador de tensión.
El indicador consiste en tres colores: rojo, amarillo y verde.
Page 81

81
E
CARSON Helikopter MARINES HM-38 50 050 7025
Luz verde encendida significa que hay suficiente electricidad
para volar;
Luz verde apagada y amarilla encendida significa que la
electricidad no es suficiente y el helicóptero se detiene;
Luz amarilla apagada y roja encendida significa que la
electricidad es muy baja y que es indispensable detener el
helicóptero enseguida.
4. Elevador.
Comanda y modifica la marcha hacia delante y hacia atrás
del helicóptero. Empujar hacia arriba para el avance y
empujar hacia abajo para el retroceso.
5. Timón.
Comanda y modifica la marcha hacia la izquierda y hacia la
derecha del helicóptero. Desplazar el mando a la izquierda
para volar a la izquierda y desplazarlo a la derecha para
volar a la derecha.
6. Palanca.
Comanda el ascenso y el descenso del helicóptero.
Empujar el mando hacia arriba para ascender y hacia abajo
para descender.
7. Alerón.
Comanda la marcha hacia la derecha y hacia la izquierda
del helicóptero. Empujar hacia la izquierda y el helicóptero
volará a la izquierda y empujar a la derecha para que vuele a
la derecha.
8. Interruptor de ON/OFF.
Enciende o apaga la tensión del transmisor. Pulsar arriba
para encender la electricidad y abajo para apagarla.
9. Corchete. Para fijar la correa del emisor.
10.
Antena. Transmite las señales.
11.
Conector de carga. Carga las baterías recargables con una
corriente de 50 mA, voltaje < 12 V.
Nota: está prohibido usar el conector para baterías no
recargables.
12.
Conector de simulación.
Para conectar al ordenador con un cable de simulador.
13.
Alojamiento de las baterías. Por favor, ten en cuenta la
polaridad a la hora de insertar las baterías.
14.
Tapa del alojamiento de las baterías: Protege las baterías del
transmisor. Por favor, abrir la tapa atendiendo a la dirección
de la flecha cuando se cambia la batería.
Identificación de los interruptores DIP
1. Elevador.
Cambia la dirección del servo del elevador.
2. Alerón.
Cambia la dirección del servo del alerón.
3. Palanca.
Cambia la dirección de la palanca.
Nota: asegurarse de que la palanca funciona bien antes de
empezar a volar.
4. Timón.
Cambia la dirección del timón.
5-12. No se emplea.
Ajustes de fábrica:
CANAL ON/OFF
1ON
2ON
3 OFF
4 OFF
5-12 No se emplea
1. MIX / Regulación del número de giros:
Ajusta el número de giros del motor principal y del motor de
cola.
Un ajuste en sentido horario aumenta el número de giros y,
en sentido antihorario, lo disminuye.
2. EXTENT (ajuste del servo):
El botón de EXTENT sirve para ajustar la trayectoria del
servo. Un ajuste en sentido horario aumenta la trayectoria
del servo y, en sentido antihorario, la disminuye.
3. Ajuste de la sensibilidad del giroscopio (SENSITIVE).
Ajusta la sensibilidad de acuerdo con la actividad de vuelo.
Un ajuste en sentido horario aumenta la sensibilidad y, en
sentido antihorario, la disminuye.
4. AILE:
Alerón, conecta al servo del alerón.
5. ELEV:
Elevador, conecta al servo del elevador.
6. Cable de señal ESC:
Conecta al cable de señal ESC.
7. LED.
LED indica el estado de recepción. Un rápido parpadeo
significa que la señal está siendo recibida; la luz encendida
significa que la señal ha
sido recibida; un parpadeo
lento significa que la señal
no está siendo recibida.
8. Motor delantero.
Conecta al motor
delantero.
9. Motor trasero.
Conecta al motor trasero.
10.
Cable de alimentación.
Conecta a la batería.
d. Identificación del receptor
➆
➀
➁
➂
➇
➈
➅
➅ ➄ ➃
➉
Page 82
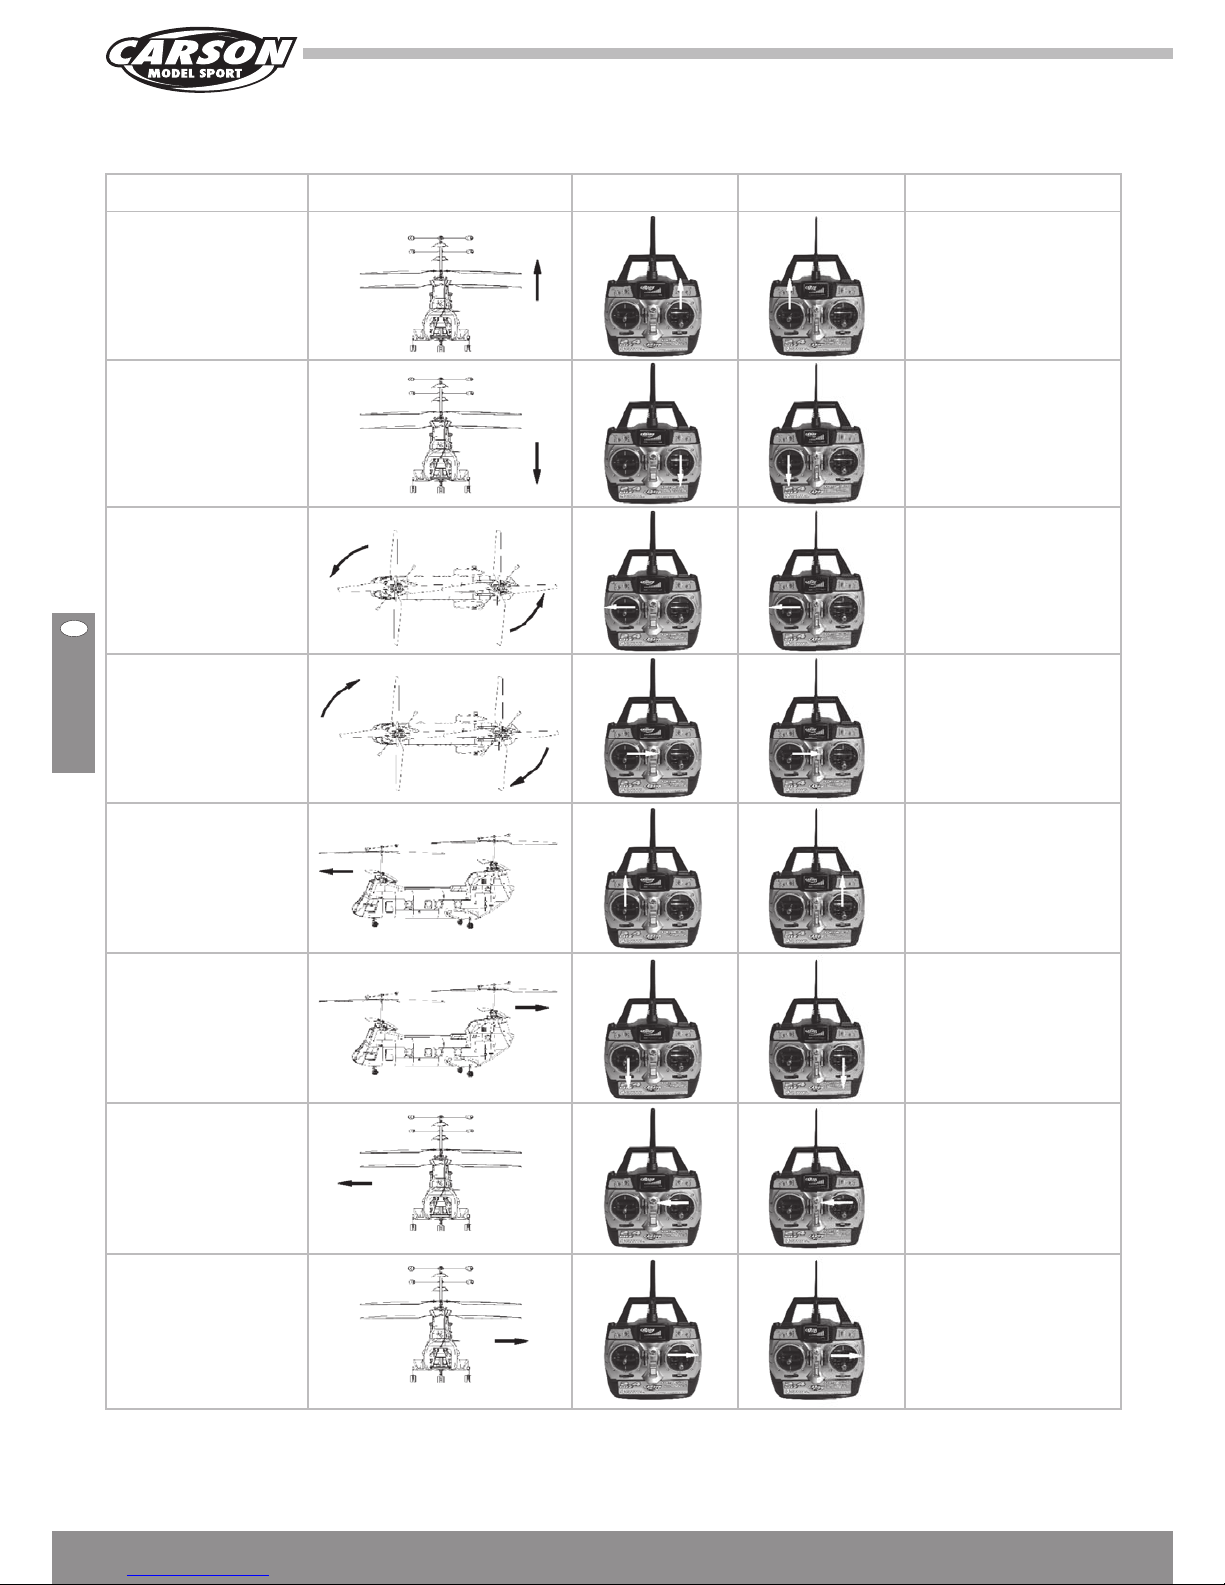
82ECARSON Helikopter MARINES HM-38 50 050 7025
e. Modo de vuelo
Mode 1 Mode 2
Vuelo ascensional Subiendo la palanca
Vuelo descendente Bajando la palanca
Viraje a la izquierda Empujando el timón
a la izquierda
Viraje a la derecha Empujando el timón
a la derecha
Bajar la proa Subiendo
el elevador
Levantar la proa Bajando
el elevador
Giro a la izquierda Desplazando el alerón
a la izquierda
Giro a la derecha Desplazando el alerón
a la derecha
Page 83
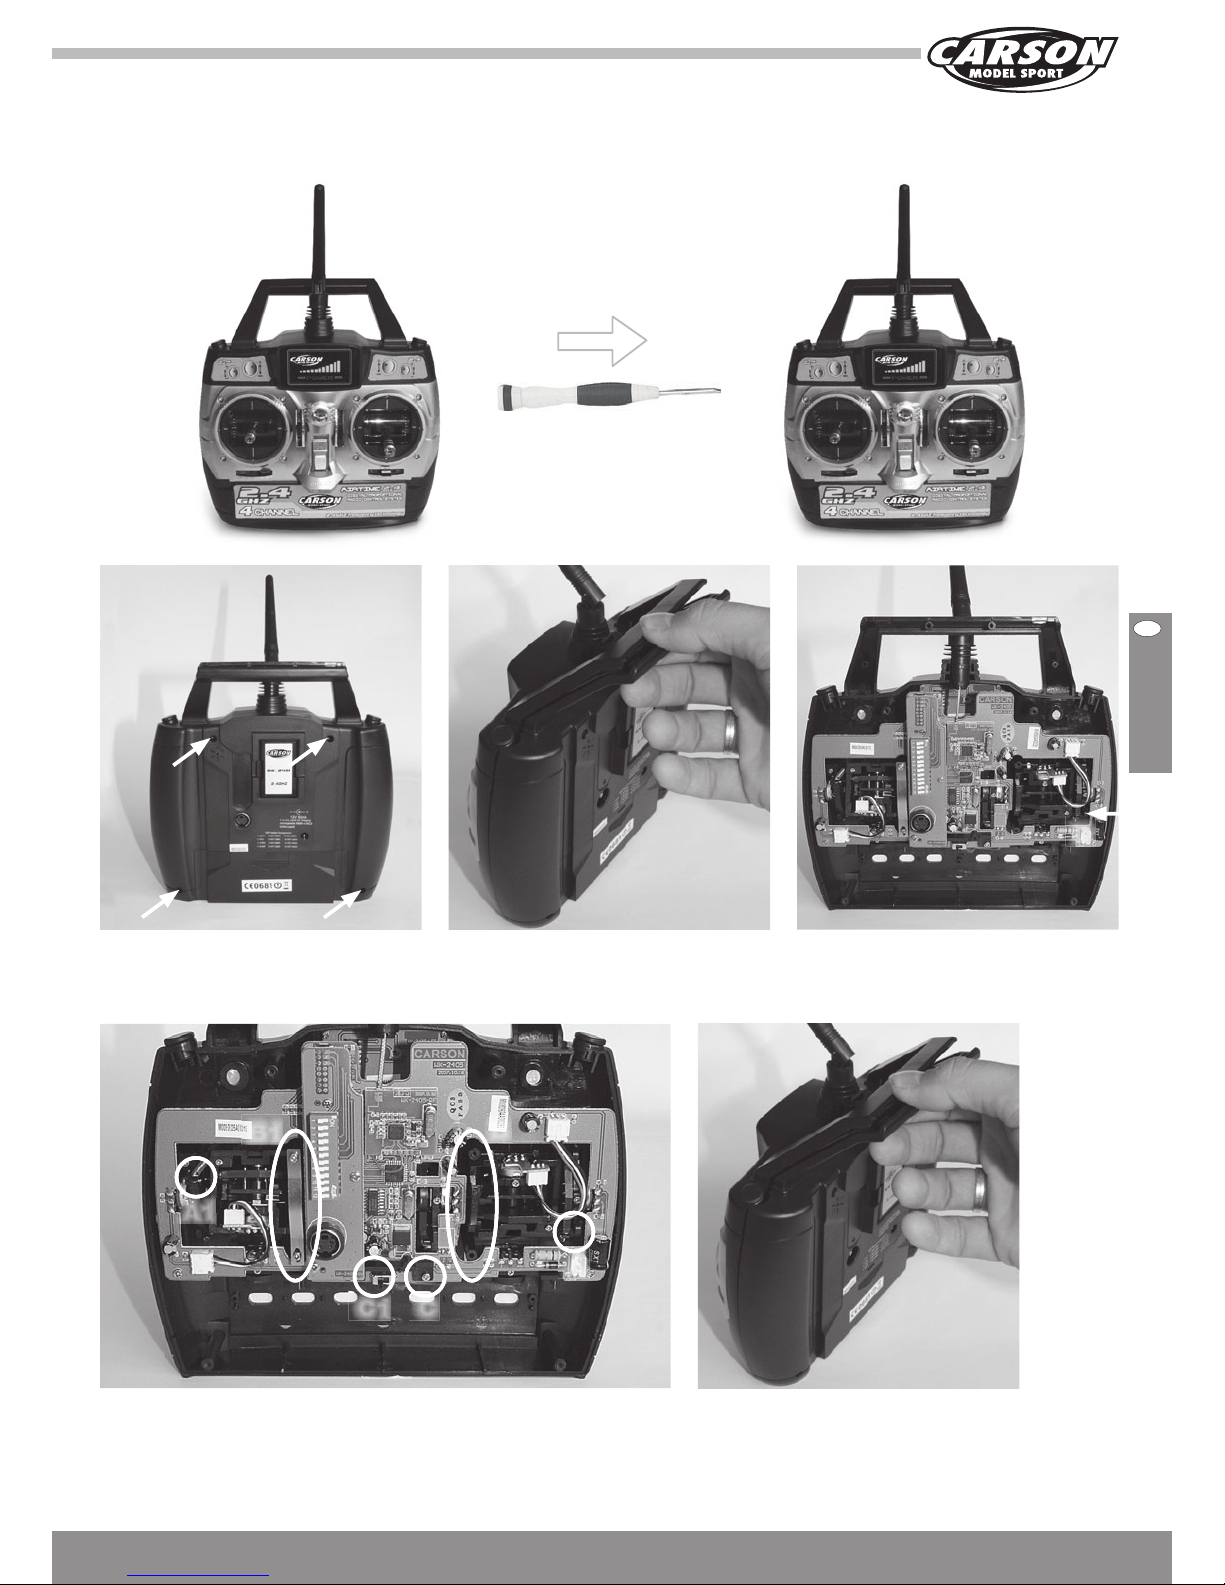
83
E
CARSON Helikopter MARINES HM-38 50 050 7025
f. Instrucciones de conversión de modo 1 a modo 2
Destornillador de estrella
Desenroscar los tornillos de la tapa del
transmisor como se muestra en la figura.
Separar la tapa trasera de la frontal del
transmisor.
Sacar el pin D, como se muestra en la
figura.
• Sacar el tornillo de A y colocarlo en A1.
• Sacar el resorte de B y colocarlo en B1.
• Conmutar de C a C1.
Colocar el pin D. Montar la tapa trasera y apretar los
tornillos, y desplazar la palanca a su posición más
baja. Ha concluido el proceso de conmutación.
1. 2. 3.
4. 5.
B
A
D
CC1
A1
B1
Page 84
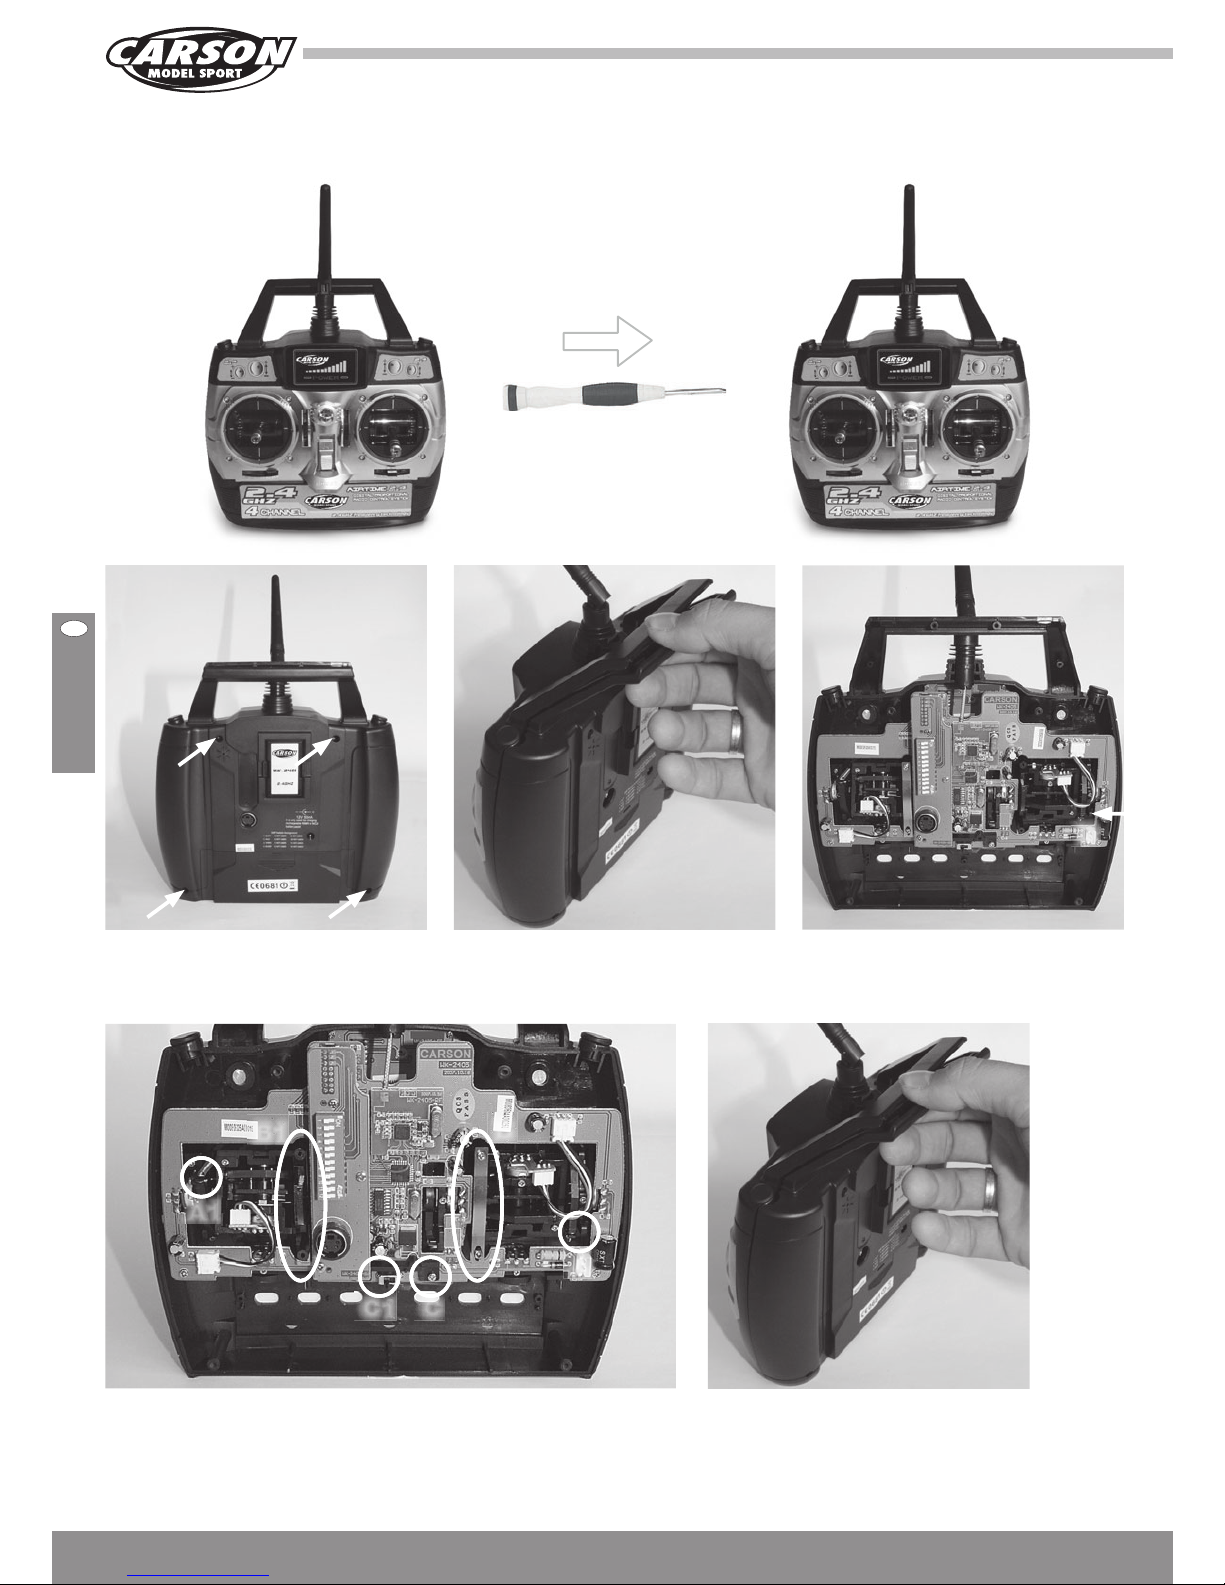
84ECARSON Helikopter MARINES HM-38 50 050 7025
g. Instrucciones de conversión de modo 2 a modo
1
Destornillador de estrella
Desenroscar los tornillos de la tapa del
transmisor como se muestra en la figura.
Separar la tapa trasera de la frontal del
transmisor.
Sacar el pin D, como se muestra en la
figura.
• Sacar el tornillo de A1 y colocarlo en A.
• Sacar el resorte de B1 y colocarlo en B.
• Conmutar de C1 a C.
Colocar el pin D. Montar la tapa trasera y apretar los
tornillos, y desplazar la palanca a su posición más
baja. Ha concluido el proceso de conmutación.
1. 2. 3.
4. 5.
B
A
D
CC1
A1
B1
Page 85
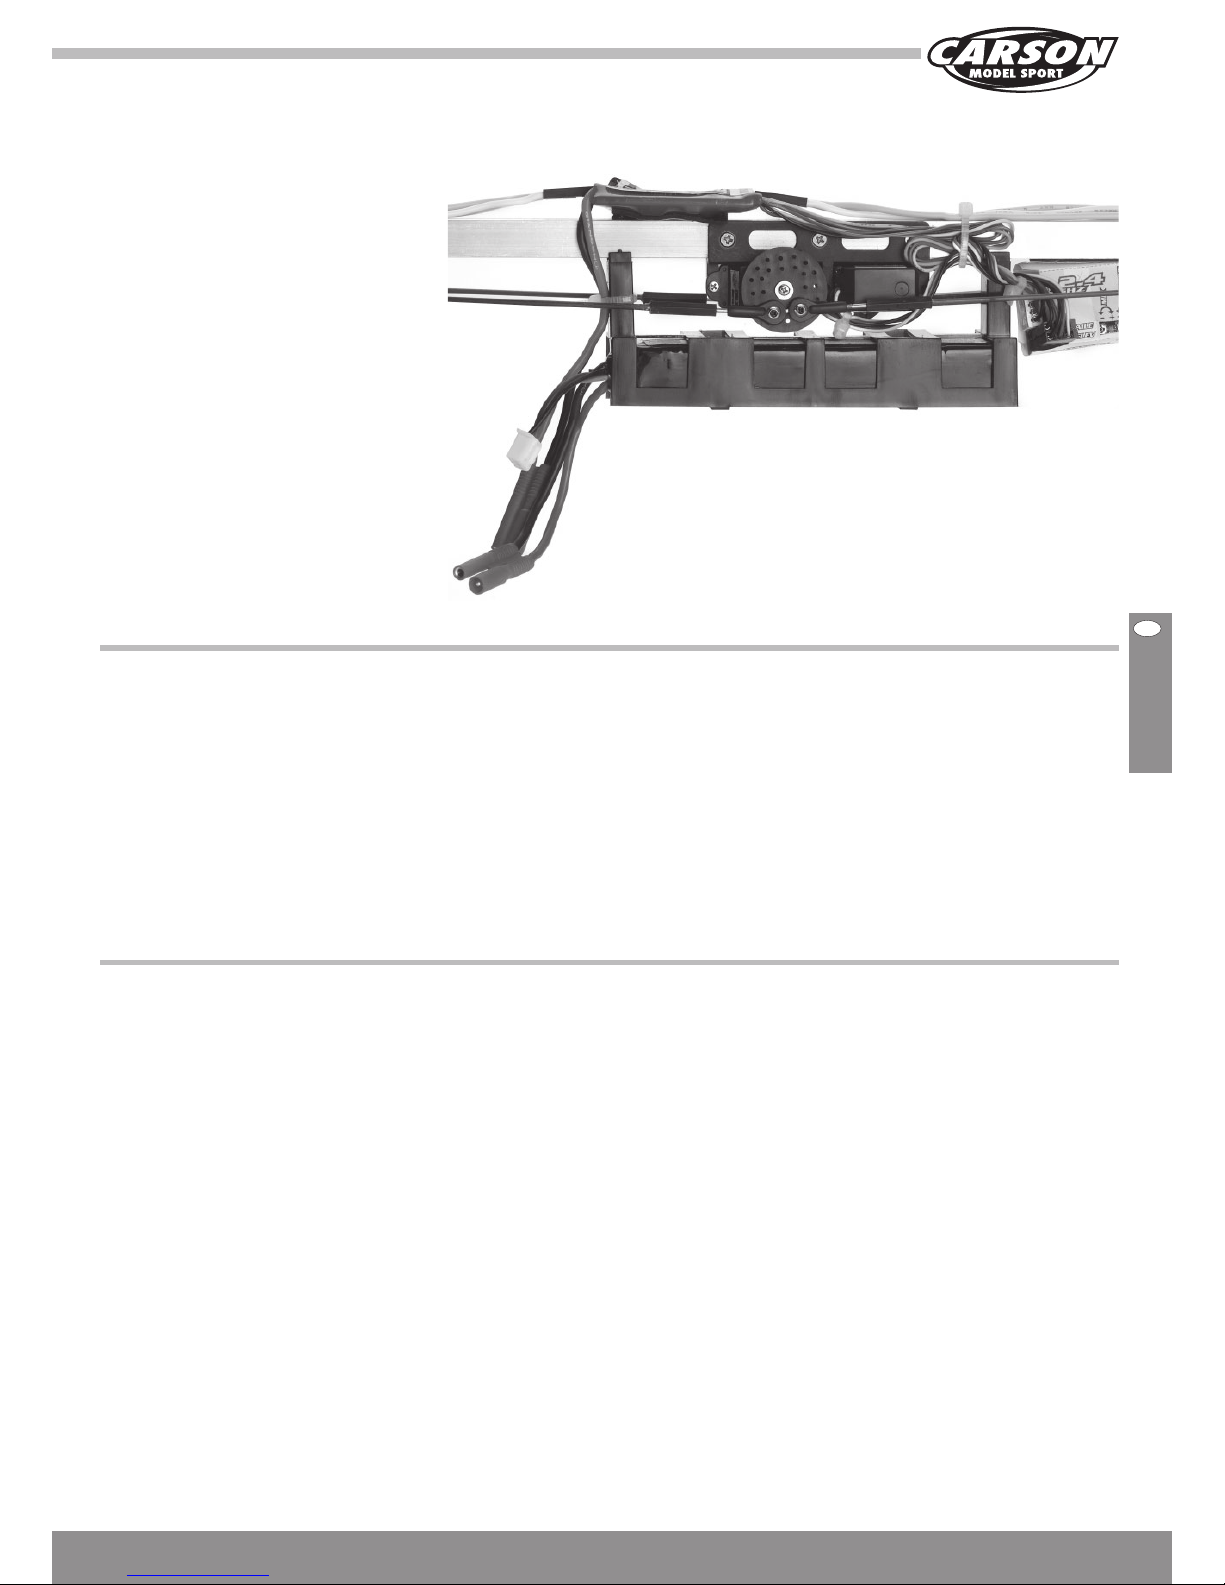
85
E
CARSON Helikopter MARINES HM-38 50 050 7025
Colocar las baterías correctamente en el
helicóptero.
h. Enchúfelo
Ubicación de las baterías
Características técnicas
1. El cargador GA-005, cuyo proceso de carga se controla
perfectamente mediante microprocesador, es más preciso,
seguro y fiable.
2. GA-005 es ideal para las baterías de iones de litio de
7,4 V/ 11,1 V o de polímeros de litio.
3. Seguimiento automático de la carga con un piloto.
4. Función automática para la detección de tensión
compensadora que consume eficazmente la máxima
capacidad de las baterías.
5. Conector de entrada: 15 - 18 V/ 1000 mA de CC
i. Cargador CARSON
Aspectos importantes
1. Este cargador es ideal para baterías de iones de litio de
2 - 3 células o de polímeros de litio. No desarmar, remontar
ni usar para otros propósitos.
2. No cargar cuando la batería acaba de terminar el vuelo y la
temperatura de la superficie aún no ha bajado.
De lo contrario, las baterías se dañan o tendrá lugar un
accidente.
3. Está prohibido cargar las baterías cuando la forma de la
batería está alterada o abultada, ya que una batería dañada
puede provocar un cortocircuito, un incendio o una
explosión.
4. No lo acerque nunca a una fuente de calor ni a equipos
electrónicos. No cargue nunca la batería bajo la acción
directa del sol.
5. No moje nunca el cargador ni lo use donde haya humedad
con el fin de evitar un cortocircuito u otros accidentes
imprevisibles.
6. Está prohibido que entren líquidos, etc. dentro del cargador.
De lo contrario, apagar inmediatamente la alimentación de
tensión y desconectar la batería. Enviar el cargador a su
distribuidor local o a nuestra compañía para realizarle el
mantenimiento.
7. Deposite el cargador en un lugar plano y evite las caídas y
los golpes.
8. Antes de conectar una batería al GA-005, asegúrese de que
la polaridad de las baterías y del cargador son correctas
para no dañar ni la batería ni el cargador.
Page 86
86ECARSON Helikopter MARINES HM-38 50 050 7025
j. Preparativos
Indicaciones generales
• En caso que tenga poca o ninguna experiencia con modelos
de aeromodelismo, debe obtenerla primero con un
simulador de vuelo.
• Pida ayuda a un piloto de aeromodelismo experimentado
para los primeros intentos.
• Familiarícese con las funciones de mando de la emisora.
• Inicie las pruebas de vuelo parado, detrás del modelo, y con
la vista en el sentido del vuelo. En este caso, la reacción de
mando es igual a la del sentido de mando.
¡Además, familiarícese con el mando del modelo en caso que
venga hacia usted (con una reacción del lado opuesto al
sentido de mando)!
Carga y montaje la batería recargable de
vuelo
Cargue el acumulador siempre fuera del modelo en/sobre un
soporte resistente al fuego.
1. Conecte el cargador con el adaptador la batería recargable.
2. Enchufe el cargador suministrado a una toma de red.
3. Coloque la batería recargable sobre una bandeja de metal y
conecte la batería al cargador.
4. Cerciórese de que la conexión de enchufe tenga un contacto
seguro para evitar un cortocircuito.
5. ¡No cubrir la batería recargable!
Durante el proceso de carga, la temperatura de la batería
recargable no debe sobrepasar los 60 °C.
El proceso de carga concluye cuando el LED verde se enciende
en el cargador.
Identificación del GA-005
1. Enchufe el alimentador que se suministra en el conector de
entrada del cargador (tener en cuenta la polaridad). El piloto
se ilumina de rojo.
2. Si se cargan baterías de iones de litio de 7,4 V o de
polímeros de litio, introducir el pin de la batería en el
conector de 2 CÉLULAS del cargador en una dirección
determinada. Luego, el piloto que indica la carga se ilumina
rojo y parpadeará, lo que significa que la batería está
empezando a cargarse. Cuando la batería se haya cargado
por completo, el piloto se ilumina de verde.
3. A la hora de cargar baterías de iones de litio de 11,1 V o
de polímeros de litio, introducir el pin de la batería en el
conector de 3 CÉLULAS del cargador en una dirección
determinada. Luego, el piloto que indica la carga se ilumina
de rojo y parpadeará, lo que significa que la batería está
empezando a cargarse. Cuando la batería se haya cargado
por completo, el piloto se ilumina de verde.
Nota:
Está permitido cargar sólo un grupo de baterías a la vez. Está
prohibido cargar dos grupos, de lo contrario, el cargador o la
batería se dañarán o se quemarán.
Si el piloto parpadea dos veces y luego no se enciende en
círculo significa que la batería está rota.
Especificación técnica
Corriente de salida: 750 mA
Tensión de entrada: 15 - 18 V/ 1000 mA CC
Tensión de salida:
Conector de 2 células
de 7,4 V CC
Conector de 3 células
de 11,1 V CC
8.4 V 12.6 V
Page 87
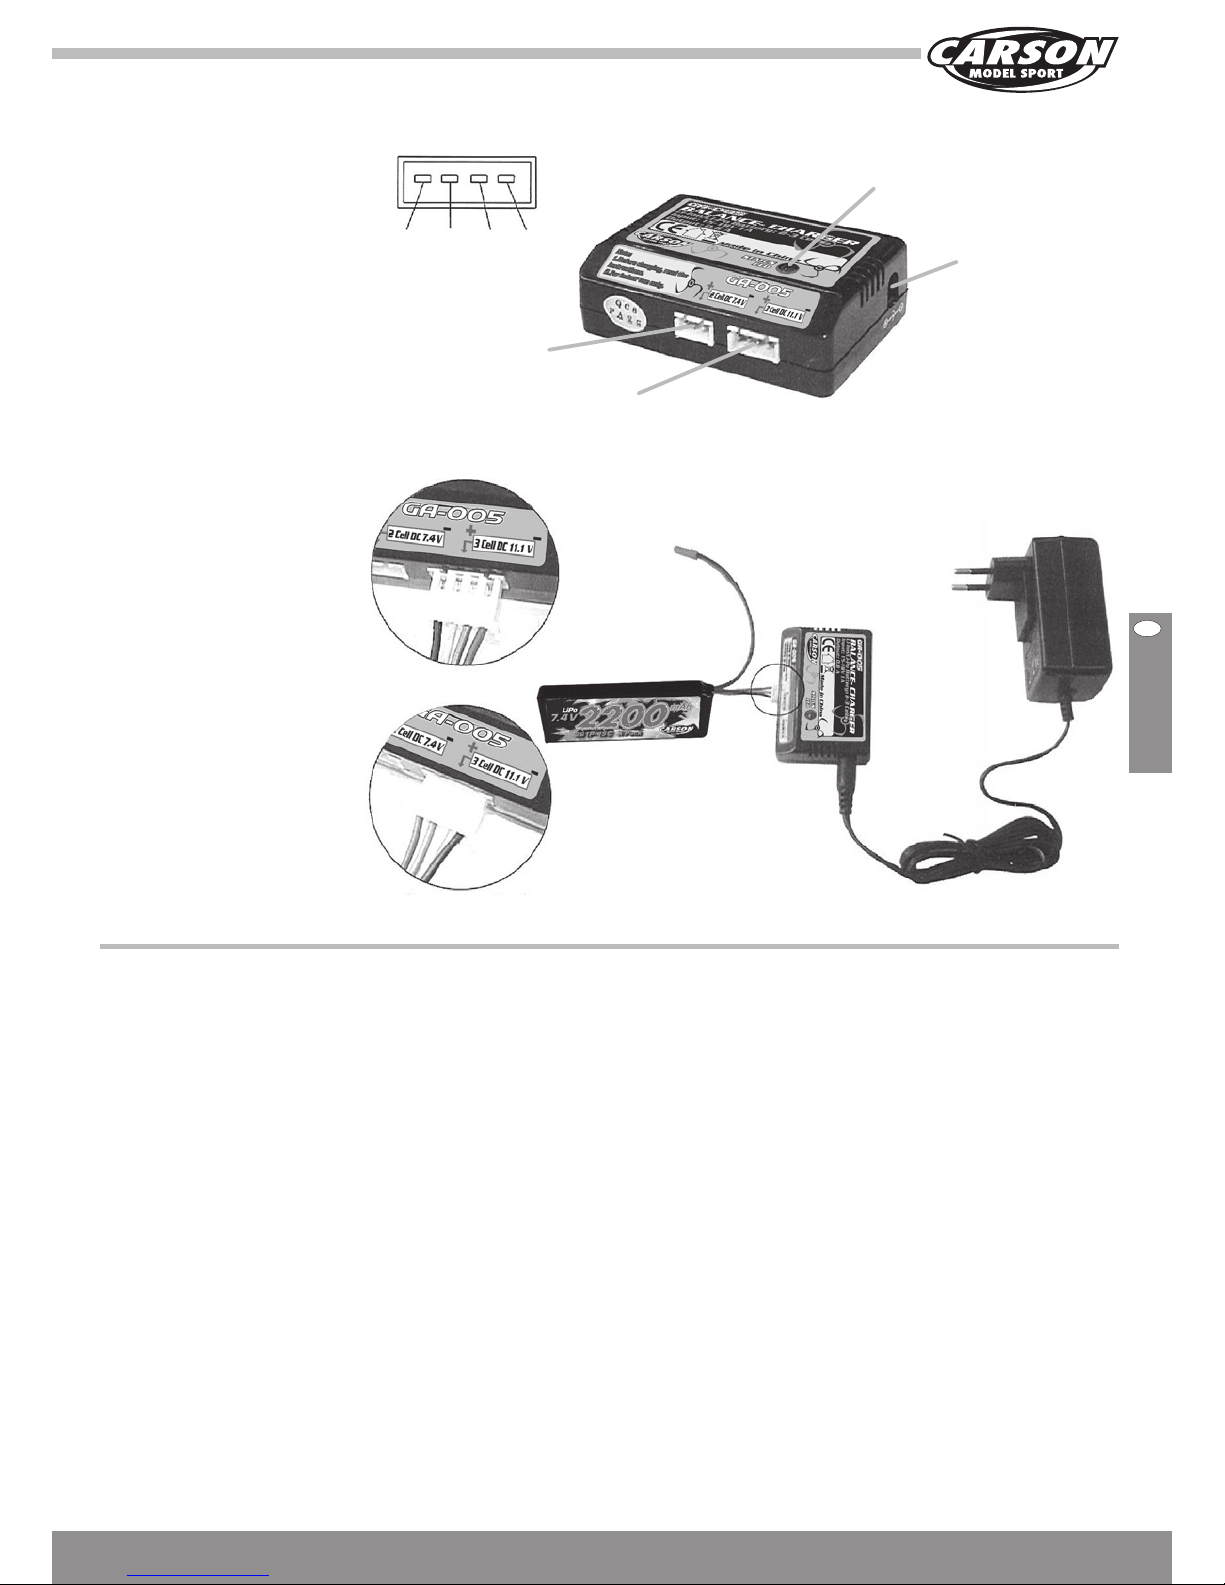
87
E
CARSON Helikopter MARINES HM-38 50 050 7025
k. Ajuste de las hojas
1. Inspección de las hojas
Encender el transmisor. Bajar ambas palancas a la posición
más baja y colocar los mandos del elevador y del alerón en la
posición neutral (MODO 1). A continuación, reconectar el cable
de alimentación del helicóptero para controlar si la hoja se
encuentra en horizontal después de haber reposicionado los
servos del elevador y del alerón.
2. Inspección de las hojas
Si la hoja no está en horizontal, ajustarla siguiendo los
siguientes pasos:
1. Ajuste del servo.
Desenroscar el tornillo del perfil circular y sacar el perfil.
Volver a conectar la alimentación del helicóptero tándem.
Tras haberse inicializado el servo, ajustar los ángulos a 90°
entre el perfil en I y su émbolo de servo y el perfil en L y su
émbolo de servo respectivamente. Luego, montar el perfil
circular y apretar el tornillo.
2. Ajuste del émbolo de dirección del servo. Ajustar la longitud
del émbolo de conexión del servo para poner la hoja
horizontal.
Esquema de conexiones
Diagrama de la polaridad
Conector de carga
para las baterías de 7,4 V
Conector de carga
para las baterías de 11,1 V
12.6 V 8.4 V 4.2 V O V
Piloto
Conector
de alimentación
Mal
Bien
Batería
Cargador
Adaptador
Page 88
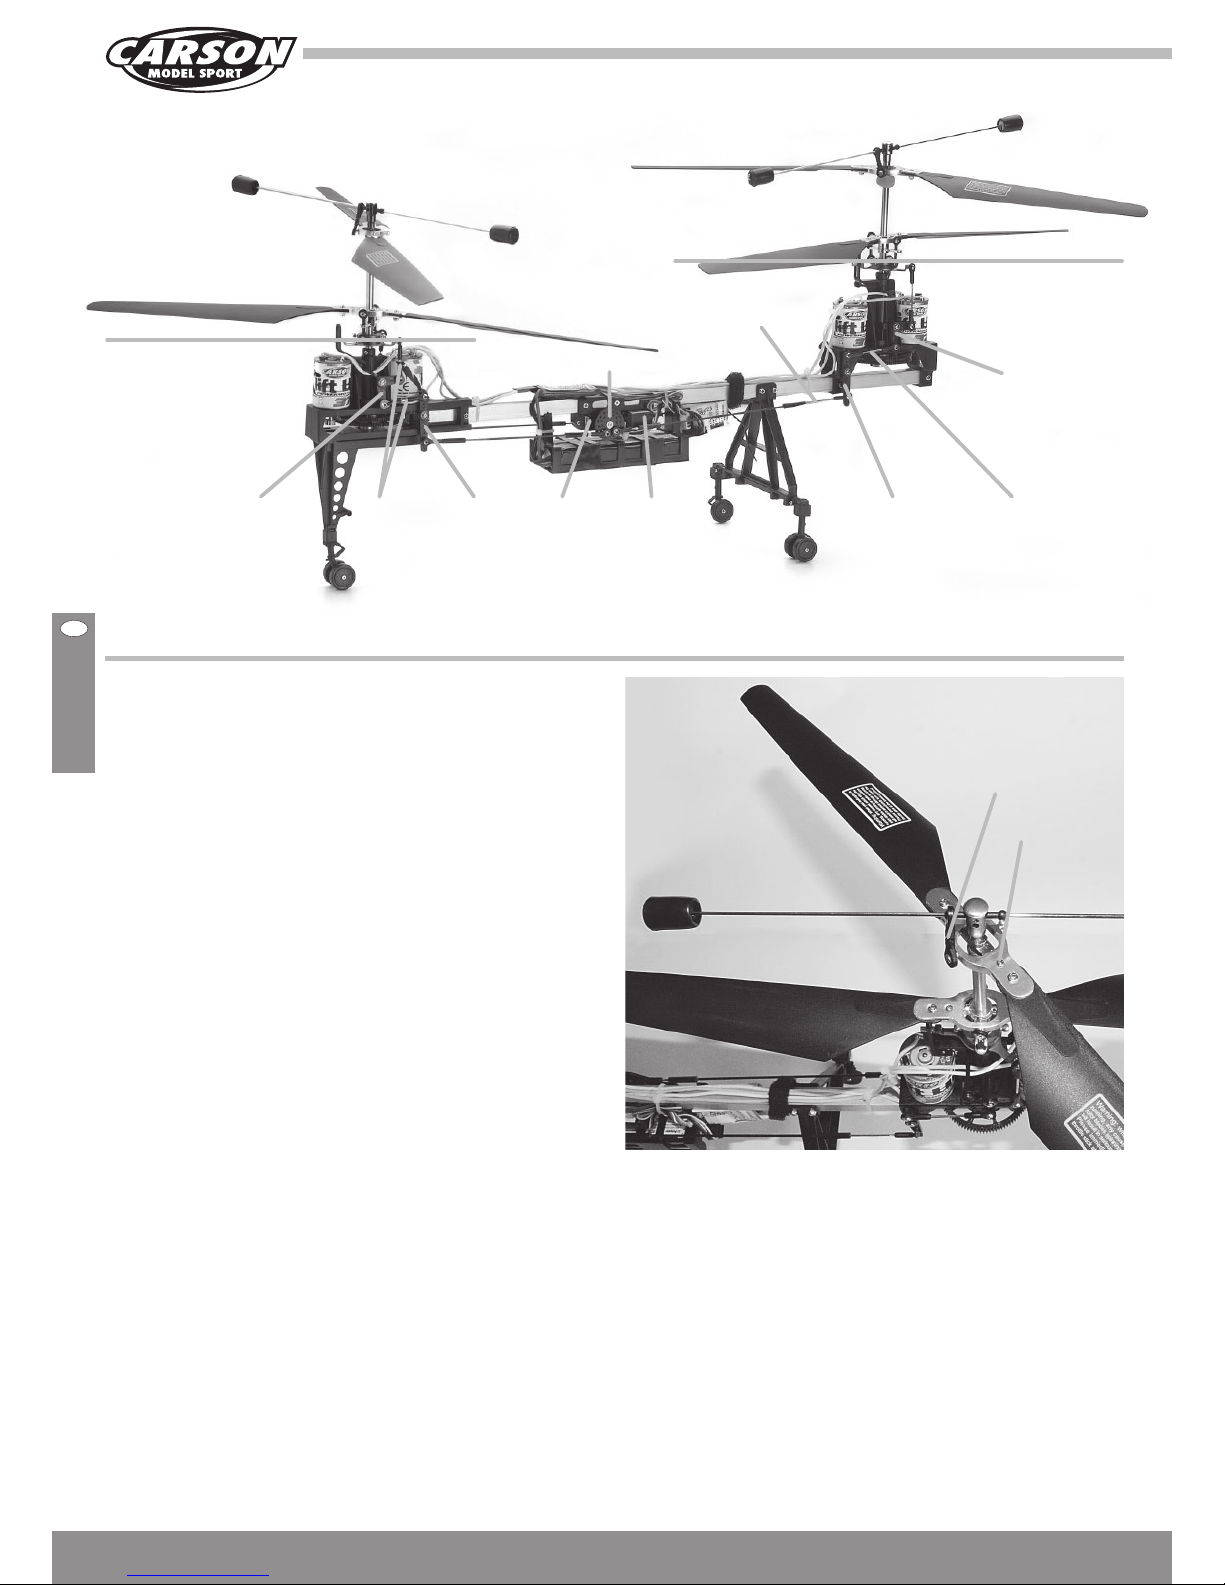
88ECARSON Helikopter MARINES HM-38 50 050 7025
Nivel horizontal
de la hoja
Nivel horizontal
de la hoja
Émbolo
del servo
Émbolo
del servo
Émbolo
del servo
Perfil en I Servo del
alerón
Servo del
elevador
Perfil circular
Perfil en L
Perfil en L
Perfil en I
Fijación de las palas de rotor
Mediante la fuerza centrífuga, las palas del rotor deben poder
colocarse por sí solas a 180° la una contra la otra.
1. Inspección de las palas del rotor principal.
a. Comprobar si los tornillos de fijación de las palas del
rotor principal están muy sueltos o muy apretados.
b. Comprobar el giro de las palas.
2. Ajuste de las palas del motor principal.
a. Si los tornillos de fijación están muy sueltos, apretar
ligeramente; si están muy apretados, alojar ligeramente.
b. Si existe un problema de giro, girar el varillaje de
dirección para alargarlo o acortarlo.
Varillaje
de dirección
Tornillo de
fijación
Page 89

89
E
CARSON Helikopter MARINES HM-38 50 050 7025
Manguito de la varilla
l. Montaje de la varilla de vuelo
1. Insertar la varilla de vuelo en la muesca del tope de
ubicación y presionar hasta que la varilla de vuelo llegue al
tope de la hendidura; introducir un extremo de la varilla a
través del orificio 1.
2. Introducir el tope haciendo coincidir su muesca en el interior
del manguito de la varilla y presionar el tope dentro del
manguito.
3. Girar 90° el manguito con la varilla en sentido antihorario y,
luego, empujar la varilla hacia fuera para que el gancho se
inserte perfectamente en el orificio 2.
Nota:
El grupo de varillas de vuelo saldrá despedido a gran velocidad
durante el vuelo si se ha montado mal, lo que puede provocar
graves daños personales o materiales.
Tope de la varilla Manguito de la varilla
➀
➁
90°
Varilla de vuelo
Muesca de ubicación
Puesta en marcha del modelo
Asegúrese de que haya suficiente espacio para realizar sus
primeros vuelos de prueba. Aunque este helicóptero puede
volar en espacios estrechos, usted necesita aproximadamente
3 m de espacio en todas las direcciones.
• Coloque el modelo sobre una superficie lisa y llana, para
que el helicóptero pueda deslizarse y despegar sin
impedimentos.
• Coloque el helicóptero en el suelo aprox. 2 m delante de
usted, la parte trasera colocada con sentido hacia usted.
De esta manera, el sentido de reacción corresponde con el
sentido de mando del helicóptero.
• Retire lo más posible el cable de mando izquierda
(inclinación). (también el equilibrado)
• Encienda la emisora.
• La indicación de batería comienza a parpadear.
• Ahora conecte al receptor la batería recargable de vuelo
cargada.
m. Operación de vuelo
2 m
Page 90

90ECARSON Helikopter MARINES HM-38 50 050 7025
¡Ahora no se debe mover al modelo!
Una vez que se ha concluido el proceso y el receptor reciba
señales correctas, el LED alumbra constantemente.
Cuando el LED parpadea lentamente significa que la tensión de
la batería recargable es demasiado baja. ¡Recargue la batería
recargable o remplácela con una batería recargable de
repuesto original!
• Mueva la palanca de mando derecha ligeramente hacia
adelante, hasta que el modelo se eleve del suelo.
• Tire la palanca de mando lentamente de nuevo hacia atrás,
de tal manera que el modelo aterrice suavemente.
¡Mueva el mando de la forma más
delicada posible!
Comprobación del alcance de la emisora
Compruebe el funcionamiento y el alcance del equipo de radio
antes de cada uso o tras un accidente, para no perder el
control de su modelo. En la posición neutral de las palancas
de mando de cabeceo y giro, también el disco oscilante debe
encontrarse en la posición neutral.
Si este no es el caso, corrija la posición con la palanca de
compensación del respectivo canal de mando en la emisora.
• Aléjese del modelo, aprox. 30 m (con el motor parado).
• Accione sucesivamente la palanca de mando a distancia de
cabeceo y giro y tenga en cuenta la reacción del modelo.
El sistema RC trabaja impecablemente cuando el modelo a
unos 30 m de distancia todavía responde correctamente a las
señales de mando a distancia.
¡Nunca utilice el modelo con un equipo de radio que no
funcione adecuadamente! En el mejor de los casos, „sólo” el
modelo sufrirá daños.
Si el equipo de radio no funciona perfectamente, compruebe el
estado de carga de las baterías.
Ajuste del helicóptero
Apenas el helicóptero se separa del suelo, se puede reconocer
si tiende a girar o deslizarse en una dirección determinada.
Corrija estas desviaciones del vuelo ascensional vertical
mediante las guías compensadoras de las respectivas
funciones de mando.
La proa de fuselaje gira hacia la derecha:
• Reduzca las revoluciones y deslice la guía compensadora de
la función trasera en la palanca izquierda de mando a
distancia paso a paso hacia la izquierda.
• Deslice la palanca de inclinación nuevamente hacia adelante
y verifique si la corrección es suficiente, y, de ser necesario,
deslice el equilibrador más hacia la izquierda.
• Repita esto hasta que el helicóptero deje de presentar
tendencias de giro hacia la derecha.
La proa de fuselaje gira hacia la izquierda:
• Proceda como se ha descrito anteriormente, pero deslice la
guía de equilibrio de la función trasera paso a paso hacia la
derecha.
El modelo se desliza (deriva) o se inclina
hacia la derecha:
• Reduzca las revoluciones y deslice la guía compensadora de
la función de inclinación en la palanca derecha de mando a
distancia paso a paso hacia la izquierda.
• Deslice la palanca de inclinación nuevamente hacia adelante
y verifique si la corrección es suficiente, y, de ser necesario,
deslice el equilibrador más hacia la izquierda.
• Repita esto hasta que el helicóptero deje de presentar
tendencia de derivar hacia la derecha.
El modelo se desliza
(deriva) o se inclina
hacia la izquierda:
• Proceda como se ha descrito
anteriormente, pero deslice la
guía de equilibrio de la función
de inclinación paso a paso hacia
la derecha.
Page 91

91
E
CARSON Helikopter MARINES HM-38 50 050 7025
El modelo se desliza (deriva) hacia
adelante:
• Reduzca las revoluciones y deslice la guía compensadora
de la función de cabeceo en la palanca derecha de mando a
distancia paso a paso hacia atrás.
• Deslice la palanca de inclinación nuevamente hacia adelante
y verifique si la corrección es suficiente, y de ser necesario
deslice el equilibrador más hacia la atrás.
• Repita esto hasta que el helicóptero deje de presentar
tendencia de derivar hacia adelante.
El modelo se desliza
(deriva) hacia atrás:
• Proceda como se ha descrito
anteriormente, pero deslice la
guía de equilibrio de la función de
cabeceo paso a paso hacia
adelante.
Vuelo estacionario
Durante el vuelo flotando el helicóptero se mantiene en una
posición estable en el aire. El vuelo flotando sólo es posible
con un helicóptero y debe practicarse como figura de vuelo
básica de forma minuciosa.
Trate de familiarizarse con las funciones de control de su
emisora de mando a distancia, de tal manera que éstas se
conviertan en algo natural para usted.
• Coloque entonces el helicóptero en el suelo aprox. 2 m
delante de usted, con la parte trasera en sentido hacia
usted.
• Deje el helicóptero sobre el suelo y primero muévalo
intencionadamente ligeramente hacia los lados, hacia
adelante y hacia atrás.
• Cuando usted ya domine el control sobre el suelo, coloque
algo más de fuerza ascensional y haga que flote un poco
sobre el suelo sin que la proa del fuselaje gire o el
helicóptero vaya a la deriva.
• Lo mejor es marcar un punto en el suelo desde el cual
arranque el modelo. Intente mantener al helicóptero sobre
este punto y volver a aterrizar sobre este punto.
• No mueva la palanca de mando muy bruscamente, de ser
así, sobre todo el aterrizaje puede ser demasiado duro. Trate
de desarrollar una sensibilidad para el control, despegando,
flotando y aterrizando repetidamente.
• En caso que usted note algún desajuste en el mando o un
desequilibrio en los rotores,
• aterrice
inmediatamente y corrija los ajustes
correspondientes.
• Aumente la altura de vuelo paulatinamente.
¡ATENCIÓN!
Hasta una altura de aprox. 30 cm., el
modelo se encuentra en la zona de
influencia de las turbulencias de aire
ocasionadas por los propios rotores.
Este “Ground Effect” posibilita, por una parte, el despegue del
helicóptero, debido a que el aire presionado hacia abajo por los
rotores aleja al helicóptero del suelo.
En la cercanía directa del suelo, este efecto se invierte, debido
a que el aire expedido lateralmente por el helicóptero genera
una presión subatmosférica y el modelo es succionad
literalmente hacia el
suelo. Esto puede
conducir a un
aterrizaje rudo.
Por esta razón, el
comportamiento de
vuelo del modelo a
baja altura es más
bien inestable. En caso que este agitado comportamiento de
vuelo le ocasione problemas, eleve paulatinamente la altura de
vuelo.
n. Ground Effect
Page 92

92ECARSON Helikopter MARINES HM-38 50 050 7025
A una altura de vuelo de aprox. 2 m, el helicóptero ya no se
encuentra en el área de influencia de las turbulencias de aire
provenientes de los propios rotores, y la situación de vuelo se
vuelve más estable.
o. Entrenamiento de vuelo libre
Una vez que usted domine el vuelo
flotante, puede empezar con figuras
sencillas:
• Entrene el dominio del modelo, deje que suba y descienda,
flote y, además, vuele hacia adelante y hacia atrás y vuele en
curvas.
• Cuando usted se sienta seguro, póngase a un lado del
modelo y entrene el control desde este ángulo de visibilidad
• o deje que el modelo vuele hacia usted y realice el mando en
sentido contrario
• Evite alternancias de carga bruscas, debido a que el rotor
superior e inferior podrían chocarse y el modelo podría
estrellarse.
• Maneje el modelo siempre frente a usted o deje que gire
en torno a usted. Si usted deja que el modelo vuele a sus
espaldas, usted podría perder la orientación y
consecuentemente el control del helicóptero.
¡Nunca intente coger el modelo con la
mano cuando está volando!
Page 93

93
E
CARSON Helikopter MARINES HM-38 50 050 7025
p. Guía de problemas
¡Lea esto antes de que ocurra!
Problema Causa Solución
El modelo no se mueve 1. Verifique que la emisora y el receptor estén
conectados
Conecte la emisora y/o receptor
2. Verifique la tensión de la batería recargable de la
emisora y del receptor
Coloque baterías recargables
completamente cargadas
3. La guía de equilibrio de la función de inclinación se
encuentra en el tope superior
Cerciórese de que la guía de equilibrio de
la función de inclinación esté en posición
neutra o algo por debajo.
El motor no gira 1. El motor está averiado Remplace el motor
2. La conexión entre el Controller y el motor está
suelta
Conecte el enchufe
El modelo reacciona
erróneamente a las
órdenes o vuela de forma
agitada
Compruebe el estado de carga de la batería
recargable de la emisora y del receptor
Coloque baterías recargables
completamente cargadas
El modelo no asciende 1. Las palas del rotor están torcidas Remplace las palas del rotor
2. El motor se ha recalentado Deje que el motor se enfríe
3. Las baterías están vacías Recargue las baterías recargables o
remplácelas
No se puede
desconectar los rotores
1. El equilibrio no se ha ajustado correctamente Corrija el equilibrio en la guía de inclinación
El modelo se mueve
hacia atrás/adelante y
lateralmente,
pero no
flota
Verifique si el helicóptero está expuesto a una
corriente de aire, p. ej., debido a una ventana abierta
o al aire acondicionado. En caso de corriente de aire,
no se puede volar flotando.
Cierre la ventana / la puerta, desconecte el
aire acondicionado o escoja un recinto más
apropiado
El modelo vibra
fuertemente
1. Compruebe si los rotores principales giran en
redondo
Equilibre, de ser necesario, las palas del
rotor
2. Verifique si el modelo está equilibrado
correctamente
Equilibre, de ser necesario, las palas del
rotor
La parte trasera no
puede ser estabilizada
1. Una o varias palas tienen defectos Cambie una o ambas palas de rotor
2. El circuito de rotor inferior y superior funciona con
una fricción diferente en el árbol de rotor
Cerciórese de que ambos circuitos de rotor
se dejen girar fácilmente
3. La velocidad de rotación del circuito superior e
inferior no es uniforme
Remplace el motor. Corrija el equilibrio en la
emisora
Page 94

94ICARSON Helikopter MARINES HM-38 50 050 7025
Caro Cliente
Ci congratuliamo con lei per l’acquisto di questo modello
radio comandato CARSON,che è stato progettato secondo gli
ultimi ritrovati della tecnica. Per mantenere sempre aggiornati
i nostri prodotti ci riserviamo il diritto di effettuare qualsiasi
aggiornamento tecnico atto a migliorarne le qualità senza alcun
preavviso. Alcune caratteristiche tecniche di questo prodotto
possono perciò essere diverse da quelle illustrate in questo
manuale o sulla scatola.
Questo manuale fa parte di questo prodotto. In caso che
non doveste seguire le istruzioni e le avvertenze di sicurezza
riportate in questo manuale scade il diritto di garanzia.
Conservate questo manuale per la rilettura e per un’eventuale
inoltrare di questo modello a terzi.
Condizioni di Garanzia
Questo prodotto è garantito da CARSON, da difetti di
fabbricazione nei materiali e lavorazioni, riscontrati nel normale
utilizzo del modello, per 24 mesi dalla data di acquisto presso
un rivenditore autorizzato.
In caso di prodotto difettoso durante il periodo di garanzia,
recarsi con il prodotto e lo scontrino o ricevuta presso qualsiasi
rivenditore CARSON. CARSON a sua discrezione, provvederà
in accordo alle normative vigenti:
(a) riparare il prodotto senza addebitare nulla ;
(b) sostituire il prodotto con un altro uguale o di simili
caratteristiche, o
(c) rimborsare il prezzo di acquisto.
Tutte le parti sostituite o rimborsate diventano di proprietà della
CARSON. Le parti nuove sostituite o riparate possono essere
utilizzate per il servizio di garanzia. Le parti riparate o sostituite
in garanzia sono a loro volta coperti da garanzia.
Dalla garanzia sono esclusi:
Danni o guasti causati da eventi naturali, normale usura, abusi,
incidenti, utilizzo non corretto, inosservanza delle istruzioni,
montaggio non corretto, imperizia dell’utilizzatore, mancanza
di manutenzione, fulmini o altri incidenti causati da eccesso di
voltaggio;
Tutte le riparazioni non effettuate da personale autorizzato
CARSON.
Le parti di consumo e le batterie danni estetici non funzionali
trasporto, spedizione o costi assicurativi costi di ritiro del
prodotto, installazioni, regolazioni e reinstallazioni. La garanzia
in ogni caso è applicata in conformità alle vigenti norme nello
stato dove il prodotto è stato acquistato.
Dichiarazione di conformità
Dickie-TAMIYA GmbH&Co KG dichiara che questo modello
in tutte le sue parti, radio, motore, batteria, caricabatteria, è
in regola con le SEGUENTI DIRETTIVE EUROPEE: 98/37EG
e 89/336/EWG inoltre è conforme alle direttive 1999/5/EG
(R&TTE).
La dichiarazione originale di conformità può essere richiesta al
seguente indirizzo:
Dickie-Tamiya GmbH&Co. KG • Werkstraße l • D-90765 Fürth •
Tel.: +49/(0)911/9765-03
Il prodotto che avete acquistato è alimentato da
batterie ricaricabili ai polimeri di litio, Nicd, oppure
NiMH.
La batteria è riciclabile.
Alla fine del suo ciclo, in diverse nazioni e/o leggi
locali, potrebbe essere illegale introdurla nei
cassonetti della immondizia. Assicuratevi come
procedure per lo smaltimento, con il vostro locale
ufficio smaltimento rifiuti.
Vi auguriamo buona fortuna e buon divertimento alla guida del
vostro modello Carson!
Prima di utilizzare il vostro nuovo modello leggete attentamente queste istruzioni!
Page 95

95
I
CARSON Helikopter MARINES HM-38 50 050 7025
Contenuto
Contenuti del kit
• Modello costruito pronto per il volo
• Calotta dell’abitacolo premontata
• Trasmettitore manuale a 4 canali 2,4 GHz
• Batterie Lipo 7,4 V/ 2200 mAh
• Carica batteria bilanciato con alimentatore
• 2 servosterzi, già montati
• Giroscopio, integrato nell’apparecchio ricevente
• Istruzioni d´uso
• 8 Pale rotore di ricambio
Prefazione ................................................................................... 94
Contenuti del kit ......................................................................... 95
Misure di Sicurezza .................................................................... 96
a. Il elicottero a più funzioni! ................................................... 101
b. Funzioni di base dell’elicottero ........................................... 102
c. Radiocomando a 4 canali .................................................... 103
d. Identificazione del ricevitore ............................................... 104
e. Moda volo ............................................................................ 105
f. Istruzioni conversione da Mode 1 a Mode 2 ...................... 106
g. Istruzioni conversione da Mode 2 a Mode 1 ...................... 107
h. Alimentazione ....................................................................... 108
i. Caricabatterie equilibrato CARSON .................................... 108
j. Preparativi ............................................................................ 109
k. Regolazione del disco oscillante ........................................ 110
l. Montaggio del gruppo flybar ............................................... 112
m. Volo ....................................................................................... 112
n. Ground Effect – Effetto suolo .............................................. 114
o. Introduzione al volo libero ................................................... 115
p. Soluzioni problematiche ...................................................... 116
Ricambi ..................................................................................... 117
Page 96
96ICARSON Helikopter MARINES HM-38 50 050 7025
Misure di Sicurezza
Questo modello non è un giocattolo!
• I modelli radiocomandati non sono giocattoli, l’utilizzo di essi
deve essere imparato passo passo.
• I bambini sotto i 14 anni possono guidare il modello solo
sotto la supervisione di un adulto.
Guidare un modello radiocomandato è un affascinante hobby
che deve essere praticato con la necessaria cautela e rispetto.
Un modello radiocomandato può causare danni e ferite in caso
di perdita di controllo di cui l’utilizzatore è responsabile.
Cautelatevi con una sufficiente copertura assicurativa, che vi
consenta di praticare il vostro hobby in assoluta sicurezza.
Il vostro modello funzionerà bene solo se sarà tenuto in
perfetta efficienza. Utilizzare solo ricambi originali e non
montare mai parti non adatte.
La responsabilità del modello è direttamente di chi lo guida,
per cui assicurarsi prima dell’utilizzo che tutto funzioni
correttamente e che tutta la viteria sia ben stretta.
Prima dell’utilizzo
Non iniziare a guidare prima di avere
osservato I seguenti punti:
• Fare attenzione a danni evidenti al modello, radiocomando,
caricabatteria e batterie litio-polimero.
• La responsabilità del modello è direttamente di chi lo guida,
per cui assicurarsi prima dell’utilizzo che tutto funzioni
correttamente e che tutta la viteria sia ben stretta.
• Le batterie del trasmettitore e della ricevente siano ben
carcariche e del corretto voltaggio
• Estraete completamente l’antenna ed assicuratevi che
nessuno intorno a voi utilizzi la stessa frequenza (numero
marcato sul quarzo) e che non ci siano interferenze.
• Assicuratevi che tutti servocomandi rispondano
correttamente al segnale del trasmettitore
• Controllare sempre le operazioni radio prima di far partire il
modello
In generale
• Leggere attentamente le istruzioni d’uso e conservarle per
future riletture.
• Si consiglia di prendere dimestichezza in modo particolare
con i consigli per il funzionamento.
Esercizio
Il modello è concepito principalmente per voli indoor, poiché il
suo scarso peso e il limitato e instabile l’assetto di volo
rendono il modello molto sensibile agli spostamenti d’aria.
Inoltre i suoi componenti non dispongono di una protezione
contro la polvere e l’umidità.
Non far volare il modellino per oltre la
carica di una batteria!
Dopo tale intervallo il motore deve essere raffreddato per
almeno 5 minuti.
Trascorso tale periodo è possibile caricare la batteria.
Lo scaricamento completo delle batterie deve essere
assolutamente evitato.
Collocare il filo dell’antenna in modo tale che non sia d’intralcio
alle parti in movimento. Creare uno scarico della trazione,
fissando il filo con del nastro adesivo alla fusoliera.
Page 97

97
I
CARSON Helikopter MARINES HM-38 50 050 7025
Far volare il velivolo
preferibilmente in
ambienti chiusi
• che abbiano uno spazio
libero di almeno 3 m in
tutte le direzioni
• che abbiano terreni piani
• che non abbiano ostacoli
fissi (mobili) o in movimento
(persone, animali)
• che non abbiano correnti
d’aria
Se si vuole far
volare il modello
all’aperto,
assicurarsi che:
• non ci sia vento,
• si sia lontani di almeno 3 km dall’aerodromo ufficiale più
vicino, in caso contrario sarà necessario trovare un accordo
sull’utilizzo delle frequenze.
Non far volare il modellino se
• Non guidare il modello se siete affaticati, e la vostra reattività
è in qualche modo scarsa.
• La forza del vento è pari a 1 o è più elevata
• Tenete il vostro modello lontano da cavi di alta tensione o
antenne radio. Non usare mai il modello durante temporali
con fulmini. Potrebbero causare malfunzionamenti elettrici
• Scegliete un’area sufficientemente aperta e libera di
ostacoli. Evitate sempre di guidare il modello in zone ristrette
e limitate o in aree popolate.
• State lontani da strade, autostrade,persone e animali.
Page 98
98ICARSON Helikopter MARINES HM-38 50 050 7025
Rotore
• Eventuali pale del rotore danneggiate devono essere
sostituite! Evitare di effettuare tentativi di riparazione!
• Tenersi lontano dai rotori non appena è stata collegata la
batteria.
• Evitare l’arresto dei rotori mentre si trovano al livello della
rotazione.
Non azionare il modello da seduti, in modo tale da riuscire a
distogliersi dalla situazione di pericolo qualora dovesse
verificarsi.
Stringere le viti di fissaggio delle pale del rotore, in modo
tale che durante il funzionamento, tramite la forza centrifuga,
possano allinearsi l’una con l’altra a 180°.
Caricabatteria
Utilizzare esclusivamente il caricabatteria
fornito in dotazione.
• Azionare il caricabatteria solo su superfici difficilmente
infiammabili e
• disporre anche la batteria durante il caricamento su un
terreno non infiammabile
• Far sì che vi sia una ventilazione sufficiente del
caricabatteria durante il caricamento.
• Non lasciare mai incontrollato il caricabatteria durante il
caricamento.
• Durante il caricamento delle batterie prestare attenzione alla
giusta polarità
Non lasciare mai il caricabatteria, le
batterie e il modello in condizioni
ambientali sfavorevoli!
Ad esempio:
• In presenza di umidità, eccessiva umidità atmosferica
(> 75 % rel., in condensa). Non toccare il caricabatteria con
le mani bagnate.
• Non azionare mai il caricabatteria immediatamente dopo che
è stato trasportato da un ambiente freddo a un ambiente
caldo. L’acqua di condensazione che ne deriva può
danneggiare l’apparecchio. Lasciare che l’apparecchio si
porti alla giusta temperatura in modo incondizionato.
• polvere e gas infiammabili, vapori o solventi, benzina
• temperature ambientali troppo elevate (> ca. +40 °C), sotto ai
raggi diretti del sole
• fiamme aperte, fonti infiammabili
• sollecitazioni meccaniche come urti e vibrazioni
• sporco persistente
• forti campi elettromagnetici (motori o trasformatori) o campi
elettrostatici (cariche)
• impianti trasmittenti (radiotelefoni, emittenti per modellismo
ecc.). L’incidente irradiazione del trasmettitore può interferire
con il caricamento o danneggiare il caricabatteria e di
conseguenza la batteria stessa.
Lasciar raffreddare il caricabatteria tra le
diverse operazioni di ricarica. Togliere il
caricabatteria dalla rete quando il
caricamento è stato completato.
Un caricabatteria difettoso non deve più essere utilizzato.
Quando l’apparecchio è difettoso, ovvero quando:
• l’apparecchio presenta dei danni evidenti,
• l’apparecchio non funziona più o
• dopo un uso prolungato si trova in condizioni sfavorevoli o
• dopo gravi sollecitazioni da trasporto,bisogna
immediatamente sospendere il suo utilizzo e assicurarlo
contro l’azionamento involontario.
Smaltire il caricabatteria divenuto inutilizzabile (non riparabile)
secondo le disposizioni di legge vigenti.
Per motivi di sicurezza e di omologazione (CE) non è permessa
la ricostruzione e/o la modifica di propria iniziativa del
caricabatteria.
Page 99
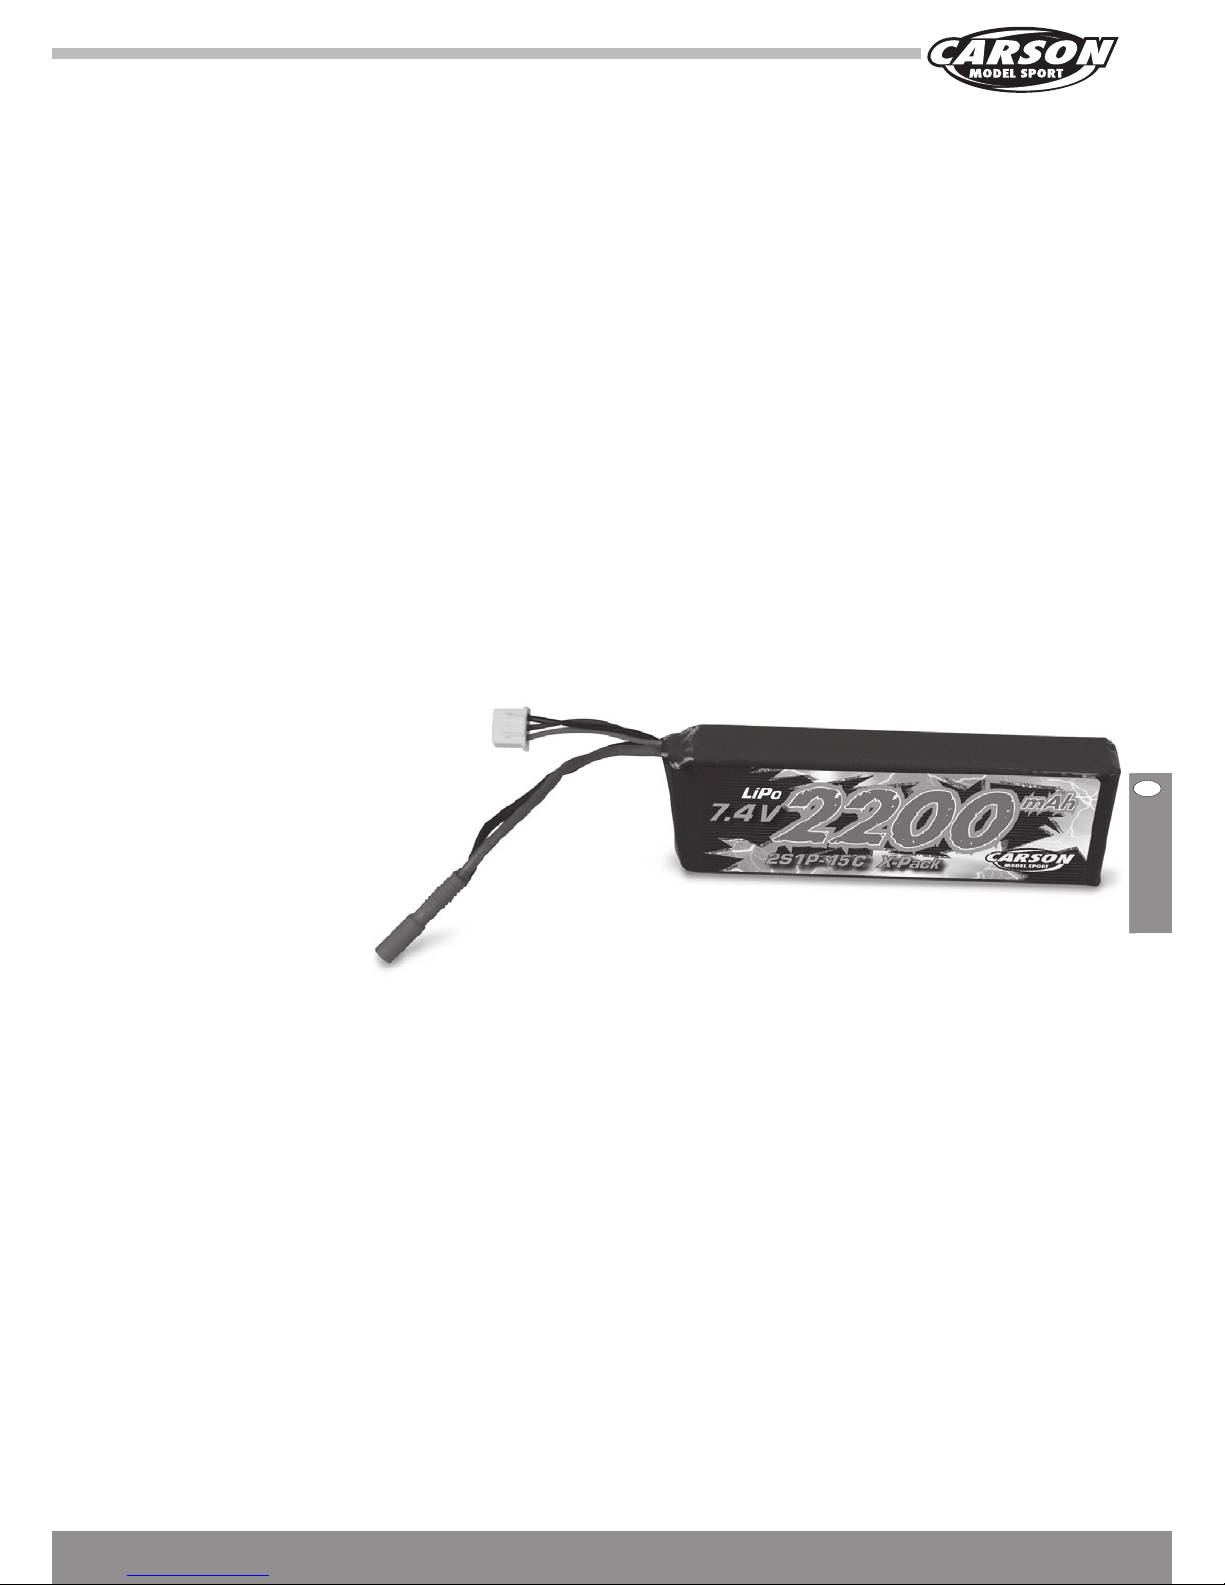
99
I
CARSON Helikopter MARINES HM-38 50 050 7025
Batterie ricaricabili ai polimeri di litio
Utilizzare la batteria ricaricabile di corredo solo con questo
modello.
In caso di sostituzione utilizzare sempre una batteria originale.
Caricare la batteria esclusivamente fuori dal modello e tenerla
lontana da materiali facilmente infiammabili!
E’ normale che la batteria tenda a scaldarsi durante la carica.
Non sovraccaricare o scaricare eccessivamente la batteria!
Fate attenzione all’indicatore di carica del vostro trasmettitore
Assicuratevi che le batterie della trasmittente e della ricevente
siano ben cariche e del corretto voltaggio. Se le batterie sono
scariche potreste perdere il controllo del vostro modello.
In caso di inutilizzo caricate la batteria almeno ogni 6 mesi per
rimediare al processo di auto scarica.
Rimuovere la batteria carica dal carica batterie per evitare
il processo di auto scarica. In caso di inutilizzo del modello
la batteria deve essere rimossa.Alla fine del suo ciclo vitale,
eliminare la batteria in conformità alle leggi vigenti in ogni
singolo stato di appartenenza, riporre la batteria nel cassonetto
della spazzatura potrebbe essere illegale, chiedete notizie sullo
smaltimento al locale ufficio di nettezza urbana.
Le Batterie non devono
• essere immerse nei liquidi
• buttate sul fuoco o esposte ad alte temperature o
sollecitazioni meccaniche
• smontate o danneggiate
• essere messe in corto circuito
Se durante la carica o nel riporle percepite un forte odore,
scolorimento, eccessivo riscaldamento, deformazioni o altre
anormalità:
• staccate la batteria dal carica batterie
• Staccate la batteria dal modello
• Non utilizzate più queste batterie.
Se fuoriesce la soluzione elettrolitica:
• impedite il contatto con gli occhi e la pelle!
• sciacquate immediatamente con acqua le eventuali parti del
corpo venute a contatto
• consutate un medico.
Page 100

100ICARSON Helikopter MARINES HM-38 50 050 7025
Istruzioni di sicurezza batteria
litio-polimero
1. Non disassemblare né ricostruire la batteria
2. Non cortocircuitare la batteria
3. Non usare né lasciare la batteria in prossimità di fiamme,
forni o altre fonti di calore (superiori a 80 gradi centigradi)
4. Non immergere la batteria nell’acqua dolce né nell’acqua
marina o in qualsiasi altro punto in cui possa bagnarsi
5. Non caricare la batteria in prossimità di fiamme o al sole
cocente
6. Utilizzare lo specifico caricabatteria e attenersi alle
condizioni di ricarica (cfr. 1A)
7. Non graffiare la batteria con l’unghia. Non colpirla con un
martello e non filettarla
8. Evitare che la batteria prenda colpi o cada
9. Non usare la batteria se presenta danni o deformazioni
evidenti
10. Non effettuare una saldatura diretta sulla batteria
11. Non invertire la carica né sovraccaricare la cella
12. Non invertire la carica né collegare in modo inverso
13. Non collegare la batteria alla presa della corrente o
all’accendisigari
14. Non usare la batteria per apparecchiature non specificate
15. Non toccare direttamente una batteria che presenta perdite
16. Non usare la batteria agli ioni di litio in combinazione con
altre batterie
17. Tenere la batteria lontana dalla portata dei bambini
18. Non continuare a caricare la batteria oltre il tempo
specificato
19. Non inserirla in un contenitore a microonde o ad alta
pressione
20. Non usare una batteria che presenta perdite in prossimità
di fiamme
21. Non usare né lasciare la batteria sotto il sole cocente (o
nella macchina riscaldata dal sole)
22. Non usare la batteria in prossimità di luoghi in cui si
genera elettricità statica (superiore a 64 V) che
danneggiano il circuito di protezione.
23. La temperatura di carica deve rientrare tra 0 gradi
centigrade e 45 gradi centigradi. Non caricare la batteria al
di fuori dell’intervallo di temperatura consigliato.
24. Quando la batteria al primo utilizzo presenta segni di
ruggine, cattivo odore o altre anomalie, non usare
l’apparecchio e portare la batteria al negozio dove è stata
acquistata.
25. In caso di utilizzo della batteria da parte de bambini, i
genitori devono insegnare loro come utilizzare le batterie
secondo il manuale con estrema cura. Inoltre quando i
bambini stanno utilizzando le batterie, i genitori devono
prestare la massima attenzione.
26. Tenere la batteria fuori dalla portata dei bambini. Inoltre
quando si utilizza la batteria assicurarsi che non venga
tolta dal caricatore o dall’apparecchio da parte dei bambini
piccoli.
27. Se la cute o gli indumenti assumono l’odore del liquido
proveniente dalla batteria, lavarli con acqua fredda. Il
liquido può causare irritazioni cutanee.
28. Non scaricare l‘accumulatore con oltre 5c e non lasciar
scendere la tensione a meno di 6 V per evitare danni
all‘accumulatore.
29. Non caricare mai l‘accumulare sopra ad un tappeto, poiché
sussiste il pericolo di incendio.
30. Non utilizzare l‘accumulatore per attrezzature non
specificate o per altri scopi.
31. Non toccare l‘accumulatore se non è a tenuta stagna.
Dopo aver toccato l‘accumulatore lavarsi subito le mani.
32. Non caricare l‘accumulatore più a lungo di quanto indicato.
33. Non utilizzare accumulatori gonfi o danneggiati.
34. Non utilizzare l‘accumulatore in punti in cui possono
formarsi cariche statiche superiori a 64 volt.
 Loading...