

Page 1
®
TM
650 Yard Rangefinder
INSTRUCTIONS FOR USE
PDF : www.carson.com/RF650
English / Français / Español / Deutsche /
RF-650
日本語
Page 2
Congratulations on selecting your new Carson® RF-650 LightWave™ rangefinder! With
reasonable care, your rangefinder will provide you with years of enjoyment. In order to
achieve optimum performance, please read the instructions carefully on the proper use
and care of your rangefinder.
SPECIFICATIONS
Range: 5-650 yards
Accuracy: +/- 1 yard
Magnification: 6x
Objective Diameter: 24mm
Optical Coatings: Fully Multi-Coated
Angle of View: 6.5°
Field of View: 341 ft. at 1000 yards
Exit Pupil: 4mm
Eye Relief: 12mm
Battery: CR2 3-Volt Lithium (included)
Built-In Tripod Mount
Includes pouch and carry strap.
2
Page 3

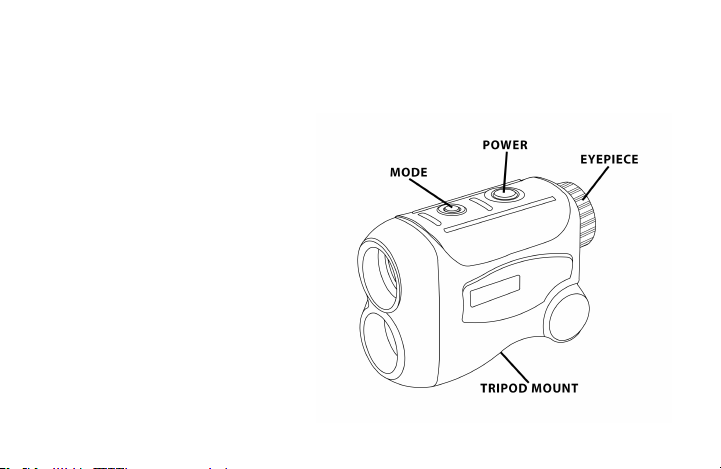
INTRODUCTION
The Carson® RF-650 LiteWave™ rangefinder emits a laser beam that is invisible and safe
to the eyes. The LiteWave™ then calculates distances by measuring the time it takes for
the laser to travel from the rangefinder to the target and then back again.
ACCURACY
The LiteWave™ rangefinder is accurate to within +/- 1 yard in most cases. The effective
operating range is from a minimum of 5 yards to a maximum range of 650 yards (3.5
meters to 600 meters). Please note that the maximum operating range may vary due to
the reflective properties of the viewing subject, the size of the viewing subject and the
environmental conditions at the time of use. Highly reflective shiny surfaces allow for
longer ranges than dull, less reflective surfaces. Larger subjects are easier to measure
than small ones. Bright light conditions adversely affect the maximum range of the
item. The angle to the viewing subject may also affect the range. Viewing objects at a
steep angle will limit the operating range.
3
Page 4
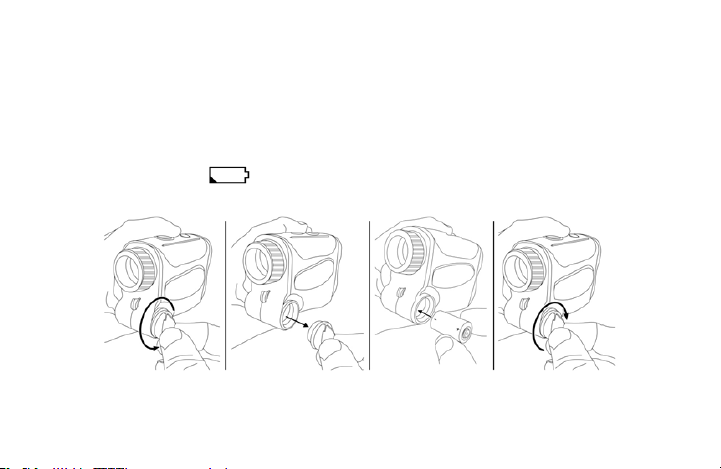
INSERTING THE BATTERY
Flip tab on battery door up and twist counter clockwise to remove. Insert included
CR2 3-Volt Lithium battery into the compartment negative side first and replace
battery door.
A low battery icon will appear at the top of the viewing screen when it is time to
replace the battery.
Please remove battery during extended periods of disuse.
*Please note a paper tab was placed in the battery compartment during shipping to
avoid battery drain. Please remove and discard this tab prior to using the item.
4
Page 5
USING YOUR RANGEFINDER
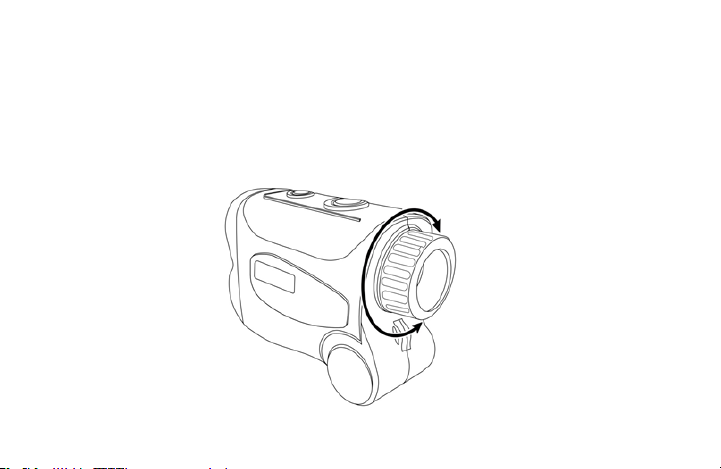
FOCUSING
While looking through the eyepiece, turn the eyepiece clockwise or counter-clockwise
until the viewing subject is in focus.
5
Page 6

UNITS OF MEASURE
The LiteWave™ can be used to measure distances in either Yards or Meters. To change
the unit of measure, first power on the unit and then press and hold both the MODE and
POWER buttons simultaneously for three seconds. You will see the reticle display toggle
between “Y” and “M”.
USAGE MODES
The LiteWave™ rangefinder operates in three different modes. Mode 1 measures straight
line distance and degree of elevation. Mode 2 measures straight line (actual) distance,
degree of elevation, horizontal distance and the vertical distance between the horizontal
and actual distances. Mode 3 displays all the measurements from Mode 2, however, in
this mode the item will continuously scan these distances as you move the reticle around
and view different subjects. The LiteWave™ will default to Mode 1 when the item is first
powered on. Press the MODE button once to access Mode 2 or twice to access Mode 3.
6
Page 7

MODE 1: MEASURING ACTUAL DISTANCE AND DEGREE OF ELEVATION
While looking through the eyepiece, press the POWER button to activate the LCD reticle
display. Focus on your viewing subject. Place the crosshairs in the center of the reticle
on your target object and press the POWER button again. The LCD will display both the
degree of elevation from +90° to -90° and the straight line (actual) distance to the target
object. To obtain a new reading or target another object simply aim and press the
POWER button again and a new reading will be displayed. The results will be displayed
for 20 seconds before the LCD automatically shuts off.
7
Page 8

MODE 2: MEASURING ACTUAL DISTANCE, DEGREE OF ELEVATION,
HORIZONTAL DISTANCE AND VERTICAL HEIGHT
After powering on the unit, press the MODE button once to access Mode 2. This mode
displays the same information as Mode 1 but also displays the horizontal distance and
vertical height.
8
Page 9

When viewing at steep inclines or declines, the actual distance to your subject is always
longer than the horizontal distance. The horizontal distance takes into account the fact
that your target might be at a different elevation than you are. Mode 2 displays both
the actual and horizontal distances.
9
Page 10

The LiteWave™ can also measure the height of the object you are viewing. This can be
accomplished several different ways depending on your elevation relative to the
object you are viewing.
If you are standing level to the base of the object you are viewing, simply point the
rangefinder to the top of the object and press the POWER button to obtain a
measurement. The Height will appear next to the word “High” in the LCD display.
10
Page 11

If you are standing level with the top of the object you are viewing, point the
rangefinder to the base of the object and obtain a measurement. The Height will
appear next to the word “High” in the LCD display.
11
Page 12

If you are standing at an elevation that is in between the top and bottom of the viewing
subject first point the rangefinder to the top of the object and obtain a measurement
(Height A). Then point the rangefinder to the base of the object and obtain a
measurement (Height B). Then add those two numbers together to get the Height
(A + B = Height).
12
Page 13

If you are standing at a level that is below the base of the object you are viewing, first
point the rangefinder to the top of the object and obtain a measurement (Height A).
Then point the rangefinder to the base of the object and obtain a measurement (Height
B). Then subtract Height B from Height A to get the Height (A - B = Height).
13
Page 14

If you are standing at a level that is above the top of the object you are viewing, first
point the rangefinder to the base of the object and obtain a measurement (Height A).
Then point the rangefinder to the top of the object and obtain a measurement (Height
B). Then subtract Height B from Height A to get the Height (A - B = Height).
14
Page 15

MODE 3: CONTINUOUS MEASURING OF ACTUAL DISTANCE, DEGREE OF
ELEVATION, HORIZONTAL DISTANCE AND VERTICAL HEIGHT
After powering on the unit, press the MODE button twice to access Mode 3. This mode
displays all the same information as shown in Mode 2, however, the measurements will
continuously update as you move the reticle around and target different objects.
TRIPOD MOUNT
The LiteWave™ rangefinder features a tripod mount located on the bottom of the unit
to easily attach the item to any standard tripod for more stable use.
CLEANING
Cleaning must be done safely and carefully to avoid scratching the lenses and
permanently damaging your range finder. Safe cleaning can be accomplished by
following the procedure below:
1. Blow away any dust or debris on the lens (or use a soft lens brush).
2. To remove dirt, grease or fingerprints, clean with a soft cotton cloth, rubbing in a
circular motion. Use of a coarse cloth or unnecessary rubbing may scratch the lens
surface and eventually cause permanent damage.
15
Page 16

3. For a more thorough cleaning, photographic type lens cleaning fluid may be used.
Always apply the fluid to the cleaning cloth, never directly on the lens.
4. IMPORTANT: Never attempt to clean your rangefinder internally or try to take them
apart.
INSTRUCTIONS FOR CARE
Do not drop or violently jar your rangefinder.
Place rangefinder in protective pouch (included) when not in use.
Do not expose to excessive moisture.
Do not leave in the sun or near a heat source for extended periods of time.
Store in a cool, dry place when not in use.
Remove battery during extended periods of disuse.
WARNING
VIEWING THE SUN CAN CAUSE PERMANENT EYE DAMAGE. DO NOT VIEW THE SUN
WITH THIS RANGE FINDER OR EVEN WITH THE NAKED EYE.
16
Page 17

WARRANTY
This Carson product is warranted to be free from defects in material and workmanship
for a period of two years from date of purchase. During this period Carson will, at its
option and without charge, either repair any part or assembly of parts found to be
defective in material or workmanship, or replace this Carson product with a Carson
product of comparable value and condition, subject to the limitations and exclusions
noted herein.
This warranty extends to the original purchaser only and is not assignable or
transferable. It shall not apply to any product that has been subject to misuse, abuse,
negligence or accident, or to any defects or damage directly or indirectly caused by the
use of unauthorized replacement parts and/or service performed by unauthorized
personnel.
This warranty gives you specific legal rights, and you may also have other rights which
could vary from state to state. Some states do not allow limitations on the life of an
implied warranty and/or do not allow excluding or limiting incidental or consequential
damages. If so, the above limitations or exclusions may not apply to you.
17
Page 18

WARRANTY PROCEDURE
Provide proof of purchase. A receipt or other dated proof of purchase must be
included with merchandise being returned for a warranty claim to be processed.
Call or write for authorization. Before returning any product for a warranty claim, a
Return Authorization (RA) number must be obtained. No merchandise will be
accepted without an RA, and failure to obtain an RA will prevent or delay processing
of the warranty claim. To obtain an RA call 631-963-5000, or write to Carson Warranty
Service, 2070 Fifth Ave, Ronkonkoma NY 11779 with a description of the problem.
Include your name, address and telephone number.
Package the return carefully. Shippers will not reimburse for damages due to
insufficient packaging, even if the merchandise is insured. Print the RA number
prominently on the top of the package.
Prepay shipping. Insure the package. Send it to Carson Warranty Service, 2070 Fifth
Ave., Ronkonoma NY 11779. Merchandise must be shipped prepaid. Carson will not
accept merchandise C.O.D.
18
Page 19

FCC NOTE
This device has been tested and complies with the limits for a Class B digital device,
Part 15 of the FCC Rules and to EU EMC directive. Two conditions must be met for
operation to take place:
(1) This device may not cause harmful interference, and (2) this device must accept any
interference received, including interference that may cause undesired operation.
These conditions are designed to provide reasonable protection against harmful
interference in a residential setting. This equipment generates, uses and can radiate
radio frequency energy and, if not installed and used in accordance with the
instructions, may cause harmful interference to radio communications. There is no
guarantee that interference will not occur in a particular installation. If this device does
cause harmful interference to radio or television reception, the user should correct the
interference by one or more of the following measures:
• Reorient or relocate the receiving antenna. • Increase the separation between the
equipment and receiver. • Consult the dealer or an experienced radio/TV technician for
help.
19
Page 20

FDA SAFETY
Class 1 laser product in accordance with IEC 60825-1:2007. Complies with 21 CFR
1040.10 and 1040.11 for laser products except for deviations pursuant to Laser
Notice No. 50, dated June 24, 2007.
Caution: There are no user controls, adjustments or procedures. Performance of
procedures other than those specified herein may result in access to invisible laser
light.
Carson Optical
2070 5th Avenue
Ronkonkoma, NY 11779
www.carson.com info@carson.com
Tel: 631-963-5000 Fax: 631-427-6749
 Loading...