

Page 1

DRAGSTER BRUSHLESS-REGLER FÜR 1:10 CARS
Instruction Manual Page 2 - 21
쮕 Betriebsanleitung Seite 22 - 41
Mode d‘emploi Page 42 - 61
Instrucciones Página 62 - 81
Istruzioni d‘uso Pagina 82 - 101
CARSON DRAGSTER Brushless-Regler
906008+906056
Page 2

Dear Customer
We congratulate you for buying this CARSON set, which is designed
using state of the art technology.
According to our policy of steady development and improvement of
our products we reserve the right to make changes in specifications
concerning equipment, materials and design of this product at any
time without notice.
GB
Specifications or designs of the actual product may vary from those
shown in this manual or on the box.
The manual forms part of this product. Should you ignore the operating and safety instructions, the warranty will be void. Keep this guide
for future reference.
Limited Warranty
This product is warranted by CARSON against manufacturing defects
in materials and workmanship under normal use for 24 months from
the date of purchase from authorised franchisees and dealers. In
the event of a product defect during the warranty period, return the
product along with your receipt as proof of purchase to any CARSON
store. CARSON will, at its option, unless otherwise provided by law:
(a) Correct the defect by repairing the product without charging for
parts and labour
(b) replace the product with one of the same or similar design; or
(c) refund the purchase price.
All replaced parts and products, and products on which a refund
is made, become the property of CARSON. New or reconditioned
parts and products may be used in the performance of warranty
services. Repaired or replaced parts and products are warranted for
the remainder of the original warranty period. You will be charged for
repair or replacement of the product made after the expiration of the
warranty period.
2
CARSON DRAGSTER Brushless-Regler 906008+906056GB3
Page 3

The Warranty does not cover:
• damage or failure caused by or attributable to acts of God, abuse,
accident, misuse, improper or abnormal usage, failure to follow
instructions, improper installation or maintenance, alteration,
lightning or other incidence of excess voltage or current;
• damage caused by losing control of your car;
• any repairs other than those provided by a CARSON Authorised
Service Facility;
• consumables such as fuses or batteries;
• cosmetic damage;
• transportation, shipping or insurance costs; or
• costs of product removal, installation, set-up service adjustment
or reinstallation
This warranty gives you specific legal rights, and you may also have
other rights which may vary according to the country of purchase.
It is forbidden to dispose of this equipment in the
household waste.
We wish you lots of fun with your
CARSON Brushless Set!
Please read this manual carefully before
using your new Carson DRAGSTER Brushless
Controller.
CARSON DRAGSTER Brushless-Regler 906008+906056
Page 4

Contents
Preface ................................................................................................. 2
Included items ..................................................................................... 4
IMPORTANT!!!! .....................................................................................6
1. Basic settings on the transmitter .................................................... 6
2. Synchronising the controller with the remote transmitter........... 8
3. Illustration of the sensorless controller........................................ 9
GB
4. Illustration of the sensor-based controller ................................. 10
5. LED display under normal operation ......................................... 11
6. Controller pre-set factory defaults ............................................. 11
7. Setting the electronic speed controller ...................................... 12
8. Selecting the battery type .......................................................... 13
9. Selecting forward – brake – backwards ..................................... 14
10. Setting the maximum brake performance .................................15
11. Setting the drag brake (engine brake) ....................................... 16
12. Setting the dead band ................................................................17
13. Selecting a pre-programmed driver profiles
(throttle / brake settings) ............................................................ 18
14. Optional accessories DRAGSTER Sport ................................... 19
15. Optional accessories DRAGSTER Pro ....................................... 20
Included items
906014 Set
Consisting of:
906008 Controller
Dragster Sport SL
906010 BL Motor 10T
4
CARSON DRAGSTER Brushless-Regler 906008+906056GB5
Page 5

906007 Set
Consisting of:
906008 Controller
Dragster Sport SL
906009 BL Motor 12T
906055 Set
Consisting of:
906056 Controller
Dragster PRO S
906060 BL Motor 6,5T
CARSON DRAGSTER Brushless-Regler 906008+906056
Page 6

IMPORTANT!!!!
Before using your new DRAGSTER Brushless Controller for the first
time please note the following:
• Please read this manual carefully before using your new CARSON
DRAGSTER Brushless Controller!
• Always make sure that you have the right gear ratio. The vehicle
must not be geared low over a long period.
GB
• Only use original CARSON SHOOTER BL motors. Only use a
sensor-based motor for the Pro Controller and a sensorless motor
for the Sport Controller.
• Stop driving immediately if the cooling fan fails.
• Do not connect the battery cable (plus and minus) with reversed
polarity. The guarantee is not valid if a short circuit occurs.
• Select the correct battery type / under-voltage protection
(Cut-Off).
1. Basic settings on the transmitter
To ensure that best operation of the electronic speed controller is not
compromised by default settings on the transmitter, certain settings
on the remote transmitter should be reset before programming the
speed controller.
• Set the upper end stop for the throttle / brake servo to maximum
by selecting the highest level for the upper EPA/ATV setting.
• Set the lower end stop for the throttle / brake servo to maximum
as well by selecting the highest level for the lower EPA/ATV
setting.
• Set the trim of the throttle / brake lever to the middle position.
• Select the neutral position for the throttle / brake lever:
For training journey at e.g. 50/50 full throttle / braking
(with reverse travel)
For racing mode at e.g. 70/30 full throttle / braking
(without reverse travel)
6
CARSON DRAGSTER Brushless-Regler 906008+906056GB7CARSON DRAGSTER Brushless-Regler 906008+906056
Page 7

Page 8

2. Synchronising the controller with the
remote transmitter
• Switch on the transmitter.
• Connect the controller to the power supply.
• Hold down the SET button and switch the controller on at the
on / off switch; you will hear a beep.
The blue LED lights up.
GB
• Set the throttle / brake lever to the full acceleration position.
The red and yellow LED lamps fl ash briefl y and then remain
illuminated. You will hear a beep.
The full throttle setting is stored.
• Return the throttle / brake lever fully.
The yellow and blue LED lamps fl ash briefl y and then remain
illuminated. You will hear two beeps.
The brake setting is stored.
• Put the throttle / brake lever to neutral.
The red and green LED lamps fl ash briefl y and then remain
illuminated. You will hear three beeps.
• The synchronization is complete, all LEDs are out.
• Switch the controller off.
When you switch the controller on again, the speed controller is
synchronized to the transmitter and is fundamentally ready for use.
If your RC car goes backwards when you activate
the transmitter to accelerate forwards, swap 2 of 3 cables
to the motor.
8
CARSON DRAGSTER Brushless-Regler 906008+906056GB9
Page 9

3. Illustration of the sensorless controller
black
schwarz
+
ON/OFF switch and SET-button
EIN/AUS Schalter und SET-Taste
To receiver
Zum Empfänger
black
schwarz
black
schwarz
-
black
schwarz
red
To battery
Zum Akku
CARSON DRAGSTER Brushless-Regler 906008+906056
rot
Page 10

4.Illustration of the sensor-based controller
GB
blue • blau
yellow • gelb
orange
ON/OFF switch and SET-button
EIN/AUS Schalter und SET-Taste
To receiver
Zum Empfänger
+
To battery
Zum Akku
-
red
black
schwarz
rot
Sensor wire • Sensorkabel
10
CARSON DRAGSTER Brushless-Regler 906008+906056GB11
Page 11

5. LED display under normal operation
Green LED illuminated: Training mode (Reverse travel ON)
Yellow LED illuminated: Racing mode (Reverse travel OFF)
All LEDs flash: Sensor cable loose or not connected,
Speed controller is not working! (Only
applies to sensor-based speed controller!)
When you operate the speed controller for the first time, the under-
voltage protection (Cut-Off) is switched off as it depends on the type
of battery used. The undervoltage protection is only activated after
the battery type has been selected:
Red LED flashes: Undervoltage protection on
NiCd/NiMH:
LED flashes when a battery voltage of 4 V is
reached or undershot, engine continues to
run.
Two-cell or three-cell LiPo:
LED flashes when the battery voltage of
3.0 V per cell is reached or undershot.
The engine continues to run, but only on
half power.
Discontinue using the vehicle and charge
the battery.
6. Controller pre-set factory defaults
Undervoltage protection Off
Maximum reverse travel 25%
Maximum braking action 30%
Percentage drag brake when
throttle / brake lever in neutral 10%
Dead band Level 3
Switchover
Braking / Reverse travel After release of the brake and the
throttle / brake lever having been
taken out of neutral.
CARSON DRAGSTER Brushless-Regler 906008+906056
Page 12

7. Setting the electronic speed controller
The speed controller can be operated immediately after it has been
synchronized with the transmitter. However, specific parameters can
be adjusted to suit particular conditions.
The controller is programmed using the SET button. When you press
the button down, different LEDs and combinations of LEDs flash one
after the other. Each LED combination represents a particular menu
which can be selected and set by releasing the SET button at the
GB
required combination.
The following parameters may be selected:
• Battery type (NiCd/NiMH, LiPo), Cut-Off
• Training journey / racing mode
• Braking action 0% - 70%
• Percentage drag brake when the throttle / braking lever is in
neutral 0% - 45%
• Dead band Level 1 – 5
• Driver profi le 1 - 5: Select from four pre-programmed settings for
throttle / brake.
Profile 5 resets the speed controller to the factory defaults.
You have various tuning options within the individual menu items.
These are distinguished by the flashing frequency of individual or
several LEDs, and are selected by pressing the SET button.
When you select the menu item, the LED flashes / LEDs flash in the
frequency of the previously selected option.
12
CARSON DRAGSTER Brushless-Regler 906008+906056GB13
Page 13

8. Selecting the battery type
When the battery type is selected, the undervoltage protection
(NiCd/NiMH: at 4V or lower, two or three-cell LiPo: at 3.0 V per cell or
lower) is activated.
If you wish to drive without undervoltage protection (Cut-Off), you
must select 5 in the driver profile (reset to factory defaults) and
reconfigure the other parameters to your requirements again.
Flashing
frequency
Battery type NiCd/NiMH LiPo
• Switch on the transmitter, then the controller!
• Press the SET button down until the red LED lights up. Release
the SET button.
• The red LED starts fl ashing.
This shows that you are in the mode for setting the battery type.
• Press the SET button again briefl y. This brings you to the next
setting.
The red LED fl ashes at the next highest speed.
• By repeatedly pressing briefl y on the SET button you can scroll
through the settings.
• When you reach the required setting, hold down the SET button
for approx. 2 seconds; the setting is stored.
• Once you have stored the setting, the status LEDs fl ash one after
the other to show that you are leaving the programming mode.
The controller is ready for
operation again.
• If you do not press the
SET button for more than
10 seconds the controller
reverts to the last setting
and is ready for use
again.
123
(2 cells)
LiPo
(3 cells)
CARSON DRAGSTER Brushless-Regler 906008+906056
Page 14

9. Selecting
forward – brake – backwards
Flashing
frequency
Direction of
travel
GB
• Press the SET button down until the blue LED lights up. Release
the SET button again.
• The blue LED starts fl ashing. This shows that you are in the mode
for setting the direction of travel.
• Press the SET button again briefl y. This brings you to the next
setting.
The blue LED fl ashes at the next highest speed.
• By repeatedly pressing briefl y on the SET button you can scroll
through the settings.
• When you reach the required setting, hold down the SET button
for approx. 2 seconds; the setting is stored.
• Once you have stored the setting, the status LEDs fl ash one after
the other to show that you are leaving the programming mode.
The controller is ready for operation again.
• If you do not press the SET button for more than 10 seconds the
controller reverts to the last setting and is ready for use again.
12
only forwards
“Racing mode”
Forwards and backwards
“Training journey”
14
CARSON DRAGSTER Brushless-Regler 906008+906056GB15
Page 15

10. Setting the maximum brake performance
Flashing
frequency
Brake
performance
(%)
• Press the SET button down until the blue and green LEDs light up.
Release the SET button again.
• The blue and green LEDs start fl ashing.
This shows that you are in the mode for setting maximum brake
performance.
• Press the SET button repeatedly until you reach the required
setting.
The blue and green LEDs fl ash at the next highest speed.
• By repeatedly pressing briefl y on the SET button you can scroll
through the settings.
• When you reach the required setting, hold down the SET button
for approx. 2 seconds; the setting is stored.
• Once you have stored the setting, the status LEDs fl ash one after
the other to show that you are leaving the programming mode.
The controller is ready for operation again.
• If you do not press the SET button for more than 10 seconds the
controller reverts to the last setting and is ready for use again.
12345678910
10 20 30 40 45 50 55 60 65 70
CARSON DRAGSTER Brushless-Regler 906008+906056
Page 16

11. Setting the drag brake (engine brake)
The drag brake simulates the friction of the brushes of brush motors.
Flashing
frequency
Drag
brake
GB
(%)
• Press the SET button down until the blue and yellow LEDs light
up. Release the SET button again.
• The blue and yellow LEDs start fl ashing.
This shows that you are in the mode for setting the parking brake.
• Press the SET button repeatedly until you reach the required
setting.
The blue and yellow LEDs fl ash at the next highest speed.
• By repeatedly pressing briefl y on the SET button you can scroll
through the settings.
• When you reach the required setting, hold down the SET button
for approx. 2 seconds; the setting is stored.
• Once you have stored the setting, the status LEDs fl ash one after
the other to show that you are leaving the programming mode.
The controller is ready for operation again.
• If you do not press the SET button for more than 10 seconds the
controller reverts to the last setting and is ready for use again.
1 2345678910
OFF 5 1015202530354045
16
CARSON DRAGSTER Brushless-Regler 906008+906056GB17
Page 17

12. Setting the dead band
With the dead band setting you can adjust the speed controller to
the transmitter being used by changing the transition from forward
drive to brake action. Level 1 means a narrower transition area which
requires particularly finely tuned transmitting signals. Simple
transmitters are sufficient for the wider transition area at Level 5.
Flashing
frequency
Dead Band (%) 23456
• Press the SET button down until the blue and red LEDs light up.
Release the SET button again.
• The blue and red LEDs start fl ashing. This shows that you are in
the mode for setting the dead band delay time.
• Press the SET button repeatedly until you reach the required
setting.
The blue and red LEDs fl ash at the next highest speed.
• By repeatedly pressing briefl y on the SET button you can scroll
through the settings.
• When you reach the required setting, hold down the SET button
for approx. 2 seconds; the setting is stored.
• Once you have stored the setting, the status LEDs fl ash one after
the other to show that you are leaving the programming mode.
The controller is ready for operation again.
• If you do not press the SET button for more than 10 seconds the
controller reverts to the last setting and is ready for use again.
12345
CARSON DRAGSTER Brushless-Regler 906008+906056
Page 18

13. Selecting a pre-programmed driver
profiles (throttle / brake settings)
Profiles 1 - 4 have no influence on the undervoltage protection set at
the time when you selected the type of battery.
Driver profile 1234reset to
GB
Cut-Off as
Reverse
travel
Percentage
reverse
travel
Maximum
braking
performance
Parking
brake
Dead Band 3344 3
• Press the SET button down until all of the LEDs light up. Release
the SET button again.
• All LEDs start fl ashing. This shows that you are in the mode for
setting the driver profi le.
• Press the SET button repeatedly until you reach the required
setting. All LEDs fl ash at the next highest speed.
• By repeatedly pressing briefl y on the SET button you can scroll
through the settings.
• When you reach the required setting, hold down the SET button
for approx. 2 seconds; the setting is stored.
• Once you have stored the setting, the status LEDs fl ash one after
the other to show that you are leaving the programming mode.
The controller is ready for operation again.
• If you do not press the SET button for more than 10 seconds the
controller reverts to the last setting and is ready for use again.
selected
as
selected
no yes yes no yes
050500 25
30% 30% 40% 40% 30%
15% 10% 15% - 10%
as
selected
as
selected
factory
defaults
5
OFF
18
CARSON DRAGSTER Brushless-Regler 906008+906056GB19
Page 19

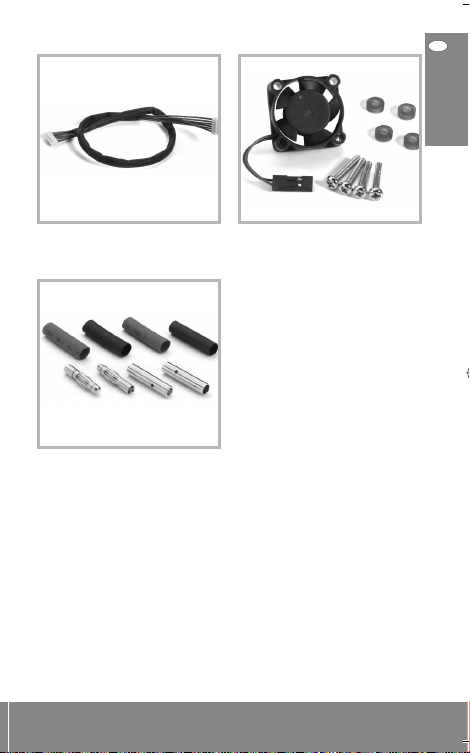
14. Optional accessories
Brushless Controller
Dragster Sport Sensorless
Item no. 906008
Brushless Motor Shooter 10T SL
Item no. 906010
Cooling Fan for Brushless
Controller, Item no. 906028
CARSON DRAGSTER Brushless-Regler 906008+906056
Brushless Motor
Shooter 12T SL
Item no. 906009
Brushless Motor Shooter 8T SL
Item no. 906011
Gold Contact Plug 4mm
Item no. 13327
Page 20

15.
Optional accessories
GB
Brushless Sensor-based
Controller Dragster PRO
Item no. 906056
Brushless Motor 4,5T S
Item no. 906058
Brushless Motor 6,5T S
Item no. 906060
20
CARSON DRAGSTER Brushless-Regler 906008+906056GB21
Brushless Motor 3,5T S
Item no. 906057
Brushless Motor 5,5T S
Item no. 906059
Brushless Motor 10,5T S
Item no. 906061
Page 21

Brushless Sensor Cable 100 mm
Item no. 906012
Gold Contact Plug 4mm
Item no. 13327
CARSON DRAGSTER Brushless-Regler 906008+906056
Cooling Fan for Brushless
Controller
Item no. 906028
Page 22

Sehr geehrter Kunde
D
Wir beglückwünschen Sie zum Kauf Ihres CARSON Sets, welcher
nach dem heutigen Stand der Technik gefertigt wurde.
Da wir stets um Weiterentwicklung und Verbesserung unserer
Produkte bemüht sind, behalten wir uns eine Änderung in technischer
Hinsicht und in Bezug auf Ausstattung, Materialien und Design jederzeit und ohne Ankündigung vor.
Aus geringfügigen Abweichungen des Ihnen vorliegenden Produktes
gegenüber Daten und Abbildungen dieser Anleitung können daher
keinerlei Ansprüche abgeleitet werden.
Diese Bedienungsanleitung ist Bestandteil des Produkts. Bei Nichtbeachtung der Bedienungsanleitung und der enthaltenen Sicherheitsanweisungen erlischt der Garantieanspruch.
Bewahren Sie diese Anleitung zum Nachlesen auf und für die
eventuelle Weitergabe des Modells an Dritte.
Garantiebedingungen
Für dieses Produkt leistet CARSON eine Garantie von 24 Monaten
betreffend Fehler bei der Herstellung in Bezug auf Material und
Fertigung bei normalem Gebrauch ab dem Kauf beim autorisierten
Fachhändler. Im Falle eines Defekts während der Garantiezeit bringen
Sie das Modell zusammen mit dem Kaufbeleg zu Ihrem Fachhändler.
CARSON wird nach eigener Entscheidung, falls nicht anders im
Gesetz vorgesehen:
(a) den Defekt durch Reparatur kostenlos in Bezug auf Material und
Arbeit beheben;
(b) das Produkt durch ein gleichartiges oder im Aufbau ähnliches
ersetzen; oder
(c) den Kaufpreis erstatten.
Alle ersetzten Teile und Produkte, für die Ersatz geleistet wird, wer-
den zum Eigentum von CARSON. Im Rahmen der Garantie leistungen
dürfen neue oder wiederaufbereitete Teile verwendet werden.
Auf reparierte oder ersetzte Teile gilt eine Garantie für die Restlaufzeit
der ursprünglichen Garantiefrist. Nach Ablauf der Garantiefrist
vorgenommene Reparaturen oder gelieferte Ersatzteile werden in
Rechnung gestellt.
22
CARSON DRAGSTER Brushless-Regler 906008+906056D23
Page 23

Von der Garantie ausgeschlossen sind:
• Beschädigung oder Ausfall durch Nichtbeachten der Sicherheits-
anweisungen oder der Bedienungsanleitung, höhere Gewalt,
Unfall, fehlerhafte oder außergewöhnliche Beanspruchung,
fehlerhafte Handhabung, eigenmächtige Veränderungen, Blitz-
schlag oder anderer Einfl uss von Hochspannung oder Strom.
• Schäden, die durch den Verlust der Kontrolle über Ihr Fahrzeug
entstehen.
• Reparaturen, die nicht durch einen autorisierten CARSON Service
durchgeführt wurden
• Verschleißteile wie etwa Sicherungen und Batterien
• rein optische Beeinträchtigungen
• Transport-, Versand- oder Versicherungskosten
• Kosten für die Entsorgung des Produkts sowie Einrichten und vom
Service vorgenommene Einstell- und Wiedereinrichtungsarbeiten.
Durch diese Garantie erhalten Sie spezielle Rechte, darüber hinaus
ist auch eine von Land zu Land verschiedene Geltendmachung
anderer Ansprüche denkbar.
Eine Entsorgung über den Hausmüll ist untersagt!
Wir wünschen Ihnen viel Spaß mit
Ihrem CARSON Brushless-Set!
Vor dem Gebrauch Ihres neuen Carson
DRAGSTER Brushless-Reglers lesen Sie bitte
dieses Handbuch sorgfältig durch!
CARSON DRAGSTER Brushless-Regler 906008+906056
Page 24

Inhalt
D
Vorwort ............................................................................................... 22
Lieferumfang ...................................................................................... 24
Wichtig ............................................................................................... 26
1. Basiseinstellungen am Sender ................................................... 26
2. Abgleichen des Reglers mit dem Fernsteuersender .................28
3. Abbildung Regler sensorless ..................................................... 29
4. Abbildung Regler sensored ........................................................ 30
5. LED-Anzeige im Normalbetrieb .................................................. 31
6. Werkseitige Voreinstellungen des Reglers ................................ 31
7. Einstellung des elektronischen Fahrtreglers ............................. 32
8. Auswahl des Akku-Typs .............................................................33
9. Auswahl Vorwärts-Bremse-Rückwärts
„Training“/ Vorwärts-Bremse „Rennmodus“..............................34
10. Einstellen der maximalen Bremsleistung ................................... 35
11. Einstellen der Dragbrake (Motorbremse) ................................... 36
12. Einstellung Dead-Band ............................................................... 37
13. Auswahl eines voreingestellten Fahrerprofils
(Gas/Brems-Einstellungen) ......................................................... 38
14. Optionales Zubehör DRAGSTER Sport ..................................... 39
15. Optionales Zubehör DRAGSTER Pro ......................................... 40
Lieferumfang
906014 Set
Bestehed aus:
906008 Regler
Dragster Sport SL
906010 BL Motor 10T
24
CARSON DRAGSTER Brushless-Regler 906008+906056D25
Page 25

906007 Set
Bestehend aus:
906008 Regler
Dragster Sport SL
906009 BL Motor 12T
906055 Set
Bestehend aus:
906056 Regler
Dragster PRO S
906060 BL Motor 6,5T
CARSON DRAGSTER Brushless-Regler 906008+906056
Page 26

WICHTIG!!!!
D
Vor dem ersten Einsatz Ihres neues DRAGSTER Brushless Reglers
bitte folgendes Beachten:
• Vor dem Gebrauch Ihres neuen Carson DRAGSTER Brushless-
Reglers lesen Sie bitte dieses Handbuch sorg fältig durch!
• Immer auf die richtige Übersetzung achten. Das Fahrzeug darf
nicht zu lange übersetzt sein.
• Nur die originalen CARSON SHOOTER BL-Motoren verwenden.
Für den Pro Regler nur die sensorgesteuerten Motoren und
für den Sport Regler nur die sensorlos gesteuerten Motoren
einsetzen.
• Bei defekten Kühlventilator den Fahrbetrieb sofort einstellen.
• Die Akkukabel (Plus und Minus) nicht verpolen. Keine Garantie bei
Kurzschluss.
• Wählen Sie den richtigen Akkutyp/Unterspannungsschutz
(Cut-Off).
1. Basiseinstellungen am Sender
Damit die optimale Funktion des elektronischen Fahrtreglers nicht
durch Vorgaben des Senders eingeschränkt wird, sollten vor der
Programmierung des Fahrtreglers bestimmte Ein stellungen am Fernsteuersender zurückgesetzt werden.
• Stellen Sie den oberen Endanschlag für das Gas/Brems-Servo
auf Maximum, indem Sie für die obere EPA/ATV Einstellung den
höchsten Wert wählen.
• Bringen Sie auch den unteren Endanschlag des Gas/Brems-
Servo auf die maximale Position, indem Sie für die untere EPA/ATV
Einstellung den höchsten Wert wählen.
• Bringen Sie die Trimmung des Gas/Bremshebels in die
Mittelstellung.
• Wählen Sie die Neutralstellung des Gas/Bremshebels:
Für Trainingsfahrten bei z. B. 50/50 Vollgas/Bremse
(mit Rückwärtsfahrt)
Für Rennmodus bei z. B.70/30 Vollgas/Bremse
(ohne Rückwärtsfahrt)
26
CARSON DRAGSTER Brushless-Regler 906008+906056D27CARSON DRAGSTER Brushless-Regler 906008+906056
Page 27

Page 28

2. Abgleichen des Reglers mit dem
D
Fernsteuersender
• Schalten Sie den Sender ein.
• Schließen Sie den Regler an die Spannungsversorgung.
• Halten Sie den SET-Knopf gedrückt und schalten Sie den Regler
am Ein/Aus- Schalter ein, es ertönt ein Signalton.
Die blaue LED leuchtet.
• Bringen Sie den Gas/Bremshebel in Vollgasstellung.
Die rote und gelbe LED blinken kurz und leuchten dann dauerhaft.
Es ertönt ein Signalton.
Die Vollgasstellung ist gespeichert.
• Nehmen Sie den Gas/Bremshebel ganz zurück.
Die gelbe und blaue LED blinken kurz und leuchten dann
dauerhaft. Es ertönen zwei Signaltöne.
Die Bremsenstellung ist gespeichert.
• Bringen Sie den Gas/Bremshebel in Neutralstellung.
Die rote und grüne LED blinken kurz und leuchten dann dauerhaft.
Es ertönen drei Signaltöne.
• Der Abgleich ist abgeschlossen, alle LEDs sind aus.
• Schalten Sie den Regler aus.
Wenn Sie den Regler wieder einschalten, ist der Fahrtregler auf den
Sender abgestimmt und grundsätzlich betriebsbereit.
Falls Ihr RC-CAR bei Gas-Vorwärtsbetätigung
des Senders Rückwärts fährt, tauschen Sie 2 von 3 Kabel
zum Motor.
28
CARSON DRAGSTER Brushless-Regler 906008+906056D29
Page 29

3. Abbildung Regler sensorless
black
schwarz
+
ON/OFF switch and SET-button
EIN/AUS Schalter und SET-Taste
To receiver
Zum Empfänger
black
schwarz
black
schwarz
-
black
schwarz
red
To battery
Zum Akku
CARSON DRAGSTER Brushless-Regler 906008+906056
rot
Page 30

4. Abbildung Regler sensored
D
blue • blau
yellow • gelb
orange
ON/OFF switch and SET-button
EIN/AUS Schalter und SET-Taste
To receiver
Zum Empfänger
+
-
red
To battery
Zum Akku
rot
black
schwarz
Sensor wire • Sensorkabel
30
CARSON DRAGSTER Brushless-Regler 906008+906056D31
Page 31

5. LED-Anzeige im Normalbetrieb
Grüne LED leuchtet: Trainingsfahrt (Rückwärtsfahrt EIN)
Gelbe LED leuchtet: Rennmodus (Rückwärtsfahrt AUS)
Alle LEDs blinken: Sensorkabel lose oder nicht
angeschlossen,
Fahrtregler arbeitet nicht!
(Nur bei einem Fahrtregler mit Sensor!)
Wenn Sie den Fahrtregler zum ersten Mal in Betrieb nehmen, ist der
Unterspannungsschutz (Cut-Off) ausgeschaltet, da dieser von dem
eingesetzten Akkutyp abhängig ist. Erst nach der Auswahl des verwendeten Akkutyps wird der Unterspannungsschutz aktiviert:
Rote LED blinkt: Unterspannungsschutz ein
NiCd/NiMH:
LED blinkt, wenn eine Akkuspannung von
4 V erreicht bzw. unterschritten wird, Motor
läuft weiter.
LiPo zwei- oder dreizellig:
LED blinkt, wenn die Akkuspannung 3,0 V
pro Zelle erreicht oder unterschreitet.
Der Motor läuft nur noch mit halber
Leistung.
Setzen Sie das Modell ausser Betrieb und
laden Sie den Fahrakku!
6. Werkseitige Voreinstellungen des Reglers
Unterspannungsschutz Aus
Maximale Rückwärtsfahrt 25%
Maximale Bremswirkung 30%
Anteil Dragbrake in Neutralstellung
des Gas/Bremshebels 10%
Dead Band Stufe 3
Umschaltung
Bremsen/Rückwärtsfahrt Nach Lösen der Bremse und
erneutem Zurücknehmen des
Gas/Bremshebels aus der
Neutralstellung
CARSON DRAGSTER Brushless-Regler 906008+906056
Page 32

7. Einstellung des elektronischen
D
Fahrtreglers
Der Fahrtregler kann nach dem Abgleich mit dem Sender sofort in
Betrieb genommen werden, bestimmte Parameter lassen sich aber
den individuellen Gegebenheiten anpassen.
Die Programmierung des Reglers erfolgt mit der SET-Taste. Während
Sie die Taste gedrückt halten, blinken nacheinander verschiedene
LEDs bzw. LED-Kombinationen. Jede LED-Kombination steht für ein
bestimmtes Auswahlmenü, das durch Loslassen des SET-Tasters bei
der gewünschten Kombination ausgewählt und eingestellt werden
kann.
Zur Auswahl stehen:
• Akkutyp (NiCd/NiMH, LiPo), Cut-Off
• Trainingsfahrt/Rennmodus
• Bremswirkung 0% - 70%
• Anteil Feststellbremse in der Neutralstellung des
Gas/Bremshebels 0% - 45%
• Dead Band Stufe 1 - 5
• Fahrerprofi l 1 - 5: Auswahl aus vier verschiedenen
Voreinstellungen für Gas/Bremse.
Profil 5 setzt den Fahrtregler auf die werkseitigen Voreinstellungen
zurück.
In den einzelnen Menüpunkten haben Sie verschiedene Einstell-
möglichkeiten. Diese werden durch die Blinkfrequenz einzelner oder
mehrerer LEDs unterschieden und durch Drücken des SET-Tasters
ausgewählt.
Wenn Sie den Menüpunkt anwählen, blinkt die LED/blinken die LEDs
in der Frequenz der zuvor eingestellten Auswahl.
32
CARSON DRAGSTER Brushless-Regler 906008+906056D33
Page 33

8. Auswahl des Akku-Typs
Mit der Auswahl eines Akkutyps wird der Unterspannungsschutz
(NiCd/NiMH: bei 4 V oder geringer, LiPo zwei- oder dreizellig: bei
3,0 V pro Zelle oder weniger) aktiviert.
Wenn Sie ohne Unterspannungsschutz (Cut-Off) fahren wollen,
müssen Sie im Fahrerprofil Profil 5 (Rücksetzen auf werkseitige
Einstellungen) auswählen und die anderen Parameter erneut Ihren
Ansprüchen anpassen.
Blinkfrequenz 1 2 3
Akkutyp NiCd/NiMH LiPo
• Schalten Sie erst den Sender, dann den Regler ein!
• Halten Sie den SET-Taster gedrückt, bis die rote LED leuchtet.
Lassen Sie den SET-Taster wieder los.
• Die rote LED beginnt zu blinken. Dies zeigt an, dass Sie sich im
Einstellmodus für den Akkutyp befi nden.
• Drücken Sie den SET-Taster erneut kurz, Sie gelangen so zum
nächsten Einstellwert. Die rote LED blinkt im nächsthöheren Takt.
• Durch wiederholtes, kurzes Drücken können Sie in einer Endlos-
schleife durch die Einstellwerte scrollen.
• Wenn Sie den gewünschten Einstellwert erreicht haben, halten Sie
den SET-Knopf für ca. 2 Sekunden gedrückt, die Einstellung wird
gespeichert.
• Wenn Sie die Einstellung gespeichert haben, blinken die Status-
LEDs nacheinander um anzuzeigen, dass Sie den Programmier-
modus verlassen. Der Regler ist wieder
betriebsbereit.
• Wenn Sie den SET-Taster
länger als 10 Sekunden
nicht drücken kehrt der
Regler zu den letzten
Einstellungen zurück und
ist wieder betriebsbereit.
(2 Zellen)
LiPo
(3 Zellen)
CARSON DRAGSTER Brushless-Regler 906008+906056
Page 34

9. Auswahl Vorwärts-Bremse-Rückwärts
D
„Training“/ Vorwärts-Bremse „Rennmodus“
Blinkfrequenz 1 2
Fahrtrichtung nur vorwärts
Rennmodus
• Halten Sie den SET-Taster gedrückt, bis die blaue LED
leuchtet. Lassen Sie den SET-Taster wieder los.
• Die blaue LED beginnt zu blinken. Dies zeigt an, dass Sie sich im
Einstellmodus für die Fahrtrichtung befi nden.
• Drücken Sie den SET-Taster erneut kurz, Sie gelangen so zum
nächsten Einstellwert. Die blaue LED blinkt im nächsthöheren
Takt.
• Durch wiederholtes, kurzes Drücken können Sie in einer Endlos-
schleife durch die Einstellwerte scrollen.
• Wenn Sie den gewünschten Einstellwert erreicht haben, halten Sie
den SET-Knopf für ca. 2 Sekunden gedrückt, die Einstellung wird
gespeichert.
• Wenn Sie die Einstellung gespeichert haben, blinken
die Status-LEDs nacheinander um anzuzeigen, dass Sie
den Programmiermodus verlassen. Der Regler ist wieder betriebs-
bereit.
• Wenn Sie den SET-Taster länger als 10 Sekunden nicht drücken
kehrt der Regler zu den letzten Einstellungen zurück und ist wie-
der betriebsbereit.
vorwärts und rückwärts
Trainingsfahrt
34
CARSON DRAGSTER Brushless-Regler 906008+906056D35
Page 35

10. Einstellen der maximalen Bremsleistung
Blinkfrequenz
Bremsleistung
(%)
• Halten Sie den SET-Taster gedrückt, bis die blaue und grüne LED
leuchtet. Lassen Sie den SET-Taster wieder los.
• Die blaue und grüne LED beginnen zu blinken. Dies zeigt an,
dass Sie sich im Einstellmodus für die maximale Bremsleistung
befi nden.
• Drücken Sie den SET-Taster so oft kurz, bis Sie die gewünschte
Einstellung erreicht haben. Die blaue und grüne LED blinkt im
jeweils nächsthöheren Takt.
• Durch wiederholtes, kurzes Drücken können Sie in einer Endlos-
schleife durch die Einstellwerte scrollen.
• Wenn Sie den gewünschten Einstellwert erreicht haben, halten Sie
den SET-Knopf für ca. 2 Sekunden gedrückt, die Einstellung wird
gespeichert.
• Wenn Sie die Einstellung gespeichert haben, blinken die Status-
LEDs nacheinander um anzuzeigen, dass Sie den Programmier-
modus verlassen. Der Regler ist wieder betriebsbereit.
• Wenn Sie den SET-Taster länger als 10 Sekunden nicht drücken
kehrt der Regler zu den letzten Einstellungen zurück und ist
wieder betriebsbereit.
12345678910
10 20 30 40 45 50 55 60 65 70
CARSON DRAGSTER Brushless-Regler 906008+906056
Page 36

11. Einstellen der Dragbrake (Motorbremse)
D
Mit der Dragbrake wird die Reibung der Kohlen von Bürstenmotoren
simuliert.
Blinkfrequenz
Dragbrake
(%)
• Halten Sie den SET-Taster gedrückt, bis die blaue und gelbe LED
leuchtet. Lassen Sie den SET-Taster wieder los.
• Die blaue und gelbe LED beginnen zu blinken. Dies zeigt an, dass
Sie sich im Einstellmodus für die Feststellbremse befi nden.
• Drücken Sie den SET-Taster so oft kurz, bis Sie die gewünschte
Einstellung erreicht haben.
Die blaue und gelbe LED blinkt im jeweils nächsthöheren Takt.
• Durch wiederholtes, kurzes Drücken können Sie in einer Endlos-
schleife durch die Einstellwerte scrollen.
• Wenn Sie den gewünschten Einstellwert erreicht haben, halten Sie
den SET-Knopf für ca. 2 Sekunden gedrückt, die Einstellung wird
gespeichert.
• Wenn Sie die Einstellung gespeichert haben, blinken die Status-
LEDs nacheinander um anzuzeigen, dass Sie den Programmier-
modus verlassen. Der Regler ist wieder betriebsbereit.
• Wenn Sie den SET-Taster länger als 10 Sekunden nicht drücken
kehrt der Regler zu den letzten Einstellungen zurück und ist
wieder betriebsbereit.
1 2345678910
AUS 5 1015202530354045
36
CARSON DRAGSTER Brushless-Regler 906008+906056D37
Page 37

12. Einstellung Dead-Band
Mit der Dead-Band Einstellung können Sie den Fahrtregler an den
verwendeten Sender anpassen, indem Sie den Übergangsbereich
von der Vorwärtsfahrt zur Bremswirkung verändern. Stufe 1 bedeutet
einen schmalen Übergangs bereich, der besonders fein abgestufte
Sendersignale erfordert. Der breitere Übergang in Stufe 5 genügt
auch einfachen Sendeanlagen.
Blinkfrequenz 12345
Dead Band (%) 23456
• Halten Sie den SET-Taster gedrückt, bis die blaue und rote LED
leuchtet. Lassen Sie den SET-Taster wieder los.
• Die blaue und rote LED beginnen zu blinken. Dies zeigt an, dass
Sie sich im Einstellmodus für die Umschaltverzögerung Dead-
Band befi nden.
• Drücken Sie den SET-Taster so oft kurz, bis Sie die gewünschte
Einstellung erreicht haben. Die blaue und rote LED blinkt im
jeweils nächsthöheren Takt.
• Durch wiederholtes, kurzes Drücken können Sie in einer Endlos-
schleife durch die Einstellwerte scrollen.
• Wenn Sie den gewünschten Einstellwert erreicht haben, halten Sie
den SET-Knopf für ca. 2 Sekunden gedrückt, die Einstellung wird
gespeichert.
• Wenn Sie die Einstellung gespeichert haben, blinken die Status-
LEDs nacheinander um anzuzeigen, dass Sie den Programmier-
modus verlassen. Der Regler ist wieder betriebsbereit.
• Wenn Sie den SET-Taster länger als 10 Sekunden nicht drücken
kehrt der Regler zu den letzten Einstellungen zurück und ist
wieder betriebsbereit.
CARSON DRAGSTER Brushless-Regler 906008+906056
Page 38

13. Auswahl eines voreingestellten
D
Fahrerprofils (Gas/Brems-Einstellungen)
Die Profile 1 - 4 haben keinen Einfluss auf den mit der Auswahl des
Akkutyps eingestellten Unterspannungsschutz.
wie
gewählt
Rückset-
zen auf
werkseitige
Einstellung
Fahrerprofil
Cut-Off
Rückwärtsfahrt
Anteil
Rückwärtsfahrt
Maximale
Bremsleistung
Feststellbremse
Dead Band 3 3 4 4 3
• Halten Sie den SET-Taster gedrückt, bis die alle LEDs
leuchten. Lassen Sie den SET-Taster wieder los.
• Alle LEDs beginnen zu blinken. Dies zeigt an, dass Sie sich im
Einstellmodus für das Fahrerprofi l befi nden.
• Drücken Sie den SET-Taster so oft kurz, bis Sie die gewünschte
Einstellung erreicht haben. Alle LEDs blinken im jeweils nächsthöheren Takt.
• Durch wiederholtes, kurzes Drücken können Sie in einer Endlosschleife durch die Einstellwerte scrollen.
• Wenn Sie den gewünschten Einstellwert erreicht haben, halten Sie
den SET-Knopf für ca. 2 Sekunden gedrückt, die Einstellung wird
gespeichert.
• Wenn Sie die Einstellung gespeichert haben, blinken die StatusLEDs nacheinander um anzuzeigen, dass Sie den Programmiermodus verlassen. Der Regler ist wieder betriebsbereit.
• Wenn Sie den SET-Taster länger als 10 Sekunden nicht drücken
kehrt der Regler zu den letzten Einstellungen zurück und ist
wieder betriebsbereit.
1234
wie
wie
gewählt
wie
gewählt
gewählt
nein ja ja nein ja
050500 25
30% 30% 40% 40% 30%
15% 10% 15% - 10%
5
AUS
38
CARSON DRAGSTER Brushless-Regler 906008+906056D39
Page 39

14. Optionales Zubehör
Brushless-Regler
Dragster Sport Sensorlos
Art.-Nr. 906008
Brushless-Motor Shooter 10T SL
Art.-Nr. 906010
Kühl-Ventilator für
Brushlessregler, Art.-Nr. 906028
CARSON DRAGSTER Brushless-Regler 906008+906056
Brushless-Motor
Shooter 12T SL
Art.-Nr. 906009
Brushless-Motor Shooter 8T SL
Art.-Nr. 906011
Goldkontaktstecker 4mm
Art.-Nr. 13327
Page 40

15. Optionales Zubehör
D
Brushless-Regler Dragster PRO
Sensor
Art.-Nr. 906056
Brushless-Motor 4,5T S
Art.-Nr. 906058
Brushless-Motor 6,5T S
Art.-Nr. 906060
40
CARSON DRAGSTER Brushless-Regler 906008+906056D41
Brushless-Motor 3,5T S
Art.-Nr. 906057
Brushless-Motor 5,5T S
Art.-Nr. 906059
Brushless-Motor 10,5T S
Art.-Nr. 906061
Page 41
Brushless-Sensorkabel 100 mm
Art.-Nr. 906012
Goldkontaktstecker 4mm
Art.-Nr. 13327
CARSON DRAGSTER Brushless-Regler 906008+906056
Kühl-Ventilator für
Brushlessregler
Art.-Nr. 906028
Page 42

Cher client
Touts nos félicitations pour l’achat de votre set CARSON, modèle
réduit construit à la pointe de la technologie.
Comme nous travaillons continuellement au développement et à
l’amélioration de nos produits, nous nous réservons la possibilité
d’effectuer des modifications techniques sans préavis pour ce qui est
de l’équipement, des matériaux et de la conception.
De légères différences entre le modèle acheté et celui décrit dans les
données et illustrations du présent manuel ne sauraient donc ouvrir
la voie à de quelconques réclamations.
Le présent mode d’emploi fait partie intégrante du produit. Tout
non-respect du mode d’emploi et des consignes de sécurité s’y
trouvant annule automatiquement tout effet de garantie. Veuillez
conserver le présent mode d’emploi pour consultation ultérieure et
F
pour la transmission éventuelle du modèle réduit à un tiers.
Conditions de garantie
CARSON vous garantit pour 24 mois à partir de la date d‘achat
(pièces justificatives à l‘appui) que la voiture est exempte de tout
défaut. L‘utilisation inappropriée, l‘usure des éléments au cours de
l‘utilisation, les transformations de votre propre chef, l‘application
ou l‘utilisation incorrecte, l‘endommagement des batteries ou
d‘autres équipements au cours de l‘utilisation ou l‘emploi abusif un
l‘endommagement causé par le transport, n‘est pas couvert par la
responsabilité civile. Notre garantie se limite à la réparation ou à
l‘échange des appareils dans l‘état original et à la hauteur du prix
d‘achat. L‘utilisateur de la voiture assume tous les risques en rapport
avec l‘utilisation de la voiture. Nous nous réservons le droit de
modifier ces conditions de garantie à tout moment et sans préavis.
En cas de réclamation veuillez contacter votre revendeur spécialisé.
42
CARSON DRAGSTER Brushless-Regler 906008+906056F43
Page 43

La garantie ne couvre pas:
• tout dommage ou défaillance causé par force majeure, abus,
accident, utilisation abusive, erronée ou anormale, non respect
des instructions, mauvaise mise en route ou maintenance
insuffi sante, altération, éclair ou tout autre conséquence d‘une
surtension ou d‘un courant excessif ;
• tout dommage provoqué par la perte de contrôle de la voiture ;
• toute réparation autre que celles réalisées par un organisme agrée
par CARSON ;
• les consommables tels que les fusibles et les batteries ;
• des dommages esthétiques ;
• le transport, l‘expédition et les frais d‘assurance ; et
• les frais de retour, d‘installation, de mise au point et de remise en
route du produit
Cette garantie vous attribue des droits spécifiques, vous pouvez par
ailleurs également prétendre à d‘autres droits en fonction du pays
d‘achat.
Toute élimination dans les ordures ménagères est
proscrite !
Nous vous souhaitons beaucoup de
plaisir avec votre set brushless de
CARSON !
Lire attentivement ce manuel avant
l’utilisation de votre nouveau variateur brushless DRAGSTER de Carson !
CARSON DRAGSTER Brushless-Regler 906008+906056
Page 44

Contenu
Préface ............................................................................................... 42
Périmètre de livraison........................................................................ 44
IMPORTANT !!!! .................................................................................. 46
1. Réglages de base au niveau de l’émetteur ...............................46
2. Synchronisation du variateur avec l’émetteur ........................... 48
3. Illustration du variateur sans capteur ........................................49
4. Illustration du variateur avec capteur ........................................50
5. Affichage DEL en service normal ............................................... 51
6. Réglages d’usine du variateur .................................................... 51
7. Réglage du variateur électronique ............................................. 52
8. Sélection du type d’accus .......................................................... 53
9. Sélection Marche avant – Frein – Marche arrière
« Entraînement »/Marche avant – Frein « Mode course » ......... 54
F
10. Réglage de la puissance maximale de freinage ........................ 55
11. Réglage du frein de ralentissement (frein-moteur) .................... 56
12. Réglage de la zone morte........................................................... 57
13. Sélection d’un profil de conducteur préréglé
(réglage de l’accélération et du freinage) .................................. 58
14. Accessoires optionnels DRAGSTER Sport ................................ 59
15. Accessoires optionnels DRAGSTER Pro ................................... 60
Périmètre de livraison
906014 Set
Comprenant :
906008 Variateur
Dragster Sport SL
906010 BL Moteur 10T
44
CARSON DRAGSTER Brushless-Regler 906008+906056F45
Page 45

906007 Set
Comprenant :
906008 Variateur
Dragster Sport SL
906009 BL Moteur 12T
906055 Set
Comprenant :
906056 Variateur
Dragster PRO S
906060 BL Moteur 6,5T
CARSON DRAGSTER Brushless-Regler 906008+906056
Page 46

IMPORTANT !!!!
Prière de respecter les instructions suivantes avant la première
utilisation de votre nouveau variateur brushless DRAGSTER.
• Lire attentivement ce manuel avant l’utilisation de votre nouveau
variateur brushless DRAGSTER de Carson !
• Toujours veiller à ce que le rapport de transmission soit correct.
La transmission du véhicule ne doit pas durer trop longtemps.
• Utiliser uniquement les moteurs brushless SHOOTER originaux de
CARSON. Pour le variateur Pro, utiliser uniquement les moteurs
à commande par capteur, pour le variateur Sport, uniquement les
moteurs à commande sans capteur.
• En cas de ventilateur défectueux, cesser immédiatement
l’utilisation.
• Respecter la polarité des câbles des accus (plus et minus).
F
Aucune garantie ne s’applique en cas de court-circuit.
• Sélectionner le type d’accus/la protection de sous-tension
(cut-off) correct(e).
1. Réglages de base au niveau de l’émetteur
Afin qu’un fonctionnement optimal du variateur électronique ne
soit pas restreint par les prescriptions de l’émetteur, il convient
de réinitialiser certains réglages au niveau de l‘émetteur avant de
programmer le variateur.
• Positionner la butée de fi n de course supérieure pour le servo
accélération/freinage sur maximum en sélectionnant la valeur
maximale pour le réglage EPA/ATV supérieur.
• Positionner, de même, la butée de fi n de course inférieure pour
le servo accélération/freinage sur maximum en sélectionnant la
valeur maximale pour le réglage EPA/ATV inférieur.
• Amener l’arrimage du levier d‘accélération et de freinage en
position intermédiaire.
• Sélectionner la position neutre du levier d‘accélération et de
freinage :
Pour les entraînements, avec, par exemple, 50/50 plein
régime/freinage (avec marche arrière)
Pour les courses, avec, par exemple, 70/30 plein régime/freinage
(sans marche arrière)
46
CARSON DRAGSTER Brushless-Regler 906008+906056F47CARSON DRAGSTER Brushless-Regler 906008+906056
Page 47

Page 48

2. Synchronisation du variateur avec
l’émetteur
• Mettre l’émetteur en marche.
• Brancher le variateur sur l’alimentation en courant.
• Maintenir le bouton SET enfoncé et allumer le variateur au niveau
du commutateur marche/arrêt. Un signal sonore retentit.
La DEL bleue s’allume.
• Amener le levier d’accélération et de freinage sur la position plein
régime.
Les DEL rouge et jaune clignotent brièvement puis s‘allument
ensuite de manière permanente. Un signal sonore retentit.
La position plein régime est enregistrée.
• Ramener le levier d’accélération et de freinage à sa position
F
initiale.
Les DEL rouge et bleue clignotent brièvement puis s‘allument
ensuite de manière permanente. Deux signaux sonores
retentissent. La position de freinage est enregistrée.
• Amener le levier d’accélération et de freinage sur la position
neutre.
Les DEL rouge et verte clignotent brièvement puis s‘allument
ensuite de manière permanente.
Trois signaux sonores retentissent.
• La synchronisation est terminée, toutes les DEL sont éteintes.
• Éteindre le variateur.
Lorsque le variateur est remis en marche, le variateur de course est
réglé sur l’émetteur et, de manière générale, prêt à l’emploi.
Si votre RC-CAR roule en marche arrière malgré
l’actionnement de la marche avant de l’émetteur, échanger
2 des 3 câbles allant au moteur.
48
CARSON DRAGSTER Brushless-Regler 906008+906056F49
Page 49

3. Illustration du variateur sans capteur
black
schwarz
+
ON/OFF switch and SET-button
EIN/AUS Schalter und SET-Taste
To receiver
Zum Empfänger
black
schwarz
black
schwarz
-
black
schwarz
red
To battery
Zum Akku
CARSON DRAGSTER Brushless-Regler 906008+906056
rot
Page 50

4. Illustration du variateur avec capteur
blue • blau
F
yellow • gelb
orange
ON/OFF switch and SET-button
EIN/AUS Schalter und SET-Taste
To receiver
Zum Empfänger
+
To battery
Zum Akku
-
red
black
schwarz
rot
Sensor wire • Sensorkabel
50
CARSON DRAGSTER Brushless-Regler 906008+906056F51
Page 51

5. Affichage DEL en service normal
DEL verte allumée : Entraînement (marche arrière ACTIVÉE)
DEL jaune allumée : Mode course (marche arrière
DÉSACTIVÉE)
Toutes les DEL clignotent : Le câble du capteur est lâche ou non
raccordé, le variateur de course ne
fonctionne pas ! (uniquement pour les
variateurs avec capteur !)
Lors de la première mise en service du variateur de course, la
protection de sous-tension (cut-off) est désactivée car celle-ci
dépend du type d’accus utilisé. La protection de sous-tension n’est
activée qu’après la sélection du type d’accus utilisé.
La DEL rouge clignote : Protection de sous-tension activée
NiCd/NiMH :
La DEL clignote lorsque la tension de
l’accu a atteint ou passe en dessous de
4 V, le moteur continue de tourner.
LiPo à deux ou trois cellules :
la DEL clignote lorsque la tension de
l’accu a atteint ou passe en dessous de
3,0 V par cellule.
Le moteur ne tourne plus qu’à mi-régime.
Mettre le modèle réduit à l’arrêt et charger
l’accu !
6. Réglages d’usine du variateur
Protection de sous-tension Désactivée
Marche arrière maximale 25%
Freinage maximal 30%
Par du frein de ralentissement en
position neutre du levier
d’accélération et de freinage 10%
Zone morte Niveau 3
Commutation
Freinage/marche arrière Après le desserrage du frein et un
nouveau dégagement du levier
d’accélération et de freinage de
la position neutre
CARSON DRAGSTER Brushless-Regler 906008+906056
Page 52

7. Réglage du variateur électronique
Une fois la synchronisation avec l’émetteur effectuée, le variateur
peut être immédiatement utilisé. Certains paramètres peuvent
cependant être adaptés selon les besoins individuels.
La programmation du variateur s‘effectue à l’aide de la touche SET.
Pendant que la touche est maintenue enfoncée, différentes DEL ou
combinaisons de DEL clignotent les unes après les autres. Chaque
combinaison de DEL correspond à un menu de sélection déterminé
qui peut être sélectionné et réglé en relâchant la touche SET pour la
combinaison souhaitée.
À disposition :
• Type d’accus (NiCd/NiMH, LiPo), cut-off
• Entraînement/mode course
• Puissance de freinage 0 % - 70 %
F
• Part du frein de stationnement en position neutre du levier
d’accélération et de freinage 0 % - 45 %
• Zone morte Niveau 1 - 5
• Profi l du conducteur 1 – 5 : sélection parmi 4 différents
préréglages pour l’accélération et le freinage.
Le profil 5 ramène le variateur aux réglages effectués préalablement
en usine.
Les différents points de menu offrent diverses possibilités de réglage.
Celles-ci se distinguent par la différence de fréquence de
clignotement d’une ou de plusieurs DEL et sont sélectionnées en
appuyant sur la touche SET.
Lorsque le point de menu est sélectionné, la ou les DEL clignotent à
la fréquence de la sélection effectuée précédemment.
52
CARSON DRAGSTER Brushless-Regler 906008+906056F53
Page 53

8. Sélection du type d’accus
La sélection du type d’accus permet d’activer la protection de
sous-tension (NiCd/NiMH : pour 4 V ou moins, LiPo à deux ou trois
cellules : pour 3,0 V par cellule ou moins).
Si la protection de sous-tension (cut-off) est souhaitée, le profil 5
(réinitialisation aux réglages d’usine) doit être sélectionné dans le
profil du conducteur et les autres paramètres de nouveau adaptés
aux besoins.
Fréquence de
clignotement
Type d’accus NiCd/NiMH LiPo
• Mettre tout d’abord l’émetteur en marche puis le variateur !
• Maintenir la touche SET enfoncée jusqu’à ce que la DEL rouge
s’allume. Relâcher la touche SET.
• La DEL rouge se met à clignoter. Cela signifi e que le mode de
réglage du type d’accus est activé.
• Appuyer de nouveau brièvement sur la touche SET pour passer
à la valeur de réglage suivante. La DEL rouge clignote au rythme
immédiatement supérieur.
• Une pression brève et répétée permet de naviguer sans fi n dans
les valeurs de réglage.
• Lorsque la valeur de réglage souhaitée est atteinte, maintenir la
touche SET enfoncée pendant environ 2 secondes, le réglage est
enregistré.
• Lorsque le réglage est enregistré, les DEL indiquant le statut
clignotent les unes après les autres pour signaler l’abandon du
mode de programmation. Le variateur est de
nouveau prêt à l’emploi.
• Lorsque la touche SET
n’est pas enfoncée
pendant plus de 10
secondes, le variateur
retourne aux derniers
réglages et est de
nouveau prêt à l’emploi.
123
(2 cellules)
LiPo
(3 cellules)
CARSON DRAGSTER Brushless-Regler 906008+906056
Page 54

9. Sélection Marche avant – Frein – Marche
arrière « Entraînement »/Marche avant –
Frein « Mode course »
Fréquence de
clignotement
Sens de la
marche
• Maintenir la touche SET enfoncée jusqu’à ce que la DEL bleue
s’allume. Relâcher la touche SET.
• La DEL bleue se met à clignoter. Cela signifi e que le mode de
réglage du sens de la marche est activé.
• Appuyer de nouveau brièvement sur la touche SET pour passer
F
à la valeur de réglage suivante. La DEL bleue clignote au rythme
immédiatement supérieur.
• Une pression brève et répétée permet de naviguer sans fi n dans
les valeurs de réglage.
• Lorsque la valeur de réglage souhaitée est atteinte, maintenir la
touche SET enfoncée pendant environ 2 secondes, le réglage est
enregistré.
• Lorsque le réglage est enregistré, les DEL indiquant le statut
clignotent les unes après les autres pour signaler l’abandon du
mode de programmation. Le variateur est de nouveau prêt à
l’emploi.
• Lorsque la touche SET n’est pas enfoncée pendant plus de 10
secondes, le variateur retourne aux derniers réglages et est de
nouveau prêt à l’emploi.
12
Marche avant
uniquement mode
course
Marche avant et marche
arrière entraînement
54
CARSON DRAGSTER Brushless-Regler 906008+906056F55
Page 55

10. Réglage de la puissance maximale de
freinage
Fréquence de
clignotement
Puissance
de freinage
(%)
• Maintenir la touche SET enfoncée jusqu’à ce que les DEL bleue et
verte s’allument. Relâcher la touche SET.
• Les DEL bleue et verte se mettent à clignoter. Cela signifi e que le
mode de réglage de la puissance maximale de freinage est activé.
• Appuyer aussi souvent et brièvement sur la touche SET jusqu’à
obtenir le réglage souhaité. Les DEL bleue et verte clignotent
respectivement au rythme immédiatement supérieur.
• Une pression brève et répétée permet de naviguer sans fi n dans
les valeurs de réglage.
• Lorsque la valeur de réglage souhaitée est atteinte, maintenir la
touche SET enfoncée pendant environ 2 secondes, le réglage est
enregistré.
• Lorsque le réglage est enregistré, les DEL indiquant le statut
clignotent les unes après les autres pour signaler l’abandon du
mode de programmation. Le variateur est de nouveau prêt à
l’emploi.
• Lorsque la touche SET n’est pas enfoncée pendant plus de 10
secondes, le variateur retourne aux derniers réglages et est de
nouveau prêt à l’emploi.
12345678910
10 20 30 40 45 50 55 60 65 70
CARSON DRAGSTER Brushless-Regler 906008+906056
Page 56

11. Réglage du frein de ralentissement
(frein-moteur)
Le frein de ralentissement permet de simuler le frottement des
charbons des moteurs à balais.
Fréquence de
clignotement
Frein de
ralentissement
(%)
• Maintenir la touche SET enfoncée jusqu’à ce que les DEL bleue et
jaune s’allument. Relâcher la touche SET.
• Les DEL bleue et jaune se mettent à clignoter. Cela signifi e que le
mode de réglage du frein de stationnement est activé.
• Appuyer aussi souvent et brièvement sur la touche SET jusqu’à
F
obtenir le réglage souhaité. Les DEL bleue et jaune clignotent
respectivement au rythme immédiatement supérieur.
• Une pression brève et répétée permet de naviguer sans fi n dans
les valeurs de réglage.
• Lorsque la valeur de réglage souhaitée est atteinte, maintenir la
touche SET enfoncée pendant environ 2 secondes, le réglage est
enregistré.
• Lorsque le réglage est enregistré, les DEL indiquant le statut
clignotent les unes après les autres pour signaler l’abandon du
mode de programmation. Le variateur est de nouveau prêt à
l’emploi.
• Lorsque la touche SET n’est pas enfoncée pendant plus de 10
secondes, le variateur retourne aux derniers réglages et est de
nouveau prêt à l’emploi.
1 2345678910
DÉSACTIVÉ
5 1015202530354045
56
CARSON DRAGSTER Brushless-Regler 906008+906056F57
Page 57

12. Réglage de la zone morte
Le réglage de la zone morte permet d’adapter le variateur à
l’émetteur utilisé en modifiant la zone de transition de la marche
avant au freinage. Le niveau 1 signifie une zone de transition étroite
qui nécessite des signaux de l’émetteur échelonnés de manière
particulièrement fine. Une transition plus large au niveau 5 suffit aussi
aux systèmes émetteurs simples.
Fréquence de
clignotement
Zone morte (%) 23456
• Maintenir la touche SET enfoncée jusqu’à ce que les DEL bleue et
rouge s’allument. Relâcher la touche SET.
• Les DEL bleue et rouge se mettent à clignoter. Cela signifi e que le
mode de réglage du délai de commutation de la zone morte est
activé.
• Appuyer aussi souvent et brièvement sur la touche SET jusqu’à
obtenir le réglage souhaité. Les DEL bleue et rouge clignotent
respectivement au rythme immédiatement supérieur.
• Une pression brève et répétée permet de naviguer sans fi n dans
les valeurs de réglage.
• Lorsque la valeur de réglage souhaitée est atteinte, maintenir la
touche SET enfoncée pendant environ 2 secondes, le réglage est
enregistré.
• Lorsque le réglage est enregistré, les DEL indiquant le statut
clignotent les unes après les autres pour signaler l’abandon du
mode de programmation. Le variateur est de nouveau prêt à
l’emploi.
• Lorsque la touche SET n’est pas enfoncée pendant plus de 10
secondes, le variateur retourne aux derniers réglages et est de
nouveau prêt à l’emploi.
12345
CARSON DRAGSTER Brushless-Regler 906008+906056
Page 58

13.
Sélection d’un profil de conducteur préréglé
(réglage de l’accélération et du freinage)
Les profils 1 à 4 n’ont aucune influence sur la protection de soustension réglée d’après le type d’accus sélectionné
Profil du
conducteur
Cut-Off
Marche
arrière
Part de
la marche
arrière
F
Puissance
de freinage
maximale
Frein de
stationnement
Zone morte 3 3 4 4 3
• Maintenir la touche SET enfoncée jusqu’à ce que toutes les DEL
s’allument. Relâcher la touche SET.
• Toutes les DEL se mettent à clignoter. Cela signifi e que le mode
de réglage du profi l du conducteur est activé.
• Appuyer aussi souvent et brièvement sur la touche SET jusqu’à
obtenir le réglage souhaité. Toutes les DEL clignotent
respectivement au rythme immédiatement supérieur.
• Une pression brève et répétée permet de naviguer sans fi n dans
les valeurs de réglage.
• Lorsque la valeur de réglage souhaitée est atteinte, maintenir la
touche SET enfoncée pendant environ 2 secondes, le réglage est
enregistré.
• Lorsque le réglage est enregistré, les DEL indiquant le statut
clignotent les unes après les autres pour signaler l’abandon du
mode de programmation. Le variateur est de nouveau prêt à
l’emploi.
• Lorsque la touche SET n’est pas enfoncée pendant plus de 10
secondes, le variateur retourne aux derniers réglages et est de
nouveau prêt à l’emploi.
1234
Comme
Comme
sélectionné
Comme
sélectionné
sélectionné
Non Oui Oui Non Oui
050500 25
30% 30% 40% 40% 30%
15% 10% 15% - 10%
Comme
sélectionné
Réinitialisation
aux réglages
d’usine
5
DÉSACTIVÉ
58
CARSON DRAGSTER Brushless-Regler 906008+906056F59
Page 59

14. Accessoires optionnels
Variateur brushless
Dragster Sport sans capteur
Art. n° 906008
Moteur brushless Shooter 10T SL
Art. n° 906010
Ventilateur pour variateur
brushless, Art. n° 906028
CARSON DRAGSTER Brushless-Regler 906008+906056
Moteur brushless
Shooter 12T SL
Art. n° 906009
Moteur brushless Shooter 8T SL
Art. n° 906011
Prise avec contacts en or 4 mm
Art. n° 13327
Page 60

15. Accessoires optionnels
Variateur brushless Dragster
PRO avec capteur
Art. N° 906056
F
Moteur brushless 4,5T S
Art. n° 906058
Moteur brushless 6,5T S
Art. n° 906060
60
CARSON DRAGSTER Brushless-Regler 906008+906056F61
Moteur brushless 3,5T S
Art. n° 906057
Moteur brushless 5,5T S
Art. n° 906059
Moteur brushless 10,5T S
Art. n° 906061
Page 61

Câble capteur brushless 100 mm
Art. n° 906012
Prise avec contacts en or 4 mm
Art. n° 13327
CARSON DRAGSTER Brushless-Regler 906008+906056
Ventilateur pour variateur
brushless
Art. n° 906028
Page 62

Estimado cliente
Le felicitamos por la adquisición de su juego CARSON, que ha sido
fabricado con tecnología de actualidad.
De acuerdo con nuestra política de constante desarrollo y mejora de
nuestros productos, nos reservamos el derecho de efectuar cambios
en las especificaciones relativas a equipo, material y diseño de este
producto en cualquier momento sin noticia previa.
Las especificaciones o diseños del producto real podrían variar de
los mostrados en el manual o envase.
Este manual es componente del producto. No cumplir las
instrucciones operativas y de seguridad incluidas invalidará la
garantía. Conserve esta guía como recordatorio o para caso de
pasar el modelo a una tercera persona.
Condiciones de la garantía
Este producto está garantizado por CARSON contra defectos de
fabricación en materiales o mano de obra bajo utilización normal por
un período de 24 meses desde la fecha de adquisición en comercios
E
autorizados.
En caso de defecto del producto durante el período de garantía, lleve
el producto y el ticket o recibo de venta como prueba de adquisición
a cualquier tienda autorizada CARSON. CARSON podrá a su elección
y salvo que las leyes dispongan otra cosa:
(a) Corregir el defecto mediante la reparación del producto sin cargo
de piezas o mano de obra;
(b) Reemplazar el producto por otro del mismo o similar diseño; o
(c) Devolver el importe de adquisición del producto.
Todas las piezas y productos reemplazados, así como los
productos cuyo importe haya sido devuelto, pasan a ser
propiedad de CARSON. Se podrán utilizar piezas nuevas o
reacondicionadas para la prestación del servicio de garantía. Las
piezas y productos reparados o reemplazados estarán garantizados
por el período restante al vencimiento de la garantía. Cualquierreparación o sustitución del producto tras vencer el período de garantía
será abonada por usted.
62
CARSON DRAGSTER Brushless-Regler 906008+906056E63
Page 63

Esta garantía no cubre:
• Daños o fallos causados o atribuibles a fuerzas de la naturaleza,
abuso, accidente, uso incorrecto, impropio o anormal, falta de
seguimiento de las instrucciones, mantenimiento o instalaciones
inadecuadas, alteraciones, Relámpago u otros incidentes causados por exceso de voltaje o corriente;
• Cualquier reparación no efectuada por un servicio de
reparaciones autorizado CARSON;
• Consumibles como fusibles o baterías;
• Daños estéticos;
• Transportes, embarques y / o costos de seguros; o
Costos de retirada del producto, instalaciones, servicio de ajuste o
reinstalación. Esta garantía le da a usted derechos legales específicos, y usted también podría tener otros derechos que variarían de
estado en estado.
Prohibido eliminar los restos a través de la basura
doméstica!
¡Le deseamos mucha diversión con
su juego CARSON sin escobillas!
¡Lea, por favor, atentamente este manual
antes de usar su nuevo regulador CARSON
DRAGSTER Brushless!
CARSON DRAGSTER Brushless-Regler 906008+906056
Page 64

Indice de contenidos
Prólogo .............................................................................................. 62
Contenido del kit ...............................................................................64
¡¡¡¡IMPORTANTE!!!! ............................................................................. 66
1. Ajustes básicos en el emisor ...................................................... 66
2. Compensación del regulador con el emisor de telemando ...... 68
3. Imagen Regulador sin sensores ................................................. 69
4. Imagen Regulador con sensores ...............................................70
5. Visualizador de LED (diodos emisores de luz)
en operación normal ...................................................................71
6. Ajustes previos del regulador por parte de la fábrica ............... 71
7. Ajuste del regulador de marcha electrónico.............................. 72
8. Selección del tipo de acumulador .............................................73
9. Selección hacia adelante – freno – hacia atrás
“entrenamiento” / adelante – freno “modo de carrera” ............ 74
10. Ajustar el rendimiento de freno máximo .................................... 75
11. Ajuste del Dragbrake (freno del motor) ...................................... 76
12. Ajuste del Dead Band ................................................................. 77
13. Selección de un perfil de conductor preajustado
(ajustes de freno / gas) ............................................................... 78
14. Accesorios optativos DRAGSTER Sport ................................... 79
15. Accesorios optativos DRAGSTER Pro ....................................... 80
E
Contenido del kit
906014 Juego
compuesto de:
906008 regulador
Dragster Sport SL
906010 BL Motor 10T
64
CARSON DRAGSTER Brushless-Regler 906008+906056E65
Page 65

906007 Juego
compuesto de:
906008 regulador
Dragster Sport SL
906009 BL Motor 12T
906055 Juego
compuesto de:
906056 regulador
Dragster PRO S
906060 BL Motor 6,5T
CARSON DRAGSTER Brushless-Regler 906008+906056
Page 66

¡¡¡¡IMPORTANTE!!!!
Observe, por favor, lo expuesto a continuación antes de poner en
marcha por primera vez su nuevo regulador DRAGSTER Brushless:
• ¡Por favor, lea cuidadosamente este manual antes de usar su
nuevo regulador Carson DRAGSTER Brushless!
• Preste atención siempre a la relación de ruedas correcta. No
se debe invertir mucho tiempo para la relación de ruedas del
vehículo.
• Utilice sólo los motores CARSON SHOOTER BL originales. Sólo
se deben emplear los motores mandados por sensores para el
Proregulador y los motores dirigidos sin sensores para el
regulador deportivo.
• Detenga inmediatamente la operación de marcha en caso de que
uno de los ventiladores de refrigeración presente algún defecto.
• No invierta los polos del cable de acumulador (Plus y Menos) En
caso de cortocircuito no habrá garantía.
• Escoja el tipo de acumulador correcto / la protección contra
subtensión (Cut-Off).
1. Ajustes básicos en el emisor
E
Es necesario que se lleven a cabo ciertos ajustes o reposiciones en
el emisor de telemando antes de programar el regulador de marcha
con el fin de evitar que la función óptima del regulador de marcha
electrónica quede limitada debido a especificaciones del emisor.
• Coloque en máximo el tope fi nal superior para el servo gas / de
freno seleccionando el valor máximo para el ajuste EPA / ATV
superior.
• Coloque también en posición máxima el tope fi nal inferior para el
servo gas / de freno seleccionando el valor máximo para el ajuste
EPA / ATV inferior.
• Lleve el ajuste de la palanca de freno / de gas a una posición
central.
• Seleccione la posición neutra de la palanca de freno / de gas:
Para viajes de entrenamiento con p.ej. 50/50 pleno gas/ freno
(con marcha atrás)
Para modo de carrera con p.ej. 70/30 pleno gas / freno
(sin marcha atrás)
66
CARSON DRAGSTER Brushless-Regler 906008+906056E67CARSON DRAGSTER Brushless-Regler 906008+906056
Page 67

Page 68

2. Compensación del regulador con el emisor
de telemando
• Encienda el emisor.
• Conecte el regulador a la alimentación de tensión.
• Mantenga apretado el botón SET y encienda el regulador en el
interruptor de encendido / apagado, luego se emitirá una señal de
sonido.
El LED azul se ilumina.
• Lleve la palanca de freno / de gas a una posición de pleno gas.
Los LEDs amarillo y rojo parpadean brevemente y se iluminan
luego por mucho tiempo. Una sonido se oirá como señal.
De este modo, quedará almacenada la posición de pleno gas.
• Retire completamente la palanca de freno / de gas.
Los LEDs amarillo y azul parpadean brevemente y se iluminan
luego por mucho tiempo. Se oirán luego dos sonidos como señal.
De este modo, quedará almacenada la posición de freno.
• Lleve la palanca de gas / de freno a una posición neutra.
Los LEDs verde y rojo parpadean brevemente y se iluminan luego
por mucho tiempo. Se oirán luego tres sonidos como señal.
E
• Finalmente, la compensación o el ajuste ha sido concluída, todos
los LEDs están apagados.
• Apague el regulador.
Si vuelve a encender el regulador, el regulador de marcha se
adaptará al emisor y básicamente listo para la operación.
Si su RC-CAR marcha hacia atrás aun si se acciona hacia
adelante el emisor con la palanca de acelerador, cambie 2 de 3
de los cables que van hacia el motor.
68
CARSON DRAGSTER Brushless-Regler 906008+906056E69
Page 69

3. Imagen Regulador sin sensores
black
schwarz
+
ON/OFF switch and SET-button
EIN/AUS Schalter und SET-Taste
To receiver
Zum Empfänger
black
schwarz
black
schwarz
-
black
schwarz
red
To battery
Zum Akku
CARSON DRAGSTER Brushless-Regler 906008+906056
rot
Page 70

4. Imagen Regulador con sensores
blue • blau
yellow • gelb
orange
E
ON/OFF switch and SET-button
EIN/AUS Schalter und SET-Taste
To receiver
Zum Empfänger
+
To battery
Zum Akku
-
red
black
schwarz
rot
Sensor wire • Sensorkabel
70
CARSON DRAGSTER Brushless-Regler 906008+906056E71
Page 71

5.
Visualizador de LED (diodos emisores de luz)
en operación normal
El LED verde se ilumina: Viaje de entrenamiento (marcha atrás
ENCENDIDA)
EL LED amarillo se ilumina: EL modo de carrera (marcha atrás
APAGADA)
Todos los LEDS parpadean: El cable de sensores está suelto o no
está conectado,
¡El Regulador de marcha no funciona!
(¡Sólo con un regulador de marcha con
sensor!)
Si pone en marcha el regulador de marcha por primera vez, se
apaga la protección contra subtensión (Cut-OFF) debido a que ésta
depende del tipo de acumulador usado. Sólo después de seleccionar
el tipo de acumulador empleado se activará la protección contra
subtensión:
El LED rojo parpadea: La protección contra subtensión está
encendida
NiCd/NiMH:
LED parpadea si se alcanza una tensión
de acumulador de 4 V o si es inferior a
ésta. El motor sigue arrancando.
LiP de dos o tres celdas:
El LED parpadea si alcanza la tensión de
acumulador 3,0 V por celda o si ésta es
inferior a este valor.
El motor arranca sólo con la mitad de
rendimiento.
¡Coloque el modelo fuera de marcha y
cargue el acumulador de marcha!
6. Ajustes previos del regulador por parte de
la fábrica
La protección contra subtensión está apagada
Marcha atrás máxima 25%
Efecto de frenado máximo 30%
Parte (en porcentaje) Dragbrake en posición neutra de la
palanca del gas /del freno 10%
Dead Band Nivel 3
Conmutación frenos / marcha atrás
volver a retirar la palanca del gas/
del freno de la posición neutra
CARSON DRAGSTER Brushless-Regler 906008+906056
Después de soltar el freno y de
Page 72

7. Ajuste del regulador de marcha electrónico
El regulador de marcha puede ponerse en marcha inmediatamente
después de haberse ajustado con el emisor, pero ciertos parámetros
no se pueden adaptar a las circunstancias individuales.
El programa del regulador se lleva a cabo con el botón SET. Mientras
que usted mantiene apretado el botón, parpadeararán sucesivamente LEDs diferentes o combinaciones de LED. Cada combinación
de LED está destinada para un menú de selección determinado que
puede ajustarse y escogerse al soltar el botón SET con la combinación deseada.
Hay a disposición para la selección:
• tipo de acumulador (NiCd/NiMH, LiPo), Cut-Off
• Viaje de entrenamiento / modo de carrera
• Efecto de frenado 0% - 70%
• Parte (en porcentaje) del freno de estacionamiento en la posición
neutra del gas / palanca de freno 0% - 45%
• Dead Band Nivel 1- 5
• Perfi l de conductor 1 – 5 selección de cuatro preajustes diferentes
para gas / freno.
El perfil 5 repone el regulador de marcha a los ajustes previos
efectuados por parte de la fábrica.
E
Usted dispone de diversas posibilidades de ajuste en cada uno
de los puntos de menú individuales. Éstos se diferencian por la
frecuencia de parpadeo de los diversos o cada uno de los LEDs o se
seleccionan pulsando el botón SET.
Si selecciona uno de los puntos del menú, el LED parpadea / los
LEDs parpadean en la frecuencia de la selección ajustada
anteriormente.
72
CARSON DRAGSTER Brushless-Regler 906008+906056E73
Page 73

8. Selección del tipo de acumulador
Al seleccionar un tipo de acumulador se activa la protección contra
subtensión 0% - 45%, con 4,0 V o menos, LiPo de dos o tres celdas,
con 3,0 V por celda o menos).
Si quiere seguir viajar sin protección contra subtensión (Cut-Off),
usted deberá seleccionar perfil 5 en el perfil del conductor
(reposición a ajustes por parte de la fábrica) y adaptar los otros
parámetros nuevamente a sus exigencias.
Frecuencia de
parpadeo
Tipo de
acumulador
• ¡Primero encienda el emisor, luego el regulador!
• Mantenga el botón SET apretado hasta que se ilumine el LED rojo.
Luego vuelva a soltar el botón SET.
• El LED rojo empieza a parpadear. Éste indica que usted se
encuentra en el modo de ajuste para el tipo de acumulador.
• Pulse el botón SET nuevamente por corto tiempo hasta que
consiga el próximo valor de ajuste. El LED rojo parpadea en el
compás de nivel más alto que sigue.
• Apretando repetidas veces y por corto tiempo, usted podrá
desplazarse de línea en línea en un bucle continuo infi nito a través
de los valores de ajuste.
• Cuando usted haya alcanzado el valor de ajuste deseado,
mantenga el botón SET aprox. unos 2 segundos apretado el
ajuste se memorizará.
• Una vez que haya memorizado el ajuste, los LEDs de estado
parpadearán sucesivamente para indicar que se está
abandonando el modo
de programación. El
regulador se encontrará
nuevamente listo para la
operación.
• Si no pulsa el botón SET
por más de 10 segundos,
el regulador volverá a los
últimos ajustes y estará
nuevamente listo para la
operación.
123
NiCd/NiMH LiPo
(2 celdas)
LiPo
(3 celdas)
CARSON DRAGSTER Brushless-Regler 906008+906056
Page 74

9. Selección hacia adelante – freno – hacia
atrás “entrenamiento” / adelante – freno
“modo de carrera”
Frecuencia de
parpadeo
Sentido de
marcha
• Mantenga el botón SET apretado hasta que se ilumine el LED
azul. Luego vuelva a soltar el botón SET.
• El LED azul empieza a parpadear. Éste indica que usted se
encuentra en el modo de ajuste para el sentido de marcha.
• Pulse el botón SET nuevamente por corto tiempo hasta que
consiga el próximo valor de ajuste. El LED azul parpadea en el
compás de nivel más alto que sigue.
• Apretando repetidas veces y por corto tiempo, usted podrá
desplazarse de línea en línea en un bucle continuo a través de los
valores de ajuste.
• Cuando usted haya alcanzado el valor de ajuste deseado,
mantenga el botón SET aprox. unos 2 segundos apretado el
ajuste se memorizará.
E
• Una vez que haya memorizado el ajuste, los LEDs de estado
parpadearán sucesivamente para indicar que se está abandonando el modo de programación. El regulador se encontrará
nuevamente listo para la operación.
• Si no pulsa el botón SET por más de 10 segundos, el regulador
volverá a los últimos ajustes y estará nuevamente listo para la
operación.
12
Sólo hacia adelante
Modo de carrera
Adelante y atrás
viaje de entrenamiento
74
CARSON DRAGSTER Brushless-Regler 906008+906056E75
Page 75

10. Ajustar el rendimiento de freno máximo
Frecuencia de
parpadeo
Rendimiento
de frenado
(%)
• Mantenga el botón SET apretado hasta que se iluminen los LED
verdes y azul. Luego vuelva a soltar el botón SET.
• Los LEDs azul y verde empiezan a parpadear. Éste indica que
usted se encuentra en el modo de ajuste para el rendimiento de
frenado.
• Oprima el botón SET tantas veces brevemente hasta que usted
haya conseguido el ajuste deseado. Los LEDs azul y verde
empiezan a parpadear en el compás del nivel más alto que sigue.
• Apretando repetidas veces y por corto tiempo, usted podrá
desplazarse de línea en línea en un bucle sin fi n a través de los
valores de ajuste.
• Cuando usted haya alcanzado el valor de ajuste deseado,
mantenga el botón SET aprox. unos 2 segundos apretado el
ajuste se memorizará.
• Una vez que haya memorizado el ajuste, los LEDs de estado
parpadearán sucesivamente para indicar que se está
abandonando el modo de programación. El regulador se estará
nuevamente listo para la operación.
• Si no pulsa el botón SET por más de 10 segundos, el regulador
volverá a los últimos ajustes y estará nuevamente listo para la
operación.
12345678910
10 20 30 40 45 50 55 60 65 70
CARSON DRAGSTER Brushless-Regler 906008+906056
Page 76

11. Ajuste del Dragbrake (freno del motor)
Con el Dragbrake se simula el frotamiento de los carbones de los
motores de escobillas.
Frecuencia de
parpadeo
Dragbrake
(%)
• Mantenga el botón SET apretado hasta que se iluminen los LEDs
azul y amarillo. Luego vuelva a soltar el botón SET.
• Los LEDs azul y amarillo empiezan a parpadear. Éste indica
que usted se encuentra en el modo de ajuste para el freno de
estacionamiento.
• Oprima el botón SET tantas veces brevemente hasta que usted
haya conseguido el ajuste deseado. Los LEDs azul y amarillo
parpadean respectivamente en el compás del nivel más alto que
sigue.
• Apretando repetidas veces y por corto tiempo, usted podrá
desplazarse de línea en línea en un bucle sin fi n a través de los
valores de ajuste.
• Cuando usted haya alcanzado el valor de ajuste deseado,
mantenga apretado el botón SET aprox. unos 2 segundos, luego
E
el ajuste se memorizará.
• Una vez que haya memorizado el ajuste, los LEDs indicadores
del estado parpadearán sucesivamente para indicar que se está
abandonando el modo de programación. El regulador se encontrará nuevamente listo para la operación.
• Si no pulsa el botón SET por más de 10 segundos, el regulador
volverá a los últimos ajustes y estará nuevamente listo para la
operación.
1 2345678910
ESTÁ
APAGADA
5 1015202530354045
76
CARSON DRAGSTER Brushless-Regler 906008+906056E77
Page 77

12. Ajuste del Dead Band
Con el ajuste Dead Band usted podrá adaptar el regulador de marcha
al emisor usado alterando el área de transición desde la marcha
hacia adelante hasta el efecto de frenado. El nivel 1 significa una
pequeña área de transición que exige señales de emisor escalonados bastante finamente. La transición más amplia en el nivel 5 exige
también plantas de emisión sencillas.
Blinkfrequenz 12345
Dead Band (%) 23456
• Mantenga el botón SET apretado hasta que se iluminen los LEDs
rojo y azul. Luego vuelva a soltar el botón SET.
• Los LEDs azul y rojo empiezan a parpadear. Éste indica que usted
se encuentra en el modo de ajuste para el retardo de conmutación
Dead Band.
• Oprima el botón SET tantas veces brevemente hasta que usted
haya conseguido el ajuste deseado. Los LEDs azul y rojo parpadean
respectivamente en el compás del nivel más alto que sigue.
• Apretando repetidas veces y por corto tiempo, usted podrá
desplazarse de línea en línea en un bucle sin fi n a través de los
valores de ajuste.
• Cuando usted haya alcanzado el valor de ajuste deseado,
mantenga el botón SET aprox. unos 2 segundos apretado el
ajuste se memorizará.
• Una vez que haya memorizado el ajuste, los LEDs de estado
parpadearán sucesivamente para indicar que se está
abandonando el modo de programación. El regulador se
encontrará nuevamente listo para la operación.
• Si no pulsa el botón SET por más de 10 segundos, el regulador
volverá a los últimos ajustes y estará nuevamente listo para la
operación.
CARSON DRAGSTER Brushless-Regler 906008+906056
Page 78

13. Selección de un perfil de conductor
preajustado (ajustes de freno / gas)
Los perfiles 1 – 4 no tienen influencia en la protección contra
subtensión ajustada al seleccionar el tipo de acumulador.
Perfil de
conductor
Cut-Off
Marcha atrás
Parte (%)
de marcha
atrás
Efecto de
frenado
máximo
Freno de
estacionamiento
Dead Band 3 3 4 4 3
• Mantenga el botón SET apretado hasta que se iluminen todos los
E
LEDs. Luego vuelva a soltar el botón SET.
• Todos los LEDs empezarán a parpadear. Éste indica que usted se
encuentra en el modo de ajuste para el perfi l de conductor.
• Oprima el botón SET tantas veces brevemente hasta que usted
haya conseguido el ajuste deseado. Todos los LEDs parpadean en
el compás respectivamente más alto que sigue.
• Apretando repetidas veces y por corto tiempo, usted podrá
desplazarse de línea en línea en un bucle sin fi n a través de los
valores de ajuste.
• Cuando usted haya alcanzado el valor de ajuste deseado,
mantenga el botón SET aprox. unos 2 segundos apretado el
ajuste se memorizará.
• Una vez que haya memorizado el ajuste, los LEDs de estado
parpadearán sucesivamente para indicar que se está
abandonando el modo de programación. El regulador se
encontrará nuevamente listo para la operación.
• Si no pulsa el botón SET por más de 10 segundos, el regulador
volverá a los últimos ajustes y estará nuevamente listo para la
operación.
12 34
Tal cual
Tal cual
se ha
seleccio-
nado
Tal cual
se ha
seleccio-
nado
se ha
seleccio-
nado
no sí sí no sí
050500 25
30% 30% 40% 40% 30%
15% 10% 15% - 10%
Tal cual
se ha
seleccio-
nado
Reposición
en el ajuste
por parte de
la fábrica
5
ESTÁ
APAGADA
78
CARSON DRAGSTER Brushless-Regler 906008+906056E79
Page 79

14. Accesorios optativos
Regulador Dragster Sport
sin escobilla – brushless sin
sensores, Art.-Nr. 906008
Brushless-Motor Shooter
(motor sin escobilla) 10T SL
Art.-Nr. 906010
Ventilador de refrigeración para
regulador sin escobillas
Art.-Nr. 906028
CARSON DRAGSTER Brushless-Regler 906008+906056
Brushless-Motor Shooter
(motor sin escobilla) 12T SL
Art.-Nr. 906009
Brushless-Motor Shooter
(motor sin escobilla) 8T SL
Art.-Nr. 906011
Enchufe de contacto de oro
4 mm, Art.-Nr. 13327
Page 80

15. Accesorios optativos
Regulador Dragster PRO sin
escobilla – brushless sensor
Art.-Nr. 906056
E
Brushless-Motor (motor sin
escobilla) 4,5T S, Art.-Nr. 906058
Brushless-Motor (motor sin
escobilla) 6,5T S, Art.-Nr. 906060
80
CARSON DRAGSTER Brushless-Regler 906008+906056E81
Brushless-Motor
(motor sin escobilla) 3,5T S
Art.-Nr. 906057
Brushless-Motor (motor sin
escobilla) 5,5T S, Art.-Nr. 906059
Brushless-Motor (motor sin
escobilla) 10,5T S, Art.-Nr. 906061
Page 81

Cable de sensores sin escobilla
– brushless 100 mm
Art Nr. 906012
Enchufe de contacto de oro
4 mm
Art.-Nr. 13327
CARSON DRAGSTER Brushless-Regler 906008+906056
Ventilador de refrigeración para
regulador sin escobillas
Art.-Nr. 906028
Page 82

Caro Cliente
Ci congratuliamo con lei per l’acquisto di questo set CARSON,
che è stato progettato secondo gli ultimi ritrovati della tecnica. Per
mantenere sempre aggiornati i nostri prodotti ci riserviamo il diritto
di effettuare qualsiasi aggiornamento tecnico atto a migliorarne le
qualità senza alcun preavviso. Alcune caratteristiche tecniche di
questo prodotto possono perciò essere diverse da quelle illustrate in
questo manuale o sulla scatola.
Questo manuale fa parte di questo prodotto. In caso che non doveste
seguire le istruzioni e le avvertenze di sicurezza riportate in questo
manuale scade il diritto di garanzia.
Conservate questo manuale per la rilettura e per un’eventuale
inoltrare di questo modello a terzi.
Condizioni di Garanzia
Questo prodotto è garantito da CARSON, da difetti di fabbricazione
nei materiali e lavorazioni, riscontrati nel normale utilizzo del modello,
per 24 mesi dalla data di acquisto presso un rivenditore autorizzato.
In caso di prodotto difettoso durante il periodo di garanzia, recarsi
con il prodotto e lo scontrino o ricevuta presso qualsiasi rivenditore
CARSON. CARSON a sua discrezione, provvederà in accordo alle
normative vigenti:
(a) riparare il prodotto senza addebitare nulla;
(b) sostituire il prodotto con un altro uguale o di simili caratteristiche,
o
I
(c) rimborsare il prezzo di acquisto.
Tutte le parti sostituite o rimborsate diventano di proprietà della
CARSON. Le parti nuove sostituite o riparate possono essere
utilizzate per il servizio di garanzia. Le parti riparate o sostituite in
garanzia sono a loro volta coperti da garanzia.
82
CARSON DRAGSTER Brushless-Regler 906008+906056I83
Page 83

Dalla garanzia sono esclusi:
Danni o guasti causati da eventi naturali, normale usura, abusi,
incidenti, utilizzo non corretto, inosservanza delle istruzioni,
montaggio non corretto, imperizia dell’utilizzatore, mancanza di
manutenzione, fulmini o altri incidenti causati da eccesso di
voltaggio;
Tutte le riparazioni non effettuate da personale autorizzato CARSON.
Le parti di consumo e le batterie danni estetici non funzionali
trasporto, spedizione o costi assicurativi costi di ritiro del prodotto,
installazioni, regolazioni e reinstallazioni. La garanzia in ogni caso è
applicata in conformità alle vigenti norme nello stato dove il prodotto
è stato acquistato.
Non è consentito lo smaltimento tra i rifiuti domestici!
E allora buon divertimento con il set
brushless CARSON!
Prima di utilizzare il nuovo regolatore per
motori brushless Carson DRAGSTER, leggere
attentamente il presente manuale!
CARSON DRAGSTER Brushless-Regler 906008+906056
Page 84
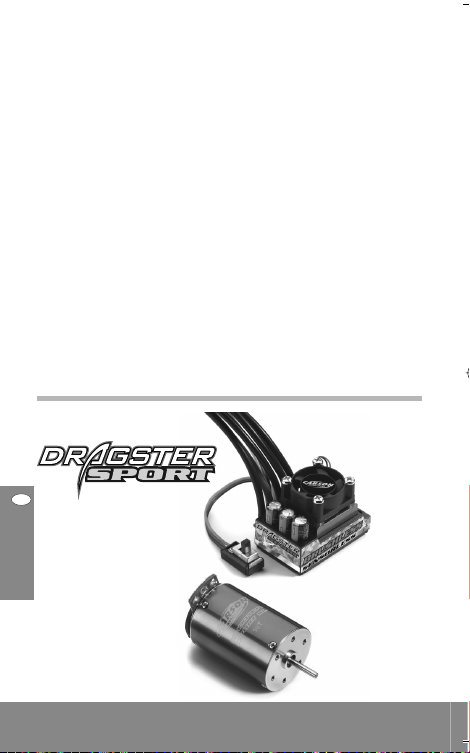
Contenuto
Prefazione .......................................................................................... 82
Contenuti del kit ................................................................................84
IMPORTANTE!!!! ................................................................................. 86
1. Impostazioni di base del trasmettitore ......................................86
2. Allineamento del regolatore con il trasmettitore a distanza .....88
3. Figura Regolatore senza sensori di posizione........................... 89
4. Figura Regolatore con sensori di posizione .............................. 90
5. Indicatore LED nella modalità normale ...................................... 91
6. Preimpostazioni di fabbrica del regolatore ................................ 91
7. Regolazione del regolatore di marcia elettronico ...................... 92
8. Selezione del tipo di batteria ...................................................... 93
9. Selezione marcia in avanti-frenata-retromarcia „Prova“/
Marcia in avanti-frenata „Modalità di corsa“ ............................. 94
10. Impostazione della potenza frenante max................................. 95
11. Impostazione del Dragbrake (freno motore) .............................. 96
12. Impostazione Dead-Band ........................................................... 97
13. Selezione di un profilo conducente predefinito
(impostazioni della leva del gas/freno) ...................................... 98
14. Accessori opzionali DRAGSTER Sport ...................................... 99
15. Accessori opzionali DRAGSTER Pro .......................................100
Contenuti del kit
I
906014 Set
composto da:
906008 Regolatore
Dragster Sport SL
906010 BL Motore 10T
84
CARSON DRAGSTER Brushless-Regler 906008+906056I85
Page 85

906007 Set
composto da:
906008 Regolatore
Dragster Sport SL
906009 BL Motore 12T
906055 Set
composto da:
906056 Regolatore
Dragster PRO S
906060 BL Motore 6,5T
CARSON DRAGSTER Brushless-Regler 906008+906056
Page 86

IMPORTANTE!!!!
Prima del primo utilizzo del nuovo regolatore per motori brushless
DRAGSTER, prestare attenzione ai seguenti punti:
• Prima di utilizzare il nuovo regolatore per motori brushless
CARSON DRAGSTER, leggere attentamente il presente manuale!
• Prestare sempre attenzione al rapporto di trasmissione corretto.
Non utilizzare il rapporto di trasmissione troppo a lungo.
• Utilizzare esclusivamente motori CARSON SHOOTER BL originali.
Per il regolatore Pro, utilizzare solo motori con sensori di
posizione; per il regolatore Sport utilizzare invece esclusivamente
motori senza sensori di posizione.
• Se il ventilatore di raffreddamento è guasto, impostare subito la
modalità di marcia.
• Non invertire la polarità dei cavi della batteria (più e meno).
Nessuna garanzia in caso di cortocircuito.
• Scegliere il giusto tipo di batteria e di protezione di minima
tensione (Cut-Off).
1. Impostazioni di base del trasmettitore
Per evitare di compromettere il funzionamento del regolatore di
marcia elettronico a causa dei dati immessi nel trasmettitore,
prima della programmazione del regolatore di marcia è necessario
ripristinare determinate impostazioni sul trasmettitore a distanza.
• Posizionare il fi necorsa superiore per servo freno e servo gas su
max., selezionando il valore massimo per l’impostazione EPA /ATV
superiore.
I
• Posizionare anche il fi necorsa inferiore per servo freno e servo
gas sulla posizione massima, selezionando il valore massimo per
l’impostazione EPA /ATV inferiore.
• Portare l’assetto della leva del gas e del freno nella posizione
centrale.
• Selezionare la posizione di folle della leva del gas e del freno:
Per le corse di prova, ad esempio a pieno gas/frenata 50/50
(con retromarcia)
Per la modalità di corsa, ad esempio a pieno gas/frenata 70/30
(senza retromarcia)
86
CARSON DRAGSTER Brushless-Regler 906008+906056I87CARSON DRAGSTER Brushless-Regler 906008+906056
Page 87

Page 88

2. Allineamento del regolatore con il
trasmettitore a distanza
• Accendere il trasmettitore.
• Collegare il regolatore all’alimentazione.
• Tenere premuto il tasto SET e accendere il regolatore con il
pulsante ON/OFF; viene emesso un segnale acustico.
Il LED blu si accende.
• Portare la leva del gas/freno nella posizione di pieno gas.
Il LED rosso e il LED giallo lampeggiano brevemente prima di
emettere una luce continua. Viene emesso un segnale acustico.
La posizione di pieno gas viene memorizzata.
• Arretrare completamente la leva del gas/freno.
Il LED giallo e il LED blu lampeggiano brevemente prima di
emettere una luce continua. Vengono emessi due segnali acustici.
La posizione del freno viene memorizzata.
• Portare la leva del gas/freno nella posizione di folle.
Il LED rosso e il LED verde lampeggiano brevemente prima di
emettere una luce continua. Vengono emessi tre segnali acustici.
• L’allineamento termina e tutti i LED si spengono.
• Spegnere il regolatore.
Alla successiva riaccensione, il regolatore di marcia è già allineato
con il trasmettitore ed è pertanto pronto per l’uso.
I
88
Se il modello RC-CAR si muove in retromarcia
azionando la marcia in avanti del trasmettitore, scambiare
CARSON DRAGSTER Brushless-Regler 906008+906056I89
2 dei 3 cavi del motore.
Page 89

3. Figura Regolatore senza sensori di posizione
black
black
schwarz
+
ON/OFF switch and SET-button
EIN/AUS Schalter und SET-Taste
To receiver
Zum Empfänger
black
schwarz
schwarz
-
black
schwarz
red
To battery
Zum Akku
CARSON DRAGSTER Brushless-Regler 906008+906056
rot
Page 90

4. Figura Regolatore con sensori di posizione
blue • blau
yellow • gelb
orange
Sensor wire • Sensorkabel
I
90
ON/OFF switch and SET-button
EIN/AUS Schalter und SET-Taste
To receiver
Zum Empfänger
CARSON DRAGSTER Brushless-Regler 906008+906056I91
+
To battery
Zum Akku
-
red
black
schwarz
rot
Page 91

5. Indicatore LED nella modalità normale
Il LED verde è acceso: Corsa di prova (retromarcia ON)
LED giallo acceso: Modalità di corsa (retromarcia OFF)
Tutti i LED lampeggiano: Cavo sensore allentato o non collegato,
Il regolatore di marcia non funziona! (Solo
con regolatore di marcia con sensore!)
Alla prima messa in funzione del regolatore di marcia, la protezione
di minima tensione (Cut-Off) è disattiva visto che dipende dal tipo di
batteria in uso. La protezione di minima tensione viene attivata solo
dopo avere scelto il tipo di batteria:
Il LED rosso lampeggia: Protezione di minima tensione ON
NiCd/NiMH:
Il LED lampeggia se la tensione della
batteria è pari o inferiore a 4 V, il motore
rimane in funzione.
LiPo a due o tre celle:
Il LED lampeggia se la tensione della
batteria è pari o inferiore a 3,0 V per cella.
Il motore funziona solo con una potenza
dimezzata.
Mettere il modellino fuori servizio e caricare
la batteria!
6. Preimpostazioni di fabbrica del regolatore
Protezione di minima tensione OFF
Retromarcia max. 25%
Forza frenante max. 30%
Quota Dragbrake in posizione
di folle della leva del gas/freno 10%
Dead Band Livello 3
Commutazione
Frenata/retromarcia Dopo il rilascio del freno e il nuovo
arretramento della leva del gas/freno
dalla posizione di folle
CARSON DRAGSTER Brushless-Regler 906008+906056
Page 92

7. Regolazione del regolatore di marcia
elettronico
Il regolatore di marcia può essere messo subito in funzione dopo
l’allineamento con il trasmettitore. Alcuni parametri possono tuttavia
essere adattati alle condizioni specifiche. La programmazione del
regolatore avviene mediante il tasto SET. Con il tasto premuto, i
diversi LED o combinazioni di LED lampeggeranno in successione.
Ogni combinazione di LED indica un determinato menu di selezione
che può essere selezionato e impostato rilasciando il tasto SET una
volta visualizzata la combinazione desiderata.
A disposizione:
• Tipo di batteria (NiCd/NiMH, LiPo), Cut-Off
• Corsa di prova/modalità di corsa
• Potenza frenante 0% - 70%
• Percentuale del freno di stazionamento della leva del gas/freno
0% - 45%
• Dead Band Livello 1 – 5
• Profi lo conducente 1 – 5: selezione tra quattro diverse
preimpostazioni per gas/freno.
Il Profilo 5 ripristina le preimpostazioni di fabbrica del regolatore di
marcia.
Le varie voci di menu prevedono diverse possibilità di impostazione.
Queste si differenziano per la frequenza di lampeggio di uno o più
LED e possono essere selezionate premendo il tasto SET.
Se si seleziona questa voce di menu, il LED o i LED lampeggiano con
la frequenza della selezione precedentemente impostata.
I
92
CARSON DRAGSTER Brushless-Regler 906008+906056I93
Page 93

8. Selezione del tipo di batteria
Selezionando un tipo di batteria, viene attivata la protezione di
minima tensione (NiCd/NiMH: a 4V o inferiore, LiPo a due o tre celle:
a 3,0 V per cella o inferiore).
Per operare senza protezione di minima tensione (Cut-Off), nel profilo
del conducente selezionare il Profilo 5 (ripristino delle impostazioni di
fabbrica) e adattare gli altri parametri alle esigenze specifiche.
Frequenza di
lampeggio
Tipo di batteria NiCd/NiMH LiPo
• Accendere per primo il trasmettitore, quindi il regolatore!
• Tenere premuto il tasto SET fi no all’accensione del LED rosso.
Rilasciare il tasto SET
• Il LED rosso inizia a lampeggiare. Questo sta ad indicare che ci si
trova nella modalità di impostazione del tipo di batteria.
• Premere ancora una volta brevemente il tasto SET per accedere
al valore di impostazione successivo. Il LED rosso lampeggia con
una frequenza superiore.
• Premendo di nuovo brevemente il tasto, è possibile scorrere i
valori di impostazione in un elenco a discesa.
• Una volta raggiunto il valore desiderato, tenere premuto il tasto
SET per circa 2 secondi. L’impostazione verrà salvata.
• Dopo avere salvato l’impostazione, i LED di stato lampeggiano
in successione per indicare che si sta uscendo dalla modalità di
programmazione. Il regolatore è di nuovo pronto per l’uso.
• Se il tasto SET non viene
premuto per più di 10
secondi, il regolatore
ritorna alle ultime
impostazioni ed è
nuovamente pronto per
l’uso.
123
(2 celle)
LiPo
(3 celle)
CARSON DRAGSTER Brushless-Regler 906008+906056
Page 94

9. Selezione marcia in avanti-frenata-
retromarcia „Prova“/ Marcia in avanti frenata „Modalità di corsa“
Frequenza di
lampeggio
Direzione di
marcia
• Tenere premuto il tasto SET fi no all’accensione del LED blu.
Rilasciare il tasto SET.
• Il LED blu inizia a lampeggiare. Questo sta ad indicare che ci si
trova nella modalità di impostazione della direzione di marcia.
• Premere ancora una volta brevemente il tasto SET per accedere al
valore di impostazione successivo. Il LED blu lampeggia con una
frequenza superiore.
• Premendo di nuovo brevemente il tasto, è possibile scorrere i
valori di impostazione in un elenco a discesa.
• Una volta raggiunto il valore desiderato, tenere premuto il tasto
SET per circa 2 secondi. L’impostazione verrà salvata.
• Dopo avere salvato l’impostazione, i LED di stato lampeggiano
in successione per indicare che si sta uscendo dalla modalità di
programmazione. Il regolatore è di nuovo pronto per l’uso.
• Se il tasto SET non viene premuto per più di 10 secondi, il
regolatore ritorna alle ultime impostazioni ed è nuovamente pronto
per l’uso.
I
12
solo marcia in
avanti
Modalità di corsa
marcia in avanti e
retromarcia
Corsa di prova
94
CARSON DRAGSTER Brushless-Regler 906008+906056I95
Page 95

10. Impostazione della potenza frenante max.
Frequenza di
lampeggio
Potenza
frenante
(%)
• Tenere premuto il tasto SET fi no all’accensione del LED blu e del
LED verde. Rilasciare il tasto SET.
• Il LED blu e il LED verde iniziano a lampeggiare. Questo sta ad
indicare che ci si trova nella modalità di impostazione della
potenza frenante max.
• Premere brevemente il tasto SET più volte fi no a raggiungere
l’impostazione desiderata. Il LED blu e il LED verde lampeggiano
con una frequenza superiore.
• Premendo di nuovo brevemente il tasto, è possibile scorrere i
valori di impostazione in un elenco a discesa.
• Una volta raggiunto il valore desiderato, tenere premuto il tasto
SET per circa 2 secondi. L’impostazione verrà salvata.
• Dopo avere salvato l’impostazione, i LED di stato lampeggiano
in successione per indicare che si sta uscendo dalla modalità di
programmazione. Il regolatore è di nuovo pronto per l’uso.
• Se il tasto SET non viene premuto per più di 10 secondi, il
regolatore ritorna alle ultime impostazioni ed è nuovamente pronto
per l’uso.
12345678910
10 20 30 40 45 50 55 60 65 70
CARSON DRAGSTER Brushless-Regler 906008+906056
Page 96

11. Impostazione del Dragbrake
(freno motore)
Con il Dragbrake è possibile simulare l’attrito delle spazzole di
carbonio del motore.
Frequenza di
lampeggio
Dragbrake
(%)
• Tenere premuto il tasto SET fi no all’accensione del LED blu e del
LED giallo. Rilasciare il tasto SET.
• Il LED blu e il LED giallo iniziano a lampeggiare. Questo sta ad
indicare che ci si trova nella modalità di impostazione del freno di
stazionamento.
• Premere brevemente il tasto SET più volte fi no a raggiungere
l’impostazione desiderata. Il LED blu e il LED giallo lampeggiano
con la frequenza superiore.
• Premendo di nuovo brevemente il tasto, è possibile scorrere i
valori di impostazione in un elenco a discesa.
• Una volta raggiunto il valore desiderato, tenere premuto il tasto
SET per circa 2 secondi. L’impostazione verrà salvata.
• Dopo avere salvato l’impostazione, i LED di stato lampeggiano
in successione per indicare che si sta uscendo dalla modalità di
programmazione. Il regolatore è di nuovo pronto per l’uso.
• Se il tasto SET non viene premuto per più di 10 secondi, il
regolatore ritorna alle ultime impostazioni ed è nuovamente pronto
per l’uso.
I
1 2345678910
OFF 5 1015202530354045
96
CARSON DRAGSTER Brushless-Regler 906008+906056I97
Page 97

12. Impostazione Dead-Band
L’impostazione Dead-Band consente di adattare il regolatore di
marcia al trasmettitore in uso modificano il campo di passaggio dalla
marcia in avanti alla potenza frenante. Il livello 1 indica un campo di
passaggio ridotto che richiede segnali precisi da parte del
trasmettitore. Per il passaggio più ampio del livello 5 bastano anche
impianti di trasmissione semplici.
Frequenza di
lampeggio
Dead Band (%) 23456
• Tenere premuto il tasto SET fi no all’accensione del LED blu e del
LED rosso. Rilasciare il tasto SET.
• Il LED blu e il LED rosso iniziano a lampeggiare. Questo sta ad
indicare che ci si trova nella modalità di impostazione del ritardo
di commutazione Dead-Band.
• Premere brevemente il tasto SET più volte fi no a raggiungere
l’impostazione desiderata. Il LED blu e il LED rosso lampeggiano
con una frequenza superiore.
• Premendo di nuovo brevemente il tasto, è possibile scorrere i
valori di impostazione in un elenco a discesa.
• Una volta raggiunto il valore desiderato, tenere premuto il tasto
SET per circa 2 secondi. L’impostazione verrà salvata.
• Dopo avere salvato l’impostazione, i LED di stato lampeggiano
in successione per indicare che si sta uscendo dalla modalità di
programmazione. Il regolatore è di nuovo pronto per l’uso.
• Se il tasto SET non viene premuto per più di 10 secondi, il
regolatore ritorna alle ultime impostazioni ed è nuovamente pronto
per l’uso.
12345
CARSON DRAGSTER Brushless-Regler 906008+906056
Page 98

13. Selezione di un profilo conducente
predefinito (impostazioni della leva del
gas/freno)
I profili 1 - 4 non influiscono sulla protezione di minima tensione
impostata durante la selezione del tipo di batteria.
Profilo
conducente
Cut-Off
Retromarcia No Sì Sì No Sì
Percentuale
di
retromarcia
Potenza
frenante
max.
Freno di stazionamento
Dead Band 3 3 4 4 3
• Tenere premuto il tasto SET fi no all’accensione di tutti i LED.
Rilasciare il tasto SET.
• Tutti i LED iniziano a lampeggiare. Questo sta ad indicare che ci si
trova nella modalità di impostazione del profi lo conducente.
• Premere brevemente il tasto SET più volte fi no a raggiungere
l’impostazione desiderata. Tutti i LED lampeggiano con una
frequenza superiore.
I
• Premendo di nuovo brevemente il tasto, è possibile scorrere i
valori di impostazione in un elenco a discesa.
• Una volta raggiunto il valore desiderato, tenere premuto il tasto
SET per circa 2 secondi. L’impostazione verrà salvata.
• Dopo avere salvato l’impostazione, i LED di stato lampeggiano
in successione per indicare che si sta uscendo dalla modalità di
programmazione. Il regolatore è di nuovo pronto per l’uso.
• Se il tasto SET non viene premuto per più di 10 secondi, il
regolatore ritorna alle ultime impostazioni ed è nuovamente pronto
per l’uso.
1234
come
come
selezionato
selezionato
050500 25
30% 30% 40% 40% 30%
15% 10% 15% - 10%
come
selezionato
come
selezionato
Ripristino
dell’
imposta-
zione
di fabbrica
5
OFF
98
CARSON DRAGSTER Brushless-Regler 906008+906056I99
Page 99

14. Accessori opzionali
Regolatore per motori brushless
Dragster Sport senza sensori
N. art. 906008
Motore brushless Shooter
10T SL, N. art. 906010
Ventilatore di raffreddamento per
regolatore per motori brushless
N. art. 906028
CARSON DRAGSTER Brushless-Regler 906008+906056
Motore brushless Shooter
12T SL
N. art. 906009
Motore brushless Shooter 8T SL
N. art. 906011
Spina con contatti in oro 4mm
N. art. 13327
Page 100

15. Accessori opzionali
Regolatore per motori brushless
PRO Sensor
N. art. 906056
Motore brushless 4,5T S
N. art. 906058
I
Motore brushless 6,5T S
N. art. 906060
100
CARSON DRAGSTER Brushless-Regler 906008+906056I101
Motore brushless 3,5T S
N. art. 906057
Motore brushless 5,5T S
N. art. 906059
Motore brushless 10,5T S
N. art. 906061
 Loading...