

Page 1
DAZZLER RTR
2WD Buggy
mit 3 ccm TOKI Verbrennungsmotor
with 3 ccm TOKI nitro engine
con motor de explosión 3 ccm TOKI
con motore a scoppio „TOKI“ 3 ccm
1,8 kW / 2,5 PS
No. 103003
Page 2
20
WWW. C A R S O N - M O D E L S P O R T.COM
2WD Buggy DAZZLER
Dear Customer
We congratulate you for buying this CARSON RC model car, which is designed using state of the art technology.
According to our policy of steady development and improvement of our products we reserve the right to make changes in
specifications concerning equipment, materials and design of this product at any time without notice.
Specifications or designs of the actual product may vary from those shown in this manual or on the box.
The manual forms part of this product. Should you ignore the operating and safety instructions, the warranty will be void.
Keep this guide for future reference
Limited Warranty
This product is warranted by CARSON against manufacturing defects in materials and workmanship under normal use for
24 months from the date of purchase from authorised franchisees and dealers.
In the event of a product defect during the warranty period, return the product along with your receipt as proof of purchase to
any Carson stockist.
This warranty does not cover:
- damage or failure caused by or attributable to acts of God, abuse, accident, misuse, improper or abnormal usage,
failure to follow instructions, improper installation or maintenance, alteration, lightning or other incidence of excess
voltage or current;
- Damage caused by losing control of your car is not covered under warranty!
- any repairs other than those provided by a CARSON Authorized Service Facility;
- consumables such as fuses or batteries;
- cosmetic damage;
- transportation, shipping or insurance costs; or
- costs of product removal, installation, set-up service adjustment or reinstallation.
This warranty gives you specific legal rights, and you mayalso have other rights which may vary according to the country of
purchase.
Declaration of conformity
Dickie-TAMIYA GmbH&Co KG hereby declares that this model kit with radio, motor, battery and charger is in accordance
with the basic requirements of the following European directives: 98/37EG and 89/336/EWG and other relevant regulations
of guideline 1999/5/EG (R&TTE).The original declaration of conformity can be obtained from the following address:
Dickie-Tamiya GmbH&Co. KG • Werkstraße l • D-90765 Fürth
The product you have purchased is powered by a rechargeable Ni-MH battery. The battery is recyclable. At
the end of its useful life, under various national / state and local laws, it may be illegal to dispose of this battery
into the municipal waste stream. Check with your local solid waste officials for details in your area for recycling
options or proper disposal.
We wish you good luck and a lot of fun with your CARSON model car
Page 3
21
No. 10 3003
09/ 0 6
2WD Buggy DAZZLER
Table of contents
Preface ....................................................................................................................................................... 20
Table of contents....................................................................................................................................... 21
Safety precautions .................................................................................................................................... 22
Description of the model .......................................................................................................................... 23
Package content .................................................................................................................................... 23
Additional items...................................................................................................................................... 24
Transmitter................................................................................................................................................. 25
Control elements.................................................................................................................................... 25
Features of the transmitter..................................................................................................................... 26
Chassis....................................................................................................................................................... 28
Technical data........................................................................................................................................ 28
Start-up....................................................................................................................................................... 29
How to charge the battery...................................................................................................................... 29
Attaching the wheels to the chassis....................................................................................................... 29
Adjusting the carburettor........................................................................................................................ 30
Adjusting the idle speed mix adjusting screw ........................................................................................ 30
Adjusting the main nozzle needle .......................................................................................................... 30
Fueling ................................................................................................................................................... 30
Drive operation .......................................................................................................................................... 31
Starting the RC-system.......................................................................................................................... 31
Starting the engine................................................................................................................................. 31
Switch off engine ................................................................................................................................... 32
Reversing the car................................................................................................................................... 32
How to control your model ..................................................................................................................... 32
Checking the range of the transmitter ................................................................................................... 32
How to change frequencies ................................................................................................................... 33
Recommendations for operation............................................................................................................ 33
Setting of the chassis frame .................................................................................................................... 34
Setting the damping............................................................................................................................... 34
Setting the camber inclination................................................................................................................ 35
Setting the alignment ............................................................................................................................. 35
Trouble shooting ....................................................................................................................................... 36
Appendix .................................................................................................................................................... 74
Exploded view...................................................................................................................................... 74
Spare parts list..................................................................................................................................... 75
Exploded view of the engine .............................................................................................................. 78
Spare parts list (engine)...................................................................................................................... 79
Bedienungsanleitung S. 2 - 19
Instruction Manual p. 20 - 37
Instrucciones p. 38 - 55
Istruzioni d´uso p. 56 - 73
Page 4

22
WWW. C A R S O N - M O D E L S P O R T.COM
2WD Buggy DAZZLER
Safety precautions
Radio controlled models are not toys, operating them has to be learned step by step.
- Children less than 14 years of age should drive the model only together with a supervising adult.
Driving a radio controlled car is a fascinating hobby which has to be practised with the necessary caution and respect.
A radio controlled model car can cause damage and injuries in case of uncontrolled driving conditions and the user is liable
for this.
- Make sure that you have sufficient insurance cover when practising your hobby.
Only a well maintained model will function in a correct manner. Only use approved spare parts and never fit any
unsuitable items.
- It is the user’s responsibility to ensure that the model is functioning correctly and that all nuts, bolts and
screws are properly tightened
Never start driving before you have made sure of the following points:
- Batteries for transmitter and receiver are well charged and of the correct voltage
- Always check the radio operation before starting the car
- Make sure that all Servos respond correctly to the signals of the transmitter.
- All operable parts are in good condition and you have tested their operation.
- You have made sure that all screws are tightened.
- There is no other RC or similar transmitter nearby which could cause interference.
Any further radio signal on the same frequency can cause the loss of control for your model.
Always switch on the transmitter first to avoid any uncontrolled reaction of the receiver to a foreign radio impulse.
- Fully extend the transmitter antenna and make sure that nobody in your environment controls a model with the same
frequency (number on the crystal) and that there is no discernable interference.
- Test runs only outdoors!
To end the operation switch off the receiver first, then the transmitter.
Keep your car away from high voltage cables or radio masts.
- Never use the model when lightning is present.
Atmospheric disturbances can affect the signals of your remote controlling transmitter.
- Do not use the model in wet areas.
- The electrical connections of the model are not waterproof.
Therefore do not drive while raining, snowing, in puddles or wet grass.
- Always avoid running radio control models in restricted, confined or populated areas.
Keep away from roads, highways, people and animals.
- Choose a sufficiently open & large area; it should be free of obstacles.
Do not drive, if you are overtired or your reactivity is impaired in any way.
- Watch your model constantly and do not become distracted.
The body shell should be correctly attached to the vehicle before driving.
- Allow cooling time for the engine components before removing the body shell.
These parts become extremely hot during operation and could cause serious injury.
Pay attention to the charge indicators on your transmitter.
- Ensure that the batteries for the radio and receiver are fully charged and of the correct voltage.
When the batteries are running low you might loose control of your model.
Never mix fully loaded batteries and batteries which have already run low, or batteries of a different capacity at the
same time.
- Never try to charge dry cell batteries.
Only charge the battery when the fuel tank is empty!
If not using the model for a longer time, the rechargeable battery has to be removed.
Fuel
Only use an approved model car glow fuel with the correct oil/methanol/nitro mixture
- The percentage of oil in fuel for plane engines is too low
- Never use vehicle gasoline
Keep the fuel in a secure and safe place and away from children and animals.
- Ensure that the container lid is tightly closed
- Store the fuel in a well ventilated area and away from moisture.
- Keep away from heat sources, naked flames, electrical appliances and batteries.
- Do not smoke
- Clean up any fuel spillages
Use appropriate containers only
- Use a fuel bottle to avoid spilling
Transport and store the model only with an empty tank
- Always empty the tank after use
Avoid skin contact and don´t swallow.
- Contact a physician immediately if you feel unwell!
Dispose of empty fuel containers in an approved manner.
- Never throw empty cans into a fire
Page 5
23
No. 10 3003
09/ 0 6
2WD Buggy DAZZLER
Description of the model
Starting your nitro powered model is made simple by pressing a button on the transmitter.
This button activates the electric on-board starter and the preheating of the glow plug
Reverse gear
A slide switch on the transmitter activates an electric motor on the chassis, so that reversing is possible.
RC system
The RC system is already mounted. Throttle/brake servo and linkage as well as steering servo and steering linkage are
already installed and properly adjusted.
The Fail Safe System in the receiver stops the car, when there is no signal from the transmitter.
Drive
The powerful 3 ccm Toki engine with 1,8 kW (2,5 hp) at 29000 rpm start functions from transmitter via an electric on-board
starter. The rotary valve carburettor is already prepared ready for running at the factory. No further adjustment or break-in is
necessary before starting the engine. Adjustment may change according to the fuel and plug to be used.
The driving power of the engine is transmitted to the differntial gear of the rear axle.
The built-in tank holds 75 ccm.
Chassis frame
The superb chassis frame and the differential gear in the rear axle provide the model with perfect handling.
If you wish to adjust the handling, you can change the camber in both axles as well as the alignment of the front wheels.
The damping is affected by resetting the oil filled shock absorbers in other linkage points and by selecting a higher or lower
s
pring preload.
Dish-wheels with grooved tyres in the front and multi spiked tyres in the back provide perfect lateral guidance and optimal
traction
Chassis
The cradle chassis with RC installation plate made of impact tough plastic offers protection to the components against
stone impact
. Additionally the receiver is placed inside an RC-Box.
The body is cut, painted and with decals.
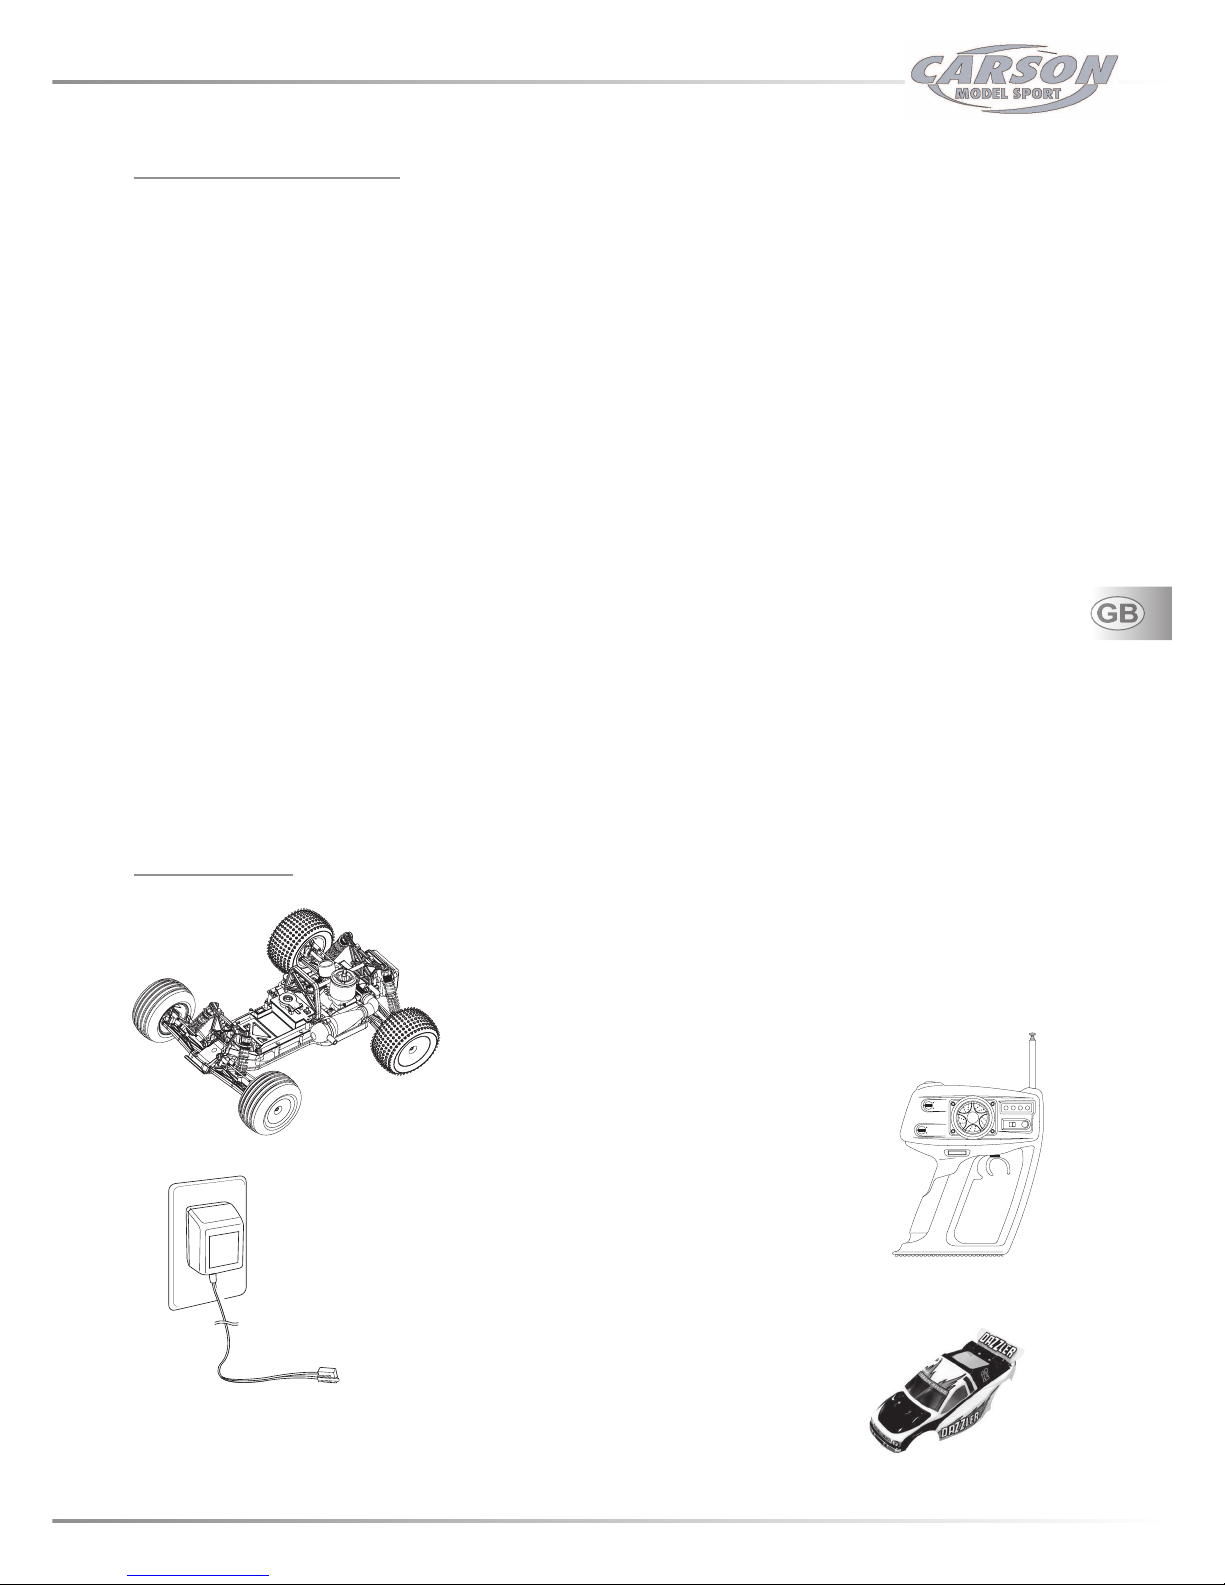
Included items
Cradle chassis with RC installation plate,
3-ccm Toki nitro powered engine
Barrel carburettor and tuning pipe, glow plug
On-board starter and reverse gear
Four dish-wheels
with grooved tyres on the front axle
and multi spiked tyres on the rear
27MHz 4-Channel Pistol grip transmitter
steering servo and throttle/brake servo already mounted
Charger
for NiMH 7,2V / 1300 mA/h battery
for on-board starter system and electrical reverse gear
Body, cut and painted
small parts such as antenna pipe, hook pins, box wrench
instruction manual
Page 6
24
WWW. C A R S O N - M O D E L S P O R T.COM
2WD Buggy DAZZLER
Additional items
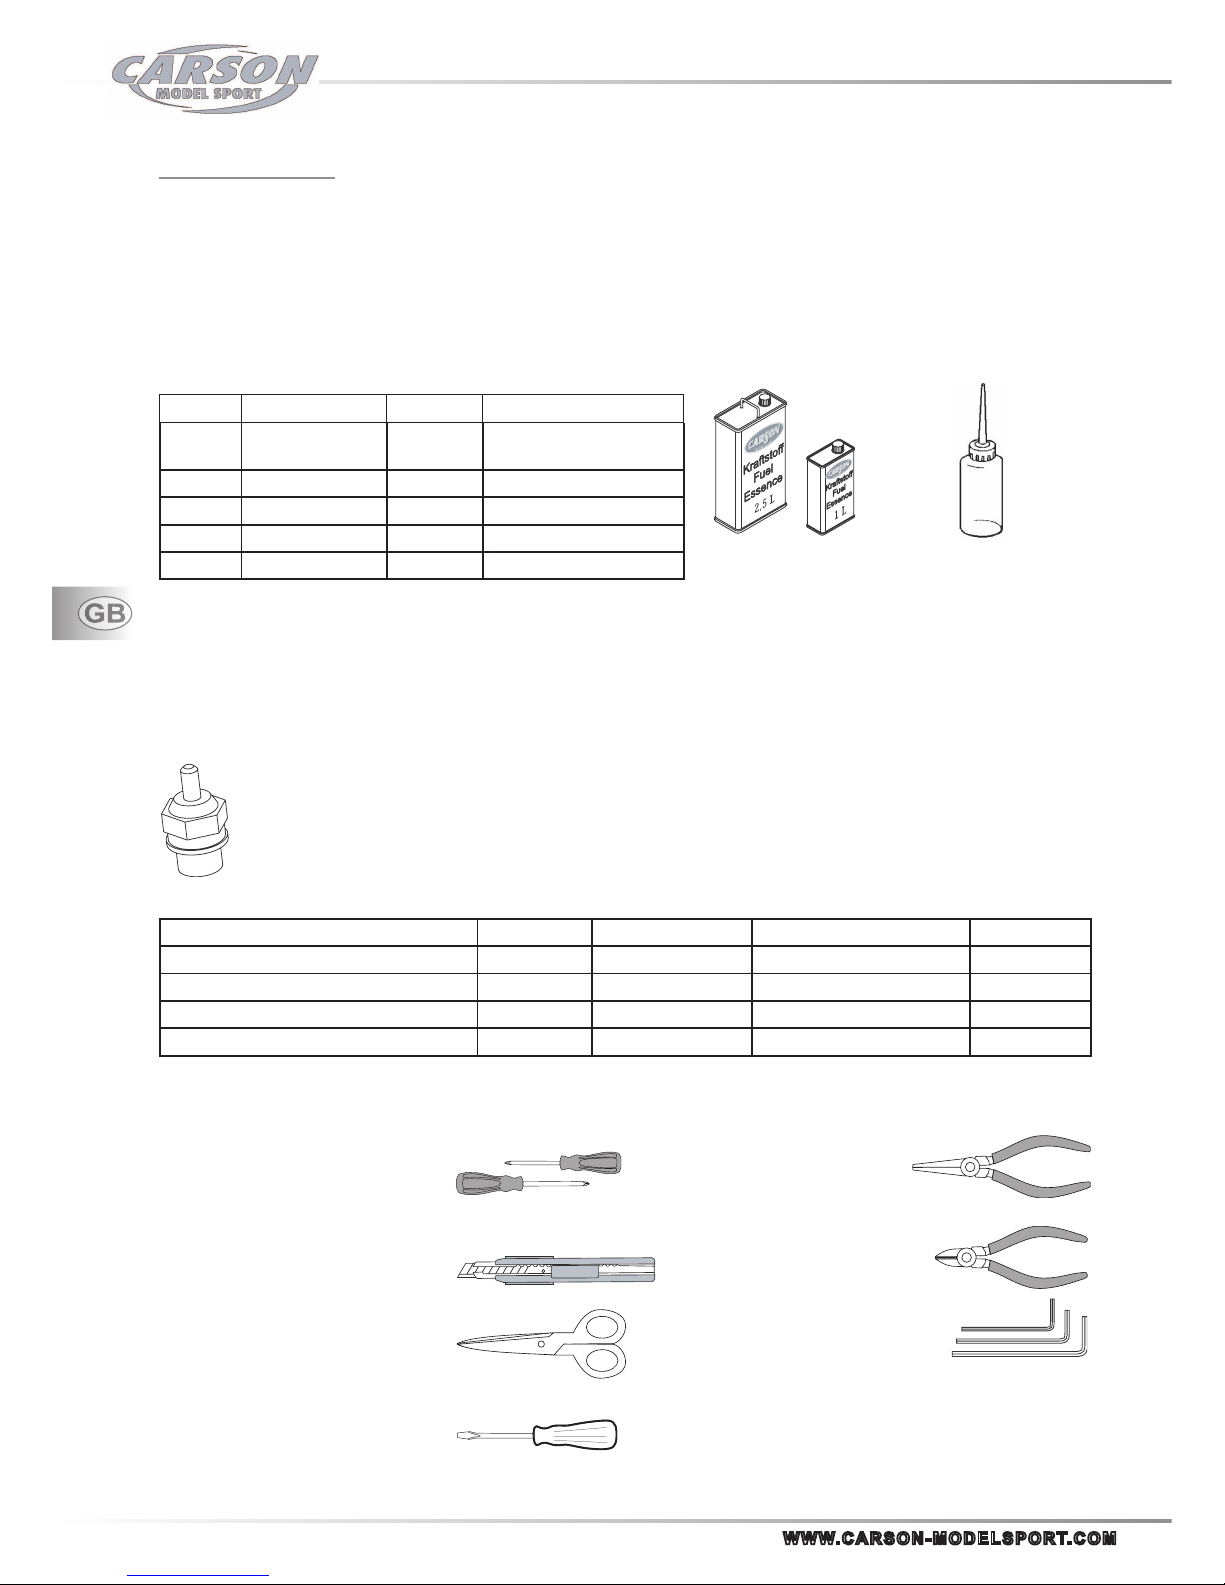
Necessary accessories
Fuel for nitro powered model cars with different percentages of nitromethane.
The lubrication of the engine depends on the percentage of oil, the flammability of
the fuel increases with the percentage of nitro methane.
There are different kinds of fuel available with a different percentage of nitro methane,
depending on usage.
You can buy the fuel for model cars in retailer shops for modelling.
Attention! Avoid skin contact and avoid swallowing!
Liter Nitromethane No. Application
1,0
10% 13934 Breaking-in phase /
Beginners
1,0
16% 13935 Normal
2,5
16% 13936
1,0 25% 13937 Race
2,5
25% 13938
After-run oil No. 905044
After-run-oil protects the cylinder against corrosion. After driving operation put some drops of after-run oil into the carburettor and into the combustion chamber of the engine.
Air filter oil No. 32648
To prevent even fine dust from penetrating into the engine via the air intake wash the air filter and oil it afterwards with air filter oil
before you start driving
Glow plugs
Glow plugs are consumable parts. Choose a glow plug according to the type of engine, the type of fuel and the
temperature of the environment. Never use glow plugs for 4-stroke plane engines! A wrong glow plug lets the
engine run incorrectly and complicates the tuning. In the worst case it destroys the engine.
Glow plug Engine type Fuel type Temperature Item-Nr.
Glow plug Rossi R2 hot 2 - 3,5 ccm w/o Nitro 0°C - +15°C 905006
Glow plug Rossi R6 cold universal 10 - 13% Nitro +10°C - +25°C 905010
Glow plug Rossi R7 cold universal 13 - 15% Nitro +15°C - +30°C 905011
Glow plug Rossi R8 extra cold universal 15 - 30% Nitro +20°C - +40°C 905012
Recommended tools:
- Philips screw driver,
big and small
- Modelling knife
- Scissors
- Screw driver
for the setting of the
carburettor
Fuel bottle
Use a special fuel bottle in order
to avoid spilling fuel
- Needle nose pliers
- Side cutter
- Hexagonal wrenches,
different sizes
Page 7

25
No. 10 3003
09/ 0 6
2WD Buggy DAZZLER
/
.
/&&
Transmitter
Control elements of the 27 MHz 4-Channel remote control
AA X 8 batteries are required for Transmitter (not included)
Steering
Steering trim
Throttle trim
LED
Antenna
Throttle trigger
Charging jack
On/Off-Switch
Throttle reverseSteering reverse
Battery cover
ST.D/R
Steering rate
adjuster
Transmitter crystal
Start button
Slide switch
(reverse gear)
Page 8

26
WWW. C A R S O N - M O D E L S P O R T.COM
2WD Buggy DAZZLER
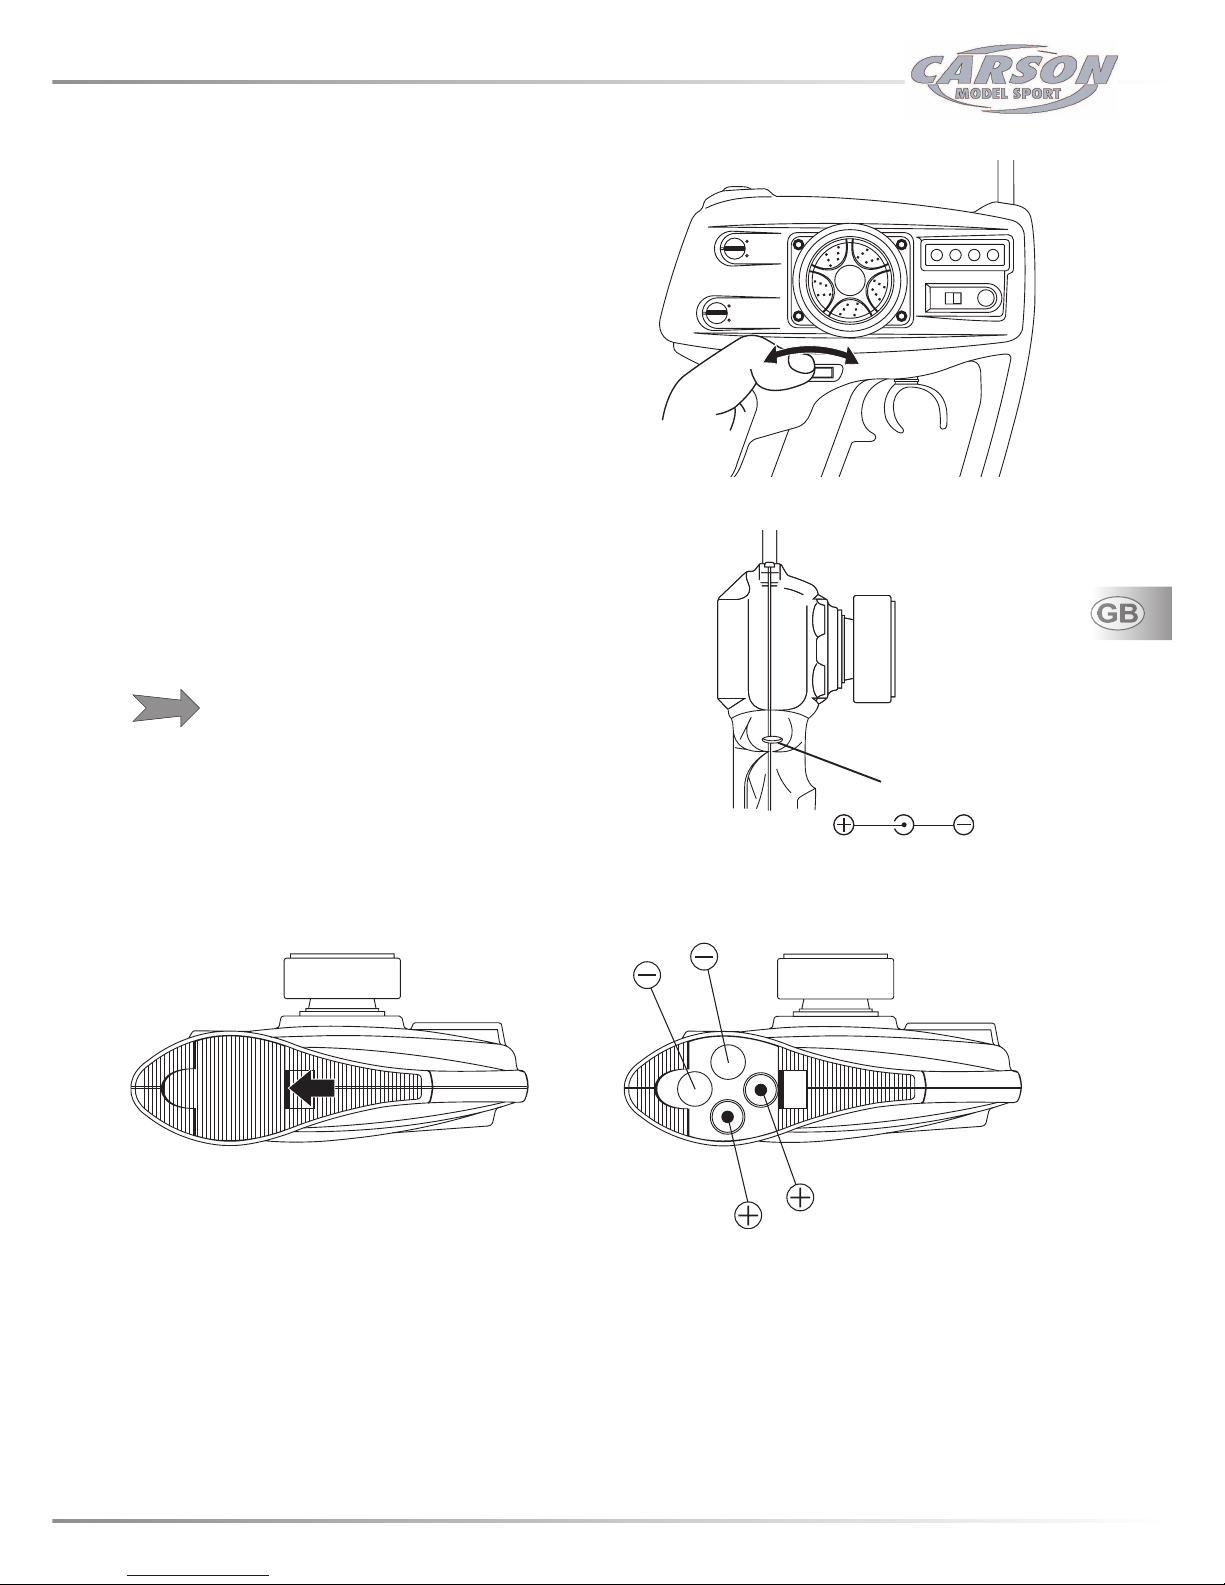
Features of the transmitter
Steering wheel
Steering wheel rotates up to 35 degrees to the right/left.
Throttle trigger
Throttle trigger moves up to 20% travel backwards (brake)
and up to 20% forward travel
Servo Reverse
These reverse switches allow the rotation of the servos to
be reversed. The servos rotate clockwise at NOR position
and rotate counterclockwise at REV position.
Steering trim
Turn the upper rotary knob in order to set the neutral point
of the steering servo.
When you adjust the position of the steering servo, set the
steering rate adjuster (ST.D/R) at the maximum position so
that the movement of the steering rate adjuster is maximized and therefore it is easy to adjust
Throttle trim
Move the trim tab to adjust the throttle servo (or the speed
controller) at the neutral position.
Throttle reverse
Steering reverse
20°
20°
Page 9
27
No. 10 3003
09/ 0 6
2WD Buggy DAZZLER
How to change the transmitter batteries
- Under light pressure in the direction shown pull the cover off. Please be aware that the batteries may pop out when the
cover is opened.
- If the transmitter voltage indicator fails to register, check the contacts, especially the negative (-) terminals and recheck
that batteries are fitted correctly.
- Also make sure the batteries are fully charged.
Steering rate adjuster (ST.D/R)
Strokes of the steering servo horn can be adjusted by
rotating this steering rate adjuster (ST.D/R), in the range
from 10% to 100%.
The bigger the percentage is, the more sensitively
the steering servo operates.
The steering rate adjuster can be rotated in the range of 300°.
- Turning to the right enlarges the steering angle,
- turning to the left decreases the steering angle.
How to charge the transmitter batteries
Note:
ON/OFF Switch should be at „OFF“ position before
charging!
ATTENTION!
Never try to charge dry cell batteries!
Charging jack
Page 10

28
WWW. C A R S O N - M O D E L S P O R T.COM
2WD Buggy DAZZLER
Technical data
Engine:
Toki combustion engine
Displacement 3 ccm
Power 1,8 kW / 2,5 PS
Engine speed 29000 rpm
Power transmission:
Rear wheel drive via universal joint to rear axle
Differential gear in the rear axle
with a one-way bearing, centrifugal clutch
Gear ratio 9,37:1
Chassis: Cradle chassis, extremely light, warp resistant and sturdy
Chassis frame:
Wheel suspension: Twin control arm suspension
Clamping screw in the upper transverse control arm
(inclination front / rear adjustable)
Steering links: Clamping screws right and left, alignment adjustable
Brakes: Drum brake
Suspension: Spring struts with oil dampened shock absorbers,
spring preload via knurled screw, adjustable,
steering point adjustable
Tyre equipment: Front / rear: grooved tyres / multi spiked tyres Ø 104 mm
Servos 80 Ncm
Fuel tank 75 ml
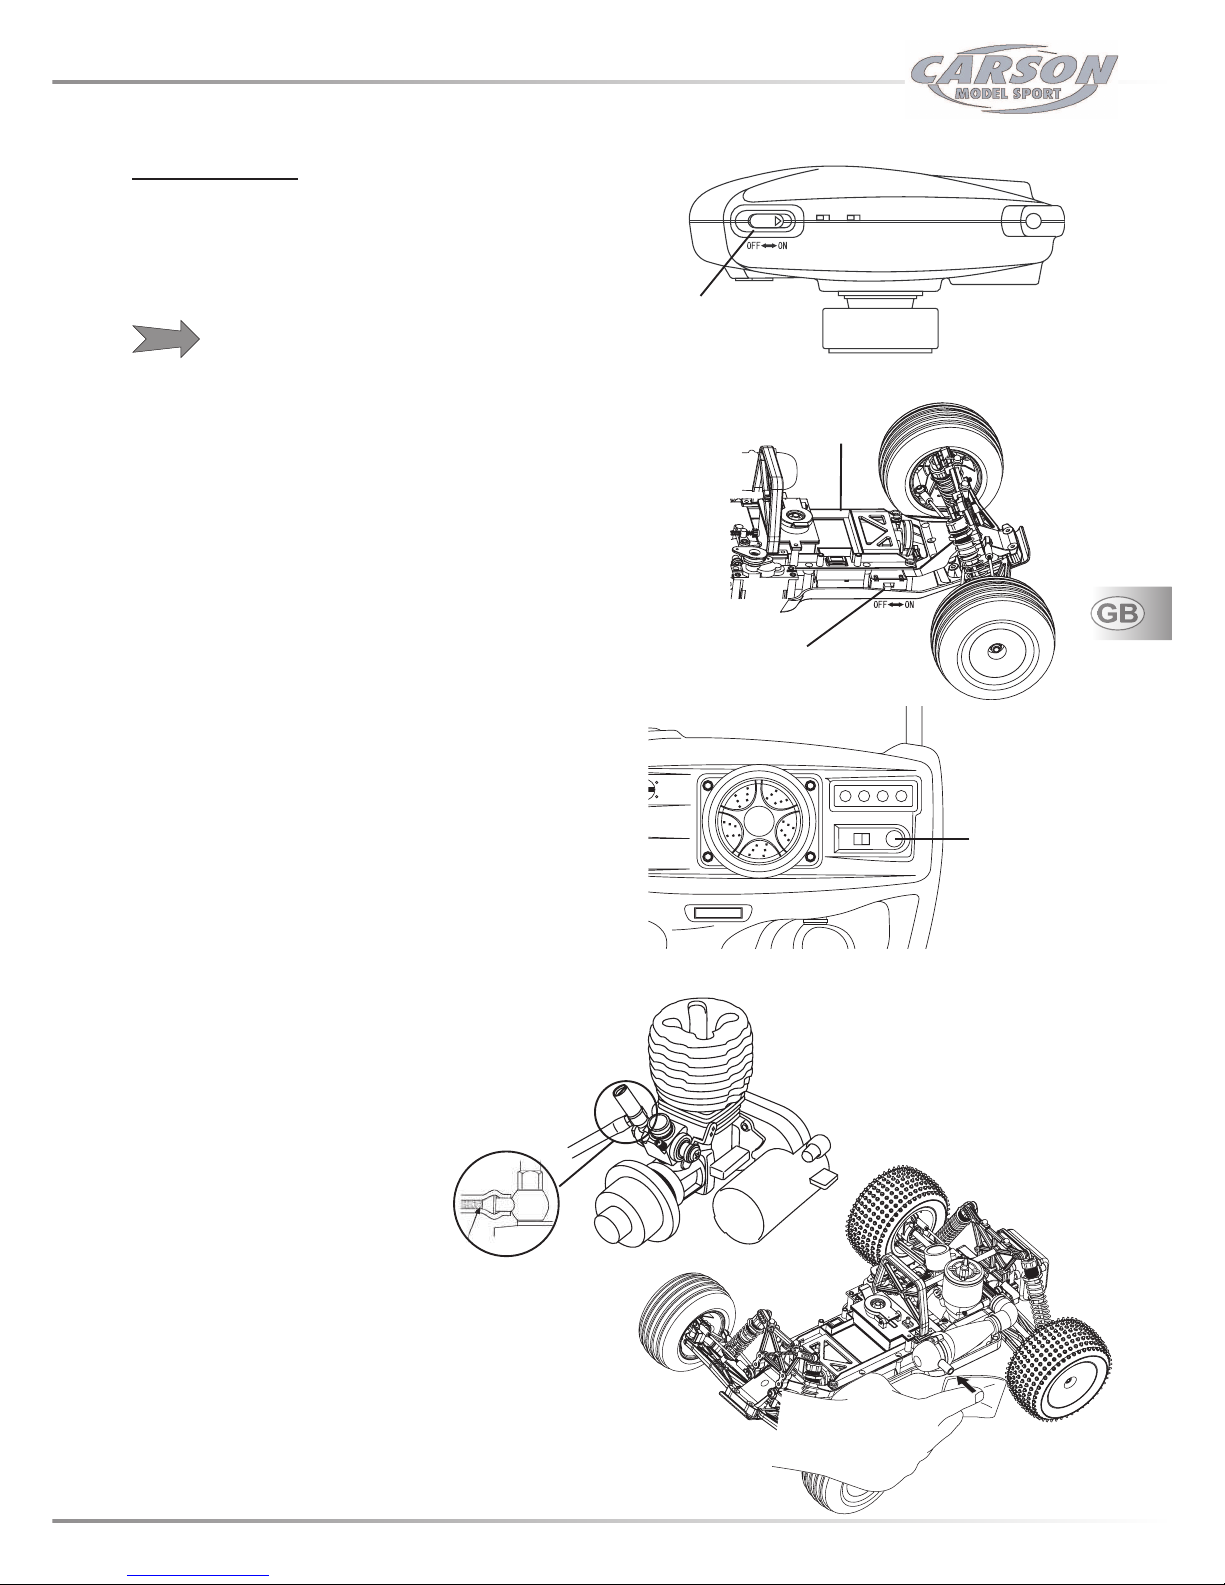
Chassis
Reverse gear
3 ccm combustion
engine
Receiver
On/Off-Switch
Front shock unit
Battery for
on-board starter and
reverse gear
Cradle chassis
Electric motor for
on-board starter and
reverse gear
Tank
Steering servo
Carburettor
Throttle/Brake servo
Total length Wheel base Width Track width Weight
436 mm 284 mm 332 mm f/r 270/266 mm 2150 g
Grooved tyre
Multi spiked tyre
Page 11
29
No. 10 3003
09/ 0 6
2WD Buggy DAZZLER
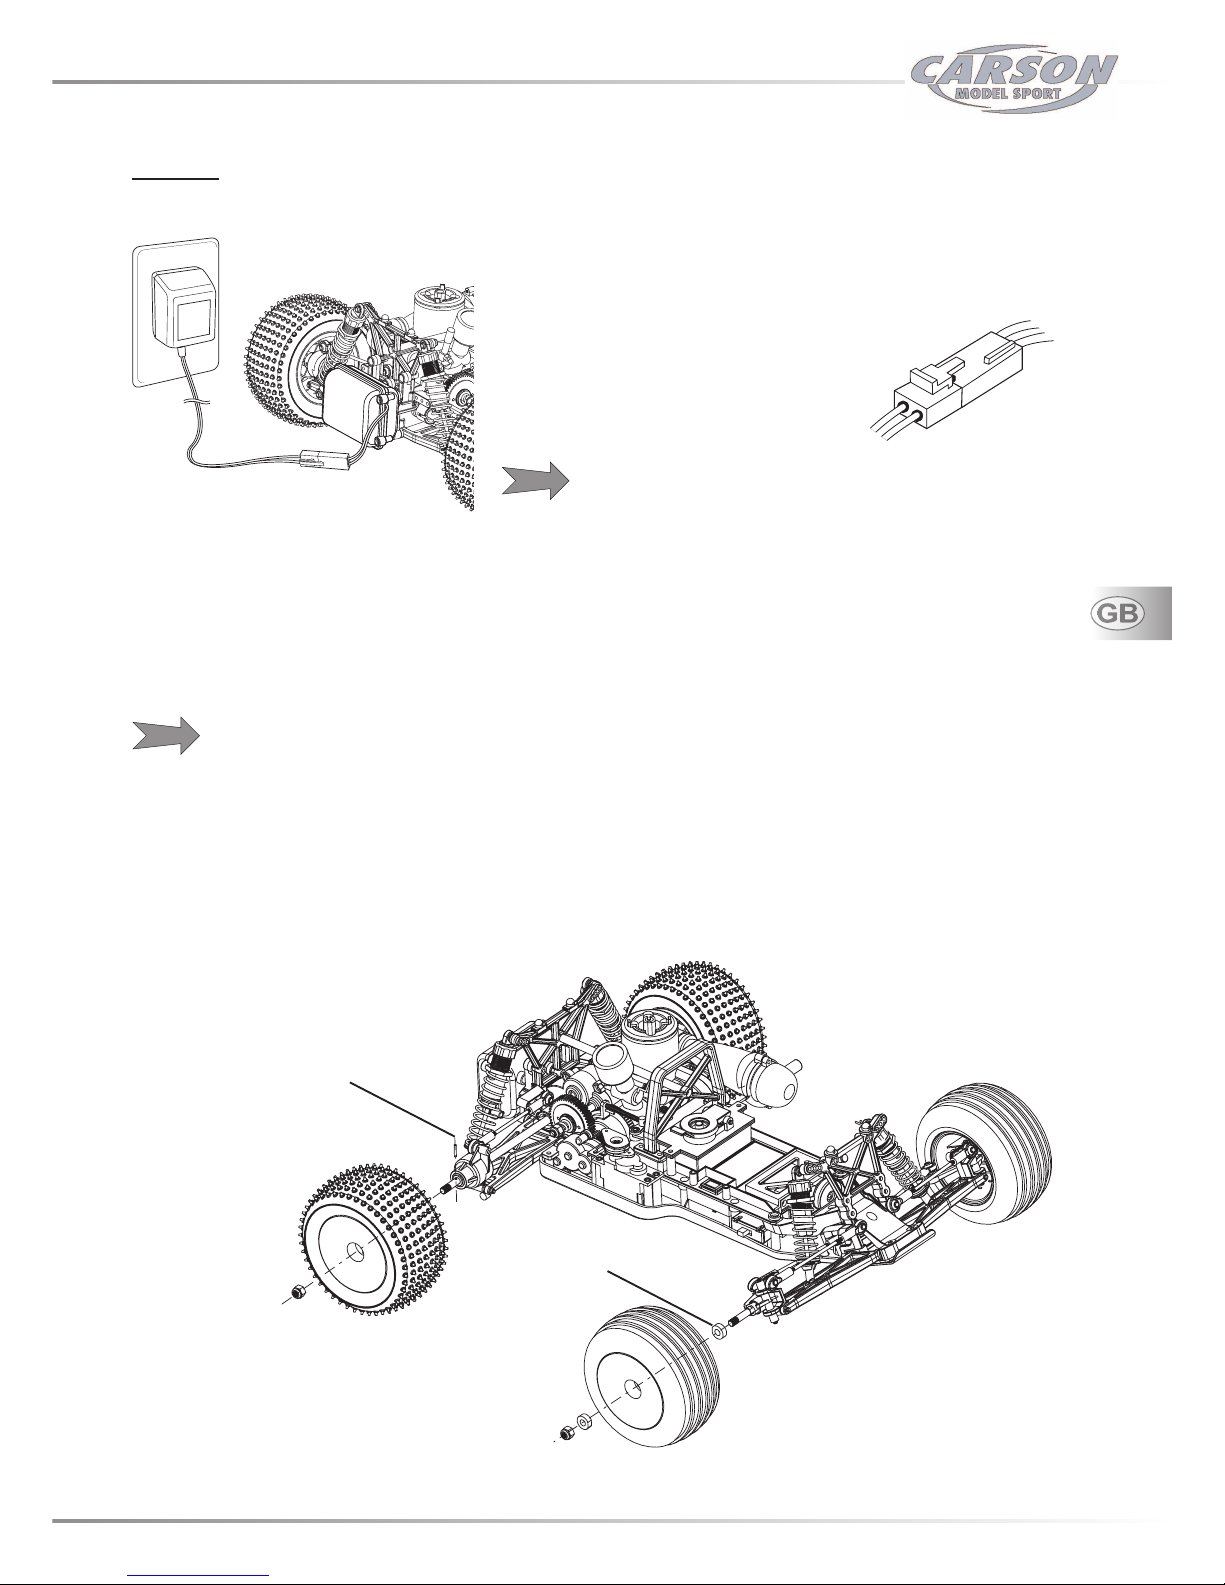
How to charge the on-board battery
T
he on-board battery supplies the receiver as well as the on-board starter
and the electric motor for the reverse driving with the operating voltage.
- Plug the supplied charger into a mains
outlet socket.
- Connect the battery to charger as
indicated.
Do not force the connectors together-
they only attach one way !
The battery is not supplied pre-charged and
has to be charged fully before using
your Dazzler.
Only charge the battery when the fuel tank is empty!
The battery and charger will get warm whilst charging.This is normal.
- Do not charge on, or near to, a material/surface that is flammable or one that can be damaged by heat.
The battery can be re-charged approximately 500 times before it needs replacing.
When the battery no longer holds a charge(is dead), it should be properly recycled. Do not dispose of it in household
waste.
Charging time : 6 hours
Attaching the wheels to the chassis
- Insert the drive pin through the drilling in the wheel axle
- Push the wheel adapter onto the wheel axle and then put on the wheel
- Lock each wheel with a lock nut on the wheel axle
Start-up
Lock nut M8
Drive pin
Wheel adapter
Lock nut M8
Page 12
30
WWW. C A R S O N - M O D E L S P O R T.COM
2WD Buggy DAZZLER
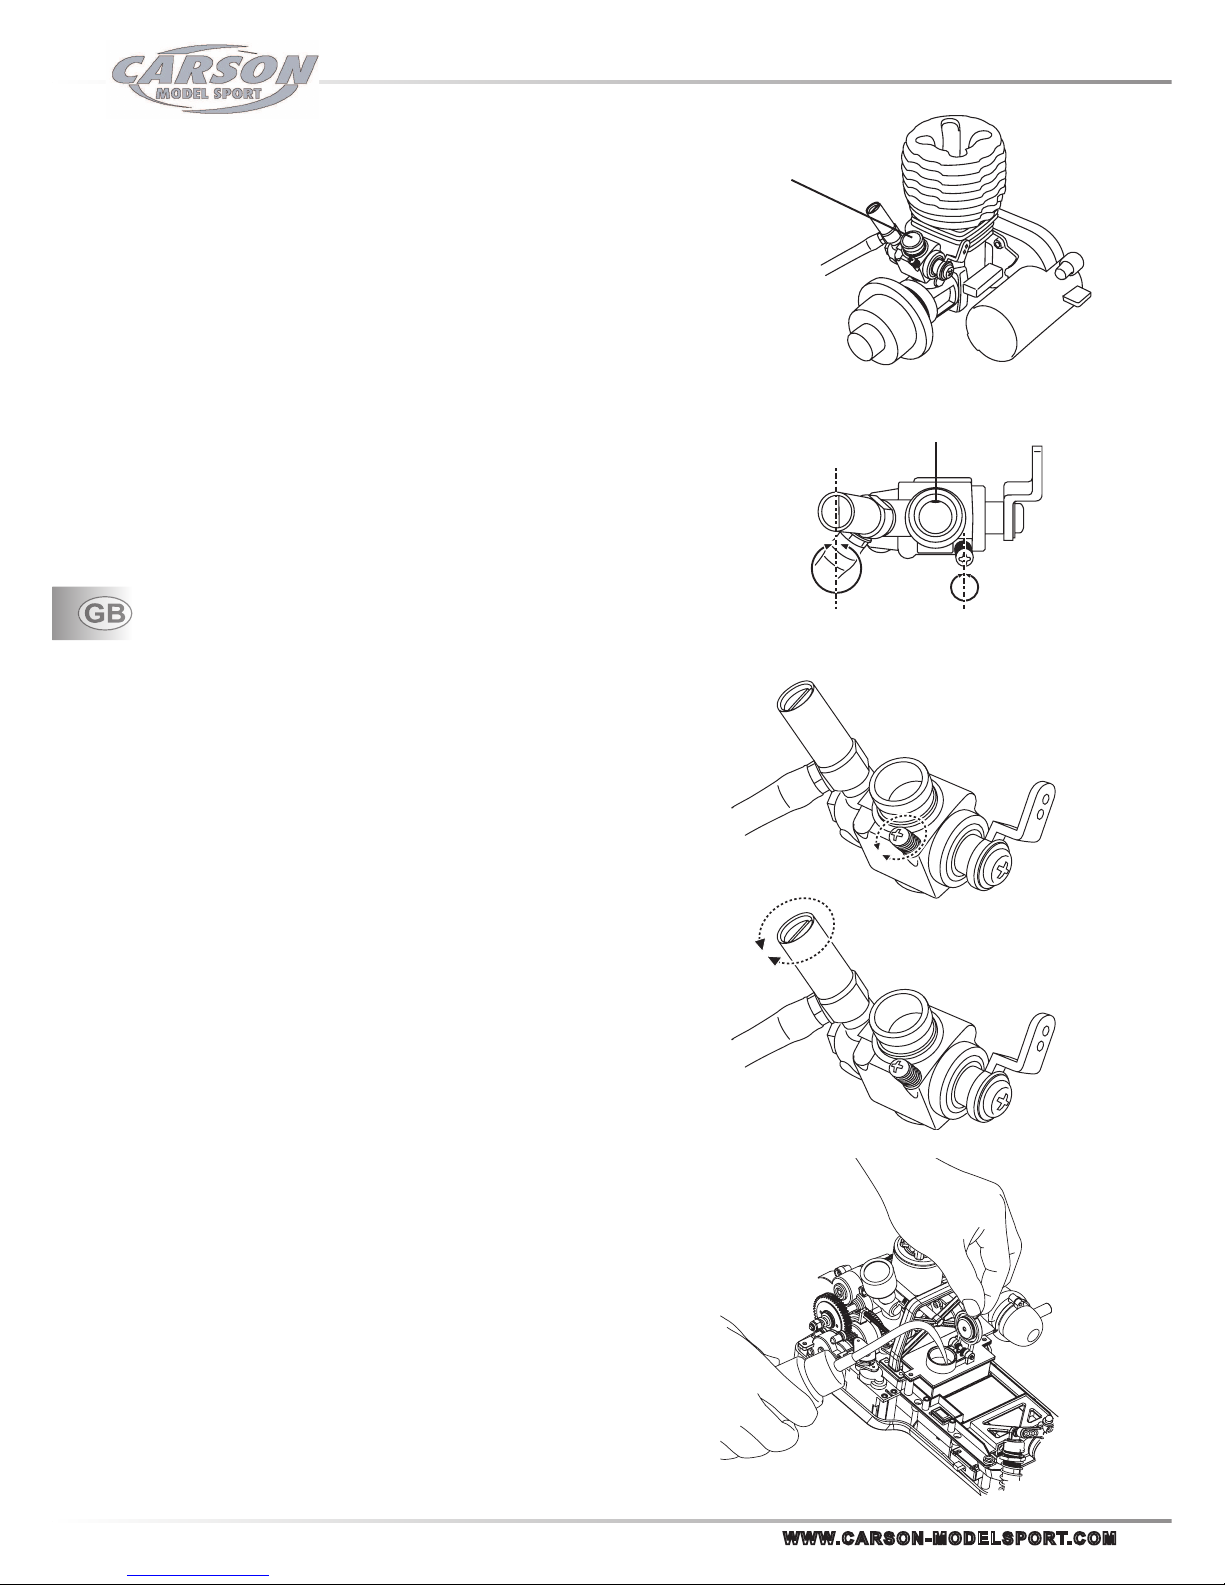
Adjusting the carburettor
The carburettor is already factory set ready to run.
No further adjustment or break-in is necessary before starting the engine.
Adjustment may change according to the fuel and plug to be used as well as
to the weather conditions such as air density and humidity.
To adjust the throttle/brake lever loosen the grub screw of the rod stopper
and reposition them.
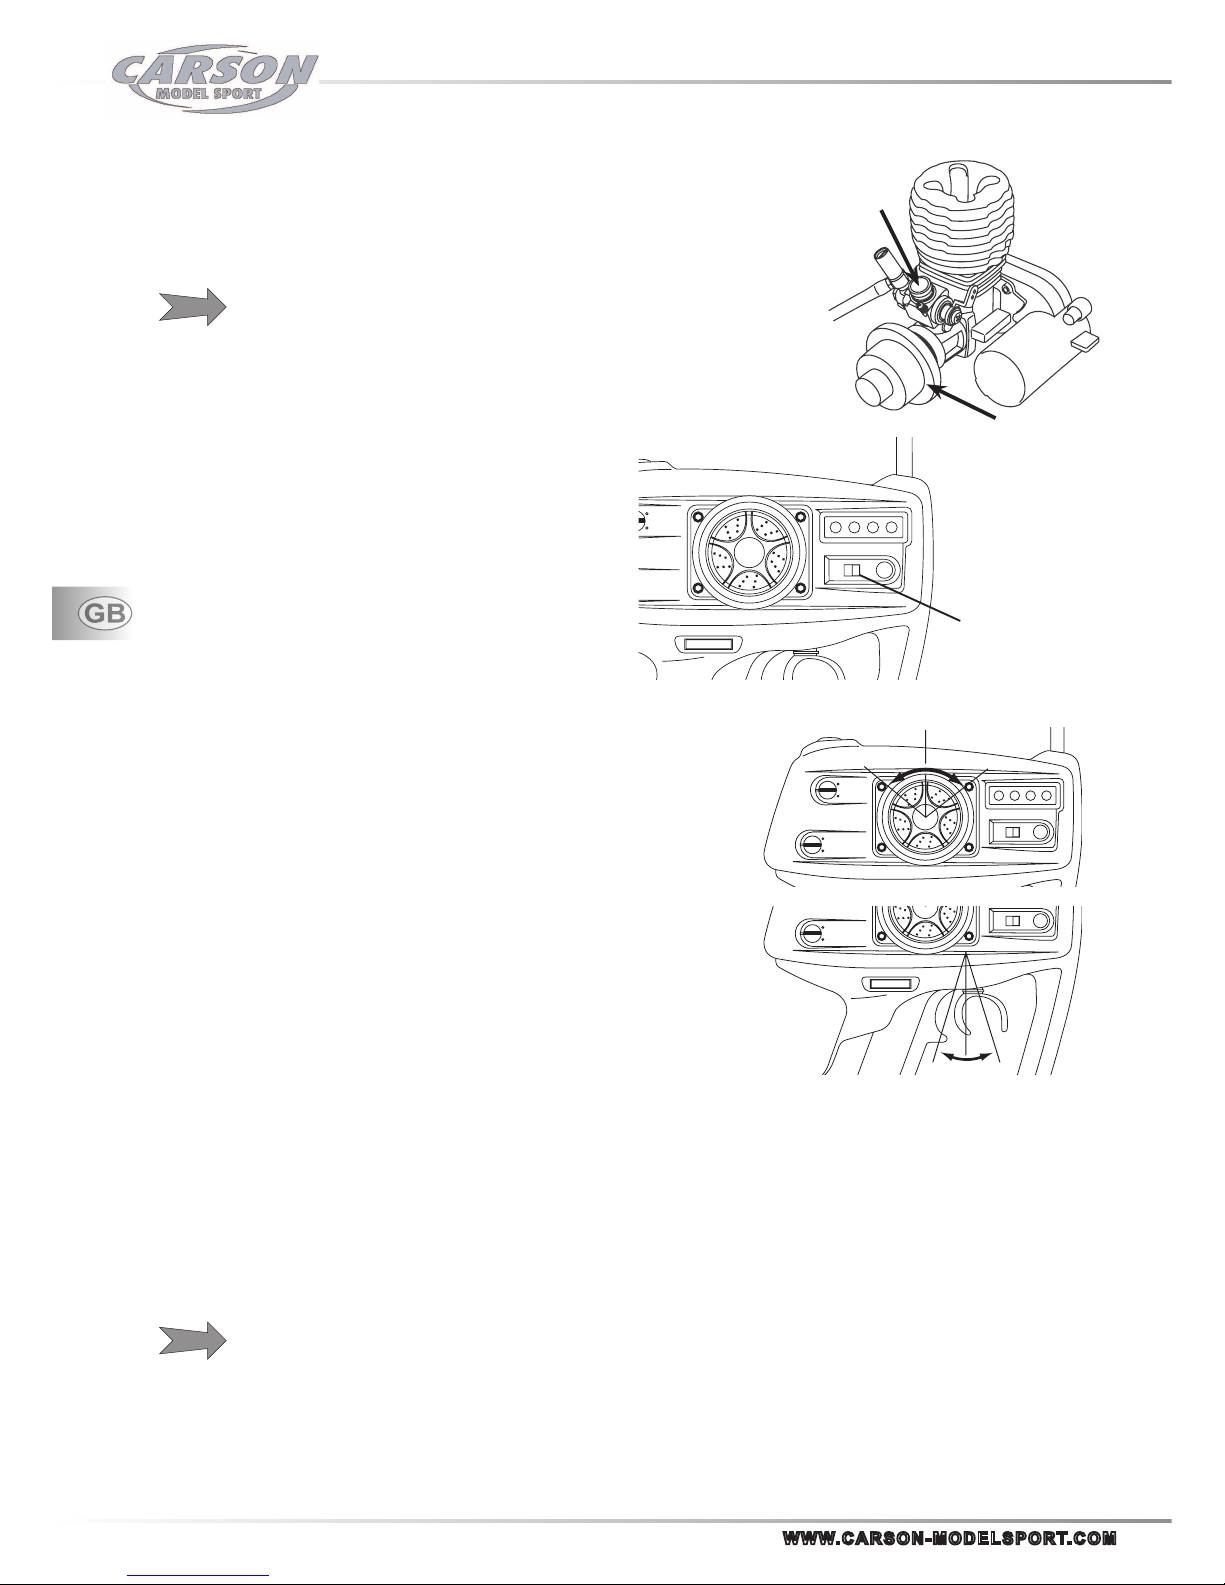
Adjusting the idle speed mix adjusting screw
A visual check of the carburettor inlet is possible after removing or before
attaching the air filter.
The gap is adjusted to 1~1.5mm at the factory and set to a slightly
increased RPM for easy starting.
Adjusting
the idle speed mix adjusting screw to fuel and plug.
- For high idling turn right / screw-in idling mix adjusting screw.
- For low idling, turn left / unscrew the screw
Adjusting the main nozzle needle
Maximum RPM (revolutions per minute) is adjusted with the main nozzle
needle.
- Turning clockwise will give increasing RPM and
- turning counterclockwise will give decreasing RPM.
Turning clockwise too much for high RPM can cause reduced lubrication
and overheating with damage to the inside of the engine.
For the first drive use the factory-set adjustment of the needle!
Fueling
Model engines are self-lubricating. The oil part in the fuel ensures the
lubrication of the engine.
Only use fuel for model car engines.
- The percentage of oil in e.g. plane engine fuels is too low
(too little lubrication)
Recommendation
In the break-in phase, a special RC car fuel with max.10% nitromethane
should be used
(Carson fuel No. 13934).
After the regulary break-in you can change to a fuel with
16% nitromethane (Carson fuel No. 13935/6),
under racing conditions use a 25% nitromethane fuel
(Carson fuel No. 13937/8)
- Close tank cap tightly after filling in fuel.
idle speed mix
adjusting screw
Main nozzle needle
Carburettor inlet
1 - 1,5 mm
Carburettor inlet
1 - 1,5 mm
Page 13
31
No. 10 3003
09/ 0 6
2WD Buggy DAZZLER
Drive operation
Starting the RC system
- Pull the transmitter antenna out completely.
The range of the radio signal is reduced if the antenna is
not pulled out completely.
CAUTION!
Always turn the transmitter´s power switch ON first!
Thread the antenna cord through the antenna pipe and
put the antenna pipe into the antenna foot on the chassis
Switch on the receiver at the On/Off switch on the chassis
- Make sure that the carburettor outlet is in idle position when the
receiver is switched on.
Starting the engine
The on-board starter spins the crankshaft of the nitro engine
in order to ingest the fuel through the carburettor into the
combustion chamber.
- Press the start button
Press the button once, then the preheating of the glow plug
starts for 20sec. (Orange LED is lit)
- Press the butto
n one more time, engine starts.
(Red LED is lit)
Do not hold the button down for more than 5 seconds at a time.
Engine does not start
If engine does not start, please check whether the fuel has
reached the inlet of the carburettor.
If fuel has not reached the carburettor inlet,
- hold a rag over the end of the muffler exhaust pipe as per
attached picture and
- press the engine start button on transmitter several
times for 1-2 seconds until fuel reaches the carburettor.
Carburettor inlet
On/Off switch
On/Off switch
Start button
Antenna foot
Page 14
32
WWW. C A R S O N - M O D E L S P O R T.COM
2WD Buggy DAZZLER
Switch off engine
Set the throttle to the idle position.
- Cut off the air supply to the carburettor.
- Block the exhaust pipe with a piece of cloth.
Attention!
Engine and exhaust system become hot during operation.
Do not touch with bare hands!
The fuel supply should not be disconnected as otherwise the engine could overheat.
Reversing the car
The model is reversed with the help of the
onboard reverse motor
The reverse gear should only be used for a few seconds!
Throttle trigger is set to neutral position.
- Slide the switch to the left and
- keep this position.
The car reverses.
The model must be standing before reversing!
How to control your model
Steering
-
Raise the tyres off the ground
- Pull out the transmitter antenna and switch on the transmitter first,
then the receiver.
- Turn the steering wheel to the right and left as far as
it will go. The wheels should steer in the same direction
- If the wheels steer in the opposite direction, operate the steering reverse
switch (ST in position REV).
- Release the remote control lever and the wheels should return to a
straight ahead position.”
- If the wheels do not point straight forward, use the steering trim knob
to adjust their position.”
- Squeeze the throttle trigger in order to accelerate and
push forward to apply the brakes
Checking the range of the remote control
Check the functions and range of the radio before starting or after any impact to ensure full control of your model.
For the range test, check the steering functions as described above
- Position yourself approximately 50m away from model (without the engine running)
- Ensure that the steering wheel and trim on the radio is in the neutral position
- Turn the steering wheel to the right and check that the wheels move in the same direction
- Repeat the process for the left hand side
- Finally, release the steering wheel and check that the wheels return to the straight ahead position.
Never drive the model if the remote control does not work properly!
A malfunction of the radio may cause damage to the model, property and/or serious injury.
If the radio does not function correctly, check the condition of the batteries and ensure that no one else is using an identical
frequency
Slide switch
(reverse gear)
Carburettor
inlet
rightleft
Fly wheel
Page 15

33
No. 10 3003
09/ 0 6
2WD Buggy DAZZLER
How to change frequencies
Make sure that nobody else is transmitting in the proximity of your frequency!
Interfering signals on the same frequency can make you lose control over your
model.
If you are driving with other Rc-users, it might
be necessary to change the frequency.
Transmitter
A rapid change of frequencies is possible simply
by unplugging an interchangeable crystal on the
back of the transmitter and then plugging in
another one.
Receiver
Plug in an interchangeable crystal into the receiver for a rapid change of frequencies.
The transmitter and receiver crystals must be of an identical frequency.
Make sure that the crystal is fully inserted in the transmitter and receiver, not partially.
Recommendations for controlling the model
Pl
ease remember that controlling RC model cars has to be learned step by step. Seek advice from an experienced R/C
user for the first few attempts.
- Start with an easy oval.
Arrange two cups as pylons and try to navigate the model around them.
- Then navigate an “Eight”
Remove the cups and use two visual fixed points to navigate around.
- Get used to the driving behaviour in curves.
- Keep in mind that the remote commands have to be given in the direction of the model.
Practice steering when the model runs towards you!
- Brake into the curves and accelerate out.
Engine
The 3-ccm engine is air-cooled (cooling through the air stream)
- Avoid short bursts of throttle and prolonged use of full throttle. These actions will not allow the engine to cool sufficiently
and could result in damage to the engine due to overheating.
If the engine is overheated, it could break down.
- Always drive with the appropriate rpm’s.
Attention!
Driving slowly for a long time may cool the engine but can damage the clutch due to slipping.
Clutch
The power of the engine is transmitted to the differential gear in the rear axle.
- The clutch doesn’t engage during low speed rotation, the model stands still with a running engine.
- As the RPM is slowly increased, the clutch engages and the vehicle begins to move forward.
If the clutch shoes slip, they can overheat and result in damage.
- At a higher RPM the clutch engages immediately and this provides the power to accelerate forward.
This method minimises the wear to the clutch linings
Bearing
Overheating of the engine and/or clutch can have a detrimental effect on the clutch bell bearings.
Crystal
Crystal
Page 16
34
WWW. C A R S O N - M O D E L S P O R T.COM
2WD Buggy DAZZLER
Suspension adjustment
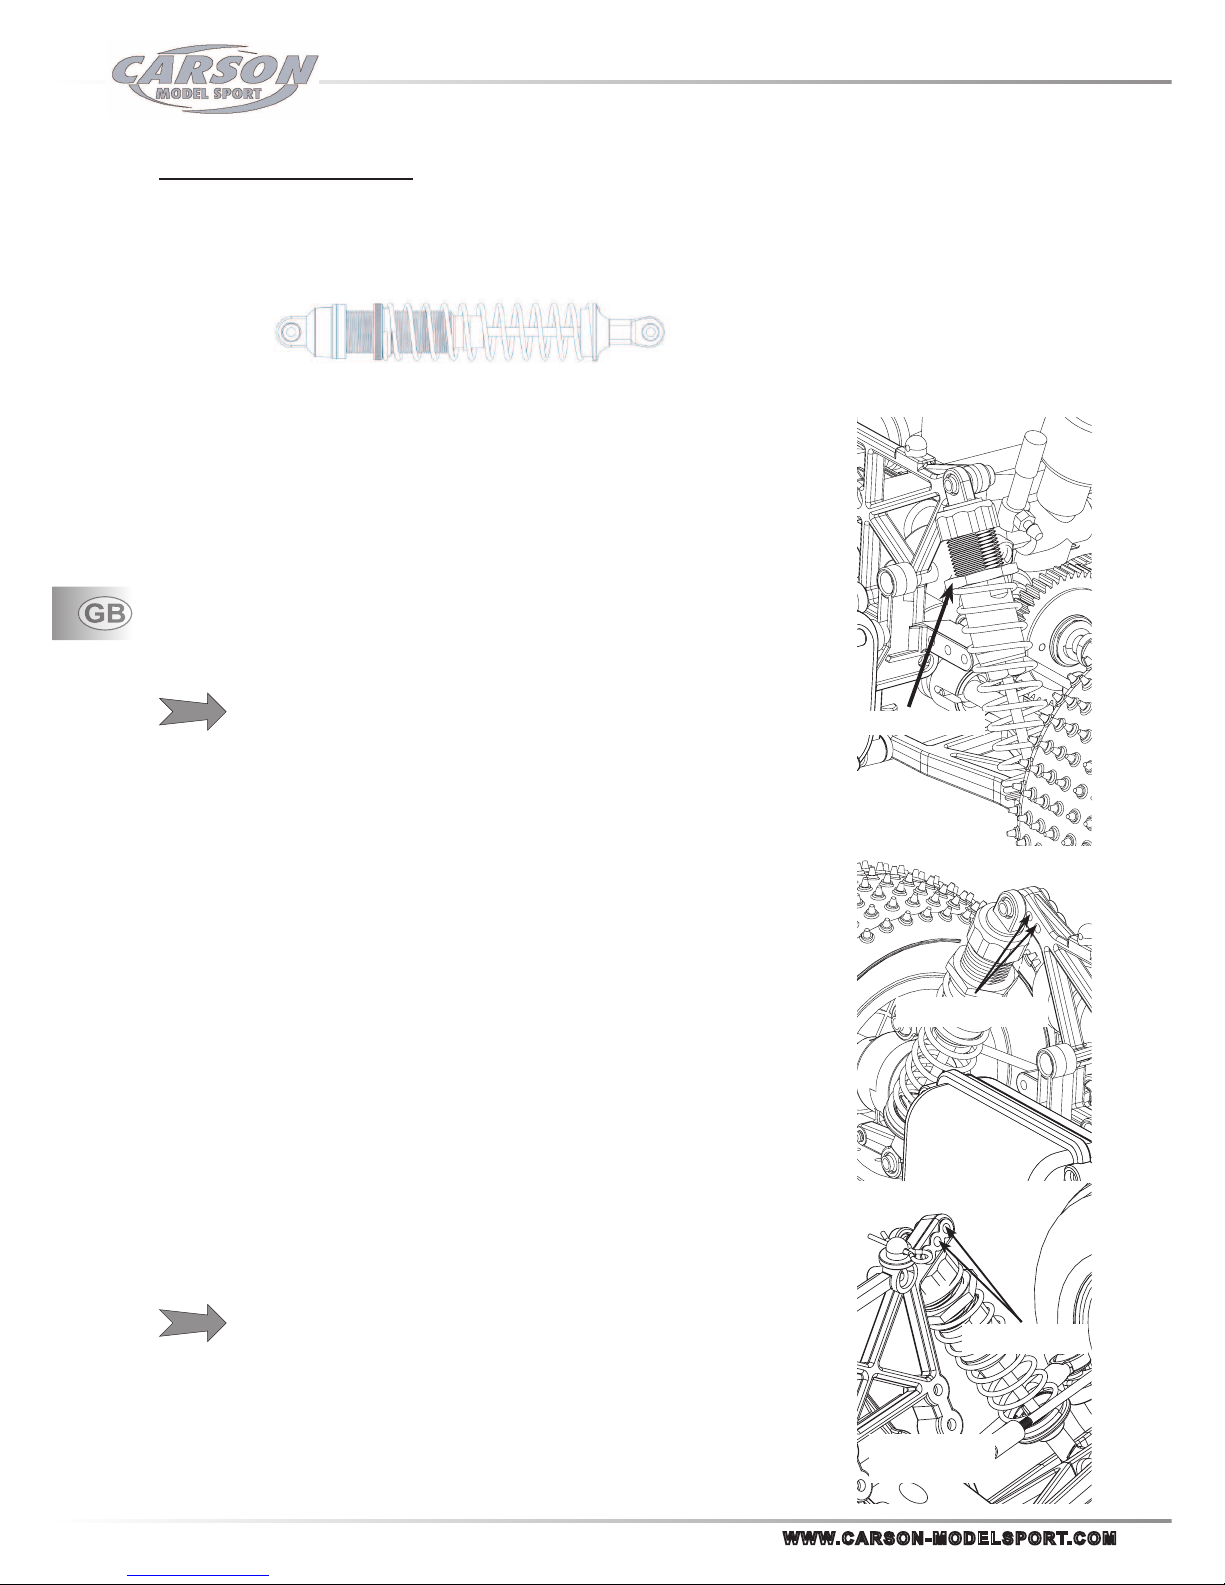
Damper settings
The four shock absorbers mounted on the chassis consist of a coil spring with an oil dampened piston in the centre.The oil
filled shock absorbers are mounted to the lower suspension arms and to the shock towers
The tension of the coil spring can be adjusted by rotating the threaded nut on the shock absorber
The setting of the suspension influences not only the ability of the model to “even out”
road unevenness, but also the behaviour in bends.
Understeer driving behaviour:
The model “pushes” the front wheels outwards (too much traction of the rear axle or too
little traction of the steered front axle).The model is difficult to steer around the bend.
As a counter measure the suspension should be set harder at the rear (or softer at the
front).
Oversteer driving behaviour
The model “pulls” in the bend, the rear tends to swerve (too little traction on the rear axle
or too much traction at the steered front axle).
As a counter measure the suspension should be set softer at the rear (or harder at the
front).
As a basic setting, the front axle should be set approximately 5 mm
lower than the rear axle!
Adjusting the spring tension
- Increasing the spring tension
Turn the threaded nut clockwise.
Suspension will be harder
- Decreasing the spring tension
Turn the threaded nut counterclockwise
Suspension will be softer
Changing the suspension angle
The dampers have two additional fixing points on the shock towers, both front and rear.
The lower fixing points for the shock absorbers can’t be changed. Changing the position
of the shock absorbers raises or lowers the ride height. This also affects how the shock
absorbers perform
Converting the shock absorbers
At a steeper angle the damping action is reduced.
- The ride height is increased at this setting.
At a reduced angle the damping action is increased.
- The ride height is reduced at this setting.
The spring tensions and fixing points have to be identical on both sides
of the axle!
Threaded nut
Rear
Fixing points
Front
Fixing points
Page 17
35
No. 10 3003
09/ 0 6
2WD Buggy DAZZLER
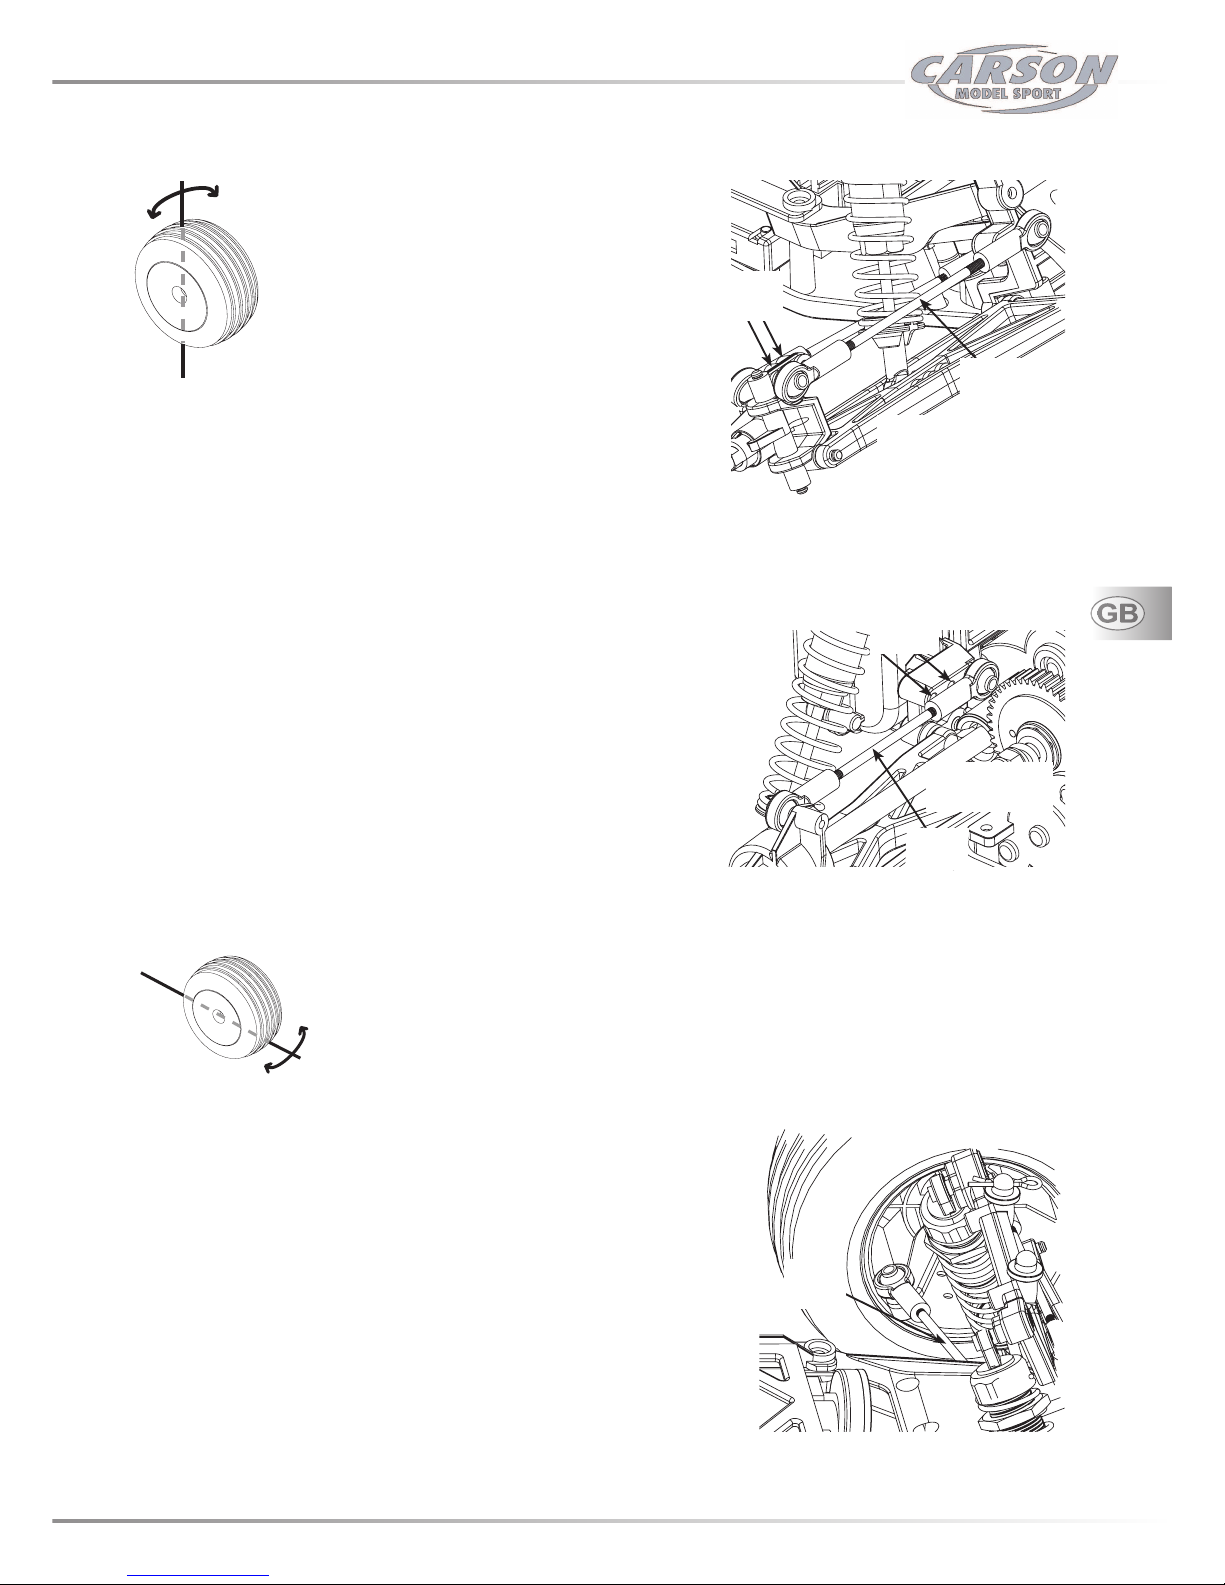
Setting the camber inclination
The camber designates the vertical inclination of
the wheel (viewed from the front)
A negative camber (the upper edge of the wheel
points to the inner side) at the front wheels raises
the cornering power of the wheels in bends.
The steering becomes more direct, steering power
decreases. At the same time the wheel is pushed on
the wheel axle.
This reduces an axial bearing clearance,
the handling becomes smoother
A negative inclination on the rear wheels reduces the tendency for the
rear of the vehicle to swerve in bends.
A negative camber increases the wear on the inside of the tyre.
Camber adjustment for the front and rear wheels
The upper transverse links both front and rear can be adjusted in two ways. Point (a) for significant adjustment. Twisting the
threaded rod (b) for minor adjustment.
Negative camber
By twisting the threaded rod (b) clockwise, the top edge of the wheel is
drawn inwards.
Positive camber
By twisting the threaded rod (b) anti clockwise, the top edge of the wheel
is pushed outwards.
Setting the alignment
Alignment of the wheel dictates the position of the wheel when driven.
When driving forward, the wheels are pushed apart by the resistance and do not stay in a parallel line. The wheels can be adjusted so that in a static position they point slightly inward. This
toe-in creates better lateral cornering and more direct steering.
By adjusting the wheels outwards the steering becomes slower and less responsive.
Adjustment is made via the steering links (c).
Toe-in
Twisting the rod and lengthening the steering arm (c) produces toe-in.
The outer edges of the tyres wear faster.
Toe-out
Twisting the rod and shortening the steering arm (c) produces toe-out.
The inner edges of the tyres wear faster
Rear
(a)
(b)
Front
(b)
(a)
Driving direction
Driving direction
(c)
Page 18

36
WWW. C A R S O N - M O D E L S P O R T.COM
2WD Buggy DAZZLER
Trouble shooting
Engine or starter
Engine does not start Bad glow plug or dead plug booster battery Replace glow plug and/or recharge battery
Starter battery defective Replace the starter battery
Fuel tank is empty or carburettor is not
primed
Fill fuel tank with fuel and prime carburettor
Carburettor not adjusted properly Set idle adjusting screw and main needle
to standard position
Fuel is old or dirty Replace fuel and check fuel filter
Combustion room full with fuel (flooded) Unscrew glow plug and allow the fuel to evapo-
rate
Additional air is sucked via fuel line or
engine
Check/replace fuel hoses and/or tighten all engine
screws
Servo links not properly adjusted Place servo in neutral position and readjust
Fuel line, air filter or exhaust
blocked
Clean blocked parts, if necessary, replace
Engine does not get fuel Main nozzle needle fully turned in Readjust the main nozzle needle according to
factory setting
Idle speed mix too lean Readjust the idle speed mix adjusting screw
to factory setting
Fuel hoses bent Check and straighten fuel hoses
Fuel tank defective Replace fuel tank
Engine starts, but stops again Fuel tank is empty Fill fuel tank
Fuel line, air filter or exhaust blocked Clean blocked parts, if necessary, replace
Carburettor not correctly set Reset idle speed and main nozzle needle
Engine overheats Check the temperature. Above 150°, the fuel mix
must be enriched.
Check the wheels whether they can move freely.
Engine does not run smoothly,
responds badly
Incorrect or defective glow plug Insert the necessary glow plug
Wrong or old fuel Fill with correct fuel
Dirty air filter
Wash air filter and apply air filter oil
Mix too rich Adjust the main nozzle needle to a leaner mix
Idle speed mix too lean Readjust the idle speed mix adjusting screw
to factory setting
Idle speed mix too rich
Setzen Sie die Leerlauf-Gemischregulierschraube
auf die werkseitige Einstellung zurück
Additional air is sucked via fuel line or
engine
Check/replace fuel hoses and/
or tighten all engine screws
Too little pressure from exhaust line Check exhaust line and, if necessary, replace
Engine overheats Mix too lean
The fuel mix must be richened
Car body too compact Ensure sufficient air supply and dissipation
to the engine by cutting the car body correspondingly.
Wheels do not move freely Check whether the wheels move freely
Wrong or old fuel Fill with correct fuel
Engine speed does not decrease Throttle stop screw is misaligned.
Reset the throttle stop screw to factory setting
Engine sucks additional air Check and tighten all engine screws
One or several joint rings on the carburettor
are defective
Replace the defective joint rings
Page 19

37
No. 10 3003
09/ 0 6
2WD Buggy DAZZLER
RC-system
Transmitter does not work properly
Transmitter and/or receiver batteries are
empty
Replace the transmitter and/or the receiver
batteries
Batteries are inserted wrong Test the polarity of the batteries
Plug from the receiver battery is loose Plug-in the plug firmly
Poor reception Receiver antenna is not pulled out completely
Transmitter range is too small Transmitter and/or receiver batteries are too
weak
Replace the transmitter and/or the receiver
batteries
Transmitter antenna is not pulled out
completely
Pull out the antenna completely
Receiver antenna is not pulled out completely Pull out the antenna completely
Receiver antenna is cut Let repair the receiver antenna
Servos do not work properly Transmitter and/or receiver batteries are too
weak
Replace the transmitter and/or receiver batteries
Gear wheels inside the servo gear do not
engage or are defective
Let repair the servo
Adjusting ring at the steering levers are loose Fix the adjusting rings again, use the standard
settings
RC transmitter does not work well
while the engine is running
Receiver crystal is loose Put-in the receiver crystal again
Plug from the receiver batteries is loose Plug-in the plug again
Poor reception Receiver antenna is not pulled out completely
Receiver damaged, e.g. after a crash Repair the receiver
Chassis
Model pulls to one side Steering trim is misaligned Correct the neutral position on the remote control
Alignment right and left is different
Reset the alignment on both sides to 0
degrees.
Wheel damaged on one side or bearings
defective
Remove the wheel, clean the bearings and, if
necessary, replace
Model can be controlled but only
with difficulty
Servo links not properly adjusted Place servos in neutral position and readjust
Receiving power of the antenna is too small Pull out the antenna of the transmitter completely.
Completely unwind the antenna of the receiver
and guide it upwards
Batteries of transmitter and/or receiver empty Replace batteries or recharge rechargeable bat-
teries
Poor braking Brake linkage misaligned Correct the adjustment of the brake steering lever
Brake disc worn out Replace brake disk
Clutch does not engage Clutch shoes worn out or defective Replace clutch shoes
Clutch bell worn out or defective Replace clutch bell
Fly wheel is loose Retighten fly wheel.
Clutch does not disengage Spring for clutch shoes worn out or defective Replace springs
Model does not function Main pinion defective Replace main pinion
Damaged pinions in the differential Replace pinions
Centrifugal clutch set too loose Reset centrifugal clutch
Damping not functioning One or more dampers are jammed Clean and/or disassemble dampers
Piston rod bent Repair the piston rod
Shock absorbers lose oil A damping component is defective Check and replace the corresponding part
Sealings worn out Replace sealings
Model rolls over towards the back
during acceleration
Centrifugal clutch set too taut Loosen the adjusting screw until the model runs
smoothly
Page 20

38
WWW. C A R S O N - M O D E L S P O R T.COM
2WD Buggy DAZZLER
Estimado cliente
Le felicitamos por la adquisición de su coche radio controlado CARSON, que ha sido fabricado con tecnología de
actualidad.
De acuerdo con nuestra política de constante desarrollo y mejora de nuestros productos, nos reservamos el derecho de
efectuar cambios en las especificaciones relativas a equipo, material y diseño de este producto en cualquier momento sin
noticia previa.
Las especificaciones o diseños del producto real podrían variar de los mostrados en el manual o envase.
Este manual es componente del producto. No cumplir las instrucciones operativas y de seguridad incluidas invalidará la
garantía. Conserve esta guía como recordatorio o para caso de pasar el modelo a una tercera persona.
Condiciones de la garantía
Este producto está garantizado por CARSON contra defectos de fabricación en materiales o mano de obra bajo utilización
normal por un período de 24 meses desde la fecha de adquisición en comercios autorizados.
En caso de defecto del producto durante el período de garantía, lleve el producto y el ticket o recibo de venta como prueba
de adquisición a cualquier tienda autorizada CARSON. CARSON podrá a su elección y salvo que las leyes dispongan otra
cosa:
Corregir el defecto mediante la reparación del producto sin cargo de piezas o mano de obra; reemplazar el producto por
otro del mismo o similar diseño; o devolver el importe de adquisición del producto.
Se podrán utilizar piezas nuevas o reacondicionadas para la prestación del servicio de garantía.
Las piezas y productos reparados o reemplazados estarán garantizados por el período restante al vencimiento de la
garantía. Cualquier reparación o sustitución del producto tras vencer el período de garantía será abonada por usted.
Esta garantía no cubre:
- Daños o fallos causados o atribuibles a fuerzas de la naturaleza, abuso, accidente, uso incorrecto, impropio o anormal,
falta de seguimiento de las instrucciones, mantenimiento o instalaciones inadecuadas, alteraciones, Relámpago u otros
incidentes causados por exceso de voltaje o corriente;
- Cualquier reparación no efectuada por un servicio de reparaciones autorizado CARSON;
- Consumibles como fusibles o baterías;
- Daños estéticos;
- Transportes, embarques y / o costos de seguros; o
- Costos de retirada del producto, instalaciones, servicio de ajuste o reinstalación.
Esta garantía le da a usted derechos legales específicos, y usted también podría tener otros derechos que variarían de
estado en estado.
Declaración de conformidad
Dickie-TAMIYA GmbH&Co KG por la presente declara que este kit do modelo con radio, motor, batería y cargador está en
concordancia con los requerimientos básicos: 98/37EG Y 89/336/EWG y otras normas pertinentes de la directiva 1999/5/EG
(R&TTE).
El producto que ha adquirido está propulsado por una batería recargable Ni-MH.
La
batería es reciclable.
Al final de su vida útil,
bajo varias leyes nacionales / estatales y locales, puede ser ilegal tirar esta batería
en los contenedores de basura normal
.
Pregunte a las autoridades locales responsables sobre las opciones
adecuadas de reciclado o deshecho
.
Le deseamos buena suerte y mucha diversión conduciendo su coche radio controlado CARSON!
Page 21

39
Ref . 10300 3
09/ 0 6
2WD Buggy DAZZLER
Tabla de contenidos
Prólogo....................................................................................................................................................... 38
Tabla de contenidos
...................................................................................................................................... 39
Precauciones de seguridad...................................................................................................................... 40
Descripción del modelo............................................................................................................................ 41
Contenido del kit .................................................................................................................................... 41
Accesorios necesarios, herramientas.................................................................................................... 42
Emisora ...................................................................................................................................................... 43
Elementos de control ............................................................................................................................ 43
Funciones .............................................................................................................................................. 44
Chasis......................................................................................................................................................... 46
Datos técnicos ....................................................................................................................................... 46
Puesta en marcha ..................................................................................................................................... 47
Como cambiar las baterias de la emisora ............................................................................................. 47
Montaje de las ruedas al chasis ............................................................................................................ 47
Ajuste del carburador ............................................................................................................................ 48
Ajuste del Tornillo de ralentí................................................................................................................... 48
Ajuste de la aguja de altas..................................................................................................................... 48
Repostaje............................................................................................................................................... 48
Operativa de uso ....................................................................................................................................... 49
Conexión del equipo de radio ................................................................................................................ 49
Arranque del motor ................................................................................................................................ 49
Parada del motor .................................................................................................................................. 50
Utilización de la marcha atrás................................................................................................................ 50
Cómo controlar el modelo...................................................................................................................... 50
Comprobación del alcance de la emisora.............................................................................................. 50
Como cambiar frecuencias .................................................................................................................... 51
Recomendaciones de uso ..................................................................................................................... 51
Ajuste del chasis ...................................................................................................................................... 52
Ajuste de la amortiguación .................................................................................................................... 52
Ajuste del ángulo de caída .................................................................................................................... 53
Ajuste del alineado ................................................................................................................................ 53
Problemas .................................................................................................................................................. 54
Apéndice
Vista explosionada................................................................................................................................. 74
Recambios............................................................................................................................................. 75
Bedienungsanleitung S. 2 - 19
Instruction Manual p. 20 - 37
Instrucciones p. 38 - 55
Istruzioni d´uso p. 56 - 73
Page 22

40
WWW. C A R S O N - M O D E L S P O R T.COM
2WD Buggy DAZZLER
Precauciones de seguridad
Los modelos radio controlados no son juguetes, su manejo debe ser aprendido paso a paso
- Los niños menores de 14 años sólo deberían manejar este modelo bajo supervisión adulta.
La conducción de coches radio controlados es un fascinante hobby que debe ser practicado con la necesaria precaución
y respeto. Un coche radio-controlado que tiene un peso considerable y capaz de desarrollar velocidades muy altas puede
causar daños y lesiones en caso de conducción incontrolada, siendo el usuario legalmente responsable de ello.
- Compruebe que dispone de un seguro con la suficiente cobertura contra los daños que pueda causar cuando practique
su hobby.
Nunca comience a conducir sin haberse asegurado de los siguientes puntos:
- Las baterías de la emisora y del receptor dan buen voltaje y no están deterioradas o desgastadas.
- Todos los componentes operativos están en buenas condiciones y se ha comprobado su correcto funcionamiento.
- Verificado que todos los tornillos estén correctamente apretados.
- Compruebe siempre el funcionamiento del sistema de radio antes de utilizar el coche
- No hay ninguna otra emisora R/C o similar cercana que pueda causar interferencias.
- La emisora y el receptor están conectados, y se ha comprobado el buen funcionamiento de todas sus funciones.
Primero conecte la emisora, luego el receptor. Invierta el procedimiento para la desconexión.
Asegúrese que nadie más está operando en la misma frecuencia que su radio y que no se aprecian interferencias.
- Cualquier otra señal de radio en la misma frecuencia puede causar la pérdida de control de su modelo.
Siempre apague el motor y desconecte el coche antes de desconectar la emisora.
¡No conduzca bajo líneas de alta tensión, radio mástiles o durante tormentas eléctricas!
Las perturbaciones atmosféricas pueden afectar las señales de su emisora de radio
- Las conexiones eléctricas de su modelo no son estancas. En consecuencia, no lo maneje en lluvia, nieve, charcos o
hierba húmeda.
- Nunca utilice el modelo en presencia de rayos.
Primero conecte la emisora, luego el receptor. Invierta el procedimiento para la desconexión.
Asegúrese que nadie más está operando en la misma frecuencia que su radio y que no se aprecian interferencias.
- Cualquier otra señal de radio en la misma frecuencia puede causar la pérdida de control de su modelo.
Siempre apague el motor y desconecte el coche antes de desconectar la emisora.
¡No conduzca bajo líneas de alta tensión, radio mástiles o durante tormentas eléctricas!
Las perturbaciones atmosféricas pueden afectar las señales de su emisora de radio
- Las conexiones eléctricas de su modelo no son estancas. En consecuencia, no lo maneje en lluvia, nieve, charcos o
hierba húmeda.
No conduzca si está cansado o si su capacidad de reacción está mermada de algún modo.
- Observe su modelo constantemente y no se distraiga.
La carrocería debería estar correctamente fijada al chasis antes de conducirlo.
- Permita cierto tiempo para que el escape y el motor se enfríen antes de quitar la carrocería.
Estas piezas están extremadamente calientes durante el uso y podrían causar heridas serias.
Preste atención a las instrucciones de carga de su emisora.
Asegúrese que las baterías de la emisora y el receptor están completamente cargadas y tienen el voltaje correcto
Con baterías medio gastadas podría perder el control de su modelo.
Nunca utilice baterías recargables o de diferente capacidad.
Nunca intente recargar las baterías.
Si no utiliza el modelo por algún tiempo, la batería recargable debe ser retirada.
Combustible
Utilice únicamente combustible para automodelismo basado en aceite / metanol
- El porcentaje de aceite en combustible para aviones es demasiado bajo
- Nunca utilice gasolina convencional
Mantenga el combustible en un sitio seguro y fuera del alcance de niños o animales.
- Asegúrese que la tapa del bote de combustible está biencerrada y apretada.
Almacene el combustible en un lugar bien ventilado y sin humedad.
El combustible glow es extremadamente inflammable.
Manténgalo fuera de fuentes de calor, llamas directas, dispositivos eléctricos y baterías.
No fume.
- Limpie cualquier vertido de combustible
Utilice únicamente recipientes adecuados
- Use un biberón de combustible para evitar vertidos
Transporte y almacene el modelo únicamente con el depósito vacío
- Vacíe el depósito si no usa el modelo durante varios días
Evite el contacto con la piel y no lo inhale.
- ¡Contacte a un médico imediatamente si no se encuentra bien!
Lea las etiquetas de advertencia del bote.
Deshágase de los botes vacíos del modo legalmente estipulado.
Nunca tire botes vacíos al fuego.
Page 23

41
Ref . 10300 3
09/ 0 6
2WD Buggy DAZZLER
Descripción del modelo
Nunca ha sido tan fácil controlar un automodelo con motor de explosión – presione el botón y el motor arrancará!
Este botón activa el arrancador eléctrico de a bordo y el calentador de la bujía.
Marcha atrás
Un interruptor en la emisora activa un motor eléctrico en el coche, permitiendo la marcha atrás.
Equipo de radio
El equipo de radio está ya instalado. El servo de acelerador / freno y su varillaje, así como el servo y varillaje de
dirección están ya instalados y debidamente ajustados.
El sistema “Fail Safe” del receptor parará el coche cuando no haya señal de la emisora.
Propulsión
El potente motor Toki 3 cc. con 1,8 kW (2,5 cv) a 29000 rpm arranca desde la emisora mediante un arrancador
eléctrico interno. El carburador de barril ya está ajustado y listo para funcionar de fábrica. No son necesarios
nuevos ajustes antes de arrancar el motor. Los ajustes variarán de acuerdo al combustible y bujía usados.
La potencia del motor se transmite al diferencial del eje trasero. El depósito permite 75 cc. de capacidad.
Chasis
El espléndido chasis y el diferencial del eje trasero proporcionan al modelo una perfecta manejabilidad. Para adaptar
la manejabilidad a su gusto, puede cambiar la caída en ambos ejes así como el alineado (convergencia) de las ruedas delanteras.
El reglaje de la suspension se efectúa resituando los amortiguadores hidráulicos en otros puntos de anclaje y seleccionando una precarga de muelles más dura o blanda.
Las llantas lenticulares con neumáticos rallados delante y multipico detrás proporcionan un perfecto guiado lateral
y una óptima tracción.
Chasis
El chasis de bañera con bandeja de radio hecha de plástico de alto impacto ofrece protección a la instalación contra las piedras levantadas. Adicionalmente, el receptor está emplazado dentro de una caja de radio.
La carrocería está ya cortada, pintada y con los adhesivos colocados.
Contenido del kit
Chasis de bañera con bandeja de radio,
Motor de explosion Toki 3 cc.
Carburador de barril y pipa de escape, bujía
Arrancador de a bordo y marcha atrás
Cuatro llantas lenticulares
Con neumáticos rallados en el eje delantero y neumáticos multipico en el trasero
Emisora de volante 27MHz 4 canales
Servos de dirección y acelerador / freno ya instalados
Cargador
Para baterías NiMH 7,2V / 1300 mA/h
Para sistema de arranque interno y marcha atrás eléctrica
Carrocería, cortada y pintada
Piezas pequeñas y tubo de antena, clips de carrocería,
llave de cruceta, manual de instrucciones
Page 24

42
WWW. C A R S O N - M O D E L S P O R T.COM
2WD Buggy DAZZLER
Artículos necesarios y herramientas
Artículos necesarios
Combustible para automodelos de explosion con diferentes porcentajes de nitrometano.
La lubricación del motor depende del porcentaje de aceite, la inflamabilidad del combustible se incrementa con el
porcentaje de nitrometano.
Existen diferentes tipos de combustible disponibles con diferentes porcentajes de nitrometano, dependiendo del tipo de
conducción.
Puede adquirir combustible para automodelos en tiendas especializadas de modelismo.
¡Atención! Evite el contacto con la piel y evite la inhalación!
Litros Nitrometano Ref. Aplicación
1,0 10% 13934 Rodaje / Principiantes
1,0 16% 13935 Normal
2,5 16% 13936
1,0 25% 13937 Competición
2,5 25% 13938
Aceite After-run Ref. 905044
El aceite After-run protege al motor contra la corrosión. Tras el uso, ponga algunas gotas de aceite after-run en el carburador y en la cámara de combustión del motor.
Aceite para filtro de aire Ref. 32648
Para evitar que incluso el polvo más fino penetre en el motor por la entrada de aire, lave el filtro de aire tras esto
acéitelo con aceite de filtro de aire antes de empezar a conducir.
Bujías
Las bujías son piezas que se desgastan. Elija una bujía de acuerdo al tipo de motor, el tipo de combustible y la temperatura ambiente. ¡Nunca utilice bujías para motores de 4 tiempos! Una bujía equivocada
hace que el motor funcione incorrectamente y complica el ajuste. En el peor de los casos, destruirá al
motor.
Bujía Tipo de
motor
Tipo de
combustible
Temperatura Ref.
Bujía Rossi R2 caliente 2 - 3,5 ccm sin Nitrometano 0°C - +15°C 905006
Bujía Rossi R6 fria universal 10 - 13% Nitrometano +10°C - +25°C 905010
Bujía Rossi R7 fria universal 13 - 15% Nitrometano +15°C - +30°C 905011
Bujía Rossi R8 extra fria universal 15 - 30% Nitrometano +20°C - +40°C 905012
Herramientas recomendadas
- Destornillador Phillips
(pequeño y grande)
- Cutter de modelismo
- Tijeras
Biberón de combustible
Use un biberón de combustible
para evitar vertidos
- Alicates de punta fina
- Tenacillas
- Llaves allen
diferentes tamaños
- Destornillador
para ajustes del carburador
Page 25

43
Ref . 10300 3
09/ 0 6
2WD Buggy DAZZLER
/
.
/&&
Vista externa de la emisora
Elementos de control
Se requieren 8 baterías AA para la emisora (no incluidas)
Direccion
Trim de direccion
Trim de acelerador
LED de conexion
Antena
Gatillo de acelerador
Toma de carga
Interruptor
Inversor de
aceleradorInversor de direccion
Tapa de Bateria
Ajuste de recorrido
de direccion
ST.D/R
Cristal
Boton de arranque
interruptor
(marcha atras)
Page 26

44
WWW. C A R S O N - M O D E L S P O R T.COM
2WD Buggy DAZZLER
Funciones
Volante de dirección
El volante de dirección gira hasta 35 grados hacia izquierda
/ derecha.
Gatillo de acelerador
El gatillo de acelerador se mueve hasta 20 grados hacia
atrás y
20 grados hacia adelante.
Inversores de servo
E
Estos interruptores de inversión permiten invertir
el sentido de giro de los servos.
Los servos
giran a derechas en posición NOR
y a izquierdas en posición
REV.
Trim de dirección (ST.TRIM)
Gire el trim para ajustar el servo de dirección en posición
neutra.
Cuando ajuste la posición del servo de dirección,
posi-
cione
el ajuste de recorrido de dirección (ST.D/R) en el
punto máximo
de modo que el movimiento del servo de
dirección se maximiza y en consecuencia resulta más fácil
de ajustar
.
Trim de acelerador (TH.TRIM)
Mueva la palanca del trim para ajustar el servo de acelerador
(o el variador de velocidad) a la posición neutra.
Inversor de
acelerador
Inversor de direccion
20°
20°
Page 27

45
Ref . 10300 3
09/ 0 6
2WD Buggy DAZZLER
Como cambiar las baterías de la emisora
- Para quitar la tapa de las baterías, deslícela en la dirección de la flecha (hacia abajo) mientras empuja ligeramente
sobre la marca de la misma.
Por favor tenga cuidado, pues las baterías podrían salirse con la tapa abierta
.
- Si el indicador de voltaje de la emisora no funciona,
compruebe los contactos,
especialmente los terminales
negativos (
-
) y asegúrese que las baterías están correctamente instaladas.
- Asegúrese también que las baterías estén completamente cargadas.
Ajuste de recorrido en dirección (ST.D/R)
El recorrido del brazo del servo de dirección
puede ser ajustado girando el regulador del recorrido
de dirección (ST.D/R), en un rango del 10% al 100%.
Mientras mayor sea el porcentaje,
mayor será la sensibilidad del servo de dirección.
El regulador de recorrido puede ser girado en un rango de 300°.
- Girando a la derecha se aumenta el radio de giro,
- Girando a la izquierda disminuye el radio de giro.
Instalación de la batería
Nota:
El interruptor
ON/OFF
debe estar en
posición
„OFF“ antes de cargar.
¡ATENCIÓN!
Nunca intente recargar las baterías.
Toma de carga
Page 28

46
WWW. C A R S O N - M O D E L S P O R T.COM
2WD Buggy DAZZLER
Datos técnicos
Motor:
Motor Toki de explosión
Cilindrada 3 cc
Potencia 1,8 kW / 2,5 CV
Revoluciones 29000 R/min
Transmisión:
Tracción trasera Mediante palieres al eje trasero
Diferencial en el eje trasero
Con rodamiento one-way, embrague centrífugo.
Desmultiplicación 9,37:1
Coche:
Chasis: Chasis de bañera, extremadamente ligero, sólido y resistente al combado
Suspensiones: Suspensión de doble brazo
Ajuste por regulación en los soportes de amortiguadores
(inclinación delantera / trasera ajustable)
Tirantes de dirección: Tirantes ajustables izquierdo y derecho, alineado ajustable
Frenos: Freno de tambor
Suspensión: Muelles con amortiguadores hidráulicos de aceite, precarga de muelle por tuerca ajustable,
pivotaje ajustable.
Equipo de neumáticos: Delantero / Trasero: neumáticos rallados / neumáticos multipico Ø 104 mm
Servos 80 Ncm
Depósito de combustible 75 ml
Chasis
Marcha atrás
Motor de explosión
3 cc.
Receptor
Interruptor
Amortiguador
delantero
Batería para arrancador
interno y marcha atrás
Chasis de bañera
Motor eléctrico para
arrancador de a
bordo y marcha atrás
Depósito
Servo de dirección
Carburador
Servo de acelerador
/ freno
Longitud Batalla Ancho Ancho de vías Peso
436 mm 284 mm 332 mm d/t 270/266 mm 2150 g
Neumático rallado
Neumático multipico
Page 29

47
Ref . 10300 3
09/ 0 6
2WD Buggy DAZZLER
Instalación de la batería
La batería de a bordo alimenta al receptor así como al arrancador interno
y al motor eléctrico para la marcha atrás.
- Enchufe el cargador suministrado a una
toma de red.
- Conecte la batería al cargador como se
indica.
¡No fuerce los conectores! Éstos solo
encajan en una postura.
La batería no se suministra con carga, debe ser completamente cargada antes de usar su Dazzler.
Cargue la batería sólo cuando el depósito de combustible
esté vacío!
La batería y el cargador cogerán temperatura durante la carga. Esto es normal.
- No cargue en, o cerca de, un material o superficie que sea inflamable o que pueda ser dañado por el calor.
La batería puede ser recargada aproximadamente 500 veces antes de necesitar ser sustituida.
Cuando la batería ya no llegue a coger carga (está agotada), debería ser debidamente reciclada. No la arroje a la basura
convencional.
Tiempo de carga: 6 horas
Fijación de las ruedas al chasis
- Inserte el pasador de arrastre a través del agujero del eje de rueda
- Empuje el hexágono de rueda sobre el eje y seguidamente coloque la rueda
- Asegure cada rueda con una tuerca autofrenante atornillada al extremo del eje
Puesta en marcha
Tuerca autofrenante M8
Pasador de arrastre
Hexágono de rueda
Tuerca autofrenante M8
Page 30

48
WWW. C A R S O N - M O D E L S P O R T.COM
2WD Buggy DAZZLER
Ajuste del carburador
El carburador ya está ajustado y listo para funcionar de fábrica. No son
necesarios nuevos ajustes antes de arrancar el motor.
Los ajustes pueden variar de acuerdo al combustible y bujía usados, así
como de las condiciones ambientales, densidad del aire y humedad.
Para ajustar la palanca de acelerador / freno, afloje el Tornillo del prisionero
y reposiciónelo.
Ajuste del Tornillo de ralentí
Es posible examinar visualmente la entrada de aire del carburador tras quitar o antes de poner el filtro de aire.
El hueco está ajustado a 1~1.5mm de fábrica, posicionado para un ligero
incremento de RPM para un arranque más fácil.
Ajuste del Tornillo de ralentí según combustible y bujía.
- Para altas revoluciones, gire a la derecha / atornille el tornillo de
ralentí
- Para bajas revoluciones, gire a la izquierda / desatornille el tornillo de
ralentí
Ajuste de la aguja de altas
Las máximas RPM (revoluciones por minuto) se ajustan con la aguja de
altas.
- Girándola en sentido horario (der.) se incrementarán las RPM y
- Girándola en sentido contrahorario (izq.) disminuirán las RPM.
Girarla en sentido horario excesivamente en busca de altas RPM puede
causar falta de lubricación y sobrecalentamiento, con daños internos de
motor.
¡Para el primer uso, utilice el ajuste de fábrica de la aguja!
Combustible
Los motores de modelismo son auto-lubricados. La proporción de aceite en
el combustible asegura ésta lubricación.
Utilice únicamente combustible para automodelismo.
- El porcentaje de aceite en, por ejemplo, el combustible
para aviones de modelismo, es muy bajo (poca lubricación)
Recomendación
Durante el período de rodaje, debería utilizar un combustible especial
para automodelismo con un máximo de10% de nitrometano (Combustible
Carson Ref. 13934).
Tras el período de rodaje, puede cambiar a combustible con el 16% de
nitrometano (Combustible Carson Ref. 13935/6), para competir use combustible con un 25% de nitrometano (Combustible Carson Ref. 13937/8)
- Asegure firmemente la tapa del depósito tras el repostado.
Tornillo de ralentíAguja de altas
Entrada de aire
1 - 1,5 mm
Entrada de aire
1 - 1,5 mm
Page 31

49
Ref . 10300 3
09/ 0 6
2WD Buggy DAZZLER
Operativa de uso
Conexión del equipo de radio
- Extienda completamente la antena de la emisora.
El radio de emisión se reducirá si no se extiende completamente la
antena.
¡ADVERTENCIA!
¡Conecte siempre primero la emisora!
Enfunde el cable de antena a través del tubo de antena
Ponga el tubo de antena en el soporte de antena del chasis
Conecte el receptor mediante el interruptor On/Off del chasis
- Asegúrese que el carburador está en posición de ralentí cuando
conecte el receptor!
Arranque del motor
El arrancador de a bordo gira al cigüeñal del motor para obligar la
entrada de combustible a la cámara de combustión a través del carburador.
- Presione el botón de arranque
Presione el botón una vez, se activará el precalentado de la bujía
durante 20seg. (se enciende el LED naranja)
- Presione el botón una vez más, el motor arrancará.
(se enciende el LED rojo)
No aguante el botón pulsado por más de 5 segundos cada vez.
El motor no arranca
Si el motor no arranca, por favor
compruebe si el combustible ha
alcanzado la entrada del carburador.
Si el combustible no ha alcanzado la entrada,
- ponga un trapo sobre la salida del escape según la
ilustración, y
- presione el botón de arranque del motor en la emisora unas
cuantas veces durante 1-2 segundos hasta que el combustible
llegue al carburador.
Entrada del
carburador
Interruptor On/Off
Interruptor On/Off
Soporte de
antena
Page 32

50
WWW. C A R S O N - M O D E L S P O R T.COM
2WD Buggy DAZZLER
Parada del motor
Ponga el acelerador en posición de ralentí.
- Tape la entrada de aire al carburador.
- Tape la salida de escape con un trapo.
Atención!
El motor y sistema de escape se calientan durante el funcionamiento.
¡No los toque con las manos desnudas!
- También puede parar el volante de inercia del motor por debajo del chasis con
un pedazo de trapo o con guantes.
La entrada de combustible no debería ser desconectada,
de otro modo el motor podría sobrecalentarse.
Marcha atrás
La marcha atrás actúa con ayuda del motor eléctrico
del arrancador de a bordo.
¡El modelo debe estar parado antes de accionar
la marcha atrás!
- Deslice el interruptor hacia la izquierda y
- mantenga esta posición.
El coche dará marcha atrás.
¡La marcha atrás debe ser usada sólo pocos segundos!
Cómo controlar su modelo
Dirección
- Levante las ruedas del suelo
- Extienda la antena de la emisora y conecte ésta primero, después
el receptor.
- Gire el volante de dirección hacia izquierda y derecha tanto como
permita.
Las ruedas deben seguir el recorrido del volante.
- Si las ruedas giran en sentido contrario, accione el interruptor inversor
de la dirección (ST en posición REV).
- Suelte el volante; ahora las ruedas deberían quedar rectas de nuevo.
- Si las ruedas no quedan rectas, corrija su posición moviendo la palanca
del trim.
- Para regular la velocidad, accione el gatillo de acelerador / freno
hacia atrás (yendo hacia delante, para aumentar la velocidad)
o hacia delante (freno).
Comprobación del alcance de la emisora
Compruebe el funcionamiento y el alcance del equipo de radio antes de cada uso o tras un accidente, para no perder el control de su modelo
Para el test de alcance, es suficiente comprobar el funcionamiento de la dirección como se ha descrito antes
- Aléjese del modelo, aprox. 50 m (con el motor parado).
- Sitúe el volante y trim de dirección de la emisora en posición neutra
- Mueva el volante de dirección (canal 1) hacia la derecha.
¡Ahora las ruedas deben girar hacia la derecha!
- Mueva el volante de dirección hacia la izquierda.
¡Ahora las ruedas deben girar hacia la izquierda!
- Suelte el volante de la emisora,
las ruedas deben volver a su posición recta.
¡Nunca utilice el modelo con un equipo de radio que no funcione adecuadamente!
En el mejor de los casos, „sólo“ el modelo sufrirá daños.
Si el equipo de radio no funciona perfectamente, compruebe el estado de carga de las baterías, a continuación asegúrese
que no hay nadie más está utilizando un vehículo en su misma frecuencia.
Interruptor de
marcha atrás
Entrada de
carburador
der.izq.
Volante de inercia
Page 33

51
Ref . 10300 3
09/ 0 6
2WD Buggy DAZZLER
Como cambiar frecuencias
Asegúrese que nadie más está transmitiendo por las proximidades en su frecuencia! Las señales se interferirán, haciéndole perder el control de su modelo.
Emisora
Es posible efectuar un cambio rápido de fre-
cuencias
simplemente desenchufando el cristal
intercambiable
de la parte trasera de la emisora
y enchufando otro.
Receptor
Enchufe un cristal
intercambiable
en el receptor
para un cambio rápido de frecuencias
.
Los cristales de la emisora y el receptor deben coincidir uno con el otro.
Asegúrese que el cristal está completamente introducido en la emisora y el receptor, no parcialmente.
Recomendaciones de uso
Por favor tenga en mente que controlar un modelo RC debe ser aprendido paso a paso. Pida ayuda a un piloto de
modelismo experimentado para los primeros intentos.
- Comience con un sencillo óvalo.
Utilice dos simples botes de plástico como pilones e intente manejar el modelo alrededor de ellos.
- A continuación, conduzca en „ocho“
También delimite el trazado utilizando otros dos botes para fijar dos puntos entre los que pasar.
- Acostúmbrese al comportamiento de conducción en curvas.
- Tenga en mente que los comandos de manejo han de ser dados en la dirección del modelo.
¡Practique la dirección cuando el modelo ruede hacia usted!
- Frene antes de las curvas y acelere de nuevo en el vértice de las curvas.
Motor
El motor de 3cc. está refrigerado por aire (refrigeración a través de corriente de aire)
Por consiguiente, no revolucione al vehículo con gatillazos rápidos. Las subidas y bajadas de revoluciones calientan al
motor sin la adecuada ventilación de una corriente de aire, como la generada durante el uso a velocidad constante.
Si el motor se sobrecalienta, podría romperse.
- Conduzca siempre a revoluciones adecuadas.
Atención!
Si conduce lentamente durante un largo período, el motor estará refrigerado por corriente de aire pero
el embrague puede resultar dañado porque patinará en vez de agarrar adecuadamente.
Embrague
La potencia del motor se transmite al diferencial, en el eje trasero.
- El embrague no agarrará adecuadamente durante el giro a bajas revoluciones, el modelo estará quieto con el motor en
marcha.
- Al incrementar las revoluciones lentamente, el embrague deslizará y el vehículo comenzará a moverse lentamente. El
constante deslizamiento del embrague puede causar que éste se queme.
- Si las revoluciones son altas, el embrague agarra y las revoluciones pueden ser directamente convertidas en impulso.
El desgaste del embrague sera mínimo.
Rodamientos
Si el motor y/o el embrague se sobrecalientan, también afectará a los rodamientos de la campana de embrague.
Cristal de cuarzo
Cristal
Page 34

52
WWW. C A R S O N - M O D E L S P O R T.COM
2WD Buggy DAZZLER
Ajuste del chasis
Ajuste de la amortiguación
Los cuatro elementos amortiguantes del chasis consisten cada uno en un muelle en cuyo centro se ubica un amortiguador
de aceite. Las cuatro suspensiones amortiguadas por aceite están fijadas a los trapecios inferiores y a los soportes de
amortiguador de las cajas de diferencial.
La precarga de muelle puede ser ajustada girando el anillo de ajuste situado en la botella del amortiguador.
El ajuste de la suspensión influencia no solo la capacidad del modelo de absorber
Irregularidades, sino también su comportamiento en curvas.
Comportamiento subvirador:
El modelo “empuja” a las ruedas delanteras hacia afuera (demasiada tracción en el tren
trasero o demasiado poca en el delantero).El modelo es difícil de meter en curva.
Como medida compensatoria, la suspensión debería ser ajustada más dura detrás (o
más blanda delante).
Comportamiento sobrevirador
El modelo “empuja” hacia el interior de la curva, la trasera tiende a deslizar bruscamente
(muy poca tracción en el tren trasero o demasiada en el delantero).
Como medida compensatoria, la suspensión debería ser ajustada más blanda detrás (o
más dura delante).
Como reglaje básico, el tren delantero debería ser ajustado aproximadamente 5 mm más bajo que el trasero.
Ajuste de la precarga de muelle
- Aumento de la precarga
Gire el anillo de ajuste hacia la derecha.
La suspensión se endurecerá
- Disminución de la precarga
Gire el anillo de ajuste hacia la derecha.
La suspensión se ablandará
Cambio del ángulo de suspensión
Los amortiguadores disponen cada uno de dos puntos más de fijación en el soporte de
amortiguadores delantero y trasero.
Las fijaciones inferiores de los amortiguadores no pueden ser cambiadas. Cambiar la posición de los amortiguadores hará al chasis más bajo o alto, igualmente cambiará la manera
en que trabajan al ser cambiado su ángulo.
Cambio de posición de los amortiguadores
- A ángulo más abierto, menor progresividad de la amortiguación. Al mismo tiempo,
el vehículo se hace más alto.
- A ángulo más cerrado, mayor progresividad de la amortiguación.
Al mismo tiempo, el vehículo se hace más bajo.
La precarga de muelle y los puntos de fijación de los amortiguadores de
cada eje deben ser ajustados de modo idéntico en izquierda y derecha.
Anillo de ajuste
Delante
Puntos de fijación
Detrás
Puntos de fijación
Page 35

53
Ref . 10300 3
09/ 0 6
2WD Buggy DAZZLER
Ajuste del ángulo de caída
La caída designa la inclinación vertical de la
rueda (vista de frente)
Una caída negativa (el borde superior de la rueda
apunta hacia dentro) en las ruedas delanteras
aumenta la capacidad de giro en curvas.
La dirección se vuelve más directa, pero la potencia
de giro disminuye. Al mismo tiempo, la rueda es
empujada sobre su eje.
Esto reduce la holgura entre rodamiento y eje, el
comportamiento es más tranquilo.
Una caída negativa de las ruedas traseras reduce la tendencia de la trasera del vehículo a derrapar en las curvas.
Una caída negativa incrementa el desgaste del interior del neumático.
Ajuste de la caída en las ruedas delanteras y traseras
Los tirantes de suspensión delanteros y traseros pueden ser ajustados en
dos puntos (a) para el reglaje inicial. Para un ajuste preciso, los tirantes de
suspensión pueden ser girados, de modo que la distancia entre las rótulas
aumenta (caída positiva) o disminuye (caída negativa).
Caída negativa
Girando el tirante (b) a la derecha, el borde superior de la rueda se cierra
hacia dentro.
Caída positiva
Utilizando los puntos de ajuste exteriores, o girando el tirante a izquierda.
El borde superior de la rueda se abre hacia fuera.
Ajuste del alineado
El alineado (convergencia) designa la posición del paralelismo de las ruedas al sentido de marcha.
En avance recto, las ruedas sufren una presión separadora frontal motivada por la fricción
de rodadura y en consecuencia no están encaradas con precisión hacia delante. Esto puede
ser equilibrado con el vehículo parado ajustando las ruedas de modo que queden apuntando
ligeramente hacia dentro. Esta convergencia genera un mejor giro lateral del neumático y en
consecuencia una dirección más directa. Ajustándolas en divergencia, las ruedas del vehículo
apuntan hacia fuera, la dirección responderá más suavemente.
Loa tirantes izquierdo / derecho para el ajuste del alineado están en las manguetas de dirección de cada lado, entre el reenvío de dirección y la palanca de la mangueta.
Convergencia
Girando los tirantes (c) a derechas éstos se alargan, la rueda es empujada
hacia dentro mediante la palanca de la mangueta, por detrás.
El lado interno de los neumáticos se desgastará más rápido con convergencia.
Divergencia
Girando los tirantes (c) a izquierdas éstos se acortan, la rueda es empujada
hacia fuera mediante la palanca de la mangueta, por detrás.
El lado interno de los neumáticos se desgastará más rápido con divergencia.
Detrás
(a)
(b)
Delante
(b)
(a)
Sentido de marcha
Sentido de marcha
(c)
Page 36

54
WWW. C A R S O N - M O D E L S P O R T.COM
2WD Buggy DAZZLER
Problemas
Motor o arrancador
El motor no arranca Bujía defectuosa o no hay batería de chispo Cambie la bujía y / o cargue la batería
Batería del arrancador defectuosa Cambie la batería del arrancador
Depósito de combustible vacío o carburador
no cebado
Llene el depósito con combustible y cebe el
carburador
Carburador desajustado Ajuste el tornillo de ralentí y la aguja de altas a
Los valores de fábrica
Combustible viejo o sucio Cámbielo y compruebe el filtro de combustible
Motor ahogado (exceso de combustible)
Mucho combustible en el motor.
Quite la bujía y evacue el exceso de combustible
Toma de aire por el tubo de combustible o
el motor
Compruebe / cambie los tubos de combustible y /
o apriete todos los tornillos del motor
Varillaje de servo incorrectamente ajustado Coloque el servo en posición neutra y reajústelo
Tubos de combustible, filtro de aire o escape
obturados
Limpie las piezas obturadas, si es necesario
cámbielas
No entra combustible al motor Aguja de altas cerrada Ajuste la aguja de altas a los valores de fábrica
Tornillo de ralentí muy cerrado Ajuste el Tornillo de ralentí a los valores de fábri-
ca
Tubo de combustible doblado Compruebe y enderece los tubos de combustible
Depósito de combustible defectuoso Cambie el depósito de combustible
El motor arranca, pero se para Depósito de combustible vacío Llene el depósito de combustible
Tubos de combustible, filtro de aire
o escape obturados
Limpie las piezas obturadas, si es necesario
cámbielas
Carburador desajustado Reajuste el tornillo de ralentí y aguja de altas
Sobrecalentamiento del motor Compruebe la temperatura. Si está por encima
de 150°, enriquezca la mezcla.
Compruebe que las ruedas se mueven libremente
El motor no va suave, responde
mal
Bujía defectuosa o incorrecta Cambie por una bujía correcta
Combustible incorrecto o sucio Llene con el combustible correcto
Filtro de aire sucio. Lávelo y ponga aceite de filtro
Mezcla demasiado rica Ajuste la aguja de altas para afinar la mezcla
Tornillo de ralentí demasiado cerrado Ajuste el tornillo de ralentí a los valores de fábrica
Tornillo de ralentí demasiado abierto Reajuste el tornillo de ralentí a los valores de
fábrica
Toma de aire por el tubo de combustible o
el motor
Compruebe / cambie los tubos de combustible y /
o apriete todos los tornillos del motor
Poca presurización desde el escape Compruebe la línea de presión, si es necesario
cámbiela
El motor se sobrecalienta Mezcla demasiado fina Enriquezca la mezcla
Carrocería demasiado compacta Asegure suficiente caudal de aire y disipación al
Motor recortando la carrocería adecuadamente.
Las ruedas no giran libremente Compruebe si las ruedas giran libremente
Combustible incorrecto o sucio Llene con el combustible correcto
El motor no baja de revoluciones Tornillo de ralentí desalineado
Reajuste el Tornillo de ralentí a los valores de
fábrica
Toma de aire en el motor
Compruebe y apriete todos los tornillos del motor
Una o más juntas tóricas del carburador
están defectuosas
Cambie las juntas tóricas defectuosas
Page 37

55
Ref . 10300 3
09/ 0 6
2WD Buggy DAZZLER
Equipo de radio
La emisora no funciona correctamente Baterías de emisora y/o receptor gastadas Cambie las baterías de la emisora y/o receptor
Baterías mal colocadas Compruebe la polaridad de las baterías
Conector de baterías de receptor suelto Enchúfelo firmemente
Recepción pobre Extienda completamente la antena de receptor
El radio de acción es demasiado
pequeño
Baterías de emisora y/o receptor gastadas Cambie las baterías de la emisora y/o receptor
Antena de emisora no extendida comple-
tamente
Extienda la antena completamente
Antena de receptor no extendida totalmente
Extienda la antena completamente
Antena de receptor cortada
Repare la antena de receptor
Los servos no funcionan correctamente
Baterías de emisora y/o receptor gastadas Cambie las baterías de la emisora y / o receptor
Los engranajes de servo no enganchan o
están defectuosos
Repare el servo
Prisioneros de varillas de dirección sueltos Ajuste de Nuevo los prisioneros, use los
reglajes de fábrica
La emisora no funciona bien cuando el motor está en marcha
Cristal de receptor suelto Enchufe el cristal correctamente
Conector de batería de receptor suelto Enchúfelo correctamente
Recepción pobre
Extienda completamente la antena de receptor
Receptor dañado, p. ej. tras un golpe Repare el receptor
Chasis
El modelo se va hacia un lado Trim de dirección desalineado Corrija la posición neutra desde la emisora
Alineado izquierdo y derecho diferentes Posicione el alineado de ambos lados a 0 grados
Rueda dañada en un lado o rodamientos
defectuosos
Quite la rueda, limpie los rodamientos y, si es
necesario, cambie
El modelo puede ser controlado
pero con dificultad
Varillaje de servo desajustado Coloque los servos en posición neutra y reajúste-
los
Potencia de emisión / recepción de las
antenas pequeña
Extienda completamente la antena de la emisora.
Extienda completamente la antena del receptor y
guíela hacia arriba
Baterías de emisora y/o receptor gastadas Cambie / cargue las baterías
Poca frenada Varillaje de freno desalineado
Disco de freno gastado
Corrija el ajuste de la leva de freno
Cambie el disco de freno
El embrague no agarra Zapatas de embrague gastadas o
defectuosas
Cambie las zapatas de embrague
Campana de embrague gastada o
defectuosa
Cambie la campana de embrague
Volante de inercia suelto Reapriete el volante de inercia
El embrague no embraga Muelle de zapatas gastado o defectuoso Cambie el muelle de zapatas
El modelo no avanza Corona principal defectuosa Cambie la corona principal
Piñones de diferencial dañados Cambie los piñones de diferencial
Slipper ajustado demasiado suelto Ajuste el slipper
Amortiguación ruda Uno o varios amortiguadores están
atascados
Limpie y/o desmonte los amortiguadores
Eje de amortiguador doblado Cambie el eje de amortiguador
Los amortiguadores pierden aceite Componente de amortiguador defectuoso Compruebe y cambie la pieza correspondiente
Juntas tóricas gastadas Sustituya las juntas tóricas
El modelo derrapa de atrás durante la aceleración
Slipper ajustado demasiado apretado Afloje la turca de ajuste del slipper hasta que el
modelo ruede con suavidad
Page 38

56
WWW. C A R S O N - M O D E L S P O R T.COM
2WD Buggy DAZZLER
Caro Cliente
Ci congratuliamo con lei per l’acquisto di questo modello radio comandato CARSON,che è stato progettato secondo gli
ultimi ritrovati della tecnica. Per mantenere sempre aggiornati i nostri prodotti ci riserviamo il diritto di effettuare qualsiasi
aggiornamento tecnico atto a migliorarne le qualità senza alcun preavviso. Alcune caratteristiche tecniche di questo prodotto
possono perciò essere diverse da quelle illustrate in questo manuale o sulla scatola.
Termini di Garanzia
Questo prodotto è garantito da CARSON, da difetti di fabbricazione nei materiali e lavorazioni, riscontrati nel normale utilizzo
del modello, per 24 mesi dalla data di acquisto presso un rivenditore autorizzato.
In caso di prodotto difettoso durante il periodo di garanzia, recarsi con il prodotto e lo scontrino o ricevuta presso qualsiasi
rivenditore CARSON. CARSON a sua discrezione, ed in accordo alle normative vigenti :
- riparare il prodotto senza addebitare nulla
- sostituire il prodotto con un altro uguale o di simili caratteristiche, o
- rimborsare il prezzo di acquisto.
Dalla garanzia sono esclusi:
- Danni o guasti causati da eventi naturali,abusi,incidenti,utilizzo non corretto,inosservanza delle istruzioni, montaggio non
corretto, imperizia dell’utilizzatore,mancanza di manutenzione, fulmini o altri incidenti causati da eccesso di voltaggio;
- I Danni causati dalla perdita di controllo del modello non sono coperti da garanzia! – Sono escluse inoltre tutte le
riparazioni non effettuate da personale autorizzato CARSON ; - le parti di consumo e le batterie – danni cosmetici;
- trasporto, spedizione o costi assicurativi; o – costi di prodotti rimovibili, installazioni, regolazioni e reinstallazioni. La
garanzia è applicata in conformità alle vigenti norme nello stato dove il prodotto è stato acquistato.
Dichiarazione di conformità
Dickie-TAMIYA GmbH&Co KG dichiara che questo modello in tutte le sue parti, radio, motore, batteria, caricabatteria, è
in regola con le SEGUENTI DIRETTIVE EUROPEE: 98/37EG e 89/336/EWG inoltre è conforme alle direttive 1999/5/EG
(R&TTE).
La dichiarazione originale di conformità può essere richiesta al seguente indirizzo:
Dickie-Tamiya GmbH & Co. KG • Werkstraße 1 • D-90765 Fürth
Il prodotto che avete acquistato è alimentato da batteria ricaricabile al Ni-MH.La batteria è riciclabile.
Alla fine del suo ciclo, in diverse nazioni e/o leggi locali, potrebbe essere illegale introdurla nei cassonetti della
immondizia. Assicuratevi come procedure per lo smaltimento, con il vostro locale ufficio smaltimento rifiuti.
Vi auguriamo buona fortuna e buon divertimento alla guida del vostro modello Carson
Page 39

57
No. 10 3003
09/ 0 6
2WD Buggy DAZZLER
Elenco contenuti prefazione
Prefazione ...................................................................................................................................................56
Elenco contenuti prefazione......................................................................................................................57
Precauzioni di sicurezza............................................................................................................................58
Descrizione del modello ............................................................................................................................59
Contenuto della confezione ....................................................................................................................59
Attrezzi ed accessori necessari ..............................................................................................................60
Descrizione del Trasmettitore ...................................................................................................................61
Controllo parti .........................................................................................................................................61
Caratteristiche del Trasmettitore.............................................................................................................62
Telaio ..........................................................................................................................................................64
Dati Tecnici .............................................................................................................................................64
Inizio ..........................................................................................................................................................65
Come caricare la batteria........................................................................................................................65
Fissaggio delle ruote sul telaio ...............................................................................................................65
Regolazione del carburatore ..................................................................................................................66
Regolazione dello spillo del minimo .......................................................................................................66
Regolazione dello spillo del masimo ......................................................................................................66
Riempimento Miscela .............................................................................................................................66
Comandi di guida .......................................................................................................................................67
Accensione impianto radio......................................................................................................................67
Accensione del motore ...........................................................................................................................67
Spegnimento del motore ........................................................................................................................68
Invertire il modello .................................................................................................................................68
Come comandare il modello..................................................................................................................68
Controllare la portata della radio ............................................................................................................68
Come cambiare la frequenza .................................................................................................................69
Raccomandazioni operative ...................................................................................................................69
Regolazioni del telaio.................................................................................................................................70
Regolazione degli ammortizzatori ..........................................................................................................70
Regolazione del Camber ........................................................................................................................71
Regolazione dell’allineamento ................................................................................................................71
Soluzione eventuali problemi....................................................................................................................72
Appendice ...................................................................................................................................................74
Disegno esploso .....................................................................................................................................74
Ricambi...................................................................................................................................................75
Disegno esploso motore .........................................................................................................................78
Ricambi motore.......................................................................................................................................79
Bedienungsanleitung S. 2 - 19
Instruction Manual p. 20 - 37
Instrucciones p. 38 - 55
Istruzioni d´uso p. 56 - 73
Page 40

58
WWW. C A R S O N - M O D E L S P O R T.COM
2WD Buggy DAZZLER
Misure di Sicurezza
I modelli radiocomandati non sono giocattoli, l’utilizzo di essi deve essere imparato passo passo.
- I bambini sotto i 14 anni possono guidare il modello solo sotto la supervisione di un adulto.
Guidare un modello radiocomandato è un affascinante hobby che deve essere praticato con la necessaria cautela e
rispetto. Un modello radiocomandato può causare danni e ferite in caso di perdita di controllo di cui l’utilizzatore è
responsabile.
- Cautelatevi con una sufficiente copertura assicurativa, che vi consenta di praticare il vostro hobby in assoluta sicurezza.
Il vostro modello funzionerà bene solo se sarà tenuto in perfetta efficienza. Utilizzare solo ricambi originali e non
montare mai parti non adatte.
– La responsabilità del modello è direttamente di chi lo guida, per cui assicurarsi prima dell’utilizzo che tutto funzioni
correttamente e che tutta la viteria sia ben stretta.
Non iniziare a guidare prima di avere osservato I seguenti punti :
- Le batterie del trasmettitore e della ricevente siano ben carcariche e del corretto voltaggio
- Controllare sempre le operazioni radio prima di far partire il modello
- Assicuratevi che tutti servocomandi rispondano correttamente al segnale del trasmettitore
- Tutte le parti del modello siano in buone condizioni ed assicuratevi della loro funzionalità
- Dovete essere sicuri che tutele viti siano ben strette.
- Che non ci siano altri modelli o trasmettitori nelle vicinanze che possano causare interferenze.
- Provare il modello all’esterno!
Accendere sempre prima il trasmettitore per evitare reazioni incontrollate della ricevente o percezione di segnali
estranei.
- Estraete completamente l’antenna ed assicuratevi che nessuno intorno a voi utilizzi la stessa frequenza
(numero marcato sul quarzo) e che non ci siano interferenze.
Spegnere sempre prima la ricevente e quindi il trasmettitore.
Tenete il vostro modello lontano da cavi di alta tensione o antenne radio.
- Non usare mai il modello durante temporali con fulmini. Potrebbero causare malfunzionamenti elettrici
- Non usare il modello in zone umide.
- Non guidare in presenza di forte vento, pioggia o temporali
Evitate sempre di guidare il modello in zone ristrette e limitate o in aree popolate.
- State lontani da strade, autostrade,persone e animali.
- Scegliete un’area sufficientemente aperta e libera di ostacoli.
- Guardare continuamente il modello e non distrasi.
Non guidare il modello se siete affaticati, e la vostra reattività è in qualche modo scarsa.
- Controllate costantemente il modello e non distraetevi assolutamente.
La carrozzeria deve essere fissata correttamente al modello prima dell’utilizzo.
- Fare raffreddare tutte le componenti del motore prima di rimuovere la carrozzeria.
Queste parti durante l’uso diventano estremamente calde e possono causare gravi ustioni .
Avvisare I presenti dell’accensione del vostro trasmettitore .
Assicurarsi che le batterie siano ben cariche e del corretto voltaggio.
- Quando le batterie si stanno scaricando potreste perdere il controllo del modello.
Non usare mai batterie scariche, e batterie poco cariche, o batterie con diversa capacità.
Non caricare batterie che non sono ricaricabili.
Dopo l’utilizzo rimuovere le batterie dal modello.
Miscela
Utilizzare esclusivamente miscela per automodelli a base di metanolo ed olio.
- La percentuale di olio nella miscela per motori di aeromodelli è troppo bassa.
- Non utilizzare benzina da trazione
Tenere la miscela in luogo sicuro e non accessibile ai bambini ed agli animali domestici.
- Assicurarsi che il coperchio del contenitore sia ben chiuso.
- Tenere la miscela in luogo asciutto e ben aerato.
- Tenere lontano dafonti di calore, fiamme vive, apparecchi elettrici e batterie.
- Non fumare
- Pulire immediatamente eventuali spruzzi.
Utilizzate solo appositi contenitori
- Usare un riempitore per evitare perdite.
Trasportare e riporre il modello solo con il serbatoio vuoto.
- Svuotare il serbatoio se non utilizzate il modello per qualche giorno.
Evitare il contatto con la pelle e non ingerire.
Contattate immediatamente un medico se non vi sentite bene!
Gettare il contenitore vuoto negli appositi contenitori .
- Non buttare mai contenitori vuoti sulle fiamme.
Page 41

59
No. 10 3003
09/ 0 6
2WD Buggy DAZZLER
Descrizione del modello
Accendere il vostro modello a scoppio è molto semplice, basta premere un pulsante sul trasmettitore.
Questo pulsante attiva lo starter elettrico e il preriscaldamento della candela.
Retromarcia
Un interruttore sulla trasmittente attiva un motore elettrico che fa indietreggiare il modello.
Apparato Radio
L’apparato radio è già montato. Tutti I componenti necessary sono già montati e correttamente collegati tra loro.
Il Fail Save System montato sulla ricevente ferma immediatamente la macchina in caso di mancanza di segnale del
trasmettitore.
Guida
Il potente motore Toki da 3 ccm con 1,8 kW (2,5 hp) a 29000 giri al minuto, si avvia dal trasmettitore con uno starter
elettrico già montato sul modello. La regolazione del carburatore è già preparata e pronta per l’utilizzo direttamente dalla
fabbrica. Non necessitano ulteriori regolazioni prima dell’avviamento. Le regolazioni possono variare a secondo della
miscela o della candela usata.
La trazione del motore è data dalla corona posteriore al differenziale.
Il serbatoio è di 75 ccm.
Regolazioni
L’ottima telaistica ed il differenziale ad ingranaggi posteriore rendono il modello estremamente maneggevole.
Per regolare il modello secondo il proprio stile di guida, potete modificare il camber in ambedue gli assi, come del
resto l’allineamento delle ruote anteriori.La regolazione degli ammortizzatori ad olio si effettua alzando o abbassando gli
ancoraggi degli stessi ai supporti.
Le gomme anteriori rigate a le posteriori multi-spike consentono un’ottima trazione ed una perfetta guida laterale.
Telaio
La protezione chassis con la piastra radio fatta di plastica resistente garantisce protezione alle installazioni di bordo da
sassi e altri detriti.Inoltre la ricevente è protetta da una scatola ricevente. La carrozzeria è tagliata, verniciata e decorate.
Contenuti del kit
Protezione Chassis con piastra radio,
Motore Toki da 3-ccm
Carburatore a levetta, marmitta tuning, candela,
Avviamento elettrico e retromarcia
Quattro Ruote con piattello di protezione
Con gomme rigate anteriori e gomme multispike
posteriori.
Trasmettitore a Pistola 4 canali 27MHz
servo sterzo e servo acceleratore/freno già montati
Caricabatterie
Per batteria NiMH 7,2V / 1300 mA/h
Per avviamento elettrico e motore di retromarcia
Carrozzeria tagliata e verniciata
Piccolo parti come tubo Antenna ricevente, fermi carrozzeria, chiavetta ruote,
Manuale di istruzione
Page 42

60
WWW. C A R S O N - M O D E L S P O R T.COM
2WD Buggy DAZZLER
Attrezzi ed accessori necessari
Accessori necessari
Miscela per automodelli con diverse percentuali di nitrometano.
La lubrificazione del motore dipende dalla percentuale di olio, l’infiammabilità della miscela aumenta in proporzione alla
percentuale di nitrometano.
Esistono tanti tipi di miscela con differenti quantità di nitrometano, a secondo delle esigenze di guida.
Potete acquistare la miscela nei negozi specializzati di modellismo.
Attenzione! Evitare il contatto con la pelle ed evitarne l’ingestione!
Litro Nitrometane No. Applicazione
1,0
10% 13934 Rodaggio / Principianti
1,0
16% 13935 Normale
2,5
16% 13936
1,0 25% 13937 Gara
2,5
25% 13938
Olio After-run No. 905044
Questo After-run-oil protegge il cilindro dalla corrosione. Dopo avere utilizzato il motore, lubrificare il carburatore e la came-
ra di scoppio con questo olio.
Filtro aria ad olio No. 32648
Per prevenire la penetrazione nel motore di polvere che può danneggiare l’accoppiamento, si consiglia di utilizzare questo
filtro ad olio.
Candele
Le candele sono come i vestiti . Scegliete il tipo di candela a secondo del tipo di motore, del tipo di miscela
e della temperatura esterna. Non utilizzare candele per motori da 4 tempi per aerie! Utilizzare la candela
sbagliata rende difficile la vita al motore, facendolo girare male ed in casi estremi lo può distruggere.
Candele Tipo di motore Fuel type Temperature Item-Nr.
Candela Rossi R2 calda 2 - 3,5 ccm senza Nitro 0°C - +15°C 905006
Candela Rossi R6 fredda universal 10 - 13% Nitro +10°C - +25°C 905010
Candela Rossi R7 fredda universal 13 - 15% Nitro +15°C - +30°C 905011
Candela Rossi R8 extra fredda universal 15 - 30% Nitro +20°C - +40°C 905012
Attrezzi raccomandati
- Cacciavite a Croce
piccolo e grande,
- Cutter
- Forbici
Riempitore miscela
Usate lo speciale riempitore per
evitare perdite di miscela
- pinzette
- tronchesina
- Chiavi esagonali,
di varie misure
- Cacciavite
per le regolazioni del
carburatore
Page 43

61
No. 10 3003
09/ 0 6
2WD Buggy DAZZLER
/
.
/&&
Descrizione del Trasmettitore
Controllo parti
AAx8 necessitano batterie stilo per trasmettitore (non incluse)
Volantino dello
sterzo (comandi
principali )
Trim
regolazione sterzo
Trim regolazione
acceleratore
Luce di accensione
Antenna
Grilletto acceleratore
Jack di ricarica
Interruttore
accensione
Inversione
acceleratore
Inversione Sterzo
Coperchio batteria
Regolatore
intensità di sterzata
(ST.D/R)
Quarzo
Pulsante d’avviamento
Interruttore a levetta
(retromarcia)
Page 44

62
WWW. C A R S O N - M O D E L S P O R T.COM
2WD Buggy DAZZLER
Caratteristiche del Trasmettitore
Volantino comando sterzo
Il volantino dello sterzo ruota sia a destra che a sinistra di
35 gradi
Grilletto acceleratore
Il grilletto acceleratore ha un movimento di 20 gradi indietro
e di 20 gradi in avanti
Inversione servi
Questi interruttori, consentono al servo di invertirne il
movimento.
Il servo ruota in senso orario nella posizione NOR e
antiorario nella posizione REV.
Trim regolazione sterzo (ST.TRIM)
Ruotate il trim per regolare il servo della sterzo in posizione
neutra.
Quando regolate la posizione del servo sterzo, regolate il
trim di regolazione sterzata (ST.D/R) in posizione massima,
in maniera che la sua corsa sia al massimo consentendo
una più facile regolazione.
Trim di regolazione acceleratore (TH.TRIM)
Muovere il trim per regolare il servo acceleratore (o il
regolatore) in posizione neutra.
Inversione
acceleratore
Inversione sterzo
20°
20°
Page 45

63
No. 10 3003
09/ 0 6
2WD Buggy DAZZLER
Come sostituire le batterie del trasmettitore
- Per aprire il coperchio batterie, fare scivolare il coperchio con una leggera pressione nella direzione del disegno e quindi
alzare il coperchio
Prestare attenzione, aprendo il vano le batterie possono cadere.
- Se l’indicatore di voltaggio, non segnala le batterie, controllare i contatti, soprattutto i terminali del negativo (-) e
ricontrollare che le batterie siano posizionate correttamente.
- Assicurarsi inoltre che le batterie siano cariche.
Regolatore intensità di sterzata (ST.D/R)
L’ampiezza del movimento del Servo Sterzo può essere
determinata mediante questo Regolatore di Sterzata (ST.D/R)
dal 10 al 100%. Maggiore è la percentuale impostata,
più ampia la corsa del Servo Sterzo.
La regolazione di sterzata può essere variata di 300°.
- girando a destra si allarga l’angolo di sterzata
- Girando a sinistra si reduce l’angolo di sterzata
Note:
l’interruttore ON/OFF prima di iniziare la carica deve essere
in posizione OFF .
ATTENZIONE!
Non provare mai a caricare batterie non
ricaricabili!
Jack di ricarica
Page 46

64
WWW. C A R S O N - M O D E L S P O R T.COM
2WD Buggy DAZZLER
Dati technici
Motore: A scoppio “Toki”
Cilindrata 3 ccm
Potenza 1,8 kW / 2,5 PS
Giri motore 29000 min
Trasmissione: Posteriore ad albero cardanico con differenziale sull’asse posteriore
Con cuscinetto a scatto libero, e frizione centrifuga.
Gear ratio 9,37:1
Chassis: chassis con protezione, estremamente leggero, robusto e resistente alle torsioni
Struttura Chassis : Sospensioni: Doppio controllo bracci sospensione
regolabili sulla parte superiore del traversino controllo braccetto
(inclinazione anteriore / posteriore regolabile )
Leveraggi sterzo: regolabili destra e sinistra, allineamento regolabile
Freni: Freno a tamburo
Sospensioni: Ammortizzatori ad olio con molla,
Molla regolabile con vite zigrinata,
Punto d’attacco regolabile
Gomme: Anteriori/ posteriori: rigate / multispike Ø 104 mm
Servi 80 Ncm
Serbatoio 75 ml
Telaio
Retromarcia
Motore
scoppio 3 ccm
Ricevente
Interruttore
Ammortizzatori
anteriori
Batteria per avviamento
elettrico e retromarcia
Protezione chassis
Motore per
avviamento elettrico
e retromarcia
Serbatoio
Servo sterzo
Carburatore
Servo acceleratore/
freno
Gomme rigate
Gomme Multispike
Lunghezza Lunghezza planale Larghezza Carreggiata Peso
436 mm 284 mm 332 mm a/p 270/266 mm 2150 g
Page 47

65
No. 10 3003
09/ 0 6
2WD Buggy DAZZLER
Montaggio delle ruote allo chassis
- Inserire I perni ruota nella ruota
- Spingere l’adattatore nel cerchio
- Serrare ogni ruota col dado in dotazione
Come caricare la batteria ricaricabile
La batteria alimenta la ricevente, l’avviamento elettrico, ed il motore per la
retromarcia.
- Collegare il caricatore in dotazione ad una presa elettrica.
- Collegare la batteria al caricatore come
da illustrazione.
Non forzare I connettori, hanno un
verso di inserimento obbligato !
La batteria è fornita scarica e
deve essere completamente
ricaricata prima dell’utilizzo del vostro Dazzler.
Caricare la batteria solo con serbatoio vuoto!
La batteria ed il caricatore diventano caldi durante la carica.
Questo è normale.
- Non caricare su o vicino a materiali/superfici infiammabili o che possano essere danneggiati dal calore.
La batteria si può ricaricare circa 500 volte poi deve essere sostituita.
Quando la batteria non tiene più la carica (è esaurita) bisogna riporla negli appositi contenitori per pile e non nel bidone
della spazzatura domestica.
Tempo di carica: 6 ore
Inizio
Dado di bloccaggio M8
Perno ruota
Adattatore ruota
Dado di bloccaggio M8
Page 48

66
WWW. C A R S O N - M O D E L S P O R T.COM
2WD Buggy DAZZLER
Regolazione Carburatore
Il carburatore è già regolato alla fabbrica.
Non necessita di ulteriori regolazioni prima della messa in moto.
Le regolazioni possono cambiare a secondo della miscela, delle candele,
delle condizioni climatiche come densità dell’aria ed umidità.
Per regolare la leva del gas/freno svitare la vite del fermo e riposizionarla.
Regolazione dello spillo del minimo
Dopo avere rimosso o prima di attaccare il filtro aria è possible controllare
l’apertura del carburatore.
L’apertura è regolata alla fabbrica a 1~1.5mm at the factory per consentire
una facile accensione.
Regolazione del minimo.
- Per alzare il minimo girare a destra/ avvitare la vite di regolazione.
- Per abbassare il minimo, girare a sinistra /svitare la vite
Regolazione dello spillo del massimo
Il Massimo dei giri RPM (giri al minuto) è regolato dallo spillo del
massimo.
- girando in senso orario si aumentano i giri del motore e
- girando in senso antiorario si calano I giri del motore.
Girando troppo in senso orario ed alzando I giri del motore si può causare una riduzione della lubrificazione ed il surriscaldamento e quindi il
danneggiamento del motore.
Per I primi giri del vostro modello, non toccata le regolazioni impostate dalla fabbrica!
Miscela
I motori dei modelli sono autolubrificanti. La parte di olio contenuta nella
miscela assicura la lubrificazione del motore.
Utilizzare solo miscela per motori per automodelli.
- La percentuale di olio contenuta nelle miscele per aeromodelli è
troppo bassa. (lubrificazione troppo scarsa)
Raccomandazioni
In fase di rodaggio, deve essere usata una miscela speciale car con
massimo .10% di nitrometano (Carson No.13934).
Dopo un rodaggio regolare si può usare una miscela col 16% di
nitrometano (Carson No. 13935/6),
In condizioni di gara utilizzate miscela al 25% di nitrometano
(Carson No. 13937/8)
- Chiudete bene il tappo serbatoio dopo avere fatto il pieno.
spillo del minimo
vite di regolazione
Spillo del
massimo
Ingresso carburatore
1 - 1,5 mm
Ingresso Carburatore
1 - 1,5 mm
Page 49

67
No. 10 3003
09/ 0 6
2WD Buggy DAZZLER
Operazioni di guida
Accensione del trasmettitore
- Estrarre completamente l’antenna del trasmettitore.
La portata del trasmettitore è ridotta se l’antenna non viene
estratta completamente.
Attenzione!
Accendere sempre prima l’interruttore
del trasmettitore!
- Inserire il filo antenna della ricevente nel tubetto antenna
- Fissare il tubetto antenna sullo chassis
Accendere la ricevente con l’interruttore On/Off posizionato sullo
chassis
- Assicuratevi che la levetta del carburatore sia al minimo prima di
accendere la ricevente.
Accensione del motore
L’avviatore elettrico fa ruotare l’albero motore per spingere la
miscela dal carburatore alla camera di scoppio.
- Premere il pulsante avviamento
Premere solo1 volta, quindi inizia il riscaldamento della
candela per 20 secondi (si accende la luce arancione)
- Premere il bottone ancora una volta ed il motore parte.
(Si accende la luce rossa)
Non tenere spinto il bottone per più di 5 secondi alla volta.
Il motore non parte
Se il motore non parte, controllate che la miscela abbia
raggiunto l’ingresso del carburatore.
Se la miscela non è arrivata al carburatore,
- tenete un dito sopra lo scarico della marmitta come da figura e
- premete il bottone start del tramettitore (sempre per 1 / 2
secondi) fino a che la miscela non arriva al carburatore.
Entrata
carburatore
Interruttore
Interruttore
Pulsante
avviamento
Attacco
antenna
Page 50

68
WWW. C A R S O N - M O D E L S P O R T.COM
2WD Buggy DAZZLER
Spegnimento del motore
Portare l’acceleratore al minimo.
- Bloccare l’aria al carburatore.
- Bloccare lo scarico con un pezzo di stoffa.
Attenzione!
Durante il funzionamento il motore e gli scarichi diventano
caldissimi. Non toccare a mani nude!
- altro sistema è quello di bloccare il volano sotto il pianale con un pezzo di
stoffa o dei guanti.
Non chiudere la miscela altrimenti il motore si può surriscaldare.
Azionare la retromarcia
Il modello va in retromarcia con l’ausilio del motore
elettrico che provvede anche all’avviamento.
La retromarcia va usata solo per pochi secondi!
Tenere il grilletto del gas in posizione neutra.
- portare l’interruttore sul lato sinistro
- mantenerlo in questa posizione.
La macchina va in retromarcia.
Prima di inserire la retromarcia attendere che il modello sia
completamente fermo!
Come controllare il vostro modello
- Alzare le gomme da terra e controllare che i comandi rispondano.
- girate il volantino dello sterzo a destra e a sinistra . Le ruote devono
sterzare seguendo i comandi.
- se le ruote girano in modo inverso, invertite i Reverse del servo (ST in
posizione REV).
- Lasciate la leva del trasmettitore, adesso le ruote debbono girare di
nuovo dritte.
- se le ruote non vanno dritte, correggete la posizione the position
muovendo i Trims dello sterzo.
- Pe
r regolare la velocità agire sulla leva del gas/freno
indietro (per andare avanti ed accelerare) e/o
in ava
nti (per frenare)
Controllo della portata del radiocomando
Controllate il funzionamento e la portatadel vostro radiocomando prima di ogni accensione o dopo un incidente,
per evitare di perdere il controllo del vostro modello.
Per la prova del funzionamento dello sterzo è sufficiente il controllo sterzo descritto sopra
- Posizionarsi a circa 50 metri dal modello (con motore spento).
- Portate in posizione neutral il volantino delo sterzo ed I relative Trims.
- Muovere il volantino sterzo (canale 1) verso destra.
Adesso le ruote si debbono muovere verso destra!
- Muovere il volantino sterzo verso sinistra.
Adesso le ruote si debbono muovere verso sinistra!
- Lasciare il volantino sterzo,
le ruote debbono tornare dritte in posizione neutra.
Non guidare mai un modello se il radiocomando non funziona perfettamente!
Nel migliore dei casi danneggerete, “solo” il modello.
Se il radiocomando non funziona perfettamente, controllate lo stato di carica delle batterie, quindi controllate che nessun
altro pilota stia utilizzando la vostra frequenza nei paraggi.
interruttore
(retromarcia)
Aperture
carburatore
destrasinistra
Volano
Page 51

69
No. 10 3003
09/ 0 6
2WD Buggy DAZZLER
Come cambiare la frequenza
Assicuratevi che nessuno stia utilizzando la vostra stessa frequenza!
Le interferenze causate dal segnale di una stessa frequenza, vi può far perdere il
controllo del vostro modello
Se state guidando con altri piloti, potrebbe
essere necessario cambiare frequenza .
Trasmettitore
E’ possible sostituire il quarzo semplicemente
sfilandolo dal suo alloggiamento nel retro del
trasmettitore e inserendone un altro.
.
Ricevente
Per un rapido cambio di frequenza sfilare il quarzo
ricevente e sostituirlo conun altro, avendo cura che sia
della stessa frequenza del trasmettitore.
Assicurarsi che i quarzi del trasmettitore e della ricevente siano della stessa frequenza.
Assicuratevi che entrambi i quarzi siano inseriti bene e non parzialmente.
Raccomandazioni per la guida di un modello
Ricordatevi che pilotare un modello si impara passo dopo passo. Per i primi tentativi fatevi aiutare da qualche pilota più
esperto.
- Iniziate con un facile percorso ovale.
Disegnate un semplice percorso con delle boe di plastica e provate a girarvi intorno.
- Dopo provate a fare un “Otto”
Delimitate il percorso usando due boe per fissure 2 punti.
- Assicuratevi che il modello abbia il giusto comportamento nelle curve.
- Ricordatevi che I comandi vanno dati in direzione del modello.
Fate pratica di guida col modello rivolto davanti a voi!
- Frenate prima della curva ed accelerate al vertice della curva.
Motore
Il motore da 3 ccm è raffreddato ad aria (si raffredda con l’afflusso di aria)
Perciò non fate delle brusche accelerate. Alti e bassi regimi surriscaldano il motore, che senza un appropriato raffreddamento da afflusso di aria , possono causare la rottura del motore.
Girare sempre ad un giusto regime di giri.
Attenzione!
Se girate lentamente per molto tempo, il motore si raffredda con l’aria, ma la frizione si può danneggiare
perché non attacca bene, ma scivola
Frizione
La potenza del motore è trasmessa al differenziale con l’asse posteriore.
- quando il motore gira al minimo la frizione non attacca, ed il modello rimane fermo.
- Aumentando leggermente i giri del motore, la frizione inizia a scivolare ed il modello inizia a muoversi lentamente.
Andare spesso lentamente può far bruciare la frizione.
- se i giri del motore sono erogati troppo violentemente, la frizione attacca subito ed il modello parte in maniera
impetuosa.
A questo punto il rivestimento della frizione è al suo minimo.
Cuscinetto
Se il motore e/o la frizione si surriscalda si può danneggiare anche il cuscinetto frizione.
Quarzo
Quarzo
Page 52

70
WWW. C A R S O N - M O D E L S P O R T.COM
2WD Buggy DAZZLER
Regolazione della meccanica del telaio
Regolazione degli ammortizzatori
Il Dazzler è dotato di 4 ammortizzatori a molla regolabili ad olio, che sono fissati sui braccetti inferiori del modello e sulla
scatola del differenziale.
Le molle già tarate si possono regolare girando la ghiera dell’ammortizzatore.
La regolazone delle sospensioni influisce non solo sulla capacità del modello di superare
le asperità del terreno, ma anche sul comportamento di guida.
Capire il comportamento del modello:
Il modello “sbanda” con le ruote anteriori (troppa trazione sull’asse posteriore o poca
trazione sull’avantreno).
Il modello diventa difficile da guidare in curva.
In questo caso gli ammortizzatori vanno regolati più duri sul posteriore (o più morbidi
sull’anteriore).
Comportamento di sovra sterzo
Il modello “tira” curva, il posteriore tende a sbandare (poca trazione sull’asse posteriore
o troppa sull’avantreno).
In questo caso gli ammortizzatori vanno regolati più morbidi sul posteriore (o più duri
sull’anteriore).
Come regolazione di base, l’asse anteriore deve essere approssimativamentethe 5 mm più basso di quello posteriore!
Regolazione delle molle precaricate
- Aumentare la tensione della molla
Girare la ghiera in senso orario.
La sospensione si indurisce
- Diminuire la tensione della molla
Girare la ghiera in senso antiorario.
La sospensione diventa più morbida
Cambiare l’angolo delle sospensioni
Gli ammortizzatori possono essere ancorati sia anteriormente che posteriormente in 3
diversi attacchi.
L’attacco inferiore è fisso. Cambiando il punto di fissaggio il telaio si alza o si abbassa, e
cambia il lavoro degli ammortizzatori a secondo dell’angolo .
Spostare gli ammortizzatori
- Aumentando l’angolo l’ammortizzatore diventa meno progressivo.
Allo stesso tempo il modello diventa più alto.
Abbassando l’angolo, l’ammortizzatore diventa più progressivo.
Allo stesso tempo il modello diventa più basso.
La regolazione delle molle ed il punto di fissaggio degli ammortizzatori
debbono essere uguali dia sul lato destro che su quello sinistro!
Ghiera di regolazione
Posteriore
Punti di fissaggio
Anteriore
Punti di fissaggio
Page 53

71
No. 10 3003
09/ 0 6
2WD Buggy DAZZLER
Regolare l’inclinazione del camber
Il camber determina l’inclinazione verticale delle
ruote (viste dal davanti)
Un camber negativo (il taglio superiore delle ruote
punta verso l’interno) sulle ruote anteriori aumenta la
capacità di sterzata in curva.
Lo sterzo diventa più diretto, cala la potenza di
sterzata. Allo stesso modo la ruota è spinta sul
perno ruota .
Questo determina un comportamento più tranquillo
Una regolazione negativa del posteriore riduce la
tendenza del posteriore a sbandare in curva.
Un camber negativo aumenta il consume interno
della gomma.
Regolazione del camber anteriore e posteriore
Gli uniball anteriori e posteriori possono essere ancorati in due punti di fissaggio (a) per la prima grossolana regolazione.
Per una regolazione più precisa svitare o avvitare gli uniball alle estremità in maniera da aumentare la distanza delle testine (camber positivo) o avvicinarle (camber negativo )
Camber negativo
Girando l’ uniball sull’asta filettata (b) in senso orario il taglio superiore
della ruota è spinta in dentro.
Camber positivo
Posizionando il punto di fissaggio su quello esterno , girando l’uniball
sull’asta filettata in senso antiorario. Il taglio superiore della ruota è spinta
verso l’esterno.
Regolazione dell’allineamento
L’allineamento della ruota determina la posizione della ruota nel senso di direzione.
Guidando dritto avanti le ruote sono spinte all’esterno dalla frizione sulla superficie, e perciò non
rimangono sempre parallele e ben allineate. Questo può essere bilanciato regolando le ruote in
maniera che puntino leggermente in dentro.
Questo allineamento verso l’interno (Toe-in) determina una migliore sterzata laterale di tutte le
gomme ed una risposta più efficace
dello sterzo .Regolando le ruote in maniera che guardini verso l’esterno (Toe-out), la sterzata
diventa più morbida, meno efficace ma meno brusca.
Gli uniball destri e sinistri (c) per la regolazione “fine” dell’allineamento sono posizionati
sull’avantreno.
Toe-in
Girando in senso antiorario si allunga l’asta dell’uniball (c) , la ruota è spinta
verso l’esterno.
La parte interna delle gomme si consumano più velocemente .
Toe-out
Girando in senso orario si accorcia l’asta dell’ uniball (c) la ruota è tirata verso l
’interno.
La parte esterna delle gomme si consumano più velocemente.
Posteriore
(a)
(b)
Anteriore
(b)
(a)
Direzione di
marcia
(c)
Direzione di
marcia
Page 54

72
WWW. C A R S O N - M O D E L S P O R T.COM
2WD Buggy DAZZLER
Possibili Problemi
Motore eavviamento
Il motore non parte Candela non buona o batteria scarica
dell’accendi candela
Sostituire la candela e/o ricaricare la bat-
teria
Batteria avviamento difettosa Sostituire la batteria
Il serbatoio è vuoto o il carburatore non è
innescato
Riempire il serbatoio di miscela ed innesca-
re il carburatore
Il carburatore non è regolato bene Regolare il minimo ed Massimo in posizione
standard
La miscela è vecchia o sporca Sostituire la miscela e pulire il filtro
Camera di combustione piena di miscela
(ingolfato)
Svitare la candela e fare uscire la miscela
in eccesso
Aria nel tubo miscela o nel motore Controllare/sostituire tubo miscela e/o strin-
gere tutte le viti del motore
Leverismo servo non regolato bene Portare in posizione neutra il servo e rego-
lare
Alimentazione miscela, filtro aria o scarico
chiusi
Pulire le parti bloccate se necessario sostituire
Il motore non riceve miscela La valvola dl Massimo è completamente
aperta
Riportare alla posizione di fabbrica
Spillo del minimo troppo magro Riportare alle regolazionidi fabbrica
Tubo miscela piegato Controllate e drizzate il tubo miscela
Serbatoio difettoso Sostituire il serbatoio
Il motore parte ma si spegne Il serbatoio è vuoto Riempire il serbatoio
Tubo miscela, filtro aria o scarico bloccati Pulire le parti bloccate se necessario sos-
tituire
Carburatore non regolato correttamente Riportare il carburatore alle regolazioni di
fabbrica
Motore surriscaldato Controllare la temperatura. Sopra I 150°, la
miscela deve essere ingrassata.
Controllare che le ruote si possano muovere liberamente.
Il motore non gira uniforme, non risponde bene
Candela sbagliata o difettosa Sostituire la candela
Miscela vecchia o non adatta Riempire con miscela nuova
Filtro aria sporco Lavare il filtro o usare un filtro ad olio
Miscela troppo grassa Smagrire la carburazione
Spillo del minimo troppo magro Resettare alle regolazioni di fabbrica
Spillo del minimo troppo grasso Riportare alle regolazioni di fabbrica
Presenza di aria nella miscela o nel motore Sostituire il tubo miscela e stringerele viti
del motore
Poca pressione dallo scarico Controllare lo scarico, la presa di pressione
e se necessario sostituirla
Surriscaldamento motore Miscela troppo magra Arricchirela carburazione
Carrozzeria troppo chiusa Tagliare la carrozzeria in maniera di far arri-
vare il flusso d’aria.
Miscela sbagliata Utilizzare solo miscela per automodelli
Il motore non prende I giri Lo stop del gas non è regolato. Riportare alle regolazioni di fabbrica
Il motore risucchia aria Controllate e stringete tutte le viti
O ring del carburatore difettosi Sostituire gli O rings difettosi
Page 55

73
No. 10 3003
09/ 0 6
2WD Buggy DAZZLER
Apparato radio
Il trasmettitore non funziona
perfettamente
Le batterie del trasmettitore e/o ricevente sono
scariche
Sostituire le batterie ricevente e trasmittente
Le batterie sono inserite male Controllate la polarità delle batterie
Il connettore delle batterie è lento Inserire bene il connettore
La portata del trasmettitore è
troppo corta
Le batterie del trasmettitore e/o ricevente sono
scariche
Sostituire le batterie ricevente e trasmittente
L’antenna del trasmettitore non è estratta com-
pletamente
Estrarre completamente l’antenna
L’antenna della ricevente non è estratta com-
pletamente
Estrarre completamente l’antenna
L’ antenna ricevente è tagliata Riparare l’antenna ricevente
I servi non rispondono ai
comandi
Le batterie del trasmettitore e/o ricevente sono
scariche
Sostituire le batterie ricevente e trasmittente
Gli ingranaggi dei servi sono rotti Sostituire gli ingranaggi
I leveraggi sono troppo lenti Fissare I leveraggi e regolare come da fabbrica
Il trasmettitore non funziona
bene con la macchina in moto
I quarzi sono lenti Inserire bene I quarzi
Il connettore della ricevente non è inserito
bene
Inserire bene la spinetta
Ricevente danneggiata dopo incidente Riparare la ricevente
Telaio
Il modello tira da una parte I trims dello sterzo non sono regolati Correggerli in posizione neutra
Allineamento destroy e sinistro è diverso Resettare l’allineamento a 0°
Ruota danneggiata da un lato o cuscinetto
difettoso
Rimuovere la ruota, pulire e se necessario sostituire il cuscinetto
Il modello si controlla con
difficoltà
I leverismi non sono regolati a dovere Posizionare I servi in maniera neutral e rifare I
leverismi
L’antenna ricevente non funziona bene Estrarre completamente l’antenna della trasmitte-
net. Svolgere completamente l’antenna della ricevente e posizionarla sul davanti.
La batterie del trasmettitore e/o ricevente sono
vuote
Sostituire o ricaricare le batterie
Il freno non funziona Il leverismo non è fatto bene Correggete il leverismo, se il disco freno è consu-
mato, sostituite il disco freno
La frizione non attacca La frizione è consumata o difettosa Sostituire le pastiglie
Frizione consumata o difettosa Sostituire la frizione
Il volano è lento Stringere il volano
La frizione non stacca Le mole della frizione sono consumate o difet-
tose
Sostituire le molle
Il modello non funziona Il pignone principale è difettoso Sostituire il pignone
Pignone differenziale danneggiato Sostituire il pignone
La frizione è troppo lenta Regolare la frizione
Ammortizzatori duri Uno o più ammortizzatori inchiodati Pulire e/ o smontare gli ammortizzatori
Pistone ammortizzatore piegato Riparare o sostituire il pistone
Ammortizzatori perdono olio Un componente ammortizzatore è difettoso Controllare e sostituire la parte difettosa
O ring consumato Sostituire o ring
Il modello sbanda sul
posteriore in accelerazione
La frizione attacca troppo Allentare la frizione così il modello parte più dolce-
mente.
Page 56

74
WWW. C A R S O N - M O D E L S P O R T.COM
2WD Buggy DAZZLER
Explosionszeichnung
Exploded view
Vista explosionada
Disegno esploso
Page 57

75
No. 10 3003
09/ 0 6
2WD Buggy DAZZLER
8+7+.07*5
.5(0*&2*5
#3/.3735
2,.2*
0B-/*5=*
03:408,
3735-&07*5
2,.2*'&6*
8648++"*7
8++0*56*7
?'*55300'B,*0
!300(&,*
.27*5*@14+*5'5B(/*
!*&56864*26.321*1'*5
@14+*5'5B(/*9352*
1.7&5366*5.*-&07*5
5327)&14*5'&6*'3)<13827
&07*5+B5@14+*5'5B(/*9352*
53276864*26.321*1'*5
-&66.6%35)*57*.0"73>+@2,*5
5327-&66.6'814*5
!@)*56*79352*"7
5327:-**06*7
"73>)@14+*59352*
5327)&14*5
'*5* 8*50*2/*59352*
5327844*5&51
'*5* 8*50*2/*5-.27*2
!*&5844*5&51
$27*5* 8*50*2/*59352*
532703:*5&51
!@)*56*7-.27*2"7
!*&5:-**06*7
*2/,*67@2,*
"7**5.2,0.2/
"73>)@14+*5-.27*2
!*&5)&14*5
$27*5* 8*50*2/*5-.27*2
!*&503:*5&51
$27*5* 8*50*2/*567.+7*-.27*2
!*&503:*5&516-&+7
8,*0/A4+*,53>"7
.037'&000&5,*4
8,*0/A4+*/0*.2"7
.037'&0061&004
!.2,*"7
!.2,
.26*2/34"(-2*.)6(-5&8'*;
"7
#&44.2,6(5*:;4(6
.26*2/34+"(-2*.)6(-5&8'*;
"7
#&44.2,6(5*:;4(6
5*16*2*.2-*.7
5&/*82.7
*2/6*593&511.7"*593"&9*5
"*593-35267**5.2,
&65*16"*593&20*2/82,
"*593-352)5.9*
Ersatzteile / Spare parts / Recambios / Parti di ricambi
Page 58

76
WWW. C A R S O N - M O D E L S P O R T.COM
2WD Buggy DAZZLER
'6477+6/+751/38+
1/55/3
!8+)0+61'*+-+6?8
.'6-+6
46*'009
'88+6=
'3'1+6378+9+67+3*+6
.'33+1"6'372/88+6
009,').*+)0+1!+3*+6
"&'88+6=)4:+6
!+3*+6'38+33+
"&38+33'
(*+)093-,@646*'009
'88+6=)'7+)4:+6
"6+/(784,,8'307).1'9).
9+18'30,9+189(+
.'77/7693*51'88+
'/3).'77/7
(+6+.'77/751'88+
#55+6*+)0
?25,+6(6@)0+./38+3
+'6*'25+6('7+
+86/+(+04251+88
6/:+-+'6)'7+
955193-7-14)0+
198).(+11
955193-77+8
198).7+8
'958>'.36'*
!596-+'6
1+/81'-+67+8!8
+'6/3-7+85)7
#38+6+9+61+30+678/,8+:463+
643814;+6'627.',87+8
+30.+(+116
39)01+16
+30.+(+1'9,3'.2+:463+16
6438039)01+('7+16
#38+61+-7).+/(+3 '*<
%.++1;'7.+6<
'*2988+63!8
%.++13985)7
$+678+/,93-7786+(+
+38+62+2(+6
'*').7+16
4/38)9549816
386/+(7;+11+32/83+.2+6
4/38)9516
).77).+30+1.'18+6./38+3
+'6'627.',8.41*+6
).77).+30+1./38+316
+'6;.++1.9(16
/3('951'88+
'*/451'8+
+3093-77+8
"/+64*)'2
Page 59

77
No. 10 3003
09/ 0 6
2WD Buggy DAZZLER
+0.'# /3#))#+
.'2#&$0
!&+#'"/!&.1 #+40
*'01+"
)+%#0--'+%/!.#34-!
#+((,-$!&+#'"/!&.1 #+40
0--'+%/!.#34-!
!&+#'"/!&.1 #+40
*'01+"
)+%#0--'+%/!.#34-!
.,//#.'#
,"5
#+((,-$!&+#'"/!&.1 #+4
0
0--'+%/!.#34
#+((,-$!&+#'"/!&.
/!&3.640
0--'+%/!.#3 )!(4-!
#) '+"#.0
5),+ +"-!
1.6#0#+"#.1*-$
.5/0)/#0
+0#++#+.,&.0
+0#++-'-#-!
0#1#.'+&#'0
)#!0.'!1+'0
Page 60

78
WWW. C A R S O N - M O D E L S P O R T.COM
2WD Buggy DAZZLER
Explosionszeichnung
Exploded view
Vista explosionada
Disegno esploso
Page 61

79
No. 10 3003
09/ 0 6
2WD Buggy DAZZLER
Ersatzteile / Spare parts / Recambios / Parti di ricambi
Pos. Artikelnummer
1 902055 Schraubenset 4 St. Screw set (for head, 4 pcs)
2 902056 Glühkerze m. Dichtung Glow plug (with gasket)
3 902057 Kühlkopf Head
4 902058 Kühlkopfdichtung Head gasket
5 902059 Kolben/Laufbuchse Piston cylinder set
6 902060 Kolbenstift Piston pin
7 902061 Pleuel Conrod
8 902062 Kurbelwellengehäuse Crank case
9 902063 Vergaserhalteschraube 2St. Carburator fitting screw
10 902064 Kugellager vorne Front bearing
11 902065 Mitnehmerscheibe Drive washer
12 Unterlegscheibe Propeller washer
13 Kurbelwellenmutter Propeller nut
14 902066 Kugellager hinten Rear bearing
15 902067 Kurbelwelle Crank shaft
16 902068 Starterwelle Starter shaft
17 902069 Gehäusedeckeldichtung Back plate gasket (1pcs.)
18 902070 Gehäusedeckel Back plate
19 902071 Schraubenset f. Gehäusedeckel 4St. Screw set (for back plate, 4 pcs.)
20 902072 Vergaser komplett Carburaetor Assembly
21 Vergaserhebelset Throttle lever
22 902073 Vergaserküken m. Hebel Throttle rotor set
23 902074 Vergaser o.Nadel und Hebel Carburetor
24 902075 Düsenstock komplett Main needle Assembly
25 Düsennadel m. Dichtung Main Needle (with O-ring)
26 Vergaser O-Ringset 2 St. Carburetor O-ring set (2 pcs)
27 902076 Vergaserdichtungsset 4 St. Carburetor gasket set (4 pcs)
28 Vergaserdichtung Carburetor gasket (1pcs.)
29 902077 Leerlaufeinstellschraube Rotor adjusting screw & spring
Page 62

Carson-Modelsport
Mitglied der SIMBA-Dickie Group
WWW.C ARS ON-MO DEL SPORT.C OM
Werkstraße 1 D-90765 Fürth / Germany
DAZZLER RTR
2WD Buggy Chassis
No. 103003
 Loading...