

Page 1

Cessna 182Cessna 182
CESSNA 182 CARSON R/C MODEL AIRCRAFT 50 050 5017
MODEL AIRCRAFT
C
ES
SN
A-182
C
E
S
S
N
A
-L
IG
HT
-A
IR
D
R
A
F
T
C
E
S
S
N
A
-L
IG
HT
-A
IR
D
R
A
F
T
Electric powered model aircraft
Instruction manual Page 2 - 22
Betriebsanleitung Seite 23 - 44
Mode d’emploie Page 45 - 66
Instrucciones Pagina 67 - 88
Instruzioni d’uso Pagina 89 -110
D
F
E
I
GB
SS
FF
HH
SS
HH
zz
Cessna 182Cessna 182Cessna 182
Page 2

2 CESSNA 182 CARSON R/C MODEL AIRCRAFT 50 050 5017
Dear Customer
Congratulations on buying the Cessna 182 specifications concerning equipment, materials
aeroplane, which is designed using state of the art and design at any time without notice.
technology. According to our policy of steady Specifications or designs of the actual product may
development and improvement of our products we vary from those shown in this manual or on the
reserve the right to make changes in box.
equipment, battery and charger. The warranty
Manual
does not cover damage caused as a result of
These instructions for completion and handling
failure to follow the operating instructions. Normal
should be used for final assembly and operation of
wear and tear, damage by accidents and damage
your model. Please read and understand this
caused by incorrect operation are not covered by
manual before starting any work on your Cessna
warranty.
182 or any accessories such as the radio control
Safety
obstacles or anything that may pose a potential
Controlling a model aircraft is an exciting hobby,
threat of a collision.
which demands a sense of responsibility. Any
relevant safety precautions have to be observed.
'Keep hands, face, hair and all parts of the
The Cessna 182 is not a toy; children of less then
body clear of the propeller blades at all times.
14 years should only fly this aeroplane when
Propeller blades rotate very fast and present a
supervised by an adult. For absolute beginners
risk of severe injury.
we recommend that this model is used in a wide
open space and well away from people,
Liability / assurance
obtained to cover liability in the event of an
The operator of a model aircraft is responsible for
accident.
any kind of damage which may be caused by
flying this model or actions howsoever caused. It is
highly recommended that suitable insurance is
The original declaration of conformity can be
Declaration of conformity
obtained from the following address:
In accordance with guidelines 1999/5/EG (R&TTE)
Dickie-Tamiya GmbH&Co. KG
Dickie-Tamiya GmbH&Co KG hereby declares that
Werkstraße l
this model kit with radio, motor, battery and
D-90765 Fürth
charger is in accordance with the basic
Tel.: +49/(0)911/9765-03
requirements and other relevant regulations of
guideline 1999/5/EG.
Disposal
discarding this equipment at a
Please note and understand the symbols on this
dedicated recycling point. The
product, packaging or instructions. Electronic
authority responsible for waste
components are valuable materials and at the
disposal or your retailer will be
end of their useful life should not be disposed
able to answer any questions you
with household waste! Help us to protect the
may have in this respect.
environment and safeguard our resources by
We wish you good luck and a lot of fun using
your CARSON R/C Model Glider.
Before using your carefully read this instruction!R/C Model Glider
GBGB
Page 3

Cessna 182
R/C-Model Aircraft
Order-Nr. 50 050 5017
TABLE OF CONTENTS
Page
Preface / Declaration of conformity. . . . . . . . . . . . . . . 2
Table of contents.............................3
Safety precautions ...........................4
Using the manual............................5
Kinds of operating the Cessna 182 ..............5
Specification................................5
Contents of the kit............................6
Explanation of some model aircraft expressions . . . . 7
Handling the LiPo-battery pack. . . . . . . . . . . . . . . . . . 9
The 4-channel radio command unit . . . . . . . . . . . . . 10
Attaching the tail unit.........................13
Assembling the wing.........................14
Mounting the landing gear ....................15
Balancing the centre of gravity . . . . . . . . . . . . . . . . . 15
Mounting and connecting the flight battery . . . . . . . . 16
Adjusting the speed controller. . . . . . . . . . . . . . . . . . 16
Flying ....................................17
Start......................................18
L a n d i n g...................................2 0
After the flight / Storing.......................20
Repairs...................................21
Limited warranty............................21
Trouble shooting............................22
Spare parts................................22
CESSNA 182 CARSON R/C MODEL AIRCRAFT 50 050 5017 3
GBGB
Page 4
SAFETY PRECAUTIONS
1. Always switch on the transmitter
General caution
first.The indicator light must light up
Radio controlled models, especially
green. If the indicator light is red, the
aircraft models are not toys, and their
transmitter batteries must be
operation has to be learned step by step.
replaced (rechargeable transmitter
Children less than 14 years of age should
batteries must be charged).
only fly the model under the supervision of
The throttle lever on the transmitter
an adult.
has to be in the "OFF" position when
Although the Cessna 182 has a
switching on.
comparatively low weight it reaches high
2. Next, connect the flight battery and
speed and in the case of a collision with a
thereby the receiver is switched on.
person or object can cause injury or
3. Check all rudders and ensure that
damage. Choose a sufficiently open &
they are in a neutral position.
large flight area where there are no people
4. Make sure that all servos respond
or animals; it should be free of obstacles
correctly to the transmitter signals.
and far enough away from any road or
traffic. Flying a model aircraft within the
Safety during flying
vicinity of an airport is forbidden.
Watch your model constantly and do not
Model aircraft clubs offer a novice the
become distracted.
opportunity to use their facilities subject to
the appropriate insurance being held.
Avoid propeller rotation as soon as the
Before you start, make sure that your
battery is connected.
model is properly assembled, all systems
function correctly and that it has a 100%
Never fly on a windy day or during rain or
integrity following a repair.
thunder.
Keep your plane away from high voltage
Before starting
cables or radio masts.
Check all attachments, screws and plug-in
Even a model in perfect condition may
connections as well as joints in the
show sudden unexpected behaviour
operating rods. Scrutinise the complete
caused by interference; always be ready
structure of the model and the propeller,
to make steering adjustments.
for any cracks or damage. Should any
Never fly towards people, animals or
defects be found, postpone the flight until
across public roads.
the defective part is repaired or replaced.
Land immediately, should you notice a
A damaged propeller or impeller has to be
reduced climbing ability, due to a low
replaced and must not be repaired.
powered aircraft battery, or if the power
The aircraft battery must be fully charged
light on the transmitter starts flashing.
before every flight, the batteries of the
To end operation, disconnect the receiver
transmitter must have sufficient power.
first and then switch off the transmitter.
The indicator light must light up green. If
Always disconnect the aircraft battery and
the indicator light is red, the transmitter
receiver / speed controller immediately
batteries must be replaced (rechargeable
after landing.
transmitter batteries must be charged).
When you have finished flying, remove the
battery from your model.
GBGB
4 CESSNA 182 CARSON R/C MODEL AIRCRAFT 50 050 5017
Page 5
SPECIFICATION
Channels 4 ch
Trans- Batteries AAx8 or suitable Ni-MH rechargeable batteries
mitter Frequency 2,4 GHz
Control distance about 300m
Functions Speed control, elevator, rudder, and ailerons
Size Length 860mm Wingspan 980mm
Aero- Aeroplane battery LiPo Accu with 2 cells (7,4V / 1300mAh)
plane Weight of Model 560g
(RX)
Wing area 13 dm²
Wing load 43g/m²
The flight time may vary based on battery manufacturer, flying conditions and flight
characteristics.
Controller Perm. current max 20A
motor operating time about 6 min.
*
CESSNA 182 CARSON R/C MODEL AIRCRAFT 50 050 5017 5
USING THIS MANUAL KINDS OF OPERATING THE
Cessna 182
This manual provides all the necessary
information for the final assembly and operation of
Due to its relatively high flight speed the
your Cessna 182 model. It should help you to
Cessna 182 is not suitable as a first model for
understand the components and operation of your
beginners. If this is the case we would recommend
and model acquire some technical knowledge,
an expert model pilot execute the start and then
even if you are a novice. For the absolute
hand over the transmitter to the novice, when the
beginner who has never operated any radio
plane has reached a safe altitude. The first
controlled model before, we would recommend the
landings should also preferably be handled by an
assistance of an expert model pilot for your first
expert. The Cessna 182 can be launched by
few flights. Ask your retailer for details on local
hand and landed on grass.
flying clubs. Safety for your environment, for
yourself and your model should always be your
first priority.
This manual also includes a list of the most
important spare parts and you should therefore
keep this manual for reference. Any descriptions
referring to direction in the manual e.g. "right side"
should be interpreted as viewed from the direction
of flight.
Assemble your Cessna 182 exactly according
to the instruction manual and make sure that all
steps are followed fully and that all parts are
correctly fitted. Only a correctly assembled
Cessna 182 can provide optimum performance.
It is possible to land on
asphalt or other hard surfaces thanks to the
landing gear. Launching from the ground is
possible, but due to the relatively small size of the
model it requires a suitable runway e.g. a grass
strip mown very short.
GBGB
Page 6

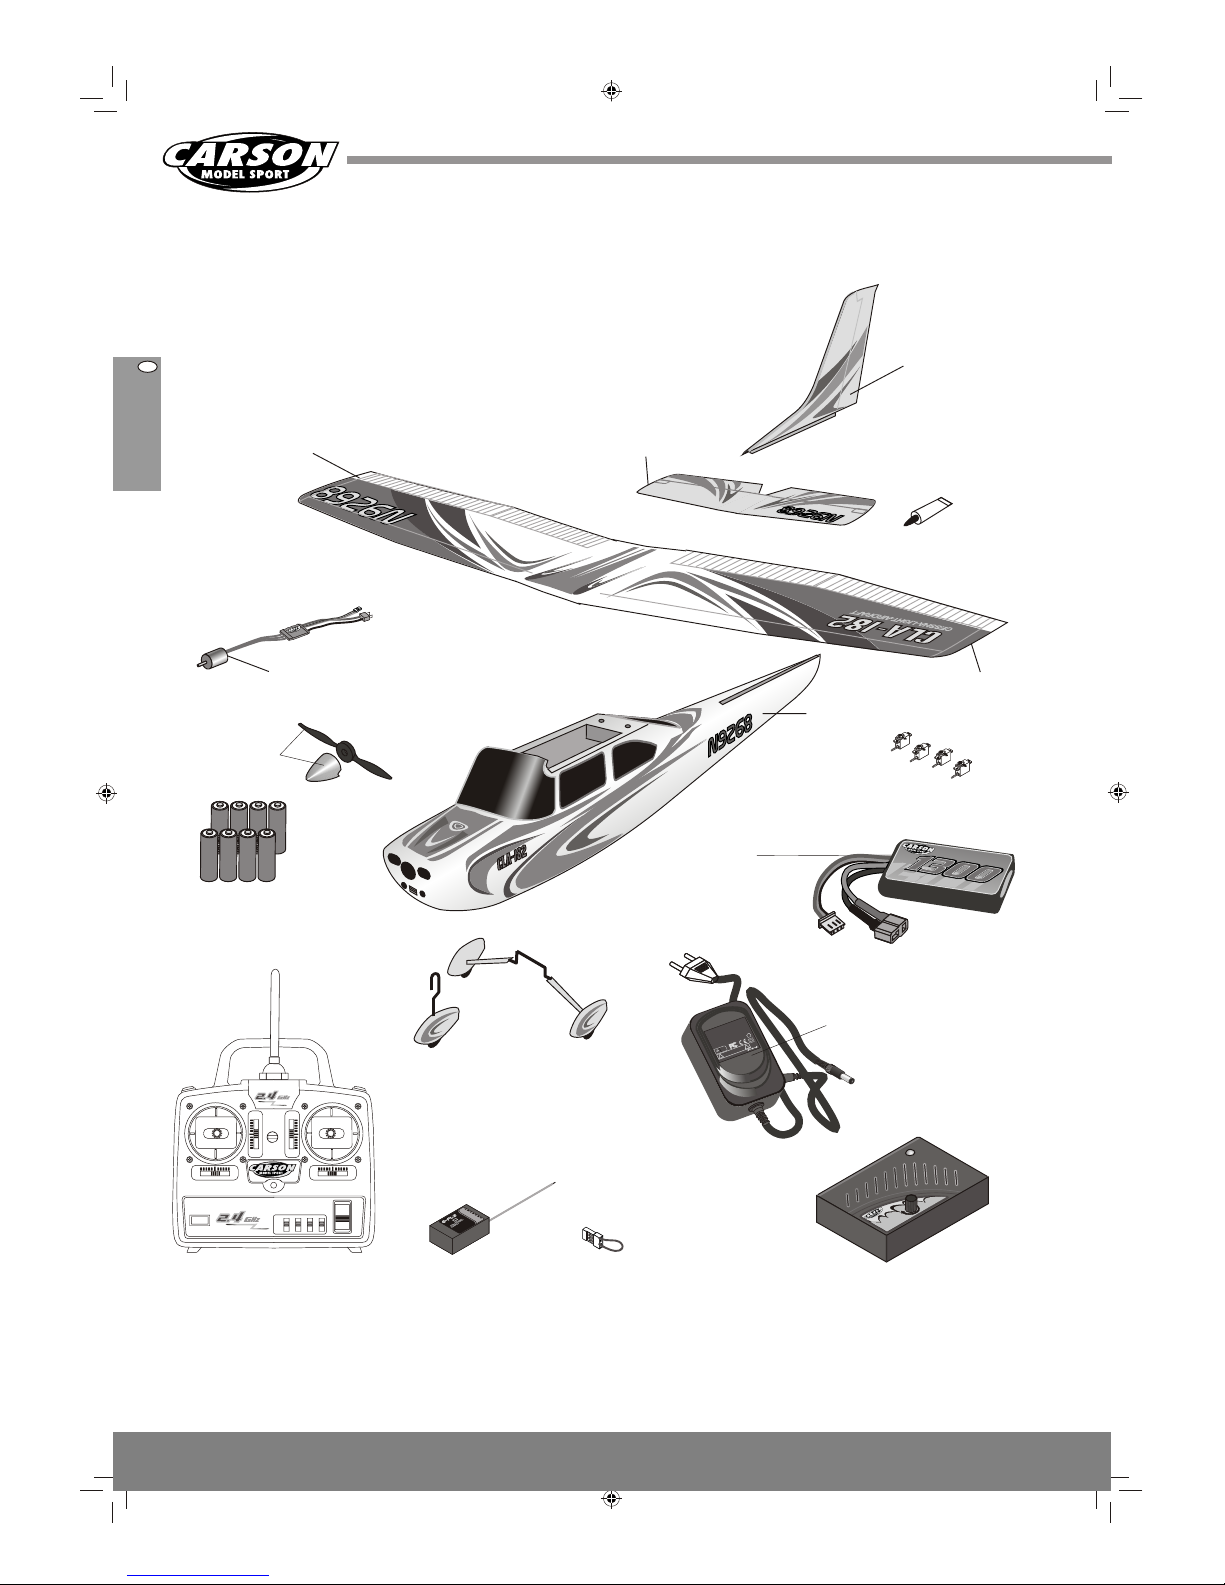
CONTENTS OF THE KIT
Stabilizer
100/240V Mains-Adapter
Output 12,8V 1,25A
Rudder
2,4GHz Microreceiver
installed
4-channel-transmitter
2,4 GHz
Wing
Wing
4 Micro-Servos
installed
DIGITAL PROPORTIONAL RADIO CONTROL SYSTEMDIGITAL PROPORTIONAL RADIO CONTROL SYSTEM
ETB41 - 2.4 GHzETB41 - 2.4 GHz
ONON
OFFOFF
11 22 33 44
REVREV
NORNOR
POWERPOWER
DICKIEDICKIE
DICKIEDICKIE
POWERPOWER
2300 mAh2300 mAh
POWERPOWER
DICKIEDICKIE
DICKIEDICKIE
POWERPOWER
2300 mAh2300 mAh
POWERPOWER
DICKIEDICKIE
DICKIEDICKIE
POWERPOWER
2300 mAh2300 mAh
POWERPOWER
DICKIEDICKIE
DICKIEDICKIE
POWERPOWER
2300 mAh2300 mAh
POWERPOWER
DICKIEDICKIE
DICKIEDICKIE
POWERPOWER
2300 mAh2300 mAh
POWERPOWER
DICKIEDICKIE
DICKIEDICKIE
POWERPOWER
2300 mAh2300 mAh
POWERPOWER
DICKIEDICKIE
DICKIEDICKIE
POWERPOWER
2300 mAh2300 mAh
POWERPOWER
DICKIEDICKIE
DICKIEDICKIE
POWERPOWER
2300 mAh2300 mAh
8 AA Mignon
Batteries
for the transmitter
GL
UE
Adhesive for attaching
tail unit
Short-circuit
connector
for binding
LiPo battery-pack
1300mAh 7,4V
BA
T
G
E
A
R
A
U
X
I
RUD
D
T
H
R
O
E
L
EV
A
IL
E
6
6
C
H
R
E
C
E
I
V
E
R
E
R
6
1
-
2
.
4
G
H
z
D
S
S
S
S
I
G
N
A
L
T
M
Motor
with speed controller
C
O
N
T
R
O
L
L
E
R
C
ES
S
N
A-
1
82
C
ES
S
N
A-LIG
H
T
-A
IR
D
R
A
F
TC
ES
S
N
A-LIG
H
T
-A
IR
D
R
A
F
T
LandingGear
B
A
L
A
N
C
E-C
HA
RG
E
R
B
A
L
A
N
C
E-C
HA
RG
E
R
FO
R
L
I-
P
O
B
A
T
T
E
R
Y
FO
R
L
I-
P
O
B
A
T
T
E
R
Y
1
.2A
0.3
A
2
0
C
X
-P
a
c
k
L
i
P
o
-A
kk
u
7
,
4V
mA
h
A
CA
C
P
OW
E
R A
D
A
PT
ER
MOD
EL:D
G-C
O
12
V010
IN
PUT
: 1
00
-2
40
V~
5
0/
60
H
z
0.
6A
M
A
X
O
U
TP
U
T
:1
2.
8V
=1.2
5A
G
S
M
AD
E
IN
C
HI
NA
!
!
RISK O
F ELE
CT
RIC
AL SH
OC
K
DO NOT OPEN
Propeller
and Spinner
Fuselage
Carger / Balancer
for charging and balancing
7,4Volt LiPo batteries
6 CESSNA 182 CARSON R/C MODEL AIRCRAFT 50 050 5017
GBGB
Page 7

The Cessna 182 may be your first flying model BEC Battery Eliminating Circuit:
and it may therefore be useful to understand some is a circuit for electric powered models where a
of the technical expressions used in this hobby. separate power source for the receiver is not
Some of these terms and their meanings are required. The receiver is supplied with current from
detailed as follows in alphabetical order. the flight battery. The voltage is controlled by a
special device to a specific value.
Accumulator: Rechargeable storage unit for
Centre of gravity: The centre of gravity is the
electrical energy commonly referred to as a
central point at which the forward and rear sections
rechargeable battery. For model airplanes Nickel
of the aircraft can be balanced. In an airplane the
Metal Hydride (NiMH) and Lithium Polymer
position of the centre of gravity in relation to lift,
batteries (Lipo) are used. The stored energy is
plays an important role.
measured in Milli-Ampere-Hours (mAh). A battery
with 1300mAh is able to discharge a current of 12A
Crystal: With the technology used to date, it is
for6 minutes. To operate the motor of an airplane
the battery must be able to discharge heavy possible to control several models at the same
current; within a few minutes it transmits its energy time via different channels (frequency bands), each
with the aid of the speed controller to the motor. channel must be specified by means of the quartz
Accumulators / batteries can be charged frequency crystals to be inserted into the
depending on their specification several hundred
transmitter and receiver. The Cessna 182 is
times. Make sure to use only the charger which is
controlled via a system in the 2.4 GHz frequency
suitable for your type of battery. Worn out or
band which, thanks to state-of-the-art technology,
defective batteries (hazardous) must be disposed
permits the simultaneous operation of almost any
in an approved manner.
number of models without the use of quartz
crystals. Susceptibility to disturbance relative to
other transmitters (e.g. including radiotelephony
with overreach) is almost zero compared to
existing technology. Transmitter and receiver are
assigned to each other, a reaction to an
Aileron: An airplane turns rather like a
extraneous signal is suppressed.
motorcycle, with aerodynamic and gravitational
forces playing an important factor. The sideways
Electric motor: Motor for direct current. The
pitch of a conventional aircraft is achieved by
design of motors and batteries which can use high
moving the flaps or ailerons on the wing. On the
powered flying with electric aeroplanes has now
MINIMOA the separate control surfaces of the
been achieved. Motors and batteries become hot
optional ailerons are operated in the opposite
during the flight. Let them cool down before
direction.
recharging and before the next flight. See also:
speed controller, brushless.
Cessna 182
Elevator: The elevator of an airplane in a normal
design is similar to a small wing at the tail of the
plane with a moveable flap at its end. By moving
this control surface up or down the lifting forces at
Battery / dry cell: Dry cells like Alkaline
the elevator are altered; the tail of the plane is
batteries are disposable power sources. With the
dropped or lifted, resulting in ascent or descent of
Cessna 182 dry cells can be used for the
the airplane.
operation of the transmitter. At the end of its
lifetime the voltage of a battery decreases and
must be disposed. Never try to recharge a dry cell
with any charger; which may result in fire or
explosion.
Appropriate servomotors and the
operating linkage are already installed in the
. When constructing the aircraft, the
appropriate connectors must be inserted into the
receiver on the wing root.
EXPLANATION OF SOME MODEL AIRCRAFT EXPRESSIONS
LiPobattery-pack
2 cells
2
0
C
X
-
P
a
c
k
L
iP
o
-
A
k
k
u
7
,
4
V
m
A
h
CESSNA 182 CARSON R/C MODEL AIRCRAFT 50 050 5017 7
GBGB
Page 8
Turning around the longitudinal
axis (banking or turn): aileron
Receiver and speed controller are already installed
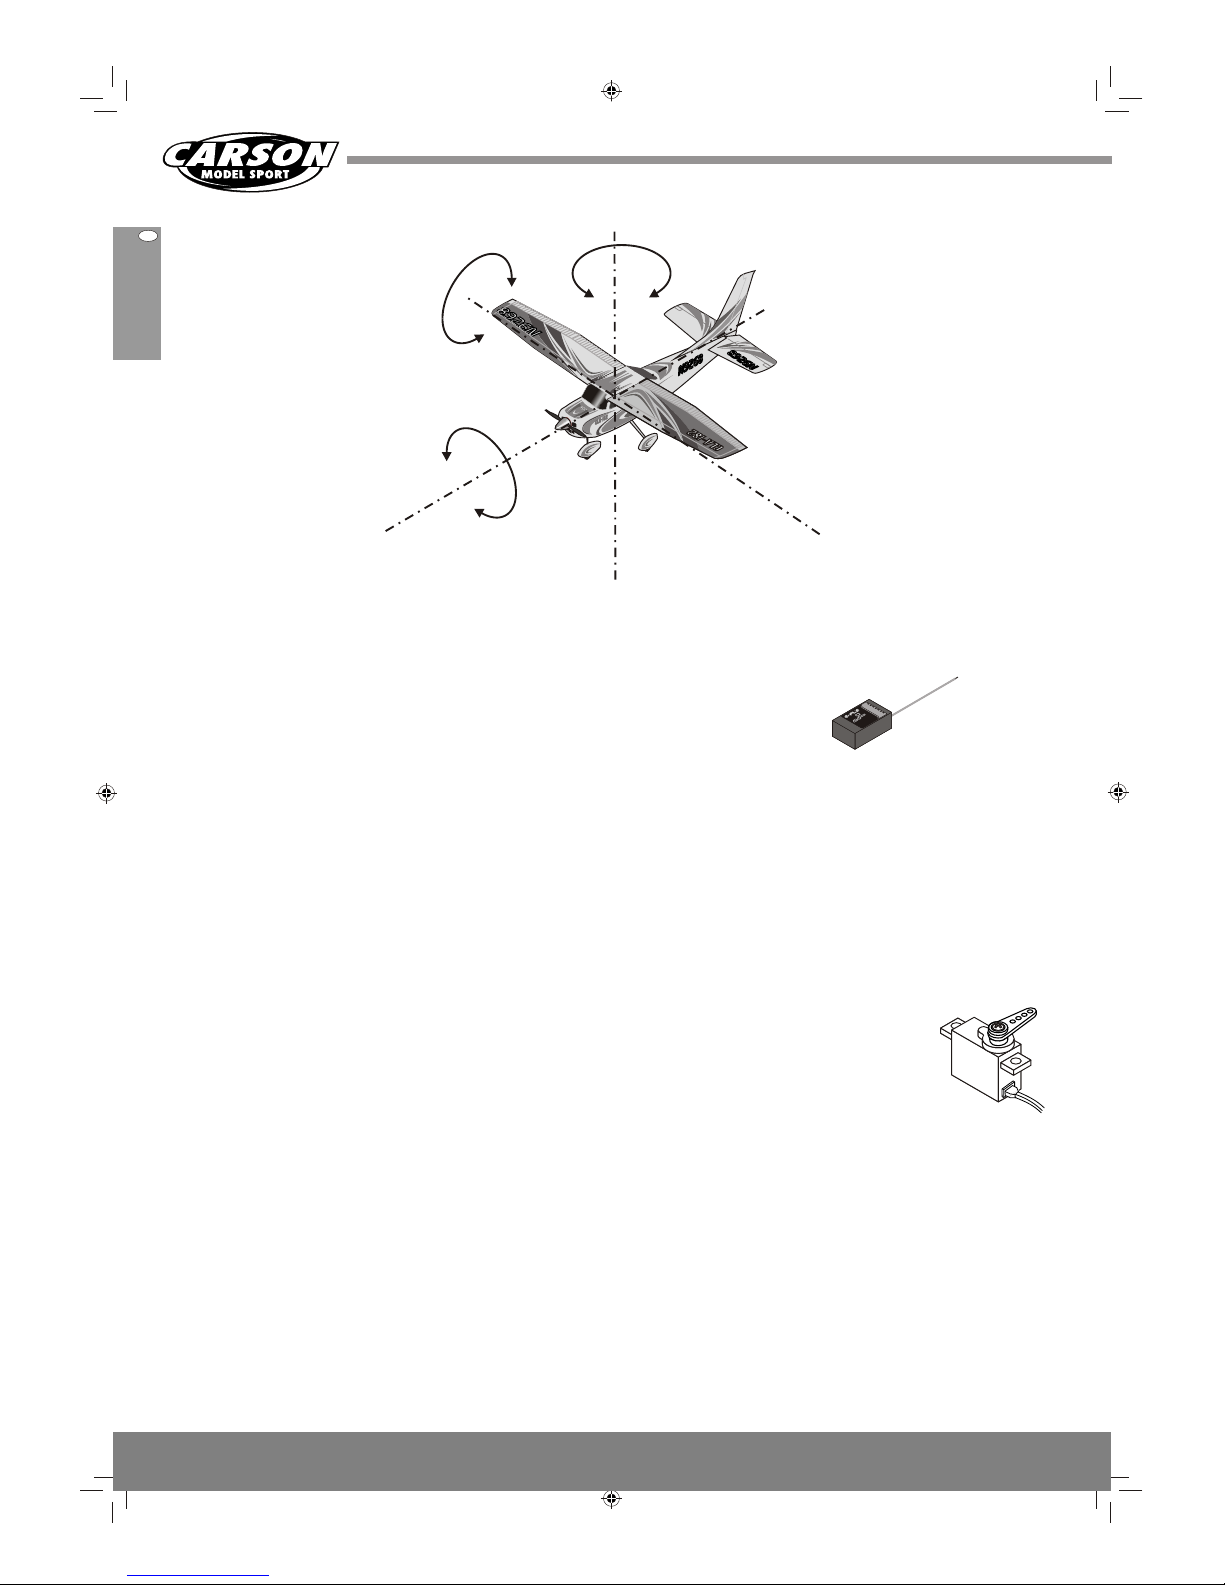
Free axes of revolution: In contrary to a car
into your Cessna 182. Only equipment from the
or a ship, the Cessna 182 is controllable at all
same manufacturer will work with the 2.4 MHz
axes (3D) as soon as it moves in the air. Changes
technology used here.
in attitude and flight direction are initiated by
movement of the control surfaces (rudder, elevator,
and aileron).
Power switch: Transmitter and receiver are
Rudder: The rudder of most airplane designs
each equipped with a switch to turn on or off
utilise at least one fin, preferably in a vertical
current supply.
position with a movable flap at the end. By
swinging the flap to the left or to the right, affects
Propeller (airscrew): The propeller is driven
the airflow which moves the tail of the airplane
by the motor and generates the propulsion of the
sideward. Together with other effects (V-shape of
model. The power of the motor, size and weight of
the wing or operating the here optional ailerons)
the model and resulting air speed, determine the
the rudder starts turning the airplane.
design of a propeller. The better the propeller is
matched for a model, the better the efficiency and
Servo: The steering signals of the transmitter are
flying performance. There are two important
converted by the receiver into control
dimensions that determine a propellers
values for the allocated servos. The
performance. Diameter and pitch preferably
servo motor operates the servo lever
indicated by the inch. The propeller of the
by means of a gear, which then
Cessna 182 with the values 8x5 (inches) has a
moves in an arc according to the
diameter of 8 and a pitch of 5 inches; during one
signal, up to 1/6th of a circle. Usually
rotation this would make a forward movement of 5
the servo lever is connected via rods
inches for one revolution. If rotating at 8,000 rpm
to the control surfaces.
that would result in approx 38 mph. The speed
which can be attained is slightly lower as the
propeller can generate propulsion only with a
Speed controller: The electronic speed
certain amount of "slip".
controller regulates the speed of the motor with
almost no power loss, by switching the motor
current on and off (with a very high frequency) in
Receiver: The receiver intercepts the signals of
differing long pulses. If the voltage of the battery
the transmitter via its antenna and converts them
drops by continuous discharge below a certain
into pulses for the servos which operate the control
limit, needed to operate the servos, the speed
surfaces. In addition it converts the radio signals
controller will stop the motor. Your Cessna 182
for the electronic speed controller which regulates
ri
the speed of the electric motor according to the
position of the throttle lever on the transmitter.
emains controllable n a power off glide.
8 MINIMOA CARSON R/C MODEL AIRCRAFT 50 050 5017
C
ES
S
N
A-
L
IG
H
T
-
A
IR
D
RAF
T
C
ES
S
N
A-
L
IG
H
T
-
A
IR
D
RAF
T
C
ES
S
N
A
-
LI
G
H
T
-
A
I
R
D
R
A
F
TC
ES
S
N
A
-
LI
G
H
T
-
A
I
R
D
R
A
F
T
Turning around the vertical axis (curve):
rudder and aileron
Turning around the lateral
axis (up - down): elevator
longitudinal axis
vertical axis
lateral axis
4-channel
Micro-receiver
B
AT
G
EA
R
A
U
X
I
R
U
D
D
T
H
RO
ELE
V
A
ILE
66
C
H
R
E
C
E
IV
E
R
E
R
6
1
-
2
.
4
G
H
z
D
S
S
S
S
I
G
N
A
L
T
M
GBGB
Page 9

LiPo batteries (Lithium-Polymer) are state of the art LiPo e
electric power sources with high capacity in s
relation to their weight. Handling such batteries d
requires special care to avoid possible hazards
and premature loss of power with regards to
c
charging and discharging as well as storing and o
any other kinds of handling. Non-observance of n
instructions and warnings can rapidly affect loss of
power, shortening of service life or defects even
under certain circumstances cause the battery to
Depending on the way you fly, the voltage of your
ignite. After the flight and at the end of charging,
LiPo battery pack will drop at some stage resulting
the battery may become hot. Within certain limits
in a lower rpm of the motor combined with reduced
this is a normal process.
climbing ability of your model.
The 100/240V charger included in the aeroplane
As soon as you realise this fact you should start to
kit consists of a power adapter, which should be
land. Landing with not enough or no power is
connected to a standard socket, and a LiPo
always difficult and you may not have sufficient
balancing charger. It delivers a current up to 1.25A
power to reach your intended landing point.
at 12.8V voltage, giving a charging time for the
LiPo battery of approximately 1 hour. The charger
/ balancing unit can also be set to a lower voltage
for slower and more gentle charging which results
in better battery life.
1. Connect the power adapter to the LiPo
balancing charger. 2. Plug the power adapter
It is prohibited to charge the battery pack inside the
into a socket.
model and we recommend removal of the battery
3. Push the white (balancer) plug of the LiPo
after each flight and storage in a safe place.
battery into the charger socket. 4. To avoid a
short circuit check that the plug connectors are
firmly connected.
5. Towards the end of the charging time check for
excessive heating of the battery. The
temperature must not exceed 50°C. If it reaches
this temperature, disconnect the battery.
5. Charging is complete when the green LED is
illuminated, and the charger should be
disconnected from the power supply as soon as
possible.
batteries are very sensitiv to deep discharge
where the voltage drops to les than 3V per cell;
they can be permanently damage by this process.
The electronic speed controller (ESC) is equipped
with a safety switch that prote ts against under
voltage by shutting down the mot r; the remaining
voltage is sufficient to maintai control in a poweroff glide.
Short circuits must be absolutely avoided; they can
cause great heat and melt the wire insulation and
can ignite surrounding combustible material.
The battery pack may be rather hot after a flight.
HANDLING THE LiPo BATTERY PACK
20
C
X
P
a
c
k
L
i
P
o
-
A
k
k
u
7
,
4V
m
A
h
CESSNA 182 CARSON R/C MODEL AIRCRAFT 50 050 5017 9
Dispose of battery properly. The durability of NiMH
to be disposed of at
battery packs depends on the kind of use and
special disposal
current consumption. If a steady high current is
sites and must not
consumed e.g. during fast flying with high rpm,
be included with
about 250 charge / discharge cycles are possible.
normal household
A reduction in capacity will also be noticed sooner.
rubbish.
A worn out (only very low capacity) or damaged
battery pack (wrapper damaged, worn cable) has
Disposal of worn out or damaged batteries
GBGB
Page 10

B
A
T
G
E
A
R
AUX
I
RU
D
D
T
H
R
O
E
L
E
V
A
IL
E
6
6
CH
R
E
C
E
I
V
E
R
E
R
6
1
2
.
4G
H
z
D
S
S
S
S
I
G
N
A
L
T
M
DIGITAL PROPORTIONAL RADIO CONTROL SYSTEMDIGITAL PROPORTIONAL RADIO CONTROL SYSTEM
ETB41 - 2.4 GHzETB41 - 2.4 GHz
ONON
OFFOFF
11 22 33 44
REVREV
NORNOR
Frequency alignment button
Short-circuit connector
10 CESSNA 182 CARSON R/C MODEL AIRCRAFT 50 050 5017
flying will be conducted at a closer distance in
Your almost-ready-to-fly Cessna 182 set includes order to see the flight attitude of the model.
a 4-channel radio control unit, receiver and flight
controller already installed in the Cessna 182, as Never start when batteries in the transmitter are
well as 4 micro-servos to operate the rudder and weak (voltage indicator in red area) otherwise your
elevator. This system is designed to have a range Cessna 182 could fly away out of control.
of 300m which means that you can control your
aeroplane up to this distance. In practice, normal
4-CHANNEL RADIO CONTROL UNIT
During remote control operation, an electronic
identifier is transmitted with each transmission
pulse in addition to the control information. Based
on this identifier the receiver identifies that the
signal is from "its" transmitter. As there are many
millions of transmitter identifiers available, it is
extremely unlikely that a foreign transmitter will be
able to affect your receiver. However, the
transmitter must communicate this identifier once
to each new receiver prior to the initial start-up.
This requires the following procedure which where
possible should be carried out in a place where
this transmission by radio cannot be disrupted by
any other electrical signals, particularly not by
other 2.4 GHz transmitters.
Assignment of Transmitter Identifier to Receiver (Binding)
1. Arrange transmitter and receiver side-by-side
and close together in working order but
switched off. To assign the receiver to the
transmitter, press the frequency alignment
button on the transmitter and switch on the
transmitter.
2. Insert the short-circuit connector (see diagram
below) into the "BATT" socket on the receiver.
Connect the flight controller to the receiver and
the flight battery to supply the receiver with
power and this should light up the indicator light.
3. If the frequency alignment was successful, the
indicator light will continue to be lit up. 4.The
indicator light will start flashing when the shortcircuit connector is removed. The receiver goes
into the ready to operate mode.
5. Press the frequency alignment button again for
acknowledgement. The transmitter is now ready
to operate and the indicator light lights up
indicating normal function of the receiver.
GBGB
Page 11
CESSNA 182 CARSON R/C MODEL AIRCRAFT 50 050 5017 11
External view of the transmitter
1 Pivotable antenna
Only use the aerial fully extended.
2 Indicator for battery condition
Sufficient power for flight control is available as
long as long as the indicator light is showing
green. If the indicator is redthe flight must be
ended as soon as possible (a safe landing is
still possible); launching again is prohibited.
The batteries are too weak and have to be
exchanged with new ones.
3 Left steering stick
4 Right steering stick
If released, the steering stick on the transmitter
returns back into the neutral (central) position
by a spring action. The throttle stick is the
opposite: it remains in the adjusted position by
a ratchet setting.
5 ON/OFF Switch 11 Charging jack (lateral)
After switching on, the indicator light on the Note: ON/OFF switch should be in the "OFF"
transmitter (2) must light up green, otherwise take- position before charging. A charger is to be used
off must not take place even if all the model's only for Nickel-Cadmium or Nickel-Metal Hydride
functions appear to be working correctly. batteries (Ni-Cd / NiMH), type N-3U or equivalent.
Other types of batteries can explode and could
cause personal injury and/or damage.
6-9 Trim tabs channel 1-4
This device enables you to trim the controls, obtain
true neutral settings and to adjust individual
12 Neck strap connector
performance characteristics of your model. The
trim tabs are on a ratchet which means that you (Available separately item No. 13898)
are able to make fine adjustments and corrections. By fixing the transmitter with the separately
available neck strap the security in handling the
transmitter is improved.
10 Receiver assignment button
A new receiver must be assigned to the transmitter
13 Carrying handle
once before starting operation (binding). The
bottom-most button among others is used for this.
14 Reverse switches
See description on page 10.
The switches make it possible to reverse the
direction of rotation of the servomotors and to
reverse the function of the flight controller
(propeller's direction of rotation).
STEERING MODE2 THROTTLE LEFT
Left stick Right stick
up / front Throttle Height down
below / rear Motor off Height up
left Rudder Turn left Aileron left up
right Rudder Turn right Aileron right up
Polarity of the
charging jack
1
4
6
7
8
9
10
11
12
DIGITAL PROPORTIONAL RADIO CONTROL SYSTEMDIGITAL PROPORTIONAL RADIO CONTROL SYSTEM
ETB41 - 2.4 GHzETB41 - 2.4 GHz
ONON
OFFOFF
11 22 33 44
REVREV
NORNOR
2
3
5
13
14
GBGB
Page 12

12 CESSNA 182 CARSON R/C MODEL AIRCRAFT 50 050 5017
Changing the transmitter batteries
To remove the battery cover, slide in the
direction of the arrow (downward) whilst
lightly pushing the finger mark. When
inserting batteries always insert the negative
end first observing the correct polarity as
stamped in the battery case. If the
transmitter voltage indicator fails to register,
check the contacts, (especially the negative)
and recheck that batteries are fitted correctly.
Also make sure the batteries are fully
charged.
Used correctly, domestic batteries are a
safe and dependable source of portable
power. Problems can occur If they are
misused or abused - resulting in leakage or,
in extreme cases, fire or explosion.
Here are some simple guidelines to safe
battery use designed to eliminate any such
problems.
Store unused batteries in their packaging
and away from metal objects which may
cause a short-circuit resulting in leakage or,
in extreme cases, fire or even an explosion
Never attempt to recharge ordinary
batteries, either in a charger or by applying
heat to them. They may leak, cause fire or
even explode. There are special
rechargeable batteries which are clearly
marked as such.
Take care to fit your batteries correctly,
observing the plus and minus marks on the
battery and appliance. Incorrect fitting can
cause leakage or, in extreme cases, fire or
even an explosion.
Remove dead batteries from equipment and
all batteries from equipment you know you
are not going to use for a long time.
Otherwise the batteries may leak and cause
damage.
Supervise children If they are replacing
batteries themselves in order to ensure
these guidelines are followed.
Replace the whole set of batteries at one
time, taking care not to mix old and new
batteries or batteries of different types,
since this can result in leakage or, in
extreme Gases, fire or even an explosion
Never dispose of batteries in fire as this can
cause them to explode. Do not put dead
batteries in with the normal household
waste. Deliver them at special collecting
institutions.
Make sure battery compartments are
secure.
BATTERY SAFETY
GUIDELINES
R
E
CY
CL
E
PUSH
AA
1.5V
AA
1.5V
AA
1.5V
AA
1.5V
AA
1.5V
AA
1.5V
AA
1.5V
AA
1.5V
SIMULATOR
GBGB
Page 13

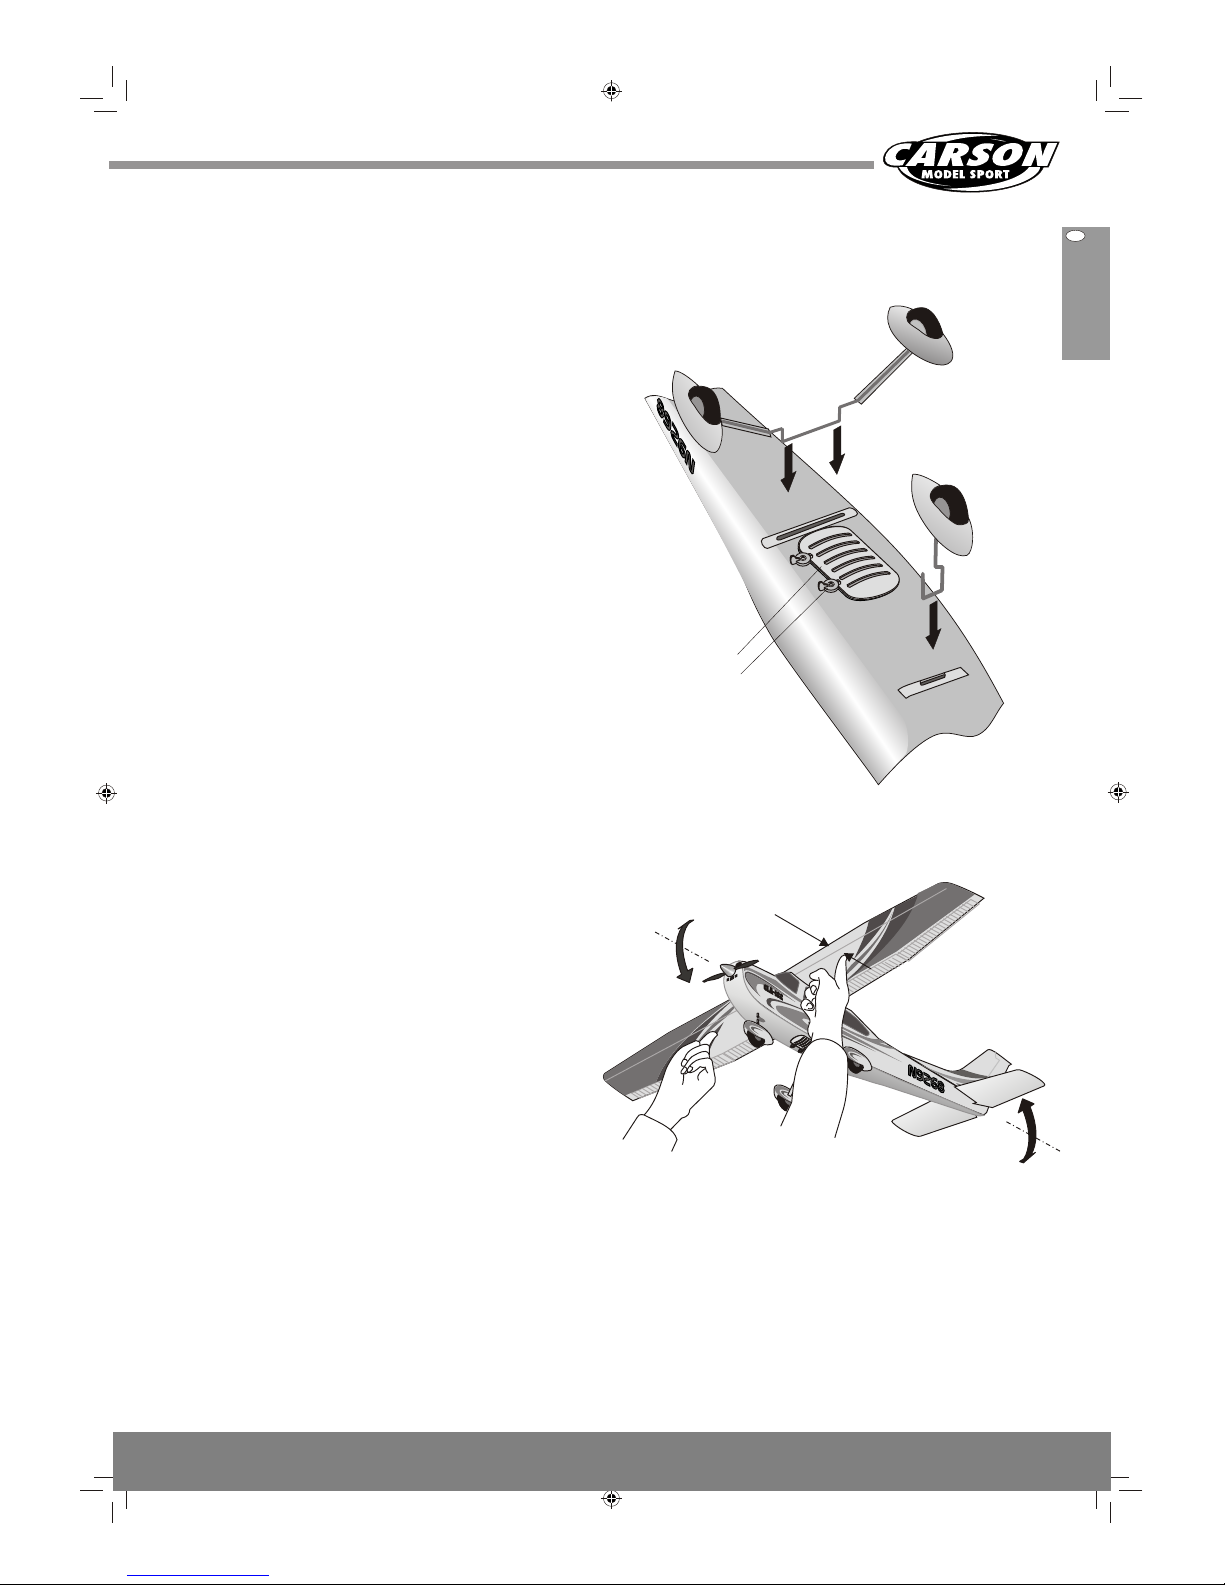
For reasons of transportation the tail assembly is
not mounted when supplied.
Apply a little adhesive to the precut slit in the
The kit includes adhesive for attaching the tail
fuselage and to the mounting tabs on the rudder
assembly. It requires a drying time of
assembly. Now push the rudder assembly into the
approximately 12 hours, during which time the glue
slit in the fuselage, checking that it is positioned
joint should not be subjected to stress. To speed
correctly and is straight. Strengthen the glue joint
up the process and provide superior adhesion, 2-
by gluing around the abutting edges. This is not
component 5-minute epoxy glue (available
necessary when using epoxy glue. Before the glue
separately) which achieves full strength in less
has dried completely, check once again that the
than an hour may be used. To improve flexibility,
parts are positioned correctly.
flex the rudder flaps of the elevator and tail fin
slightly. Do not overflex!
Attaching the elevator
Push the elevator into the precut slit in the
fuselage and check that the rudder flap can move
freely. If it scrapes against the fuselage and is
difficult to move, use a modelling knife to cut away
the fuselage at this point taking extreme care.
Apply the glue contained in the kit to the parts on
the elevator that will later come into contact with
the fuselage. You should also apply a little glue to
the contact surfaces on the slit in the fuselage.
Ease the fuselage slightly apart and push the
elevator (the rudder horn facing downwards) into
the fuselage, checking that it is positioned straight
in both directions. Allow the glue to dry slightly
before continuing with assembly.
Gluing the rudder in
.
Adhesive
If necessary cut here
Adhesive
9
0
°
90°
CESSNA 182 CARSON R/C MODEL AIRCRAFT 50 050 5017 13
ATTACHING THE TAIL UNIT
GBGB
Page 14

The wings of the Cessna 182 are removable for
transport.
Before mounting the wings, push the plug for the
aileron servos (merged into one channel) into
Channel 1. You can use the cable
colour of the servos that are already
plugged in to guide you. Push the wing
with the nose on the front edge into the
fuselage cutout behind the windshield,
pushing it in from the top at an angle. Then
fix the wings to the fuselage using the two
plastic screws. The ailerons are deflected in
opposite directions. The first time they should be
checked for correct operation. Joystick to the right:
right aileron up, left aileron down, joystick to the
left, positions reversed. If this is not the case, the
servo release switch for channel 1 must be
switched over..
C
E
S
S
N
A
-L
IG
H
T
-
A
IRD
RA
F
T
C
E
S
S
N
A
-L
IG
H
T
-
A
IRD
RA
F
T
C
ESS
NA-
LIG
H
T-
AIR
C
R
AF
T
C
ESS
NA-
LIG
H
T-
AIR
C
R
AF
T
To adjust the rudder flaps on the tail unit, the Do not forget to disconnect the battery again and
remote control must be in operation, i.e. the switch off the transmitter.
transmitter must first be switched on and the flight
battery connected. The throttle control must not be
pushed forward, the aeroplane should be held
firmly and kept away from the propeller’s plane of
rotation, as there is always the chance that the
engine may be started unintentionally. The left
hand control stick on the transmitter (for the engine
and rudder) must be in the “Engine Off” position
(completely down) and for the rudder on “neutral”
(in the middle). The right hand control stick
(elevator and ailerons) should be in the fully
neutral position. The trims for the fin and elevator
must also be in the centre position. To allow the
plastic fork crown of the control linkage to be
screwed in and out of the rudder horn, it must be
adjusted in such a way that the bearing pin fits
exactly into the second hole in the rudder horn
(from the outside). It should then be pushed into
this hole and secured by pushing together. The
elevator and side rudder should also be fixed in
this way. You should now check that the rudder
flaps function correctly: joy stick for the rudder to
the right, rudder deflection in direction of flight to
the right (right bend); joy stick for elevator forward,
rudder deflection up (climbing). Slight deviations
can be corrected using the trim lever, greater
deviations should be corrected at the fork crown.
Check that the tail assembly functions by operating
the transmitter.
If horizontal and vertical are reversed on the
transmitter, pull the plugs in channels 2 and 3 out
and plug them back in the opposite way round.
Adjusting the tail unit to neutral
14 CESSNA 182 CARSON R/C MODEL AIRCRAFT 50 050 5017
MOUNTINGING THE WINGS
GBGB
Page 15
CE
S
S
N
A
-
1
8
2
C
E
SS
N
A-
LIG
H
T
A
IR
CR
A
F
T
C
E
SS
N
A-
LIG
H
T
A
IR
CR
A
F
T
50
mm
Push the main landing gear firmly into the slit in the
plastic mounting. It is kept in place by this clamping
action.
Push the nose wheel into the plastic mounting in
the nose of the fuselage.
If the plane travels in a gentle arc when pushed (by
hand), this can be corrected by careful bending of
the landing gear wires.
MOUNTING THE LANDING GEAR
Battery flap
with bolts
CESSNA 182 CARSON R/C MODEL AIRCRAFT 50 050 5017 15
If the nose or tail sections have a tendency to tilt using double sided tape and should be equally
downwards, the weight is biased in this direction. balanced. A centre of gravity which is too far
Occasionally the centre of gravity of the aeroplane rearward (nose too light) will make flying difficult
may have to be corrected e.g. after a repair, by the and needs to be corrected.
addition of small weights. These should be applied
An airplane's centre of gravity is designed to be in
a certain relation to its lifting areas and the
Cessna 182 it is set up correctly on delivery. The
margin at which the centre of gravity may move in
relation to the ideal set up is very small. You can
check the centre of gravity of the Cessna 182 by
holding it up at the points shown (140 mm from the
rear edge of the wing) with two fingers. It should
then slightly swing around the horizontal position
and not be inclined to the front or rear.
BALANCING THE CENTRE OF GRAVITY
GBGB
Page 16
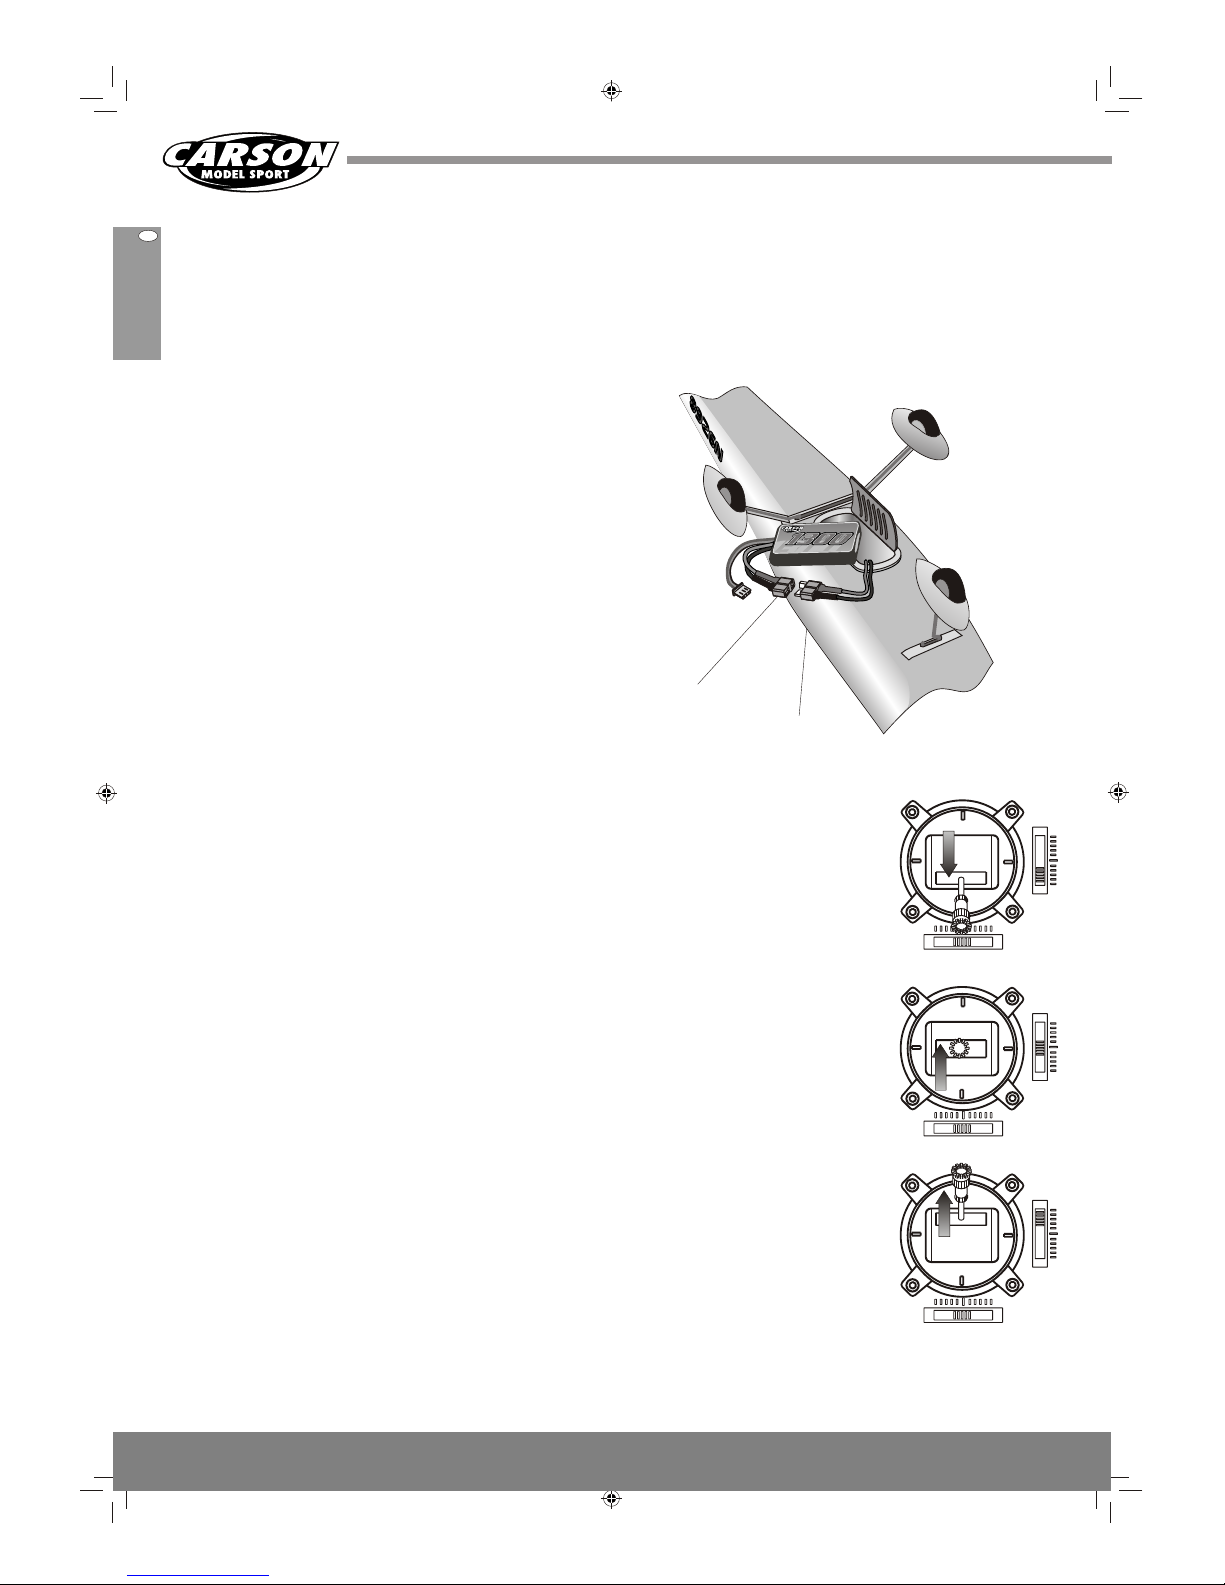
The battery compartment is secured by means of the stick being moved, this is not an
two rotary latches and is located on the bottom of indication of any interference.
the fuselage. After flying the battery must be
- Close the battery compartement,
disconnected from the flight controller immediately.
We strongly recommend removing the LiPo battery
after operation and storing it somewhere with a
non-combustible base.
Before launching, first switch on the transmitter
and take the previously recommended precautions
before connecting the battery.
- Switch on the transmitter. The throttle stick
has to be in the lowest position (throttle off)
- Attach the battery connector to the flight
controller connector and note the shape of
the plug which will only fit in one direction.
The flight controller's connector and battery
connector should clip firmly together.
- Keep clear of propeller rotation.
- The servo may give a short twitch without
MOUNTING AND CONNECTING THE BATTERY PACK
From battery
To flight controller
20C
X-Pack
Li
P
o-
A
kk
u
7
,
4
V
mAh
16 CESSNA 182 CARSON R/C MODEL AIRCRAFT 50 050 5017
The Cessna 182 should now be ready for take off.
Change the position and
Prior to this, the functioning of the speed controller
try again.
must be adjusted or tested. It features a unit which
6. The electronic speed
prevents accidental motor start-up when switching
controller has a power off
on with an incorrectly positioned transmitter control
function if the
stick and provides an automatic motor shut down if
rechargeable battery
the rechargeable battery voltage falls below 7V.
voltage falls below the
specified voltage. If the
1. Switch on the transmitter and then the airplane
voltage is lower than
(receiver).
5 Volts, the engine will be
2. Pull back the throttle stick to the “motor off”
cut off. Since the battery
position and leave it there for at least 3
has a certain ability to
seconds. If the motor continues to run also pull
“recharge” it may be
the throttle trim to minimum.
possible to restart the
3. Now slowly push the throttle stick forward (up).
engine for a short period
The motor starts and the speed increases.
after a pause and drawing
4. If the stick is moved near to the maximum
back the throttle stick
position the motor should run at full speed. Use
(see 2.).
the the throttle trim to check whether a higher
speed can be attained; nevertheless, the
position “motor off” must be secured.
5. If the motor does not start at all, it is probably
due to the reverse switch of the transmitter (ch
3, see page 14) being in the wrong position.
ADJUSTING THE SPEED CONTROLLER
2.
3.
4.
GBGB
Page 17

CESSNA 182 CARSON R/C MODEL AIRCRAFT 50 050 5017 17
FLYING
Pre flight check
the correct operation of the ailerons etc. The
Like any real airplane, the model aircraft should
voltage indicator of the transmitter must indicate
undergo a complete pre flight check. This begins
sufficient power for the flight to commence. In the
with visually checking that all parts are in the
event of a hard landing any damaged items must
correct place and firmly attached to the model.
be completely repaired before flying is resumed.
Next, switch on the radio equipment and test for
- Operate the steering sticks in short intervals
Before flying your Cessna 182 for the first time it
and monitor the reaction of the rudders.
is vital to check the range of the radio signal.
- Your R/C is performing well if the rudders
show the correct response at a distance of
- Switch on the transmitter first, then connect
about 300m between transmitter and the
the receiver.
model.
- Slowly increase the distance between the
transmitter and the model, which should be
Never fly if your radio system does not work
held by a second person as precautionary
perfectly, even if it is a temporary fault.
measure. Ensure that they keep the
propeller away from any part of their body
Testing the reach of the radio system
There are different regulations from country to If you are a beginner you
country governing model aircraft. Pay attention to should avoid flying in
the corresponding safety precautions in choosing conditions where there is
your flight area. anything other than a very
light wind.
The ideal location is a model airplane club with its
own facilities or large field with short grass.
There should be no animals, people, traffic or
parked vehicles present.
Never fly near large obstacles, electricity pylons or
overhead cables.
Obtain information about the weather and wind
velocity via the media (TV, newspaper, radio etc)
before you commence flying, in order to avoid the
risk of starting in unsuitable conditions. Never fly in
strong wind, rain or thunder.
Requirements of the flight terrain
GBGB
Page 18
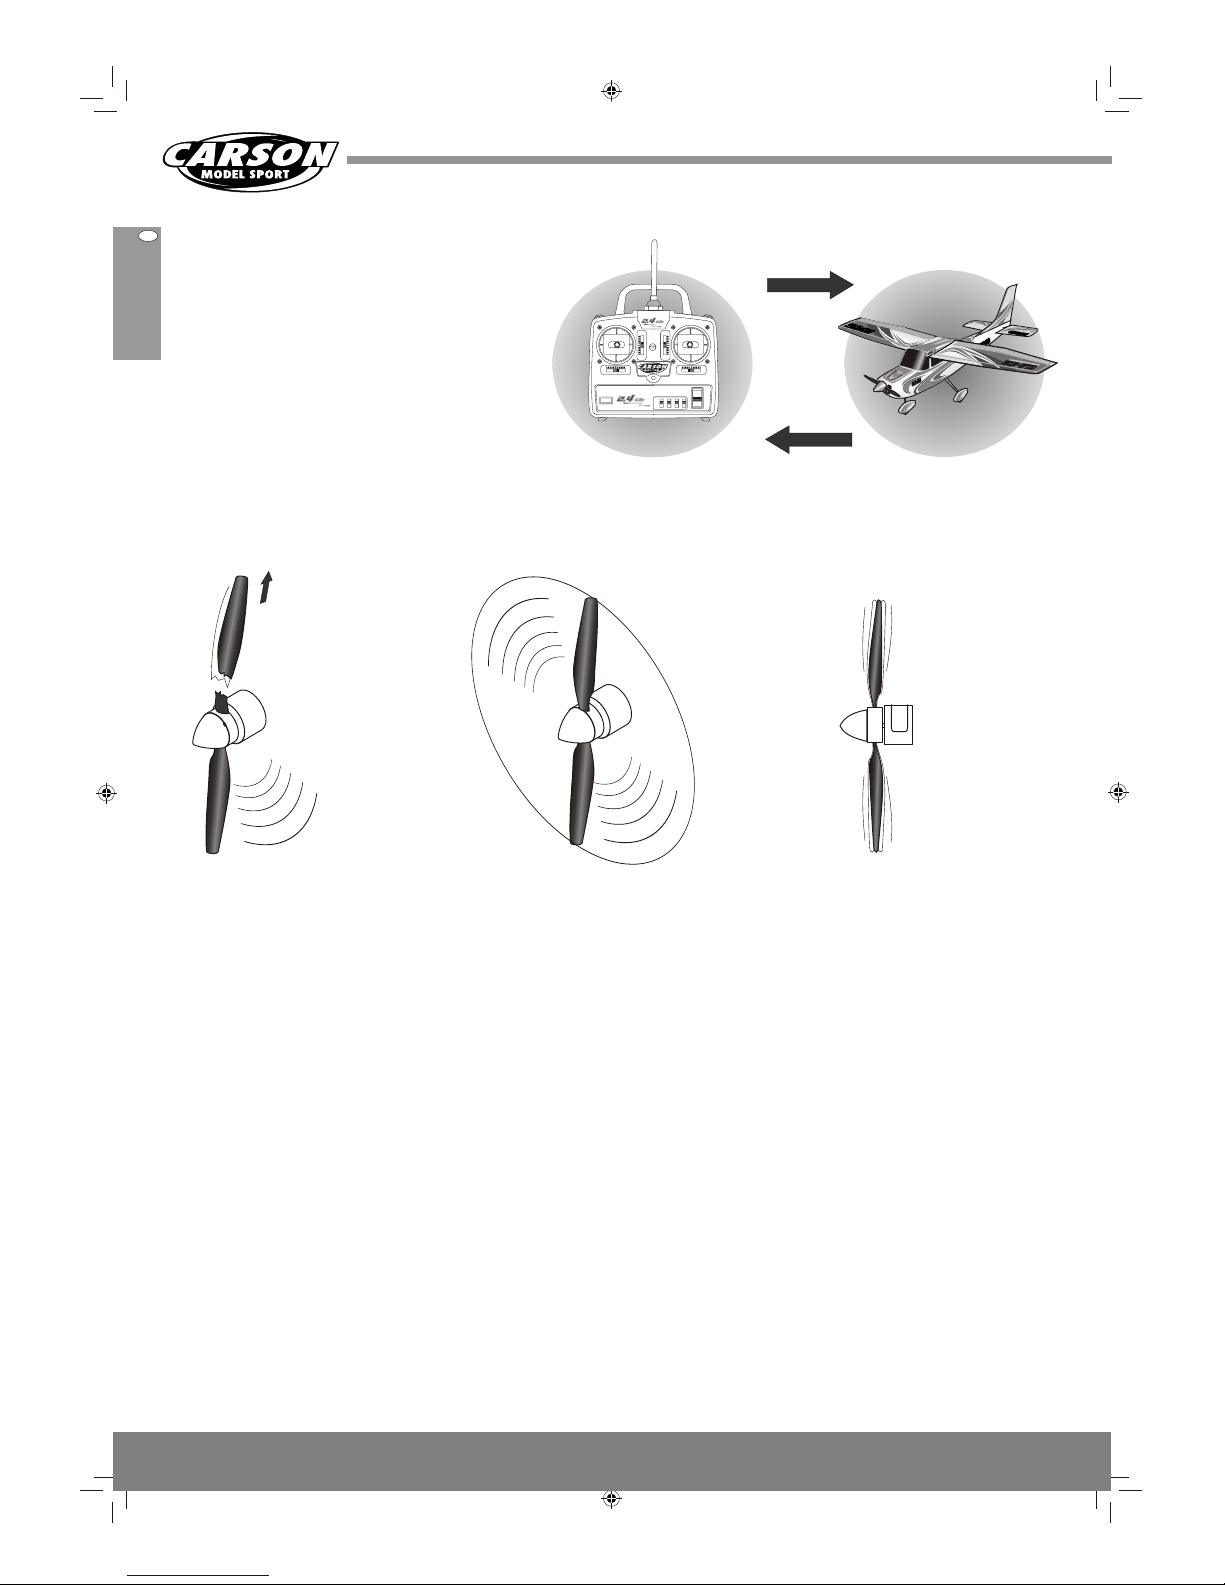
Check before each start
If you have checked that your model is in
good condition, switch on the transmitter
first, and then connect the receiver.
Now check by moving the transmitter sticks
(set the throttle stick in the OFF-position)
the function of the flaps (direction, amount
of deflection, and ease of operation).
Scrutinise the propeller once again; it must
be replaced even if there is only a tiny
fingers well clear of the propeller. Your
amount of damage present. Hold the Cessna 182
Cessna 182 is now ready to fly.
by the fuselage and check the rpm of the motor and
correct rotation of the propeller. Keep hands and
Switch on
Switch off
DIGITAL PROPORTIONAL RADIO CONTROL SYSTEMDIGITAL PROPORTIONAL RADIO CONTROL SYSTEM
ETB41 - 2.4 GHzETB41 - 2.4 GHz
ONON
OFFOFF
11 22 33 44
REVREV
NORNOR
C
E
S
S
N
A
-
18
2
C
E
S
S
N
A
-
L
I
G
H
T
-
A
I
R
D
RA
F
T
C
E
S
S
N
A
-
L
I
G
H
T
-
A
I
R
D
RA
F
T
18 CESSNA 182 CARSON R/C MODEL AIRCRAFT 50 050 5017
Damaged propeller
may break
Propeller
wobbels
Propeller rotates
smoothly
START
General
The forces which an airplane needs to stay in the A good way to get accustomed to this
air depend upon its airspeed, weight, drag and the phenomenon is to practice on a PC using a flight
amount of lift. Flying into the wind creates more lift
simulation program.
relative to its airspeed. Conversely a tail wind will
For instance CARSON “CFG Flight simulator” item
require a greater airspeed to generate an equal No. 508068 can be recommended.
amount of lift. Take off and landing should For absolute beginners we recommend that they
therefore always take place against the wind
are assisted by an expert model pilot and only take
whenever possible. Be aware that when the plane
over control of the transmitter when the plane is
is flying towards the pilot, the left and right controls flying at a safe altitude.
are reversed.
GBGB
Page 19

Launching by hand
- Hold model in the centre of gravity over the
If there is only an area with relatively high grass
throwers head as shown.
available for launching, the aeroplane should be
- Push the throttle stick all way to the front,
launched by hand.
testing intensity of thrust.
We recommend that an assistant executes
- Throw the model forward in one swift
launching so that the pilot can react to unforeseen
movement.
attitude at any time. Follow the procedure as
- Control attitude of the plane immediately and
detailed below:
climb at a flat angle.
- Switch on transmitter,
- Check all rudder and aileron functions.
then connect batte
The model should be thrown as horizontal as speed diminishes and the ensuing breaking away
possible to achieve an easily controllable attitude. from the airflow (no more lifting forces) is likely to
If it is thrown downwards it becomes faster and result in a crash. Always try to launch into the wind.
may be difficult to level up before it hits the ground.
If the throw is directed steeply upward the flight
C
E
S
S
N
A
-
1
8
2
CESSNA-LIGHT-AIRDRAFTCESSNA-LIGHT-AIRDRAFT
CE
S
S
N
A
-18
2
C
E
SSN
A
-
L
IG
H
T
-
A
IR
D
R
A
F
T
C
E
SSN
A
-
L
IG
H
T
-
A
IR
D
R
A
F
T
C
E
S
SN
A
-
1
8
2
C
E
S
SN
A-
L
IG
H
T
A
IR
D
R
AF
T
C
E
S
SN
A-
L
IG
H
T
A
IR
D
R
AF
T
Ground launch
Even with the engine switched off the model is still
Due to the relatively small size of the model it
easy to steer when gliding, but you must ensure
requires a suitable runway e.g. a grass strip mown
that it does not get too slow because of the
very short. It must always be launched as close
danger of temporarily
as possible to the direction from which the wind is
uncontrolled flying conditions
blowing. After all of the rudders have been
and possible stalling.
checked for correct functioning, the pilot should
position him or herself
behind the model to
allow him or her to
react quickly if the
model veers to the
side. At full throttle,
after rolling
approximately 20m, and if
the speed seems high enough,
the aeroplane can take off by
gentle pulling on the elevator. Now
gradually increase the speed and do
not allow to climb too steeply!
Once a sufficiently safe height has been
reached, the throttle for normal flying mode
can be reduced to about 30%. This lengthens
the flight duration accordingly.
CESSN
A-182
C
E
S
S
N
A
L
I
G
H
T
A
I
R
C
R
A
F
T
WIND
CESSNA 182 CARSON R/C MODEL AIRCRAFT 50 050 5017 19
WIND WIND WIND
Correct
Wrong, downward
Wrong, too
steep upward
GBGB
Page 20

20 CESSNA 182 CARSON R/C MODEL AIRCRAFT 50 050 5017
LANDING
- On approach to the landing point, lift the
As soon as you realise that there is a decrease in
elevator slightly and control speed with the
motor performance you should prepare for landing.
power of the motor. Insufficient speed may
Ensure that you have enough reserve to correct a
cause the plane to crash.
wrong landing attempt and to commence a new
approach. An ideal landing should be performed as
- Reduce the throttle a little and let the model
follows:
glide.
- Fly with a tail wind some distance parallel to
- Just before touchdown, pull back the throttle
the runway.
stick fully and allow the model to land.
- If a suitable height and distance to the runway
- If the approach is too high increase motor
is reached turn in a 180° curve in the direction
speed and gain height for a new approach.
of the runway; now against the windStraighten the model to the runway and let it
descend by reducing motor speed.
When your Cessna 182 has landed
successfully you should immediately
disconnect the LiPo battery. Then
switch off the transmitter. If another
modeller would like to use your
frequency advise them that your
transmitter is now off. You must not
use your transmitter again until you
have ensured that your frequency is
not being used by somebody else.
If you do not intend to use the radio
control unit for several weeks, you
should remove the batteries from the
transmitter.
If you store your Cessna 182 at home make sure
The special plastic material (EPO) from which the
that no parts are jammed or twisted, any distortion
Cessna 182 is mainly constructed, is very
could become permanent after a period of time
sensitive to high temperatures. Do not expose
and this will affect flight behaviour.
your aeroplane to direct sunlight for a long time
and do not store it in a car which may be heated
by the sun.
For information relating to
the flying battery please refer to the
manufacturer's instructions and follow
the recommended advice.
AFTER THE FLIGHT AND STORING
GBGB
Page 21

CESSNA 182 CARSON R/C MODEL AIRCRAFT 50 050 5017 21
REPAIRS
Several parts such as the propeller, electronic
During normal flight operation the Cessna 182
components, operating rods, motor and support
should withstand rough handling, but it is inevitable
cannot be repaired. They must be replaced with
that repairs will be necessary at some stage. The
new items, which should be sourced through your
plastic, from which the aeroplane is made, can be
local dealer.
repaired very easily, with a two part, 5 minute
epoxy adhesive or instant cement (cyan acrylic).
During curing, the parts have to be aligned and
bonded against each other in order to achieve a
complete repair. Never fly the Cessna 182 if it has
been damaged and you are unsure as to the
integrity of the airplane or a repair.
LIMITED WARRANTY
This warranty does not cover:
This product is warranted by CARSON against
manufacturing defects in material and
(a) damage or failure caused by or attributable to
workmanship under normal use for 24 months
acts of God, abuse, accident, misuse,
from the date of purchase from authorized
improper or abnormal usage, failure to follow
franchisees and dealers.
instructions, improper installation or
In the event of a product defect during the warranty
maintenance, alteration, lightning or other
period, take the product and the CARSON sales
incidence of excess voltage or current;
receipt as proof of purchase date to any CARSON
(b) any repairs other than those provided by a
store. CARSON will, at its option, unless otherwise
CARSON Authorized Service Facility;
provided by law:
(c) consumables such as fuses or batteries;
(d) cosmetic damage;
(a) correct the defect by product repair without
(e) transportation, shipping or insurance costs; or
charge for parts and labor;
(f) costs of product removal, installation, set-up
(b) replace the product with one of the same or
service adjustment or reinstallation. This
similar design; or
warranty gives you specific legal rights, and
(c) refund the purchase price.
you may also have other rights which vary
All replaced parts and products, and products
from state to state.
on which a refund is made, become the
property of CARSON. New or reconditioned
parts and products may be used in the
performance of warranty service. Repaired or
replaced parts and products are warranted for
the
remainder of the original warranty period. You
will be charged for repair or replacement of
the product made after the expiration of the
warranty period.
GBGB
Page 22

Wing 500508500
Fuselage 500508502
Tail unit
500508501
Propeller
2pcs 500508503
C
E
SS
N
A
-
1
8
2
C
E
S
S
NA
-
L
IG
H
T
-
AIR
D
R
A
F
T
C
E
S
S
NA
-
L
IG
H
T
-
AIR
D
R
A
F
T
Spinner-Set
500508505
Landing gear
500508504
22 CESSNA 182 CARSON R/C MODEL AIRCRAFT 50 050 5017
TROUBLE SHOOTING
Problem
Cause
1 Flight battery not charged.
2 Transmission signal too weak,
indicator light red or off.
3 Plug-in connection loose.
1 Servo connector not properly inserted.
2 Servomotor damaged.
1 Yaw rudder not in neutral position
when joystick in centre position.
2 Wing not cleanly assembled.
3. Aileron not in neutral position when
joystick in centre position.
1 Flight battery not charged sufficiently.
2 Flight battery damaged during
handling.
3 Both ailerons are pointing upwards.
1 Transmitter voltage too low
Remedy
1 Charge flight battery.
2 Replace all batteries of
transmitter or charge
rechargeable batteries.
3 Check plug-in connections.
1 Insert servo connector firmly.
2 Replace servomotor.
1 Align yaw rudder using
trimming lever, readjust to
rudder linkage if necessary.
2 Reassemble wing.
3 Readjust aileron with joystick
in neutral position.
1 Charge flight battery.
2 Replace flight battery.
3 Readjust aileron with joystick
in neutral position.
1 Replace all batteries of
transmitter or charge
rechargeable batteries.
Motor fails to start
Servomotor does not react
to control command.
Fails to fly straight.
Fails to climb.
Range too short on testing
SPARE PARTS
The use and fitting of accessories is described
The following replacement and spare parts are
elsewhere.
available for the MINIMOA.
GBGB
Page 23

FUNKFERNGESTEUERTES
BETRIEBSANLEITUNG
Artikel Nr. 50 050 5017
RC MOTORFLUGZEUG
CESSNA 182 CARSON R/C MOTORFLUGZEUG 50 050 5017 23
D
CES
SNA-182
C
E
S
S
N
A
-LIGH
T
-A
IRD
R
A
F
TC
E
S
S
N
A
-LIGH
T
-A
IRD
R
A
F
T
Cessna 182Cessna 182Cessna 182
Page 24
Sehr geehrter Kunde
Hinsicht und in Bezug auf Ausstattung, Materialien
und Design jederzeit und ohne Ankündigung vor.
wir beglückwünschen Sie zum Kauf Ihrer Cessna
Aus geringfügigen Abweichungen des Ihnen vorlie-
182 die nach neuestem Stand der Technik gefertigt
genden Produktes gegenüber Daten und
ist. Da wir stets um Weiterentwicklung und
Abbildungen dieser Anleitung können daher kei-
Verbesserung unserer Produkte bemüht sind,
nerlei Ansprüche abgeleitet werden.
behalten wir uns eine Änderung in technischer
Vor dem ersten Einsatz des Modells unbedingt diese Betriebsanleitung lesen!
mitgelieferte Zubehör wie Fernsteuerung, Akku
Anleitung
und Ladegerät. Für Schäden, die durch
Diese Fertigstellungs- und Bedienungsanleitung
Nichtbeachtung der Montage- und
soll Ihnen bei der Endmontage und dem Betreiben
Bedienungsanleitung entstehen, besteht kein
des Modells behilflich sein, Sie sollten Sie daher
Garantieanspruch. Ebenso von der Garantie
vor Aufnahme irgendwelcher Arbeiten am Modell
ausgeschlossen sind normaler Verschleiß,
gründlich gelesen und verstanden haben. Dies gilt
Unfallschäden und durch fehlerhafte Bedienung
sowohl für das Modell als auch für das
entstandene Schäden.
ersten Starts das Hinzuziehen eines erfahrenen
Sicherheit
Modellpiloten empfehlenswert.
Das Betreiben eines Flugmodells ist ein
faszinierendes Hobby, das jedoch auch ein hohes
Maß an Verantwortung erfordert. Die entsprechenden Sicherheitsanweisungen sind daher
unbedingt zu befolgen. Die Cessna 182 ist kein
Spielzeug, Kinder unter 14 Jahren sollten daher
das Modell nur unter Aufsicht eines Erwachsenen
starten lassen. Für absolute Anfänger ist bei den
Hände, Gesicht, Haare und überhaupt alle
Körperteile zu jeder Zeit vom Drehkreis des
Propellers fernhalten. Durch die hohe Drehzahl
der Propellerblätter bergen sie das Risiko
schwerer Verletzungen.
Haftung/Versicherung
Flugzeugs ohne Versicherungsschutz ist eine mit
Der Betreiber eines Flugmodells haftet
Bußgeld zu ahndende Ordnungswidrigkeit. Der
grundsätzlich für jeglichen Schaden, den sein
Versicherungsnachweis ist jeweils beim Start
Fluggerät anrichtet, unabhängig davon, ob er
mitzuführen. Erkundigen Sie sich diesbezüglich
selbst der Verursacher ist. Seit Juli 2005 besteht
bei Ihrem Versicherungsagenten, beim Deutschen
laut Luftverkehrszulassungsordnung (LuftVZO)
Aeroclub oder beim Deutschen Modellflieger
eine grundsätzliche Versicherungspflicht für alle
Verband (DMFV).
Modellflugzeuge, das Starten eines Modell-
Konformitätserklärung
Die Original-Konformitätserklärung kann unter
gemäß Richtlinie 1999/5/EG (R&TTE)
untenstehender Anschrift angefordert werden.
Hiermit erklärt Dickie-Tamiya GmbH&Co KG, dass
Dickie-Tamiya GmbH&Co. KG • Werkstraße l •
sich dieses Modell
D-90765 Fürth • Tel.: +49/(0)911/9765-03
n Übereinstimmung mit den
grundlegenden Anforderungen und den anderen
relevanten Vorschriften der Richtlinie 1999/5/EG
befindet.
einschließlich
Fernsteueranlage i
Entsorgung
bei den entsprechenden
Bedeutung des Symbols auf dem Produkt, der
Rücknahmestellen ab. Fragen dazu
Verpackung oder der Gebrauchs-anleitung:
beantwortet Ihnen die für die
Elektrogeräte sind Wertstoffe und gehören am
Abfallbeseitigung zuständige
Ende der Laufzeit nicht in den Hausmüll. Helfen
Organisation oder Ihr Fachhändler.
Sie uns beim Umweltschutz und
Resourcenschonung und geben Sie dieses Gerät
Wir wünschen Ihnen viel Freude beim Einsatz
Ihres CARSON Flugmodells.
D
22 CESSNA 182 CARSON R/C MOTORFLUGZEUG 50 050 5017
Page 25
Cessna 182
RC-Flugmodell
Bestell-Nr. 50 050 5017
INHALTSANGABE
Seite
Vorwort / Konformitätserklärung . . . . . . . . . . . . . . . . 24
Inhaltsangabe..............................25
Sicherheitshinweise .........................25
Verwendung der Anleitung....................27
Einsatzmöglichkeiten der Cessna. . . . . . . . . . . . . . . 27
Technische Daten...........................27
Inhalt des Flugzeug-Sets .....................28
Erforderliches Zubehör.......................26
Erläuterung einiger Begriffe aus dem Modellbau . . . 29
Handhabung des LiPo-Akkupacks . . . . . . . . . . . . . . 31
Die 4-Kanal Fernsteueranlage . . . . . . . . . . . . . . . . . 32
Befestigen des Leitwerks.....................35
Montage der Tragflächen .....................36
Einsetzen des Fahrgestells. . . . . . . . . . . . . . . . . . . . 37
Auswiegen des Schwerpunkts . . . . . . . . . . . . . . . . . 37
Anschließen des Flugakkus . . . . . . . . . . . . . . . . . . . 38
Einstellung des Flugreglers. . . . . . . . . . . . . . . . . . . . 38
Flugbetrieb................................39
Start......................................40
L a n d u n g..................................4 2
Nach der Landung / Aufbewahrung . . . . . . . . . . . . . 42
Reparaturen ...............................43
Garantiebedingungen........................43
Fehlersuche und-Behebung...................44
Ersatzteile.................................44
D
CESSNA 182 CARSON R/C MOTORFLUGZEUG 50 050 5017 25
Page 26

SICHERHEITSHINWEISE
oder die KontrollLeuchte am Sender in den roten Bereich
gewandert ist.
. Die Kontroll-Leuchte muss grün
Nehmen Sie nach Beendigung des
leuchten. Sollte die Kontrolleuchte rot leuch-
Flugbetriebs den Akku aus dem Modell.
ten, müssen die Senderbatterien gewechselt
werden (Senderakkus geladen werden).
1. Schalten Sie immer zuerst den Sender
ein, auch wenn bei der 2.4 GHz-Anlage
eine Reaktion des Empfängers auf
Allgemeines
Fremdsignale eher unwahrscheinlich ist.
Funkferngesteuerte Modelle, speziell
Der Gashebel muss sich hierbei in der
Flugmodelle sind kein Spielzeug, Ihre
Stellung “Aus” (unten) befinden.
Bedienung muss schrittweise erlernt werden.
2. Schalten Sie dann den Empfänger ein
Kinder unter 14 Jahren sollten das Modell nur
und stellen Sie die Steckverbindung zum
unter Aufsicht von Erwachsenen in Betrieb
Flugakku her.
nehmen.
3.Überprüfen Sie, ob sich alle Steuerflächen
Auch wenn Ihre Cessna 182 ein vergleichs-
in der Stellung “Neutral” befinden.
weise geringes Gewicht aufweist, erreicht sie
4. Prüfen Sie, ob die Servos in gewünschter
doch eine hohe Geschwindigkeit und kann bei
Weise auf die Steuerbefehle des Senders
Absturz auf eine Person oder z.B. ein Auto
reagieren.
Verletzungen oder Beschädigungen herbeiführen.
Wählen Sie ein ausreichend großes, hinder-
Sicherheit im Flugbetrieb
nisfreies Fluggelände fernab einer öffentlichen
Halten Sie immer direkten Sichtkontakt zu
Straße, auf dem sich keine Personen aufhal-
Ihrem Modell und lassen Sie sich nicht ablen-
ten. In der Nähe von Flughäfen ist Modellflug
ken.
verboten. Modellflugclubs bieten bei Vorlage
Halten Sie sich vom Propeller fern, sobald der
eines Versicherungsnachweises u.U. gegen
Akku angeschlossen ist.
ein geringes Entgelt auch Gästen die Nutzung
Vermeiden Sie den Aufenthalt in der
des Geländes.
Rotationsebene der Luftschraube.
Starten Sie nur mit einem einwandfrei zusam-
Fliegen Sie niemals bei stärkerem Wind,
mengebauten und voll funktionsfähigen
Regen oder Gewitter.
Modell, vergewissern Sie sich, dass nach
Halten Sie Ihr Modell im Flug fern von
einer eventuell erforderlichen Reparatur die
Hochspannungsleitungen oder Funkmasten.
Flugfähigkeit wieder zu 100% hergestellt ist.
Auch ein völlig intaktes Modell kann infolge
von Störsignalen plötzlich unerwartete
Vor jedem Start
Manöver ausführen, rechnen Sie stets damit,
Überprüfen Sie alle Befestigungen, Schraub-
diese aussteuern zu müssen.
und Steckverbindungen sowie die Anschlüsse
Fliegen Sie niemals in Richtung auf Personen
der Betätigungsgestänge.
und Tiere oder über öffentlichen
Überprüfen Sie die gesamte Struktur des
Verkehrsflächen.
Fluggeräts, auch den Propeller; es dürfen sich
Setzen Sie rechtzeitig zur Landung an, wenn
nirgendwo Risse zeigen, andernfalls hat der
Sie feststellen, dass die Steigleistung Ihres
Start bis zur Behebung des Schadens zu
Modells stärker nachlässt
unterbleiben. Ein beschädigter Propeller
muss ausgetauscht werden, unterlassen Sie
Reparaturversuche!
Bei Betriebsende erst den Empfänger, dann
Der Flugakku sollte vor dem Start voll geladen
den Sender ausschalten.
sein, die Senderbatterien (-akkus) müssen
Die Steckverbindung zum Flugakku nach der
über ein ausreichendes Leistungspotenzial
Landung immer trennen!
verfügen
D
26 CESSNA 182 CARSON R/C MOTORFLUGZEUG 50 050 5017
Page 27
Cessna 182
VERWENDUNG DER
ANLEITUNG
Cessna 182
Cessna 182
Cessna 182
Bauweise durchaus auch
Anfangs
Cessna
182
Bodenstarts und Landungen auf Asphalt oder
anderen Hartpisten sind möglich, erfordern
aber schon einige Flugerfahrung.
Montieren Sie Ihre gewissenhaft
gemäß Anleitung und überprüfen Sie dabei
alle Schritte auf exakte Ausführung und
korrekten Sitz. Nur eine einwandfrei montierte
Diese Montage- und Bedienungsanleitung
kann die volle Leistung
bietet alle nötige Information, die Sie zum
erbringen.
Betrieb Ihres -Flugmodells
benötigen. Sie lernen mit ihr die
Komponenten und Funktionen Ihres Modells
EINSATZMÖGLICHKEITEN
und gewinnen ein technisches
DES CESSNA 182- MODELLS
Hintergrundwissen, so dass Sie auch als
Neuling in der Lage sind, Ihr Modell
erfolgreich zu starten. Für den absoluten Die ist auf Grund ihrer
Laien, der noch nie ein ferngesteuertes als erstes Modell
Modell betrieben hat, würden wir jedoch die für Anfänger geeignet. würden wir
Unterstützung durch einen erfahrenen empfehlen, dass ein erfahrener Modellpilot
Modellpiloten für die ersten Starts und den Start übernimmt und erst wenn eine
Landungen empfehlen. Falls Sie selbst keine ausreichende Höhe erreicht ist, den Sender
Kontakte zu Modellfliegern haben, lassen Sie an den Neuling übergibt. Die ersten
sich in Ihrem Fachgeschäft entsprechende Landungen sollten dann eventuell auch vom
Empfehlungen geben. Oberstes Gebot muss Routinier ausgeführt werden. Die
immer die Sicherheit für Ihre Umgebung, für wird vorteilhaft von Hand gestartet und
Sie selbst und Ihr Modell sein. auf einer Graspiste gelandet.
Die Anleitung enthält ferner eine Aufstellung
der wichtigsten Ersatzteile, bewahren Sie
diese daher gut auf. Alle Richtungsangaben Es wird ein ausreichend großes,
wie z.B. “rechts” sind in Flugrichtung zu hindernisfreies Gelände (Wiese) empfohlen.
sehen.
D
TECHNISCHE DATEN
Kanäle 4 Steuerkanäle
Sender Batterien 8 Mignonzellen AA oder entsprechende Ni-MH Akkus
Frequenz 2,4 GHz
Reichweite ca. 300m
Funktionen Motordrehzahl, Höhen-, Seiten- und Querruder
Abmessungen Länge 860mm Spannweite 980mm
Flugakku LiPo-Akku mit 2 Zellen (7,4V / 13 mAh)
Flugzeug Gewicht Flugmodell : 560g
Tragfläche 13 dm²
Flächenbelastung 43g/dm²
Die Flugdauer ist abhängig von der Qualität des Flugakkus, der eingesetzten Motordrehzahl
und dem gewählten Betriebsmodus.
00
Flugregler Dauerstrom max. 20A
Motorlaufzeit ca. 6 Min.
CESSNA 182 CARSON R/C MOTORFLUGZEUG 50 050 5017 27
Page 28
INHALT DES FLUGZEUG-SETS
D
Höhenruder
100/240V Netzteil 50/60Hz
Ausgang 12,8V 1,25A
für LiPo-Akku
Ladegerät/Balancer
Seitenruder
2,4GHz MikroEmpfänger
eingebaut
4-Kanal-Sender
2,4 GHz
Tragfläche
Tragfläche
4 Mikro-Servos
eingebaut
DIGITAL PROPORTIONAL RADIO CONTROL SYSTEMDIGITAL PROPORTIONAL RADIO CONTROL SYSTEM
ETB41 - 2.4 GHzETB41 - 2.4 GHz
ONON
OFFOFF
11 22 33 44
REVREV
NORNOR
POWERPOWER
DICKIEDICKIE
DICKIEDICKIE
POWERPOWER
2300 mAh2300 mAh
POWERPOWER
DICKIEDICKIE
DICKIEDICKIE
POWERPOWER
2300 mAh2300 mAh
POWERPOWER
DICKIEDICKIE
DICKIEDICKIE
POWERPOWER
2300 mAh2300 mAh
POWERPOWER
DICKIEDICKIE
DICKIEDICKIE
POWERPOWER
2300 mAh2300 mAh
POWERPOWER
DICKIEDICKIE
DICKIEDICKIE
POWERPOWER
2300 mAh2300 mAh
POWERPOWER
DICKIEDICKIE
DICKIEDICKIE
POWERPOWER
2300 mAh2300 mAh
POWERPOWER
DICKIEDICKIE
DICKIEDICKIE
POWERPOWER
2300 mAh2300 mAh
POWERPOWER
DICKIEDICKIE
DICKIEDICKIE
POWERPOWER
2300 mAh2300 mAh
8 AA Mignon
Batterien
für den Sender
GL
UE
Kleber zum Befestigen
des Leitwerks
Kurzschluss-Stecker
für EmpfängerZuordnung
2-zelliger
LiPo-Akku
1300mAh 7,4V
BA
T
G
E
A
R
A
U
X
I
RUD
D
T
H
R
O
E
L
EV
A
IL
E
6
6
C
H
R
E
C
E
I
V
E
R
E
R
6
1
-
2
.
4
G
H
z
D
S
S
S
S
I
G
N
A
L
T
M
Motor
mit Regler
C
O
N
T
R
O
L
L
E
R
C
ES
S
N
A-
1
82
C
ES
S
N
A-LIG
H
T
-A
IR
D
R
A
F
TC
ES
S
N
A-LIG
H
T
-A
IR
D
R
A
F
T
DreibeinFahrgestell
B
A
L
A
N
C
E-C
HA
RG
E
R
B
A
L
A
N
C
E-C
HA
RG
E
R
FO
R
L
I-
P
O
B
A
T
T
E
R
Y
FO
R
L
I-
P
O
B
A
T
T
E
R
Y
1
.2A
0.3
A
2
0
C
X
-P
a
c
k
L
i
P
o
-A
kk
u
7
,
4V
mA
h
A
CA
C
P
OW
E
R A
D
A
PT
ER
MOD
EL:D
G-C
O
12
V010
IN
PUT
: 1
00
-2
40
V~
5
0/
60
H
z
0.
6A
M
A
X
O
U
TP
U
T
:1
2.
8V
=1.2
5A
G
S
M
AD
E
IN
C
HI
NA
!
!
RISK O
F ELE
CT
RIC
AL SH
OC
K
DO NOT OPEN
Propeller
und Spinner
Rumpf
Ladegerät/Balancer
zum Spannungsausgleich
zwischen den Akkuzellen
28 CESSNA 182 CARSON R/C MOTORFLUGZEUG 50 050 5017
Page 29

Da die Cessna 182 möglicherweise Ihr erstes
BEC Battery Eliminating Circuit ist ein
Modellflug-Gerät ist und die Kenntnis gewisser
Schaltkreis, durch welchen bei Modellen mit
Grundbegriffe eine Hilfe sowohl beim Umgang mit
Elektroantrieb eine eigene Stromversorgung für
dem Modell als auch gegen das Image eines
den Empfänger eingespart wird. Der Empfänger
blutigen Anfängers sein kann, werden nachfolgend
wird über den Fahr-/Flugakku mit einer auf einen
einige Fachausdrücke und deren Funktion in
verträglichen Wert geregelten Spannung versorgt.
alphabetischer Reihenfolge erklärt.
Drehachsen Im Gegensatz zum Auto oder
Akku Wiederaufladbarer Speicher für elektrische
Schiff ist ein Flugzeug, sobald es sich in der Luft
Energie. Bei diesem Modell wird ein 2-zelliger
bewegt, um alle Achsen (dreidimensional, 3D)
LiPo-Akku verwendet. Die gespeicherte Energie
steuerbar. Die gewünschten Änderungen der
wird in Milli-Ampere-Stunden (mAh) gemessen. Ein
Fluglage und -richtung werden über die
Akku mit 1300mAh kann etwa 6 Minuten lang
Steuerflächen (Seitenruder, Höhenruder,
einen Strom in einer Stärke von 12A liefern. Für
Querruder) eingeleitet.
den Antrieb von Flugmotoren muss der Akku
EIN-AUS-Schalter Sender und
“hochstromfähig” sein, er kann dann einen sehr
Empfängerstromkreis verfügen jeweils über einen
hohen Strom und damit seine gesamte Ladung
Schalter, der die Stromversorgung in Gang setzt
innerhalb weniger Minuten über den Regler an den
oder unterbricht.
Motor abgeben. Akkus können je nach Bauart
mehrere 100mal aufgeladen werden, verwenden
Empfänger Der Empfänger setzt die über die
Sie hierfür ausschließlich ein für den Akkutyp
Antenne empfangenen Steuersignale des Senders
geeignetes Gerät. Verbrauchte oder defekte Akkus
in Stellimpulse für die Servos um, welche die
(teilweise giftig) müssen bei entsprechenden
Steuerflächen betätigen. Ferner erteilt er dem
Sammelstellen entsorgt werden.
elektronischen Flugregler die Steuerbefehle für die
laut Knüppelstellung am Sender gewünschte
Batterie Nicht selten werden auch wiederauflad-
Motordrehzahl. Er wird meist als Set zusammen
bare Akkus als Batterie bezeichnet (z.B. Auto-
mit dem Sender verkauft, bei der hier verwendeten
batterie). Normalerweise versteht man darunter
2,4MHz-Technik können ausschließlich Geräte des
jedoch die Einmal-Stromlieferant (Trockenbatterie),
gleichen Herstellers zusammenwirken.
z.B. eine Alkaline-Batterie. Bei der Cessna 182
können Trockenbatterien zum Betrieb des Senders
eingesetzt werden. Am Ende der Lebensdauer fällt
die Spannung einer Batterie stark ab und sie muss
ebenso wie ein defekter Akku entsorgt werden.
Versuchen Sie niemals, eine Trockenbatterie mit
einem Ladegerät aufzuladen, es besteht Brandund Explosionsgefahr.
ERLÄUTERUNG EINIGER BEGRIFFE AUS DEM MODELLBAU
D
Hochachse
Querachs
e
Drehung um die Hochachse (Kurve):
Seitenruder
Drehung um die Querachse
(hoch-tief): Höhenruder
Drehung um die Längsachse
(Seitenneigung, auch Kurve):
Querruder
Längsachse
LiPoAkkupack
2 Zellen
4-Kanal
Mikroempfänger
B
A
T
G
E
AR
A
UX
I
RU
D
D
T
HRO
E
L
E
V
AIL
E
6
6
C
H
R
E
CE
I
V
E
R
E
R
6
1
-
2
.
4
G
H
z
D
S
S
S
S
I
G
N
A
L
T
M
CE
S
SN
A-
L
IG
H
T
-
AIR
D
RA
FTCE
S
SN
A-
L
IG
H
T
-
AIR
D
RA
FT
C
E
S
S
N
A-
L
I
GH
T
-
A
I
R
D
R
A
F
TC
E
S
S
N
A-
L
I
GH
T
-
A
I
R
D
R
A
F
T
2
0
C
X
-
P
a
c
k
L
i
P
o
-
A
kk
u
7
,
4V
m
A
h
CESSNA 182 CARSON R/C MOTORFLUGZEUG 50 050 5017 29
Page 30

D
Flugregler, elektronisch Querruder Ein Flugzeug muss sich wie ein
Motorrad “in die Kurve legen”, da andernfalls die
Der Antriebsmotor wird über einen elektronischen
aerodynamischen Kräfte für einen Kurvenflug nicht
Regler mit Strom versorgt, welcher die
zur Verfügung stehen. Diese Seitenneigung wird
Motordrehzahl nahezu verlustfrei entsprechend der
beim Standard-Flugzeug durch auftriebsverändern-
vom Empfänger vorgegebenen Drehzahl ansteu-
de Klappen in den Tragflächen bewirkt, sie werden
ert. Unterschreitet bei zunehmender Entladung die
über Gestänge von einem in der Tragfläche ver-
zur Verfügung stehende Spannung des Flugakkus
senkten Servo gegenläufig betätigt. Bei der
einen Grenzwert, der für das Betätigen der Servos
Cessna 182 sind entsprechende Servos und das
erforderlich ist, so schaltet der Regler den Motor
Betätigungsgestänge bereits eingebaut. Beim
ab. Die Cessna 182 bleibt dann zumindest im
Aufbau des Flugzeugs sind die entsprechenden
Gleitflug noch steuerbar.
Stecker an der Tragflächenwurzel in den
Empfänger einzustecken.
Höhenleitwerk Ein Höhenleitwerk normaler
Bauart gleicht einer kleinen, am Heck des
Schwerpunkt Der Schwerpunkt ist der Ort, in
Flugzeugs angeordneten Tragfläche mit einer
dem man sich für verschiedene physikalische
beweglichen Klappe am Ende. Durch Auf- oder
Vorgänge die Masse eines Körpers oder eines ver-
Abbewegen dieser Steuerfläche ändern sich die
bundenen System vereinigt denken kann. Beim
Auftriebsverhältnisse am Höhenleitwerk, das Heck
Flugzeug spielt die Lage des Schwerpunktes und
des Flugzeugs wird gesenkt oder angehoben, ent-
seine Relation zu den Auftriebskräften eine ent-
sprechend geht das Flugzeug in Steig- oder
scheidende Rolle. Liegt der Schwerpunkt weit vor-
Sinkflug.
ne, tendiert das Flugzeug dazu, sich in schnellem
Flug dem Boden zu nähern, liegt er weit hinten,
Propeller (Luftschraube) Der vom Motor
reagiert das Flugzeug heftig auf das Höhenruder
angetriebene Propeller sorgt für den Vortrieb des
und wird eventuell unsteuerbar.
Modells. Motorleistung, Modellgröße und -gewicht
und damit die Fluggeschwindigkeit gehen in die
Seitenleitwerk Das Seitenleitwerk besteht bei
Auslegung eines Propellers ein. Je besser die
den meisten Flugzeugbauformen aus mindestens
Luftschraube auf das Modell abgestimmt ist, umso
einer, bevorzugt senkrecht angeordneten Flosse,
besser der Wirkungsgrad und die Flugleistung.
die am hinteren Ende eine verstellbare Klappe
Zwei Zahlen charakterisieren einen Propeller: der
trägt. Durch Ausschlagen der Klappe nach links
Durchmesser und die Steigung, sie werden gerne
oder rechts entstehen unterschiedliche
in Zoll (2,54cm) angegeben. Ein Propeller hat z.B.
Anströmverhältnisse, die eine Kraft erzeugen, wel-
bei 8x5 einen Durchmesser von 20cm und würde
che das Flugzeugheck zur Seite bewegen.
sich bei einer Umdrehung auf einer Schraubenlinie
Zusammen mit anderen Wirkungen (V-Form der
um 5x2,54 = 12,7 cm nach vorne bewegen, bei
Tragfläche oder Querruder-Ausschlag) leitet meist
z.B. 1/min (Umdrehungen des Motors) wären
das Seitenleitwerk den Kurvenflug ein
dies 000 17m/sec bzw. 61km/h.
Die erreichbare Geschwindigkeit ist jedoch gerin-
Servo Die vom Empfänger registrierten
ger, da der Propeller nur bei einem gewissen
Steuersignale des Senders werden in Stellbefehle
Schlupf Zugkraft erzeugen kann.
für zugeordnete Servos umgewandelt. Das Servo
besitzt einen Stellmotor und betätigt über ein
Quarze In der bisher üblichen Technik ist die
Getriebe den Servoarm, auch Servohorn genannt,
gleichzeitige Steuerung mehrerer Modelle über
welches sich dann je nach Befehl etwa auf 1/6
unterschiedliche Kanäle (Frequenzbereiche) mög-
Kreisbogen bewegt.
lich, die jeweils durch in den Sender und
Servos sind üblicherweise über Gestänge mit
Empfänger einzusteckende Frequenzquarze fest-
Steuerflächen verbunden.
zulegen sind. Die Cessna 182 wird über eine
Anlage im Frequenzbereich 2,4GHz gesteuert, wel-
Tragfläche Die sich aus
che dank modernster Technik ohne die
Fluggeschwindigkeit und der
Verwendung von Quarzen das gleichzeitige
Bewegung der Luft (Wind) ergeben-
Betreiben fast beliebig vieler Modelle zulässt. Die
de Relativgeschwindigkeit der das
Störanfälligkeit gegenüber anderen Sendern (z.B.
Flugzeug umströmenden Luft
auch Sprechfunk mit Überreichweite) geht im
erzeugt infolge des Anstellwinkels und der
Vergleich zur bisherigen Technik gegen Null.
Profilierung der Tragfläche eine nach oben
Sender und Empfänger sind einander zugeordnet,
gerichtete Kraft, welche ab bestimmten Werten so
eine Reaktion auf ein Fremdsignal wird unter-
groß ist, dass das Flugzeug fliegt. Verändern sich
drückt.
.
8000
102 cm/min oder
30 CESSNA 182 CARSON R/C MOTORFLUGZEUG 50 050 5017
Page 31

D
die Werte z.B. durch Rückenwind nach einer Kurve Flächeninhalt der Tragfläche in Relation zum
oder nicht ausreichende Vortriebskraft, bricht der Flugzeuggewicht ist, desto langsamer kann ein
Auftrieb zusammen und das Flugzeug nähert sich - Flugzeug fliegen.
eventuell unkontrolliert - dem Boden. Je größer der
Bei LiPo-Akkus (Lithium-Polymer) handelt es sich Akkus überprüfen. 50°C dürfen nicht
um Stromlieferanten nach neuestem Stand der überschritten werden, ansonsten Akku vom Netz
Technik mit hoher Ladekapazität in Relation zum nehmen.
Gewicht. Im Umgang mit solchen Akkus ist 6. Mit Aufleuchten der grünen LED ist der
besondere Sorgfalt erforderlich, um mögliche Ladevorgang beendet, die Stromzufuhr sollte
Gefahren und vorzeitigen Leistungsverlust zu dann möglichs umgehend unterbrochen werden.
vermeiden. Dies betrifft sowohl Ladung und
Entladung als auch Lagerung und sonstige LiPo-Akkus sind besonders empfindlich gegen so
Handhabung. Nichtbeachtung von Anleitung und genannte “Tiefentladung” bei welcher die
Warnhinweisen kann sehr schnell zu Spannung einer Zelle unter 2,5V pro Zelle absinkt,
Leistungseinbußen, Verkürzung der Lebensdauer sie können dadurch dauerhaft geschädigt werden.
oder Defekten und unter bestimmten Bedingungen Der Flugregler verfügt über einen Unterspannungsauch zu einem Brand des Akkus führen. Nach dem Schutzschalter, welcher den Motor bei zu geringer
Flugbetrieb und gegen Ende des Ladevorgangs Spannung abstellt, die verbleibende Spannung
kann der Akku relativ warm sein. Dies ist in reicht aus, um die Steuerfähigkeit des Modells im
gewissen Grenzen normal. Gleitflug zu erhalten.
Je nachdem, wie Sie Ihren Flug gestaltet haben,
Das dem Flugzeug-Set beiliegende 100/240V- sinkt nach längerer oder kürzerer Zeit die
Ladegerät bestehend aus Netzteil und Lipo- Spannung des LiPo-Akkupacks ab, was sich in
Balancer-Ladegerät, Ersteres wird an eine normale geringerer Motordrehzahl und z.B. deutlich
Steckdose angeschlossen. Es liefert bei 12,8V verringerter Steigleistung des Modells im Flug
Spannung einen Strom von bis zu 1,25A , damit niederschlägt. Sobald Sie dies bemerken, sollten
lässt sich der LiPo-Flugakku in etwa 1 Stunde Sie zur Landung ansetzen. Eine Landung mit zu
aufladen. Am Ladegerät/Balancer-Regler kann geringer oder keiner Motorleistung ist immer
auch ein niedrigerer Strom eingestellt werden, die problematisch, weil auch das Erreichen des
Aufladung verläuft dann schonender und ergibt sicheren Landeplatzes in Frage gestellt ist.
eventuell eine bessere Kapazitätsausnutzung. Kurzschlüsse sind unbedingt zu vermeiden, sie
führen zu einem Schmelzen der Kabelisolierung
1. Netzteil mit dem LiPo-Balancer Ladegerät oder sogar zu einer Explosion. Brennbares
verbinden Material der Umgebung kann sich entzünden.
2. Das Netzteil in eine Netzsteckdose stecken Der Akkupack ist nach einem Flug eventuell
3. Den weißen (Balancer-) Stecker des LiPo-Akkus ziemlich heiß. Da es ohnehin ratsam ist, den
mit der Buchse des Ladegeräts verbinden. Akkupack außerhalb des Modells aufzuladen,
4. Zur Vermeidung von Kurzschluss auf sicheren empfehlen wir, diesen grundsätzlich nach jedem
Kontakt der Steckverbindungen achten. Flug / jeder Fahrt aus dem Modell zu entfernen
5. Gegen Ablauf der Ladezeit die Erwärmung des und sicher zu verwahren.
HANDHABUNG DES LiPo-AKKUPACKS
Die Lebensdauer von LiPo-Akkupacks hängt vom
defekte/verbrauchte
Einsatzzweck und der dabei auftretenden
Senderbatterien / -
Stromentnahme ab. Bei beständiger Entnahme
akkus bei den
sehr hoher Ströme, wie es ein zügiger Flugbetrieb
entsprechenden
mit höherer Motordrehzahl erfordert, werden etwa
Sondermüll-
200 Lade- / Entladezyklen erreicht, ein Nachlassen
Sammelstellen
der Ladekapazität macht sich bereits früher
abgegeben werden
bemerkbar. Verbrauchter (Kapazität nur noch sehr
und dürfen keines-
gering) oder beschädigter Akkus (Hülle beschädigt,
falls in den Hausmüll
Kabel abgerissen etc.) müssen ebenso wie
geworfen werden.
Entsorgung von verbrauchten oder defekten Akkus
20
C
X
P
ac
k
L
i
P
o
-
A
k
k
u
7
,
4
V
m
A
h
CESSNA 182 CARSON R/C MOTORFLUGZEUG 50 050 5017 31
Page 32

B
A
T
G
EA
R
A
U
X
I
RU
D
D
T
H
R
O
EL
E
V
A
IL
E
6
6
C
H
R
E
C
E
I
V
E
R
E
R
61
2
.
4
G
H
z
D
S
S
S
SI
G
N
AL
T
M
Fluglage nur sehr schwer zu erkennen ist.
Ihr Komplettset Cessna 182 enthält eine 4-Kanal
Störungen sind selbst bei modernster Technik nie
Fernsteueranlage, der Empfänger und der
zu 100% auszuschließen und die Möglichkeit von
Flugregler sind bereits in die Cessna 182
Fehlreaktionen des Modells steigt mit der
eingebaut, dazu kommen vier Mikroservos für die
Entfernung vom Sender an. Starten Sie niemals,
Betätigung von Seitenruder, Höhenruder und
wenn die Batterien (Akkus) im Sender bereits
Querruder. Die Anlage hat in dieser Konstellation
schwach sind (Spannungsanzeige im roten
eine Reichweite von ca. 300m, d.h. bis auf diese
Bereich), es könnte sonst eintreten, dass Ihre
Entfernung ist Ihr Flugmodell kontrollierbar. Der
Cessna 182 unkontrolliert auf
normale Flugbetrieb wird sich in weit geringeren
Nimmerwiedersehen davonfliegt.
Entfernungen abspielen, weil andernfalls die
DIE 4-KANAL-FERNSTEUERANLAGE
D
Zuordnung der Senderkennung zum Empfänger (Binding)
Zusätzlich zur Steuerinformation wird im Möglichkeit an einem Ort vorgenommen werden
Fernsteuerbetrieb mit jedem Sendeimpuls eine sollte, wo diese Übertragung auf dem Funkwege
elektronische Kennung übertragen, an Hand durch keine anderen elektrischen Signale, vor
welcher der Empfänger erkennt, dass es sich um allem nicht durch andere 2.4GHz-Sender gestört
ein Signal „seines“ Senders handelt. Da viele werden kann.
Millionen von Senderkennungen verfügbar sind, ist 1. Sender und Empfänger funktionsfähig aber
es extrem unwahrscheinlich, dass ein fremder ausgeschaltet in geringer Entfernung
Sender Ihren Empfänger beeinflussen kann. nebeneinander anordnen. Für die Zuordnung
Jedem neuen Empfänger muss allerdings einmalig des Empfängers zum Sender die Frequenzvor der ersten Inbetriebnahme diese Kennung Abgleichs-Taste am Sender gedrückt halten und
seitens des Senders mitgeteilt werden. Dazu ist den Sender einschalten.
nachfolgendes Verfahren erforderlich, das nach 2. Am Empfänger den Kurzschluss-Stecker (siehe
Bild unten) in den Steckplatz “BATT” einstecken.
Zur Stromversorgung des Empfängers den
Flugregler mit dem Empfänger und dem
Flugakku verbinden, worauf das Kontroll-Licht
leuchtet.
3. War der Frequenz-Abgleich erfolgreich, leuchtet
das Kontroll-Licht weiter.
4. Beim Herausziehen des Kurzschluss-Steckers
wechselt das Kontroll-Licht auf Blinken. Der
Empfänger geht in den Modus betriebsbereit.
5. Die Frequenz-Abgleichtaste für die
Rückmeldung erneut drücken. Der Sender ist
jetzt betriebsbereit und das Kontroll-Licht
leuchtet, womit die normale Funktion des
Empfängers angezeigt wird.
DIGITAL PROPORTIONAL RADIO CONTROL SYSTEMDIGITAL PROPORTIONAL RADIO CONTROL SYSTEM
ETB41 - 2.4 GHzETB41 - 2.4 GHz
ONON
OFFOFF
11 22 33 44
REVREV
NORNOR
Frequenz-Abgleichs-Taste
Kurzschluss-Stecker
32 CESSNA 182 CARSON R/C MOTORFLUGZEUG 50 050 5017
Page 33

Draufsicht auf den Sender
1 Schwenkbare Antenne
Nicht mit der Antennenspitze auf das Modell
zielen.
2 Kotroll-Leuchte der
Batteriespannung
So lange die Kontroll-Leuchte grünes Licht
zeigt, steht eine ausreichende Sendeleistung
für den Flugbetrieb zur Verfügung. Bei roter
Anzeige muss ein laufender Flug möglichst
umgehend beendet werden (sichere Landung
ist noch möglich), ein Start ist nicht mehr
zulässig, die Batterien sind leer und müssen
gegen neue ausgetauscht werden.
3 Linker Steuerknüppel
Die Steuerknüppel werden bei Loslassen
durch Federwirkung jeweils in die Neutral(Mittel-) Stellung gebracht. Eine Ausnahme
bildet der Gashebel, welcher mittels einer
Rasterung in der eingestellten Position
verbleibt.
4 Rechter Steuerknüppel
STEUERMODUS ” MODE 2”
Linker Knüppel Rechter Knüppel
oben / vorne Motor an Höhe abwärts
unten /hinten Motor aus Höhe aufwärts
links Seitenruder links Querruder
rechts Seitenruder rechts Querruder
5 Ein/Aus-Schalter 11 Ladebuchse(seitlich)
Nach dem Einschalten muss die Kontroll-Leuchte Hinweis: der EIN/AUS-Schalter sollte vor dem
am Sender (2) grünes Licht zeigen, andernfalls Laden auf "OFF" stehen. Es darf nur bei
darf nicht gestartet werden, auch wenn Bestückung mit Akkus (Ni-MH) ein Ladegerät mit
anscheinend alle Funktionen des Modells korrekt maximal 500mA eingesetzt werden.
arbeiten. Trockenbatterien können explodieren und
Verletzungen oder Sachschäden anrichten.
6-9 Trimmhebel Kanal 1-4
Die Trimmhebel ermöglichen es, die Steuerung
auszutrimmen und Neutralpositionen einzustellen,
womit Sie auf verschiedene, unvorhersehbare
12 Befestigungsöse für Nackenriemen
Abweichungen im Leistungsverhalten Ihres
Durch die Fixierung mit einem separat erhältlichen
Modells reagieren können. Die Trimmhebel bieten
Nackenriemen wird die Sicherheit der
eine sehr feine und fixierte Raster-Einstellung.
Senderhandhabung erhöht.
10 Empfänger-Zuordnungs-Taste
13 Tragegriff
Vor Betriebsbeginn muss ein neuer Empfänger
14 Reverseschalter Servos und Regler
einmalig dem Sender zugeordnet werden
Die Schalter ermöglichen die Umkehr der
(Binding). Hierzu dient unter Anderen diese Taste.
Drehrichtung der Servos und der Wirkungsweise
Siehe Beschreibung Seite 32.
des Flugreglers (Drehrichtung des Propellers).
1
4
6
7
8
9
10
11
12
D
DIGITAL PROPORTIONAL RADIO CONTROL SYSTEMDIGITAL PROPORTIONAL RADIO CONTROL SYSTEM
ETB41 - 2.4 GHzETB41 - 2.4 GHz
ONON
OFFOFF
11 22 33 44
REVREV
NORNOR
2
3
5
13
14
Polung der
Ladebuchse
CESSNA 182 CARSON R/C MOTORFLUGZEUG 50 050 5017 33
Page 34

Zum Abnehmen des Batteriefachdeckels, diesen in
Richtung des Pfeils (nach unten) schieben und
dabei leicht auf die Finger- Grifffläche drücken.
Beim Einlegen der Batterien immer jeweils das
Negativ-Ende zuerst einsetzen und auf die richtige
Polarität entsprechend dem Eindruck im Gehäuse
achten. Falls die Spannungsanzeige des Senders
nichts anzeigt, sind die Kontakte - speziell am
negativen Ende - und die richtige Lage der
Batterien zu überprüfen. Ferner ist zu kontrollieren,
ob alle Batterien frisch bzw. Akkus voll geladen
sind.
RICHTLINIEN ZUR
BATTERIE-SICHERHEIT
RICHTLINIEN ZUR
BATTERIE-SICHERHEIT
Richtig eingesetzt sind haushaltsübliche Batterien
eine sichere und zuverlässige, mobile Stromquelle.
Probleme können nur auftreten, falls sie fehlerhaft
verwendet werden, was zum Auslaufen oder in
extremen Fällen zu Feuer oder Explosion führen
kann.
Nachfolgend daher einige einfache Richtlinien für
sicheren Gebrauch von Batterien, welche das
Aufkommen irgendwelcher Probleme verhindern
können.
Bewahren Sie unbenutzte Batterien in ihrer
Verpackung und entfernt von Metallgegenständen
auf, welche eventuell Kurzschluss verursachen
könnten, der zum Auslaufen oder - in extremen
Fällen - zu Feuer oder sogar Explosion führen
könnte.
Versuchen Sie niemals, normale Batterien wieder
aufzuladen, weder mit einem Ladegerät noch durch
Einsatz von Wärme. Sie könnten auslaufen,
Brände verursachen oder sogar explodieren. Es
gibt wiederaufladbare Akkus, die eindeutig als
solche gekennzeichnet sind.
Achten Sie darauf, Ihre Batterien richtig
einzulegen; beachten Sie dabei die Plus- und
Minus-Markierungen auf Batterie und Gerät.
Fehlerhaftes Einlegen kann zum Auslaufen oder in extremen Fällen - zu Feuer oder sogar Explosion
führen.
Entfernen Sie leere Batterien aus Ihrem Gerät und
auch alle Batterien aus Geräten, die Sie für längere
Zeit nicht betreiben wollen. Batterien könnten
auslaufen und Schaden verursachen.
Beaufsichtigen Sie Kinder, wenn diese
selbstständig Batterien austauschen, um sicher zu
gehen, dass sie diese Richtlinien befolgen.
Tauschen Sie jeweils den gesamten Batteriesatz
auf einmal aus und achten Sie darauf, nicht alte
und neue Batterien oder solche unterschiedlichen
Typs zu mischen, da dies zum Auslaufen oder - in
extremen Fällen - zu Feuer oder sogar Explosion
führen kann.
Werfen Sie Batterien niemals ins Feuer, sie
könnten dadurch zur Explosion gebracht werden.
Geben Sie verbrauchte Batterien bei
entsprechenden Sammelstellen ab.
Achten Sie darauf, dass Batteriefächer gesichert
sind.
E
NT
S
ORG
UNG
Auswechseln der Senderbatterien
D
PUSH
AA
1.5V
AA
1.5V
AA
1.5V
AA
1.5V
AA
1.5V
AA
1.5V
AA
1.5V
AA
1.5V
SIMULATOR
34 CESSNA 182 CARSON R/C MOTORFLUGZEUG 50 050 5017
Page 35

BEFESTIGEN DES LEITWERKS
D
Das Leitwerk ist aus Transportgründen noch nicht
angebracht.
Einkleben des Seitenruders
Dem Bausatz liegt Klebstoff zum Befestigen des
Tragen Sie etwas Klebstoff in den für das Leitwerk
Leitwerks bei. Dieser hat eine Trocknungszeit von
vorgesehenen Spalt am Rumpf und auf die
etwa 12 Stunden, vorher sollte die Klebestelle nicht
Befestigungszungen des Seitenleitwerks auf.
belastet werden. Zur Beschleunigung der Arbeiten
Drücken Sie jetzt das Seitenleitwerk in den
und für höhere Klebkraft kann auch 2-
Rumpfspalt ein und achten Sie dabei auf die
Komponenten 5-Minuten Epoxikleber (getrennt
richtige Position sowie die Rechtwinkligkeit.
erhältlich) verwendet werden, der in weniger als
Verstärken Sie die Klebe-Verbindung durch einen
einer Stunde die volle Festigkeit erreicht. Klappen
Rundum-Leimauftrag an der Stoßkante. Dies ist
Sie zur Verbesserung der Beweglichkeit die
bei Epoxiverklebung nicht erforderlich. Vor dem
Ruderklappen von Höhen- und Seitenleitwerk
Durchtrocknen des Klebstoffs nochmals die
etwas hin und her. Nicht überdehnen!
korrekte Ausrichtung der Teile überprüfen.
Befestigung des Höhenleitwerks
Schieben Sie das Höhenleitwerk in den dafür
vorgesehenen Rumpfspalt und überprüfen Sie die
Freigängigkeit der Ruderklappe. Falls sie am
Rumpf anstößt und schwer beweglich ist,
schneiden Sie an dieser Stelle mit einem
Modellbaumesser äußerst vorsichtig den Rumpf
etwas frei.
Tragen Sie auf das Höhenleitwerk an den Stellen,
wo es später mit dem Rumpf in Kontakt kommt,
den im Bausatz beiliegenden Kleber auf.
Tragen Sie auch im Rumpfspalt an den
Kontaktflächen etwas Kleber auf.
Den Rumpf ganz wenig auseinander drücken und
das Höhenleitwerk (das Ruderhorn zeigt nach
unten) in den Rumpf einschieben und dabei die
Position in beiden Richtungen auf Rechtwinkligkeit
überprüfen. Vor Fortsetzung der Arbeiten den
Kleber leicht antrocknen lassen.
Klebstoff
eventuell freischneiden
Klebstoff
9
0
°
90°
CESSNA 182 CARSON R/C MOTORFLUGZEUG 50 050 5017 35
Page 36

MONTAGE DER TRAGFLÄCHE
Für den Transport sind die Tragflächen der Cessna
182 demontierbar
Vor dem Montieren der Tragfläche den Stecker für
die Querruderservos (auf einen Kanal
zusammengeführt) in Kanal 1 einstecken.
Als Anhalt kann die Kabelfarbe der
bereits eingesteckten Servos dienen.
Die Tragfläche mit der Nase an der
Vorderkante schräg von oben in die
Rumpfausnehmung hinter der
Frontscheibe einsetzen. Dann die Tragfläche
mit den beiden Kunststoffschrauben auf dem
Rumpf befestigen. Die Querruder schlagen
gegenläufig aus. Beim ersten Mal sollte deren
Funktion überprüft werden. Knüppel nach rechts:
rechtes Querruder nach oben, linkes Querruder
nach unten, Knüppel nach links entsprechend
umgekehrt. Ist dies nicht der Fall, muss der ServoReverse-Schalter für Kanal 1 umgeschaltet werden.
C
E
S
S
N
A
-L
IG
H
T
-
A
IRD
RA
F
T
C
E
S
S
N
A
-L
IG
H
T
-
A
IRD
RA
F
T
C
ESS
NA-
LIG
H
T-
AIR
C
R
AF
T
C
ESS
NA-
LIG
H
T-
AIR
C
R
AF
T
Zum Einstellen der Ruderklappen am Leitwerk oben (Steigen). Geringe Abweichungen können
muss die Fernsteuerung funktionsfähig sein, d.h. über die Trimmhebel ausgeglichen werden, bei
der Sender muss zuerst eingeschaltet werden, größerer Abweichung wird am Gabelkopf
dann muss der Flugakku angeschlossen werden. nachgestellt. Nicht vergessen, die Steckverbindung
Ab diesem Zeitpunkt den Gashebel nicht mehr des Flugakkus wieder zu trennen und dann den
nach vorne drücken, das Flugzeug immer gut Sender auszuschalten.
festhalten und sich vom Drehkreis des Propellers
fernhalten, da unbeabsichtigtes Anlaufen des
Motors nie ganz ausgeschlossen werden kann.
Der linke Steuerknüppel am Sender (Motor und
Seitenruder) muss sich in der Stellung: „ Motor
aus“ (ganz nach unten) und für das Seitenruder
auf „neutral“ (in der Mitte) befinden. Der rechte
Knüppel (Höhen- und Querruder) steht in der
absoluten Neutralstellung. Die Trimms für Seite
und Höhe müssen ebenfalls in der Mittelstellung
stehen.
Der Plastik-Gabelkopf des Steuergestänges muss
zum Einhängen in das Ruderhorn durch Hineinoder Herausschrauben so eingestellt werden, dass
der Mitnehmerstift genau auf die zweite Bohrung
des Ruderhorns (von außen) treffen kann. Er wird
dann in diese Bohrung eingedrückt und durch
Zusammendrücken fixiert. Dies gilt gleichermaßen
für Höhen- und Seitenruder. Anschließend wird die Die Funktion des Leitwerks durch Betätigen mit
Funktion der Ruderklappen überprüft: Knüppel für dem Sender überprüfen.
Seitenruder nach rechts, Ruderausschlag in Falls Höhe und Seite am Sender vertauscht sind,
Flugrichtung nach rechts (Rechtskurve); Knüppel Stecker in Kanal 2 und 4 ziehen und in
für Höhenruder nach vorne, Ruderausschlag nach ausgetauschter Reihenfolge neu einstecken.
Einstellen der Neutralstellung des Leitwerks
36 CESSNA 182 CARSON R/C MOTORFLUGZEUG 50 050 5017
D
Page 37

CE
S
S
N
A
-
1
8
2
C
E
SS
N
A-
LIG
H
T
A
IR
CR
A
F
T
C
E
SS
N
A-
LIG
H
T
A
IR
CR
A
F
T
Hat Bug oder Heck ein Tendenz, nach unten zu jeweils an einem möglich langen Hebelarm zum
kippen, so ist das Modell dort zu schwer. Meist Schwerpunkt, also in der Nase oder am Leitwerk)
kann es genügen, den Flugakku um ein kleines korrigiert werden. Vor allem ein nach hinten
Stück in Längsrichtung zu versetzen. In seltenen verlagerter Schwerpunkt (vorne zu leicht!) führt zu
Fällen (z.B. nach einer Eigenreparatur) muss der einem sehr kippeligen Flugverhalten und sollte
Schwerpunkt des Flugzeugs durch Anbringen daher korrigiert werden.
(Aufkleben mit doppelseitigem Klebeband) von
kleinen Zusatzgewichten (Blei, kleine Geldstücke,
e
50
mm
Der Schwerpunkt eines Fluggeräts muss in ganz
bestimmter Relation zu dessen Auftriebsflächen
stehen, bei der Cessna 182
e
r
,
Cessna 182 e
n
ü
p
Cessna 182
wird dieser durch die
Position d s Akkus bestimmt. Der Spielraum, um
den sich der Schwe punkt gegenüber dem idealen
Wert verschieben darf ist sehr klein. Bei der
überprüft man den Schw rpunkt wie nebenstehend abgebildet - indem sie a den
angegebenen Punkten mit zwei Fingern unterst tzt
wird. Sie muss dann leicht um die Horizontale
endeln; dies sollte bei einer korrekt montierten
der Fall sein.
AUSWIEGEN DES SCHWERPUNKTS
Das Hauptfahrgestell fest in den Schlitz der
Plasitkhalterung eindrücken. Es ist durch die
Klemmwirkung fixiert.
Das Bugrad in den zugehörigen Schlitz der
Plasitkhalterung in der Rumpfnase eindrücken.
Sollte sich bei Rollversuchen (von Hand) eine
leichte Kurvenfahrt herausstellen, kann diese durch
geeignetes und vorsichtiges Biegen der
Fahrgestelldrähte korrigiert werden
EINSETZEN DES FAHRGESTELLS
Akkuklappe
mit Verriegelung
CESSNA 182 CARSON R/C MOTORFLUGZEUG 50 050 5017 37
D
Page 38

D
An der Rumpfunterseite befindet sich das mit zwei - Ein kurzes Zucken eines Servos ohne
Drehriegeln zu verschließende Akkufach. Die Betätigung eines Knüppels ist möglich und
Steckverbindung des Akkus zum Flugregler muss kein Hinweis auf eine Störung.
jeweils nach Beendigung des Flugs sofort getrennt - Schließen Sie das Akkufach.
werden. Es wird dringend empfohlen, denn LiPoAkku nach Betriebsende aus dem Modell zu
nehmen und an einem Ort mit nicht brennbarer
Unterlage aufzubewahren.
Als Sicherheitsmaßnahme empfehlen wir, den
Flugakku jeweils erst kurz vor dem Start wie unten
beschrieben anzuschließen.
- Schalten Sie zuerst den Sender ein, der
Gasknüppel muss ganz unten stehen (kein
Gas).
- Verbinden Sie den Akkustecker mit dem des
Flugreglers und achten Sie dabei auf die Form
des Steckers, es gibt nur eine korrekte
Richtung des Zusammensteckens.
- Halten Sie sich ab dem Moment des
Zusammensteckens vom Drehkreis des
Propellers fern.
ANSCHLIESSEN DES FLUGAKKUS
Vom Akku
Zum Flugregler
20C
X-Pack
Li
P
o-
A
kk
u
7
,
4
V
mAh
5. Falls der Motor überhaupt
Ihre Cessna 182 sollte jetzt betriebsbereit sein.
nicht anläuft, steht unter
Vorher ist noch die Funktion des Flugreglers
Umständen der Reverse-
einzustellen bzw. zu überprüfen. Er verfügt über ein
Schalter ( , h
System gegen unbeabsichtigtes Anlaufen des
Motors beim Einschalten mit falscher
Knüppelstellung und eine automatische
6. Der elektronische
Motorabschaltung bei Absinken der Akkuspannung
Flugregler besitzt eine
unter 6V.
Motorabschaltung bei zu
weit abgesunkener
1. Erst den Sender einschalten, dann die
Akkuspannung. Beträgt
Steckverbindung zum Flugakku herstellen.
die Spannung (gespei-
2. Den Gasknüppel in die Stellung “Motor aus”
cherte Energie geht zu
zurückziehen und ihn dort mindestens 3
Ende) weniger als 5 Volt,
Sekunden belassen. Falls der Motor nicht
wird der Motor abgeschal-
auszuschalten ist, auch den Gastrimm ganz
tet. Da der Akku eine
nach unten schieben.
gewisse Fähigkeit hat,
3. Den Gasknüppel langsam nach vorne (oben)
sich zu “erholen”, kann
schieben. Der Motor läuft an und die Drehzahl
nach einer kurzen Pause
steigt.
mit Zurückziehen des
4. Wird der Knüppel fast bis zur Maximalstellung
Knüppels (siehe 2.) der
bewegt, sollte die Motordrehzahl bis auf den
Motor nochmals für kurze
Maximalwert steigen. Testen Sie mit dem
Zeit gestartet werden.
Gastrimm, ob ein noch höherer Wert möglich ist;
allerdings muss die Stellung “Motor aus”
zuverlässig gewährleistet bleiben.
Kanal 3 sie e
Seite 15) im Sender in der
falschen Position.
EINSTELLUNG DES FLUGREGLERS
2.
3.
4.
38 CESSNA 182 CARSON R/C MOTORFLUGZEUG 50 050 5017
Page 39

D
Auf Handzeichen - damit der Helfer entspre-
Bevor sich Ihre Cessna 182 erstmals in die Luft
chend vorbereitet ist - wird auch der Motor
erhebt, muss - am besten auf dem Original-
eingeschaltet
Startplatz - ein Reichweitentest der
Fernsteueranlage durchgeführt werden.
- Wenn bei einer Entfernung von etwa 300m
zwischen Sender und Modell die Ruder noch
korrekt reagieren, arbeitet Ihre RC-Anlage
- Schalten Sie erst den Sender ein, ehe Sie
einwandfrei.
die Steckverbindung zwischen Akku und
Flugregler herstellen.
Fliegen Sie niemals, wenn Ihre Fernsteueranlage
- Ein Helfer entfernt sich mit dem betriebsbe-
auch nur vorübergehend fehlerhaft arbeitet. Wenn
reiten Modell vom Bediener des Senders
Sie sichergestellt haben, dass Flugakku und
- Es werden in kurzen Abständen die
Senderbatterien volle Leistung liefern, ist dieser
Steuerknüppel betätigt. Der Helfer achtet
Reichweitentest nur einmal erforderlich.
auf die Reaktion der Ruder.
FLUGBETRIEB
Nach oben stehender Inbetriebnahme (Anschluss
Überprüfungen vor dem Start
des Flugakkus) sind alle beweglichen Teile - hier
die Ruderklappen - auf einwandfreie Funktion
(Richtung und Größe des Ausschlags) zu
Wie bei einem echten Flugzeug sollte auch beim
überprüfen.
Modell vor jedem Start ein kompletter Check
Die Spannungskontroll-Leuchte am Sender muss
durchgeführt werden. Diese beginnt mit einer
grünes Licht zeigen Sollte irgendein Teil - etwa bei
optischen Überprüfung, ob alle Bauteile
einer harten Landung - locker geworden sein, darf
vorhanden, an der richtigen Stelle und fest mit dem
nicht gestartet werden bevor der Schaden nicht zu
Modell verbunden sind.
100% behoben ist.
.
Reichweitentest der Fernsteueranlage
Umgebungsbedingungen
In Deutschland herrschen sehr strenge
Versuchung zu erliegen,
Bestimmungen bezüglich des Aufstiegs eines
einen Start bei ungeeigne-
Flugmodells, beachten Sie daher bei der Wahl des
ten Verhältnissen zu
Fluggeländes die Sicherheitshinweise.
riskieren. Bei stärkerem
Wählen Sie am besten einen Modellflugplatz oder
Wind, Regen oder Gewitter
eine große, gemähte Wiese.
sollten Sie keinesfalls
In dem Bereich, über dem Sie fliegen wollen,
starten. Wenn Sie noch
dürfen sich keine Personen oder Tiere aufhalten,
wenig Flugerfahrung haben
ferner sollten dort keine Kraftfahrzeuge fahren oder
sollten Sie allenfalls bei
abgestellt sein.
schwachem, nicht böigem
Informieren Sie sich in den Medien (z.B. Segelflug-
Wind starten.
Wetterbericht im Videotext) über die
Witterungs- und Windverhältnisse bevor Sie zu
einem Fluggelände aufbrechen, um nicht der
CESSNA 182 CARSON R/C MOTORFLUGZEUG 50 050 5017 39
Page 40

D
Check vor jedem Start
Ist Ihr Modell augenscheinlich intakt, zuerst
den Sender einschalten
die Akkuklappe
schließen.
Jetzt die Funktion aller Ruderklappen
(Richtung, Größe des Ausschlags,
Leichtgängigkeit) durch Betätigung der
Steuerknüppel am Sender überprüfen.
Halten Sie die Cessna 182 am Rumpf fest und
Kontrollieren Sie nochmals den Propeller, auch bei
überprüfen Sie die Drehzahlsteuerung des
der geringsten Beschädigung muss er ausgetauscht
Motors sowie den sauberen Lauf des Propellers.
werden.
, dann die
Steckverbindung zwischen Akku und
Regler herstellen und
Beschädigter
Propeller kann brechen
Propeller
flattert
Propeller läuft
rund
Einschalten
Ausschalten
DIGITAL PROPORTIONAL RADIO CONTROL SYSTEMDIGITAL PROPORTIONAL RADIO CONTROL SYSTEM
ETB41 - 2.4 GHzETB41 - 2.4 GHz
ONON
OFFOFF
11 22 33 44
REVREV
NORNOR
C
E
S
S
N
A
-
18
2
C
E
S
S
N
A
-
L
I
G
H
T
-
A
I
R
D
RA
F
T
C
E
S
S
N
A
-
L
I
G
H
T
-
A
I
R
D
RA
F
T
START
Allgemeines
Der Auftrieb, den ein Flugzeug benötigt, um sich in
links umkehren. Eher bewältigt wird dieses
der Luft zu halten, ist besonders von seiner
Problem, wenn der Pilot vorher ferngesteuerte
Geschwindigkeit relativ zur Luft abhängig. Gegen Modell-Fahrzeuge betrieben hat. Eine sehr gute
den Wind verringert sich die erforderliche Vorbereitung ist es, den Modellflug mit einem
Geschwindigkeit des Flugzeugs relativ zum Boden
Modellflug-Simulationsprogramm am PC/Laptop zu
um den Wert der Windgeschwindigkeit.
üben. Hier kann zum Beispiel der CARSON “CFG
Bei Rückenwind ist fürs Fliegen eine höhere Flugsimulator” Artikelnummer 50 050 8068
Relativgeschwindigkeit zum Boden erforderlich. empfohlen werden.
Starten und Landen sollte daher nach Möglichkeit
immer gegen den Wind erfolgen.
Absoluten Anfängern wird geraten, sich bei den
ersten Starts von einem erfahrenen Modellpiloten
Für den Anfänger problematisch ist der unterstützen zu lassen und zunächst den Sender
Flugzustand in dem das Flugzeug auf den Piloten nur in sicherer Höhe zu übernehmen.
zukommt, da sich hier vermeintlich rechts und
40 CESSNA 182 CARSON R/C MOTORFLUGZEUG 50 050 5017
Page 41

D
Handstart
des Akkus herstellen.
Falls nur ein Gelände mit relativ hohem Gras
- Prüfen der Ruderfunktionen.
vorhanden ist, wird das Flugzeug per Handstart in
- Modell etwa im Schwerpunkt am Rumpf über
die Luft befördert. Es wird empfohlen, das Werfen
den Kopf halten.
des Flugzeugs von einem Helfer ausführen zu
- Gas geben, Propellerzug überprüfen.
lassen, damit der Pilot jederzeit auf unerwartete
- Modell kräftig und zügig horizontal nach vorne
Flugmanöver reagieren kann. Der Ablauf sollte wie
werfen.
folgt stattfinden:
- Fluglage sofort mit der Steuerung kontrollieren,
in flachem Winkel wegsteigen.
- Einschalten von Sender, dann Steckverbindung
Das Modell sollte möglichst horizontal geworfen dem Boden auftrifft. Erfolgt der Wurf zu steil nach
werden, da es dann umgehend in eine kontrollierte oben, reduziert sich die Fluggeschwindigkeit stark,
Fluglage kommt. Wird es nach unten geworfen es droht ein Strömungsabriss (kein Auftrieb mehr)
nimmt es etwas mehr Fahrt auf und kann und Absturz.
vermutlich noch abgefangen werden, bevor es auf
Richtig
WIND WIND WIND
Falsch, nach unten
Falsch,
Wurf zu steil
C
E
S
S
N
A
-
1
8
2
CESSNA-LIGHT-AIRDRAFTCESSNA-LIGHT-AIRDRAFT
CE
S
S
N
A
-18
2
C
E
SSN
A
-
L
IG
H
T
-
A
IR
D
R
A
F
T
C
E
SSN
A
-
L
IG
H
T
-
A
IR
D
R
A
F
T
C
E
S
SN
A
-
1
8
2
C
E
S
SN
A-
L
IG
H
T
A
IR
D
R
AF
T
C
E
S
SN
A-
L
IG
H
T
A
IR
D
R
AF
T
Bodenstart
entsprechend die Flugdauer. Selbst bei
abgeschaltetem Motor bleibt das Modell im
Wegen der vergleichsweise geringen Größe des
Gleitflug gut steuerbar, allerdings muss darauf
Modells benötigt es für einen Bodenstart eine
geachtet werden, dass es nicht zu langsam wird,
entsprechend geeignete Startbahn, z.B. eine kurz
da sonst ein vorübergehend
gemähte Graspiste. Es muss immer möglichst
unkontrollierter Flugzustand
genau gegen den Wind gestartet werden. Nach
mit Strömungsabriss droht.
einem Funktionscheck aller Ruder sollte sich der
Pilot hinter das Modell
stellen, da so eine
rasche Reaktion auf
mögliches, seitliches
Ausbrechen des
Modells erfolgen
kann. Bei Vollgas und
nach einer Rollstrecke von
etwa 20m, wenn gleichzeitig
die Geschwindigkeit hoch
genug erscheint, kann durch
leichtes Ziehen am Höhenruder
abgehoben werden. Zunächst langsam
weitere Geschwindigkeit aufnehmen und
nicht zu steil steigen!
Ist eine ausreichend sichere Höhe erreicht,
kann das Gas für normales Fliegen auf etwa 30%
zurückgenommen werden. Dies verlängert
CESSN
A-182
C
E
S
S
N
A
L
I
G
H
T
A
I
R
C
R
A
F
T
WIND
CESSNA 182 CARSON R/C MOTORFLUGZEUG 50 050 5017 41
Page 42

D
- Modell zur Landebahn ausrichten und durch
Sobald Sie ein Nachlassen der Motorleistung
Drehzahlreduzierung sinken lassen.
feststellen, sollten Sie zur Landung ansetzen, es
- Bei Annäherung an den Landeort etwas
bleibt dann genug Reserve um einen falschen
Höhenruder geben und Geschwindigkeit über
Landeanflug zu korrigieren und erneut anzufliegen.
die Motordrehzahl regeln. Nicht zu langsam
Die Landung hat normalerweise folgenden Ablauf:
werden.
- Etwas Gas herausnehmen und Modell aus-
- In einigem Abstand parallel zur Landebahn mit
schweben lassen
Rückenwind anfliegen.
- Kurz vor dem Aufsetzen Gas ganz herausneh-
- Wenn passende Höhe und Abstand zur
men und Modell aufsetzen lassen.
Landebahn erreicht sind, in einer 180°-Kurve
- Bei zu hohem Anflug Gas geben und durch-
auf die Landebahn einschwenken, jetzt gegen
starten zu neuem Anflug.
den Wind.
Wenn Ihre Cessna 182 erfolgreich
gelandet ist, sollten Sie umgehend die
Steckverbindung des Flug-Akkus
lösen. Dann ist der Sender auszuschalten.
Die Trockenbatterien oder Akkus im
Sender sind relativ unproblematisch,
wird die Steuerung allerdings mehrere
Wochen nicht benutzt, sollten auch
diese aus dem Gerät genommen
werden.
Der Kunststoff, aus welchem die
lassen Sie es nicht in einem von der Sonne
Cessna 182 hauptsächlich besteht, ist
aufgeheizten Auto liegen.
temperaturempfindlich und kann bei höheren
Wenn Sie Ihre Cessna 182 aufbewahren, sollten
Temperaturen bleibend verformt werden.
Sie darauf achten, dass keine Teile gequetscht
oder gebogen werden, die Verformung könnte
Setzen Sie Ihr Flugmodell daher nicht für längere
nach einiger Zeit irreparabel sein.
Zeit der direkten Sonnenbestrahlung aus oder
Zum Umgang mit dem Flugakku
beachten Sie bitte die Anleitung des
Herstellers und befolgen Sie die dort
gegebenen Ratschläge.
NACH DER LANDUNG / AUFBEWAHRUNG
LANDUNG
42 CESSNA 182 CARSON R/C MOTORFLUGZEUG 50 050 5017
Page 43

D
REPARATUREN
Im normalen Flugbetrieb ist die Cessna 182
Fliegen Sie nie mit einer bei einem Absturz
ziemlich strapazierfähig, allerdings gibt es keinen
beschädigten Cessna 182, wenn Sie nicht
Modellflieger, der nicht ab und zu Reparaturen an
überzeugt sind, dass die Reparatur den
seinen Modellen ausführen müsste. Der Kunststoff,
Originalzustand wieder hergestellt hat.
aus welchem das Modell überwiegend gefertigt ist,
lässt sich mit Sekunden- oder 2-Komponenten-
Bei verschiedenen Bauteilen, z.B. Propeller,
Kleber sehr gut reparieren. Während des Aushärtens
Elektronischen Bauteile, Betätigungsgestänge,
des Klebers müssen allerdings die zu verklebenden
Motor und Halterung gibt es keine
Teile gut zueinander ausgerichtet fixiert werden,
Reparaturmöglichkeit. Wenden Sie sich in
damit eine 100% Wiederherstellung des geklebten
solchen Fällen bitte an Ihren Fachhändler.
Bauteils gelingt.
GARANTIEBEDINGUNGEN
Für dieses Produkt leistet CARSON eine Garantie
Diese Garantie erstreckt sich nicht auf:
von 24 Monaten betreffend Fehler bei der
Herstellung in Bezug auf Material und Fertigung
(a) Beschädigung oder Ausfall durch höhere
bei normalem Gebrauch ab dem Kauf beim
Gewalt, Missbrauch, Unfall, fehlerhafte oder
autorisierten Fachhändler.
außergewöhnliche Beanspruchung,
Nichtbefolgen der Anleitung, unrichtigen
Im Falle eines Produkt-Defekts während der
Zusammenbau oder Handhabung,
Garantiezeit bringen Sie das Produkt zusammen
eigenmächtige Veränderungen, Blitzschlag
mit dem Kaufbeleg zu Ihrem Fachhändler.
oder anderer Einfluss von Hochspannung oder
CARSON wird nach eigener Entscheidung falls
-strom;
nicht anders im Gesetz vorgesehen:
(b) irgendwelche Reparaturen außer solchen
durch den CARSON Service;
(a) den Defekt durch Reparatur kostenlos in
(c) Verschleißteile wie etwa Sicherungen und
Bezug auf Material und Arbeit beheben;
Batterien
(b) das Produkt durch ein gleichartiges oder im
(d) rein optische Schäden
Aufbau ähnliches ersetzen; oder
(e) Transport-, Versand- oder
(c) den Kaufpreis erstatten.
Versicherungskosten
Alle ersetzten Teile und Produkte, für welche
(f) Kosten für die Entsorgung des Produkts,
Ersatz geleistet wird, werden zum Eigentum
Einrichten und vom Service vorgenommene
von CARSON. Im Rahmen der
Einstell- und Wiedereinrichtungsarbeiten.
Garantieleistungen dürfen neue oder
Durch diese Garantie erhalten Sie spezielle
wiederaufbereitete Teile verwendet werden.
Rechte, darüber hinaus ist auch eine von Land
Auf reparierte oder ersetzte Teile gilt eine
zu Land verschiedene Geltendmachung
Garantie für die Restlaufzeit der
andere Ansprüche denkbar.
ursprünglichen Garantiefrist. Nach Ablauf der
Garantiefrist vorgenommene Reparaturen
oder gelieferte Ersatzteile werden in
Rechnung gestellt.
CESSNA 182 CARSON R/C MOTORFLUGZEUG 50 050 5017 43
Page 44

D
ERSATZTEILE
Verwendung und Einbau von Zubehörteilen ist an
Für die Cessna 182 sind unten stehende
anderer Stelle beschrieben.
Ersatz- und Austauschteile verfügbar.
D
Ersatztragfläche 500508500
Ersatzrumpf 500508502
Leitwerke
500508501
Ersatzpropeller
2Stück 500508503
FEHLERSUCHE UND -BEHEBUNG
Problem
Motor läuft nicht an
Keine Servo-Reaktion
auf Steuerbefehl
Fliegt nicht
geradeaus
Steigt nicht
Reichweite bei
Test zu gering
Ursache
1 Flugakku nicht aufgeladen.
2 Sendesignal zu schwach, Kontroll-
Leuchte rot oder aus.
3 Steckverbindung lose
1 Servostecker nicht richtig eingesteckt.
2 Servo beschädigt.
1 Seitenruder bei Steuerknüppel in
Mittelstellung nicht neutral.
2 Tragfläche unsauber montiert.
3.Querruder bei Steuerknüppel in
Mittelstellung nicht neutral.
1 Geringe Ladung des Flugakkus.
2 Flugakku durch Fehler bei der
Behandlung beschädigt.
3 Beide Querruder stehen nach oben.
1 Senderspannung zu gering.
Behebung
1 Flugakku laden.
2 Alle Batterien des Senders
austauschen bzw. Akkus
aufladen.
3 Steckverbindungen prüfen.
1 Servostecker fest einstecken.
2 Servo austauschen.
1 Seitenruder über Trimmhebel
ausrichten, ggf. an der Ruder-
anlenkung neu justieren.
2 Tragfläche neu montieren.
3 Querruder bei neutralem
Steuerknüppel neu justieren.
1 Flugakku laden.
2 Flugakku ersetzen.
3 Querruder bei neutralem
Steuerknüppel neu justieren.
1 Alle Batterien des Senders
austauschen bzw. Akkus
aufladen.
C
E
SS
N
A
-
1
8
2
C
E
S
S
NA
-
L
IG
H
T
-
AIR
D
R
A
F
T
C
E
S
S
NA
-
L
IG
H
T
-
AIR
D
R
A
F
T
Spinner-Set
500508505
Fahrwerk
500508504
44 CESSNA 182 CARSON R/C MOTORFLUGZEUG 50 050 5017
Page 45

CESSNA 182 CARSON R/C MODÈLE VOLANT 50 050 5017 45
CES
SNA-182
C
E
S
S
N
A
-LIGH
T
-A
IRD
R
A
F
TC
E
S
S
N
A
-LIGH
T
-A
IRD
R
A
F
T
MODÉLE VOLANT
MODE D’EMPLOI
Article N° 50 050 5017
F
Cessna 182Cessna 182Cessna 182
Page 46

Cher client,
Nous vous félicitons pour l'achat de votre avion
es spécifications de l'équipement, des matériaux et
Cessna 182, qui bénéficie des dernières
de la conception de ce produit à tout moment sans
technologies. Selon notre politique de
avis préalable. Les spécifications ou conceptions
développement et d'amélioration continus de nos
du produit peuvent être différents de celles
produits, nous nous réservons le droit de modifier l
présentés dans ce manuel ou sur la boîte.
Avant la première utilisation du modèle absolument lire ce manuel!
Manuel
et chargeur par exemple). Tous dommages
Les instructions de montage et de manipulation
résultant du non respect des instructions
doivent être scrupuleusement respectées lors de
d'utilisation entraîneront une annulation de la
l'assemblage final et de l'utilisation de votre
garantie. L'usure normale, les dommages causés
modèle réduit. Veuillez lire et vous assurer que
par des accidents et les dommages causés par
vous comprenez bien l'ensemble de ce manuel
une utilisation incorrecte de l'appareil ne sont pas
avant de toucher à votre modèle réduit ou ses
couverts par la garantie.
accessoires (système de radiocommande, batterie
dégagé et isolé, à l'écart de personnes,
Sécurité
d'obstacles ou de tout ce avec quoi il pourrait
Commander un modèle réduit d'avion est une
entrer en collision.
activité extrêmement ludique, mais qui exige un
sens élevé des responsabilités. Les précautions
Tenez-vous à l'écart de l'hélice dès que la
de sécurité applicables doivent toujours être
batterie est raccordée. Ne restez pas dans le
respectées. L'avion Cessna 182 n'est pas un
plan de rotation de l'hélice.
jouet. Les enfants de moins de 14 ans ne doivent
Attention : les batteries LiPo peuvent
l'utiliser que sous la surveillance d'un adulte. Pour
fortement s'échauffer en cas d'erreur de
les débutants, nous recommandons d'utiliser votre
manipulation.
modèle réduit dans un espace
Responsabilité/assurance
fortement conseillé de souscrire une assurance
L'opérateur d'un modèle réduit est responsable de
appropriée couvrant les responsabilités en cas
toutes sortes de dommages susceptibles d'être
d'accidente.
causés par son engin ou par ses actions. Il est
1999/5/CE.
Déclaration de conformité
La déclaration de conformité originale peut être
Conformément à la directive 1999/5/CE (R&TTE)
demandée en écrivant à l'adresse ci-dessous.
Par la présente Dickie-Tamiya GmbH&Co KG
Dickie-Tamiya GmbH&Co. KG • Werkstraße l •
déclare que ce modèle volant Cessna 182 et lla
D-90765 Fürth • Tel.:+49/(0)911/9765-03
télecommande est conforme aux exigences
essentielles et autres dispositions de la directive
Mise au rebus
de collecte approprié. Si vous
Signification du symbole sur le produit,
avez des questions sur
l’emballage ou le mode d’emploi. Les appareils
l’élimination des déchets,
électriques sont des biens potentiellement
adressez-vous aux organisations
recyclables qui ne doivent pas être jetés aux
compétentes ou à votre
ordures ménagères une fois usés. Aidez-nous à
revendeur.
protéger notre environnement et à économiser
nos ressources et remettez cet appareil à un lieu
Nous vous souhaitons beaucoup de joie avec votre modèle volant Cessna 182.
46 CESSNA 182 CARSON R/C MODÈLE VOLANT 50 050 5017
F
Page 47

Cessna 182
Modèle d’un avion
SOMMAIRE
Page
..............................
Sommaire ......................................................................47
.................................................48
................................................49
de la Cessna 182................................49
Spécification ..................................................................49
...............................................................50
.......................................51
Manipulation des batteries rechargeables NiMH...........53
Radiocommande 4 voies ...............................................54
Fixation de l’empennage ...............................................57
Montage de la voilure ....................................................58
....................................
.....60
.....................................60
..................................................................................61
.....................................................................62
...................................................................64
........................................64
...................................................................65
Conditions de garantie...................................................65
..........................................................66
Commande électronique de la vitesse
référence 50 050 5017
Préface / Déclaration de conformité 46
Précautions de sécurité
Utilisation de ce manuel
Fonctionnement
Contenu du kit
Explication de certaines expressions du langage
des modèles réduits d'avions
Réglage du train ............................................................59
Equilibrage du centre de gravité 59
Mise en place et raccordement de la batterie du vol
Réglage du bloc de commande
Vol
Démarrage
Atterrissage
Après atterrissage / stockage
Réparations
Recherche des défautes et dépannage.........................66
Pièces détachées
CESSNA 182 CARSON R/C MODÈLE VOLANT 50 050 5017 47
F
Page 48

SECURITE
1. Allumez toujours l'émetteur en premier
Mise en garde générale
même quand un réaction non contrôlée du
Les modèles réduits radiocommandés, en
récepteur à un signal radio étranger es très
particulier les avions, ne sont pas des jouets, et
improbable. L'accélérateur, sur l'émetteur, doit
vous devez apprendre à les utiliser étape par
être en position “OFF” lors de l'allumage.
étape. Les enfants de moins de 14 ans ne doivent
2. Raccordez ensuite les connecteurs de la
utiliser le modèle réduit que sous la surveillance
batterie et du contrôleur de vitesse.
d'un adulte.
3. Vérifiez que toutes les gouvernes sont en
Même si l'avion Cessna 182 est relativement
position neutre.
léger, il atteint des vitesses élevées et, en cas de
4. Assurez-vous que tous les servos répondent
collision avec une personne ou une voiture,
correctement aux signaux envoyés par
pourrait causer des blessures ou des dommages.
l'émetteur.
Choisissez une aire de vol suffisamment grande et
dégagée sans personnes ni animaux. La zone doit
Sécurité en vol
être exempte d'obstacles et suffisamment éloignée
de la route ou de zones de trafic public. Il est
Gardez toujours l'œil sur votre appareil et ne vous
interdit de faire voler des modèles réduits d'avion à
laissez pas distraire.
proximité d'un aéroport. Les clubs de modélisme
Tenez-vous à l'écart de l'hélice dès que la
autorisent les participants à utiliser leur zone de vol
batterie est raccordée. Ne restez pas dans le
si le pilote peut prouver qu'il est assuré pour son
plan de rotation de l'hélice.
avion.
Ne volez jamais un jour de grand vent, de pluie ou
Avant de commencer, assurez-vous que votre
d'orage.
engin est correctement assemblé et que tous les
Tenez votre avion à l'écart des lignes à haute
systèmes fonctionnent correctement, et, après
tension et des pylônes d'antenne.
réparation, que la capacité de vol est restaurée à
Un modèle réduit même en parfait état peut
100 %.
soudain se comporter de façon imprévisible en
raison d'une interférence. N'oubliez jamais que
Avant de commencer
vous devez corriger ce comportement en tournant.
Ne volez jamais vers des personnes ou des
Vérifiez toutes les pièces, les vis et les connexions
animaux ou au dessus de voies publiques.
ainsi que les joints des tiges de commande.
Commencez l'atterrissage à temps si vous
Inspectez toute la structure de l'appareil et de
constatez que la capacité à monter de votre
l'hélice, vérifiez l'absence de fissures ou de
modèle diminue, par exemple si la batterie de
dommages. Le cas échéant, réparez ou remplacez
l'appareil est faible ou que vous constatez une
la pièce défectueuse avant d'utiliser l'appareil. Si
diminution de la performance du moteur ou que le
l'hélice est endommagée, elle doit être remplacée.
voyant de contrôle sur l'émetteur est passé au
N'essayez en aucun cas de la réparer !
rouge..
La batterie de l'appareil doit être entièrement
Pour terminer, éteignez d'abord le récepteur, puis
chargée avant chaque vol, et les piles de
l'émetteur.
l'émetteur doivent avoir suffisamment de
Séparez toujours les connecteurs de la batterie de
puissance (l’indication de tension de l'émetteur doit
l'appareil et du récepteur /contrôleur de vitesse.
se trouver clairement dans la zone autorisée.).
Si vous avez terminé votre session de vol, retirez
Le voyant de contrôle doit être allumé et de
la batterie de votre modèle réduit.
couleur verte. Un voyant de contrôle rouge signifie
qu'il faut remplacer les piles de l'émetteur
(recharger les accus de l'émetteur).
48 CESSNA 182 CARSON R/C MODÈLE VOLANT 50 050 5017
F
Page 49

Assemblez l'avion exactement selon les
UTILISATION DE CE
instructions du manuel, assurez-vous de suivre
toutes les étapes à la lettre et vérifiez que toutes
MANUEL
les pièces sont correctement installées. Seul une
Cessna 182 correctement assemblé pourra offrir
Ce manuel d'utilisation fournit toutes les
une performance maximale.
informations nécessaires à l'assemblage et au
pilotage de votre avion Cessna 182. Il devrait
vous aider à comprendre les éléments et les
actions de votre modèle réduit et à acquérir des
Cessna 182
connaissances techniques pour vous permettre
d'utiliser votre appareil même si vous êtes
débutant. Si vous n'avez jamais piloté de modèle
En raison de son vitesse de vol moindre, la
radiocommandé, nous vous conseillons de vous
Cessna 182 est recommandé aussi pour les
faire aider d'un pilote expert pour les premiers
débutants. Nous recommandons quandmême
décollages et atterrissages. Si vous ne connaissez
qu'un pilote de modèle réduit expérimenté prenne
pas de pilote de modèles réduits, adressez-vous à
en charge le décollage et ne transmette l'émetteur
votre revendeur. Votre principale priorité doit
qu'une fois l'avion ayant atteint une hauteur
toujours être la sécurité de votre environnement,
suffisante. Les premiers atterrissages devraient
votre propre sécurité, et votre modèle réduit.
également être réalisés par le pilote chevronné.
Typiquement, la Cessna 182 décolle de la main et
Ce manuel présente également un schéma des
atterrit sur une piste en herbe. Les atterrissages
principales pièces détachées, et il est donc
sur asphalte ou sur d'autres pistes en dur sont
important que vous le conserviez en lieu sûr.
possibles grâce à la roue intégrée, mais ils
Toutes les déclarations de direction qui
peuvent entraîner des dégradations mineures.
apparaissent dans le manuel, par exemple "côté
Nous recommandons de voler sur un terrain
droit" s'entendent dans le sens du vol.
suffisamment grand et sans obstacles (prairie).
FONCTIONNEMENT DE LA
SPECIFICATION
Voies 4 voies
Piles AAx8 ou Ni-MH batteries rechargeables convenables
Emetteur Fréquence 2,4 GHz
Portée environ 300m
Dimensions Longueur 860mm envergure 980mm
Avion Batterie LiPo Accu (7,4 A
Poids Modèle: 560g
Surface portante 13 dm²
Charge de surface 43g/dm²
Fonctionnement nombres de rotation, gouvernail de profondeur/ direction,
ailerons
à 2 cellules V / 1300m h)
* La durée de fonctionnement peut varier selon le fabricant de la batterie, la surface de vol et
la façon dont vous pilotez.
Variateur Courant max. 20A
Durée de marche. ca. 6 min
CESSNA 182 CARSON R/C MODÈLE VOLANT 50 050 5017 49
F
Page 50

Gouvernail
de profondeur
110/230V alimentation
sur le secteur pour le
chargeur 12,8V 1,25A
Gouvernail
de direction
Aile
Aile
4 Micro-Servos
installées
DIGITAL PROPORTIONAL RADIO CONTROL SYSTEMDIGITAL PROPORTIONAL RADIO CONTROL SYSTEM
ETB41 - 2.4 GHzETB41 - 2.4 GHz
ONON
OFFOFF
11 22 33 44
REVREV
NORNOR
POWERPOWER
DICKIEDICKIE
DICKIEDICKIE
POWERPOWER
2300 mAh2300 mAh
POWERPOWER
DICKIEDICKIE
DICKIEDICKIE
POWERPOWER
2300 mAh2300 mAh
POWERPOWER
DICKIEDICKIE
DICKIEDICKIE
POWERPOWER
2300 mAh2300 mAh
POWERPOWER
DICKIEDICKIE
DICKIEDICKIE
POWERPOWER
2300 mAh2300 mAh
POWERPOWER
DICKIEDICKIE
DICKIEDICKIE
POWERPOWER
2300 mAh2300 mAh
POWERPOWER
DICKIEDICKIE
DICKIEDICKIE
POWERPOWER
2300 mAh2300 mAh
POWERPOWER
DICKIEDICKIE
DICKIEDICKIE
POWERPOWER
2300 mAh2300 mAh
POWERPOWER
DICKIEDICKIE
DICKIEDICKIE
POWERPOWER
2300 mAh2300 mAh
8 AA Mignon
piles pour
l’émetteur
GL
UE
LiPo-Accu
à 2 éléments
1300mAh 7,4V
BA
T
G
E
A
R
A
U
X
I
RUD
D
T
H
R
O
E
L
EV
A
IL
E
6
6
C
H
R
E
C
E
I
V
E
R
E
R
6
1
-
2
.
4
G
H
z
D
S
S
S
S
I
G
N
A
L
T
M
Moteur
avec contrôleur
C
O
N
T
R
O
L
L
E
R
C
ES
S
N
A-
1
82
C
ES
S
N
A-LIG
H
T
-A
IR
D
R
A
F
TC
ES
S
N
A-LIG
H
T
-A
IR
D
R
A
F
T
Train d’aterrissage
B
A
L
A
N
C
E-C
HA
RG
E
R
B
A
L
A
N
C
E-C
HA
RG
E
R
FO
R
L
I-
P
O
B
A
T
T
E
R
Y
FO
R
L
I-
P
O
B
A
T
T
E
R
Y
1
.2A
0.3
A
2
0
C
X
-P
a
c
k
L
i
P
o
-A
kk
u
7
,
4V
mA
h
A
CA
C
P
OW
E
R A
D
A
PT
ER
MOD
EL:D
G-C
O
12
V010
IN
PUT
: 1
00
-2
40
V~
5
0/
60
H
z
0.
6A
M
A
X
O
U
TP
U
T
:1
2.
8V
=1.2
5A
G
S
M
AD
E
IN
C
HI
NA
!
!
RISK O
F ELE
CT
RIC
AL SH
OC
K
DO NOT OPEN
hélice avec
les accessoires
Fuselage
CONTENUE DE LA KIT
2,4GHz
Micro-récepteur
installé
Emetteur à 4 voies
2,4 Ghz
Connecteur de
court-circuit
pour assignation
du code
Chargeur / èquilibrateur
12,0V 0,3-1,2A
pour LiPo-Accu
Colle pour fixation
du gouvernail de
direction
50 CESSNA 182 CARSON R/C MODÈLE VOLANT 50 050 5017
F
Page 51

CE
S
SN
A-
L
IG
H
T
-
AIR
D
RA
FTCE
S
SN
A-
L
IG
H
T
-
AIR
D
RA
FT
C
E
S
S
N
A-
L
I
GH
T
-
A
I
R
D
R
A
F
TC
E
S
S
N
A-
L
I
GH
T
-
A
I
R
D
R
A
F
T
EXPLICATION DE CERTAINES EXPRESSION DU LANGAGE
DES MODELES REDUITS D'AVIONS
La Cessna 182 est peut-être votre premier une moto, sans quoi les forces aérodynamiques
appareil volant, et il est donc fondamental que pour voler dans un virage ne seraient pas disponivous maîtrisiez certaines expressions ainsi que le bles. Cette inclinaison latérale sur un avion de
fonctionnement de l'appareil. Certains termes conception normale est réalisée à l'aide de volets
techniques et leurs actions sont expliqués ci-après, sur les ailes. Pour la Cessna 182 les ailerons sont
par ordre alphabétique. installés avec des servos.
Axes de révolution libres: Contrairement à
Accumulateur: Unité de stockage rechargeab-
une voiture ou un bateau, la Cessna 182 peut être
le pour l'énergie électrique (batterie rechargeable).
contrôlé à tous les axes dès qu'il s'envole. Les
Pour les modèles réduits d'avions, les batteries au
changements d'attitude et de direction de vol sont
Nickel Metal Hydride (NiMH) et Lithium Polymère
initiés par les gouvernes (direction, profondeur et
(Lipo) sont utilisées. L'énergie stockée est mesu-
aileron).
rée en Milli-Ampères-Heure (mAh) . Une batterie
de 2100 mAh est capable de décharger un courant
Batterie / élément sec: Les éléments secs
de 20 mA pendant 6 minutes. Pour pouvoir faire
fonctionner le moteur d'un avion, la batterie doit tels que les piles Alcalines sont des sources de
être capable de décharger un courant élevé. En courant jetables. Les éléments secs peuvent être
quelques minutes, elle transmet son énergie à utilisés dans l'émetteur de la Cessna 182. A la fin
l'aide du contrôleur de vitesse au moteur. Selon de sa vie utile, la tension d'une pile diminue et elle
leurs spécifications, les accumulateurs / batteries doit être jetée. N'essayez jamais de recharger un
peuvent être chargés plusieurs centaines de fois. élément sec. Vous risqueriez de provoquer un
N'utilisez que le chargeur approprié au type de incendie ou une explosion.
batterie. Les accus / batteries usés ou défectueux
(partiellement nocifs) doivent être mis au rebut sur
les sites appropriés.
Aile (profil de voilure): La surface de
portance de l’aile influence la vitesse de vol du
modèle. Poids augmenté et pas beaucoup surface
produit grande vitesse. La Cessna 182 est dans
un secteur moyen.
Aileron: Un avion a besoin d'un angle, comme
B
AT
G
EA
R
A
U
X
I
R
U
D
D
THR
O
ELE
V
AIL
E
6
6
C
H
R
E
C
E
IV
E
R
E
R
6
1
-
2
.
4
G
H
z
D
S
S
S
S
I
G
N
A
L
T
M
20
C
X
-
Pa
ck
Li
P
o
-
A
kk
u
7,
4V
m
A
h
Accu à
2 éléments
Micro recepteur
Tourner autour de l'axe vertical
(virage) : gouvernail de direction
Tourner autour de l'axe latéral
(haut - bas) : profondeur
Tourner autour de l'axe longitudinal
(inclinaison latérale, virage) :
gouvernail de direction et V-type de
l’aile et aileron
axe longitudinal
axe vrtical
axe l
atéral
CESSNA 182 CARSON R/C MODÈLE VOLANT 50 050 5017 51
F
Page 52

deux valeurs : le diamètre et le pas, de préférence
BEC Simulateur de batterie : Circuit de
indiqués en pouces. L'hélice de la, avec les
modèles réduits électriques dans lequel une
valeurs 8x5 (pouces), a un diamètre de 8 pouces
source de courant séparée est économisée pour le
(20cm) et un pas de 45 pouces (12,7cm). Lors
récepteur. Le récepteur est fourni avec le courant
d'une rotation, ceci entraînerait un mouvement
de la batterie de conduite/pilotage. La tension est
vers l'avant de 5 pouces par révolution. Si elle
contrôlée par un dispositif spécial à une valeur
tourne à raison de 8 000 tpm, on obtient une
acceptable.
vitesse d'environ 61 km/h. La vitesse qui peut être
atteinte est quelque peu inférieure car l'hélice ne
Centre de gravité: Le centre de gravité est
peut générer une propulsion qu'avec un certain
l'endroit où, pour certains processus physiques,
glissement.
toute la masse d'un solide ou un système de
masse cohérent peut être supposé. Dans un avion,
Interrupteur d'alimentation: L'émetteur
la position du centre de gravité en relation avec les
est équipés d'un interrupteur de courant.
forces de portance joue un rôle important.
Moteur électrique : C’est un moteur pour
Contrôleur de vitesse: Le contrôleur de
courant direct qui se distingue par une haute
vitesse électronique régule la vitesse du moteur
nombre de rotations. Le moteur peut s’échauffer
sans pratiquement aucune perte, en allumant et en
par faire tourner sans cesse à grande puissance.
éteignant le courant du moteur (à une très haute
fréquence) en impulsions de différentes longueurs.
Quartz: La technique utilisée jusqu'à maintenant
Si la tension de la batterie descend, par décharge
permettait de commander simultanément plusieurs
continue, au dessous d'une certaine limite, ce qui
modèles réduits via différents canaux (plages de
est nécessaire pour actionner les servos, le
fréquence). Ces canaux étaient déterminés par
contrôleur de vitesse arrête le moteur. Votre
des quartz de fréquence enfichés dans l'émetteur
Cessna 182 reste contrôlable en vol plané.
et dans le récepteur. Le MINIMOA est commandé
par un système utilisant une fréquence de 2,4 GHz
Empennage latéral: L’empennage latéral de
qui permet, grâce à une technique de pointe, de
la plupart des avions est formée d'au moins une
commander simultanément un nombre quasi
dérive, de préférence en position verticale, avec un
illimité de modèles réduits sans utiliser de quartz.
volet mobile au bout. En basculant le volet vers la
La sensibilité à d'autres émetteurs (par exemple
gauche ou la droite, le flux change et la queue de
équipement de radiotéléphonie d'une portée
l'avion se déplace latéralement. Combinée aux
particulièrement grande) est pratiquement nulle par
autres effets (aile en V ou actionnement des
rapport aux techniques utilisées jusqu'à
ailerons), la direction commence à faire virer
maintenant. L'émetteur et le récepteur sont
l'avion. La Cessna 182 possède un empennage
assignés l'un à l'autre, toute réaction à des signaux
latéral avec volet ; le vol en virage est ici effectué à
externes est empêchée.
l'aide de l'aile en V.
Récepteur: Le récepteur intercepte les signaux
Gouverne de profondeur: La gouverne de
de l'émetteur via son antenne et les convertit en
profondeur d'un avion de conception normale est
impulsions pour les servos qui actionnent les
similaire à une petite aile à l'arrière de l'avion, avec
gouvernes. Il transforme en outre les signaux radio
un volet mobile à l'extrémité. En soulevant ou en
pour le contrôleur de vitesse électronique, qui
abaissant cette gouverne, les forces de levage au
ajuste les rotations du moteur en fonction de la
niveau de la gouverne de profondeur sont modifié-
position de la manette des gaz au niveau de
es, la queue de l'appareil est abaissée ou soulevée
l'émetteur. Le récepteur et le contrôleur de vitesse
selon que l'avion monte ou descend.
est pré installé sur la Cessna 182.
Hélice: L'hélice actionnée par le moteur génère
Servo: Les signaux de pilotage de l'émetteur
la propulsion du modèle réduit. La puissance du
sont convertis par le récepteur en
moteur, la taille et le poids du modèle réduit, et
valeurs de commande pour les
donc la vitesse du vol entrent en compte pour la
servos. Le servomoteur actionne le
conception de l'hélice. Mieux l'hélice est adaptée à
levier d'asservissement
un modèle et meilleures sont l'efficacité et les
performances de vol. L'hélice se caractérise par
52 CESSNA 182 CARSON R/C MODÈLE VOLANT 50 050 5017
F
Page 53

La durabilité de la batterie dépend du type d'utilisa-
câble démoli) doit
tion et de la consommation de courant. Si un
être mise au rebut
courant constant élevé est consommé, comme
dans des sites
c'est le cas lors de vols rapides à des tpm élevés,
spéciaux et non
250 cycles de charge/décharge sont possibles, et
jetée dans les
une baisse de capacité peut apparaître plus
ordures ménagères
rapidement. Une batterie usée (très faible capacité) ou endommagée (emballage endommagé,
Mise au rebut des batteries usées ou défectueuses
20
C
X
P
ac
k
L
i
P
o
-
A
k
k
u
7
,
4
V
m
A
h
au moyen d'un engrenage, qui se déplace ensuite
Surface portante: La Cessna 182 possède une
en un arc en fonction du signal, jusqu'à 1/6ième de
forme classique comme par exemple un planeur
cercle. Généralement, le levier d'asservissement
moderne, avec une surface portante arrondi et un
est raccordé via des tiges aux gouvernes.Les
empennage à l'arrière du fuselage. Le rapport
servos correspondants et la tringlerie de comman-
entre le poids de l'avion et la force de portance de
de sont déjà montés sur la Cessna 182. Lors du
la surface portante s'appelle la charge alaire, un
montage de l'avion, les fiches en question situées
poids élevé avec une surface portante réduite
à la base de l'aile doivent être branchées sur le
requiert une vitesse de vol élevée. La Cessna 182
récepteur.
est plutôt léger, il est donc adapté à des vitesses
de vol basses.
MANIPULATION DES BATTERIES RECHARGEABLES LiPo
Les batteries Ni-MH (nickel-hydrure de métal) sont
des composants d'alimentation électrique d'une
technologie récente avec une capacité de charge
élevée par rapport à leur masse. La manipulation
de telles batteries doit être particulièrement
La batterie doit être débranchée du chargeur à la
soigneuse afin d'éviter tout danger et toute fin de la recharge. Les batteries LiPo sont
diminution prématurée des performances. sensibles aux « décharges profondes » où la
Après un vol ou un chargement, la batterie risque
tension passe en dessous de 3V par cellule, ces
d'être chaude. Dans une certaine limite, ceci est
décharges peuvent les endommager durablement.
normal. Le bloc de pilotage dispose d'un coupe-circuit de
Le chargeur 100/240 V fourni avec le kit est sous-tension, qui éteint le moteur en cas de
composé d’un bloc d’alimentation et d’un chargeur
tension trop faible, la tension restante suffit à
LiPo Balancer. Le bloc d’alimentation est branché
maintenir la capacité de commande du modèle
sur une prise de courant normale. Il livre un
réduit en vol libre.
courant de 1,25 A au plus pour une tension de 12,8 Selon la façon dont vous pilotez, la tension de la
V, ce qui permet de recharger la batterie de vol batterie chutera tôt ou tard, entraînant une
LiPo en 1 heure environ. Il est aussi possible de
réduction du nombre de révolutions du moteur et
régler le chargeur/régulateur Balancer sur un
de la capacité à monter de l'appareil. Dès que vous
courant inférieur ; la recharge se fait alors plus en constatez ceci, faites atterrir votre modèle. Tenter
douceur, ce qui peut améliorer la capacité de la d'atterrir avec peu ou pas de puissance est
batterie.
toujours difficile, et vous risquez de ne pas avoir
suffisamment de puissance pour atteindre votre
point d'atterrissage.
Eviter impérativement les courts-circuits, ils
peuvent faire fondre les gaines des câbles et
enflammer les matériaux combustibles à proximité.
Les batteries LiPo peuvent fortement s'échauffer
au fin d’un vol.
Etant donné qu'il est conseillé de charger la
batterie hors du modèle, nous vous conseillons de
retirer la batterie après chaque usage et de la
stocker dans un endroit sûr.
6. Lorsque le voyant vert est allumé, cela signifie
que la recharge est terminée ; débrancher dans
ce cas le plus rapidement possible le chargeur
de la source de courant.
1. Relier le bloc d’alimentation au chargeur LiPo
Balancer.
2. Relier le bloc d’alimentation à une prise de
courant.
3. Relier la fiche blanche (Balancer) de la batterie
LiPo à la prise qui se trouve sur le chargeur.
4. Vérifier les contacts des liaisons pour prévenir
tout risque de court-circuit.
5. Vérifier la température de la batterie vers la fin
de la recharge. La température ne doit pas
dépasser 50 °C ; si cette limite est dépassée,
débrancher la batterie du secteur.
CESSNA 182 CARSON R/C MODÈLE VOLANT 50 050 5017 53
F
Page 54

Assignation du code de l'émetteur au récepteur (binding)
En plus de l’information de commande, un code 1. Placer l’émetteur et le récepteur en état de
électronique est transmis avec chaque impulsion marche, mais éteints à proximité l’un de l’autre.
en mode de contrôle à distance ; ce code permet Pour assigner le récepteur à l’émetteur,
au récepteur de savoir qu’il s’agit d’un signal de « maintenir la touche de synchronisation de la
son » émetteur. Comme il existe plusieurs millions fréquence enfoncée sur l’émetteur et allumer
de codes d’émetteur, il est extrêmement peu l’émetteur.
probable qu’un émetteur externe puisse contrôler 2. Brancher la fiche pontée (voir illustration civotre récepteur. Néanmoins, il est nécessaire de dessous) sur la prise « BATT » sur le récepteur.
communiquer au récepteur le code de l’émetteur Pour que le récepteur soit sous tension, relier le
avant la première mise en service. Pour cela, on contrôleur de vol au récepteur et à la batterie de
procède comme suit en se plaçant de préférence vol ; le voyant de contrôle s’allume.
dans un endroit où la transmission radio ne risque 3. Si la synchronisation de la fréquence a réussi, le
pas d’être perturbée par d’autres signaux voyant de contrôle reste allumé.
électriques, et en particulier pas par d’autres 4. Lorsque vous débranchez la fiche pontée, le
émetteurs 2,4 GHz. voyant de contrôle se met à clignoter. Le
récepteur passe en mode opérationnel.
5. Appuyer à nouveau sur la touche de
synchronisation de la fréquence pour le signal
de confirmation. L’émetteur est à présent
opérationnel et le voyant de contrôle est allumé
pour indiquer que le récepteur fonctionne
normalement.
DIGITAL PROPORTIONAL RADIO CONTROL SYSTEMDIGITAL PROPORTIONAL RADIO CONTROL SYSTEM
ETB41 - 2.4 GHzETB41 - 2.4 GHz
ONON
OFFOFF
11 22 33 44
REVREV
NORNOR
B
A
T
GEA
R
A
U
X
I
R
U
DD
T
H
R
O
EL
E
V
A
IL
E
6
6
C
H
R
E
C
E
I
V
E
R
E
R
6
1
2
.
4
G
H
z
D
S
S
S
S
I
G
N
A
L
T
M
Connecteur de court-circuit
Votre kit Cessna 182 Les dysfonctionnements
ulne peuvent être totalement exclus, même avec les
équipements techniques les plus modernes. N
i
Cessna 182
dt
ae
contient une radio 4 voies , devient trop importante.
n récepteur et un variateur installé. Aussi instal e
sont deux microservos pour les gouvernails de
e
d rection et profondeur. Ce système de
jamais utiliser votre lorsque les
radiocomman e offre une portée de 300m. ba teries de votre émetteur sont faibles, vous
Cependant les vols cl ssiques s'effectuent à une risqu z de perdre le contrôle du modèle.
distance inférieure en raison de la difficulté
d'appréciation lorsque la distance avec le modèle
RADIOCOMMANDE 4 VOIES INCLUS
F
54 CESSNA 182 CARSON R/C MODÈLE VOLANT 50 050 5017
Touche de synchronisation de la fréquence
Page 55

Vue externe de l’émetteur
1. Antenne pivotante.
2. Voyant de contrôle de la tension
de la batterie
Tant que le voyant de contrôle est allumé et de
couleur verte, la tension d'émission disponible
est suffisante pour le fonctionnement en vol.
Lorsqu'il passe au rouge, il est recommandé
d'interrompre tout vol en cours sans tarder (un
atterrissage sûr est encore possible), tout
envol doit être proscrit, les batteries sont
déchargées et doivent être remplacées.
3. Manette gauche
4. Manette droite
Grâce à un ressort de rappel, les manches
retournent toujours en position neutre (au
milieu) dès qu'ils sont relâchés. La manette
des gaz constitue une exception, car elle
demeure dans la position donnée grâce à un
tramage.
équivalent. Les autres types de piles risquent
5. Interrupteur
d'éclater et de causer des dommages physiques
ou matériels.
Ce dispositif utile permet de régler la commande et
d'obtenir un neutre réel, ce qui permet des
variations non prévues des caractéristiques de
performance de votre modèle. Les boutons de
réglages permettent d'effectuer des réglages fins.
12. Crochet pour bandoulière
(disponible séparément)
11. Prise de chargement
Remarque : l'interrupteur de marche/arrêt doit être
en position d'arrêt (OFF) avant le chargement. Un
chargeur doit être utilisé uniquement pour les piles
au Nickel-Metalhydride (NiMH), type 3U ou
6-9 Leviers de trim voies 1-4
10 Touche d’affectation du récepteur
Avant de pouvoir être utilisé, le nouveau récepteur
doit être affecté au récepteur (binding). Pour cela,
on utilise entre autres cette touche. Voir la
13 Poignée
description à la page 54.
14 Commutateurs d’inversion des servos et
de la commande
Les commutateurs permettent d’inverser le sens
de rotation des servos et l’effet de la commande
de vol (sens de rotation de l’hélice).
1
4
6
7
8
9
10
11
12
DIGITAL PROPORTIONAL RADIO CONTROL SYSTEMDIGITAL PROPORTIONAL RADIO CONTROL SYSTEM
ETB41 - 2.4 GHzETB41 - 2.4 GHz
ONON
OFFOFF
11 22 33 44
REVREV
NORNOR
2
3
5
13
14
pôles de la prise
de chargement
MODE GAZ À GAUCHE “MODE 2”
manette gauche manette droite
en haut/avant gaz altitude vers le bas
dessous/arr. moteur arrête altitude en haut
gauche aileron gauche gouvern. de dir.g.
droite aileron droite gouvern. de dir.d.
CESSNA 182 CARSON R/C MODÈLE VOLANT 50 050 5017 55
F
Page 56

PUSH
AA
1.5V
AA
1.5V
AA
1.5V
AA
1.5V
AA
1.5V
AA
1.5V
AA
1.5V
AA
1.5V
SIMULATOR
Pour retirer le couvercle des piles, faites-le
glisser dans le sens des flèches (vers le
bas) tout en poussant doucement sur la
partie striée. Lorsque vous insérez des piles,
commencez toujours par l'extrémité négative
et respectez la polarité indiquée dans le
compartiment des piles. Si l'indicateur de la
tension de l'émetteur ne fonctionne pas,
vérifiez les contacts, plus particulièrement le
côté négatif, puis revérifiez que les piles
sont insérées correctement. Assurez-vous
également que les piles sont entièrement
chargées.
CONSIGNES
DE SECURITE
SUR LES PILES
CONSIGNES
DE SECURITE
SUR LES PILES
Installer les piles correctement en respectant les
polarités. Une installation incorrecte peut entraîner
des fuites ou dans des cas extrêmes, incendie ou
explosion.
Toujours enlever les piles usagées de l'équipement
et toutes les piles si cet équipement ne sera pas
utilisé pendant une longue période. Si les piles sont
laissées en place, il y a risque de fuites pouvant
endommager l'équipement.
Toujours surveiller les enfants qui remplacent eux
mêmes les piles de façon à s'assurer que ces
conseils sont suivis.
Toujours remplacer le jeu complet de piles et bien
veiller à ne pas mélanger piles neuves et usagées
ou encore mélanger différents types de piles car il
y a risque de fuite ou dans des cas extrêmes,
d'incendie ou explosion.
Ne jamais jeter les piles dans un feu car il y a
risque d'explosion. Ne jamais jeter les piles à la
poubelle. Toujours éliminer correctement.
Toujours s'assurer que le compartiment à piles est
bien fermé.
ELIM
INER
Utilisées correctement, les piles à usage
domestique constituent une source d'énergie fiable
et sûre. Des problèmes peuvent survenir si on ne
les emploie pas correctement: fuite ou dans des
cas extrêmes, incendie ou explosion. Voici
quelques conseils simples qui vous permettront
d'éviter ce genre de problèmes.
Toujours stocker des piles neuves dans leur emballage d'origine à l'écart d'objets métalliques pouvant
causer un court circuit entraînant des fuites ou
dans des cas extrêmes, incendie ou explosion.
Ne jamais essayer de recharger des piles
ordinaires que ce soit au moyen d'un chargeur ou
en les chauffant. Il peut en résulter des fuites,
causer un incendie ou même exploser. Il existe des
piles rechargeables clairement identifiables.
Changement des piles de l'émetteur
56 CESSNA 182 CARSON R/C MODÈLE VOLANT 50 050 5017
F
Page 57

L'empennage n'est pas encore monté à la livraison
pour des raisons de transport.
Collage du gouvernail de
direction
Le kit est livré avec de la colle servant à la fixation
Appliquez un peu de colle dans la fente prévue à
de l’empennage. La colle a un temps de séchage
cet effet sur le fuselage et sur les languettes de
de 12 heures environ ; aucune force ne doit être
fixation de l’empennage latéral. Insérez alors
exercée sur la zone collée durant ces 12 heures.
l’empennage latéral dans la fente sur le fuselage
Pour accélérer les travaux et augmenter
en faisant attention à ce qu’il soit bien positionné et
l’adhérence, il est aussi possible d’utiliser une colle
parfaitement à angle droit.
époxy bi-composants à prise rapide en 5 minutes
Renforcez la liaison en appliquant de la colle sur
(disponible séparément) ; cette colle atteint sa
toute la bordure. Cette étape n’est pas nécessaire
résistance définitive en moins d’une heure. Pour
si vous utilisez de la colle époxy. Avant que la colle
une mobilité accrue, rabattez un peu dans les deux
ne sèche complètement, vérifiez à nouveau que
sens les volets du gouvernail de profondeur et de
les pièces sont bien positionnées.
l’empennage latéral. Ne forcez pas !
Fixation du gouvernail de
profondeur
Insérez le gouvernail de profondeur dans la fente
prévue à cet effet sur le fuselage et vérifiez que le
volet peut bouger normalement. Si le volet heurte
le fuselage et bouge difficilement, découpez un
peu le fuselage à cet endroit avec un cutter de
modélisme en faisant extrêmement attention.
Appliquez la colle fournie avec le kit sur le
gouvernail de profondeur aux points de contact
avec le fuselage.
Mettez aussi un peu de colle sur les surfaces de
contact dans la fente du fuselage.
Écartez un tout petit peu l’ouverture du fuselage et
introduisez le gouvernail de profondeur (le guignol
tourné vers le bas) en vérifiant qu’il est bien à
angle droit dans les deux sens. Laissez la colle
sécher rapidement avant de poursuivre le travail.
Colle
éventuel couper
Colle
9
0
°
90°
MONTAGE DE L'EMPENNAGE
CESSNA 182 CARSON R/C MODÈLE VOLANT 50 050 5017 57
F
Page 58

MONTAGE DE LA VOILURE
L’ aile de la Cessna182 peuvent être démontées
lors du transport.
Avant de monter la voilure, insérez la fiche des
servos d’ailerons (regroupés sur un canal) dans la
prise du canal 1. On peut prendre comme
repère la couleur du câble des servos
déjà branchés. Insérez la voilure
obliquement par en haut dans
l’évidement du fuselage derrière la vitre
avant ; le nez de la voilure doit être placé
contre le bord avant. Puis vissez la voilure
sur le fuselage à l’aide des deux vis en
plastique. Les ailerons bougent dans le sens
opposé. Leur bon fonctionnement doit être contrôlé
lors du premier essai. Manche vers la droite :
l’aileron droit remonte, l’aileron gauche descend ;
inversement quand on pousse le manche vers la
gauche. Si ce n’est pas le cas, permutez le
commutateur d’inversion des servos pour le canal 1.
C
E
S
S
N
A
-L
IG
H
T
-
A
IRD
RA
F
T
C
E
S
S
N
A
-L
IG
H
T
-
A
IRD
RA
F
T
C
ESS
NA-
LIG
H
T-
AIR
C
R
AF
T
C
ESS
NA-
LIG
H
T-
AIR
C
R
AF
T
La télécommande doit être opérationnelle pour vers l’avant, le gouvernail va en position vers le
procéder au réglage des volets sur l’empennage, haut (ascension). Les petites divergences peuvent
c’est-à-dire que l’émetteur doit être allumé et la être compensées par les leviers de trim ; en cas de
batterie de vol raccordée. À partir de ce moment, divergences plus importantes, il est nécessaire de
faites attention à ne plus amener le levier de reprendre le réglage de la tête de fourche. Ne pas
l’accélérateur vers l’avant, maintenez fermement oublier ensuite de débrancher à nouveau la
l’avion et éloignez-vous du périmètre de l’hélice au batterie de vol, puis d’éteindre l’émetteur.
cas où le moteur se mettrait en marche de manière
intempestive, ce qui ne peut être totalement exclu.
Le manche gauche sur l’émetteur (moteur et
gouvernail de direction) doit être en position «
Moteur éteint » (complètement vers le bas) et sur «
neutre » (au centre) pour le gouvernail de
direction. Le manche de droite (gouvernail de
profondeur et aileron) est en position totalement
neutre. Les leviers de trim de la direction et de
l’altitude sont également au centre.
La tête de fourche en plastique de la tringlerie de
commande doit être vissée ou dévissée lors de
l’accrochage dans le guignol de gouverne de telle
manière que la cheville d’entraînement puisse
coïncider parfaitement avec le deuxième trou du
guignol (en partant de l’extérieur). Enfoncez-la
alors dans le trou et appuyez. Cette marche à
suivre est également valable pour les gouvernails
de profondeur et de direction. Puis vérifiez le bon
fonctionnement des volets de gouverne : quand on
pousse le manche de commande du gouvernail de
direction vers la droite, le gouvernail va en position
de vol vers la droite (virage vers la droite) ; quand
on pousse le manche du gouvernail de profondeur
Vérifier le fonctionnement de l'empennage en
l'actionnantavec l'émetteur.
Si la hauteur et le côté sont inversés sur l'émetteur,
débrancher les fiches des canaux 2 et 4 et les
rebrancher dans l'ordre inverse.
Réglage de la position neutre de l’empennage
58 CESSNA 182 CARSON R/C MODÈLE VOLANT 50 050 5017
F
Page 59

CE
S
S
N
A
-
1
8
2
C
E
SS
N
A-
LIG
H
T
A
IR
CR
A
F
T
C
E
SS
N
A-
LIG
H
T
A
IR
CR
A
F
T
50
mm
Enfoncez complètement le train principal dans la
fente de la fixation en plastique. Il est bloqué par
l’effet de pincement.
Enfoncez la roue avant dans la fente
correspondante de la fixation en plastique sur le
nez du fuselage.
Si vous constatez une légère déviation lors des
essais de roulement (à la main), il est possible d’y
remédier en tordant délicatement les fils de fer du
train.
RÉGLAGE DU TRAIN
Si l'avant ou l'arrière a tendance à basculer, cela ruban adhésif double face) de petits poids
signifie que cette partie est trop lourde. Souvent, il supplémentaires (symétriques à les dérives rigides
suffit de déplacer axialement les batteries fixées à ou dans le nez). En particulier, si le centre de
l'aide d'un velcro. Rarement (par exemple après gravité se trouve trop à l'arrière (trop léger à
une réparation par l'opérateur), le centre de gravité l'avant), le comportement en vol s'en trouve
de l'avion doit être corrigé en fixant (à l'aide de affecté, et il convient de corriger le problème.
EQUILIBRAGE DU CENTRE DE GRAVITE
Le centre de gravité d'un avion dépend de ses
zones de portance. Le centre de gravité de la
Cessna 182 est correct au moment de sa
livraison. La marge à laquelle le centre de gravité
peut bouger par rapport à la valeur idéale est
minimale. Vous pouvez vérifier le centre de gravité
de la Cessna 182 en le portant par les points
indiqués à l'aide de deux doigts. Il devrait basculer
doucement autour de la position horizontale, sans
s'incliner vers l'avant ou l'arrière.
CESSNA 182 CARSON R/C MODÈLE VOLANT 50 050 5017 59
F
Couvercle avec des
verrous rotatifs
Page 60

Le compartiment de la batterie se trouve sur la
face inférieure du fuselage et est fermé par deux
verrous rotatifs. La liaison entre la batterie et le
contrôleur de vol doit être défaite immédiatement
après chaque vol. Il est vivement recommandé de
retirer la batterie LiPo de la maquette après
utilisation et de la conserver sur un support non
combustible.
Avant le décollage, allumez l’émetteur et ne
procédez qu’ensuite au branchement de la batterie
de vol en respectant les consignes de sécurité
énoncées:
- Un mouvement bref d'un servo sans
actionnement d'un manche est possible et
n'indique pas de perturbation.
- fermer le compartiment de la batterie.
- Allumer tout d'abord l'émetteur, la manette des
gaz doit être en position basse (pas de gaz).
- Souslever l’avion.
- Raccorder la prise de la batterie avec celle du
bloc de commande en veillant à la forme de la
prise, une seule disposition est possible. Le
jack de la prise du bloc de commande doit être
encliqueté dans la prise de la batterie.
- Lors du branchement, se maintenir éloigné du
cercle de rotation de l'hélice.
MISE EN PLACE ET RACCORDEMENT DE L’ACCU
de l’accu
au contrôleuer
20C
X-Pack
Li
P
o-
A
kk
u
7
,
4
V
mAh
2.
3.
4.
REGLAGE DU BLOC DE COMMANDE
La Cessna 182 est maintenant normalement prêt à 5. Si le moteur ne démarre
voler. Régler, respectivement vérifier tout d'abord pas du tout, vérifier si
encore le fonctionnement du bloc de commande. Il l'inverseur (canal 3, voir
dispose d'un système contre la mise en marche p. 51) de l'émetteur ne
inopinée du moteur dans le cas où il est mis en se trouve pas en
route avec un mauvais positionnement de la mauvaise position.
manette des gaz et une coupure automatique du 6. Le bloc de commande
moteur si la tension de la batterie passe sous 7V. électronique contient
une coupure
1. Commencer par allumer l’émetteur avant d'alimentation en cas de
d’établir la connexion avec la batterie de vol. tension de batterie trop
2. Remettre la manette des gaz en position "arrêt faible. Si la tension est
moteur" et le laisser comme cela au moins 3 de moins de 7V (fin de
secondes. Si le moteur ne s'arrête pas, abaisser l'énergie emmagasinée),
aussi le levier de compensation des gaz. le moteur est coupé.
3. Pousser la manette des gaz lentement vers Comme la batterie a une
l'avant (haut). Le moteur démarre et le régime certaine capacité à "se
augmente. refaire", il est possible
4. Si la manette des gaz est poussée jusqu'en de retirer la manette
butée, le moteur doit normalement tourner à son après un certain temps
régime maxi. Vérifier avec le levier de (voir 2.) pour redémarrer
compensation des gaz si une valeur supérieure le moteur une nouvelle
est possible, mais la position "arrêt moteur" doit fois.
en tout état de cause être assurée.
60 CESSNA 182 CARSON R/C MODÈLE VOLANT 50 050 5017
F
Page 61

VOL
Vérifications avant le départ
Comme pour un véritable avion, il est recommandé
vérifier le fonctionnement de toutes les pièces
d'effectuer sur un modèle réduit un check-up mobiles - ici les gouvernes - toutes doivent
complet avant le démarrage. Ceci commence par fonctionner parfaitement : direction et course du
un contrôle visuel, présence de tous les compo- mouvement.
sants, au bon endroit et bonne liaison de ces
composants à l'avion.
Si une pièce quelconque - p.ex. suite à un atterrisSuite à la procédure de mise en route mentionnée sage brutal - présente un jeu, ne pas décoller de
ci-dessus (raccordement de la batterie de vol), nouveau avant que ce problème n'ait été corrigé.
Le voyant de contrôle de la tension
sur l'émetteur doit être vert.
Test de la portée du système radio
Avant d'utiliser votre Cessna 182 pour la première
fois, il convient de vérifier la distance de
commande du système radio, de préférence sur le
lieu de départ.
Ne pilotez jamais votre engin si le système radio
ne fonctionne pas parfaitement, même
temporairement.
- Les manettes sont actionnées à brefs
intervalles. L’assistant observe la réaction des
ailerons. Faire un signe de la main – afin que
l’assistant soit prêt – et mettre en marche
également le moteur.
Avant que votre MINIMOA ne prenne son envol - Si les ailerons réagissent encore correctement à
pour la première fois, il est nécessaire de tester la une distance de 300 m environ entre l’émetteur
portée de la télécommande – de préférence à et le modèle réduit, votre système de
l’endroit où aura lieu le décollage. -Mettre en télécommande est en parfait état de marche.
marche l’émetteur avant d’établir la connexion
entre la batterie et le contrôleur de vol.
- Un assistant portant le modèle réduit en état de
marche s’éloigne de la personne qui commande
l’émetteur.
Terrain de vol
Ne faites jamais voler votre
Les règlementations régissant le pilotage des
avion un jour de grand
modèles réduits d'avions sont différentes d'un
vent, de pluie ou d'orage.
pays à un autre. Veillez à respecter les
Si vous avez une
précautions de sécurité lorsque vous choisissez
expérience limitée du
une aire de vol.
pilotage de modèles réduits
Les terrains les mieux adaptés sont les terrains
ne pilotez l'avion que s'il
d'aviation pour modèles réduits, un pré ou un large
n'y a pas ou très peu de
plan d'eau. Vous ne devez pas faire voler votre
vent, sans rafales. Le
avion dans des endroits où se trouvent des
ruban en soie qui se trouve
personnes ou des animaux, ou des véhicules,
sur l'antenne de l'émetteur,
même stationnés. Essayez d'obtenir suffisamment
tenu verticalement, peut
d'informations sur les conditions météo et la
être utilise comme manche
vitesse du vent (télé, journaux) avant de vous
à air.
préparer à partir piloter votre avion, afin de ne pas
être tenté de prendre le risque de faire voler votre
appareil dans des conditions non satisfaisantes.
CESSNA 182 CARSON R/C MODÈLE VOLANT 50 050 5017 61
F
Page 62

DIGITAL PROPORTIONAL RADIO CONTROL SYSTEMDIGITAL PROPORTIONAL RADIO CONTROL SYSTEM
ETB41 - 2.4 GHzETB41 - 2.4 GHz
ONON
OFFOFF
11 22 33 44
REVREV
NORNOR
C
E
S
S
N
A
-
18
2
C
E
S
S
N
A
-
L
I
G
H
T
-
A
I
R
D
RA
F
T
C
E
S
S
N
A
-
L
I
G
H
T
-
A
I
R
D
RA
F
T
Si v vous avez vérifié que votre modèle est
en bon état, allumez l'émetteur en premier,
Vérifiez ensuite, en manipulant les
manettes de l'émetteur (accélérateur en
position OFF) le fonctionnement des volets
(direction, déflexion et facilité d'opération).
Inspectez à nouveau l'hélice, et changez-la
même si elle n'est que très légèrement
endommagée. Vérifiez le nombre de révolutions du
moteur et corrigez la rotation de l'hélice.
Votre est prêt à démarrer.
puis raccorder l'accu et le régulateur et
fermer le cockpit.
Là aussi, il est nécessaire d'éliminer la cause
avant le départ.
En mode d'entraînement à turbine, un bruit soudain,
Cessna 182
inhabituel et fort est le signe d'un problème.
Vérifications préalables au vol
Mettre
Fermer
Hélice endommagée
peut rompre
Hélice se tourne
homogènement
Hélice
vibre
DEMARRAGE
Généralités
Les forces de portance dont un avion a besoin
dans la mesure du possible. Les débutants se
pour rester dans les airs dépendent en particulier trouvent généralement désorientés lorsque l'avion
de sa vitesse par rapport à l'air. Contre le vent, la vole vers eux, car la droite et la gauche semblent
vitesse requise de l'avion par rapport au sol
avoir été échangés. Avec un peu d'expérience, le
diminue avec la vitesse du vent. Avec un vent
pilote apprend à gérer cette situation. Il est donc
arrière, une vitesse supérieure par rapport au sol
conseillé de s'entraîner auparavant sur un
est nécessaire. Le décollage et l'atterrissage simulateur informatique.
doivent donc toujours s'effectuer contre le vent
62 CESSNA 182 CARSON R/C MODÈLE VOLANT 50 050 5017
F
Page 63

C
E
S
S
N
A
-1
8
2
CESSNA-LIGHT-AIRDRAFTCESSNA-LIGHT-AIRDRAFT
C
E
S
S
N
A
-
1
82
C
E
S
S
N
A
-
L
IG
H
T
-
A
IR
D
R
A
F
T
C
E
S
S
N
A
-
L
IG
H
T
-
A
IR
D
R
A
F
T
C
E
S
S
NA
-
1
8
2
C
E
S
S
N
A
L
IG
H
T
A
IR
D
R
A
F
T
C
E
S
S
N
A
L
IG
H
T
A
IR
D
R
A
F
T
Démarrage au sol
augmente la durée de vol. Même lorsque le
En raison de la taille relativement réduite de la
moteur est éteint, la maquette reste aisément
maquette, il est nécessaire de disposer d’une
contrôlable en vol plané ; dans ce cas, il faut
piste de décollage adaptée à un démarrage au
toutefois surveiller qu’elle ne ralentisse pas trop,
sol, par exemple avec du gazon tondu très ras.
car elle pourrait alors passer en
Toujours démarrer l’avion contre le vent le plus
vol non contrôlé avec
précisément possible. Après avoir vérifié le bon
décrochage.
fonctionnement de tous les ailerons, le pilote se
place derrière la
maquette de manière
à pouvoir réagir
rapidement si elle
part sur le côté.
Lorsque la maquette
roule à pleins gaz après
un parcours d’une
vingtaine de mètres, et si la
vitesse paraît suffisamment
élevée, tirer légèrement sur le
gouvernail de profondeur pour faire
décoller l’avion. Au départ, continuer à
prendre de la vitesse progressivement
sans monter trop à pic !
Une fois que l’avion a atteint une hauteur
suffisante, il est possible de réduire les gaz de 30
% environ pour passer en vol normal. Cela
CESSN
A-182
C
E
S
S
N
A
L
I
G
H
T
A
I
R
C
R
A
F
T
Vent
VENT VENT VENT
Correct
Défavorable,
vers le bas
Défavorable,
trop ardu
Décollage à la main
- Allumez l'émetteur,
La ne décolle que lancé à la main,
- Vérifier le fonctionnement de toutes les
contre le vent (ou sans vent) car il ne dispose pas
gouvernes.
d'un train d'atterrissage,
- Tenez le modèle au niveau du centre de
. Pour les premiers
gravité comme illustré.
décollages, il est préférable de demander à un
- Poussez l'accélérateur à fond vers l'avant, en
autre pilote de modèles réduits de lancer le
testant l'intensité.
modèle afin que le pilote puisse à tout moment
- Lancez le modèle vers l'avant.
réagir à toute manœuvre imprévue. Le processus
- Contrôlez immédiatement l'attitude de l'avion
doit s'effectuer comme suit :
et montez à angle plat
puis raccordement de
l'accu.
Cessna 182
la roue intégrée ne sert
que pour l'atterrissage.
Le modèle devrait être lancé aussi relevé avant qu'il ne touche le sol. Si vous lancez
horizontalement que possible pour pouvoir être l'avion vers le haut, la vitesse de vol diminue, et
correctement contrôlé. S'il est lancé vers le bas, il sans forces de portance, l'avion risque de
prend de la vitesse et peut éventuellement être s'écraser.
CESSNA 182 CARSON R/C MODÈLE VOLANT 50 050 5017 63
F
Page 64

Une fois l'atterrissage réussi, éteignez
immédiatement le récepteur et
déconnectez la batterie. Eteignez
ensuite l'émetteur.
Les éléments secs ou les piles
rechargeables d'un autre type (NiMH)
ne sont pas aussi critiques, mais si
vous n'utilisez pas la radiocommande
pendant plusieurs mois, retirez-les
tout de même de l'émetteur.
Le plastique utilisé dans la construction de la majeure partie de la
Si vous conservez votre chez vous,
est très sensible aux températures
veillez à ne tordre aucune pièce. Après un certain
élevées. N'exposez pas le modèle à la lumière
temps, elles risqueraient d'être irrémédiablement
directe du soleil et ne le laissez pas dans une
abîmées.
voiture garée en plein soleil.
Nous recommandons de retirer la
batterie de l'avion si elle est stockée.
Pour savoir comment manipuler l'accu
de vol, veuillez vous reporter aux
instructions du fabricant et suivre les
conseils qui s'y trouvent
Cessna 182
Cessna 182
ATTERRISSAGE
- Redressez l'avion et laissez-le descendre en
Dès que vous constatez une diminution de la
réduisant la vitesse du moteur.
performance du moteur, préparez-vous à atterrir.
- A l'approche du point d'atterrissage, soulevez
Vous aurez ainsi suffisamment de réserve pour
légèrement la gouverne de profondeur et
corriger une mauvaise tentative d'atterrissage et
contrôlez la vitesse au moyen du nombre de
recommencer. Atterrir s'effectue normalement de
révolutions du moteur. Ne ralentissez pas
la façon suivante :
trop.
- Diminuer un peu les gaz et laisser planer.
- Volez avec les ailettes parallèle, à une
Juste avant l'atterrissage, couper les gaz et
certaine distance, de la piste.
laisser se poser le modèle réduit.
- Si la hauteur et la distance à la piste sont
- Si l'approche est trop haute, augmentez la
suffisantes, pivotez à 180° dans la direction
vitesse du moteur et reprenez de la hauteur,
de la piste, maintenant contre le vent.
puis recommencez.
APRES ATTERRISSAGE / STOCKAGE
64 CESSNA 182 CARSON R/C MODÈLE VOLANT 50 050 5017
F
Page 65

REPARATIONS
votre Cessna 182 s'il a été endommagé et que
En vol normal, la Cessna 182 est plutôt résistant,
vous n'êtes pas absolument certain qu'il a été
mais tous les pilotes de modèles réduits doivent tôt
remis en état.
ou tard réparer leurs modèles. Le plastique utilisé
dans la construction de l'avion peut être réparé à
Certaines pièces, comme l'hélice, les éléments
l'aide de résine époxy à séchage rapide (2
électroniques, les tiges et le moteur ne peuvent
composants) ou de cément instantané. Pendant la
pas être réparées. Elles doivent être remplacées
réparation, les pièces doivent être alignées et fixées
par des pièces neuves. Dans ce cas, contactez
les unes aux autres pour assurer une réparation
votre revendeur:
complète. Ne faites jamais voler
Ce produit est garanti par CARSON contre tout Cette garantie de couvre pas :
défaut de fabrication (pièces et main d'œuvre)
(a) tout dommage ou défaillance causé par force
pour une utilisation normale pour une durée de 24
majeure, abus, accident, utilisation abusive,
mois à compter de la date d'acquisition auprès de
erronée ou anormale, non respect des
votre revendeur spécialisé. Dans le cas d'un
instructions, mauvaise mise en route ou
défaut apparaissant sur le produit au cours de la
maintenance insuffisante, altération, éclair ou
période de garantie, emmener le produit et la
tout autre conséquence d'une surtension ou
facture comme preuve de la date d'acquisition
d'un courant excessif ;
chez votre revendeur CARSON. Sauf indication
(b) toute réparation autre que celles réalisées par
contraire de la législation, CARSON s'engage de
quelqu'un d'agrée par CARSON ;
manière unilatérale à:
(c) les consommables tels que les fusibles et les
(a) corriger le défaut par une réparation à titre
batteries ;
gracieux (pièces et main d'œuvre) ;
(d) des dommages esthétiques ;
(b) remplacer le produit par un produit identique
(e) le transport, l'expédition et les frais d'assurance
ou de conception similaire ; ou
; et
(c) rembourser le prix d'acquisition.
(f) les frais de retour, d'installation, de mise au
Tous les produits et pièces remplacés et tous les
point et de remise en route du produit. Cette
produits remboursés deviennent la propriété de
garantie vous attribue des droits spécifiques,
CARSON. Les produits et pièces nouveaux ou
vous pouvez par ailleurs également prétendre
remplacés sont couverts par la garantie d'origine.
à d'autres droits en fonction du pays
Les produits et pièces nouveaux ou remplacés
d'acquisition.
sont garantis pendant la durée de la garantie
d'origine. Les réparations et remplacements
réalisés après l'écoulement de la durée de
garantie seront facturés.
CONDITIONS ET LIMITES DE GARANTIE
CESSNA 182 CARSON R/C MODÈLE VOLANT 50 050 5017 65
F
Page 66

Aile 500508500
Fuselage 500508502
Gouvernail
500508501
Hélice
2pcs 500508503
C
E
SS
N
A
-
1
8
2
C
E
S
S
NA
-
L
IG
H
T
-
AIR
D
R
A
F
T
C
E
S
S
NA
-
L
IG
H
T
-
AIR
D
R
A
F
T
Capot de l’hélice
500508505
Train d’atterrissage
500508504
CHERCHE DES DEFAUTES ET DÉPANNAGE
Problem
Le moteur ne démarre pas
Le servo ne réagit pas aux
commandes
Le modèle réduit ne vole pas
droit
Le modèle réduit ne prend pas
d’altitude
Portée trop limitée lors du test
Cause
1. Batterie de vol non rechargée.
2. Signal de l’émetteur trop faible, voyant
de contrôle rouge ou éteint.
3. Branchements pas bien fixés.
1. Fiche du servo mal branchée.
2. Servo endommagé.
1. Le gouvernail de direction n’est pas
neutre quand la manette est au centre.
2. L’aile n’a pas été bien montée.
3. L’aileron n’est pas neutre quand la
manette est au centre.
1. La batterie de vol n’est pas assez
chargée.
2. La batterie de vol a été abîmée par une
erreur de manipulation.
3. Les deux ailerons sont tournés vers le
haut.
1. La tension de l’émetteur est trop faible.
Solution
1.Recharger la batterie de vol.
2.Remplacer toutes les piles de
l’émetteur ou recharger les
accus.
3.Vérifier les branchements.
1.Bien brancher la fiche du servo.
2.Remplacer le servo.
1.Ajuster le gouvernail de direction
à l’aide du levier de trim,
réajuster éventuellement
l’articulation du gouvernail.
2.Remonter l’aile.
3.Réajuster l’aileron quand la
manette est en position neutre.
1.Recharger la batterie de vol.
2.Remplacer la batterie de vol.
3.Réajuster les ailerons quand la
manette est en position neutre.
1.Remplacer toutes les piles de
l’émetteur ou recharger les
accus.
PIÉCES DETACHEES
dessous.
Vous disposez pour la Cessna 182 des pièces
L'utilisation et le montage des accessoires sont
détachées et de rechange indiquées ci-
décrit ailleurs
66 CESSNA 182 CARSON R/C MODÈLE VOLANT 50 050 5017
F
Page 67

AVIÓN RADIOCONTROLADO
MANUAL
Artículo Ref. 50 050 5017
CESSNA 182 CARSON AVIÓN RADIOCONTROLADO 50 050 5017 67
C
ES
SN
A-182
C
E
S
S
N
A
-L
IGH
T-A
IRD
R
A
F
TC
E
S
S
N
A
-L
IGH
T-A
IRD
R
A
F
T
Cessna 182Cessna 182Cessna 182
E
Page 68

cambios en las especificaciones relativas al
Estimado cliente,
equipo, materiales y diseño de este producto en
Le felicitamos por la adquisición del avión
cualquier momento sin previo aviso. Las
MINIMOA, diseñado utilizando la última
especificaciones o diseños del corriente producto
tecnología. De acuerdo con nuestra política de
pueden variar respecto a lo mostrado en este
constante desarrollo y mejora de nuestros
manual o en la caja.
productos, nos reservamos el derecho de efectuar
batería y cargador. No hay garantía por daños
Manual
causados como resultado de falta de seguimiento
Estas instrucciones de acabado y manejo
de las instrucciones operativas. El desgaste y
deberían ser usadas durante el montaje final y
deterioro normales producidos por el uso, daños
operativa de su modelo. Por favor lea y
por accidentes y daños causados por una
comprenda este manual antes de efectuar
operativa incorrecta no están cubiertos por la
manipulación alguna en su MINIMOA o en
garantía.
cualquier accesorio como sistema de radio,
Seguridad
Recomendamos a los absolutos principiantes
Controlar un modelo volador es un excitante
utilizar este modelo en un espacio amplio y bien
hobby, que en cualquier caso demanda un alto
alejado de gente, obstáculos o cualquier cosa
sentido de responsabilidad. Cualquier precaución
contra la que se pudiese colisionar.
de seguridad pertinente debe ser contemplada. El
MINIMOA no es un juguete; los niños menores
de 14 años deberían utilizar este avión
únicamente bajo la supervisión de un adulto.
Responsabilidad / seguro
Es altamente recomendable obtener un seguro
El usuario de un modelo volador es responsable
adecuado para cubrir responsabilidades en caso
de cualquier tipo de daño que pueda ser causado
de accidente.
por su aparato volador o derivado de su uso.
Declaración de conformidad
La declaración de conformidad original puede
De acuerdo con la directiva 1999/5/EG (R&TTE)
obtenerse en la siguiente dirección:
Dickie-Tamiya GmbH&Co KG por la presente
Dickie-Tamiya GmbH&Co. KG Werkstraße l
declara que este kit de modelismo con radio,
D-90765 Fürth Tel.: +49/(0)911/9765-03
motor, batería y cargador está en concordancia
con los requerimientos básicos y otras normas
pertinentes de la directiva 1999/5/EG.
recursos deshaciéndose de este
Eliminado de residuos
equipo en un punto de reciclaje
Significado de los símbolos en el producto,
adecuado. Las autoridades
empaquetado e instrucciones: Los sistemas
responsables de los residuos o su
electrónicos son materiales valorados que al
vendedor le podrán responder a
final de su vida útil no deberían ser tirados a la
cualquier pregunta que pueda
basura convencional! Ayúdenos a proteger el
tener sobre esto.
medio ambiente y a salvaguardar nuestros
68 CESSNA 182 CARSON AVIÓN RADIOCONTROLADO 50 050 5017
E
Page 69

Cessna 182
Avión radiocontrolado
articulo Ref. 50 0505017
TABLA DE CONTENIDOS
Página
Prólogo Declaración de conformidad ................................68
Tabla de contenidos ......................................................69
Precauciones de seguridad ............................................70
Utilización del manual ....................................................71
Tipos de operativa ...........................................................71
Especificaciones ...............................................................71
Contenido del kit ............................................................72
Explicación de algunas terminologías de vuelo ..............73
Manejo de baterias recargabiles de NiMH ......................75
Equipo de radio de cuatro canales....................................76
Colocatión del mecanismo de dirección............................79
Ensemblaje de las superficies de sustentatión .................80
Inserción del tren de aterrizaje..........................................81
Equilibrado del centro de gravedad ..................................81
Inserción y conexión del pack de acumulador .................82
Ajuste del regulador de vuelo............................................82
Vuelo .................................................................................83
Comienzo .......................................................................84
Aterrizaje .........................................................................86
Tras aterrízar / Almacenado ............................................86
Reparaciones ....................................................................87
Garantía limitada...............................................................87
Búsqueda y Solución de Errores.......................................88
Piezas de repuesto ...........................................................88
CESSNA 182 CARSON AVIÓN RADIOCONTROLADO 50 050 5017 69
E
Page 70

2. Tras esto, conecte la batería
Advertencias generales
principal.
Los modelos radio controlados,
especialmente los voladores no son
3. Compruebe que todos los timones
juguetes, su manejo ha de ser aprendido
se encuentren en posición neutral.
paso a paso. Los niños menores de 14
4. Asegúrese que todos los servos
años deberían utilizar este avión
responden correctamente a las
únicamente bajo la supervisión de un
señales de la emisora.
adulto.
Aunque el avión pueda tener un peso
Seguridad durante el vuelo
relativamente bajo alcanza altas
Observe a su modelo constantemente y
velocidades, y en caso de colisionar con
no se distraiga.
una persona podría ocasionarle serios
Manténgase alejado de la hélice tan
daños o heridas.
pronto conecte la batería. Evite
permanecer en el plano de rotación de
Antes de comenzar
la hélice.
Compruebe todas las sujeciones,tornillos
Nunca vuele en días de fuerte viento,
y conexiones así como las uniones de las
lluvia o trueno.
varillas de mando.
Mantenga su aparato alejado de cables
Revise la estructura completa de la
de alto voltaje o torres de radio.
máquina voladora y hélice, compruebe si
Incluso un modelo en perfecto estado
existen grietas o daños. Si viese alguno,
puede mostrar repentinamente un
aplace el vuelo hasta que la pieza
comportamiento inesperado causado por
defectuosa sea reparada o sustituida.
interferencias; sea siempre consciente
Una hélice dañada debe ser sustituida,
que deberá corregir esto con dirección.
¡nunca intente repararla!. La batería del
Nunca vuele hacia gente o animales o a
aparato debe estar completamente
través de la vía pública.
cargada antes de cada vuelo, las baterías
Aterrice en el momento que note una
de la emisora deben tener suficiente
reducción en la capacidad de ascensión
potencia. El testigo de control debe
del modelo (la batería se está viniendo
encenderse en verde. Si el testigo de
abajo) o el testigo de control del emisor
control se encendiera en rojo, se tendrán
ha entrado en la zona roja. Para finalizar
que sustituir las pilas del emisor (cargarse
el uso, desconecte primero el receptor y a
las baterías el emisor).
continuación la emisora.
Desconecte siempre la batería principal
del variador / receptor tras el aterrizaje.
1. Conecte siempre primero la emisora
Si ha acabado de volar, retire la batería
para evitar cualquier reacción
del modelo.
incontrolada del receptor por un
impulso de radio ajeno. La palanca
de acelerador en la emisora debe
estar en posición “OFF” durante la
conexión.
PRECAUCIONES DE SEGURIDAD
70 CESSNA 182 CARSON AVIÓN RADIOCONTROLADO 50 050 5017
E
Page 71

Monte su avión exactamente de acuerdo con el
UTILIZACIÓN DE ESTE
manual de instrucciones y asegúrese que todos
los pasos se han seguido completamente y todos
MANUAL
los componentes están correctamente instalados.
Sólo una Cessna 182 correctamente ensamblado
Este manual de acabado y operativa ofrece toda
podrá mostrar sus máximas prestaciones.
la información necesaria para montar y utilizar su
avión Cessna 182. Debería permitirle entender
los elementos y reacciones de su modelo, y ganar
conocimientos de formación técnica de modo que
pueda utilizar su modelo satisfactoriamente
La Cessna 182, debido a su velocidad de vuelo
incluso si es un principiante. Para un principiante
relativamente elevada, no es precisamente un
absoluto que nunca ha utilizado anteriormente
primer modelo adecuado para principiantes. En
ningún modelo radio controlado, le
estos casos, recomendamos que un piloto de
recomendaríamos la asistencia de un piloto de
modelismo experto lleve a cabo el despegue y
modelismo experto en los primeros despegues y
cuando el avión haya alcanzado una altura
aterrizajes. Si no conoce a ningún piloto de
suficiente, le pase el emisor al novato. Los
modelismo, pídale recomendación a su vendedor.
primeros aterrizajes, en dichos casos,
La seguridad para su entorno, para usted mismo y
eventualmente, también los debería realizar el
para su modelo deberían ser siempre la principal
experto. La Cessna 182 se despega, en
prioridad.
principio, a mano y se aterriza sobre una pista de
hierba. Gracias a la rueda integrada se pueden
Adicionalmente el manual incluye un diagrama de
efectuar aterrizajes sobre el asfalto u otras pistas
los recambios más importantes, razón por la que
duras, aunque pueden provocar pequeños daños.
debería conservarlo cuidadosamente. Todas las
Se recomienda aterrizarlo en un terreno
anotaciones en cualquier sentido del manual, por
suficientemente grande y sin obstáculos (prado).
ejemplo “lado derecho” han de ser entendidas en
la dirección de vuelo.
TIPOS DE OPERATIVA
ESPECIFICACIONES
Canales 4ch
Baterías 8xAA
Frecuencia 2,4 GHz
Distancia de control Alrededor de 300m
Funciones variador de velocidad, timon, profundidad y aleron
Dimensiones Largo 860mm x Envergadura 980mm
Baterías LiPo 2 células (7,4
Peso Modelo: 560g
* El tiempo de funcionamiento variará de acuerdo con el fabricante de la batería,
condiciones de vuelo y su propio manejo.
Emisora
Avión V / 1300mAh)
Ala 13dm²
Carga alar 43g/dm²
Variador Corriente 20A
Duración del motor 6 min
CESSNA 182 CARSON AVIÓN RADIOCONTROLADO 50 050 5017 71
E
Page 72

CONTENIDO DEL KIT
Profundidad
Bloque de alimentación
100/240V 50/60Hz
Potencia de salida
12,8V 1,25A
Timón
Ala
Ala
4 Micro-Servos
DIGITAL PROPORTIONAL RADIO CONTROL SYSTEMDIGITAL PROPORTIONAL RADIO CONTROL SYSTEM
ETB41 - 2.4 GHzETB41 - 2.4 GHz
ONON
OFFOFF
11 22 33 44
REVREV
NORNOR
POWERPOWER
DICKIEDICKIE
DICKIEDICKIE
POWERPOWER
2300 mAh2300 mAh
POWERPOWER
DICKIEDICKIE
DICKIEDICKIE
POWERPOWER
2300 mAh2300 mAh
POWERPOWER
DICKIEDICKIE
DICKIEDICKIE
POWERPOWER
2300 mAh2300 mAh
POWERPOWER
DICKIEDICKIE
DICKIEDICKIE
POWERPOWER
2300 mAh2300 mAh
POWERPOWER
DICKIEDICKIE
DICKIEDICKIE
POWERPOWER
2300 mAh2300 mAh
POWERPOWER
DICKIEDICKIE
DICKIEDICKIE
POWERPOWER
2300 mAh2300 mAh
POWERPOWER
DICKIEDICKIE
DICKIEDICKIE
POWERPOWER
2300 mAh2300 mAh
POWERPOWER
DICKIEDICKIE
DICKIEDICKIE
POWERPOWER
2300 mAh2300 mAh
8 Batteríe Typo AA
por el emisora
2-células
Batería LiPo
1300mAh 7,4V
BA
T
G
E
A
R
A
U
X
I
RUD
D
T
H
R
O
E
L
EV
A
IL
E
6
6
C
H
R
E
C
E
I
V
E
R
E
R
6
1
-
2
.
4
G
H
z
D
S
S
S
S
I
G
N
A
L
T
M
C
O
N
T
R
O
L
L
E
R
C
ES
S
N
A-
1
82
C
ES
S
N
A-LIG
H
T
-A
IR
D
R
A
F
TC
ES
S
N
A-LIG
H
T
-A
IR
D
R
A
F
T
Tren de
aterrrizaje
B
A
L
A
N
C
E-C
HA
RG
E
R
B
A
L
A
N
C
E-C
HA
RG
E
R
FO
R
L
I-
P
O
B
A
T
T
E
R
Y
FO
R
L
I-
P
O
B
A
T
T
E
R
Y
1
.2A
0.3
A
2
0
C
X
-P
a
c
k
L
i
P
o
-A
kk
u
7
,
4V
mA
h
A
CA
C
P
OW
E
R A
D
A
PT
ER
MOD
EL:D
G-C
O
12
V010
IN
PUT
: 1
00
-2
40
V~
5
0/
60
H
z
0.
6A
M
A
X
O
U
TP
U
T
:1
2.
8V
=1.2
5A
G
S
M
AD
E
IN
C
HI
NA
!
!
RISK O
F ELE
CT
RIC
AL SH
OC
K
DO NOT OPEN
Hélice
Fuselaje
Motor
con regulador
GL
UE
Pegamento para fijar
el timón de dirección
Cargador 0,3-1,2 A
para LiPo Batería
2,4GHz MicroReceptor
ya instalado
Emisora
2,4 GHz
Conector de cortocircuito
para la sincronización
del receptor
72 CESSNA 182 CARSON AVIÓN RADIOCONTROLADO 50 050 5017
E
Page 73

La Cessna 182 puede ser su primera máquina
Batería / pila seca: Las pilas secas como las
voladora; en consecuencia el conocimiento de
baterías alcalinas son fuentes de electricidad
cierta terminología fundamental puede ser útil
desechables. Con la pueden utilizar-
tanto para operar su modelo como para evitar la
se pilas secas para alimentar a la emisora. Al final
imagen de “fastidioso novato”. Algunos términos
de su vida útil el voltaje de la batería desciende y
técnicos y sus acciones se explican en orden
debe ser desechada. Nunca intente recargar una
alfabético.
pila seca con ningún cargador; hay riesgo de
fuego y explosión.periodo vitale, il loro voltaggio
Acumulador: Unidad recargable de almacen-
cala e devono essere smaltite negli appositi
amiento para la energía eléctrica, en español
contenitori. Non provare mai a ricaricare una
llamado mayoritariamente batería recargable. Para
batteria a secco, con qualsiasi tipo di caricabatte-
modelos de avión se suelen utilizar de Níquel-
ria, può causare pericolo d'incendio ed esplosione.
Metal Hidruro (Ni-MH) y Polímero de Litio (LiPo).
La energía acumulada se mide en Miliamperios /
hora (mAh). Una batería con 1300mAh puede
BEC (Battery Eliminator Circuitry): Es un
descargar una corriente de 12 A durante 6 minu-
circuito para modelos eléctricos que permite
tos. Para alimentar el motor de un avión la batería
prescindir de un sistema de alimentación por
debe ser capaz de entregar una elevada descarga;
separado. El receptor se alimenta con corriente de
en sólo unos pocos minutos transmite su energía
la batería principal. El voltaje es controlado por un
al motor con la ayuda del variador. Los acumula-
sistema especial dentro de unos valores aceptab-
dores / baterías pueden ser cargados dependien-
les.
do de sus especificaciones algunos cientos de
veces. Asegúrese de utilizar sólo el cargador que
se adapta a su tipo de batería. Las células /
baterías gastadas o defectuosas (en parte venenosas) deben ser desechadas en las instituciones
Hélice: La hélice tractora impulsada por el motor
correspondientes.
genera la propulsión del modelo. Las potencia del
motor, tamaño y peso del modelo y, en consecuencia, la velocidad de vuelo entran en el diseño de la
hélice. Mientras mejor concuerde la hélice para un
modelo, mejor será la eficiencia y prestaciones de
vuelo. Dos parámetros caracterizan a una hélice:
Alas: La posee una forma de
Diámetro y paso, preferiblemente indicados en
construcción clásica para, por ejemplo, aviones
pulgadas. Una hélice por ejemplocon los valores
privados monomotores con alas rectangulares y
8x5” tiene un diámetro de 8 y un paso de 5,
ala guía al final del fuselaje. La relación entre el
pulgadas; durante la rotación esto supondría un
peso de avión y las alas se llama la carga alar, un
avance de 5 pulgadas por revolución. Si girase a
mayor peso por una menor superficie requiere
8.000 rpm., esto generaría una velocidad de
mayor velocidad de vuelo. La MINIMOA es más
aproximadamente 61 Km/h. La velocidad que
bien leve, es decir concebido para una velocidad
puede ser obtenida es en realidad algo menor en
reducida raggiunge un valore medio.
tanto que la hélice genera propulsión con cierta
pérdida.
Alerón: Un avión necesita girar de forma
parecida a una moto, de otro modo no sería
posible tener las fuerzas aerodinámicas necesarias para abordar un giro. Esta inclinación lateral en
un avión de diseño normal se efectúa mediante
unas “aletas” (alerones) situadas en el ala principal. . Con alerones transversales, son posibles
unas curvas y piruetas aún más apuradas (figuras
de vuelo acrobático).
Cessna 182
Cessna 182
LiPoAcumulador
2 células
2
0
C
X
-
Pa
c
k
L
i
P
o
-
A
k
k
u
7,
4
V
m
A
h
EXPLICACIÓN DE ALGUNAS TERMINOLOGÍAS DE VUELO
CESSNA 182 CARSON AVIÓN RADIOCONTROLADO 50 050 5017 73
E
Page 74

Interruptor: La emisora es equipados cada uno Servo: Las señales de giro de la emisora son
con un interruptor para conectar o desconectar el convertidas por el receptor en valores de control
suministro de energía. para los servos de destino. El servomotor opera el
brazo de servo a través de engranajes, que se
mueven en arco hasta 1/6 de círculo.
Profundidad: La profundidad de un avión con
Normalmente el brazo de servo está conectado
diseño normal es similar a una pequeña ala en la
mediante varillas a las superficies de control.
cola del avión con un timón móvil en su extremo
final. Moviendo esta superficie de control arriba o
Timón: El timón de la mayoría de los diseños de
abajo se alteran las fuerzas sustentadoras; la cola
del avión es elevada o bajada y el avión sube o aviones se compone de al menos una aleta,
baja en concordancia. La profundidad de la preferentemente en posición vertical con un “flap”
tiene una apariencia muy similar a un móvil en el extremo. Balanceando el “flap” hacia la
alerón de coche como el de los Fórmula 1, que izquierda o derecha se genera una diferencia en la
también tiene efecto de una pequeña ala. corriente de flujo que hace moverse la cola del
Receptor: el receptor capta la señal de la emisora avión hacia un lado. Junto con otros efectos
a través de su antena y las convierte en pulsos (forma en “V” del ala o actuando con los alerones),
para los servos, que operan las superficies de el timón comienza a a girar el avión.
control. Adicionalmente transforma las señales
para el variador de velocidad, que ajusta la
Variador de velocidad: El variador de
velocidad del motor en función de la posición de la
velocidad electrónico regula la velocidad del motor
palanca de acelerador en la emisora. El receptor
sin tener prácticamente pérdida mediante
con variador de velocidad ya viene instalado en
interrupciones de la corriente del motor (a muy alta
sua .
frecuencia) en pulsos de diferente longitud. Los
motores necesitan un variador específicamente
diseñado para este tipo de motores.
Receptor: el receptor capta la señal de la
Si el voltaje de la batería cae mediante descarga
emisora a través de su antena y las convierte en continua por debajo de unos determinados límites
pulsos para los servos, que operan las superficies necesarios para operar los servos, el variador
de control. Adicionalmente transforma las señales parará el motor. Sua permanecerá
para el variador de velocidad, que ajusta la controlable como planeador sin motor.
velocidad del motor en función de la posición de la
palanca de acelerador en la emisora. El receptor
con variador de velocidad ya viene instalado en
sua Cessna 182.
Cessna 182
Cessna 182
Cessna 182
C
ES
SN
A
-
L
IG
HT
-
A
IR
D
R
A
FT
C
ES
SN
A
-
L
IG
HT
-
A
IR
D
R
A
FT
C
E
S
S
N
A-
L
I
G
HT
-
A
I
R
D
RA
F
T
C
E
S
S
N
A-
L
I
G
HT
-
A
I
R
D
RA
F
T
vertical
Rotación sobre el eje
vertical (giro): timón
de dirección.
Rotación sobre el eje horizontal
(subir bajar): timón de profundidad
longitudinal
horiz
onta
l
Rotación sobre el eje longitudinal
(caída de ala, también giro): timón
de direción y alerones
transversales
Micro-Receptor
4 canales
B
A
T
GE
A
R
A
U
X
I
R
U
D
D
TH
R
O
E
L
E
V
AILE
66
C
H
R
E
C
E
I
V
E
R
E
R
6
1
-
2
.
4
G
H
z
D
S
S
S
S
I
G
N
A
L
T
M
74 CESSNA 182 CARSON AVIÓN RADIOCONTROLADO 50 050 5017
E
Page 75

En el caso de los acumuladores LiPo(Lithio Los acumuladores LiPo son muy sensibles a la
Polymer) se trata de suministradores de energía llamada “descarga profunda”, en la que la tensión
conformes al estado más actual de la técnica y con por célula baja por debajo de 3 V, lo que puede
una elevada capacidad de carga en relación con provocar daños irreversibles. El regulador de vuelo
su peso. Al manipular estos acumuladores, hay dispone de interruptor de protección contra baja
que tener mucho cuidado para evitar posibles tensión, que para el motor cuando la tensión es
riesgos y la pérdida de potencia prematura. Tras el demasiado baja. La tensión que queda es
vuelo y al final de la carga, la batería puede estar suficiente para controlar el modelo en el vuelo de
bastante caliente. Dentro de unos límites esto es descenso.
una situación normal.
Dependiendo del modo en que vuele el voltaje de
El cargador de 100/240V incluido en el kit del su batería LiPo descenderá antes o después,
avión, compuesto de una fuente de alimentación y resultando en una bajada de revoluciones del
un cargador-compensador Lipo, se conecta a una motor combinada con una reducción de la
toma de corriente normal. Con 12,8 V de tensión capacidad ascensional del modelo. Tan pronto
se consigue una corriente de hasta 1,25A, con la note esta situación debería comenzar a aterrizar.
cual se puede cargar la batería de vuelo LiPo en Aterrizar con poca o nula potencia es siempre
apenas 1 hora. En el cargador/regulador- difícil, y podría no disponer de suficiente potencia
compensador también se puede ajustar una para alcanzar el punto de aterrizaje deseado.
corriente más baja, con lo cual la carga se
realizará entonces de forma más protectora y Se tienen que evitar, necesariamente los
ofrecerá una mejor explotación de la capacidad cortocircuitos, ya que provocan el derretido del
aislamiento del cable y pueden hacer arder el
1. Unir la fuente de alimentación con el cargador- material inflamable del entorno.
compensador LiPo
2. Insertar la fuente de alimentación en una toma Tras un vuelo o uso, la batería puede estar
de corriente bastante caliente. Al igual que es recomendable en
3. Unir el conector (compensador) blanco de la cualquier caso cargar la batería fuera del modelo,
batería LiPo con la hembrilla del cargador. le recomendamos quitar la batería tras cada vuelo
4. Para evitar un cortocircuito, procurar que el o uso y almacenarla en un lugar seguro.
contacto de las uniones por enchufe sea seguro.
5. Comprobar el calentamiento de la batería
durante el proceso de carga. No se deben
sobrepasar los 50 °C, de lo contrario desenchufar
la batería de la red.
6. Cuando se encienda el LED verde habrá
finalizado el proceso de carga, la alimentación de
corriente deberá interrumpirse entonces lo antes
posible.
MANEJO DE BATERIAS RECARGABLES DE LiPo
La duración de las baterías LiPo depende del tipo
desechada en
de uso y el consumo de corriente presente. Si el
instituciones
consumo de corriente es constantemente elevado,
especiales para este
como durante un vuelo rápido con altas revolucio-
fin y no debe ser
nes de motor, serán posibles unos 250 ciclos de
arrojada a la basura
carga / descarga, y pronto podría ser apreciable
normal.
una reducción de la capacidad. Una batería
gastada (muy poca capacidad) o dañada (retráctil
dañado, cable en muy mal estado) debe ser
2
0
C
X
P
a
c
k
L
i
P
o
-
A
k
k
u
7
,
4V
m
A
h
Deshecho de las baterías gastadas o dañadas
Deshacerse de las baterías adecuadamente
CESSNA 182 CARSON AVIÓN RADIOCONTROLADO 50 050 5017 75
E
Page 76

El set de sua Cessna 182 incluye el equipo de la dificultad que supone reconocer la situación de
radio de cuatro canales, el receptor con variador vuelo. Las averías no se pueden descartar nunca
de velocidad está ya instalado en la Cessna 182. al 100% aunque la técnica sea la más moderna.
El sistema con esta configuración tiene un alcance Nunca comience con las baterías de la emisora
de 300m, lo que significa que puede controlar su
gastadas (la aguja del voltímetro pasa a la zona
avión hasta esta distancia. El vuelo normalmente
roja ), de otro modo puede suceder que sua
tendrá lugar dentro de una distancia más corta por Cessna 182 vuele fuera de control.
EQUIPO DE RADIO DE CUATRO CANALES
E
DIGITAL PROPORTIONAL RADIO CONTROL SYSTEMDIGITAL PROPORTIONAL RADIO CONTROL SYSTEM
ETB41 - 2.4 GHzETB41 - 2.4 GHz
ONON
OFFOFF
11 22 33 44
REVREV
NORNOR
Tecla de sintonización de la frecuencia
B
AT
GE
AR
A
U
XI
R
U
D
D
T
HRO
E
L
EV
AIL
E
6
6
C
H
R
E
C
E
I
VE
R
E
R
61-2
.
4
G
H
z
D
S
S
S
SI
G
N
A
L
T
M
Conector de cortocircuito
Adicionalmente a la información de control, en el 1. Situar el emisor y el receptor uno junto a otro
funcionamiento a distancia se transmite una listos para funcionar pero desconectados a
identificación electrónica con cada impulso del una corta distancia. Para sincronizar el
emisor, con ayuda de la cual el receptor detecta receptor al emisor, se debe mantener pulsada
que se trata de una señal de "su" emisor. Puesto la tecla de sincronización de la frecuencia del
que hay muchos millones de identificaciones de emisor y conectar el emisor.
emisores disponibles, es extremadamente 2. Insertar el conector de cortocircuito en el
improbable que un emisor ajeno pueda influir en receptor (véase la imagen inferior) en el lugar
su receptor. En cualquier caso, el emisor debe de enchufe “BATT”. Para alimentar con
facilitar esta identificación una sola vez a cada corriente el receptor, conectar el regulador de
nuevo receptor antes de la primera puesta en vuelo con el receptor y la batería de vuelo, con
marcha. Para ello es necesario el siguiente lo cual el testigo de control se encenderá.
procedimiento que debería llevarse a cabo en lo 3. Si la sincronización de la frecuencia se ha
posible en un lugar en el que esta transmisión no realizado con éxito, el testigo de control
pueda ser perturbada radioeléctricamente por seguirá encendido. 4.Al extraer el conector de
ninguna otra señal eléctrica, sobre todo por otros cortocircuito el testigo de control empieza a
emisores de 2,4 Ghz. parpadear. El receptor pasa al modo listo para
el funcionamiento.
5. Volver a pulsar la tecla de sincronización de la
frecuencia para obtener una respuesta. El
emisor está ahora listo para el funcionamiento
y el testigo de control está encendido, lo cual
indica que el receptor funciona normalmente.
Sincronización de la identificación del emisor al receptor (binding)
76 CESSNA 182 CARSON AVIÓN RADIOCONTROLADO 50 050 5017
Page 77

MODO GAS A LA IZQUIERDA
Stick izquierdo Stick derecho
Arriba / delante Acelerar Descender
Abajo / detrás Desacelerar Ascender
Izquierda Timón a izquierda Alerón izquierda
Derecha Timón a derecha Alerón derecha
Vista externa de la emisora
1
2 Indicación de la tensión de la
batería
, hay suficiente potencia de emisión a
disposición para hacer volar el avión.
, se tiene que finalizar lo más
rápido posible el vuelo en curso (aún se puede
realizar un aterrizaje seguro). No se podrá
realizar despegue alguno, ya que las baterías
están vacías y se tienen que cambiar por otras.
3 Palancas de mando 1/4
4 Palancas de mando 2/3
Las palancas de mando cuando se sueltan,
vuelven, respectivamente, a su posición neutral
(central) gracias el efecto del resorte. La
palanca de aceleración es una excepción, ya
que permanece en la posición ajustada por
medio de un encastre.
Antena basculable
Mientras el testigo de control esté encendido en
verde
En caso de
indicación roja
5 Interruptor ON/OFF
Después de la conexión, el testigo de control del
emisor (2) debe mostrar una luz verde, en caso
contrario no debe iniciarse, aunque parezca que
todas las funciones del modelo trabajan
correctamente
13 Asa de transporte
14 Interruptores de inversión de servos
y regulador
Los interruptores permiten la inversión del sentido
de giro de los servos y el efecto del regulador de
vuelo (sentido de giro de las hélices).
11 Jack de carga
Nota: El interuptor ON/OFF debe estar en posición
“OFF” antes de cargar. Se debe utilizar un
cargador únicamente para baterías de NíquelMetal Hidruro (NiMH), tipo Tamiya N-3U o
equivalente. Otros tipos de Batería podrían estallar
causando heridas y daños personales.
6-9 Trim derecho de control
Este útil sistema permite ajustar el control y
obtener un auténtico punto neutro, siendo posible
diferentes variaciones en las características de
12 Conector de cinta
rendimiento de su modelo. Las lengüetas de ajuste
Disponible por separado.
están en un trinquete que le permitirá efectuar
precisos ajustes fijos.
10 Tecla de asignación del receptor
Antes de comenzar el funcionamiento se debe
sincronizar un nuevo receptor una sola vez al
emisor (binding). Para ello se utiliza, entre otras,
esta tecla. Vea la descripción de la página 76.
E
1
4
6
7
8
9
10
11
12
DIGITAL PROPORTIONAL RADIO CONTROL SYSTEMDIGITAL PROPORTIONAL RADIO CONTROL SYSTEM
ETB41 - 2.4 GHzETB41 - 2.4 GHz
ONON
OFFOFF
11 22 33 44
REVREV
NORNOR
2
3
5
13
14
CESSNA 182 CARSON AVIÓN RADIOCONTROLADO 50 050 5017 77
Page 78

DIRECTRICES DE
SEGURIDAD PARA LAS
BATERIAS
DIRECTRICES DE
SEGURIDAD PARA LAS
BATERIAS
Utilizadas correctamente, las baterías domésticas
son una fuente segura y fiable de energía portátil.
Los problemas pueden ocurrir si éstas resultan
incorrectamente usadas o abusadas generando
fugas o, en casos extremos, fuego o explosión.
Aquí exponemos algunas simples directrices para
el uso seguro de las baterías, concebidas para
evitar tales problemas.
Guarde las baterías en su embalaje y lejos de
objetos metálicos que pudieran causar un cortocircuito resultante en fugas o, en casos extremos,
fuego o incluso explosión.
Nunca intente recargar baterías (pilas) comunes, ni
con un cargador ni aplicándoles calor. Pueden
tener fugas, causar fuego o explotar. Existen
baterías especiales recargables que están
claramente marcadas como tales.
Tenga cuidado de colocar correctamente sus
baterías, contemplando los signos mas y menos de
la batería y aparato. La colocación inadecuada
puede causar fugas o, en casos extremos, fuego e
incluso explosión.
Quite las baterías gastadas del equipo y quite
todas las baterías del equipo si no va a utilizarlo
durante un tiempo. De otro modo, las baterías
podrían tener fugas y causar daños.
Supervise a los niños si están cambiando las
baterías ellos mismos para asegurarse que se
siguen estas directrices.
Sustituya el juego completo de baterías a la vez,
cuidando de no mezclar baterías viejas y nuevas o
de diferentes tipos, en tanto que esto puede
generar fugas o, en casos extremos, fuego e
incluso explosión.
Nunca tire las baterías al fuego ya que esto puede
hacerlas explotar. No tire las baterías gastadas a la
basura convencional. Entréguelas en las
instituciones especiales al efecto.
Verifique que los compartimentos de batería son
seguros.
R
E
C
IC
LAJE
Para quitar la tapa de las baterías, deslícela en
la dirección de la flecha (hacia abajo) mientras
empuja ligeramente sobre la marca de la
misma. Cuando intale las baterías, siempre
conecte primero los polos negativos
comprobando que la polaridad está de acuerdo
a lo impreso en la batería. Si el indicador de
voltaje no marca, compruebe los contactos
(especialmente los negativos) y compruebe de
nuevo que las baterías están colocadas
correctamente. Además, asegúrese que las
baterías están totalmente cargadas.
Cambio de las baterías de la emisora
E
PUSH
AA
1.5V
AA
1.5V
AA
1.5V
AA
1.5V
AA
1.5V
AA
1.5V
AA
1.5V
AA
1.5V
SIMULATOR
78 CESSNA 182 CARSON AVIÓN RADIOCONTROLADO 50 050 5017
Page 79

COLOCACIÓN DEL MECANISMO DE DIRECCIÓN
El kit de montaje incluye el pegamento para fijar el
mecanismo de dirección. Este pegamento tiene un
tiempo de secado de unas 12 horas, por lo que no
se debe cargar antes la zona de pegado. Para
acelerar los trabajos y para aumentar la fuerza de
pegado también se puede utilizar pegamento epoxi
de 2 componentes de 5 minutos (disponible por
separado) que alcanza su máxima resistencia en
menos de una hora. Mueva de un lado a otro los
flaps del estabilizador de elevación y del timón de
dirección para mejorar la movilidad. No extender
en exceso.
Pegado del timón
Aplique un poco de pegamento en la hendidura
prevista para el mecanismo de dirección en el
fuselaje y en las lengüetas de fijación del timón de
dirección. Introduzca ahora el timón de dirección
en la hendidura del fuselaje ejerciendo presión y
observe que la posición así como la
rectangularidad sean correctos.
Refuerce la unión pegada aplicando cola alrededor
del reborde. Esto no es necesario en el pegado
con epoxi. Antes de que se seque completamente
el pegamento volver a comprobar que la
Fijación del estabilizador de
alineación de las piezas sea correcta
elevación
Introduzca el estabilizador de elevación en la
hendidura del fuselaje prevista para ello y
compruebe la libertad de movimiento del flap. En
caso de que choque con el fuselaje y se mueva
con dificultad, corte por este punto del fuselaje con
extremo cuidado mediante una cuchilla de
modelismo para liberarlo un poco.
Aplique sobre el estabilizador de elevación en los
puntos donde luego entra en contacto con el
fuselaje el pegamento incluido en el kit de montaje.
Aplique también un poco de pegamento en la
hendidura del fuselaje en las superficies de
contacto.
Separar un poquito el fuselaje ejerciendo presión e
introducir el estabilizador de elevación (la punta
del flap señala hacia abajo) en el fuselaje
comprobando la rectangularidad de la posición en
ambas direcciones. Antes de proseguir los trabajos
dejar que el pegamento se seque un poco.
Liberarlo un poco
Pegamento
90
°
9
0
°
Pegamento
CESSNA 182 CARSON AVIÓN RADIOCONTROLADO 50 050 5017 79
E
Page 80

MONTAJE DE LA SUPERFICIE DE SUSTENTACIÓN
Antes de montar la superficie de sustentación,
insertar el conector para el servo del alerón
transversal (juntos en un canal) en el canal 1. Como
referencia se puede utilizar el color de cable del
servo ya conectado. Insertar la superficie
de sustentación con el saliente del
borde delantero inclinado desde arriba
en la escotadura del fuselaje detrás del
parabrisas. A continuación fijar la
superficie de sustentación con los dos
tornillos de plástico sobre el fuselaje. Los
alerones transversales se abren en sentido
opuesto. La primera vez debe comprobarse su
función. Palanquilla hacia la derecha: alerón
transversal derecho hacia arriba, alerón
transversal izquierdo hacia abajo, palanquilla
hacia la izquierda a la inversa. Si este no es el
caso, se tendrá que conmutar el interruptor de
inversión servo para el canal 1.
C
E
S
S
N
A
-L
IG
H
T
-
A
IRD
RA
F
T
C
E
S
S
N
A
-L
IG
H
T
-
A
IRD
RA
F
T
C
ESS
NA-
LIG
H
T-
AIR
C
R
AF
T
C
ESS
NA-
LIG
H
T-
AIR
C
R
AF
T
Para ajustar los flaps del mecanismo de dirección, para alerón de altura hacia delante, desviación de
el telecontrol debe estar listo para funcionar, es flap hacia arriba (subir). Las pequeñas
decir, el emisor se debe conectar primero y luego divergencias se pueden compensar mediante la
conectarse la batería de vuelo. A partir de este palanca de estabilización, si la divergencia es
momento dejar de presionar la palanca del gas mayor se reajusta mediante la cabeza de horquilla.
hacia delante, sujetar con firmeza el avión y No olvidar volver a separar la unión por enchufe
mantenerse alejado del radio de giro de las de la batería de vuelo y luego desconectar el
hélices, ya que nunca se puede descartar emisor.
completamente que el motor arranque de forma
involuntaria. La palanquilla de mando izquierda del
emisor (motor y alerón) debe encontrarse en la
posición: "Motor apagado" (completamente hacia
abajo) y el alerón en "Neutral" (en el centro). La
palanquilla derecha (estabilizador de altura y
alerones transversales) se halla en la posición
neutral absoluta. Los estabilizadores para
dirección y altura también deben encontrarse en
posición central.
La cabeza de horquilla de plástico del varillaje de
mando debe ajustarse de tal manera para
engancharla en la punta del flap mediante
enroscado y desenroscado que la espiga de
arrastre pueda situarse exactamente sobre el
segundo orificio de la punta del flap (desde el
exterior). Entonces se presiona en este orificio y
se fija mediante compresión. Esto también es
aplicable por igual al estabilizador de altura y a los
alerones. Seguidamente se comprueba la función
de los flaps: Palanquilla para alerón hacia la
derecha, desviación de flap en dirección vuelo
hacia la derecha (curva a la derecha); palanquilla
Comprobar el funcionamiento del mecanismo de
dirección accionándolo con el emisor. En caso de
que la altura y la lateralidad estén intercambiadas
en el emisor, extraer el
conector en el canal 2 y 4 e insertarlos de nuevo
en el orden contrario.
Ajuste del punto muerto del mecanismo de dirección
80 CESSNA 182 CARSON AVIÓN RADIOCONTROLADO 50 050 5017
E
Page 81

CE
S
S
N
A
-
1
8
2
C
E
SS
N
A-
LIG
H
T
A
IR
CR
A
F
T
C
E
SS
N
A-
LIG
H
T
A
IR
CR
A
F
T
50
mm
Presionar con firmeza el tren de aterrizaje principal
en la ranura del soporte de plástico. El tren de
aterrizaje está fijado por el efecto de apriete.
Introducir a presión la rueda de morro en la ranura
correspondiente del soporte de plástico en la parte
delantera del fuselaje.
Si al intentar una marcha sobre ruedas (con la
mano) se constatara un ligera marcha en curva, se
podrá corregir mediante un pliegue adecuado y
cuidadoso de los alambres del tren de aterrizaje.
INSERCIÓN DEL TREN DE ATERRIZAJE
cierres giratorios
tapa de la batería
Si la proa o la popa tienden a inclinarse, ésa es (mediante cinta adhesiva de doble cara) pequeños
una zona demasiado pesada. La mayor parte de pesos adicionales (simétricos en los extremos del
las veces, suele ser suficiente con desplazar el aleta lateral rígida. Especialmente un centro de
acumulador de vuelo sujeto por medio de una cinta gravedad que está muy atrasado (proa muy ligera)
de velcro un poquito en sentido longitudinal. En tiene como efecto un comportamiento de vuelo
alguna rara ocasión (por ejemplo, tras haber inquieto y debería ser corregido.
efectuado una reparación casera) el centro de
gravedad debe ser corregido añadiendo
EQUILIBRADO DEL CENTRO DE GRAVEDAD
El centro de gravedad de un aparato volador debe
guardar cierta relación con las superficies de
sustentación; En la Cessna 182, está correcto
según se entrega. El margen en el que el centro
de gravedad se mueve respecto al valor ideal es
muy pequeño. Puede comprobar el centro de
gravedad de la Cessna 182 sujetándolo por los
puntos que se muestran con dos dedos. Éste se
debería balancear ligeramente sobre su posición
horizontal sin inclinarse hacia adelante o atrás.
CESSNA 182 CARSON AVIÓN RADIOCONTROLADO 50 050 5017 81
E
Page 82

En la parte inferior del fuselaje se encuentra el manténgase alejado del campo de giro de la
compartimento de la batería que se cierra con dos hélice. -Alce el avión y conecte el receptor. Es
cierres giratorios. La unión por enchufe de la posible que se produzca un breve movimiento
batería hacia el regulador de vuelo debe brusco de un servo sin que se haya accionado
desenchufarse inmediatamente después de ninguna palanca de mando y esto no significa
finalizar el vuelo. Se recomienda encarecidamente que haya una avería.
extraer del modelo la batería LiPo al final del - Cerrar la tapa de la batería.
funcionamiento y guardarla en un lugar con una
base no inflamable.
Antes del arranque, conectar primero el emisor y
luego encender la batería teniendo en cuenta las
medidas de seguridad ya mencionadas.
- Primero, conecte el emisor. La palanquita de
aceleración tiene que estar abajo del todo (sin
gas).
- Conecte el enchufe del acumulador al regulador
de vuelo y fíjese en la forma del enchufe, ya
que sólo hay una posición en la que puede ser
conectado correctamente. La toma hembra del
enchufe del regulador de vuelo tiene que estar
encastrada en el saliente del enchufe del
acumulador.
- Una vez que haya realizado la conexión,
INSERCIÓN Y CONEXIÓN DEL PACK DE ACUMULADOR
Del acumulador
Al regulador
20C
X-Pack
L
i
P
o
-
A
kk
u
7
,
4
V
mAh
2.
3.
4.
Ahora la Cessna182 debería estar listo para el
puede ser que el
servicio. Primeramente, todavía se debe ajustar o
interruptor de reversa
verificar el funcionamiento del piloto de vuelo.
(canal 3, ver página 71)
Cuenta con un sistema de protección del motor al
en la emisora se
arrancarse en posición falsa de palanca y una
encuentre en posición
desconexión automática del motor cuando la
equivocada.
tensión de la batería recargable baja a menos
6. El regulador de vuelo
de 7V.
electrónico posee una
desconexión de motor en
1. Conectar primero el emisor, luego establecer la
caso de una tensión de
unión por enchufe con la batería de vuelo.
batería recargable
2. Retroceder la palanca a la posición “motor
reducida. Si la tensión es
desconectado” y dejarla allí por lo menos 3
menor de 7 voltios (la
segundos. En caso que el motor no se pueda
energía acumulada se
desconectar, desplazar el equilibrio de gas
agota), se desconecta el
totalmente hacia abajo.
motor. Debido a que la
3. Deslizar la palanca lentamente hacia adelante
batería recargable tiene
(arriba). El motor arranca y aumentan las
una cierta capacidad de
revoluciones.
“recuperación”, es
4. Si la palanca se mueve hasta casi su posición
posible que después una
máxima, las revoluciones deberían aumentar a
breve pause, tirando
su valor máximo. Pruebe si con el equilibrador
hacia atrás la palanca
de gas es posible un valor aún mayor; sin
(ver 2.) del motor,
embargo, se debe preservar la posición “motor
nuevamente se pueda
desconectado”.
arrancar el motor por
5. En caso que el motor no arranque del todo,
poco tiempo.
AJUSTE DEL REGULADOR DE VUELO
82 CESSNA 182 CARSON AVIÓN RADIOCONTROLADO 50 050 5017
E
Page 83

VUELO
Tras la puesta en marcha con el avión hacia arriba
Comprobaciones antes del
(conexión del acumulador de vuelo) se tiene que
comprobar que todas las piezas móviles en este
despegue
caso aletas del timón- funcionan correctamente
(sentido y tamaño de la oscilación).
Como en el caso de los aviones de verdad, en el
El testigo de control de tensión del emisor debe
modelo también se debería realizar una revisión
mostrar luz verde, claramente, en una gama
completa antes de cada despegue. Ésta debe
permitida.
comenzar con una comprobación visual, para
Si se ha aflojado alguna pieza p. e., debido a un
verificar que dispone de todos los componentes,
aterrizaje accidentado-, no se debe hacer
que éstos están en su sitio y bien fijados al
despegar el avión hasta que no se hayan
modelo.
subsanado los daños al 100%.
Comprobación del alcance del
- Las palanquillas de mando se accionan con
equipo de radio
breves intervalos de tiempo. El ayudante
está pendiente de la reacción de los
Antes que sua Cessna 182 se desenvuelva en su
alerones. Mediante una indicación con la
elemento por primera vez, debe efectuar una mano, para que el ayudante también esté
comprobación del alcance del equipo de radio preparado, se arranca el motor.
lo mejor sería en el mismo sitio que pretenda
- Si a una distancia de unos 300 m entre el
utilizarlo.
emisor y el modelo los alerones aún
reaccionan correctamente, significa que el
- Conecte el emisor antes de que establezca
equipo de radiocontrol funciona correcta-
la unión por enchufe entre el acumuladory
mente.
el regulador de vuelo.
- Un ayudante se aleja con el modelo listo
Nunca vuele si su equipo de radio no funciona
para el funcionamiento de la persona que
perfectamente incluso si el fallo es temporal.
maneja el emisor
Requisitos del área de vuelo
Existen diferentes regulaciones de país a país en
Si sólo tiene poca experien-
relación al vuelo de aviones de modalismo radio
cia de vuelo y tiene instala-
controlado. Preste atención a las correspondien-
das las alas de entreno, lo
tes precauciones de seguridad al elegir su área de
mejor es que lo utilice con
vuelo. Lo más adecuado sería utilizar un campo
muy poco o ningún viento.
de aviación, un buen pradogrande.
En la zona donde pretenda volar no debe haber
personas o animales, tampoco debe haber
vehículos aparcados o circulando.
Intente obtener suficiente información sobre el
tiempo y velocidad del viento a través de los
medios (TV, periódicos) antes de prepararse para
el vuelo, y no correr el riesgo de tener la tentación
de usar el aparato bajo condiciones atmosféricas
adversas. Nunca debería usarlo en un día de
fuerte viento, lluvia o trueno.
E
CESSNA 182 CARSON AVIÓN RADIOCONTROLADO 50 050 5017 83
E
Page 84

DIGITAL PROPORTIONAL RADIO CONTROL SYSTEMDIGITAL PROPORTIONAL RADIO CONTROL SYSTEM
ETB41 - 2.4 GHzETB41 - 2.4 GHz
ONON
OFFOFF
11 22 33 44
REVREV
NORNOR
C
E
S
S
N
A
-
18
2
C
E
S
S
N
A
-
L
I
G
H
T
-
A
I
R
D
RA
F
T
C
E
S
S
N
A
-
L
I
G
H
T
-
A
I
R
D
RA
F
T
Si ha comprobado que su modelo está en
buen estado, conécte la emisora primero, a
continuación el receptor.
Ahora compruebe moviendo las palancas
de mando (sticks) de la emisora (deje la
palanca de acelerador en posición OFF) la
funcionalidad de los timones (dirección,
cantidad de movimiento y sencillez de
operativa).
Compruebe la hélice una vez más; ésta
debe ser cambiada incluso si simplemente
del motor y la correcta rotación de la hélice.
tiene un mínimo daño. Compruebe las revoluciones
Sua Cessna 182 ahora está listo para comenzar.
La hélice gira
suavemente
La hélice
tiembla
La hélice dañada
puede romperse
COMIENZO
Generalidades
si la izquierda y la derecha hubieran sido
Las fuerzas ascensionales que un aeroplano
ambiadas. El problema puede ser más fácilment
necesita para permanecer en el aire dependen
gestionado si el piloto ha manejado con
especialmente de su velocidad en relación al aire.
anterioridad vehículos R/C. El mejor
Contra el viento, la velocidad requerida por el
entrenamiento y preparación es ejercitar el vuelo
avión relativa al suelo desciende de acuerdo con
en un programa de simulación para PC.
el valor de velocidad del viento. Con viento de
A los muy principiantes se les recomienda que
cola, será necesaria una mayor velocidad en
durante el primer despegue les ayude un piloto de
relación al suelo. En consecuencia, el despegue y
modelismo experto y que cojan el emisor sólo
aterrizaje deberán tener lugar contra el viento en
cuando el avión esté a una altura segura.
la medida de lo posible. Para un principiante total,
cuando el avión vuela hacia el piloto parece como
Conexión
Desconexión
Comprobar antes de cada uso
Lanzamiento a mano
reaccionar en cualquier momento a maniobras de
En caso de que solo se encuentre disponible un
vuelo inesperadas. Para los primeros vuelos
único terreno con césped relativamente elevado,
recomendamos el lanzamiento a mano contra el
se hace despegar el avión en el aire con la mano.
viento (o sin viento). Para los primeros vuelos,
Recomendamos que un ayudante realice el
sería optimo que otro piloto pudiese lanzar el
lanzamiento del avión, para que el piloto pueda
modelo.
84 CESSNA 182 CARSON AVIÓN RADIOCONTROLADO 50 050 5017
E
Page 85

El proceso debería tener lugar como sigue: Empuje a fondo el stick del acelerador,
comprobando la intensidad de la corriente de
Conecte la emisora, luego establecer la unión
aire generada.
por enchufe del acumulador.
Lance el modelo de un impulso recto hacia
Compruebe la funcionalidad de todos los
delante.
timones.
Controle la reacción del modelo
Sujete el modelo por el centro de gravedad
inmediatamente y ascienda con poco ángulo
sobre la cabeza según se muestra.
-
-
-
-
-
-
El modelo debería ser lanzado tan horizontal como efectuado hacia arriba, la velocidad de vuelo
sea posible para obtener una actitud controlable. disminuye y con ella el flujo de aire (no hay fuerza
Si es lanzado hacia abajo alcanzará velocidad ascensional), con el consiguiente probable
antes, y quizá pueda ser nivelado antes de impacto.
impactar contra el suelo. Si el lanzamiento es
Despegue desde el suelo
Esto alarga correspondientemente la duración del
Debido al comparativamente reducido tamaño del
vuelo. Incluso con el motor desconectado, el
modelo, para el despegue desde el suelo necesita
modelo se puede controlar perfectamente en
una pista de despegue adecuada, por ejemplo
vuelo de planeo, aunque se tiene que vigilar que
una pista de césped bien segada. Se debe
la velocidad no disminuya demasiado, ya que de
despegar siempre lo más exactamente posible
lo contrario puede existir riesgo
contra el viento. Después de comprobar el
de un vuelo descontrolado
funcionamiento de todos los timones, el piloto
temporalmente con entrada
debe colocarse detrás del modelo, ya que así es
en pérdida.
posible una reacción rápida ante un posible
arranque lateral del
modelo. A pleno gas y
después de un
recorrido en tierra de
unos 20 m, si al
mismo tiempo la
velocidad parece lo
suficientemente elevada, se
puede levantar el vuelo tirando
ligeramente del alerón de altura.
En primer lugar ir tomando
lentamente más velocidad y no subir
demasiado empinado.
Una vez se ha alcanzado una altura
suficientemente segura, se podrá reducir el
gas para un vuelo normal a aprox. al 30%.
CESSN
A-182
C
E
S
S
N
A
L
I
G
H
T
A
I
R
C
R
A
F
T
VIE
NTO
VIENTO VIENTOVIENTO
correcto equivocado equivocado
CESSNA 182 CARSON AVIÓN RADIOCONTROLADO 50 050 5017 85
CESSNA-182
CESSNA-LIGHT-AIRDRAFTCESSNA-LIGHT-AIRDRAFT
CESSNA-182
C
E
S
SN
A
LIG
H
T
A
IR
D
R
A
F
T
C
E
S
SN
A
LIG
H
T
A
IR
D
R
A
F
T
CESSNA-182
C
E
S
S
N
A
-
L
IG
H
T
-
AIRD
R
A
F
T
C
E
S
S
N
A
-
L
IG
H
T
-
AIRD
R
A
F
T
E
Page 86

Si sua Cessna 182 ha aterrizado con
éxito, usted debería desconectar
inmediatamente el receptor y la
batería . A continuación desconecte la
emisora.
Las pilas secas o baterías
recargables de otros tipos (NiMH) no
son tan críticas, pero si no usa el
equipo de radio durante varias
semanas, debería quitarlas de la
emisora.
Al usar el acumulador Lipo de vuelo,
tener en cuenta las instrucciones del
fabricante y seguir los consejos.
El material plástico especial en el que
la Cessna 182 está principalmente
hecho es muy sensible a las altas
Si guarda sua Cessna 182 en casa, preste
temperaturas. No exponga su avión a la luz
atención que no haya partes presionadas o
solardirecta durante un largo período y no lo
dobladas. La distorsión podría volverse permanente
guarde en un coche que esté calentado por el
tras algún tiempo.
sol.
ATERRIZAJE
Tan pronto como note un descenso en las presta-
- Alinee el modelo a la pista y déjelo bajar
ciones del motor, debería prepararse para el
reduciendo la velocidad del motor.
aterrizaje. En este caso, dispone de suficiente
- Cuando se aproxime al punto de aterrizaje
reserva para corregir un mal intento de aterrizaje y
suba ligeramente la profundidad y controle la
comenzar uno nuevo. El aterrizaje normalmente
velocidad con las revoluciones del motor. No
tiene el siguiente proceso:
entre demasiado lento.
- Quite un poco de gas y deje que el modelo
- Vuele con viento de cola a cierta distancia
planee
paralelo a la pista.
- Un poco antes de tomar tierra, quite el gas
- Si se alcanza la altura y distancia a la pista
del todo y deje que el modelo tome tierra.
adecuadas, gire 180º en dirección a la pista;
- Si la aproximación es demasiado alta,
ahora contra el viento.
incremente la velocidad del motor y gane
altura para una nueva aproximación.
TRAS ATERRIZAR / ALMACENADO
86 CESSNA 182 CARSON AVIÓN RADIOCONTROLADO 50 050 5017
E
Page 87

REPARACIONES
vuele la Cessna 182 si éste ha sido dañado y
usted no está completamente seguro que la
En una operativa de vuelo normal, la Cessna 182
reparación le ha devuelto su estado original.
aguantará bastante mal trato; pero no existe ningún
piloto de modelismo que no haya tenido que hacer
Para algunas piezas como la hélice, elementos
nunca alguna reparación en su modelo. El plástico,
electrónicos y motor con soporte, no hay
del que está hecho el avión, puede ser reparado con
posibilidad de reparación alguna. Éstas deben
epoxi de 5 minutos (2 componentes) o con adhesivo
ser sustituidas por recambios. En estos casos,
instantáneo muy fácilmente. Durante el fraguado, las
contacte con su vendedor especializado.
piezas deben estar bien alineadas y sujetas la una
con la otra para conseguir una correcta reparación.
Nunca
(a) corregirá el defecto reparando el producto sin
GARANTIA LIMITADA DE
cargo alguno por componentes y mano de obra;
VEINTICUATRO MESES
(b) reemplazará el producto por otro igual o de
características similares; o
Este producto está garantizado por CARSON
(c) reembolsará el precio de compra. Todos los
contra defectos de fabricación en el material y
productos y componentes reemplazados, así
mano de obra bajo condiciones normales de uso
como los productos cuyo costo es
durante veinticuatro meses a partir de la fecha de
reembolsado, pasan a ser propiedad de
compra en tiendas propiedad de la empresa
CARSON.
CARSON, franquicias y distribuidores autorizados
de CARSON. Exceptuando lo aquí establecido,
Pueden utilizarse componentes y productos
carson no ofrece garantías explícitas y las
nuevos o reacondicionados para llevar a cabo el
garantías implícitas, incluyendo la garantía de que
servicio de garantía. Los componentes y
el producto podrá ser comercializado y que es
productos reparados o reemplazados están
adecuado para un fin específico, tienen una
garantizados por el período remanente de la
duración limitada al período de vigencia de las
garantía original. La reparación o sustitución del
garantías limitadas aquí expuestas por escrito.
producto no serán gratuitas después de la
Exceptuando lo aquí establecido, carson no
expiración del período de garantía.
tendrá responsabilidad ni obligación alguna hacia
Esta garantía no cubre:
el cliente u otra persona o entidad con respecto a
(a) daños o averías causadas por o atribuibles a
las responsabilidades, pérdidas o daños causados
causa fortuita, abuso, accidente, mal uso, uso
directa o indirectamente por el uso u operación del
anormal o impropio, falta de atención a las
producto o resultantes de una violación de esta
instrucciones, instalación o mantenimiento
garantía, incluyendo pero sin limitarse a, daños
impropio, alteración, caída de rayos u otra
causados por inconveniencia, pérdida de tiempo,
incidencia de excesivo voltaje o corriente;
datos, bienes, ingresos o ganancias, o daños
indirectos, especiales, incidentales o
(b) reparaciones no efectuadas por un taller
consecuenciales, aún si se ha notificado a carson
autorizado por CARSON;
de la posibilidad de tales daños. Algunos estados
(c) consumibles tales como fusibles o pilas;
no permiten limitantes a la duración de una
(d) daños a la apariencia;
garantía implícita ni la exclusión o limitación de los
(e) costos de transporte, envío o seguro; o
daños incidentales o consecuenciales, por lo que
(f) costos de recogida, instalación, servicio de
es posible que las limitaciones o exclusiones
ajuste o reinstalación.
mencionadas más arriba puedan no ser de
aplicación.
Esta garantía le otorga derechos legales
específicos, si bien también puede tener otros
En caso de defecto del producto durante el
derechos que varían de un estado a otro. La
período de garantía, lleve el producto y el recibo
traducción al español se provee solamente para
de compra que sirve de comprobante de la fecha
su conveniencia. En caso de discrepancias entre
de compra a cualquier tienda CARSON. Salvo si
las versiones en inglés y en español, prevalecerá
la ley dispone lo contrario, CARSON a su opción:
la versión en inglés.
E
CESSNA 182 CARSON AVIÓN RADIOCONTROLADO 50 050 5017 87
Page 88

Ala 500508500
Fuselaje 500508502
Ala guia
500508501
Hélice
2pzs 500508503
C
E
SS
N
A
-
1
8
2
C
E
S
S
NA
-
L
IG
H
T
-
AIR
D
R
A
F
T
C
E
S
S
NA
-
L
IG
H
T
-
AIR
D
R
A
F
T
Capacete de la hélice
500508505
Tren de aterrizaje
500508504
BÚSQUEDA Y SOLUCIÓN DE ERRORES
Problema
El motor no arranca
No hay reacción servo
a la orden de mando
No vuela en
línea recta
No levanta el vuelo
Alcance insuficiente
en el test
Causa
1 Batería de vuelo no cargada.
2 Señal del emisor demasiado débil, testigo
de control en rojo o apagado.
3 Unión de enchufe suelta.
1 Servoconector no correctamente
insertado..
2 Servo dañado
1 Timón de dirección con la palanquilla de
mando en posición neutral no neutral
2 Superficie de sustentación montada
desalineada
3.Ambos alerones miran hacia arriba
1 Batería de vuelo con carga insuficiente.
2 Batería de vuelo dañada por un error en el
manejo
3 Ambos alerones señalan hacia arriba.
1 tensión del emisor insuficiente
Solución
1 Cargar batería de vuelo
2 Cambiar todas las pilas del emisor o
cargar las baterías.
3 Comprobar las uniones de enchufe
1 Insertar correctamente el
servoconector
2 Cambiar servo.
1 Timón de dirección con la
palanquilla de mando en posición
neutral no neutral
2 Ajustar de nuevo los alas.
3 Ajustar de nuevo los alerones con la
palanquilla de mando en neutral.
1 Cargar la batería de carga.
2 Cambiar la batería de carga.
3 Ajustar de nuevo los alerones con la
palanquilla de mando en neutral
1 Cambiar todas las pilas del emisor o
cargar las baterías.
PIEZAS DE REPUESTO
El uso y el montaje de los accesorios se encuentra
Para la Cessna 182 se encuentran disponibles
descrito en otro lugar.
las siguientes piezas de repuesto.
E
88 CESSNA 182 CARSON AVIÓN RADIOCONTROLADO 50 050 5017
Page 89

CESSNA 182 CARSON R/C AEROMODELLO 50 050 5017 89
CES
SNA-182
C
E
S
S
N
A
-LIGH
T
-A
IRD
R
A
F
TC
E
S
S
N
A
-LIGH
T
-A
IRD
R
A
F
T
Cessna 182Cessna 182Cessna 182
AEROMODELLO RC
INSTRUCIONI D’USO
Articolo No. 50 050 5017
I
Page 90

Gentile cliente,
riserviamo il diritto di effettuare qualsiasi
Ci congratuliamo con lei per l'acquisto di quest’
aggiornamento tecnico atto a migliorarne le qualità
aeromodello radiocomandato CARSON
senza alcun preavviso. Alcune caratteristiche
Cessna 182, che è stato progettato secondo gli
tecniche di questo prodotto possono perciò essere
ultimi ritrovati della tecnica. Per mantenere sempre
diverse da quelle illustrate in questo manuale o
aggiornati i nostri prodotti ci
sulla scatola.
Prima di utilizzare il vostroaeromdello leggete attentamente queste istruzioni!
Manuale d'Istruzioni
accessori come apparato radio, batterie e
Queste istruzioni sono necessarie per le
caricabatteria. In caso d'inosservanza di queste
operazioni di messa a punta e della fase finale del
norme la garanzia decade. La garanzia non copre
vostro modello. Vi preghiamo di leggere
I Danni causati da normale usura e rottura dei
attentamente questo manuale primo di iniziare a
materiali, e da un utilizzo non corretto del modello.
lavorare sul vostra Cessna 182 o altri
Sicurezza
utilizzarlo solo sotto la supervisione di un adulto.
Pilotare un aeromodello è un hobby eccitante, che
Ai principianti raccomandiamo di usarlo in zone
ad ogni modo richiede un alto senso di
ampie e ben lontane da persone, ostacoli o altro
responsabilità. Bisogna osservare alcune
cui è possibile andare a sbattere.
importanti precauzioni.La Cessna 182 non è un
giocattolo; I ragazzi sotto I 14 anni possono
Responsabilità / assicurazione
il proprio rivenditore o un club di aeromodellismo e
L'utilizzatore di un aeromodello è responsabile dei
di stipulare una buona polizza assicurativa che
possibili danni causati dal suo modello ,
copra da questi rischi in caso di incidente.
indipendentemente dalla causa di un eventuale
incidente. Si consiglia vivamente di informarsi con
La dichiarazione originale di conformità può
Dichiarazione di conformità
essere richiesta al seguente indirizzo:
Dickie-Tamiya GmbH & Co. KG dichiara che
Dickie-Tamiya GmbH & Co. KG
questo modello in tutte le sue parti, radio, motore,
Werkstraße 1 D-90765 Fürth
batteria, caricabatteria, è completamente a norma,
Tel.: +49/(0)911/9765-03
e quindi in regola con le normative vigenti in
materia 1999/5/EG (R&TTE).
materiale di scarto nei punti di
Smaltimento parti
riciclaggio. Per queste informazioni
Significato dei simboli del prodotto, imballaggio o
consultare il locale ufficio
istruzioni:
smaltimento rifiuti oppure il vostro
Le parti elettroniche alla fine del loro utilizzo non
negoziante, sapranno darvi
possono essere gettate nei normali cassonetti
indicazioni a riguardo.
dell'immondizia! Aiutateci a proteggere l'ambiente
e a salvaguardare le nostre risorse portando il
Vi auguriamo buona fortuna e buon divertimento alla guida del vostro aeromodello Carson.
I
90 CESSNA 182 CARSON R/C AEROMODELLO 50 050 5017
Page 91

Cessna 182
Aeromodello RC
articolo No.50 050 5017
ELENCO DEGLI ARGOMENTI
Pagina
Prefazione e dichiarazione di conformità.....................90
Elenco degli argomenti ................................................91
Norme di Sicurezza......................................................92
Utilizzo di questo manuale...........................................93
Operazioni possibili con Cessna 182...........................93
Caratteristiche tecniche ...............................................93
Contenuto del kit..........................................................94
Spiegazione d'alcune nozioni aeromodellistiche..........95
Modalitá d’utilizzo die pachi di Baterie LiPo.................97
Apparato radio .............................................................98
Fissaggio del impennaggio .........................................101
Assemblaggio delle superfici alari...............................102
Montagio del telaio......................................................103
Bilanciamento del centro di gravità.............................103
Volo.............................................................................105
Partenza .....................................................................106
Atterraggio ..................................................................108
Post-Atterraggio..........................................................108
Riparazioni..................................................................109
Condizioni di garanzia.................................................109
Ricerca ed eliminazione die guasti .............................110
Parti di Ricambio.........................................................110
Inserimento e Collegamento della batteria LiPo .........104
Impostazione del regolatore di volo ............................104
I
CESSNA 182 CARSON R/C AEROMODELLO 50 050 5017 91
Page 92

NORME DI SICUREZZA
1. Accendete sempre prima il trasmettitore per
Avvertenze generali
evitare che eventuali interferenze provochino
I modelli radiocomandati, ed in particolar modo gli
reazioni incontrollate della ricevente.
aeromodelli non sono giocattoli, e il modo d'utilizzo
All'accensione la leva del gas del
deve essere imparato con gradualità. I ragazzi
trasmettitore deve essere in posizione “OFF”.
sotto i 14 anni possono utilizzare il modello solo
2. Quindi collegate la batteria.
dietro la supervisione di un adulto.
3. Controllate che tutti I timoni siano in posizione
Anche se il modello è relativamente leggero,
neutra.
raggiunge alte velocità ed in caso d'incidente può
4. Assicuratevi che tutti I servi rispondano ai
colpire persone, animali o cose, provocando gravi
comandi del trasmettitore.
lesioni e danni.
Scegliete una zona di volo sufficientemente estesa
Sicurezza durante il volo
dove non ci sono persone o animali; quest’ area
deve essere libera da ostacoli e lontani da strade
Guardate sempre il vostro modello e non
e da traffico pubblico. E' vietato volare con un
distraetevi.
aeromodello nelle vicinanze di un aeroporto.
Tenetevi lontano dall'elica quando la batteria è
Molti club d'aeromodellismo, cui in seguito è
collegata. Evitate di posizionarvi vicino all'elica
possibile iscriversi,offrono la possibilità di provare
in movimento.
a volare in condizioni di assoluta sicurezza, inoltre
Non volare mai in giornate ventose, con pioggia o
spesso organizzano corsi per principianti.
temporali.
Prima di iniziare a volare assicuratevi che il
Tenete il vostro aereo lontano da cavi di alta
modello sia assemblato correttamente e che dopo
tensione e da antenne di trasmissione.
un'eventuale riparazione tutti i sistemi funzionino
Anche un modello in perfette condizioni può subire
correttamente al 100%
una reazione improvvisa causata da un’
interferenza, siate sempre attenti e pronti a
controllarlo.
Prima del volo
Non volare mai in direzione di persone o animali o
Controllare tutti i collegamenti, viti di fissaggio e
in strade pubbliche.
cavetti di collegamento e le verismi.
Iniziate la manovra d'atterraggio in tempo, se
Riguardare la completa struttura del modello e
notate una riduzione dell'angolo di salita, vuol dire
l'elica, controllate dopo ogni incidente eventuali
che la batteria del modello si sta scaricando, o che
danneggiamenti che potrebbero esservi sfuggiti-
la spia di controllo del trasmettitore si è spostata
ritardate il volo fino a che la parte danneggiata è
nell'area rossa.
stata riparata o sostituita. L'elica rotta non va mai
A fine volo spegnete prima la ricevente quindi il
riparata, ma assolutamente sostituita!
trasmettitore.
La batteria del modello deve essere
Dopo l'atterraggio staccate sempre i connettori
completamente caricata prima d'ogni volo, le
della batteria collegati alla ricevente e regolatore
batterie del trasmettitore devono avere abbastanza
elettronico.
potenza. La spia di controllo deve essere accesa e
Se avete finito di volare rimuovete la batteria dal
di colore verde. Se è accesa e di colore rosso,
vostro modello.
sostituire le batterie del trasmettitore (caricare gli
accumulatori del trasmettitore).
I
92 CESSNA 182 CARSON R/C AEROMODELLO 50 050 5017
Page 93

attentamente le istruzioni del manuale e
UTILIZZO DI QUESTO
assicuratevi che tutti i passaggi siano eseguiti in
modo giusto e che tutte le parti siano montate
MANUALE
correttamente. Solo così Cessna 182 può dare il
massimo delle prestazioni.
Questo manuale operativo vi offre tutte le
informazioni necessarie per l'assemblaggio e il
funzionamento del vostro aeromodello
OPERAZIONI POSSIBLI CON
Cessna 182. Dovrebbe aiutarvi a capire il
funzionamento e le reazioni del vostro modello,
Cessna 182
dandovi alcune conoscenze che vi aiuteranno ad
imparare con successo anche se siete dei
Cessna 182 a causa della sua velocità di volo
principianti. Per i principianti che non hanno mai
relativamente bassa è propriamente adatto come
utilizzato prima un modello radiocomandato, è
primo modellino per i principianti. Tuttavia
necessario l'aiuto di un esperto che li assiste nelle
consigliamo che un pilota esperto esegua la
prime partenze e nei primi atterraggi.
partenza e, solo una volta raggiunta un'altezza
Se non conoscete nessuno che vi possa aiutare
sufficiente, passare il comando al principiante.
rivolgetevi al vostro rivenditore di fiducia o ad un
Eventualmente anche i primi atterraggi
club d'aeromodellismo. La Sicurezza di chi vi sta
dovrebbero essere effettuati dal pilota esperto.
intorno, di voi stessi e del vostro modello deve
Cessna 182 è avviato sostanzialmente in modo
essere prioritaria al divertimento.
manuale e atterra su una pista erbosa. Gli
atterraggi e decolli de terra sull'asfalto o altre
Inoltre il manuale contiene l'elenco delle parti di
piste dure, sono possibili.
ricambio più importanti ed anche per questo
Si consiglia un'area (prato) sufficientemente
motivo lo dovete conservare al sicuro. Tutte le
ampia e priva d'ostacoli.
indicazioni di direzione ad esempio, “verso destra”
devono essere intese nel senso di volo, come se
foste seduti sul modello.
Assemblate il vostro aeroplano, seguendo
I
CHARACTERISTICHE TECNICHE
Canali 4 ch
Trans- Batterie AAx8 o NiMH batterie
metittore
Dist. di Controllo Circa 300m
Funzioni giri del motore, elevatore ed alettone
Misure Lunghezza 860mm x Apertura d’ala 980mm
Aero- Batterie Batterie NiMH 8cell (9,6V / 2100mAh)
plano Peso Modello: 560g
Motore Elettrico con regolatore
ricaricabili
Frequenza FM 2,4GHz
impennaggio orizzontale,
* La durata dipende dalla costruzione della batteria, dalla superficie di volo e dal vostro modo di guida.
tensione batteria 7,4V
Corrente continua 20A
Regola- Durata del motor
tore in marcia circa 6Min
CESSNA 182 CARSON R/C AEROMODELLO 50 050 5017 93
Page 94

INHALT DES FLUGZEUG-SETS
100/240V Alimentatore
50/60Hz
Capacità 12,8V 1,25A
DIGITAL PROPORTIONAL RADIO CONTROL SYSTEMDIGITAL PROPORTIONAL RADIO CONTROL SYSTEM
ETB41 - 2.4 GHzETB41 - 2.4 GHz
ONON
OFFOFF
11 22 33 44
REVREV
NORNOR
POWERPOWER
DICKIEDICKIE
DICKIEDICKIE
POWERPOWER
2300 mAh2300 mAh
POWERPOWER
DICKIEDICKIE
DICKIEDICKIE
POWERPOWER
2300 mAh2300 mAh
POWERPOWER
DICKIEDICKIE
DICKIEDICKIE
POWERPOWER
2300 mAh2300 mAh
POWERPOWER
DICKIEDICKIE
DICKIEDICKIE
POWERPOWER
2300 mAh2300 mAh
POWERPOWER
DICKIEDICKIE
DICKIEDICKIE
POWERPOWER
2300 mAh2300 mAh
POWERPOWER
DICKIEDICKIE
DICKIEDICKIE
POWERPOWER
2300 mAh2300 mAh
POWERPOWER
DICKIEDICKIE
DICKIEDICKIE
POWERPOWER
2300 mAh2300 mAh
POWERPOWER
DICKIEDICKIE
DICKIEDICKIE
POWERPOWER
2300 mAh2300 mAh
GL
UE
Batteria LiPo
1300mAh 7,4V
BA
T
G
E
A
R
A
U
X
I
RUD
D
T
H
R
O
E
L
EV
A
IL
E
6
6
C
H
R
E
C
E
I
V
E
R
E
R
6
1
-
2
.
4
G
H
z
D
S
S
S
S
I
G
N
A
L
T
M
C
O
N
T
R
O
L
L
E
R
C
ES
S
N
A-
1
82
C
ES
S
N
A-LIG
H
T
-A
IR
D
R
A
F
TC
ES
S
N
A-LIG
H
T
-A
IR
D
R
A
F
T
Telaio
B
A
L
A
N
C
E-C
HA
RG
E
R
B
A
L
A
N
C
E-C
HA
RG
E
R
FO
R
L
I-
P
O
B
A
T
T
E
R
Y
FO
R
L
I-
P
O
B
A
T
T
E
R
Y
1
.2A
0.3
A
2
0
C
X
-P
a
c
k
L
i
P
o
-A
kk
u
7
,
4V
mA
h
A
CA
C
P
OW
E
R A
D
A
PT
ER
MOD
EL:D
G-C
O
12
V010
IN
PUT
: 1
00
-2
40
V~
5
0/
60
H
z
0.
6A
M
A
X
O
U
TP
U
T
:1
2.
8V
=1.2
5A
G
S
M
AD
E
IN
C
HI
NA
!
!
RISK O
F ELE
CT
RIC
AL SH
OC
K
DO NOT OPEN
Elica
12V Caricabatterie
LiPo Balancer
0,3-1,2A
Ricevente
installato
Trasmettitore
2,4 Ghz
I
Spina di cortocircuito
per l’assegnazione
del ricevitore
Motore con regolatore
8 AA Mignon Batterie
per itrasmettitore
Ala
Ascensore
colla per il fissaggio
dell’impennaggio
orizzontale
Timone
Ala
4 Micro-Servi
installati
Fusoliera
94 CESSNA 182 CARSON R/C AEROMODELLO 50 050 5017
Page 95

LiPoAccumulatore
C
ES
S
N
A
-
L
IG
H
T
-
AIR
D
R
AF
T
C
ES
S
N
A
-
L
IG
H
T
-
AIR
D
R
AF
T
CES
SNA
-LI
G
H
T
-A
I
R
D
R
A
FT
CES
SNA
-LI
G
H
T
-A
I
R
D
R
A
FT
2
0
C
X
-
Pa
c
k
Li
P
o
-
A
kk
u
7,
4V
m
A
h
SPIEGAZIONI DI ALCUNE NOZIONI DI AEROMODELLISMO
Cessna 182 potrebbe essere la vostra prima Alettone Un aeroplano necessita di una
macchina volante; perciò la conoscenza di qualche particolare angolazione che gli consente di
nozione fondamentale vi può essere d'aiuto sfruttare il flusso d'aria sulle superfici delle ali.
nell'utilizzo del vostro modello per evitarvi la figura Questa inclinazione laterale in un aeroplano si
del principiante catastrofico. Alcuni termini tecnici e effettua grazie ai flaps delle ali. In questo modello
relative spiegazioni sono nel seguente ordine di Cessna 182, inoltre, i relativi servi e la tiranteria
alfabetico: di azionamento sono già integrati. In fase di
montaggio del velivolo, le spine corrispondenti
Accumulatore. Un accumulatore ricaricabile
della radice delle superfici alari vanno inserite nel
d’energia è comunemente chiamato batteria. Per
ricevitore.
gli aeromodelli sono usate batterie Nickel Metal
Assi liberi di girare al contrario di una
Hydride (NiMH) e Polimeri di lithio (Lipo). L'energia
immagazzinata è misurata in Milli-Ampere-ora macchina o di una nave la Cessna 182 è guidabile
(mAh) . Una batteria con 1300 mAh può cedere su tutti gli assi come si muove in aria. Cambi
corrente a 12A per 6 minuti. Per alimentare il d'altitudine e direzione di volo sono effettuati dal
motore di un aeroplano la batteria deve essere in controllo di superficie (elevatore e timone)
grado di cedere molta corrente; entro pochi minuti
Batterie a secco. Questo tipo di batterie usa e
trasmette la sua energia al motore, con l'aiuto del
getta tipo le alcaline sono una fonte d'energia. Nel
regolatore elettronico. La batteria può essere
modello Cessna 182 le batterie a secco possono
caricata qualche centinaio di volte, dipende dalle
essere usate per alimentare il trasmettitore. Alla
caratteristiche. Assicuratevi di effettuare la carica
fine del loro periodo vitale, il loro voltaggio cala e
corretta per il vostro tipo di batteria. Le batterie
devono essere smaltite negli appositi contenitori.
usurate o difettose devono essere smaltite
Non provare mai a ricaricare una batteria a secco,
seguendo le indicazioni del locale ufficio
con qualsiasi tipo di caricabatteria, può causare
smaltimento rifiuti.
pericolo d'incendio ed esplosione.
BEC è un circuito che serve per eliminare la
batteria della ricevente, che viene quindi
Ala (profilo) La velocità di volo di un aeroplano
alimentata dalla stessa batteria del motore. Il
è rispetto alla superficie dell’ala e al peso: Un aero
voltaggio è controllato in maniera funzionale da
con gran peso e poca superficie dell’ala deve
uno speciale dispositivo.
volare con alta velocità. Cessna 182 raggiunge un
valore medio.
verticale
Muovendo l'asse verticale (curva) :
timone; anche alettone
Muovendo l'asse traversale
(su - giù): ascensore
Muovendo l'asse longitudinale (virata
più decisa): qui timone e
alettone
forma a V
delle superfici alari o
longitudinale
latérale
CESSNA 182 CARSON R/C AEROMODELLO 50 050 5017 95
I
Page 96

movimento ad arco di 1/6 di giro. Generalmente il
Centro di gravità Il centro di gravità è il punto
servo è collegato con un tirante alla parte che deve
di equilibrio di una massa solida ed in un
fare muovere.
aeromodello il centro di gravità riveste un ruolo
determinante in relazione alle forze ascensionali.
Speed controller
Interruttore Sia il trasmettitore sia la ricevente
(regolatore elettronico)
sono corredate di interruttore per accendere e
Il regolatore elettronico determina la velocità del
spegnere.
motore quasi senza perdita di potenza, invece di
accendere e spegnere il motore (con una altissima
frequenza) dando e togliendo corrente in modo
Propulsore (elica) L'elica fissata sul motore
progressivo. Quando il voltaggio della batteria
genera la propulsione del modello.
scende sotto un certo livello, il regolatore spegne il
La potenza del motore, dimensioni e peso del
motore. Il vostro modello avrà così residua
modello,insieme alla forma dell'elica determinano
corrente per essere guidato all'atterraggio a
la velocità del modello. Più è adatta l'elica al
motore spento.
modello, migliore è la prestazione dello stesso. 2
numeri identificano l'elica: il diametro ed il passo
Superficie alare Cessna 182 ha la forma
sempre indicati in pollici. Un’elica per esempio a
classica ad esempio degli aerei privati ad un
8x5 vuol dire che ha il diametro di 8 ed un passo di
motore con una superficie alare quasi rettangolare
5 pollici. E sviluppa una velocità di 61 chilometri
e il timone sull'estremità della fusoliera. Il rapporto
per ora a 8.000 giri il minuto. La velocità che può
tra il peso in ordine di volo e la superficie alare che
essere raggiunta è un poco più bassa dato lo
genera la spinta viene definito carico alare, un
slittamento dell'elica.
peso elevato in presenza di una superficie ridotta
richiede un'alta velocità di volo. Cessna 182 è
Quarzi La tecnologia usata sino ad oggi
piuttosto leggero, quindi è idoneo per velocità
permetteva il comando contemporaneo di più
minori.
modelli attraverso diversi canali (campi di
frequenza), che venivano fissati tramite quarzi di
Timone di direzione Il timone nella maggior
frequenza inseriti nel trasmettitore e nel ricevitore.
parte di aeroplani si trova alla fine del piano di
Il MINIMOA è invece comandato da un sistema nel
coda preferibilmente in posizione verticale con un
campo di frequenza dei 2,4 GHz, che, grazie alla
flap mobile alla fine. Muovendo questo flap a
tecnologia più moderna, consente il funzionamento
destra o a sinistra si determina un movimento
simultaneo di un numero di modelli praticamente
laterale che consente al modello di virare a destra
illimitato, senza l’uso di quarzi. La suscettibilità
o a sinistra. Insieme agli altri elementi (Forma a V
all'interferenza è praticamente nulla rispetto ai
dell'ala e alettoni mobili come accessori) il timone
trasmettitori con tecnologia tradizionale (ad
inizia la virata del modello. Cessna 182 presenta
esempio radiotelefoni con propagazione anomala).
un timone di direzione rigido non controllabile
Il trasmettitore e il ricevitore sono assegnati l’uno
senza ipersostentatore, in questo caso la virata
all’altro, in modo da impedire la reazione ai segnali
viene avviata attraverso la posizione inclinata
esterni.
dell'aereo mediante gli alettoni ed eventualmente
mediante l'equilibratore.
Ricevente La ricevente capta il segnale del
trasmettitore per mezzo dell'antenna e lo converte
in impulsi ai servocomandi che effettuano i
movimenti di superficie. La ricevente è già
installata sul vostra Cessna 182.
Servo Il segnale di cambio direzione del
trasmettitore è trasformato dalla ricevente in
comandi di movimento ai servi montati sul modello.
Il servocomando tramite un ingranaggio effettua un
Microricevente
Microservo
I
B
A
T
GE
A
R
A
U
X
I
R
U
DD
T
H
RO
E
L
E
V
A
IL
E
6
6
C
H
R
E
C
E
I
V
E
R
E
R
6
1
-
2
.
4
G
H
z
DS
S
S
S
I
G
N
A
L
T
M
96 CESSNA 182 CARSON R/C AEROMODELLO 50 050 5017
Page 97

Smaltire la batteria in maniera appropriata.
rifiuti e non riporre
La durata del pacco NiMH dipende dal tipo
mai nel normale
d'utilizzo e dalla corrente con ciò consumata. Se
cassonetto delle
utilizzata costantemente con alti assorbimenti voli
immondizie.
veloci con alti giri del motore, la durata è di circa
250 cariche/scariche, vi accorgerete facilmente del
calo della durata. Un pacco batteria usurato
(capacità molto bassa) o danneggiato(Involucro
danneggiato, cavetti rovinati) deve essere smaltito
secondo le regole del locale ufficio smaltimenti
20
C
X
P
a
c
k
L
i
P
o
-
A
k
k
u
7
,
4V
m
A
h
Smaltimento di batterie esaurite o danneggiate
MODALITÁ D’UTILIZZO DEI PACCHI DI BATTERIE LiPo
Le batterie LiPo (Polimeri di lithi) sono l'ultimo L
ritrovato della tecnica con un'elevata capacità di r
carica rispetto al peso. Durante l'uso di tali batterie a
si deve prestare particolare attenzione in modo da n
evitare possibili pericoli e una perdita di potenza r
anticipata. n
Dopo il volo ed a fine carica, la batteria può essere s
piuttosto calda. Entro certi limiti questo è normale. i
o
Il caricabatterie da 100/240V fornito insieme al kit
di montaggio costituito da un alimentatore e un A secondo del vostro modo di pilotare, la batteria
caricabatterie LiPo Balancer può essere collegato tenderà a scaricarsi più o meno velocemente, vi
a una normale presa. Con una tensione di 12,8V accorgerete che il motore cala di potenza e che il
fornisce fino a 1,25A di corrente, consentendo di modello prende quota più lentamente. Quando vi
ricaricare la batteria di volo LiPo in 1 ora rendete conto che la batteria si sta scaricando
circa.Trascorso questo tempo la batteria va iniziate la manovra d'atterraggio. L'atterraggio con
rimossa dal caricabatteria, onde evitarne il poca o senza batteria è sempre più difficoltoso e
surriscaldamento e possibili danni. Il potreste non avere abbastanza autonomia per
caricabatterie/regolatore Balancer può essere raggiungere il punto desiderato di atterraggio.
impostato anche per una potenza di corrente
inferiore, in tal caso la ricarica è più graduale con Si devono assolutamente evitare cortocircuiti, essi
conseguente possibilità di sfruttare al meglio la causano una fusione dell'isolamento del cavo e
capacità disponibile possono accendere il materiale infiammabile
vicino.
1. Collegare l’alimentatore al caricabatterie LiPo
Balancer. Le batterie LiPo se utilizzate scorrettamente
2. Inserire l’alimentatore in una presa di rete. possono surriscaldarsi.
3. Collegare la spina (del bilanciatore) bianca della b l
batteria LiPo con la presa del caricabatterie. i
4. Per evitare eventuali cortocircuiti prestare c
attenzione al contatto sicuro dei connettori.
5. Controllare il riscaldamento della batteria in
rapporto al tempo di carica. Non devono essere
superati i 50°C, in tal caso scollegare la batteria
dalla rete.
6. Quando il LED verde si accende il processo di
carica è terminato e l’alimentazione elettrica
deve essere interrotta il prima possibile.
e batterie LiPo sono sensibili al cosiddetto
“sca icamento completo” con il quale la tensione di
un cella scende sotto il livello 3V per cella
causa do un loro danneggiamento permanente. Il
regolato e di volo è dotato di un interruttore di
protezio e dalla sottotensione che arresta il motore
in ca o di tensione ridotta, la tensione residua è
suff ciente per mantenere il controllo del mezzo nel
v lo librato.
In ogni caso isogna caricare la batteria fuori de
modello, ci raccomandiamo di rimuovere la batter a
dopo ogni volo o corsa e riporla in un posto si uro.
I
CESSNA 182 CARSON R/C AEROMODELLO 50 050 5017 97
Page 98

Il set completo Cessna 182 contiene un inferiore (100/150 metri) altrimenti non si riescono
telecomando a 4 canali, il ricevitore e il regolatore a capire le reazioni del modello ai comandi.
di volo sono già incorporati nella Cessna 182, così Possibili guasti non possono mai essere esclusi al
come quattro microservo comandi per azionare gli 100% nemmeno con la tecnologia più moderna,
alettoni e l'equilibratore. Il segnale radio ha una quindi on iniziare mai un volo con batterie del
gittata di circa 300 metri, quindi non portarsi mai trasmettitore scariche altrimenti si rischia di
oltre tale distanza. Normalmente volare a distanza perdere il controllo del modello.
APPARATO RADIO
I
Assegnazione del riconoscimento del trasmettitore al ricevitore
Oltre alle informazioni di controllo, durante il 1. Disporre il trasmettitore e il ricevitore funzionanti
controllo a distanza insieme a ogni impulso di a breve distanza fra loro, ma spenti. Per
trasmissione viene trasmesso un impulso di l’assegnazione del ricevitore al trasmettitore,
riconoscimento elettronico in base al quale il tenere premuto il tasto di taratura della
ricevitore capisce che si tratta del segnale del “suo” frequenza sul trasmettitore e accendere il
trasmettitore. Poiché sono disponibili milioni di trasmettitore.
riconoscimenti, è molto improbabile che un 2. Inserire la spina di cortocircuito (vedere
trasmettitore esterno possa influenzare il proprio illustrazione in basso) nello slot “BATT” del
ricevitore. Tuttavia, ad ogni nuovo ricevitore prima ricevitore. Per l’alimentazione di corrente del
del primo azionamento deve essere comunicato ricevitore, collegare il regolatore di volo al
una sola volta il riconoscimento del proprio ricevitore e alla batteria di volo. Si accenderà la
trasmettitore. Quindi è necessario il seguente spia di controllo.
procedimento, da eseguire possibilmente in un 3. Se la taratura della frequenza è riuscita, la spia
luogo nel quale la trasmissione radio non sia di controllo rimane accesa.
disturbata da nessun altro segnale elettrico, in 4. Se la spina di cortocircuito viene estratta, la spia
particolare quelli generati da altri trasmettitori a 2,4 di controllo lampeggia. Il ricevitore passa alla
GHz. modalità di pronto operativo.
5. Premere di nuovo il tasto di taratura della
frequenza per la risposta. A questo punto il
trasmettitore è pronto all’uso e la spia di
controllo è accesa a indicare il funzionamento
normale del ricevitore.
DIGITAL PROPORTIONAL RADIO CONTROL SYSTEMDIGITAL PROPORTIONAL RADIO CONTROL SYSTEM
ETB41 - 2.4 GHzETB41 - 2.4 GHz
ONON
OFFOFF
11 22 33 44
REVREV
NORNOR
Tasto di taratura della frequenza
B
A
T
G
E
AR
A
U
X
I
R
U
D
D
T
H
R
O
E
L
E
V
A
IL
E
6
6
C
H
R
E
C
E
I
VE
R
E
R
6
1
-2
.
4
G
H
z
D
S
S
S
S
I
G
N
A
L
T
M
spina di cortocircuito
98 CESSNA 182 CARSON R/C AEROMODELLO 50 050 5017
Page 99

Vista esterna della trasmettitore
1. Antenna orientabile
2. Spia di controllo della tensione della
batteria
Finché la spia di controllo è verde, è disponibile
una sufficiente potenza di trasmissione per l
funzionamento dell'aereo. Se la luce
visualizzata è rossa, si deve interrompere il volo
in corso (è ancora possibile un atterraggio
sicuro), non è più consentito un ulteriore
decollo, le batterie sono scariche e devono
essere sostituite.
3. Canale 1/4 stick sinistro
4. Canale 2/3 stick destro
Le cloche sono portate nella rispettiva
posizione neutrale (intermedia) rilasciando
l'effetto a molla. Un'eccezione è rappresentata
dalla leva del gas, che rimane nella posizione
impostata mediante un arresto.
5. Interruttore on/off (Acceso/Spento) 11. Jack di ricarica
Note: l'interruttore ON/OFF deve essere in
posizione "OFF" prima di ricaricare. Utilizzare una
6-9 Trims canale 1/4
caricabatteria per batterie idruro di nickel-metallo
Questo utile congegno consente di regolare la
(NiMH) tipo N-3U o equivalente. Altri tipi di batterie
posizione del servo ed ottenere il punto neutro,
possono infiammarsi causandovi Danni e ferite.
consentendo di effettuare piccole regolazioni che
possono influire notevolmente sulla guida del
modello. I trims hanno delle piccole tacche e si
utilizzano per le regolazioni finali.
12. Collare supporto trasmittente
Disponibile separatamente
10 Tasto di assegnazione del ricevitore
Prima di iniziare l’uso, assegnare al trasmettitore
13 Maniglia
una sola volta un nuovo ricevitore (collegamento).
Per fare questo premere, fra gli altri, questo tasto.
14 Interruttori reverse, servi e regolatore di
Vedere descrizione a pagina 98.
volo
Gli interruttori permettono l’inversione del senso di
rotazione dei servi e dell'azione del regolatore di
volo (senso di rotazione dell'elica).
GAS A SINISTRA
Stick sinistro Stick destro
sup. / davanti Accelerare Altitudine ingiù
inf. / dietro Motore levato Altitudine insù
sinistro timone sinistra alettone sinistra
destra timone destra alettone destra
I
1
4
6
7
8
9
10
11
12
DIGITAL PROPORTIONAL RADIO CONTROL SYSTEMDIGITAL PROPORTIONAL RADIO CONTROL SYSTEM
ETB41 - 2.4 GHzETB41 - 2.4 GHz
ONON
OFFOFF
11 22 33 44
REVREV
NORNOR
2
3
5
13
14
Polarità del
Jack di ricarica
CESSNA 182 CARSON R/C AEROMODELLO 50 050 5017 99
Page 100

INDICAZIONI DI
SICUREZZA PER
LE BATTERIE
INDICAZIONI DI
SICUREZZA PER
LE BATTERIE
Usate correttamente, le batterie sono sicure ed
importante fonte d'energia trasportabile. Possono
sorgere dei problemi se sono male utilizzate col
risultato che possono perdere acidi, incendiarsi od
esplodere.
Qui trovata qualche piccola indicazione per
utilizzare correttamente le batterie ed evitare
problemi.
Tenere le batterie nuove nella loro confezione e
lontane da oggetti metallici che possono causare
un corto circuito con conseguenti perdite di liquidi o
addirittura incendi ed esplosioni.
Non provare mai a ricaricare batterie non
ricaricabili (a secco) si può causare perdite di
liquidi o addirittura incendi ed esplosioni. Le
batterie ricaricabili sono ben contrassegnate.
Assicuratevi di posizionare correttamente le
batterie rispettando le polarità indicate sulle stesse
e sugli apparecchi, la cattiva disposizione può
causare perdite di liquidi o addirittura incendi ed
esplosioni.
Rimuovere le batterie scariche dall'apparecchio,
anche quelle che se pur cariche sono montate da
tanto tempo altrimenti si possono verificare perdite
di liquidi e danneggiare l'apparecchio.
Controllate che i bambini se sostituiscono le
batterie osservino questi suggerimenti.
Sostituite contemporaneamente tutto il set di
batterie, assicurandovi di non mischiare batterie
vecchie e nuove o di tipi diversi, l'inosservanza può
causare perdite di liquidi o addirittura incendi ed
esplosioni.
Non buttare mai le batterie su fiamme, altrimenti
possono esplodere. Non gettate le batterie
scariche nella spazzatura, ma negli speciali bidoni
atti allo smaltimento.
Assicuratevi che il vano delle batterie sia ben
chiuso.
D
E
POSIT
O
Sostituzione batterie
trasmittente
Per rimuovere il coperchio batterie,
sfilarlo verso il basso in direzione delle
frecce, facendo leggermente pressione
con le dita. Inserire le batterie
osservando la corretta polarità
stampata sulle vane batterie. Se
l'indicatore di voltaggio non rileva le
batterie controllare la polarità ed
assicurasi di avere utilizzato batterie
cariche.
I
PUSH
AA
1.5V
AA
1.5V
AA
1.5V
AA
1.5V
AA
1.5V
AA
1.5V
AA
1.5V
AA
1.5V
SIMULATOR
100 CESSNA 182 CARSON R/C AEROMODELLO 50 050 5017
 Loading...