

Page 1

CARSON 3D Helicopter Bluster 250se 50 050 7028
RADIO CONTROLLED MICRO 3D HELICOPTER
Instruction Manual Page 2 - 22
쮕
Betriebsanleitung Seite 23 - 43
Mode d’emploi Page 44 - 64
Instrucciones Página 66 - 86
Istruzioni d’uso Pagina 87 - 107
Page 2
2
GB
CARSON 3D Helicopter Bluster 250se 50 050 7028
Dear Customer
Thank you for choosing the Bluster 250se model helicopter
from CARSON. This helicopter is powered by a micro electric
motor and is our latest product. The Bluster 250se is equipped
with adjustable collective pitch, which makes it suitable for
outdoor flying.
Bluster 250se helicopter is designed with BALL HALL
collective pitch system.
With the good combination of stability and flexibility as well as
stable flying performance, it is suitable for outdoor flying.
Equipped with head-lock gyro, it is with excellent stability. It
has perfect 3D aerobatic flying ability due to specifications of
powerful brushless motor, li-polybattery.
Limited Warranty
This product is warranted by CARSON against manufacturing
defects in materials and workmanship under normal use for 24
months from the date of purchase from authorised franchisees
and dealers. In the event of a product defect during the
warranty period, return the product along with your receipt as
proof of purchase to any CARSON store. CARSON will, at its
option, unless otherwise provided by law:
(a) Correct the defect by repairing the product without
charging for parts and labour
(b) Replace the product with one of the same or similar design;
or
(c) Refund the purchase price.
All replaced parts and products, and products on which a
refund is made, become the property of CARSON. New or
reconditioned parts and products may be used in the performance of warranty services. Repaired or replaced parts and
products are warranted for the remainder of the original
warranty period. You will be charged for repair or replacement
of the product made after the expiration of the warranty period.
The Warranty does not cover:
• Damage or failure caused by or attributable to acts of God,
abuse, accident, misuse, improper or abnormal usage,
failure to follow instructions, improper installation or
maintenance, alteration, lightning or other incidence of e
xcess voltage or current;
• Damage caused by losing control of your model;
• Any repairs other than those provided by a CARSON
Authorised Service Facility;
• Consumables such as fuses or batteries;
• Cosmetic damage;
• Transportation, shipping or insurance costs; or
• Costs of product removal, installation, set-up service
adjustment or reinstallation
This warranty gives you specific legal rights, and you may also
have other rights which may vary according to the country of
purchase.
Declaration of conformity
Dickie-TAMIYA GmbH&Co. KG hereby declares that this model
kit with radio, motor, battery and charger is in accordance with
the basic requirements of the following European directives:
98/37EG and 89/336/EWG and other relevant regulations of
guideline 1999/5/EG (R&TTE). The original declaration of
conformity can be obtained from the following address in
Germany:
Dickie-Tamiya GmbH&Co. KG • Werkstraße l • D-90765 Fürth •
Germany
Tel.: +49/ (0)911/ 9765-03
The product you have purchased is powered by a
rechargeable lithium-polymer battery.
The battery is recyclable. At the end of its useful life,
under various national / state and local laws, it may
be illegal to dispose of this battery into the
municipal waste stream.
Check with your local solid waste officials for details
in your area for recycling options or proper disposal.
We wish you good luck and a lot of fun with your CARSON
model helicopter!
Before flying your new model carefully read these instructions!
Page 3

3CARSON 3D Helicopter Bluster 250se 50 050 7028
GB
Contents
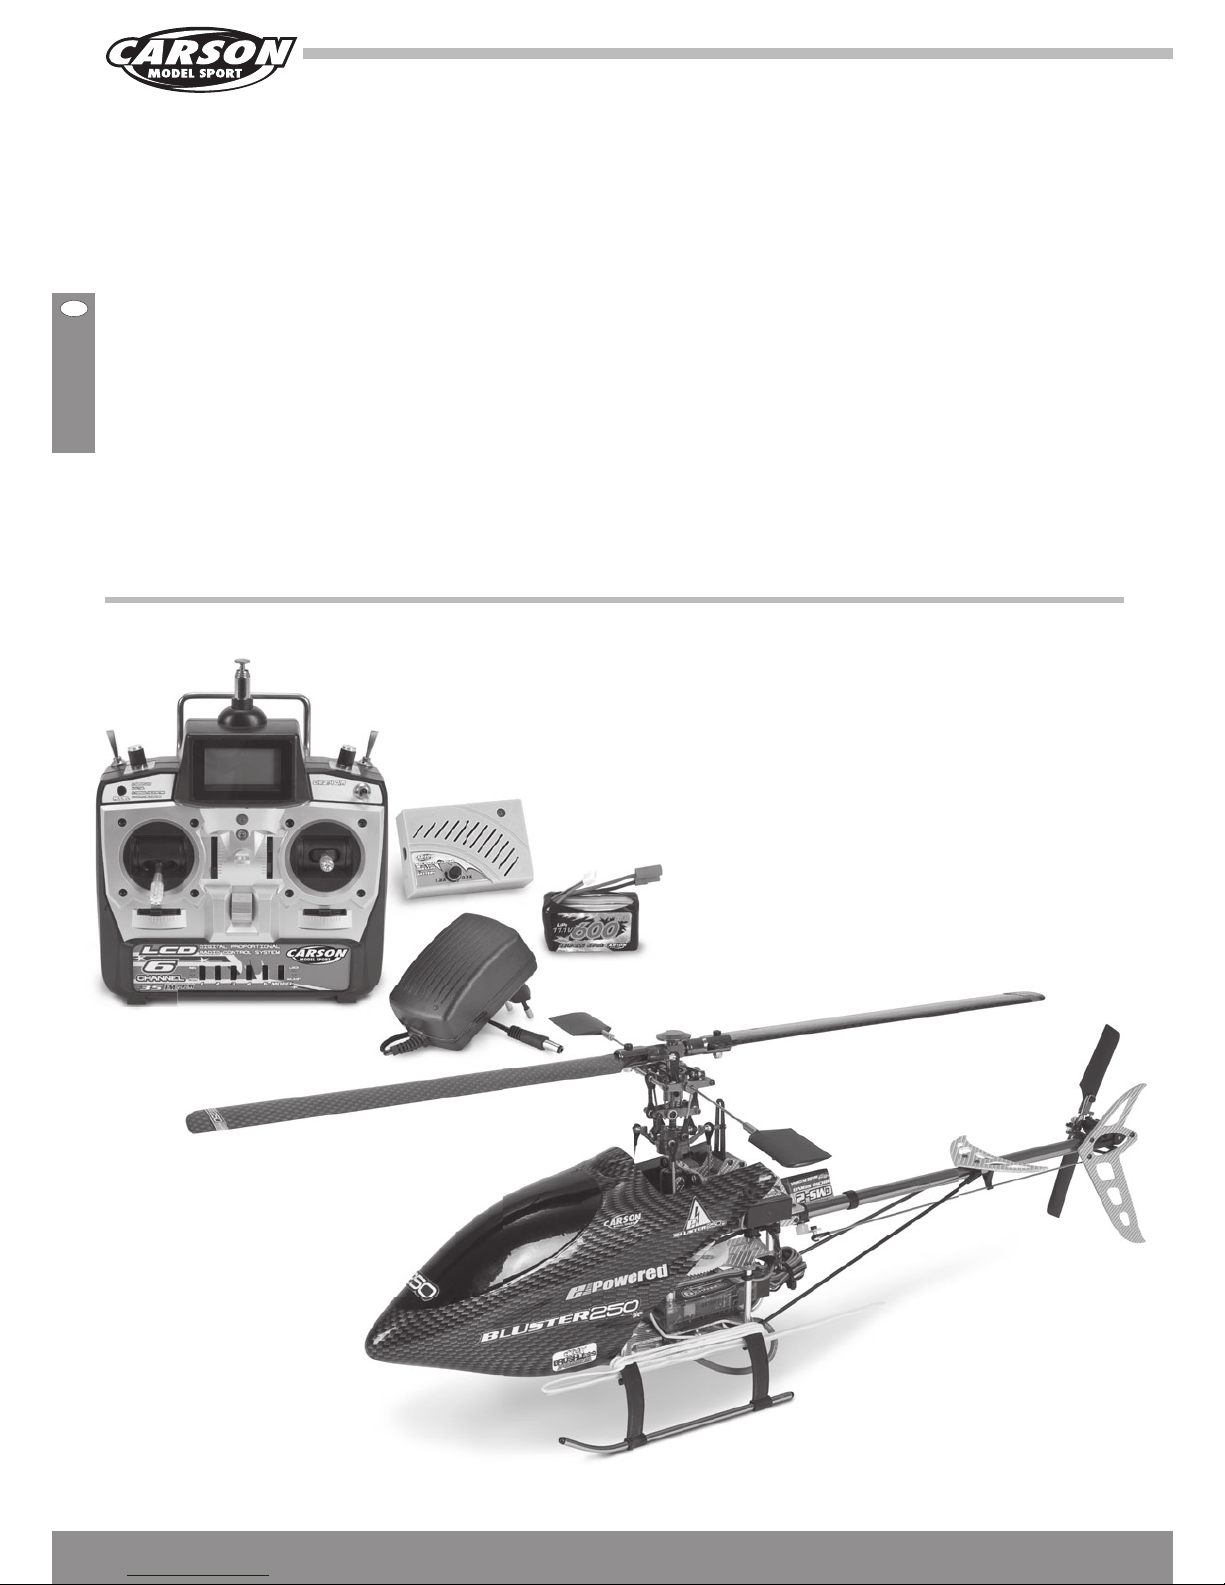
Included Items
• Preassembled and ready-to-fly model
• 6-channel remote control transmitter 35 MHz FM with
LCD display
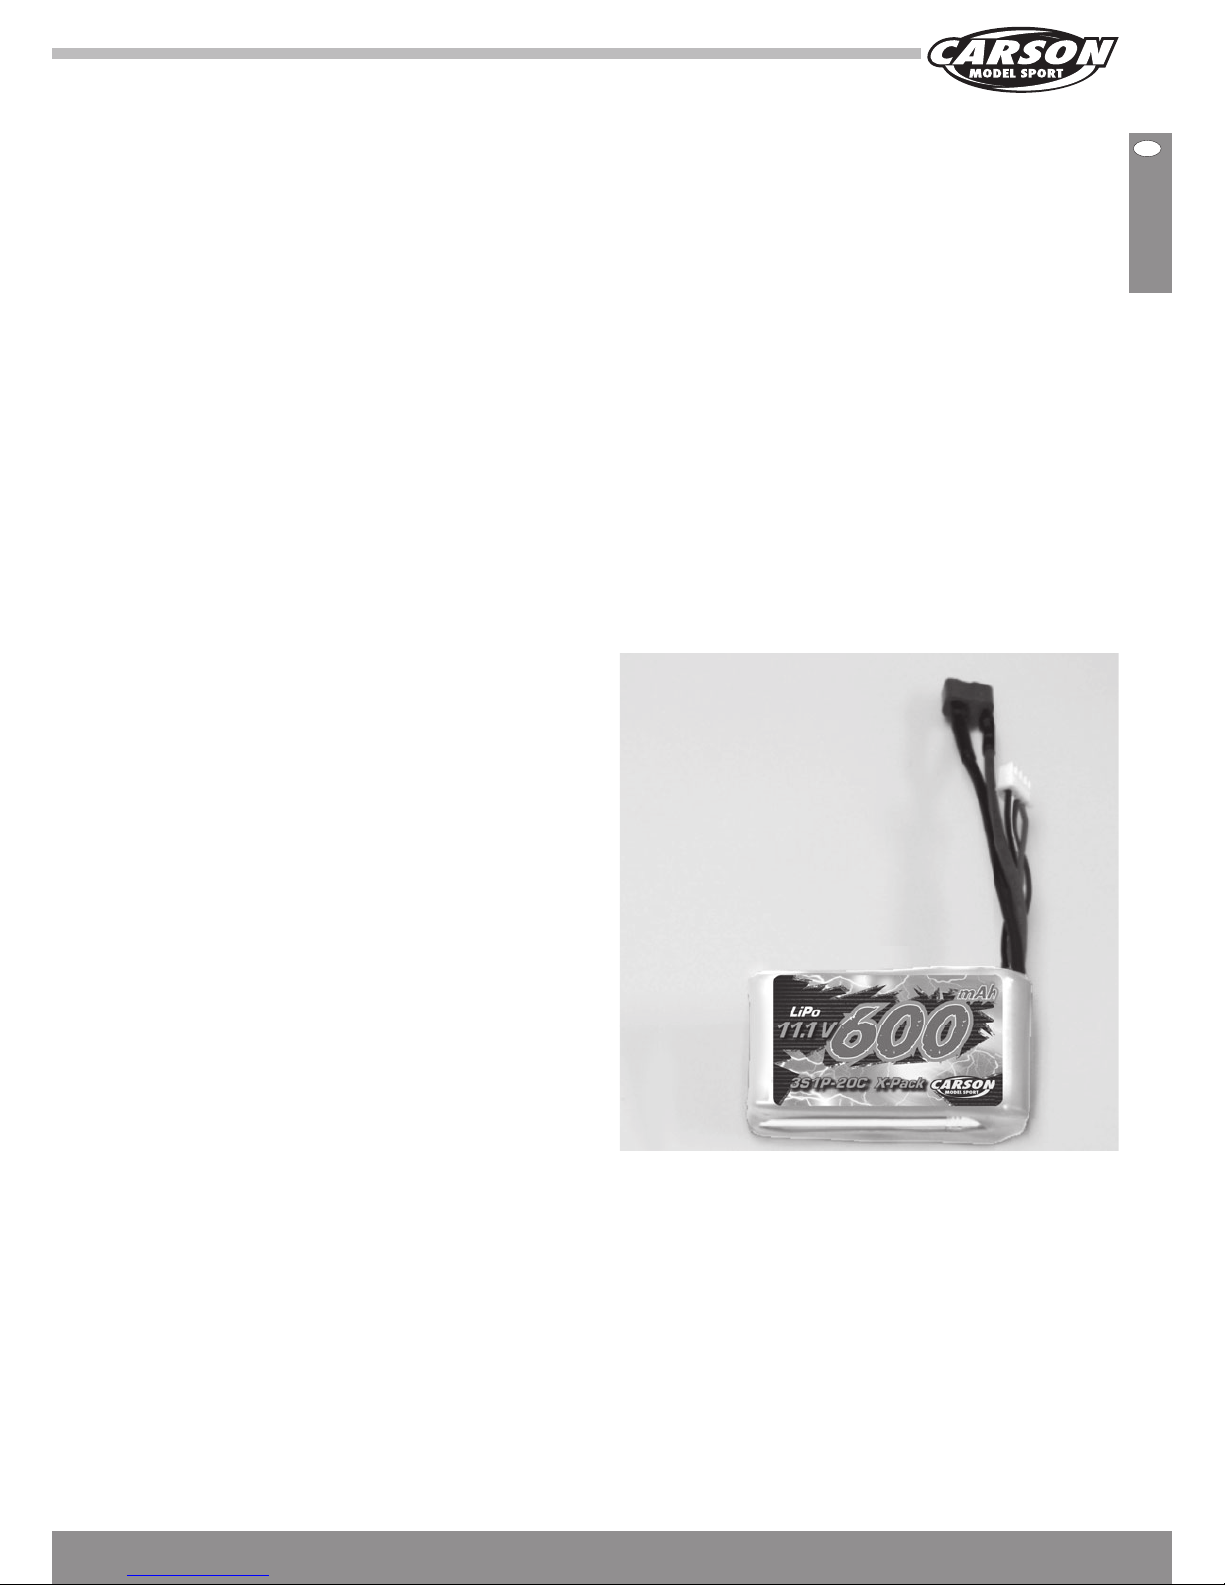
• Lipo battery 11.1 V/ 600 mAh
• LiPo-Balance charger with power adaptor
• 4 x 5 g servos, already installed
• Fully adjustable high-tech gyro
• User instructions with lots of tips
• Brushless motor/ controller built in
• Flight simulator software and connection lead
Preface ....................................................................................... 2
Included Items ........................................................................... 3
Specifications ............................................................................ 4
Safety precautions .................................................................... 4
Tips for Safety ........................................................................... 5
a. Parts List .............................................................................. 9
b. Functions for Control Set ..................................................10
c. Picture of Control Set Connection ....................................11
d. Gyro Adjustment ................................................................ 11
e. Preparations ....................................................................... 12
f. Preflight Check List ........................................................... 13
g. Normal Flight ...................................................................... 14
h. All Parts and Equipment .................................................... 15
i. Balancing the Main Rotor Blades and Tail Blades ........... 16
j. Adjusting Blade Tracking ................................................... 16
k. Power Checking .................................................................16
l. Maintenance ...................................................................... 17
m. How to Change Frequencies ............................................. 18
n. Common Flight .................................................................. 19
o. 3D Aerobatics Flight .......................................................... 20
p. Inverted 3D Flight .............................................................. 21
q. Troubleshooting ................................................................. 22
Exploded Drawing ................................................................. 108
Spare Parts ............................................................................ 112
Accessories ........................................................................... 115
Page 4

4
GB
CARSON 3D Helicopter Bluster 250se 50 050 7028
Safety Precautions
This model is not a toy!
• This radio controlled model is not a toy. Learning how to
control it correctly is a gradual process.
• Children under 14 years of age should be supervised by an
adult.
Driving a radio controlled car is a fascinating hobby. However, it
has to be practised with the necessary caution and respect.
A radio controlled model car can cause damage and injury and
the user is liable for any such incident.
Make sure that you have sufficient insurance cover when
practising your hobby.
Only a well maintained model will function in a correct manner.
Only use approved spare parts and never improvise with any
unsuitable items.
It is the user’s responsibility to ensure that the model is
functioning correctly and that all nuts, bolts and screws are
properly tightened.
Caution
R/C modeling is a hobby with high technology and should
not be considered a children’s toy. There is risk involved during
the operation of this product and the user should take all
precautions seriously or serious bodily injury may result.
Improper disassembly, improper adjustments and setup can
lead to unsatisfactory or unsafe operation. If you have any questions regarding the use, maintenance, or safe operation of this
model, please contact your local retailer.
General
• Read unconditionally the Operating Manual carefully before
use and keep it for future reference.
• Make yourself familiar with all the instructions for flight
operation.
Note
As with any R/C product there are risks involved when flying
this model. A beginner should seek the help of a qualified
skilled R/C pilot to ensure that the model is airworthy and
capable of safe operation.
Any damage, neglect, or unfamiliar use of this product can
cause unexpected accidents or injury. Be sure to read this
manual and follow all of the safety notes.
Remember this is not a toy and children should be supervised
prior to starting or flying this helicopter.
Specifications:
RTF (ADVANCED)
Length 515 mm
Height 155 mm
Diameter for main rotor 390 mm
Diameter for tail rotor 105 mm
Weight 255 g without battery
Sender 6 channels
Receiver 6 channels
Gyro: adjustable hightech gyro
Brushless motor: CARSON HELI-X B10
Brushless motor speed controller: CARSON HELI-X 10 A
Li-poly battery: 600 mAH/ 11.1V
Servo: 4x micro servos 5 g
*Specifications may change without notice.
Note
If the 3D flight mode is selected (the right hand side switch in
3D position) when the Tx is turned on, the throttle will have no
function.
The motor will not start even if you move from full back to zero
throttle.
In order to start the motor, the Tx must be in normal flight
mode (the right hand side switch in nor position) when the Tx
is turned on. Also the throttle must be in zero before the motor
can be started.
Page 5

5CARSON 3D Helicopter Bluster 250se 50 050 7028
GB
1. Locate an appropriate location to fly
your helicopter:
R/C helicopters are capable of flying at high speeds, thus
posing a certain degree of potential danger to both the flyer
and bystanders. Try to choose and appropriate flying site where
the surface is flat, smooth, and clear of obstacles. A good
choice would be and empty parking lot free from parked
cars and pedestrians. An empty gymnasium or warehouse
without obstructions. Do not fly near buildings, trees or high
voltage lines to ensure the safety of yourself and others and
your model. Do not fly your helicopter during inclement weather
such as rain, snow, high winds or darkness.
2. Obtain the assistance of and
experienced pilot.
Prior to turning on your model and transmitter check to make
sure that no one else is operating on the same frequency as
your model. Frequency interference can cause your model to
become uncontrollable as well as other models if they are on
the same frequency. The help of and experienced pilot will
ensure that you will have a well trimmed, correctly functioning
helicopter for the first flight.
3. The same frequency may not be used
in your immediate vicinity.
Please check that no-one is using the same transmission
frequency at the same time in your immediate vicinity otherwise
this may result in you losing control of the helicopter which
could lead to an accident.
Tips for Safety
Anfänger Anfänger Experte
35.950 MHz
35.950 MHz
Page 6

6
GB
CARSON 3D Helicopter Bluster 250se 50 050 7028
4. Always be aware of the rotating blades.
During the operation of your new Bluster 250se helicopter the
main rotor and tail rotor will be spinning at a high rate of speed.
The blades are capable of inflicting serious bodily injury and
damage to you and to others. Be conscious of your actions and
be careful to keep your hands, face, eyes, and loose clothing
away from the blades and gears.
Always fly your model a safe distance from yourself and others
as well as nearby objects. Never take your eyes off the model
or leave it unattended while it is
turned on. Always turn off your
model, then your transmitter
after each flight.
5. Keep your Bluster 250se helicopter
away from heat and humidity.
Your new Bluster 250se helicopter is a hi-tech electronic
device; never subject your model to temperature extremes,
do not leave your model in an automobile for extended times
because high temperatures can damage the delicate electronic
and plastic parts.
Charge mode and warning
Charge the Lithium polymer battery only with the supplied wall
charger. Observe the polarity of the battery and the charger
and ensure that the connection is correct, do not force the
connector or damage may result.
Please charge your battery prior to the first use so that you
start with a freshly charged battery. When the battery is
charged the LED will glow green, during charging the LED on
the charger will glow red.
To ensure safe operation do not charge the battery for
extended periods of time. Never leave the charger unattended
and never leave the charger on overnight. Adult supervision is
required during the charging of lithium batteries.
The supplied 600 mAH Li-Poly battery only should be charged
with the included Li-Poly battery charger only. Charging the
battery with a charger not designed specifically for lithium
batteries can cause fire or and explosion of the battery. Please
observe all safety instructions. If the battery ever becomes
puffy or is damaged dispose of the battery in a safe container
outdoors away from flammable materials.
1. Do not place the battery on or near to things which might
catch fire during the charging process.
2. Charge the lithium-polymer battery on a non-flammable
base, e.g. on a metal or stone plate.
Page 7
7CARSON 3D Helicopter Bluster 250se 50 050 7028
GB
Lithium-Polymer battery
Employ the enclosed battery exclusively for this model.
Only employ an original part as the replacement battery.
• Load the battery exclusively outside of the model and away
from easily flammable materials! It is normal that the battery
warms up when charging.
• Do not overload or exhaustively discharge the battery!
• Pay attention to the charge indicators on your transmitter.
• Ensure that the batteries for the radio and receiver are fully
charged and of the correct voltage. When the batteries are
running low you might loose control of your model.
• Charge the LiPo battery at least every six months in order to
avoid low discharging.
• Remove the charged battery from the battery charger in
order to avoid self-discharging. If not using the model for a
longer time, the rechargeable battery has to be removed.
At the end of its useful life, under various national / state and
local laws, it may be illegal to dispose of this battery into the
municipal waste stream. Check with your local solid waste
officials for details in your area for recycling options or proper
disposal.
The batteries must not
• Be immersed in liquid,
• Be thrown in the fire or subjected to high temperatures or
• Mechanical stresses or
• Be taken apart or damaged
• Or be short-circuited.
If during operation or while charging or storing the battery you
perceive a noticeable smell, a discolouration, excessive heating
or deformation or any other abnormality:
• Disconnect the battery from the battery charger
• Separate the battery from the consumer
• No longer employ the battery.
If electrolyte drains out:
• Avoid contact with eyes and skin!
• Wash the affected locations immediately with clear water
and consult a physician.
Page 8

8
GB
CARSON 3D Helicopter Bluster 250se 50 050 7028
Li-Polymer battery Safety Instruction
1. Do not disassemble or reconstruct battery.
2. Do not short circuit battery.
3. Do not use or leave battery nearby fire, stove or heated
place (more than 80 degrees centigrade).
4. Do not immerse the battery in the water and sea water, or
get it wet.
5. Do not charge battery nearby the fire or under the blazing
sun.
6. Do use the specified charger and observe charging
requirement.
7. Do not drive a nail into the battery. Strike it by hammer, or
tread it.
8. Do not give battery impact or fling it.
9. Do not use the battery with conspicuous damage or
deformation.
10. Do not make the direct soldering on battery.
11. Do not reverse charge or overdischarge the cell.
12. Do not reverse-charge or reverse-connect.
13. Do not connect battery to the plug socket or car-cigaretteplug.
14. Do not use battery for unspecified equipment.
15. Do not touch a leaked battery directly.
16. Do not use Lithium ion battery in mixture.
17. Keep the battery away from babies.
18. Do not continue to charge battery over specified time.
19. Do not get into a microwave or high pressure container.
20. Do not use a leaked battery nearby fire.
21. Do not use or leave the battery under the blazing sun (or
heated car by sunshine).
22. Do not use nearby the place where generates static
electricity (more than 64 V) which give damage to the
protection circuit.
23. Charging temperature range is regulated 0 degrees
centigrade and 45 degrees centigrade. Do not charge the
battery out of recommended temperature range.
24. When the battery has rust, bad smell or something
abnormal at first-time-using, do not use the equipment and
go to bring the battery to the shop which it was bought.
25. In case children use the battery, their parents teach how
to use batteries according the manual with care. And also,
when children are using the batteries, pay attention to
according to that or not.
26. Keep the battery out of the reach of children. And also,
using the battery, pay attention to be taken out from the
charger or equipment by little children.
27. If the skin or cloth is smeared with liquid from the battery,
wash with fresh water. It may cause the skin inflammation.
28. Never discharge the battery at a rate of more than 5c nor
allow the voltage to go below 9 V, as this damages the
battery.
29. Never charge the battery on a carpeted floor as this may
cause a fire.
30. Do not use the battery for equipment that is not specified
nor for any other purposes.
31. Do not touch the battery if it is leaking. If you do touch the
battery, you should wash your hands immediately.
32. Do not charge your battery for longer than specified.
33. Do not use any batteries that have swelled up or are
damaged.
Page 9

9CARSON 3D Helicopter Bluster 250se 50 050 7028
GB
The Bluster 250se includes the following parts, please check to
make sure that all of the parts are included in your kit. Should
anything be missing please contact your local dealer.
Paddle
Main rotorblade
Rotorblade holder
Rotor shaft
Swashplate
Tail pipe
Landing gear
Canopy
Tail rotor
a. Parts List
Gyro Receiver 35 MHz BL-Motor Controller
Battery 11.1 V/ 600 mAh Balance charger
Transmitter 4 x 5 g servos
Page 10
10GBCARSON 3D Helicopter Bluster 250se 50 050 7028
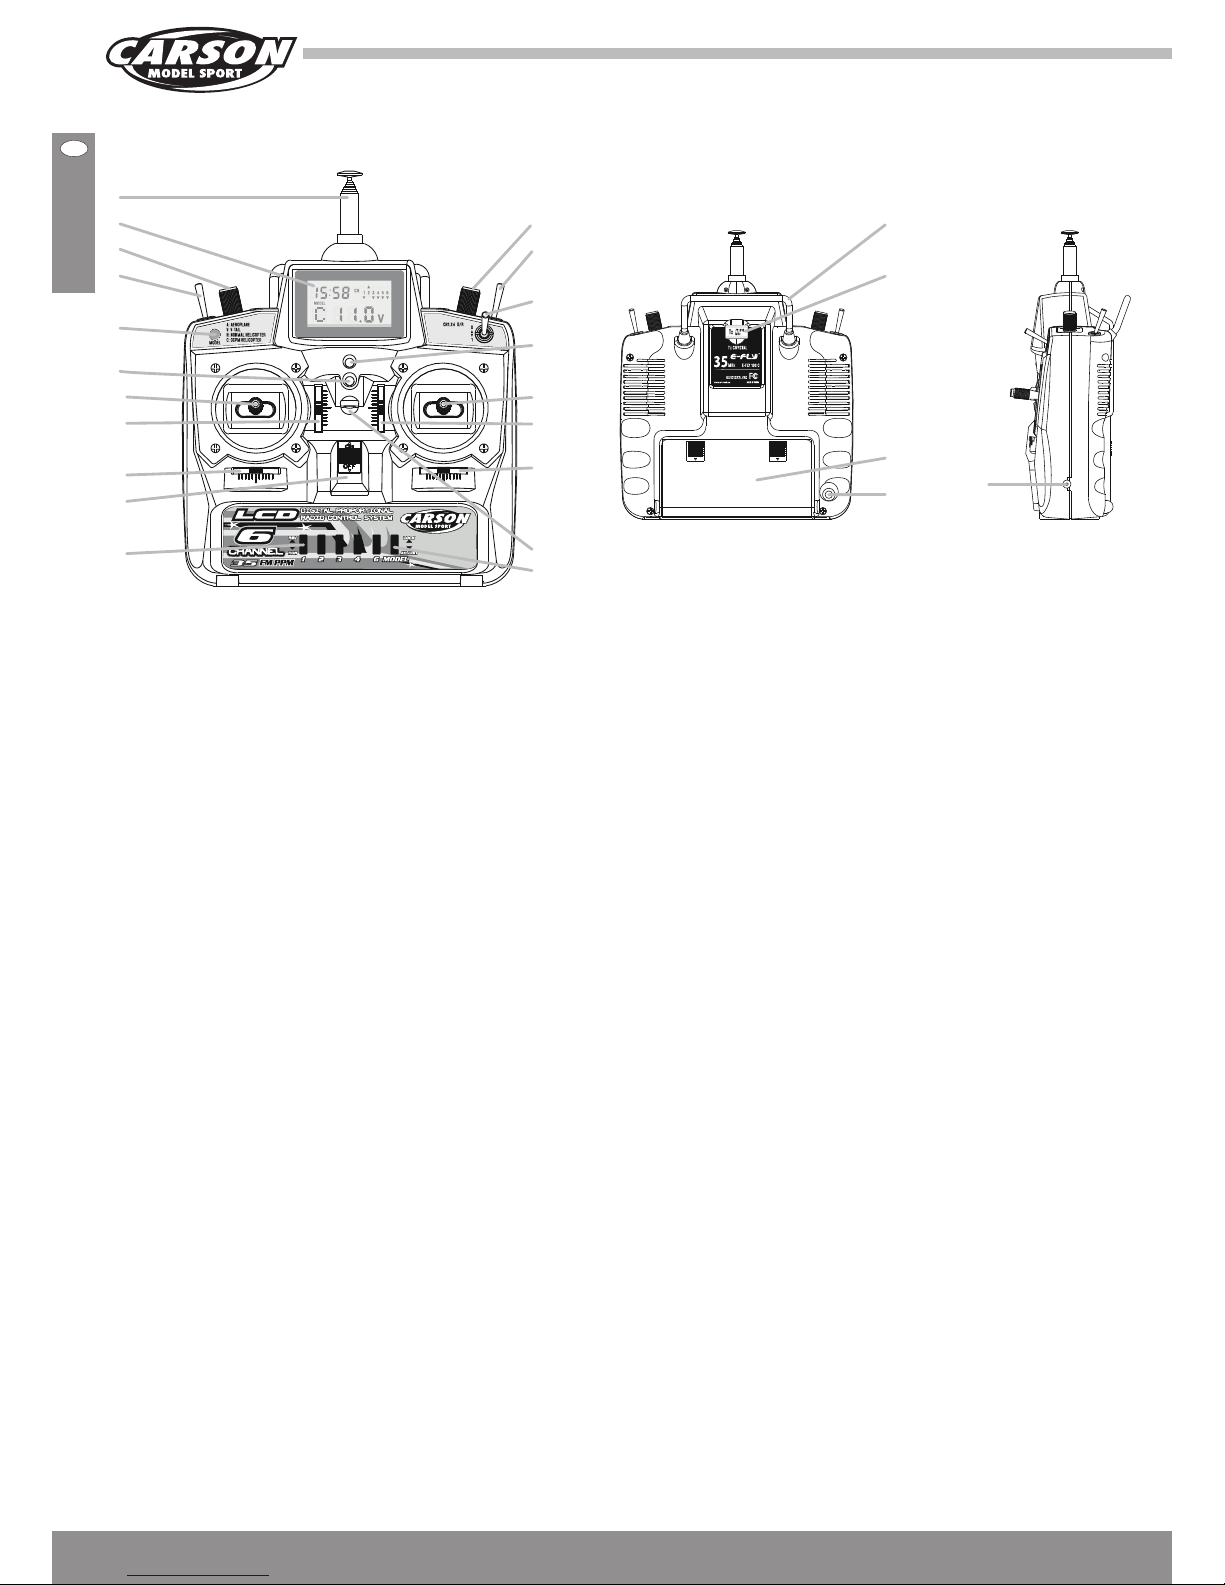
b. Functions for Control Set
1 Telescope antenna
2 LCD
1. To read the battery voltage
2. Shows which channel is on ”reverse”
3. To show the flying time
4. To show the flying mode
5. To show the status of the key lock (unlocked/ locked)
3 Pitch full-range deflection
4 Pitch trim
5 Switch 1
This switch controls channel 5. This one controls the gyro.
Can also be used for a collapsable landing gear, a camera,
etc.
6 3D switch
Switches ”Normal/ hover flight” or ”3D mode”
7 Switch ”MODEL” to choose the requested flight model
MODEL A: simulaton of flaps
MODEL V: additional function
MODEL H, C, C1: Freewheel in the mid position of the gas/
pitch joystick.
WARNING!
If the models H, C und C1 are choosed, you only can switch
to 3D mode, if the gas/ pitch joystick is in mid position!
8 LED (green) indicator for power
9 LED (red) indicator for low voltage
If the red LED flashes, immediately change the sender
batteries, at the latest when the LCD display extinguishes!
10 Right joystick (channel 2 and 1)
11 Left joystick (channel 3 and 4 )
Both joysticks can be lengthened about 5 mm.
12 Trim channel 2
13 Trim channel 4
14 Trim channel 1
15 Trim channel 3
16 Ring for neck strap
17 Power on/ off switch
WARNING!
Switching on the sender with preselected MODEL H, C und
C1, the 3D switch has to be at ”NOR”!
18 ”LOCK” slide switch to lock the control dial and the
pushbutton ”MODEL”.
19 Reverse switch channel 1, 2, 3, 4, 6
Up: NOR (normal)
Down: REV (reverse)
20 Carry handle
21 Crystal (back of the transmitter)
22 Battery bay (back of the transmitter)
23 Socket for fly simulator (back of the transmitter)
24 Rechargeable socket (side)
25 Snap switch, dual rate channel 1, 2, 4
Reduction of the ways of function 1, 2 and 4 from 100%
(Pos. 0) to 70% (Pos. 1)
1
2
3
5
7
9
11
13
15
17
19
4
6
25
8
10
12
14
16
18
20
21
22
23
24
Page 11
11CARSON 3D Helicopter Bluster 250se 50 050 7028
GB
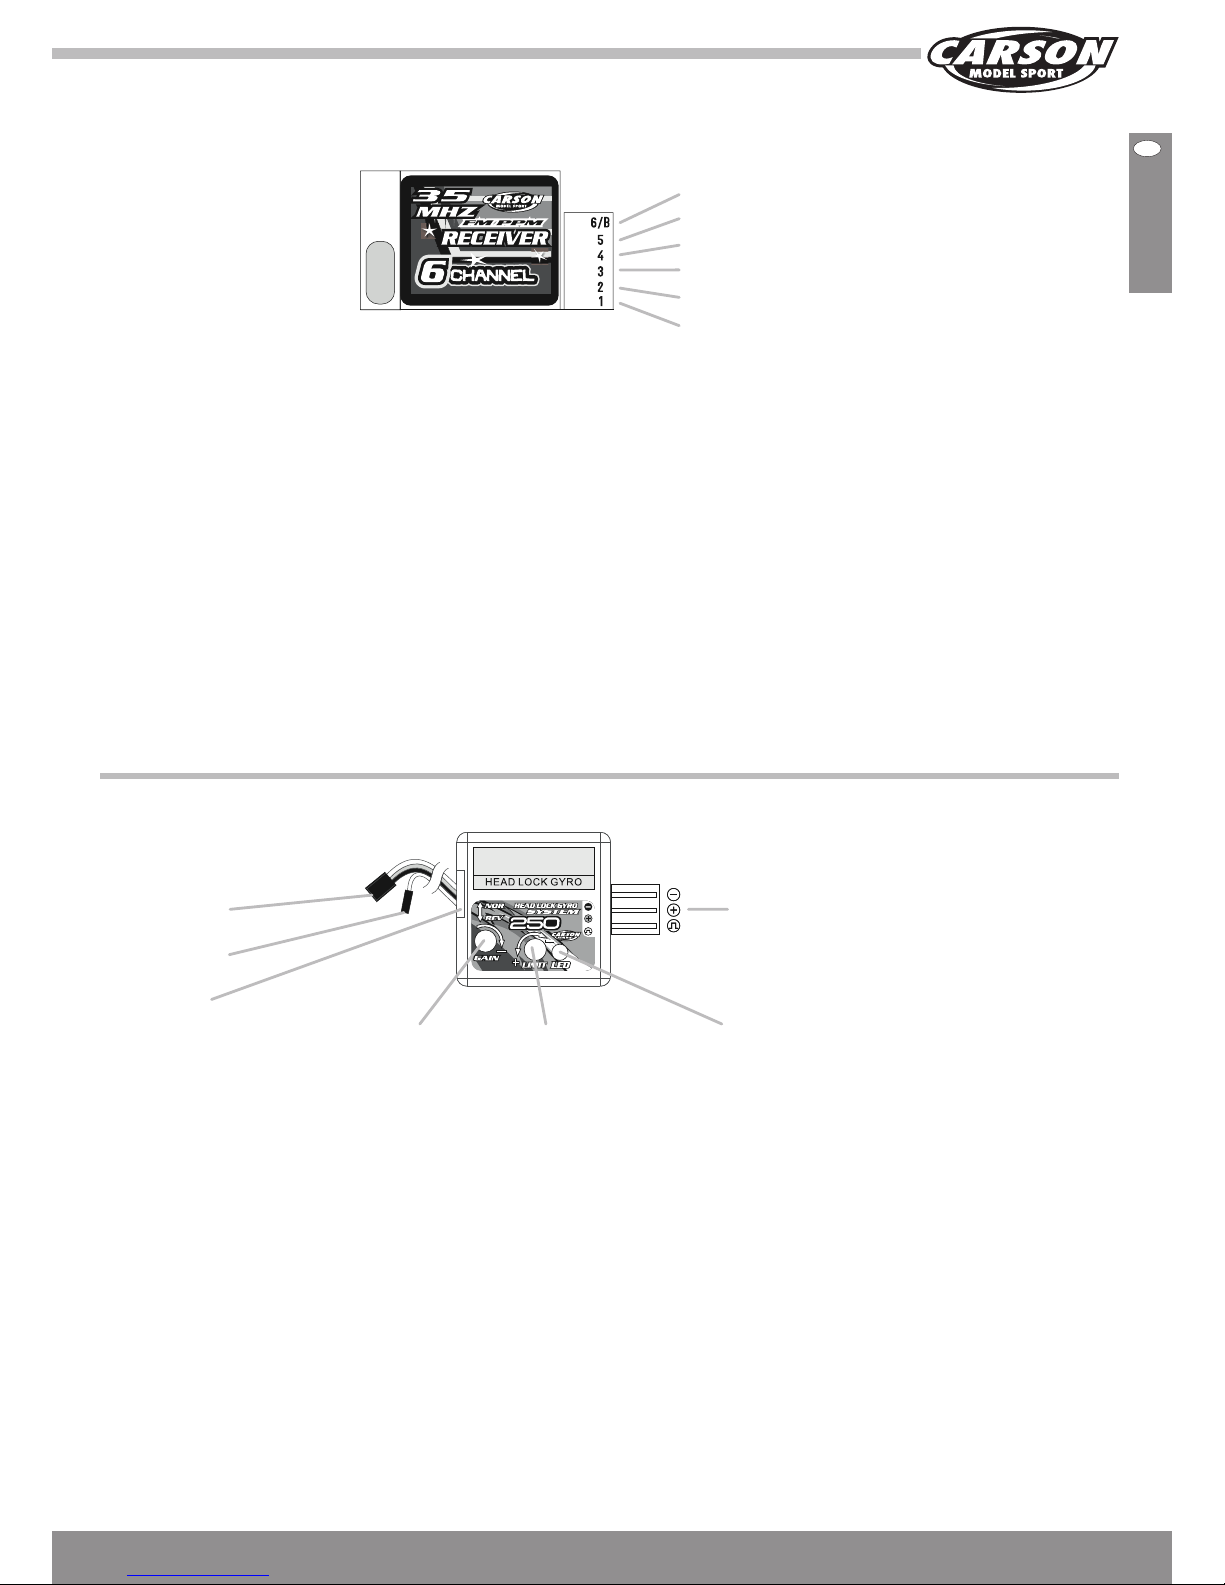
c. Picture of Control Set Connection
d. Gyro Adjustment
Assemling gyro:
Make sure all the radio control system components and servos
are in right and easy working condition, and the servo arms are
in the right position.
Fix the gyro to the right place close to the center of gravity.
Plug the connector of the gyro to plug-in 4 and the second one
for the sensitivity (only one cable) to plug-in 5.
Switch on the transmitter and center the trim of the tail rotor.
Connect the flying battery with the controller and wait untill the
LED of the gyro is on. Now the gyro is initialising and it is not
allowed to move the helcopter. After ca. 10 seconds the gyro is
ready and the process of adjustment completed. Otherwise you
need to check the connections over again.
To set the reverse switch of the gyro:
Turn the helicopter head to the left, if the servo’s movement on
the tail pipe is the same as the servo’s when turning the rudder
joystick right, that means the direction is ok. Otherwise you
need to turn the reverse switch to the other end.
Gain adjustment:
With the first test of the helicopter, after take off, notice the tail
pipe. Is there any deflexion or is the tail of the helicopter not
calm, you have to reduce the gain till you get a good result.
6. Pitch
5. Gyro gain
4. Tail rotor servo
3. Throttle up + down
2. Nick
1. Roll
Gyro signal connect to
receiver plug-in 4
Gyro gain connect to
receiver plug-in 5
Reverse switch
Connect to tail servo
Gain adjust Rudder itinery
adjustment
Indicator LED
Page 12

12GBCARSON 3D Helicopter Bluster 250se 50 050 7028
e. Preparations
General remarks
• If you have no or little experience with airplane models, you
should first practice with a Flight simulation program.
• Seek advice from an experienced R/C user for the first few
attempts.
• Acquaint yourself with the control functions of the
transmitter.
• Begin your flight experiments standing behind the model,
the line of sight in the flight direction. In this case, the control
reaction is the same as the direction of control.
Furthermore acquaint yourself with the control of the model as
it comes towards you (side-inverted reaction to the direction of
control)!
Charging the lithium-polymer flight
battery.
Always charge the lithium-polymer battery out of the model in/
on a fireproof base.
1. Connect the power supply to the lithium-polymer balance
charger.
2. Plug the power supply cable into a mains socket.
3. Connect the white connector of the lithium-polymer battery
to the socket of the lithium-polymer charger.
4. Ensure that the plug-in connections make a secure contact
to prevent short-circuiting.
5. Do not cover the battery up under any circumstances.
The temperature of the battery may not exceed 60 °C during
the charging process. The charging process is complete when
the green LED lights up on the balance charger.
• Connect the lipo balance charger to the power
supply’s cable.
• Connect the lipo battery’s white balance
connector to the lipo balance charger.
• The battery is completely charged when all
3 leds flash up green.
Lipo Balance Charger
Inserting the battery into the model
1. Pull the hood carefully away from the hood retainers on the
right and left-hand side.
2. You can now push the lithium-polymer battery into the
chassis horizontally from the front.
3. Connect the battery to the flight controller
(make sure beforehand that the transmitter is switched on).
Page 13

13CARSON 3D Helicopter Bluster 250se 50 050 7028
GB
The following actions should be
performed by the operator prior to every
flight.
1. Ensure that the blades have been balanced and are equally
tight on the blade grips. Note: if you hold the helicopter on
its side the blades should be tight enough that they do not
drop even if model is shaken.
2. Inspect the helicopter for any loose wiring, screws,
fasteners, connectors, prior to flying.
3. Turn on your transmitter first followed by connecting the
battery to the speed controller in the helicopter, you should
also ensure that the 3D switch is set to normal and the
throttle is set to off, i.e. all the way down.
4. Walk away from the helicopter with the antenna collapsed
to check range, you should be able to walk 50 paces away
and still have full control over the helicopter. If the distance
is significantly less check antenna wire and connections on
the receiver of the helicopter.
5. Check the CG (center of gravity) by having the main blades
at 12:00 o’clock and 6 o’clock. Lift the helicopter by the fly
bar and observe the landing skids. The skids should be level
with the ground and not leaning forward or backward. If it
leans they lean adjust the position of the battery by sliding it
backwards or forwards until the skids remain level.
6. If this is your first flight, we recommend that you use the
training frame, art. no. 50 050 8141 (not included), before
risking a flight.
The training gear will prevent the model tipping, a tip over
which can cause blade and or main shaft damage. once you
have learnt to hover your helicopter you can remove the
training gear.
7. Fully extend the antenna prior to lift-off this will ensure you
have maximum radio range.
8. Slowly apply throttle and observe the rotor disk, it should
appear perfectly flat with no noticeable tilt or lean. If the
rotor seems tilted or is leaning move the trim levers on the
transmitter until the rotor disk appears flat.
9. After lift-off and holding the helicopter in a hover it should
require very little input on the sticks to maintain a stable
hover. Should the helicopter wander forwards backwards
or side to side, adjust the trim levers on the transmitter until
the hover is stable.
Note: a well trimmed helicopter should be able to hover for
short periods with very little input from the pilot.
10. After completing your flight disconnect the power from the
battery in the helicopter first, then you may turn off your
transmitter.
Never turn off the transmitter first since it could cause you
to loose control of the helicopter and cause a crash or
serious personal injury.
f. Preflight Check List
Page 14

14GBCARSON 3D Helicopter Bluster 250se 50 050 7028
g. Normal Flight
Up Pull the left
stick downward
Down Pull the left
stick upward
Nose turn left Pull the left
stick left
Nose turn right Pull the left
stick right
Nose down ahead Pull the right stick
downward
Nose up back Pull the right
stick upward
Model goes left Pull the right
stick left
Model goes right Pull the right
stick right
Chart for R/C mode 2 (left hand throttle)
Page 15

15CARSON 3D Helicopter Bluster 250se 50 050 7028
GB
Transverse axis
(Nick)
Vertical axis
(Tail)
Horizontal axis
(Roll)
h. All Parts and Equipment
Swashplate
Lipo battery Motor Servo Landing gear
Gyro
Antenna tube
Paddle bar
Paddle
Rotorhead
Tail rotor
Main rotorblade
Steering gear
Page 16
16GBCARSON 3D Helicopter Bluster 250se 50 050 7028
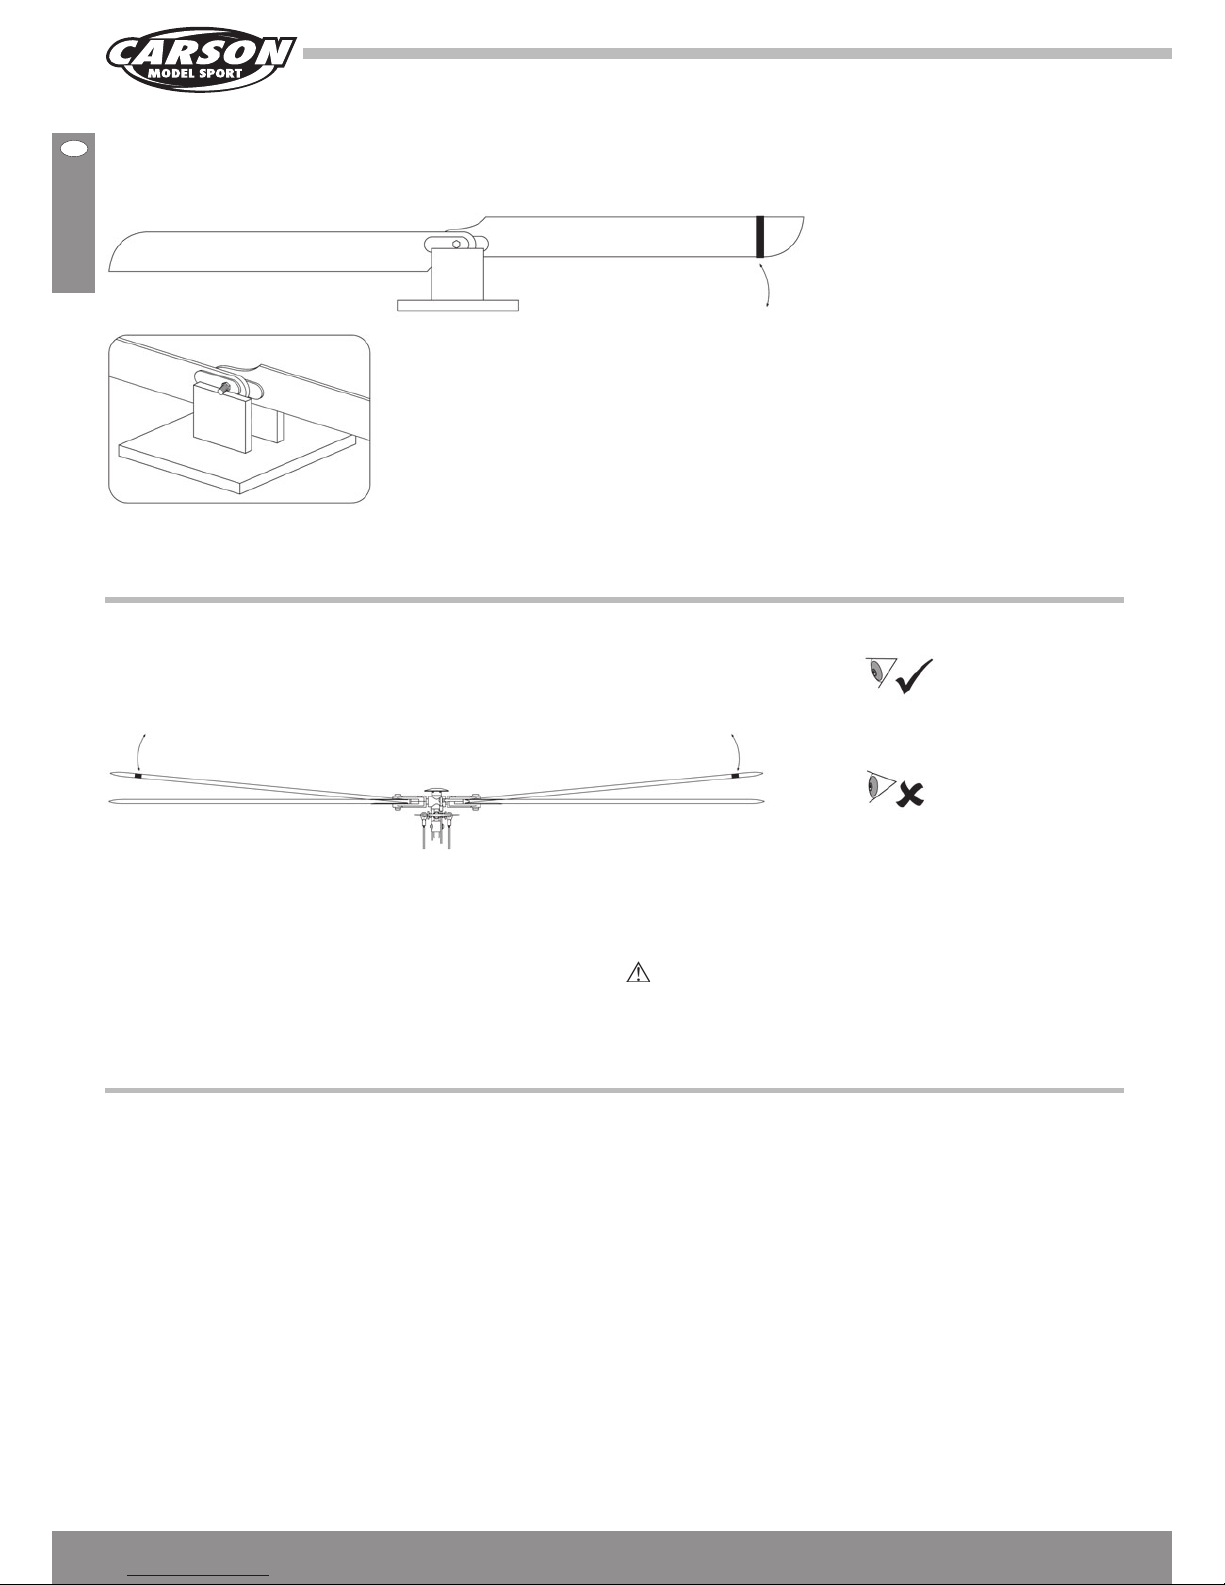
i. Balancing the Main Rotor Blades and Tail
Blades
Check and correct the balance of the main rotor blades before
your first flight. Place a 3M screw through the two main blades
as shown in the diagram. Tighten the blades and ensure that
they are straight as shown in the diagram. Add tape to the
higher blade until the two blades become level. Repeat the
same process for the tail blades.
Mark for adjustment
j. Adjusting Blade Tracking
Using the small coloured pieces of tape provided in the kit, affix
the tape to the ends of the rotor blades as shown in the picture.
Hover the helicopter and observe the blade tips, they should
appear to be on one plane or you should see just one blade
when viewed from the end of the blades. If one blade appears
higher than the other adjust the low blade by turning the ball
link one turn at a time either clockwise or counter clockwise
until both blades are tracking on the same plane, see diagram.
This adjustment is carried out on the ball joint connection that
comes from the rotor blade holder.
Never keep your eyes on the level of revolving blades to
avoid any hurt from flying off blades accidentally.
Mark for adjustment Mark for adjustment
k. Power Checking
Please check the following items when power and speed
appear low.
1. Whether the battery has enough power to properly power
the motor.
2. Pitch is too high or too low (over pitch will affect power and
flight times).
3. Blade tracking is correct, if the blades are out of track there
will be less power and more vibration.
4. There is a shake when spooling up the helicopter, either
fighten or loosen the blade grips so that both blades are
equally tight.
Page 17

17CARSON 3D Helicopter Bluster 250se 50 050 7028
GB
l. Maintenance
The Bluster 250se helicopter is a fine model constructed of
precision components. In order to maintain good performance
you must make sure that every component is in good working
order. Poor maintenance may cause damage and accidents; we
suggest that you perform the preflight checklist prior to flying
your Bluster 250se helicopter.
Main rotor
1. Please inspect the main blades, fly bar, main shaft to see
that they are not distorted and that they run true. Any erratic
vibrations or wobble is an indication that something is either
bent or not in balance. Vibrations can affect the quality of
the flight and can lead to loss of control or a crash. If you
observe any damage replace the parts with new parts of the
correct type. Inspect the blades for any damage, if you find
any cracks or chips discard the blades and replace with new
ones prior to flying your helicopter.
2. Please check whether the main rotor O-rings are tight and
that the head i s not loose at the blade grips. Over time the
rubber O-rings can soften which can lead to poor flight
performance. If the O-rings become soft replace them with
new ones.
3. Check the pitch range on the rotor blades to make sure there
is enough pitch for flight. Check the shaft bearing for wear
and looseness, replace with new bearing if they become
worn.
Caution
Before you fly, please balance the main rotor blades carefully
since this will determine if the helicopter will perform properly.
4. Please make sure the control arms move freely without
binding or sticking. The screws that hold the arms in place
should be just tight enough so that they don’t bind or
prohibit movement.
5. Make sure that the swash plate does not bind or touch the
frame with full servo movements.
Frame check
1. Please change the main shaft ball-bearing after 100 flights or
as soon as you notice any play or slack in the bearings to
main shaft. Should you notice any abnormal noise or drag it
is advisable to replace the bearings with new ones
immediately.
2. Please take apart the ball-bearing and clean and
lubricate it with light machine oil after 50 flights. If there is
any damage to the one ball-bearing you should replace it
with a new one.
3. You should replace the tail drive shaft if you discover any
damage to the drive train or tail rotors. The tail drive shaft is
made of carbon fiber and after time it will fatigue and should
be replaced.
Control sticks check:
Please make sure that every servo is connected and tight.
Control linkages should be tight but not too strong. If you find a
binding or a servo that drags, it should be repaired or replaced
with a new servo.
Page 18

18GBCARSON 3D Helicopter Bluster 250se 50 050 7028
Tail rotor system check:
1. Make sure the tail gear set is working correctly. There should
be no gaps at the gears and gear mesh should be smooth
with no binding. If there are any teeth missing on the gears
or binding the gears should be replaced before the next
flight.
2. Make sure that there is no grass in the gear system when
flying in grassy areas. Do not oil the exposed gears since
this can attract dirt which will rapidly wear out the gears and
gear mesh.
3. Take apart the tail system after 50 flights and clean the gears
and drive train. Inspect the gear set and replace any worn or
damaged gears/ gear mesh.
4. Should your helicopter hit the ground hard, inspect for
damage immediately, replace any component that is
damaged with a new part prior to flying again.
Caution:
Check all of the fasteners and screws prior to the start of
a flight, loose screws can cause unexpected accidents and
possible crash or personal injury..
Make sure that nobody else is transmitting in the proximity of
your frequency! Interfering signals on the same frequency can
make you lose control over your model. If you are flying with
other RC users, it might be necessary to change the frequency.
Transmitter
A rapid change of frequencies is possible simply by unplugging
an interchangeable crystal on the back of the transmitter and
then plugging in another one.
For reasons of operational safety, employ only crystals recommended by the suppliers explicitly for use in your remote
control system.
Remove the holder for the transmitter crystal from the back of
the transmitter housing of a switched-off transmitter.
Set the crystal replacement with another channel of the same
frequency band. Pay attention that the correct crystal is
employed. Transmitter crystals are as a rule characterized with
the letters T or TX (T = Transmitter).
Receiver
Plug in an interchangeable crystal into the receiver for a rapid
change of frequencies.
The suitable receiver crystal with the frequency suitable to the
transmitter must be labelled with the same channel number as
the transmitter crystal. It additionally bears the identification
letter R or RX (R = Receiver).
Now take the transmitter and subsequently the receiver into
operation and check the functioning of the equipment.
Do not mix up the transmitter and
receiver crystals!
The transmitter and receiver crystals must be of an identical
frequency.
Make sure that the crystal is fully inserted in the transmitter and
receiver, not partially.
m. How to Change Frequencies
Page 19

19CARSON 3D Helicopter Bluster 250se 50 050 7028
GB
n. Common Flight
Joystick high-speed/ throttle curve 100% / Pitch +9° ~+11°
Joystick center position/ hover flight/ throttle curve 65% ~ 70% / Pitch +5° ~+6°
Joystick low-speed/ throttle curve 0% / Pitch 0°
Common flight
Throttle curve Pitch
5 100% high speed +9° ~+11°
4 85%
3 65% ~70% hanging +5° ~+6°
2 40%
1 0% low speed 0°
Throttle curve on mode of hovering
Warning
When switching from normal to idle 1, (3 D position on the
switch) do not switch the switch unless you have the throttle
set to at least 70% of throttle setting. This will prevent possible
gear damage because when using this switch it increases the
throttle to a higher level. Should you switch the 3D switch,
idle 1 prior to having a high throttle setting it can cause the
helicopter to become unstable and could cause a tip over or
crash. Idle 1, or the 3D switch allows the throttle to have full
power at the bottom and top positions of the throttle stick
travel. With the 3D switch activated you can perform acrobatic
flight, i.e., inverted flying.
Page 20

20GBCARSON 3D Helicopter Bluster 250se 50 050 7028
o. 3D Aerobatics Flight
Joystick high-speed/ throttte curve 100% / Pitch +9° ~+11°
Joystick mid-speed/ throttle curve 50% / Pitch 0°
Joystick minimal amplitude/ full throttle/ throttle curve 100% / Pitch -8° ~-10°
3D aerobatics flight
Swashplate Pitch
5 100% high speed +9° ~+11°
3 50% hanging +5° ~+6°
1 0% low speed +8° ~+10°
Throttle curve on mode of 3D aerobatics
Notice
1. Total journey of Pitch 21°
2. Over pitch will reduce the power and shorten the flight time.
3. It is better to use lower pitch and faster rotor speed than to
have too high a pitch.
Page 21

21CARSON 3D Helicopter Bluster 250se 50 050 7028
GB
p. Inverted 3D Flight
(Flying mode switch has to be on 3D mode)
Up Pull the left
stick downward
Down Pull the left
stick upward
Nose turn left Pull the left
stick left
Nose turn right Pull the left
stick right
Nose down ahead Pull the right stick
downward
Nose up back Pull the right
stick upward
Model goes left Pull the right
stick left
Model goes right Pull the right
stick right
Chart for R/C mode 2 (left hand throttle)
Page 22

22GBCARSON 3D Helicopter Bluster 250se 50 050 7028
q. Troubleshooting
Please read this before something happens.
Problem Cause Reparation
The model does not
move
1. Check whether the transmitter and the receiver are
switched on
Switch transmitter and/or receiver on
2. Check the battery voltage of transmitter and
receiver
Employ completely charged batteries
3. Check whether transmitter and receiver frequency
agree
Possibly exchange the crystal
4. The trim slider of the pitch-function stands on the
upper stop
Ensure that the trim slider of the pitch
function is in neutral position or somewhat
below.
Motor does not turn 1. Motor is defective Exchange the motor
2. Connection of controller and motor is loose Connect the connector
The model reacts
incorrectly to the control
commands or flies
choppily
1. Check the state of the transmitter and receiver
battery charges
Employ completely charged batteries
2. Transmitter antenna not completely withdrawn Extend the transmitter antenna totally
3. Receiver antenna still wound up Unwind the receiver antenna completely
4. Interference Make certain that there is no frequency
superposition by other transmitters and no
atmospheric disturbances
The model does not take
off
1. Pitch value is not right. Check pitch value.
2. Batteries are empty Charge the batteries or exchange them
The rotors do not allow
shut down
Trim is not correctly adjusted Correct the trim on the pitch controller
The model vibrates
severely
1. Check whether the principal rotors run true Possibly balance the rotor blades
2. Check whether the model is correctly balanced Possibly balance the rotor blades
The tail does not permit
stabilizing
1. One or more rotor blades are defective Replace one or both rotor blades
2. Lower and upper rotor revolution run with different
friction on the rotor shaft
Ensure that both rotor revolutions allow for
easy rotation
3. The gyroscope is not adjusted correctly or is faulty. Re-adjust or replace the gyroscope.
Page 23

23CARSON 3D Helicopter Bluster 250se 50 050 7028
D
Hiermit erklärt CARSON MODEL-SPORT, dass sich dieses
Modell einschließlich Fernsteueranlage in Übereinstimmung mit
den grundlegenden Anforderungen und den anderen relevanten
Vorschriften der Richtlinie 1999/5/EG (R&TTE) befindet.
Die Original-Konformitätserklärung kann angefordert werden:
Dickie-Tamiya GmbH&Co. KG • Werkstraße l • D-90765 Fürth •
Tel.: +49/(0)911/9765-03
Im Lieferumfang enthalten ist ein wiederaufladbarer
Lithium-Polymer.
Dieser Akku ist recyclebar.
Defekte/ nicht mehr aufladbare Akkus sind dem
Sondermüll (Sammelstellen) zuzuführen.
Eine Entsorgung über den Hausmüll ist untersagt!
Wir wünschen Ihnen viel Spaß mit Ihrem CARSON Modellhubschrauber und jederzeit guten Flug!
Sehr geehrter Kunde
Vielen Dank, dass Sie sich für das Bluster 250se Helikoptermodell von CARSON entschieden haben. Dieser Helikopter wird
über einen elektrischen Mikromotor angetrieben und ist unser
neuestes Produkt. Der Bluster 250se ist mit einem einstellbaren Collective Pitch ausgestattet, wodurch er auch im freien
Gelände geflogen werden kann.
Der Bluster 250se Helikopter mit einem BALL HALL Collective
Pitch System ausgestattet.
Aufgrund der guten Kombination von Stabilität und Flexibilität
sowie einer stabilen Fluglage, kann das Modell auch für Flüge
im Freien genutzt werden. Ausgestattet mit einem Head-Lock
Gyro (Kreisel) bietet das Modell eine ausgezeichnete Stabilität.
Die Spezifikationen des leistungsstarken Brushless Motors und
des LiPo-Akkus sorgen für perfekte 3D Kunstflugmöglichkeiten.
Garantiebedingungen
Für dieses Produkt leistet CARSON eine Garantie von 24
Monaten betreffend Fehler bei der Herstellung in Bezug auf
Material und Fertigung bei normalem Gebrauch ab dem Kauf
beim autorisierten Fachhändler. Im Falle eines Defekts während
der Garantiezeit bringen Sie das Modell zusammen mit dem
Kaufbeleg zu Ihrem Fachhändler.
CARSON wird nach eigener Entscheidung, falls nicht anders im
Gesetz vorgesehen:
(a) den Defekt durch Reparatur kostenlos in Bezug auf Material
und Arbeit beheben;
(b) das Produkt durch ein gleichartiges oder im Aufbau
ähnliches ersetzen; oder
(c) den Kaufpreis erstatten.
Alle ersetzten Teile und Produkte, für die Ersatz geleistet wird,
werden zum Eigentum von CARSON. Im Rahmen der Garantieleistungen dürfen neue oder wiederaufbereitete Teile verwendet
werden.
Auf reparierte oder ersetzte Teile gilt eine Garantie für die
Restlaufzeit der ursprünglichen Garantiefrist. Nach Ablauf
der Garantiefrist vorgenommene Reparaturen oder gelieferte
Ersatzteile werden in Rechnung gestellt.
Von der Garantie ausgeschlossen sind:
• Beschädigung oder Ausfall durch Nichtbeachten der Sicherheitsanweisungen oder der Bedienungsanleitung, höhere
Gewalt, Unfall, fehlerhafte oder außergewöhnliche
Beanspruchung, fehlerhafte Handhabung, eigenmächtige
Veränderungen, Blitzschlag oder anderer Einfluss von
Hochspannung oder Strom.
• Schäden, die durch den Verlust der Kontrolle über Ihr Modell
entstehen.
• Reparaturen, die nicht durch einen autorisierten CARSON
Service durchgeführt wurden
• Verschleißteile wie etwa Sicherungen und Batterien
• Rein optische Beeinträchtigungen
• Transport-, Versand- oder Versicherungskosten
• Kosten für die Entsorgung des Produkts sowie Einrichten
und vom Service vorgenommene Einstell- und Wiedereinrichtungsarbeiten.
Durch diese Garantie erhalten Sie spezielle Rechte, darüber
hinaus ist auch eine von Land zu Land verschiedene Geltendmachung anderer Ansprüche denkbar.
Konformitätserklärung
Vor dem Gebrauch Ihres neuen Modells lesen Sie bitte dieses Handbuch
sorgfältig durch!
Page 24
24DCARSON 3D Helicopter Bluster 250se 50 050 7028
Inhalt
Lieferumfang
• Flugfertiges und eingestelltes Modell
• 6 Kanal Computer Handsender 35 MHz FM
mit LCD-Display
• Lipo-Akku 11,1 V/ 600 mAh
• Lipo-Balance Ladegerät mit Netzteil
• 4 x 5 g- Servos, bereits installiert
• Voll einstellbarer High Tech-Gyro
• Bedienungsanleitung mit vielen Tipps
• Brushless Motor/Regler bereits eingebaut
• Flugsimulatorsoftware und Anschlusskabel
Vorwort ..................................................................................... 23
Lieferumfang ............................................................................ 24
Technische Details .................................................................. 25
Sicherheitsanweisungen ......................................................... 25
Sicherheitstipps ....................................................................... 26
a. Teileliste .............................................................................. 30
b. Funktionen der Fernsteuerung .......................................... 31
c. Empfängerkanalbelegung ................................................. 32
d. Gyro Justierung ................................................................. 32
e. Vorbereitungen ................................................................... 33
f. Endkontrolle vor dem Flug ................................................ 34
g. Normaler Flug .................................................................... 35
h. Alle Ersatzteile und Ausrstung .......................................... 36
i. Ausbalancieren der Hauptrotor- und Heckrotorblätter .... 37
j. Spurlaufeinstellung ............................................................ 37
k. Überprüfen der Stromzufuhr .............................................37
l. Wartung .............................................................................. 38
m. Wechseln der Sendefrequenz ........................................... 39
n. Allgemeiner Flug ................................................................ 40
o. 3D Kunstflug ...................................................................... 41
p. Rückenflug ......................................................................... 42
q. Problembehandlung .......................................................... 43
Explosionszeichnung ............................................................ 108
Ersatzteile .............................................................................. 112
Zubehör .................................................................................. 115
Page 25

25
D
CARSON 3D Helicopter Bluster 250se 50 050 7028
Sicherheitsanweisungen
Dieses Modell ist kein Spielzeug!
• Funkferngesteuerte Modelle sind kein Spielzeug, Ihre
Bedienung muss schrittweise erlernt werden.
• Kinder unter 14 Jahren sollten das Modell nur unter Aufsicht
von Erwachsenen in Betrieb nehmen.
Wenn Sie noch über keine Erfahrungen mit Flugmodellen verfügen, wenden Sie sich an einen erfahrenen Modellpiloten oder
an einen Modellbau-Club für die ersten Flugversuche.
Das Fliegen von ferngesteuerten Modellhubschraubern ist ein
faszinierendes Hobby, das jedoch mit der nötigen Vorsicht und
Rücksichtnahme betrieben werden muss.
Ein ferngesteuerter Modellhubschrauber kann in einem
unkontrollierten Flugzustand erhebliche Beschädigungen und
Verletzungen verursachen, für die Sie als Betreiber haftbar sind.
Als Hersteller und Vertreiber des Modells haben wir keinen
Einfluss auf den korrekten Umgang und die korrekte Bedienung
des Modells.
Vergewissern Sie sich bei Ihrer Versicherung, ob Sie beim
Ausüben Ihres Hobbys versichert sind, bzw. schließen Sie eine
spezielle Modellflugversicherung ab.
Kontaktadresse ist hierfür der Deutsche Modellfliegerverband
e.V. Rochusstr. 104 – 106, 53123 Bonn.
Bewahren Sie das Modell außerhalb der Reichweite von
Kleinkindern auf. Diese könnten das Modell unabsichtlich in
Betrieb setzen und sich so Verletzungen zufügen oder Akkus
und Kleinteile in den Mund nehmen und verschlucken.
Vorsicht
Der R/C Modellbau ist ein hochtechnologisches Hobby, daher
sollte das Gerät nicht als Kinderspielzeug angesehen werden.
Während des Betriebs dieses Produkts bestehen Risiken.
Der Benutzer sollte daher alle möglichen Vorsichtsmaßnahmen
treffen, da ansonsten schwere Personenschäden nicht auszuschließen sind.
Ein mangelhafter Aufbau, unsachgemäße Einstellungen
und Handhabung können zu einer unbefriedigenden oder
unsicheren Funktionsweise führen. Falls Sie Fragen zur Verwendung, Wartung oder zum sicheren Betrieb dieses Modells
haben sollten, wenden Sie sich bitte an Ihren Händler vor Ort.
Allgemein
• Lesen Sie unbedingt die Bedienungsanleitung vor Gebrauch
sorgfältig durch und bewahren Sie sie zum Nachlesen auf.
• Machen Sie sich insbesondere mit den Hinweisen zum Flugbetrieb vertraut.
Hinweis
Wie bei jedem R/C Produkt bestehen Risiken, wenn Sie dieses
Modell fliegen. Ein Anfänger sollte die Hilfe eines sachkundigen
R/C-Piloten in Anspruch nehmen, um sicherzugehen, dass das
Modell flugtauglich und für einen sicheren Betrieb geeignet ist.
Jede Beschädigung, Nachlässigkeit oder ungewohnte Verwendung dieses Produkts kann zu unerwarteten Zwischenfällen
oder Verletzungen führen. Lesen Sie sich diese Anleitung
aufmerksam durch und befolgen Sie die Sicherheitshinweise.
Beachten Sie, dass es sich nicht um ein Spielzeug handelt.
Kinder sollten vor dem Starten oder beim Fliegen dieses
Helikopters beaufsichtigt werden.
Technische Details:
RTF (ADVANCED)
Länge 515 mm
Höhe 155 mm
Durchmesser Hauptrotor 390 mm
Durchmesser Heckrotor 105 mm
Gewicht 255 g ohne Akku
Sender 6 Kanäle
Empfänger 6 Kanäle
Kreisel: einstellbarer Hightech Gyro
Brushless Motor: CARSON HELI-X B10
Brushless Regler: CARSON HELI-X 10 A
Lipo-Akku: 600 mAH/ 11,1 V
Servos: 4x Mikroservo 5 g
*Änderungen vorbehalten.
Hinweis
Der Motor kann nicht gestartet werden, wenn beim Einschalten
des Senders der 3D Mode aktiv ist (Schalter auf der rechten
Seite).
Es nützt dann auch nichts den Pitch/ Throttle Knüppel in die
„Leerlauf/ Motor aus” Position zu bewegen, der Motor lässt
sich dennoch nicht starten.
Um den Motor zu starten muss der 3D Schalter beim Einschalten des Senders in der Position „nor” also 3D aus sein.
Page 26

26DCARSON 3D Helicopter Bluster 250se 50 050 7028
1. Suchen Sie eine geeignete Stelle, an
der Sie Ihren Helikopter fliegen lassen
können:
R/C Helikopter sind in der Lage, mit hohen Geschwindigkeiten
zu fliegen. Dadurch besteht ein gewisses Risiko sowohl für den
Piloten als auch für Zuschauer. Wählen Sie ein angemessenes
Fluggelände mit einer ebenen Fläche ohne Hindernisse. Eine
gute Wahl wäre ein leerer Parkplatz ohne Autos und Fußgänger,
eine leere Turnhalle oder ein Lagerhaus ohne Hindernisse.
Fliegen Sie nicht in der Nähe von Gebäuden, Bäumen oder
Hochspannungsleitungen, um Ihre eigene Sicherheit, die
anderer Personen und die Ihres Modells zu gewährleisten.
Fliegen Sie Ihren Helikopter nicht bei schlechten Witterungsbedingungen wie Regen, Schneefall, starken Winden oder bei
Dunkelheit.
2. Lassen Sie sich von einem erfahrenen
Piloten unterstützen.
Bevor Sie Ihr Modell und den Sender einschalten, sollten Sie
überprüfen, dass keine andere Person die gleiche Frequenz wie
Ihr Modell benutzt. Frequenzstörungen können dazu führen,
dass Ihr Modell unkontrollierbar wird, wenn es auf der gleichen
Frequenz geflogen wird wie andere Modelle in der Umgebung.
Die Unterstützung eines erfahrenen Piloten sorgt dafür, dass
Sie beim ersten Flug einen gut gepflegten, korrekt funktionierenden Helikopter haben.
3. In Ihrer Umgebung darf nicht die
gleiche Frequenz verwendet werden.
Bitte überprüfen Sie, dass niemand in Ihrer Umgebung gleichzeitig die gleiche Sendefrequenz verwendet, da Sie dadurch
die Kontrolle über den Hubschrauber verlieren können, was zu
einem Unfall führen kann.
Sicherheitstipps
Anfänger Anfänger Experte
35.950 MHz
35.950 MHz
Page 27

27
D
CARSON 3D Helicopter Bluster 250se 50 050 7028
4. Achten Sie auf die sich drehenden
Rotoren.
Während des Betriebs Ihres neuen CARSON Helikopters
drehen sich der Hauptrotor und der Heckrotor mit hoher
Geschwindigkeit. Die Rotorblätter können Ihnen und anderen
schwerwiegende Verletzungen zufügen. Seien Sie sich Ihrer
Handlungen bewusst und halten Sie Ihre Hände, Ihr Gesicht,
die Augen und lose Kleidung von den Rotorblättern und vom
Antrieb fern.
Fliegen Sie Ihr Modell immer in einem sicheren Abstand von
sich selbst und anderen sowie von nahen Objekten. Verlieren
Sie Ihr Modell nie aus den
Augen und lassen Sie es niemals
unbeaufsichtigt, während es
eingeschaltet ist. Schalten Sie
nach jedem Flug immer erst Ihr
Modell aus, danach den Sender.
5. Setzen Sie Ihren Bluster 250se
Helikopter keiner Hitze und
Feuchtigkeit aus.
Ihr neuer CARSON Helikopter ist ein elektronisches Hi-Tech
Gerät. Setzen Sie Ihr Modell niemals Temperaturextremen aus,
lassen Sie Ihr Modell nicht über längere Zeiträume in einem
Auto zurück, da hohe Temperaturen die empfindliche Elektronik
sowie Plastikteile beschädigen können.
Lademodus und Warnung
Laden Sie den Lithium-Polymer-Akku nur mit dem mitgelieferten Ladegerät. Beachten Sie die Polung des Akkus und des
Ladegeräts und achten Sie darauf, dass die Anschlüsse richtig
liegen. Wenden Sie keine Kraft auf, da dies zu Schäden führen
kann.
Bitte laden Sie Ihren Akku vor dem ersten Gebrauch auf, so
dass Sie mit einem voll geladenen Akku starten. Sobald der
Akku voll geladen ist, leuchtet die LED grün, während des
Ladevorgangs leuchtet die LED auf dem Ladegerät rot.
Um einen sicheren Betrieb zu gewährleisten, sollten Sie den
Akku nicht über längere Zeiträume laden. Lassen Sie das
Ladegerät nie unbeaufsichtigt und lassen Sie das Ladegerät
nicht über Nacht eingeschaltet. Der Ladevorgang der LithiumAkkus sollte von einem Erwachsenen beaufsichtigt werden.
Der mitgelieferte 600 mAh Lipo-Akku sollte nur mit dem mitgelieferten LiPo-Akkuladegerät aufgeladen werden. Das Laden
des Akkus mit einem Ladegerät, das nicht speziell für LithiumAkkus entwickelt wurde, kann Feuer oder eine Explosion des
Akkus verursachen. Bitte beachten Sie alle Sicherheitshinweise.
Sollte der Akku aufquellen oder beschädigt werden, entsorgen
Sie diesen bitte in einem sicheren Behälter im Freien und nicht
in der Nähe von entflammbaren Materialien.
1. Legen Sie den Akku nicht auf oder in die Nähe von
Dingen, die während des Ladevorgangs Feuer fangen
können.
2. Laden Sie den Akku auf einer nicht entzündlichen
Unterlage, z. B. auf einer Metall- oder Steinplatte.
Page 28

28DCARSON 3D Helicopter Bluster 250se 50 050 7028
Lithium-Polymer Akku
Verwenden Sie den beigefügten Akku ausschließlich für dieses
Modell.
Verwenden Sie auch als Ersatzakku nur ein Originalteil.
• Laden Sie den Akku ausschließlich außerhalb des Modells
und fern von leicht entflammbaren Materialien! Es ist normal,
dass sich der Akku beim Laden erwärmt.
• Akku nicht überladen oder tiefentladen! Beides kann zum
Austreten von Elektrolyten und zur Selbstentzündung führen.
• Mischen Sie niemals volle mit halbleeren Akkus / Batterien
oder Akkus unterschiedlicher Kapazität.
• Laden Sie den LiPo-Akku mindestens alle 6 Monate, um
Tiefentladung zu verhindern.
• Ziehen Sie den geladenen Akku vom Ladegerät ab, um eine
Selbstentladung zu vermeiden.
• Entfernen sie den Akku, wenn Sie das Modell längere Zeit
nicht benutzen wollen.
Defekte / nicht mehr aufladbare Akkus sind dem Sondermüll
(Sammelstellen) zuzuführen.
Eine Entsorgung über den Hausmüll ist untersagt!
Die Akkus dürfen nicht
• in Flüssigkeit getaucht,
• ins Feuer geworfen oder hohen Temperaturen sowie
• mechanischen Belastungen ausgesetzt oder
• auseinandergenommen / beschädigt werden
• kurzgeschlossen werden.
Wenn Sie während des Gebrauchs, der Ladung, oder der
Lagerung des Akkus einen Geruch wahrnehmen, eine Verfärbung, übermäßige Erhitzung, eine Deformation oder andere
Auffälligkeiten bemerken:
• stecken Sie den Akku vom Ladegerät ab
• trennen Sie den Akku vom Verbraucher
• benutzen Sie den Akku nicht mehr.
Wenn Elektrolyt ausläuft:
• Vermeiden Sie den Kontakt mit Augen und Haut!
• Waschen Sie die betroffenen Stellen sofort mit klarem Wasser ab und suchen Sie einen Arzt auf.
Page 29

29
D
CARSON 3D Helicopter Bluster 250se 50 050 7028
Sicherheitshinweise für
Lithium-Polymer-Akkumulatoren
1. Der Akku darf weder auseinandergebaut noch umgebaut
werden.
2. Der Akku darf nicht kurzgeschlossen werden.
3. Verwenden Sie den Akku nicht in der Nähe von Feuer, Öfen
oder anderen beheizten Stellen (über 80°C).
4. Tauchen Sie den Akku nicht in Wasser, Meerwasser oder
setzen ihn anderer Feuchtigkeit aus.
5. Laden Sie den Akku nicht in der Nähe von Feuer oder unter
direkter Sonneneinstrahlung auf.
6. Verwenden Sie nur das spezifizierte Ladegerät und befolgen
Sie die Ladehinweise.
7. Treiben Sie keine Nägel in den Akku, traktieren ihn mit
einem Hammer oder treten auf ihn.
8. Setzen Sie den Akku keinem äußeren Druck aus oder
werfen ihn.
9.
Verwenden Sie keine beschädigten oder deformierten Akkus.
10. Löten Sie nicht direkt am Akku.
11. Den Akku weder verpolen noch zu stark entladen.
12.
Achten Sie beim Laden und Entladen auf die richtige Polarität.
13. Verbinden Sie den Akku nicht mit einer Steckdose oder dem
Zigarettenanzünder im Auto.
14. Verwenden Sie den Akku nur für Geräte, die auch dafür
vorgesehen sind.
15. Vermeiden Sie direkten Kontakt mit undichten Akkus.
16. Verwenden Sie den Akku nicht zusammen mit Lithiumbatterien.
17. Halten Sie den Akku von Kleinkindern fern.
18. Laden Sie den Akku nicht länger als angegeben auf.
19. Platzieren Sie den Akku nicht in einer Mikrowelle oder
einem Druckbehälter.
20. Verwenden Sie keine undichten Akkus in der Nähe von
offenen Feuerstellen.
21. Setzen Sie den Akku keiner direkten Sonneneinstrahlung
aus oder verwenden ihn unter dieser (oder im erhitzten
Auto).
22. Verwenden Sie den Akku nicht in Umgebungen, in denen
sich statische Elektrizität bildet oder bilden kann (mehr als
64V), da dadurch der Schutzkreislauf beschädigt werden
kann.
23. Der Akku kann innerhalb einer Temperaturspanne von
0°C bis 45°C geladen werden. Vermeiden Sie einen Ladevorgang außerhalb der vorgegebenen Spanne.
24. Sollte der Akku vor dem ersten Gebrauch Rost aufweisen,
verdächtig riechen oder auf andere Weise ungewöhnlich
erscheinen, verwenden Sie ihn nicht und bringen Sie ihn
zurück in das Geschäft, in dem Sie ihn gekauft haben.
25. Wenn Kinder den Akku verwenden, sollten sie vorab von
ihren Eltern über den richtigen Gebrauch laut Bedienungsanleitung belehrt werden. Achten Sie darauf, dass sich die
Kinder an Ihre Anweisungen halten.
26. Halten Sie den Akku von Kindern fern und achten Sie
darauf, dass diese den Akku nicht aus dem Ladegerät
entfernen können.
27. Sollte etwas von der im Akku enthaltenen Chemikalie auf
Haut oder Kleidung kommen, waschen Sie diese umgehend
mit klarem Wasser ab, um Hautreizungen zu vermeiden.
28. Entladen Sie den Akku niemals mit mehr als 5c und lassen
Sie die Spannung auf weniger als 9 V sinken, da dies den
Akku beschädigt.
29. Laden Sie den Akku niemals auf einem Teppichboden, da
dies zu Bränden führen kann.
30. Verwenden Sie den Akku nicht für nicht spezifiziertes
Equipment oder andere Zwecke.
31. Berühren Sie den Akku nicht, wenn dieser undicht ist.
Wenn Sie den Akku anfassen, sollten Sie Ihre Hände sofort
waschen.
32. Laden Sie Ihren Akku nicht länger als vorgegeben.
33. Verwenden Sie keine Akkus, die aufgequollen oder
beschädigt sind.
Page 30

30DCARSON 3D Helicopter Bluster 250se 50 050 7028
Im Lieferumfang des Bluster 250se sind die folgenden Teile
enthalten. Bitte prüfen Sie, ob all diese Teile in Ihrem Bausatz
enthalten sind. Nehmen Sie bitte Kontakt mit Ihrem Händler vor
Ort auf, falls ein Teil fehlen sollte.
D
Paddel
Haupt-Rotorblatt
Rotorblatthalter
Rotorwelle
Taumelscheibe
Heckrohr
Landegestell
Kabinenhaube
Heckrotor
a. Teileliste
Kreisel (Gyro) 35 MHz Empfänger BL-Motor Flugregler
Akku 11,1 V/ 600 mAh Balanceladegerät
Sender 4x 5 g- Servos
Page 31

31
D
CARSON 3D Helicopter Bluster 250se 50 050 7028
b. Funktionen der Fernsteuerung
1 Teleskopantenne
2 LCD
1. Ablesen der Akku/ Batteriespannung
2. Zeigt welcher Kanal auf „reverse” geschalten ist.
3. Zeigt Flugzeit an
4. Zeigt Flugmodus
5. Zeigt den Status von Tastensperre an (unlock/ lock)
3 Pitch-Endausschlag
4 Pitch-Trimmung
5 Schalter 1
Dieser Schalter steuert Kanal 5. Dieser steuert den Gyro an.
Kann aber auch für ein Einziehfahrwerk, eine Kamera usw.
ansteuern.
6 3D Schalter
Schaltet „Normal/ Schwebeflug” oder „3D-Modus”
7 Taster „MODEL” zur Auswahl des gewünschten Flugmodells
MODEL A: Simulaton von Wölbklappen
MODEL V: Zusatzfunktion
MODEL H, C, C1: Leerlauf in der Mittelstellung des Gas/
Pitch-Hebels.
ACHTUNG!
Wenn die Modelle H, C und C1 gewählt sind, darf nur in den
3D-Betrieb umgeschaltet werden, wenn der Gas/Pitch-Hebel
in Mittelstellung steht!
8 LED (grün) zur Anzeige des Einschaltzustandes
9 LED (rot) zur Unterspannungsanzeige.
Wechseln Sie umgehend die Senderakkus, wenn die rote
LED blinkt, spätestens wenn die LCD-Anzeige ausgeht!
10 Fernsteuerhebel rechts (Funktionskanal 2 und 1)
11 Fernsteuerhebel links (Funktionskanal 3 und 4 )
Beide Fernsteuerhebel können um ca. 5 mm verlängert
werden.
12 Trimmung Funktionskanal 2
13 Trimmung Funktionskanal 4
14 Trimmung Funktionskanal 1
15 Trimmung Funktionskanal 3
16 Öse für Tragegurt
17 An-/ Ausschalter
ACHTUNG!
Beim Einschalten des Senders mit der Vorauswahl MODEL
H, C und C1 muss der 3D-Schalter auf „NOR” stehen!
18 LOCK Schiebeschalter zur Sperrung der Drehregler und des
Tasters „MODEL”.
19 Reverse-Schalter Funktionskanal 1, 2, 3, 4, 6
Unten: NOR (normal)
Oben: REV (reverse)
20 Tragegriff
21 Senderquarz (Senderrückseite)
22 Batterie/ Akkufach (Senderrückseite)
23 Anschlussbuchse für Flugsimulator (Senderrückseite)
24 Ladebuchse (Seite)
25 Kippschalter, Dual Rate Funktionskanal 1, 2, 4
Reduktion der Funktionswege 1, 2 und 4 von 100% (Pos. 0)
auf 70% (Pos. 1)
1
2
3
5
7
9
11
13
15
17
19
4
6
25
8
10
12
14
16
18
20
21
22
23
24
Page 32

32DCARSON 3D Helicopter Bluster 250se 50 050 7028
c. Empfängerkanalbelegung
d. Gyro Justierung
Gyro/ Kreisel Montage:
Versichern Sie sich das alle RC-Komponenten und Servos
richtig und leichtgängig arbeiten und sich die Ruderhörner der
Servos in der korrekten Position befinden.
Befestigen Sie den Gyro auf einer ebenen Fläche in Nähe des
Schwerpunktes.
Stecken Sie den Anschluss des Gyros in Steckplatz 4 und
den zweiten für die Empfindlichkeit (hat nur ein Kabel) in
Steckplatz 5.
Schalten Sie den Sender ein und bringen Sie die Trimmung des
Heckrotors auf Neutralstellung. Verbinden Sie den Flugakku
mit dem Regler und warten Sie bis die LED am Gyro aufleuchtet. Nun initialisiert sich der Gyro und der Helikopter darf nicht
bewegt werden. Nach ca. 10 Sekunden ist der Gyro Startbereit
und der Abgleich-Prozess abgeschlossen. Andernfalls müssen
Sie noch mal die Anschluss-Verbindungen überprüfen.
Einstellung des Umkehr-Schalters am
Gyro:
Drehen Sie die Helikopter mit der Nase nach links, muss sich
das Servo am Heckrohr in die gleiche Richtung bewegen wie
wenn Sie die den Steuerknüppel für den Heckrotor nach rechts
drücken. Andernfalls müssen Sie den Reverseschalter umlegen.
Empfindlichkeit einstellen:
Beim ersten Test des Helikopters achten Sie nach dem
Abheben auf das Heckrohr. Schlägt es aus oder verhält sich
das Heck des Helikopters nicht ruhig, so muss die Empfindlichkeit herabgesetzt werden bis ein gutes Ergebnis erreicht ist.
6. Pitch
5. Gyro Empfindlickeit
4. Heckrotorservo
3. Gas/ Regler
2. Nick
1. Roll
Gyroanschluss auf
Empfänger-Steckplatz 4
Empfindlichkeit auf
Empfänger-Steckplatz 5
Umkehrschalter
Anschluss Heckrotorservo
Empfindlichkeitseinstellung
Servoausschlagbegrenzer
Kontroll-LED
Page 33

33
D
CARSON 3D Helicopter Bluster 250se 50 050 7028
e. Vorbereitungen
Allgemeine Hinweise
• Wenn Sie keine oder wenig Erfahrungen mit Flugmodellen
haben, sollten Sie diese zuerst mit einem Flugsimulationsprogramm sammeln.
• Holen Sie sich für die Feineinstellungen des Helikopters und
der Steuerung Rat bei erfahrenen Modellpiloten.
• Machen Sie sich mit den Steuerfunktionen des Senders vertraut.
• Beginnen Sie Ihre Flugversuche hinter dem Modell stehend,
die Blickrichtung in Flugrichtung. In diesem Fall ist die
Steuerreaktion gleich der Steuerrichtung.
Machen Sie sich außerdem mit der Steuerung des Modells
vertraut, wenn es auf Sie zufliegt (seitenverkehrte
Reaktion auf die Steuerrichtung)!
Laden des Lipo-Flugakkus
Laden Sie den Akku stets außerhalb des Modells in/auf einer
feuerfesten Unterlage.
1. Verbinden Sie das Netzteil mit dem Lipo-Balance Ladegerät.
2. Stecken Sie das Netzteil-Kabel in eine Netzsteckdose.
3. Verbinden Sie den weißen Stecker des Lipo-Akkus mit der
Buchse des Lipo-Balance Ladegeräts.
4. Achten Sie auf sicheren Kontakt der Steckverbindungen, um
einen Kurzschluß zu vermeiden.
5. Akku auf keinen Fall abdecken.
Die Temperatur des Akkus darf während des Ladevorgangs
60 C° nicht überschreiten.
Der Ladevorgang ist abgeschlossen wenn die grüne LED am
Balance-Ladegerät aufleuchtet.
• Verbinde das LIPO-BALANCE Ladegerät mit
dem Kabel des Netzteiles.
• Verbinde nun den weißen Balancer-Stecker
des Lipo-Akkus mit dem LIPO-BALANCE
Ladegerät.
• Der Akku ist vollständig geladen wenn alle
3 Glühbirnchen grün aufleuchten.
Lipo Balance Charger
Platzieren des Akkus im Modell
1. Ziehen Sie die Haube vorsichtig links und rechts von den
Haubenhaltern ab.
2. Jetzt können Sie den Lipo-Akku waagerecht von vorne in
das Chassis schieben.
3. Verbinden Sie den Akku mit dem Flugregler
(vorher vergewissern das der Sender angeschaltet ist).
Page 34

34DCARSON 3D Helicopter Bluster 250se 50 050 7028
Vor dem Flug sollten vom Bediener die
folgenden Dinge überprüft werden:
1. Stellen Sie sicher, dass die Rotorblätter ausbalanciert sind
und an der Rotorblattabdeckung gleich fest angezogen sind.
Hinweis: Wenn Sie den Helikopter auf die Seite legen, sollten
die Rotorblätter fest genug angezogen sein, dass sie bei
leichtem Schütteln nicht herunterfallen.
2. Inspizieren Sie den Helikopter auf lose Verkabelungen,
Schrauben, Halterungen, Anschlüsse, bevor Sie ihn fliegen.
3. Schalten Sie erst Ihren Sender ein. Schließen Sie dann den
Akku an die Regler im Helikopter an. Sie sollten dabei auch
darauf achten, dass der 3D-Schalter auf „Normal” gestellt
und der Gashebel ausgeschaltet bzw. vollständig nach
unten geschoben ist.
4. Entfernen Sie sich vom Helikopter. Überprüfen Sie mit
eingeschobener Antenne die Reichweite. Sie sollten sich
ca. 50 Schritte entfernen können und dabei immer noch die
volle Kontrolle über den Helikopter haben. Wenn die Distanz
deutlich geringer ist, sollten Sie das Antennenkabel und die
Anschlüsse am Empfänger des Helikopters über prüfen.
5. Überprüfen Sie den Schwerpunkt, indem Sie die Hauptrotorblätter auf 12:00 und 6:00 Uhr stellen. Heben Sie den
Helikopter an der Paddelstange an und schauen Sie sich das
Landegestell an. Die Kufen sollten sich auf einer Parallelen
mit dem Boden befinden und nicht nach vorne oder hinten
geneigt sein. Falls sie sich neigen sollten, justieren Sie
die Position der Batterie, indem Sie sie vor oder zurück
schieben, bis die Kufen parallel zum Boden stehen, wenn Sie
den Helikopter an der Paddelstange anheben.
6. Wenn dies Ihr erster Flug ist, ist es sehr empfehlenswert,
das Trainingsgestell, Art.-Nr. 50 050 8141, zu benutzen,
bevor Sie einen Flug wagen (nicht enthalten). Das Landegestell verhindert ein Umkippen, wodurch Schäden an den
Rotorblättern oder an der Abtriebswelle verursacht werden
können. Sobald Sie Ihren Helikopter justiert haben, können
Sie das Trainings gestell entfernen.
7. Ziehen Sie die Antenne vollständig aus, bevor Sie Ihren
Helikopter abheben lassen. Dadurch ist eine maximale Funkreichweite gewährleistet.
8. Geben Sie langsam Gas und beobachten Sie die Rotorscheibe. Sie sollte vollkommen flach ohne erkennbare
Neigung sein. Falls der Rotor eine Neigung aufweisen sollte,
bewegen Sie die Trim-Hebel auf dem Sender, bis die Rotorscheibe flach ist.
9. Nach dem Abheben und wenn Sie den Helikopter im
Schwebezustand halten, sollte es sehr leicht sein, mit
leichten Bewegungen der Hebel eine stabile Schwebeposition zu halten. Sollte sich Ihr Helikopter vorwärts, rückwärts oder zur Seite bewegen, justieren Sie die Trim-Hebel
auf dem Sender, bis der Schwebezustand stabil ist.
Hinweis: Ein gut justierter Helikopter sollte ohne große
Eingriffe des Piloten über einen kurzen Zeitraum schweben
können.
10. Nachdem Sie Ihren Flug abgeschlossen haben, trennen
Sie zuerst die Anschlüsse vom Akku im Helikopter. Danach
können Sie den Sender ausschalten.
Schalten Sie nie zuerst den Sender aus, da Sie dadurch
die Kontrolle über den Helikopter verlieren könnten, was
zu einem Absturz oder schweren Personenschäden führen
könnte.
f. Endkontrolle vor dem Flug
Page 35

35
D
CARSON 3D Helicopter Bluster 250se 50 050 7028
g. Normaler Flug
Hoch
Drücken Sie den linken Hebel
nach vorne
Runter Ziehen Sie den linken Hebel nach
hinten
Nase nach links Drücken Sie den linken Hebel
nach links
Nase nach rechts Drücken Sie den linken Hebel
nach rechts
Nase nach unten Drücken Sie den rechten Hebel
nach vorne
Nase hoch Drücken Sie den rechten Hebel
nach hinten
Nach links rollen Drücken Sie den rechten Hebel
nach links
Nach rechts rollen Drücken Sie den rechten Hebel
nach rechts
Übersicht R/C Modus 2 (linker Gashebel)
Page 36

36DCARSON 3D Helicopter Bluster 250se 50 050 7028
Querachse
(Nick)
Hochachse
(Heck)
Längsachse
(Roll)
h. Alle Ersatzteile und Ausrüstung
Taumelscheibe
Lipo Akku Motor Servo Landegestell
Gyro
Antennenröhrchen
Paddelstange
Paddel
Rotorkopf
Heckrotorblatt
Hauptrotorblatt
Leitwerk
Page 37

37
D
CARSON 3D Helicopter Bluster 250se 50 050 7028
i. Ausbalancieren der Hauptrotorblätter und
Heckrotorblätter
Überprüfen und korrigieren Sie vor Ihrem ersten Flug die
Balance der Hauptrotorblätter. Befestigen Sie wie in der
Abbildung dargestellt eine 3M-Schraube durch die zwei Hauptblätter. Ziehen Sie die Blätter an und sorgen Sie dafür, dass sie
wie in der Abbildung gerade sind. Bringen Sie Klebeband auf
dem höheren Blatt an, bis die beiden Blätter gleich hoch sind.
Wiederholen Sie diesen Vorgang für die Heckrotorblätter.
Marke für die Justierung
j. Spurlaufeinstellung
Bringen Sie die im Lieferumfang enthaltenen kleinen farbigen
Klebestreifen wie in der Abbildung dargestellt an den Enden
der Rotorblätter an. Lassen Sie den Helikopter schweben und
beobachten Sie die Spitzen der Rotorblätter. Sie sollten sich
auf einer Ebene befinden. Wenn Sie vom Ende der Rotor blätter
aus schauen, sollten Sie nur ein Rotorblatt sehen. Falls ein
Rotorblatt höher zu sein scheint als das andere, justieren Sie
das niedrigere Rotorblatt, indem Sie das Kugelgelenk einmal
entweder im oder gegen den Uhrzeigersinn drehen, bis sich
beide Blätter auf einer Ebene befinden – siehe Abbildung. Diese
Justierung wird an der Kugelgelenk-Verbindung, die vom Rotorblatthalter weggeht, vorgenommen.
Ihre Augen sollten sich niemals auf Höhe der Rotorblätter
befinden. So können Verletzungen vermieden werden, wenn
sich Rotorblätter aus Versehen lösen sollten.
Marke für die Justierung Marke für die Justierung
k. Überprüfen der Stromzufuhr
Bitte überprüfen Sie die folgenden Dinge, wenn Leistung und
Geschwindigkeit abfallen:
1. Bitte überprüfen Sie, ob der Akku vollständig geladen ist und
ob er gemäß seiner Spezifikationen geeignet ist.
2. Ist der Pitch zu hoch oder zu niedrig (ein Über-Pitch
beeinflusst die Leistung und die Flugzeiten)?
3. Kontrollieren Sie, ob sich die beiden Hauptrotorblätter auf
einer Ebene befinden.
4. Überprüfen Sie, ob am Haupt- oder Heckrotor eine Unwucht
auftritt. Dies könnte von einer verbogenen Welle oder
gelockerten Antriebsteilen hervorgerufen werden.
Page 38

38DCARSON 3D Helicopter Bluster 250se 50 050 7028
l. Wartung
Der Bluster 250se Helikopter ist ein ausgezeichnetes Modell,
das aus Präzisionsteilen hergestellt wurde. Um weiter gute
Leistungen zu erzielen, müssen Sie sich vergewissern, dass
sich alle Bestandteile in einem guten Zustand befinden.
Eine schlechte Wartung kann zu Beschädigungen und Unfällen
führen. Wir empfehlen, dass Sie vor jedem Flug mit Ihrem
Bluster 250se Helikopter die aufgeführte Checkliste durchgehen.
Hauptrotor
1. Bitte überprüfen Sie, ob die Hauptrotorblätter, die Flugachse
oder die Antriebswelle deformiert sind und richtig laufen.
Jede ungleichmäßige Vibration oder ein Flattern ist ein
Zeichen dafür, dass etwas verbogen oder nicht ausbalanciert ist. Vibrationen können die Flugqualität beeinflussen
und zu einem Kontrollverlust oder Absturz führen. Falls Sie
irgendwelche Schäden entdecken, sollten Sie die Teile durch
neue Teile des richtigen Typs austauschen. Inspizieren Sie
die Rotorblätter auf Schäden. Falls Sie Bruchstellen oder
Absplitterungen finden, wechseln Sie die Rotorblätter gegen
neue aus, bevor Sie Ihren Helikopter in Betrieb nehmen.
2. Bitte überprüfen Sie regelmässig, ob die Dämpfungs gummis
des Hauptrotors nicht beschädigt sind. Im Laufe der Zeit
können diese weich und brüchig werden, was zu einer
schlechteren Flugleistung führen kann. Bitte die Dämpfungsgummis immer fetten. Sollten diese weich und brüchig
werden, bitte mit neuen Gummis austauschen.
3. Überprüfen Sie die Pitch-Reichweite der Rotorblätter, um
ausreichend Pitch für einen Flug zu gewährleisten.
Überprüfen Sie die Lagerwelle auf Verschleiß und Lockerheit.
Falls Verschleiß auftritt, setzen Sie ein neues Lager ein.
Vorsicht
Bevor Sie fliegen, sollten Sie die Hauptrotorblätter genau ausbalancieren, da sich hierdurch entscheidet, ob der Helikopter
gut funktioniert.
4. Stellen Sie sicher, dass sich die Steuerarme frei und ohne
Bindung oder Haftung bewegen. Die Schrauben, die die
Arme halten, sollten fest genug sein, so dass sie nicht
festlaufen und die Bewegung verhindern.
5. Achten Sie darauf, dass die Taumelscheibe nicht festläuft
oder bei vollen Servobewegungen den Rahmen berührt.
Überprüfung des Rahmens
1. Bitte wechseln Sie die Kugellager nach 100 Flügen oder
sobald Sie ein Spiel oder Schlupf in den Lagern der Antriebswelle feststellen. Sollten Sie unnormale Geräusche
oder einen Widerstand feststellen, ist es ratsam, die Lager
sofort durch neue zu ersetzen.
2. Bitte nehmen Sie die Kugellager nach 50 Flügen auseinander und reinigen sowie schmieren Sie sie mit leichtem
Maschinen öl. Bei Schäden am Kugellager sollte dieses durch
ein neues ersetzt werden.
3. Sie sollten die Heckantriebswelle austauschen, wenn Sie
Schäden am Antriebsstrang oder am Heckrotor feststellen.
Im Laufe der Zeit tritt eine Ermüdung des Materials ein,
daher sollte die Achse dann ausgetauscht werden.
Überprüfung der Steuerhebel
Bitte stellen Sie sicher, dass jedes Servo angeschlossen und
angezogen ist. Steuerverbindungen sollten angezogen aber
nicht zu steng sein. Wenn Sie ein Blockieren feststellen, oder
einen Servo entdecken, der schleift, sollte dieser repariert oder
durch ein neues Servo ersetzt werden.
Page 39

39
D
CARSON 3D Helicopter Bluster 250se 50 050 7028
Systemcheck Heckrotor
1. Achten Sie darauf, dass der Heckantrieb richtig funktioniert.
An den Zahnrädern und Antriebsriemen sollten keine Lücken
erkennbar sein und der Antriebseingriff sollte glatt und ohne
Bindung sein. Falls Zähne fehlen sollten, sollten die Zahnräder oder der Riemen vor dem nächsten Flug ausgetauscht
werden.
2. Stellen Sie sicher, dass sich kein Gras im Antriebssystem
befindet, wenn Sie über Rasenflächen fliegen. Ölen Sie
die ungeschützten Zahnräder nicht, da hierdurch Schmutz
angezogen wird, was wiederum zu einem schnelleren
Verschleiß der Zahnräder/ Zahnriemen führt.
3. Nehmen Sie das Hecksystem nach 50 Flügen auseinander
und reinigen Sie die Zahnräder sowie den Antriebsstrang.
Überprüfen Sie den Rädersatz und ersetzen Sie verschlissene oder beschädigte Zahnräder/ Zahnriemen.
4. Sollte Ihr Helikopter hart auf den Boden treffen, sollten Sie
ihn sofort auf Beschädigungen überprüfen. Tauschen Sie
alle beschädigten Teile gegen ein neues Teil aus, bevor Sie
wieder starten.
Vorsicht
Überprüfen Sie vor einem Start alle Halterungen und
Schrauben. Lockere Schrauben können unvorhergesehene
Unfälle, Abstürze oder Verletzungen verursachen.
Stellen Sie sicher, dass niemand sonst in
der Umgebung auf Ihrer Frequenz sendet!
Störsignale auf gleicher Frequenz können bewirken, dass Sie
die Kontrolle über Ihr Modell verlieren. Wenn Sie mit anderen
RC-Modellsportlern fliegen, kann es daher notwendig werden,
die Sendefrequenz zu wechseln.
Sender
Durch Austauschen des Steckquarzes auf der Senderrückseite
ist ein schneller Wechsel der Sendefrequenz möglich.
Verwenden Sie aus Gründen der Betriebssicherheit nur Quarze,
die vom Zulieferer ausdrücklich für den Einsatz in Ihrer Fernsteueranlage empfohlen werden.
Ziehen Sie den Halter für den Senderquarz bei ausgeschaltetem Sender aus der Rückseite des Sendergehäuses.
Setzen Sie den Wechselquarz mit einem anderen Kanal im
selben Frequenzband ein. Achten Sie darauf, den richtigen
Quarz einzusetzen. Senderquarze sind in der Regel mit den
Buchstaben T oder TX (T = Transmitter oder Sender) gekennzeichnet.
Empfänger
Entnehmen Sie den Empfängerquarz ggf. mit Hilfe einer Pinzette und stecken Sie einen neuen, passenden Empfängerquarz
in den Empfänger.
Der passende Empfängerquarz mit der zum Sender passenden
Frequenz muss mit der selben Kanalzahl wie der Senderquarz
beschriftet sein. Zusätzlich trägt er die Buchstabenkennung R
oder RX (R = Receiver oder Empfänger).
Nehmen Sie nun den Sender und anschließend den Empfänger
in Betrieb und prüfen Sie die Funktion der Anlage.
Sender- und Empfängerquarz nicht
vertauschen!
Sender- und Empfängerquarz müssen exakt aufeinander
abgestimmt sein.
Stellen Sie sicher, dass der Quarz vollständig eingesteckt ist
und fest sitzt.
m. Wechseln der Sendefrequenz
Page 40

40DCARSON 3D Helicopter Bluster 250se 50 050 7028
n. Allgemeiner Flug
Gasknüppel Vollausschlag/ Gaskurve 100% / Pitch +9° ~+11°
Gasknüppel Mittelstellung/ Schwebeflug/ Gaskurve 65% ~ 70% / Pitch +5° ~ +6°
Gasknüppel Minimalausschlag/ Gaskurve 0%/ Pitch 0°
Allgemeiner Flug
Taumelscheibe Pitch
5 100% Ausschlag +9° ~+11°
4 85%
3 65% ~70% Mittelstellung +5° ~+6°
2 40%
1 0% Minimalausschlag 0°
Gaskurve im Modus Schwebeflug
Achtung
Wenn Sie von Normal zu Idle 1 wechseln (3D-Position auf dem
Schalter), sollten Sie den Schalter nicht umlegen, wenn Sie
den Gashebel nicht auf mindestens 70% der Gaseinstellung
eingestellt haben. Dadurch wird ein möglicher Antriebsschaden
vermieden, denn durch die Verwendung dieses Schalters
wird die Position Gashebel gesteigert. Sollten Sie den 3DSchalter oder Idle 1 betätigen, bevor Sie eine hohe Gas
einstellung vorgenommen haben, kann der Helikopter unstabil
werden, umkippen und einen Absturz verursachen. Mit Idle
1 oder dem 3D-Schalter hat der Gashebel volle Kraft in der
untersten und obersten Position des Gashebelwegs. Wenn der
3D-Schalter aktiviert ist, können Sie akrobatische Flüge wie
etwa seitenverkehrte Flüge durchführen.
Page 41

41
D
CARSON 3D Helicopter Bluster 250se 50 050 7028
o. 3D Kunstflug
Gasknüppel Vollausschlag/Vollgas / Gaskurve 100% / Pitch +9° ~+11°
Gasknüppel Mittelstellung / Gaskurve 50% / Pitch 0°
Gasknüppel Minimalausschlag/Vollgas / Gaskurve 100% / Pitch -8° ~-10°
3D Kunstflug
Taumelscheibe Pitch
5 100% Ausschlag +9° ~+11°
3 50% Mittelstellung +5° ~+6°
1 0% Minimalausschlag +8° ~+10°
Gaskurve im Modus 3D Kunstflug
Hinweis
1. Gesamtweg Pitch 21°
2. Ein Über-Pitch reduziert die Leistung und verkürzt die
Flugzeit.
3. Die Verwendung eines niedrigeren Pitchs und einer höheren
Rotorgeschwindigkeit eignet sich besser als ein zu hoher
Pitch.
Page 42

42DCARSON 3D Helicopter Bluster 250se 50 050 7028
p. Rückenflug
(Flugmodusschalter muss auf 3D-Mode stehen)
Hoch Drücken Sie den linken Hebel
nach unten
Runter Drücken Sie den linken Hebel
nach oben
Nase nach links Drücken Sie den linken Hebel
nach links
Nase nach rechts Drücken Sie den linken Hebel
nach rechts
Nase nach unten vorn Drücken Sie den rechten Hebel
nach unten
Nase hoch rückwärts Drücken Sie den rechten Hebel
nach oben
Nach links Drücken Sie den rechten Hebel
nach links
Nach rechts Drücken Sie den rechten Hebel
nach rechts
Übersicht R/C Modus 2 (linker Gashebel)
Page 43

43
D
CARSON 3D Helicopter Bluster 250se 50 050 7028
q. Problembehandlung
Lesen Sie dies, schon bevor es passiert.
Problem Ursache Behebung
Das Modell bewegt sich
nicht
1. Prüfen Sie, ob der Sender und der Empfänger eingeschaltet sind
Schalten Sie Sender und/oder Empfänger
ein
2. Prüfen Sie die Akkuspannung von Sender und
Empfänger
Setzen Sie vollständig geladene Akkus ein
3. Prüfen Sie, ob Sender- und Empfängerfrequenz
übereinstimmen
Tauschen Sie ggf. die Quarze aus
4. Der Trimmschieber der Pitch-Funktion steht am
oberen Anschlag
Stellen Sie sicher, dass der Trimmschieber
der Pitch-Funktion in Neutralstellung oder
etwas darunter steht.
Motor dreht nicht 1. Motor ist defekt Tauschen Sie den Motor aus
2. Verbindung von Controller und Motor ist lose Befestigen Sie den Stecker vom Motor
Das Modell reagiert
falsch auf die Steuerbefehle oder fliegt unruhig
1. Überprüfen Sie den Ladezustand von Sender- und
Empfängerakkus
Setzen Sie vollständig geladene Akkus ein
2. Senderantenne nicht vollständig herausgezogen Ziehen Sie die Senderantenne ganz heraus
3. Empfängerantenne noch aufgewickelt Wickeln Sie die Empfängerantenne vollständig ab
4. Störimpulse Vergewissern Sie sich, dass es keine Frequenzüberlagerung durch andere Sender
und keine atmosphärischen Störungen gibt
Das Modell steigt nicht
auf
1. Pitchwert stimmt nicht Pitchwert kontrollieren
2. Akkus sind leer Laden Sie die Akkus oder tauschen Sie sie
aus
Die Rotoren lassen sich
nicht abstellen
Trimmung ist nicht korrekt eingestellt Korrigieren Sie die Trimmung am Pitch-Reg-
ler
Das Modell vibriert heftig 1. Prüfen Sie, ob die Hauptrotoren rund laufen Wuchten Sie die Rotorblätter ggf. aus
2. Prüfen Sie, ob das Modell korrekt ausbalanciert ist Wuchten Sie die Rotorblätter ggf. aus
Das Heck lässt sich nicht
stabilisieren
1. Ein oder mehrere Rotorblätter sind defekt Ersetzen Sie ein oder beide Rotorblätter
2. Unterer und oberer Rotorkreis laufen mit unter-
schiedlicher Reibung auf der Rotorwelle
Stellen Sie sicher, dass sich beide Rotorkreise leicht drehen lassen
3. Der Kreisel ist nicht korrekt eingestellt oder defekt Kreisel neu einstellen oder tauschen
Page 44

44FCARSON 3D Helicopter Bluster 250se 50 050 7028
Par la présente, CARSON MODEL-SPORT déclare que ce
modèle réduit, y compris sa radiocommande, est conforme aux
exigences de base et aux autres prescriptions significatives de
la directive 1999/5/CE (R&TTE).
La déclaration originale est disponible sur demande :
Dickie-Tamiya GmbH&Co. KG • Werkstraße l • D-90765 Fürth •
ALLEMAGNE
Tel.: +49 / (0) 911 / 9765-03
Le produit que vous avez acheté est entraîné par une
batterie rechargeable lithium-polymer.
Cette batterie est recyclable.
Les batteries défectueuses ou qui ne sont plus
rechargeables sont à déposer aux points de collecte
spécifiques.
Ne pas jeter parmi les ordures ménagères !
Nous vous souhaitons beaucoup de plaisir avec votre
hélicoptère CARSON et surtout bon vol !
Cher client
Merci d’avoir choisi la maquette d’hélicoptère Bluster 250se de
CARSON. Cet hélicoptère, qui est notre tout dernier modèle,
est actionné par un micromoteur électrique. Le Bluster 250se
est équipé d’un collective pitch réglable (pas collectif) qui
permet de l’utiliser également à l’extérieur.
L’hélicoptère Bluster 250se doté d’un système de collective
pitch BALL HALL (pas collectif).
Combinant stabilité, flexibilité et équilibre en vol, la maquette
peut aussi être utilisée pour les vols en extérieur. La maquette
possède un gyroscope head-lock pour une très bonne stabilité.
Les spécifications du puissant moteur brushless et de l’accu
LiPo assurent des acrobaties parfaites en vol en trois
dimensions.
Conditions de garantie
CARSON vous garantit pour 24 mois à partir de la date d’achat
(pièces justificatives à l’appui) que le modèle est exempte de
tout défaut. L’utilisation inappropriée, l’usure des éléments au
cours de l’utilisation, les transformations de votre propre chef,
l’application ou l’utilisation incorrecte, l’endommagement des
batteries ou d’autres équipements au cours de l’utilisation ou
l’emploi abusif un l’endommagement causé par le transport,
n’est pas couvert par la responsabilité civile.
Notre garantie se limite à la réparation ou à l’échange des
appareils dans l’état original et à la hauteur du prix d’achat.
L’utilisateur du modèle assume tous les risques en rapport avec
l’utilisation du modèle. Nous nous réservons le droit de modifier
ces conditions de garantie à tout moment et sans préavis.
En cas de réclamation veuillez contacter votre revendeur
spécialisé.
La garantie ne couvre pas:
• tout dommage ou défaillance causé par force majeure,
abus, accident, utilisation abusive, erronée ou anormale, non
respect des instructions, mauvaise mise en route ou
maintenance insuffisante, altération, éclair ou tout autre
conséquence d’une surtension ou d’un courant excessif ;
• tout dommage provoqué par la perte de contrôle de la
modèle ;
• toute réparation autre que celles réalisées par un organisme
agrée par CARSON ;
• les consommables tels que les fusibles et les batteries ;
• des dommages esthétiques ;
• le transport, l’expédition et les frais d’assurance ; et
• les frais de retour, d’installation, de mise au point et de
remise en route du produit
Cette garantie vous attribue des droits spécifiques, vous
pouvez par ailleurs également prétendre à d’autres droits en
fonction du pays d’achat.
Déclaration de conformité
Lire attentivement ces instructions avant d’utiliser ce nouveau modèle réduit.
Page 45

45
F
CARSON 3D Helicopter Bluster 250se 50 050 7028
Contenu
Périmètre de livraison
• Maquette déjà réglée et prête à voler
• Émetteur manuel ordinateur 6 canaux 35 MHz FM
avec écran LCD
• Accu Lipo 11,1 V/ 600 mAh
• Chargeur Lipo-Balance avec bloc d’alimentation
• 4 servos de 5 g
• Gyroscope haute technologie entièrement réglable
• Mode d’emploi avec de nombreux conseils
• Moteur brushless/régulateur déjà intégrés
• Logiciel de simulateur de vol et câble de raccordement
Préface ..................................................................................... 44
Périmètre de livraison ............................................................. 45
Détails techniques ................................................................... 46
Consignes de sécurité ............................................................ 46
Conseils de sécurité ................................................................ 47
a. Liste des pièces ................................................................. 51
b. Fonctions de la radiocommande ...................................... 52
c. Affectation des canaux du récepteur ...............................53
d. Ajustage du gyroscope ...................................................... 53
e. Préparatifs .......................................................................... 54
f. Contrôle final avant le vol .................................................. 55
g. Vol normal .......................................................................... 56
h. Toutes les pièces détachées et équipement .................... 57
i. Équilibrage des pales de rotor principal et de
rotor anticouple .................................................................. 58
j. Réglage du pas .................................................................. 58
k. Vérification de l’alimentation électrique ........................... 58
l. Entretien ............................................................................. 59
m. Changement de la fréquence d’émission ......................... 60
n. Vol général .......................................................................... 61
o. Vol acrobatique 3D ............................................................ 62
p. Vol sur le dos ...................................................................... 63
q. Elimination des erreurs ...................................................... 63
Vue éclatée ............................................................................ 108
Pièces détachees .................................................................. 112
Accessoires ........................................................................... 115
Page 46

46FCARSON 3D Helicopter Bluster 250se 50 050 7028
Consignes de sécurité
Ce modèle n’est pas un jouet
• Un modèle télécommandé n’est pas un jouet, sa
manipulation doit être apprise progressivement.
• Les enfants de moins de 14 ans ne doivent pas conduire le
modèle sans être accompagnés d’un adulte.
La conduite d’une modèle radiocommandée est une activité
passionnante. Elle doit toutefois être exercée avec la prudence
et l’attention nécessaires.
Un modèle radiocommandée peut provoquer des dommages et
des blessures si elle n’est pas conduite de manière
contrôlée, l’utilisateur est responsable de sa conduite.
Assurez-vous de disposer d’une couverture d’assurance
suffisante pour pratiquer cette activité.
Seul un modèle bien entretenu fonctionnera de manière
correcte. N’utiliser que des pièces détachées homologuées
et ne jamais improviser de réparations avec des éléments
inadaptés.
L’utilisateur est responsable du bon fonctionnement du
modèle et du bon serrage de tous les écrous, boulons et vis.
Conservez la maquette hors de portée des jeunes enfants. Ils
pourraient mettre la maquette en marche de manière inopinée
et se blesser ou bien porter à leur bouche des accus ou des
petites pièces et les avaler.
Attention !
Le maquettisme télécommandé est un passe-temps de haute
technologie et cet appareil ne doit donc pas être considéré
comme un jouet pour enfants. L’utilisation de ce produit
présente des risques.
L’utilisateur doit donc prendre toutes les précautions
nécessaires afin d’éviter des blessures graves. Un montage
incorrect, des réglages inappropriés et une mauvaise
manipulation peuvent entraîner des dysfonctionnements ou
des risques à l’usage. Si vous avez des questions concernant
l’utilisation, la maintenance ou le fonctionnement sûr de cette
maquette, veuillez vous adresser à votre revendeur local.
Généralités
• Lire le présent mode d’emploi absolument avant usage et le
conserver pour consultation ultérieure.
• Il est important de se familiariser avec les indications
concernant le vol.
Remarque
Comme tout produit télécommandé, cet appareil présente des
risques en vol. Les débutants doivent demander l’aide d’une
personne maîtrisant le pilotage télécommandé afin de s’assurer
que la maquette est sûre et apte au vol. Toute dégradation,
négligence ou utilisation inhabituelle de ce produit peut
entraîner des incidents ou des blessures. Lisez soigneusement
ces instructions et respectez les consignes de sécurité. Nous
attirons votre attention sur le fait qu’il ne s’agit pas d’un jouet.
Surveillez les enfants avant la mise en marche de l’hélicoptère
ou en cours de vol.
Détails techniques :
RTF ( Avancé )
Longeur 515 mm
Hauteur 155 mm
Diamètre du rotor principal 390 mm
Diamètre du rotor arrière 105 mm
Poids 255 g sans accumulateur
Émetteur 6 canaux
Receveur 6 canaux
Gyroscope : gyroscope réglable haute technologie
Moteur brushless : CARSON HELI-X B10
Brushless régulateur : CARSON HELI-X 10 A
Accumulateur Lipo : 600 mAH / 11,1 V
Servos : 4x servo micro 5 g
*Sous réserve de modifications.
Remarque
Le moteur ne peut pas être mis en marche quand le mode 3D
est activé à la mise en marche de l’émetteur (commutateur sur
la droite).
Cela ne sert à rien non plus d’amener le manche Pitch/Throttle
en position « Marche à vide/Moteur éteint », il ne sera toujours
pas possible de mettre en marche le moteur.
Pour mettre en marche le moteur, le commutateur 3D doit être
en position « nor » à la mise en marche de l’émetteur, c’est-àdire que le mode 3D doit être désactivé.
Page 47

47
F
CARSON 3D Helicopter Bluster 250se 50 050 7028
1. Cherchez un endroit approprié pour
faire voler votre hélicoptère :
Les hélicoptères télécommandés peuvent atteindre des
vitesses élevées en vol. Cela présente un certain risque pour
le pilote et pour les spectateurs. Choisissez un terrain de vol
approprié avec une surface plane sans obstacles. Vous pouvez
par exemple vous installer sur un parking vide, sans voitures ni
piétons, dans un gymnase vide ou dans un entrepôt dégagé.
Ne volez pas à proximité de bâtiments, d’arbres ou de lignes
haute tension pour votre propre sécurité, celle des autres
personnes et celle de la maquette. N’utilisez pas votre
hélicoptère dans des conditions météorologiques mauvaises
(pluie, neige, vents violents ou obscurité).
2. Demandez l’aide d’un pilote
expérimenté.
Avant de mettre en marche la maquette et l’émetteur, vérifiez
qu’aucune autre personne n’utilise la même fréquence. En cas
de perturbations de la fréquence, la maquette peut devenir
incontrôlable si elle est commandée à la même fréquence que
d’autres maquettes dans les environs. L’assistance d’un pilote
expérimenté lors du premier vol vous permet d’être sûr que
vous disposez d’un hélicoptère bien entretenu et fonctionnant
correctement.
3. La fréquence ne doit pas être déjà
utilisée à proximité.
Assurez-vous que personne à proximité n’utilise en même
temps la même fréquence d’émission, car vous risqueriez
alors de perdre le contrôle de l’hélicoptère et de provoquer un
accident.
Conseils de sécurité
Débutant Débutant Pilote
expérimenté
35.950 MHz
35.950 MHz
Page 48

48FCARSON 3D Helicopter Bluster 250se 50 050 7028
4. Faites attention aux rotors en rotation.
Le rotor principal et le rotor anticouple de votre nouvel
hélicoptère CARSON tournent à une vitesse élevée en cours
d’utilisation. Les pales du rotor peuvent causer des blessures
graves pour vous-même et pour les autres personnes. Ayez
conscience de vos gestes et gardez les mains, le visage,
les yeux et les vêtements lâches à l’écart des pales et de
l’entraînement.
Faites toujours voler la maquette à une distance sûre de
vous-même et des autres personnes, ainsi que des objets
environnants. Ne perdez jamais la maquette des yeux et ne la
laissez jamais sans surveillance
quand elle est en marche. Après
chaque vol, éteignez d’abord la
maquette, puis l’émetteur.
5. N’exposez pas votre hélicoptère Bluster
250se à la chaleur et à l’humidité.
Votre nouvel hélicoptère CARSON est un appareil électronique
de haute technologie. N’exposez jamais votre maquette à des
températures extrêmes, ne laissez jamais la maquette dans
votre voiture de manière prolongée, car les températures
élevées risqueraient d’abîmer les systèmes électroniques
sensibles et les pièces en plastique.
Mode de recharge et mise en garde
Ne rechargez l’accu lithium-polymère qu’à l’aide du chargeur
fourni. Faites attention à la polarité de l’accu et du chargeur et
veillez à ce que les branchements soient corrects. N’ayez pas
recours à la force pour éviter tout dommage.
Veuillez charger l’accu avant la première utilisation de manière
à démarrer avec un accu complètement chargé. Dès que l’accu
est complètement rechargé, le voyant vert s’allume ; durant la
recharge, le voyant rouge est allumé sur le chargeur.
Pour plus de sûreté, ne chargez pas l’accu de manière
prolongée. Ne laissez jamais le chargeur sans surveillance et ne
laissez pas le chargeur allumé durant la nuit. La recharge des
accus lithium doit être surveillée par un adulte.
L’accu fourni Lipo 600 mAh ne doit être rechargé qu’avec le
chargeur fourni pour accus LiPo. La recharge de l’accu avec
un chargeur qui n’est pas spécialement conçu pour les accus
lithium peut entraîner un incendie ou faire exploser l’accu.
Respectez toutes les consignes de sécurité.
Si l’accu gonfle ou est endommagé, placez-le dans un récipient
sûr à l’extérieur en prenant garde à ne pas le déposer à
proximité de matériaux inflammables.
1. Ne posez pas l’accu sur des choses ou à côté de choses
qui pourraient prendre feu durant la recharge.
2. Rechargez l’accu sur un support non inflammable, par
exemple une plaque en métal ou en pierre.
Page 49

49
F
CARSON 3D Helicopter Bluster 250se 50 050 7028
Batterie lithium-polymère
N’utiliser les batteries fournies que pour ce modèle réduit.
Prendre également pour batterie de rechange une pièce
d’origine.
• Ne charger la batterie qu’en dehors du modèle réduit et à
distance de matériaux facilement inflammables ! Un
échauffement de la batterie durant la charge est normal.
• Ne pas surcharger ou décharger profondément une batterie.
Les deux peuvent entraîner des fuites de l’électrolyte et
l’auto-ignition de la batterie.
• Recharger la batterie Li-Po au moins tous les 6 mois afin
d’éviter une décharge profonde.
• Retirer la batterie du chargeur pour éviter une autodécharge.
• Retirez l’accu du récepteur si vous n’utilisez pas le modèle
pour une longue durée.
Les batteries défectueuses ou qui ne sont plus rechargeables
sont à déposer aux points de collecte spécifiques.
Ne pas jeter parmi les ordures ménagères !
Les batteries ne doivent pas :
• Être plongées dans un liquide,
• Être jetées dans le feu ou exposées à une température
élevée,
• Exposées à des sollicitations mécaniques importantes,
• Démontées / endommagées,
• Court-circuitées.
Si au cours de l’utilisation, de la charge ou du stockage de
la batterie, vous percevez une odeur, une coloration, un
échauffement particulier, une déformation ou tout autre
phénomène :
• Déconnecter la batterie du chargeur,
• Déconnecter la batterie de son appareil,
• Ne plus utiliser cette batterie.
Si de l’électrolyte s’écoule :
• Éviter tout contact avec les yeux et la peau,
• Rincer sans tarder les zones touchées à l’eau pure, et faire
appel à un médecin.
Page 50

50FCARSON 3D Helicopter Bluster 250se 50 050 7028
Instructions de sécurité pour les batteries
Li-Po
1. Ne pas désassembler ou réassembler la batterie.
2. Ne pas court-circuiter la batterie.
3. Ne pas utiliser ou laisser la batterie à proximité d’une
flamme ou d’une source de chaleur (plus de 80 °C).
4. Ne pas plonger la batterie dans l’eau ou l’eau de mer, ne
pas la mouiller.
5. Ne pas remplacer la batterie à proximité d’une source de
chaleur ou en plein soleil.
6. Utiliser le chargeur spécifié et respecter les consignes de
chargement.
7. Ne pas introduire de pointe dans la batterie. Ne pas la
frapper avec un objet contendant ou la piétiner.
8. Ne pas faire subir d’impact à la batterie ou la lancer.
9. Ne pas utiliser la batterie avec des dommages ou
déformations visibles.
10. Ne pas effectuer de brasages directement sur la batterie.
11. Ne pas inverser la charge ou sur-décharger la cellule.
12. Ne pas inverser la charge ou le raccordement.
13. Ne pas raccorder la batterie à une prise électrique ou à
l’allume-cigare du modèle.
14. Ne pas utiliser la batterie pour des équipements non
indiqués.
15. Ne pas toucher directement une batterie présentant des
fuites.
16. Ne pas mélanger avec des batteries Li-ion.
17. Maintenir la batterie à distance des petits enfants.
18. Ne pas continuer à charger la batterie au-delà du temps
indiqué.
19. Ne pas déposer la batterie dans un four à micro-ondes ou
un conteneur en surpression.
20. Ne pas utiliser de batterie avec une fuite à proximité d’une
flamme.
21. Ne pas utiliser ou laisser la batterie en plein soleil (ou dans
un véhicule au soleil).
22. Ne pas utiliser dans des milieux générant de l’électricité
statique (plus de 64 V) qui pourraient endommager le circuit
de protection. La plage de température de chargement va
de 0 °C à 45 °C.
23. Ne pas charger la batterie en dehors de cette plage.
24. Si lors de la première utilisation, la batterie est corrodée,
dégage une mauvaise odeur ou a un comportement
anormal, ne pas l’utiliser mais la rapporter chez le
revendeur.
25. Dans le cas où des enfants souhaitent utiliser la batterie,
il est nécessaire que les parents leur montrent comment
l’utiliser en respectant scrupuleusement le manuel. Veiller
par la suite lors de leur utilisation qu’ils se conforment bien
aux instructions.
26. Maintenir la batterie hors de portée des petits enfants.
Lors de l’utilisation, veiller à ce que la batterie ne soit pas
déconnectée du chargeur ou de son équipement par des
petits enfants.
27. Rincer abondamment la peau ou des habits souillés par
du liquide provenant de la batterie. Il peut entraîner des
irritations cutanées.
28. Ne jamais décharger la batterie de plus de 5c et abaisser la
tension de façon à ce qu’elle soit inférieure à 6 V, car cela
endommagerait la batterie.
29. Ne jamais charger la batterie sur la moquette, car cela peut
déclencher des incendies.
30. Ne pas utiliser la batterie pour des équipements non
spécifiés, ni pour des usages autres que l’usage prévu.
31. Ne jamais toucher la batterie si celle-ci n’est pas étanche.
Si l’on a touché la batterie, se laver les mains immédiatement après.
32. Ne pas charger la batterie pendant plus longtemps que la
durée spécifiée.
33. Ne jamais utiliser de batteries gonflées ou endommagées.
Page 51

51
F
CARSON 3D Helicopter Bluster 250se 50 050 7028
Le Bluster 250se 450 est fourni avec les pièces suivantes.
Veuillez vous assurer que toutes ces pièces sont fournies avec
votre maquette. Veuillez contacter votre revendeur local au cas
où il manquerait une pièce.
Barre de bell
Pale pricipale
Tête de rotor
Axe rotor
Plateau cyclique
Tube arrière
Train d’attérissage
Capot de cabine
Rotor anticouple
a. Liste des pièces
Gyroscope Récepteur 35 MHz BL moteur Régulateur
Accu 11,1 V / 600 mAh Chargeur « LiPo-Balance »
Radiocommande 4 x 5 g servos
Page 52

52FCARSON 3D Helicopter Bluster 250se 50 050 7028
b. Fonctions de la radiocommande
1 Antenne télescopique
2 LCD
1. Lecture de la tension de l’accu/ la batterie
2. Montre le canal monté sur « reverse ».
3. Indique la durée de vol
4. Indique le mode de vol
5. Indique le statut du verrouillage des touches (unlock/ lock)
3 Butée du pitch
4 Trim du pitch
5 Commutateur 1
Ce commutateur commande le canal 5. Celui-ci contrôle
le gyroscope. Mais il peut aussi contrôler un châssis
escamotable, une caméra, etc.
6 Commutateur 3D
Commute « Normal/Vol plané » ou « Mode 3D »
7 Commutateur « MODEL » pour sélectionner le modèle de vol
souhaité
MODEL A : simulation de volets de courbure
MODEL V : fonction complémentaire
MODEL H, C, C1 : marche à vide avec levier gaz/ pitch en
position centrale.
ATTENTION !
Quand les modèles H, C et C1 sont sélectionnés, vous ne
pouvez passer en mode 3D que quand le levier gaz/ pitch
est en position centrale !
8 Voyant (vert) d’affichage de l’état de marche
9 Voyant (rouge) d’affichage d’une sous-tension
Changez rapidement les accus de l’émetteur quand le
voyant rouge clignote et changez-les au plus tard quand le
voyant s’éteint !
10 Levier de commande à distance droite
(canal de fonction 2 et 1)
11 Levier de commande à distance gauche
(canal de fonction 3 et 4)
Les deux leviers de commande à distance peuvent être
prolongés de 5 mm environ.
12 Trim canal de fonction 2
13 Trim canal de fonction 4
14 Trim canal de fonction 1
15 Trim canal de fonction 3
16 Anneau pour sangle de transport
17 Interrupteur marche/arrêt
ATTENTION !
À la mise en marche de l’émetteur en ayant sélectionné
le MODEL H, C et C1, le commutateur 3D doit être sur
« NOR » !
18 Commutateur coulissant LOCK pour bloquer le bouton de
réglage rotatif et le poussoir « MODEL ».
19 Commutateur Reverse canal de fonction 1, 2, 3, 4, 6
En bas : NOR (normal)
En haut : REV (reverse)
20 Poignée de transport
21 Quartz d’émetteur (dos de l’émetteur)
22 Batterie/ compartiment pour accu (dos de l’émetteur)
23 Prise de raccordement pour simulateur de vol (dos de
l’émetteur)
24 Prise de recharge (côté)
25 Commutateur basculant, Dual Rate canal de fonction 1, 2, 4
Réduction des trajets fonctionnels 1, 2 et 4 de 100 % (pos. 0)
à 70 % (pos. 1)
1
2
3
5
7
9
11
13
15
17
19
4
6
25
8
10
12
14
16
18
20
21
22
23
24
Page 53

53
F
CARSON 3D Helicopter Bluster 250se 50 050 7028
c. Affectation des canaux du récepteur
d. Ajustage du gyroscope
Montage du gyroscope :
Assurez-vous que tous les composants RC et les servos
fonctionnent correctement sans être grippés et que les
guignols des servos se trouvent dans la bonne position.
Fixez le gyroscope sur une surface plane à proximité du centre
de gravité.
Reliez la prise du gyroscope à l’emplacement 4 et la deuxième
prise de la sensibilité (un seul câble) à l’emplacement 5.
Allumez l’émetteur et amenez le trim du rotor anticouple en
position neutre. Reliez l’accu de vol au régulateur et attendez
que le voyant s’allume sur le gyroscope. Le gyroscope est alors
initialisé et l’hélicoptère ne doit plus être bougé. Au bout de
10 secondes environ, le gyroscope est prêt pour le départ et le
réglage est achevé. Dans le cas contraire, vérifiez à nouveau
les raccordements.
Réglage du commutateur d’inversion sur
le gyroscope :
Lorsque vous tournez l’hélicoptère avec le nez vers la gauche,
le servo sur le tube arrière doit tourner dans la même direction
que quand vous appuyez le manche du rotor anticouple vers la
droite. Dans le cas contraire, inversez le commutateur Reverse.
Réglage de la sensibilité :
Lors du premier test de l’hélicoptère, faites attention au
tube arrière après le décollage. S’il bouge ou si l’arrière de
l’hélicoptère est instable, la sensibilité doit être abaissée
jusqu’à obtenir un résultat satisfaisant.
6. Pitch
5. Sensibilité gyroscope
4. Servo de rotor anticouple
3. Gaz/ régulateur
2. Nick
1. Roll
Raccordement gyroscope sur
emplacement récepteur 4
Sensibilité sur
emplacement récepteur 5
Commutateur Reverse
Raccordement servo rotor arrière
Réglage sensibilité Limitateur amplitude
du servo
Voyant de contrôle
Page 54

54FCARSON 3D Helicopter Bluster 250se 50 050 7028
e. Préparatifs
Consignes générales
• Dans le cas d’une expérience faible ou nulle en
aéromodélisme, nous conseillons d’en acquérir tout d’abord
avec un logiciel de simulateur de vol.
• Consulter des pilotes chevronnés pour des conseils de
réglages fins et de pilotage de l’hélicoptère.
• Bien prendre en main les fonctions de commande de
l’émetteur.
• Commencer les essais en vol debout derrière le modèle
réduit, en regardant dans le sens du vol. Dans ce cas, les
réactions de pilotage sont les mêmes que les directions de
pilotage.
Il est de plus nécessaire de prendre en main le pilotage de
l’hélicoptère quand il vient sur le pilote (inversion apparente
des gouvernes de directions).
Chargement et montage de la batterie de vol
Toujours charger la batterie en dehors du modèle réduit !
• Raccorder le chargeur à l’adaptateur de la batterie.
• Brancher le chargeur enfichable dans la prise.
• Monter la batterie dans la gaine métallique.
• Raccorder la batterie au chargeur.
• Veiller à un contact sûr avec le raccordement par prise pour
éviter tout court-circuit.
• Ne pas recouvrir la batterie !
La température de l’accu ne doit pas dépasser 60 °C durant la
recharge.
La recharge est achevée quand le voyant vert du chargeur
Balance s’allume.
• Brancher le chargeur équilibreur lipo au câble
d’alimentation.
• Brancher le connecteur blanc de la batterie
lipo au chargeur.
• La batterie est entièrement chargée lorsque le
s3 leds s’éclairent en vert.
Lipo Balance Charger
Insérez l’accu de vol
1. Dégagez prudemment le capot des fixations sur la gauche et
sur la droite.
2. Vous pouvez à présent insérer horizontalement l’accu Lipo
vers l’avant dans le châssis.
3. Reliez l’accu au régulateur de vol
(assurez-vous préalablement que l’émetteur est allumé).
Page 55

55
F
CARSON 3D Helicopter Bluster 250se 50 050 7028
Avant le vol, l’opérateur doit contrôler les
points suivants :
1. Assurez-vous que les pales du rotor sont équilibrées et
serrées de manière égale au niveau du cache des pales.
Remarque : si vous posez l’hélicoptère de côté, les pales de
rotor doivent être suffisamment serrées pour ne pas tomber
quand vous secouez légèrement l’hélicoptère.
2. Avant de faire voler l’hélicoptère, inspectez-le pour détecter
tout problème de câble, vis, fixations, branchements mal
serrés.
3. Allumez alors seulement l’émetteur. Raccordez ensuite
l’accu aux régulateurs dans l’hélicoptère. Faites attention
à ce que le manche des gaz soit éteint ou complètement
poussé vers le bas.
4. Éloignez-vous de l’hélicoptère. Vérifiez la portée avec
l’antenne rentrée. Vous devez pouvoir vous éloigner à une
cinquantaine de pas tout en gardant le contrôle total de
l’hélicoptère. Si la distance est nettement inférieure, vérifiez
le câble de l’antenne et les branchements sur le récepteur
de l’hélicoptère.
5. Vérifiez le centre de gravité en amenant les pales de rotor en
position 12 heures et 6 heures. Soulevez l’hélicoptère par la
barre de Bell et examinez le train d’atterrissage. Les patins
doivent être parallèles au sol et ne pas être inclinés vers
l’avant ou l’arrière. S’ils penchent, ajustez la position de la
batterie en la poussant vers l’avant ou vers l’arrière jusqu’à
ce que les patins soient parallèles au sol quand vous
soulevez l’hélicoptère par la barre de Bell.
6. S’il s’agit de votre premier vol, il est vivement conseillé
d’utiliser le châssis d’entraînement, Art.-Nr. 50 050 8141,
avant de tenter un vol (non fourni). Le train d’atterrissage
évite que l’hélicoptère ne se renverse, ce qui pourrait endommager les pales de rotor ou l’arbre
secondaire. Dès que l’hélicoptère est bien réglé, vous
pourrez retirer le châssis d’entraînement.
7. Sortez complètement l’antenne avant de laisser l’hélicoptère
décoller. Cela garantit une portée maximale des commandes
radio.
8. Donnez lentement des gaz et observez le disque du rotor. Il
doit être complètement à plat sans inclinaison notable. Si le
rotor présente une inclinaison, bougez le levier de trim sur
l’émetteur jusqu’à ce que le disque du rotor soit à plat.
9. Après le décollage, lorsque vous maintenez l’hélicoptère
en vol plané, il doit garder très simplement une position
stable en l’air juste en bougeant légèrement les leviers. Si
l’hélicoptère bouge vers l’avant, vers l’arrière ou sur le côté,
ajustez les leviers de trim sur l’émetteur jusqu’à ce que
l’hélicoptère soit stable.
Remarque : un hélicoptère bien réglé doit pouvoir rester en
vol plané un court instant sans intervention importante du
pilote.
10. À la fin du vol, défaites tout d’abord les branchements de
l’accu dans l’hélicoptère. Puis éteignez l’émetteur.
Ne commencez jamais par éteindre l’émetteur, car vous
perdriez alors le contrôle de l’hélicoptère, ce qui pourrait
entraîner une chute ou des blessures graves.
f. Contrôle final avant le vol
Page 56

56FCARSON 3D Helicopter Bluster 250se 50 050 7028
g. Vol normal
Vol ascendant
Manette gauche
vers l’avant
Vol descendant
Manette gauche
vers l’arrière
Rotation à gauche Manette gauche
vers la gauche
Rotation à droite Manette gauche
vers la droite
Abaisser le nez Manette droite
vers l’avant
Relever le nez Manette droite
vers l’arrière
Roulis à gauche Manette droite
vers la gauche
Roulis à droite Manette droite
vers la droite
Vue d’ensemble R/C mode 2 :
Le manche gauche correspond aux fonctions gaz / pitch et rotor anticouple
Le manche droit correspond à la fonction Nick et Roll
Page 57

57
F
CARSON 3D Helicopter Bluster 250se 50 050 7028
Axe
transversal
Axe de lacet
Axe
longitudinal
h. Toutes les pièces détachées et équipement
Plateau cyclique
Accumulatuer Moteur Servo Train d’attérissage
Lipo
Gyroscope
Petit tube d’antenne
Barre de Bell
Palette
Tete de rotor
Pale de rotor
anticouple
Pales superieures
Stabilisateur
Page 58

58FCARSON 3D Helicopter Bluster 250se 50 050 7028
i. Équilibrage des pales de rotor principal et de
rotor anticouple
Vérifiez et corrigez l’équilibre des pales de rotor principal avant
de procéder à votre premier vol. Fixez une vis 3M à travers les
deux pales principales comme indiqué sur l’illustration.
Serrez les pales et veillez à ce qu’elles soient bien droites
comme sur l’illustration. Collez du ruban adhésif sur la pale
supérieure jusqu’à ce que les deux pales soient de la même
hauteur. Répétez l’opération pour les pales du rotor anticouple.
Repère pour l’ajustage
j. Réglage du pas
Placez les petites bandes adhésives fournies de couleur aux
extrémités des pales de rotor comme indiqué sur l’illustration.
Laissez l’hélicoptère voler en vol stationnaire et observez les
pointes des pales du rotor. Elles doivent se trouver sur un
même niveau. Quand vous vous placez dans l’axe de l’une
des extrémités de pale, vous ne devez voir qu’une seule pale.
Si une pale de rotor semble surélevée par rapport à l’autre,
ajustez la pale la plus basse en tournant l’articulation à bille
dans le sens des aiguilles d’une montre ou dans le sens
contraire jusqu’à ce que les deux pales se trouvent au même
niveau (voir illustration). Cet ajustage est effectué sur la liaison
à rotule qui part de la fixation de la pale de rotor.
Vos yeux ne doivent jamais se trouver au niveau des pales
de rotor. Vous risqueriez de vous blesser si des pales se
détachaient de manière intempestive.
Repère pour l’ajustage Repère pour l’ajustage
k. Vérification de l’alimentation électrique
Veuillez vérifier les points suivants en cas de diminution des
performances et de la vitesse :
1. Vérifiez que l’accu est complètement chargé et qu’il est
adapté à cet usage d’après ses spécifications.
2. Le pas (pitch) est-il trop élevé ou trop bas ?
(Un pitch trop élevé a une influence sur les performances et
les durées de vol.)
3. Assurez-vous que les deux pales du rotor principal sont au
même niveau. Veillez à ce que le manche des gaz soit sur la
position minimum.
4. Vérifiez s’il y a un problème de déséquilibrage au niveau du
rotor principal ou du rotor anticouple. Cela peut provenir
d’un arbre tordu ou de pièces d’entraînement desserrées.
Page 59

59
F
CARSON 3D Helicopter Bluster 250se 50 050 7028
l. Entretien
L’hélicoptère Bluster 250se est une maquette de grande
qualité fabriquée à partir de pièces de précision. Afin de
garantir le bon fonctionnement de l’appareil, assurez-vous que
tous les composants sont en bon état.
Un mauvais entretien peut entraîner des dommages et des
accidents. Nous vous recommandons de procéder avant
chaque vol à une vérification de votre hélicoptère Bluster 250se
à l’aide de la liste de contrôle fournie.
Rotor principal
1. Vérifiez si les pales du rotor principal, l’axe de vol ou
l’arbre de commande sont déformés et assurez-vous qu’ils
fonctionnent correctement. Toute vibration ou tout tremblement anormal est le signe que quelque chose est tordu ou
mal équilibré. Les vibrations peuvent influer sur la qualité
du vol et entraîner une perte de contrôle ou une chute. Si
vous découvrez les moindres dégradations, remplacez les
pièces en question par des pièces neuves du même modèle.
Inspectez l’état des pales de rotor. Si vous constatez des
fissures ou des éclats, remplacez les pales de rotor par des
pales neuves avant de remettre en service l’hélicoptère.
2. Assurez-vous régulièrement que les amortisseurs en
caoutchouc du rotor principal ne sont pas abîmés. Ceux-ci
peuvent ramollir et devenir cassants au fil du temps, ce qui
nuit aux performances en vol. Veillez à toujours lubrifier les
amortisseurs en caoutchouc. S’ils deviennent mous et
cassants, remplacez-les par des pièces neuves.
3. Vérifiez la portée du pitch des pales de rotor pour vous
assurer que le pas est suffisant pour un vol. Vérifiez l’usure
et la fixation de l’arbre de palier. En cas d’usure, remplacez
par un nouveau palier.
Attention !
Avant de faire voler l’hélicoptère, équilibrez parfaitement les
pales du rotor principal, car c’est ce qui fait que l’hélicoptère va
fonctionner correctement ou non.
4. Assurez-vous que les bras de commande peuvent bouger
librement, sans être reliés ni retenus par quoi que ce soit.
Les vis qui maintiennent les bras doivent être serrées de
manière à ne pas se bloquer et empêcher le mouvement.
5. Veillez à ce que le plateau cyclique ne se bloque pas et ne
touche pas le châssis en cas de mouvements complets du
servo.
Überprüfung des Rahmens
1. Veuillez remplacer les roulements à billes au bout de 100
vols ou dès que vous observez du jeu ou un glissement dans
les paliers de l’arbre d’entraînement. Si vous constatez des
bruits anormaux ou une résistance, il est conseillé de
remplacer immédiatement les paliers par des pièces neuves.
2. Après 50 vols, démontez les roulements à billes, nettoyezles et lubrifiez-les avec de l’huile pour machine légère. Si
le roulement à billes est endommagé, remplacez-le par un
nouveau.
3. Remplacez l’arbre de l’entraînement arrière lorsque vous
constatez des dégradations sur la chaîne d’entraînement ou
sur le rotor anticouple. Les matériaux s’usent avec le temps
et l’essieu doit donc être alors changé.
Vérification des manches
Assurez-vous que chaque servo est raccordé et enclenché. Les
liaisons de commande doivent être enclenchées, mais sans se
bloquer. Si vous constatez un blocage ou des frottements au
niveau d’un servo, réparez-le ou remplacez-le par un nouveau
servo / une nouvelle liaison.
Page 60

60FCARSON 3D Helicopter Bluster 250se 50 050 7028
Contrôle du système de rotor anticouple
1. Assurez-vous que le rotor anticouple fonctionne
correctement. Vous ne devez distinguer aucun trou sur la
courroie et l’engrènement de l’entraînement doit être lisse et
propre. S’il manque des dents sur les roues ou sur la
courroie, remplacez la courroie avant le prochain vol.
2. Assurez-vous qu’il n’y a pas d’herbe dans le système de
la courroie lorsque vous volez au-dessus de pelouses.
Ne lubrifiez pas les roues dentées non protégées, car cela
attirerait les impuretés et entraînerait une usure prématurée
de la courroie.
3. Démontez le système arrière au bout de 50 vols et nettoyez
les roues dentées et la courroie d’entraînement. Vérifiez le
jeu de roues et remplacez les roues dentées ou les courroies
usées ou endommagées.
4. Si votre hélicoptère heurte le sol brutalement, assurez-vous
immédiatement qu’il n’est pas abîmé. Remplacez tous les
éléments abîmés par de nouvelles pièces avant de le
remettre en marche.
Attention !
Vérifiez toutes les fixations et vis avant chaque mise en
marche. Les vis desserrées peuvent entraîner des accidents,
des chutes ou des blessures.
S’assurer que personne à proximité
n’émet à la même fréquence !
Les signaux parasites à la même fréquence peuvent faire
perdre le contrôle de l’appareil. Lors d’un vol avec d’autres
aéromodélistes, il peut donc être nécessaire de modifier la
fréquence d’émission.
Emetteur
Le remplacement du quartz à l’arrière de l’émetteur permet un
changement rapide de la fréquence d’émission.
Pour des raisons de sécurité de fonctionnement, seuls des
quartz expressément recommandés par le fabriquant pour
l’émetteur utilisé peuvent être montés.
L’émetteur éteint, tirer sur l’arrière du boîtier de l’émetteur le
support du quartz.
Mettre le quartz de rechange avec un autre canal dans la même
bande de fréquence. Veiller à mettre le bon quartz. Les quartz
d’émetteur sont en général identifiés avec les lettres T ou TX
(T = transmetteur ou émetteur).
Récepteur
Retirer le quartz du récepteur – éventuellement avec une
pincette – et insérer un nouveau quartz de récepteur adapté.
Le quartz de récepteur avec la fréquence en correspondance
avec celle de l’émetteur doit comporter le même numéro de
canal que celui de l’émetteur. Il est par ailleurs identifié avec les
lettres R ou RX (R = récepteur).
Mettre ensuite en marche d’émetteur, puis le récepteur, et
vérifier le bon fonctionnement de l’installation.
Ne pas échanger les quartz de récepteur
et d’émetteur !
Les quartz d’émetteur et de récepteur doivent parfaitement
correspondre.
S’assurer que le quartz est correctement encastré et tient bien.
m. Changement de la fréquence d’émission
Page 61

61
F
CARSON 3D Helicopter Bluster 250se 50 050 7028
n. Vol général
Manche des gaz à fond/ courbe des gaz à 100 % / pitch +9° ~+11°
Manche des gaz en position centrale/ vol plané/ courbe des gaz 65% ~ 70% / pitch +5° ~ +6°
Manche des gaz en position minimale/ courbe des gaz 0 % / pitch 0°
Vol général
Plateau cyclique Pitch
5 100% à fond +9° ~+11°
4 85%
3 65% ~70% position centrale +5° ~+6°
2 40%
1 0% minimum 0°
Courbe des gaz en mode vol stationnaire
Attention
Si vous passez de Normal à Idle 1 (position 3D sur le
commutateur), ne modifiez pas le commutateur si vous n’avez
pas réglé le levier des gaz sur 70 % au moins du réglage des
gaz. Cela évite une possible dégradation de l’entraînement, car
l’utilisation de ce commutateur augmente la position du levier
des gaz. Si vous actionnez le commutateur 3D ou Idle 1 avant
d’avoir augmenté les gaz, l’hélicoptère peut devenir instable,
basculer et s’écraser. Avec Idle 1 ou le commutateur 3D, le
levier des gaz possède sa force maximale en position inférieure
ou supérieure de la course du levier des gaz. Quand le
commutateur 3D est activé, vous pouvez exécuter des vols
acrobatiques tels que des vols à l’envers.
Page 62

62FCARSON 3D Helicopter Bluster 250se 50 050 7028
o. Vol acrobatique 3D
Manche des gaz à fond/ accélération à fond/ courbe des gaz à 100 % / pitch +9° ~+11°
Manche des gaz en position centrale/ courbe des gaz 50% / pitch 0°
Manche des gaz en position minimale/ accélération à fond/ courbe des gaz 100% / pitch -8° ~-10°
Vol acrobatique 3D
Plateau cyclique Pitch
5 100% à fond +9° ~+11°
3 50% position centrale +5° ~+6°
1 0% minimum +8° ~+10°
Courbe des gaz en mode vol
acrobatique 3D
Remarque
1. Course totale du pitch : 21°
2. Un réglage trop élevé du pitch nuit aux performances et
réduit la durée de vol.
3. Un pitch inférieur et une vitesse supérieure du rotor sont
préférables à un pitch trop élevé.
Page 63

63
F
CARSON 3D Helicopter Bluster 250se 50 050 7028
p. Vol sur le dos
(Le commutateur du mode de vol doit être sur le mode 3D)
Haut Appuyez le levier gauche vers le
bas
Bas Appuyez le levier gauche vers le
haut
Nez vers la gauche Appuyez le levier gauche vers la
gauche
Nez vers la droite Appuyez le levier gauche vers la
droite
Nez vers le bas avant Appuyez le levier droit
vers le bas
Nez vers le haut arrière Appuyez le levier droit
vers le haut
Vers la gauche Appuyez le levier droit
vers la gauche
Vers la droite Appuyez le levier droit
vers la droite
Vue d’ensemble R/C mode 2
(manche droit comme manche des gaz)
Page 64

64FCARSON 3D Helicopter Bluster 250se 50 050 7028
q. Elimination des erreurs
Il est conseillé de lire ces informations avant la survenue de la
première panne !
Problème Cause Solution
Le modèle réduit ne se
déplace pas
1. Vérifier si l’émetteur et le récepteur sont allumés Mettre en marche l’émetteur / le récepteur
2. Vérifier la tension des batteries de l’émetteur et du
récepteur
Monter des batteries entièrement chargées
3. Vérifier la correspondance entre les quartz de
l’émetteur et du récepteur.
Les replacer le cas échéant.
4. Le correcteur de la fonction de l’angle de pas se
trouve en butée en haut
S’assurer que le correcteur de la fonction de
l’angle de pas se trouve en position neutre
ou un peu en dessous.
Le moteur ne tourne pas 1. Moteur défectueux Remplacer le moteur
2. La transmission entre le moteur et la tête du rotor
est détachée
Fixer la tête de rotor
Le modèle réduit réagit
de manière erronée aux
commandes ou vole de
manière erratique
1. Vérifier l’état de charge de la batterie l’émetteur et
du récepteur
Monter des batteries entièrement chargées
2. L’antenne de l’émetteur n’est pas entièrement sortie Sortir entièrement l’antenne de l’émetteur
3. L’antenne du récepteur est encore enroulée Dérouler entièrement l’antenne du récepteur.
4. Impulsions parasites S’assurer qu’il n’y a pas de chevauchement
de fréquence du à un autre émetteur, ni de
perturbations atmosphériques.
Le modèle réduit ne
monte pas
1. La valeur du pitch est incorrecte Contrôler la valeur du pitch
2. Les batteries sont déchargées Recharger les batteries ou les remplacer
Les rotors ne peuvent
être corrigés
1. La compensation n’est pas correctement effectuée Corriger cette compensation avec le
correcteur d’angle de pas
Le modèle réduit vibre
fortement
1. Vérifier si les rotors principaux tournent
correctement
Equilibrer le cas échéant les pales de rotor
2. Vérifier que le modèle réduit est correctement
équilibré
Equilibrer le cas échéant les pales de rotor
La queue est instable 1. Une ou plusieurs pales de rotor défectueuses Remplacer une ou deux pales
2. Les rotors supérieur et inférieur tournent avec un
frottement différent sur l’arbre rotor
S’assurer que les deux rotors tournent
librement
3. La vitesse de rotation des rotors supérieur et inféri-
eur est irrégulière
Remplacer le moteur. Corriger l’équilibrage
sur l’émetteur
Page 65

65
F
CARSON 3D Helicopter Bluster 250se 50 050 7028
Page 66

66ECARSON 3D Helicopter Bluster 250se 50 050 7028
Dickie-TAMIYA GmbH&Co. KG por la presente declara que
este kit do modelo con radio, motor, batería y cargador está
en concordancia con los requerimientos básicos: 98/37EG Y
89/336/EWG y otras normas pertinentes de la directiva 1999/5/
EG (R&TTE).
Dickie-Tamiya GmbH&Co. KG • Werkstraße l • D-90765 Fürth •
Germany
Tel.: +49/ (0)911/ 9765-03
El producto que ha adquirido funciona mediante una batería
recargable de Litio-Polímero.
La batería es reciclable. Al final de su vida útil, bajo
varias leyes nacionales / estatales y locales, puede
ser ilegal tirar esta batería en los contenedores de
basura normal.
Pregunte a las autoridades locales responsables
sobre las opciones adecuadas de reciclado o
deshecho.
Le deseamos buena suerte y mucha diversión conduciendo su
modelo radio controlado CARSON!
Estimado cliente
Muchas gracias por haber adquirido el modelo de helicóptero
Bluster 250se de CARSON. Este helicóptero es propulsado por
un micromotor eléctrico y es nuestro último producto. Bluster
250se está equipado con un Collective Pitch (paso colectivo),
mediante el cual también se puede volar en campo libre.
El helicóptero Bluster 250se viene equipado con un sistema
Collective Pitch BALL HALL.
Gracias a la excelente combinación de estabilidad y flexibilidad
y si el viento es idóneo el modelo también puede volar al aire
libre. Equipado con un giroscopio Head-Lock, el modelo ofrece
una estabilidad excelente. Las especificaciones del motor sin
escobillas de gran potencia y la batería LiPo ofrecen unas
posibilidades de vuelo acrobático en 3D perfectas.
Condiciones de la garantía
Este producto está garantizado por CARSON contra defectos
de fabricación en materiales o mano de obra bajo utilización
normal por un período de 24 meses desde la fecha de
adquisición en comercios autorizados.
En caso de defecto del producto durante el período de
garantía, lleve el producto y el ticket o recibo de venta como
prueba de adquisición a cualquier tienda autorizada CARSON.
CARSON podrá a su elección y salvo que las leyes dispongan
otra cosa:
(a) Corregir el defecto mediante la reparación del producto sin
cargo de piezas o mano de obra;
(b) Reemplazar el producto por otro del mismo o similar
diseño;
o
(c) Devolver el importe de adquisición del producto.
Todas las piezas y productos reemplazados, así como los
productos cuyo importe haya sido devuelto, pasan a ser
propiedad de CARSON. Se podrán utilizar piezas nuevas o
reacondicionadas para la prestación del servicio de garantía.
Las piezas y productos reparados o reemplazados estarán
garantizados por el período restante al vencimiento de la
garantía. Cualquierreparación o sustitución del producto tras
vencer el período de garantía será abonada por usted.
Esta garantía no cubre:
• Daños o fallos causados o atribuibles a fuerzas de la
naturaleza, abuso, accidente, uso incorrecto, impropio o
anormal, falta de seguimiento de las instrucciones,
mantenimiento o instalaciones inadecuadas, alteraciones,
Relámpago u otros incidentes causados por exceso de
voltaje o corriente;
• Cualquier reparación no efectuada por un servicio de
reparaciones autorizado CARSON;
• Consumibles como fusibles o baterías;
• Daños estéticos;
• Transportes, embarques y / o costos de seguros; o
Costos de retirada del producto, instalaciones, servicio de
ajuste o reinstalación. Esta garantía le da a usted derechos
legales específicos, y usted también podría tener otros
derechos que variarían de estado en estado.
Declaración de conformidad
Antes de utilizar su nuevo modelo lea estas instrucciones
cuidadosamente!
Page 67

67
E
CARSON 3D Helicopter Bluster 250se 50 050 7028
Indice de contenidos
Contenido del kit
• Modelo configurado y listo para volar
• Emisor manual de 6 canales de 35 MHz FM
con pantalla LCD
• Batería Lipo de 11,1 V/ 600 mAh
• Cargador con balance Lipo y fuente de alimentación
• 4 x 5 g-Servos
• Gyro de alta tecnología totalmente ajustable
• Instrucciones de uso con mucho trucos
• Motor sin escobillas/regulador ya montado
• Software de simulación de vuelo y cable de conexión
j. Ajuste del trazado .............................................................. 80
k. Comprobación de la alimentación de corriente ............... 80
l. Mantenimiento ................................................................... 81
m. Como cambiar frecuencias ............................................... 82
n. Vuelo general ..................................................................... 83
o. 3D Vuelo acrobático .......................................................... 84
p. Vuelo de espalda ............................................................... 85
q. Guía de problemas ............................................................ 86
Vista desarrolladda ................................................................ 108
Recambios ............................................................................. 112
Accesorios ............................................................................. 115
Prólogo .................................................................................... 66
Contenido del kit ..................................................................... 67
Precauciones de seguridad .................................................... 68
Detallado técnicos ................................................................... 68
Consejos de seguridad ........................................................... 69
a. Lista de piezas ................................................................... 73
b. Funciones del mando a distancia ..................................... 74
c. Ocupación del canal receptor ........................................... 75
d. Ajuste del giroscopio ......................................................... 75
e. Preparativos ....................................................................... 76
f. Control final antes del vuelo .............................................. 77
g. Vuelo normal ...................................................................... 78
h. Todas las piezas de repuesto y equipamiento ................. 79
i. Equilibrado de las palas del rotor principal y ......................
del rotor de cola ................................................................. 80
Page 68

68ECARSON 3D Helicopter Bluster 250se 50 050 7028
Precauciones de seguridad
¡Este modelo no es un juguete!
• Los modelos radio controlados no son juguetes, su manejo
debe ser aprendido paso a paso
• Los niños menores de 14 años sólo deberían manejar este
modelo bajo supervisión adulta.
La conducción de modelos radio controlados es un fascinante
hobby que debe ser practicado con la necesaria precaución
y respeto. Un modelo radio-controlado que tiene un peso
considerable y capaz de desarrollar velocidades muy altas
puede causar daños y lesiones en caso de conducción
incontrolada, siendo el usuario legalmente responsable de ello.
Compruebe que dispone de un seguro con la suficiente
cobertura contra los daños que pueda causar cuando
practique su hobby.
Sólo un vehículo montado correctamente funcionará y
reaccionará de la manera esperada.
Nunca improvise en las reparaciones y utilice únicamente los
recambios originales si fuese necesario. Igualmente y ante un
modelo premontado, deberá repasar todas las conexiones y
tortillería para asegurarse que están correctamente apretados
ajustados.
Guarde el modelo fuera del alcance de los niños. Los niños
podrían poner el modelo en funcionamiento de forma
accidental y provocarse lesiones o llevarse las baterías y las
piezas pequeñas a la boca y tragarlas.
Precaución
El modelismo por radiocontrol es un hobby de alta tecnología,
por lo que el aparato no debe verse como un juguete para
niños. Durante el uso de este producto existen riesgos.
El usuario debe, por tanto, tomar todas las medidas de
precaución posibles, ya que de lo contrario pueden
ocasionarse graves daños personales.
Una construcción deficiente, así como unos ajustes y un
manejo inadecuados pueden provocar un funcionamiento
insatisfactorio o inseguro. En caso de dudas acerca de la
utilización, el mantenimiento o la seguridad de funcionamiento
de este modelo, diríjase a su distribuidor local.
Generalidades
• Lea todo este manual de instrucciones detalladamente, ante
uso, y guárdelo para lecturas posteriores.
• Familiarícese sobre todo con las indicaciones para la
operación de vuelo.
Nota
Como en cualquier producto de radiocontrol existen riesgos al
hacer volar este modelo. Un principiante debería recurrir a la
ayuda de un experimentado piloto de radiocontrol para estar
seguro de que el modelo es apto para el vuelo y es apropiado
para un funcionamiento seguro. Cualquier daño, negligencia o
uso impropio de este producto puede ocasionar incidentes
inesperados o lesiones. Lea atentamente estas instrucciones y
siga las indicaciones de seguridad. Tenga en cuenta que no se
trata de ningún juguete.
Los niños deben estar vigilados antes del despegue o el vuelo
de este helicóptero
Detallado técnicos:
RTF (ADVANCED)
Longitude 515 mm
Alto 155 mm
Diámetro del rotor principal 390 mm
Diámetro del rotor de cola 105 mm
Peso 255 g sin acumulador
Emisora 6 canales
Receptor 6 canales
Giroscopio: giroscopio ajustable de alta tecnología
Motore Brushless: CARSON HELI-X B10
Regulador Brushless: CARSON HELI-X 10 A
Acumulador LiPo 600 mAH/ 11,1 V
Servos: 4x servo micro 5 g
*Sin previo aviso.
Nota
El motor no se puede arrancar cuando al conectar el emisor el
modo 3D está activo (interruptor en el lado derecho).
En ese caso tampoco sirve de nada mover la palanquilla Pitch/
Throttle a la posición de „ralentí/ motor apagado”, el motor
sigue sin poder arrancarse.
Para arrancar el motor, el interruptor 3D debe encontrarse en la
posición „nor”, es decir, 3D debe estar apagado al conectar el
emisor.
Page 69

69
E
CARSON 3D Helicopter Bluster 250se 50 050 7028
1. Busque un lugar adecuado donde
pueda hacer volar su helicóptero:
Los helicópteros radiocontrolados están en situación de volar
a muy altas velocidades. Ello conlleva un alto riesgo tanto para
el piloto como para los espectadores. Elija una pista de vuelo
adecuada con una superficie plana sin obstáculos. Una buena
elección sería un parking vacío sin vehículos y peatones, un
pabellón deportivo vacío o un almacén sin obstáculos.
No vuele en las proximidades de edificios, árboles o líneas
de alta tensión para así garantizar su propia seguridad, la de
otras personas y la de su propio modelo. No haga volar su
helicóptero en caso de condiciones climatológicas adversas
como lluvia, nieve, viento fuerte o en la oscuridad.
2. Permita que un piloto experimentado
le ayude.
Antes de conectar su modelo y el emisor, debe comprobar
que no haya ninguna otra persona que utilice la misma
frecuencia que su modelo. Las interferencias pueden
provocar que su modelo se vuelva incontrolable cuando se
hace volar en la misma frecuencia que otros modelos de los
alrededores. El apoyo de un piloto experimentado le permitirá
tener un helicóptero que funcione correctamente y bien
cuidado en su primer vuelo.
3. En sus alrededores no se debe utilizar
la misma frecuencia.
Compruebe que no haya nadie en sus alrededores que utilice
simultáneamente la misma frecuencia, ya que, debido a ello,
puede perder el control sobre su helicóptero, lo cual puede
ocasionar un accidente.
Consejos de seguridad
Anfänger Anfänger Experte
35.950 MHz
35.950 MHz
Page 70

70ECARSON 3D Helicopter Bluster 250se 50 050 7028
4. Vigile los rotores en rotación.
Durante el funcionamiento de su nuevo helicóptero CARSON, el
rotor principal y el rotor de cola giran a altas velocidades. Las
palas de los rotores pueden infligir lesiones graves a usted y
a los demás. Sea consciente de sus acciones y mantenga sus
manos, cara, ojos y ropa suelta alejadas de las palas del rotor y
del accionamiento.
Haga volar su modelo siempre a una distancia segura de sí
mismo y de los demás así como de los objetos cercanos. No
pierda de vista su modelo y
no lo deje nunca sin vigilancia
mientras
está conectado. Desconecte
siempre primero su modelo
después de cada vuelo y luego
el emisor.
5. No exponga el helicóptero
Bluster 250se al calor ni a la humedad.
Su nuevo helicóptero CARSON es un aparato electrónico de
alta tecnología. No exponga su modelo nunca a temperaturas
extremas, no deje su modelo durante un período de tiempo
prolongado en el interior de un automóvil, ya que las elevadas
temperaturas pueden dañar la sensible electrónica así como
las piezas de plástico.
Modalidad de carga y advertencia
Cargue la batería de litio-polímero sólo con el cargador
suministrado. Respete la polaridad de la batería y del cargador
y asegúrese de que las conexiones con correctas. No utilice la
fuerza bruta, ya que esto podría ocasionar daños.
Cargue su batería antes del primer uso de manera que empiece
con una batería totalmente cargada. En cuanto la batería esté
completamente cargada, el LED se iluminará en verde, durante
el proceso de carga el LED está encendido en rojo.
Para asegurar un funcionamiento más seguro, no cargue la
batería por un período de tiempo más prolongado del debido.
No deje el cargador sin vigilancia y tampoco deje el cargador
conectado por la noche. El proceso de carga de la batería de
litio debe ser supervisado por un adulto.
La batería 600 mAh Lipo suministrada sólo debe cargarse
con el cargador de baterías LiPo suministrado. La carga de
la batería con un cargador, que no ha sido desarrollado
especialmente para baterías de litio, puede provocar fuego o
una explosión en la batería. Observe todas las indicaciones de
seguridad.
Si la batería se hinchara o dañara, colóquela en un recipiente
seguro al aire libre y no cerca de materiales inflamables.
1. No coloque la batería encima o cerca de objetos que
puedan captar el fuego durante el proceso de carga.
2. Cargue la batería encima de una base no inflamable, por
ej. sobre una placa de metal o de piedra.
Page 71

71
E
CARSON 3D Helicopter Bluster 250se 50 050 7028
Baterías recargables litio-polímeras
Utilice la batería recargable adjunta solamente con este
modelo.
También utilice como batería recargable de repuesto solamente
piezas originales.
• Es normal que la batería recargable se recaliente durante la
carga.
• ¡No sobrecargar o descargar totalmente la batería
recargable! Ambas situaciones pueden conducir a fugas de
electrolitos y a ignición espontánea.
• Asegúrese que las baterías de la emisora y el receptor están
completamente cargadas y tienen el voltaje correcto. Con
baterías medio gastadas podría perder el control de su
modelo.
• Nunca mezcle baterías recargables/baterías medio llenas
con vacías, o baterías recargables de diferente
capacidad.
• Retire la batería recargable cargada del cargador para evitar
una descarga autónoma.
• Si no utiliza el modelo por algún tiempo, la batería
recargable debe ser retirada.
Al final de su vida útil, bajo varias leyes nacionales/ estatales y
locales, puede ser ilegal tirar esta batería en los contenedores
de basura normal. Pregunte a las autoridades locales
responsables sobre las opciones adecuadas de reciclado o
deshecho.
Las baterías recargables no deben
• Ser sumergidas en líquidos,
• Tirarse al fuego o ser expuestas a altas temperaturas ni
• A cargas mecánicas
• Ni ser desmontadas / averiadas
• Ni recibir corto-circuitos.
En caso que durante la utilización, la carga, o el
almacenamiento de la batería recargable usted note un olor,
decoloración, sobrecalentamiento, deformación u otra
anomalía:
• Retire la batería recargable del cargador
• Retire la batería recargable del equipo usado
• No vuelva a utilizar la batería recargable.
En caso de fuga de electrolitos:
• ¡Evite el contacto con los ojos o la piel!
• Lave inmediatamente los lugares afectados con agua limpia
y busque un médico.
Page 72

72ECARSON 3D Helicopter Bluster 250se 50 050 7028
Instrucción de seguridad para batería
Li-Po.
1. No desmontar ni reconstruir battería.
2. No haga corto circuito a la battería.
3. No utilice ni deje la batería cerca de fuego, cocina o lugar
caliente (más de 80 grados centígrados).
4. No sumerja la batería en agua o en agua de mar, ni deje
que se moje.
5. No cargar la batería cerca de un fuego ni bajo rayos de sol.
6. Utilice el cargador especificado y observe los requisitos
para la carga .
7. No introduzca clavos en la batería. No la golpe con un
martillo, ni la perfore .
8. No permita que la batería sufra impacto o tirones.
9. No utilice baterías con deformaciones o daños manifiestos.
10. No realice el soldado directo en la batería.
11. No invierta la carga ni sobrecargue la pila.
12. No cargue de forma inversa ni la conecte de forma
inversa.
13. No conecte la batería al soquete de enchufe ni al
interruptor de cigarrillos del automóvil.
14. No utilice la batería para equipamiento no especificado.
15. No toque directamente una batería que presente fuga.
16. No utilice baterías de Litio ion mezcladas.
17. Mantenga las baterías alejadas de los bebés.
18. No siga utilizando la batería después del tiempo
especificado.
19. Impida que entre en un microondas o un contenedor de
alta presión.
20. No utilice una batería con fuga cerca de un fuego.
21. No utilice o deje la batería bajo los rayos solares (ni en un
coche recalentado por la luz solar).
22. No debe utilizarse cerca de un lugar que genere
electricidad estática (más de 64 V) y que pudiera dañar el
circuito de protección.
23. El ámbito de la temperatura de carga está regulado entre
0° grados centígrados y 45° grados centígrados. No cargue
la batería fuera del ámbito de temperatura recomendada.
24. Cuando la batería tenga herrumbre, huela mal o presente
alguna anomalía al usarla por primera vez, no utilice el
equipo y devuelva la batería a la tienda donde la compró.
25. En caso de que sean niños quienes utilicen la batería, sus
padres deben enseñarles cuidadosamente cómo utilizar las
baterías de acuerdo con el manual de instrucciones.
Y además, cuando los niños utilizan las baterías, prestar
atención dependiendo de a esto.
26. Mantenga la batería fuera del alcance los niños. Y además,
cuando utilice la batería, preste atención en caso que sean
retiradas del cargador o equipos por niños pequeños.
27. Si la piel o alguna tela se mancha con el líquido de la
batería, debe lavarse con agua fresca. Podría causar
irritación cutánea.
28. Nunca cargue el acumulador con más de 5C ni deje que
la tensión se reduzca a menos de 6 V, ya que esto podrá
causar daños en el acumulador.
29. Nunca cargue el acumulador sobre una moqueta puesto
que pueden surgir incendios.
30. No use el acumulador para un equipo no especificado u
otros fines.
31. No toque el acumulador en caso de que éste no sea
estanco. Si usted toca el acumulador, lávese, por favor, las
manos inmediatamente.
32. No lave el acumulador por un tiempo mayor al indicado.
33. No utilice acumuladores que estén dañados o hinchados.
Page 73

73
E
CARSON 3D Helicopter Bluster 250se 50 050 7028
El volumen de suministro del Bluster 250se incluye las
siguientes piezas. Compruebe que no falta ninguna de estas
piezas en su modelo. Póngase en contacto con su distribuidor
local en caso de que faltara alguna pieza.
Vara de palas
Rotor principal
Soporte de las palas
Eje de rotor
Disco oscilante
Tubo de cola
Tren de aterizaje
Cubierta
Rotor de cola
a. Lista de piezas
Gyro Receptor 35 MHz Motor BL Regulador
Acumulador 11,1 V/ 600 mAh Cargador ”Balance”
Emisora 4 x servos 5 g
Page 74

74ECARSON 3D Helicopter Bluster 250se 50 050 7028
b. Funciones del mando a distancia
1 Antena telescópica
2 LCD
1. Lectura de la batería/ tensión de la batería
2. Muestra qué canal está conmutado a „reverse”.
3. Muestra el tiempo de vuelo
4. Muestra el modo de vuelo
5. Muestra el estado del bloqueo de teclas
(desbloqueado/ bloqueado)
3 Tope final Pitch
4 Nivelación Pitch
5 Interruptor 1
Este interruptor controla el canal 5. Éste activa el
giroscopio. También puede utilizarse para un mecanismo
de inserción, una cámara, etc.
6 Interruptor 3D
Conmuta „Normal/ vuelo en suspensión” o „Modo 3D”
7 Pulsador „MODEL” para seleccionar el modelo de vuelo
deseado
MODEL A: Simulación de flaps convexos
MODEL V: Función adicional
MODEL H, C, C1: Ralentí en la posición central del gas/
palanca del Pitch.
¡ATENCIÓN!
¡Si los modelos H, C y C1 están seleccionados, sólo se
debe conmutar al modo 3D cuando la palanca del gas/
Pitch se encuentra en la posición central!
8 LED (verde) para indicar el estado de conexión
9 LED (rojo) para indicar la subtensión.
¡Cambie inmediatamente la batería del emisor cuando el
LED rojo parpadee, a más tardar cuando el visor LCD se
apague!
10 Palanca de control remoto derecha (canal de función 2 y 1)
11 Palanca de control remoto izquierda (canal de función 3 y 4)
Ambas palancas de control remoto se pueden alargar en
unos 5 mm.
12 Nivelación del canal de función 2
13 Nivelación del canal de función 4
14 Nivelación del canal de función 1
15 Nivelación del canal de función 3
16 Argollas para la correa de transporte
17 Conector
¡ATENCIÓN!
¡Al conectar el emisor con la preselección MODEL H, C y
C1, el interruptor 3D debe estar situado en „NOR”!
18 Interruptor deslizante LOCK para bloquear el regulador
giratorio y el pulsador „MODEL”.
19 Interruptor de reversión con canales de función 1, 2, 3, 4, 6
Abajo: NOR (normal)
Arriba: REV (reverse)
20 Asa de transporte
21 Cuarzo del emisor (lado posterior del emisor)
22 Batería/ compartimento (lado posterior del emisor)
23 Casquillo de conexión para el simulador de vuelo
(lado posterior del emisor)
24 Casquillo de carga (lado)
25 Interruptor basculante, Dual Rate canales de función 1, 2, 4
Reducción de las vías de función 1, 2 y 4 del 100% (Pos. 0)
al 70% (Pos. 1)
1
2
3
5
7
9
11
13
15
17
19
4
6
25
8
10
12
14
16
18
20
21
22
23
24
Page 75

75
E
CARSON 3D Helicopter Bluster 250se 50 050 7028
c. Ocupación del canal receptor
d. Ajuste del giroscopio
Montaje del giroscopio:
Asegúrese de que todos los componentes de radiocontrol y
los dispositivos servo funcionan de forma correcta y sin
obstáculos, así como que los cuernos del timón de los servos
se hallen en la posición correcta.
Fije el giroscopio sobre una superficie plana cerca del centro
de gravedad.
Inserte la conexión del giroscopio en el lugar de enchufe 4 y el
segundo para la sensibilidad (sólo tiene un cable) en el lugar de
enchufe 5.
Conecte el emisor y lleve el nivelador del rotor de cola a la
posición neutral. Una la batería con el regulador y espere hasta
que el LED en el giroscopio se encienda. Ahora se inicializa
el giroscopio y el helicóptero no se debe mover. Tras unos 10
segundos, el giroscopio estará listo para arrancar y el proceso
de adaptación habrá concluido. En caso contrario, deberá
comprobar nuevamente las uniones de conexión.
Ajuste del interruptor de inversión en el
giroscopio:
Gire el helicóptero con el saliente hacia la izquierda, el servo
en el tubo de cola debe moverse en la misma dirección como
cuando se mueve la palanquilla de mando para el rotor de cola
hacia la derecha. En caso contrario, se deberá cambiar de
posición el interruptor de reversión.
Ajuste de la sensibilidad:
En el primer test del helicóptero, vigile el tubo de cola tras
la primera elevación. Si oscila o la cola del helicóptero se
comporta de forma nerviosa, se tendrá que reducir la
sensibilidad hasta obtener un resultado satisfactorio.
6. Pitch
5. Sensibilidad del giroscopio
4. Servo del rotor de cola
3. Gas/ regulador
2. Cabeceo
1. Balanceo
Conexión del giroscopio en lugar
de enchufe del receptor 4
Sensibilidad en lugar de
enchufe del receptor 5
Interruptor de inversión
Conexión servo del rotor de cola
Ajuste de sensibilidad Limitador de
oscilación servo
LED de control
Page 76

76ECARSON 3D Helicopter Bluster 250se 50 050 7028
e. Preparativos
Indicaciones generales
• En caso que tenga poca o ninguna experiencia con modelos
de aeromodelismo, debe obtenerla primero con un
simulador de vuelo.
• Pida ayuda a un piloto de aeromodelismo experimentado
para los primeros intentos.
• Familiarícese con las funciones de mando de la emisora.
• Inicie las pruebas de vuelo parado, detrás del modelo, y con
la vista en el sentido del vuelo. En este caso, la reacción de
mando es igual a la del sentido de mando.
¡Además, familiarícese con el mando del modelo en caso que
venga hacia usted (con una reacción del lado opuesto al
sentido de mando)!
Carga y montaje la batería recargable de
vuelo
¡Cargue siempre la batería recargable teniéndola fuera del
modelo!
1. Conecte el cargador con el adaptador la batería recargable.
2. Enchufe el cargador suministrado a una toma de red.
3. Coloque la batería recargable sobre una bandeja de metal y
conecte la batería al cargador.
4. Cerciórese de que la conexión de enchufe tenga un contacto
seguro para evitar un cortocircuito.
5. ¡No cubrir la batería recargable!
La temperatura de la batería no debe sobrepasar los 60 C°
durante el proceso de carga.
El proceso de carga concluye cuando el LED verde se enciende
en el cargador de balance.
• Conecte el cargador equilibrador LiPo al cable
de la fuente de alimentación.
• Conecte el conector blanco de equilibrado de
la batería LiPo al cargador equilibrador LiPo.
• La batería estará completamente cargada
cuando los tres LED parpadeen en verde.
Lipo Balance Charger
Insertar el acumulador de vuelo
1. Extraiga con cuidado la cubierta a izquierda y derecha de
los soportes de la misma.
2. Ahora puede introducir la batería Lipo en posición horizontal
desde delante en el chasis.
3. Una la batería con el regulador de vuelo
(asegurarse antes de que el emisor está desconectado).
Page 77

77
E
CARSON 3D Helicopter Bluster 250se 50 050 7028
Antes del vuelo, el usuario debería
comprobar las siguientes cosas:
1. Asegúrese de que las palas del rotor están equilibradas y
que se encuentran igual de apretadas en la cubierta de la
pala del rotor. Nota: Si deposita el helicóptero sobre el
lateral, las palas del rotor deben estar lo suficientemente
apretadas como para que no caigan si se agitan ligeramente.
2. Examine el helicóptero en búsqueda de elementos sueltos
como cables, tornillos, soportes o conexiones antes de
hacerlo volar.
3. Conecte primero su emisor. Conecte luego el acumulador al
regulador en el helicóptero. Al mismo tiempo, asegúrese de
que la palanca del gas está desconectada o se encuentra
completamente en posición inferior.
4. Aléjese del helicóptero. Compruebe el alcance con la antena
retraída. Debería poder alejarse unos 50 pasos y seguir
manteniendo el control completo sobre el helicóptero. Si la
distancia fuera claramente inferior, compruebe el cable de
antena y las conexiones en el receptor del helicóptero.
5. Compruebe el centro de gravedad situando las palas del
rotor principal en las posiciones horarias de las 12:00 y las
6:00 horas. Eleve el helicóptero por la barra de paletas y
observe el bastidor de aterrizaje. Los patines deben formar
una línea paralela con el suelo y no inclinarse hacia delante
ni hacia atrás. En caso de que se inclinaran, ajuste la
posición de la batería moviéndola hacia delante o hacia
atrás, hasta que los patines se encuentren en paralelo
respecto al suelo cuando levanta el helicóptero por la barra
de paletas.
6. Si éste es su primer vuelo, es muy recomendable que utilice
un bastidor de entrenamiento, Art.-Nr. 50 050 8141, antes
de atreverse a realizar un vuelo (no incluido). El bastidor de
aterrizaje evita un vuelco, que podría causar daños en las
palas del rotor o en el árbol de accionamiento. En cuanto
haya ajustado su helicóptero, podrá retirar el bastidor de
entrenamiento.
7. Extraiga completamente la antena antes de que despegue
su helicóptero. De este modo se garantiza el máximo
alcance de radiocomunicación.
8. Dé gas lentamente y observe el disco del rotor. Debería estar
totalmente plano sin que se aprecie ninguna inclinación. En
caso de que el rotor presentara una inclinación, mueva la
palanca de nivelado en el emisor hasta que el disco del rotor
esté plano.
9. Después de la elevación, y cuando el helicóptero se halle en
suspensión, debería ser muy sencillo mantener una posición
en suspensión estable con suaves movimientos de la
palanca. Si el helicóptero se moviera hacia delante, hacia
atrás o hacia un lado, ajuste la palanca de nivelado en el
emisor hasta que el estado en suspensión sea estable.
Nota: Un helicóptero bien ajustado debería poder estar
suspendido sin demasiadas intervenciones del piloto por un
breve espacio de tiempo.
10. Una vez que haya concluido su vuelo, separe primero las
conexiones de la batería en el helicóptero. A continuación,
puede desconectar el emisor.
No desconecte nunca primero el emisor, ya que podría
perder el control sobre el helicóptero, lo cual puede
ocasionar la caída o graves daños personales.
f. Control final antes del vuelo
Page 78

78ECARSON 3D Helicopter Bluster 250se 50 050 7028
g. Vuelo normal
Vuelo ascensional Palanca de mando izquierda
hacia adelante
Vuelo descendente Palanca de mando izquierda
hacia atrás
Viraje a la izquierda Palanca de mando izquierda
hacia la izquierda
Viraje a la derecha Palanca de mando izquierda
hacia la derecha
Bajar la proa Palanca de mando derecha
hacia adelante
Levantar la proa Palanca de mando derecha
hacia atrás
Giro a la izquierda Palanca de mando derecha
hacia la izquierda
Giro a la derecha Palanca de mando derecha
hacia la derecha
Vista general R/C modo 2:
Palanca de control izquierda es el gas/ pitch y el rotor de cola
La palanca de mando derecha es la inclinación y la función de
balanceo
Page 79

79
E
CARSON 3D Helicopter Bluster 250se 50 050 7028
Eje transversal
(Nick)
Eje alto
Eje longitudinal
(Roll)
h. Todas las piezas de repuesto y equipamiento
Disco oscilante
Batería Lipo Motor Servo Tren de aterrizaje
Giroscopio
Tubito de antena
Barra de paletas
Paleta
Soporte de palas
Pala del rotor de cola
Rotor principal
Mecanismo de
dirección
Page 80

80ECARSON 3D Helicopter Bluster 250se 50 050 7028
i. Equilibrado de las palas del rotor principal y
del rotor de cola
Compruebe y corrija antes de su primer vuelo el equilibrado
de las palas del rotor principal. Fije tal como se muestra en la
imagen un tornillo 3M a través de las dos palas principales.
Apriete las palas y procure que formen una línea recta como en
la imagen. Pegue la cinta adhesiva sobre la pala superior hasta
que ambas palas estén a la misma altura. Repita este proceso
para las palas del rotor de cola.
Marca para el ajuste
j. Ajuste del trazado
Coloque las pequeñas tiras adhesivas de color incluidas en el
volumen de suministro tal como se muestra en la imagen en
los extremos de las palas del rotor. Mantenga el helicóptero
en suspensión y observe las puntas de las palas del rotor.
Deberían encontrarse en un mismo plano. Si mira desde el
extremo de una de las palas del rotor sólo debería ver una pala
del rotor. En caso de que una pala del rotor parezca estar más
elevada que la otra, ajuste la pala del rotor que se encuentra
por debajo girando la articulación esférica en el sentido de las
agujas del reloj, o bien en sentido contrario, hasta que las dos
palas se encuentren en el mismo nivel (ver imagen).
Este ajuste se realiza en la articulación esférica que viene del
soporte de la hoja del rotor.
Sus ojos no deberían hallarse nunca a la altura de las palas
del rotor. Así se pueden evitar lesiones en caso de que las
palas del rotor se soltaran por accidente.
Marca para el ajuste Marca para el ajuste
k. Comprobación de la alimentación de corriente
Compruebe los siguientes elementos cuando la potencia y la
velocidad desciendan:
1. Compruebe si el acumulador está completamente cargado y
si se ajusta a las especificaciones.
2. Si el pitch es demasiado elevado o bajo (un pitch excesivo
influye en la potencia y en los tiempos de vuelo)
3. Compruebe que las dos palas del rotor principal se
encuentren en el mismo plano. Asegúrese de que la palanca
del gas se encuentra en la posición de gas mínima.
4. Compruebe si en el rotor principal o en el rotor de cola existe
un desequilibrio. Esto puede deberse a un eje deformado o a
las piezas sueltas del accionamiento.
Page 81

81
E
CARSON 3D Helicopter Bluster 250se 50 050 7028
l. Mantenimiento
El helicóptero Bluster 250se es un modelo excelente fabricado
con piezas de precisión. Para seguir obteniendo buenos
resultados, debe asegurarse de que todos los componentes
se encuentran en un buen estado.
Un mantenimiento deficiente puede ocasionar daños y
accidentes. Recomendamos que revise la lista de
comprobación relacionada antes de cada vuelo con su
helicóptero Bluster 250se.
Rotor principal
1. Compruebe si las palas del rotor principal, el eje de vuelo
o el árbol de accionamiento están deformados y avanzan
correctamente. Cualquier vibración no uniforme es una
señal de que hay algo deformado o desequilibrado. Las
vibraciones pueden perjudicar la calidad de vuelo y provocar
una pérdida de control o una caída. En caso de que
detectara algún daño, sustituya las piezas dañadas por
piezas nuevas del mismo tipo. Examine las palas del rotor en
busca de daños. Si encontrara puntos fracturados o astillas,
cambie las palas del rotor por unas nuevas antes de poner
en funcionamiento su helicóptero.
2. Compruebe de forma periódica si las gomas de
amortiguación del rotor principal están dañadas. Con el
paso del tiempo se pueden ablandar y volverse quebradizas,
lo cual puede derivar en un rendimiento de vuelo deficiente.
Lubricar siempre las gomas de amortiguación. Si se
ablandaran o volvieran quebradizas, sustitúyalas por unas
nuevas.
3. Compruebe el alcance del pitch de las palas del rotor para
garantizar un pitch suficiente para un vuelo. Compruebe si el
árbol del cojinete está desgastado o suelto. En caso de que
presente desgaste, inserte un nuevo cojinete.
Precaución
Antes de volar, equilibre con exactitud las palas del rotor
principal, ya que con ello se decide si el helicóptero funciona
bien.
4. Asegúrese de que los brazos de mando se mueven con
libertad y sin uniones o adherencias. Los tornillos que
sujetan los brazos deben estar lo suficientemente fijos para
que no se encallen e impidan el movimiento.
5. Observe que la placa de tambaleo no se encalle o toque el
bastidor en los movimientos servo.
Comprobación del bastidor
1. Cambie el cojinete de bolas después de 100 vuelos o en
cuanto se aprecie juego o deslizamiento en los cojinetes del
árbol primario. En caso de que detectara ruidos anormales o
cierta resistencia, es aconsejable sustituir de forma
inmediata los cojinetes por unos nuevos.
2. Separe el cojinete de bolas después de 50 vuelos, límpielo
y lubríquelo con aceite suave para máquinas. En caso de
daños en el cojinete de bolas, sustitúyalo por uno nuevo.
3. El árbol de accionamiento de cola deben sustituirse cuando
se han determinado daños en la cadena cinemática o en el
rotor de cola. A lo largo del tiempo, se produce lo que se
denomina fatiga del material, debido a lo cual el eje debe
sustituirse.
Comprobación de la palanca de mando
Asegúrese de que todos los dispositivos servos están
conectados y fijados. Las uniones deben estar apretadas pero
sin que produzcan una encalladura. Si detecta una encalladura
o hay un servo que roce, deberá repararlo o sustituirlo por un
servo nuevo o una unión nueva.
Page 82

82ECARSON 3D Helicopter Bluster 250se 50 050 7028
Chequeo del sistema del rotor de cola
1. Asegúrese de que el rotor de cola funciona correctamente.
En la correa no se deberían distinguir huecos y el contacto
del accionamiento debería ser liso y no tener impurezas. En
caso de que en las ruedas o en la correa faltaran dientes,
debe sustituirse la correa antes del siguiente vuelo.
2. Asegúrese de que no hay hierba en el sistema de correa
cuando sobrevuele superficies de césped. No lubrique con
aceite las ruedas dentadas descubiertas, ya que ello atraería
la suciedad, lo cual, a su vez, aceleraría el desgaste de la
correa.
3. Desmonte el sistema de cola después de 50 vuelos y limpie
las ruedas dentadas así como la correa de accionamiento.
Compruebe el juego de ruedas y sustituya las ruedas
dentadas desgastadas o dañadas o la correa.
4. Si el helicóptero tocara el suelo de forma brusca,
compruebe inmediatamente si ha sufrido daños. Cambie
todas las piezas dañadas por nuevas antes de volver a
despegar.
Precaución
Compruebe antes de un despegue todas las sujeciones y
tornillos. Los tornillos sueltos pueden provocar accidentes
imprevisibles, caídas o lesiones.
Asegúrese que nadie más está
transmitiendo por las proximidades en su
frecuencia!
Las señales se interferirán, haciéndole perder el control de su
modelo.
Emisora
Es posible efectuar un cambio rápido de frecuencias
simplemente desenchufando el cristal intercambiable de la
parte trasera de la emisora y enchufando otro.
Por razones de seguridad de funcionamiento, solamente
utilice cristales de cuarzo que le hayan sido recomendados
expresamente por el proveedor para la utilización en su
sistema de mando a distancia.
Retire el cristal de cuarzo de la emisora, con la emisora
apagada, de la parte posterior de la carcasa de la emisora.
Coloque el cristal de cuarzo de reemplazo con otro canal en la
misma banda de frecuencia. Cerciórese de utilizar el cristal de
cuarzo correcto. Los cristales de cuarzo de la emisora, por lo
general, están identificados con las letras T o TX
(T = transmisor o emisora).
Receptor
Enchufe un cristal intercambiable en el receptor para un
cambio rápido de frecuencias.
Se debe rotular la correcta frecuencia de recepción con la
respectiva frecuencia de emisora así como el cristal de cuarzo
emisor. Además, la denominación con letras R o RX
(R = receptor).
Encienda primeramente la emisora y a continuación el receptor,
y verifique el funcionamiento del sistema.
¡No confundir el cristal de la emisora con
el del receptor!
Los cristales de la emisora y el receptor deben coincidir uno
con el otro.
Asegúrese que el cristal está completamente introducido en la
emisora y el receptor, no parcialmente.
m. Como cambiar frecuencias
Page 83

83
E
CARSON 3D Helicopter Bluster 250se 50 050 7028
n. Vuelo general
Palanquilla de gas en amplitud máxima/ curva de gas 100% / Pitch +9° ~+11°
Palanquilla de gas en posición central/ vuelo en suspensión/ curva de gas 65% ~ 70% / Pitch +5° ~ +6°
Palanquilla de gas en amplitud mínima/ curva de gas 0%/ Pitch 0°
Vuelo general
Disco oscilante Pitch
5 100% Desviación +9° ~+11°
4 85%
3 65% ~70% Posición central +5° ~+6°
2 40%
1 0% Desviación mínima 0°
Curva de gas en el modo vuelo en
suspensión
Atención
Si pasa de la posición Normal a Idle 1 (posición 3D en el
interruptor), no debe cambiar de posición el interruptor cuando
la palanca del gas no se ha ajustado a al menos el 70% del
ajuste de gas. De esta manera se evita posibles daños en el
accionamiento, pues el uso de este interruptor se aumenta la
posición de la palanca de gas. Si acciona el interruptor 3D
o Idle 1 antes de haber realizado un ajuste alto del gas, el
helicóptero puede volverse inestable, volcar y ocasionar una
caída. Con Idle 1 o el interruptor 3D, la palanca del gas tiene
plena potencia en la posición más inferior y superior del
recorrido del gas. Si el interruptor 3D está activo, puede
realizar vuelos acrobáticos como vuelos en posición invertida.
Page 84

84ECARSON 3D Helicopter Bluster 250se 50 050 7028
o. 3D Vuelo acrobático
Palanquilla de gas en amplitud máxima/ marcha / curva de gas 100% / Pitch +9° ~+11°
Palanquilla de gas en posición central/ curva de gas 50% / Pitch 0°
Palanquilla de gas en amplitud mínima/ marcha / curva de gas 100% / Pitch -8° ~-10°
3D Vuelo acrobático
Disco oscilante Pitch
5 100% Desviación +9° ~+11°
3 50% Posición central +5° ~+6°
1 0% Desviación mínima +8° ~+10°
Curva de gas en el modo 3D vuelo
acrobático
Nota
1. Recorrido total del pitch 21°
2. Un pitch excesivo reduce la potencia y acorta el tiempo de
vuelo.
3. El uso de un pitch más reducido y una velocidad del rotor
más elevada se adecua mejor que un pitch demasiado
elevado.
Page 85

85
E
CARSON 3D Helicopter Bluster 250se 50 050 7028
p. Vuelo de espalda
(El interruptor del modo de vuelo debe encontrarse en el modo 3D)
Arriba Presione la palanca izquierda
hacia abajo
Abajo Presione la palanca izquierda
hacia arriba
Morro hacia la izquierda Presione la palanca izquierda
hacia la izquierda
Morro hacia la derecha Presione la palanca izquierda
hacia la derecha
Morro hacia abajo
adelante
Presione la palanca derecha
hacia abajo
Morro arriba hacia atrás Presione la palanca derecha
hacia arriba
Hacia la izquierda Presione la palanca derecha
hacia la izquierda
Hacia la derecha Presione la palanca derecha
hacia la derecha
Vista general R/C modo 2
(palanca de mando derecha como palanca de gas)
Page 86

86ECARSON 3D Helicopter Bluster 250se 50 050 7028
q. Guía de problemas
¡Lea esto antes de que ocurra!
Problema Causa Solución
El modelo no se mueve 1. Verifique que la emisora y el receptor estén
conectados
Conecte la emisora y/o receptor
2. Verifique la tensión de la batería recargable de la
emisora y del receptor
Coloque baterías recargables
completamente cargadas
3. Cerciórese de que la frecuencia de la emisora y la
del receptor coincidan.
De ser necesario, remplace los cristales de
cuarzo
4. La guía de equilibrio de la función de inclinación se
encuentra en el tope superior
Cerciórese de que la guía de equilibrio de
la función de inclinación esté en posición
neutra o algo por debajo.
El motor no gira 1. El motor está averiado Remplace el motor
2. La conexión entre el cabezal del rotor y el motor
está suelta
Sujete la cabeza del rotor
El modelo reacciona
erróneamente a las
órdenes o vuela de forma
agitada
1. Compruebe el estado de carga de la batería
recargable de la emisora y del receptor
Coloque baterías recargables
completamente cargadas
2. La antena de la emisora no se ha sacado
completamente
Saque la antena de la emisora
completamente
3. La antena del receptor está todavía enrollada Desenrolle completamente la antena del
receptor
4. Impulsos de perturbación Cerciórese de que no exista superposición
de frecuencias debido a otras emisoras o
perturbaciones atmosféricas
El modelo no asciende 1. El valor de Pitch no concuerda Controlar el valor de Pitch
2. Las baterías están vacías Recargue las baterías recargables o remplácelas
No se puede
desconectar los rotores
El equilibrio no se ha ajustado correctamente Corrija el equilibrio en la guía de inclinación
El modelo vibra
fuertemente
1. Compruebe si los rotores principales giran en
redondo
Equilibre, de ser necesario, las palas del
rotor
2. Verifique si el modelo está equilibrado
correctamente
Equilibre, de ser necesario, las palas del
rotor
La parte trasera no
puede ser estabilizada
1. Una o varias palas tienen defectos Cambie una o ambas palas de rotor
2. El circuito de rotor inferior y superior funciona con
una fricción diferente en el árbol de rotor
Cerciórese de que ambos circuitos de rotor
se dejen girar fácilmente
3. La velocidad de rotación del circuito superior e
inferior no es uniforme
Remplace el motor. Corrija el equilibrio en la
emisora
Page 87

87CARSON 3D Helicopter Bluster 250se 50 050 7028
Dickie-TAMIYA GmbH&Co. KG dichiara che questo modello
in tutte le sue parti, radio, motore, batteria, caricabatteria, è
in regola con le SEGUENTI DIRETTIVE EUROPEE: 98/37EG
e 89/336/EWG inoltre è conforme alle direttive 1999/5/EG
(R&TTE).
La dichiarazione originale di conformità può essere richiesta al
seguente indirizzo:
Dickie-Tamiya GmbH&Co. KG • Werkstraße l • D-90765 Fürth •
Tel.: +49/(0)911/9765-03
Il prodotto che avete acquistato è alimentato da
batterie ricaricabili ai polimeri di litio.
La batteria è riciclabile.
Alla fine del suo ciclo, in diverse nazioni e/o leggi
locali, potrebbe essere illegale introdurla nei
cassonetti della immondizia. Assicuratevi come
procedure per lo smaltimento, con il vostro locale
ufficio smaltimento rifiuti.
Vi auguriamo buona fortuna e buon divertimento alla guida del
vostro modello Carson!
Caro Cliente
Grazie per aver acquistato il modello di elicottero Bluster 250se
di CARSON. Questo elicottero è azionato da un micromotore
elettrico ed è la nostra novità. Bluster 250se è dotato di passo
collettivo regolabile che gli consente di volare anche all’aperto.
L’elicottero Bluster 250se è dotato di un sistema a passo
collettivo BALL HALL.
Grazie alla buona combinazione di stabilità e flessibilità,
nonché ad un’idoneità al vento antistabile, il modello può
essere utilizzato anche per voli all’aperto. Dotato di un
Head-Lock Gyro (giroscopio), il modello offre una
straordinaria stabilità. Le specifiche del potente motore
brushless e dell’accumulatore LiPo garantiscono perfetti voli
acrobatici 3D.
Condizioni di Garanzia
Questo prodotto è garantito da CARSON, da difetti di
fabbricazione nei materiali e lavorazioni, riscontrati nel normale
utilizzo del modello, per 24 mesi dalla data di acquisto presso
un rivenditore autorizzato.
In caso di prodotto difettoso durante il periodo di garanzia,
recarsi con il prodotto e lo scontrino o ricevuta presso qualsiasi
rivenditore CARSON. CARSON a sua discrezione, provvederà
in accordo alle normative vigenti:
(a) riparare il prodotto senza addebitare nulla ;
(b) sostituire il prodotto con un altro uguale o di simili
caratteristiche, o
(c) rimborsare il prezzo di acquisto.
Tutte le parti sostituite o rimborsate diventano di proprietà della
CARSON. Le parti nuove sostituite o riparate possono essere
utilizzate per il servizio di garanzia. Le parti riparate o sostituite
in garanzia sono a loro volta coperti da garanzia.
Dalla garanzia sono esclusi:
Danni o guasti causati da eventi naturali, normale usura, abusi,
incidenti, utilizzo non corretto, inosservanza delle istruzioni,
montaggio non corretto, imperizia dell’utilizzatore, mancanza
di manutenzione, fulmini o altri incidenti causati da eccesso di
voltaggio;
Tutte le riparazioni non effettuate da personale autorizzato
CARSON.
Le parti di consumo e le batterie danni estetici non funzionali
trasporto, spedizione o costi assicurativi costi di ritiro del
prodotto, installazioni, regolazioni e reinstallazioni. La garanzia
in ogni caso è applicata in conformità alle vigenti norme nello
stato dove il prodotto è stato acquistato.
Dichiarazione di conformità
Prima di utilizzare il vostro nuovo modello leggete attentamente queste istruzioni!
I
Page 88

88ICARSON 3D Helicopter Bluster 250se 50 050 7028
Contenuto
Contenuti del kit
• Modello pronto per il volo e preimpostato
• Trasmettitore manuale elettronico FM a 6 canali da
35 MHz con display LCD
• Batteria ricaricabile Lipo da 11,1 V/ 600 mAh
• Caricabatterie Lipo-Balance con alimentatore
• 4 servocomandi da 5 g
• Giroscopio high-tech completamente regolabile
• Manuale di istruzioni con numerosi suggerimenti
• Motore Brushless/ regolatore già integrati
• Software simulatore di volo e cavo di collegamento
Prefazione ................................................................................ 87
Contenuti del kit ......................................................................88
Dettaglio tecnici ....................................................................... 89
Misure di Sicurezza ................................................................. 89
Suggerimenti per la vostra sicurezza ..................................... 90
a. Elenco componenti ............................................................94
b. Funcioni del radiocomando .............................................. 95
c. Occupazione canali ricevitore ........................................... 96
d. Regolazione del giroscopio ............................................... 96
e. Preparativi .......................................................................... 97
f. Controllo finale prima del volo ..........................................98
g. Volo normale ...................................................................... 99
h. Ricambi e dotazioni ......................................................... 100
i. Equilibratura delle pale rotore principale e
rotore di coda ................................................................... 101
j. Ajuste del trazado ............................................................ 101
k. Controllo dell’alimentazione di corrente ......................... 101
l. Manutenzione ..................................................................102
m. Cambio della frequenza radio ......................................... 103
n. Volo generico ................................................................... 104
o. Volo acrobatico 3D ..........................................................105
p. Volo rovescio ....................................................................106
q. Soluzioni problematiche .................................................. 107
Disegno esploso .................................................................... 108
Ricambi .................................................................................. 112
Accessori ............................................................................... 115
Page 89

89
I
CARSON 3D Helicopter Bluster 250se 50 050 7028
Misure di Sicurezza
Questo modello non è un giocattolo!
• I modelli radiocomandati non sono giocattoli, l’utilizzo di essi
deve essere imparato passo passo.
• I bambini sotto i 14 anni possono guidare il modello solo
sotto la supervisione di un adulto.
Guidare un modello radiocomandato è un affascinante hobby
che deve essere praticato con la necessaria cautela e rispetto.
Un modello radiocomandato può causare danni e ferite in caso
di perdita di controllo di cui l’utilizzatore è responsabile.
Cautelatevi con una sufficiente copertura assicurativa, che vi
consenta di praticare il vostro hobby in assoluta sicurezza.
Il vostro modello funzionerà bene solo se sarà tenuto in
perfetta efficienza. Utilizzare solo ricambi originali e non
montare mai parti non adatte.
La responsabilità del modello è direttamente di chi lo guida,
per cui assicurarsi prima dell’utilizzo che tutto funzioni
correttamente e che tutta la viteria sia ben stretta.
Tenere il modello fuori dalla portata dei bambini piccoli.
Potrebbero mettere in funzione accidentalmente il modello e
ferirsi o mettersi in bocca gli accumulatori e i piccoli elementi
e soffocare.
Attenzione
Il modellismo R/C è un hobby altamente tecnologico.
Pertanto, l’apparecchio non deve essere considerato un
giocattolo. Durante l’utilizzo di questo prodotto sussistono dei
rischi.
L’utilizzatore deve pertanto adottare tutte le misure possibili. In
caso contrario non è possibile escludere danni gravi a persone.
Installazione difettosa, impostazioni e utilizzo impropri possono
causare un funzionamento insoddisfacente e non sicuro.
Per eventuali dubbi sull’impiego, sulla manutenzione o su come
utilizzare in sicurezza questo modello, rivolgersi al proprio
rivenditore in loco.
In generale
• Leggere assolutamente le istruzioni d’uso, prima di uso, e
conservarle per future riletture.
• Si consiglia di prendere dimestichezza in modo particolare
con i consigli per il funzionamento.
Note
Come per ogni prodotto R/C sussistono dei rischi mentre
si fa volare questo modello. Un principiante deve consultare
un pilota R/C esperto, per essere certo che il modello sia
compatibile con il volo acrobatico e che sia sicuro.
Qualsiasi danneggiamento, negligenza o impiego diverso da
quello abituale di questo prodotto può causare incidenti
inattesi o lesioni. Leggere attentamente il presente manuale e
seguire le indicazioni di sicurezza. Tenere presente che non si
tratta di un giocattolo.
Sorvegliare i bambini prima di avviare o di fare volare questo
elicottero.
Dettaglio tecnici:
RTF (ADVANCED)
Lunghezza 515 mm
Altezza 155 mm
Diametro del rotore principale 390 mm
Diametro del rotore posteriore 105 mm
Peso 255 g sensa batteria
Trasmettitore 6 canali
Ricevitore 6 canali
Giroscopio: hightech regolabile
Motore Brushless: CARSON HELI-X B10
Controllo Brushless: CARSON HELI-X 10 A
Batterie Lipo: 600 mAH/ 11,1 V
Servos: 4x servo micro 5 g
*Salvo errori ed omissioni.
Note
Il motore non può essere avviato se, all’accensione del
trasmettitore, è attiva la modalità 3D (interruttore sul lato
destro).
Non è nemmeno sufficiente spostare la cloche passo/
acceleratore in posizione ”Funzionamento a vuoto/Motore off”;
il motore non si avvia comunque.
Per avviare il motore, l’interruttore 3D, all’accensione del
trasmettitore, deve essere in posizione ”nor”, quindi 3D deve
essere spento.
Page 90

90ICARSON 3D Helicopter Bluster 250se 50 050 7028
1. Cercare un luogo idoneo dove poter far
volare l’elicottero
Gli elicotteri R/C sono in grado di volare ad elevate velocità.
Pertanto sussiste un determinato rischio per il pilota e per
lo spettatore. Scegliere un campo di volo adatto con una
super ficie piano senza ostacoli. Un parcheggio vuoto senza
macchine e pedoni, una palestra vuota o un magazzino senza
ostacoli sono luoghi idonei.
Non volare nelle vicinanze di edifici, alberi o cavi dell’alta
tensione, al fine di garantire la sicurezza vostra, di altre
persone e del modellino stesso. Non far volare l’elicottero in
caso di condizioni meteorologiche sfavorevoli quali pioggia,
neve, vento forte o oscurità.
2. Farsi aiutare da un pilota esperto
Prima di accedere il modellino e il trasmettitore, verificare che
non vi siano altre persone che utilizzare la stessa frequenza del
vostro modellino. Interferenze sulla stessa frequenza possono
rendere incontrollabile il modellino mentre è in volo. Il supporto
di un pilota esperto fa sì che durante il primo volo voi abbiate
un elicottero ben manutenzionato e correttamente funzionante.
3. Nelle vicinanze non deve essere
utilizzata la stessa frequenza
Verificare che nessuno nelle vicinanze usi la stessa frequenza
di trasmissione altrimenti perderete il controllo dell’elicottero,
causando un incidente.
Suggerimenti per la vostra sicurezza
Anfänger Anfänger Experte
35.950 MHz
35.950 MHz
Page 91

91
I
CARSON 3D Helicopter Bluster 250se 50 050 7028
4. Attenzione ai rotori in movimento
Mentre il vostro nuovo elicottero CARSON è in funzione, il
rotore principale e quello di coda ruotano ad alta velocità. Le
pale del rotore possono causare gravi lesioni a voi e ad altre
persone. Agire pertanto in modo consapevole e tenere lontano
dalle pale del rotore e dall’azionamento le mani, il viso, gli occhi
e indumenti non aderenti.
Fare volare il modellino sempre ad una distanza di sicurezza da
se stessi e da altre persone, nonché dagli oggetti vicini. Non
perdere mai di vista il modellino
e non lasciarlo mai incustodito
mentre è acceso.
Dopo ogni volto spegnere
dapprima il modellino e quindi il
trasmettitore.
5. Non esporre l’elicottero Bluster 250se
a calore e umidità
Il vostro nuovo elicottero CARSON è un apparecchio elettronico
Hi-Tech. Non esporlo mai a temperature troppo elevate,
non lasciarlo per lunghi periodi in macchina in quanto le
temperature elevate potrebbero danneggiare la sensibile
elettronica e gli elementi in plastica.
Modalità di carica e avviso
Caricare l’accumulatore a polimeri di litio solo con il
caricabatterie fornito. Fare attenzione alla polarità
dell’accumulatore e del caricabatterie e accertarsi che i
collegamenti siano corretti. Non utilizzare troppa forza, in
quanto ciò potrebbe causare danni.
Caricare l’accumulatore prima del primo uso in modo da
iniziare con un accumulatore a piena carica. Non appena
l’accumulatore è completamente carico, il LED diventa verde,
durante la carica, il LED del caricabatterie è rosso.
Per garantire un funzionamento sicuro, non caricare
l’accumulatore troppo a lungo. Non lasciare mai incustodito
il caricabatterie e non lasciarlo acceso durante la notte.
L’operazione di carica dell’accumulatore al litio deve essere
sorvegliata da un adulto.
L’accumulatore Lipo da 600 mAh fornito deve essere caricato
solo l’apposito caricabatterie in dotazione. La carica
dell’accumulatore con un caricabatterie non idoneo agli
accumulatori al litio può dare origine a incendi o esplosioni
dell’accumulatore. Rispettare tutte le norme di sicurezza.
Se l’accumulatore si gonfia o si danneggia, smaltirlo in un
contenitore sicuro all’aperto e non nelle vicinanze di materiali
infiammabili.
1. Non posizionare l’accumulatore sopra o nelle vicinanze
di oggetti che durante la carica possono dare origine a
incendi.
2. Caricare l’accumulatore su una superficie non
infiammabile, ad es. su un pannello di metallo o di pietra.
Page 92

92ICARSON 3D Helicopter Bluster 250se 50 050 7028
Batterie ricaricabili ai polimeri di litio
Utilizzare la batteria ricaricabile di corredo solo con questo
modello.
In caso di sostituzione utilizzare sempre una batteria originale.
• Caricare la batteria esclusivamente fuori dal modello e
tenerla lontana da materiali facilmente infiammabili! E’
normale che la batteria tenda a scaldarsi durante la carica.
• Non sovraccaricare o scaricare eccessivamente la
batteria! Entrambi possono causare la fuoriuscita di elettroliti
e l’autocombustione.
• Non mischiare mai accumulatori/ batterie carichi con
accumulatori/ batterie semiscarichi o con accumulatori di
capacità diversa.
• In caso di inutilizzo caricate la batteria almeno ogni 6 mesi
per rimediare al processo di auto scarica.
• Rimuovere la batteria carica dal carica batterie per evitare il
processo di auto scarica.
• In caso di inutilizzo del modello la batteria deve essere
rimossa.
Accumulatori guasti/ non più ricaricabili devono essere smaltiti
come rifiuti speciali (punti di raccolta).
È vietato smaltirli nei rifiuti domestici!
Le Batterie non devono
• Essere immerse nei liquidi
• Buttate sul fuoco o esposte ad alte temperature o
sollecitazioni meccaniche
• Smontate o danneggiate
• Essere messe in corto circuito.
Se durante la carica o nel riporle percepite un forte odore,
scolorimento, eccessivo riscaldamento, deformazioni o altre
anormalità:
• Staccate la batteria dal carica batterie
• Staccate la batteria dal modello
• Non utilizzate più queste batterie.
Se fuoriesce la soluzione elettrolitica:
• Impedite il contatto con gli occhi e la pelle!
• Sciacquate immediatamente con acqua le eventuali parti del
corpo venute a contatto e consutate un medico.
Page 93

93
I
CARSON 3D Helicopter Bluster 250se 50 050 7028
Istruzioni di sicurezza batteria
litio-polimero
1. Non disassemblare né ricostruire la batteria.
2. Non cortocircuitare la batteria .
3. Non usare né lasciare la batteria in prossimità di fiamme,
forni o altre fonti di calore (superiori a 80 gradi centigradi) .
4. Non immergere la batteria nell’acqua dolce né nell’acqua
marina o in qualsiasi altro punto in cui possa bagnarsi.
5. Non caricare la batteria in prossimità di fiamme o al sole
cocente.
6. Utilizzare lo specifico caricabatteria e attenersi alle
condizioni di ricarica.
7. Non graffiare la batteria con l’unghia. Non colpirla con un
martello e non filettarla.
8. Evitare che la batteria prenda colpi o cada.
9. Non usare la batteria se presenta danni o deformazioni
evidenti.
10. Non effettuare una saldatura diretta sulla batteria.
11. Non invertire la carica né sovraccaricare la cella.
12. Non invertire la carica né collegare in modo inverso .
13. Non collegare la batteria alla presa della corrente o
all’accendisigari.
14. Non usare la batteria per apparecchiature non specificate.
15. Non toccare direttamente una batteria che presenta perdite.
16. Non usare la batteria agli ioni di litio in combinazione con
altre batterie.
17. Tenere la batteria lontana dalla portata dei bambini.
18. Non continuare a caricare la batteria oltre il tempo
specificato.
19. Non inserirla in un contenitore a microonde o ad alta
pressione.
20. Non usare una batteria che presenta perdite in prossimità di
fiamme .
21. Non usare né lasciare la batteria sotto il sole cocente (o
nella macchina riscaldata dal sole).
22. Non usare la batteria in prossimità di luoghi in cui si
genera elettricità statica (superiore a 64 V) che danneggiano
il circuito di protezione.
23. La temperatura di carica deve rientrare tra 0 gradi
centigrade e 45 gradi centigradi. Non caricare la batteria al
di fuori dell’intervallo di temperatura consigliato.
24. Quando la batteria al primo utilizzo presenta segni di
ruggine, cattivo odore o altre anomalie, non usare
l’apparecchio e portare la batteria al negozio dove è stata
acquistata.
25. In caso di utilizzo della batteria da parte de bambini, i
genitori devono insegnare loro come utilizzare le batterie
secondo il manuale con estrema cura. Inoltre quando i
bambini stanno utilizzando le batterie, i genitori devono
prestare la massima attenzione.
26. Tenere la batteria fuori dalla portata dei bambini. Inoltre
quando si utilizza la batteria assicurarsi che non venga
tolta dal caricatore o dall’apparecchio da parte dei bambini
piccoli.
27. Se la cute o gli indumenti assumono l’odore del liquido
proveniente dalla batteria, lavarli con acqua fredda. Il
liquido può causare irritazioni cutanee.
28. Non scaricare l’accumulatore con oltre 5c e non lasciar
scendere la tensione a meno di 6 V per evitare danni
all’accumulatore.
29. Non caricare mai l’accumulare sopra ad un tappeto, poiché
sussiste il pericolo di incendio.
30. Non utilizzare l’accumulatore per attrezzature non
specificate o per altri scopi.
31. Non toccare l’accumulatore se non è a tenuta stagna.
Dopo aver toccato l’accumulatore lavarsi subito le mani.
32. Non caricare l’accumulatore più a lungo di quanto indicato.
33. Non utilizzare accumulatori gonfi o danneggiati.
Page 94

94ICARSON 3D Helicopter Bluster 250se 50 050 7028
La fornitura del Bluster 250se comprende i seguenti
componenti. Verificare che questi siano presenti nel vostro
modellino. In caso contrario, contattare il vostro rivenditore.
Aletta zavorrata
Pale principale
Pale del rotore
Albero rotore
Piatto oscillante
Trave di coda
Carrello
Cappottina
Rotore di coda
a. Elenco componenti
Gyro Ricevitore 35 MHz Motore BL Regolatore
Accumulatore 11,1 V/ 600 mAh Caricabatterie ”Balance”
Radiocommando 4 x 5 g servi
Page 95

95
I
CARSON 3D Helicopter Bluster 250se 50 050 7028
b. Funcioni del radiocomando
1 Antenna telescopica
2 LCD
1. Lettura dell’accumulatore/tensione della batteria
2. Indica quale canale è impostato su ”reverse”.
3. Indica il tempo di volo
4. Indica la modalità di volo
5. Indica lo stato del blocco tasti (unlock/ lock)
3 Fine-scala passo
4 Assetto passo
5 Interruttore 1
Questo interruttore avvia il canale 5. Questo comanda il
giroscopio. Può anche comandare un carrello retrattile, una
telecamera, ecc.
6 Interruttore 3D
Attiva la modalità ”Normale/ Hovering” o ”3D”
7 Tasto ”MODEL” per la scelta del modello di volo desiderato
MODEL A: simulazione flap
MODEL V: funzione supplementare
MODEL H, C, C1: funzionamento a vuoto in posizione
centrale della leva del gas/passo.
ATTENZIONE!
Se sono stati selezionati i modelli H, C e C1, è possibile
passare alla modalità 3D quando la leva del gas/passo si
trova in posizione centrale!
8 LED (verde) per la visualizzazione dello stato di accensione
9 LED (rosso) per la visualizzazione di sottotensione.
Cambiare immediatamente gli accumulatori di
trasmissione quando il LED rosso lampeggia, al più tardi
quando il display LCD si spegne!
10 Leva di comando a distanza destra
(canale di funzionamento 2 e 1)
11 Leva di comando a distanza sinistra
(canale di funzionamento 3 e 4)
Entrambe le leve di comando a distanza possono essere
prolungate di ca. 5 mm.
12 Assetto canale di funzionamento 2
13 Assetto canale di funzionamento 4
14 Assetto canale di funzionamento 1
15 Assetto canale di funzionamento 3
16 Occhiello per cintura da spalla
17 Interruttore on/off
ATTENZIONE!
All’accensione del trasmettitore con la preselezione MODEL
H, C e C1, l’interruttore 3D deve trovarsi su ”NOR”!
18 Interruttore a scorrimento LOCK per bloccare il regolatore e
il tasto ”MODEL”.
19 Interruttore Reverse canale di funzionamento 1, 2, 3, 4, 6
In basso: NOR (normale)
In alto: REV (reverse)
20 Maniglia
21 Quarzo trasmettitore (retro trasmettitore)
22 Batteria/ vano accumulatore (retro trasmettitore)
23 Connettore femmina per simulatore di volo (retro trasmetti-
tore)
24 Boccola di carica (lato)
25 Interruttore a leva, canale di funzionamento Dual Rate
1, 2, 4
Riduzione delle vie di funzionamento 1, 2 e 4 dal 100%
(pos. 0) al 70% (pos. 1)
1
2
3
5
7
9
11
13
15
17
19
4
6
25
8
10
12
14
16
18
20
21
22
23
24
Page 96

96ICARSON 3D Helicopter Bluster 250se 50 050 7028
c. Occupazione canali ricevitore
d. Regolazione del giroscopio
Montaggio giroscopio:
Accertarsi che tutti i componenti RC e i servoazionamenti
funzionino correttamente e in modo scorrevole e che le
squadrette per azionamento piani dei servoazionamenti si
trovino nella posizione corretta.
Fissare il giroscopio su una superficie piana nelle vicinanze del
baricentro.
Innestare il collegamento del giroscopio nello slot 4 e il
secondo per la sensibilità (ha solo un cavo) nello slot 5.
Accendere il trasmettitore e portare l’assetto del rotore di
coda in posizione neutra. Collegare la batteria ricaricabile e
attendere, finché il LED sul giroscopio non s’illumina. Ora il
giroscopio s’inizializza e l’elicottero non deve essere mosso.
Dopo ca. 10 secondi, il giroscopio è pronto e il processo di
allineamento sarà concluso. In caso contrario, verificare di
nuovo i collegamenti.
Impostazione dell’interruttore di
inversione sul giroscopio:
Ruotare l’elicottero con il nasello verso sinistra, il
servoazionamento del tubo di coda deve muoversi nella
stessa direzione di quando si preme verso destra la cloche
di comando per il rotore di coda. In caso contrario, spostare
l’interruttore Reverse.
Impostazione della sensibilità:
Durante il primo test dell’elicottero accertarsi che il tubo di
coda si sollevi. Se la coda dell’elicottero oscilla o si comporta
in modo anomalo, ridurre la sensibilità fino ad ottenere un buon
risultato.
6. Passo
5. Sensibilità giroscopio
4. Servoazionamento rotore di corda
3. Gas/ regolatore
2. Beccheggio
1. Rollio
Collegamento del giroscopio
su slot ricevitore 4
Sensibilità su slot ricevitore 5
Interruttore di inversione
Collegamento servoazionamento
rotore di coda
Regolazione della
sensibilità
Limitatore deflessione
servoazionata
LED di controllo
Page 97

97
I
CARSON 3D Helicopter Bluster 250se 50 050 7028
e. Preparativi
Consigli generali
• Se si possiedono ancora poche esperienze con modelli di
velivoli, sarebbe opportuno esercitarsi prima con un
programma di simulazione di volo.
• Per i primi tentativi fatevi aiutare da qualche pilota più
esperto.
• Si consiglia di prendere dimestichezza con le funzioni di
pilotaggio del trasmettitore.
• Iniziare le prove di volo stando dietro al modello, osservando
la rotta. In questo caso la reazione di pilotaggio corrisponde
alla direzione di pilotaggio.
Prendere dimestichezza inoltre con il pilotaggio del modello
quando è in direzione di arrivo verso di voi (reazione nel
verso contrario alla direzione di pilotaggio)!
Caricamento e inserimento delle batterie
del velivolo
Caricare sempre la batteria al di fuori del modello!
• Collegare il caricabatteria all’adattatore.
• Collegare il caricatore in dotazione ad una presa elettrica.
• Disporre la batteria su un piatto metallico e
• Collegare la batteria al caricatore
• Per evitare un corto circuito, rispettate il contatto sicuro del
collegamento a spine.
• Non coprire la batteria!
La temperatura dell’accumulatore non deve superare i 60°C
durante l’operazione di carica.
La carica è terminata quando il LED verde sul caricabatterie
Balance si accende.
• Collegate il bilanciatore delle lipo al cavetto di
alimentazione.
• Collegate le batterie lipo al cavetto bianco del
caricabatterie bilanciatore.
• La batteria è completamente carica quando i
3 leds lampeggeranno verde.
Lipo Balance Charger
Inserire l’accumulatore dell’aeromobile
1. Estrarre con cautela la cappottina a destra e a sinistra dei
rispettivi supporti.
2. Ora è possibile spingere l’accumulatore Lipo
orizzontalmente dall’avanti nel telaio.
3. Collegare l’accumulatore con il regolatore di volo
(accertarsi in precedenza che il trasmettitore sia acceso).
Page 98

98ICARSON 3D Helicopter Bluster 250se 50 050 7028
L’utilizzatore deve verificare i seguenti
punti prima di procedere al volo:
1. Accertarsi che le pale rotore siano allineate e che siano
ben fissate alla rispettiva copertura. Avvertenza: poggiando
l’elicottero su un lato, le pale rotore devono essere
sufficientemente serrate da non cadere in seguito a
vibrazioni leggere.
2. Controllare che nell’elicottero non vi siano cavi, viti, supporti,
collegamenti allentati prima di farlo volare.
3. Accendere prima il trasmettitore. Collegare quindi la batteria
al regolatore presente nell’elicottero. Accertarsi anche che
la leva del gas sia spenta e/o spinta completamente verso il
basso.
4. Allontanarsi dall’elicottero. Verificare la portata con l’antenna
inserita. Deve essere possibile allontanarsi di circa 50 passi
e continuare ad avere il pieno controllo dell’elicottero.
Se la distanza è notevolmente inferiore, verificare il cavo
dell’antenna e i collegamenti sul trasmettitore dell’elicottero.
5. Controllare il baricentro posizionando le pale del rotore
principale a ore 12:00 e ad ore 6:00. Sollevare l’elicottero
tenendolo per la barra stabilizzatrice e osservare il carrello
di atterraggio. I pattini devono trovarsi su una parallela e non
devono essere inclinati in avanti o indietro. Se dovessero
essere inclinati, regolare la posizione della batteria
spingendola avanti o indietro, finché i pattini non sono
paralleli al suolo, sollevando l’elicottero tenendolo per la
barra stabilizzatrice.
6. Se si tratta del primo volo, si consiglia di utilizzare un
carrello di training, Art.-Nr. 50 050 8141, prima di effettuare
un volo (non incluso).
Il carrello di atterraggio impedisce
che l’elicottero si ribalti, cosa che potrebbe danneggiare le
pale rotore o l’albero primario. Dopo aver messo a punto
l’elicottero, è possibile rimuovere il carrello di training.
7. Estrarre completamente l’antenna prima di fare sollevare
l’elicottero. Ciò consente di ottenere la massima portata
radio.
8. Dare lentamente gas e osservare il disco del rotore. Deve
essere completamente piatto senza alcuna inclinazione.
Se il rotore è inclinato, muovere la leva dell’assetto sul
trasmettitore, finché il disco del rotore non è piatto.
9. Dopo il sollevamento e quando l’elicottero è in stato di
hovering, deve essere molto facile mantenerlo in tale
posizione stabile con semplici movimenti della leva. Se
l’elicottero si muove in avanti, all’indietro o di lato, regolare
la leva dell’assetto sul trasmettitore, finché il movimento di
hovering è stabile.
Nota: un elicottero ben regolato deve volare in modo
stazionario senza grandi interventi da parte del pilota per un
breve intervallo di tempo.
10. Dopo aver concluso il volo, scollegare dapprima i
collegamenti dell’accumulatore nell’elicottero. Quindi è
possibile spegnere il trasmettitore.
Mai spegnere per primo il trasmettitore in quanto si
perderebbe il controllo dell’elicottero, cosa che potrebbe
causare una caduta o gravi danni a persone.
f. Controllo finale prima del volo
Page 99

99
I
CARSON 3D Helicopter Bluster 250se 50 050 7028
g. Volo normale
Salita Leva di comando sinistra
in avanti
Discesa Leva di comando sinistra
indietro
Rotazione a sinistra Leva di comando sinistra
a sinistra
Rotazione a destra Leva di comando sinistra
a destra
Abbassare il naso Leva di comando
destra in avanti
Sollevare il naso Leva di comando
destra indietro
Roll a sinistra Leva di comando destra
a sinistra
Roll a destra Leva di comando destra
a destra
Panoramica modo R/C 2:
La leva di comando sinistra è gas/passo e rotore di coda
La leva di comando destra è beccheggio e funzione di rollio
Page 100

100ICARSON 3D Helicopter Bluster 250se 50 050 7028
Asse
trasversale
Asse
verticale
Asse
longitudinale
h. Ricambi e dotazioni
Piatto oscillante
Batteria Lipo Motore Servo Carrello
Gyro
Tubetto di antenna
Barra stabilizzatrice
Paletta piatto oscillante
Testa rotore
Pala rotore di coda
Pale principale
Impennaggio
 Loading...