

Page 1
Page 2
www.car-solutions.com
Car Solutions
1. Before installation
1.1 Specification
1.2 Features 4
1.3 System diagram 5
3
1.4 Components
1.5 Exterior
2. User interface
2.1 Dip switch
2.2 Keypad
2.3 Factory mode
2.4 Rear parking guide line
2.5 OSD(On Screen Display)
3 Troubleshooting
8
10
11
13
14
6
7
9
Page 3
www.car-solutions.com
Car Solutions
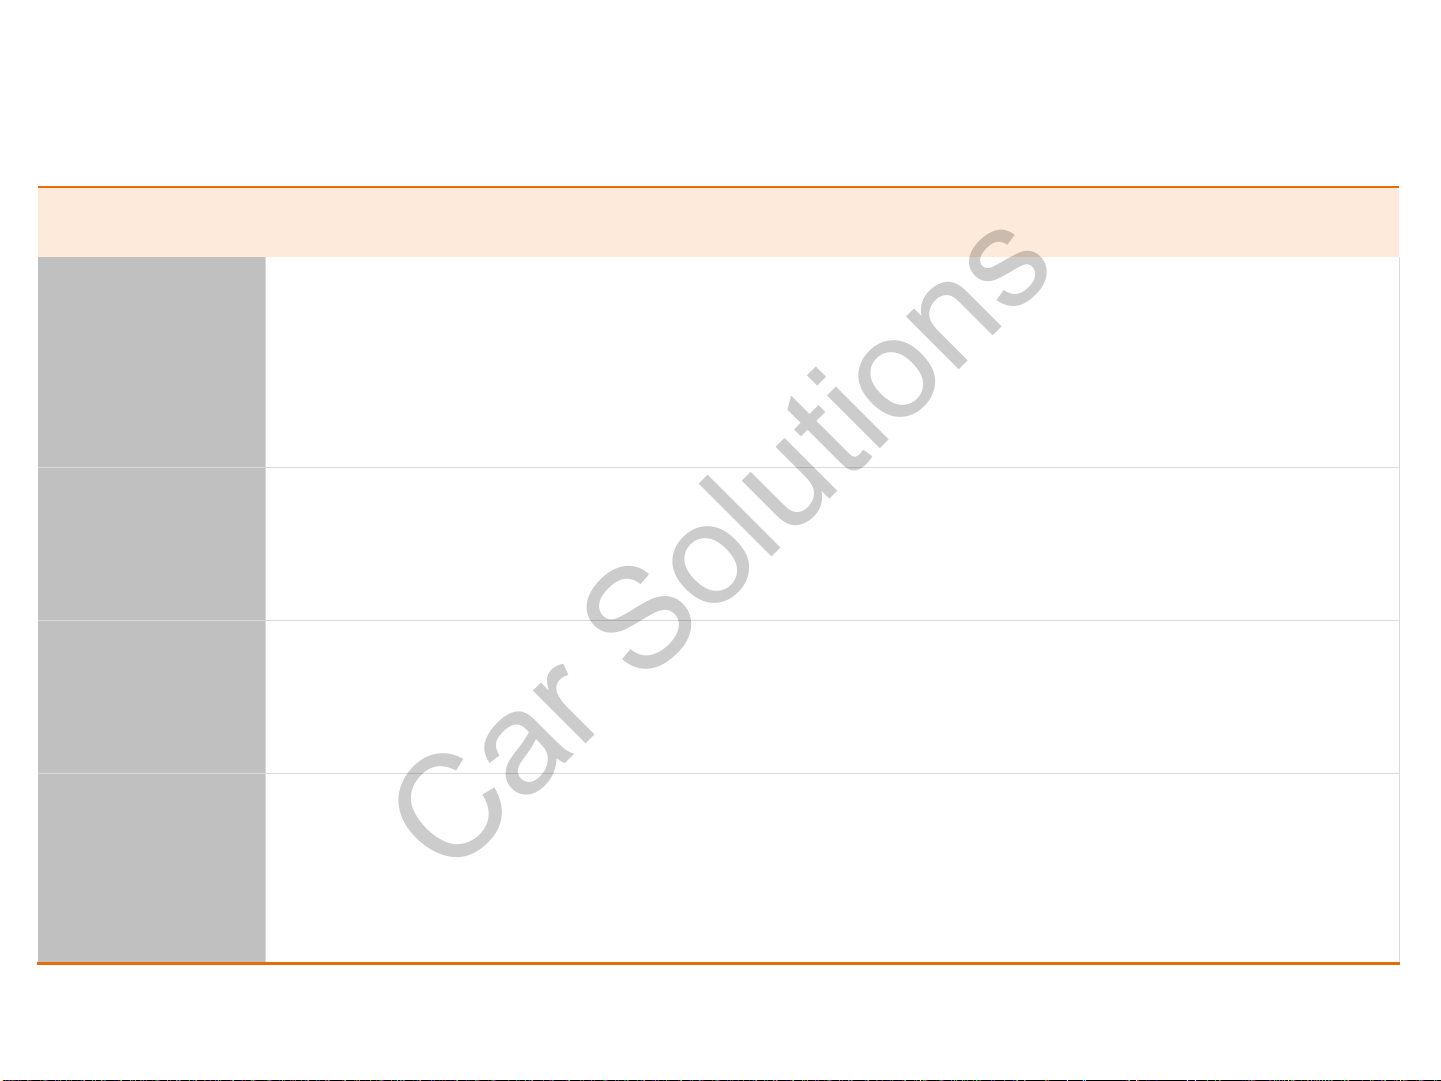
INDEX CONTENTS
Input Spec.
(video interface)
Output Spec.
Power Spec.
Switching mode
- 3 x A/V Input (Rear video source)
- 1 x CVBS(Rear camera) Input (Rear camera source)
- 1 x Analog RGB Input (Navigation System output)
- 1 x LCD Input (Car system Input)
- 1 x LCD Output (LCD operation)
- 4 x Audio Select (12V power comes out from 4 wires of cable by video, Navigation mode)
- Input power : 10VDC ~ 16VDC
- Power consumption : 6WATT in maximum level
- Skip function of input video : Able to skip each input source via adjusting DIP switch.
- Able to change a mode to another by using the mode switch.
- Able to change modes and get back to the OEM screen through the genuine buttons.
Page 4
www.car-solutions.com
Car Solutions
– Clear high definition screen
– NTSC, PAL system support
– Mode exchange via the original buttons
– Control over the position of NAVI, AV screen
– Additional function of adjusting the screen size of NAVI
Page 5
www.car-solutions.com
Car Solutions
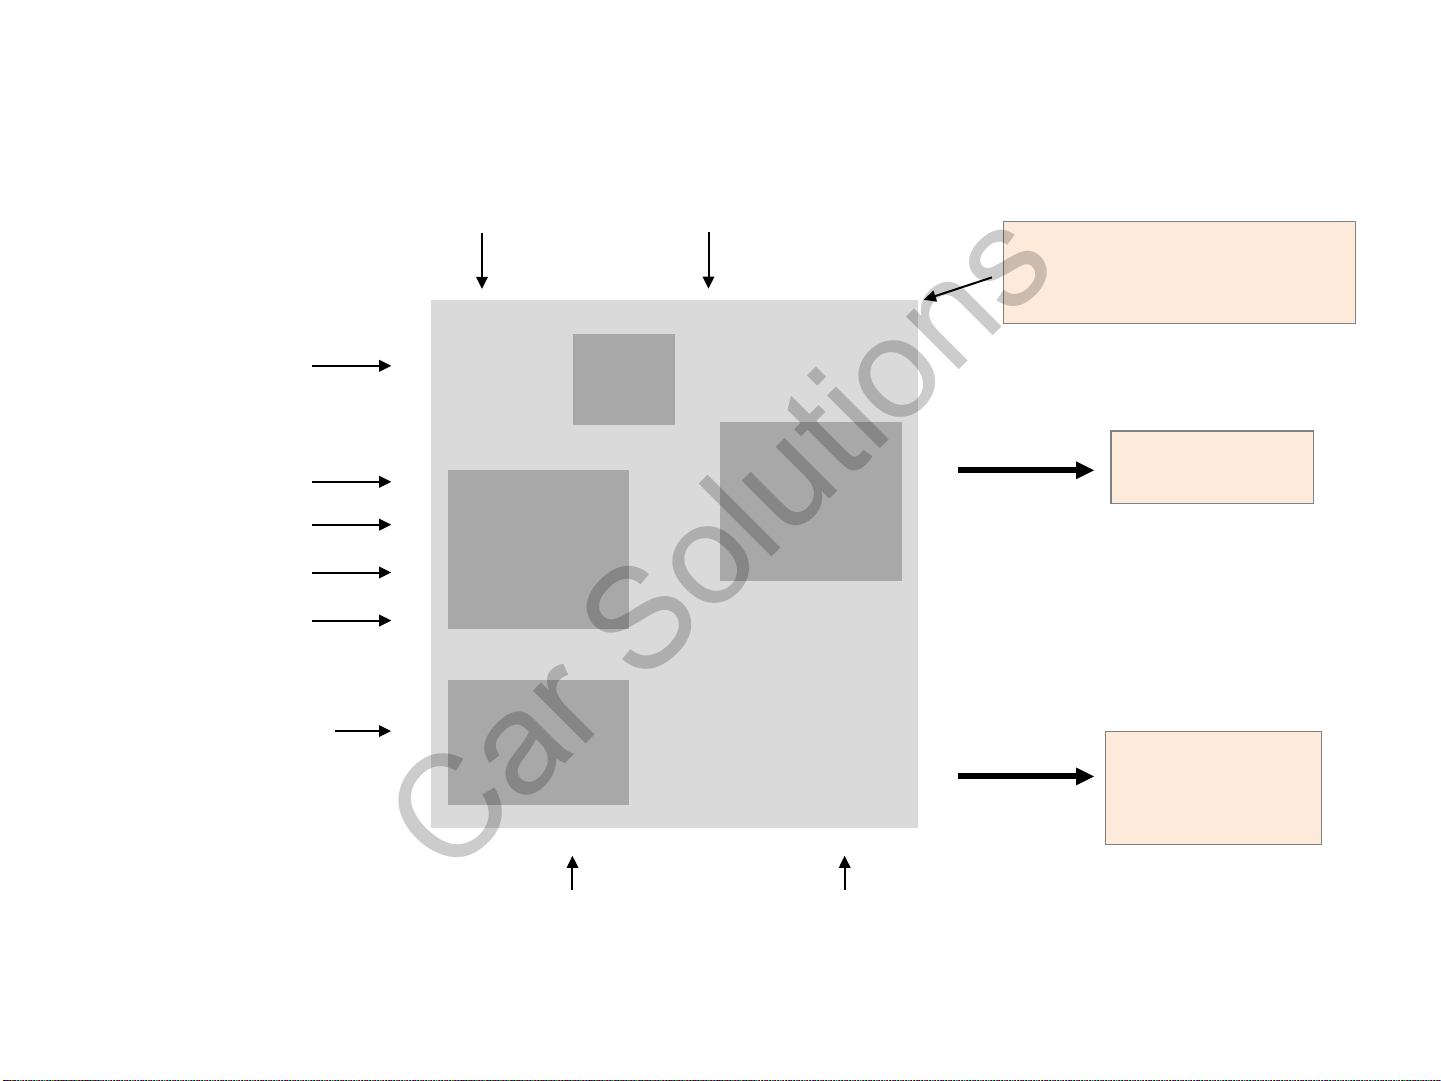
NAVIGATION Input
(Analog RGB)
CVBS
(Rear camera)
Car Screen Input
(CAR MAIN BOARD)
A/V 1
A/V 2
A/V 3
Keypad
Switch for source toggle
OEM Navi Button (NAV)
MCU
VIDEO MUX
DISPLAY
Car Installation
OEM LCD
VIDEO
CIRCUIT
POWER
CIRCUIT
A/V OUT
HEADREST
MONITOR
Power Input
Dip S/W
(+10VDC ~ +16VDC)
Page 6
www.car-solutions.com
Car Solutions
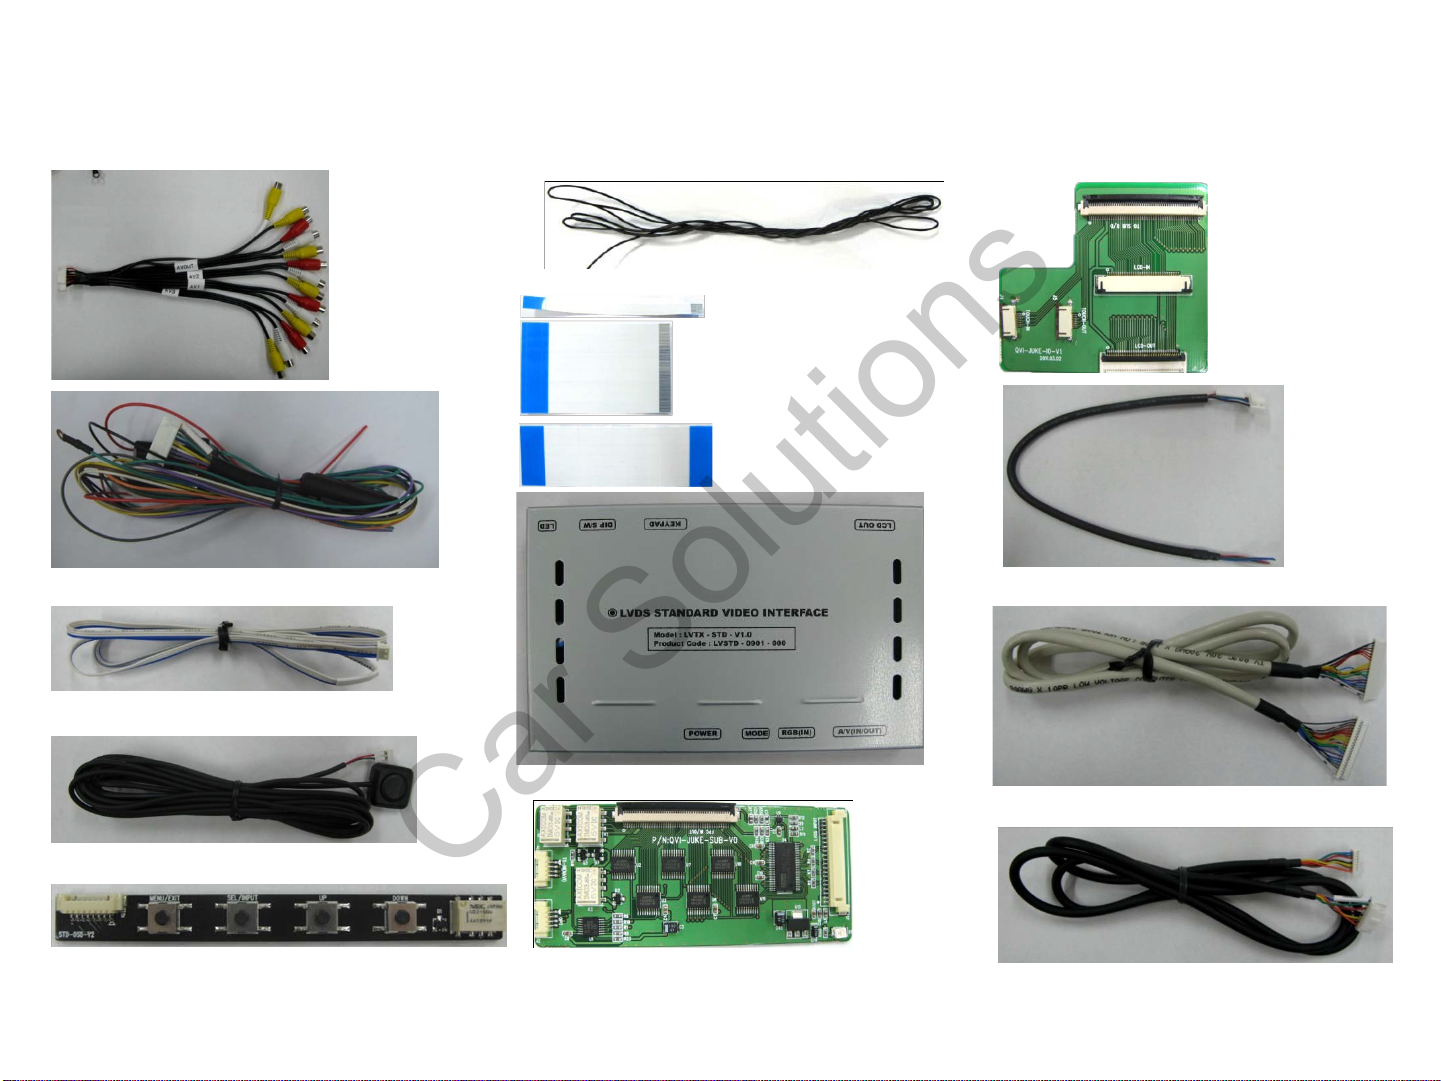
AV cable *
1ea
Black wire * 1ea
I/O board * 1ea
FPC cable * 3ea
Power cable * 1ea
Touch cable * 1ea
RGB cable * 1ea
Main board * 1ea
LVDS cable * 1ea
Mode switch * 1ea
OSD keypad with Relay * 1ea
Sub-board * 1ea
Ground cable * 1ea
Page 7
1.5 Exterior
www.car-solutions.com
Car Solutions
⑤ ⑥ ⑦ ⑧
⑧ ⑦ ⑥
① ②
③
⑤
④
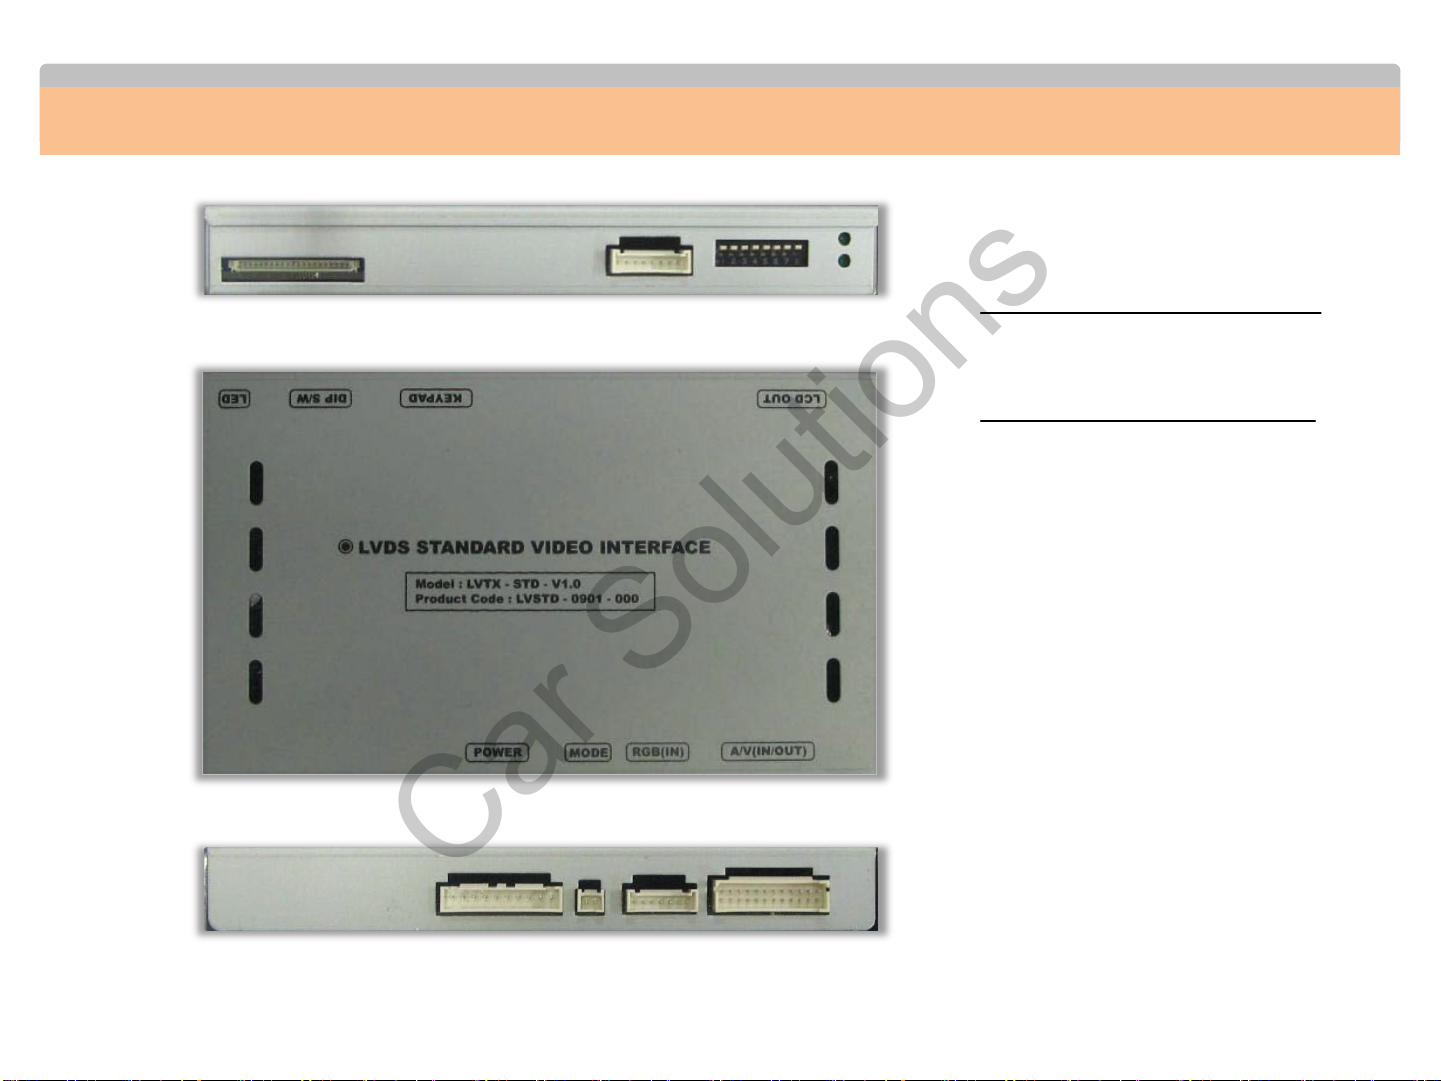
Product dimension
155mm (Horizontal length)
93mm (Vertical length)
20mm (Height)
① POWER
② MODE
③ RGB (IN)
④ AV(IN/OUT)
⑤ LCD OUT
⑥ KEYPAD
⑦ DIP S/W
① ②
③
⑧ LED
④
Page 8
2
3
4
7
2.1 DIP switch
www.car-solutions.com
Car Solutions
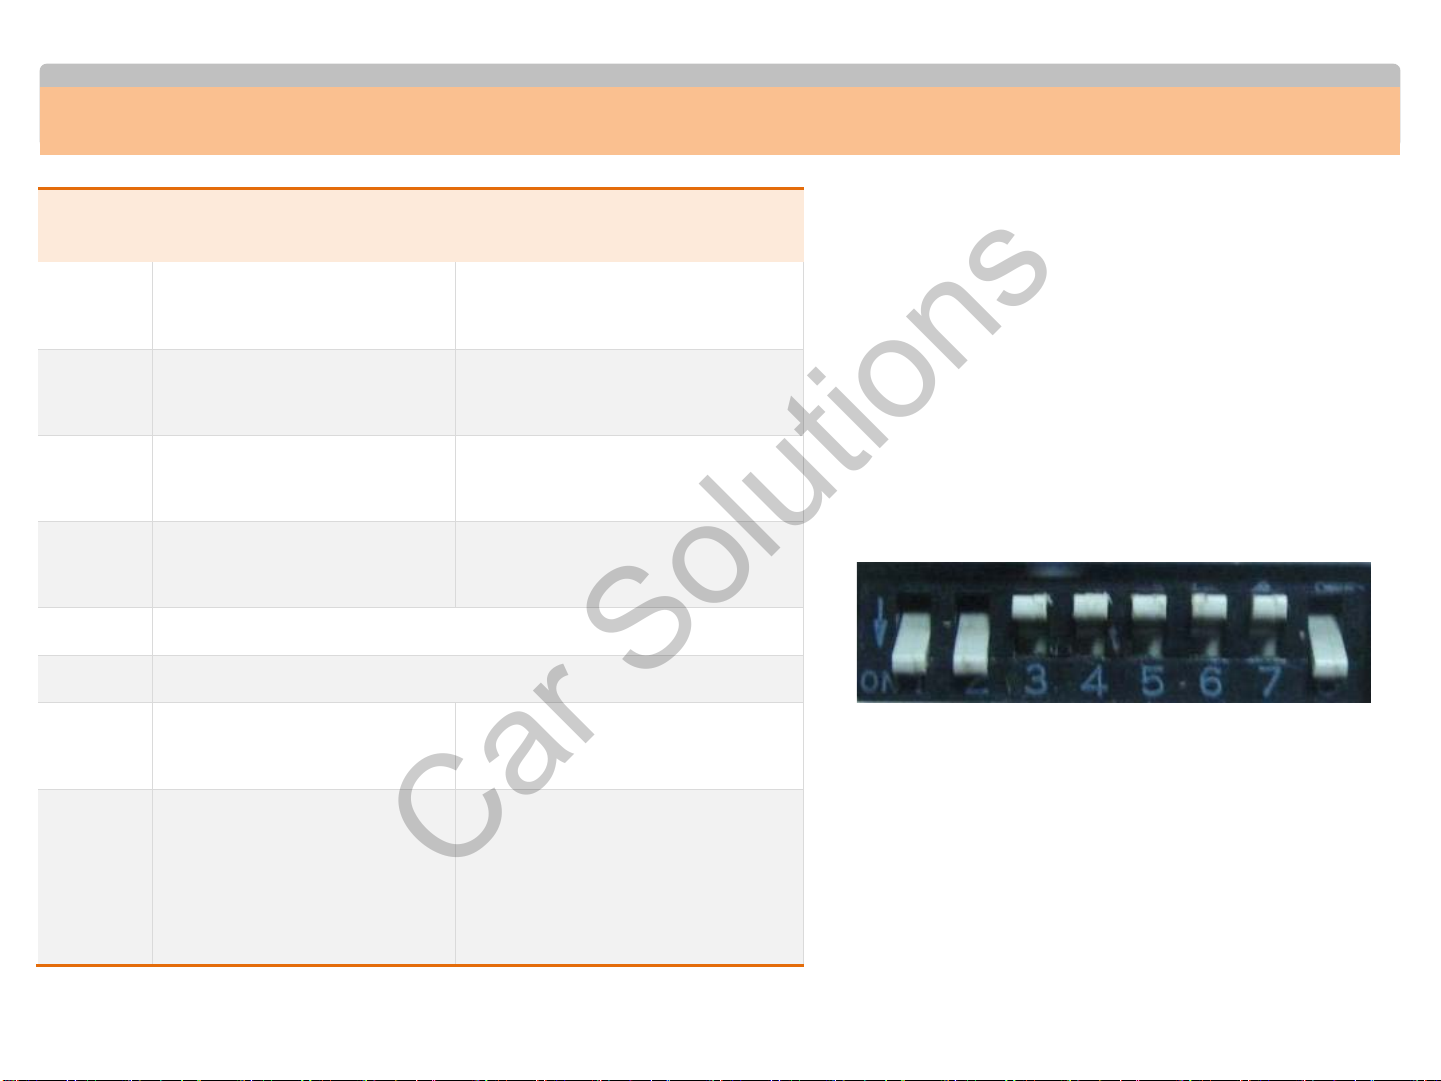
#PIN Function Usage
1
5 N.C
RGB INPUT skip
A/V 1 skip
A/V 2 skip
A/V 3 skip
ON : RGB Mode X
OFF : RGB Display
ON : A/V 1 X
OFF : A/V1 Display
ON : A/V 2 X
OFF : A/V2 Display
ON : A/V 3 X
OFF : A/V3 Display
※ ON : DOWN, OFF : UP default : all OFF
※ DIP S/W usage example
- Input mode use : A/V2, A/V3
- Use original navigation
▷ DIP S/W : 1,2
▷ DIP S/W : 3
▷ DIP S/W : 4
▷ DIP S/W : 5, 6, 7
▷ DIP S/W : 8
ON (INPUT MODE SKIP)
OFF (enable A/V2)
OFF (enable A/V3)
OFF
ON
6 N.C
Rear mode
8
Selecting original NAVI
ON : CVBS4
OFF : MAIN
ON : Changing mode ; MainMain-NAVI-AV1~3 (This is for
original Navi)
OFF : Changing mode ; MainNAVI-AV1~3
Page 9
2.2 Keypad
www.car-solutions.com
Car Solutions
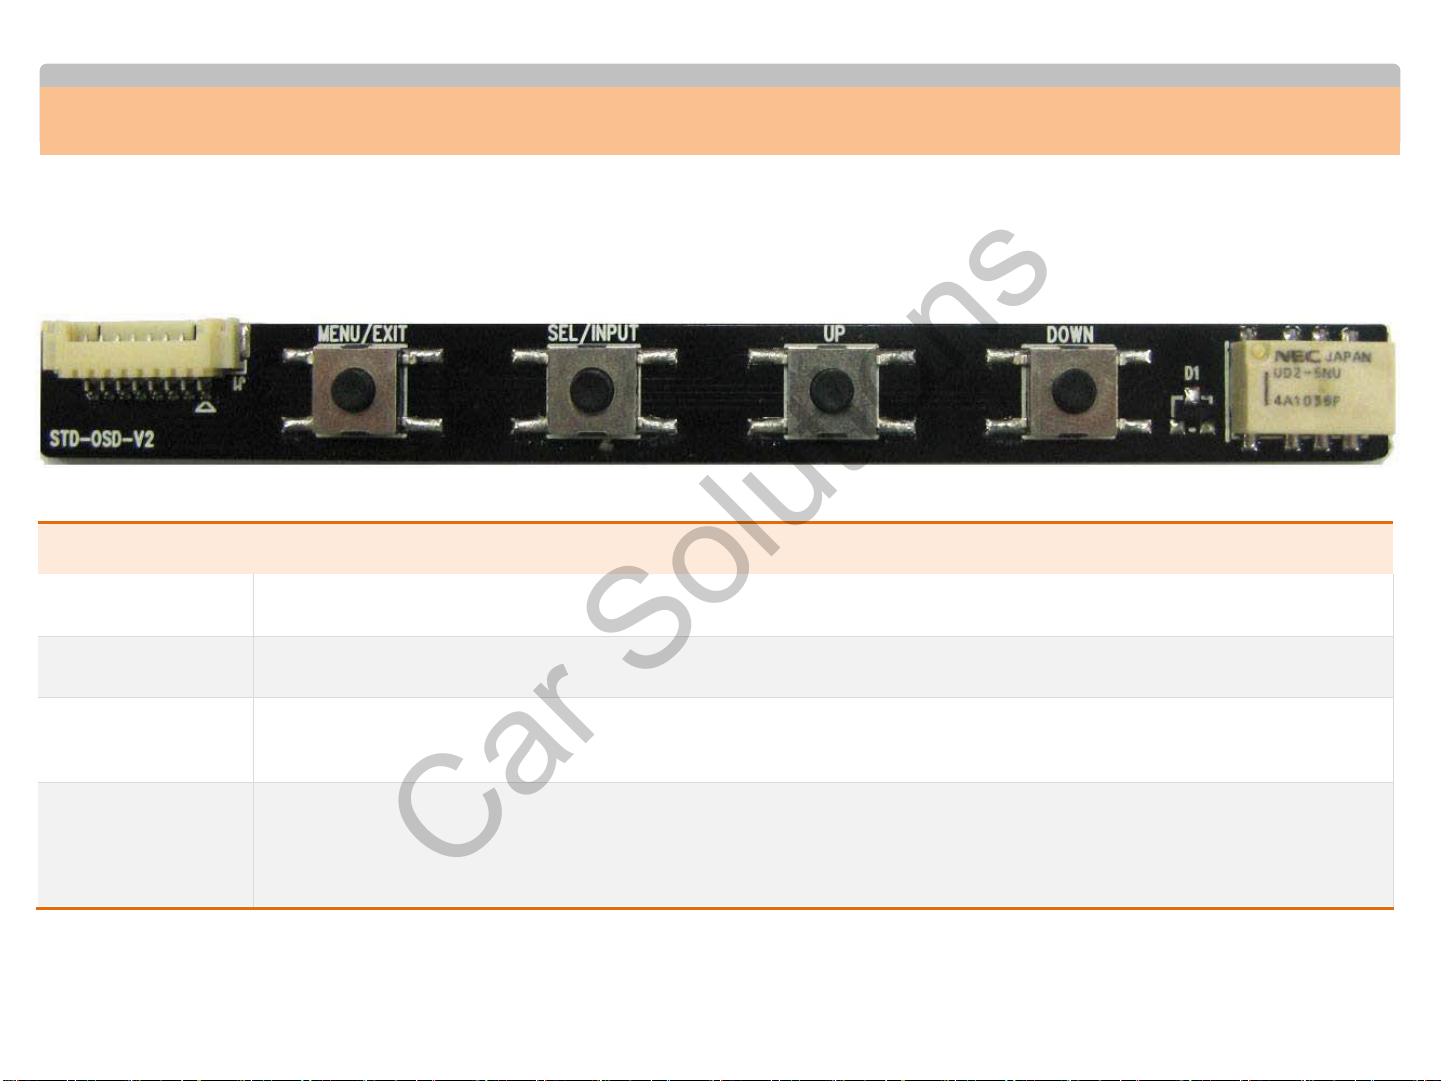
※ FACTORY MODE (Interface setting)
: Press “UP” button about 2 seconds long and you will approach FACTORY mode. Also you can get there in pressing these
keys in this sequence; “UP” → “DOWN” → “UP” → “MENU”
Key Function
MENU/EXIT
SEL/INPUT
UP
DOWN
Implement OSD screen
Selection
Move upward, if you press about 2 seconds long, you are able to approach the FACTORY mode.
Move downward, if you press about 2 seconds long, you are able to reset the factory mode.
Page 10
2.3 Factory mode
www.car-solutions.com
Car Solutions
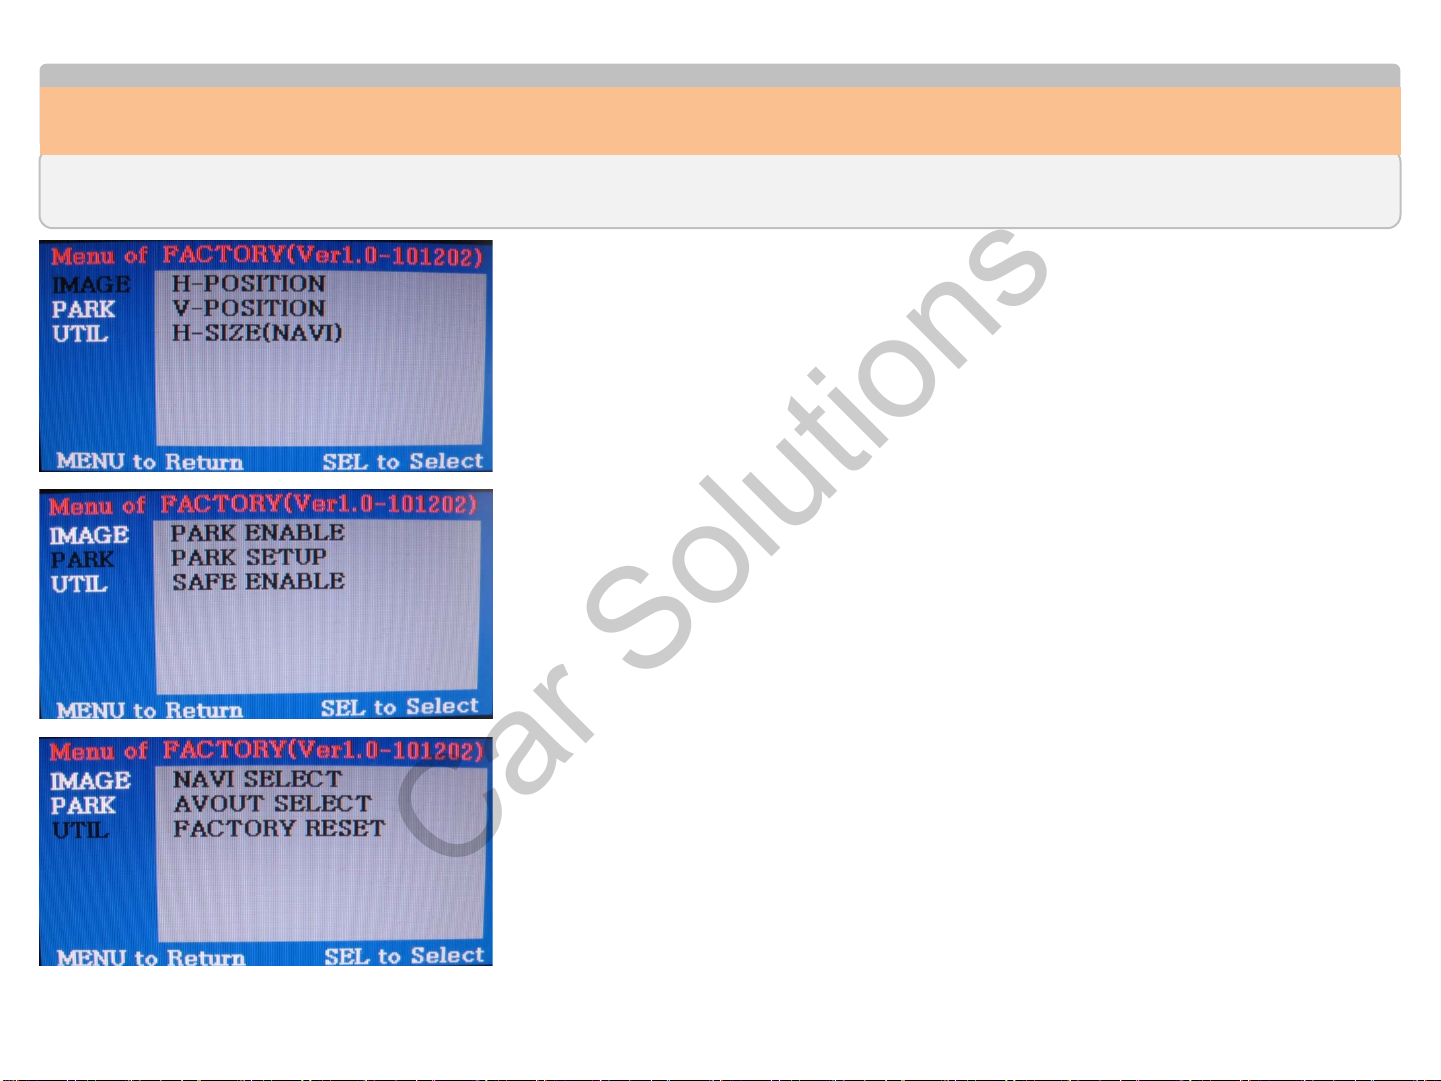
※ FACTORY mode – Press “UP” button on the keypad long about 2 seconds or press these buttons in this sequence;
“UP”→”DOWN”→”UP”→”MENU”
IMAGE
- H-POSITION : control over the horizontal position of the screen
- V-POSITION : control over the vertical position of the screen
- H-SIZE : control over the size of NAVI s c reen
PARK
- PARK ENABLE : able to choose whether the rear guide line is displayed or not with rear
gear. (default-ON)
- PARK SETUP : able to adjust the position of the rear guide line with the keypad.
- SAFE ENABLE
while driving. User returns to the main screen by this function. (Default : off)
( Refer to the page#11 )
UTIL
- NAVI SELECT (N.C)
- AVOUT SELECT : making a choice of AVOUT output in the OEM & NAVI screen
(Default – AV3)
- FACTORY RESET : reset
: The function that forbids drivers to change the LCD to DVD or A/V
Page 11
www.car-solutions.com
Car Solutions
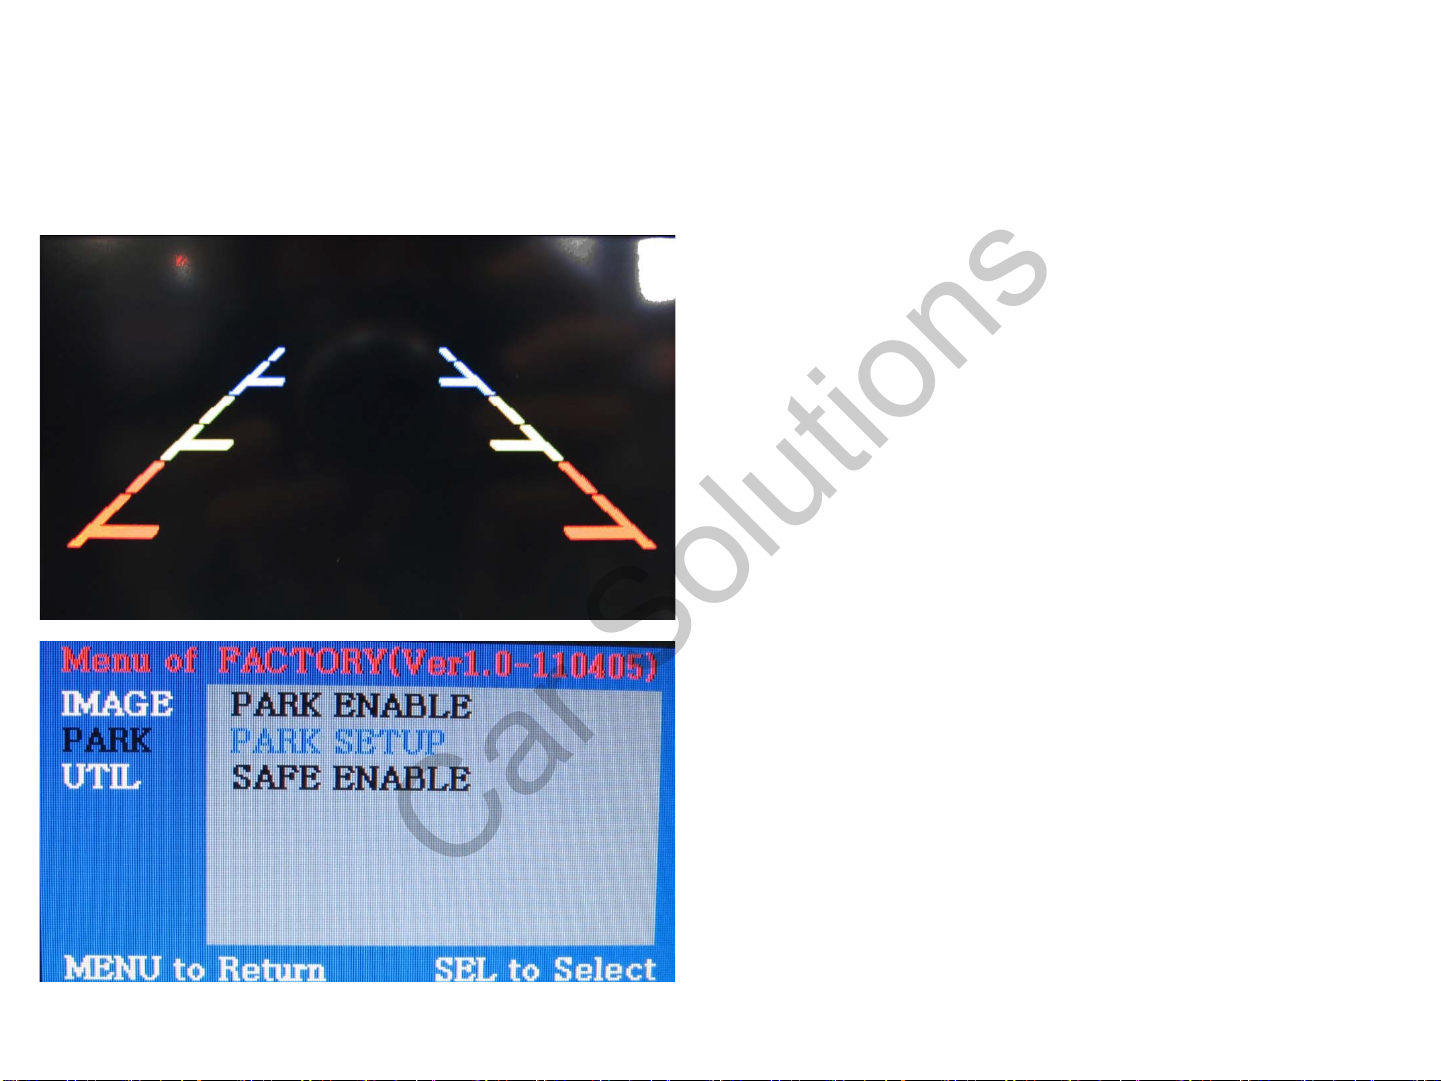
① Once you change up into rear gear, the rear parking guide line
will automatically appear on the screen like the left picture.
※ FACTORY default : DISPLAY - ENABLE
② If you press “UP” button on the keypad about 2 seconds long,
you can see the left image on the screen. Now that you choose
“PARK SETUP” and press “OK” on the keypad, you can control
the width of the rear parking guide line.
Page 12
www.car-solutions.com
Car Solutions
>>>
level 0
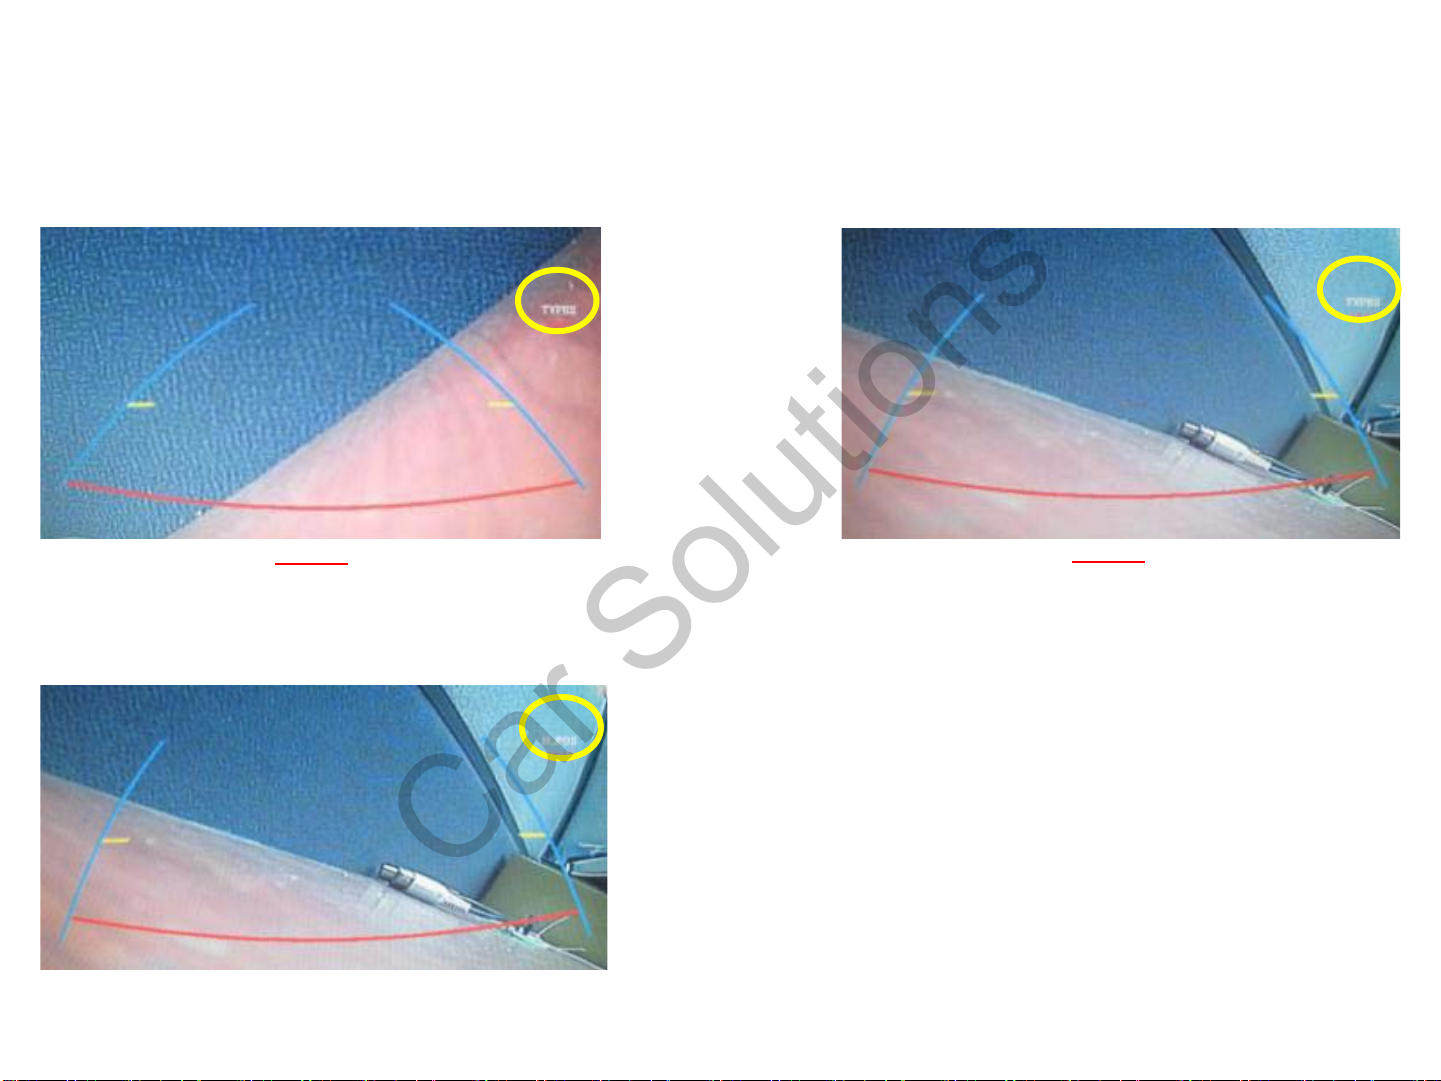
③ The width of the rear parking guide line has 5 level(0~4). After you control the level with “UP”, “DOWN” button on the
keypad, you can move to the horizontal positioning mode after pressing “SEL” button and saving process. ( The current state
is displayed right-top. ) ※ FACTORY default -Types:0, H_Pos:50, V_Pos:120
④ After you control the horizontal position with “UP”, “DOWN” button on
the keypad, you can move to the vertical positioning mode after
pressing “SEL” button and saving process. Once you finish that and
press “SEL”, all the things will be saved. ( Adjustable between level 0
and level 255. )
※ Unless you want the rear parking guide line, set the value of
“PARK ENABLE” as “OFF”.
level 4
Page 13
www.car-solutions.com
Car Solutions
Analog RGB Mode Video Mode
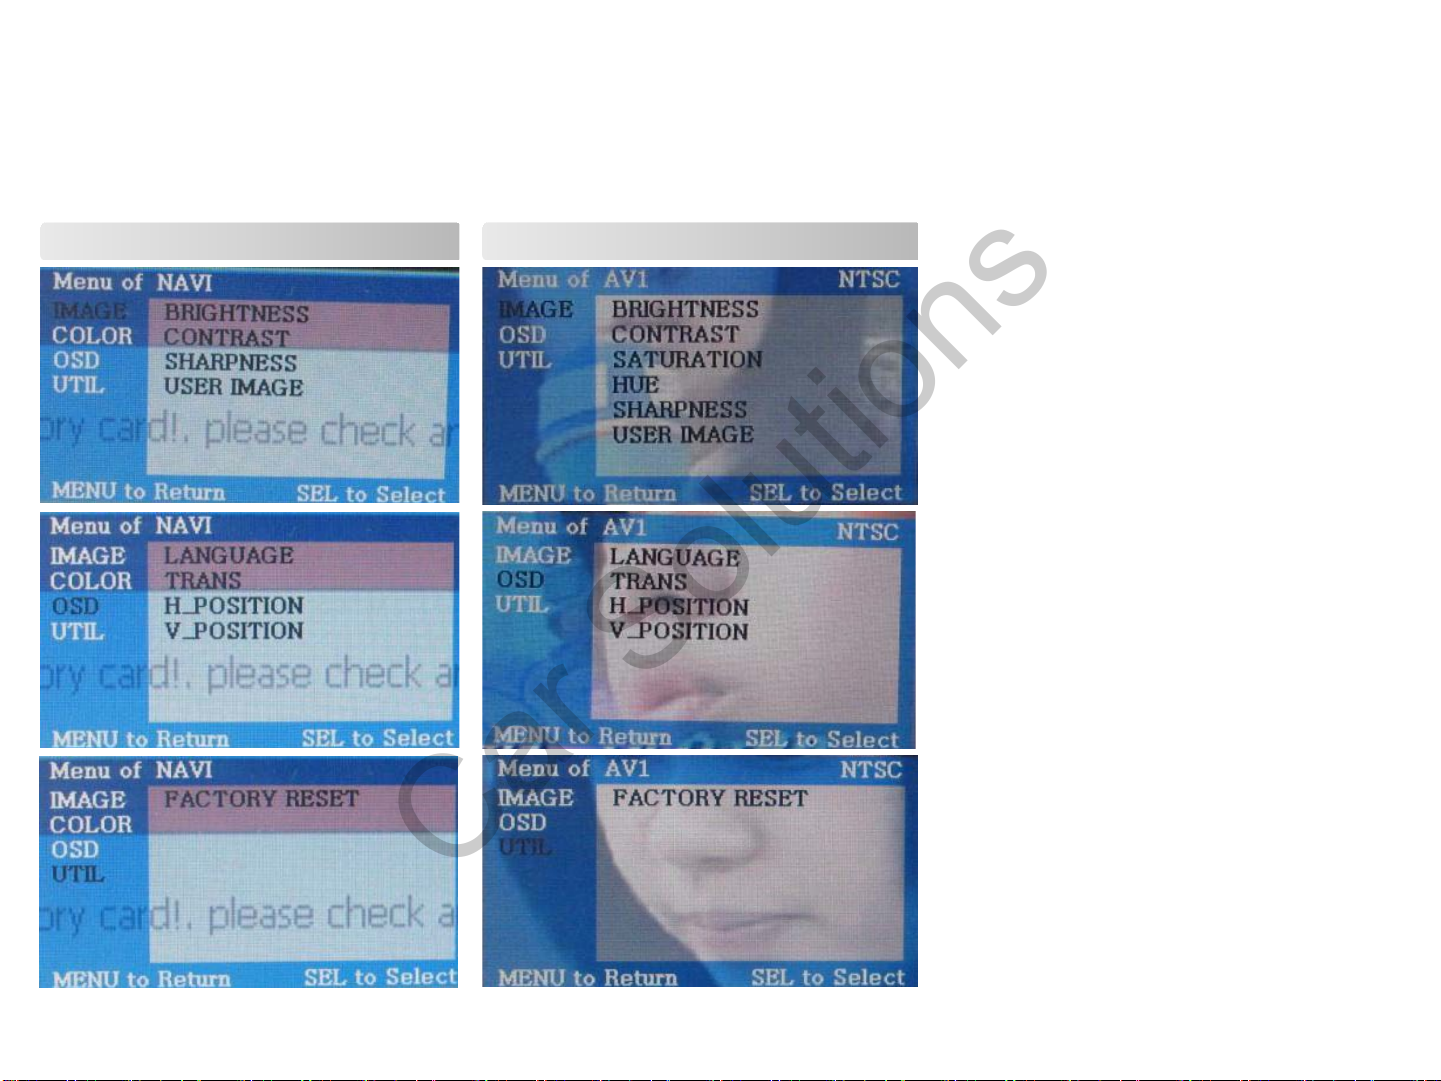
IMAGE
- BRIGHTNESS : adjusting brightness
- CONTRAST : adjusting contrast
- SATURATION : adjusting saturation
- HUE : adjusting hue
- SHARPNESS : adjusting sharpness
- USER IMAGE : able to make a choice
among 4 set-colors of the screen
OSD
- LANGUAGE : choice of language
- TRANSPARENT : control over the
transparency of OSD
- H_POSITION : control over the horizontal
position of OSD
- V_POSITION : control over the vertical
position of OSD
UTIL
- FACTORY RESET : able to reset the whole
value of the NAVI or AV screens to the
default.
Page 14
3 Troubleshooting
www.car-solutions.com
Car Solutions
Q. I can not switch A/V sources.
A. Check IR or Ground cable connection. Check LED lamps in the interface, if it is not on, check power cable.
Q. All I got on the screen is black.
A. Check second LED lamp of the interface is on, if not, check A/V sources connected are working well.
(Second lamp indicates AV sources connected works well.) Check interface connection has been done well.
Q. Displayed image color is not proper. (too dim or not suitable color)
A. Try to select “INITIAL” in OSD menu, if it does not work, inform the manufacturer.)
Q. Rear camera image does NOT appear.
A. Set DIP switch #7 in “ON”
Q. Unwanted A/V mode is displayed. (A/V source switching order : OEM->RGB->AV1->AV2->AV3)
A. Check DIP Switch Setting.
Q. OEM image is not displayed.
A. Check interface’s LCD In/Out cable connection. If the status keeps on, inform the manufacturer.
Q. Screen only displays white like left picture.
A. Check LCD out cable is connected well, if this status keeps, inform the manufacturer.
 Loading...