

Page 1

Release date : 2011.07.14
Car-solutions.com
Model : QVI-BM09-MAIN-V5.1 IF / Product code : QVI-BM-1107-004
Video Interface for BMW
3/5/6/7 Series
V5.1
User Manual
www.car-solutions.com support@carsolutions.com
Page 2

Contents
Car-solutions.com
1. Before installation
1.1 Main specification
1.2 Features
1.3 System diagram
1.4 Components
1.5 Exterior
1.6 POWER cable
2. Setup
2.1 DIP switch
2.2 Setup for car model & navigation
2.3 Factory mode
2.4 Original buttons usage
2.5 Remote controller usage
2.6 Keypad usage
2.7 Setup for rear camera
2.8 OSD (on screen display)
3. Installation
3
4
5
6
7
8
9
10
11
13
14
15
16
18
3.1 Installation diagram
3.2 Cautions on installation
3.3 Installation
4. Troubleshooting
www.car-solutions.com
20
21
22
24
2
Page 3

1.1 Main specification
Car-solutions.com
1. Compatibility
Most of brand-new cars coming with CIC Navigation Computer System including BMW 3,5,6,7,Xseries
2. Product composition
Multimedia Interface (made for specific models) * 1ea
Most TV-Free (displaying original DVD and navigation) – optional
3. MULTIMEDIA INTERFACE input spec.
3 * A/V input (external video input)
1 * CVBS input (rear camera source input)
1 * Analog RGB input (navigation system output)
1 * LCD input (car system input)
4. MULTIMEDIA INTERFACE output spec.
1 * LCD output
5. POWER spec.
input power : 8VDC ~ 24VDC
consumption power : 12WATT (in maximum level)
6. Switch input mode
Input video skip function : able to select whether to use the respective input video sources or not via DIP switch.
Able to change input modes via the keypad or the remote controller.
Able to detect rear camera via CAN or rear lamp cable.
www.car-solutions.com
3
Page 4

1.2 Features
Car-solutions.com
800 x RGB x 480 24bit wide display of high definition
LED backlight device (600cd) – able to adjust brightness
Stereo sound support via headphone input
ZOOM Function ( 16:9 -> 4:3 )
Able to connect external video/audio device
Able to display original images at once ( Normal -> Zoom1 -> Zoom2 -> Zoom3 )
www.car-solutions.com
4
Page 5

1.3 System diagram
Car-solutions.com
NAVIGATION Input
(Analog RGB)
A/V 1
A/V 2
A/V 3
CVBS
(Rear camera)
Car Screen Input
(CAR MAIN BOARD)
Keypad
Switch for source toggle
VIDEO
CIRCUIT
POWER
CIRCUIT
MCU
VIDEO MUX
DISPLAY
A/V OUT
OEM Button (Can Intrface)
Car Installation
OEM LCD
HEADREST
MONITOR
Power Input
(+8VDC ~ +18VDC)
Dip S/W
Rear Camera
www.car-solutions.com
5
Page 6

1.4 Components
Car-solutions.com
Mode cable * 1EA
IR cable * 1EA
LCD cable * 1EA
Remote control * 1ea
A/V cable * 1EA
REAR CAMERA POWER cable * 1EA
Modified POWER cable (7P) * 1EA
RGB cable * 1ea
www.car-solutions.com
6
Page 7

1.5 Exterior
Car-solutions.com
⑤ ⑥ ⑦ ⑧ ⑨ ⑩
Dimension
Horizontal length 164.4mm
Vertical length 94.4mm
Height 28.2mm
① POWER
② RGB(IN)
③ REAR CAMERA POWER
④ A/V(IN/OUT)
⑤ LCD-OUT
⑥ LCD-IN
⑦ IR
⑧ MODE
⑨ LED
① ② ③ ④
⑩ DIP switch
www.car-solutions.com
7
Page 8

1.6 POWER cable
Car-solutions.com
This has to be connected
NOISE FILTER BOX
Approximately 15cm
to the spot located at the
back of the monitor which
the original power & CAN
cable originally connected.
Noise
filter box
CAN(H)
CAN(L)
Approximately 1M
www.car-solutions.com
The original power&
CAN cable has to be
connected to this
part.
ACC
GND
8
Page 9

2.1 DIP switch
PIN
Function
Dip S/W Selection
Car-solutions.com
1 Displaying RGB input
2 Displaying A/V 1
3 Displaying A/V 2
4 Displaying A/V 3
5 Setup of monitor size
ON : displaying RGB mode
OFF : hiding RGB mode
ON : displaying A/V 1
OFF : hiding A/V1
ON : displaying A/V 2
OFF : hiding A/V2
ON : displaying A/V 3
OFF : hiding A/V3
ON : 7.2”
OFF : 10.2”
※ ON : DOWN / OFF : UP
default : ON (DIP #8)
※ DIP S/W usage example
- Input Mode : A/V2, A/V3
- Original Navigation
- External rear camera
▷ DIP S/W : 1,2 ON (hiding INPUT MODE)
▷ DIP S/W : 3 OFF (displaying A/V2)
▷ DIP S/W : 4 OFF (displaying A/V3)
▷ DIP S/W : 5,6 OFF
▷ DIP S/W : 7 ON (for external rear camera)
▷ DIP S/W : 8 OFF
6 Unavailable
7 Setup of rear camera use
8
www.car-solutions.com
Setup of original screen
display
ON : CVBS4
OFF : MAIN
ON : By MUX
OFF : By Relay
( ON : DEFAULT )
9
Page 10

2.2 Setup for car model & navigation
Car-solutions.com
FACTORY mode – Press ◀ button 2 seconds long on the remote controller.
Setup for car model Setup for navigation
UTIL - CAR MODEL
Selecting model of the car
MINI : mini cooper, cars coming
after the year 2011
F10 : series 5, cars coming after
the year 2010
F01 : series 7, cars coming with
round connector
E90 : series 3, X series, cars coming
after the year 2010
* Set pin#5 of DIP switch to the right
size of the monitor after selecting
model of the car. (Refer to page9.)
UTIL – NAVI MODEL
Definition of the navigation
DEFAULT : default, 400X234, low
definition
KD-900(WVGA) : 800x480 in high
definition, for Chinese
MD7000(WVGA) : 800x480 in high
definition, for domestic use
MYVI(WVGA) : 800x480 in high
definition
* Go into FACTORY/ IMAGE (as shown
right) and adjust the position and the
size of the navigation after setting the
definition of the navigation.
IMAGE
Adjusting the position and the size
of navigation
H-POSITION : moving in horizontal
direction (applicable in 7” models)
V-POSITION : moving in vertical
direction (applicable in 7” models)
H-SIZE : adjusting the horizontal
size of the navigation
www.car-solutions.com
10
Page 11

2.3.1 FACTORY mode
Car-solutions.com
FACTORY mode – Press ◀ button 2 seconds long on the remote controller.
UTIL- DMB SKIP
For domestic use only
ON : deactivating DMB
OFF : activating DMB
UTIL - A/V SELECT
Selecting background sound while
navigation is displayed on the screen
DEFAULT : default, the sound of
previous image before displaying
navigation
DMB : sound of DMB
A/V : sound of A/V source
UTIL - FACTORY RESET
Resetting factory mode
YES : resetting factory mode
NO : undoing reset of the factory
mode
www.car-solutions.com
11
Page 12

2.3.2 FACTORY mode
Car-solutions.com
FACTORY mode – Press ◀ button 2 seconds long on the remote controller.
I_DRV - I_DRV REMOTE
Selecting model of navigation and
DMB respectively to control I_DRV
function
ML 740T
ARION
PANASONIC
HSD100
COMTEC
NET770
PIONEER
ML100
•Selecting NAVIGATION model : in RGB
mode
•Selecting DVD model : in A/V mode
I_DRV/ I_DRV CONTROL
Selecting whether to use I_DRV
function or not
ON / OFF
www.car-solutions.com
12
Page 13

2.4 Original buttons usage
Mode
Key
Operation
Function
Mode
Key
Operation
Function
Mode
Key
Operation
Function
Car-solutions.com
I-Drive buttons
(whole model)
Whole
mode
DMB
MENU
△
Press this button 2 seconds long Changing modes
Press this button short
Press this button 2 seconds long in the direction of 12 O’clock Scanning channel
Press this button short in the direction of 12 O’clock Changing channel upward
Getting back to Original
image
▽ Press this button short in the direction of 6 O’clock
AV1~3 ▽ Press this button 2 seconds long in the direction of 6 O’clock Activating PIP function
Rear
camera
▽
Press this button 2 seconds long in the direction of 6 O’clock Activating PIP function
Press this button short in the direction of 6 O’clock
Changing channel
downward
Adjusting the position of
the transparent PDC image
Steering wheel buttons (5series)
Whole mode Circulation button Press 2 seconds long Activating PIP function
Whole mode Downward arrow button Press 2 seconds long Changing modes
Hot Key Function
Whole mode “1” button next to the radio button Press short Changing modes
www.car-solutions.com
13
Page 14
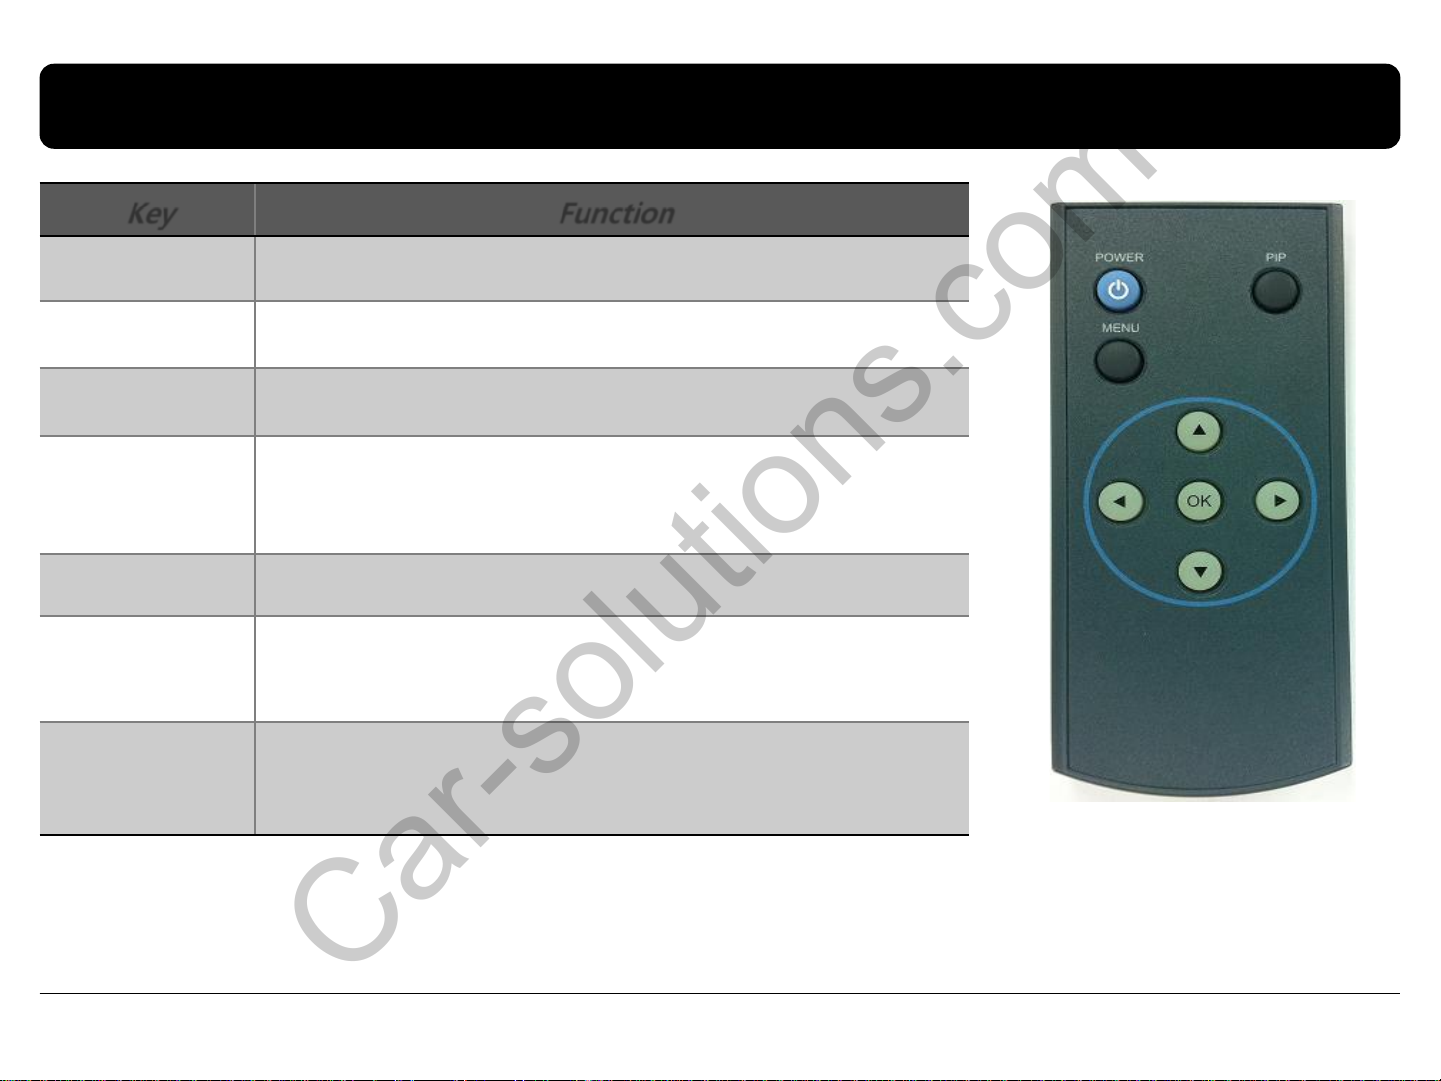
2.5 Remote controller usage
Key
Function
Car-solutions.com
POWER & PIP Unavailable
MENU Activating OSD menu
OK Making a selection, changing image display
Moving upward
▲
▼ Moving downward
◀
(If you press this button 2 seconds long, “Hot key” function will
activate/ deactivate.)
Moving leftward
(If you press this button 2 seconds long, you can get access to the
factory mode.)
Moving rightward
▶
What is Hot Key function ?
You can use this function via pressing number “1” button next to the radio button. You can change audio source to the external
AUX with this function. (original function of BMW) Our device let it change to an external video source for driver to use this
function via this button. So, you can change sources (audio<->video) by pressing this button without any other install process.
www.car-solutions.com
(If you press this button 2 seconds long, you can reset all the data
about user environment.)
14
Page 15

2.6 Keypad usage
Key
Function
Car-solutions.com
Select one between the remote controller and the keypad
FACTORY MODE (Interface setting) :
Press these buttons on OSD keypad in the following sequence; UP→DOWN→UP →MENU
MENU/EXIT Activating OSD menu and Getting back to the previous state after setting mode
SEL/INPUT Making a selection and hanging modes
UP
DOWN
www.car-solutions.com
Moving leftward or upward (If you press this button 2 seconds long, you can get access
to HOT KEY function.)
Moving rightward or downward (IF you press this button 2 seconds long, you can reset
all data.)
15
Page 16

2.7.1 Setup for rear view camera
Car-solutions.com
FACTORY mode – Press ◀ button 2 seconds long on the remote controller.
UTIL - REAR SELECT
Selecting how to detect the rear view
camera
LAMP : Detecting the rear view
camera via rear lamp (Installer must
connect “Rear-C” cable of the power
cable to the rear lamp of the car.)
CAN : Detecting the rear view camera
via CAN signal (Installer must connect
“CAN” cable of the power cable to the
“CAN” cable of the car.)
• On installing rear view camera : Pull down
DIP switch pin#7 to set it as “ON”. (Refer
to page9.)
PARK
PARK ENABLE : Selecting whether to display the parking guide line or not
on rear gear (default : ON)
PARK SETUP : Adjusting the position of the parking guide line (available
in PARK SETUP -> V-POSITION, H-POSITION)
SAFE ENABLE : If your car is connected with CAN cable and it is in ”ON”
state, you can NOT watch DVD or A/V except original image or
navigation while driving. At that time the screen get back to the main
(default : OFF)
a. If you want to get to the FACTORY mode, set the gear as rear state
and press “LEFT” button 2 seconds long on the remote controller or
the keypad. (as shown left top)
b. If you set ‘PARK ENABLE’ as “ON” state, there will be the rear view
parking guide line. (as shown right top)
www.car-solutions.com
16
Page 17

2.7.2 Setup for rear view camera
Car-solutions.com
Setup for displaying rear view
series5 : Press button on the steering
wheel and select one from 4 options as
shown below.
series7 : Press button about 2 seconds
long on I-Drive and select one among
4 options.
< whole PDC screen : F10, E90, F01 >
Positioning transparent PDC image
Press button on the steering wheel and select a
position of PDC image among 3 options as shown
below.
• The types of PIP function in rear view mode can differ
from along car models. And the 7” screen is provided
by full screen of camera and original PDC image.
* Available in F01 and E09 after the year 2009
< full rear view on screen : F10, E90, F01 >
< DUAL screen : E90, F01 >
< DUAL screen2 : F10, E90, F01 >
www.car-solutions.com
17
Page 18

2.8.1 OSD (on screen display)
Car-solutions.com
Analog RGB Mode
IMAGE
BRIGHTNESS
CONTRAST
SHARPNESS
USER IMAGE : Selecting one
among 4 color options.
COLOR
RED : Adjusting red
GREEN : Adjusting green
BLUE : Adjusting blue
USER COLOR : Selecting a
color option among set
color options
OSD
LANGUAGE : Choosing
interface language while
changing mode between
A/V and DVD
TRANS : Adjusting
transparency of OSD
H_POSITION, V_POSITION :
Positioning OSD menu
UTIL
FACTORY RESET : Resetting
all the data about the
relevant mode
(applicable to navigation,
A/V, DMB, rear mode
respectively)
www.car-solutions.com
18
Page 19

2.8.2 OSD (on screen display)
Car-solutions.com
Video mode
DMB mode (only for domestic use)
IMAGE
BRIGHTNESS
CONTRAST
SHARPNESS
USER IMAGE : Selecting one among 4
color options
OSD
LANGUAGE : Choosing interface
language while changing mode
between A/V and DVD
TRANS : Adjusting transparency of
OSD
H_POSITION, V_POSITION :
Positioning OSD menu
UTIL
FACTORY RESET : Resetting all the
data about the relevant mode
(applicable to navigation, A/V, DMB,
rear mode respectively)
www.car-solutions.com
19
Page 20

3.1 Installation diagram
Car-solutions.com
Connecting this to the spot which the original POWER & CAN cable was connected.
Connecting the original POWER & CAN cable to this part.
Control box
Original
Monitor
Original LCD cable
Offered LCD cable
CAN
CAN
www.car-solutions.com
www.car-solutions.com
Noise
filter box
GND
ACC
R DATA (red) G DATA (green)
SYNC (white)
B DATA (blue)
GND (black)
DVD
REAR (12V OUT)
NAVI
REAR C
GND
AV1
AV2
AV3
AV/OUT
Audio R
Audio L
Video
20
20
Page 21

3.2 Cautions on installation
Car-solutions.com
Ignition key should be taken off before starting installation, interface power connection must be
the last step in installation.
Power cable should be separated when connecting interface.
Should be no any electronic devices or magnetic pole around installation place.
All steps of installation should be done by well-trained specialist.
Dismantling without manufacturer’s permission can not be guaranteed, (No permission to break
attached label on the board.)
Kindly check all parts are in the box, when receiving the product, if anything missing, inform to the
supplier or manufacturer.
According to our sales policy, any problems caused by user’s mistake, careless can not be
guaranteed.
www.car-solutions.com
21
Page 22

3.3 Installation
Car-solutions.com
3.3.1 Connecting the monitor with the interface
① Connect LCD cable enclosed in our package to the spot that the
original one is connected after disconnecting the original LCD cable from
the monitor as shown left.
② Connect the original LCD cable to “LCD-IN” socket of the interface.
www.car-solutions.com
22
Page 23

3.3 Installation
Car-solutions.com
3.3.3 Connecting CAN cable respectively
CAN-High
POWER
CAN-Low
CABLE
Connect CAN-H cable (green+brown) enclosed in our package with the original CAN-H cable (green+orange).
And connect CAN-L cable (green) enclosed in our package with the original CAN-L cable (green).
www.car-solutions.com
23
Page 24

4. Troubleshooting
Car-solutions.com
Q. I can not switch A/V sources
A. Check IR or Ground cable connection. Check LED lamps in the interface, if it is not on, check power cable.
Q. All I got on the screen is black.
A. Check second LED lamp of the interface is on, if not, check A/V sources connected are working well. (Second lamp indicates AV sources
connected works well.) Check interface connection has been done well.
Q. Displayed image color is not proper (too dim or not suitable color)
A. Try to select “INITIAL” in OSD menu, if it does not work, inform to manufacturer.)
Q. I can watch the rear camera on the screen
A. Set the DIP switch #7 as state “ON”.
Q. Unwanted A/V mode is displayed. (A/V source switching order : OEM->RGB->AV1->AV2->AV3)
A. Check DIP Switch Setting.
Q. OEM image is not displayed.
A. Check interface’s LCD In/Out cable connection. If the status keeps on, inform to manufacturer.
Q. Screen only displays white color.
A. Check LCD out cable is connected well, if this status keeps, inform to manufacturer.
Q. After setting PIP function, I got only half OEM image at the right in the screen.
A. This is not an error, just caused by user’s setting mistake, user should set to
“Split Screen” in the OEM menu.
Q. Rear CAM does not appear, when car is in reverse after CAN wiring.
A. Operate “FACTORY MODE” like left picture, then select “UTIL Rear Select” If it is set as “LAMP”, change it to “CAN” by remote or keypad.
※ LAMP : In case of connecting “Rear-C” wire of Power Cable to Rear Lamp in vehicle.
CAN : In case of detecting Rear Cam thru CAN signal. (CAN must be wired)
Q. After moving gear to “P” or “D” from “Reverse”, I can’t get navigation, but half PDC Image in the screen.
A. Once, you starts driving, the screen displays navigation right away, this is not an system error.
www.car-solutions.com
24
 Loading...