


AFTER CARE:
To maintain the appearance of this tap, ensure that it is regularly cleaned only
using a clean, soft damp cloth. A solution of warm water and a mild liquid
detergent may be used where necessary, and then the fitting rinsed thoroughly
and wiped dry. Abrasive cleaners, scouring cleaners and acid cleaners must not
be used under any circumstances. All bath cleaning powders and liquids will
damage the surface of your fitting even the non-scratch cleaners.
Avoid contact with all solvents and any harsh household chemicals. You will
damage the plated finish and void your guarantee.
GUARANTEE AND LIABILITY
In the unlikely event that you should experience any defect in the material or workmanship
of your mixer tap within 5 years of purchase, we will replace the faulty part free of charge.
Decorative surface finishes and valves are guaranteed for one year from the date of
purchase provided that our advise concerning care has been observed and no scouring
agents have been used. This is provided that the mixer or tap has been used for normal
domestic purposes in the UK and that the care, installation and maintenance instructions
have been observed.
Scuff and scratches caused by normal wear and tear, improper installation or accidental
damage are excluded from this guarantee.
You should retain a copy of your dated invoice as proof of purchase to validate any claims
under this guarantee.
No other warranties, express or implied, are made, including merchantability or fitness for a
particular purpose.
SPARE PARTS AND SERVICE
Contact CARRON PHOENIX
Phone 01324 638321
Fax 01324 611962
E-mail sales@carron.com
Web-site www.carron.com
ELEN Optima
Fitting Instructions
& Contents List
Please keep these instructions for future reference and request of replacement
parts.
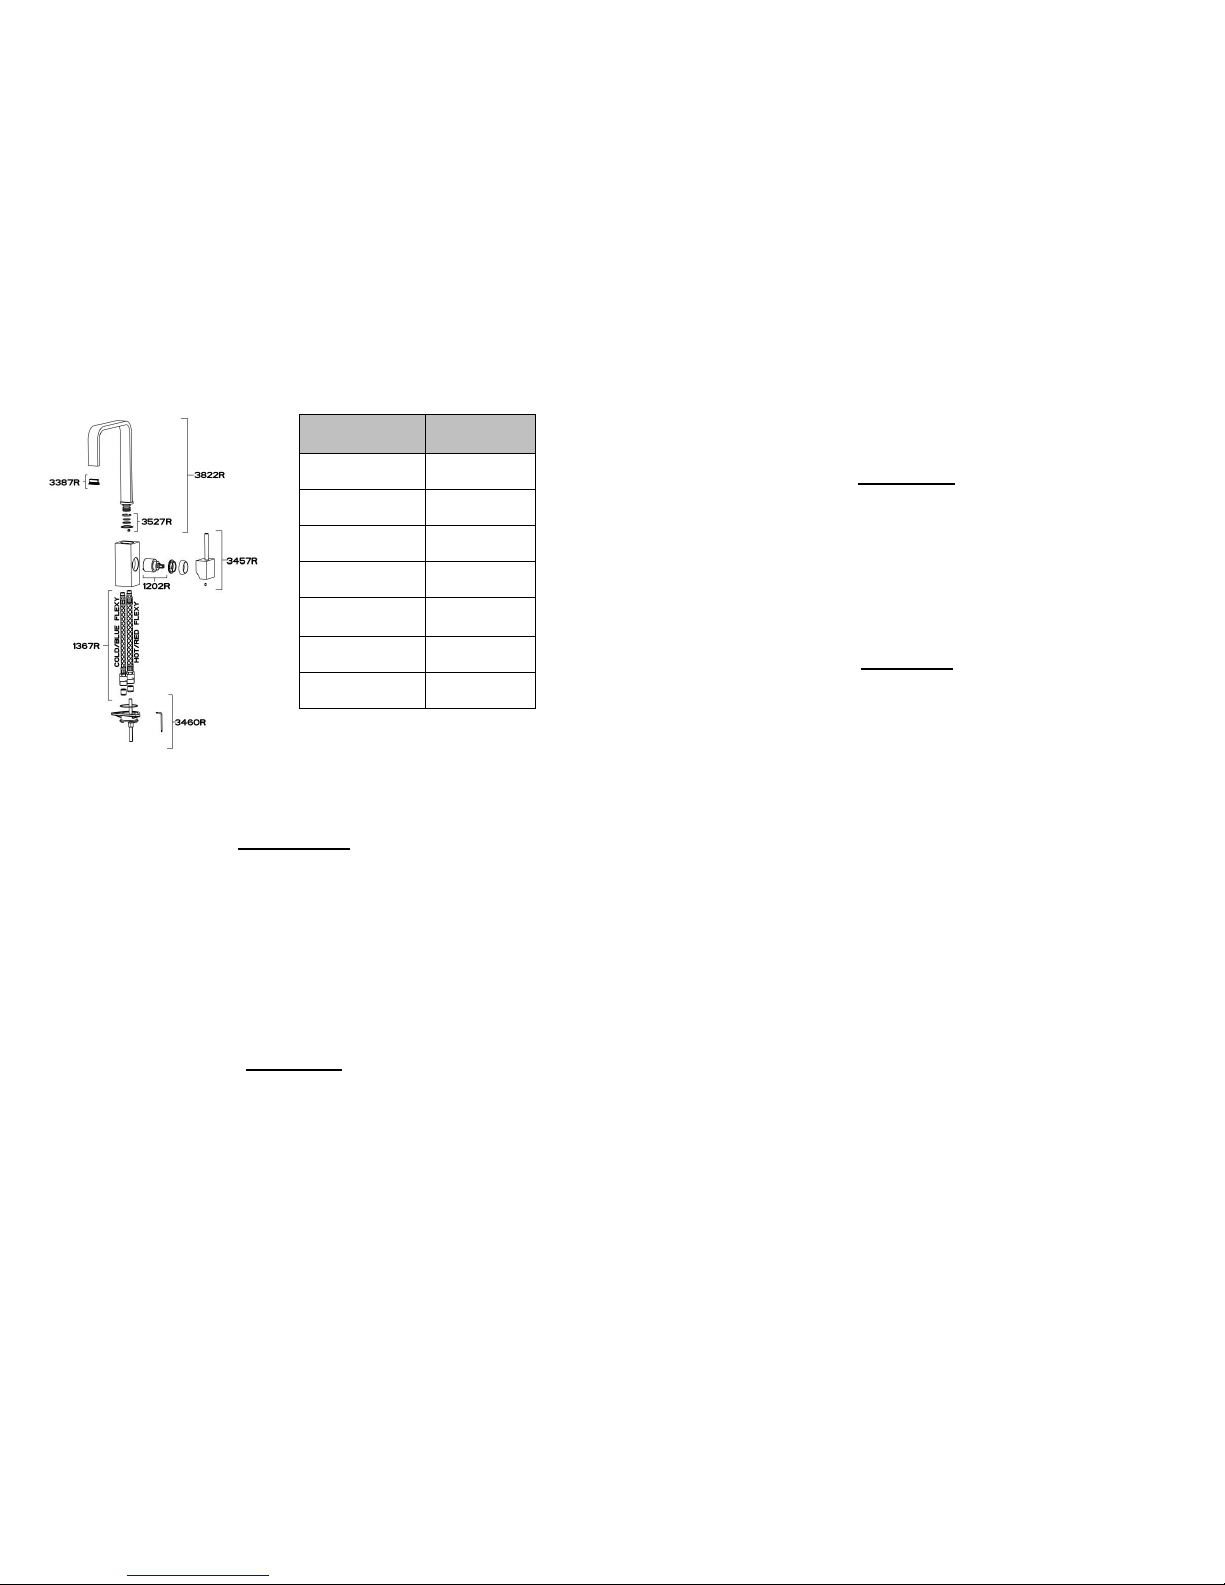
CODE
DESCRIPTION
3387R
Antisplash
3822R+color
Spout
3527R
O-ring kit
3457R+color
Handle
1202R
Cartridge
3460R
Fixing Kit
1367R
Tail pipes
In the unlikely event you find a part missing please contact our Customer Service Help line
on 01324 – 638321 for immediate dispatch of part.
Maintenance:
If the fitting begins to drip:
1) Turn off the water supply
2) Loosen grub screw under handle lever, remove handle and valve
3) Carefully clean seating, rubber washer and ceramic disc.
4) Replace valve and handle, then turn on the water supply.
5) If problem persist contact our help line quoting the product code.
Where an antisplash is fitted to the outlet of the spout, it will need occasional
cleaning. This will be evident when the water flow slows down to an unacceptable
level. To accomplish this pull-out the antisplash and remove the mesh. Immerse the
mesh in a suitable descaling fluid overnight, rinse thoroughly in clean water and reinstall.
Remember:
Maximum water supply pressure: 75 PSI (5 bar)
Minimum water supply pressure : 0,5 bar
Maximum hot-water supply temperature: 70 °C
Recommended hot-water supply temperature: 65 °C
If these temperatures or water pressure are exceeded damage to the tap can
result. A pressure reducing valve may be required to be fitted in high water
pressure situations.
Please read these instructions before you install and use the tap. All
designs, descriptions and dimensions are subject to change without notice.
Preparation
Flush the plumbing system before installing the mixer tap. This is to avoid
plumbing residues clogging the mesh of the aerated outlet, or possibly
damaging the valve’s washers. This is especially important where extensive
plumbing work has been carried out.
First shut off your water heating system then, with your mains stop cock closed,
open the lowest hot and cold taps in the house and allow to run until the cold
storage tank and pipes are empty. (The hot water storage cylinder always
remains full).
Installation
First screw the threaded stud into the mixer body. Screw the Flexi-tails
into the mixer body, and fully hand tighten.
Pass the rubber washer over the flexi-tails and threaded stud to from a
seal on sink top.
When the tap is in position (with the handle on the right when viewed
from the front) slide the nylon bracing plate up to the underside to the
sink together with the retaining plate, and secure by screwing the fixing
nut finger tight. Check that the mixer body is correctly positioned and
fully tighten fixing nut.
For safety, a non return valves is supplied with the flexible
connections. Therefore, this mixer is designed to conform to all UK
regulations
Hot water should be connected to the rear when viewed from the front.
Having first checked all new connections, turn on the mains stop cock,
close all taps except the new mixer and as the system starts to refill
check for leaks.
 Loading...