

Page 1
Adit 3000 Series and
Multi-Service Router (MSR) Card
GUI REFERENCE MANUAL
Part Number: 770-0169 BB
Product Release: Adit 3000 Series - 1.6
MSR Card - 2.0
April 2008
Page 2

Copyright 2008 Turin Networks Inc. All rights reserved.
The information presented in this manual is subject to change without notice and does not represent a commitment on the
part of Turin Networks Inc. The hardware and software described herein are furnished under a license or non-disclosure
agreement. The hardware, software, and manual may be used or copied only in accordance with the terms of this agreement.
It is against the law to reproduce, transmit, transcribe, store in a retrieval system, or translate into any medium - electronic,
mechanical, magnetic, optical, chemical, manual, or otherwise - any part of this manual or software supplied with the Adit
3000 series or MSR products for any purpose other than the purchaser’s personal use without the express written
permission of Turin Networks Inc.
The Turin Networks logo and Adit are registered trademarks of Turin Networks Inc. All other brand or product names are
trademarks or registration trademarks of their respective companies or organizations.
Corporate Contact Information:
Turin Networks
1415 North McDowell Blvd.
Petaluma, CA 94954
Phone: +1-707-665-4400
Fax: +1-707-793-4935
www.TurinNetworks.com
Customer Support:
E-mail: tech-support@TurinNetworks.com
Phone: 800-786-9929 or 303-218-5655
Supporting Software Versions:
Adit 3104 - Release 1.6
Adit 3200 - Release 1.6
Adit 3500 - Release 1.6
Multi-Service Router (MSR) Card - Release 2.0
Page 3

Safety Information
CAUTION! WHEN USING YOUR TELEPHONE EQUIPMENT, BASIC SAFETY PRECAUTIONS SHOULD
ALWAYS BE FOLLOWED TO REDUCE THE RISK OF FIRE, ELECTRIC SHOCK AND INJURY TO PERSONS,
INCLUDING THE FOLLOWING:
Do not use this product near water for example, near a bathtub, washbowl, kitchen sink or
laundry tub, in a wet basement or near a swimming pool.
Avoid using a telephone (other than a cordless type) during an electrical storm. There may be
a remote risk of electric shock from lightning.
PREFACE
Preface
Do not use the telephone to report a gas leak in the vicinity of the leak.
Use only the power cord and batteries indicated in this manual. Do not dispose of batteries in a
fire. They may explode. Check with local codes for possible special disposal instructions.
Refer to the installation section of this manual for a safe and proper installation procedure. All
wiring external to this equipment should follow the current provision of the National Electrical
Code
NOTE: For Safety and Compliance information for the Multi-Service Router (MSR) card and
Adit 600 platform, please refer to the Adit 600 User Manual.
Page 4

Preface
Notices
This manual contains important information and warnings that must be followed to ensure safe
operation of the equipment.
DANGER! A DANGER NOTICE INDICATES THE PRESENCE OF A HAZARD THAT CAN OR WILL
CAUSE DEATH OR SEVERE PERSONAL INJURY IF THE HAZARD IS NOT AVOIDED.
CAUTION! A CAUTION NOTICE INDICATES THE POSSIBILITY OF INTERRUPTING NETWORK
SERVICE IF THE HAZARD IS NOT AVOIDED.
WARNING! A WARNING NOTICE INDICATES THE POSSIBILITY OF EQUIPMENT DAMAGE IF THE
HAZARD IS NOT AVOIDED.
NOTE: A Note indicates information to help you understand how to perform a procedure or how the
system works. Notes should be read before performing the required action.
iv Adit 3000 (Rel. 1.6) and MSR Card (Rel 2.0) GUI
Page 5

TABLE OF CONTENTS
Table of Contents
Preface
Safety Information . . . . . . . . . . . . . . . . . . . . . . . . . . . . . . . . . . . . . . . . . . . . . . . . . . . . . . . . . . . . . iii
Notices . . . . . . . . . . . . . . . . . . . . . . . . . . . . . . . . . . . . . . . . . . . . . . . . . . . . . . . . . . . . . . . . . . . . . . iv
1 Web Based Management
Overview of Supported Products . . . . . . . . . . . . . . . . . . . . . . . . . . . . . . . . . . . . . . . . . . . . . . . . . .1-2
Adit 3104 IP Business Gateway . . . . . . . . . . . . . . . . . . . . . . . . . . . . . . . . . . . . . . . . . . . . . . . 1-2
Adit 3200 Business Router . . . . . . . . . . . . . . . . . . . . . . . . . . . . . . . . . . . . . . . . . . . . . . . . . . . 1-2
Adit 3500 Trunk Gateway . . . . . . . . . . . . . . . . . . . . . . . . . . . . . . . . . . . . . . . . . . . . . . . . . . . 1-2
Multi-Service Router (MSR) Card (for the Adit 600 Platform) . . . . . . . . . . . . . . . . . . . . . . . 1-2
Accessing the GUI . . . . . . . . . . . . . . . . . . . . . . . . . . . . . . . . . . . . . . . . . . . . . . . . . . . . . . . . . . . . . 1-3
Overview . . . . . . . . . . . . . . . . . . . . . . . . . . . . . . . . . . . . . . . . . . . . . . . . . . . . . . . . . . . . . . . . . . . . 1-4
Navigation Pane Icons . . . . . . . . . . . . . . . . . . . . . . . . . . . . . . . . . . . . . . . . . . . . . . . . . . . . . .1-5
Action Icons (for Managing Lists) . . . . . . . . . . . . . . . . . . . . . . . . . . . . . . . . . . . . . . . . . . . . . 1-5
Home . . . . . . . . . . . . . . . . . . . . . . . . . . . . . . . . . . . . . . . . . . . . . . . . . . . . . . . . . . . . . . . . . . . . . . . 1-6
Network Map . . . . . . . . . . . . . . . . . . . . . . . . . . . . . . . . . . . . . . . . . . . . . . . . . . . . . . . . . . . . . 1-7
Quick Setup . . . . . . . . . . . . . . . . . . . . . . . . . . . . . . . . . . . . . . . . . . . . . . . . . . . . . . . . . . . . . . . . . 1-10
Internet Connection. . . . . . . . . . . . . . . . . . . . . . . . . . . . . . . . . . . . . . . . . . . . . . . . . . . . . . . . 1-11
Network Connections. . . . . . . . . . . . . . . . . . . . . . . . . . . . . . . . . . . . . . . . . . . . . . . . . . . . . . . . . . 1-20
Main Window . . . . . . . . . . . . . . . . . . . . . . . . . . . . . . . . . . . . . . . . . . . . . . . . . . . . . . . . . . . . 1-20
Security . . . . . . . . . . . . . . . . . . . . . . . . . . . . . . . . . . . . . . . . . . . . . . . . . . . . . . . . . . . . . . . . . . . . 1-22
Voice over IP . . . . . . . . . . . . . . . . . . . . . . . . . . . . . . . . . . . . . . . . . . . . . . . . . . . . . . . . . . . . . . . . 1-23
Advanced . . . . . . . . . . . . . . . . . . . . . . . . . . . . . . . . . . . . . . . . . . . . . . . . . . . . . . . . . . . . . . . . . . . 1-25
System Monitoring. . . . . . . . . . . . . . . . . . . . . . . . . . . . . . . . . . . . . . . . . . . . . . . . . . . . . . . . . . . . 1-26
Logout . . . . . . . . . . . . . . . . . . . . . . . . . . . . . . . . . . . . . . . . . . . . . . . . . . . . . . . . . . . . . . . . . . . . . 1-28
2 Advanced
Overview . . . . . . . . . . . . . . . . . . . . . . . . . . . . . . . . . . . . . . . . . . . . . . . . . . . . . . . . . . . . . . . . . . . . 2-2
ARP . . . . . . . . . . . . . . . . . . . . . . . . . . . . . . . . . . . . . . . . . . . . . . . . . . . . . . . . . . . . . . . . . . . . . . . . 2-3
Certificates . . . . . . . . . . . . . . . . . . . . . . . . . . . . . . . . . . . . . . . . . . . . . . . . . . . . . . . . . . . . . . . . . . . 2-4
Digital Certificates . . . . . . . . . . . . . . . . . . . . . . . . . . . . . . . . . . . . . . . . . . . . . . . . . . . . . . . . . 2-4
X.509 Certificate Format . . . . . . . . . . . . . . . . . . . . . . . . . . . . . . . . . . . . . . . . . . . . . . . . . . . .2-5
Obtaining and Loading an X.509 Certificate . . . . . . . . . . . . . . . . . . . . . . . . . . . . . . . . . . . . . 2-6
Registering the CA’s Certificate. . . . . . . . . . . . . . . . . . . . . . . . . . . . . . . . . . . . . . . . . . . . . . 2-11
Date and Time . . . . . . . . . . . . . . . . . . . . . . . . . . . . . . . . . . . . . . . . . . . . . . . . . . . . . . . . . . . . . . . 2-13
Setting the Date and Time . . . . . . . . . . . . . . . . . . . . . . . . . . . . . . . . . . . . . . . . . . . . . . . . . . 2-14
Diagnostics. . . . . . . . . . . . . . . . . . . . . . . . . . . . . . . . . . . . . . . . . . . . . . . . . . . . . . . . . . . . . . . . . . 2-16
Pinging an IP Address. . . . . . . . . . . . . . . . . . . . . . . . . . . . . . . . . . . . . . . . . . . . . . . . . . . . . .2-17
Performing a Traceroute . . . . . . . . . . . . . . . . . . . . . . . . . . . . . . . . . . . . . . . . . . . . . . . . . . . . 2-17
Page 6

Table of Contents
DNS Static Entries . . . . . . . . . . . . . . . . . . . . . . . . . . . . . . . . . . . . . . . . . . . . . . . . . . . . . . . . . . . 2-18
Viewing the DNS Table. . . . . . . . . . . . . . . . . . . . . . . . . . . . . . . . . . . . . . . . . . . . . . . . . . . . 2-18
Adding a New Entry to the DNS Table . . . . . . . . . . . . . . . . . . . . . . . . . . . . . . . . . . . . . . . . 2-19
Modifying an Entry in the DNS Table. . . . . . . . . . . . . . . . . . . . . . . . . . . . . . . . . . . . . . . . . 2-20
Dynamic DNS . . . . . . . . . . . . . . . . . . . . . . . . . . . . . . . . . . . . . . . . . . . . . . . . . . . . . . . . . . . . . . . 2-21
Using Dynamic DNS . . . . . . . . . . . . . . . . . . . . . . . . . . . . . . . . . . . . . . . . . . . . . . . . . . . . . . 2-22
IP Address Distribution (DHCP). . . . . . . . . . . . . . . . . . . . . . . . . . . . . . . . . . . . . . . . . . . . . . . . . 2-23
Summary of Services . . . . . . . . . . . . . . . . . . . . . . . . . . . . . . . . . . . . . . . . . . . . . . . . . . . . . . 2-23
IPSec (IP Security) . . . . . . . . . . . . . . . . . . . . . . . . . . . . . . . . . . . . . . . . . . . . . . . . . . . . . . . . . . . 2-28
General IPSec Settings. . . . . . . . . . . . . . . . . . . . . . . . . . . . . . . . . . . . . . . . . . . . . . . . . . . . . 2-29
Key Management . . . . . . . . . . . . . . . . . . . . . . . . . . . . . . . . . . . . . . . . . . . . . . . . . . . . . . . . . 2-30
Log Settings . . . . . . . . . . . . . . . . . . . . . . . . . . . . . . . . . . . . . . . . . . . . . . . . . . . . . . . . . . . . . 2-31
Creating a New Secured Connection . . . . . . . . . . . . . . . . . . . . . . . . . . . . . . . . . . . . . . . . . . 2-32
NAT/FW Connections. . . . . . . . . . . . . . . . . . . . . . . . . . . . . . . . . . . . . . . . . . . . . . . . . . . . . . . . . 2-33
Network Objects . . . . . . . . . . . . . . . . . . . . . . . . . . . . . . . . . . . . . . . . . . . . . . . . . . . . . . . . . . . . . 2-34
PPTP (Point-to-Point Tunneling Protocol) . . . . . . . . . . . . . . . . . . . . . . . . . . . . . . . . . . . . . . . . . 2-36
RADIUS Client . . . . . . . . . . . . . . . . . . . . . . . . . . . . . . . . . . . . . . . . . . . . . . . . . . . . . . . . . . . . . . 2-37
Configuring RADIUS . . . . . . . . . . . . . . . . . . . . . . . . . . . . . . . . . . . . . . . . . . . . . . . . . . . . . 2-37
Remote Administration . . . . . . . . . . . . . . . . . . . . . . . . . . . . . . . . . . . . . . . . . . . . . . . . . . . . . . . . 2-38
Restart . . . . . . . . . . . . . . . . . . . . . . . . . . . . . . . . . . . . . . . . . . . . . . . . . . . . . . . . . . . . . . . . . . . . . 2-39
Restore Defaults . . . . . . . . . . . . . . . . . . . . . . . . . . . . . . . . . . . . . . . . . . . . . . . . . . . . . . . . . . . . . 2-40
Routing . . . . . . . . . . . . . . . . . . . . . . . . . . . . . . . . . . . . . . . . . . . . . . . . . . . . . . . . . . . . . . . . . . . . 2-41
Static Routing. . . . . . . . . . . . . . . . . . . . . . . . . . . . . . . . . . . . . . . . . . . . . . . . . . . . . . . . . . . . 2-41
RIP . . . . . . . . . . . . . . . . . . . . . . . . . . . . . . . . . . . . . . . . . . . . . . . . . . . . . . . . . . . . . . . . . . . . 2-46
OSPF . . . . . . . . . . . . . . . . . . . . . . . . . . . . . . . . . . . . . . . . . . . . . . . . . . . . . . . . . . . . . . . . . . 2-47
Scheduler Rules. . . . . . . . . . . . . . . . . . . . . . . . . . . . . . . . . . . . . . . . . . . . . . . . . . . . . . . . . . . . . . 2-52
Simple Network Management Protocol . . . . . . . . . . . . . . . . . . . . . . . . . . . . . . . . . . . . . . . . . . . 2-55
Configuring the Adit’s SNMP Agent. . . . . . . . . . . . . . . . . . . . . . . . . . . . . . . . . . . . . . . . . . 2-55
System Settings . . . . . . . . . . . . . . . . . . . . . . . . . . . . . . . . . . . . . . . . . . . . . . . . . . . . . . . . . . . . . . 2-57
Defining an Outgoing Mail Server. . . . . . . . . . . . . . . . . . . . . . . . . . . . . . . . . . . . . . . . . . . . 2-60
Technical Information. . . . . . . . . . . . . . . . . . . . . . . . . . . . . . . . . . . . . . . . . . . . . . . . . . . . . . . . . 2-61
Configuration File . . . . . . . . . . . . . . . . . . . . . . . . . . . . . . . . . . . . . . . . . . . . . . . . . . . . . . . . 2-63
Upgrade From a Local Computer . . . . . . . . . . . . . . . . . . . . . . . . . . . . . . . . . . . . . . . . . . . . . . . . 2-64
Upgrading the Software . . . . . . . . . . . . . . . . . . . . . . . . . . . . . . . . . . . . . . . . . . . . . . . . . . . . 2-64
Users . . . . . . . . . . . . . . . . . . . . . . . . . . . . . . . . . . . . . . . . . . . . . . . . . . . . . . . . . . . . . . . . . . . . . . 2-65
Adding a User . . . . . . . . . . . . . . . . . . . . . . . . . . . . . . . . . . . . . . . . . . . . . . . . . . . . . . . . . . . 2-66
Editing a User. . . . . . . . . . . . . . . . . . . . . . . . . . . . . . . . . . . . . . . . . . . . . . . . . . . . . . . . . . . . 2-67
Configuring E-mail Notification for Users . . . . . . . . . . . . . . . . . . . . . . . . . . . . . . . . . . . . . 2-68
VLAN Configuration . . . . . . . . . . . . . . . . . . . . . . . . . . . . . . . . . . . . . . . . . . . . . . . . . . . . . . . . . 2-69
Configuring a VLAN . . . . . . . . . . . . . . . . . . . . . . . . . . . . . . . . . . . . . . . . . . . . . . . . . . . . . . 2-70
vi Adit 3000 (Rel. 1.6) and MSR Card (Rel 2.0) GUI
Page 7

Table of Contents
3 Network Connections
Overview . . . . . . . . . . . . . . . . . . . . . . . . . . . . . . . . . . . . . . . . . . . . . . . . . . . . . . . . . . . . . . . . . . . . 3-2
Adit 3000 Connections . . . . . . . . . . . . . . . . . . . . . . . . . . . . . . . . . . . . . . . . . . . . . . . . . . . . . .3-2
Adit MSR Connections. . . . . . . . . . . . . . . . . . . . . . . . . . . . . . . . . . . . . . . . . . . . . . . . . . . . . . 3-3
Preconfigured Connections . . . . . . . . . . . . . . . . . . . . . . . . . . . . . . . . . . . . . . . . . . . . . . . . . . . . . . 3-5
Ethernet 1 . . . . . . . . . . . . . . . . . . . . . . . . . . . . . . . . . . . . . . . . . . . . . . . . . . . . . . . . . . . . . . . . 3-5
Ethernet 2 . . . . . . . . . . . . . . . . . . . . . . . . . . . . . . . . . . . . . . . . . . . . . . . . . . . . . . . . . . . . . . . . 3-9
Serial 1 (Adit 3000 Only) . . . . . . . . . . . . . . . . . . . . . . . . . . . . . . . . . . . . . . . . . . . . . . . . . . . 3-12
T1 1 - T1 4 (Adit 3000 Only) . . . . . . . . . . . . . . . . . . . . . . . . . . . . . . . . . . . . . . . . . . . . . . . . 3-13
Connections that Require Configuration . . . . . . . . . . . . . . . . . . . . . . . . . . . . . . . . . . . . . . . . . . . 3-16
Multilink . . . . . . . . . . . . . . . . . . . . . . . . . . . . . . . . . . . . . . . . . . . . . . . . . . . . . . . . . . . . . . . 3-17
Serial (PPPoDS0) . . . . . . . . . . . . . . . . . . . . . . . . . . . . . . . . . . . . . . . . . . . . . . . . . . . . . . . . . 3-21
New Connection. . . . . . . . . . . . . . . . . . . . . . . . . . . . . . . . . . . . . . . . . . . . . . . . . . . . . . . . . . . . . . 3-27
Point-to-Point Protocol over DS0 (Serial) . . . . . . . . . . . . . . . . . . . . . . . . . . . . . . . . . . . . . . 3-29
Multilink Point-to-Point Protocol over DS0 (Multilink) . . . . . . . . . . . . . . . . . . . . . . . . . . . 3-32
Point-to-Point Tunneling Protocol (PPTP) . . . . . . . . . . . . . . . . . . . . . . . . . . . . . . . . . . . . . . 3-34
Point-to-Point Tunneling Protocol Server (PPTP Server) . . . . . . . . . . . . . . . . . . . . . . . . . . 3-35
Layer Two Tunneling Protocol (L2TP) . . . . . . . . . . . . . . . . . . . . . . . . . . . . . . . . . . . . . . . . 3-37
Internet Protocol Security (IPSec) . . . . . . . . . . . . . . . . . . . . . . . . . . . . . . . . . . . . . . . . . . . . 3-38
OSPF Configuration on the Network Connection . . . . . . . . . . . . . . . . . . . . . . . . . . . . . . . . . . . . 3-40
4 Security
Overview . . . . . . . . . . . . . . . . . . . . . . . . . . . . . . . . . . . . . . . . . . . . . . . . . . . . . . . . . . . . . . . . . . . . 4-2
General . . . . . . . . . . . . . . . . . . . . . . . . . . . . . . . . . . . . . . . . . . . . . . . . . . . . . . . . . . . . . . . . . . . . . . 4-4
Security Levels . . . . . . . . . . . . . . . . . . . . . . . . . . . . . . . . . . . . . . . . . . . . . . . . . . . . . . . . . . . . 4-5
Access Control . . . . . . . . . . . . . . . . . . . . . . . . . . . . . . . . . . . . . . . . . . . . . . . . . . . . . . . . . . . . . . . . 4-6
Adding an Access Control Rule . . . . . . . . . . . . . . . . . . . . . . . . . . . . . . . . . . . . . . . . . . . . . . . 4-7
Modifying an Access Control Rule . . . . . . . . . . . . . . . . . . . . . . . . . . . . . . . . . . . . . . . . . . . . 4-9
Creating a User-Defined Rule. . . . . . . . . . . . . . . . . . . . . . . . . . . . . . . . . . . . . . . . . . . . . . . . 4-10
Local Servers . . . . . . . . . . . . . . . . . . . . . . . . . . . . . . . . . . . . . . . . . . . . . . . . . . . . . . . . . . . . . . . . 4-13
Adding a Local Server . . . . . . . . . . . . . . . . . . . . . . . . . . . . . . . . . . . . . . . . . . . . . . . . . . . . . 4-14
Modifying a Local Server . . . . . . . . . . . . . . . . . . . . . . . . . . . . . . . . . . . . . . . . . . . . . . . . . . . 4-16
DMZ Host . . . . . . . . . . . . . . . . . . . . . . . . . . . . . . . . . . . . . . . . . . . . . . . . . . . . . . . . . . . . . . . . . . 4-17
Designating a Local Computer as a DMZ Host . . . . . . . . . . . . . . . . . . . . . . . . . . . . . . . . . . 4-18
Port Triggering. . . . . . . . . . . . . . . . . . . . . . . . . . . . . . . . . . . . . . . . . . . . . . . . . . . . . . . . . . . . . . . 4-19
Setting up Port Triggering . . . . . . . . . . . . . . . . . . . . . . . . . . . . . . . . . . . . . . . . . . . . . . . . . . 4-20
Remote Administration . . . . . . . . . . . . . . . . . . . . . . . . . . . . . . . . . . . . . . . . . . . . . . . . . . . . . . . . 4-23
Configuring Remote Administration . . . . . . . . . . . . . . . . . . . . . . . . . . . . . . . . . . . . . . . . . . 4-24
IP/Hostname Filtering . . . . . . . . . . . . . . . . . . . . . . . . . . . . . . . . . . . . . . . . . . . . . . . . . . . . . . . . . 4-25
Adding an Address/Hostname to the Restricted List . . . . . . . . . . . . . . . . . . . . . . . . . . . . . . 4-26
Advanced Filtering. . . . . . . . . . . . . . . . . . . . . . . . . . . . . . . . . . . . . . . . . . . . . . . . . . . . . . . . . . . . 4-28
Adding an Advanced Filtering Rule . . . . . . . . . . . . . . . . . . . . . . . . . . . . . . . . . . . . . . . . . . . 4-29
NAT Bypass. . . . . . . . . . . . . . . . . . . . . . . . . . . . . . . . . . . . . . . . . . . . . . . . . . . . . . . . . . . . . . . . . 4-33
Adding/Modifying a NAT Bypass Rule . . . . . . . . . . . . . . . . . . . . . . . . . . . . . . . . . . . . . . . . 4-33
Security Log. . . . . . . . . . . . . . . . . . . . . . . . . . . . . . . . . . . . . . . . . . . . . . . . . . . . . . . . . . . . . . . . . 4-34
Changing the Security Log Settings . . . . . . . . . . . . . . . . . . . . . . . . . . . . . . . . . . . . . . . . . . . 4-35
Adit 3000 (Rel. 1.6) and MSR Card (Rel 2.0) GUI vii
Page 8

Table of Contents
5 System Monitoring
6 Voice Over IP
Firewall Implementation . . . . . . . . . . . . . . . . . . . . . . . . . . . . . . . . . . . . . . . . . . . . . . . . . . . . . . . 4-37
Network Connection Configuration. . . . . . . . . . . . . . . . . . . . . . . . . . . . . . . . . . . . . . . . . . . 4-37
Firewall Processing Sequence . . . . . . . . . . . . . . . . . . . . . . . . . . . . . . . . . . . . . . . . . . . . . . . 4-39
Overview . . . . . . . . . . . . . . . . . . . . . . . . . . . . . . . . . . . . . . . . . . . . . . . . . . . . . . . . . . . . . . . . . . . . 5-2
Connections. . . . . . . . . . . . . . . . . . . . . . . . . . . . . . . . . . . . . . . . . . . . . . . . . . . . . . . . . . . . . . . . . . 5-4
Traffic . . . . . . . . . . . . . . . . . . . . . . . . . . . . . . . . . . . . . . . . . . . . . . . . . . . . . . . . . . . . . . . . . . . . . . 5-5
System Log . . . . . . . . . . . . . . . . . . . . . . . . . . . . . . . . . . . . . . . . . . . . . . . . . . . . . . . . . . . . . . . . . . 5-6
T1 Log (Adit 3000 Only) . . . . . . . . . . . . . . . . . . . . . . . . . . . . . . . . . . . . . . . . . . . . . . . . . . . . . . . 5-7
SIP Log . . . . . . . . . . . . . . . . . . . . . . . . . . . . . . . . . . . . . . . . . . . . . . . . . . . . . . . . . . . . . . . . . . . . . 5-8
PRI Log . . . . . . . . . . . . . . . . . . . . . . . . . . . . . . . . . . . . . . . . . . . . . . . . . . . . . . . . . . . . . . . . . . . . . 5-9
T1 Performance (Adit 3000 Only) . . . . . . . . . . . . . . . . . . . . . . . . . . . . . . . . . . . . . . . . . . . . . . . 5-10
Alarms . . . . . . . . . . . . . . . . . . . . . . . . . . . . . . . . . . . . . . . . . . . . . . . . . . . . . . . . . . . . . . . . . . . . . 5-11
System . . . . . . . . . . . . . . . . . . . . . . . . . . . . . . . . . . . . . . . . . . . . . . . . . . . . . . . . . . . . . . . . . . . . . 5-12
Overview . . . . . . . . . . . . . . . . . . . . . . . . . . . . . . . . . . . . . . . . . . . . . . . . . . . . . . . . . . . . . . . . . . . . 6-2
IP Telephony . . . . . . . . . . . . . . . . . . . . . . . . . . . . . . . . . . . . . . . . . . . . . . . . . . . . . . . . . . . . . . . . . 6-3
Configuring the Digit Map. . . . . . . . . . . . . . . . . . . . . . . . . . . . . . . . . . . . . . . . . . . . . . . . . . . 6-6
Advanced (Button). . . . . . . . . . . . . . . . . . . . . . . . . . . . . . . . . . . . . . . . . . . . . . . . . . . . . . . . . 6-9
Redundancy (Button) . . . . . . . . . . . . . . . . . . . . . . . . . . . . . . . . . . . . . . . . . . . . . . . . . . . . . . 6-12
Phone Settings . . . . . . . . . . . . . . . . . . . . . . . . . . . . . . . . . . . . . . . . . . . . . . . . . . . . . . . . . . . . . . . 6-14
Phone Book . . . . . . . . . . . . . . . . . . . . . . . . . . . . . . . . . . . . . . . . . . . . . . . . . . . . . . . . . . . . . . . . . 6-19
Line Monitoring . . . . . . . . . . . . . . . . . . . . . . . . . . . . . . . . . . . . . . . . . . . . . . . . . . . . . . . . . . . . . 6-22
Trunk Settings . . . . . . . . . . . . . . . . . . . . . . . . . . . . . . . . . . . . . . . . . . . . . . . . . . . . . . . . . . . . . . . 6-25
Channel Configuration. . . . . . . . . . . . . . . . . . . . . . . . . . . . . . . . . . . . . . . . . . . . . . . . . . . . . 6-30
Trunk Monitoring . . . . . . . . . . . . . . . . . . . . . . . . . . . . . . . . . . . . . . . . . . . . . . . . . . . . . . . . . . . . 6-32
Trunk Registration. . . . . . . . . . . . . . . . . . . . . . . . . . . . . . . . . . . . . . . . . . . . . . . . . . . . . . . . . . . . 6-35
Adding a PBX Phone Line. . . . . . . . . . . . . . . . . . . . . . . . . . . . . . . . . . . . . . . . . . . . . . . . . . 6-36
Glossary
Index
viii Adit 3000 (Rel. 1.6) and MSR Card (Rel 2.0) GUI
Page 9

CHAPTER
1
Web Based Management
This Reference Manual covers the web-based Graphical User Interface (GUI) for the following
products:
Adit 3000 series (Adit 3104, Adit 3200, and Adit 3500)
Multi-Service Router (MSR) Card (a service card for the Adit 600 platform)
These products are generically referred to as "the Adit" in this manual.
The web-based GUI provides a user-friendly interface for setup of the unit. This interface
provides a Quick Setup option for the unit, as well as specific features for advanced setup.
NOTE: Throughout this manual, examples primarily reflect the Adit 3000 series. Where
differences exist for the MSR card, these differences are noted.
In this Chapter
Overview of Supported Products
Accessing the GUI
Overview
Home
Quick Setup
Network Connections
Security
Voice over IP
Advanced
System Monitoring
Logout
Page 10

Web Based Management
Overview of Supported Products
Overview of Supported Products
The following products have different hardware configurations, as well as optional features that can be
purchased (for example, a VPN software keyed feature), therefore there are many possibilities for
window options. For the most of the examples in this manual, the Adit 3500 is shown, as the majority
of features are available on this product.
Adit 3104 IP Business Gateway
The Adit 3104 IP Business Gateway incorporates VoIP capabilities with a high-performance router. It
supports a single T1 or Fast Ethernet WAN port, four-port Ethernet switch, stateful firewall, intrusion
detection, and terminates up to 24 voice lines of VoIP.
The Adit 3104 creates a secure partition between external public network access while enabling remote
users to securely connect to their businesses.
Adit 3200 Business Router
The Adit 3200 collapses multiple network entities - a high-performance router, managed switch, and
stateful firewall - into one compact device. By providing a T1 termination port and an Ethernet port, it
provides the ability to upgrade bandwidth without the need to replace hardware. The Adit 3200’s
advanced VoIP-aware routing engine provides wire-speed throughput even when all security features
have been enabled.
Adit 3500 Trunk Gateway
The Adit 3500 integrates the features of a trunk gateway, high-performance router, and stateful firewall,
with flexible WAN options. It replaces multiple elements at the customer premises that typically
provide routing, security, and trunk gateway functions, offering a powerful blend of speed, security,
data, and voice. Additionally, a 4-FXS option provides connectivity for analog fax and modems.
This single platform offers scalability and high-performance for Internet and IP access, LAN-to-LAN
connectivity over private and public networks, and VoIP PBX trunk service applications.
Multi-Service Router (MSR) Card (for the Adit 600 Platform)
The Multi-Service Router (MSR) card for the Adit 600 integrates the features of a trunk gateway, highperformance IPSec VPN-capable router, and stateful firewall with flexible WAN options. It replaces
multiple elements at the customer premises that typically provide routing, security, and trunk gateway
functions – offering a powerful blend of speed, security, data, and voice. When integrated into the Adit
600, the MSR card offers scalability and high performance for Internet and IP access, LAN-to-LAN
connectivity over private and public networks, and VoIP PBX trunk service applications
1-2 Adit 3000 (Rel. 1.6) and MSR Card (Rel 2.0) GUI
Page 11
Web Based Management
Accessing the GUI
Accessing the GUI
NOTE: The following instructions assume that you have connected your PC to the Ethernet
port on the Adit 3000 (3104, 3200, or 3500) or MSR card. For additional connection options,
see the User Manual for your product.
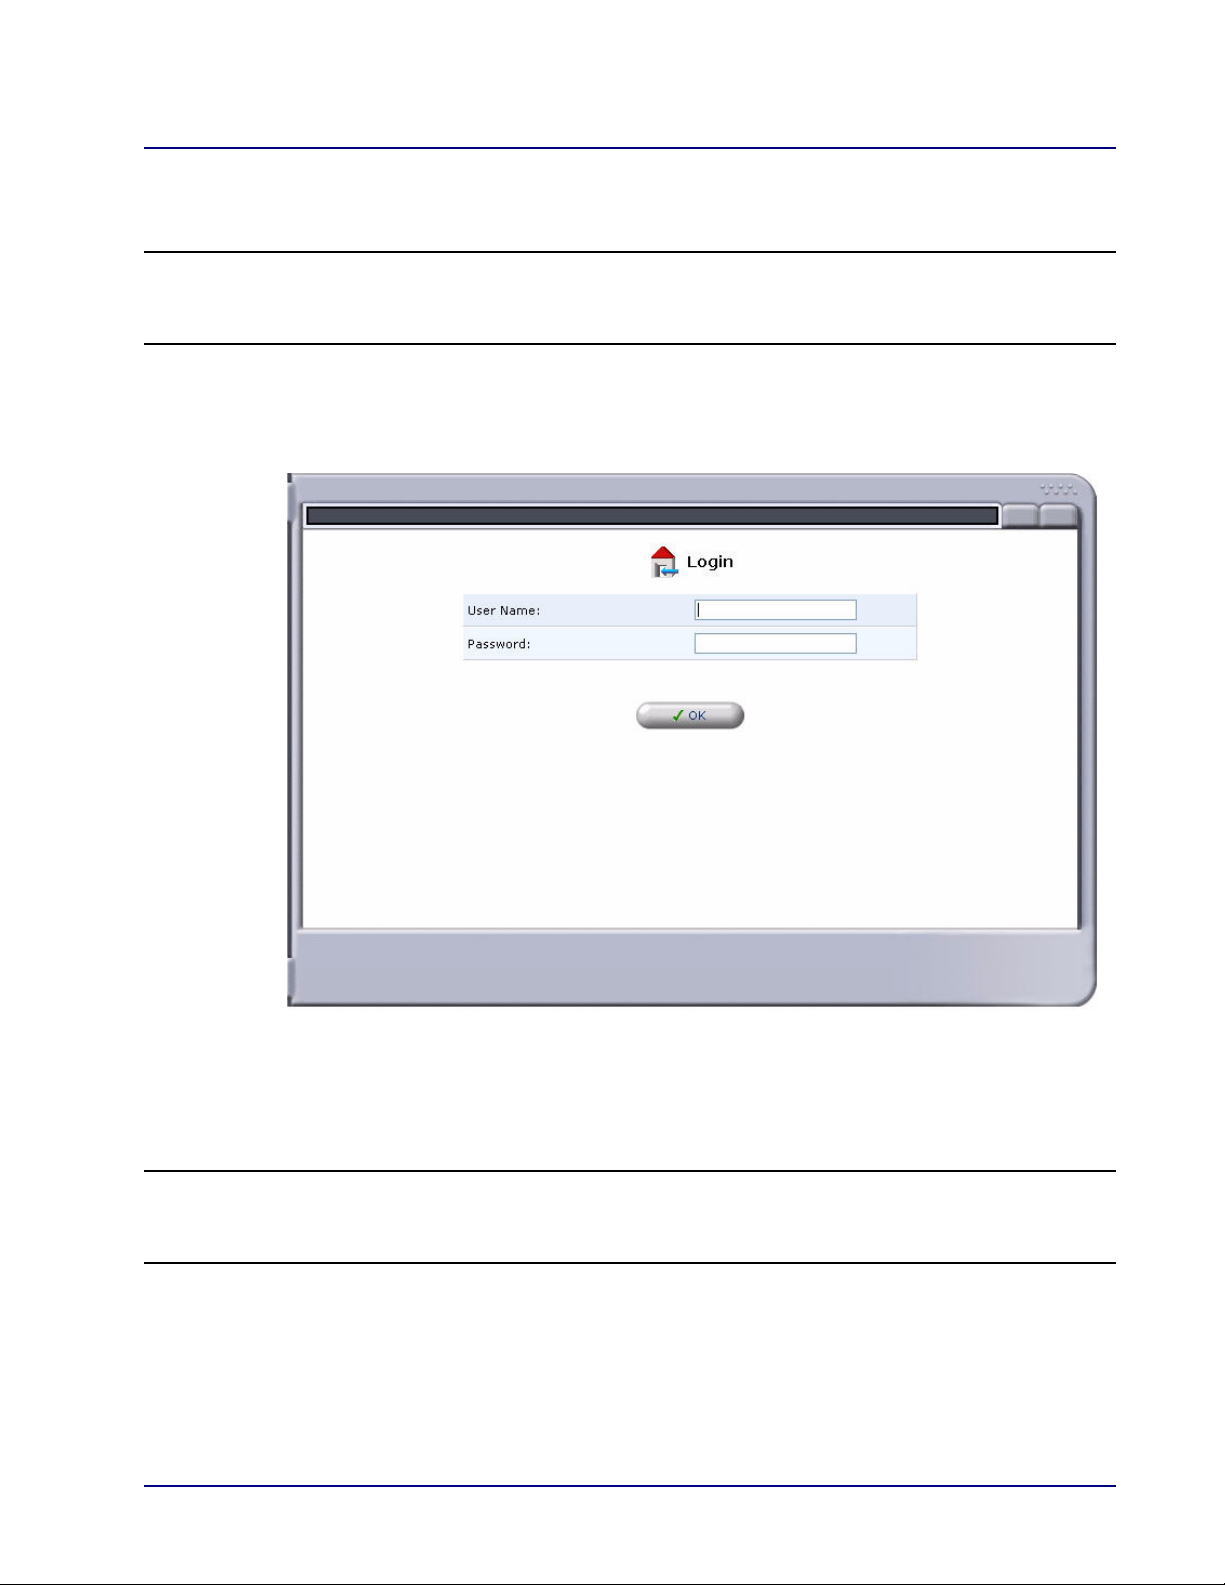
1. Launch a web browser on your PC from the same LAN as the Adit 3000 or MSR.
2. Enter the Adit 3000 or MSR card’s IP address or name in the address bar.
The default IP address is http://192.168.1.1. The Login screen appears.
3. Log in to the unit by entering the user name and password.
The default user name is admin
The default password is admin 123
NOTE: For security purposes, the user name and password should be changed from the
default settings after the initial login. See Editing a User on page 2-67 for information on
modifying user names and passwords.
Adit 3000 (Rel. 1.6) and MSR Card (Rel 2.0) GUI 1-3
Page 12
Web Based Management
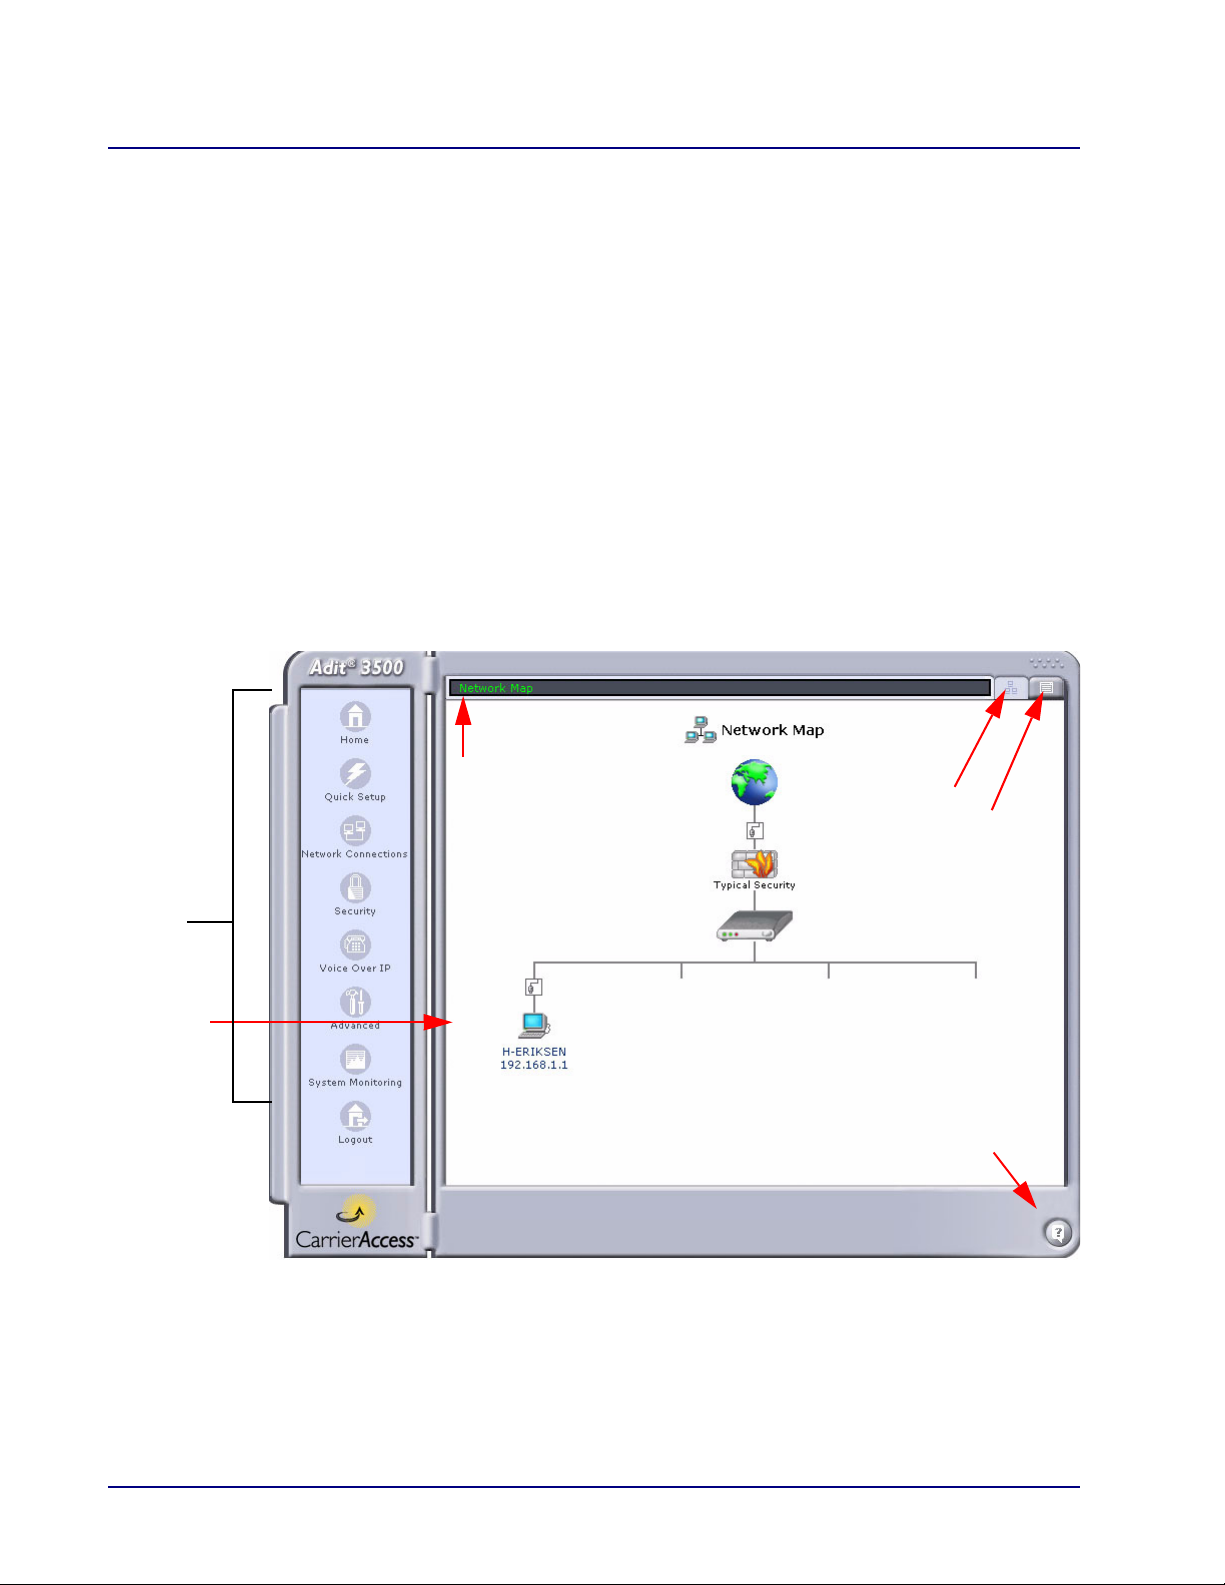
Navigation
Pane
Display
Window
Address
Bar
Network
Network
Map
Question Mark
Overview
Overview
The GUI management window contains two sections:
Navigation Pane (on the left) – Provides a list of topics to view and configure. When you select
an icon, the information is displayed on the right.
Display window (on the right) – Displays the setup windows for a topic selected from the
Navigation Pane or items that have been selected through a shortcut button.
Other helpful features:
Address Bar (along the top) – Displays the current path to the information displayed in the
window below.
Network Map (Button) – Provides a shortcut to the Network Map. See Network Map on
page 1-7.
Network (Button) – Displays the Network List.
Question Mark (Button) – Provides a shortcut to Technical Information about the system.
1-4 Adit 3000 (Rel. 1.6) and MSR Card (Rel 2.0) GUI
Page 13

Web Based Management
Overview
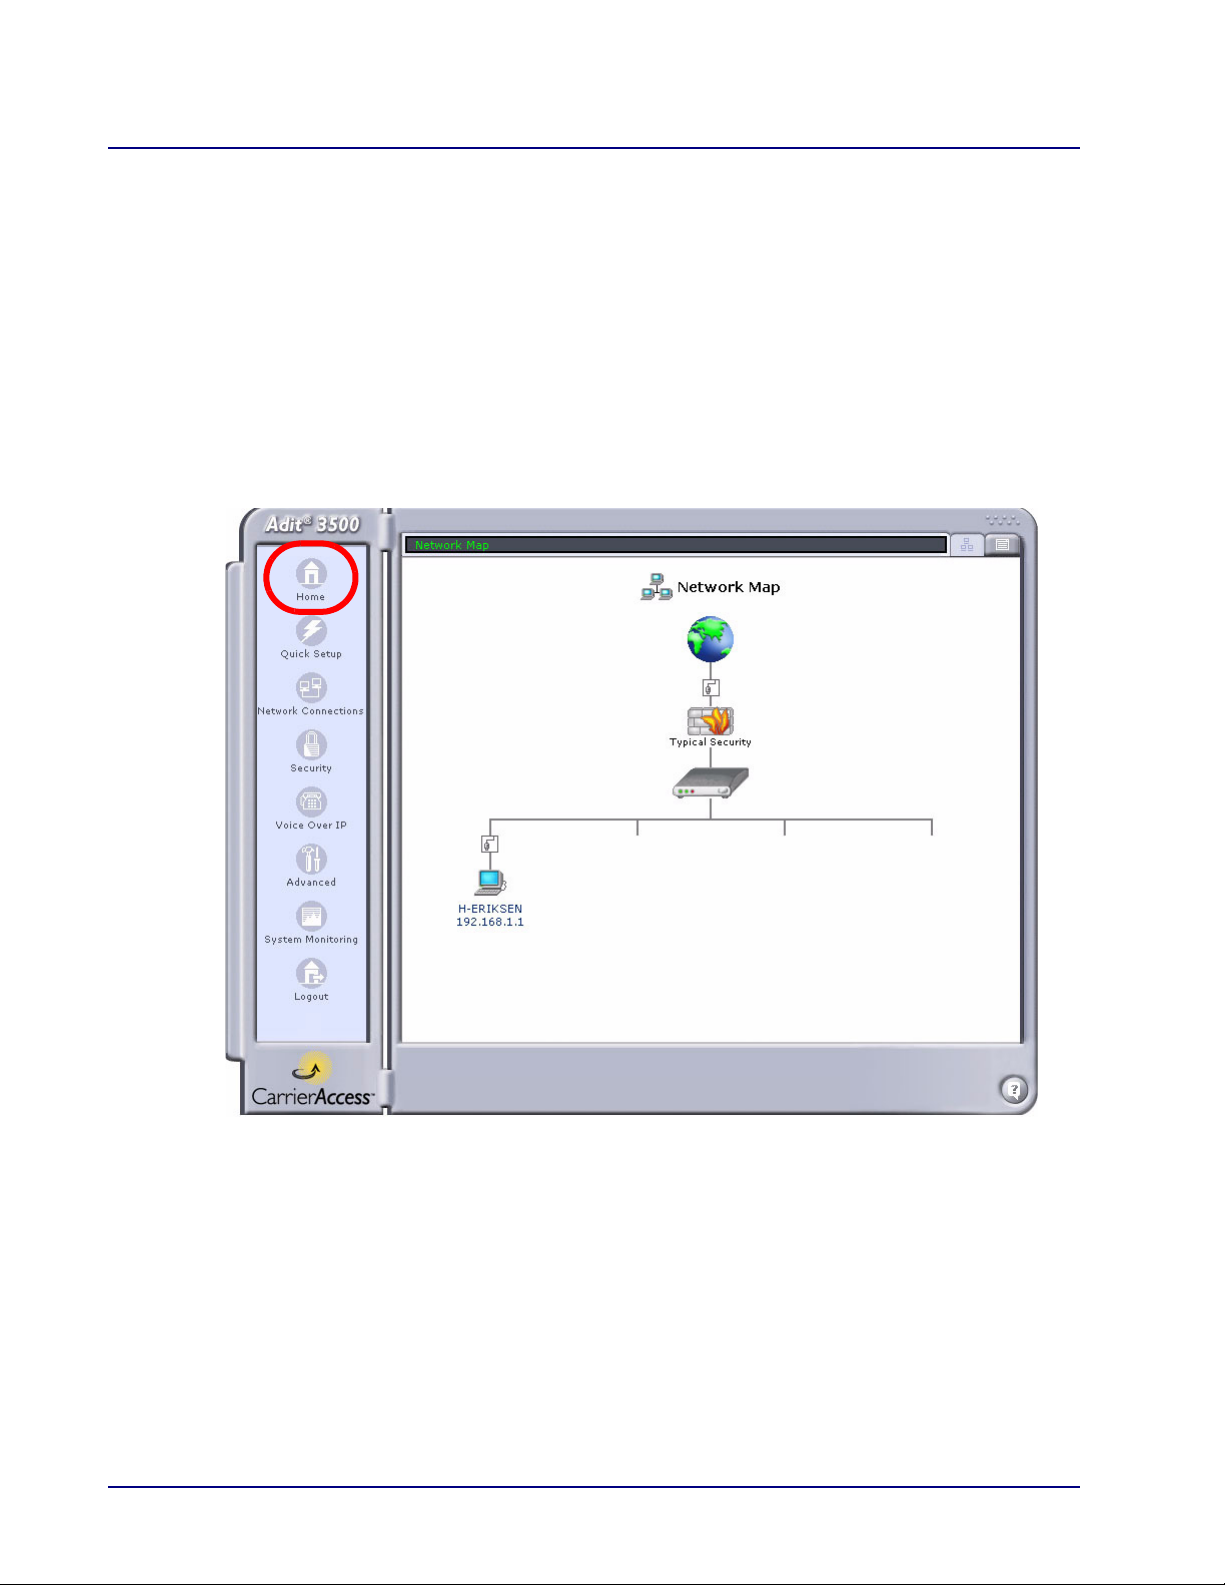
Navigation Pane Icons
The following icons are available on the Navigation Pane:
Home - Displays the Network Map.
Quick Setup - Allows you to quickly configure your Internet connection.
Network Connections - Allows you to create and configure network connections.
Security - Allows you to configure the Firewall and regulate communication between
the Internet and the network.
Voice Over IP - Allows you to configure VoIP features.
Note: This feature is not supported on the Adit 3200.
Advanced - Allows you to control network parameters (DHCP server, DNS) and
perform administrative functions, including changing passwords and upgrading the
system.
System Monitoring - Displays system information, statistics, logs, and alarms.
Logout - Logs you out of the current session.
Action Icons (for Managing Lists)
The following icons may appear in a list, under Action:
Add - Adds an item to the list.
Edit - Edits an item in the list.
Delete - Removes an item from the list.
Adit 3000 (Rel. 1.6) and MSR Card (Rel 2.0) GUI 1-5
Page 14
Web Based Management
Home
Home
The Home window displays the Network Map which shows the various elements in the network.
Note: This window is modified as the configuration changes.
Local network computers
Firewall
Adit 3000 or MSR
External network interface (Internet connection)
Internal network interface (Ethernet, etc.)
1-6 Adit 3000 (Rel. 1.6) and MSR Card (Rel 2.0) GUI
Page 15
Web Based Management
WAN
LAN
Home
Network Map
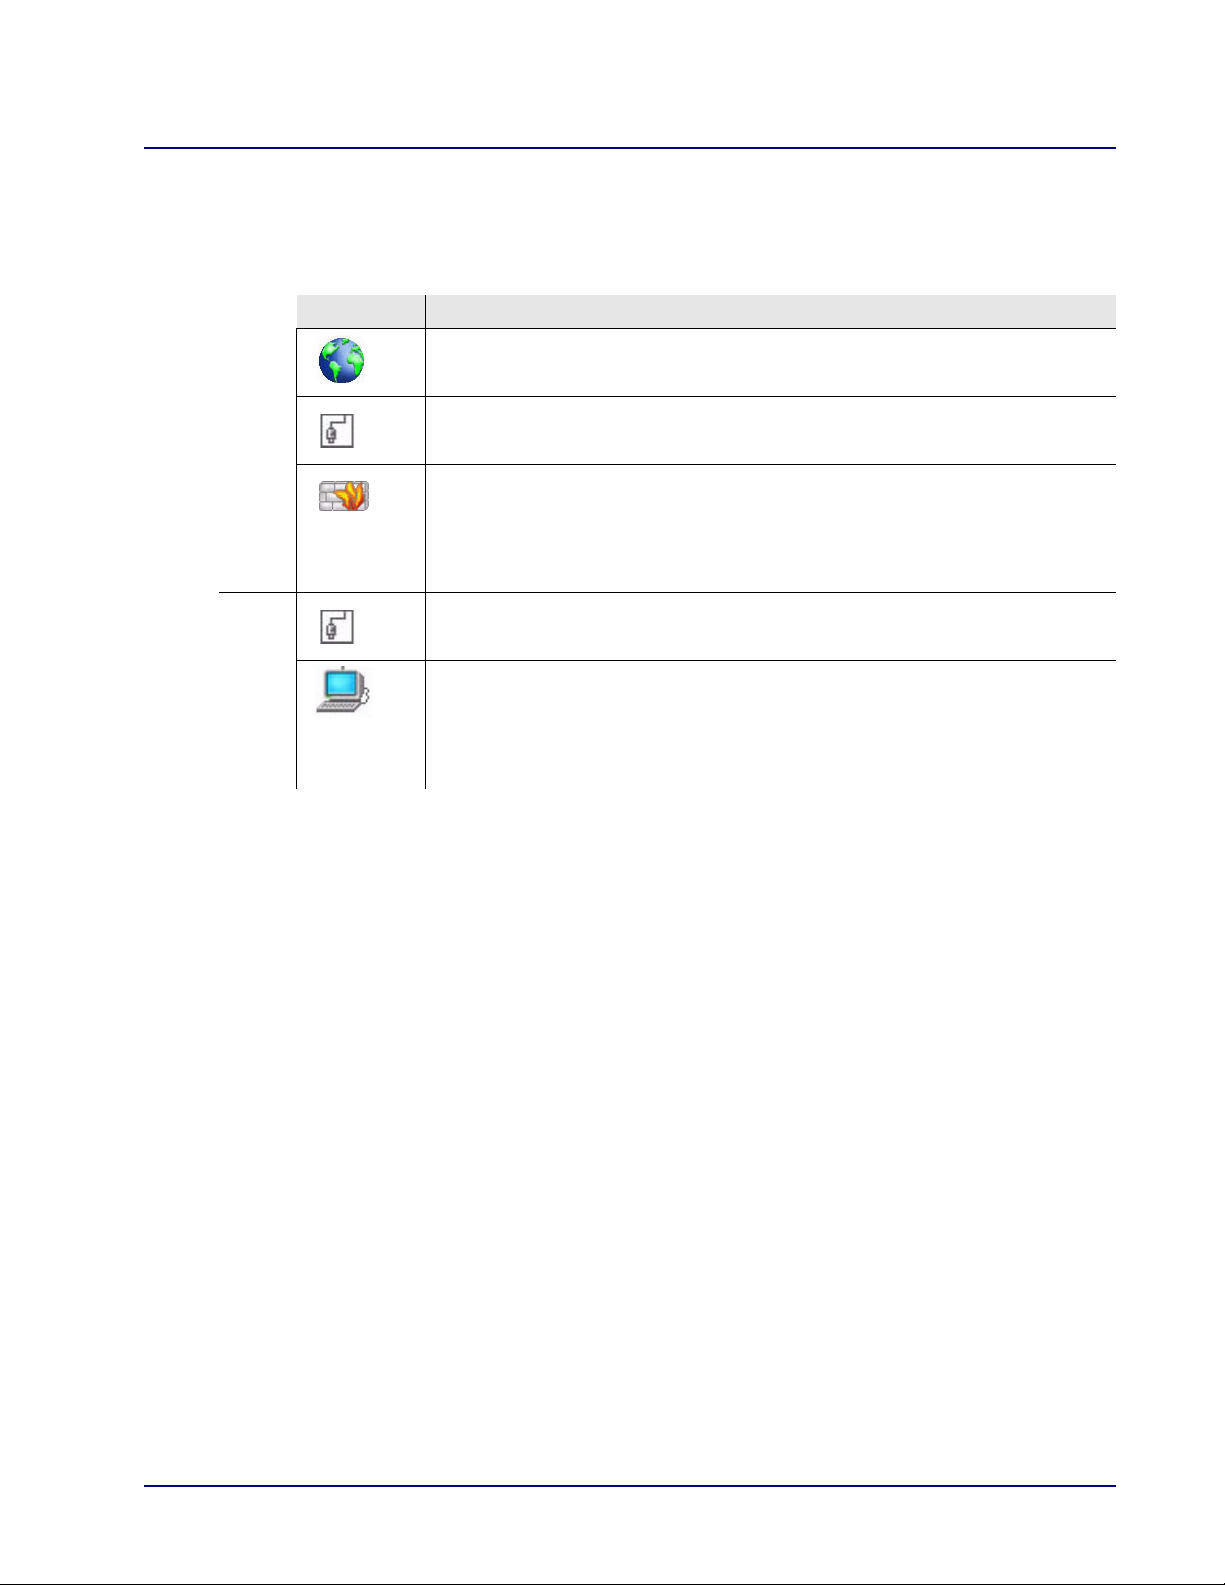
The following icons appear on the Network Map. For all icons except the Internet, you can open the
item’s configuration window by clicking on the icon.
Symbol Represents
Internet.
Opens the Quick Setup window.
Ethernet WAN connection.
Opens the Quick Setup window.
Firewall.
Opens the Security setup window.
Note that the height of the wall corresponds to the security level currently
selected.
Ethernet Local Area Network (LAN) connection.
Opens the LAN Ethernet Properties window.
A computer (host) connected in the network.
Opens the Host Information window (see the following section).
Note: This icon appears only when the host is connected with dynamic IP
allocation. Hosts that have statically defined IPs are not shown.
Adit 3000 (Rel. 1.6) and MSR Card (Rel 2.0) GUI 1-7
Page 16

Web Based Management
Home
Host Information Window
To display this window, click on the Computer Host icon on the Network Map.
The Host Information window displays network information for the corresponding
computer.
Field Definition
Host Displays the Host Name.
IP Address Displays the Host IP Address.
Subnet Mask Displays the Subnet Mask of the Host IP Address.
Network Connection Displays the type of Network Connection.
Lease Type Displays the type of lease.
Local Servers Displays the Local Server.
Ping Test This button will test the connectivity through a Ping test.
See the following section on Test Connectivity.
Windows Shared Folders Displays an address for the host, which is also a link to the address.
1-8 Adit 3000 (Rel. 1.6) and MSR Card (Rel 2.0) GUI
Page 17
Web Based Management
Home
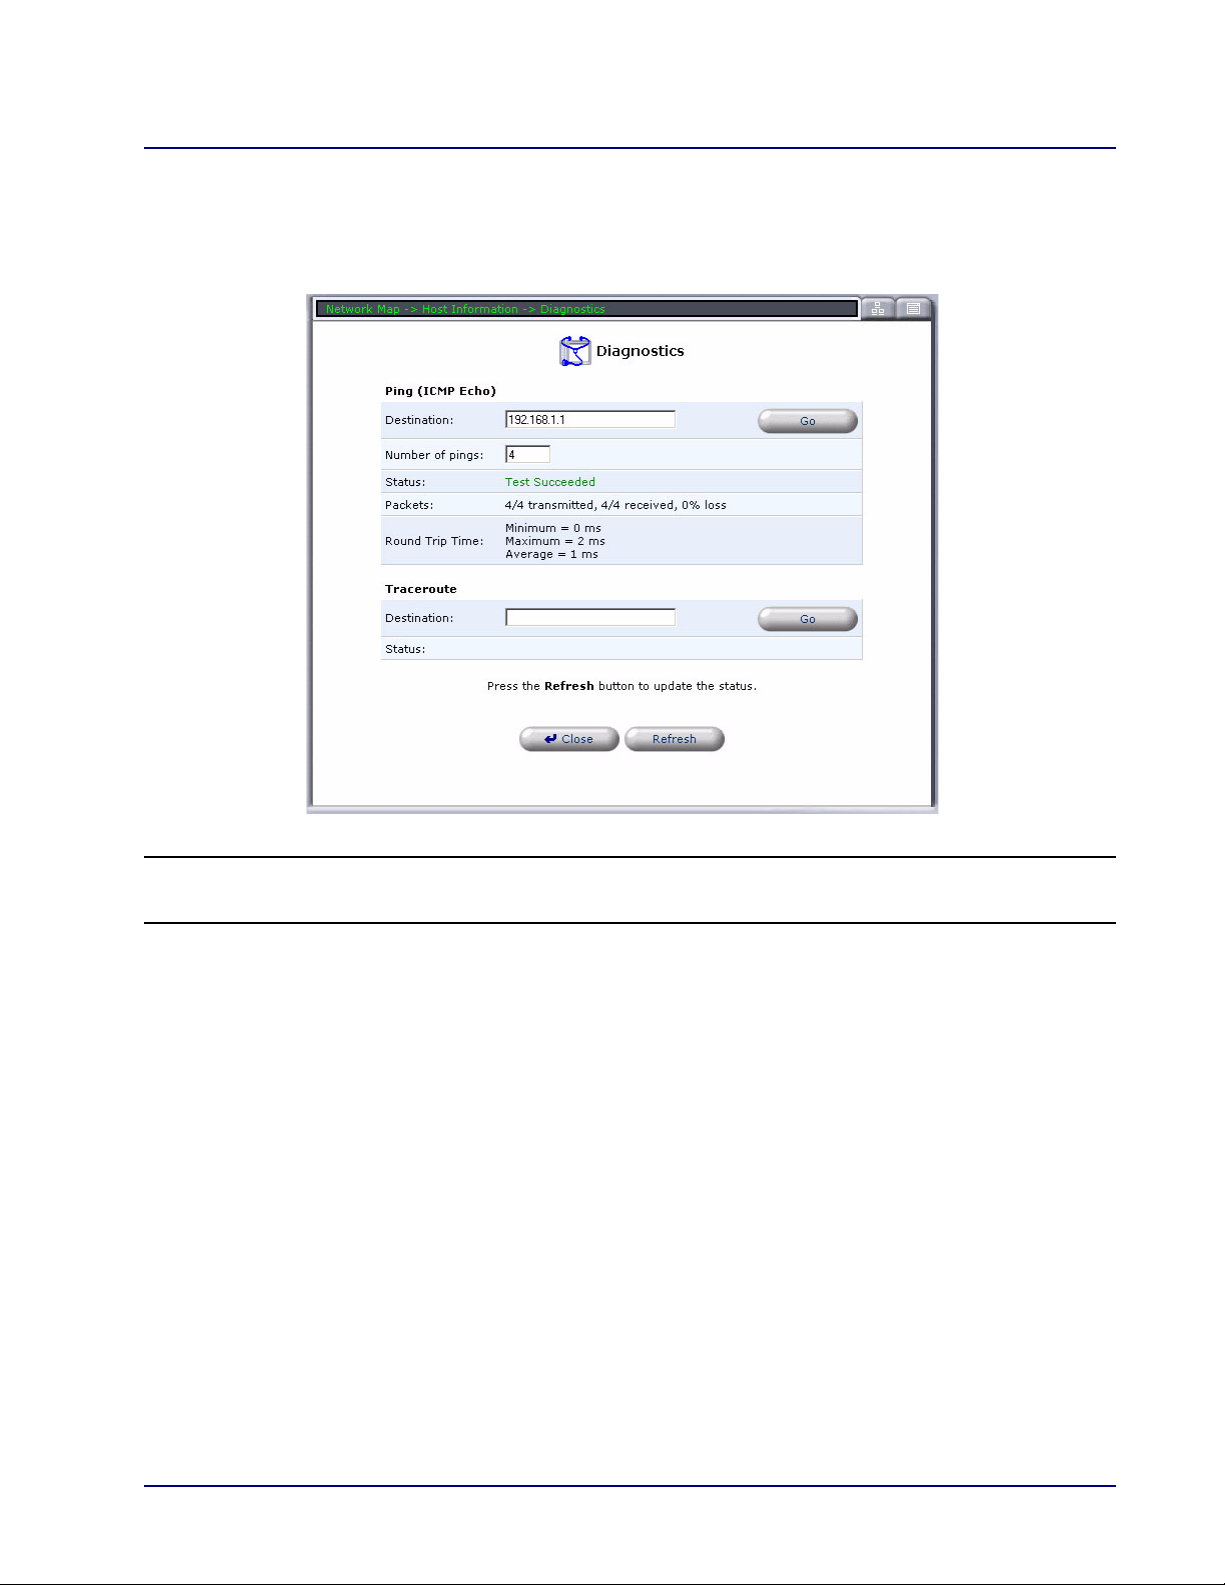
Test Connectivity
The Test Connectivity button brings up the Diagnostics window. This window will automatically
ping the Host IP Address and display the results.
NOTE: This window can also be accessed through Advanced/Diagnostics.
See Diagnostics on page 2-16, for detailed information on this window.
Adit 3000 (Rel. 1.6) and MSR Card (Rel 2.0) GUI 1-9
Page 18
Web Based Management
Quick Setup
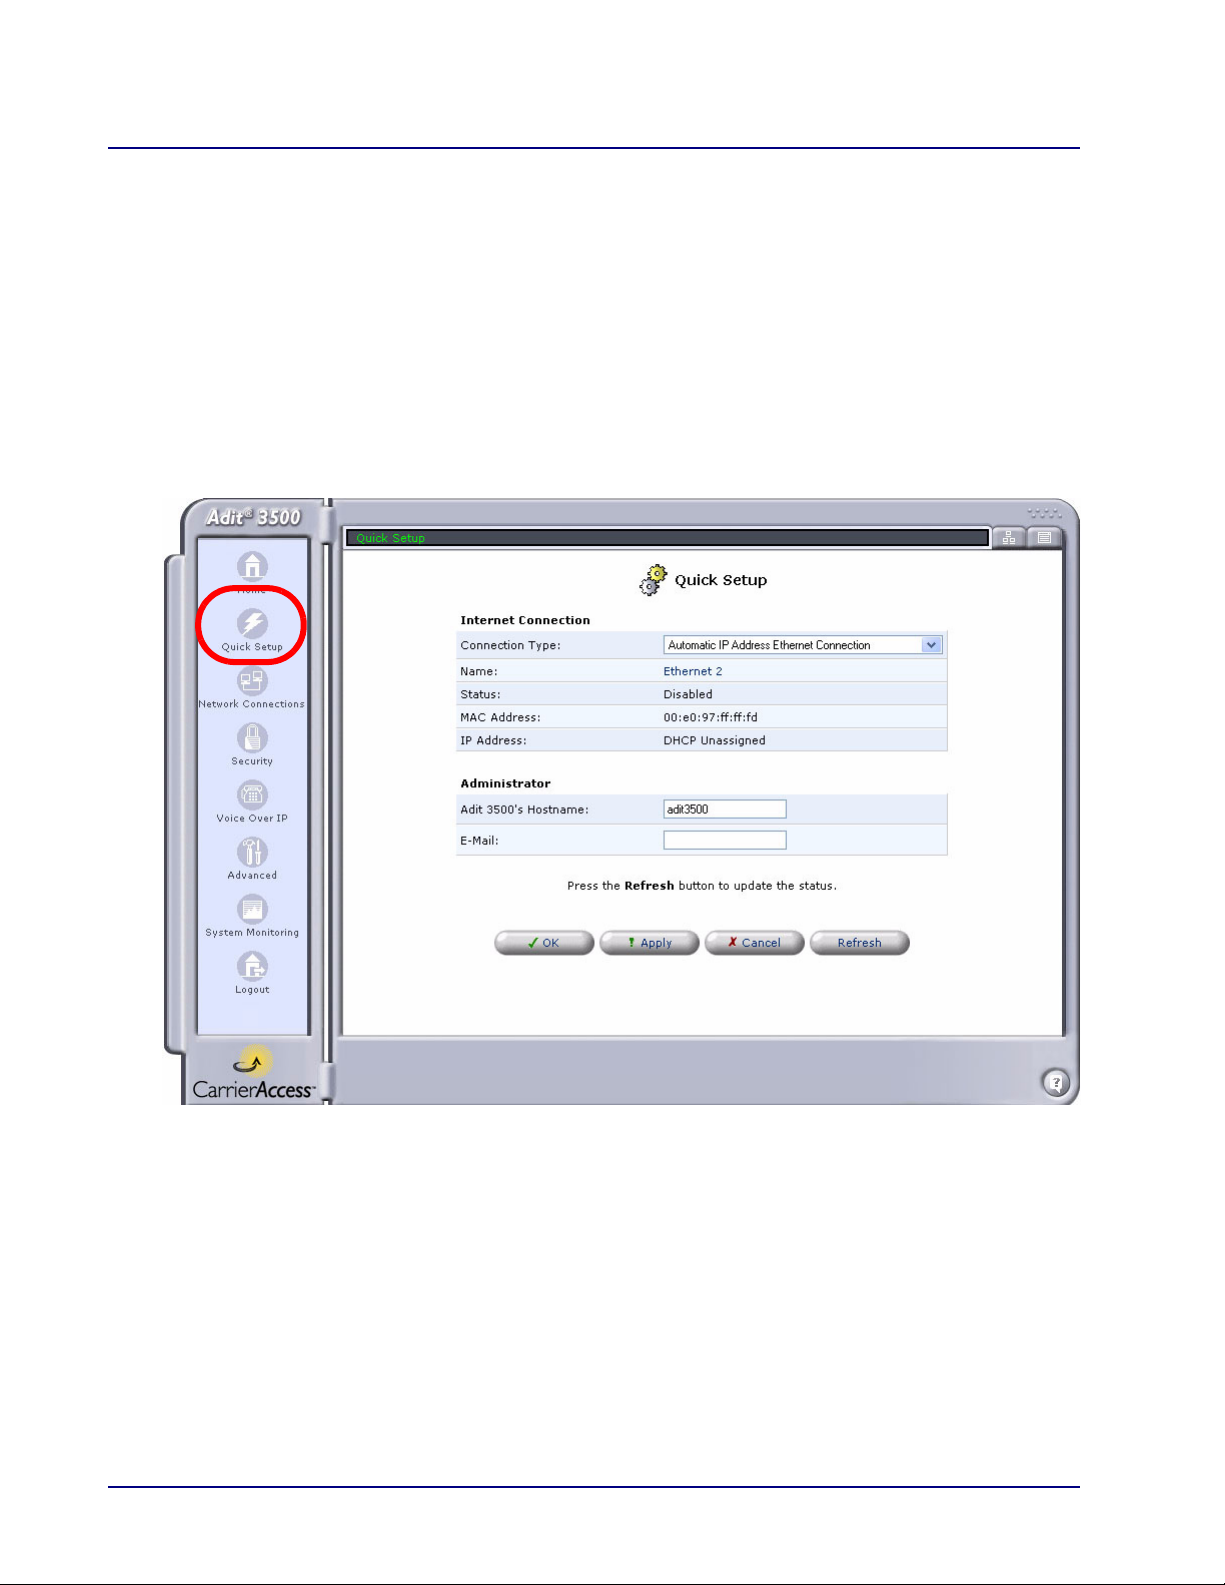
Quick Setup
The Quick Setup window enables quick configuration of your Internet connection.
When subscribing to a broadband service, you should be aware of the method by which you are
connecting to the Internet. Technical information regarding the properties of your Internet connection
should be provided by your Internet Service Provider (ISP). For example, your ISP should inform you
whether you connect to the Internet using a static or dynamic IP address and what protocols, such as
PPTP, you use to communicate over the Internet.
The Quick Setup window appears upon initial login, or it can opened by selecting the Quick Setup
button on the navigation pane.
1-10 Adit 3000 (Rel. 1.6) and MSR Card (Rel 2.0) GUI
Page 19

Web Based Management
Quick Setup
Internet Connection
Connection Type
The WAN connection can be configured using any of the following methods. With each of these
connection types, the window displays a different set of field options. See the following sections
for information on each of these connection types and the associated options.
Manual IP Address Ethernet Connection
Automatic IP Address Ethernet Connection
Point-to-Point Protocol over DS0 (Serial)
Multilink Point-to-Point Protocol over DS0 (Multilink)
Point-to-Point Tunneling Protocol (PPTP)
No Internet Connection
Adit 3000 (Rel. 1.6) and MSR Card (Rel 2.0) GUI 1-11
Page 20
Web Based Management
Quick Setup
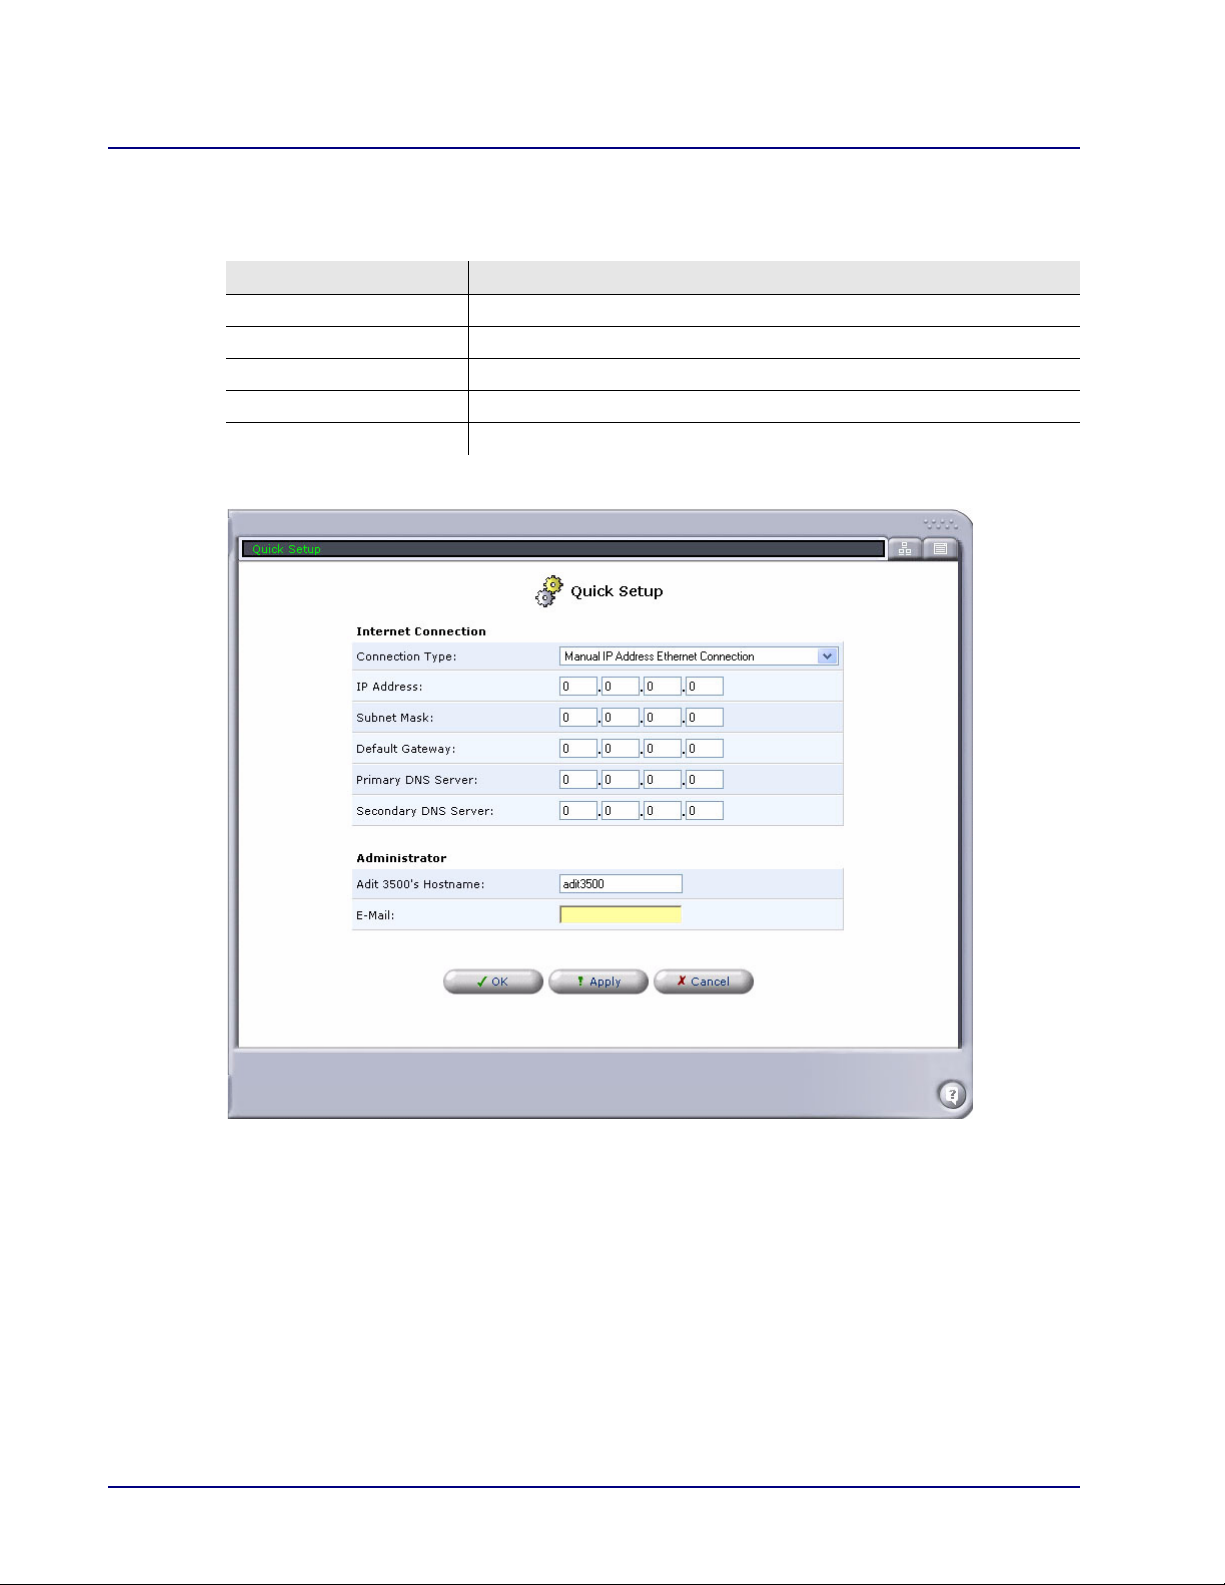
Manual IP Address Ethernet Connection
This window is used to manually configure the Internet Connection with a specific IP Address.
Field Definition
IP Address Enter the IP Address for the Ethernet connection of this device.
Subnet Mask Enter the Subnet Mask for the IP Address above.
Default Gateway Enter the Default Gateway address for this device.
Primary DNS Server Enter the Primary DNS Service address.
Secondary DNS Server Enter the Secondary DNS Service address.
1-12 Adit 3000 (Rel. 1.6) and MSR Card (Rel 2.0) GUI
Page 21

Web Based Management
Quick Setup
Automatic IP Address Ethernet Connection
With this selection, the device uses DHCP to find and set an address for this connection.
Adit 3000 (Rel. 1.6) and MSR Card (Rel 2.0) GUI 1-13
Page 22

Web Based Management
Quick Setup
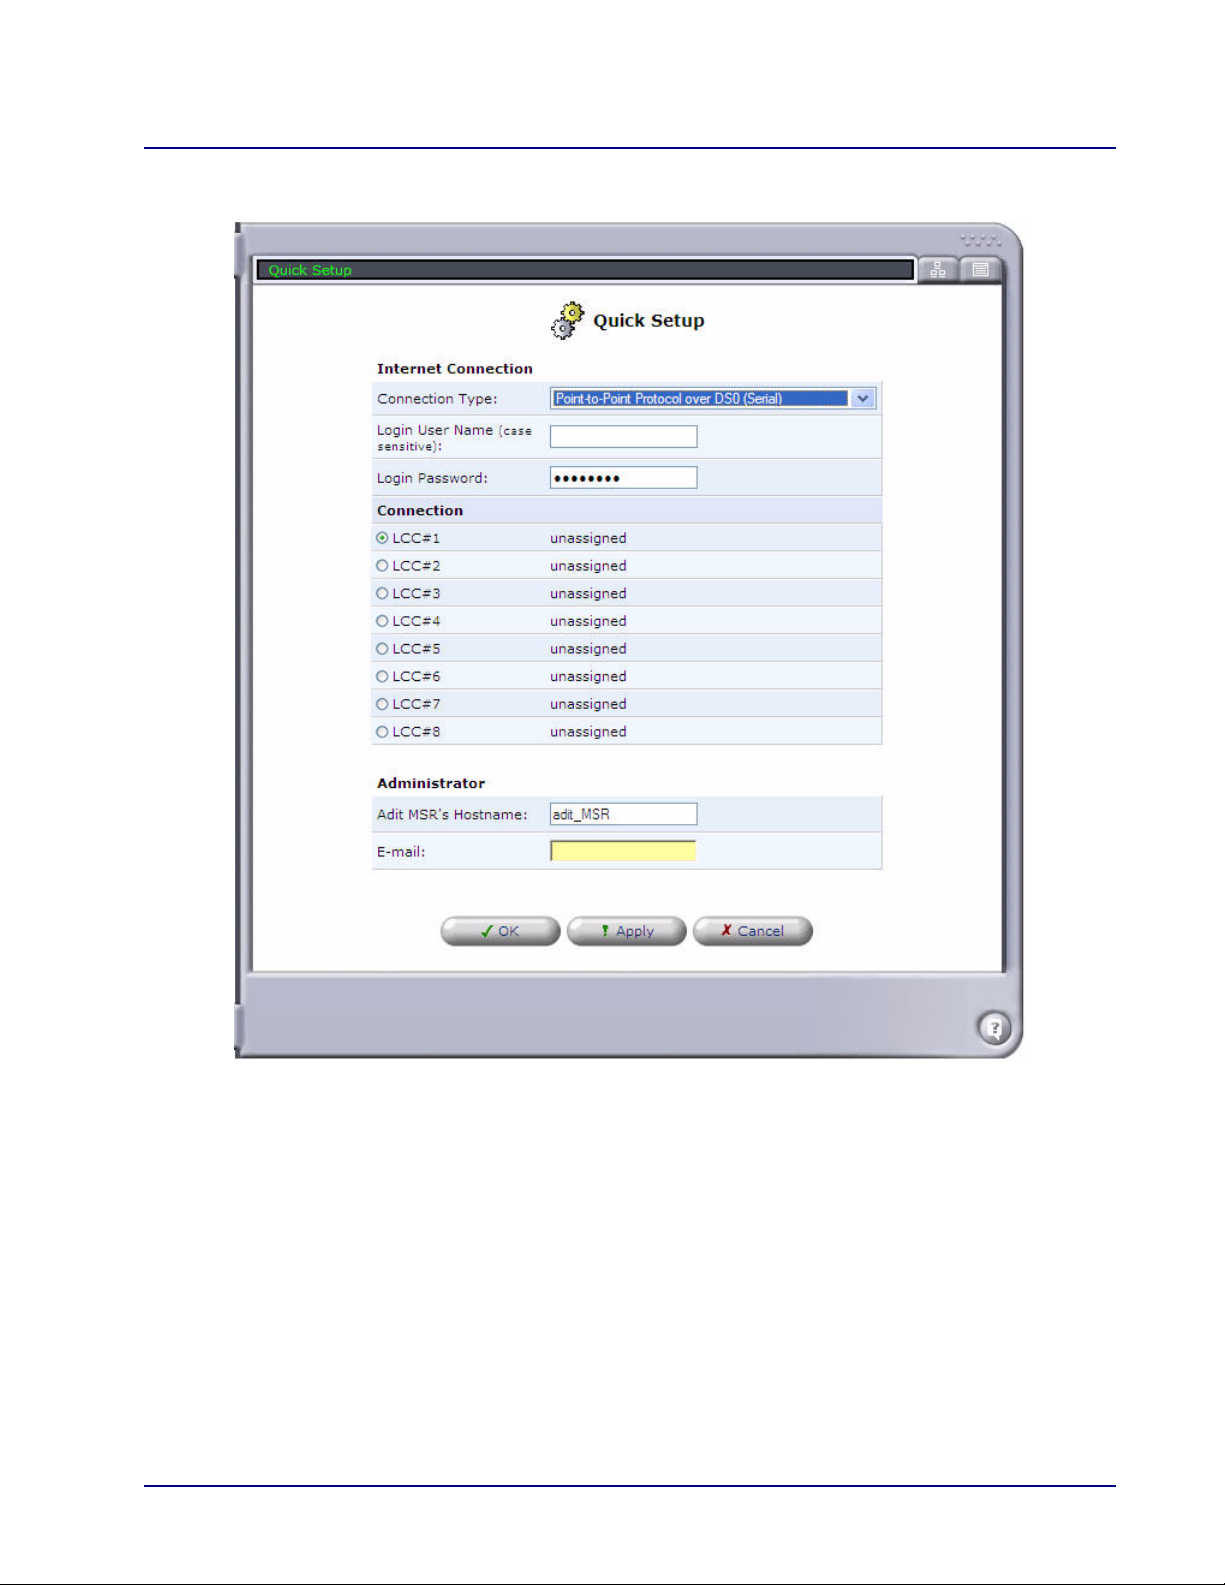
Point-to-Point Protocol over DS0 (Serial)
With this selection, the MSR card uses a single Link Cross-Connect (LCC) PPP WAN for Internet
connectivity.
Field Definition
Login User Name Enter the user name for this unit.
Login Password Enter the password for this unit.
Connection Shows the LCCs available for the connection.
NOTE: For the MSR card, cross-connects from Adit 600 resources (T1 lines or WAN-capable
cards) must be made before setting up the WAN link. All DS0s cross-connected to the WAN
link must be of type "Data." Use the connect (msr) command to cross-connect resources to
the MSR card. (See the Adit 600 User Manual for more information.)
1-14 Adit 3000 (Rel. 1.6) and MSR Card (Rel 2.0) GUI
Page 23
Web Based Management
Quick Setup
Adit 3000 (Rel. 1.6) and MSR Card (Rel 2.0) GUI 1-15
Page 24

Web Based Management
Quick Setup
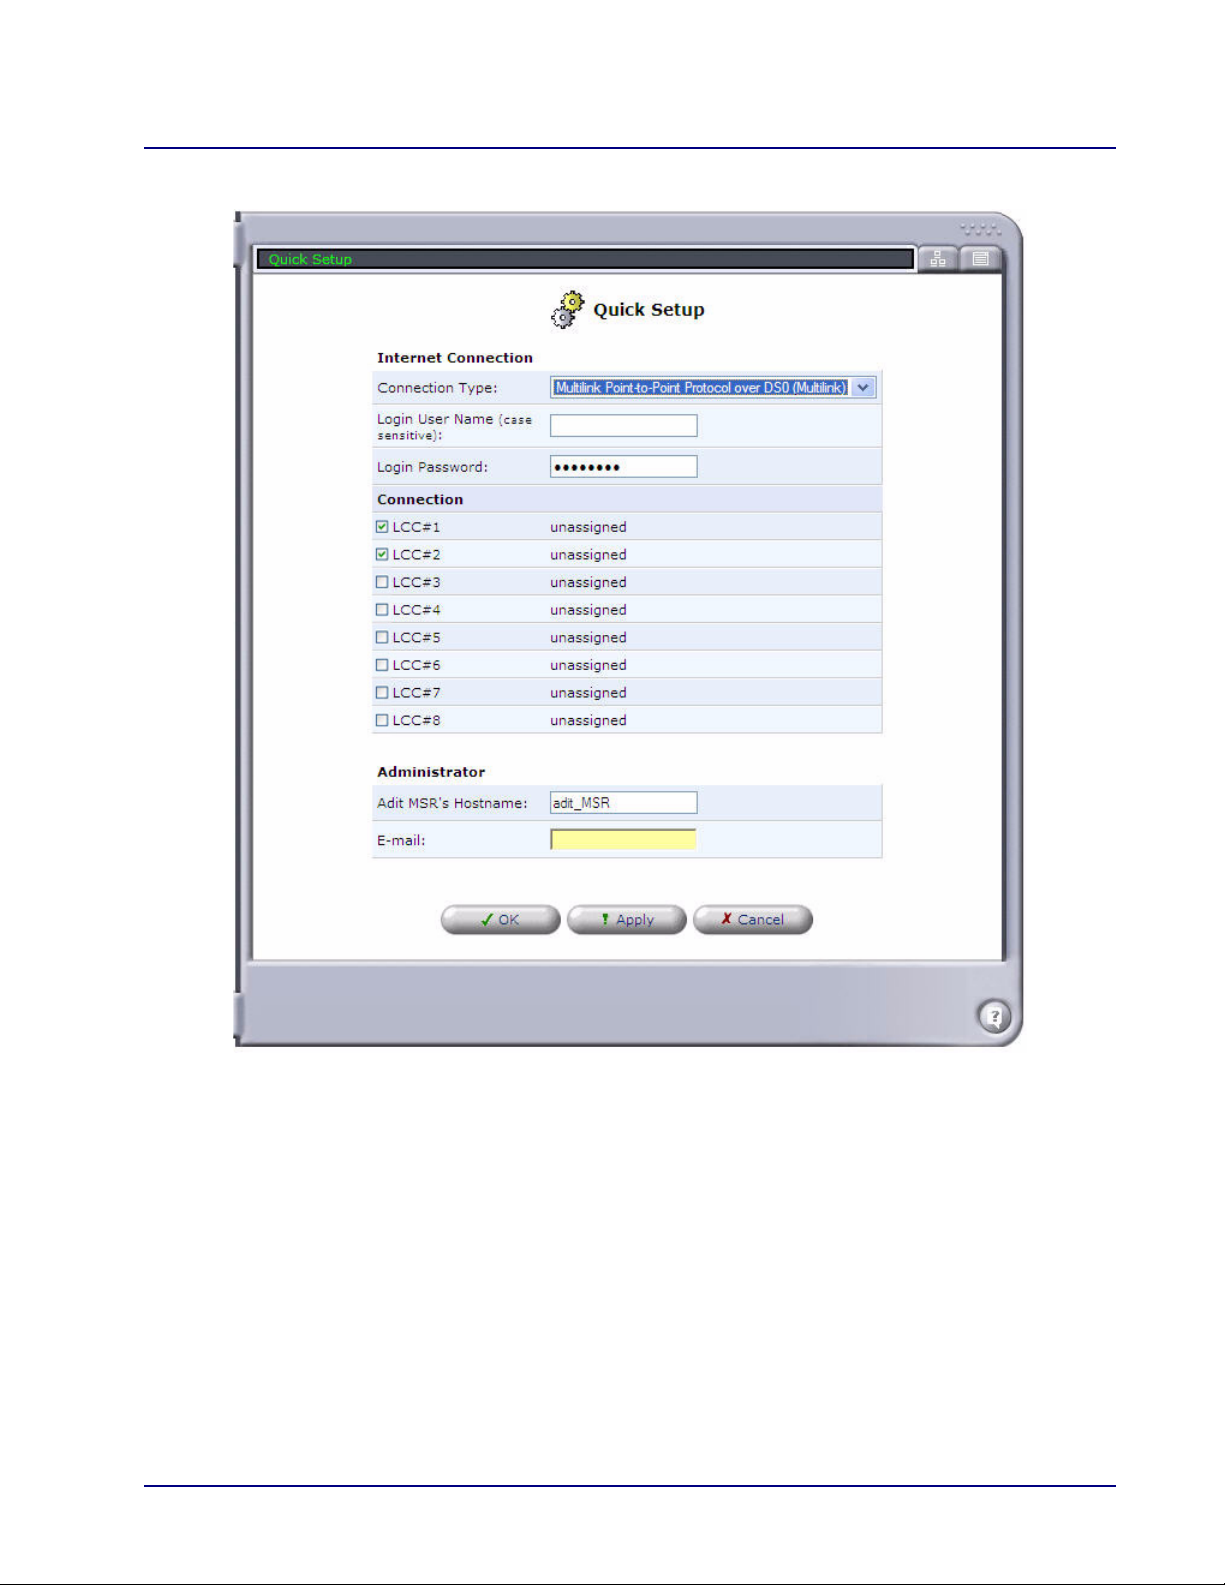
Multilink Point-to-Point Protocol over DS0 (Multilink)
With this selection, the MSR card uses a multiple Link Cross-Connect (LCC) WAN for Internet
connectivity.
Field Definition
Login User Name Enter the user name for this unit.
Login Password Enter the password for this unit.
Connection Shows the LCCs available for the connection.
NOTE: For the MSR card, cross-connects from Adit 600 resources (T1 lines or WAN-capable
cards) must be made before setting up the WAN link. All DS0s cross-connected to the WAN
link must be of type "Data." Use the connect (msr) command to cross-connect resources to
the MSR card. (See the Adit 600 User Manual for more information.)
1-16 Adit 3000 (Rel. 1.6) and MSR Card (Rel 2.0) GUI
Page 25
Web Based Management
Quick Setup
Adit 3000 (Rel. 1.6) and MSR Card (Rel 2.0) GUI 1-17
Page 26
Web Based Management
Quick Setup
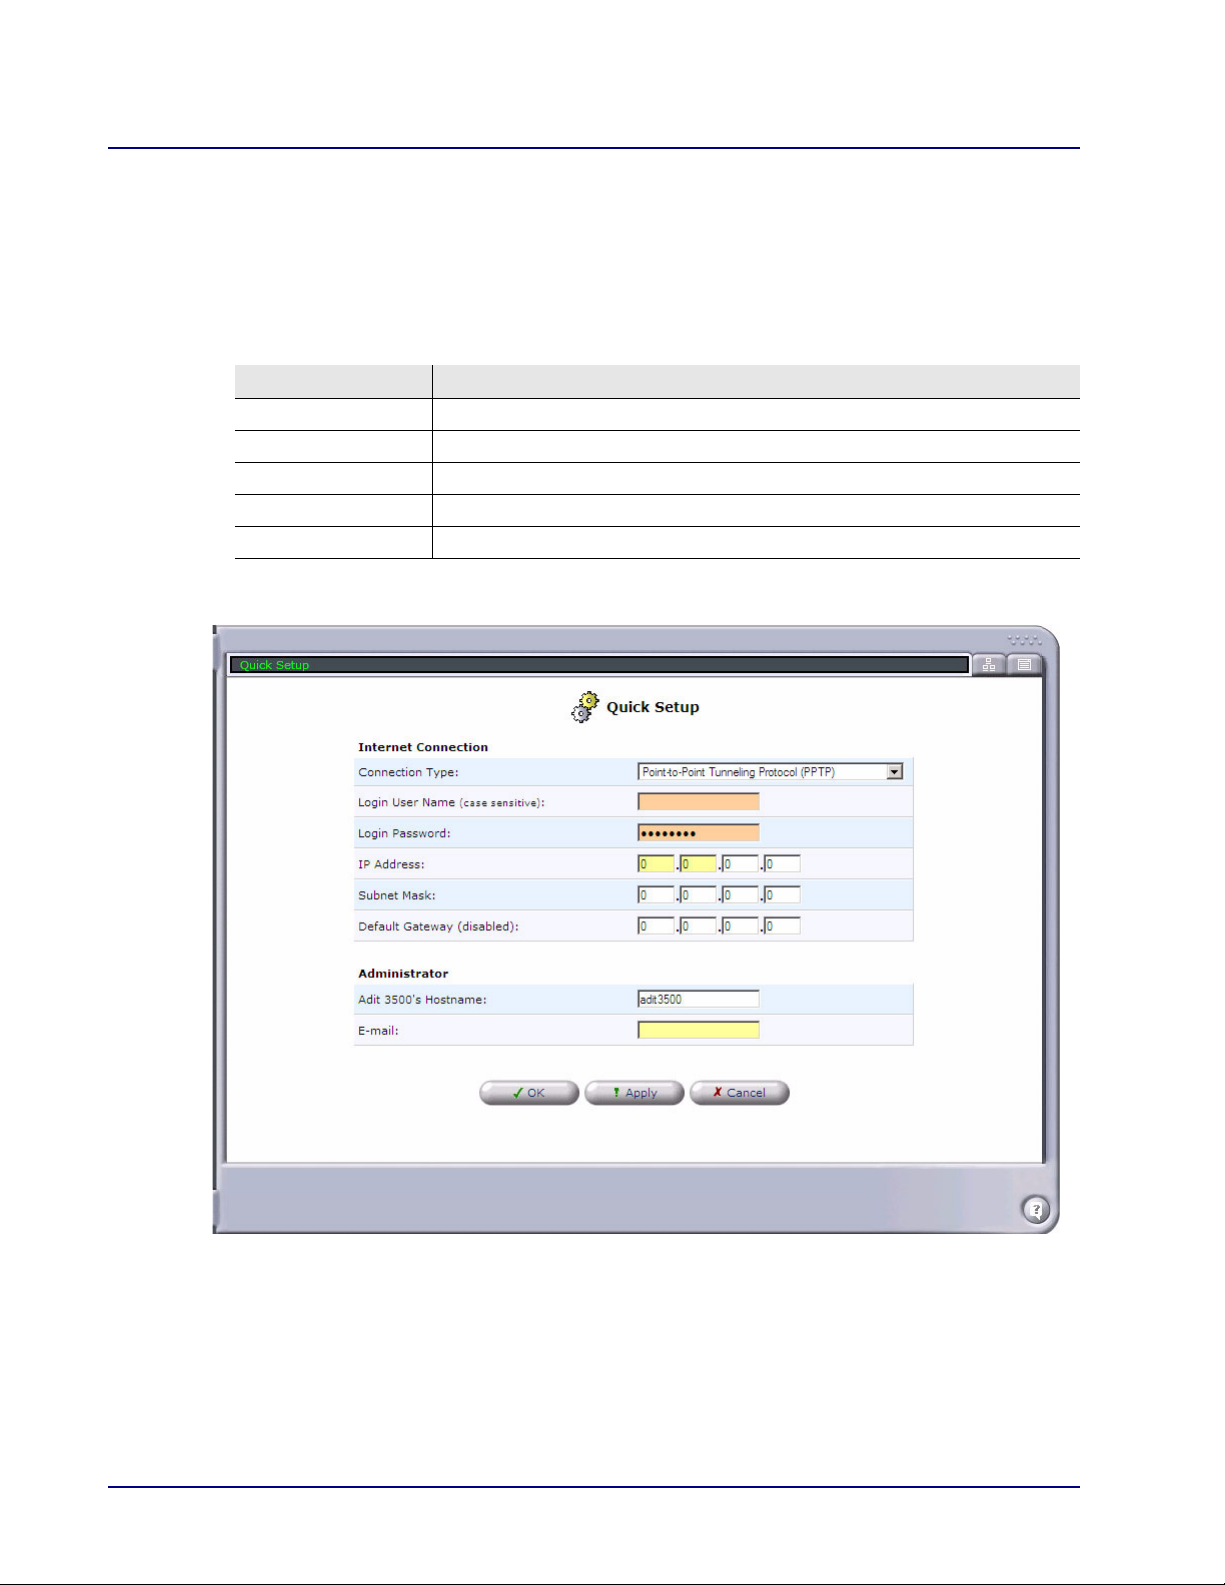
Point-to-Point Tunneling Protocol (PPTP)
Point-to-Point Tunneling is a technology for creating Virtual Private Networks (VPNs). A VPN is
a private network of computers that uses the public Internet to connect some nodes. Because the
Internet is essentially an open network, the Point-to-Point Tunneling Protocol (PPTP) is used to
ensure that messages transmitted from one VPN node to another are secure. With PPTP, users can
dial in to their corporate network via the Internet.
Field Definition
Login User Name Enter the User name for this unit.
Login Password Enter the password for this unit.
IP Address Enter the IP Address for the Ethernet connection of this device.
Subnet Mask Enter the Subnet Mask for the IP Address above.
Default Gateway Enter the Default Gateway address for this device.
1-18 Adit 3000 (Rel. 1.6) and MSR Card (Rel 2.0) GUI
Page 27

Web Based Management
Quick Setup
No Internet Connection
This option disables the Internet connection on the device.
Administrator
The following section appears on all Quick Setup windows (located at the bottom of the window).
Field Definition
Adit 3000’s or
Adit MSR’s Hostname
E-Mail Enter an E-Mail address to be used for monitoring and alert purposes.
Adit 3000 (Rel. 1.6) and MSR Card (Rel 2.0) GUI 1-19
Display/set the current the Host Name for this device.
Page 28
Web Based Management
Network Connections
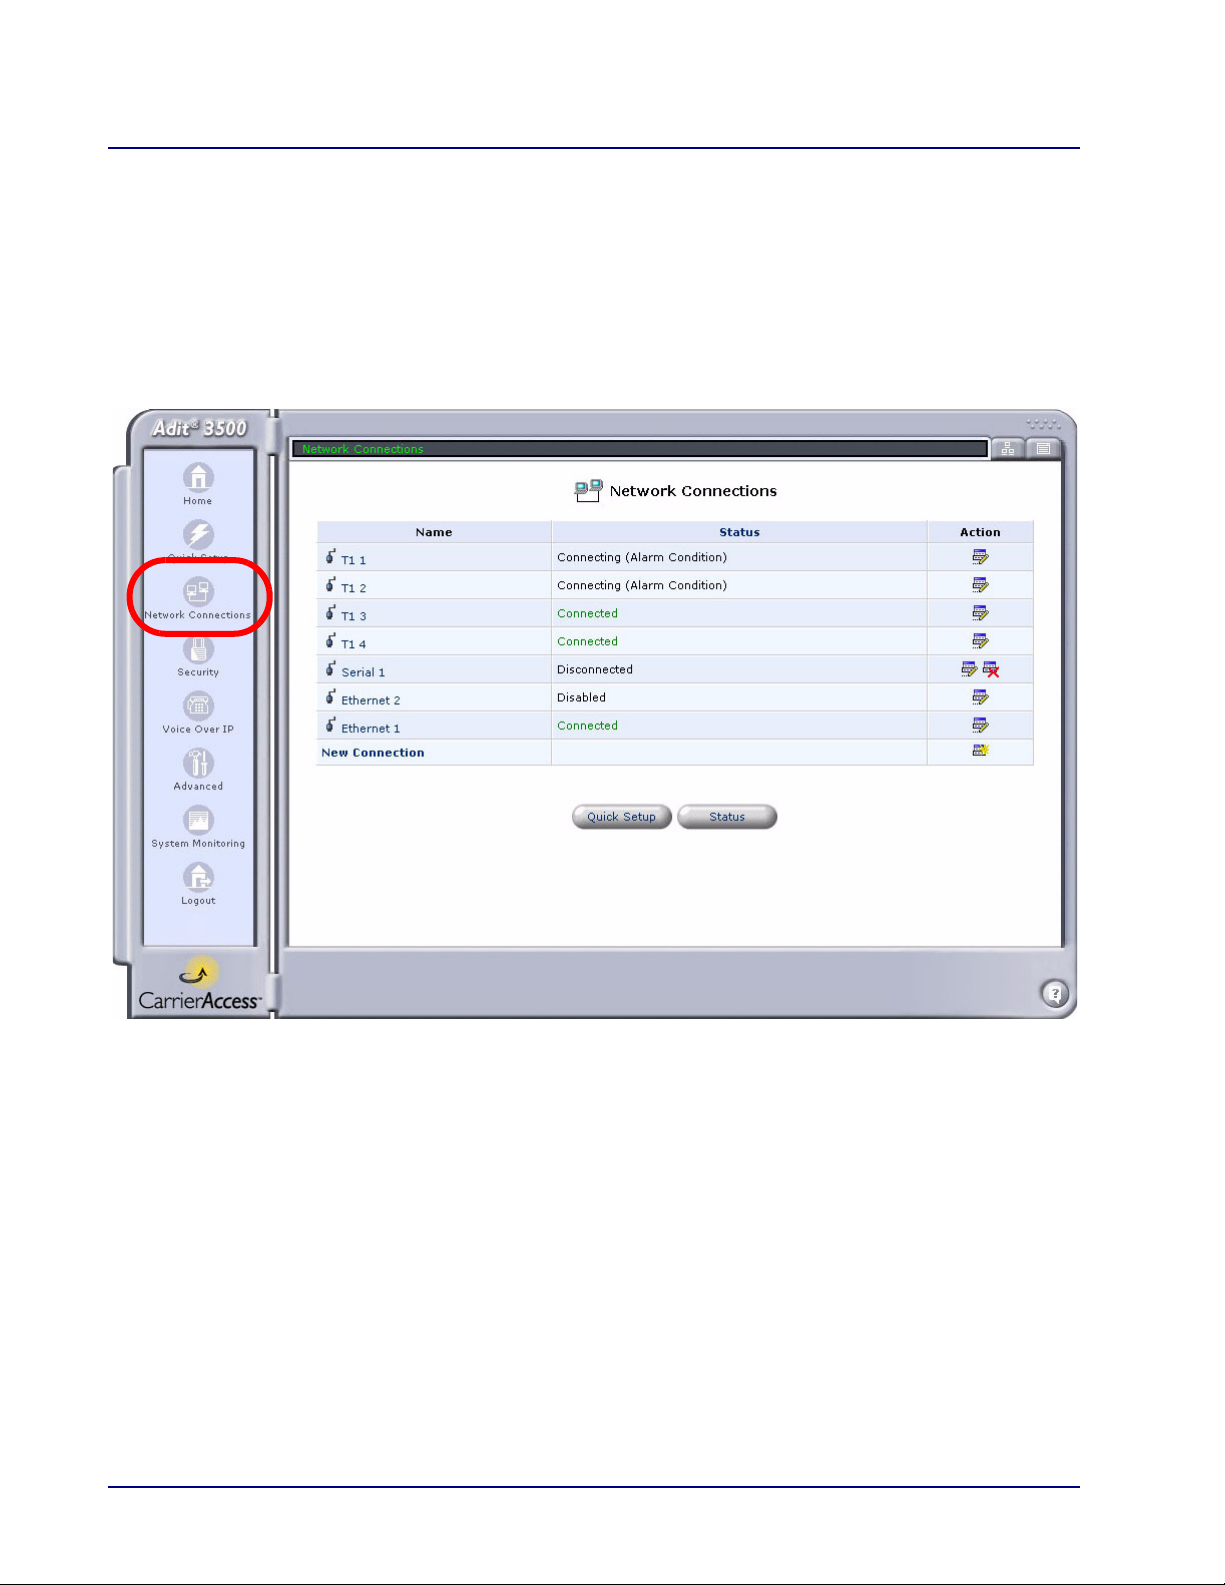
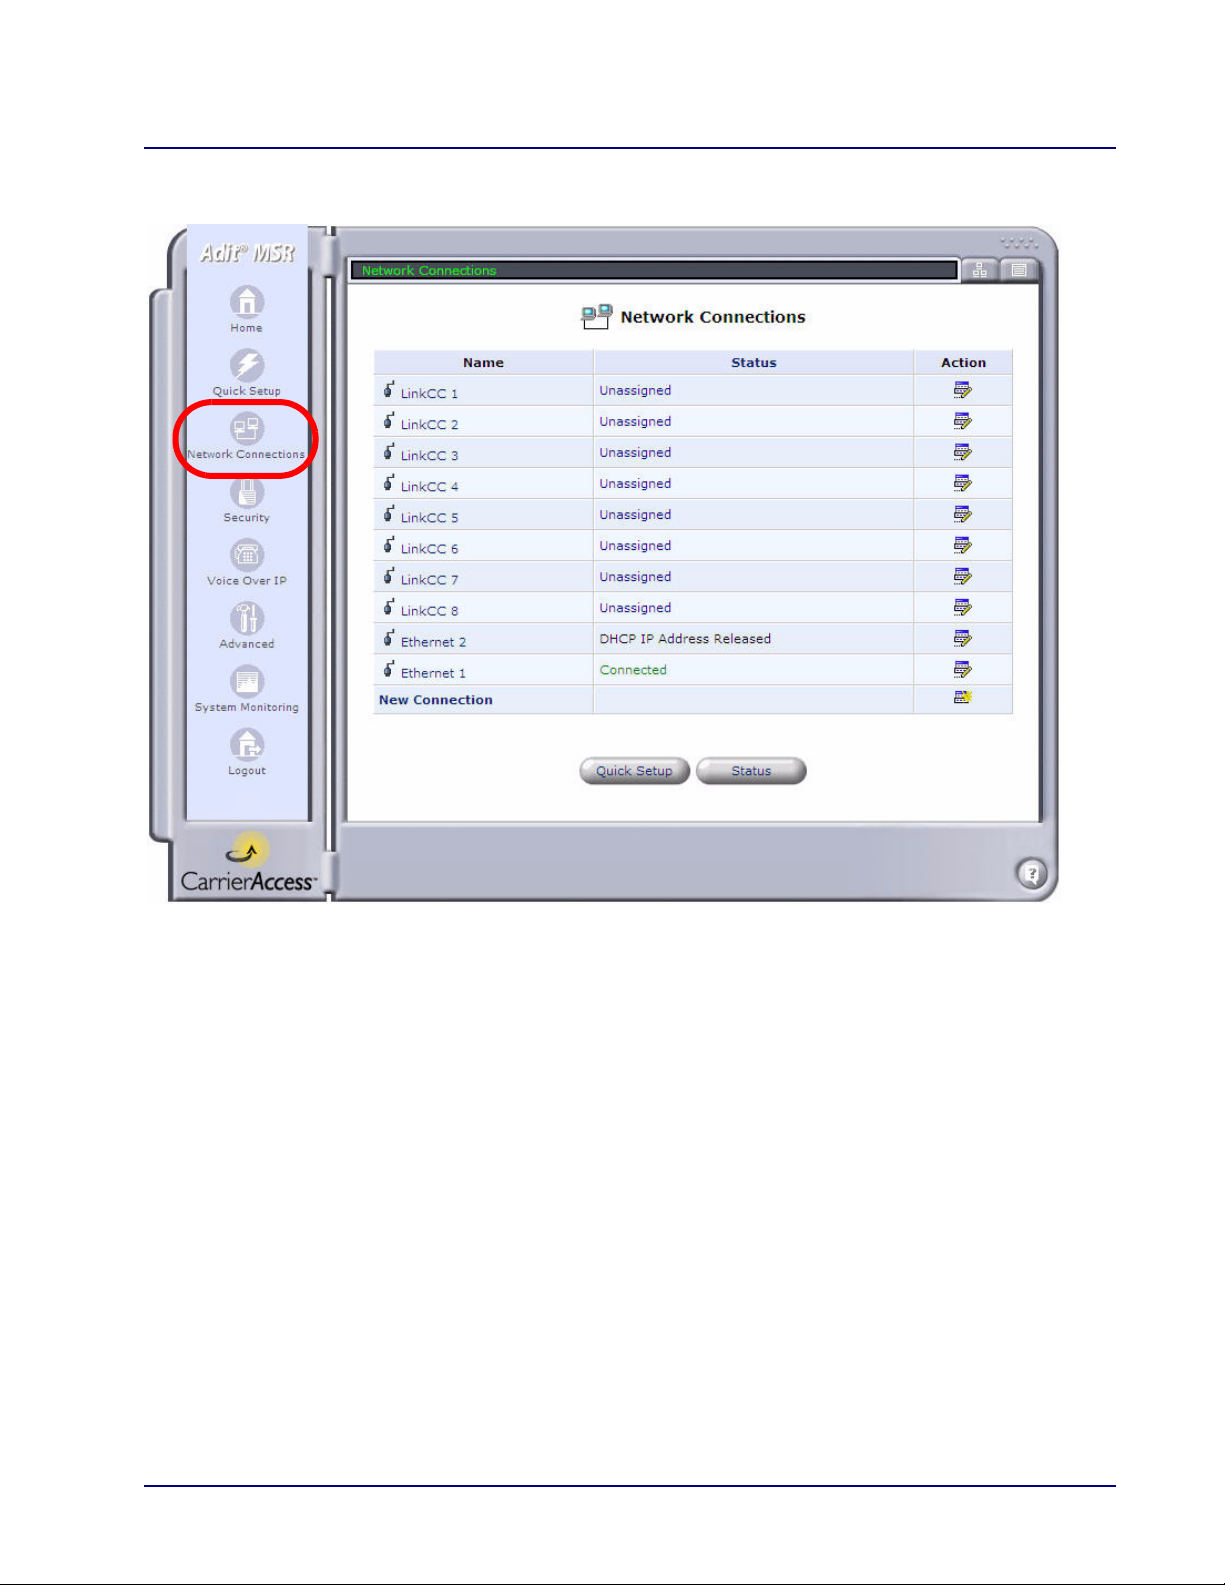
Network Connections
Main Window
The Network Connection window allows the user to create and configure network connections. For the
Adit 3000, the basic connections for this system are preconfigured. Additional connections can be set
up with the New Connection option.
For detailed information on Network Connections, see Chapter 3, Network Connections.
Adit 3500
1-20 Adit 3000 (Rel. 1.6) and MSR Card (Rel 2.0) GUI
Page 29
Web Based Management
Network Connections
Adit MSR
Adit 3000 (Rel. 1.6) and MSR Card (Rel 2.0) GUI 1-21
Page 30
Web Based Management
Security
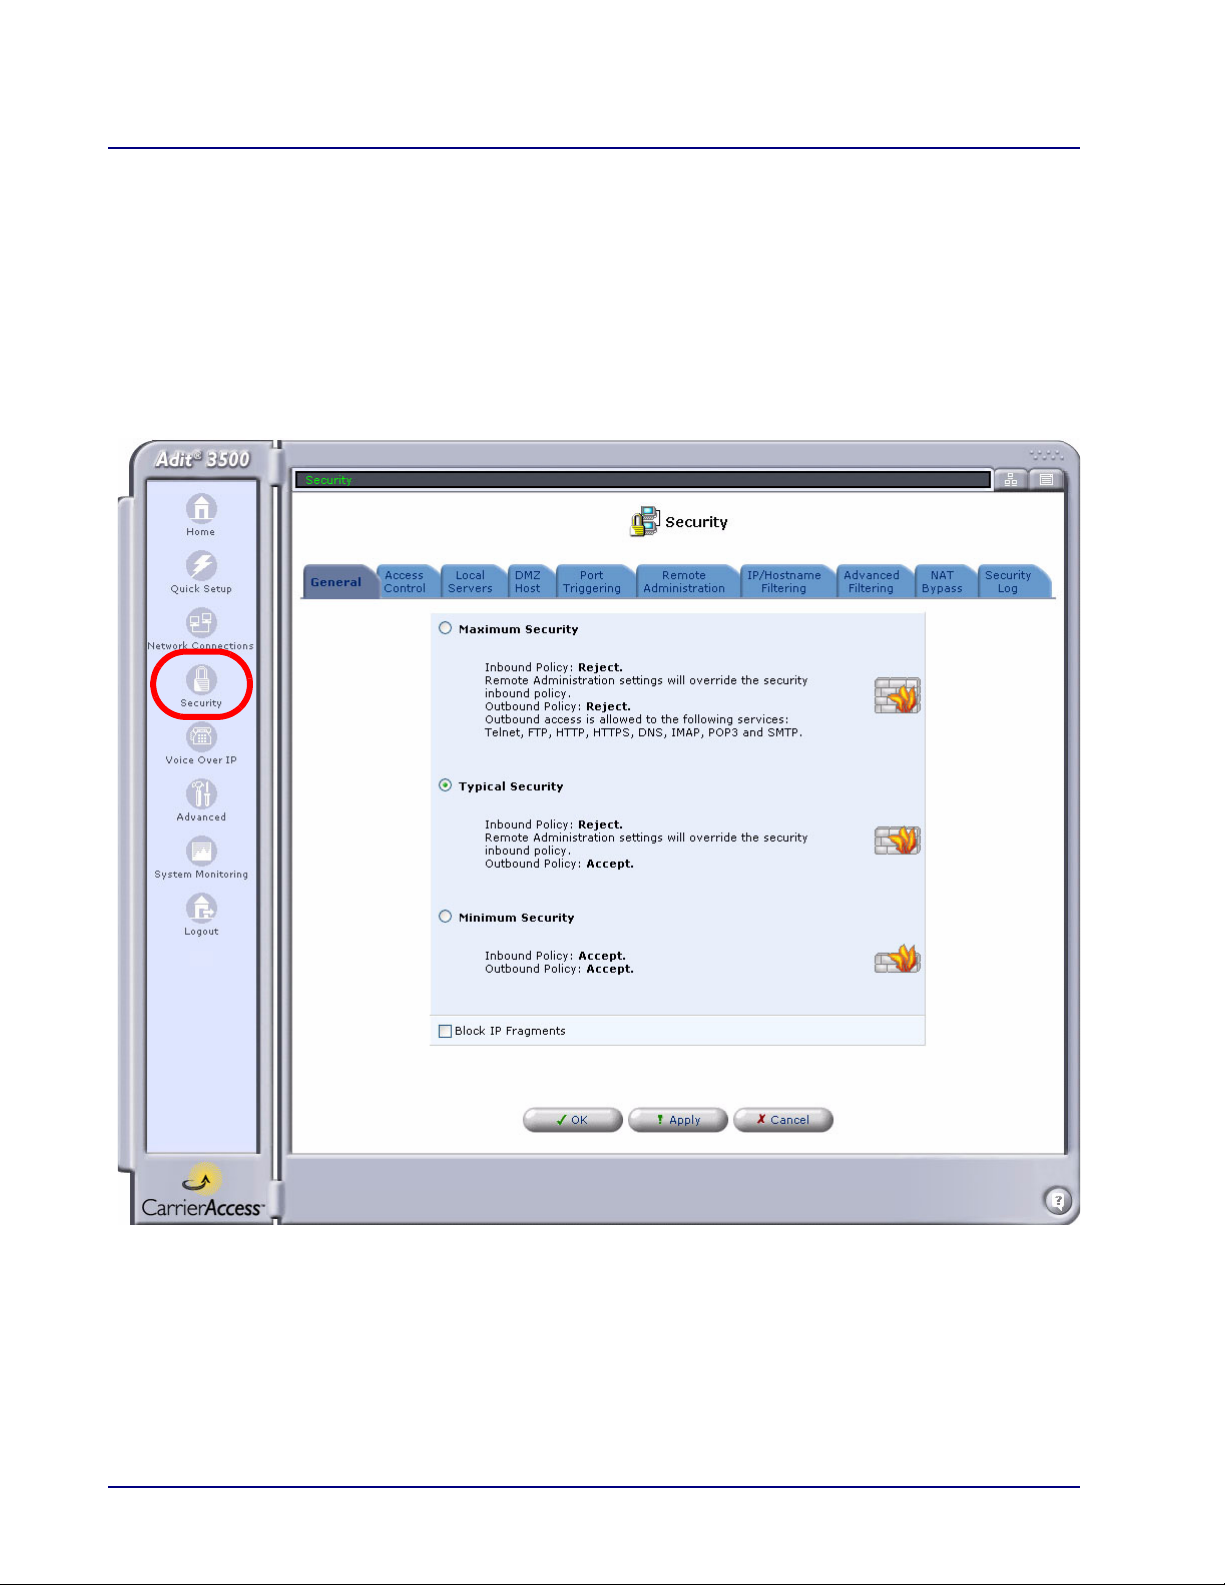
Security
The Adit 3000 and MSR include comprehensive and robust security services:
Stateful Packet Inspection Firewall
User authentication protocols
Password protection mechanisms
For detailed information on security features, see Chapter 4, Security.
1-22 Adit 3000 (Rel. 1.6) and MSR Card (Rel 2.0) GUI
Page 31

Web Based Management
Voice over IP
Voice over IP
The VoIP feature allows you to connect multiple phones over a single broadband connection, providing
the benefits and quality of digital voice. The Adit 3104, 3500, and MSR enable you to place and receive
calls over the Internet using a standard telephone set connected to the Adit.
For detailed information on VoIP features, see Chapter 6, Voice Over IP.
NOTE: This feature is not supported by the Adit 3200.
WARNING! ANY CHANGES TO THE VOIP SETTINGS WILL RESTART THE VOIP TASK AND WILL
CAUSE ANY ACTIVE CALLS TO BE DROPPED.
Adit 3000 (Rel. 1.6) and MSR Card (Rel 2.0) GUI 1-23
Page 32

Web Based Management
Voice over IP
1-24 Adit 3000 (Rel. 1.6) and MSR Card (Rel 2.0) GUI
Page 33

Web Based Management
Advanced
Advanced
This section of the Management Console is intended primarily for more advanced users. Some changes
to settings within this section could adversely affect the operation of the Adit and the network, and
should be made with caution.
For detailed information on Advanced features, see Chapter 2, Advanced.
Adit 3000 (Rel. 1.6) and MSR Card (Rel 2.0) GUI 1-25
Page 34

Web Based Management
System Monitoring
System Monitoring
The System Monitoring window displays important system information that can be used to monitor and
troubleshoot the system. Connection status, alarms, system information, and logs are all accessible
through this window.
Adit 3500
1-26 Adit 3000 (Rel. 1.6) and MSR Card (Rel 2.0) GUI
Page 35

Web Based Management
System Monitoring
Adit MSR
Adit 3000 (Rel. 1.6) and MSR Card (Rel 2.0) GUI 1-27
Page 36

Web Based Management
Logout
Logout
The Logout feature logs the user out of the system and returns to the Login window.
1-28 Adit 3000 (Rel. 1.6) and MSR Card (Rel 2.0) GUI
Page 37

In this Chapter
Overview
ARP
Certificates
Date and Time
CHAPTER
2
Advanced
Diagnostics
DNS Static Entries
Dynamic DNS
IP Address Distribution (DHCP)
IPSec (IP Security)
NAT/FW Connections
Network Objects
PPTP (Point-to-Point Tunneling Protocol)
RADIUS Client
Remote Administration
Restart
Restore Defaults
Routing
Scheduler Rules
Simple Network Management Protocol
System Settings
Technical Information
Upgrade From a Local Computer
Users
VLAN Configuration
Page 38

Advanced
Overview
Overview
This section of the Management Console is intended primarily for more advanced users. Some changes
to settings within this section could adversely affect the operation of the system and the network, and
should be made with caution.
2-2 Adit 3000 (Rel. 1.6) and MSR Card (Rel 2.0) GUI
Page 39

Advanced
ARP
ARP
The ARP (Address Resolution Protocol) window displays the current ARP table.
There are display options:
eth-1 - When checked, displays the LAN Ethernet ARP.
eth-2 - When checked, displays the WAN Ethernet ARP.
Clear - Clears those entries related with the interface(s) from the display.
Refresh - Refreshes the ARP table.
Adit 3000 (Rel. 1.6) and MSR Card (Rel 2.0) GUI 2-3
Page 40

Advanced
Certificates
Certificates
Public-key cryptography uses a pair of keys:
Public Key, which encrypts data (known to the world)
A corresponding private key for decryption (secret)
Anyone with access to your public key can encrypt information, but only the person who has the
corresponding private key can decrypt the information.
Digital Certificates
When working with public-key cryptography, the user must be careful and verify that the correct public
key is used. Man-in-the-middle attacks pose a potential threat, where an ill-intending 3rd party posts a
phony key with the name and user ID on an intended recipient. Data transfer that is intercepted by the
owner of the counterfeit key can fall in the wrong hands.
Digital certificates provide a means for establishing whether a public key truly belongs to the supposed
owner. It is a digital form of credentials. It has information on it that identifies you, and an authorized
statement to the effect that someone else has confirmed your identity.
Digital certificates are used to foil attempts by an ill-intending party to use an unauthorized public key.
A digital certificate consists of the following:
A Public Key
Certificate Information - the “identity” of the user (name, user ID, etc.).
Digital Signatures - A statement stating that the information enclosed in the certificate has been
vouched for by a Certificate Authority (CA).
Binding this information together, a certificate is a public key with identification forms attached,
coupled with a stamp of approval by a trusted party.
2-4 Adit 3000 (Rel. 1.6) and MSR Card (Rel 2.0) GUI
Page 41

Advanced
Certificates
X.509 Certificate Format
The Adit 3000 and Adit MSR support X.509 certificates that comply with the ITU-T X.509
international standard. An X.509 certificate is a collection of a standard set of fields containing
information about a user or device and their corresponding public key. The X.509 standard defines what
information goes into the certificate, and describes how to encode it (the data format). All X.509
certificates have the following data:
Certificate holder’s public key - the public key of the certificate holder, together with an
algorithm identifier that specifies which cryptosystem the key belongs to and any associated
key parameters.
Serial number of the certificate - the entity that created the certificate is responsible for
assigning it a unique serial number to distinguish it from other certificates it issues.
Certificate holder’s unique identifier - this name is intended to be unique across the Internet
and consists of multiple subsections.
Certificate’s validity period - the certificate’s start date/time and expiration date/time,
indicates when the certificate will expire.
Unique name of the certificate issuer - the unique name of the entity that signed the
certificate. This is normally a CA. Using the certificate implies trusting the entity that signed
this certificate.
Digital signature of the issuer - the signature using the private key of the entity that issued the
certificate.
Signature algorithm identifier - identifies the algorithm used by the CA to sign the certificate.
Adit 3000 (Rel. 1.6) and MSR Card (Rel 2.0) GUI 2-5
Page 42

Advanced
Certificates
Obtaining and Loading an X.509 Certificate
To obtain an X509 certificate, you must ask a CA to issue you one. You provide your public key, proof
that you possess the corresponding private key, and some specific information about yourself. You then
digitally sign the information and send the whole package (the certificate request) to the CA. The CA
then performs some due diligence in verifying that the information you provided is correct and, if so,
generates the certificate and returns it.
You might think of an X509 certificate as looking like a standard paper certificate with a public key
taped to it. It has your name and some information about you on it, plus the signature of the person who
issued it to you.
To obtain and load an X.509 certificate:
1. Select Advanced/ Certificates.
2-6 Adit 3000 (Rel. 1.6) and MSR Card (Rel 2.0) GUI
Page 43

Advanced
Certificates
2. On the Adit 3000 or Adit MSR’s Local tab, select the Create Certificate Request button.
3. Fill in your current information and select the Generate button.
Note: It may take a minute or so to get the certificate, and you may need to refresh the window.
Adit 3000 (Rel. 1.6) and MSR Card (Rel 2.0) GUI 2-7
Page 44

Advanced
Certificates
4. Copy and store the exact contents of the certificate to a file, and send it to a CA for signing.
2-8 Adit 3000 (Rel. 1.6) and MSR Card (Rel 2.0) GUI
Page 45

Advanced
Certificates
5. Select the Close button. The Certificates window appears, listing the certificate as Unsigned.
6. After receiving the signed certificate from the CA, select Load Certificate.
Adit 3000 (Rel. 1.6) and MSR Card (Rel 2.0) GUI 2-9
Page 46

Advanced
Certificates
7. Paste the signed certificate.
8. Select the Load button. The Certificates window appears, displaying the name and issuer of
the certificate.
2-10 Adit 3000 (Rel. 1.6) and MSR Card (Rel 2.0) GUI
Page 47

Advanced
Certificates
Registering the CA’s Certificate
After receiving the signed certificate from the CA:
1. Select the CA’s tab on the Advanced/Certificates window.
Adit 3000 (Rel. 1.6) and MSR Card (Rel 2.0) GUI 2-11
Page 48

Advanced
Certificates
2. Select Load Certificate, and paste the CA’s certificate into the window.
3. Select the Load button to register the signed Certificate. The Certificates window appears,
displaying the name and issuer of the certificate.
2-12 Adit 3000 (Rel. 1.6) and MSR Card (Rel 2.0) GUI
Page 49

Advanced
Date and Time
Date and Time
This window allows the user to configure the date and time parameters for the unit.
NOTE: By default, Time of Day management for the MSR is provided by the Adit 600
controller. Use the settings in this window for the MSR only if you are using NTP or another
time service and need to manually adjust the time due to a loss of contact with the server.
Adit 3000 (Rel. 1.6) and MSR Card (Rel 2.0) GUI 2-13
Page 50

Advanced
Date and Time
Setting the Date and Time
1. Select Advanced/ Date and Time.
2. Set the Time Zone of this unit from the Time Zone pulldown menu.
3. Set Daylight Saving Time as necessary:
Field Definition
Enabled Check box to enable Daylight Saving Time.
Start Set the date and time when Daylight Saving starts.
End Set the date and time when Daylight Saving ends.
Offset Set the Daylight Saving Time offset.
4. To configure the current date, select the Clock Set button. Enter the current system date and
time, then click OK.
5. Configure Automatic Time Update (bottom of window) as desired.
2-14 Adit 3000 (Rel. 1.6) and MSR Card (Rel 2.0) GUI
Page 51

Advanced
Date and Time
Field Definition
Enabled Check box to enable the Automatic Time Update.
Protocol Select the protocol to be used to perform the time update.
Time of Day - Retrieves the time from the TOD server (defined in the Time
Server field below).
Network Time Protocol - Retrieves the time from the network (Network
Time Server defined in the Time Server field below).
Update Every Range 1-480 hours.
Time Server Select New Entry and enter the IP Address or domain name of the Time
Server.
Status Displays the current status of the Automatic Time Update.
Adit 3000 (Rel. 1.6) and MSR Card (Rel 2.0) GUI 2-15
Page 52

Advanced
Diagnostics
Diagnostics
The Diagnostics window allows the user to test network connectivity using the following methods:
Ping an IP address and view the statics
Perform a Traceroute
2-16 Adit 3000 (Rel. 1.6) and MSR Card (Rel 2.0) GUI
Page 53

Advanced
Diagnostics
Pinging an IP Address
1. Select Advanced/ Diagnostics.
2. Enter the IP address in the Ping/Destination field.
3. Select the Go button. The results of the Ping will be displayed.
Performing a Traceroute
1. Select Advanced/ Diagnostics.
2. Enter the IP address in the Traceroute/Destination field.
3. Select the Go button. The results of the Traceroute will be displayed.
Adit 3000 (Rel. 1.6) and MSR Card (Rel 2.0) GUI 2-17
Page 54

Advanced
DNS Static Entries
DNS Static Entries
The Domain Naming System (DNS) provides a service that translates domain names into IP addresses
and vice versa. The Adit’s DNS server is an auto-learning DNS, which means that when a new computer
is connected to the network, the DNS server learns its name and automatically adds it to the DNS table.
Other network users may immediately communicate with this computer using either its name or its IP
address.
Additional features of the Adit’s DNS:
Shares a common database of domain names/IP addresses with the DHCP server
Supports multiple subnets within the LAN simultaneously
Automatically appends a domain name to unqualified names
Allows new domain names to be added to the database using the Adit’s
Web-based Management
Permits a computer to have multiple host names
Permits a host name to have multiple IPs (if a host has multiple network cards)
The DNS server does not require configuration. However, you may wish to view the list of computers
known by the DNS, edit the host name or IP address of a computer on the list, or manually add a new
computer to the list.
Viewing the DNS Table
1. Select Advanced/ DNS Static Entries.
2-18 Adit 3000 (Rel. 1.6) and MSR Card (Rel 2.0) GUI
Page 55

Advanced
DNS Static Entries
Adding a New Entry to the DNS Table
1. Select Advanced/ DNS Static Entries.
2. Select New DNS Entry.
3. Enter the computer’s Host Name and IP Address.
4. Select OK. The new DNS entry is displayed in the DNS Static Entries table.
Adit 3000 (Rel. 1.6) and MSR Card (Rel 2.0) GUI 2-19
Page 56

Advanced
DNS Static Entries
Modifying an Entry in the DNS Table
1. Select Advanced/ DNS Static Entries.
2. Select an entry on the list to modify.
3. The DNS Entry window appears. Modify the Host Name and IP Address, as needed.
4. Select OK. The modified DNS entry is displayed in the DNS Static Entries table.
NOTE: An entry can be deleted by selecting the Action/Delete button.
2-20 Adit 3000 (Rel. 1.6) and MSR Card (Rel 2.0) GUI
Page 57

Advanced
Dynamic DNS
Dynamic DNS
The Dynamic DNS service allows you to alias a dynamic IP address to a static host name, allowing your
computer to be more easily accessible from various locations on the Internet. Typically, when you
connect to the Internet, your service provider assigns an unused IP address from a pool of IP addresses,
and this address is used only for the duration of a specific connection. Dynamically assigning addresses
extends the usable pool of available IP addresses, while maintaining a constant domain name. Each time
the IP address provided by your ISP changes, the DNS database will change accordingly to reflect the
change in IP address. In this way, even though a domain name’s IP address will change often, your
domain name will still be accessible.
To be able to use the Dynamic DNS feature you must open a DDNS account, free of charge, at
http://www.dyndns.org/account/create.html. When applying for an account, you will need to specify a
user name and password. For more information regarding Dynamic DNS, please refer to
http://www.dyndns.org.
Adit 3000 (Rel. 1.6) and MSR Card (Rel 2.0) GUI 2-21
Page 58

Advanced
Dynamic DNS
Using Dynamic DNS
1. Select Advanced/ Dynamic DNS.
2. Specify the Dynamic DNS operating parameters:
Field Definition
Connection to Update Select the connection to be used for the update from the pulldown
menu.
Offline Select the checkbox to work offline.
Status The status field displays relevant information regarding the information
exchange between the Adit and DDNS. The Manual Update button
invokes a manual update of the DDNS parameters. It is not advisable to
frequently update the DDNS parameters manually, since this may
cause unneccessary traffic on the DDNS servers.
User Name Enter your Dyndns user name.
Password Enter you Dyndns password.
Host Name Enter a subdomain name, and select a suffix from the domain combo-
box to define your host name.
The Name may not contain spaces. Only letters, digits, dash (-),
underscore (_) or a dot (.).
These special characters (- _ .) may not appear at the beginning or at the
end of a name.
The maximum length of a label (text between two dots) is 63.
Wildcard This allows a user to update DNS records for a specific sub-domain,
therefore not updating all sub-domains.
Mail Exchanger Enter your mail exchange server address, to redirect all E-mails
arriving at your Dyndns address to your mail server.
Backup MX Backup mail exchanger.
3. Select Apply or OK to save the configuration.
2-22 Adit 3000 (Rel. 1.6) and MSR Card (Rel 2.0) GUI
Page 59

Advanced
IP Address Distribution (DHCP)
IP Address Distribution (DHCP)
The Adit’s DHCP server makes it possible to easily add computers that are configured as DHCP clients
to the network. It provides a mechanism for allocating IP addresses to these hosts and for delivering
network configuration parameters to them.
The DHCP-based autoconfiguration feature provides a method of updating the Adit’s firmware and
configuration automatically. This is accomplished by querying a DHCP server in the boot sequence,
then using the data provided to download firmware and configuration files, and then rebooting if there
are changes that need to take effect.
A client (host) sends out a broadcast message on the LAN requesting an IP address for itself. The DHCP
server then checks its list of available addresses and leases a local IP address to the host for a specific
period of time and simultaneously designates this IP address as “taken”. At this point the host is
configured with an IP address for the duration of the lease.
The host can choose to renew an expiring lease or let it expire. If it chooses to renew a lease, it will also
receive current information about network services, as it did with the original lease, allowing it to update
its network configurations to reflect any changes that may have occurred since it first connected to the
network. If the host wishes to terminate a lease before its expiration, it can send a release message to
the DHCP server, which will then make the IP address available for use by others.
Summary of Services
To view a summary of the services currently being provided by the DHCP server, select Advanced/ IP
Address Distribution.
NOTE: If a device is listed as Disabled in the Status column, DHCP services are not being
provided to hosts connected to the network through that device. This means that the Adit will
not assign IP addresses to these computers. This may be of some use when working with
static IP addresses only.
Adit 3000 (Rel. 1.6) and MSR Card (Rel 2.0) GUI 2-23
Page 60

Advanced
IP Address Distribution (DHCP)
Editing DHCP Server Settings
To edit the DHCP server setting for a device:
1. Select Advanced/ IP Address Distribution.
2. Select the interface to configure (Ethernet 1/Ethernet 2).
3. Edit the DHCP settings by completing the following fields:
Field Definition
IP Address Distribution Disabled - Disables DHCP.
DHCP Server - Assigns addresses to LAN clients.
DHCP Relay - Responsible for forwarding the requests and
responses negotiating between the DHCP clients and the server.
DHCP Server
Start IP Address The IP address range defines the number of hosts that may be
connected to the network in this subnet. Start defines the first IP
address that may be assigned in this subnet.
End IP Address End IP address defines the last IP address in the subnet (see
above).
Subnet Mask A mask used to define the subnet an IP address belongs to.
WINS Server IP Address Enter the WINS server IP address.
Lease Time In Minutes The lease duration in minutes.
2-24 Adit 3000 (Rel. 1.6) and MSR Card (Rel 2.0) GUI
Page 61

Advanced
IP Address Distribution (DHCP)
Field Definition (Continued)
Provide Host Name if Not
Specified by Client
DHCP Relay
New IP Address Opens a new window for entering an IP address.
If the DHCP client does not have a host name, the Adit will assign
the client a default name.
Adit 3000 (Rel. 1.6) and MSR Card (Rel 2.0) GUI 2-25
Page 62

Advanced
IP Address Distribution (DHCP)
Defining a New Connection with a Fixed IP Address
1. Select Advanced/ IP Address Distribution.
2. Select the Connection List button.
2-26 Adit 3000 (Rel. 1.6) and MSR Card (Rel 2.0) GUI
Page 63

Advanced
IP Address Distribution (DHCP)
3. Select New Static Connection.
4. Enter the host information in the following fields:
Field Definition
Host Name Enter the host name for this connection.
IP Address Enter a fixed IP address to assign to the computer.
MAC Address Enter the MAC address of the computer’s network card.
5. Select OK to save the configuration. The DHCP Connections window will display the Static
Connection.
Adit 3000 (Rel. 1.6) and MSR Card (Rel 2.0) GUI 2-27
Page 64

Advanced
IPSec (IP Security)
IPSec (IP Security)
IPSec (IP security) is a standard for securing IP communications by encrypting and/or authenticating
all IP packets. IPSec provides security at the network level.
The Internet Protocol Security (IPSec) window allows display/modification of IPSec settings:
General IPSec settings
Key management settings
Log settings
Advanced IPSec Connection settings
2-28 Adit 3000 (Rel. 1.6) and MSR Card (Rel 2.0) GUI
Page 65

Advanced
IPSec (IP Security)
General IPSec Settings
Field Definition
Block Unauthorized IP When an IP address fails to register with IPSec connection, it can be blocked
for a set amount of time by the firewall.
Enabled Checked box enables the blocking of unauthorized IP access.
Maximum number or
authentication failures
Block Period Sets the number of seconds for the IP address to be blocked.
Anti-Replay
Enable anti-replay
protection
Connections
New Connection Creates a new secured connection. The user is guided through a series of
Maximum number of failures before a block takes effect.
Range 0 - 2147483647 failures.
Range 0 - 2147483647 seconds.
Anti-Replay is a security service where the receiver can reject old or
duplicate packets to protect itself against replay attacks. IPSec provides this
optional service by use of a sequence number combined with the use of data
authentication. PIX Firewall IPSec provides this service whenever it provides
the data authentication service, except in the following:
The service is not available for manually established security associations
(security associations established by manual configuration and not by IKE).
windows to configure this connection.
Adit 3000 (Rel. 1.6) and MSR Card (Rel 2.0) GUI 2-29
Page 66

Advanced
IPSec (IP Security)
Key Management
1. Select Advanced/ IPSec.
2. Select the Settings button.
3. The Settings window displays the Adit’s public key. If necessary, you can copy the public key
from this window.
Field Definition
Recreate Key (button) Recreate the public key.
Refresh (button) Refresh the public key displayed.
2-30 Adit 3000 (Rel. 1.6) and MSR Card (Rel 2.0) GUI
Page 67

Advanced
IPSec (IP Security)
Log Settings
Use the IPSec Log Settings window to specify the type of information to be displayed in the IPSec Log.
NOTE: The IPSec log is displayed in the System Log (System Monitoring/System Log).
Events can also be forwarded to another location.
1. Select Advanced/ IPSec.
2. Select the Log Settings button.
3. Select the check boxes next to the information you would like recorded in the IPSec log. Click
OK.
Adit 3000 (Rel. 1.6) and MSR Card (Rel 2.0) GUI 2-31
Page 68

Advanced
IPSec (IP Security)
Creating a New Secured Connection
1. Select New Connection on the Internet Protocol Security (IPSec) window.
2. Follow the instructions provided in the series of screens presented.
2-32 Adit 3000 (Rel. 1.6) and MSR Card (Rel 2.0) GUI
Page 69

Advanced
NAT/FW Connections
NAT/FW Connections
The NAT Firewall Connections table displays all active NAT and Firewall connections.
Adit 3000 (Rel. 1.6) and MSR Card (Rel 2.0) GUI 2-33
Page 70

Advanced
Network Objects
Network Objects
The Network Objects window will create a Network Object, which is a set of host names, IP address or
MAC addresses. Network Objects allow security rules to be applied to a distinct LAN subset.
1. Select Advanced/ Network Objects.
2. Select New Entry.
3. Name the Network Object in the Description field.
4. Select New Entry under Items..
2-34 Adit 3000 (Rel. 1.6) and MSR Card (Rel 2.0) GUI
Page 71

Advanced
Network Objects
5. Set the following fields:
Field Definition
Network Object Type IP Address - Enter the IP address of the Network Object.
MAC Address - Enter the MAC address of the Network Object.
Host Name - enter the Host Name of the Network Object.
6. Click OK. The newly created Network Object appears in the Network Objects table.
Adit 3000 (Rel. 1.6) and MSR Card (Rel 2.0) GUI 2-35
Page 72

Advanced
PPTP (Point-to-Point Tunneling Protocol)
PPTP (Point-to-Point Tunneling Protocol)
The Adit can be configured as a Point-to-Point Tunneling Protocol Server (PPTP Server), accepting
PPTP client connection requests.
2-36 Adit 3000 (Rel. 1.6) and MSR Card (Rel 2.0) GUI
Page 73

Advanced
RADIUS Client
RADIUS Client
For authentication to function, the client’s transmission must go through the Adit and reach the backend server that performs the actual authentication. The wireless client contacts the access point, which
in-turn, communicates with the RADIUS (Remote Authentication Dial-in User Service) server. The
RADIUS server verifies the client’s credentials to determine whether the device is authorized to connect
to the LAN. If the RADIUS server accepts the client, the server responds by exchanging data with the
Adit, including security keys for subsequent encrypted sessions.
Configuring RADIUS
1. Select Advanced/ RADIUS Client.
2. Set the following fields:
Field Definition
Enable RADIUS Client Enables RADIUS client authentication.
Server IP Enter the RADIUS server’s IP address.
Server Port Enter the RADIUS server’s port.
Shared Secret Enter your shared secret password, up to 8 characters.
Authentication Method From the pulldown menu select the method:
PAP - Unencrypted Password
CHAP - Challenge Handshake Authentication
MS-CHAP - Microsoft CHAP
MS-CHAPv2 - Microsoft CHAP Version 2
Adit 3000 (Rel. 1.6) and MSR Card (Rel 2.0) GUI 2-37
Page 74

Advanced
Remote Administration
Remote Administration
In it’s default state, the Adit locks all external users from connecting to or communicating with your
network. Therefore the system is safe from hackers who may try to intrude on the network and damage
it. However, you may wish to enable certain services that grant remote users administrative privileges
in your network.
Configuring Remote Administration Services
1. Select Advanced/ Remote Administration.
2. Select the services you wish to enable.
3. Select OK.
2-38 Adit 3000 (Rel. 1.6) and MSR Card (Rel 2.0) GUI
Page 75

Advanced
Restart
Restart
This option allows the user to reboot the Adit 3000 or MSR card.
Restarting the System
1. Select Advanced/ Restart.
2. Select OK to reboot the system.
Adit 3000 (Rel. 1.6) and MSR Card (Rel 2.0) GUI 2-39
Page 76

Advanced
Restore Defaults
Restore Defaults
The Restore Defaults option sets the Adit back to its factory settings.
IMPORTANT: All Web-based management settings and parameters will be restored to their default
values, including:
Administrator password and all user-specified passwords
IP address for configuration access
After the restore defaults function is complete, the Adit will reboot.
Restoring Default Settings
1. Select Advanced/ Restore Defaults.
2. Select OK to restore the defaults.
2-40 Adit 3000 (Rel. 1.6) and MSR Card (Rel 2.0) GUI
Page 77

Advanced
Routing
Routing
The Advanced/Routing feature provides access to configuration options for the following:
Static Routing
RIP
OSPF
Static Routing
Select Advanced/Routing to view the routing table rules. This window displays the following:
Static Routing - Displays all static routes. This table provides access to create, modify, and
delete routes.
Routing Table - Displays the current routing table.
Adit 3000 (Rel. 1.6) and MSR Card (Rel 2.0) GUI 2-41
Page 78

Advanced
Routing
Adding a New Route
1. Select Advanced/ Routing.
2. Select New Route.
2-42 Adit 3000 (Rel. 1.6) and MSR Card (Rel 2.0) GUI
Page 79

Advanced
Routing
3. Set the following fields:
Field Definition
Name Select a name from the Pulldown menu.
Destination This is the destination host, subnet address, network address, or
default route. The destination for a default route is 0.0.0.0
Netmask The Network mask is used in conjunction with the destination to
determine when a route is used.
Gateway Enter the gateway IP address.
Metric A measurement of the preference of a route. Typically, the lowest
metric is the most preferred route. If multiple routes exist to a given
destination network, the route with the lowest metric is used.
4. Select OK.
Adit 3000 (Rel. 1.6) and MSR Card (Rel 2.0) GUI 2-43
Page 80

Advanced
Routing
Editing a Route
1. Select Advanced/ Routing.
2. Select a Route listed on the Routing Table (click on the name, or select the edit icon).
3. Modify settings as needed and select OK.
2-44 Adit 3000 (Rel. 1.6) and MSR Card (Rel 2.0) GUI
Page 81

Advanced
Routing
Deleting a Route
1. Select Advanced/ Routing.
2. Select Action/Delete icon, to remove the Route listed on the table.
Adit 3000 (Rel. 1.6) and MSR Card (Rel 2.0) GUI 2-45
Page 82

Advanced
Routing
RIP
Select Advanced/Routing and click on the RIP tab. The RIP window allows you to enable RIP
routing.
2-46 Adit 3000 (Rel. 1.6) and MSR Card (Rel 2.0) GUI
Page 83

Advanced
Routing
OSPF
Select Advanced/Routing and click on the OSPF tab. The OSPF window allows you to enable OSPF
routing.
Adit 3000 (Rel. 1.6) and MSR Card (Rel 2.0) GUI 2-47
Page 84

Advanced
Routing
OSPF Field Definitions
When the Open Shortest Past First (OSPF) option is enabled, the window displays additional fields:
Field Definition
Routing Protocols
Open Shortest Path First (OSPF) Enables OSPF.
General Parameters Sets the OSPF Global Parameters.
Compatible RFC 1583 Enables the method used to calculate summary route costs
per RFC 1583.
Router ID Null - Do not use a fixed router ID.
Input Router ID - Define a fixed router ID to be used.
Enter a router IP address.
OSPF Area Configure the OSPF Area Parameters.
Area ID Specify IP Address - Enter the Area ID IP address.
Specify a Number - Enter the Area ID number.
Stub Area Yes - Define this area as a Stub area.
No - Define this area to not be a Stub area.
2-48 Adit 3000 (Rel. 1.6) and MSR Card (Rel 2.0) GUI
Page 85

Advanced
Routing
Field Definition (Continued)
Area Authentication Type None - Set the Area Authentication to none.
Simple Authentication - Enable Simple Authentication
Authentication on the OSPF Area.
Message-Digest - Enable Message-Digest Authentication on
the Area.
Network Address Table Displays the current OSPF neighbors.
New Entry Select this option to open a configuration window to enter
OSPF neighbors. See the following section for detailed
information.
Adit 3000 (Rel. 1.6) and MSR Card (Rel 2.0) GUI 2-49
Page 86

Advanced
Routing
NOTE: For interface OSPF configuration information, see OSPF Configuration on the
Network Connection on page 3-40.
Configuring OSPF
1. Select Advanced/ Router.
2. Select the OSPF tab.
3. Enable OSPF by checking the Open Shortest Path First (OSPF) checkbox.
4. Set Enable Compatible RFC 1583, if required.
5. Set Router ID as needed.
6. Define the Area ID with the Area number or Area IP Address. Note: 0.0.0.0 is not accepted in
this field.
7. Define the Area as Stub, if required.
8. Define the Area Authentication, as required.
9. Select New Entry.
2-50 Adit 3000 (Rel. 1.6) and MSR Card (Rel 2.0) GUI
Page 87

Advanced
Routing
10. Enter the Network IP Address of the Neighbor to add to the OSPF Network.
11. Enter an IP address mask that includes "don’t care" bits.
12. Select OK. The new address appears in the Network Address Table.
Adit 3000 (Rel. 1.6) and MSR Card (Rel 2.0) GUI 2-51
Page 88

Advanced
Scheduler Rules
Scheduler Rules
To create a scheduling rule:
1. Select Advanced/Scheduler Rules.
2. Select New Scheduler Entry.
3. Enter a name for the rule in the Name field (maximum of 64 characters).
4. Under Rule Activity Setting, indicate whether the rule will be active or inactive at the
scheduled time.
2-52 Adit 3000 (Rel. 1.6) and MSR Card (Rel 2.0) GUI
Page 89

Advanced
Scheduler Rules
5. Select New Time Segment Entry to define the day(s) of the week to apply the rule to.
Note: At a minimum, one day must be selected.
6. Under Hours Range, select New Time Segment Entry to define the Start and End time.
Adit 3000 (Rel. 1.6) and MSR Card (Rel 2.0) GUI 2-53
Page 90

Advanced
Scheduler Rules
7. Select OK for each window until at the Scheduler Rules table.
The new rule appears in the table.
2-54 Adit 3000 (Rel. 1.6) and MSR Card (Rel 2.0) GUI
Page 91

Advanced
Simple Network Management Protocol
Simple Network Management Protocol
SNMP enables network management systems to remotely configure and monitor the Adit. Your Internet
Service Provider (ISP) may use SNMP to identify and resolve technical problems.
Configuring the Adit’s SNMP Agent
Technical information regarding the properties of the Adit’s SNMP agent should be provided by your
ISP. Note: SNMP community strings are passwords used in SNMP messages between the management
system and the Adit.
1. Select Advanced/ Simple Network Management Protocol.
2. Set the SNMP parameters, as provided by the ISP:
Field Definition
Enable SNMP Agent Enables the SNMP on this unit.
Read-Only Community Name A read-only community allows the manager to monitor the
Adit.
Read-Write Community Name A read-write community allows the manager to both monitor
and configure the Adit.
Adit 3000 (Rel. 1.6) and MSR Card (Rel 2.0) GUI 2-55
Page 92

Advanced
Simple Network Management Protocol
3. Set the Trusted Peer. This is the IP address and subnet that identifies which remote
management stations are allowed to perform SNMP operation on the Adit.
Field Definition
Any Address No restriction to remote access.
Specify an IP Address Requires an IP address.
Specify a Subnet Requires an IP address and Subnet.
4. Enable the SNMP Traps, if desired. Traps are messages sent by the Adit to a remote
management station notifying the manager about important events or serious conditions. When
SNMP traps are enabled, the fields expand.
Field Definition
Enable Check to enable the SNMP traps.
Version SNMP v1- SNMP version 1
SNMP v2c - SNMP version 2C
Destination Enter the Destination IP address.
Community Enter a community string (a password that allows access to a network device).
2-56 Adit 3000 (Rel. 1.6) and MSR Card (Rel 2.0) GUI
Page 93

Advanced
System Settings
System Settings
Select Advanced/System Settings to view and modify general system settings.
As shown in the screen shots on the following pages, the system settings differ slightly between the Adit
3000 and MSR. For example, the MSR does not support the Clock Source fields, and T1 Logging is
replaced by LCC (Link Cross-Connect) Logging.
Adit 3000 (Rel. 1.6) and MSR Card (Rel 2.0) GUI 2-57
Page 94

Advanced
System Settings
Adit 3500
2-58 Adit 3000 (Rel. 1.6) and MSR Card (Rel 2.0) GUI
Page 95

Advanced
System Settings
Adit MSR
Adit 3000 (Rel. 1.6) and MSR Card (Rel 2.0) GUI 2-59
Page 96

Advanced
System Settings
Defining an Outgoing Mail Server
Features that require the Adit to send e-mail (example: e-mail notification) require an outgoing SMTP
server to be defined.
1. Enter the host name of your outgoing SMTP server in the Server field.
2. Enter a “from” e-mail address in the From E-mail Address field.
Each e-mail requires a “from” address. Some outgoing servers refuse to forward e-mail without
a valid “from” address for anti-spam considerations.
2-60 Adit 3000 (Rel. 1.6) and MSR Card (Rel 2.0) GUI
Page 97

Advanced
Technical Information
Technical Information
Select Advanced/Technical Information to view technical information about the system, including
software version numbers and contact information.
As shown in the following screen shots, the technical information differs slightly between the Adit 3000
and MSR. For example, the MSR technical information includes the boot version, memory size, and
slot position in the Adit 600 chassis.
Adit 3500
Adit 3000 (Rel. 1.6) and MSR Card (Rel 2.0) GUI 2-61
Page 98

Advanced
Technical Information
Adit MSR
2-62 Adit 3000 (Rel. 1.6) and MSR Card (Rel 2.0) GUI
Page 99

Advanced
Technical Information
Configuration File
The Configuration File button on the Technical Information window displays the current configuration
file for the system. The configuration file can be saved, modified, and reloaded, if necessary.
This feature can simplify the process of modifying one or more variables of a configuration and loading
it onto the original or other Adits.
WARNING! ALL PASSWORDS ON THE SYSTEM WILL BE RESET TO DEFAULT VALUES WHEN THE
“REPLACE WITH THE NEW CONFIG FILE” OPTION IS SELECTED.
Field Definition
Save Configuration File The system walks you through the saving of the configuration.
Load Configuration File The system opens a new window and asks you to locate a configuration
file. Once located, you have the following options:
Merge in new config file - modify the configuration.
Replace with the new config file - replace the configuration.
Adit 3000 (Rel. 1.6) and MSR Card (Rel 2.0) GUI 2-63
Page 100

Advanced
Upgrade From a Local Computer
Upgrade From a Local Computer
This feature allows the user to easily upgrade the Adit software.
Upgrading the Software
1. Select Advanced/ Upgrade From a Local Computer.
2. Select the Browse button and select the upgrade file (example: adit3000_1_6.rmt).
3. Select OK to download the file.
4. If the download was successful, select OK to upgrade the system.
2-64 Adit 3000 (Rel. 1.6) and MSR Card (Rel 2.0) GUI
 Loading...