

Page 1

VVVVTT BByyppaassss IIII CCoonnttrroolllleerr
IInnssttaallllaattiioonn aanndd SSttaarrtt--uupp GGuuiiddee
CARRIER CORPORATION ©2019
A member of the United Technologies Corporation family · Stock symbol UTX · Catalog No. 11-808-601-01 · 1/25/2019
Page 2

www.hvacpartners.com
Document revision history
Verify that you have the most current version of this document from
office.
Important changes are listed in
CARRIER CORPORATION ©2019. All rights reserved throughout the world. i-Vu is a registered trademark of Carrier
Corporation. All other trademarks are the property of their respective owners.
at the end of this document.
or your local Carrier
Page 3

Introduction .................................................................................................................................................................. 1
Installing the VVT Bypass II ......................................................................................................................................... 6
Start-up ....................................................................................................................................................................... 22
Sequence of operation .............................................................................................................................................. 26
To adjust the driver properties.................................................................................................................................. 29
Troubleshooting ......................................................................................................................................................... 35
Compliance ................................................................................................................................................................ 39
Contents
What is a VVT Bypass II? ...................................................................................................................................... 1
Specifications ........................................................................................................................................................ 3
Safety Considerations .......................................................................................................................................... 5
Field-supplied hardware ...................................................................................................................................... 6
Mounting the VVT Bypass II ................................................................................................................................. 7
To mount the controller and actuator .................................................................................................. 7
Wiring the VVT Bypass II for power ................................................................................................................. 12
To wire the controller for power .......................................................................................................... 13
Addressing the VVT Bypass II ........................................................................................................................... 14
Wiring for communications .............................................................................................................................. 14
Wiring specifications for BACnet MS/TP and ARC156 ...................................................................... 14
To wire the controller to the BACnet network .................................................................................... 15
Wiring inputs and outputs ................................................................................................................................ 16
Wiring a Duct Air Temperature sensor to an input ............................................................................ 16
Wiring field-supplied actuators to the analog output ........................................................................ 17
Wiring and mounting the Equipment Touch to the Rnet port ........................................................... 20
Wiring the TruVu™ ET Display to the Rnet port ................................................................................. 21
Configuring the VVT Bypass II's properties .................................................................................................... 22
Performing system checkout ........................................................................................................................... 23
Bypass damper .................................................................................................................................... 23
Variable frequency drive (VFD) ........................................................................................................... 24
Duct static pressure control ............................................................................................................................. 26
LAT monitoring and limiting ............................................................................................................................. 26
Equipment fan off detection ............................................................................................................................ 27
Supply Air Temperature Alarm ........................................................................................................................ 27
Airside linkage .................................................................................................................................................... 27
Air source mode determination....................................................................................................................... 28
Driver ................................................................................................................................................................... 29
Device .................................................................................................................................................................. 30
Notification Classes ........................................................................................................................................... 31
Calendars ............................................................................................................................................................ 32
Common Alarms ................................................................................................................................................ 32
Specific Events ................................................................................................................................................... 33
Switches, Jumpers, Options ............................................................................................................................. 33
Flow Calibration Archive ................................................................................................................................... 33
Act Net Network Details ................................................................................................................................... 34
LED's .................................................................................................................................................................... 35
To get the serial number .................................................................................................................................. 36
To restore factory defaults ............................................................................................................................... 36
To replace the battery ....................................................................................................................................... 37
To clean the airflow sensor orifice .................................................................................................................. 37
FCC Compliance ................................................................................................................................................. 39
CE Compliance ................................................................................................................................................... 39
BACnet Compliance........................................................................................................................................... 39
Page 4

Contents
Appendix A: VVT Bypass II Points/Properties ......................................................................................................... 40
Appendix B: BACnet points list ................................................................................................................................ 45
Document revision history ........................................................................................................................................ 46
Status................................................................................................................................................................... 40
Unit Configuration .............................................................................................................................................. 40
Maintenance ....................................................................................................................................................... 42
Alarms ................................................................................................................................................................. 43
Linkage ................................................................................................................................................................ 43
I/O Points ............................................................................................................................................................ 44
Page 5

What is a VVT Bypass II?
NOTE
Introduction
The VVT Bypass II (#OPN-VVTBP-02), a component of the i-Vu® Control System, regulates the supply duct static
pressure by controlling one of the following:
• The system's bypass damper
The controller's damper actuator provides 45 in/lbs (5 Nm) of torque. If the actuator's torque is insufficient,
the VVT Bypass II can be used to drive an external high-torque actuator. Or, the controller can drive multiple
external damper actuators.
• The air source supply fan's variable frequency drive (VFD)
The VVT Bypass II controller is available in both English or Metric units. The metric version has (-M)
appended to the part number. Everything in this document applies to both versions.
The i-Vu Control System uses linkage to exchange data between the zone terminals and their air source to form a
coordinated HVAC system. The system's air source controller, zone controllers, and bypass controller are linked so
that their data exchange can be managed by one zone controller configured as the VVT Master.
You can disconnect the actuator from the controller and mount them separately, connecting them with just the
actuator cable or using an additional extension cable, up to a maximum distance of 300 feet.
The following illustration shows the VVT Bypass II in a typical i-Vu® Control System.
VVT Bypass II Controller CARRIER CORPORATION ©2019
Installation and Start-up Guide All rights reserved
1
Page 6

Introduction
NOTE
This document gives instructions for field-installation of a VVT Bypass II in an i-Vu® Control System.
VVT Bypass II Controller CARRIER CORPORATION ©2019
Installation and Start-up Guide All rights reserved
2
Page 7

Introduction
Specifications
CAUTION
Driver drv_bpopn02
Power 24 Vac ±10%, 50–60 Hz
14 VA power consumption
26 Vdc (25 V min, 28.8 V max)
Single Class 2 source only, 100 VA or less
Actuator Belimo brushless DC motor, torque 45 inch-pounds (5 Nm), runtime 154 seconds
Act Net port To connect the actuator cable and the VVT Bypass II
BACnet port
Rnet port You can connect:
Local Access port For system start-up and troubleshooting
Input 1 input for connecting the Duct air temperature sensor (#33ZCSENDAT)
For communication with the controller network using BACnet ARC156 (156 kbps)
or BACnet MS/TP (9600 bps – 76.8 kbps)
One Equipment Touch, using an external 24 Vac power supply
or
One TruVu™ ET Display, using an external 24 Vdc power supply
Input resolution 10 bit A/D
Analog output 1 analog output, 0–10 Vdc (5 mA max).
The controlled device must have a minimum of 2000 Ohms resistance measured
from its input to ground and must share the same ground as the controller.
Output resolution 8 bit D/A
Integral airflow sensor Precision differential pressure sensor 0–2 in. H2O, sensitive down to ±0.001 in.
H2O. Barbed tapered airflow connections accept 3/16 in. (4.75 mm) I.D. tubing.
Allows for readings across the 0–2 in. H2O range, accurate to ±5% of full flow at 2
in. H2O.
Battery 10-year Lithium CR2032 battery retains the following data for a maximum of
10,000 hours during power outages: control programs, editable properties,
schedules, and trends.
Protection Built-in surge and transient protection for power and communications in
compliance with EN61000-6-1.
Incoming power and network connections are protected by non-replaceable
internal solid-state polyswitches that reset themselves when the condition that
causes a fault returns to normal.
The power, network, input, and output connections are also protected against
transient excess voltage/surge events lasting no more than 10 msec.
To protect against large electrical surges on serial EIA-485
networks, place a PROT485 at each place wire enters or exits the building.
BT485 connector You attach a BT485 (not included) to a controller at the beginning and end of a
network segment to add bias and to terminate a network segment.
VVT Bypass II Controller CARRIER CORPORATION ©2019
Installation and Start-up Guide All rights reserved
3
Page 8

Introduction
Status indicators LEDs indicate status of communications, running, errors, power, and digital
outputs
Environmental operating
32 to 130°F (0 to 54.4°C), 10–90% relative humidity, non-condensing
range
Storage temperature range -24 to 140°F (-30 to 60°C), 0 to 90% relative humidity, non-condensing
Physical UL94-5VA plenum rated enclosure for installation in plenum (or other space for
environmental air) in accordance with NEC Section 300.22 (c) and (d)
Controller and actuator
overall dimensions
Width:
Height:
8.9 in. (22.7 cm)
5.9 in. (15.0 cm)
Controller and actuator
mounting dimensions
Controller overall
dimensions
Controller mounting
dimensions
Actuator overall dimensions Width:
Actuator mounting
7.1 in. (18.0 cm) from left side controller mounting hole centerline to actuator
mounting hole centerline
Width:
Height:
Depth:
6.4 in. (16.3 cm)
5.7 in. (14.5 cm)
2.1 in. (5.3 cm)
5.3 in. (13.4 cm) from left side controller mounting hole centerline to right side
controller mounting hole centerline
3.0 in. (7.6 cm)
Height:
Depth:
5.9 in. (15.0 cm)
2.5 in. (6.4 cm)
4.4 in. (11.2 cm) from shaft centerline to actuator mounting hole centerline
dimensions
Panel depth 2.5 in. (6.4 cm) minimum
Shaft dimensions Minimum shaft diameter: .25 in. (.64 cm)
Maximum shaft diameter: .63 in. (1.59 cm)
Minimum shaft length: 1.75 in. (4.45 cm)
Weight 1.8 lbs (0.82 kg)
BACnet support Conforms to the BACnet Advanced Application Controller (B-AAC) Standard Device
Profile as defined in ANSI/ASHRAE Standard 135-2012 (BACnet) Annex L,
Protocol Revision 9
Listed by UL-916 (PAZX), cUL-916 (PAZX7), FCC Part 15-Subpart B, Class B, CE
VVT Bypass II Controller CARRIER CORPORATION ©2019
Installation and Start-up Guide All rights reserved
4
Page 9

Introduction
Safety Considerations
CAUTION
WARNING Electrical Shock Hazard
WARNING
Air conditioning equipment will provide safe and reliable service when operated within design specifications. The
equipment should be operated and serviced only by authorized personnel who have a thorough knowledge of
system operation, safety devices, and emergency procedures.
Good judgment should be used in applying any manufacturer's instructions to avoid injury to personnel or damage
to equipment and property.
Failure to follow this warning could cause personal injury, death, and/or equipment damage.
Disconnect all power to the unit before performing maintenance or service. Unit may automatically start if power is
not disconnected.
materials such as mercury contactors.
Follow all local, state, and federal laws regarding disposal of equipment containing hazardous
VVT Bypass II Controller CARRIER CORPORATION ©2019
Installation and Start-up Guide All rights reserved
5
Page 10

Installing the VVT Bypass II
Field-supplied hardware
Installing the VVT Bypass II
To install the VVT Bypass II:
1 Mount the controller (page 7).
2 Wire the controller for power (page 12).
3 Set the controller's address (page 14).
4 Wire the controller to the BACnet MS/TP or BACnet ARC156 network (page 14).
5 Wire the inputs and outputs (page 16).
Each VVT Bypass II installation requires the following field-supplied components:
• damper
• damper actuator (if high-torque actuator or slaved dampers are required)
• duct air temperature sensor
• transformer— 24 Vac, 40VA
• wiring
VVT Bypass II Controller CARRIER CORPORATION ©2019
Installation and Start-up Guide All rights reserved
6
Page 11

Installing the VVT Bypass II
Mounting the VVT Bypass II
To mount the controller and actuator
Mount the VVT Bypass II on the bypass duct damper actuator shaft. For service access, allow at least 1 foot (.3 m)
of clearance between the front of the controller and adjacent surfaces.
To disconnect and mount the controller and actuator separately
VVT Bypass II Controller CARRIER CORPORATION ©2019
Installation and Start-up Guide All rights reserved
7
Page 12

Installing the VVT Bypass II
Act Net
Disconnect the actuator from the controller by inserting a screw driver in the slot on the back of the VVT Bypass II
and pressing the tab. The actuator cable or an attached extension cable must connect to the controller's
port.
1 Turn the damper shaft to fully close the damper.
2 Mount the controller to the VVT terminal by sliding the clamp assembly onto the damper shaft.
VVT Bypass II Controller CARRIER CORPORATION ©2019
Installation and Start-up Guide All rights reserved
8
Page 13

Installing the VVT Bypass II
NOTE
O-ring Bushing
Anti-rotation slot
NOTES
For service access, allow at least 1 foot (.3 m) of clearance between the front of the controller and
adjacent surfaces.
3 Secure the controller and the actuator by installing the screws, anti-rotation slot's bushings, and o-rings that
are supplied with the VVT Bypass II.
○ Center the bushing in the slot. Failure to do so may cause the actuator to stick or bind.
○ The VVT Bypass II must be secured, but loose enough to allow movement. of the damper shaft.
VVT Bypass II Controller CARRIER CORPORATION ©2019
Installation and Start-up Guide All rights reserved
9
Page 14

Installing the VVT Bypass II
CAUTIONS
must
○ You
use the screws, anti-rotation slot's bushings, and o-rings that are shipped with the VVT Bypass
II.
○ Overtightening the screws so that the controller and actuator cannot move may damage the unit.
4 Hold down the controller’s damper release button and rotate the actuator clamp in the same direction that
closed the damper. Rotate the clamp until it stops, then rotate it back one notch.
5 Release the button.
6 Tighten the actuator clamp to the damper shaft by tightening the two M5 nuts.
VVT Bypass II Controller CARRIER CORPORATION ©2019
Installation and Start-up Guide All rights reserved
10
Page 15

Installing the VVT Bypass II
High
NOTE
7 Hold down the actuator damper release button and rotate the damper from fully closed to fully open. If the
damper traveled less than 90 degrees, do the following to set the actuator's fully open position:
a) Loosen the appropriate stop clamp screw. See figure below.
b) Move the stop clamp until it contacts the
edge of the actuator cam.
c) Tighten the screw.
8 Hold down the actuator damper release button, rotate the damper to verify that it fully opens and closes, then
release the button.
9
10 Connect the tube provided to the controller's
connector. Using 1/4" poly tubing, connect the other end
to a duct static pressure probe (for example, Dwyer Instruments part #A-491, or the equivalent, for a 6”
length probe) located in the supply air duct downstream of the bypass damper, but before the first branching
of ductwork.
Tubing should be at least 2 ft. (.61 meters) long for stable airflow measurement. The combined high
and low tubing length should not exceed 16.4 ft. (5 meters) in order to ensure accurate measurements.
VVT Bypass II Controller CARRIER CORPORATION ©2019
Installation and Start-up Guide All rights reserved
11
Page 16

Installing the VVT Bypass II
Low
Wiring the VVT Bypass II for power
WARNING
CAUTIONS
11 Connect the controller's
return.
connector to open space for plenum return or to a room space if using ducted
• The VVT Bypass II is powered by a Class 2 power source. Take appropriate isolation measures when mounting
it in a control panel where non-Class 2 circuits are present.
• Carrier controllers can share a power supply as long as you:
• Maintain the same polarity.
• Use the power supply only for Carrier controllers.
Do not apply line voltage (mains voltage) to the controller's ports and terminals.
VVT Bypass II Controller CARRIER CORPORATION ©2019
Installation and Start-up Guide All rights reserved
12
Page 17

Installing the VVT Bypass II
To wire the controller for power
Gnd
24 Vac
Gnd
Power
Run
1 To access the screw terminal connectors, lift up the controller's cover by pulling the tabs located on both
sides of the controller's left mounting bracket.
2 Remove power from the power supply.
3 Pull the screw terminal connector from the controller's power terminals labeled
and
.
4 Connect the transformer wires to the screw terminal connector.
5 Apply power to the power supply.
6 Measure the voltage at the VVT Bypass II’s power input terminals to verify that the voltage is within the
operating range of 21.6–26.4 Vac.
7 Connect a 4-inch (10.2 cm) wire from
to the control panel.
8 Insert the screw terminal connector into the VVT Bypass II's power terminals.
9 Verify that the
LED is on and the
LED is blinking.
VVT Bypass II Controller CARRIER CORPORATION ©2019
Installation and Start-up Guide All rights reserved
13
Page 18

Installing the VVT Bypass II
Addressing the VVT Bypass II
Gnd
24 Vac
Tens (10's
Ones (1's
EXAMPLE
Tens (10's
Ones (1's
10's 1's
1
3
4
5
2
7
8
9
6
0
1
3
4
5
2
7
8
9
6
0
CAUTION
Wiring for communications
NOTE
Wiring specifications for BACnet MS/TP and ARC156
WARNING
You must give the VVT Bypass II an address that is unique on the network. You can address the VVT Bypass II
before or after you wire it for power.
1 If the VVT Bypass II has been wired for power, pull the screw terminal connector from the controller's power
terminals labeled
2 Using the rotary switches, set the controller's address. Set the
address, and set the
the
If the controller’s address is 25, point the arrow on the
and
) switch to 5.
. The controller reads the address each time you apply power to it.
) switch to the tens digit of the
) switch to the ones digit.
) switch to 2 and the arrow on
The factory default setting is 00 and must be changed to successfully install your VVT Bypass
II.
The VVT Bypass II communicates using BACnet on the following types of network segments:
• MS/TP communicating at 9600 bps, 19.2 kbps, 38.4 kbps, or 76.8 kbps
• ARC156 communicating at 156 kbps
For more networking details, see the Open Controller Network Wiring Installation Guide.
Cable: 22 AWG or 24 AWG, low-capacitance, twisted, stranded, shielded copper wire
Maximum length: 2000 feet (610 meters)
Do not apply line voltage (mains voltage) to the controller's ports and terminals.
VVT Bypass II Controller CARRIER CORPORATION ©2019
Installation and Start-up Guide All rights reserved
14
Page 19

Installing the VVT Bypass II
To wire the controller to the BACnet network
WARNING
Act Net
Gnd
24 Vac
Net +, Net -
Shield
NOTE
For...
Set BACnet ARC156 or MS/TP
jumper to...
Set DIP switches 1 and 2 to...
ARC156
MS/TP
MS/TP Baud
NOTE
terminating resistors on that network.
1 Pull the screw terminal connector from the controller's power terminals labeled
2 Check the communications wiring for shorts and grounds.
3 Connect the communications wiring to the controller’s screw terminals labeled
4 Set the communication type and baud rate.
Attaching any ARCNET or MS/TP network to the
Use the same polarity throughout the network segment.
port damages BT485s, DIAG485s, or
and
.
, and
.
ARC156
MS/TP
Use the same baud rate for all controllers on the network segment.
5 If the VVT Bypass II is at either end of a network segment, connect a BT485 to the VVT Bypass II.
6 Insert the power screw terminal connector into the VVT Bypass II's power terminals.
7 Verify communication with the network by viewing a Module Status report in the i-Vu® interface.
N/A. Baud rate will be 156 kbps regardless of the
The appropriate baud rate. See the
DIP switch settings.
diagram on the controller.
VVT Bypass II Controller CARRIER CORPORATION ©2019
Installation and Start-up Guide All rights reserved
15
Page 20

Wiring inputs and outputs
WARNING
CAUTION
Wiring a Duct Air Temperature sensor to an input
NOTE
warning could cause electrical shock, personal injury, or damage to the controller.
Disconnect electrical power to the VVT Bypass II before wiring it. Failure to follow this
• Do not run sensor or relay wires in the same conduit or raceway with Class 1 AC or DC service wiring.
• Do not abrade, cut, or nick the outer jacket of the cable.
• Do not pull or draw cable with a force that may harm the physical or electrical properties.
• Avoid splices in any control wiring.
Part #33ZCSENDAT
The VVT Bypass II must be connected to a Duct Air Temperature (DAT) sensor that monitors the temperature
of the air delivered by the air source.
This document gives instructions for wiring the sensor to the VVT Bypass II. For mounting and wiring
the sensor, see the Carrier Sensors Installation Guide.
Wiring specifications
Cable from sensor to controller: If <100 ft (30.5 meters) 22 AWG, unshielded
If >100 ft (30.5 meters) 22 AWG, shielded
Maximum length: 500 feet (152 meters)
VVT Bypass II Controller CARRIER CORPORATION ©2019
Installation and Start-up Guide All rights reserved
16
Page 21

Installing the VVT Bypass II
NOTE
Wiring field-supplied actuators to the analog output
NOTE
To wire and mount the DAT sensor
1 Wire the sensor to the controller. See diagram below.
Sensor wiring does not have polarity. The wires can be connected to either terminal.
2 Using electrical tape, insulate any exposed wire to prevent shorting.
You can wire a high-torque actuator or parallel actuators to the controller's 0–10 Vdc analog output.
You cannot use the VVT Bypass II's actuator if wiring external actuator(s) to the analog output.
VVT Bypass II Controller CARRIER CORPORATION ©2019
Installation and Start-up Guide All rights reserved
17
Page 22

Installing the VVT Bypass II
NOTE
High-torque actuators
You can wire one of the following Belimo actuators to the VVT Bypass II's analog output instead of using the
controller's 45 in.-lb (5 Nm) actuator.
NMX24-MFT P-10028 90 in.-lb (10 Nm) actuator with 0–10 Vdc control and 0–10 Vdc
feedback
AMX24-MFT P-10028 180 in.-lb (20 Nm) actuator with 0–10 Vdc control and 0–10 Vdc
feedback
1 Install the actuator according to the manufacturer's instructions.
2 Wire the actuator to the controller using the diagram below.
For proper operation and to prevent damage to the devices, use the same polarity for the actuator's
power and the VVT Bypass II's power.
VVT Bypass II Controller CARRIER CORPORATION ©2019
Installation and Start-up Guide All rights reserved
18
Page 23

Installing the VVT Bypass II
NOTE
Linked actuators
You can wire up to 4 of the following Belimo actuators to the VVT Bypass II's analog output. Link actuators
whose travel times and other parameters coincide.
LMX24-MFT P-10028 45 in.-lb (5 Nm) actuator with 0–10 Vdc control
NMX24-MFT P-10028 90 in.-lb (10 Nm) actuator with 0–10 Vdc control
AMX24-MFT P-10028 180 in.-lb (20 Nm) actuator with 0–10 Vdc control
1 Install the actuators according to the manufacturer's instructions.
2 Wire the actuators to the controller using the diagram below.
3 Set the direction rotation switch on each actuator to CW.
Maintain polarity if using the same power supply for more than one actuator.
VVT Bypass II Controller CARRIER CORPORATION ©2019
Installation and Start-up Guide All rights reserved
19
Page 24

Installing the VVT Bypass II
Wiring and mounting the Equipment Touch to the Rnet port
CAUTION
CAUTION
Rnet+
Rnet-
NOTE
Gnd
NOTE
provided by the equipment may be impaired.
For complete Equipment Touch installation instructions including wiring diagrams, see the Equipment Touch
Installation and Setup Guide.
Mounting
The Equipment Touch must be mounted within the building interior. You can mount the Equipment Touch:
• In a panel with the controller or on the panel door
• On a wall up to 500 feet from the controller
Wiring
• The Equipment Touch requires a 24 Vac power supply. It is not powered by the Rnet.
you:
○ Maintain the same polarity.
○ User the power supply only for Carrier controllers.
• You can also wire an external 10 kOhm, Type II thermistor (Carrier part# 33ZCT55SPT) to the Equipment
Touch.
Only one Equipment Touch can be connected to the Rnet, using a 2-conductor cable instead of the standard
4-conductor Rnet cable and follow the instructions below.
1 Turn off the VVT Bypass II's power.
2 Partially cut, then bend and pull off the outer jacket of the cable. Do not nick the inner insulation.
If the equipment is used in a manner not specified by the manufacturer, the protection
The Equipment Touch can share a power source with the Carrier controller as long as
1 Strip about .25 inch (.6 cm) of the inner insulation from each wire.
2 Wire the VVT Bypass II's
Touch's connector.
If using shielded wire, connect the shield wire and the ground wire to the
3 Connect the Equipment Touch to an external 24 Vac power source.
4 Turn on the VVT Bypass II's power.
5 Turn on the Equipment Touch.
You do not need to set an address for the Equipment Touch.
and
terminals to the terminals of the same name on the Equipment
terminal.
VVT Bypass II Controller CARRIER CORPORATION ©2019
Installation and Start-up Guide All rights reserved
20
Page 25

Installing the VVT Bypass II
Wiring the TruVu™ ET Display to the Rnet port
WARNING
24V DC
CAUTION
NOTE
RS485
Rnet
Gnd
Gnd, +
Rnet
+, -
Rnet -
Wiring power
Do not apply line voltage (main) - 24 Vdc power only.
Wire the TruVu™ ET Display
connector to the 24 Vdc power supply using 2-conductor 18 AWG wire.
Maximum distance 100 feet (30 meters).
The TruVu™ ET Display can share a power supply with the Carrier controller as long as:
• The power supply is DC power.
• You maintain the same polarity.
• You use the power source only for Carrier controllers.
Purchase a power supply from a third-party manufacturer.
Wiring communication
1 Turn off the VVT Bypass II's power.
2 Wire the TruVu™ ET Display's
to
using 2-conductor 22 AWG wire with a maximum distance of 500 feet (152 meters).
connector to the <ALCProduct>'s
port,
to
to
3 Turn on the VVT Bypass II's power.
VVT Bypass II Controller CARRIER CORPORATION ©2019
Installation and Start-up Guide All rights reserved
21
Page 26

Start-up
This interface...
Provides a...
Field Assistant
Equipment Touch
i-Vu®
System Touch
CAUTION
Configuring the VVT Bypass II's properties
NOTE
Start-up
Use one of the following interfaces to start up, access information, read sensor values, and test the controller.
application -
Runs on a laptop that connects to controller's Local Access port
device -
2
Connects to controller's Rnet port
application
Available for BACnet systems only
device
Available only for BACnet MS/TP systems.
1
Temporary or permanent
interface
Permanent interface
Temporary or permanent
interface
Temporary interface
Wire to a BACnet MS/TP network connector and a 24 Vac power supply 3
1
Requires a USB Link (Part #USB-L).
2
See the Equipment Touch Installation and Setup Guide for detailed instructions.
3
See the System Touch Installation and Setup Guide for detailed instructions.
If multiple controllers share power but polarity was not maintained when they were wired,
the difference between the controller's ground and the computer's AC power ground could damage the USB
Link and the controller. If you are not sure of the wiring polarity, use a USB isolator between the computer
and the USB Link. Purchase a USB isolator online from a third-party manufacturer.
To start up the VVT Bypass II, you must configure certain points and properties. Appendix A (page 40) is a
complete list of all the points and properties, with descriptions, defaults, and ranges. These properties affect
the unit operation and/or control. Review and understand the meaning and purpose of each property before
changing it.
See Appendix A (page 40) for a complete list of the controller's points/properties.
Engineering units shown in this document in the defaults and ranges are strictly for reference. You
must enter an integer only.
VVT Bypass II Controller CARRIER CORPORATION ©2019
Installation and Start-up Guide All rights reserved
22
Page 27

Start-up
Performing system checkout
Bypass damper
Properties
Control Program > Configuration > Service Configuration
Service Test
Service Test
Service Test
Properties
Control Program > Unit
Configuration
Bypass Control
Details
Damper Full Close
Damper Full Open
Zero Cal
Done
Apply
Properties > Control
Program
Configuration > Service Configuration > Service Test
Fan Test
Service Test
Properties
Control Program > Unit
Configuration
Bypass Control
Details
Target Damper Position
Duct Static
Pressure
Target Damper Position
Duct Static Pressure Setpoint
High
Duct
Static Pressure
Pressure Sensor Cal
Apply
High
Automatic Control
1 Verify the VVT Bypass II is securely fastened to the bypass damper shaft and duct work.
2 Verify duct air temperature sensor is installed at the inlet of the damper or in the air source supply duct
upstream of the bypass damper connection.
3 Verify that the high pressure tubing from the controller's airflow (pressure) sensor is connected to the
duct static pressure probe downstream of the bypass damper. Then verify that the low pressure
connector is not blocked.
4 Calibrate damper and pressure sensor:
a) Disable the air source heating, cooling, and fan outputs using one of the following methods:
• Physically disconnect the air source controller’s output wiring to the unit.
• In the i-Vu® or Field Assistant navigation tree, select the RTU Open controller. Go to
Make sure all
other outputs under
b) Select the Bypass controller in the tree, then go to
c) Click
d) Click
e) Click
f) Enable the air source fan output using one of the following methods:
g) Select the Bypass controller in the tree, then go to
h) After the static pressure has stabilized, make sure that
i) Using a branch-tee, connect a magnehelic gauge to the
j) Remove the magnehelic gauge from the
k) Click
.
• Physically connect the air source controller’s fan enable wiring at the unit.
• In the i-Vu® or Field Assistant tree, select the RTU Open controller. Go to
other outputs under
adjust the
sensor, then measure the static pressure. If the measured static pressure is different from the
the button, then click
>
to close the bypass damper and zero the pressure sensor. When
>
>
are not locked and that
, then verify that the damper is fully closed.
, then verify that the damper is fully open.
by ±.05 in. (+.012 kPa), click
to return the bypass to normal control.
are disabled.
>
tab.
are disabled.
>
tab.
slightly to get the damper within this range.
.
connector, then reinsert the pressure tubing.
>
>
, then enable
>
is >0% and <100%. You may have to
connector on the controller's airflow
, then enable
, enter the measured value next to
. Make sure all
appears, click
and
>
.
VVT Bypass II Controller CARRIER CORPORATION ©2019
Installation and Start-up Guide All rights reserved
23
Page 28

Start-up
Properties > Control
Program > Configuration > Service Configuration > Service Test
Service Test
Fan
Test
Service Test
CAUTION
Variable frequency drive (VFD)
VFD/ACT
Properties > Control Program
Unit Configuration
Control Device Type
VFD
Properties
Control Program > Configuration > Service Configuration
Service Test
Service Test
Service Test
Properties
Control Program > Unit
Configuration
Bypass Control
Details
Damper Full Open
VFD/ACT
Gnd
Damper Full Close
VFD/ACT
Gnd
Zero Cal
Done
Apply
Properties > Control
Program
Configuration > Service Configuration > Service Test
Fan Test
Service Test
Properties
Control Program > Unit
Configuration
Bypass Control
Details
Target Damper Position
Duct Static
Pressure
Target Damper Position
Duct Static Pressure Setpoint
l) Enable the air source’s heating and cooling outputs using one of the following methods:
• Reconnect the air source controller’s output wiring at the unit.
• In the i-Vu® or Field Assistant tree, select the RTU Open controller. Go to
. Make sure all other outputs under
are disabled.
, then disable
and
Pressing the actuator release button and moving the damper or disconnecting the actuator
ribbon connector while the bypass controller is powered will cause the damper position to be out of
calibration. To recalibrate the damper position, you must perform steps 4c and 4d above or power cycle the
controller.
1 Verify that the controller's
configured for a 0-10 Vdc control signal.
2 In the i-Vu® or Field Assistant tree, select the Bypass controller. Go to
3 Verify duct air temperature sensor is installed in the air source supply duct.
4 Verify that the high pressure tubing from the controller's airflow (pressure) sensor is connected to the
duct static pressure probe downstream of the bypass damper. Then verify that the low pressure
connector is not blocked.
5 Calibrate the VFD and pressure sensor:
a) Disable the air source heating, cooling, and fan outputs using one of the following methods:
• Physically disconnect the air source controller’s output wiring to the unit.
• In the i-Vu® or Field Assistant navigation tree, select the RTU Open controller. Go to
Make sure all
other outputs under
b) Select the Bypass controller in the tree, then go to
c) Click
d) Click
e) Click
>
to zero the pressure sensor. When
f) Enable the air source fan output using one of the following methods:
• Physically connect the air source controller’s fan enable wiring at the unit.
• In the i-Vu® or Field Assistant tree, select the RTU Open controller. Go to
>
other outputs under
g) Select the Bypass controller in the tree, then go to
>
h) After the static pressure has stabilized, make sure that
adjust the
are not locked and that
, then verify that
, then verify the voltage at
, then verify the voltage at
output wiring is correctly connected to the VFD and that the VFD is
is set to
.
>
, then enable
are disabled.
>
tab.
>
and
and
appears, click
is 0 Vdc.
is 10 Vdc.
.
, then enable
. Make sure all
are disabled.
>
tab.
>
and
is >0% and <100%. You may have to
slightly to get the damper within this range.
>
>
.
VVT Bypass II Controller CARRIER CORPORATION ©2019
Installation and Start-up Guide All rights reserved
24
Page 29

Start-up
High
Duct
Static Pressure
Pressure Sensor Cal
Apply
High
Automatic Control
Properties > Control
Program > Configuration > Service Configuration > Service Test
Service Test
Fan
Test
Service Test
i) Using a branch-tee, connect a magnehelic gauge to the
connector on the controller's airflow
sensor, then measure the static pressure. If the measured static pressure is different from the
the button, then click
j) Remove the magnehelic gauge from the
k) Click
by ±.05 in. (+.012 kPa), click
.
to return the bypass to normal control.
, enter the measured value next to
connector, then reinsert the pressure tubing.
l) Enable the air source’s heating and cooling outputs using one of the following methods:
• Reconnect the air source controller’s output wiring at the unit.
• In the i-Vu® or Field Assistant tree, select the RTU Open controller. Go to
. Make sure all other outputs under
are disabled.
, then disable
and
VVT Bypass II Controller CARRIER CORPORATION ©2019
Installation and Start-up Guide All rights reserved
25
Page 30

Sequence of operation
Duct static pressure control
NOTE
NOTE
NOTE
LAT monitoring and limiting
Minimum Cooling SAT
Maximum Heating SAT
LAT Duct Static Pressure
Setpoint
LAT Duct Static Pressure Setpoint
Maximum Heating SAT
Minimum Cooling SAT
Controlling Pressure Setpoint
LAT Airflow Increase
Sequence of operation
The VVT Bypass II maintains supply duct static pressure under all system operating conditions and can
operate as part of a linked VVT system or as a stand-alone controller.
The VVT Bypass II modulates a bypass damper or VFD to maintain the static pressure in the supply duct of the
pressure-dependent VVT system. The VVT Bypass II has a damper actuator that provides 45 in./lbs (5 Nm) of
torque.
You can use the controller's 0–10 Vdc output to:
• Drive a larger actuator if the VVT Bypass II's actuator's torque is insufficient. The actuator must be
installed so that 0 volts causes the bypass damper to fully open. See
actuator.
below and High-torque
• Drive multiple damper actuators from a single bypass controller. See
• Control a VFD
You cannot use the VVT Bypass II's actuator if external actuator(s) are wired to the analog output.
If linkage is active, normal duct static pressure control is overridden if the linked air source is in either of the
following modes:
• Fire shutdown or evacuation mode – The bypass damper will be fully open. If controlling a VFD, the VFD
output will be at 0%.
• Pressurization mode – The bypass damper will be fully closed. If controlling a VFD, the VFD output will be
at 100%.
To protect the air source from excessive supply air temperature conditions, the VVT Bypass II monitors the
supply air temperature. If the temperature reaches either the
the
which increases airflow through the air source.
The amount of increase in airflow is related to the square root of the pressure increase. For example, a 25%
increase in airflow at 1 in. (.249 kPa) of static pressure would require a 56% increase in duct static pressure
[1 in.H2O (.249 kPa) * 1.252 = 1.56 in. H2O (.388 kPa)]. The default
in.H
O (.199 kPa) provides a maximum 25% increase in airflow over the default Duct Static Pressure Setpoint
2
of .5 in.H
the
O (.125 kPa). [.5 in.H2O (.125 kPa)* 1.252 = .75 [~.8] in.H2O (.199 kPa)]. When the LAT exceeds
2
condition and displays the
[120° F (48.9°C) default], the Bypass controls to the
or
below and Linked actuators.
[45°F (7.2°C) default] or
of 0.8
, the controller detects and indicates the excessive LAT
and the associated
(%).
VVT Bypass II Controller CARRIER CORPORATION ©2019
Installation and Start-up Guide All rights reserved
26
Page 31

Sequence of operation
Supply Air Temperature Alarm
Equipment fan off detection
Supply Air Temperature Alarm
Maximum
Heating SAT
Minimum Cooling SAT
Airside linkage
The Bypass does not resume normal control to the Duct Static Pressure Setpoint until the SAT drops 15 °F
(8.3
°C) below the Maximum Heating Sat or rises 7 °F (3.9 °C) above the Minimum Cooing Setpoint.
If the supply air temperature exceeds the configured limits, a
is generated. If
Linkage is active, the controller monitors the supply air temperature from the equipment rather than its own
temperature input for faster response.
The VVT Bypass II continuously monitors its damper's position and the supply duct static pressure. If the
pressure drops below 10% of the nominal setpoint and the bypass damper is fully closed (or VFD is
commanded to maximum speed), after 1 minute the controller assumes that the equipment fan turned off.
The bypass damper then modulates to 65% open and the VFD speed is commanded to 35% (3.5 volts) to
facilitate a fan restart. The controller monitors the static pressure to determine when the equipment fan
restarts. If it rises above 10% of the nominal pressure setpoint, the controller assumes the fan restarted and
controls to maintain the duct static pressure setpoint. If Linkage is active, the air source mode is provided to
the VVT Bypass II.
The VVT Bypass II generates an alarm if the supply air temperature remains above the configured
or below the configured
When the VVT Bypass II is part of a linked system, it uses data received through Linkage (equipment SAT and
mode) to detect excessive leaving air temperature (LAT) conditions at the equipment and equipment
operating mode.
for more than 5 minutes.
VVT Bypass II Controller CARRIER CORPORATION ©2019
Installation and Start-up Guide All rights reserved
27
Page 32

Sequence of operation
Air source mode determination
Linked air source modes
OFF
WARMUP
HEAT
FREECOOL
COOL
PRESSURIZATION
EVACUATION
VENT
– In a linked system, the air source determines its operating mode and qualifies
that mode based on its own SAT. The following modes can be sent by the air source depending on its
capability and configuration:
Air source fan is off. Terminal damper is positioned approximately 70%
open to allow for system restart.
Air source fan is on and providing first cycle of heat when changing from
unoccupied to occupied. It may also be used as an equipment safety to
increase system airflow. The terminal’s heating setpoint temporarily
increases to the midpoint between the configured occupied heating and
occupied cooling setpoints.
Air source fan is on and providing heat. The terminal modulates its primary
air damper to maintain the current heating setpoint.
Air source fan is on and providing cooling using only the economizer and
usually during an unoccupied period. The terminal modulates its primary air
damper to maintain the midpoint between the configured occupied heating
and occupied cooling setpoints.
Air source fan is on and providing cooling. The terminal modulates its
primary air damper to maintain the current cooling setpoint.
Air source supply fan is on usually as a result of a fire-life safety input being
active. It may also be used as an equipment safety to increase system
airflow. The terminal modulates its primary air damper to provide the
configured maximum cooling airflow.
Evacuation is usually the result of a fire-life safety input at the air source
being active. The terminal fully closes its primary air damper and disables
its terminal fan, if equipped.
All terminals treat VENT mode the same as the COOL mode. For VVT
terminals, VENT modes allows for an increase in airflow. VVT terminals use
the greater of the configured Vent Damper Position or the Minimum Cooling
Damper Position as the minimum during the VENT mode.
See the air source’s installation manual for more specific operation.
VVT Bypass II Controller CARRIER CORPORATION ©2019
Installation and Start-up Guide All rights reserved
28
Page 33

To adjust the driver properties
Driver Properties
Properties
Driver
Driver
Driver
Settings
TouchScreen Control
TouchScreen Schedule Edit
Enable
Module Clock
Clock Fail Date and Time
TIP
Time Synch Sensitivity
(seconds)
Network Microblocks
Number of poll retries before
Network Input Microblocks
indicate failure
Periodic rebinding interval
To adjust the driver properties
Use the following if you want to change the driver's properties in the i-Vu® interface.
1 On the i-Vu® navigation tree, right-click the VVT Bypass II and select
2 Make changes as needed on the
page for
and any of its children.
.
On the
page >
below.
tab, you can change the Module clock synchronization and failure. See table
This field is checked automatically to allow a user to edit this controller's
schedules from an Equipment Touch's Schedules screen. Uncheck to disable.
Date and time the control program uses when controller's time is invalid.
Use an occupied date and time (such as a Tuesday at 10 a.m.) so the
equipment does not operate in unoccupied mode if the controller loses power
during occupancy.
When the controller receives a time sync request, if the difference between the
controller's time and the time sync's time is greater than this field's value, the
controller's time is immediately changed. If the difference is less than this field's
value, the controller's time is slowly adjusted until the time is correct.
The maximum number of retries after the initial attempt that a Network
microblock will attempt to communicate with its target device. If unsuccessful, the
point will transition to an idle state for 30 seconds before attempting to
communicate again. Change this field only if directed by Technical Support.
If a microblock uses a wildcard in its address, this timer determines how often the
microblock will attempt to find the nearest instance of its target. For example, if
an outside air temperature address uses a wildcard, a VAV application will look for
the outside air temperature on the same network segment or on the nearest
device containing that object.
VVT Bypass II Controller CARRIER CORPORATION ©2019
Installation and Start-up Guide All rights reserved
29
Page 34

To adjust the driver properties
BACnet COV Throttling
Enable COV Throttling
Excessive COV
Common Alarms
Trend Sampling
Collect a daily midnight
sample for all points in this
controller that are sampling
on COV
Device
Device
Configuration
NOTE
Max Masters and Max Info
Frames
Under normal circumstances, COV Throttling should be enabled to prevent
excessive network traffic if an object's COV Increment is set too low. See
EXCEPTION below.
When enabled, if an object generates excessive COV broadcasts (5 updates in 3
seconds), the driver automatically throttles the broadcasts to 1 per second. Also,
if the object's value updates excessively for 30 seconds, an alarm is sent to the iVu® application listing all objects that are updating excessively. A Return-tonormal alarm is sent only after all objects have stopped updating excessively.
EXCEPTION: In rare circumstances, such as process control, a subscribing object
may require COV updates more frequently than once per second. For these
situations, clear this checkbox, but make sure that your network can support the
increased traffic. You will also need to disable the
the driver's
.
alarms under
For values that change infrequently, select to verify at midnight daily that the
point is still able to communicate trend values.
On the
• BACnet device object properties for the VVT Bypass II
• VVT Bypass II network communication
page, you can view the following properties:
The three APDU fields refer to all networks over which the VVT Bypass II
communicates.
Apply only if the VVT Bypass II is on an MS/TP network.
VVT Bypass II Controller CARRIER CORPORATION ©2019
Installation and Start-up Guide All rights reserved
30
Page 35

To adjust the driver properties
Notification Classes
Priorities
NOTE
Priority range
Network message priority
Priority of Off-Normal
Priority of Fault
Priority of Normal
Ack Required for Off-Normal,
Fault, and Normal
TIP
Alarm
Enable/Disable
Recipient List
Recipients
Add
Recipient Description
Recipients
Recipient Type
Address
Issue Confirmed
Notifications). This use is rare.
Recipient Device Object
Identifier
Device Instance
#
Process Identifier
Issue Confirmed
Notifications
Transitions to Send
Alarms in the i-Vu® application use Notification Class #1. A BACnet alarm's Notification Class defines:
• Alarm priority for Alarm, Fault, and Return to Normal states
• Options for BACnet alarm acknowledgment
• Where alarms should be sent (recipients)
00–63 Life Safety
64–127 Critical Equipment
128–191 Urgent
192–255 Normal
BACnet priority for Alarms.
BACnet priority for Fault messages.
BACnet priority for Return-to-normal messages.
BACnet defines the following Network message priorities for Alarms and
Events.
Specifies whether alarms associated with this Notification Class require a BACnet
Acknowledgment for Off-Normal, Fault, or Normal alarms.
You can require operator acknowledgment for an Alarm or Return-to-
normal message (stored in the i-Vu® database). In the i-Vu® interface on the
>
source or an alarm category.
tab, change the acknowledgment settings for an alarm
The first row in this list is from the i-Vu® application. Do not delete this row. Click
if you want other BACnet devices to receive alarms associated with this
Notification Class.
Name that appears in the
Use
table.
(static binding) for either of the following:
• Third-party BACnet device recipients that do not support dynamic binding
When you want alarms to be broadcast (you must uncheck
•
Days and times The days and times during which the recipient will receive alarms.
Type the
the
field.
from the network administrator for third-party devices in
Change for third-party devices that use a BACnet Process Identifier other than 1.
The i-Vu® application processes alarms for any 32-bit Process Identifier.
Select to have a device continue sending an alarm message until it receives
delivery confirmation from the recipient.
Uncheck the types of alarms you do not want the recipient to get.
VVT Bypass II Controller CARRIER CORPORATION ©2019
Installation and Start-up Guide All rights reserved
31
Page 36

To adjust the driver properties
Calendars
Schedules
Common Alarms
Common alarms:
• Module Halted
Excessive COV
Module Generated Alarm
Description
Alarms
Events
Alarm Category and Alarm
Template
Enable
Notification Class
Calendars are provided in the driver for BACnet compatibility only. Instead, use the
Vu® interface.
On these pages, you can enable/disable, change BACnet alarm properties, or set delays for the following
BACnet alarms:
• All Programs Stopped
• Duplicate Address
• Locked I/O
• Control Program
• Program Stopped
•
Short message shown on the i-Vu®
type of alarm is generated.
feature in the i-
page or in an alarm action when this
VVT Bypass II Controller CARRIER CORPORATION ©2019
Installation and Start-up Guide All rights reserved
32
See Alarms in i-Vu® Help.
Clear these checkboxes to disable Alarm or Return to normal messages of this
type from this controller.
Do not change this field.
Page 37

To adjust the driver properties
Specific Events
Specific alarms:
NOTES
Module Generated Alarm
Description
Alarms
Events
Alarm Category and Alarm
Template
Enable
Notification Class
Switches, Jumpers, Options
Switches, Jumpers, Options
Flow Calibration Archive
Flow Calibration Archive
On these pages, you can enable/disable, change BACnet alarm properties, or set delays for the following
BACnet alarms:
• Flow Control Alarm
• Reheat Valve Alarm (future use)
• To set up alarm actions for controller generated alarms, see See Alarms in i-Vu® Help.
• Reheat Valve Alarms are for future use.
Short message shown on the i-Vu®
Clear these checkboxes to disable Alarm or Return to normal messages of this
Do not change this field.
The
page shows the current physical settings on the VVT Bypass II.
type of alarm is generated.
See Alarms in i-Vu® Help.
type from this controller.
page or in an alarm action when this
VVT Bypass II Controller CARRIER CORPORATION ©2019
Installation and Start-up Guide All rights reserved
33
The
Test and Balance tool.
page shows measured flow and sensor readings that were entered in the i-Vu®
Page 38

To adjust the driver properties
Act Net Network Details
NOTE
Act Net
CAUTION
Duplicate address on network
No communication with device
Device
Status
Act Net Address Setting
Act Net Statistics
The actuator serial numbers are automatically read and filled in by the i-Vu® application. Only those devices
that are physically connected or in the control program will show in the table.
See To get the Carrier VVT Bypass II serial number (page 36) for the controller serial number.
The
network shows the VVT Bypass II’s actuator has Address 1.
, contact Carrier Control Systems Support. Do not use
If you see
Carrier Control Systems Support.
or
under
unless directed by
VVT Bypass II Controller CARRIER CORPORATION ©2019
Installation and Start-up Guide All rights reserved
34
Page 39

Troubleshooting
NOTE
LED's
If this LED is on...
Status is...
Power
Rx
Tx
CW
CCW
Run
Error
If Run LED shows...
And Error LED shows...
Status is...
Run
Run
Run
Troubleshooting
If you have problems mounting, wiring, or addressing the VVT Bypass II, contact Carrier Control Systems
Support.
To help you troubleshoot, obtain a Module Status (Modstat) from the controller and review the System
Error and Warning details.
The LED's on the VVT Bypass II show the status of certain functions. Verify the LED patterns by cycling power
to the controller and noting the lights and flashes.
The VVT Bypass II has power.
The VVT Bypass II is receiving data from the network segment
The VVT Bypass II is transmitting data over the network segment
The actuator motor is turning clockwise
The actuator motor is turning counterclockwise
The
and
LED's indicate controller and network status.
2 flashes per second Off Normal
2 flashes per second 2 flashes,
alternating with
2 flashes per second 3 flashes,
then off
2 flashes per second 1 flash per second The controller is alone on the network
2 flashes per second On Exec halted after frequent system errors or
5 flashes per second On Exec start-up aborted, Boot is running
5 flashes per second Off Firmware transfer in progress, Boot is running
Five minute auto-restart delay after system error
LED
The controller has just been formatted
control programs halted
VVT Bypass II Controller CARRIER CORPORATION ©2019
Installation and Start-up Guide All rights reserved
35
7 flashes per second 7 flashes per second,
alternating with
14 flashes per second 14 flashes per second,
alternating with
Ten second recovery period after brownout
LED
Brownout
LED
Page 40

Troubleshooting
If Run LED shows...
And Error LED shows...
Status is...
Replace the VVT Bypass II.
To get the serial number
Core
Main) board hardware
Module Status
To restore factory defaults
CAUTION
Gnd
24 Vac
Format Short pins
Error
Run
On On Failure. Try the following solutions:
If you need the VVT Bypass II's serial number when troubleshooting, the number is on a Module Status report
(Modstat) under
To obtain a modstat in the i-Vu® interface:
1 Select the VVT Bypass II in the navigation tree.
2 Right-click and select
(or
• Turn the VVT Bypass II off, then on.
• Format the VVT Bypass II.
• Download memory to the VVT Bypass II.
•
.
reconfigure all custom settings. It is recommended to restore the factory defaults only under the guidance of
Carrier Control Systems Support.
To erase volatile memory data and restore factory default configuration settings:
1 Pull the screw terminal connector from the controller's power terminals labeled
sure the address switches are not set to 0, 0.
2 Short the
3 Insert the power screw terminal connector into the VVT Bypass II's power terminals.
4 Continue to short the jumper until the
5 Remove the short.
VVT Bypass II Controller CARRIER CORPORATION ©2019
Installation and Start-up Guide All rights reserved
36
This erases all archived information and user-configuration settings. You will have to
and
jumper’s pins and maintain the short for steps 3 and 4.
LED flashes three times in sync with the
LED.
. Make
Page 41

Troubleshooting
To replace the battery
CAUTION
To clean the airflow sensor orifice
High
Low
If the VVT Bypass II experiences a power outage and the control program stops functioning, replace the
battery.
You need to replace the battery if the voltage measures below 2.9 volts when the controller is not powered.
1 Verify that the VVT Bypass II's power is on.
data will be lost.
2 Remove the VVT Bypass II's cover.
3 Remove the battery from the controller, making note of the battery's polarity.
4 Insert the new battery, matching the battery's polarity with the polarity indicated on the controller's cover.
5 Replace the VVT Bypass II's cover.
6 Download the VVT Bypass II.
If the controller's power is not on when replacing the battery, your date, time, and trend
In less than .02% of installations, small particulates (micron/submicron-level) can build up in the airflow
sensor's internal orifice causing airflow restriction. Symptoms of airflow restriction are:
• Diffuser noise increases over time
• Space overcools at minimum airflow
• Frequency of dampers opening to maintain flow setpoint increases over time
• AHU fan speed increases over time
To check for these symptoms, set up trending of:
• Damper position to look for long term increase
• AHU fan speed for maintaining static pressure
If you see these symptoms, you should clean the flow sensor.
To clean the flow sensor
You can use a can of compressed air to clean the sensors while the controller is installed or on a repair
bench.
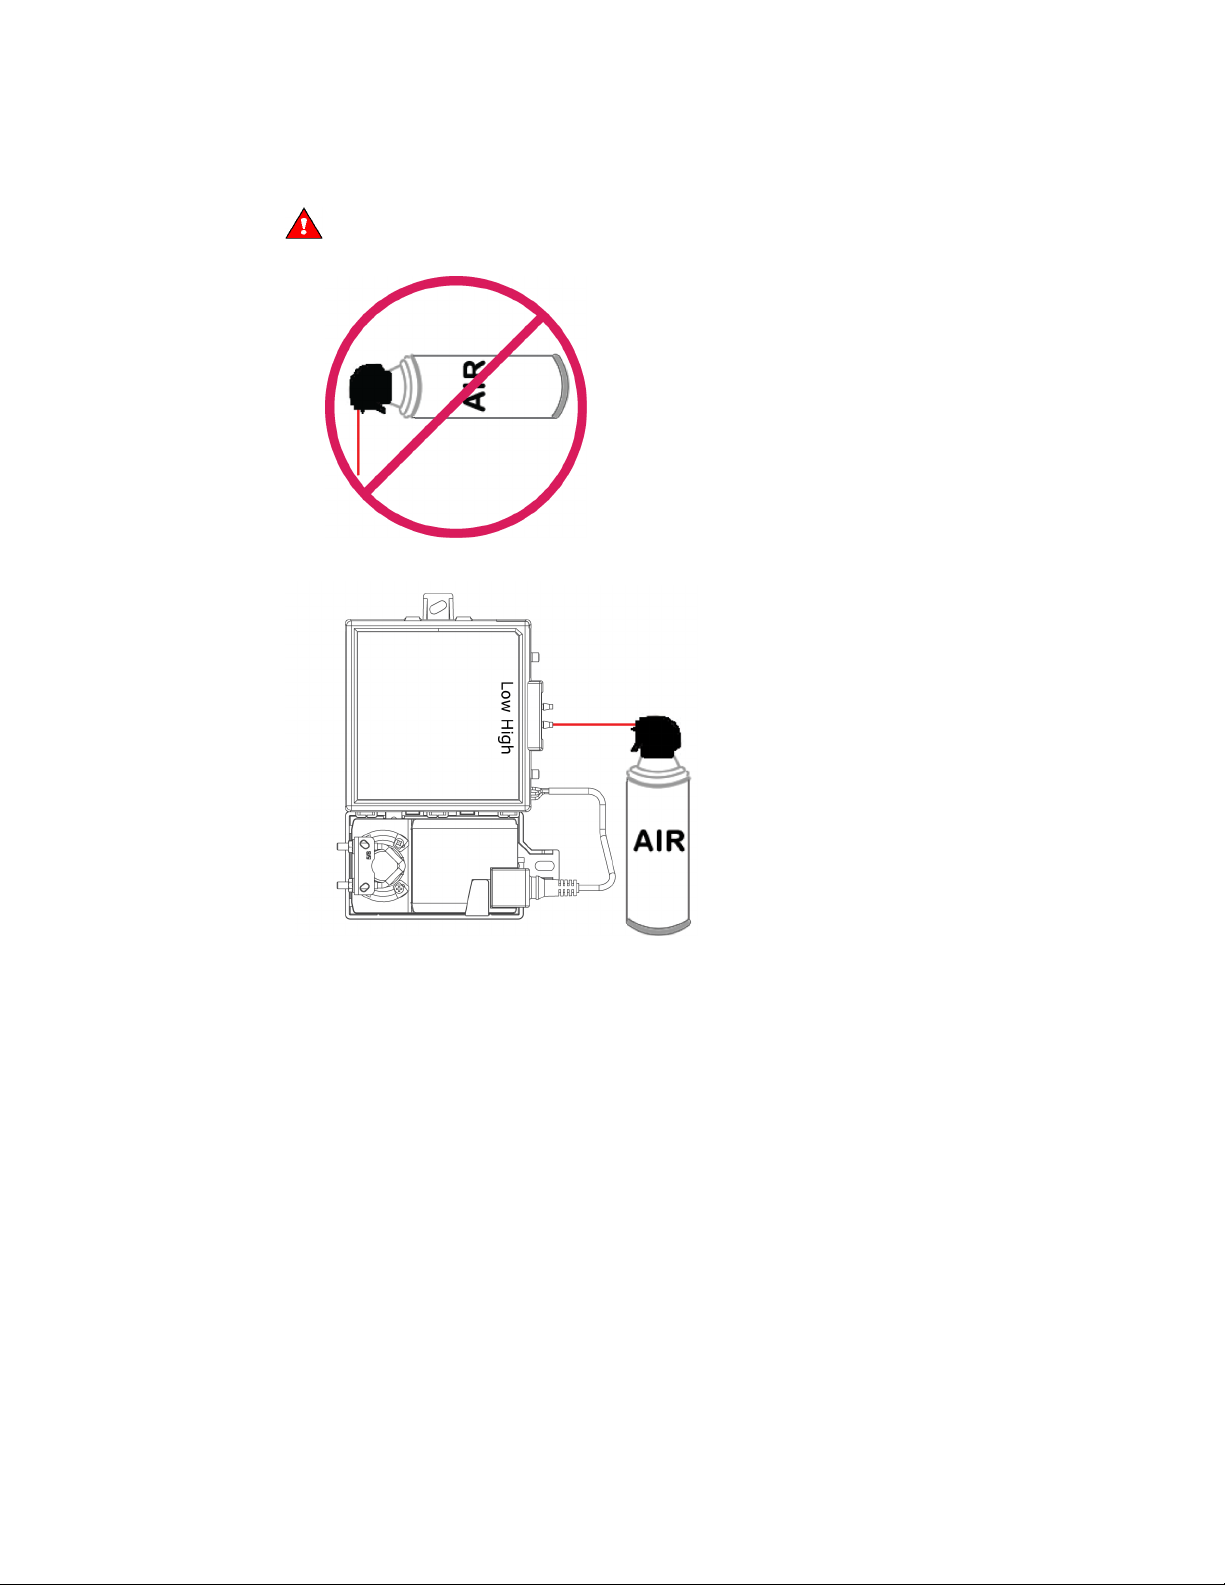
1 Disconnect the
and
flow sensor tubes.
VVT Bypass II Controller CARRIER CORPORATION ©2019
Installation and Start-up Guide All rights reserved
37
Page 42
Troubleshooting
High
WARNING
High
Low
2 Insert the compressed air straw 1/4" into the controller's
The compressed air can MUST be upright. It will damage the flow sensors by producing
ice crystals if the can is on its side.
connector.
3 Press the air can's trigger twice for no more than 2 seconds each time.
4 Reconnect tubing to the
and
flow sensor tubes.
VVT Bypass II Controller CARRIER CORPORATION ©2019
Installation and Start-up Guide All rights reserved
38
Page 43

Compliance
FCC Compliance
IMPORTANT
NOTE
CE Compliance
WARNING
BACnet Compliance
Compliance
This device complies with Part 15 of the FCC Rules. Operation is subject to the following two conditions:
1 This device may not cause harmful interference.
2 This device must accept any interference received, including interference that may cause undesired
operation.
user's authority to operate the equipment.
This equipment has been tested and found to comply with the limits for a Class B digital device,
pursuant to Part 15 of the FCC Rules. These limits are designed to provide reasonable protection against
harmful interference when the equipment is operated in a residential installation. This equipment generates,
uses, and can radiate radio frequency energy, and if it is not installed and used in accordance with this
document, it may cause harmful interference to radio communications. However, there is no guarantee that
interference will not occur in a particular installation. If this equipment does cause harmful interference to
radio or television reception, which can be determined by turning the equipment off and on, the user is
encouraged to try to correct the interference by one or more of the following measures:
• Reorient or relocate the receiving antenna.
Any changes or modifications not expressly approved by manufacturer could void the
• Increase the separation between the equipment and receiver.
• Connect the equipment into an outlet on a circuit different from that to which the receiver is connected.
• Consult the dealer or an experienced radio/TV technician for help.
This is a Class B product. In a light industrial environment, this product may cause radio
interference in which case the user may be required to take adequate measures.
Compliance of listed products to requirements of ASHRAE Standard 135 is the responsibility of BACnet
International. BTL
VVT Bypass II Controller CARRIER CORPORATION ©2019
Installation and Start-up Guide All rights reserved
39
®
is a registered trademark of BACnet International.
Page 44

Appendix A: VVT Bypass II Points/Properties
NOTE
Status
Navigation:
i-Vu® / Field Assistant:
Properties > Control Program > Status
Point Name/Description
Range
Static Pressure - Prime Variable
Supply Air Temperature
Airside Linkage Status
Active
Airside Linkage Status
Not Active
Damper Position
Control Device Type
Actuator
VFD output
Control Device Type
VFD
LAT Control
LAT Airflow Increase
LAT Control
LAT Duct Static Pressure Setpoint
Controlling Pressure Setpoint
Unit Configuration
Navigation:
i-Vu® / Field Assistant:
Properties > Control Program > Unit Configuration
Point Name/Description
Default/Range
Control Device Type
Power Fail Restart Delay
Automatic Deadband Adjustment
Appendix A: VVT Bypass II Points/Properties
Engineering units shown in this document in the defaults and ranges are strictly for reference. You
must enter an integer only.
– The current supply duct static pressure. This value is
shown on the default area graphic in i-Vu or Field Assistant.
– If
is
current supply air temperature. If
the local SAT sensor.
position.
– If
– If
is
is
, this is the current VFD speed capacity. R: 0 to 100%
, this is the current open damper
– The status of LAT Limit duct static pressure override control of the
bypass.
– If
is On, this is the percent of increase in supply
airflow that the overriding
normal
.
, this is the air source’s
is
, this value is from
will provide above the
R:
0 to 2.0 in. H2O
(0 to .498 kPa
R: -56 to 245°F
(-48.9 to 118.3°C)
R: 0 to 100%
R: On/Off
R: 0 to 100%
– The device the controller uses to control static pressure. D:
– How long the controller delays normal operation after the
power is restored.
– If using an actuator, set to Enable to automatically
adjust the damper for full travel to correctly scale the damper position. If using a VFD
drive, set to Disable.
VVT Bypass II Controller CARRIER CORPORATION ©2019
Installation and Start-up Guide All rights reserved
40
Actuator
R:
Actuator/VFD drive
D:
60 seconds
R:
0 to 600 secs
D:
Enable
R:
Enable/Disable
Page 45

Appendix A: VVT Bypass II Points/Properties
Point Name/Description
Default/Range
Maximum Heating SAT
LAT Duct Static Pressure Setpoint
Supply Air Temperature Alarm
Minimum Cooling SAT
Supply Air Temperature Alarm
Pressure Control Deadband
CAUTION
Bypass Control
Direction Clockwise
Duct Static Pressure Setpoint
LAT Duct Static Pressure Setpoint
Maximum Heating SAT
Minimum Cooling SAT
Duct Static Pressure Setpoint
Locks
CAUTION
Duct Static Pressure
Target damper position
– The value that the SAT must exceed to cause the static
pressure setpoint to be set to the
. This is also the
's high limit.
– The minimum low limit value that the SAT must exceed to
cause the static pressure setpoint to be set to the LAT Duct Static Pressure Setpoint.
This is also the
's low limit.
– The amount that is added to and subtracted from the
bypass controlling setpoint (Duct Static Pressure Setpoint or LAT Duct Static Pressure
Setpoint). When the static pressure is within the controlling setpoint +/- this value, the
output to the actuator or VFD drive maintains at its current position. When the static
pressure is greater than the controlling setpoint +/- this value, the output modulates
accordingly.
If this value is too low, the damper may oscillate to maintain the static
pressure. This could cause the actuator to fail prematurely.
clockwise.
(Only in the i-Vu®/Field Assistant applications)
controller will maintain.
controller will maintain if the SAT exceeds the
– Set this field to the damper's position when it rotates
– The normal static pressure setpoint the
– The static pressure setpoint that the
or
value. To disable this function, set this value less than
or equal to the
.
D:
120°F (48.9°C)
R:
40 to 180°F
(4.4 to 82.2°C)
D:
45°F (7.2°C)
R:
40 to 180°F
(4.4 to 82.2°C)
D:
.05 in H
R:
0 to 2.0 in. H2O
2
(0 to .498 kPa
D:
Close
R:
Open/Close
D:
.5 in. H2O (.125 kPa)
R:
.1 to 2.0 in. H2O
(.025 to .498 kPa)
D:
.8 in. H
R:
.1 to 2.0 in. H
O (.199 kPa)
2
(.025 to .498 kPa)
O (.012 kPa)
O
2
ductwork.
testing and troubleshooting.
damper/VFD for the purpose of testing and troubleshooting.
VVT Bypass II Controller CARRIER CORPORATION ©2019
Installation and Start-up Guide All rights reserved
41
–
Overriding these values may damage equipment or
– Lets you override the static pressure sensor input for
– Allows you to override the normal control of the
R:
0 to 2.0 in. H
O
2
(0 to .498 kPa
R: 0 to 100%
Page 46

Appendix A: VVT Bypass II Points/Properties
Point Name/Description
Default/Range
Test and Balance
Zero Cal
Pressure Sensor Cal
Damper Full Open
Automatic Control
This
must be activated when you finish using any of the other Test and Balance
commands.
Damper Full Close
Local Sensor Calibration
Supply Air Temperature
Supply Air Temp Calibration
Maintenance
Navigation:
i-Vu® / Field Assistant:
Properties > Control Program > Maintenance
Point Name/Description
Range
Static Pressure
Controlling Pressure Setpoint
Maximum Duct Pressure Setpoint
Minimum Duct Pressure Setpoint
– Closes the bypass damper and waits for the air source to go to the
Off mode before zeroing out the static pressure sensor. This does not occur if
the static pressure is > .05 in. H2O (.0125 kPa) .
– Allows you to calibrate the pressure sensor after the
Zero Cal has been performed. To enter a value here, neither the damper nor
the pressure sensor can be locked, the bypass cannot be in LAT mode and the
damper position must be >0% and <100%. The value entered will be the actual
static pressure measured with an accurate static pressure measuring device.
– Overrides the damper to its full open position.
– Returns the damper to its normal control routines.
– Overrides the damper to its full closed position.
– Displays the current supply air temperature. R: -56 to 245°F
– A calibration offset value to allow the supply air
temperature sensor to be adjusted to match a calibrated standard measuring the
temperature in the same location.
(-48.9 to 118.3°C)
R: -20 to 20
(-11.1 to 11.1
°F
°C)
– The current supply duct static pressure. R:
– The active static pressure setpoint that the bypass
controls to.
the active static pressure setpoint.
from the active static pressure setpoint.
– The Pressure Control Deadband that is added to
– The Pressure Control Deadband that is subtracted
0 to 2.0 in. H
(0 to .498 kPa
R:
.1 to 2.0 in. H2O
(.025 to .498 kPa)
R:
0 to 2.0 in. H2O
(0 to .498 kPa
R:
0 to 2.0 in. H2O
(0 to .498 kPa
O
2
VVT Bypass II Controller CARRIER CORPORATION ©2019
Installation and Start-up Guide All rights reserved
42
Page 47

Appendix A: VVT Bypass II Points/Properties
Alarms
Navigation:
i-Vu® / Field Assistant:
Properties > Control Program > Alarms
Point Name/Description
Range
Supply Air Temperature Alarm
Airside Linkage Alarm
Linkage
Navigation:
i-Vu® / Field Assistant:
Properties > Control Program > Linkage
Point Name/Description
Range
Air Linkage Status
Active
Not Active
Air Source Mode
Airside Linkage Status
Active
Airside Linkage Status
Not Active
Air Source Supply Air Temp
Airside Linkage Status
Active
Airside Linkage Status
Not Active
– Indicates if the supply air temperature exceeds the
high temperature alarm limit or drops below the low temperature alarm limit.
– Indicates that it lost Linkage communications with the air
source.
– If
controller is operating as a stand-alone device.
– If
linked air source. If
source as determined by the zone controller’s SAT sensor.
is
is displayed.
. If
, the controller is part of a linked system. If
is
is
, this is the current mode of the
, this is the mode of the air
– Shows the air source’s SAT when
is
, the controller's local DAT sensor value
R: Normal/Alarm
R: Normal/Alarm
, the
R: Active/Not Active
R: OFF
WARMUP
HEAT
COOL
FREECOOL
PRESSURE
EVAC
VENT
R: -56 to 245°F
(-48.9 to 118.3°C)
VVT Bypass II Controller CARRIER CORPORATION ©2019
Installation and Start-up Guide All rights reserved
43
Page 48

Appendix A: VVT Bypass II Points/Properties
I/O Points
Navigation:
i-Vu® / Field Assistant:
Properties > I/O Points
Point Name/Description
Range
Pressure Input
SAT Sensor
AO Output
VFD/ACT
sensor.
– The current duct air temperature sensor that is physically connected to
the controller.
– The current voltage on the controller's
– The current duct static pressure of the controller's integrated airflow
output terminal. R: 0 to 10 Vdc
R:
0 to 2.0 in. H2O
(0 to .498 kPa
R: -56 to 245°F
(-48.9 to 118.3°C)
VVT Bypass II Controller CARRIER CORPORATION ©2019
Installation and Start-up Guide All rights reserved
44
Page 49

Appendix B: BACnet points list
BACnet
Default
BACnet Object
Controlling Pressure
Damper Position
R %
dpr_pos
AV:1013
LAT Airflow Increase
R %
lat_airflow_inc
AV:5002
Maximum Duct Pressure
Maximum Heating SAT
R/W
°F
120
sat_ht_max
AV:83004
Minimum Cooling SAT
R/W
°F
45
sat_cl_min
AV:83003
Power Fail Restart Delay
R/W
sec
60
start_delay
AV:9007
Pressure Control Deadband
R/W
in H2O
0.05
press_hysteresis
AV:3016
Static Pressure - Prime
Supply Air Temperature
R
°F sa_temp
AV:1008
VFD output
R %
vfd_output
AV:1014
0=Not Active
Automatic Deadband
0=Disable
0=Actuator
0=Off
1=Off
0=Normal
Supply Air Temperature
0=Normal
Appendix B: BACnet points list
Point Name Point Access Units
Setpoint
R in H2O sys_press_stpt AV:1015
Value
BACnet Point Name
ID
Setpoint
Variable
Airside Linkage Status R
Adjustment
Control Device Type R/W
LAT Control R
Air Source Mode R
Airside Linkage Alarm R
Alarm
R in H2O max_press_stpt AV:5003
R in H2O static_press AV:1016
R/W
R
1=Active
1=Enable
1=VFD
1=Active
2=Warmup
3=Heat
4=Cool
5=Freecool
6=Pressure
7=Evac
8=Vent
1=Alarm
1=Alarm
a_link_status
Active (1) auto_adjust BV:99003
Inactive (0) ctrl_type BV:99002
lat_control BV:1013
link_ahu_mode
air_linkage_fail BV:7030
sat_alarm BV:7004
VVT Bypass II Controller CARRIER CORPORATION ©2019
Installation and Start-up Guide All rights reserved
45
Page 50

Document revision history
Date
Topic
Change description
Code*
Specifications
Added surge CAUTION to Protection specification.
X-TS-AK-E-CC
12/17/18
Wiring the VVT Bypass II for power > To
Added photograph of lifting up the cover.
X-H-RE-E-CC-JS
Mounting the VVT Bypass II > To mount
Added caution stating that you must use the bushing, O-ring, and
X-H-RE-E-CC-JS
8/28/18
Wiring the TruVu™ ET Display to the
New topic.
C-D
Specifications
Added TruVu™ ET Display to Rnet port
C-H-JS-O
Document revision history
Important changes to this document are listed below. Minor changes such as typographical or formatting errors are not
listed.
1/25/19
wire the controller for power.
the controller and actuator
Rnet port
* For internal use only
screws that are shipped with the VVT Bypass II, along with
applicable graphic.
Added first paragraph to Protection specification.
VVT Bypass II Controller C
Installation and Start-up Guide All rights reserved
ARRIER CORPORATION ©2019
46
Page 51

Page 52

CARRIER CORPORATION ©2019
A member of the United Technologies Corporation family · Stock symbol UTX · Catalog No. 11-808-601-01 · 1/25/2019
 Loading...