

Page 1
Page 2

OPERATION AND
SERVICE MANUAL
INTEGRA 30S
TRUCK REFRIGERATION UNIT
BEGINNING WITH S/N PB 225225
Page 3

TABLE OF CONTENTS
PARAGRAPH NUMBER Page
GENERAL SAFETY NOTICES Safety-1............................................................
FIRST AID Safety-1.............................................................................
OPERATING PRECAUTIONS Safety-1............................................................
MAINTENANCE PRECAUTIONS Safety-1..........................................................
SPECIFIC WARNING AND CAUTION STATEMENTS Safety-1........................................
DESCRIPTION 1-1...............................................................................
1.1 INTRODUCTION 1-1.....................................................................
1.2 GENERAL DESCRIPTION 1-1.............................................................
1.3 CONDENSING SECTION 1-1.............................................................
1.3.1 Condenser/Subcooler 1-1..............................................................
1.3.2 Filter Drier 1-1........................................................................
1.3.3 Oil Separator 1-3.....................................................................
1.3.4 Hot Gas Solenoid Valve (HGS1) 1-3.....................................................
1.3.5 Condenser Pressure Control Valve (HGS2) 1-3...........................................
1.3.6 Compressor 1-3......................................................................
1.3.7 Standby Motor 1-3....................................................................
1.3.8 Receiver 1-3.........................................................................
1.3.9 High Pressure Switch (HP1) 1-4........................................................
1.3.10 Condenser Pressure Control Switch (HP2) 1-4............................................
1.4 EVAPORATOR SECTION 1-4.............................................................
1.4.1 Thermostatic Expansion Valve 1-4......................................................
1.4.2 Compressor Pressure Regulating Valve (CPR) (115V Only) 1-4.............................
1.4.3 Defrost T ermination Thermostat (DTT) 1-4...............................................
1.4.4 Quench Valve (BPV) 1-4...............................................................
1.4.5 Evaporator 1-4.......................................................................
1.4.6 Low Pressure Switch (LP) 1-4..........................................................
1.5 SYSTEM OPERATING CONTROLS AND COMPONENTS 1-8.................................
1.6 UNIT SPECIFICATIONS 1-9...............................................................
1.6.1 Compressor Data 1-9.................................................................
1.6.2 Refrigeration System Data 1-9..........................................................
1.6.3 Electrical Data 1-10....................................................................
1.6.4 T orque Values 1-10....................................................................
1.7 SAFETY DEVICES 1-11...................................................................
1.8 REFRIGERANT Circuit 1-12................................................................
1.8.1 Cooling 1-12..........................................................................
1.8.2 Heat And Defrost 1-12..................................................................
i
62--10848
Page 4

TABLE OF CONTENTS (Continued)
PARAGRAPH NUMBER Page
OPERATION 2-1.................................................................................
2.1 CONTROL SYSTEM 2-1..................................................................
2.1.1 Introduction 2-1......................................................................
1.8.3 Microprocessor Module 2-1............................................................
2.1.2 Cab Command 2-1....................................................................
2.2 START-- UP 2-2..........................................................................
2.2.1 Inspection 2-2........................................................................
2.2.2 Connect Power 2-3...................................................................
2.2.3 Starting 2-3..........................................................................
2.3 SETPOINT ADJUSTMENT 2-3............................................................
2.4 MANUAL DEFROST 2-3..................................................................
2.5 DEFROST CYCLE ADJUSTMENT 2-3......................................................
2.6 ALARM DISPLAY 2-4.....................................................................
2.6.1 Accessing Alarm Messages 2-4........................................................
2.6.2 Low Battery Voltage Alarm for Road Only Units 2-5.......................................
2.6.3 Clearing Alarm Messages 2-5..........................................................
2.7 CHECKING THE EEPROM VERSION 2-5...................................................
2.8 STOPPING THE UNIT 2-5................................................................
2.9 MICROPROCESSOR CONFIGURATION 2-6................................................
2.9.1 ROAD ONLY FUNCTIONAL SETTINGS 2-6.............................................
2.9.2 ROAD/STANDBY FUNCTIONAL SETTINGS 2-7.........................................
TEMPERATURE CONTROL 3-1...................................................................
3.1 SEQUENCE OF OPERATION 3-1..........................................................
3.1.1 Perishable Mode 3-1..................................................................
3.1.2 Frozen Mode 3-1.....................................................................
3.2 DEFROST CYCLE 3-2....................................................................
3.3 MINIMUM OFF TIME 3-2.................................................................
SERVICE 4-1....................................................................................
4.1 MAINTENANCE SCHEDULE 4-1...........................................................
4.2 BELT MAINTENANCE AND ADJUSTMENT 4-2..............................................
4.2.1 Standby Motor--Compressor V-Belt 4-2..................................................
4.3 INSTALLING R-134A MANIFOLD GUAGE SET 4-2..........................................
4.3.1 Preparing Manifold Gauge/Hose Set For Use 4-2.........................................
4.3.2 Connecting Manifold Gauge/Hose Set 4-2................................................
4.3.3 Removing the Manifold Gauge Set 4-3..................................................
4.4 REMOVING THE REFRIGERANT CHARGE 4-3.............................................
4.4.1 Refrigerant Removal From A Non--Working Compressor. 4-3...............................
4.5 REFRIGERANT LEAK CHECKING 4-3.....................................................
4.6 EVACUATION AND DEHYDRATION 4-4....................................................
4.6.1 General 4-4..........................................................................
4.6.2 Preparation 4-4.......................................................................
4.6.3 Procedure For Evacuation And Dehydrating System 4-4...................................
62--10848
ii
Page 5

TABLE OF CONTENTS (Continued)
PARAGRAPH NUMBER Page
SERVICE (Continued) 2-1........................................................................
4.7 CHARGING THE REFRIGERATION SYSTEM 4-5...........................................
4.7.1 Checking The Refrigerant Charge 4-5...................................................
4.7.2 Installing A Complete Charge 4-5.......................................................
4.7.3 Adding A Partial Charge 4-5............................................................
4.8 CHECKING FOR NON--CONDENSABLES 4-5...............................................
4.9 REPLACING THE COMPRESSOR 4-6.....................................................
4.9.1 Removing Compressor 4-6.............................................................
4.9.2 Installing Compressor 4-6..............................................................
4.10 CHECKING AND REPLACING FILTER-DRIER 4-6...........................................
4.10.1 Checking Filter-Drier 4-6...............................................................
4.10.2 Replacing The Filter-Drier 4-6..........................................................
4.11 HIGH PRESSURE (HP1) AND CONDENSER PRESSURE (HP2) SWITCHES 4-6................
4.11.1 Removing Switch 4-6..................................................................
4.11.2 Checking Pressure Switch 4-6..........................................................
4.12 CHECKING AND REPLACING CONDENSER FAN MOTOR BRUSHES 4-7.....................
4.13 HOT GAS (HGS1) AND CONDENSER PRESSURE CONTROL SOLENOID VALVES 4-7.........
4.13.1 Replacing Solenoid Coil 4-7...........................................................
4.13.2 Replacing Valve Internal Parts 4-7.......................................................
4.14 ADJUSTING THE COMPRESSOR PRESSURE REGULATING VALVE (CPR) (115V ONLY) 4-8....
4.15 THERMOSTATIC EXPANSION VALVE 4-8..................................................
4.15.1 Replacing expansion valve 4-8.........................................................
4.15.2 Measuring Superheat 4-8..............................................................
4.16 DIAGNOSTIC TOOL 4-9..................................................................
4.17 MICROPROCESSOR 4-9.................................................................
4.18 EVAPORATOR COIL CLEANING 4-9.......................................................
4.19 CONDENSER COIL CLEANING 4-9........................................................
TROUBLESHOOTING 5-1.........................................................................
5.1 INTRODUCTION 5-1.....................................................................
5.2 REFRIGERATION 5-2....................................................................
5.2.1 Unit Will Not Cool 5-2.................................................................
5.2.2 Unit Runs But Has Insufficient Cooling 5-2...............................................
5.2.3 Unit Operates Long or Continuously in Cooling 5-3........................................
5.2.4 Unit Will Not Heat or Heating Insufficient 5-3.............................................
5.2.5 Defrost Malfunction 5-3................................................................
5.2.6 Abnormal Pressure 5-3................................................................
5.2.7 Abnormal Noise 5-4...................................................................
5.2.8 Cab Command Malfunction 5-4.........................................................
5.2.9 No Evaporator Air Flow or Restricted Air Flow 5-4.........................................
5.2.10 Expansion Valve 5-4..................................................................
5.2.11 Malfunction Hot Gas Solenoid or Condenser Pressure Regulating Valve 5-4..................
5.2.12 Standby Compressor Malfunction 5-4...................................................
SCHEMATIC DIAGRAMS 6-1......................................................................
6.1 INTRODUCTION 6-1.....................................................................
iii
62--10848
Page 6

LIST OF ILLUSTRATIONS
FIGURE NUMBER Page
Figure 1-1 Integra 30S 1-2......................................................................
Figure1-2 TopView 1-2.........................................................................
Figure 1-3 Rear View Evaporator 1-3.............................................................
Figure 1-4 Oil Separator 1-3.....................................................................
Figure 1-5 Typical Standby Control Box 1-5
Figure 1-6 Standby Microprocessor Module 1-6....................................................
Figure 1-7 Road Microprocessor Module 1-7.......................................................
Figure 1-8 Cab Command 1-8...................................................................
Figure 1-9 Refrigeration Circuit Cooling Cycle 1-13..................................................
Figure 1-10 Refrigeration Circuit Heating Cycle 1-14..................................................
Figure 2-1 Cab Command 2-1...................................................................
Figure 2-2 Green Light Status -- Standby 2-2......................................................
Figure 2-3 Green Light Status -- Road Only 2-2....................................................
Figure 2-4 Temperature Selection Jumper 2-7......................................................
Figure 3-1 Operating Sequence -- Perishable Mode 3-1.............................................
Figure 3-2 Operating Sequence -- Frozen Mode 3-1................................................
Figure 4-1 Belt Tension Gauge 4-2...............................................................
Figure 4-2 Layout of V-belt 4-2...................................................................
Figure 4-3 Manifold Gauge Set (R-134a) 4-3.......................................................
Figure 4-4 Vacuum Pump Connection 4-4.........................................................
Figure 4-5 Typical Setup For Testing Pressure Switches HP1 And HP2 4-7............................
Figure 4-6 Fan Motor Brushes 4-7................................................................
Figure 4-7 Hot Gas or Condenser Pressure Control Solenoid 4-7.....................................
Figure 4-8 Compressor Pressure Regulating Valve 4-8..............................................
Figure 4-9 Thermostatic Expansion Valve Bulb And Thermocouple 4-8................................
Figure 4-10 Cab Command Diagnostic Tool 4-9.....................................................
Figure 6-1 Electrical Schematic Wiring Diagram - Based On Dwg. No. 62-61350 Rev D 6-2.............
Figure 6-2 Electrical Schematic Wiring Diagram - Based On Dwg. No. 62-61350 Rev D 6-3.............
Figure 6-3 Electrical Schematic Wiring Diagram - Based On Dwg. No. 62-61353 Rev A 6-5..............
Figure 6-4 Electrical Schematic Wiring Diagram - Based On Dwg. No. 62-61354 Rev A 6-6..............
Figure 6-5 Electrical Schematic Wiring Diagram - Based On Dwg. No. 62-61354 Rev A 6-7..............
Figure 6-6 Electrical Schematic Wiring Diagram - Based On Dwg. No. 62-61352 Rev A 6-9..............
LIST OF TABLES
TABLE NUMBER Page
Table 1-1 Model Chart 1-1......................................................................
Table 1-2 Additional Support Manuals 1-1........................................................
Table 2-1 Alarms For Road Only Units 2-4........................................................
Table 2-2 Alarms For Standby Units 2-5..........................................................
Table 4-1 Maintenance Schedules 4-1...........................................................
Table 4-2 Service Category Descriptions 4-1......................................................
Table 4-3. Belt Tension (See Figure 4-2) 4-2.......................................................
Table 4-4 R-134a Temperature-Pressure Chart 4-10................................................
Table 5-1 Alarm Indications 5-1.................................................................
Table 5-2 Mechanical Indications 5-2.............................................................
62--10848
iv
Page 7

SAFETY SUMMARY
SAFETY PRECAUTIONS
Your Carrier Transicold refrigeration unit has been designed with the safety of the operator in mind. During normal
operation, all moving parts are fully enclosed to help prevent injury. During all pre-trip inspections, daily inspections,
and problem troubleshooting, you may be exposed to moving parts. Stay clear of all moving parts when the unit is in
operation and when the ON/OFF switch is in the ON position.
FIRST AID
No injury, no matter how slight, should go unattended. Always obtain first aid or medical attention immediately.
OPERATING PRECAUTIONS
Always wear safety glasses. Wear hearing protection as required.
Keep hands, clothing and tools clear of the evaporator and condenser fans.
No work should be performed on the unit until all circuit breakers are turned off, and battery power supply is
disconnected.
Always work in pairs. Never work on the equipment alone.
In case of severe vibration or unusual noise, stop the unit and investigate.
MAINTENANCE PRECAUTIONS
Beware of unannounced starting of the unit. This unit is equipped with Auto--Start in both the road and standby modes.
The unit may start at any time. When performing any check of the system make certain all circuit breakers are turned
off, and battery power supply is disconnected.
Be sure power is turned off before working on motors, controllers, solenoid valves and electrical control switches. Tag
circuit breaker and vehicle ignition to prevent accidental energizing of circuit.
Do not bypass any electrical safety devices, e.g. bridging an overload, or using any sort of jumper wires. Problems with
the system should be diagnosed, and any necessary repairs performed, by qualified service personnel.
When performing any arc welding on the unit or container, disconnect all wire harness connectors from the
microprocessor. Do not remove wire harness from the modules unless you are grounded to the unit frame with a static
safe wrist strap.
In case of electrical fire, open circuit switch and extinguish with CO
REFRIGERANTS
The refrigerant contained in your unit can cause frostbite, severe burns, or blindness when in direct contact with the
skin or eyes. For this reason, and because of legislation regarding the handling of refrigerants during system service,
we recommend that you contact your nearest Carrier Transicold authorized repair facility whenever your unit requires
refrigeration system service .
(never use water).
2
62--10848Safety-1
Page 8

SPECIFIC WARNING AND CAUTION STA TEMENTS
To help identify the label hazards on the unit and explain the level of awareness each one carries, an explanation is
given with the appropriate consequences:
DANGER -- means an immediate hazard which WILL result in severe personal injury or death.
WARNING -- means to warn against hazards or unsafe conditions which COULD result in severe personal injury or
death.
CAUTION -- means to warn against potential hazard or unsafe practice which could result in minor personal injury,
product or property damage.
The statements listed below are applicable to the refrigeration unit and appear elsewhere in this manual. These
recommended precautions must be understood and applied during operation and maintenance of the equipment
covered herein.
WARNING
Beware of unannounced starting of the unit. The unit may cycle the fans and operating compressor
unexpectedly as control requirements dictate. Press OFF key on the cab command and disconnect
power plug.
WARNING
Do not attempt to connect or remove power plug before ensuring the unit is OFF (press OFF key on
Cab Command) and external power circuit breaker is open.
WARNING
Beware of V-belt and belt-driven components as the unit may start automatically.
WARNING
Ensure power to the unit is OFF, power plug is disconnected and circuit breaker is open or vehicle
engine is OFF and negative battery cable is connected before replacing compressor.
WARNING
Slowly open the plug on the suction and discharge valves of the new compressor to vent the nitrogen
holding charge.
WARNING
Do not use a nitrogen cylinder without a pressure regulator. (See Figure 4-5) Cylinder pressure is
approximately 2350 psig (160 bars). Do not use oxygen in or near a refrigerant system as an explosion may occur.
CAUTION
Under no circumstances should anyone attempt to repair the microprocessor module or Cab Command! Should a problem develop with these components, contact your nearest Carrier Transicold
dealer for replacement.
62--10848
Safety-2
Page 9

CAUTION
If starting unit for the first time after installation or starting after adding/removing an optional feature
if Owners operating parameters have changed, the Configuration will need to be reset.
or
CAUTION
Compressor failure will occur if inert gas brazing procedures are not used on units with
R134A and POE oil. For more information see Technical Procedure 98-50553-00 -- Inert Gas
Brazing.
CAUTION
To prevent trapping liquid refrigerant in the manifold gauge set be sure set is brought to suction
pressure before disconnecting.
CAUTION
Do not damage or over tighten the enclosing tube assembly. Place all parts in the enclosing tube in
proper sequence in order to avoid premature coil burn-out.
CAUTION
Observe proper polarity when installing battery, negative battery terminal must be grounded.
CAUTION
Underno circumstances should a technician electrically probe the processor at any point, other than
the connector terminals where the harness attaches. Microprocessor components operate at different voltage levels and at extremely low current levels. Improper use of voltmeters, jumper wires, continuity testers, etc. could permanently damage the processor.
CAUTION
Most electronic components are susceptible to damage caused by electrical static discharge (ESD).
In certain cases, the human body can have enough static electricity to cause resultant damage to the
componentsby touch. This is especiallytrue of the integrated circuits found on the microprocessor.
Use proper board handling techniques. (See Section 4.17).
62--10848Safety-3
Page 10
SECTION 1
Road
S
d
b
lb(
DESCRIPTION
1.1 INTRODUCTION
WARNING
Beware of unannounced starting of the
unit. The unit may cycle the fans and operating compressor unexpectedly as control requirements dictate. Press OFF key on the
Cab Command and disconnect power plug.
This manual contains Operating Data, Electrical Data
and Service Instructions for the Carrier Transicold
Model 30S truck refrigeration units listed in Table 1-1.
Additional support manuals are listed in Table 1-2.
The model/serial nameplate is located on the cover.
1.2 GENERAL DESCRIPTION
The unit (Figure 1-1) is of the split system type with the
condenser mounted outside the truck body, evaporator
mounted in the body, and a Cab Command control
center mounted in the driver’s compartment. Two types
of compressor drive are available:
D Road operation: the road compressor is located in
the engine compartment and is driven by the engine
of the vehicle when in operation over--the--road
D Road/Standby version: a second compressor is
mounted in the condensing section and is driven by
an electric motor when in standby mode.
Table 1-1 Model Chart
1.3 CONDENSING SECTION
The condensing section (see Figure 1-2) contains the
condenser fan & coil, filter--drier, oil separator, hot gas
solenoid valve, receiver, and a condenser pressure
control valve. On road/standby units the condensing
section also houses the standby compressor, control
box and rectifier and houses the transformer assembly
(see Figure 1-2 and Figure 1-5 ).
1.3.1 Condenser/Subcooler
The condenser is of the tube and fin type and acts as a
heat exchanger in which the compressed refrigerant
gas is condensed into a liquid and lowered in temperature. Air movement over the condenser is provided by a
fan mounted in the condensing section.
A portion of the condenser is occupied by the subcooler.
Refrigerant leaving the receiver is passed through the
subcooler where additional heat is removed. Removal
of this additional heat helps to ensure that only liquid
refrigerant enters the thermal expansion valve.
1.3.2 Filter Drier
The drier is a cylindrical shell containing a drying agent
and screen. It is installed in the liquid line and functions
to keep t he system clean and remove moisture from the
refrigerant.
R134a
Model No. Description
8002189 Road Only --
8002191
8002193
8002195
Manual Number
Road/Standby
1 15/1/60Hz
Road/Standby
230/1/60Hz
Road/Standby
230/3/60Hz
62--10835 Supra 30S Parts List
62--10847 Supra 30S Easy To Run
62--10849 Supra 30S Operator’s Manual
LB Kg
4 1.8 TM 16
Table 1-2. Additional Support Manuals
Equipment Covered Type of Manual
Compressor
Compressor
tan
TM 16
Condenser Weight
y
Road
88 lb
(40 kg)
Road and
Standby
165 lb (75
kg
Evap. Wt.
66
30
Kg)
1-1
62-10848
Page 11
CAB COMMAND
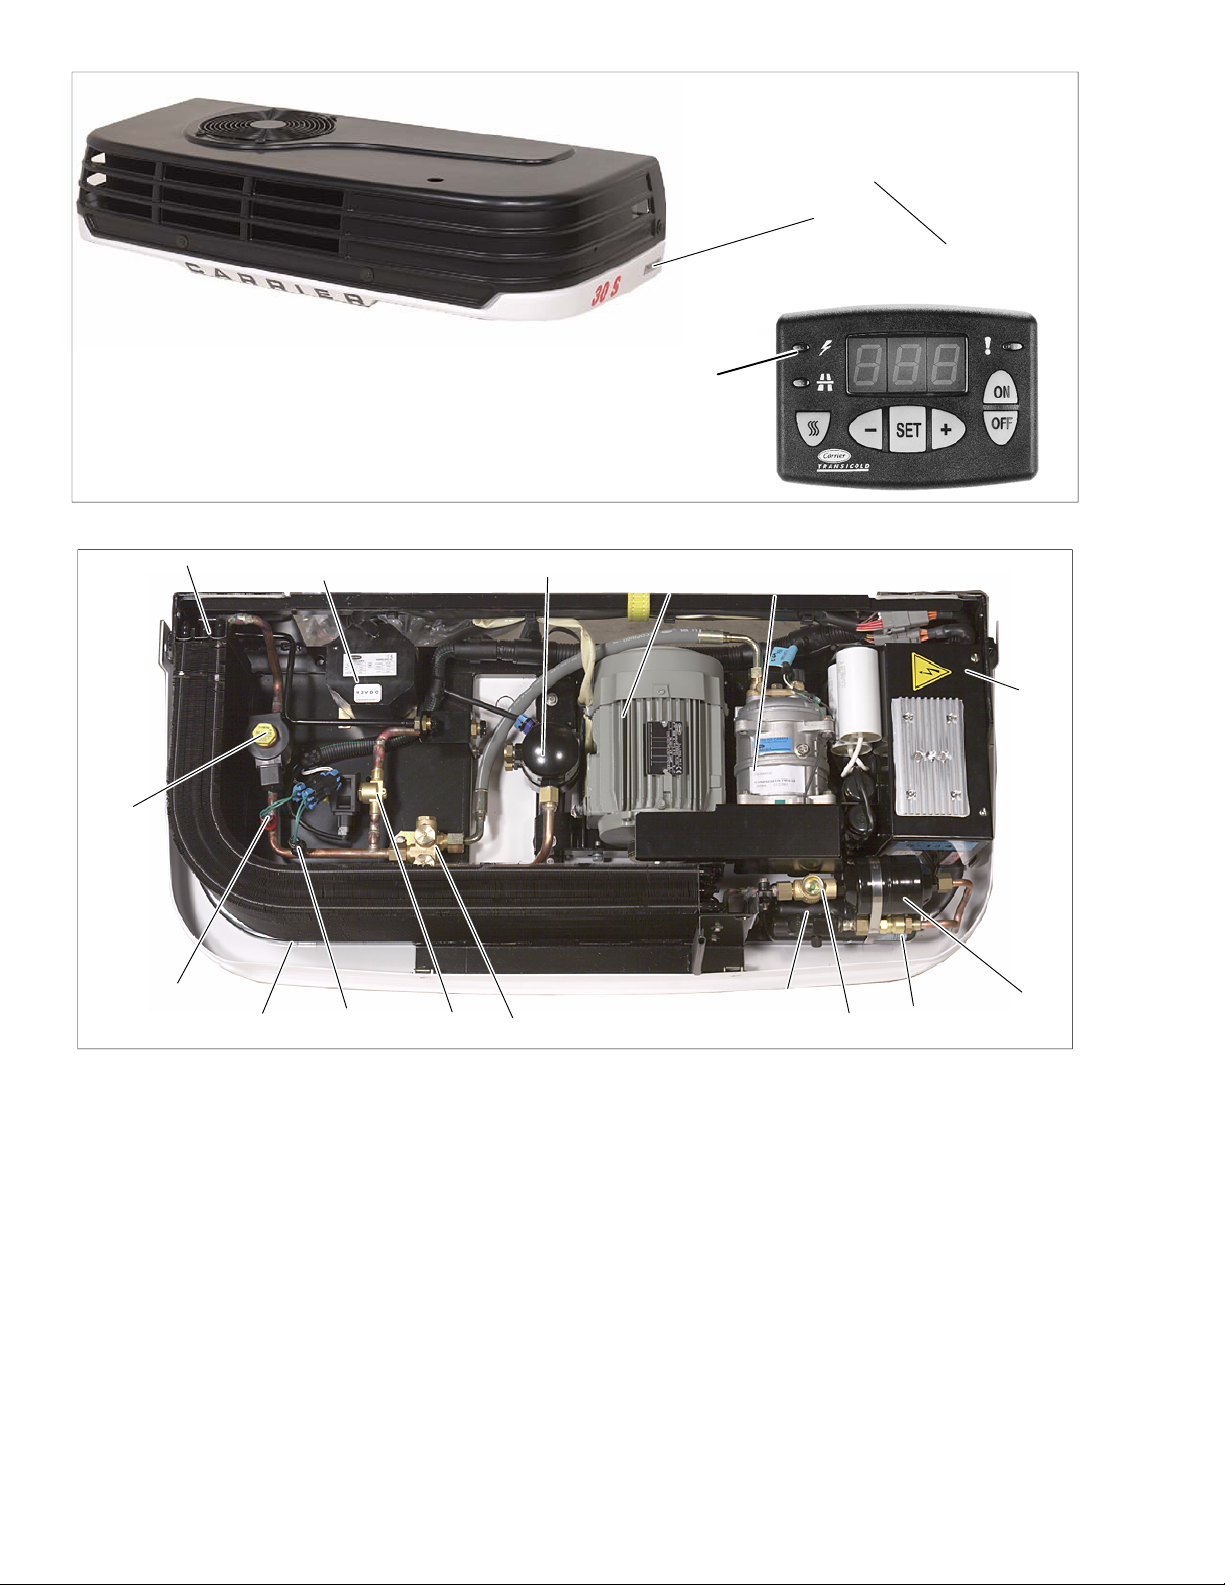
Figure 1-1 Integra 30S
1
1
2
17
16
1. Nameplate
2. Condenser Coil
3. Transformer (TR)
4. Oil Separator
5. Standby Motor
6. Standby Compressor (See Table 1-1)
7. Control Box
8. Filter Drier
9. Liquid Line Check Valve
15
3
14
4
13
12
Figure 1-2 Top View
5
10. Sight Glass
1 1. Receiver
12. Discharge Manifold
13. Hot Gas Solenoid Valve (HGS1)
14. Condenser Pressure Control Switch (HP2)
15. Frame
16. High Pressure Switch (HP1)
17. Condenser Pressure Control Valve (HGS2)
6
11
10
9
7
8
1-262-10848
Page 12
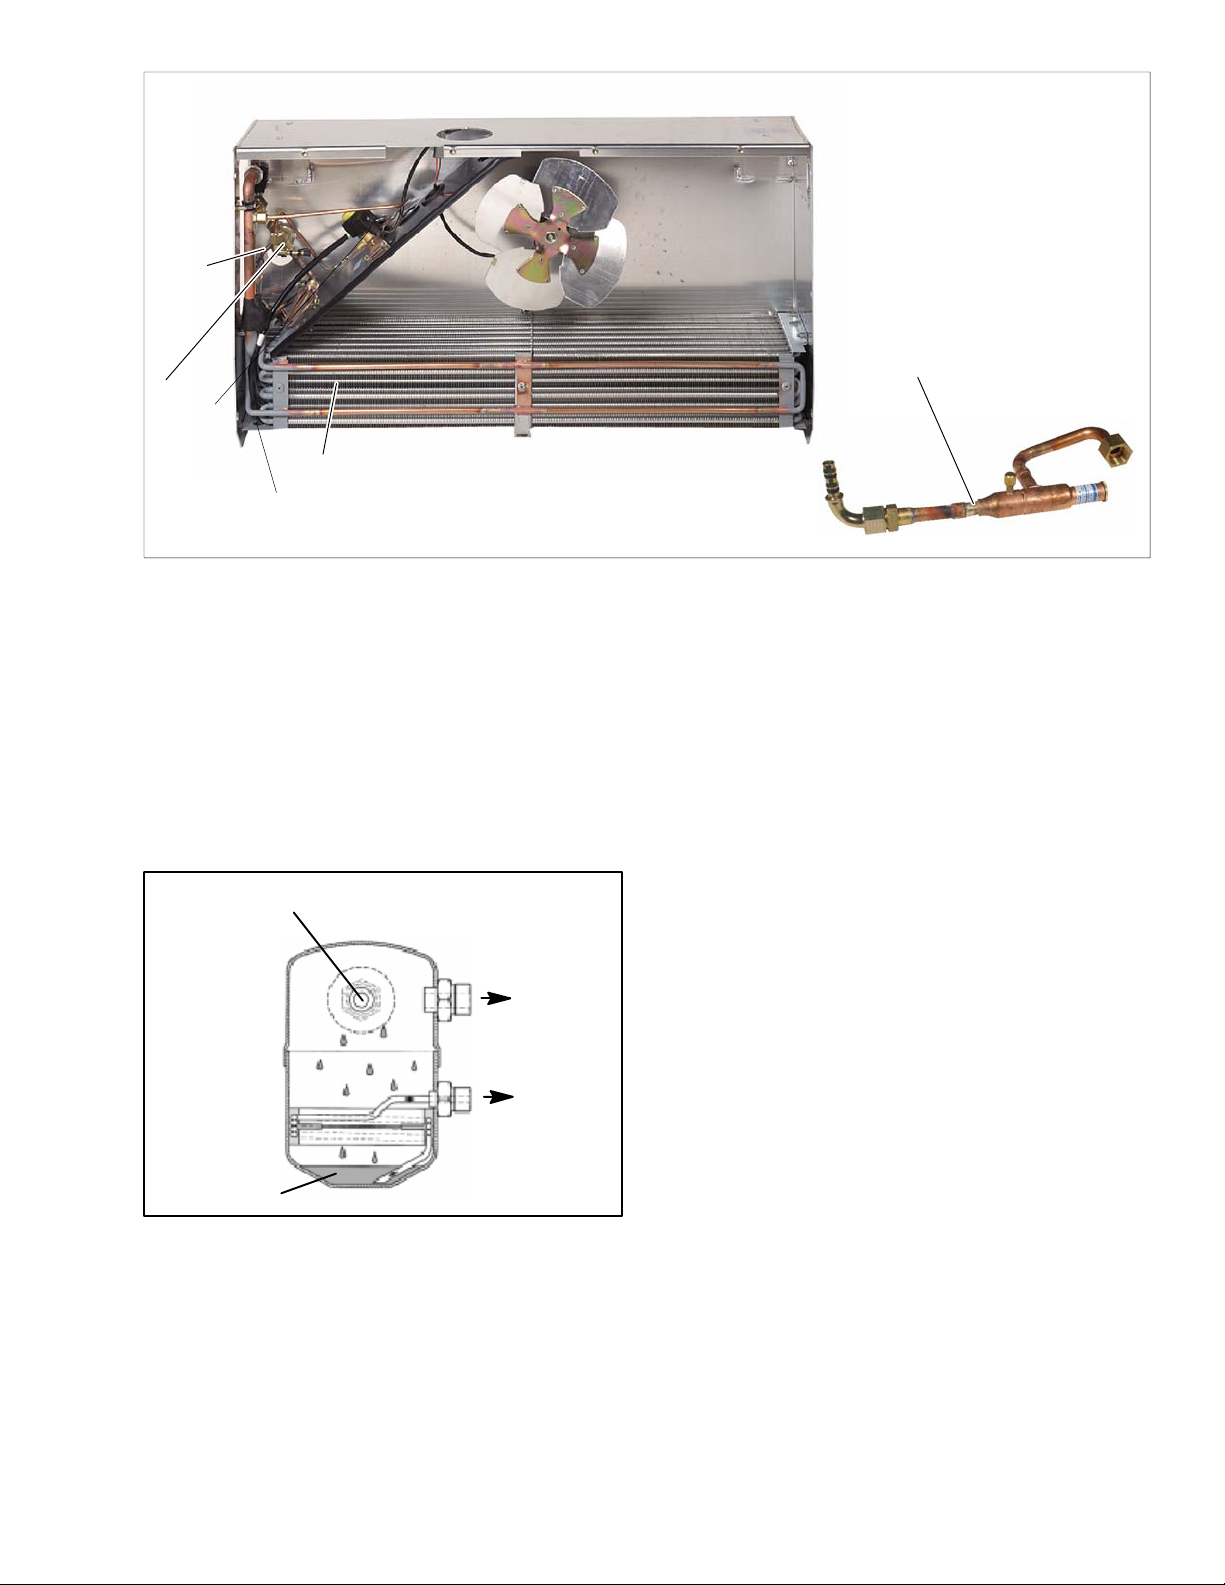
1
6
2
3
5
4
1. Low Pressure Switch (LP)
2. Expansion Valve (TXV)
3. Quench Valve (BPV)
4. Defrost Termination Thermostat (DTT)
Figure 1-3 Rear View Evaporator
1.3.3 Oil Separator
The oil separator is installed in the discharge line from
the road compressor. The hot gas coming from the compressor is forced through a filter which separates the
gas from the oil. The oil collects at the bottom after
passing through a second filter and then returns to the
compressor via a capillary tube.
OIL AND GASFROM COMP.
REFRIGERANT
GAS TO
COND.
OIL TO
COMP.
SUCTION
LINE
OIL
Figure 1-4 Oil Separator
1.3.4 Hot Gas Solenoid Valve (HGS1)
HGS1 is normally closed and prevents discharge gas
from entering the evaporator. The valve opens to allow
hot gas refrigerant to be delivered from the compressor
to the evaporator during heat or defrost modes.
5. Evaporator coil
6. Compressor Pressure Regulating Valve
(CPR)115V only
1.3.5 Condenser Pressure Control Valve (HGS2)
The condenser pressure control valve (or condenser
closing valve) is a normally open valve that is powered
when the condenser pressure control switch (HP2) is
closed. With the solenoid coil de-energized, the valve is
in the cool mode and the compressor discharge gas is
delivered to the condenser. In the cool mode, heat is
removed from the air inside the truck body and rejected
to the surrounding air. With the solenoid coil energized,
the valve is in the heat mode and the compressor discharge gas is diverted to the evaporator and rejected to
the air inside the truck body.
1.3.6 Compressor
The compressor withdraws refrigerant gas from the
evaporator and delivers it to the condenser at an increased pressure. The pressure is such that refrigerant
heat can be absorbed by the surrounding air at ordinary
temperatures.
1.3.7 Standby Motor
The standby motor operates on nominal
1 15v--1ph--60hz or 208/230v--1ph--60hz or
230v--3ph--60hz power. An overload and short cycle
protection is provided along with automatic reset. Units
are also equipped with a remote mounted power receptacle.
1.3.8 Receiver
Liquid refrigerant from the condenser is deliver to the
receiver. The receiver serves as a liquid reservoir when
there are surges due to load changes in the system; as a
storage space when pumping down the system and as a
liquid seal against the entrance of refrigerant gas into
the liquid line.
1-3
62-10848
Page 13

1.3.9 High Pressure Switch (HP1)
HP1 is a normally closed switch which monitors the
system for high pressure and shuts down the unit when
pressure rises above predetermined setting. For HP1
settings see Section 1.6.2.
1.3.10 Condenser Pressure Control Switch (HP2)
HP2 is a normally open switch which closes to signal the
microprocessor to activate the condenser fan. HP2 also
cycles the condenser pressure control valve (HGS2)
and the quench valve (BPV) in addition to the condenser
fan in order to maintain head pressure for heating capacity. For HP2 settings see Section 1.6.2.
1.4 EVAPORATOR SECTION
The evaporator assembly consists of an evaporator fan,
evaporator coil, thermostatic expansion valve, defrost
termination thermostat, a compressor pressure
regulating valve (115V only) and a quench valve.
1.4.1 Thermostatic Expansion Valve
The thermostatic expansion valve is an automatic device which controls the flow of liquid to the evaporator
according to changes in superheat to the refrigerant
leaving the evaporator. The thermal expansion valve
maintains a relatively constant degree of superheat in
the gas leaving the evaporator regardless of suction
pressure. Thus, the valve has a dual function; automatic
expansion control and preventing liquid from returning
to the compressor. For TXV superheat settings see
Section 1.6.2. To adjust the TXV, refer to Section
4.15.2.
1.4.2 Compressor Pressure Regulating Valve
(CPR) (115V Only) (See Figure 1-3)
The CPR valve is installed on the suction line of the
standby compressor to regulate the suction pressure
entering the compressor. The CPR valve is set to limit
the maximum suction pressure. For CPR settings refer
to section 1.6.2.
The suction pressure is controlled to avoid overloading
the electric motor during high box temperature
operation. To adjust the CPR valve, refer to section 4.17
1.4.3 Defrost Termination Thermostat (DTT)
Normally closed thermal switch on Standby units only.
As evaporator cools to setpoint, the switch closes and
signals microprocessor that defrost may be initiated.
Switch terminates defrost by opening at predetermined
setpoint. For DTT settings refer to section 1.6.2.
1.4.4 Quench Valve (BPV)
The quench valve is a normally closed solenoid valve
controlled by the quench thermostat (BPT) mounted on
the road compressor discharge line. The valve allows
metered liquid refrigerant to enter the suction line in the
evaporator in order to provide compressor cooling. For
BPT settings refer to section 1.6.2.
1.4.5 Evaporator
The evaporator is of the tube and fin type. The operation
of the compressor maintains a reduced pressure within
the coil. At this reduced pressure, the liquid refrigerant
evaporates at a temperature sufficiently low enough to
absorb heat from the air. Air movement over the evaporator is provided by an electric fan.
1.4.6 Low Pressure Switch (LP)
The low pressure switch is a normally closed switch
which signals the microprocessor to shut down the unit
when the system is outside the low pressure limit. For
LP settings refer to section 1.6.2.
1-462-10848
Page 14
6
5
4
3
2
1
7
8
9
10
11
12
115/1/60
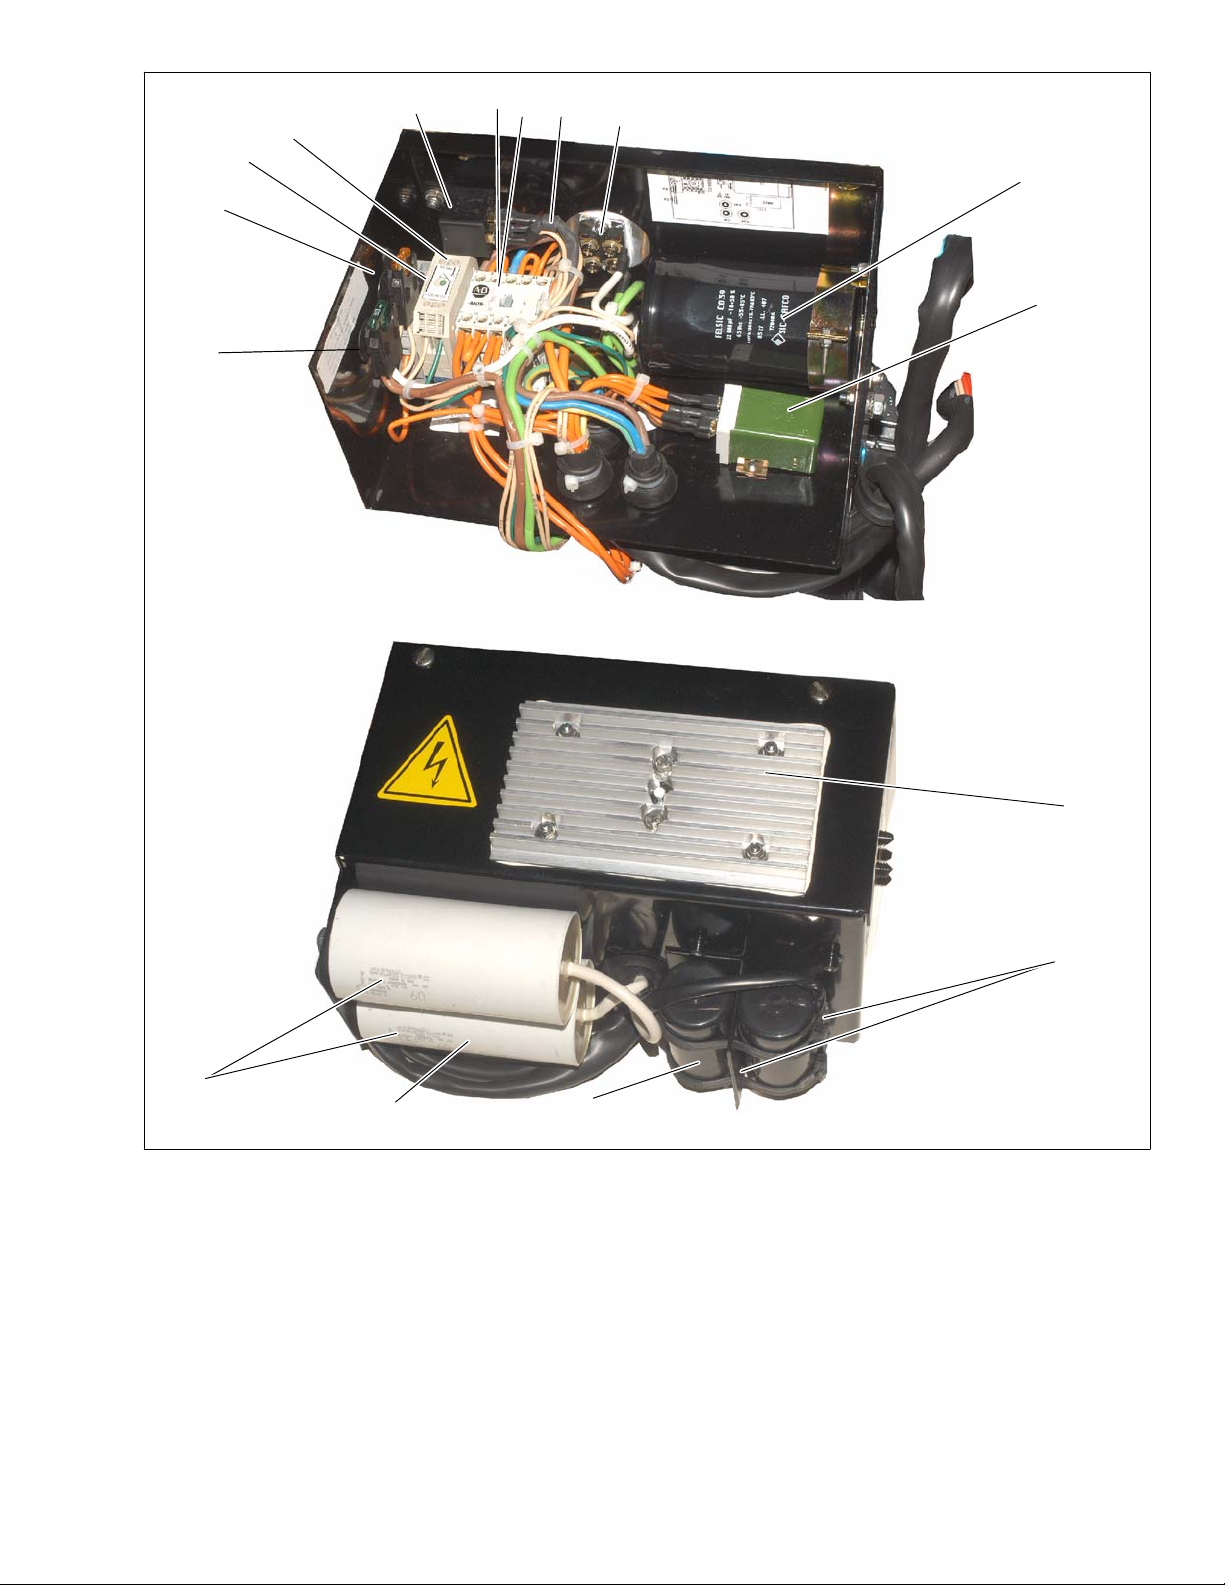
1. Standby clutch fuse (F2) -- 30 Amp
2. Standby Fuse (F3) -- 5 Amp
3. Transformer Fuse (F4) -- 5 Amp
4. Clutch Time Delay Relay (CT) -- Single Phase
Only
5. Clutch Relay (CR)
6. Motor Contactor (MC)
7. Overload Relay (OL) (230V Only)
12
230/1/60
13
230/1/60
14
13
115/1/60
8. Diode
9. Rectifier Bridge Assembly (BR)
10. Filter Capacitor (C1)
1 1. Start Relay (STBR)
12. Run Capacitor (CR)
13. Start Capacitor (CS)
14. Heat sink (rectifier bridge)
Figure 1-5 Typical Standby Control Box
1-5
62-10848
Page 15
1
2
9
3
8
4
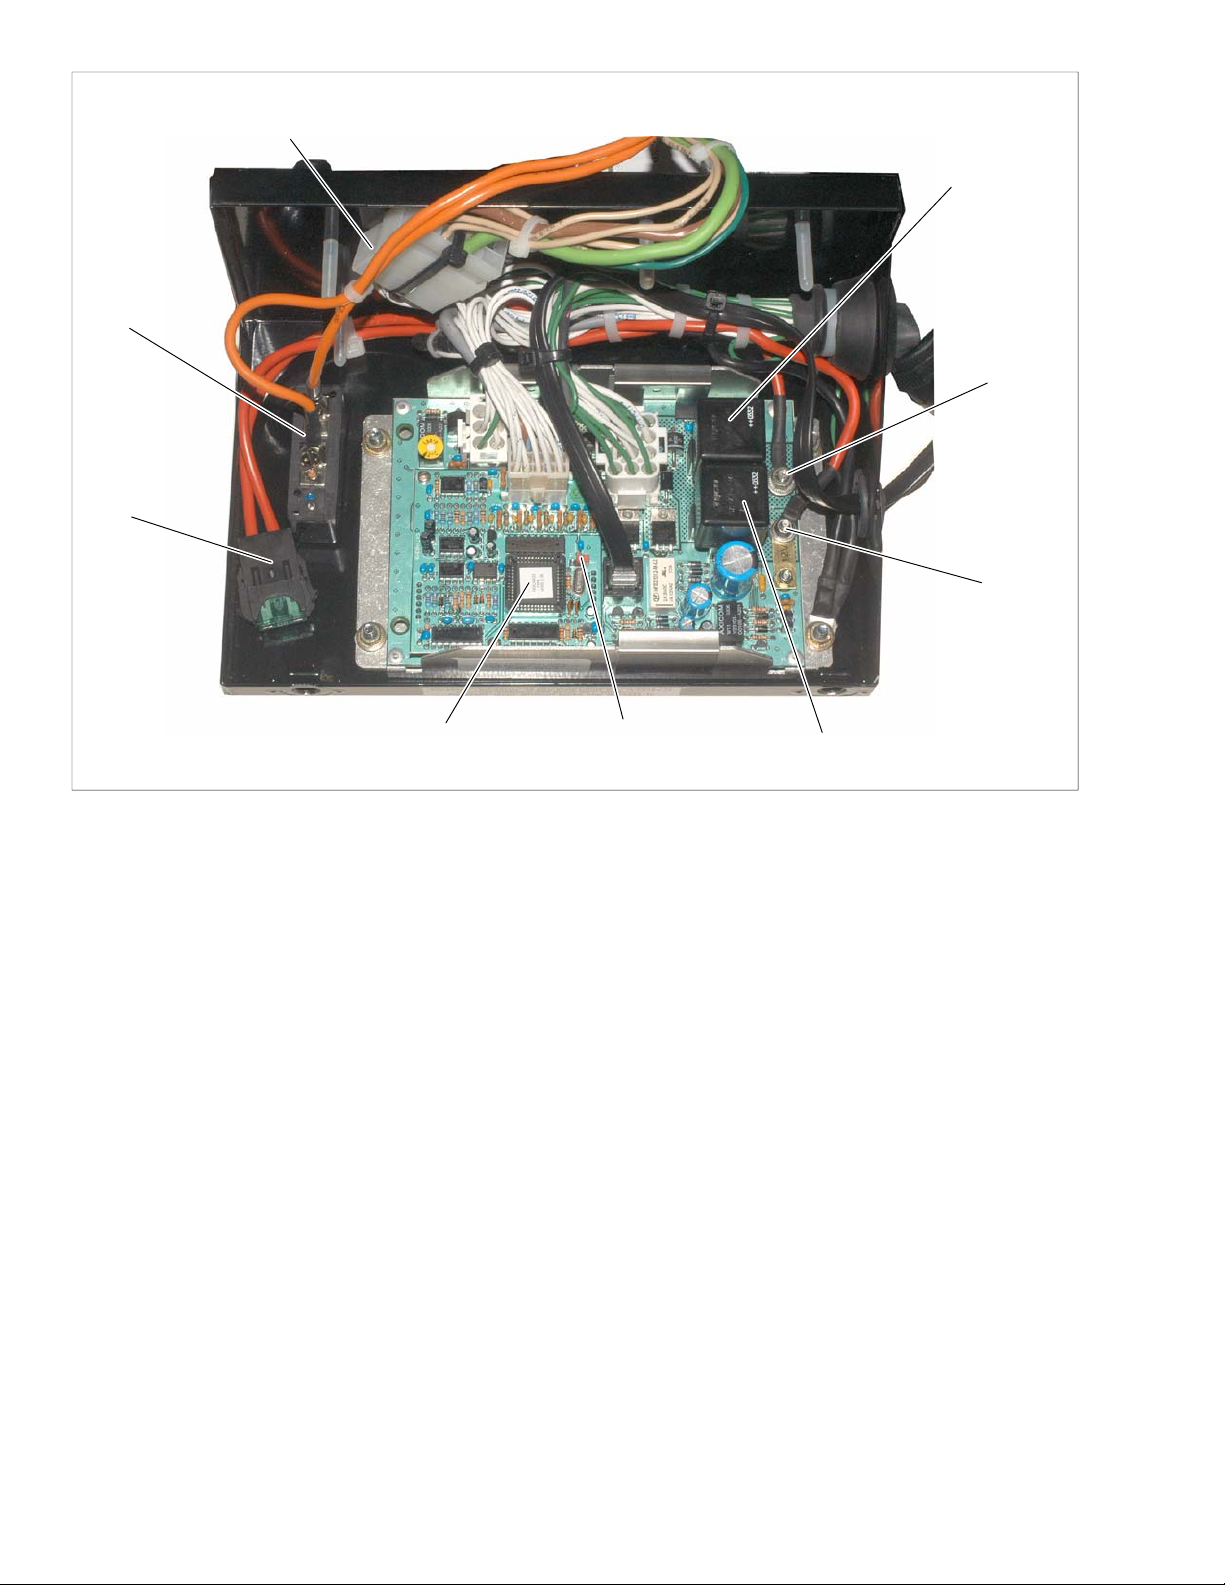
1. Connector
2. Road Relay (RR)
3. 12 Volt dc Road Connection
4. 12 Volt dc Standby Connection
5. Standby Relay (SR)
Figure 1-6 Standby Microprocessor Module
7
6
6. C_ or F_ Temperature Selector
7. Microprocessor (PC)
8. Road Fuse (F1) 30A
9. Overload Relay (OL) 25A (115V Only)
5
1-662-10848
Page 16

1
2
3
1. C_ or F_ Temperature Selector
2. Road fuse (25A)
3. + Positive Battery Connection
4. -- Negative Battery Connection
5. --Microprocessor (PC)
5
4
Figure 1-7 Road Microprocessor Module
1-7
62-10848
Page 17
1.5 SYSTEM OPERATING CONTROLS AND
COMPONENTS
The unit is furnished with a microprocessor control system. Once the setpoint is entered at the Cab Command,
the unit will operate automatically to maintain the desired temperature within very close limits.
WARNING
Beware of unannounced starting of the,
standby motor, evaporator fan or condenser fan. The unit may cycle the standby motor or fans unexpectedly as control requirements dictate.
The control system consists of the Cab Command located in the driver’s section (See Figure 1-8) and the
microprocessor module (See Figure 1-6) located in the
control box.
The Carrier Transicold Control System incorporates the
following features:
a. Control return air temperature to tight limits by provid-
ing refrigeration control, heat and defrost to ensure
conditioned air delivery to the load.
b. Permanently displays the return air temperature and
on request the setpoint temperature.
c. Digital display and selection of data.
CAUTION
Under no circumstances should anyone attempt to repair the microprocessor module
or Cab Command! Should a problem develop with these components, contact your
nearest Carrier Transicold dealer for replacement.
Figure 1-8 Cab Command
1-862-10848
Page 18

1.6 UNIT SPECIFICATIONS
1.6.1 Compressor Data
Model
Displacement
TM 16
9.9 in
(
162 cm3)
3
No. Cylinders 6
15.5 lbs
Weight
(7 kg)
Oil Charge 5.07in3(180 cm3)
Approved Oil Mobil Arctic EAL68
1.6.2 Refrigeration System Data
a. Defrost Timer
Automatic triggering or at preset intervals :
0 (Disabled), auto, 1h, 2h, 3h, 4h, 5h, 6h
b. Defrost Termination Thermostat(DTT) (Standby
Only)
Opens at: 48_ ¦ 5_F(9_ ¦ 3_C)
Closes at: 37_ ¦ 5_F(3_ ¦ 3_C)
c. High Pressure Switch (HP1)
Cutout at : 355 psig ± 10 PSI (24.5 bars)
Cut-in at : 290 psig ± 10 PSI (20 bars)
d. Condenser Pressure Control Switch (HP2)
Cutout at : 130 psig ± 10 PSI (9 bars)
Cut-in at : 175 psig ± 10 PSI (12 bars)
e. Refrigerant charge
RefertoTable1-1.
f. Compressor Pressure Regulating Valve (CPR)
115V only
19±1 psig (1.3 Bar)
g. Thermostatic Expansion Valve (TXV)
Superheat setting = 4_C(7¦ 1_F) at box temperature
of -20_C(0_F).
h. Low Pressure switch (LP)
Cutout at : --13.23 inHG ± 6inHG
(-- 0.45 ± 0.2 bar)
Cut-in at : +6.5 psig ± 3 psig
(+0.44 ± 0.2 bar)
i. Quench Thermostat (BPT)
Opens at: 248_F (120_C)
Closes at: 220_F (104_C)
1-9
62-10848
Page 19

1.6.3 Electrical Data
ContactorDataVol
t
T
f
C
t
ionP
h
kWHPS
d
1.5
2
a. Fan Motors
Evaporator Fan Motor (EFM)
Bearing Lubrication Factory Lubricated Bearing Lubrication Factory Lubricated
Horse Power 0.1 kw
Operating Amps 10.8 amps Operating Amps 10 amps
Speed 2800/3000 rpm Speed 3300 rpm
b. Standby Compressor Speed
1740 rpm -- 60 hz
c. Standby Motor Ratings
age
1 15/1/60 Δ 1 1745 rpm 18.3 132.5
208/1/60 Δ 1
230/1/60 Δ 1
230/3/60 Δ 3 1700 rpm 5.9 40
* MRA = Maximum Rotor Amps LRA = Locked Rotor Amps
Resistance = 9.2Ω
d. Road Compressor Clutch
Amp Draw = 3.75A
Resistance = 3.2Ω
e. Hot Gas Solenoid Valve (HGS1) Coil
Amp Draw = 1.33 Amp
Resistance = 9.2Ω
f. Condenser Pressure Control Valve (HGS2) Coil
Amp Draw = 1.65 Amp
Resistance = 7.3Ω
g. Quench Valve (BPV) Coil
Amp Draw = 1.16 Amp
Resistance = 10.3Ω
h. Standby Motor Contactor Coil
Amp Draw = 0.19 Amp
Resistance = 60Ω
ype o
onnec
ase
Condenser Fan Motor (CFM)
pee
1690 rpm 9.2 70
1715 rpm 8.5 60
MRA* LRA*
1.6.4 Torque Values
Assembly
Standby compressor platform 40 5.5
Standby motor platform 40 5.5
Standby motor pulley 32 4.5
Evaporator fan motor 13 1.8
Evaporator fan 7 1.0
Condenser - frame 7 1.0
Mounting Bolts 44 to 60 6to8
ft-lb kg-m
1-1062-10848
Page 20

1.7 SAFETY DEVICES
System components are protected from damage caused by unsafe operating conditions by automatically shutting
down the unit when such conditions occur. This is accomplished by the following fuses and safety devices.
Automatic
Unsafe Conditions
Safety Device
restart
with fault
Device setting
cleared
1 Excessive drop in pressure Automatic reset of low
pressure switch (LP)
2 Excessive current draw on all mi-
Electronic relay
croprocessor outputs (evaporator
and condenser fan)
3 Excessive current draw control
Fuse on electronic board
circuit
4 Excessive current draw motor
compressor
5 Excessive current draw evapora-
230 = Overload relay
1 15/1/60 = Circuit Breaker
Electronic relay
tor and condenser fan motors
6 Excessive compressor discharge
pressure
7 Excessive current draw standby
Automatic reset of High
pressure switch (HP1)
Fuse F3
(a)
clutch
8 Excessive current draw unit in
Standby fuse F2
(a)
standby operation
9 Excessive current draw unit in
Fuse F1
(b)
road operation
10 Connection error on primary
Fuse F4 and/or F5
(a)
transformer
Cutout : --13.23 inHG
YES
(- 0.45 bar)
Timer 5 min
Self-protected opening
YES
NO
Self-protected opening
YES/NONODepending on Selection
See electrical wiring diagram
YES
Self-protected opening
YES Cutout : 355 psig (24.5 bar )
NO Opens at 5 A (12 V)
NO
NO
NO
Opens at 30 A (12 V)
Opens at 30 A (12 V)
Opens at 4 A
11 Excessive temperature on stand-
by motor bearing
12 Clutch malfunction - road (exces-
sive current draw)
13 Clutch malfunction - road (insuffi-
cient current draw)
14 Double power supply (road +
standby)
Internal Motor Thermostat
(PT0)
Electronic relay
Electronic relay
Microprocessor
YES
YES
YES
YES
Self-protected opening
Self-protected opening
Opens 311_ F (155° C)
Detection of min. threshold
at 750 mA
Display on Cab Command
until one of the 2 power supplies have been disconnected.
15 Low battery voltage Microprocessor YES Cutout/cut-in at 10 V
16 Excessive current draw on igni-
tion circuit (Neiman)
Fuse FI
NO
Opens at 1 A
(a) On road / standby unit only (b) This fuse is located close to the vehicle battery (12 v).
1-11
62-10848
Page 21

1.8 REFRIGERANT Circuit
1.8.1 Cooling (See Figure 1 -9)
When cooling, the unit operates as a vapor compression
refrigeration system. The main components of the
system are the reciprocating compressor, air-cooled
condenser, thermostatic expansion valve and the direct
expansion evaporator.
The compressor raises the pressure and temperature of
the refrigerant and forces it through the discharge check
valve and condenser pressure control valve into the
condenser tubes. The discharge check valves prevent
reverse flow through the non operating compressor.
When operating on the road compressor, the flow also
passes through the oil separator where oil is removed
and returned to the road compressor.
The condenser fan circulates surrounding air over the
outside of the condenser tubes. Heat transfer is thus
established from the refrigerant gas (inside the tubes) to
the condenser air (flowing over the tubes). The
condenser tubes have fins designed to improve the
transfer of heat. This removal of heat causes the
refrigerant to liquefy. Liquid refrigerant flows from the
condenser to the receiver.
The receiver stores the additional charge necessary for
low ambient operation and for heating and defrost
modes.
The refrigerant leaves the receiver and flows through a
manual receiver shut-off valve (king valve).
The refrigerant then flows through a check valve. The
check valve serves to prevent reverse flow of refrigerant
during the heating/defrost cycle.
The refrigerant then flows through the filter-drier, where
an absorbent keeps it dry and clean. The refrigerant
then flows though a sight glass. The sight glass is fitted
with an indicator that changes color to indicate moisture
content of the refrigerant. The refrigerant then flows
through the subcooler which removes additional heat
from the liquid to improve system efficiency.
The liquid than enters the thermostatic expansion valve
(with external pressure equalizer) which regulates the
flow rate of refrigerant towards the evaporator in order to
obtain maximum use of the evaporator heat transfer
surface.
The evaporator tubes have aluminium fins to increase
heat transfer; therefore heat is removed from the air
circulated through the evaporator. This cold air is
circulated throughout the truck to maintain the cargo at
the desired temperature.
The transfer of heat from the air to the low temperature
liquid refrigerant causes the liquid to vaporize. The
vapor at low temperature and is then drawn out by the
compressor. From this point, the cycle starts over.
On 115v units the refrigerant then enters the
compressor regulating valve (CPR) which regulates
refrigerant pressure entering the compressor. The cycle
then starts over.
The quench valve opens as required to maintain a
maximum discharge temperature. (Refer to section
1.6.2 for settings.)
1.8.2 Heat And Defrost (See Figure 1-10)
When refrigerant vapor is compressed to a high
pressure and temperature in a compressor, the
mechanical energy necessary to operate the
compressor is transferred to the gas as it is being
compressed. This energy is referred to as the “heat of
compression” and is used as the source of heat during
the heating or defrost cycle.
When the microprocessor activates heating or defrost,
the hot gas solenoid valve energizes and the condenser
pressure control valve energizes, closing the port to the
condenser and opening a port which allows heated
refrigerant vapor to flow directly to the evaporator coil .
The main difference between heating and defrosting is
that when in heating mode the evaporator fans continue
to run thus circulating the air throughout the truck to heat
the product. When in defrost, the evaporator fans stop,
thus allowing the heated vapor to defrost any ice
build-up on the coil.
When the pressure is above the setting of the
condenser pressure control switch, the condenser
pressure control valve (HGS2) is closed to prevent
additional pressure rise in the system. When pressure is
below the setting of the condenser pressure control
switch, the valve is opened to pressurize the receiver
and force additional refrigerant into the system and
increase heating capacity.
1-1262-10848
Page 22

QUENCH VALVE (BPV)
SUCTION
CHARGING
PORT
TXV EQUALIZER LINE
EVAP.
LP
DEFROST
ELEMENT
OIL SEPARATOR
TXV
CHECK
VALVE
KING VALVE
CPR
115V
ONLY
FILTER DRIER/SIGHTGLASS
RECEIVER
HOT GAS SOLENOID
VALVE (HGS1)
DISCHARGE
CHECK VAL VEMANIFOLD
ASSEMBLY
SUBCOOLER
CONDENSER
COND.
PRESS.
CONTROL
VALVE
(HGS2)
HP1
DISCHARGE
CHARGING
PORT
QUENCH
THERMOSTAT
(BPT)
ROAD
COMPRESSOR
HP2
STAND BY
COMPRESSOR
DISCHARGE
LIQUID
LIQUID INJECTION LINE
HOT GAS LINE
SUCTION LINE
Figure 1-9 Refrigeration Circuit Cooling Cycle
1-13
62-10848
Page 23

QUENCH VALVE
(BPV)
SUCTION
CHARGING
PORT
TXV EQUALIZER LINE
EVAP.
LP
DEFROST
ELEMENT
OIL SEPARATOR
TXV
CHECK
VALVE
KING VALVE
HOT GAS SOLENOIDVALVE (HGS1)
CPR
115V
ONLY
FILTER DRIER/SIGHTGLASS
RECEIVER
DISCHARGE
CHECK VAL VEMANIFOLD
ASSEMBLY
SUBCOOLER
CONDENSER
COND.
PRESS.
CONTROL
VALVE
(HGS2)
HP1
DISCHARGE
CHARGING
PORT
QUENCH
THERMOSTAT
(BPT)
ROAD
COMPRESSOR
Figure 1-10 Refrigeration Circuit Heating Cycle
HP2
STAND BY
COMPRESSOR
DISCHARGE
LIQUID
LIQUID INJECTION LINE
HOT GAS LINE
SUCTION LINE
1-1462-10848
Page 24

SECTION 2
OPERATION
2.1 CONTROL SYSTEM
2.1.1 Introduction
CAUTION
Under no circumstances should anyone attempt to service the microprocessor module and Cab Command. Should a problem
develop with the control system, contact
your nearest Carrier Transicold dealer for
replacement components.
The Control System consists of the microprocessor
module (Figure 1-6), Cab Command (Figure 2-1) and
interconnecting wiring.
a. The Microprocessor Module includes the tempera-
ture control software and necessary input/output circuitry to interface with the unit controls.
b. The Cab Command is remotely mounted in the truck.
The Cab Command includes the LCD display and
keypad. The keypad and display serve to provide
user access and readouts of microprocessor information. The information is accessed by keypad
selections and viewed on the display.
1.8.3 Microprocessor Module
The microprocessor controls the following functions:
a. Maintains the box temperature at setpoint by regu-
lating the cooling, heat, off mode and automatic defrost cycles.
b. Permanently displays the return air temperature and
on request the setpoint temperature.
c. Digital display and selection of data.
For further details on digital message display, see
section 2.6.
2.1.2 Cab Command
The Cab Command is mounted in the cab and allows the
driver to carry out the control operations:
viewed on the display .
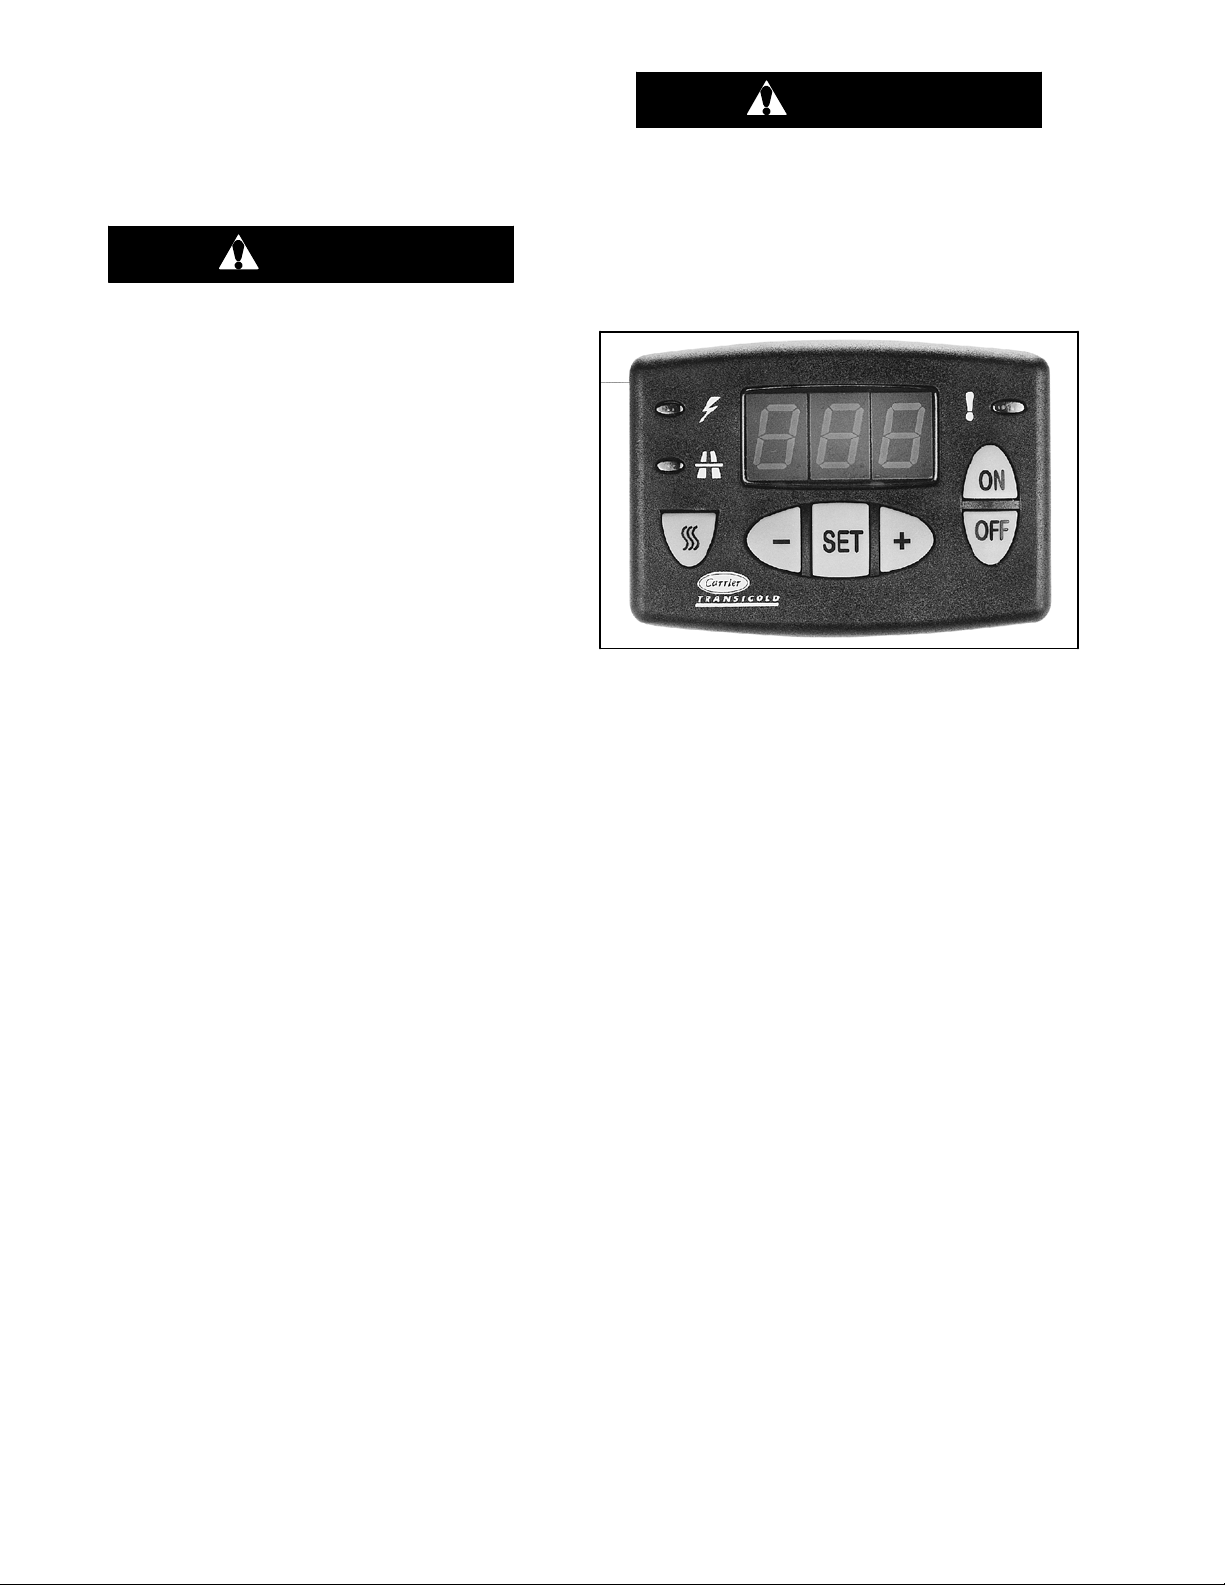
Figure 2-1 Cab Command
a.
Display
The digital display consists of 3 alphanumeric
characters. The default value displayed is the box
temperature. The microprocessor enables selection of
the display in degrees Celsius or Fahrenheit. The
display also includes settings for defrost operation (dF).
The display also includes three LEDs:
Digital Display
Standby operation LED
Road operation LED
Unit operating LED
D Green : cycling (left-hand side)
D Red : malfunction (right-hand side)
• start up and shut-down the unit
• automatic start-up in road or standby mode
• adjust the setpoint
• defrost
The driver can display the box temperature, and see
whether the setpoint is being maintained by checking
the green indicator. The indicator lights up red in the
event of a malfunction.
When the battery voltage is too low, a fail-safe system
shuts down the unit. Unit restart is automatic and
time-delayed if the voltage rises to the normal level.
The command consists of the display and the keypad.
The keypad and display serve to provide user access
and readouts of microprocessor information. The
information is accessed by keypad selections and
2-1
62-10848
Page 25

Unit operating LEDs
a. Green Light Status for Standby Units
Under normal operation, the green LED will indicate the
temperature control status as follows:
Setpoint + 9°F
(5_C)
NULL
BAND
Setpoint -- 9°F
(5_C)
Figure 2-2 Green Light Status -- Standby
a. Green Light Status for Road Only Units
Under normal operation, the green LED will indicate the
temperature control status as follows:
Green LED
flashing 3 Hz
Green LED
flashing 0.5 Hz
Steady
green LED
Steady
green LED
Green LED
flashing 0.5 Hz
Green LED
flashing 3 Hz
Setpoint +
differential of
1.8°F(1°C),
3.6°F(2°C) or
5.4°F(3_C)
SETPOINT
Setpoint -differential of
1.8°F(1°C),
3.6°F(2°C) or
5.4°F(3_C)
b. Red Light Status
After an alarm has been present for 15 minutes, the red
unit indicating light flashes at 3 Hz. The light will
continue to flash at 0.5 Hz until the temperature returns
to setpoint ± differential. At that point the steady green
indicator light will light and the alarm become inactive.
c. Keypad
The keypad consists of six keys that enable the operator
to activate various functions, display operating data and
modify operating parameters.
Manual defrost control key
Unit start-up key
Unit shut-down key in standby or road
mode
On road operation, the unit can also be
shut down with the ignition key.
Unit data and function modification keys
The SET key, together with the + and -keys, enables display and modification
of unit operating data.
The display scrolls through parameters
each time the SET key is pressed.
Decrease key for selected data
Steady green
LED
NULL
BAND
Figure 2-3 Green Light Status -- Road Only
Green LED is
OFF
Green LED
flashing 1 Hz
COOLING
SETPOINT
HEATING
Increase key for selected data
2.2 START--UP
2.2.1 Inspection
Before starting the truck engine or connecting standby
power check the following
a. Check condenser coil for cleanliness
b. Check condition of refrigerant hoses
c. Check condition and tension of compressor belt(s)
d. Check condition of condenser fan blade, motor and
brushes
e. Check truck battery fluid level
f. Check truck battery and terminal connections -- clean
and tighten as necessary
g. Check defrost water drains from evaporator
h. Check evaporator coil for cleanliness
i. Check condition of evaporator fan blades, motor and
brushes
j. Check oil level in standby compressor sight glass
62-10848
2-2
Page 26

2.2.2 Connect Power
If the unit is to be operated in the standby mode, connect
power as follows:
WARNING
Do not attempt to connect or remove power
plug before ensuring the unit is OFF (press
OFF key on Cab Command) and external
power circuit breaker is open.
2.3 SETPOINT ADJUSTMENT
It is possible to increase or decrease the setpoint by
whole numbers until the required setpoint is displayed. If
display stays highlighted, the setpoint displayed has not
been validated.
The new setting for the setpoint is validated by pressing
the SET key.
Displays the setpoint temperature
WARNING
Make sure the power plug is clean and dry
before connecting to any power source
a. Check that the external power source corresponds to
the characteristics of the unit (see paragraph 1.6.3
step c.). Make sure external power source circuit
breaker is open.
b. Make sure unit is OFF by pressing the OFF button on
the Cab Command.
c. Plug the power cord into unit receptacle.
2.2.3 Starting
CAUTION
If starting uni t for the first time after installation the compressor pressure regulating
valve will need to be reset (refer to paragraph 4.14)
CAUTION
If starting uni t for the first time after installation or
optional feature or
rameters have changed the Configuration
will need to be reset (refer to paragraph 2.9)
Depending on desired mode of operation, either start
the vehicle engine or close the power source circuit
breaker.
starting after adding/removing an
if Owners operating pa-
Decrease the setpoint
Increase the setpoint
Validate setpoint temperature
Return to display of box temperature.
2.4 MANUAL DEFROST
Check that box temperature is 40°F(4.4°C) or lower.
Press manual defrost key to
initiate manual defrost.
2.5 DEFROST CYCLE ADJUSTMENT
Defrost parameters may be set to eliminate defrost,
decrease the time between defrosts, allow full
automatic defrost, increase the time between defrosts
or set a forced interval between defrosts. To adjust the
defrost cycle, do the following:
Shut-down unit.
+
OR
Display parameters.
Modify parameters.
Press the ON key to start the unit
(For Standby units, start up is
time delayed for 10 seconds.
For Road units, start up is time
delayed for 40 seconds.)
The digital display of the Cab
Command displays the box temperature.
Check that temperature setpoint
is correct by pressing the SET
key. The setpoint temperature is
highlighted on the digital display.
2-3
Validate modified settings
Return to display of box
temperature.
NOTE
If no key is pressed within 5 seconds of
adjusting settings the system reverts to displaying the box temperature. Only validated
changes are recorded.
62-10848
Page 27

2.6 ALARM DISPLAY
In the event of a malfunction the unit will shut down and
the Cab Command will display an error message or
alarm message. The message will remain displayed
until the malfunction is corrected. If standby power is
connected and the malfunction is such that standby
operation can be allowed, the unit will start in the
standby mode. A listing of the error messages and
alarm codes is provided in Table 2-1.
Table 2-1 Alarms For Road Only Units
Malfunction
Codes
A00
A01
A02
A04
A06
A07
A09
A10
A11
A15
BAT
EE
Err
Red LED flashes
No malfunction.
Unit in operation.
High or Low pressure switch X
High or Low pressure switch X
Road clutch malfunction X
Condenser fan motor fault X
Evaporator fan motor fault X
Hot gas solenoid valve malfunction (HGS1) X
Quench valve malfunction (BPV) X
Condenser pressure control valve (HGS2) X
Setpoint adjusted out of the range --20.2 to
86°F(--29°C/+30°C) or below the programmed
low threshold
Low battery voltage X
Probe malfunction or evaporator temperature
out of limits [--49° to 174°F(--45° to 79°C)]
Programming error on part of operator X
Description
2.6.1 Accessing Alarm Messages
To access the alarm messages:
Press SET for 5 seconds : enables access to alarm messages.
OR
In the event of more than one alarm,
press the + or -- keys to list them.
ALARM
ONLY
X
X
ALARM AND UNIT SHUT
DOWN
62-10848
2-4
Page 28

Malfunction
Codes
A00
A01
A02
A03
A04
A05
A06
A07
A08
A09
A10
A11
A12
A13
A14
A15
BAT
EE
Err
Table 2-2 Alarms For Standby Units
Description
Red LED flashes
No malfunction.
Unit in operation.
Low pressure switch
High pressure switch
Electric motor overload
protection on start-up
Road clutch malfunction X
Standby clutch and contactor X
Condenser fan motor fault X
Evaporator fan motor fault X
Heating option command X
Hot gas valve malfunction (HGS1) X
Quench valve malfunction (BPV) X
Condenser pressure control valve (HGS2) X
High temperature alarm X
Low temperature alarm X
Defrost alarm > 45 minutes X
Setpoint adjusted out of the range --20.2 to
86°F(--29°C/+30°C) or below the programmed
minimum setpoint
Low battery voltage X SEE SECTION 2.6.2
Probe malfunction or evaporator temperature
out of limits [--49° to 174°F(--45° to 79°C)]
Programming error on part of operator X
ALARM
ONLY
X
X
ALARM AND UNIT SHUT
DOWN
X -- AFT ER 3 SUCCESSIVE
FAULTS
X -- AFT ER 5 SUCCESSIVE
FAULTS
X -- AFT ER 3 SUCCESSIVE
FAULTS
2.6.2 Low Battery Voltage Alarm for Road Only
Units
There is a 40 second time delay during start--up. After
this delay if the battery voltage drops below 10V ±0.2V
for Standby units or 10.5V ±0.5V for Road only units, the
microprocessor will react 20 seconds later and the unit
will go out of temperature control mode. The
microprocessor will check the voltage after another 20
seconds. If battery voltage still has not risen, the unit will
remain out of temperature control mode for another 10
minutes, and the battery alarm will be activated and the
Cab Command will display the message “bAt”. Unit will
return to temperature control mode if battery voltage
has risen after 10 minutes. If the battery voltage has not
risen after this 10 minute period the unit will remain out
of temperature control mode another 2 minutes and the
microprocessor will check the battery voltage every 2
minutes. Unit will return to temperature control mode in
its current configuration when battery voltage rises to
10V ±0.2V for Standby units or 10.5V ±0.5V for Road
only units.
2.6.3 Clearing Alarm Messages
The alarm list provides information on current alarms
and past alarms which may be helpful in trouble
shooting unit problems. Once all the alarm information
has been noted and service is complete, the alarm list
may be cleared. To clear the alarm messages:
++
Press the ON, the + and
the -- keys at the same
time.
2.7 CHECKING THE EEPROM VERSION
Start up unit
Press the SET key to display eeprom
version number.
Press SET key to return to box
temperature.
2.8 STOPPING THE UNIT
Press the OFF key or turn the ignition
key to off position.
2-5
62-10848
Page 29

2.9 MICROPROCESSOR CONFIGURATION
CAUTION
6 hours) using the (+) or (--) keys. Selection MUST be
validated by pressing the SET key.
3. The next steps must be performed with the unit ON:
If starting uni t for the first time after installation or
optional feature or
rameters have changed, the Configuration
will need to be reset.
2.9.1 ROAD ONLY FUNCTIONAL SETTINGS
The procedure for adjusting the functional parameters is
as follows:
1. The temperature display is selectable between Fahrenheit and Celsius. Units are configured for Celsius
from the factory. To set the display to Fahrenheit, the
selection jumper must be removed and discarded.
SeeFigure1-6.
The board contains another set of pins similar to
the Degrees C/Degrees F selection jumper,
marked as J1. This jumper is not used for unit
operation, but it is used during the microprocessor controller manufacturing process. DO NOT
CONNECT THE J1 PINS TOGETHER.
2. The following steps must be performed with the unit
OFF:
If no buttons are depressed within 5 seconds of
pressing the Defrost and On Keys (Step 2 of the
above procedure) or modifying parameters, the
Cab Command reverts to box temperature display and the configuration procedure is
aborted.
starting after adding/removing an
if Owners operating pa-
NOTE
Shut-down unit.
Hold both keys
THEN
OR
momentarily in order to
display parameters.
Modify parameters. (See a.
and b. below)
Validate modified settings.
NOTE
Unit start-up
Press the +, then -- then
THEN THEN
OR
If no buttons are depressed within 5 seconds of
pressing the ON key or modifying parameters,
the Cab Command reverts to box temperature
display and the configuration procedure is
aborted.
a. The minimum setpoint parameter is displayed. The
minimum setpoint can be selected by scrolling
through available options [--20°F (--28.9°C), --4°F
(-- 20°C), 32°F(0°C)] using the (+) or (--) keys. Factory
setting is --20°F . Selection MUST be validated by
pressing the SET key.
b. The null mode differential temperature is displayed
next. This setting determines the temperature difference between box temperature and setpoint that controls compressor cycling. The differential can be selected by scrolling through available options [1.8°F
(1°C), 3.6°F(2°C), or 5.4°F(3°C)] using the (+) or (--)
keys. Factory setting is 3.6°F(2°C). Selection MUST
be validated by pressing the SET key.
c. The ON/OFF (Continuous airflow) parameter for the
evaporator fan is displayed next. This feature determines whether the evaporator fan is on or off when
the unit cycles off upon reaching setpoint. The factory
setting is OFF. Change setting by using the (+) or (--)
keys. Selection MUST be validated by pressing the
SET key.
d. The return air temperature will be displayed after the
above sequence.
DEFROST keys. All
keys should be held
momentarily after
pressing in the correct
sequence.
Modify parameters.
(See a., b. and c.
below)
NOTE
a. The defrost duration parameter is displayed. This set-
ting determines the length of time in minutes the unit
will remain in defrost once defrost is initiated. The defrost duration can be selected by scrolling through
available options (10, 20, 25, 30 or 45 minutes) using
the (+) or (--) keys. Selection MUST be validated by
pressing the SET key.
b. The defrost interval parameter is displayed next. This
setting determines the time between defrosts in
hours. The defrost interval can be selected by scrolling through available options (0, 1, 1.5, 2, 2.5, 3, 4, 5,
62-10848
2-6
Page 30

2.9.2 ROAD/STANDBY FUNCTIONAL SETTINGS
The procedure for adjusting the functional parameters is
as follows:
1. The temperature display is selectable between Fahrenheit and Celsius. Units are configured for Celsius
from the factory. To set the display to Fahrenheit,
move the Celsius end of the jumper to the Fahrenheit
pin as shown in Figure 2-4.
CF
Unit start-up
Press the +, then -- then
THEN THEN
OR
Keys must be pressed before the unit starts.
DEFROST keys. All
keys should be held
momentarily after
pressing in the correct
sequence.
Modify parameters.
(See a., b., c. and d.
below)
NOTE
Figure 2-4 Temperature Selection Jumper
NOTE
The board contains another set of pins similar to
the Degrees C/Degrees F selection jumper,
marked as J1. This jumper is not used for unit
operation, but it is used during the microprocessor controller manufacturing process. DO NOT
CONNECT THE J1 PINS TOGETHER.
2. The following steps must be performed with the unit
OFF:
Shut-down unit.
Hold both keys
THEN
OR
If no buttons are depressed within 5 seconds of
pressing the Defrost and On Keys (Step 2 of the
above procedure) or modifying parameters, the
Cab Command reverts to box temperature display and the configuration procedure is
aborted.
a. The defrost interval parameter is displayed. This set-
ting determines the time between defrosts in hours.
The defrost interval can be selected by scrolling
through available options. Settings are for either automatic defrost (AUT) or fixed time intervals between
1 to 6 hours. The setting can be selected by pressing
the (+) or (--) keys. Selection MUST be validated by
pressing the SET key.
The next steps must be performed with the unit ON:
momentarily in order to
display parameters.
Modify parameters. (See a.
and b. below)
Validate modified settings.
NOTE
NOTE
If no buttons are depressed within 5 seconds of
pressing the ON key or modifying parameters,
the Cab Command reverts to box temperature
display and the configuration procedure is
aborted.
a. The minimum setpoint parameter is displayed. The
minimum setpoint can be selected by scrolling
through available options [--20°F (--28.9°C), --4°F
(-- 20°C), 32°F(0°C)] using the (+) or (--) keys. Factory
setting is --20°F . Selection MUST be validated by
pressing the SET key.
b. The null mode differential temperature is displayed
next. This setting determines the temperature difference between box temperature and setpoint that controls compressor cycling. The differential can be selected by scrolling through available options [1.8°F
(1°C), 3.6°F(2°C), or 5.4°F(3°C)] using the (+) or (--)
keys. Factory setting is 3.6°F(2°C). Selection MUST
be validated by pressing the SET key.
c. The ON/OFF (Continuous airflow) parameter for the
evaporator fan is displayed next. This feature determines whether the evaporator fan is on or off when
the unit cycles off upon reaching setpoint. The factory
setting is OFF. Change setting by using the (+) or (--)
keys. Selection MUST be validated by pressing the
SET key.
d. The 2ET or 3ET parameter is now displayed. This
feature determines heating mode operation based on
the presence of a condenser pressure control valve.
Since all 30S units covered by this manual have a
condenser pressure control valve installed, 3ET must
be selected. This enables cooling, null, and heating
modes of operation. Selection MUST be validated by
pressing the SET key. Change setting by using the (+)
or (--) keys. Selection MUST be validated by pressing
the SET key.
WARNING
Beware of unannounced starting of the
unit. The unit may cycle the fans and operating compressor unexpectedly as control requirements dictate. Press OFF key on the
Cab Command and disconnect power plug.
2-7
62-10848
Page 31

SECTION 3
TEMPERATURE CONTROL
3.1 SEQUENCE OF OPERATION
General operation sequences for cooling, null, and
heating are provided in the following paragraphs. The
microprocessor automatically selects the mode
necessary to maintain box temperature at setpoint.
3.1.1 Perishable Mode
The unit operates in the perishable mode with set points
above 10°F(--12°C)
a. With return air temperature above setpoint and de-
creasing, the unit will be cooling with the compressor
and evaporator fans operating. (See Section 1.8.1 for
a description of the refrigeration circuit during cooling) The condenser fan will operate for the first three
minutes after start up then operate under the control
of the condenser pressure control switch (HP2). The
green unit operating LED will operate in accordance
with Figure 2-2 or Figure 2-3.
b. If discharge temperature increases to the setpoint of
the quench thermostat (BPT), the thermostat will
close, energizing the quench valve (BPV). This will allow liquid into the suction line in order to cool compressor. Once the discharge temperature decreases
to the certainty of the PPT, the thermostat will open,
DE--energizing the PP.
COOL
+1.8_F(+1_C)
or +3.6_F(+2_C)
or +5.4_F(+3_C)
UNIT STOPPED
HEAT
SETPOINT
-- 1 . 8 _F(--1_C)
or --3.6_F(--2_C)
or --5.4_F(--3_C)
(setting)
Figure 3-1 Operating Sequence -- Perishable
Mode
3.1.2 Frozen Mode
The unit operates in the frozen mode with setpoints at or
below 10°F(--12°C). Operation in the frozen mode is the
same as in the perishable mode except no heating takes
place.
c. Once temperature decreases to the certainty, the unit
will enter the null mode. If the continuous air flow parameter is set to ON, the evaporator fans will continue
to operate with all other components OFF. If the continuous air flow parameter is OFF, the evaporator
fans and all other components will be OFF. A 5 minute delay is required before restart is allowed.
d. If temperature increases during the null mode, the
unit will restart in cooling.
e. If temperature continues to decrease the unit will en-
ter the heating mode with the compressor and evaporator fans operating and the hot gas solenoid valve
(HGS1) energized (open). The condenser fan and
condenser pressure control valve (HGS2) will operate under the control of the condenser pressure
switch (HP2). If the engine coolant or electric heat option is installed, the optional heaters will also be energized. (See Section 1.8.2 for a description of the refrigeration circuit during heat and defrost.)
+1.8_F(+1_C)
COOL
UNIT STOPPED
or +3.6_F(+2_C)
or +5.4_F(+3_C)
SETPOINT
-- 1 . 8 _F(--1_C)
or --3.6_F(--2_C)
or --5.4_F(--3_C)
(setting)
Figure 3-2 Operating Sequence -- Frozen Mode
3-1
62-10848
Page 32

3.2 DEFROST CYCLE
Defrost is an independent cycle overriding cooling and
heating functions in order to melt frost and ice from the
evaporator when necessary. Defrost may be initiated by
the microprocessor or manually by the operator once
the defrost termination thermostat has closed. (See
Section 1.6.2 for settings). In defrost mode, the
microprocessor displays “dF” on the cab command and
setpoint is no longer displayed.
During defrost, the evaporator fans shut down and
operation of the condenser fan is controlled by the
microprocessor. The end of the cycle is controlled by the
opening of the defrost termination thermostat. (See
Section 1.8.2 for a description of the refrigeration circuit
during heat and defrost.)
3.3 MINIMUM OFF TIME
Once the unit has cycled off, it will remain off for the
minimum off time of 5 minutes. This prevents the unit
from rapid cycling due to changes in air temperature. Air
temperature in the box changes rapidly but it takes time
for the product temperature to change.
62-10848
3-2
Page 33

SECTION 4
4.Checktheoperationofcabcom
SERVICE
WARNING
Beware of unannounced starting of the unit. The unit may cycle the fans and operating compressor
unexpectedly as control requirements dictate. Press OFF key on the cab command and disconnect
power plug.
CAUTION
Compressor failure will occur if inert gas brazing procedures are not used on units with
R134A and POE oil. For more information see Technical Procedure 98-50553-00 -- Inert Gas
Brazing.
NOTE
To avoid damage to the earth’s ozone layer, use a refrigerant recovery system whenever removing
refrigerant. When working with refrigerants you must comply with all local government environmental
laws, U.S.A. EPA section 608.
4.1 MAINTENANCE SCHEDULE
Regular servicing is required in order to optimize the life
and reliability of your unit. The recommended scheduled
maintenance intervals and categories are provided in
Table 4-1 while descriptions of the service procedures
to be carried out under each category are provided in
Table 4-2
Table 4-1 Maintenance Schedules
Kilometers
Miles
Service A
Service B
Service C
Service D
5
000300006000090000
3
0001800036000540007200090000
J J J J J J J J
J J J J J J J
J J J
120
000
J
150
000
180
000
108
000
210
000
126
000
Refrigerant : Type R134a.
Road compressor oil type: The road compressorsare
supplied with CARRIER POLYESTER (POE) oil. Oils of
PAG ty p e are strictly incompatible with the operation
of this unit, never use an oil other than that approved
by CARRIER.
Table 4-2 Service Category Descriptions
Service A
1. Check the tension of the compressor
belt(s).
2 .Check that the vehicle engine idles
correctly with unit operating. Check
compressor mounting hardware and
belt tension. (Paragraph 4.2)
3 .Check the tightness of bolts and
screws and that the unit is correctly
fastened onto the box.
Service B 1 . Clean evaporator & condenser.
(Paragraphs 4.18 & 4.19)
2. Replace the road and standby compressor belt(s).
3. Check and if required replace the
filter-drier. (Paragraph 4.10)
mand.
5. Check the defrost
DCut-in
DFan shut-down
DCut-out
DDefrost water drain
Service C 1. Check the operation of the evapora-
tor and condenser fans. Change the
condenser/evaporator motor brushes.
2. Change the compressor oil. Use
polyester oil (POE) approved by CARRIER. Refer to paragraph 1.6.1.
Service D 1. Change the removable relays, fuses
and capacitor (if any) in the control
box.
-
-
4-1
62-10848
Page 34

4.2 BELT MAINTENANCE AND ADJUSTMENT
Table 4-3. Belt Tension (See Figure 4-2)
WARNING
Beware of V- belt and belt-driven components as the unit may start automatically.
A belt tension gauge provides an accurate and easy
method of adjusting belts to their proper tension.
Properly adjusted belts give long lasting and efficient
service. Too much tension shortens belt and bearing life,
and too little tension causes slippage and excessive belt
wear. It is also important to keep belts and sheaves free
of any foreign material which may cause the belts to slip.
The Belt Tension gauge can be used to adjust all belts.
The readings which we specify for Carrier Transicold
units are applicable only for our belts and application, as
the tension is dependent on the size of the belt and
distance between sheaves. When using this gauge, it
should be placed as close as possible to the midpoint
between two sheaves.
BELTS
Standby Motor
to Compressor
4.2.1 Standby Motor--Compressor V-Belt
a. Loosen the retaining bolts of the standby motor sup-
port plate.
b. Replace the V-belt. Position the motor to correct belt
tension. Tighten the motor retaining bolts.
4.3 INSTALLING R-134A MANIFOLD GUAGE SET
A R-134a manifold gauge/hose set with self-sealing
hoses is required for service of models covered within
this manual. The manifold gauge/hose set is available
from Carrier Transicold. (Carrier Transicold P/N
07-00294-00, which includes items 1 through 6,
Figure 4-3). To perform service using the manifold
gauge/hose set, do the following:
4.3.1 Preparing Manifold Gauge/Hose Set For Use
a. If the manifold gauge/hose set is new or was
exposed to the atmosphere it will need to be evacuated to remove contaminants and air as follows:
New Install
Ten sion
90 ft./lbs
(122 Nm)
Running
Ten sion
80 to 90 ft./lbs
(108 to 122
Nm)
Figure 4-1 Belt Tension Gauge
(Carrier Part Number 07--00203--00)
Belt tension depends on each kit. Refer to Installation
Instructions provided with the kit for belt tension
requirements. In each kit installation instruction, we
indicate the belt tension (given with belt tension gauge
P/N 07-00203-00.
When installing a new V-belt the tension should be
somewhat higher than specified and readjusted after
allowing the unit to run for some time.
Standby
motor
1. Standby Motor-Compressor V-belt
Compressor
b. Back seat (turn counterclockwise ) both field service
couplers (see Figure 4-3) and midseat both hand
valves.
c. Connect the yellow hose to a vacuum pump and an
R-134a cylinder.
d. Evacuate to 10 inHg (254mmHg) and then charge
with R-134a to a slightly positive pressure of 1.0 psig
(0.07 Bar).
e. Front seat both manifold gauge set hand valves and
disconnect from cylinder. The gauge set is now
ready for use.
4.3.2 Connecting Manifold Gauge/Hose Set
To connect the manifold gauge/hose set for reading
pressures, do the following:
a. Remove service valve stem cap and check to make
sure it is backseated. Remove access valve cap.
b. Connect the field service coupler (see Figure 4-3) to
the access valve.
c. Turn the field service coupling knob clockwise, which
will open the system to the gauge set.
d. Read system pressures.
62-10848
Figure 4-2 Layout of V-belt
e. Repeat the procedure to connect the other side of
the gauge set.
4-2
Page 35

4.3.3 Removing the Manifold Gauge Set
1. While the compressor is still ON, backseat the high
side service valve.
2. Midseat both hand valves on the manifold gauge set
and allow the pressure in the manifold gauge set to
be drawn down to low side pressure. This returns
any liquid that may be in the high side hose to the
system.
CAUTION
To prevent trapping liquid refrigerant in the
manifold gauge set be sure set is brought to
suction pressure before disconnecting.
3. Backseat the low side service valve. Backseat both
field service couplers and frontseat both manifold set
hand valves. Remove the couplers from the access
valves.
4. Install both service valve stem caps and access
valve caps (finger-tight only).
Low Pressure
Gauge
1
High Pressure
Gauge
4.4 REMOVING THE REFRIGERANT CHARGE
NOTE
To avoid damage to the earth’s ozone layer, use
a refrigerant recovery system whenever removing refrigerant.
Connect a refrigerant recovery system (Carrier P/N
M V S -- 1 1 5 -- F -- L -- C T ( 1 1 5 V ) o r M V S -- 2 4 0 -- F -- L -- C T
(240V) ) to the unit to remove refrigerant charge. Refer
to instructions provided by the manufacturer of the refrigerant recovery system.
4.4.1 Refrigerant Removal From A Non --Working
Compressor.
To remove the refrigerant from a compressor that is not
operational, do the following:
a. Attach a manifold gauge set as shown in Figure 4-3
b. Recover refrigerant with a refrigerant recovery sys-
tem.
c. Service or replace components as required and leak
check the entire system. (See Section 4.5).
4.5 REFRIGERANT LEAK CHECKING
Opened
(Backseated )
Hand Valve
To Low Side
Access Valve
3
BLUE
2
4
6
(Blue Knob)
1. Manifold Gauge Set
2. Hose Fitting (0.5-16 Acme)
3. Refrigeration and/or Evacuation Hose
. (SAE J2196/R-134a)
4. Hose Fitting w/O-ring (M14 x 1.5)
5. High Side Field Service Coupler
6. Low Side Field Service Coupler
Figure 4-3 Manifold Gauge Set (R-134a)
2
RED
3
YELLOW
Closed
(Frontseated)
Hand Valve
To High Side
Access Valve
3
4
5
(Red Knob)
A refrigerant leak check should always be performed
after the system has been opened to replace or repair a
component. To check for leaks in the refrigeration
system, perform the following procedure:
NOTE
Use only R134a to pressurize the system. Any
other gas or vapor will contaminate the system
which will require additional purging and evacuation of t he high side (discharge) of the system.
a. If system is without refrigerant, charge system with
refrigerant to build up pressure between 30 to 50 psig
(2 to 3.4 Bars). Remove refrigerant cylinder and leak
check all connections.
b. Add sufficient nitrogen to raise system pressure to
150 to 200 psig (10.21 to 13.61 bar).
c. Check for leaks. The recommended procedure for
finding leaks in a system is with an electronic leak detector. (Carrier P/N 07--00295--00). Testing joints
with soap suds is satisfactory for locating large leaks
but be necessary when an electronic leak detector will
not function correctly.
d. Remove refrigerant using a refrigerant recovery sys-
tem and repair any leaks. Evacuate and dehydrate
the unit. (Refer to section 4.6) Charge unit with refrigerant. (Refer to section 4.7)
4-3
62-10848
Page 36

4.6 EV ACUATION AND DEHYDRATION
4.6.1 General
Moisture can seriously damage refrigerant systems.
The presence of moisture in a refrigeration system can
have many undesirable effects. The most common are
copper plating, acid sludge formation, “freezing-up” of
metering devices by free water, and formation of acids,
resulting in metal corrosion.
4.6.2 Preparation
a. Evacuate and dehydrate only after pressure leak test.
(Refer to section 4.5)
b. Essential tools to properly evacuate and dehydrate
any system include a good vacuum pump (5 cfm =
8m#H volume displacement, P/N 07-00176-01) and a
good vacuum indicator such as a thermocouple vacu-
um gauge (vacuum indicator). (Carrier P/N
0700414--00).
NOTE
Use of a compound gauge is not recommended
because of its inherent inaccuracy.
c. Keep the ambient temperature above 60_F (15.6_C)
to speed evaporation of moisture. If ambient temperature is lower than 60_F (15.6_C), ice might form before moisture removal is complete. Heat lamps or alternate sources of heat may be used to raise system
temperature.
d. Additional time may be saved during a complete sys-
tem pump down by replacing the filter--drier with a
section of copper tubing and the appropriate fittings.
Installation of a new filter--drier may be performed
during the charging procedure.
4
1
1 Refrigerant Recovery Unit
2 Refrigerant Cylinder
3 Evacuation Manifold
4.6.3 Procedure For Evacuation And Dehydrating System
a. Remove refrigerant using a refrigerant recovery sys-
tem.
b. The recommended method to evacuate and dehy-
drate the system is to connect three evacuation
hoses (Do not use standard service hoses, as they
are not suited for evacuation purposes.) as shown in
Figure 4-4 to the vacuum pump and refrigeration unit.
3
4
2
6
4
4Valve
5 V acuum Pump
6 Electronic Vacuum Gauge
Figure 4-4 Vacuum Pump Connection
c.Connect lines to unit and manifold and make sure vac-
Also, as shown, connect a evacuation manifold, with
evacuation hoses only, to the vacuum pump, electronic vacuum gauge, and refrigerant recovery system.
uum gauge valve is closed and vacuum pump valve is
open.
62-10848
4-4
Page 37

d. Start vacuum pump. Slowly open valves halfway and
then open vacuum gauge valve.
e. Evacuate unit until the electronic vacuum gauge indi-
cates 2000 microns. Close the electronic vacuum
gauge and vacuum pump valves. Shut off the vacuum
pump. Wait a few minutes to be sure the vacuum
holds.
f. Break the vacuum with clean dry nitrogen. Raise sys-
tem pressure to approximately 2 psig (0.14 Bar).
g. Purge nitrogen from system.
h. Repeat steps e through g one time.
i. Evacuate unit to 500 microns. Close off vacuum
pump valve and stop pump. Wait five minutes to see if
vacuum holds. This checks for residual moisture and/
or leaks.
j. With a vacuum still in the unit, the refrigerant charge
may be drawn into the system from a refrigerant con-
tainer on a scale. The correct amount of refrigerant
may be added by observing the scale. (Refer to sec-
tion 4.7)
4.7 CHARGING THE REFRIGERATION SYSTEM
4.7.1 Checking The Refrigerant Charge
a. Start unit in cooling mode and run approximately ten
minutes.
b. Partially block off air flow to condenser coil so dis-
charge pressure rises to 174 psig (12 Bars).
c. The unit is correctly charged when there are no
bubbles in the sight glass.
4.7.2 Installing A Complete Charge
g. Start unit and check for non--condensables.
4.7.3 Adding A Partial Charge
NOTE
When partially charging the refrigeration system with R134a, install a vapor charge.
a. Place refrigerant cylinder on scale and connect
charging line between suction port and refrigerant
cylinder.
b. Note weight of refrigerant cylinder.
c. Run unit on high speed cool and open cylinder vapor
valve.
d. If necessary, partially block off air flow to condenser
coil so discharge pressure rises to 174 psig (12 Bars).
e. The unit is correctly charged when there are no
bubbles in the sight glass.
f. Start unit and check for non--condensables.
NOTE
It may be necessary to finish charging the unit
using the partial charge method, due to pressure rise in the high side of the system. (Refer to
paragraph 4.7.3)
a. Dehydrate unit and leave in deep vacuum. (Refer to
section 4.6)
b. Place refrigerant cylinder on scale and connect
charging line from cylinder to receiver outlet (king)
valve. Purge charging line at outlet valve.
c. Note weight of refrigerant cylinder.
d. Open liquid valve on refrigerant cylinder. Open king
valve half way and allow the liquid refrigerant to flow
into the unit until the correct weight of refrigerant has
been added as indicated by scale. Correct charge will
be found in Table 1-1.
NOTE
It is possible that all liquid may not be pulled into
the receiver, as outlined in step d. above. In this
case, vapor charge remaining refrigerant
through the suction service port (See Section
4.7.3).
e. When refrigerant cylinder scale indicates that the cor-
rect charge has been added, close liquid line valve on
cylinder and backseat the king valve.
f. Replace all valve caps.
4.8 CHECKING FOR NON--CONDENSABLES
To check for non--condensables, proceed as follows:
a. Stabilize system to equalize pressure between the
suction and discharge side of the system.
b. Check temperature at the condenser and receiver.
c. Check pressure at the receiver outlet (King) valve.
d. Check saturation pressure as it corresponds to the
condenser/receiver temperature using the Temperature-Pressure Chart, Table 4-4.
e. If gauge reading is 3 psig (0.2 Bar) or more than the
calculated P/T pressure in step d., non--condensables are present.
f. Remove refrigerant using a refrigerant recovery sys-
tem. (Refer to section 4.4)
g. Evacuate and dehydrate the system. (Refer to sec-
tion 4.6.)
h. Charge the unit. (Refer to section 4.7.)
4-5
62-10848
Page 38

4.9 REPLACING THE COMPRESSOR
4.10 CHECKING AND REPLACING FILTER-DRIER
4.9.1 Removing Compressor
WARNING
Ensure power to the unit is OFF, power plug
is disconnected and circuit breaker is open
or vehicle engine is OFF and negative battery cable is connected before replacing
compressor.
a.Remove the refrigerant. (See Section 4.4.1).
WARNING
Slowly open the plug on the suction and
discharge valves of the new compressor to
vent the nitrogen holding charge.
b. Remove bolts from flanges.
c. Release and remove belt.
4.10.1 Checking Filter-Drier
Check for any obstruction of the filter-drier by feeling the
inlet and outlet connections of the liquid line on the filter
cartridge. If the temperature of the outlet connection
seems lower than the temperature of the inlet
connection, replace the filter-drier.
4.10.2 Replacing The Filter-Drier
Remove refrigerant charge (See section 4.4). Remove
the drier mounting clip, then replace the filter-drier.
Following drier replacement, evacuate and recharge
unit (refer to sections 4.6 & 4.7).
4.11 HIGH PRESSURE (HP1) AND CONDENSER
PRESSURE (HP2) SWITCHES
4.11.1 Removing Switch
a. A SCHRAEDER valve is located under each switch to
allow removal and installation without removing the
refrigerant charge.
b. Remove switch and test in accordance with para-
graph 4.11.2.
c. Replace or reinstall switch.
4.11.2 Checking Pressure Switch
d. Remove the bolts mounting the compressor. Re-
move the compressor from chassis.
e. Remove the pulley from the compressor.
4.9.2 Installing Compressor
a.. To install the compressor, reverse the procedure out-
lined when removing the compressor. Refer to section 1.6.4 for torque values.
NOTE
The service replacement compressor is sold
without flanges.
b. Pump down the compressor. (See Section 4.4)
c. Charge compressor. (See Section 4.7.2)
NOTE
It is important to check the compressor oil level
of the new compressor and fill if necessary. (Refer to section 1.6.1)
d. Check refrigerant cycles.
Compressor oil type: The road compressors are
supplied with CARRIER PO LYESTER (POE) oil.
Ensure compressor is marked with a factory sticker
indicating the correct oil has been installed. Oils of PAG
type are strictly incompatible with the operation of this
unit, never use an oil other than that approved by
CARRIER.
WARNING
Do not use a nitrogen cylinder without a
pressure regulator. (See Figure 4-5) Cylinder pressure is approximately 2350 psig
(160 bars). Do not use oxygen in or near a
refrigerant system as an explosion may occur.
a. Remove switch as outlined in paragraph 4.11.1.
b. Connect ohmmeter across switch terminals. Ohm-
meter will indicate resistance if switch is closed (HP1)
or open (HP2) after relieving pressure.
b. Connect switch to a cylinder of dry nitrogen (see
Figure 4-5).
c. Set nitrogen pressure regulator higher than cut-out
point on switch being tested. Pressure switch settings
points are provided in paragraph 1.6.2.
d. Close valve on cylinder and open bleed-off valve.
e. Open cylinder valve. While observing meter, slowly
close bleed-off valve and increase pressure until the
switch opens (HP1) or closes (HP2). Slowly open
bleed-off valve (to decrease pressure) until switch reverts to normal position.
f. The meter will indicate open. Open pressure on
gauge. Slowly open bleed-off valve (to decrease
pressure) until switch closes (ohmmeter will move).
g. If switch does not activate within tolerances provided,
replace switch. Test new switch before installation.
62-10848
4-6
Page 39

1
4
2
5
6
3
1. Cylinder valve and gauge
2. Pressure regulator
3. Nitrogen cylinder
4. Pressure gauge (0 to 400 psig = 0 to 28 bars)
5. Bleed-off valve
6. 1/4 inch connection
Figure 4-5 Typical Setup For Testing Pressure
Switches HP1 And HP2
paper. Wipe out any accumulation of greasy material
using a clean rag dampened with solvent. Reassemble the motor. Install new brushes and replace cap.
4.13 HOT GAS (HGS1) AND CONDENSER
PRESSURE CONTROL SOLENOID VALVES
4.13.1 Replacing Solenoid Coil
It is not necessary to remove the refrigerant charge to
replace the coil (see Figure 4-7).
a. Remove coil snap cap, voltage plate and coil assem-
bly. Disconnect leads and remove coil junction box if
necessary.
b. Verify coil type, voltage and frequency. This informa-
tion appears on the coil voltage plate and the coil
housing.
c. Place new coil over enclosing tube and then install
voltage plate and snap cap.
1
2
3
4
4.12 CHECKING AND REPLACING CONDENSER
FAN MOTOR BRUSHES
To maintain proper operation of the fan motors, the fan
motor commutator and brushes should be checked
periodically for cleanliness and wear .
2
1
1. Brush Cap 2. Brush
Figure 4-6 Fan Motor Brushes
To check brushes proceed as follows :
a. With unit off and battery disconnected, remove brush
cap (Item 1 ; 2 per motor). See Figure 4-6
b. Remove brushes (Item 2; 2 per motor) and check the
length of the brush. If the length is less than 1/4 inch (6
mm) the brushes should be replaced.
c. Blow out the brush holder with low pressure air to re-
move any carbon dust in the holder. This dust could
prevent a good contact between the brushes and
commutator.
d. Remove the back cover of the motor and inspect the
commutator. If the commutator is heavily grooved,
polish it using fine sandpaper. Do not use abrasive
5
6
1. Snap cap
2. Voltage plate
3. Coil assembly
4. Enclosing tube
Figure 4-7 Hot Gas or Condenser Pressure
Control Solenoid
4.13.2 Replacing Valve Internal Parts
a. Remove the refrigerant charge. (See Section 4.4).
b. Remove coil snap cap, voltage cover and coil assem-
bly. Remove the enclosing tube.
c. Check for foreign material in valve body.
d. Check for damaged plunger and o-ring. If o-ring is to
be replaced, always put refrigerant oil on o-rings be-
fore installing.
7
5. Plunger assembly
6. Valve body assembly
7. Direction of flow
CAUTION
Do not damage or over tighten the enclosing tube assembly. Place all parts in the enclosing tube in proper sequence in order to
avoid premature coil burn-out.
e. Tighten enclosing tube.
f. Install coil assembly, voltage cover and snap cap.
4-7
62-10848
Page 40

g. Evacuate, dehydrate and recharge unit. See Sec-
tions 4.6 and 4.7.
h. Start unit and check operation.
e. Braze the equalizer tubes to expansion valve.
f. Evacuate, dehydrate and recharge unit. (See Sec-
tions 4.6 and 4.7).
123
1. Cap
3. Set Screw
2. Jam Nut
Figure 4-8 Compressor Pressure Regulating Valve
4.14 ADJUSTING THE COMPRESSOR PRESSURE
REGULATING VALVE (CPR) (115V ONL Y)
When adjusting the compressor pressure regulating
valve (CPR) (see Figure 4-8), the unit must be running
in heating or defrost mode. This will ensure a suction
pressure above the proper CPR setting. To adjust the
CPR valve, proceed as follows :
a. Install a gauge on the suction line .
b. Remove cap from CPR valve.
c. With an 8 mm Allen wrench, loosen the jam nut.
d. Using the 8 mm Allen wrench, adjust the set screw. To
raise the suction pressure turn the set screw clockwise; to lower the suction pressure, turn counterclockwise. Refer to paragraph 1.6.2 for CPR valve
setting.
e. When the setting has been adjusted, tighten the jam
nut securely against the set screw. This will prevent
any movement of the set screw due to vibrations in
the unit. Replace the cap.
4.15 THERMOSTATIC EXPANSION VALVE
The thermal expansion valve is an automatic device
which maintains constant superheat of the refrigerant
gas leaving the evaporator regardless of suction
pressure. The valve functions are: (a) automatic
response of refrigerant flow to match the evaporator
load and (b) prevention of liquid refrigerant entering the
compressor. Unless the valve is defective, it seldom
requires any maintenance.
NOTE
Due to the time involved in adjusting the superheat, replace the valve rather than adjusting it.
g. Check superheat (See Section 1.6.2.g.).
4.15.2 Measuring Superheat
a. Remove insulation from expansion valve bulb and
suction line. See Figure 4-9
b. Loosen one TXV bulb clamp and make sure area un-
der clamp (above TXV bulb) is clean.
c. Place thermocouple above (parallel to) the TXV bulb
and then secure loosened clamp making sure both
bulbs are firmly secured to suction line as shown in
Figure 4-9
d. Connect an accurate gauge to the ¼” port on the suc-
tion service valve.
e. Run unit until stabilized at --4_F (-20_C) box tempera-
ture.
f. From the temperature/pressure chart (Table 4-4), de-
termine the saturation temperature corresponding to
the evaporator outlet pressure.
g. Note the temperature of the suction gas at the expan-
sion valve bulb.
h. Subtract the saturation temperature determined in
Step f. from the average temperature measured in
Step g.. The difference is the superheat of the suction
gas. Refer to paragraph 1.6.2 for superheat setting.
i. If required, adjust superheat by turning the adjusting
screw located under the cap on the side of the valve.
2
1
3
5
4
4.15.1 Replacing expansion valve
a. Remove refrigerant charge (See section 4.4).
b. Remove insulation from expansion valve bulb and
then remove bulb from suction line.
c. Loosen flare nut and disconnect equalizer line from
expansion valve.
d. The txv bulb is located below the center of the suction
line. This area must be clean to ensure positive bulb
contact. Strap bulb to suction line and insulate both.
62-10848
1. Suction Line
(end view)
2. TXV Bulb Clamp
3. TXV Bulb
4. Thermocouple
5. Nut and Bolt (Clamp)
Figure 4-9 Thermostatic Expansion Valve Bulb
And Thermocouple
4-8
Page 41

4.16 DIAGNOSTIC TOOL
NOTE
The Cab Command diagnostic tool comes with
two jumpers. These are not applicable to the
30S system and should not be used in this application.
PRIMARY
TOOL
Figure 4-10 Cab Command Diagnostic Tool
(CTD P/N 07--00440-- 00)
a. Testing a cab command cable that is already
installed on the unit and routed into the truck cab requires the use of both pieces of the diagnostic tool.
b. Unplug the cab command cable from the micropro-
cessor and also from the back of the cab command
module.
c. Plug one end of the cable into the primary tool and
the other end into the remote tool.
d. Begin the test by turning on the power switch and ob-
serving the sequence of green lights. As each circuit
is tested, the corresponding light is illuminated. If a
fault is found in the cable, the light that corresponds
to that particular circuit is not illuminated.
e. To test a cable that is not installed on a unit, simply
plug each end of the cable into the primary tool and
perform the test as above.
4.17 MICROPROCESSOR
REMOTE
TOOL
When welding is required on the unit frame, or on the
front area of the truck, ALL wiring to the microprocessor
MUST be disconnected. When welding is performed on
other areas of the truck and van, the welder ground
connection MUST be in close proximity to the area being
welded. It is also a good practice to remove both battery
cables before welding on either the unit frame or the
truck to prevent possible damage to other components
such as the alternator and voltage regulator.
4.18 EVAPORAT OR COIL CLEANING
The use of recycled cardboard cartons is increasing.
The recycled cardboard cartons create much more fiber
dust during transport than ”new” cartons. The fiber dust
and particles are drawn into the evaporator where they
lodge between the evaporator fins. If the coil is not
cleaned on a regular basis, sometimes as often as after
each trip, the accumulation can be great enough to
restrict air flow, cause coil icing, repetitive defrosts and
loss of unit capacity. Due to the ”washing” action of
normal defrost the fiber dust and particles may not be
visible on the face of the coil but may accumulate deep
within.
It is recommended to clean an the evaporator coil on a
regular basis, not only to remove cardboard dust, but to
remove any grease oil film which sometimes coats the
fins and prevents water from draining into the drain pan.
Cardboard fiber particles after being wetted and dried
several times can be very hard to remove. Therefore,
several washings may be necessary.
a. Spray coil with a mild detergent solution such as any
good commercial-grade automatic dish washer detergent and let the solution stand for a few minutes.
Reverse flush (opposite normal air flow) with clean
water at mild pressure. A garden hose with spray
nozzle is usually sufficient. Make sure drain lines are
clean.
b. Run unit until defrost mode be initiated to check for
proper draining from drain pan.
WARNING
Under no circumstances should anyone attempt to repair the microprocessor module
or Cab Command! Should a problem develop with these components, contact your
nearest Carrier Transicold dealer for replacement.
Although there is less danger of electrical static
discharge (ESD) damage in the outdoor environment,
where the processor is likely to be handled, proper
board handling techniques should be stressed. Boards
should always be handled by their edges, in much the
same way one would handle a photograph. This not only
precludes the possibility of ESD damage, but also
lowers the possibility of physical damage to the
electronic components. Although the microprocessor
boards are fairly rugged when assembled, they are
more fragile when separated and should always be
handled carefully.
4.19 CONDENSER COIL CLEANING
Remove all foreign material from the condenser coil by
reversing the normal air flow. (Air is pulled in through the
front.) Compressed air or water may be used as a
cleaning agent. It may be necessary to use warm water
mixed with any good commercial dishwasher detergent.
Rinse coil with fresh water if a detergent is used.
4-9
62-10848
Page 42

Table 4-4. R-134a Temperature-Pressure Chart
BOLD FIGURES = Inches Mercury Vacuum (cm Hg VAC)
LIGHT FIGURES = psig (kg/cm2and Bar)
TEMPERATURE PRESSURE TEMPERATURE PRESSURE
_F _C Psig Kg/cm
2
Bar _F _C Psig Kg/cm
2
-- 4 0 -- 4 0 14.6 37.08 -- . 4 9 30 -- 1 26.1 1.84 1.80
-- 3 5 -- 3 7 12.3 31.25 -- . 4 2 32 0 27.8 1.95 1.92
-- 3 0 -- 3 4 9.7 24.64 -- . 3 3 34 1 29.6 2.08 2.04
-- 2 5 -- 3 2 6.7 17.00 -- . 2 3 36 2 31.3 2.20 2.16
-- 2 0 -- 2 9 3.5 8.89 -- . 1 2 38 3 33.2 2.33 2.29
-- 1 8 -- 2 8 2.1 5.33 -- . 0 7 40 4 35.1 2.47 2.42
-- 1 6 -- 2 7 0.6 1.52 -- . 0 2 45 7 40.1 2.82 2.76
-- 1 4 -- 2 6 0.4 .03 .03 50 10 45.5 3.30 3.14
-- 1 2 -- 2 4 1.2 .08 .08 55 13 51.2 3.60 3.53
-- 1 0 -- 2 3 2.0 .14 .14 60 16 57.4 4.04 3.96
-- 8 -- 2 2 2.9 .20 .20 65 18 64.1 4.51 4.42
-- 6 -- 2 1 3.7 .26 .26 70 21 71.1 5.00 4.90
-- 4 -- 2 0 4.6 .32 .32 75 24 78.7 5.53 5.43
-- 2 -- 1 9 5.6 .39 .39 80 27 86.7 6.10 5.98
-- 0 -- 1 8 6.5 .46 .45 85 29 95.3 6.70 6.57
2 -- 1 7 7.6 .53 .52 90 32 104.3 7.33 7.19
4 -- 1 6 8.6 .60 .59 95 35 114.0 8.01 7.86
6 -- 1 4 9.7 .68 .67 100 38 124.2 8.73 8.56
8 -- 1 3 10.8 .76 .74 105 41 135.0 9.49 9.31
10 -- 1 2 12.0 .84 .83 110 43 146.4 10.29 10.09
12 -- 1 1 13.2 .93 .91 11 5 46 158.4 11.14 10.92
14 -- 1 0 14.5 1.02 1.00 120 49 171.2 12.04 11. 8 0
16 -- 9 15.8 1.1 1 1.09 125 52 184.6 12.98 12.73
18 -- 8 17.1 1.20 1.18 130 54 198.7 13.97 13.70
20 -- 7 18.5 1.30 1.28 135 57 213.6 15.02 14.73
22 -- 6 19.9 1.40 1.37 140 60 229.2 16.11 15.80
24 -- 4 21.4 1.50 1.48 145 63 245.6 17.27 16.93
26 -- 3 22.9 1.61 1.58 150 66 262.9 18.48 18.13
28 -- 2 24.5 1.72 1.69 155 68 281.1 19.76 19.37
Bar
62-10848
4-10
Page 43

SECTION 5
A01High
P
i
tch(HP1
)
)
Open(Road
)
ess
ure
S
)
o
LowPressureSwitch(LP)or
g()
S
Units
Onl
y
V
erifylinevoltag
e
Onl
y
Verifylinevoltage
Standby
StandbyContactor(MC)hig
h
Units
p
highampdraw
A07p(
)
TROUBLESHOOTING
WARNING
Beware of unannounced starting of the unit. The unit may cycle the fans and operating compressor
unexpectedly as control requirements dictate. Press OFF key on the cab command, turn vehicle engine off or disconnect power plug and open circuit breaker.
CAUTION
Under no circumstances should anyone attempt to service the microprocessor module and cab command. Should a problem develop with the control system, contact your nearest Carrier Transicold
dealer for replacement components.
5.1 INTRODUCTION
Under normal circumstances, unit problems will be indicated by an active alarm in the alarm list. Suggested
troubleshooting actions for each alarm indication are provided in Table 5-1. Suggested corrective actions for
mechanical type problems are listed under subject headings in Table 5-2.
Table 5-1 Alarm Indications
ALARM
A00 No Malfunction All components functioning normally -- --
Description CORRECTIVE ACTION
Unit undercharged 4.7.1
Liquid line filter--drier restricted
Low Pressure Switch (LP) or
ressureSw
Open(Road
TXV strainer plugged with foreign material/ice.
TXV malfunction
Verify operation of evaporator fans.
Failed switch
Unit overcharged 4.7.1
Verify operation of condenser fan
r
Noncondensibles in system
Discharge check valve failed closed (standby only
A02
LowPr
High Pressure Switch (HP1)
Open
witch(LP
Failed switch
A03
tandby
Units
Electric motor overload
Thermal overload open in motor windings.
Current overload tripped.
Reference
Paragraph
4.10.1
4.15
4.15
-- --
4.11.2
-- --
4.8
Replace
4.11.2
A04
A05
Units
Only
A06
Road Compressor Clutch
(CLHR) Malfunction
amp draw
Condenser Fan Motor (CFM)
Evaporator Fan Motor (EFM)
high amp draw
Current draw of road clutch coil either high or low Replace
Contactor coil either high or low (0.2A for 3 phase;
0.5A for 1 phase)
Verify plunger moves freely
Replace contactor
Verify motor rotates freely -- --
Verify condition of brushes
Replace motor
Verify motor rotates freely -- --
Replace motor
5-1
-- --
4.12
-- --
-- --
62-10848
Page 44

Table 5-1 Alarm Indications -- Continued
Standby
thehotwatercontrolrelayorth
e
Units
p
HotGasSolenoidValve
g(ppp
)
A09()
)
A10QuenchValve(BPV)
A11CondenserPressureControl
Units
tur
e
Units
tur
e
Standby
Def
t
Cycle>4
5minutesUnits
Veri
fyHGS1/HGS2val
t
ion4.1
3
g
A15range2
0.2to86
F
C
hecksetpoint
2.3
bAt
LowBat
t
l
t
t
i
tth
t
i
ALARM
A08
Units
Only
A09
A12
Standby
Only
A13
Standby
Only
A14
Standby
Units
Only
EE Return Air Sensor Return air sensor defective Replace
-- -- --
Err Setpoint error. Programming error. Reset. 2.3
Heating option control -- Either
the hot water control relay or the
electric heat contactor coil amp
draw is high
Hot Gas Solenoid Valve
(HGS1)
high amp draw
Quench Valve(BPV
high amp draw
Condenser Pressure Control
Valve (HGS2) high amp draw
Out of Range -- High Tempera-
Out of Range -- Low Tempera-
Setpoint adjusted out of the
ran
(--29°C/+30°C) or below the
programmed low threshold
Using Road & Standby opera-
on a
Description CORRECTIVE ACTION
Verify coil resistance
Check wiring to controls
Current draw of coil high or low (approx 1.6 amp) -- --
Replace coil 4.13.1
Current draw of coil high or low (approx 1.2 amp) -- -Replace coil 4.13.1
Current draw of coil high or low (approx 1.6 amp) -- -Replace coil 4.13.1
Unit out of range for 15 minutes Verify Setting
Verify cooling operation of unit -- -Hot gas solenoid open 4.13.1
Unit out of range for more than 15 minutes Verify Setting
Verify heating operation of unit -- -Heating option not active (Set configuration) 2.9
Unit terminated defrost after 45 minutes -- --
ros
ve opera
e--20.2to86°F
eryVo
esame
age
me.
Vehicle battery voltage low Correct
Check alternator system -- -If operating on road, disconnect standby power sup-
ply
If operating on standby, shut down vehicle engine.
Reference
Paragraph
-- --
-- --
Table 5-2 Mechanical Indications
INDICATION/TROUBLE
5.2 REFRIGERATION
5.2.1 Unit Will Not Cool
Compressor malfunction
Refrigeration system
5.2.2 Unit Runs But Has Insufficient Cooling
Compressor Compressor defective 4.9
Refrigeration system
62-10848
Compressor drive (clutch) defective
Compressor defective
Defrost cycle has not terminated
Abnormal pressure
Hot gas solenoid malfunction (HGS1)
Abnormal pressure
Expansion valve malfunction
Non--existent or restricted evaporator airflow
POSSIBLE CAUSES
5-2
REFERENCE
SECTION
Replace
4.9
5.2.5
5.2.6
4.13
5.2.6
5.2.10
5.2.9
Page 45

Table 5-2 Mechanical Indications -- Continued
INDICATION/TROUBLE
POSSIBLE CAUSES
REFERENCE
SECTION
5.2.3 Unit Operates Long or Continuously in Cooling
Hot Load
Box
Defective box insulation or air leak
Refrigeration system Abnormal pressure
Temperature controller malfunction
Insufficient pull
down time
Correct
5.2.6
5.2.8
Compressor Defective 4.9
5.2.4 Unit Will Not Heat or Heating Insufficient
Abnormal pressure
Refrigeration
Temperature controller malfunction
Hot gas solenoid malfunction (HGS1)
Compressor Compressor drive (clutch) defective
Compressor defective
5.2.6
5.2.8
4.13
Check
4.9
5.2.5 Defrost Malfunction
Automatic defrost will not initiate
Manual defrost will not initiate
Defrost cycle initiates but does
not defrost
Frequent defrost
Does not terminate or cycles on
Defrost thermostat (DTT) open or defective
Hot gas solenoid valve malfunction
Defrost disabled through cab command
Microprocessor defective
Defrost thermostat (DTT) open or defective
Hot gas solenoid malfunction (HGS1)
Condenser Pressure Control valve malfunction (HGS2)
Wet load
Defrost settings set to low.
Defrost thermostats (DTT) shorted closed Replace
Replace
4.13
2.5
Replace
Replace
4.13
4.13
-- --
2.5
defrost
5.2.6 Abnormal Pressure
5.2.6.1 Cooling
High discharge pressure
Low discharge pressure
High suction pressure
Low suction pressure
Suction and discharge pressures
tend to equalize when unit is
Condenser coil dirty
Noncondensibles in system
Refrigerant overcharge
Condenser fan/motor defective
Compressor defective
Hot gas solenoid malfunction
Low refrigerant charge
Compressor defective
Hot gas solenoid malfunction
Compressor pressure regulator misadjusted (CPR)
Filter–drier partially plugged
Low refrigerant charge
Expansion valve malfunction
No evaporator air flow or restricted air flow
Excessive frost on coil
Compressor defective
Hot gas solenoid malfunction
4.19
4.8
4.7.1
4.12
4.9
4.13
4.7.1
4.9
4.13
4.14
4.10
4.7.1
5.2.10
5.2.9
Check
4.9
4.13
operating
5.2.6.2 Heating
High discharge pressure
Low discharge pressure
Low suction pressure
Overcharged system
Condenser fan or HP2 pressure switch defective
Noncondensibles in system
Condenser motor/fan defective
Compressor defective
Hot gas solenoid valve malfunction
Low refrigerant charge
Compressor pressure regulating valve misadjusted (CPR)
Condenser Pressure Regulating valve fault (HGS2)
4.7.1
4.11
4.8
4.12
4.9
4.13
4.7.1
4.14
4.13
5-3
62-10848
Page 46

Table 5-2 Mechanical Indications -- Continued
INDICATION/TROUBLE
POSSIBLE CAUSES
5.2.7 Abnormal Noise
Loose mounting bolts
Worn bearings
Compressor
Worn or broken valves
Liquid slugging
Insufficient oil
Loose shroud
Condenser or evaporator fan
Bearings defective
Fanlooseonshaft
Bent shaft
5.2.8 Cab Command Malfunction
Fuse open
Cab Command non–operational
Microprocessor malfunction
Microprocessor/Cab command cable
5.2.9 No Evaporator Air Flow or Restricted Air Flow
Evaporator coil blocked
Heavy frost on coil
Coil dirty
Evaporator fan loose or defective
No or partial evaporator air flow
Evaporator fan rotating backwards
Evaporator air flow blocked in box
Fan motor(s) malfunction
5.2.10 Expansion Valve
Low refrigerant charge
Low suction pressure with high
superheat
External equalizer line plugged
Broken capillary
Superheat setting too high
REFERENCE
SECTION
Tighten
4.9
4.9
5.2.10
Check
Check
Check
Check
Replace
Replace
Check
Check
4.18
Check
Check
Check
Replace
4.7.1
Repair
Repair
4.15.2
Low superheat and liquids lugging in compressor
Superheat setting too low
External equalizer line plugged
Pin and seat of expansion valve eroded or held open by
4.15.2
Repair
4.15
foreign material
Fluctuating suction pressure
Improper bulb location or installation
Insulation missing from sensing bulb
Low superheat setting
4.15
Replace
4.15.2
High superheat Expansion valve setting 4.15.2
5.2.11 Malfunction Hot Gas Solenoid or Condenser Pressure Regulating Valve
Valve does not function properly
No power to valve
Improper wiring or loose connections
Valve improperly assembled
Coil or coil sleeve improperly assembled
Movement of plunger restricted due to:
Check
Check
4.13
a. Corroded or worn parts
b. Foreign material lodged in valve
c. Bent or dented enclosing tube
Valve shifts but refrigerant
continues to flow
Foreign material lodged under seat
Defective seat
4.13
5.2.12 Standby Compressor Malfunction
Standby compressor fails to start
Motor contactor defective
Motor Overload open
Improper power supply
5–minute timer active
Replace
Check
Correct
Check
Standby motor starts, then stops Motor Overload open Check
62-10848
5-4
Page 47

SECTION 6
ELECTRICAL SCHEMATIC WIRING DIAGRAM
6.1 INTRODUCTION
This section contains Electrical Schematic Wiring Diagram covering the Models listed in Table 1-1. The following
general safety notices supplement the specific warnings and cautions appearing elsewhere in this manual. They are
recommended precautions that must be understood and applied during operation and maintenance of the equipment
covered herein.
WARNING
Beware of unannounced starting of the unit. The unit may cycle the fans and operating compressor
unexpectedly as control requirements dictate. Press OFF key on the cab command and disconnect
power plug.
WARNING
Under no circumstances should ether or any other starting aids be used to start engine.
WARNING
Under no circumstances should anyone attempt to repair the microprocessor module or Cab
Command! Should a problem develop with these components, contact your nearest Carrier
Transicold dealer for replacement.
CAUTION
Observe proper polarity when installing battery, negative battery terminal must be grounded.
CAUTION
Underno circumstances should a technician electrically probe the processor at any point, other than
the connector terminals where the harness attaches. Microprocessor components operate at
different voltage levels and at extremely low current levels. Improper use of voltmeters, jumper
wires, continuity testers, etc. could permanently damage the processor.
CAUTION
Most electronic components are susceptible to damage caused by electrical static discharge (ESD).
In certain cases, the human body can have enough static electricity to cause resultant damage to the
componentsby touch. This is especiallytrue of the integrated circuits found on the microprocessor.
Use proper board handling techniques. (See Section 4.17).
6-1 62--10848
Page 48

ROAD ONLY
LOCATION SYMBOL DESCRIPTION LOCATION IN UNIT
B--9 LP LOW PRESSURE SWITCH EVAPORATOR
B--8 BPT QUENCH THERMOSTAT ROAD COMPRESSOR
P--9 BPV QUENCH VALVE EVAPORATOR
A--5 CC CAB COMMAND CAB
P--7 CFM CONDENSER FAN MOTOR CONDENSER
P--4 CLHR ROAD CLUTCH ENGINE COMPARTMENT
P--6 EFM EVAPORATOR FAN MOTOR EVAPORATOR
D--3 FUSE 25A FUSE LOGIC BOARD
B--10 FI IGNITION FUSE ENGINE COMPARTMENT
B--9 HP1 HIGH PRESSURE SWITCH CONDENSER
B--7 HP2 CONDENSER PRESSURE SWITCH CONDENSER
P--8 HGS1 HOT GAS SOLENOID VALVE CONDENSER
P--9 HGS2 CONDENSER PRESSURE CONTROL VALVE CONDENSER
Figure 6-1 Electrical Schematic Wiring Diagram - Based On Dwg. No. 62-61350 Rev D
B--7 RAS RETURN AIR SENSOR EVAPORATOR
62--10848
6-2
Page 49

ROAD ONLY
6-3
Figure 6-2 Electrical Schematic Wiring Diagram - Based On Dwg. No. 62-61350 Rev D
LP
62--10848
Page 50

CONDENSER
J
-
-9C
TCL
U
TCH
TIMED
ELAYREL
A
Y
STAND
BYPANEL
J
9
C
TCL
U
TCH
TIMED
ELAYREL
A
Y
STAND
BYPANEL
SWITCH
D--13 PMC GROUND PANEL CONTROL BOX
N--7 PTO MOTOR INTERNAL THERMOSTAT STANDBY MOTOR
115V/1/60Hz
N--8 CS START CAPACITOR STANDBY PANEL D--2 PC MICROPROCESSOR CONTROL BOX
-I--2 CFM CONDENSER FAN MOTOR CONDENSER N--2 PSR POWER SUPPLY RECEPTACLE EXTERNAL
I--5 HGS2 CONDENSER PRESSURE CONTROL VALVE CONDENSER M--12 R DISCHARGE RESISTOR STANDBY PANEL
I--7 CLHR ROAD CLUTCH ENGINE COMP. B--5 RAS RETURN AIR SENSOR EVAPORATOR
J--12 CLHS STANDBY CLUTCH CONDENSER D--10 RR ROAD RELAY MICROPROCESSOR
N--12 C1 FILTER CAPACITOR STANDBY PANEL N--7 DMB STANDBY MOTOR CONDENSER
62--10848
I--3 EFM EVAPORATOR FAN MOTOR EVAPORATOR P--9 STBR START RELAY STANDBY PANEL
B--2 DTT DEFROST TERMINATION THERMOSTAT EVAPORATOR F--10 SR STANDBY RELAY MICROPROCESSOR
I--8 FI IGNITION FUSE ENGINE COMP. Q11 TR TRANSFORMER CONDENSER
LOCATION SYMBOL DESCRIPTION LOCATION IN UNIT LOCATION SYMBOL DESCRIPTION LOCATION IN UNIT
I--9 ALARM (I MAX: 0.1A) EXTERNAL D-- 11 F1 IA FUSE STANDBY PANEL
B--5 LP LOW PRESSURE SWITCH CONDENSER M--10 F2 30A FUSE STANDBY PANEL
B--3 BPT QUENCH THERMOSTAT ROAD COMPR. K--11 F3 5A FUSE STANDBY PANEL
I--5 BPV QUENCH VALVE EVAPORATOR S--10 F4 TRANSFORMER FUSE STANDBY PANEL
D--12 BTY BATTERY ENGINE COMP. B--4 HP1 HIGH PRESSURE SWITCH CONDENSER
A--8 CC CAB COMMAND CAB I--5 HGS1 HOT GAS SOLENOID VALVE CONDENSER
O--12 BR BRIDGE STANDBY PANEL B--4 HP2 CONDENSER PRESSURE CONTROL
N--8 CP PERMANENT CAPACITOR STANDBY PANEL N--4 MC MOTOR CONTACTOR STANDBY PANEL
L--9/M--11 CR CLUTCH RELAY STANDBY PANEL O-- 5 OL OVERLOAD RELAY CONTROL BOX
6-4
Page 51

115V/1/60Hz
LP
6-5
Figure 6-3 Electrical Schematic Wiring Diagram - Based On Dwg. No. 62-61353 Rev B
62--10848
Page 52

230/1/60Hz
I
-
-2CFMCOND
ENS
E
RFA
NMO
TOR
CONDENSER
I
2
CFMCOND
ENS
E
RFA
NMO
TOR
CONDENSER
CONDENSER
SWITCH
N--2 PSR POWER SUPPLY RECEPTACLE EXTERNAL
N--7 PTO MOTOR INTERNAL THERMOSTAT STANDBY MOTOR
Figure 6-4 Electrical Schematic Wiring Diagram - Based On Dwg. No. 62-61354 Rev A
I--9 ALARM (I MAX: 0.1A) EXTERNAL D-- 11 F1 IA FUSE STANDBY PANEL
LOCATION SYMBOL DESCRIPTION LOCATION IN UNIT LOCATION SYMBOL DESCRIPTION LOCATION IN UNIT
B--5 LP LOW PRESSURE SWITCH CONDENSER M--10 F2 30A FUSE STANDBY PANEL
B--3 BPT QUENCH THERMOSTAT ROAD COMPR. K--11 F3 5A FUSE STANDBY PANEL
I--5 BPV QUENCH VALVE EVAPORATOR S--10 F4 TRANSFORMER FUSE STANDBY PANEL
D--12 BTY BATTERY ENGINE COMP. B--4 HP1 HIGH PRESSURE SWITCH CONDENSER
O--12 BR BRIDGE STANDBY PANEL B--4 HP2 CONDENSER PRESSURE CONTROL
A--8 CC CAB COMMAND CAB I--5 HGS1 HOT GAS SOLENOID VALVE CONDENSER
N--8 CP PERMANENT CAPACITOR STANDBY PANEL N--4 MC MOTOR CONTACTOR STANDBY PANEL
L--9/M11 CR CLUTCH RELAY STANDBY PANEL O--5 OL OVERLOAD RELAY CONTROL BOX
N--8 CS START CAPACITOR STANDBY PANEL D--2 PC MICROPROCESSOR CONTROL BOX
6-6
K--9 CT CLUTCH TIME DELAY RELAY STANDBY PANEL D--13 PMC GROUND PANEL CONTROL BOX
--
I--5 HGS2 CONDENSER PRESSURE CONTROL VALVE CONDENSER M--12 R DISCHARGE RESISTOR STANDBY PANEL
I--7 CLHR ROAD CLUTCH ENGINE COMP. B--5 RAS RETURN AIR SENSOR EVAPORATOR
J--12 CLHS STANDBY CLUTCH CONDENSER D--10 RR ROAD RELAY MICROPROCESSOR
I--3 EFM EVAPORATOR FAN MOTOR EVAPORATOR P--9 STBR START RELAY STANDBY PANEL
I--8 FI IGNITION FUSE ENGINE COMP. Q11 TR TRANSFORMER CONDENSER
B--2 DTT DEFROST TERMINATION THERMOSTAT EVAPORATOR F--10 SR STANDBY RELAY MICROPROCESSOR
N--12 C1 FILTER CAPACITOR STANDBY PANEL N--7 DMB STANDBY MOTOR CONDENSER
62--10848
Page 53

230/1/60Hz
LP
6-7
Figure 6-5 Electrical Schematic Wiring Diagram - Based On Dwg. No. 62-61354 Rev B
62--10848
Page 54

230/3/60Hz
J
-
-12
C
L
HSS
T
A
N
D
B
Y
CLU
T
CHCONDENSER
J
12C
L
HSS
T
A
N
D
B
Y
CLU
T
CHCONDENSER
N--2 PSR POWER SUPPLY RECEPTACLE EXTERNAL
N--7 PTO MOTOR INTERNAL THERMOSTAT STANDBY MOTOR
Q11 TR TRANSFORMER CONDENSER
I--7 CLHR ROAD CLUTCH ENGINE COMP. D--13 OMC GROUND PANEL CONTROL BOX
-N--12 C1 FILTER CAPACITOR STANDBY PANEL M--12 R DISCHARGE RESISTOR STANDBY PANEL
I--3 EFM EVAPORATOR FAN MOTOR EVAPORATOR D--10 RR RUN RELAY MICROPROCESSOR
B--2 DTT DEFROST TERMINATION THERMOSTAT EVAPORATOR B--5 RAS RETURN AIR SENSOR EVAPORATOR
I--8 FI IGNITION FUSE STANDBY PANEL N--7 SMB STANDBY MOTOR CONDENSER
D--11 F1 IA FUSE STANDBY PANEL F--10 SR STANDBY RELAY MICROPROCESSOR
62--10848
LOCATION SYMBOL DESCRIPTION LOCATION IN UNIT LOCATION SYMBOL DESCRIPTION LOCATION IN UNIT
I--9 ALARM (I MAX: 0.1A) EXTERNAL M--10 F2 30A FUSE STANDBY PANEL
B--5 LP LOW PRESSURE SWITCH CONDENSER K--11 F3 5A FUSE STANDBY PANEL
B--3 BPT QUENCH THERMOSTAT ROAD COMPR. O--10 F4 230V TRANSFORMER FUSE STANDBY PANEL
I--5 BPV QUENCH VALVE EVAPORATOR N--10 F5 400V TRANSFORMER FUSE STANDBY PANEL
D--12 BTY BATTERY ENGINE COMP. B--4 HP1 HIGH PRESSURE SWITCH CONDENSER
A--8 CC CAB COMMAND CAB I--5 HGS1 HOT GAS VALVE CONDENSER
O--12 BR BRIDGE STANDBY PANEL B--4 HP2 CONDESNER PRESSURE SWITCH CONDENSER
L--9/M--11 CR CLUTCH RELAY STANDBY PANEL M--9 MC MOTOR CONTACTOR STANDBY PANEL
I--2 CFM CONDENSER FAN MOTOR CONDENSER N--5/K--5 OL OVERLOAD RELAY CONTROL BOX
I--5 HGS2 CONDENSER PRESSURE CONTROL VALVE CONDENSER D--2 PC MICROPROCESSOR CONTROL BOX
6-8
Page 55

230/3/60Hz
LP
6-9
Figure 6-6 Electrical Schematic Wiring Diagram - Based On Dwg. No. 62-61352 Rev B
62--10848
Page 56

INDEX
A
Abnormal Noise, 5-4
Abnormal Pressure, 5-3
Accessing Alarm Messages, 2-4
Alarm Display, 2-4
Alarm Indications, 5-1
B
Belt Adjustment, 4-2
Belt Tension, 4-2
C
Cab Command, 2-1
Cab Command Malfunction, 5-4
Checking The Eeprom Version, 2-5
Checking the Refrigerant Charge, 4-5
Clearing Alarm Messages, 2-5
Compressor, 1-3
Compressor Pressure Regulating Valve, 4-8
Compressor Pressure Regulating Valve, 1-4
Condenser Coil Cleaning, 4-9
Condenser Fan Motor, 1-10
Condenser Fan Motor Brushes, 4-7
Condenser Pressure Control Solenoid , 4-7
Condenser Pressure Control Valve, 1-10
Condenser Pressure Control Valve , 1-3
Condenser Pressure Switch, 4-6
Condenser Pressure Switch, 1-4
Condenser Pressure Switch (HP2), 1-9
Condenser/Subcooler, 1-1
Connect Power, 2-3
Control System, 2-1
Cooling, 1-12
Description, 1-1
Diagnostic Tool, 4-9
E
Electrical Data, 1-10
Evacuation and Dehydrating System, 4-4
Evacuation And Dehydration, 4-4
Evaporator, 1-4
Evaporator Coil Cleaning, 4-9
Evaporator Fan Motor, 1-10
Expansion Valve, 5-4
F
Filter Drier, 1-1
FILTER--DRIER, 4-6
Frozen Mode, 3-1
H
Heat And Defrost, 1-12
High Pressure Safety Switch, 1-4
High Pressure Switch , 4-6
Hot Gas Solenoid, 4-7
Hot Gas Valve, 1-10
Hot Gas Valve 1, 1-3
I
Inspection, 2-2
Installing a Complete Charge, 4-5
Insufficient Cooling, 5-2
L
Low Battery Alarm, 2-5
Low Pressure Switch, 1-4
D
Defrost Cycle, 2-3, 3-2
Defrost Malfunction, 5-3
Defrost Termination Thermostat, 1-9
Defrost Timer, 1-9
M
Maintenance Schedule, 4-1
Manual Defrost, 2-3
Microprocessor, 4-9
Minimum Off Time, 3-2
Index-1 62--10848
Page 57

INDEX
N
No Evaporator Air Flow or Restricted Air Flow, 5-4
O
Oil Separator, 1-3
OPERATION, 2-1
P
Partial Charge, 4-5
Perishable Mode, 3-1
Q
Quench Valve, 1-4, 1-10
Quench Valve (BPV), 1-9
R
Receiver, 1-3
Refrigerant Leak Checking, 4-3
Refrigerant Removal From Compressor, 4-3
Refrigeration System, 1-9
Replacing The Compressor, 4-6
Road Compressor Clutch, 1-10
Service, 4-1
Set--point, 2-3
Standby Compressor Malfunction, 5-4
Standby Compressor Speed, 1-10
Standby Motor , 1-3
Standby Motor Contactor, 1-10
Standby Motor Ratings, 1-10
Standby Motor--Compressor V--Belt, 4-2
Start--up, 2-2
Starting, 2-3
Stopping, 2-5
T
Temperature Control, 3-1
Thermal Expansion Valve, 1-4
Thermostatic Expansion Valve, 4-8
Thermostatic Expansion Valve, 1-9
Torque Values, 1-10
Troubleshooting, 5-1
U
Unit Operates Long or Continuously in Cooling, 5-3
Unit Will Not Cool, 5-2
Unit Will Not Heat or Heating Insufficient, 5-3
S
Safety Devices, 1-11
Sequence Of Operation, 3-1
62--10848
W
Wiring Diagram, 6-2, 6-3, 6-5, 6-6, 6-7, 6-9
Index-2
Page 58

North America
Carrier Transicold
700 Olympic Drive
Athens, GA 30601 USA
Tel: 1--706--357--7223
Fax: 1--706--355--5435
Central America
and Mexico
Ejercito Nacional No. 418
Piso 9, Torre Yumal
Col. Chapultepec Morales
11570 Mexico, D.F .
Tel: (5255) 9126.0300
Fax: (5255) 9126.0373
A member of the United Technologies Corporation family. Stock symbol UTX
©2005 Carrier Corporation D Printed in U. S. A. 0805
Carrier Transicold Division,
Carrier Corporation
Truck/Trailer Products Group
P.O. Box 4805
Syracuse, N.Y. 13221 U.S A
www.carrier.transicold.com
 Loading...