

Page 1
L010126H63 - 1104
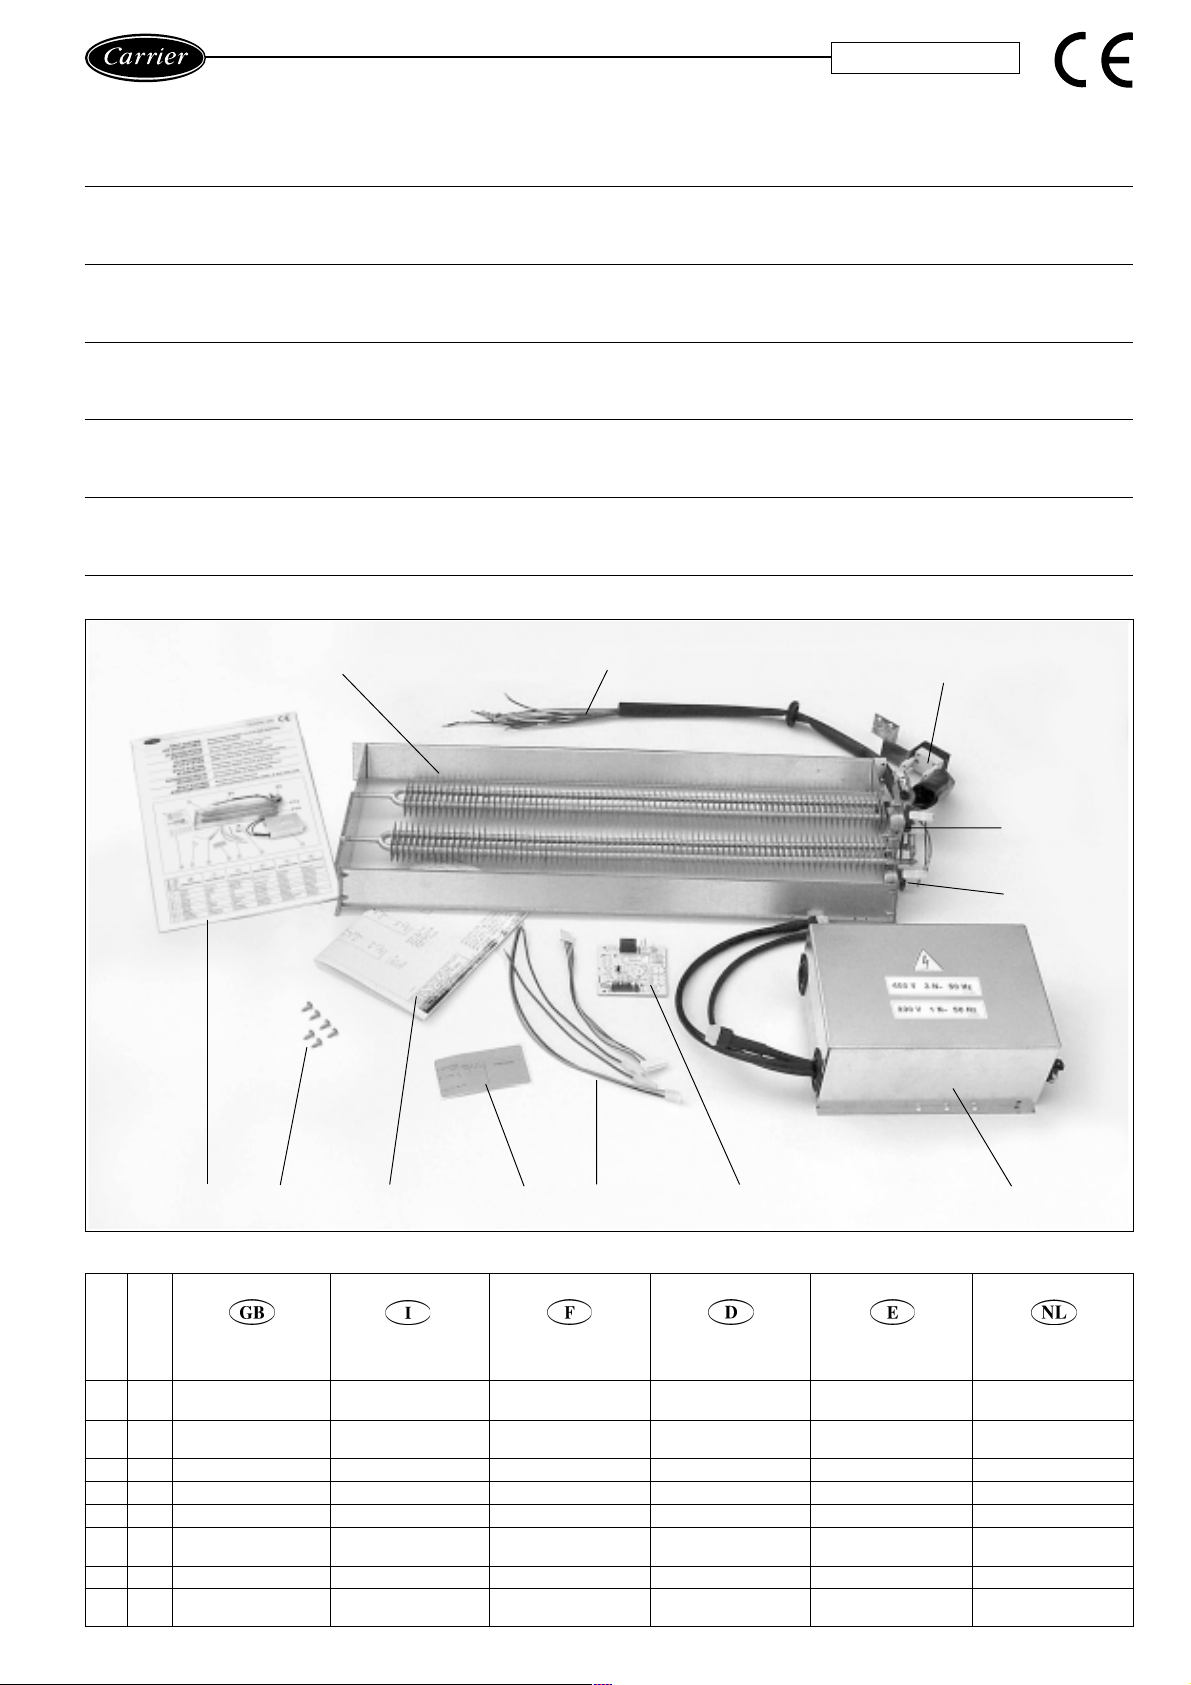
SPLIT SYSTEM Electric heater for 40SMC---N
AIR CONDITIONER Installation instructions
CLIMATIZZATORE Istruzioni di installazione elementi riscaldanti
SISTEMA SPLIT per unità 40SMC---N
CLIMATISEUR Résistance électrique chauffante pour unités
SPLIT-SYSTEM 40SMC---N Consignes d’installation
SPLIT SYSTEM- Anweisungen zur Installation der Elektroheizung
KLIMAGERÄT für die Geräte 40SMC---N
ACONDICIONADOR Instrucciones de instalación calentador électrico
DE AIRE SPLIT para unidad 40SMC---N
SPLIT-SYSTEM Montage-instructies elektrisch
AIRCONDITIONER verwarmingselement voor typen 40SMC---N
X6
F9
F12
F10
Ref. Q.ty
Rif. Q.tà
Réf. Q
.té
Bez. Anz.
Ref. Ctd.
Ref. Aantal
1 Electric board
1 Board wiring diagram
1 Rating plate
6 Screws
DESCRIPTION
Electric
1
heater
Control
1
box
Wiring
1
diagram
Installation
1
instructions
DESCRIZIONE
Elemento
riscaldante
Quadro
elettrico
Scheda ausiliaria
Cablaggi scheda
Targa caratteristiche
Schema
elettrico
Viti
Istruzioni di
installazione
DESCRIPTION
Résistance électrique
chauffante eléctrico
Boîtier de
commande eléctrico
Carte auxiliaire
Câblage de la carte
Plaque signalétique
Schéma de
câblage eléctrico
Vis
Consignes
d'installation
BESCHREIBUNG
Elektroheizung
Schaltkasten
Hilfsplatine
Platinenverkabelungen
Leistungsschild
Schaltplan
Schrauben
Installationsanleitungen
DESCRIPCIÓN
Calentador
Cuadro
Tarjeta auxiliar
Cableados de la tarjeta
Placa de características
Esquema
Tornillos
Instrucciones de
instalación
OMSCHRIJVING
Elektrisch
verwarmingselement
Elektrische
aansluitkast
Hulpprintplaat
Printplaatbedrading
Kenplaat
Elektrisch
schema
Schroeven
Montage-
instructies
Page 2
40SMC---N installation Installation 40SMC---N
Installazione 40SMC---N
Fig. 1 -
Abb. 1
X2
X1
Fig. 2 -
Abb. 2
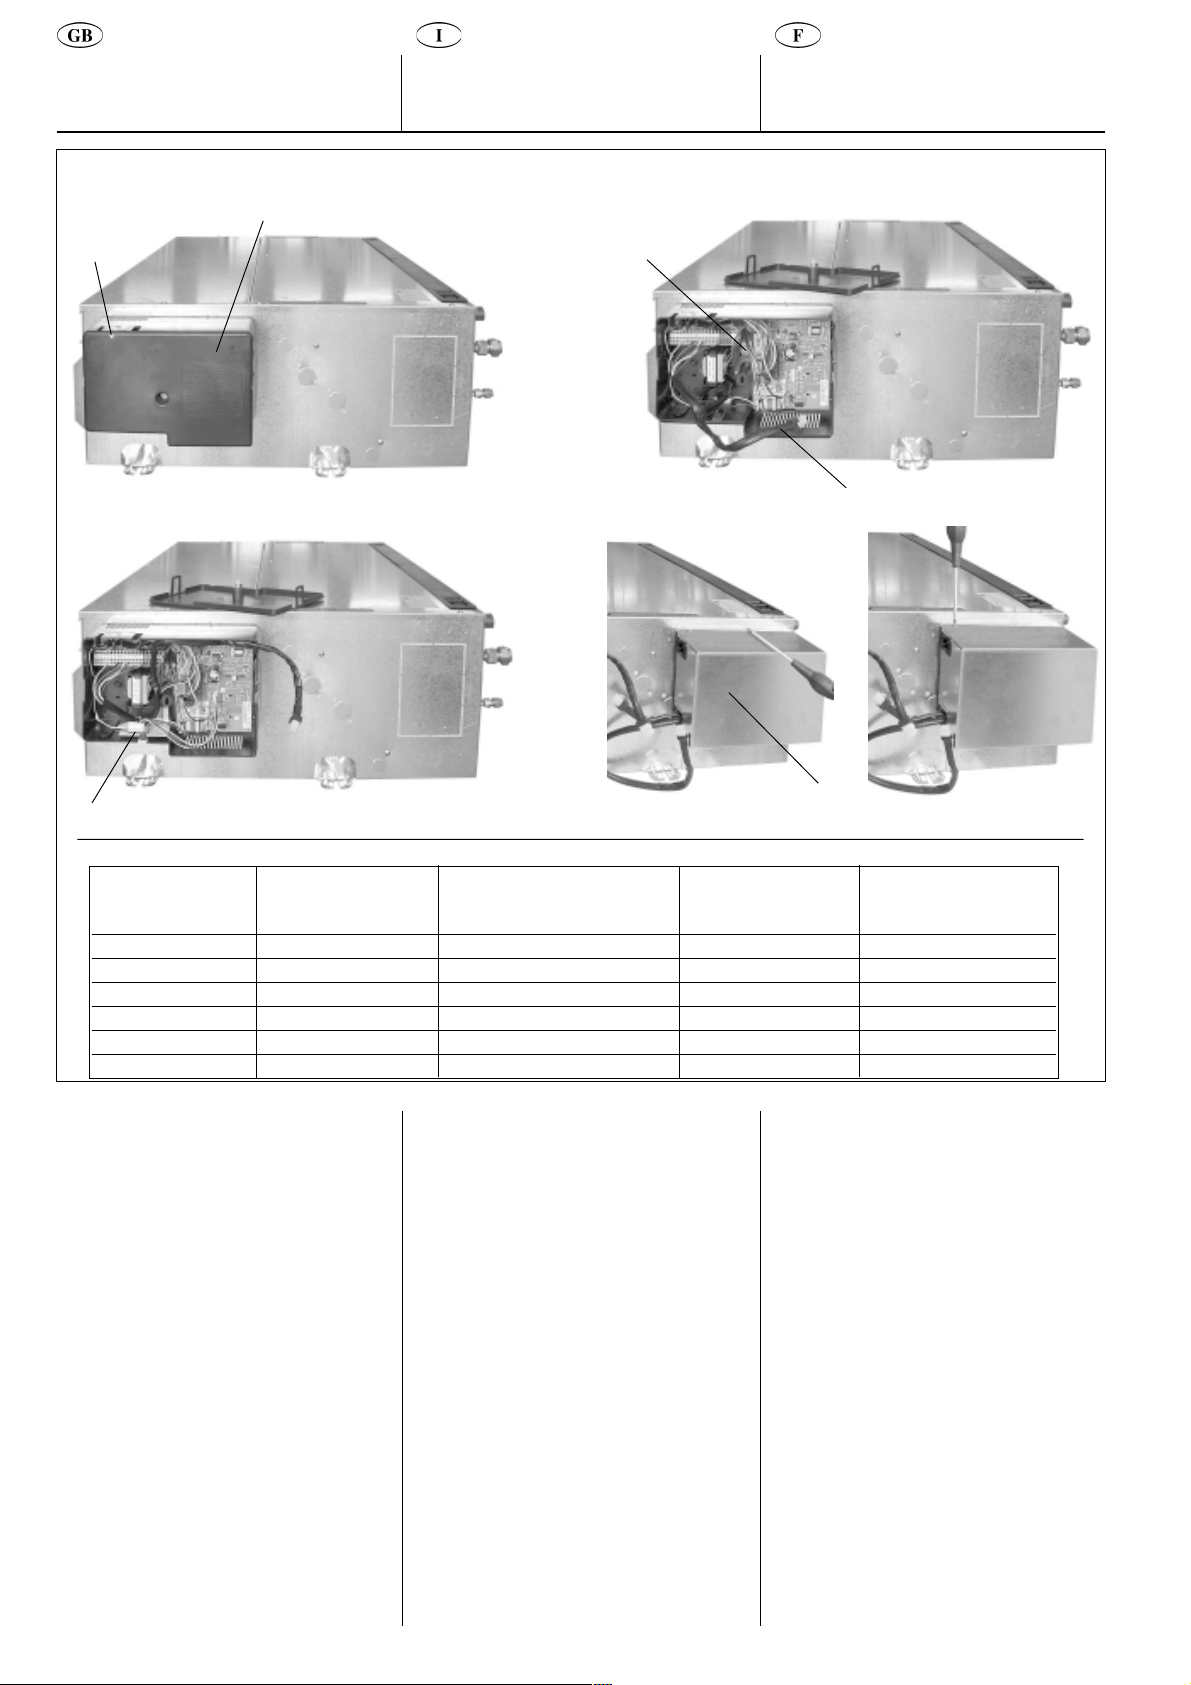
• Disconnect the system from power
supply before installing the kit.
• Open the control box cover
(figure 1) on the unit unloosen the
fixing screw and disconnect the male
connector X1 from the female
connector X2 inside (figure 2).
• Insert the auxiliary board ref. and
connect the cables (figure 3) as shown
in the wiring diagram.
• Position the control box of the electric
heater ref. on the unit and secure it
using the 2 screws ref. (figure 4).
• Remove the control box cover ref.
unscrewing the fixing screw (figure 5).
• Connect connector X1 to connector X3
(figure 6).
Connect connector X4 to connector X2
inside the unit control box (figure 6).
• Remove the fixing screws and slide out
the lower panels (figure 7).
• Remove the screws and pull out the
condensate drain pan (figure 8).
• Insert the electric heater frame ref.
and position it on the supporting tabs
(figure 9).
Fig. 3 -
Abb. 3
Kit Système
System
Sistema
40SMC9001 012-018A/C 1500 W 3 X 2,5 mmq 8A
40SMC9002 012-018H/P 3000W 3 X 2,5 mmq 16A
40SMC9003 024÷036H/P 3000W 5 X 2,5 mmq 3 x 6A
40SMC9004 048-060H/P 4500W 5 X 2,5 mmq 3 x 8A
40SMC9005 024÷036A/C 6000W 5 X 2,5 mmq 3 x 12A
40SMC9006 048-060A/C 9000W 5 X 2,5 mmq 3 x 16A
Sistema
System
Systeem
Power
Puissance
Potencia
Fig. 4 -
Potenza
Leistung
Vermogen
Abb. 4
Cable
Cavo
Kabel Cable
FR OR/CEI 20-20 Fusible
• Togliere l’alimentazione elettrica al
sistema prima di procedere
all’installazione del kit.
• Aprire il coperchio del quadro elettrico
(figura 1) esistente sull’unità
allentando la vite di fissaggio e al suo
interno scollegare il connettore maschio
X1
da quello femmina X2 (figura 2).
• Inserire scheda ausiliaria rif. e collegare i cablaggi (figura 3) come da schema
elettrico.
• Posizionare il quadro elettrico
dell’elemento riscaldante rif. sull'unità e
fissarlo usando 2 viti rif. (figura 4).
• Togliere il coperchio del quadro elettrico
rif.
svitando la vite di fissaggio (figura
5).
• Collegare il connettore X1 al
connettore X3 (figura 6).
Collegare il connettore X4 al connettore
X2
all'interno del quadro elettrico dell’uni-
tà (figura 6).
• Svitare le viti di fissaggio e sfilare i
pannelli inferiori (figura 7).
• Svitare le viti ed estrarre la bacinella
raccolta condensa (figura 8).
• Introdurre il telaio dell’elemento riscaldante rif. e posizionarlo sulle alette di
supporto (figura 9).
2
Fig. 5 -
Câble Fuse
Kabel
•Couper l’alimentation secteur du système
avant d’installer le kit.
•
Ouvrir le couvercle du boîtier de commande
(figure 1) sur l’unité en dévissant la vis de
fixation et débrancher le connecteur
mâle X1 du connecteur femelle X2 à
l’intérieur (figure 2).
•Insérer la carte auxiliaire réf. et brancher
les câbles (figure 3) comme indiqué dans le
schéma de câblage.
•Placer le boîtier de commande de la
résistance électrique chauffante réf. sur
l’unité et le fixer à l’aide des 2 vis réf.
(figure 4).
•Retirer le couvercle du boîtier de
commande réf. en dévissant la vis de
fixation (figure 5).
•Brancher le connecteur X1 au connecteur
X3 (figure 6). Brancher le connecteur X4
au connecteur X2 à l’intérieur du boîtier de
commande de l’unité (figure 6).
•Enlever les vis de fixation et retirer les
panneaux inférieurs en les faisant
glisser (figure 7).
•Enlever les vis et extraire le bac à
condensats (figure 8).
•
Insérer le cadre de la résistance électrique
chauffante réf. et le positionner sur les
languettes de support (figure 9).
Fusible
Sicherung
Abb. 5
Fusibile
Zekering
Page 3
Installation 40SMC---N
Instalación 40SMC---N
Montage 40SMC---N
Fig. 6 -
X2
Abb. 6
X4
X1
X3
Fig. 7 -
Abb. 7
Fig. 8 -
• Elektrische Versorgung des Systems
ausschalten, bevor den Satz zu installieren.
• Den Schaltkasten-Deckel am Gerät
öffnen (Abb. 1), indem man die
Befestigungs- schraube löst und den
Steckanschluß
X2
• Die Hilfsplatine Bez. einsetzen und die
Verkabelungen (Abb. 3) laut Schaltplan
anschließen.
• Den Schaltkasten der Elektroheizung
Bez. am Gerät ansetzen und mit den
beiden Schrauben Bez. befestigen
(Abb. 4).
• Den Schaltkasten-Deckel Bez.
entfernen, indem Sie die
Befestigungsschraube lösen (Abb. 5).
• Konnektor
anschließen (Abb. 6). Konnektor
Konnektor
anschließen (Abb. 6).
• Die Befestigungsschrauben entfernen und
die unteren Bleche herausziehen (Abb. 7).
• Die Schrauben entfernen und die
Kondensatablaufwanne herausziehen
(Abb. 8).
• Den Elektroheizungsrahmen Bez.
einführen und auf den Trägeransätzen
positionieren (Abb. 9).
Abb. 8
X1
abtrennen (Abb. 2).
von der Steckfassung
X1
an Konnektor
X2
im Geräte-Schaltkasten
X3
X4
an
• Cortar el suministro eléctrico al sistema
antes de proceder con la instalación
del kit.
• Abra la tapa del cuadro eléctrico
(fig. 1) situado sobre la unidad aflojando el
tornillo de sujeción y desconecte en el
interior el conector macho X1 del conector
hembra X2 (fig. 2).
• Introduzca la tarjeta auxiliar y conectar
los cableados (fig. 3) de conformidad con
el esquema eléctrico.
• Coloque el cuadrodel elemento calentador
eléctrico ref. sobre la unidad y fíjelo
usando 2 viti rif. (fig. 4).
• Desmonte la tapa del cuadro eléctrico ref.
desenroscando el tornillo de fijación
(fig. 5).
• Conecte el conector X1 al conector X3
(fig. 6). Conecte el conector X4 al conector
X2 del interior del cuadro eléctrico (fig. 6).
• Desenrosque los tornillos de fijación y
saque los paneles inferiores
deslizándolos (fig. 7).
• Desenrosque los tornillos y extraiga la
bandeja de drenaje de condensado
(figura 8).
• Inserte el bastidor del calentador eléctrico
ref. y colóquelo sobre las aletas de
soporte (figura 9).
3
Fig. 9 -
BELANGRIJK:
Schakel, voordat u werkzaamheden op de unit
uitvoert, de hoofdstroom uit.
• De elektrische voeding van het systeem
uitschakelen voordat u met de installatie
van de kit begint.
• Open de schakelkast (fig. 1) op de unit
door de bevestigingsschroef los te draaien
en verwijder de uitwendige connector
van de inwendige connector
• Plaats de hulpprintplaat ref. en sluit de kabels
(fig. 3) aan volgens het elektrisch schema.
• Plaats de aansluitkast van het elektrische
verwarmingselement op de unit en
bevestig hem met behulp van de 2
schroeven ref (fig. 4).
• Draai de bevestigingschroef van het
deksel van de aansluitkast los en
verwijder het deksel (fig. 5).
• Sluit connector
(fig. 6). Sluit connector
X2
in de aansluitkast van de unit (fig. 6).
• Verwijder de bevestigingsschroeven en
schuif de onderpanelen eruit (fig. 7).
• Draai de schroeven los en verwijder de
condensaatopvangbak (fig. 8).
• Schuif het frame van het elektrisch
verwarmingselement in de unit en
plaats dit op de steunlipjes (fig. 9).
X1
aan op connector
X4
Abb. 9
X2
aan op connector
X1
(fig. 2).
X3
Page 4

40SMC---N installation
Installazione 40SMC---N
Installation 40SMC---N
Fig. 10 -
Abb. 10
X6
Fig. 11 -
F9
Abb. 11
Fig. 12 -
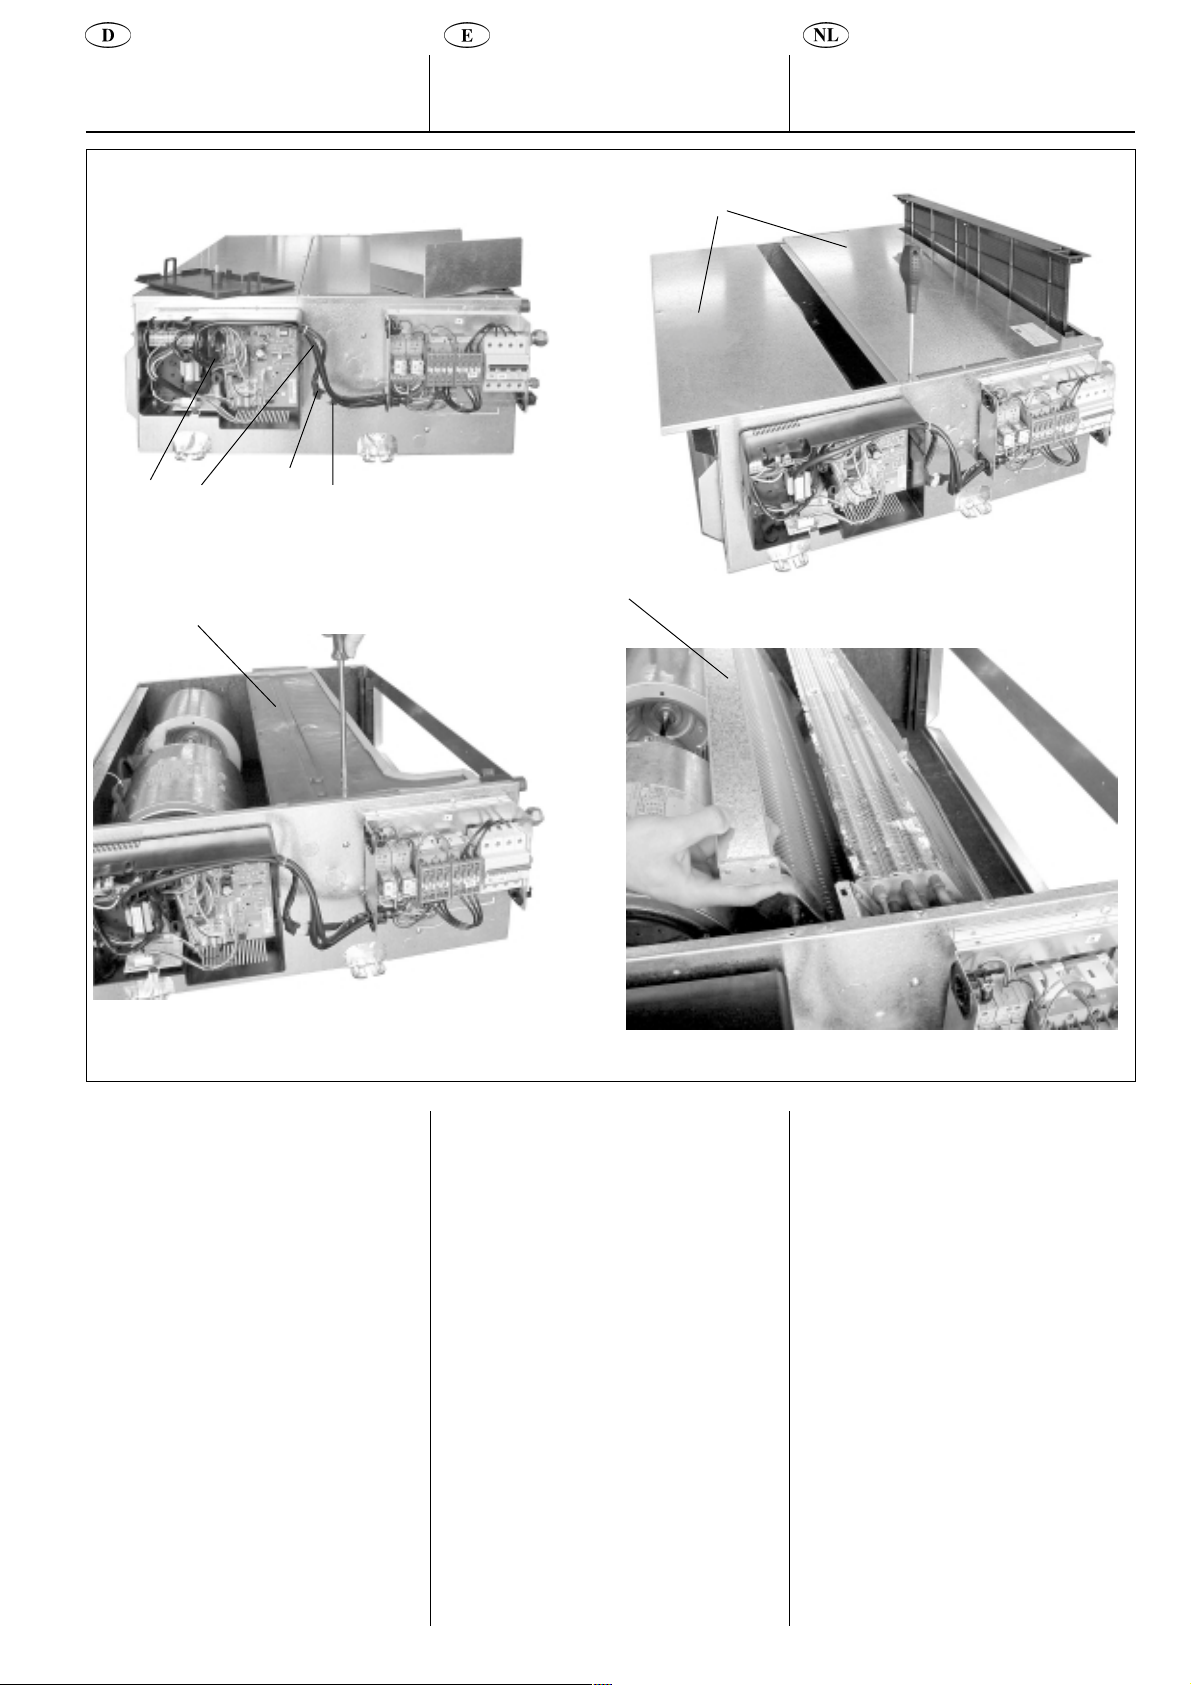
• Secure the heater frame ref.
on both sides to the supporting tab,
using the two screws rif. (figure 10).
• By means of the two screws ref. ,
secure the manual reset thermostat
(F9) to the electric heater frame
(figure 11).
• Break the pre-punched hole on the unit
side, pass cable X6 through and insert
the grommet (figure 12).
• Make the electrical connections
(figure 13) according to the wiring
diagram ref. .
• Apply the rating plate ref. supplied
with the kit ref. 6 onto the metal box in
the control box (figure 14).
• Make sure connection to power supply is
made through a disconnect switch with a
3 mm contact opening.
• Reinstall the condensate drain pan the
panels and the control box cover
(figure 14).
Abb. 12
• Fissare il telaio dell’elemento
riscaldante rif. all’aletta di supporto su
entrambi i lati con 2 viti rif. (figura 10).
• Fissare con 2 viti rif. la staffa supporto
del dispositivo di interruzione termico a
riarmo manuale (F9) sul telaio dell’elemento riscaldante (figura 11).
• Rompere il foro pretranciato sul pannello
dell’unità, far passare il cavo X6 inserendo il passacavo (figura 12).
• Eseguire i collegamenti elettrici
(figura 13) in accordo allo schema
elettrico rif. .
• Applicare sulla cassa metallica quadro
elettrico la targa caratteristica rif.
fornita nel kit (figura 14).
• Assicurarsi che il collegamento alla rete
elettrica sia stato effettuato attraverso un
interruttore onnipolare con apertura dei
contatti di almeno 3mm.
• Rimontare la bacinella raccolta
condensa, i pannelli ed il coperchio del
quadro elettrico (figura 14).
4
•Fixer le cadre de la résistance chauffante
(réf. ) aux languettes de support situées
de chaque côté avec les deux vis (fig. 10).
•Fixer avec les deux vis réf. la plaque
métallique de support du thermostat à
réarmement manuel (F9) au cadre de la
résistance chauffante (fig. 11).
•Percer l’orifice pré-perforé situé sur le
côté de l’unité, passer le câble X6 à
travers et insérer le passe-tube
(figure 12).
•Effectuer les branchements électriques
(figure 13) conformément au schéma de
câblage réf. .
•Appliquer la plaque signalétique réf.
fournie avec le kit réf. 6 à la structure
métallique du boîtier de commande (figure 14).
•Vérifier que le branchement à l’alimentation
secteur est assuré par un disjoncteur avec
ouverture des contacts de 3 mm minimum.
•Remettre en place le bac à condensats,
les panneaux et le couvercle du boîtier de
commande (figure 14).
Page 5

Installation 40SMC---N
Instalación 40SMC---N
Montage 40SMC---N
Fig. 13 -
Abb. 13
Fig. 14 -
Abb. 14
• Den Heizungsrahmen Bez. mit 2
Schrauben Bez. an beiden Seiten auf
den Trägeransätzen befestigen (Abb. 10).
• Den Tragbügel der thermischen
Ausschaltvorrichtung mit manueller
Wiedereinschaltung (F9) mit 2 Schrauben
Bez. am Heizungs- rahmen befestigen
(Abb. 11).
• Das vorgestanzte Loch an der
Geräteseite ausbrechen, das Kabel
X6
durchziehen und die Gummihülse
einsetzen (Abb. 12).
• Die elektrischen Anschlüsse entsprechend
dem Schaltplan Bez. vornehmen (Abb. 13).
• Leistungsschild (Bez. 5), im Satz
enthalten, an Metallplatte des Schaltkasten
anbringen (Abb. 14).
• Sicherstellen, dass der Stromnetzanschluss
durch allpoligen Schalter mit Kontaktöffnung
von mindestens 3 mm ausgeführt wurde.
• Die Kondensatablaufwanne, die Bleche und
den Schaltkasten-Deckel wieder einsetzen
(Abb. 14).
• Fije el bastidor del elemento calentador
ref. sobre las aletas en ambos lados,
utilizando para ello 2 tornillos ref. (figura 10).
• Fije con 2 tornillos ref. la pletina metálica
de soporte del dispositivo de interrupción
térmico de rearme manual (F9) en el
bastidor del elemento calentador (figura 11).
• Rompa el taladro troquelado sobre el
panel lateral de la unidad, pase por el
taladro el cable X6 e inserte el
prensaestopas (figura 12).
• Realice las conexiones eléctricas (figura 13)
siguiendo el esquema eléctrico ref. .
• Aplicar en la caja metálica del cuadro
eléctrico la placa de características ref.
suministrada en el kit (figura 14).
• Asegurarse de que la conexión a la red
eléctrica haya sido realizada a través de
un interruptor omnipolar con una apertura
mínima de contacto de 3 mm.
• Vuelva a montar la bandeja de drenaje de
condensado, los paneles y la tapa del
cuadro eléctrico (figura 14).
5
• Bevestig het frame van het
verwarmingselement aan beide kanten op
de steunlipjes met behulp van de twee
eerder verwijderde schroeven (figuur 10).
• Bevestig de metalen steunplaat van de
thermostaat (F9) met handmatige
terugstelling met een schroef op het frame
van het verwarmingselement (figuur 11).
• Doorboor de voorgestanste opening aan
de zijkant van de unit, leid kabel
X6
erdoor
en breng de dichtingsring aan (figuur 12).
• Voer de elektrische aansluitingen (figuur 13)
uit overeenkomstig het elektrisch schema .
• Op de stalen kast van het schakelbord het
typeplaatje rif. aanbrengen, dat met de
kit geleverd wordt (figuur 14).
• Zich ervan vergewissen, dat de aansluiting
aan het stroomnet door middel van een alpolaire
schakelaar uitgevoerd wordt met opening
van de contactpunten van minstens 3 mm.
• Monteeur opnieuw de condensaatopvangbak,
de panelen en het deksel van het
schakelbord (figuur 14).
Page 6

E-HTR configuration by
Room Controller
Configurazione E-HTR
tramite Room Controller
Configuration E-HTR par
Room Controller
After making all electrical connections,
power the unit.
With control
• Press push buttons up/down for 5
seconds is displayed:
• Always keeping push button
pressed, press the following push
buttons one after the other:
OFF
down
FAN MODE up
is displayed:
• Press
up until:
Dopo aver effettuato tutti i collegamenti
elettrici, alimentare l’unità.
Con il comando in
• Premere i tasti
OFF
up/down
per 5”
apparirà:
• Tenendo sempre premuto il tasto
down
premere in sequenza i tasti:
FAN MODE up
apparirà:
• Premere il tasto
up
fino a:
Après avoir effectué tous les branchements
électriques, mettre l’unité sous tension.
La commande en
• Appuyer sur up/down pendant 5
secondes et s’affiche:
• Toujours en maintenant pressé la
touche
down, presser les touches
suivantes en séquence:
OFF
FAN MODE up
s’affiche:
• Appuyer sur la touche
up jusqu’à:
• Press
• Press
• Press
After 20 sec. approximately, the Room
Controller exits the program automatically.
MODE
is displayed:
up
is displayed:
FAN
is displayed:
• Premere il tasto
MODE
apparirà:
• Premere il tasto
up
apparirà:
• Premere il tasto
FAN
apparirà:
Dopo circa 20” il Room Controller uscirà
dal programma automaticamente.
• Appuyer sur la touche
s’affiche:
• Appuyer sur la touche
s’affiche:
• Appuyer sur la touche
s’affiche:
Après 20 s. environ, le Room Controller
quitte le programme automatiquement.
MODE
up
FAN
Tab. I
Tab. II
Outdoor static pressure
40SMC---N
Max. outdoor
pressure (Pa)
Electric heater
operating range
Temperature indoor air
+ 27 °C
009 - 012 - 018 048
024 - 036 060
70 160
Tab.I
Limiti di funzionamento
dell’elemento riscaldante
Temperatura massima dell’aria interna
+ 27 °C
Tab. II
Pressione statica esterna
40SMC---N
Massima pressione
statica esterna (Pa)
009 - 012 - 018 048
024 - 036 060
70 160
6
Tab. I
Limites de fonctionnement
de la résistance électrique chauffante
Température maxi. air intérieur
Tab. II
Pression statique extérieure
40SMC---N
Pression statique
extérieure maxi (Pa)
+ 27 °C
009 - 012 - 018 048
024 - 036 060
70 160
Page 7

Konfiguration E-HTR
mittels Room Controller
Configuración E-HTR
mediante Room Controller
Configuratie E-HTR door
middel van Room Controller
Nachdem alle Elektroanschlüsse ausgeführt wurden, das Gerät versorgen.
Mit der Steuerung auf
• Die Tasten
up/down
OFF
per 5” lang
drücken, es erscheint:
• Indem man die Taste
down
stets
gedrückt hält, der Reihenfolge nach die
Tasten:
FAN MODE up
drücken,
somit
erscheint:
• Die Taste
up
drücken bis:
Después de haber realizado todas las
conexiones eléctricas, ponga la unidad bajo
tensión.
Con el mando en
• Pulse las teclas up/down durante 5”
segundos: aparecerá:
• Manteniendo pulsada la tecla
pulsar en secuencia las teclas:
OFF
down
FAN MODE up
aparecerá :
• Pulsar la tecla up hasta:
Stel de unit in werking, nadat u alle
elektrische aansluitingen heeft uitgevoerd.
Met de bediening op
• Druk de
up/down
OFF
toetsen 5” in, nu
wordt het volgende getoond:
• Druk, met de
down
toets steeds
ingedrukt, in volgorde op de toetsen:
FAN MODE up
nu wordt het volgende getoond:
• Druk de
up
toets in tot:
• Die Taste
MODE
drücken,
es erscheint:
• Die Taste
up
drücken,
es erscheint:
• Die Taste
FAN
drücken,
es erscheint:
Nach etwa 20” geht der Room Controller
automatisch aus dem Programm heraus.
• Pulsar la tecla
aparecerá:
• Pulsar la tecla
aparecerá:
• Pulsar la tecla
aparecerá:
Después de 20 segundos, el Room
Controller saldrá automáticamente del
programa.
MODE
up
FAN
• Druk de
MODE
toets in
nu wordt het volgende getoond:
• Druk de
up
toets in:
nu wordt het volgende getoond:
• Druk de
FAN
toets in:
nu wordt het volgende getoond:
Na ongeveer 20”zal de Room Controller
automatisch het programma verlaren.
Tab. I
Betriebsbegrenzungen
der Elektoheizung
Maximale Temperatur der internen Luft
+ 27 °C
Tab. II
Externer statischer Druck
40SMC---N
Maximaler externer
statischer Druck (Pa)
009 - 012 - 018 048
024 - 036 060
70 160
Tab. I
Límites de funcionamiento del elemento
Temperatura máxima del aire interior
calentador eléctrico
+ 27 °C
Tab. II
Presión estática exterior
40SMC---N
Presión estática
exterior máxima
009 - 012 - 018 048
024 - 036 060
70 160
7
Tab. I
Bedrijfslimieten van het
verwarmingselement
Maximum temperatuur van de binnenlucht
+ 27 °C
Tab. II
Uitwendige statische druk
40SMC---N
Maximum uitwendige
statische druk
009 - 012 - 018 048
024 - 036 060
(Pa)
70 160
Page 8

E-HTR configuration by
Infrared Remote
Configurazione E-HTR
tramite telecomando a raggi
infrarossi
Configuration E-HTR par
télécommande à rayons
infrarouges
After making all electrical connections,
power the unit. .
With control
• Press push buttons and
for 5 seconds is displayed:
• Press push buttons
seconds is displayed:
• Press push-button
OFF
and for 5
twice until
Dopo aver effettuato tutti i collegamenti
elettrici, alimentare l’unità.
Con il comando in
• Premere i tasti
OFF
e
per 5”,
apparirà:
• Tenendo premuti per 5” i tasti
apparirà:
• Premere il tasto
e
2 volte fino a:
Après avoir effectué tous les branchements
électriques, mettre l’unité sous tension.
La commande en
• Appuyer sur et pendant
5 secondes et s’affiche:
• Appuyer sur
secondes et s’affiche:
• Appuyer 2 fois sur la touche
OFF
et pendant 5
et
is displayed.
• Press push-button
is displayed.
• Press push-button
You will hear a « beep » and the writing
below will be displayed:
After 20 sec. approximately, the Infrared
Remote exits the program automatically.
or and the
flashing
to confirm.
fixed
• Premere il tasto
lampeggiante
o
apparirà:
• Premere il tasto per confermare.
Si udirà un beep e la scritta apparirà fissa:
Dopo circa 20” il telecomando a raggi
infrarossi uscirà dal programma automaticamente.
s’affiche.
• Appuyer sur
s’affiche.
• Valider au moyen de la touche
l suit un «bip» et l’inscription suivante
s’affiche :
Après 20 s. environ, la télécommande à
rayons infrarouges quitte le programme
automatiquement.
ou et
clignotant
.
8
Page 9

Konfiguration E-HTR mittels
Infrarot-Fernbedienung
Configuración E-HTR
mediante mando a distancia
de infrarrojos
Configuratie E-HTR door
middel van Infra rood
Afstandbediening
Nachdem alle Elektroanschlüsse ausgeführt wurden, das Gerät versorgen.
Mit der Steuerung auf
• Die Tasten
lang drücken, es erscheint:
• Die Tasten
drücken, es erscheint:
• Die Taste
OFF
und
und per 5” lang
zweimal drücken bis:
per 5”
Después de haber realizado todas las
conexiones eléctricas, ponga la unidad bajo
tensión.
Con el mando en
• Pulse las teclas y
durante 5” segundos: aparecerá:
• Pulse las teclas
segundos: aparecerá:
• Pulsar la tecla
que aparezca:
OFF
y durante 5”
2 veces hasta
Stel de unit in werking, nadat u alle
elektrische aansluitingen heeft uitgevoerd.
Met de bediening op
• Druk de
in, nu wordt het volgende getoond:
• Druk de
wordt het volgende getoond:
• De toets
tot het volgende wordt getoond:
OFF
en
en toetsen 5” in, nu
tweemaal indrukken
toetsen 5”
• Taste
erscheint:
blinkend
• Zur Bestätigung, Taste drücken.
Ein Pieps wird ausgegeben und die
Anzeige blinkt nicht mehr:
Nach etwa 20” geht die InfrarotFernbedienung automatisch aus dem
Programm.
oder drücken. Es
• Pulsar la tecla
parpadeando
• Pulsar la tecla
Se oirá un bip y la inscripción aparecerá
fija:
Después de 20 segundos, el mando a
distancia de infrarrojos saldrá
automáticamente del programa.
ó , aparecerá:
para convalidar.
of
• De toets
volgende wordt getoond:
knipperend
• De toets indrukken om te
bevestigen.
Men hoort een beep en het volgende wordt
getoond
Na ongeveer 20” zal de Infra rood
Afstandbediening het programma
automatisch verlaten.
ndrukken en het
9
Page 10

Carrier S.p.A. - Via R. Sanzio, 9 - 20058 Villasanta (MI) Italy - Tel. 039/3636.1
The manufacturer reserves the right to change any product specifications without notice.
La cura costante per il miglioramento del prodotto può comportare senza preavviso, cambiamenti o modifiche a quanto descritto.
Le fabricant se réserve le droit de modifier les spécifications du produit, sans avertissement préalable.
Änderungen im Zuge der technischen Weiterentwicklung vorbehalten.
El fabricante se reserva el derecho de cambiar algunas especificaciones de los productos sin previo aviso.
Wijzigingen voorbehouden.
November, 2004. Printed in Italy
 Loading...