

Carrier 40RU, 40RUA07, 40RUA08, 40RUA12, 40RUA14 Installation, Start-up And Service Instructions Manual
...Page 1

40RU
Packaged Air---Handling Units
60 Hz
With PuronR(R---410A) Refrigerant
Sizes 07, 08, 12, 14, 16
Installation, Start---Up and
Service Instructions
TABLE OF CONTENTS
SAFETY CONSIDERATIONS 1...................
PRE--INSTALLATION 2.........................
Moving and Storage 2..........................
Rigging 2....................................
INSTALLATION 2–22..........................
General 2....................................
Uncrating 2..................................
Accessories 2.................................
Unit Positioning 12............................
Unit Isolation 13..............................
Refrigerant and Chilled Water Piping Access 13.....
Refrigerant Piping 13..........................
Chilled Water Piping 17........................
Condensate Drain 18...........................
Fan Motors and Drives 18.......................
Power Supply and Wiring 19....................
Connecting Ductwork 22.......................
Return--Air Filters 22..........................
START--UP 23.................................
SERVICE 23–36...............................
Panels 23....................................
Fan Motor Lubrication 23.......................
Fan Shaft Bearings 23..........................
Centering Fan Wheel 24........................
Fan Shaft Position Adjustment 24................
Individual Fan Wheel Adjustment 24..............
Fan Belts 24.................................
Fan Rotation 24...............................
Fan Pulley Alignment 25.......................
Pulley and Drive Adjustment 25..................
Condensate Drains 25..........................
Return--Air Filters 25..........................
Chilled Water Coil Freeze Protection 25...........
Coil Removal 25..............................
Cleaning Cooling Coil 25.......................
Cleaning Insulation 25.........................
Replacing Filters 26...........................
START--UP CHECKLIST 39--40..................
SAFETY CONSIDERATIONS
Improper installation, adjustment, alteration, service,
maintenance, or use can cause explosion, fire, electrical
shock or other conditions which may cause personal
injury or property damage. Consult a qualified installer,
service agency, or your distributor or branch for
information or assistance. The qualified installer or
agency must use factory--authorized kits or accessories
when modifying this product. Refer to the individual
instructions package
Follow all safety codes. Wear safety glasses and work
gloves. Use quenching cloths for brazing operations and
have a fire extinguisher available. Read these instructions
thoroughly and follow all warnings or cautions attached to
the unit. Consult local building codes and appropriate
national electrical codes (in USA, ANSI/NFPA70,
National Electrical Code (NEC); in Canada, CSA C22.1)
for special requirements.
It is important to recognize safety information. This is the
safety--alert symbol
unit and in instructions or manuals, be alert to the
potential for personal injury.
Understand the signal words DANGER, WARNING,
CAUTION, and NOTE. These words are used with the
safety--alert symbol. DANGER identifies the most serious
hazards which will result in severe personal injury or
death. WARNING signifies hazards which could result in
personal injury or death. CAUTION is used to identify
unsafe practices, which may result in minor personal
injury or product and property damage. NOTE is used to
highlight suggestions which will result in enhanced
installation, reliability, or operation.
. When you see this symbol on the
Page 2
!
WARNING
ELECTRICAL SHOCK HAZARD
Failure to follow this warning could cause in personal
injury or death.
Before performing service or maintenance operations
on unit, always turn off main power switch to unit and
install lockout tag. Unit may have more than one
power switch.
!
WARNING
UNIT OPERATION AND SAFETY HAZARD
Failure to follow this warning could cause in personal
injury,death and/or equipment damage.
R
40RU
Puron
higher pressures than standard R--22 systems. Do not
use R--22 service equipment or components on Puron
refrigerant equipment.
PERSONAL INJURY AND ENVIRONMENTAL
HAZARD
Failure to follow this warning could cause in personal
injury or death.
Relieve pressure and recover all refrigerant before
system repair or final unit disposal.
Wear safety glasses and gloves when handling
refrigerants. Keep torches and other ignition sources
away from refrigerants and oils.
CUT HAZARD
Failure to follow this caution may result in personal
injury.
Sheet metal parts may have sharp edges or burrs. Use
care and wear appropriate protective clothing, safety
glasses and gloves when handling parts and servicing
40RU units.
(R--410A) refrigerant systems operate at
!
WARNING
!
CAUTION
PRE--INSTALLATION
1. The power supply (v, ph, and Hz) must correspond to
that specified on unit rating plate.
2. The electrical supply provided by the utility must be
sufficient to handle load imposed by this unit.
3. Refer to Installation, General section (page 2) and
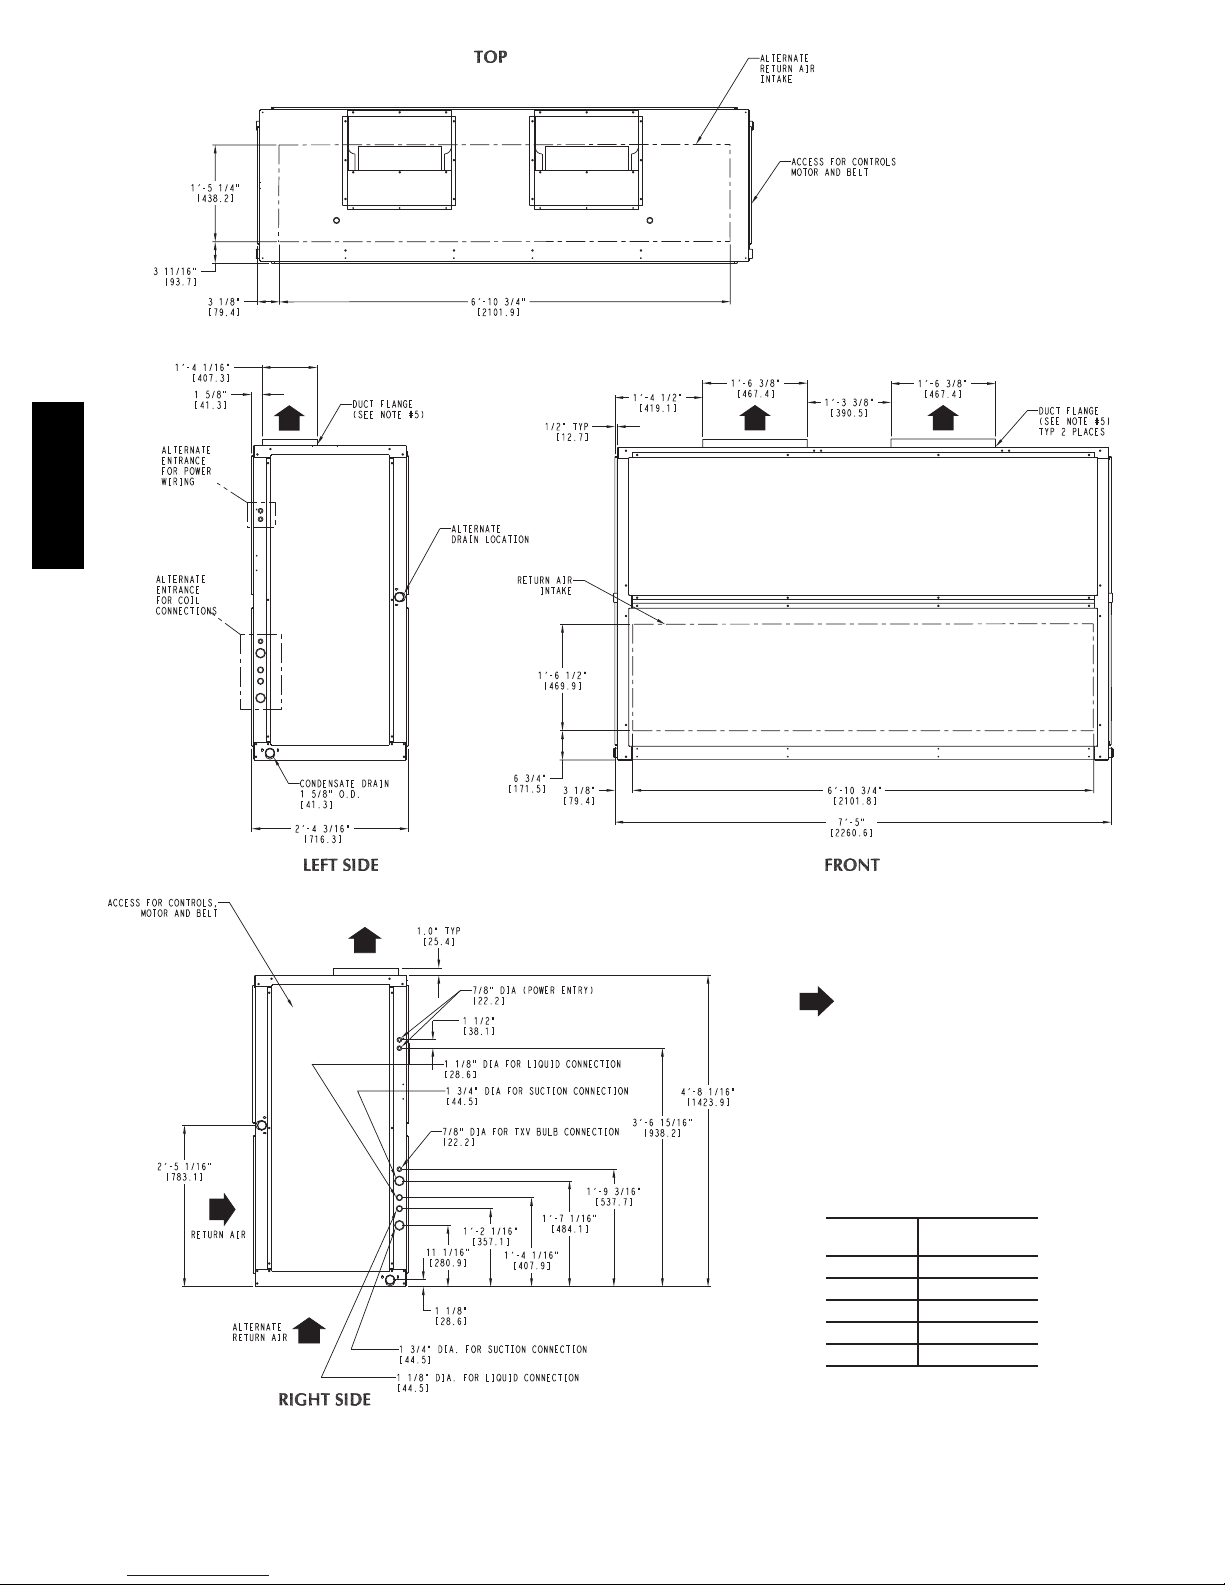
Fig. 1 and Fig. 2 for locations of electrical inlets, condensate drain, duct connections, and required clearances before setting unit in place.
4. This installation must conform with local building
codes and with the NEC (National Electrical Code) or
ANSI (American National Standards Institute)/NFPA
(National Fire Protection Association) latest revision.
Refer to provincial and local plumbing or wastewater
codes and other applicable local codes.
Moving and Storage -- To transfer unit from truck to
storage site, use a fork truck. Do not stack units more than
2 high during storage. If unit is to be stored for more than
2 weeks before installation, choose a level, dry storage
site free from vibration. Do not remove plastic wrap or
skid from unit until final installation.
Rigging -- All 40RU Series units can be rigged by using
the shipping skid. Units are shipped fully assembled. Do
not remove shipping skids or protective covering until unit
is ready for final placement; damage to bottom panels can
result. Use slings and spreader bars as applicable to lift
unit.
INSTALLATION
General -- Allow the following clearances for service
access and airflow:
1
S Rear: 3 ft (914 mm) [2
accessory]
1
S Front: 2
S Right Side: 3
S Left Side: 2
For units equipped with an economizer, refer to the
accessory installation instructions for additional clearance
requirements. Be sure floor, wall, or ceiling can support
unit weight (Tables 1A – 1F). See Fig. 1 and Fig. 2 for
dimensions.
Uncrating -- Move unit as near as possible to final
location before removing shipping skid.
/2ft (762 mm)
1
/2ft (1067 mm)
1
/2ft (762 mm)
/2ft (762 mm) with electric heat
!
CAUTION
UNIT OPERATION HAZARD
Failure to follow this caution could cause equipment
damage.
Ensure voltage listed on unit data plate agrees with
electrical supply provided for the unit.
Remove metal banding, top skid, and plastic wrap.
Examine unit for shipping damage. If shipping damage is
evident, file claim with transportation agency. Remove
base skid just prior to actual installation.
Check nameplate information against available power
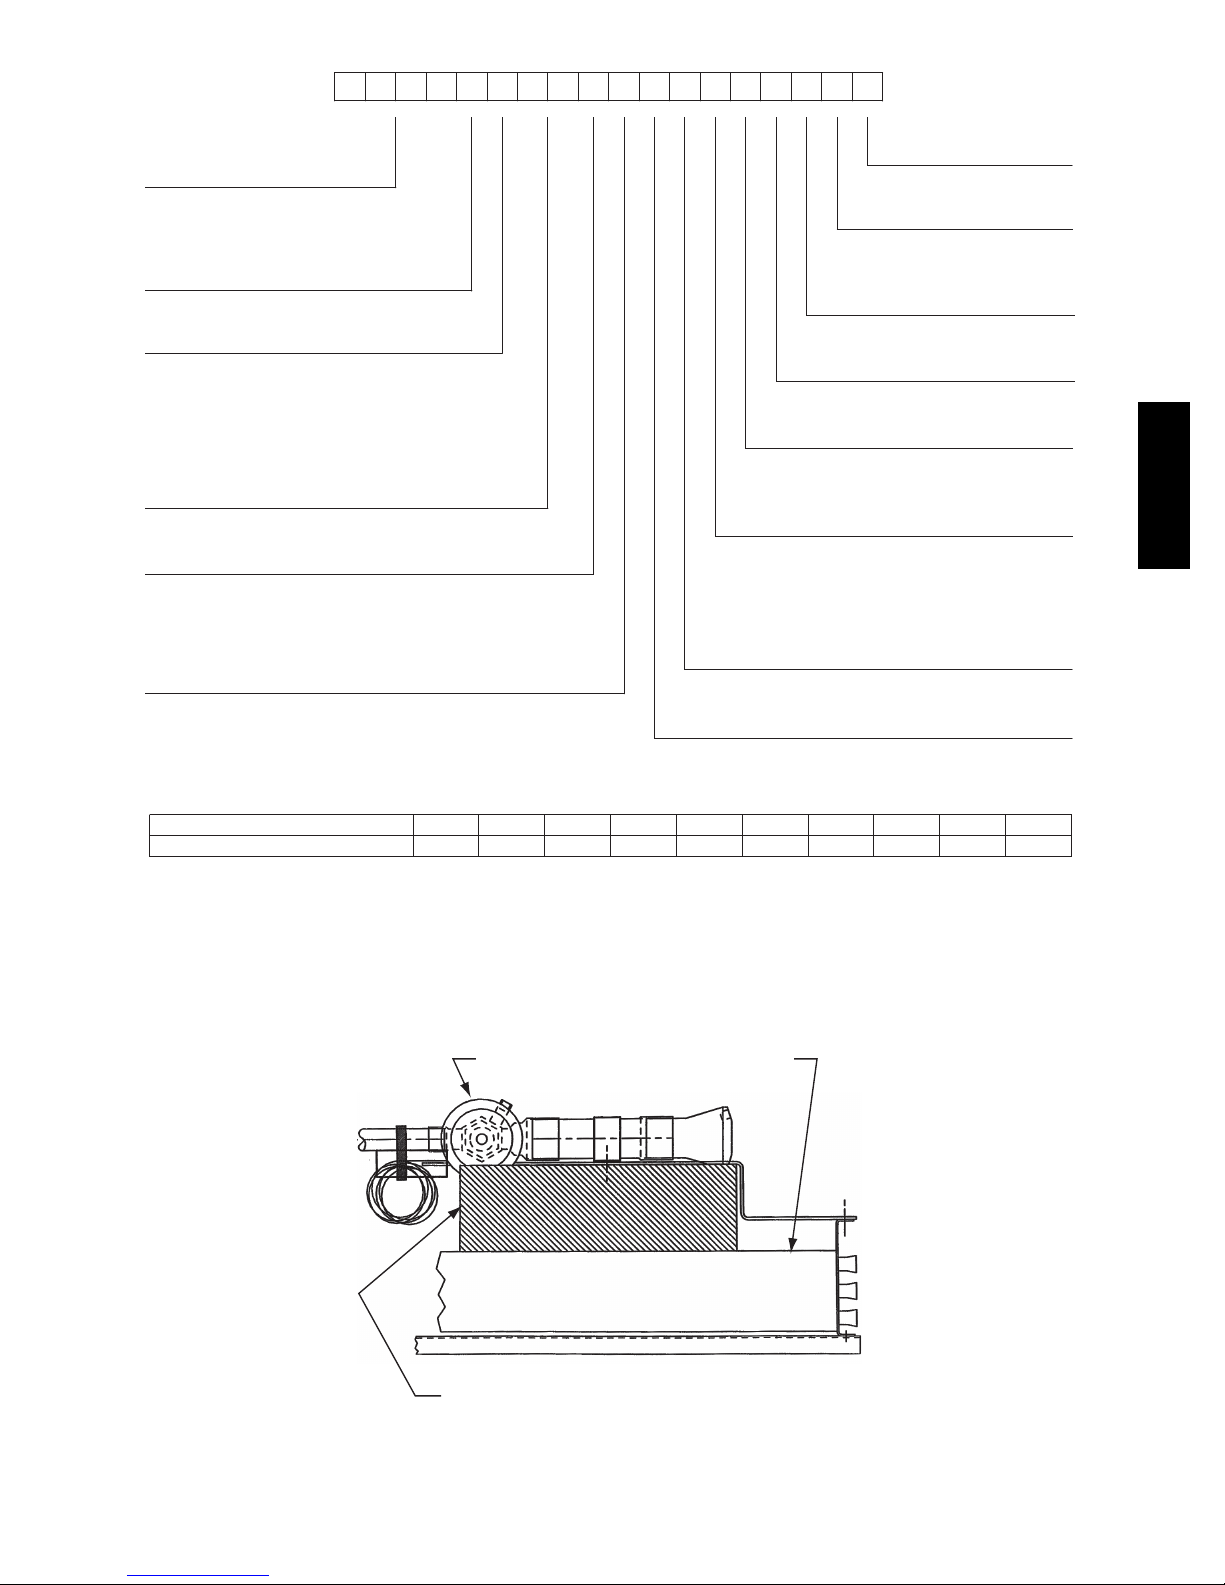
supply and model number description in Fig. 3.
NOTE: Be sure to remove the styrofoam shipping pad
from the thermostatic expansion valve (TXV). Verify that
it has been removed. See Fig. 5.
Accessories -- Refer to instructions shipped with each
accessory for specific information.
2
Page 3
Table 1A — 40RUA Physical Data, English — Cooling Units
UNIT 40RUA* 07 08 12 14 16
NOMINAL CAPACITY (Tons)
6 7
1/
2
10 12
OPERATING WEIGHT (lb)
Base Unit with TXV 381 385 405 670 685
Plenum 175 175 175 225 225
FANS
Qty...Diam. (in.) 1...15 1...15 1...15 2...15 2...15
Nominal Airflow (cfm) 2400 3000 4000 5000 6000
Airflow Range (cfm) 1800--- 3000 2250--- 3750 3000--- 5000 3750--- 6250 4500--- 7500
Nominal Motor Hp (Standard Motor)
208/230---1 --- 60 1.3 2.4 — — —
208/230--- 3 --- 60 and 460--- 3---60 2.4 2.4 2.4 2.9 3.7
5 7 5 --- 3 --- 6 0 1.0 2.0 2.0 3.0 3.0
Motor Speed (rpm)
208/230---1 --- 60 1725 1725 — — —
208/230--- 3 --- 60 and 460--- 3---60 1725 1725 1725 1725 1725
5 7 5 --- 3 --- 6 0 1725 1725 1725 1725 1725
REFRIGERANT
Operating charge (lb)
(approx per circuit)
{
DIRECT--- EXPANSION COIL
3.0 3.0 1.5/1.5 2.0/2.0 2.5/2.5
Enhanced Copper Tubes, Aluminum Sine---Wave Fins
R--- 410A
Max Working Pressure (psig) 450
Face Area (sq ft) 6.67 8.33 10.0 13.25 17.67
No. of Splits 1 1 2 2 2
No. of Circuits per Split 12 15 9 12 16
Split Type...Percentage — — Face...50/50
Fins/in. 15 15 15 15 15
PIPING CONNECTIONS,
Quantity...Size (in.)
DX Coil — Suction (ODF) 1...1
DX Coil — Liquid Refrigerant (ODF) 1...
1/
8
5/
Steam Coil, In (MPT) 1...2
Steam Coil, Out (MPT) 1...1
Hot Water Coil, In (MPT) 1...1
Hot Water Coil, Out (MPT) 1...1
Condensate (PVC) 1...1
FILTERS
1/
1...1
8
8
1/
2
1/
2
1/
2
1/
2
2...1
1/
4ODM/1IDF
Throwaway — Factory Supplied
1/
8
Quantity...Size (in.) 4...16 x 24 x 2
Access Location Either Side
STEAM COIL
}
Max Working Pressure (psig at 260° F) 20
Tota l F a ce Are a ( s q f t) 6.67 6.67 6.67 13.33 13.33
Rows...Fins/in. 1...9 1...9 1...9 1...10 1...10
HOT WATER COIL
}
Max Working Pressure (psig) 150
Tota l F a ce Are a ( s q f t) 6.67 6.67 6.67 13.33 13.33
Rows...Fins/in. 2...8.5 2...8.5 2...8.5 2...8.5 2...8.5
Water Volume
(gal) 8.3 13.9
(ft3) 1.1 1.85
LEGEND
DX — Direct Expansion
TXV — Thermostatic Expansion Valve
{
Units are sh ipped without refrigerant charge.
}
Field installed accessory only.
1/
2
1/
2...1
8
5/
2...
8
1/
1...2
2
1/
1..1
2
4...16 x 20 x 2
4...16 x 24 x 2
15
2...1
1...2
1...2
40RU
1/
8
3
Page 4
40RU
Table 1B — 40RUA Physical Data, SI — Cooling Units
UNIT 40RUA* 07 08 12 14 16
NOMINAL CAPACITY (kW)
OPERATING WEIGHT (kg)
Base Unit with TXV 173 175 184 304 311
Plenum ă80 ă80 ă80 102 102
FANS
Qty...Diam. (mm) 1...381 1...381 1...381 2...381 2...381
Nominal Airflow (L/s) 1133 1604 1888 2360 2831
Airflow Range (L/s) 850- --1416 1203--- 2006 1416--- 2360 1770--- 2949 2124--- 3539
Nominal Motor kW (Standard Motor)
208/230---1 --- 60 0.97 1.79 — — —
208/230--- 3 --- 60 and 460--- 3---60 1.79 1.79 1.79 2.16 2.16
5 7 5 --- 3 --- 6 0 0.75 1.49 1.49 2.24 2.24
Motor Speed (r/s)
208/230---1 --- 60 28.8 28.8 — — —
208/230--- 3 --- 60 and 460--- 3---60 28.8 28.8 28.8 28.8 28.8
5 7 5 --- 3 --- 6 0 28.8 28.8 28.8 28.8 28.8
REFRIGERANT
Operating charge (kg)
(approx per circuit)
{
DIRECT--- EXPANSION COIL
Max Working Pressure (kPag) 3102
Face Area (sq m) 0.62 0.77 0.93 0.93 1.64
No. of Splits 1 1 2 2 2
No. of Circuits per Split 12 15 9 12 16
Split Type...Percentage — — Face...50/50
Fins/m 591 591 670 591 591
PIPING CONNECTIONS,
Quantity...Size (in.)
DX Coil — Suction (ODF) 1...1
DX Coil — Liquid Refrigerant (ODF) 1...
Steam Coil, In (MPT) 1...2
Steam Coil, Out (MPT) 1...1
Hot Water Coil, In (MPT) 1...1
Hot Water Coil, Out (MPT) 1...1
Condensate (PVC) 1...1
FILTERS
Quantity...Size (mm) 4...406 x 610 x 51
Access Location Either Side
STEAM COIL
}
Max Working Pressure (kPag at 126° C) 138
Tota l F a ce Are a ( s q m ) 0.62 0.62 0.62 1.24 1.24
Rows...Fins/m 1...355 1...355 1...355 1...394 1...394
HOT WATER COIL
}
Max Working Pressure (kPag) 1034
Tota l F a ce Are a ( s q m ) 0.62 0.62 0.62 1.24 1.24
Rows...Fins/m 2...335 2...335 2...335 2...335 2...335
Water Volume
(L) 31.4 52.6
(m3) 0.031 0.052
LEGEND
DX — Direct Expansion
TXV — Thermostatic Expansion Valve
{
Units are sh ipped without refrigerant charge.
}
Field installed accessory only.
21 26 35 43 52
R--- 410A
1.36 1.36 0.68/0.68 0.90/0.90 1.13/1.13
Enhanced Copper Tubes, Aluminum Sine---Wave Fins
1/
8
5/
1/
1...1
8
8
1/
2
1/
2
1/
2
1/
2
1/
2...1
8
1/
4ODM/1IDF
2...1
2...
1...2
1..1
1/
8
5/
8
1/
2
1/
2
2...1
1...2
1...2
Throwaway — Factory Supplied
4...406 x 508 x 51
4...406 x 610 x 51
1/
8
4
Page 5
Table 1C — 40RUQ Physical Data, English — Heat Pump Units
UNIT 40RUQ* 07 08 12 16
NOMINAL CAPACITY (Tons)
6 7
1/
2
OPERATING WEIGHT (lb)
Base Unit with TXV 385 385 427 713
Plenum 175 175 175 225
FANS
Qty...Diam. (in.) 1...15 1...15 1...15 2...15
Nominal Airflow (cfm) 2400 3000 4000 6000
Airflow Range (cfm) 1800 ---3000 2250--- 3750 3000--- 5000 4500--- 7500
Nominal Motor Hp (Standard Motor)
208/230---1 --- 60 1.3 2.4 — —
208/230--- 3 --- 60 and 460--- 3---60 2.4 2.4 2.4 3.7
5 7 5 --- 3 --- 6 0 1.0 2.0 2.0 3.0
Motor Speed (rpm)
208/230---1 --- 60 1725 1725 — —
208/230--- 3 --- 60 and 460--- 3---60 1725 1725 1725 1725
5 7 5 --- 3 --- 6 0 1725 1725 1725 1725
REFRIGERANT
Operating charge (lb)
(approx per circuit)
{
DIRECT--- EXPANSION COIL
3.0 3.0 2.0/2.0 3.0/3.0
Enhanced Copper Tubes, Aluminum Sine---Wave Fins
R--- 410A
Max Working Pressure (psig) 650
Face Area (sq ft) 8.33 8.33 10.0 16.56
No. of Splits 1 1 2 2
No. of Circuits per Split 15 12 9 10
Split Type...Percentage — — Face...50/50 Face...50/50
Rows...Fins/in. 3...15 4...15 4...15 4...15
PIPING CONNECTIONS,
Quantity...Size (in.)
DX Coil — Suction (ODF) 1...1
DX Coil — Liquid Refrigerant (ODF) 1...
Steam Coil, In (MPT) 1...2
Steam Coil, Out (MPT) 1...1
Hot Water Coil, In (MPT) 1...1
Hot Water Coil, Out (MPT) 1...1
1/
8
5/
8
1/
2
1/
2
1/
2
1/
2
Condensate (PVC) 1...1
FILTERS
1/
1...1
8
5/
1...
8
1/
1...2
2
1/
1...1
2
1/
1...1
2
1/
1...1
2
1/
4ODM/1IDF
Throwaway — Factory Supplied
Quantity...Size (in.) 4...16 x 24 x 2 4...16 x 20 x 2
Access Location Either Side
STEAM COIL
}
Max Working Pressure (psig at 260° F) 20
Tota l F a ce Are a ( s q f t) 6.67 6.67 6.67 13.33
Rows...Fins/in. 1...9 1...9 1...9 1...10
HOT WATER COIL
}
Max Working Pressure (psig) 150
Tota l F a ce Are a ( s q f t) 6.67 6.67 6.67 13.33
Rows...Fins/in. 2...8.5 2...8.5 2...8.5 2...8.5
Water Volume
(gal) 8.3 13.9
(ft3) 1.1 1.85
LEGEND
DX — Direct Expansion
TXV — Thermostatic Expansion Valve
{
Units are sh ipped without refrigerant charge.
}
Field installed accessory only.
2...1
2...
1...2
1...1
1...1
1...1
10
15
1/
8
5/
8
1/
2
1/
2
1/
2
1/
2
2...1
2...
1...2
1...1
1...2
1...2
4...16 x 24 x 2
40RU
1/
8
5/
8
1/
2
1/
2
5
Page 6
Table 1D — 40RUQ Physical Data, SI — Heat Pump Units
40RU
UNIT 40RUQ* 07 08 12
NOMINAL CAPACITY (kW)
21 26 35
16
52
OPERATING WEIGHT (kg)
Base Unit with TXV 175 175 194 323
Plenum 80 80 80 102
FANS
Qty...Diam. (mm) 1...381 1...381 1...381 2...381
Nominal Airflow (L/s) 1133 1604 1888 2831
Airflow Range (L/s) 850---1416 1203--- 2006 1416 --- 2360 2124 ---3539
Nominal Motor kW (Standard Motor)
208/230---1 --- 60 0.97 1.79 — —
208/230--- 3 --- 60 and 460--- 3---60 1.79 1.79 1.79 2.76
5 7 5 --- 3 --- 6 0 0.75 1.49 1.49 2.24
Motor Speed (r/s)
208/230---1 --- 60 28.8 28.8 — —
208/230--- 3 --- 60 and 460--- 3---60 28.8 28.8 28.8 28.8
5 7 5 --- 3 --- 6 0 28.8 28.8 28.8 28.8
REFRIGERANT
Operating charge (kg)
(approx per circuit)
{
DIRECT--- EXPANSION COIL
1.36 1.36 0.91/0.91 1.36/1.36
Enhanced Copper Tubes, Aluminum Sine---Wave Fins
R--- 410A
Max Working Pressure (kPag) 4482
Face Area (sq m) 0.77 0.77 0.93 1.54
No. of Splits 1 1 2 2
No. of Circuits per Split 12 12 9 10
Split Type...Percentage — — Face...50/50 Face...50/50
Rows...Fins/m 3...591 3...591 3...591 4...591
PIPING CONNECTIONS,
Quantity...Size (in.)
DX Coil — Suction (ODF) 1...1
DX Coil — Liquid Refrigerant (ODF) 1...
Steam Coil, In (MPT) 1...2
Steam Coil, Out (MPT) 1...1
Hot Water Coil, In (MPT) 1...1
Hot Water Coil, Out (MPT) 1...1
1/
8
5/
8
1/
2
1/
2
1/
2
1/
2
Condensate (PVC) 1...1
FILTERS
Quantity...Size (mm) 4...406 x 610 x 51
1...1
1...
1...2
1...1
1...1
1...1
1/
5/
1/
1/
1/
1/
8
8
2
2
2
2
1/
4ODM/1IDF
2...1
2...
1...2
1...1
1...1
1...1
1/
8
5/
8
1/
2
1/
2
1/
2
1/
2
Throwaway — Factory Supplied
2...1
2...
1...2
1...1
1...2
1...2
4...406 x 508 x 51
4...406 x 610 x 51
Access Location Either Side
STEAM COIL
}
Max Working Pressure (kPag at 126° C) 138
Tota l F a ce Are a ( s q m ) 0.62 0.62 0.62 1.24
Rows...Fins/m 1...355 1...355 1...355 1...394
HOT WATER COIL
}
Max Working Pressure (kPag) 1034
Tota l F a ce Are a ( s q m ) 0.62 0.62 0.62 1.24
Rows...Fins/m 2...335 2...335 2...335 2...335
Water Volume
(L) 31.4 52.6
(m3) 0.031 0.052
LEGEND
DX — Direct Expansion
TXV — Thermostatic Expansion Valve
{
Units are sh ipped without refrigerant charge.
}
Field installed accessory only.
1/
8
5/
8
1/
2
1/
2
6
Page 7
Table 1E — 40RUS Physical Data, English — Chilled Water Units
UNIT 40RUS* 08 12 14 16
NOMINAL CAPACITY (Tons)
1/
7
2
10 12
OPERATING WEIGHT (lb)
Base Unit 390 391 661 677
Plenum 175 175 225 225
FANS
Qty...Diam. (in.) 1...15 1...15 2...15 2...15
Nominal Airflow (cfm) 3000 4000 5000 6000
Airflow Range (cfm) 2250 ---3750 3000 ---5000 3750---6250 4500--- 7500
Nominal Motor Hp (Standard Motor)
208/230---1 --- 60 2.4 — — —
208/230--- 3 --- 60 and 460--- 3---60 2.4 2.4 2.9 3.7
5 7 5 --- 3 --- 6 0 2.0 2.0 3.0 3.0
Motor Speed (rpm)
208/230---1 --- 60 1725 — — —
208/230--- 3 --- 60 and 460--- 3---60 1725 1725 1725 1725
5 7 5 --- 3 --- 6 0 1725 1725 1725 1725
CHILLED WATER COIL
Enhanced Copper Tubes, Aluminum Sine---Wave Fins
Max Working Pressure (psig) 435
Face Area (sq ft) – Upper 8.3 9.9 8.3 8.3
Face Area (sq ft) – Lower — — 5.5 8.3
Rows...Fins/in. 3...15
PIPING CONNECTIONS,
Quantity...Size (in.)
Chilled Water — In 1...1
Chilled Water — Out 1...1
3/
8ODF
3/
8ODF
Steam Coil, In (MPT) 1...2
Steam Coil, Out (MPT) 1...
Hot Water Coil, In (MPT) 1...1
Hot Water Coil, Out (MPT) 1...1
Condensate (PVC) 1...1
FILTERS
3/
2...1
8ODF
3/
2...1
8ODF
1/
2
1/
2
1/
1/
1/
4ODM/1IDF
Throwaway — Factory Supplied
Quantity...Size (in.) 4...16 x 24 x 2
Access Location Either Side
STEAM COIL
}
Max Working Pressure (psig at 260° F) 20
Tota l F a ce Are a ( s q f t) 6.67 6.67 13.33 13.33
Rows...Fins/in. 1...9 1...9 1...9 1...10
HOT WATER COIL
}
Max Working Pressure (psig) 150
Tota l F a ce Are a ( s q f t) 6.67 6.67 13.33 13.33
Rows...Fins/in. 2...8.5 2...8.5 2...8.5 2...8.5
Water Volume
(gal) 8.3 13.9
(ft3) 1.1 1.85
LEGEND
}
Field installed accessory only.
1/
2
3/
2...1
8ODM
3/
2...1
8ODM
2
2
2...1
2...1
15
3/
3/
1...2
1...2
4...16 x 20 x 2
4...16 x 24 x 2
40RU
8ODM
8ODM
7
Page 8
40RU
Table 1F — 40RUS Physical Data, SI — Chilled Water Units
UNIT 40RUS* 08 12 14 16
NOMINAL CAPACITY (kW)
OPERATING WEIGHT (kg)
Base Unit 177 177 300 307
Plenum 80 80 102 102
FANS
Qty...Diam. (mm) 1...381 1...381 2...381 2...381
Nominal Airflow (L/s) 1416 1888 2360 2831
Airflow Range (L/s) 1062--- 1770 1416 --- 2360 1770 ---2949 2124 ---3539
Nominal Motor kW (Standard Motor)
208/230---1 --- 60 1.79 — — —
208/230--- 3 --- 60 and 460--- 3---60 1.79 1.79 1.79 2.76
5 7 5 --- 3 --- 6 0 1.49 1.49 1.49 2.24
Motor Speed (r/s)
208/230---1 --- 60 28.8 — — —
208/230--- 3 --- 60 and 460--- 3---60 28.8 28.8 28.8 28.8
5 7 5 --- 3 --- 6 0 28.8 28.8 28.8 28.8
CHILLED WATER COIL
Max Working Pressure (kPag) 2999
Face Area (sq m) – Upper 0.77 0.91 0.77 0.77
Face Area (sq m) – Lower — — 0.51 0.77
Rows...Fins/m 3...591
PIPING CONNECTIONS,
Quantity...Size (in.)
Chilled Water — In 1...1
Chilled Water — Out 1...1
Steam Coil, In (MPT) 1...2
Steam Coil, Out (MPT) 1...
Hot Water Coil, In (MPT) 1...1
Hot Water Coil, Out (MPT) 1...1
Condensate (PVC) 1...1
FILTERS
Quantity...Size (mm) 4...406 x 610 x 51
Access Location Either Side
STEAM COIL
}
Max Working Pressure (kPag at 125° C) 138
Tota l F a ce Are a ( s q m ) 0.62 0.62 1.24 1.24
Rows...Fins/m 1...355 1...355 1...355 1...394
HOT WATER COIL
}
Max Working Pressure (kPag) 1034
Tota l F a ce Are a ( s q m ) 0.62 0.62 1.24 1.24
Rows...Fins/m 2...335 2...335 2...335 2...335
Water Volume
(L) 31.4 52.6
(m3) 0.031 0.052
LEGEND
}
Field installed accessory only.
26 35 43 52
Enhanced Copper Tubes, Aluminum Sine---Wave Fins
3/
8ODF
3/
8ODF
3/
2...1
8ODF
3/
2...1
8ODF
1/
2
1/
2
1/
4ODM/1IDF
3/
2...1
8ODM
3/
2...1
1/
1/
2
8ODM
2
2...1
2...1
3/
3/
1...2
1...2
Throwaway — Factory Supplied
4...406 x 508 x 51
4...406 x 610 x 51
8ODM
8ODM
8
Page 9
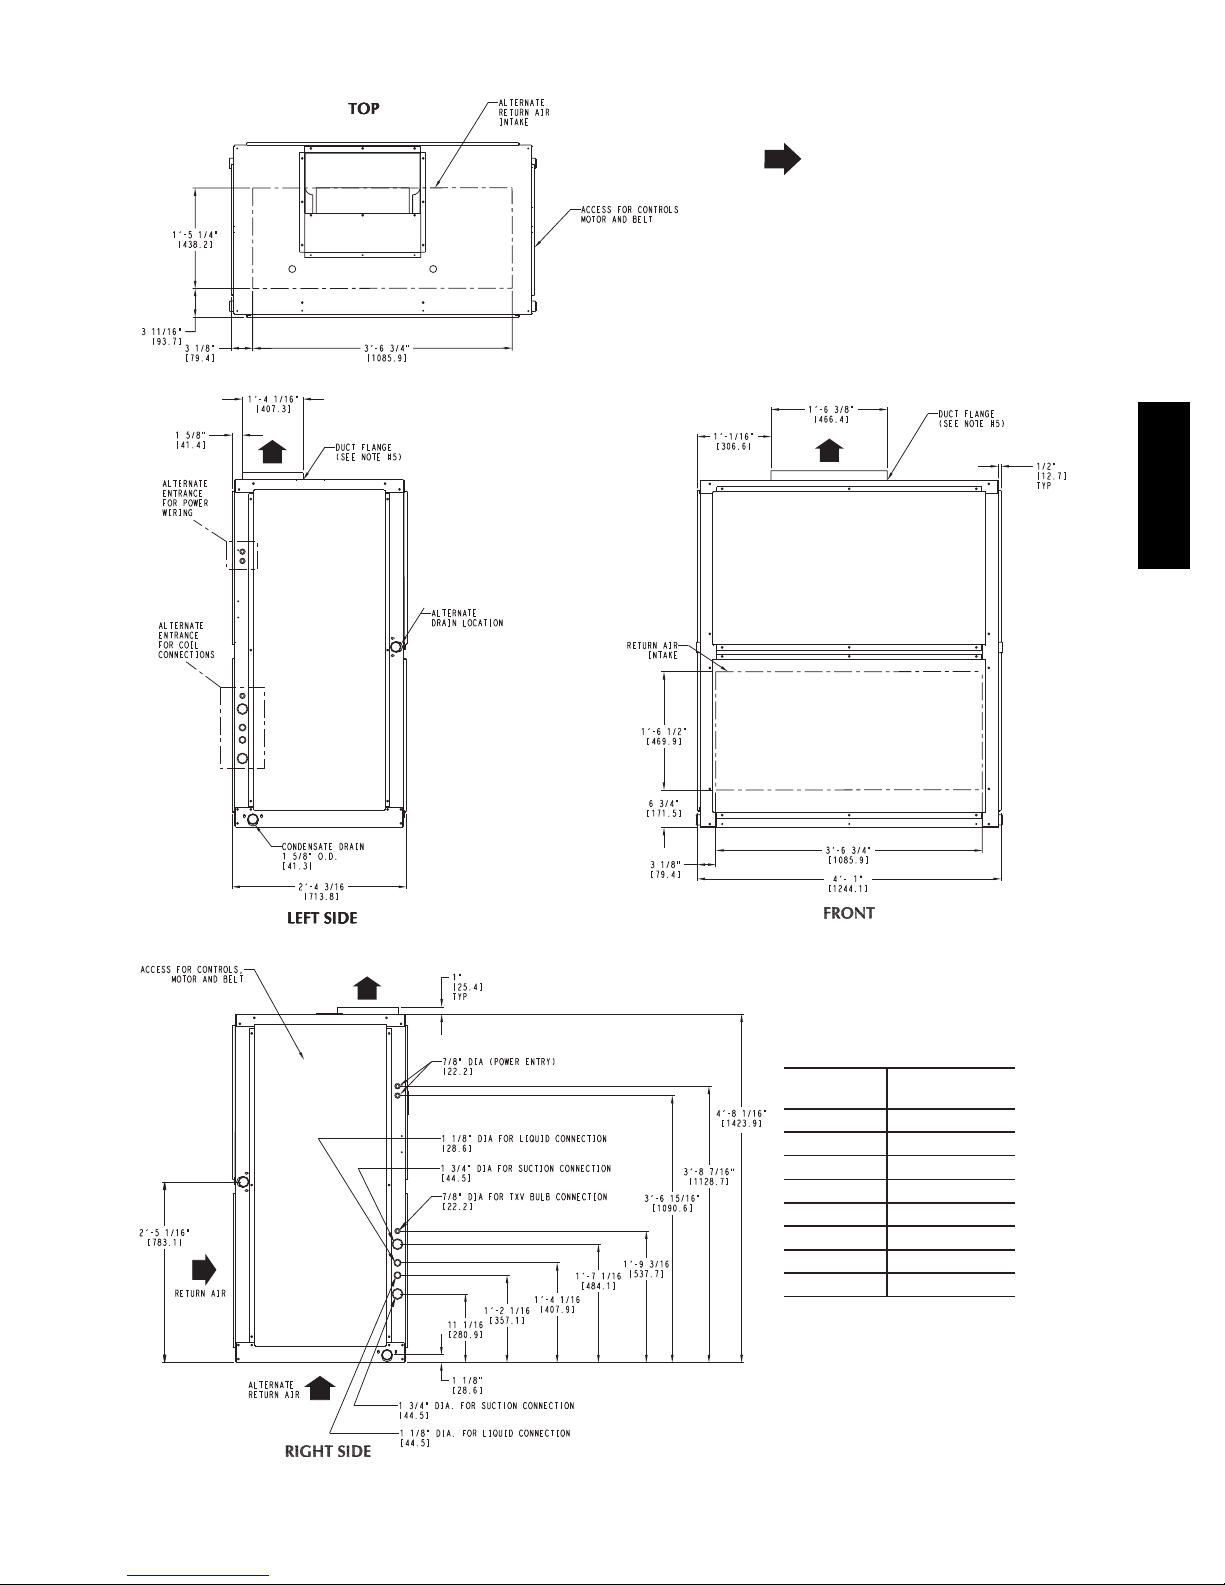
LEGEND
TXV — Thermostatic Expansion Valve
NOTES:
1. Dimensions in [ ] are in millimeters.
2. Direction of airflow.
3. Recommended clearance:
• Rear: 3 in. [914 mm] (2 ft, 6 in. [762 mm]
with electric heat accessory)
• Front: 2 ft, 6 in. [762 mm]
• Right Side: 2 ft, 6 in. [762 mm]
• Left Side: 2 ft, 6 in. [762 mm]
• Local codes or jurisdiction may prevail.
4. Liquid piping not supplied by Carrier.
5. Duct flange is factory supplied and field
installed.
40RU
Fig. 1 -- Dimensions – Sizes 07 -- 12
9
UNIT
40RUA07 381 (173)
40RUA08 385 (175)
40RUA12 405 (184)
40RUQ07 385 (175)
40RUQ08 385 (175)
40RUQ12 427(194)
40RUS08 390 (177)
40RUS12 391 (177)
UNIT WEIGHT
lb (kg)
C10679
Page 10
40RU
LEGEND
TXV — Thermostatic Expansion Valve
NOTES:
1. Dimensions in [ ] are in millimeters.
2. Direction of airflow.
3. Recommended clearance:
• Rear: 3 in. [914 mm] (2 ft, 6 in. [762 mm]
with electric heat accessory)
• Front: 2 ft, 6 in. [762 mm]
• Right Side: 2 ft, 6 in. [762 mm]
• Left Side: 2 ft, 6 in. [762 mm]
• Local codes or jurisdiction may prevail.
4. Liquid piping not supplied by Carrier.
5. Duct flange is factory supplied and field
installed.
Fig. 2 -- Dimensions – Sizes 14 and 16
10
UNIT
40RUA14
40RUA16
40RUQ16
40RUS14
40RUS16 677 (307)
UNIT WEIGHT
lb (kg)
670 (304)
685 (331)
713 (323)
661 (300)
C10680
Page 11
1 2 3 4 5 6 7 8 9 10 11 12 13 14 15 16 17 18
40RUAA14A1A6 –0A0A0
_____________ ____
Model Type
40RU = Carrier Fan Coil
Puronr R---410A Refrigerant
Typ e of Coi l
A=StandardDXCoil
Q = DX Coil for Heat Pump Duty
S = Chilled Water Coil
Refrigerant Options
A=None
Nominal Tonnage
07 = 6 Tons
08 = 7.5 Tons
12 = 10 Tons
14 = 12.5 Tons
16 = 15 Tons
Not Used
A=PlaceHolder
Indoor Fan Options
1 = Fan Drive and Motor - Low / Motor Efficiency - Standard
2 = Fan Drive and Motor - Med / Motor Efficiency - Standard
3 = Fan Drive and Motor - High / Motor Efficiency - Standard
Fig. 3 -- Model Number Nomenclature
Brand / Packaging
0=Standard
Not Used
A=PlaceHolder
Service Options
0 = Non-Painted Cabinet
1 = Painted Cabinet
Not Used
A=PlaceHolder
Not Used
0=PlaceHolder
Design Rev
– = Catalog Model Number
1 = Design Revision (original)
Voltage
1 = 575/3/60
3 = 208/ 230/1/60 (07 and 08 Only)
5 = 208/ 230/3/60 (Size 16 and Indoor Fan 3 Only)
6 = 460/3/60
Coil Options
A=Al/Cu
40RU
C10681
POSITION NUMBER
TYPICAL
12345678910
2610G12345
SETANGISEDNOITISOP
)radnelac lacsif( erutcafunam fo keeW1−2
Year of manufacture (“10” = 2010)3−4
)ASU ,saxeT ,PTE = G( noitacol gnirutcafunaM5
rebmun laitneuqeS6−10
C10682
Fig. 4 -- Serial Number Nomenclature
TXV COIL
REMOVE FOAM BLOCK
LEGEND
TXV — Thermostatic Expansion Valve
Fig. 5 -- Foam Block Location
C10683
11
Page 12
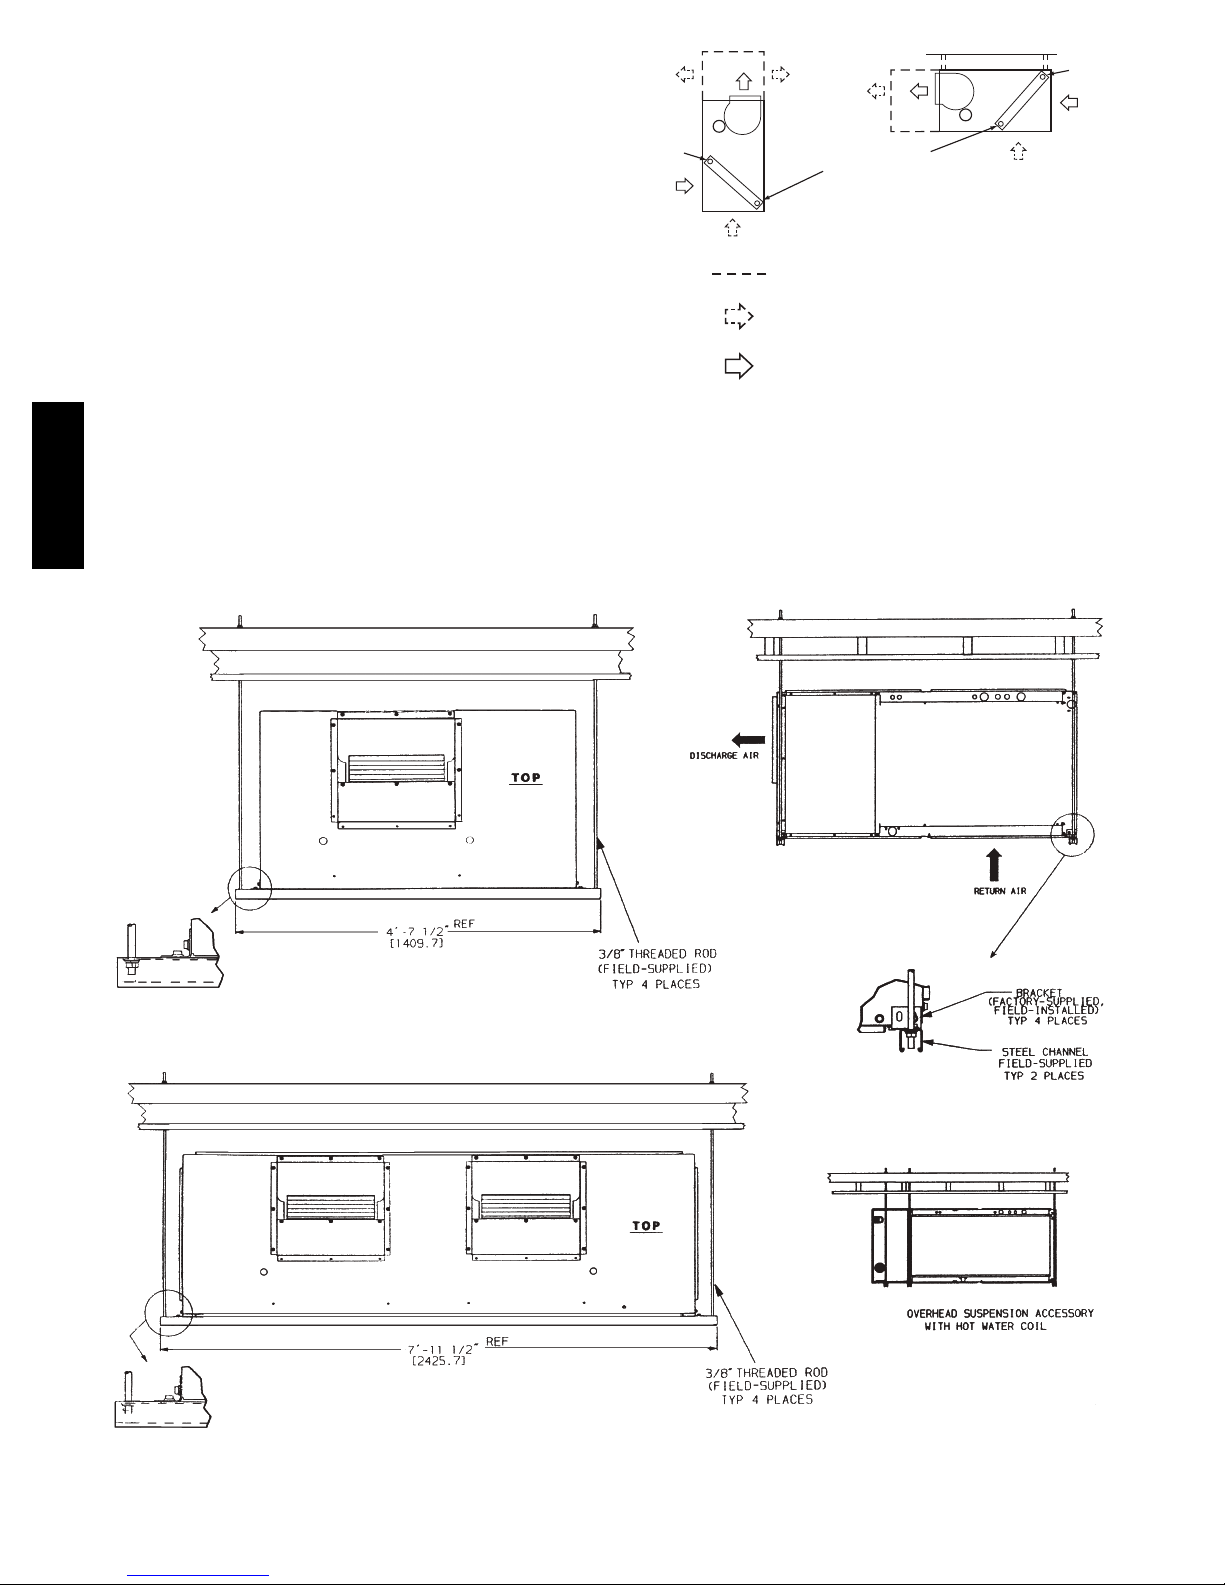
Unit Positioning -- The unit can be mounted on the floor for
vertical application with return air entering the face of the
unit and supply air discharging vertically through the top of
the unit. The unit can also be applied in a horizontal
arrangement with return air entering horizontally and the
supply air discharging horizontally. When applying the unit
in a horizontal arrangement, ensure the condensate drain pan
is located at the bottom center of the unit for adequate
condensate disposal. See Fig. 6 for condensate connections
for each unit position.
IMPORTANT: Do NOT attempt to install unit with return
air entering top panel of unit. Condensate will not drain from
unit.
Typical positioning and alternate return air locations are
shown in Fig. 6. Alternate return air locations can be used
by moving the unit panel from the alternate return air
location to the standard return air location. Refer to overhead
suspension accessory drawing (Fig. 7) for preferred
suspension technique. The unit needs support underneath to
40RU
prevent sagging.
OVERHEAD SUSPENSION ACCESSORY
UNIT SIZES 07 - 12
PLUG
CONDENSATE
DRAIN
LEGEND
Accessory Line
Alternate Air Intake and Discharge
Air Intake and Discharge
Note: Maintain recommended clearances
per Fig. 1 and Fig. 2
Fig. 6 -- Typical Unit Positioning
PLUG
C10684
UNIT SIZES 14 - 16
NOTE: Dimensions in [ ] are millimeters.
C10685
Fig. 7 -- Preferred Suspension Technique
12
Page 13
Unit Isolation -- Where extremely quiet operation is
essential, install isolators between floor and base of unit,
or between ceiling and top section of unit.
Be sure that unit is level and adequately supported. Use
channels at front and sides of unit for reference points
when leveling.
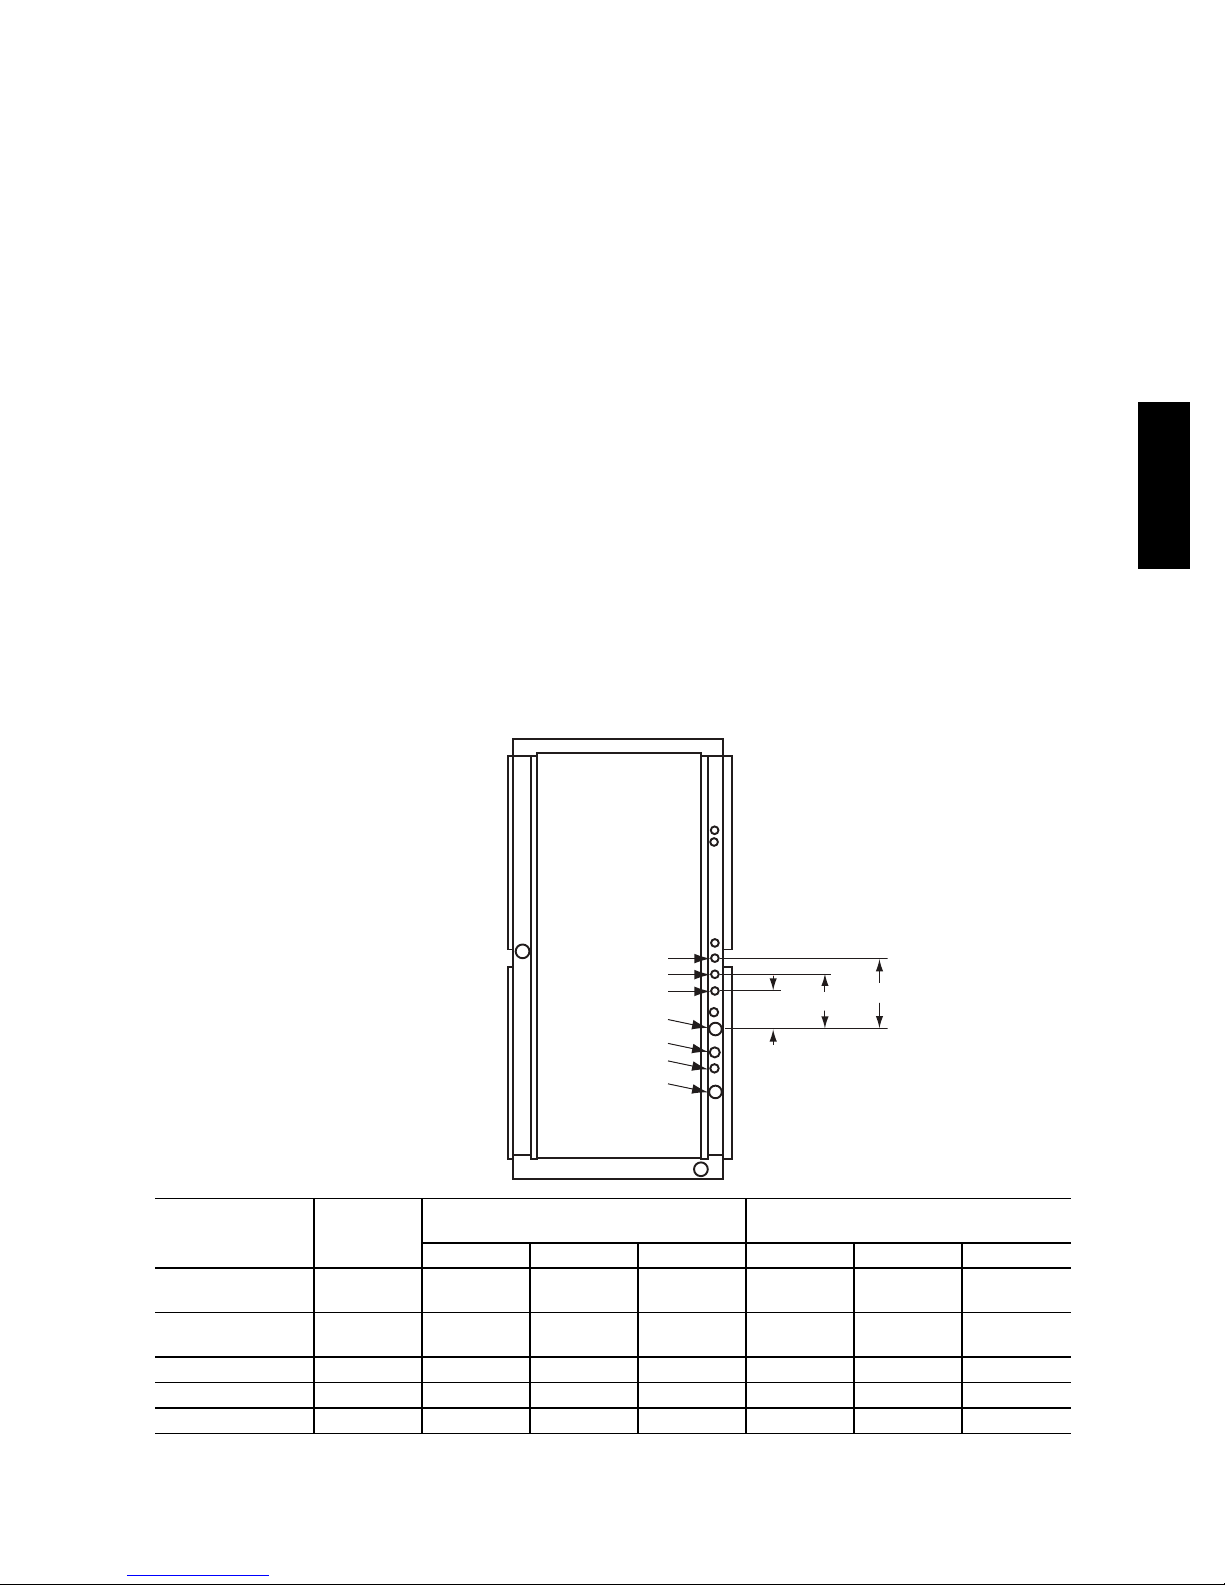
Refrigerant and Chilled Water Piping Access -- The
40RU Series units come with standard knockouts for
refrigerant and chilled water piping. These knockouts are
located on both sides of the unit for installation flexibility.
The standard knockouts provide sufficient access to the
unit’s coils for all 40RUA*07, 08, 12, 14, 16 and
40RUQ*07, 08, 12 units. 40RUQ*16 units, as well as
40RUS*08, 12, 14, and 16 units require additional holes
which must be field--fabricated to accommodate the
piping. See Fig. 8 for positions and dimensions of the
additional access holes required for the 40RUQ*16 and
40RUS units. Recommended access hole use is also listed
for all units. Note that Fig. 8 shows the access holes on
the control--box side of the unit; this is the side of the unit
with the coil headers, so it is used most often for piping
access.
IMPORTANT: Do not bury refrigerant piping underground.
Refrigerant Piping -- See Tables 1A–1F for refrigerant
pipe connection sizes. For ease in brazing, it is
recommended that all internal solder joints be made
before unit is placed in final position.
The 40RU direct--expansion units have internal
factory--installed thermostatic expansion valves (TXVs),
distributors, and nozzles for use with R--410A. See Table 2
for part numbers. Knockouts are provided in the unit corner
posts for 40RU refrigerant piping. See Fig. 8, which also
lists recommended knockouts and access holes to use for
each 40RU unit size. Recommended fittings are listed in
Tabl e 3.
The sensor bulb capillary tubes must be routed from the
TXVs inside the unit through one of the piping access
holes. Clamp the TXV sensor bulb on a vertical portion of
the suction line, outside the unit. See Fig. 9.
NOTE: Be sure to remove the styrofoam shipping pad
from the TXV. Verify that it has been removed. See Fig. 5.
IMPORTANT: Never attach the sensor to the suction
manifold. Do NOT mount the sensor on a trapped portion
of the suction line.
The 40RU Series evaporator coils have a face--split design.
Ensure that lower circuit of coil is first on/last off when
connected to the condensing unit and/or system controls. See
Fig. 10.
External TXV equalizer connections are provided and
factory--brazed into the coil suction manifolds.
If suction line must be horizontal, clamp bulb to suction
line at least 45 degrees above bottom, at approximately
the 4 o’clock or 8 o’clock position. See Fig.11.
40RU
7
6
5
4
3
2
1
UNIT
40RUA*07, 08
40RUQ*07, 08
40RUA*12, 14, 16
40RUQ12
40RUS*08, 12 4, 5 13/4(44.5) — — 6.25 (158.8) — —
40RUS*14, 16 4, 5, 6, 7 13/4(44.5) 13/4(44.5) 13/4(44.5) 3.0 (76.2) 6.0 (152.5) 10.5 (266.7)
40RUQ*16 3{,5,6,7 11/8 (28.6) 11/8 (28.6) 13/4(44.5) 3.25 (82.6) 6.125 (155.6) 10.38 (263.7)
{
Must be enlarged from 11/8in. (28.6mm) to 13/4in. (44.5mm)
N OTE : Acc e s s h o l e k no c k o u t s 1 --- 4 a re f a c t o ry --- s u p p l i e d .
USE HOLE
NUMBERS
1, 3 — — — — — —
1, 2, 3, 4 — — — — — —
FIELD-- -FABRICATED HOLE DIAMATERS
in. (mm)
No. 5 No. 6 No. 7 A B C
A
FIELD-- -FABRICATED HOLE POSITION
C
B
DIMENSIONS, in. (mm)
Fig. 8 -- Refrigerant and Chilled Water Piping Access Holes
13
C10686
Page 14
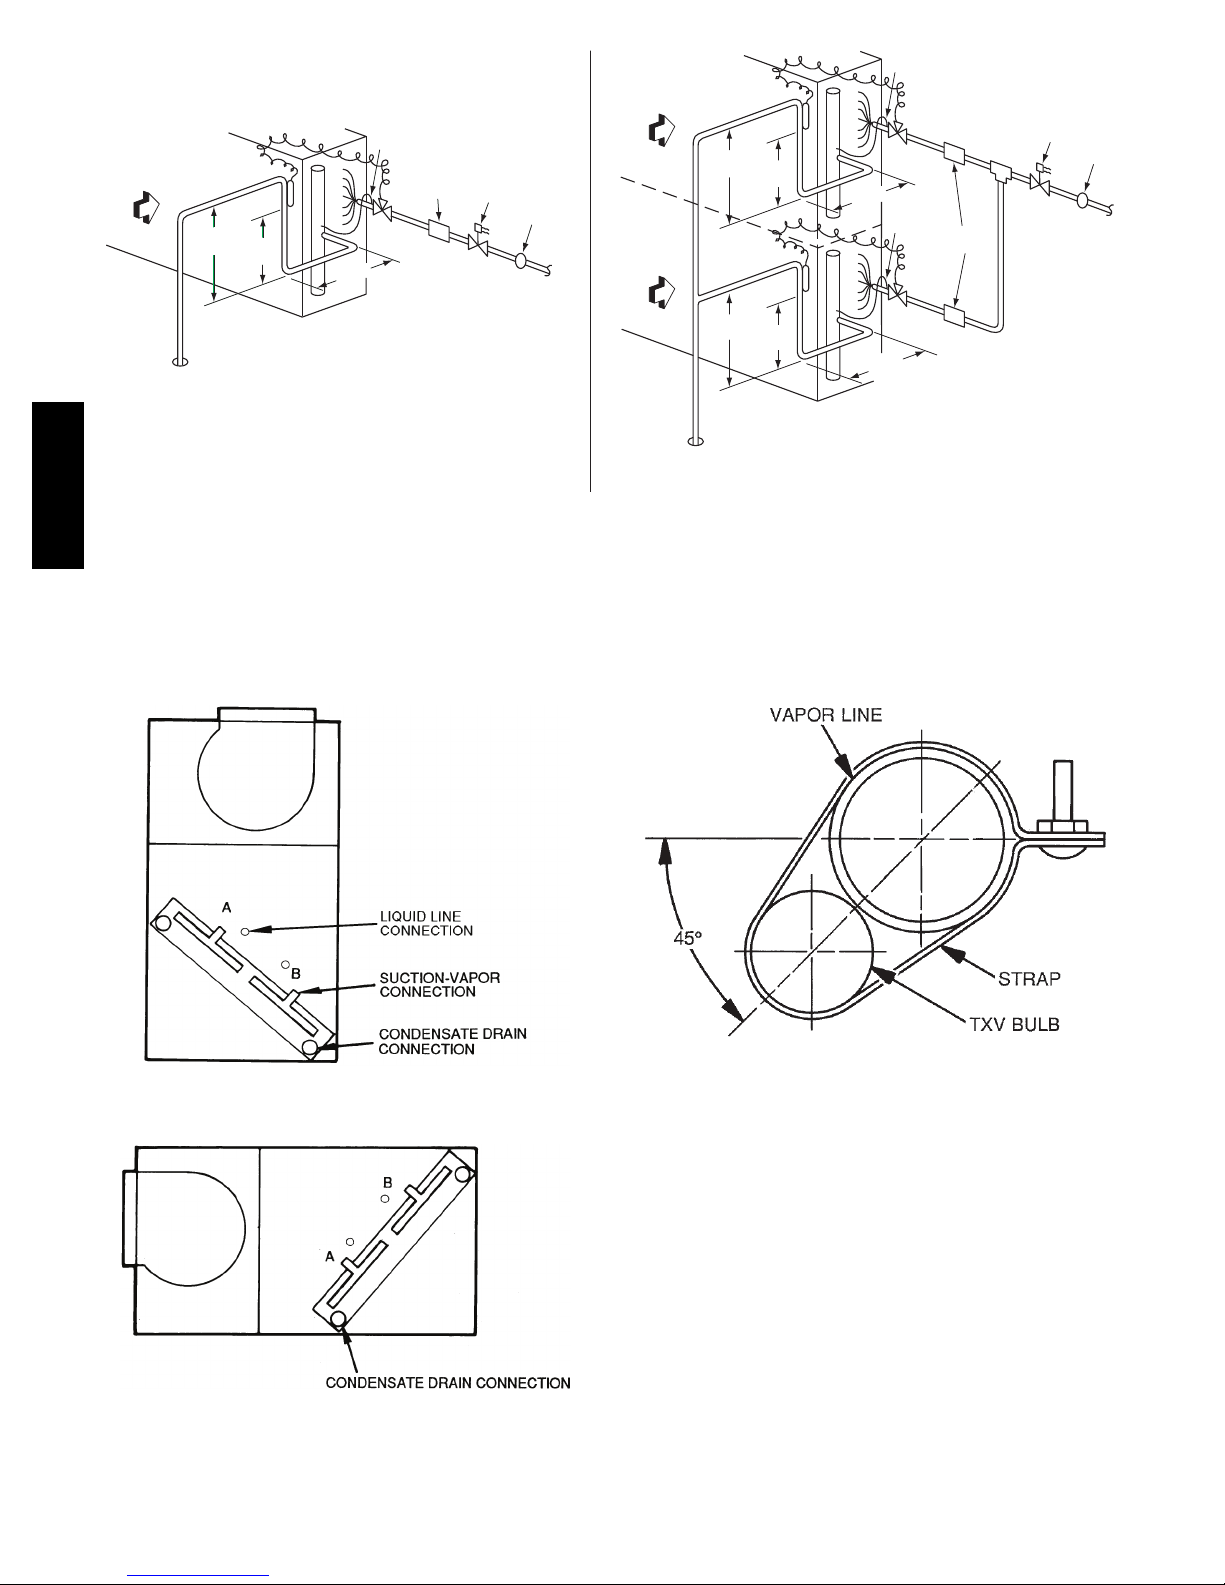
UPPER
SPLIT
AIRFLOW
TXV
SENSING
BULB
15 DIAMS
MIN
10
DIAMS
8 DIAMS
MIN
EQUALIZER LINE
FILTER
DRIER
TXV
SOLENOID
VALV E
SIGHT
GLASS
UPPER
SPLIT
AIRFLOW
LOWER
SPLIT
AIRFLOW
TXV
SENSING
BULB
15 DIAMS
MIN
TXV
SENSING
BULB
15 DIAMS
MIN
10
DIAMS
10
DIAMS
8 DIAMS
MIN
8 DIAMS
EQUALIZER LINE
TXV
EQUALIZER
LINE
TXV
MIN
INDOOR
COIL
FILTER
DRIER
SOLENOID
VALV E
SIGHT
GLASS
40RU
Single Circuit Coil Piping Configuration - RU*07, 08
For single compressor condensing units.
LEGEND:
TXV – Thermostatic Expansion Valve
NOTE: Component location arrangemetshown for field installation of
sight glasses, solenoid valves, filter driers, and TXV sensing bulbs.
The TXVs and equilizer lines are factory installed.
Fig. 9 -- Face--Split Coil Suction and Liquid Line Piping (Typical)
Dual Circuit Coil Piping Configuration - RU*12-16
For single compressor condensing units
C10687
FIRST ON/LAST OFF = B
VERTICAL INSTALLATION
FIRST ON/LAST OFF = A
HORIZONTAL INSTA LLATION
Fig. 10 -- Typical Evaporator Coil Connections (40RU)
LEGEND
TXV — Thermostatic Expansion Valve
NOTE: The 8 o’clock position is shown above.
C10689
Fig. 11 -- TXV Sensing Bulb Location
C10688
14
Page 15
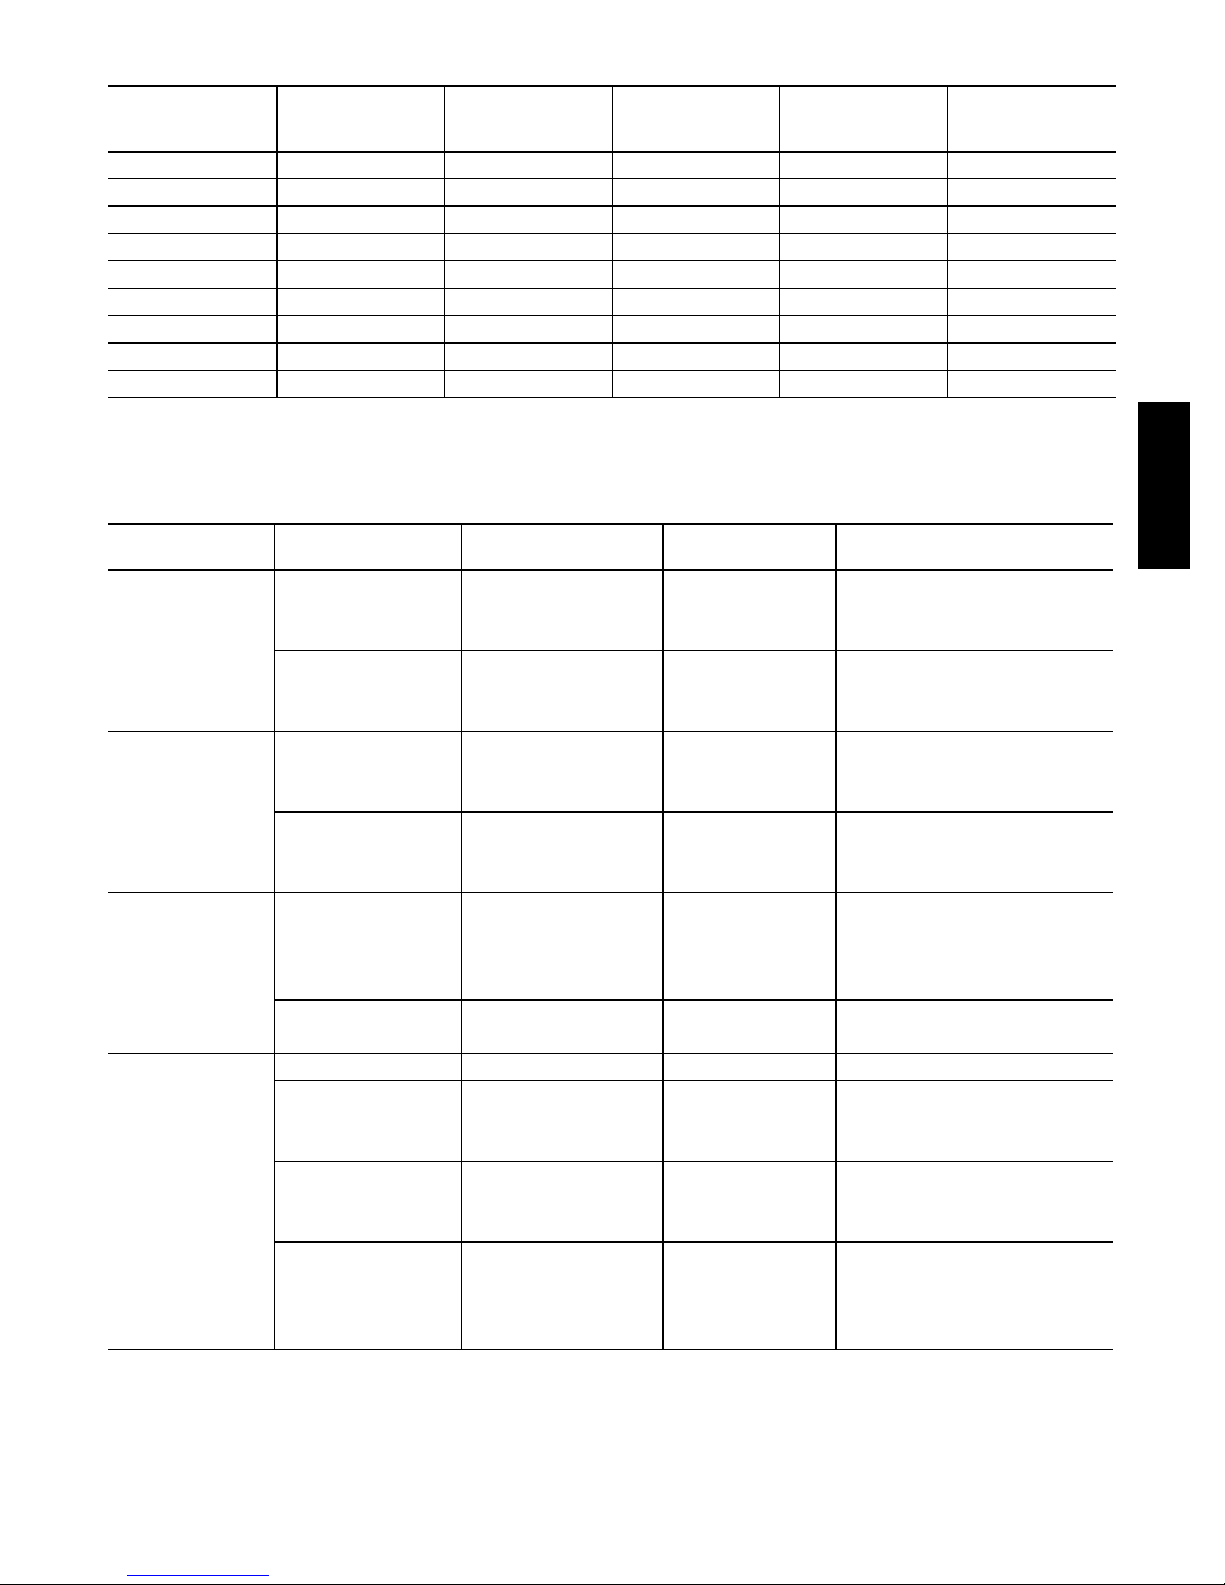
Table 2 – Factory--Installed Nozzle and Distributor Data
UNIT
COIL TYPE
STD
TXV
Qty...Part No.
DISTRIBUTOR
Qty...Part No.
PER DISTRIBUTOR
40RUA*07 4Row 1. . . B B IZ E --- 5 --- G A 1...1135 12...1/
40RUQ*07 3Row 1 . . . B B I Z E --- 5 --- G A 1...1136 15...1/
40RUA*08 4Row 1. . . B B IZ E --- 6 --- G A 1...1136 15...1/
40RUQ*08 4Row 1 . . . B B I Z E --- 8 --- G A 1...1113 12...3/
40RUA*12 4Row 2. . . B B IZ E --- 4 --- G A 2...1135 ă9...1/
40RUQ*12 4Row 2 . . . B B I Z E --- 5 --- G A 2...1113 9...3/
40RUQ*16 4Row 2 . . . B B I Z E --- 8 --- G A 2...1113 10...3/
40RUA*14 4Row 2. . . B B IZ E --- 5 --- G A 2...1113 12...3/
40RUA*16 4Row 2. . . B B IZ E --- 6 --- G A 2...1136 16...3/
{
Feeder tube size is1/4in. (6.35 mm).
NOTE: Hot gas bypass applications require field --- supplied auxiliary side connector .
Table 3 – Fitting Requirements
UNIT
ACCESS
HOLE NO.
}
1 Suction —
40RUA*07
40RUQ*07
3 Liquid —
1 Suction —
40RUA*08
40RUQ*08
3 Liquid —
4 Return —
40RUS*08
40RUS*12
5 Supply —
1 Suction Lower (2) 11/8Street Elbow
2 Liquid Lower
40RUA*12
3 Liquid Upper
4 Suction Upper
}
See Fig. 8 for access hole location by number.
†
Fittings are listed in order from header or tee stub connection out to access hole in corner support post.
CONNECTION
TYPE
CIRCUIT
FEEDER TUBES
Qty...Size (in.)
4
4
4
16
4
16
16
16
16
11/8Street Elbow
11/8Nipple, 105/8L
11/8Long Radius Elbow
5
/8Street Elbow
5
/8Nipple, 85/8L
5
/8Long Radius Elbow
11/8Street Elbow
11/8Nipple, 85/8L
11/8Long Radius Elbow
5
/8Street Elbow
5
/8Nipple, 85/8L
5
/8Long Radius Elbow
13/8Nipple, 43/8L
13/8Long Radius Elbow
13/8Nipple, 73/8L
13/8Long Radius Elbow
13/8Nipple, 65/8L
13/8Long Radius Elbow
5
/8Street Elbow
5
/8Nipple, 81/2L
5
/8Long Radius Elbow
5
/8Street Elbow
5
/8Nipple, 131/2L
5
/8Long Radius Elbow
11/8Nipple, 53/4L
11/8Long Radius Elbow
11/8Nipple, 12 L
11/8Long Radius Elbow
{
NOZZLE
Qty...Part No.
1...G4
1...G5
1...G5
1...G5
2...G3
2...G3
2...G5
2...G3
2...G4
FITTINGS REQUIRED
(in.)
40RU
†
15
Page 16
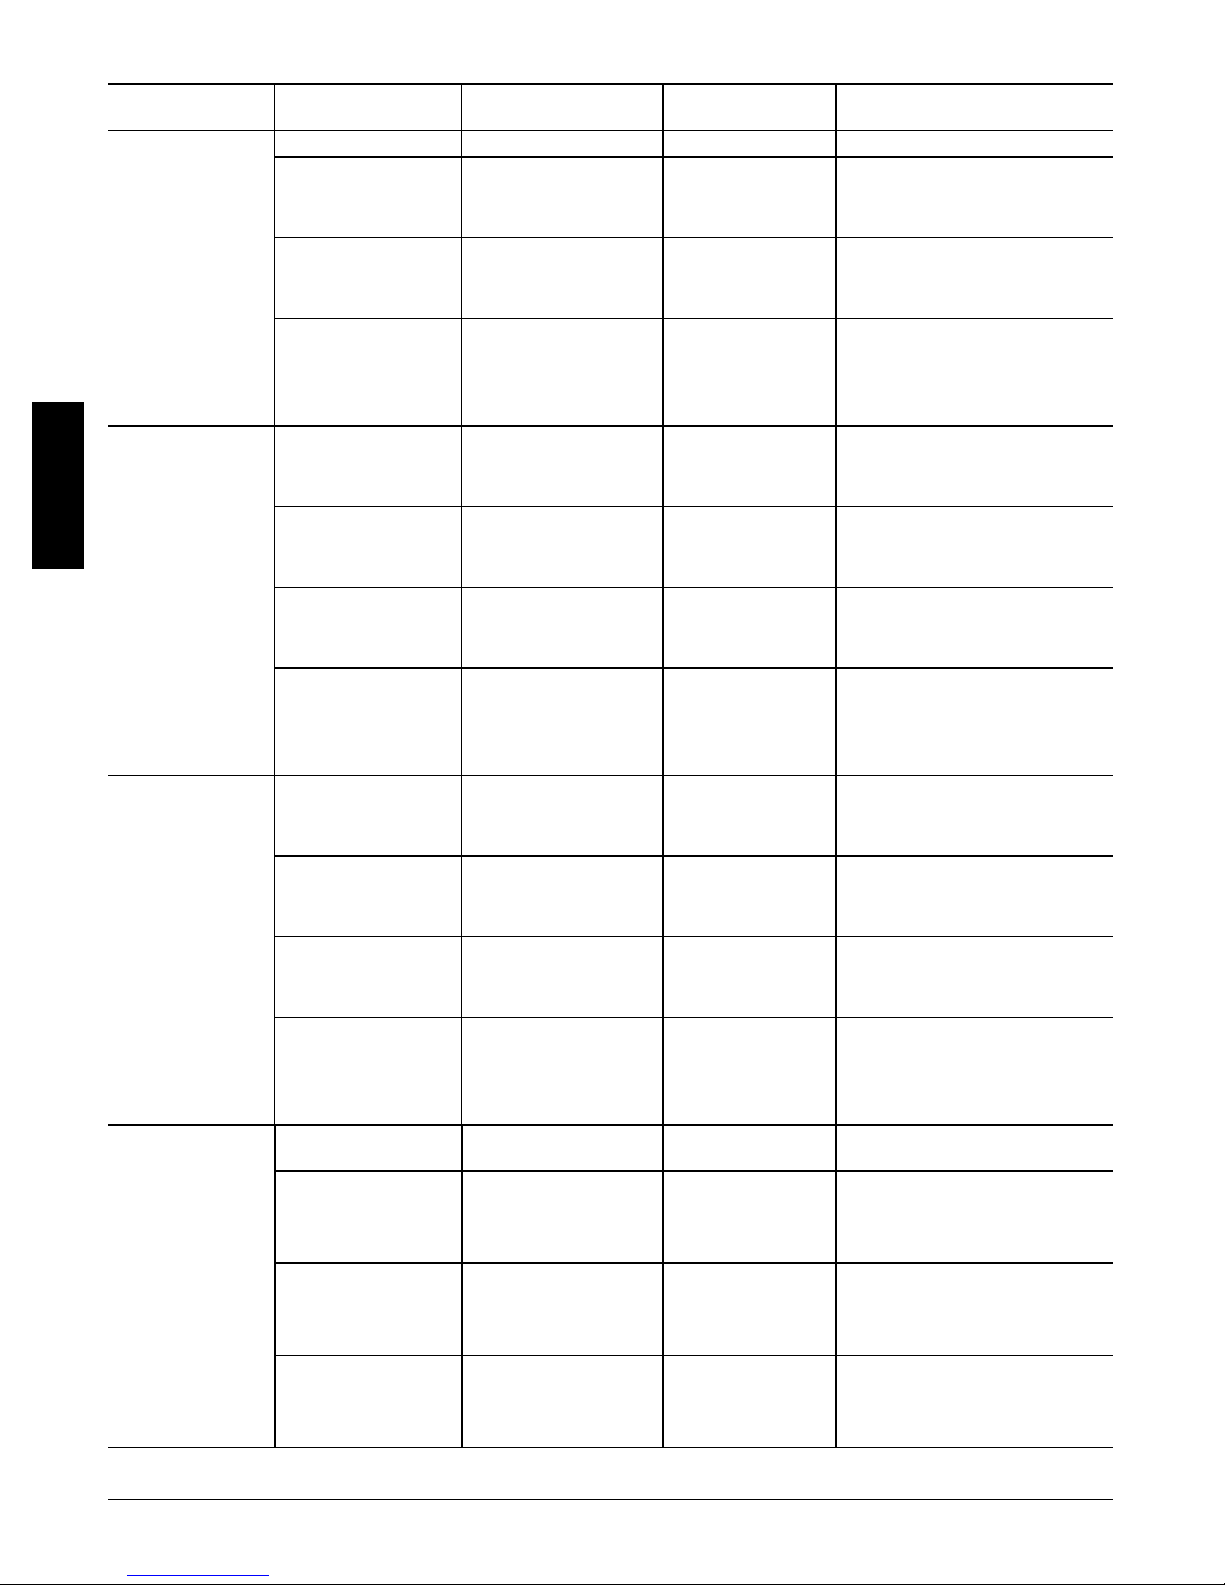
Table 3 -- Fitting Requirement (cont)
40RU
UNIT
ACCESS
HOLE NO.
}
CONNECTION
TYPE
CIRCUIT
1 Suction Lower
2 Liquid Lower
40RUQ*12
3 Liquid Upper
4 Suction Upper
1 Suction Lower
2 Liquid Lower
40RUA*14
3 Liquid Upper
4 Suction Upper
1 Suction Lower
2 Liquid Lower
40RUA*16
3 Liquid Upper
4 Suction Upper
3 Suction Lower
5 Suction Lower
40RUQ*16
6 Liquid Upper
7 Suction Upper
}
See Fig. 8 for access hole location by number.
†
Fittings are listed in order from header or tee stub connection out to access hole in corner support post.
FITTINGS REQUIRED
(in.)
(2) 11/8Street Elbow
5
/8Street Elbow
5
/8Nipple, 51/2L
5
/8Long Radius Elbow
5
/8Street Elbow
5
/8Nipple, 101/2L
5
/8Long Radius Elbow
11/8Nipple, 55/8L
11/8Long Radius Elbow
11/8Nipple, 12 L
11/8Long Radius Elbow
11/8Street Elbow
11/8Nipple, 75/8L
11/8Long Radius Elbow
5
/8Street Elbow
5
/8Nipple, 17/16L
5
/8Long Radius Elbow
5
/8Street Elbow
5
/8Nipple, 111/2L
5
/8Long Radius Elbow
11/8Nipple, 55/8L
11/8Long Radius Elbow
11/8Nipple, 13 L
11/8Long Radius Elbow
11/8Street Elbow
11/8Nipple, 723/4L
11/8Long Radius Elbow
5
/8Street Elbow
5
/8Nipple, 13/8L
5
/8Long Radius Elbow
5
/8Street Elbow
5
/8Nipple, 111/2L
5
/8Long Radius Elbow
11/8Nipple, 55/8L
11/8Long Radius Elbow
11/8Nipple, 13 L
11/8Long Radius Elbow
11/8Nipple, 3 L
11/8Long Radius Elbow
5
/8Nipple, 27/8L
5
/845_ Elbow
5
/8Nipple, 15/8L
5
/8Long Radius Elbow
5
/8Nipple, 27/8L
5
/845_ Elbow
5
/8Nipple, 41/4L
5
/8Long Radius Elbow
11/8Nipple, 5 L
11/845_ Elbow
11/8Nipple, 83/4L
11/8Long Radius Elbow
†
16
Page 17
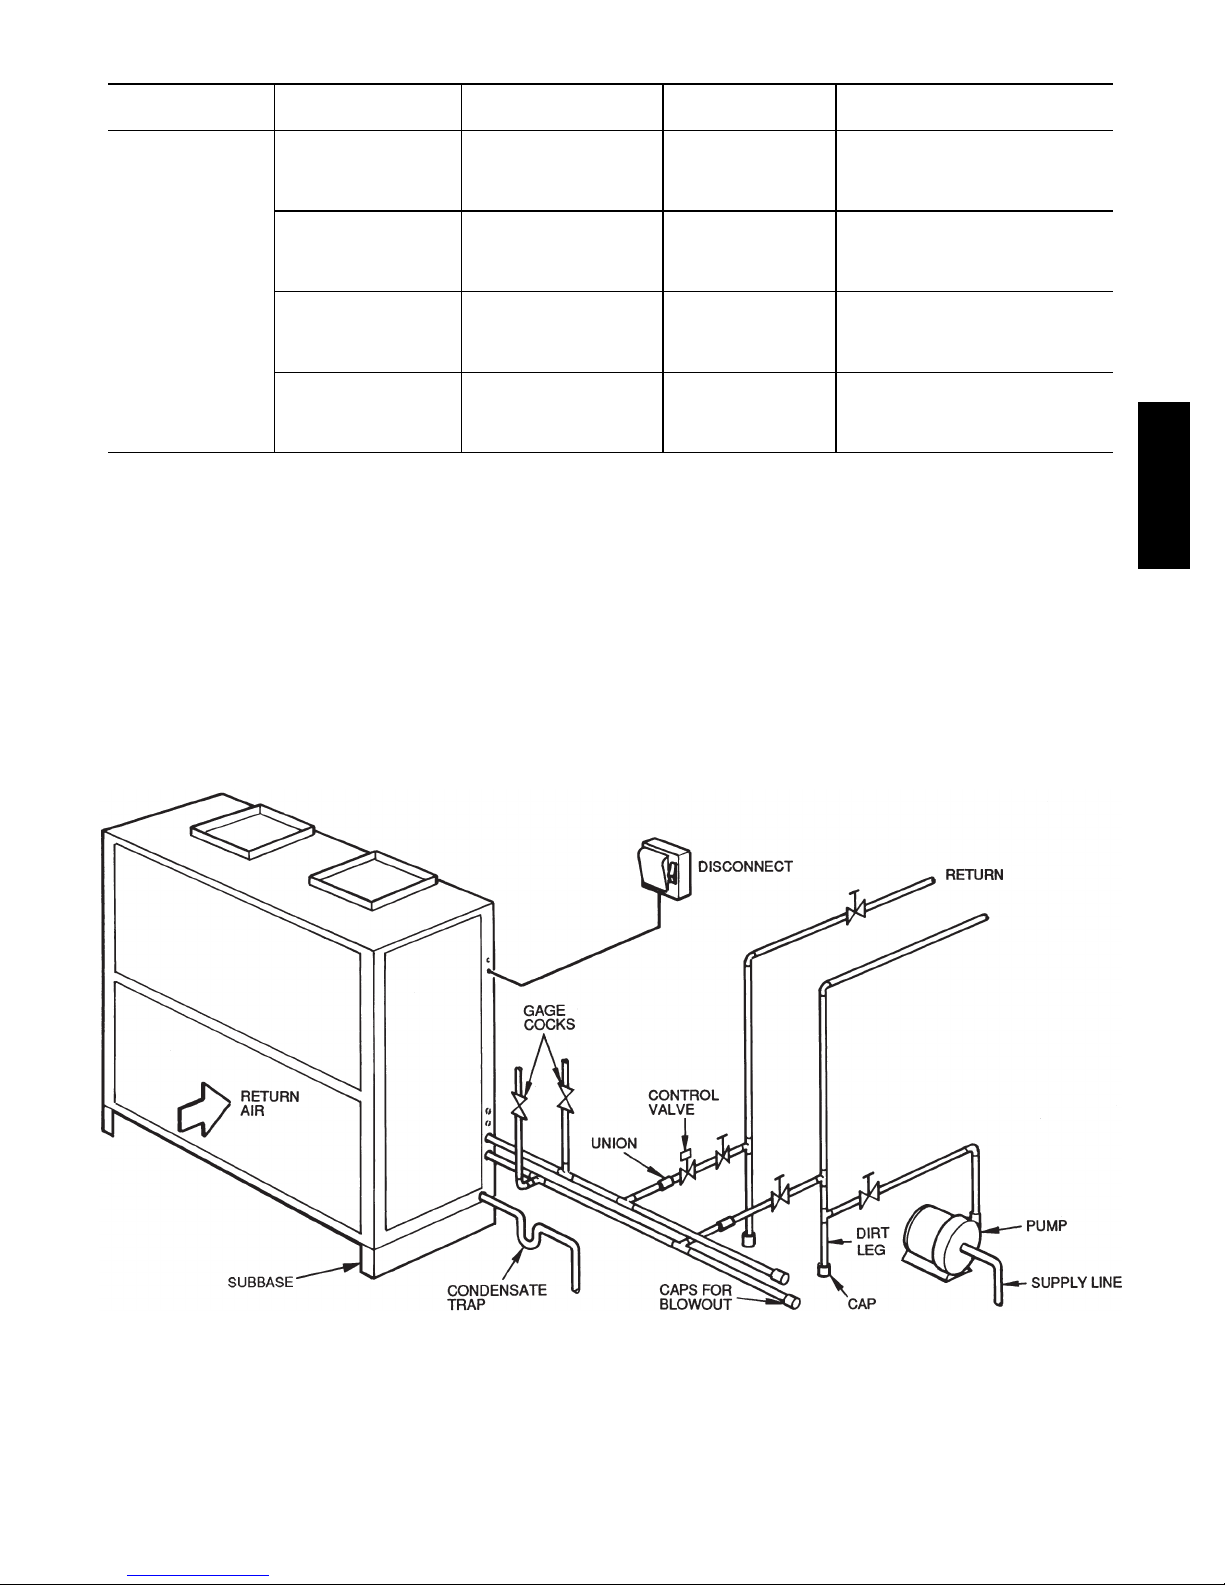
Table 3 -- Fitting Requirement (cont)
UNIT
40RUS*14
40RUS*16
}
See Fig. 8 for access hole location by number.
†
Fittings are listed in order from header or tee stub connection out to access hole in corner support post.
ACCESS
HOLE NO.
}
4 Supply Lower
5 Return Lower
6 Return Upper
7 Supply Upper
Chilled Water Piping -- See Tables 1E and 1F for chilled
water connection sizes. For ease in brazing, it it
recommended that all internal solder joints be made
before unit is placed in final position.
Knockouts are provided in the unit corner posts for
40RUS refrigerant piping. Additional field--fabricated
access holes are required for 40RUS chilled water piping.
See Fig. 8, which lists recommended knockouts and
access holes to use for each 40RUS unit size.
CONNECTION
TYPE
To size, design, and install chilled water piping, consult
the Carrier System Design manual. See Fig. 12 for an
example of a typical installation. Recommended fittings
are listed in Table 3.
To access 40RUS coil vents and drains, remove the unit
side panel over the coil header. Vent and drain plugs are
on the top and bottom of header, respectively. See the
Service section for information on preventing coil
freeze--up during winter.
CIRCUIT
FITTINGS REQUIRED
(in.)
13/8Long Radius Elbow
13/8Nipple, 33/4L
13/8Long Radius Elbow
13/8Long Radius Elbow
13/8Nipple, 33/8L
13/8Long Radius Elbow
13/8Long Radius Elbow
13/8Nipple, 7 L
13/8Long Radius Elbow
13/8Long Radius Elbow
13/8Nipple, 113/4L
13/8Long Radius Elbow
†
40RU
Fig. 12 -- Typical 40RUS Chilled Water Piping
C10690
17
Page 18
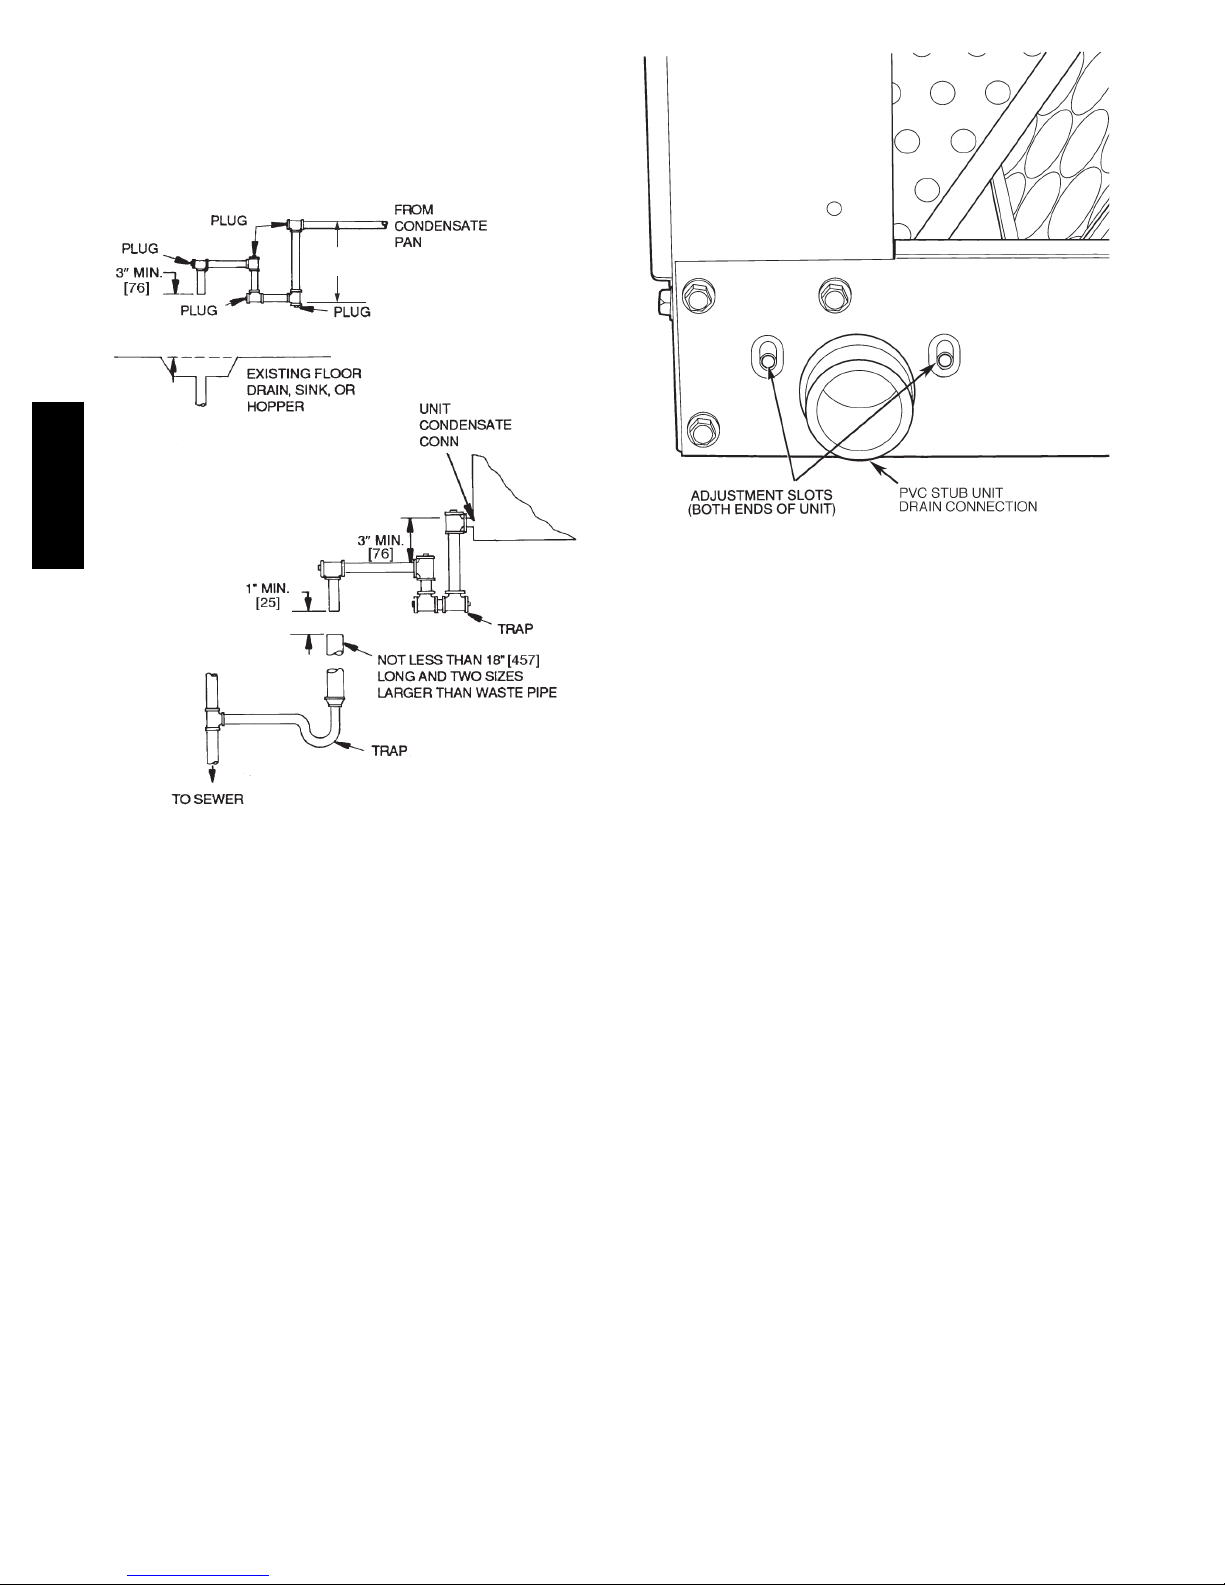
Condensate Drain — Install a trapped condensate drain
line to unit connection as shown in Fig. 13. The unit drain
connection is a PVC stub. See Fig. 14. Some areas may
require an adapter to connect to either galvanized steel or
copper pipe. For these applications, install a
field--supplied threaded PVC adapter.
3” MIN.
[76]
40RU
NOTE: Dimensions in [ ] are in millimeters
Fig. 13 -- Condensate Drains
C10691
C10692
Fig. 14 -- Drain Pan Slope Adjustment
As shipped, the unit’s condensate drain pan is NOT sloped
towards the drain connection. The pan slope must be
changed to pitch towards the side of the unit with the
drain connection. See Fig. 14. Loosen the 2 screws next to
the drain outlet at both ends of the unit, push drain pan
down in the slots near the drain connection, and up in the
slots on the opposite end. Re--tighten screws. The pan
1
should have a pitch of at least
/4--in. over its length
toward the drain connection.
Fan Motor and Drives -- Motor and drive packages are
factory installed in all units. The motor and drive
packages consist of the following items:
NOTE: A trap must be installed in the condensate drain
line to ensure that the static pressure of fans is balanced with
the water column in the drain line and that condensate can
drain completely from pan. Without a trap, air can be drawn
up drain line until water level in condensate pan becomes
equal to static pressure created by fans, preventing complete
drainage. Conditions will worsen as filters become dirty.
Install clean--out plugs in trap. Pitch drain line downward
to an open floor drain or sump. Provide service clearance
around drain line to permit removal of unit panels.
Observe all local sanitary codes.
1 — fan motor
1 — adjustable motor pulley
1—fanpulley
1—fanbelt
(40RUA*07--12, 40RUQ*07--12, 40RUS*08--12 units)
2 — matched fan belts
(40RUA*14--16, 40RUQ*16, 40RUS*14--16 units)
For instructions on changing fan rotation, changing drive
speeds and adjusting drives, see Pulley and Drive
Adjustment in the Service section.
18
Page 19
Power Supply and Wiring -- Check the unit data plate to
A
ensure that available power supply matches electrical
characteristics of the unit. Provide a disconnect switch
with an integrated lock--out feature of size required to
provide adequate fan motor starting current. See Tables
4--6 for unit electrical data.
!
WARNING
ELECTRICAL SHOCK HAZARD
Failure to follow this warning could result in personal
injury or death.
Do not use gas piping as an electrical ground. Unit
cabinet must have an uninterrupted, unbroken electrical
ground to minimize the possibility of personal injury if
an electrical fault should occur. This ground may consist
of electrical wire connected to unit ground lug in control
compartment, or conduit approved for electrical ground
when installed in accordance with NEC (National
Electrical Code); ANSI/NFPA 70, latest edition (in
Canada, Canadian Electrical Code CSA [Canadian
Standards Association] C22.1), and local electrical
codes.
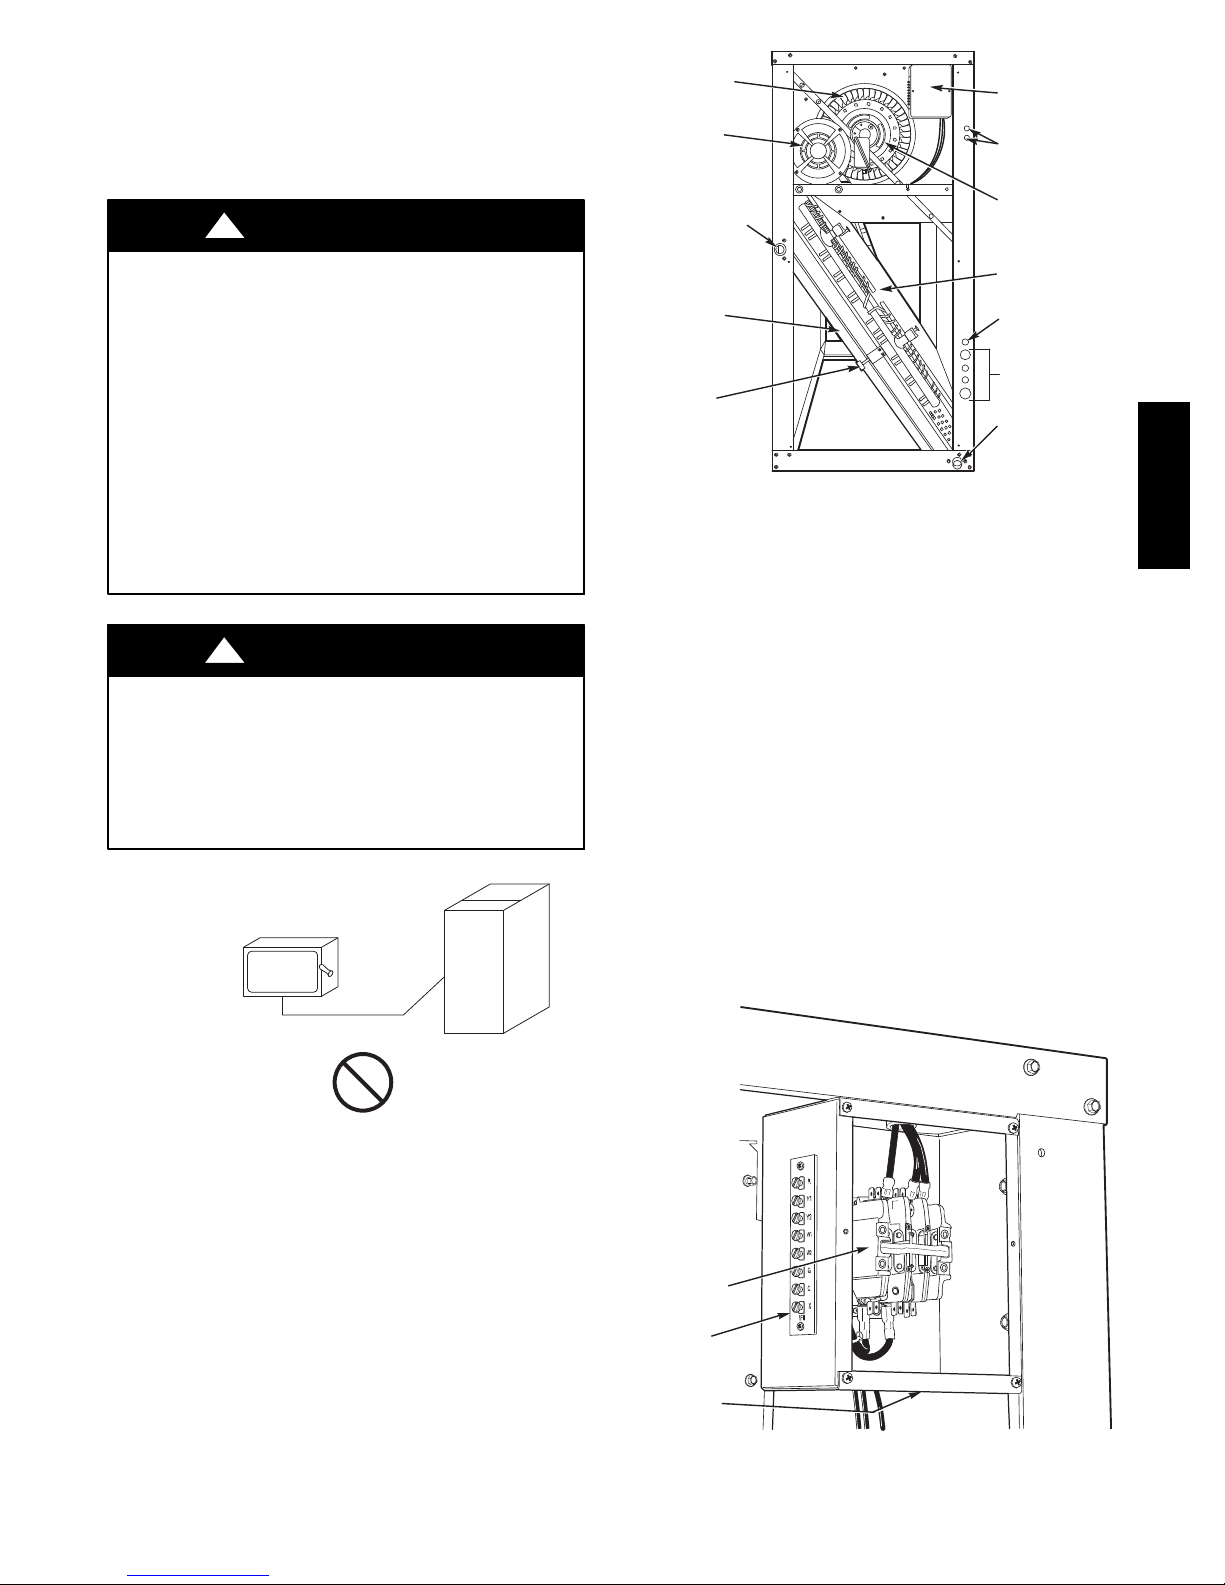
FAN SCROLL
MOTOR
ND DRIVE
CONDENSATE
DRAIN
CONNECTION
(HORIZONTAL)
FILTER
ELEMENTS
FILTER
RETAINER
CLIP
FAN
CONTACTOR
BOX
WIRE
ACCESS
FAN DRIVE
PULLEY
COIL
TXV BULB
ACCESS
REFRIGERANT
PIPING ACCESS
CONDENSATE
DRAIN
CONNNECTION
(VERTICAL)
TXV — Thermostatic Expansion Valve
LEGEND
Fig. 16 -- Wiring and Service Access
(Side Panel Removed)
40RU
C10693
!
WARNING
460--v, 3--ph, 60 Hz operation can be field--converted to
208/230--v, 3--ph, 60 Hz operation. Rewire the motor
The 40RU size 07--16 units that have motors wired for
FIRE HAZARD
Failure to follow this warning could result in intermittent
operation or performance satisfaction.
Do not connect aluminum wire between disconnect
switch and fan coil unit. Use only copper wire.
(See Fig. 15)
according to the diagram plate on the motor. After
reconfiguring the motor, mark the motor specifying 208--v or
230--v operation replacing the 460--v sticker information on
the units’ corner post.
Fan motors are factory--installed on all units. Indoor--fan
contactors are located in the fan contactor box behind the
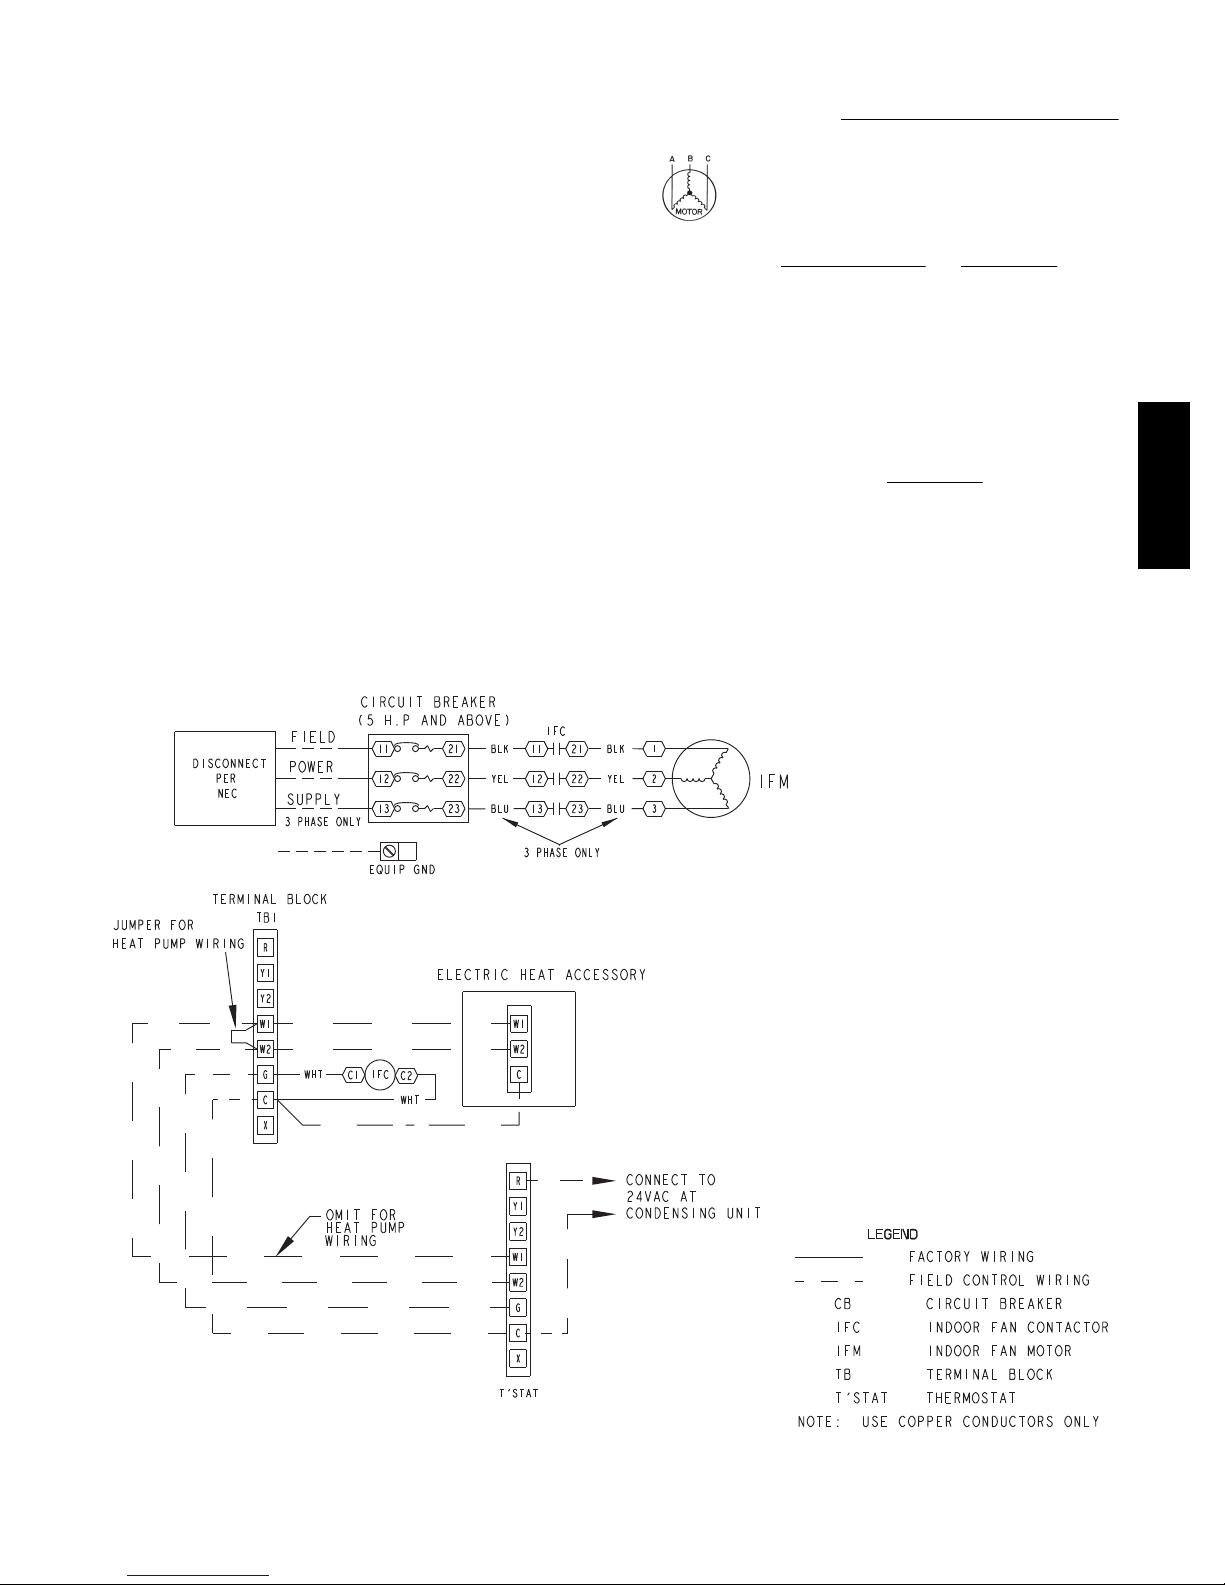
side access panel (see Fig. 16 and 17). Wire the thermostat
to the 24--v control circuit terminal block located in the
side of the fan contactor control box, according to Fig. 18
or the unit label diagram. If the air handler is part of a
ELECTRIC
DISCONNECT
SWITCH
COPPER
WIRE ONLY
ALUMINUM
WIRE
A93033
Fig. 15 -- Disconnect Switch and Unit
Install disconnect switch and power wiring in accordance
with all applicable local codes. See Fig. 15--17 and the
split system, complete the wiring from the condensing
unit to the thermostat shown in Fig. 18.
A
J
VR
00
6
C
°
5
0
1
23
22
21
W
unit label diagram. For units with motor sizes less than 5
Hp (3.7 kW), connect power wiring to unit with no. 10
ring terminal. For units with motor sizes of 5 Hp (3.7 kW)
1
or more, connect power wiring with
/4--in. ring terminal.
FAN
CONTACTOR
24V
TERMINAL
BLOCK
POWER
WIRING
KNOCKOUT
3
1
2
1
1
1
C10694
Fig. 17 -- Fan Contactor Box and Terminal Block
(Cover Removed) (Typical)
19
Page 20
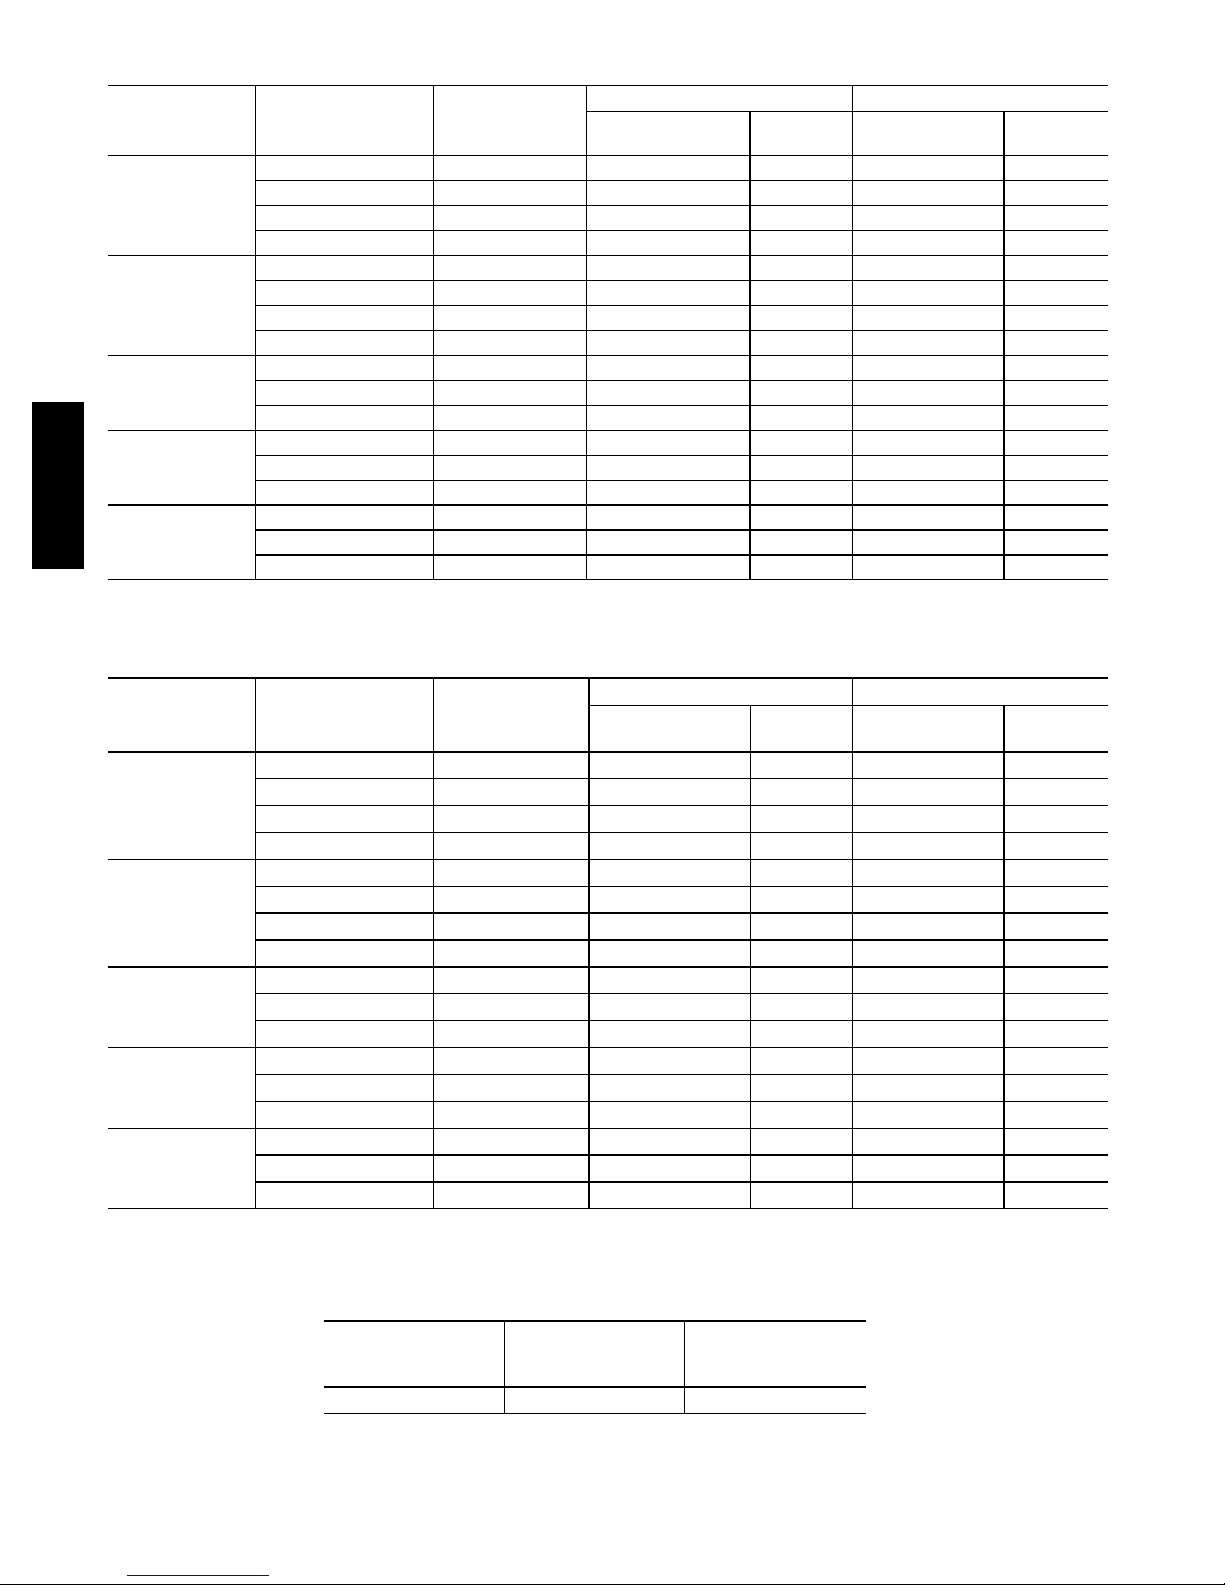
Table 4 – Electrical Data, Standard Motors
40RU
UNIT V --- P H --- H z
208/230--- 1--- 60 187--- 253 1.3 (0.97) 7.6 9.5 15
40RUA*07
40RUQ
*07
40RUA*08
40RUQ
*08
40RUS
*08
40RUA*12
40RUQ
*12
40RUS
*12
40RUA*14
40RUS
*14
40RUA*16
40RUQ
*16
40RUS
*16
See Legend and Notes on page 21.
208/230--- 3--- 60 187--- 253 2.4 (1.79) 5.8 7.3 15
4 6 0 --- 3 --- 6 0 414 ---506 2.4 (1.79) 2.6 3.3 15
5 7 5 --- 3 --- 6 0 518 ---632 1.0 (0.75) 1.4 1.7 15
208/230--- 1--- 60 187--- 253 2.4 (1.79) 11.0 13.8 20
208/230--- 3--- 60 187--- 253 2.4 (1.79) 5.8 7.3 15
4 6 0 --- 3 --- 6 0 414 ---506 2.4 (1.79) 2.6 3.3 15
5 7 5 --- 3 --- 6 0 518 ---632 2.0 (1.49) 2.4 8.0 15
208/230--- 3--- 60 187--- 253 2.4 (1.79) 5.8 7.5 15
4 6 0 --- 3 --- 6 0 414 ---506 2.4 (1.79) 2.6 3.3 15
5 7 5 --- 3 --- 6 0 518 ---632 2.0 (1.49) 2.4 3.0 15
208/230--- 3--- 60 187--- 253 2.4 (1.79) 5.8 7.5 15
4 6 0 --- 3 --- 6 0 414 ---506 2.4 (1.79) 2.6 3.3 15
5 7 5 --- 3 --- 6 0 518 ---632 3.0 (2.24) 3.8 4.8 15
208/230--- 3--- 60 187--- 253 3.7 (2.76) 10.6 13.3 20
4 6 0 --- 3 --- 6 0 414 ---506 3.7 (2.76) 4.6 6.0 15
5 7 5 --- 3 --- 6 0 518 ---632 3.0 (2.24) 3.8 4.8 15
{
VOLTAGE
LIMITS
FAN MOTOR POWER SUPPLY
Hp (kW) FLA
Table 5 – Electrical Data, Alternate Motors
Minimum
Circuit Amps
MOCP
UNIT V --- P H --- H z
208/230--- 1--- 60 187--- 253 2.4 (1.79) 11.0/11.0 13.8/13.8 20
40RUA*07
40RUQ
*07
40RUA*08
40RUQ
*08
40RUS
*08
40RUA*12
40RUQ
*12
40RUS
*12
40RUA*14
40RUS
*14
40RUA*16
40RUQ
*16
40RUS
*16
See Legend and Notes on page 21.
208/230--- 3--- 60 187--- 253 2.9 (2.16) 7.5 9.4 15
4 6 0 --- 3 --- 6 0 414 -- -506 2.9 (2.16) 3.4 4.3 15
5 7 5 --- 3 --- 6 0 518 -- -632 2.0 (1.49) 2.4 3.0 15
208/230--- 1--- 60 187--- 253 2.4 (1.79) 11.0 13.8 15
208/230--- 3--- 60 187--- 253 2.9 (2.16) 7.5/7.5 9.4/9.4 15
4 6 0 --- 3 --- 6 0 414 -- -506 2.9 (2.16) 3.4 4.3 15
5 7 5 --- 3 --- 6 0 518 -- -632 3.0 (2.24) 3.8 4.8 15
208/230--- 3--- 60 187--- 253 3.7 (2.76) 10.5/10.5 13.3/13.3 20
4 6 0 --- 3 --- 6 0 414 -- -506 3.7 (2.76) 4.8 6.0 15
5 7 5 --- 3 --- 6 0 518 -- -632 3.0 (2.24) 3.8 4.8 15
208/230--- 3--- 60 187--- 253 3.7 (2.76) 10.2 12.7 20
4 6 0 --- 3 --- 6 0 414 -- -506 3.7 (2.76) 4.8 6.0 15
5 7 5 --- 3 --- 6 0 518 -- -632 5.0 (3.73) 5.1 6.4 15
208/230--- 3--- 60 187--- 253 5.0 (3.73) 14.6/12.8 18.3/16.0 30/25
4 6 0 --- 3 --- 6 0 414 -- -506 5.0 (3.73) 6.4 8.0 15
5 7 5 --- 3 --- 6 0 518 -- -632 5.0 (3.73) 5.1 6.4 15
{
VOLTAGE
LIMITS
FAN MOTOR POWER SUPPLY
Hp (kW) FLA
Minimum
Circuit Amps
MOCP
UNIT
40RU*
07, 08, 12, 14, 16 24 10
Table 6 – Fan Contactor Coil Data
VOLTAGE
(vac)
20
MAXIMUM
HOLDING
VA
Page 21
Legend and Notes for Tables 4 and 5
LEGEND:
F L A --- F u l l L o a d A m p s
MOCP --- Maximum Overcurrent Protection
{
Motors are designed for satisfactory operation within 10% of
normal voltage shown. Voltages should not exceed the limits
shown in the Voltage Limits column.
NOTES:
1. Minimum circuit amps (MCA) and MOCP values are calculated in accordance with The NEC. Article 440.
2. Motor FLA values are established in accordance with Underwriters’ Laboratories (UL). Standard 1995.
3. Unbalanced 3-Phase Supply Voltage
Never operate a motor where a phase imbalance in supply
voltage is greater than 2%. Use the formula in the example
(see column to the right) to determine the percentage of voltage imbalance.
4. Installation with Accessory Electric Heaters
Size the Field Power Wiring between the heater TB1 and the
40RU indoor fan motor per NEC Article 430 ---28 (1) or (2)
(depends on length of conduit between heater enclosure and
40RU power entry location). Install wires in field ---installed
conduit.
Example: Supply voltage is 230-3-60
% Voltage Imbalance = 100 x
max voltage deviation from average voltage
average voltage
AB = 393 v
BC = 403 v
AC = 396 v
Average Voltage =
(393 + 403 + 396)
3
= 397
1192
=
3
Determine maximum deviation from average voltage.
(AB) 397 – 393 = 4 v
(BC) 403 – 397 = 6 v
(AC) 397 – 396 = 1 v
Maximum deviation is 4 v.
Determine p ercent of voltage imbalance.
% Voltage Imbalance = 100 x
=1.5%
6
397
This amount of phase imbalance is satisfactory as it is below the
maximum allowable 2%.
IMPORTANT: If the supply voltage phase imbalance is more than
2%, contact your local electric utility company immediately.
40RU
C10695
Fig. 18 -- Unit Wiring
21
Page 22
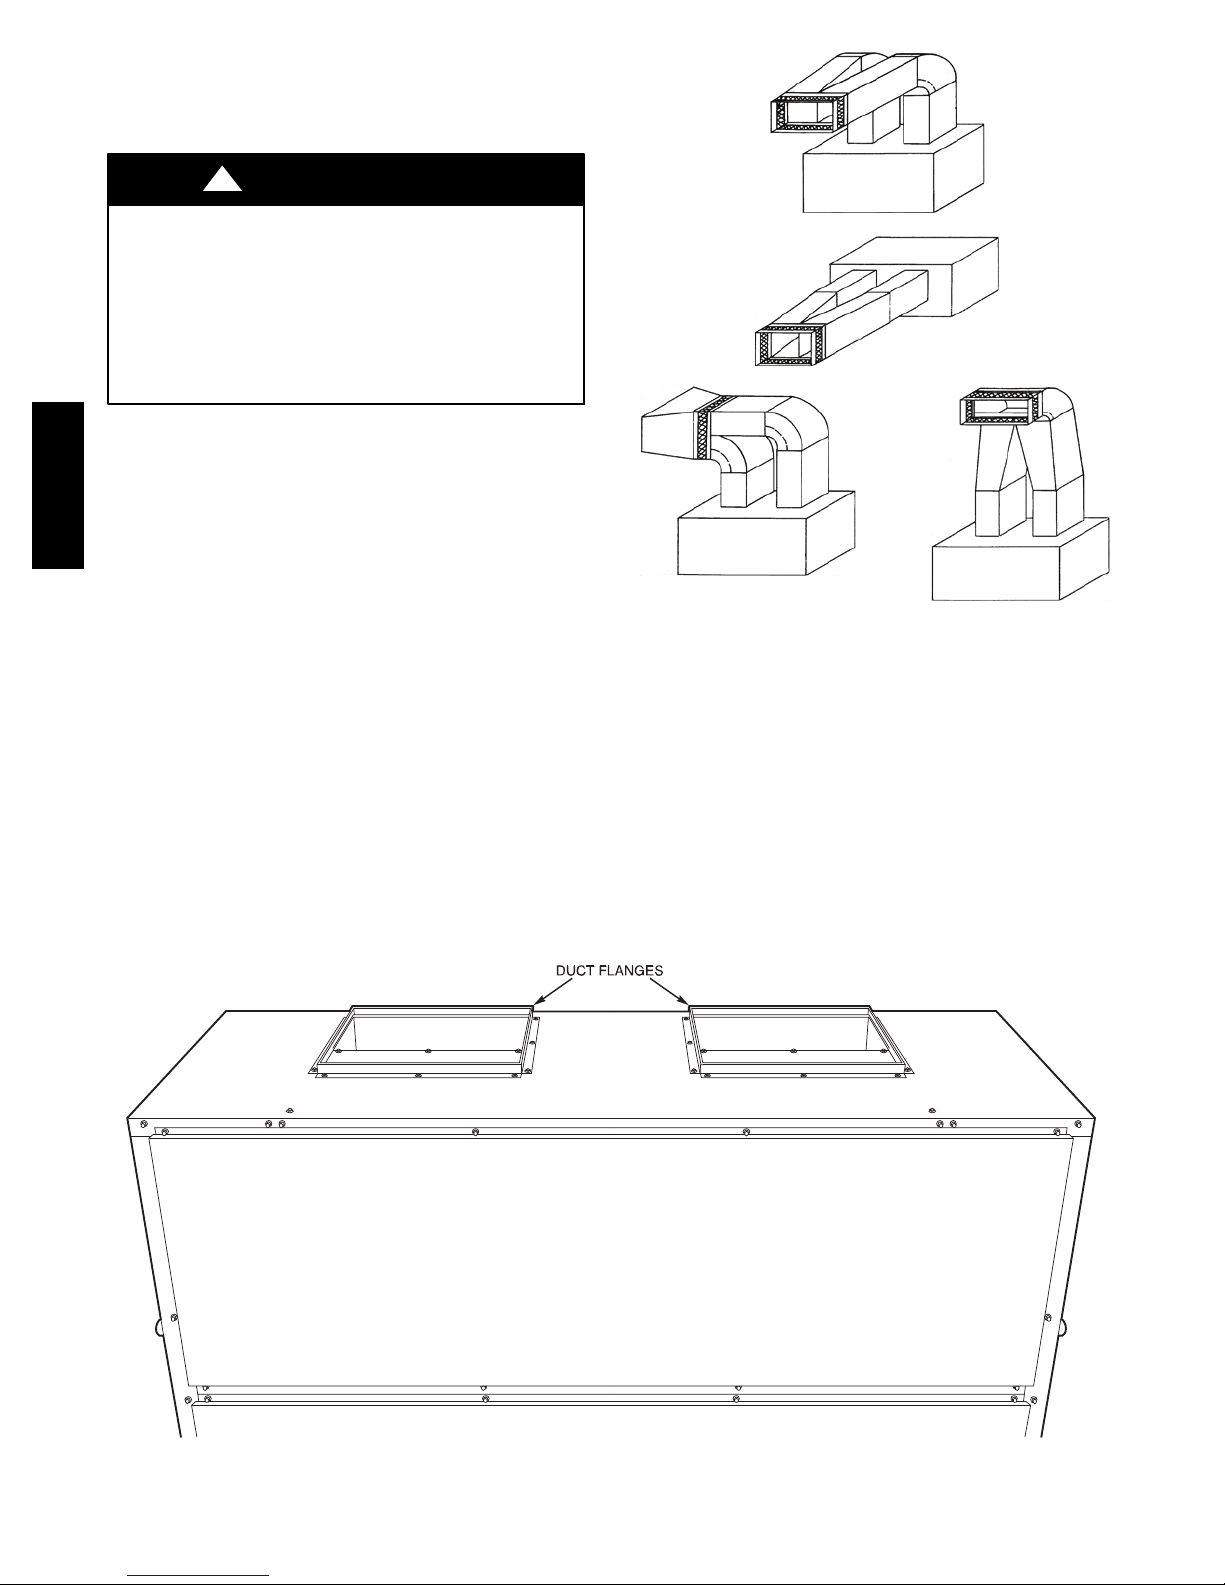
Connecting Ductwork -- Refer to the Carrier System
Design Manual for the recommended design and layout of
ductwork. Fig. 19 shows recommended duct connection to
units with 2 fans.
!
CAUTION
UNIT OPERATION HAZARD
Failure to follow this caution could cause equipment
damage.
Do not operate unit without ductwork or discharge
plenum unless fan speed has been adjusted for
external static pressure of zero in. wg. Failure to do so
may result in motor overload.
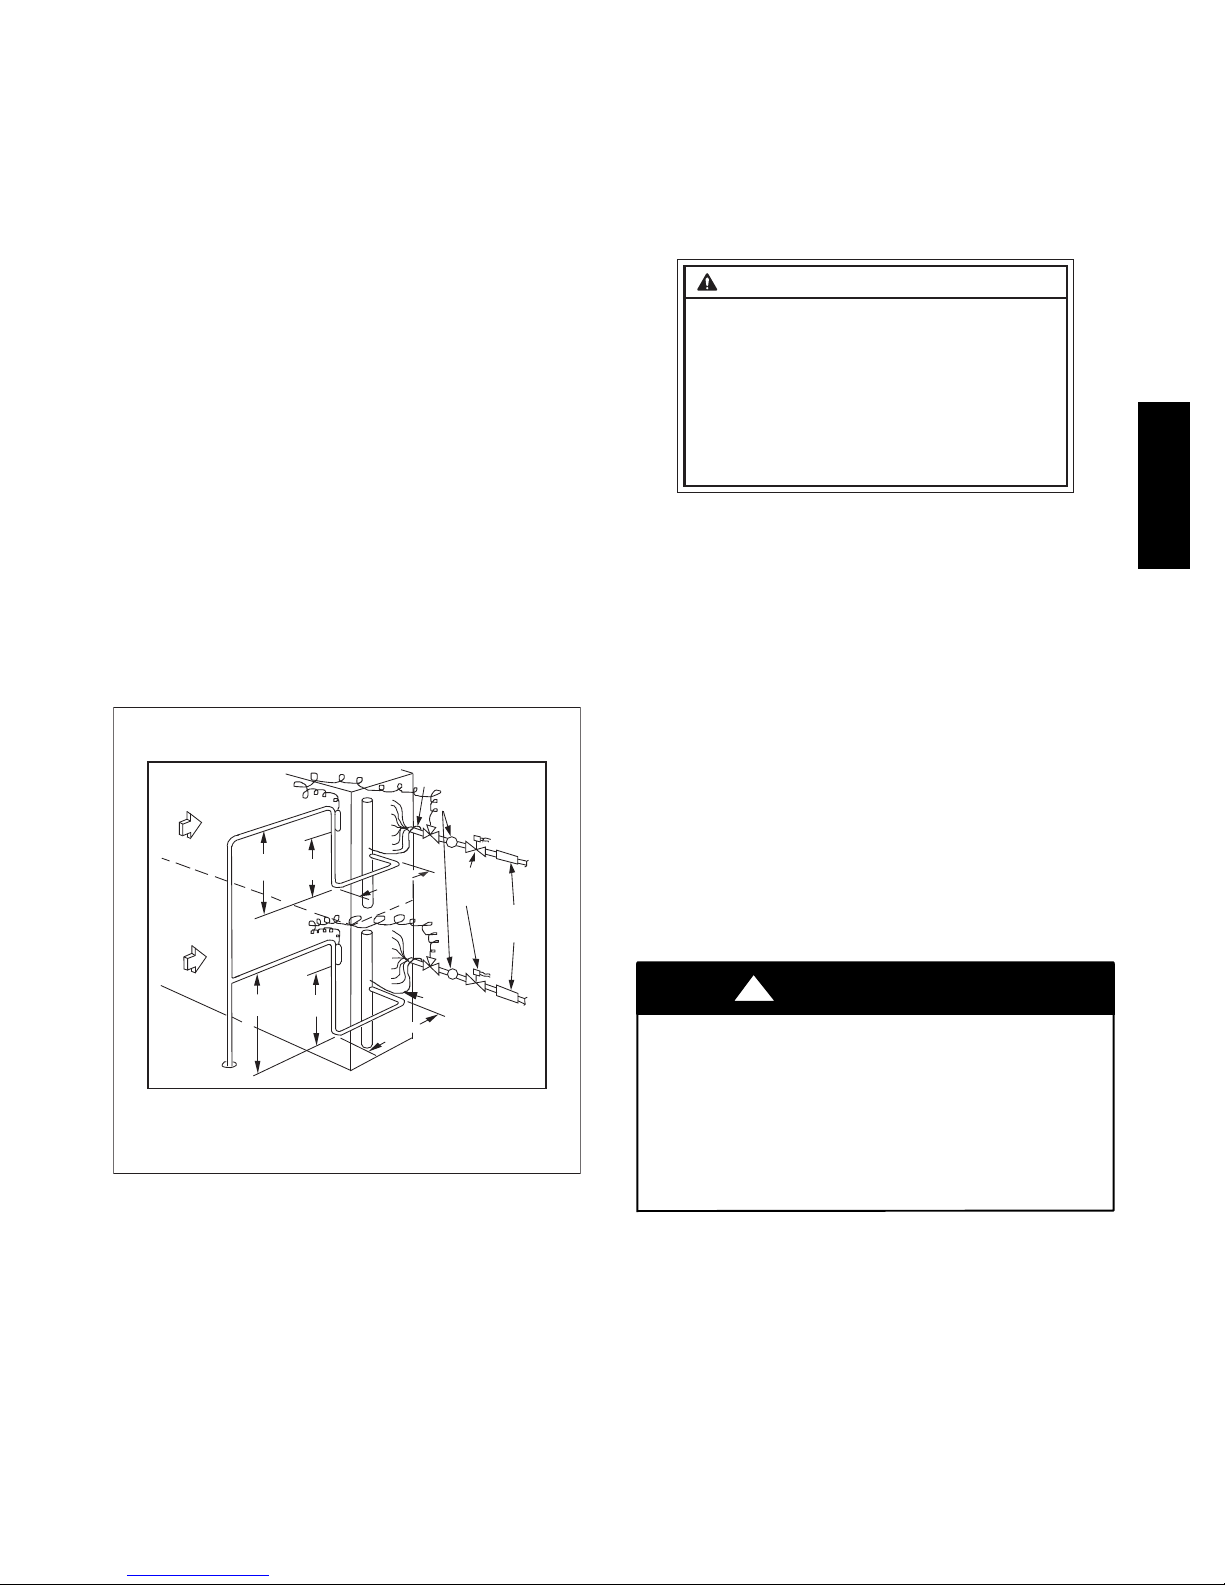
DISCHARGE CONNECTIONS — Duct flanges are
factory--supplied; they are shipped inside the unit attached to
the hairpin end of the coil tube sheet for field installation.
40RU
Using the existing screws, install the duct flanges on the
unit’s fan deck. Each fan discharge requires 2 flanges; each
flange must be bent in the middle to conform to the
discharge opening. See Fig. 20. After flanges are installed,
connect them to the supply duct using a canvas connection
to prevent vibration. It is important that this connection be
properly fabricated to prevent high air friction losses and air
noise.
C10696
Fig. 19 -- Typical Fan Discharge Connections
for Multiple Fan Units
RETURN CONNECTIONS — When using return--air
ductwork, route return--air duct to the unit’s return air inlet
near the filter rack, using a canvas connection to prevent
transmission of unit vibration. If the duct blocks off the
unit’s access panel, provide a slip joint in the ductwork to
permit removal for servicing.
OUTDOOR--AIR INLET CONNECTIONS — Connect
outdoor--air inlet to field--installed accessory economizer.
Refer to Economizer Installation Instructions.
Return--Air Filters -- Type and size of filters are shown in
Tables 1A – 1F and are factory--supplied and
factory--installed. In all units with 2 fans, a filter replacement
tool (hook) is shipped inside the unit for field use when
replacing filters. See the Service section for instructions on
filter element replacement.
C10697
Fig. 20 -- Duct Flange Installation
22
Page 23
START--UP
Before starting unit, check the following and correct as
necessary:
S Is unit solidly supported?
S Is fan adjusted for speed and pulley alignment?
S Are pulleys, motor, and bearings securely mounted?
S Are there any loose parts that will rattle or vibrate?
S Is condensate drain pan pitched for correct drainage?
S Are coil baffle plates tight against coil to prevent air
bypass?
S Are all panels securely fastened?
S Are all electrical connections correct and tight?
40RUA and 40RUQ ONLY —
S Is TXV bulb located on suction tube per Fig. 21?
S Is the capillary tube to the bulb free of kinks and not
subject to pinching?
S Is the bulb well secured to the suction tube with strap?
2. To increase superheat, turn the stem clockwise. To decrease the superheat, turn the stem counterclockwise.
Do not turn the stem more than one full turn.
3. Wait until suction pressure and superheat stabilize.
This may take more than 30 minutes.
4. Continue adjustment until superheat reaches 10_Fto
15_F (5.5_Cto8.3_C).
5. Replace the seal cap; tighten.
INSTALLER / INSTALLATEUR
TXV superheat must be checked at initial
unit start-up and adjusted if necessary.
Superheat must be 10 - 15 deg F.
La surchauffe TXV doit être vérifiée au
moment de la mise en route initiale et
ajustée si nécessaire. La surchauffe doit
être comprise entre 10 et 15 degrés F.
40RU500073 2.0
C10828
Fig. 22 -- Label, TXV Adjustment
SERVICE
40RU
Also refer to condensing unit or outdoor heat pump section
instructions before starting a split system. A split system
start--up checklist is provided at the end of these instructions.
40RU500072 2.0
IMPORTANT! / IMPORTANT
TXV
UPPER SPLIT
BLOC SUPÉRIEUR
AIR FLOW
CIRCULATION
D'AIR
LOWER
SPLIT
BLOC
INFÉRIEUR
AIR FLOW
CIRCULATION
The sensor bulb capillary tubes must be routed from the TXVs inside the unit through one of the piping
access holes. Clamp the TXV sensor bulb on a vertical portion of the suction line, outside the unit.
See Fig. 7 in the installation, start-up and service instruction. Super heat must be adjusted in field.
Les tubes capillaires du capteur doivent être acheminé à partir du détendeur thermostatique situé à l'intérieur
de l'appareil au travers de l'un des trous d'accès de conduites. Attacher le capteur sur une portion verticale
de la conduite de succion, à l'extérieur de l'appareil. Voir la Figure 7 dans le manuel d'installation, de mise
SENSING
BULB
CAPTEUR TXV
10 DIAMS
15 DIAMS MIN
10 x DIA. MIN
15 x DIA. MIN
TXV SENSING
BULB
CAPTEUR TXV
D'AIR
15 DIAMS MIN
en marche, et d'entretien. La surchauffe doit être ajustée sur place.
15 x DIA. MIN
10 DIAMS
10 x DIA. MIN
Fig. 21 -- Label, TXV Bulb Location
EQUALIZER LINE
CONDUITE D'ÉQUILIBRAGE
TXV
8 DIAMS MIN
8 x DIA. MIN
TXV
8 DIAMS MIN
8 x DIA. MIN
SIGHT GLASS
HUBLOT
SOLENOID
VALVE
VANNE
SOLÉNOÏDE
DESSICCATEUR
EQUALIZER LINE
CONDUITE D'ÉQUILIBRAGE
INDOOR COIL
ÉCHANGEUR INTÉRIEUR
FILTER
DRIER
FILTRE
C10827
Inspection and maintenance should be performed at
regular intervals and should include the following:
S Complete cleaning of cabinet, fan wheel, cooling coil,
condensate pan and drain, heating coils, and return--air
grille (if present).
S Inspection of panels and sealing of unit against air
leakage.
S Adjustment of fan motor, belt, bearings, and wheels.
S Cleaning or replacement of filters.
S Testing for cooling/heating system leaks.
S Checking of all electrical connections.
!
WARNING
ELECTRICAL SHOCK HAZARD
Failure to follow this warning could result in personal
injury or death.
Before performing service or maintenance operations
on unit, always turn off main power switch to unit and
install lockout tag. Unit may have more than one
power switch.
Adjusting TXV for Superheat
(40RUA and RUQ only) —
The unit--mounted thermostatic expansion valve(s) is/are
factory set to provided superheat at the bulb location in
10_Fto15_F (5.5_Cto8.3_C) range. Actual system load
conditions may require adjustment of the factory setting.
To adjust the TXV superheat setting:
1. Remove the seal cap from the bottom of the TXV
body.
Most unit service can be performed by removing one or
both of the unit’s side panels. Coil cleaning or removal or
insulation cleaning may require removal of a rear, top, or
bottom panel, depending on the unit’s orientation. When
service is completed, replace unit panels.
Panels -- Panels are fastened to unit frame with sheet metal
screws. Fan and coil compartment must be sealed tightly
after service to prevent air from bypassing the cooling coil.
Fan Motor Lubrication -- Fan motor supplied with unit is
permanently lubricated and requires no further lubrication.
23
Page 24
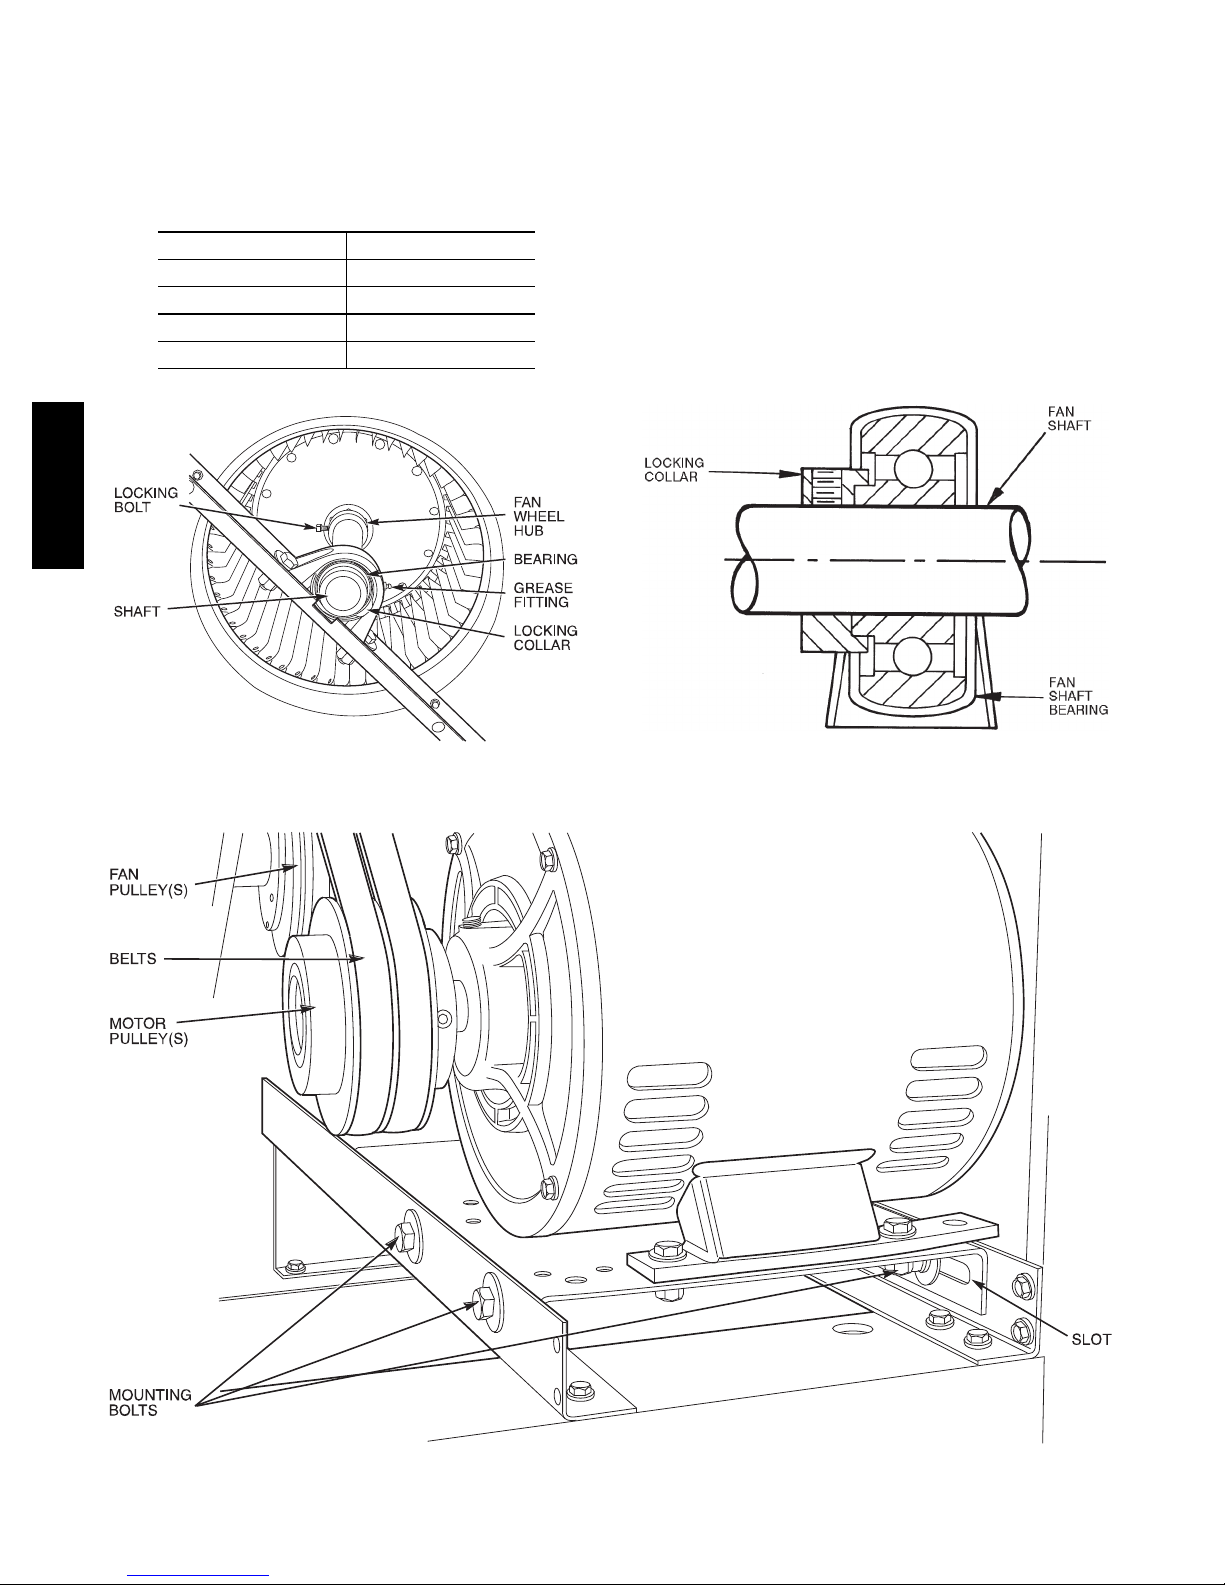
Fan Shaft Bearings -- Bearings on size 07--12 units are
sealed, permanently lubricated bearings that require no
further lubrication. Size 14--16 units have pillow--block
bearings (Fig. 23) that must be lubricated with suitable
bearing grease approximately every 3 months. See Table 7
for suitable lubricants.
Centering Fan Wheel -- If fan and fan shaft assembly are
not properly centered, blades may scrape against the
blower side scroll plate or may create an objectionable
whistling noise. It may be necessary to adjust individual
fan wheels or move entire fan shaft. See the following two
sections.
Table 7 – Lubricant Data
MANUFACTURER LUBRICANT
Mobil Mobilplex EP No. 2
Sunoco Prestige 42
Texac o Multifak 2
Texac o R e g a l A FB --- 2 *
*Preferred lubricant, contains rust and oxidation inhibitors.
40RU
Fig. 23 -- Fan Shaft, Bearings, and Fan Wheel (Typical)
C10698
Fan Shaft Position Adjustment -- Loosen setscrew or
locking collar of each fan shaft bearing. Slide shaft into
correct position and replace locking collar (Fig. 24). To
replace locking collar, push collar up against inner face of
bearing. Turn collar in direction of fan rotation until tight,
and tighten setscrew. Tightening locking collar in
direction of fan rotation results in further tightening of
collar should setscrew work itself loose.
C10699
Fig. 24 -- Fan Shaft Bearing
C10700
Fig. 25 -- Fan Motor Mounting
24
Page 25
Individual Fan Wheel Adjustment -- Loosen the 2
locking bolts holding fan wheel hub to shaft. See Fig. 23.
Position fan wheel in center of the fan housing and tighten
locking bolts. Clearance between wheel and housing
should be the same on both sides.
Fan Belts -- Motor mounting plate and motor support
angles are slotted to permit both vertical and horizontal
adjustment. Adjust belt(s) for correct deflection by
loosening motor plate mounting bolts, moving motor/plate
assembly forward or back, and re tightening bolts. Press
down on belt with one finger midway between fan and
motor pulleys to check deflection. For units with motor
sizes up to and including 3.7 Hp (2.76 kW), correct
3
deflection is
correct deflection is
/16--in. (4.8 mm). For larger motor sizes,
1
/8--in. (3.2 mm). See Fig. 25.
If complete belt replacement is required during servicing,
loosen the motor plate mounting bolts (Fig. 25), move
motor/plate assembly towards fan pulley, and pull belt(s)
off pulleys. Reverse the procedure with new bolts and
readjust deflection.
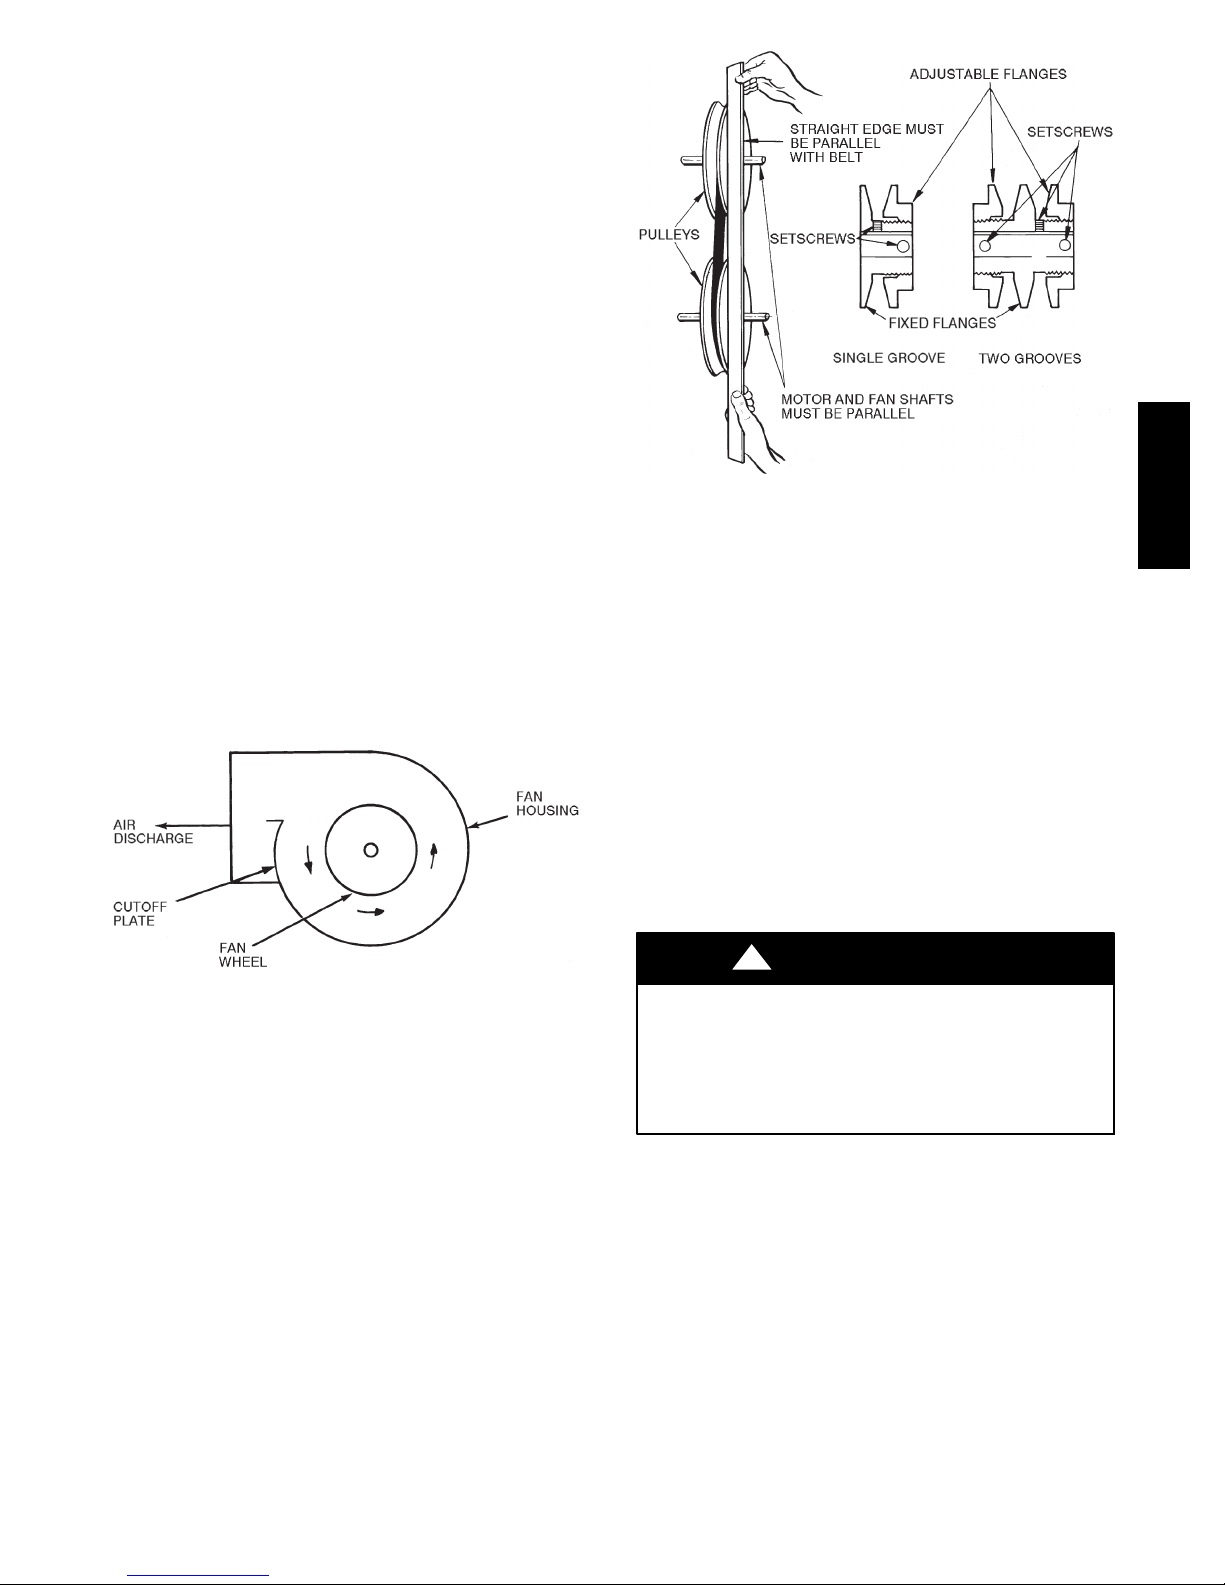
Fan Rotation -- Correct fan rotation with respect to fan
outlet is shown in Fig. 26.
To reverse the direction of rotation of a 3--phase fan
motor, reverse any 2 of the power leads. Refer to the
connection diagram on the inside of motor terminal box
cover for proper reversing procedure of single--phase
motor.
C10702
Fig. 27 -- Fan Pulley Adjustments
4. If pulleys are not in correct alignment, loosen the motor holddown bolts and slide the motor axially until
the pulleys are aligned.
5. Tighten motor holddown bolts.
Pulley and Drive Adjustment -- To obtain desired fan
speed, refer to the fan motor and drive data in Tables
8A--11D and adjust fan motor pulley as follows:
1. Remove belt from fan motor pulley after loosening
motor from motor base.
2. Loosen setscrew in moveable flange of pulley. Screw
moveable flange toward fixed flange to increase the
fan speed and away from fixed flange to reduce
speed. Before tightening setscrew, make certain that
setscrew is over nearest flat surface of pulley hub
(Fig. 27).
40RU
Fig. 26 -- Fan Rotation
Fan Pulley Alignment -- Align as follows:
1. Loosen setscrews on pulleys.
2. Align pulleys visually and tighten setscrews on fan
pulley to lock it in place.
3. Use the methods shown in Fig. 27 to check proper
pulley alignment.
C10701
!
CAUTION
UNIT OPERATION HAZARD
Failure to follow this caution could cause equipment
damage.
Increasing fan speed produces a greater load on motor.
Do not exceed rated capacity of motor.
Condensate Drains -- Keep condensate drains free of dirt
and foreign matter.
Return--Air Filters -- Refer to Replacing Filters section
for filter accessibility and removal. Replace with clean
filters of the sizes listed in Tables 1A--1F.
25
Page 26
Chilled Water Coil Freeze Protection -- Shut off water
supply to unit. Remove side panel of unit and remove vent
and drain plugs in top and bottom of coil header. Drain
coil and blow out remaining water. Reinstall plugs and
side panel.
Alternative freeze protection methods follow:
S Circulate hot water within the water coil’s supply main
or supplementary space heating.
S Close off supply lines to unit and open a union or
field--supplied drain valve in the return line.
IMPORTANT: Draining from return line will not
completely drain water from coils.
S After draining as much water as possible from coils, add
sufficient antifreeze to prevent residual water in the coil
from freezing.
40RU
S Add a sufficient quantity of non--corrosive antifreeze to
the entire system to prevent all water within the system
from freezing.
Coil Removal -- Remove unit panels and corner posts as
required. Disconnect coil connections and remove
fastening screws. Remove coil through end or side
sections of unit.
!
CAUTION
UNIT OPERATION HAZARD
Failure to follow this caution could cause equipment
damage.
Do not operate unit without air filters.
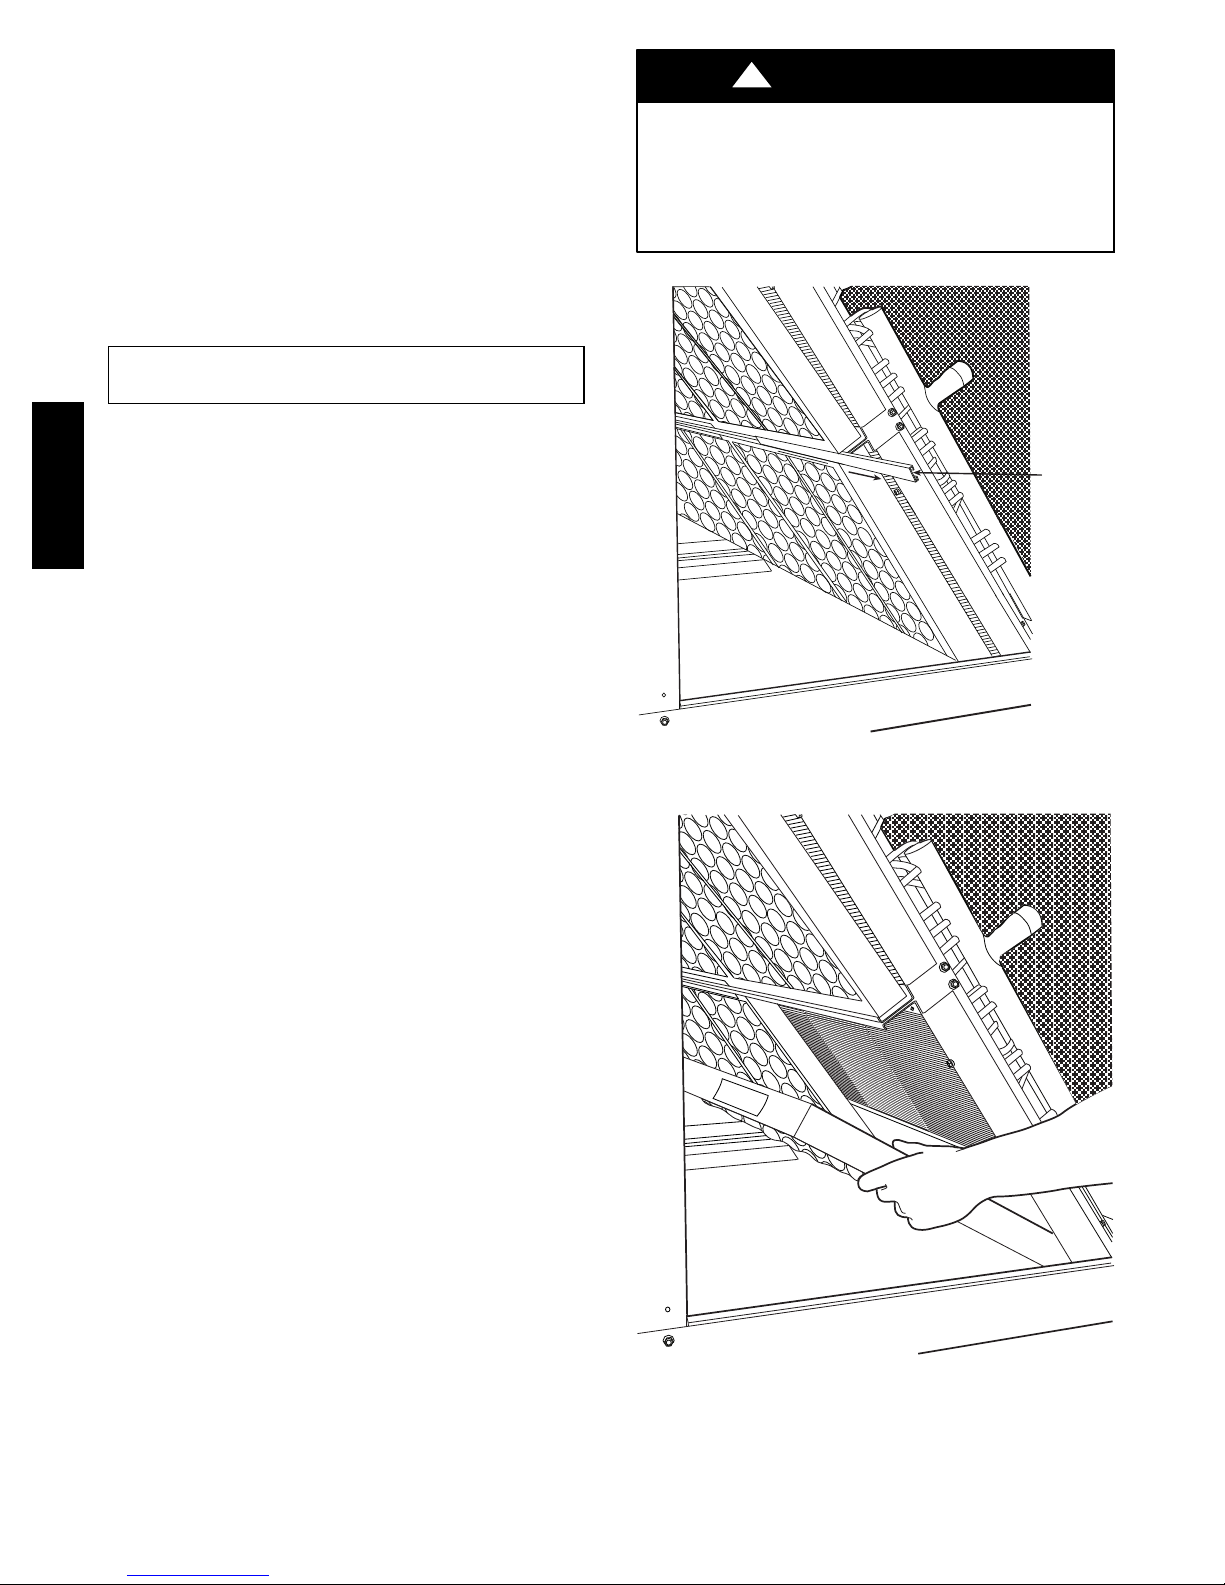
SLIDE
FILTER
RETAINER
CLIP
Cleaning Cooling Coil -- Remove return--air filters.
Remove any heavy dirt that may have accumulated on
underside of coil. Coil can be cleaned more easily with a
stiff brush, vacuum cleaner, or compressed air when coil
is dry. If coil is wet or if water is to be used for cleaning,
guard against splashing water on electrical components or
damaging surrounding area. Clean coil baffles as
applicable and check for tight fit to be sure air does not
bypass coil.
Cleaning Insulation -- The insulation contains an
immobilized antimicrobial agent that helps prevent the
growth of bacteria and fungi. Clean the inner surface of
the insulation according to the separate maintenance
instructions shipped with the unit.
Replacing Filters -- Filters can be removed and installed
from either side of the unit. Install new filters in units that
have one fan as follows:
1. Remove the side access panel (retain screws).
2. Remove the filter retainer clip (see Fig. 28).
3. Remove old filters by lifting and tilting them out of
the filter track. See Fig. 16 and 29.
4. Reverse the procedure to install new filters.
To install new filters in larger units that have 2 fans,
follow the preceding steps, but use the factory--supplied
filter hook to slide filters within reach for removal. The
filter hook is shipped inside the unit in the filter track.
C10703
Fig. 28 -- Remove Filter Retainer Clip
C10704
Fig. 29 -- Filter Removal/Replacement
26
Page 27
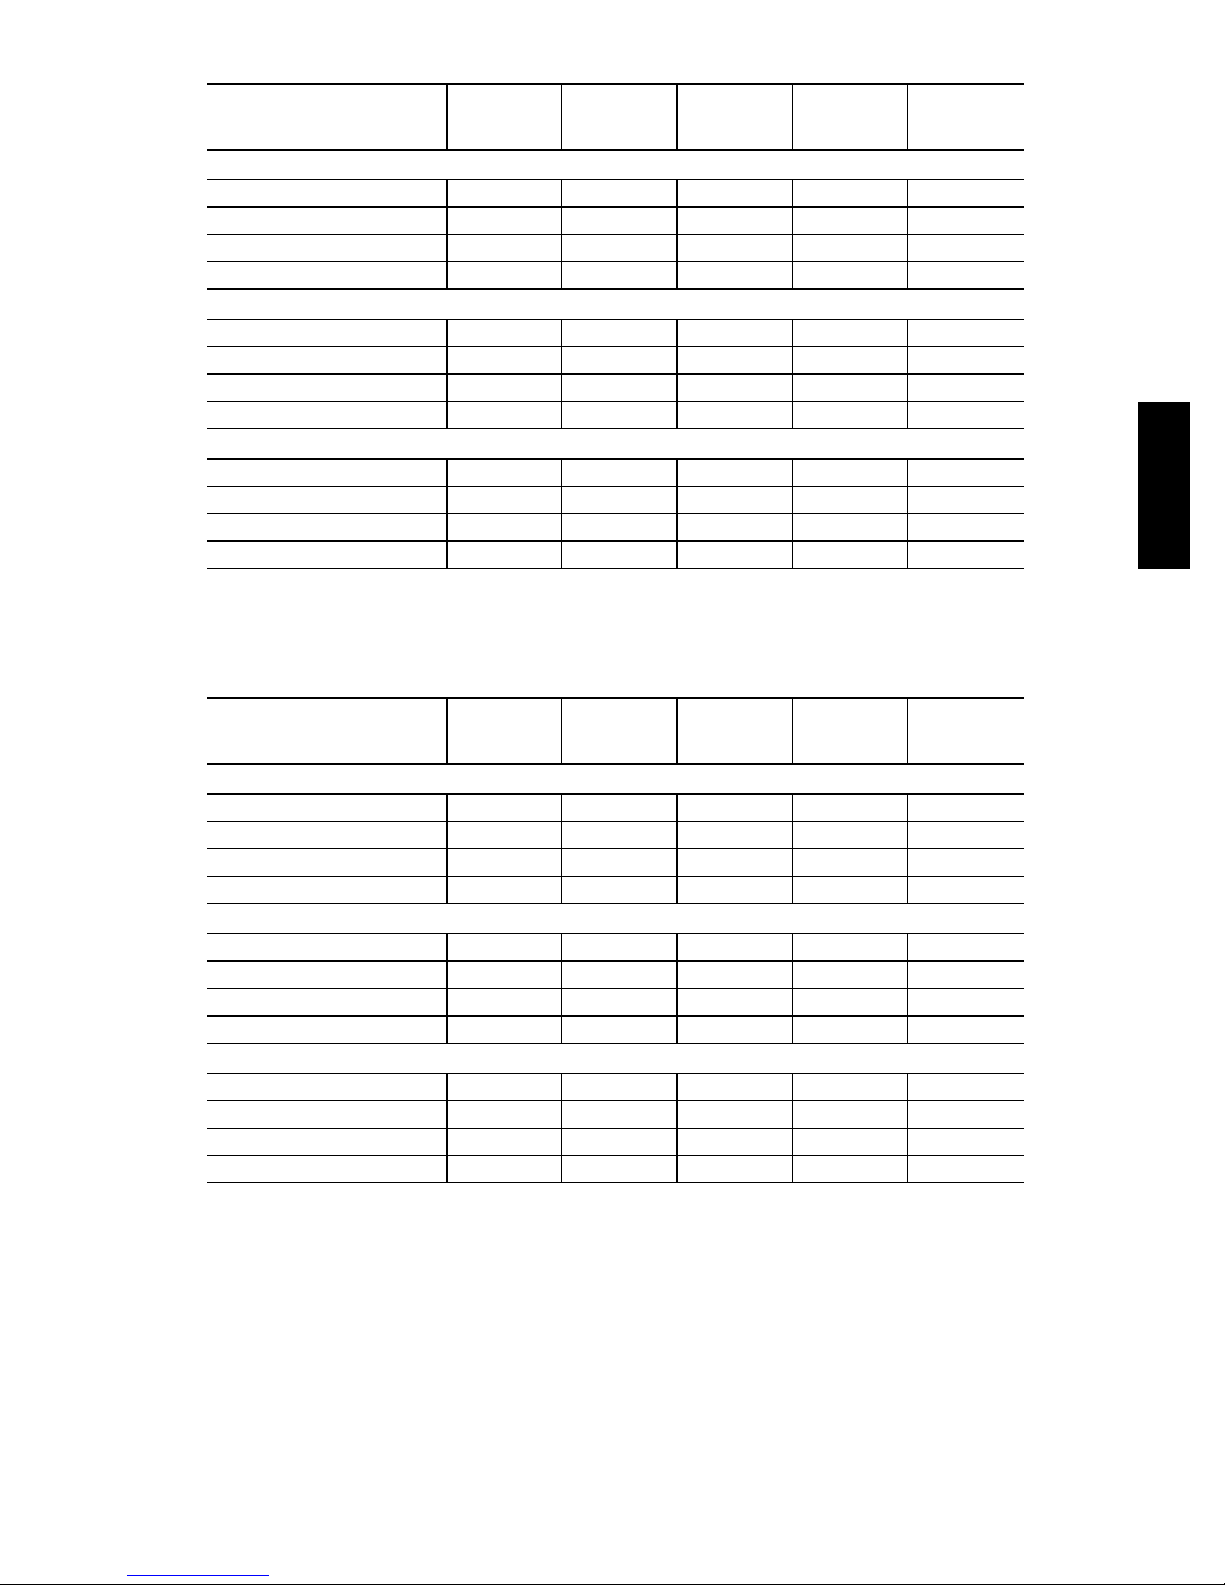
Table 8A -- Fan Motor Data, Standard Motor — English
UNIT
40RUA*07
40RUQ*07
40RUA*08
40RUQ*08
40RUS*08
40RUA*12
40RUQ*12
40RUS*12
40RUA*14
40RUS*14
40RUA*16
40RUQ*16
40RUS*16
208/230---1 --- 60
Speed (rpm) 1725 1725 — — —
Hp 1.3 2.4 — — —
Frame (NEMA) 56Y 56Y — — —
Shaft Dia (in.)
5
/
8
5
/
8
— — —
208/230--- 3 --- 60 and 460--- 3---60
Speed (rpm) 1725 1725 1725 1725 1725
Hp 2.4 2.4 2.4 2.9 3.7
Frame (NEMA) 56Y 56Y 56Y 56Y 56Y
Shaft Dia (in.)
5
/
8
5
/
8
5
/
8
7
/
8
5 7 5 --- 3 --- 6 0
Speed (rpm) 1725 1725 1725 1725 1725
Hp 1.0 2.0 2.0 3.0 3.0
Frame (NEMA) 56 56HZ 56HZ 56HZ 56HZ
Shaft Dia (in.)
LEGEND
NEMA — National Electrical Manufacturers Association
5
/
8
7
/
8
7
/
8
7
/
8
Table 8B -- Fan Motor Data, Alternate Motor — English
7
/
8
40RU
7
/
8
UNIT
40RUA*07
40RUQ*07
40RUA*08
40RUQ*08
40RUS*08
40RUA*12
40RUQ*12
40RUS*12
40RUA*14
40RUS*14
40RUA*16
40RUQ*16
40RUS*16
208/230---1 --- 60
Speed (rpm) 1725 1725 — — —
Hp 2.4 2.4 — — —
Frame (NEMA) 56Y 56Y — — —
Shaft Dia (in.)
5
/
8
5
/
8
— — —
208/230--- 3 --- 60 and 460--- 3---60
Speed (rpm) 1725 1725 1725 1725 1725
Hp 2.9 2.9 3.7 3.7 5.0
Frame (NEMA) 56Y 56Y Y56Y Y56Y S184T
Shaft Dia (in.)
7
/
8
7
/
8
7
/
8
7
/
8
5 7 5 --- 3 --- 6 0
Speed (rpm) 1725 1725 1725 1745 1745
Hp 2.0 3.0 3.0 5.0 5.0
Frame (NEMA) 56HZ 56HZ 56HZ 184T 184T
Shaft Dia (in.)
LEGEND
NEMA — National Electrical Manufacturers Association
7
/
8
7
/
8
7
/
8
11/
8
11/
11/
8
8
27
Page 28
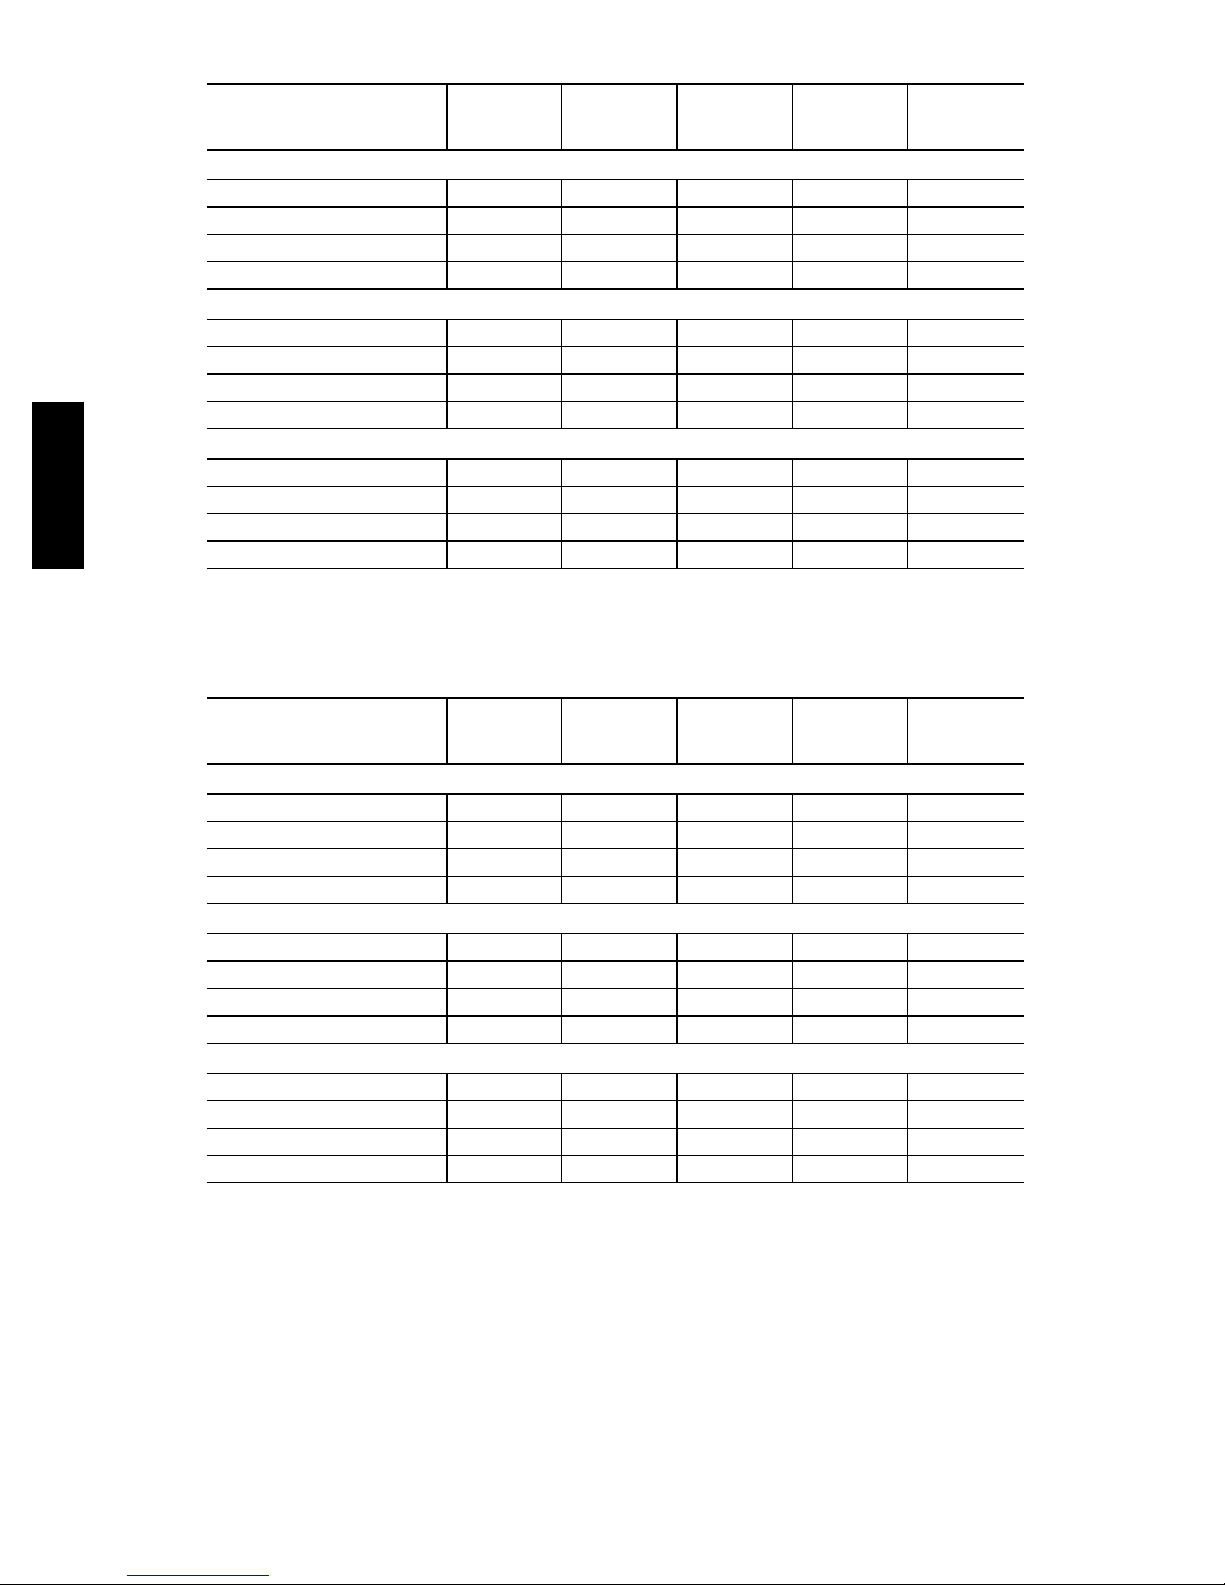
Table 8C -- Fan Motor Data, Standard Motor — SI
40RU
UNIT
208/230---1 --- 60
Speed (r/s) 28.75 28.75 — — —
Shaft kW 0.97 1.79 — — —
Frame (NEMA) 56Y 56Y — — —
Shaft Dia (mm) 15.9 15.9 — — —
208/230--- 3 --- 60 and 460--- 3---60
Speed (r/s) 28.75 28.75 28.75 28.75 28.75
Shaft kW 1.79 1.79 1.79 2.16 2.76
Frame (NEMA) 56Y 56Y 56Y 56Y 56Y
Shaft Dia (mm) 15.9 15.9 15.9 22.2 22.2
5 7 5 --- 3 --- 6 0
Speed (r/s) 28.75 28.75 28.75 28.75 28.75
Shaft kW 0.746 1.49 1.49 2.24 2.24
Frame (NEMA) 56 56HZ 56HZ 56HZ 56HZ
Shaft Dia (mm) 15.9 22.2 22.2 22.2 22.2
LEGEND
NEMA — National Electrical Manufacturers Association
40RUA*07
40RUQ*07
40RUA*08
40RUQ*08
40RUS*08
40RUA*12
40RUQ*12
40RUS*12
40RUA*14
40RUS*14
40RUA*16
40RUQ*16
40RUS*16
Table 8D -- Fan Motor Data, Alternate Motor — SI
UNIT
208/230---1 --- 60
Speed (r/s) 28.75 28.75 — — —
Shaft kW 1.79 1.79 — — —
Frame (NEMA) 56Y 56Y — — —
Shaft Dia (mm) 15.9 15.9 — — —
208/230--- 3 --- 60 and 460--- 3---60
Speed (r/s) 28.75 28.75 28.75 28.75 29.08
Shaft kW 2.16 2.16 2.76 2.76 3.73
Frame (NEMA) 56Y 56Y Y56Y Y56Y S184T
Shaft Dia (mm) 22.2 22.2 22.2 22.2 28.6
5 7 5 --- 3 --- 6 0
Speed (r/s) 28.75 28.75 28.75 29.08 29.08
Shaft kW 1.49 2.24 2.24 3.73 3.73
Frame (NEMA) 56HZ 56HZ 56HZ 184T 184T
Shaft Dia (mm) 22.2 22.2 22.2 28.6 28.6
LEGEND
NEMA — National Electrical Manufacturers Association
40RUA*07
40RUQ0*7
40RUA*08
40RUQ*08
40RUS*08
40RUA*12
40RUQ*12
40RUS*12
40RUA*14
40RUS*14
40RUA*16
40RUQ*16
40RUS*16
28
Page 29
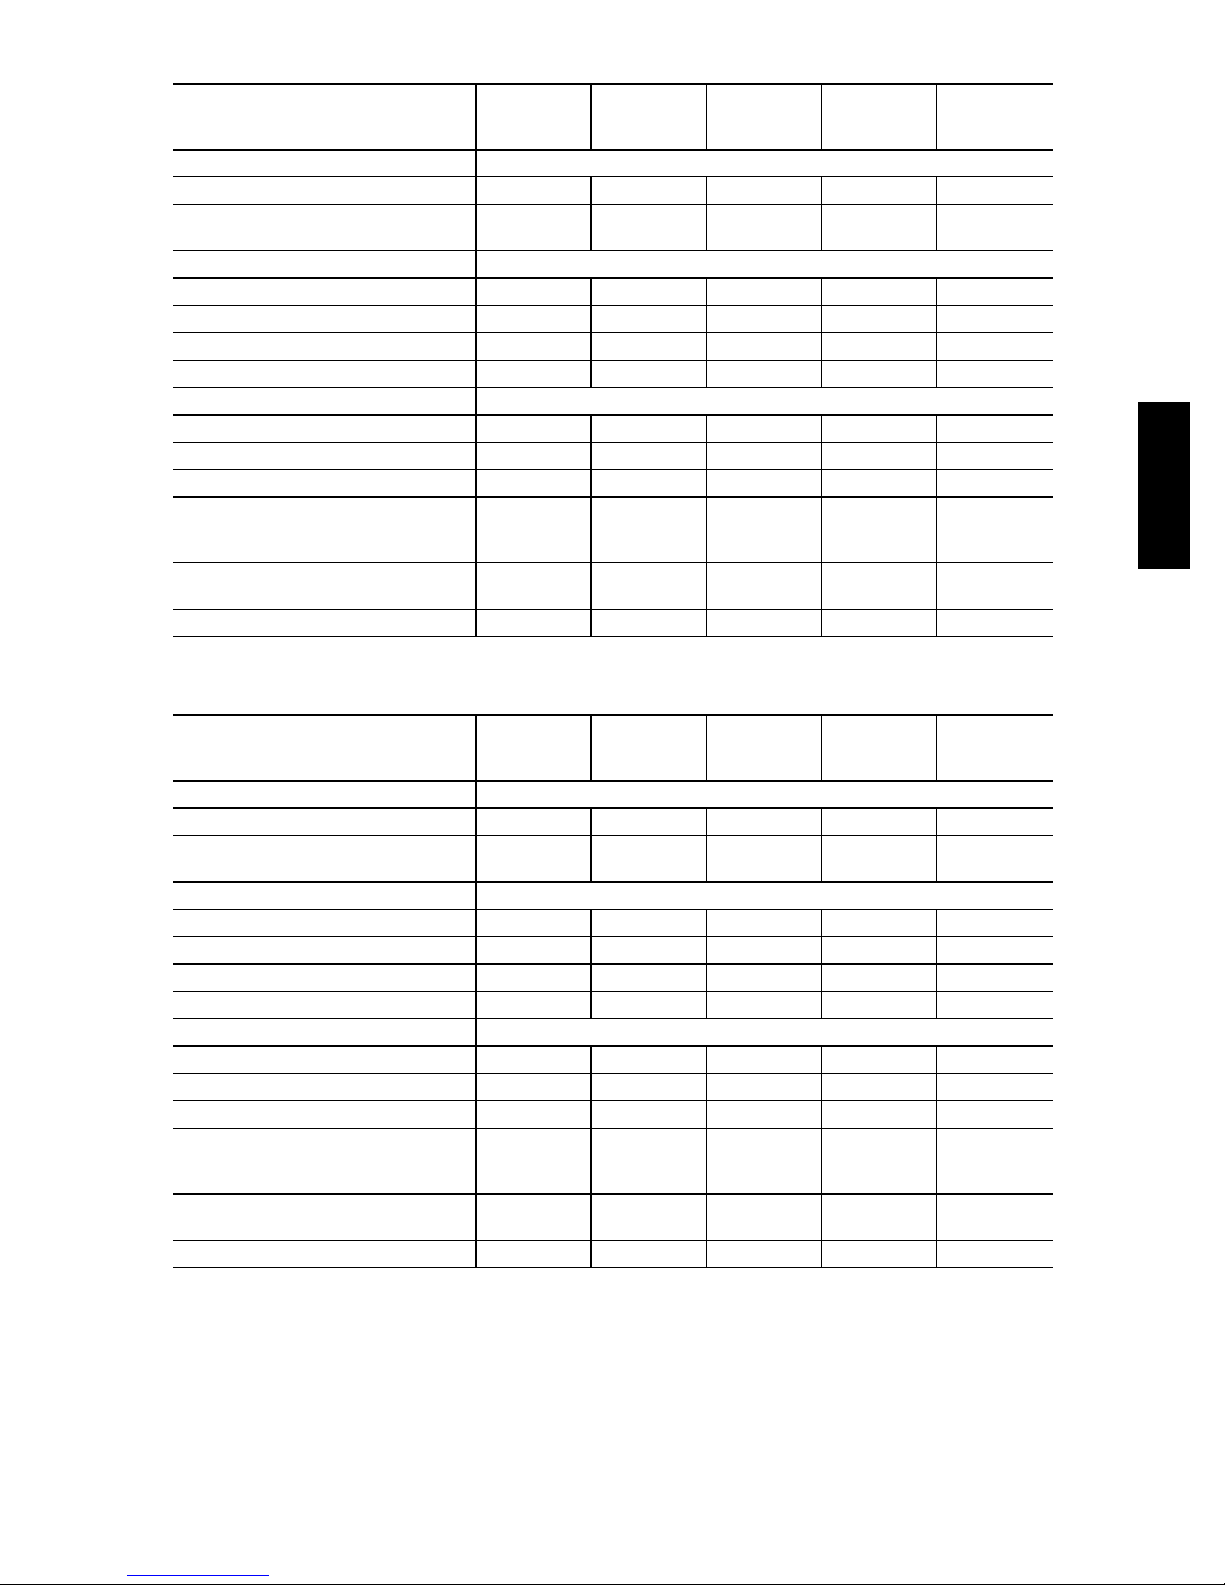
Table 9A-- Standard Drive Data, 60 Hz — English
UNIT
40RUA*07
40RUQ0*7
40RUA*08
40RUQ*08
40RUS*08
40RUA*12
40RUQ*12
40RUS*12
40RUA*14
40RUS*14
40RUA*16
40RUQ*16
40RUS*16
MOTOR DRIVE
Motor Pulley Pitch Diameter (in.) 2.4--- 3.4 2.8--- 3.8 3.4--- 4.4 2.8--- 3.8 2.8---3.8
Pulley Factory Setting
Full Turns Open
2.5 2.5 2.5 2.5 2.5
FAN DRIVE
Pulley Pitch Dia (in.) 8.8 8.8 8.8 9.0 9.0
Pulley Bore (in.) 1 1 1 17/
16
17/
16
Belt No. — Section 1—A 1—A 1—A 1—A 1—A
Belt Pitch (in.) 40.3 41.3 42.3 42.3 42.3
FAN SPEEDS (rpm)
Factory Setting 568 647 764 632 632
Range 470 ---666 549--- 745 666 --- 863 537 ---728 537--- 728
Max Allowable Speed (rpm) 1200 1200 1200 1200 1200
Change per1/2Turn of
Moveable Motor Pulley
19.6 19.6 19.7 19.1 19.1
Flange
MAX FULL TURNS FROM
CLOSED POSITION
5 5 5 5 5
SHAFTS CENTER DISTANCE (in.) 10.44--- 12.32 10.44 --- 12.32 10.44 --- 12.32 10.44--- 12.32 10.44 --- 12.32
40RU
Table 9B -- Medium--Static Drive Data, 60 Hz — English
UNIT
40RUA*07
40RUQ*07
40RUA*08
40RUQ*08
40RUS*08
MOTOR DRIVE
Motor Pulley Pitch Diameter (in.) 3.4--- 4.4 3.4--- 4.4 3.4--- 4.4 3.4--- 4.4 3.7---4.7
Pulley Factory Setting
Full Turns Open
2.5 2.5 2.5 2.5 3.0
FAN DRIVE
Pulley Pitch Dia (in.) 8.8 8.0 8.0 8.2 8.6
Pulley Bore (in.) 1 1 1 17/
Belt No. — Section 1—A 1—A 1—A 1—A 1—B
Belt Pitch (in.) 42.3 40.3 40.3 41.3 41.8
FAN SPEEDS (rpm)
Factory Setting 764 841 841 820 842
Range 666 ---863 733--- 949 733 --- 949 715 ---926 742--- 943
Max Allowable Speed (rpm) 1200 1200 1200 1200 1200
Change per1/2Turn of
Moveable Motor Pulley
19.7 21.6 21.6 21.1 16.7
Flange
MAX FULL TURNS FROM
CLOSED POSITION
5 5 5 5 6
SHAFTS CENTER DISTANCE (in.) 10.44--- 12.32 10.44 --- 12.32 10.44 --- 12.32 10.44--- 12.32 10.44 --- 12.32
40RUA*12
40RUQ*12
40RUS*12
40RUA*14
40RUS*14
16
40RUA*16
40RUQ*16
40RUS*16
17/
16
29
Page 30
Table 9C -- High--Static Drive Data, 60 Hz — English
40RU
UNIT
40RUA*07
40RUQ*07
40RUA*08
40RUQ*08
40RUS*08
40RUA*12
40RUQ*12
40RUS*12
40RUA*14
40RUS*14
40RUA*16
40RUQ*16
40RUS*16
MOTOR DRIVE
Motor Pulley Pitch Diameter (in.) 3.4--- 4.4 3.4--- 4.4 3.4--- 4.4 3.7 --- 4.7 4.3 ---5.3
Pulley Factory Setting
Full Turns Open
2.5 2.5 2.5 3.0 3.0
FAN DRIVE
Pulley Pitch Dia (in.) 7.0 6.0* 6.0 7.4 7.9
Pulley Bore (in.) 1 1 1 17/
16
17/
16
Belt No. — Section 1—A 1—A 1—A 1—B 1—B
Belt Pitch (in.) 41.3 37.3 37.3 39.8 39.8
FAN SPEEDS (rpm)
Factory Setting 961 1121 1121 979 1060
Range 838 ---1084 978 ---1200*† 978 ---1200† 873--- 1096 950--- 1171
Max Allowable Speed (rpm) 1200 1200 1200 1200 1200
Change per1/2Turn of
Moveable Motor Pulley
24.6 28.7 28.7 19.4 18.4
Flange
MAX FULL TURNS FROM
CLOSED POSITION
5 5 5 6 6
SHAFTS CENTER DISTANCE (in.) 10.44--- 12.32 10.44 --- 12.32 10.44 --- 12.32 10.44--- 12.32** 9.16--- 10.99
* Values for 3---phase motor shown. For single ---phase motor, pull ey pitch diameter is 7 in. And
resulting fan speed is 837---1096 rpm.
† It is possible to adjust drive so that fan speed exceeds maximum allowable. DO NOT exceed 1200 rpm.
** 575---v un it has a center distance of 9.16 --- 10.99.
Table 9D -- Standard Drive Data, 60 Hz — SI
UNIT
40RUA*07
40RUQ*07
40RUA*08
40RUQ*08
40RUS*08
MOTOR DRIVE
Motor Pulley Pitch Diameter (mm) 61.0---86.4 71.1--- 96.5 86.4---111.8 71.1--- 96.5 71.1 --- 96.5
Pulley Factory Setting
Full Turns Open
2.5 2.5 2.5 2.5 2.5
FAN DRIVE
Pulley Pitch Dia (mm) 224 224 224 229 229
Pulley Bore (mm) 25.4 25.4 25.4 36.5 36.5
Belt No. — Section 1—A 1—A 1—A 1—A 1—A
Belt Pitch (mm) 1024 1049 1074 1074 1074
FAN SPEEDS (r/s)
Factory Setting 9.5 10.8 12.7 10.5 10.5
Range 7.8--- 11.1 9.2--- 12.4 11.1--- 14.4 9.0---12.1 9.0 ---12.1
Max Allowable Speed (r/s) 20.0 20.0 20.0 20.0 20.0
Change per1/2Turn of
Moveable Motor Pulley
0.327 0.327 0.328 0.318 0.318
Flange
MAX FULL TURNS FROM
CLOSED POSITION
5 5 5 5 5
SHAFTS CENTER DISTANCE (mm) 265 --- 313 265---313 265 --- 313 265--- 313 265--- 313
40RUA*12
40RUQ*12
40RUS*12
40RUA*14
40RUS*14
40RUA*16
40RUQ*16
40RUS*16
30
Page 31
Table 9E -- Medium--Static Drive Data, 60 Hz — SI
UNIT
MOTOR DRIVE
Motor Pulley Pitch Diameter (mm)
Pulley Factory Setting
Full Turns Open
FAN DRIVE
Pulley Pitch Dia (mm) 224 203 203 208 218
Pulley Bore (mm) 25.4 25.4 25.4 36.5 36.5
Belt No. — Section 1—A 1—A 1—A 1—A 1—B
Belt Pitch (mm) 1074 1024 1024 1049 1062
FAN SPEEDS (r/s)
Factory Setting 12.7 14.0 14.0 13.7 14.0
Range 11.1---14.4 12.2--- 15.8 12.2 --- 15.8 11.9 --- 15.4 12.4--- 15.7
Max Allowable Speed (r/s) 20.0 20.0 20.0 20.0 20.0
Change per1/2Turn of
Moveable Motor Pulley
Flange
MAX FULL TURNS FROM
CLOSED POSITION
SHAFTS CENTER DISTANCE (mm) 265--- 313 265--- 313 265--- 313 265 --- 313 265 ---313
40RUA*07
40RUQ*07
86.4---
111.8
2.5 2.5 2.5 2.5 3.0
0.328 0.360 0.360 0.352 0.278
5 5 5 5 6
40RUA*08
40RUQ*08
40RUS*08
86.4---
111.8
40RUA*12
40RUQ*12
40RUS*12
86.4---
111.8
40RUA*14
40RUS*14
86.4---
111.8
40RUA*16
40RUQ*16
40RUS*16
94.0---
119.4
40RU
Table 9F -- High--Static Drive Data, 60 Hz — SI
UNIT
MOTOR DRIVE
Motor Pulley Pitch Diameter (mm) 86.4---111.8 86.4--- 111.8 86.4--- 111.8 94.0--- 119.4 109.2 ---134.6
Pulley Factory Setting
Full Turns Open
FAN DRIVE
Pulley Pitch Dia (mm) 178 152* 152 188 201
Pulley Bore (mm) 25.4 25.4 25.4 36.5 36.5
Belt No. — Section 1—A 1—A 1—A 1—B 1—B
Belt Pitch (mm) 1049 947 947 1011 1011
FAN SPEEDS (r/s)
Factory Setting 16.0 18.7 18.7 16.3 17.7
Range 14.0--- 18.1 16.3 ---20.0*† 16.3 ---20.0† 14.4--- 18.3 15.8 ---19.5
Max Allowable Speed (r/s) 20.0 20.0 20.0 20.0 20.0
Change per1/2Turn of
Moveable Motor Pulley
Flange
MAX FULL TURNS FROM
CLOSED POSITION
SHAFTS CENTER DISTANCE (mm) 265 --- 313 265---313 265 --- 313 265 --- 313** 232--- 279
* Values for 3---phase motor shown. For single ---phase motor, pulley pitch diameter is 178 mm and
resulting fan speed is 14.0---18.3 r/s.
† It is possible to adjust drive so that fan speed exceeds maximum al lowable. DO NOT exceed 20 r/ s.
** 575---v unit has a center distance of 233 --- 279.
40RUA*07
40RUQ*07
2.5 2.5 2.5 3.0 3.0
0.410 0.478 0.478 0.323 0.307
5 5 5 6 6
40RUA*08
40RUQ*08
40RUS*08
40RUA*12
40RUQ*12
40RUS*12
40RUA*14
40RUS*14
40RUA*16
40RUQ*16
40RUS*16
31
Page 32
Table 10A -- 40RU Standard Fan Performance Data — 0.0--2.4 in. wg External Static Pressure — English
UNIT
40RUA*07
40RUQ*07
40RUA*08
40RUQ*08
40RUS*08
40RUA*12
40RUQ*12
40RUS*12
AIRFLOW
40RU
40RUA*14
40RUS*14
40RUA*16
40RUQ*16
40RUS*16
See Legend and Notes on page 36.
EXTERNAL STATIC PRESSURE (in. wg)
(Cfm)
1,800 399 0.19 454 0.24 548 0.35 634 0.47 713 0.60 785 0.74 850 0.89
2,100 446 0.28 497 0.34 583 0.46 660 0.59 733 0.73 802 0.88 867 1.05
2,400 498 0.40 541 0.47 622 0.60 693 0.74 760 0.89 824 1.05 885 1.22
2,700 544 0.55 588 0.63 663 0.78 730 0.93 792 1.09 851 1.26 909 1.44
3,000 594 0.73 635 0.82 707 0.99 770 1.15 828 1.32 883 1.50 937 1.69
2,250 273 0.08 493 0.37 580 0.49 656 0.62 727 0.76 794 0.92 858 1.08
2,600 322 0.15 540 0.52 622 0.66 693 0.81 757 0.96 819 1.12 878 1.29
3,000 552 0.65 595 0.73 673 0.91 740 1.07 800 1.24 856 1.41 910 1.60
3,400 615 0.91 653 1.01 726 1.21 789 1.40 846 1.59 899 1.78 950 1.97
3,750 671 1.20 706 1.31 773 1.53 834 1.74 889 1.95 940 2.16 988 2.37
3,000 399 0.29 573 0.69 654 0.86 722 1.03 784 1.19 841 1.37 896 1.55
3,500 604 0.92 641 1.02 714 1.22 780 1.42 838 1.61 892 1.81 942 2.01
4,000 680 1.33 713 1.45 778 1.68 839 1.91 896 2.14 947 2.36 995 2.58
4,500 756 1.86 787 1.99 845 2.26 901 2.52 955 2.78 1005 3.03 1051 3.28
5,000 834 2.51 861 2.67 914 2.96 966 3.25 1016 3.54 1064 3.82 1109 4.11
3,750 394 0.40 453 0.52 558 0.80 643 1.10 717 1.39 785 1.71 848 2.04
4,300 436 0.57 487 0.70 586 1.00 670 1.34 742 1.67 806 2.01 867 2.36
5,000 492 0.86 535 0.99 623 1.31 704 1.69 775 2.08 838 2.47 896 2.86
5,700 550 1.23 587 1.37 664 1.71 740 2.11 809 2.55 872 2.99 929 3.43
6,250 596 1.59 630 1.74 700 2.09 770 2.51 837 2.97 899 3.45 955 3.94
4,500 428 0.59 475 0.70 570 0.99 656 1.33 730 1.68 796 2.02 856 2.38
5,300 488 0.92 528 1.04 609 1.34 689 1.71 762 2.11 827 2.51 886 2.92
6,000 542 1.29 578 1.43 649 1.74 721 2.11 791 2.55 855 3.00 914 3.46
6,800 604 1.83 637 1.99 700 2.32 763 2.70 826 3.15 888 3.64 946 4.15
7,500 660 2.42 690 2.59 747 2.95 804 3.34 861 3.79 919 4.29 975 4.83
0.0 0.2 0.4 0.6 0.8 1.0 1.2
Rpm Bhp Rpm Bhp Rpm Bhp Rpm Bhp Rpm Bhp Rpm Bhp Rpm Bhp
Table 10A-- 40RU Standard Fan Performance Data — 0.0--2.4 in. wg External Static Pressure — English (cont)
UNIT
40RUA*07
40RUQ*07
40RUA*08
40RUQ*08
40RUS*08
40RUA*12
40RUQ*12
40RUS*12
40RUA*14
40RUS*14
40RUA*16
40RUQ*16
40RUS*16
See Legend and Notes on page 36.
AIRFLOW
(Cfm)
Rpm Bhp Rpm Bhp Rpm Bhp Rpm Bhp Rpm Bhp Rpm Bhp
1,800 910 1.04 965 1.20 1016 1.36 1065 1.52 1111 1.69 1155 1.86
2,100 927 1.21 983 1.38 1035 1.56 1084 1.74 1131 1.92 1175 2.11
2,400 944 1.41 999 1.59 1052 1.78 1101 1.98 1149 2.18 1193 2.38
2,700 964 1.63 1018 1.82 1069 2.03 1118 2.24 1165 2.45 — —
3,000 989 1.89 1039 2.10 1089 2.31 1136 2.53 1183 2.76 — —
2,250 918 1.26 975 1.43 1029 1.62 1079 1.80 1126 1.99 1172 2.18
2,600 936 1.48 991 1.67 1044 1.87 1094 2.07 1142 2.28 1188 2.49
3,000 963 1.79 1014 1.99 1064 2.20 1113 2.42 1159 2.64 — —
3,400 998 2.18 1045 2.39 1092 2.61 1137 2.83 1182 3.07 — —
3,750 1034 2.58 1078 2.80 1122 3.03 1164 3.27 — — — —
3,000 949 1.74 1000 1.93 1050 2.14 1099 2.36 1147 2.58 1192 2.81
3,500 990 2.21 1037 2.42 1083 2.64 1128 2.86 1172 3.10 — —
4,000 1040 2.80 1084 3.03 1126 3.26 1167 3.50 — — — —
4,500 1094 3.53 1136 3.78 1176 4.03 — — — — — —
5,000 1151 4.39 1191 4.66 — — — — — — — —
3,750 909 2.37 968 2.74 1026 3.12 1080 3.51 1131 3.92 1181 4.32
4,300 925 2.73 980 3.11 1034 3.52 1084 3.92 1135 4.35 1184 4.78
5,000 950 3.26 1002 3.67 1052 4.09 1101 4.53 1148 4.98 1190 5.44
5,700 981 3.88 1031 4.33 1079 4.79 1125 5.25 1169 5.73 — —
6,250 1007 4.42 1057 4.91 1103 5.40 1148 5.90 1191 6.40 — —
4,500 912 2.75 967 3.13 1019 3.52 1070 3.92 1120 4.35 1168 4.79
5,300 940 3.33 992 3.75 1041 4.18 1088 4.61 1134 5.06 1179 5.52
6,000 968 3.92 1018 4.38 1066 4.85 1112 5.32 1156 5.80 1198 6.29
6,800 1000 4.67 1050 5.19 1097 5.71 1142 6.23 1185 6.76 — —
7,500 1028 5.39 1078 5.97 1125 6.54 1170 7.11 — — — —
EXTERNAL STATIC PRESSURE (in. wg)
1.4 1.6 1.8 2.0 2.2 2.4
32
Page 33
Table 10B -- 40RU Standard Fan Performance Data — 0--600 kPa External Static Pressure — SI
UNIT
40RUA*07
40RUQ*07
40RUA*08
40RUQ*08
40RUS*08
40RUA*12
40RUQ*12
40RUS*12
40RUA*14
40RUS*14
40RUA*16
40RUQ*16
40RUS*16
See Legend and Notes on page 36.
AIRFLOW
(L/s)
r/s kW r/s kW r/s kW r/s kW r/s kW r/s kW r/s kW
850 6.64 0.14 7.56 0.18 9.13 0.26 10.56 0.35 11.88 0.45 13.08 0.55 14.16 0.66
990 7.73 0.21 8.28 0.25 9.71 0.34 11.00 0.44 12.22 0.54 13.37 0.66 14.44 0.78
1130 8.30 0.30 9.02 0.35 10.36 0.45 11.55 0.55 12.67 0.66 13.73 0.78 14.76 0.91
1270 9.06 0.41 9.79 0.47 11.06 0.58 12.17 0.69 13.20 0.81 14.19 0.94 15.14 1.07
1420 9.91 0.55 10.58 0.61 11.78 0.74 12.83 0.86 13.80 0.99 14.72 1.12 15.61 1.26
1060 4.55 0.06 8.21 0.27 9.67 0.37 10.93 0.46 12.11 0.57 13.23 0.68 14.30 0.81
1230 5.37 0.11 8.99 0.38 10.37 0.49 11.55 0.60 12.62 0.71 13.65 0.84 14.64 0.96
1420 9.21 0.48 9.92 0.55 11.22 0.67 12.33 0.80 13.33 0.92 14.27 1.05 15.17 1.19
1600 10.25 0.68 10.89 0.75 12.09 0.90 13.15 1.04 14.10 1.18 14.99 1.33 15.83 1.47
1770 11.18 0.90 11.76 0.98 12.88 1.14 13.90 1.30 14.82 1.45 15.67 1.61 16.46 1.77
1420 6.65 0.22 9.55 0.51 10.89 0.64 12.04 0.77 13.06 0.89 14.02 1.02 14.93 1.15
1650 10.06 0.68 10.69 0.76 11.90 0.91 13.00 1.06 13.97 1.20 14.86 1.35 15.70 1.50
1890 11.33 0.99 11.88 1.08 12.96 1.25 13.99 1.43 14.93 1.59 15.78 1.76 16.58 1.92
2120 12.61 1.38 13.11 1.49 14.08 1.68 15.02 1.88 15.92 2.07 16.74 2.26 17.51 2.44
2360 13.90 1.87 14.36 1.99 15.23 2.21 16.10 2.42 16.94 2.64 17.73 2.85 18.48 3.06
1770 6.57 0.30 7.54 0.39 9.31 0.60 10.72 0.82 11.95 1.04 13.09 1.27 14.13 1.52
2030 7.27 0.43 8.11 0.52 9.76 0.75 11.16 1.00 12.36 1.25 13.44 1.50 14.45 1.76
2360 8.20 0.64 8.92 0.74 10.38 0.98 11.73 1.26 12.91 1.55 13.97 1.84 14.93 2.13
2690 9.16 0.92 9.79 1.02 11.07 1.27 12.33 1.58 13.48 1.90 14.53 2.23 15.48 2.56
2950 9.93 1.18 10.50 1.30 11.66 1.56 12.83 1.87 13.95 2.22 14.98 2.58 15.92 2.94
2120 7.13 0.44 7.91 0.52 9.50 0.74 10.94 0.99 12.17 1.25 13.26 1.51 14.26 1.77
2500 8.13 0.68 8.80 0.78 10.15 1.00 11.48 1.27 12.70 1.57 13.78 1.87 14.76 2.18
2830 9.03 0.96 9.63 1.07 10.81 1.30 12.01 1.58 13.18 1.90 14.25 2.24 15.23 2.58
3210 10.07 1.37 10.62 1.48 11.66 1.73 12.71 2.01 13.77 2.35 14.80 2.71 15.76 3.09
3540 10.99 1.81 11.50 1.93 12.45 2.20 13.40 2.49 14.35 2.83 15.31 3.20 16.24 3.60
EXTERNAL STATIC PRESSURE (kPa)
0 50 100 150 200 250 300
40RU
Table 10B -- 40RU Standard Fan Performance Data — 0--600 kPa External Static Pressure — SI (cont)
UNIT
40RUA*07
40RUQ*07
40RUA*08
40RUQ*08
40RUS*08
40RUA*12
40RUQ*12
40RUS*12
40RUA*14
40RUS*14
40RUA*16
40RUQ*16
40RUS*16
See Legend and Notes on page 36.
AIRFLOW
(L/s)
r/s kW r/s kW r/s kW r/s kW r/s kW r/s kW
850 15.16 0.78 16.08 0.89 16.94 1.01 17.74 1.13 18.51 1.26 19.25 1.39
990 15.44 0.90 16.38 1.03 17.25 1.16 18.07 1.30 18.84 1.43 19.58 1.57
1130 15.73 1.05 16.65 1.19 17.53 1.33 18.36 1.48 19.14 1.62 19.89 1.77
1270 16.07 1.21 16.96 1.36 17.82 1.51 18.64 1.67 19.42 1.83 — —
1420 16.48 1.41 17.32 1.56 18.14 1.72 18.94 1.89 19.71 2.06 — —
1060 15.31 0.94 16.25 1.07 17.14 1.20 17.98 1.34 18.77 1.48 19.53 1.63
1230 15.60 1.10 16.51 1.24 17.39 1.39 18.23 1.54 19.03 1.70 19.80 1.86
1420 16.05 1.33 16.90 1.48 17.74 1.64 18.54 1.80 19.32 1.97 — —
1600 16.64 1.62 17.42 1.78 18.20 1.94 18.95 2.11 19.69 2.29 — —
1770 17.23 1.93 17.97 2.09 18.70 2.26 19.41 2.44 — — — —
1420 15.81 1.29 16.67 1.44 17.51 1.60 18.32 1.76 19.11 1.92 19.87 2.09
1650 16.51 1.65 17.29 1.80 18.05 1.97 18.80 2.13 19.53 2.31 — —
1890 17.34 2.09 18.06 2.26 18.77 2.43 19.45 2.61 — — — —
2120 18.24 2.63 18.93 2.82 19.59 3.00 — — — — — —
2360 19.18 3.27 19.85 3.48 — — — — — — — —
1770 15.15 1.77 16.13 2.04 17.10 2.33 18.00 2.62 18.85 2.92 19.68 3.22
2030 15.41 2.04 16.34 2.32 17.24 2.62 18.07 2.92 18.92 3.24 19.73 3.56
2360 15.84 2.43 16.70 2.74 17.54 3.05 18.35 3.38 19.14 3.71 19.83 4.06
2690 16.36 2.89 17.19 3.23 17.98 3.57 18.75 3.92 19.49 4.27 — —
2950 16.79 3.30 17.61 3.66 18.39 4.03 19.13 4.40 19.84 4.77 — —
2120 15.20 2.05 16.12 2.33 16.98 2.62 17.83 2.92 18.67 3.24 19.47 3.57
2500 15.67 2.49 16.53 2.80 17.35 3.12 18.13 3.44 18.90 3.77 19.65 4.12
2830 16.13 2.92 16.97 3.27 17.77 3.62 18.53 3.97 19.26 4.33 19.97 4.69
3210 16.66 3.48 17.50 3.87 18.29 4.26 19.03 4.65 19.75 5.04 — —
3540 17.13 4.02 17.97 4.45 18.75 4.88 19.50 5.30 — — — —
EXTERNAL STATIC PRESSURE (kPa)
350 400 450 500 550 600
33
Page 34
Table 10C -- 40RU High--Capacity Fan Performance Data — 0.0--2.4 in. wg External Static Pressure — English
UNIT
40RUA*07
40RUQ*07
40RUA*08
40RUQ*08
40RUS*08
40RUA*12
40RUQ*12
40RUS*12
AIRFLOW
40RU
40RUA*14
40RUS*14
40RUA*16
40RUQ*16
40RUS*16
See Legend and Notes on page 36.
EXTERNAL STATIC PRESSURE (in. wg)
(Cfm)
1,800 419 0.21 471 0.26 564 0.37 649 0.49 727 0.63 797 0.77 862 0.92
2,100 471 0.31 519 0.37 602 0.49 679 0.62 751 0.77 819 0.92 882 1.09
2,400 524 0.44 568 0.51 645 0.64 715 0.79 781 0.94 844 1.11 905 1.28
2,700 578 0.61 619 0.69 690 0.84 755 0.99 816 1.15 875 1.33 932 1.51
3,000 633 0.81 671 0.90 738 1.07 799 1.24 856 1.41 910 1.60 963 1.79
2,250 290 0.10 510 0.39 594 0.51 669 0.65 739 0.79 806 0.95 870 1.12
2,600 349 0.19 561 0.55 640 0.70 709 0.84 773 1.00 834 1.16 893 1.34
3,000 579 0.70 621 0.79 695 0.96 759 1.12 818 1.30 874 1.47 928 1.66
3,400 646 0.99 683 1.09 752 1.29 813 1.48 869 1.67 920 1.86 970 2.06
3,750 705 1.31 739 1.42 804 1.63 862 1.85 915 2.05 964 2.26 1011 2.48
3,000 421 0.35 592 0.73 670 0.90 737 1.06 797 1.23 854 1.41 908 1.59
3,500 626 0.98 664 1.08 735 1.28 798 1.48 855 1.67 908 1.87 958 2.07
4,000 706 1.42 738 1.54 803 1.77 862 2.00 917 2.23 967 2.45 1014 2.67
4,500 786 1.99 815 2.12 873 2.39 929 2.65 980 2.90 1028 3.16 1073 3.41
5,000 867 2.70 893 2.84 946 3.14 997 3.43 1046 3.72 1092 4.00 1135 4.28
3,750 410 0.43 467 0.55 567 0.83 649 1.12 721 1.41 788 1.72 851 2.05
4,300 455 0.62 504 0.74 599 1.05 679 1.38 748 1.70 811 2.04 871 2.39
5,000 514 0.92 556 1.06 641 1.39 718 1.76 786 2.14 847 2.52 903 2.91
5,700 575 1.32 612 1.47 686 1.82 759 2.23 825 2.66 884 3.09 939 3.52
6,250 624 1.71 657 1.87 725 2.24 793 2.66 856 3.12 915 3.59 969 4.06
4,500 437 0.61 483 0.72 576 1.01 660 1.35 732 1.69 797 2.03 856 2.38
5,300 499 0.95 538 1.07 617 1.37 696 1.74 767 2.13 830 2.53 888 2.94
6,000 555 1.34 590 1.48 659 1.79 730 2.17 798 2.59 860 3.04 918 3.49
6,800 620 1.91 651 2.06 712 2.39 774 2.78 836 3.22 896 3.71 952 4.21
7,500 677 2.52 706 2.69 761 3.04 817 3.44 873 3.89 929 4.39 984 4.93
0.0 0.2 0.4 0.6 0.8 1.0 1.2
Rpm Bhp Rpm Bhp Rpm Bhp Rpm Bhp Rpm Bhp Rpm Bhp Rpm Bhp
Table 10C -- 40RU High--Capacity Fan Performance Data — 0.0--2.4 in. wg External Static Pressure — English (cont)
UNIT
40RUA*07
40RUQ*07
40RUA*08
40RUQ*08
40RUS*08
40RUA*12
40RUQ*12
40RUS*12
40RUA*14
40RUS*14
40RUA*16
40RUQ*16
40RUS*16
See Legend and Notes on page 36.
AIRFLOW
(Cfm)
Rpm Bhp Rpm Bhp Rpm Bhp Rpm Bhp Rpm Bhp Rpm Bhp
1,800 921 1.07 975 1.23 1026 1.39 1074 1.55 1120 1.72 1164 1.90
2,100 942 1.26 997 1.43 1048 1.61 1097 1.79 1143 1.97 1186 2.16
2,400 963 1.47 1017 1.66 1069 1.85 1118 2.05 1164 2.25 — —
2,700 987 1.71 1039 1.91 1090 2.12 1138 2.33 1185 2.55 — —
3,000 1015 1.99 1065 2.20 1113 2.42 1161 2.65 — — — —
2,250 930 1.29 986 1.47 1039 1.65 1089 1.84 1136 2.03 1181 2.22
2,600 950 1.53 1005 1.72 1057 1.92 1107 2.13 1154 2.33 — —
3,000 980 1.86 1031 2.06 1081 2.27 1129 2.49 1175 2.72 — —
3,400 1018 2.26 1065 2.48 1111 2.70 1156 2.93 — — — —
3,750 1057 2.69 1101 2.92 1144 3.15 1186 3.39 — — — —
3,000 961 1.78 1012 1.98 1062 2.19 1111 2.41 1158 2.64 — —
3,500 1005 2.27 1052 2.49 1098 2.71 1142 2.94 1186 3.18 — —
4,000 1058 2.90 1101 3.13 1143 3.36 1184 3.60 — — — —
4,500 1116 3.66 1157 3.91 1196 4.16 — — — — — —
5,000 1176 4.56 — — — — — — — — — —
3,750 912 2.39 971 2.76 1028 3.14 1083 3.54 1135 3.95 1185 4.36
4,300 928 2.75 982 3.13 1036 3.53 1087 3.94 1138 4.37 1187 4.81
5,000 956 3.30 1007 3.71 1056 4.13 1104 4.56 1151 5.00 1196 5.46
5,700 990 3.96 1039 4.40 1086 4.85 1130 5.31 1174 5.78 — —
6,250 1019 4.54 1067 5.02 1112 5.50 1156 5.99 1198 6.49 — —
4,500 912 2.75 967 3.12 1019 3.52 1070 3.92 1120 4.35 1168 4.79
5,300 942 3.34 992 3.76 1041 4.18 1088 4.61 1134 5.06 1179 5.52
6,000 971 3.95 1020 4.40 1067 4.86 1112 5.33 1156 5.81 1198 6.29
6,800 1005 4.72 1054 5.23 1101 5.75 1145 6.27 1187 6.79 — —
7,500 1036 5.48 1084 6.04 1131 6.61 1174 7.17 — — — —
1.4 1.6 1.8 2.0 2.2 2.4
EXTERNAL STATIC PRESSURE (in. wg)
34
Page 35
Table 10D -- 40RU High--Capacity Fan Performance Data — 0--600 kPa External Static Pressure — SI
UNIT
40RUA*07
40RUQ*07
40RUA*08
40RUQ*08
40RUS*08
40RUA*12
40RUQ*12
40RUS*12
40RUA*14
40RUS*14
40RUA*16
40RUQ*16
40RUS*16
See Legend and Notes on page 36.
AIRFLOW
(L/s)
r/s kW r/s kW r/s kW r/s kW r/s kW r/s kW r/s kW
850 6.98 0.16 7.86 0.19 9.40 0.27 10.81 0.37 12.11 0.47 13.29 0.57 14.36 0.69
990 7.84 0.23 8.64 0.27 10.03 0.36 11.31 0.46 12.52 0.57 13.65 0.69 14.71 0.81
1130 8.73 0.33 9.46 0.38 10.75 0.48 11.91 0.59 13.01 0.70 14.07 0.83 15.08 0.96
1270 9.63 0.45 10.31 0.51 11.51 0.62 12.58 0.74 13.60 0.86 14.58 0.99 15.53 1.13
1420 10.55 0.61 11.18 0.67 12.30 0.80 13.31 0.92 14.26 1.05 15.17 1.19 16.05 1.33
1060 4.83 0.07 8.50 0.29 9.91 0.38 11.15 0.48 12.32 0.59 13.44 0.71 14.50 0.83
1230 5.81 0.14 9.35 0.41 10.67 0.52 11.81 0.63 12.88 0.74 13.90 0.87 14.89 1.00
1420 9.65 0.52 10.35 0.59 11.59 0.71 12.66 0.84 13.64 0.97 14.57 1.10 15.47 1.24
1600 10.76 0.74 11.39 0.81 12.54 0.96 13.55 1.10 14.48 1.24 15.34 1.39 16.17 1.53
1770 11.74 0.97 12.32 1.06 13.40 1.22 14.37 1.38 15.25 1.53 16.07 1.69 16.86 1.85
1420 7.02 0.26 9.86 0.54 11.17 0.67 12.28 0.79 13.29 0.92 14.23 1.05 15.14 1.19
1650 10.44 0.73 11.06 0.80 12.25 0.96 13.31 1.10 14.25 1.25 15.13 1.39 15.96 1.54
1890 11.76 1.06 12.31 1.15 13.38 1.32 14.37 1.49 15.28 1.66 16.11 1.83 16.89 1.99
2120 13.10 1.48 13.59 1.58 14.55 1.78 15.48 1.97 16.34 2.17 17.14 2.35 17.89 2.54
2360 14.45 2.01 14.89 2.12 15.76 2.34 16.62 2.56 17.43 2.77 18.20 2.98 18.92 3.19
1770 6.84 0.32 7.78 0.41 9.46 0.62 10.82 0.83 12.02 1.05 13.13 1.28 14.19 1.53
2030 7.58 0.46 8.40 0.55 9.98 0.78 11.31 1.03 12.47 1.27 13.52 1.52 14.51 1.78
2360 8.57 0.69 9.27 0.79 10.68 1.04 11.96 1.31 13.09 1.60 14.11 1.88 15.05 2.17
2690 9.59 0.99 10.20 1.10 11.44 1.36 12.64 1.66 13.74 1.98 14.74 2.30 15.65 2.63
2950 10.40 1.28 10.96 1.39 12.09 1.67 13.21 1.98 14.27 2.33 15.25 2.68 16.15 3.03
2120 7.28 0.45 8.05 0.54 9.60 0.75 11.00 1.00 12.21 1.26 13.28 1.51 14.27 1.78
2500 8.32 0.71 8.97 0.80 10.29 1.02 11.59 1.30 12.78 1.59 13.84 1.89 14.80 2.19
2830 9.25 1.00 9.83 1.10 10.99 1.33 12.16 1.62 13.29 1.93 14.34 2.27 15.30 2.60
3210 10.33 1.42 10.85 1.54 11.87 1.78 12.90 2.07 13.93 2.40 14.93 2.76 15.87 3.14
3540 11.29 1.88 11.77 2.01 12.69 2.27 13.62 2.56 14.56 2.90 15.49 3.27 16.40 3.67
EXTERNAL STATIC PRESSURE (kPa)
0 50 100 150 200 250 300
40RU
Table 10D -- 40RU High--Capacity Fan Performance Data — 0--600 kPa External Static Pressure — SI (cont)
UNIT
40RUA*07
40RUQ*07
40RUA*08
40RUQ*08
40RUS*08
40RUA*12
40RUQ*12
40RUS*12
40RUA*14
40RUS*14
40RUA*16
40RUQ*16
40RUS*16
See Legend and Notes on page 36.
AIRFLOW
(L/s)
r/s kW r/s kW r/s kW r/s kW r/s kW r/s kW
850 15.34 0.80 16.25 0.92 17.10 1.03 17.90 1.16 18.66 1.28 19.39 1.41
850 15.69 0.94 16.61 1.07 17.47 1.20 18.28 1.33 19.04 1.47 19.77 1.61
1130 16.04 1.09 16.95 1.23 17.81 1.38 18.63 1.53 19.40 1.67 — —
1270 16.44 1.27 17.32 1.42 18.17 1.58 18.97 1.74 19.75 1.90 — —
1420 16.91 1.49 17.75 1.64 18.56 1.81 19.34 1.97 — — — —
1060 15.50 0.96 16.43 1.10 17.31 1.23 18.14 1.37 18.93 1.51 19.68 1.66
1230 15.84 1.14 16.75 1.28 17.62 1.43 18.45 1.58 19.24 1.74 — —
1420 16.34 1.38 17.19 1.54 18.01 1.70 18.81 1.86 19.59 2.03 — —
1600 16.97 1.69 17.76 1.85 18.52 2.02 19.27 2.19 — — — —
1770 17.61 2.01 18.35 2.18 19.07 2.35 19.77 2.53 — — — —
1420 16.02 1.33 16.87 1.48 17.71 1.64 18.52 1.80 19.30 1.97 — —
1650 16.76 1.70 17.53 1.85 18.29 2.02 19.04 2.19 19.77 2.37 — —
1890 17.64 2.16 18.35 2.33 19.05 2.51 19.74 2.69 — — — —
2120 18.60 2.73 19.28 2.91 19.93 3.10 — — — — — —
2360 19.61 3.40 — — — — — — — — — —
1770 15.21 1.78 16.19 2.06 17.13 2.34 18.04 2.64 18.91 2.94 19.75 3.25
2030 15.46 2.05 16.37 2.33 17.26 2.63 18.12 2.94 18.96 3.26 19.78 3.59
2360 15.94 2.46 16.78 2.77 17.60 3.08 18.40 3.40 19.18 3.73 19.94 4.07
2690 16.51 2.95 17.32 3.28 18.09 3.62 18.84 3.96 19.57 4.31 — —
2950 16.99 3.39 17.78 3.74 18.54 4.10 19.26 4.47 19.96 4.84 — —
2120 15.21 2.05 16.11 2.33 16.98 2.62 17.83 2.93 18.66 3.24 19.47 3.57
2500 15.69 2.49 16.54 2.80 17.35 3.12 18.14 3.44 18.90 3.77 19.64 4.11
2830 16.18 2.94 17.01 3.28 17.79 3.63 18.54 3.97 19.27 4.33 19.97 4.69
3210 16.75 3.52 17.57 3.90 18.34 4.29 19.08 4.67 19.78 5.06 — —
3540 17.26 4.09 18.07 4.50 18.84 4.93 19.57 5.35 — — — —
EXTERNAL STATIC PRESSURE (kPa)
350 400 450 500 550 600
35
Page 36
Legend and Notes for Tables 10A and 10C
LEGEND
Bhp — Brake Horsepower Input to Fan
ESP — External Static Pressure
NOTES:
1. Maximum allowable fan speed is 1200 rpm for all sizes.
2. Fan performance is based on deductions for wet coil, clean
2--- in. filters, and unit casing. See table at right for factory ---supplied filter pressure drop.
3. Refer to fan motor and drive tables for additional data.
40RU
LEGEND
ESP — External Static Pressure
NOTES:
1. Maximum allowable fan speed is 20 r/s for all sizes.
2. Fan performance is based on deductions for wet coil, clean
51--- mm filters, and unit casing. See table at right for factory --supplied filter pressure drop.
3. Refer to fan motor and drive tables for additional data.
FACTORY--SUPPLIED PRESSURE DROP — ENGLISH
UNIT
40RUA*07
40RUQ*07
40RUA*08
40RUQ*08
40RUS*08
40RUA*12
40RUQ*12
40RUS*12
40RUA*14
40RUS*14
40RUA*16
40RUQ*16
40RUS*16
Legend and Notes for Tables 10B and 10D
FACTORY--SUPPLIED PRESSURE DROP — SI
UNIT
40RUA*07
40RUQ*07
40RUA*08
40RUQ*08
40RUS*08
40RUA*12
40RUQ*12
40RUS*12
40RUA*14
40RUS*14
40RUA*16
40RUQ*16
40RUS*16
AIRFLOW
(Cfm)
850 0.05
1150 0.08
1450 0.11
2,250 0.07
3,000 0.11
3,750 0.15
3,000 0.11
4,000 0.17
5,000 0.23
3,750 0.06
5,000 0.10
6,250 0.13
4,500 0.08
6,000 0.12
7,500 0.17
AIRFLOW
(L/s)
850 13
1150 20
1450 28
1000 17
1400 27
1800 38
1450 28
1900 42
2350 56
1750 15
2350 24
2950 33
2100 20
2800 30
3500 42
PRESSURE DROP
PRESSURE DROP
(in. wg)
(Pa)
36
Page 37

40RU
37
Page 38

40RU
Copyright 2010 Carrier Corp. D 7310 W. Morris St. D Indianapolis, IN 46231 Printed in U.S.A. Edition Date: 08/10
Manufacturer reserves the right to change, at any time, specifications and designs without notice and without obligations.
Catalog No: 40RU --- 06SI
Replaces: 40RU--- 04SI
38
Page 39
START--UP CHECKLIST
(SPLIT SYSTEMS WITH 40RU UNITS)
I. PRELIMINARY INFORMATION
OUTDOOR: MODEL NO. INDOOR: MODEL NO.
SERIAL NO. SERIAL NO.
ADDITIONAL ACCESSORIES
II. PRE--START--UP
OUTDOOR UNIT
IS THERE ANY SHIPPING DAMAGE? (Y/N)
IF SO, WHERE:
WILL THIS DAMAGE PREVENT UNIT START--UP? (Y/N)
CHECK POWER SUPPLY. DOES IT AGREE WITH UNIT? (Y/N)
HAS THE GROUND WIRE BEEN CONNECTED? (Y/N)
HAS THE CIRCUIT PROTECTION BEEN SIZED AND INSTALLED PROPERLY? (Y/N)
ARE THE POWER WIRES TO THE UNIT SIZED AND INSTALLED PROPERLY? (Y/N)
HAVE COMPRESSOR HOLDDOWN BOLTS BEEN LOOSENED? (Y/N)
CONTROLS
ARE THERMOSTAT(S) & INDOOR FAN CONTROL WIRING CONNECTIONS MADE & CHECKED? (Y/N)
ARE ALL WIRING TERMINALS (including main power supply) TIGHT? (Y/N)
HAVE OUTDOOR UNIT CRANKCASE HEATERS BEEN ENERGIZED FOR 24 HOURS? (Y/N)
INDOOR UNIT
HAS WATER BEEN PLACED IN DRAIN PAN TO CONFIRM PROPER DRAINAGE? (Y/N)
ARE PROPER AIR FILTERS IN PLACE? (Y/N)
HAVE FAN AND MOTOR PULLEYS BEEN CHECKED FOR PROPER ALIGNMENT? (Y/N)
DO THE FAN BELTS HAVE PROPER TENSION? (Y/N)
PIPING
40RUA, 40RUQ
40RU
HAS FOAM SHIPPING BLOCK BEEN REMOVED FROM THE TXV (Thermostatic Expansion Valve)? (Y/N)
ARE LIQUID LINE SOLENOID VALVES LOCATED AT THE INDOOR UNIT (40RUA) OR OUTDOOR UINT
(40RUQ) COILS AS REQUIRED? (Y/N)
HAVE LEAK CHECKS BEEN MADE AT COMPRESSORS, CONDENSERS, INDOOR COILS,
TXVs (Thermostatic Expansion Valves) SOLENOID VALVES, FILTER DRIERS, AND FUSIBLE PLUGS
WITH A LEAK DETECTOR? (Y/N)
LOCATE, REPAIR, AND REPORT ANY LEAKS
HAVE ALL COMPRESSOR SERVICE VALVES BEEN FULLY OPENED (BACKSEATED) (Y/N)
ARE THE COMPRESSOR OIL SIGHT GLASSES SHOWING CORRECT LEVELS? (Y/N)
40RUS
HAS AIR BEEN BLED FROM SYSTEM? (Y/N)
HAVE LEAK CHECKS BEEN MADE AT COMPRESSORS, CHILLERS, VALVES, & INDOOR COILS? (Y/N)
LOCATE, REPAIR, AND REPORT ANY LEAKS.
39
Page 40
CHECK VOLTAGE IMBALANCE
LINE-TO-LINE VOLTS: AB V AC V BC V
(AB + AC + BC)/3 = AVERAGE VOLTAGE = V
MAXIMUM DEVIATION FROM AVERAGE VOLTAGE = V
VOLTAGE IMBALANCE = 100 X (MAX DEVIATION)/(AVERAGE VOLTAGE) =
IF OVER 2% VOLTAGE IMBALANCE, DO NOT ATTEMPT TO START SYSTEM!
CALL LOCAL POWER COMPANY FOR ASSISTANCE.
III. START--UP
CHECK INDOOR FAN MOTOR SPEED AND RECORD.
AFTER AT LEAST 10 MINUTES RUNNING TIME, RECORD THE FOLLOWING MEASUREMENTS:
40RU
COMP A1 COMP B1
OIL PRESSURE
SUCTION PRESSURE
SUCTION LINE TEMP
DISCHARGE PRESSURE
DISCHARGELINETEMP
ENTERING OUTDOOR UNIT AIR TEMP
LEAVING OUTDOOR UNIT AIR TEMP
INDOOR UNIT ENTERING AIR DB TEMP
INDOOR UNIT ENTERING AIR WB TEMP
INDOOR UNIT LEAVING AIR DB TEMP
INDOOR UNIT LEAVING AIR WB TEMP
OUTDOOR UNIT ENTERING WATER TEMP
(40RUS ONLY)
OUTDOOR UNIT LEAVING WATER TEMP
(40RUS ONLY)
INDOOR UNIT ENTERING WATER TEMP
(40RUS ONLY)
INTDOOR UNIT LEAVING WATER TEMP
(40RUS ONLY)
COMPRESSOR AMPS (L1/L2/L3) ____/____/____ ____/____/____
CHECK THE COMPRESSOR OIL LEVEL SIGHT GLASSES, ARE THE SIGHT GLASSES SHOWING
1
OIL LEVEL AT
/8to1/3FULL? (Y/N)
NOTES:
Copyright 2010 Carrier Corp. D 7310 W. Morris St. D Indianapolis, IN 46231 Printed in U.S.A. Edition Date: 08/10
Manufacturer reserves the right to change, at any time, specifications and designs without notice and without obligations.
40
Catalog No: 40RU --- 06SI
Replaces: 40RU--- 04SI
 Loading...