

Page 1

20071590 ELECTRONIC LAP COUNTER
Montage- und Betriebsanleitung
Assembly and instructions
Instructions de montage et d’utilisation
Instrucciones de uso y montaje
Instruções de montagem e modo de utilização
Istruzioni per il montaggio e l’uso
Montage- en gebruiksaanwijzing
Monterings- och bruksanvisning
Asennus- ja käyttöohjeet
Montajse- og bruksanvisning
Ősszeszerelési és használati útmutató
Instrukcja obsługi i montażu
Návod na montáž a pre prevádzkuo
Návod na montáž a pro provoz
Ръководство за монтаж и експлоатация
Οδηγίες συναρμολόγησης και λειτουργίας
Instrucţiuni de montaj şi de utilizare
Monterings- og driftsvejledning
安装和使用说明
取扱説明書取扱説明書の内容は予
조립과 작동 방법
Montaj ve işletme kılavuzu
Инструкция по монтажу и эксплуатации
Page 2
InhaltsverzeichnisTable of contents
Safety instructions
Contents of package
Safety instructions 8
Contents of package 8
Power supply 8
Assembly 9
Lining up the vehicles 9
How it works 9
Settings 9
Switching on 9
Race modes 9
Start of the race 10
Lap race procedure 11
Automatic switch-off 11
Troubleshooting/Driving tip 11
Technical specifications 11
Welcome
Welcome to the Team Carrera!
The operating instructions contain important information regarding
assembly and operation of your Carrera Evolution / GO!!! Electronic
Lap Counter. Please read them carefully and keep them in a safe
place afterwards.
If you have any queries, please do not hesitate to contact our distributor or visit our website: carrera-toys.com
Please check the contents for completeness and possible transport
damage. The packaging contains important information and should
also be retained.
We hope you will derive a lot of pleasure from your new
Carrera Evolution / GO!!! Electronic Lap Counter.
• WARNING! Not suitable for children under 36 months. Danger of
suffocation due to small parts which may be swallowed.
Warning: Risk of pinching caused by function.
• WARNING!
This toy contains magnets or magnetic components. Magnets sticking together or becoming attached to a metallic object inside the human body can cause serious or fatal injury. Seek immediate medical
help if magnets are swallowed or inhaled.
• Do not open the housing of the Lap Counter.
• Only the mentioned batteries may be used.
• Pay attention to the correct polarity when inserting the batteries.
• Do not use batteries of varying types or new and used ones together.
• Used batteries should be removed from the vehicle.
• Batteries which are nonrechargeable may not be recharged.
• Rechargeable batteries may not be used.
WARNING! Used batteries should not be disposed of with normal
household waste. Use special battery disposal.
B
A
1 Electronic Lap Counter
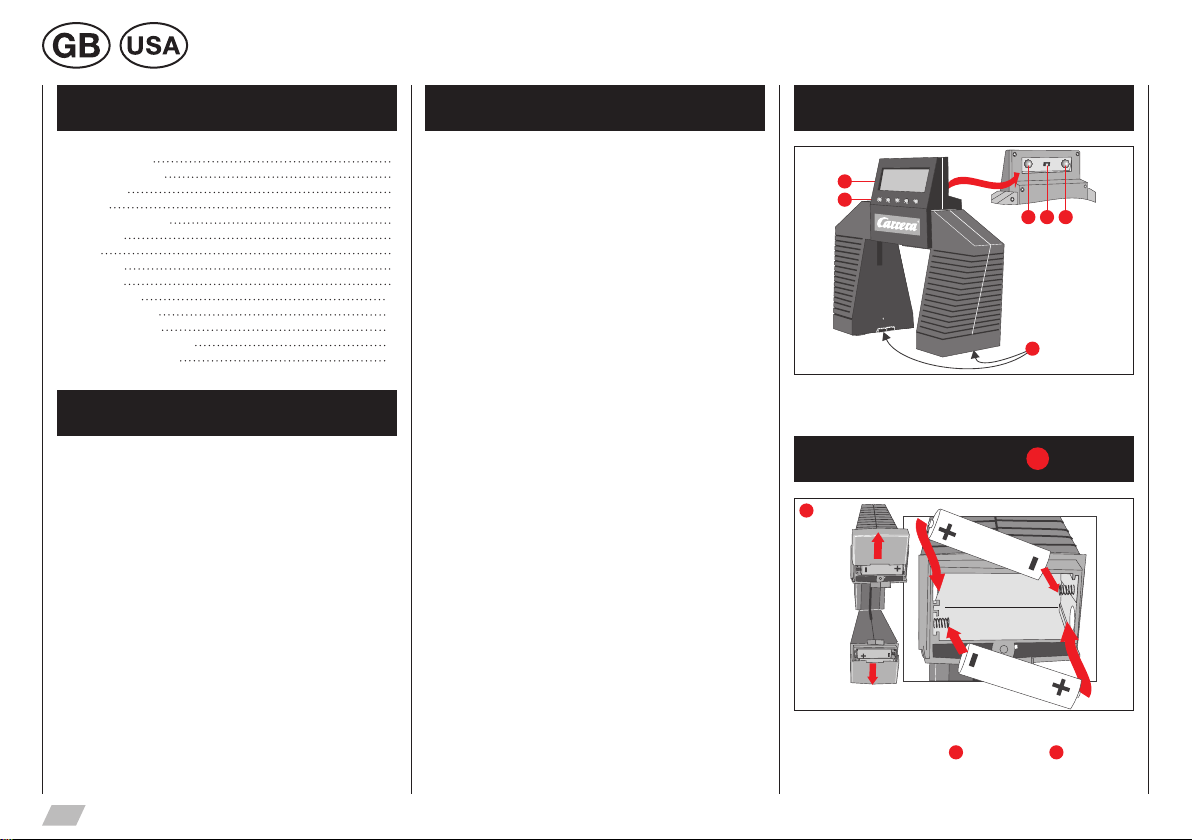
Power supply
1
C D E
F
F
Insert two AA (R6) batteries in the battery compartment in each of
the two feet of the lap counter
included). Close the compartments.
8
F
as shown in fig. 1 (batteries not
Page 3

Assembly
How it works
Switching on
1
Pull out the lap counter to the width of the track being used (fig. 1).
Insert the sides of the track into the projections on the inside of the
feet of the lap counter.
Lining up the vehicles
1 2
A
Line up the vehicles in the direction of driving (fig. 1) so that they
are close to the light barrier (fig.
2
) of the lap counter.
1
2
The lap counter recognizes a vehicle when it passes through the
light barrier. You can either select a race with a specific number
of laps (e. g. Formula 1, fig.
2
race, fig.
einstellen.
Settings are made using the two buttons (
tings and the progress of the race are shown on the display (over
the lanes).
).
1
) or a specific time (e. g. 24 hour
Settings
C D E
C
and E). These set-
1
100
00:44:28
Push the power switch D into the ON position. The display shows
the active racing mode (fig.
1
, flashing).
100
00:41:32
Race modes
1
100
00:44:28
2
100
00:44:28
Settings for a lap race
Keep one of the buttons (
blinking (> 2 secs.). The default setting is 100 laps. Press button
C
again (
or E) for the track you want to make the setting for and
keep it pressed until the counter begins to automatically count backward.
The units are set first, then the ten and finally the hundreds. The
number of laps can be set manually by releasing the button and
then making short, intermittent presses. If you keep the button
pressed for a longer period of time again, the setting process will
begin again with units. Max. number of laps: 999.
Number of laps for second lane
As for the first lane, but using the other button.
C
106
00:41:32
045
00:41:32
or E) pressed until the display stops
9
Page 4

3
100
00:44:28
4
045
00:44:28
5
100
00:44:28
6
00:01:00
7
00:70:00
8
60:00:00
10
999
00:41:32
045
00:41:32
100
00:41:32
00:01:00
00:70:00
60:00:00
9
99:59:00
Settings for a time race
When you switch on the lap counter and the display is flashing,
press one of the enter buttons (
shows the time race mode (fig.
C
(
or E) until the display stops flashing (> 3 secs.).
Setting the duration of the race for both lanes
Keep one of the buttons (
blinking (>2sec.).
The defaut setting is 1 second.
Keep one of the buttons (
seconds begins to automatically count forwards. After 1 run through
the display will jump automatically to the minutes. Here, too, you
can release the button and make short, intermittent presses if you
want to set the time manually. If you keep the button pressed for a
longer period of time again, the setting process will begin at the first
position. Max. race length: 99:59:00 minutes.
1
C
C
Start of the race
038
00:17:55
2
032
54:48:27
99:59:00
C
or E) briefly until the display
3
). Then push one of the buttons
or E) pressed until the display stops
or E) pressed until the dispay for the
036
88:15:62
029
54:48:27
The start phase of the selected racing mode will begin 10 seconds
after the last press of the enter button. The red LEDs in the set of
starting lights
seconds. At the same time, you can hear an increasingly higher
acoustic signal until all the lights are on.
After two further seconds another long sound can be heard and
all of the lights will go out. The race has been officially started and
you can drive off.
False start: If a vehicle drives off before the race has been officially
started, the lap will not be evaluated for this lane. The count will
begin when the vehicle passes through the light barrier the second
time.
1
2
Lap race
Every time a car passes through the light barrier you will hear a
sound and one lap will be deducted from the total number of laps
for this lane (fig.
be displayed.
The race is at an end when the lap counter displays 000 for one
of the two lanes (fig.
if a vehicle drives through the light barrier. If two racing cars are
competing on the last lap, the time lapse between the two will be
displayed on the lap counter.
A melody signalizes the end of the race. If you then press the Enter
button briefly, the fastest lap
A
will light up one after another at intervals of 1.5
Lap race procedure
038
00:17:55
004
F0:01:32
1
). The time required for the lap in this lane will
2
). The lap counter will no longer respond
F
036
00:15:62
000
00:17:26
will be shown on the display.
Page 5

3
032
54:48:27
4
363
00:00:00
Time race
During the race the remaining time will be displayed (fig.
00:00:00 is reached. The lap counter will then no longer respond if
a vehicle drives through the light barrier. An acoustic signal can be
heard every time a vehicle passes through the light barrier during
a race and the number of laps displayed for this lane will increase
by one.
The race is at an end when the time counter reaches 00:00:00
4
(fig.
). The maximum number of laps which can be displayed is
999. If this number is reached in the course of a race, the counter
will reset to zero and counting will begin anew.
Cancelling a race or a further race
C
Press the
flashing display will then appear and the racing can be selected
again.
or E button for longer than 2 seconds. The standard
029
54:48:27
359
00:00:00
3
) until
Automatic switch-off
If no car passes through the lap counter or no key is pressed for a
period of 3 minutes, the lap counter will switch off automatically in
order to save power. You can return to the Enter mode by pressing
the ON/OFF switch.
Troubleshooting
Driving tips
• By pressing the buttons C and E for a short period of time you
can select either a lap or a time race.
• Neither transmitter nor receiver may be obstructed by sections of
track or any other objects. An obstruction of the light barrier would
cause a malfunction of the lap counter.
• The lap counter may only be set up over sections of track which
are lying flat.
• In the event of any malfunctions, all four batteries must be replaced.
Technical specifications
Current source:
4 x 1.2 V or 1.5 V Mignon batteries (AA/R6).
Batteries are not included in delivery.
It is not possible to use rechargeable batteries.
This device is marked by “selective sort throught” symbol related to
sort through domestic, electric and electronic, waste. This means
the product must be treated by a specialized “sorting/collecting” system in accordance with European directive 2012/19/CE, to reduce
the impact upon environment. For more precise information, please
contact your local administration. Electronical product which are
not going through special collecting, are potentially dangerous for
environment and human health, because of dangerous substance.
Current source:
4 x 1.2 V or 1.5 V Mignon batteries (AA/R6).
Batteries are not included in delivery.
It is not possible to use rechargeable batteries.
11
Page 6

Stadlbauer Marketing + Vertrieb GmbH · Rennbahn Allee 1 · 5412 Puch/Salzburg · Austria
carrera-toys.com
7.99.12.24.00 · 02/2016
 Loading...