

CARR 103994 Hoop II Multi-Mount Step User Manual
Hoop II Multi
-
Mount Step
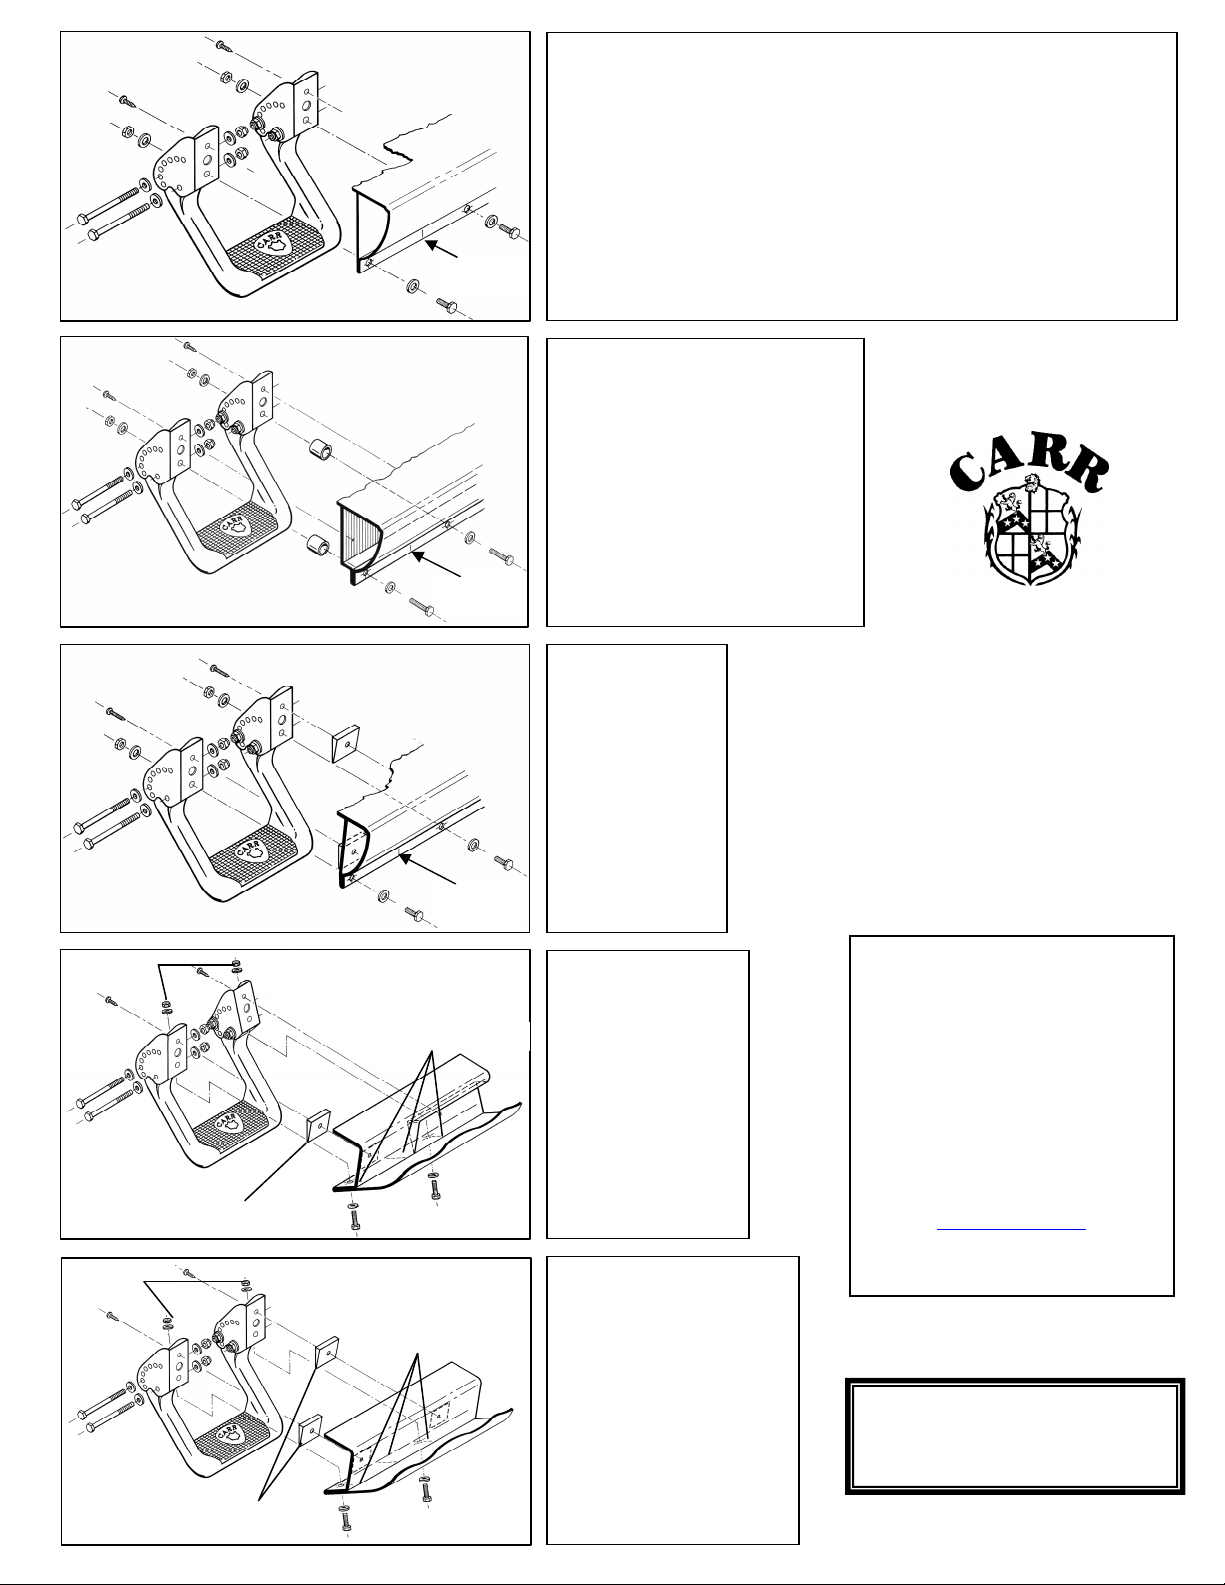
A
89-93 Pickup
Applications for Diagram
“A”
A
D
E
B
C
WAX YOUR STEP ON
A
3 vertical marked center holes
3 vertical marked center holes
5/16 Jam Nut
center line
center line
center line
Mark
CHEVY/GMC
73-87 Pickup
76-91 Suburban
76-93 S10/S15 PU
67-96 F/S Van
DODGE
74-93 F/S PU
97-09 Dakota
74-92 Ram Chrgr
83-91 Raider
Applications for Diagram “B”
FORD
91-01 Explorer
96-01 Mer Mtn
75-02 F/S E-Van
05-14 F/S E-Van
JEEP
93-98 Grd Chrk
MAZDA
91-94 Navajo
MITSUBISHI
78-94 Pickup
83-99 Montero
NISSAN
98-04 Frontier
02-04 Frntier Crw
00-04 Xterra all drs
86-01 Pathfinder
86-97 Hrdbody PU
72-86 Pickup
TOYOTA
74-88 Pickup
84-89 4 Runner
80-91 FJ60/FJ62
MERCEDES
10-14 Sprinter Van
Optional wedge washers
5/16 Jam Nut
Mark
Mark
DODGE
02-09 F/S Pickup*
02-09 Quad Cab
06-09 Mega Cab
*Will not fit 09 1500
IZUSU
84-91 Trooper
91-02 Trooper
91-02 Rodeo
91-02 Amigo
Applications for Diagram
Applications for
“C”
Diagram “C”
DODGE
“Old Body Style”
94-02 F/S PU
98-02 F/S Quad
Applications for
Diagram “D”
FORD
01-03 Super Crew
97-04 F150 F/S PU
04 F150 Heritage
97-03 F150 Quad Cab
97-14 Expedition
Applications for Diagram “E”
MAZDA
83-93 B-Ser PU
MITSUBISHI
97-02 Montr Sport
TOYOTA
89-95 Pickup
90-95 4 Runner
91-98 FJ80 LC
Installation Instructions
Part No’s:103991 / 103992 / 103994
For Diagrams: A / B / C / D / E
Quality and Style that Endures
Follow the diagram and the
written directions carefully for a
proper, safe installation.
Should you encounter an
unusual, unforeseen problem,
contact our Technical Help Line
7:00 AM – 3:00 PM Pacific Time
(951) 719-1068
Visit our web-site at
www.CARR.com
Carr Pattern Co., Inc.
Optional wedge washers
CHEVY/GMC
02-09 Trail Blazer
02-09 Envoy
02-14 Denali Truck only
88-14 Sierra/Silverado 1500-
3500
88-14 F/S Crew Cab all doors
02-13 Avalanche
FORD
04-14 F150 New Body Style
REGULAR BASIS TO
MAINTAIN ITS LUSTER

Hoop II Multi-Mount Step Installation Instructions
MATERIALS NEEDED:
Drill
Motor, 3/8” drill bit, ¼” drill bit, 1/8” drill bit, pencil, Phillips screw driver, center punch, two
1.
DIAGRAMS A, B, C, D, E:
These steps mount to an extremely strong part of your vehicle, the back side of its rocker panels.
Carr Pattern Co., Inc.
CARR
● 27447 Bostik Court ● Temecula CA 92590
Part No’s:103991 / 103992 /103994
For Diagrams: A / B / C / D / E
Do not over tighten the nuts and bolts or damage to the castings and or stripping of the threads could result.
FOR SAFE AND PROPER USAGE OF THIS PRODUCT, THE MOUNTING INSTRUCTIONS MUST BE FOLLOWED CAREFULLY AND COMPLETELY.
The manufacturer and distributor of this product are in no way responsible for the consumer’s failure to adhere to the warnings and directions of these instructions in the
event of damage to the consumer’s vehicle, other properties and or personal injury.
WARNINGS!
½” wrenches, two 7/16” wrenches and silicone.
MATERIAL FURNISHED: Two step casting, four steel mounting brackets, instruction page and two hardware packs
(Important! Not all of the parts in these hardware packs may be needed for proper installation).
For the proper position of the step, the front edge of the seat while in normal driving position should be in line with the center
of the step. For personal preference or to avoid any obstruction that may be on the backside of the rocker panel, the step can
be moved towards the front or the rear of the vehicle.
2. Assemble the steel mounting brackets to the step as shown in the drawing, but only hand tighten.
3. When positioning the assembled step against the back side of the rocker panel, be sure to avoid all bumps and screws to
ensure that the step is against a flat surface. Take a pencil and mark a vertical line that lines up with the front edge of the seat,
on the outside painted surface of the pinch weld. (See diagram). Disassemble the brackets from the step.
4. Measure 4 1/8” on each side of the marked vertical line and mark two more lines on that same surface. The dimension
between the two outside marked lines should be 8 ¼”.
5. Measure 3/8” from the edge of the pinch weld where you marked the other vertical lines and mark two horizontal lines,
creating a cross hair. NOTE: DOUBLE CHECK DIMENSIONS BEFORE DRILLING! (Warning: when drilling holes leave
at least 1/8” of metal between the hole and the edge of the pinch weld).
6. Take a center punch and punch the center where the two sets of lines cross.
7. DIAGRAM B: Drill the holes up against the bend of the rocker panel and the pinch weld.
8. Take a 1/8” drill bit and drill out the centered punched holes.
9. Enlarge the 1/8” hole with a 5/16” drill bit.
10. After drilling make sure that all the burrs are removed.
11. Place the steel mounting brackets on the vehicle where the two holes are drilled. DIAGRAM B: Be sure to install the tubes.
12. DIAGRAMS A, D, E: Use the 5/16” x 5/8” hex bolts (DIAGRAM B: uses the 5/16” x 1 ¾” hex bolts) with the 5/16” hex
nuts and 5/16” washers to securely tighten the steel mounting brackets on the vehicle. If the 5/16” flat washers do not fit on
the pinch weld due to interference, don’t use them.
13. DIAGRAM C: Use the 5/16” x 5/8” hex bolts with the 5/16” hex nuts and 5/16” washers and only hand tighten the steel
mounting brackets to the vehicle.
14. DIAGRAMS A, B, D, E: Using the top ¼” hole at the top of each steel mounting bracket, take a 1/8” drill bit and drill holes
into the body metal. Take the 5/8” long sheet metal screws provided and securely tighten. (Drilling at an angle may be
necessary due to interference or for proper alignment). Place the step into the steel mounting brackets and securely tighten.
DIAGRAM D ONLY: Ford application will need the front steel mounting bracket to be pivoted back to properly fit.
15. DIAGRAM C: Place the step into the steel mounting brackets and securely tighten. Insert the wedge washers between the
back side of the rocker panel and the steel mounting brackets far enough so that the step will be level. While holding the step
in the level position, use the top ¼” holes on each steel mounting bracket, mark the holes on both wedge washers. Remove
the wedge washers and drill the marked holes out with a ¼” drill bit. Place the wedge washers back into place. Take a 1/8”
drill bit and drill through the holes in the steel mounting bracket and the holes in the wedge washer into the body metal. Use
the longer sheet metal screws to securely tighten the steel mounting brackets to the vehicle. Remove the step once again from
the steel mounting brackets. Now securely tighten the steel mounting brackets to the vehicle. Place the step back into the
steel mounting brackets and securely tighten.
16. We advise putting silicone sealer around the areas where the steel mounting brackets comes in contact the body metal.
17. After one month of use, go back and give all hardware a final tightening.
Finishes: Limited Lifetime
Structural Warranty: Limited Lifetime
Warranty Conditions:
a. All warranties start from consumer’s date of purchase.
b. A new product will be sent out immediately to replace a warranty claim.
c. The above guidelines apply only to the Original Purchaser.
d. Original proof of purchase must be submitted for all warranty and returns issues.
Warranty Limitations:
a. Warranty coverage extends ONLY to repair or replacement of the CARR product. This warranty does not cover the cost of labor, transportation, installation or removal of the product.
b. Warranty coverage does not extend to damage caused by: collision, fire, theft, freezing, vandalism, riot, explosion or object striking the product, or misuse of the product and/or the vehicle on which the product is being installed.
c. Warranty coverage does not extend to damage caused by: airborne fallout (chemicals, tree sap, etc.), stones, hail, earthquake, water or flood, windstorm, lightning, the application of chemicals or sealants subsequent to
manufacture.
d. Warranty coverage does not extend to damages caused by: normal wear and tear, abuse, modification or improper installation of the product.
e. Warranty coverage does not extend to any economic loss or extra expense including (without limitation), payment for the loss of time or pay, inconvenience, storage, loss of vehicle use, vehicle rental expense, equipment rental
expense, lodging, meals, or other travel costs.
Other Terms:
This warranty gives you specific legal rights and you may also have other rights that vary from state to state. CARR does not authorize any person to create for it any other obligation or liability in connection with its products. ANY
IMPLIED WARRANTY OF MERCHANTABILITY OR FITNESS FOR A PARTICULAR PURPOSE APPLICABLE TO THIS PRODUCT IS LIMITED IN DURATION TO THE DURATION OF THIS WRITTEN
WARRANTY. PERFORMANCE OF REPAIRS AND NEEDED ADJUSTMENTS IS THE EXCULSIVE REMEDY UNDER THIS WRITTEN WARRANTY OR ANY IMPLIED WARRANTY. CARR SHALL NOT BE LIABLE
FOR INCIDENTAL OR CONSEQUENTIAL DAMAGES RESULTING FROM BREACH OF THIS WRITTEN WARRANTY.*
*Some states do not allow limitations on how long an implied warranty will last or the exclusion or limitation of incidental or consequential damages, so that above limitations or exclusions may not apply to you.
Guarantee: Every attempt has been made to manufacture and distribute the finest quality products available. Our manufactured products are guaranteed to be free of defects due to workmanship or materials. Distributed products are
subject to manufacturer’s warranty only.
Warranty Policy
 Loading...