

Carpoint V4050 User Manual

VV44005500OOwwnneerr’’s
MMaannuuaal
l
s

Thank you for choosing the XROAD V4050 Navigation system.
T
This model includes:
9 4.3” Wide[16:9] TFT Touch Screen LCD with Ultra-bright 480x272 resolution in 16.7 million colors
9 400MHz Samsung CPU to ensure powerful performance
9 Built-in Bluetooth Hands-Free Calling
9 Premium multimedia functions supporting music (MP3), video (AVI), picture (JPEG) and game
9 Internal Enhanced GPS receiver (SIRFIII / SIRFstarIII) for a quick start
9 Powerful Lithium-Polymer 2100mAH Battery
9 Microsoft WinCE Core Version 5.0
9 2.0 GB SD card preloaded with U.S. and Canada map data
WARNING: DANGER OF ACCIDEN
When you use XROAD navigation in your vehicle, it is your
sole responsibility to use the device in a manner that will
not cause accidents, personal injury or property damage,
and not obstruct your view or interfere with operation of
vehicle safety equipment. The user of this product is solely
responsible for observing safe driving practices. DO NOT
operate XROAD V4050 while driving. Park the vehicle first
and operate when necessary.
XROAD DISCLAIMS ALL
LIABILITY FOR ANY USE
OF THIS PRODUCT IN A
WAY THAT MAY CAUSE
ACCIDENTS, DAMAGE,
OR THAT MAY VIOLATE
THE LAW

1. About This Book
This handbook provides a quick guide to the XROAD NAVIGATION system, and the basic functions
of the device are described mainly in respect of hardware. For reasons of product development some
information may not be updated yet, and contents may be changed at any time without prior
notification. No liability shall be assumed for technical or editorial errors or omissions herein; nor for
incidental or consequential damages resulting from the performance or use of this material.
This document contains information protected by copyright and thus may not be reproduced in whole
or in part for any purpose whatsoever. Likewise, it may not be transmitted or reproduced in any form
whatsoever, whether electronically or mechanically - including photocopying and recording.
All brands and trademarks mentioned in this document may be registered by a third party and subject
to current legislation and to the rights of their respective owners, without reservation. The absence of
explicit labeling of registered trademarks does not admit the conclusion that the brand is not subject to
the rights of third parties.
© Copyright 2007, XROAD. All rights reserved.

02. For Proper/Best Use
Page_02
2.1 General
ཿ Effective route planning prior to the beginning of each journey is recommended. If you need to setup a
new itinerary while en route, please drive to a safe place or a parking site first. For your own safety, do not
operate the product while driving.
ྀ The product is intended to be used only as a navigation aid, not as a precise measurement of
direction, distance, location or topography. Because calculated routes and voice guidance are for
reference only and may be different from the actual road circumstances, it is the user’s responsibility to
follow traffic signs, road layout and local regulations above all else.
ཱྀ When you get out of the car, please do not leave your device on the dashboard in direct sunlight,
since an overheated battery can cause malfunction and/or hazard. Use the product within the
recommended operational temperature range (0’C ~ 50’C), and do not expose it to excess heat or cold.
ྂ GPS satellite signals cannot pass through solid materials other than glass. So when you are inside a
tunnel or a building or in case of metallic windshield, GPS positioning may not be available. Likewise,
signal reception can be affected by situations such as bad weather or dense overhead cover such as trees.
Similarly, wireless devices may interfere with satellite signals, causing variable signal reception.
ྃ Look at the display only when it is absolutely safe to do so. If you have not fully understood the
instructions given by the device, or if you are not sure about what to do next, you may refer briefly
to the map or arrow view of your navigation system.

02. For Proper/Best Use
2.1 General
ཆ A car holder is necessary when using the device in a car, and it is strongly recommended that you
place the device in an appropriate place, avoiding areas for example which obstruct airbag panels and
instruments, or which interfere with the driver’s vision.
ཇ Taking good care of your device will ensure trouble-free operation and reduce the risk of damage to
it. Never clean your device with the power on. Use a soft, lint-free cloth moistened with water to wipe the
screen and the exterior of your device. Do not use paper towels to clean the screen. Do not place anything
on top of your device or drop objects on top of it. Do not drop your device or subject it to severe shock. Be
careful not to sit on your device when it is in the back pocket of your trousers, etc. The screen surface is
easily scratched.
Keep your device away from excessive moisture and extreme temperatures. Do not subject your
device to sudden and severe temperature changes that could cause condensation inside the unit, with
consequent damage. In the event of moisture condensation, allow your device to dry out completely.
Avoid exposing your device to direct sunlight or strong ultraviolet light for extended periods of time.
Page_03

02. For Proper/Best Use
Page_04
2.2 Safety Precaution
ཿ Main System
Never attempt to disassemble, repair or make any modification to your device since this could
cause damage to the device, and even bodily injury or property damage. Do not store or carry flammable
liquids, gases or explosive materials in the same compartment as your device and its parts or
accessories.
ྀ Battery
This device contains a non-replaceable Lithium-Polymer internal battery that can burst or explode, releasing
hazardous chemicals. To reduce the danger of fire or burns, never disassemble, crush, puncture, or
dispose of in fire or water. Since there is a high risk of explosion if the battery is replaced by an
incorrect type, replace it only with same type or an equivalent one recommended by the manufacturer.
The battery must be recycled or disposed of properly. Similarly, use a specified battery charger as
approved by the manufacturer.
ཱྀ Adapter
Never use the AC adapter in a high-moisture environment, or touch it when your hands/feet are wet.
Also, for cooling purposes, make sure there is adequate ventilation around the adapter when in use, and do
not cover it with paper, vinyl, cloth (including the carrying case) or any other material. The adapter
must be connected to the correct power source, according to the voltage requirements indicated on the
case or packaging of the product. Do not attempt to service the unit if its power lead or body becomes
damaged or exposed to excess moisture.
ྂ SD Memory Card
Keep SD or MMC cards in a well-protected case so as to avoid dust and humidity when you are not
using it, and also make sure that no foreign objects can enter the SD slot.
3. Getting It Started
3.1 Inserting SD Card
3.2 Mounting & Connecting
Your device has an SD slot, for an optional Secure Digital card storing the initial
Page_05
startup program, digital maps and other data i.e. MP3 files, movie files and
image files. To use the memory card, insert it pointing up into the slot, and the
label facing the front of the device. To remove the card, first make sure that no
application is accessing it, slightly push the top of the card to release it, and then
pull it out of the slot. To take out the card, please turn off the unit. Before
inserting another card, please press on the Power button. When you put SD Card
into SD Slot located at the bottom of the device, please give a deep and hard
push, which works for taking it out of the slot as well.
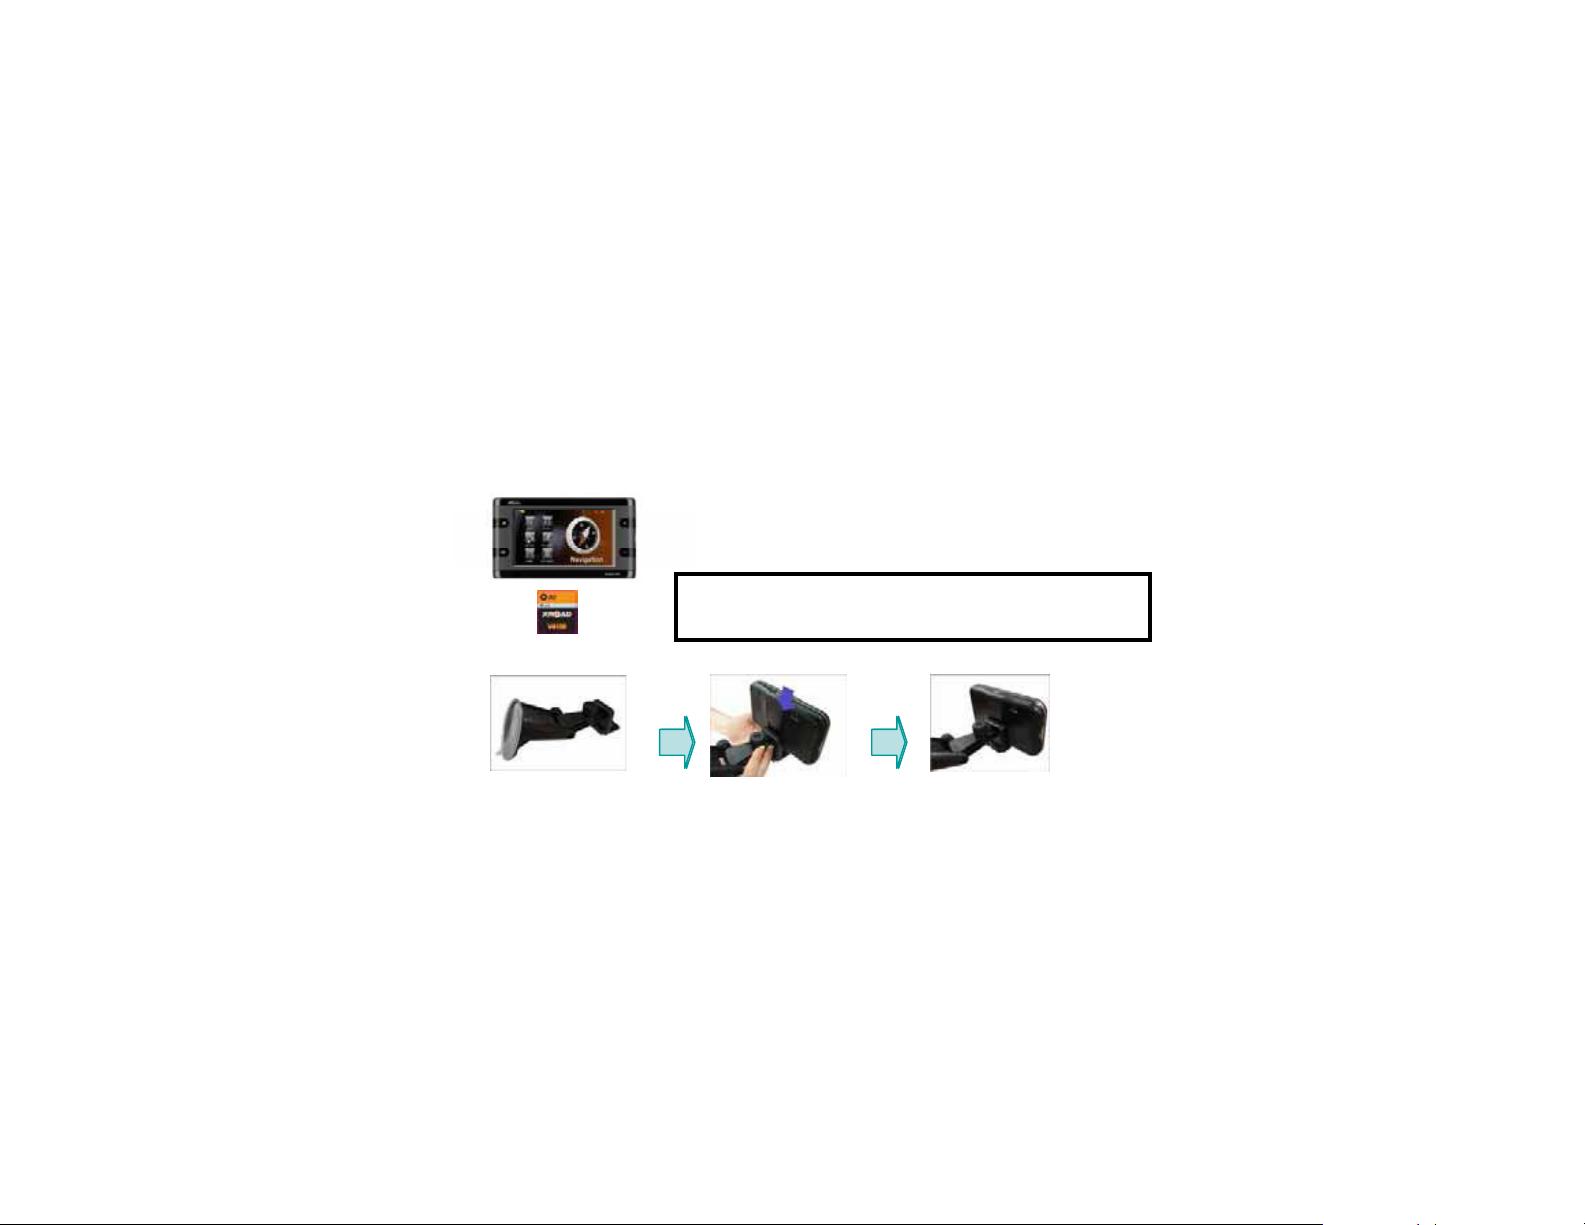
WARNING: To avoid personal injury, or accidents, DO NOT install or remove the XROAD
V4050 from the windshield suction mount while driving your vehicle. Also, be careful not
to install the XROAD V4050 in a position to obstruct the view of the driver.
1. First, clean the windshield.
Then, push the center of the
suction cup onto the windshield and then press the
fixing lever down
2. Slide the rectangular part 3. Insert the jack at the end of
of the suction-cup mount the DC power leading into the
into the corresponding part
at the bottom rear of the unit
small socket on the side of device
and put the other end into the
cigar lighter socket.

3. Getting It Started
3.3. Power Manipulation
Page_06
Power On Press the Power On/Off button to turn on the device. In case of the first use
of the device that is discharged, connect the power into the unit through the
car cigarette power jack or AC adaptor, then press Power On/Off button.
Power Off Press the Power On/Off button to turn off the device. If the device remains
connected to a 12V power jack, the battery will be charged.
Bluetooth
Press the
Bluetooth
On/Off button to launch the
Bluetooth
system
Button
WARNING:
* Please allow this delicate gadget to have enough time for its operation (e.g. in pressing buttons,
tapping touch screen, executing each menu, pushing in/out SD card etc.) since running it too hastily
and excessively often leads to mechanical trouble.
the battery is still running and discharging in all modes, except Power Off mode.

5. Hardware Accessories
ྛ
5.1 Standard Accessories 5.2 Optional Accessories
Page_07
ྙ
ྚ
ྙྚ
ྛྜ
ྛ
ྜྷ
ྞ
ྙ DVD with manuals & map data
Quick ྚ Start Guide
Windshield Suction Mount & Cradle
Note: the brand, type, spec, and photo of above accessories may vary with actual accessories. Also, accessories packagin g items may be
Cigarྜ -light adaptor
ྜྷ SD memory card
Stylus pen
ྞ
ྙ AC Adaptor
TMC External Antennaྚ
External GPS Antennaྛ
ྜ
SD Card Readerྜ
changed without prior notice.

6. A Look at the Home Screen
g
6.1 Overview
ཁ Fin
er Touch: This navigation instrument can easily be operated with your fingertip. However, if the
vehicle is moving too much, or if you want to select a point with great accuracy, you will need to use the
stylus pen. The surface of the LCD screen may be damaged if a sharp object is used, or if excessive
pressure is used on the screen.
ག SD memory card provided: If the map file is deleted, the navigation function does not perform properly.
གྷ Multitasking: This function is used to perform multitasking (for example, navigation plus audio
playback). However, this feature is NOT provided with the V4050 product. Once you pressed M button on
the top left of the navigation, you may switch to main menu, but all other icons will be grayed out and will
not function when you tap on it.
Page_10

6. A Look at the Home Screen
g
6.1 Overview
Select the desired menu icon from the main
menu screen. The corresponding program then
starts running.
Navigation plus additional menus like Music,
Movie, Picture, Game, Settings. To use the main
menu during program execution,
press the main menu key or
press the program end key to move to the main
menu. When you enter main menu, the program
being executed automatically ends. Press the
desired menu icon in the main menu. The
corresponding program then starts running.
Main menu function description
- Navi: Starts the navigation function.
- Music: Starts the music playback function that enables playin
- Movie: Starts the movie playback function that enables playing avi, files.
- Picture: Starts the picture function that enables viewing bmp, jpg, gif, and png files.
- Game: Starts the game
- Settings: Starts the screen/environment setting function.
mp3 and wav files.
Page_11

6. A Look at the Home Screen
6.2 Navi
This function guides you to your final destination by voice prompts and a mapping screen, showing
crossroads, city names and much more. It also provides various map-guiding modes and the
approximate time left to your destination.
Pop into the Navi menu and wait for the navigation program to load all the necessary data. Soon a
digital map will appear before your eyes. For further information regarding navigation usage, refer to
the separate software user manual contained in the DVD provided as a standard package.
Page_12

6. A Look at the Home Screen
g
6.3 Music
ཁ Information Before Playin
To play a music file, the mp3, wav, or wma file must be saved in an SD memory card. If there is no SD
memory card, a sample file is read. If the SD memory card is disconnected during playback, a sample file is
located at the file being played and the music playback stops. If the SD memory card is short of capacity,
purchase another SD card. Then you can save more files. Even if the capacity of the SD memory card is
not enough to download a music file, do not delete the map file.
Music Files
Page_13

6. A Look at the Home Screen
6.3 Music
ག Music Screen Description
Select Music from the main menu. When you enter Music, the last file played is located at Current Music.
If the last music file does not exist in the SD memory card, the first file available in the card is located at
Current Music. If there is no SD memory card, a sample file is located at Current Music. Press the End
Button(x) on the drawing here after or the main menu key to end Music and move to the main menu. If
you push on main menu key, music goes on. At that time, if you come back to the main menu, you can
choose other available applications.
Page_14

6. A Look at the Home Screen
g
6.3 Music
ཱྀ Playin
Press the Play button to play a music file located at Current Music. Current playing time is being counted.
Current status is displayed as playback status. If a file being played is damaged, the next file will be played
without opening a pop-up screen.
a Music File
Page_15

6. A Look at the Home Screen
g
6.3 Music
ཱྀ Playin
Press the Play button when a file located at Current Music is damaged.
- 1 Track Repeat: Music playback stops after a pop-up screen opens.
- 1 Track Repeat/All Play/All Repeat: If all music files are damaged, press the Play button. A pop-up screen
opens and the music playback stops.
a Music File - All Files Damaged
Page_16

6. A Look at the Home Screen
g
6.3 Music
ང Playin
Press the Play button when a file located at Current Music is damaged. All Play/All Repeat: A pop-up screen
opens and the next playable file is played.
a Music File - There is a Damaged File
Page_17

6. A Look at the Home Screen
6.3 Music
ཅ Pause
Playback stops temporarily. Current status is displayed as Pause. The Play button is deactivated and the
Pause button is activated. The playback indicator on the playback bar stops moving. When pressing the
previous/next music file during Pause, pause is automatically released and the previous/next music file is
played. Press the Play button when a file located at Current Music is damaged. All Play/All Repeat: A popup screen opens and the next playable file is played.
Page_18

6. A Look at the Home Screen
6.3 Music
྄ Stop
Playback stops. Current status is displayed as Stop. Current playing time appears as ’00:00:00’. When
pressing the previous/next music file during Stop, only the file name moves.
Page_19
 Loading...