

Page 1
Version 2.0
Page 2
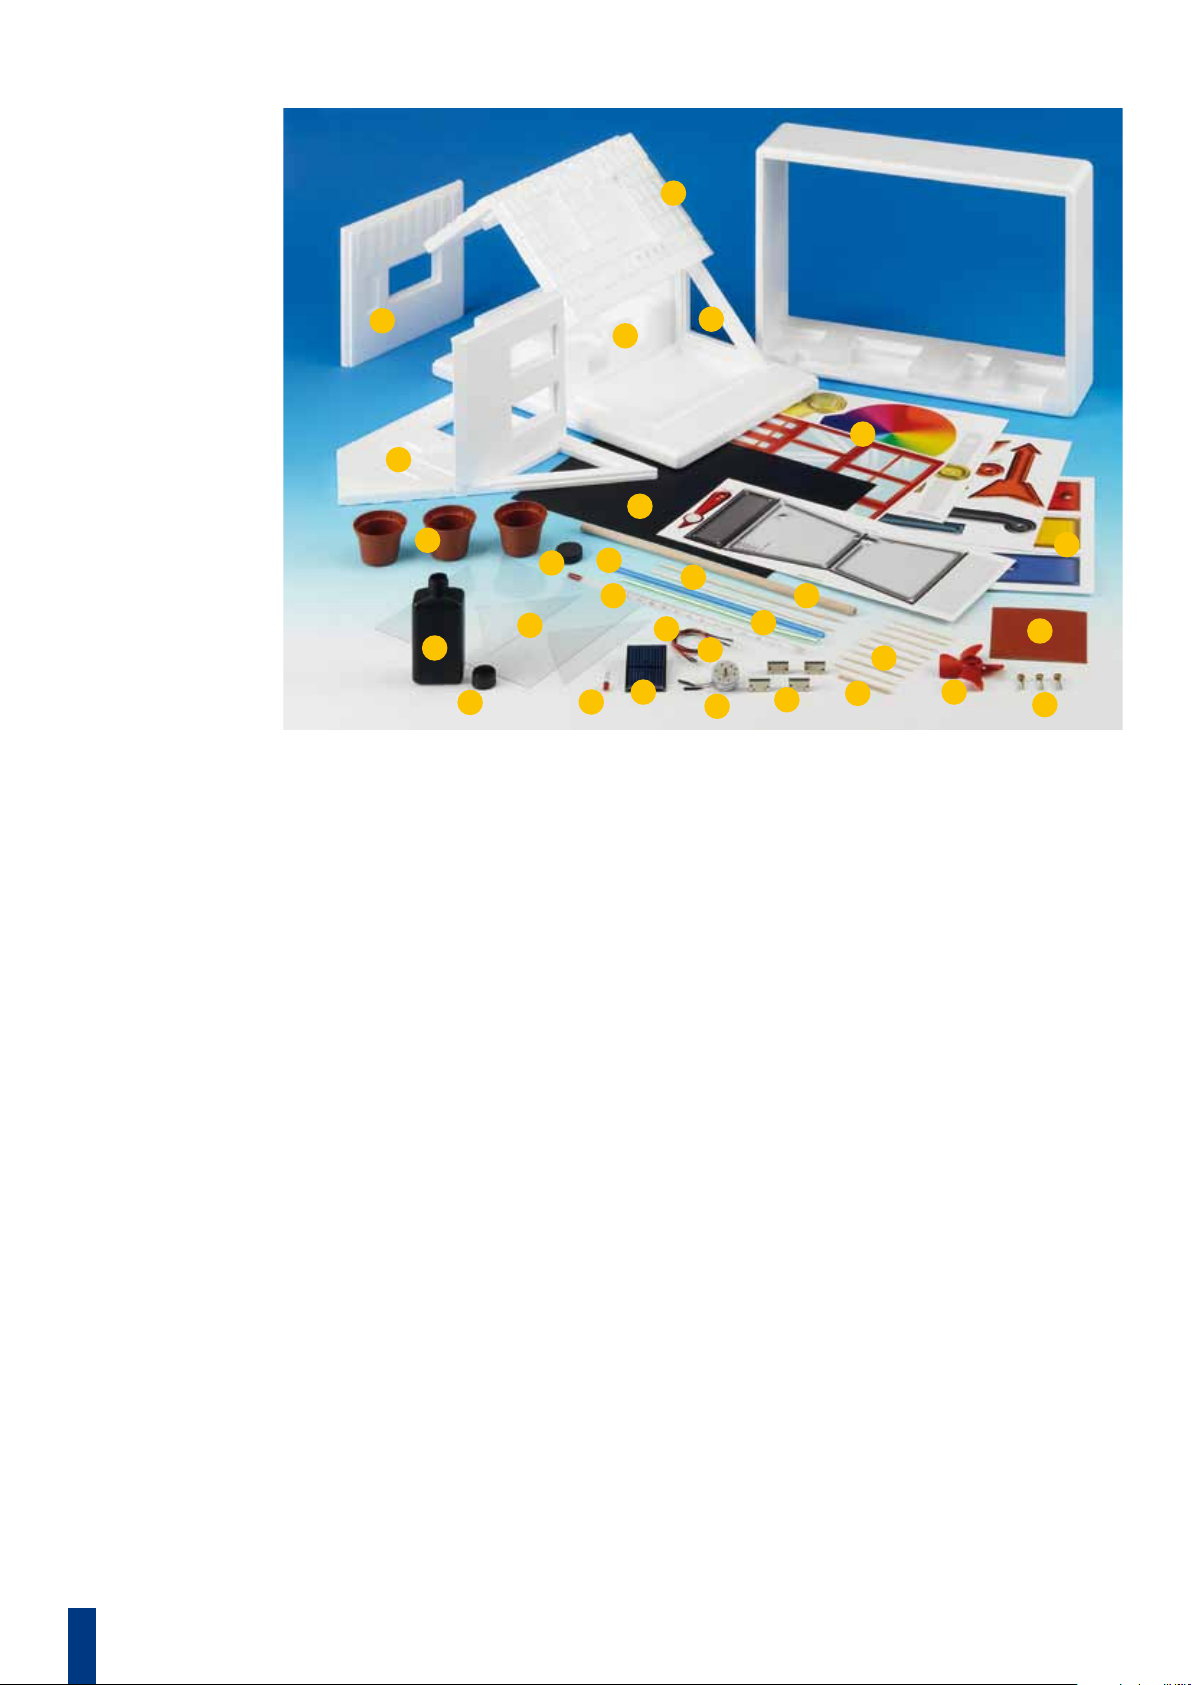
Kit Contents
1a
1e
1b
15
16
10
6
7
1d
12
23
5
20
2
9
The Power House experiment kit contains the
following parts:
Description Qty. Item No.
1 Power House polystyrene parts: 708662
a) Base, roof sections, inserts
b) Wall (pointed) with house door
c) Wall (pointed) with window
d) Wall with solarium
e) Wall with window
2 Solar cell 1 708678
3 Solar motor 1 709143
4 Contact Clips 4 708664
5 Thermometer 1 232105
6 Black bottle
(Solar collector) 1 263160
7 Lid 1 709131
8 Large dowel 1 263118
9 LED 1 000145
10 Solarium cover 1 708665
11 Long wooden sticks 2 020042
12 Black paper sheet 1 702303
13 Propeller 1 263143
14 Sandpaper 1 700881
15 Plastic pot 3 705804
16 Disk 1 708666
17 Short wooden sticks 8 705296
18 Die-cut sheet 1 708663
19 Cut-out sheet 1 709170
20 Connecting wire, black 1 263140
21 Connecting wire, red 1 263139
22 Small dowel 1 709140
23 Straight drinking straw 1 707597
24 Bendable drinking straw 1 529118
25 Fastening clips 3 020039
1c
18
11
21
3
24
8
14
17
4
22
13
Additional Items Needed
You will also need various household items
for some of your experiments. These items are
highlighted in italics in the individual experiments. Before beginning an experiment, carefully read through the list of all the things you
will need, and make sure to get anything that
might be missing.
19
25
2
Page 3
Table of Contents
Research for the future .........................4
Construction material ..........................6
Cold, warmer, hot .............................8
Project Power House .......................... 10
Heat — familiar yet mysterious ................. 20
The sun as heat dispenser ...................... 24
There’s something in the air ....................28
Water, salt, and rain ...........................32
Great climate ................................34
Light and heat from the sun .................... 36
Electricity from solar energy ................... 42
Energy from the wind .........................50
Tricks that plants use .......................... 60
3
Page 4

Light and heat from
the sun
Heating water is nice enough. But the sun’s
light can be used to do other things as well.
First, though, you have to learn a little about
the behavior of light.
=
EXP.
53
Strange: Objects in sunlight cast sharp
shadows. How can that be, if rays of light move
apart from one another as soon as they leave
their source?
You will need
“Light path” die-cut piece, roof piece, white
paper, lamp
Do the sun’s rays also
diverge?
EXP.
52
to say it emits light. What happens to the light
it sends out?
An adult should be present for this experiment!
You will need
“Light path” die-cut piece, tealight candle,
matches, white paper, tape
Experiment
1. Remove the “light path” piece from the
die-cut sheet. Bend it together into a circle and
secure it with some tape.
2. Place the circle on a sheet of white paper in
a darkened room. Set a tealight candle in the
center and light it. What do you see?
A star made of light
A candle’s flame illuminates, which is
Experiment
1. Remove the tape and pull the strip apart
again. Tape it to the roof of your experimental
house and observe the patterns that the sun
makes as it shines through it.
2. Unlike the candle in the previous experiment,
the sun is very far away from the “comb.” Use a
desk lamp or flashlight to experiment with the
way that the distance between the light source
and the “comb” can affect the shadows.
Explanation
A ray of light streams through each one of the
slits. It runs perfectly straight. So light spreads
out equally in all directions. As the rays of light
get farther from their source, they diverge farther and farther from each other.
Explanation
Rather than diverging, the rays of the sun run
parallel — that is, they always keep the same
distance from one another. That is due to the
unbelievably huge distance of the sun from
Earth. That becomes clear in the second pat of
the experiment: The greater the distance between the “comb” and the light source, the less
the rays diverge.
Appearances are deceiving: The sun’s rays only seem to
diverge. In reality, they run parallel.
36
Page 5

EXP.
54
Power House and, more importantly, in an actual building, the outside temperature will have
an important role to play. In the winter, you will
need a lot more heat than in summer, because
it is cold. But why is it cold, actually?
You will need
Flashlight, yarn or string, tape, scissors, graph
paper, colored marker
Experiment
1. Cut off a piece of yarn about 30 cm in length.
Tape one end to the center of a sheet of graph
paper, and tie the other end to the flashlight.
2. Shine the light straight
down on the paper
from above with the
yarn pulled taut, and
use the marker to
draw a line around the
spot of light.
Why it gets cold in winter
If you want to save energy with your
EXP.
55
showed, light rays will stubbornly run
straight ahead and won’t turn any corners.
There are a few tricks, though…
You will need
Solarium annex cover, aluminum foil, white
paper
Experiment
1. Look at the transparent annex cover at a
slant. It is reflective. So you will see things, for
example, that are behind you and to the side.
2. If you hold the paper and cover sheet in the
sun as shown in the illustration, you can create
a bright spot on the paper or on a shaded wall.
3. Bend the edges of the sheet slightly toward
the sun. How do the shape and size of the spot
change?
4. Now bend the edges of the sheet away from
the sun. What effect does that have on the
spot?
5. Place smooth aluminum foil behind the
sheet, with the shiny side toward the sheet, and
repeat the experiments. Now the spot is somewhat brighter.
Light rays take a detour
Normally, as Experiment 52
3. Now shine the light at an angle from the side
from the same distance, and mark the bright
spot again.
4. Count the squares inside the two outlined
areas and compare.
Explanation
When you shine the light at a slant, the bright
spot is much larger, but also less bright. That is
due to the fact that the quantity of light from
the flashlight now has to be distributed across a
much larger surface area. Any single individual
square, then, gets less light.
It’s similar with sunshine. In the winter,
when the sun stands closer to the horizon than
in winter, its light and warmth are distributed across a larger area of Earth, so
any individual spot gets less of it
and is therefore cooler.
Explanation
Smooth surfaces reflect light rays — in other
words, they change the direction of movement
of the rays. That fact lets you use the sheet to
look around corners, for example, or to direct
the sunlight onto a shaded wall. It works even
better with the shiny aluminum foil, which reflects more light — the cover, after all, lets most
of the light through. Mirrors work best of all.
With a smooth sheet, incoming parallel light
rays keep traveling in parallel manner after
being reflected, just in a different direction. But
if you bend the sheet, you also change the manner in which the rays of light are reflected back.
As shown in the illustration, you can use this
technique to concentrate the rays on one spot
or to pull them apart.
37
Page 6

EXP.
56
pensive. Why not try it with a piece of
paper?
You will need
Black paper, white paper
Experiment
1. Hold the white sheet of paper in the full sun
a few centimeters away from a shaded wall.
The wall close to the paper will appear brighter,
but only slightly so. You won’t see a clearly
bright spot.
2. Repeat the experiment with the black paper.
Now the wall doesn’t look any brighter at all.
Explanation
The black paper swallows up almost all the light
and therefore doesn’t light up the wall at all.
The white paper, on the other hand, reflects
back almost all the light that hits it — which is
why it looks bright white to us. But it scatters
the light: The originally parallel rays are steered
in all directions by the rough paper surface.
Diffuse lighting
A good mirror is pretty ex-
You will need
Thermometer, small concave mirror from the
cutout sheet, aluminum foil, scissors, glue
Experiment
1. Cut out the small concave mirror from the
cutout sheet and glue aluminum foil to its back,
shiny side down. The foil should be as smooth
as possible.
2. Pull the ends over one another to form a
cone-shaped structure with the aluminum foil
on the inside, and secure it with glue.
EXP.
57
the sun’s light, can it do that with heat as well?
You will need
Thermometer, solarium annex cover, aluminum
foil, tape
Experiment
1. Set the solarium cover on the table and lay
a piece of aluminum foil on top of it, with the
dull side toward the cover. Smooth out the foil
and secure it to the cover with tape. Now the
shiny side is nice and flat and can easily be used
as a mirror.
2. Hold the thermometer in a shady location
for a few minutes in order to measure the air
temperature, and make a mental note of it.
3. Then use the aluminum foil to direct sunlight
to the bulb of the thermometer — but don’t let
direct sunlight hit it. After a few minutes, take
a reading of the temperature.
Explanation
Even reflected sunlight can increase the thermometer temperature quite a bit. Apparently,
then, the heat of the sun is reflected too.
Can heat be reflected?
If the aluminum foil redirects
3. Hold the concave mirror in the sun and use
your hand or a small piece of paper to determine where most of the reflected rays meet.
That will be the brightest spot, and you will
even be able to feel a little warmth with your
hand.
4. Push the thermometer into the concave mirror from below so that as many reflected rays as
possible hit the thermometer bulb, but as little
direct sunlight as possible. As you do this, hold
38
EXP.
58
to focus rays of light by using a certain
shape of mirror. Maybe you can do that with
heat rays too.
Focused heat rays
In Experiment 55, you saw how
Page 7

the thermometer from the top by the small
ring. Watch the temperature. Within a few
minutes, it will start to rise.
Explanation
The aluminum foil concentrates the captured
solar energy onto one small area, which therefore becomes hotter. Even though the concave
mirror is small and doesn’t have a particularly
shiny surface, the effect is quite noticeable.
EXP.
59
ous experiment managed to produce
quite a noticeable increase in temperature. Will
the effect be even more noticeable with a bigger and better mirror?
You will need
Thermometer, large concave mirror from the
cutout sheet, scissors, aluminum foil, glue
Experiment
1. Cut out the large concave mirror from the
sheet and glue aluminum foil to its back, shiny
side out. The foil should be as smooth as possible. Glue the ends over one another as in the
previous experiment.
2. Point the concentrated rays at the bulb of the
thermometer, and watch the temperature. It
will rise quickly and dramatically.
The bigger, the hotter
The little mirror in the previ-
Concave mirror
This is the name for a mirror that has an inward-curving surface rather than a flat one.
Incoming parallel rays of light are not reflected back as a bundle of parallel rays, but
are concentrated together in a tight spot. If
the concave mirror forms a hemisphere, it
creates a shape known as catacaustic, with
the rays failing to meet exactly at one point.
It is only with a so-called parabolic mirror
that they do that, as shown in cross-section
in the drawing. The larger the mirror, the
more of the sun’s rays it can capture and the
hotter it will get at this “focal point.”
In the Pyrenees Mountains in
southern France, there is a giant solar oven
with a concave mirror as tall as a house that
is capable of generating temperatures of
3600 degrees Celsius. It has 63 secondary
tracking mirrors that reflect the sun’s light
into the large concave mirror.
Be careful not to let the temperature rise above
100 degrees Celsius, or the thermometer could
get damaged.
Explanation
With its large surface area, this mirror captures
a lot more sunlight than the small one.
Be careful when experimenting with the concave mirror and the sun!
Never look directly into the sun, or you could
suffer eye damage.
Always store the concave mirror with its foil
side down, and never leave it unattended. Do
not leave any ground lenses, such as magnifying lenses or eyeglasses, lying near it. It could
cause a fire!
Instead of round mirrors, large solar power
plants usually have parabolic mirrors in
the shape of a channel or “trough.” These
mirrors have a focal line rather than a focal
point, along which pipes carry a special
liquid that is heated by the sun and that
transports the heat to electricity generators.
Parabolic trough power
plant in the California
desert
Energy Saving Tip
Don’t let water run unnecessarily
(while brushing your teeth, for
example).
39
 Loading...