

Page 1
INSTRUCTION MANUAL
Page 1
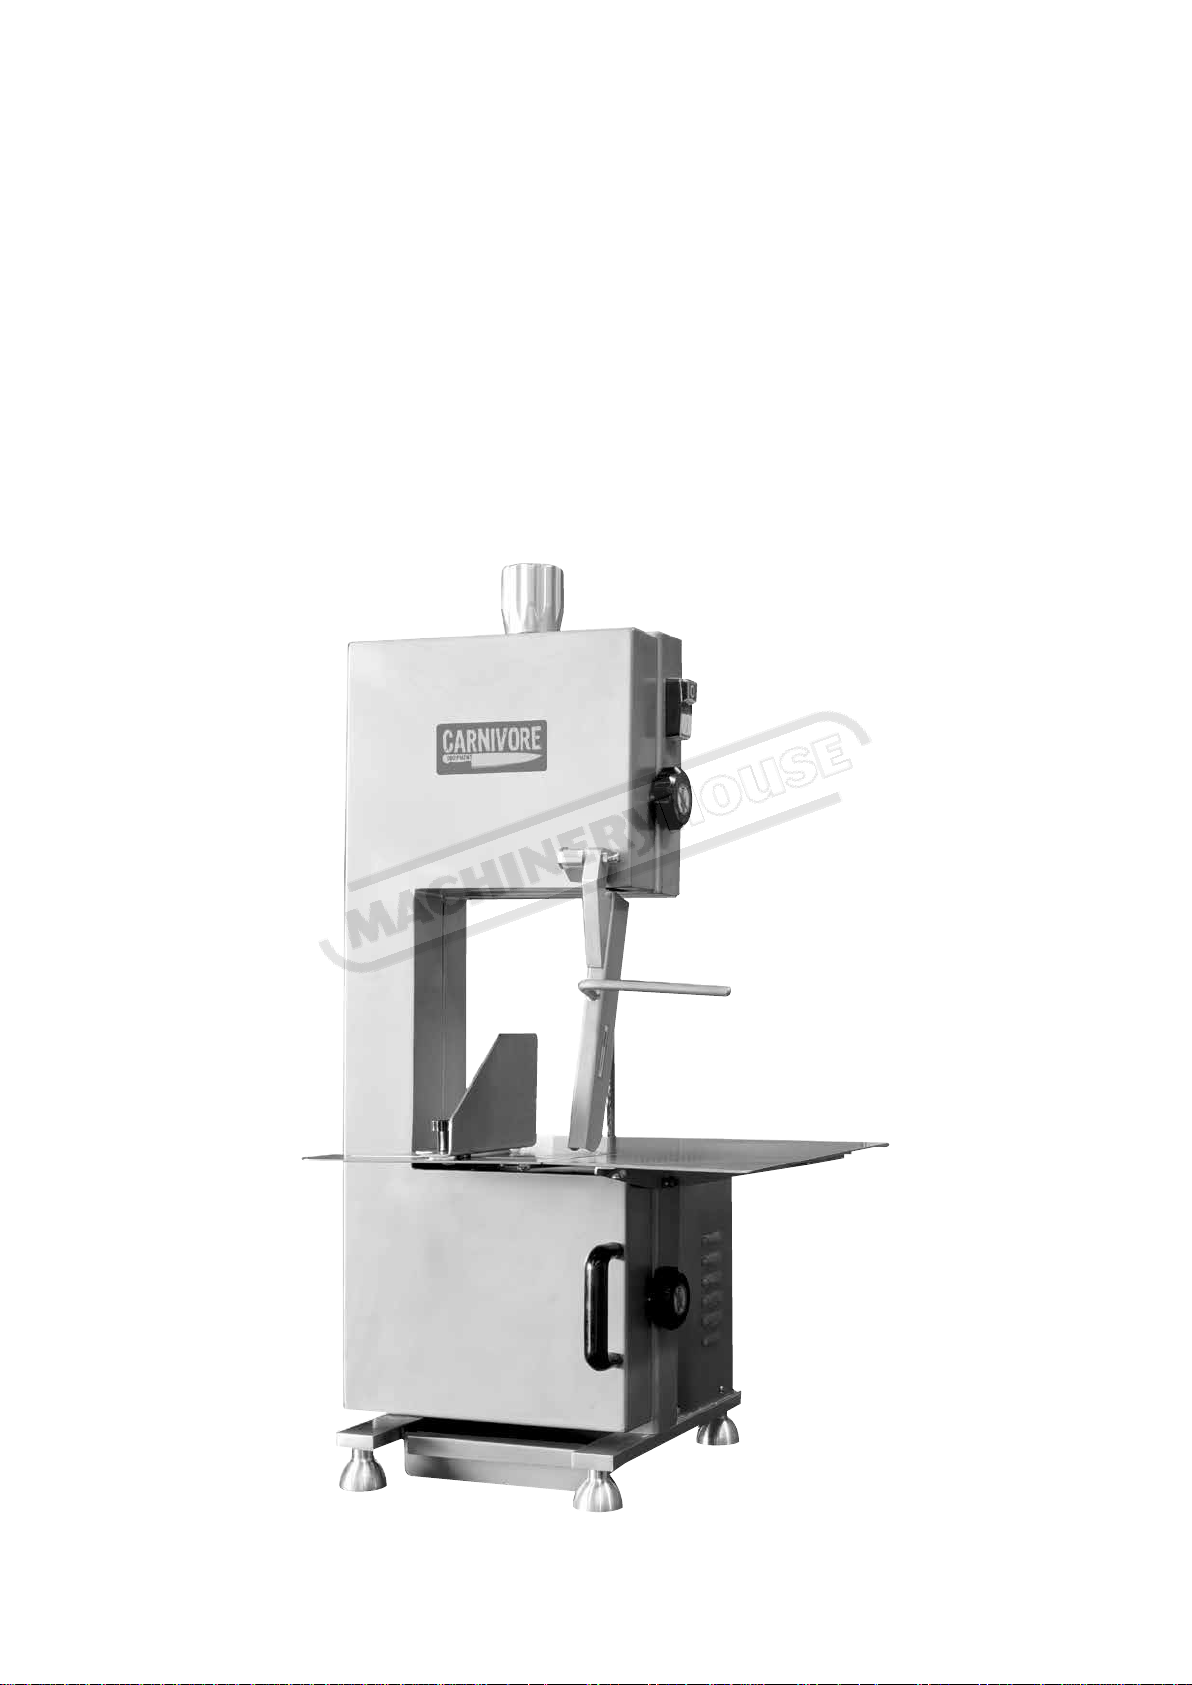
Instructions Manual for MB-210 (F320)
09/06/2016
MB-210
Meat & Bone Bench Band Saw (240V)
185 x 240mm Capacity
F320
Page 2

Page 2
Instructions Manual for MB-210 (F320)
09/06/2016
INTRODUCTION
This instruction manual gives the customer all the necessary information about the
appliance and the manufacturing standards applied, as well as all instructions for use and
maintenance so that the appliance can be used correctly maintaining its efficiency.
This instruction manual is for the end user and for service personnel
INDEX
1 INFORMATION ABOUT THE APPLIANCE
1.1 GENERAL WARNINGS
1.2 SAFETY FEATURES INSTALLED
1.3 APPLIANCE DESCRIPTION
1.3.1 GENERAL DESCRIPTION
1.3.2 APPLIANCE COMPONE NTS
2 TECHNICAL DATA
2.1 TECHNICAL SPECIFICATIONS
3 UPON RECEIVING THE APPLIANCE
3.1 CHECKING PACKAGING UPON RECEIPT OF GOODS
4 INSTALLING THE APPLIANCE
4.1 APPLIANCE LOCATION
4.2 WIRING DIAGRAMS MB-210/MB-250
5 USING THE APPLIANCE
5.1 CONTROLS
5.2 SETTING UP THE MB-210/MB-250 FOR USE
5.3 CUTTING WITH THE MB-210/MB-250
5.4 REMOVING OR CHANGING A BLADE
6 REGULAR CLEANING
6.1 GENERALITIES
6.2 PROCEDURE TO FOLLOW FOR CLEANING THE APPLIANCE
7 MAINTENANCE
7.1 GENERALITIES
7.2 FOOT SUPPORTS
7.3 POWER SUPPLY CABLE
7.4 START/STOP PUSH BUTTONS
7.5 BLADE
7.6 LUBRICATION
7.7 LOWER WHEEL REMOVAL
8 SCRAPPING
8.1 OUT OF SERVICE
8.2 SCRAPPING
Page 3

Page 3
Instructions Manual for MB-210 (F320)
09/06/2016
1 INFORMATION ABOUT THE APPLIANCE
1.1 GENERAL WARNINGS
The appliance must only be used by a competent person who has carefully read this manual and
understood all the safety information described herein.
In the event of an inexperienced operator, it is necessary that this manual is carefully read by th e
new operator before us ing t he appliance & training by an experie nced & competent operator is giv en.
Although safety devices are installed on the appliance, avoid touching the moving parts with your
hands and avoid touching t he appliance with wet hands.
Before cleaning, sanitizing or servicing the appliance it must be disconnected from the elect rici ty
power supply.
When cleaning or servicing the MB-210/MB-250 take into consideration all hazards including
residual risks & always concentrate on what y ou ar e doing and avoid any possible distr act ions.
WARNING – If a fault with the machine is detected the machine should only be repaired by the
importer or authorized repair agent.
If the power cord is damaged, it must be replaced by the importer, a n authorized service agent or
qualified electrician.
Prior to operation always check the electricity power cable to ensure there are no twists in the
cable, always completely u n wi nd . A worn or damaged cable poses a dangerous electrical hazard & the
machine should not be used until it is replaced by a qualified electrician. Keep the power lead away
from heated or sharp cutting surfaces and avoid pulling the c able to remove the plug from the s ocket.
Should the MB-210/MB-250 have a presu med malfunctio n or does not work correctly, do not use it
or repair it yourself. First contact the place of purchase with your proof of purchase to confirm if the
machine should be returned or repaired by an auth or iz ed s er vice agent.
This appliance is designed for only cutting meat & bone. Do not use this appliance for non-food
products and do not cut any metallic obje c ts with the bandsaw .
The manufacturer cannot be held re sponsible for t he following situ ations:
If the appliance or safety devices are tampered with by unauthorized personnel.
If non-original spare parts are used.
If the instructions given in t his man ual are not carefully followed or respected.
If unsuitable cleaning pr oducts (inflammable, corrosive or toxic) ar e used t o clean the appliance.
1.2 SAFETY FEATURES INS TALLED
The MB-210/MB-250 is fitted out with a safety micro switch to ensure the machine cannot be run with
the door open & the MB-210/MB-250 is fitted with electrical and mechanical safety protections that
conform to the standards in within Australia & New Zealand. However, there are RESIDUAL RISKS that
cannot be completely eliminated, these risks are referred to in the risk as sessment. For the appropriate
management of the risks involved including while operating & cleaning the MB-210/MB-250 please refer
to this document.
1.3 APPLIANCE DESCRIPTION
1.3.1 GENERAL DESCRIPTION
We have designed and m anufactured the MB-210/MB-250 with
Superior safety w
A high level of hygiene thanks to a meticulous selection of the materials that come in contact with
the food products and than ks to the elimination of any sharp and rough edges it makes cleaning easy.
hen using, cleaning and servicing
Page 4
Model:
MB-210
240V / 50Hz / 1 Phase
Motor Power
750W
Lenght of Blade:
1650mm
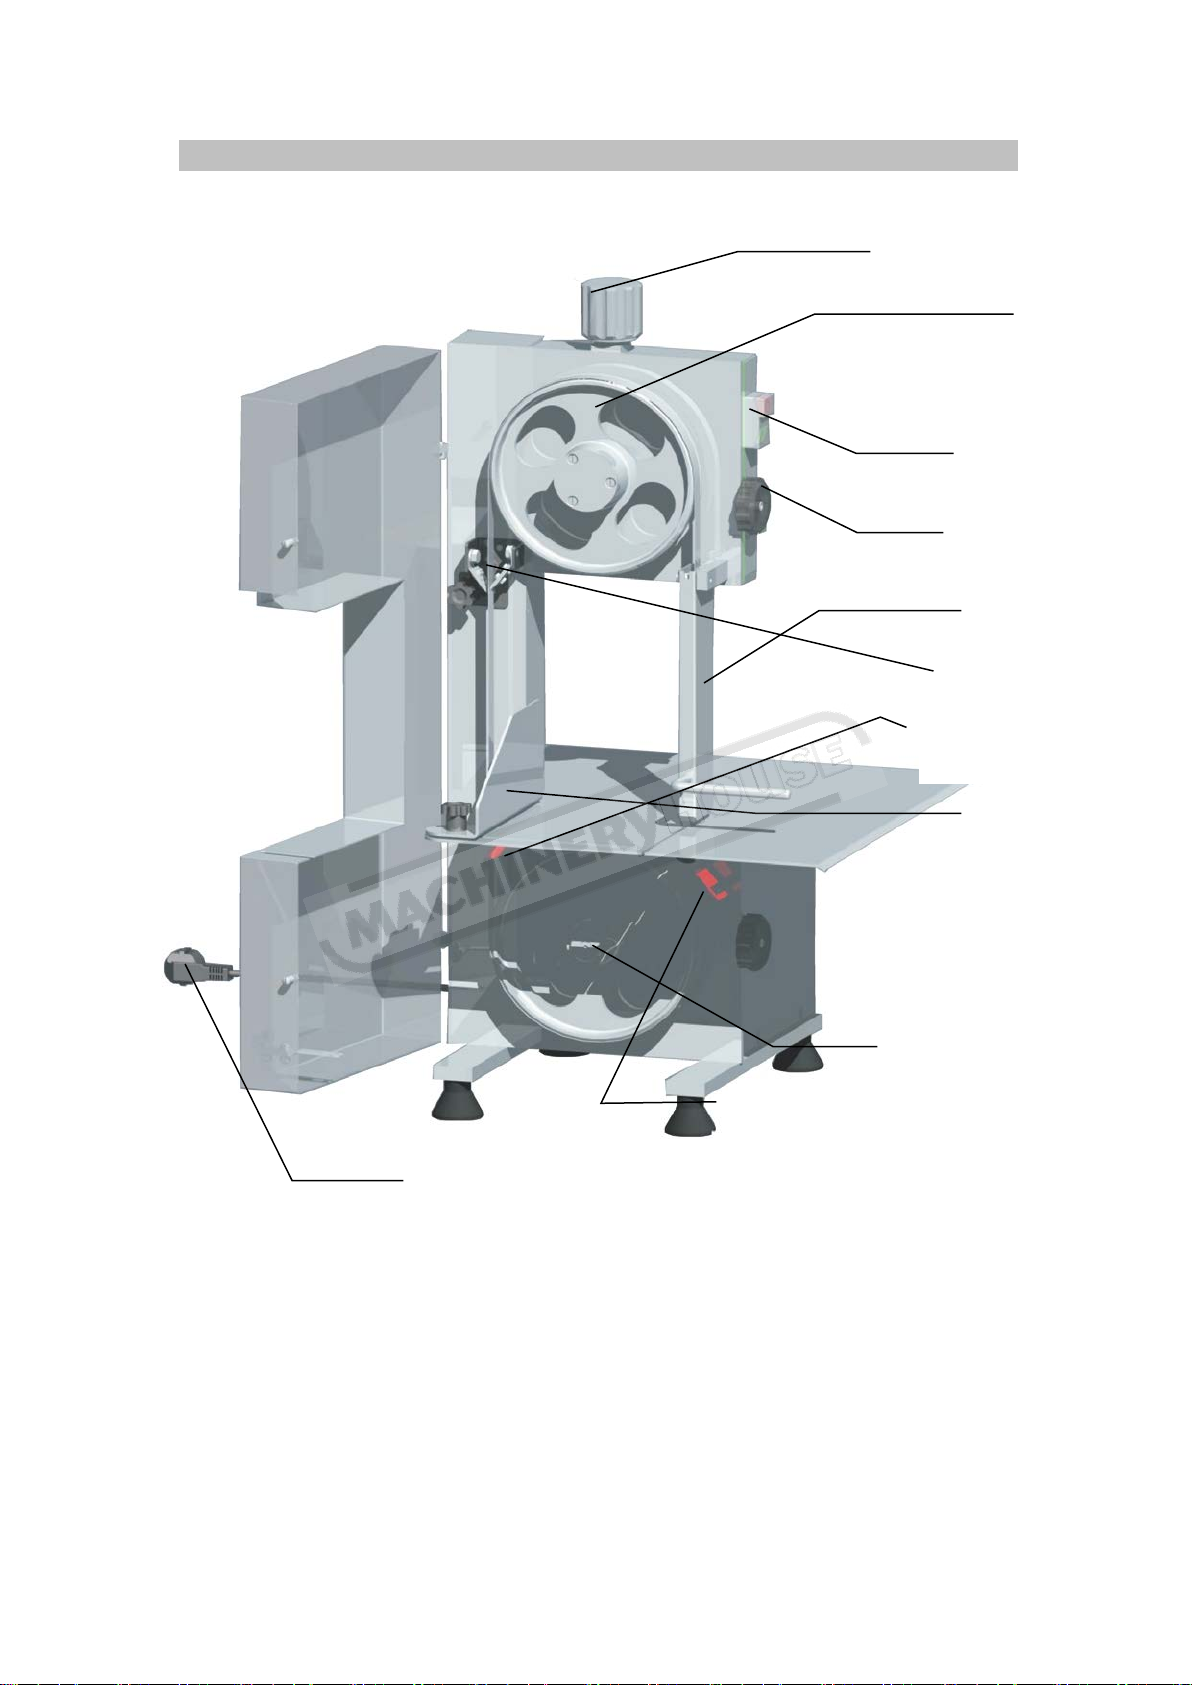
Flesh Scraper
Guide Fence
Tension knob
Top wheel
On/off Switch
Door lock knob
Push Device
Lower wheel
Electric Cord
Flesh Scraper
Scraper
Page 4
Instructions Manual for MB-210 (F320)
09/06/2016
1.3.2 - MB-210 Appliance Components
MB-210- Specifications
Electric source:
Page 5
MB-210
MB-250
240V/50HZ
240V/50HZ
Power
750W
1500W
Blade Length
1650mm
2020mm
Throat Depth
185mm
55kg
134 kg
57 x 55 x 100cm
75 x 67 x 170cm
Page 5
Instructions Manual for MB-210 (F320)
09/06/2016
2 TECHNICAL DATA
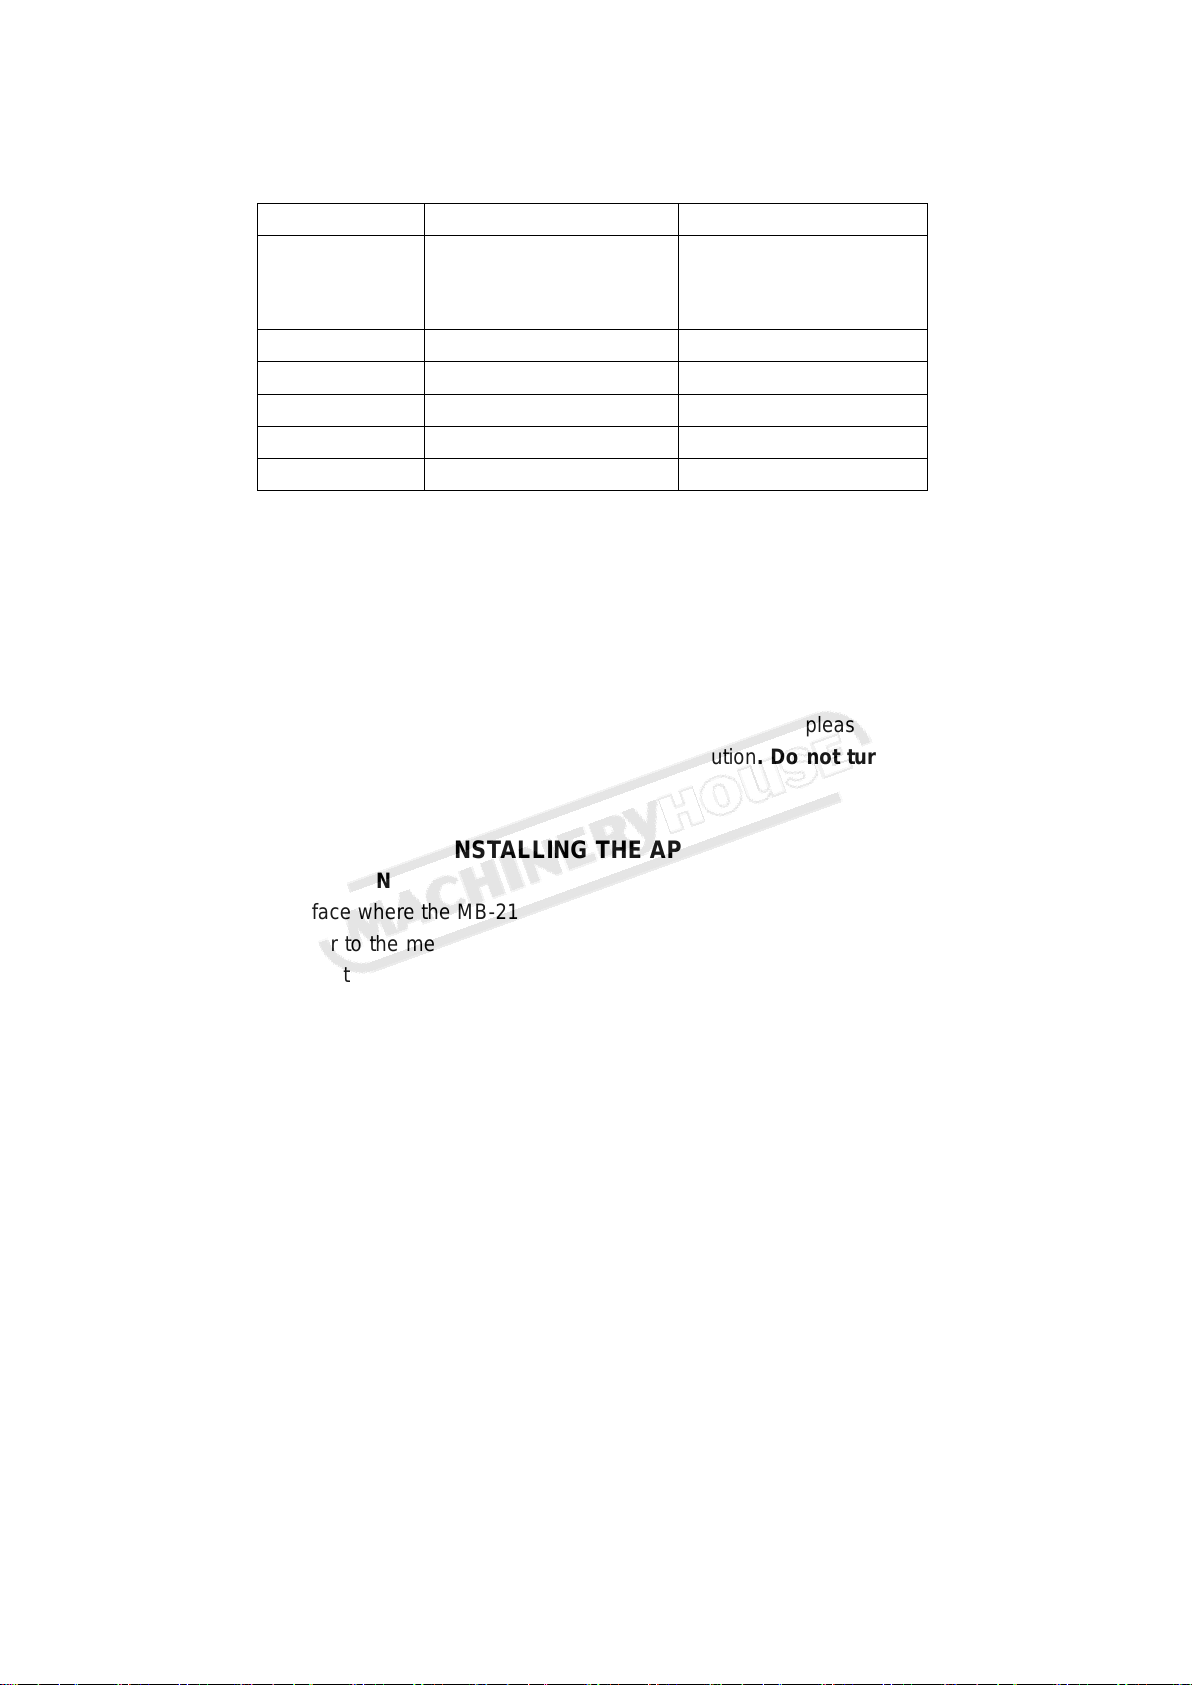
FIG-2 TECHNICAL SPECIFICATIONS
Model
Voltage
1 Phase
Weight
Measurement
CAUTION: the appliance is designed for the electrical specifications given on the plate applied to the
rear of the appliance.
1 Phase
3 UPON RECEIVING THE APPLIANCE
3.1 CHECKI NG P ACKAGING UPON RECEIPT OF GOODS
When the goods are received please proceed by opening the packaging to check there are no signs of
damage. If, when the goods are delivered, there are signs of damage please contact your place of
purchase immediately to report the damage & discuss a resolution. Do not turn the packed goods
upside down!
4.1 APPLIANCE LOCATION
4.1.1 The work surface where the MB-210/MB-250 will be located must be suitable for the size of the
appliance, please refer to the measurements given in FIG 2. The work surface must be level and dry
and at a height so that the working table of the bandsaw is at a height of 80 - 90cm from the ground.
Leveling feet are provided to ensure the machine does not wobble.
4.1.2 The machine is supplied with an approved plug & lead with a grounding wire & pin, you must
ensure the plug is always plugged into a socket with the matching size grounding pin to ensure the
appliance has reliable grounding.
4.1.3 In order to prevent serious harm it is highly recommended the bandsaw is plugged into an
appropriate size electrical circuit that has an RCD (Residual Current Device) also known as an RCCB
(Residual Current Circuit Breaker) to quickly disconnect the machine in the event of an ongoing
electrica l fault.
4.1.4 It is not recommended to use an extension lead, in the event that you absolutely must use an
extension lead only do so on a temporary basis & keep the length of the lead as short as possible.
Extension leads can cause a voltage drop which can damage electrical components & shorten the life
span of the motor . Any extension cord must contain a gr ounding wire with the correct sockets t o suit.
4 INSTALLING THE APPLIANCE
Page 6
MB-210 Circuit Diagram
Page 6
Instructions Manual for MB-210 (F320)
09/06/2016
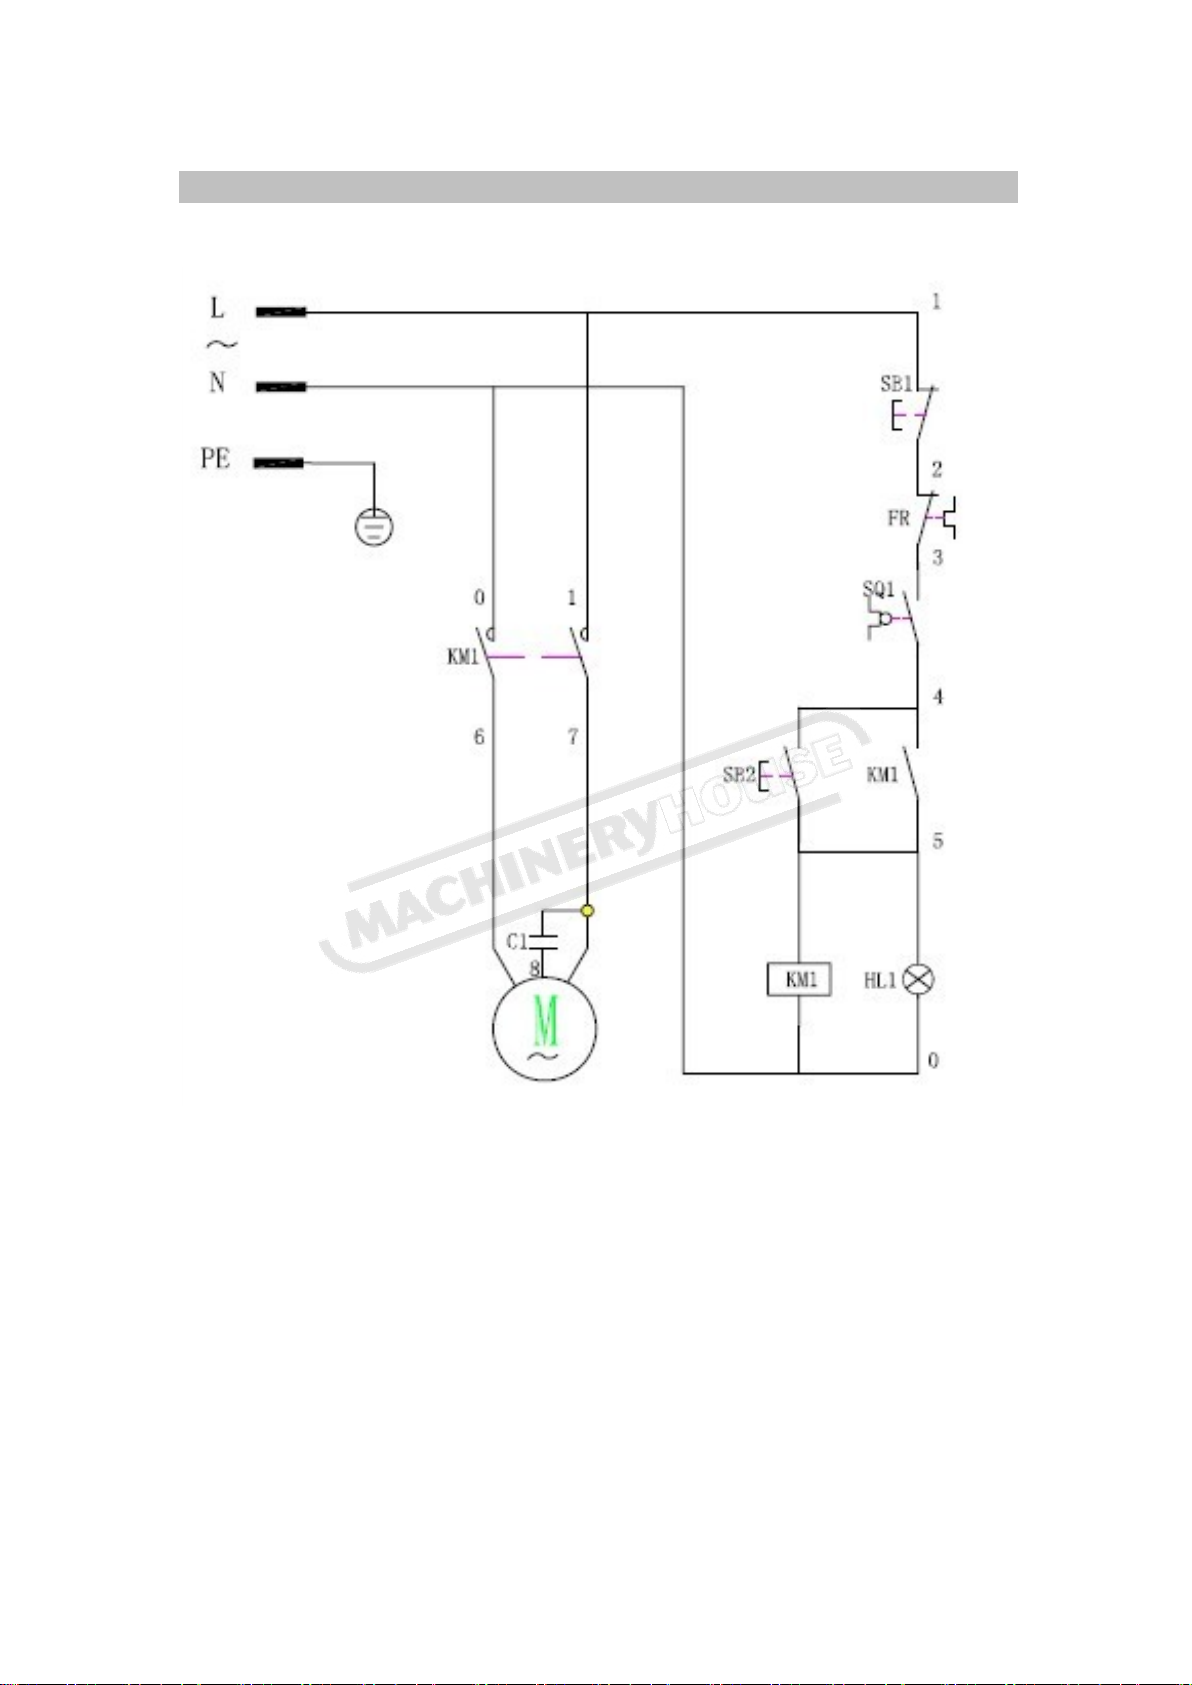
4.2WIRING DIAGRAMS MB-210
Ps:1.Aust/NZ standard voltage: 240V,50Hz
2.USA standard voltage:110-120V,60Hz
M: Motor FR: Overload protection C1: Running capacitor
SQ1: Switch SB1:Stop button SB2: Starr button
KM1: Contactor HL1: Indicator light
Page 7
5 USING THE APPLIANCE
Switch
“Key”
Page 7
Instructions Manual for MB-210 (F320)
09/06/2016
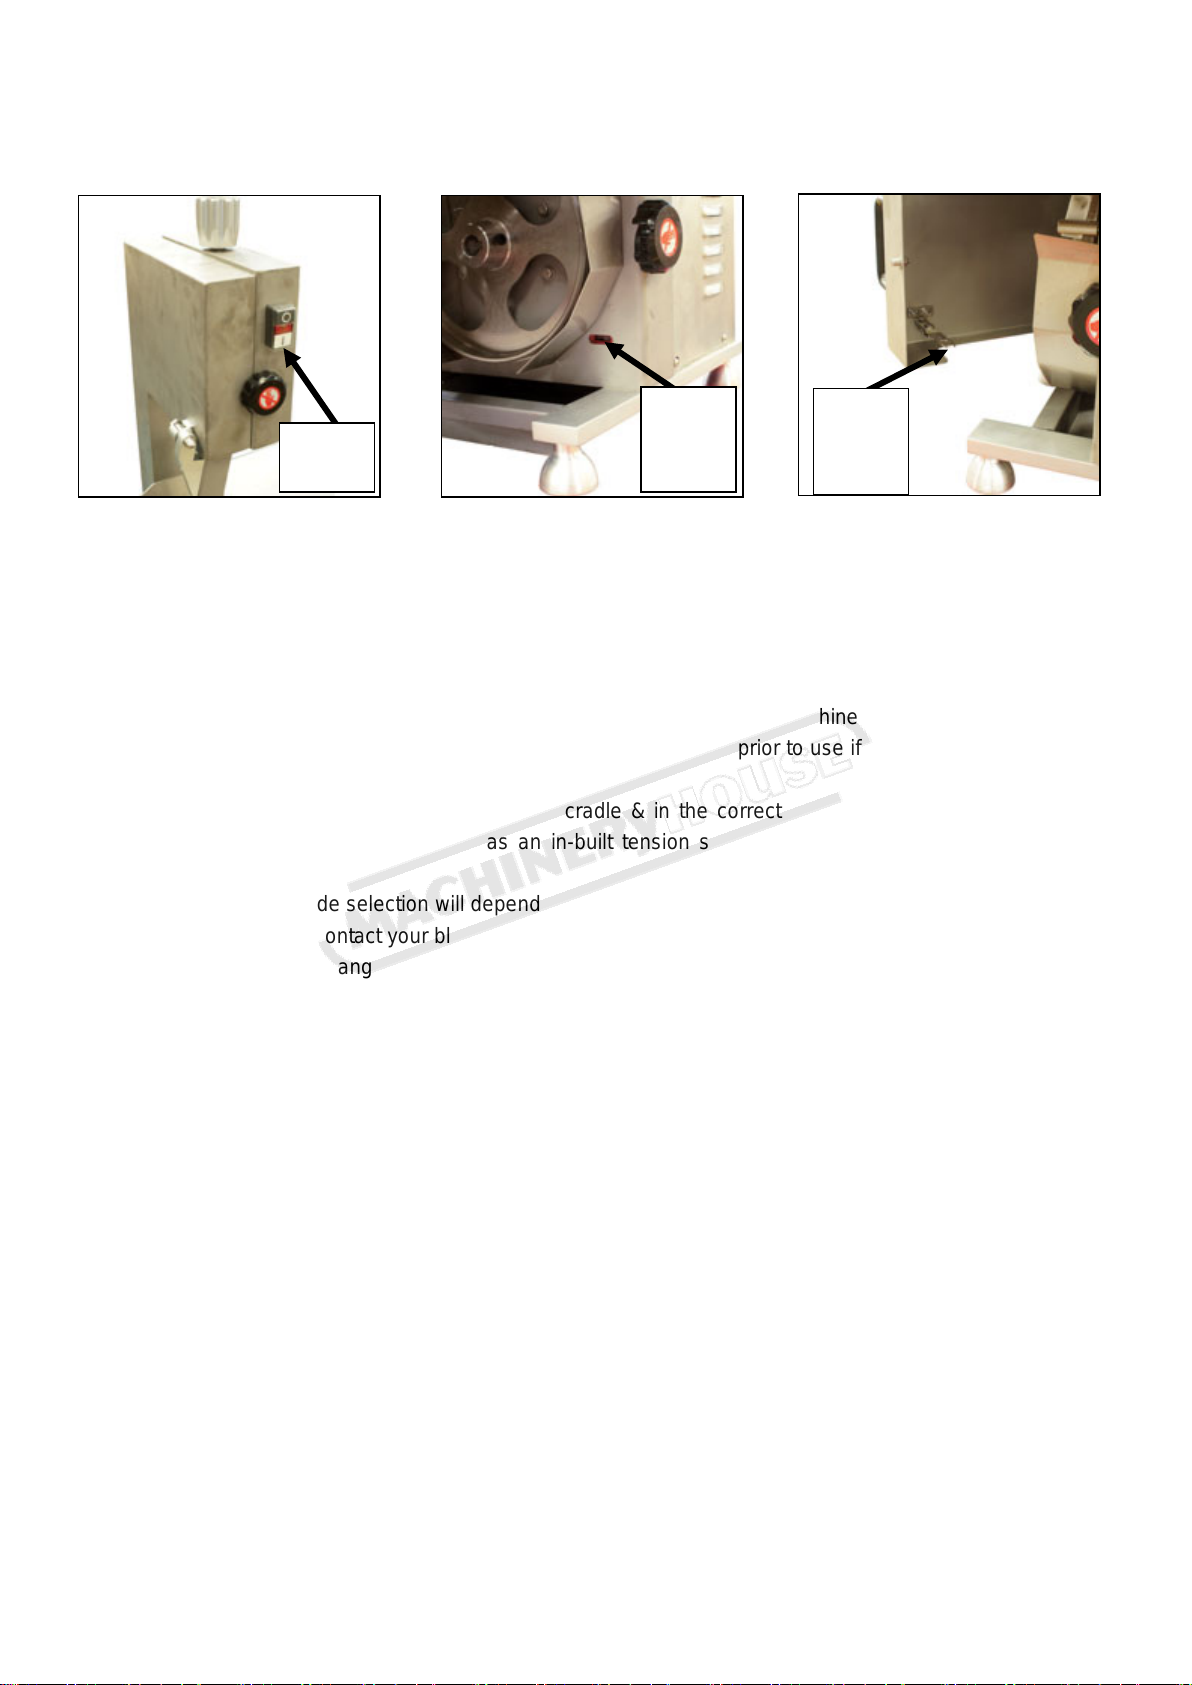
5.1 CONTRO LS
On/Off
1 - Start Switch “on” 3 – Micro Safety Switch
2 - Stop Switch “off” 4 – Micro Safety switch “Key”
5.2 SETTING UP THE MB-210/MB-250 FOR USE
Note : It is recommended that these pre-use checks are done with the electrical lead removed from the
power supply to isolate it. For the bandsaw to operate the door must be securely closed so that the
safety micro switch key is engaged into the micr o s witch otherwise the machi ne will not operate.
Make sure all components are properly cleaned & sanitized prior to use if not refer to section 6.2
of this manual for correct cleaning instructions.
Ensure the top wheel is located into its cradle & in the correct position so that the blade has
sufficient tension. The tension knob has an in-built tension setting function to ensure it is not over
tightened.
The correct blade selection will depend on the type of meat or bone you are sawing & if the meat
is frozen of thawed. Contact your blade sup plier to ensure you are using t he correct blade & refer t o 5. 4
for details on how to change the blade.
Ensure the flesh scrapers are set to remove excess meat or fat from the sides of the blade &
ensure the scrapers are not t ouchin g t he teeth of the blade otherwise this wi ll w ear t he blade as well as
the scrapers.
Using your hand spin the top blade wheel to test the machine can run freely without any
obstructions to the blade.
While spinning the top blade wheel e nsure t he blad e is trac king corr ectly, if adjustment is required
see section 5.4 for more infor m ation on adjustment of the trac king.
Ensure the door is closed properly & secured using the two door lo ck knobs.
Check again that there are no obstr uc tions around the cutting edg e of t he blade
Set the cutting guide fence t o t he desired size
Now connect the machine to the power supply & in order to prevent serious harm it is highly
recommended the bandsaw is plugged into an appropriate size electrical circuit that has an RCD
(Residual Current Device) also known as an RCCB (Residual Current Circuit Breaker) to quickly
disconnect the machine in t he event of an ongoing electrical fau lt.
The machine is now ready to use.
5.3 CUTTING WITH THE MB-210/MB-250
Micro
Safety
Micro
Switch
Page 8
When using the Meat Bandsaw it is important that you stand in the correct position. Do not position
Adjustment
Guide
Page 8
Instructions Manual for MB-210 (F320)
09/06/2016
yourself so that a ny part of your body comes in di r ect contact with the blade when working.
N.B The bandsaw must only be used when the machine is running do not start the machine with any
objects in conta ct with the blade. The procedure to follow is:
1. Start the bandsaw using the start button ensuring the blade is clear of a ny obstructions
2. Ensure the blade is running in a clockwis e direction.
3. Position the meat to be cut onto the table & with the use of the guide fence & the pushing devise
carefully pass the meat through the blade ensuring your hands are well clear of the blade.
4. To remove the cut piece, switch the machine off & wait until the blade has completely stopped
before removing any cut piece s .
5. When you have finished using the appliance, remove the power cord from the power supply then
strip the appliance and thoroughly clean all components.
5.4 REMOVING OR CHANGING A BLADE
Note : It is recommended that blade changing is done with the electrical lead removed from the power
supply to isolate it.
Using the tension knob turn it anti-clockwise to release the t ension.
Wearing safety gloves carefully remove the blade from the whee ls
The correct blade selection will depend on the type of meat or bone you are sawing & if the meat
is frozen of thawed. Contact your blade supplier t o ensure you are using the correct bla de.
When installing a new blade ensure that the blade teeth are facing the correction direction for the
operation of the saw otherw ise you will damage the blade edge
Pass the blade through the slot on the table & position the blade over the two wheels, ensure the
blade is located into the upper blade guide then turn the tension knob clockwise to tension the blade.
The tension knob has an in-built tension setting function to ensure it is n ot over tightened.
Ensure the flesh scrapers are set to remove excess meat or fat from the sides of the blade &
ensure the scrapers are not t ouchin g the teeth of the blade otherwise this w i ll w ear t he blade as well as
the scrapers.
Using your hand spin the top blade wheel to test the machine can run freely without any
obstructions to the blade.
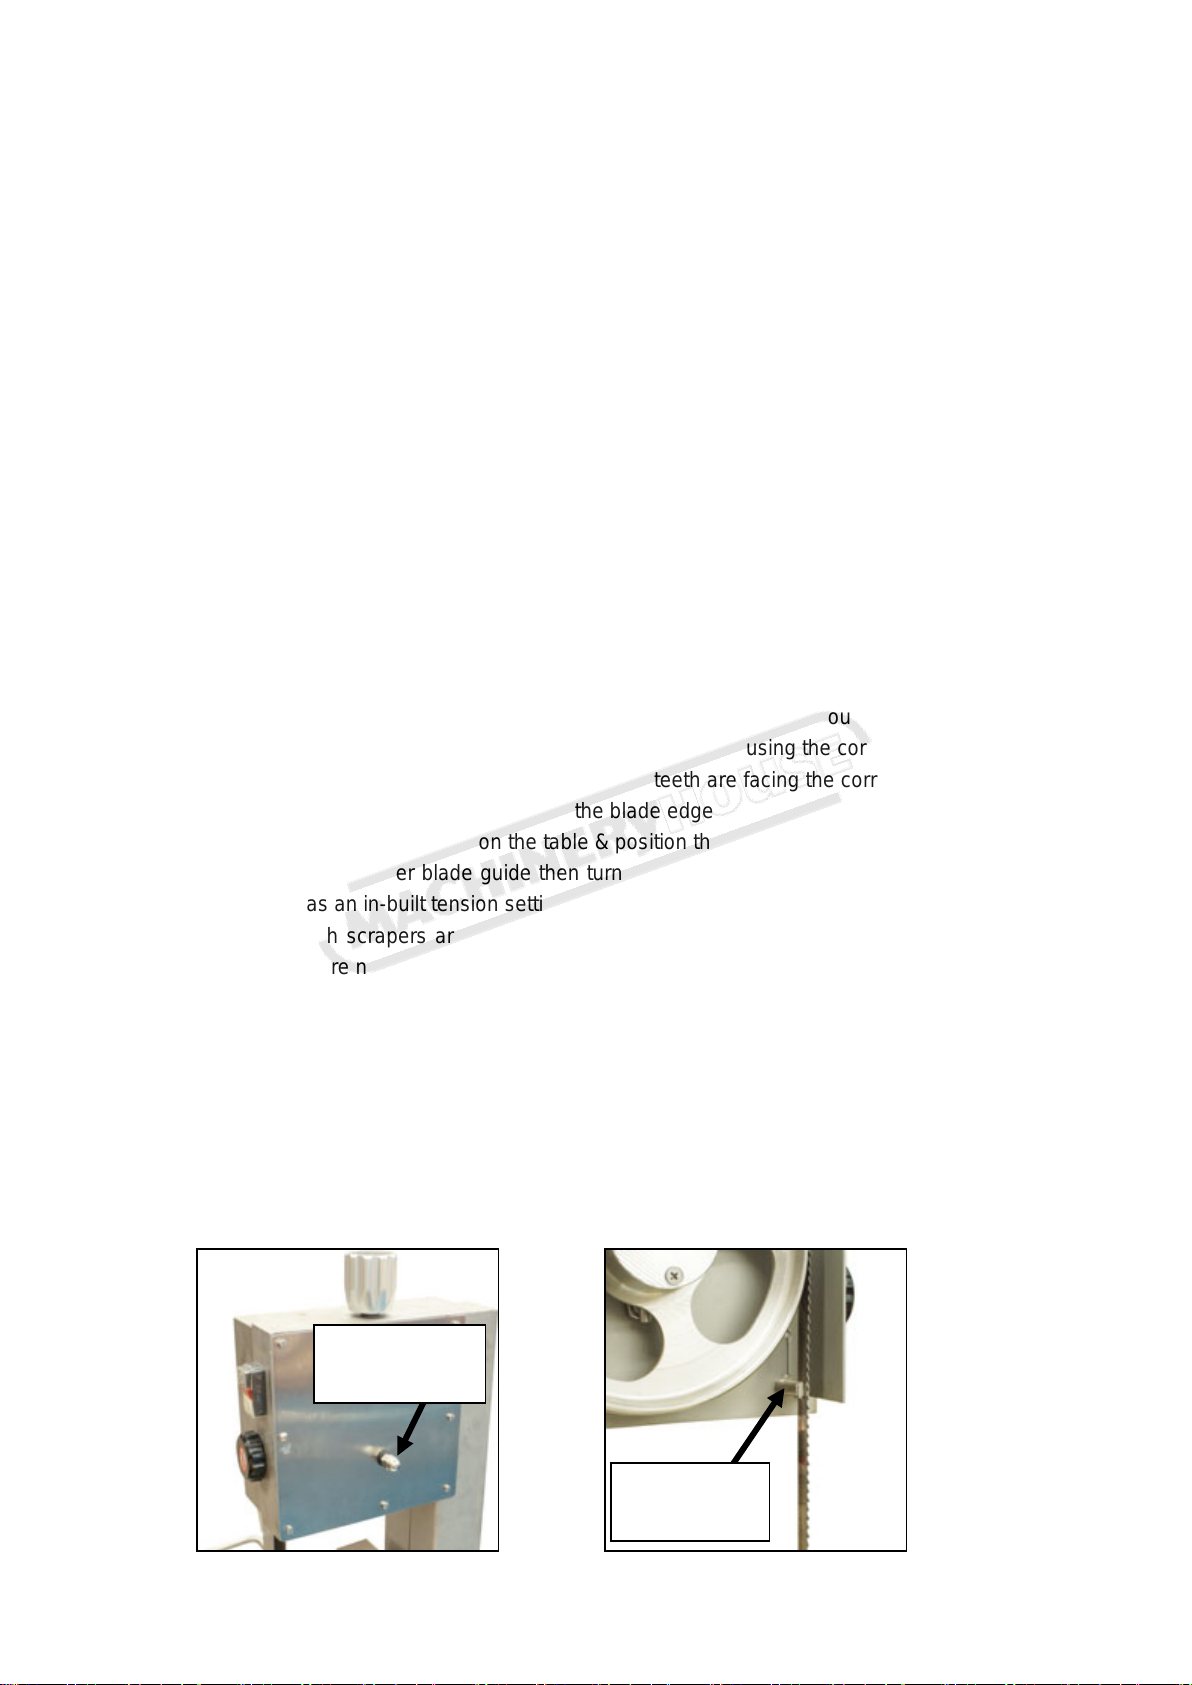
If the blade is not tracking straight on the upper wheel there is an adjustment screw that will pivot
the blade wheel to allow the blade to track straight. Loosen the lock nut & while free spinning the top
wheel by hand adjust the blade tracking adjustment screw in or out until the blade is tracking straight
then tighten the lock nut to secure t he adjustment screw in place.
Blade Trac king
Upper Blade
Page 9
6 REGULAR CLEANING
Blade
Wiper
Wheel
Page 9
Instructions Manual for MB-210 (F320)
09/06/2016
6.1 GENERALITIES
It is recommended the appliance be thoroughly cleaned & sanitized at least prior to &
definitely after every use.
Before cleaning, you must remove the electricity supply plug isolating the appliance
from the main power circuit.
Always use a food safe detergent, warm water & a soft cl ot h.
Never clean the MB-210/MB-250 with a pressurized water-jet, industrial cleaners, wire
brushes or any other type of cleaning utensil that could da mag e t he surface of the appliance.
Thoroughly clean & sanitize all the various components of the MB-210/MB-250 whether they
come in direct contact w ith the food product or not.
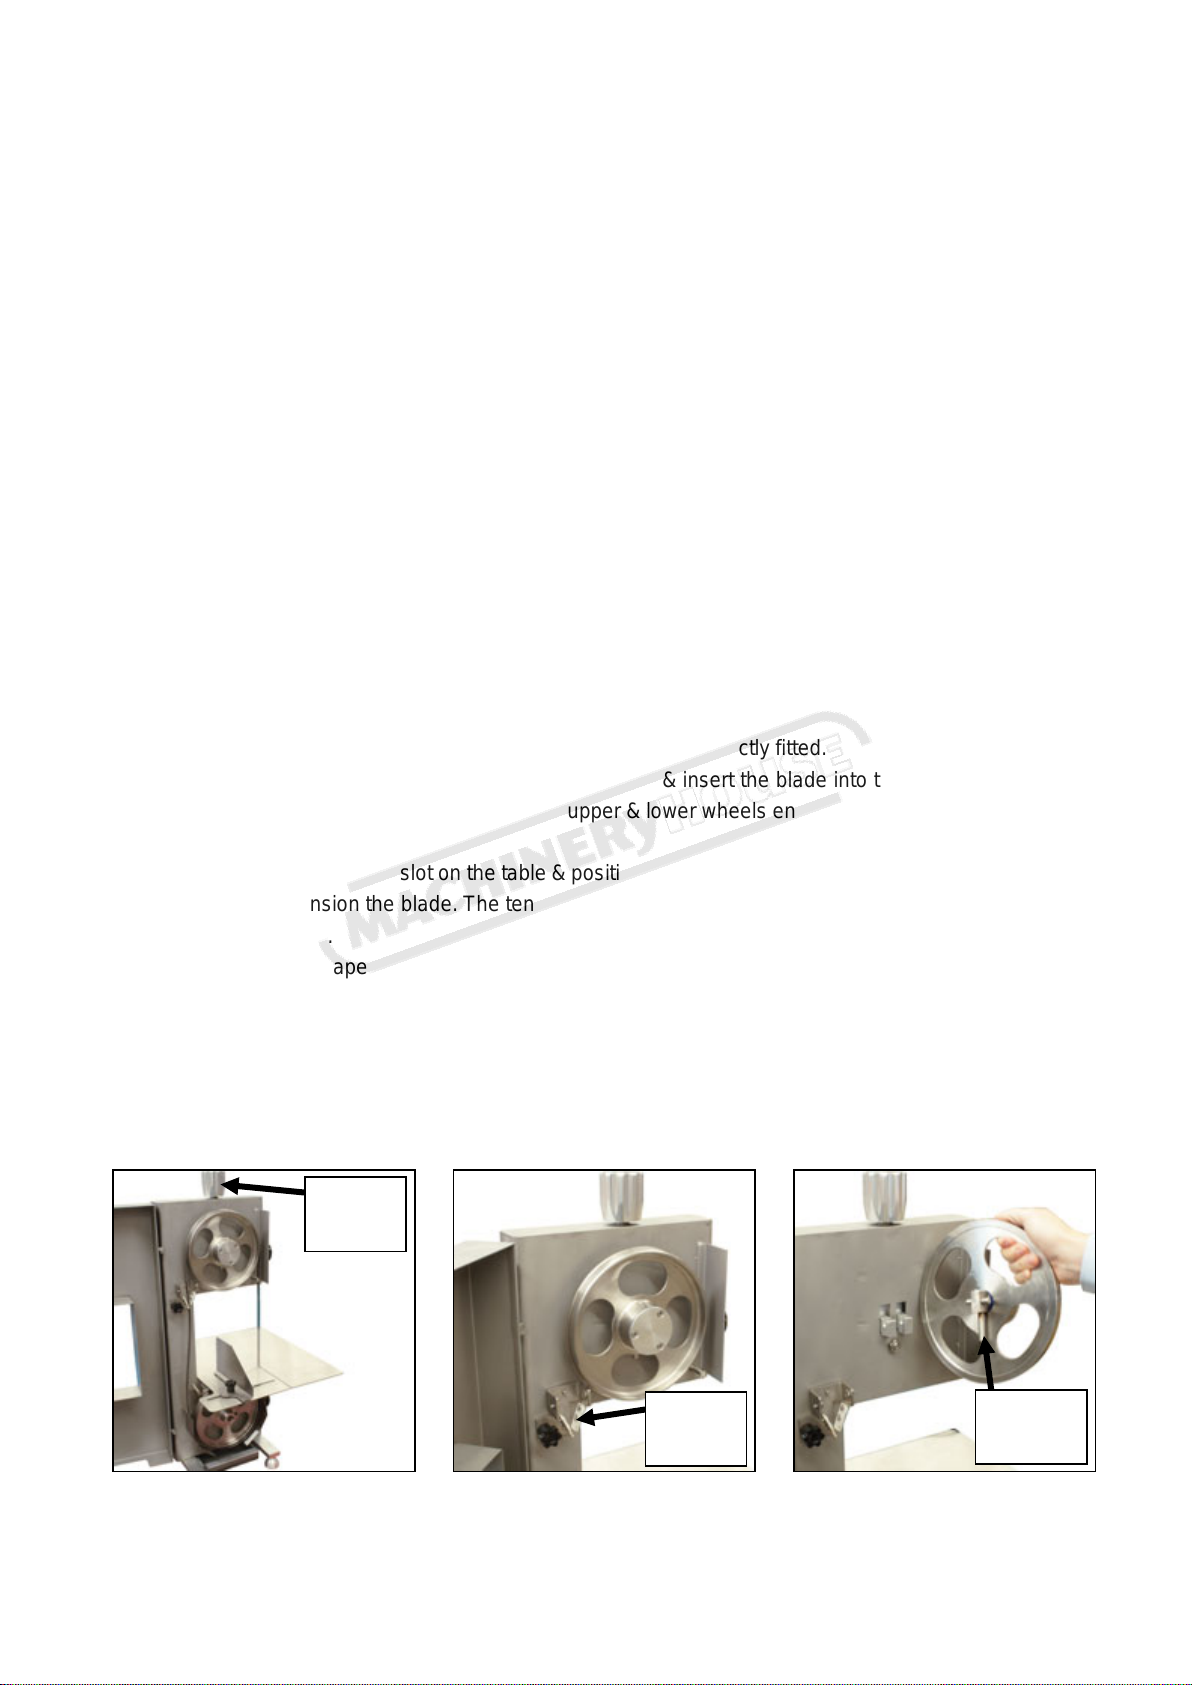
6.2 PROCEDURE TO FOLLOW FOR CLEANI NG THE APPLIA NCE (see fig 6)
- Ensure the appliance is disconnected from the power supply prior to dis-assembly
- Release the tension on the bl ade & remove the blade from the wheels
- Remove the top wheel from its cradle
- Remove the catcher tray from the bottom of the machine.
Now all the component s can be was hed (see fig 7) using war m water ( 50 ℃) and a food safe detergent.
To clean the ma in bo dy use a damp cloth remember to frequently rinse
Make sure all the components are completely dry before remounting them.
1) Re-insert the top whee l into the wheel cradle ensuring it is corr ectly fitted.
2) Pass the blade through the blade opening on the table & insert the blade into the upper blade guide
on the machine frame, inst all th e blad e onto t h e upp er & l ower w he els ens urin g it is p a ssing t hro ugh th e
flesh scrapers.
3) Pass the blade t hrough the slot on t he tab le & posi tion the blade over the two wheels, turn the tens ion
knob clockwise to tension the blade. The tensi on know has an in-built tension setting function to ensur e
it is not over tightened.
4) Ensure the flesh scrapers are set to remove excess meat or fat from the sides of the blade & ensure
the scrapers are not touching the teeth of the blade otherwise this will wear the blade as well as the
scrapers.
FIG 6 - Cleaning
Loosen
Blade
Remove
Page 10
7 MAINTENANCE
Bolt
Page 10
Instructions Manual for MB-210 (F320)
09/06/2016
7.1 GENERALITIES
Before servicing the appliance it must be disconnect from the electricity supply plug isolating the
appliance from the main power source.
7.2 FOOT SUPPORTS
In time the foot supports c an deteriorate causing instability. If this is the case repl ac es them.
7.3 POWER SUPPLY CABLE
Periodic ally c heck for wear in the power cable and if necessary contact your nearest authorized repair
agent.
7.4 START/STOP PUSH BUTTONS
Over time the start/stop buttons could become damaged or broken. If this should happen contact your
nearest authorized repair agent for replacements.
7.5 BLADES
The blade can break or deteriorate over time. If this should happen contact the place of purchase for
original replacements. Please review 5.4 for the procedure to replace a broken or old blade.
7.6 LUBRICATION
The bearings in the blade wheels are a sealed & pre-lubricated bearing requiring no on-going
maintenance. It is suggested t o maint ain th e blade & table s urface w ith a thi n film of food gr ade lu bricant,
do not use cooking oils as these can tend to becom e rancid ov er time & cou ld cause illne ss. Ensure t he
lubrication is specifically designed for use on food processing machinery.
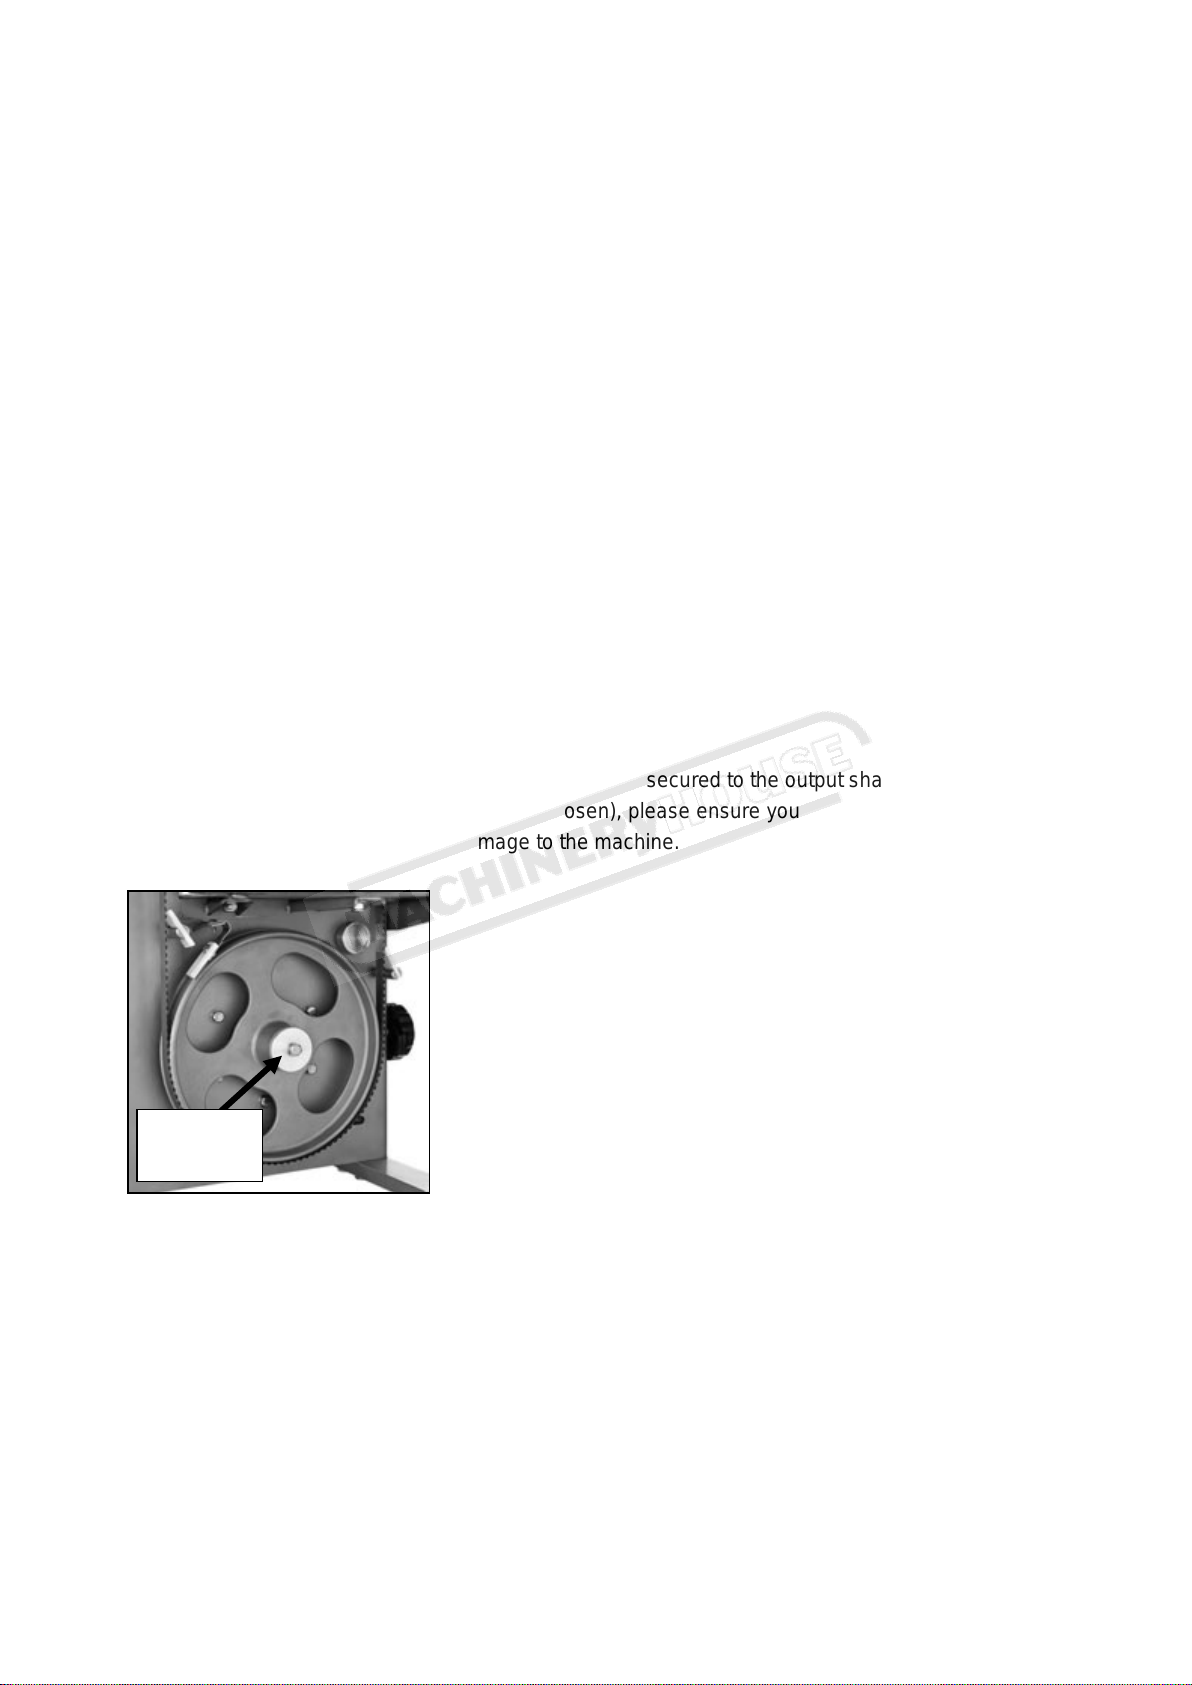
7.7 LOWER WHEEL REMOVAL
If you are required to remov e the lower blade w heel it is secure d to t he output shaf t of the motor us in g a
LEFT HAND threaded bolt (turn clockwise to loosen), please ensure you do not turn this bolt the wrong
direction otherwise this m ay cause damage to the machine.
Left Hand
8 SCRAPPING
8.1 OUT OF SERVICE
If the appliance for some reason is to be put out of service, make sure it can no longer be used,
disconnect and remov e all elect r i cal connections & ensure the ma chi ne is safe so it can’t be run.
8.2 SCRAPPI NG
Once the appliance is out of service it can be scrapped. Contact a specialized company to sc rap it
conforming to the materi al s us ed for manufacturing the various components.
 Loading...