

Page 1
Configuration Software
G3800 X015
User Manual
Preliminary Data
December 2002
Du line
®
Fieldbus
Installationbus
Page 2

2 © 2002 Carlo Gavazzi Industri A/S. All rights reserved
G 3800 X015 Configuration Software October 2002
1. Introduction 4
1.1. Start-up 4
1.1.1. Hardware requirements 4
1.1.2. Installation 4
1.1.3. Start-up of program 4
1.2. Functions in the main window 5
1.2.1. File menu 5
1.2.2. Edit menu 6
1.2.3. Select menu 7
1.2.4. Tools menu 7
1.2.5. Help menu 8
1.2.6. Configuration of channel functions 9
1.3. Basic Setup 10
2. Objects 11
2.1. General 11
2.2. Standard objects 12
2.2.1. Blank channel (no function) 12
2.2.2. The push-button function 13
2.2.3. The toggle switch function 15
2.2.4. Timer/Recycler 17
2.2.5. Real-time clock 20
2.2.6. Master function 22
2.3. Special objects 25
2.3.1. Analog sensors 25
2.3.2. Motion detector 30
2.4. Alarm functions 33
2.4.1. Overview 33
2.4.2. General features 33
2.4.3. ISA Alarm 34
2.4.4. The Smoke Alarm 39
2.4.5. The Intruder Alarm 44
2.4.6. The Water Alarm 50
2.4.7. Common Siren 55
2.5. Roller blind control 56
2.5.1. Decentralized roller blind up-down function 56
2.5.2. Roller blind master 61
2.6. Counter and Multiplexer 64
2.6.1. Multiplexer (transmission of counter values) 64
2.6.2. Multiplexer (transmission of analog values) 66
3. Logic Setup 68
3.1. Introduction 68
3.2. The dialog - logic functions 68
3.2.1. Setup 68
3.3 Application 69
3.3.1. Setups and Functions 69
3.3.2. Inversion and Edge Triggering 70
3.3.3. Using flags 71
3.3.4. Internal processing of the logic setups 71
3.4. Notes and Documentation 71
4. GSM Modem functions (only valid for G38001015) 72
4.1. SMS Setup 72
4.2 Event-based SMS messages 73
4.3. SMS Control commands and Requests for Dupline data 74
5. Radio Modem driver 76
5.1. General 76
5.2 Setup of Radio Modem Central 77
5.3. Setup of Radio Modem Substation 78
Table of Contents
Page 3

© 2002 Carlo Gavazzi Industri A/S. All rights reserved 3
G 3800 X015 Configuration Software October 2002
Page 4

4 © 2002 Carlo Gavazzi Industri A/S. All rights reserved
G 3800 X015 Configuration Software October 2002
1. Introduction
The G38xx15 program has been designed for configuration of the G3800X015 master generator. All functions
in the generator are represented by graphic symbols. To each channel function are related parameters and
comments, which can be edited locally in the PC and transferred to the master generator through RS232.
Likewise, data from the master generator can be uploaded and edited.
1.1. Start-up
1.1.1. Hardware requirements
• The program operates under Windows 95/98/2000/xp and NT and requires at least:
• 486 processor with 8 Mbytes Ram or higher
• A free serial port (Com1 or Com2)
• 5 Mbytes hard disk for installation
• Screen resolution of 800 x 600 pixels, 256 colours or higher
• Mouse or other pointing tool desirable, but not necessary
1.1.2. Installation
Insert disk 1 in the A-drive and run the program “Setup.exe”. This will guide you through the installation process. After installation, the program can be started by clicking G38xx15.
1.1.3. Start-up of program
When G38xx15 is started, two windows will open:
To the left, the main window showing the 128 channels available in Dupline and the menus. To the right, the
properties window, which for each function shows the parameters related to this particular function.
Page 5

© 2002 Carlo Gavazzi Industri A/S. All rights reserved 5
G 3800 X015 Configuration Software October 2002
1.2. Functions in the main window
1.2.1. File menu
The file menu contains the usual functions:
Menu Item: Explanation
New: Start from the beginning with default data
Open: Open existing file
Save: Save file
Save As: Save file under new name
Write Generator: Download the present configuration file to the Generator
Read Generator: Read the configuration file from the Generator
Print: The following options are available:
Print-out of:
Address Listing
Master Channels
Real time Channels or
Logic Settings
SMS Setup
Exit: Exit program
Page 6

6 © 2002 Carlo Gavazzi Industri A/S. All rights reserved
G 3800 X015 Configuration Software October 2002
Menu Item: Explanation:
Basic Setup: Basic setup of the G3800X015 generator
Logic Setup: Configuration of logic functions
Holiday Setup: Setup of holiday period. The holiday setup is active when
the current date falls within any of the set time intervals.
SMS (only valid for G38001015) Basic setup of the SMS messaging functions facilitated by
the built-in GSM modem.
Counter and Mux analog Setup: Basic setup of the multiplex functions required when
Counter Modules and Multiplexed Analog Modules are
used.
Communication Setup: Configuration of the communication functions available for
the two RS 232 ports and the RS485 port of the Generator.
1.2.2. Edit menu
Page 7

© 2002 Carlo Gavazzi Industri A/S. All rights reserved 7
G 3800 X015 Configuration Software October 2002
Menu Item: Explanation:
Language: Select between 3 languages. By using the “Select new” menu,
other languages can be inserted in the 3-language menu.
Serial port: Selection of Com 1, Com 2, Com 3 or Com 4 port, for connection
of the G3800X015 Generator.
1.2.4. Tools menu
Generator firmware: In this menu it is possible to download a new firmware file to the Generator. New
firmware files are typically made available when new features are added to the Generator. Three steps need to
be carried out:
1. Browse to select the desired firmware file.
2. Activate the Download button
3. Activate the program button
1.2.3. Select menu
Page 8

8 © 2002 Carlo Gavazzi Industri A/S. All rights reserved
G 3800 X015 Configuration Software October 2002
Menu Item: Explanation:
General information: You can call the Help menu at any time by pressing F1.
About program: Shows the opening screen
1.2.5. Help menu
Page 9

© 2002 Carlo Gavazzi Industri A/S. All rights reserved 9
G 3800 X015 Configuration Software October 2002
When the basic settings have been made under “Basic Setup”, the functions of the remaining channels to be
used are defined as follows:
Activate one of the channels, then click on the right mouse button for pop-up menu. Click on the desired
channel function with the left mouse button. The channel is thereby assigned a symbol indicating the selected
channel function. Click on the symbol with the left mouse button, and the parameters which can be set for
that particular channel function can be viewed in the properties window.
The arrow keys can also be used to select channel function in the pop-up menu. Furthermore, channel function can be selected by clicking on different letters. To see how to select functions by clicking on letters,
select the General information menu under Help.
Tool tip
When the cursor is positioned on a channel button, a bar appears indicating channel number, describing
channel type and showing the user-defined channel description.
1.2.6. Configuration of channel functions
Page 10

10 © 2002 Carlo Gavazzi Industri A/S. All rights reserved
G 3800 X015 Configuration Software October 2002
1.3. Basic Setup
General description
The text window is for entering general information, eg name of user, date of configuration, reference to documentation, etc.
No. of channels
For selection of the number of channels desired in the system. The minimum is 8, the maximum is 128 in one
Dupline network.
Auto-start Dupline on short-circuit
In case of a short-circuit on Dupline, the Generator shuts down the Dupline signal. Under default conditions,
power-off followed by power-on needs to be performed to reset the Generator after removal of the short-circuit. However, if the "Auto-start Dupline on short-circuit" box is checked, then the Generator will automatically
start up the Dupline signal after removal of the short-circuit.
Enable automatic update of realtime status upon Config-download and System power-up
If this box is checked, the Generator will automatically set the correct status for realtime channels according
to the switch-time settings, provided that the actual Day of the week matches the internal Day of the week of
the Generator. Also, the Generator will only scan the switch times (ON or OFF) for that same day.
Enable Automatic Daylight saving. Central European Time standard
If this box is checked, the Generator will automatically change the time settings 2 times per year according to
the European standard for daylight savings.
Enable RTC Powerline Autocalibration
Selecting Auto-calibrate, will enable the internal Realtime clock to adjust its internal calibration against the
Mains-supply frequency. In most countries, the Mains-supply frequency is very accurate, and in that case an
improved accuracy on the Realtime clock can be achieved.
Syncronize Time to PC date and Time
If this button is activated when the Generator is connected to the PC, then the PC date and time will be transferred to the realtime clock of the Generator.
Page 11

© 2002 Carlo Gavazzi Industri A/S. All rights reserved 11
G 3800 X015 Configuration Software October 2002
2.1. General
The objects are the specific functions of the G 3800 X015. The functions are assigned to channels, and the
associated parameters determines the operation of the channels.
2. Objects
Page 12

12 © 2002 Carlo Gavazzi Industri A/S. All rights reserved
G 3800 X015 Configuration Software October 2002
2.2.1. Blank channel (no function)
Description
The use of blank channels in Dupline is based on the circumstance that in- and output are independent of
each other. Since this object does not fulfill a function between in- and output, an input on the address configured as blank function will be ineffective.
At the same time, it is possible to control the channel - and consequently the functions coded for the
address - either through the master function (see chapter 2.2.6) or as output of logic setups (see chapter 3). In
addition, a blank channel can be used as a monostable flag.
Parameters
None.
• Function: None
• Application: Activation of output channels through master functions or logic setups
• Insert with mouse (“Blank channel”)
2.2. Standard objects
Page 13
© 2002 Carlo Gavazzi Industri A/S. All rights reserved 13
G 3800 X015 Configuration Software October 2002
2.2.2. The push-button function
Description
The push-button function - the most simple object of the Dupline Master Generator - makes it possible to
connect any type of push button switch and contact to the Dupline bus. With this function, outputs can indirectly be controlled with logic functions.
In this function, the output follows the input signal: the output is activated as long as the input signal is ON
(inverted in Normally Closed function).
Parameters
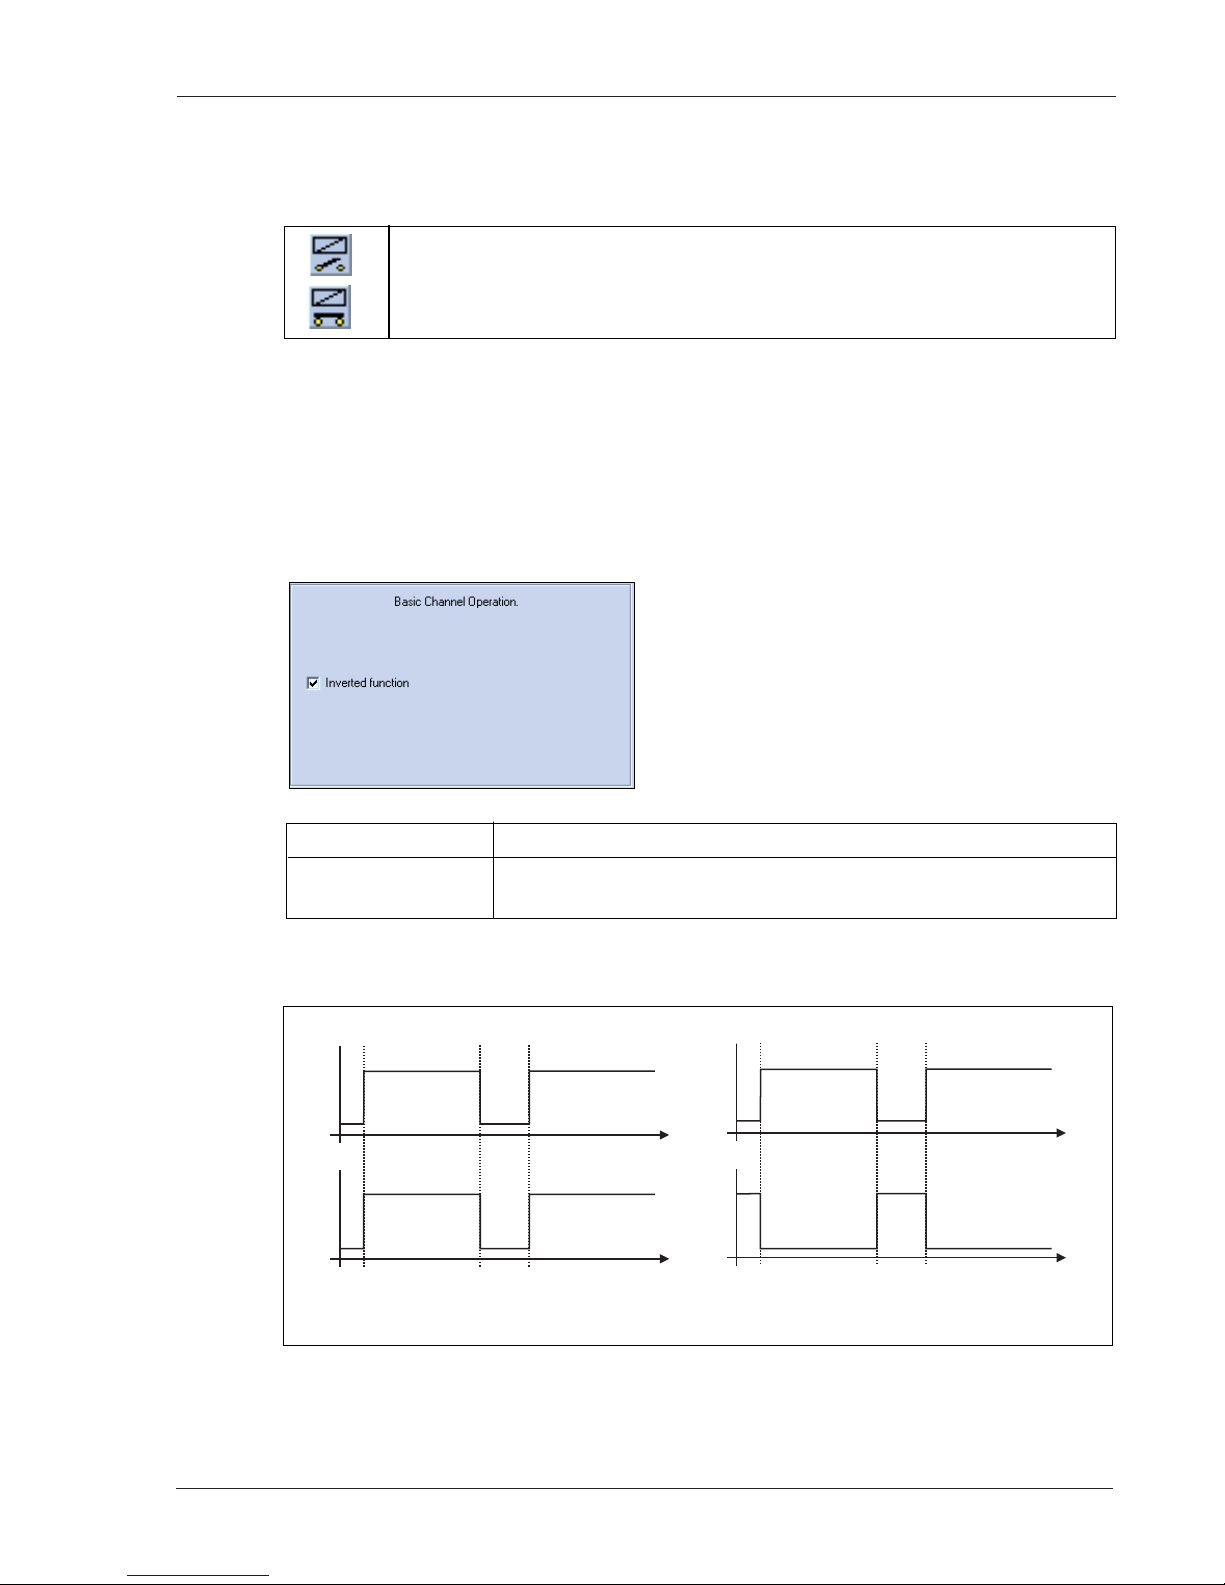
Configuration window of push-button function:
Time characteristics
t
t
PManTTast_1a
t
3
t
2
t
1
t
t
PManTTast_2a
t
3
t
2
t
1
The output follows the input upon a short delay. In the Normally closed function, the output function is the
opposite of the input function.
Parameter Description
Inverted function When this function is selected, the output signal is inverted. This means that the
output is activated as long as the input has not been set.
• Function: Monostable
• Application: Connection of push-button switches and contacts for load
switching
• Also Normally Closed function
• Select with mouse (“Push button”) or short-cut key “0” (Zero)
Normally Open
Normally Closed
IN
IN
OUT
OUT
Page 14

14 © 2002 Carlo Gavazzi Industri A/S. All rights reserved
G 3800 X015 Configuration Software October 2002
Object Function Channel
In-/outputs
Relay output Lamp A1
Switch Light switch A1
Configuration of Master Generator
Push button function Light control A1
Application Example
Task: A lamp is to be switched on and off by means of a switch.
Solution: Use for example the universal input module to provide the input signal and configure one of the
inputs for address A1. Assign the same address to one of the outputs of a relay module. Finally,
configure channel A1 in the Master Generator as push button function.
Page 15

© 2002 Carlo Gavazzi Industri A/S. All rights reserved 15
G 3800 X015 Configuration Software October 2002
2.2.3. The toggle switch function
Description
The toggle switch function makes it possible to simulate the operation of a toggle switch: Pressing the switch
once activates the output, pressing the switch once more de-activates the output again.
Parameters
Configuration window of the toggle switch function:
Time characteristics
t
t
PMan_TToggle_1a
t
3
t
2
t
1
The first triggering of the input switches the output on, the second triggering switches the output off again.
Parameter Description
Intruder alarm When this function is selected, the input is used in a configured intruder alarm
system. This means that in an armoured alarm system with no time delay set, an
alarm is released when the input is activated.
• Function: Bistable Flip-Flop
• Application: Connection of switches and contacts for load switching
• Can be used in intruder alarm systems
• Select with mouse (“Toggle switch”) or short-cut key “F”
IN
OUT
Page 16

16 © 2002 Carlo Gavazzi Industri A/S. All rights reserved
G 3800 X015 Configuration Software October 2002
Object Function Channel
In-/outputs
Relay output Lamp A1
Switch Light switch A1
Configuration of Master Generator
Toggle switch function Light control A1
Application Example
Task: A lamp is to be switched on and off by means of a conventional switch.
Solution: Use for example the universal input module to provide the input signal and configure one of the
inputs for address A1. Assign the same address to one of the outputs of a relay module. Finally,
configure channel A1 in the Master Generator as switching function.
Page 17
© 2002 Carlo Gavazzi Industri A/S. All rights reserved 17
G 3800 X015 Configuration Software October 2002
2.2.4. Timer/Recycler
Description
This object makes it possible to select between two modes of operation: timer and recycler. In both modes,
an input coded to the channel of the timer starts the functions, but the input can also be activated by a different channel or flag.
Timer (with on-delay or off-delay)
The timer allows the setting of an on-delay and/or an off-delay. When an input coded to this channel is activated, the on-delay starts. After elapse of this delay, the Off time starts. The Off time stops after the set time, if
the input is released before expiry of the set time. If the input is not released, the output remains activated.
Recycler
If the recycler is activated by an input, the recycler continuously generates a square-wave signal. The output
is activated after the set on-delay period and de-activated after the set off-delay period. This process is
repeated, as long as the input or the additional trigger is ON.
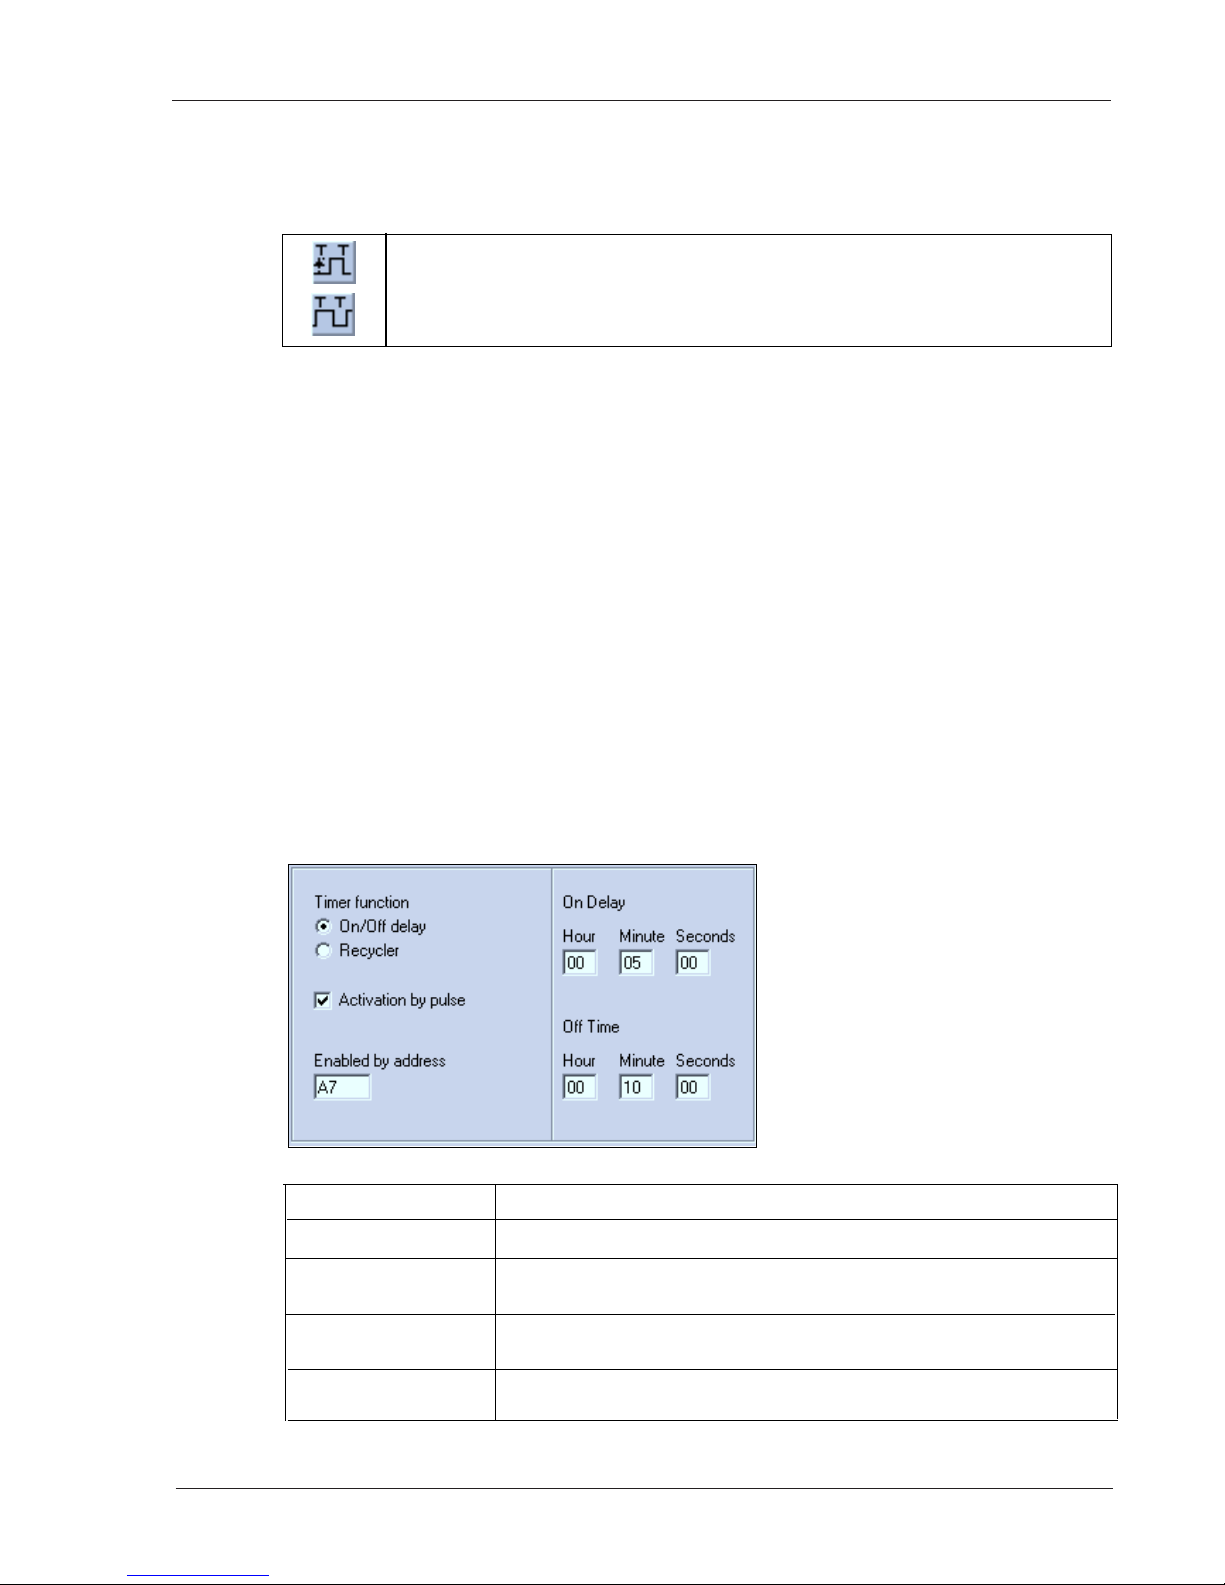
Parameters
Depending on the options selected under Timer function, a number of parameters can be selected for Timer
and Recycler:
Timer (with on-delay or off-delay)
Configuration window for timer with on- or off-delay:
Parameter Description
Timer function Select the option On-Off delay, in order to use the Timer function
Activation by pulse Select this option to start the timer by means of a short impulse, eg through a
push button switch
On delay Enter the time (0 s to 99 h, 59 min, 59 s) which must pass before the channel is
activated
Off time Enter the time (0 s to 99 h, 59 min, 59 s) for which the channel should be activat-
ed
• Function: Timer or Recycler
• Application: Switching with on- or off-delay or recycler
• Activation by signal or impulse
• Activation by additional channel or flag
• Select with mouse “Timer” or short-cut key “T”
Page 18

18 © 2002 Carlo Gavazzi Industri A/S. All rights reserved
G 3800 X015 Configuration Software October 2002
Time characteristics
Timer with on- or off-delay
t
t
PMan_TTimer_1a
t
2
t
1
t3t4t
5
t
7
t
6
The on-delay tEstarts shortly after the input signal at time t1. After elapse of the delay, the On-time tNstarts.
After elapse of the On-time (t
3
), the output switches off again. To achieve this, the input must be reset before
time t
3
.
Parameter Description
Enabled by address Entering of an additional channel (A1..P8) or flag (W1..Z8) which will also enable
the timer function. To prevent locking, the channel assigned to the timer itself
must not be used.
If the additional signal is an impulse, select the option Activation by pulse.
Recycler
Configuration window for recycler
Parameter Description
Timer function To select the Recycler function, select “Recycler”
On-time Entering of the time (1 s to 99 h, 59 min, 69 s) for which the output is On during
recycling
Off-time Entering of the time (0 s to 99 h, 59 min, 59 s) for which the output is Off during
recycling
Enabled by address Entering of an additional channel or flag which will also enable the recycler. To pre-
vent locking, the channel assigned to the recycler itself must not be used.
IN
OUT
T
E
T
E
T
N
T
N
Page 19

© 2002 Carlo Gavazzi Industri A/S. All rights reserved 19
G 3800 X015 Configuration Software October 2002
Object Function Channel
In-/outputs
Relay output Bathroom light A1
Switch Light switch A1
Relay output Bathroom fan A2
Configuration of Master Generator
Toggle switch function Light control A1
Timer Fan control A2
Application Example
Task: A fan in a bathroom is to start 5 min after the light has been switched on and run for 10 min.
Solution: The lighting is activated by a push button connected to a sensor module (for example a univer-
sal input module) and configured for address A1 as a toggle switch function. An output of a
relay module is assigned the same address and activates the lighting. A second channel A2 is
configured as Timer and activated by the above-mentioned push button. An additional channel
of the output module is also assigned the address A2 and activates the fan.
Recycler
The impulse is generated shortly after the input has switched on at time t
1
. A pulse cycle consists of the On-
time t
E
and the Off-time tA. When the input is switched off, the pulse cycle also ends.
t
t
PMan_TTimer_2a
t
2
t
1
t
4
t
3
IN
OUT
By use of the additional trigger A1, the timer starts when the light is switched on.
T
E
T
A
Page 20
20 © 2002 Carlo Gavazzi Industri A/S. All rights reserved
G 3800 X015 Configuration Software October 2002
2.2.5. Real-time clock
Description
The real-time clock enables on- and off-switching of loads in relation to the internal time setting of the Master
Generator. It is possible to pre-define up to four switch-on and switch-off times for each clock on freely
selectable weekdays and holidays.
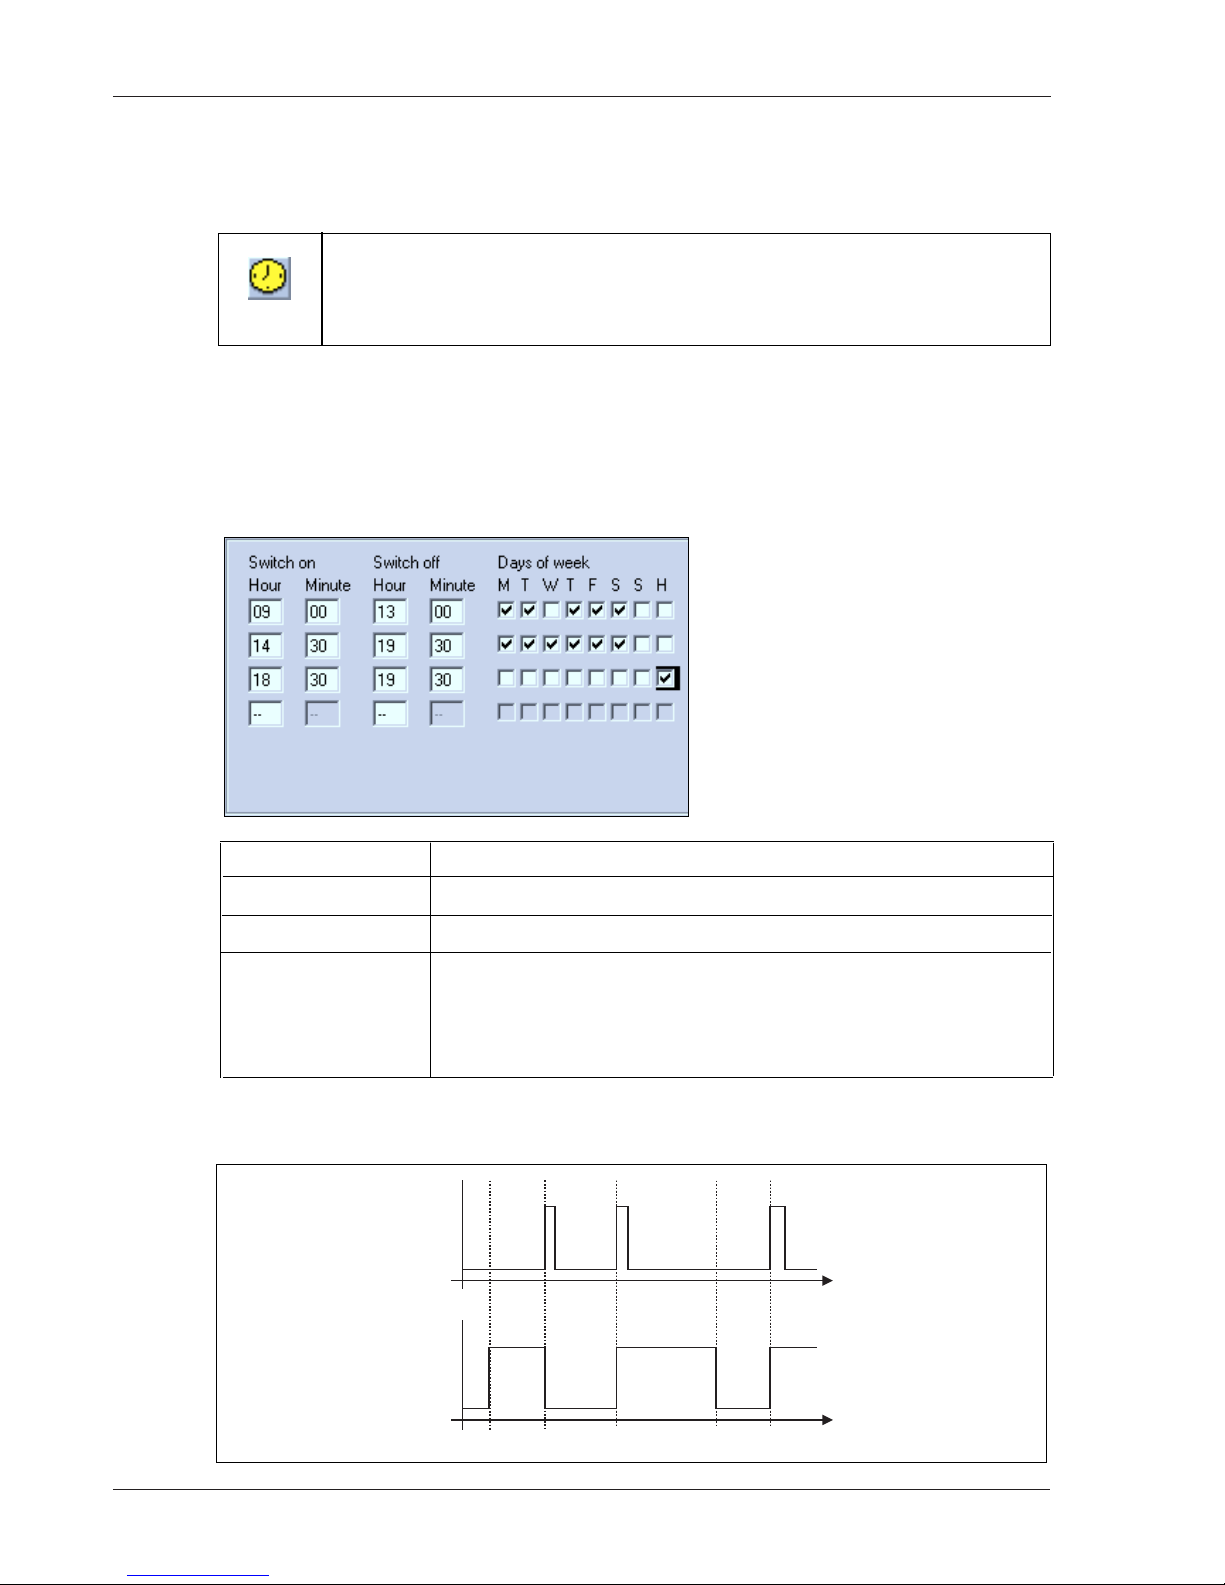
Parameters
Configuration window of real-time clock function:
Time characteristics
t
t
PMan_TReal_1a
t
2
t
1
t
4
t
3
t
5
• Function: Real-time clock with week and holiday planner
• Application: Time-controlled switching on and off of loads
• Also applicable as switching function
• Holiday setting can be performed centrally for all clocks
• Select with mouse “Real-time” or short-cut key “R”
IN
OUT
Parameter Description
Switch-on time Time at which the channel is to switch on
Switch-off time Time at which the channel is to switch off
Days of week Day(s) on which the switching time indicated to the left applies
(M: Monday, T: Tuesday, W: Wednesday, T: Thursday, F: Friday, S: Saturday,
S: Sunday)
If “H” is activated, the clock also switches on holidays. In this case, the corresponding days must be entered under <Edit><Holiday setup>.
Page 21

© 2002 Carlo Gavazzi Industri A/S. All rights reserved 21
G 3800 X015 Configuration Software October 2002
Object Function Channel
In-/outputs
Relay output Outdoor lamp A1
Switch Light switch A1
Configuration of Master Generator
Toggle switch function Light control A1
Application Example
Task: A lamp is to be switched on and off by means of a switch.
Solution: Use for example the universal input module to provide the input signal and configure one of the
inputs for address A1. Assign the same address to one of the outputs of a relay module. Finally,
configure channel A1 in the Master Generator as a toggle switching function.
t
1
: The real-time clock activates the channel at the pre-defined time without affecting the input channel.
t
2
: By activation of the input, the output switches off directly.
t
3
: By activating the input once more, the output switches on again.
t
4
: At the set Switch off time, the input is always deactivated.
t
5
: The output can always be activated againg through the output.
Page 22

22 © 2002 Carlo Gavazzi Industri A/S. All rights reserved
G 3800 X015 Configuration Software October 2002
2.2.6. Master function
Description
The master function allows simultaneous activation of a random number of channels configured for suitable
objects.
When the master function is activated, an on-signal is generated on the channels configured for switching on.
Likewise, an off-signal is generated on channels configured for switching off. The objects configured for these
channels thus determine the behaviour of the outputs.
Note: the following characteristics of the master function:
• A master function has priority over the individual functions at the time of activation, ie it is not possible to
activate the individual channels as long as the master function is on. Upon reset of the master function,
the decentral functions are accepted again.
• It is to be noted, in particular in connection with real-time clocks, that only one master command can
apply at a time. When several master functions are activated at the same time, only the one with the highest address number (eg B7 has priority over A5) will be applied.
• The master function cannot affect channels with advanced functions, eg alarm channels or analog sensors.
• A master function cannot activate another master function.
Parameters
Configuration window of Master function: (In this example, a real-time clock is included and the option “Enter
Switch times”:
• Function: Simultaneous on- and off-switching of multiple toggle switch functions, real-time
clocks, etc, upon activation of input.
• Integrated real-time clock with four switch times
• Application: Simultaneous off- on on-switching of multiple loads, calling lighting scenes in
connection with dimmers.
• Select with mouse (“Master function”) or short-cut key “M”.
• Bistable master function
Page 23

© 2002 Carlo Gavazzi Industri A/S. All rights reserved 23
G 3800 X015 Configuration Software October 2002
Tip: Entire address groups can be changed by clicking on the right mouse button.
Time characteristics (without toggle function selected)
t
t
t
PMan_TMaster_1a
t
2
t
1
t
4
t
3
IN
OUT
Switched
outputs
Toggle switch
function
Push button
function
The master function remains active until the input is switched off. In the above example, the outputs switch on,
and - in the case of a push button function - remain on, until the master function switches off again.
Parameter Description
Address matrix Mark the addresses to be switched on by the master function with “1” and the
addresses to be switched off with “0”.*
Addresses marked with “x” are not affected. Addresses which are automatically
marked with a red line cannot be controlled by a master function, eg master functions, roller blind controls, etc.
Toggle switch If this function is selected, the master function will toggle between the selected
output status and the inverted output status, whenever the input is activated.
Include Real-time A real-time clock is included to time-control the master function. The field “Enter
Switch times” appears.
Enter Switch times Click here to open or close a matrix in which to enter switch times
Real-time clock Normally, the real-time clock for time-control of the master function behaves in
the same way as the object “Real-time clock”. See chapter 2.2.5. Real-time clock
for further details.
Unlike a separate real-time clock, the built-in real-time clock only generates one
switching impulse. This is particularly important to bear in mind when the master
function is to control push button functions, since the switch signal may be of
very short duration.
As a Flip-Flop Master The real-time function operates both ON-switching and OFF-switching. This
enables simultaneous ON- and OFF-switching of multiple channels. The channels
marked with “1” switch on when the master is activated and switch off upon
deactivation. The channels marked with “0” behave in the opposite way.
Page 24

24 © 2002 Carlo Gavazzi Industri A/S. All rights reserved
G 3800 X015 Configuration Software October 2002
Object Function Channel
In-/outputs
Push button input Master on A1
Push button input Master off A2
Push button input Push button for call- A3
ing lighting scene 6
Dimmer channels Channels for calling B1.. B4
lighting scenes B5..B8
Relay outputs Lamps C1..C4
Configuration of Master Generator
Master function Master on A1
Master function Master off A2
Master function Calling lighting A3
scene
Push button function Dimmer channels B1..B4
1..4 B5..B8
Toggle switch function Lamps C1..C4
Application Example
Task: The master function is to control four lamps and two dimmers in a building.
- Master on: Switches all lamps on and sets dimmer at 100%.
- Master off: Switches all lamps off and sets dimmer at 0%.
- Lighting scene for living room: lighting scene 6 (factory setting: 85%) is to be called by both
dimmers.
Solution: Three push buttons are configured on addresses A1 to A3 to initiate the master function for
calling the lighting scene. The channels of the dimmer are coded for B1 to B8 and configured
as push button functions.
Page 25

© 2002 Carlo Gavazzi Industri A/S. All rights reserved 25
G 3800 X015 Configuration Software October 2002
2.3. Special objects
2.3.1. Analog sensors
Description
The objects of the analog sensors offer the possibility of integrating analog measuring devices in Dupline and
processing their values. It is possible to select among four types of sensor functions.
Measuring sensor
General sensor object, with which all the other sensor types can be integrated (the following sensors, such as
the light sensor, are indicated by different icons and the measuring ranges are partly pre-defined).
Since all sensors operate in the same way, their functions are illustrated by means of the general measuring
sensor.
Light sensor
This pre-defined object for the light sensor DLUX operates in the same way as the measuring sensor, but has
a different icon and the preset measuring range of 0.1 to 100,000 Lux.
Wind sensor
This sensor object is intended for the integration of a wind meter (anemometer), but requires a conversion
module. Apart from that, this object operates like the measuring sensor.
Temperature sensor
This object also operates in the same way as the measuring sensor, but has its own icon for easy recognition.
General information
Channels for analog transmission operate in the same way as other switching channels. For example, they
cannot be switched with switches that operate on the same channel. This means that an additional channel is
needed when for example a sensor only is to be switched manually and only at a certain time.
Furthermore, analog values cannot be processed by means of flags. In stead, it is possible to configure any
number of analog sensors so that they relate to the same “source value”.
• Function: Transmission and output of analog values (from temperature, light and other sen
sors) to perform switching functions
• Application: Display of analog (AnaLink) values on text display/touchscreen: load switching
(for example heating elements, lamps, roller blinds) in relation to temperature or outdoor light,
etc.
• Readout at any time of analog values in relation to external values
• Up to two switching ranges can be defined on each channel
• Disabling of switching operations through an additional channel or flag
• Select with mouse “Analog Sensor”
Page 26

26 © 2002 Carlo Gavazzi Industri A/S. All rights reserved
G 3800 X015 Configuration Software October 2002
Parameters
Configuration window of the analog sensor function:
In general, the operation of sensors depends on the purpose of using the values:
Showing data on PC, Touchscreen or Text display
In this case, the parameters “Control output” and “Alternative input” should not be activated, because in that
case the analog value will only be transmitted and not displayed. Finally, the measuring range should be configured with minimum and maximum values (eg -30 ˚C and +60 ˚C):
Hint: In this operating mode, limit values can be set. It is also possible to use the switching commands of this
channel as input in logic functions without activating the parameter “Control output”.
Switching an electrical load by means of the sensor
For this purpose, the parameter “ Control output” must be activated in order to output the set limit values.
This output function causes a switching command on this channel and thereby an output (eg relay) on the
same address. The sensor is to be configured as follows:
1. Enter the measuring range of the sensor (stated directly on the sensor or in the user manual), e.g. -30 ˚C
and +60 ˚C.
2. Enter the switching range at which the object switches on or off: Standard setting gives the threshold value
Off < Limit and On > Limit. This means that the channel switches off when the analog value drops below the
first entered value, and the channel switches on when the analog value exceeds the second entered value.
But this is rarely the case. More often - and in particular in heating control systems - the heating element is to
switch on when the temperature drops below set value and switch off when set value is exceeded. The inverted output function needed for this purpose is selected with the parameter “Invert limits”, which changes the
entered values into On < Limit and Off > Limit. Select the values appearing in the window in order to control
the temperature of a room within the range of 19 ˚C and 21 ˚C.
3. If you want to add night setback to your heating control system, select the option “Enable Limit 2” to enter
a second pair of limit values and specify a channel or flag in the field “Enabled by address”, eg address A3
configured for the real-time clock function.
Hint: These limits can also be inverted by clicking “Invert limits”.
4. The entire analog signal output can be disabled through a channel or a flag by entering a “Disable
address”. When the Disable address is switched on, the sensor object switches neither On nor Off.
5. Finally, the analog values can also in this case be provided by another channel. By clicking in the field
“Alternative input” and entering an address in the field “Measuring channel”, an analog value can generate a
random number of outputs.
When the Configuration Software has
been connected to the master, the
actual values are shown:
Page 27

© 2002 Carlo Gavazzi Industri A/S. All rights reserved 27
G 3800 X015 Configuration Software October 2002
The following table gives an overview of all parameters:
Parameter Description
Function Select the function of an ordinary measuring sensor, light sensor, wind or tempe-
rature sensor. Basically, all functions operate in the same way.
Disable address When the channel or flag entered here is activated, all switching operations of the
sensor are disabled.
The value can be overwritten at any time and deleted by the Delete-key.
Control output This entry is needed in order to use the sensor to activate a relay coded to the
same address.
If the analog value is to be displayed on this channel (for instance on a Touchscreen), then this option must not be selected.
Invert limits This option inverts the switching function in relation to the limit values.
Alternative input When selecting this option, the analog value is provided by another channel. The
channel to provide the alternative analog value is entered in the field “Measuring
channel”.
Sensor input range The upper and lower limit values of the sensor. For example, the lower value
could be -30 ˚C, while the upper value could be 60 ˚C.
Note: The entry of each value must be confirmed with the Enter-key.
Measuring channel If the sensor providing the value is coded for another channel, this “source chan-
nel “ is entered here. For this purpose, the option “Alternative input” must be activated. The value can be overwritten at any time and deleted again by the Deletekey.
Off < Limit These are the switching limits of the sensor object. If the option “Invert limits” is
On > Limit not selected, the limit values appear as described, ie if the values “17.0” and
or “20.0” are entered, the channel switches off when the actual value is below 17.0
On < Limit and switches on when the actual value is above 20.0.
Off > Limit
When the limit values are inverted, the sensor switches on when the actual value
is below 17.0 and switches off when the actual value is above 20.0. This setting is
typical for a heating control system.
The limit values are only active, when the address enabling a second pair of limit
values is not switched on.
Note: The entry of each value must be confirmed with the Enter-key.
Enable limit 2 This option is selected in order to enter a second pair of limit values, for instance
for night setback.
Off < Limit The second pair of limit values makes it possible to enable a different switching
On > Limit operation through a different address - “Enabled by address”. If “Enabled by
or address” is activated, the second pair of limit values will apply in stead of the first
On < Limit pair.
Off > Limit
The second pair of limit values can also be inverted by the “Invert limits” option.
Note: The entry of each value must be confirmed with the Enter-key.
Enabled by address When the selected channel or flag is not active, the first pair of limit values will
apply, when it is active, the second pair will apply.
The value can be overwritten at any time and deleted by the Delete-key.
Page 28

28 © 2002 Carlo Gavazzi Industri A/S. All rights reserved
G 3800 X015 Configuration Software October 2002
Time characteristics
Sensor for display of measuring values
In this application, the displayed value follows the actual value after a short delay.
Note: Upon switch-on of the sensor or the Dupline bus, the actual sensor value is only reached after a time
elapse of 30 s. This time is needed by the system to calculate the value accurately.
Sensor as switching channel
The time characteristics of the sensors are here illustrated by the example of a temperature sensor: the upper
curve shows the room temperature, the curve in the middle shows the Disable address, and the lower curve
shows temperature sensor as switching channel.
t
t
t
PMan_TTemp_1a
t
2
t
1
t
5
t3t
4
t
6
t1: The room temperature drops to the value entered for On > Limit, eg 21°C. Since no Disable Address
is entered, the object “Temperature sensor” switches the channel on.
t
2
: The temperature reaches the value entered for Off < Limit, eg 17°C. Since a Disable Address is still not
entered, the channel assigned to the “Temperature sensor” object switches off.
t
3
: The room temperature reaches the lower limit value again, and the object switches on.
t
4
: The Disable Address (channel or flag) is activated, for example through a toggle switch.
t
5
: Although the upper limit value is reached, the object does not switch the channel on, because the
Disable address is active.
t
6
: The temperature sensor switching channel does not switch off, until the Disable address is deactivated.
Temperature sensor
Disable address
Room temperature:
Value for Off > Limit
Value for On < Limit
Page 29

© 2002 Carlo Gavazzi Industri A/S. All rights reserved 29
G 3800 X015 Configuration Software October 2002
Object Function Channel
In-/outputs
Temperature sensor Temperature A2
Relay output Heating valve A3
Configuration of Controller
Analog sensor: Transmission of A2
Temperature sensor analog value
Analog sensor: Analog signal out- A3
Temperature sensor put and switching
channel for the
relay of the heating
valve
Real-time clock Timer for night A4
setback
Application Example
Task: A heating element is to keep the room temperature between 19°C and 21°C during daytime. At
night, the temperature must be lowered by 4°C.
A temperature sensor located in the room is coded for address A2 and displays the temperature on a Touchscreen.
Solution: Since the analog sensor value on A2 is already needed for displaying the temperature, we
assign the temperature sensor object - and consequently the relay controlled by the heating
element - to address A3.
For the night setback, we assign a real-time clock to A4 with the desired switching times. The
real-time clock serves as an additional address for enabling the second pair of limit values.
Page 30

30 © 2002 Carlo Gavazzi Industri A/S. All rights reserved
G 3800 X015 Configuration Software October 2002
Description
The object “Motion detector” makes it possible to include Dupline Passive Infrared Detector (PIR), eg G8910
1127 and conventional motion detectors, which are connected to the Dupline bus via binary inputs.
The PIR detector can have an off time defined and be integrated in the intruder alarm system. Thereby it
becomes possible avoid false alarms by setting the number of impulses which must be detected within a 10 s
time window before the alarm starts.
Note: If you want a PIR detector to generate the off time indepedently, the object “Push button function”
should be used.
The off time of G8910 1127 can be operated through DIP-switches.
Parameters
Configuration window of Motion detector:
• Function: Includes motion detectors or similar input modules in the Dupline system.
• Application: Control of lamps and integration in the intruder alarm system
• Off time adjustable from 00 h 00 min 00 s to 99 h 59 min 59 s
• Variable number of movement impulses helps to avoid false alarms in the intruder alarm
• Select with mouse (“Motion detector”)
Parameter Description
Off time: The time for which the channel remains activated (00.00.00 to 99.59.59) after a
motion impulse has occured. Each additional impulse will start the off time again.
When entering an off time of 00:00:00, the Master Generator generates a short
output signal indpendently of the duration of the input signal.
Use in Intruder alarm Click in the check box in order to include the channel in the intruder alarm sys-
tem.
A signal from this channel will then also start the intruder alarm (see chapter
2.4.5).
Number of pulses The value entered here (1..255) determines how many impulses the motion
detector may generate within 10 s, before the alarm starts.
When an impulse is detected, the Master Generator checks whether the number
of impulses during the past 10 s has exceeded the set number. If this is the case,
an alarm is generated in the connected intruder alarm system.
This setting thus reduces the risk of false alarms.
Note: Since the signal output takes place subsequently, an additional impulse is
always needed. This means that when the number of impulses is set to 3, the
alarm will go off at the fourth signal. The set off time has no influence on the
alarm.
2.3.2. Motion detector
Page 31

© 2002 Carlo Gavazzi Industri A/S. All rights reserved 31
G 3800 X015 Configuration Software October 2002G 3800 X015 Configuration Software October 2002G 3800 X015 Configuration Software October 2002
Time characteristics
In the following figure, “IN” is the input channel of the motion detector or the contact, while “OUT” is the output signal of the same channel. In addtion, the object “Motion detector” has been integrated in the intruder
alarm system (whose alarm siren can also be seen in the below diagram). The number of impulses has been
set to “3”.
t
t
t
PMan_TMotion_1a
t
P2
t
P1
t
P4
t
P3
tP1, tP2, tP3and tP4are the points of time at which the motion detector generates a signal. The impulse duration
depends on the characteristics of the detector. T
N
is the set off time retriggered by the impulses tP2and tP3and
therefore only begins after elapse of the third impulse.
The alarm will not start until after the fourth impulse t
P4
, and only when the time elapse between tP1and tP4is
less than 10 s.
Alarm siren
IN
OUT
T
N
Page 32

32 © 2002 Carlo Gavazzi Industri A/S. All rights reserved
G 3800 X015 Configuration Software October 2002
Application Example
Task: A floor lighting is to switch on automatically for 5 minutes with PIR sensor G 8910 1127 and
also serve as intruder alarm when the house is empty.
Solution: G 8910 1127 must be connected to the Dupline bus and given an address (here A1). In this
example, increase of the signal transmission time through the DIP switch is to be switched out.
Configure both the object “Motion detector” and an output channel of a relay module for
address A1 and additional objects needed for the intruder alarm (Manual armouring, Alarm
siren).
Also in this case, the motion detector activates the output module for the lighting directly on address A1. If
the alarm system is activated via the manual armouring, the Master Generator generates an alarm within 10 s
after the third impulse.
Additional details about the intruder alarm can be found in chapter 2.4.5.
Tip: If you want to use the Sabotage protection (Normally closed function) of the G 8910 1127, you should
configure the object “Push button function” for the normally closed function and use the increase of signal
transmission time function provided by the module.
In order to include the detector with sabotage protection in an intruder alarm system, you must use the object
“Active detector” of the intruder alarm system in stead of the Push button function.
Page 33

© 2002 Carlo Gavazzi Industri A/S. All rights reserved 33
G 3800 X015 Configuration Software October 2002
This chapter will assist you in using the four different Dupline alarm systems:
1. ISA-alarm (chapter 2.4.3)
This general alarm system develped acc. to ISA specifications is very flexible and has formed the basis of
the development of the other alarms systems. Application areas include temperature- and level control
as well as plants requiring ordinary alarm functions.
2. Smoke alarm (chapter 2.4.4.)
The primary purpose of this alarm system is the connection of the Dupline smoke detector.
Of course, other smoke detectors can also be used if they provide a Normally closed or Normally open
contact. In this case, the connection to the Dupline system can take place through a digital input.
3. Intruder alarm (chapter 2.4.5)
This system provides objects which allow monitoring of input signals for the intruder alarm. The inputs
can be either floating or non-floating contacts connected to the system through digital Dupline inputs.
4. Water alarm (chapter 2.4.6)
The Water alarm was developed as a separate system intended for the connection of water stop sensors.
The alarm systems differ in the following ways:
In the armouring (manual/door lock)
In the type of alarm resetting (Acknowledgement/Reset)
In the way of alarming and
In the time characteristics
2.4.2.1. In-/output on one channel
The alarm systems benefit more than any objects fromt he capability of Dupline to differ between in- and outputs on the same channel (Split I/O). Thereby it is possible to use a Normally open contact to reset the system
and subsequently switch it in and out alternately.
The user should therefore not be surprised when:
a channel is activated without an input being activated or
a channel is not activated although an input is activated
2.4.2.2. Master functions
Alarm objects can generally not be affected by master functions.
2.4.2. General features
2.4. Alarm functions
2.4.1. Overview
Page 34

34 © 2002 Carlo Gavazzi Industri A/S. All rights reserved
G 3800 X015 Configuration Software October 2002G 3800 X015 Configuration Software October 2002G 3800 X015 Configuration Software October 2002
2.4.3. ISA Alarm
• Function: General alarm system with inclusion of Passive detector, Active detector,
Acknowledgement, Reset, Lamp test and Alarm siren
• Application: Monitoring of contacts and other alarm sources.
• Select with mouse (“ISA alarm”) or short-cut key “A”
Description
The purpose of the ISA-Alarm is to serve as a general alarm system acc. to the ISA specifications. The system
supports two operation modes:
1. Standard: An alarm is reset (“Reset”) and switched on again manually by push button.
2. Auto reset: An alarm is reset and switched on again automatically after acknowledgement and removal of
the cause of alarm (Normal position of the alarm contacts).
Alarm contacts are generally included in the system through the objects “Passive detector” and “Active
detector”. The alarm system is switched on for the first time after downloading of the application when all
alarm contacts are in off-position or the Reset button is activated. The alarm is released when one or several
alarm contacts are activated. The system actuates the activated alarm contact approx. every second and
switches the alarm output on for the set duration.
When the Acknowledgement button has been actuated in the “Standard” operation mode, the alarm contacts
switch from flashing to continuous operation and the alarm output is switched off. At this point of time,
renewed actuation of an alarm contact does not trigger off an alarm. Subsequent acuation of the Reset button
switches the alarm contact off and releases the alarm system.
If the Reset button is actuated before the Acknowledgement button, the system will also switch off the alarm
output, but the alarm contacts will continue to flash. A new alarm is caused by renewed activation of an alarm
contact.
In the operation mode “Auto reset”, the alarm system is restarted after acknowledgement and with alarm contacts in off-position.
The status of the alarm contacts can easily be displayed, eg on a panel. This only requires that the output
channels are coded for the same addresses as the alarm contacts. The functionality of the lamps can then be
tested by means of the object “Lamp test”.
For giving out alarms, the object “Common siren” can also be used. Further details can be found in chapter
2.4.7.
The various ISA objects are selected under “Function”:
Passive detector: Normally open input. This object makes it possible to include
passive detectors. When the contact is activated and a “1”-Signal
consequently transmitted on the Dupline bus, an alarm is started.
Active detector: Normally closed input. This object makes it possible to include
active detectors. When the contact is activated and a “0”-Signal
consequently transmitted on the Dupline bus, an alarm is started.
Acknowledgement: This object makes it possible to include acknowledgement buttons.
Upon actuation of an acknowledgement button, the alarm output is
reset and the alarm source indication prepared for the resetting
(changing from flashing to continuous operation).
Note: This object must always be configured.
Reset: This object is only needed in the operation mode “Standard” and
makes it possible to include a button for resetting the alarm and
restarting the system. This requires prior acknowledgement of the alarm.
Page 35

© 2002 Carlo Gavazzi Industri A/S. All rights reserved 35
G 3800 X015 Configuration Software October 2002G 3800 X015 Configuration Software October 2002G 3800 X015 Configuration Software October 2002
Parameter Description
Operation mode Standard:
This setting means that activation of the alarm system takes place upon prior
release by the reset button. This entails that the object “Reset” must be configured.
Auto reset:
With this setting, the system activates itself automatically upon acknowledgement, when all passive and active detectors are in their “normal” position (in
which they do not trigger off alarms)
Note: Operation mode can be selected for any object of the ISA alarm - but
applies to the entire system. If the object “Reset” is selected to include a reset
button, the system assumes that the operation mode “Standard” is to be selected. Simultaneously, the option operation mode is deactivated and can only be reactivated by unclicking the object “Reset”.
If “Auto reset” is selected, the system prevents configuration of the “Reset”
object.
Passive detector
Disable address Enter an address (A1..P8) or a flag (W1..Z8) whose activation (“1”-signal) will leave
out the Passive detector function of the monitoring system whereby it cannot
trigger off any further alarms.
On-delay Enter a time value in seconds (0..255) for which the alarm signal is delayed upon
activation of the alarm contact.
Active detector
Disable address Enter an address (A1..P8) or a flag (W1..Z8) whose activation (“1”-signal) will leave
out the Passive detector function of the monitoring system whereby it cannot
trigger off any further alarms.
If a contact is activated during resetting, the system triggers off a new alarm
When this object is configured, the operation mode “Standard” is automatically
selected.
Lamp test: This object makes it possible to test the function of lamps indicating the status of
the alarm contacts. All alarm channels are activated upon actuation of the lamp
test button.
Alarm siren: The alarm siren indicates the occurence of an alarm. The channel configured for
this object can be used for alarm output on a random number of output modules.
It usually activates a relay output switching a siren.
Parameters:
Page 36

36 © 2002 Carlo Gavazzi Industri A/S. All rights reserved
G 3800 X015 Configuration Software October 2002G 3800 X015 Configuration Software October 2002G 3800 X015 Configuration Software October 2002
On-delay Enter a time value in seconds (0..255) for which the alarm signal is delayed upon
activation of the alarm contact.
Acknowledge No configuration possibilities.
Reset No configuration possibilities.
Lamp test No configuration possibilities.
Alarm siren
Siren time This setting determines for how long the alarm output is to remain activated in
the case of alarm. The value can be between 0 and 60 min.
Note: With the Minus-key (-), the time can be set to an indefinite time. This is indicated by “»»»“.
Time characteristics
Operation mode “Standard”
t
t
t
PMan_TISA_1a
t
2
t
1
t
4
t
3
t
t
Passive detector (IN)
Passive detector (OUT)
Acknowledgement
Reset
Alarm siren
T
EV
Page 37

© 2002 Carlo Gavazzi Industri A/S. All rights reserved 37
G 3800 X015 Configuration Software October 2002G 3800 X015 Configuration Software October 2002G 3800 X015 Configuration Software October 2002
The above illustration shows the normal sequence and reset of an alarm in the operation mode “Standard”:
t1: When all contacts are in off-position, the Master Generator alerts the alarm system automatically upon
loading of the application.
t
2
: After elapse of on delay TEV, the Master Generator activates the alarm siren and causes the output of the
source channel to flash.
t
3
: By activation of the acknowledgement button, the Master Generator switches the alarm siren off (provided
that the siren time has not elapsed) and transfers the alarm source indication into a continuous signal.
t
4
: By activation of the reset button, the alarm source indication turns off and the system is alert again.
Operation mode “Auto reset”
The above illustration shows the normal sequence and reset of an alarm in the operation mode “Auto reset”:
t
1
: When all contacts are in off-position, the Master Generator alerts the alarm system automatically upon
loading of the application.
If a contact is subsequently activated, initially nothing will happen because of entered on delay T
EV
.
t
2
: After elapse of on delay TEV, the Master Generator activates the alarm siren and causes the output of the
source channel to flash.
t
3
: After elapse of the siren time TAand reset of the alarm contact, the Master Generator switches the alarm
siren off.
t
4
: Acknowledgement deactivates the Normally open output, and the system at once brings itself in the alert
state again.
t
5/t6
: As t1/t2.
t
7
: In spite of the acknowledgement of the alarm, the flashing source indication changes to continuous
operation, because the alarm source is still activated at this point of time. Since the siren time has not yet
elapsed, the alarm siren turns off.
t
8
: Only when the alarm source switches off, is the source indication also reset and the alarm system in the
alert state again.
t
t
PMan_TISA_2a
t
2
t
1
t
3
t
5
t
t
t7t
6
t
8
t
4
Passitve detector (IN)
Passive detector (OUT)
Acknowledgement
Alarm siren
T
a
T
EV
Page 38

38 © 2002 Carlo Gavazzi Industri A/S. All rights reserved
G 3800 X015 Configuration Software October 2002G 3800 X015 Configuration Software October 2002G 3800 X015 Configuration Software October 2002
Object Function Channel
In-/outputs
Alarm switch Alarm contact A1..A8
Push button input Acknowledgement B1
Push button input Reset B2
Push button input Lamp test B3
Semiconductor output LED for source in- A1..A8
cation on a panel
Relay output Alarm siren B4
Configuration of Master Generator
ISA alarm: Alarm sources A1.. A8
Passive detector
ISA alarm: Alarm B1
Acknowledgement acknowledgement
ISA alarm: Reset Alarm reset B2
ISA alarm: Lamp test Activation of all B3
LEDs on the panel
ISA alarm: Alarm siren Alarm sounding B4
Application Example
Task: In a chemical factory, eight laboratories are to be provided with alarm switches. Upon activation
of an alarm button, the fire staff of the factory is informed via a siren. When the fire staff has
acknowledged the alarm, they go to the lab where the alarm was started.
Solution: The alarm switches are coded for channels A1 to A8. The source of the alarm is indicated on a
panel whose LED is activated via a mimic display. The addresses correspond to those of the
alarm contacts. The fire staff uses a button coded for address B1 to acknowledge the alarms.
The alarm is reset through a reset button coded for address B2. The alarm is sounded by
means of a horn activated through a relay output of DSM 8 coded for address B4.
Page 39

© 2002 Carlo Gavazzi Industri A/S. All rights reserved 39
G 3800 X015 Configuration Software October 2002G 3800 X015 Configuration Software October 2002
2.4.4. The Smoke Alarm
• Function: Fire alarm system including Passive detector, Active detector, Reset, Alarm Siren
and Alarm signal
• Application: Wiring of smoke/fire indicators to an alarm system
• Select with mouse (“Smoke alarm”) or short-cut key “S”
Description
The purpose of the Smoke Alarm is an alarm system consisting of smoke and fire indicators integrated as
Passive or Active detectors. The wiring makes it possible to replace conventional fire alarm systems.
Smoke detectors are generally included in the system through the objects “Passive detector” or “Active
detector”. The alarm system is automatically alert after elapse of the Reset delay (set with the Reset object),
when the Configuration software has been downloaded or the Master Generator has been switched on. The
Reset output switches on within this time.
An alarm is triggered off when one or several alarm contacts are activated for more than 10 s. The channel for
the activated alarm contacts (alarm source indication) as well as the alarm output start to flash approx. every
second. By subsequent activation of the reset key, the Master Generator switches the channel out of the system. If contacts are still activated, another alarm is triggered off after elapse of the reset delay.
Note: Configuration of the object “Reset” is absolutely necessary to ensure correct function.
The status of the alarm contacts can be shown in a simple way on a panel. All that is needed for this purpose
is that the output channels are coded to the addresses of the alarm contacts.
The object “Alarm signal” makes it possible to control a telephone or GSM modem because of the short message on this channel.
For alarm purposes, the object Common Siren can also be used. Details can be found in the section describing The alarm siren/Common siren.
The various smoke alarm objects are set under “Channel function”:
Passive detector: Normally open input. This object makes it possible to include
passive detectors. When the contact is activated and a “1”-Signal
consequently transmitted on the Dupline bus, an alarm is started.
Active detector: Normally closed input. This object makes it possible to include
active detectors. When the contact is activated and a “0”-Signal
consequently transmitted on the Dupline bus, an alarm is started.
Reset: This object makes it possible to include a button to reset the alarm and restart the
system. .
If a contact is activated during reset, a new alarm is started after elapse of the
reset delay.
Note: This object must be configured in order to achieve correct function of
the smoke alarm system.
Alarm siren: The siren indicates that an alarm has occurred. The channel configured with
this object can be used to output the alarm on any output modules. It usually
activates a relay output through which a siren is switched.
Note: The alarm output basically flashes.
Alarm signal: When an alarm occurs, a channel configured with this object is activated for
10 s and can thus be used to activate a telephone or GSM-modem.
Page 40

40 © 2002 Carlo Gavazzi Industri A/S. All rights reserved
G 3800 X015 Configuration Software October 2002G 3800 X015 Configuration Software October 2002
Parameters:
Parameter Description
Passive detector
Disable address Enter an address (A1..P8) or a flag (W1..Z8) whose activation (“1”-signal) will leave
out the Passive detector function of the monitoring system whereby it cannot trigger off any further alarms.
Active detector
Disable address Enter an address (A1..P8) or a flag (W1..Z8) whose activation (“1”-signal) will leave
out the Active detector function of the monitoring system whereby it cannot trigger off any further alarms.
Reset
Reset delay The delay after which the system becomes alert or an alarm is suppressed upon
activation of the reset button. This function can be used to ensure that the measuring chambers are completely emptied of smoke.
This time is also used in connection with downloading of the software and switching on of the channel generator.
Page 41

© 2002 Carlo Gavazzi Industri A/S. All rights reserved 41
G 3800 X015 Configuration Software October 2002G 3800 X015 Configuration Software October 2002
Parameter Description
Alarm siren
Siren time With this setting, you determine the duration of the activation of the alarm output
upon the occurence of an alarm. The value can lie between 0 and 60 min. The
entered value is automatically adopted by the Common Siren.
Alarm signal
Alarm signal delay With this setting, you determine the time to elapse after switching on of the alarm
siren till the alarm signal is activated. The value can lie between 0 and 10 min.
Page 42

42 © 2002 Carlo Gavazzi Industri A/S. All rights reserved
G 3800 X015 Configuration Software October 2002G 3800 X015 Configuration Software October 2002G 3800 X015 Configuration Software October 2002
The above illustration shows the normal sequence and reset of an alarm:
t1: When power supply is connected, the system becomes alert after elapse of the set reset delay TR, indicated by reset of the reset output.
t
2
: After a short delay (approx. 3 s) after the occurence of a fire (activation of the Passive detector), the alarm
is started. This takes place by the alarm siren flashing and by output of the Passive detector channel, whereby
the alarm source is indicated.
t
3
: The channel generator activates the alarm signal channel after elapse of the set alarm signal delay TM.
t
4
: By activation of the reset button, the alarm siren and the alarm source indication are reset, although the
alarm source (Passive detector) is activated as before. The reason is that the Master Generator ignores all
alarm sources during the reset delay.
t
5
: By removing the smoke from the smoke detector, the Passive detector opens again and deactivates the
alarm channel.
t
6
: After elapse of the reset delay, the system becomes alert again, and the reset output is reset.
Time characteristics
Passive detector (IN)
Passive detector (OUT)
Reset (IN)
Alarm signal
T
EV
Siren
t
t
t
PMan_TSmoke_1a
t
2
t
1
t4t
3
t
t
t
t
5
t
6
Reset (OUT)
T
R
T
R
T
M
Page 43

© 2002 Carlo Gavazzi Industri A/S. All rights reserved 43
G 3800 X015 Configuration Software October 2002G 3800 X015 Configuration Software October 2002G 3800 X015 Configuration Software October 2002
Application Example
Task: In a residential building, eight rooms are to be equipped with smoke detectors. When an alarm
occurs, a siren switches on and the fire authorities are notified.
Solution: The alarm channels of the smoke detector are assigned to channels C1 to C8. The alarm
source is indicated on a panel whose LED is activated by mimic display. The addresses correspond to those of the alarm contacts. The alarm is sounded through a horn which is activated
through address D2 of a relay module. The alarm is reset again by a push button on address
B1.
Page 44

44 © 2002 Carlo Gavazzi Industri A/S. All rights reserved
G 3800 X015 Configuration Software October 2002G 3800 X015 Configuration Software October 2002G 3800 X015 Configuration Software October 2002
2.4.5. The Intruder Alarm
• Function: Intruder alarm system including Passive/Active detector contacts, Toggle switch
functions, Motion detectors, Manual and Door-lock Armouring, Code lock Armouring, Alarm
siren and Alarm signal
• Application: Wiring of intruder detector contacts to an alarm system
• Select with mouse (“Intruder alarm”) or short-cut key “I”
Description
The purpose of the Intruder Alarm is an alarm system consisting of various contacts integrated as Passive or
Active detectors. The wiring makes it possible to replace conventional intruder alarm systems.
Apart from the contacts represented by their own objects (Passive and Active dectector), it is also possible to
include toggle switch functions and motion detectors which have already been configured. This is done
directly when setting the parameters for these objects.
A system which is enabled will then start an alarm when one or several alarm contacts have been activated.
The channel for the activated alarm channels (as alarm source indication) as well as the alarm output start to
flash after the set time delay. By subsequent activation of the Manual armouring, the Door-lock armouring or
Code lock armouring, the Master Generator switches the channel out of the system and switches the alarm
output off.
If an alarm is not acknowledged before elapse of the alarm signal delay, the system automatically becomes
alert again.
Note: Configuration of the objects “Manual armouring”, “Door-lock armouring” or “Code lock armouring” is
absolutely necessary to ensure correct function.
It is not necessary to use the objects “Manual armouring” or “Code lock armouring”, but it is possible to have
an operation mode in addition to or in stead of the “Manual armouring”. By use of two objects, an alarm must
necessarily be acknowledged with the object which is also used to alert the system.
The status of the alarm detectors can be shown in a simple way on a panel. All that is needed for this purpose
is that the output channels are coded to the addresses of the alarm contacts.
The object “Alarm signal” makes it possible to control a telephone or GSM modem because of the short message on this channel.
For alarm purposes the object Common Siren can also be used. Details can be found in the chapter describing The alarm siren/Common siren.
The various Intruder alarm objects are selected under “Channel function”:
Passive detector: This object makes it possible to control windows, doors, etc. with Passive de-
tector. If the contact is activated and a “1”-Signal consequently
transmitted on the Dupline bus, an alarm is started.
Active detector: This object makes it possible to control windows, doors, etc. with Active de-
tector. When the contact is activated and a “0”-Signal consequently
transmitted on the Dupline bus, an alarm is started.
Toggle switch function: “Use in Intruder alarm”. See the chapter describing the Toggle Switch function
Motion detector: The motion detector can also be integrated in the intruder alarm. See the
chapter describing the Motion detector.
Page 45

© 2002 Carlo Gavazzi Industri A/S. All rights reserved 45
G 3800 X015 Configuration Software October 2002G 3800 X015 Configuration Software October 2002G 3800 X015 Configuration Software October 2002
Manual This object makes it possible to include a push button to enable
armouring: and reset the alarm.
The object only enables the alarm contacts for which no or a deactivated disable address has been entered.
Manual armouring thus partly enables alarms.
Upon activation of manual armouring, the armouring delay begins
to run. During this time, the channel generator ignores activated
alarm contacts.
If subsequently an enabled alarm contact is activated, this channel
begins to flash and triggers off an alarm through the siren after
elapse of the de-armouring delay.
To acknowledge the alarm, press the manual armouring key once.
To restart the alarm system, press twice.
Door lock This object makes it possible to include a switch to activate the
armouring: alarm system. The function is similar to that of the manual armour-
ing, only in door lock armouring the disable addresses entered at
the alarm contacts are ignored. This means that the switch performs total enabling.
Upon activation of the switch, the armouring delay begins to run.
During this time, the channel generator ignores activated alarm
contacts.
If subsequently an alarm contact is activated, this channel (like
manual armouring) begins to flash and triggers off an alarm through
the siren after elapse of the de-armouring delay.
The alarm is acknowledged by switching off the door-lock armouring. The system becomes alert by renewed switching on.
Code lock This object can be used as an alternative to door-lock armouring.
armouring: The mode of operation is identical, since this object also performs
total enabling of all - also disabled - alarm contacts.
The object awaits an impulse from the code lock to make the alarm
system alert. An additional impulse is needed in order to acknowledge an occuring alarm (see manual armouring).
Alarm siren: The alarm siren indicates that an alarm has occured. The channel
configured for this object can be used to output the alarm on different output modules. It usually activates a relay output through
which a siren is switched.
The configuration also allows the alarm output to flash
and makes it possible to determine additional channels which also
flash.
Alarm signal: When an alarm occurs, a channel configured with this object is
activated for 10 s and can thereby be used to activate a telephone
modem or a GSM modem.
Page 46

46 © 2002 Carlo Gavazzi Industri A/S. All rights reserved
G 3800 X015 Configuration Software October 2002G 3800 X015 Configuration Software October 2002
Parameter Description
Passive detector
Disable address Enter an address (A1..P8) or a flag (W1..Z8) whose activation (“1”-signal) will leave
out the Passive detector function of the monitoring system whereby it cannot
trigger off any further alarms.
Active detector
Disable address Enter an address (A1..P8) or a flag (W1..Z8) whose activation (“1”-signal) will leave
out the Active detector function of the monitoring system whereby it cannot trigger off any further alarms.
Manual armouring
Door-lock armouring
Code lock armouring
Armouring delay Here you can determine the delay with which - after activation of the Manual
armouring function - the system becomes alert.
De-armouring delay With this setting you determine how many seconds are to elapse from an alarm
has occured till the alarm siren is to be activated. This also allows early acknowledgement of the alarm or prevents an alarm output on the siren, for example in
order to make it possible to enter a building.
Parameters
Page 47

© 2002 Carlo Gavazzi Industri A/S. All rights reserved 47
G 3800 X015 Configuration Software October 2002G 3800 X015 Configuration Software October 2002G 3800 X015 Configuration Software October 2002
Parameter Description
Alarm siren
Siren time With this setting you determine how long the alarm output is to remain activated
when an alarm occurs. The value can lie between 0 and 60 min.
The system becomes alert again, when the siren time has elapsed and no alarm
contact is activated any more.
A value entered here is automatically adopted by the Common siren.
Flash when Alarm By ticking off this checkbox, the option Flashing Channels allows you to select
which channels are to flash in case of alarm as well as their flash interval (see
below). The alarm siren channel is thereby constantly switched on.
Note.: The options Flash Interval and Flashing Channels only appear when the
option Flash when Alarm has been selected.
Flash Interval Here you can enter the switch on/off time span of the flashing alarm signals. The
option “Flash when Alarm” must be switches on.
The value can lie between 0 and 60 s. Please note that flash intervals below 2
seconds may turn out inaccurately because of the cycle time. When the value 0 is
entered, flashing takes place at the fastest possible rate.
Flashing Channels By mouse-click on this option, an address matrix appears in which you can select
the channels which are to flash upon an alarm. This option is only available when
the option Flash when Alarm has been selected.
Alarm signal
Alarm signal delay With this setting you can determine the time which is to elapse from the alarm
siren is activated till the alarm signal is activated. The value can lie between 0 and
10 min.
Page 48

48 © 2002 Carlo Gavazzi Industri A/S. All rights reserved
G 3800 X015 Configuration Software October 2002G 3800 X015 Configuration Software October 2002G 3800 X015 Configuration Software October 2002
The above illustration shows the normal sequence of an alarm as well as early acknowledgement and the
switching of the system back into the alert state through the Manual Armouring option:
t1: When the Master Generator is switched on, the alarm system becomes alert through activation (once) of
the Manual Armouring function.
t
2
: An alarm contact is activated, eg by the opening of a secured port. Since the armouring delay TFVin this
example has not yet elapsed, nothing happens at first.
t
3
: After elapse of the armouring delay T
FV,
the alarm is started, ie both the channel of the alarm contact and
that of the Manual Armouring start to flash.
t
4
: After elapse of the de-armouring delay TAV, the Master Generator activates the alarm siren.
t
5
: After elapse of the siren time TA, the alarm siren channel is deactivated. The flashing of the alarm contact
and the Manual Armouring output continues.
t
6
: After elapse of the alarm signal delay TMset at the object “Alarm signal”, the channel is briefly activated. At
the same time, the alarm contact is continuously switched off and the Manual Armouring output continuously
switched on.
Time characteristics
Passive detector (IN)
Passive detector (OUT)
Manual armouring (IN)
Alarm signal
T
EV
Alarm siren
t
t
t
2
t
1
t
PMan_TBurglar_1a
t
4
t
3
t
t
t
t
6
t
7
t
8
t
5
Manual armouring (OUT)
T
FV
FV
T
A
A
T
AAV
V
T
M
M
Page 49

© 2002 Carlo Gavazzi Industri A/S. All rights reserved 49
G 3800 X015 Configuration Software October 2002G 3800 X015 Configuration Software October 2002G 3800 X015 Configuration Software October 2002
t7: Activation of the Manual Armouring will acknowledge the alarm, and the Manual Armouring output will be
reset.
t
8
: Activating the Manual Armouring once more will bring the system back into the alert state - after the
armouring delay T
FV
.
Application Example
Task: In a residential building, eight rooms are to be equipped with window and door contacts. All
light switches as well as two motion detectors are to be included in the system. When an alarm
occurs, a siren switches on and the police is informed via a telephone modem. A panel shows
the source of the alarm. The system should moreover make it possible to disable the alarm
contacts on each floor.
Solution: The alarm contacts are grouped room-wise (switched in series). Each room is assigned to a NO
contact within the range E1..E8. The source of the alarm is shown on a panel whose LED is
acitvated via a mimic display. The addresses correspond to those of the alarm contacts. The
alarm is sounded through a horn, which is activated via a relay on address F3. The alarm can
be brought into the alert state as well as acknowledged through the Manual Armouring function
on F1 in the input range or through the Code Lock Armouring function at the entrance door.
Disabling of floors is performed with two switches.
Page 50

50 © 2002 Carlo Gavazzi Industri A/S. All rights reserved
G 3800 X015 Configuration Software October 2002G 3800 X015 Configuration Software October 2002G 3800 X015 Configuration Software October 2002
2.4.6. The Water Alarm
• Function: Water alarm system including Passive detector, Active detector, Reset, Siren and
Alarm signal
• Application: Wiring of water indicators, eg the water stop sensor, to an alarm system
• Select with mouse (“Water alarm”) or short-cut key “W”
Description
The purpose of the Water Alarm is an alarm system consisting of water sensors integrated as Passive or
Active detector. The wiring makes it possible to replace conventional fire alarm systems.
Water detectors are generally included in the system through the objects “Passive detector” or “Active detector”. The alarm system is automatically alert after elapse of the Reset delay (set with the reset object), when
the Configuration software has been downloaded or the Master Generator has been switched on. The Reset
output switches on within this time.
An alarm is triggered off when one or several alarm contacts are activated for more than 10 s. The system
steps through the activated alarm contacts (as alarm indication) as well as the alarm output approx. every
second. The alarm siren flashes with a pulse-pause ratio of approx. 3 s/57 s. By subsequent activation of the
reset key, the Master Generator resets the stepping through of the alarm contacts and the alarm output. If
contacts are still activated, another alarm is triggered off after elapse of the reset delay.
Note: Configuration of the object “Reset” is absolutely necessary to ensure correct function.
The status of the alarm contacts can be shown in a simple way on a panel. All that is needed for this purpose
is that the output channels are coded to the addresses of the alarm contacts.
The object “Alarm signal” makes it possible to control a telephone or GSM modem because of the short message on this channel.
For alarm purposes, the object Common Siren can also be used. Details can be found in the chapter describing the alarm siren/Common siren.
The various fire alarm objects are selected under “Channel function”:
Passive detector: Normally open input. This object makes it possible to include
passive detectors. When the contact is activated and a “1”-Signal
consequently transmitted on the Dupline bus, an alarm is started.
Active detector: Normally closed input. This object makes it possible to include
active detectors. When the contact is activated and a “0”-Signal
consequently transmitted on the Dupline bus, an alarm is started.
Reset: This object makes it possible to include a button to reset the alarm and restart the
system. .
If a contact is activated during reset, a new alarm is started after elapse of the
Reset delay.
Note: This object must be configured in order to achieve correct function of
the water alarm system.
Alarm siren: The alarm siren indicates the occurrence of an alarm. The channel configured
for this object can be used for alarm output on any output
modules. It usually activates a relay output switching a siren.
In case of alarm, this output flashes with an on-time of approx. 3 s and an offtime of approx. 57 s.
Alarm signal: When an alarm occurs, a channel configured for this object is activated for 10
s and can thus be used to activate a telephone or GSM modem.
Page 51

© 2002 Carlo Gavazzi Industri A/S. All rights reserved 51
G 3800 X015 Configuration Software October 2002G 3800 X015 Configuration Software October 2002G 3800 X015 Configuration Software October 2002
Parameter Description
Passive detector
Disable address Enter an address (A1..P8) or a flag (W1..Z8) whose activation (“1”-signal) will leave
out the Passive detector function of the monitoring system whereby it cannot trigger off any further alarms.
Active detector
Disable address Enter an address (A1..P8) or a flag (W1..Z8) whose activation (“1”-signal) will leave
out the Active detector function of the monitoring system whereby it cannot trigger off any further alarms.
Reset
Reset delay The delay after which the system becomes alert or is to remain switched off upon
activation of the reset button. The reset delay can be from 2 and 10 min.
Parameters
Page 52

52 © 2002 Carlo Gavazzi Industri A/S. All rights reserved
G 3800 X015 Configuration Software October 2002G 3800 X015 Configuration Software October 2002G 3800 X015 Configuration Software October 2002
Parameter Description
Alarm siren
Siren time With this setting, you determine the duration of the activation of the alarm output
upon the occurence of an alarm. The value can lie between 0 and 60 min. The
entered value is automatically adopted by the Common Siren.
Alarm signal
Alarm signal delay With this setting, you determine the time to elapse after switching on of the alarm
siren till the alarm signal is activated. The value can lie between 0 and 10 min.
Page 53

© 2002 Carlo Gavazzi Industri A/S. All rights reserved 53
G 3800 X015 Configuration Software October 2002G 3800 X015 Configuration Software October 2002
The above illustration shows the normal sequence and reset of an alarm:
t1: When power supply is connected, the system becomes alert after elapse of the set reset delay TR, indicated by reset of the reset output.
t
2
: An alarm contact is activated. This starts the switch on delay TEV, which can run for 3 - 11 s depending on
the number of channels.
t
3
: Upon elapse of the switch-on delay TEV, the Master Generator causes the output of the activated contact
as well as the alarm siren to flash. The alarm siren is then switched on for approx. 3 s and switched off for
approx. 57 s.
t
4
: Upon elapse of the alarm signal delay TM, the alarm signal is briefly activated.
t
5
: Activation of the reset button starts the reset delay and the siren is switched off.
Time characteristics
Passive detector (IN)
Passive detector (OUT)
Reset (IN)
Alarm signal
T
EV
Siren
t
t
t
1
t
PMan_TWater_1a
t
4
t
3
t
t
t
t
5
t
2
Reset (OUT)
T
R
T
R
T
M
3s 57s
Page 54

54 © 2002 Carlo Gavazzi Industri A/S. All rights reserved
G 3800 X015 Configuration Software October 2002G 3800 X015 Configuration Software October 2002
Application Example
Task: In a residential building, eight rooms are to be protected against water damage. When an alarm
occurs, a siren switches on and the house owner is informed by means of an SMS-message.
The room in question should be recognizable on a panel.
Solution: The alarm channels of the water stop sensors are assigned to channels G1 to G8. The alarm
source is indicated on a panel, whose LED is activated by a mimic display. The addresses correspond to those of the alarm contacts. The alarm is sounded through a horn which is activated
through address D2 of a relay module. The alarm is reset again by a pushbutton on address H1.
Page 55

© 2002 Carlo Gavazzi Industri A/S. All rights reserved 55
G 3800 X015 Configuration Software October 2002G 3800 X015 Configuration Software October 2002
2.4.7. Common Siren
• Function: Common output of ISA-, Smoke-, Intruder- and Water alarm
• Application: Output of several alarms on one siren in addition to or in replacement of alarm
system specific sirens
• Select with mouse (“Common Siren”)
Description
The Common Siren offers the possibility of transmitting the alarms of all alarm systems on one channel. The
alarm of the siren output behaves in the same way as the individual alarm sirens. If several alarms are on, they
are indicated wtih the following priority:
1. Smoke alarm
2. Intruder alarm
3. Water alarm
4. ISA alarm
The operation of the common siren is independent of whether a siren was configured in the individual alarm
system.
Note: The signal time entered in the Common siren is automatically adopted by the individual sirens. This also
applies to reversed function.
If an alarm has been acknowledged or reset, the Master Generator also resets the signal of the common siren.
Parameters:
Parameter Description
Common siren
Channel function Here you select one or several alarm systems whose alarm will also activate this
siren.
Siren time Here you enter the max. time for which this siren is to remain activated. The value
can lie between 0 min and 60 min.
Application Example
Task: In a commercial building, different alarm systems (smoke, water, ISA and Intruder) are to acti-
vate the siren mounted outside.
Solution: The alarm systems described in the previous examples are used. The relay for the outdoor siren
is configured for address I1. The siren time of each connected alarm is configured.
Page 56

56 © 2002 Carlo Gavazzi Industri A/S. All rights reserved
G 3800 X015 Configuration Software October 2002G 3800 X015 Configuration Software October 2002G 3800 X015 Configuration Software October 2002G 3800 X015 Configuration Software October 2002
2.5. Roller blind control
2.5.1. Decentralized roller blind up-down function
Description
The decentralized roller blind up-down control makes it possible to run Dupline roller blind control modules
for roller blind and sun blind motors. By organizing the up- and down-channels, the Master Generator ensures
undisturbed operation by preventing both directions from being activated at the same time and ensuring that
the delay time is observed.
The up-channel generally overrides the down-channel, ie if both are activated at the same time, the Master
Generator will execute the up-command.
Address configuration
The roller blind control can only be configured for an uneven channel number. This means that the up-channel
must have an uneven address number assigned to it and the down-channel must have an even address number assigned to it. This reflects the address coding of the roller blind modules. Here the up-channel must also
have an uneven output assigned to it, while the down-channel must have an even output channel addressed
to it.
• Function: Up-Down control of roller blind motors
• Application: Control of motors for roller blinds, sun blinds and roof windows through
Dupline modules G 3430 4249.
• Run time and Switch time individually adjustable
• Tilted blinds for sun blinds and priority control for example for wind sensor.
Note: When, in spite of correct address configuration, the motor runs in the opposite direction, the corresponding connecting cables of the motor are reversed. In this case, correct connection must be ensured - the
channels must under no circumstances be reversed.
Operation
The up- and down-buttons configured for the addresses of the roller blind control allow very simple operation:
• By pressing the direction key once, the motor runs to the end position or for the duration of the roll time.
• By pressing the same direction key once more, the motor stops.
• By pressing in the opposite direction, the motor stops shortly and runs in the opposite direction until it
reaches end position or for the duration of the roll time.
When the option “Tilted blinds” is selected, the following options are available:
• If the direction key is pressed for less than three seconds, the motor stops when the key is no longer
pressed.
• If the direction key is pressed for more than three seconds, the motor runs to the end position or for the
duration of the run time. Here it is also possible to stop the motor by pressing the key once more or let it
run in the opposite direction by pressing the other direction key.
The Tilted blinds function makes it possible to activate the sun blinds shortly, so that in stead of causing upor down-movenment it changes the position of the tilting blinds.
Automating the roller blind control
Surely, many methods of automatic operation of roller blinds exist. Not only wind- and rain sensors, but also
light sensors and clock timers increase comfort through automatic functions.
Such functions should - if not configured as priority address - usually be made by means of Logic setup,
where primarily edge triggering is to be used which prevents continuous signals and allows permanent operator control. Further details can be found in the chapter on Logic Setup.
Page 57

© 2002 Carlo Gavazzi Industri A/S. All rights reserved 57
G 3800 X015 Configuration Software October 2002G 3800 X015 Configuration Software October 2002G 3800 X015 Configuration Software October 2002G 3800 X015 Configuration Software October 2002
Connection of several motors
Simultaneous activation of several motors can be achieved by:
1. connecting all motors to separate outputs and
2. assigning the same address to all up-channels as well as all down-channels.
We strongly advise against connecting two or more motors in parallel to one output channel.
The flexible way of controlling several motors centrally or group-wise is to use the Roller blind master function. Further details are found in chapter 2.5.2.
Page 58

58 © 2002 Carlo Gavazzi Industri A/S. All rights reserved
G 3800 X015 Configuration Software October 2002G 3800 X015 Configuration Software October 2002G 3800 X015 Configuration Software October 2002G 3800 X015 Configuration Software October 2002
Parameter Description
Roller blind control
(Decentralized Up-Down)
Roll time Insert the times (seconds) for which the motor is to run in each direction. The
value must be within 0 and 255 s.
The selected time interval should ensure that the roller blinds can reach the end
positions in both directions where an end position contact must switch the
motor off. Intermediate values allows shadow, for example. But it should be
ensured that the roller blind is in one of the end positions before start.
The entered roll time is overwritten by the roll time of the master.
Reverse delay Enter the delay time (milliseconds) before the roller blind changes direction. The
value should lie between 500 and 2000 ms.
Tilting blinds This option allows adjustment of tilting blinds. The function stops within the first
three seconds after the key is released.
The tilting blinds option must be activated if you want to define for how long the
roller blinds must run in the opposite direction after expiry of the roll time
Address By activation of the entered channel address, the roller blind runs in the selected
direction for the entered roll time. As long as the indicated priority channel is set,
input signals on the roller blind channels are ignored.
Note: The priority channel also overrides the master control.
Priority A channel or flag can be entered by which the up- or down-direction of the roller
blinds is given priority
Parameters
Page 59

© 2002 Carlo Gavazzi Industri A/S. All rights reserved 59
G 3800 X015 Configuration Software October 2002G 3800 X015 Configuration Software October 2002G 3800 X015 Configuration Software October 2002G 3800 X015 Configuration Software October 2002
t
t
PMan_TRollerUpD_1a
t
2
t
1
t3t
4
t
t
t
6
t
5
t
7
The above illustration is based on a roller blind application with adjustment of tilting blinds (Reverse Up time
TVof 3 s).
t
1
: The button for the up-direction is activated. Since the impulse is shorter than the Reverse Up time T
V
(3 s), the motor stops when the button is released.
t
2
: The up-direction is activated again. Since the impulse this time is longer than the Reverse Up time TV, the
roller master control attempts to switch the channel on for the total roll time.
t
3
: An additional actuation in the same direction stops the motor.
t
4
: Now the button for the up-direction is activated again and the motor consequently started in the up-
direction.
t
5
: By activation of the button for the down-direction, the motor is stopped and the Reverse delay TUstarts.
t
6
: After elapse of the Reverse delay TU, the motor rolls in the down-direction.
t
7
: After elapse of the roll time TL, the motor is stopped. In order to reach the end of the roll time, the activa-
tion of the Down-button must last longer than the Reverse Up time T
V
.
Time characteristics
Up-button
Down-button
Up-channel
Down-channel
T
V
T
L
T
V
T
U
T
V
Page 60

60 © 2002 Carlo Gavazzi Industri A/S. All rights reserved
G 3800 X015 Configuration Software October 2002G 3800 X015 Configuration Software October 2002G 3800 X015 Configuration Software October 2002G 3800 X015 Configuration Software October 2002
Object Function Channel
In-/outputs
Push button inputs Local activation A1..B4
C1..D4
Push button inputs Group-wise B5/6
Master D5/6
D7/8
Binary inputs for Priority control E1/E2
wind/rain sensors
Relay outputs Motors A1..B4
Configuration of Master Generator
Decentralized Roller blind/roof A1.. B4
Roller Blind Up-Down window control C1..D4
Roller Blind Master Group-wise con- B5/6
trol ground floor
Roller Blind Master Group-wise con- D5/6
trol 1st floor
Roller Blind Master Master control D7/8
Push button function Connection of E1/E2
Application Example
Task: Control of several roller blinds as well as a roof window in a building. The system should include
groupwise control for two different floors as well as master control of all roller blinds together.
To protect the roller blinds, a wind sensor and a rain sensor are installed. The roller blinds are to
roll down by rain and up by wind, and wind has priority. The roof window is to close by rain.
Solution: The roller blinds as well as the roof window are activated through Dupline roller blind control
modules. For the group-wise and the master control, roller blind master controls are used. The
address of the wind sensor is marked directly in the roller blind controls as priority address. The
down-channel of the master control is activated through logic setup via the address of the rain
sensor. Further details can be found in chapter 2.5.2.
With the logic setup below, the rain sensor activates all roller blinds in the Down-direction through the master
function. If the wind sensor channel is set, the command of the decentralized up-down control is not executed
(priority control at each decentral roller blind object).
Output Input 1 Function Input 2
D8 /E2 AND /E2
Page 61

© 2002 Carlo Gavazzi Industri A/S. All rights reserved 61
G 3800 X015 Configuration Software October 2002G 3800 X015 Configuration Software October 2002G 3800 X015 Configuration Software October 2002G 3800 X015 Configuration Software October 2002
2.5.2. Roller blind master
Description
This object enables group-wise and master control of for example roller blinds, sun blinds and roof windows.
The decentralized roller blind channels configured above (chapter 2.5.1.) are included in the Roller blind master by marking them in the channel matrix.
The roll time set for the Roller blind master applies to all indiviual controls and overrides their roll times. Entering a Reverse Up Time allows automatic adjustment of tilting blinds at the end of a cycle. After elapse of the
set roll time, the Controller switches the motor in the opposite direction for the set Reverse Up time.
The Roller blind master offers two operation modes for starting the motors:
1. Simultaneous: All motors are started simultaneously.
2. Sequential: All motors - starting with the lowest address - are started at 1 sec. intervals. Thereby current
peaks are avoided.
Address configuration
The Roller blind master can only be configured for an uneven address number. This means that the Up-channel must lie on an uneven (eg A1, B5 or P7) and the Down-channel must lie on an even address (eg A2, B6 or
P8).
Operation
The Up- and Down-buttons configured for the addresses of the Roller blind master allows very simple operation:
• By pressing a direction key once, all selected motors roll until end position is reached or the roll time has
elapsed.
• By pressing the same direction key once more, the set roll time starts again. Thus, it cannot be stopped.
• By pressing the other direction key, the motors stop shortly (decentrally set Reverse Up time) and run in
the opposite direction until the end position is reached or the set roll time has elapsed.
• After elapse of the Down-time, the motors run in the Up-direction, provided that a Reverse Up time has
been entered and the Tilting blinds function has been activated at the decentral roller blind control.
• During the master command, all motors can also be actuated through their individual decentral roller blind
control channels. All functions of the decentral roller blind control are available (Stop, reversal of direction,
adjustment of tilting blinds).
Automation of master command
Surely, many methods of automatic operation of roller blinds exist. Not only wind- and rain sensors, but also
light sensors and clock timers increase comfort through automatic functions.
Such functions should - if not configured as priority address - usually be made by means of Logic setup,
where primarily edge triggering is to be used which prevents continuous signals and allows permanent control by the operator. Further details can be found in the chapter describing the logic setup.
Hint: Please be aware that in the application of clock timers in particular, only one master command can be
executed at a time. When several master commands are activated at the same time, the Controller only executes the command with the highest address number, eg H3/H4 before F7/F8.
• Function: Group-wise or master control of decentralized roller blinds
• Application: Group-wise or master control of motors for roller blinds,
• Roll time with priority over individual roll times adjustable
• Simultaneous or sequential roller blind start selectable
• Reverse Up time for tilting blinds when end position reached.
• Enter with mouse (“Roller blind master”)
Page 62

62 © 2002 Carlo Gavazzi Industri A/S. All rights reserved
G 3800 X015 Configuration Software October 2002G 3800 X015 Configuration Software October 2002G 3800 X015 Configuration Software October 2002G 3800 X015 Configuration Software October 2002
Parameter Description
Roller blind master
Operation mode The setting determines whether the roller blinds are started simultaneously or
sequentially. With the setting “Sequentially”, the roller blinds start and stop successively at 1 second intervals. This time interval is also observed in connection
with change of direction or tilting blind (Reverse Up time). This time interval does
not affect the set roll time.
Roll time The roll time determines for how long the roller blinds must run. This roll time
overrides the roll time set in the Decentral up-down roller blind control.
Reverse Up time The Reverse Up time determines the time in seconds for which the roller blinds
must run in the opposite direction after expiry of the roll time. Applies to tilting
blinds.
Note: The Controller only executes the Reversing function in decentral roller
blind controls in which the option adjustment of “Tilting blinds” has been activated.
Parameters
Page 63

© 2002 Carlo Gavazzi Industri A/S. All rights reserved 63
G 3800 X015 Configuration Software October 2002G 3800 X015 Configuration Software October 2002G 3800 X015 Configuration Software October 2002G 3800 X015 Configuration Software October 2002
t
t
PMan_TRollerMaster_1a
t
2
t
1
t3t
4
t
t
t
6
t
5
t
7
t
t
The above illustration is based on a roller blind master application with sequential operation mode and a
Reverse Up time TR.
t
1
: The button for the up-direction is activated. The up-channel of the first motor is activated.
t
2
: In the operation mode “Sequential”, the Controller switches the up-channel of the second motor on after
a time delay of 1 s.
t
3
: Before elapse fo the master roll time, the Down-button is actuated whereby the roller blind is forced in
the opposite direction. The motors stop one by one, and the Reverse delay T
U
set for the decentral roller
blind object begins.
t
4
: After elapse of the Reverse delay TU, the first motor starts in the opposite direction, while the second
motor is activated after a delay of 1 s.
t
5
: After the end of the roll time TL, the Reverse delay TUis postponed due to the subsequent Reversing.
t
6
: Based on the set Reverse Up time TR, the roller blinds again run in the opposite direction in order to tilt
the blinds.
t
7
: After elapse of the Reverse Up time TR, the motor of the first roller blind stops
Application example
A detailed example is described in connection with the decentralized up-down roller blind function.
Time characteristics
Up-button central
Down-button central
Up-channel (roller blind 1)
Down-channel
(roller blind 1)
Up-channel (roller blind 2)
T
R
T
L
T
V
T
U
T
U
T
U
T
V
T
V
T
L
Page 64

64 © 2002 Carlo Gavazzi Industri A/S. All rights reserved
G 3800 X015 Configuration Software October 2002G 3800 X015 Configuration Software October 2002G 3800 X015 Configuration Software October 2002G 3800 X015 Configuration Software October 2002
2.6. Counter and Multiplexer
2.6.1. Multiplexer (transmission of counter values)
Description
The counter channels with the sum sign ∑ are for transmission of counter values. This multiplex transmission
of up to 128 counter values is dedicated to the use of the counter module G 4420 7401.
The range of values to be transmitted can be selected in the Basic setup through the option “Counter range”.
Depending on the range of values, a corresponding number of address groups are reserved, whereby the
Multiplex system is started.
Hint: The reserved addresses must not be used for other purposes, eg to output switch commands.
There are no further configuration possibilities in the Configuration software - addressing of the channels as
well as transmission and saving of data is carried out automatically by the Master Generator.
Module configuration
Detection of the counter values requires correct setting of the counter module G 4420 7401. Apart from the
setting the counter range, it is also necessary to assign an address to each module through rotary switch.
Data format
A description of the used data format can be found in the user manual of the counter module G 4420 7401.
Counter value output
Access to and output of the stored counter values is only done through the Modbus communication interface
of the Master Generator. There are basically 3 possibilities of continued processing:
1. Representing the values in visualization software or operator panel (eg on a PC with the Dupline WebServer).
2. Through communication programmes, eg the Dupline DDEServer - an open software interface to for
example Microsoft
®
Office applications.
3. Individual reset of counter values.
Simultaneous operation with Multiplex Analog Value Transmisison
If transmission of counter and analog values is needed, care should be taken to avoid address overlap. The
transmission channels of the analog modules must be set so that they do not overlap the channels of the
counter value transmission. Read the following chapter 2.6.2. “Multiplexer (Transmission of analog values)”.
• Function: Object for detection of max. 128 counter values
• Application: Registration of energy and operating hours with counter module G 4420
7401.
• Configuration through the option Counter and Mux Analog Setup in the edit menu.
Page 65

© 2002 Carlo Gavazzi Industri A/S. All rights reserved 65
G 3800 X015 Configuration Software October 2002G 3800 X015 Configuration Software October 2002G 3800 X015 Configuration Software October 2002G 3800 X015 Configuration Software October 2002
Parameter Description
Multiplexer
(Detection of counter
values)
Counter range With this setting made under <Edit><Counter And Mux Analog Setup>, you
select the range of counter values. Depending on the range, a coresponding
number of channel groups, beginning by “B” are reserved:
Counter ranges Reserved groups
--- None (counter operation switched off)
0..99 B..C
0..9999 B..D
0..999999 B..E
0..99999999 B..F
Parameters
Object Function Channel
In-/outputs
Counter input Detection of B1..F8
impulses from
energy counter
Relay output Switching power G1..N8
outlets
Configuration of Master Generator
Counter range Channels for B1..F8
counter values
Toggle switch function Switches for power G1..N8
Application Example
Task: On a camping site, 64 current values are to be detected and used on a PC for the issue of
invoices.
Solution: The counter modules G4420 7401 are built into the local power cabinets. Four Dupline energy
counters supply one G4420 7401 with the corresponding impulses. The Master Generator is
configured for Counter setup through entry of the counter ranges. A data entry software available through a DDE interface reads out the values via the DDEServer and resets the counter
value when a new guest arrives.
The voltage of the individual power outlet is turned on from the PC through a relay module
(software DP-Camp). Free channels are used for this purpose.
The applied Master Generator can, of course, also perform additional automation functions.
Page 66

66 © 2002 Carlo Gavazzi Industri A/S. All rights reserved
G 3800 X015 Configuration Software October 2002G 3800 X015 Configuration Software October 2002G 3800 X015 Configuration Software October 2002G 3800 X015 Configuration Software October 2002
Description
The (original) multiplexing of analog values makes it possible ot read and write Dupline multiplex analog values. As opposed to AnaLink transmission with analog sensors, two addresses are needed in stead of one,
which allows transmission of accurate analog values. The transmission speed is also higher. A full analog value needs one bus cycle, at best. AnaLink values need 256 cycles.
While for the transmission of counter values (see chapter 2.6.1.) only input modules are available, various
Dupline output modules are available for multiplex analog values. The output modules have the output ranges
0..20 mA, 4..20 mA and 0..10 V.
In connection with the configuration of the multiplexer in the Basic setup (Options Multiplexer Count and Multiplexer delay), the Configuration software automatically reserves four channels (A1..A4) for addressing the
modules. The addressing on these channels is performed automatically by the Master Generator. Data is
transferred on two consecutive address groups (C/D, E/F, G/H, I/J, D/L, M/N and O/P). The channels can be
set individially to the applied modules and can thus not be reserved by the Master Generator.
Also when the number is limited to 16 because only four channels have been reserved, 112 values can actually be processed. This is possible because up to 7 analog channels receive the same binary address, but subsequently transmit the values to different channel groups. (see above).
Note: The reserved addresses must not be used for other purposes, eg to output switch commands.
Module configuration
Transmission of analog values requires correct setting of the analog modules. Apart from the setting of the
transmission channels, it is also necessary to assign a binary address to each module. Details can be found
in the datasheets.
Data format
Within the two channel groups (in this case C and D), the value “1957” is generated continuously.
• Function: Object for detection of max. 112 analog values
• Application: Fast transmission of multiplexed analog values through Dupline analog modules
• Configuration under the option “Multiplexer channels” in the Basic setup
Signal available means that an input module continuously provides the value
Value valid indicates that the value is valid
An “0” stands for a positive value
An “1” stands for a negative value
Channel C1 C2 C3 C4 C5 C6 C7 C8 D1 D2 D3 D4 D5 D6 D7 D8
Factor 1 8 4 2 1 8 4 2 1 8 4 2 1
Example:
Channel
state: 1 1 0 1 1 0 0 1 0 1 0 1 0 1 1 1
Value 1 9 5 7
Signal availabe
Value valid
Sign
Value in thousands
Time
Value in hundreds Value in tens Single-digit value
2.6.2. Multiplexer (transmission of analog values)
Page 67

© 2002 Carlo Gavazzi Industri A/S. All rights reserved 67
G 3800 X015 Configuration Software October 2002G 3800 X015 Configuration Software October 2002G 3800 X015 Configuration Software October 2002G 3800 X015 Configuration Software October 2002
Processing of analog values
As opposed to the counter values, it is not only possible to visualize the analog multiplex values through the
Modbus communication interface, but also to change them. There are basically two possibilities of value processing:
1. Representing the values in visualization software or operator panel (eg on a PC with the Dupline WebServer).
2. Through communication programmes, eg the Dupline DDEServer - an open software interface to for
example Microsoft
®
Office applications.
Simultaneous operation with transmission of multiplex analog values
If both multiplex modes are used, care should be taken to avoid address overlap. The transmission channels
of the analog modules must be set so that they do not overlap the channels of the counter value transmission. Read the preceding chapter 2.6.1. “Multiplexer (Transmission of counter values)”.
Working with test unit GTU8
GTU8 makes it easy to read out and simulate analog values of this format (operation mode Analog BCD). In
the case of simulation, care should be taken that both the bit “Signal available” and the validity bit have been
set (see above).
Parameter Description
Multiplexer
(Transmisison of
analog values)
Multiplex channels With this setting made under <Edit><Counter & Mux Analog Setup>, you select
how many modules should be addressed. The number depends on the number
of applied modules and their in-/output channels. From 0 to 16 addresses can
be selected. The value 0 switches the multiplex operation out.
Multiplex delay With this setting made under <Edit><Counter & Mux Analog Setup>, you select
how fast the Master Generator may scan the multiplex addresses. This setting
only has an effect when multiplex transmission has been activated (at least 1
multiplex channel selected).
Since some of the Dupline Multiplex modules need a large part of their capacity
for internal processing, their response time is reduced. This can be balanced by
a longer delay. The Master Generator then waits for the corresponding number of
cycles between the scans.
Parameters
Page 68

68 © 2002 Carlo Gavazzi Industri A/S. All rights reserved
G 3800 X015 Configuration Software October 2002G 3800 X015 Configuration Software October 2002G 3800 X015 Configuration Software October 2002G 3800 X015 Configuration Software October 2002G 3800 X015 Configuration Software October 2002
3. Logic Setup
3.1. Introduction
The preceding chapters have illustrated the simplicity of configuring channels with the pre-defined objects.
Praxis, hower, is not always so simple - for example when the outdoor lamps must be controlled in relation to
the time of day, or the roller blinds in relation to light or weather or conditions.
The Master Generator offers a splendid tool for solving these tasks: the logic functions, with which any relation can be established between the individual channels. The logic functions are described in the following
chapter.
3.2. The dialog - logic functions
3.2.1. Setup
The processing of logic functions takes place in the Dialog “Logic Setup”
Dialog Menu
Logic setup Logic setup
Configuration window of the Logic funtions:
Each logic block always shows eight setups. The individual blocks are selected by pressing the corresponding block numbers. The selected block is marked by a small bar below the box.
Each setup consists of two inputs interconnected by an operand (eg AND). The result of the setup (“True or
“False”) is then assigned to the output.
The components are summarized in the following table:
Page 69

© 2002 Carlo Gavazzi Industri A/S. All rights reserved 69
G 3800 X015 Configuration Software October 2002G 3800 X015 Configuration Software October 2002G 3800 X015 Configuration Software October 2002G 3800 X015 Configuration Software October 2002G 3800 X015 Configuration Software October 2002
Designation Values Description Abb.
(1)
Output A1..P8 Channel or flag whose status is to be changed A
W1..Z8
Input 1 A1..P8 Channel or flag causing the first part of the E1
W1..Z8 conditions for the change in output status
-,/,\
Function AND, OR, XOR The logic operand connection the two inputs Fkt
Input 2 A1..P8 Channel or flag causing the second part of the E2
W1..Z8 conditions for the change in output status
-,/,\
(1) This abbreviation is used in the following to designate the various components.
3.3 Application
3.3.1. Setups and Functions
3.3.1.1. Creating Setups
Navigating
For jumbing between the individual fields, press the Tab-key (forward) or the Alt- and Tab-keys
(backwards)
Adding
All fields in a logic setup must be filled in, ie all 4 components must be available. Any number of
setups can be selected, and gaps are allowed.
To add a function, place the cursor in any field in the row. Depending on the component, press a
letter or number key.
Changing
Changes are made in the same way as additions: place the cursor in the field “Function” and
overwrite the old value with the new value.
Deleting
The entire logic row can be deleted by placing the cursor in the field “Function” and press the
Delete-key or the space bar.
3.3.1.2. Mode of operation
The in- and outputs can be channel addresses (A1 to P8) or flags (W1 to Z8).
Depending on the inputs or logic setup (result of the function), the output is set in each bus cycle
(max. all 134 ms). This means that the output assumes the value “0” when the setup is not fulfilled and the value “1” when the setup is fulfilled.
The three logic functions correspond to the mathematical functions AND, OR and XOR (exclusive
of OR).
AND
The output is always “1”, when both inputs are “1”.
OR
The output is always “1”, when one or both inputs are “1”.
XOR
The output is “1”, when only one of the two inputs are “1”.
Page 70

70 © 2002 Carlo Gavazzi Industri A/S. All rights reserved
G 3800 X015 Configuration Software October 2002G 3800 X015 Configuration Software October 2002G 3800 X015 Configuration Software October 2002G 3800 X015 Configuration Software October 2002G 3800 X015 Configuration Software October 2002
The following tables summarize the results of the logic setups:
AND
E1 E2 A
000
100
010
111
OR
E1 E2 A
000
101
011
111
XOR
E1 E2 A
000
101
011
110
Example: If in the XOR-function, both input 1 (E1) and input 2 (E2) have the value “1”, the output (A) will
assume the value “0”.
3.3.2. Inversion and Edge Triggering
A special feature of the logic functions is the possibility of inverting the output:
• When a - (minus) is added in front of the value, the input value and consequently the output are inverted,
ie if the input had the value “0”, it gets the value “1” and vice versa.
• Adding a / (slash) in front of the address leads to triggering on leading edge.
• Adding a \ (backslash) in front of the address leads to triggering on trailing edge.
This change in ouput does not affect the input channels or flags.
3.3.2.1. Inversion
Inversion can be applied to both channels and flags. The output can be of any type.
Example of a logic setup:
Output Input 1 Function Input 2
A1 E1 AND -E2
Time characteristics
t
t
t
PMan_003a
t
1
t
2
E1
E2
A1
Output A is only active, when input E1 is active and input E2 is not active (range between the dotted lines).
The internal processing in the Master Generator inverts the value of E2 before it is output (ie sees it as active).
3.3.2.2. Example of Edge Triggering
Edge triggering can only be used on channels A1 to P8. Since the process is dynamic and lasts only two bus
cycles, it is necessary to select an output channel capable of processing impulses, eg channels with toggle
switch function, timer function or master function.
A push button function can also be generated with this setup, but it should be noted that in this case the output will only be active for one cycle.
Example of a logic setup:
Output Input 1 Function Input 2
A1 E1 AND /E2
Page 71

© 2002 Carlo Gavazzi Industri A/S. All rights reserved 71
G 3800 X015 Configuration Software October 2002G 3800 X015 Configuration Software October 2002G 3800 X015 Configuration Software October 2002G 3800 X015 Configuration Software October 2002G 3800 X015 Configuration Software October 2002
Time characteristics
Two conditions must be fulfilled (AND): E1 must be active and E2 must trigger on leading edge. This only
takes place at t1 (the dotted line to the left). If the signal on E1 goes Off (dotted line to the right), output A will
also be reset.
It is assumed that the channel set as output A is configured for a “toggle switch function”, for example. This
function only needs one impulse to execute the switching function. A “push button function” would release
again immediately.
Dupline offer flags, with which the intermediate results of logic setups can be “stored” in order to be used in
other setups.
Characteristics
• The flags are on the channels W1..8, X1..8, Y1..8 and Z1..8.
• The flags are initialized for zero upon voltage application at the Master Generator.
• The flags are not stored upon voltage failure at the Master Generator.
• Flags basically operate in the same way as the “Push button function”, ie the value of the flags changes
immediately with the result of the logic setup. Only edge triggering is not possible with flags.
Application
If a channel is to be related to more than two other channels, flags help to organize the setup. The following
example illustrates how channels A1, A2 and A3 are organized and assigned to B1:
Output Input 1 Function Input 2
W1 A1 AND A2
B1 W1 AND A3
In most objects in the matrix, eg the decentral roller blind Up-Down function, flags can be used in stead of
channels. In this way, it is possible to have priority control functions, which are related to several channel statuses.
Note: Flags used in this way may only be used once in the logic function.
3.3.4. Internal processing of the logic setups
The Master Generator processes the setups from block 1 to block 8, and within each block from top to bottom.
3.4. Notes and Documentation
For later documentation of the logic setups, it is useful to add comments in the field “Notes”. When the logic
setups are later printed out, the notes appear next to the individual rows so that each individual function is
commented on.
t
t
t
PMan_003a
t
1
t
2
E1
E2
A1
3.3.3. Using flags
Page 72

72 © 2002 Carlo Gavazzi Industri A/S. All rights reserved
G 3800 X015 Configuration Software October 2002G 3800 X015 Configuration Software October 2002G 3800 X015 Configuration Software October 2002G 3800 X015 Configuration Software October 2002G 3800 X015 Configuration Software October 2002
4. GSM Modem functions (only valid for G38001015)
4.1. SMS Setup
The G38001015 Master Generator has a built-in GSM Modem which enables Monitoring and control of
Dupline signals via SMS messages to/from mobile GSM telephones. There are 3 different ways to use SMS
messaging:
• The Master Generator can be programmed to send out event-based SMS messages. The event can be a
channel switching ON or OFF, or it can be an analog signal crossing a set-point.
• Requests for status of digital or analog data can be sent and answered via SMS messages
• Status of digital channels can be controlled by sending commands via SMS messages
In order to make use of the GSM modem, the following is required:
• A SIM-card with the pin-code 9090 needs to be inserted into the slot in the front of G38001015. The pincode can be changed, by inserting the SIM-card in a mobile phone and making use of the setting possi
bilities in the mobile phone. The SIM-card must be a 3V type.
• A GSM antenna needs to be connected to the FME connector on G38001015. If the unit is installed in a
metal enclosure, the antenna must be installed outside the enclosure and connected to the Master Generator via a cable (an antenna of this type is available, with type number ANT1).
An LED in the front of G38001015 indicates the status of the GSM modem. By emitting different blink patterns, the LED indicates "connecting", "SIMcard missing", "No network found", "No response from modem",
"SMS sent" and "SMS received". See appendix for further information about the LED indications.
In order to set up the basic SMS functions, select "SMS Setup" in the Edit menu.
Parameters
Parameter Description
Page 73

© 2002 Carlo Gavazzi Industri A/S. All rights reserved 73
G 3800 X015 Configuration Software October 2002G 3800 X015 Configuration Software October 2002G 3800 X015 Configuration Software October 2002G 3800 X015 Configuration Software October 2002G 3800 X015 Configuration Software October 2002
Dial Out Phone-Numbers
Up to 4 telephone numbers where the SMS messages shall be sent to can be entered. The country code
must be included in the numbers (e.g. +4520213324). It can be selected if an event-based SMS message
shall be sent out to all the telephone numbers on the list simultaneously, or if it shall be sent to the telephone
numbers one by one, until an acknowledge is received. The acknowledge is done by sending either a request
or just an empty SMS message to the Generator.
4.2 Event-based SMS messages
Parameter Description
Dial Out Phone
Numbers Up to 4 telephone numbers to which the SMS messages shall be sent can be
entered. The country code must be included in the numbers (e.g. +4520213324).
It can be selected if an event-based SMS message shall be sent out to all the
telephone numbers on the list simultaneously, or if it shall be sent to the telephone numbers one by one, until an acknowledgement is received. Acknowledgement is performed by sending either a request or just an empty SMS message to the Generator.
Max. User Response
time Only valid when "one by one to acknowledge" is selected. Here, the maximum
time the Generator shall wait for a response from a called number is entered.
Otherwise the next number will be called.
Acknowledge: Either a request, a command, or an empty SMS (password must
be included, if user password is selected).
Message Identifying
text Optional SMS identifier text, that will be included in the SMS messages sent by
the Generator.
Erase SMS on SImcard
during Power-Up Check this box to erase "old" unread SMS messages on the SimCard, during
System power-Up. This is to prevent out-dated messages from interfering.
Check Dial-in Numbers Check this box to activate the Dial-In number protection. Any received SMS-
message, contains the original phone-number. This number must exist in the
Dial-In numbers list, before any command is accepted by the Master Generator,
when this option is selected.
Allowed Dial-in Numbers Enter the phone numbers, which are allowed to send control and read com-
mands to the Generator. The country code must be included in the numbers
(e.g. +4520213324).
Use Password Check this box to activate the Password-protection. Any received SMS-mes-
sage, will then be checked for the correct password, before any command is
accepted by the Mastergenerator.
Dial-in Password Type in a password with 4 characters, to be used in case "Use Password" is
selected.
Page 74

74 © 2002 Carlo Gavazzi Industri A/S. All rights reserved
G 3800 X015 Configuration Software October 2002G 3800 X015 Configuration Software October 2002G 3800 X015 Configuration Software October 2002G 3800 X015 Configuration Software October 2002G 3800 X015 Configuration Software October 2002
If more dial-out phone numbers have been defined, an acknowledgement can be sent to the Generator by
sending an empty SMS message back. The Generator will then stop sending messages to the following
phone numbers.
SMS messages for AnaLink channels contain the actual AnaLink value.
Commands for control or triggering of channel functions can be sent to the Generator vi messages.
Also, it is possible to send an SMS to the Generator with request for channel status.
The Generator will then answer by sending back an SMS with the requested data. The format of the
SMS commands and requests are shown in the example below:
NB: When using controlling commands on a channel, which is also configured to send a message when changing status, the message will also be sent to the GSM phone.
Not all channel types can be controlled.
With passport option
Controlling command Example
Password, Channel, argument 1234,F4,on
1234,f4,on
1234,Alarm reset,on
Request Command Example
Password, Channel,? 1234.F3? (alt: 1234,F3?)
1234,Siren,?
With passport option
Controlling command Example
Channel, argument F4,on
Alarm reset,on
Request Command Example
Channel,? F3? (alt: F3?)
Siren,?
If the "SMS by ON" box is checked, the Generator will send an SMS with the time and date, the identifying
text, the description text for the channel and the status, whenever E1 becomes active. The recipient of the
SMS will see the following message in the display of the GSM phone:
4.3. SMS Control commands and Requests for Dupline data
Page 75

© 2002 Carlo Gavazzi Industri A/S. All rights reserved 75
G 3800 X015 Configuration Software October 2002G 3800 X015 Configuration Software October 2002
As it can be seen, it is possible to use either the channel reference directly (eg F4) or to use the descriptive
text defined for that channel.
The only channel types whose outputs are actually controlled directly ON or OFF by the SMS command are
the Toggle and Realtime channels. For Push button, Timer, Master, Roller Blind, Alarm Reset and Acknowledge channels, an SMS ON-command will initiate a pulse on the channel and thereby be able to trigger a
function (eg a Master function or logic function). In this way, it is avoided that non-resettable channel activations appear. An SMS OFF-command to these channels may not ensure that the channel output is turned off,
since the output of the channel is also controlled by transmission on the channel.
All other channel types cannot be controlled via SMS.
Page 76

76 © 2002 Carlo Gavazzi Industri A/S. All rights reserved
G 3800 X015 Configuration Software October 2002G 3800 X015 Configuration Software October 2002G 3800 X015 Configuration Software October 2002
5. Radio Modem driver
5.1. General
The Master Generator has a built-in driver for control of an external Radio Modem, which can be used to create wireless links where no cable is available in parts of an installation. One Master Generator must be defined
as the central MGEN and up to 32 Master Generators can be defined as remote MGEN’s. The central MGEN
is continuously polling and updating the Dupline data from all remote MGEN’s via the radio modem network,
and in this way it makes the entire system operate as one big Dupline network. Apart from increased reaction
time (depending on the number of remote MGEN’s), the system will operate as if it was one Master Generator
connected to all the I/O-modules with cable. The Master Generator supports the Radio Modem type 2ASxE
and all 3AS types from the Finnish manufacturer SATEL (www.satel.fi). These are not supplied by Carlo
Gavazzi, but are available with local support worldwide. Find below an application diagram for the Radio
Modem option. Note: Analink modules cannot be used with Radio Modems.
The Radio Modem must be connected to the COM2 of the Master Generator. For serial cable pin connections,
please refer to the Master Generator datasheet. The baud rate selected for COM2 must correspond to the
baudrate used by the radio modems and the other master generators in the network.
The central MGEN must be defined for "Radio Modem central" function for COM2, while the remote MGEN’s
must be defined as "Radio modem substation". The central MGEN can be configured for the usual intelligent
functions, and it can also be connected via COM1 or the RS485 port to a PLC or PC. The remote MGEN’s,
however, cannot be configured for any intelligent function. They will simply operate as Radio Modem interfaces. The system can handle all types of digital, analog (incl. multiplexed) and counter values, except for
Analink values. The configuration of the Radio Modem function is performed in the menu "Edit" under "Communication setup".
Page 77

© 2002 Carlo Gavazzi Industri A/S. All rights reserved 77
G 3800 X015 Configuration Software October 2002G 3800 X015 Configuration Software October 2002G 3800 X015 Configuration Software October 2002
Parameter: Radio Modem Central
Parameter Description
Modem turn-around
time Defines the time delay the Master Generator uses when changing between
receiving and transmitting. This can be used to adapt to individual radio modem
types, which may have different requirements for this parameter. The default value of 100 ms will work in most cases.
Substation max.
response time Defines the time the central master generator will wait for an answer from a sub-
station. If the master generator does not receive an answer within this time it
continues to the next substation. The default time is 1 s, which is fine for most
applications, but longer time may be needed if repeater stations are used on the
radio modems.
No. of substations Defines the number of substations connected via radio modem to the central
master generator.
Important Note: The master generators configured as "Radio modem substation" must be given the ID numbers from 1 and onwards. Example: When "No of
substations" are set to 3, then the 3 master generators configured as "radio
modem substation" must be given the ID numbers 1, 2 and 3 respectively.
Select groups for exchange of Mux analog If multiplexed analog I/O’s are used in the radio modem system, then it is neces-
sary to define which "channel group pairs" are used for this purpose. This is simply done by selecting the relevant check boxes. It is only possible upon prior
setup of Multiplex-count under the menu Counters and Mux Analog Setup.
5.2 Setup of Radio Modem Central
Page 78

78 © 2002 Carlo Gavazzi Industri A/S. All rights reserved
G 3800 X015 Configuration Software October 2002G 3800 X015 Configuration Software October 2002
5.3. Setup of Radio Modem Substation
Parameter: Radio Modem Substation
Parameter Description
Clear data upon loss
of radio communication Per default, the substations maintain the last received Dupline output data no
matter how long time has passed since the last telegram was received from the
central master generator. If "Clear data upon loss of radio communication" is
checked, then the output data will be cleared when the time-out defined in
"Time to Data-clear" has run out.
Time to Data-clear Defines the time-out when "Clear data upon loss of radio modem communica-
tion" is selected.
 Loading...