

Page 1
Additional Items Needed
4-channel (or more) Radio Control Set
CA or Epoxy glue (large)
1/2oz. Thin CA glue
.40 to .61 (.90 4-cycle) R/C engine
13 running ft of covering material ( two
79”
rolls of material)
Paint (fuel-proof, quantity
depends on desired finish)
one 1-1/4” and two 3-1/4” Wheels
1/2” x8” x12” CG R/C Foam Rubber
Optional T
ools
CG Engine Test Stand (no. 293)
Propeller balancer
Combination prop/glow-plulg wrench
CG Hinge Slotting Kit (no. 269)
Engine Mounting Option
Drill & Tap, Size No. 43
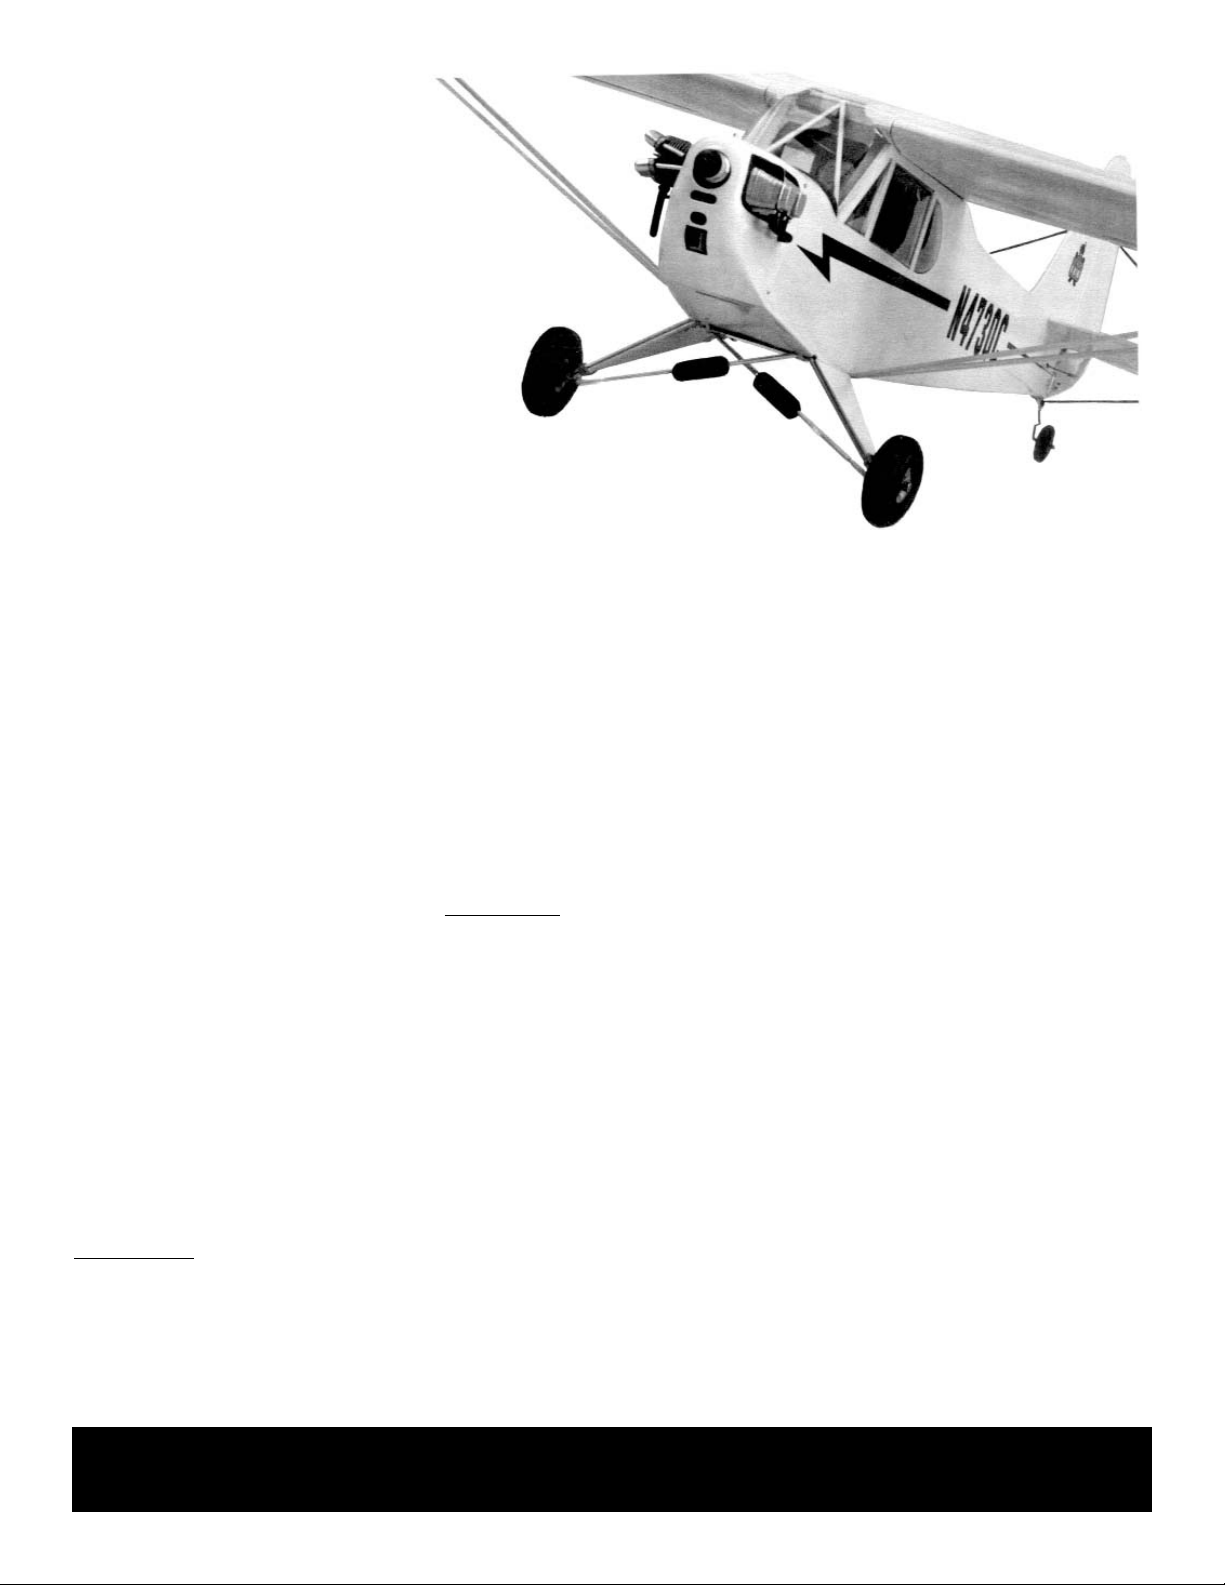
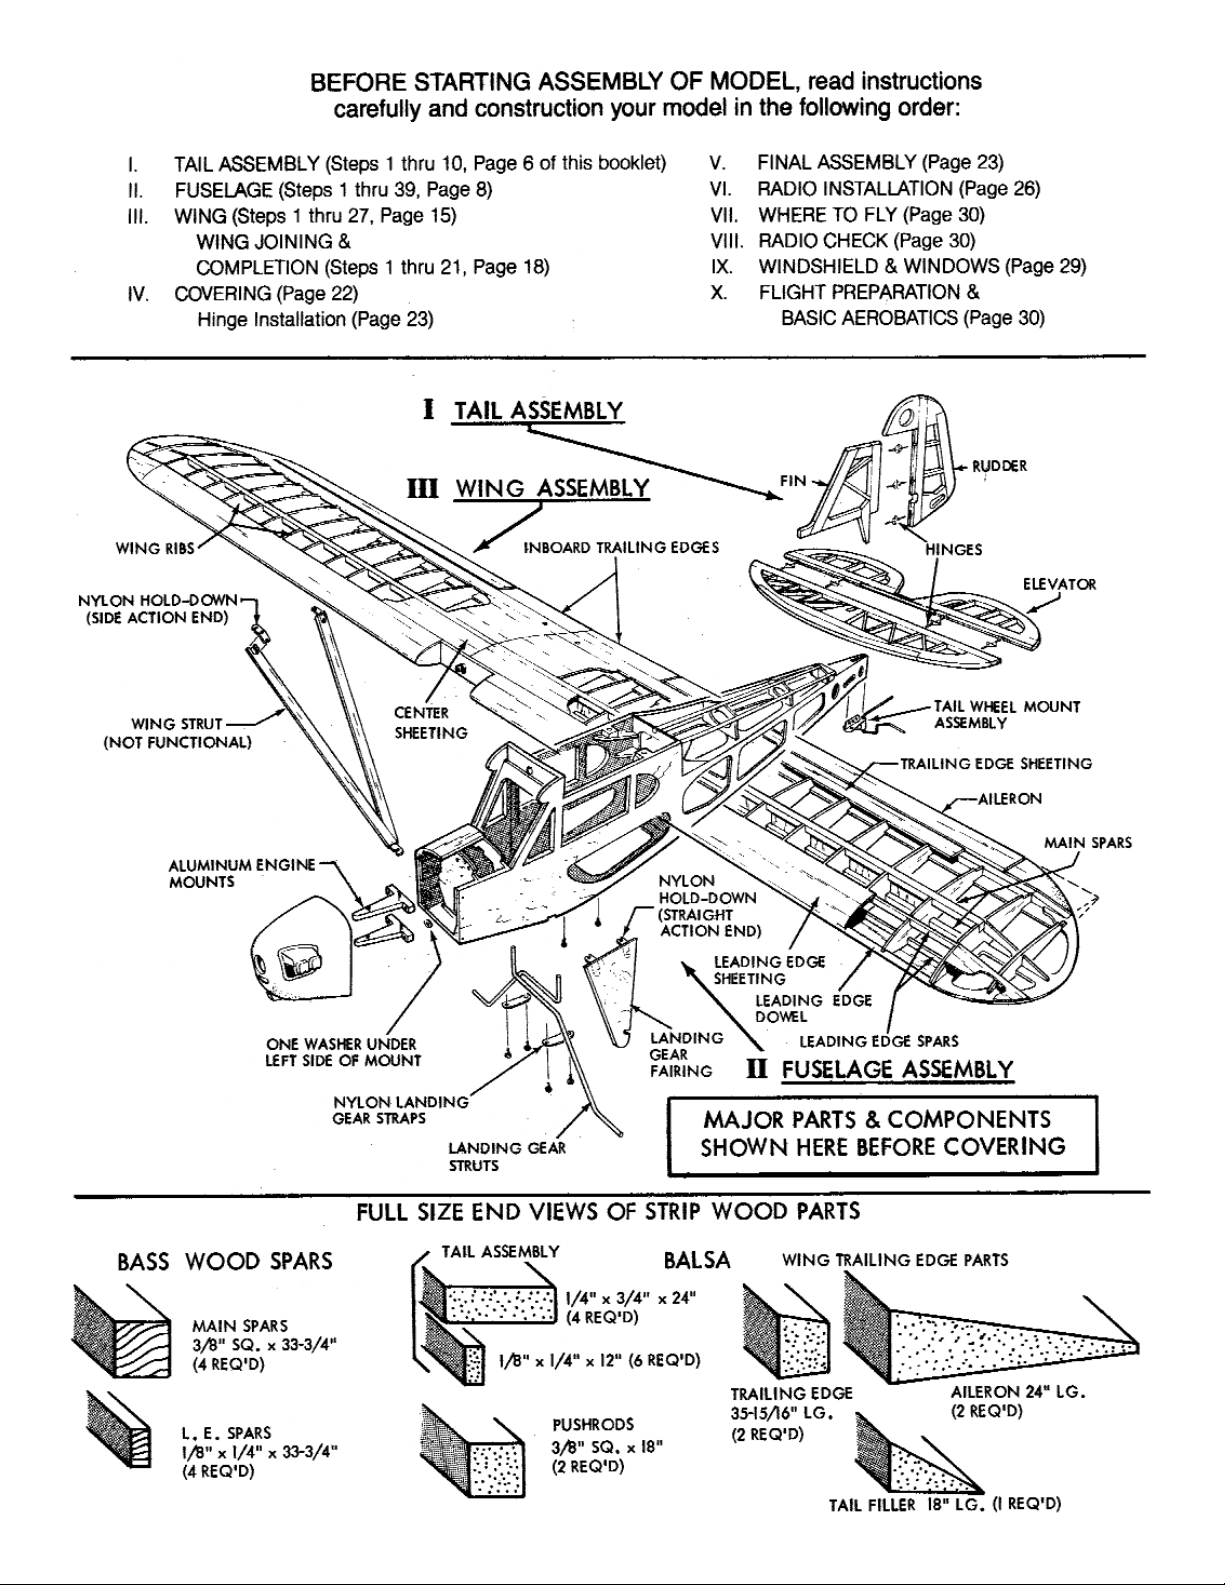
There really is nothing like a “Cub”! The C.G. version retains the honest, easy to fly qualities that made the full size airplane famous.
With the standard long wing, the model is a very graceful, realistic flyer. It’s aerobatic performance tends to be big,round, and slow.
Like the full size airplane, the model can be modified into an aerobatic version byshortening the wings. This “Clipped Wing” option
is a thrilling aerobatic machine that will provide outstanding performance, including point rolls, inside and outside
maneuvers, snaps and spins.
Building is easy, but to prevent simple mistakes, the step-by-step instructions should be followed. Many a modeler has made two
right fuselage sides instead of one right and one left as a results of not following the directions.
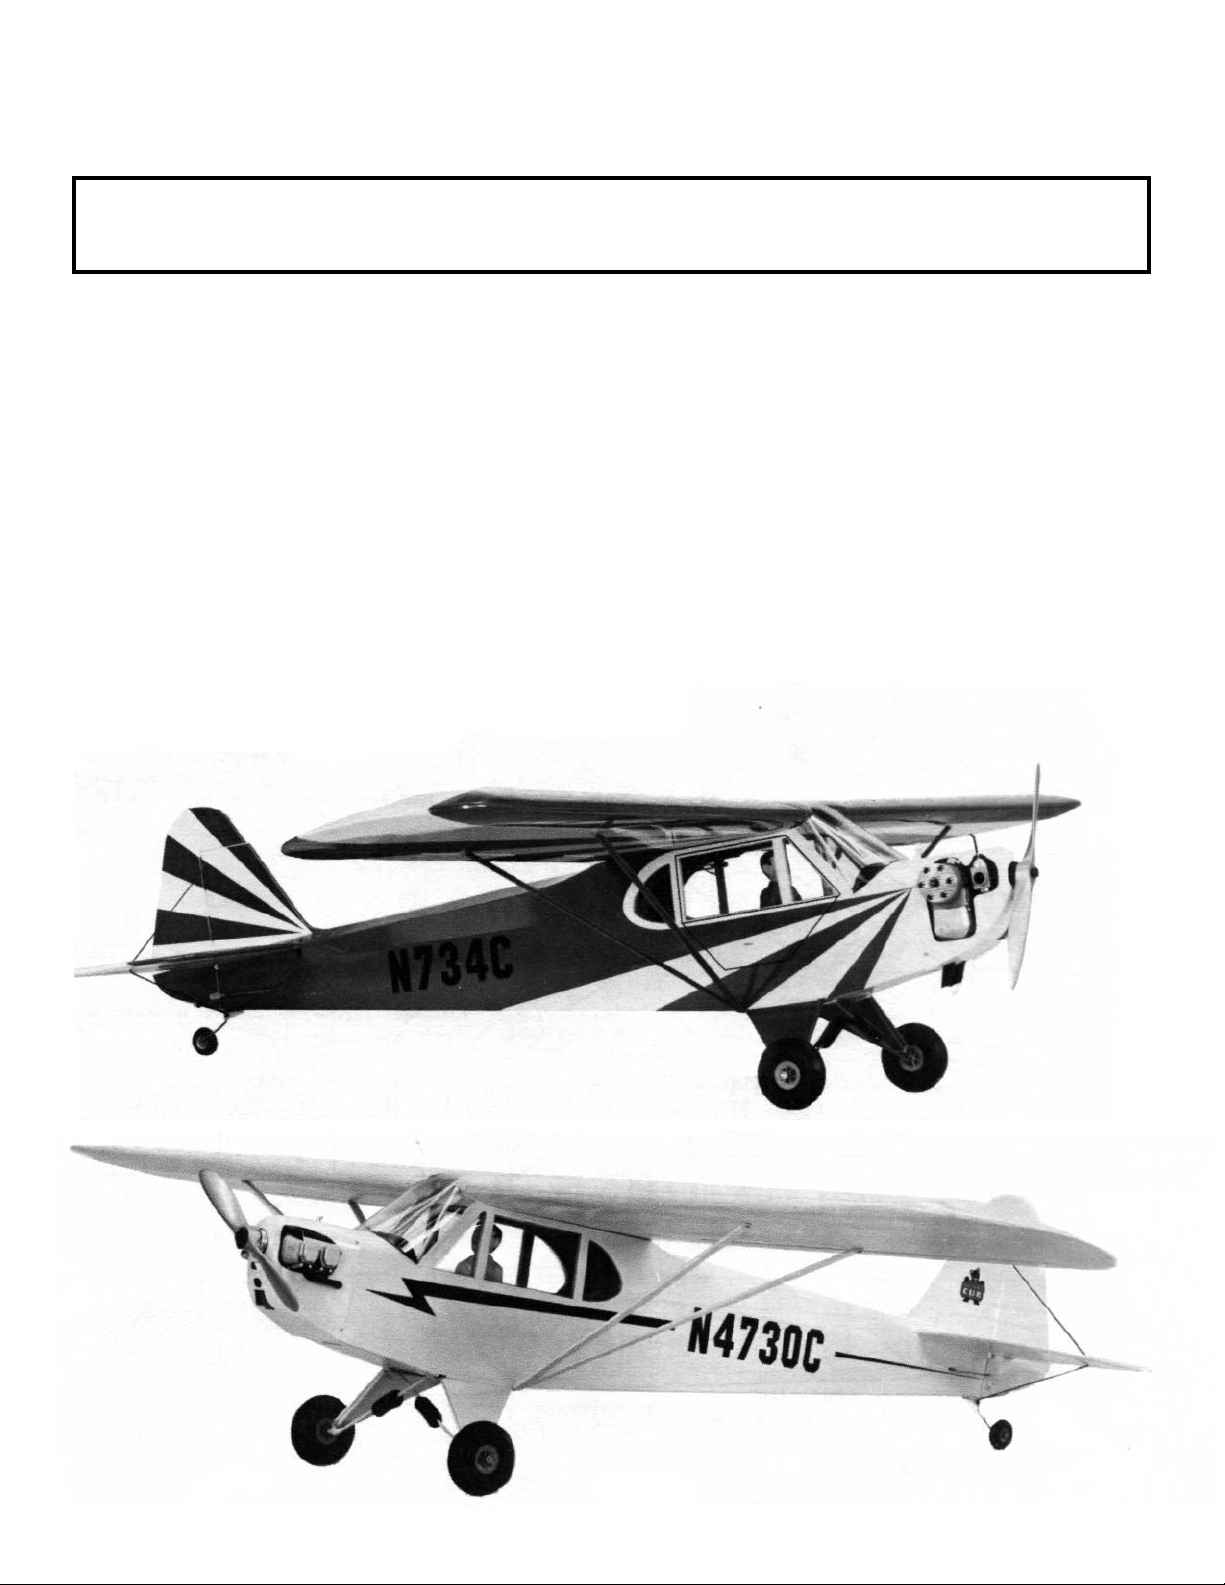
The Cub can be finished in any of the unlimited color schemes of of the original airplane.We show three popular types; standard,
sport, and military. Color scheme information's provided later in the instructions.
We’re sure that you will enjoy countless hours of flying fun with your Goldberg Cub, just as generations of pilots have had with
theirs!
Optional Parts
For Door Details
1/16” black CG Color-Stripe tape
Pilot figure (2” Scale)
“Pitts” type muffler (2-cycle only)
Small tube silicone caulk
Zap Formula 560 canopy glue
For optional “Military L-4” Scheme
WWII decals (various manufacturers)
Paint for Fuse Interior
Small spray can (gray)
Paint for Engine Detail
Artist’s acrylics, etc.
For simulating tail bracewires
1/16” nom. x36” elastic cord
Optional “Scale” Gear Struts
.025 x1/4” x2” brass strip
CG 1/16” Threaded Couplers (No.
217)
CG Mini-Snaps (No. 210)
5/32” O.D. dia. x 10” brass tube
3/32” O.D. dia. x 7” brass tube
Soldering iron, etc.
Tools & Supplies Needed
(You probably already have most of these)
Miscellaneous rubber bands
Wax paper or plastic wrap
Modeling knife or single edge razor blade
Sandpaper block & sandpaper; any grade 100
to 200, and any grade 240 to 320
A few dozen straight pins (“T” pins best)
Light power or hand drill & drill bits (sizes
1/16”,
3/32”, 1/8”, 5/32”, 3/16”, & 1/4”)
Three Allen wrenches (1/16” for #6 set screw
and 3/32” for #4 & 7/64” for #6 socket head
screws)
Flat building board (that you can push pins
into)
24” x 60”
Pliers
Small screwdrivers (1/8” and 3/16” blade tips)
Iron for applying covering (small household or
travel iron may be okay.
Masking, drafting, or scotch tape (for Holding
parts during assembly)
Carl Goldberg Products, Ltd.
P.O. Box 818 Oakwood, Ga. 30566 Phone 678-450-0085 Fax 770-532-2163 www.carlgoldbergproducts.com
©copyright 1985 Carl Goldberg Products, Ltd. Pt. #2077 issue #2 4-1-94
Instructions
Cub
Page 2
2
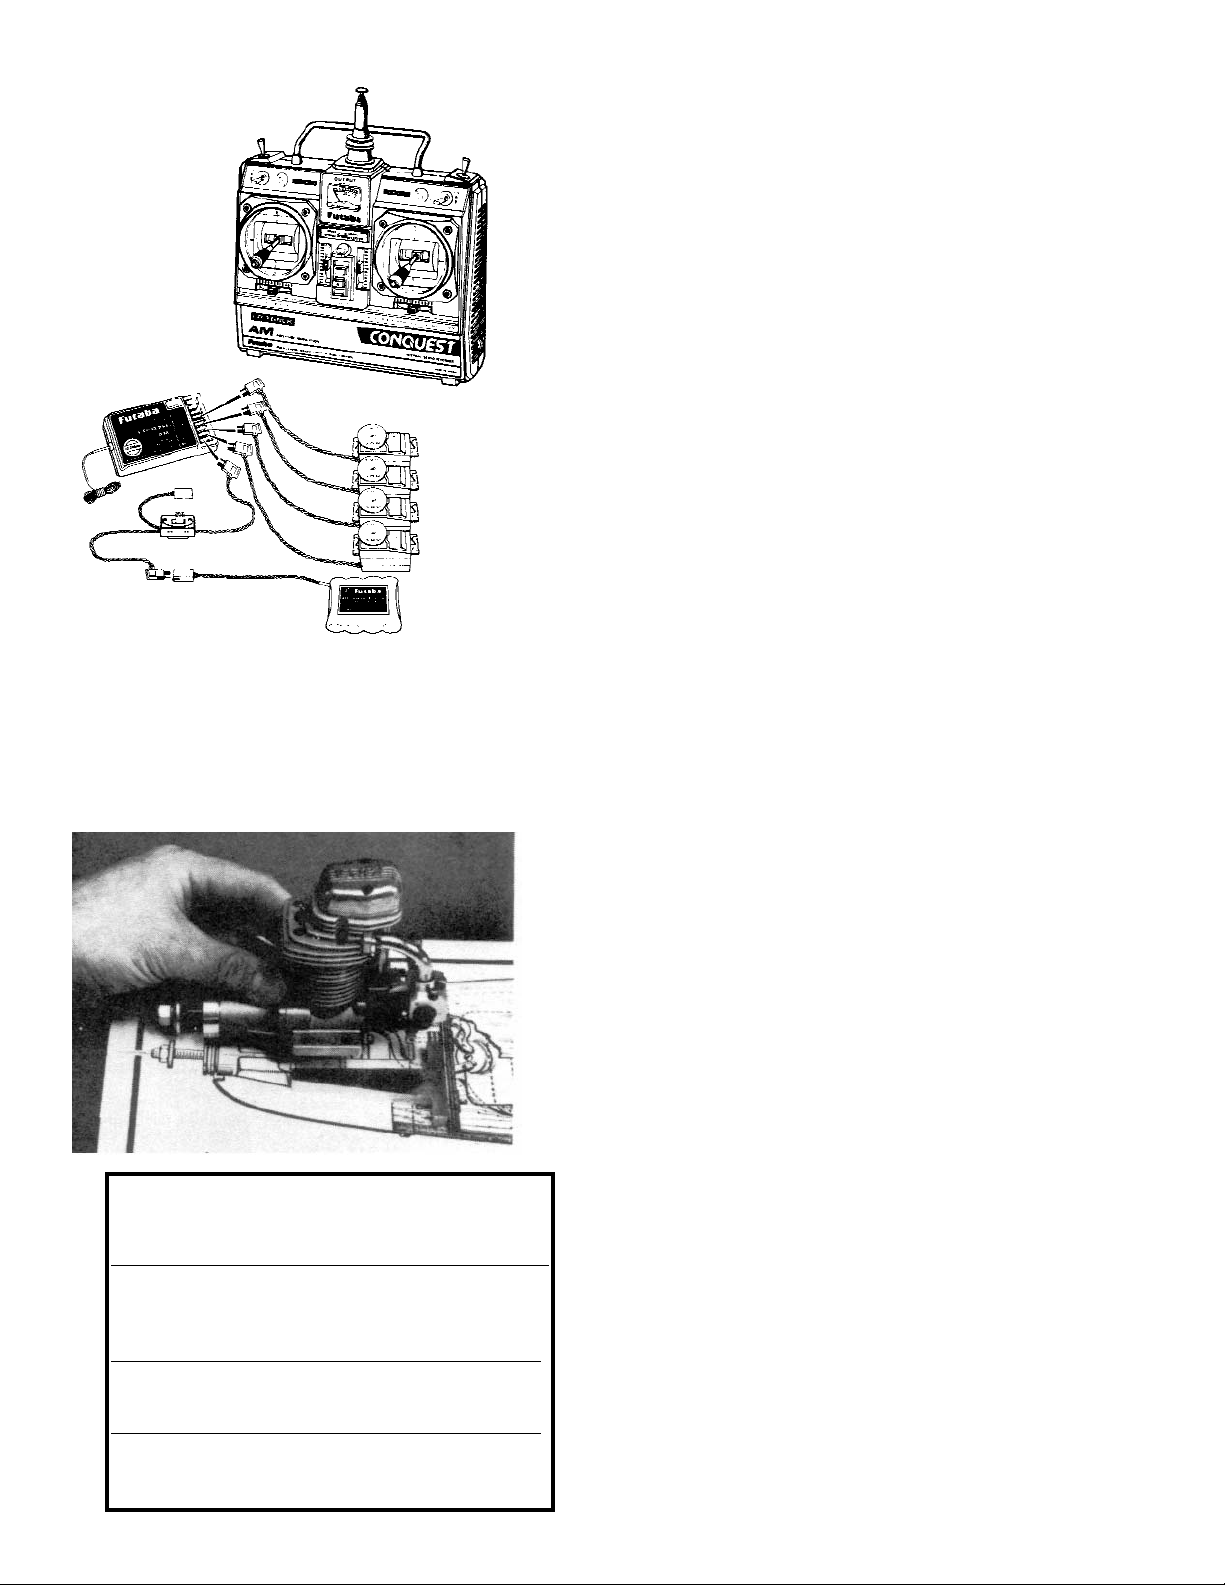
Digital proportional
Radio Control
One of many systems available,
please see your local dealer or
club for advice on selecting
your radio.
PROP AND FUEL TANK CHART
NUMBERS IN PARENTHESIS
REFER TO 4-CYCLE ENGINES
___________________________________________
FOR USE AND
ENGINE PROP TANK
SIZE SIZE SIZE
___________________________________________
.40-.51 10/6, 11/4, 11/6 8-10 OUNCE
(.40-.49) (12/6) (8)
___________________________________________
.60-.61 12/6 12 OUNCE
(.60-.91) (14/6) (10-12)
Selecting Radio Control Equipment
The Cub is designed for 4-channel radio control equipment. Many of the
radio systems now available feature “servo reversing” switches which allow you to
reverse the response of the servo. This feature simplifies radio installation and is a
worthwhile consideration when selecting a radio system.
Engine & Propeller
The Cub flies well using any engine size from .40 to .61 (.90 4-cycle). cubicinch
displacement. If you live in a warm climate, or your flying field is approximately
3,000 feet or more above sea level, you should use a .49 engine or larger. The propeller size must be matched with the engine. For example, a .40 engine may use a
10” diameter prop, while a .61 uses 11”. Refer to the prop and fuel tank chart at
lower left.
Balancing your propeller helps to protect your radio from the damaging
effects of vibration. Good balancers are on the market, and generally are
easy to use. We recommend sanding or scraping the heavy blade on the
curved face rather than the flat face, and out near the tip. Try to maintain the normal
airfoil curvature. And avoid scratches which might cause the prop to break.
Adhesives
All our test models were built using cyanoacrylate glue(CA) which is
specially formulated to firmly glue the plywood, hardwood, plastic, and balsa used
in your Cub, and we strongly recommend it. Other good glues to use are“15 Minute
Epoxy” or Aliphatic Resin. They will, however, add considerably to the assembly
time required (they dry a lot slower than CA). Also, Aliphatic Resin does not glue
plastic, so you will need one of the adhesives mentioned above (or similar) for the
plastic parts.
IMPORTANT!
In a few specific areas of assembly we suggest the use of thin type of instant glue (
CA) for example, sheeting the leading edge of the wing.
Other than when specifically recommended, these thin types of glue
should not be used since they do not glue plywood adequately and also
require that your work must be near perfect. Be careful when using instant glue to
install windows, as applying too much glue can sometimes cause fogging to occur.
This can be easily wiped off with a damp rag. A sure way to avoid fogging is to use
either epoxy or Zap Formula 560 canopy glue.
After you have finished gluing the model together, go back and re-glue all the
joints for added strength, and just in case some joints may have been
missed the first time. Be careful not to use too little glue. Too little leaves a
model weak. Since CA almost eliminates waiting for glue joints to dry, you can
work straight through and finish each assembly by following the step-by -step building sequence. If you use epoxy, you can save time while waiting for one assembly to
dry (the stabilizer, for example) by turning a few pages ahead and starting another
part (the fuselage, perhaps). Check-off boxes are provided at each step so you can
tell at a glance what steps you have completed.
Tack-Cementing. Sometimes it is necessary to temporarily glue a part
in place that must later be removed. To provide for easy removal of the part
without damage, it should have been glued in place using only a small dab of glue.
This is referred to as “tack-cementing” later on in the instructions.
Using Cyanoacrylate Glue. CA lets you b uild almost as fast as your hands
can press parts toghether! When pressed into a very thin layer, it sets almost instantly. So be careful, read instrluctions thoroughly and use check-off boxes to avoid
errors (like building two right-hand wings-instead of a left and a right)! CA allows
only for momentary positioning of parts. So be sure to trial fit parts toghether to
check fit and placement before applying glue. After its initial bond, CA continues to
strengthen. CA sets up a bit slower with plywood and hardwood, so hold such joints
together a little longer than you would for balsa. CA in corners takes a while longer
to dry because of its not being a thin layer. The tendency for all instant glues to set
slower on hardwood or plywood and when in a thick layer can be elilminated by
using Kicker, an accelerator for cyanoacrylate glue. Kicker bridges greater gaps,
speeds up slow bonds, and provides strong joint fillets.
Using Epoxy. Epoxy comes in two parts which need to be mixed before
using. Paper cups and wood coffee stirrers are useful for ixing. When
buying epoxy, check the package to see how long it takes to set (some formulas\
set in 5 minutes, others may take hours). We recommend 15 minute
Page 3
3
epoxy. Disposable wood strips, cotton swabs, cheap stiff bristle brushes, or acid brushes from auto stores make good applicators.
Because epoxy is so thick, it’s easy to apply too much. If you use epoxy to build the entire model be especially careful to use sparingly
when assembling fin, stabilizer, and wing.
Caution
Some people may experience allergic reactions when exposed to fumes from instant glue or epoxy. This is very rare. However, it is always
important that such glues, and also paints, thinners and solvents, be used with adeqquate ventilation to carry fumes away.
Windshield
The Cub windshield was carefully designed to realistically duplicate the distinctive lines of the original, yet still be easy to install. For good final
appearance, follow instructions carefully, especially those dealing with removing scrap plastic from windshield base and its’ installation. If tinted
windows are desired, do not try to dye them (the plastic does not dye well).Instead, we recommend “transparent” spray enamels be carefully
applied to the inside window surface (they are not fuel proof).
Covering The Model
The full size Cub is of wood and metal construction, which is covered with fabric. The fabric is then painted. For your model, fabric types of covering duplicate the fabric appearance of the full size airplane quite realistically. There are many good covering materials available that have good
resistance to tearing and punctures. General information on applying iron-on covering can be found on page 22. Because of specific differences in
the application of various brands of covering, make sure instructions have been provided by the manufacturer of the covering you select.
Clipped Wing Option
The shortened wing for this option is accomplished by cutting the spars, leadings edges, etc. to the shorter lengths shown on the plan. This is
fully described at the beginning of the wing assembly.
Page 4
4
Be careful when removing parts (such as fuselage sides)
from die-cut sheets. Long parts are fragile until glued into a
structural unit. If necessary, use a razor knife or razor saw
to assist in the removal of parts from sheet. Sometimes a
little trimming and sanding can improve parts where
desired. Save scrap until model is completed, in case you
should miss a part. Scrap is used also in some building
steps on the plan. Other easily recognized parts, such as
engine bearers, are not shown here.
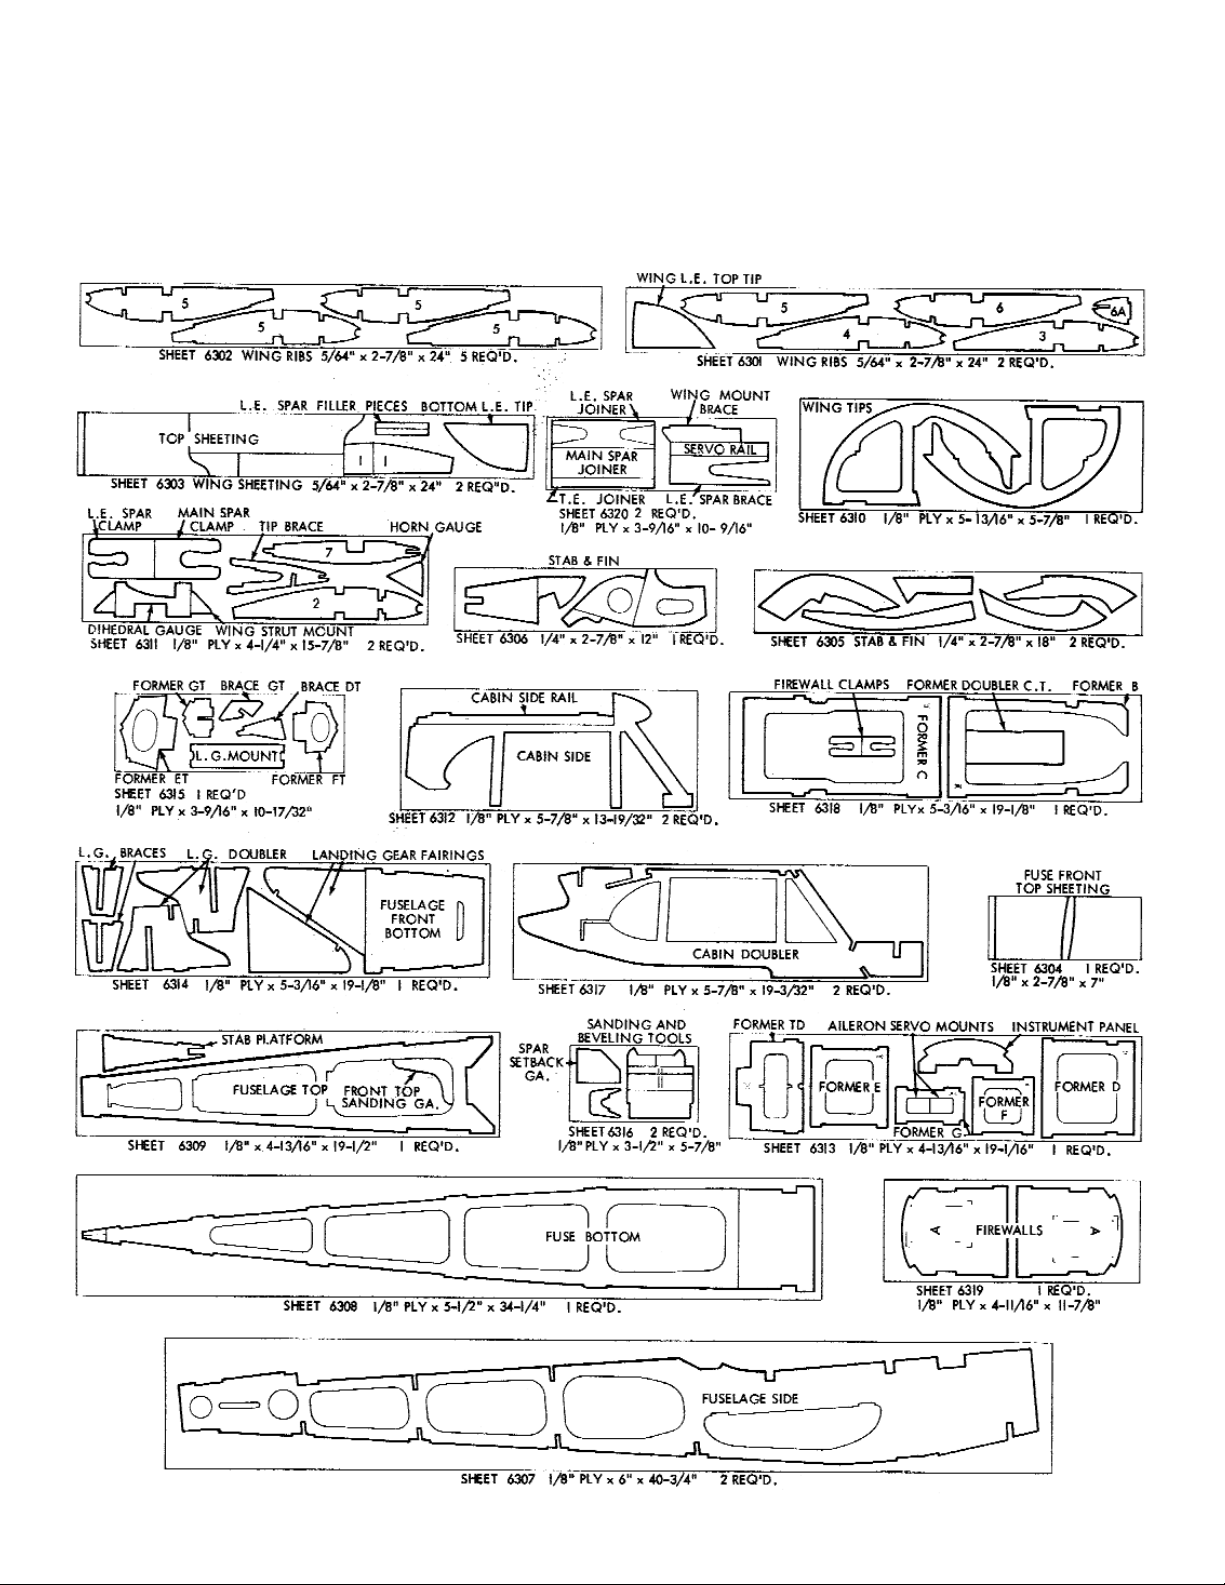
Wood Parts Identification
Page 5
5
Page 6
6
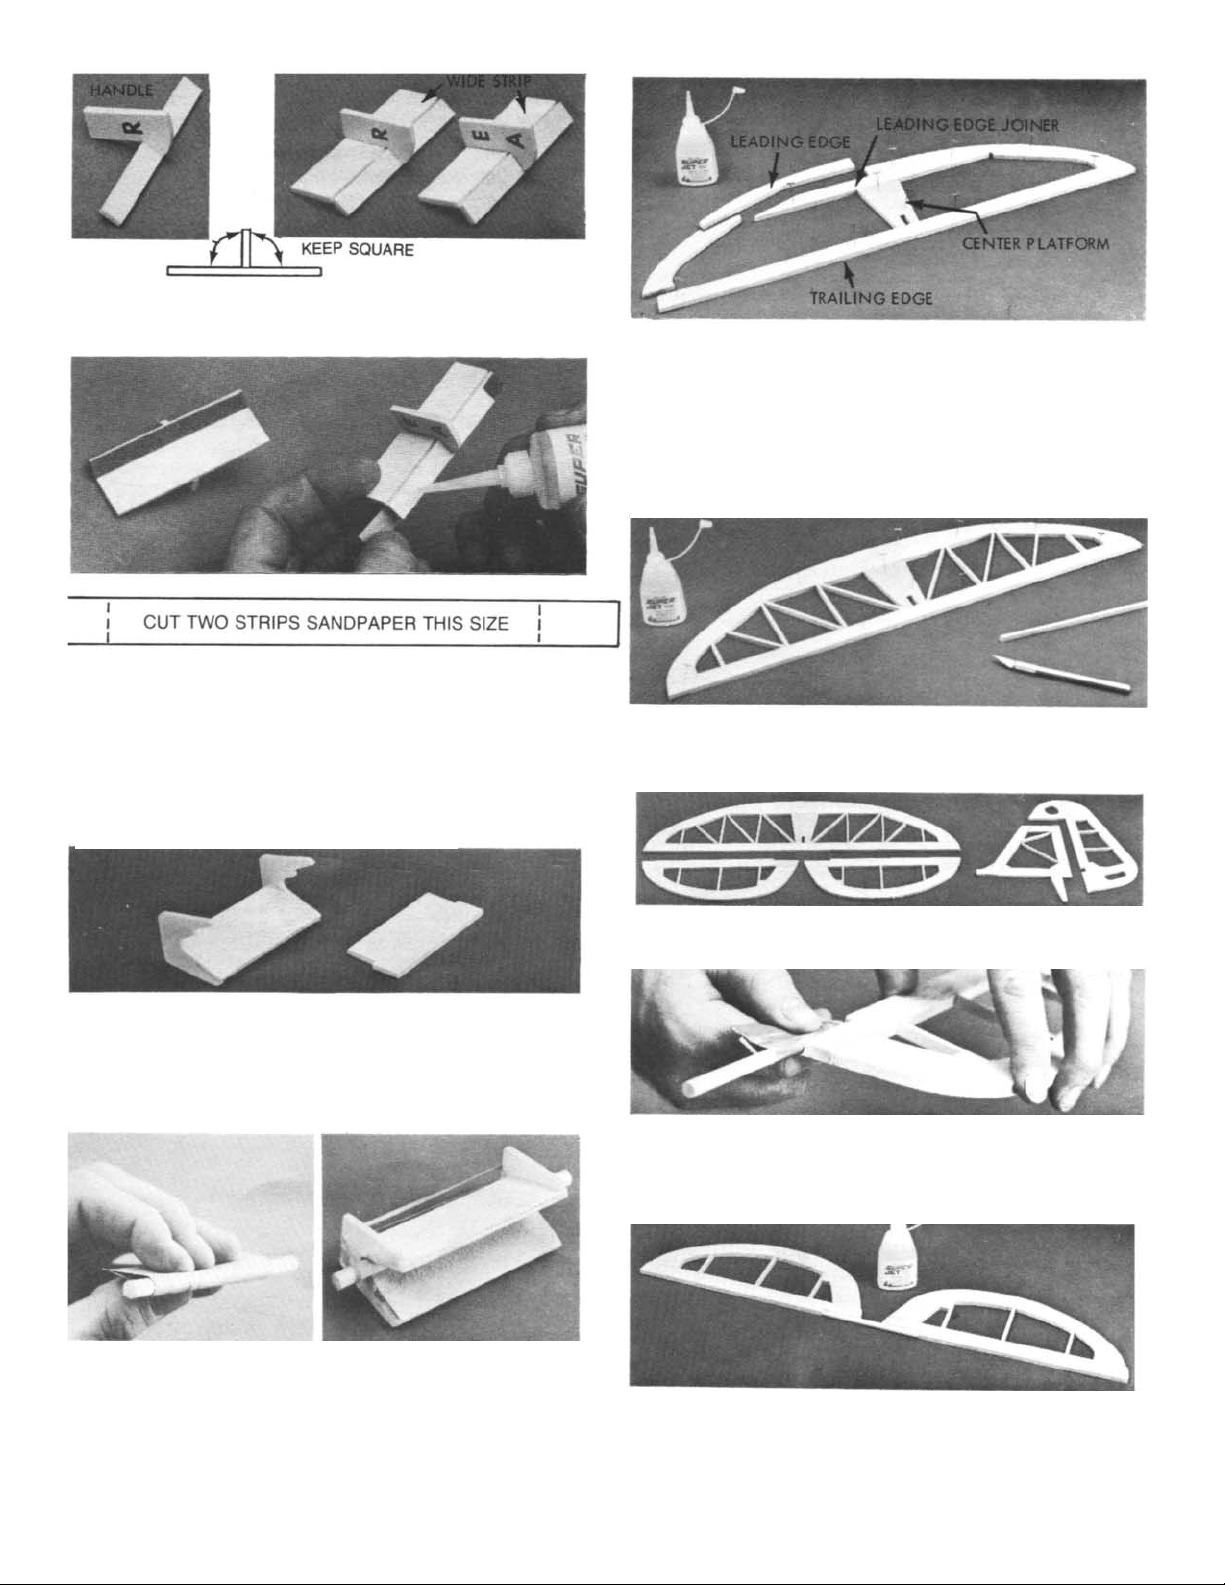
1. First, glue narrow strip to handle, keeping them
square, as shown above left. Then glue wide strip to
handle and narrow strip, again keeping things square.
2. Cut two strips of 100-200 grit sandpaper to size shown
above. Tack-cement sandpaper to tools as shown.
Die-Cut Sanding Tool
1. Glue one strip into handles notches keeping them
square. Then glue remaining strip to other half of handles.
2.
Cut one piece of 100-200 grit sandpaper to size of
2-1/4” x 3”.
Center 1/4” dowel over grit side of sandpaper. Roll
sandpaper around it as shown above left.
Slide dowel and sandpaper into tool and hold with
rubber band as shown at right. Glue sandpaper to tool.
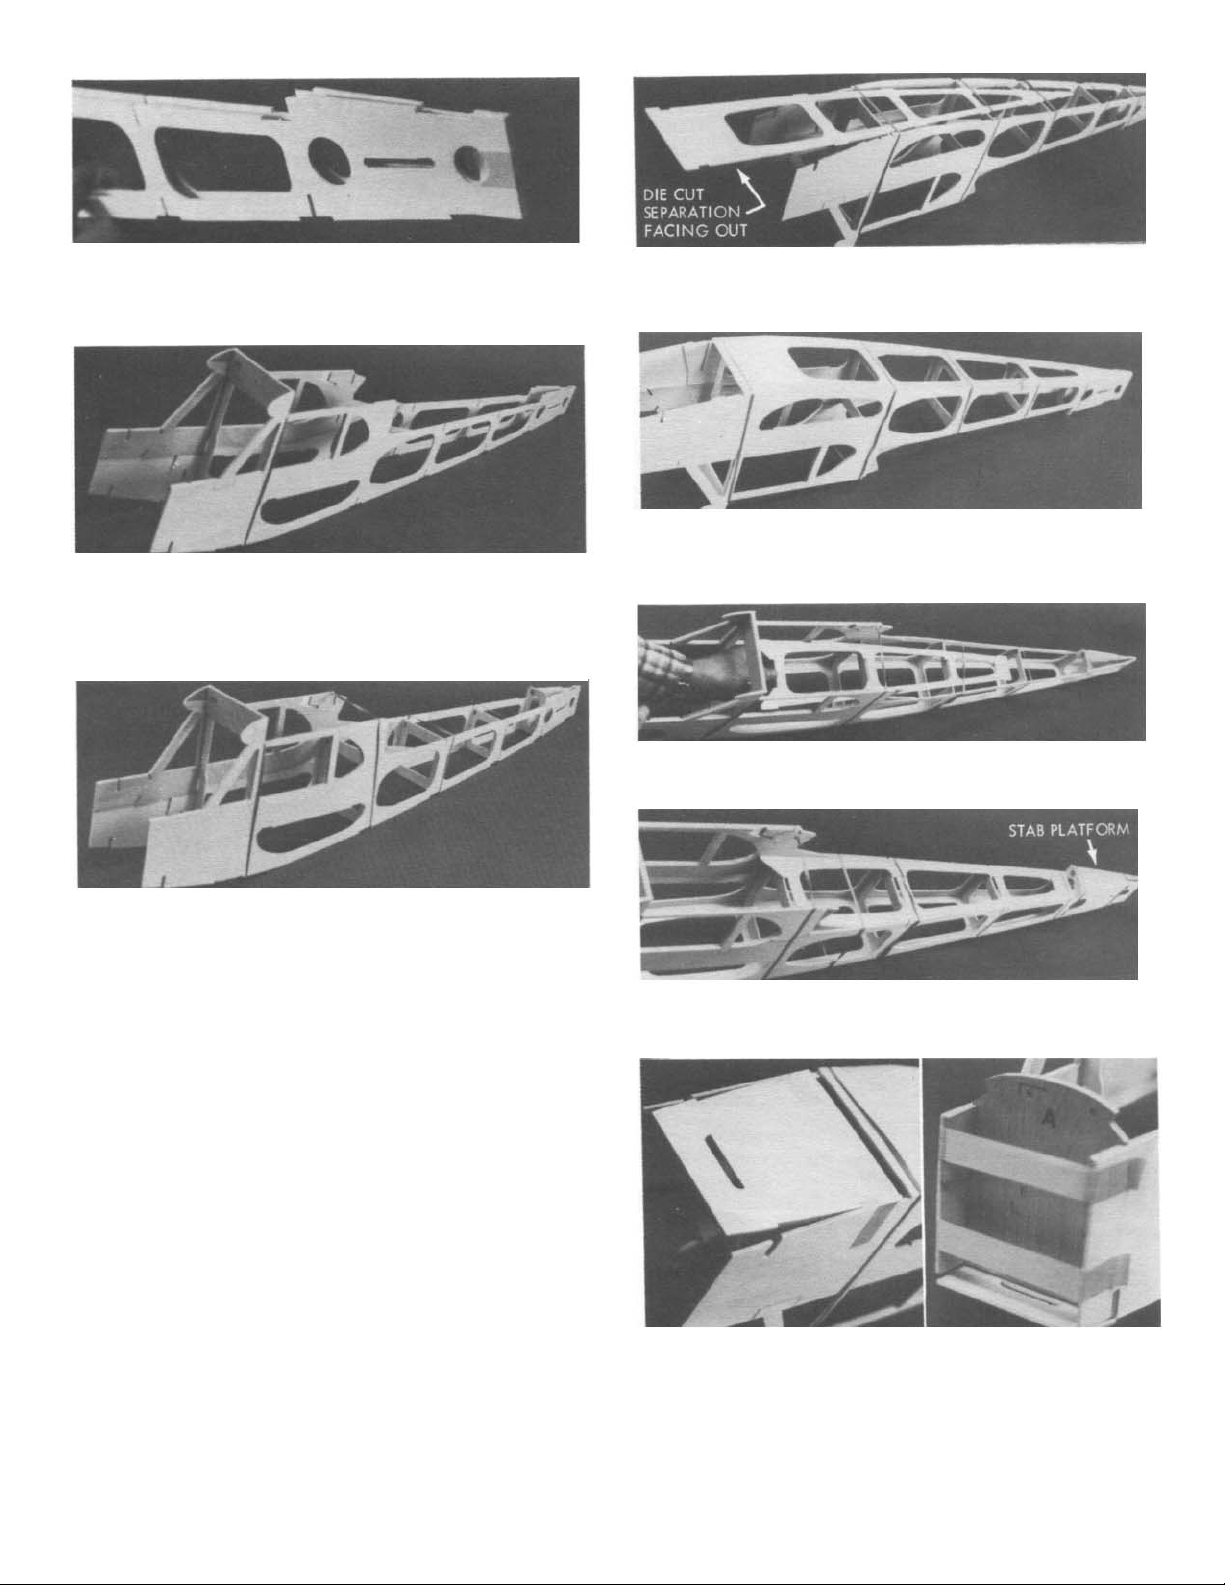
1. From 1/4” x3/4” balsa stick material, make stabilizer
(stab) trailing edge (T.E.). Cut balsa carefully to match
with plan at ends. Pin in place.
Position and pin die-cut center platform over plan. Cut
stab leading edge (L.E.) joiner from 1/4” x 3/4” balsa to
match with plan and pin in position.
Assemble die-cut curved L.E. segments to form stab
outline, glue all parts together.
2. From 1/8”x 1/4” strip balsa, cut all trusses to size over
plan. Trim to fit well-don’t force into place. Glue in place.
Let dry thoroughly.
3. Assemble elevator halves, fin and rudder in same
manner as stab, using die-cut and stick parts.
4. Wrap 100-200 grit sandpaper around 1/4” x4-1/2”
dowel. Carefully sand recessed area in elevator L.E. so
dowel will fit flush with front of elevator.
Repeat for other elevator half.
Carefully align L.E.’s of elevators over plan and pin in
place. Join them with the 1/4” dowel, glue it securely in
place! Let dry thoroughly.
Page 7
7
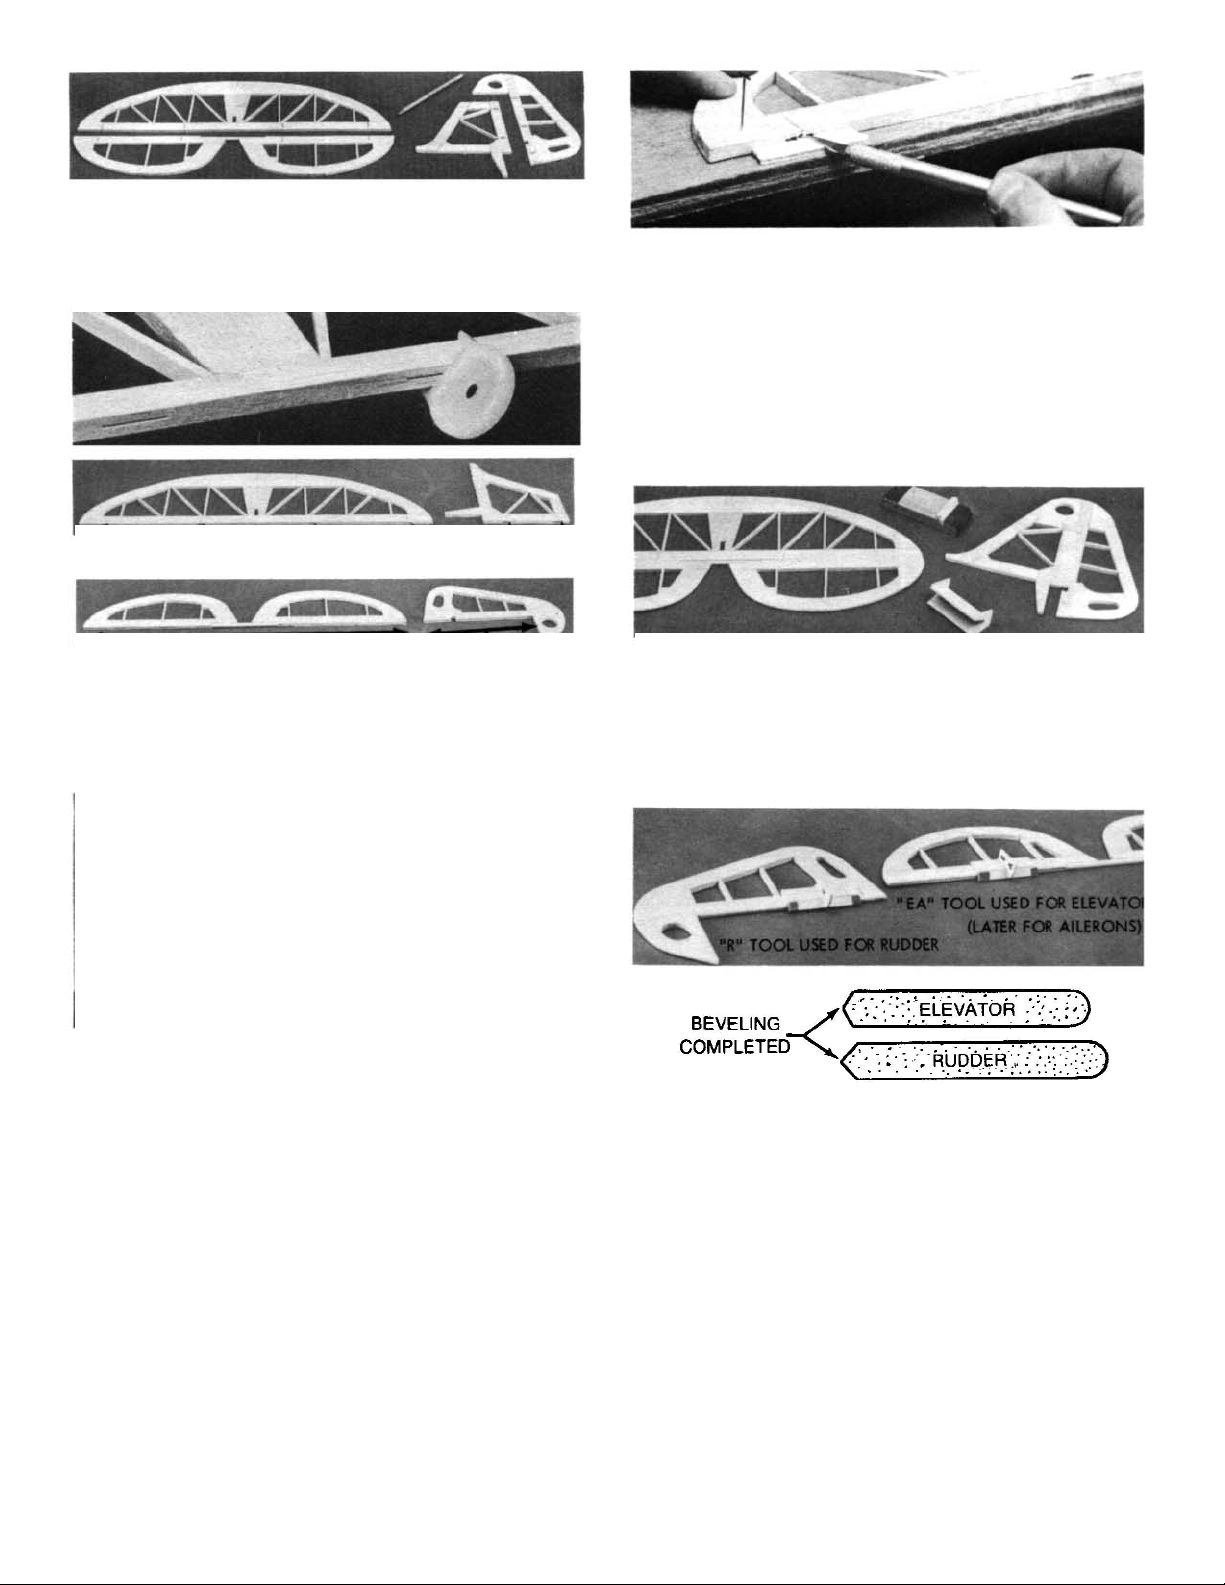
5. Place fin and rudder over plan and mark hinge location
Mark hinge locations for stab and elevator.
On stab & fin, mark center lines at hinge locations
On elevator & rudder, mark center lines along entire L.E.
6.
Using CG Center-Line marker provided, mark center-
lines along edges of parts as shown above. Tilt marker so
guide pegs touch the wood., then lightly pass the marker
back and forth. Point will scribe center line.
Using scrap ply from “sanding tool” sheet as a shim,
cut slots for hinges as shown. Sand ply if necessary so
blade cuts on center.
8.
Repeat this method in step 7 for fin and rudder.
First break corners with the sanding block. Then,
follow with stab sanding tool, rounding off all outside
edges except bottom of fin and the rudder L.E. Blend stab
and elevator at tips.
IMPORTANT! The hinges are not
9. Using a sanding block, flat sand stab, elevator, fin
and rudder, smoothing out surfaces.
Using no glue, TEMPORARILY attach elevator to stab
and fin to rudder with hinges in place. Hold parts together
with tape.
10. Remove tapes and separate elevator and rudder from
stab and fin.
Tape T.E. of elevator and rudder to work surface,
using
appropriate beveling tool, sand L.E. to center line.
Turn parts over and repeat beveling for other side.
THIS COMPLETES THE TAIL ASSEMBLY
CONSTRUCTION.
Page 8
8
II FUSELAGE ASSEMBLY
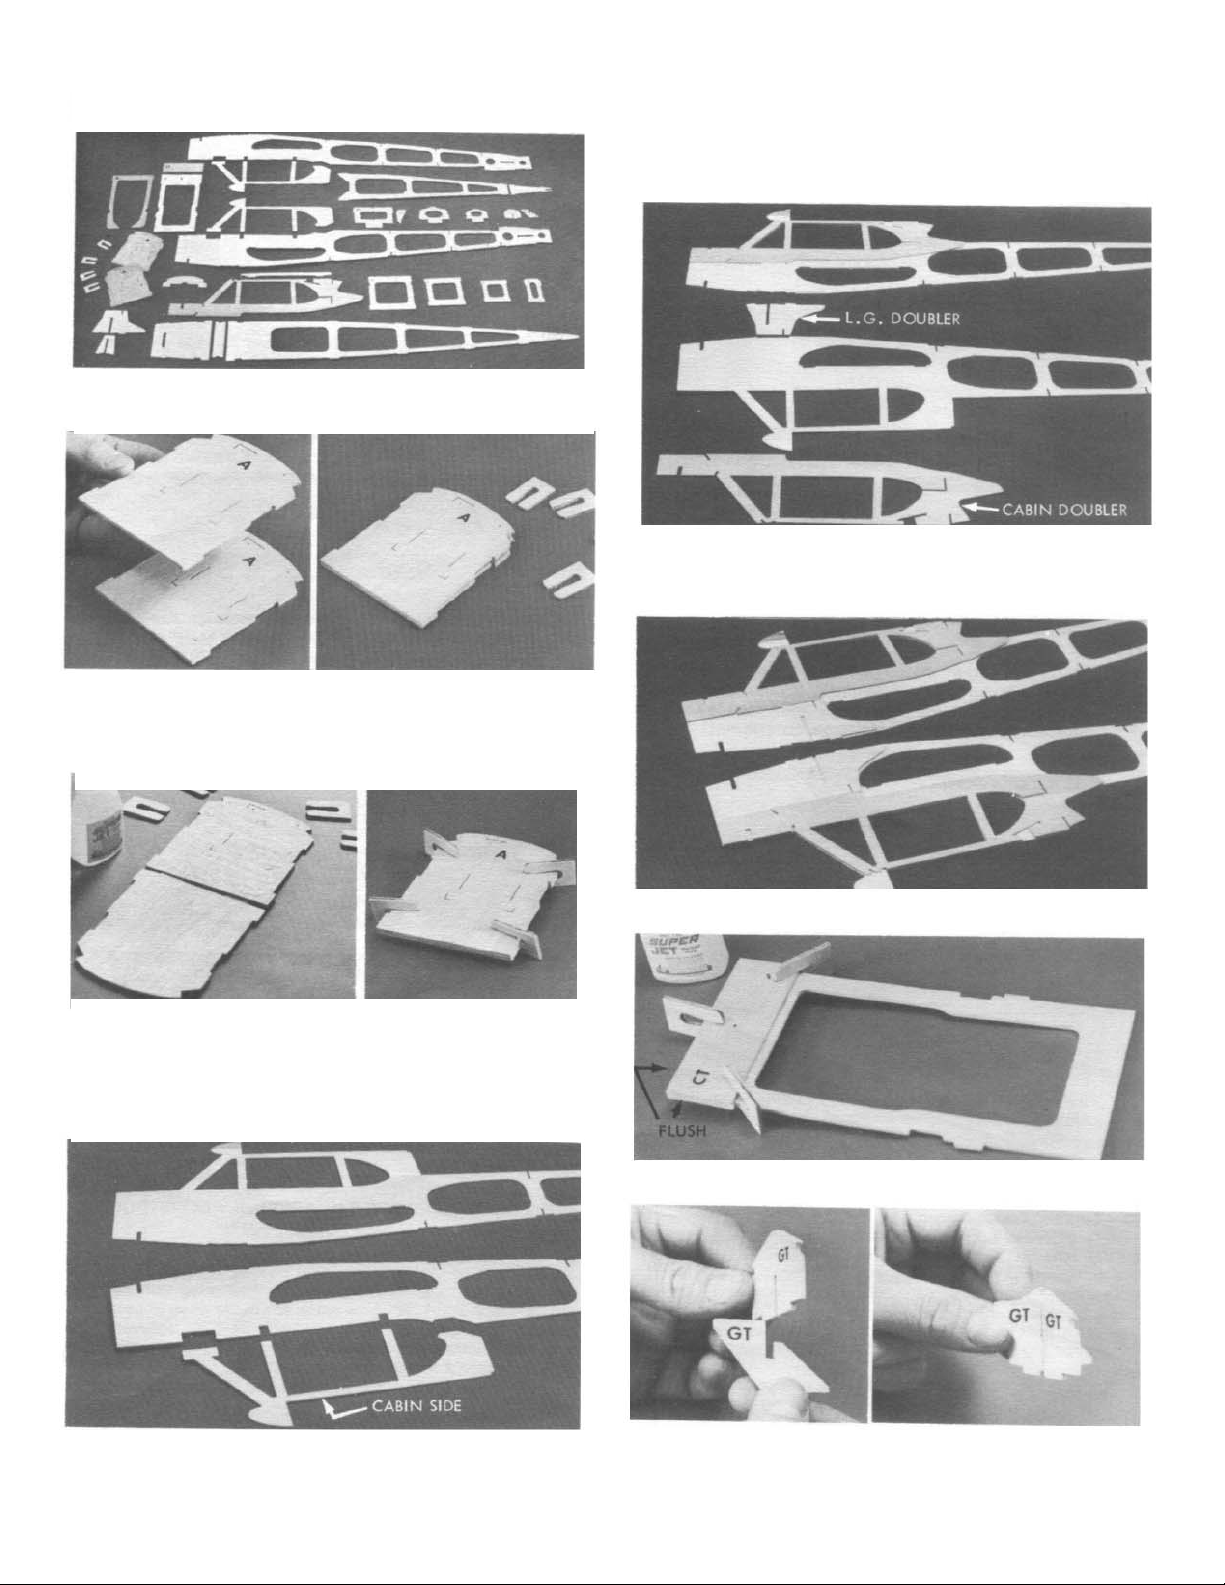
1. Carefully remove all fuselage (fuse) parts from die-cut
sheets. Lightly sand any rough edges.
2. With side stamped “A” facing out, position two 1/8”
ply formers (firewall) together, matching all edges. To hold
them in alignment, tape them securely together along one
edge as shown at right. Have four ply clamps ready for
next operation.
3. Open firewalls and apply a liberal amount of glue to
one part as shown at left.
Keep edges aligned as you close firewalls and tape
opposite edges together, squeeze firewalls together using
die-cut clamps. When dry, remove clamps and tapes; set
clamps aside for use later.
Temporarily position cabin sides in notches. Check
f it and ;placement of parts before gluing.
Glue cabin sides to fuse.
Temporarily position cabin and landing gear (L.G.)
doublers on fuse side, checking fit and placement before
gluing.
Glue cabin and L.G. doublers in place.
5.
Glue former doubler “CT” to former C.
Slide brace GT fully into former GT. Hold brace
square to former and glue.
Page 9
9
Glue former brace DT to rear of former DT.
Drill a 1/4” diameter hole through CT & C at punch
mark location.
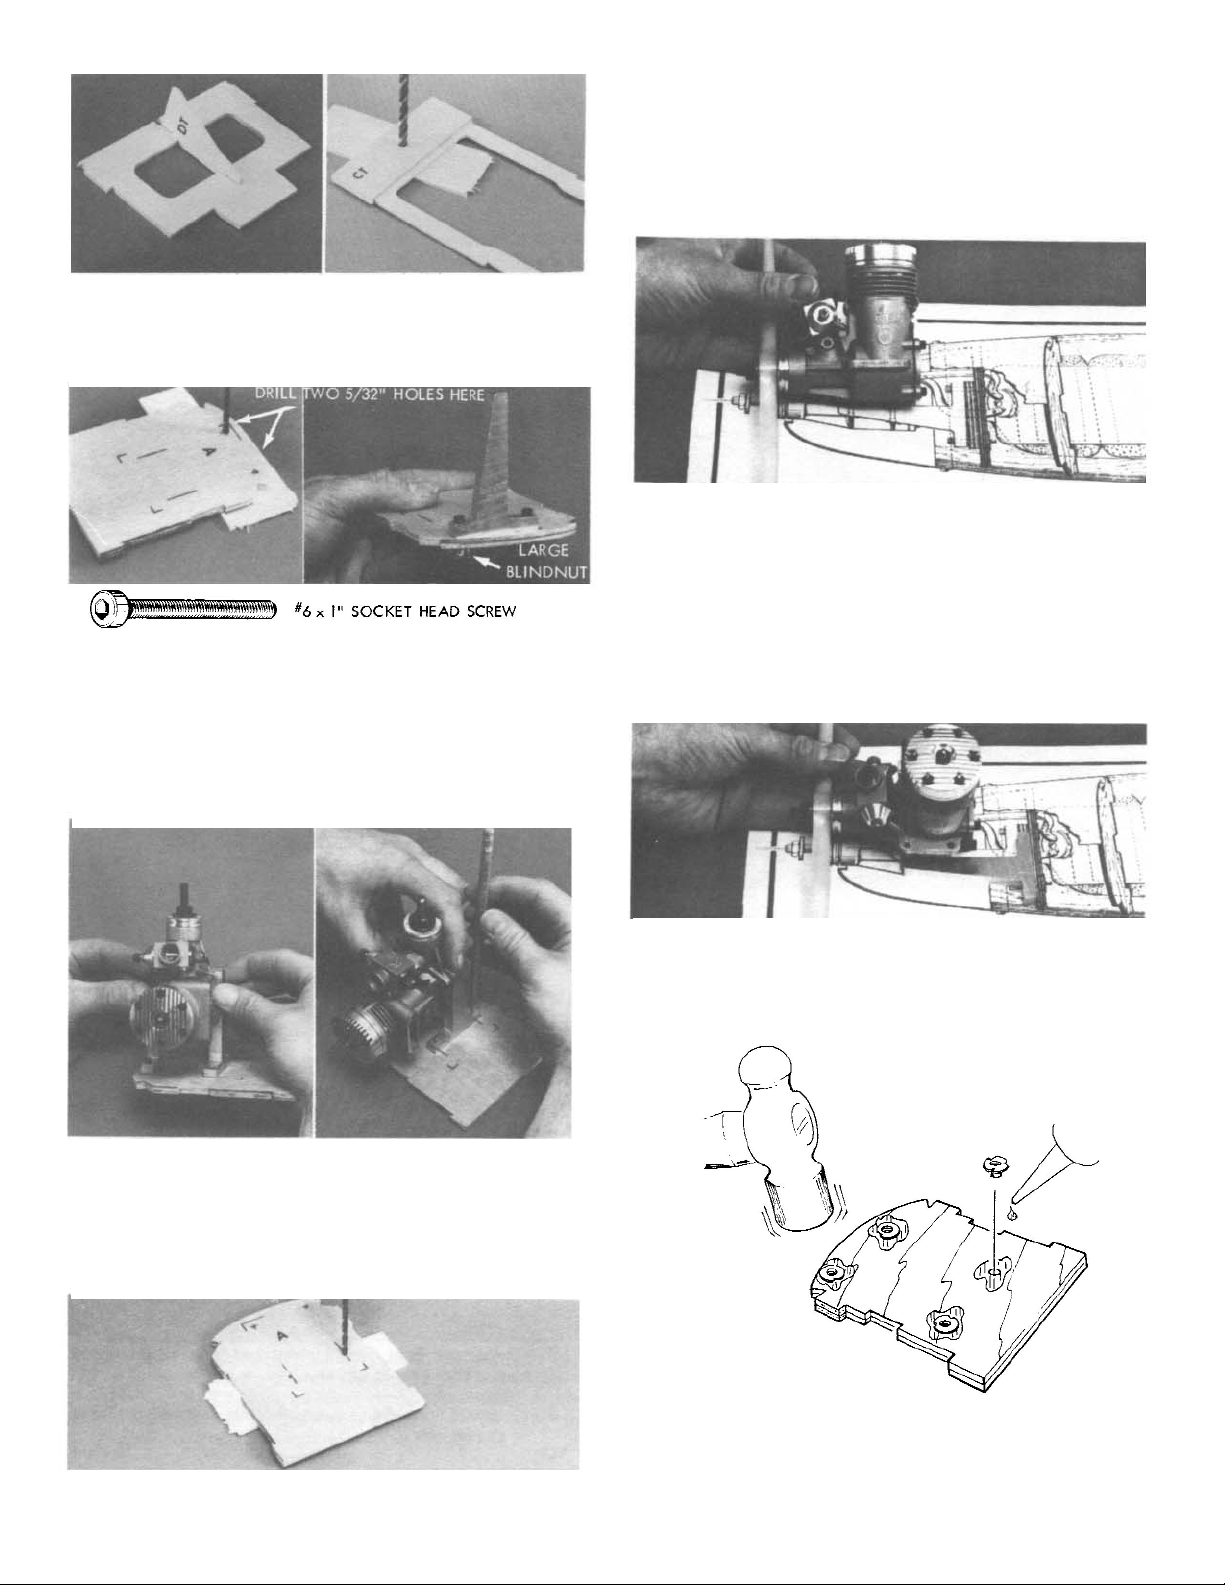
6. Drill two 5/32” diameter holes through firewall at
upper punch mark locations (place scrap wood under
backside while drilling to avoid splitout).
Temporarily install one of the motor mounts, using (2)
#6x1” socket head bolts and blindnuts. Do not pull the
blindnuts into firewall at this time, since they may need to
be removed at a later time.
7. Position the engine between both mounts, holding it
vertical to firewall and parallel to mounts. Spread mounts
apart to match engine mounting holes (there are two
stamped reference lines for positioning mount directly
under the upper one.)
Mark straight down through holes in lower mount.
8. Remove engine and mounts. Drill two more 5/32”
holes at lower mount location.
NOTE: Your kit may include an non-updated plan. The
1/4” ply motor mount extension is no longer needed with the
change to the fiber filled engine mounts now included with
the kit. If you have an older plan, please disregard any
reference to the ply extension.
9. Mount propeller on your engine. Position engine over
fuse top view on plan and compare it to the installation
shown. Back of your prop should protrude 1/8” to 1/4”
beyond the cowl front as shown on the plan. Hold engine
in this location.For long 4-cycle engines, check for at
least 1/8” clearance between engine rear and firewall; to
obtain this clearance the engine may have to be shifted
forward as required. Measure the distance from the
engine rear to the firewall. Write this measurement down,
it will be used later for engine mounting.
10. Position one engine mount, butting its rear flange
against the firewall location shown on the plan. Observe
how the front engine mounting holes relate to the engine
mount.
11. Insert the four blind nuts into the holes on the BACK
side of the firewall. CA glue the nuts to the ply and seat
them into the firewall with a hammer.
Page 10
10
12a. Place fuse sides one on the other, tape rear
together around the back end. Spread fuse fronts apart,
and plug former “C” into holes in body sides. Hold parts
together with a rubber band.
12b. Hold fuse tail end up, carefully spread fuse rear
open,and plug former “G” in place, hold with a rubber
band. Working towards front, install formers “F”, “E”
and “D” in same manner, using rubber bands to hold
parts.
12c. With die-cut separation facing out, insert bottom
sheet under rubber bands at former “C”, and work it
towards tail, slipping it under bands as you go.
12d. Lock tabs at sides and ends of bottom sheet into
corresponding notches in fuse sides. Hold parts with
tape.
12e. Working through former C, position top sheet in
same manner, sliding it towards rear.
12f. Position stab platform between fuse ends, and hold
parts in place with tape or rubber bands.
13. Position front bottom sheet and tape it securely to
fuse at rear only as shown.
14.
Install firewall and pull fuse fronts toghether with tape
as shown.
Page 11

11
15. Complete installation of bottom sheet, holding with
tape as shown.
16. Install former B, gently compressing legs to fit into
fuse. Lock top tabs in place, then plug lower legs in posi-
tion.
17. Place fuse over TOP VIEW on plan sheet. Viewing
from above, carefully align the fuse to match plan out
line. If an area of the fuse is off, adjust that portion in the
direction required. Tape parts to hold in position.
18. When satisfied with alignment, permanently glue
sides, formers and sheet parts in place. Apply a bead of
A along all joints inside and outside, or from
both sides in the case of formers-it will penetrate the
joint and leave a slight reinforcing fillet.
At tail end, glue bottom sheet to conform to slight
bend in fuse sides.
19. Trial fit the tail wheel bracket at die-cut separation in
bottom sheet. The bracket flange will probably not fit the
slot. Using a small saw, enlarge slot as required for correct
fit. DO NOT GLUE bracket in place at this time.
20. Install top formers “DT”, “ET”,”FT”, and “GT” in
their respective slots in fuse top (braces DT and GT must face
each other).
Install a 3/16” diameter x 18” dowel in top center slots.
Flush dowel with former DT. Glue in place.
Cut rear end of dowel flush with back of former GT.
Page 12

12
21. Install remaining two dowels, positioning them in
slots at top cabin sides. Pull dowels down in place into former
slots and hold with tape or rubber bands. Glue in place.
Trim dowels flush with rear of former G.
22. Former DT should be reinforced so that after the fuse
is covered it will not bend. From 1/8” x1/4” tail truss
scrap, cut reinforcement pieces and glue to rear of former.
23. Plug 1/8” fie-cut braces into slotted locations in cabin
doublers and glue securely in place.
Position and glue wing mounting blocks. Reglue
these joints thoroughly, the wing attaches here-it must
be strong.
24. Place the L.G. mount on inside bottom of fuse. The
cutouts at each end of mount must be positioned evenly
over the slot in the fuse bottom. Glue mount in place.
The L.G. braces interlock with L.G.mount, and the
slots must be matched to those in the fuse sides. IMPORTANT:
the arrow stamped on each braced must be positioned
towards the front of the model. Glue in place.
Position side rail tabs in fuse notches and glue in place.
25. Glue instrument panel solidly in place.
26.
From scrap 1/4” x 3x4” stab material, cut pieces as
shown. Glue into panel and firewall notches and to fuse
sides. Trim flush with panel.
27. Match curved edge of 1/8” balsa top sheet with instru
ment panel, and align edge with fuse center. Glue in
place. Glue other half in place.
28. Trim flush with fuse front and sides.
Using a sanding block, first flat sand sides. Then,
round the corners, blending surfaces-check your sanding
with the template.
Page 13

13
29. The balsa tail fin fairings shown in photos below are
cut from triangle strip. First, cut two 6-3/4” lengths. Then,
taper-sand fairings to curved pointed shape as
shown on fuse views on plan.
Center stab on fuse, measuring to obtain equal
distance from side to side, and from nose of fuse to rear
corner of each stab tip (see dimension “A” page 23).
Trial fit fin in place. Position fairings on both sides of
fin and butted against former GT. Glue fairings to fin
ONLY at this time.
30. From scrap balsa tri strip, cut two reinforcing fillets
and glue in place at lower corners of fuse front.
31. Remove windshield from vac-formed sheet by cutting
on lines as shown in sketches above. Temporarily set
Windshield is not glued in place until pushrods are installed.
windshield in place on fuse to check fit.
32.
Carefully remove side windows from vac-formed sheet
by cutting on lines (about 1/4” all around windows). Cut front
triangle window from others along center of connecting flange.
Using no glue at this time, temporarily fit windows into
fuse openings. if they fit too tight, remove and lightly sand
openings the minimum required for good fit. Remove windows
and set aside until later.
33.
To protect the engine area from becoming oil soaked,
it needs to be “fuel-proofed.” Either polyurethane, CA, or
epoxy is good for this. Apply your fuel proofer to entire
engine area, firewall,sides and fues front. Open up screw holes
with toothpick while paint is wet. Let dry thoroughly.
34. Carefully cut flashing material from base of cowl. Cut
out the opening for the prop shaft.
Using the measurement from step 9, position and
tack-cement engine on mounts (engine must parallel
mounts and point straight out from firewall).
Carefully cut cowl for engine cylinder clearance. Work
slowly, fitting and trimming until cowl overlaps the fuse
front by about 1/4”, hold with tape.
CAREFULLY REMOVE
FLASHING AT WINDSHIELD REAR
TRIM SCRAP FROM
REAR BY CUTTING
ON MARKED LINE
TRIM SCRAP FROM
FRONT BY CUTTING
ON MARKED LINE
Page 14

14
Loosely install prop on engine. There should be 1/8” to
1/4” clearance between back of prop and cowl.
Attach cowl to fuse using #2 x 3/8” screws and
washers. Remove prop and cowl. With engine still on
mounts proceed directly to step 35.
35. Bolt the motor mounts to the firewall, using the four
4-40 x 1” bolts with a #4 flat washer.
Mount the engine, refer to the plan for the correct thrust
orientation. Drill a 1/16” pilot hole for each #6 x 3/4”
mounting screw. Check the cowl fit-up after you install the
engine.
36. For rear end of elevator and rudder pushrods, bend
both 10” threaded rods as accurately as possible over
plan.. Cut off excess, leaving about 1/4” at right angle.
Using threaded end of a rod, file a slight recess 1-1/4”
long at one end of each 3/8” square balsa pushrod. (The other
end of the pushrod is completed later during radio installation).
Drill a 1/16” dia. hole at end of recess in both
pushrods.
Glue rods into balsa pushrods as shown.
When dry, taper ends of pushrods and round off corners.
bind with strong thread, coat with glue and let dry.
#2 x3/8” SHEET METAL SCREW
TO INSTALL #2 SCREW,
FIRST DRILL 1/16” DIA
HOLES.
37. Insert formed wire L.G. struts in fuse. Position nylon
landing gear straps; then mark, drill, and mount with #2 x
3/8” screws (see above and illustration on page 5).
38. Cut open straight action end of four nylon hold-downs.
Grasp at center hole and bend it over (it will spring back to
proper angle).
#2 x3/16” SHEET METAL SCREW.
Lay L.G. fairings down left and right as shown and
install hold downs using #2 x 3/16” sheet metal screws at
punch mark locations. Position them with straight action
end facing up towards center.
#2 SHOULDER SCREW
39.
Align fairing front with L.G. strut and adjust so hold
downs project over fuse bottom. Mark, drill, and mount
fairings with #2 shoulder screws (exposing enough unthreaded shank to engage hold-down). Later when flying,
hold lower fairing to strut with a rubber band.
Page 15

15
III WING ASSEMBLY
SINCE THE WING IS BUILT IN TWO HALVES, AND STEPS 1
TO 27 ARE REPEATED IN THE PROCESS, TWO CHECK
BOXES ARE PROVIDED WITH EACH OF THESE STEPS. ONE
FOR RIGHT WING AND ONE FOR THE LEFT. THE RIGHT
WING IS BUILT FIRST.
1.
This step for clipped (short) wing only (for long wing
start with Step 2). On plan sheet 2 between the wings is a template.
Carefully match wing parts to corresponding lengths indicated on
the template. Mark and cut them to new length.
Carefully cut wing tip panels as indicated on plan sheet 2.
Move panels two rib spaces inboard (match arrows on plan) and
tape in position,. Note: from step 2 on in the wing assembly photos,
the long wing is shown, but the assembly procedure is the same for
the short wing,.
2. Position one main spar in place over RIGHT WING (or
LEFT WING) on plan. Align spar end at center of wing on plan.
Hold spar in exact position by cross pinning at circled locations
on plan. CAUTION: Do not build two RIGHT WINGS!
Using no glue, place one No. 5 over rib 3 location on
plan, and two more ribs 5 as shown.
Position :L.E. sheeting over plan and pin in place.
Slide L.E. sheeting in place under rib fronts until it stops
at rib notch. Butt sheet next to L.E. filler (rib No. 2 location over
plan). Pin in place.
3. For short wing, proceed directly to step 4.
For long wing, cut a T.E. filler piece from 11-7/8”
sheet. Cut filler to fit from center of wing to center of rib 2 location. Pin in place.
4. Slide T.E. sheeting under ribs until it stops in bottom
notches. Butt sheet against T.E. filler (for short wing, align
sheet end at wing center). Pin in place.
5. Remove No.5 rib from rib 3 location.
Raise rib fronts high enough to slide L.E. spar in
position. Align spar at wing center and press ribs back down
on spar.
Temporarily set rib 3 in place to locate L.E. spar.
7. Remove rib No.3 and fit front bottom sheet in position.
Pin in place.
Position one rear bottom sheet against T.E. Place other
sheet at rear of main spar overlapping the first one. Holding both
sheets in place, trim first sheet even with edge of second sheet.
8. Glue rear sheeting halves together, and to spar and T.E.do not glue front sheeting at this time.
Page 16

16
9. Using no glue, position ribs 2,3, and 4 in place overplan.
Position notched T.E. on T.E. sheeting, align at wing
center. IMPORTANT: the T.E. has a 1/8” wide notch at one endmatch this notch with rib 2.
Starting with rib 2, press ribs into their respective T.E.
notches. Pin T.E. in place.
10. Glue ribs 2,3, and 4 to bottom sheeting, main spar,
and T.E. (when gluing rib 2, tilt it very slightly using the setback gauge as shown).
11. Lay parts out as shown. Glue rib doubler 6a to rib 6,
make one left and one right rib 6. IMPORTANT: when
installing rib 6 in next step, position rib so doubler 6a faces out
toward wingtip!
12. Working one at a time, glue remaining ribs 5 and 6 to
main and L.E. spars and T.E. (do not glue L.E. sheeting at this
time!). Hold each rib up straight as it dries.
Glue T.E. and T.E. sheeting.
13. Position set-back gauge touching bottom main spar.
Touch end of top spar to gauge, and set spar in rib slots. Glue
top spar to all ribs.
14. Install top L.E. spar in same manner and glue.
15. At locations shown on plan, glue two strut mounting
plates in place., Rear plate is glued directly over T.E. sheeting
(for short wing-move mounts one rib bay inboard as indicated
on plan).
Drill a 1/16” hole through each mount at punch mark
location.
16. Position L.E. dowel, butting it against rib 6a and
checking it to be flush with rib No. 2. If the dowel in your kit is
over length, trim it to fit as shown below. Roll your knife over
the dowel in gradually deepening cuts.
Working a few ribs at a time, apply CA to glue ribs to
L.E. Gently squeeze L.E. into ribs and hold until set. Repeat
until all ribs are glued to L.E.
17. Slide an aileron under L.E. sheeting to raise it in
contact with ribs. Only the rear half of the sheeting will be
touching the ribs. At this time glue only that portion of sheeting in contact with the ribs. Move aileron on down the wing as
you go. Note: Instant CA is recommended here, since being
watery thin, a drop readily flows into the tight fitted joints and
dries instantly.
18.
Working a few ribs at a time, carefully pull the
remaining sheeting up against the L.E. dowel and glue in place.
Using CA, go back and reglue L.E. spar and all ribs
securely to sheeting.
Page 17

17
Holding your knife straight up, trim excess sheeting
flush with dowel.
19.
Lightly sand rib joints along top of dowel, for
smooth fit of top sheeting.
Align one edge of top sheet with L.E. spar, then
flush one end with rib No.2 (the other end should fall over the
joint between rib 6 and 6al). Tape sheeting to spar at several
points along the wing.
20.
With a damp rag, moisten the top of the sheeting
(this will curve the sheeting slightly making it easier to glue to
the ribs in the next step).
21.
With the taped edge as a hinge, lift the sheeting.
Apply a bead of CA along the entire lengths of dowel and spar,
and along the top of each rib.
22. Wing tip is made from three interlocking ply parts.
Slide ply rib 7 into brace. Install this assembly in wing tip.
Press top sheeting down in position, holding in place
until dry.
Slide brace tabs into rib slots behind main spar.
Push tip fully in, engaging front in rib 6a slot. Glue tip
securely in place. Glue tip rear to T.E. sheeting and T.E.
23. Starting at rib 6, taper T.E. down to level of ply tip.
Try to keep taper straight. Lightly sand.
Cut T.E. sheeting flush with tip.
24. Position top T.E. sheeting in rib notches. Align sheet
end at center of rib 2. Remove sheet, apply a bead of CA to top
of T.E. and ribs, and glue sheet in place.
At wing tip, bend sheeting down and glue to tip.
25. The shear webs to be installed in the next step are
packaged in a plastic wrap as shown in photo above.
Install webs in wing positions shown on the plan as
follows: Apply two ribbons of glue (near top and bottom), position webs equally on spars until set. The web between ribs 2
and 3 must be cut 1/16” lower for top sheeting clearance.
26. Slide L.E. spar brace into slots in rib 2. Push brace
fully into wing until it is flush with wing center. Glue brace
securely to spar.
27.
Repeat steps 2 through 26 for left wing.
Page 18

18
WING JOINING & COMPLETION
1. With left wing still pinned down, position RIGHT WING
in place next to it. Raise RIGHT WING tip and support it using
die-cut gauges; for long wing-support wing at 5th rib in from tip
(as shown above) for short wing-support under 3rd rib (as
shown). Note: gauges are shaped to fit under curved L.E. and
flat T.E. position accordingly. Hold gauges firmly to the ribs by
tack-cementing or stationery clamps, clothespins, etc.
2. Photo above shows joiners and clamps ready for installation in next step. Remove the die-cut areas from one L.E.
joiner, this joiner goes behind the L.E. Also , when installing
the clamps, position the stamped markings on the L.E. clamps
towards the front of the wing.
3. Tape windshield to fuse. Check the fit of the fuse cabin
front in place at L.E. opening it. It should fit just loose enough
to allow room for covering material.
Study entire center joint; all end parts of right wing
should just touch those of the left (tiny gaps are all right). If the
fit between most parts is a little loose because one
part protrudes too much, slightly sand only the protruding part
for better fit. When sanding it is better to take off too little
than too much!
TEMPORARILY set dihedral joiners in place using die
cut clamps provided to hold joiners tight against spars.
Be sure RIGHT WING is held firmly against LEFT
WING and pin in place as shown above. Remove joiners.
4. Apply a liberal bead of glue to joints of spars, sheeting
and T.E.
Apply two ribbons of glue to one side of both main spar
joiners, near the top and the bottom. Position one end of joiner
in place and swing the other end up against spars-hold momentarily. Repeat for other joiner-immediately reinstall clamps to
hold both joiners tight on spars.
Install L.E. joiners in same manner (joiner with side
cut-outs at rear of spar). When installing the clamps, position
the “L.E.” markings toward the wing front.
Glue T.E. joiner in space.
5. Glue filler blocks in position at T.E.
Refer to location shown on plan and center your aileron
servo over bottom sheeting joint.Allowing 1/16” clearance, position rear ribs No. 1 on both sides of the servo. Glue ribs in place,
being careful not to glue servo. Remove servo.
Position one half of one front rib No. 1 so one side aligns
with center line of wing. Adjust rib to align with spar center
joints,. Glue in place.
Glue remaining No. 1 rib to first rib, making double thickness
center rib at center joints.
Be sure to glue any joints still needing glue.
6.
Remove all clamps, gauges, and pins from wing structure.
Page 19

19
7. Glue top sheeting in place, trimming to fit as required.
Glue L.E. to filler pieces in place.
8. Install die-cut L.E. sheeting at wing tips (Note: parts are
marked for top and bottom).
Trim excess sheeting flush with T.E.
Flat sand T.E. along its entire length.
9.
For short wing only, cut 7-3/8” long nylon tube to 3-
1/8” long. Repeat for other tube.
10a. Slide brass tube onto aileron horn wire. Repeat for
other tube and wire.
10b.
Tape horn angle gauges securely to THREADED
ends of strip aileron horns as shown (corner stamped “B” at
bottom).
10c. Make one aileron horn as shown above. Place wire
over wing plan to get correct length.Hold wire so bottom of
gauge is horizontal. Firmly grasp UNTHREADED end of wire
at bend location on plans (see above) and bend wire horizontally 90degrees, Check on table, adjust as necessary.
10d. Make 2nd aileron horn opposite to first one by bending UNTHREADED end as shown above.
For short wing, after bending, measure and cut wires
so only 3/4” length remains.
10e.
File bent ends of wire to a pointed shape for easier
mounting of ailerons later on.
11. From the three 24” ailerons provided, choose the better
two for the ailerons, the remaining one to be cut up for inboard
and wing tip T.E.s.
For long wing-cut aileron into two 8” pieces (as shown
above) for short wing-cut into two 3-5/8” pieces. These are the
inboard T.E.
12a. Using the center-line marker, make a center line
along entire lengths of T.E. inboard section, and ailerons.
For long wing only; mark each T.E. 9” from center
joint.
For short wing only; mark each T.E. 4-3/4” from cen-
ter joint.
Mark front of ailerons about 1” from inner ends.
Page 20

20
12b. Use edge of dowel (or sharp tool) to make 1/16”
deep grooves 9” long in T.E. (4-3/4” for short wing), 1” long
in ailerons, and full length in inboard sections, for both wing
halves.
12c. Using threaded end of aileron wire, file the grooves
to a rounded shape so half of the nylon tubing will lie
recessed in both the aileron and the T.E.
12d. Cut two clearance slots 3/4” from center joint in
wing T.E., and 3/4” from inner ends of T.E. inboard sections.
13. Using NO GLUE AT FIRST, temporarily place horns
in wing grooves, position both T.E.inboard sections and check
for horn movement-top to move about 3/4” total fore and aft.
Remove T.E. inboard sections, and carefully glue horn
wire tubing and T.E. inboard section in place (CAUTION: keep
glue off wires).
14. Make two wing tip T.E.’s from remaining material
from step 11.
Temporarily hold aileron at T.E., and position wing tip
T.E. (allow 1/16” between end of aileron and tip T.E.). Glue tip
T.E. pieces in place.
Carefully cut tip to shape. Repeat for opposite tip.
16. With corners stamped “M” towards bottom, position ply
horn angle gauge at threaded end of one horn wire, slowly press
aileron on other 3/4” end of wire to make a mark. With a small
nail, make a hole for the wire. Work carefully, keeping the hole
centered inside the aileron. Repeat for other aileron. When fitting aileron, keep it centered to allow clearance at ends. Mark
hinge location over plan and drill hinge holes.
Using beveling tool “EA”, bevel front edge of aileron to
centerline. Turn aileron over and repeat sanding. Repeat for
other aileron.
17. Using 240 grit (fine) sandpaper, flat sand entire wing
to blend surfaces and remove high spots.
Shape L.E. by first sanding sheeting at about 45 degree
angle, then carefully round off and blend surfaces.
18. Position wing on fuse and check fit at wing/cabin. You
should be able to insert a sheet of sandpaper into the joint as
shown. If too tight, work the sandpaper into the joint with a
sawing action. This allows clearance for covering material.
Page 21

21
19. Set wing in place on fuse, then check and adjust until
wing tips are equidistance from rear end.
Measuring carefully 2-1/2” from, wing T.E. and 1/2” in
from fuse sides, drill two holes 5/32” dia. down through wing and
bolt mounting blocks.
Remove wing from fuse. Install blindnuts in bottom of
mounting blocks, pulling them up in place using screws and
washers.
Install bolts. Check alignment of wing and fuse at front.
At hole in former C, drill a 1/4” dia. hole about 3” deep into
wing.
Cut remaining 1/4”x4-1/2” dowel to 2-7/8” length. Glue
this dowel securely into wing, leaving about 1/4” protruding.
20a. Glue one end of 2-1/2” wide nylon fabric to scrap
wood. Let dry until the nylon is glued solidly to the balsa.
Then roll up nylon on to wood.
Apply a line of CA across center joint on wing tip and
stick one end of 1-1/2” wide nylon to it. Let dry until the
nylon is glued solidly to the balsa.
21b. Cut openings in nylon for aileron horns.
Apply a squiggle of glue to wing and pull nylon fabric
down into it. Rub nylon into glue with your finger (cover finger with plastic bag or similar).
20c. Repeat gluing procedure and apply nylon around
T.E., across top of wing and out past the L.E. spar (do not
apply nylon to front of joiner). Trim nylon flush with joiner.
After entire center joint has been wrapped with
nylon, apply another coat of glue and force it down through
the nylon. Let dry thoroughly.
21a. Temporarily mount servo on die cut rails. See wing
side view on plan for added details of aileron servo installation.
21b. Position servo behind bottom main spar and mark size
for opening.
Cut out bottom sheeting as required to suit your servo.
Glue servo rails to wing. Avoid getting glue on servo.
The servo should be removed before covering,
THIS COMPLETES THE WING ASSEMBLY.
Page 22

Page 23

22
Page 24

23
COVERING THE FUSELAGE 1. For added realism, the cabin interior may be painted: this is easily done now, before
covering, using spray paint such as gray auto primer.
2. Cut and apply bottom covering to fuse.
Cut and apply side covering to fuse.
Carefully cut out window openings.
3. Cut and apply top covering
(DO NOT COVER stab platform).
Important
THE WINDSHIELD IS NOT PERMANENTLY GLUED IN
PLACE UNTIL AFTER THE PUSH RODS ARE INSTALLED.
DECAL INSTRUCTIONS
For the instrument panel decal only, when cutting it from decal
sheet carefully trim it even with the black printed area to provide
a good fit on the dashboard. Apply panel and remaining decals
as described below.
Clean model surfaces thoroughly before applying decals
Cut decal sheets apart in sections as needed. Using
scissors, trim to within 1/8”. Carefully position decal on
model and stick in place. Working from center, rub decal
down while peeling off backing.
Cabin Front Trussing. For added scale detail, glue two
1/8” x 4-15/16” dowels in the cabin front as shown on the
label photo.
FINAL ASSEMBLY
When the wing is in place, a seal is needed to protect against the
entry of exhaust oil and dirt into the radio compartment. Also the seal
acts as a cushion between wing and fuse to prevent abrasion of the
covering. For this seal we recommend the use of silicone caulk. Since
it dries slowly, save this step as the last of a building session. Tape
plastic kitchen wrap around the wing center section. Apply a thin
ribbon of caulk to the wing rest surface on top of the fuse. Install
wing and bolt down moderately-do no wipe off the silicone that
squeezes out. Let dry overnight. Remove wing and using a sharp blade,
trim excess flush with fuse sides.
Bolt wing in place on fuse. Using no glue, trial fit stab in place on
fuse, adjusting as necessary to line up with wing. Then measure from
stab tips to fuse front (arrows ‘A’) to make sure stab is square with
fuse.
To provide a firm wood-to-wood glue joint, strip covering from
bottom of stab center where stab contacts fuse. Avoid cutting structure
underneath. Be certain to leave enough covering firmly bonded to stab
center (minimum 1/8” to 3/16”). Likewise, if stab area on fuse was covered, remove covering. Glue stab firmly to fuse and let dry.
Trial fit fin in place on stab (arrows ‘B’). Strip covering from fin
in bottom (if covered) and respective area on fuse/stab. Glue fin firmly
in place, and square with stab.
INSTALLING HINGES
IMPORTANT! Read and follow hinging instructions carefully. All
hinges must be firmly glued in place. Loose hinges can allow a control
surface to fall off, resulting in a crash! Tug hard on each hinge to
check bond.
When all the parts are ready for hinging then remount the hinge with a pin inserted in the center. when satisfied
that all parts are aligned properly, remove pin. Apply 3 to 4 drops
of thin CA glue to the exposed hinge line. Turn over and apply
another 3 to 4 drops to the hinge line of the other surface.
Hinge elevator to stab. When dry, tug hard on each hinge to check
bond.
CONTINUED ON NEXT PAGE
Allow 10 minutes for the CA to cure, before flexing the surface.
Work the surface up and down to remove any stiffness you
may feel.
Page 25

24
Hinge rudder to fin.
Hinge ailerons to wing (IMPORTANT! When hinging ailerons to wing,
be sure to glue strip aileron horn wires into ailerons, but DO NOT GLUE
ailerons to nylon tubing!).
Tug hard on each hinge to check bond.
FUEL SYSTEM
Install your fuel tank, hold it level by supporting the rear end with foam
rubber as shown on the plan.
OPTIONAL PRESSURE FEED
If your muffler has a fuel-line type fitting on it, you can use it to
“pressure feed” to the engine for smoother and more reliable running. In this
case, the vent line is connected to the muffler fitting.
Install wheels on axles as shown: wheel collar and set screw first,
wheel, then second wheel collar. If the axle hole in your wheels do not fit
the L.G. wire, enlarge holes with a 3/16” drill. Hold wheel loosely so it will
center itself while drilling, and use slow drill speeds if possible.
Refer to plan and bend up 1/4” of tail wheel wire. Glue
eyelet into rudder bottom to match bend. Plug wire into rudder eyelet., then glue and screw nylon bracket securely to
fuse. OPTIONAL: Instead of bending the wire into the rudder, glue scrap tubing to rudder bottom and insert straight tail
wire into it.
ENGINE DETAIL. A formed engine detail is furnished for the
left side of the cowl only (the R/C engine will be on the right
side. Carefully remove scrap flashing from around the engine
by cutting along marked outline. Paint engine as desired (do no
use lacquer based paints on the engine). Exhaust pipes are simulated with5/16” dia. black automotive vacuum tube. Insert 14
gauge solid wire into tube (to hold shape). Assemble parts as
shown in sketch and glue in position to cowl (materials not
included).
Page 26

25
WING STRUTS. The wing was designed to be flown without wing
struts. The struts are intended for scale appearance only and use snap
fittings for quick set-up at the flying field. Before fitting struts, the
wing must be covered and checked for trueness (all warps removed),
once fitted in place, the struts are set and not adjustable.
Install #2 shoulder screws in wing at four strut mount locations.
When assembling struts, orient all hold-downs so side openings face
towards front of model (see photos above and illustration on page 5).
Bend one hold-down at center. Cut a recess in strut end and glue holdown flush in strut
Install strut on wing at front shoulder screw. Cut other end off at
the fuse, behind the L.G. fairing.
Bend, recess and glue second hold-down in bottom of strut end.
Attach this hold-down to fuse bottom using a #2 shoulder screw.
Install rear strut in same manner.
Cut rear strut to butt against front strut and glue. IMPORTANT:
the struts must not alter or twist the wing.
TAIL WIRE BRACING. To simulate bracing, use 1/16” elastic cord
(from sewing shop). Drill holes through tailwheel bracket, stab, and
fin at locations shown on plan (refer to label photos for more details).
Lace cord through holes and tie it off at tailwheel bracket, secure
knot with CA (apply a drop to cord ends for easier lacing).
PILOT FIGURE. A pilot figure adds a final touch of realism to the Cub,
especially during those low & slow fly-bys. Assemble and paint the pilot
per manufacturer. From scrap ply, make pilot platform and install it in
model as shown on plan sheet 1.
Page 27

26
VI PREPARATION AND INSTALLATION OF RADIO
Model is fully covered and painted wherever
necessary (Page 22).
Control surfaces are covered, and hinged in place (Page 23).
Tail assembly is glued solidly to fuse (Page23).
Engine screwed in place (Page 14).
Muffler on.
Prop in place.
Fuel tank installed, with foam rubber supports to hold it level.
Stab and rudder pushrods complete, rear end only (Page 14).
Landing gear and wheels installed.
2. BALANCING THE MODEL
Tape stab and rudder pushrods to side of fuse with rear ends in
approximate final position (refer to full size view on plan).
Set R/C airborne equipment temporarily in fuse (refer to plan for
approximate location).
a) Battery most forward.
b)Receiver (RX) next.
c)Servos rearmost.
d) Install aileron servo in wing.
Refer to fuse side view on plan for “BALANCE RANGE,” then
measure and mark this range at top of cabin sides.
Bolt wing in place on top of fuse.
Enlist someone’s aid to help you balance the model as shown.
If you must balance it alone, make the simple balance stand at left
from scrap lumber (2x4, etc.) to assist you Lift the model under the
wing by finger tips.
a) Move finger tips or balance stand through the balance range until
model is level.
b) If you need to support the model outside the balance range to
get it level, remove wing and shift R/C equipment away from heavy
end of model until model will balance within the range. The pre
ferred location is at the main wing spar.
c) If shifting the R/C gear still doesn’t balance the model, add
weight to extreme nose or tail respectively until it’s right. The least
weight is needed when added as far forward.or back as possible.
Fasten weight permanently in place.
Carefully remove the wing, and mark on fuse interior
the locations of all R/C parts.
Completing elevator and rudder pushrods.
a) Measure about 2” from the backsides of the servos to
the balsa pushrods, and mark them at this point.
b) Remove pushrods from fuse, and cut them at marks.
c) Cut one 1/16” x12” wire in half, and use these pieces
to complete forward end of pushrods.
3. Radio installation.
A. Read and follow the instructions that come with your radio.
B. Your batteries should be fully charged.
C. Refer to “Transmitter Function Sketch” and observe which servo
wheels move when stick is moved for various controls.
Apply tape (which you can write on) to each servo. Identify each servo
for its control function. Mark the plug to each servo the same way: “R” for
rudder, “E” for elevator, “T” for throttle, “A” for ailerons. If your receiver
doesn’t have separate plugs for each servo, but places for the servos to plug in,
apply a piece of tape nearby that you can mark for each application.
If a servo mounting tray is furnished with your radio, it
makes it easier to mount servos. The most common tray
is a “2+1” type (as shown above left and in the main
plan view).Either a 2+1 or a 3-abreast can be used in the
CUB because of its wide roomy interior. Note: if a tray
is not used, the 3-abreast mounting is recommended with
servos mounted directly on plywood rails (as shown
below the main plan view).
For “2+1” mounting, with throttle servo at forward position, place servo so output wheel is on same side as engine
throttle arm. For 3-abreast mounting, place throttle servo on
same side of model as throttle arm.
Rudder servo should be on side opposite to throttle servo.
4. Servo arrangement.
Page 28

2728293031
Page 29

Page 30

Page 31

Page 32

Page 33

32
Super Tote
Field Box
Part # 102
 Loading...