

Page 1

1
MONSTER TOTE
MONSTER TOTE
Copyright © 2003 Carl Goldberg Products Ltd.
P.O. Box 818, Oakwood GA. 30566
Page 2
2
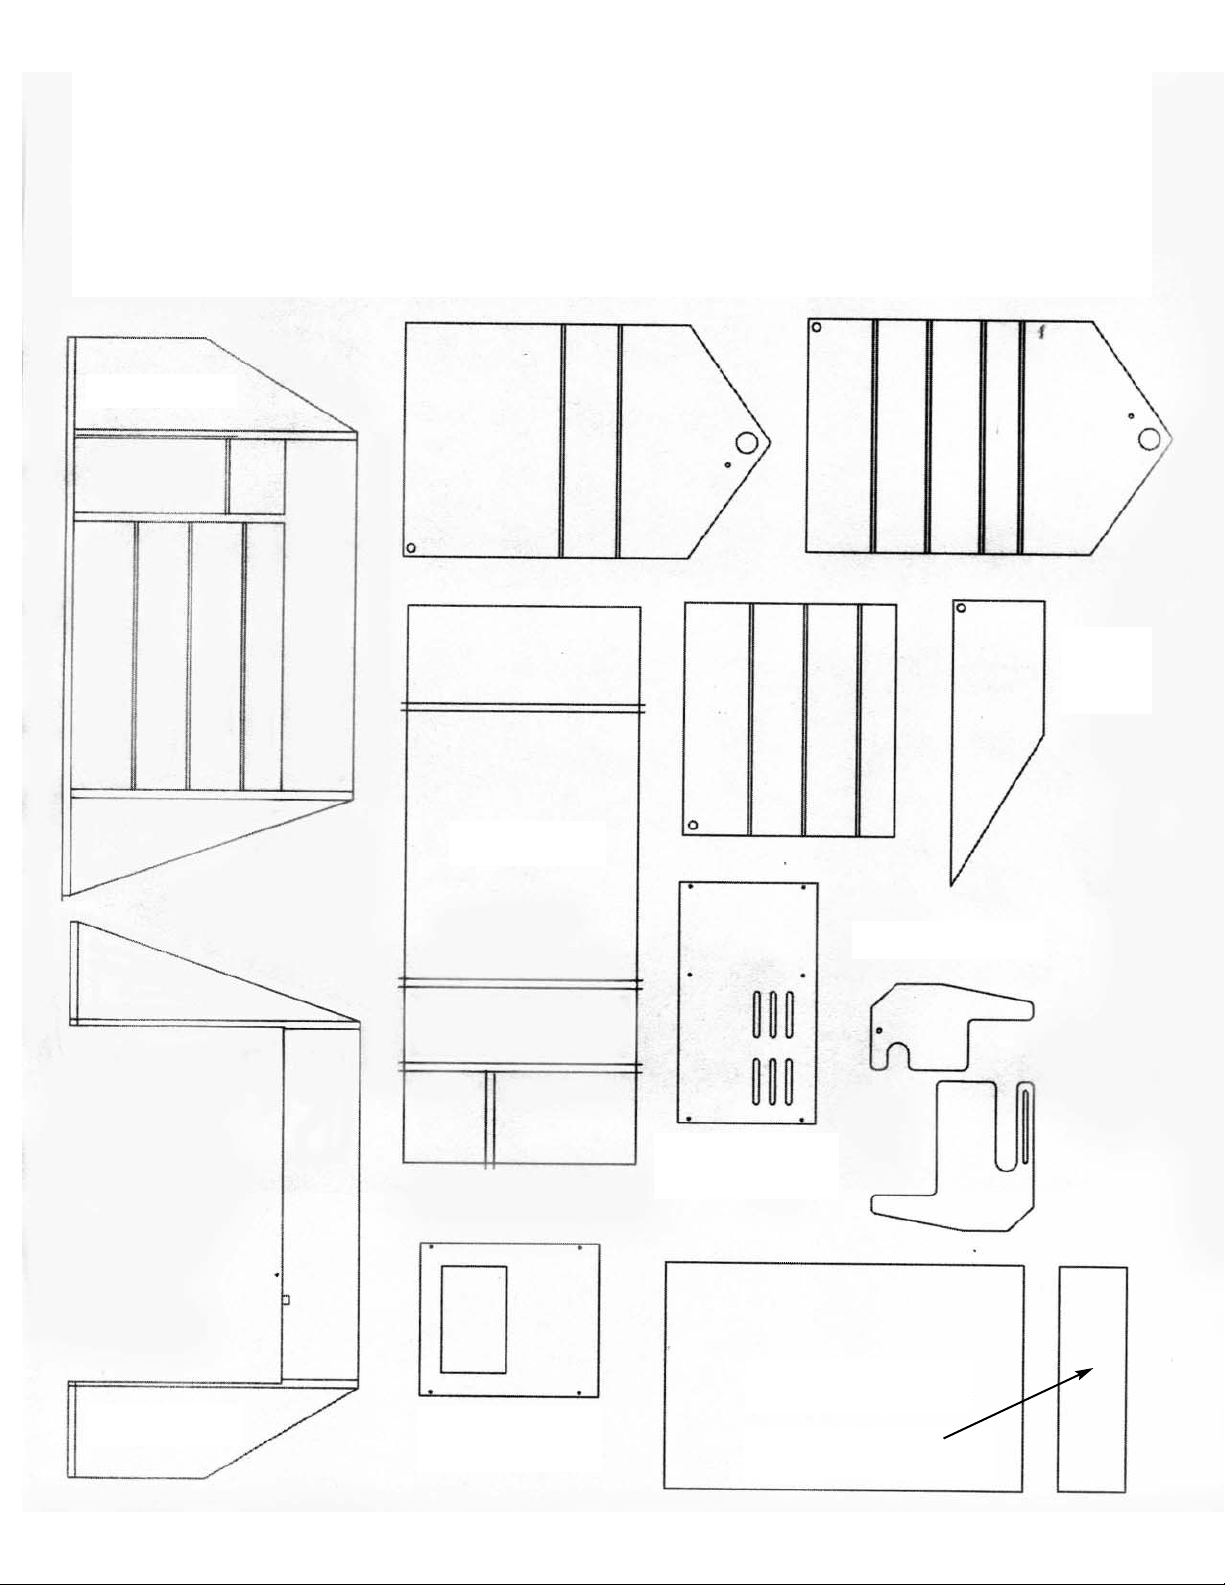
Monster Tote
Router cut part identification
All the drawer parts are bagged separately so they
may be easily identified.
Floor
Back panel
Front panel
Power panel
mount
Top shelf
Battery Cover
Top shelf divider
Airplane Cradle
Drawer Divider
Battery
panel
divider
Right upright
Left upright
Page 3

3
Safety instructions and warnings for
Carl Goldberg Flite Boxes
Important: For your own safety and that of others,
observe the following instructions and warnings:
1. Never use the flite box for engine testing or while an engine is running. The cradles are designed
only for holding the model when building, repairing or storing.
2. Remember that model fuel is highly inflammable and explosive!! Therefore, treat it with utmost
care. Do not allow anything to come near the can that could set off a spark; do not smoke or bring
any flame near the fuel can. use care when carrying your Tote so as not to drop the unit with the can
on or in it or bang the can. If you store any battery (e.g. glow plug starter battery) or electrical device
in your Tote, make certain that no short circuit can occur; wrap the plug end in insulation and keep
terminals from shorting out.
3. Make certain any fuel can mounted on your Tote does not leak; inspect frequently for this. Make
certain it is sealed tight and that it does not come in contact with any battery, electrical device, tool,
or anything that might cause a spark or excessive heat.
4. If you mount any kind of power panel into your Tote, be certain to run its leads so as to avoid
shorting out, causing sparking or excessive heat; the same precautions must be used when mounting any electric fuel pump in your Tote.
5. At all times and in all cases--
Remember that you are carrying highly flammable fuel close to batteries, tools and other devices
that may cause sparks, short circuits or cause heat high enough to ignite the fuel.
Use good common sense. Keep all pump wiring or panel wiring you choose to install in good con-
dition and safely wired without crowding.
DON’T keep matches, lighters or anything in your Tote that might cause a spark or flame.
6. Keep your Tote out of the way of any running engine or its exhaust.
7. Store your Tote in a safe place-keeping children and others away from your Tote at all times. Do
not carry or store in the trunk of a car during hot weather.
8. From time to time inspect all fastener used to hold components on your finished Tote to be certain they are secure.
The Failure to obey these safety instructions and warnings may result in fire, explosion
or other casualty causing serious personal harm or property damage to yourself or others!
Page 4

4
1. Begin construction by locating the bottom,
rear panel and left upright. Sand any burrs left from
the cutting process on the edges of the dado slots.
Lightly sand the bottom edge of the upright where it
fits into the dado slot. Trial fit the upright into the
dado slots on the floor and in the back panel. Align
the back panel on the floor making sure the dado
slots line up. Now insert the upright in the floor and
the back panel dado slots. Make sure the 1/8” dado
slots for the drawers line up on the back panel and
the upright. When satisfied with the fit you can use
CA glue or disassemble and use white glue.
align slots
align slots
2 Locate the right upright and fit into the match-
ing dado slots on the floor and back panel. Make
sure the drawer slots on the back panel are aligned
with the slots on the upright.
align slots
hole for fuel pump wire
The rear lower corner of both uprights has a hole
to pass the wire from your power panel to the fuel
pump. There is enough room behind the drawers to
run the wire.
drawer slots aligned right upright
hole for fuel pump wire
3.Fit the drawer divider in the dado slots on the
floor and back panel. Be sure and turn it so the side
with three slots faces the right upright. Align the
dado slots for the drawer shelves with the back
panel.
hole for pump
wire
align slots
Page 5

5
4.Install the lower drawer shelf(1/8”x10-3/4”x12-
5/8”) by sliding into the dado slots in the right
upright and the drawer divider. Make sure it goes
into the slots on the back panel.
5.Install the other two drawer shelves in the same
manner. (1/8”x10-3/4”x12-5/8”)
6.Install the small drawer shelf (1/8”x10-3/4”x3-
7/8”) between the left upright and the drawer divider
in the same manner.
8. Install the top shelf into the dado slots on each
upright. (1/8”x10-1/2”x16-5/8”)
9. Install the front panel. Fit into dado slots along
the bottom and each upright.
10. Install the battery panel divider in the dado
slot in the floor. Make sure it is vertical so the power
panel will fit.
Make sure the distance is
the same at both ends.
(7-1/8”)
Page 6

6
11. Tape the battery box cover in place flush with
the front and back panel and the floor. Tape the
power panel in place flush with the front panel and
sitting on top of the battery cover. Using a 5/64”
drill, drill through the holes in the power panel and
battery cover to make pilot holes for the #4 screws.
Install the 10 #4 x 3/8” sheet metal screws to hold
the panels in place.
12. Install the 1” wooden handle in the holes on
each upright. Due to the tolerance of wooden dowels,
the holes will probably be very tight and may require
sanding to get a good fit.
13. The top shelf divider can be installed in the
middle or at any spacing you desire. It is
1/8”x3.156”x10.43”.
14. This finishes the assembly of the box. You
will now need to build the six drawers. Each drawer
is bagged separately to help you identify the parts. It
is suggested you open one bag at a time and complete that drawer.
15. After the drawers are built you can install the
drawer pulls using the #10x5/8” screw. It is a good
idea to glue the know on also.
Page 7

7
16. After the drawers are installed you will need
to install the drawer divider strip between the two
side drawers and the four main drawers. It is a piece
of 5mm x 1/4””x9-7/8”” and glues to the face of the
drawer divider.
Drawer divider strip
17. Two strip of 9mmx1”x25” are provided for
runners on the bottom of the box to space it off the
ground. Glue to bottom of box approximately 1” in
from front and back and centered length wise.
18. The cradles are make by laminating two
1/8”pieces of each cradle part together.
19. After the parts are laminated, install around
the handle and insert the #10x1-1/4” bolt with a #10
washer on each side and secure with the #10 wing
nut. By loosening the wing nut the cradle can be
adjusted in width.
20. Locate the cradle foam and cut into two equal
length pieces. Using a sharp knife or scissors. split
the foam on one side down the entire length. The
foam can now be installed on the cradle openings to
protect your model.
Page 8

8
21. Locate the nylon strap and drill a 1/8” hole in
one end 1/2” from the end. Set your fuel jug or can
in place and using the two #4x3/8” screws and #4
washes, attach the nylon strap to the front and rear
panel across the middle of the fuel jug to hold it in
place.
Page 9

9
Finishing and painting
Epoxy paints are strongly recommended since they are fuel proof. However, they do have to be
carefully mixed before using. Poly-urethane paints can be used right out of the can and are also fuel
resistant. But, depending on humidity, polyurethane paints may be slow to dry.
For a smooth, good-looking final appearance, we recommend spending some time preparing the
wood surfaces for painting. If most of your effort goes into the prep work, paint will flow and cover
better, producing a high quality finish you’ll be proud of. Painting alone will not hide defects. To
smooth out grainy wood, joints, etc., use modeling grade wood filler, or equivalent. Even household
“vinyl” spackle works well as a filler, although when dry it dents easily. Use whatever material you
feel comfortable with, just be sure it sands down easily. Although more expensive, polyester resin is
very easy to use since it usually only takes one coat to fill the surface. It dries to a hard surface in
about an hour regardless of humidity. And it sands well.
1. So that all surfaces are unobstructed for sanding and painting, remove all screws. Set these aside
for final assembly after painting. Similarly, the cradles should be dissembled so each part can be
carefully sanded and individually painted.
2. Apply paste fillers using a knife blade or plastic scraper to squeegee filler into wood pores, especially in end grain of the base and upright panels. Liquid fillers should be brushed on. Repeat applications may be required. Allow filler to dry thoroughly.
3. Wrap 100 grit sandpaper on a block and flat sand all exterior surfaces of the Tote. If desired, take
a little more time to smooth out interior areas of drawers and open top compartments. Interior of battery compartment does not require any sanding. Repeat sanding with 220 grit until surface begins to
smooth out. Repeat steps 2&3.
4. Remove all sanding dust from surfaces. Apply a good coat of primer and let dry. Additional applications of primer may be needed at porous areas (corners, end grain). Sand primed surfaces with
220 grit paper. If required, apply additional prime coats, sanding between coats until the surface
begins to smooth out. For final sanding, switch to 400 grit wet/dry sandpaper.
5. Using a tack rag, thoroughly wipe down the Tote and remove all excess dust. Following the paint
instructions, apply a very thin coat and allow to dry. Apply additional coats lightly, gradually building
up the color intensity. Heavy applications of paint will run.
6. The decal has pressure sensitive adhesive and only requires removing the backing and sticking
in place. It is best to remove about 1” of the backing and stick the end down, and then peel the
backing off as you rub the decal down from one end to the other. This will avoid getting wrinkles in
the middle that you cannot remove.
Clear finishing
Follow steps 1,2,&3 above except use plastic wood to fill nicks and dents. Automotive clear coat
works very well. Follow instruction on the label to apply.
Page 10

10
Slimline Mfg. Inc.
P.O. Box 3295
Scottsdale AZ. 85271-3295
Phone number 480 967 5053
Fax 480 967 5030
SL-2000 Model Fuel Pump
Boxxer Model Fuel Pump
Manual Composite Pump
Pro Bottle Cap
Sonic-Tropics Inc.
7865 Mill Road
Elkins Park, Pa. 19027
Super “X” Electric Fuel Pump
sot250 3.6v-6v DC
sot1250 7.5v-12v DC
Mark “X” Electric Fuel Pump
sot249 3.6v-6v DC
sot1249 7.5v-12vDC
Glow Plug Caddy
sot260
Magna-tray
sot261
Ni-Starter
MCD101 1.5” with 110v AC Charger
MCD105 1.5” NI-Starter only
MCD217 2.5” with 110v AC Charger
MCD218 2.5” Ni-Starter only
MCD204 3.5” with 110v AC Charger
MCD208 3.5” Ni-Starter only
MCD202 Remote NI-Starter w/110v AC Charger
MCD203 Remote NI-Starter Only
Hobbico
P.O. Box 9021,1610 Interstate Drive
Champaign, Illinois 61826-9021
Order only 800 637 7660
Dealer only order support 800 262 7885
HCAP0302 Deluxe Power Panel II
HCAP3105 Top Fueler MKIII 12v Fuel Pump
HCAP3107 Pnl Fdy Top Fueler MKIII 12v Fuel Pump
HCAP3015 Hand Crank Fuel Pump
Hot-Shot 2 Glo-Starters
HCAP2520 2” Standard Hot-Shot 2
HCAP2522 3” Long Hot-Shot 2
HCAP2528 Super Hot-Shot 2
TorqMaster 90 & 180 Starters
HCAP0901 Power Core 12v MKII Starter Power Pack
HCAP0905 Power Core Battery Pack only
HCAP0210 12v Power Core Charger w/Led
HCAP3200 TorqMaster 90 Starter
HCAP3205 Panel-Ready TorqMaster 90 Starter
HCAP3300 TorqMaster 180 Starter
HCAP3305 Panel-Ready TorqMaster 180 Starter
Maxx Products
815 Oakwood Rd. Unit D.
Lake Zurich, Il. 60047
Order only 800 416 MAXX(6299)
Info 847 438 2233
Fax 847 438 2898
ACC116 Electric fuel pump
ACC244 Hand crank fuel pump
ACC108 Power Panel.
Sullivan Model Products
1 North Haven Street
Baltimore, MD 21224
Phone 410 732 3500
Fax 410 327 7443
M040 Head Lite with NICad Battery
M041 Head Lite with NICad Battery and Wall Charger
M045 Head Lite without battery
M054 Head lite Extended with NiCad Battery
M038 Metered Head Lite with NiCad Battery
M039 Metered Head Lite w/NiCad Battery and Charger
M055 Metered Head Lite Extended with NiCad Battery
S600 Hi-Tork Starter
S601 Deluxe Hi-Tork Starter
S603 Dynatron Starter
Sources for Additional Items used in Monster Tote
 Loading...