

Page 1
ASSEMBLY INSTRUCTIONS
™
REQUIRED ITEMS
Adhesives & Building Supplies
Great Planes® Pro™ aliphatic
resin (wood glue) (2 oz. [60g],
GPMR6160)
1/2 oz. [15g] Medium Pro CA+
(GPMR6007)
1 oz. [30g] Thick Pro CA- (GPMR6014)
CA applicator tips (HCAR3780)
Pro 30-minute epoxy (GPMR6047)
Pro 6-minute epoxy (GPMR6045)
2 oz. [60g] Foam Safe CA Activator (GPMR6035)
Great Planes Easy-Touch hand sander (GPMR6169)
Easy-Touch™ sandpaper assortment (GPMR6189)
Drill bits: 5/64" [2mm], 7-64" [2.8mm], 5/32 [4mm], 3/8"
[9.5mm]
Masking tape (TOPR8018)
18" flexible steel rule (HCAR0460)
6" steel pocket rule (found at most hardware stores)
Builder’s Triangle Set (HCAR0480)
#11 hobby knife (HCAR0105)
#11 blades (5-pack, HCAR0211)
1" [25.4mm] Steel C-clamp (you’ll need 4)
24" [610mm] bar clamp
Weighted bags (use steel shot or BBs)
Rotary tool such as Dremel
Rotary tool reinforced cut-off wheel (GPMR8200)
Sanding drum – coarse (DRER0965)
Plan Protector 25' [7.6m] roll (GPMR6167)
Latex foam rubber 1/2" [13mm] (HCAQ1050)
Denatured alcohol
Hobbico Retractable Fabric Tape Measure (HCAR0478)
Finishing Supplies
For a painted surface, we recommend using any fuel-
proof spray paint such as Top Flite
household spray paints available at your local hardware
store will also work, but be sure to test the paint to make
sure it is indeed fuel-proof.
For a bare-wood finish, we recommend
the following options:
Great Planes Finishing Resin (GPMR6049)
OR
Your choice of oil-based polyurethane varnish
Standard household paint brush 1" – 1-1/2" [25-38mm]
HobbyLite™ balsa colored wood filler (HCAR3401)
®
LustreKote. Most
™
Page 2
FIELD EQUIPMENT SUGGESTIONS
This is a list of items you may want to order to outfit your
field box.
Flightline Equipment
Hobbico® Deluxe Power Panel II (HCAP0302)
Hot Shot™ 2 standard NiCd glo-starter (HCAP2520)
TorqMaster™ 180 electric starter (HCAP3305)
TorqMaster 12V, 7A sealed lead-acid battery (HCAP0800)
Hobbico Expanded-Scale Voltmeter Mk. II (HCAP0351)
GloBee™ IntelliTach™ (GLBP0111)
Hobbico Top Fueler™ Mk. III (HCAP3107)
Filling Station fuel fitting set (GPMP4155)
Recoil fuel tubing 5' [1.5m] (HCAP2200)
Dave Brown Pour-N-Pump fuel can & pump (DAVP2570)
Futaba® J charge leads Tx/Rx (HCAP0101)
Glo-starter charge leads (all) (HCAP0107)
Hobbico Quick Field Charger Mk. II (HCAP0290)
Triton 2™ DC computer charger (GPMM3153)
Adhesives & Oils
1/2 oz. [15g] Thin Pro CA (GPMR6001)
1/2 oz. [15g] Medium Pro CA+ (GPMR6007)
2 oz. [60g] Foam Safe CA Activator (GPMR6035)
Great Planes® Pro Threadlocker (GPMR6060)
After-run oil 2oz [60g] (HCAP3000)
Tools
4-way glow plug wrench (HCAP2550)
#11 hobby knife (HCAR0105)
Standard & metric ball-end hex drivers (HCAR0520,
HCAR0521)
Straight pliers w/ cutter (CNSR0452)
Flat-nosed pliers 5" [127mm] (EXLR5570)
Hobbico heavy-duty diagonal cutter 7" (HCAR0627)
Curved-tip hemostat (BRUR1303)
Screwdriver set
4-in-1 installation tool (GPMR8035)
4-step std prop reamer (GPMQ5005)
Finger-tip prop balancer (GPMQ5000)
Chicken stick (HCAP3335)
7x4x1" parts box (HCAR3005)
Spares
1/4 – 20 x 1" nylon wing bolt (replacement part for cradle)
(GPMA2389)
O.S. #8 std long glow plug (OSMG2691)
Segmented lead weights 6oz [170g] (GPMQ4485)
Tie wraps, 4" [102mm] (TRIC6277)
Aluminum fuel line plugs/dots (GPMQ4166)
#64 rubber bands (1/4 lb [113g] box, HCAQ2020)
Blenderm™ tape (DUBQ0916)
1
2345
67 8
15 13 12 11
9
10
16
17 18
19
20
21
22
23
24
25
29
2
2
27
Page 3

PREPARE FOR ASSEMBLY
BUILD THE MAIN BOX
1. Decide on the type of glue that you will use to build
your field box. You may use wood glue (aliphatic resin),
CA, or epoxy to assemble your field box. For the strongest
and most durable glue joints we recommend you use wood
glue. To build the box you see here in the manual, we used
wood glue for each joint and then we used evenly spaced
drops of CA to hold each piece in alignment while the wood
glue dried. If you prefer to use CA and accelerator to build
the box, use only a light misting of accelerator (spray from
about 9" [228mm] away). This prevents bubbling of the CA
as it cures and makes a stronger joint.
2. Depending on the layout you choose, you may build
your Super Tote with the power panel and battery on the left
side or the right side. For this manual, we will show you how
to build the box with the power panel and battery on the left.
Decide on what’s more comfortable for you.
1. Install four 5/16" x 3/8" x 7" [8x10x187mm] hardwood
rails in the channels provided in each of the two uprights
(part #8). Glue these in place so that there is at least 13/64"
[5mm] distance from the end of the rail to the edge of the
upright on either side. Sand the rail down to size if this is
not the case.
2. Lay one of the two battery box sides (part #2) onto the
left side of the base (part #10). Align the edge as shown.
Hold the battery box side in place using masking tape. This
will help you align the left side upright. Place three pieces of
masking tape under the base as shown.
3. Use a sanding block with some 150 grit sandpaper
to smooth the surface of the wood. Sand and bevel the
edges of the two uprights (part #8) and the base (part #10).
Remember that time spent preparing the wood now will
improve the final finish later. After you’re done with the box,
you will spend a bit more time sanding it for your final finish
application. Rough-prepping the individual pieces now will
save you a bit of time and effort later.
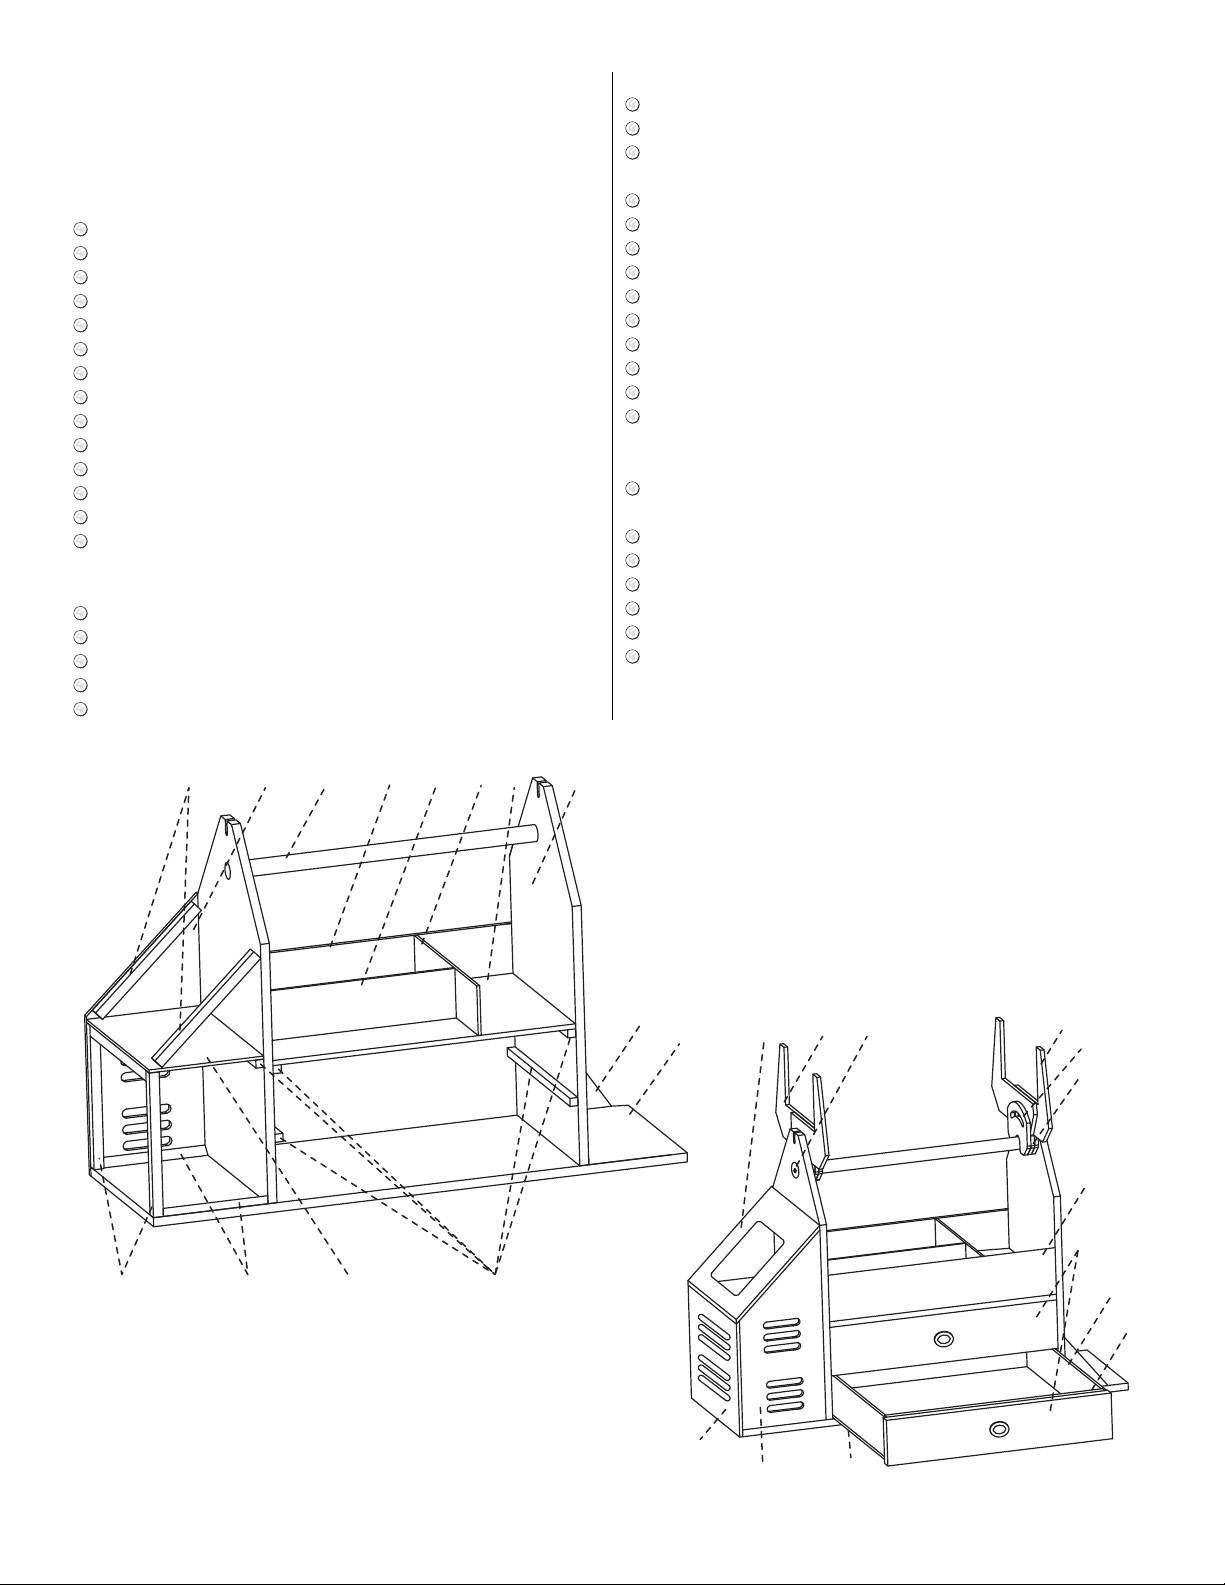
4. Please refer to the numbered parts diagrams on the
previous page to help you build this field box. Parts are
numbered and show parts orientation.
3
Page 4

3. Glue the left side upright to the base being careful not
to get glue on the battery box side. Butt the back wall (part
#4) up against the upright and glue it in place. Use the tape
you applied in the last step to hold the back wall tightly up
against the base. Apply a few more pieces of tape to hold
the upright up against the back wall. Remove the battery
box side now and wipe up the excess glue that squeezes
out of the joints. Allow the glue to dry. To help hold all pieces
in alignment, you can use a small drop of thick CA every 2"
[51mm] and cure it with some CA accelerator.
5. Glue the right side upright to the base and the back
wall using the front panel as a guide to help you position
the upright. Wipe up any excess glue and use a few evenlyspaced drops of thick CA to tack the upright in place. Remove
the front panel from the base. Clean up any excess glue.
Tape the left upright to the back wall and let the glue dry.
6. Run a bead of glue into all of the joints. Run your
finger over the bead to remove the excess glue and smooth
it into a fillet.
4. Tape the front panel (part #22) to the base as shown.
Butt the panel up against the left side upright.
7. Glue the top tray floor (part #7) to the uprights, rails, and
the back wall. Make sure that the uprights are square with the
top tray floor and the back wall. Hold everything in position
with two 1" [25.4mm] steel C-clamps. Allow the glue to dry.
4
Page 5
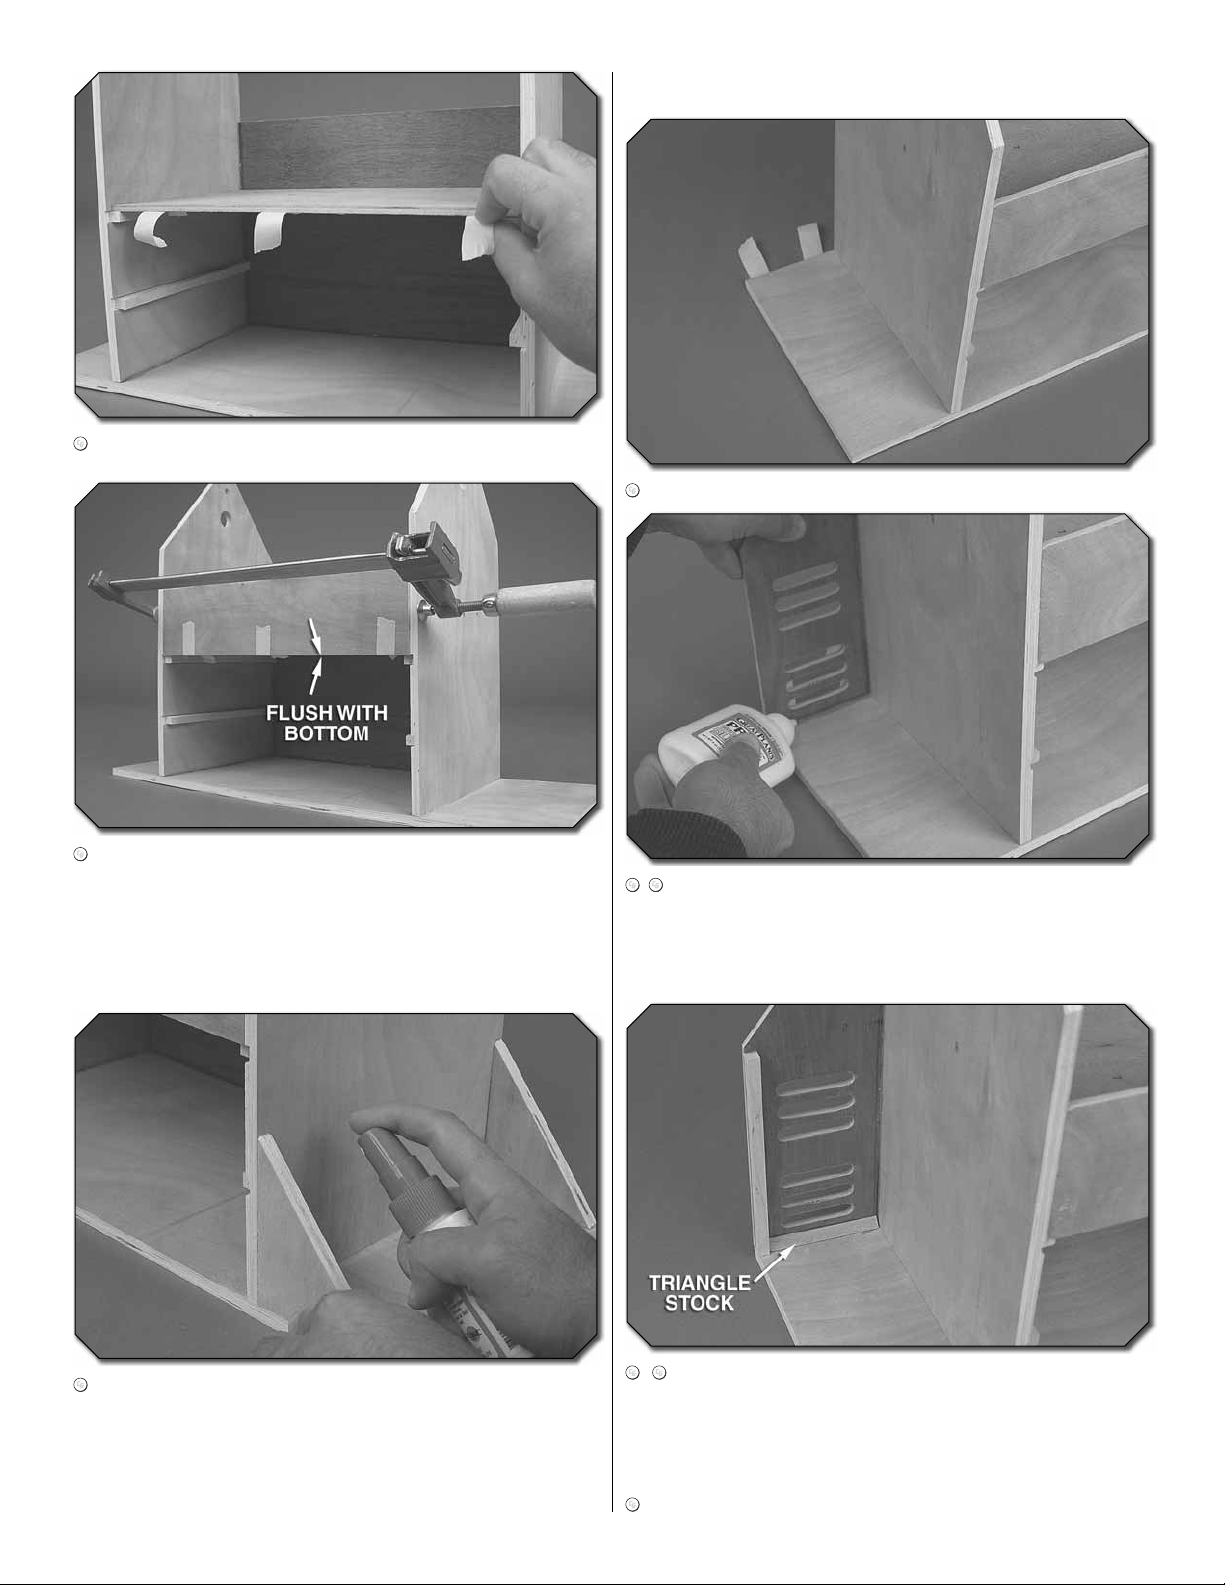
8. Place three pieces of tape under the top tray floor.
BUILD THE BATTERY BOX
1. Apply two pieces of tape from underneath the base.
9. Glue the front panel (part #22) in place so that the
bottom edge of the panel sits flush with the bottom face
of the top tray floor. Use a 24" [610mm] bar clamp to hold
everything in alignment as the glue dries. If you do not have
a bar clamp, you may use long pieces of masking tape.
Remove the clamps and tape after the glue is dry.
10. Glue the two fuel tank tray gussets (part #9) in the
locations shown. Align each gusset so that it is flush with the
edge of the base and upright. Note: The tall side of the gusset
is glued to the upright. Place a drop of thick CA on the back
side of the gussets at the horizontal joint and the vertical joint to
hold the gusset tightly up against the corner as the glue dries.
2. Glue one battery box side (part #2) to the base and
the left side upright so that the edges sit along the top face
of the base and the left face of the upright. Tape the battery
box side securely to the base and upright. Remove the tape
after the glue dries.
3. Glue one 5/16" x 5/16" x 5-3/4" [8x8x146mm]
hardwood stick to the battery box side so that the edge of
the stick sits flush with the edge of the battery box side.
Glue one piece of 5/16" x 5/16" x 3" triangle stock in the
fillet between the battery box side and the base.
4. Repeat steps 1 through 3 for the other battery box side.
5
Page 6

5. Use a pocket ruler to make a mark 5-3/4" [146mm]
up from the base on the left upright. Make a mark at the
corner of both battery box sides and the upright. Install the
remaining 5/16" x 3/8" x 7" [8x10x187mm] hardwood rail onto
the left side upright so that the top edge of the rail is 5-3/4"
[146mm] from the base, or even with the marks you made.
7. Drill a hole in the battery shield to route the power
panel wires through. Start with a 3/8" [9.5mm] drill bit and
enlarge the hole with a Dremel® tool or equivalent rotary
tool fitted with a sanding drum to enlarge the hole.
8. Fit the battery cover in place so that both sides of the
cover are even with the battery box sides and the beveled
edge sits as shown. Using a pencil, make a mark on the
cover centered approximately over each hardwood rail. Do
this for the left and the right side of the cover. Draw a faint
line parallel with the edge of the cover all the way down to
the bottom along the marks you made.
6. Glue the battery shield (part #12) in place. Clamp or
tape the battery box sides together. Apply a bead of glue to
all joints.
9. Tape the battery cover (part #29) in place so that the
beveled edge of the cover is flush with the angled edge of
the battery box sides. The battery cover is properly aligned
if the power panel face plate sits flat against the beveled
edge and the battery box sides.
6
Page 7

10. Drill six 5/64" [2mm] evenly spaced holes along the line
you made earlier. If you will be clear-coating or staining your
field box, erase or sand off the pencil marks you made. Install
six 10mm sheet metal screws using six small flat washers.
11. Test-fit your power panel and make sure that it fits in
the cutout of the power panel face plate (part #16). If not,
use your rotary tool to enlarge the opening. Be careful not to
remove too much material.
13. Apply a bead of glue to the rails and set the face plate
into position. When you’re satisfied with the fit, hold it in
place with a few strips of masking tape. Allow the glue to dry.
14. Remove the battery cover and wick one drop of thin
CA into each of the screw holes in the hardwood rails.
12. Place a long piece of masking tape along the top
edge of the battery cover. This will keep the power panel
cover from being glued to the battery cover. Glue the two
5/16" x 5/16" x 5-1/8" [8x8x130mm] sticks to the battery box
sides so that they are flush with the tops of the sides. Glue
one stick on each side.
15. Route your power panel’s wires through the hole
you drilled in the battery shield and fit the power panel to
the face plate. Drill four 5/64" [2mm] holes. Use four 10mm
sheet metal screws with four small flat washers to attach
your power panel. Remember to harden the screw holes
with a drop of thin CA.
7
Page 8

16. Fit your 12V lead-acid battery in place. Use folded-up
pieces of latex foam to cushion the battery and keep it from
sliding around. Install the battery cover.
BUILD THE DRAWERS
1. Set the drawer base (part #27) on a flat surface. If
the base is slightly warped, use a weighted bag to hold it
flat as you build. Glue one drawer side (part #24) to the left
side of the base so that the side sits atop the base. Tape it
in position. Glue the drawer back (part #25) to the side and
base. Tape everything together and set the drawer on a flat
surface. Place a weighted bag (or bags) on the base and
use a builder’s triangle or a builder’s square to make sure
everything is square. Note: Both drawers are identical.
17. Install the handle using two 20mm pan-head phillips
sheet metal screws and two 1" [25.4mm] O.D. large-area
washers. Remove the screws and harden the screw holes
with thin CA. Reinstall the screws and washers.
2. Glue the drawer front (part #25 again) and the other
drawer side (part #24) to the base. Tape all of the joints
tightly together. Flip the box over and set weight on the
8
Page 9

base to take out any warping. Make sure that the tape stays
stuck and that all sides are tightly joined. Allow the glue to
fully cure.
3. While you’re waiting, repeat steps 1 and 2 to build the
other drawer.
6. Glue the drawer face (part #23) onto each drawer so
that the bottom edge is aligned flush with the bottom edge
of the base and the side edges are aligned with the drawer
sides. Clamp on the face using your 1" [25.4mm] steel
clamps. Place a piece of scrap wood under the jaws of the
clamps to prevent damage to the drawer face.
4. After the drawers are fully cured, remove the masking
tape and set the drawers upside-down on your work
surface. If the drawers are still warped, spray a light mist
of water on the wood (both sides). Prop up one corner of
the drawer opposite the direction of twist. This removes the
twist by twisting the drawer slightly in the opposite direction.
A couple of coins stacked together work well. Set weight
on the base to hold the drawer down. Let the wood dry
overnight like this.
7. Make a pencil mark along each side edge of the
drawer face 1-1/4" [32mm] up from the bottom edge of the
face. Align your ruler with these marks and make a single
mark in the center of the drawer. Drill a 5/32" [4mm] hole
at this mark. Hint: Place a piece of masking tape over the
mark to avoid damaging the wood.
5. When your drawers are straight and fully cured, sand
all edges and sides so that they sit flush with one another.
8. Locate the parts shown above. You should have two
plastic knobs, two flat washers, and two 20mm sheet metal
screws. Install the knob.
9
Page 10

9. Turn the drawer over and sand the bottom edge of
the drawer face panel flush with the base of the drawer.
10. Repeat steps 6 through 9 for the other drawer.
INSTALL THE CRADLES
This section details the installation of the optional adjustable
fuselage cradles. If you want to use these cradles on your field
box, follow the steps detailed in this section. If you don’t want
to use them, skip to section Apply Your Choice of Finish.
1. Install a blind nut in the pre-drilled hole in each of the
uprights from the outside. Tap it in place with a hammer
using a block of wood on the other side of the upright to
help you hold the box in position as you install the blind nut.
11. Check the fit and operation of both drawers. Please
realize that there might still be a bit of a twist in each
drawer which may affect operation, but with weight in the
drawer the drawer should straighten itself out and the gaps
between the panels should line up. Sand the edges of the
drawer faces to create an evenly spaced gap all the way
between each drawer.
12. Depending on how you care to arrange your flight
box, install the upper tray dividers (parts 5&6). Fit your
starter, transmitter, and any other gear in the upper tray and
mark the position of each divider. Use a jigsaw, coping saw,
or your Dremel tool to make cutouts that fit your field gear.
2. Wick some thin CA into the end-grain of the plywood
cradle arms (parts 17 & 19). This will make them stronger.
3. Glue cradle spacer 21 onto cradle arm 19. Be careful
to align the edges and the semi-circular cutouts. Make a left
10
Page 11

and a right side. Hint: Wood glue will allow you the working
time needed to properly position the pieces.
5. When the glue dries from the last step, remove the
sliding cradle arms and discard the wax paper. Without
using glue, place one 15mm square plywood piece inside
each of the sliding arms. Slide the plywood square back
and forth in the rectangular cutout and make sure that it
slides freely. Sand the cutout to achieve smooth operation.
Refit the sliding arm in the cradle assembly with the 15mm
square in position.
4. Wrap a small piece of Great Planes® Plan Protector,
MonoKote® backing, or waxed paper around cradle arm 17.
Glue cradle retainer 20 onto cradle spacer 21 with cradle
arm 17 positioned as shown. Align the cradle retainer so
that all of the edges and the cutouts match. Use two clamps
to hold the retainer onto the spacer while the glue dries.
Repeat this step for the other cradle piece.
6. Install each cradle assembly onto your field box so that
the fixed cradle arm (part 19) sits up against the inside face
of each upright. Install the 1/4-20 nylon wing bolt, making
sure it passes through the 15mm square plywood piece.
Test for smooth operation of the cradles. Note: Replacement
bolts can be ordered using this part number - GPMA2389.
11
Page 12

7. Tighten down your cradles to fully seat the blind nuts.
Remove the cradle assemblies. Mix up a batch of epoxy and
apply a bead around the perimeter of each blind nut. This
will help hold the blind nuts permanently to the uprights.
Please see steps 1 through 4 in the section Finishing
and Outfitting Your Field Box to apply the foam cushion
material to the cradle arms.
APPLY YOUR CHOICE OF FINISH
Some kind of fuel-proof finish must now be applied to
your field box to protect it from fuel, oil, dirt, and moisture.
The finish can be a transparent one like wood stain,
polyurethane, varnish, shellac, or it can be a painted
one. Avoid acrylic or water-based finishes. These will not
withstand prolonged contact with fuels or oils. If you choose
to use paint, most household spray paints are OK, but
please test the paint that you use to make sure that it is
®
fuel-proof. Top Flite
durable, and is available in colors that match the MonoKote
LustreKote® spray paint is fuel-proof,
®
finish applied to the models you have.
to fill any irregularities or gaps. If you stain or clear-coat
your field box, several types of stainable filler putties are
available to match your finish coat. Experiment with these
to get the finish you desire. Switch to progressively finer
grit sandpaper until you get the finish you desire. Start with
150 grit, move to 220 grit, and finish with 400 grit paper.
Wipe down the finished parts with a tack rag or use an air
compressor to completely blow off the dust on each part.
3. Apply your choice of finish to the underside of the base
first. Allow this to dry before turning over the box. Apply the
remaining finish to the entire field box, the insides of the
drawers, and the individual cradle parts. If you are painting
your field box and you will be using light colors, prime the
surface with either a special primer or white paint. Mask
off the trim scheme of your choice and start by painting the
lightest colors first. Apply the darkest colors last.
4. Allow all pieces to fully dry before reassembly. Note:
You may have to lightly re-sand the cradle pieces to achieve
smooth operation.
1. Remove the cradles, power panel, drawers, plastic
knobs, and carrying handle.
2. Sand down any rough edges and make overlapping
joints flush with their adjoined panels. Use suitable wood
filler like Hobbico HobbyLite™ wood filler (HCAR3401)
12
Page 13

FINISHING AND OUTFITTING YOUR FIELD BOX
1. Cut two 3-1/2" [89mm] pieces and two 7-1/4" [184mm]
pieces of foam tubing from the single strip provided. Use
scissors to cut a slit in the tubing as shown.
4. Glue the 7-1/4" [184mm] foam piece to the fixed cradle
arm (part 19) as shown. Apply a bead of glue to the back
side of the cradle arm (the side opposite the spacer and
retainer). Do not glue the foam on the spacer/retainer side
– the sliding arm must be free to travel.
2. Cut a notched section out of each foam piece so that
the center of the notch is 3/4" [19.1mm] from one end of
the tubing.
3. Glue the 3-1/2" [89mm] foam piece to the sliding cradle
arm (part 17) as shown. The notched portion is at the top of
the arm and allows the foam to conform to the bend.
5. Reassemble the cradle as shown. Don’t forget to install
the 15mm square piece! Reinstall the cradles to your field box.
6. Cut four 1" [25.4mm] pieces from the long strip of
hook-and-loop material. Separate the hook side from the
loop side of each piece. Use medium or thick CA to glue
the loop side (fuzzy side) pieces to the back of each drawer.
Glue each piece near the side edges as shown. Run a bead
of CA along the top and bottom cloth sides of the loop strips.
This will hold them on permanently. Spray the CA with CA
accelerator to ensure that it fully cures before the next step.
13
Page 14

7. Attach the hook side to the loop side of each strip
you glued in place. Working with one drawer now, place a
drop of thick or medium CA on the back side of each hook
fastener and proceed immediately to the next two steps –
do not allow the CA to dry yet.
8. Spray a generous amount of CA accelerator to the
inside back wall of the box.
11. Reach back into the field box and thoroughly glue down
the hook side fasteners with CA. Spray some CA accelerator
onto the hook fasteners to thoroughly cure the CA.
12. Locate the long strip of non-adhesive backed hook
and loop fastener material. Cut it in half and separate the
hook side from the loop side. Reattach the two sides so that
they overlap each other by at least 4" [102mm].
9. Install the drawer in its proper slot so that the hook
side fastener material contacts the back wall. Allow the CA
about a minute to cure and then gently remove the drawer.
Hint: Reach inside and use your finger to help separate the
hook and loop sides as you gently pull out the drawer.
10. Repeat steps 7 though 9 for the other drawer.
13. Place your fuel tank on the tank tray and stretch one
of the straps you made across the upper part of the tank.
Center the attached portion of the strap over the front of
your tank and tape the ends of the strap to the field box.
14
Page 15

14. Drill one 5/64" [2mm] hole on each side of the hook
and loop strap. Install the strap using two 10mm sheet
metal screws and two small flat washers.
15. Trim the ends of the strap. Note: Extra hook and loop
material, screws, and washers are supplied if you want to
use a second strap.
17. After you’re done with your field box, you can add
feet (not included). Circular rubber, nylon, or felt bumpers
are available at your local hardware store.
18. As an added option you can use four #6 x 3/4"
[19.1mm] sheet metal screws and washers (not supplied) to
reinforce the uprights. Draw lines across the base centered
with each upright. Drill four 7/64" [2.8mm] holes into the
uprights and install the screws and washers.
16. If you want, you can use a scrap piece of hook and
loop material to hold your fueling line.
19. Your field box is now ready to be outfitted with all of
your tools and flight line equipment. Some items you may
want to carry are listed in the section titled: Field Equipment
Suggestions, at the start of this manual.
15
Page 16

Questions or comments? Please contact us at:
Carl Goldberg Products Product Support
3002 N. Apollo Drive, Suite #1
Champaign IL 61822
airsupport@greatplanes.com
www.carlgoldbergproducts.com
Telephone: 1-217-398-8970
Monday-Friday, 8am-5pm U.S. Central Time.
FAX: 1-217-398-7721
Please be sure to include a daytime telephone number or return fax number so that we can contact you.
Copyright © 2009 GBGP0102Instr
 Loading...