

Page 1
QUICK START MANUAL – MULTI SMART
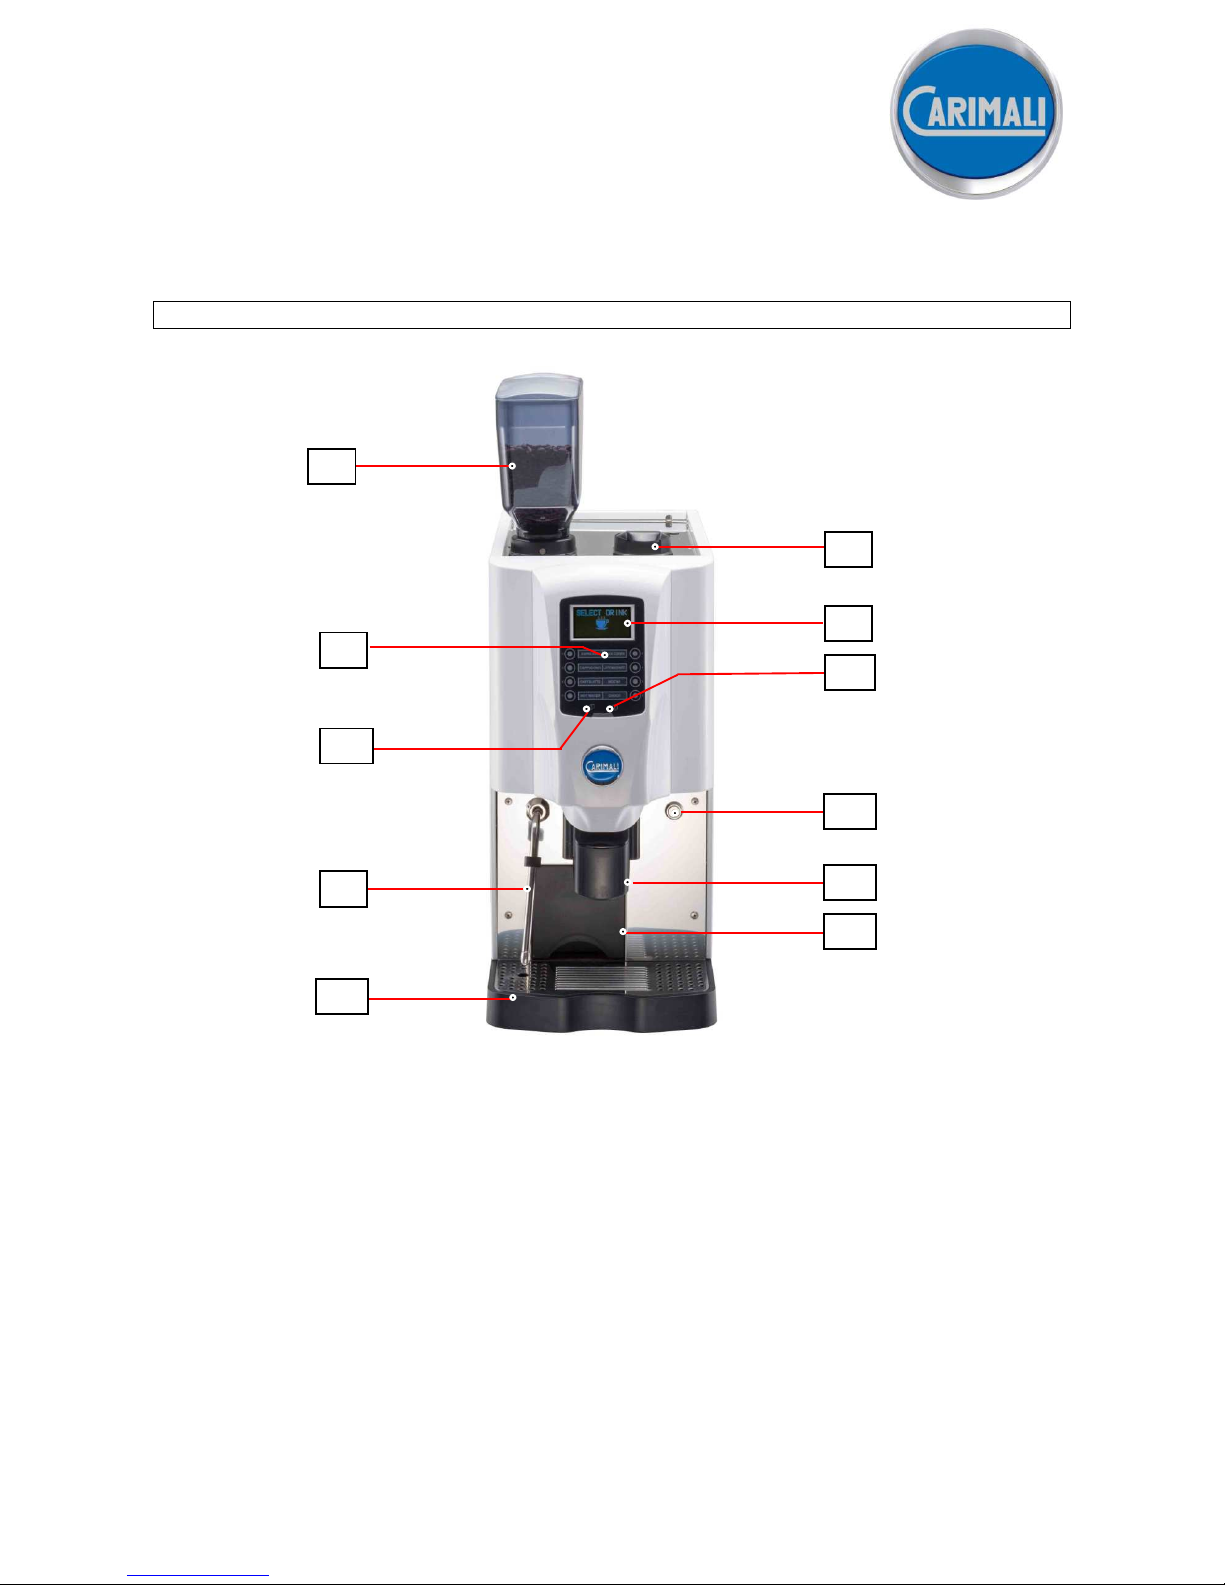
MACHINE DESCRIPTION
LEGEND
1 COFFEE HOPPER
2 DECAFFEINATED DOOR
3 DISPLAY
4 DOSE BUTTONS
5 INFO BUTTON
6 SHIFT BUTTON
7 STEAM ARM
8 DOOR LOCK
9 ADJUSTABLE DELIVERY OUTLETS
10 DRIP TRAY
11 GROUNDS BIN
Only for US market (ETL Sanitation): The equipment shall be installed with backflow protection to
comply with applicable federal, state and local codes.
1
2
3
7
4
5
6
8
9
10
11
Page 2
STARTING UP
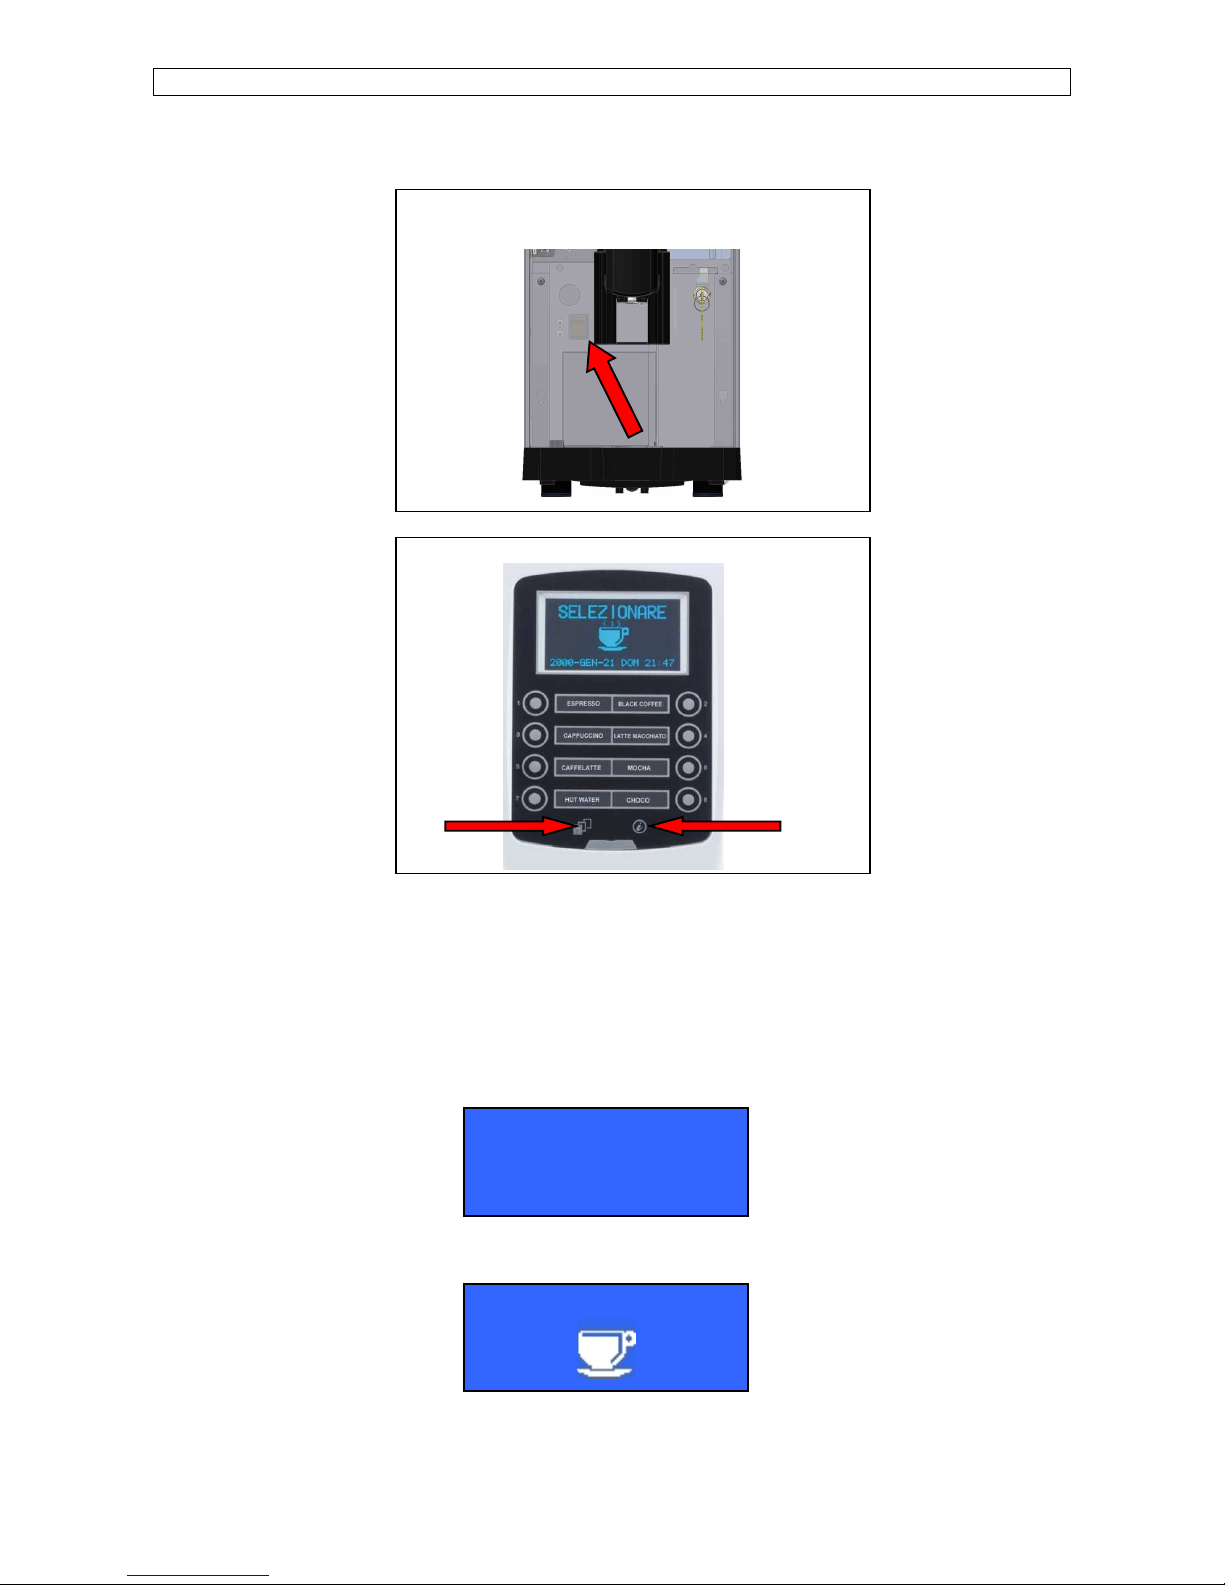
After checking that the machine door is closed and the drip tray are inserted, power ON the machine by means of the main switch inside
the machine (pic. A),
keep key SHIFT pressed and then press key INFO, (pic. B) and the machine will set itself to ON state.
FOR SELF CONFIGURATION
To switch ON the machine : keep key SHIFT pressed and then press key INFO, afterwards insert the waiter password 61111).
To switch OFF the machine: Open the front door.
When the boiler temperature of 50°C (122°F) is reached, the machine carries out a group rinsing. The display shows:
When the set-up temperature is reached, the display shows (machine configuration Standard or Self):
SELECT DRINK
G.AUTO CLEANING
A) Power on the machine by means the main switch,
that can be reached by temporarily removing the coffee
grounds bin.
Keep key SHIFT pressed and then press key INFO,
Pic. B
Page 3
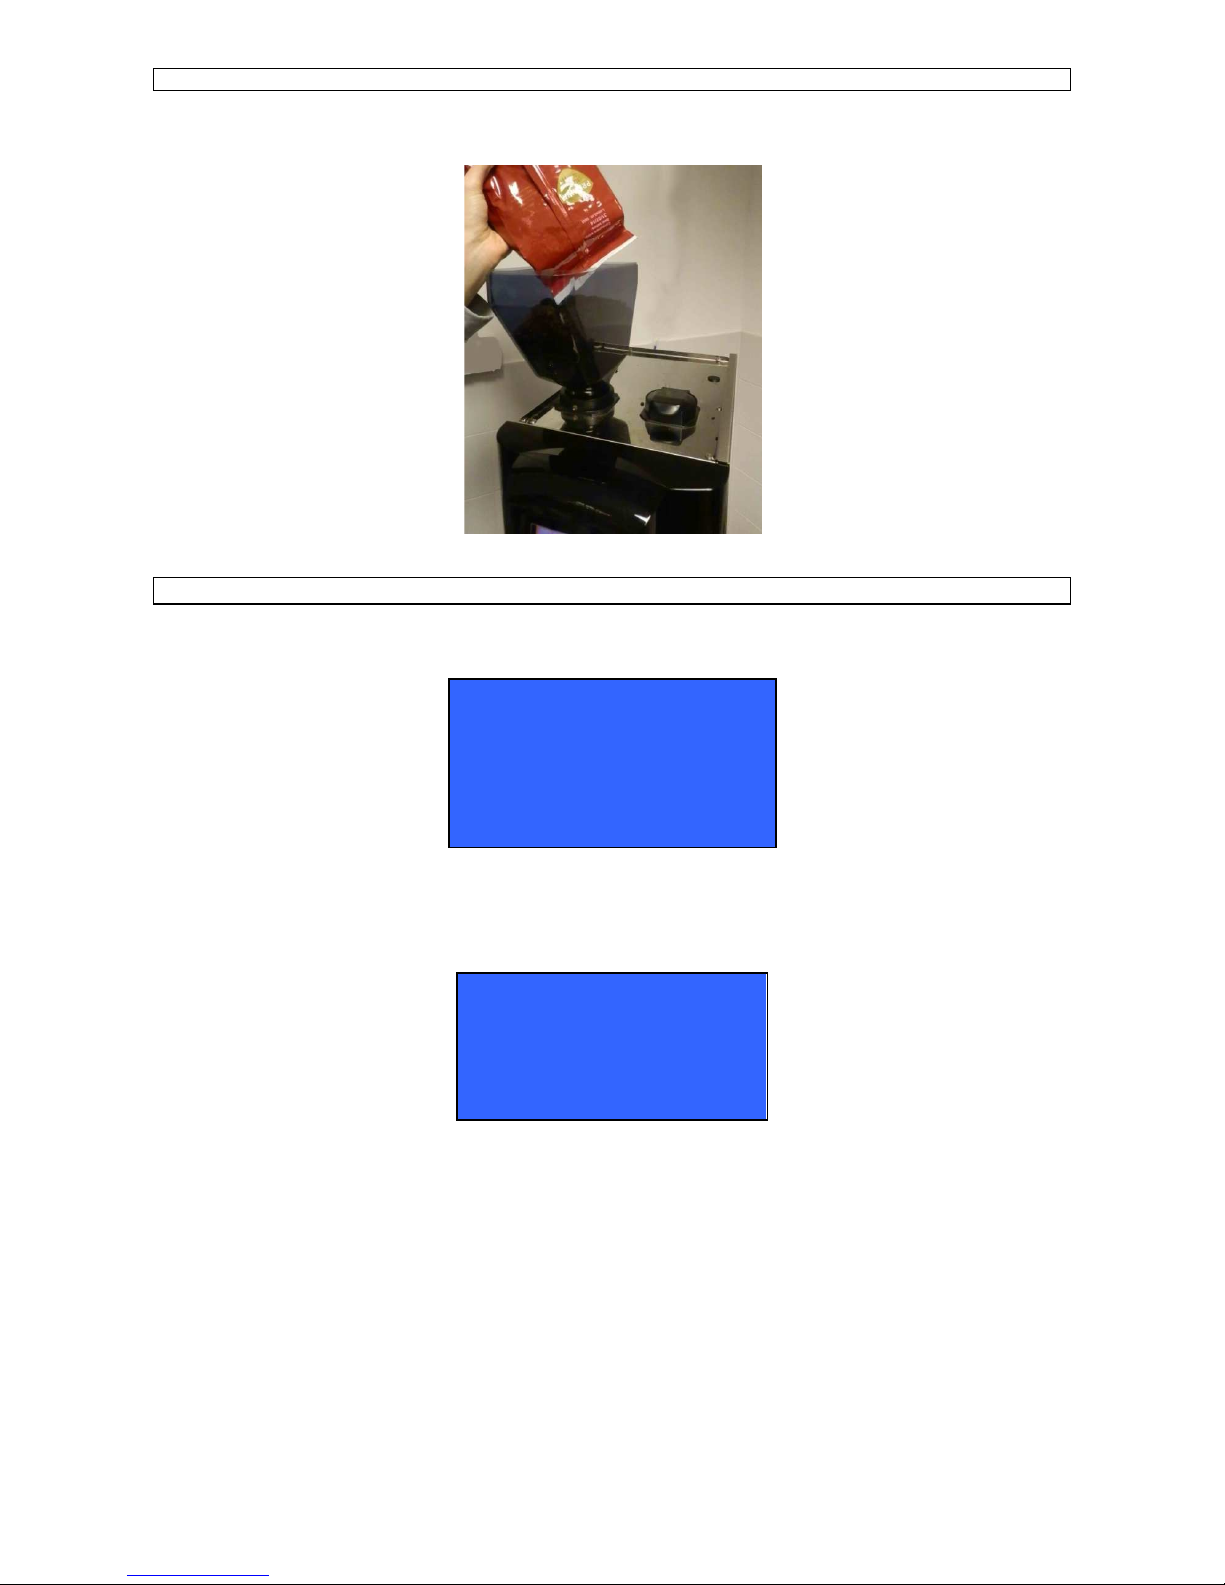
FILL IN BEAN HOPPER
Fill in the required amount for daily consumption in order to keep coffee and product always fresh.
DISPLAY THE AVAILABLE DRINKS SELECTION AND BOILERS TEMPERATURE
Press the INFO key with the machine in SELECT DRINK mode to display the available drinks selection :
Press SHIFT button once or twice to display the second or third dose drinks menu
Where B1 / B8 indicate the numbers of the drink keys.
Press twice the INFO key with the machine in SELECT DRINK mode to display the boiler temperature :
Where YYY indicates the steam boiler temperature.
B1 ESPRESSO BLACK COFFEE B2
B3 CAPPUCCINO LATTE MACCHIATO B4
B5 CAFFELATTE LATTE B6
B7 HOT WATER STEAM B8
STEAM TEMPERATURE
YYY
Page 4
DISPENSING
1) COFFEE/CAPPUCCINO
Adjust the coffee dispenser to the correct height and place a cup under it, then press the desired dose key.
Where “XXXXXXXX” indicates the selected dose key name.
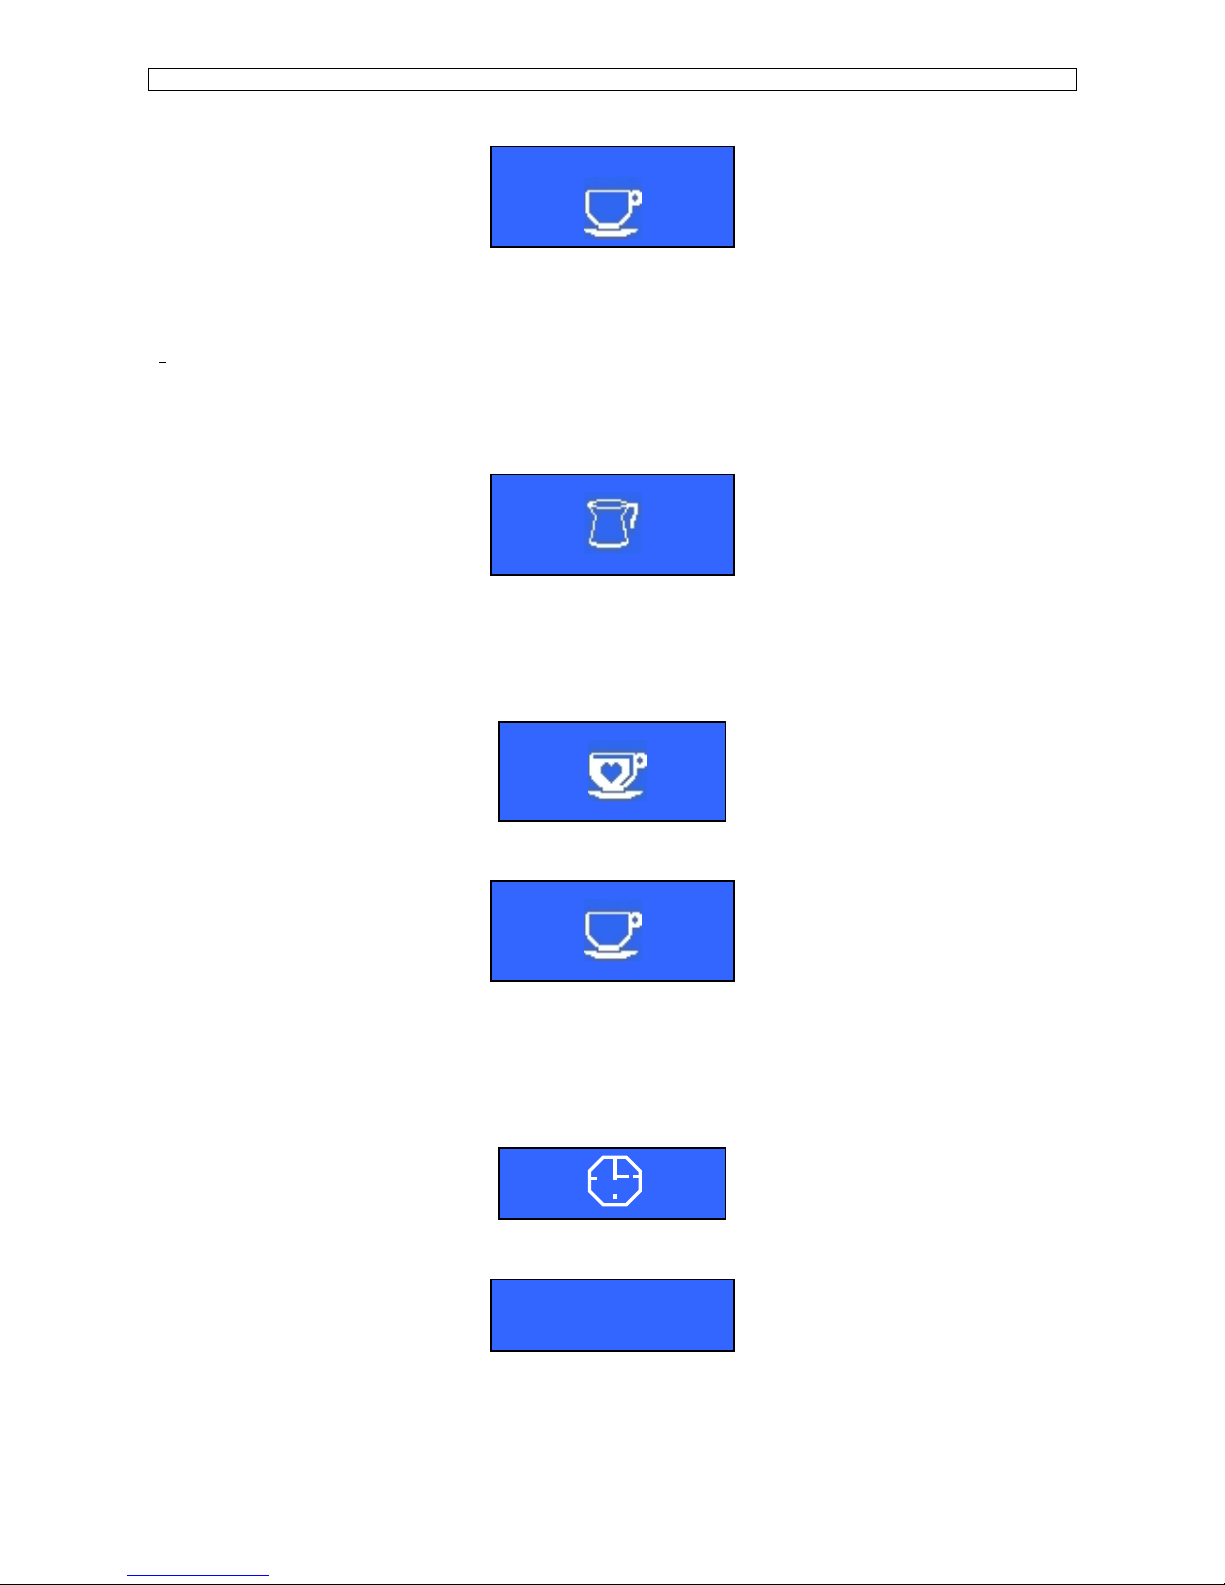
The filling up of the cup icon indicates the amount of drink being dispensed.
PLEASE NOTE :
• Pressing the same dose key during dispensing can stop the selected dose (not available for Self configuration).
• By means of the SHIFT button the 8 selections can be tripled for a total of 24 drink doses. Press SHIFT button once or twice to
switch the second or third dose drinks menu.
2) HOT WATER
Adjust the hot water outlet to the correct height and place a cup under it, then press the hot water key. Dispensing will be automatically
stopped once the programmed dose is over. The display shows:
The filling up of the jug icon indicates the amount of drink being dispensed.
PLEASE NOTE: Pressing the same dose key during dispensing can stop the selected dose (not available for Self configuration).
3) DECAFFEINATED DISPENSING (not available for Self configuration)
Adjust the coffee dispenser to the correct height and place a cup under it, then open the decaffeinated coffee door, the display shows:
SELECT DRINK
- Pour in the powdered coffee
- Close the decaffeinated door
- Press the desired dose key. The display shows:
The selected dose will be dispensed without the activation of the grinders.
The filling up of the cup icon indicates the amount of drink being dispensed.
PLEASE NOTE:
• Pressing the same dose key during dispensing can stop the selected dose (not available for Self configuration).
• If the decaffeinated door is not closed, or if the dose button is not selected, the machine will automatically cancel this function after
20 seconds. The coffee group will carry out a cleaning cycle of the brewing chamber. The display shows:
4) EXTRAMILK DISPENSING (only LM machine, not available for Self configuration)
Press a milk-based key and keep it pressed, after 2 seconds foamed milk will start being dispensed, the display shows:
By releasing the pressed key, dispensing will be stopped.
XXXXXXXX
HOT WATER
XXXXXXXX
EXTRA MILK
Page 5
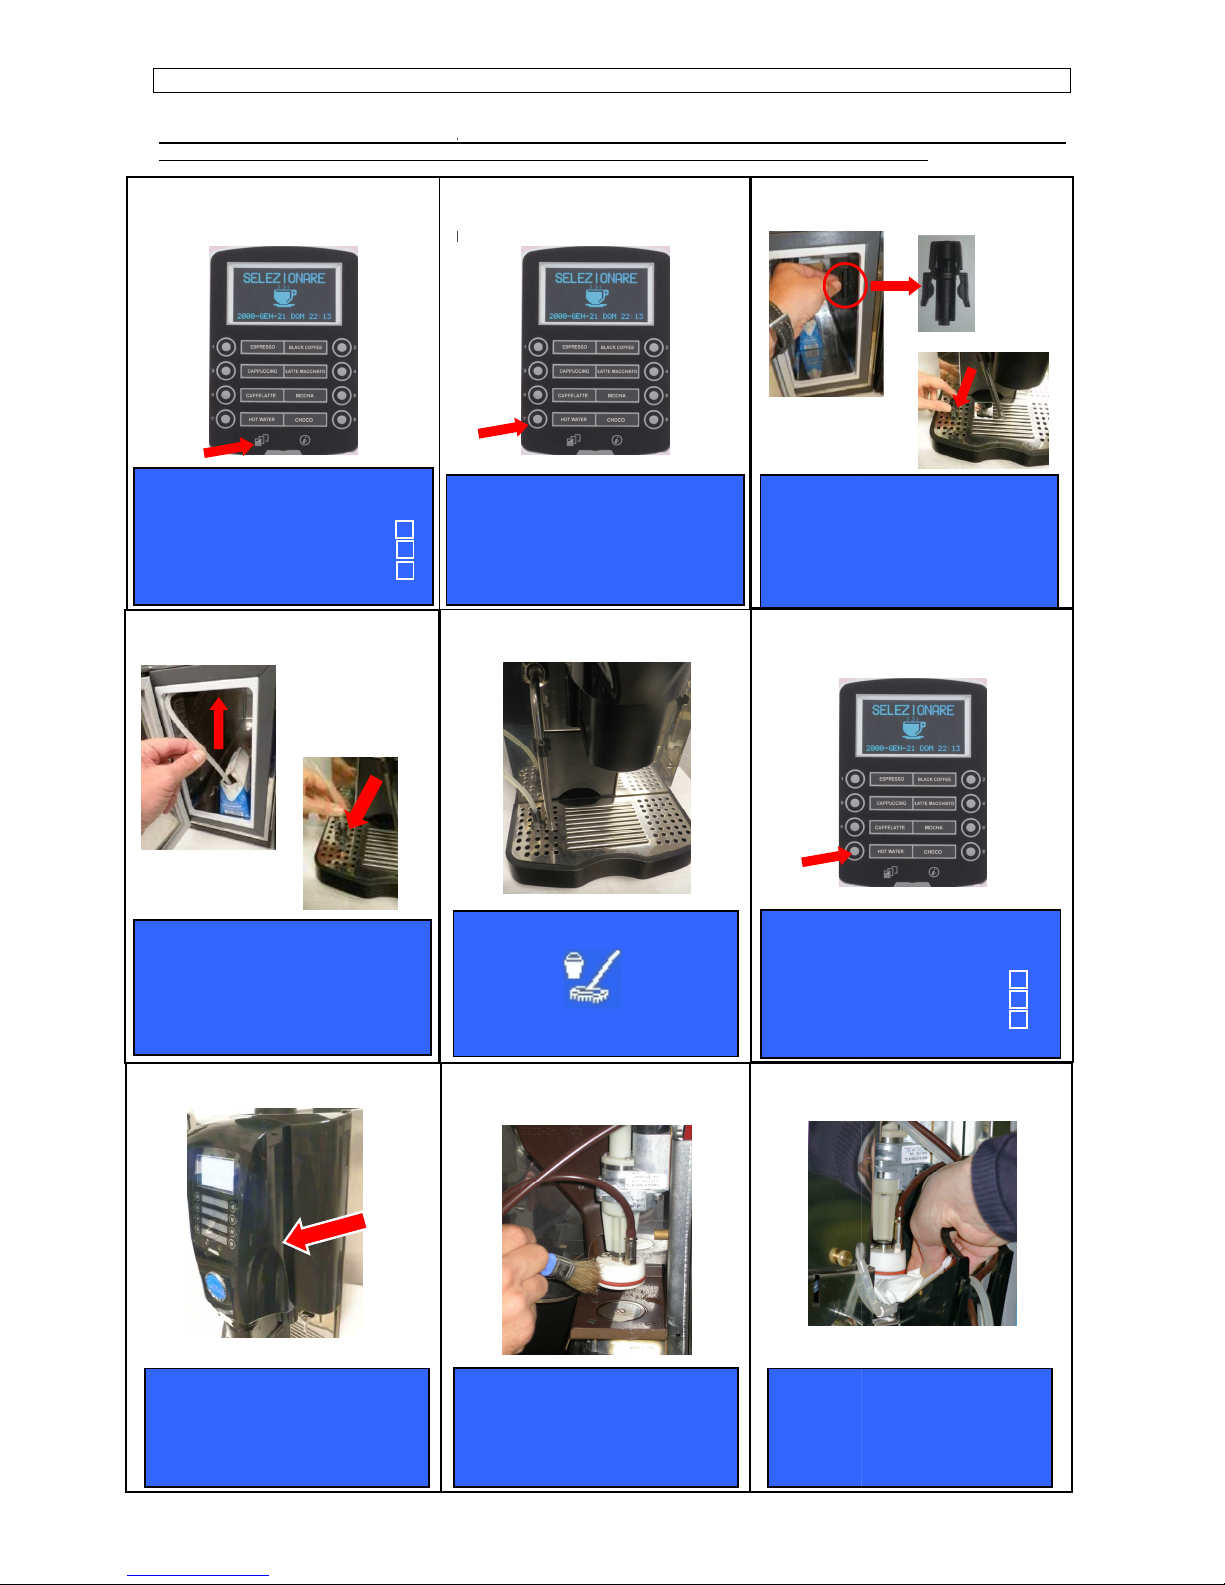
AUTOMATIC CLEANING
AT THE END OF EACH WORKING DAY , AND/OR IN CASE THE MACHINE WILL NOT BE USED SOME TIME, WE STRONGLY
RECOMMEND TO CARRY OUT AUTOMATI
2
cleaner cycle ( press N°4 key to skip the
Power cleaner).
1
►
Keep (Shift) key pressed for five
seconds ( for SELF configuration insert
the waiter password 61111).
4
►
Insert the silicone tube into the black
support and press (N°7) key.
5
cycle delivery.
PRESS B 7
TO START
PRESS B 4 TO SKIP
POWER CLEANER
GROUP CLEANING
MILKER CLEANING
7
►
Open the machine door.
GROUP CLEANING
OPEN FRONT PANEL
AND CLEAN COMPONENT
POWER CLEANER
Remove the silicone tube from
the milk box and place it into the
black support
PRESS B 7 TO START
OF POWER CLEANER - COFFEE GROUP -
MILK FROTHER
C CLEANING OF THE COFFEE GROUP
AND THE MILK FROTHER
2
►
Press (N°7) key to start the Power
cleaner cycle ( press N°4 key to skip the
Power cleaner).
3
►
Insert the black pipe support in the drip
tray grid and press
►
Wait the end of the Power cleaner
6
►
Press
(N°7) key
cleaning cycle.
POWER
CLEANER
Insert the black pipe support
into the hole in the drip tray grid
PRESS B 7
TO START
POWER CLEANER
Insert the
black pipe support
into the hole in the drip tray grid
PRESS B 7
POWER
CLEAN
ER
ENDS IN XX Sec.
PRESS B 7
POWER
CLEAN
GROUP CLEANING
MILKER CLEANING
8
►
Clean the group from any coffee
residues.
GROUP CLEANING
CLEAN &
CLOSE FRONT PANEL
9
►
Clean the group filters by means of a
cloth.
GROUP CLEANING
CLOSE
.
(N°7) key.
to start the group
TO START
TO START
ER √√√√
CLEAN &
FRONT PANEL
Page 6
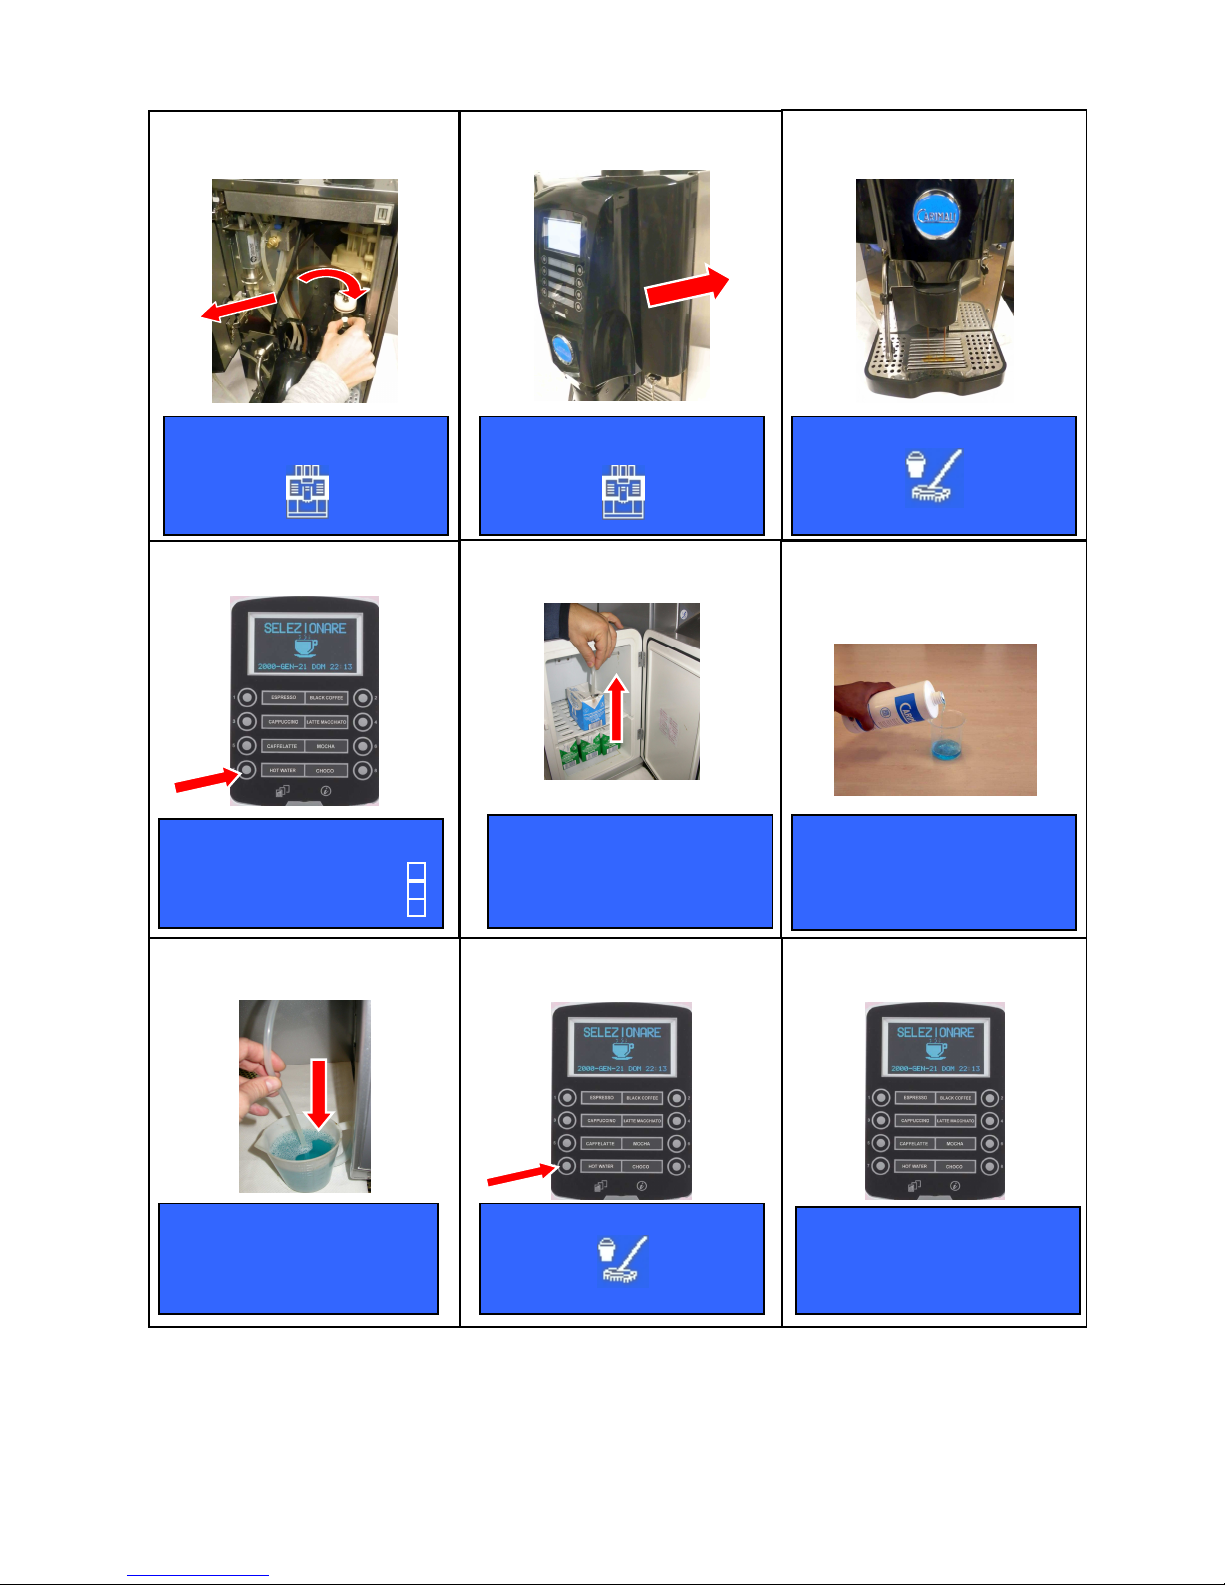
- Put the milk infeed pipe into a glass of cold water
- Press (N°7) key, the milk frother will start dispensing another cleaning cycle only with water.
10
►
Open the front door -1-, insert the
detergent tablet into the brewing
chamber -2-
GROUP CLEANING
INSERT CLEANSER
11
►
Close the front door
1
6
►
Insert the milk feeding tube into a
container with detergent
1
5
►
Prepare a solution of water and
detergent (q.ty 200ml for standard
version, 500ml if milk pump present) by
following the instructions indicated in the
product label
1
4
►
Take the milk feeding tube out of the
milk box
1
3
►
Press (N°7) key to start the milker
cleaning cycle.
MILKER
CLEANING
INSERT
CLEANING SOLUTION
PRESS B7 TO START
MILKER
CLEANING
INSERT
CLEANING SOLUTION
PRESS B7 TO START
MILKER
CLEANING
INSERT
CLEANING SOLUTION
PRESS B7 TO START
12
►
Wait the end of the group cleaning
cycle delivery.
1
2
GROUP
CLEANING
ENDS IN XX Sec.
GROUP CLEANING
INSERT CLEANSER
PRESS B 7
TO START
POWER CLEANER √√√√
GROUP CLEANING √√√√
MILKER CLEANING
1
7
►
Press (N°7) key to start the milker
cleaning cycle.
MILKER CLEANING
ENDS IN XX Sec.
1
8
►
At the end of the milker cleaning
cycle the display will show :
MILKER
CLEANING
REPEAT CLEAN
USING ONLY WATER
PRESS B7 TO START
Page 7
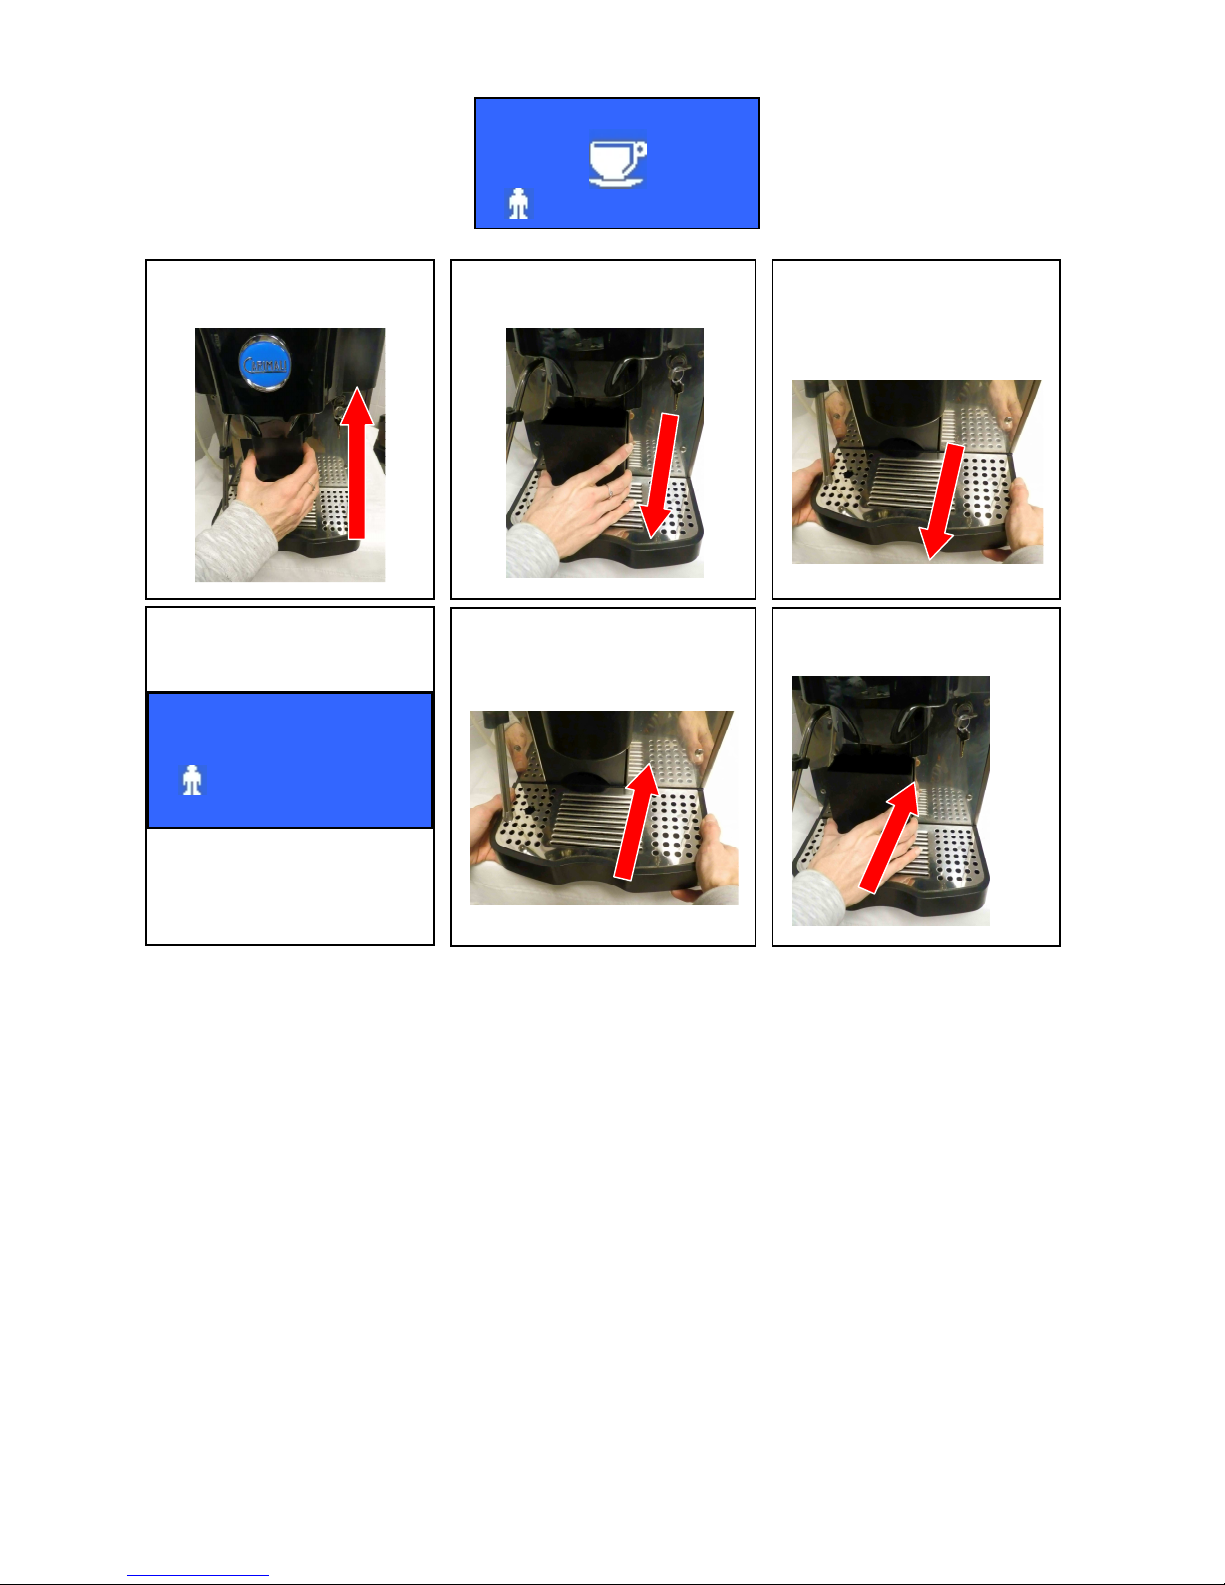
AT THE END OF THE MILKER CLEANING CYCLE THE DISPLAY WILL SHOW :
SELECT DRINK
GROUNDS BIN FULL
23
►
Remove and empty the grounds
bin.
24
►
Remove and empty also the drip
tray (only for machines without direct
water discharge).
SELECT DRINK
GROUNDS BIN OPEN
22
►
Lift the coffee outlets completely.
25►
Wait at least 5 seconds, the
display will show:
26►
Reinsert the drip tray (only for
machines without direct water
discharge).
27►
Reinsert the grounds bin and
press ON/OFF key:
Page 8
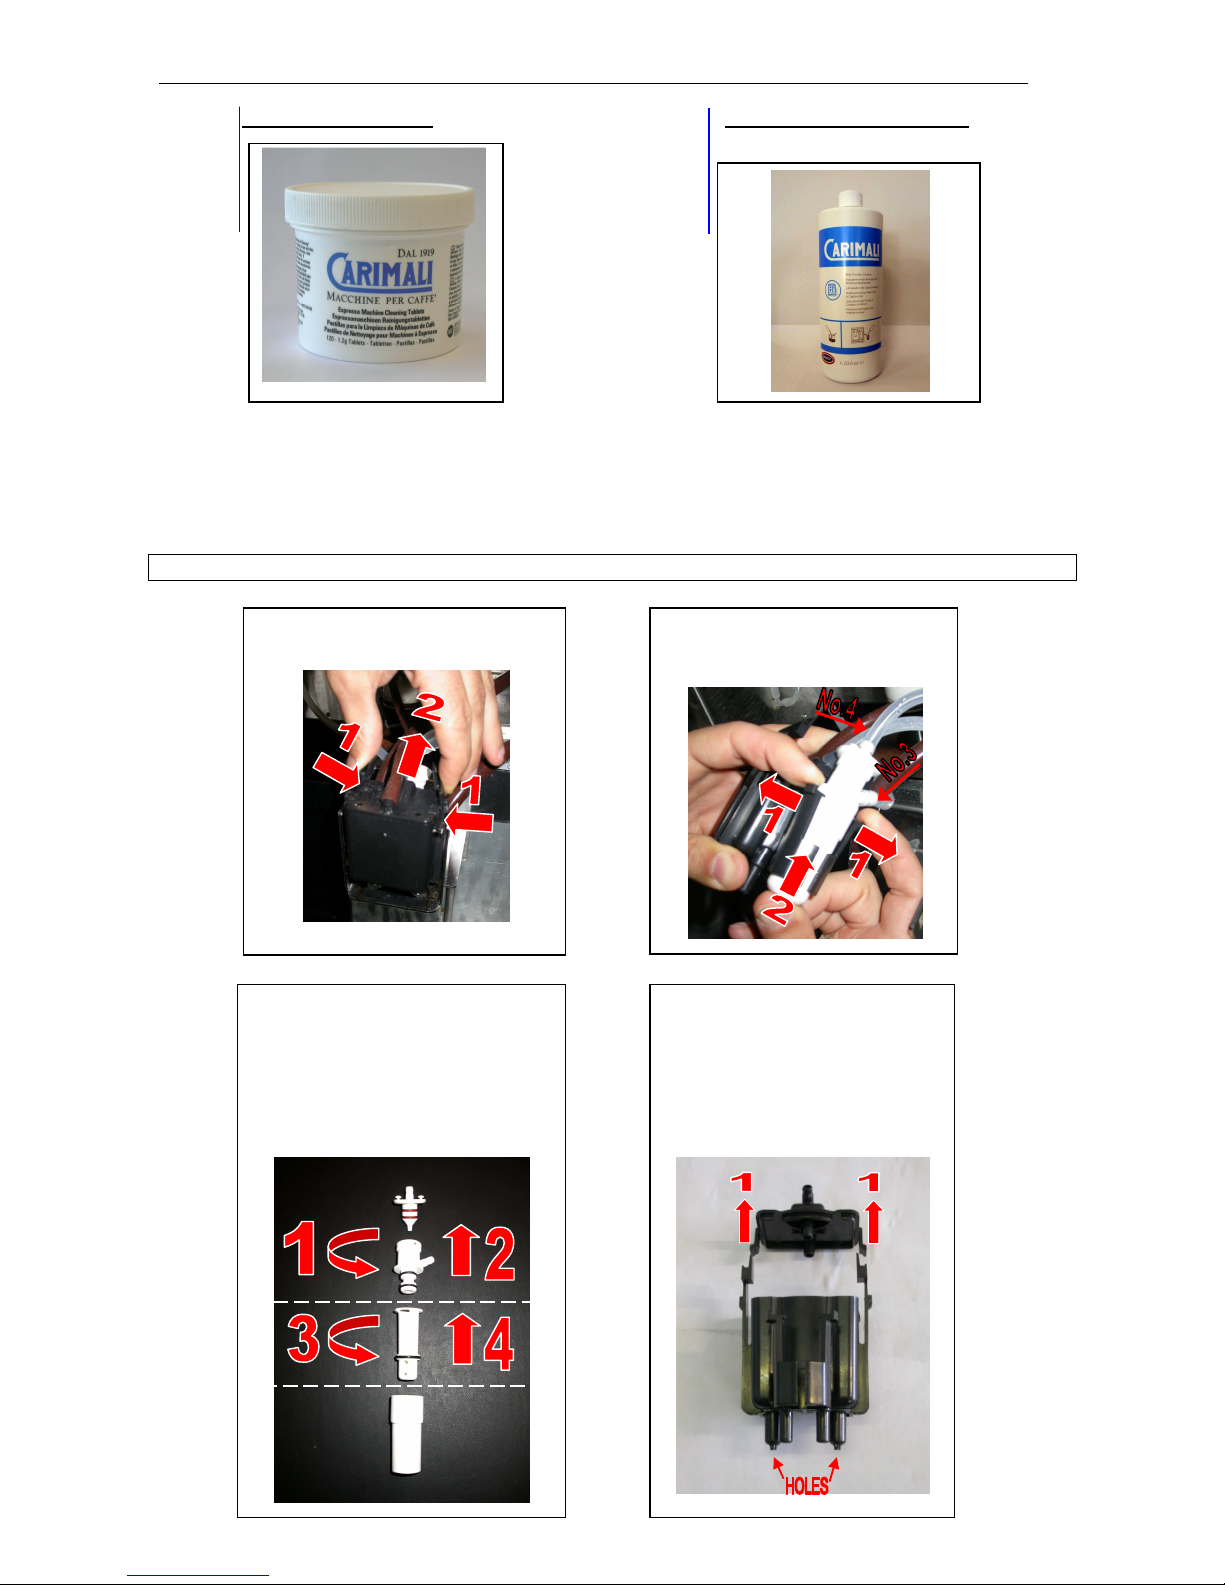
FOR CLEANING OPERATIONS , CARIMALI STRONGLY RECOMMEND TO USE THE FOLLOWING DETERGENT PRODUCTS:
CLEANING TABLETS MILK FROTHER CLEANER
PLEASE NOTE:
a) Do not interrupt the cleaning cycle. If the cleaning cycle is interrupted by any type of operation unrelated to the procedure, when the
machine functioning is set back again, the cleaning cycle will automatically be activated.
b) Only in case that after the automatic cleaning process of the coffee outlet or the milk frother are not properly dispensing, carry out a
manual cleaning; see the following steps.
MANUAL CLEANING OF MILK FROTHER AND COFFEE OUTLET
1
► Remove the coffee outlet from its
holder .
2
► Remove the milk frother from the
coffee outlet and disconnect Silicone
tubes No. -3- and -4.
4
► Disassemble the milk frother in all its
parts (first by turning and then by pulling as
shown in the picture) and wash it either by
hand or in a dishwasher. Make sure that all
the holes are free from milk residues and
also to use provided tools to clean the
holes. Check also that the O-rings are in
good condition
5► Disassemble the coffee outlet (1)
and wash it by hand or in a dishwasher.
Make sure that all the holes are free
from any coffee residues , and also to
use provided tools to clean the holes.
Page 9
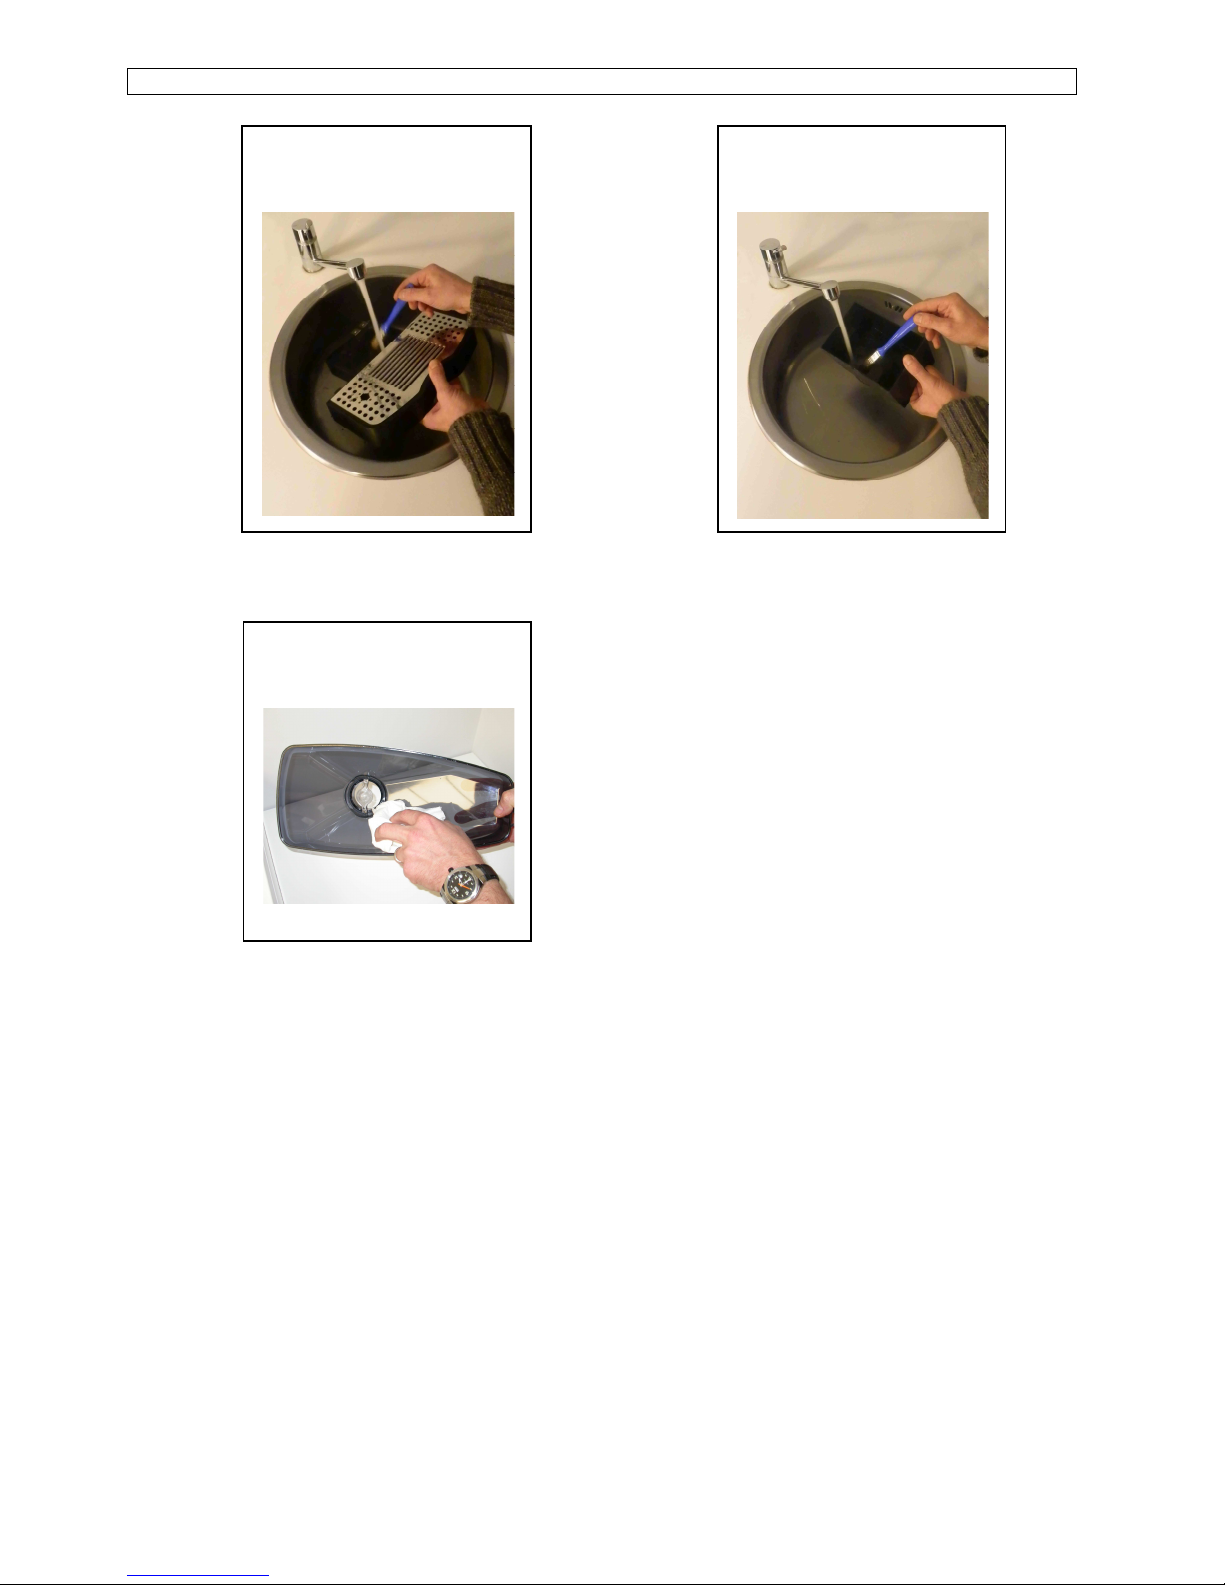
OTHER RECOMMENDED CLEANING
HOPPER CLEANING
GROUDS BIN CLEANING
Once a day rinse the grounds bin in a
sink.
DRIP TRAY CLEANING
Once a day rinse the drip tray in a
sink.
a) Once a week clean the hopper by
means of a cloth and approved food
detergent.
Page 10
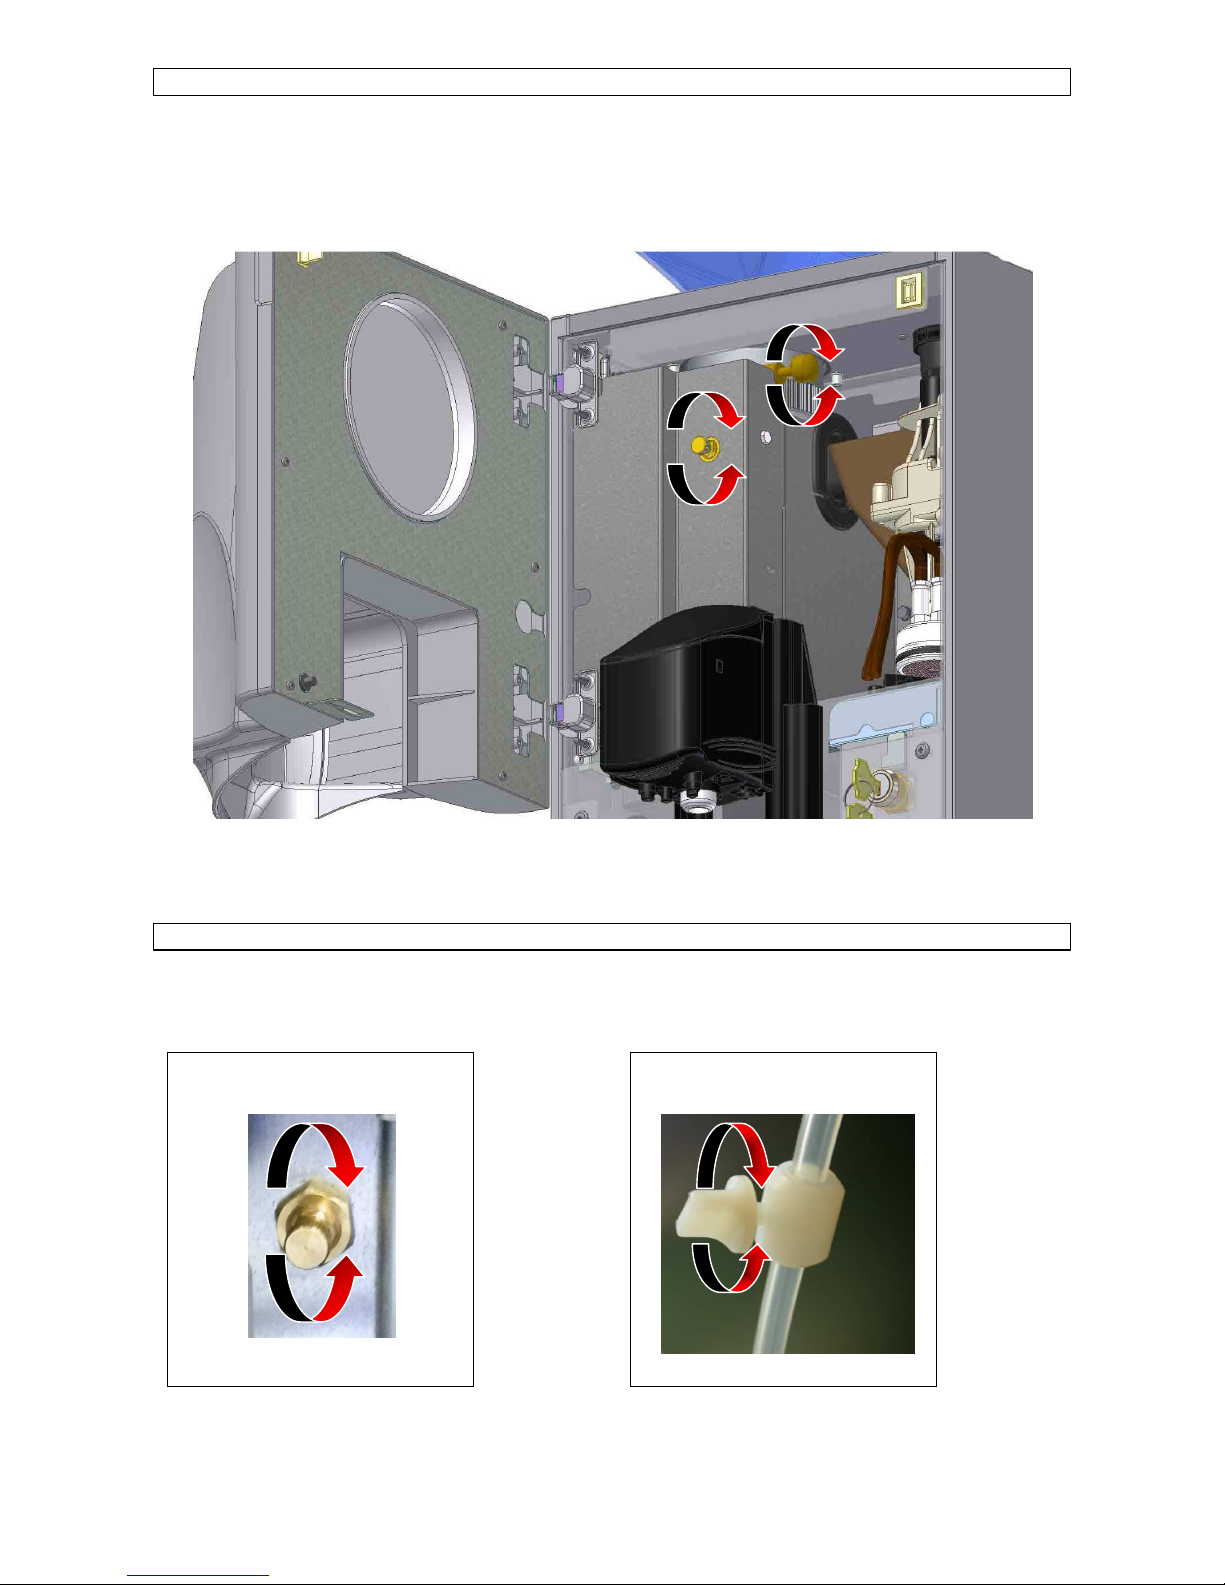
GRINDER ADJUSTMENT
Open the machine front door, then:
- Loosen the adjustment by turning in clockwise direction for a coarser grinding
- Tighten the adjustment by turning in anticlockwise direction for a finer grinding
Please Note:
Brew and throw one dose, the second one will be dispensed with the new grinder set.
MILK FROTHER ADJUSTMENT
Foam setting
The milk frother is equipped with a FOAM REGULATOR which sets the quantity of air needed to froth milk.
Open the machine door, turn the ring nut clockwise for thicker foam (small bubbles), or turn it anticlockwise for more voluminous foam
(large bubbles) Pic.A.
Milk temperature setting
The milk frother is equipped with a MILK TEMPERATURE REGULATOR which reduces the quantity of sucked milk.
Turn the regulator clockwise to increase the milk temperature, or turn it anticlockwise to reduce it.Pic. B
Pic. A
Pic. B
MILK FROTHER ADJ
GRINDER ADJ
Page 11
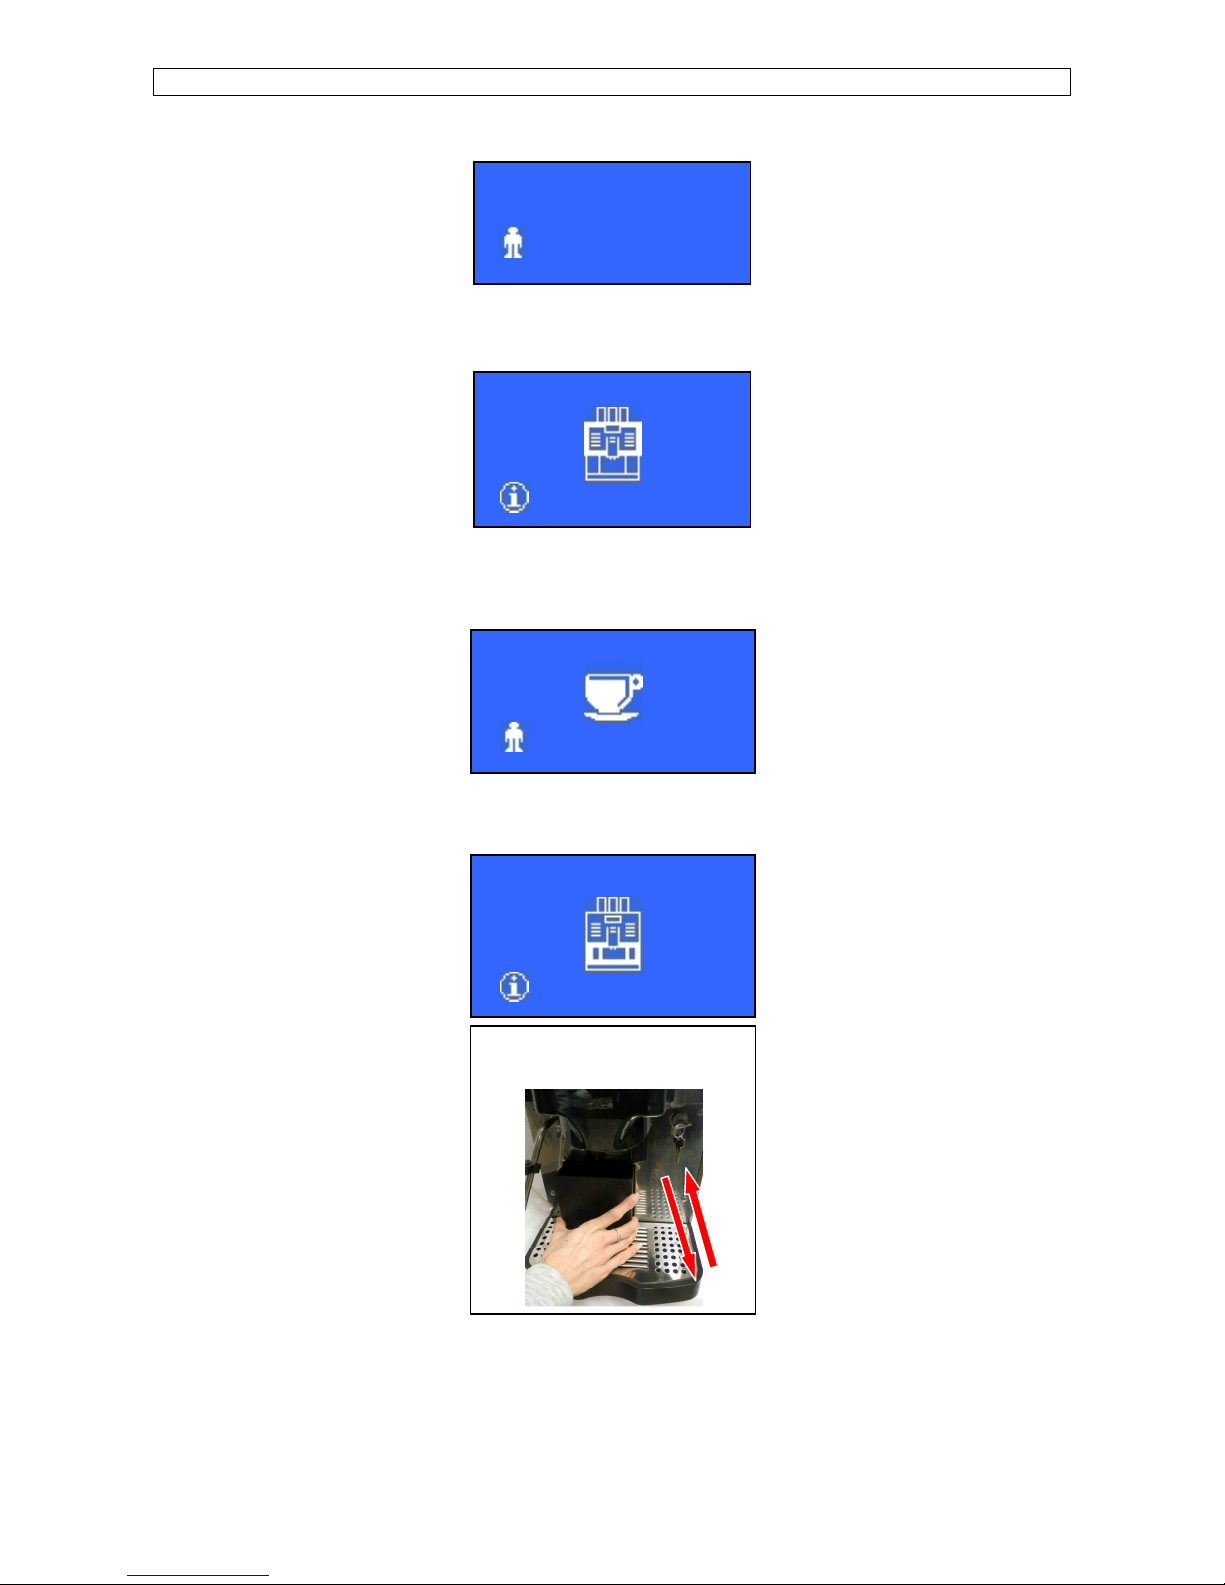
MACHINE FUNCTIONS MESSAGES
1) Alarm for machine door position
OFF
OPEN DOOR
Cause: the front door is open; the micro switch does not touch the door
Result: shutdown of the machine functions
Solution: press Info key, the display shows:
CLOSE FRONT PANEL
OPEN DOOR
Close the door and turn the machine ON.
2) Full grounds bin alarm
Cause: grounds bin full; the number of coffee grounds in the bin has reached the programmed value
Result: shutdown of the coffee-based dispensing selections
Solution: press Info key, the display shows:
SELECT DRINK
GROUNDS BIN FULL
EMPTY GROUNDS BIN
WAIT 10 SEC.
GROUNDS BIN FULL
a) Remove and empty the grounds
bin.
Page 12
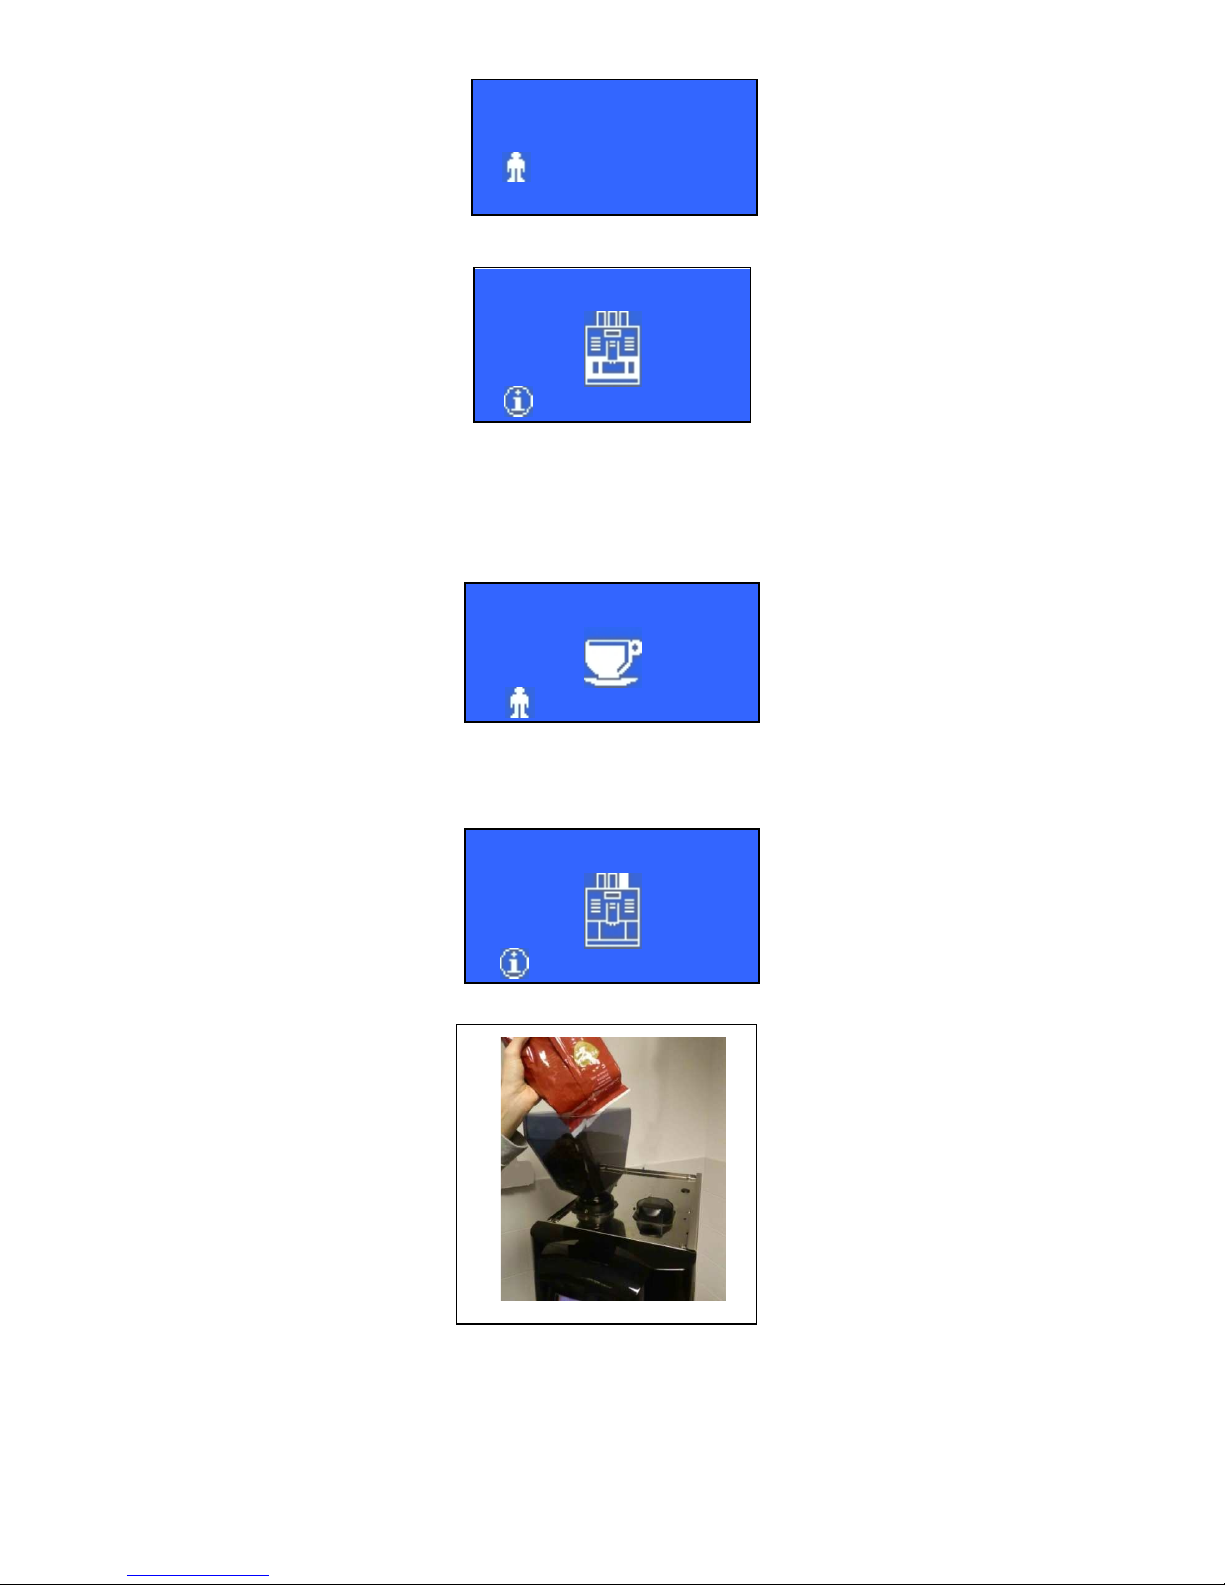
After 10 seconds the display shows :
Press Info key, the display shows:
CLOSE THE GROUNDS BIN
GROUNDS BIN OPEN
Reinsert the grounds bin into its housing.
3) Message of missing coffee
Cause: there is no coffee into the hopper and therefore into the brewing chamber
Result: the machine interrupts the coffee-based dispensing selections
Solution : press Info key, the display shows:
to reset the alarm put coffee into the hopper and press again the dose required.
SELECT DRINK
MISSING COFFEE
FILL THE HOPPER
MISSING COFFEE
SELECT DRINK
GROUNDS BIN OPEN
Page 13
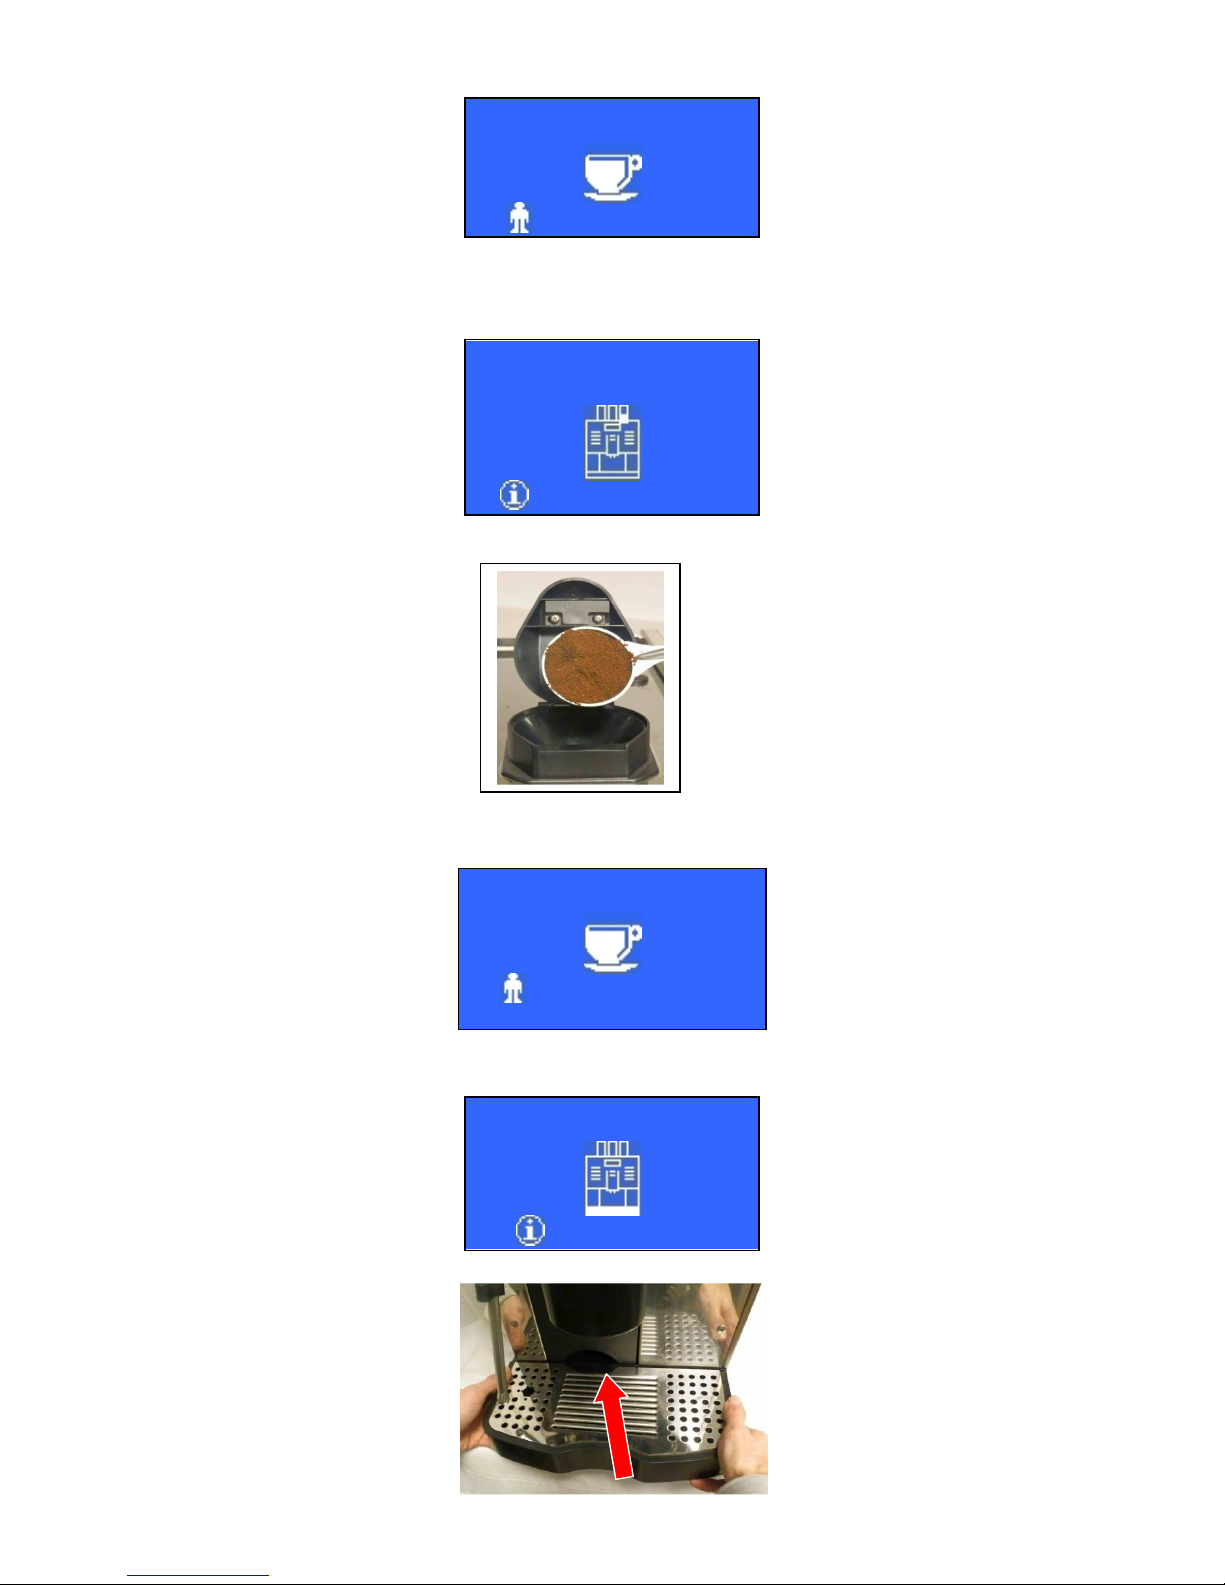
4) Message of missing decaffeinated
Cause: Missing coffee in the decaffeinated door and in the brewing chamber
Result: The machine interrupts the decaffeinated dispensing selections
Solution : press Info key, the display shows:
To reset the alarm put decaffeinated into the decaf door and press again the dose required.
5) Message of drip tray not in position.
The display will show the following message:
Cause: the drip tray is not in position. The micro switch contact is open.
Result: The message is displayed without disabled the dispensing keys.
Solution: press Info key, the display shows:
Reinsert the drip tray.
SELECT DRINK
MISSING DECAF.
INSERT DECA COFFEE
POWNDER 7/8 gr. min.
MISSING DECAF.
SELECT DRINK
DRIP TRAY OUT
INSERT DRIP TRAY
DRIP TRAY OUT
Page 14
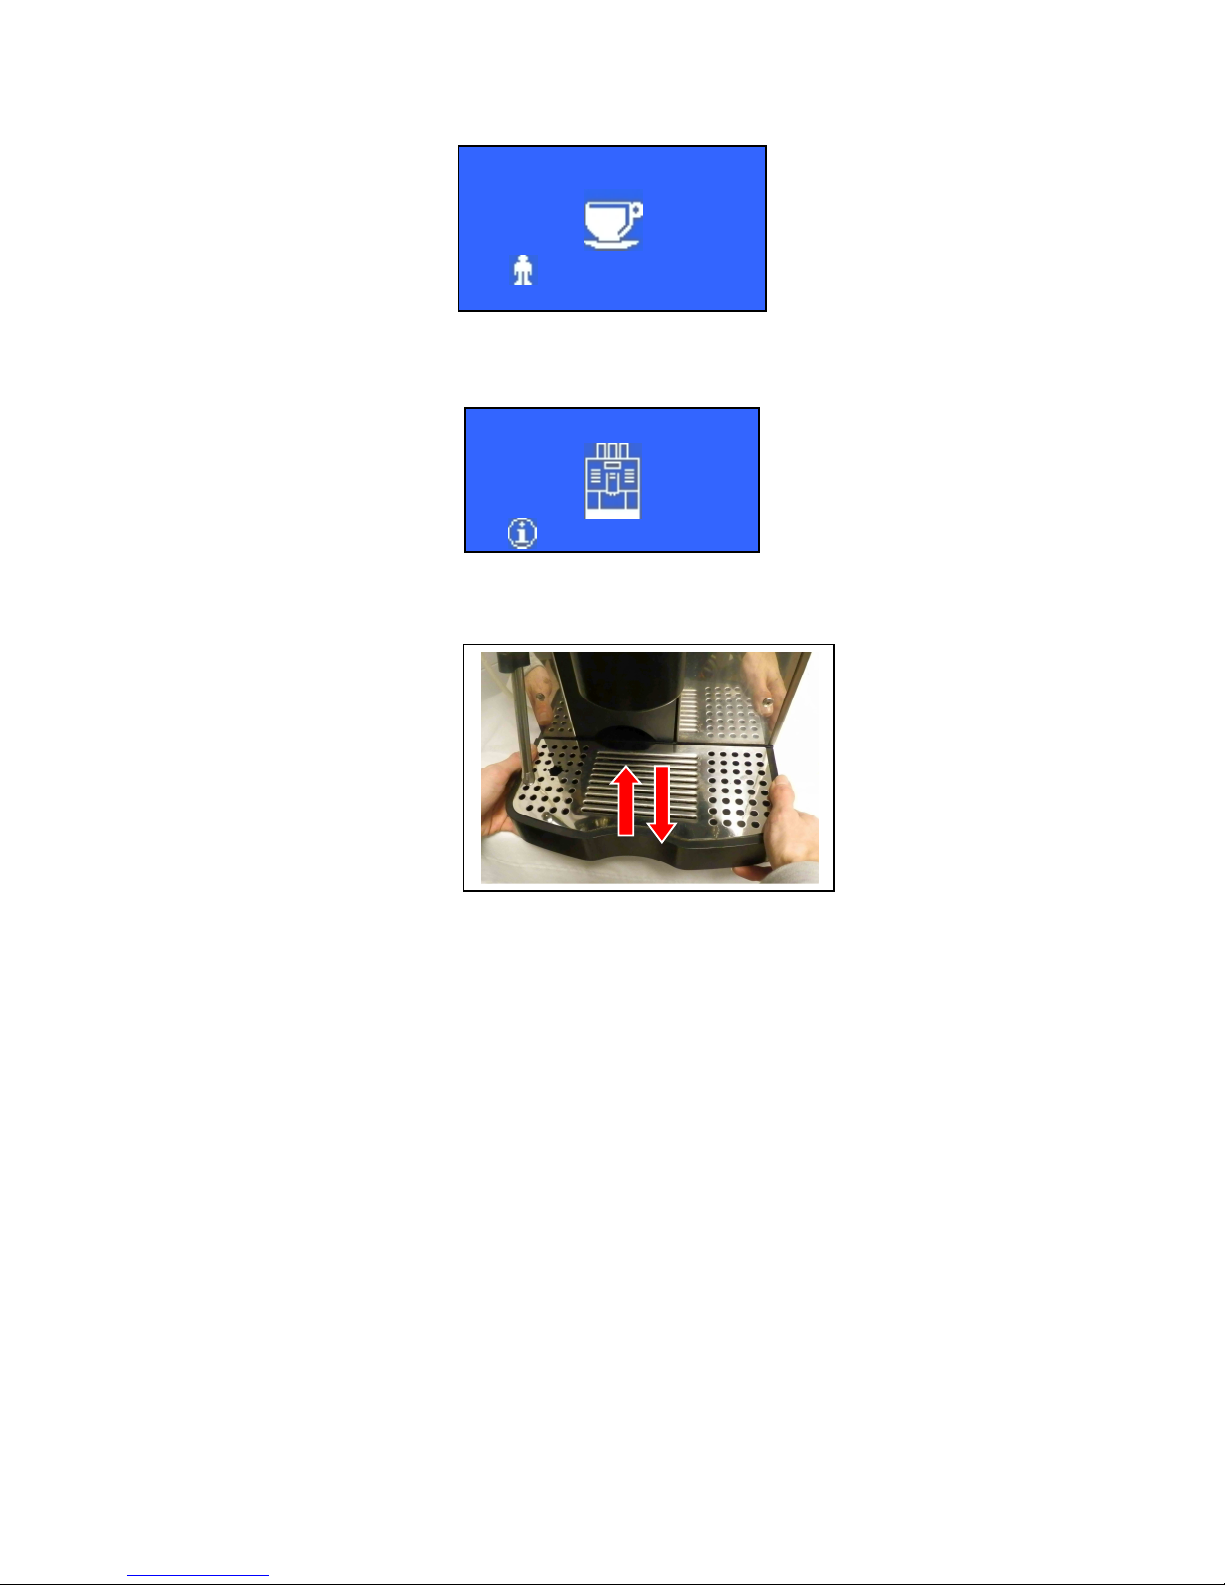
6) Message of drip tray full
The display will show the following message:
Cause: the drip tray is full, the quantity of water inside the drip tray touches the level probe.
Result: shutdown of the dispensing keys.
Solution: press Info key, the display shows:
remove the drip tray and empty it.
PLEASE NOTE: FOR ALL OTHER MESSAGES PLEASE REFER TO YOUR SERVICE CENTER.
SELECT DRINK
DRIP TRAY FULL
EMTY THE DRIP TRAY
DRIP TRAY FULL
Page 15
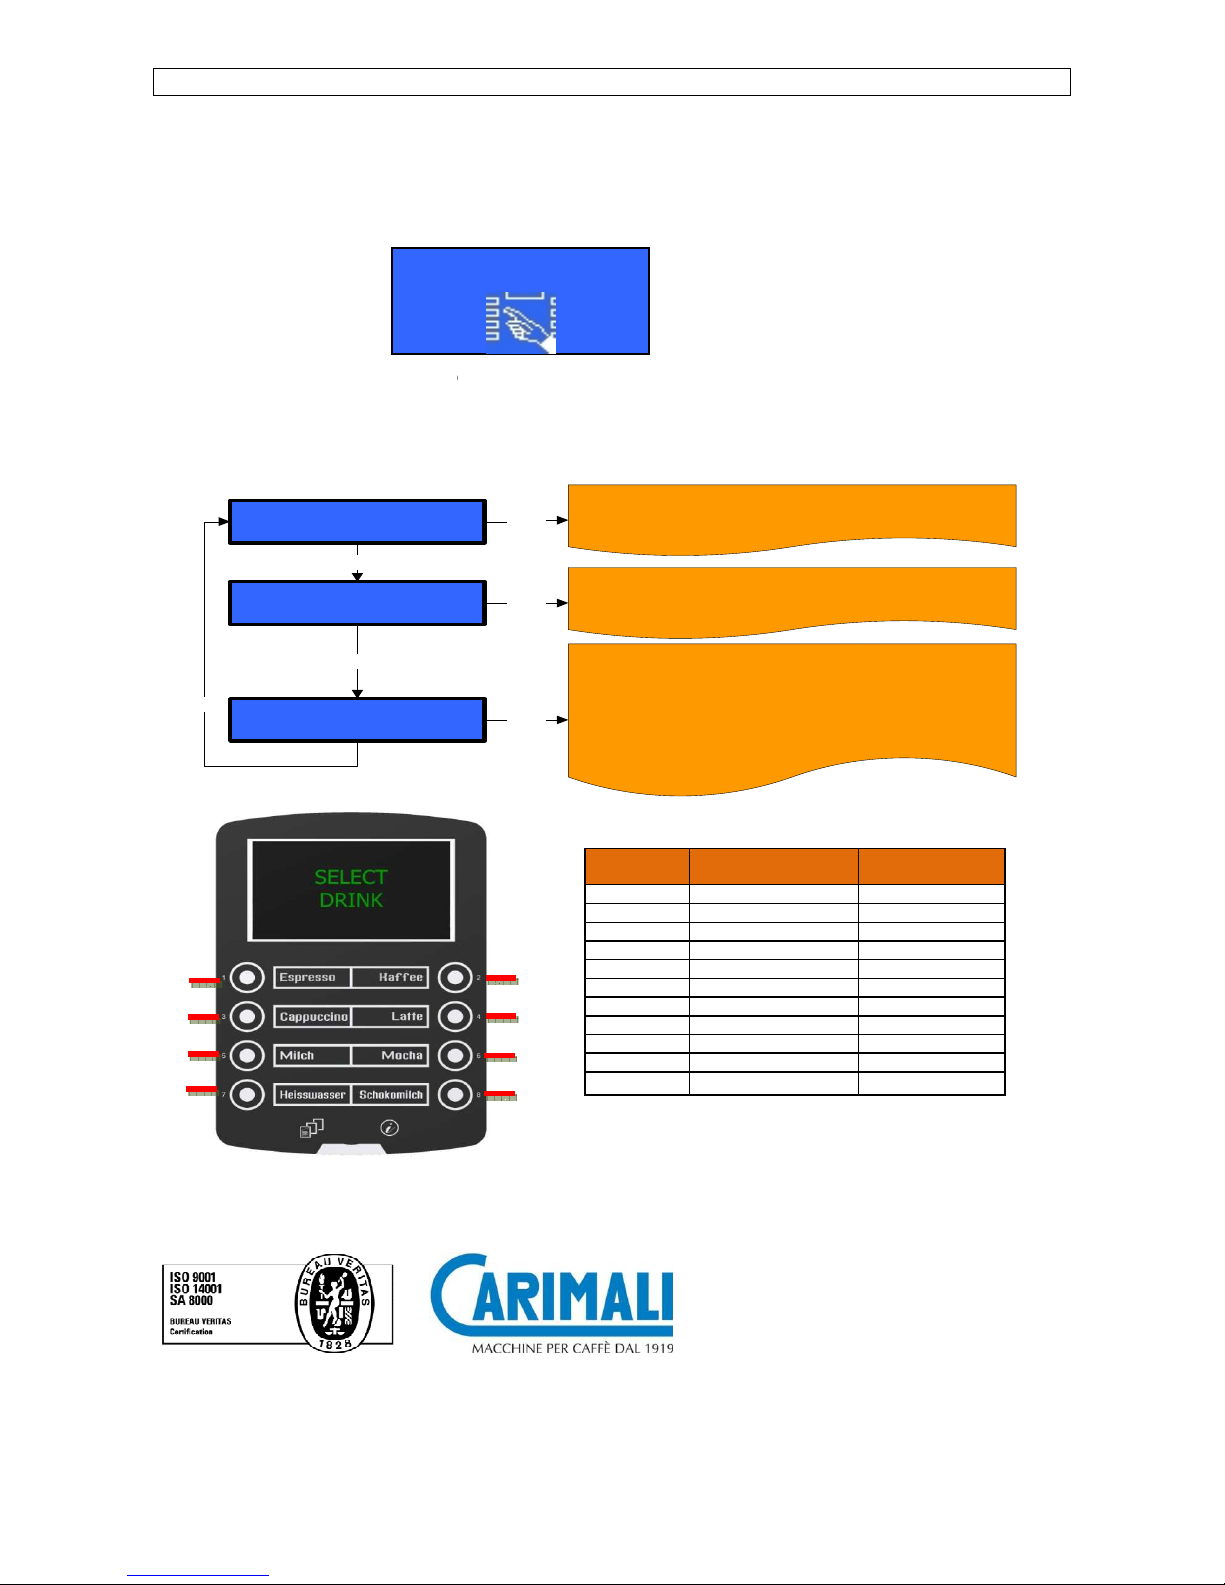
ACCESS THE MAIN SETT
A) ACCESS THE MAIN SETT
ING MENUS WITH PASSW
To enter the programming environments a password is required
The password must consist of 5 digits.
To insert the password proceed as follows:
- Turn the machine OFF
-
Keep “SHIFT” key pressed for 5 seconds. The display shows:
Enter one of the following passwords
by using digits from
- Owner 2 2 2 2 2
- Waiter 6 1 1 1 1
After inserting the password,
the display shows the main menu programming environments:
Select
Info - reset
Select
Dose programming
+ / -
Select
System manager
+ / -
-
Carimali S.p.A. con socio unico
Via Industriale, 1
T: +39 035 4949555 F
: +39 035 905447
www.carimali.com –
service@carimali.com
1
3
5
7
ING MENUS WITH PASSW
ORD
ORD
, it defines
the access rights to the different environments.
1 to 8:
Enter
Enter
Enter
Press (Enter)
key to show the following parameters
- Read doses data
- System data
Press (Enter)
key to show the following parameters
- Set doses
- Price set up
Press (Enter)
key to show the following sub
- System Clock Programming
- Service
- Alarm History
- Display Regulation
- Machine Parameter
- Group manual movements
- Change Password
- 24040 Chignolo d'Isola (BG) - Italia
PASSWORD
- - - - -
KEY
NUMBER
FUNCTION
1
Exit
( Edit )
2
Insert blank
3
Delete character
4
Scroll
5
-
6
+
7
Enter
8
Esc
9
Info
10 Shift /Clean
2
4
6
8
:
:
-menus:
NT-05317-00-EN
KEY
PASSWORD
1
2
3
4
5
6
7
8
 Loading...