

Carimali ETA BETA Series, ETA BETA 1 GROUPS, ETA BETA 2 GROUPS, ETA BETA 3 GROUPS Installation - Use - Maintenance
INSTALLATION, USE, MAINTENANCE
INSTALLATION, GEBRAUCH, WARTUNG
ETA BETA – LM
GB ENGLISH
D DEUTSCH
LB.00056.30
EDITION October, Oktober 2003
lb.00056.30 Pag. 2 26/05/10
lb.00056.30 Pag. 3 26/05/10

TABLE OF CONTENTS
INTRODUCTION AND GENERAL NOTES 5
INSTALLATION NOTES 5
USE AND MAINTENANCE NOTES 5
MAIN FEATURES 6
STARTING UP 7
DISPENSING 8
HOW TO MAKE A GOOD CUP OF COFFEE 9
WASHING 10
PROGRAMMING 11
SPECIAL FUNCTIONS FOR MACHINE CALIBRATION 11
SECURITY - ALARMS 13
SPECIAL MAINTENANCE 14
CONTROL UNIT LEGEND 14
lb.00056.30 Pag. 4 26/05/10

INTRODUCTION AND GENERAL NOTES
Thoroughly read the instructions contained in this booklet because it gives important information regarding safety for installation, use and maintenance.
Keep this booklet in a safe and accessible place for further consultation.
This machine must be used only for the purpose it was designed:
dispensing coffee, cappuccino, pouring hot water.
Any other use is to be considered inappropriate and therefore dangerous.
The manufacturer declines all responsibility for damage caused by any improper, incorrect and unreasonable use of the machine.
The use of any electric appliance implies the observance of some fundamental rules.
More specifically:
- do not touch the appliance with your hands or feet wet or damp
- do not use the appliance with bare feet
- do not pull the power cord to disconnect the plug from the power socket
- dot not leave the appliance exposed to the weather (rain, sun, frost)
- do not let children or untrained persons use the appliance.
Before carrying out any cleaning and maintenance, disconnect the appliance from the power supply, pulling the plug from the power socket and turning off
the main switch.
In case of failure or malfunction turn the machine off and do not attempt to carry out any repairs or direct operations on the machine.
All repairs must be carried out in an authorised service centre, using original spare parts only.
Failure to comply with the above recommendations will compromise the safety of the machine and the warranty conditions.
If this machine is no longer used we recommend that it is made inoperative by disconnecting the cable from the power supply, and all potentially dangerous
parts are made harmless, especially to protect children who might use the machine for their games.
INSTALLATION NOTES
Installation must be carried out according to the manufacturer’s instructions.
An incorrect installation can cause damage to persons, animals or things; the manufacturer declines all responsibility for such situation.
After unpacking check that the machine is not damaged.
If in doubt, do not use the machine and contact an Authorised Service Centre.
All packing materials (plastic wrapping, polystyrene, nails, etc.) are potentially dangerous and must be kept out of children’s reach and disposed of in a safe
manner for the environment.
Before connecting the machine to the power supply make sure that the rating information of the machine correspond to that of the power supply: if the
power socket is not compatible with the plug of the machine (if supplied), replace the socket with a proper one, ensuring that the size of the cable is suitable
for the absorbed power of the machine.
Make sure that the voltage rating of the machine corresponds to that of the power supply, and that the power supply is adequate to additional power
absorption of the machine.
After installing the main switch and fuses, connect the power cord of the machine to the main switch according to the attached electrical diagram.
The use of adapters, multiple power boards and extension cords is not recommended.
If it is absolutely necessary, then use only single or multiple adapters and extension cords which comply with current safety regulations, ensuring also that
the electricity load capacity of the single adapters and extension cords and the maximum power rating of the multiple adapters is suitable.
The electrical safety of this machine can be guaranteed only if correctly connected to an efficient earth circuit as indicated by current electrical safety
regulations.
It is necessary to check this fundamental safety prerequisite, and in case of doubt, ask a professionally qualified technician to check the circuit.
The manufacturer declines all responsibility for any damage caused by failure to earth the equipment.
In order to avoid any dangerous overheating, we recommend that the power cord be fully unwound.
In case of damage to the cord, contact exclusively an authorised service centre to have it replaced.
The power cord of this machine must not be replaced by the customer.
Do not leave the machine connected unnecessarily.
Turn off the main switch of the machine when not in use.
Do not cover the ventilation openings of the machine.
Place the machine at an adequate distance from walls, objects, etc.
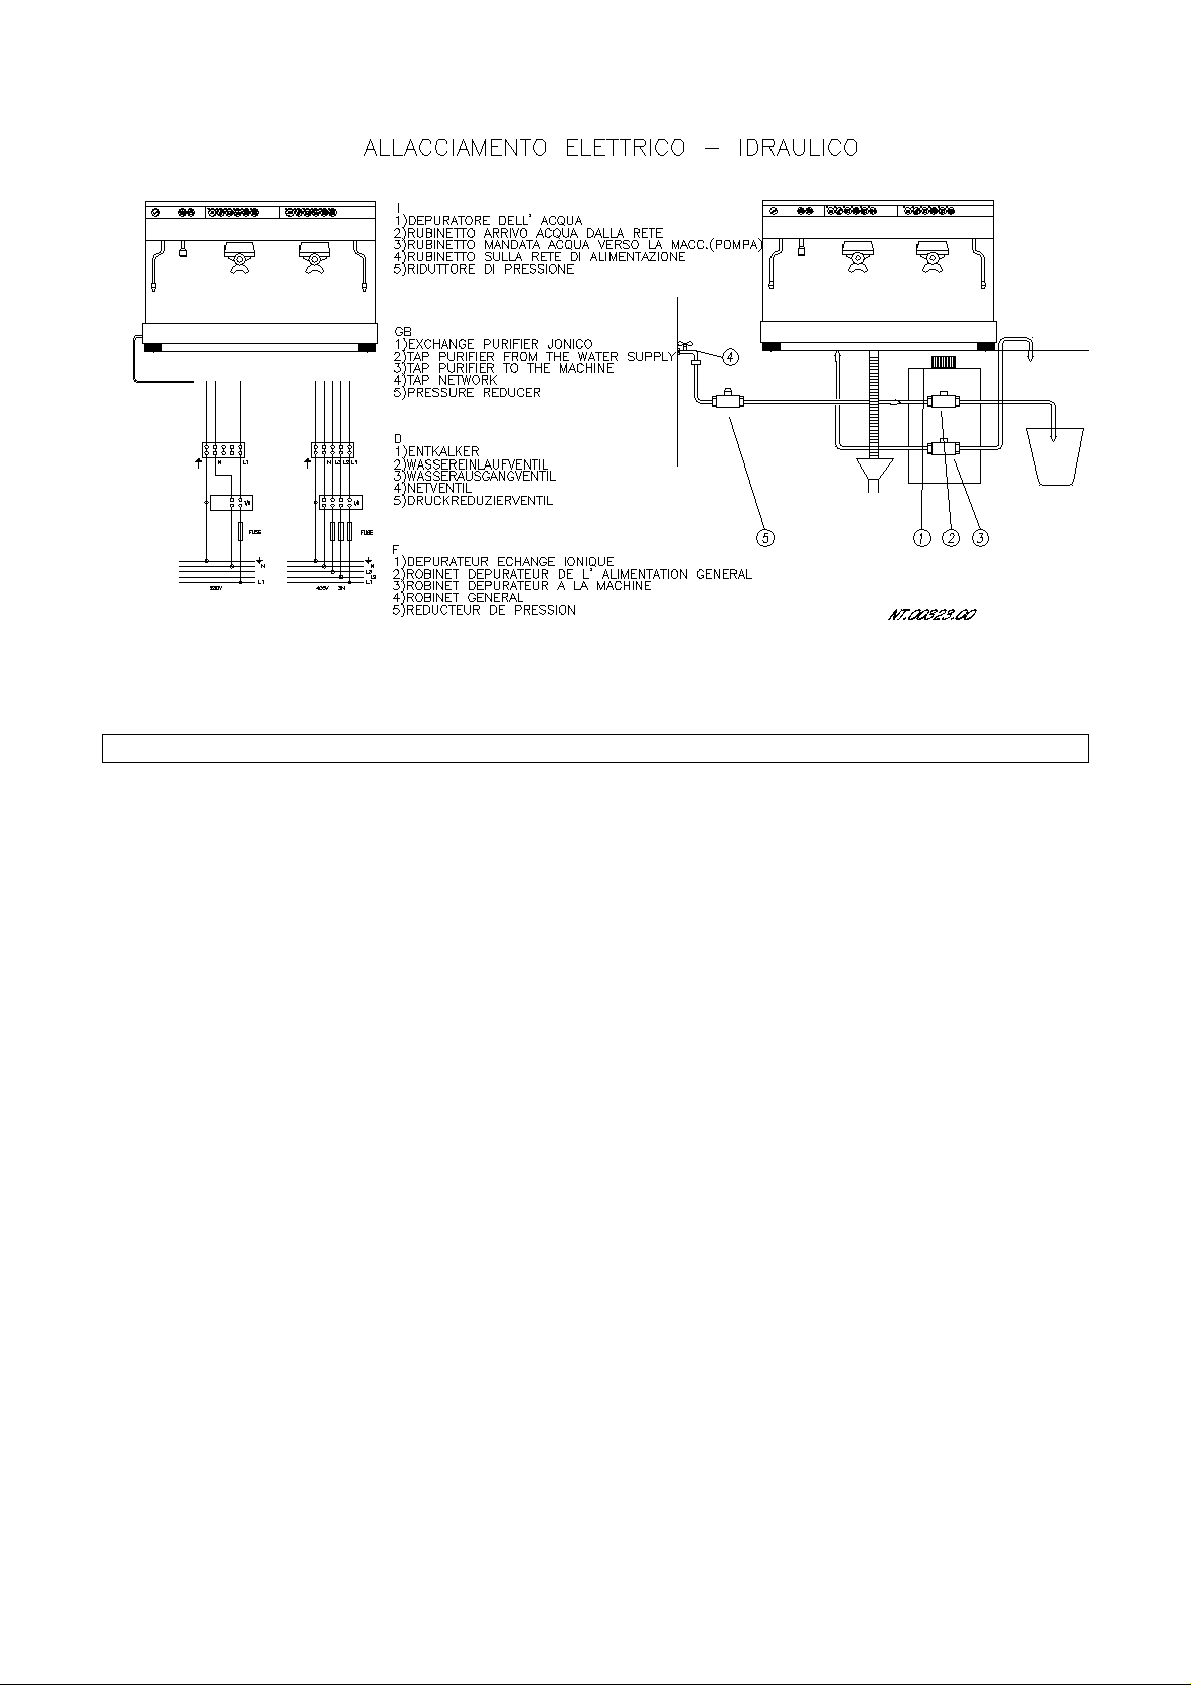
The machine must be connected to a system with a water pressure which is not greater than 5 bar (Kg/cm2).
If the pressure is greater, a pressure reducer must be installed.
The machine must be connected to a softener.
ENVIRONMENTAL CONDITIONS TO USE THE MACHINE
Environmental temperature: 5 – 45 °C (emp ty the hydraulic system in case of freezing)
Maximum humidity: 80% relative humidity
Water hardness: 5° eh, 7° dH, 13° Fh
USE AND MAINTENANCE NOTES
For a correct functioning of the machine it is fundamental to comply with the manufacturer’s instructions, having qualified personnel to carry out special
maintenance and to check all safety devices.
Do not use the machine without water.
Avoid to expose hands or other parts of the body to the coffee dispensing spouts or to the steam or hot water nozzles.
The water and steam from the nozzles is very hot and can cause severe burns.
The water and steam nozzles and the filter holders are very hot and therefore must be handled with care, holding them in the appropriate points.
Do not leave the machine in rooms where the temperature is below 0°C or 32°F without having first drai ned the boiler and the hydraulic circuit.
Cups and coffee cups must be placed on the cup-warmer tray (if fitted) only after having been fully drained.
Only the crockery related to the machine should be placed on the cup-warmer tray.
Placing any other object on the tray is to be considered incorrect.
La falta de la limpieza diaria de las maquinas para café Carimali S.p.A., principalmente el grupo café y el cappuccinatore, según el procedimiento indicado
en el presente manual, con los detergentes de la casa madre o compatibles, anula las condiciones de garantía vigentes.
lb.00056.30 Pag. 5 26/05/10
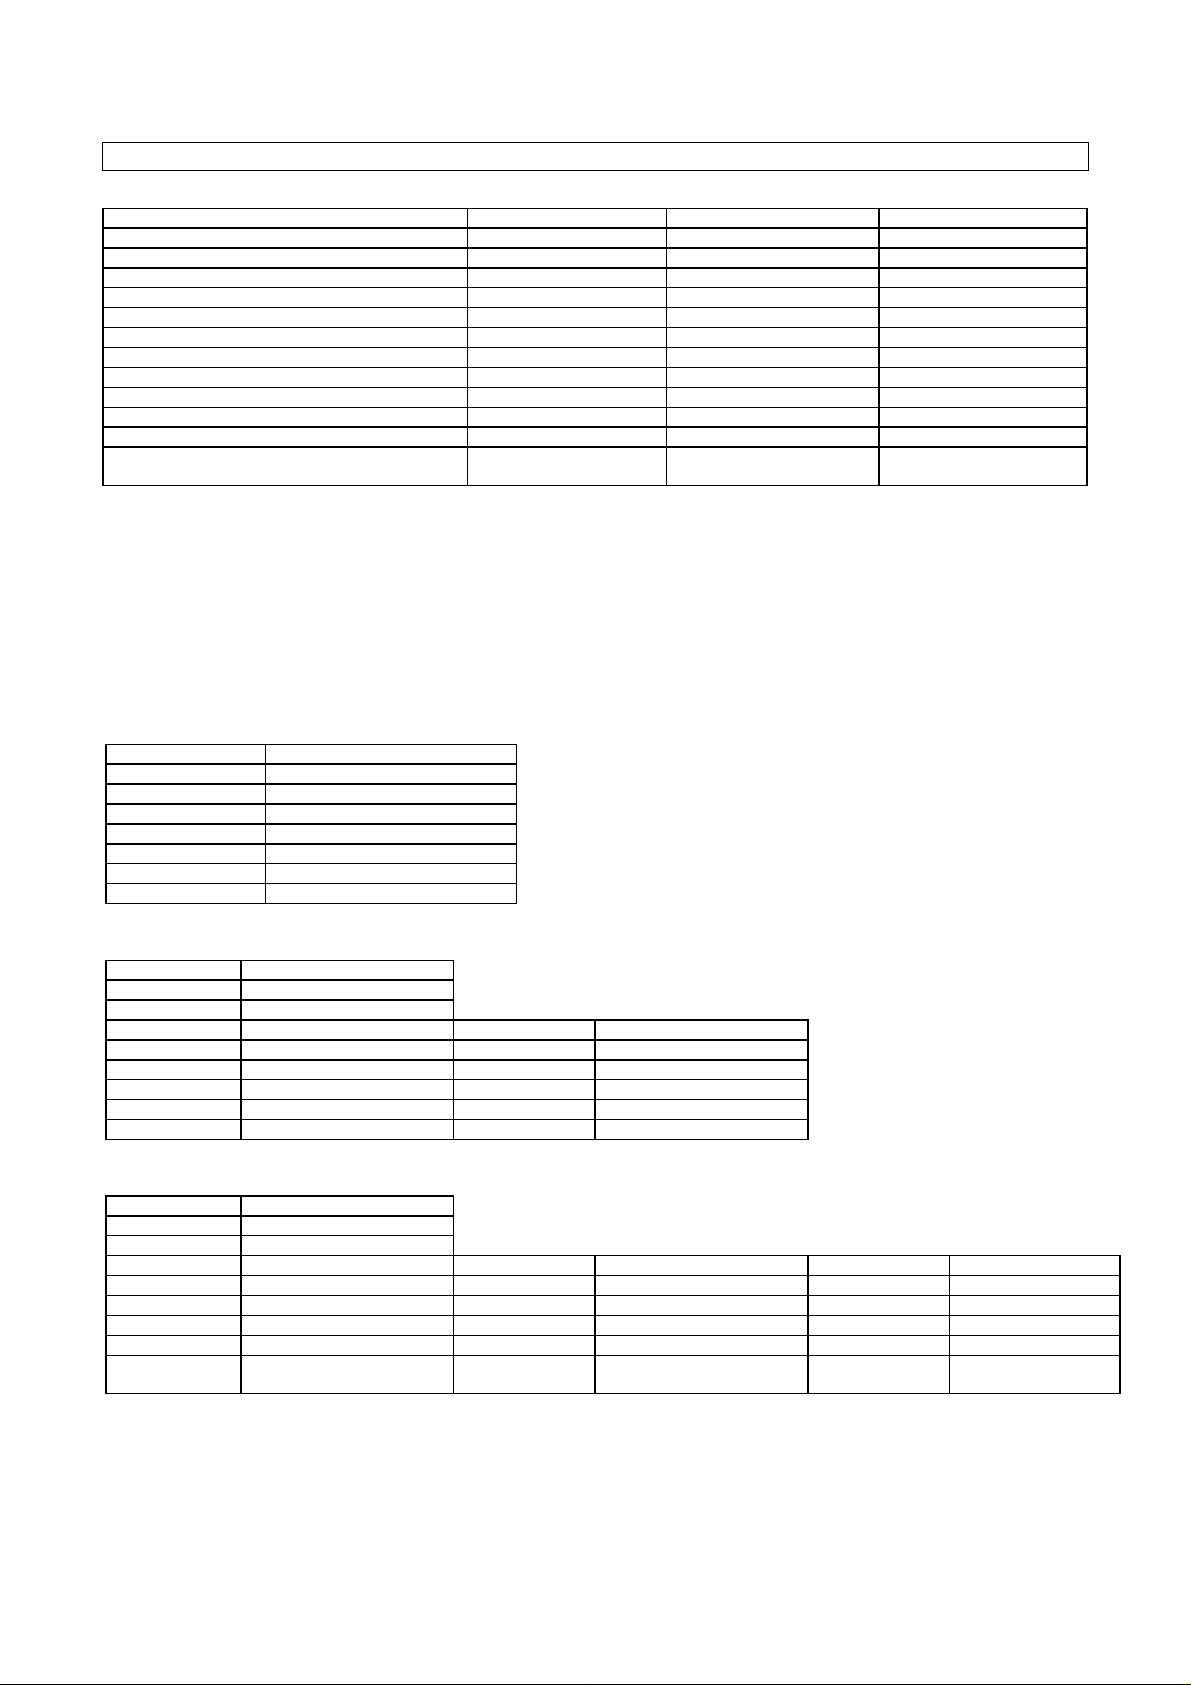
MAIN FEATURES
MACHINE
ETA BETA 1 GROUPS
ETA BETA 2 GROUPS
ETA BETA 3 GROUPS
Maximum quantity of coffee dispensed per hour 240 480 720
Width (mm.) 243 655 795
Height (mm.) 500 500 500
Depth (mm.) 500 500 500
Net weight (Kg.) 43 53 64
Boiler capacity (lt.) 4 10 14
Hot water nozzle 1 1 1
Steam nozzle 1 2 2
Automatic cappuccino LM maker optional 1 1+1 1+1
Brewer group resistor W (PTC) 70 70+70 70+70+70
Boiler resistor (W) Standard version 1600 30000 5000
Voltage 230 single phase 230V single or three-phase
Materials used:
- Copper for boiler and piping
- reinforced silicone for the articulated feed tube
- reinforced silicone for the articulated pump tube
- brass chromed for the brewing group
- brass for taps and connections
- metal bodywork.
Included with the machine is a pipe and connection for attaching the drip tray to a direct waste discharge system.
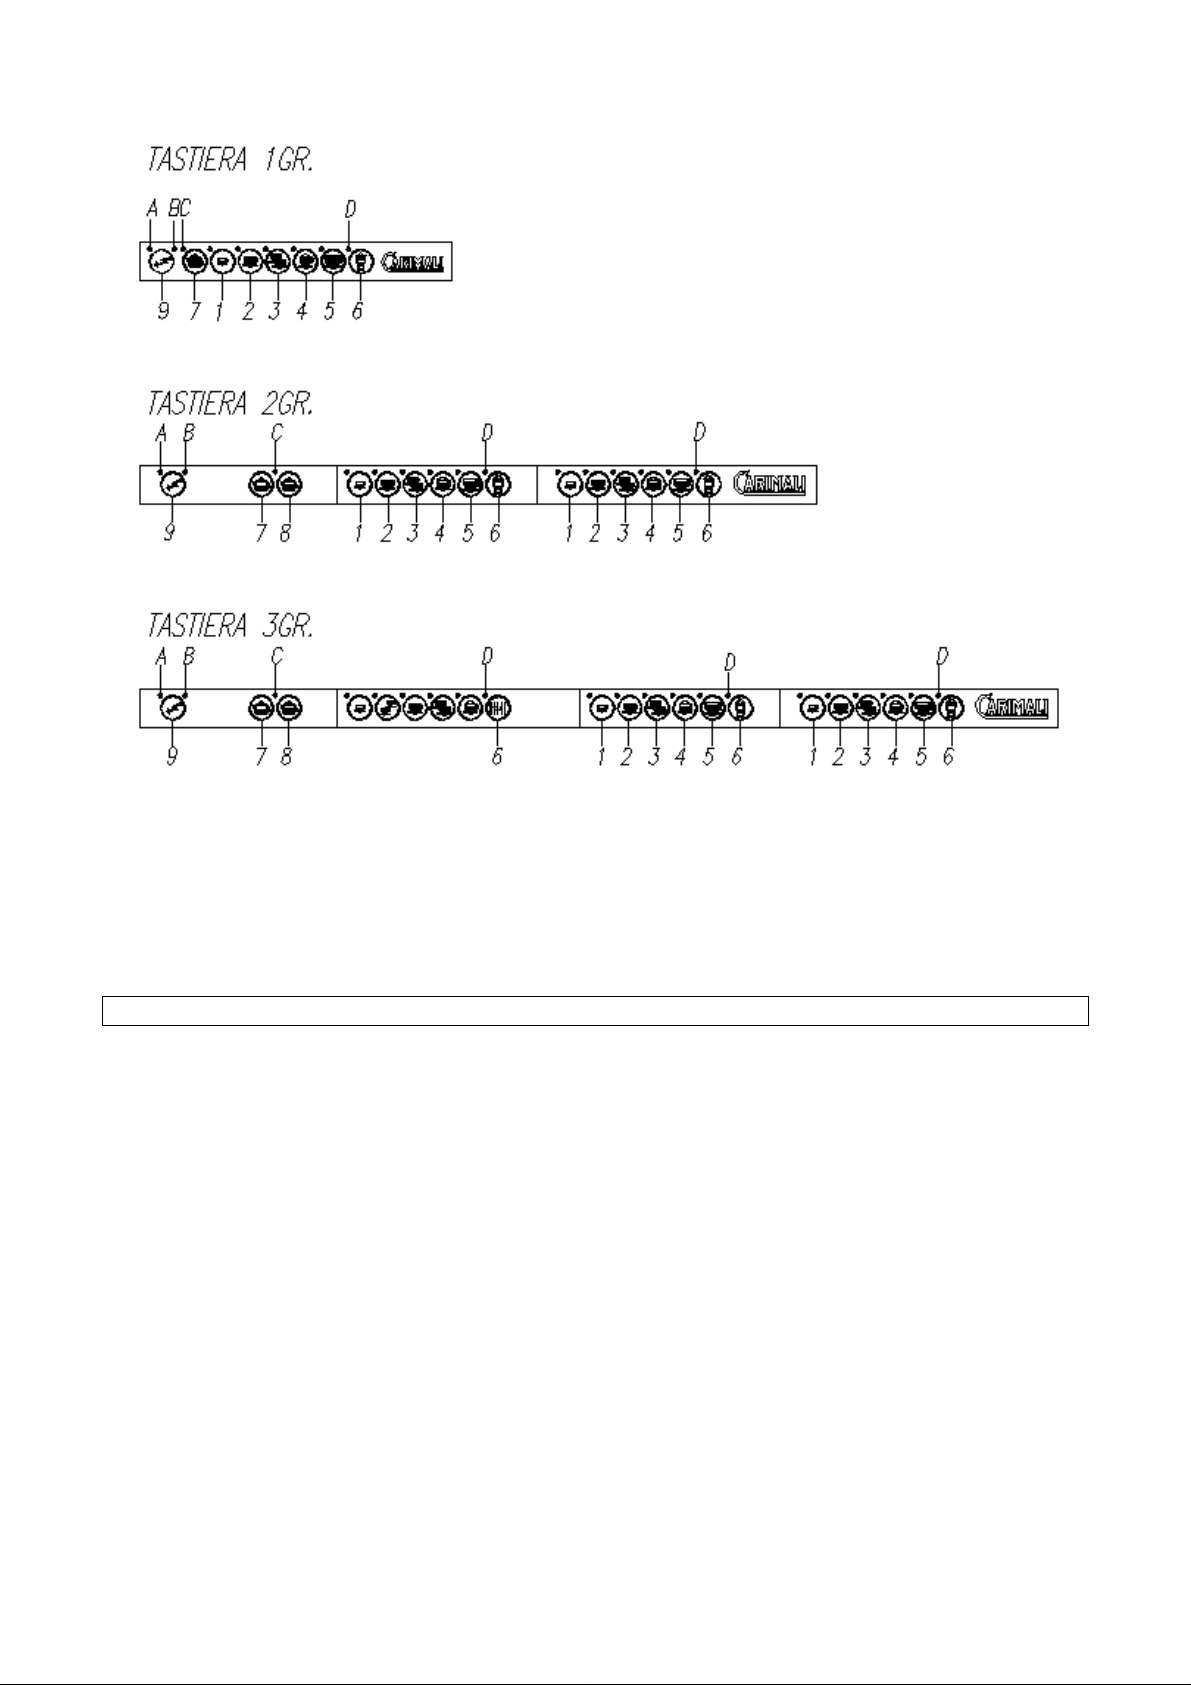
Machine keypads Eta Beta 1.
Services keypad: On / OFF
Tea key/Programming
Group keypad: 1 espresso key
1 long coffee key
2 long coffees key
1 cappuccino key
1 caffè latte key
1 latte macchiato
Machine keypads Eta Beta 2.
Services keypad On / OFF
Tea key/ Programming
Tea key
Group 1 keypad 1 espresso key Group 2 keypad 1 espresso key
1 long coffee key 1 long coffee key
2 long coffees key 2 long coffees key
1 cappuccino key 1 cappuccino key
1 caffè latte key 1 caffè latte key
1 latte macchiato key 1 latte macchiato key
Machine keypads Eta Beta 3.
Services keypad On / OFF
Tea key/ Programming
Tea key
Group 1 keypad 1 espresso key Group 2 keypad 1 espresso key Group 3 keypad 1 espresso key
2 espressos key 1 long coffee key 1 long coffee key
1 long coffee key 2 long coffees key 2 long coffees key
2 long coffees key 1 cappuccino key 1 cappuccino key
1 long coffee key 1 caffè latte key 1 caffè latte key
Continuos cycle
N.B. In the Eta Beta 3 machine, all the keys on group 1 keypad dispense coffee based drinks and there is also the “Continuous” key
which enables continuos dispensing.
1 latte macchiato key 1 latte macchiato key
400V three-phase
230V single or three-phase
400V three-phase
lb.00056.30 Pag. 6 26/05/10
Peripheral applications.
Serial output RS 232 C for:
- I/O interface
- mini-counter 1 key
- mini counter with 15 keys.
NOTE:
The registration and technical data plate of the machine is on the front of the machine itself.
STARTING UP
Open the water mains supply tap and switch on the power line switch. The machine will automatically set itself to OFF status: red LED
on.
Press the N° 9 ( ON / OFF) key to switch the machine on. The machine will set itself to ON status: B LED on.
Press the N° 9 ( ON / OFF ) key to switch the machine off. The machine will set itself to OFF status: A LED on.
The machine will automatically carry out the following operations:
Re-filling the boiler.
This operation will automatically stop when the level of the probe is reached.
Heating the boiler.
This phase will automatically stop when the pressure level in the boiler is reached.
PLEASE NOTE:
The pressure switch controls the temperature inside the boiler and the pressure gauge on the front of the machine indicates the
calibrating pressure which is normally 1-1.1 bars.
Infuser group heating.
During this phase the group will reach the standard temperature for which the machine has been preset. No electronic control is
provided.
The keypads will be functional when the “B” light is on. It is still necessary for the boiler to reach the correct pressure.
lb.00056.30 Pag. 7 26/05/10
DISPENSING
1) Coffee Dispensing.
Place a cup under the dispenser and press one of the coffee dose keys (N° 1-2-3). The dose will automa tically stop once the preprogrammed dose has been delivered.
The system can be used for the simultaneous dispensing of coffee from all the groups on the machine.
2) Cappuccino Dispensing.
Put a cup under the dispenser and press dose key N° 4. The light on the selected key will remain lit until the beverage has been
completely delivered.
3) Caffe latte Dispensing.
Put a cup under the dispenser and press dose key N° 5. The light on the selected key will remain lit until the beverage has been
completely delivered.
The machine will first dispense the coffee, then after X seconds hot milk followed by foamed milk.
4) Latte macchiato Dispensing.
Put a cup under the dispenser and press dose key N° 6. The light on the selected key will remain lit until the beverage has been
completely delivered.
The machine will first dispense the hot milk, then foamed milk followed by a pause (no dispensing) and lastly coffee.
N.B. The pause is set in order to allow the milk to layer before the coffee is dispensed.
5) Extra milk function.
Put the milk suction tube of the cappuccino maker into the milk container and place a cup under the dispenser.
Keep key N° 4 pressed and after a few seconds milk will start being dispensed.
Stop the dispensing by pressing key N° 4.
6) Hot water dispensing.
Place a cup under the dispenser and press one of the keys N° 7 – 8 (Tea).
The dispensing will stop automatically once the dose is completed.
7) Dispensing steam.
Warm up drinks (milk, cognac, etc) as follows:
slowly turn the steam lever on, and then dip the nozzle in the drink.
turn the steam lever back on for a moment to purge the nozzle from any liquid trapped inside.
This operation is very important as it prevents milk or other liquids from being drawn into the boiler.
PLEASE NOTE:
a) The dispensing cycles can be stopped by pressing the selected dose key again.
In the case of milk based doses, pressing for the first time will stop dispensing the milk, a second time will stop dispensing the
coffee.
b) Do not dispense milk based drinks if the milk in the container has run out.
lb.00056.30 Pag. 8 26/05/10
Condition of the coffee
It comes out slowly
It comes out rapidly
HOW TO MAKE A GOOD CUP OF COFFEE
The physical state of the ground coffee is fundamental for a good beverage.
Dose of ground coffee Excessive Insufficient
Pressure on ground coffee Excessive Insufficient
Atmospheric humidity Too damp Too dry
Degree of grinder Too fine Too coarse
Filter condition Partly clogged, dirty Holes enlarged by wear
Proceed with preparation of the first cups of coffee:
Fill the filter with the correct quantity of ground coffee and press it lightly by means of the special presser.
The machine is supplied with the following as standard:
Dosage and grinding must be set according to the machine and strength of coffee desired.
If too much coffee is used, the filter holder cannot be inserted into the unit; if too little coffee is used, the coffee grounds get too wet.
For a perfect cup of coffee, it is advisable to have a self-dosing coffee grinder beside the machine.
This will give improved quality of the coffee, and ensure it is kept constant because it is freshly ground.
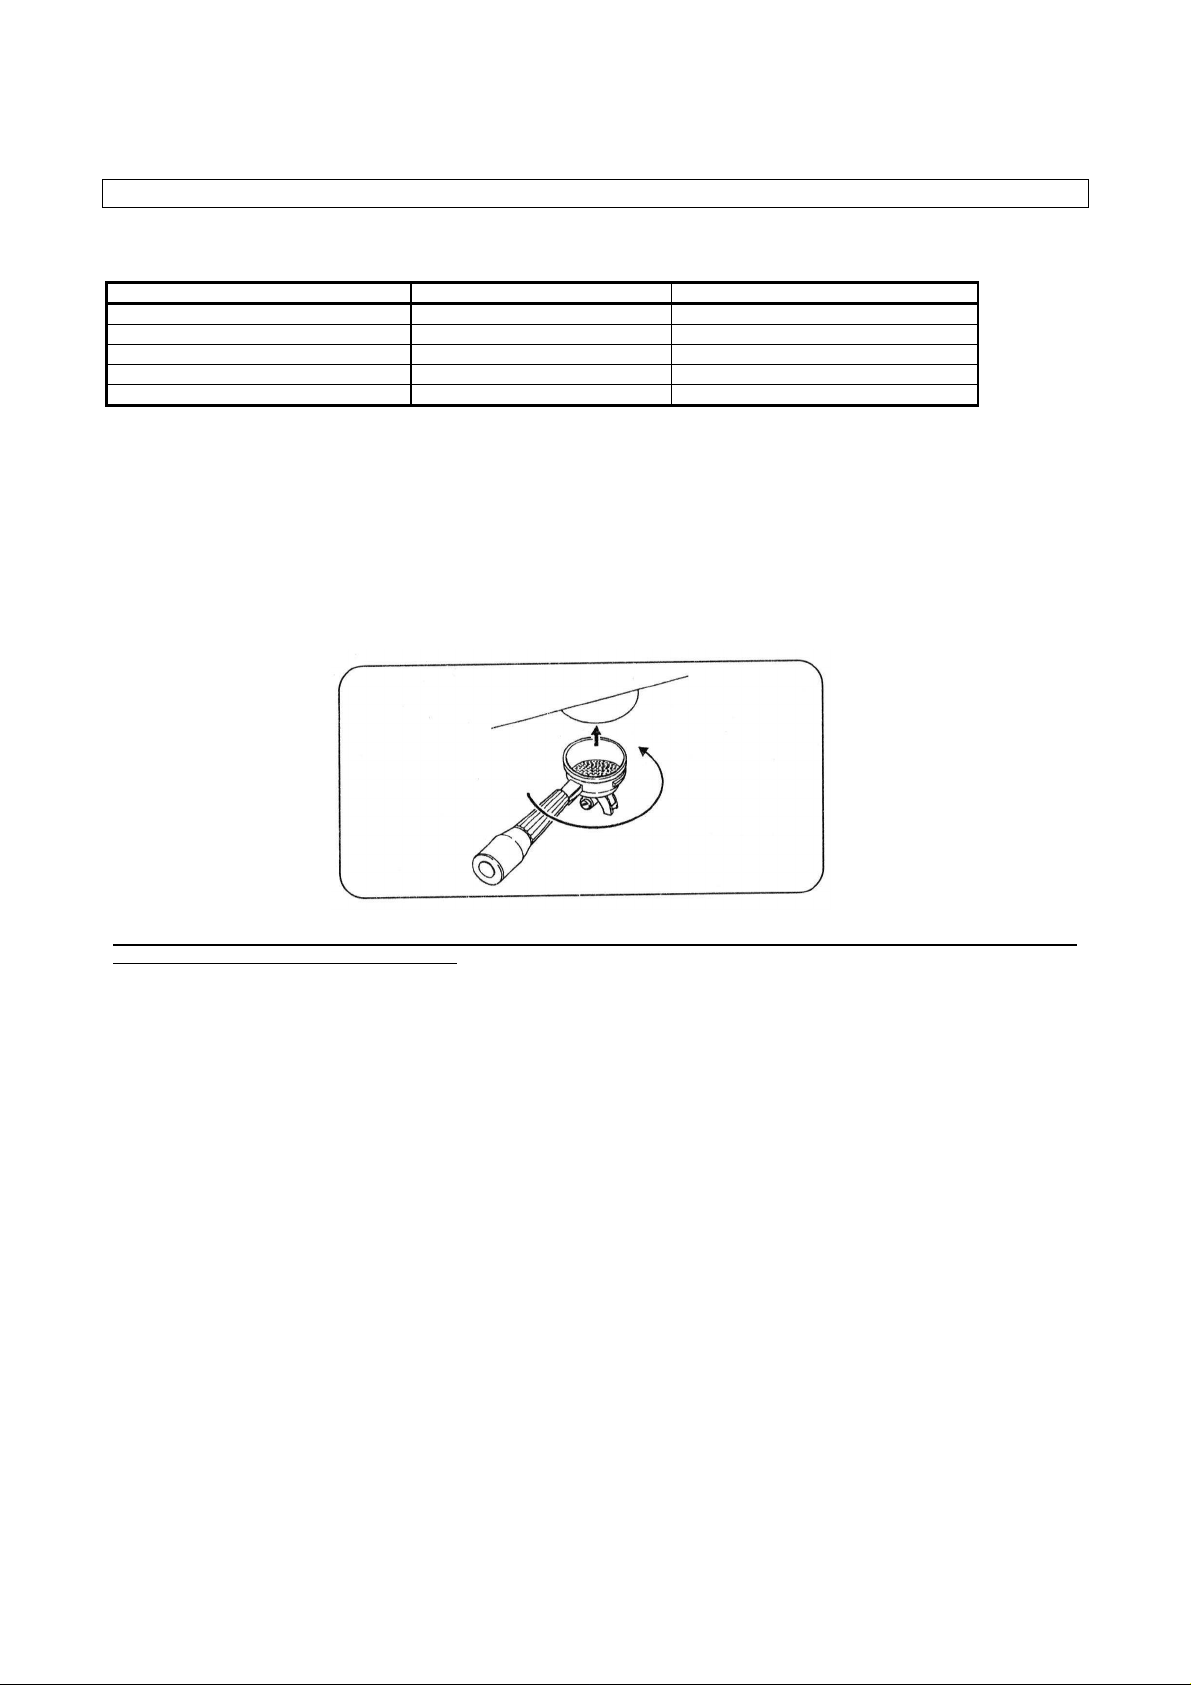
Fit the filter holder into the unit with the knob facing to the left, then turn in to the right until it locks.
When the coffee grounds have to be emptied out, knock the filters against a wooden surface and not a metal one as this could damage
the edge of the filter and jeopardise its tightness.
lb.00056.30 Pag. 9 26/05/10

WASHING
1) Washing the group and filter holder.
It is advisable to carry out these types of washing at the end of each working day.
1a) washing the filter holders.
Carry out the following operations:
Remove the filters from the filter holders and wash both parts under running water.
Remove the remaining coffee using a cloth.
If the filters get clogged up and you cannot manage to clean them by washing, it is advisable to place it under a naked flame to burn any
coffee particles remaining in the holes.
This operation should not be carried out frequently, as it may damage the filter.
1b) washing the group gasket.
Carry out the following operations:
Insert the blind filter membrane supplied in the filter holder.
- Turn the machine Off;
- While keeping the key N. 7 pressed, press the key N. 1 of the group you want to clean. The group will dispense at pulses for a total
duration of 90 seconds;
- Slightly open and close the filter holder a few times, letting the water flow out. Be careful not to let hands and other parts of the body
come into contact with water, in order to avoid danger of burns;
- If necessary repeat this operation several times, and remove the remaining coffee from the group gasket using a cloth.
PLEASE NOTE: Only for Eta Beta 2-3 groups.
1c) washing the third duct of the group.
Carry out the following operations:
- Insert the blind filter membrane supplied in the filter holder;
- Turn the machine Off;
- While keeping the key N. 7, press the key N. 1 of the group you want to clean. The group will dispense at pulses for ten times for a
total duration of 90 seconds.
PLEASE NOTE: Only for Eta Beta 2-3 groups.
2) washing the cappuccino maker.
We recommend carrying out this type of washing several times a day.
Carry out the following operations:
- Turn the machine Off;
- Insert the milk suction tube in a glass of cold water, containing detergent;
- While keeping the key N. 7 pressed, press the key N. 6 of the group where you want to clean the cappuccino maker. The
cappuccino maker will dispense steam at pulses for a total duration of 60 seconds.
PLEASE NOTE:
a) Only for Eta Beta 2-3 groups;
b) At the end of each working day, the cappuccino maker should be dismantled and cleaned by hand using a detergent. Take care in
reassembling the cappuccino maker parts correctly.
lb.00056.30 Pag. 10 26/05/10

PROGRAMMING
1) Programming the coffee dose or hot water dose for tea.
The following procedure is valid only for the coffee based keys, not for the milk based keys.
- Press key N° 7 and keep it pressed for five seconds. The programming level is shown by the flashing light D on the keys N° 6.
- press the coffee or tea dose key to be programmed and the beverage will start being dispensed;
- press the selected dose key again when the required dose has been delivered. The dose will be stored in memory automatically.
2) Programming key N° 4 (cappuccino) dose.
The following procedure is only valid for key N° 4.
- Press key N° 7 and keep it pressed for five seconds. The programming level is shown by the flashing light D on the keys N° 6.
- press dose key N° 4 and the coffee will start being dispensed;
- when the required dose of coffee has been delivered, press the key again and the coffee dose will stop. Next, the foamed milk will
start being dispensed.
- press the selected dose key again when the required dose of foamed milk has been delivered. The dose will be stored in memory
automatically.
3) Programming key N° 5 (Caffe latte) dose.
The following procedure is only valid for key N° 5.
- Press key N° 7 and keep it pressed for five seconds. The programming level is shown by the flashing light D on the keys N° 6.
- press dose key N° 5 and the coffee will start being dispensed;
- press the coffee dose key again when the required coffee dose has been delivered. A pause (no dispensing) starts;
- and once the required pause is over, press the selected key again and the hot milk will start being dispensed;
- once the required hot milk has been delivered, press the selected key again and the foamed milk will start being dispensed;
- press the selected dose key again when the required dose of foamed milk has been delivered. The dose will be stored in memory
automatically;
4) Programming key N° 6 (Latte macchiato) dose.
The following procedure is only valid for key N° 6.
- Press key N° 7 and keep it pressed for five seconds. The programming level is shown by the flashing light D on the keys N° 6.
- press dose key N° 6 and the coffee will start being dispensed;
- press the coffee dose key again when the required coffee dose has been delivered. A pause (no dispensing) starts;
- and once the required pause is over, press the selected key again and the hot milk will start being dispensed;
- once the required hot milk has been delivered, press the selected key again and the foamed milk will start being dispensed;
- press the selected dose key again when the required dose of foamed milk has been delivered. The dose will be stored in memory
automatically.
PLEASE NOTE:
For all the programmed milk based doses, the coffee dose will always be dispensed before the milk.
SPECIAL FUNCTIONS FOR MACHINE CALIBRATION
Only Assistance Service personnel authorised by CARIMALI S.P.A. are permitted to enable the use of these functions.
1) Reset machine parameters.
This function is used to reset all the counts and the water and steam values will return to the standard ones. Moreover, all the software
settings will be eliminated, and the cappuccino maker definition.
It is also possible to remove all eventual incorrect operating data from memory.
The procedure is performed as follows:
- power down the machine;
- supply power by keeping pressed keys N° 7 and N° 6 of the left-hand group until the respective light D comes on.
- power down the machine;
- power up the machine again. At this point it is ready for use.
2) Configuration for milk ( PRE ).
By enabling this configuration, the milk will be dispensed before the coffee in the cappuccino dose (key N° 4).
The procedure is carried out in the following way:
- Cut off the power supply to the machine;
- power up the machine while keeping key N° 1 pressed until the light D on key N° 6 of the same keypad comes on;
- cut off the power supply to the machine;
- power up the machine again. At this point it is ready for use.
3) Configuration for milk ( POST ).
By enabling this configuration, the milk will be dispensed after the coffee in the cappuccino dose (key N° 4).
The procedure is carried out in the following way:
- Cut off the power supply to the machine;
- power up the machine while keeping key N° 2 pressed until light D on key N° 6 of the same keypad comes on;
- cut off the power supply to the machine;
- power up the machine again. At this point it is ready for use.
lb.00056.30 Pag. 11 26/05/10

4) Enabling the dispensing of milk based doses for keys N° 4 (Cappuccino), N° 5 (Caffe latte) and N° 6 (Latte macchiato).
This function enables the dispensing of milk based doses for keys N° 4, N° 5 and N° 6.
The procedure is carried out in the following way:
- Cut off the power supply to the machine;
- power up the machine while keeping key N° 3 pressed until light D on key N° 6 of the same keypad comes on;
- cut off the power supply to the machine;
- power up the machine again. At this point it is ready for use.
5) Disabling the dispensing of milk based doses for keys N° 4 (Cappuccino), N° 5 (Caffe latte) and N° 6 (Latte macchiato).
This function disables the dispensing of milk based doses for keys N° 4, N° 5 and N° 6, thus allowing only coffee based doses to be
dispensed.
The procedure is carried out in the following way:
- Cut off the power supply to the machine;
- power up the machine while keeping key N° 4 pressed until the light D on key N° 6 of the same keypad comes on;
- cut off the power supply to the machine;
- power up the machine again. At this point it is ready for use.
6) Calibrating expansion valve of the coffee water exchanger.
To calibrate the working pressure (12 Bars), rotate the rubber sitting holder connection of the expansion valve “15” clockwise to increase
it, and anti-clockwise to decrease it.( see hydraulic diagram )
The working pressure is displayed on pressure gauge “7” , when the machine has a steady stand-by temperature.
7) Calibrating the steam boiler pressure switch
To calibrate the working pressure of the steam boiler (0.9-1.1 Bars), rotate the “PR” pressure switch screw (see hydraulic diagram)
clockwise to increase it, and anti-clockwise to decrease it.
The working pressure of the steam boiler is displayed on pressure gauge “6”, when the machine has a steady temperature.
8) Calibrating the coffee dispensing pressure (pump pressure).
To calibrate the coffee dispensing pressure (8-9 Bars), rotate the “MP” pumping body screw (see hydraulic diagram) clockwise to
increase it, and anti-clockwise to decrease it.
The adjusting screw is reached through the special hole behind the coffee grounds bin.
The coffee dispensing pressure is displayed on pressure gauge “7” ; when the machine is in the coffee dispensing phase.
9) Cold – hot water mix flow adjustment for coffee group .
The cold water mix solenoid valve (Y2.9) adjustment screw must be adjusted as follows to change the amount of cold water that is
mixed with the hot for making coffee :
- turn the adjustment screw on the solenoid valve in a clockwise direction to reduce the amount of cold water.
- turn the adjustment screw on the solenoid valve in an anticlockwise direction to increase the amount of cold water.
See (NT-00448).
lb.00056.30 Pag. 12 26/05/10

Default settings.
1 Espresso 50
1 long coffee 100
2 long coffees 200
1 Cappuccino 50 9”
1 Caffe latte 50 5” 5”
1 Latte macchiato 50 10” 14”
Tea solenoid valve: 10 seconds.
Keypad Coffee (cc) Foamed milk Steam milk
SECURITY - ALARMS
1) Boiler filling alarm.
Causes: the stage of boiler fillings has exceeded the maximum time of 2 minutes; the level of the probe (SLC) has not been reached.
Result: the machine is OFF, and all the keypad leds flash simultaneously.
Solution: carry out the following controls.
1) Level probe (SLC) is dirty, so isolated from the water (the complete filling of the boiler is checked)
2) no water from mains
3) low water pressure
4) faulty motor pump
5) faulty filler solenoid valve
6) incorrect electrical connections (level probe (SLC) cord stopped.
2) Boiler minimum level alarm.
Cause: the water level in the boiler has dropped lower than the safety level (SLS).
Result: the heating is disabled, the boiler pressure gauge indicates a falling pressure.
Solution: carry out the following controls.
1) Level probe (SLC) is earthen
2) no water from mains
3) low water pressure
4) faulty motor pump
5) faulty filler solenoid valve
6) incorrect electrical connections (safety probe (SLC) cord stopped.
3) Turbine alarm.
Cause: the volume meter is not sending signals to the control unit within a time-out of 5 seconds.
Result: delivery continues up to a time-out of 240 seconds or until the selected key is pressed.
Solution: carry out the following controls.
1) No water from mains (coffee is not dispensed)
2) clogged group piston filters (coffee is not dispensed)
3) faulty group solenoid valve (coffee is not dispensed)
4) clogged entrance filters (coffee is not dispensed)
5) blocked or faulty volume meter (coffee dispensed continuously)
6) faulty electrical connection (coffee dispensed continuously).
Note: If the coffee is dispensed continuously, use the machine as if it were manual: press the required key to start up the dose, then
press the same key to stop the dose being dispensed, after checking the amount in the cup.
4) Safety thermostat operation.
Cause: The water level in the boiler has dropped lower than the resistor.
Result: the heating is disabled, the boiler pressure gauge indicates a falling pressure.
Solution: carry out the following controls.
1) Level probe (SLC) and safety probe (SLS) are earthen
2) level probe (SLC) is earthen and resistor remote control switch has stuck contacts.
5) Safety valve operation.
Cause: overpressure in steam boiler
Result: the 1.7-1.9 bar safety valve opens and releases steam in the upper part of the machine.
Solution: carry out the following controls:
1) Pressure switch contact is stuck
2) pressure switch feed tube is clogged
3) contacts of resistor remote control switch are stuck.
6) Anti-vacuum valve.
The "10" anti-vacuum valve (see hydraulic diagram) is installed on the boiler and prevents any air remaining during the loading phase
and a depression being created during the heating phase.
7) Anti-suction valve.
The anti-suction valve is installed on the steam taps and prevents milk from entering into the boiler when there is a depression.
lb.00056.30 Pag. 13 26/05/10
8) Non-return valve.
The "2" non-return valve (see hydraulic diagram) is installed between the "EC" loading solenoid valve and the boiler, and has the
following function:
During the loading phase it opens by means of the water pressure, letting the water enter into the boiler.
Once the loading phase is over, it closes preventing the water in the steam boiler from returning to the water supply network.
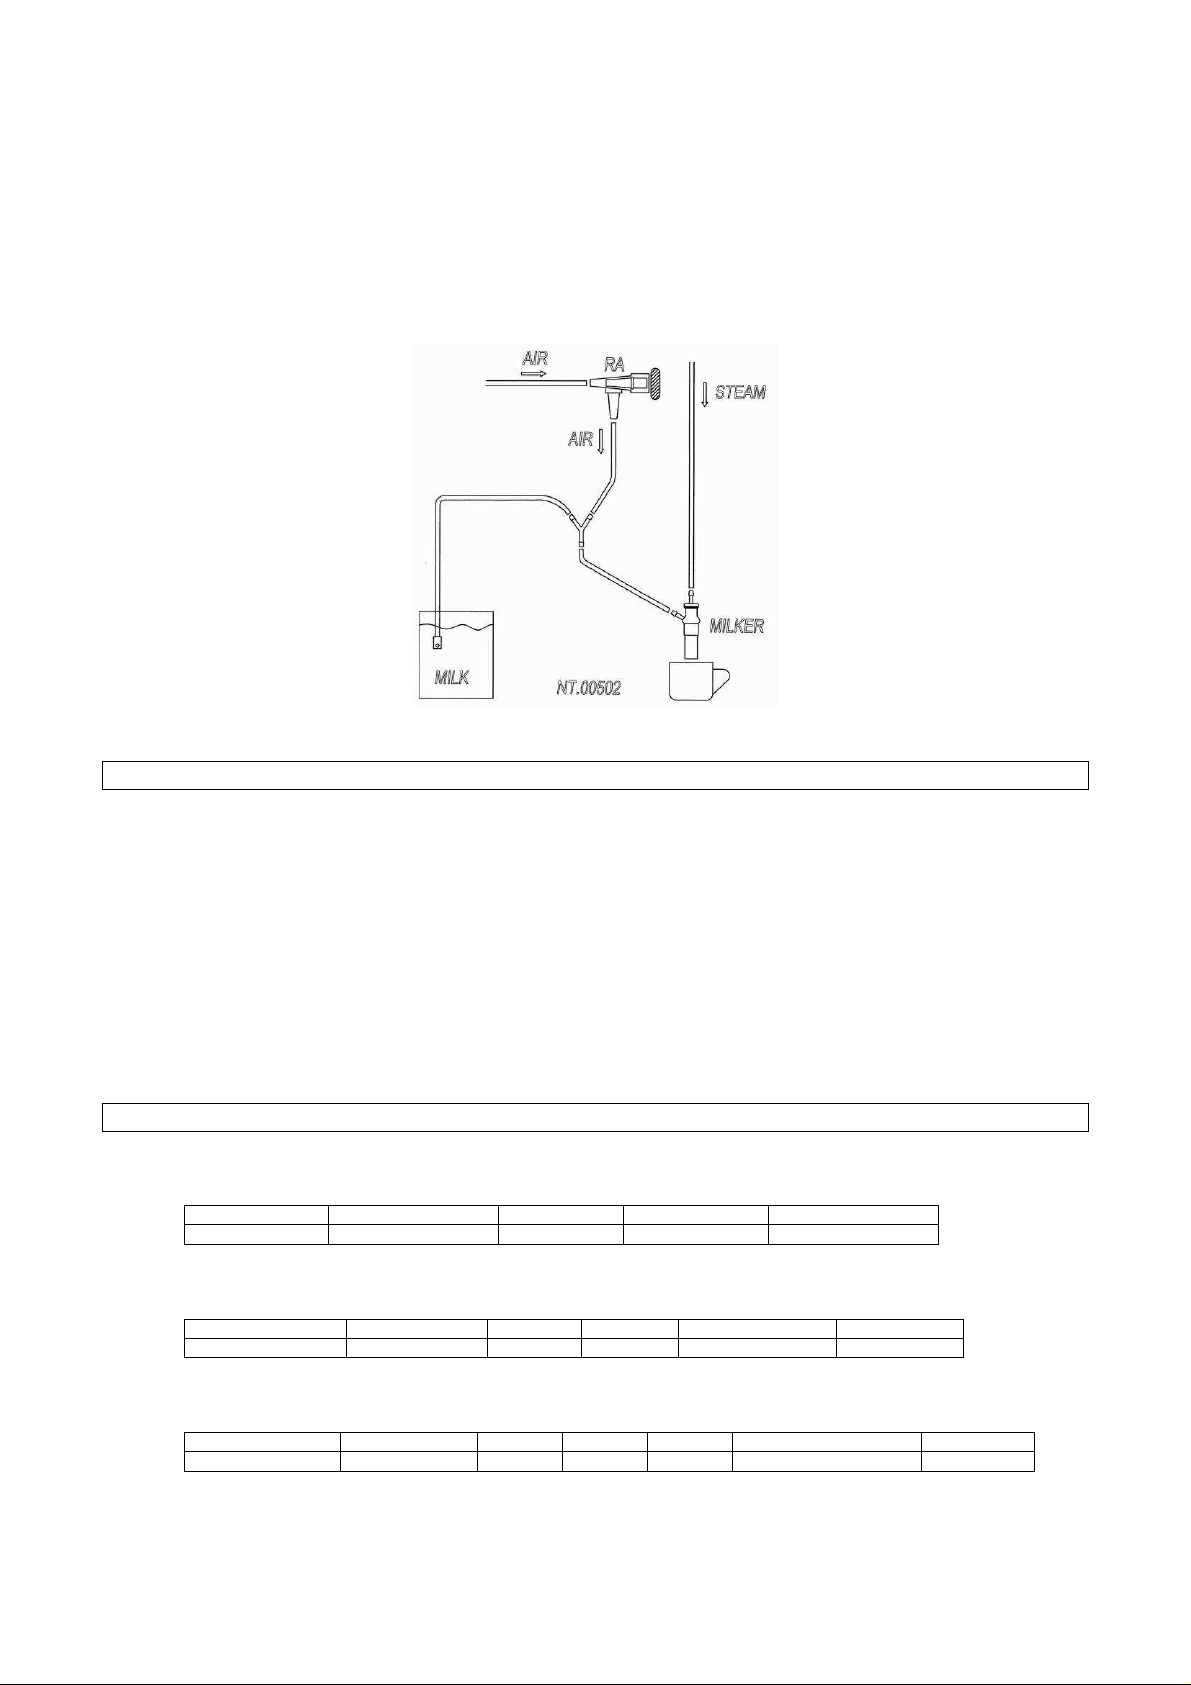
9) Milker Setting.
The machine has a control (RA) which sets the quantity of air needed for whisking milk.
Turn the ring nut clockwise for denser foam (small bubbles), or turn it anticlockwise for more voluminous foam (large bubbles)
(see diagram)
SPECIAL MAINTENANCE
Routine maintenance must be carried out daily by authorised staff as specified in the specific chapters of instructions of the machine.
Cleaning of the coffee outlet by means of the provided special brush is part of the daily maintenance.
Special maintenance must be carried out periodically by the CARIMALI SPA authorised service centre in the following way:
Replace filter holder gasket every 3-6 months
Replace the steam-water valve gasket every 6 months
Replace the steam nozzle joint gasket every 6-12 months
To reach the pump, the pressure-switch, the boiler heater, and the dilatation valve, remove the cup warming cover and the right side of
the machine.
To reach the groups solenoid valves, flowmeter, and exchanger, remove the cup warming cover.
To reach the PTC element, which heats the coffee groups, remove the cover at the bottom of the groups.
To reach the control unit, remove the cup warming cover and the left side of the machine.
CONTROL UNIT LEGEND
Eta Beta 1grup control unit legend
Table connectors:
Fuse: FU1 primary- trasformer
Eta Beta 2 grups.
Table connectors:
Fuse: FU1 comun load FU2 primary- trasformer
Eta Beta 3 grups.
Table connectors:
Fuse: FU1 comun load FU2 primary- trasformer
CN1 CN3 CN4 CN5 CN6
grup 1 on / off– tea push key Valves- pump Turbine and level Serial trasmission
CN1 CN2 CN4 CN5 CN6 CN7
Serial trasmission Turbine and level grup 1 grup 2 On/off- tea push key Valves- pump
CN1 CN2 CN3 CN4 CN5 CN6 CN7
Serial trasmission Turbine and level grup 1 grup 2 grup 3 ON/OFF- tea push key Valves- pump
lb.00056.30 Pag. 14 26/05/10

INHALT
VORBEMERKUNG UND ALLGEMEINE HINWEISE 16
VORSCHRIFTEN FÜR DIE INSTALLATION 16
BESONDERE VORSCHRIFTEN FÜR DEN GEBRAUCH UND DIE WARTUNG 16
ALLGEMEINE EIGENSCHAFTEN 17
Inbetriebsetzung 18
ABGABEN 19
WIE MAN EINEN OPTIMALEN KAFFEE ERHALT 20
reinigungszyklus 20
PROGRAMMIERUNG 21
SPEZIALFUNKTIONEN – EINSTELLUNGEN DER MASCHINE 22
ALARM – SIChereit 23
AUSSERORDENTLICHE WARTUNG 25
ERLÄUTERUNGEN Steuereinheit 25
lb.00056.30 Pag. 15 26/05/10

VORBEMERKUNG UND ALLGEMEINE HINWEISE
Die in diesem Handbuch enthaltenen Anweisungen sind aufmerksam zu lesen, weil sie wichtige Angaben über die Sicherheit der Installation, des
Gebrauchs und der Wartung liefern.
Das Handbuch ist für alle späteren Konsultationen sorgfältig aufzubewahren.
Dieses Gerät darf ausdrücklich nur zu dem Zweck benutzt werden, für den es entwickelt und hergestellt wurde:
Abgabe von Kaffee, Cappuccino und Entnahme von heißem Wasser.
Jeder andere Gebrauch wird als unsachgemäß betrachtet und ist daher gefährlich.
Der Hersteller kann für eventuelle Schäden, die durch nicht sachgemäßen, falschen und nicht dem Zweck entsprechenden Gebrauch verursacht werden,
nicht verantwortlich gemacht werden.
Der Gebrauch von jedem elektrischen Gerät verlangt die Beachtung einiger Grundregeln, insbesondere:
- Das Gerät nicht berühren, wenn man nasse oder feuchte Hände oder Füße hat.
- Das Gerät nicht benutzen, wenn man barfüßig ist.
- Nicht am Versorgungskabel ziehen, um den Stecker aus der Steckdose herauszuziehen.
- Das Gerät nicht der Witterung ausgesetzt lassen (Regen, Sonne, Frost).
- Nicht zulassen, dass das Gerät von Kindern oder nicht befähigten Personen benutzt wird.
Vor jeder Art der Reinigung oder Wartung ist das Gerät vom elektrischen Versorgungsnetz zu trennen. Dazu ist der Stecker herauszuziehen oder die
Anlage auszuschalten.
Im Falle eines Defekts oder einer Betriebsstörung des Geräts ist dieses auszuschalten. Jeder Versuch einer Reparatur oder eines direkten Eingriffs hat zu
unterbleiben.
Für eventuelle Reparaturen hat man sich ausschließlich an einen Autorisierten Kundendienst CARIMALI S.p.A. zu wenden und Original-Ersatzteile
anzufordern.
Wird dies nicht beachtet, kann man die Sicherheit des Geräts beeinträchtigen und riskiert den Verlust des Garantieanspruchs.
Sollte man sich irgendwann entscheiden, dieses Gerät nicht mehr zu benutzen, empfiehlt es sich, seinen Betrieb stillzulegen, d. h. das Stromkabel und die
Wasserzuleitung vom Versorgungsnetz zu trennen und alle Teile unschädlich zu machen, die eine Gefahr hervorrufen könnten, vor allem für Kinder, die
das stillgelegte Gerät für ihre Spiele verwenden könnten.
VORSCHRIFTEN FÜR DIE INSTALLATION
Die Installation hat nach den Anweisungen des Herstellers zu erfolgen.
Eine falsche Installation kann Schäden an Personen, Tieren oder Sachen verursachen, für die der Hersteller nicht verantwortlich gemacht werden kann.
Nach dem Auspacken muss man sich von der Unversehrtheit des Geräts überzeugen.
Im Zweifelsfall darf man das Gerät nicht benutzen und muss sich an einen Autorisierten Kundendienst CARIMALI S.p.A. wenden.
Die Packstoffe (Kunststoffbeutel, Polystyrol, Nägel usw.) sind von Kindern fernzuhalten, da sie eine potentielle Gefahrenquelle darstellen, und dürfen nicht
in der Umwelt verstreut werden.
Vor dem Anschluss des Geräts an das Stromnetz muss man sich vergewissern, dass die auf dem Typenschild angegebenen Daten mit denen des
elektrischen Versorgungsnetzes übereinstimmen. Falls die Steckdose und der Stecker des Geräts (falls mitgeliefert) nicht zusammenpassen, ist die
Steckdose gegen einen anderen passenden Typ auszuwechseln, wobei man sich vergewissern muss, dass der Querschnitt der Kabel für die
Leistungsaufnahme des Geräts passend ist. Falls das Stromkabel ersetzt wird, muss wieder ein Kabel vom Typ H07RN-F verwendet werden.
Sich vergewissern, dass die Netzspannung mit der Spannung, für welche die Maschine ausgelegt ist, übereinstimmt, und dass die Netzleitung in der Lage
ist, neben den bereits bestehenden Belastungen diejenigen der Maschine aufzunehmen.
Nach der Installation des Netzschalters mit Sicherungen (siehe Anlage) sind die Drähte des Maschinenkabels nach beigelegtem Schaltplan an den
Netzschalter anzuschließen.
Es wird empfohlen, keine Zwischenstecker, Mehrfachsteckdosen und Verlängerungskabel zu benutzen.
Falls es unumgänglich sein sollte, einfache oder Mehrfach-Adapter und Verlängerungskabel zu benutzen, die den geltenden Sicherheitsvorschriften
entsprechen, muss man darauf achten, dass der höchstzulässige Strom, der auf dem einfachen Adapter und den Verlängerungskabeln angezeigt ist, und
die höchstzulässige Stromstärke, die auf dem Mehrfach-Adapter angezeigt ist, nicht überschritten wird.
Die elektrische Sicherheit des Geräts ist nur dann gewährleistet, wenn dieses korrekt an eine leistungsfähige Erdungsanlage angeschlossen ist, wie es in
den gültigen Sicherheitsvorschriften für die elektrischen Anlagen vorgesehen ist.
Es ist notwendig, diese grundsätzliche Anforderung an die Sicherheit zu überprüfen und im Zweifelsfalle eine sorgfältige Kontrolle der Anlage durch
qualifizierte Fachkräfte anzufordern.
Der Hersteller kann für eventuelle Schäden, die auf die fehlende Erdung des Geräts zurückzuführen sind, nicht verantwortlich gemacht werden.
Um gefährliche Überhitzungen zu vermeiden, empfiehlt es sich, das elektrische Versorgungskabel über seine ganze Länge abzuwickeln.
Das Versorgungskabel dieses Geräts darf vom Benutzer nicht ausgewechselt werden.
Falls das Kabel beschädigt ist oder ausgewechselt werden muss, hat man sich ausschließlich an einen Autorisierten Kundendienst CARIMALI S.p.A. zu
wenden.
Das Gerät nicht unnötigerweise eingeschaltet lassen.
Das Gerät mit dem Hauptschalter ausschalten und den Hahn der Wasserversorgung schließen, wenn das Gerät nicht benutzt wird. Non Den Hauptschalter
des Geräts ausschalten, wenn dieses nicht gebraucht wird.
Die Öffnungen oder Spalten für die Lüftung oder Wärmeabfuhr nicht verschließen.
Einen angemessenen Abstand von Wänden, Gegenständen usw. bewahren.
Die Maschine wird an eine Anlage zur Wasserversorgung angeschlossen, deren Druck 5 atm (Kg/cm2) nicht übersteigt.
Bei größerem Druck empfiehlt sich der Einbau eines Druckverminderers.
Vor der Maschine ist ein Wasserenthärter zu installieren.
UMWELTEIGENSCHAFTEN FUER DIE BENUTZUNG DER MASCHINE:
Raumtemperatur: 5-45° C (falls es frieren sollte, das Wassersystem entleeren)
Hoechste Feuchtigkeit: 80% relative Feuchtigkeit
Wasserhaerte: 5° eh, 7° dH, 13° Fh
BESONDERE VORSCHRIFTEN FÜR DEN GEBRAUCH UND DIE WARTUNG
Zum korrekten Betrieb ist es unerlässlich, dass man sich an die Weisungen des Herstellers hält und die periodische Wartung und die Kontrolle aller
Sicherheitsvorrichtungen durch qualifizierte Fachkräfte ausführen lässt.
Es ist zu vermeiden, die Hände oder andere Körperteile in die Nähe der Abgabeöffnungen für den Kaffee oder der Heißwasserdüse zu bringen. Das
Wasser, das daraus austritt, ist erhitzt und kann Verbrennungen verursachen.
Die Wasserdüse ist überhitzt. Deshalb darf sie nur mit Sorgfalt verstellt werden, wobei sie nur an dem vorgesehenen Punkt angefasst werden darf.
Die Kaffeemaschine darf niemals ohne Wasser benutzt werden.
Niemals die Maschine in Räumen belassen, in denen die Temperatur unter null Grad ist, ohne vorher den Heizkessel und den Wasserkreislauf zu
entleeren.
An Orten mit sehr hartem Wasser, an denen folglich die Gefahr der Kalkverkrustung besonders groß ist, muss ein Wasserenthärter eingesetzt werden.
Aber auch an Orten mit relativ weichem Wasser ist es angebracht, den Heizkessel unter Kontrolle zu halten und erforderlichenfalls durch Fachkräfte eine
Entkalkung der Widerstände und Rohrleitungen vornehmen zu lassen.
Wenn die empfohlenen täglichen Reinigung der Carimali S.p.A. Maschinen, im besonderen der Gruppe und des Milker, die laut der Vorschriften
geschildert auf diesem Buch ausgeführt sein soll, und nur mit Produkten die von der Firma Carimali S.p.A. (und/oder vereinbaren) geliefert sind, nicht
gemacht ist, wird die garantie etkräft sein.
lb.00056.30 Pag. 16 26/05/10
 Loading...