

Page 1
1
QUICK START GUIDE
DIVA
NT-05414-01-EN
Page 2
2
STARTING UP
1
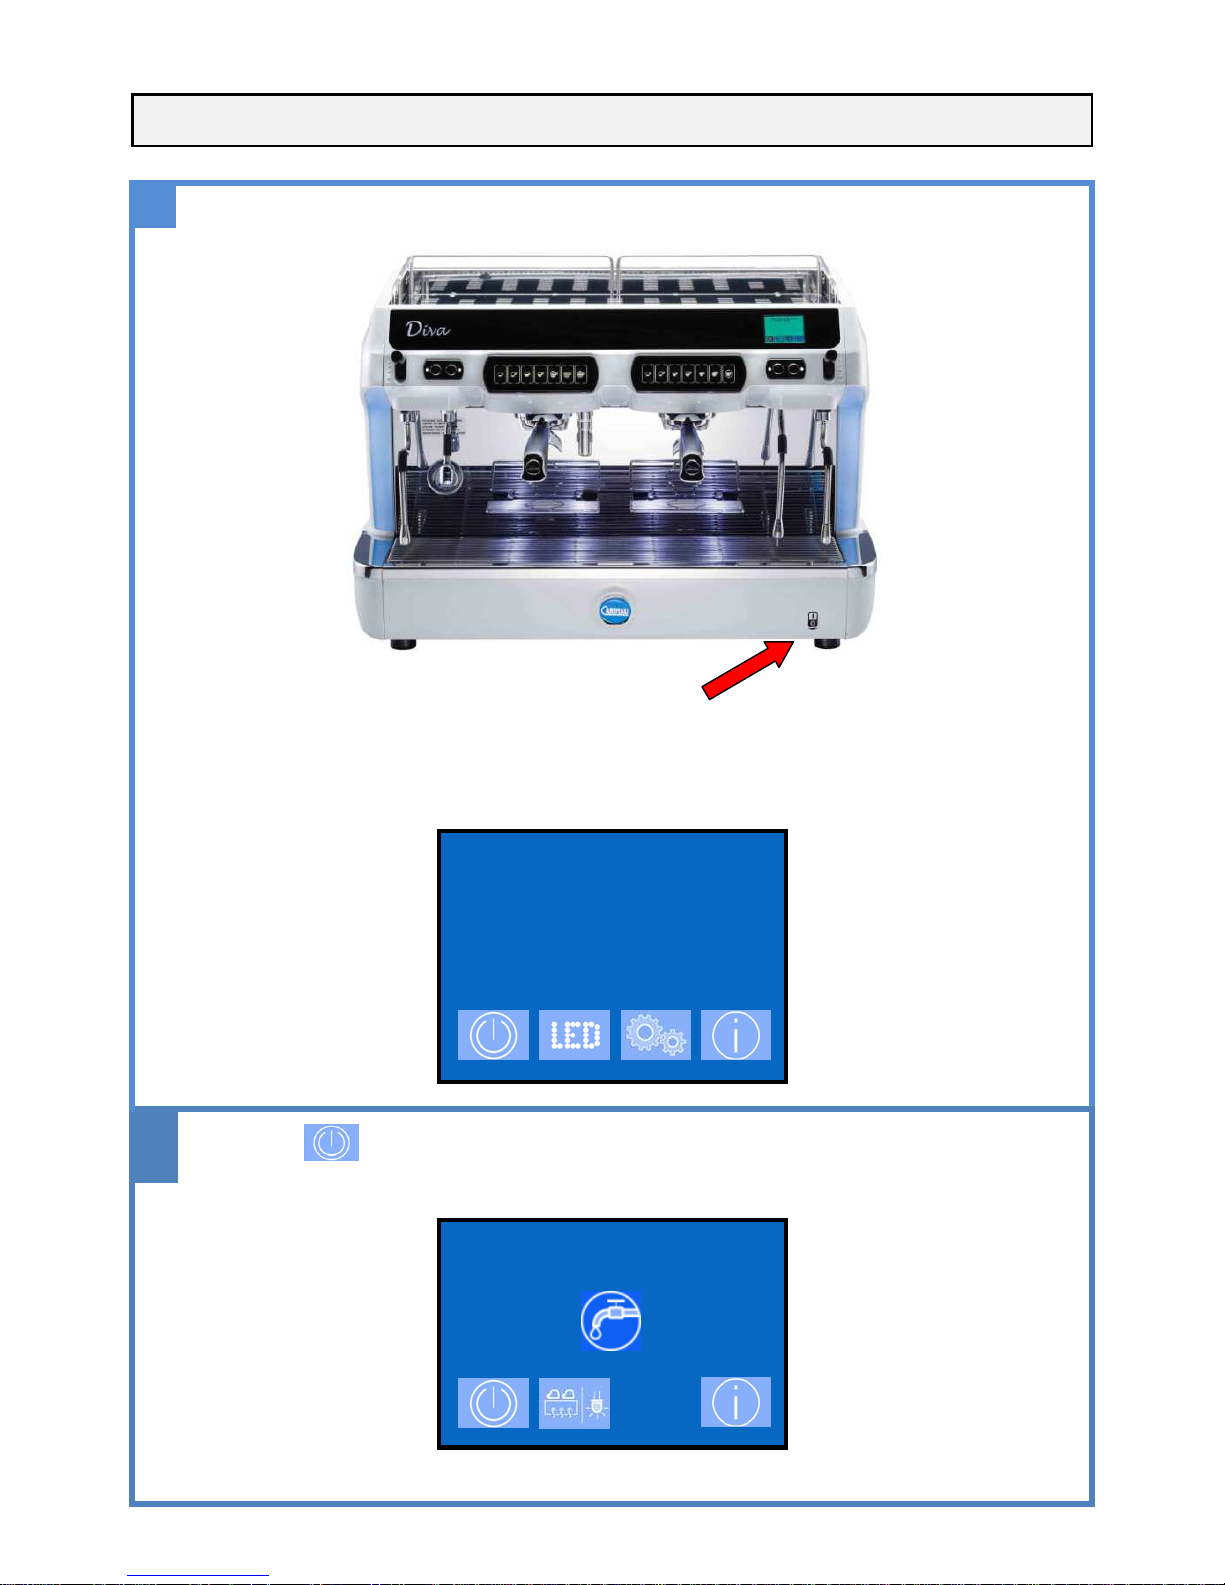
• Turn on the tap from the water mains and switch the power ON by pressing the main switch located bottom
right underneath the machine.
• The machine will automatically go into OFF state, the message displayed will be:
2015-FEB-16 TUE 04:54
OFF
2
•
Press to switch ON the machine,
filling up will start and t
he display will show:
2015-FEB-16 TUE 04:54
FILLING UP BOILER
Page 3
3
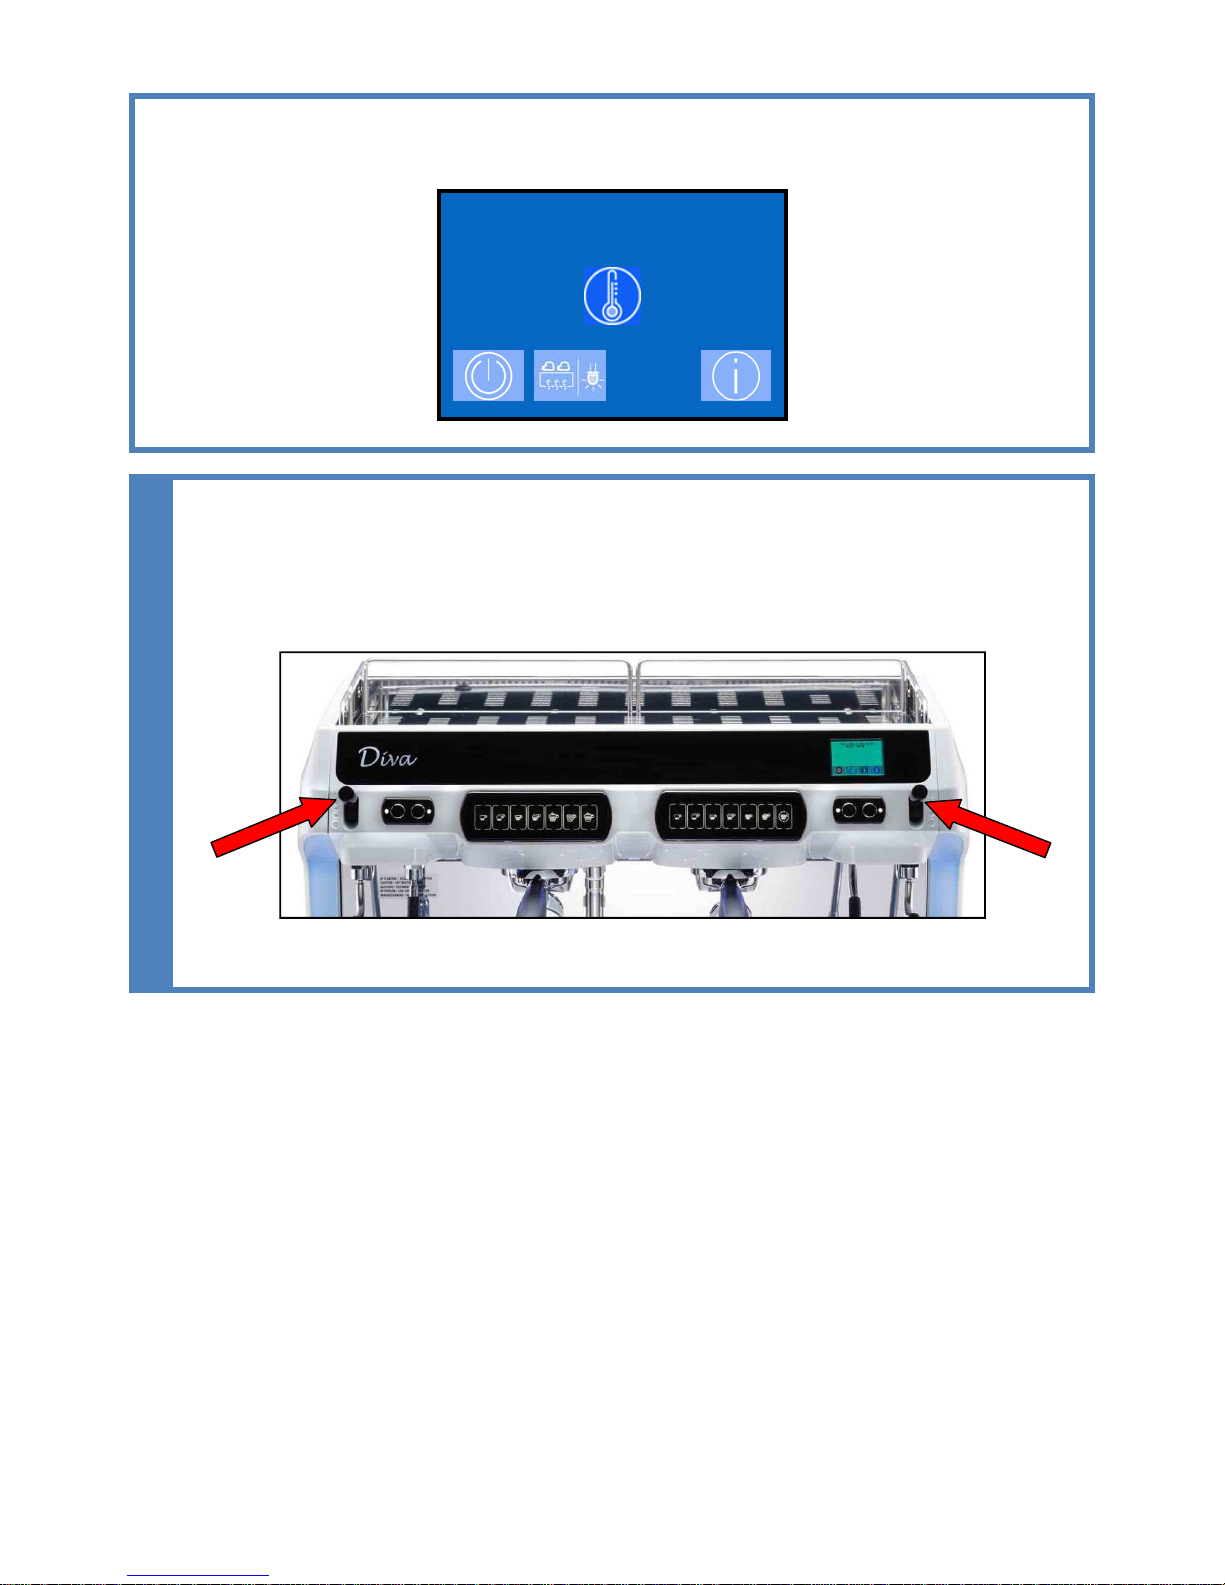
• Afterwards the keypad lights will be off and heating of the boiler starts. Please wait about 15 minutes to reach
the set temperature
2015-FEB-16 TUE 04:54
BOILER HEATING
3
•
HEATING UP:
LM Version: during the warming up, the milker solenoid valve will stay open from 0°c to 95°c and the
barista steam wand from 50°C to 95°C. This will release the air from the boiler
COF Version: during this stage, keep the steam lever open for a few seconds, this operation will
release the air from the boiler
Page 4
4
4
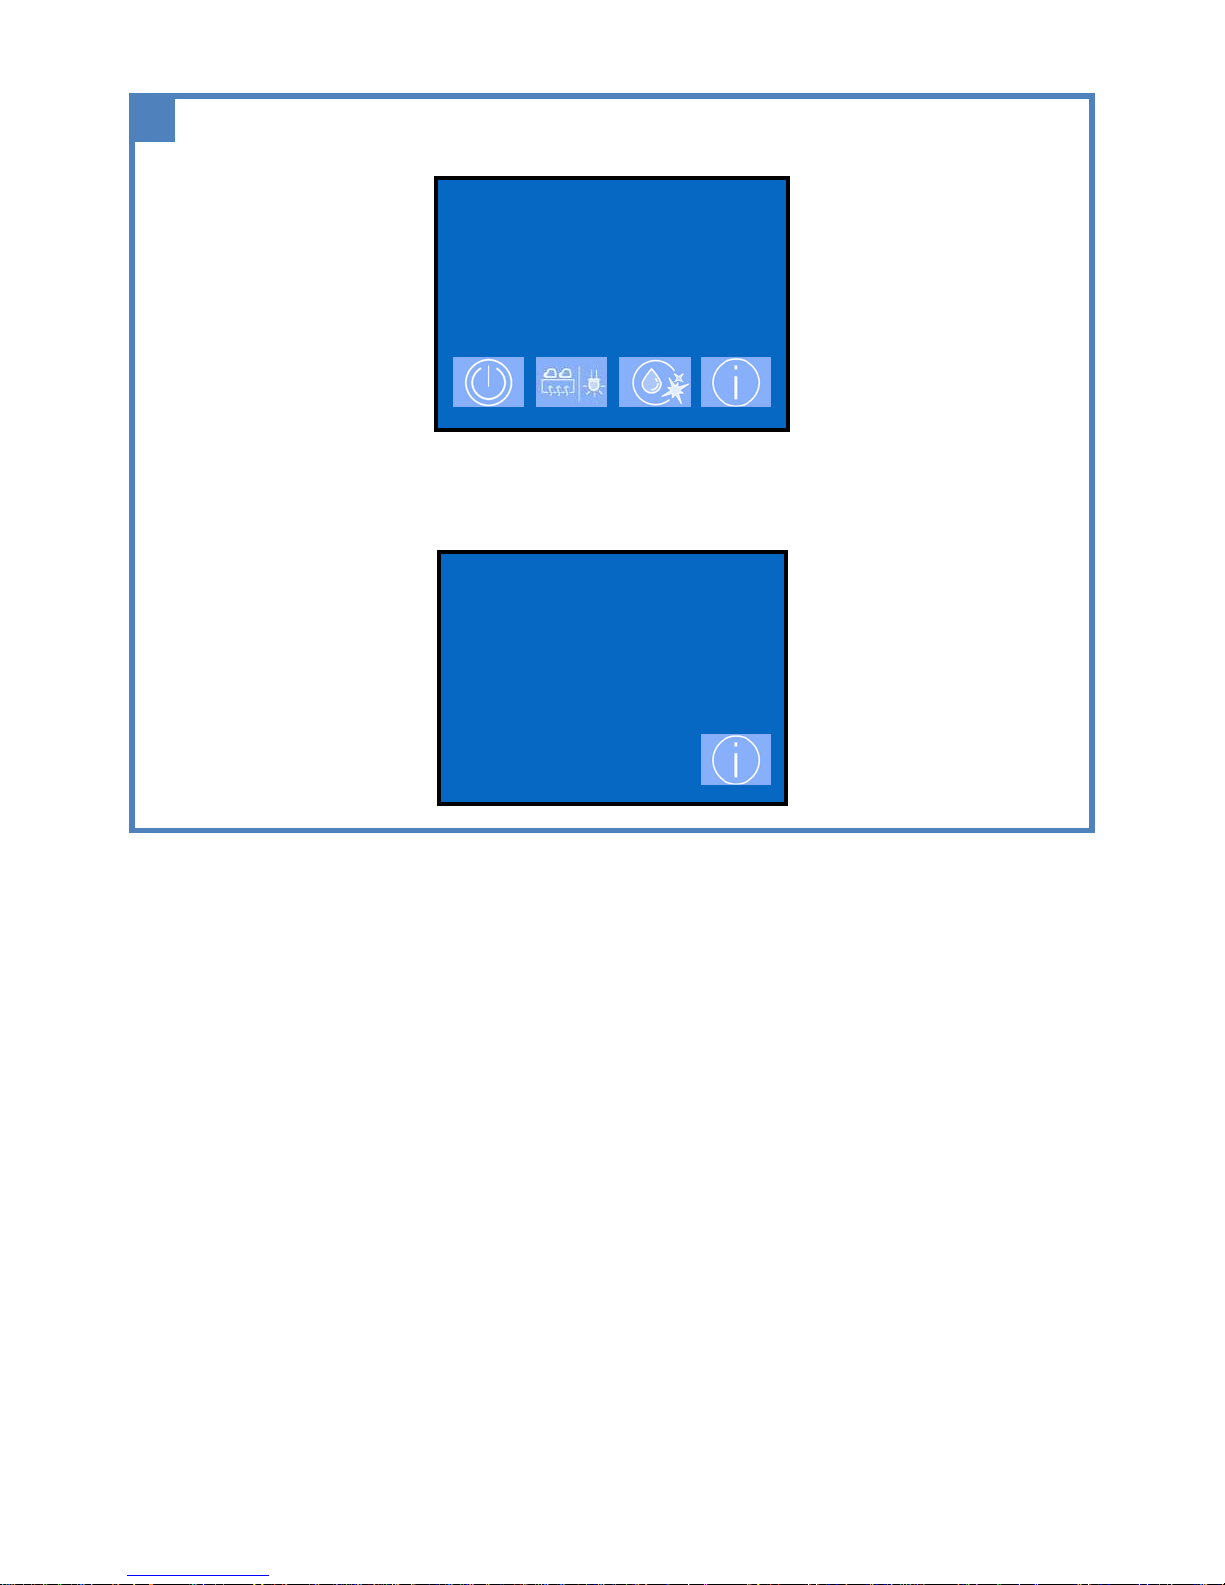
• The machine will be ready when the boiler temperature is reached, the display shows:
2015-FEB-16 TUE 04:54
SELECT DRINK
• The Info section of the menu indicates following data:
2015-FEB-16 TUE 04:54
TEMPERATURE
124 °C STEAM
1,2 bar STEAM
77 °C GROUP 1
77 °C GROUP 2
CUP WARMER MID
Page 5
5
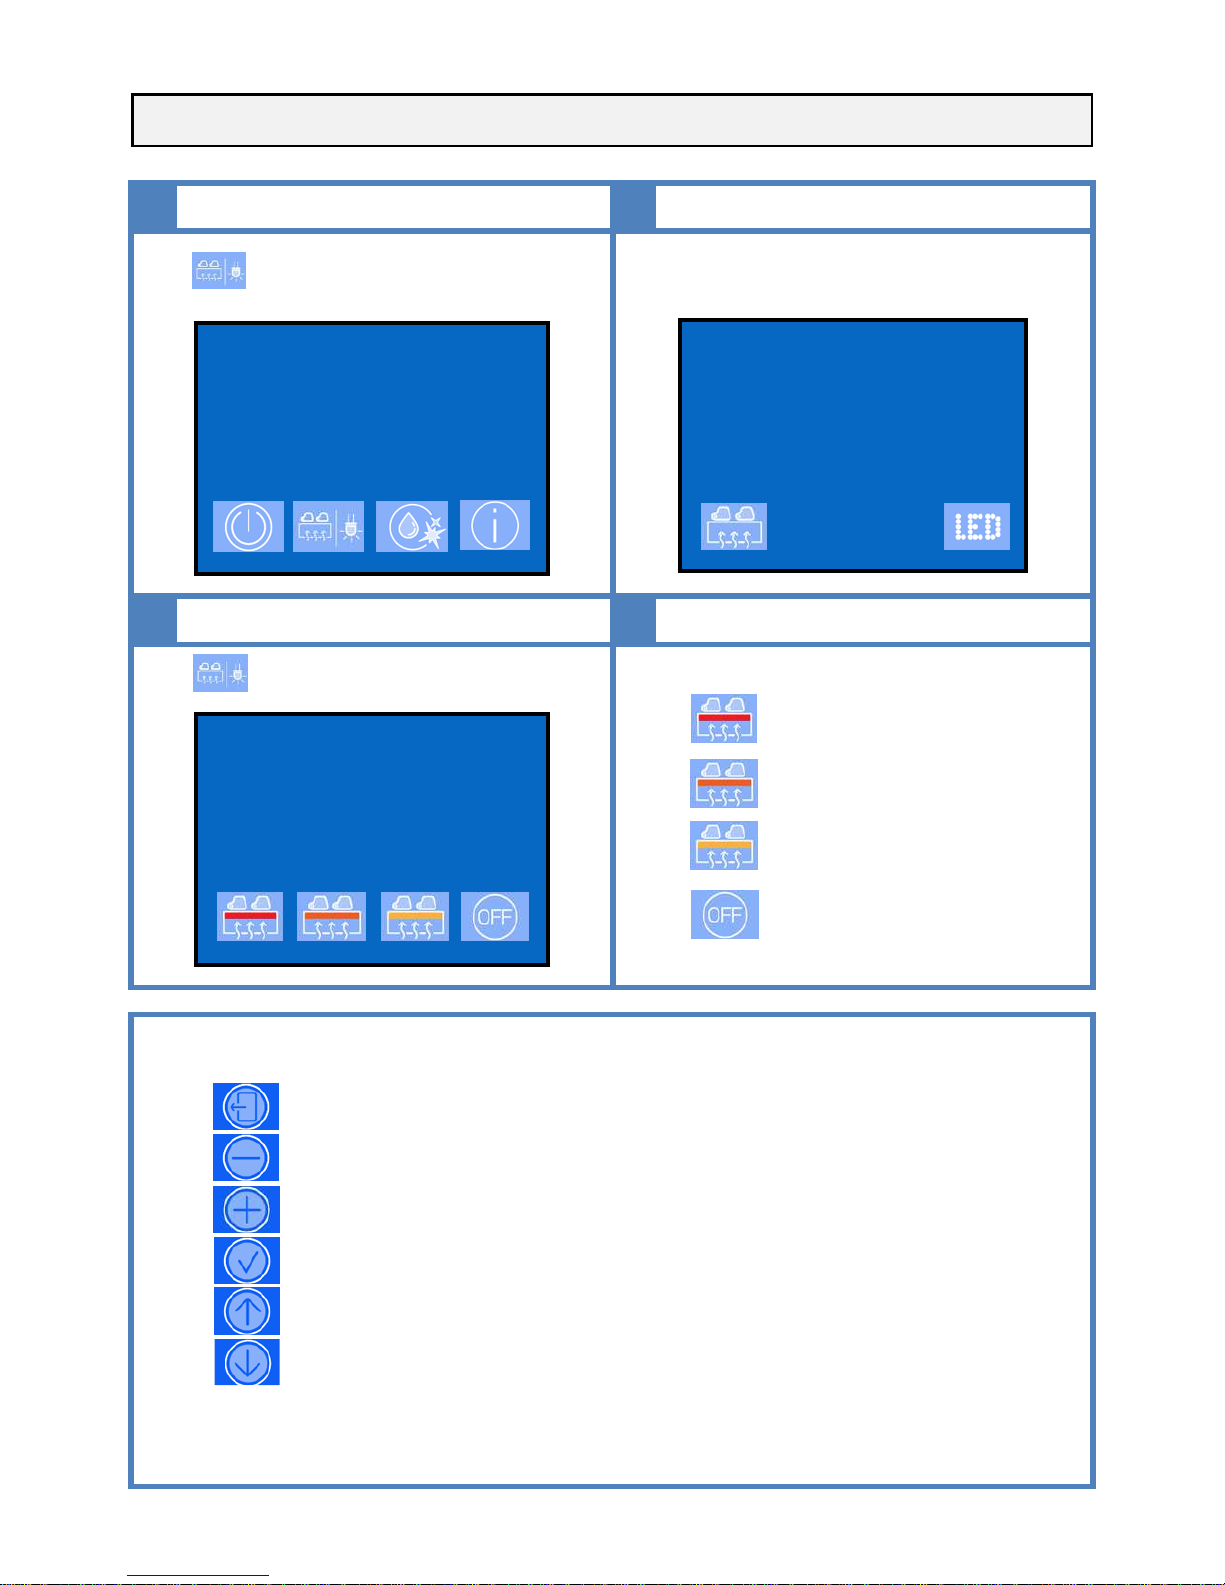
CUP WARMER
1
2
2
Press to access to the cup warmer menu
2015-FEB-16 TUE 04:54
SELECT DRINK
The display shows:
2015-FEB-16 TUE 04:54
SELECT DRINK
3
4
Press to get to cup warmer temperature profile
2015-FEB-16 TUE 04:54
SELECT DRINK
Select the cup wermer temperature profile between:
• FULL
•
MID
• LOW
• OFF
KEYS DESCRIPTION
•
ESC
•
DECREASE VALUE
•
INCREASE VALUE
•
ENTER
•
SCROLL UP
•
SCROLL DOWN
Page 6
6
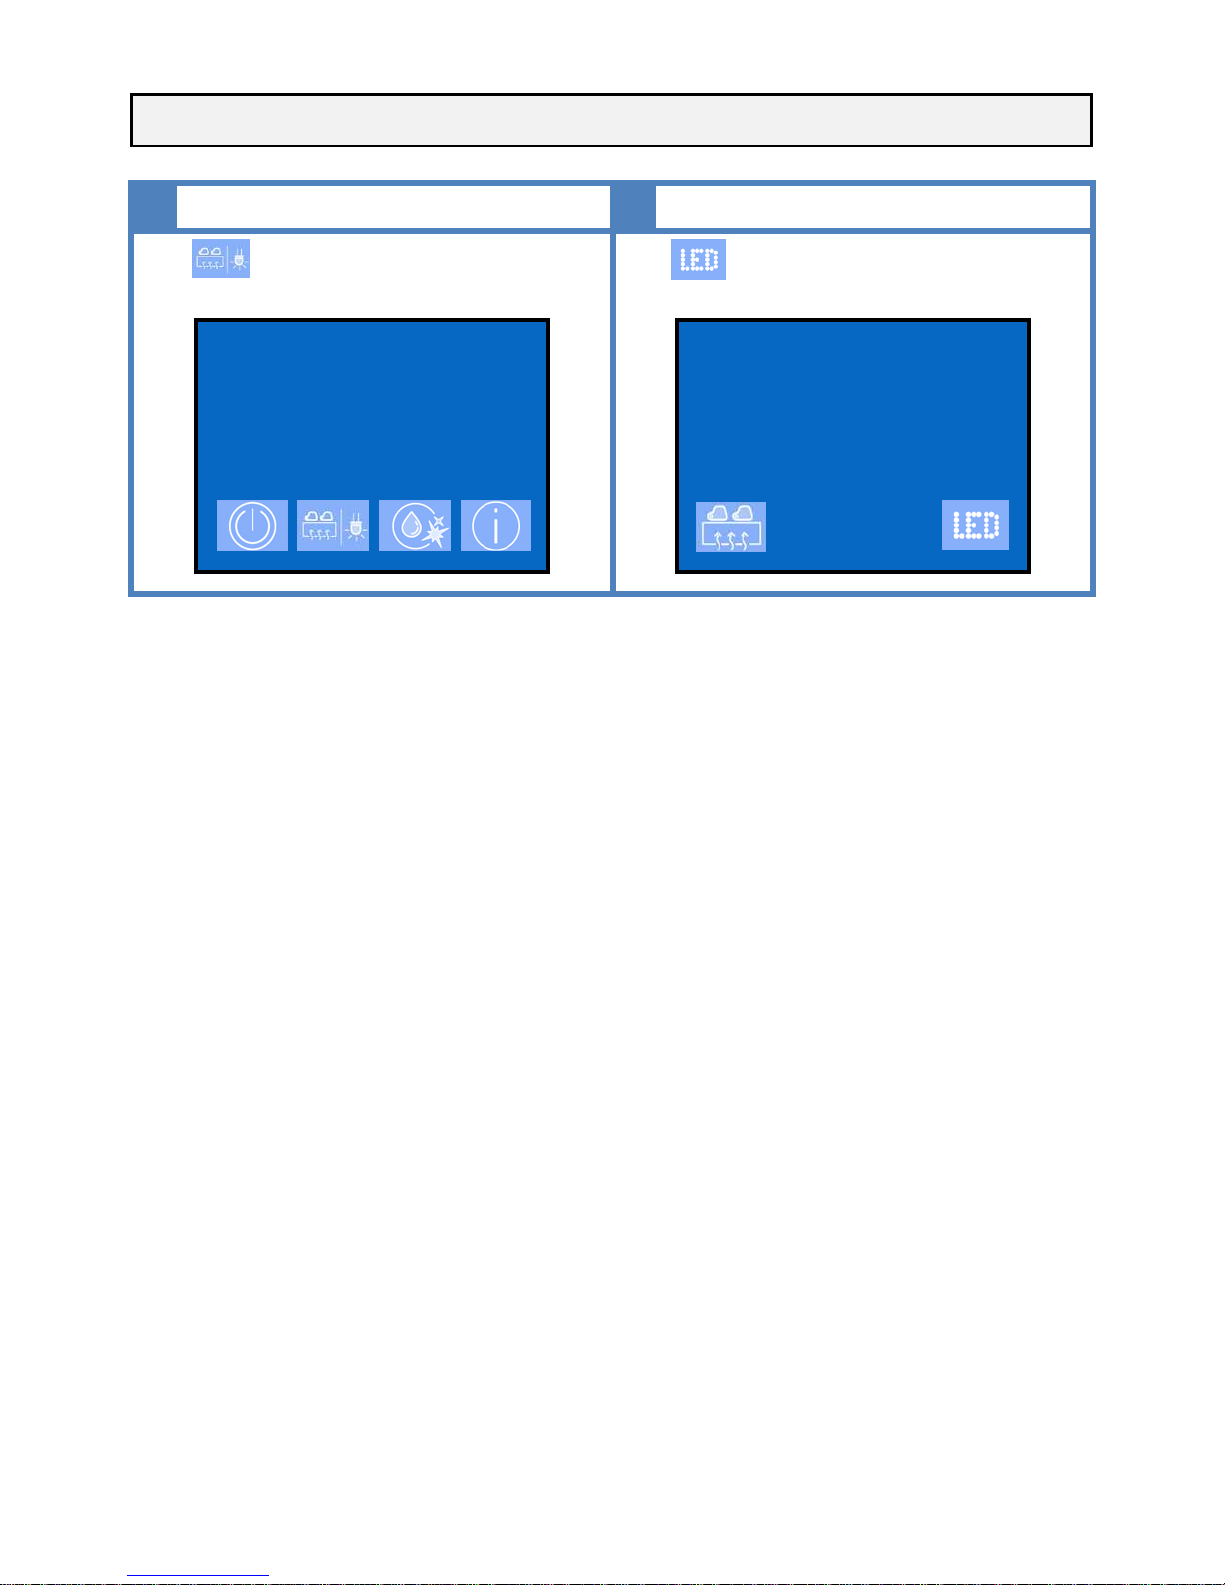
LIGHTS
1
2
2
Press to access to the lights menu
2015-FEB-16 TUE 04:54
SELECT DRINK
Press to turn ON or OFF the side lights
2015-FEB-16 TUE 04:54
SELECT DRINK
Page 7
7
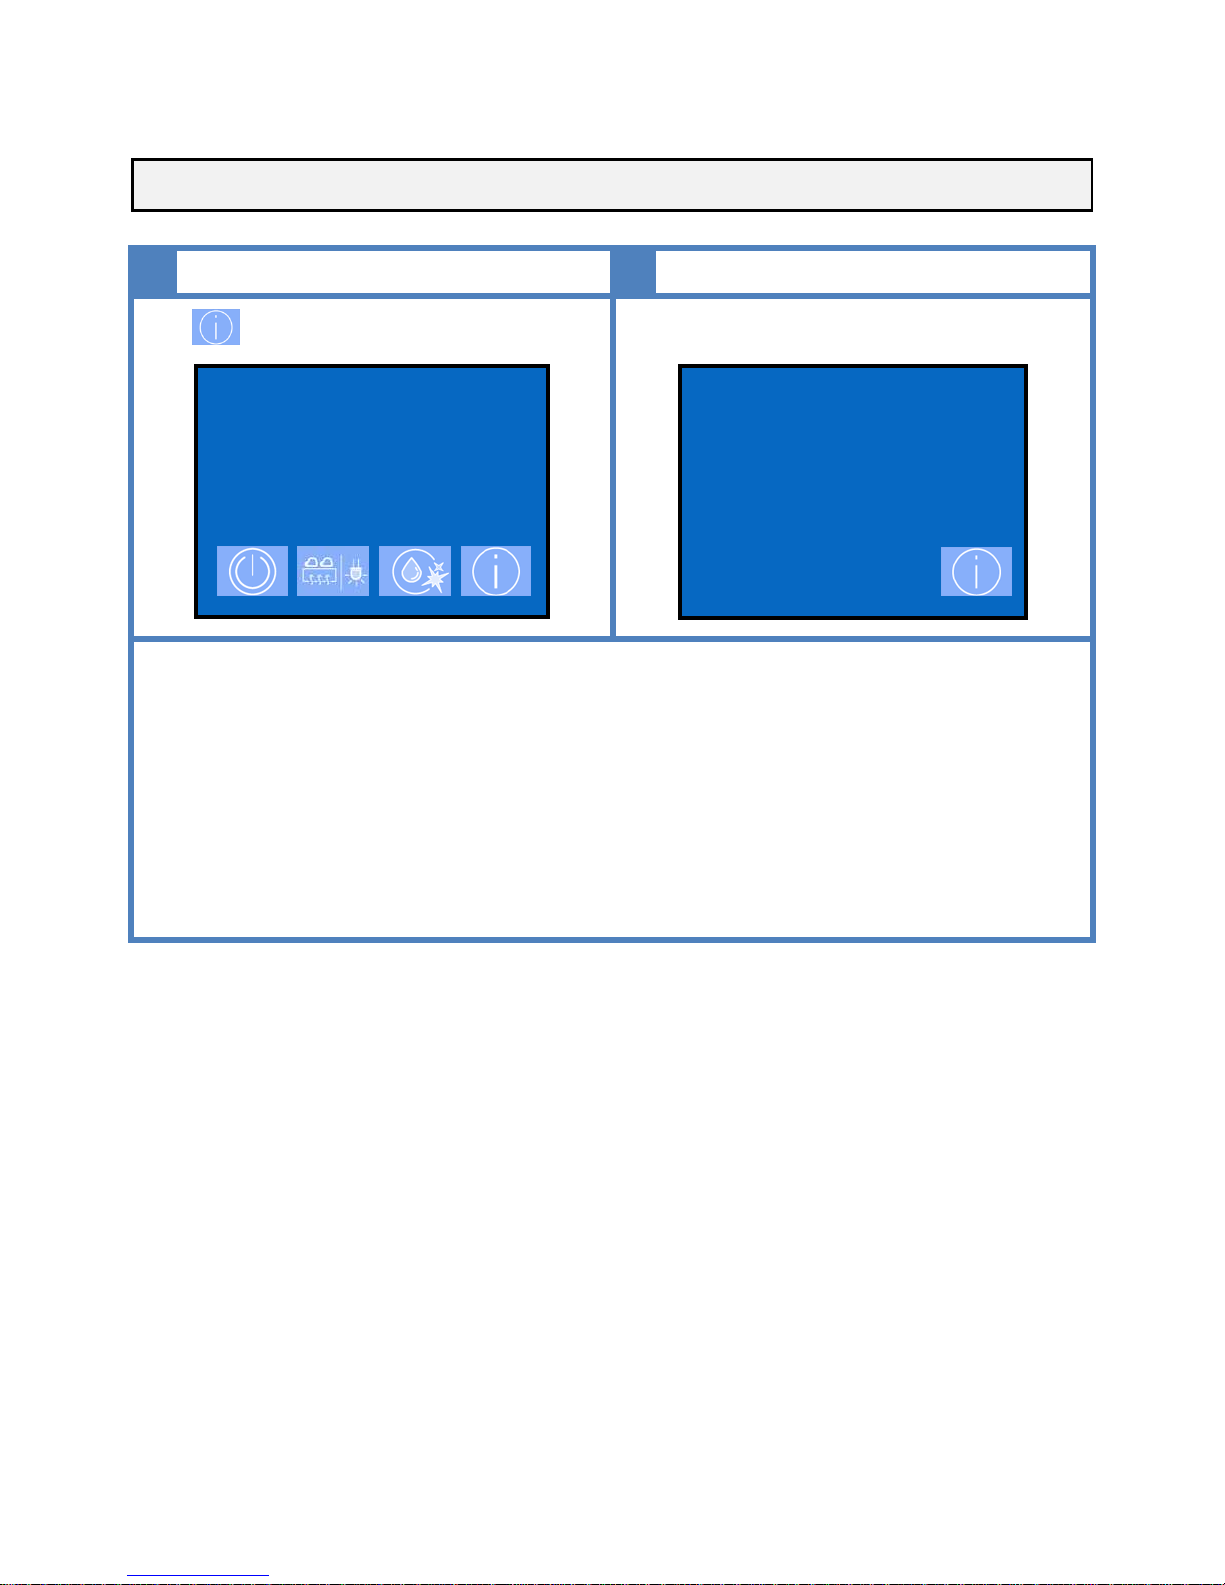
INFO
1
2
2
Press to access to machine Info data
2015-FEB-16 TUE 04:54
SELECT DRINK
The display shows the following data:
2015-FEB-16 TUE 04:54
TEMPERATURE
XX °C STEAM
YY bar STEAM
ZZ °C GROUP 1
SS °C GROUP 2
CUP WARMER VVV
DATA DESCRIPTION
• XX °C STEAM: STEAM TEMPERATURE
• YY bar STEAM: STEAM PRESSURE
• ZZ °C GROUP 1: GROUP 1 TEMPERATURE
• SS °C GROUP 2: GROUP 2 TEMPERATURE
• CUP WARMER VVV: CUP WARMER TEMPERATURE PROFILE
Page 8
8
DISPENSING
1
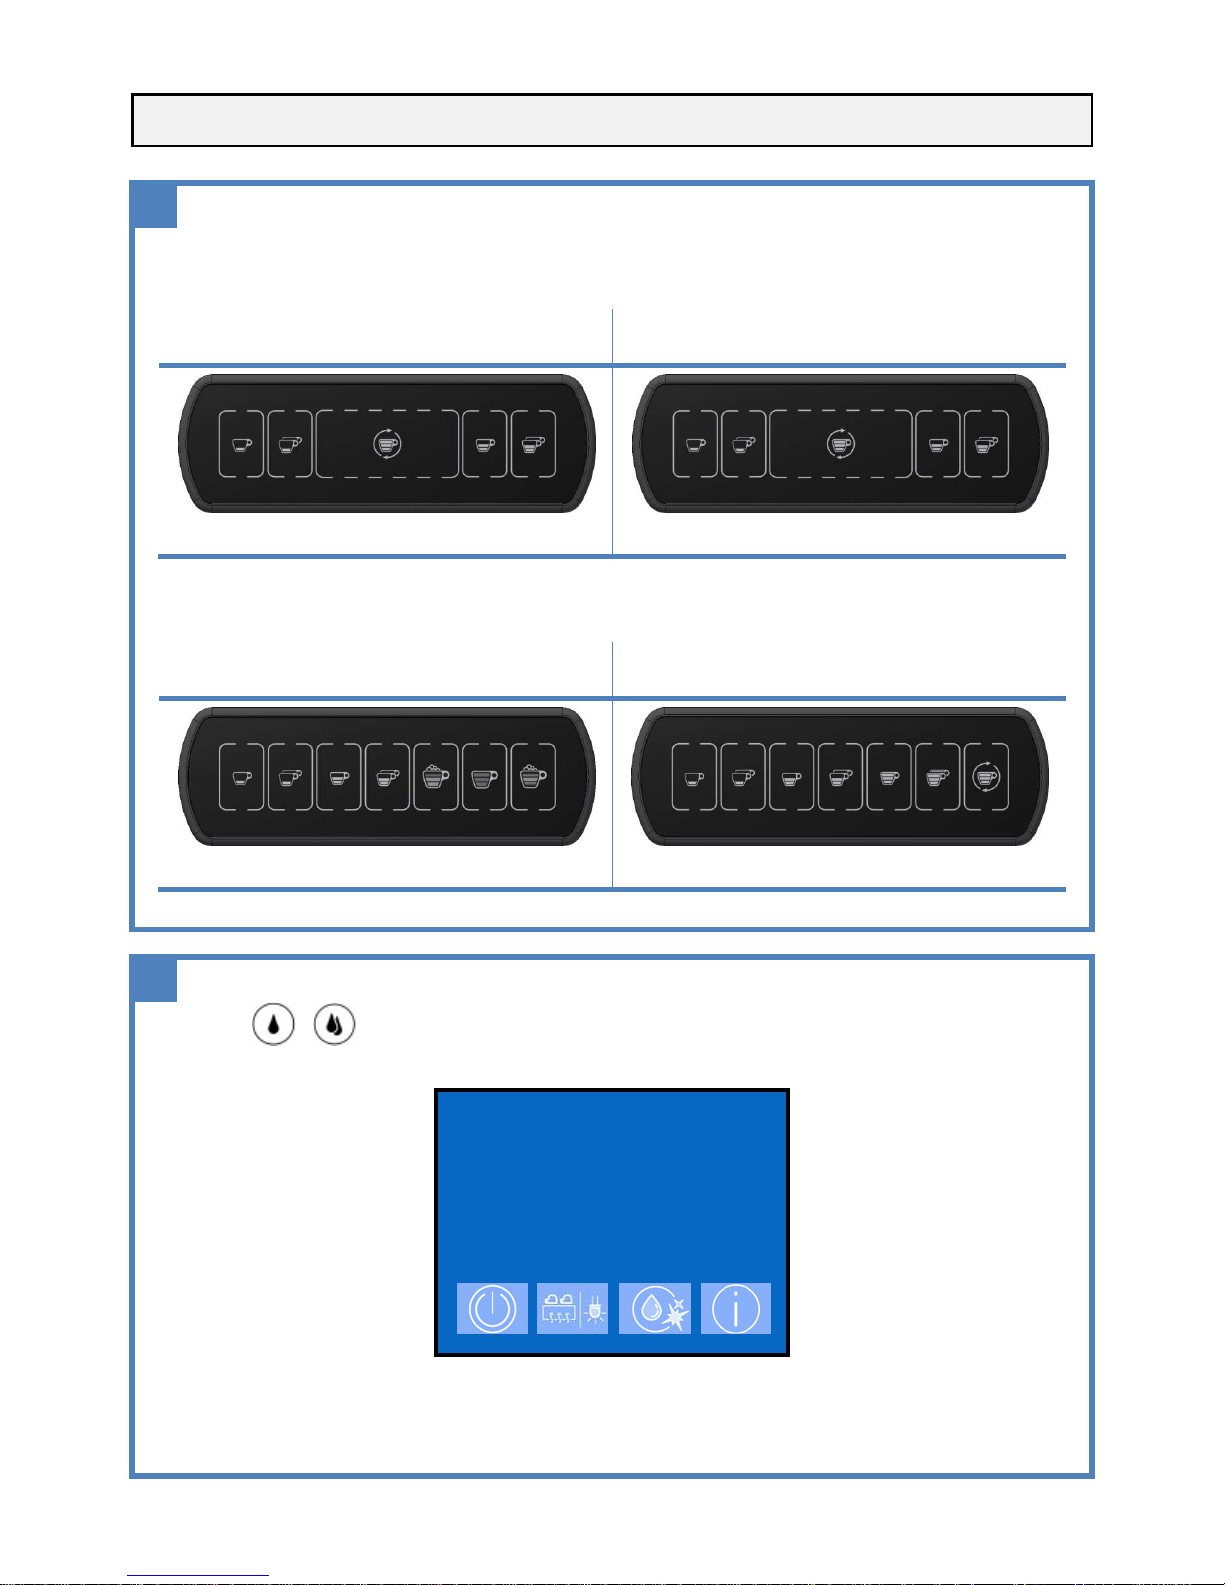
COFFEE DISPENSING: place a cup under the dispenser and press one of the coffee dose keys
MACHINE KEYPADS DIVA COF 2GR
Gr. 1 keypad
Gr. 2 keypad
11 12 13 14 15 21 22 23 24 25
MACHINE KEYPADS DIVA LM 2GR
Gr. 1 keypad
Gr. 2 keypad
11 12 13 14 15 16 17 21 22 23 24 25 26 27
2
HOT WATER DISPENSING: place a cup under the hot water nozzle and press the Tea / Hot water keys
or , to activate dispensing of the related hot water dose
2015-FEB-16 TUE 04:54
H2O: HOT WATER 1
Gr1: SELECT DRINK
Gr2: SELECT DRINK
Bar: SELECT DRINK
PLEASE NOTE: delivery in progress can be stopped before reaching the desired programmed product quantity by
pressing the same key of the unit used for product delivery
Page 9
9
3
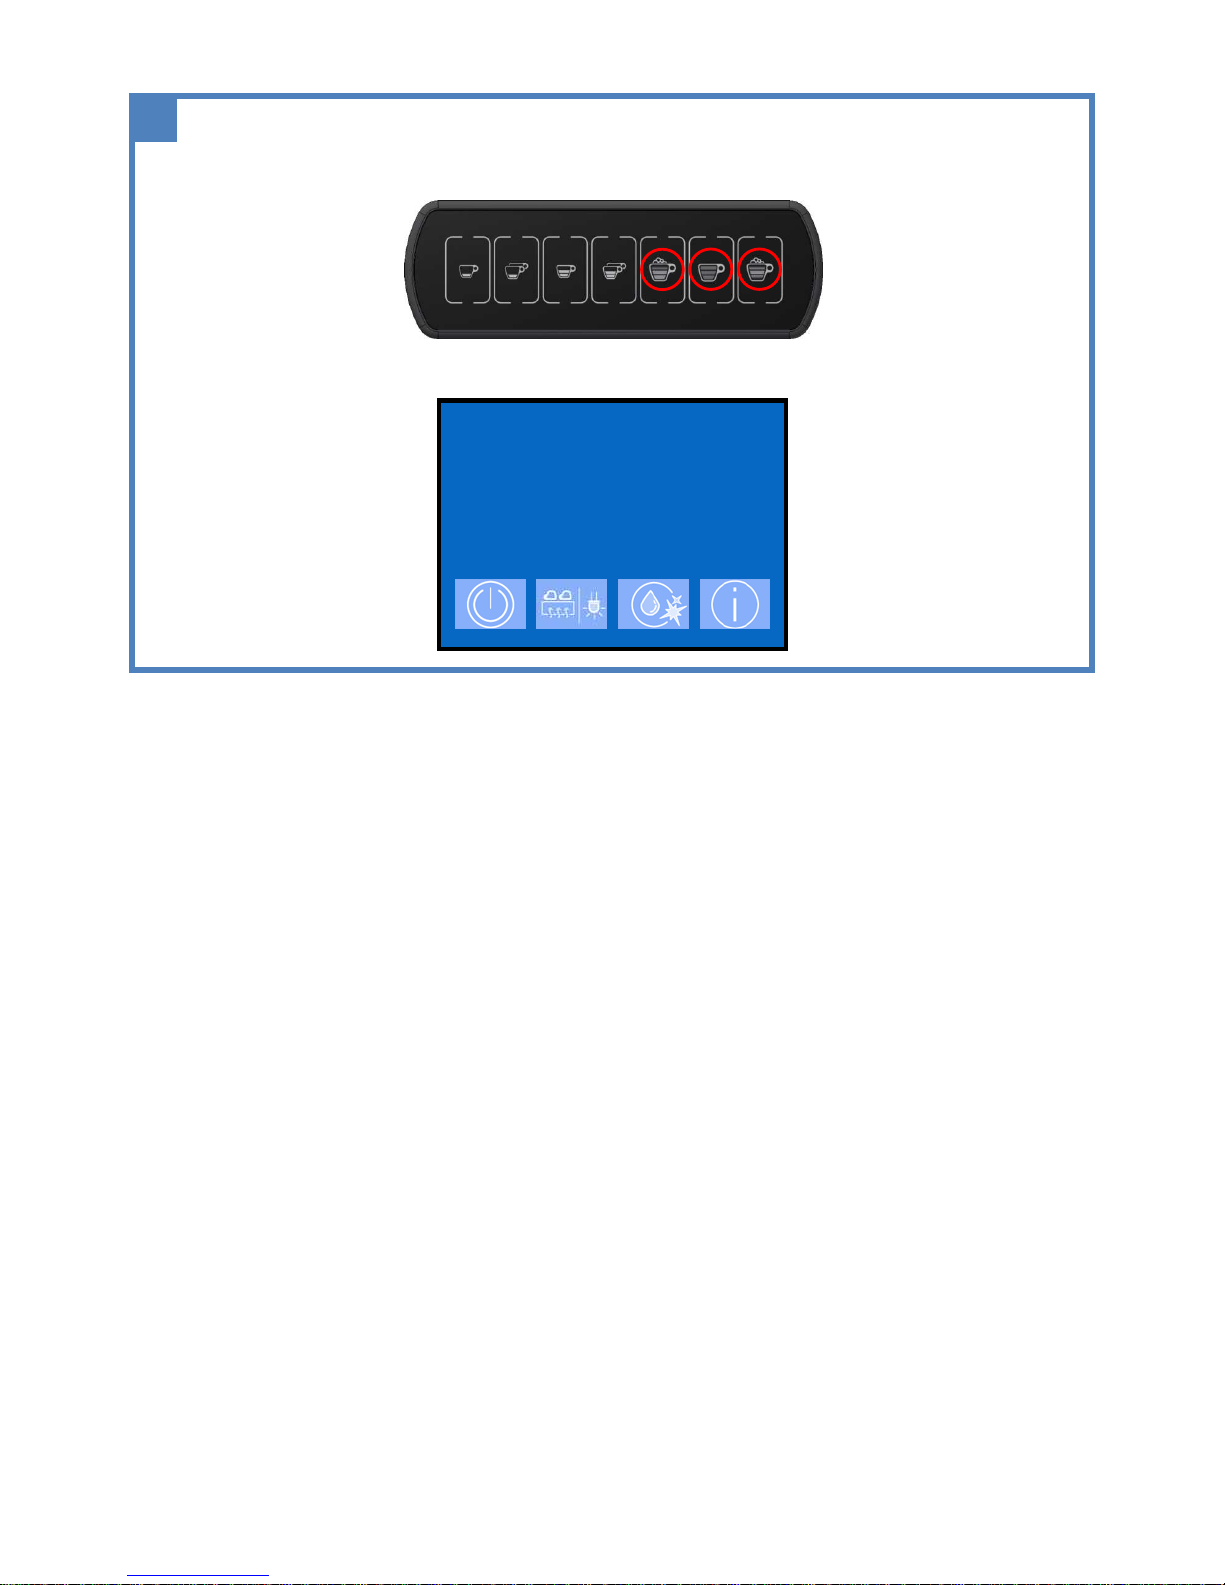
• DISPENSING EXTRAMILK (ONLY LM MACHINES):
If enabled in program menu, keep pressed any Milk - based drink, release the key to interrupt the delivery
• The display will show:
2015-FEB-16 TUE 04:54
H2O: SELECT DRINK
Gr1: EXTRAMILK
Gr2: SELECT DRINK
Bar: SELECT DRINK
Page 10
10
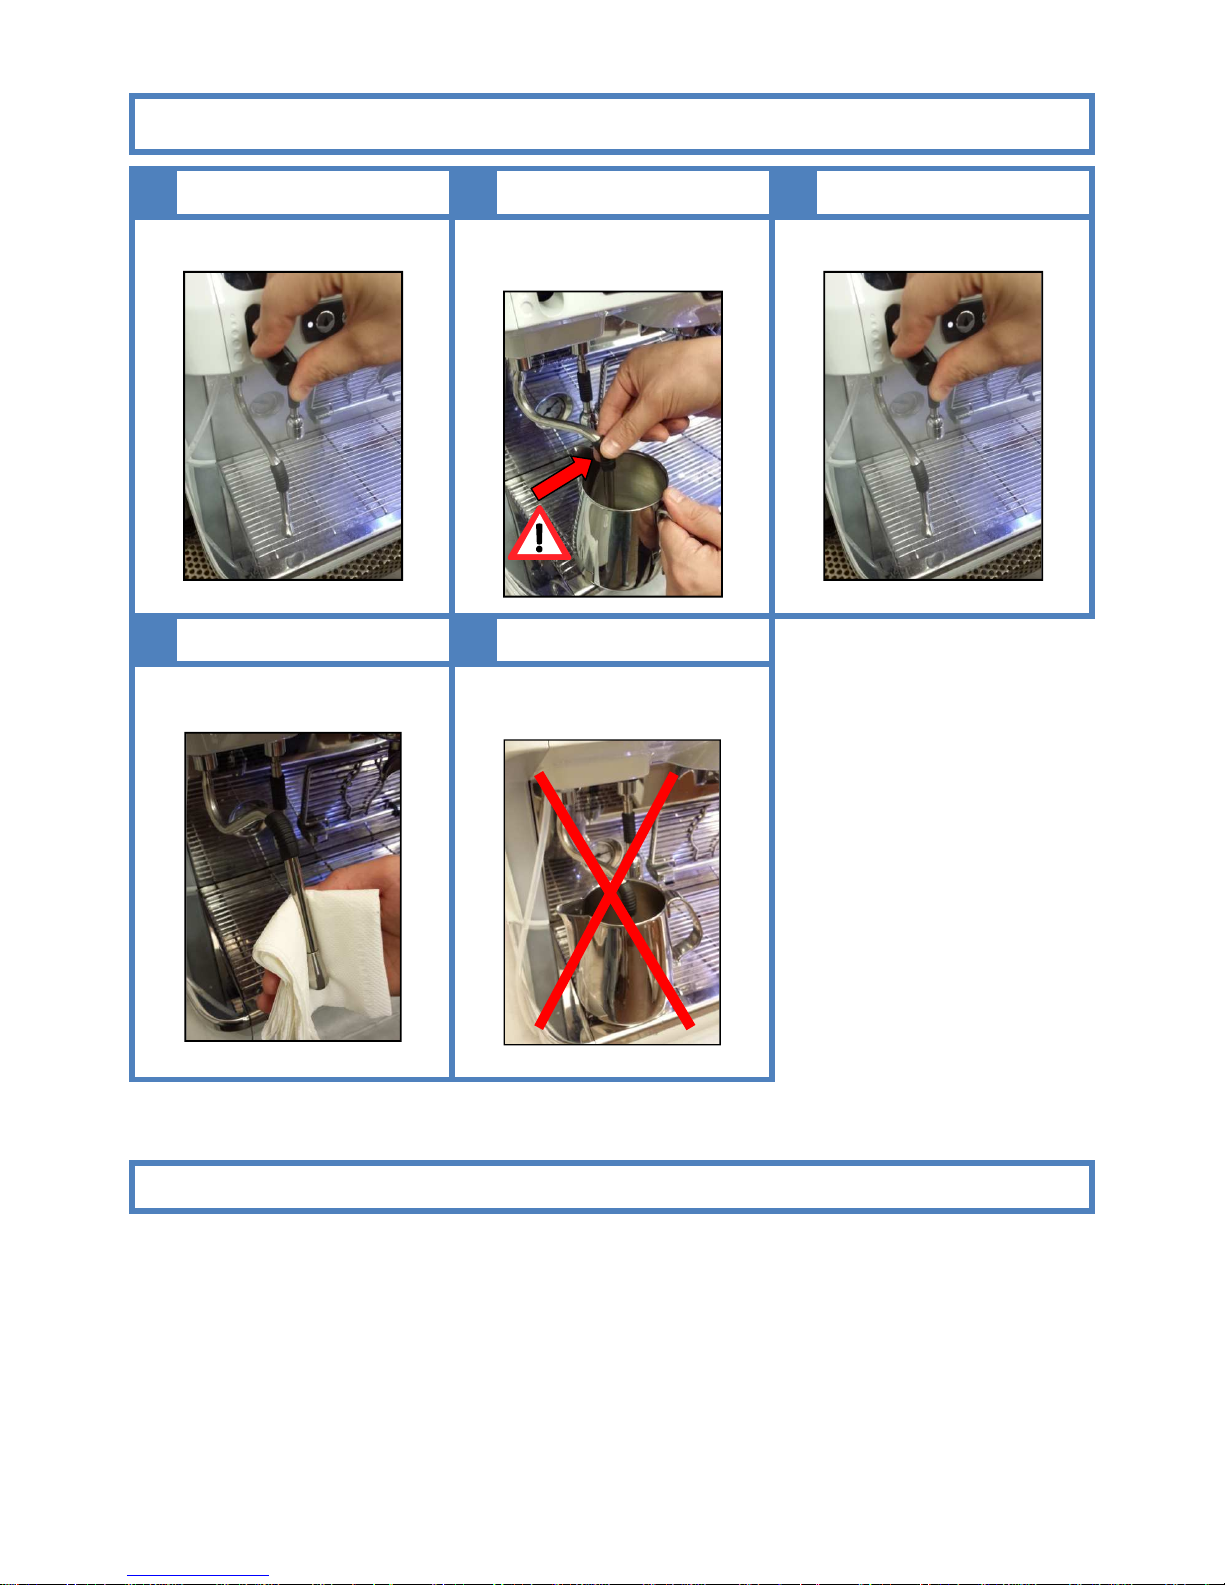
DISPENSING STEAM: warm up drinks (milk, cognac, etc) as follows, slowly pull down the steam lever, and then dip
the nozzle into the drink
1
2
3
Before using the steam wand pull down
the steam lever to purge the nozzle
Use the steam wand to foam or heat
any liquid into the jug, by handling the
plastic handle
After using the steam wand pull down
the steam lever to purge the nozzle
4
5
Clean the steam wand by means of a
cloth
Do not leave the steam wand into any
liquid at any time
WE STRONGLY RECOMMEND TO USE AND CLEAN THE STEAM WAND AS ABOVE SHOWN
Page 11
11
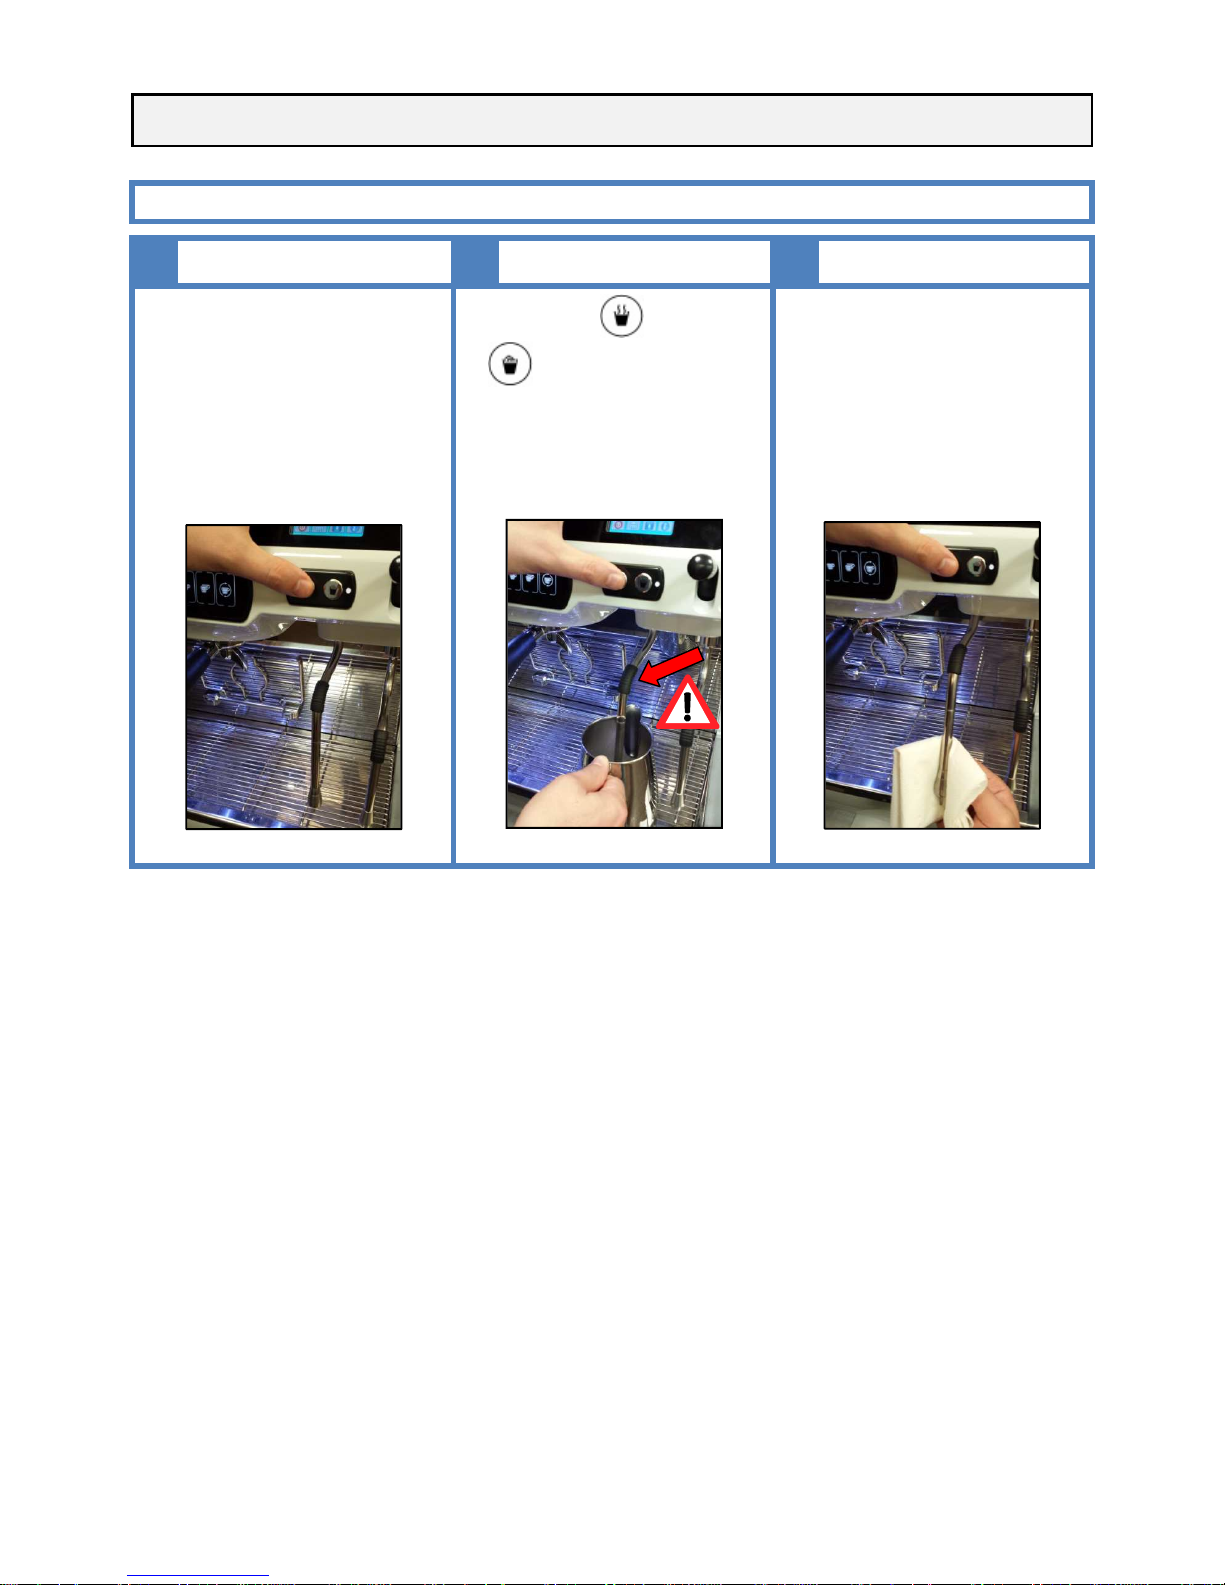
BARISTA STEAM WAND USE AND CLEANING
USE OF THE BARISTA STEAM WAND
1
2
3
Before using the barista steam wand,
keep the button pressed to purge the
nozzle
Press the button (steamed milk)
or (foamed milk) to activate the
barista steam wand. Heat or foam milk
into the jug, by handling the plastic
handle. The steam will automatically
stop once the programmed temperature
is reached
After using the barista steam wand,
keep the button pressed to purge the
nozzle
Page 12
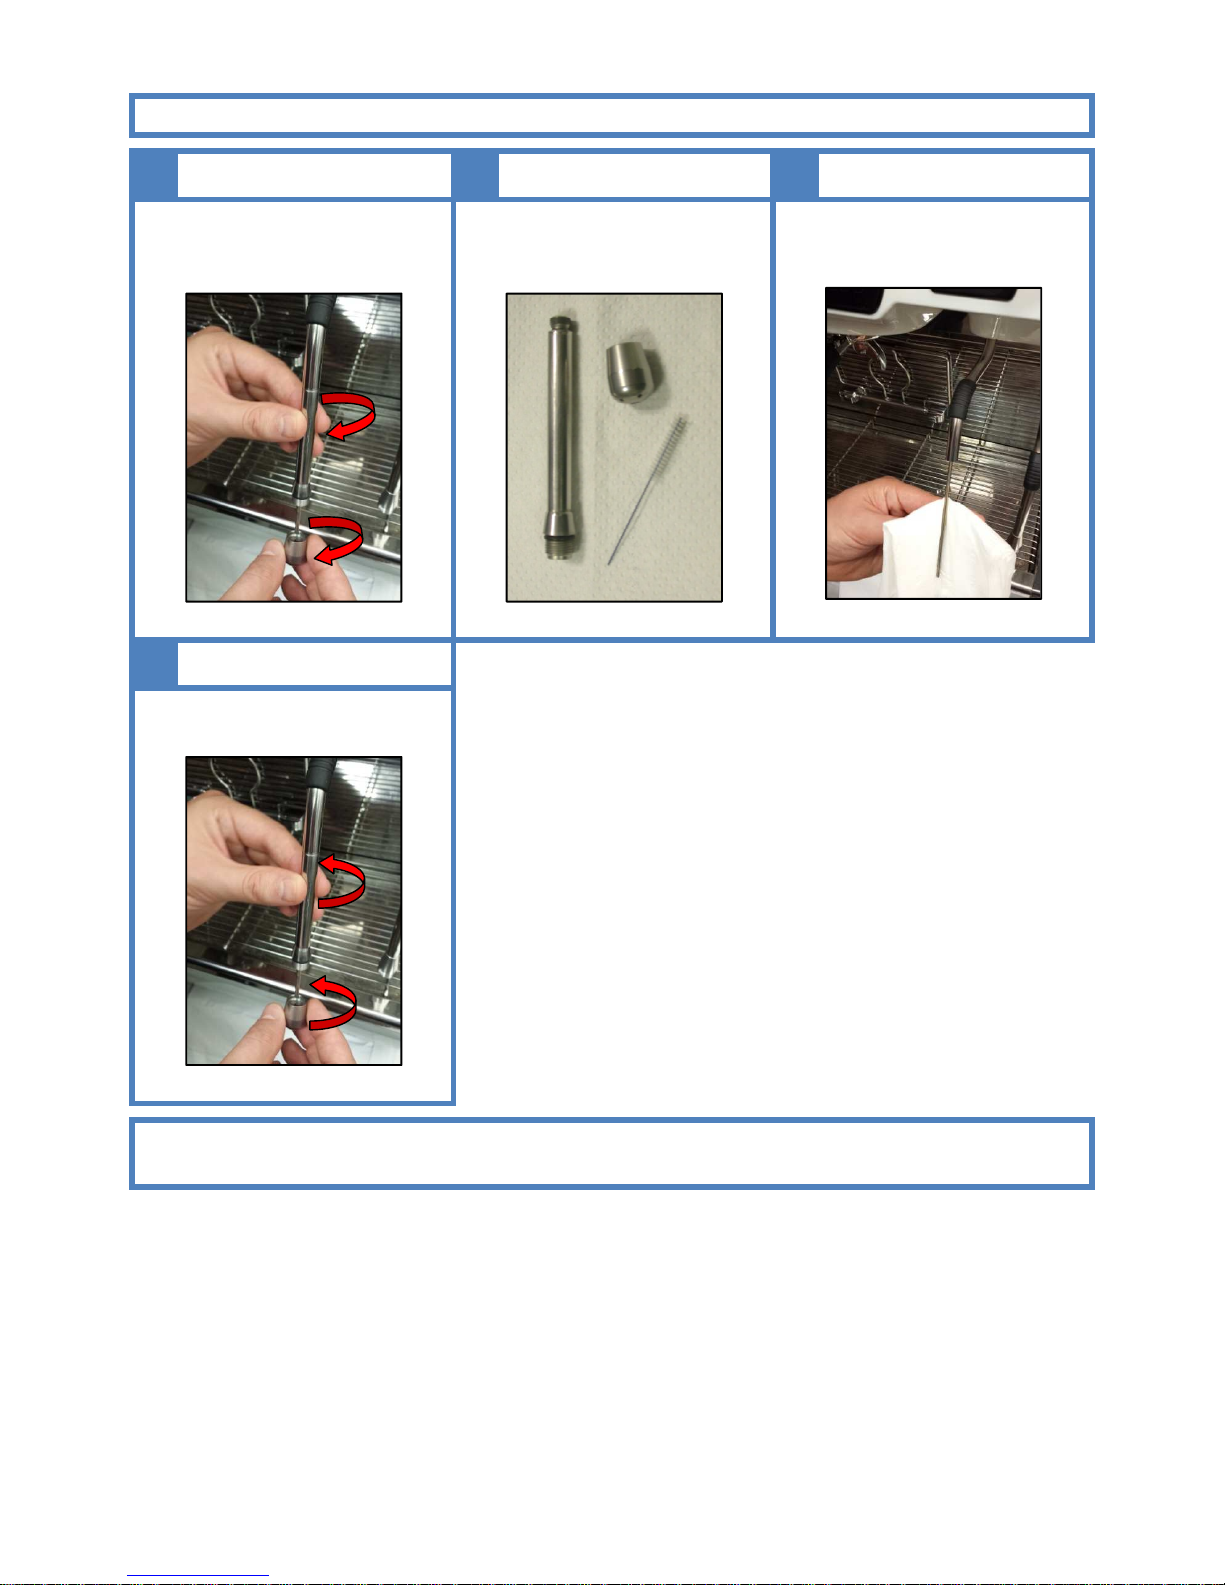
CLEAN THE BARISTA STEAM WAND
1
Remove the nozzle and the end part of
the barista steam wand to clean the
inner part
4
Screw the end part of the barista steam
wand and the nozzle
PLEASE NOTE:
WE RECOMMEND CARRYING OUT THE FOLLOWING CLEANING OPERATIONS AT THE END OF
12
2
3
Clean by using the provided brush, a
cloth is also recommended
Clean the inner part of the barista
steam wand by using a cloth
EACH WORKING DAY
Page 13
13
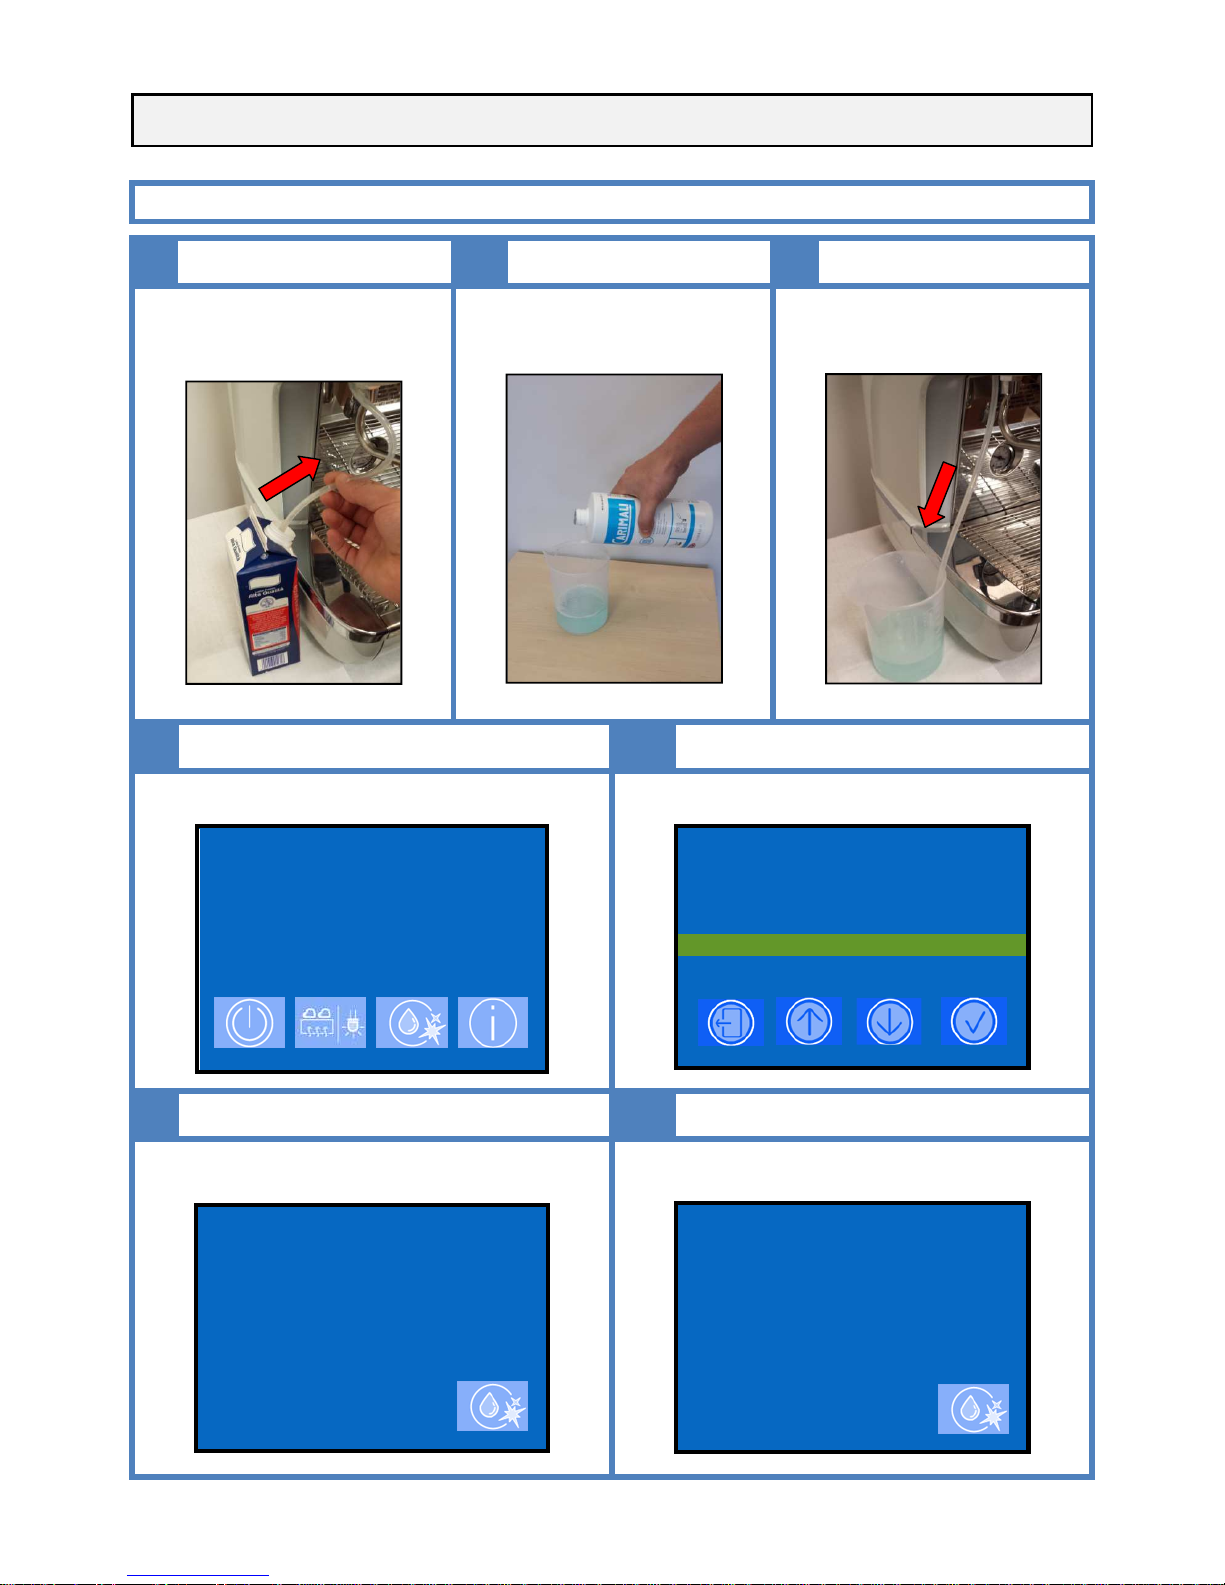
AUTOMATIC AND MANUAL CLEANING OF MILK FROTHER
AUTOMATIC CLEANING
1
2
3
Take the milk feeding tube out of the
milk box
Prepare a solution of water and
detergent (q.ty 500 ml) by following the
instructions indicated in the product
label
Insert the milk feeding tube into a
container with detergent
4
5
Press Clean key to access into the cleaning menu
2015-FEB-16 TUE 04:54
SELECT DRINK
Select Milker cleaning options and confirm by pressing enter
2015
-
OCT-10 SAM 08:00
CLEANING
GROUP 1
CLEANING
GROUP 2 CLEANING
MILKER
CLEANING
6
7
Leds of the related keyboard start flashing, press clean to
start cleaning.
2015-FEB-16 TUE 04:54
MILKER CLEANING
INSERT CLEANSER
Repeat the cleaning cycle starting from the beginning using
only water without detergent by pressing clean
2015-FEB-16 TUE 04:54
MILKER CLEANING
REPEAT CLEAN
USING ONLY WATER
PRESS CLEAN TO START
Page 14
14
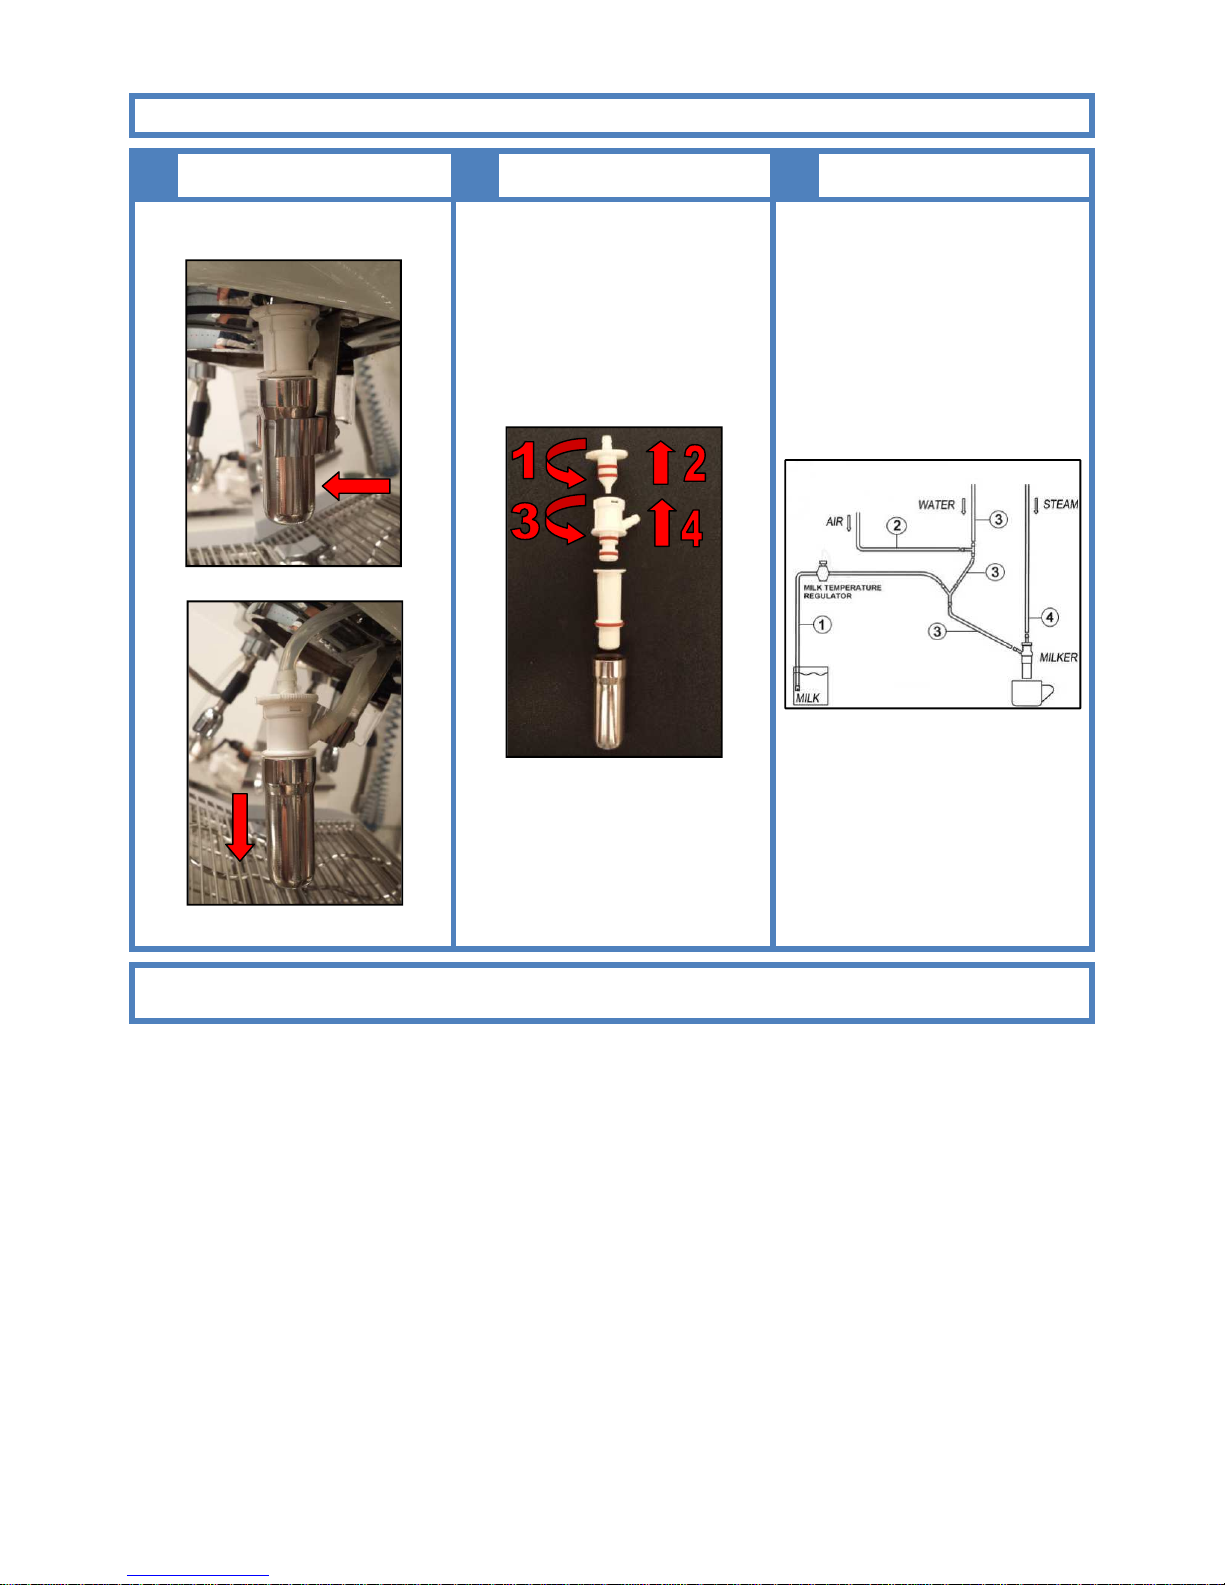
MANUAL CLEANING
1
2
3
Remove the milk frother from its holder
Disassemble the milk frother in all its
parts (first by turning and then by
pulling as shown in the picture) and
wash it either by hand or in a
dishwasher. Make sure that all the
holes are free from milk residues and
that the O-rings are in good condition
Reassemble the milk frother as
indicated in the assembling instructions
PLEASE NOTE: ONLY IN CASE THAT AFTER THE AUTOMATIC CLEANING PROCESS THE MILK FROTHER IS NOT
PROPERLY DISPENSING, CARRY OUT A MANUAL CLEANING
Page 15
15
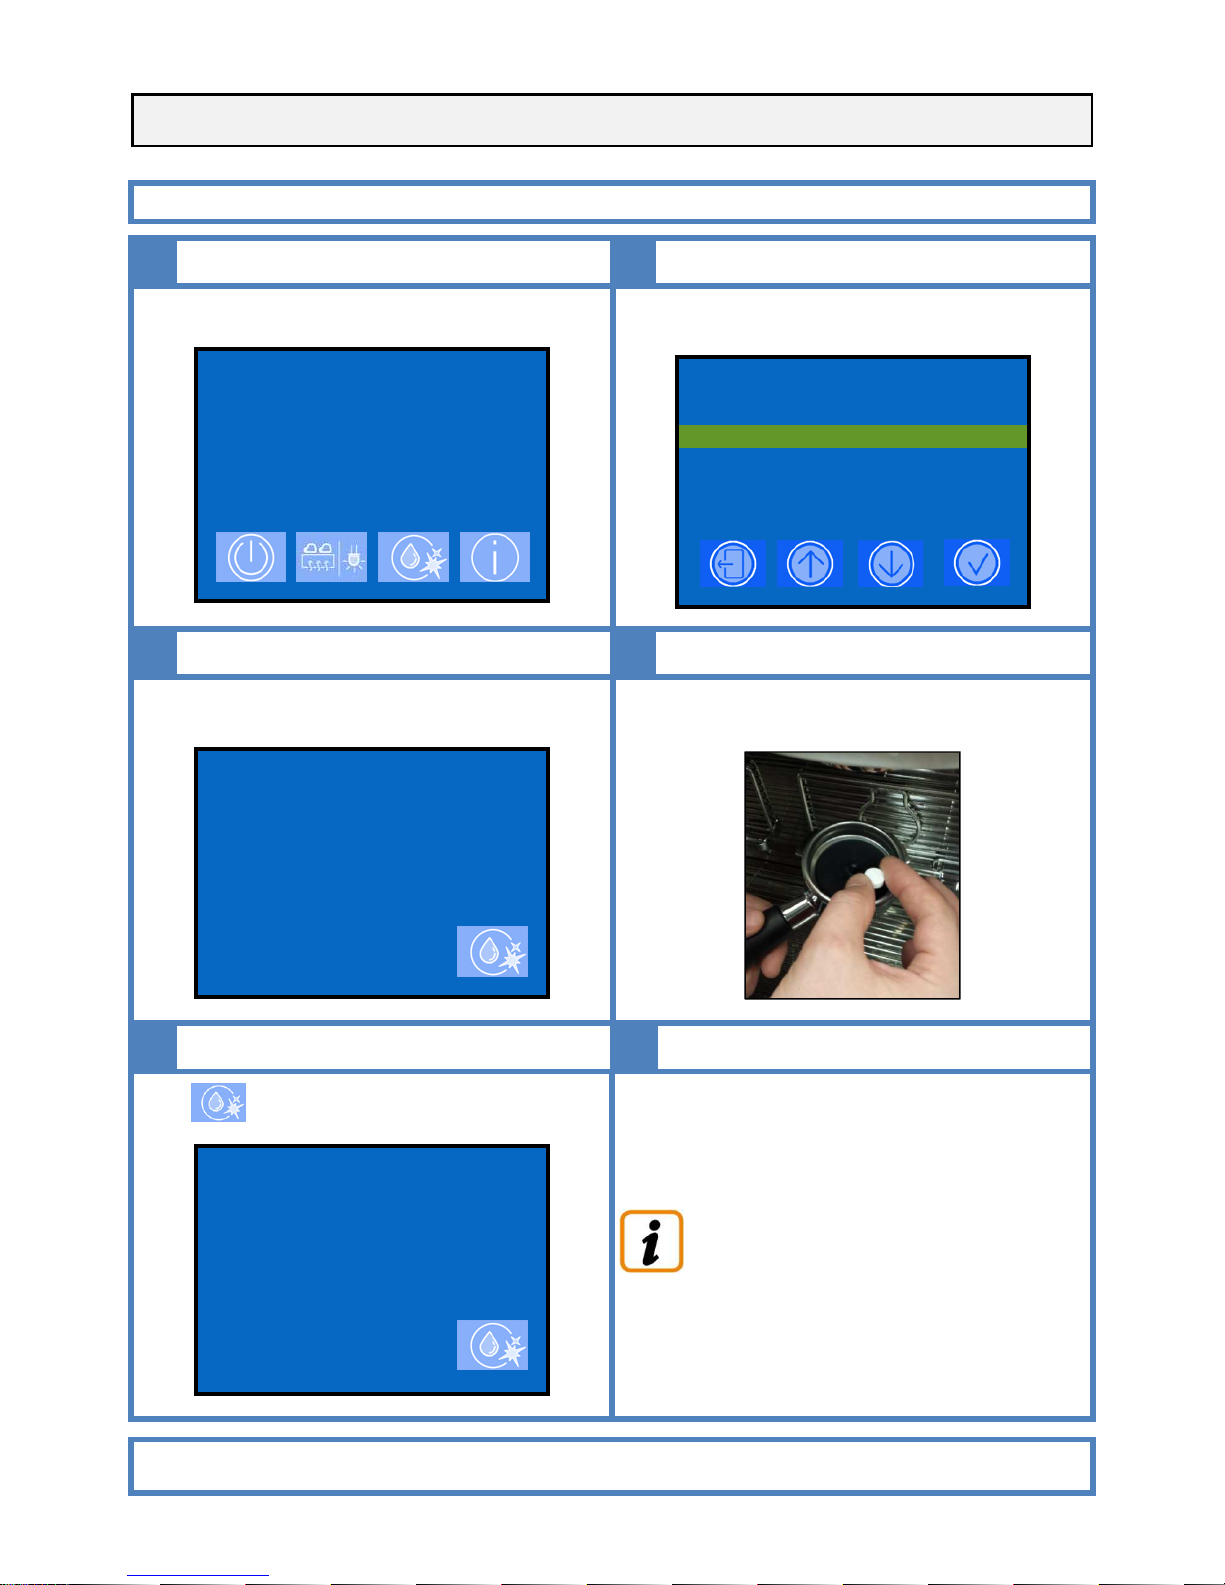
AUTOMATIC AND MANUAL GROUP CLEANING
AUTOMATIC CLEANING
1
2
2
Perform the following operations with the machine ON.
.
2015-FEB-16 TUE 04:54
SELECT DRINK
Select one of the two group cleaning options and confirm by
pressing enter.
2015-FEB-16 TUE 04:54
CLEANING
GROUP 1 CLEANING
GROUP 2 CLEANING
MILKER CLEANING
3
4
Leds of the related keyboard start flashing
2015-FEB-16 TUE 04:54
GROUP 1 CLEANING
INSERT CLEANSER
PRESS CLEAN TO START
Insert the supplied blind filter diaphragm and cleaning tablet
in the filter holder and fit it into the group
5
6
Press to start cleaning
2015-FEB-16 TUE 04:54
GROUP 1 CLEANING
INSERT CLEANSER
PRESS CLEAN TO START
Repeat the above described operation for all groups of the
machine
While a cleaning is in progress on the group 1, it is
possible to deliver coffee from the other one.
PLEASE NOTE:
WE RECOMMEND TO CARRY OUT FOLLOWING CLEANING OPERATIONS AT THE END
OF EACH WORKING DAY
Page 16
16
MANUAL CLEANING
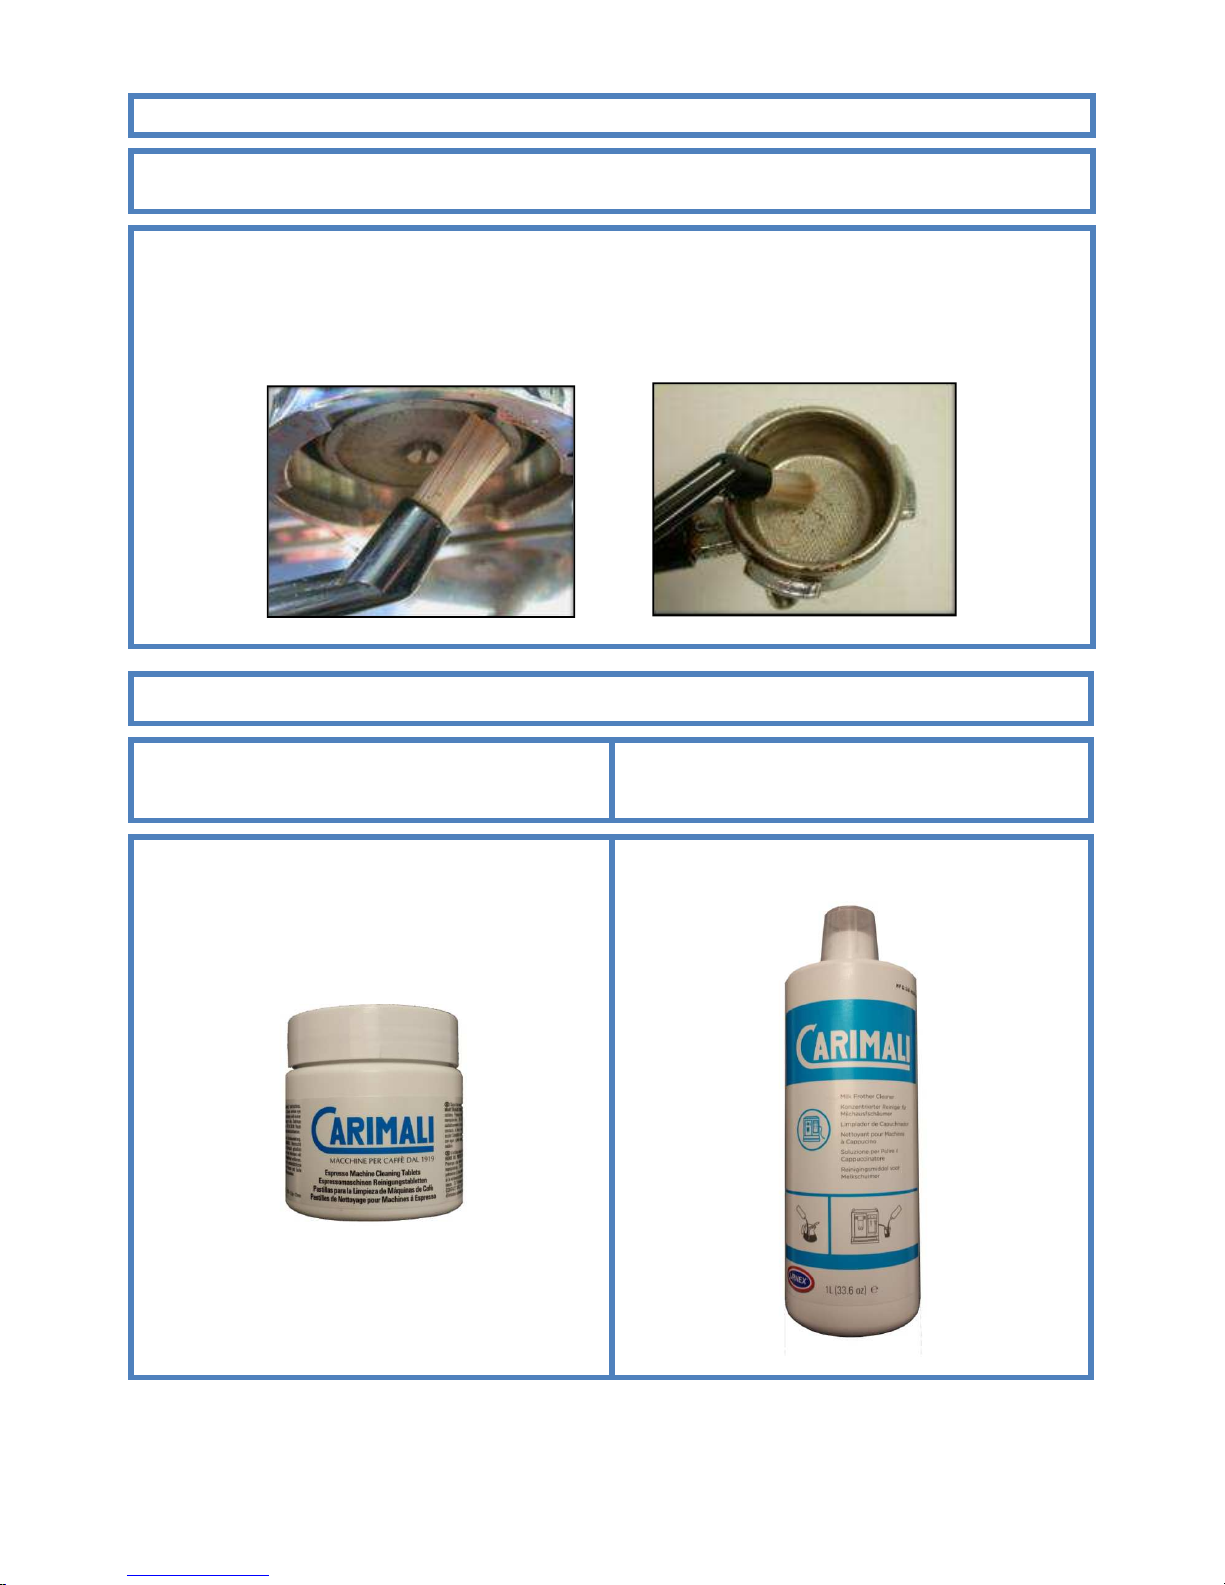
PLEASE NOTE: WE ALSO RECOMMEND TO USE THE SPECIAL BRUSH (CODE N° 95.01773) SUPPLIED
WITH THE MACHINE, TO ELIMINATE COFFEE RESIDUES FROM THE FILTERS AND SHOWERS
CLEANING THE FILTER HOLDERS
Carry out the following operations:
- We recommend to use the special brush (code N° 95.01773)
supplied with the machine, to eliminate coffee residues from
the filters and showers
- Remove the filters from the filter holders and wash both parts under running water
- Remove the remaining coffee by using a cloth
FOR CLEANING OPERATIONS, WE STRONGLY RECOMMEND TO USE OUR CLEANING PRODUCTS
CLEANING TABLETS
120 Tablets (1 gr
) Code N° 06.00133
MILK FROTHER CLEANER
1 Litre for 60 cleanings Code N° 06.00136
Page 17
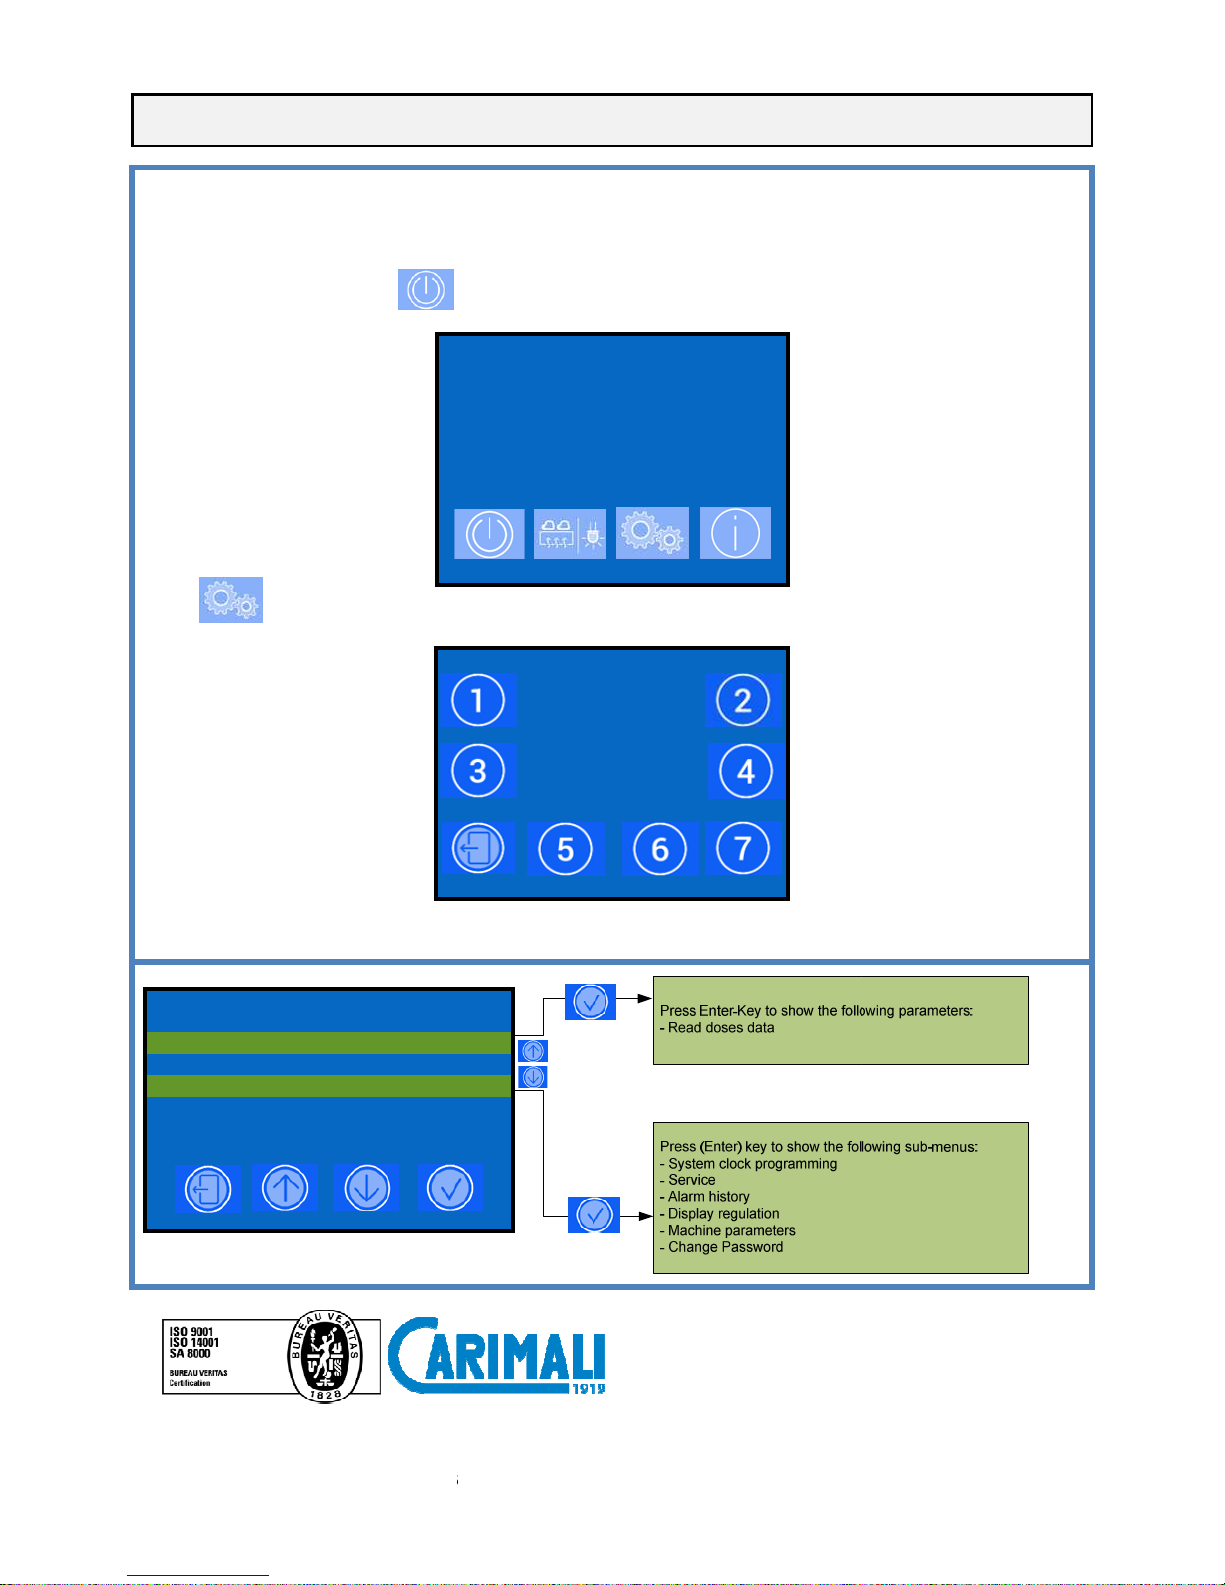
ACCESS THE MAIN SETTING MENUS WITH PASSWORD
To enter the programming environments, a password is required which define the access rights to the different environments.
The password must be
composed with 5 numbers.
To insert the passwords proceed as follows:
- Turn the machine OFF pressing
- Press
to access the password section
Enter the following passwords:
- Owner 2 2 2 2 2
SELECT
INFO-RESET
DOSE-PROGRAMMIN
G
SYSTEM
MANAGER
Carimali S.p.A. con socio
unico Via Industriale, 1
T: +39 035 4949555 F: +39 035 905447
www.carimali.com –
service@carimali.com
17
for 5 seconds, the display shows:
2015-FEB-16 TUE 04:54
OFF
:
INSERT PASSWORD
- - - - -
- 24040 Chignolo d'Isola (BG) -
Italia
 Loading...