

Page 1

LB-00145-55
Pag. 1
TECHNICAL
INSTRUCTIONS
TECHNICAL
INSTRUCTIONS
6.1
EN - ENGLISH
LB-00145-55
EDITION MARCH 2016
www.carimali.com
Page 2

LB-00145-55
Pag. 2
SOMMARIO
INTRODUCTION AND GENERAL INSTRUCTIONS ................................................................ 3
AVR STUDIO 6.1 AND SUB-PROGRAM INSTALLATION ...................................................... 5
FIRMWARE AVRISPmkII UPGRADE ....................................................................................... 10
MANUAL FIRMWARE UPDATE OF AVRISP mkII ................................................................ 11
CARIMALI MAIN BOARD ........................................................................................................... 12
AVRISPmkII – MAIN BOARD CONNECTION ......................................................................... 16
FIRMWARE UPDATE PC TO MACHINE MAINBOARD ................................................... 17
MACHINE SET-UP DATA READING ................................................................................... 18
MACHINE SET-UP DATA WRITE....................................................................................... 19
MACHINE MAIN BOARD ERASE .............................................................................................. 20
TROUBLESHOOTING .................................................................................................................. 21
Page 3
LB-00145-55
Pag. 3
INTRODUCTION AND GENERAL INSTRUCTIONS
The AVR USB programmer allows to carry out the following operation:
1. program the microprocessor on the machine master board with the machine software, file.hex;
2. transfer to the laptop the machine settings file (dose settings, counters...);
3. transfer the above mentioned file to another machine microprocessor;
4. format the microprocessor.
Atmel Studio 6.1 is based on Microsoft .NET 4.0 technology and is thus Windows software. The supported software
platforms are listed below.
• Windows XP (x86) with Service Pack 3 - all editions except Starter Edition
• Windows Vista (x86 & x64) with Service Pack 2 - all editions except Starter Edition
• Windows 7 (x86 & x64)
• Windows 8 ( x64 )
• Windows Server 2003 (x86 & x64) with Service Pack 2
• Windows Server 2003 R2 (x86 & x64)
• Windows Server 2008 (x86 & x64) with Service Pack 2
• Windows Server 2008 R2 (x64)
Recommended hardware:
• 1.6GHz processor or faster
• DirectX 9 capable video card running at 1024x768 resolution (minimum 800x600 screen)
• 1 GB (32 Bit) or 2 GB (64 Bit) RAM (Add 512 MB if running in a virtual machine)
• 5400 RPM hard disk drive
• 2 GB free hard disk space
• 1 port USB 2.0
We always recommend to have the latest OS versions and Service packs installed. We also recommend Internet
Explorer 7 or later.
Software:
ATMEL: AVR Studio 6.1
Page 4
LB-00145-55
Pag. 4
INTRODUCTION AND GENERAL INSTRUCTIONS
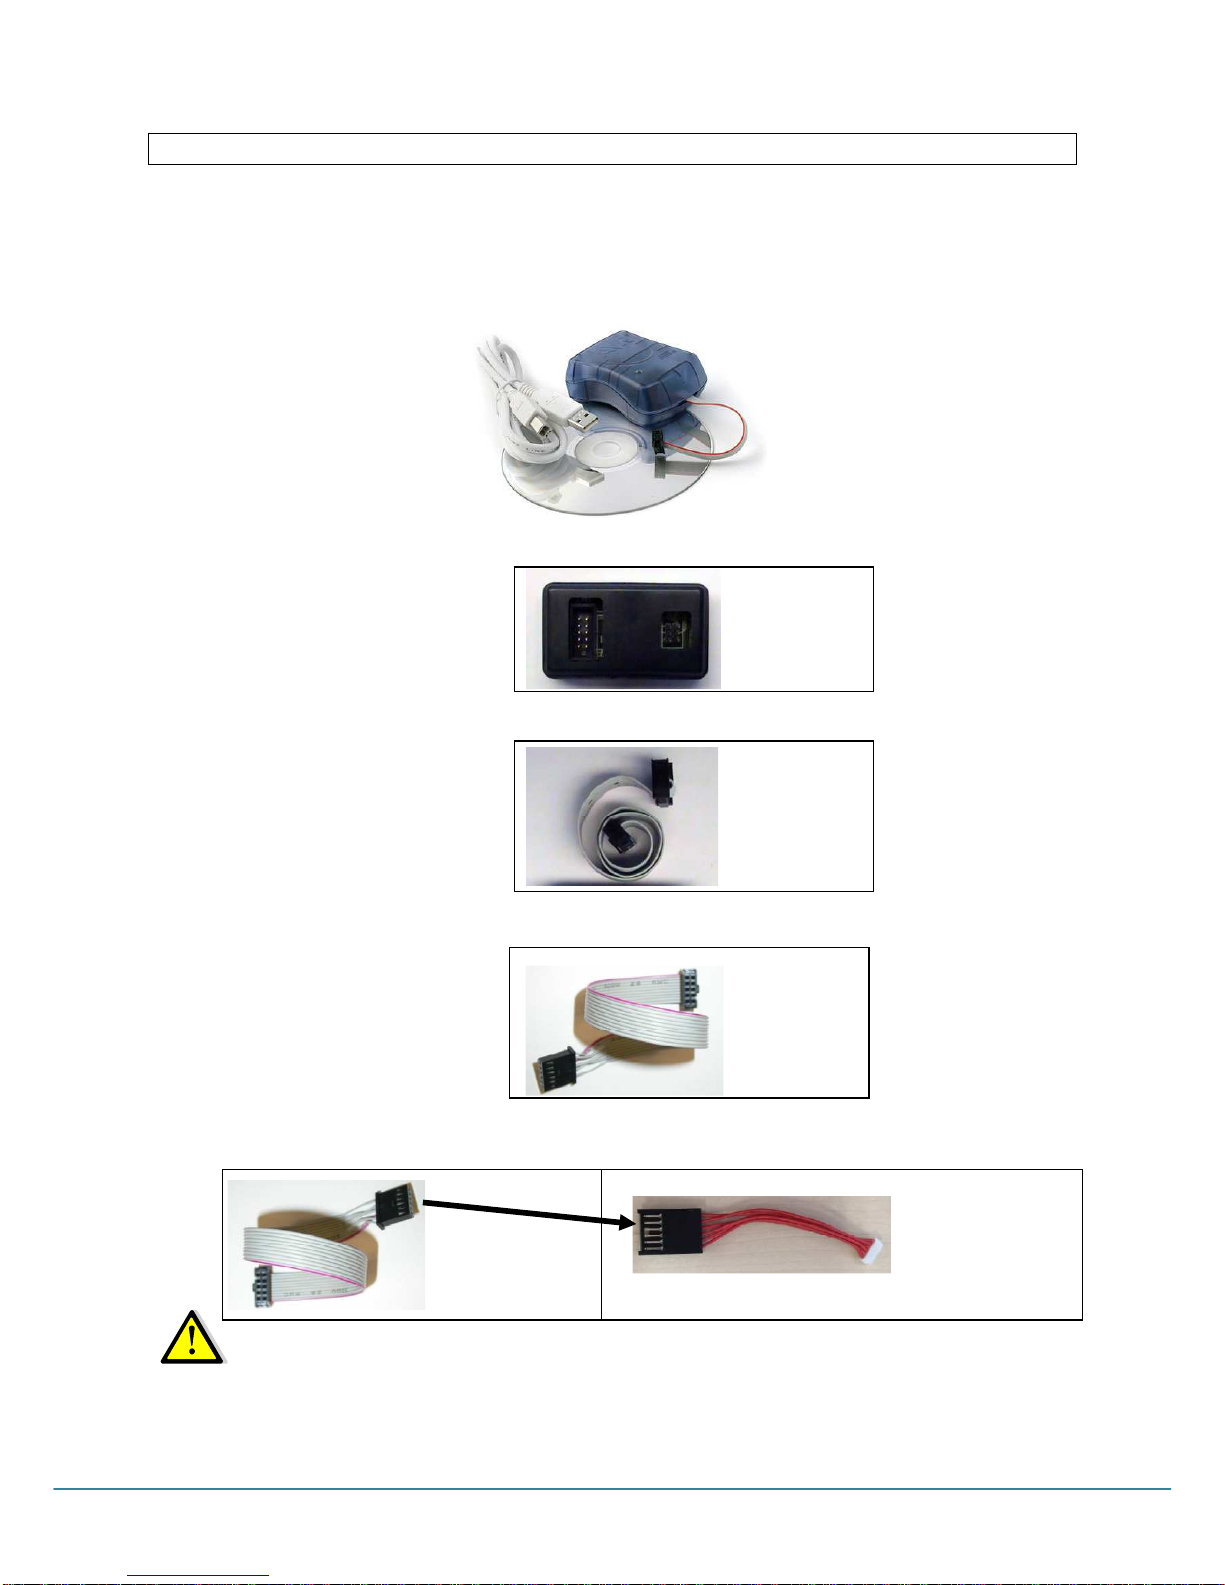
The kit code -04.00828- Includes:
a. 1x CD-ROM containing: a folder with the installation software on PC, and the technical manual
b. 1x Master board AVRISP mkII complete with cable 3x2 pin;
c. 1x Cable to connect the AVRISP mkII to a laptop USB port;
The items referring to a. b. c. can be separately supplied with code 96.00765.L1, see the following picture:
d. 1x interface board between the AVRISP mkII and the machine master board with microprocessor Atmega.
e. 1x cable 10x2 PIN, to connect the interface board ref. d. and the machine master board with microprocessor
ATmega32 / 644 / 128 / 2560.
f. 1x cable 10x2 to 6 PIN, to connect the interface board ref. d. and the machine master board with microprocessor
ATmega168P.
g. 1x cable 6 PINs to be connected in series to the cable 03.05036 (ref. f.), used to connect the interface board
ref. d. and the machine master board with microprocessor ATmega2560.
NOTE: AVR Studio 6.1 and the USB driver must be installed before AVRISP mkII is connected to the pc.
code 96.00773
code 03.01082
code 03.05036
code 03.05201
code 03.05036
Page 5

LB-00145-55
Pag. 5
AVR STUDIO 6.1 AND SUB-PROGRAM INSTALLATION
Insert the CD-ROM / USB pen drive in the reader and open the folder CD-1.09 (or later version).
Picture 1.1 Picture 1.2
Open the folder Studio 6.1:
Carry out the AStudio61sp2net [or later version] by clicking twice the icon [Picture 1.3]
Click Install [Picture 1.4]
Picture 1.3 Picture 1.4
Remove the checkmark in the box [ Picture 1.5],accept the license terms then press Next [Picture 1.6].
Picture 1.5 Picture 1.6
Page 6

LB-00145-55
Pag. 6
Select the Full feature and the path in which the setup will install the Visual Studio 2010 Shell [Picture 1.7].
Press Install to start the installation.[Picture 1.8].
Picture 1.7 Picture 1.8
Press “Finish” to end the Visual Studio 2010 installation [Picture 1.9
Picture 1.9
Page 7
LB-00145-55
Pag. 7
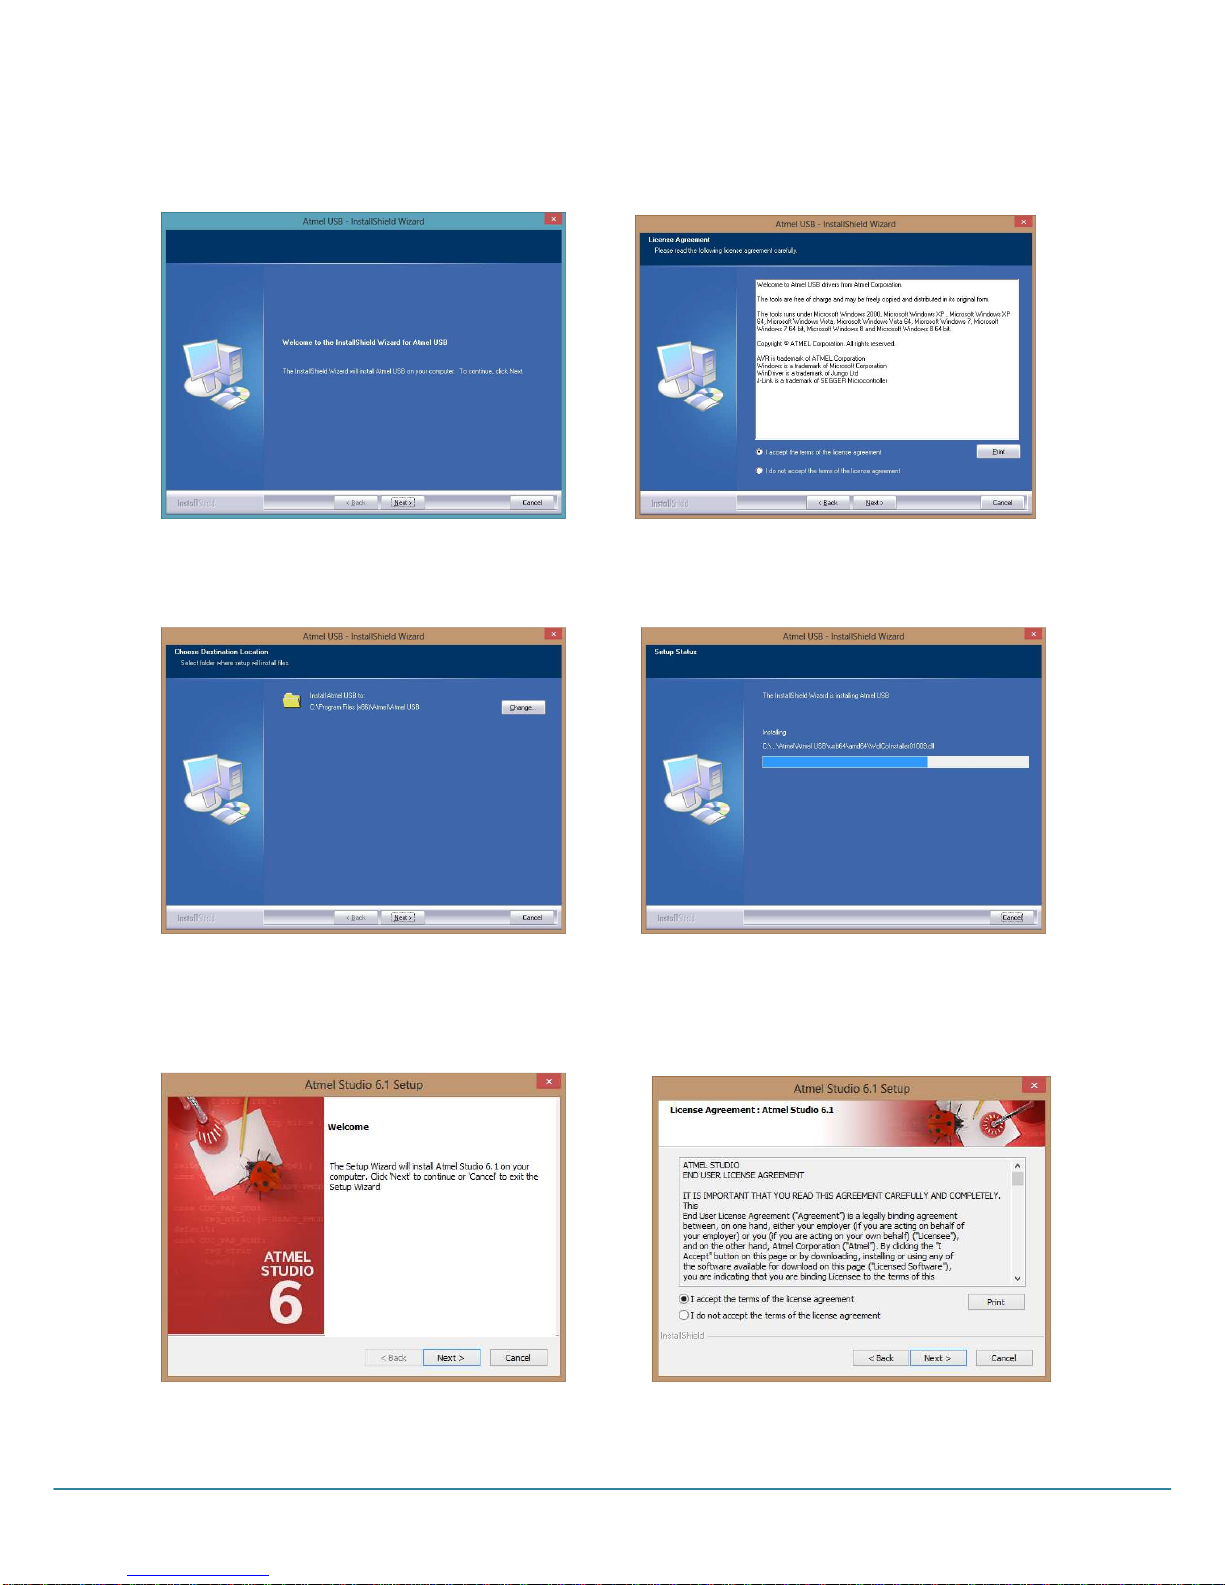
Press Next to start the Avr Jungo Usb installation [Picture 2.2]
Accept the terms licence agreement and click Next [Picture 2.3 ]
Picture 2.2 Picture 2.3
Click next then install to begin the installation[Picture 2.4 ] wait for the completion of the installation then press finish
[Picture 2.5 ]
Picture 2.4 Picture 2.5
The wizzard Setup will install the Avr Studio 6.1, Click Next to start [ Picture 2.6 ]. Accept the terms licence agreement
and click Next [Picture 2.7 ]
Picture 2.6 Picture 2.7
Page 8

LB-00145-55
Pag. 8
Specify the folder where Avr Studio 6.1 will be installed [ Picture 2.8 ].
Picture 2.8
Setup has enough information to start copying the files, if you are not sure about the setting press Back.If you are
satisfied with the setting click Next.[ Picture 2.9 ] wait for the completion of the installation [ Picture 3.0 ]
Picture 2.9 Picture 3.0
Remove the checkmark in the Associate files box then press Finish to end the Avr Studio 6.1 installation [ Picture 3.1 ]
Picture 3.1
Page 9

LB-00145-55
Pag. 9
In the menu START –Click twice the AVR Studio 6.1 icon to open it [Picture 3.2].
Picture 3.2
The following window will be shown:
Remove the checkmark from “Close page after project load” and “Show page at start-up”, then close the Start Page
[Picture 3.3]
Picture 3.3
Connect the AVRISPmkII to PC USB port through the supplied cable. The PC will automatically start the hardware
installation procedure of the AVRISP mkII.
Page 10

LB-00145-55
Pag. 10
FIRMWARE AVRISPmkII UPGRADE
AVR Studio 6.1 will contain the latest firmware available from Atmel. AVR Studio after connecting the AVR, system
may require an firmware update.
Press “Yes” [ Picture 3.4 ], then “upgrade” to start the upgrade procedure[ Picture 3.5 ].
Picture 3.5
Wait until the progress bar fills up [ Picture 3.6 ].Press “close” to end the upgrade [ Picture 3.7 ].
Picture 3.6 Picture 3.7
Disconnect and reconnect the AVR programmer from/to the PC USB: if the led turned toward the USB port
[ Picture 3.8 ] will get green, the programmer installation has been succesfull.
Picture 3.8 Picture 3.9
For some of Atmega master boards, it will be necessary to use the adaptor code 96.00773
[Picture 3.9] supplied with the Kit Avr isp mkII.
Picture 3.4
Page 11

LB-00145-55
Pag. 11
MANUAL FIRMWARE UPDATE OF AVRISP mkII
Firmware updating is usually handled automatically by AVR Studio 6.1 , if the firmware distributed with AVR studio 6.1
is newer than the firmware loaded into AVRISP mkII.
However, the AVRISP mkII can stop responding to firmware upgrating if the firmware on the AVRISP mkII is corrupted.
Corruption of the firmware can happen if the comunication between the AVRISP mkIIand the PC is broken during
firmware updating or if the firmware in the AVRISP mkII is re- programmed with the wrong file.
Follow the steps below to manually upgrade the AVRISP mkII . This procedure should work in all cases:
1. Disconnect the Avr Isp MKII from the machine master board
2. Disconnect the cable USB from the PC
3. Open the Avr Isp MKII by moving the 4 plastic clips that holds the top and the bottom parts of the enclosure
togethr.
4. Short-circuit the Pin 1 e Pin 3 on the pinholes next to the AVRISP mkII silk print on the PCB as shown in
[ Picture 4.5 ]
5. Insert the USB cable. The AvrISP mkII will blink red and orange.
6. Start the application AVRISP mkII Tools Firmware Upgrade located in the “Tools” menu in AVR Studio.
7. Click the “Upgrade”button
8. When upgrade is finished, remove the short circuit between pin 1 and pin 3 on the AVRISP mkII.
9. Toggle AVRISP mkII power by unplag and re-insert the USB cable.
10. Press “Close” button.
The AVRISP mkII in now upgraded and ready for use!
Picture 4.5
Page 12

LB-00145-55
Pag. 12
CARIMALI MAIN BOARD
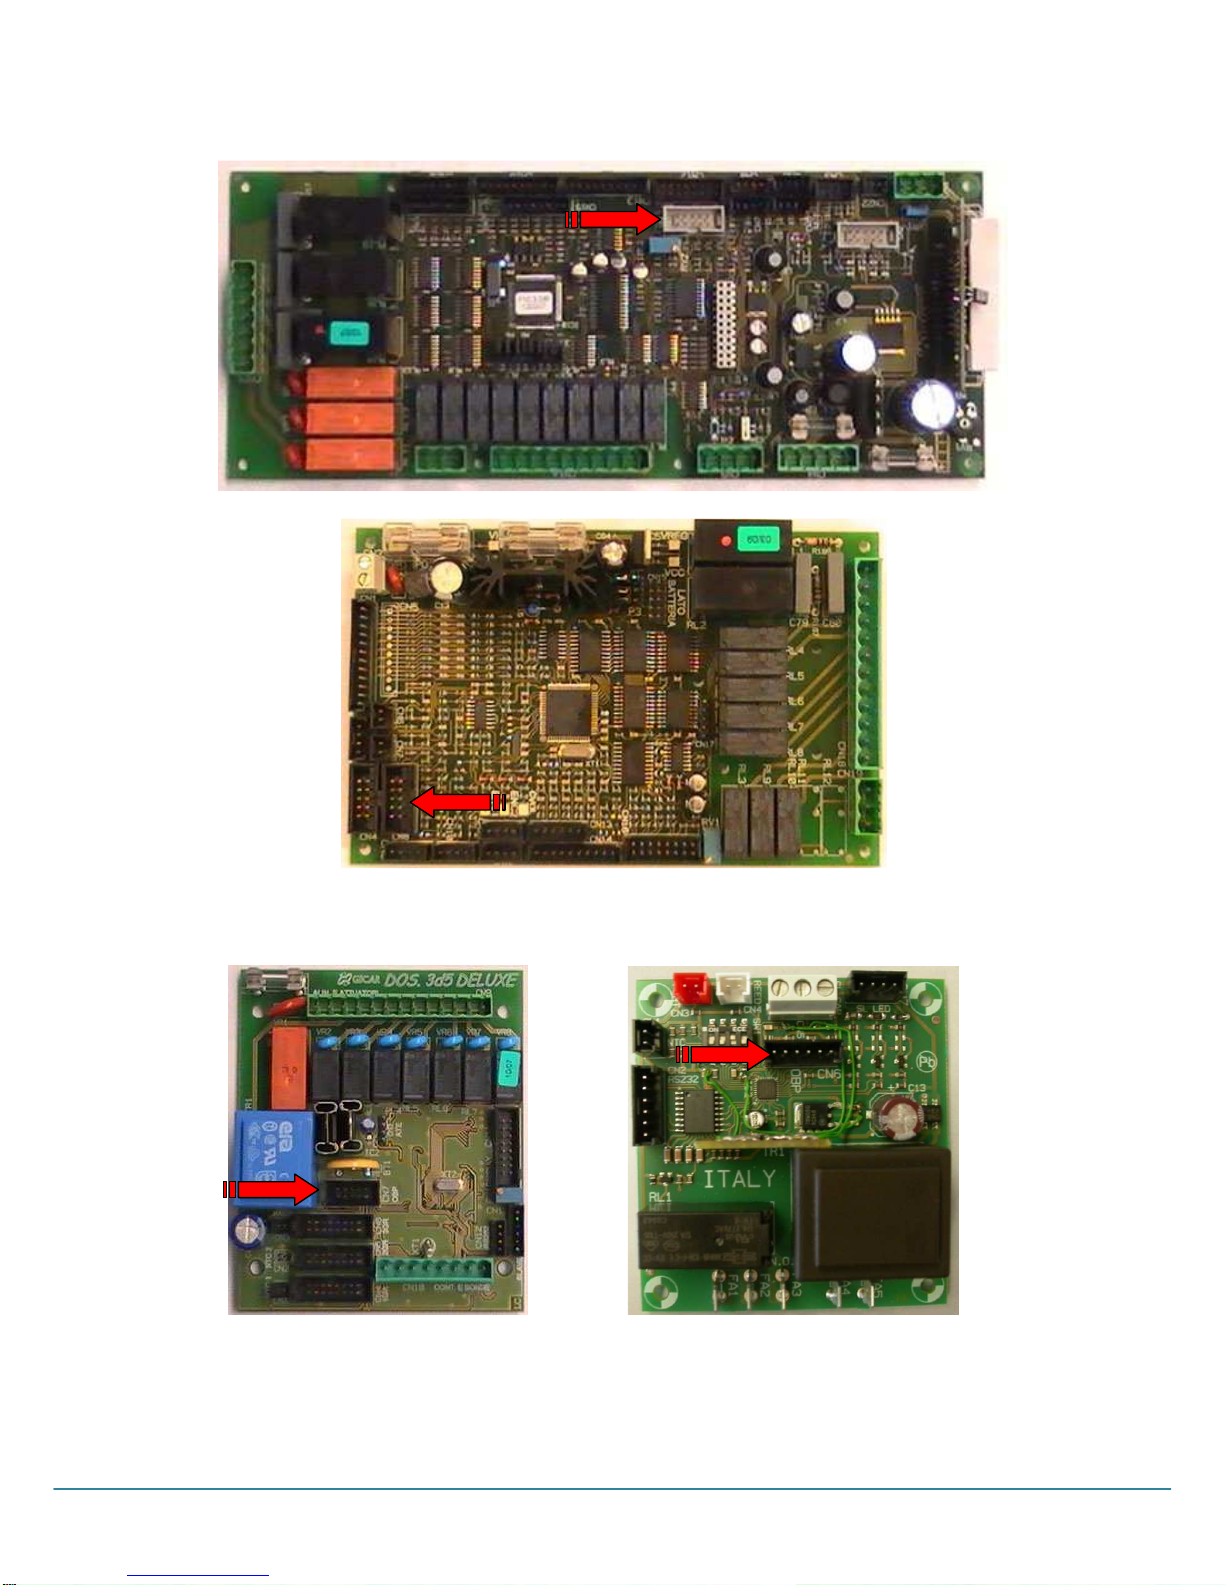
The master boards used by Carimali which can be programmed with the AVRISP are the following:
The arrow shows where to connect the programmer AVRISP.
Atmega 2560 Mega – Sirio series
Atmega2560 Armonia – MX-3 series
Page 13

LB-00145-55
Pag. 13
Atmega2560 Armonia smart – MX-2
Atmega2560 Multi smart - Mya
Atmega128 Armonia - MX-3 series Atmega128 Armonia smart – MX-2 - Mya
[Display] [Display]
Page 14
LB-00145-55
Pag. 14
Atmega128 F V2 and V3 series
Atmega128 Multi V2 series
ATmega 32 – Atmega 644 ATmega 168P
Kicco, Eta BetaV2, Tema Style, Espresso9 Fridge Plus
Page 15

LB-00145-55
Pag. 15
ATmega2560
Diva
Page 16
LB-00145-55
Pag. 16
AVRISPmkII – MAIN BOARD CONNECTION
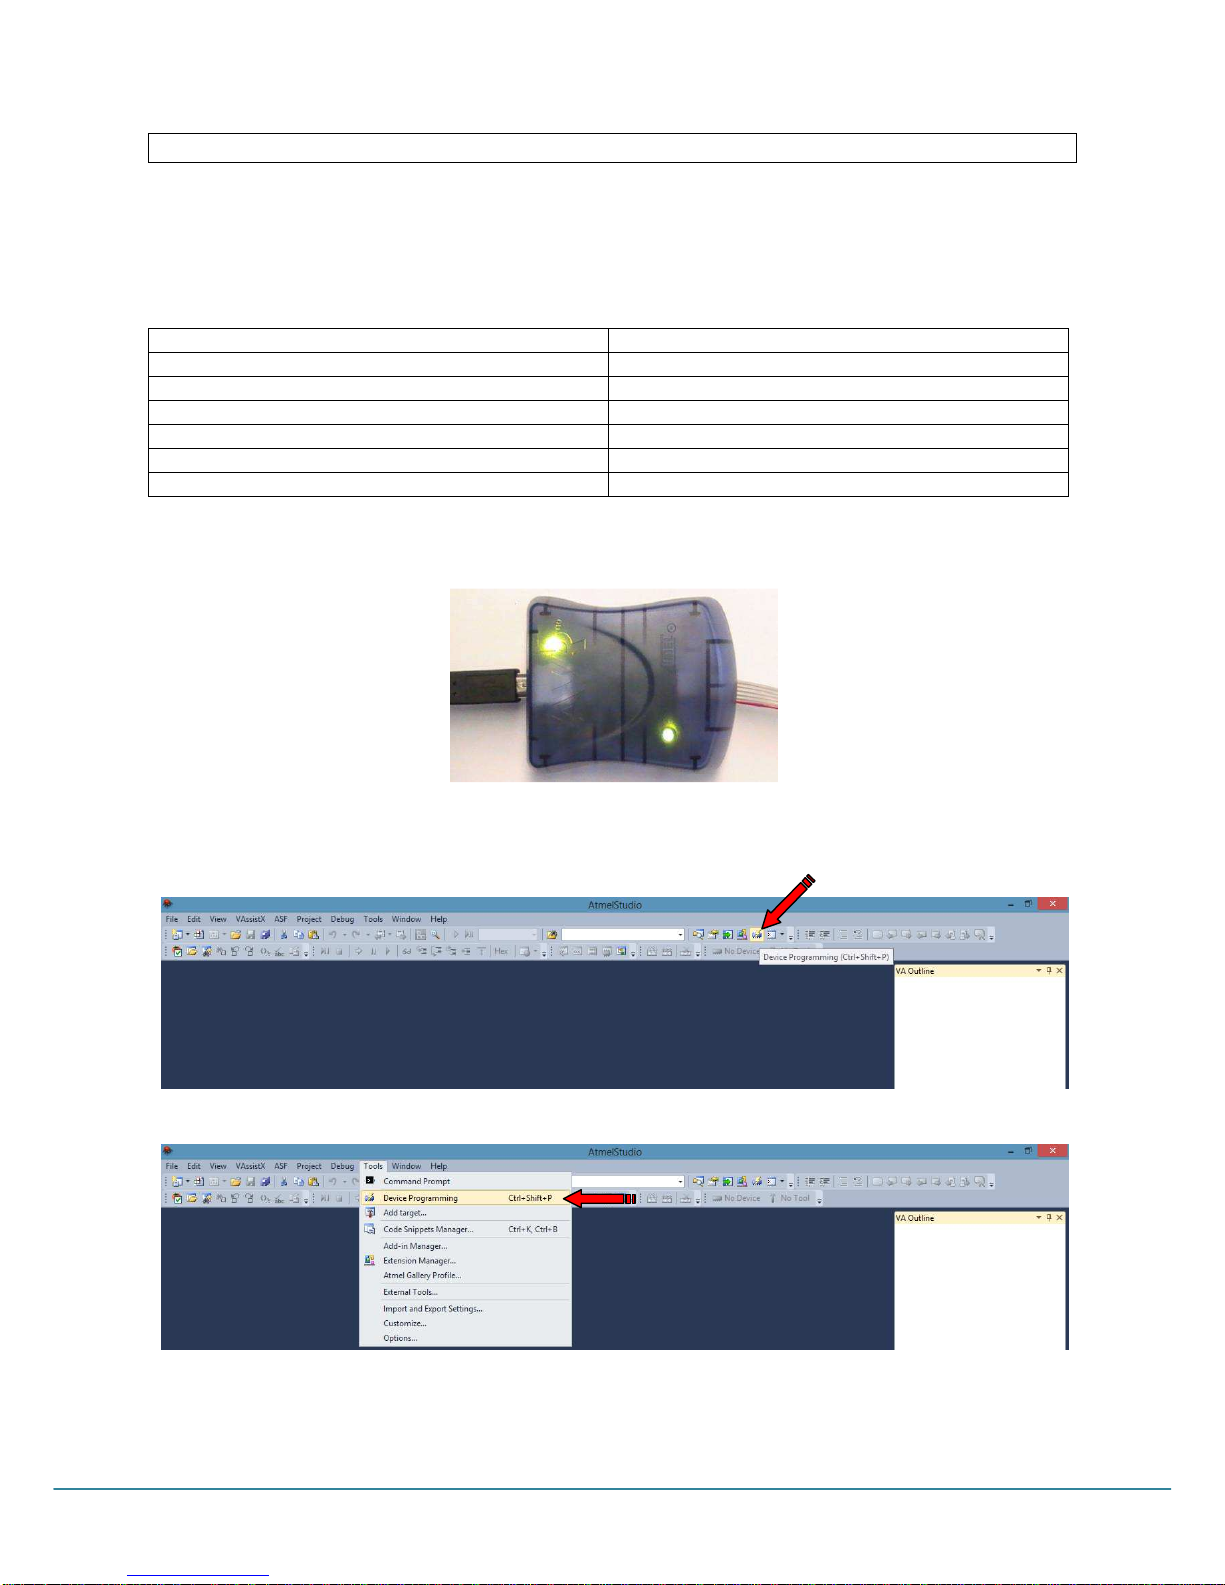
Start the Avr Studio 6.1 sw and switch the machine in Stand-by mode. Connect the programmer Avr Isp MKII to both
the USB port and master board connector.
Inside a Avrisp mkII there are two leds, one next to the USB connector that indicates a USB traffic, the other a
3 color led, this indicates the status of the Avrisp mkII.
LED COLOR DESCRIPTION
Red Idle - No target power
Green Idle - With target power
Orange Busy - Programmming
Orange blinking Reversed target cable connection
Red blinking Short-circuit on target
Red – Orange blinking Upgrade mode
If the 2 leds are green, the connection has been successful and the programmer is ready to transfer data [Picture 4.6 ]
Picture 4.6
Select from toolStrip [ Picture 4.7 ]or from drop-down menu [ Picture 4.8 ] the AVR PROGRAMMING icon
Picture 4.7
Picture 4.8
Page 17
LB-00145-55
Pag. 17
FIRMWARE UPDATE PC TO MACHINE MAINBOARD
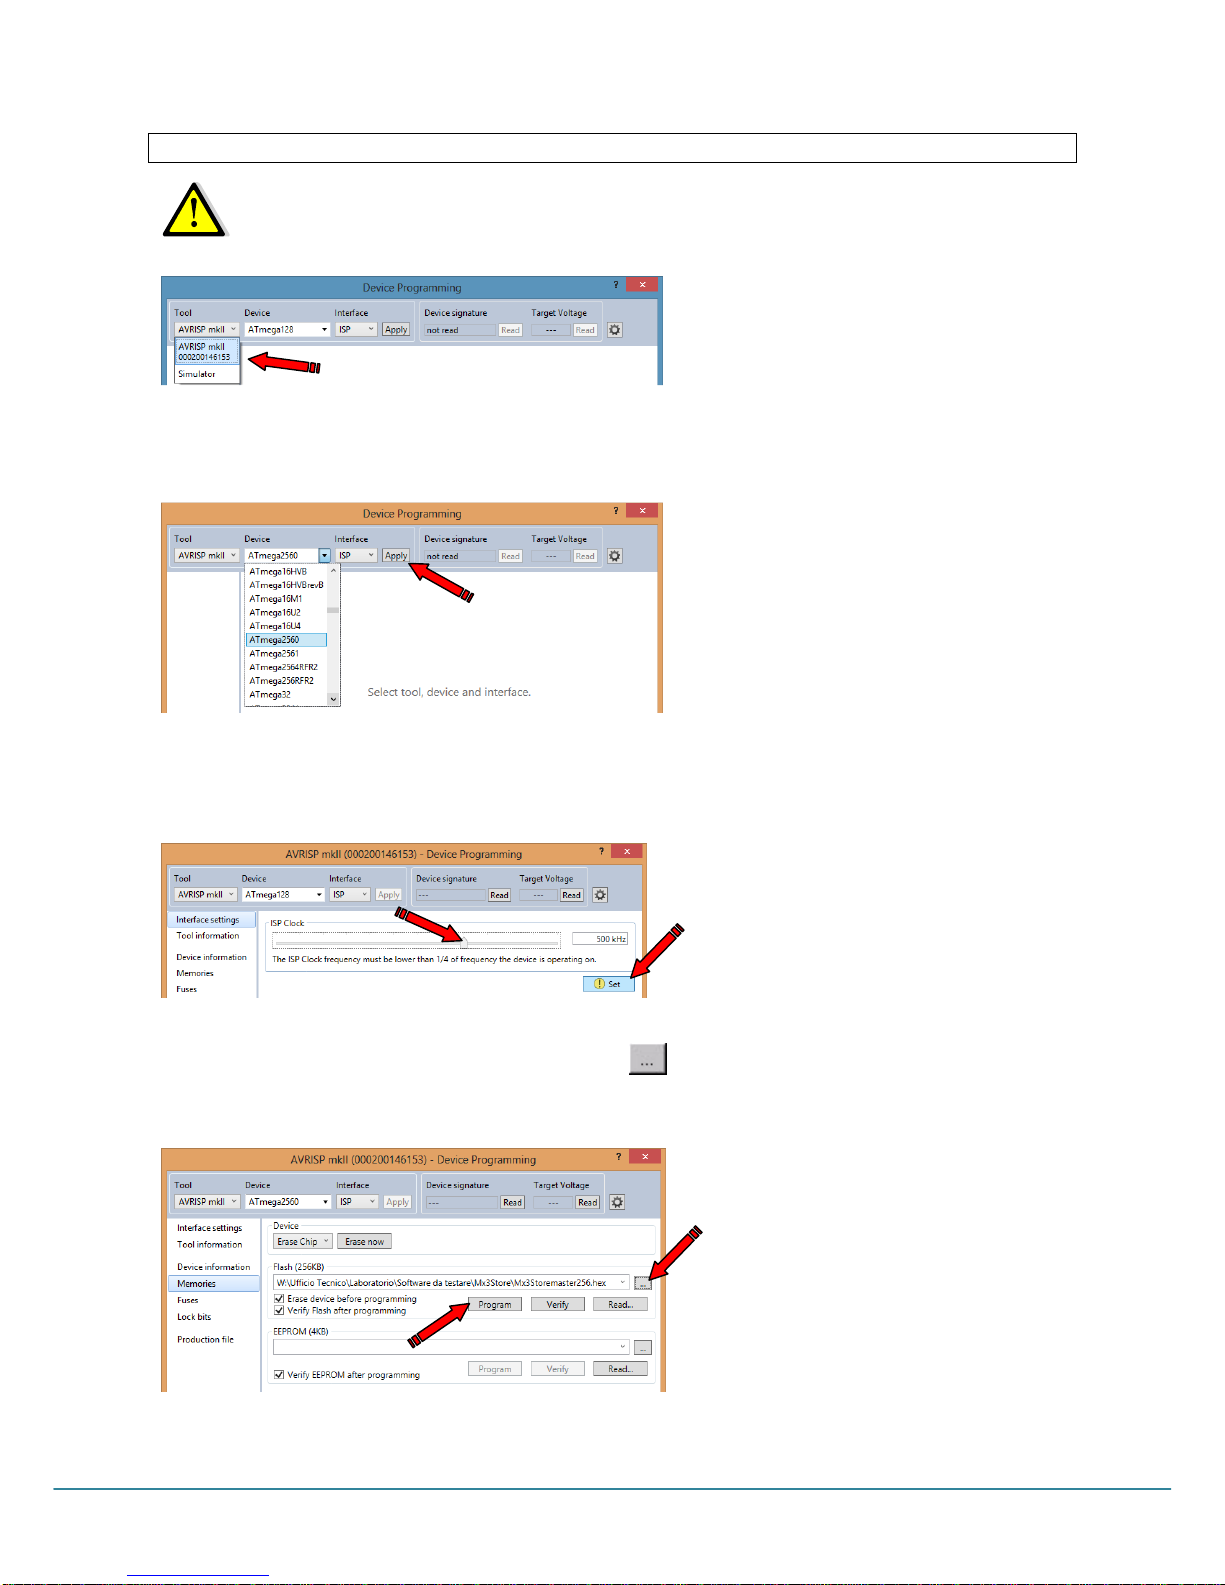
Select from drop-down menu the AVRISP mkII platform [ Picture 4.9 ]
Tool: Avr ISP mkII ( parameter available if connected to PC USB port ).
Picture 4.9
Device: Select the type of microprocessor to program in according with the type of main board ,( see paragraph
CARIMALI MAIN BOARD )then press Apply [Picture 5.0]
Picture 5.0
ISP Clock: Set the ISP frequency in according with the target clock. (max. 500 kHz ), then press Set to confirm the
selection [ Picture 5.1 ].
Picture 5.1
Memories: Select Memories from the menu on the left
Flash: write down the path and the file name “.hex”, or click for a quick research of the file. Click “Program” to
start transferring the file.[ Picture 5.2 ].
Picture 5.2
Example for machines series E9 - Kicco – Tema Style
Device = ATmega 644 – Programming mode = ISP mode – Flash= trad64_303g.hex
Page 18

LB-00145-55
Pag. 18
MACHINE SET-UP DATA READING
To transfer to laptop the machine settings file (dose setting, counters….)
Select from drop-down menu the AVRISP mkII platform [ Picture 5.3 ]:
Tool: AVRISP mkII ( parameter available if connected to PC USB port )
Picture 5.3
Device: Select the type of microprocessor to program in according with the type of main board ,( see paragraph
CARIMALI MAIN BOARD [Picture 5.4]) then press Apply
Picture 5.4
ISP Clock: Set the ISP frequency in according with the target clock. (max. 500 kHz ), then press Set [ Picture 5.5 ]:
Picture 5.5
Memories: Select Memories from the menu on the left
EEPROM: Click “Read” and write the path and the name for the file to be saved [ Picture 5.6 ].
Picture 5.6
Page 19
LB-00145-55
Pag. 19
MACHINE SET-UP DATA WRITE
To transfer the machine settings file from one machine to another.
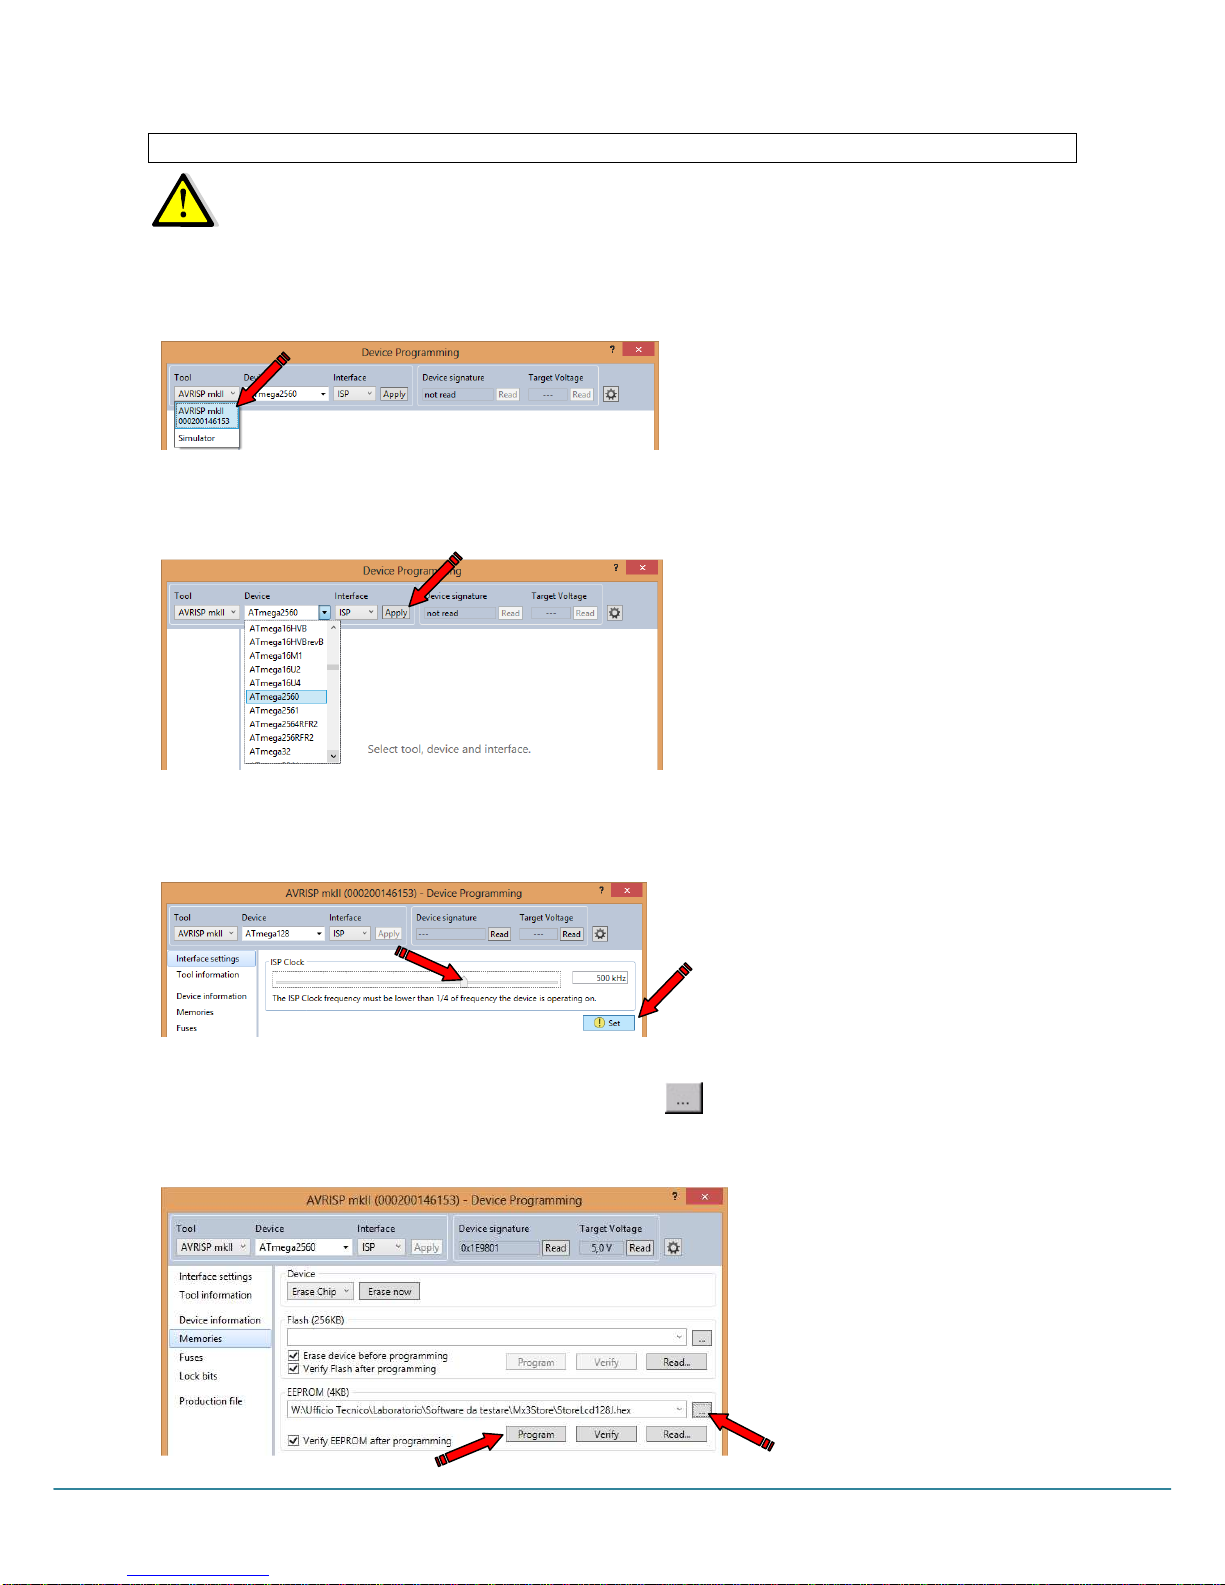
Select from drop-down menu the AVRISP mkII platform [ Picture 5.7 ]:
Tool: AVRISP mkII ( parameter available if connected to PC USB port )
Picture 5.7
Device: Select the type of microprocessor to program in according with the type of main board ,( see paragraph
CARIMALI MAIN BOARD ) then press Apply [ Picture 5.8 ]
Picture 5.8
ISP Clock: Set the ISP frequency in according with the target clock. (max. 500 kHz ), then press Set [ Picture 5.9 ]
Picture 5.9
Memories: Select Memories from the menu on the left
EEPROM: Insert the path and file name “.hex” to transfer, or click for a quick search of the file. Click “Program”
to start transferring [ Picture 6.0 ].
Picture 6.0
Page 20
LB-00145-55
Pag. 20
MACHINE MAIN BOARD ERASE
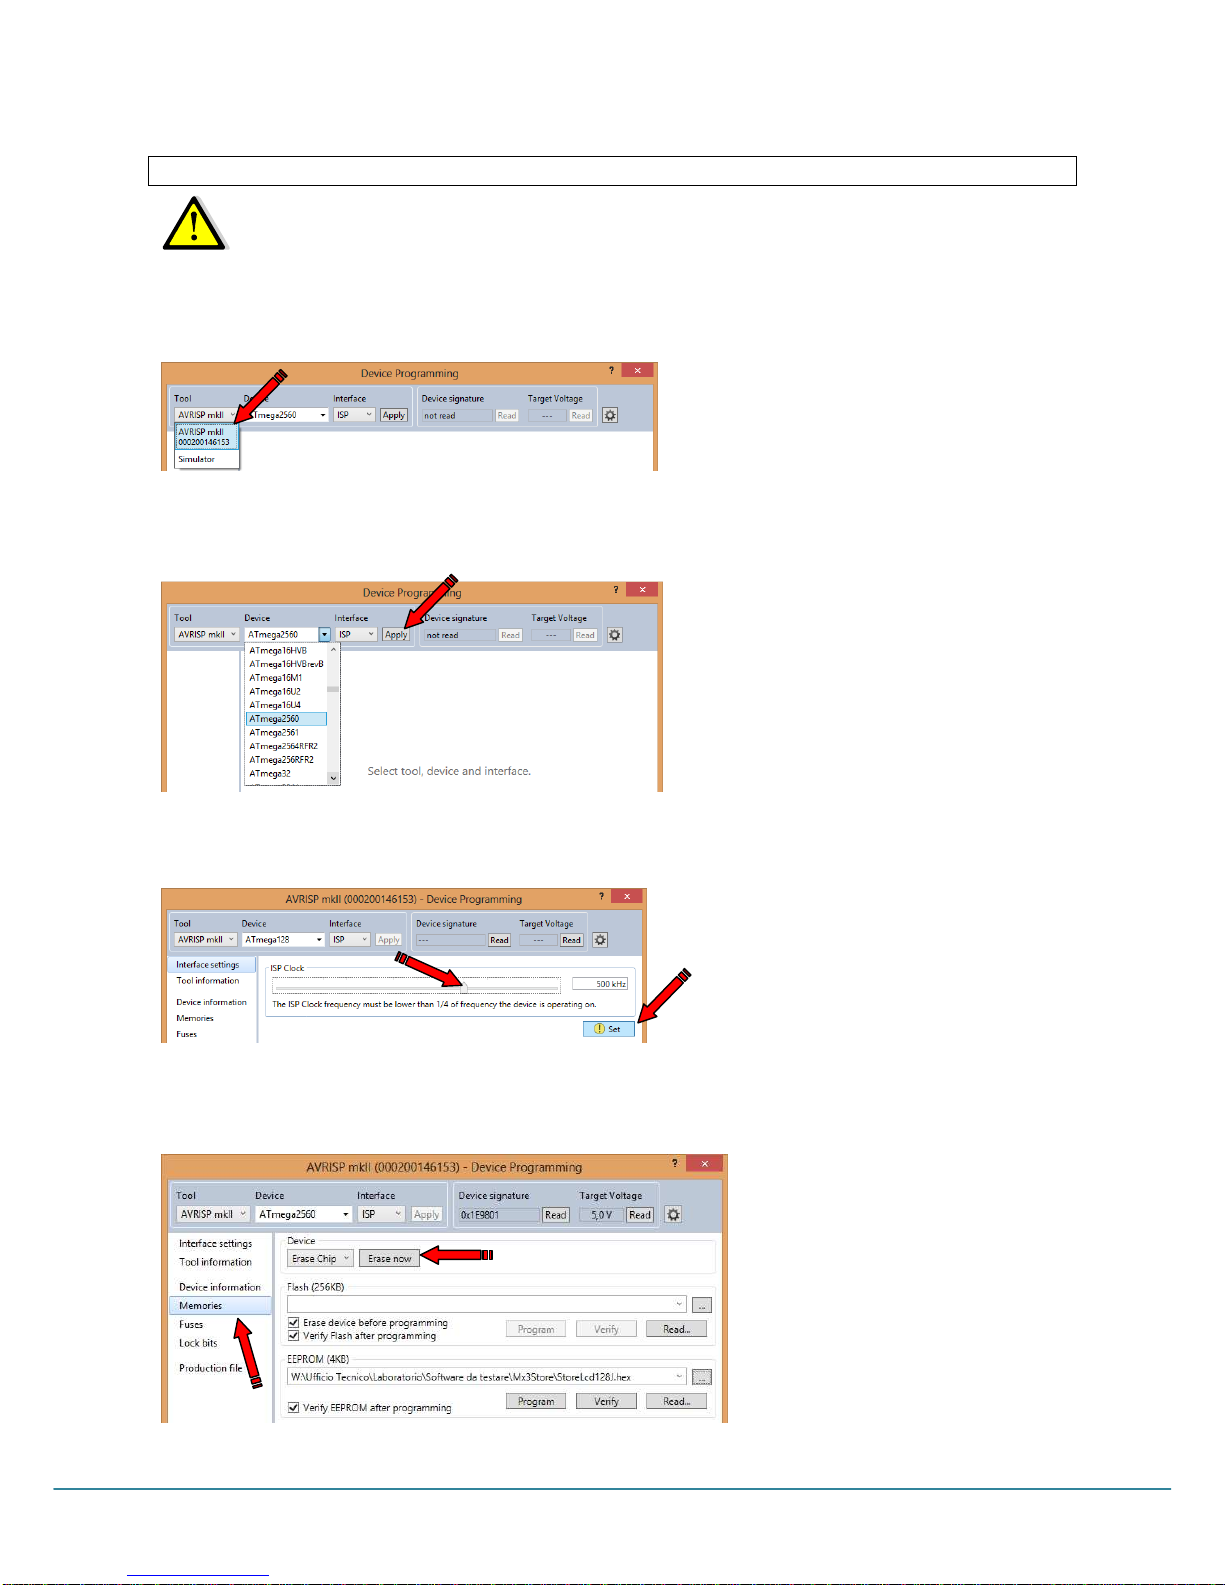
Once the procedure is done, all the actuators may be activated. We recommend therefore to disconnect
the motors and solenoid valves connectors from the master board, before starting.
Select from drop-down menu the AVRISP mkII platform [ Picture 6.1 ]::
Tool: AVRISP mkII ( parameter available if connected to PC USB port )
Picture 6.1
Device: Select the type of microprocessor to program in according with the type of main board ,
( see paragraph CARIMALI MAIN BOARD ) then press Apply [Picture 6.2]
Picture 6.2
ISP Clock: Set the ISP frequency in according with the target clock. (max. 500 kHz ), then press Set [ Picture 6.3 ]
Picture 6.3
Memories: Select Memories from the menu on the left
Device: Click Erase now to end the procedure [ Picture 6.4 ]
Picture 6.4
After erase follow the instruction on section FIRMWARE UPDATE PC to MACHINE MAINBOARD.
Page 21

LB-00145-55
Pag. 21
TROUBLESHOOTING
Problem Reason Solution
1 Can’t connect to AVRISP
mkII from PC
USB hub cannot provide
enough power
The AVRISP mkII require an
active/self-powered USB
hub that deliver 500mA.
2 Can’t connect to AVRISP
mkII from PC, the green
USB status led is off, and
point 1 is OK
USB driver is not installed
properly.
Install USB driver
3 AVRISP mkII status LED is
blinking orange
ISP cable is not mounted
correctly
Check that the red stripe
on the cable is matching
pin 1 on the inteface board
4 AVRISP mkII reports short
circuit on the target
The ISP cable is not
mounted correctly, or
some of the target pins are
shorted to GND
Check for short circuits.
5 Can’t detect target The machine is OFF Switch the machine in
stand –by mode
6 Detect target , but can’t
enter program mode or
programming fails.
The ISp frequency is too
high.
Lay down the ISP
frequency. The ISP
frequency is dependent on
the target clock.
(max. 500 kHz )
Technical Support
For technical support please contact [email protected] . When requesting technical support for AVRISP mkII and
Studio 6.1 please include the following information:
• Version number of AVR Studio. This can be found in AVR studio menu “ Help” – “About Atmel Studio”
• PC processor type and speed
• Fuse setting on the AVR
• Target clock frequency
• Targhet voltage
• Programming speed, ISP frequency
• A detailed description of the problem, and how to create it.
Page 22
LB-00145-55
Pag. 22
The Carimali product you have purchased is subject to Directive 2002/96/EC of the European Parliament and the
Council of the European Union on waste electrical and electronic equipment (WEEE) and, in jurisdictions adopting that
Directive, is marked as being put on the market after August 13, 2005, and should not be disposed of as unsorted
municipal waste. For further information please contact Carimali.
The manufacturer reserves the right to change, without prior notice, the specifications of the equipment illustrated in
this publication; the manufacturer declines all responsibility for any mistakes due to printing and/or typing errors
contained in this publication.
All instructions, drawings, tables and information contained in this publication are reserved and may not be
reproduced entirely or in part or be communicated to a third party without written authorisation from the
manufacturer who holds exclusive rights.
REVISION TABEL DATE NOTE REVISED BY
LB-00145-20 02/05/2007 Libretto unificato / Icone Giuliano Viola
LB-00145-30 17/09/2007 Atmega644 Giuliano Viola
LB-00145-40 26/02/2008 Atmega644 Lorenzo Cauli
LB-00145-50 07/04/2009 No icone Lorenzo Cauli
LB-00145-51 04/11/2010 Atmega168P Giuliano Viola
LB-00145-52 23/05/2011 Giuliano Viola
LB-00145-53 15/11/2011 Studio 5 Lorenzo Cauli
LB-00145-54 11/12/2013 Studio 6.1 Windows 8 ( x64 ) Lorenzo Cauli
LB-00145-55 17/03/2016 scheda Diva Giuliano Viola
 Loading...