

Carima IM series, DM250 User Manual
User manual
IM
DLP
3D printer
IM Series
s e R I E S

II
III
IV
V
Soft ware Install and Using
Preparing and Printing
Check Output
Maintenance
01
Carima-Slicer Install
02
Carima-Slicer Using
01
Printing Preparation
02
03
LCD Panel Using Method
Start Printing
01
Output Demount
02
After Output Processing
01
Printer Maintain
02
03
Other Maintain
FAQ
11
13
31
33
40
44
45
50
51
53
I
IM Series Introduction
01
IM Series Information
01
02
03
04
Component Name
Precaution
Whole Process
02
03
07
05
IM Series compatible material
08
C O N T E N T S
DLP Print Method
What is DLP 3D Printing?
DLP: Digital Light Processing Mask Projection Image Hardening Method
• A cross-section photograph of the output is laminated by irradiating the photo-curable liquid
resin with UV light..
• Due to the optical mask, the cross-sectional photograph of the output is totally inspected.
• Because of this surface unit lamination method, the output speed is fast and the surface
roughness high, so it is possible to make use of precision.

I IM Series Introduction
Hello.
This manual provides instructions on how to use the "IM Series".
Understand how to use "IM Series" through the manual and
experience "IM Series" easily and conveniently.
Check List
01 IM Series Information
02
03
04
Component
Precaution
Whole Process
05
IM Series compatible material

I IM Series Introduction
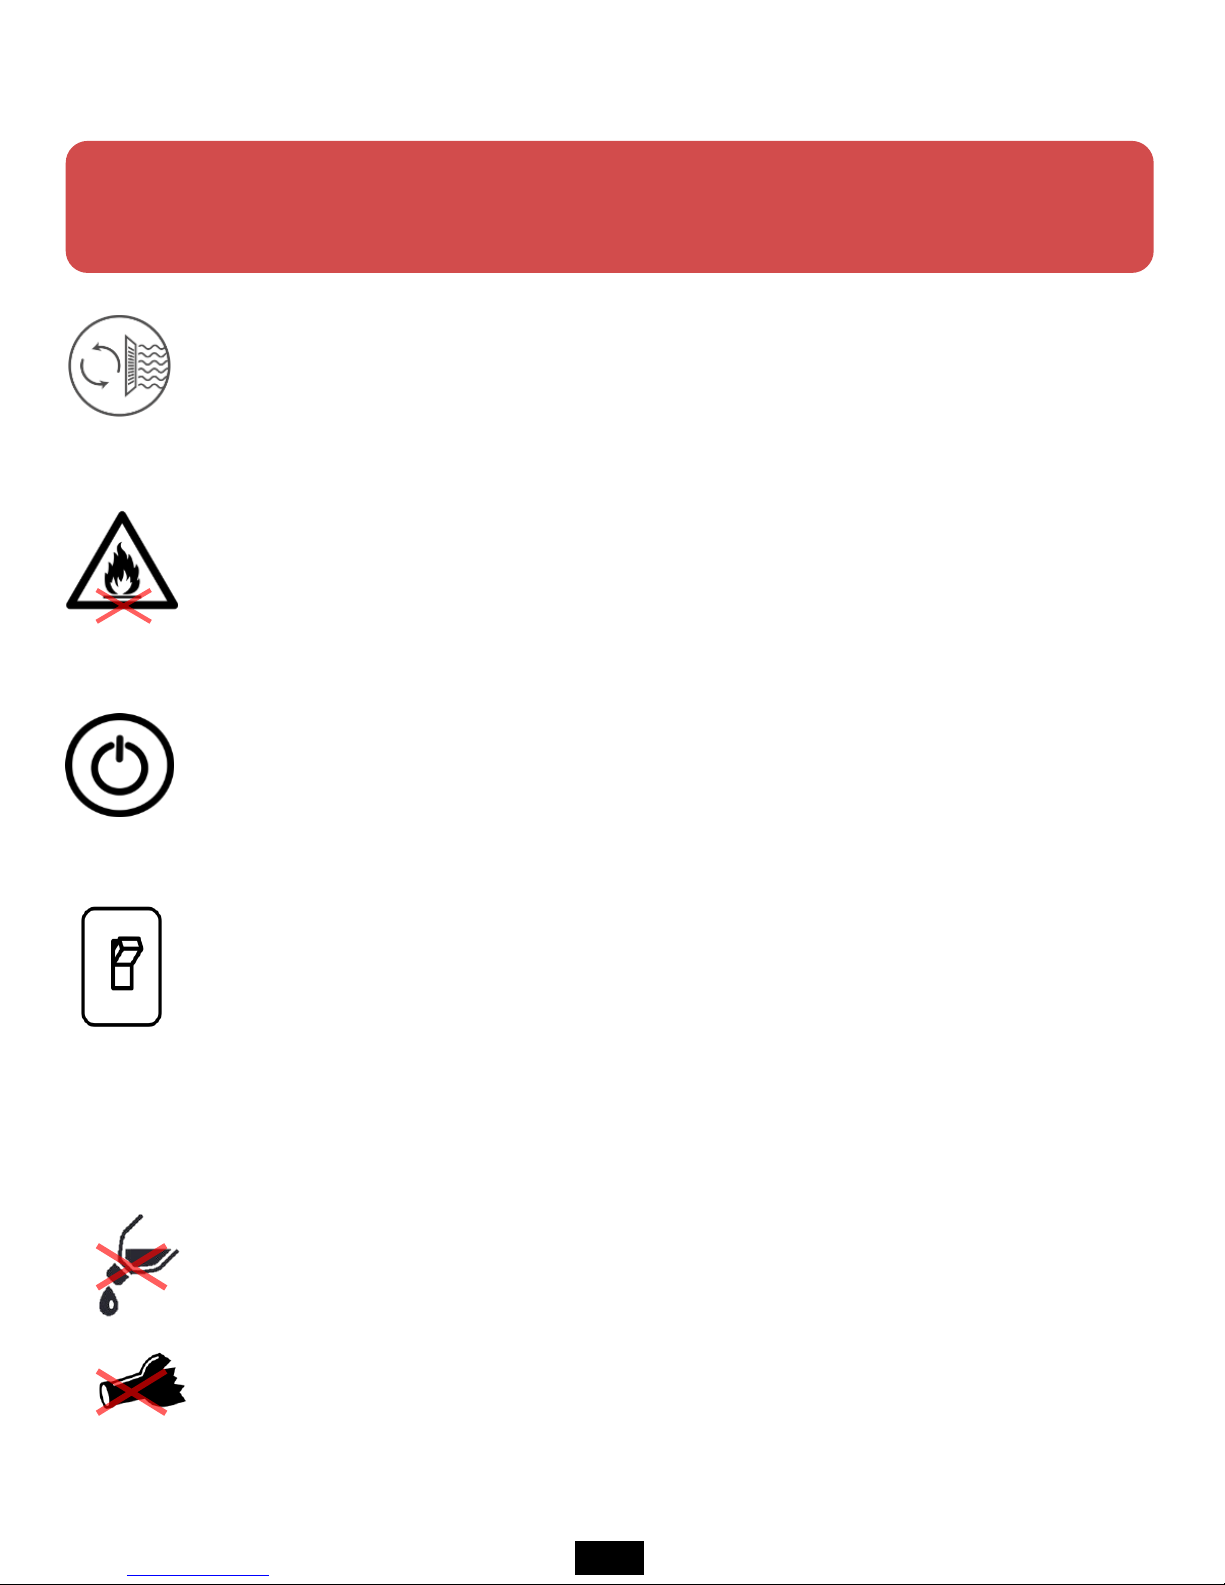
01. IM Series Information
IM Series is an ultra-precise DLP 3D printer, the most suitable printer to
implement a precise model, and is a 3D printer commonly used in the Design,
Jewelry, and Dental industries.
Model Name IM Series
Resolution 1980 X 1080
Light Source UV LED
Printing Size(mm)
96 × 54 × 150 110 × 85 × 200
130 × 74 × 100
Lamination
Thickness(mm)
0.025 / 0.05 / 0.075 / 0.1
Precision 50 μm
Product Size(mm) 304 x 315 x 622
Weight(kg) 22
Power 100-240V, 50/60Hz, 2.5A, 260W
Material DLP, SLA Resin
Control Type Control method using embedded touch screen
Using
Environment
18-26 (℃) / 20% - 50% (% humidity)
+
If you use the printer in this environment, it will help you to printing better.
1
02. Component
A
Front
LED Power Button
LCD Touch Screen
Print Room Cover
USB Port
1
2
3
4
B
Equal Angles
Ethernet port
Power cable ports and switches
1
2
handle
Low Noise Cooling Fan
1
2
2
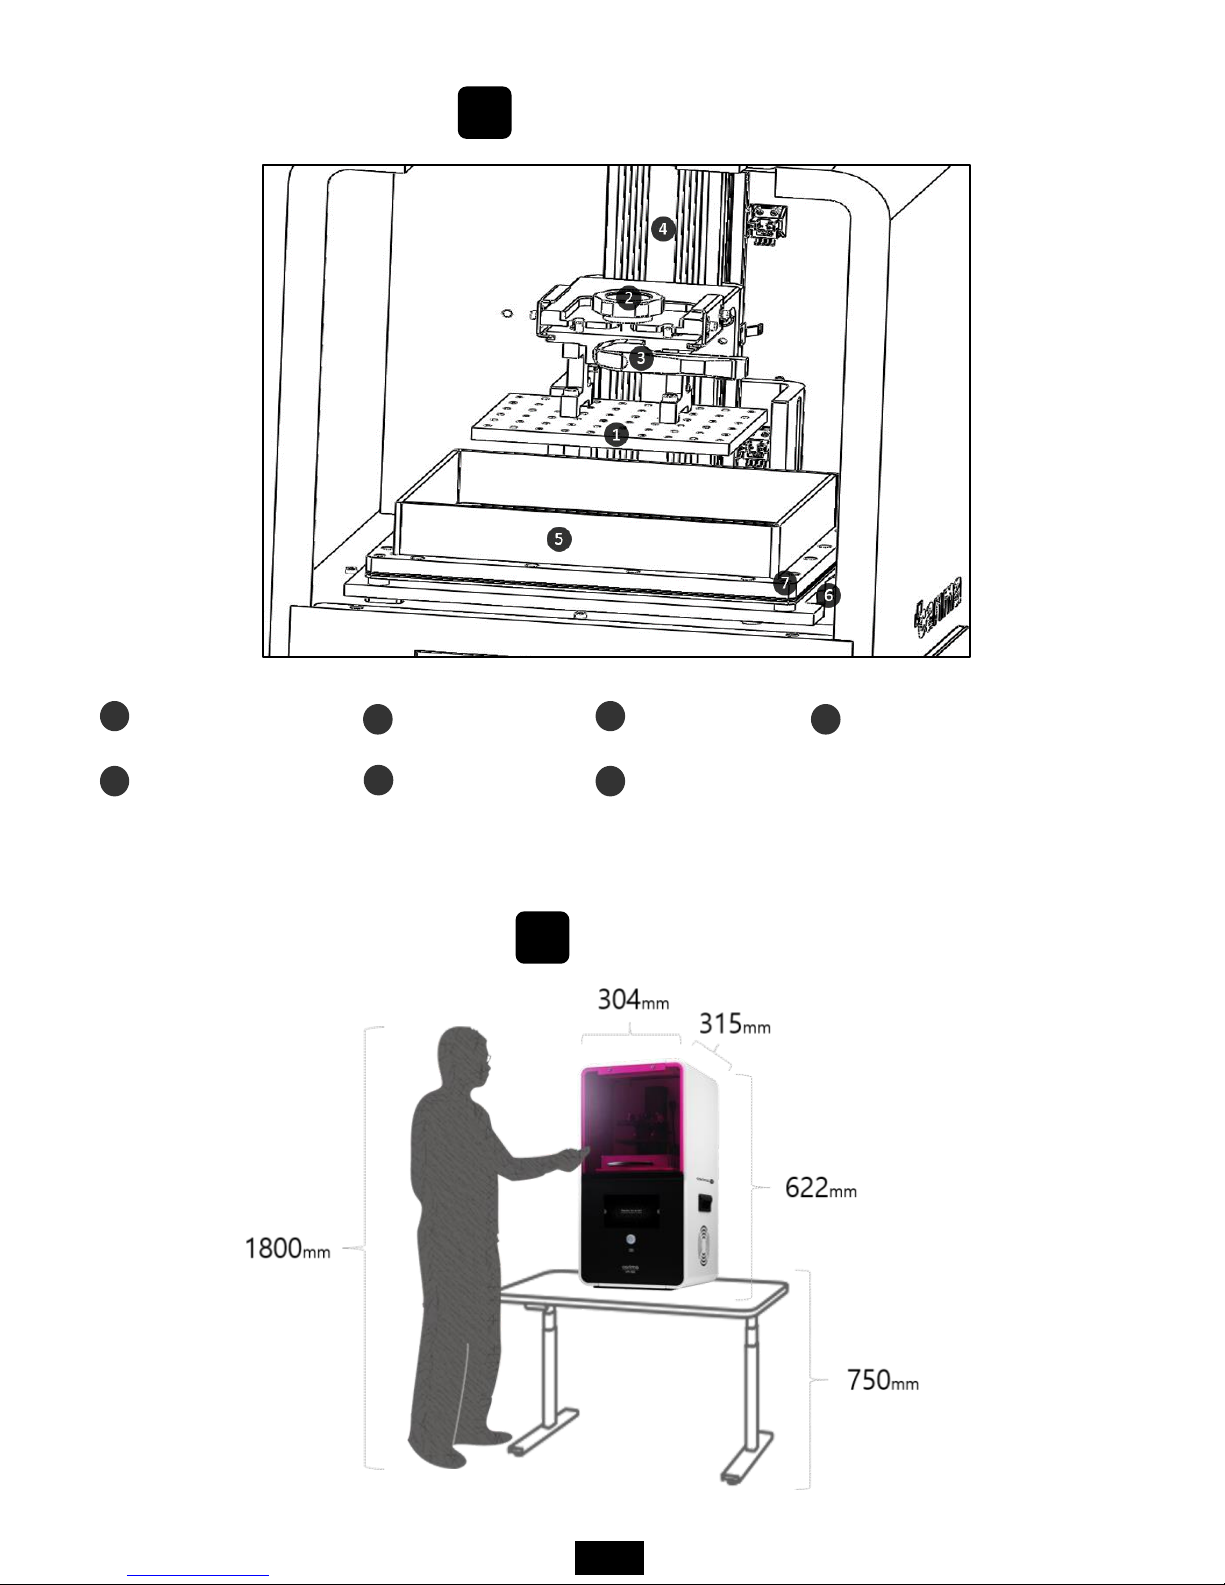
C
internal structure
Plastic plate
Open sheet tray
Plate fixing pin
Tray tilting axis
1
5
2
6
Plate handle
Tray fixing hex screw
plate vertical movement axis
3
7
4
D
Real Size
3
03. Precaution
This information is intended to protect your safety and property damage.
For your safety, please be aware of the precautions to prevent personal injury or printer damage.
When you print out the printer, it may cause the resin to smell distinctive, so
please install the printer in a well-ventilated place.
When using volatile objects near the printer, do not use it because there is a
risk of fire or explosion.
When moving the printer, be sure to completely shut down the printer, and
then remove the resin or tray to avoid overflowing the resin in the tray.
If the printer is on, do not off the power switch located on the back of the
printer. Forcible termination can shorten the life of the printer engine and
cause mechanical failure. Press the Exit button on the LCD panel to shut down
the printer.
If some objects such as water or other liquids, metal chips, or other conductive
materials are introduced into the printer, it may adversely affect the printer,
such as mechanical malfunction. In addition, do not operate with wet hands
because of the risk of electric shock, please wear the nitrile gloves and using.
4
If you touch the door or touch screen strained with gloves or tools, it may
cause malfunction(Touch screen malfunction, door crack, etc.).
If the tray removed while the plate attached after printing, impurities may fall
inside and cause a failure. First, remove the plastic plate, remove the tray
afterwards.
When removing the tray, be careful that the bearings that were used as the
bearing may be lost (If you lose, you may incur costs).
After the output, take out the resin remaining in the tray with a syringe, filtering
residue with a sieve, and store it separately.
If you put the resin in the tray due to frequent work, keep it closed that is not
exposed to the external environment as much as possible.
If the dyestuff of the resin stored in the tray is separated, it must be mixed with
a rubber spatula before printing.(If the sheet is damaged by storing the resin in
the tray for a long period of time, this is the customer's fault.)
After the output is completed, When you remove the plastic plate with the
printout, be sure to move the tray (tray) that supports the resin that falls down
so that the material does not fall inside the product. If the material falls inside
the product, it may cause deformation or breakdown.
5
If the printer power cable and USB cable are damaged due to being pulled or
stepped on the rough surface, please note that sparking or voltage
malfunction may occur. Also, if there is a lot of current in the power cord or
outlet, there is a risk of fire due to overheating.
The printer has potential risks in terms of chemical composition and voltage.
To prevent injuries to children and pets, install a printer in a safe place to
prevent accidents.
If the printer is installed in a location where there is a lot of humidity or
temperature changes, it may cause deformation or malfunction of the product.
If you disassembling or remodeling the printer artificially, the warranty benefits
will be lost and you will not be held liable for any loss caused by this.
For inquiries regarding A/S inquiries and product warranty, please contact
Carima Co., Ltd. for a friendly consultation.(82-2-3663-8877).
Malfunction or trouble due to non-compliance, tuning, disassembly, etc. are
recognized as customer errors and will be charged during the warranty period.
6
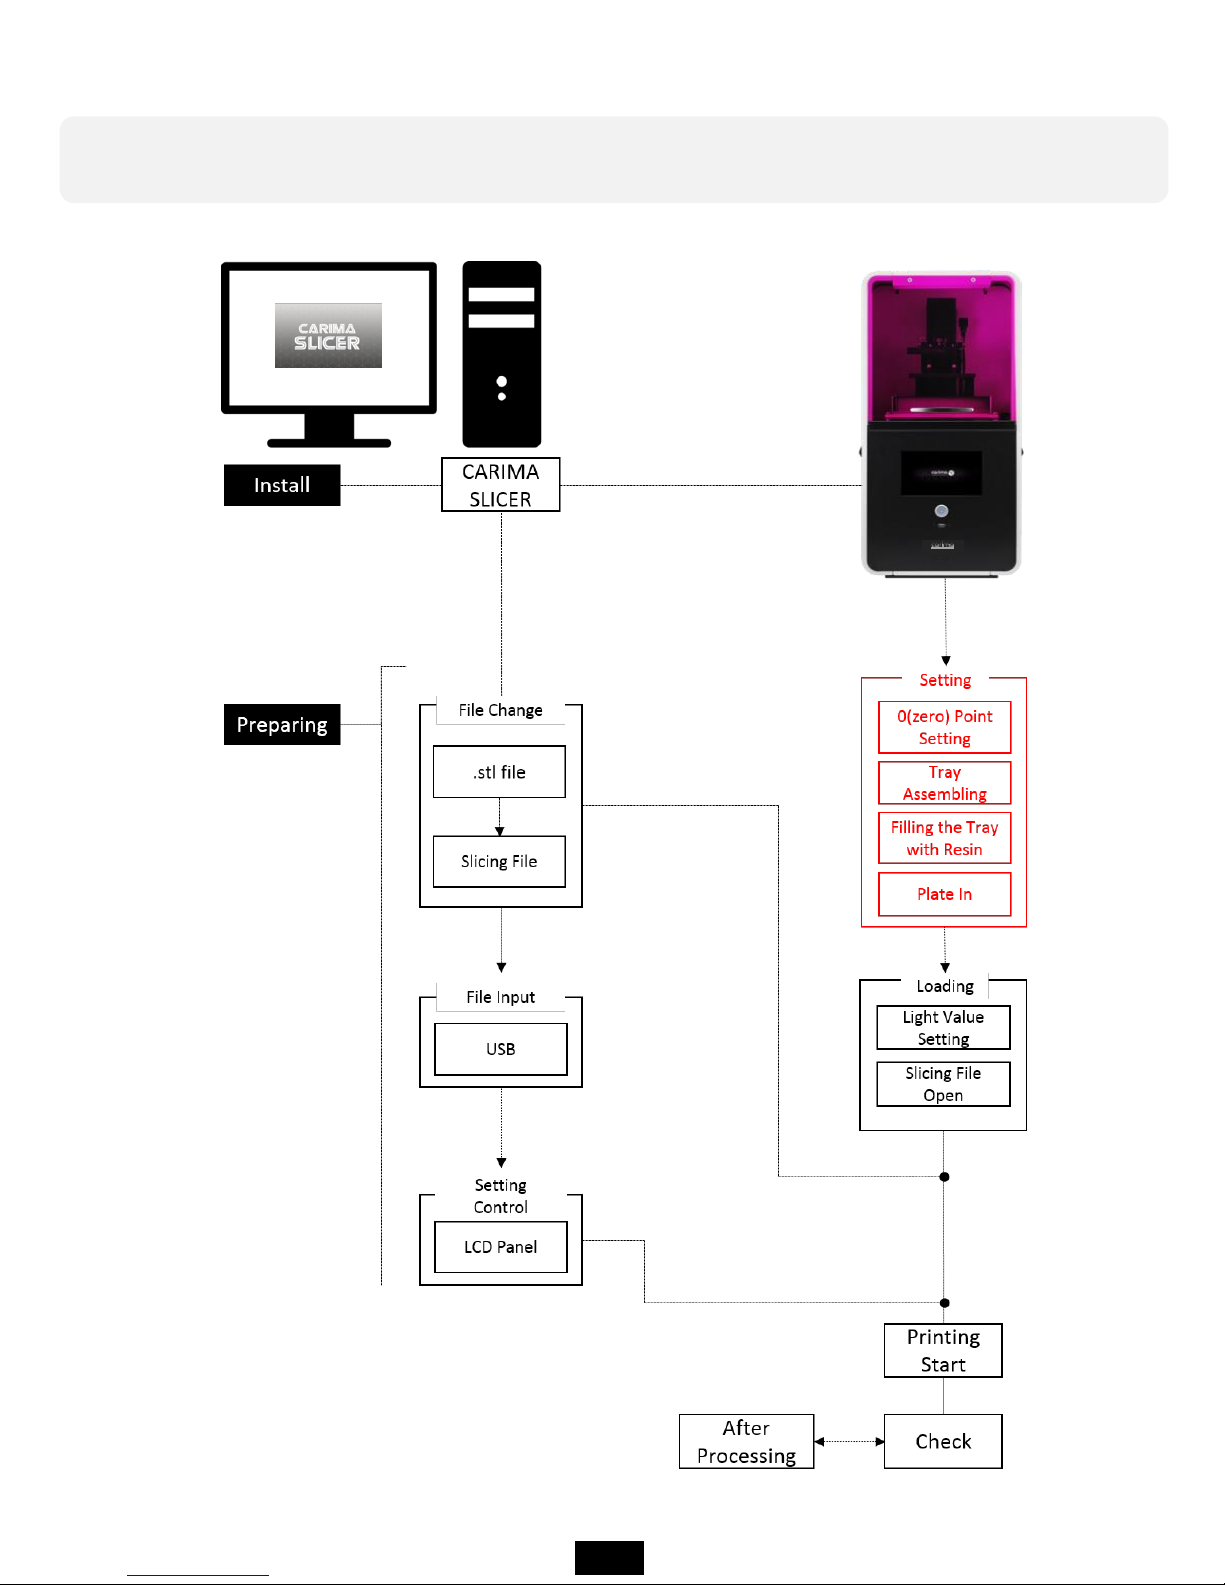
04. Whole Process
In order to output to IM Series, you have to go through the following
procedure.
7
IM Series
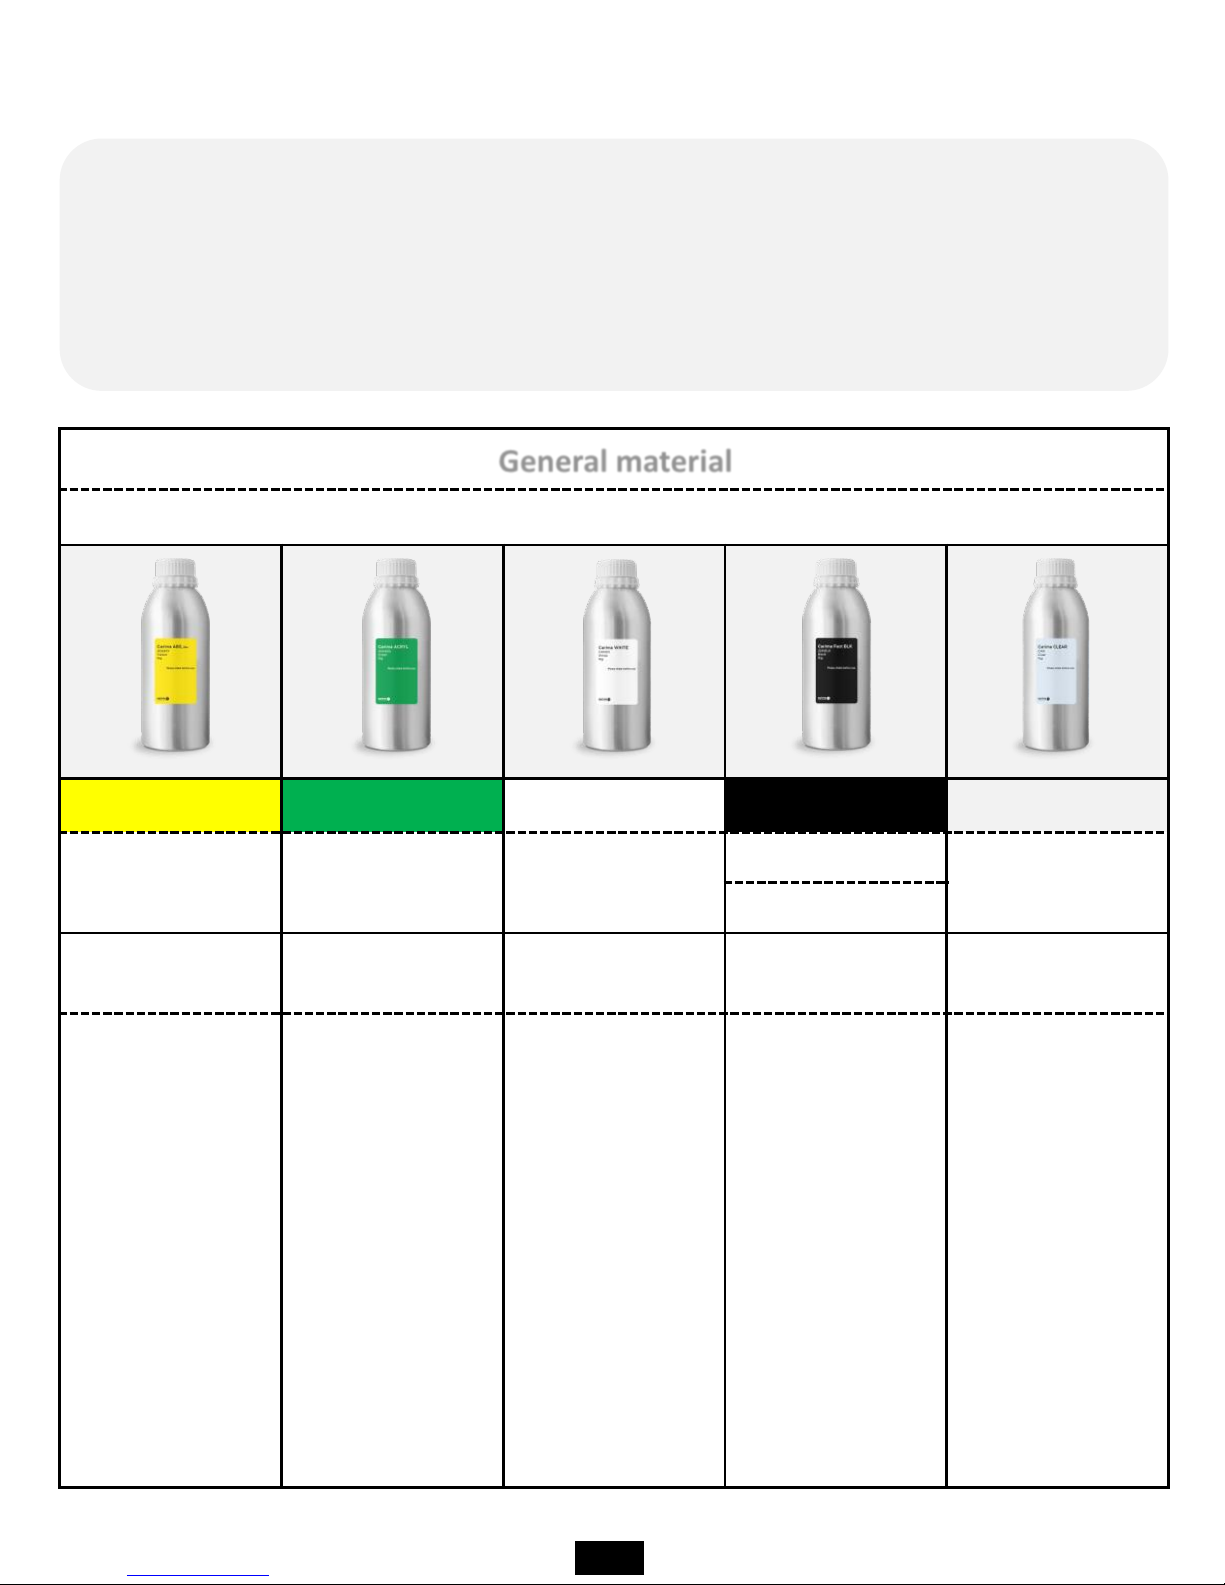
General material
Plastic-based material
Carima ABS-like Carima ACRYL Carima WHITE Carima Fast BLK Carima CLEAR
ABS-3DK83Y ACRYL-3DK83G WHITE-CRM011
Fast BLK-3DKBLK
CLEAR-CRM
CAM008
Prototype
Mock-up
Prototype
Mock-up
Prototype
Mock-up
Prototype
Mock-up
Prototype
Mock-up
Yellow-based
prototypes or
materials that
can be used for
3D modeling in
general.
For green-based
prototypes or for
the production of
full-scale models,
it is generally
possible to use
3D printing with
ABS.
It is a material
that can perform
3D printing work
for white base
prototype or real
size model
production.
It is a black
plastic type
general material
that Carima
developed in-
house, and it is
possible to
realize high
reactivity and
precision.
Transparent
prototypes,
transparent
materials that
can be modeled
on a full scale.
05. IM Series compatible material
The IM Series can be used for 3D printing using materials of various
characteristics. Among Carima's general material range, IM Series can output
all common materials. (However, I am not sure whether it will be possible to
output special materials other than Carima special materials.)
8
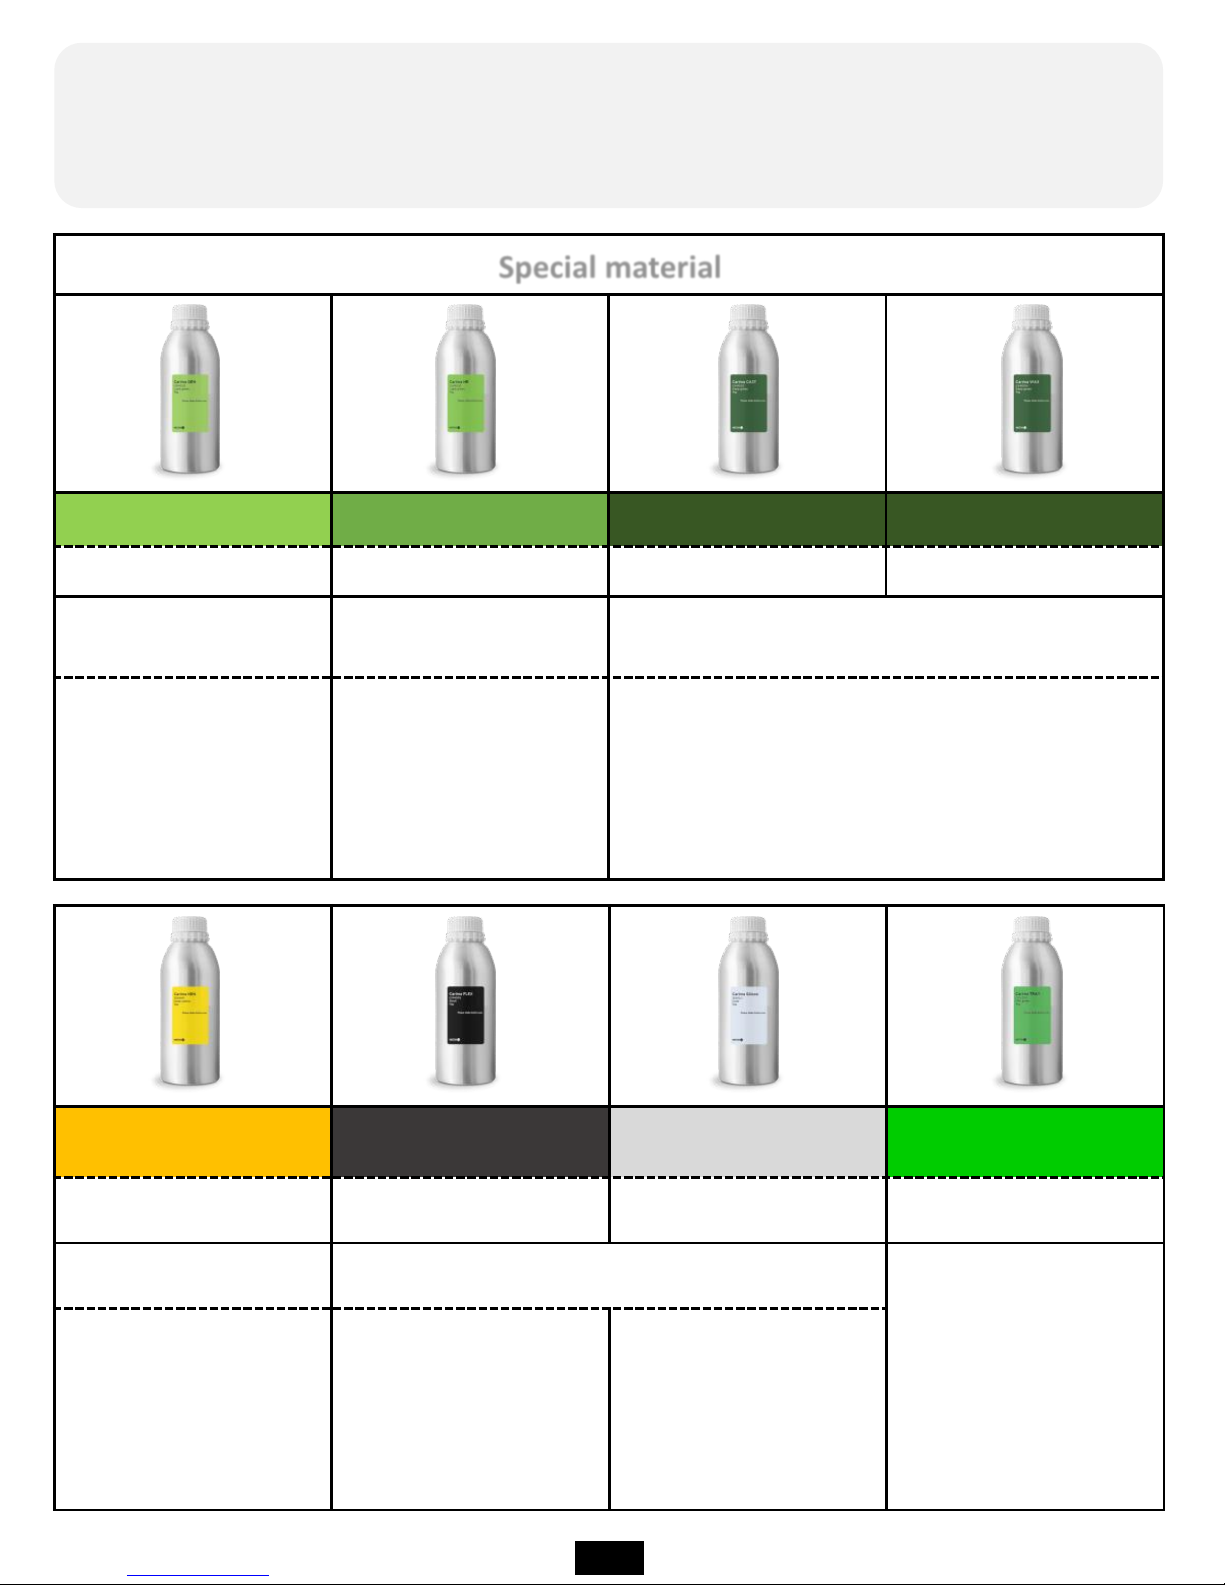
Carima HRN
Carima FLEX Carima Silicon Carima TRAY
HRN-3DKHR1
FLX-CFM005 Silicon-3DKSL1 TRAY-CDV300, CDP011
Heat-resistant material
Flexible material
Dental bracket
dedicated material
Heat-
resistant material
can withstand up to
200 degrees,
yellow base.
Special material with
soft rubber like
features.
Silicon material
Special material
Carima GRN Carima HR Carima CAST Carima WAX
GRN-CRM003 HR-CAM003 CAST-CAM002 WAX-CAM004
Flexible and strength-
based materials
Precision-only material
Precision jewelery output
and casting exclusive material
A material with some
flexibility and strength.
A material capable of
achieving a precision
of about 25 μm to 50
μm.
Rings that require precision, such as necklaces
and accessories The material can be used
professionally from the output of the model.
Among the special materials of Carima, IM Series can output all special
materials(However, I am not sure whether it will be possible to output special
materials other than Carima special materials.)
9
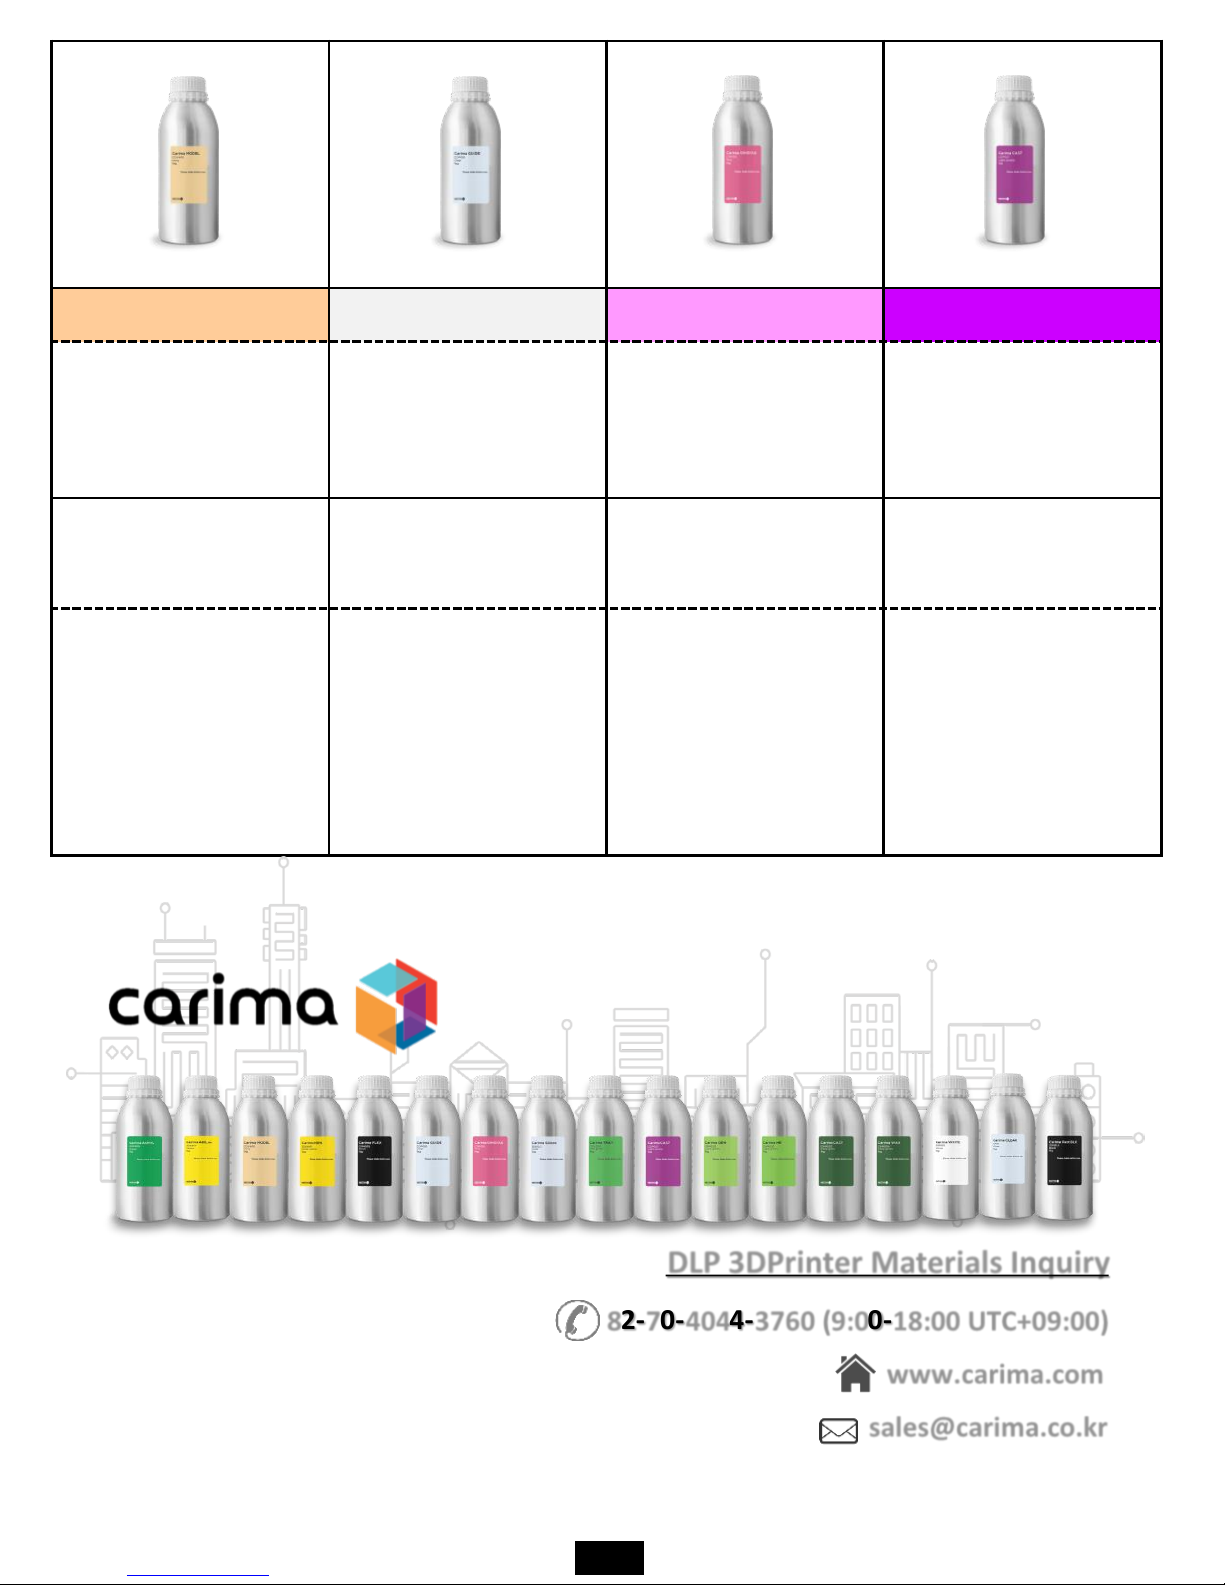
Carima MODEL Carima GUIDE Carima GINGIVA Carima CAST
MODEL-CDV400,
CDP013
GUIDE-CDP010,
CDP001,
CDV600
GINGIVA-CDP015
CAST-CDP012,
CDV100
Dental guide material
Implant guide material Gingiva material
Dental casting only
material
Based on flesh-based
high-precision output
of the dental upper
and lower mandible
Material.
Transparent-based
implant guide only
material.
A material similar to
the gums that can be
used to identify the
shape of the gums that
have subtracted teeth.
A special material that
can open teeth with
gold, silver, etc.
DLP 3DPrinter Materials Inquiry
www.carima.com
sales@carima.co.kr
82-70-4044-3760 (9:00-18:00 UTC+09:00)
10
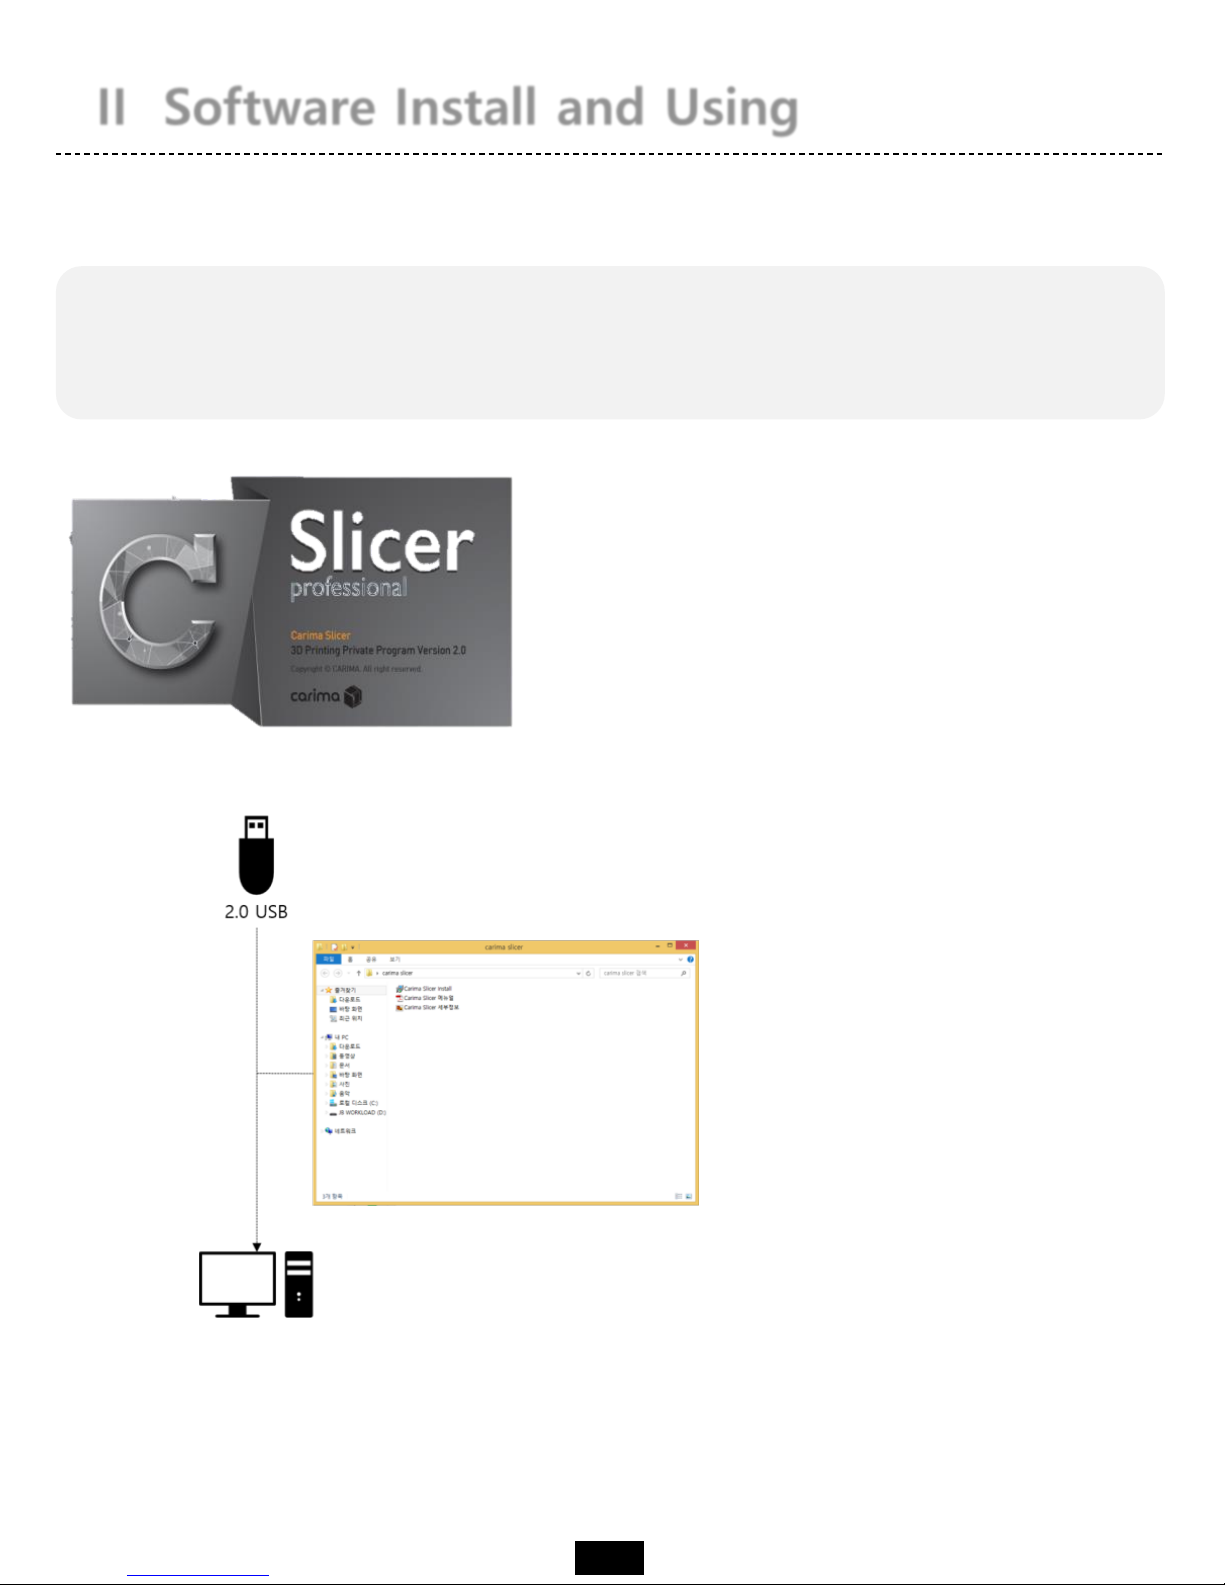
II Software Install and Using
If you are using the IM Series, you must install
the slicer program provided by Carima.
Realize your imagination and experience
creation with Carima Slicer.
Check List
01
Carima Slicer Install
02
Carima Slicer Using
II Software Install and Using
01. Carima Slicer Install
The Carima Slicer is a program that helps you to output from the IM Series.
Carima Slicer is a self-made slicing program
from Carima Co., Ltd. It is a program that
slices each model to output and makes it
into a picture form. It is easy to save it as
file such as stl, jpg, crv.
The Carima Slicer Setup program is attached to the USB
provided by Carima. Install CarimaSLICER with USB.
CarimaSLICER can not be installed on any other PC (or
notebook) other than one PC (or notebook).
★ CarimaSLICER is compatible only with 3D printers manufactured by Carima Co., Ltd.
You can not use CarimaSLICER with other 3D printers.
11
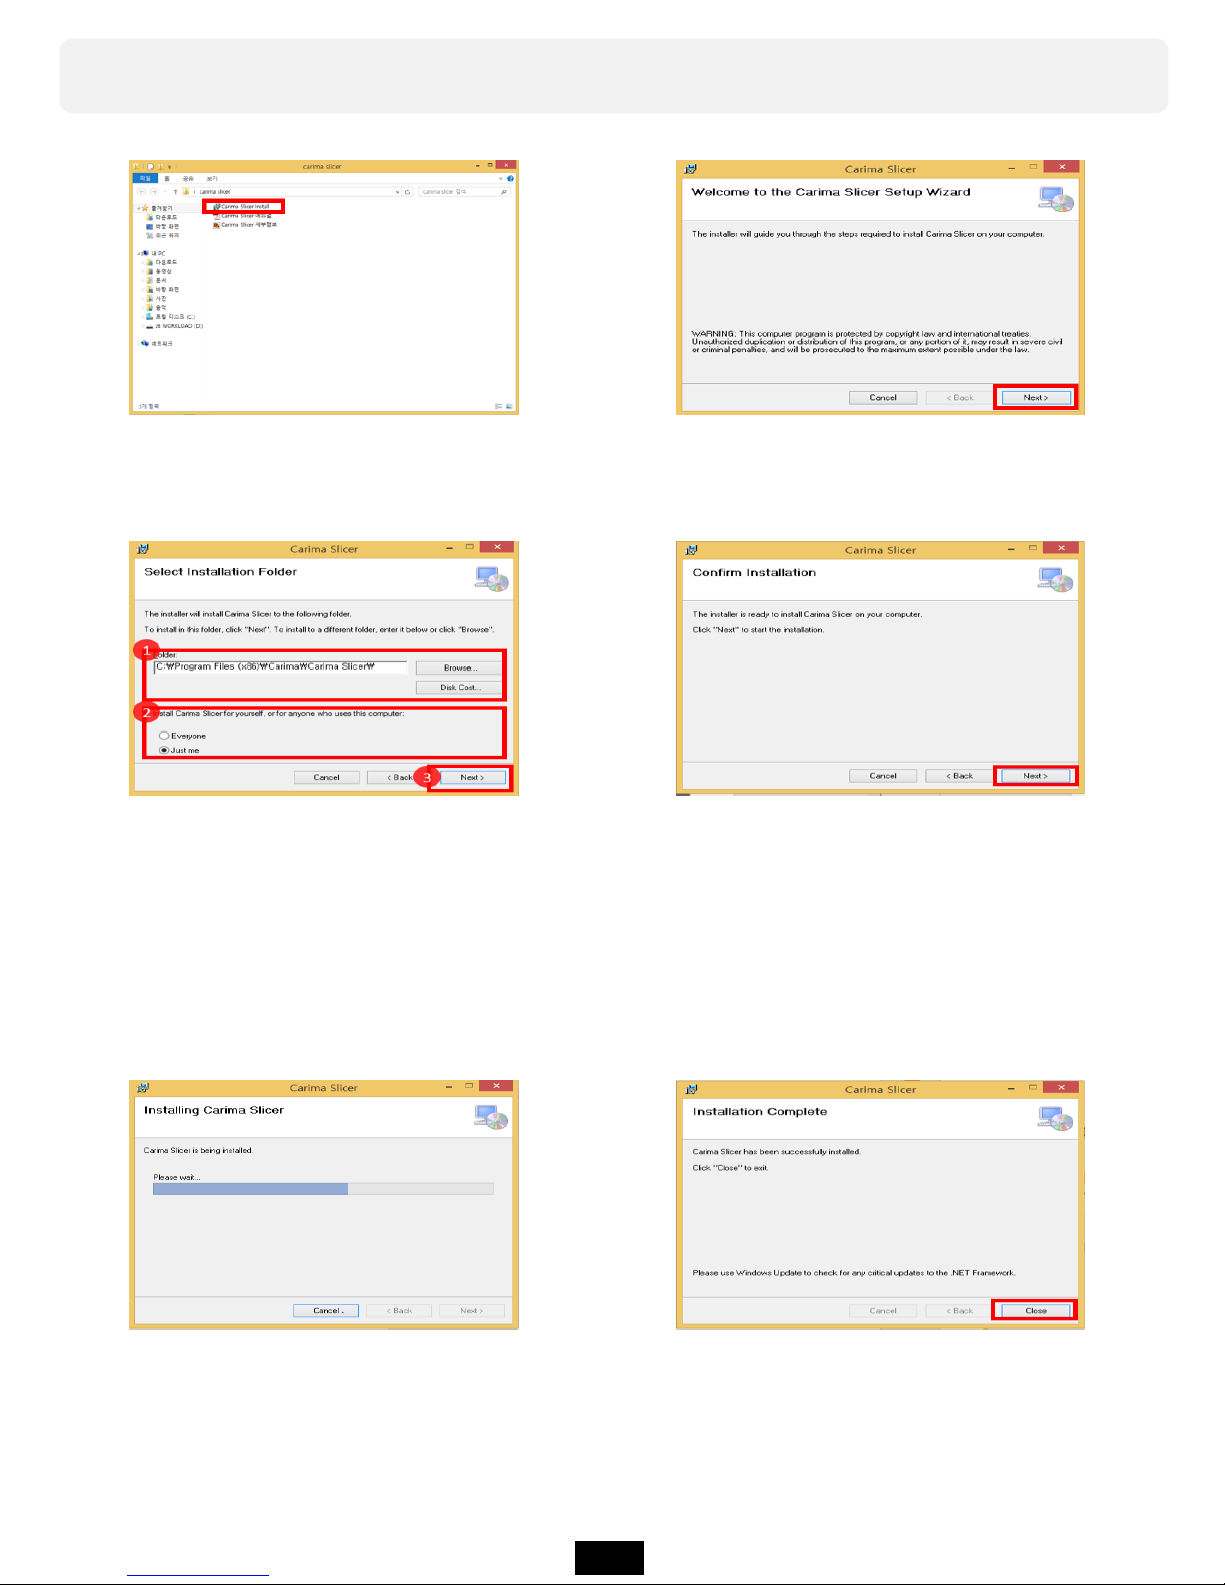
You can install Carima Slicer in the following process.
a. Double-click the Carima-
Slicer Install file.
b. Carima-Slicer Install Setup file
screen. Click Next>.
c. After specifying the path where
Carima-Slicer will be installed,
select one of "Just me" or
"Everyone" of the Windows
account and click Next>.
d. After completing the setup,
please proceed to the final
installation with the message
that installation is completed.
Click Next>.
e. Click Next> to proceed
with the installation.
f. When the installation
is finished, click Close.
12
02. Carima Slicer Using
You can apply a variety of settings to ensure easy use of the Carima slicer.
★ If CarimaSLICER is not installed properly, please contact
the following address. Carima 82 - 2 - 3663 - 8877
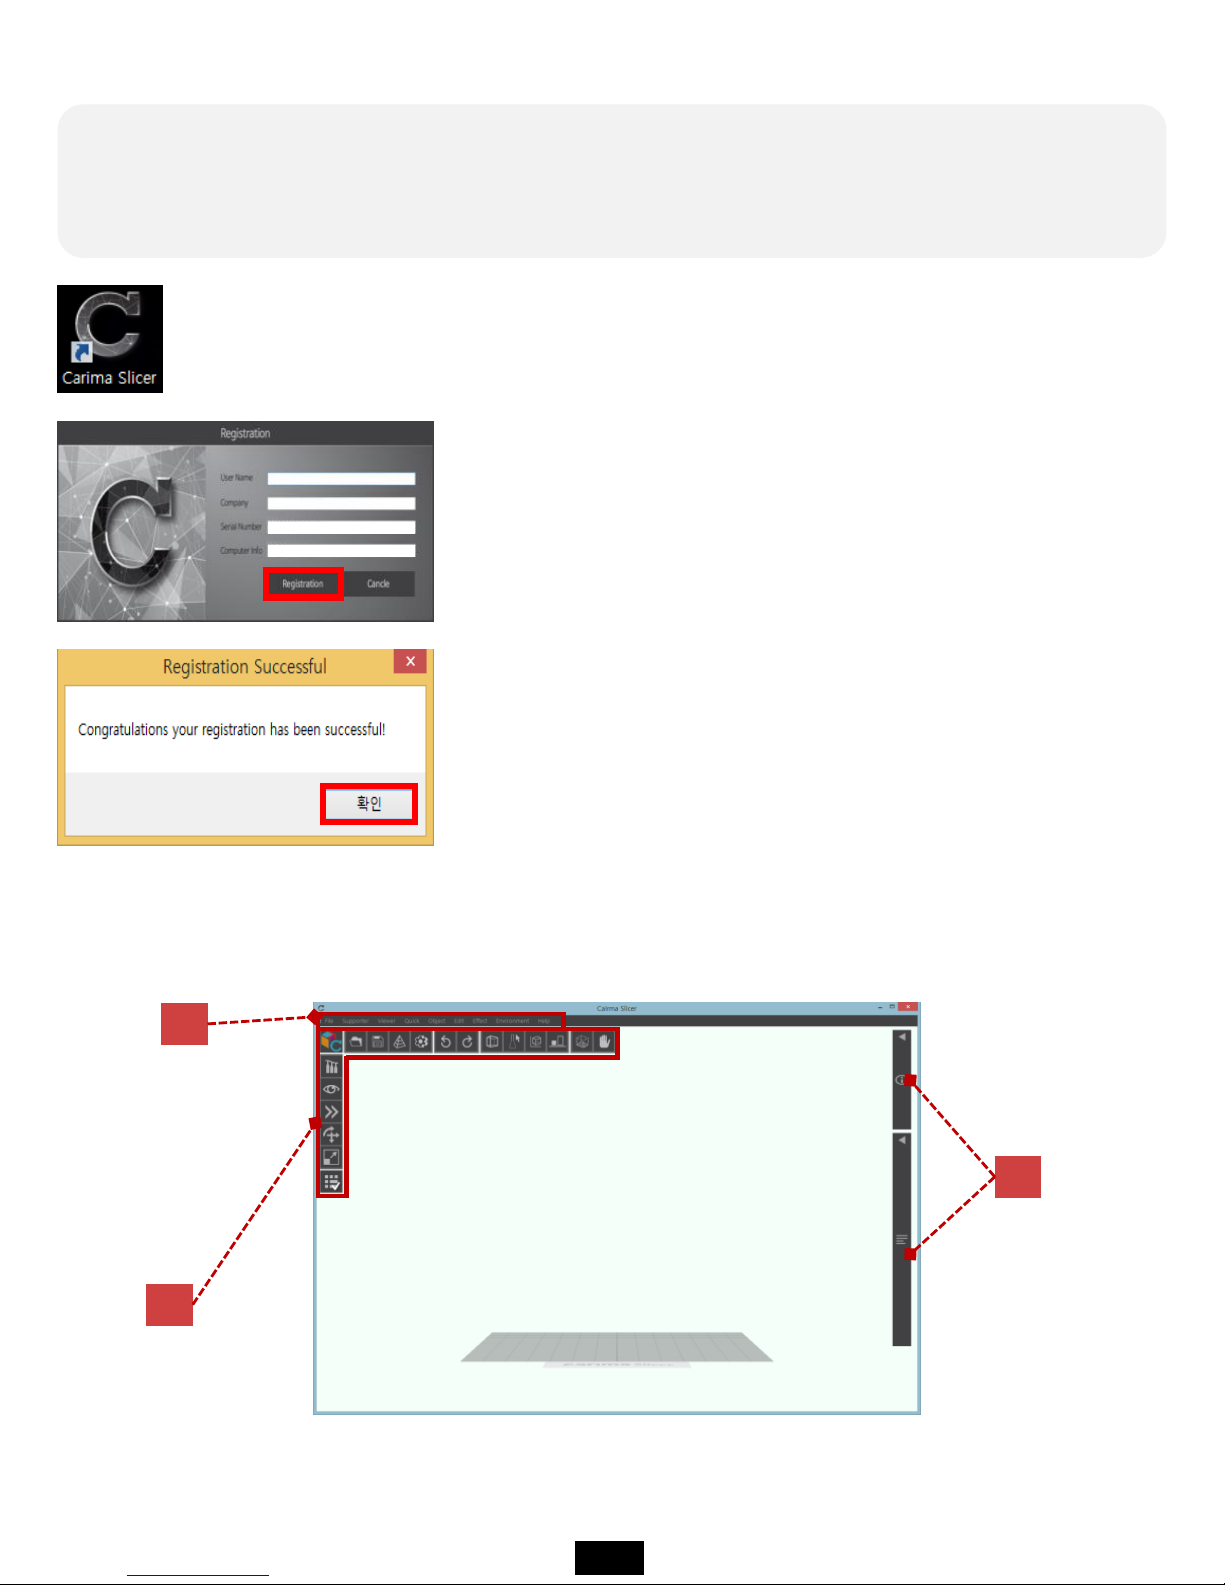
After registering, if you run Carima Slicer program,
you can see the following interface screen.
C
A
B
Once you have completed the installation, the Carima slicer icon will be created on
your desktop. Double click the icon and start Carima slicer.
When you run Carima Slicer program, you can see the
following registration screen.
On the registration screen, only information about serial
number and computer information is displayed.
Serial Number and Computer Information are automatically
formed, so if you click Registration immediately, you will
get a message that the registration is as follows. Click OK
and meet Carima Slicer!
13
A
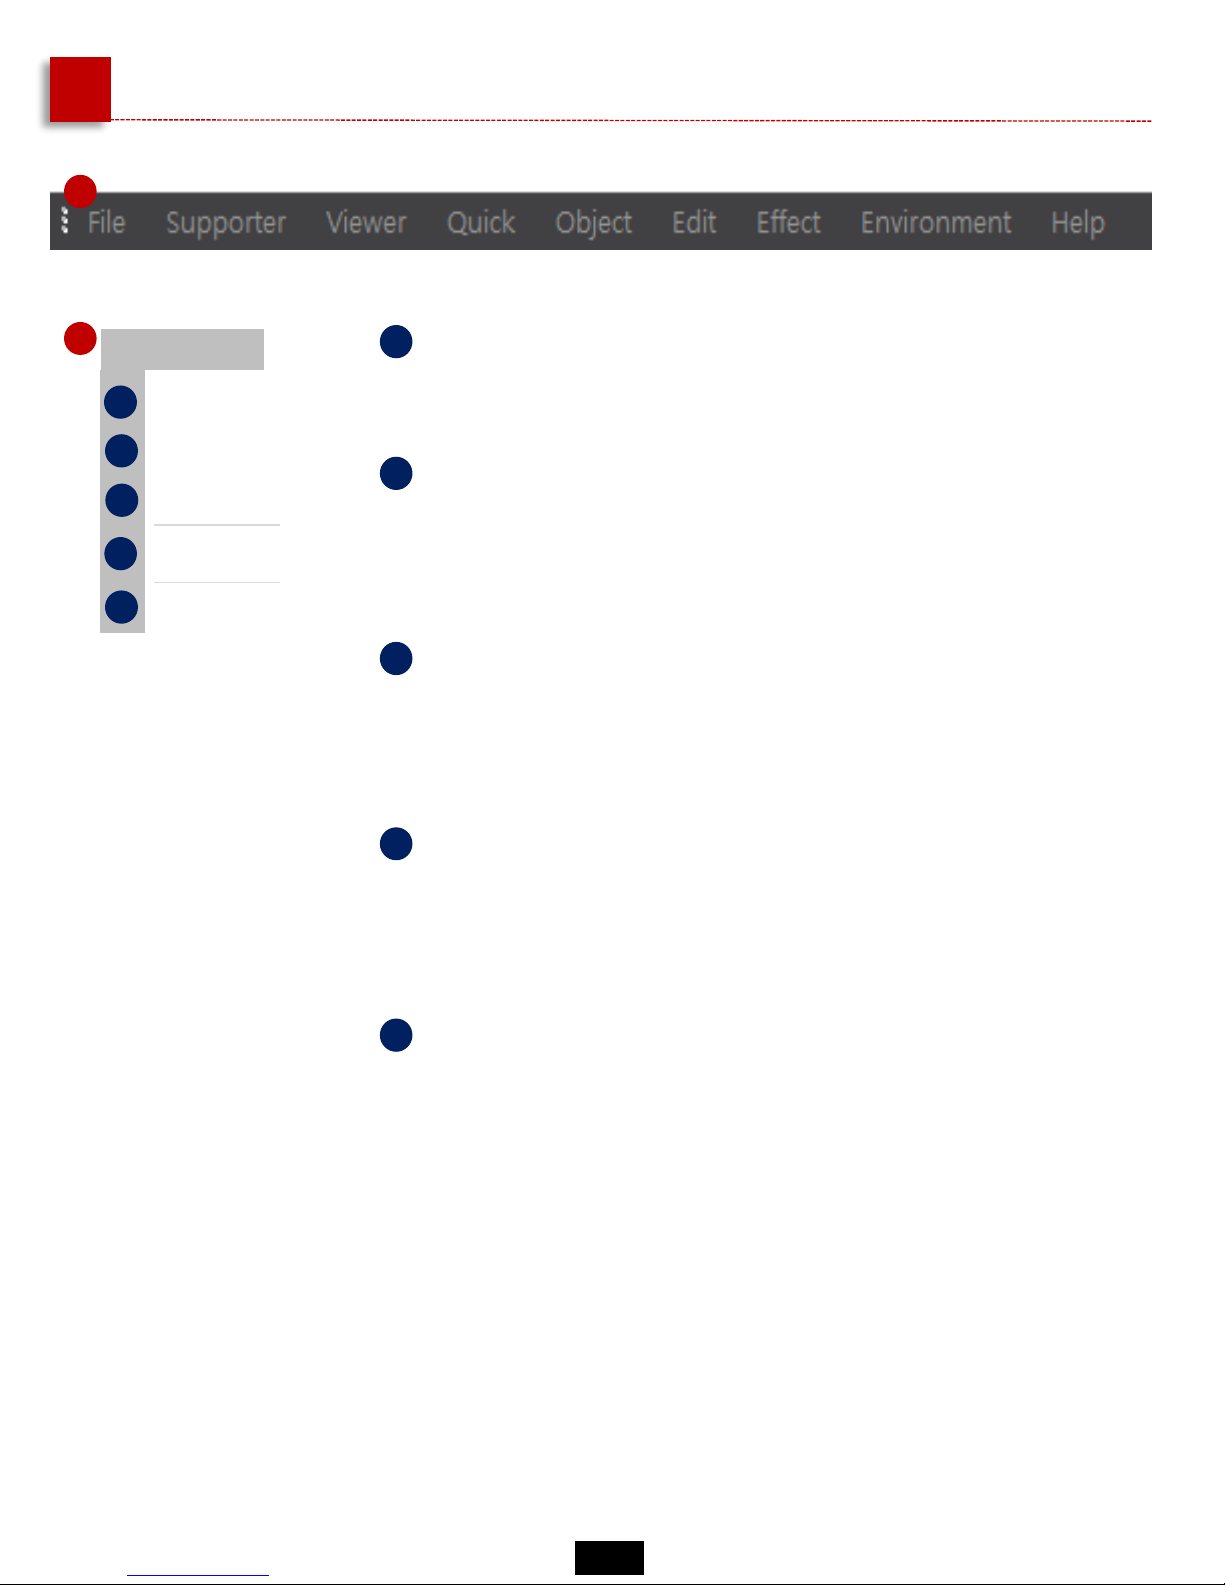
Carima-SLICER Basic Manu
1
File
Open
Save
Slicing
Config
Exit
a
b
c
d
e
a
Open
Stored files such as "stl" can be loaded.
b
Save
You can save models that you have worked with a
Carima slicer in slt, crv, and other file formats.
c
Slicing
The imported modeling files can be sliced into single-sided
photo files. The file is in JPGE format.
d
Config
You can change the color of the modeling file, set the user
name, build size, resolution, and image pixels.
e
Exit
Exit the Carima slicer.
1
14
 Loading...