

Page 1
Automotive components since 1963
211083
GB
Vedpak 104GB_Version 2_040909
User Manual
ELECTRICAL
TEsTER
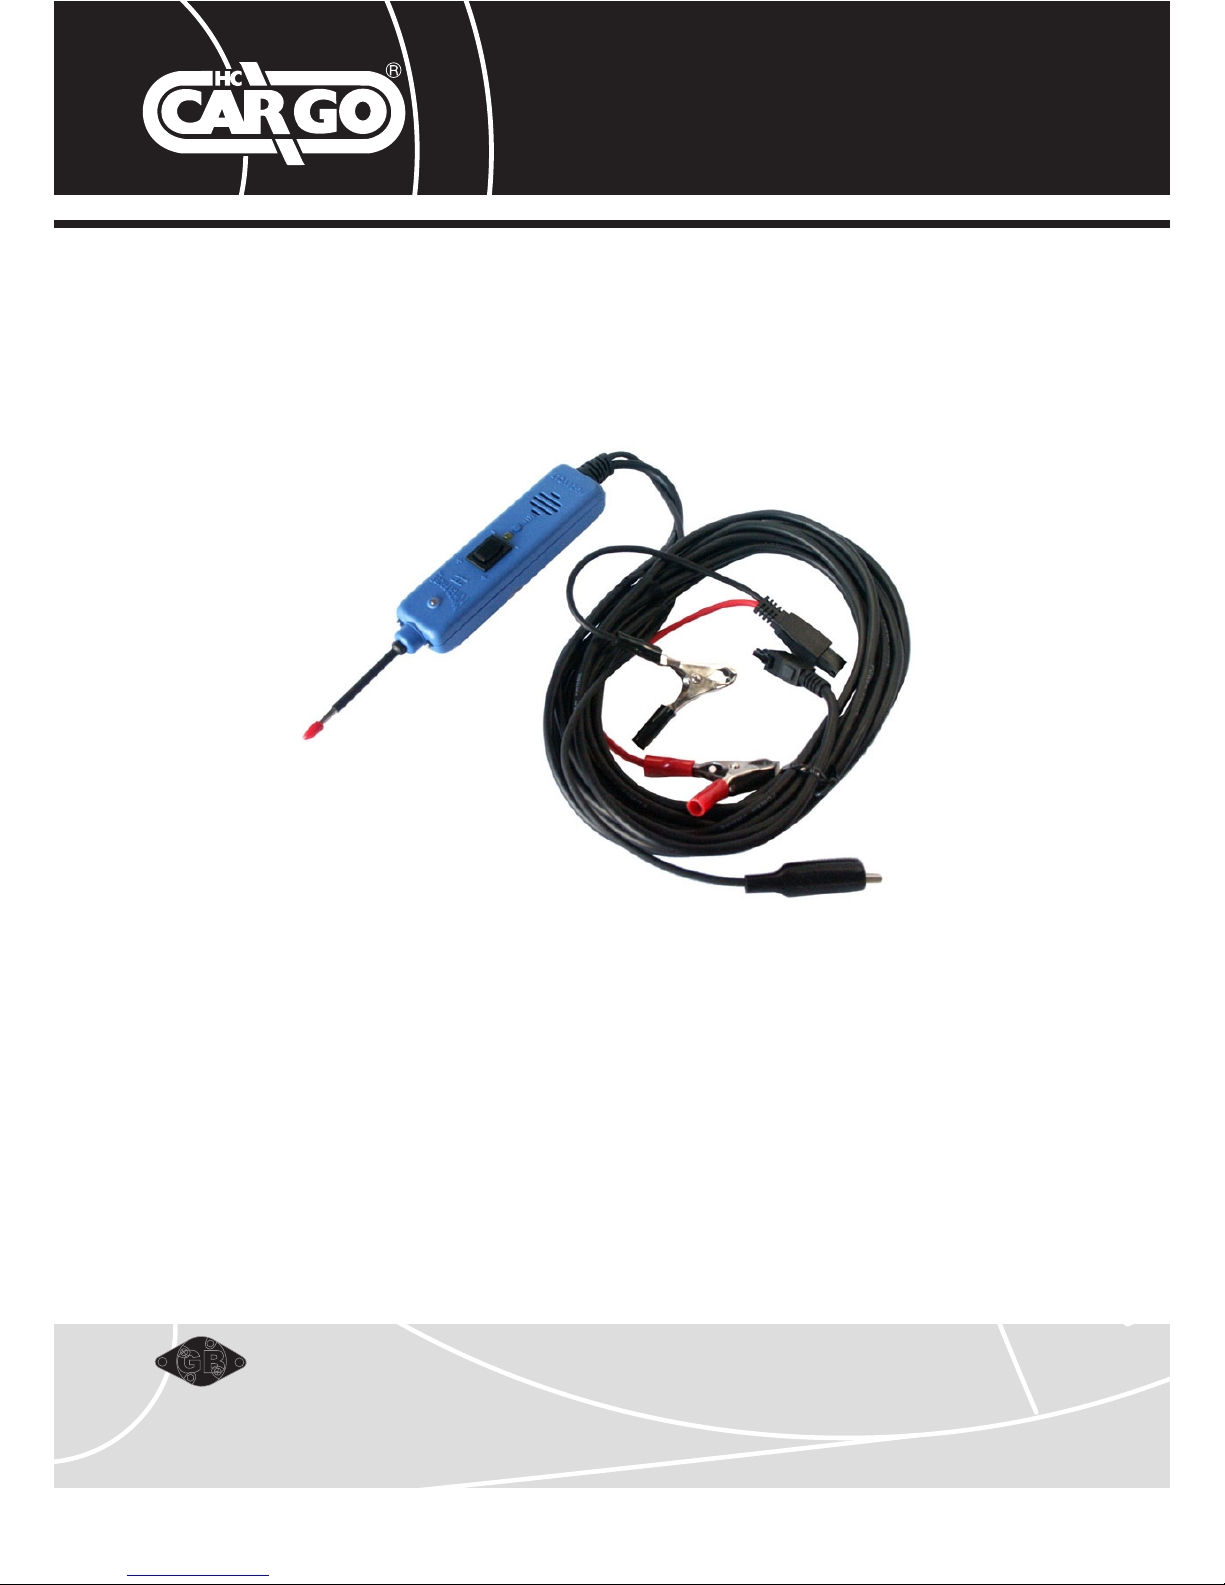
When you connect your Cargo 211083 to
the car battery you will have a multitude of
testers at your nger tips. With the press of
a switch you’ll have an instant hot lead or
ground lead. Use the hot and ground lead
simultaneously to activate componenets right
in your hand. Instantly check components
for continuity as well as identify positive,
negative and open circuits without
re-polarizing hook-up clips. Follow and locate
shorts without wasting fuses. The 19ft lead
will allow you to test bumper to bumper
without jumper leads.
New features:
• New louder, easier to hear audio signal.
• Audio tone indicates positives by a higher
pitched tone and negative by a lower
pitched tone.
• Cargo 211083 now has 2 bright white
headlights instead of one.
• The new headlights are long life LEDS
assurring years of replacement free service.
Page 2

211083
2
Vedpak 104GB_Version 2_040909
GB
Table of Contents
Cargo 211083 Instructions ........................................................ 1
Hook-up and quick self-test .......................................................3
Polarity testing ...........................................................................4
Continuity testing .......................................................................5
Activating components out of vehicle’s electrical system ..........6
Testing trailer lights and connections ......................................... 7
Activating electrical components with positive (+) voltage ......... 8
Activating electrical components with negative (-) voltage ........9
Jumper lead feature ................................................................. 10
Checking for bad ground contacts ........................................... 11
Following and locating short circuits ........................................ 11
Using the light and tone ........................................................... 12
IMPORTANT TIP:
When powering-up components, you can increase the life of your
Cargo 211083 switch, if you first press the switch, then contact the tip
to the component. The arcing will take place at the tip instead of the
contacts of the switch.
INTRODUCTION
The Cargo 211083 is the best professional
electrical tester for reducing diagnostic time in
6 to 24 Volt automotive electrical systems. After
a simple hook-up of the tester to the vehicle’s
battery, the automotive technician can determine
at a glance at the red/green LED indicator, if
a circuit is positive, negative or open without
reconnecting hook-up clips from one battery pole
to the other. The Cargo 211083 switch allows the
automotive technician to conduct a positive or
negative
battery current to the tip for testing the function of
electrical components without the use of jumper
wires. And yes, it is short-circuit protected. It
tests for bad ground contacts instantly without
performing voltage drop tests. It allows you to
follow and locate short circuits without wasting
precious fuses. The Cargo 211083 can also test
for continuity with the assistance of its auxiliary
ground lead. With a flip of the power switch, you
will know at a glance that your tester is
functioning without running to the battery as
you would otherwise have to do with simple test
lights. The Cargo 211083’s long cable allows
you to test along the entire length of the vehicle
without constantly searching for ground hook-ups.
Before using the tester please read the
instruction book carefully.
WARNINg
When the testers switch is depressed battery
current is conducted directly to the tip which may
cause sparks when contacting ground or certain
circuits. Therefore the tester should NOT be
used around flammables such as gasoline or its
vapors. The spark of an energized Cargo 211083
could ignite these vapors.
Use the same caution as you would when using
an arc welder.
Cargo 211083 is only for use with 6-24 Volt
systems.
Page 3
211083
3
Vedpak 104GB_Version 2_040909
GB
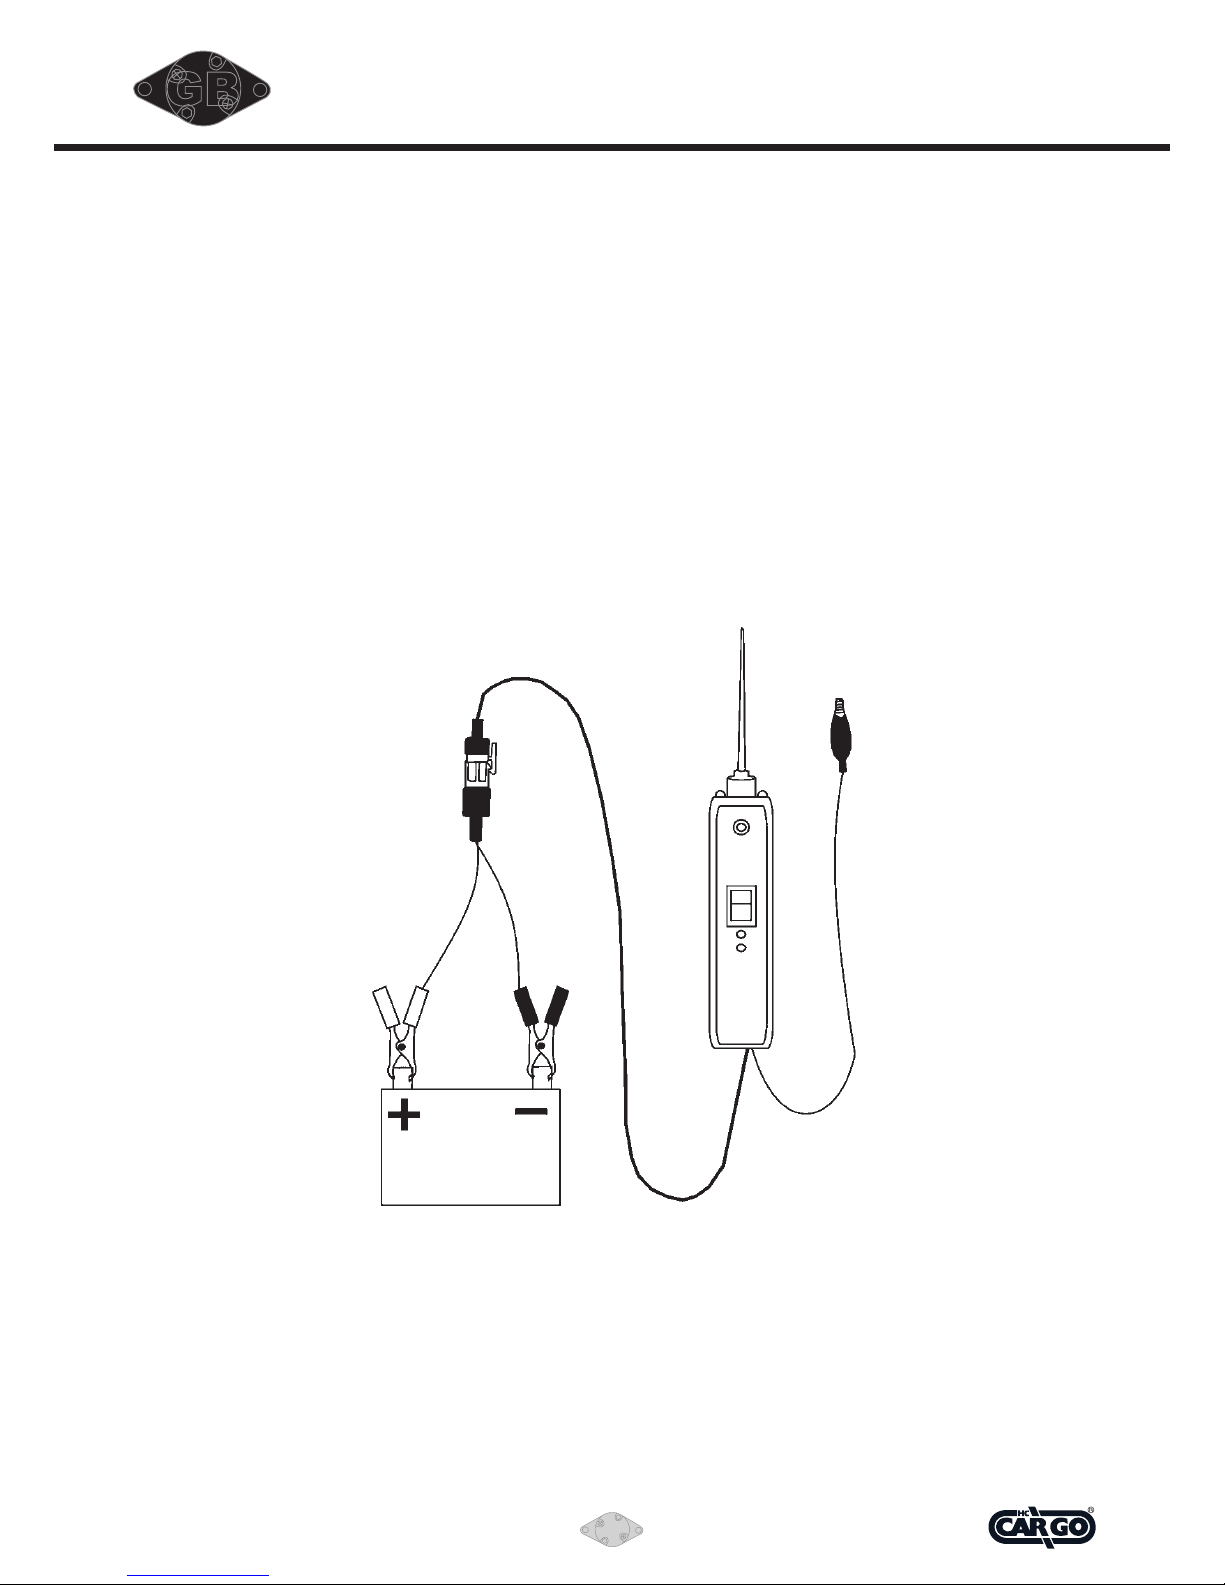
HOOk-UP
Unroll the cable.
Clamp the RED battery hook-up clip to the
POSITIVE (+) terminal of the vehicle’s battery.
Clamp the BLACK battery hook-up clip to the
NEGATIVE (÷) terminal of the vehicle’s battery.
QUICk self-TesT
Rock the power switch forward (+),
the LED indicator should light RED.
Rock the power switch rearward (-),
the LED indicator should light GREEN.
The Tester is now ready to use.
If the indicator did not light, depress the reset
button of the circuit breaker on the right side of
the housing and try the self test again.
Page 4

211083
4
Vedpak 104GB_Version 2_040909
GB
POlARITy TesTINg
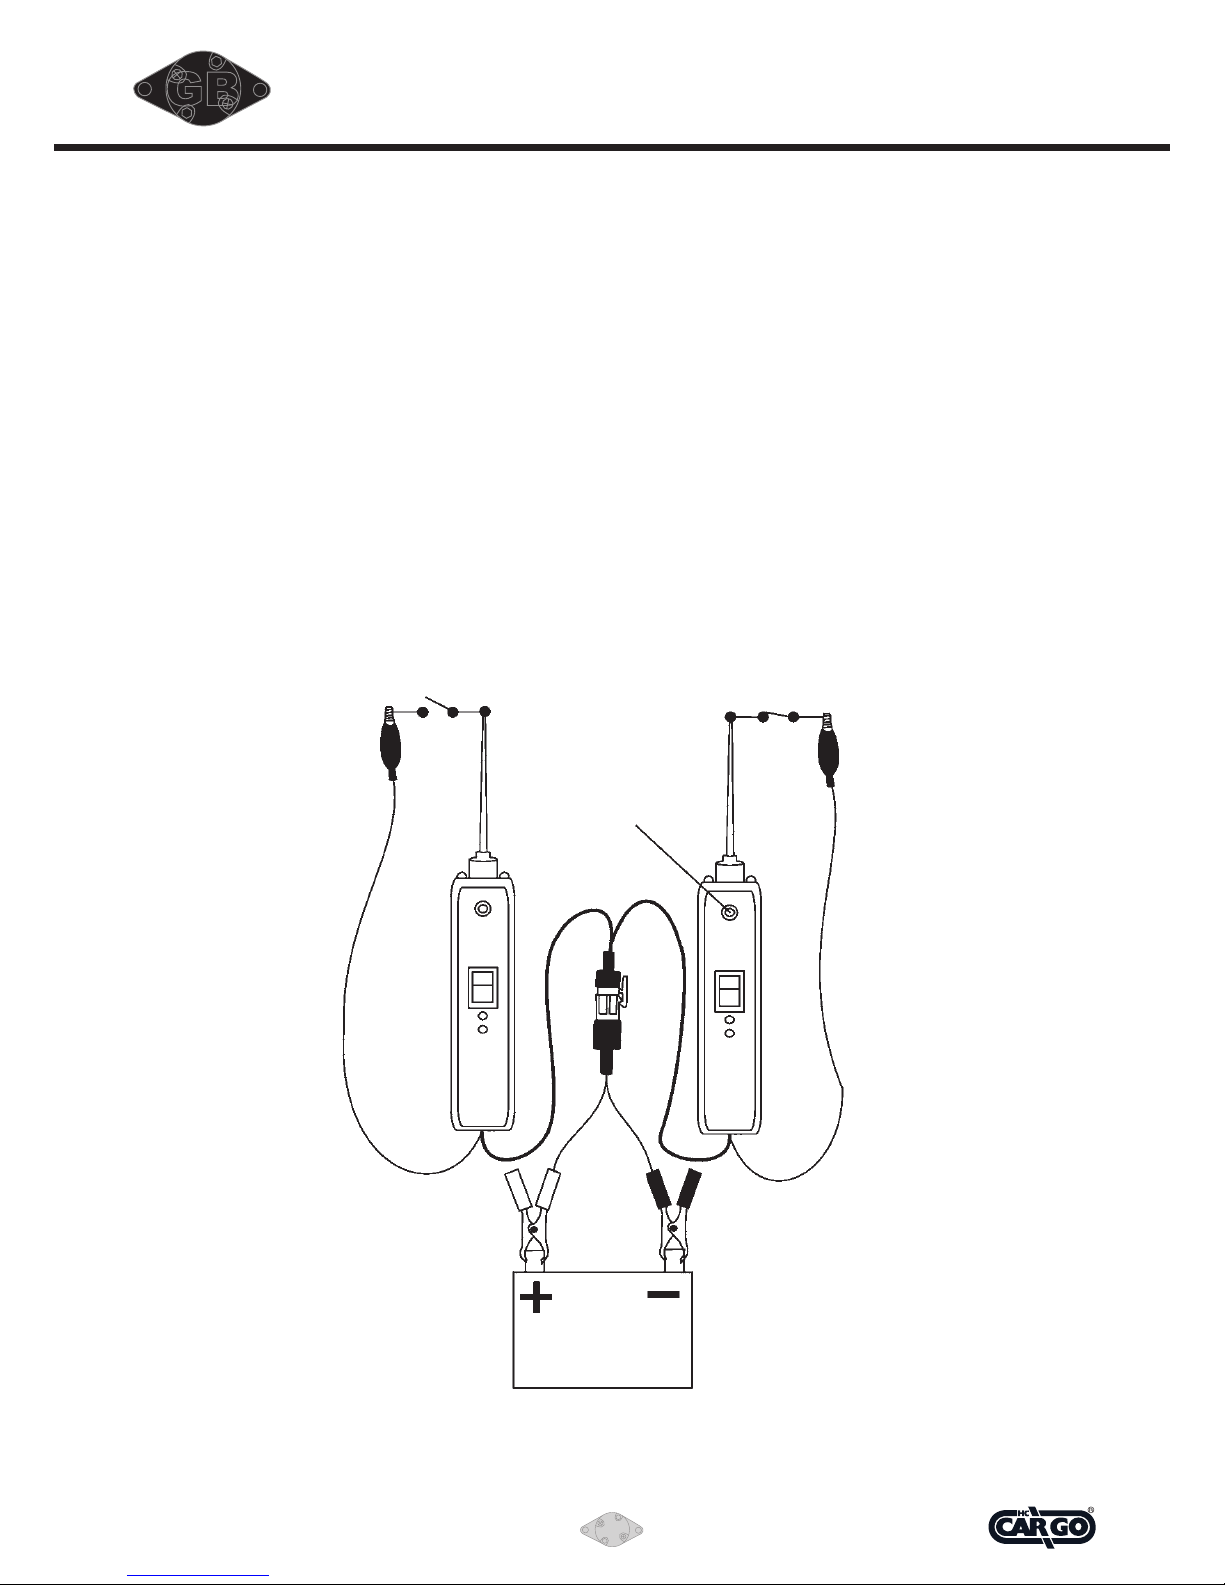
Contacting the tip to a POSITIVE (+) circuit will
light the LED indicator RED.
(The Cargo 211083 audio feature will sound a
high pitched tone when contacting positive).
Contacting the tip to a NEGATIVE (-) circuit will
light the LED indicator GREEN.
(The Cargo 211083 audio feature will sound a
low pitched tone when contacting negative).
Contacting the tip to an OPEN circuit will be
indicated by the LED indicator not lighting.
Red = Positiv
Green = Negativ
Page 5
211083
5
Vedpak 104GB_Version 2_040909
GB
CONTINUITy TesTINg
By using the tip together with the auxiliary ground
test lead, continuity can be tested on wires and
components that are disconnected from the
vehicle’s electrical system.
When continuity is present, the LED indicator will
light GREEN.
Continuity
Green = Continuity
No continuity
Page 6
211083
6
Vedpak 104GB_Version 2_040909
GB
ACTIvATINg COMPONeNTs OUT Of THe
veHICle’s eleCTRICAl sysTeM
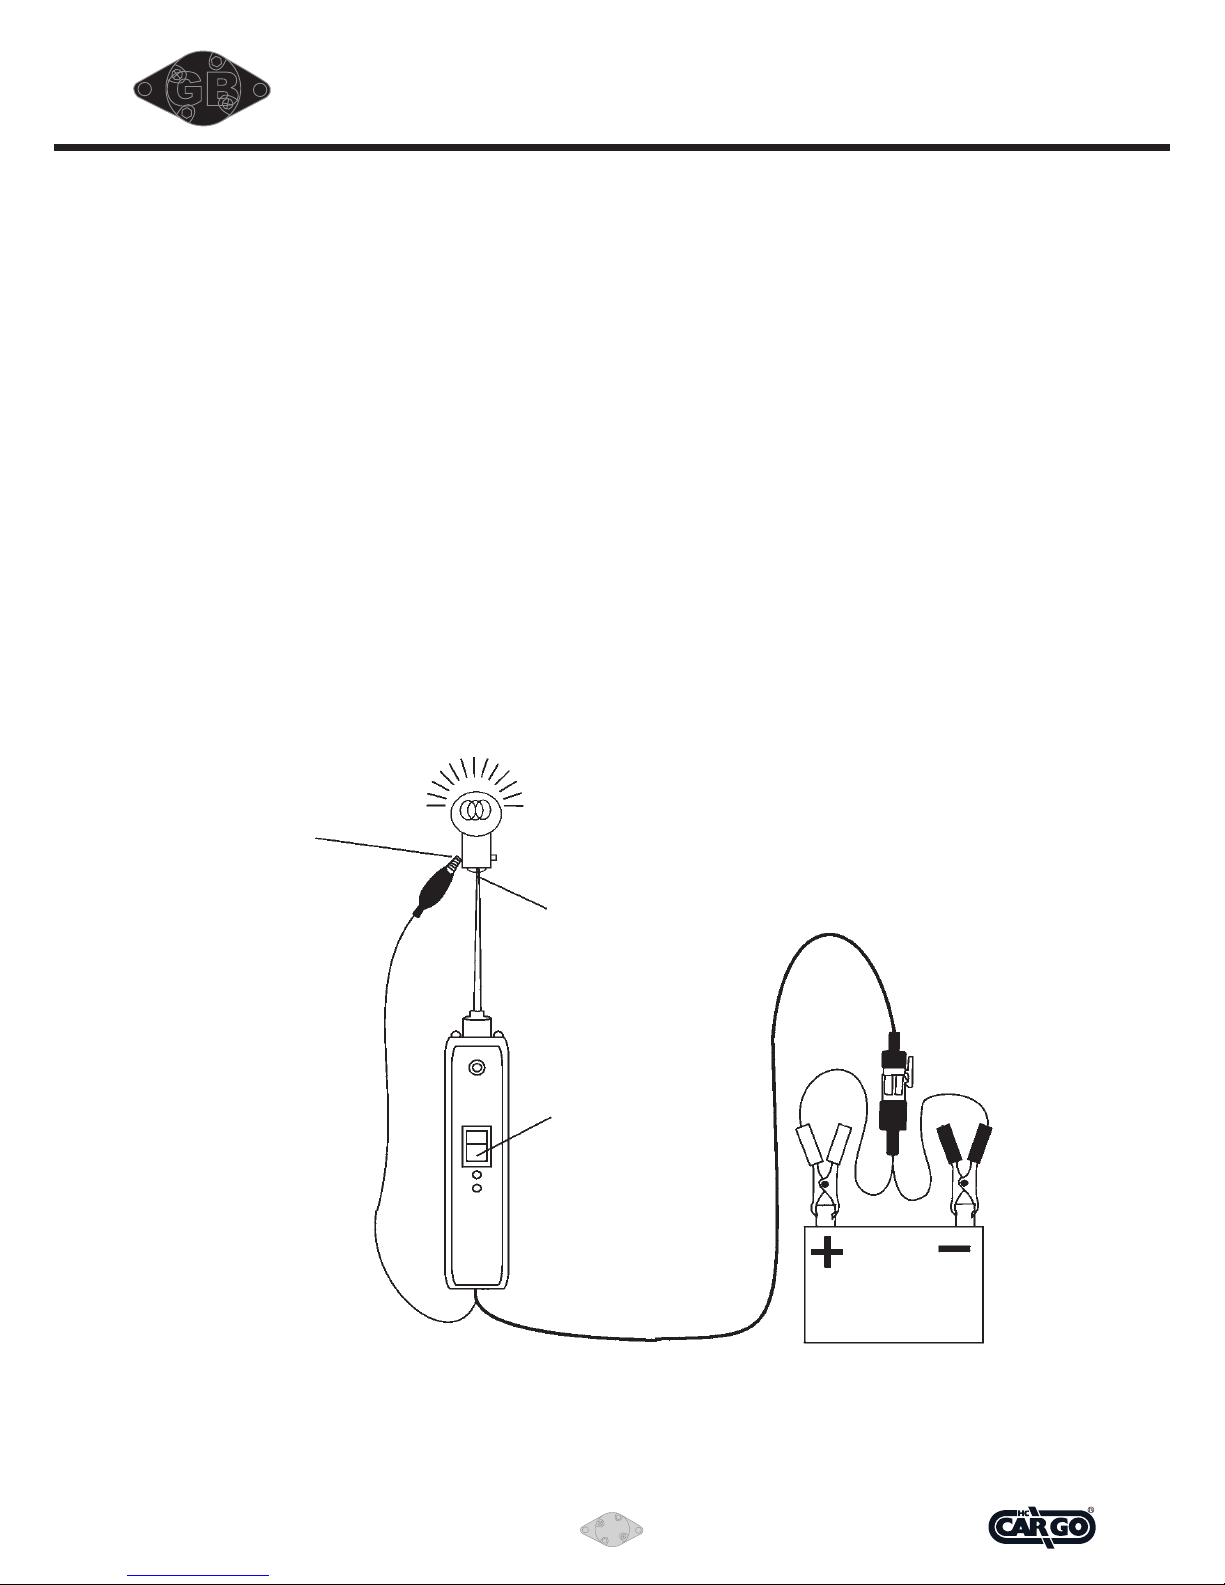
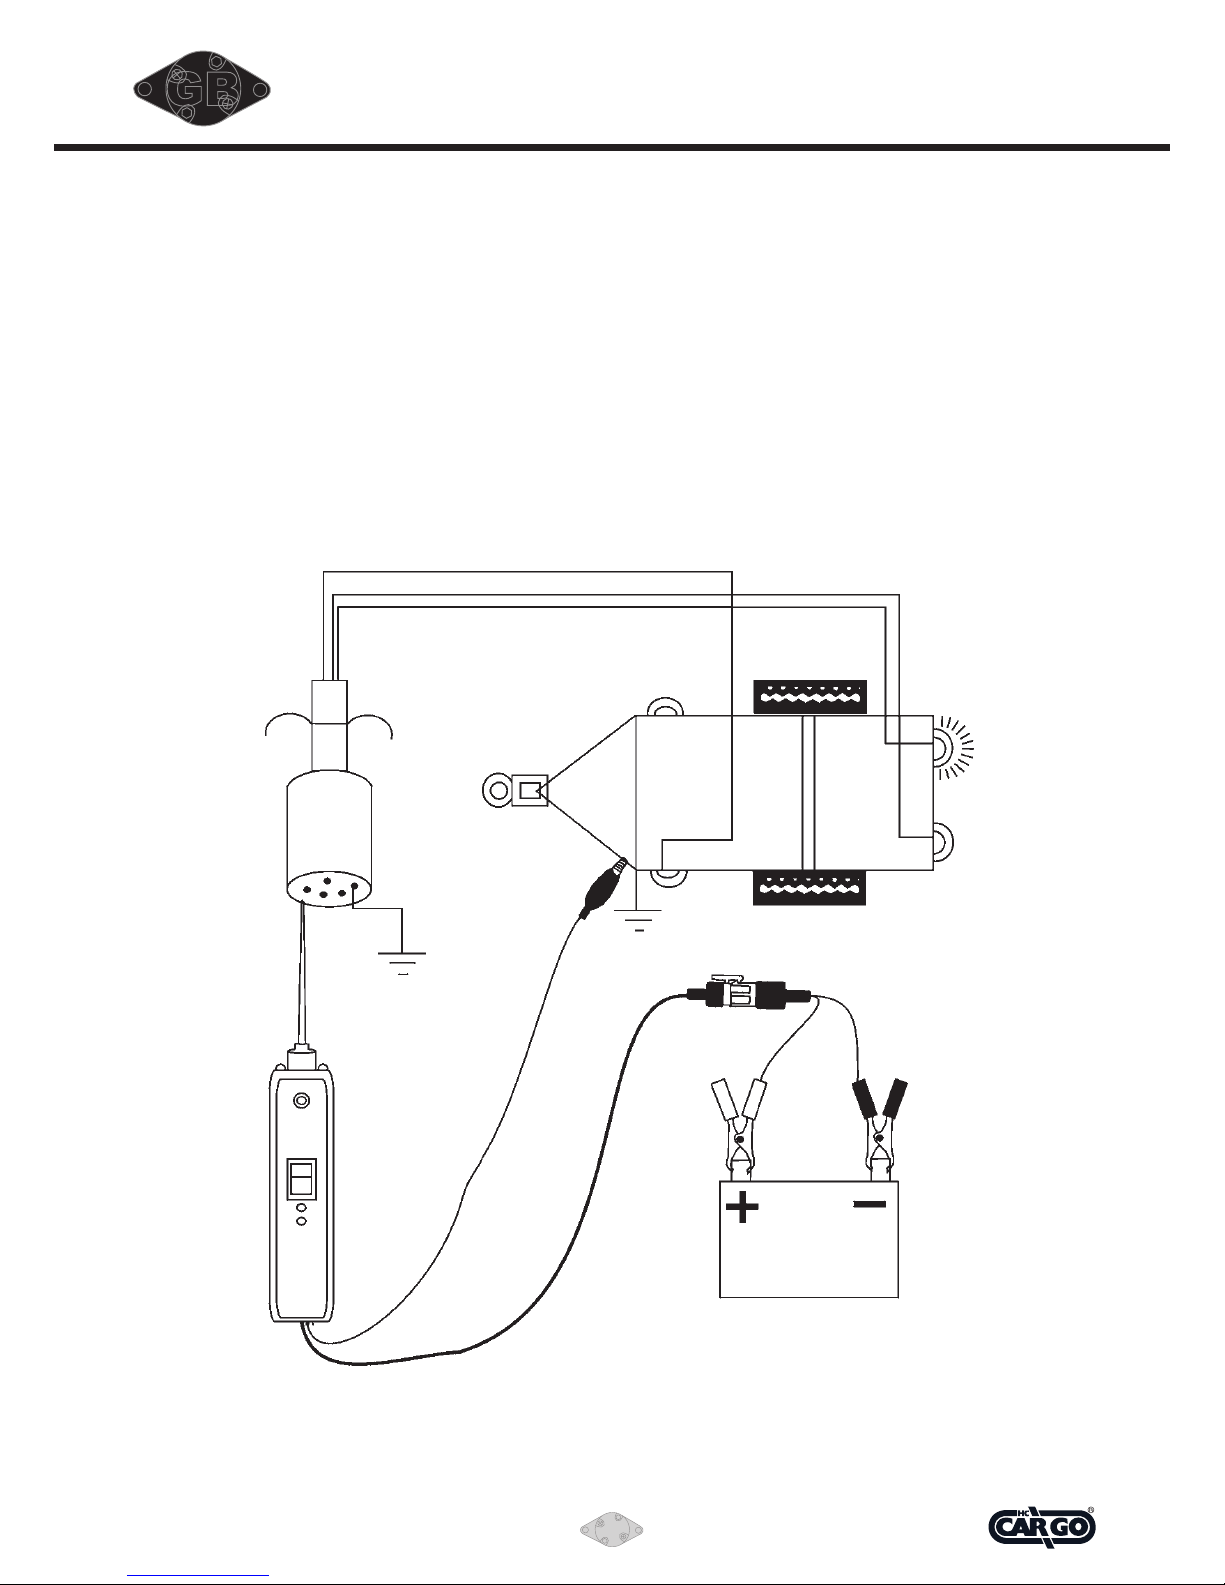
By using the tip together with the auxiliary ground
lead, components can be activated, thereby
testing their function.
Connect the negative auxiliary clip to the
negative terminal of the component being tested.
Contact the probe to the positive terminal of
the component, the LED indicator should light
GREEN indicating continuity through the
component.
While keeping an eye on the green LED indicator,
quickly depress and release the power switch
forward (+). If the green indicator changed
instantly from GREEN to RED you may proceed
with further activation. If the green indicator went
off at that instant or if the circuit breaker tripped,
the Cargo 211083 has been overloaded. This
could happen for the following reasons:
• Thecontactisadirectgroundornegative
voltage.
• Thecomponentisshort-circuited.
• Thecomponentisahighamperage
component (i.e., starter motor).
Connect the
negative auxiliary
clip
Connect the tip to
the positive terminal
of the bulb
Press the power
switch forward to
activate the bulb
Page 7
211083
7
Vedpak 104GB_Version 2_040909
GB
TesTINg TRAIleR lIgHTs
AND CONNeCTIONs
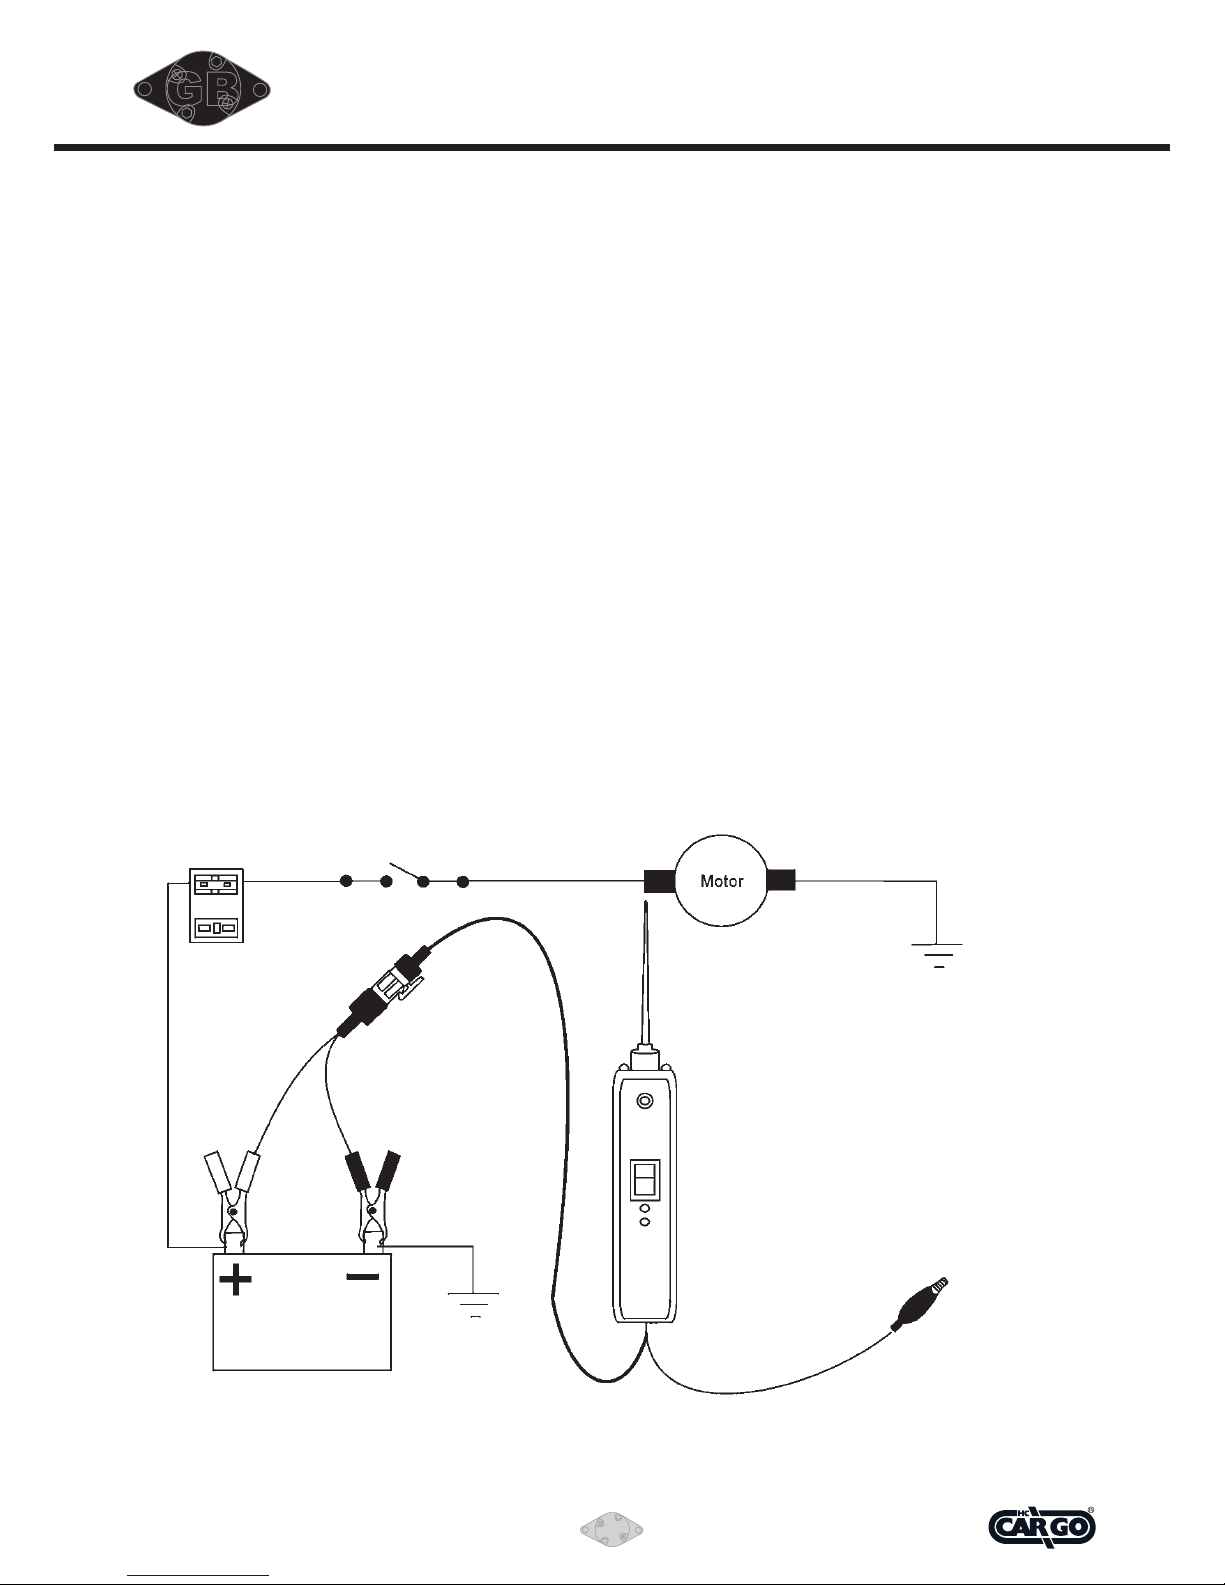
1. Connect the tester to a good battery.
2. Clip the auxiliary ground clip to the trailer
ground.
3. Probe the contacts at the jack and apply
voltage to them. This lets you check
the function and orientation of the trailer lights.
If the circuit breaker tripped, reset it by
depressing the reset button.
Page 8
211083
8
Vedpak 104GB_Version 2_040909
GB
TO ACTIvATe COMPONeNTs WITH
POsITIve (+) vOlTAge
Contact the probe tip to the positive terminal of
the component, the LED indicator should light
GREEN.
While keeping an eye on the green indicator,
quickly depress and release the power switch
forward (+). If the green indicator changed
instantly from GREEN to RED you may proceed
with further activation. If the green indicator went
off at that instant or if the circuit breaker tripped,
the tester has been overloaded. This could
happen for the following reasons:
• Thecontactisadirectground.
• Thecomponentisshort-circuited.
• Thecomponentisahighcurrentcomponent
(i.e., starter motor).
If the circuit breaker tripped, reset it by
depressing the reset button.
WARNINg: Haphazardly applying voltage to
certain circuits can cause damage to a vehicle’s
electronic components. Therefore, it is strongly
advised to use the correct schematic and
diagnosing procedure while testing.
Trick: When powering-up components, you can increase the life
of your tester switch if you first
press the switch, then contact the
tip to the component. The arcing
will take place at the tip instead
of the contacts of the switch.
Page 9
211083
9
Vedpak 104GB_Version 2_040909
GB
ACTIvATINg eleCTRICAl COMPONeNTs
WITH NegATIve (-) vOlTAge
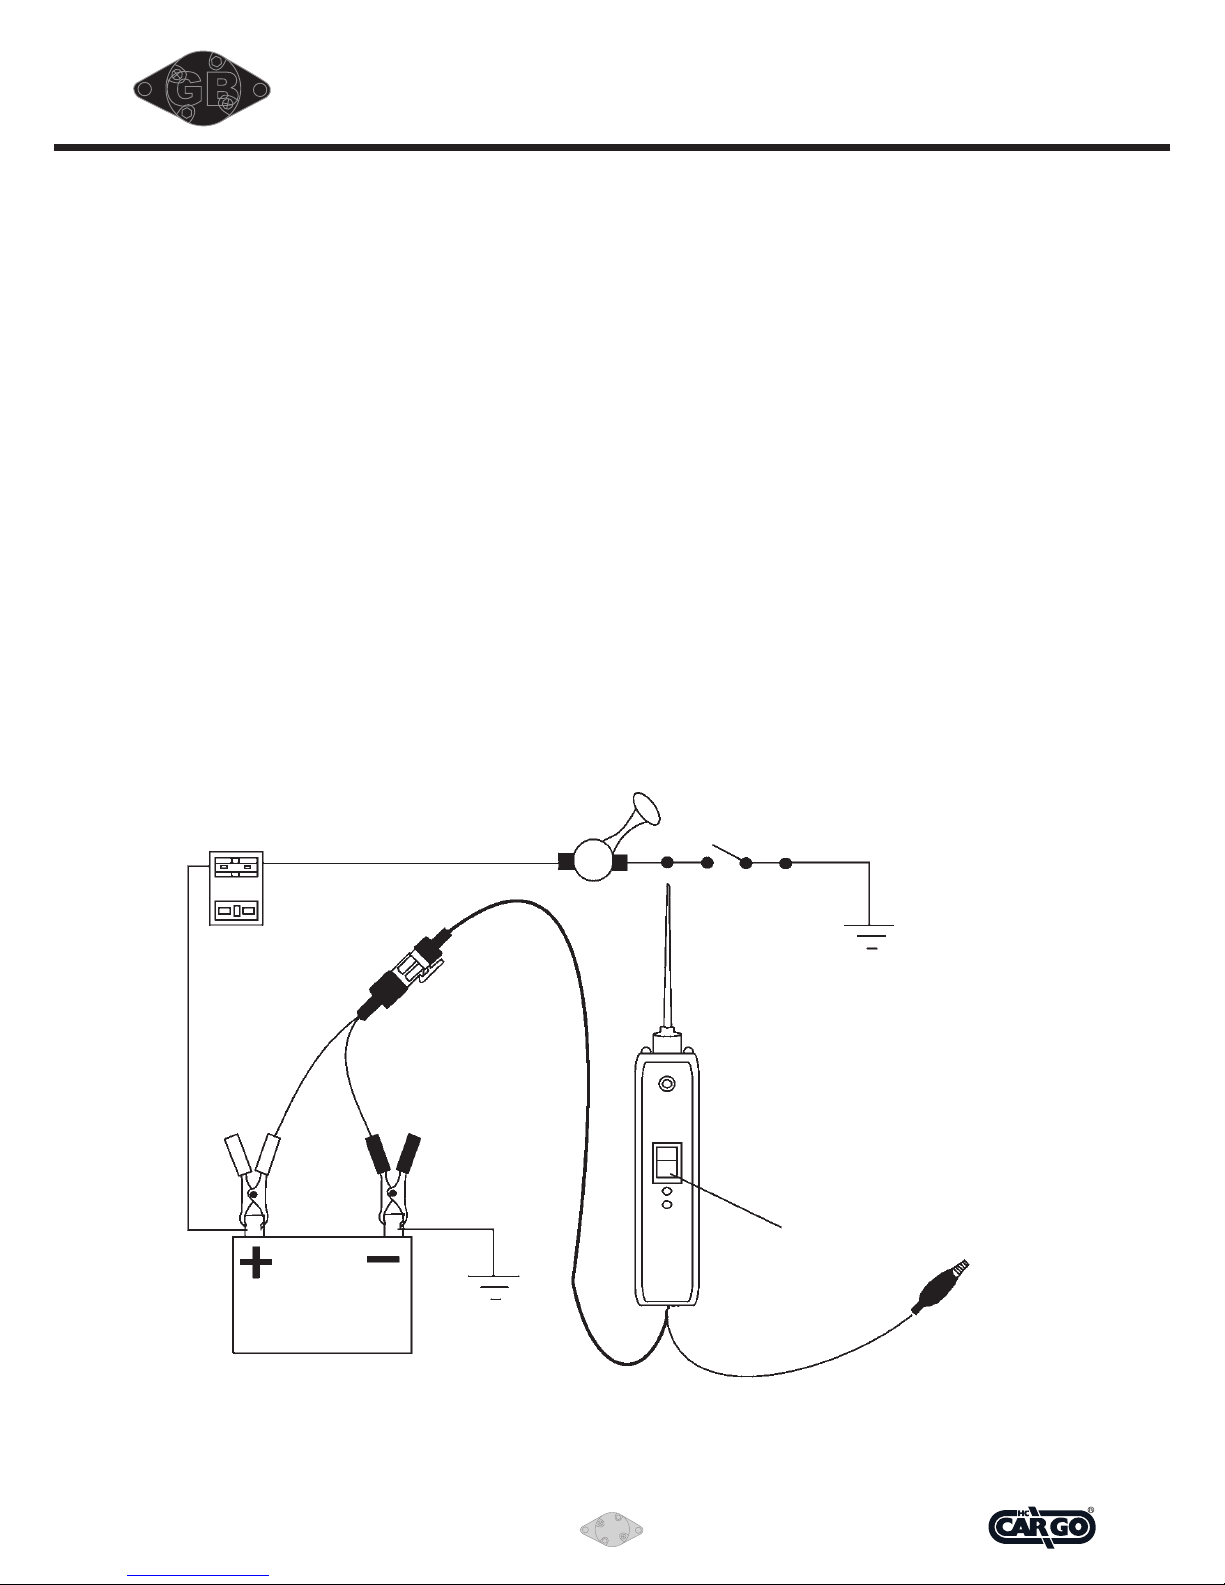
Contact the probe tip to the negative terminal of
the component, the LED indicator should light
RED.
While keeping an eye on the red LED indicator,
quickly depress and release the power switch
rearward (-). If the red indicator changed instantly
from RED to GREEN you may proceed with
further activation. If the green indicator went off
at that instant or if the circuit breaker tripped,
the tester has been overloaded. This could have
happened for the following reasons:
•Thecontactisadirectpositivevoltage.
•Thecomponentisshort-circuited.
•Thecomponentisahighamperagecomponent
(i.e., starter motor).
If the circuit breaker tripped, reset it by
depressing the reset button.
WARNINg: With this function a vehicle’s fuse
can be blown or tripped if grounding the contact
in series with it.
Depress the rocker switch
rearward to ground the horn
Page 10
211083
10
Vedpak 104GB_Version 2_040909
GB
JUMPeR leAD feATURe
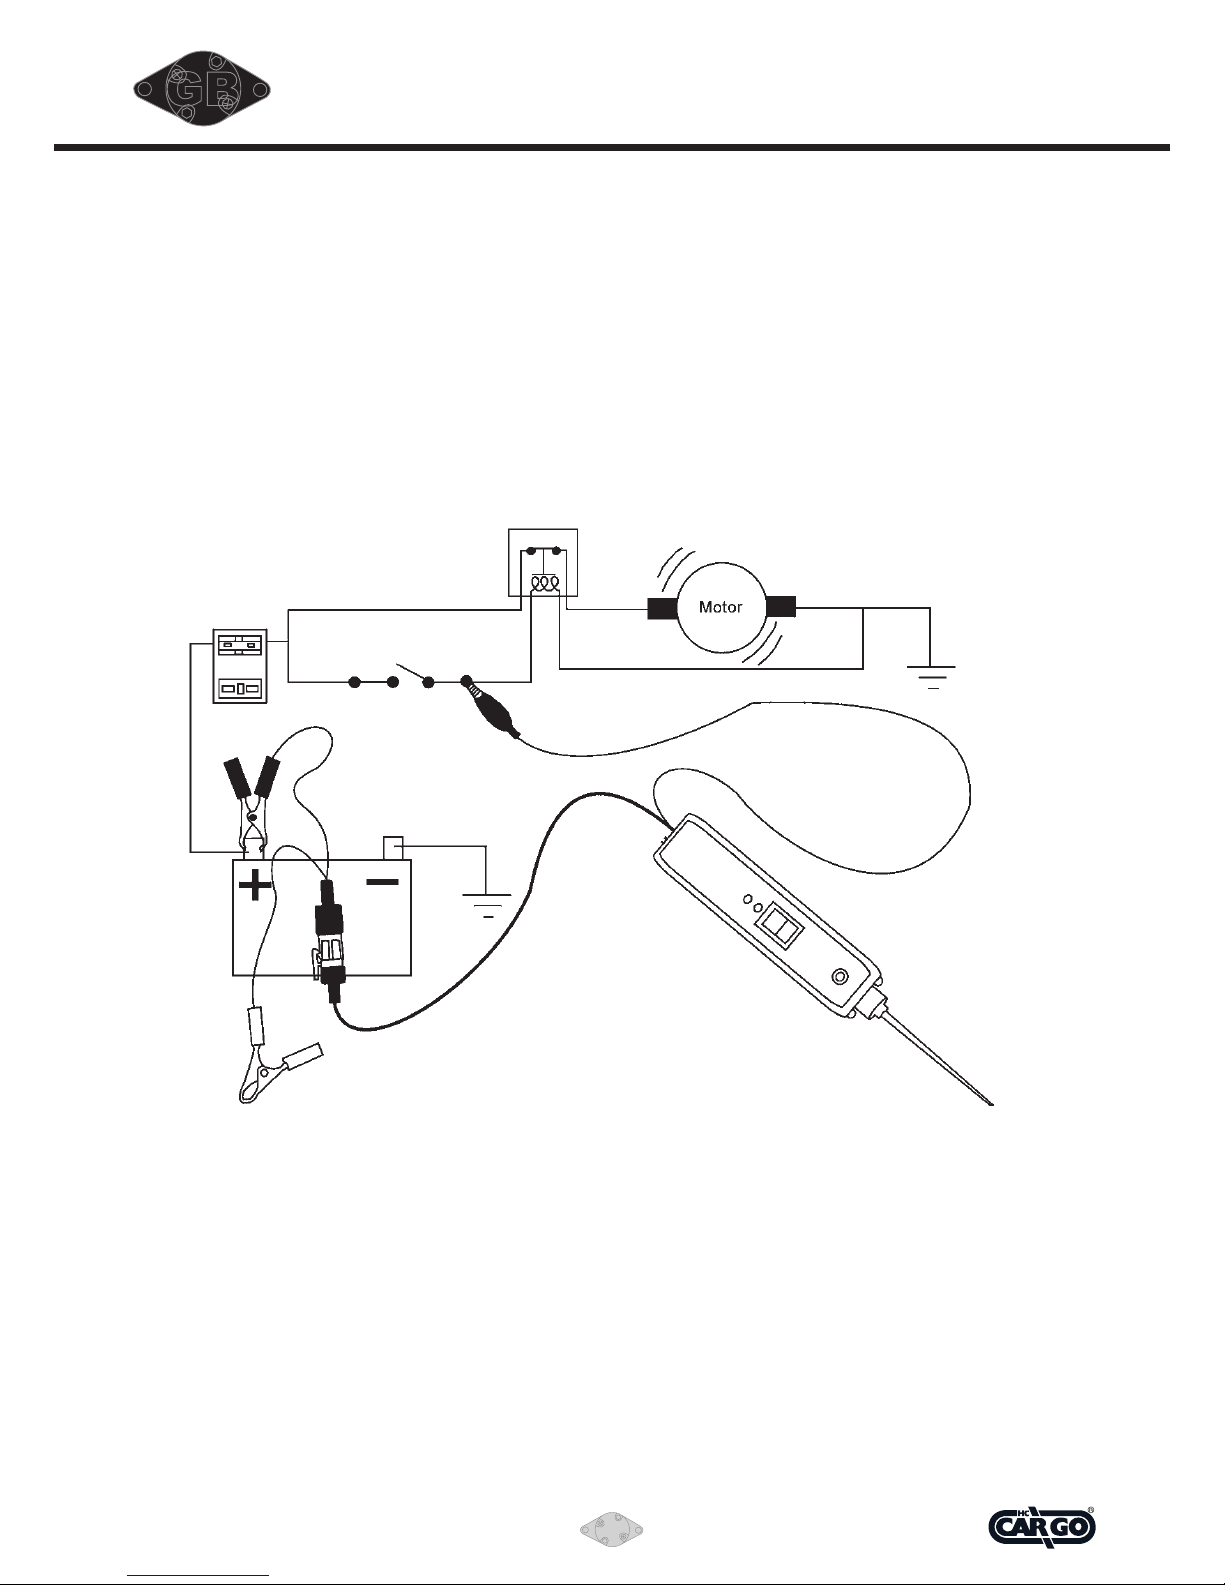
The testers positive battery hook-up lead and
auxiliary ground lead are connected directly
through the tester. By leaving the negative h
ook-up disconnected from the vehicle’s battery,
the tester can be used as a long jumper lead.
Be careful to avoid short circuits and overloading
when using this jumper function. The leads, in
this configuration, are NOT protected by the
testers circuit breaker.
Positive current is now flowing directly through the lead and is activating the relay.
Negative hook-up clip hangs loose.
Page 11

211083
11
Vedpak 104GB_Version 2_040909
GB
HeCkINg fOR bAD gROUND CONTACTs
Probe the suspected ground wire or contact with
the probe tip.
Observe the green LED indicator.
Depress the power switch forward then release.
If the LED indicator changed from GREEN to
RED, this is not a true ground.
If the circuit breaker tripped, this circuit is more
than likely a direct ground. Keep in mind that high
current components such as starter motors will
also trip the circuit breaker.
fOllOWINg AND lOCATINg sHORT
CIRCUITs
In most cases a short circuit will appear by a fuse
or a fusible link blowing or a protection device
tripping (i.e., a circuit breaker). Here is the best
place to begin the search.
Remove the blown fuse from the fuse box. Use
the testers tip to energize each of both contacts
in the fuse box. The side which trips the tester
circuit breaker is the shorted circuit. Take note of
this wire’s identification code or color. Follow the
wire as far as you can along the wiring harness,
for instance if you are following a short in the
brake light circuit you may know that the
wire must pass though the wiring harness at
the door sill. Locate the color-coded wire in
the harness and expose it. Probe through the
insulation of the wire with the tester tip and
depress the power switch forward to energize the
wire. If the tester circuit breaker tripped you have
verified the shorted wire.
Cut the wire and energize each end with the
tester tip. The wire which trips the tester circuit
breaker again will lead you to the shorted area.
Follow the wire in the shorted direction and
repeat this process until the short is located.
Page 12
Automotive components since 1963
211083
Vedpak 104GB_Version 2_040909
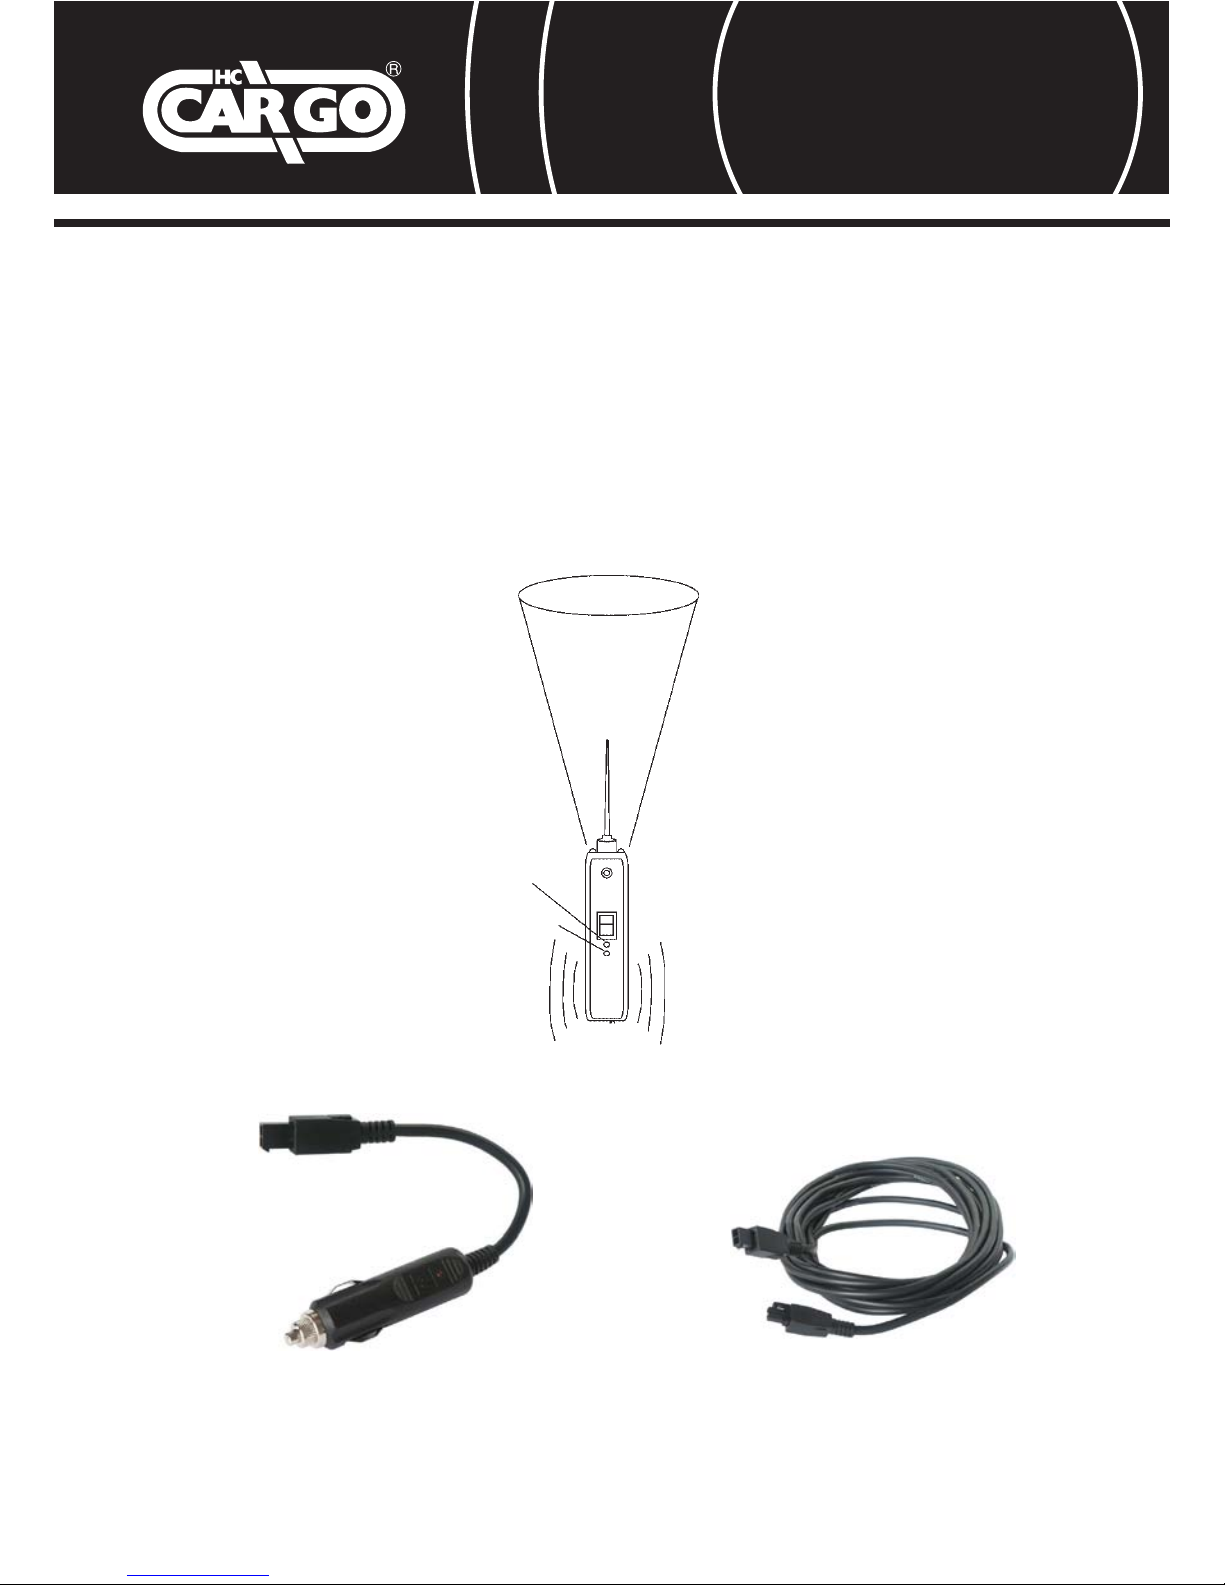
UsINg THe lIgHT AND TONe
The Cargo 211083 has the option of a light and
tone. Once connected to a good battery, the light
and the tone will be activated.
The light illuminates the area you are testing and
is a great asset for seeing in dark areas.
The tone feature enhances the polarity signal.
When the tip is contacted to a positive circuit,
a high pitch tone will sound off. When the tip is
contacted to a negative circuit, a low pitch tone
will sound off. The tone can be toggled on or off
by pressing the audio tone On/Off button.
Light
Sound
ACCessORIes
CARgO 181488 CARgO 192775
Adapter for cigarette lighter. 6 mtr. Extion lead.
 Loading...