

Page 1
1
USER MANUAL
________________________________________________________________________________
Renaissance
v 1.0.0
EN
Page 2

2
TABLE OF CONTENTS
1. IN TRODUC TION ............................................................................................................................ 4
2. PAC KAGE CONT E NTS ................................................................................................................... 4
3. DEV ICE D ESCRI PTION .................................................................................................................. 4
3.1 KEY S DES CRIPT ION .............................................................................................................. 4
4. FI RST ST EPS ................................................................................................................................... 5
4.1 BA TTERY CHAR GING ............................................................................................................ 5
4.2 BA TTERY LEVEL INDI CA TION ............................................................................................. 6
5. OUT PUT S YSTEM .......................................................................................................................... 6
5.1 SH OWING NUMBE RS ........................................................................................................... 6
5.2 MUL TI-DI GIT N UMBER S ..................................................................................................... 7
5.3 SH OWING SIGNA LS .............................................................................................................. 7
6. OUT PUT M ODES ........................................................................................................................... 8
6.1 VI BRATI O NS-ONL Y MOD E .................................................................................................. 8
6.2 AC OUSTI C -ONLY MODE ...................................................................................................... 8
6.3 CO M BINE D MODE ................................................................................................................ 8
6.4 OUT PUT M O DE CH ECKIN G AND SETTI N G ....................................................................... 8
6.5 OUT PUT M ODE SP EED C H ECKIN G AND SETT I NG .......................................................... 9
7. ST ANDAR D OPER ATION M ODE ............................................................................................... 10
7.1 ST ANDAR D MODE ACTI VA TION AND C HECKI NG ........................................................ 10
7.2 TIM E IND ICAT ION AND SETTI NG IN STAND ARD MO D E............................................. 10
7.3 DAT E IND ICAT ION IN S TANDA RD MOD E ...................................................................... 11
7.4 READING VALU E S AND S ETTIN GS OF WAKE UP AL ARM ............................................. 12
7.4 .1 ALAR M RIN G AND ALARM ST ATUS ............................................................................ 12
7.5 READING VALU E S AND S ETTIN G OF HOURL Y REMIND ERS ....................................... 13
7.5 .1 HOUR LY REM INDER RING ............................................................................................ 13
8. EASY OP E RATIO N MOD E .......................................................................................................... 13
8.1 EASY MOD E ACT IVAT ION AND CHEC K ING .................................................................... 14
8.2 TIM E IND ICAT ION IN E ASY M O DE .................................................................................. 14
8.3 DAT E IND ICAT ION IN E ASY M ODE ................................................................................. 14
9. AP P LICAT IONS OPERA TI ON MO DE......................................................................................... 14
9.1 AP P LICAT ION M ODE C HE CKING AND SETTI NG ........................................................... 15
9.2 MED ICATI ON RE MIND E R .................................................................................................. 15
9.2 .1 READ ING V ALUES AND S ET T INGS OF ME DICAT I O N REM INDER .......................... 16
Page 3

3
9.2 .2 MEDIC ATION REM I NDER RING AND ALAR M STAT E ............................................... 16
9.3 FI RST M E DICAT IONRE MI NDERS GROU P ....................................................................... 17
9.4 SE COND M EDICA TION RE MINDE RS GR OUP ................................................................. 17
9.5 ST O P WAT CH AP PLICA TI ON ............................................................................................. 17
9.6 CO U NTDOW N TIM ER AP P L I CATI ON ............................................................................... 18
10. OPTIO NAL: WIREL ESS L INK MODE ..................................................................................... 20
10. 1 WIRELE SS LI NK MO D E: CHE CKING AND A CTIVA T I NG ............................................ 20
10. 2 CONNE C T WIT H AN EXTERNA L DEVICE ..................................................................... 21
10. 3 KITCHE N SCA LE HE IDI WIT H INT EGRATE D WIR E L ESS M ODE ............................... 21
10. 4 SCALE HAPPY DAY W ITH IN TEGRA TED W IRELES S MODE ...................................... 23
10. 5 DEACTI VATIN G OF THE WIR E LESS LINK MODE ....................................................... 24
10. 6 RESTAR T OF THE W IRELESS LINK MODE ................................................................... 24
11. SETTI NGS ................................................................................................................................. 24
11. 1 SE T TING OF VA LUES ...................................................................................................... 24
11. 2 RET URNI NG SET TINGS TO DEFA ULT V ALUES ........................................................... 25
11. 3 RESETTING TH E WAT C H AND S TARTI NG BO OTLOADE R ........................................ 25
12. TROUB LESHO OTING .............................................................................................................. 26
13. SAFE TY AND CLEA NING ........................................................................................................ 26
14. TECHNICAL DATA ................................................................................................................... 27
15. GUAR ANTEE AND S ERVIC E ................................................................................................... 27
16. LEGAL NOTI CE ON THE DIS POSAL OF E LECTR O N IC DEV ICES ....................................... 28
16. 1 DIS POSAL OF U SED E LE C TRONIC DEV ICES ............................................................... 28
16. 2 BA TTERY DISPO SAL ....................................................................................................... 28
17. SYMBO LS US ED ...................................................................................................................... 28
18. MANU FACT URER ......................................................................................................................... 30
Page 4

4
1. INTRODUCTION
Thank you for purchasing the Renaissance. You can say this watch is truly special, because it was
developed by a small international team of enthusiasts, including myself, from the idea to its
perfection. Of course, that was a challenge, but also a very beautiful process. I hope you will enjoy
using it as much as we did developing it.
Yours,
Dietmar Litschel
2. PACKAGE CONTENTS
The package of the Renaissance contains, besides the watch itself:
- Micro-USB charging cradle
- USB to micro-USB cable
- USB power supply
- Printed user manual
- Acoustic instructions and PC-Software on the mini CD
3. DEVICE DESCRIPTION
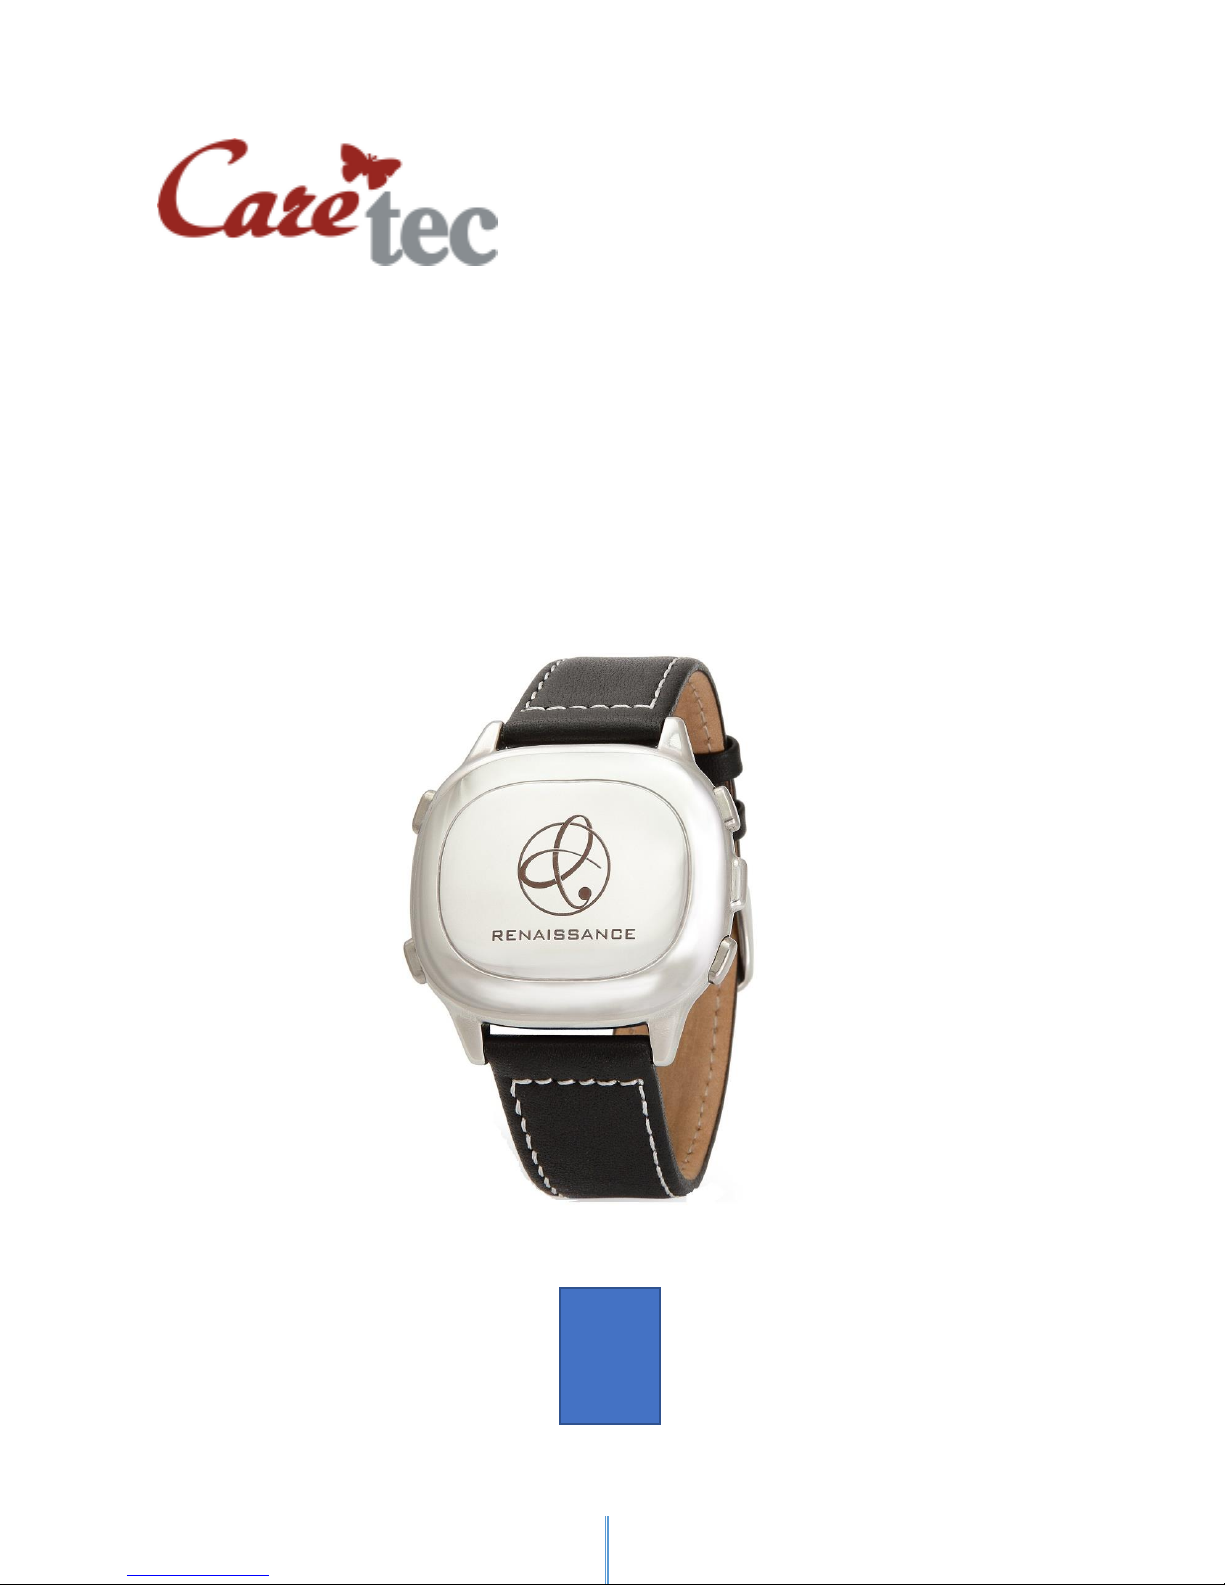
Renaissance is primarily a conventional wristwatch, which reliably indicates time and date.
But its appearance is not conventional at all. On the top side, where you would normally expect a
display or a dial, two engravings can be felt. The narrow lettering RENAISSANCE, and the circular logo
of Litschel Design. You won’t find a display or clock hands on Renaissance, because it gives all
information via acoustic signals or using vibrations.
Before you continue any further, carefully take your Renaissance out of the box and place it in front
of you. The metallic part of the watch should be facing upwards and the side of the watch with 1
false button and 2 regular buttons should be pointing to your right side.
3.1 KEYS DESCRIPTION
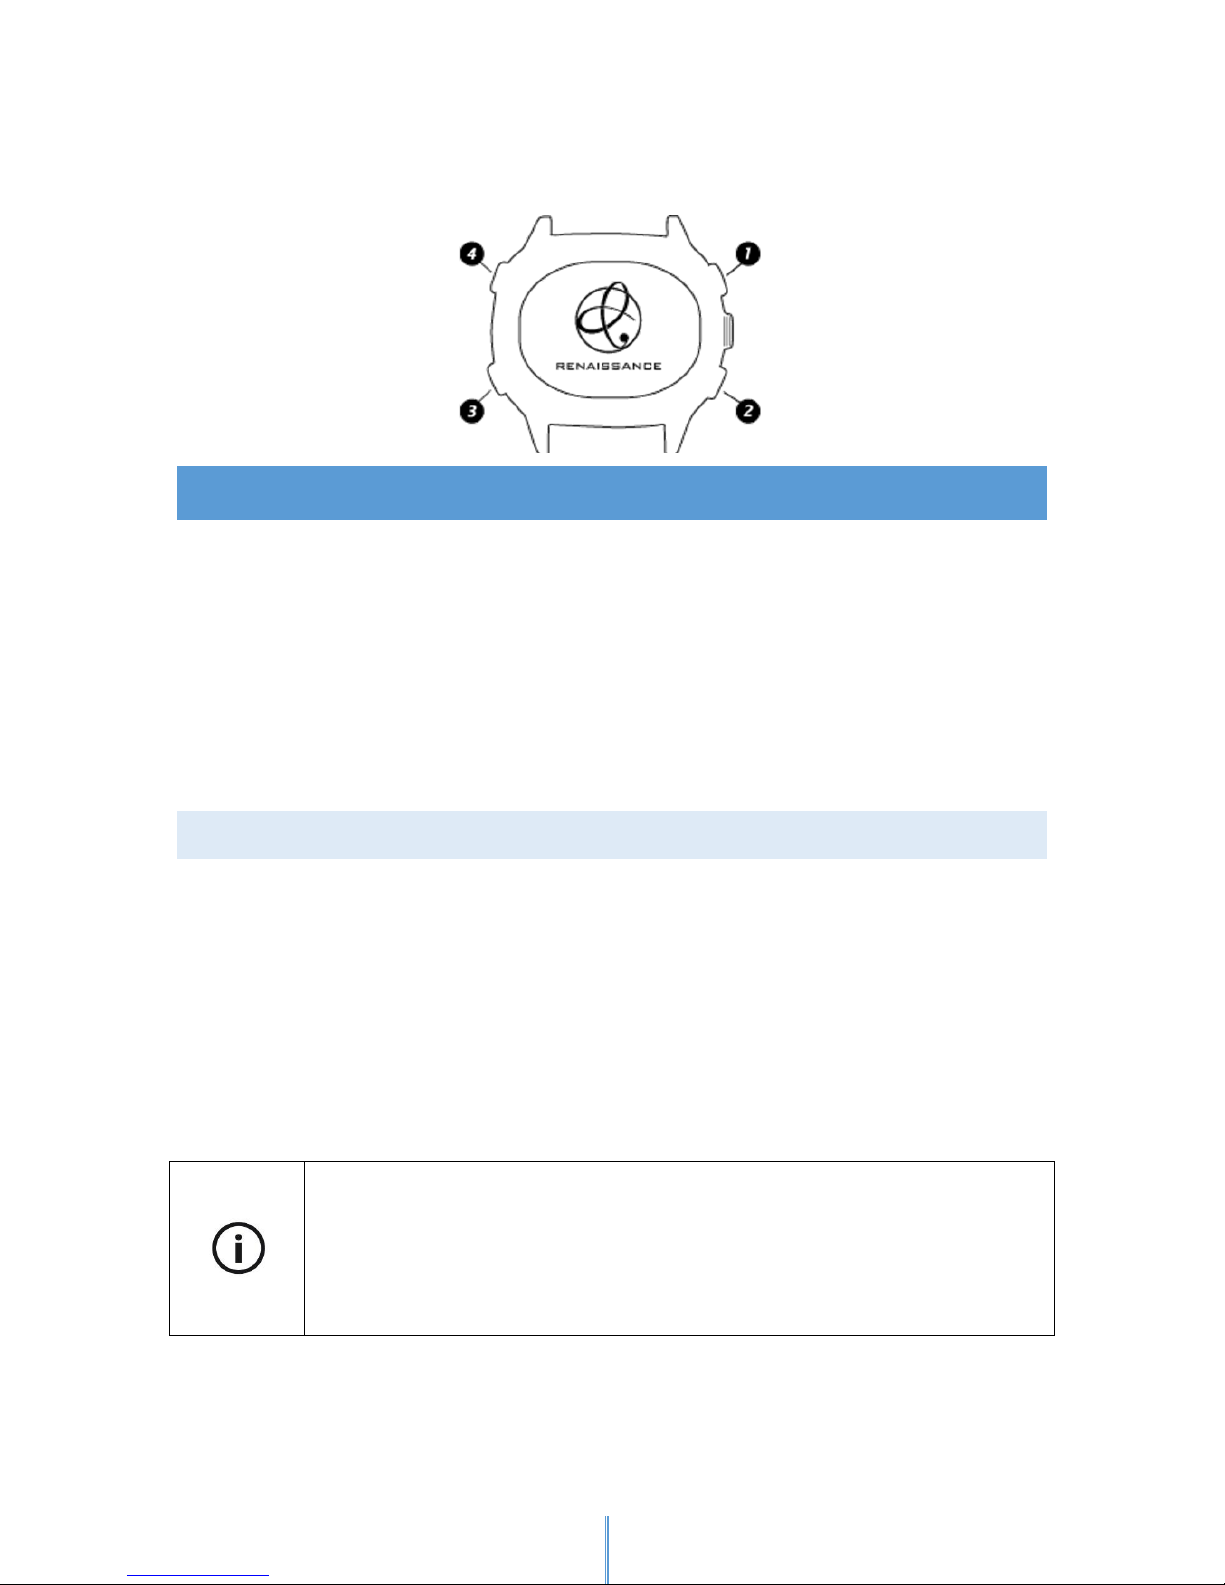
Renaissance has 4 buttons located on the narrow side of the watch and they are arranged in a
clockwise order. On the top right side (at “one o’clock”) you will find Button 1. The false Button is
exactly on the right (at three “o’clock”). On the bottom right side (at “five o’clock”) is the Button 2.
Page 5
5
Button 3 is on the bottom left side (at “seven o’clock”) and Button 4 is on the top left side (at “eleven
o’clock”).
4. FIRST STEPS
After unpacking the watch, please remove the protective foil which covers the face. Although
Renaissance is charged before shipping, we recommend to fully charge the battery before first use.
To do so use the micro-USB-cable and connect it to a plug socket or to your computer.
The Renaissance is set to the date and time in the distributor’s/customer’s time zone. You can also
let the software synchronize your watch with your computer by installing the Renaissance sync
software and connecting your Renaissance to it via cradle. You can also change date and time
manually, for that please take a look at the "Standard operation mode- Settings" section.
4.1 BATTERY CHARGING
Renaissance is powered by a rechargeable battery. To charge the battery of your Renaissance use the
supplied charging cradle. Open the cradle by pressing the release button on the opposite side of the
micro-USB socket. Once the cradle is opened, place the watch with the metallic engraved side facing
up and the tactile marking (false button) close to the opening knob in the charging station. Only
when the watch is correctly placed in the charging station, the hinge can be closed. Plug the smaller
end of the micro-USB cable into the socket on the opposite side of the opening knob.
Now the charging station needs to be powered. You can plug the larger end of the micro-USB cable
into the supplied USB charger, any other standard USB charger or into a computer with a USB
interface.
At both events, “Charging started” and “Charging finished”, the user is notified with the following
signals: “Charging started” and “Charging finished”. If the battery is completely uncharged, charging
time is approximately 2 hours with the supplied USB charger.
Note: Depending on the USB port of your computer, different power output
may be available for charging. The watch will always be synchronized when
charging via computer, if the supplied software is installed. Regularly charge
the battery to make sure you do not lose any data or settings.
Page 6
6
Note: You can also check the charging status, while the watch is in the charging cradle. By pressing
the key combination Button 2 and Button 4 once briefly. Renaissance will output the signal “Charging
started”, if it is still in progress or the signal “Charging finished”, when the charging cycle is complete.
Note: To extend battery life it should not remain discharged for longer than 6 months.
4.2 BATTERY LEVEL INDICATION
To retrieve the remaining charge level, press the key combination Button 2 and Button 4 once briefly.
The battery level is indicated by values 10 (fully charged) to 1 (battery almost empty).
Charging Battery
Button
Count
Period
Command
Output
2+4
1x
short
Charge Level Indicator
Value between 0 and 10
5. OUTPUT SYSTEM
Renaissance works with a system of signals representing numerical values and sequences of signals
to display more information. All signals can be displayed optionally as vibrations, sounds or both.
Every numerical value and information is represented by a unique sequence of signals.
Sequences can contain 6 types of signals:
- The wave signal
- The short signal
- The long signal
- The very long signal (only used for charging purpose)
- The very long wave signal (only used for medication reminder or stop watch application)
- The click signal (only used for manual settings)
5.1 SHOWING NUMBERS
When displaying numbers, every signal has a value assigned to it:
Wave signal represents the number 0
Short signal represents the number 1
Long signal represents the number 4
Digits can be calculated as a sum of values.
For example:
Number 6: 1 long signal, 2 short signals (4 + 1 + 1)
Number 9: 2 long signals, 1 short signal (4 + 4 + 1)
Page 7

7
Note: If a sequence of signals represents a number, the long signals will be displayed first, followed
by the short ones.
5.2 MULTI-DIGIT NUMBERS
Renaissance displays, except in Easy Mode, all numbers as double digit values. They are displayed as
tens digits followed by a longer pause and then ones digits. If the value is less than 10, the first digit is
represented by number 0 (wave signal).
For example:
08: wave signal, longer pause, two long signals
10: short signal, longer pause, wave signal
16: short signal, longer pause, long signal, two short signals
23: 2 short signals, longer pause, three short signals
This way Renaissance can display numbers from 0 to 99.
Please note: In the standard mode, time is specified in 24 hour format.
Easy mode uses a 12 hour format.
5.3 SHOWING SIGNALS
Additional to the numeric values, Renaissance uses other signals for giving more information. These
signals are listed below:
ON: 1 short signal
OFF: 1 wave signal
Charging started: 1 short signal, 1 very long signal, 1 short signal
Charging finished: 1 short signal, 1 very long signal, 2 short signals
Error: 1 short signal, 3 long signals (with falling frequency for buzzer
output)
YES: 1 long signal, 1 short signal, 1 long signal, 1 short signal
NO: 1 short signal, 1 long signal, 1 short signal, 1 long signal
Confirmation: 1 long signal
Alarm ring: 3 wave signals
Snoozed alarm ring: 3 wave signals, 1 short signal, 1 long signal
Medication alarm ring: 1 very long wave signal, followed by the number of the alarm
which is ringing
Countdown ring: 1 very long wave signal
SOS ring: 3 short signals, 3 long signals, 3 short signals
In Wireless Link Modus: (only for Renaissance +)
Search for wireless link devices: sequence of single short signals
Connecting with wireless devices: sequence of double short signals
Connection established: Yes signal
Page 8

8
Connection separated: No signal
Value received: 4 short signals, 1 long signal, 4 short signals
(with rising and falling frequency for buzzer output)
6. OUTPUT MODES
Renaissance has 3 output modes:
- Vibrations-only mode (value 0)
- Acoustic-only mode (value 1)
- Combined mode (value 2)
You can check the current mode by pressing the key combination Button 2 and Button 4 twice
briefly.
6.1 VIBRATIONS-ONLY MODE
The first mode is the vibration mode. Signals are emitted only via vibrations. This mode is particularly
suitable for deafblind users or in a noisy environment. It is also a very discrete alternative for
someone who wishes to use Renaissance quietly.
6.2 ACOUSTIC-ONLY MODE
The second mode is the acoustic mode. Signals are emitted only via beeps. Sequences for numbers
and information are exactly the same, but different frequencies will help to distinguish the
sequences easier. Using acoustic signals only, slightly increases the battery life compared to the
combined mode.
6.3 COMBINED MODE
The third mode is the combined mode. Both, vibrations and acoustic signals are active.
Note: This is the default mode for the Renaissance.
6.4 OUTPUT MODE CHECKING AND SETTING
To verify which output mode is activated, briefly press the key combination Button 2 and Button 4
twice. Default setting is the combination mode, in that case the Renaissance will announce, that the
value is 2 (2 short signals).
To set the output mode, follow the steps 1 - 4:
1. First retrieve the current value of the setting you want to change by pressing the key
combination Button 2 and Button 4 twice briefly.
Page 9
9
2. Press and hold the key combination Button 1 and Button 3, until the Renaissance emits a
confirming signal, to activate setting mode.
3. Now press Button 2 to reach the desired setting. By activating the setting mode the value
is set to 0. Every time Button 2 is pressed, the setting increases by 1. Change new setting
to 0 for vibrations-only mode, to 1 for acoustic-only mode and to 2 for the combined
mode. Any other value is invalid and will not be accepted.
4. Confirm the changed value by pressing the key combination Button 1 and Button 3 once
briefly. If the changes are done correctly, you will get the “YES”-signal. Invalid entries or
inactivity timeout (after 12 seconds) will be confirmed with a “NO”-signal and the old
value of the setting will be kept.
Output Modes
Button
Count
Period
Command
Output
2+4
2x
short
Check Output Mode
0, 1 or 2
1+3
1x
long
Activate Settings
Confirmation signal
2
Set Mode, for Zero do not press
0, 1 or 2
1+3
1x
short
Confirm Setting
2+4
2x
short-long
Reset in Combined Mode
6.5 OUTPUT MODE SPEED CHECKING AND SETTING
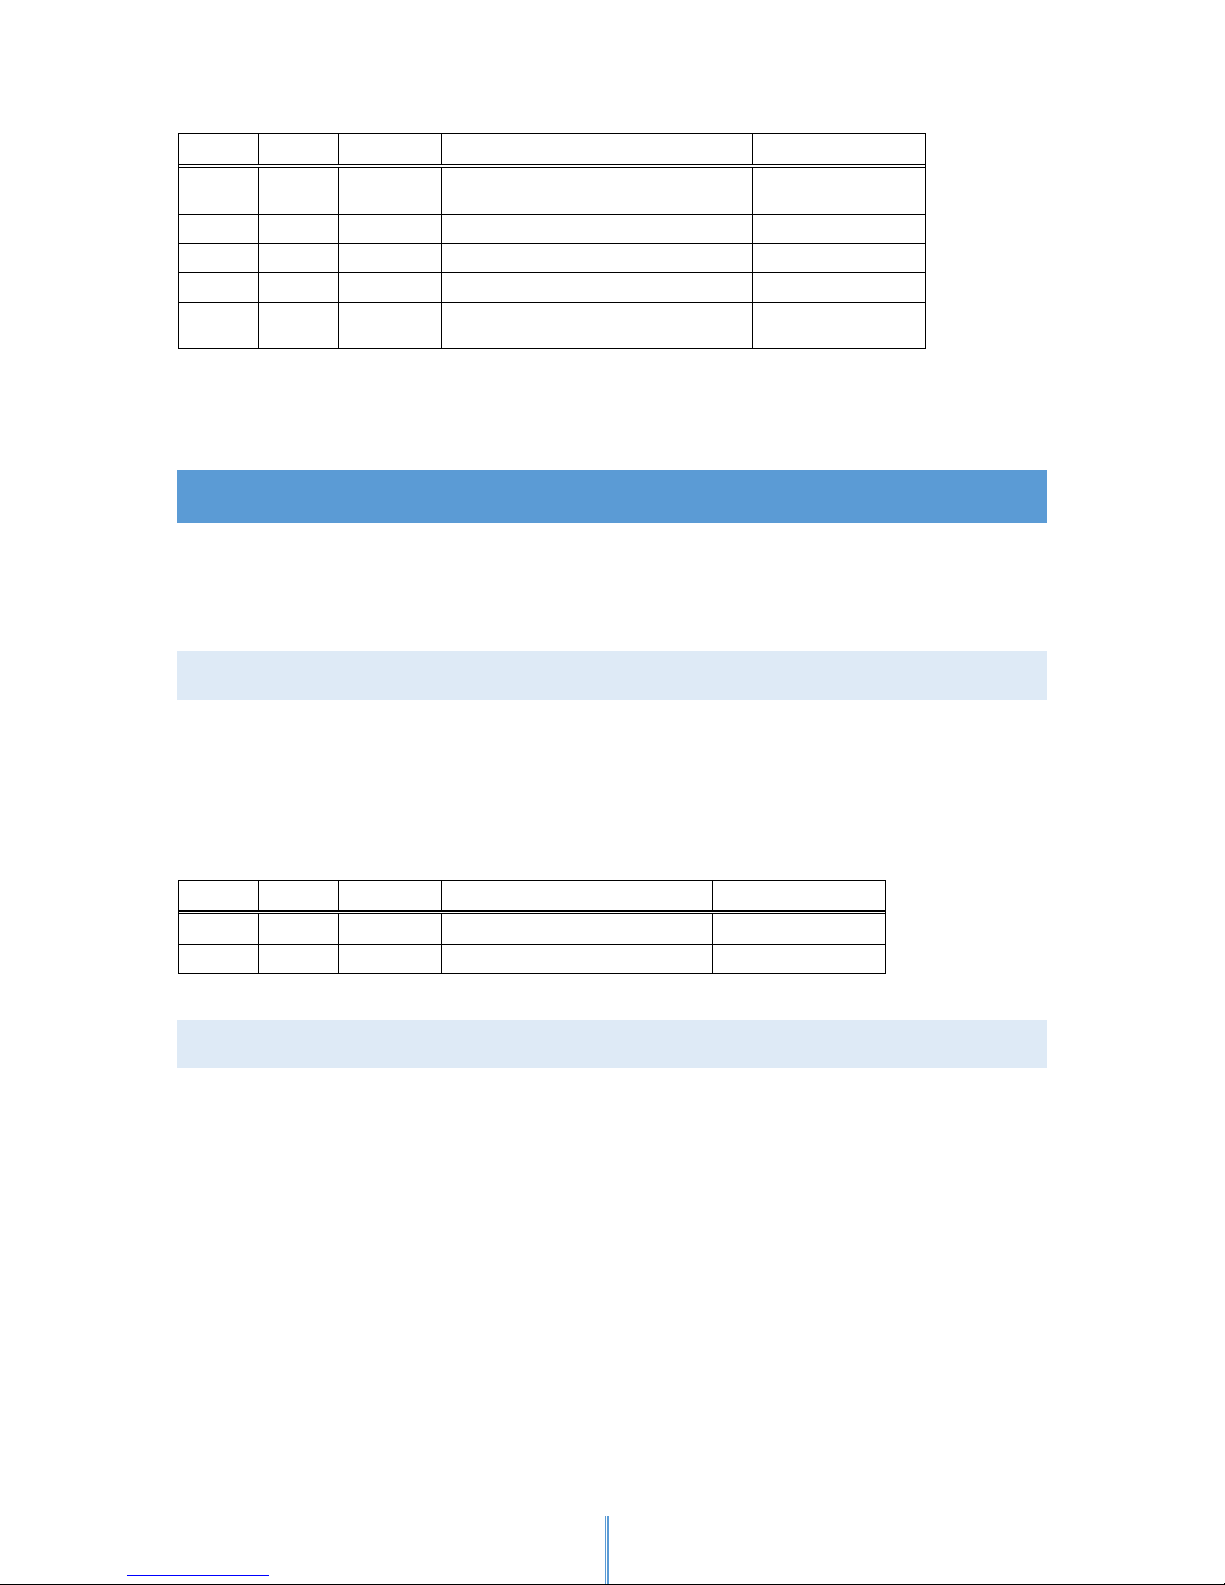
Renaissance offers the possibility to choose among 7 different speed levels at which the signals are
displayed. Level 0 is the slowest and level 6 is the fastest.
To verify to which value the output speed is set, briefly press key combination Button 2 and Button 4
three times. The default setting of output speed is 3, so in that case Renaissance will tell the value is
3 (3 short signals).
To set the output speed, proceed as follows:
1. First retrieve the current value of the setting you want to change, by pressing the key
combination Button 2 and Button 4 three times briefly.
2. Press and hold key combination Button 1 and Button 3, until Renaissance emits a confirming
signal, to switch to the setting mode.
3. Now keep pressing Button 2 as many times to increase the setting to the new desired value. At
the start of the setting mode the value is set to 0. Each time you press Button 2, the setting
increases by 1. You can choose the new value from 0, which is the slowest setting, fit for
beginners, up to the fastest value 6, which would be appreciated by the advanced users. The
default value is 3. Any other value is invalid and will not be accepted.
4. Confirm the changed value by pressing the key combination Button 1 and Button 3 once
briefly. If the changes are done correctly, you will get the “YES”-signal. Invalid entries or
inactivity timeout will be confirmed with a “NO”-signal and the old value of the setting will be
kept.
Output Speed
Page 10
10
Button
Count
Period
Command
Output
2+4
3x
short
Output Speed
Value between 0
and 6
1+3
1x
long
Activate Settings
Confirmation signal
2
Set Speed, for Zero do not press
Between 0 and 6
1+3
1x
short
Confirm Setting
2+4
3x
shortshort-long
Reset Output Speed to 3
7. STANDARD OPERATION MODE
Renaissance provides different operation modes the default one is standard mode for the
Renaissance. It provides the full range of functions: time display, date display, hourly reminder and
the wakeup alarm function.
7.1 STANDARD MODE ACTIVATION AND CHECKING
To check whether standard mode is on just press key combination Button 2 and Button 3 briefly. If it
is switched on you will receive “ON”-signal (1 short signal) or if switched off you receive “OFF”-signal
(1 wave signal). For activating just press long key combination Button 2 and Button 3 until you get a
confirmation signal. If standard mode is already set, that won´t have any effect.
Switch to Standard-Mode
Button
Count
Period
Command
Output
2+3
1x
short
Check Standard-Mode On / Off
On / Off symbol
2+3
1x
long
Activate Standard-Mode
Confirmation signal
7.2 TIME INDICATION AND SETTING IN STANDARD MODE
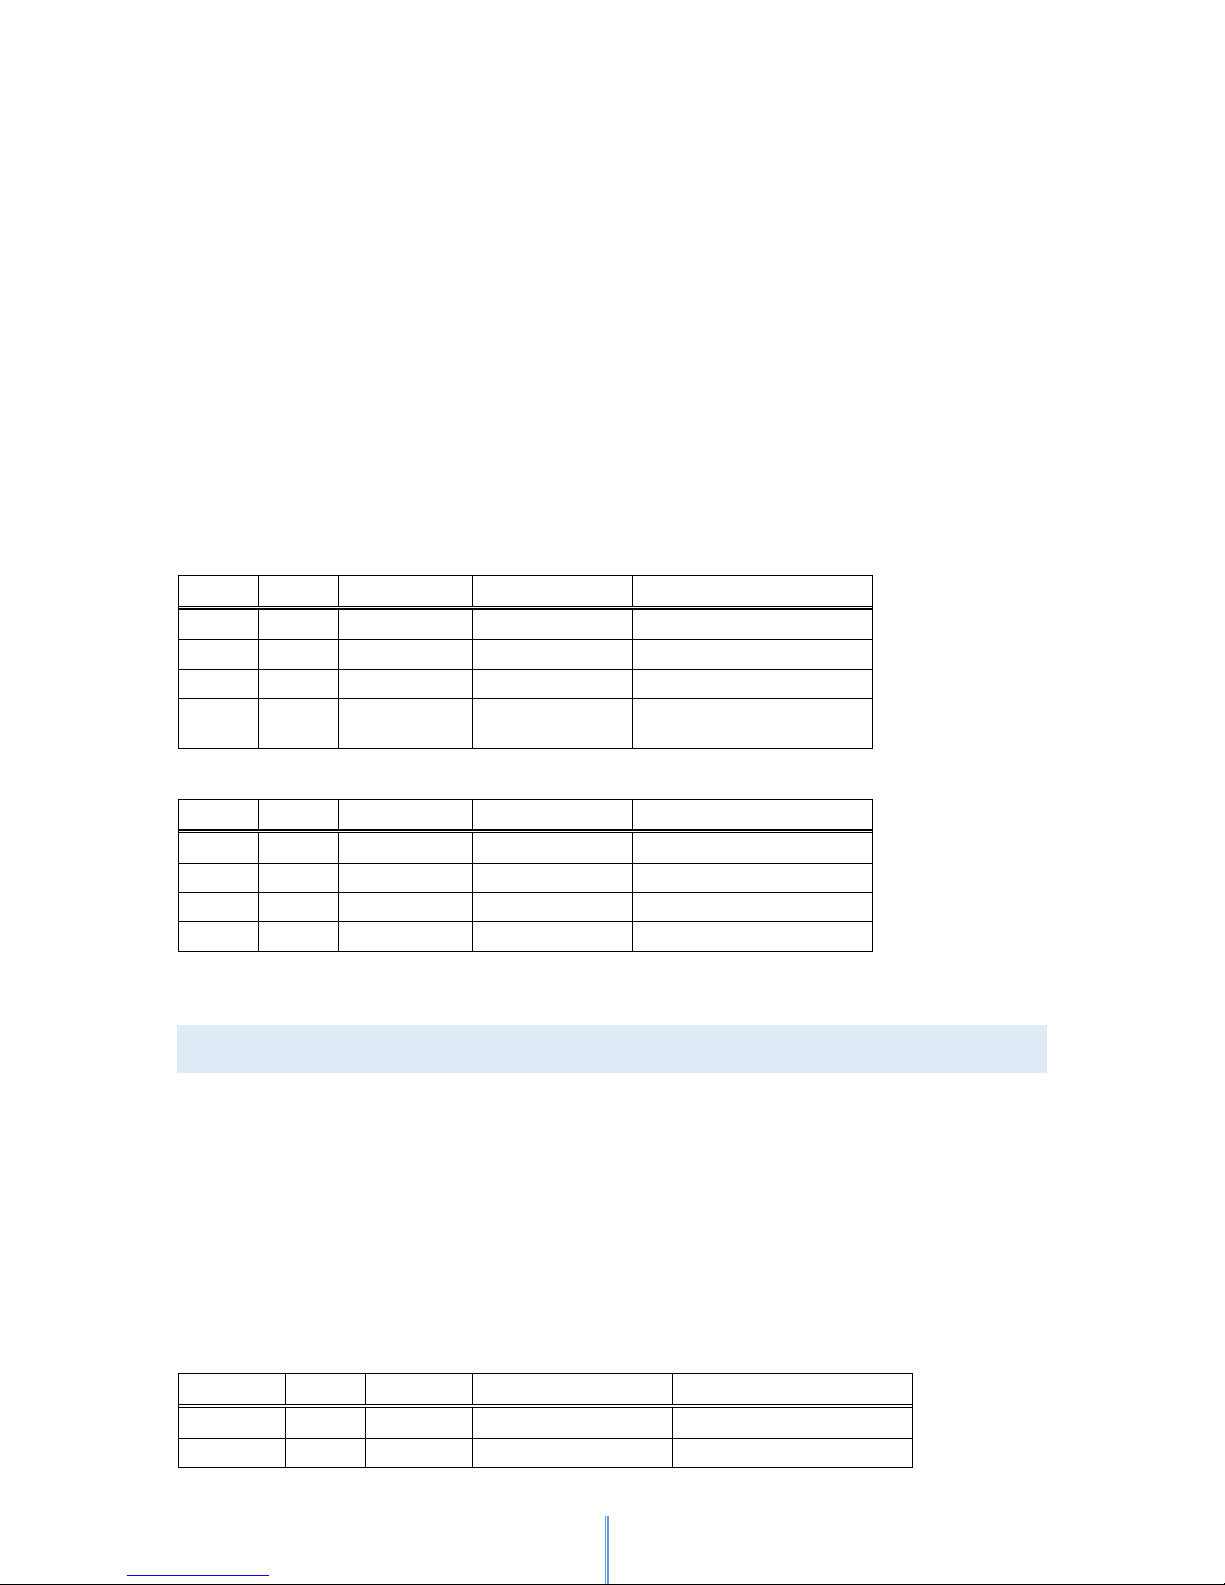
Getting the time in standard mode can be requested via Button 1.
Briefly press Button 1:
Once - to get the hours
Twice - to get the minutes
Three times - to get the seconds
To set values such as time, date, a desired alarm time or hourly reminders, proceed as follows:
1. First retrieve the current value of the setting you want to change.
2. Press and hold key combination Button 1 and Button 3, until Renaissance outputs a
confirmation signal, to switch to the setting mode.
Page 11
11
3. Now press Button 1 as many times to increase the tens digits of the value you want to change
and Button 2 for the ones digits value. Every tap is confirmed by a “Click”-signal. At the
beginning of the setting mode the value of every digit is set to zero. Every time, you push one
of the before mentioned buttons you increase the value by 1. All increases that overrun
number 9 will be ignored.
4. Confirm the changed value by pressing the key combination Button 1 and Button 3 once
briefly. If the changes are made correctly, you will get the “YES”-signal. Invalid entries or
inactivity timeout (more than 12 seconds) will be confirmed with a “NO”-signal and the old
setting is kept.
Setting the seconds is not possible, but they can be reset to zero via this key sequence:
SHORT Button 1 + SHORT Button 1 + HOLD Button 1
Note: Inactivity timeout in setting mode is 12 seconds.
Time
Button
Count
Period
Command
Output
1
1x
short
Hour
Hour
1
2x
short
Minute
Minute
1
3x
short
Second
Second
1
3x
short-shortlong
Set second to zero
Confirmation signal
Setting Time
Retrieve first the function
which has to be set
Button
Count
Period
Command
Output
1+3
1x
long
Activate Settings
Confirmation signal
1
Set tens digit
2 Set ones digit
1+3
1x
short
Confirm Setting
7.3 DATE INDICATION IN STANDARD MODE
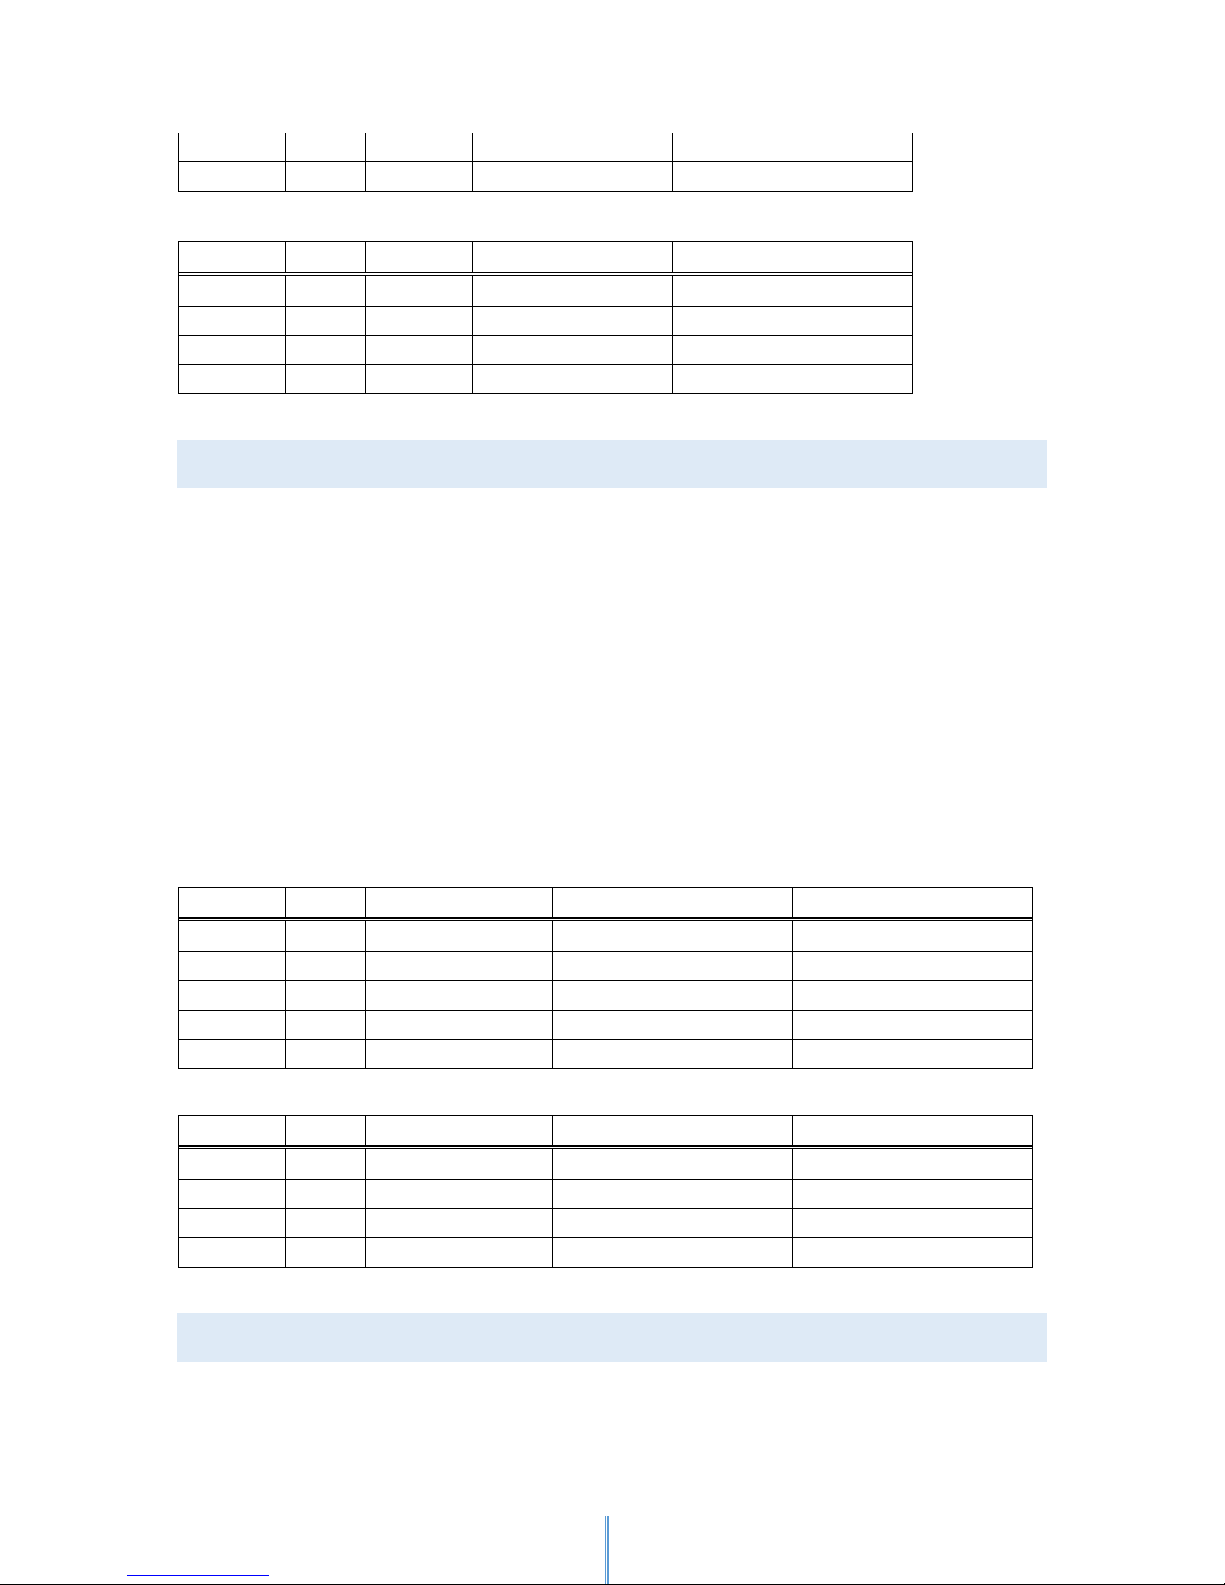
Date information in standard mode can be requested via Button 2.
Briefly press Button 2:
Once - indicates the day of the week
Twice - indicates the day
Three times - indicates the month
Four times - indicates the last two digits of the year
Date
Button
Count
Period
Command
Output
2
1x
short
Day
Day, automatically setting
2
2x
short
Date of day
Date of day
Page 12
12
2
3x
short
Month
Month
2
4x
short
Year
Year
Setting Date
Retrieve first the function
which has to be set
Button
Count
Period
Command
Output
1+3
1x
long
Activate Settings
Confirmation signal
1
Set tens digit
2 Set ones digit
1+3
1x
short
Confirm Setting
7.4 READING VALUES AND SETTINGS OF WAKEUP AL ARM
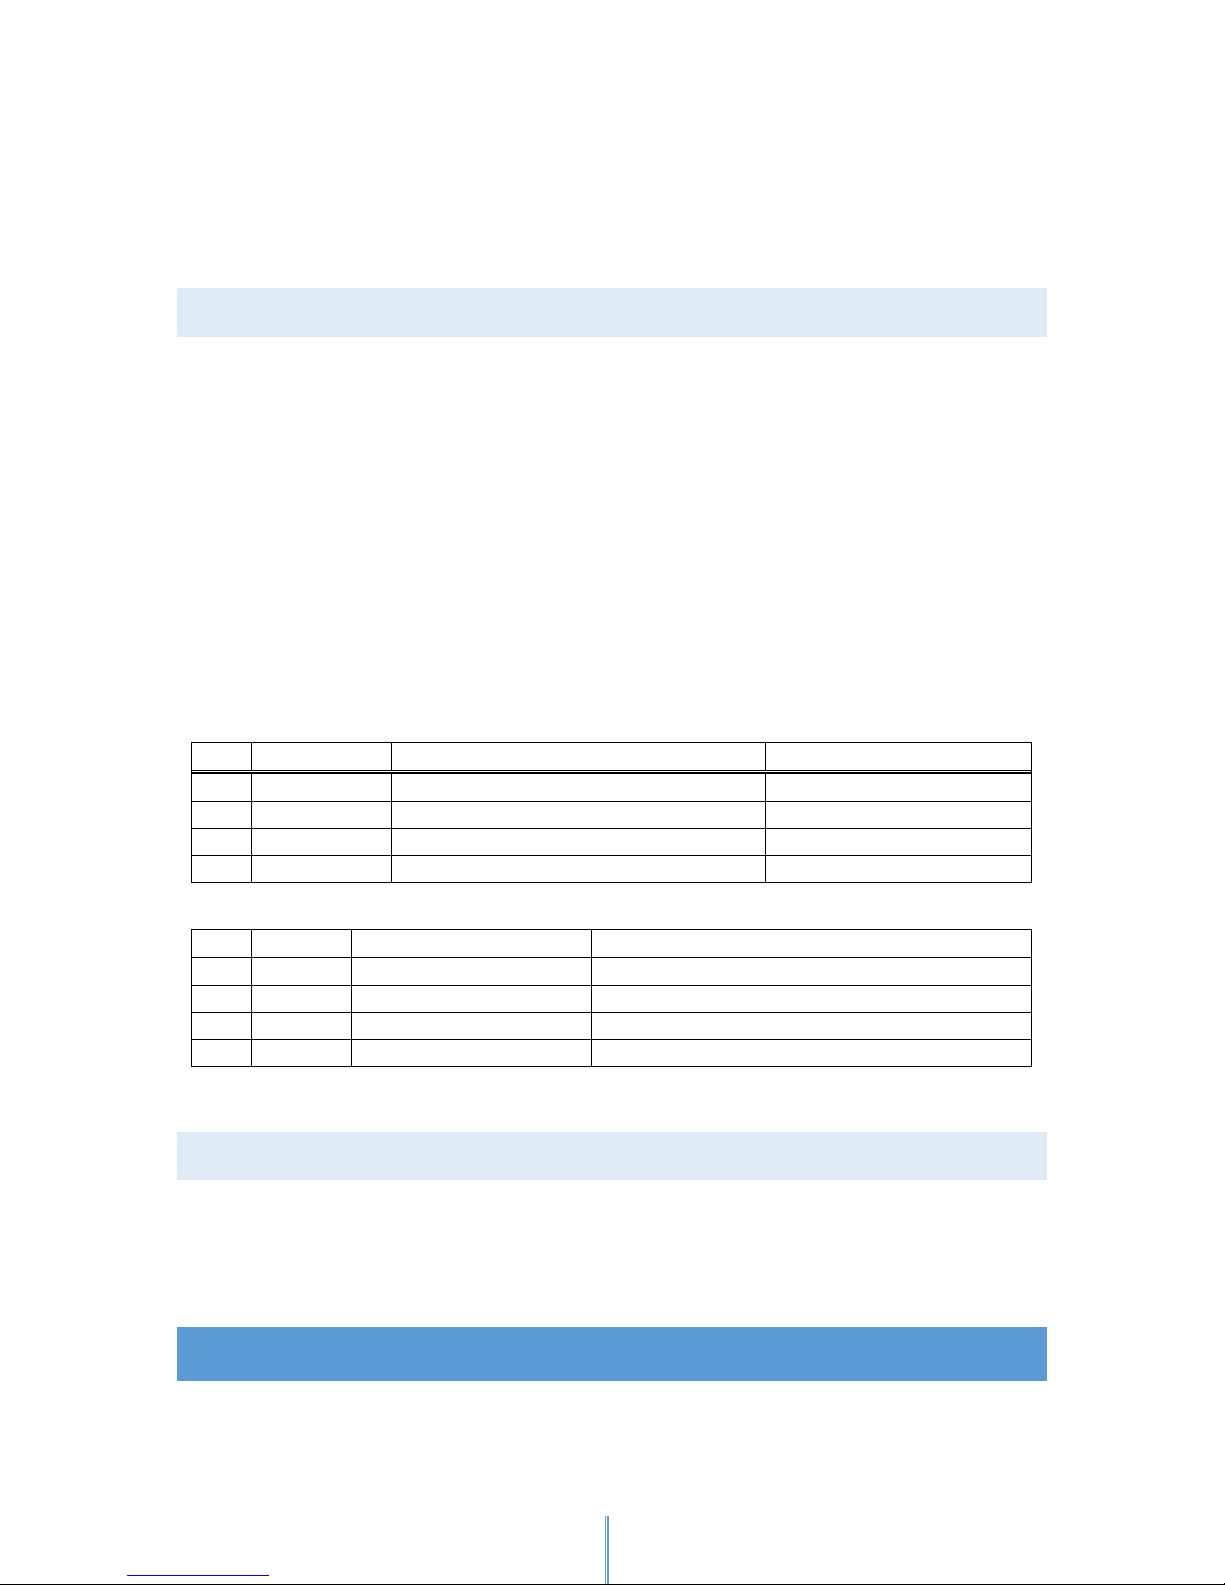
You can set the alarm to any time of the day and use it as a wakeup or reminder alarm. All wakeup
alarm related information can be requested via Button 3.
Briefly press Button 3:
Once - to get the alarm hours (double digit output [0 – 23])
Twice - to get the alarm minutes (double digit output [0 – 59])
Three times - to get check whether the alarm is enabled (signal output [ON/OFF])
You can use a shortcut key sequence to switch on or off the alarm:
SHORT Button 3 + SHORT Button 3 + HOLD Button 3
Renaissance will emit a confirmation signal on execution of the command.
To change any of the values or settings, follow the instructions explained in “setting time indication”
Alarm
Button
Count
Period
Command
Output 3 1x
short
Alarm Hour
Adjusted Hour
3
2x
short
Alarm Minute
Adjusted Minute
3
3x
short
Check Alarm on / off
On / Off signal
3
3x
short-short-long
Alarm turn on / off
Confirmation signal
1
1x
short
Alarm-Snooze
Signal every 5 min. for 1 hour
Setting Alarm
Retrieve first the function
which has to be set
Button
Count
Period
Command
Output
1+3
1x
long
Activate Settings
Confirmation signal
1
Set tens digit
2
Set ones digit
1+3
1x
short
Confirm Setting
7.4.1 ALARM RING AND ALARM STATUS
When the alarm starts ringing, Renaissance enters alarm state. If not canceled or snoozed, the alarm
will keep ringing 1 full minute every 5 minutes for the duration of 1 hour and then stop itself. To
immediately cancel the alarm you briefly press key combination Button 1 and Button 3. To snooze
Page 13
13
the alarm you can do this with a short tap on Button 1. Snoozing the alarm immediately cancels the
ring tones, all consequent alarm tones will be emitted with the snooze alarm signal instead of the
regular alarm signal, but the alarm state still remains active. Pressing any other key combination
during the alarm state causes a single alarm signal or a snooze alarm signal. These signals are
indicating, that you have to turn off the alarm before using any other mode of the Renaissance.
7.5 READING VALUES AND SETTING OF HOURLY REM INDERS
All hourly reminder related information can be requested via Button 4.
Briefly press Button 4:
Once - To set the first hour to be reminded in a day (double digit output [0 – 23])
Twice - To set the last hour to be reminded in a day (double digit output [0 – 23])
Three times - To check whether the reminder is enabled (signal output [ON/OFF])
You can use a shortcut key sequence to switch the hourly reminder enabled setting:
SHORT Button 4 + SHORT Button 4 + HOLD Button 4
Renaissance will emit a Confirmation signal after setting.
To change any of the values or settings, follow the instructions explained in “setting time indication”.
Hourly Reminder
Count
Period
Command
Output
1x
short
Start Hour of reminding
Adjusted Hour
2x
short
End Hour of reminding
Adjusted Minute
3x
short
Check Hourly Reminder on / off
On / Off signal
3x
short-short-long
Hourly Reminder turn on / off
Confirmation signal
Setting hourly reminder Scan first the function which has to be set
Count
Period
Command
Output
1x
long
Activate Settings
Confirmation signal
Set tens digit
Set ones digit
1x
short
Confirm Setting
7.5.1 HOURLY REMINDER RING
Once the full hour is reached and it is within the range specified by the user, the hourly reminder is
sending a specific signal (4 short signals followed by 1 very long signal). By pressing any button the
user can simply dismiss the ring tone and it is not repeated again.
8. EASY OPERATION MODE
The easy operation mode was especially developed for beginners, who want to become familiar with
the Renaissance rapidly. The range of functions is limited to displaying hours, minutes, day, month
Page 14
14
and the day of the week. Every digit is requested and announced separately. Setting time/date values
are not possible in the easy mode.
8.1 EASY MODE ACTIVATION AND CHECKING
To check the Easy mode just briefly press key combination Button 3 and Button 4, you will receive a
“ON”-signal when the mode is active or a “OFF”-signal when the mode is switched off. For activating
just press key combination Button 3 and Button 4 long. If easy mode is already set, it won´t have any
effect.
Switch to Easy Mode
Button
Count
Period
Command
Output
3+4
1x
short
Check Easy Mode On / Off
On / Off signal
3+4
1x
long
Activate Easy-Mode
Confirmation signal
8.2 TIME INDICATION IN E ASY MODE
Easy mode uses the 12 hour format time display.
Getting the time in easy mode can be requested via Button 1 and Button 2.
Briefly press Button 1:
Once - to indicate the tens digit of the current hour (single digit output [0 – 1])
Twice - to indicate the ones digit of the current hour (single digit output [0 – 9])
Briefly press Button 2:
Once -to indicate the tens digit of the current minute (single digit output [0 – 5])
Twice - to indicate the ones digit of the current minute (single digit output [0 – 9])
8.3 DATE INDICATION IN E ASY MODE
Getting the date in easy mode can be requested via Button 3 and Button 4.
Briefly press Button 3:
Once - to indicate the tens digit of the current month (single digit output [0 – 1])
Twice - to indicate the ones digit of the current month (single digit output [0 – 9]
Briefly press Button 4:
Once - to indicate the tens digit of the current day (single digit output [0 – 3])
Twice - to indicate the ones digit of the current day (single digit output [0 –9])
Three times – to indicate the current day of the week (single digit output [1 – 7])
9. APPLICATIONS OPERATION MODE
Page 15
15
Applications mode provides access to extended functions of the Renaissance like eight different
medication reminders, stop watch and a countdown timer. In this operation mode, you cannot set
functions manually, but select the required ones.
9.1 APPLICATION MODE CHECKING AND SETTING
To check whether the application mode is active, briefly press the key combination Button 1 and
Button 2. Renaissance will announce the status by outputting the “OFF”-signal (1 wave signal) or by
the number of the active application:
1 (1 short signal) count down timer application
2 (2 short signals) stop watch
3 (3 short signals) medication reminders group 1
4 (1 long signal) medication reminders group 2
To activate the application mode press and hold the key combination Button 1 and Button 2 until the
Renaissance outputs a confirming signal. Now you have 12 seconds to choose which application you
want to activate by pressing once quickly:
Button 1 for timer application
Button 2 for stop watch application
Button 3 for medication reminders group 1
Button 4 for medication reminders group 2
Successful activation is confirmed by the ”YES”-signal and unsuccessful by the “NO”-signal.
Application Mode
Button
Count
Period
Command
Output
1+2
1x
short
Check Application Mode on / off
1x short Countdown
2x short Stopwatch
3x short Medical-Alarm Group 1
1x long Medical-Alarm Group 2
1+2
1x
long
Activate Application Mode
confirmation signal
1
1x
short
Countdown Timer
Yes or No signal
2
1x
short
Stopwatch
Yes or No signal
3
1x
short
Medical Reminder Group 1
Yes or No signal
4
1x
short
Medical Reminder Group 2
Yes or No signal
9.2 MEDICATION REMINDER
Medication reminders are designed to help you execute the daily medication schedule (e.g. taking
pills, doing exercises or measurements etc.). These alarms have to be properly canceled, because
after three separate alarm signal cycles the watch will start constantly ringing the SOS signal via
beeping and vibrations and will ignore the current setting of the output mode. This signal should
catch the attention of other people around the watch owner, to support him because the medication
Page 16
16
alarm was not properly canceled. Each medication reminder has its own and unique alarm signal so
the user can immediately recognize, which medication reminder is ringing. Every medication
reminder signal contains first a very long wave signal which is followed by a number corresponding to
the medication reminder number, which is currently ringing. If two or more medication reminders
are set to the same time, only one of them will be replayed.
9.2.1 READING VALUES AND SETTINGS OF MEDICATION REMINDER
You can set the medication reminder to any time of the day. All medication reminder related
information can be requested via the Button assigned to it in its medication reminders group.
Briefly press the assigned button:
Once - to indicate the reminder hours (double digit output [0 – 23])
Twice - to indicate the reminder minutes (double digit output [0 – 59])
Three times - to check whether the reminder is enabled (symbol output [ON/OFF])
You can use a shortcut key sequence to switch to the reminder enabled setting:
SHORT Assigned button + SHORT Assigned button + HOLD Assigned button
Renaissance will output the Confirmation signal on execution of the command.
To change any of the values or settings, follow the instructions in chapter "Standard operation modeSettings"
Setting Medical Alarm
Button
Count
Period
Command
Output
every
1x
short
check Hour
Hour (0 - 23)
every
2x
short
check Minute
Minute (0 - 59)
every
3x
short
Check On / Off
On / Off signal
every
3x
shortshort-long
Set On / Off for Medical-Alarm
1+3
1x
short
Stop Medical-Alarm
Set Medical Alarm
Button
Count
Period
Command
Output
1+3
1x
long
Activate Settings
1
Set tens digit
2
Set ones digit
1+3
1x
short
Confirm Setting
2+3
1x
long
Leave Application Mode
4
1x
shortshort-long
Start Medical-Alarm in normal
Modus
Confirmation signal
9.2.2 MEDICATION REMINDER RING AND ALARM STATE
When medication reminder starts ringing, Renaissance is put into a medication reminder state. If not
canceled, the medication reminder will keep ringing for 4 seconds during 1 full minute every 2
minutes. After the sixth time of ringing, it will switch into continuous SOS ringing mode until
Page 17

17
canceled. To cancel the medication reminder, briefly press the key combination Button 1 and Button
3. Medication reminders have no snooze function.
9.3 FIRST MEDICATIONREMINDERS GROUP
This group contains the medication reminders 1 to 4. They are assigned to these buttons:
Medication reminder 1 - Button 1
Medication reminder 2 - Button 2
Medication reminder 3 - Button 3
Medication reminder 4 - Button 4
9.4 SECOND MEDICATION REMINDERS GROUP
This group contains the medication reminders 5 to 8. They are assigned to these buttons:
Medication reminder 5 - Button 1
Medication reminder 6 - Button 2
Medication reminder 7 - Button 3
Medication reminder 8 - Button 4
9.5 STOP WATCH APPLICATION
Next to the Start/Pause/Resume functions, the stop watch application allows you also to measure
last lap, shortest lap and longest lap. When the stop watch is active, small “tick” signals are emitted
every 2 seconds via vibrations and/or buzzer according to the output mode setting. Leaving the
application interrupts the stop watch and resets it to its default state. Reaching the lap value
23:59:00 will automatically close this application. To clear the values and reset the stop watch, you
simply reactivate/reenter this application again.
Following commands are available in this application:
Briefly press Button 1:
Once - to indicate the current lap hours (double digit output [0 – 23])
Twice - to indicate the current lap minutes (double digit output [0 – 59])
Three times - to indicate the current lap seconds (double digit output [0 – 59])
Press and hold Button 1 to Start/Pause/Resume the stop watch.
Briefly press Button 2:
Once - to indicate the last lap hours (double digit output [0 – 23])
Twice - to indicate the last lap minutes (double digit output [0 – 59])
Three times - to indicate the last lap seconds (double digit output [0 – 59])
Press Button 2 long to mark end of the current lap and begin timing of the new lap
automatically.
Briefly press Button 3:
Page 18

18
Once - to indicate the shortest lap hours (double digit output [0 – 23])
Twice - to indicate the shortest lap minutes (double digit output [0 – 59])
Three times - to indicate the shortest lap seconds (double digit output [0 – 59])
Press and hold Button 3 to clear the shortest lap time.
Briefly press Button 4:
Once - to indicate the longest lap hours (double digit output [0 – 23])
Twice - to indicate the longest lap minutes (double digit output [0 – 59])
Three times - to indicate the longest lap seconds (double digit output [0 – 59])
Press and hold Button 4 to clear the longest lap time.
To change any of the values or settings, follow the instructions in chapter “Standard mode settings”.
Stopwatch
Button
Count
Period
Command
Output
1+2
1x
long
Activate Application Mode
1x Confirmation signal
2
1x
short
Stopwatch
Yes or No signal
1
1x
short
Check Hours, not adjustable
Hours of the current lap (0-23)
1
2x
short
Check Minutes, not
adjustable
Minutes of the current lap (0-59)
1
3x
short
Check Seconds, not
adjustable
Seconds of the current lap (0-59)
1
1x
long
Start, Stop, Continue
Confirmation signal
2
1x
short
Check Hours
Hours of the last lap (0-23)
2
2x
short
Check Minutes
Minutes of the last lap (0-59)
2
3x
short
Check Seconds
Seconds of the last lap (0-59)
2
1x
long
End of current lap + Start
new lap
Confirmation signal
3
1x
short
Check Hours
Hours of the shortest lap (0-23)
3
2x
short
Check Minutes
Minutes of the shortest lap (0-59)
3
3x
short
Check Seconds
Seconds of the shortest lap (0-59)
3
1x
long
Clear the best lap-time
Confirmation signal
4
1x
short
Check Hours
Hours of longest lap (0-23)
4
2x
short
Check Minutes
Minutes of longest lap (0-59)
4
3x
short
Check Seconds
Seconds of longest lap (0-59)
4
1x
long
Clear worst lap-time
Confirmation signal
9.6 COUNTDOWN TIMER APPLICATION
The Countdown timer permits you to set a time and to be alarmed after that period of time expires.
Intervals up to 23:59:59 are available. Pause and resume functions are present as well as two user
defined preset times for a quick use.
Page 19

19
By default the initial value of the time interval (managed by Button 2) is set to 00:01:00, but the
watch will always keep the last time value set by you, once it is changed to a value different than any
preset value. Preset 1 has the initial value of 00:03:00 and Preset 2, 00:10:00. The user can change
those default values according to his preference.
When the countdown timer is running, there is a small “tick” signal every 2 seconds via vibrations
and/or buzzer according to the output mode setting. Leaving the application stops the countdown
timer and resets it to its default state. When the preset time for the countdown timer expires, you
will get the very long wave signal every 2 seconds during 1 minute or until you cancel the application
by short pressing key combination Button 1 and Button 3. After activating this application for the first
time, you can start the timer by long pressing Button 1, but once the preset time has expired, it will
not roll over to the initial time interval. You have to either make some changes to the current time
interval, or by restarting the countdown timer (press and hold Button 2).
Following commands are available in this application:
Short pressing Button 1:
Once - indicates the remaining hours (double digit output [0 – 23])
Twice - indicates the remaining minutes (double digit output [0 – 59])
Three times - indicates the remaining seconds (double digit output [0 – 59])
Press and hold Button 1 to Start/Pause/Resume the countdown.
Short pressing Button 2:
Once - indicates the preset interval hours (double digit output [0 – 23])
Twice - indicates the preset interval minutes (double digit output [0 – 59])
Three times - indicates the preset interval seconds (double digit output [0 – 59])
Press and hold Button 2 to start a new countdown cycle, using the initial interval overrules other
countdown cycles.
Short pressing Button 3:
Once - indicates the Preset 1 hours (double digit output [0 – 23])
Twice - indicates the Preset 1 minutes (double digit output [0 – 59])
Three times - indicates the Preset 1 seconds (double digit output [0 – 59])
Press and hold Button 3 to load the time values from the Preset 1 into the initial time interval. This
will also deactivate any countdown in use.
Short pressing Button 4:
Once indicates the Preset 2 hours (double digit output [0 – 23])
Twice - indicates the Preset 2 minutes (double digit output [0 – 59])
Three times - indicates the Preset 2 seconds (double digit output [0 – 59])
Press and hold Button 4 to load the time values from the Preset 2 into the initial time interval. This
will also deactivate any running countdown.
To change any of the values or settings, follow the instructions in chapter “Standard mode settings”.
Entering the setting mode will also deactivate any running countdown.
Page 20
20
Countdown-Timer
Button
Count
Period
Command
Output
1+2
1x
long
Activating Application Mode
1x Confirmation signal
1
1x
short
Countdown Timer
Yes or No signal
1
1x
short
Check Hours, not adjustable
Remained Hours
1
2x
short
Check Minutes, not adjustable
Remained Minutes
1
3x
short
Check Seconds, not adjustable
Remained Seconds
1
1x
long
Start, Stop, Continue
Confirmation signal
2
1x
short
Check Hours
Interval of the set Hours
2
2x
short
Check Minutes
Interval of the set Minutes
2
3x
short
Check Seconds
Interval of the set Seconds
2
1x
long
Start of a new Countdown
Confirmation signal
3
1x
short
Check Hours
Presetting 1 (Hours)
3
2x
short
Check Minutes
Presetting 1 (Minutes)
3
3x
short
Check Seconds
Presetting 1 (Seconds)
3
1x
long
Load presetting 1
Confirmation signal
4
1x
short
Check Hours
Presetting 2 (Hours)
4
2x
short
Check Minutes
Presetting 2 (Minutes)
4
3x
short
Check Seconds
Presetting 2 (Seconds)
4
1x
long
Load presetting 2
Confirmation signal
Set Countdown-Timer
Retrieve first the function that has to be
set
Button
Count
Period
Command
Output
1+3
1x
long
Activate Settings
1
Set tens digit
2
Set ones digit
1+3
1x
short
Confirm Setting
2+3
1x
long
Leave Application Mode
10. OPTIONAL: WIRELESS LINK MODE
The wireless link mode enables Renaissance to connect with other devices and receive information.
This mode is only available with Renaissance Plus! A model of Renaissance without wireless link will
give you an “Error”-signal, if you try to activate that mode.
Note: On the Non-wireless versions of the Renaissance all wireless link mode commands are invalid
and therefore will produce an “Error” signal.
10.1 WIRELESS LINK MODE: CHECKING AND ACTIVATING
Page 21

21
To check out whether wireless link is active press key combination 1 and 4 briefly, Renaissance will
display an “ON”-signal or an “OFF”-signal. To activate wireless mode press long key combination 1
and 4.
10.2 CONNECT WITH AN EXTERNAL DEVICE
To connect Renaissance with another device switch on wireless link mode on both devices and make
sure they are in range to each other less than 10 meters.
1. Switch on the external device and activate the wireless link mode.
2. Press key combination 1 and 4 long until Renaissance emits the “Confirmation”-signal to
assure you of the active wireless link mode.
3. A series of short signals starts to announce the search of a capable device.
4. If no device can be found Renaissance will emit the “NO”-signal and will return to the mode
set before. If at least one device is found Renaissance tries to connect with that device,
during that trial a series of short dual signals are emitted.
5. When the connection is successful Renaissance will emit the “YES”-signal, or if the
connection fails the “NO”-signal will be emitted.
Note: For every external device only one Renaissance wristwatch can be connected.
10.3 KITCHEN SCALE HEIDI WITH INTEGRATED WIRELESS MODE
Heidi with an integrated wireless link module can send the measurement of the weight to your
Renaissance wrist watch. Such Heidi has an additional print “ WIRELESS ON ” on its keypad.
After switching on the scale, activate wireless link mode by pressing key combination “+” and “1”.
Heidi gives you a short beep signal and then announce “Ready”. After this, check out if the wireless
link on your Renaissance is active by pressing short key combination Button 1 and Button 4, you will
get a “ON”-signal (1 short signal) or a “OFF”-signal (1 wave signal). To activate the watch´s wireless
link just press long key combination Button 1 and Button 4. Now Renaissance is searching within a
range of maximum 10 meters for another active wireless link device and emits short signals until it
connects with the other device, you will get a “YES”-signal in case Renaissance was successful or a
“NO”-signal if Renaissance fails. If Heidi is switched off, Renaissance will give you a “NO”-signal to
inform you that the wireless link is no longer active. Also if you switch to another mode with your
Renaissance the wireless link will be cut off. Activating the wireless mode when it is already active or
even when the connection is established, will result in closing any active connection and completely
resetting the wireless mode. Each time Heidi announces the weight it sends a 4 digit value to the
watch and it always represents weight in grams, even when the scale itself is set to display the
weight in different units, like kilograms e.g. 5 kilograms would be announced as 5000. If you are
experiencing difficulties by connecting to the scale, activate the wireless link on the scale again and
try to reconnect with Renaissance.
The complete usage process is as follows:
Page 22

22
1) Make sure that the Renaissance battery level is at least 10%. Also the battery of Heidi should
not be very low or empty, alternatively use the power supply to power the scale.
2) Put the empty scale on a flat surface and turn it on. After the scale announces “Ready”, turn
on the wireless module by pressing the key combination “+” and “1” briefly on the scale, now
Heidi announces “Active”.
3) Turn on the wireless link mode on you Renaissance by pressing the key combination Button 1
and Button 4 long and wait for it to connect with the scale. If you experience any difficulties
in establishing the connection, activate the wireless module on the scale again and try to
connect again.
4) Press Button 3 on the watch to permit reception of the weight and put the object you want
to measure on the scale.
5) Once the weighing is done and the weight value is announced by the scale, Renaissance will
receive and remember this value. Renaissance emits now a short melody and vibrations to
confirm the receiving of the value. At the end of this list you will find a detailed explanation
how to retrieve the values from the watch. As long as the wireless mode is active on the
watch and you don’t permit the reception of a new value, you can retrieve the weight again,
even if the next measurement is done. Every announced weight is sent to Renaissance, until
you do not permit their reception, these values are ignored. To go on with the reception of a
new value press Button 3 on your Renaissance.
6) Once you are ready for the next measurement, clear the scale tray and wait for
approximately 3 seconds until the scale announces 0, before you do the next measurement.
Then press Button 3 on the watch and place the new object on the scale tray.
7) If you leave the objects on the scale tray to receive the same weight as before, briefly press
key “1” on the scale. Heidi will now repeat the current weight and send it again to the
Renaissance.
Renaissance offers you several functions in the wireless mode like:
Short press Button 1:
Once - announcing first 2 digits of the weight
Twice - announcing the last 2 digits of the weight
Short press Button 2:
Once - announcing the first digit of the weight
Twice - announcing the second digit of the weight
Three times - announcing the third digit of the weight
Four times - announcing the fourth digit of the weight
Short press Button 3:
Once - permission to receive the next measured weight
Page 23

23
10.4 SCALE HAPPY DAY WITH INTEGRATED WIRELESS MODE
Happy Day with an integrated wireless link module can send the measurement of the weight to your
Renaissance wrist watch. To activate the wireless link mode on Happy Day just step on the scale.
After this, check out if the wireless link on your Renaissance is active by pressing short key
combination Button 1 and Button 4, you will get a “ON”-signal (1 short signal) or a “OFF”-signal (1
wave signal). To activate the watch´s wireless link just press long key combination Button 1 and
Button 4. Now Renaissance is searching within a range of maximum 10 meters for another active
wireless link device and emits short signals until it connects with the other device, you will get a
“YES”-signal in case Renaissance was successful or a “NO”-signal if Renaissance fails. If Happy Day is
switched off, Renaissance will be connected for another 3 minutes with Happy Day. When this time
expire Renaissance gives you a “NO”-signal to inform you that the wireless link is no longer active.
Also if you switch to another mode with your Renaissance the wireless link will be cut off. Activating
the wireless mode when it is already active or even when the connection is established, will result in
closing any active connection and completely resetting the wireless mode. Happy Day always
announces the weight as a 4 digit value to the watch for example 72, 4 kilograms will be given as
0724 value. If you are experiencing difficulties by connecting to the scale, activate the wireless link on
the scale again and try to reconnect with Renaissance.
The complete usage process is as follows:
1) Make sure that the Renaissance battery level is at least 10%. Also the battery of Happy Day
should not be very low or empty, alternatively use the power supply to power the scale.
2) Put the empty scale on a flat surface and turn it on. After the scale announces “Ready”.
3) Turn on the wireless link mode on you Renaissance by pressing the key combination Button 1
and Button 4 long and wait for it to connect with the scale. If you experience any difficulties
in establishing the connection, activate the wireless module on the scale again and try to
connect again.
4) Press Button 3 on the watch to permit reception of the weight and step on the scale for the
weighing.
5) Once the weighing is done and the weight value is announced by the scale, Renaissance will
receive and remember this value. Renaissance emits now a short melody and vibrations to
confirm the receiving of the value. At the end of this list you will find a detailed explanation
how to retrieve the values from the watch. As long as the wireless mode is active on the
watch and you don’t permit the reception of a new value, you can retrieve the weight again,
even if the next measurement is done. Every announced weight is sent to Renaissance, until
you do not permit their reception, these values are ignored. To go on with the reception of a
new value press Button 3 on your Renaissance.
6) Once you are ready for the next measurement, clear the scale tray and wait for
approximately 3 seconds until the scale announces 0, before you do the next measurement.
Then press Button 3 on the watch and place the new object on the scale tray.
Page 24

24
Renaissance offers you several functions in the wireless mode like:
Short press Button 1:
Once - announcing first 2 digits of the weight
Twice - announcing the last 2 digits of the weight
Short press Button 2:
Once - announcing the first digit of the weight
Twice - announcing the second digit of the weight
Three times - announcing the third digit of the weight
Four times - announcing the fourth digit of the weight
Short press Button 3:
Once - permission to receive the next measured weight
10.5 DEACTIVATING OF THE WIRELESS LINK MODE
While deactivating the wireless link mode on the external device (by switching off or timeout)
Renaissance will disconnect and after some seconds will display the “NO”-signal. Alternatively the
connection can be separated by activating another mode on Renaissance. You will receive a
“Confirmation”-signal, that just informs you about the switching to another mode.
10.6 RESTART OF THE WIRELESS LINK MODE
While an active connection is established press the key combination Button 1 and Button 4 long, this
will lead to a restart of the wireless link mode. Connected devices will be disconnected and a new
connection attempt will be done.
11. SETTINGS
Renaissance has various settings, which defer from mode to mode. To activate the different modes
press the necessary key combination long.
11.1 SETTING OF VALUES
A lot of settings can be done by you. Some of them are two digit values like hours, months or years.
Others are single digit values like the mode of the alarm clock. And some other settings just can be
requested like the charging status or the day of the week. Every mode of the Renaissance has its own
key combination for requesting status or activation. Settings of seconds just can be set to 0.
Page 25

25
To do settings like time, date or an alarm, have a look to the following instructions:
1. First request the value you want to change. You will get a one or two digit value. Two digit
values will be announced with e.g. 07 if the ten digit is 0.
2. Press the key combination Button 1 and Button 3 long until Renaissance emits a
“Confirmation”-signal.
3. Now push as many times Button 1 ´til you reached the desired value (ten digit) and Button 2
to reach the desired value of the one digit value. Every push on one of the button will be
confirmed with a short “Click”-signal. At the beginning of every setting the values of each
number is set to 0. Every time pushing button 1 increases the ten digit value by 1 and every
push on button 2 increases the one digit value by 1. All values higher than 9 will be ignored.
4. Briefly press key combination Button 1 and Button 3 to confirm your setting. If the setting is
successful you will get the “YES”-signal. If not because of a mistake or timeout you will get
the “NO”-signal and the old setting is kept.
Note: Inactivity timeout is reached after 12 seconds.
11.2 RETURNING SETTINGS TO DEFAULT VALUES
Some settings can be quickly returned to their default values, without going through regular setting
value procedure.
To turn the output mode into its default value (combined mode) enter this key sequence:
Briefly press (Button 2 + Button 4) | HOLD (Button 2 + Button 4)
To turn output speed into its default value (speed level 3) enter this key sequence:
Briefly press (Button 2 + Button 4) | briefly press (Button 2 + Button 4) | HOLD (Button 2 + Button 4)
11.3 RESETTING THE WATCH AND STARTING BOOTLOADER
Resetting the watch will return all the settings to their factory default values including the date and
time. To perform reset press this key sequence.
Briefly press (Button 1) | briefly press (Button 2) | briefly press (Button 3) | briefly press (Button 4)
For resetting the Renaissance into the software update mode, user have to enter a slightly different
key sequence:
Briefly press (Button 1) | briefly press (Button 2) | briefly press (Button 3) | briefly press (Button 4) |
HOLD (Any button)
Warning: these action can’t be canceled.
To exit software update mode enter the following key sequence:
Briefly press (Button 1+Button 2+Button 3+Button 4)
Page 26

26
You need to enter the software update mode primarily to perform the software update of the watch.
To find out if the update is compatible with the current software version, use following key
combination:
Briefly press key combination Button 2 + Button 4:
Four times - indicates the first 2 digits of the version number.
Five times - indicates the last 2 digits of the version number.
For example version 1.0.00 would be output as digits 10 and 00.
12. TROUBLESHOOTING
- If you want to know whether a certain operation mode is active, press shortly the key combination
assigned to it to retrieve the status. If you are interested in working with a certain mode, you can
switch to it straight away by holding the key combination assigned to it. Keep in mind that activating
the wireless mode, when it is already active, will cause the disconnection from current wireless
device and the beginning of a new search and connect procedure.
- If the watch is not responding to input commands and doesn’t output any signals, it is time to
recharge the battery. Take the charger supplied with the Renaissance and proceed as in Section 10.2.
"Battery charging". If you are a user who can’t work with acoustic signals, make sure that the output
mode is not set to acoustic only.
- For wireless link mode: If Renaissance can’t find an external device, make sure that wireless link is
enabled on that device. It is recommended to enable the wireless link on an external device first and
then on the Renaissance. If your Renaissance is still unable to connect, then check that the distance
from the external device is within 10 meter range and re-enable the wireless link function on both
devices.
13. SAFETY AND CLEANING
To ensure the safe use and a long service life of the Renaissance, please keep in mind the following
information:
The watch should not be opened. It is specially assembled to ensure safe operation and water
resistance.
The watch should not be exposed to extreme temperatures.
Functional reliability can only be guaranteed at temperatures between +5 and + 40 ° Celsius.
Use the Renaissance only in an undamaged condition.
If you are using another Micro USB cable or charger, than that which is included, make sure that its
output voltage is 5 volts and charging current does not exceed 1.5A.
To help Renaissance keep its elegant look you should clean the metallic surface regularly with a soft,
non-scratching cloth. When a more substantial cleaning is necessary, dissolve a small amount of soap
Page 27
27
in the water and apply it using a soft non-scratching cloth. Be careful not to press any buttons until
the watch is completely dry. Do not scrub nor use any aggressive cleaning chemicals.
14. TECHNICAL DATA
Power supply:
1 x 3.7V 160mAh Lithium-polymer rechargeable battery
Dimensions:
47 x 46 x 11 mm (without the wristband)
Weight:
295 g (with standard leather wristband)
Storage
temperature:
14 °F to 122 °F (-10 °C to +50 °C)
Operating
temperature:
32 °F to 104 °F (0 °C to +40 °C)
Included in box:
Micro-USB charging cradle, USB to micro-USB cable, USB power supply, Black
& white user guide, acoustic instructions and PC software on mini CD
15. GUARANTEE AND SERVICE
Warranty periods from date of purchase:
Twenty-four (24) month on the device itself
Twelve (12) months on the accessories (e.g. power supply, batteries, earphones, etc.)
Six (6) months on wear parts (e.g. battery, case, etc.)
For storage devices (CDs, SD cards, etc. ) as well as for batteries no guarantee is provided
During the warranty periods mentioned above, the product will be either repaired or replaced free of
charge. In no event shall CareTec be liable for indirect, special or consequential damages. The
exposure of the device to liquids, strong electromagnetic fields, heat as well as dropping the device
or opening the case causes immediate loss of guarantee. In case of problems please contact CareTec
or your local distributor before returning the device without any apparent reason. We will then
inform you about the necessary procedures. The device may only be opened by authorized
personnel! CareTec reserves the right to make any changes or improvements to its products without
further notice.
Page 28
28
16. LEGAL NOTICE ON THE DISPOSAL OF ELECTRONIC
DEVICES
16.1 DISPOSAL OF USED ELECTRONIC DEVICES
16.2 BATTERY DISPOSAL
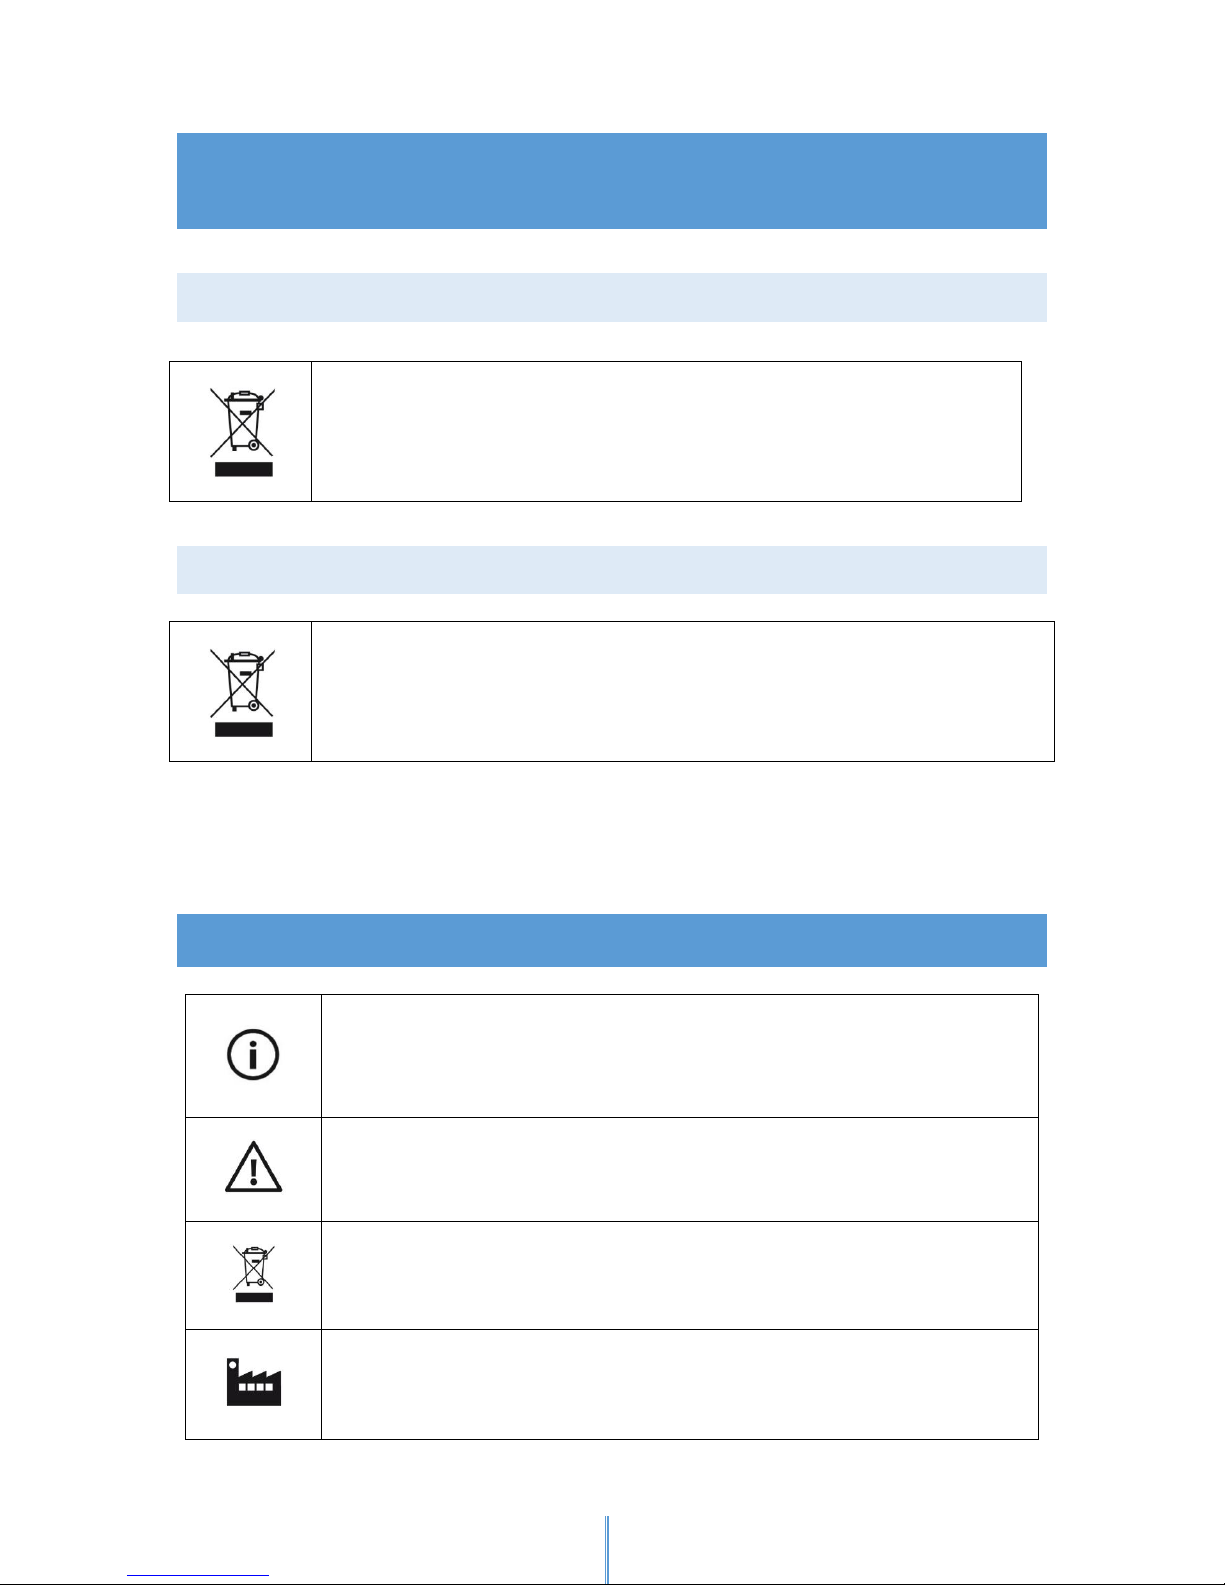
Pb-Cd-Hg These signs can be found on contaminant-laden batteries.
Pb = containing lead
Cd = containing cadmium
Hg = containing mercury
17. SYMBOLS USED
This product must be disposed of separately from household waste at specially
designated collection and recycling points. For further information, please
contact your local authorities.
Batteries must not be disposed together with household waste. As a consumer, you
are legally obligated to bring your old batteries to public collecting points (in your
community or any shop that provides these batteries).
Note
Caution
Dispose of separately from household waste
Manufacturer
Page 29

29
Page 30
30
18. MANUFACTURER
Renaissance_BA_EN_062016_V5.8
CareTec International GmbH
Stubenbastei 1
A 1010 Vienna, Austria
Is the manufacturer of this product.
Phone: (+43 1) 513 80 81 0
Fax: (+43 1) 513 80 81 9
Email: [email protected]
Web: www.caretec.at
 Loading...