

Page 1
USER MANUAL
________________________________________________________________________________
Picobello
Electronic pocket compass with watch function,
thermometer & money recognition
Page 2

TABLE OF CONTENTS
1. INTRODUCTION ............................................................................................................................... 3
2. PACKAGE CONTENT ........................................................................................................................ 3
3. DEVICE DESCRIPTION ..................................................................................................................... 3
4. FIRST STEPS ...................................................................................................................................... 4
4.1 SETTINGS - USEFUL TIPS AND NOTES .................................................................................. 5
4.2 CHARGING THE BATTERY......................................................................................................... 6
4.3 BATTERY LEVEL INDIC ATION – CALL UP/CHECK ............................................................. 6
4.4 DATE AND TIME SYNCHRONIZATION .................................................................................... 6
5. AUDIO SIGNAL SYSTEM.................................................................................................................. 7
5.1 NUMERIC SIGNALS ............................................................................................................... 7
5.2 MULTI-DIGIT NUMBERS ...................................................................................................... 7
5.3 SIGNAL STATUS TRANSMISSION ........................................................................................ 8
6. SIGN AL MODES ................................................................................................................................ 8
6.1 ACOUSTIC MOD E - CHECK AND SET ...................................................................................... 8
6.2 VIBRATION MODE - CHECK AND SET .................................................................................... 9
6.3 SIGNAL MODE SPEED RATE - CHECK AND SET .................................................................... 9
7. PICOBELLO FUNCTIONS ............................................................................................................... 10
7.1 COMPASS FUNCTION (L A RGE OVAL BUTTON 1) .......................................................... 10
7.2 ORIENTATION – SIMPLE MODE........................................................................................ 11
7.2.1 ORIENTATION – ADVANCED MODE ............................................................................ 11
7.3 SELECTED ROU TE MONITORING ..................................................................................... 11
7.4 DATE AND TIME FUNCTION (SMALL ROUND BUTTON 2) .......................................... 12
7.4.1 TIME MODE – CALL UP & SET..................................................................................... 12
7.4.2 TIME CALL UP & CHANGE ............................................................................................ 12
7.4.3 DATE – C ALL UP & CHANGE ........................................................................................ 13
7.5. TEMPERATURE .................................................................................................................... 15
7.6 EURO BANKNOTE RECOGNITIO N ..................................................................................... 15
7.7 RESET DEVICE TO DEFAULT SETTINGS ........................................................................... 15
7.8 VERSION NUMBER (DOUBLE DIGIT NUMBER) ............................................................. 16
8. OVERVIEW DATA & SETTINGS ..................................................................................................... 17
9. SAFETY INSTRUCTIONS ................................................................................................................ 18
10. TECHNICAL DATA ......................................................................................................................... 18
11. GUARANTEE AND SERVIC E ........................................................................................................ 19
12. LEGAL NOTICE - DISPOSAL ........................................................................................................ 19
12.1 DISPOSAL OF USED ELECTRONIC DEVICES ............................................................... 19
12.2 BATTERY DISP OSAL ....................................................................................................... 19
13. SYMBOLS USED ............................................................................................................................ 20
14. MANUFACTURER ......................................................................................................................... 20
Page 3
1. INTRODUCTION
Thank you for purchasing the Picobello, a stylish hand painted and easy to use pocket size electronic
compass with watch function and simple thermometer. All information is transmitted via acoustic
signals and/or vibrations. Tactile markings on the back of the device enable the recognition of the
widths of 5, 10, 20 and 50 Euro banknotes.
2. PACKAGE CONTENT
The Picobello-pack contains:
- Picobello
- USB power supply plug
- Micro-USB cable
- Printed user manual
- A USB stick with acoustic instructions and PC software
- Cord/lanyard
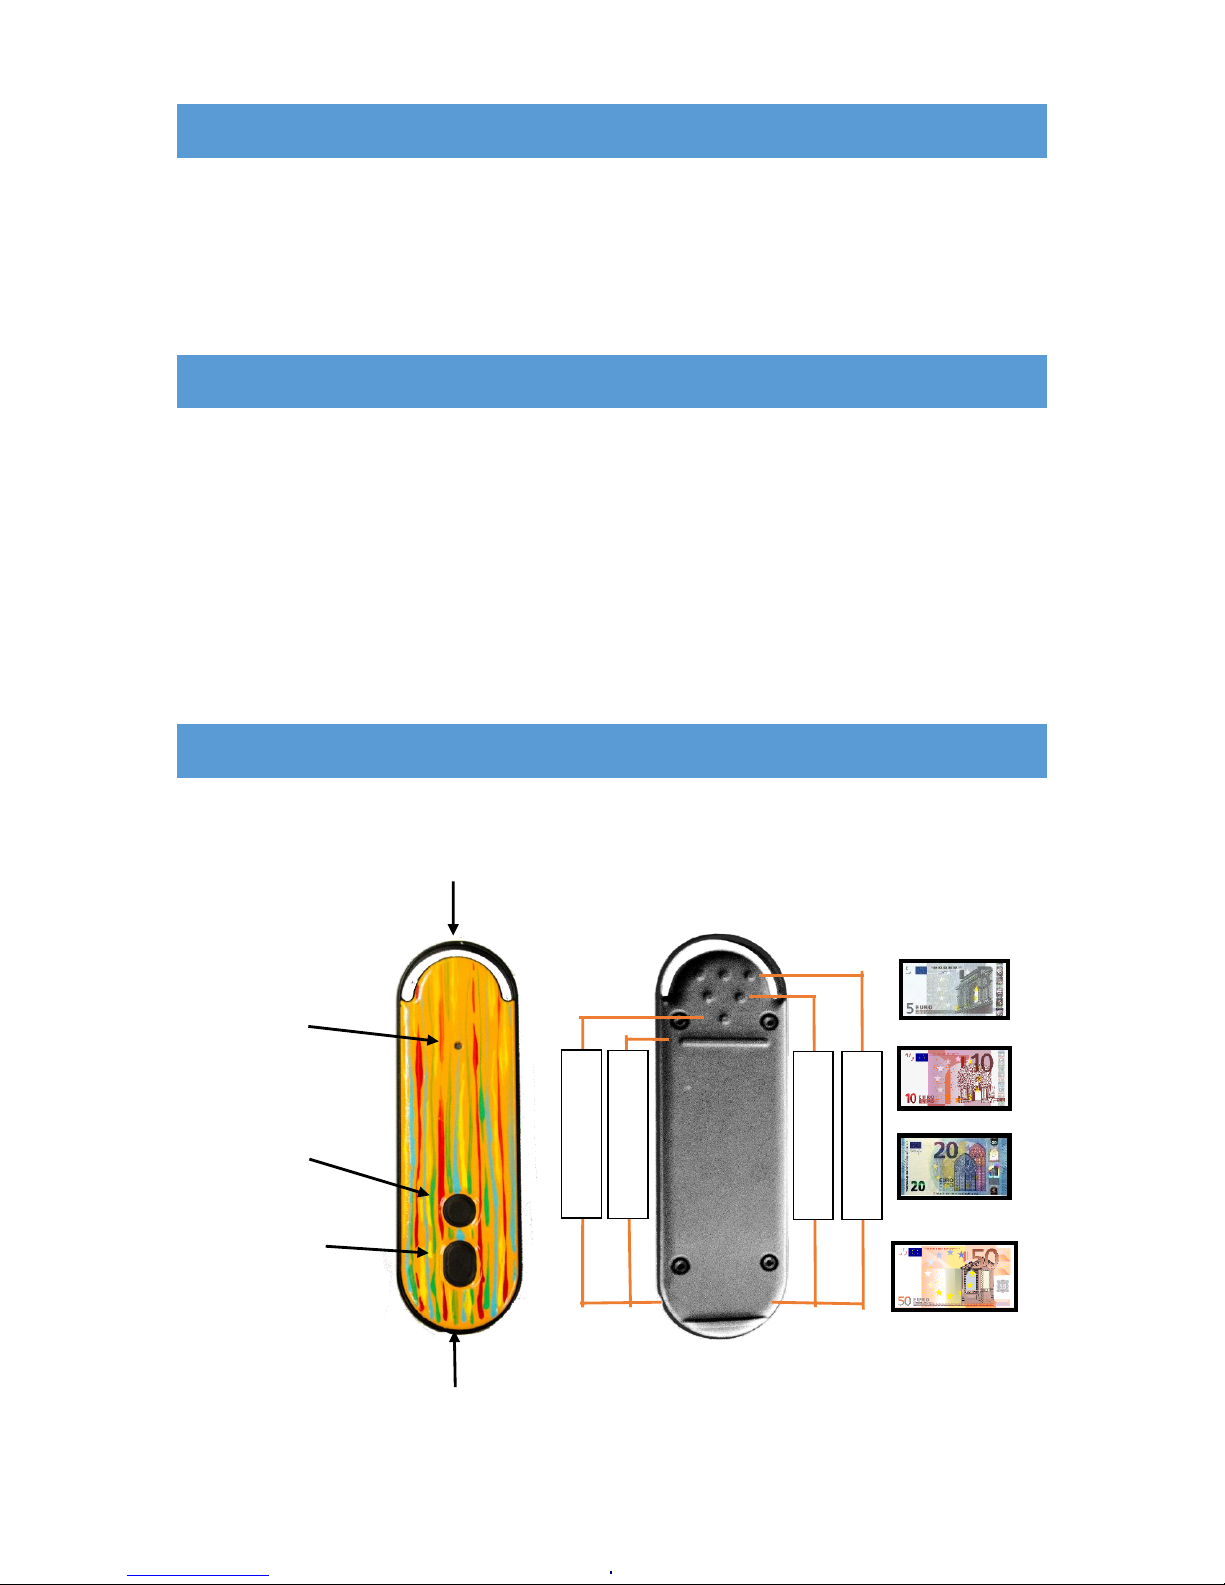
3. DEVICE DESCRIPTION
FRONT VIEW BACK VIEW
Opening for lanyard etc. Banknotes recognition (Euro)
Acoustic Signal
Button for clock
Functions
(Button 2)
Button for
Compass Functions
(Button 1)
Micro-USB socket
20
E
U
RO
50
E
U
R
O
5
E
U
R
O
10
E
U
R
O
Page 4

Hold/place the device so that the upper side with the control buttons is facing up and the USB-socket
is at the lower end of the device.
Lower End
On the lower end is the micro-USB socket. Connect the socket with the delivered micro-USB cable (or
any standard micro-USB cable) to a computer, in order to charge the battery or to synchronize the
date and time of the Picobello.
Top
At the top of the device, there is an opening between the frame and the body where a cord or
lanyard can be attached.
Front
Near the bottom two buttons can be felt, (Button 1) large and oval-shaped and above it (Button 2)
smaller and round. The larger button is to control the compass functions and the smaller one is to
control the watch functions. Combinations of both buttons can be used to retrieve additional
information.
Back
On the back, there are four tactile markings enabling the recognition of 5, 10, 20 and 50 Euro
banknotes. For more information on recognizing banknotes, see chapter 7.5.
4. FIRST STEPS
Via prolonged pressing of one of the buttons, the Picobello is activated. For energy saving, the device
switches off automatically after 30 seconds of inactivity. When Picobello is loading or connected to
the computer, as mentioned in chapter 4.1, it will not automatically switch off.
Picobello uses an integrated battery, which is charged before shipping. However, we recommend
charging the device before first use. To do so, use the USB power supply plug or the USB cable to
connect with a computer.
Note: Handle the USB plug-in and the USB socket with care. Both fit easily to each
other, if plugged correctly and carefully.
Page 5

4.1 SETTINGS - USEFUL TIPS AND NOTES
Picobello is a complex but at the same time easy-to-use device. To enable a fast familiarization with
the functions and logics see the following notes and tips.
The cardinal directions (compass points) as well as date and time are each operated by a single
button: the oval button (1) operates the compass function and the small round button (2) operates
time and date.
Other settings, ambient temperature, battery status, acoustic mode and its volume levels,
vibration mode and speed are operated by using combinations of both buttons.
Which functions does the Picobello offer?
Compass as well as time, date and ambient temperature. Tactile markings on the back of the
device offer Euro bank note identification.
There are two methods for the compass identification: the Simple Mode (via simple symbols)
and the Advanced Mode (indication via a numeric system).
The time indication has two options: a 24 hour or a 12 hour (a.m./p.m.) mode.
The temperature indication has two options: degrees Celsius and degrees Fahrenheit.
Which presettings does the Picobello have?
The Picobello is delivered with the following presettings: Acoustic and vibration are both
active, acoustic mode is at level 2 (the loudest level), speed is preset at level 3 (there are 7
speed levels) and the compass is preset at Simple mode.
Depending on the country where the Picobello was purchased the time is preset either in 24
hour or 12 hour (a.m./p.m.) mode and preset in degrees Celsius or degrees Fahrenheit.
Is it possible to save settings so that these are not lost?
(For example, when the battery runs dry or the Picobello factory settings are accidently reset)
Yes! Personal settings can be saved via 4x SHORT press of Button 2 and 1x LONG press of
Button 1.
Change a setting – how to access the menu quickly?
To change a setting the same button sequences are used as with the call up mode, the last
button press is however LONG (not short)
For example: Set Speed: To call up speed press both buttons simultaneously 4x SHORT.
To change the speed press both buttons simultaneously 3x SHORT and 1x LONG.
Is there a way to become familiar with the various settings before deciding which to utilize?
Yes! Once in the MENU the Picobello enables a run through before a setting is chosen.
For example: Speed setting. In menu press Button 1 only for the setting (in this case speed) to
increase by one level. The Picobello gives the following signal (a long signal followed by three
short signals – the signal for the number 7). For every time that Button 1 is pressed, this
signal sequence is heard – in this case a faster level. This procedure can be repeated via a
SHORT press of Button 1 to get to know the variations of this specific setting. Once the
desired setting is established, confirm via a SHORT press of Button 2.
Help notes valid for all settings:
Once in the menu, the Picobello signals via a long signal that settings can be made.
While pressing the relevant button a short signal, a „Click“, can be heard/felt, confirming that
the Picobello has accepted the button press.
With the oval button (Button 1) the setting is increased which can then be confirmed by
pressing the small button (Button 2).
To enter the “0“setting press the small round button (Button 2) to confirm setting.
- If no setting activity takes place for 15 seconds then the error signal is emitted and the
process must be repeated otherwise the original settings are set.
Page 6
4.2 CHARGING THE BATTERY
To charge the rechargeable battery, connect USB charging cable to a socket plug. Alternatively
connect and charge from a Computer. A charging process signal (1x SHORT, 1x very LONG, 1x SHORT)
is heard.
The loading process signal (1x SHORT, 1x very LONG, 2x LONG) signals completion of charging. The
rechargeable battery is full.
If the rechargeable battery is absolutely empty then the charging process takes about 2,5 hours.
Charging time varies when charging via a computer.
4.3 BATTERY LEVEL INDICATION – CALL UP/CHECK
To establish the battery level, press Button 1 briefly and then Button 2. The level indication will be
heard via different signals. Examples:
1 short signal = 10% battery level
1 long signal + 1 short signal = 50% battery level
1 short signal + a wave signal = 100% battery level
Note: You can also check the charging status, while the Picobello is charging, by pressing Button 1 and
Button 2 once. Picobello will emit the signal ‘Charging start’ if it is still in progress or ‘Charging
finished’, if the charging cycle is complete.
If the battery is completely discharged, all settings, date and time, have to be reset
unless the settings have been saved. To save settings press 4x SHORT Button 2 and
1x LONG Button 1.
To extend battery life it should not remain discharged for more than 6 months.
4.4 DATE AND TIME SYNCHRONIZATION
To be able to synchronize date and time, the ‘Caretec PC-Link’ application must be installed onto a
computer. Connect the included USB stick to the computer and launch the installation file
CareTecPClink_Versionsnummer_setup.exe. During the installation process, a security query might
occur requiring the use of the administrator password. After installing the ‘Caretec PC-Link’, Picobello
synchronizes date and time with the settings on the computer within 10 seconds. When the device is
connected for the first time, it could take the computer up to 2 minutes to install the drivers.
When the synchronization process is completed, a confirmation sequence (5 short signals with rising
tonality) will be heard.
Alternatively, set date and time manually. For this please read chapter 7.3 “Date and Time function”.
Page 7

5. AUDIO SIGNAL SYSTEM
Picobello works via a system of signals representing numbers, 8 cardinal directions and signal
sequences. These signals are presented as acoustic signals and/or vibrations. Each individual number
and all data is represented by a unique sequence of signals.
The sequence can contain 5 signal types:
- The wave signal
- The short signal
- The very short signal (only used with manual settings to
indicate that the device is ready for the next input of
number settings)
- The long signal
- The very long signal (only emitted for battery charging)
5.1 NUMERIC SIGNALS
When signaling numbers, each signal has a specific number assigned to it:
Wave signal represents the number 0
Short signal represents the number 1
Long signal represents the number 4
Digits are calculated as a sum, a sequence of numbers.
For example:
Number 6: 1 long signal, 2 short signals (4 + 1 + 1)
Number 9: 2 long signals, 1 short signal (4 + 4 + 1)
Note: If a sequence of signals represents a number, long signals are transmitted first and short ones
afterwards.
5.2 MULTI-DIGIT NUMBERS
Picobello signals all numbers as double digits. For double digit numbers the tens digit is signaled first
followed by a longer pause and then the single (units) digit. If less than 10, the number 0 represents
the first digit (wave signal).
For example:
08: wave signal, longer pause, two long signals
10: short signal, longer pause, wave signal
16: short signal, longer pause, long signal, two short signals
23: 2 short signals, longer pause, three short signals
Via this method Picobello can signal numbers from 0 to 99.
Page 8

5.3 SIGNAL STATUS TRANSMISSION
In addition to numbers, Picobello also signals a wide range of other information through signal
sequences. Here is a list of these sequences:
Wake up: 3 short signals (with rising frequency for acoustic signal output)
Charging started: 1 short signal, 1 very long signal, 1 short signal
Charging finished : 1 short signal, 1 very long signal, 2 long signals
Confirmation: 1 long signal
Confirm adjustment: 1 long signal, 1 short signal, 1 long signal, 1 short signal
Boot: 3 short signals, 1 long signal (with rising frequency for acoustic signal
output)
Error: 1 short signal, 3 long signals (with falling frequency for acoustic signal
output)
PC sync. completed: 5 short signals (with rising frequency for acoustic signal output)
6. SIGNAL MODES
Picobello presents all information via acoustic signals, vibrations or both. Both types of signal can be
active at the same time, but they cannot be inactive at the same time. For example: Switching off
acoustic signals while vibrations are off reactivates the vibration mode. Switching off vibrations while
acoustic signals are off will reactivate acoustic signals and vice versa.
6.1 ACOUSTIC MODE - CHECK AND SET
Acoustic signals allow users to receive the same information as via the vibration mode with the
advantage of having two selectable volume levels. By only using acoustic signals, a slight increase in
battery life, compared to the vibration mode, can be achieved.
CALL UP STATUS
Briefly press both buttons at the same time twice and the device will signal its acoustic status:
0 – OFF
1 – ON with volume low
2 – ON with volume high
SET ACOUSTIC SIGNALS
To change the acoustic status, press the key combination 1x SHORT Button 1 & Button 2 + thereafter
1x LONG Button 1 & Button 2 to enter to menu mode, which is confirmed by a LONG signal. Press
Button 1 to change setting: 1x for function 1 (ON with low volume) or twice for function 2 (ON with
higher volume). Do not press any button to leave the setting on 0 (Off). To confirm briefly press
Button 2.
If the setting was carried out correctly, a “Confirm adjustment” signal (1 long signal, 1 short signal, 1
long signal, 1 short signal) is heard otherwise an error signal (1 short signal, 3 long signals) is heard.
Page 9

6.2 VIBRATION MODE - CHECK AND SET
Especially in loud environments, vibration mode provides a more reliable method for device
information. It allows the user to use the Picobello without disturbing others. The vibration mode
also enables deaf-blind people to use the device.
CALL UP STATUS
Briefly press both buttons three times and the device will tell you it´s vibration status:
0 – OFF
1 – ON
SET VIBRATION STATUS
To change the vibration status, press the button combination Button 1 & Button 2 twice SHORT & 1x
LONG. Set the digit number by pressing 1x SHORT Button 1. Press Button 1 briefly to set it to 1 (ON)
or leave it unchanged to set it to 0 (OFF). To confirm, briefly press Button 2.
If the setting is carried out correctly, a “Confirm adjustment” signal (1 long signal, 1 short signal, 1
long signal, 1 short signal) is emitted otherwise an error signal (1 short signal, 3 long signals) is
emitted.
6.3 SIGNAL MODE SPEED RATE - CHECK AND SET
Picobello offers 7 different signal speed levels. Level 0 is the slowest and level 6 the fastest.
To verify which level the signal speed is set at, briefly press the key combination Button 1 and Button
2 four times. The default setting is 3, a moderate speed level.
CALL UP STATUS
Briefly press the key combination Button 1 and Button 2 four times and the device will signal its
speed level:
0 – SLOWEST, 1, 2, 3, 4, 5, 6 – FASTEST
SET SPEED
To change the speed level, press the key combination three times SHORT Button 1 + Button 2 and
once LONG Button 1 & Button 2. Set the signal speed level by pressing Button 1 briefly as often as
necessary to reach the desired level (1 to 6). To confirm, briefly press Button 2. For ‘0’, don´t press any
button rather confirm immediately by pressing Button 2 briefly.
If the setting is carried out correctly, a “Confirm adjustment” signal (1 long signal, 1 short signal, 1
long signal, 1 short signal) is emitted otherwise an error signal (1 short signal, 3 long signals) is
emitted.
Page 10
7. PICOBELLO FUNCTIONS
Picobello offers various functions, compass, direction monitoring, date, time, and thermometer.
All functions will be explained in detail in this chapter.
7.1 COMPASS FUNCTION (LARGE OVAL BUTTON 1)
Using the larger button checks the direction or monitors direction used. For optimal use of the
Picobello, please take note of the following:
Note: The delivered device is factory-calibrated and is therefore very accurate. For
reliable cardinal direction measurements the compass must be held horizontally,
otherwise the individual measurement could be distorted.
Optimal results can be obtained outside of cities, away from power lines, large
production machinery or other magnetic fields. Constant directional changes could be
an indication that magnetic forces are nearby.
The cardinal direction settings are made via 2 different systems, the Simple mode and the Advanced
mode. Specific signals are used for the cardinal directions Simple mode. The Picobello signals the
cardinal directions in the Advanced mode via the correct numerical order (0 to 7). The delivered
Picobello is preset in the Simple mode. To establish which mode is currently in use press 5x SHORT
Button 1. If the device is in Simple mode it emits a short signal (the number 1).
If the device is in Advance mode, Picobello confirms with a wave signal (the number 0). To change to
the other mode press 1x SHORT Button 1 and 1x LONG Button 1. Select via Button 1 the required
setting and confirm via press 1x SHORT Button 2. As with all other settings, the Picobello responds
with the number 7. If after the number 7 there is a wave signal the device is in Simple mode.
If only number 7 is signalled, the device is in Advanced mode. Picobello confirms a successful change
with the confirmation signal (signal sequence: long-short-long-short) and in the event of a faulty
setting with an error signal (a short followed by 3 long signals).
Page 11
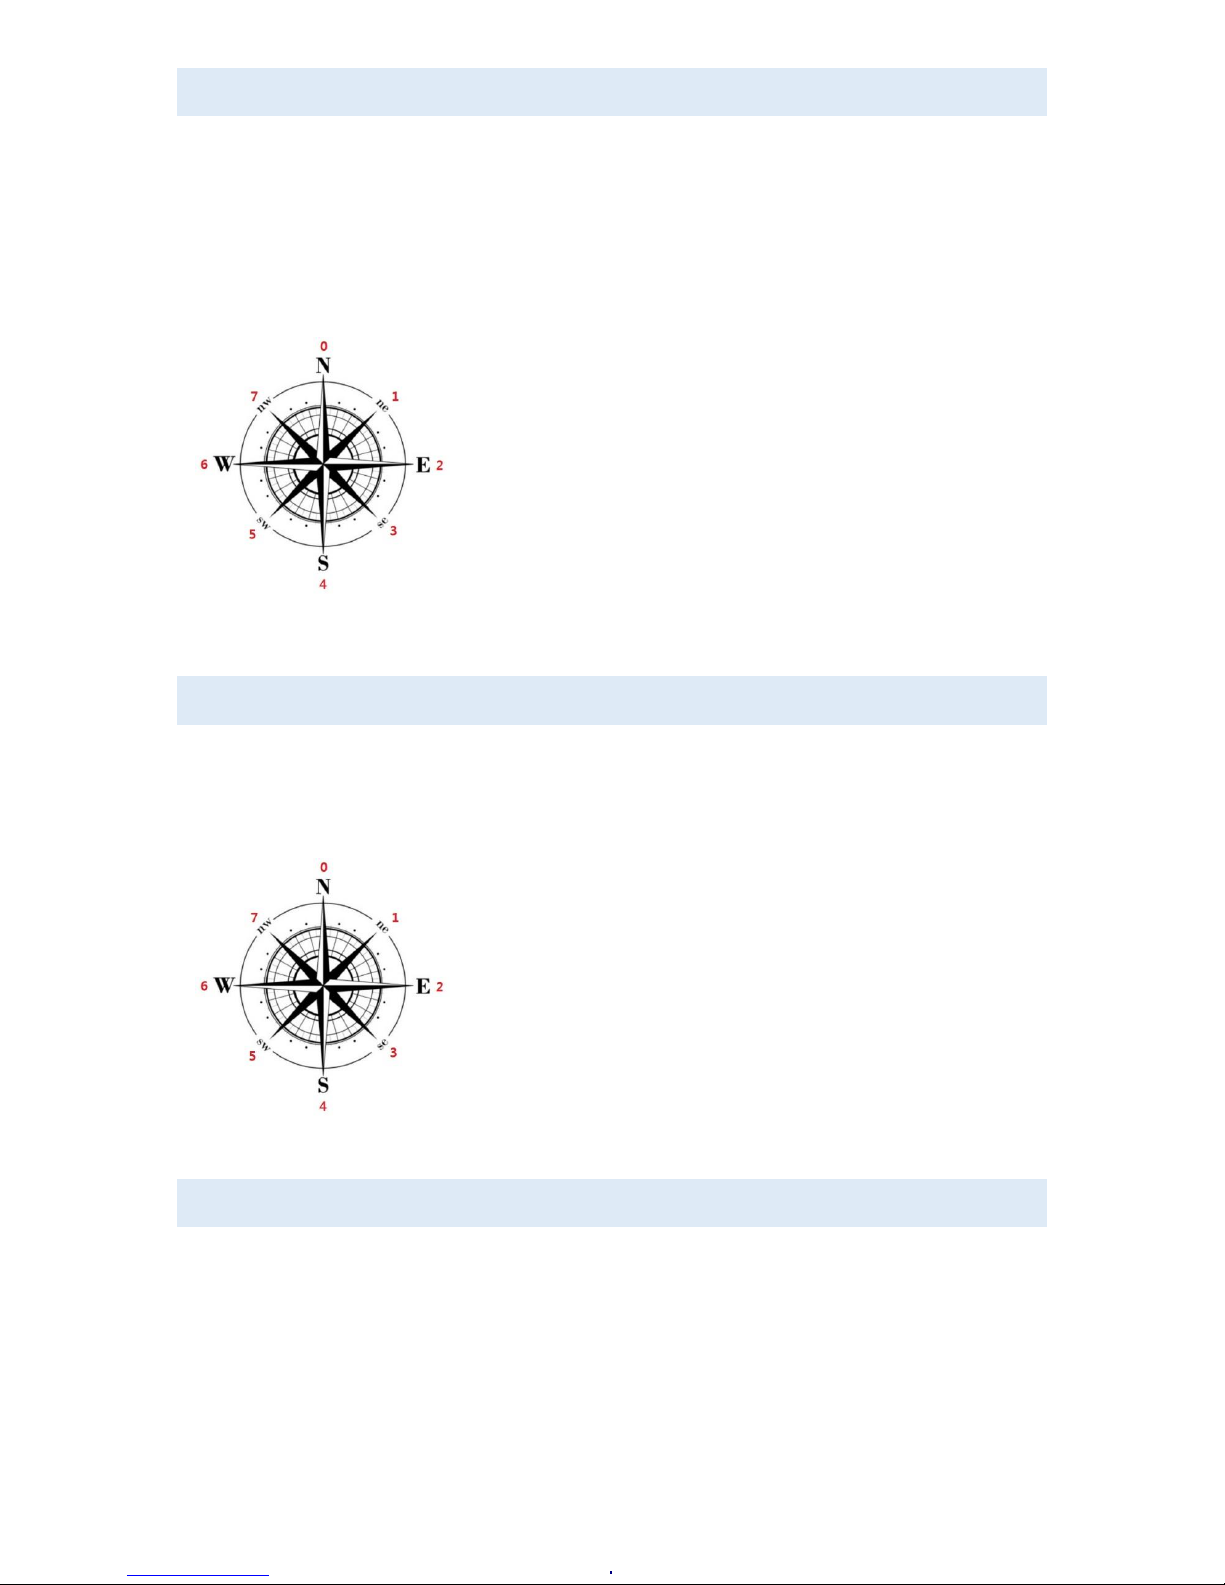
7.2 ORIENTATION – SIMPLE MODE
As with the Advanced mode, 8 cardinal directions are indicated. The 4 main and the 4 half-cardinal
directions. The 4 main cardinal directions are signalled via sequential short signals (1 to 4). The halfcardinal directions are signalled via the same signals followed by a wave signal.
For example: North is signalled by a short signal. North East via a short signal and a wave signal.
To establish a compass direction, point the device in the direction wanted and press Button 1 briefly.
North 1 (a short signal)
North East 1+0 (a short signal and a wave signal)
East 2 (two short signals)
South East 2+0 (two short signals & a wave signal)
South 3 (three short signals)
South West 3+0 (three long signals & a wave signal)
West 4 (four short signals)
North West 4+0 (four short signals & a wave signal)
7.2.1 ORIENTATION – ADVANCED MODE
To establish a compass direction, point the device in the direction wanted and press Button 1 briefly.
The 4 cardinal and 4 half cardinal points will be indicated via the numbers 0 to 7 as follows
North 0 (wave signal)
North-East 1 (one short signal)
East 2 (two short signals)
South-East 3 (three short signals)
South 4 (one long signal)
South-West 5 (one long signal &one short signal)
West 6 (one long signal & two short signals)
North-West 7 (one long signal & three short signals)
7.3 SELECTED ROUTE MONITORING
Point the device in the direction interested in and press LONG Button 1. The device will start the
direction monitoring mode and will remember this orientation as the one required. Any deviations
from the target orientation when moving around will be constantly communicated.
Deviation information will be signaled via vibrations or acoustic signals. The larger the deviation, the
more ticks are present in the sequence of signals played. From the acoustic emission type the
magnitude of the deviation and its direction can be distinguished by different sounding ticks in
emission sequences. To end the direction monitoring mode, press any button.
Page 12

7.4 DATE AND TIME FUNCTION (SMALL ROUND BUTTON 2)
Both synchronized date and time settings can be done via a computer (as described in 4.3) or
manually. The Picobello has both 12 hour (as is customary in America, Canada, Australia etc.) or 24
hour setting possibilities.
Picobello is set in 12 or 24 hour mode depending in which country it is purchased. To establish
morning (am) or afternoon (pm) there is a wave signal after the time to indicate the morning (am) or
a long signal after the time to indicate the afternoon (pm). The 12 hour mode has 0 – 12 hours and 0
– 59 minutes
7.4.1 TIME MODE – CALL UP & SET
To call up the current time mode press 1x SHORT Button 2 and 1x SHORT Button 1. If in 12 hour mode
a short (number 1) is signalled. If in 24 hour mode a wave (number 0) is signalled.
To change to the opposite mode press 1x SHORT Button 2 and once LONG Button 1. Choose with
Button 1 the desired setting and confirm via press 1x SHORT Button 2. As with all settings the
demonstration example is the number 7. As this mode is a time check and this is always in tens and
units, the signal before the number 7 is an additional wave signal. If after the number 7 there is a
further wave signal the current mode is for the 12 hour time system (0-7-0). If there is only one wave
signal and the number 7 then it is the 24 hour time system (0-7).
Confirm a desired setting via press 1x SHORT Button 2. A confirmation is indicated via a (long-shortlong-short) signal. An error signal that a mode change has failed is indicated via a (short-long-shortlong) signal.
7.4.2 TIME CALL UP & CHANGE
HOUR (press 1x SHORT Button 2)
To call up the hour briefly press Button 2 once. The hour is indicated as a two-digit number. E.g. ‘09’
will be given as a wave (0) for the tens digit and two long signals (2x4) and one short signal (1) for the
units' digit.
For the 12 hour mode call up and signals operate the same way. Time depending a wave or long
signal are emitted
MINUTE (press 2x SHORT Button 2)
To call up the minute briefly press Button 2 twice. The minute is indicated as a two-digit number. E.g.
‘19’ is indicated as one short signal (1) for the tens digit and two long signals (4+4) and one short
signal (1) for the units' digit.
SET HOURS MANUALLY (TWO DIGIT NUMBER)
To set the hour manually press LONG Button 2 to enter the setting mode (hear the “Confirmationsignal”). Press Button 1 as often as needed to reach the desired number of the hour’s tens' digit (they
can only be 0, 1 or 2). Each press increases the current number by 1. For ‘0’ do not press Button 1 as 0
is always the default setting.
Page 13

Confirm the tens' digit by pressing Button 2 once briefly (hear the ‘confirmation-signal’).
Press Button 1 as often as needed, to reach the desired number for the hour’s unit (can be 0 to 9 if
the tens' digit is 0 or 1 and 0 to 4 if the tens' digit is 2). For ‘0’ do not press Button 1, because it is the
default setting. Confirm the unit by pressing Button 2 once briefly.
If the setting is carried out correctly, a “Confirm adjustment” signal is heard (1 long signal, 1 short
signal, 1 long signal, 1 short signal) otherwise an error signal (1 short signal, 3 long signals) is heard.
SET MINUTES MANUALLY (TWO DIGIT NUMBERS)
To set the minutes manually, press SHORT Button 2 + LONG Button 2 to enter the setting mode (hear
“Confirmation-signal”). Press Button 1 as often as needed to reach the desired number for the tens'
digit of the minutes (can be only 0 to 6). For ‘0’ do not press any button. Confirm the tens' digit by
pressing Button 2 once briefly (hear the ‘confirmation-signal’).
Press Button 1 as often as needed to reach the desired number for the units' digit of the minutes (can
be 0 to 9). For ‘0’ do not press Button 1 as it is a default setting. Confirm by pressing Button 2 once
briefly.
If the setting is carried out correctly, hear a “Confirm adjustment” signal (1 long signal, 1 short signal,
1 long signal, 1 short signal) otherwise an error signal (1 short signal, 3 long signals) is heard.
7.4.3 DATE – CALL UP & CHANGE
CALL UP DAY (press 3x SHORT Button 2)
To call up the day briefly press Button 2 three times. The day will be signaled as a two digit number.
E.g. ‘30’ will be signaled as three short signals (3) for the tens' digit and a wave (0) for units' digit.
CALL UP MONTH (press 4x SHORT Button 2)
To call up the month briefly press Button 2 four times. The month will be signaled as a two digit
number. E.g. ‘09’ as a wave (0) for the tens' digit and two long signals (4+4) and one short signal (1)
for units' digit.
CALL UP YEAR (LAST TWO DIGITS OF THE YEAR) (press 5x SHORT Button 2)
To call up the year, briefly press the Button 2 five times. The year is signaled as a two digit number,
e.g. ‘16’ represents 2016.
E.g. ‘16’ will be given as one short signal (1) for the tens' digit and one long signals (4) and two short
signals (2) for the units' digit.
SET DAY MANUALLY (TWO DIGITS)
To manually set the day, press 2x SHORT Button 2 + LONG Button 2 to enter the setting mode
(“Confirmation-signal” is heard). Press Button 1 as often as needed to get the desired number for the
tens' digit of the day (only 0, 1, 2 or 3). For ‘0’ do not press Button 1 as it is a default setting. Confirm
the tens' digit by pressing Button 2 once briefly (‘Confirmation-signal’ is heard).
Press Button 1 as often as needed to reach the desired number for the units' digit of the day (0 to 9 if
the tens' digit is 0, 1 or 2 and 0 or 1 if the tens' digit is 3). For ‘0’ do not press Button 1 as it is a default
setting. Confirm the unit by pressing Button 2 once briefly.
Page 14

If the setting was carried out correctly a “Confirm adjustment” signal (1 long signal, 1 short signal, 1
long signal, 1 short signal) is emitted otherwise an error signal (1 short signal, 3 long signals) is
emitted.
SET MONTH MANUALLY (TWO DIGITS)
To set the month manually, press 3x SHORT Button 2. Then press LONG Button 2 until the
“Confirmation-signal” is heard to enter the setting mode. Press Button 1 as often as needed to get the
desired tens' digit of the month (only 0 or 1). For ‘0’ do not press any button. Confirm the tens' digit
by pressing Button 2 once briefly (the ‘Confirmation-signal’ is heard).
Press Button 1 as often as needed to get the desired number for the units of the month (0 to 9 if the
tens' digit is 0 and 0 to 2 if the tens' digit is 1). For ‘0’ do not press Button 1 as it is a default setting.
Confirm the tens' digit by pressing Button 2 once briefly.
If the setting was carried out correctly, a “Confirm adjustment” signal (1 long signal, 1 short signal, 1
long signal, 1 short signal) is heard otherwise an error signal (1 short signal, 3 long signals) is heard.
SET YEAR MANUALLY (TWO DIGITS)
The year is shown as a two-digit number, e.g. ‘16’ represents 2016. To set the year manually, press 4x
SHORT Button 2 + PRESS & HOLD Button 2 to enter the setting mode (the “Confirmation-signal” is
heard). Press Button 1 as often as needed to reach the desired number for the tens' digit of the year.
For ‘0’ do not press Button 1 as it is a default setting. Confirm the tens' digit by pressing Button 2
once briefly (the “Confirmation-signal” is heard).
Press Button 1 as often as needed to reach the desired number for the units of the year. For ‘0’ do not
press Button 1 as it is a default setting. Confirm the units by pressing Button 2 once briefly.
If the setting was carried out correctly, a “Confirm adjustment” signal (1 long signal, 1 short signal, 1
long signal, 1 short signal) is heard otherwise an error signal (1 short signal, 3 long signals) is heard.
Page 15
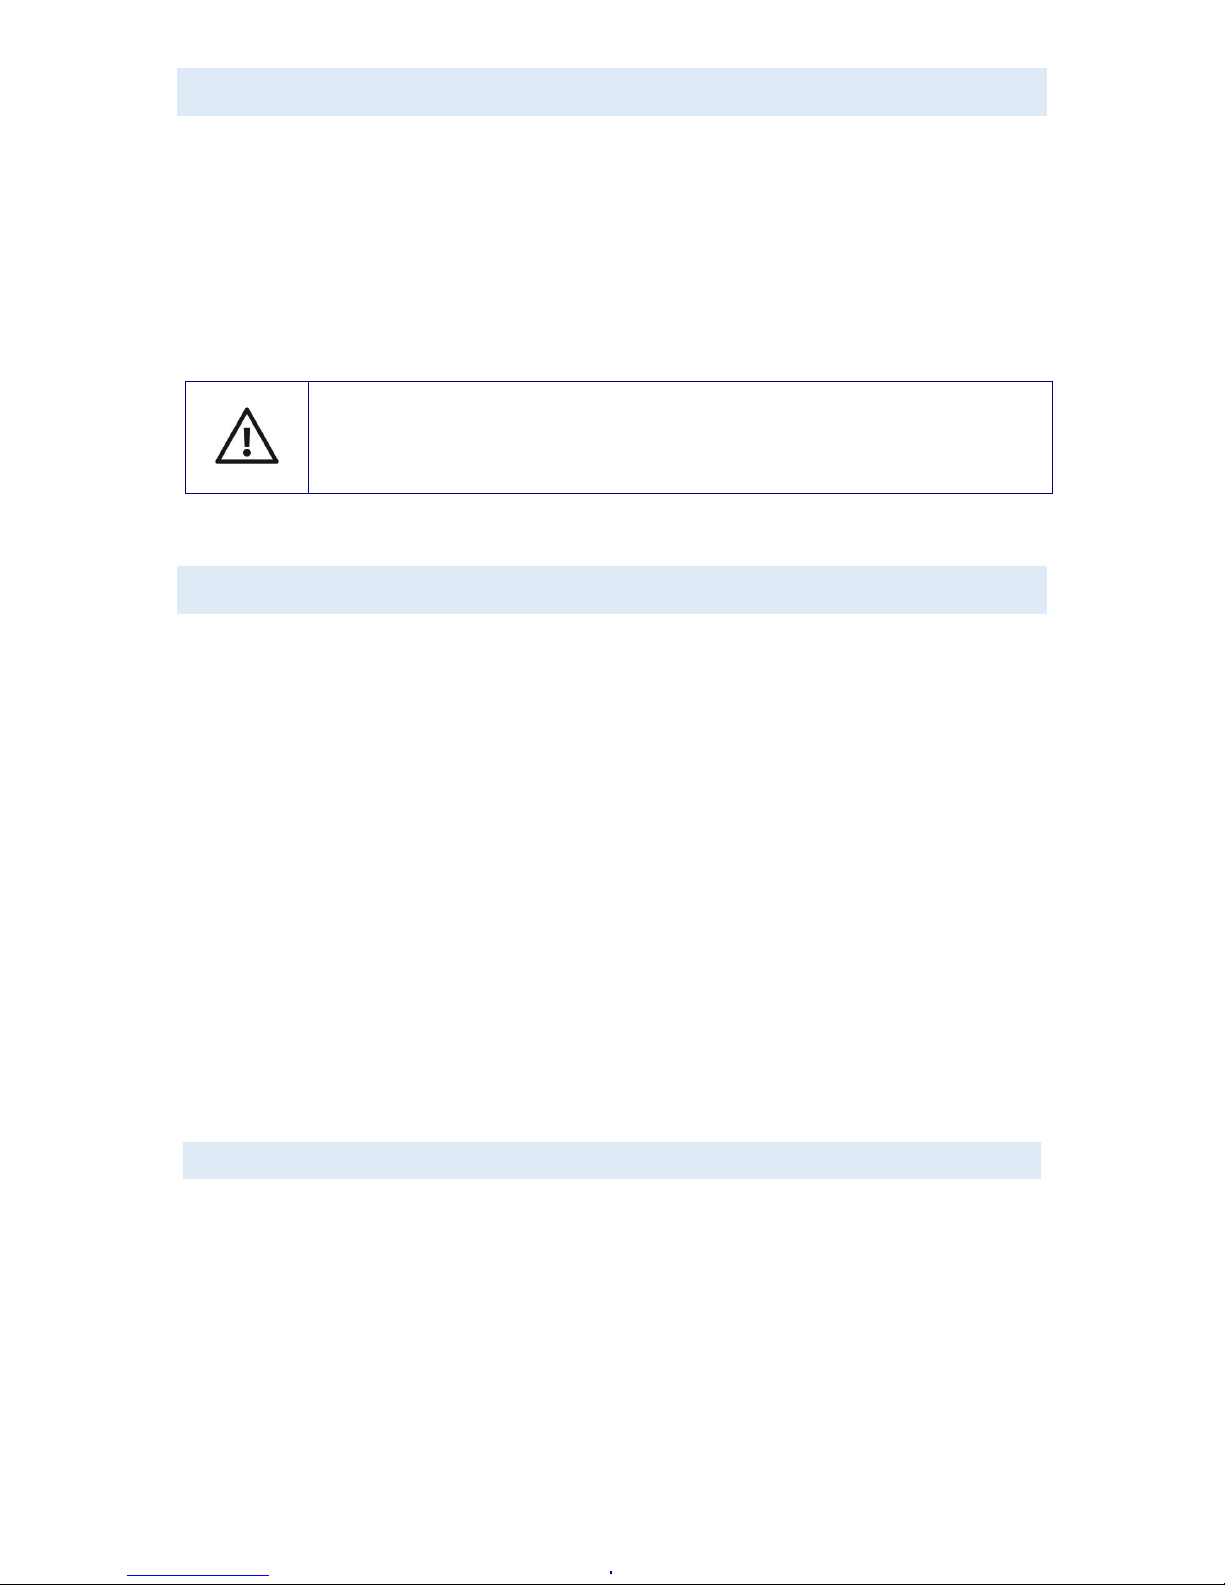
7.5 TEMPERATURE
To get the temperature, briefly press Button 1 + Button 2 + Button 2
The device measures temperatures either in Centigrade or in Fahrenheit. To establish the current
settings press 1x SHORT Button 2 and thereafter 2x SHORT Button 1. If the Picobello is in Fahrenheit
mode then a short signal is heard. For Centigrade the Picobello emits a wave signal. To change to the
opposite mode press 1x SHORT Button 1 and then 1x LONG Button 1 which is now the Setting Menu.
Press Button 1 and the Picobello indicates via the number 7 the current mode. Celsius is always a
double digit number and Fahrenheit is always a 3 digit number.
Caution: Device stated temperatures are always an approximation. For a more
precise result, leave the device in the surrounding temperature for 3 minutes while
keeping it away from heat sources, cold or direct sunlight.
7.6 EURO BANKNOTE RECOGNITION
Turn the Picobello over. This side has different (tactile) markings:
At the lower end (opposite of where the buttons are on the front side) a tactile line can be felt. Above
that, at the upper end, there is another tactile line and above that one stud, above that two studs
and above that three studs.
All these markings measure the widths of Euro-banknotes as follows:
Between the line at the lower end and: The line (at upper end) 5 Euro
One stud (at upper end) 10 Euro
Two studs (at upper end) 20 Euro
Three studs (at upper end) 50 Euro.
To measure the widths of a Euro-banknote hold the Picobello facing up. Place a Euro-banknote
sideways between the line at the lower end and the markings (line, one, two or three studs) at the
upper end. The first marking not covered by the note indicates the value of the bank note.
7.7 RESET DEVICE TO DEFAULT SETTINGS
Resetting returns the Picobello to its factory default settings, including the date and time. To perform
a reset press the following key sequence:
SHORT Button 1 + SHORT Button 2 + SHORT Button 1 + SHORT Button 2 + LONG Button 1 & Button 2.
Page 16

7.8 VERSION NUMBER (DOUBLE DIGIT NUMBER)
To retrieve the firmware version enter the key sequences as follows:
Call up version number part 1:
SHORT Button 2 + SHORT Button 1 + SHORT Button 1 + SHORT Button 1
Call up version number part 2:
SHORT Button 2 + SHORT Button 1 + SHORT Button 1 + SHORT Button1 + SHORT Button 1
Page 17

8. OVERVIEW DATA & SETTINGS
Many settings on the Picobello can be executed by the user. Double digits, for example, hours,
months and years. Or single digits, for example the output mode. There are also some special settings
that can be retrieved, for instance battery status or temperature. Picobello operation modes have
dedicated key sequences for status retrieving and enabling.
SETTING
CALL UP/CHECK
SETTING/CHANGE
CONFIRMATI
ON
SIGNAL after
change
ACTIVATE/TURN
ON
Press any button – LONG
or attach to a USB connection
-----
COMPASS
Cardinal Direction
Press 1x SHORT - B1
-----
-----
Simple and
Advanced Modes
Press 5x SHORT - B1
Press 4x SHORT - B1 – then 1x LONG
Yes
Control mode set
selected direction
-----
Press 1x LONG - B1
-----
Turn the selected
direction control
mode off
-----
Press any button
-----
TIME (double
digit) in 24 hour
system
Press 1x SHORT - B2 then B1
1x SHORT - B1
Press 1x SHORT - B2 then
1x LONG - B1
Yes
Hour
Press 1x SHORT - B2
Press 1x LONG - B2
Yes
Minute
Press 2x SHORT - B2
Press 1x SHORT - B1 then B2 –
Yes
TIME (double
digit) in 12 hour
system
Press 1x SHORT - B2 then
1x SHORT - B1
Press 1x SHORT - B2 – then
1x LONG - B1
Yes
Hour
Press 1x SHORT - B2
Press 1x SHORT - B2
-----
Minute
Press 2x SHORT - B2
Press 1x SHORT - B1 and then B2
-----
DATE (double
digit)
Day
Press 3x SHORT - B2
Press 2x SHORT – B2 &
1x LONG – B2
Yes
Month
Press 4x SHORT - B2
Press 3x SHORT - B2 &
1x LONG - B2
Yes
Year
Press 5x SHORT - B2
Press 4x SHORT - B2 &
1x LONG - B2
Yes
TEMPERATURE
Press 1x SHORT - B1 &
2x SHORT – B2
-----
-----
Degrees
Celcius/Fahrenhei
t
Press 1x SHORT - B2 &
2x SHORT – B1
Press 1x SHORT - B2 &
1x SHORT - B1 & 1x LONG - B1
Save personal
settings
Press 4x SHORT - B2 &
1x LONG - B1
RESET to original
settings
Press 1xSHORT - B1 then B2, B1, B2,
and 1x LONG - B1 + B2
SOFTWARE
VERSION PART 1
Press 1x SHORT - B2 &
3x SHORT - B1
-----
-----
Page 18

9. SAFETY INSTRUCTIONS
To ensure the safe use and a long service life of the Picobello, please remember the following:
The Picobello should not be opened. Its special assembly is to ensure safe operation and water
resistance.
The Picobello should not be exposed to extreme temperatures.
Functional reliability can only be guaranteed at temperatures between 0° and + 40 ° Celsius.
Use the Picobello only when it is in an undamaged condition.
If you are using Micro-USB cables or chargers other than those included, make sure that its output
voltage is 5 volts and charging current does not exceed 2.0 A.
10. TECHNICAL DATA
Power supply:
1 x 3.7V 160mAh Lithium-polymer rechargeable battery
Dimensions:
95 x 30 x 9,5 mm
Weight:
22 g
Storage temperature:
14 °F to 122 °F (-10 °C to +50 °C)
Operating temperature:
32 °F to 104 °F (0 °C to +40 °C)
Included in box:
Picobello
USB power supply
Micro-USB cable
Printed user manual
Acoustic instructions and PC software on a USB stick
Page 19
11. GUARANTEE AND SERVICE
Warranty periods from date of purchase:
Twenty-four (24) months on the device itself
Twelve (12) months on the accessories (e.g. power supply plug, earphones, etc.)
Six (6) months on durable parts (e.g. rechargable battery, case, etc.)
For storage devices (CDs, SD cards, etc.) as well as for disposable batteries no guarantee is
provided
During the warranty periods mentioned above, the product will be either repaired or replaced free of
charge. In no event shall CareTec be liable for indirect, special or consequential damages. The
exposure of the device to liquids, strong electromagnetic fields, heat, as well as dropping the device
or opening the case, causes immediate loss of guarantee. Should difficulties occur please contact
CareTec or a local distributor before returning the device for no apparent reason.
Necessary procedures will be communicated. Authorized personnel should only open the device!
CareTec reserves the right to make any changes or improvements to its products without further
notice.
12. LEGAL NOTICE - DISPOSAL
DISPOSAL OF USED ELECTRONIC DEVICES
This product must be disposed of separately from household waste at specially
designated collection and recycling points. For further information, please contact
your local authorities.
BATTERY DISPOSAL
Batteries must not be disposed together with household waste. As a consumer, you
are legally obligated to bring your old batteries to public collecting points (in your
community or any shop that provides these batteries).
Pb-Cd-Hg These signs can be found on contaminant-laden batteries.
Pb = containing lead
Cd = containing cadmium
Hg = containing mercury
Page 20
13. SYMBOLS USED
Note
Caution
Dispose of separately from household waste
Manufacturer
14. MANUFACTURER
CareTec International GmbH
Stubenbastei 1
A 1010 Vienna, Austria,
is the manufacturer of this product.
Phone: (+43 1) 513 80 81 0
Fax: (+43 1) 513 80 81 9
Email: [email protected]
Web: www.caretec.at
Picobello_EN_04.2017_V1.7
 Loading...