

Page 1
!
1
Care Messenger
Welcome to
Installation & Setup
Version 1.1
DVB-OTT-STB
Page 2
#
2
Welcome
to your new
Care Messenger
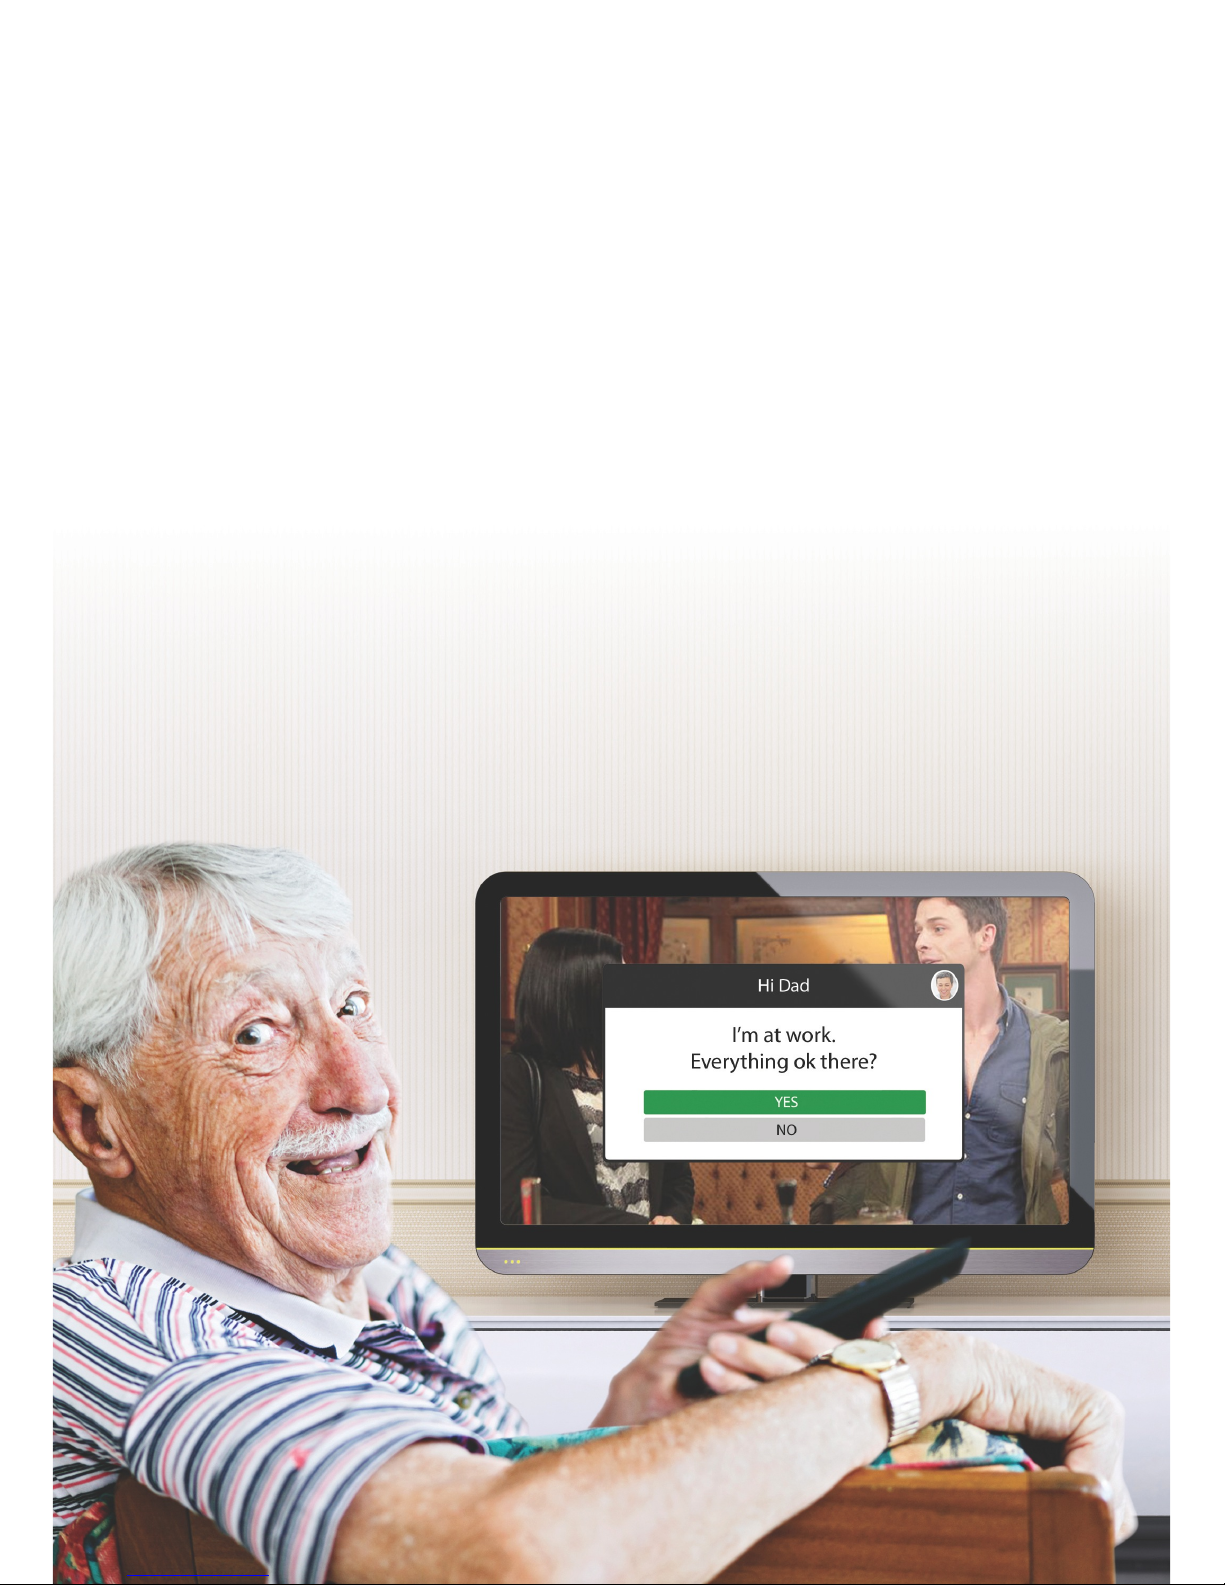
Care Messenger makes keeping in touch easy for everybody,
using technology everyone can cope with.
#
It allows you to send messages and pictures from your
mobile or computer, straight to a television screen, using our
simple box.
#
And the person receiving the message can send a simple
response back using their familiar television remote control.
Page 3

#
3
Contents
1: Setting up the Care Messenger remote
#
2: Positioning the Care Messenger device
#
3: Connections and cables
#
4: Connecting to your TV
#
5: Setup 1 - from an aerial
#
6: Setup 2 - pass through (HDMI)
#
7: Setup 3 - pass through (CVBS)
#
8: Selecting your source
#
9: Setting your location
#
10: Network interface
#
11: Default input
#
12: Setting your wireless network
#
13: Wireless network password
#
14: Network settings
#
15: Tuner channel search
#
16: Remote control synchronisation
4
#
5
#
6
#
7
#
8
#
9
#
10
#
11
#
12
#
13
#
14
#
15
#
16
#
17
#
18
#
19
Support: call 0191 206 4004 or visit www.caremessenger.co.uk
Page 4
#
4
1: Installing Care Messenger
Follow the instructions in this section to get your Care
Messenger device working and ready to use. We'll need to:!
#
• make sure your box is plugged in and switched on
• is connected correctly to your television
• is working with the remote we supplied
• is connected to your broadband.
#
Setting up the Care
Messenger remote
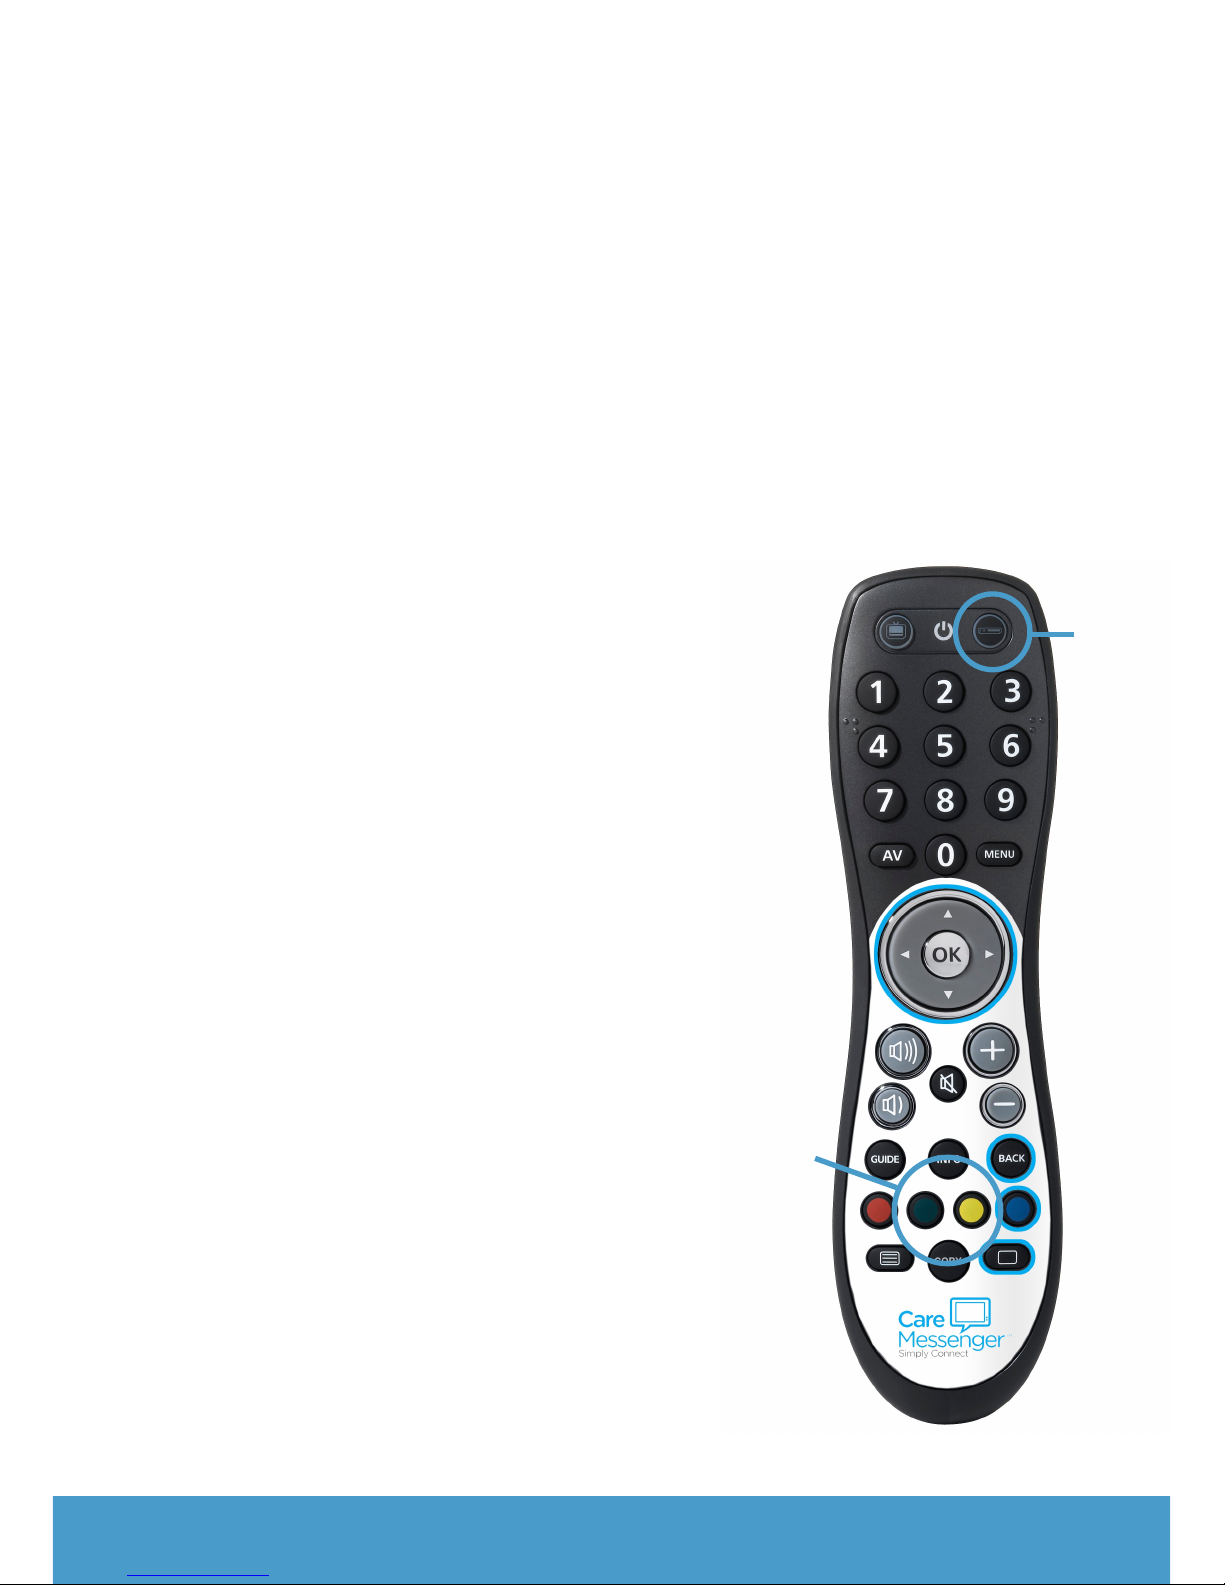
1. Put 2 x AAA batteries in the
remote by removing the rear
cover and inserting as shown
inside the battery
compartment. Ensure the
batteries are the correct way
round.
2. To program the Care Messenger
remote, begin by pressing the
yellow and green buttons (a) at
the same time until the right
hand button at the top of the
remote (b) flashes twice. Do the
next step as soon as possible.
3. Now press 0820 using the
number keys. The top right
button should flash again The
remote is now ready to use.
Support: call 0191 206 4004 or visit www.caremessenger.co.uk
a
b
Page 5
#
5
Support: 0191 206 4004 or visit www.caremessenger.co.uk
2: Positioning your device
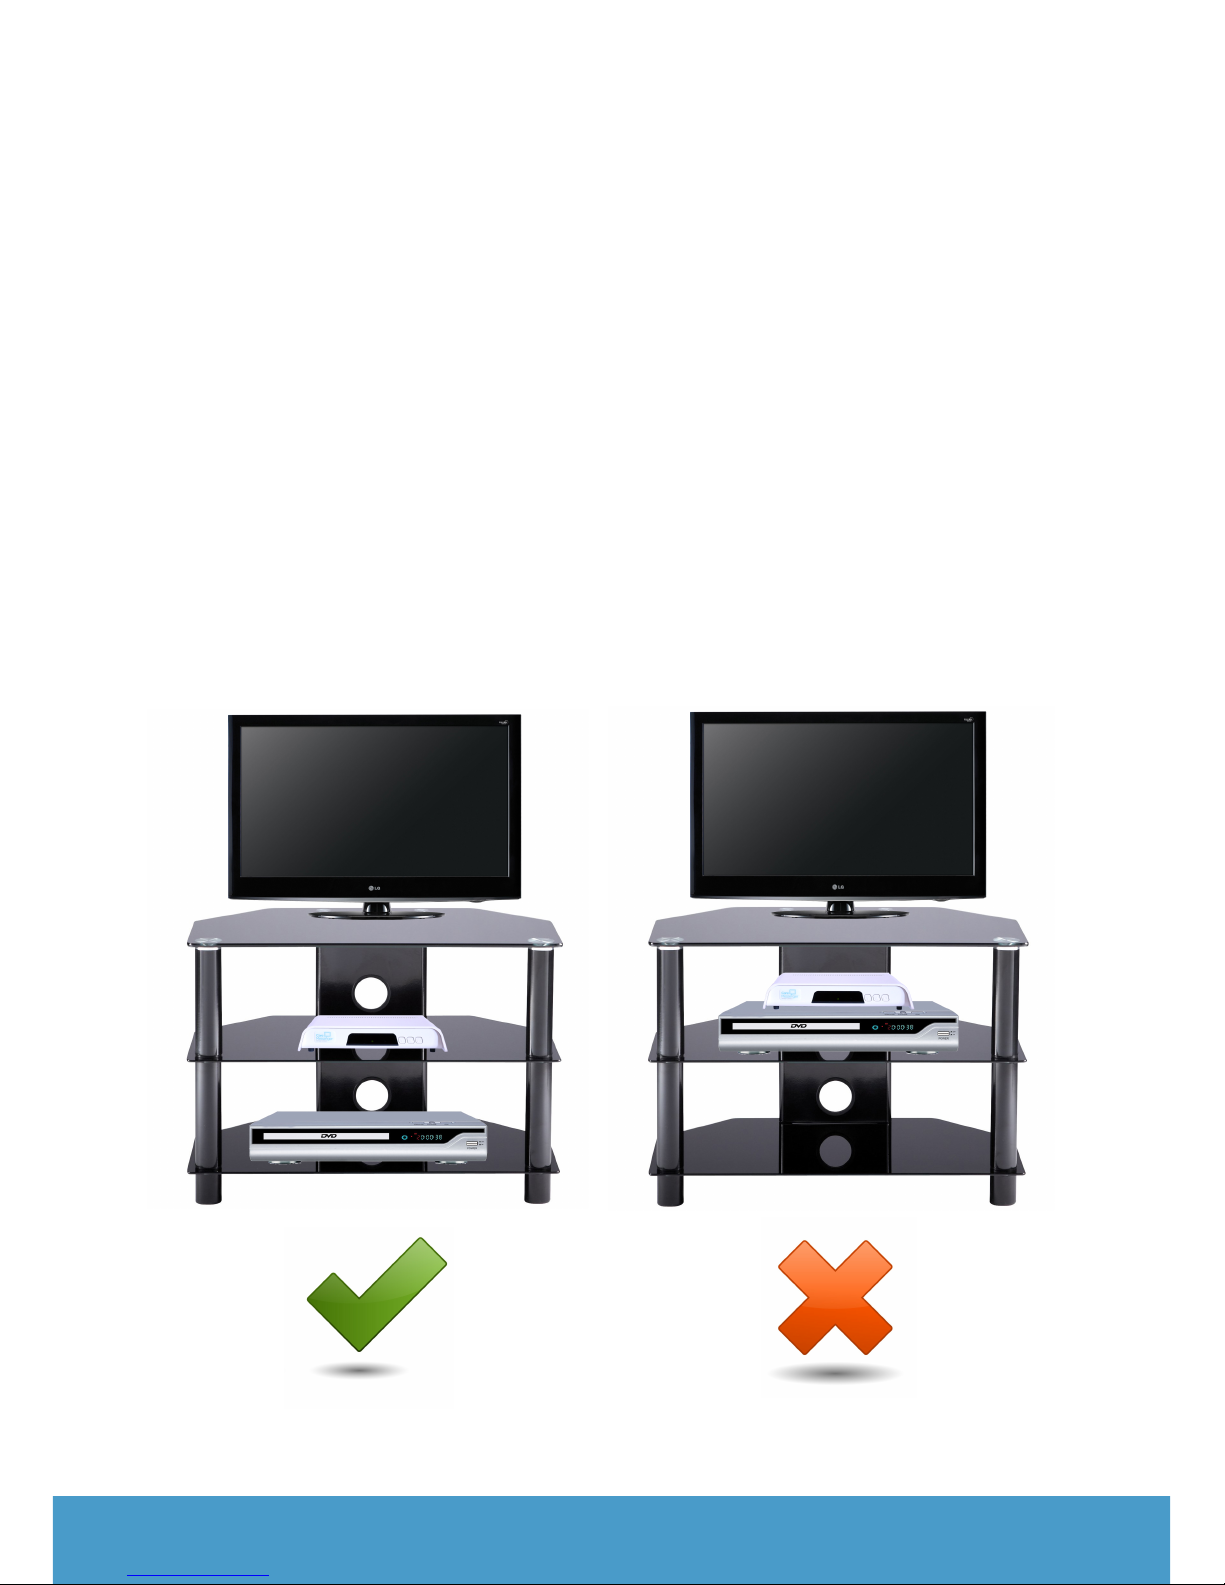
It is very important that all electrical equipment has
adequate ventilation.
#
To ensure safe and reliable operation, please ensure that
you do not locate your Care Messenger device directly
underneath or on top of any other electrical equipment.
#
The Care Messenger device must not be stacked on top of
equipment such as satellite TV, cable or other set top
boxes, or DVD / Blu-ray players.
Page 6
#
6
Support: call 0191 206 4004 or visit www.caremessenger.co.uk
3: Connections and cables
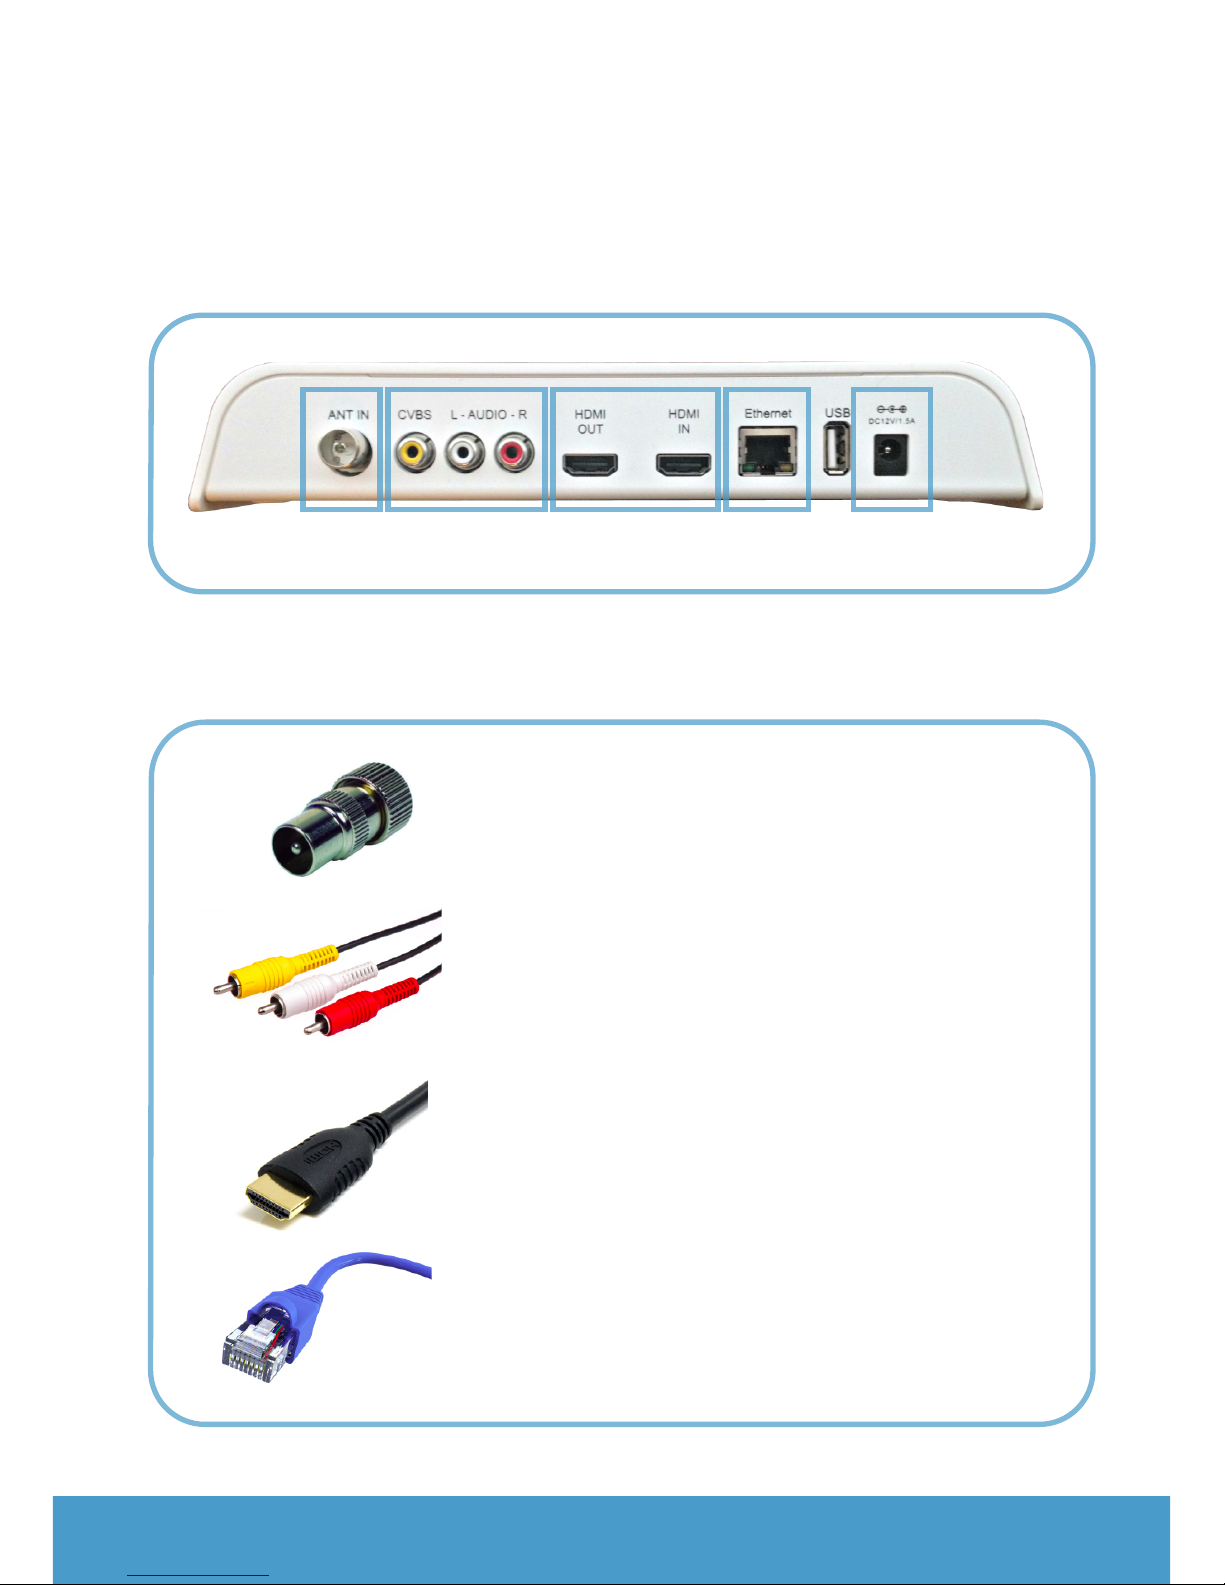
The back of your Care Messenger device looks like this:
Your cable connectors look like this:
Aerial /Antenna !
(NOT APPLICABLE TO USA / CANADA)!
Output from a TV aerial
SD / CVBS / L-R Audio!
Connects an existing device (TV
receiver / DVD player) to your Care
Messenger device
HDMI!
Connects the Care Messenger device
to your TV, and existing devices to
Care Messenger
Ethernet!
Connects the Care Messenger device
to your network instead of using Wi-Fi
Aerial CVBS HDMI Ethernet Power
Page 7
#
7
Support: call 0191 206 4004 or visit www.caremessenger.co.uk
4: Connecting to your TV
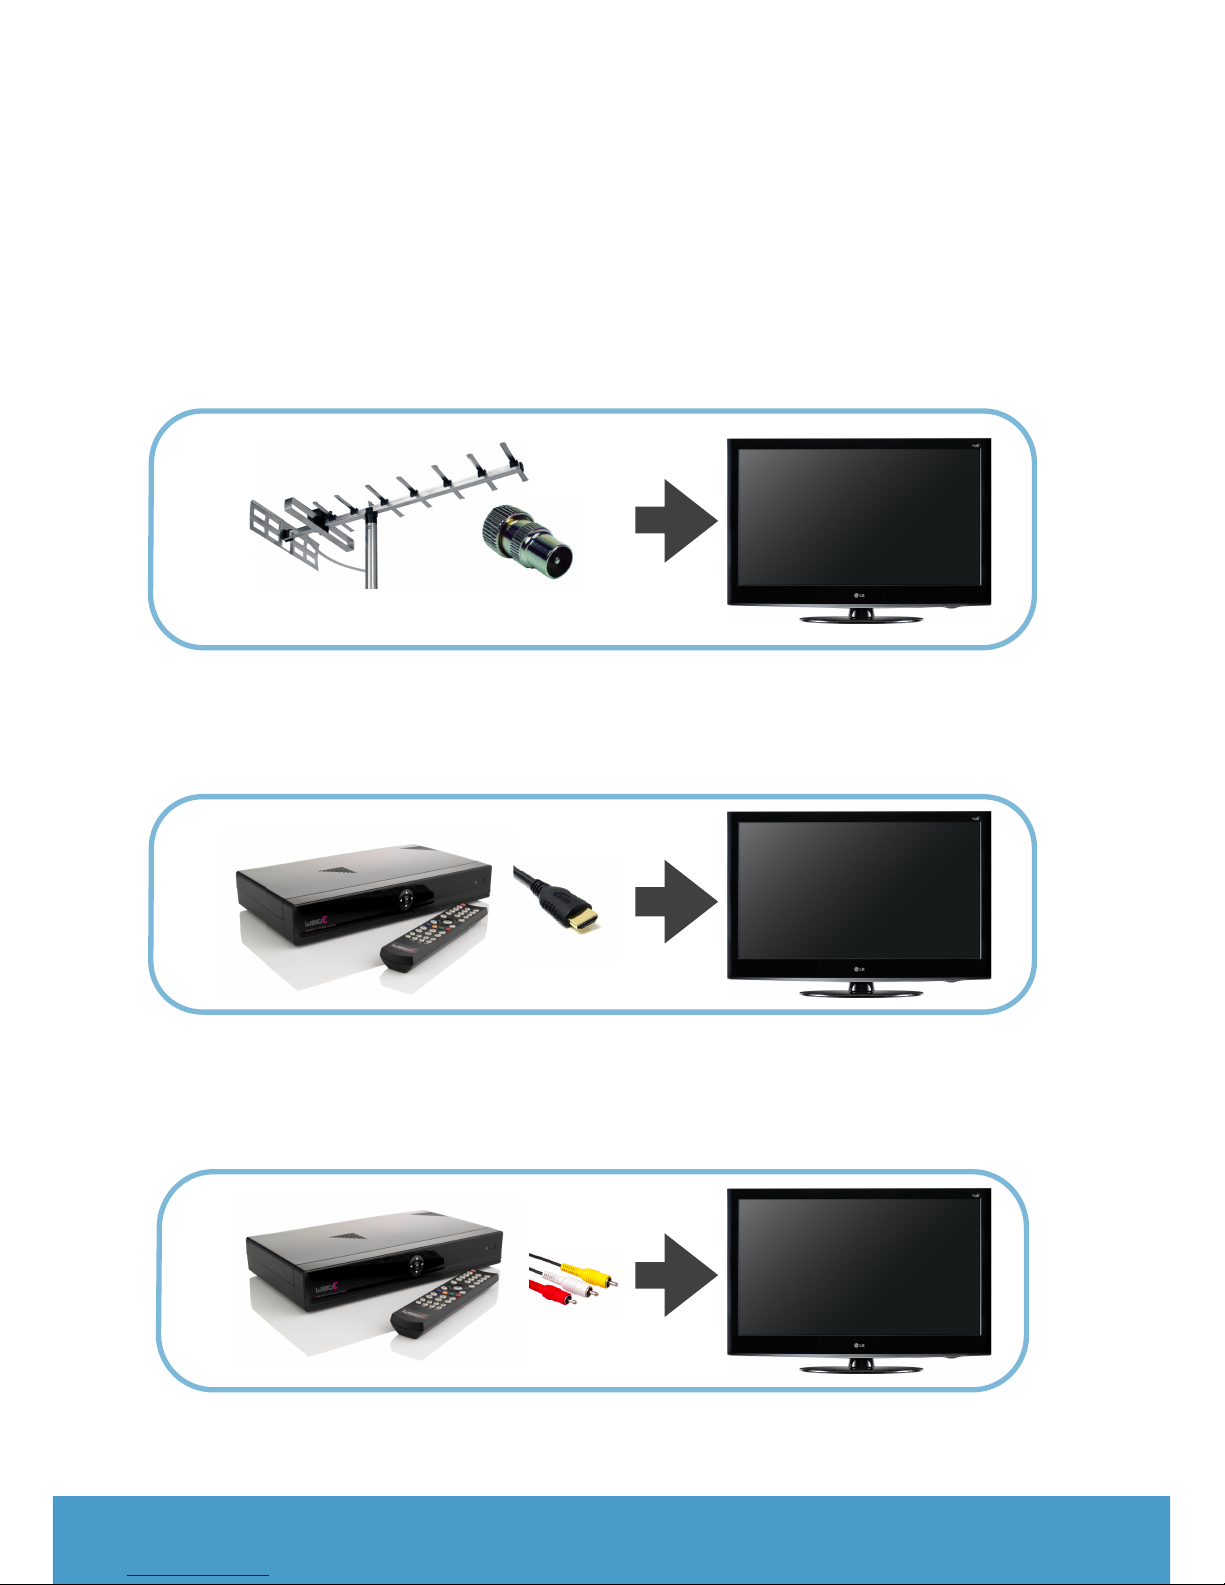
Choose which of these three setups you require:
If your TV aerial is plugged directly into your TV with an
aerial connector, and you don’t have SATELLITE or CABLE,
then you need Setup 1 on page 8.
#
#
#
#
If you have SATELLITE or CABLE or a similar service that
provides you with your TV that is plugged into your TV with
an HDMI cable, then you needSetup 2 on page 9.
#
#
#
#
If you have SATELLITE or CABLE or a similar service that
provides you with your TV that is connected to your TV but
NOTwith an HDMI cable, useSetup 3 on page 10.
1
2
3
To TV HDMI Input
To TV HDMI Input
To TV HDMI Input
Page 8
#
8
Support: call 0191 206 4004 or visit www.caremessenger.co.uk
5: Setup 1 - from an aerial
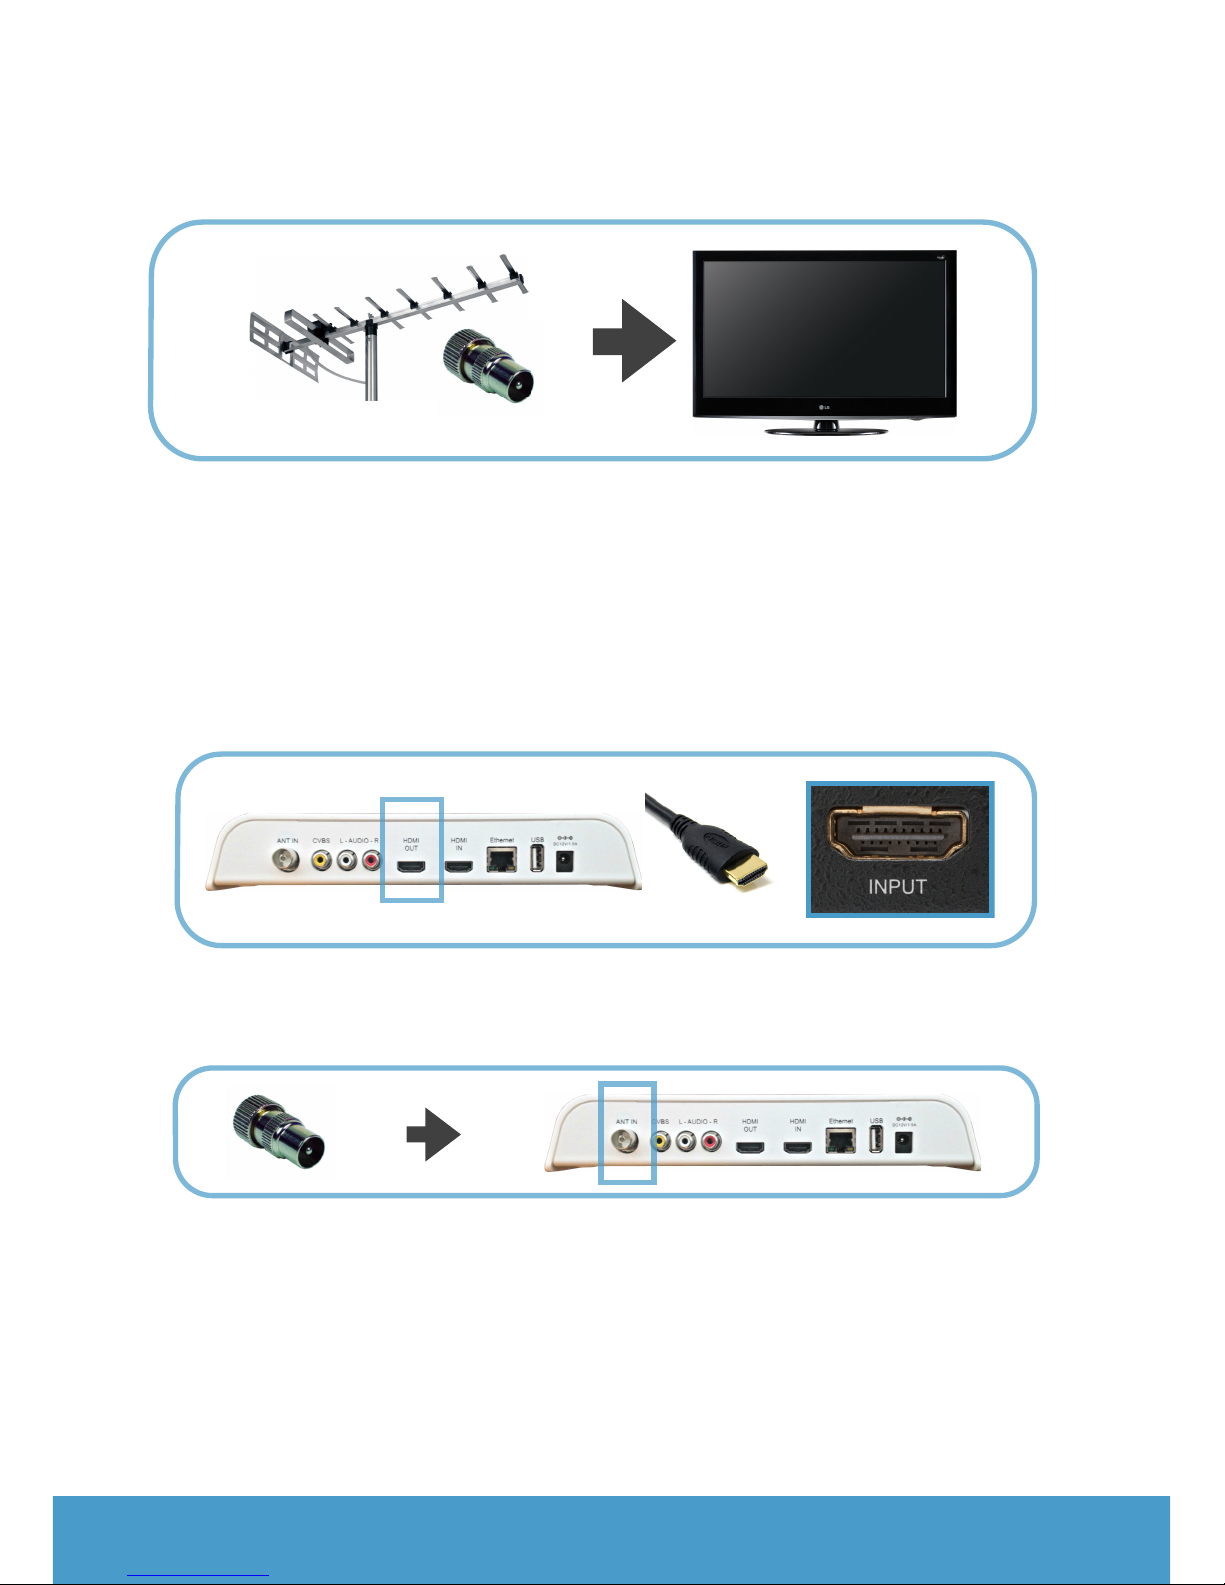
(Points 1 and 2 NOT APPLICABLE TO USA / CANADA)
1. Connect the Care Messenger device HDMI OUT
port to an HDMI port on your TV using the HDMI
cable provided. The cable only goes into the port
one way, and it doesn’t matter which end of the
cable goes into the box or TV, either way will work.!
!
!
!
#
#
2. Disconnect the aerial from your TV and plug it into
the ANT IN port on the Care Messenger device.!
!
!
1
Optional step for those with DVD / Blu-ray device
If you wish to plug in a DVD or Blu-ray player connect
the HDMI cable from the player to the HDMI IN port.
TV
To TV HDMI Input
Now go to Section 8: Selecting your source (page 11)
Page 9
#
9
Support: call 0191 206 4004 or visit www.caremessenger.co.uk
6: Setup 2 - pass through (HDMI)
2
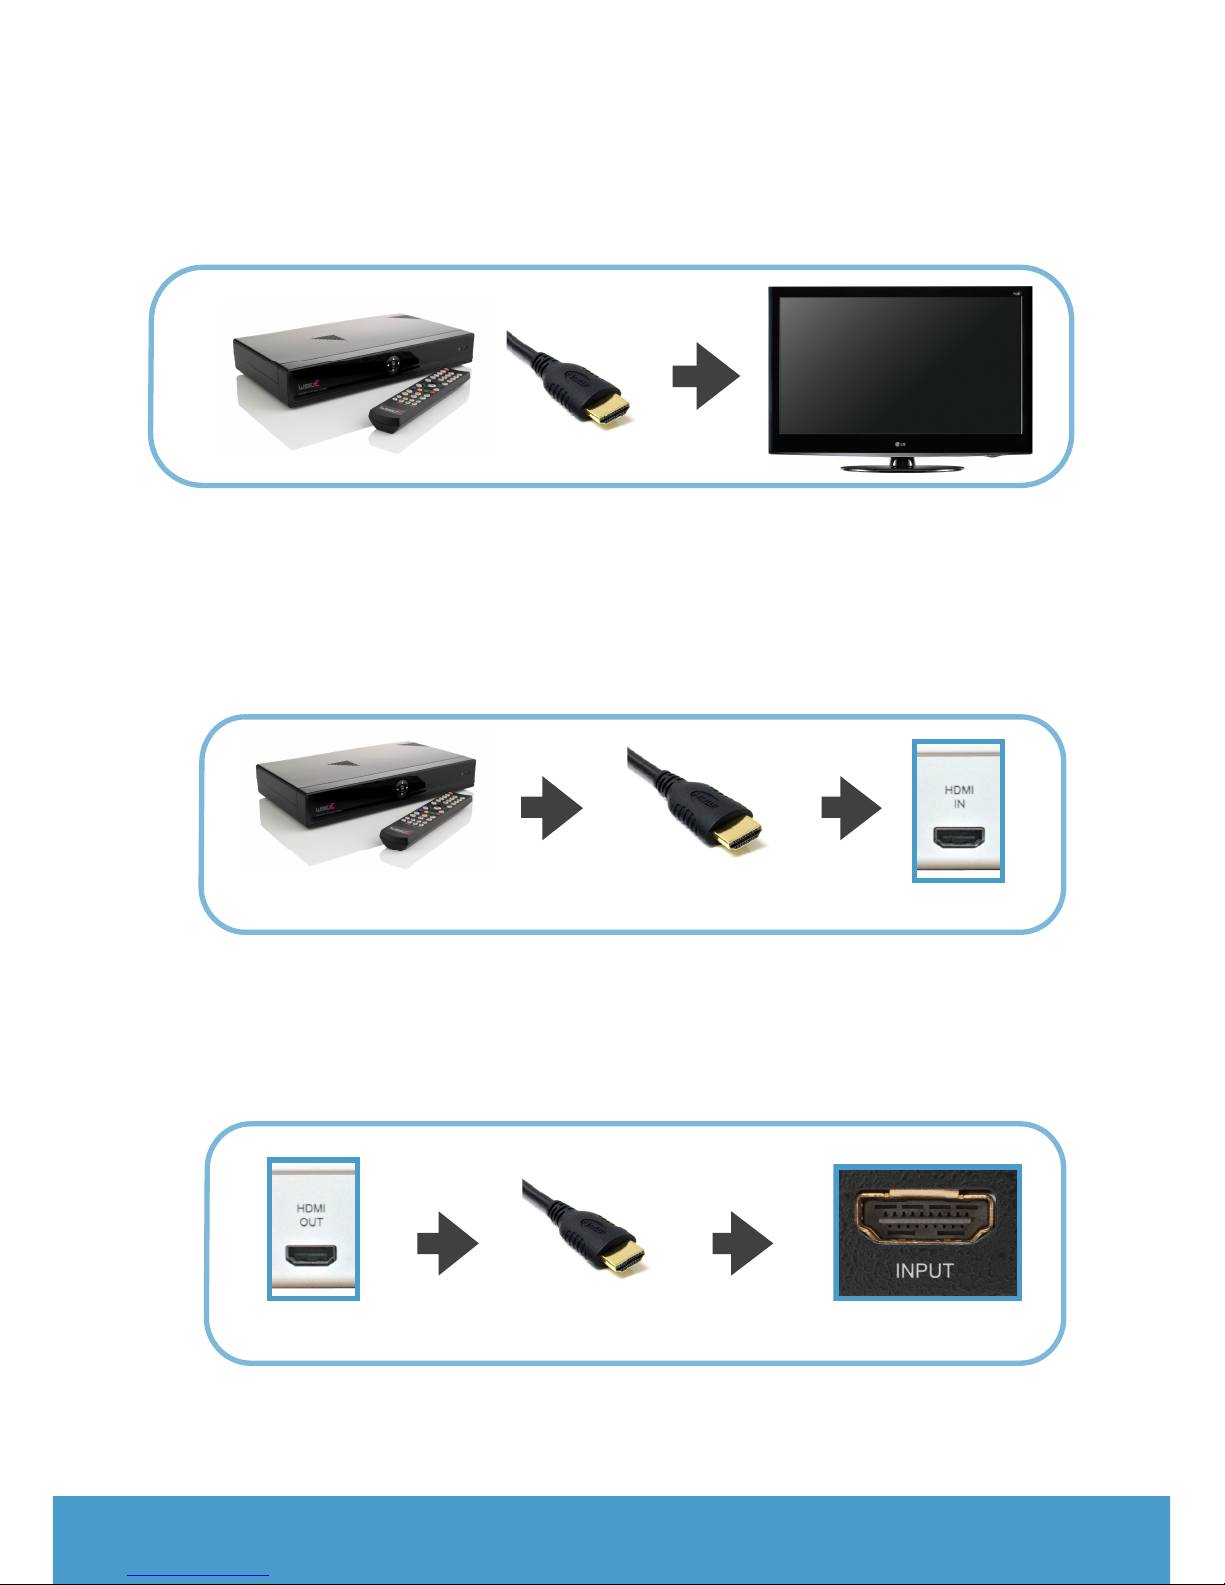
1. First disconnect the HDMI cable that comes from your
existing set top box from the HDMI port on your TV.
2. Plug this HDMI cable into the HDMI IN port on the Care
Messenger device.!
!
!
!
!
!
#
3. Using the HDMI cable provided, plug one end into the
HDMI OUT port on the Care Messenger device, and the
other into the same HDMI port on the TV which was
being used previously.
Care Messenger HDMI out using HDMI lead to TV HDMI in
Your set top box HDMI out to Care Messenger HDMI in
If your TV is from an existing set top box by HDMI input:
To TV HDMI Input
Now go to Section 8: Selecting your source (page 11)
Page 10
#
10
Support: call 0191 206 4004 or visit www.caremessenger.co.uk
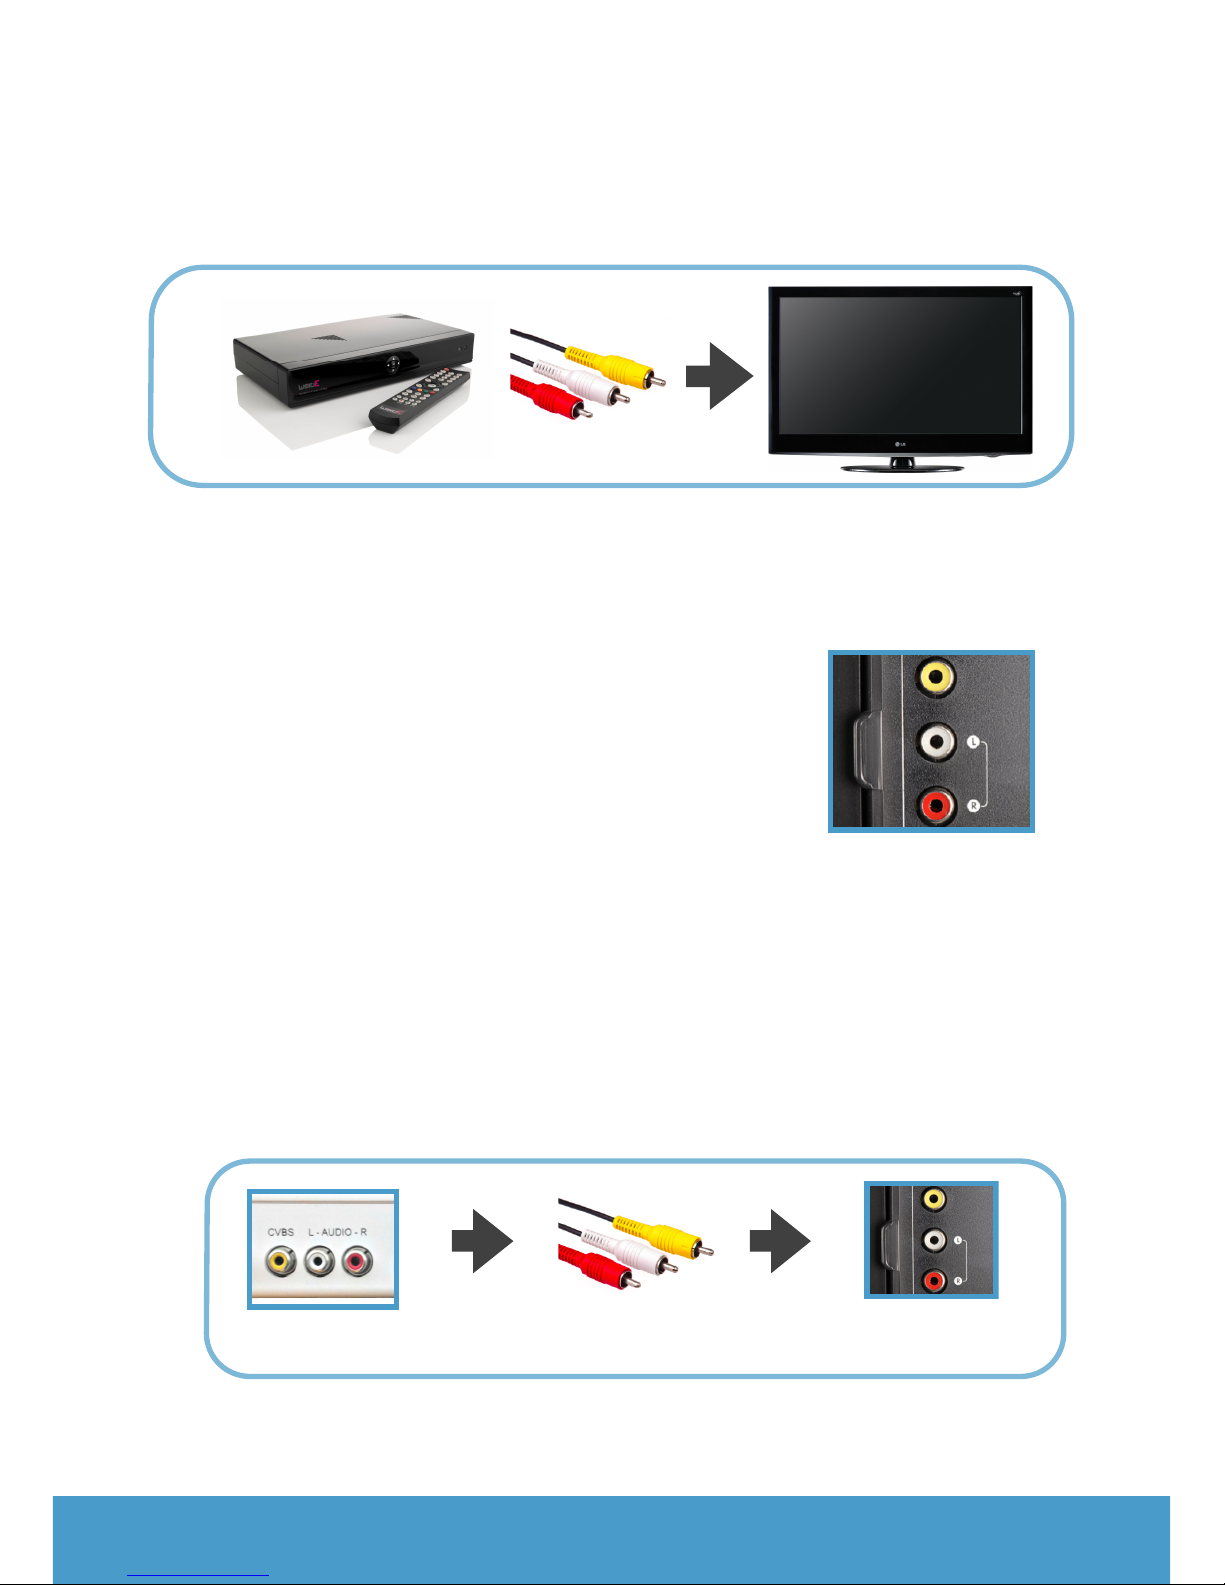
7: Setup 3 - pass through (CVBS)
2
1. Using the HDMI cable provided, plug one end into the
HDMI OUT port on the Care Messenger device, and the
other into the HDMI port on the TV.
2. Locate the Video (yellow connector)
and L and R Audio ports on your set
top box. On most equipment it will
look something like this.
3. Using the 3 ended cable provided,
connect your set top box to the Care
Messenger device ensuring you connect the same
coloured connectors together, if your equipment does
not have coloured connectors or labels then use the
following guide.
a) Yellow- CVBS/Video!
b) White – Left Audio!
c) Red – Right Audio
If your TV is from an existing set top box by CVBS inputs:
Care Messenger CVBS out using CVBS lead to TV CVBS in
To TV HDMI Input
Now go to Section 8: Selecting your source (page 11)
Page 11
#
11
Support: call 0191 206 4004 or visit www.caremessenger.co.uk
8: Selecting your source
Choose between a wired or WiFi connection
If you are using a wired connection to your internet router, this
must be plugged into the Care Messenger Ethernet port. If
you are using a wireless/Wi-Fi connection there is no need to
connect a network cable. A wired connection can be more
reliable if you are able to use one.
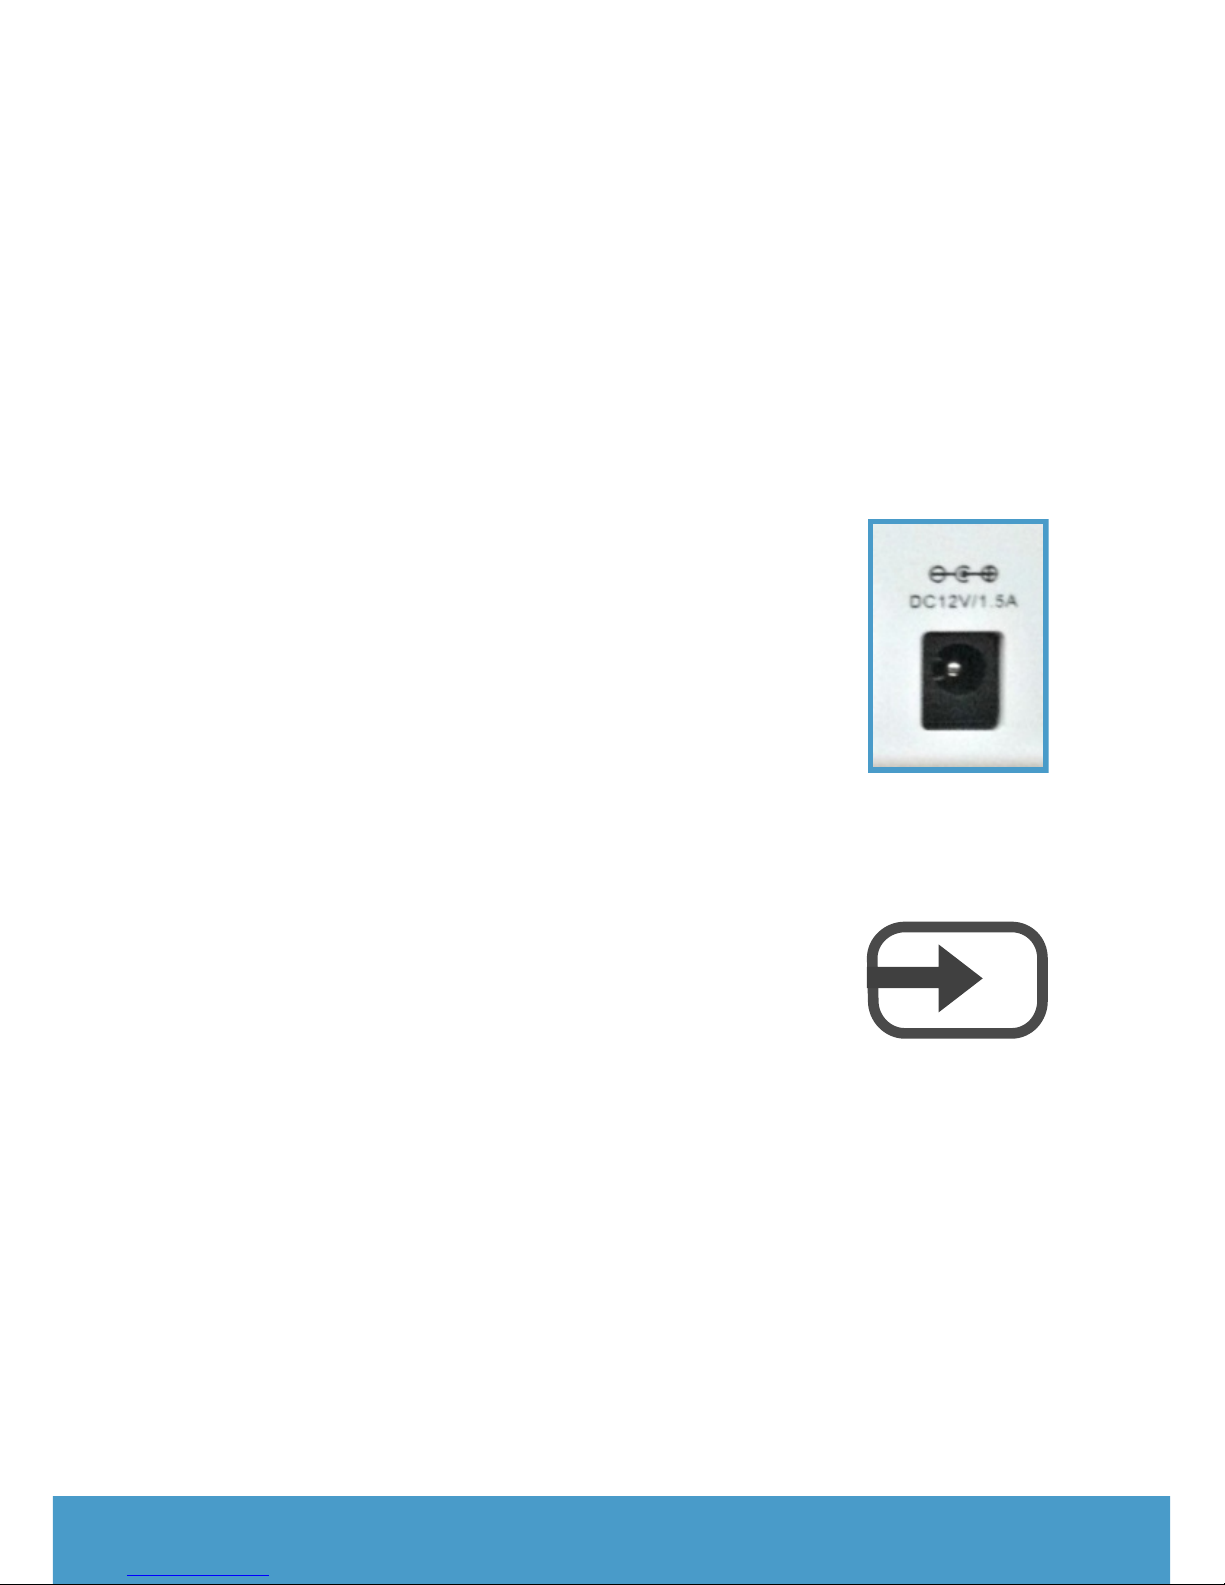
Power up your Care Messenger device
Connect the small round metal connector on
the cable from the power supply provided into
the porton theCare Messenger device
marked ‘DC 12V/1.5A', then plug the power
supply into the wall socket andswitch on.
Select the Care Messenger source on your TV
You will have to select the correct input / source on your TV
to be able to see the setup screens. To do this you need to
use your existing TV remote. To switch inputs
you will need to use whichever button cycles
through the various inputs. This may be
labelled AV, INPUT, SOURCE, and look like this:
The correct input will usually be HDMI 1 or HDMI
2. You will know you have the correct input once you see the
image shown on Page 12 of this manual on your screen. When
you can, if possible make this the default input for your TV
viewing. This is the input Care Messenger uses.
NOTE: All other steps in this manual refer to the remote we
have supplied, not your existing TV remote.
Page 12
#
12
Support: call 0191 206 4004 or visit www.caremessenger.co.uk
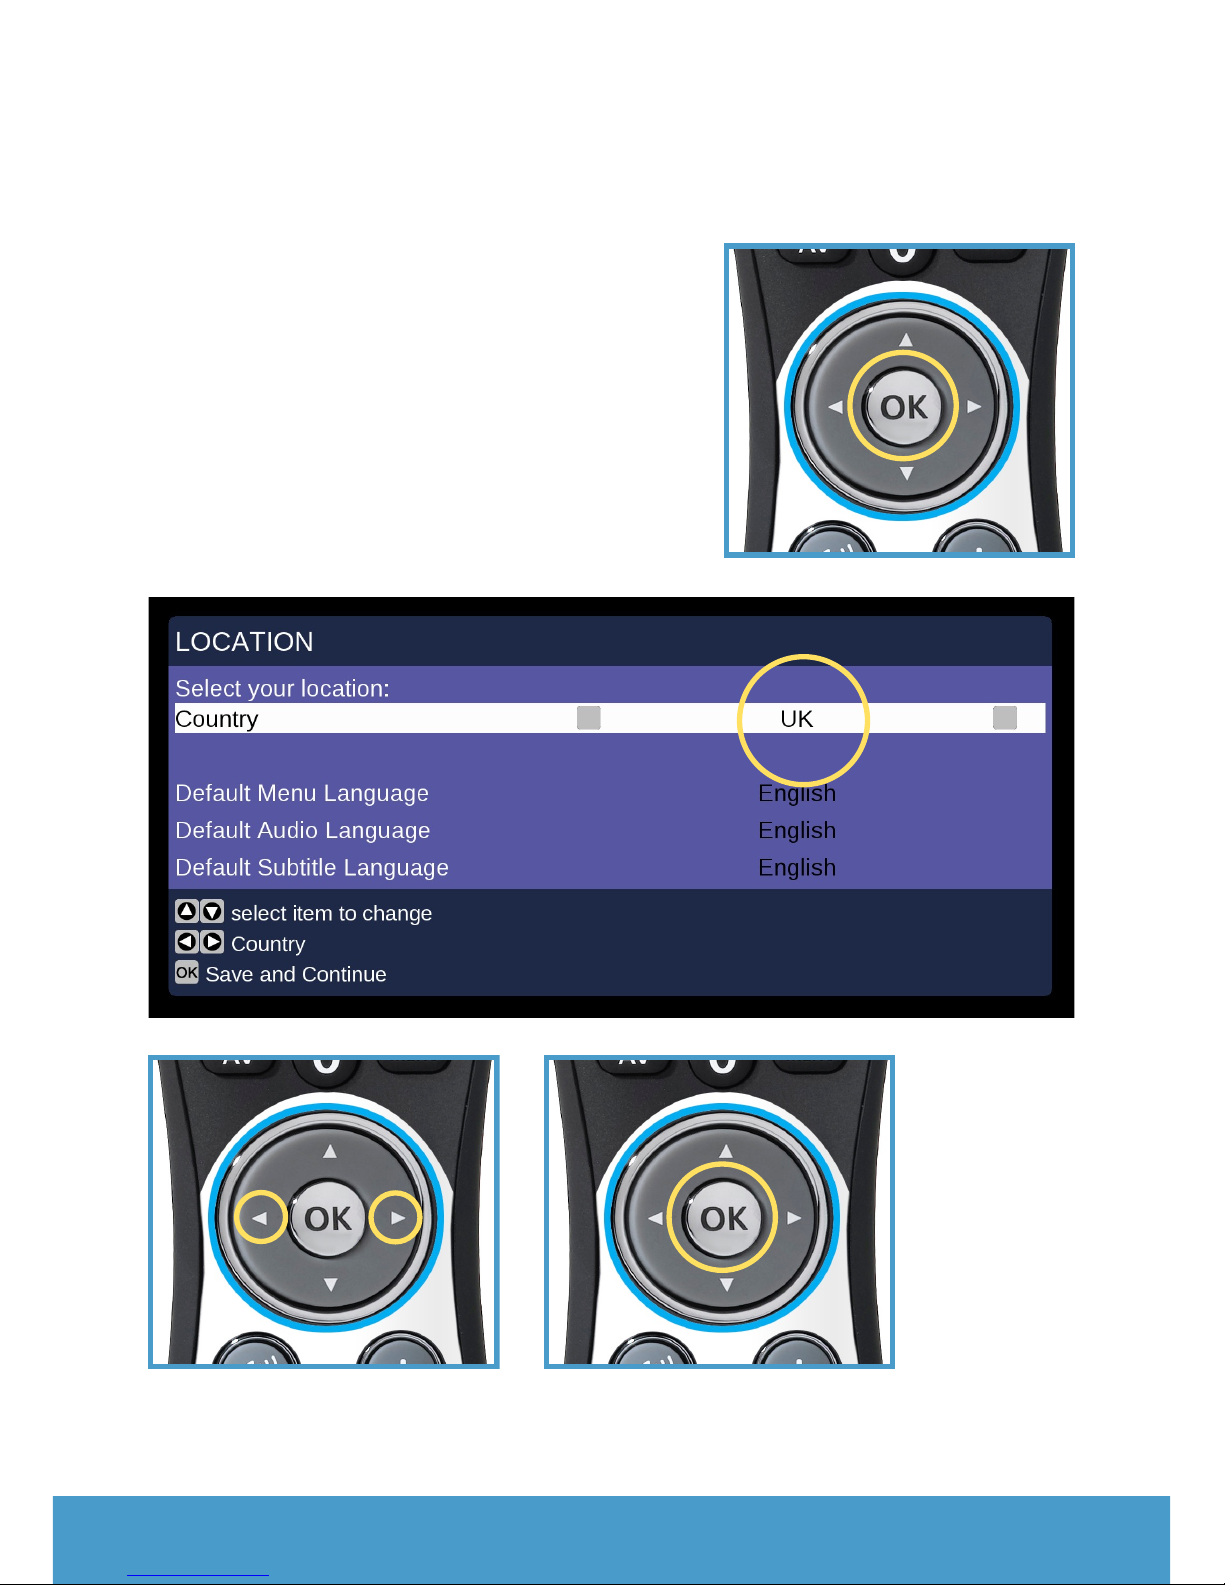
9: Setting your location
First you need to set your location.
UK is the default. If you are in the
UK you do not need to change
anything. Press OK now.
If you are not in the UK, use left /
right arrow keys on your Care
Messenger remote to select your
country. Press OK to continue.
Page 13
#
13
Support: call 0191 206 4004 or visit www.caremessenger.co.uk
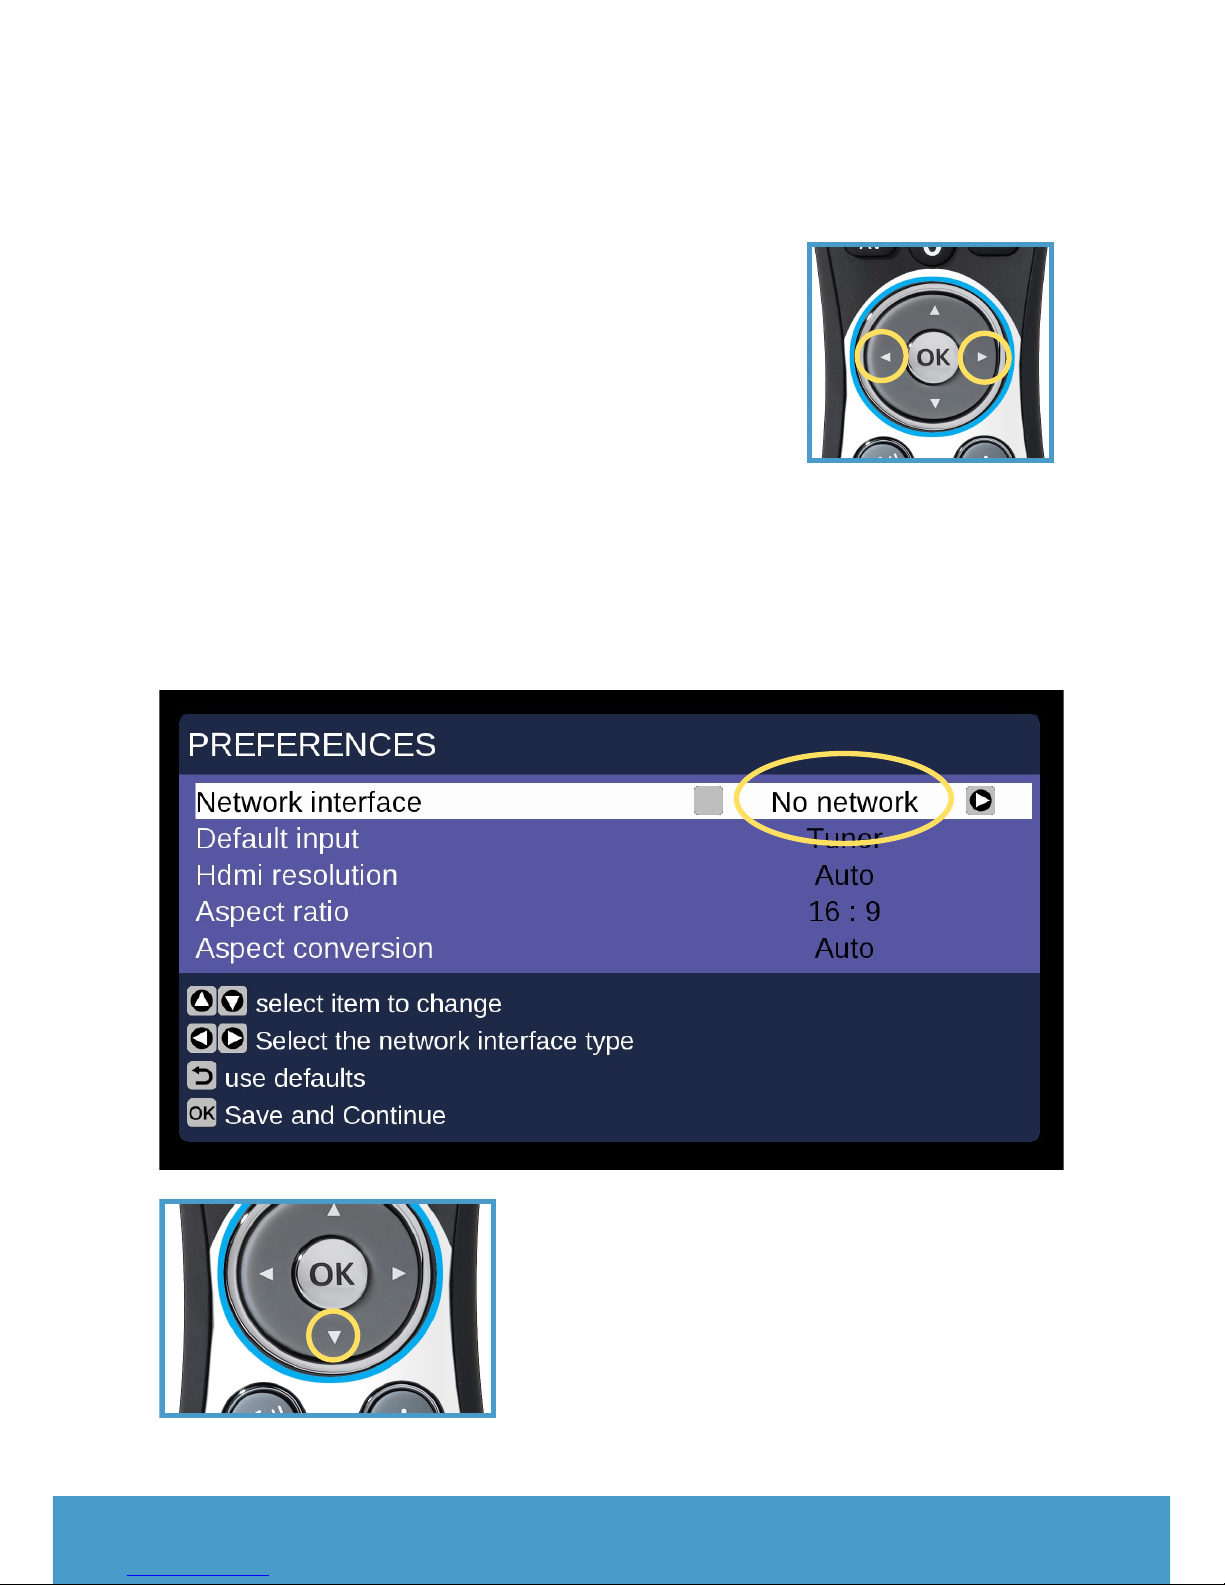
10: Network interface
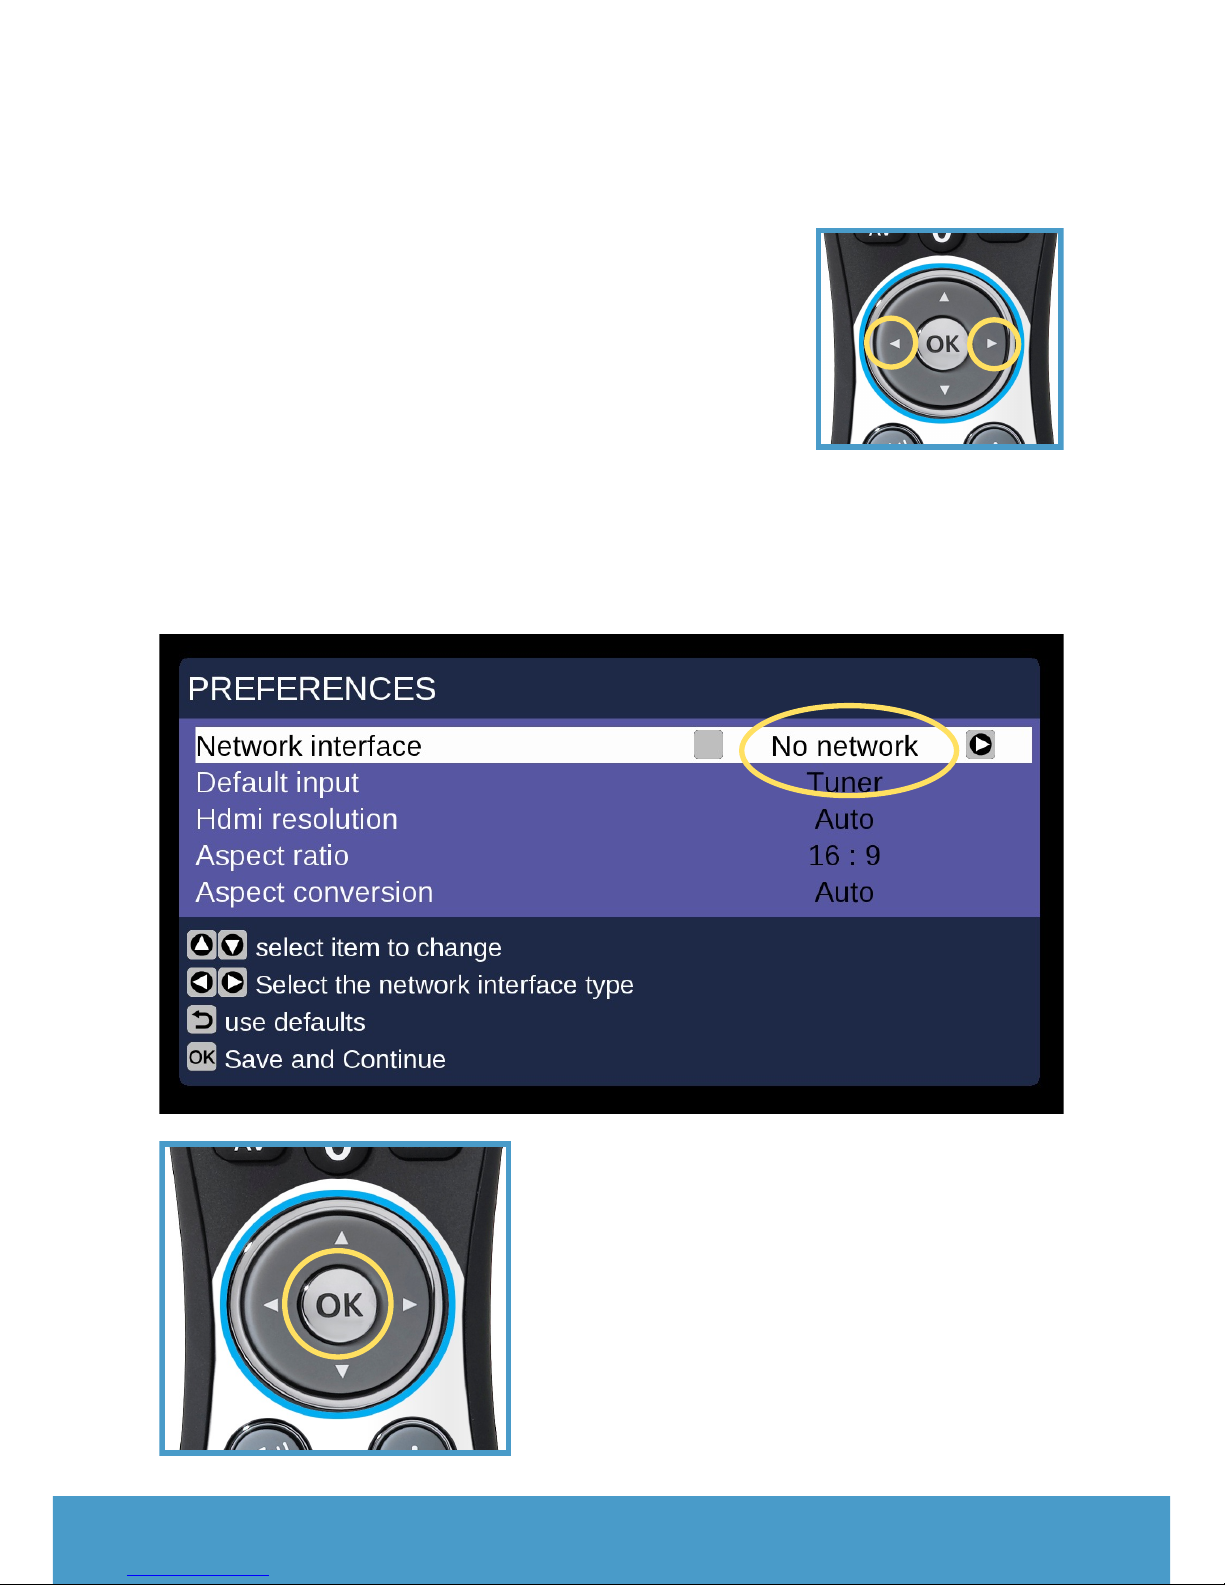
Next you are asked to set preferences.
This step and the next are on the same
screen - please read carefully.
Choose your Network interface using the
left / right arrows on your Care
Messenger remote. Select one of the
following two options:
a) If you are using a cable to connect to!
your router (Ethernet), choose Wired.
b) Or, if you are using Wi-Fi, select Wireless.
Press the down arrow on your
remote to move to the next step.
IMPORTANT: Please do NOT press
OK until AFTER the next step on
page 14.
Page 14
#
14
Support: call 0191 206 4004 or visit www.caremessenger.co.uk
11: Default input
You also need to choose the Default Input
to your box using the left / right arrows on
your Care Messenger remote.
a. If you used Setup 1 select Tuner !
!
b. If you used Setup 2 select HDMI!
!
c. If you used Setup 3 select CVBS
#
When you have selected the correct
input for your setup, press OK to
continue.
Page 15
#
15
Support: call 0191 206 4004 or visit www.caremessenger.co.uk
12: Setting wireless network
Please note: if you are using an Ethernet cable to connect to
your router, you do not need to do this step. Please proceed
to section 14: Network settings (page 17).
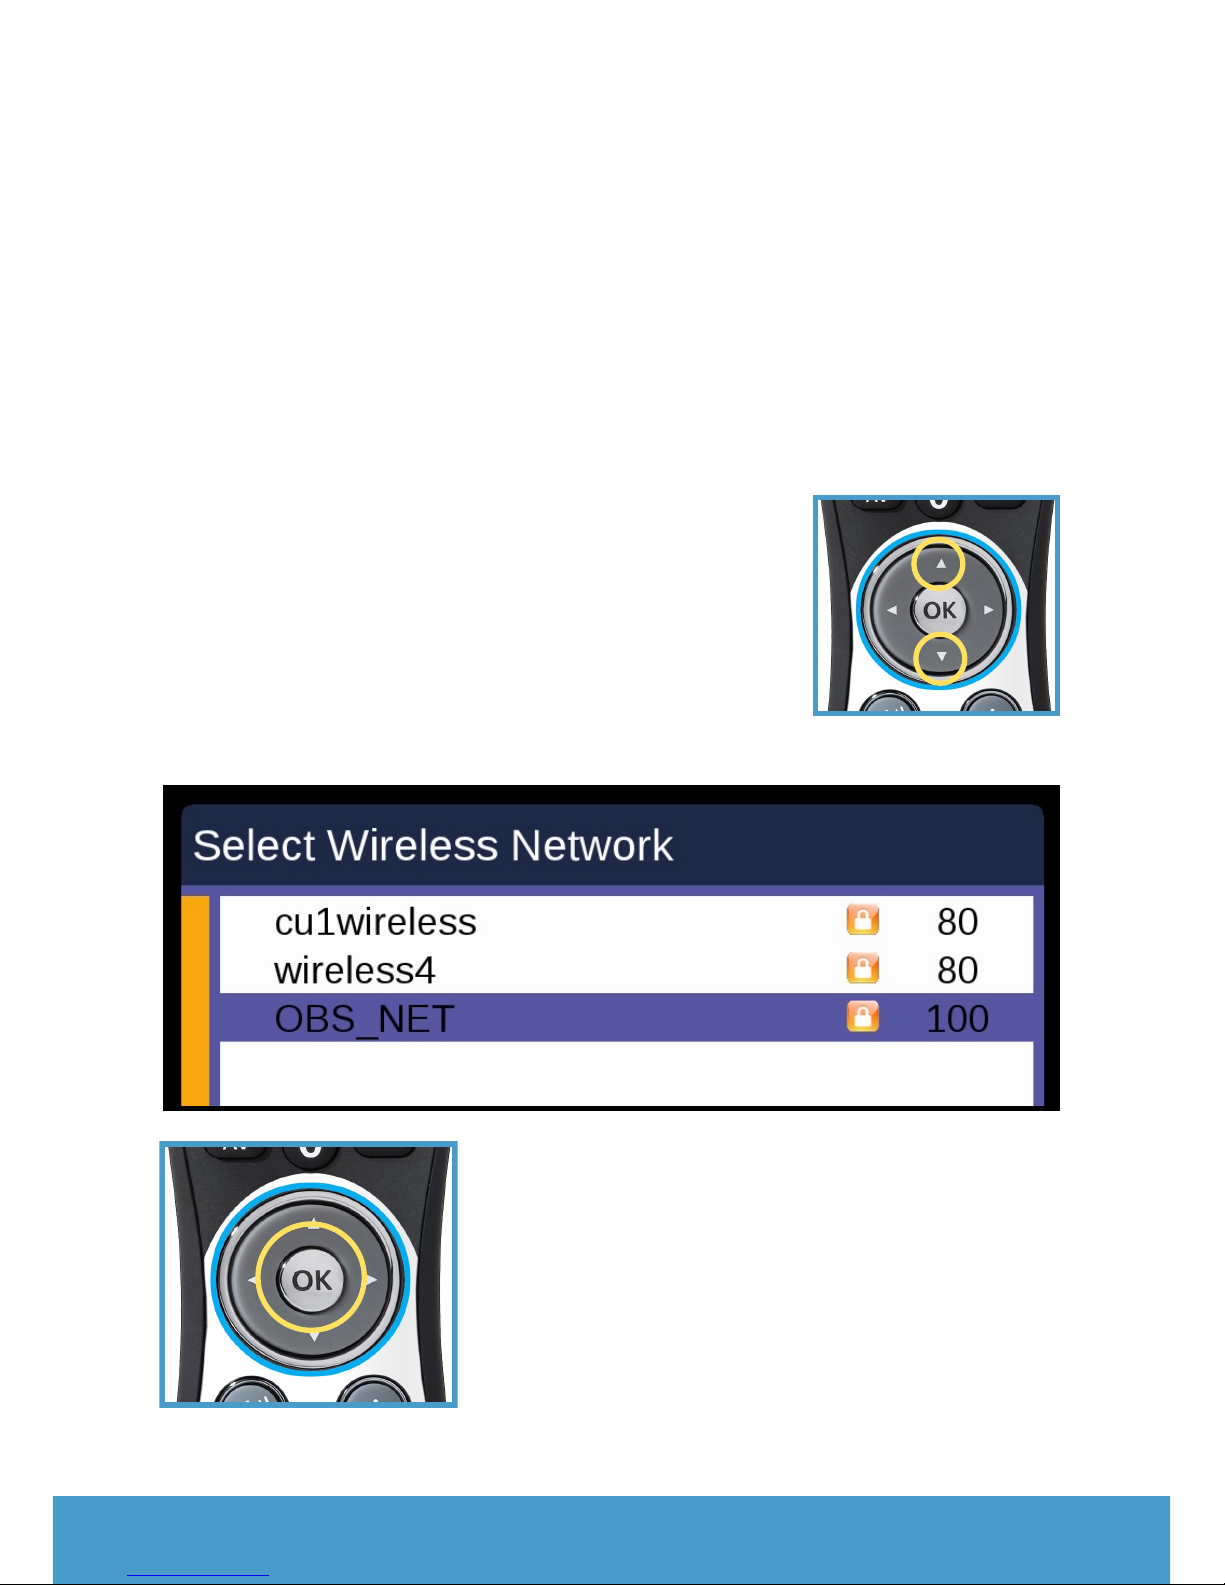
If you chose Wireless networking you will be asked to choose
your Wi-Fi network from the list of detected networks.
Select your network using the up / down
arrows and when selected press OK.
Please note: it can take a few seconds to
connect to your network. Please wait after
pressing the OK button to select, as
pressing it again may skip the next step.
Page 16
#
16
Support: call 0191 206 4004 or visit www.caremessenger.co.uk
13: Network password
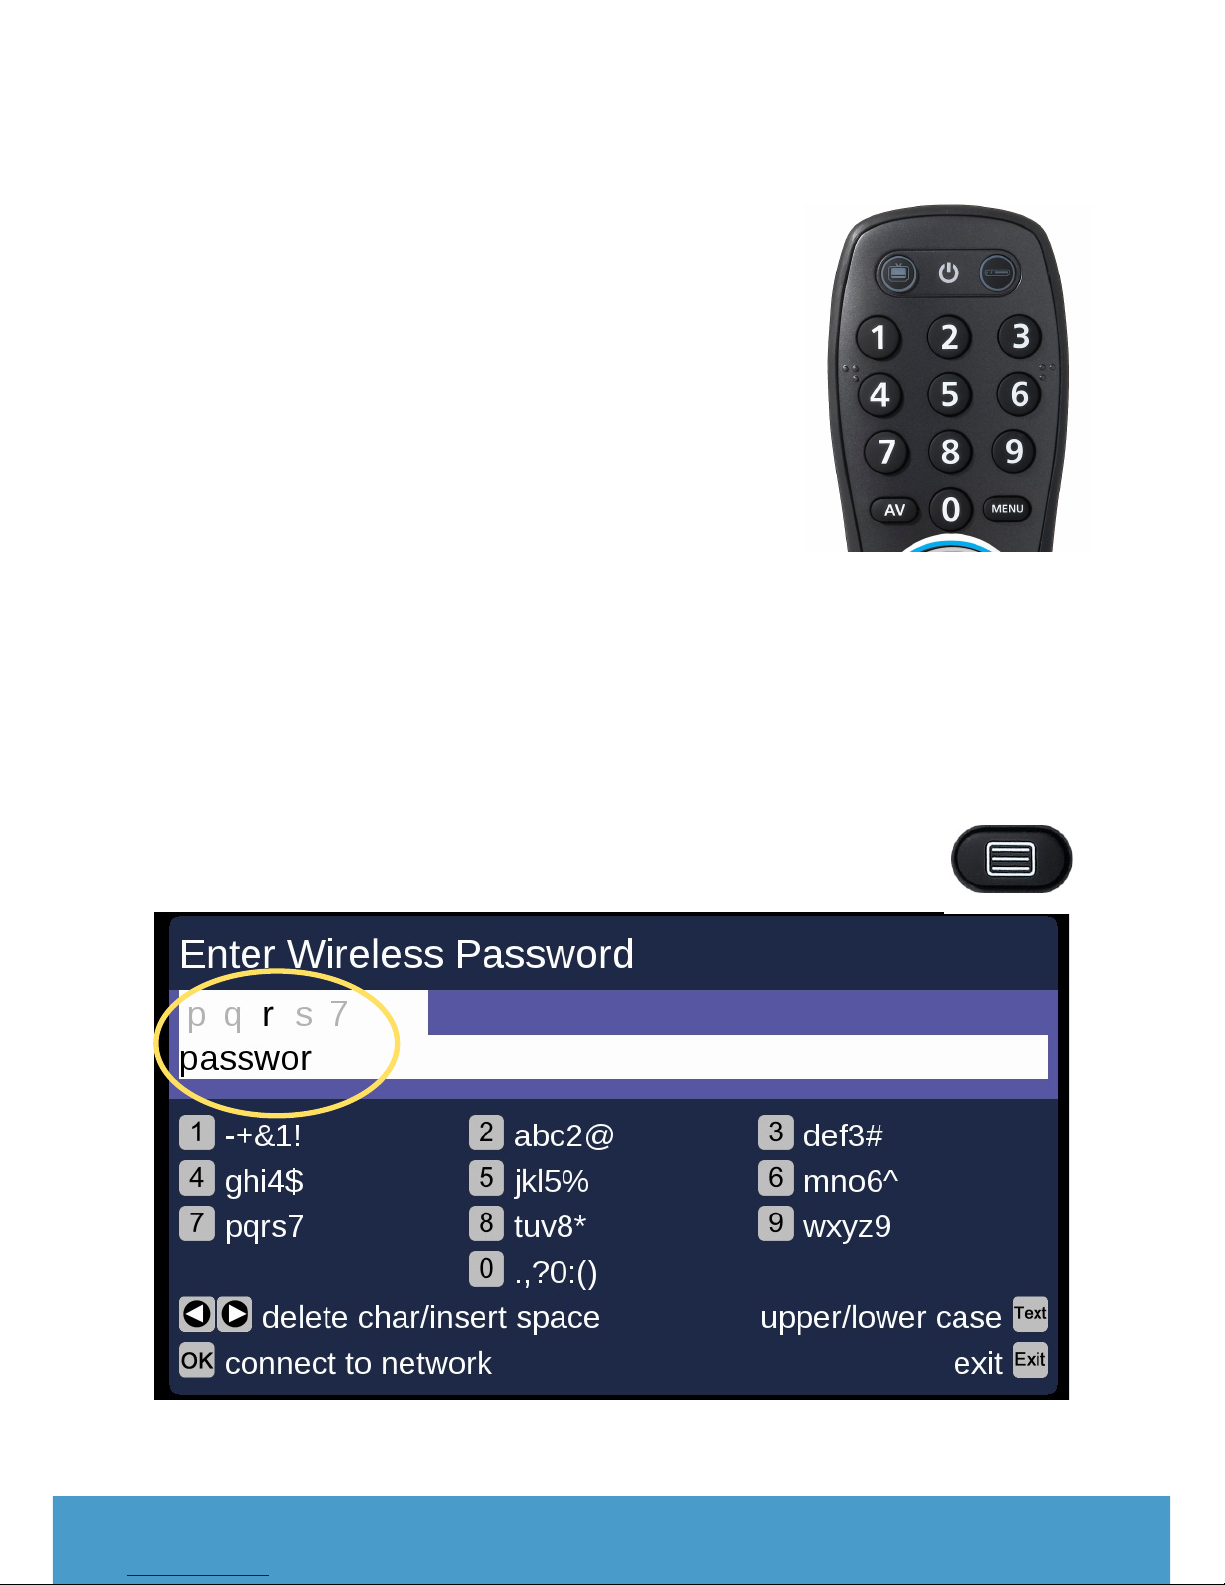
If you are connecting to your network with
Wi-Fi (wireless), you need to input your Wi-Fi
password (usually found on a sticker
somewhere on your Wi-Fi router) using the
remote control number keys. Please read the
following instructions carefully.
Pressing a number key on the remote control
multiple times cycles through the dierent
characters for that key as detailed below.
Example: Pressing the Number 3 key twice selects ‘e’
When you have the character required, wait for 2seconds until the
cursor moves waiting for the next character.
Press OK only when the full password has been entered. If you need
to switch between upper and lower case options please
use the key at the bottom left of the Care Messenger
remote pictured here.
#
#
#
Page 17
#
17
Support: call 0191 206 4004 or visit www.caremessenger.co.uk
14: Network settings
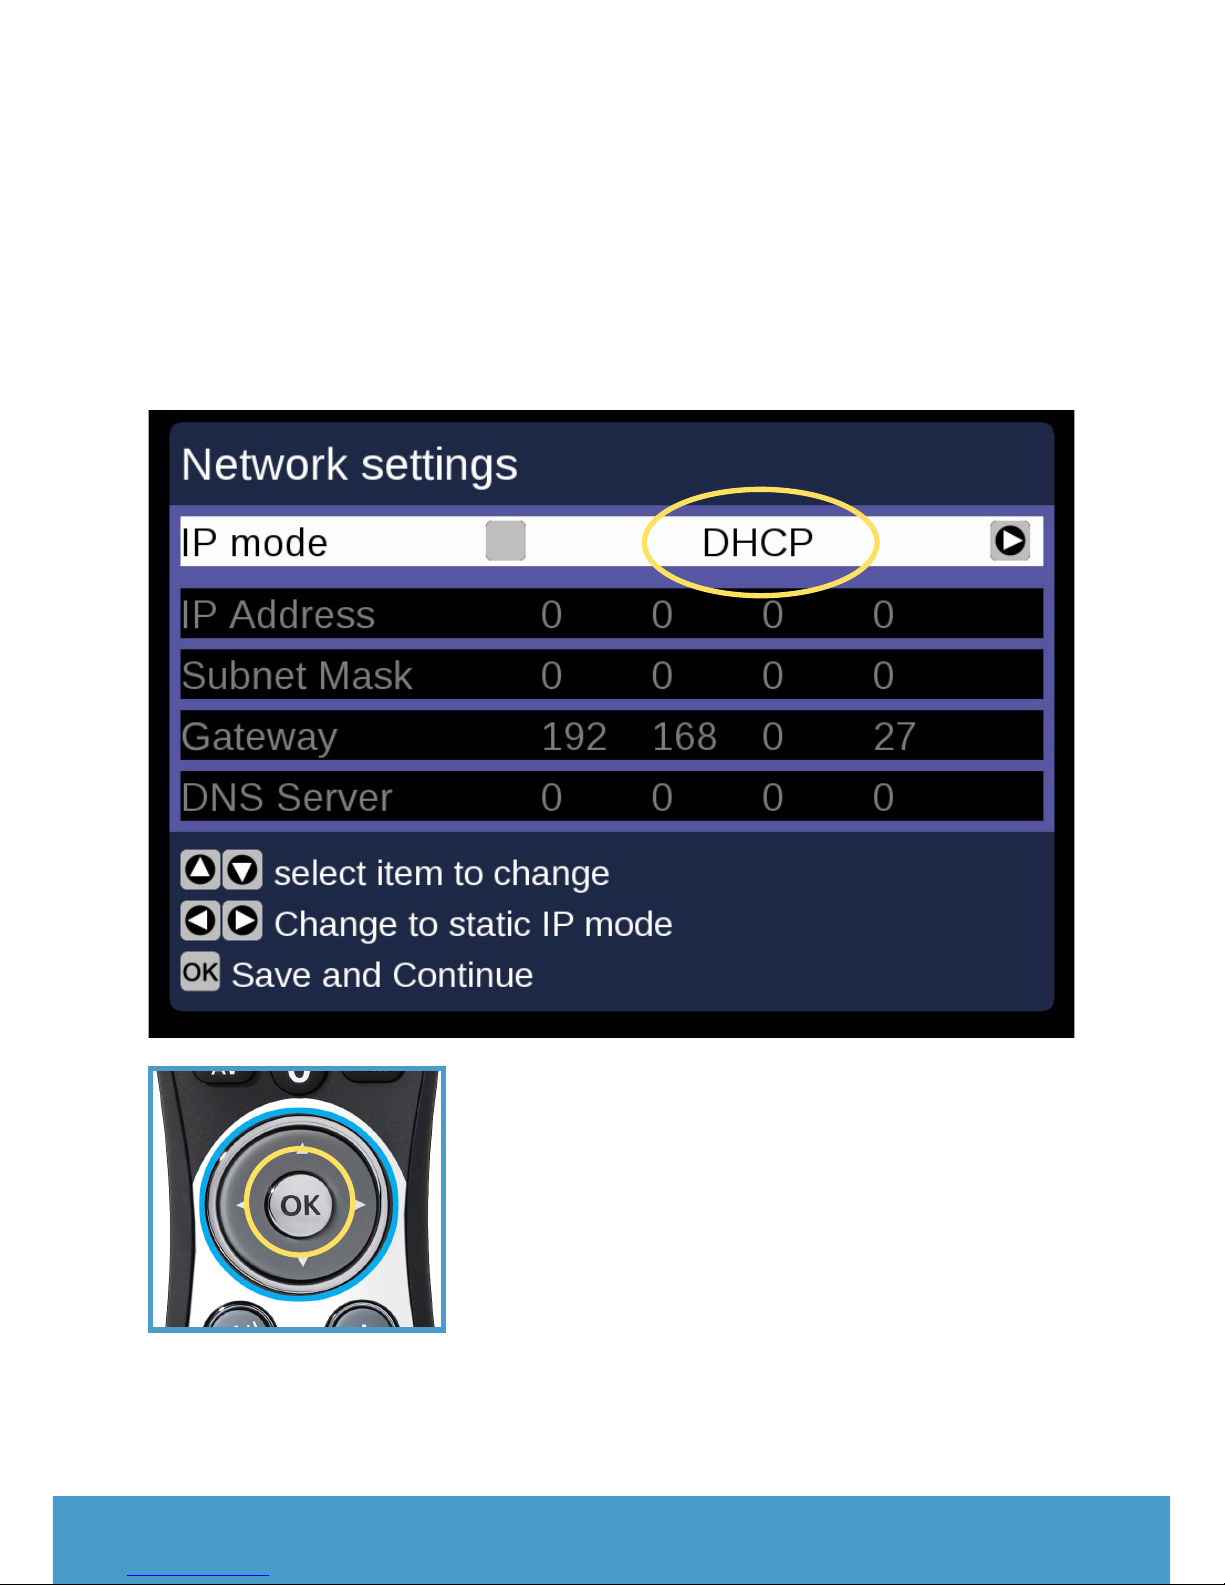
On this screen, select the DHCP option and pressOKto continue.
Note:If you have the knowledge and are able to use the advanced
settings, you may enter a static IP address and associated
configuration.
Page 18
#
18
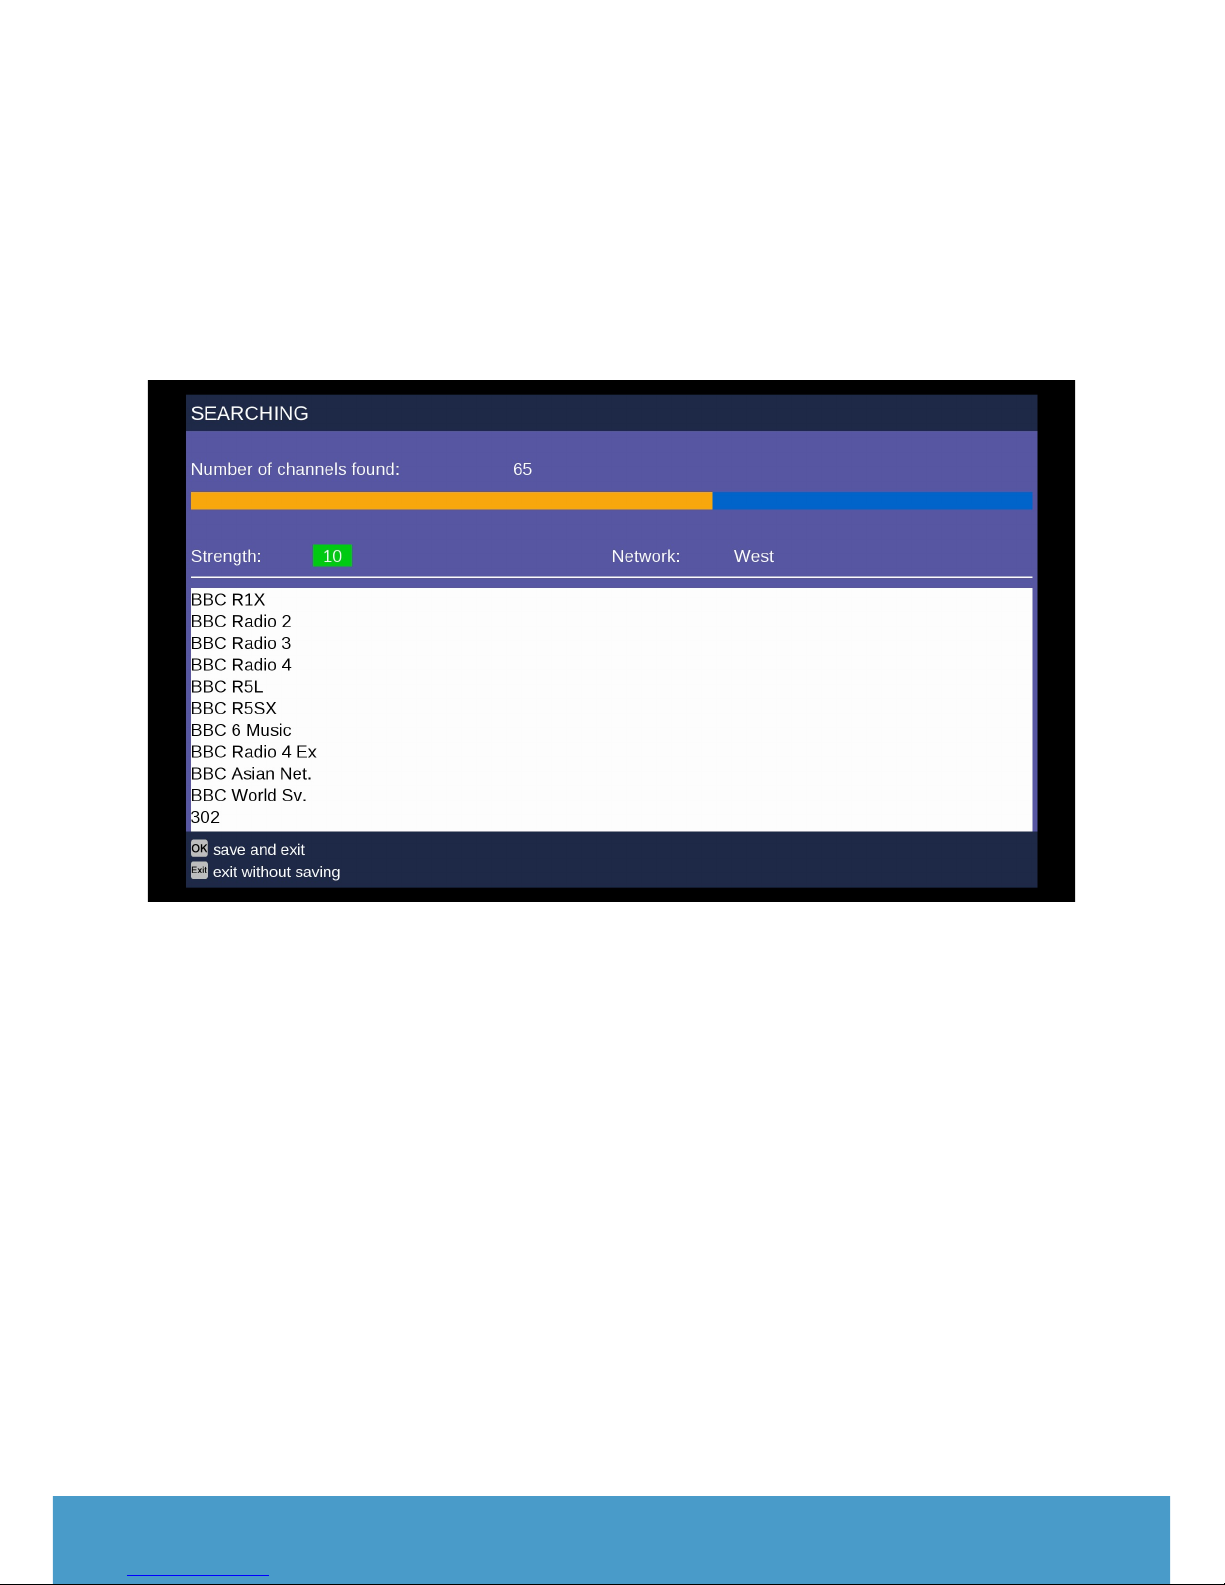
15: Tuner channel search
The final screen shows the TV tuner searching for TV channels
that are available in your area. When this has completed, press
OK on the remote to continue watching TV.
#
#
#
#
#
#
#
#
#
On the next screen you are asked if you wish to use the Aerial
to view live TV. If you do, press OK.
If you do not have an aerial connected it is VERY IMPORTANT
that you press BACK.
Your Care Messenger system is now ready to use.
Please refer to the Welcome To Care Messenger - Quick Start & User
Guide for information on using Care Messenger, or visit our web site
at www.caremessenger.co.uk
Support: call 0191 206 4004 or visit www.caremessenger.co.uk
Page 19
#
19
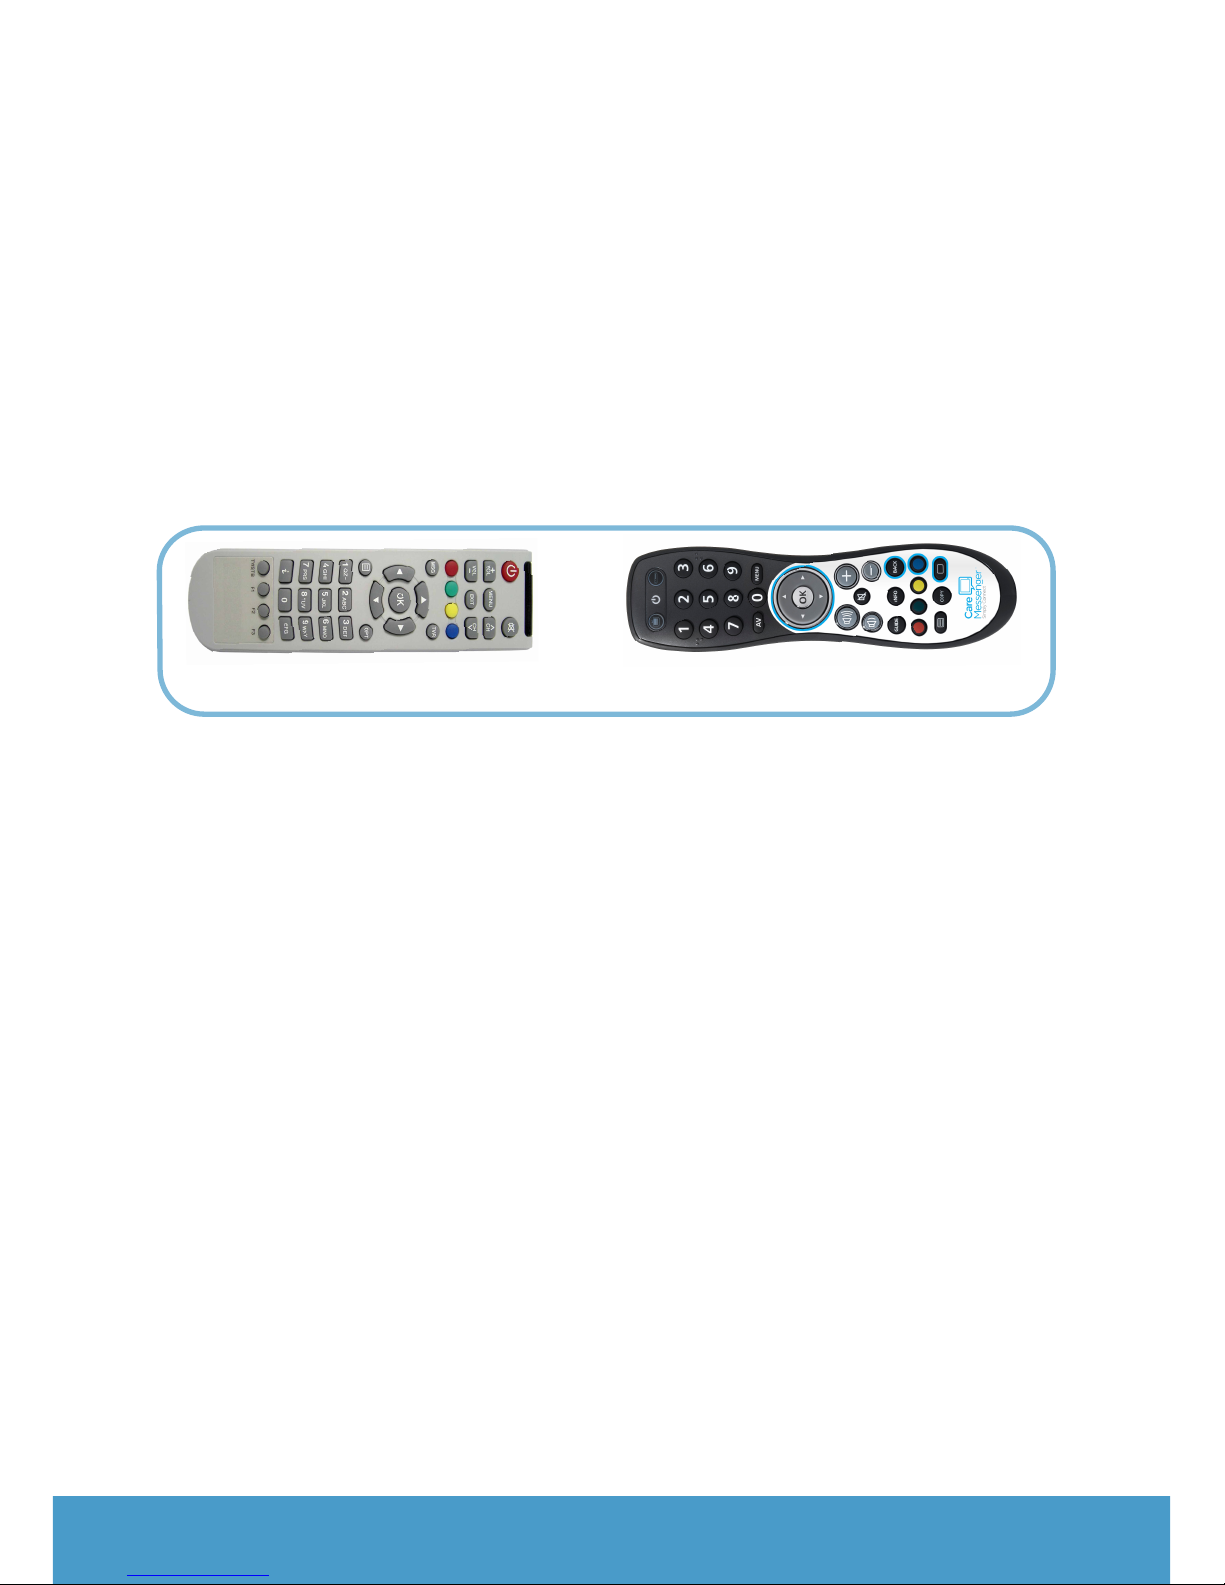
As an optional setup step, we recommend that you copy the
VOLUME, MUTE and ON/OFF controls from your existing TV
remote to your Care Messenger Remote.
To do this read and follow these instructions carefully. Please ensure
both remotes have good battery life, and that the steps are carried
out without interruption or pauses.
1. Place both remote controls on a flat surface with ends that
normally point to TV facing each other.!
!
!
!
!
!
!
!
#
2. Press and hold the COPY button on the Care Messenger
remote for 3 seconds. The two lights at the top of the Care
Messenger remote will blink twice.
3. Press the On/O button on the top left hand side of the Care
Messenger remote until the two buttons at the top begin to
flash quickly. This will be the button that will turn your TV on
and o in the future.
4. Place both remote controls on a flat surface. Make sure that
the ends you normally point at your TV are facing each other.
5. Press the On/O button on your existing TV remote to send
the signal to the Care Messenger remote.
6. If the two lights at the top of the Care Messenger remote
blink twice, copying has been successful. If you get a long
blink, you will need to repeat step 5.
7. Now repeat steps 5 & 6 for VOLUME UP, VOLUME DOWN
and MUTE keys. Remember to press these buttons only on
your existing remote not the Care Messenger remote.
8. When all controls are copied, press and hold the COPY
button on the Care Messenger remote until the two lights at
the top blink twice again. This exits the copying mode.
#
16: Remote control sync
Support: call 0191 206 4004 or visit www.caremessenger.co.uk
Your existing TV remote and Care Messenger remote facing each other
Page 20
"
20
Support: call 0191 206 4004 or visit www.caremessenger.co.uk
Page 21
21
Federal Communication Commission Interference Statement!
This device complies with Part 15 of the FCC Rules. Operation is subject to the following two
conditions: (1) This device may not cause harmful interference, and (2) this device must accept
any interference received, including interference that may cause undesired operation.
This equipment has been tested and found to comply with the limits for a Class B digital device,
pursuant to Part 15 of the FCC Rules. These limits are designed to provide reasonable protection
against harmful interference in a residential installation. This equipment generates, uses and can
radiate radio frequency energy and, if not installed and used in accordance with the instructions,
may cause harmful interference to radio communications. However, there is no guarantee that
interference will not occur in a particular installation. If this equipment does cause harmful
interference to radio or television reception, which can be determined by turning the equipment
off and on, the user is encouraged to try to correct the interference by one of the following
measures:
- Reorient or relocate the receiving antenna.!
- Increase the separation between the equipment and receiver.!
- Connect the equipment into an outlet on a circuit different from that to which the receiver is
connected.!
- Consult the dealer or an experienced radio/TV technician for help.
FCC Caution: Any changes or modifications not expressly approved by the party responsible for
compliance could void the user's authority to operate this equipment.
This transmitter must not be co-located or operating in conjunction with any other antenna or
transmitter.
Radiation Exposure Statement
This equipment complies with the FCC exposure limits set forth for an uncontrolled environment.
This equipment should be installed and operated with minimum distance 20cm between the
radiator and your body.
Note: The country code selection is for non-US model only and is not available to all US model.
Per FCC regulation all WiFi products marketed in US must fixed to US operation channels only.
 Loading...