


WebGate
Manuale d’uso
User manual
LEGGI E CONSERVA
QUESTE ISTRUZIONI
READ AND SAVE
THESE INSTRUCTIONS


Vogliamo farvi risparmiare tempo
e denaro!
Vi assicuriamo che la completa lettura
di questo manuale vi garantirà una corretta installazione ed un sicuro utilizzo del prodotto descritto.
AVVERTENZE IMPORTANTI
PRIMA DI INSTALLARE O INTERVENIRE
SULL’APPARECCHIO, LEGGERE ATTENTAMENTE E
SEGUIRE LE ISTRUZIONI CONTENUTE IN QUESTO
MANUALE.
Questa apparecchiatura è stata costruita per
funzionare senza rischi per gli scopi prefissati
purché:
• l’installazione, la conduzione e la manutenzione siano
eseguite secondo le istruzioni contenute in questo
manuale;
• le condizioni dell’ambiente e della tensione di
alimentazione rientrino tra quelle specificate.
Ogni utilizzo diverso da questo e l’apporto di
modifiche, non espressamente autorizzate dal
costruttore, sono da intendersi impropri.
La responsabilità di lesioni o danni causati da uso
improprio ricadrà esclusivamente sull’utilizzatore.
Si osservi che questa macchina contiene componenti
elettrici sotto tensione e quindi tutte le operazioni di
servizio o manutenzione devono essere condotte da
personale esperto e qualificato, cosciente delle necessarie precauzioni.
Prima di accedere alle parti interne sezionare la
macchina dalla rete elettrica.
Smaltimento delle par
ti del controllore
Il controllore è composto da parti elettroniche, in
metallo e in plastica. Tutte queste parti vanno smaltite
secondo le Normative locali in materia di
smaltimento.
We wish to save you time and
money!
We can assure you that a thorough
reading of this manual will guarantee
correct installation and safe use of the
product described.
IMPORTANT
BEFORE INSTALLING OR OPERATING ON THE
DEVICE, CAREFULLY READ THE INSTRUCTIONS IN
THIS MANUAL.
This instrument has been designed to operate without
risks only if:
• installation, operation and maintenance are performed
according to the instructions in this manual;
• the environmental conditions and supply voltage fall
within the values specified.
All other use or changes that have not been
previously authorised by the manufacturer, are
considered improper.
Liability for injures or damage caused by improper
use lies exclusively with the user.
Warning: some of the electrical components in this
instrument are live, and thus all service or
maintenance operations must be performed by expert
and skilled personnel only, aware of the necessary
precautions to be taken.
Before accessing the internal parts, disconnect the
power supply.
Disposal of the instrument
The product is made of electronic, metal and plastic
parts.
Such components must be disposed of in accordance
with the laws in force in each country.
LEGGI E CONSERVA
QUESTE ISTRUZIONI
READ AND SAVE
THESE INSTRUCTIONS


Indice
Presentazione 3
1 Installazione 4
1.1 Connessioni 5
2. Interfaccia utente 7
2.1 LED 7
2.2 Pulsante di Reset 9
3. Interfaccia di Configurazione HTML 10
3.1 Pagina informativa 10
3.2 Pagine di configurazione 11
3.3 Collegamento ‘Customer Site’ 14
4. Consolle interfaccia RS232 15
4.1 Introduzione 15
4.2 Impostazioni 15
4.3 Esempio di configurazione guidata 15
4.4 Ulteriori informazioni sulla consolle 17
5. File system 17
5.1 File 17
5.2 Cartelle e protezione file con “Accesso in lettura” 18
5.3 Protezione file con “Accesso in scrittura” 18
5.4 Nota aggiuntiva 18
6. File Transfer Protocol (FTP) 19
6.1 I client FTP 19
6.2 Protezione file con “Accesso in scrittura” 19
6.3 Nota aggiuntiva 19
6.4 Esempio 20
7. Creare una pagina Web personalizzata per WebGate 21
7.1 Introduzione 21
7.2 Requisiti 21
7.3 Creare Pagine Web 21
7.4 Suggerimenti per l’ottimizzazione delle pagine HTML 36
8. Protocollo SNMP per WebGate 37
8.1 Il protocollo SNMP in breve 37
8.2 Structure of management information: gli agent MIB 38
8.3 Assegnazione dei nomi agli OID: la struttura ad albero del web 38
8.4 L’Albero SNMP Carel Enterprise 39
8.5 Commandi e versione SNMP 45
8.6 Community 45
8.7 Le variabili system MIB-II 46
8.8 I messaggi TRAP 47
8.9 Messaggi di errore 47
8.10 Dimensioni dell’MTU per l’SNMP WebGate 48
9. Gestione Utenti 48
9.1 Restrizioni di Accesso 48
9.2 Definizione degli Utenti 49
9.3 Convenzioni nell’assegnazione dei nomi 49
9.4 Utente anonimo 49
9.5 Livello di accesso “guest” e password 49
9.6 Livello di Accesso per le Pagine Precaricate 49
9.7 Accesso alle Pagine HTML Protette 50
9.8 Problematiche relative alla sicurezza 50
9.9 Gestione Avanzata della Tabella Utenti 50
10. Aggiornamento del Firmware 51
11. Funzioni Script del WebGate 51
11.1 Funzioni in ordine alfabetico: 52
11.2 Funzioni per categorie 52
11.3 Descrizione dettagliata dei comandi 54
12. Expressioni, Registri e Funzioni 79
12.1 Registri 80
12.2 Alcune note sulle espressioni aritmetiche: 87
13. Caratteristiche Tecniche 80
Index:
Introduction 5
1. Installation 7
1.1 Connections 8
2. User Interface 10
2.1 LED 10
2.2 Reset Button 12
3. HTML Configuration Interface 13
3.1 Information page 13
3.2 Configuration pages 14
3.3 Customer Site link 16
4. RS 232 Console Interface 17
4.1 Introduction 17
4.2 Settings 17
4.3 A step-by-step configuration example 17
4.4 Additional notes about the console 19
5. File system 20
5.1 Files 20
5.2 Directories and “Read Access” file protection 20
5.3 “Write Access” file protection 20
5.4 Additional Note 20
6. File Transfer Protocol (FTP) 21
6.1 The FTP client 21
6.2 “Write Access” file protection 21
6.3 Additional Note 21
6.4 Example 21
7. Creating a custom Web page on the WebGate 23
7.1 Introduction 23
7.2 Requirements 23
7.3 Creating Web Pages 23
7.4 Suggestions for HTML pages optimization 38
8. WebGate SNMP Protocol 39
8.1 A brief overview of the SNMP protocol 39
8.2 The structure of management information: agent MIBs 39
8.3 Naming OIDs: the tree hierarchy structure of the web 40
8.4 Carel Enterprise SNMP Tree 41
8.5 SNMP command and version 46
8.6 Communities 46
8.7 System MIB-II variables 47
8.8 TRAP messages 47
8.9 Error Messages 48
8.10 MTU dimension for WebGate SNMP 48
9. User Management 49
9.1 Access Restrictions 49
9.2 Users Definition 49
9.3 Naming Conventions 49
9.4 “anonymous” User 49
9.5 “guest” access level and passwords 49
9.6 Access Levels for Factory Shipped Pages 49
9.7 Accessing to Protected HTML Pages 50
9.8 Security Issues 50
9.9 Advanced User Table Management 50
10. Firmware Upgrade 51
11. WebGate Script Functions 52
11.1 Functions in alphabetical order 52
11.2 Functions sorted by category 53
11.3 Detailed commands description 54
12. About Expressions, Registers and Functions 82
12.1 Registers 82
12.2 Some additional notes about arithmetic expressions: 82
13. Technical Specifications 80


Presentazione
Il WebGate è un dispositivo elettronico innovativo, le cui dimensioni
sono quelle di un normale modem da tavolo dotato di una tecnologia
all'avanguardia, che consente il collegamento di tutti i controlli Carel
alla propria rete locale basata sugli standard Ethernet™ e TCP/IP.
Ethernet™ è uno standard di comunicazione diffuso, veloce,
economico ed affidabile ed è il supporto fisico per il protocollo TCP/IP.
Reti Ethernet™ sono ormai presenti in molti impianti e si possono
quindi sfruttare come dorsale per la trasmissione di dati per mettere in
supervisione gli strumenti senza dovere effettuare ulteriori cablaggi.
Ethernet™ e TCP/IP sono le tecnologie su cui si fonda Internet e
grazie ad esse il WebGate consente l'impiego di strumenti, come i
browser Web, per funzioni di diagnostica e monitoraggio locale e
remoto dei propri impianti.
Il protocollo TCP/IP funziona poi da supporto per altri protocolli, che
possono essere utilizzati per trasferire, ad un supervisore locale o
remoto, tutti i dati che provengono dai controlli collegati sulla rete
Ethernet™.
Il WebGate inoltre è facilmente configurabile, sia da Web che da
seriale RS232: richiede infatti solo una configurazione minima per
l'impostazione del proprio indirizzo IP.
Funzionalità WEB SERVER
Una delle principali funzioni svolte dal WebGate è quella di WebServer:
utilizzando cioè le regole dettate dal protocollo HTTP (Hyper Text
Transfer Protocol), il WebGate può "servire" pagine Web a computer
client ad esso collegati in rete locale o WAN.
Le pagine Web vanno scritte in base alle caratteristiche della specifica
installazione per la gestione dei dati che arrivano dagli strumenti via
rete Carel RS485. L'utente potrà quindi visualizzare e modificare i
parametri dell'impianto utilizzando come interfaccia un browser per
Internet come Microsoft
®
Internet Explorer™ o NetScape Navigator®,
da cui digitare l'indirizzo IP del WebGate.
Per la scrittura delle pagine si possono poi utilizzare strumenti software
molto diffusi, che permettono la creazione di pagine anche complesse,
pur avendo solo una conoscenza di base del linguaggio di
programmazione delle pagine Web.
Protocollo FTP
Le pagine Web relative alla specifica installazione vanno memorizzate
nella memoria "flash" interna al WebGate tramite il protocollo FTP (File
Transfer Protocol), utilizzato per il trasferimento di file su reti TCP/IP.
Quindi, con un semplice "drag and drop" del mouse si copiano dal
proprio computer al WebGate i file HTML che realizzano le pagine Web.
Protocollo SNMP
Il WebGate è anche un gateway SNMP. Infatti converte il protocollo di
comunicazione Carel nel Simple Network Management Protocol
(SNMP), protocollo con cui invia sulla rete Ethernet™ - TCP/IP i dati
che provengono dagli strumenti collegati ad un supervisore locale o
remoto, per le opportune elaborazioni.
SNMP è un protocollo sviluppato appositamente per la gestione di reti
TCP/IP, nato nel 1988 su specifica dello IAB (Internet Administration
Board), il consiglio che supervisiona il protocollo Internet. Si tratta
quindi di un protocollo nato proprio per la gestione di dati su reti
TCP/IP ed è perciò molto diffuso e adatto alla specifica applicazione.
La gestione di SNMP è complementare a quella di HTTP: infatti tramite
un browser per Internet, che utilizza HTTP, si può accedere ai dati
dell'impianto per modifica o monitoraggio, ma non si possono effettuare
molte operazioni tipiche di un sistema di supervisione, come ad
esempio storicizzare dati, gestire allarmi, ecc. Per realizzare queste
funzioni è necessario un sistema di supervisione continuamente
collegato al WebGate, che riceva dalla rete TCP/IP i dati dei controlli.
Questi vengono inviati dal WebGate con il protocollo SNMP e possono
essere quindi gestiti da un supervisore dotato della funzionalità di
SNMP manager.
Introduction
WebGate is a innovative electronic device that measures the same size
as a normal desktop modem. It features avant-garde technology for
connecting all Carel controllers to the local network based on the
standard Ethernet™ and TCP/IP.
Ethernet™ is a widespread, fast, economical and reliable
communication standard, and is the physical support for the TCP/IP
protocol. Ethernet™ networks are now used in numerous different
types of systems, and can thus be exploited as the backbone for the
transmission of data, without needing to add further wiring in the
supervision of the instruments.
Ethernet™ and TCP/IP are the technologies that underlie the Internet,
and as a result WebGate allows the use of tools, such as web
browsers, for performing diagnostic functions and the local and remote
monitoring of the systems.
The TCP/IP protocol can also be used as the support for other
protocols, when transferring the data from the controls connected in the
Ethernet™ network to a local or remote supervisor.
WebGate is easy to configure either via the web or using an RS232
serial connection: as a matter of fact, only a minimum configuration is
sufficient for setting its individual IP address.
WEB SERVER functions
One of the main functions performed by WebGate is the WebServer
function: using the HTTP (Hyper Text Transfer Protocol) standard,
WebGate can “serve” web pages to client computers connected in a
local network or WAN.
The web pages are written based on the characteristics of the specific
installation, for the management of the data from the instruments via
the Carel RS485 network. The user can thus display and modify the
installation parameters using an Internet browser, such as Microsoft®
Internet Explorer™ or NetScape Navigator®, as the interface, and
typing in the IP address of the WebGate.
The pages can be written using numerous readily available HTML
editors that can be used to create even very complex web pages with
only basic knowledge of the web page programming language.
FTP protocol
The web pages relating to the specific installation are saved to the
“flash” memory inside the WebGate via FTP (File Transfer Protocol),
the protocol used to transfer files on TCP/IP networks. Then, using
simple “drag and drop” operations with the mouse, the web page HTML
files can be copied from the user’s computer to the WebGate.
SNMP protocol
WebGate is also an SNMP gateway. It in fact converts the Carel
communication protocol to the Simple Network Management Protocol
(SNMP), the protocol used to send data from the instruments on the
Ethernet™ – TCP/IP network to a local or remote supervisor for
subsequent processing.
SNMP is a protocol developed specifically for the management of
TCP/IP networks, founded in 1988 based on the specifications of the
IAB (Internet Administration Board), the body that supervises the
Internet protocol. This is thus a protocol developed specifically for the
management of data on TCP/IP networks, and is consequently very
widespread and suitable for the specific application.
The SNMP functions are complementary to the HTTP functions: as a
result, an Internet browser, which uses HTTP, can be used to access
the installation data for modification or monitoring. Nonetheless, it is not
possible to perform the other typical supervisor functions, such as
logging the data, managing alarms, etc. These functions in fact require
a supervisor that is continuously connected to the WebGate, and which
receives the data from the controllers via the TCP/IP network. These
are then sent to the WebGate via the SNMP protocol and can be
managed by a supervisor with SNMP management functions.
3
Manuale WebGate - cod. +030220230 rel. 1.0 - 16.09.2003

1. Installazione
Su tavolo
Per l’installazione su tavolo montare i piedini in gomma negli appositi
alloggi.
Montaggio a apnnello
Per il montaggio a guida DIN, utilizzare un tronchese per togliere le
due parti in plastica prefratturate, aprendo così i fori per il montaggio
delle staffe della guida DIN.
Avvertenze per l’installazione
Va evitato il montaggio delle schede in ambienti che presentano le
seguenti caratteristiche:
• umidità relativa maggiore del 90%;
• presenza di forti vibrazioni o urti;
• esposizione a getti d'acqua;
• esposizione ad atmosfere aggressive ed inquinanti (ad esempio: gas
solforici e ammoniacali, nebbie saline, fumi) con conseguente
corrosione e/o ossidazione;
• presenza di elevate interferenze magnetiche e/o radiofrequenze
(evitare quindi l'installazione delle macchine vicino ad antenne
trasmittenti);
• esposizione all'irraggiamento solare diretto e agli agenti atmosferici in
genere;
• presenza di ampie e rapide fluttuazioni della temperatura ambiente;
• presenza di esplosivi o miscele di gas infiammabili;
• esposizione alla polvere (formazione di patina corrosiva con possibile
ossidazione e riduzione dell'isolamento);
• ampie e rapide fluttuazioni della temperatura ambiente.
1. Installation
Desktop
For desktop installation, inserte the rubber feet to the housings
provided.
Panel mounting
For DIN rail mounting, using cutting nippers, remove the 2 pre-cut plastic part on the hatch, leaving the holes for the DIN rail brackets to be
inserted.
Installation Warnings
Avoid installing the boards in environments with the following
characteristics:
• relative humidity above 90%;
• strong vibrations or knocks;
• exposure to jets of water;
• exposure to aggressive and polluting agents (e.g.: sulphurous and
ammonia gases, saline mists, smoke) which may cause corrosion
and/or oxidation;
• high levels of magnetic and/or radio-frequency interference (thus
avoid installation near transmitting antennas);
• exposure of the device to direct sunlight and atmospheric agents in
general;
• large and rapid fluctuations in ambient temperature;
• environments where explosives or mixes of inflammable gases are
present;
• exposure to dust (formation of corrosive patina with possible oxidation
and reduction of insulation);
• wide and rapid fluctuations of the room temperature.
4
Manuale WebGate - cod. +030220230 rel. 1.0 - 16.09.2003
12
1
2
3
4
123
Fig. 1.1
Fig. 1.2

1.1 Connessioni
Alle connessioni WebGate si accede dal retro dell’unita, come illustrato
nella figura qui sotto:
1. interfaccia Ethernet 10BaseT a rete locale (LAN)
2. interfaccia RS232 DTE a consolle locale
3. interfaccia RS485 a rete Carel, utilizzata per i collegamenti ai
dispositivi Carel
4. connettore per adattatore da 18VAC (installazione su tavolo)
5. connettore per alimentazione da 24VAC (montaggio a pannello)
Per il collegamento del WebGate è necessario osservare le
seguenti AVVERTENZE:
1. Una tensione di alimentazione elettrica diversa da quella prescritta
può danneggiare seriamente il sistema.
2. Utilizzare capicorda adatti ai morsetti. Allentare ciascuna vite ed
inserirvi i capicorda, quindi serrare le viti. Ad operazione ultimata,
tirare leggermente i cavi per verificarne il corretto serraggio.
3. Evitare di avvicinarsi con le dita ai componenti elettronici montati
sulle schede per evitare scariche elettrostatiche (estremamente
dannose) dall'operatore ai componenti.
4. Separare quanto più possibile i cavi dei segnali dai cavi di potenza
per evitare possibili disturbi elettromagnetici. Non inserire mai cavi di
potenza (compresi i cavi dell’alimentazione principale) e cavi RS485,
RS232 o Ethernet nelle stesse canaline.
5. Non cercare di smontare l’unità o di modificarla in alcun modo,
perchè questo può comportare il rischio di incendio e di scossa.
1.1.1 Collegamento al cavo Ethernet
Il WebGate utilizza un connettore RJ45 per Ethernet 10BaseT 10Mb/s.
Per il collegamento ad un hub o ad uno switch utilizzare un cavo patch.
Per il collegamento diretto a PC utilizzare un cavo cross.
1.1.2 Collegamento all’interfaccia RS232
Il WebGate è dotato di un interfaccia standard di tipo DTE, con
connettore maschio DB-9 a 9 vie: la tabella che segue illustra i segnali
standard RS232:
Pin Sigla Nome completo Direzione
1 CD CARRIER DETECT Da DCE
2 RD RECEIVE DATA Da DCE
3 TD TRANSMIT DATA A DCE
4 DTR DATA TERMINAL READY A DCE
5 SG SIGNAL GROUND --6 DSR DATA SET READY1 Da DCE
7 RTS REQUEST TO SEND A DCE
8 CTS CLEAR TO SEND1 Da DCE
9 RI RING INDICATOR2 Da DCE
Tab. 1.1.2.1
1
Questi pin possono non essere collegati in alcuni modelli WebGate
2
Questo pin non è collegato in nessun modello WebGate.
1.1 Connections
WebGate connections are accessible from the back panel of the unit,
as indicated below:
1. Ethernet 10BaseT connector to corporate LAN.
2. RS232 DTE interface to connect a local console
3. RS485 interface to Carel Network, used to connect the Carel devices
4. Plug connector for the 18VAC power adapter (desktop installation)
5. Connector for the 24VAC power supply (panel mounting)
When connecting WebGate the following WARNINGS should be
heeded:
1. Voltages different from the power ratings will seriously damage the
system.
2. Use cable-ends which are suitable for the terminals being used.
Loosen each screw and insert the cable-end, then tighten the
screws. On completing the operation lightly tug the cables to check
that they are correctly inserted.
3. Avoid touching or nearly-touching electronic components mounted
on the boards to avoid electrostatic discharges (extremely
damaging) from the operator to the components.
4. Separate as much as possible the signal cables from any power
cables to avoid possible electromagnetic influence. Never insert
power cables (including mains cables) and RS485, RS232 or
Ethernet cables in the same channels.
5. Never try to disassemble the unit or modify it in any way, because
this may cause fire and electric shock.
1.1.1 Connection of the Ethernet cable
WebGate uses a RJ45, 10BaseT connector, 10Mb/s interface. When
connecting to a hub or switch use a straight cable patch.When
connecting directly to a PC use a cross cable instead.
1.1.2 Connection of the RS232 interface
WebGate is provided with a standard DTE interface with a 9 pin male
DB-9 connector: In the following table are depicted the standard RS232
signals:
Pin No Abbreviation Description Direction
1 CD CARRIER DETECT From DCE
2 RD RECEIVE DATA From DCE
3 TD TRANSMIT DATA To DCE
4 DTR DATA TERMINAL READY To DCE
5 SG SIGNAL GROUND --6 DSR DATA SET READY1 From DCE
7 RTS REQUEST TO SEND To DCE
8 CTS CLEAR TO SEND1 From DCE
9 RI RING INDICATOR2 From DCE
Tab. 1.1.2.1
1
These pins may be unconnected in some WebGate models
2
This pin is unconnected in all WebGate models.
5
Manuale WebGate - cod. +030220230 rel. 1.0 - 16.09.2003
1 2 3 4 5
Fig. 1.1.1

Per collegare il WebGate ad un PC va utilizzato
un cavo schermato null-modem. Sono
necessarie solo le linee TD, RD e SG. Si ricordi
che, poiché il PC e il WebGate sono dotati di
interfaccia DTE, le linee TD e RD devono
essere scambiate:
1.1.3 Collegamento all’interfaccia RS485
Il cavo di connessione del WebGate con le periferiche Carel in RS485
che Carel consiglia è:
• a 2 fili ritorti,
• schermato, preferibilmente con filo di continuità,
• di sezione AWG20 (0,5 mm2) o AWG22 (0,32÷0,38 mm
2
),
• capacità tra i conduttori minore di 100 pF/m
(i modelli 8761 e 8762 della Belden, ad esempio, soddisfano i
precedenti requisiti)
Collegare sempre la resistenza di terminazione da 120W, in dotazione,
all’estremità remota della rete tra “Tx/Rx+” e “Tx/Rx-“.
Esempio:
1.1.4 Collegamento all’alimentazione
I connettori di alimentazione 4 e 5 (Fig. 1.1.1) sono elettricamente
equivalenti. I due connettori non vanno quindi utilizzati allo stesso
momento.
Il connettore 4 serve per l’installazione su tavolo.Utilizzare SOLO
l’adattatore di alimentazione (cod. TRA1806ITA) fornito, su richiesta,
da Carel. L’utilizzo di adattatori diversi può danneggiare l’hardware.
Il connettore 5 serve per il montaggio a pannello. Utilizzare un
trasformatore di sicurezza con una capacità minima di 6VA. Si consiglia
l’utilizzo del trasformatore (cod.TRA1810DIN) fornito, su richiesta, da
Carel. E’ necessario installare un fusibile da 500mAT in serie
all’alimentazione dell’unità.
To connect WebGate to a PC use a shielded
null-modem cable. Only TD, RD and SG lines
are strictly required. Remember that since the
PC and WebGate are provided with a DTE
interface, TD and RD lines must be swapped:
1.1.3 Connection of the RS485 interface
The wire for the connection of WebGate with Carel peripherals in
RS485 suggested by Carel is:
• 2 twisted wires,
• shielded, preferably with a continuity wire,
• section AWG20 (0,5mm2) or AWG22 (0,32÷0,38mm
2
),
• wire capacity lower than 100pF/m
(the models 8761 and 8762 of Belden, for example, satisfy the
previous requirements).
Always connect the supplied 120W terminator resistor to the remote
end of the network between the “Tx/Rx+” and “Tx/Rx-“ wires.
Example:
1.1.4 Connection of the Power Supply
Power supply connectors 4 and 5 (Fig. 1.1.1) are electrically equivalent.
Do not use the two power supply connectors at the same time.
Connector 4 is for desktop installation. Use ONLY the power adapter
supplied on request by Carel (code TRA1806ITA). The use of different
power adapters may damage the hardware.
Connector 5 is for panel mounting. Use a safety transformer rated to at
least 6VA. The use of the power adapter supplied on request by Carel
is suggested (code TRA1810DIN). It is obligatory to insert in series
with the unit power supply a 500mAT fuse.
6
Manuale WebGate - cod. +030220230 rel. 1.0 - 16.09.2003
1
2
3
4
5
6
7
8
9
5
4
3
2
1
9
8
7
6
DB9 femmina
DB9 female
DB9 femmina
DB9 female
ir32
220 V
ir32
220 V
ir32
220 V
120
Ω
1
2...
...16
Fig. 1.1.2.1
Fig. 1.1.3.1

2. Interfaccia utente
Tutte le funzioni del WebGate possono essere controllate utilizzando
pagine HTML o una interfaccia consolle RS232.Vi sono comunque tre
LED multicolore e un pulsante di “reset” per semplificare l’installazione.
2.1 LED
2.1.1 Ethernet
Il LED in alto fornisce informazioni sulla connessione Ethernet.
Funzionamento normale
Durante il funzionamento normale, il comportamento del LED è quello
indicato in tabella:
Colore Significato
Spento Collegamento (Link), nessun trasferimento
di dati in corso.
Verde (lampeggiante) Collegamento, trasferimento dati in corso.
Giallo Nessun collegamento, il WebGate sta
tentando una trasmissione.
Rosso Nessun collegamento. Generalmente indica
che un cavo è scollegato, un cablaggio è
scorretto o l’interfaccia remota (generalmente
un PC o un hub) è spenta.
Tab. 2.1.1.1
Accensione:
Durante la fase di accensione, il LED Ethernet diventa rosso per alcuni
secondi fino a quando l’interfaccia non è inizializzata.
2. User Interface
All WebGate functions can be controlled using HTML pages or RS232
console interface. However, three multicolor LEDs and a “reset” button
are provided to simplify installation.
2.1 LED
2.1.1 Ethernet
The top LED gives information about the Ethernet link and connection.
Normal behaviour
The normal LED behaviour is indicated in the table below:
Color Meaning
Off Connected (Link), no data transfer in
progress.
Green (flashing) Link, data transfer in progress.
Yellow No link, WebGate is trying a transmission.
Red No link. Generally this indicates disconnected
cable, wrong cabling or remote interface
(generally a PC or a hub) powered off.
Tab. 2.1.1.1
Power up:
When WebGate is powered up, the Ethernet LED becomes red for
some seconds until the interface is properly initialized.
7
Manuale WebGate - cod. +030220230 rel. 1.0 - 16.09.2003
tasto reset /
reset button
Fig. 2.1 (retro del WebGate / back side of WebGate)
Fig. 2.1 (parte superiore del WebGate / top side of WebGate)
2.1.2 RS485
Il LED centrale visualizza lo stato della rete Carel RS485.
Funzionamento normale
Questo LED visualizza, ad intervalli di 500ms, lo stato di ciascuna unità
connessa all’interfaccia seriale RS485.
In questo modo è possibile valutare velocemente lo stato della rete.
La tabella qui sotto illustra il significato dei colori del LED:
Colore Significato
Spento Unità non ancora riconosciuta.
Verde Unità in linea (dati ricevuti dall’unità)
Giallo “Heartbeat”, indica che la scansione della rete è attiva
(il WebGate tenta di trasmettere alle unità).
Rosso Unità scollegata
Tab. 2.1.2.1
Nota: le periferiche vengono scandite a partire dall’indirizzo “1“ fino
all’indirizzo indicato dalla funzione “MaxDevs” (vedi “Funzioni Script del
WebGate”).
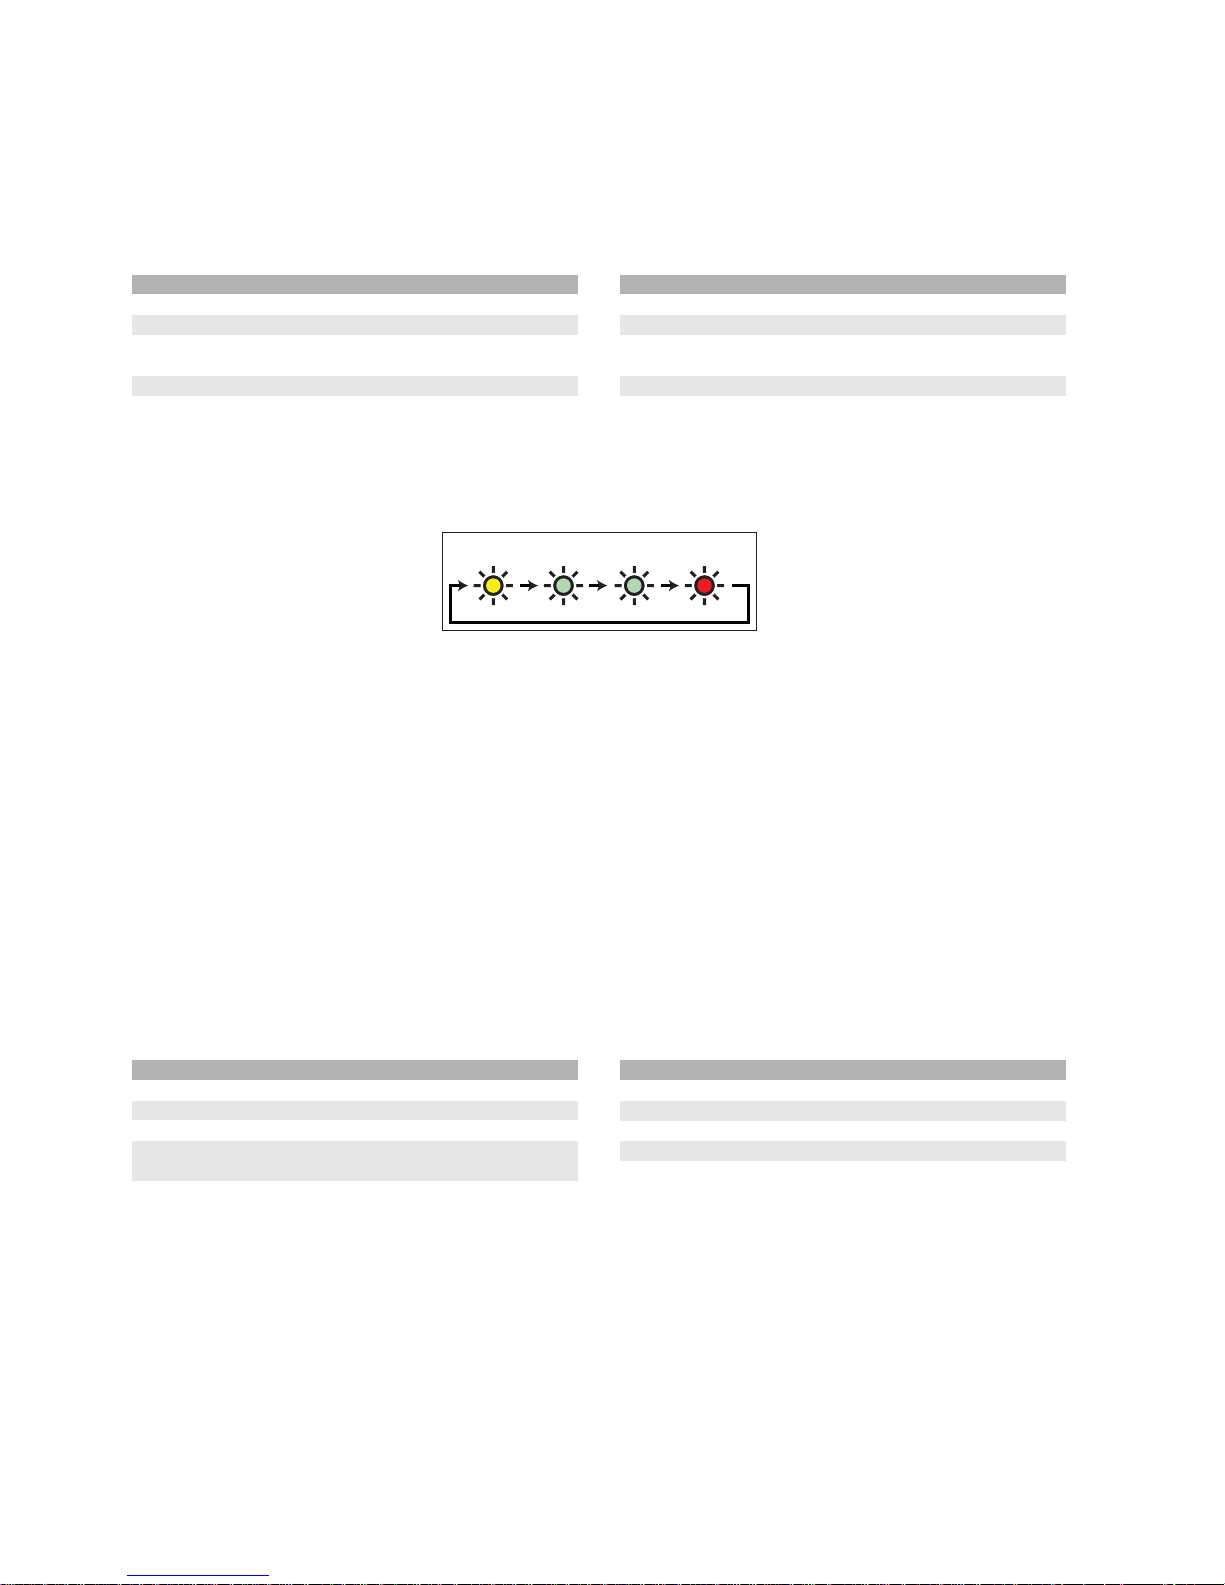
La figura seguente illustra la sequenza dei
colori nella situazione in cui vi siano:
• 3 unità collegabili (la funzione “MaxDevs” è
impostata su “3” dispositivi)
• unità 1 e 2 in linea,
• unità 3 scollegata.
Cavo di rete scollegato
Se il cavo di rete è scollegato, dopo alcuni secondi il LED lampeggerà
solamente rosso e giallo.
Accensione:
Quando il WebGate viene acceso, il LED non si accende per alcuni
secondi fino a quando l’interfaccia non è correttamente inizializzata.
Dopo l’inizializzazione, attendere alcuni secondi fino a quando tutte le
unità sono in linea.
Se il LED rimane spento (o se a volte lampeggia “rosso”) durante il
funzionamento normale, è possibile utilizzare la funzione “Status485”
da consolle per ottenere ulteriori informazioni (vedi “Funzioni Script del
WebGate”).
2.1.3 Status
Il LED in basso mostra gli stati di funzionamento del WebGate, come
indicato nella tabella qui sotto:
Colore Significato
Spento Scollegato
Verde Funzionamento normale
Giallo Il WebGate è occupato
Rosso Inizializzazione all’accensione (circa un secondo)
o errore fatale
Tab. 2.1.3.1
Accensione/Riaccensione:
Quando il WebGate viene acceso o riattivato con il comando “Reboot”,
il LED di status diventa giallo per pochi secondi fino a quando
l’interfaccia è correttamente inizializzata.
Funzionamento anomalo:
Se durante l’accensione il LED rosso di status lampeggia
continuamente, oppure non si accende, si è verificato un errore grave.
Procedura di Aggiornamento del Firmware:
L’aggiornamento del firmware è una procedura che inizia dopo un
riavvio e che può durare per alcuni minuti. Durante questa procedura, il
LED di status rimane acceso giallo.
2.1.2 RS485
The central LED displays the status of the RS485 Carel network.
Normal behaviour
This LED normally visualizes at intervals of 500ms the status of each
unit that should be connected to the RS485 interface.
In this manner, it is possible to evaluate quickly the network status.
In the following table is indicated the normal color meanings of the LED:
Color Meaning
Off Unit not scanned yet.
Green Unit online (data is received from the unit)
Yellow “Heartbeat”, used to display that the network scan is
active (WebGate is trying to transmit to units).
Red Unit offline
Tab. 2.1.2.1
Note: peripherals are scanned from address “1“ up to the address
indicated from the function “MaxDevs” (see WebGate Script Functions).
An example sequencing of colors is reported
in the example figure below; the following
assumptions are made:
• 3 units connectable (function “MaxDevs” is
set to “3” devices)
• units 1 and 2 are online,
• unit 3 is disconnected.
Network cable disconnected
If the network cable is disconnected, after some seconds the LED will
light up red and yellow only.
Power up:
When WebGate is powered up, the LED doesn’t light up for some
seconds until the interface is properly initialized. After initialization,
please wait some seconds to get all the units online.
If the LED remains off (or if it blinks “red” sometimes) during normal
operation, you can use the “Status485” function from the console to
obtain further information (see WebGate Script Functions).
2.1.3 Status
The bottom LED displays the generic status of the WebGate, as
indicated in the following table:
Color Meaning
Off Power off
Green Normal operation
Yellow WebGate is busy
Red Initialization at power-up (about one second) or fatal error
Tab. 2.1.3.1
Power-up or Reboot:
When WebGate is powered up or restarted with the “Reboot”
command, the Status LED becomes yellow for few seconds until the
interface is properly initialized.
Abnormal operation:
If during power-up the Status LED continuously blinks red or don’t light
up at all, a serious error is occurred.
Firmware Update Procedure:
The firmware update is a procedure that starts after a reboot and that
may take up some minutes. During this time the status LED will
continuously light yellow.
8
Manuale WebGate - cod. +030220230 rel. 1.0 - 16.09.2003
Yellow Green Green Red
Fig. 2.1.2.1

AVVERTENZE importanti.
Non togliere mai l’alimentazione quando il WebGate è occupato (LED
di status giallo), poiché ciò può causare la perdita della configurazione
e dei file utente.
In particolare, non togliere mai e per nessun motivo l’alimentazione
quando il WebGate sta aggiornando il firmware (LED di status giallo),
poiché ciò può danneggiare seriamente il dispositivo e comportare la
necessità di assistenza tecnica.
2.2 Pulsante di Reset
Il pulsante di reset è utile per ripristinare la configurazione del
WebGate con i valori di default. Ciò può risultare necessario soprattutto
se le impostazioni dei parametri di comunicazione sono state
modificate e dimenticate.
Sono disponibili due modalità di reset: Reset Configurazione ed
Eliminazione Totale.
2.2.1 Reset Configurazione
Per ripristinare le impostazioni di base con i valori originari, premere e
tenere premuto il pulsante di reset per 2 secondi.
Quando il pulsante viene rilasciato, il LED di status lampeggia
alternativamente giallo e verde per alcuni secondi. Quando il LED torna
ad un verde stabile, i parametri illustrati nella seguente tabella hanno
riacquisito i loro valori di default:
Parametri Valori di Default
IPAddress 192.168.0.250
NetMask 0.0.0.0
Gateway 255.255.255.255 (Disabilitato)
Baudrate485 19200
MaxDevs 16
Baudrate232 19200
TRAPIPAddress 255.255.255.255 (Disabilitato)
Tab. 2.2.1.1
2.2.2 Eliminazione Totale:
Questa opzione viene fornita come “ultima possibilità” in caso di perdita
della password.
AVVERTENZA importante.
Si noti che
, per ragioni di sicurezza, con questa procedura vengono
eliminati tutti i file utente (comprese quindi le pagine web
personalizzate) e il file system torna ai valori di fabbrica (o all’ultimo
aggiornamento).
Per eseguire un’eliminazione totale, premere per 10 secondi il pulsante
di reset.
Quando il pulsante viene rilasciato, il LED di status lampeggia
alternativamente giallo e rosso per alcuni secondi. Quando il LED torna
verde, oltre al ripristino dei valori di default, indicati nella tabella qui
sopra (Tab. 2.2.1.1), si verificheranno anche i seguenti cambiamenti:
• verranno eliminati tutti i file utente (con qualsiasi livello di accesso:
“guest”, “user”, “supervisor” o “administrator”)
• verrà eliminata la tabella utenti e quindi cancellati tutti i nomi utente
e le relative password.
Non vengono invece modificati i seguenti dati:
• i file predefiniti o i file aggiornati con un aggiornamento fornito dal
costruttore
• i parametri della seguente tabella:
Parametri NON modificati dal pulsante di reset
RWCommunity
SNMPSysname
SNMPSyscont
SNMPSysloc
TRAPCommunity
ROCommunity Tab. 2.2.2.1
Important WARNINGS.
Ne
ver remove power supply when WebGate is busy (status LED is
yellow), since this may cause loss of the configuration and user files.
Absolutely never remove power supply when WebGate is performing a
firmware update (status led is yellow), since this may severely damage
the device and require technical assistance.
2.2 Reset Button
The reset button is useful to restore the WebGate configuration to its
factory default. This may be necessary in particular if the settings of the
communication parameters were changed and forgotten.
Two reset modes are provided: Configuration Reset and Total Erase.
2.2.1 Configuration Reset
To restore basic configuration settings to their original values press the
reset button and hold it down for 2 seconds.
When the button is released, the status LED will blink alternatively
yellow and green for some seconds. When the LED will return back to
a steady green the following parameters will gain their default values:
Parameter Default Values
IPAddress 192.168.0.250
NetMask 0.0.0.0
Gateway 255.255.255.255 (Disabled)
Baudrate485 19200
MaxDevs 16
Baudrate232 19200
TRAPIPAddress 255.255.255.255 (Disabled)
Tab. 2.2.1.1
2.2.2 Total Erase:
This option is provided basically as a “last chance” aid when passwords
are lost.
Important WARNING.
Please note that as a secur
ity measure, all user files will be erased
from this procedure (included the customized web pages), and the file
system will return to its factory (or last update) state.
To perform a total erase press the reset button and hold it down for 10
seconds.
When the button is released, the status LED will blink alternatively
yellow and red for some seconds.When the LED will retur n green
again, in addition to the default values indicated in the table above
(Tab. 2.2.1.1),, the following changes will also occur:
• All user files will be erased (with any access level :“guest”, “user”,
“supervisor” or “administrator”)
• The user table will be erased, removing any user name and relevant
passwords.
The following items are not changed instead:
• Factory files or files updated with a distribution upgrade
• The parameters in the table below:
Parameters NOT changed by reset button
RWCommunity
SNMPSysname
SNMPSyscont
SNMPSysloc
TRAPCommunity
ROCommunity Tab. 2.2.2.1
9
Manuale WebGate - cod. +030220230 rel. 1.0 - 16.09.2003

3. Interfaccia di Configurazione HTML
Il WebGate viene consegnato con alcune pagine predefinite per una
facile configurazione dell’unità.
Come spiegheremo nel paragrafo che segue, tutte le informazione rese
disponibili da queste pagine, si possono ottenere utilizzando una
funzione script: per maggiori informazioni sull’argomento, vedi Funzioni
Script del WebGate.
Gli utenti del WebGate possono anche creare pagine personalizzate
con le stesse funzioni di quelle precaricate (vedi Creare una pagina
Web personalizzata per WebGate).
La pagina può essere visualizzata al meglio con un browser abilitato
per JavaScript e Cascading Style Sheets (CSS) (ad esempio Internet
Explorer™ 5.0) su monitor con risoluzione di almeno 800x600 pixel,
32bpp.
3.1 Pagina informativa
La pagina Information è la prima pagina che appare quando ci si
collega al WebGate.
E’ l’unica pagina a cui tutti possono accedere. Per accedere a qualsiasi
altra pagina di configurazione è richiesto il livello di accesso
administrator.
I campi visibili sono spiegati nella tabella che segue:
Campo Descrizione Funzione
Firmware Ultima versione aggiornata del software SWVersion
Version WebGate
Hardware Versione hardware del WebGate. Il valore HWVersion
Tracking è puramente indicativo. Ogni volta che si
contatta l’assistenza Carel, vanno sempre
riportati i numeri di versione e di serie
indicati sulla etichetta.
Files Indica quanti byte e posizioni di file sono FreeFiles
Space liberi per la memorizzazione di file nel file
system del WebGate.
Last Indica l’ultimo eventuale errore verificatosi UpdateStatus
Update nel corso dell’ultimo riavvio e tentato
Status aggiornamento del firmware. Si noti che
il messaggio “Update file not found” è
normale e non indica un errore.
Tab. 3.1.1
3. HTML Configuration Interface
WebGate is shipped from the factory with some predefined pages
provided to configure easily the unit.
As indicated in the following paragraph, every information available
from these pages is obtained through the use of a script function: to
obtain more information about any function see WebGate Script
Functions.
In addition, WebGate users can create custom pages with the same
capabilities as the original shipped from factory (see Creating a custom
Web page on the WebGate).
The page is best viewed with a browser enabled for JavaScript and
Cascading Style Sheets (CSS) (for example, Internet Explorer™ 5.0)
on a monitor displaying a resolution of at least 800x600 pixels, 32bpp.
3.1 Information page
The Information page is the first page displayed when you connect to
WebGate.
This is the only page accessible to everybody. To access to any other
configuration page is required an administrator access level instead.
The visible fields are explained below:
Field Description Function
Firmware Latest WebGate software update version SWVersion
Version (revision)
Hardware WebGate hardware version (revision). HWVersion
Tracking The value indicated here is only indicative.
When contacting for Carel support, always
report the release and serial number
indicated on the label
Files Indicates how many bytes and file FreeFiles
Space locations are free to store files in the
WebGate file system.
Last Return the possible last error occurred UpdateStatus
Update (if any) when the last reboot was
Status performed and a firmware update was
tried. Please note that the indication
“Update file not found” is normal and it
not indicates an error.
Tab. 3.1.1
10
Manuale WebGate - cod. +030220230 rel. 1.0 - 16.09.2003
Fig. 3.1.1

3.2 Pagine di configurazione
Per accedere a qualsiasi pagina di configurazione è richiesto il livello di
accesso administrator.
3.2.1 Scheda di configurazione General
La scheda di configurazione General è la prima pagina visibile cliccando
il collegamento “Configure” sulla barra di navigazione a sinistra:
I campi visibili sono spiegati nella tabella che segue:
Campo Descrizione Funzione
REBOOT Questa casella di controllo viene utilizzata Reboot
WEBGATE per riavviare il WebGate con una
procedura simile a quella di accensione.
Si utilizza soprattutto quando si vuole
procedere con un aggiornamento del
firmware. Per riavviare il WebGate è
sufficiente selezionare la casella di controllo
e premere il pulsante “Apply”. Si noti che
l’aggiornamento del software potrebbe
richiedere alcuni minuti; è necessario inoltre
aggiornare la pagina manualmente
premendo il pulsante “aggiorna” del browser.
Tab. 3.2.1.1
3.2.2 Scheda di configurazione Network
La scheda Network viene utilizzata per configurare l’interfaccia
Ethernet:
3.2 Configuration pages
To access to any configuration page is required an administrator
access level.
3.2.1 General configuration tab
The General configuration tab is the first page visible when you click on
the “Configure” link on the left navigation panel:
The visible fields are explained below:
Field Description Function
REBOOT This checkbox is used to restart the Reboot
WEBGATE WebGate in a way similar to the power-up.
This is used mainly when you want to
proceed for a firmware update. To reboot
WebGate, simply check the box and press
the “Apply” button. Please note that the
operation may take some minutes when a
software update is performed and, in addition,
you will have to manually refresh the page
pressing the “update” button of the browser.
Tab. 3.2.1.1
1.2.2 Network configuration tab
The Network tab is used to configure Ethernet interface:
11
Manuale WebGate - cod. +030220230 rel. 1.0 - 16.09.2003
Fig. 3.2.1.1
Fig. 3.2.2.1

I campi visibili sono spiegati nella tabella che segue:
Campo Descrizione Funzione
IP Address L’indirizzo IP del WebGate. Per default, Reboot
questo valore è impostato
a “192.168.0.250”.
Subnet Mask Pattern di rete. Se non si ha NetMask
Mask bisogno di utilizzare un gateway, è
possibile impostare questo valore al
default di 0.0.0.0
Gateway Indirizzo del Gateway di rete. Se non si Gateway
ha bisogno di utilizzare un gateway, è
possibile impostare questo valore al
default di 255.255.255.255
MAC Indirizzo hardware Ethernet. Questo MACAddress
Address valore può essere utile agli amministratori
di sistema e non può essere modificato.
Network Si tratta di una lista di statistiche di rete. NetStat
Statistics Può essere utile agli amministratori di
sistema. Per una descrizione dettagliata,
vedi il paragrafo sul comando “NetStat”.
Tab. 3.2.2.1
AVVERTENZA.
Se non avete familiarità con la gestione di rete, vi consigliamo di
consultare il capitolo Funzioni Script del WebGate per comprendere
meglio il significato delle varie funzioni. Per ottenere un Indirizzo IP,
un Subnet Mask e un indirizzo Gateway validi, contattate il vostro
amministratore di rete.
3.2.3 Scheda di configurazione RS845
La scheda RS485 viene utilizzata per configurare l’interfaccia RS485
verso la Rete Carel:
I campi visibili sono spiegati nella tabella che segue:
Campo Descrizione Funzione
Baudrate Baudrate per l’interfaccia RS485 Baudrate485
Maximum Numero massimo di dispositivi collegati MaxDevs
number of al WebGate.
devices Si consiglia di impostare questo valore al
numero effettivo di unità collegate, in modo
da ottenere una risposta più veloce e un
corretto funzionamento del LED “RS485”.
Tab. 3.2.3.1
The visible fields are explained below:
Field Description Function
IP Address IP Address of WebGate itself. By default, Reboot
this value is set to “192.168.0.250”.
Subnet Network Mask Pattern. If you don’t need NetMask
Mask to use a gateway you can safety set this
value to its default of 0.0.0.0
Gateway Network Gateway Address. If you don’t Gateway
need to use a gateway set this value to
its default of 255.255.255.255
MAC Ethernet hardware address. This value MACAddress
Address can be useful to system administrators
and cannot be changed.
Network This is a list of network statistics. This NetStat
Statistics may be useful to system administrators.
For a detailed description please refer to
the “NetStat” command paragraph.
Tab. 3.2.2.1
WARNING.
If you aren’t accustomed with network management we suggested to
consult the chapter WebGate Script Functions to better understand
how the related functions works. In such a situation, to obtain a valid IP
Address, Subnet Mask and Gateway address contact your system
administrator.
3.2.3 RS845 configuration tab
The RS485 tab is used to configure the RS485 interface towards Carel
Network:
The visible fields are explained below:
Field Description Function
Baudrate Baudrate for the RS485 interface Baudrate485
Maximum Maximum number of devices connected MaxDevs
number of to WebGate.
devices Is suggested to set this value to the
number of actually connected units to
allow a faster response and a proper
“RS485” LED working.
Tab. 3.2.3.1
12
Manuale WebGate - cod. +030220230 rel. 1.0 - 16.09.2003
Fig. 3.2.3.1
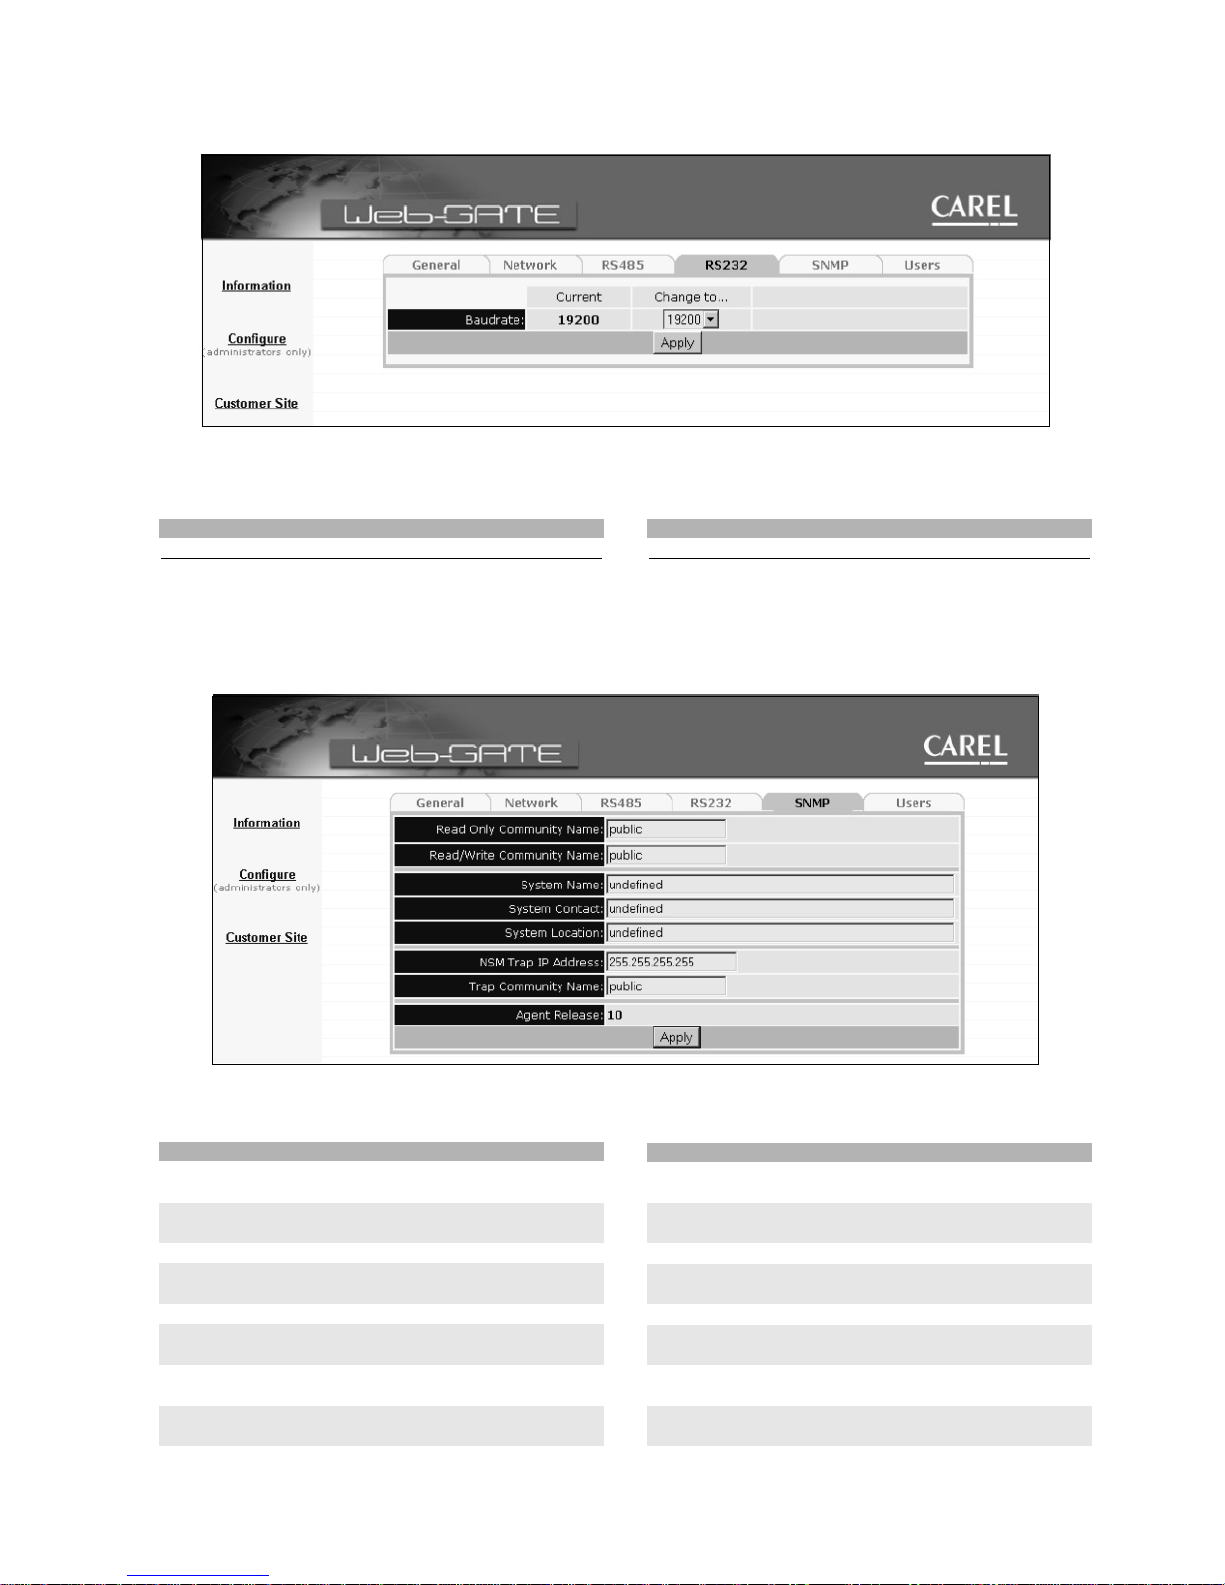
3.2.4 Scheda di configurazione RS232
La scheda RS232 viene utilizzata per configurare l’interfaccia seriale
RS232 per l’utilizzo della consolle:
I campi visibili sono spiegati nella tabella che segue:
Campo Descrizione Funzione
Baudrate Baudrate per interfaccia RS232 Baudrate232
Tab. 3.2.4.1
3.2.5 Scheda di configurazione SNMP
La scheda SNMP viene utilizzata per configurare le caratteristiche del
protocollo SNMP:
I campi visibili sono spiegati nella tabella che segue:
Campo Descrizione Funzione
Read Only SNMP Read Only ROCommunity
Community Name Community Name
Read/Write SNMP Read/Write RWCommunity
Community Name Community Name
System Name SNMP System Name SNMPSysname
System Contact SNMP Contact Name SNMPSyscont
(Operatore)
System Location SNMP System Location SNMPSysloc
NSM Trap Indirizzo IP del Trap Manager TrapIPAddress
IP Address
Trap Community SNMP Trap Community Name TrapCommunity
Name
Agent Release Release software dell’Agent SNMPAgentRel
WebGate
Tab. 3.2.5.1
3.2.4 RS232 configuration tab
The RS232 tab is used to configure the RS232 interface for the serial
console interface:
The visible fields are explained below:
Field Description Function
Baudrate Baudrate for the RS232 interface Baudrate232
Tab. 3.2.4.1
3.2.5 SNMP configuration tab
The SNMP tab is used to configure the SNMP protocol features:
The visible fields are explained below:
Field Description Function
Read Only SNMP Read Only ROCommunity
Community Name Community Name
Read/Write SNMP Read/Write RWCommunity
Community Name Community Name
System Name SNMP System Name SNMPSysname
System Contact SNMP Contact Name SNMPSyscont
(Operator)
System Location SNMP System Location SNMPSysloc
NSM Trap Trap Manager IP Address TrapIPAddress
IP Address
Trap Community SNMP Trap Community Name TrapCommunity
Name
Agent Release WebGate Agent software SNMPAgentRel
release
Tab. 3.2.5.1
13
Manuale WebGate - cod. +030220230 rel. 1.0 - 16.09.2003
Fig. 3.2.4.1
Fig. 3.2.5.1
AVVERTENZA
La lunghezza massima di ogni stringa SNMP è:
Lunghezza max variabili system nel WebGate
Variabile system Lungh. max
SysName 39 caratteri
sysContact, sysLocation 79 caratteri
Tab. 3.2.5.2
Inoltre, la stringa deve essere composta esclusivamente da caratteri
alfanumerici (0…9, A…Z e a…z). Non sono permessi spazi o segni di
punteggiatura.
Per una descrizione completa del protocollo SNMP, vedi il capitolo
Protocollo SNMP per WebGate.
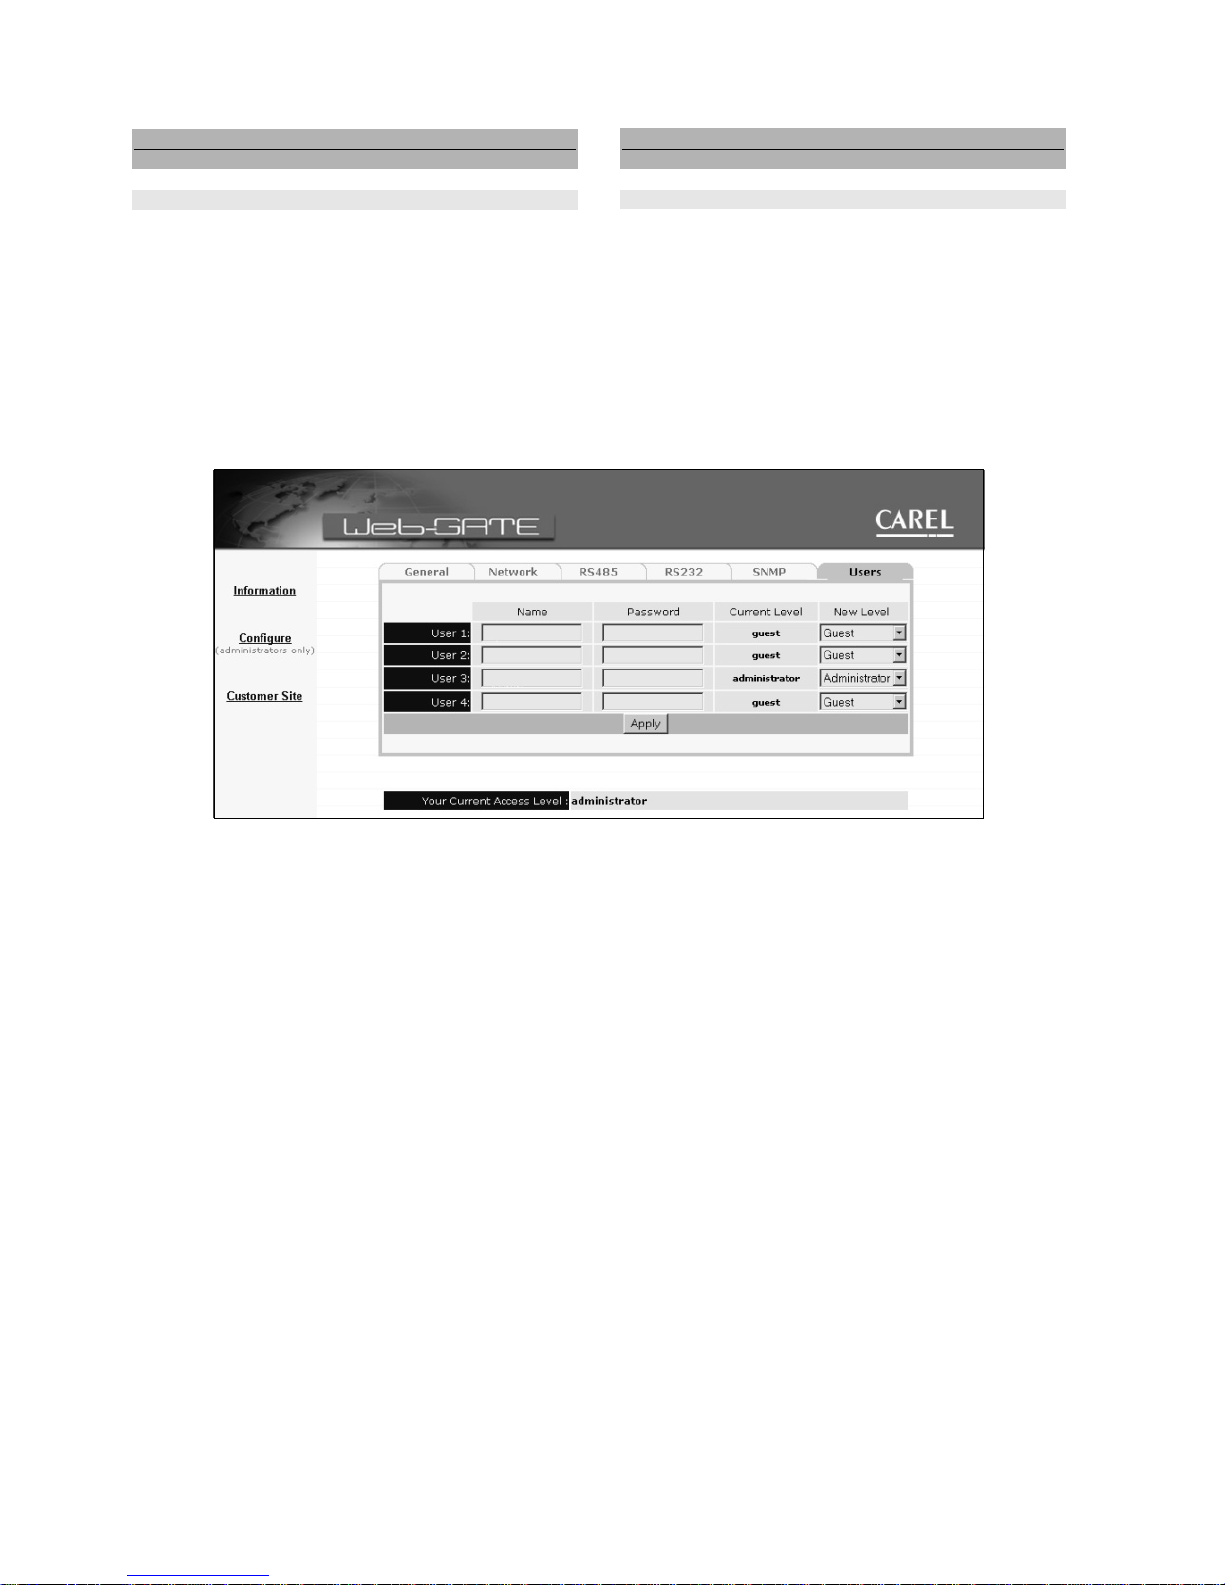
3.2.6 Scheda di configurazione Users
La scheda Users viene utilizzata per configurare gli utenti del
WebGate:
Nel paragrafo Gestione Utenti è possibile trovare una descrizione
completa della configurazione degli utenti.
3.3 Collegamento ‘Customer Site’
Il collegamento “Customer Site” indirizza direttamente alla pagina
“/default.html” che dovrebbe essere la vostra pagina personalizzata
principale.
WARNING
The maximum length of each string SNMP is:
Max. length of the system variables in the WebGate
System Variable Max. Length
SysName 39 characters
sysContact, sysLocation 79 characters
Tab. 8.7.1
Moreover, the string have to be composed only of alphanumeric
characters (0…9, A…Z and a…z). No spaces or punctuation marks are
allowed.
For a complete description on SNMP please see WebGate SNMP
Protocol.
3.2.6 Users configuration tab
The Users tab is used to configure the WebGate Users:
A complete description on how to configure users can be found in User
Management.
3.3 Customer Site link
The “Customer Site” link provides a fixed link to the “/default.html” page
that should be your main customized page.
14
Manuale WebGate - cod. +030220230 rel. 1.0 - 16.09.2003
Fig. 3.2.6.1
4. Interfaccia RS232 (consolle)
4.1 Introduzione
L’interfaccia utente RS232 (consolle) rappresenta un modo veloce e
comodo per configurare il WebGate e sperimentarne le funzioni.
Si tratta di un’interfaccia a riga di comando a cui si accede attraverso
la porta seriale RS232, utilizzando un PC e un programma di
emulazione terminale. Il WebGate è fornito di un connettore DTE e va
quindi collegato al PC con un cavo null-modem. Sono richiesti solo i
segnali TX e RX.
4.2 Impostazioni
Per la configurazione dell’emulatore terminale sono richieste le
seguenti impostazioni:
• Selezionare la porta di comunicazione a cui il WebGate è collegato
(generalmente COM1 o COM2);
• Impostare la configurazione della porta seriale a 8 bit di dati,
nessuna parità, 1 bit di stop, nessun controllo di flusso;
• Assicurarsi che il terminale sia configurato alla stessa velocità di
comunicazione del WebGate. Il baudrate di default della porta seriale
del WebGate è 19200 baud. Questo valore può essere modificato
utilizzando l’interfaccia HTML (vedi Scheda di configurazione
RS232). E’ importante assicurarsi che il terminale sia configurato
con le stesse impostazioni.
Per la configurazione dell’emulatore terminale si consigliano le
seguenti impostazioni:
• Utilizzare la modalità di emulazione TTY
• Disabilitare l’eco dei caratteri digitati localmente. I caratteri vengono
ripetuti dal WebGate in remoto.
• Abilitare l’opzione “cancella con backspace”, se disponibile, in modo
da permettere una corretta gestione del carattere di “backspace”
inviato dal WebGate
• Non aggiungere un “avanzamento riga” ad ogni ritorno a capo
trasmesso.
• Non aggiungere un “avanzamento riga” ad ogni ritorno a capo
ricevuto (eseguito automaticamente dal WebGate).
4.3 Esempio di configurazione guidata
Il paragrafo descrive in che modo un emulatore terminale può essere
utilizzato come consolle per il WebGate.
Come esempio utilizzeremo Hyperterminal®, l’emulatore di terminale
fornito con Microsoft® Windows©. Potrà comunque essere utilizzato
qualsiasi emulatore di terminale, qualora configurato correttamente.
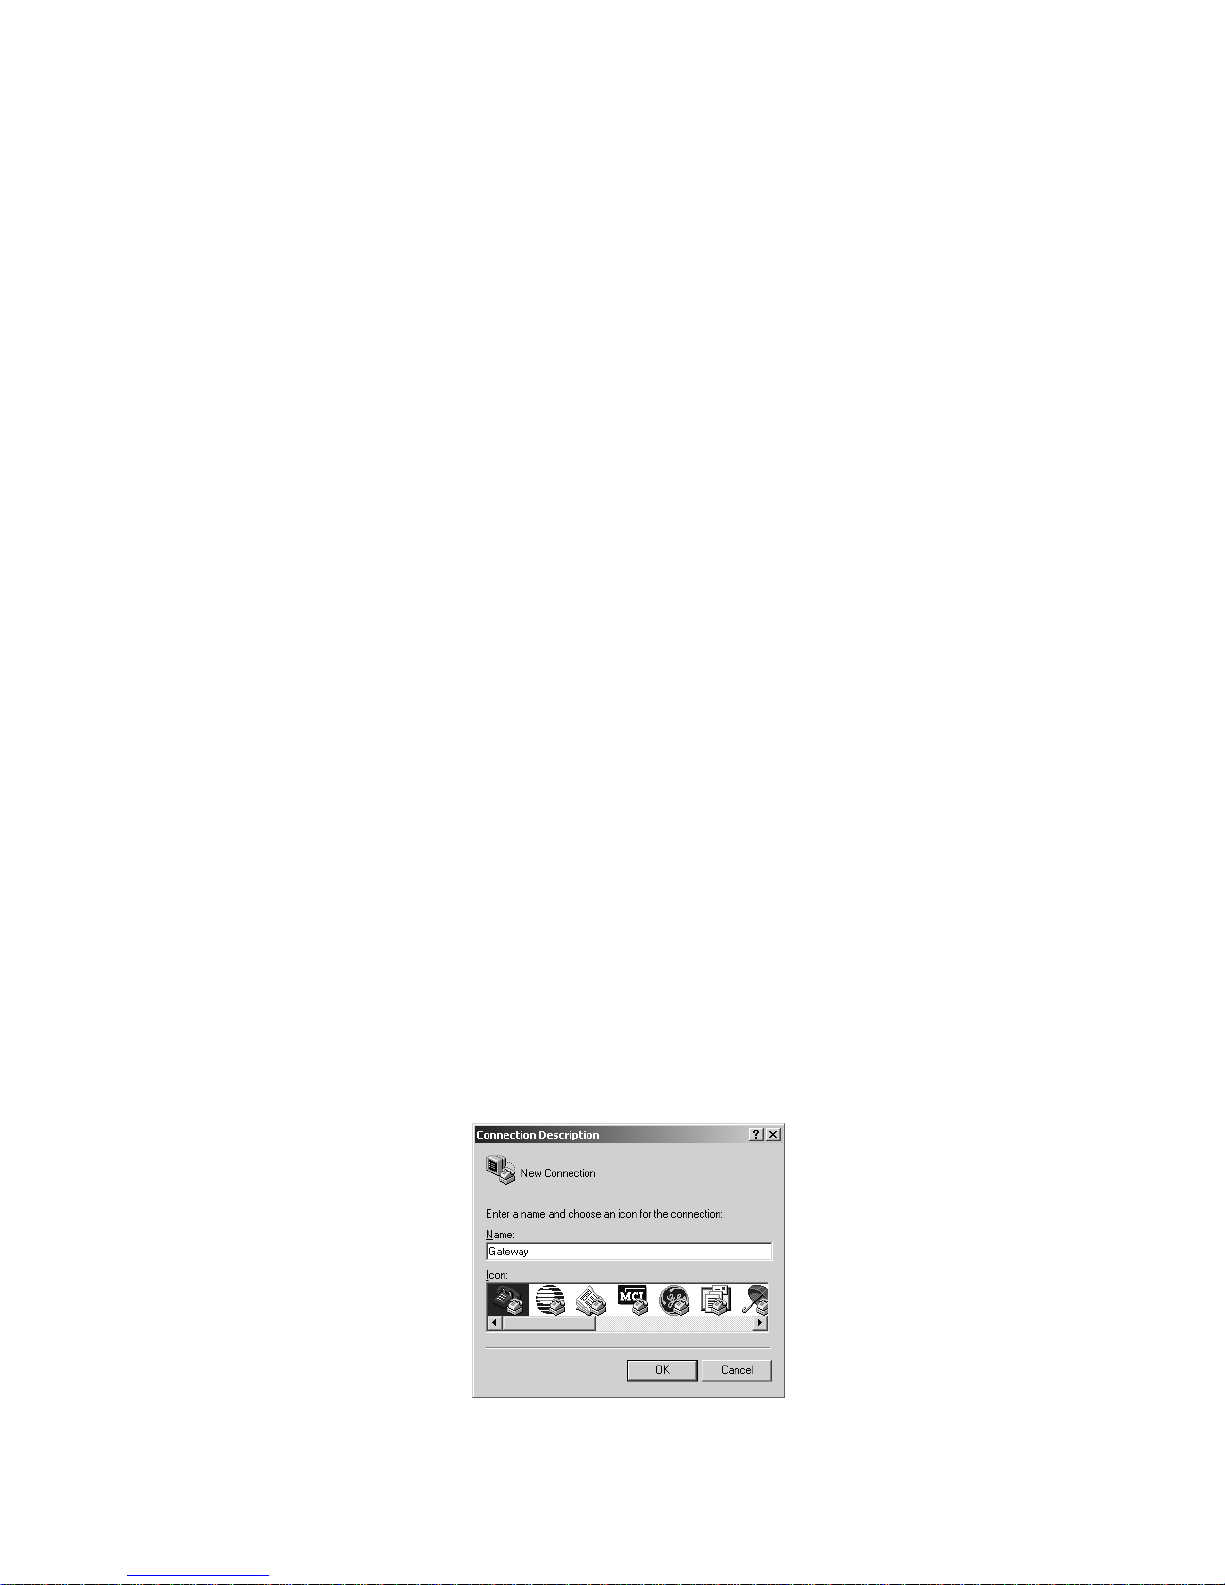
1. Selezionare ed eseguire Hypertrm.exe da
Start>Programmi>Accessori>Hyperterminal;
apparirà la finestra seguente (potrebbe
anche essere in parte diversa a seconda
della lingua del sistema operativo utilizzato):
4. Interface RS 232 (Console)
4.1 Introduction
The console user interface RS232 is a fast and convenient way to
configure WebGate and to experiment with its functions.
It is basically a command line interface accessed via the RS232 port
using a PC and a terminal emulation program.
Since WebGate is provided with a DTE interface connector, it must be
connected to the PC with a null-modem cable. Only the TX and RX
signals are required.
4.2 Settings
The following settings are required when configuring the terminal
emulator:
• Select the communication port where the WebGate is connected to
(generally COM1 or COM2);
• Set the serial port configuration to 8 bit data, no parity, 1 stop bit,
no flow control;
• Make sure that the terminal is configured at the same communication
speed of the WebGate speed.The default serial port baudrate of
WebGate is 19200 baud. This value can be changed using the HTML
interface (see RS232 configuration tab). However, make sure that
the terminal is configured in the same way.
The following settings are suggested when configuring the terminal
emulator:
• Use the TTY emulation mode
• Disable local characters echo. Characters are remotely echoed from
WebGate.
• enable the “delete with backspace” option when available, to allow the
correct handling of the “backspace” character sent by WebGate
• Don’t add a “LF” after transmitted lines
• Don’t’ add a “LF” after received lines (this is performed automatically
by WebGate).
4.3 A step-by-step configuration example
In this paragraph is described step-by-step how a terminal emulator
can be used as console interface for the WebGate.
For example we will use Hyperterminal®, the terminal emulator
supplied with Microsoft® Windows©. However, any terminal emulator, if
properly configured, may be used.
1. Select and run Hypertrm.exe from
Start>Programs>Accessories>Hyperterminal; the following window
will appear (it may be differ somewhat
depending on your operative system
language):
15
Manuale WebGate - cod. +030220230 rel. 1.0 - 16.09.2003
Fig. 4.3.1

2. Immettere un nome e scegliere un’icona
per la connessione, ad esempio
WebGate, e cliccare OK. Apparirà la
finestra riportata di seguito:
3. Selezionare la porta seriale COM[x] per
il collegamento tra PC e WebGate, ad
esempioCOM1, e cliccare il pulsante
OK, ora si possono impostare i
parametri di comunicazione dalla
finestra riportata di seguito:
4. Selezionare: 19200 baud, 8 bit di dati, nessuna parità, 1 bit di stop,
nessun controllo di flusso e cliccare OK.
La consolle è così impostata per la comunicazione tra PC e WebGate
a 19200 bps, cioè il baudrate di default per la porta seriale RS232 del
WebGate.
AVVERTENZA: se le impostazioni del WebGate non sono quelle di
default e il baudrate RS232 non
corrisponde al baudrate
dell’HyperTerminal, la vostra
consolle non funzionerà
correttamente. Quando si
cercherà di inviare uno dei
comandi disponibili, come ad
esempio il comando “help”, la
finestra della consolle
visualizzerà dei caratteri
anomali, come illustrato nella
figura che segue:
Se si dimentica il baudrate impostato in precedenza per la porta seriale
RS232 del WebGate, il problema si può risolvere ripristinando il gateway
in modo da impostare il baudrate a 19200 (vedi Pulsante di Reset).
2. Choose an icon and a name for the
console section you want, for example
WebGate and click OK.The following
window appears:
3. Select the COM[x] serial port for the
connection between PC and WebGate, i.e.
COM1, and click the OK button, so you can
choose now the communication parameters
from the following window:
4. Select: 19200 baud, 8 bit data, no parity, 1 stop bit, no flow control
and click OK.
Now you have the console window for the communication between PC
and WebGate working at 19200 bps, which is the default baudrate for
the RS232 WebGate serial port.
WARNING: if the WebGate’s settings are not the default one and its
RS232 baudrate doesn’t match
the HyperTerminal baudrate,
your console will not work
correctly. Trying to send one of
the available commands, the
“help” command for example,
the console window will show
anomalous characters as in the
following figure:
If you don’t remember the baudrate previously setted to the WebGate’s
RS232 serial port, the problem can be solved resetting the gateway in
order to certainly set its baudrate to 19200 (see Reset Button).
16
Manuale WebGate - cod. +030220230 rel. 1.0 - 16.09.2003
Fig. 4.3.2
Fig. 4.3.3
Fig. 4.3.4

4.4 Ulteriori informazioni sulla consolle
4.4.1 Prompt
Quando il WebGate è pronto per un comando utente visualizza una
riga che inizia con il segno “>”.
4.4.2 Login
Per default, l’accesso alla consolle avviene con il livello di
autorizzazione dell’utente “anonymous”.
Perciò, se si utilizzano le procedure di user management (vedi
Gestione Utente) alcune funzioni potrebbero non essere disponibili.
Per un accesso completo alle funzioni della consolle, utilizzare il
comando “Login” (vedi Funzioni Script del WebGate).
Alla consegna del WebGate, l’utente anonymous ha diritti da
“administrator”. Perciò per la prima configurazione non è necessario
usare il comando Login.
4.4.3 Limitazioni nell’uso di espressioni
Quando si esegue una funzione dal terminale, va ricordato che le
espressioni che seguono il segno “=” non devono contenere spazi:
set(test) = test+ 1 ← Errato
set(test) = 3 + 1 ← Errato
set(test) = test+1 ← OK
4.4.4 Ritardi successivi all’esecuzione delle funzioni
In seguito all’esecuzione di alcune funzioni (ad esempio “IPAddress”)
può verificarsi un evidente rallentamento del terminale e alcuni caratteri
della tastiera potrebbero venire ignorati.Si tratta di un comportamento
normale ed inevitabile, che si verifica quando viene modificato un file di
configurazione interna. Durante questa fase il LED status si accende
giallo ad indicare lo stato di occupato.
5. File system
Il WebGate si basa su un file system integrato accessibile all’utente.
Il file system viene utilizzato per memorizzare pagine HTML e qualsiasi
altro file che possa risultare utile all’utente.
L’utente può memorizzare fino a 100 file in 400 KByte di spazio
riservati a questo scopo.
Inoltre, il WebGate viene fornito con alcuni file pre-caricati (pagine di
configurazione, immagini, ecc.), ridondanti e non sovrascrivibili, per
garantire maggiore affidabilità.
5.1 File
I file utente hanno le seguenti caratteristiche:
• La lunghezza massima del nome del file è di 127 caratteri ASCII.
• Sono consentiti i seguenti simboli:
, , e
Non sono consentiti né caratteri con codice ASCII minore di “33” o
maggiore di 127, né i caratteri elencati qui sotto:
Ad esempio, non sono permessi “spazi” all’interno di un nome.
• Le lettere maiuscole e minuscole vengono preservate, ma vengono
ignorate nelle ricerche (come in MS Windows TM).
• I file sono memorizzati con un “header” di circa 150 byte in settori di
1KByte ciascuno. Di conseguenza, ciascun file utilizzerà un’area di
memoria un po’ più grande delle dimensioni del file stesso.
4.4 Additional notes about the console
4.4.1 Prompt
When WebGate is ready for a user command, it displays a line
beginnig with a “>” sign.
4.4.2 Login
By default, console access is restricted to the same rights of the
“anonymous” user.
Since of this, if you are using the user management capabilities (see
User Management) some functions may be restricted to you. To gain
full access to console functions, please use the “Login” command (see
WebGate Script Functions).
When WebGate is shipped from factory, the anonymous user have
“administrator” rights. Since of this, for the first configuration you don’t
need to use the Login command.
4.4.3 Limitations using expressions
When using a function with the terminal, please remember that
expressions following the assignment operator “=” must not contain
spacing characters:
set(test) = test+ 1 ← Wrong
set(test) = 3 + 1 ← Wrong
set(test) = test+1 ← OK
4.4.4 Delays after function execution
After the execution of some functions (e.g.“IPAddress”) a noticeable
terminal slow-down may occur and some keyboards characters could
be ignored.
This is a normal and unavoidable behaviour that occurs when the
internal configuration file is modified. During this time the status LED
will light on yellow to indicate a busy status.
5. File system
WebGate is based on an embedded file system accessible to the user.
File system is used to store HTML pages and any other file that may
be useful to the user.
The user can store up to 100 user files in the 400 KBytes storage
space reserved to this purpose.
In addition, WebGate comes with some factory files (configuration
pages, images, etc.) that are redundant and write protected for
increased reliability.
5.1 Files
User files have the following characteristics:
• Maximum file name length is 127 ASCII characters.
• The following symbols are allowed:
, , and
Neither characters with ASCII code less of “33” or greater than 127,
or characters listed below are not allowed:
For instance, please note that “space” characters inside a name are
not allowed.
• Capital and non-capital letters are preserved, but file search is not
case sensitive (in a similar way to MS Windows TM).
• Files are stored with a “header” of about 150 bytes in sectors of
1KByte each. Consequently, every file will use a memory area a little
17
Manuale WebGate - cod. +030220230 rel. 1.0 - 16.09.2003

• I file sono caratterizzati da un livello di accesso minimo in lettura e in
scrittura. I paragrafi che seguono descrivono come impostare questi
livelli per ogni file.
• Dal momento che il WebGate non ha un orologio real time integrato,
ciascun file viene memorizzato con una data di creazione “simulata”
(giorno 1, mese 1 del 2002 alle 00:00)
5.2 Cartelle e protezione file con “Accesso in lettura”
La struttura delle cartelle nel WebGate è fissa e gli utenti non possono
creare o eliminare le cartelle.
Se non c’è la necessità di accedere alle funzioni di gestione utenti si
può semplicemente memorizzare tutti i file nella cartella principale.
Altrimenti si possono utilizzare le altre cartelle “\user\”, “\supervisor\” e
“\administrator\”.
In pratica, la struttura delle cartelle viene utilizzata per assegnare un
livello di accesso in lettura ad un file:
• I file in “\” (principale) possono essere letti da tutti coloro che hanno il
livello di accesso “guest”.
• I file in “\user\” possono essere letti con il livello di accesso “user”o
superiore.
• I file in “\supervisor\” possono essere letti con il livello di accesso
“supervisor” o superiore.
• I file in “\administrator\” possono essere letti con il livello di
accesso “administrator” o superiore.
Con l’FTP (vedi File Transfer Protocol), l’operatore può vedere solo le
cartelle a cui ha accesso. Ad esempio, se l’operatore ha un livello di
accesso da “supervisor”, la cartella “\administrator\” rimane
nascosta.
5.3 Protezione dei file dall’accesso in scrittura
• Ciascun file memorizzato nel WebGate ha una protezione
dall’accesso “in scrittura”, distinta dalla protezione all’accesso
“in lettura”, per evitarne la cancellazione o la modifica, sia
involontaria che intenzionale, da parte di utenti non autorizzati.
• La protezione dei file con accesso in scrittura si imposta mediante
FTP, descritto al capitolo File Transfer Protocol.
5.4 Nota aggiuntiva
Quando si leggono o scrivono file si illumina in giallo il LED “status”.
bit greater than the size of the file itself.
• Files are characterized from a minimum read access level and a
minimum write access level. Next paragraphs describe how this levels
can be set for any file.
• Since WebGate don’t have an on board real time clock, every file is
stored with a fixed “fake” date of creation (day 1, month 1 of 2002 at
00:00)
5.2 Directories and “Read Access” file protection
The structure of the folders in WebGate is fixed. The users cannot
create or cancel the folders.
If it is not necessary to access the user management functions, it is
possible to memorize all the files in the main folder. Other wise, it is
possible to use the other folders “\user\”, “\supervisor\” and
“\administrator\”.
Basically, the directory tree is used to assign a read access level to a
file:
• Files placed in “\” (root) are readable from everybody with “
guest”
access level.
• Files placed in “\user\” are readable with “user” or greater access
level.
• Files placed in “\supervisor\” are readable with “supervisor” or
greater access level.
• Files placed in “\administrator\” are readable with
“administrator” or greater access level.
When using FTP (see File Transfer Protocol (FTP)), an operator can
only see the directory folders he can access to. For example, if the
operator has a “supervisor” access level, the “\administrator\” directory
is hidden.
5.3 “Write Access” file protection
• Every file stored into WebGate is provided with a “write” access
protection, distinguished from the “read” access protection, to avoid
involuntary or malicious file deletion or modification by unauthorized
users.
• Write Access file protection is obtained through FTP and is described
in File Transfer Protocol.
5.4 Additional Note
When reading and writing files, the “busy” LED will light up yellow.
18
Manuale WebGate - cod. +030220230 rel. 1.0 - 16.09.2003

6. File Transfer Protocol (FTP)
Nota: prima di leggere il capitolo che segue è necessario acquisire una
certa familiarità con il File System del WebGate, descritto al capitolo
File System. E’ possibile accedere al file system in lettura tramite HTTP.
E’ tuttavia necessario l’FTP per memorizzare i file nel WebGate. L’FTP
è un modo semplice per gestire i file. I client FTP moderni si integrano
perfettamente con i sistemi operativi a finestre, semplificando così il
trasferimento di file. Allo stesso tempo forniscono un’ampia descrizione
degli errori qualora qualcosa non funzioni correttamente.
6.1 I client FTP
Consigliamo di utilizzare il programma freeware SmartFTPTM
(http://www.smartftp.com).
E’ possibile tuttavia utilizzare pressoché qualsiasi client FTP, anche se
alcuni sono sconsigliati (come ad esempio Microsoft© Internet
Explorer®).
I client FTP in genere necessitano solamente di una piccola, e a volte
di nessuna, configurazione per comunicare con il WebGate.
Vanno comunque rispettate le seguenti regole:
• Il client non va impostato in “Passive Mode“ (PASV);
• Il numero massimo di “thread” da utilizzare per lo scarico deve essere
impostato a 1;
• Se si passa attraverso un Firewall o un Proxy Server, assicurarsi che
il protocollo FTP non sia bloccato. Il blocco dell’FTP è spesso
impostato per “sicurezza” come default nei Firewall. In caso di
difficoltà di connessione, contattate il vostro amministratore di
sistema.
6.2 Protezione file con “Accesso in scrittura”
Ciascun file memorizzato nel WebGate ha una protezione all’accesso
“in scrittura”, distinta dalla protezione all’accesso “in lettura”, che ne
evita la cancellazione o la modifica, involontaria o intenzionale, da
parte di utenti non autorizzati.
La protezione file con Accesso in Scrittura inibisce le funzioni di
“scrittura” o di “eliminazione” in FTP.
La protezione dei file in scrittura è molto semplice: ogni file che si
carica sul WebGate avrà un proprio “livello di accesso in scrittura”
uguale al livello di accesso del login FTP utilizzato per la connessione.
Solo gli utenti con un livello di accesso uguale o superiore a questo,
potranno eliminare o sovrascrivere i file. Ad esempio, se ci si collega
con il client FTP utilizzando un livello di accesso da “supervisor”, solo i
supervisor e gli administrator saranno in grado di modificare i file
caricati durante questa sessione.
E’ importante notare che, per lo stesso file, la protezione di accesso in
scrittura può essere ‘superiore’ rispetto alla protezione di accesso in
lettura: ad esempio, se vi collegate con il client FTP usando un livello di
accesso da “supervisor” e memorizzate un file nella cartella principale,
tutti saranno in grado di leggere i file, ma solo i supervisor e gli
administrator saranno in grado di modificarli.
6.3 Nota aggiuntiva
Non caricate nel WebGate un file se il nome contiene degli spazi. Se il
nome del file originale nel PC host contiene uno spazio, questo viene
troncato quando è copiato nel WebGate. In alcuni casi, si può avere
invece un messaggio di errore.
6. File Transfer Protocol (FTP)
Note: before reading the following chapter you must be accustomed
with the WebGate File System, described in File System.
File system read access is provided through HTTP. However FTP is
required to store files into WebGate.
FTP is a user friendly way to deal with files. Modern FTP clients fully
integrates with windows based operating systems, greatly simplifying
file transfers. Moreover they provide an extensive error description
when something doesn’t work properly.
6.1 The FTP client
We suggest to use the freeware program SmartFTPTM
(http://www.smartftp.com).
However, nearly any FTP client can be used, but some one is
discouraged (for example, Microsoft© Internet Explorer®).
FTP clients generally needs a little configuration to communicate with
WebGate, or nothing at all.
However, the following rules must be kept in mind:
• The client must not be set to “Passive Mode“ (PASV)
• The maximum number of threads to use for download must be set
to 1.
• f you are passing through a Firewall or a Proxy Server, make sure
FTP protocol is not blocked, since this is a common “security” limit
imposed by the firewalls’ default settings. If you are having troubles
with the connection contact your system administrator.
6.2 “Write Access” file protection
Every file stored into WebGate is provided with a “write” access
protection, distinguished from the “read” access protection, to avoid
involuntary or malicious file deletion or modification by unauthorized
users.
Write Access file protection acts denying “write” or “delete”
capabilities through FTP.
File write protection is quite straightforward: every file you upload to the
WebGate will get a “write access level” same as your current FTP login
access level used for the connection. Only users with an access level
equal or greater than this will be allowed to erase or overwrite it.
For example, if you logged in with the FTP client using a “supervisor”
access level, only supervisors and administrators will be able to
change the files you uploaded during this section.
For instance please note that, for the same file, write access protection
can be “stronger” than read access protection: for example, if you
logged in with the FTP client using a “supervisor” access level and you
stored a file into the root directory, everybody will be able to read the
file, but only supervisors and administrators will be allowed to change
that file.
6.3 Additional Note
Do not upload to the WebGate a file if the name contains spaces. If the
original file name in the host PC contains a space, the name is
truncated when copied into WebGate or an error is returned.
19
Manuale WebGate - cod. +030220230 rel. 1.0 - 16.09.2003

6.4 Esempio
Gli esempi presenti in questo capitolo sono stati realizzati utilizzando il
programma freeware SmartFTP®(http://www.smartftp.com).
Segue un esempio di cosa è possibile visualizzare con un livello di
accesso da “administrator”.
Le cartelle visibili dipendono infatti dal livello di accesso dell’utente che
si connette al WebGate. Come descritto in Gestione Utenti sarà
possibile vedere solo le cartelle con il livello di accesso uguale o
minore al vostro.
Con il livello di accesso più basso (guest) sarete abilitati a vedere
solo i file caricati nella cartella principale, poiché questi non prevedono
nessuna protezione in lettura.
Se volete caricare un file nel WebGate (pwd.html nell’esempio),
assegnandogli un livello di accesso da “supervisor”, dovete caricarlo
nella cartella “supervisor”. Solo un utente con il livello
“supervisor” o superiore sarà quindi abilitato a vedere questo file.
Per caricare il file, aprite la cartella “supervisor” cliccandola e trascinate
il file con il mouse dal vostro file manager alla finestra client FTP, come
illustrato nelle Fig. 6.4.2 e 6.4.3.
6.4 Example
The examples of this chapter were realized using the freeware program
SmartFTP® (http://www.smartftp.com).
Below is depicted an example of what you see if you have
“administrator” access-level.
As a matter of fact, visible folders depend on the access level of the
user who is connecting to the WebGate. As described in User
Management you will be able to see only the folders with an access
level equal or lower than yours.
If you have the lowest access level (guest) you will be able to see only
files loaded in the root folder, since they aren’t provided with any read
protection.
If you want to upload a file to the WebGate (pwd.html in the example),
giving it “supervisor” access-level, you have to load it in the
“
supervisor” folder. Only a user with “supervisor” or greater
membership will then be able to view such a file.
To upload the file you have to open the “supervisor” folder clicking on it,
and using your mouse drag the file from your file manager to the FTP
client window, as shown below in Fig. 6.4.2 and 6.4.3.
20
Manuale WebGate - cod. +030220230 rel. 1.0 - 16.09.2003
Fig. 6.4.1
Fig. 6.4.2 Fig. 6.4.3

7. Creare una pagina Web personalizzata per
WebGate
7.1 Introduzione
Questo capitolo vi spiega come creare una semplice pagina Web, che
vi permetterà di monitorare e controllare i valori delle variabili di rete di
una rete locale (LAN) o di una rete WAN.
Si presuppone che abbiate una conoscenza di base del linguaggio
HyperText Markup Language (HTML).
Per inviare al browser pagine Web che visualizzino le variabili di rete,
dovete inserire alcuni “tag” speciali nel codice HTML della pagina Web.
Prima di inviare la pagina Web al browser, il server Web integrato nel
WebGate analizza la pagina alla ricerca di un tag speciale HTML che
indichi una variabile di rete o un parametro di configurazione. Il server
Web, quando invia informazioni al browser, sostituisce quindi i tag con
il valore attuale della variabile di rete.
E’ possibile creare pagine Web utilizzando qualsiasi elaboratore di
testo o editor HTML disponibile in commercio.
Tutti i parametri di tutti i controlli Carel su rete RS485 possono essere
monitorati e modificati mediante l’utilizzo di pagine Web.
7.2 Requisiti
Sono richiesti i seguenti requisiti software:
• Un’applicazione client FTP standard come SmartFTP
(www.smartftp.com) per caricare le pagine Web nel WebGate
• Un editor HTML, come Macromedia® DreamWeaver™
(www.dreamweaver.com).
• Microsoft® Internet Explorer™ (versione 5 o successiva) o Netscape
Communicator™ (versione 6 o successiva).
Avrete inoltre bisogno di alcune conoscenze di base dell’HyperText
Markup Language (HTML).
7.3 Creare Pagine Web
I file HTML per WebGate possono essere creati utilizzando qualsiasi
elaboratore di testo o editor HTML standard. Il server Web integrato
supporta la versione standard HTML per la definizione della struttura e
del formato della pagina Web, oltre ad alcuni tag speciali HTML per
richiamare elementi dinamici di dati ed elaborare form HTML.
I file HTML e grafici risiedono in alcune cartelle speciali della memoria
flash del WebGate. Per i file utente sono disponibili
approssimativamente 400 KB di spazio (vedi anche File system).
I file vengono letti e scritti nella memoria flash del WebGate utilizzando
il protocollo standard FTP su connessione IP (vedi File Transfer
Protocol).
Per visualizzare una pagina Web, digitate
http://192.168.0.250/mywebpage.htm (dove 192.168.0.250 è l’indirizzo
IP del WebGate) nella finestra URL del browser. Assicuratevi di usare
le maiuscole e le minuscole in modo corretto.
Se digitate solo l’indirizzo IP del WebGate si visualizzerà l’home page
precaricata oppure, se presente, la pagina DEFAULT.HTML.
AVVERTENZA. La vostra home page va chiamata obbligatoriamente
DEFAULT.HTML. Se non avete nessuna pagina Web chiamata
DEFAULT.HTML, quando digitate l’indirizzo IP del WebGate apparirà la
pagina INDEX.HTML pre-caricata.
Tutti i parametri di tutti i controlli Carel su rete RS485 possono essere
monitorati e modificati mediante l’utilizzo di pagine Web.
7. Creating a custom Web page on the WebGate
7.1 Introduction
This chapter describes how to create a simple Web page which allows
you to monitor and control the values of network variables over a local
network (LAN) or wide area network (WAN).
It is assumed you have a basic understanding of the HyperText Markup
Language (HTML).
In order to serve Web pages that display the network variables to a
standard Web browser, you must insert some special “tags” in the
HyperText Markup Language of the Web page.
Before returning a Web page to the browser, the Web server
embedded in the WebGate parses the page searching for a special
HTML tag indicating a network variable or a configuration parameter
reference.The Web server, when retur ning information to the browser,
replaces so the current value of the network variable for this tag.
Web pages may be constructed with any off-the-shelf text or HTML
editor. All the parameters of all Carel controllers in RS485 can be
monitored and modified through Web pages.
7.2 Requirements
You will need the following software:
• A standard FTP client application such as SmartFTP
(www.smartftp.com) for uploading your Web pages into the WebGate
• An HTML editor, such as Macromedia® DreamWeaver™
(www.dreamweaver.com).
• Microsoft® Internet Explorer™ (version 5 or higher) or Netscape
Communicator™ (version 6 or higher).
You will need also a basic understanding of the HyperText Markup
Language (HTML).
7.3 Creating Web Pages
HTML files for the WebGate can be created with any standard text or
HTML editor.The WebGate embedded Web server supports standard
HTML for defining the structure and format of your Web page, as well
as some special HTML tags for retrieving dynamic data elements and
processing HTML forms.
HTML and graphic files reside in some special directories of the
WebGate flash memory. Approximately 400 KB of space is available for
user files (see File system).
Files are read and written to the WebGate flash memory using the
standard FTP protocol over IP connection (see File Transfer Protocol
(FTP)).
To retrieve your Web page enter http://192.168.0.250/mywebpage.htm
(where 192.168.0.250 is the WebGate’s IP address) in the browser’s
URL window. Be sure to use the proper case; file names are case
sensitive.
If you enter only the WebGate’s IP address you will get the home page
preloaded by the factory or the DEFAULT.HTML page if it is present.
WARNING. Your home Web page must be named DEFAULT.HTML. If
you don’t have any Web page named DEFAULT.HTML, the
INDEX.HTML factory preloaded page will be served when you will
enter the WebGate’s IP address.
All parameters of all Carel controllers on the RS485 network can be
monitored and modified through the usage of web pages
21
Manuale WebGate - cod. +030220230 rel. 1.0 - 16.09.2003

7.3.1 <%var(x, y, z)%> Tag di Visualizzazione
Si tratta di un tag che fornisce l’accesso ai dati delle variabili di rete dei
dispositivi collegati al WebGate, per il monitoraggio attraverso un
browser Web.
Per visualizzare una variabile di rete particolare di un dispositivo
collegato al WebGate, dovete inserire nel codice HTML della pagina il
tag che segue:
<%var(x, y, z)%>
dove:
x = indirizzo del dispositivo;
y = tipo di variabile;
z = indice di supervisione della variabile.
[x]: è l’indirizzo seriale del dispositivo collegato alla rete locale Carel
RS485. I valori sono compresi nella gamma [1 ÷ maxdevs], dove
“maxdevs” è il parametro di sistema che corrisponde al numero
massimo di dispositivi da collegare al WebGate. Potete configurare
il parametro “maxdevs” tramite consolle o con un browser Web
attraverso la pagina di configurazione HTML “RS485”.
[y]: esprime il tipo di variabile da visualizzare: digitale, analogica o
intera, nel modo illustrato dalla tabella che segue:
y Tipo di variabile
1 Digitale
2 Analogica
3 Intera
Tab. 7.3.1.1
[z]: rappresenta l’indice di supervisione della variabile nelle
comunicazioni tra il dispositivo e un supervisore. Questo indice
deve essere ricercato nel database CAREL del dispositivo
connesso alla rete RS485 e fornibile da CAREL.
Esempio 1
Per creare una semplice pagina Web che
visualizzi il set point della temperatura del
dispositivo 3 (x=3), rappresentato ad
esempio da una variabile analogica (y=2)
con indice 123 (z=123), dovete inserite il
tag: <%var(3, 2, 123)%> nella posizione
appropriata.
7.3.1 <%var(x, y, z)%> Visualization Tag
This is a tag that provides access to the network variables’ data of the
devices connected to the WebGate for monitoring through a Web
browser.
To see a particular network variable of a device connected to the
WebGate, you must insert the following tag into the HyperText of the
HTML page:
<%var(x, y, z)%>
where:
x = device address;
y = variable type;
z = supervision index of the variable.
[x]: it is the serial address of the device connected on the local RS485
Carel network. It can change in the range [1 ÷ maxdevs], where
“maxdevs” is the system parameter, setting the maximum number
of devices you want to connect to the WebGate.You can configure
the “maxdevs” parameter using a console or a Web browser
through the HTML configuration page “RS485”.
[y]: expresses the variable type to be displayed: digital, analog or
integer, as shown in the following table:
y Type of variable
1 Digital
2 Analogue
3 Integer
Tab.7.3.1
[z]: it represents the supervision index of the variable in a
communication between the device and a supervisor.This index
must be searched for in the CAREL database, which can be
supplied by CAREL, of the device connected to the network
RS485.
Example 1
To create a simple Web page which will
monitor the temperature set-point of the
device 3 (x=3), rapresented for example
by an analogue (y=2) variable having
index 123 (z=123), you must insert the
tag: <%var(3, 2, 123)%> in the proper
position.
22
Manuale WebGate - cod. +030220230 rel. 1.0 - 16.09.2003
Esempio 1 / Example 1
<HTML>
<head>
<title>Display temperature setpoint of device 3</title>
</head>
Temperature Setpoint = <%var(3,2,123)%><p>
</HTML>
Fig. 7.3.1.1

Esempio 2
La Tab.7.3.3 presenta un testo HTML più
complesso che corrisponde alla pagina della
figura qui sotto. Questa pagina comprende
un’immagine chiamata “IR32.jpg” e una
variabile digitale: “compressor status”.
AVVERTENZA. Se il dispositivo è OFF-LINE (o il WebGate è occupato
a leggere tutte le variabili del dispositivo per la prima volta), durante la
conversione dei tag verrà visualizzato il seguente messaggio:
“Unit OFF-LINE”.
Example 2
In Tab.7.3.3 you can see a more complex
HTML text for the following page having a
figure named “IR32.jpg” and the digital
variable: “compressor status” being
monitored.
WARNING. If the device is in the OFF-LINE status (or the WebGate is
busy in reading all the variables of device for the first time), the tag
conversion will give back the following warning string: “Unit OFF-LINE.
23
Manuale WebGate - cod. +030220230 rel. 1.0 - 16.09.2003
Esempio / Example 2
<HTML>
<HEAD>
<title>compressor status</title>
</HEAD>
<BODY bgcolor=”#FFFFFF” text=”#000000”>
<TABLE width=”627” border=”0” cellspacing=”0” align=”center”>
<TR>
<DIV align=”center”>
<FONT face=”Verdana, Arial, Helvetica, sans-serif”>
<img src=”IR32.jpg” width=”257” height=”187” align=”top” vspace=”0” hspace=”0”>
</FONT>
</DIV>
<TABLE width=”346” border=”0” cellspacing=”0” align=”center”>
<TR>
<TD width=”255” align=”center” height=”35” bgcolor=”#f8f8f8”>
<DIV align=”center”>
<FONT face=”Verdana, Arial, Helvetica, sans-serif”></FONT>
<FONT face=”Verdana, Arial, Helvetica, sans-serif”>
<B><font size=”2”></font></B>
</FONT>
</DIV>
<DIV align=”right”>
<B><font face=”Verdana, Arial, Helvetica, sans-serif ” size=”2”>
compressor status:
</font>
</B>
</DIV>
</TD>
<TD width=”87” height=”35” align=”center” bgcolor=”#e8e8e8”>
<FONT face=”Verdana, Arial, Helvetica, sans-serif” size=”2” color=”#0000ff”>
<b><b> <%var(1,1,4)%> </b></b>
</FONT>
</TD>
</TR>
</TABLE>
</TR>
</TABLE>
</BODY>
</HTML>
Fig. 7.3.1.2

7.3.2 Scrivere i parametri del dispositivo utilizzando form
Uno degli aspetti più importanti delle comunicazioni Ethernet tra
“server” e “client”Web è dato dalla possibilità di includere funzioni
interattive. Il modo più semplice per farlo è quello di utilizzare delle
“form”.
Le form non sono altro che dei moduli utilizzati nelle pagine Web per
raccogliere informazioni dagli utenti del browser.
Attraverso una form il client può inviare informazioni al server
utilizzando oggetti di immissione come ad esempio caselle di testo,
menù, caselle di controllo e così via.
In questo capitolo, dopo una breve introduzione degli elementi di base
di una form, vi mostreremo come utilizzarle per leggere e scrivere sia i
parametri del WebGate che il valore di uno o più variabili del
dispositivo collegato al Webgate.
Come vengono elaborati i contenuti di una form dal server dopo che il
client ha inviato le informazioni? Generalmente un programma interno
al server, come ad esempio il CGI (Common Gateway Interface) o
[N/I]SAPI (Netscape/Internet Server Application Program Interface),
analizza le informazioni inviate.
Dal momento che il WebGate non è dotato di programma CGI
integrato, analizza i dati in tempo reale utilizzando i comandi GET o
POST e trovando le informazioni all’interno dei comandi stessi.
Una volta immesse le informazioni in una form, questa viene inviata al
server utilizzando la funzione “Submit”. In alternativa, la form che non è
ancora stata inviata, può essere riportata ai valori originali utilizzando
la funzione “Reset”. Queste due funzioni, “Submit” e “Reset”, sono
elementi standard nelle form delle pagine Web. Per maggiori
informazioni sull’utilizzo e la sintassi di queste due funzioni, potete
consultare la documentazione disponibile sull’HTML.
7.3.2.1 Gli attributi della form
Gli attributi della form sono name, method e action:
Attributi del form
name
method
action Tab. 7.3.2.1.1
Ad esempio: <form name="form4" method="post"
action="mypage.htm">.
Gli attributi method e action sono i più importanti al fine del suo
corretto funzionamento.
Attr
ibuto ACTION: Generalmente l’attributo action specifica l’indirizzo
del programma che gestirà i dati all’interno della
form. Di solito è impostato con l’indirizzo di uno
script CGI per la decodifica dei dati. Ad esempio,
il codice
<FORM ACTION = “http://www.myserver.com/cgiprog/post-command…> fa riferimento ad uno
script chiamato post-command nella cartella
cgi-prog sul server il cui indirizzo è dato dall’URL
www.myserver.com.
Dal momento che il WebGate non è dotato di
un programma CGI integrato, per
l’elaborazione dei dati, gli unici URL permessi
per questo attributo sono quelli che
indirizzano a pagine precedentemente caricate
(inclusa la pagina con la form), in grado di
visualizzare i risultati dei dati inviati
dall’utente.
Ad esempio:
ACTION = “IR32cold.HTML” o ACTION =
“192.168.10.42/mypage.htm” dove 192.168.10.42
è l’indirizzo IP del WebGate.
7.3.2 Writing device parameters using Forms
One of the most important aspects of the Ethernet communications
between “Web servers” and their “clients” is the possibility to include
interactive features.The easiest way to do it is using “forms”.
Forms are used in Web pages to get information from browser end
users.
By a form the client can send information to the server by using input
objects such as text boxes, menus, check boxes and so on.
In this chapter, after a brief introduction on the basis elements of a
form, you will see how forms can be used for reading and writing both
WebGate’s parameters and the value of one or more variables of the
device connected to the WebGate.
How the contents of a form can be processed by the server once the
client submit the information? Generally a program inside the server, as
CGI (Common Gateway Interface) or [N/I]SAPI (Netscape/Internet
Server Application Program Interface), parses the submitted information data.
As WebGate hasn’t any CGI program on board it parses data in real
time using the GET or POST commands, having information data
inside the commands themselves.
Once information has been entered into a form, the form is submitted
to the server.This is accomplished using the “Submit” function.
Alternatively, a form that has not already been submitted can be
restored to its original values using the “Reset” function.These two
functions, “Submit” and “Reset”, are standard HTML form elements that
control forms in Web pages. For information on their use and syntax,
please consult a standard HTML reference.
7.3.2.1 The form attributes
The form attributes are name, method and action:
Form Attributes
name
method
action Tab. 7.3.2.1.1
For example: <form name="form4" method="post"
action="mypage.htm">.
The second two attributes, method and action, are the most important
to make the form work.
A
CTION attribute: Generally the action attribute specify the address of
the program that will handle the data inside the
form. It is usually set to a URL pointing to a CGI
script to decode the data. For example, the code:
<FORM ACTION = “http://www.myserver.com/cgiprog/post-command…>
is for a script called post-command in the directory
cgi-prog on the server which address is given by the
URL www.myserver.com.
As WebGate hasn’t any CGI program on board to
parse the data, the only URLs permitted for this
attribute are those pointing to pages previously
loaded (included the page with the form itself),
able to show the effects of the form data sent by
the user.
For example:
ACTION = “IR32cold.HTML” or ACTION =
“192.168.10.42/mypage.htm” where 192.168.10.42
is the IP address of the WebGate.
24
Manuale WebGate - cod. +030220230 rel. 1.0 - 16.09.2003

Attributo METHOD: Questo attributo definisce il metodo usato per
inviare dati al server.
GET e POST sono i due metodi supportati.
ENCTYPE invece non è supportato.
GET è il metodo di default con cui un client,
tramite un browser, invia richiestead un server. Il
metodo GET invia dati al server allegando i dati
contenuti nella formall’URL dopo un punto di
domanda (?) separatore.
POST: simile al metodo precedente. La differenza
principale è che i dati non vengono inseriti
nell’URL della richiesta, ma vengono inviati alla
fine,dopo gli header della richiesta stessa. Una
volta che il WebGate ha ricevuto una richiesta
con modalità POST, sa di dover continuare ad
“ascoltare”, dopo gli header della richiesta, i
parametri contenuti nella form.
Per ragioni di sicurezza si consiglia di
utilizzare POST invece di GET. Con il metodo
GET, infatti, tutte le informazioni appaiono
nel campo URL del browser.
Attr
ibuto NAME: Fa sì che il programma CGI controlli i dati prima
dell’invio. Nel nostro caso, questo attributo non
viene utilizzato.
7.3.2.2 Gli elementi della form
In una form possono essere utilizzati diversi oggetti per la
personalizzazione delle informazioni inviate al server.
Oggetti della Form
Text-Box
List-Menu
Jump-Menu
Button
Check-Box
Radio-Button Tab. 7.3.2.2.1
T
ext-Box: E’ un campo nel quale l’utente può scrivere un testo
alfanumerico, come ad esempio password, nomi,
valori numerici e così via. Potete utilizzare questo tag
quando volete modificare il valore di una variabile di
rete.
List-Men
u: Questo tipo di menù è utile quando si vogliono offrire
scelte multiple in uno spazio limitato. Un esempio
potrebbe essere la selezione dei baudrate per la
comunicazione seriale da un insieme di valori
standard (1200,2400, 4800, 9600, 19200).
METHOD attr
ibute: This attribute defines the method used to send
data to the server.
GET and POST are the two supported methods.
ENCTYPE is not supported.
GET is the default method for a client, trough a
browser, to submit requests to a server. GET
method sends data to the server by appending the
data to the URL form itself after a question mark
(?) separator.
POST: it is similar to the previous method: the
main difference is that data do not come into a
unique request, but after the headers of the
request itself. Once the WebGate has received a
request from a form using POST, it knows it has to
continue “listening”, after the requested headers,
the parameters contained in the form.
for the rest of information data.
The usage of POST instead of GET is
reccomended for security reason, because
using the GET method all the information
appears in the URL textbox of the browser.
NAME attr
ibute: This attribute is important for a CGI program to
check data before submission.This isn’t our case.
7.3.2.2 The form elements
A form generally has different objects, useful to customise information
that will be sent to the server.
FORM Objects
Text-Box
List-Menu
Jump-M enu
Button
Check-Box
Radio-Button Tab. 7.3.2.2.1
T
ext-Box: It’s a field inside which user can write an alphanumeric
text, as passwords, names, numeric values, and so on.
For example, use this tag when you want to modify a
network variable value.
List-Men
u: Useful when you want to present multiple choices in a
limited space. An example maybe the selection of the
baudrates for serial communication in a set of standard
values (1200,2400, 4800, 9600, 19200).
25
Manuale WebGate - cod. +030220230 rel. 1.0 - 16.09.2003
Fig. 7.3.2.2.1
Fig. 7.3.2.2.2

Jump-Menu: Il jump menu è un menu a tendina che propone un
elenco di opzioni che a loro volta collegano a
documenti o a file. Questo oggetto è utile se si vuole
un menu veloce per selezionare pagine che si
riferiscono a dispositivi diversi.
Button:
Sono pulsanti che controllano le operazioni eseguibili
all’interno di una form. Questi pulsanti possono
essere utilizzati per inviare ad un server i dati da
elaborare o per risettare il form.
Chec
k-Box: Le caselle di controllo permettono all’utente di
selezionare più di un’opzione da un insieme di
opzioni. Ogni casella di controllo è un elemento
indipendente e deve avere un nome unico nel campo
Name.
Radio-Button:
I Radio-Button possono essere utilizzati quando va
selezionata solo una scelta da un insieme di opzioni.
I pulsanti Radio, di solito, vengono utilizzati in gruppi.
Tutti i pulsanti radio di un gruppo devono avere lo
stesso nome ma valori di campo diversi.
Gli oggetti maggiormente utilizzati nelle pagine personalizzate sono i
Text-Box, i List-Menu, i Button e i Jump-Menu.
I paragrafi che seguono illustrano alcuni esempi dell’utilizzo degli
oggetti all’interno di un form.
J
ump-Menu: A jump menu is a pop up menu that lists options that
link to documents or files. This object is interesting
when you want a fast menu to select different pages
referring to different devices.
Button:
Form buttons control form operations.You can use a
form button to submit data to a server for processing,
or use a form button to reset a form.
Chec
k-Box: Check-boxes allow the user to select more than one
option from a set of options. Each check-box object is
an individual element and must have a unique name
in the Name field.
Radio-Button:
The Radio-Button can be seen when you select only
one choice from a set of options. Radio buttons are
typically used in groups. All radio buttons in a group
must have the same name and must contain different
field values.
The most used objects in custom application pages are Text-Box,
List-Menu, Button and Jump-Menu.
The following paragraphs show some examples of using objects inside
a form.
26
Manuale WebGate - cod. +030220230 rel. 1.0 - 16.09.2003
Fig. 7.3.2.2.3
Fig. 7.3.2.2.4
Fig. 7.3.2.2.5

7.3.2.3 Uso di Text-Box e Button nei form 7.3.2.3 Using Text-Boxes and Buttons inside forms
27
Manuale WebGate - cod. +030220230 rel. 1.0 - 16.09.2003
Esempio di utilizzo di text-box e button in un form / Example of using text-box and button inside a form
<HTML>
<head>
<title>Untitled Document</title>
<meta http-equiv="Content-Type" content="text/HTML; charset=iso-8859-1">
</head>
<body bgcolor="#FFFFFF" text="#000000">
<form name="form1" method="post" action="esform.htm">
<table width="500" border="0" cellspacing="0" align="center">
<tr>
<td width="51" align="center" height="35" bgcolor="#f8f8f8">
<div align="center">
<font face="Verdana, Arial, Helvetica, sans-serif">
<a href="detail.htm" target="main">
<img src="Unit.gif" width="38" height="20" align="middle" border="0"></a>
</font></div></td>
<td width="50" align="right" height="35" bgcolor="#f8f8f8">
<div align="left">
<font face="Verdana, Arial, Helvetica, sans-serif">
<b><font size="2">MPX unit1</font></b>
</font></div></td>
<td width="14" align="right" height="35" bgcolor="#f3f3f3">
<font face="Verdana, Arial, Helvetica, sans-serif">
<b><img src="r.gif" width="12" height="22"></b>
</font></td>
<td width="50" align="right" height="35" bgcolor="#f3f3f3" nowrap>
<div align="left">
<font face="Verdana, Arial, Helvetica, sans-serif">
<b><font size="2" color="#0000FF"><%var(1,2,1)%></font>
<font size="2">ºC</font></b>
</font></div></td>
<td width="20" align="right" height="35" bgcolor="#e8e8e8">
<font face="Verdana, Arial, Helvetica, sans-serif">
<b><font size="2">Setpoint</font></b>
</font>:</td>
<td width="20" height="35" align="left" bgcolor="#e8e8e8">
<font face="Verdana, Arial, Helvetica, sans-serif">
<b><font face="Verdana, Arial, Helvetica, sans-serif">
<b><font size="2" color="#0000CC">
<input type="text" name="?script:var(1,2,7,12.4,13.2)" size="10" maxlength="16" value="<%var(1,2,7)%>">
</font><font size="2"> </font>
</b></font></b></font></td>
<td width="50" height="35" valign="middle" bgcolor="#c2c2c2" align="left">
<div align="center">
<input type="submit" name="Button1" value="Change">
</div></td></tr></table></form></body></HTML>
Fig. 7.3.2.3.1

La tabella 7.3.2.3.1 illustra il testo HTML di una pagina contenente un
form.
Innanzi tutto si può notare che i tre attributi principali del form sono
presenti in questa tag:
<form name="form1" method="post" action="esform.htm">
Si noti che:
• la form è inserita in una tabella; il primo dato della tabella è costituito
da una figura chiamata “Unit.gif” che attraverso il tag <a href…> si
collega alla pagina detail.htm. Cliccando con il mouse sulla figura, il
WebGate visualizzerà la nuova pagina detail.htm;
• il dato successivo della tabella visualizza la temperatura utilizzando il
tag <%var(1,2,1)%>.
• il penultimo tag <TD> comprende una casella di testo per modificare
il valore della variabile analogica 7 del dispositivo numero 2; 12.4 e
13.2 sono i valori minimo e massimo ammessi per quella variabile:
<input type="text" name="?script:var(1,2,7,12.4,13.2)"
...value="<%var(1,2,7)%>">
Questa sezione descrive il nome e il valore del tag.
name:
La stringa del nome è composta da due campi: un “header”
e un “campo comando” come è possibile vedere nella tabella
che segue:
Tag di scrittura per casella di testo
Header Campo comando
?script: comando generico o var (x,y,z,min,max)
Tab. 7.3.2.3.1
L’header “?script:“ viene usato per segnalare al WebGate che l’utente
sta scrivendo il parametro, quando analizza il dato inviato.
In questo esempio, il parametro è una variabile di tipo [y] del
dispositivo [x] con indice di supervisione [z]; min. e max. sono infine i
valori minimo e massimo che definiscono il range di variazione
ammesso per quel parametro. E’ anche possibile usare uno degli altri
comandi disponibili. La lista dei comandi disponibili si trova nella
documentazione di configurazione.
Quando l’utente digita un valore per questa variabile nella casella di
testo, il WebGate elabora il comando utilizzando quel valore, come se il
comando fosse stato inviato dalla consolle interfaccia RS232.
v
alue: Impostando il valore con il “tag di visualizzazione” è possibi
le visualizzare anche il risultato del comando inviato.
L’ultimo tag nella tabella <TD> include il pulsante:
<input type="submit" name="Button1" value="Change">
Poiché il valore input type è impostato a “submit”, l’utente deve inviare
la form cliccando sul pulsante.
Una volta che il valore è stato immesso nella casella di testo è anche
possibile inviarlo con il tasto di invio (ø).
AVVERTENZA: a volte ci possono essere ritardi nello scaricare la
pagina specificata dall’attributo ACTION dopo aver immesso un nuovo
valore per le variabili del dispositivo. Tale ritardo è dovuto al
meccanismo di comunicazione: il WebGate invia al dispositivo un
messaggio con il nuovo valore, attraverso la linea seriale RS485 e
quindi attende al massimo 30 secondi per controllare l’avvenuta
impostazione del nuovo valore. Se la comunicazione non va a buon
fine, o si supera questo tempo massimo,il WebGate torna alla pagina
HTML con il vecchio valore della variabile. Ad esempio, la Fig. 7.3.2.3.2
mostra cosa potrebbe visualizzare il browser durante un ritardo nella
comunicazione per la modifica del setpoint dell’“IR32 cold”.
La Fig. 7.3.2.3.3 visualizza la pagina dopo che è stata scaricata.
Table 7.3.2.3.1 shows the HTML text of a page having a form.
First you can observe the three main attributes of the form into its tag:
<form name="form1" method="post" action="esform.htm">
Note that:
• the form content is a table; the first table data is a figure called
“Unit.gif” linked by <a href…> tag to the page detail.htm. Clicking your
mouse on the figure from the browser, the WebGate will send the
new page detail.htm;
• a following table entry displays a temperature using the tag
<%var(1,2,1)%>.
• the <TD> tag before the last includes a Text-Box field used to change
the value of the analog variable 7 of the device number 2; 12.4 and
13.2 are the minum and maximum value for that variable:
<input type="text" name="?script:var(1,2,7,12.4,13.2)"
...value="<%var(1,2,7)%>">
This section describes the name and value of this tag.
name:
The name string is composed by two fields: an “header” and a
“command field” as you can see in the following table:
Writing tag for text-boxes
Header Command-field
?script: generic command or var(x,y,z,min,max)
Tab. 7.3.2.3..2
The header “?script:“ is used to signal to WebGate that the user is
writing the parameter, when it parses the submitted data.
In this example the parameter is a type[y] variable of device[x] having
supervision index[z]; min and max are its minimum and maximum
values that define the variation range allowed for that parameter.You
can also use one of the other available commands. Refer to the
configuration documentation to have a list of the available commands.
When the user digits a value for this variable into the text-box, the
WebGate parses the command using that value, as if the command
has been sent using the RS232 console interface.
v
alue: Setting the value using the “visualization tag”, you can
also see the result of the command sent.
The last table data tag <TD> includes the button using:
<input type="submit" name="Button1" value="Change">
As the input type is set to “submit” you will submit the data form by
clicking on the button.
Once the value has been digitised into the text-box, you can also send
it using the enter key (ø).
WARNING: sometimes you may observe a delay during the download
of a page specified in the ACTION attribute, after a new value is
entered for devices variables. This delay is due to the communication
mechanism: WebGate sends to the device, through the RS485 serial
line, an appropriate message reporting the new value, and it will wait at
most 30 seconds to check if the setting of the new value has occured.
If this communication fails, or if the max. time has been exceeded,
WebGate will return the HTML page with the old variable value. For
example, Fig. 7.3.2.3.2 shows what the browser may display during the
communication delay, due to the change of an “IR32” cold setpoint.
Fig. 7.3.2.3.3 report the page after the page download ended.
28
Manuale WebGate - cod. +030220230 rel. 1.0 - 16.09.2003

7.3.2.4 Uso dei List-Menu nei form
La tabella che segue
mostra il codice HTML di
una pagina contenente un
form con List-Menu
7.3.2.4 Using List-Menu
inside forms
The following table shows
the HTML code of a page
having a form with a
List-Menu inside.
29
Manuale WebGate - cod. +030220230 rel. 1.0 - 16.09.2003
Fig. 7.3.2.3.2
Fig. 7.3.2.3.3
Fig. 7.3.2.4.1

Come si può vedere, la seconda riga della tabella <TR> ha un tag
<TD> per visualizzare il baudrate RS232 attuale con il “Tag di
visualizzazione” <%Baudrate232%>.
Il testo in grassetto che segue evidenzia la parte del codice HTML che
corrisponde al List-Menu.
L’elemento “size” imposta il numero di voci visualizzate allo stesso
momento.
Gli elementi <option> definiscono le possibili scelte che appaiono sul
menù.
La presenza dell’attributo “selected” nell’elemento <option> significa
che questa voce viene selezionata per default. Se non viene
selezionato nessun valore, di solito il campo rimane indefinito.
Si noti come la stringa “value” abbia la stessa struttura della stringa
“name” nei Text Box e sia composta da due campi: un “campo header”
(?script:) e un “campo comando”.
Il campo header “?script:“ viene usato per segnalare al WebGate che
l’utente sta scrivendo il parametro.
As you can see, the second table row <TR> has a <TD> tag to display
the current RS232 baudrate by the “Visualization tag”
<%Baudrate232%>.
The successive boldface text highlights part of the List-Menu HTML
language.
The size element sets the number of items showing at once.
The <option> elements specify the actual choices on the menu.
An occurrence of the attribute “selected” in the <option> element sets
the form control to select this item by default. If no value is selected,
typically the field remains undefined.
Note that the value string has the same structure of the name string for
Text Boxes and it is composed by two fields: an “header field” (?script:)
and a “command field”.
The header field “?script:“ is used to signal to WebGate that the user is
writing the parameter, when it parses the submitted data.
30
Manuale WebGate - cod. +030220230 rel. 1.0 - 16.09.2003
Esempio di utilizzo di list-menu in un form / Example of using list-menu inside a form
<HTML>
<head>
<title>Untitled Document</title>
<meta http-equiv="Content-Type" content="text/HTML; charset=iso-8859-1">
</head>
<body bgcolor="#FFFFFF" text="#000000">
<form name="form1" method="get" action="RS232.htm">
<table width="517" border="0" cellspacing="0" align="center">
<tr align="center">
<td colspan="5" bgcolor="#FFCC33">
<font face="Verdana, Arial, Helvetica, sans-serif">
<b><font size="2">RS232 Setup</font></b></font></td>
</tr>
<tr>
<td width="142" align="right" height="12" bgcolor="#e8e8e8">
<font face="Verdana, Arial, Helvetica, sans-serif">
<b><font size="2">Current Baudrate:</font></b></font></td>
<td width="58" height="12" align="left" bgcolor="#e8e8e8">
<font face="Verdana, Arial, Helvetica, sans-serif">
<b><font face="Verdana, Arial, Helvetica, sans-serif">
<b><font size="2" color="#0000CC"><%Baudrate232%></font>
<font size="2"> </font></b></font></b></font></td>
<td width="96" height="12" align="right" bgcolor="#d7d7d7">
<font face="Verdana, Arial, Helvetica, sans-serif">
<b><font size="2">Change to...</font></b></font></td>
<td width="116" height="12" valign="middle" bgcolor="#d7d7d7" align="left">
<font face="Verdana, Arial, Helvetica, sans-serif">
<b><font size="2">
<select name="select2" size="1">
<option value="?script:baudrate232=1200" selected>1200</option>
<option value="?script:baudrate232=2400">2400</option>
<option value="?script:baudrate232=4800">4800</option>
<option value="?script:baudrate232=9600">9600</option>
<option value="?script:baudrate232=19200">19200</option>
<option value="?script:baudrate232=38400">38400</option>
<option value="?script:baudrate232=115200">115200</option>
</select>
baud</font></b></font></td>
<td width="95" height="12" valign="top" bgcolor="#d7d7d7" align="center">
<input type="submit" name="Button" value="Confirm">
</td>
</tr>
<tr>
<td colspan="5" align="center" height="34"></td>
</tr>
</table></form></body></HTML>

7.3.2.5 Utilizzo del Jump-Menu nei form
Il jump menu è un menù a tendina
che elenca possibili collegamenti a
documenti o file.
La tabella che segue mostra il
testo HTML di una form contenente
un Jump-Menu.
7.3.2.5 Using Jump-Menu inside forms
A jump menu is a pop-up menu
listing possible connections that
link to documents or files.
In the following table you can see
the HTML text of a form using a
Jump-M enu.
31
Manuale WebGate - cod. +030220230 rel. 1.0 - 16.09.2003
Esempio di utilizzo di jump-menu in un form / Example of using jump-menu inside a form
<HTML>
<head>
<title>Untitled Document</title>
<meta http-equiv="Content-Type" content="text/HTML; charset=iso-8859-1">
<script language="JavaScript">
<!--
function MM_jumpMenu(targ,selObj,restore){ //v3.0
eval(targ+".location='"+selObj.options[selObj.selectedIndex].value+"'");
if (restore) selObj.selectedIndex=0;
}
function MM_findObj(n, d) { //v4.0
var p,i,x; if(!d) d=document; if((p=n.indexOf("?"))>0&&parent.frames.length) {
d=parent.frames[n.substring(p+1)].document; n=n.substring(0,p);}
if(!(x=d[n])&&d.all) x=d.all[n]; for (i=0;!x&&i<d.forms.length;i++) x=d.forms[i][n];
for(i=0;!x&&d.layers&&i<d.layers.length;i++) x=MM_findObj(n,d.layers[i].document);
if(!x && document.getElementById) x=document.getElementById(n); return x;
}
function MM_jumpMenuGo(selName,targ,restore){ //v3.0
var selObj = MM_findObj(selName); if (selObj) MM_jumpMenu(targ,selObj,restore);
}
//-->
</script>
</head>
<body bgcolor="#FFFFFF" text="#000000">
<form name="form1" method="get" action="E.htm">
<table width="517" border="0" cellspacing="0" align="center">
<tr align="center">
<td colspan="5" bgcolor="#FFCC33"><font face="Verdana, Arial, Helvetica, sans-serif">
<b><font size="2">Main Units Menu </font></b></font></td>
</tr>
<tr>
<td width="300" align="left" height="12" bgcolor="#e8e8e8">
<font face="Verdana, Arial, Helvetica, sans-serif"><b><font size="2">Select
unit type to view unit variables:</font></b></font></td>
<td width="150" height="12" valign="middle" bgcolor="#d7d7d7" align="left">
<div align="center"><font face="Verdana, Arial, Helvetica, sans-serif">
<b><font size="2">
<select name="menu1" onChange="MM_jumpMenu('parent',this,0)">
<option value="IRcold.htm" selected>IR32 Cold</option>
<option value="IRuniv.htm">IR32 Universal</option>
</select>
<input type="button" name="Button1" value="Go" onClick="MM_jumpMenuGo('menu1','parent',0)">
</font></b></font></div></td>
</tr>
</table></form></body></HTML>
Fig. 7.3.2.5.1

Il testo in grassetto nero evidenzia l’opzione <SCRIPT> utilizzata in
questo caso per definire le tre funzioni JavaScript del Jump-Menu.
E’ stato creato automaticamente dall’editor HTML utilizzato per
realizzare questa pagina.
Il testo che segue riguarda il menu a tendina.
Le figure 7.3.2.5.1 e 7.3.2.5.2 mostrano i risultati visualizzati dal
browser se è in grado di eseguire JavaScript.
IR32 Cold è la voce di default, come si può vedere nel primo elemento
<option> nel testo evidenziato.
Quando si clicca sul pulsante Go, si attiva un collegamento alla pagina
IR32cold.htm e il WebGate invia la pagina al browser.
Allo stesso modo, selezionando la seconda voce dal Jump-Menu,
appare la pagina IR32univ.htm.
AVVERTENZA. L’impiego di Java o JavaScript può talvolta non dare i
risultati sperati. Può infatti capitare che non funzionino bene a seconda
della versione di browser che utilizzate. Generalmente, comunque, non
danno problemicon Microsoft® Internet Explorer™ versione 5 o successive.
7.3.2.6 Utilizzo delle Check-Box nelle form
Le check-box vi permettono di selezionare più di un’opzione da un
insieme di opzioni.
La tabella che segue riporta un esempio di come scegliere il baudrate
seriale.
The black boldface text highlights the <SCRIPT> option, used to edit
the three JavaScript functions for the Jump-Menu. It has been
automatically created by the HTML editor used to construct this page.
The following text is relative to the pop-up menu.
Figures 7.3.2.5.1 and 7.3.2.5.2 show the effects in your browser, if it is
able to make JavaScript running.
IR32 Cold is the default item, as you can see in the first <option>
elements of the highlighted text.
When you click on the Go button, a link to the IR32cold.htm page is
activate, and the WebGate sends that page to your browser.
In the same way, by selecting the second item on Jump-Menu, the
IR32univ.htm page appears.
WARNING. The use of Java or JavaScript sometimes can’t give the
expected results.They could not work properly depending mainly by
the version of the browser you are using. Generally, they works fine on
Microsoft® Internet Explorer™ version 5 or higher.
7.3.2.6 Using Check-Boxes inside forms
A check-box allows you to select more than a option from a set.
The following table gives you an example about the choice of a serial
baudrate.
32
Manuale WebGate - cod. +030220230 rel. 1.0 - 16.09.2003
Fig. 7.3.2.5.2
Fig. 7.3.2.6.1

Ciascuna check box che aggiungete ad una form deve avere un nome
unico.
Per quanto riguarda il suo valore, vale la stessa regola delle text-box.
Poiché l’opzione check-box viene spesso utilizzata per impostare un
valore, il comando è normalmente un comando di scrittura. In questo
esempio sono “Baudrate232=19200” e “Baudrate485=19200”.
Naturalmente potete scegliere uno o
entrambi i comandi menzionati sopra, e
successivamente confermare cliccando il
pulsante Update o premendo Invio (↵).
Le due tag di visualizzazione alla fine
dell’esempio vi permettono di vedere le
impostazioni.
La figura precedente illustra il caso in cui
entrambe le opzioni sono state
selezionate, quando il primo baudrate era
1200 e il secondo 4800.
La figura che segue mostra il caso in cui
ACTION è impostato per
visualizzare i risultati sulla stessa
pagina.
Each checkbox you add to a form must have a unique name.
About its value, the rule is the same enounced for text-boxes.
Because the check-box option is normally used for choosing a value in
a range, the command generally is a writing command. In this example
it is “Baudrate232=19200” and “Baudrate485=19200”.
Of course you can choose one or both of the above mentioned
commands, than confirm clicking on the
Update button or typing enter (↵).
The two visualization tag at the end allow
you to see the settings.
The above figure shows the case of both
options selected, when the first baudrate
was 1200 and the second 4800.
The following figure displays the result, if
ACTION is set to the same page.
33
Manuale WebGate - cod. +030220230 rel. 1.0 - 16.09.2003
Esempio di utilizzo di check-box in un form / Example of using check-boxes inside a form
<HTML>
<head>
<title>Untitled Document</title>
<meta http-equiv="Content-Type" content="text/HTML; charset=iso-8859-1">
</head>
<body bgcolor="#FFFFFF" text="#000000">
<table width="100%" border="0" cellspacing="0" align="center">
<tr align="center"><td colspan="5" bgcolor="#FFCC33"><font face="Verdana, Arial, Helvetica, sans-serif">
<b><font size="2">Default Baudrates for RS232 and RS485</font></b></font></td>
</tr>
</table>
<form name="form1" method="post" action="Checkboxes.htm">
<table width="100%" border="0" cellspacing="0" cellpadding="0" bordercolor="#FDFBB3" bgcolor="#FDFBB3">
<tr><td>
<div align="center"><b><font face="Geneva, Arial, Helvetica, san-serif" size="2" color="#0066FF">
Default RS485 baudrate</font></b></div>
</td><td>
<div align="center"><b><font face="Geneva, Arial, Helvetica, san-serif" size="2" color="#0066FF">
Default RS232 baudrate</font></b></div>
</td></tr><tr><td>
<div align="center"><input type="checkbox" name="RS485" value="?script:Baudrate485=19200">
</div>
</td><td>
<div align="center"><input type="checkbox" name="RS232" value="?script:Baudrate232=19200">
</div>
</td></tr>
</table>
<table width="100%" border="0" cellspacing="0" cellpadding="0" bgcolor="#FDFBB3">
<tr>
<td>
<div align="center"><input type="submit" name="Submit" value="Update"></div>
</td>
</tr>
</table>
</form>
<p><b><font face="Geneva, Arial, Helvetica, san-serif" size="2" color="#0066FF">RS485
baudrate</font></b>
<%baudrate485%>
</p>
<p><b><font face="Geneva, Arial, Helvetica, san-serif" size="2" color="#0066FF">RS232
baudrate</font></b>
<%baudrate232%>
</p>
</body>
</HTML>
Fig. 7.3.2.6.2

7.3.2.7 Utilizzo dei Radio-Button nelle form
I Radio-Button sono utili quando
l’utente deve selezionare solo una
scelta da un insieme di opzioni.
I Radio-Button vengono
solitamente usati in gruppi. Tutti i
Radio-Button di un gruppo
devono avere lo stesso nome ma
valori di campo diversi.
Il testo in grassetto che definisce
un gruppo di cinque pulsanti,
nella tabella che segue, permette
all’utente di selezionare un unico
baudrate tra cinque possibilità.
Gli elementi Radio-Button sono
inseriti in una tabella 1x5 (si noti il
tag <TD>).
Il nome “RS485” è lo stesso per
tutti.
La figura precedente mostra la
pagina che viene visualizzata
quando l’utente seleziona
l’opzione 4800 e il baudrate
attuale è di 19200. La figura che
segue illustra invece il risultato.
Si noti come tutti i dati inviati con il
form appaiano nel campo URL del
browser. L’elemento ACTION è
GET.
7.3.2.7 Using Radio-Buttons inside a form
The Radio-Buttons are useful
when the user must select only
one choice from a set of options.
The Radio-Buttons are typically
used in groups. All the
Radio-Buttons in a group must
have the same name and must
contain different field values.
The boldface text for a group of
five buttons in the next table
allows the user to select a unique
baudrate in a range of five
possibilities.
The Radio-Buttons elements are
inserted in a table 1x5 (note the
<TD> tag).
The name “RS485” is the same for
all.
The above figure shows the page
displayed when the user selects
4800 baud and the current
baudrate is 19200. The next figure
displays the result.
Note how all the data submitted by
the form appear into the URL box
of the browser.The ACTION
element is GET.
34
Manuale WebGate - cod. +030220230 rel. 1.0 - 16.09.2003
Gruppo di cinque Radio-Button / Group of five Radio-Buttons
………………………………
………………………………
<td colspan="5">
<div align="center">
<input type="radio" name="RS485" value="?script:Baudrate485=1200">
</div>
</td>
<td>
<div align="center">
<input type="radio" name="RS485" value="?script:Baudrate485=2400">
</div>
</td>
<td>
<div align="center">
<input type="radio" name="RS485" value="?script:Baudrate485=4800">
</div>
</td>
<td>
<div align="center">
<input type="radio" name="RS485" value="?script:Baudrate485=9600">
</div>
</td>
<td>
<div align="center">
<input type="radio" name="RS485" value="?script:Baudrate485=19200">
</div>
</td>
………………………………
………………………………
Fig. 7.3.2.7.1
Fig. 7.3.2.7.2

7.3.3 Modificare l’indirizzo IP e il SUBNET-MASK
Tutti i dispositivi di una rete
richiedono un unico indirizzo IP
utilizzato dall’host per
comunicare. Il SUBNET mask,
assieme all’indirizzo IP, definisce
la gamma di indirizzi IP
disponibili sulla rete locale
Ethernet LAN.
L’utente può modificare
l’indirizzo IP e il SUBNET mask
del WebGate in due modi: da
consolle, utilizzando il software
HyperTerminal, oppure durante
una connessione Ethernet.
Un esempio del secondo caso è
illustrato nella figura e nella
tabella che seguono.
7.3.3 Changing the IP address and the SUBNET-MASK
All devices on a network
requires a unique IP address
which host can use to
communicate with them. The
SUBNET mask, along with the
IP address, defines what range
of IP addresses are on the
local Ethernet LAN.
The user has 2 ways to
change the WebGate’s IP
address and SUBNET mask:
the first is from the console
using HyperTerminal software,
the second is during an
Ethernet connection.
An example of the last case is
given in the figure and table
below.
35
Manuale WebGate - cod. +030220230 rel. 1.0 - 16.09.2003
Esempio di codice HTML per l’impostazione dell’indirizzo IP e del NETMASK
Example of HTML code for setting IP and NETMASK
<html>
<head>
<title>Untitled Document</title>
<meta http-equiv="Content-Type" content="text/html; charset=iso-8859-1">
</head>
<body bgcolor="#FFFFFF" text="#000000">
<form name="form1" method="post" action="Ipnet.htm">
<table width="382" border="0" cellspacing="0" align="center">
<tr align="center">
<td colspan="2" bgcolor="#FFCC33"><font face="Verdana, Arial, Helvetica, sans-serif">
<b><font size="2">Network Setup </font></b></font></td>
</tr>
<tr>
<td width="105" align="right" height="12" bgcolor="#E8E8E8">
<font face="Verdana, Arial, Helvetica, sans-serif"><b><font size="2">
IP Address </font></b></font></td>
<td width="130" height="12" valign="top" bgcolor="#E8E8E8">
<font face="Verdana, Arial, Helvetica, sans-serif"><b><font size="2">
</font><font face="Verdana, Arial, Helvetica, sans-serif"><b><font size="2">
<input type="text" name="?script:IPaddress" maxlength="16" value="<%IPAddress%>">
</font></b></font></b></font></td>
</tr>
<tr>
<td width="105" align="right" bgcolor="#D7D7D7">
<font face="Verdana, Arial, Helvetica, sans-serif">
<b><font size="2">NetMask</font></b></font></td>
<td width="130" bgcolor="#D7D7D7">
<font face="Verdana, Arial, Helvetica, sans-serif"><b><font size="2">
</font><font face="Verdana, Arial, Helvetica, sans-serif">
<b><font face="Verdana, Arial, Helvetica, sans-serif"><b><font size="2">
<input type="text" name="?script:NetMask" maxlength="16" value="<%NetMask%>">
</font></b></font></b></font></b></font></td>
</tr>
<tr>
<td colspan="2" align="center" height="34">
<input type="submit" name="Button2" value="Confirm">
</td>
</tr>
</table>
</form>
</body>
</html>
Fig. 7.3.3.1

Come si può vedere osservando il testo in grassetto, le regole per
l’inserimento di una casella di testo da utilizzare per impostare i due
parametri menzionati, sono sempre le stesse.
Quando si modifica il subnet-mask e/o l’indirizzo IP, il WebGate
visualizza i valori appena selezionati. Tuttavia, se altri utenti hanno
attivato un processo di connessione (FTP o HTTP), è possibile che vi
sia un ritardo prima che le impostazioni abbiano effetto, in quanto
devono prima concludersi tutti i processi di connessione che fanno
riferimento al valore IP precedente.
Ecco perché, quando si attiva una connessione utilizzando il nuovo
valore IP, durante questo intervallo di tempo, è possibile ricevere il
messaggio “URL not found” o osservare un ritardo prima che la
richiesta venga accettata.
Per modificare l’IP più velocemente è preferibile effettuare l’operazione
quando le richieste da parte di altri utenti sono in stand-by.
7.3.4 Pagine di avviso
Queste pagine vengono inviate dal WebGate come “messaggi di
avviso” quando l’utente tenta un’operazione temporaneamente inibita o
assolutamente non permessa.
Se il vostro browser è abilitato a javascript, cliccando sul testo in
grassetto “click here to go back” tornerete alla pagina precedente.
7.4 Suggerimenti per l’ottimizzazione delle pagine HTML
Le pagine HTML sono file di testo e, in quanto tali, utilizzano una
considerevole quantità di spazio. Una pagina di grandi dimensioni limita
il numero di file che possono essere memorizzati nel WebGate e
rallenta le operazioni di scarico.
Per ridurre lo spreco di memoria, eliminate i rientri dai file prima di
caricarli nel WebGate. Spesso gli editor HTML possono essere
configurati in modo da minimizzare automaticamente le dimensioni
dei file.
Si possono anche utilizzare i fogli di stile (CSS) quando più elementi in
una pagina o di più pagine condividono gli stessi stili di visualizzazione.
Infine, quando possibile, utilizzate immagini compresse. Ad esempio,
ricordate che i file GIF, TIFF e BMP occupano molto più spazio rispetto
al formato JPEG.
As you can see looking at the boldface text, the rules to insert a text
box interface for setting the two mentioned parameters are always the
same.
When you change its subnet-mask and/or IP, the WebGate displays the
values just selected; however, if some connection process is active
(FTP or HTTP) because of other users, a delay is possible before the
settings have effect due to the fact that all the connection processes
referred to the precedent IP value must be solved by the WebGate.
That’s why, activating a connection using the new IP value during this
time interval, you could get the “URL not found” warning or a delay
before the request is accepted.
To change the IP faster, it’s better to perform this action when other
user’s requests are in stand-by.
7.3.4 Warnings pages
These pages are sent by the WebGate to give a “warning message”
when the user tries to do a temporary inhibited or absolutely not
permitted operation.
If your browser is javascript-enabled clicking on the boldface “click here
to go back” you will return to the previous page.
7.4 Suggestions for HTML pages optimization
HTML pages are text files and, since of this, they uses an appreciable
quantity of file space. A big page reduces the amount of files that can
be stored into WebGate and ultimately slows down the download.
To reduce the memory wasted, remove any indentation from the file
before upload to WebGate. Generally, HTML editors can be configured
to automatically obtain the minimum file footprint.
Additionally, use cascading style sheet (CSS) files when more
elements in a page or more pages shares the same visualization
styles.
Furthermore, use compressed images if possible. For instance,
remember that GIF, TIFF and BMP files occupies considerably more
space than JPEG format.
36
Manuale WebGate - cod. +030220230 rel. 1.0 - 16.09.2003
Fig. 7.3.4.1

8. Protocollo SNMP per WebGate
8.1 Il protocollo SNMP in breve
Il protocollo SNMP (Simple Network Management Protocol) è un
protocollo Internet-standard, introdotto nel 1988 per la gestione di
dispositivi su reti IP. Nel corso degli ultimi anni, le reti sono via via
divenute sempre più complesse per l’aggiunta di molti dispositivi
diversi, come router, server, proxy, switch, workstation, stampanti,
gateway, UPS e così via.
Il protocollo SNMP può essere utilizzato per monitorare sia hardware di
rete standard che variabili specifiche, come la temperatura e l’umidità
di un ambiente.
L’essenza del protocollo è costituita da un insieme di operazioni che
permettono agli amministratori di rete di controllare e modificare lo
stato di alcuni dispositivi SNMP o i valori delle più importanti variabili di
un controllo, come ad esempio il setpoint.
Le due entità principali dell’archittettura di rete SNMP sono i manager
e gli agent (Fig.8.1.1). Un manager è un server in grado di svolgere
compiti di gestione di rete. I manager vengono spesso chiamati
Network Management Station (NMS). L’NMS interroga gli agent e da
questi riceve dei trap. L’azione di interrogazione da parte di un NMS
corrisponde alla richiesta di informazioni. Un trap è il modo in cui
l’agent informa l’NMS dell’accadimento di un particolare evento.
Generalmente, la richiesta di informazioni è sincrona, e cioè gli agent
rispondono solo in seguito ad una richiesta da parte di un NMS. I
messaggi trap sono invece asincroni: gli agent cioè inviano un trap
senza che vi sia stata alcuna richiesta da parte di un NMS, poiché
l’NMS non è a conoscenza del tipo di evento e del momento in cui
esso si verifica. In altre parole, non esistono limiti temporali per le
richieste di informazioni da parte di un NMS ad un agent né per l’invio
di un trap.
L’agent è un software eseguito dal dispositivo di rete (il WebGate nel
nostro caso), che fornisce all’NMS informazioni relative alla gestione,
come ad esempio lo stato, il valore di variabili significative, le
informazioni statistiche e così via.
8. WebGate SNMP Protocol
8.1 A brief overview of the SNMP protocol
SNMP (Simple Network Management Protocol) is an Internet-standard
protocol, introduced in 1988, for managing devices on IP networks.
Network complexity has increased very hard in last years by addition of
several different kinds of devices, as routers, servers, proxies, switches,
workstations, printers, gateways, UPSs, and so on.
SNMP can be used to monitor both standard network hardware and
specific variables, like the temperature and humidity inside a room.
The core of the protocol is a simple set of operations that gives to the
network administrators the ability to control and change the state of
some SNMP-based devices or the value of the most important
variables of a controller, i.e. a setpoint.
The two principal entities of an SNMP network architecture are
managers and agents (Fig.8.1.1). A manager is a server system that
can handle management tasks for a network. Managers are often
referred to as Network Management Station (NMSs). An NMS is
responsible for polling agents and for receiving traps from agents in the
network. Polling action by NMS is the act of querying an agent for
information. A trap is a way for the agent to inform NMS about a
particular event.
Generally querying is synchronous, that is agents respond only after a
request by NMS. Trap messages are asynchronous: agents send a trap
without any request by NMS, because NMS can’t knows nothing about
the nature of the event and instant the event occur. In other words,
there are no restrictions on when the NMS can query the agent or
when the agent can send a trap.
by keeping track of various aspects of the device, such as its state,
value of important variables, statistical informations, and so on.
37
Manuale WebGate - cod. +030220230 rel. 1.0 - 16.09.2003
built-in terminal built-in terminal
Network Management Station
Portante Ethernet /
Ethernet Backbone
polling line
trap line
Carel network
Agent 1 Agent 2 Agent 3 Agent N-1 Agent N
Fig. 8.1.1

8.2 Structure of management information: gli agent MIB
Il database gestito dall’agent SNMP viene chiamato MIB (Management
Information Base), ovvero database dell’informazionedi gestione, ed è
un insieme di oggetti standard che rappresentano i valori statistici e di
controllo. Il protocollo SNMP, inoltre, permette di aggiungere ai valori
standard altri valori specifici per un determinato agent, mediante
l’utilizzo di MIB privati. Ogni oggetto MIB è costituito da due attributi
principali (Fig.8.2.1):
Oggetto MIB
Name (OID) Value
Fig. 8.2.1
Il Name o Identificatore di oggetto (OID, Object IDentifier) definisce
in modo univoco un oggetto gestito nella rete.
L’identificatore di oggetto, di solito, viene rappresentato in due modi:
numerico o “leggibile”, come spiegheremo nei prossimi paragrafi.
Praticamente si tratta di un indirizzo che specifica, in modo univoco,
dove si trova un oggetto nella rete.
Il Valu e rappresenta il valore della variabile associata all’oggetto.
Un agent può implementare più di un MIB. L’insieme globale degli
oggetti di un agent SNMP si chiama MIBview.
8.3 Assegnazione dei nomi agli OID: la struttura ad albero
del web
Gli oggetti gestiti sono organizzati in una struttura ad albero. Questa
struttura è alla base del sistema di definizione dei nomi secondo il
protocollo SNMP.
Un OID è una sequenza di numeri interi che rappresentano i nodi
dell’albero, separatati da punti (.).
Esiste anche una forma alternativa dell’identificatore che è più
facilmente leggibile rispetto a una stringa di numeri. Si tratta di una
sequenza di nomi, separatati da punti, ognuno dei quali rappresenta un
nodo dell’albero. E’ possibile utilizzare sia i numeri che la sequenza di
nomi.
La Fig. 8.3.1 illustra i principali nodi dell’albero.
La sommità dell’albero è chiamata root node (nodo radice); le
derivazioni di un nodo sono i subtree (sotto-alberi). Come si può
vedere nell’esempio dato dalla figura 8.3.1, il nodo radice ha tre
sotto-alberi: “ccitt(0)”, “iso(1)” e “joint(2)”. Iso(1) è l’unico nodo che
contiene a sua volta un sotto-albero. Gli altri due nodi spesso vengono
chiamati leaf node (nodi foglie). La Tab. 8.3.1 offre una breve
descrizione del significato di questi nodi.
8.2 The structure of management information: agent MIBs
The database, controlled by the SNMP agent, is referred to as the
SNMP Management Information Base (MIB), i.e. database of the
management information, and is a standard set of objects representing
statistical and control values. SNMP additionally allows the extension of
these standard values with values specific to a particular agent through
the use of private MIBs. Each MIB object is composed by two main
attributes (Fig.8.2.1):
MIB object
Name (OID) Value
Fig. 8.2.1
The Name or Object IDentifier (OID) uniquely defines a managed
object on the network.
Object identifier commonly appear in two forms: numeric or “readable”,
as we’ll see in the next paragraphs. It can be thought of as an address
that specifies uniquely where is the object on the network.
Val ue represents the value of the variable associated to the object.
An agent may implement many MIBs.The global set of objects of an
SNMP agent is named MIBview.
8.3 Naming OIDs: the tree hierarchy structure of the web
Managed objects are organized into a tree-like hierarchy. This structure
is the basis for SNMP’s naming scheme.
An OID is made up of a series of integers based on the nodes in the
tree, separated by dots (.).
Moreover there’s a human-readable form that’s more friendly than a
string of number.This form is a series of names separated by dots,
each of which represents a node of the tree. So we can use the
number themselves or a sequence of names that represent the
numbers.
The main nodes of the tree are the following (Fig.8.3.1).
The top of the tree is called root node. Childrens of a node are called
subtrees. For example, as figure 8.3.1 shows, the root has three
subtrees, that are “ccitt(0)”, “iso(1)”, “joint(2)”. Iso(1) is the only node
that contains a subtree. The other two nodes are often called “leaf
nodes”. A brief description about the meaning of this nodes can be
found in Tab. 8.3.1.
38
Manuale WebGate - cod. +030220230 rel. 1.0 - 16.09.2003
iso (1
)
org (3
)
dod (6
)
internet (1
)
ccitt (0
)
j
oint (2
)
mgmt (2
)
experimental (3
)
directory (1
)
p
rivate (4
)
Fig. 8.3.1

Sotto-alberi del nodo radice
Ccitt(0) Sotto-albero amministrato dall’International Telegraph and
Telephone Consultative Committee
iso(1) International Organization for Standardization
Joint(2) Amministrato da ISO e CCITT
Tab. 8.3.1
La corrispondenza tra la sequenza di numeri interi e la sequenza di
nomi ora è immediata: ad ogni nodo è assegnato un numero e un
nome; in questo modo, il sotto-albero internet può essere
rappresentato dalla sequenza internet=1.3.6.1 oppure
internet=iso(1).org(3).dod(6).1
Il sotto-albero riportato in Fig.8.3.1 può essere rappresentato con la
seguente sintassi:
internet OBJECT IDENTIFIER::={iso(1).org(3).dod(6).1}={1.3.6.1}
directory OBJECT IDENTIFIER::= {internet 1}={1.3.6.1.1}
mgmt OBJECT IDENTIFIER::= {internet 2}={1.3.6.1.2}
experimental OBJECT IDENTIFIER::= {internet 3}={1.3.6.1.3}
private OBJECT IDENTIFIER::= {internet 4}={1.3.6.1.4}
L’IDENTIFICATORE DI OGGETTO è uno dei principali tipi di dati
utilizzati nel protocollo SNMP, mentre ::= precede la definizione.
In riferimento alla Fig. 8.3.1 possiamo dire che internet è un
sotto-albero del Department of Defence degli USA: infatti, è un
sotto-albero del nodo dod(6) nella struttura ad albero del web.
8.4 L’Albero SNMP Carel Enterprise
Possiamo ora utilizzare il concetto di struttura ad albero per illustrare
come vengono organizzate da CAREL le informazioni sugli agent
SNMP e sulle variabili delle unità.
Sotto il nodo enterprises::={private(4).1} ci sono tutti i nodi SNMP che
descrivono i fornitori e le organizzazioni private. CAREL è una di
queste e il suo OID, assegnatogli da IANA (Internet Assigned Number
Authority ), è 9839.
Carel OBJECT IDENTIFIER::={enterprises 9839}
Carel-System OBJECT IDENTIFIER::={Carel 1}
Carel-Instruments OBJECT IDENTIFIER::={Carel 2}
Subtrees of Root-Node
ccitt(0) Subtree administered by International Telegraph and
Telephone Consultative Committee
iso(1) International Organization for Standardization
joint(2) Administered jointly by ISO and CCITT
Tab. 8.3.1
Dualism between series of integer and series of names is now
immediate: each node is numbered and named; so internet subtree can
be referred to as the sequence internet=1.3.6.1 or
internet=iso(1).org(3).dod(6).1
We can define the subtree represented into Fig.8.3.1 using the
following syntax:
internet OBJECT IDENTIFIER::= {iso(1).org(3).dod(6).1}={1.3.6.1}
directory OBJECT IDENTIFIER::= {internet 1}={1.3.6.1.1}
mgmt OBJECT IDENTIFIER::= {internet 2}={1.3.6.1.2}
experimental OBJECT IDENTIFIER::= {internet 3}={1.3.6.1.3}
private OBJECT IDENTIFIER::= {internet 4}={1.3.6.1.4}
OBJECT IDENTIFIER is one of the main datatypes used in SNMP
protocol and ::= is a definition operator.
Looking at Fig. 8.3.1we can say that internet is a subtree of the
Department Of the American Defence: in fact it is a subtree of the node
dod(6) in the tree structure of the web.
8.4 Carel Enterprise SNMP Tree
Using the concept of tree-hierarchy, now we can show how the information
about snmp-agent and unit-variables are organised by CAREL.
Under the node enterprises::={private(4).1} there are all the SNMP
nodes referring to vendors and private organizations. CAREL is one of
them and its OID, assigned by IANA (Internet Assigned Numbers
Authority ), is 9839.
Carel OBJECT IDENTIFIER::={enterprises 9839}
Carel-System OBJECT IDENTIFIER::={Carel 1}
Carel-Instruments OBJECT IDENTIFIER::={Carel 2}
39
Manuale WebGate - cod. +030220230 rel. 1.0 - 16.09.2003
iso (1
)
System (1
)
Instruments (2
)
iso(1)org(3)dod(6)internet(1)private(4
)
Fig. 8.4.1
8.4.1 Il sotto-albero Carel-System
Il sotto-albero Carel-System ha solo due
oggetti: Agent-release e Agent-code.
Agent Release rappresenta la versione
firmware dell’agent WebGate.
Agent Code è l’identificatore (sempre “1”
per il WebGate).
Il sotto-albero è riportato in Fig. 8.4.1.1.
Segue la definizione di questi oggetti MIB:
Agent-release OBJECT-TYPE
SYNTAX INTEGER
ACCESS read-only
Status ---
DESCRIPTION “versione firmware agent”
::={Carel-System 1}
Agent-code OBJECT-TYPE
SYNTAX INTEGER
ACCESS read-only
Status ---
DESCRIPTION “identificatore agent”
::={Carel-System 2}
Di conseguenza, se ad esempio un NMS invia un comando di lettura
Get-request (vedi Comandi e versione SNMP) per l’“Agent release”,
l’OID completo sarà:
{iso(1).org(3).dod(6).internet(1).private(4).enterprises(1).carel(9839)
.carel-system(1).1.0} oppure {1.3.6.1.4.1.9839.1.1.0}.
Si noti che l’OID completo termina con uno 0. Lo 0 finale rappresenta
l’identificatore di istanza (instance-identifier) dell’OID. Ogni OID può
essere considerato come una combinazione di due parti: il
nome-oggetto e l’identificatore di istanza:
OID = Nome Oggetto . Identificatore di Istanza
Per gli oggetti scalari (che non siano tabelle o liste), l’identificatore di
istanza è sempre 0.
Poiché il WebGate gestisce tutti gli oggetti come “scalari”, ogni OID
termina con uno “.0”.
8.4.2 Il sotto-albero Carel-Instruments
Sotto il nodo Carel-Instruments ci sono due
sotto-alberi principali: Carel_WebGate-Info e
Carel_Units-Var (Fig. 8.4.2.1).
(x): (superiore a 0) è l’indirizzo dell’unità
(2÷9): ci sono 8 sotto-alberi, uno per
ogni tipo di informazione generale sulle
unità, ad esempio α=2 è il
sotto-albero “unit-type”.
Il sotto-albero Carel_WebGate-Info
contiene informazioni
relative ai parametri del
WebGate e dati generali sulle unità (tipo,
codice, versione
software,…)
Il sotto-albero
Carel_Units-Var contiene informazioni relative alle variabili delle unità.
Quindi abbiamo:
Carel_WebGate-Info OBJECT IDENTIFIER::={Carel-Instruments 0}
Carel_Units-Var OBJECT IDENTIFIER::={Carel-Instruments a}
1 £ a £ MaxDevs
Agent-Parameters OBJECT IDENTIFIER::={Carel-WebGate-Info 1}
General-Units-Info OBJECT IDENTIFIER::={Carel-WebGate-Info b}
2 £ b £ 9
8.4.1 The Carel-System subtree
Carel-System Subtree has only two
objects: Agent-release and Agent-code.
Agent Release represents the firmware
release of the agent firmware
incorporated into the WebGate.
Agent Code is the Agent-identifier
(always “1” for WebGate).
The subtree is represented in Fig.
8.4.1.1.
We can use the following formal template to define these MIB objects:
Agent-release OBJECT-TYPE
SYNTAX INTEGER
ACCESS read-only
Status ---
DESCRIPTION “firmware release of agent”
::={Carel-System 1}
Agent-code OBJECT-TYPE
SYNTAX INTEGER
ACCESS read-only
Status ---
DESCRIPTION “agent-identifier”
::={Carel-System 2}
Consequently, if for example a NMS sends a reading command Get
request (see SNMP commands and version) for the “Agent release”,
the complete OID is:
{iso(1).org(3).dod(6).internet(1).private(4).enterprises(1).carel(9839)
.carel-system(1).1.0} or
{1.3.6.1.4.1.9839.1.1.0}.
Please note that the complete OID ends by 0. The final 0 represents
the “instance-identifier” of the OID. Each OID can be though of as the
union of two parts: the object-name and the instance-identifier:
OID = Object Name . Instance Identifier
For scalar objects (not tables or lists) the instance identifier is always 0.
As the WebGate handles every object as “scalar”, every OID ends with
“.0”.
8.4.2 The Carel-Instruments subtree
Under the node Carel-Instruments there
are two main subtree: Carel_WebGateInfo and Carel_Units-Var (Fig. 8.4.2.1).
(x): (greater than 0) is the unit address
(2÷9): There are 8 subtree,
one for any type of general
data informations about
units: for example α=2 is
the “unit-type” subtree
In the Carel_WebGate-Info
sub-tree there are information regarding the WebGate’s parameters and
general data about units (type, code, software
release,…)
In the Carel_Units-Var sub-tree there are
information regarding units’ variables.
So we have:
Carel_WebGate-Info OBJECT IDENTIFIER::={Carel-Instruments 0}
Carel_Units-Var OBJECT IDENTIFIER::={Carel-Instruments a}
1 £ a £ MaxDevs
Agent-Parameters OBJECT IDENTIFIER::={Carel-WebGate-Info 1}
General-Units-Info OBJECT IDENTIFIER::={Carel-WebGate-Info b}
2 £ b £ 9
40
Manuale WebGate - cod. +030220230 rel. 1.0 - 16.09.2003
Carel-System (1)
Agent-release (1) Agent-code (2
)
Agent-Parameters (1)
General-Units-Info (2
9)
Carel Instruments (2)
Carel_WebGate-Info (0)
Carel_Units-Var (x)
Fig. 8.4.1.1
Fig. 8.4.2.1

Passando ora al sotto-albero Carel-instruments
(OID-NOME=1.3.6.1.4.1.9839.2), possiamo elencare questi casi
(Tabella 8.4.2.1).
OID-NOME=1.3.6.1.4.1.9839.2.a.b
a b sotto-albero
0 1 Agent-parameters
0 2 £ b £ 9 General-Units-info
1 £ a £ MaxDevs --- Units-var
Tabella 8.4.2.1
8.4.3 Il nodo Agent-parameters
Questo nodo contiene due parametri
(Figura 8.4.3.1): Netsize e Baudrate,
con il seguente significato:
Netsize OBJECT-TYPE
SYNTAX INTEGER
ACCESS read-write
Status --DESCRIPTION “numero massimo di unità collegate al WebGate”
::={Agent-Parameters 1}
Baudrate OBJECT-TYPE
SYNTAX INTEGER
ACCESS read-write
Status --DESCRIPTION “Baudrate unità in rete”
::={Agent-Parameters 2}
L’OID completo per entrambi i parametri è composto dall’OID più
l’istanza 0. Quindi abbiamo:
Netsize OID = 1.3.6.1.4.1.9839.2.0.1.1.0
Baudrate OID = 1.3.6.1.4.1.9839.2.0.1.2.0
8.4.4 I sotto-alberi General-Units-info
Ci sono altri 8 sotto-alberi in corrispondenza del nodo
Carel_WebGate-Info, che contengono informazioni di natura generale
relative alle unità, quali unit-type (tipo di unità),
unit-code (codice unità), ecc. (Fig. 8.4.4.1). La
Tabella 8.4.4.1 elenca i significati di ciascun nodo.
(*): x (superiore a 0) è
l’indirizzo dell’unità.
Sotto-alberi General-Units-Info
Indice nodo Dati
2 Unit-Type
3 Unit-Code
4 Unit-Software_release_
5 Unit-Min_Software_release_
6 Unit-Max_Software_release_
7 Unit-No_Answer_counter
8 Unit-Error_checksum_counter
9 Unit-Timeout_counter
Tab. 8.4.4.1
(_): solo per controlli parametrici.
Resuming, moving on carel-instruments subtree
(OID-NAME=1.3.6.1.4.1.9839.2), we can have the following cases
(Table 8.4.2.1).
OID-NAME=1.3.6.1.4.1.9839.2.a.b
a b subtree
0 1 Agent-parameters
0 2 £ b £ 9 General-Units-info
1 £ a £ MaxDevs --- Units-var
Table 8.4.2.1
8.4.3 The Agent-parameters node
There are two parameters under this
node (Figure 8.4.3.1): Netsize and
Baudrate, that have the following
definition:
Netsize OBJECT-TYPE
SYNTAX INTEGER
ACCESS read-write
Status --DESCRIPTION “max No of units connected to the WebGate”
::={Agent-Parameters 1}
Baudrate OBJECT-TYPE
SYNTAX INTEGER
ACCESS read-write
Status --DESCRIPTION “Baudrate of units network”
::={Agent-Parameters 2}
We obtain the complete OID for both the parameters adding to the
OID-name the instance 0. So we have:
Netsize OID = 1.3.6.1.4.1.9839.2.0.1.1.0
Baudrate OID = 1.3.6.1.4.1.9839.2.0.1.2.0
8.4.4 The General-Units-info subtrees
Under Carel_WebGate-Info node there are other 8 subtree, having
general information about units, such as unit-type, unit-code, and so on
(Fig. 8.4.4.1).Tab. 8.4.4.1 gives the meanings
of each node index.
(*): x (greater than 0) is the unit address.
General-Units-Info subtrees
Node index Data
2 Unit-Type
3 Unit-Code
4 Unit-Software_release_
5 Unit-Min_Software_release_
6 Unit-Max_Software_release_
7 Unit-No_Answer_counter
8 Unit-Error_checksum_counter
9 Unit-Timeout_counter
Tab. 8.4.4.1
(_): only for parametric controllers.
41
Manuale WebGate - cod. +030220230 rel. 1.0 - 16.09.2003
Agent-parameters (1
)
Netsize (1
)
Baudrate (2
)
Code (3.x*)
SW_rel (4.x*)
Type (2.x*)
Timeout (9.x*)
Carel_WebGate-Info (0)
Fig. 8.4.3.1
Fig. 8.4.4.1

Ognuno degli 8 nodi può avere un numero
massimo di oggetti= a Netsize (1£ x £Netsize).
Esempio: In riferimento al nodo
Unit-Type (indice=2), la
situazione nel caso di 3 unità è
la seguente:
Segue la definizione di tutti gli oggetti appartenenti agli otto sotto-alberi.
Each of the 8 nodes has up to Netsize objects
(1£ x £Netsize).
Example: Referring to the
Unit-Type node (index=2), the
situation for 3 units is the
following:
Here follows the definition for any type of data object under the eight
subtrees.
42
Manuale WebGate - cod. +030220230 rel. 1.0 - 16.09.2003
Unit-type (2)
Unit2-type (2)
OID
{1.3.6.1.4.1.9839.2.0.2.2.0}
Unit1-type (1)
OID
{1.3.6.1.4.1.9839.2.0.2.1.0}
Unit3-type (3)
OID
{1.3.6.1.4.1.9839.2.0.2.3.0}
UnitType(X) OBJECT-TYPE
SYNTAX DISPLAY-STRING
ACCESS read-only
STATUS --DESCRIPTION “descrive il tipo di unità con indirizzo X”/”describes the type of the Unit having address X”
::={ Carel-WebGateInfo 2.X}
UnitCode(X) OBJECT-TYPE
SYNTAX INTEGER
ACCESS read-only
STATUS --DESCRIPTION “descrive il codice unità con indirizzo X”/”represents the code of the Unit having address X”
::={ Carel-WebGateInfo 3.X}
UnitSoftRel(X) OBJECT-TYPE
SYNTAX INTEGER
ACCESS read-only
STATUS --DESCRIPTION “descrive la versione software dell’unità con indirizzo X”
”represents the software release of the Unit having address X”
::={ Carel-WebGateInfo 4.X}
UnitMinSoftRel (X) OBJECT-TYPE
SYNTAX INTEGER
ACCESS read-only
STATUS --DESCRIPTION “rappresenta la versione minima del software dell’unità con indirizzo X”
“represents the minimum software release of the Units having address X”
::={ Carel-WebGateInfo 5.X}
UnitMaxSoftRel (X) OBJECT-TYPE
SYNTAX INTEGER
ACCESS read-only
STATUS --DESCRIPTION “rappresenta la versione massima del software dell’unità con indirizzo X”
“represents the maximum software release of the Units having address X”
::={ Carel-WebGateInfo 6.X}
UnitNoAnswcnt(X) OBJECT-TYPE
SYNTAX INTEGER
ACCESS read-only
STATUS --DESCRIPTION “Contatore di nessuna risposta dell’unità con indirizzo X”
“No answer counter of the Unit address X”
::={ Carel-WebGateInfo 7.X}
UnitChkErrcnt(X) OBJECT-TYPE
SYNTAX INTEGER
ACCESS read-only
STATUS --DESCRIPTION “Contatore di errore checksum dell’unità con indirizzo X”
“Checksum error counter of the Unit having address X”
::={ Carel-WebGateInfo 8.X}
UnitTimeoutcnt (X) OBJECT-TYPE
SYNTAX INTEGER
ACCESS read-only
STATUS --DESCRIPTION “Contatore timeout dell’unità con indirizzo X”/timeout counter of the Unit having address X”
::={ Carel-WebGateInfo 9.X}
Fig. 8.4.4.2

8.4.5 Il sotto-albero Carel-Units-var
Questo nodo contiene tutti gli oggetti SNMP relativi alle variabili dei
dispositivi collegati al WebGate. La Figura 8.4.5.1 riporta la struttura
del sotto-albero, considerando Netsize=4.
Definizione di un oggetto associato ad una variabile nel protocollo
SNMP:
Variable OBJECT-TYPE
SYNTAX INTEGER
ACCESS read-write(_)
Status --DESCRIPTION “variabile generica intera, digitale o
analogica di un dispositivo”
::={Carel-Instruments x.y.z}
(_): tutte le variabili permettono l’accesso in lettura-scrittura come
impostazione predefinita. Se un parametro di un’unità è impostato in
“sola lettura”, quando un manager tenta una Set-operation, il WebGate
restituisce il messaggio d’errore “readONLY”.
Dove:
x=indirizzo dell’unità 1 £ x £ Netsize
y=tipo 1=digitale, 2=analogico, 3=intero
z=indice 1 £ z £ MaxIndex=207
Come indicato nella Fig. 8.4.5.1, l’OID della prima variabile intera per
l’unità 2 è 1.3.6.1.4.1.9839.2.2.3.1.0, dove l’indirizzo unità=2, tipo=3 e
indice=1.
8.4.5 The Carel-Units-var subtree
Under this node a manager can find all the SNMP objects relative to
the variables of the devices connected to the WebGate. Figure 8.4.5.1
shows how this subtree is structured, assuming
Netsize=4.
The formal SNMP definition for an object associated to a variable is:
Variable OBJECT-TYPE
SYNTAX INTEGER
ACCESS read-write(_)
Status --DESCRIPTION “generic integer, digital or analogue device
variable”
::={Carel-Instruments x.y.z}
(_): all variables have default read-write access. If a unit parameter is
declared “readable only”, when a manager tries a Set-operation,
WebGate returns the error message “readONLY”.
Where:
x=unit address 1 £ x £ Netsize
y=type 1=digital, 2=analogue, 3=integer
z=index 1 £ z £ MaxIndex=207
As indicated in Fig. 8.4.5.1, the OID of the first integer variable for unit
2 is 1.3.6.1.4.1.9839.2.2.3.1.0, where unit address=2, type=3 and
index=1.
43
Manuale WebGate - cod. +030220230 rel. 1.0 - 16.09.2003
Analogue (2)
Digital (1)
{1.3.6.1.4.1.9839.2.3}
Unit 2
Database digitale
Digital database
Unit 2
Database analogico
Analogue database
Unit 2
Database intero
Integer database
OID={1.3.6.1.4.1.9839.2.2.3.z.0}
Fig. 8.4.5.1

La Tabella 8.4.5.1 indica il rapporto tra l’OID-nome dell’oggetto per una
variabile generica e i parametri x,y,z.
OID-nome delle variabili dell’unità*
OID-nome=1.3.6.1.4.1.9839.2.x.y.z
x=indirizzo unità y=tipo z=indice
1 £ x £ Netsize 1=digitale, 2=analogico, 3=intero 1 £ z £ 207
Tab. 8.4.5.1
(*): si ricordi che l’OID è sempre composto da:
OID-nome.Identificatore di istanza.
L’OID completo è quindi sempre OID-nome.0
Esempi:
Indirizzo dell’unità n.1
Tipo variabile Indirizzo OID-nome delle variabili
Carel Carel
Digitale 1 1.3.6.1.4.1.9839.2.1.1.1.0
Digitale 2 1.3.6.1.4.1.9839.2.1.1.2.0
Digitale .... ...
Digitale 206 1.3.6.1.4.1.9839.2.1.1.206.0
Digitale 207 1.3.6.1.4.1.9839.2.1.1.207.0
Analogico 1 1.3.6.1.4.1.9839.2.1.2.1.0
Analogico 2 1.3.6.1.4.1.9839.2.1.2.2.0
Analogico ... ...
Analogico 206 1.3.6.1.4.1.9839.2.1.2.206.0
Analogico 207 1.3.6.1.4.1.9839.2.1.2.207.0
Intero 1 1.3.6.1.4.1.9839.2.1.3.1.0
Intero 2 1.3.6.1.4.1.9839.2.1.3.2.0
Intero ... ...
Intero 206 1.3.6.1.4.1.9839.2.1.3.206.0
Intero 207 1.3.6.1.4.1.9839.2.1.3.207.0
Tab. 8.4.5.2
Indirizzo dell’unità n.2
Tipo variabile Indirizzo OID-nome delle variabili
Carel Carel
Digitale 1 1.3.6.1.4.1.9839.2.2.1.1.0
Digitale 2 1.3.6.1.4.1.9839.2.2.1.2.0
Digitale .... ...
Digitale 206 1.3.6.1.4.1.9839.2.2.1.206.0
Digitale 207 1.3.6.1.4.1.9839.2.2.1.207.0
Analogico 1 1.3.6.1.4.1.9839.2.2.2.1.0
Analogico 2 1.3.6.1.4.1.9839.2.2.2.2.0
Analogico ... ...
Analogico 206 1.3.6.1.4.1.9839.2.2.2.206.0
Analogico 207 1.3.6.1.4.1.9839.2.2.2.207.0
Intero 1 1.3.6.1.4.1.9839.2.2.3.1.0
Intero 2 1.3.6.1.4.1.9839.2.2.3.2.0
Intero ... ...
Intero 206 1.3.6.1.4.1.9839.2.2.3.206.0
Intero 207 1.3.6.1.4.1.9839.2.2.3.207.0
Tab. 8.4.5.3
Segue un esempio di MIB tree completo, supponendo una sola unità
(IR32Cold), avente indirizzo 1, collegata al WebGate.
Table 8.4.5.1 gives the relationship between the object OID-name for a
generic variable and x,y,z parameters.
OID-name for unit variables*
OID-name=1.3.6.1.4.1.9839.2.x.y.z
x=unit address y=type z=index
1 £ x £ Netsize 1=digital, 2=analogue, 3=integer 1 £ z £ 207
Tab. 8.4.5.1
(*): remember that OID is made by OID-name.Instance-identifier.
So the complete OID is always OID-name.0
Examples:
Addressing unit n.1
Carel Variable Carel OID-name for variables
Type Address
Digital 1 1.3.6.1.4.1.9839.2.1.1.1.0
Digital 2 1.3.6.1.4.1.9839.2.1.1.2.0
Digital .... ...
Digital 206 1.3.6.1.4.1.9839.2.1.1.206.0
Digital 207 1.3.6.1.4.1.9839.2.1.1.207.0
Analogue 1 1.3.6.1.4.1.9839.2.1.2.1.0
Analogue 2 1.3.6.1.4.1.9839.2.1.2.2.0
Analogue ... ...
Analogue 206 1.3.6.1.4.1.9839.2.1.2.206.0
Analogue 207 1.3.6.1.4.1.9839.2.1.2.207.0
Integer 1 1.3.6.1.4.1.9839.2.1.3.1.0
Integer 2 1.3.6.1.4.1.9839.2.1.3.2.0
Integer ... ...
Integer 206 1.3.6.1.4.1.9839.2.1.3.206.0
Integer 207 1.3.6.1.4.1.9839.2.1.3.207.0
Tab. 8.4.5.2
Addressing unit n.2
Carel Variable Carel OID-name for variables
Type Address
Digital 1 1.3.6.1.4.1.9839.2.2.1.1.0
Digital 2 1.3.6.1.4.1.9839.2.2.1.2.0
Digital .... ...
Digital 206 1.3.6.1.4.1.9839.2.2.1.206.0
Digital 207 1.3.6.1.4.1.9839.2.2.1.207.0
Analogue 1 1.3.6.1.4.1.9839.2.2.2.1.0
Analogue 2 1.3.6.1.4.1.9839.2.2.2.2.0
Analogue ... ...
Analogue 206 1.3.6.1.4.1.9839.2.2.2.206.0
Analogue 207 1.3.6.1.4.1.9839.2.2.2.207.0
Integer 1 1.3.6.1.4.1.9839.2.2.3.1.0
Integer 2 1.3.6.1.4.1.9839.2.2.3.2.0
Integer ... ...
Integer 206 1.3.6.1.4.1.9839.2.2.3.206.0
Integer 207 1.3.6.1.4.1.9839.2.2.3.207.0
Tab. 8.4.5.3
Following, a complete example of MIB tree, supposing a single unit
(IR32Cold), with address 1, connected to the WebGate.
44
Manuale WebGate - cod. +030220230 rel. 1.0 - 16.09.2003

8.5 Commandi e versione SNMP
L’agent in esecuzione sul WebGate utilizza il protocollo SNMPv.1. Di
conseguenza, vengono gestiti i seguenti tipi di messaggi:
SNMPv.1
Tipo messaggio
Get-request
GetNext-request
Get-response
Set-request
Tab. 8.5.1
8.6 Community
La gestione dell’informazione nel protocollo SNMP si basa sull’utilizzo
di community name. Ogni messaggio SNMP contiene una community
che funge da password per la comunicazione tra il manager e l’agent.
Per la sintassi dei community name, vedi le funzioni corrispondenti nel
capitolo Funzioni Script del WebGate.
Il WebGate utilizza tre community:
Community READ-ONLY: valida per messaggi get e getnext.
Community READ-WRITE: valida per tutti i messaggi, compreso il
set-operation.
Community TRAP: valida per i messaggi TRAP inviati dall’agent.
Il valore predefinito per tutte le stringhe di community è “public”.
Quando l’utente modifica una stringa community, il nuovo nome viene
salvato nel file di configurazione e sarà valido fino alla modifica
successiva.
Se il community name nel messaggio inviato dal manager non è valido,
il WebGate non invia nessuna risposta.
8.5 SNMP command and version
The agent running on WebGate implements SNMPv.1 protocol.
Consequently the handled message types are:
SNMPv.1
Message type
Get-request
GetNext-request
Get-response
Set-request
Tab. 8.5.1
8.6 Communities
The information in the protocol SNMP is based on the use of
community names. Each SNMP message includes a community name
that works like a password for communication between the manager
and the agent. For the sintax of community names see the related
functions in WebGate Script Functions.
WebGate has three community names:
READ-ONLY community: valid for get and getnext messagges.
READ-WRITE community: valid for all messages, including set
operation.
TRAP community: valid for TRAP messages sent by the agent.
The default value for all community strings is “public”. When the user
changes a community string, the new community name is saved in the
configuration file, and it will be valid until the next change.
If the community name in the message sent by the manager is not
valid, no response will be sent back by WebGate.
45
Manuale WebGate - cod. +030220230 rel. 1.0 - 16.09.2003
Fig. 8.4.5.2

8.7 Le variabili system MIB-II
Il MIB (Management Information Base) è il
database principale per le applicazioni di rete
SNMP. Uno dei sottogruppi più importanti del
nodo MIB-II è system (vedi Fig. 8.7.1). Le tre
variabili sysContact, sysName e sysLocation
nel gruppo system sono obbligatorie per tutti
gli agenti.
Segue la definizione delle 3 variabili del MIB-II system gestite dal
WebGate,:
sysContact OBJECT-TYPE
SYNTAX OCTET STRING
ACCESS read-write
Status --DESCRIPTION “La persona responsibile del nodo e
informazioni quali il numero di telefono”
::={System 4}
sysName OBJECT-TYPE
SYNTAX OCTET STRING
ACCESS read-write
Status --DESCRIPTION “Nome Agent”
::={System 5}
sysLocation OBJECT-TYPE
SYNTAX OCTET STRING
ACCESS read-write
Status --DESCRIPTION “La posizione del dispositivo”
::={System 6}
AVVERTENZA
La lunghezza massima di ogni stringa SNMP è:
Lungh. max variabili system nel WebGate
Variabile system Lungh. max
SysName 39 caratteri
sysContact, sysLocation 79 caratteri
Tab. 8.7.1
Inoltre, la stringa deve essere composta esclusivamente da caratteri
alfanumerici (0…9, A…Z e a…z). Non sono permessi spazi o segni di
punteggiatura.
8.7 System MIB-II variables
MIB = Management Information Base is
the main informations database for an
SNMP network application. One of the
most important groups under MIB-II node,
is the system group (see Fig. 8.7.1). The
three variables sysContact, sysName and
sysLocation belonging to the system
group are mandatory for any agent.
The definition of the 3 MIB-II system variables managed by the
WebGate is:
sysContact OBJECT-TYPE
SYNTAX OCTET STRING
ACCESS read-write
Status --DESCRIPTION “A person responsible for the node, along
with information such as phone number”
::={System 4}
sysName OBJECT-TYPE
SYNTAX OCTET STRING
ACCESS read-write
Status --DESCRIPTION “Agent name”
::={System 5}
sysLocation OBJECT-TYPE
SYNTAX OCTET STRING
ACCESS read-write
Status --DESCRIPTION “The physical location of the device”
::={System 6}
WARNING
The maximum SNMP size for each string is:
Max size for WebGate system variables
System variable Max size
sysName 39 characters
sysContact, sysLocation 79 characters
Tab. 8.7.1
In addition, the string must be a string composed from alphanumeric
characters only (0…9, A…Z and a…z). No spacing or punctuation
characters are allowed.
46
Manuale WebGate - cod. +030220230 rel. 1.0 - 16.09.2003
System ::= iso(1).org(3).dod(6).internet(1).mgmt(2).mib-2(1).1
SysVariabiles = sysDescr ::= {system 1}
sysObjectID ::= {system 2}
sysUpTime ::= {system 3}
sysContact ::= {system 4}
sysName ::= {system 5}
sysLocation ::= {system 6}
sysServices ::= {system 7}
System (1
)
sysVariables
Fig. 8.7.1

8.8 I messaggi TRAP
I messaggi trap abilitano l’agent a segnalare una situazione critica o un
evento importante ad una stazione di gestione. Nel protocollo SNMP le
trap vanno utilizzate poche volte e con cautela e quindi l’unica trap
SNMP inviata dal WebGate è warmStart (1). Questo segnala che il
WebGate si sta re-inizializzando in seguito ad un riavvio e che la
configurazione rimarrà invariata fino al riavvio successivo.
8.8.1 La destinazione dei TRAP
Se nel WebGate non è stato assegnato un indirizzo IP come
destinazione delle trap, la destinazione predefinita è:
Destinazione TRAP predefinita = 255.255.255.255 (disabilitata)
Questo significa che il WebGate non invierà alcun messaggio trap fino
a che non verrà assegnata una destinazione diversa.
8.9 Messaggi di errore
I principali messaggi di errore SNMPv.1 sono:
Messaggi di errore SNMPv.1
Tipo Descrizione
tooBig (1) Il messaggio di risposta con il risultato di
un’operazione è troppo grande.
noSuchName (2) Una delle variabili della richiesta non esiste nel
MIB view.
badValue (3) Una set-request ha chiesto all’agent di scrivere un
valore inappropriato, ad esempio un numero intero
quando è invece richiesta una stringa di testo.
readOnly (4) Una set-request ha cercato di scrivere una
variabile che l’operatore non è autorizzato a
scrivere.
genErr (5) Una variabile non può essere richiamata per un
motivo diverso da quelli elencati sopra.
Tab. 8.9.1
Come si può vedere nella tabella 8.9.1, il messaggio di errore inviato
dall’Agent dipende dal tipo di richiesta.
Per quanto riguarda il WebGate, i casi più frequenti sono i seguenti:
8.8 TRAP message
Trap messages enable an agent to report a serious condition or an
important event to a manager station. The SNMP philosophy affirms
that traps should be used carefully and sparingly. To respect that
concept, the only SNMP trap message sent by WebGate is warmStart
(1), signaling that the sender is reinitialising after a reboot, and its
configuration will not change until next reboot.
8.8.1 TRAP destination
If no IP-Address has been ever set up as trap destination on the
WebGate, the default destination is:
Default TRAP destination = 255.255.255.255 (disabled)
It means that no trap messages will be sent by WebGate, until a
different destination is defined by the user.
8.9 Error Messages
The main SNMPv.1 error messages are:
SNMPv.1 Error messages
Error type Description
tooBig (1) The get-response message containing the result of
an operation is bigger than the local
implementation can handle.
noSuchName (2) One of the variables indicated in the request does
not match anything in the relevant MIB view.
badValue (3) A set-request asked the agent to write an
inappropriate value, for example to write an integer
when a text string was required.
readOnly (4) A set-request tried to write a variable that the
operator is not allowed to write.
genErr (5) A variable can not be retrieved for some reason
other than those listed above.
Tab. 8.9.1
As we can see in table 8.9.1, error message sent by an agent depends
on the manager request type.
Concerning WebGate we have the following cases:
47
Manuale WebGate - cod. +030220230 rel. 1.0 - 16.09.2003
Messaggi di errore del WebGate
Messaggio di Tipo Possibile causa e soluzione
errore PDU*
TooBig G-GN Il messaggio di risposta è troppo lungo. Riprovare con una richiesta per un minor numero di variabili.
NoSuchName G-S Il manager richiede una o più variabili che non esistono nel MIB view del WebGate. L’indice di errore indica
la prima variabile che ha generato l’errore. Controllare l’OID della variabile e riprovare.
Alcuni casi specifici comprendono:
• Variabili MIB-II system diverse da sysContact, sysName, sysLocation;
• Oggetti non presenti nel sotto-albero Carel-system o nel nodo Agent-parameters;
• L’indice nodo > 9 nel sotto-albero General-Units-Info o unità con indirizzo > Netsize:
• Unità con indirizzo > Netsize nel sotto-albero Carel-Instruments.
• L’indice di una variabile di unità è superiore a MaxIndex=207 nei sotto-alberi Carel-Units-Var.
Quando l’NMS richiede un oggetto successivo all’ultimo di un sotto-albero, il WebGate invia questo messaggio d’errore.
GN Quando l’OID è corretto, possono verificarsi errori nei casi che seguono:
• Variabili MIB-II system con OID-nome inferiore a sysUpTime o superiore a sysName (le uniche variabili
system definite sono sysContact, sysName, sysLocation);
• Variabile diversa da Agent-release nel sotto-albero Carel-system;
• Variabile diversa da Netsize nel nodo Agent-parameters;
• Variabile di unità con indice superiore a MaxIndex-1.
readOnly S Una set-request ha cercato di scrivere una variabile che l’operatore non è autorizzato a scrivere.
BadValue S Alcuni casi specifici possono essere:
• La scrittura di una stringa con caratteri non-alfanumerici o troppo lunga per le variabili di sistema;
• Il tentativo di impostare Netsize superiore a 16 o valori scorretti del baudrate;
genErr G-GN-S Il WebGate generalmente invia questo messaggio d’errore quando:
• L’NMS tenta di leggere la versione software di unità di alto livello;
• L’NMS tenta operazioni su unità che non sono in linea;
• L’NMS tenta un Set-request per scrivere una variabile di unità quando la lista dei messaggi in uscita è piena;
(*): G=Get-request, GN=GetNext-request, S=Set-request; Tab. 8.9.2

8.10 Dimensioni dell’MTU per l’SNMP WebGate
L’MTU (Maximum Transmission Unit) su reti Ethernet per WebGate è
impostato a 576 byte. Non vanno inviati pacchetti superiori a questo
valore, in quanto saranno eliminati e non riconosciuti dal WebGate.
9. Gestione Utenti
Il WebGate permette la gestione degli utenti.
La gestione degli utenti fornisce restrizioni di accesso a pagine HTML
e file system.
Il WebGate permette 4 livelli di accesso di base:“Administrator”
(accesso massimo), “Supervisor”, “User” e “Guest” (restrizioni
massime).
9.1 Restrizioni di Accesso
La gestione utenti permette le seguenti impostazioni:
• Limiti di accesso alle funzioni script.
L’accesso in lettura è permesso a tutti gli utenti, mentre l’accesso in
scrittura è limitato ad alcuni utenti in base al tipo di funzione, come
indicato al capitolo Funzioni Script del WebGate.
Ad esempio, l’accesso in scrittura alla funzione “Var” è limitato al
“Supervisor” e all’“Administrator”, per evitare che chiunque possa
modificare le impostazioni dei dispositivi collegati alla rete RS485.
L’associazione tra una funzione e il livello di accesso minimo richiesto è
fissa e non modificabile.
• Limiti di accesso al file system.
Le restrizioni in lettura e scrittura possono essere applicate a
qualunque file, utilizzando sia HTTP che FTP.
I livelli di accesso ai file vengono impostati attraverso l’FTP. Vedi il
capitolo File Transfer Protocol per un’approfondita descrizione dell’FTP.
8.10 MTU dimension for WebGate SNMP
The Ethernet MTU (Maximum Transmission Unit) for WebGate is set to
576 bytes. Do not send packets greater than this value, since they will
be trashed and not recognized by the WebGate.
9. User Management
WebGate is provided with some basic user management capabilities.
User Management provides access restrictions when using functions
and accessing to HTML pages and file system.
WebGate provides 4 basic access levels: “Administrator” (maximum
access capabilities), “Supervisor”, “User” and “Guest” (maximum
restrictions).
9.1 Access Restrictions
User Managements works in the following ways:
• Applying access restrictions to script functions.
Functions read access is allowed to everybody, but write access is
limited to some users on a function-by-function basis, as indicated in
chapter WebGate Script Functions.
For instance, the “Var” function write access is limited to “Supervisor”
and “Administrator” to avoid that everybody could change the settings
of devices connected to the RS485 network. The association between
a function and the minimum access level required is fixed and not
modifiable.
• Limiting access to the file system.
Read and write restrictions can be applied to any file, valid either using
HTTP and FTP.
File access levels are set through FTP. Please see chapter File Transfer
Protocol for an extensive description of FTP.
48
Manuale WebGate - cod. +030220230 rel. 1.0 - 16.09.2003
WebGate Error Messages
Error Messages PDU Possible cause and solution
type*
tooBig G-GN The length of the response message is too big. Try a new request querying for a number of variables less than the
previous one.
noSuchName G-S The manager is querying for one or more variables that doesn’t match anything in the MIBView of the WebGate.
The error index indicates which is the first variables that caused the error. Check the OID of the variable and retry.
Particular cases are querying for:
• MIB-II system variables different by sysContact, sysName, sysLocation;
• Objects not present in Carel-system subtree or under the Agent-parameters node;
• For a General-Units-Info subtree with node index > 9 or, in such subtrees, for units having address > Netsize:
• Unit with address > Netsize in the Carel-Instruments subtree.
• The Index of a unit variable is greater than MaxIndex=207 in the Carel-Units-Var subtrees.
Generally, when NMS asks for an object immediately successive at last in any subtree, WebGate sends this error
message.
GN Along with the general case, with correct OID, some particular items are querying for:
• MIB-II system variables having OID-name less than sysUpTime or greater than sysName (the only system
variables defined are sysContact, sysName, sysLocation);
• Variable different by Agent-release in the Carel-system subtree;
• Variable different by Netsize in Agent-parameters node (Fig.8);
• Unit variable with index greater than MaxIndex-1.
readOnly S A set-request tried to write a variable that the operator is not allowed to write.
badValue S Particular cases are:
• Writing not alphanumeric strings or too long for system variables;
• Trying to set Netsize greater than 16 or wrong baudrate values;
genErr G-GN-S WebGate generally sends this error message when:
• NMS tries to read software-releases of High-level units;
• NMS tries operations on units that are off-line;
• NMS tries a Set-request to write a unit variable and output-message-queue is full;
Tab. 8.9.2
(*): G=Get-request, GN=GetNext-request, S=Set-request;

9.2 Definizione degli Utenti
La gestione utenti del WebGate si basa su una “tabella utenti” che ad
ogni utente associa una password e un livello di accesso. Il modo più
semplice per impostare le proprietà utente è quello di utilizzare la
scheda “Users” nella pagina di configurazione predefinita del WebGate,
come indicato qui sotto:
9.3 Convenzioni nell’assegnazione dei nomi
I nomi e le password utente devono contenere al massimo 20 caratteri
alfanumerici, senza spazi.
Si noti che i nomi e le password fanno distinzione fra maiuscole e
minuscole: ciò significa che “Paul” e “paul” sono due utenti distinti.
Se si desidera eliminare un utente dalla tabella è sufficiente
cancellarne il nome.
Se il campo “password” viene lasciato vuoto, l’utente potrà ottenere
l’accesso con qualsiasi password.
9.4 Utente anonimo
L’accesso anonimo viene utilizzato quando qualcuno si collega per la
prima volta al WebGate con un browser, un client FTP o attraverso la
consolle. L’utente anonimo è quello con il campo del nome impostato
con “anonymous”.
Per default, se l’utente anonimo non appare nella tabella utenti, il
WebGate gli assegna il livello di accesso massimo (“Administrator”). Di
conseguenza, se non necessitate della gestione utenti, potete
semplicemente ignorare queste procedure. D’altra parte, per sfruttare
al meglio le potenzialità della gestione utenti, suggeriamo di creare un
utente anonimo, assegnandogli un livello di accesso appropriato e/o
una password.
Come esempio, potete far riferimento all’immagine precedente, in cui
all’utente “anonymous” (“User 3”) è stato assegnato il livello di accesso
“guest”, senza alcuna password.
AVVERTENZA. Ricordatevi di creare un utente con il livello di accesso
da administrator prima di modificare il livello di accesso “anonymous”
da “Administrator” ad uno inferiore.
9.5 Livello di accesso “guest” e password
Non è richiesta una password per il livello di accesso “guest” quando si
accede a pagine HTML. Si RACCOMANDA quindi di NON impostare
una password per gli utenti guest, in quanto non supportato. Si noti che
tutti i file memorizzati nella cartella principale del WebGate sono sempre visibili senza bisogno di password.
9.6 Livello di Accesso per le Pagine Precaricate
Le pagine HTML pre-caricate, con l’introduzione (“index.html”) e le
informazioni generali (“wg_info.htm”), possono essere lette da qualsiasi
utente. Al contrario, tutte le pagine di configurazione richiedono il livello
“Administrator”.
9.2 Users Definition
WebGate user management is based on a “user table” that associates
every user with a password and an access level. The simplest way to
set user properties is through the “Users” tab in the predefined
WebGate configuration page, as indicated below:
9.3 Naming Conventions
User names and passwords must be composed of at most 20
alphanumeric characters, without spacing.
Furthermore, names and passwords are case sensitive: this means
that “Paul” and “paul” is not the same user.
If you want to remove an user from the table, simply clear his name
from the user table.
If the “password” field is left empty, the associated user will gain access
with any password.
9.4 “anonymous” User
Anonymous access is used when somebody connects for the first time
to WebGate with a browser, a FTP client or through the console.The
anonymous user is the one with name field set to “anonymous”.
By default, if the anonymous user doesn’t appear in the user table,
WebGate assign to him maximum access capabilities (“Administrator”).
Consequently, if you don’t need user management you can simply
ignore the user management capabilities provided by the WebGate.
However, to proficiently use user management capabilities you will
have to create an anonymous user in the table, assigning to him a
proper access level, and/or a password.
For example, refer to the previous image where to the “anonymous”
user (“User 3”) was assigned the “guest” access, without any
password.
WARNING. Take care to have an Administrator user before changing
the “anonymous” access level from “Administrator” to a lower level
9.5 “guest” access level and passwords
Password are not required for “guest” access level when accessing to
HTML pages. We RECOMMEND NOT to set a password for guest
users, because not supported. Please note that as a final result, any
file placed in the WebGate root directory is always visible without any
password.
9.6 Access Levels for Factory Shipped Pages
HTML pages shipped with the WebGate for introduction (“index.html”)
and general information (“wg_info.htm”) are readable from any user. In
contrast, all configuration pages requires “Administrator” level.
49
Manuale WebGate - cod. +030220230 rel. 1.0 - 16.09.2003
Fig. 9.2.1

9.7 Accesso alle Pagine HTML Protette
La protezione HTML è garantita dalle funzioni di gestione della
password del browser. Nel momento in cui cercate di vedere una
pagina protetta, il browser visualizza una finestra che vi chiede la
password, simile a quella riportata nella fig.9.7.1 qui a lato:
Se non si fornisce una combinazione valida di
nome e password, l’accesso vi viene negato.
AVVERTENZA: Come già menzionato, le
pagine di configurazione del WebGate
richiedono per lo meno il livello di
accesso”Administrator”. Per questo motivo, siate
particolarmente attenti quando create gli utenti:
prima di tutto, dovete creare almeno un
Administrator. In caso contrario o nel caso in cui
vi dimentichiate la password da administrator,
sarete costretti a cancellare completamente i
contenuti del WebGate, seguendo la procedura
descritta nel paragrafo Eliminazione Totale.
Si noti che quando si crea il primo administrator, la finestra con la
richiesta di password verrà visualizzata immediatamente dopo aver
premuto il pulsante “apply” nella scheda di configurazione “Users”.
9.8 Problematiche relative alla sicurezza
La gestione utenti del WebGate è uno strumento con cui si intende
dissuadere l’accesso non autorizzato, tuttavia NON è uno dispositivo di
sicurezza. Non contiene protocolli codificati o particolari protezioni
contro attacchi informatici. Di conseguenza, tutte le migliorie alla
sicurezza, di cui il cliente possa avere bisogno, vanno assicurate a
livello di rete, mediante firewall o strumenti simili.
9.8.1 Metodi POST e GET
Quando create una pagina HTML (vedi Creare una pagina Web
personalizzata per WebGate), se la pagina richiesta dall’attributo
“action” ha un livello di protezione maggiore a “guest”, si raccomanda
di usare il metodo POST anziché GET per inviare i dati, poiché il
metodo GET vi permette di visualizzare solo le pagine con un livello di
accesso “guest”.
9.9 Gestione Avanzata della Tabella Utenti
La gestione utenti può essere ulteriormente potenziata con l’utilizzo
delle funzioni “UserLevel”, “UserName” e “UserPwd”, infatti:
• Nonostante nella tabella standard vengano visualizzati solo 4 utenti,
è possibile crearne fino a 6.
• I livelli di accesso utenti possono essere suddivisi in più sottolivelli
rispetto ai quattro indicati (tuttavia, la struttura ad albero del file
system è fissa, come indicato in Cartelle e Protezione File con
“Accesso in lettura”.
In pratica, a ciascuna classe viene associato un livello di accesso
scelto da una gamma di valori (vedi Tab. 9.9.1). Per default, il livello di
accesso associato a ciascuna classe è il valore più alto nella gamma:
99 per “guest”, 149 per “user”, 199 per “supervisor” e 249 per
“administrator”.
Classe di Appartenenza Livello di Accesso
Guest Da 0 a 99
User Da 100 a 149
Supervisor Da 150 a 199
Administrator Da 200 a 249
Tab. 9.9.1
Potete trovare la descrizione delle funzioni “UserLevel”, “UserName” e
“UserPwd” nel paragrafo Funzioni Script del WebGate.
Il cliente può creare la propria pagina e impostare i livelli di accesso
che preferisce (da 0 a 249).
La Fig. 9.9.1 è un esempio di come può essere realizzata una pagina
di questo tipo.
9.7 Accessing to Protected HTML Pages
HTML protection is provided through the use of the browser password
management capabilities. When you try to view a protected page, the
browser will display a password request window similar to the one
depicted on the right in fig.9.7.1:
If a valid combination of name and password is
not provided, the access is forbidden.
WARNING: As said before, WebGate
configuration pages requires at least
”Administrator” access level. Since of this, be
careful when creating users, because first of all
you must create at least an Administrator. If you
fail to create an administrator or if you forget
your administrator password, you will have to
completely erase WebGate contents, following
the procedure described in Total Erase.
Please note that when creating the first
administrator the password request window will
be visualized immediately after pressing the “apply” button in the
“Users” configuration tab.
9.8 Security Issues
WebGate user management is provided as a basic method to
discourage unauthorized access but is NOT a security feature. No
encoded protocols or particular protections against security attacks are
implemented. Since of this, any security improvement required from the
customer must be assured at network level with firewalls and similar
devices.
9.8.1 POST and GET methods
When creating an HTML page (see Creating a custom Web page on
the WebGate), if the page requested by the “action” attribute has a
protection level greater than “guest” it is recommended to use the
POST method instead of GET to submit data, because GET method
allows you to show only pagewith “guest” access level.
9.9 Advanced User Table Management
Through the use of “UserLevel”, “UserName” and “UserPwd” functions
user magament can be further improved, in fact:
• Despite only 4 users are displayed in the standard user tab, up to 6
table entries can be created.
• User access levels can be subdivided in more sublevels than the four
indicated (however, the file system director y tree is fixed, as indicated
in (Directories and “Read Access” file protection).
Basically, an access level among a range of values is associated to
each class (see Tab. 9.9.1). By default the access level associated to
each class is the higher value in the range: 99 for “guest”, 149 for
“user”, 199 for “supervisor” and 249 for “administrator”.
Membership Class Access-Level
Guest From 0 to 99
User From 100 to 149
Supervisor From 150 to 199
Administrator From 200 to 249
Tab. 9.9.1
For a description of “UserLevel”, “UserName” and “UserPwd” functions
please see WebGate Script Functions.
The customer can build his own page to be able to set the access-level
he likes (from 0 to 249).
Fig. 9.9.1 is an example of how a this page can be built.
50
Manuale WebGate - cod. +030220230 rel. 1.0 - 16.09.2003
Fig. 9.7.1

10. Aggiornamento del Firmware
Il WebGate è facile da aggiornare, poiché il firmware risiede in una
memoria integrata riscrivibile.
L’aggiornamento può essere effettuato da remoto, copiando il file
fornito da Carel nella cartella principale del file system con un
programma client FTP e riavviando il dispositivo.
I file di aggiornamento hanno l’estensione “.pack” e possono
aggiornare non solo il firmware, ma anche le pagine HTML
pre-caricate e la scheda di configurazione dei dispositivi di basso
livello, utilizzati per comunicare con alcuni controlli Carel.
Per procedere ad un aggiornamento, seguite queste istruzioni:
1. I file di aggiornamento necessitano di spazio per la memorizzazione
(di solito circa 300Kbyte), e possono anche richiedere ulteriore
spazio durante e dopo l’installazione. Per questo motivo, di norma,
si consiglia di eliminare tutti i file installati dagli utenti.
2. Copiate il file fornito da Carel nella cartella principale del WebGate
usando un programma client FTP. Per fare ciò non avete bisogno di
nessun particolare diritto di accesso.
3. Aprite con un browser la pagina di configurazione “General”,
selezionate il checkbox “reboot” e premete “Apply”.
4. L’operazione di aggiornamento ora procederà automaticamente e
potrà durare alcuni minuti.
5. Aprite la pagina “index.html”. Se tutto è andato bene, dovreste
vedere la nuova versione del firmware (se diversa) e nella riga “last
update status” dovreste leggere “Update file not found”. Ciò è
normale poiché l’aggiornamento è stato effettuato correttamente e il
file che avete copiato, come da punto 2, è stato eliminato dal
WebGate.
Nota
Se lo spazio disponibile per i file non fosse sufficiente a completare
l’aggiornamento, o nel caso si verifichi un errore, dopo il riavvio il
messaggio che apparirà nella riga “last update status” della pagina
HTML “information” indicherà la natura del problema.
AVVERTENZA IMPORTANTE
Non togliere mai l’alimentazione mentre il WebGate si sta aggiornando,
poiché ciò potrebbe danneggiare seriamente il dispositivo e
comportare la necessità di assistenza tecnica.
11. Funzioni Script del WebGate
La consolle WebGate e l’interfaccia utente HTML utilizzano alcune
“funzioni” script.
Le funzioni Script vengono fornite principalmente per permettere
all’utente di leggere e scrivere nei dispositivi di rete Carel e di
modificare alcuni parametri di configurazione del WebGate (ad
esempio l’Indirizzo IP), e vengono elaborate se presenti nei file con
estensione “.htm”, “.html” o “.js”.
Una funzione può essere parametrica o non avere parametri
(“comando”). I nomi delle funzioni non fanno distinzione tra lettere
maiuscole e minuscole.
In questo capitolo vengono elencate e descritte, una ad una, tutte le
funzioni disponibili.
10. Firmware Upgrade
WebGate ensures that upgrades can be easily obtain since the
firmware is stored into an embedded rewritable memory.
The upgrade can be performed remotely copying a file supplied by
Carel into the file system root directory using a FTP client program and
rebooting the device.
Upgrade files have a “.pack” extension and can update not only the
firmware, but also factory HTML pages and the low-level devices
configuration table used to communicate with some Carel controls.
To proceed for an upgrade follow the following instructions:
1. The upgrade file needs some space to be stored (typically about
300Kbyte), and it may also require some additional space during
and after the installation. Since of this, as a general rule, remove any
user installed file.
2. Copy the file supplied by Carel into the WebGate root directory using
a FTP client program. To do this you don’t need any special access
right.
3. Open with a browser the “General” configuration page, check the
“reboot” checkbox and press “Apply”.
4. The update operation now proceed automatically and may take
some minutes.
5. Open the “index.html” page. If everything goes fine, you should see
the new firmware release (if changed from the update) and in the
“last update status” line you should read “Update file not found”. This
is normal since the update was correctly performed and the file you
copied at step 2 has been removed from WebGate.
Note
If the file space is not sufficient to complete the upgrade, or if any other
error occurred, after the reboot a message in the “last update status”
line of the HTML “information” page will address the problem.
IMPORTANT WARNING.
Absolutely never remove power supply when the WebGate is
performing a firmware update, since this could severely damage the
device and require technical assistance.
11. WebGate Script Functions
The WebGate console and HTML user interface is based on some
script “functions”.
Script Functions are provided principally to allow the user to read from
and write to Carel network devices and to change specific WebGate
configuration parameters (for example its IP Address) ), and can be
processed if present in the file with extension “.htm”, “.html” or “.js”.
A function may be parametric or without any parameter (“command”).
Function names are not case sensitive.
In this chapter all the available functions are listed and individually
described.
51
Manuale WebGate - cod. +030220230 rel. 1.0 - 16.09.2003

11.1 Funzioni in ordine alfabetico:
AccessLevel AccessLevelString Baudrate232
Baudrate485 ClearConfig Ctrl232
DebugStrings Dev DevInfo
Eval FlashFormat FreeFiles
Gateway Help HWVersion
IPAddress IsSelBaudrate232 IsSelBaudrate485
IsSelUserLevel Login Logout
LumpTest MACAddress MaxDevs
NetMask NetStat Option
Passwd Reboot Registers
ROCommunity RWCommunity ScanDevs
Set SetMax SetMin
SNMPAgentRel SNMPSyscont SNMPSysloc
SNMPSysname Status Status485
SWVersion TrapCommunity TrapIPAddress
UpdateStatus UserLevel UserLevelString
UserName UserPwd Var
WakeOn
Tab. 11.1.1
11.2 Funzioni per categoria:
11.1 Functions in alphabetical order:
AccessLevel AccessLevelString Baudrate232
Baudrate485 ClearConfig Ctrl232
DebugStrings Dev DevInfo
Eval FlashFormat FreeFiles
Gateway Help HWVersion
IPAddress IsSelBaudrate232 IsSelBaudrate485
IsSelUserLevel Login Logout
LumpTest MACAddress MaxDevs
NetMask NetStat Option
Passwd Reboot Registers
ROCommunity RWCommunity ScanDevs
Set SetMax SetMin
SNMPAgentRel SNMPSyscont SNMPSysloc
SNMPSysname Status Status485
SWVersion TrapCommunity TrapIPAddress
UpdateStatus UserLevel UserLevelString
UserName UserPwd Var
WakeOn
Table 11.1.1
52
Manuale WebGate - cod. +030220230 rel. 1.0 - 16.09.2003
Consolle
Login Collega un nuovo utente alla consolle
Logout Scollega l’utente attuale dalla consolle
Passwd Immette la password utente per la consolle
RS232
Baudrate232 Ottiene/imposta il baudrate per l’interfaccia seriale RS232
Ctrl232 Da accesso a specifiche linee di controllo RS232
IsSelBaudrate232 Restituisce una stringa specifica se il baudrate attuale corrisponde al parametro dato
RS485 (Rete Carel)
Baudrate485 Ottiene/imposta il baudrate per l’interfaccia seriale RS485
Dev Visualizza informazioni concise su un dispositivo
DevInfo Visualizza informazioni estensive su un dispositivo
IsSelBaudrate485 Restituisce una stringa specifica se il baudrate attuale corrisponde al parametro dato
MaxDevs Imposta il numero massimo di dispositivi collegati al WebGate
ScanDevs Scandisce tutti i dispositivi collegati al WebGate
Status485 Ottiene informazioni sull’interfaccia RS485 e rete Carel
Var Ottiene/imposta il valore di una variabile di un dispositivo
Ethernet – LAN
Gateway Ottiene/imposta l’Indirizzo IP di un gateway di rete
IPAddress Ottiene/imposta l’Indirizzo IP del WebGate
MACAddress Restituisce l’indirizzo hardware Ethernet del WebGate (MAC)
NetMask Ottiene/imposta il mask pattern di rete
NetStat Visualizza alcune statistiche di rete
SNMP
ROCommunity Ottiene/imposta il Read/Only Community Name
RWCommunity Ottiene/imposta il Read/Write Community Name
SNMPAgentRel Restituisce la versione software dell’Agent
SNMPSyscont Ottiene/imposta il System Contact
SNMPSysloc Ottiene/imposta il System Location
SNMPSysname Ottiene/imposta il System Name
TrapCommunity Ottiene/imposta il Trap Community Name
TrapIPAddress Ottiene/imposta l’Indirizzo IP del Trap Manager
User Management
AccessLevel Restituisce il livello di accesso utente attuale
AccessLevelString Restituisce la stringa descrittiva del livello di accesso minimo per l’utente attuale
IsSelUserLevel Restituisce una stringa specifica se il livello dell’utente attuale corrisponde al parametro dato
UserLevel Ottiene/imposta il livello di accesso di un utente
UserLevelString Restituisce la stringa descrittiva del livello di accesso minimo per un utente dato
UserName Ottiene/imposta il nome utente
UserPwd Ottiene/imposta una password utente
Altre
Eval Elabora un’espressione numerica
FreeFiles Restituisce lo spazio di memoria disponibile per la memorizzazione dei file
Help Visualizza una lista di tutte le funzioni disponibili
HWVersion Restituisce la versione hardware del WebGate

11.2 Functions sorted by category:
53
Manuale WebGate - cod. +030220230 rel. 1.0 - 16.09.2003
Reboot Riavvia il WebGate
Registers Visualizza una lista di tutti i registri attualmente definiti
Set Assegna un valore numerico ad un registro
SetMin Imposta il valore minimo consentito per un registro
SetMax Imposta il valore massimo consentito per un registro
Status Visualizza lo stato attuale del WebGate
SWVersion Restituisce la versione software del WebGate
UpdateStatus Restituisce il codice di errore dell’ultimo riavvio dopo un aggiornamento
WakeOn Visualizza il tempo trascorso dall’ultimo riavvio
Riservate
ClearConfig Questo comando è riservato e non deve essere utilizzato
DebugStrings Questo comando è riservato e non deve essere utilizzato
FlashFormat Questo comando è riservato e non deve essere utilizzato
LumpTest Questo comando è riservato e non deve essere utilizzato
Option Questo comando è riservato e non deve essere utilizzato
Tab. 11.2.1
Console
Login Login a new user to the console
Logout Logout the current user from the console
Passwd Enter the user password for the console
RS232
Baudrate232 Get/set the baudrate for the RS232 serial interface
Ctrl232 Give access to specific RS232 control lines
IsSelBaudrate232 Return a specific string when the current baudrate match the given parameter
RS485 (Carel Network)
Baudrate485 Get/set the baudrate for the RS485 serial interface
Dev Display concise information about a device
DevInfo Display extended information about a device
IsSelBaudrate485 Return a specific string when the current baudrate match the given parameter
MaxDevs Set the maximum number of devices connected to the WebGate
ScanDevs Rescan all the devices connected to WebGate
Status485 Get information about the RS485 and Carel Network interface
Var Get/set a device variable value
Ethernet – LAN
Gateway Get/set the network gateway IP Address
IPAddress Get/set the WebGate IP Address
MACAddress Return the WebGate Ethernet hardware address (MAC)
NetMask Get/set the network mask pattern
NetStat Displays some network statistics
SNMP
ROCommunity Get/set the Read Only Community Name
RWCommunity Get/set the Read/Write Community Name
SNMPAgentRel Return the Agent software release
SNMPSyscont Get/set the System Contact
SNMPSysloc Get/set the System Location
SNMPSysname Get/set the System Name
TrapCommunity Get/set the Trap Community Name
TrapIPAddress Get/set the trap manager IP Address
User Management
AccessLevel Return the current user access level
AccessLevelString Return the minimum access level descriptive string for the current user
IsSelUserLevel Return a specific string when the current user level match the given parameter
UserLevel Get/set a user access level
UserLevelString Return the minimum access level descriptive string for a given user
UserName Get/set a user name
UserPwd Get/set a user password
Other
Eval Evaluate a numerical expression
FreeFiles Return the amount of memory free for files storage
Help Show a list of all the available functions
HWVersion Return the WebGate hardware version
Reboot Restart the WebGate
Registers Displays a list of all the currently defined registers
Set Assigns a numeric value to a register
SetMin Set the minimum allowed value for a register
SetMax Set the maximum allowed value for a register
Status Displays the current WebGate status

11.3 Descrizione dettagliata dei comandi:
Nel paragrafo che segue vengono descritti dettagliatamente tutti i
comandi, in ordine alfabetico.
Nel titolo in alto, le voci descrittive hanno i seguenti significati:
•“Lettura” indica se il comando può restituire un valore in lettura (√)
oppure no (×),
•“Scrittura” è il livello utente minimo richiesto per l’accesso in scrittura
(se ammesso). Si noti che l’accesso in lettura non viene mai inibito
dal sistema di gestione utenti.
•“Salvato” indica se il comando eseguito è “salvato” (√) nella memoria
di configurazione permanente del WebGate e ricaricato con ogni
riavvio, oppure no (×).
Ciascun paragrafo è corredato da un esempio d’esecuzione da
consolle, in quanto più semplice da realizzare.Tutte le funzioni
possono però essere utilizzate, senza alcuna restrizione, anche in
pagine HTML. In questo caso, si noti che alcuni comandi non
restituiscono alcun valore visibile al browser, mentre nel caso di errori
può venire generata una “pagina di avvertenze” dedicata.
Inoltre, anche se non lo indicheremo per ogni singola funzione, qualora
il nome di una funzione venga scritto in modo errato o i valori non
rientrino nell’intervallo consentito, generalmente viene restituito un
messaggio di errore.
Infine, si noti che l’espressione “utente” indicata nei paragrafi che
seguono, si riferisce a qualsiasi operatore che accede al WebGate e
non al livello di accesso “user”, se non espressamente indicato.
AccessLevel
Descrizione Lettura Scrittura Salvato
Restituisce il livello di accesso
utente attuale √ ××
Visualizza il livello di accesso utente attuale in formato numerico.
Questa funzione è disponibile sia tramite consolle che in HTML.
Vedi il capitolo Gestione Utenti per una descrizione del sistema di
gestione utenti.
Sintassi:
AccessLevel
Esempio consolle:
> AccessLevel ↵
249
> _
AccessLevelString
Descrizione Lettura Scrittura Salvato
Restituisce la stringa descrittiva del
livello di accesso minimo per l’utente
attuale √ ××
Visualizza il livello di accesso utente attuale in forma di testo.
Vedi il capitolo Gestione Utenti per una descrizione del sistema di
gestione utenti.
Sintassi:
AccessLevelString
11.3 Detailed commands description:
In the following paragraphs all commands are described in detail, in
alphabetical order.
In the upper title, the description items have the following meanings:
•“Read” indicates whether the command can return a value when read
(√) or not (×),
•“Write” is the minimum user access level required for write access
(when allowed). Please note that read access is never restricted by
user management system instead.
•“Saved” indicates whether the command performed is “saved” (√) in
the WebGate persistent configuration memory and reloaded at every
reboot, or not (×).
Every paragraph is completed with a simple console example, since
this interface is the most straightforward to experiment with. However,
any function can be used, without restrictions, in HTML pages too. In
this last case, please note that some commands don’t make any output
value visible in the browser or, for some errors, a dedicated “warning
page” to be displayed can be generated.
Also if not indicated for each function, when a function name is
misspelled or values are outside the allowed ranges, generally an error
is returned.
As a final notice, please note that the expression “user” indicated in the
following paragraphs refers to any operator currently accessing the
WebGate and is not referred to the “user” level of access, if not
expressly written.
AccessLevel
Description Read Write Saved
Return the current user access level √ ××
Displays the current user access level in numeric format.
This function is available either for console or HTML.
Please see chapter User Management for a description of user
management system.
Syntax: AccessLevel
Console example:
> AccessLevel ↵
249
> _
AccessLevelString
Description Read Write Saved
Return the minimum access level
descriptive string for the current user √ ××
Displays the current user access level in textual format.
Please see chapter User Management for a description of user
management system.
Syntax:
AccessLevelString
54
Manuale WebGate - cod. +030220230 rel. 1.0 - 16.09.2003
SWVersion Return the WebGate software version
UpdateStatus Return the last reboot update error code
WakeOn Displays the time elapsed since the last WebGate reboot
Reserved
ClearConfig This command is reserved and must not be used
DebugStrings This command is reserved and must not be used
FlashFormat This command is reserved and must not be used
LumpTest This command is reserved and must not be used
Option This command is reserved and must not be used
Valore restituito:
Il valore restituito è uno dei seguenti:
• Guest (0 ≤ livello di accesso utente ≤ 99)
• User (100 ≤ livello di accesso utente ≤ 149)
• Supervisor (150 ≤ livello di accesso utente ≤ 199)
• Administrator (200 ≤ livello di accesso utente ≤ 249)
Esempio consolle:
> AccessLevelString ↵
administrator
> _
Baudrate232
Descrizione Lettura Scrittura Salvato
Ottiene/imposta il baudrate per
l’interfaccia seriale RS232 √ Administrator √
Questa funzione visualizza o modifica il baudrate RS232 attuale.
Questo valore viene utilizzato dall’interfaccia consolle per comunicare
con un emulatore di terminali.
Sintassi (lettura):
Baudrate232
Sintassi (scrittura): Baudrate232 = <value>
Valori ammessi: 1200, 2400, 4800, 9600, 19200, 38400
Se viene digitato un valore non valido, verrà restituito un messaggio di
errore.
Valore di default: 19200 Baud
Esempio consolle:
> Baudrate232=12 ↵←Sbagliato !
Invalid baudrate (code -401)
> Baudrate232=19200 ↵
> Baudrate232 ↵
19200
> _
Baudrate485
Descrizione Lettura Scrittura Salvato
Ottiene/imposta il baudrate per
l’interfaccia seriale RS485 √ Administrator √
Questa funzione visualizza o modifica il baudrate RS485 attuale.
Questo valore è usato dall’interfaccia rete Carel per comunicare con i
dispositivi Carel.
Sintassi (lettura):
Baudrate485
Sintassi (scrittura): Baudrate485 = <value>
Valori ammessi: 1200, 2400, 4800, 9600, 19200
Se viene digitato un valore non valido, verrà restituito un
messaggio di errore.
Valore di default: 19200 Baud
Esempio consolle:
> Baudrate485=12 ↵←Sbagliato !
Invalid baudrate (code -401)
> Baudrate485=19200 ↵
> Baudrate485 ↵
19200
> _
Returned Value:
The returned value is one of the following:
• Guest (0 user access level 99)
• User (100 user access level 149)
• Supervisor (150 user access level 199)
• Administrator (200 user access level 249)
Console example:
> AccessLevelString ↵
administrator
> _
Baudrate232
Description Read Write Saved
Get/set the baudrate for the RS232
serial interface √ Administrator √
This function displays or changes the current RS232 baudrate.
Currently, this value is used by the console user interface to
communicate with a terminal emulator.
Syntax (read):
Baudrate232
Syntax (write): Baudrate232 = <value>
Allowed values: 1200, 2400, 4800, 9600, 19200, 38400
If an invalid value is entered, an error string will be returned.
Default Value: 19200 Baud
Console example:
> Baudrate232=12 ↵←Wrong !
Invalid baudrate (code -401)
> Baudrate232=19200 ↵
> Baudrate232 ↵
19200
> _
Baudrate485
Description Read Write Saved
Get/set the baudrate for the RS485
serial interface √ Administrator √
This function displays or changes the current RS485 baudrate.This
value is used by the Carel Network interface to communicate with
Carel devices.
Syntax (read): Baudrate485
Syntax (write): Baudrate485 = <value>
Allowed values: 1200, 2400, 4800, 9600, 19200
If an invalid value is entered, an error string will be returned.
Default Value: 19200 Baud
Console example:
> Baudrate485=12 ↵←Wrong !
Invalid baudrate (code -401)
> Baudrate485=19200 ↵
> Baudrate485 ↵
19200
> _
55
Manuale WebGate - cod. +030220230 rel. 1.0 - 16.09.2003

Ctrl232
Descrizione Lettura Scrittura Salvato
Da accesso a specifiche linee di
controllo RS232 √ ××
NOTA: Questa funzione è fornita solo a fini di debug. L’accesso in
scrittura è sempre inibito.
Ottiene il valore delle linee di stato e di controllo dell’interfaccia RS232.
Sintassi:
Ctrl232
Valore restituito: Restituisce un valore esadecimale, dove i bit hanno
il seguente significato:
76543210
CD DSR CTS RTS DTR
Ciascun bit impostato a “1” indica che la linea corrispondente è attiva.
Il capitolo Collegamento all’interfaccia RS232 comprende un’ampia
descrizione di ciascun bit e della loro corrispondenza con i pin del
connettore seriale.
Esempio consolle:
> Ctrl232 ↵
0xb3
> _
Dev
Descrizione Lettura Scrittura Salvato
Visualizza informazioni concise su
un dispositivo √ ××
Restituisce lo stato e il codice tipo di un dispositivo Carel collegato.
Sintassi:
Dev(<address>)
<address> rappresenta l’indirizzo fisico dell’unità desiderata.
Se questo valore è minore di ‘1’ o maggiore del valore
restituito dalla funzione “MaxDevs”, il WebGate invia un
messaggio di avvertimento.
Valore restituito: Il “codice tipo” è un numero che identifica il tipo di
dispositivo collegato. Nella tabella che segue sono riportati i codici di
riferimento di alcuni dispositivi. Poiché vengono realizzati sempre nuovi
dispositivi, la lista può non essere completa.
Codice Descrizione
1, 2, 3 Scheda I/F asincrona per IR32/µChiller (che indica la
versione firmware)
10 µChiller compact
21 MPX
101 PCO
102 Espansione I/O per pCO
2
(pCO con BIOS personalizzato)
110 MGE MPX
111…119 Riservato per MGE
120 Power split
121 Power split cell
148 IR plug-in
149 mP30 Uniflair
150 FCM
151 µAC Carel
152 Controllo umidificatore URC (resistenze)
153 Controllo umidificatore UEC (elettrodi)
154 Controllo umidificatore UEC (elettrodi, basso costo)
155 Controllo umidificatore (gas)
156 Controllo umidificatore (atomizzazione)
200 Stampante PlantWatch (indirizzo unità 21h, riservati
21h-25h)
201 pCO
2
202 Terminale PST (indirizzi riservati 26h-29h)
Se il dispositivo richiesto è configurato (cioè è stato riconosciuto dal
Webgate) ma al momento non è in linea, il WebGate restituisce il
codice tipo dell’ultimo dispositivo con quell’indirizzo.
Ctrl232
Description Read Write Saved
Give access to specific RS232
control lines √ ××
NOTE: This function is provided for debug purposes only. Write access
is always forbidden.
Get the value of RS232 status and control lines.
Syntax:
Ctrl232
Returned Value: It returns a hexadecimal value, with the bit meanings
indicated below:
76543210
CD DSR CTS RTS DTR
Every bit set to “1” indicates that the corresponding line is active.
In the Chapter Connection of the RS232 interface you can find an
extended description of any bit and its correspondence with serial
connector pins.
Console example:
> Ctrl232 ↵
0xb3
> _
Dev
Description Read Write Saved
Display concise information about
a device √ ××
Returns the status and type code of a connected Carel device.
Syntax:
Dev(<address>)
<address> represents the physical address of the unit of interest.
If this value if less than ‘1’ or greater than the value
returned from the “MaxDevs” function, WebGate returns a
warning message.
Returned Value: The “type code” is a number identifying the type of
device connected. In the table below are reported for reference some
device codes. Since new devices are continuosly developed, you are
advised that this may not be an exhaustive list.
Code Description
1, 2, 3 Asynchronous I/F board for IR32/µChiller (indicating
firmware release)
10 µChiller compact
21 MPX
101 pCO
102 I/O pCO
2
Expansion (pCO with custom BIOS)
110 MGE MPX
111…119 Reserved for MGE
120 Power split
121 Power split cell
148 IR plug-in
149 mP30 Uniflair
150 FCM
151 µAC Carel
152 Humidifier controller URC (resistors)
153 Humidifier controller UEC (electrodes)
154 Humidifier controller UEC (electrodes, low cost)
155 Humidifier controller (gas)
156 Humidifier controller (atomization)
200 PlantWatch Printer (unit address 21h, reserved 21h-25h)
201 pCO
2
202 PST Terminal (reserved address 26h-29h)
If the required device is configured (that is: it was recognized from
Webgate) but it is currently off-line, WebGate returns the type code of
the last device with the given address.
56
Manuale WebGate - cod. +030220230 rel. 1.0 - 16.09.2003

Esempio consolle:
> Dev(1) ↵
Low-Level Unit ON-LINE: Type code 10
> _
DevInfo
Descrizione Lettura Scrittura Salvato
Visualizza informazioni estensive su
un dispositivo √ ××
Restituisce un rapporto completo sullo stato di un dispositivo Carel
collegato.
Sintassi:
DevInfo(<address>)
<address> rappresenta l’indirizzo fisico dell’unità desiderata.
Se questo valore è minore di ‘1’ o maggiore del valore
restituito dalla funzione “MaxDevs”, il WebGate invia un
messaggio di avvertimento.
Valore restituito: Le informazioni restituite possono essere utili per
identificare un dispositivo o per risolvere i problemi di una connessione
di rete non ideale. Vedi anche la funzione “Dev” per la descrizione dei
“codici tipo”
Esempio consolle:
> DevInfo(1) ↵
Low-Level Unit ON-LINE: Type code 10
Forcing by master to read all variables completed.
Software Release 13
No answer counter 0
CheckSum error counter 0
Timeout counter 0
Software release min.: 13
Software release max.: 13
> _
Eval
Descrizione Lettura Scrittura Salvato
Elabora un’espressione numerica √ ××
Questa funzione elabora un’espressione aritmetica e ne restituisce il
risultato. Può essere utile nella realizzazione di pagine HTML.
Sintassi:
Eval(<expression>)
<expression> Le espressioni aritmetiche vengono spiegate al capitolo
Espressioni, Registri e Funzioni: queste possono
essere numeri, registri o una combinazione di entrambi
Valore restituito: Il risultato numerico delle operazioni comprese
nell’espressione.
Esempio consolle:
> Set(Address)=7 ↵
> Eval(Address – 1) ↵
6
> Set(Index)=Address+2 ↵←NON inserire spazi qui
> Eval(Index – Address + 1) ↵
3
> _
Console example:
> Dev(1) ↵
Low-Level Unit ON-LINE: Type code 10
> _
DevInfo
Description Read Write Saved
Get extended information about
a device √ ××
Returns a complete status report of a connected Carel device.
Syntax:
DevInfo(<address>)
<address> represents the physical address of the unit of interest.
If this value if less than ‘1’ or greater than the value
returned from the “MaxDevs” function, WebGate returns a
warning message.
Returned Value: The information returned can be useful to identify a
device or to debug network conections that seems to be poor. Please
refer to “Dev” function for a description of “type codes”
Console example:
> DevInfo(1) ↵
Low-Level Unit ON-LINE: Type code 10
Forcing by master to read all variables completed.
Software Release 13
No answer counter 0
CheckSum error counter 0
Timeout counter 0
Software release min.: 13
Software release max.: 13
> _
Eval
Description Read Write Saved
Evaluate a numerical expression √ ××
This function evaluates an arithmetic expression and returns the result.
It may prove useful when creating HTML pages.
Syntax:
Eval(<expression>)
<expression> Arithmetic expressions are explained in About
Expressions, Registers and Functions: they may be
numbers, registers, or a combination of the two
Returned Value: Numerical result of the operations implied in the
expression.
Console example:
> Set(Address)=7 ↵
> Eval(Address – 1) ↵
6
> Set(Index)=Address+2 ↵←DO NOT insert blanks here
> Eval(Index – Address + 1) ↵
3
> _
57
Manuale WebGate - cod. +030220230 rel. 1.0 - 16.09.2003

FreeFiles
Descrizione Lettura Scrittura Salvato
Restituisce lo spazio di memoria
disponibile per la memorizzaz. dei file √ ××
Restituisce la quantità di byte e posizioni di file liberi per memorizzare i
file nel file system del WebGate.
I file possono essere scritti nel WebGate mediante PC utilizzando
un’applicazione client FTP.
Sintassi:
FreeFiles
Valore restituito: Il valore restituito è una stringa come quella che
segue: <f> free of <t> (comprising <mf> mirrored of <mt> ). <fa> files
available
I campi evidenziati con <> hanno i seguenti significati:
<f> : numero di byte liberi per la memorizzazione di file da parte
dell’utente
<t> : numero totale di byte disponibili nel file system
1
<mf> : numero di byte liberi nella parte ‘mirror’ del file system
2
<mt> : numero totale di byte disponibili nella parte ‘mirror’ del file system
2
<fa> : numero di posizioni di file libere
1
Una piccola parte di questa area (solitamente circa 100 Kbyte) è
riservata e non può essere liberata dall’utente.
2
Questa memoria è riservata e non è disponibile per l’utente.
Spazio disponibile per l’utente:
Il WebGate WEBG0000B0 offre all’utente circa 400KByte di spazio per
la memorizzazione dei file. Possono essere memorizzati un massimo di
100 file nello stesso momento.
Per quanto riguarda lo spazio occupato dai file si noti che: i file sono
memorizzati con un “header” di circa 150 byte in settori da 1KByte
ciascuno. Di conseguenza, ciascun file utilizza un’area di memoria
leggermente più grande rispetto alle dimensioni del file stesso.
Esempio consolle:
> FreeFiles ↵
15360 free of 516096 (comprising 25600 mirrored
of 129024 ). 98 files available.
> _
Gateway
Descrizione Lettura Scrittura Salvato
Ottiene/imposta l’indirizzo IP del
gateway di rete √ Administrator √
Visualizza o modifica l’indirizzo del gateway di rete.Permette di
impostare l’indirizzo IP di un gateway Ethernet, utilizzato per inviare
pacchetti IP ad una destinazione che non è direttamente collegata alla
subnet definita dalla combinazione di “IPAddress” e “NetMask”.
Sintassi (lettura):
Gateway
Valore restituito in lettura: <IPx>.<IPy>.<IPz>.<IPw>
Dove <IPx>, <IPy>, <IPz> e <IPw> sono i quattro byte dell’indirizzo IP
espressi con stringa standard in formato separato da punti.
Sintassi (scrittura):
Gateway = <IPx>.<IPy>.<IPz>.<IPw>
Dove <IPx>, <IPy>, <IPz> e <IPw> sono i quattro byte dell’indirizzo IP
espressi con stringa standard, in formato decimale, separato da punti.
Si consiglia di contattare l’amministratore di sistema per conoscere
l’indirizzo gateway corretto. Se non avete bisogno di utilizzare un
gateway, potete disabilitarlo utilizzando i seguenti comandi:
Gateway = 255.255.255.255, e NetMask = 0.0.0.0
Valori ammessi: Qualsiasi combinazione di quattro numeri compresi
nell’intervallo 0…255
Nota: Quando modificate l’indirizzo del gateway, il WebGate
memorizzerà immediatamente il valore appena selezionato.Tuttavia
continuerà ad essere utilizzato il valore precedente finché ci sarà
ancora una connessione attiva (FTP, HTTP o SNMP). Di conseguenza,
FreeFiles
Description Read Write Saved
Return the amount of memory free
for files storage √ ××
Return how many bytes and file locations are free to store files in the
WebGate file system.
Files can be written to the WebGate using a PC running a FTP client
application.
Syntax:
FreeFiles
Returned Value: The value returned is a string like the following:
<f> free of <t> (comprising <mf> mirrored of <mt> ). <fa> files available
The fields highlighted with <> have the following meanings:
<f> : number of bytes free to the user for file storage
<t> : number of total bytes available in the file system
1
<mf> : number of bytes free in the mirrored part of the file system
2
<mt> : number of total bytes available in the mirrored part of the file
system
2
<fa> : number of file locations already free
1
A small amount of this area (tipically about 100 Kbytes) is reserved and
cannot be freed by the user.
2
This memory is reserved and is not available to the users.
Space available to user:
WebGate WEBG0000B0 provides the user with about 400KByte of
memory available for files storage. A maximum of 100 files can be
stored at the same time.
Note about the space occupied by files:
Files are stored with a “header” of about 150 bytes in sectors of 1KByte
each. Consequently, every file will use a memory area a little greater
than the size of the file itself.
Console example:
> FreeFiles ↵
15360 free of 516096 (comprising 25600 mirrored
of 129024 ). 98 files available.
> _
Gateway
Description Read Write Saved
Get/set the network gateway
IP address √ Administrator √
Displays or changes the network gateway address. It allows to set the
IP address of an Ethernet gateway which is used to forward IP packets
to a destination not directly attached to the same subnet defined by the
combination of “IPAddress” and “NetMask”.
Syntax (read):
Gateway
Returned value for read: <IPx>.<IPy>.<IPz>.<IPw>
Where <IPx>, <IPy>, <IPz> and <IPw> are the four bytes of IP
expressed using the standard dotted format string.
Syntax (write):
Gateway = <IPx>.<IPy>.<IPz>.<IPw>
Where <IPx>, <IPy>, <IPz> and <IPw> are the four bytes of IP
expressed using the standard dotted decimal format string.
Please contact your system administrator to obtain the proper gateway
address. If you don’t need to use a gateway, disable it using the
following commands: Gateway = 255.255.255.255,
and NetMask = 0.0.0.0
Allowed values: Any combination of four numbers in the range 0…255
Note: When you change gateway address, WebGate will immediately
store the value just selected. However, the old value will be used until a
connection (FTP, HTTP or SNMP) is still active. As a consequence, any
tentative to obtain a connection through the new gateway during this
58
Manuale WebGate - cod. +030220230 rel. 1.0 - 16.09.2003

qualsiasi tentativo di stabilire una connessione attraverso il nuovo
gateway, durante questo intervallo di tempo, fallirà. Per evitare che ciò
accada ed espletare l’operazione più velocemente, suggeriamo di
cambiare l’indirizzo quando non sono attive richieste da parte di utenti.
Valore restituito in scrittura:
Può verificarsi una delle seguenti situazioni:
• Valore valido e nessuna connessione attiva: IP value updated!
• Valore valido e una o più connessioni attive:Valid for next connection!
• Valore non valido: stringa “bad value” o “syntax error”.
Valore di default: 255.255.255.255 (disabilitato)
Esempio consolle:
> Gateway ↵
192.168.0.32
> Gateway=192.168.0.20 ↵
IP value updated!
> _
Help
Descrizione Lettura Scrittura Salvato
Visualizza una lista di tutte le funzioni
disponibili √ ××
Questa funzione fornisce una lista di tutti i comandi e i parametri
disponibili da consolle o HTML.
I caratteri che seguono il nome della funzione indicano cosa può fare
l’utente con la funzione data:
R : significa che l’utente è abilitato a usare la funzione in lettura
W : significa che l’utente è abilitato a usare la funzione in scrittura
-C : significa che la voce è un comando (cioè non richiede né
parametri né valore)
-- : significa che la funzione non è disponibile per l’utente attuale.
Si noti che alcune funzioni non permettono né la lettura né la scrittura.
Inoltre, la disponibilità di ciascuna funzione dipende anche dal livello di
accesso dell’utente (ad esempio, la funzione “var” è permessa solo a
supervisor e administrator).
Sintassi:
Help
Esempio consolle:
> Help ↵
Available commands and variables are:
AccessLevel R- | Option RW
AccessLevelString R- | Passwd -W
Baudrate232 RW | Reboot -C
Baudrate485 RW | Registers RClearConfig -C | ROCommunity RW
Ctrl232 RW | RWCommunity RW
DebugStrings RW | ScanDevs -C
Dev R- | Set -W
DevInfo R- | SetMax -W
Eval R- | SetMin -W
FlashFormat -C | SNMPAgentRel RFreeFiles R- | SNMPSyscont RW
Gateway RW | SNMPSysloc RW
Help R- | SNMPSysname RW
HWVersion R- | Status RIPAddress RW | Status485 RIsSelBaudrate232 R- | SWVersion RIsSelBaudrate485 R- | TRAPCommunity RW
IsSelUserLevel R- | TRAPIPAddress RW
Login -W | UpdateStatus RLogout -C | UserLevel RW
LumpTest RW | UserLevelString RMACAddress RW | UserName RW
MaxDevs RW | UserPwd RW
NetMask RW | Var RW
NetStat R- | WakeOn R-
> _
time interval will fail. To avoid this and to perform the operation faster,
we suggest to change it, if possible, when no other user’s requests are
active.
Returned value for write:
One of the following situations may occur:
• Valid value entered and no connections still active: IP value updated!
• Valid value entered and one or more connections still active: Valid for
next connection!
• Invalid value entered: “bad value” or “syntax error” string.
Default Value: 255.255.255.255 (disabled)
Console example:
> Gateway ↵
192.168.0.32
> Gateway=192.168.0.20 ↵
IP value updated!
> _
Help
Description Read Write Saved
Show a list of all the available functions √ ××
This command gets a list of all the commands and parameters
available for use by console interface or HTML.
The characters following the function name indicates what the user is
allowed to do with that function:
R : means that the user is allowed to use that function for read
W : means that the user is allowed to use that function for write
-C : means that the item is a command (that is, it requires neither
parameters nor value)
-- : means that the function is not available to the current user.
Please note that some functions are not allowed for read or write at all.
Moreover, the availability of each function is dependant also on the
current user access level (for example, the “var” function is allowed only
to supervisors and administrators).
Syntax:
Help
Console example:
> Help ↵
Available commands and variables are:
AccessLevel R- | Option RW
AccessLevelString R- | Passwd -W
Baudrate232 RW | Reboot -C
Baudrate485 RW | Registers RClearConfig -C | ROCommunity RW
Ctrl232 RW | RWCommunity RW
DebugStrings RW | ScanDevs -C
Dev R- | Set -W
DevInfo R- | SetMax -W
Eval R- | SetMin -W
FlashFormat -C | SNMPAgentRel RFreeFiles R- | SNMPSyscont RW
Gateway RW | SNMPSysloc RW
Help R- | SNMPSysname RW
HWVersion R- | Status RIPAddress RW | Status485 RIsSelBaudrate232 R- | SWVersion RIsSelBaudrate485 R- | TRAPCommunity RW
IsSelUserLevel R- | TRAPIPAddress RW
Login -W | UpdateStatus RLogout -C | UserLevel RW
LumpTest RW | UserLevelString RMACAddress RW | UserName RW
MaxDevs RW | UserPwd RW
NetMask RW | Var RW
NetStat R- | WakeOn R-
> _
59
Manuale WebGate - cod. +030220230 rel. 1.0 - 16.09.2003

HWVersion
Descrizione Lettura Scrittura Salvato
Restituisce la versione hardware del
WebGate √ ××
Questa funzione restituisce la versione hardware del WebGate
Sintassi:
HWVersion
Valore restituito: <Version>.<Release> (buid <build>)
Il formato qui sopra è stato scelto in quanto compatibile con il comando
“SWVersion”.
<Version> identifica una modifica importante all’hardware
<Release> identifica una modifica minore all’hardware
<Build> al momento non utilizzato. Il suo valore è fisso a zero.
Si noti che il valore restituito da questa funzione è puramente indiativo
e non corrisponde alla “reale” versione hardware riportata sulla
targhetta, allegata al WebGate. Ogni qualvolta richiedete l’assistenza
Carel, dovete riportare sempre il numero di versione e di serie indicati
sulla targhetta.
Esempio consolle:
> HWVersion ↵
(build 0)
> _
IPAddress
Descrizione Lettura Scrittura Salvato
Ottiene/imposta l’indirizzo IP del
WebGate √ Administrator √
Visualizza o modifica l’indirizzo IP del WebGate.
Sintassi (lettura):
IPAddress
Valore restituito in lettura: <IPx>.<IPy>.<IPz>.<IPw>
Dove <IPx>, <IPy>, <IPz> e <IPw> sono i quattro byte dell’indirizzo IP
espressi con la stringa standard, in formato separato da punti.
Sintassi (scrittura):
IPAddress = <IPx>.<IPy>.<IPz>.<IPw>
Dove <IPx>, <IPy>, <IPz> e <IPw> sono i quattro byte dell’indirizzo IP
espressi con la stringa standard, in formato decimale, separato da
punti.
Contattate il vostro amministratore di sistema per ottenere un indirizzo
IP valido.Tuttavia, ricordate che ogni dispositivo di rete deve avere un
proprio indirizzo IP. Fate attenzione ad evitare l’uso dello stesso
indirizzo IP per più dispositivi. Indirizzi in conflitto tra loro possono
provocare problemi di configurazione e conseguenti malfunzionamenti
della rete.
Valori ammessi: Qualsiasi combinazione di quattro numeri compresi
nell’intervallo 0…255
Nota: Quando modificate l’indirizzo IP, il WebGate memorizzerà
immediatamente il valore appena selezionato.Tuttavia continuerà ad
essere utilizzato il valore precedente finché ci sarà ancora una
connessione attiva (FTP, HTTP o SNMP). Di conseguenza, qualsiasi
tentativo di stabilire una connessione attraverso il nuovo valore IP,
durante questo intervallo di tempo, fallirà. Per evitare che ciò accada ed
espletare l’operazione più velocemente, suggeriamo di cambiare
l’indirizzo quando non sono attive richieste da parte di utenti.
Valore restituito in scrittura:
Può verificarsi una delle seguenti situazioni:
• Valore valido e nessuna connessione attiva: IP value updated!
• Valore valido e una o più connessioni attive:Valid for next connection!
• Valore non valido: stringa “bad value” o “syntax error”.
Valore di default: 192.168.0.250
HWVersion
Description Read Write Saved
Return the WebGate hardware version √ ××
This function returns the WebGate hardware version (revision).
Syntax:
HWVersion
Returned value: <Version>.<Release> (buid <build>)
The above format was choosen to be compatible with the “SWVersion”
command.
<Version> is used to identify a major hardware change
<Release> is used to identify a minor hardware change
<Build> currently is not used. Its value is fixed to zero.
Please note that the value returned from this function is only indicative
and not related to the “true” hardware version reported on the label
attached to the WebGate. When contacting Carel for support, always
report the release and serial number indicated on the label.
Console example:
> HWVersion ↵
(build 0)
> _
IPAddress
Description Read Write Saved
Get/set the WebGate IP address √ Administrator √
Displays or changes the IP address of the WebGate itself.
Syntax (read):
IPAddress
Returned value for read: <IPx>.<IPy>.<IPz>.<IPw>
Where <IPx>, <IPy>, <IPz> and <IPw> are the four bytes of IP
expressed using the standard dotted format string.
Syntax (write):
IPAddress = <IPx>.<IPy>.<IPz>.<IPw>
Where <IPx>, <IPy>, <IPz> and <IPw> are the four bytes of IP
expressed using the standard dotted decimal format string.
Please contact your system administrator to obtain a valid IP address.
Anyway, remember that every network appliance must have its own IP
address. Carefully avoid to use the same IP address for more
appliances. Conflicting addresses is a common configuration pitfall that
will result in network malfunctions.
Allowed values: Any combination of four numbers in the range 0…255
Note: When you change IP address, WebGate will immediately store
the value just selected. However, the old value will be used until a
connection (FTP, HTTP or SNMP) is still active. As a consequence, any
tentative to obtain a connection using the new IP value during this time
interval will fail. To avoid this and to perform the operation faster, we
suggest to change it, if possible, when no other user’s requests are
active.
Returned value for write:
One of the following situations may occur:
• Valid value entered and no connections still active: IP value updated!
• Valid value entered and one or more connections still active:
Valid for next connection!
• Invalid value entered: “bad value” or “syntax error” string.
Default Value: 192.168.0.250
60
Manuale WebGate - cod. +030220230 rel. 1.0 - 16.09.2003

Esempio consolle:
> IPAddress=192.168.0.200 ↵
IP value updated!
> IPAddress ↵
192.168.0.200
> _
IsSelBaudrate232
Descrizione Lettura Scrittura Salvato
Restituisce una stringa specifica se il
baudrate attuale corrisponde al
parametro dato √ ××
Questa funzione restituisce un valore a seconda della corrispondenza
del parametro dato con il valore attuale del baudrate RS232. E’ utile in
combinazione con le liste di selezione.
Sintassi:
IsSelBaudrate232(<expression>)
<expression> rappresenta il baudrate da comparare.
Valore restituito:
• Stringa vuota se il baudrate non corrisponde, oppure
• selected se il baudrate è lo stesso.
Esempio consolle:
> Baudrate232=19200 ↵
> IsSelBaudrate232(2400) ↵
> IsSelBaudrate232(19200) ↵
Selected
> _
Esempio HTML:
IsSelBaudrate485
Descrizione Lettura Scrittura Salvato
Restituisce una stringa specifica se il
baudrate attuale corrisponde al
parametro dato √ ××
Questa funzione restituisce un valore a seconda della corrispondenza
del parametro dato con il valore attuale del baudrate RS485. E’ utile in
combinazione con le liste di selezione.
Sintassi:
IsSelBaudrate485(<expression>)
<expression> rappresenta il baudrate da comparare.
Valore restituito:
• Stringa vuota se il baudrate non corrisponde, oppure
• selected se il baudrate è lo stesso.
Esempio consolle:
> Baudrate485=19200 ↵
> IsSelBaudrate485(2400) ↵
> IsSelBaudrate485(19200) ↵
Selected
> _
Console example:
> IPAddress=192.168.0.200 ↵
IP value updated!
> IPAddress ↵
192.168.0.200
> _
IsSelBaudrate232
Description Read Write Saved
Return a specific string when the
current baudrate match the given
parameter √ ××
This function returns a value depending on the match of the given
parameter with the current RS232 baudrate value. It is useful in
combination with drop-down selection lists.
Syntax:
IsSelBaudrate232(<expression>)
<expression> represents the baudrate to compare with.
Returned value:
• Empty string if the baudrate doesn’t match, or
• selected if the baudrate is the same.
Console example:
> Baudrate232=19200 ↵
> IsSelBaudrate232(2400) ↵
> IsSelBaudrate232(19200) ↵
Selected
> _
HTML example:
IsSelBaudrate485
Description Read Write Saved
Return a specific string when the
current baudrate match the given
parameter √ ××
This function returns a value depending on the match of the given
parameter with the current RS485 baudrate value. It is useful in
combination with drop-down selection lists.
Syntax:
IsSelBaudrate485(<expression>)
<expression> represents the baudrate to compare with.
Returned value:
• Empty string if the baudrate doesn’t match, or
• selected if the baudrate is the same.
Console example:
> Baudrate485=19200 ↵
> IsSelBaudrate485(2400) ↵
> IsSelBaudrate485(19200) ↵
Selected
> _
61
Manuale WebGate - cod. +030220230 rel. 1.0 - 16.09.2003
<select name="select3" size="1">
<option value="?script:baudrate232=1200" <%IsSelBaudrate232(1200)%>>1200</option>
<option value="?script:baudrate232=2400" <%IsSelBaudrate232(2400)%>>2400</option>
<option value="?script:baudrate232=4800" <%IsSelBaudrate232(4800)%>>4800</option>
<option value="?script:baudrate232=9600" <%IsSelBaudrate232(9600)%>>9600</option>
<option value="?script:baudrate232=19200" <%IsSelBaudrate232(19200)%>>19200</option>
<option value="?script:baudrate232=38400" <%IsSelBaudrate232(38400)%>>38400</option>
</select>
risultato grafico
graphical result

Esempio HTML:
IsSelUserLevel
Descrizione Lettura Scrittura Salvato
Restituisce una stringa specifica se il
livello utente attuale corrisponde al
parametro dato √ ××
Questa funzione restituisce un valore a seconda della corrispondenza
del livello di accesso dell’utente dato con il valore attuale. E’ utile in
combinazione con le liste di selezione.
Si consiglia di vedere anche il capitolo Gestione Utenti per la
descrizione del Sistema di Gestione Utenti.
Sintassi:
IsSelUserLevel(<index>, <level>)
<index> rappresenta l’indice utente nella tabella utenti (0…5)
<level> rappresenta il livello utente da comparare
Valore restituito:
Stringa vuota se il livello di accesso non corrisponde, oppure
selected se il livello di accesso è lo stesso.
Esempio consolle:
> UserLevel(1) = 200 ↵
> IsSelUserLevel(1, 100) ↵
> IsSelUserLevel (1, 200) ↵
Selected
> _
Esempio HTML:
Login
Descrizione Lettura Scrittura Salvato
Collega un nuovo utente alla consolle × Guest ×
Da ad un utente il diritto di accesso alla consolle.
La consolle è conforme ai limiti imposti dal sistema di gestione utenti,
come descritto al capitolo Gestione Utenti.
Per ottenere l’accesso al WebGate attraverso la consolle, l’utente deve
prima effettuare due operazioni:
1. Immettere il proprio nome, utilizzando il comando Login
2. Immettere la propria password, utilizzando il comando Passwd
Se si immette una password errata, si verifica un errore e l’intera
procedura va ripetuta dall’inizio.
Si noti che il comando login non genera un errore immediato se il
nome immesso non è definito nella tabella utenti. L’errore verrà
generato successivamente dal comando passwd.
Sintassi:
Login = <UserName>
Dove <UserName> rappresenta il nome dell’utente da immettere.
Valore restituito:
• “Already logged in, you must logout first (code -311)” se un altro
utente è già collegato;
HTML example:
IsSelUserLevel
Description Read Write Saved
Return a specific string when the
current user level match the given
parameter √ ××
This function returns a value depending on the match of the given user
and access level with the current value. It is useful in combination with
drop-down selection lists.
Please see chapter User Management for a description of user
management system.
Syntax:
IsSelUserLevel(<index>, <level>)
<index> represents the user index in the users table (0…5)
<level> represents the user level to compare with
Returned value:
Empty string if the access level doesn’t match, or selected if the
access level is the same.
Console example:
> UserLevel(1) = 200 ↵
> IsSelUserLevel(1, 100) ↵
> IsSelUserLevel (1, 200) ↵
Selected
> _
HTML example:
Login
Description Read Write Saved
Login a new user to the console × Guest ×
Give console access rights to an user.
The console interface fully comply with the restrictions imposed from the
users management system, described in chapter User Management.
To gain access to WebGate through the console interface, a user is
required to perform a two steps operation first:
1. Enter his/her name using the Login command
2. Enter his/her password using the Passwd command
When a wrong password is entered, an error is issued and the entire
process must be repeated from the beginning.
Moreover, please note that the login command will not issue any
immediate error if the entered name is not defined in the users table.
The error will be addressed from the next passwd command.
Syntax:
Login = <UserName>
Where <UserName> represents the user name to enter with.
Returned value:
• “Already logged in, you must logout first (code -311)” if another user
is already logged in;
62
Manuale WebGate - cod. +030220230 rel. 1.0 - 16.09.2003
<select name="select3" size="1">
<option value="?script:baudrate485=1200" <%IsSelBaudrate485(1200)%>>1200</option>
<option value="?script:baudrate485=2400" <%IsSelBaudrate485(2400)%>>2400</option>
<option value="?script:baudrate485=4800" <%IsSelBaudrate485(4800)%>>4800</option>
<option value="?script:baudrate485=9600" <%IsSelBaudrate485(9600)%>>9600</option>
<option value="?script:baudrate485=19200" <%IsSelBaudrate485(19200)%>>19200</option>
</select>
<select name="select">
<option value="?script:UserLevel(1)=99" <%IsSelUserLevel(1, 99)%>>Guest</option>
<option value="?script:UserLevel(1)=149" <%IsSelUserLevel(1, 149)%>>User</option>
<option value="?script:UserLevel(1)=199" <%IsSelUserLevel(1, 199)%>>Supervisor</option>
<option value="?script:UserLevel(1)=249" <%IsSelUserLevel(1, 249)%>>Administrator</option>
</select>
risultato grafico
graphical result
risultato grafico
graphical result

• Un messaggio che descrive l’errore se la stringa non è un nome valido;
• Nessun messaggio se la stringa è un nome valido.
Nota: Quando si riavvia il WebGate, non viene collegato
automaticamente nessun utente. Per prevenire l’accesso non
autorizzato, gli utenti vengono automaticamente scollegati dopo 5
minuti dall’ultimo input da consolle. Quando non ci sono utenti
collegati, la consolle può comunque essere utilizzata. Tuttavia,
l’accesso è limitato ai diritti dell’utente “anonymous” (vedi Utente
“anonymous”). Per default l’utente anonimo ha gli stessi diritti
dell’utente administrator. Di conseguenza, se non avete bisogno delle
funzioni di sicurezza, non servirà che usiate il comando “login”.
Esempio consolle:
> Logout ↵
> Login = JohnDoe ↵
> Passwd =↵
Welcome JohnDoe! Your access level is 249
(administrator)
> _
Logout
Descrizione Lettura Scrittura Salvato
Scollega l’utente attuale dalla
consolle × Guest ×
Questo comando scollega l’utente attuale dalla consolle e riporta il
WebGate al livello di accesso “anonimo” come da default (vedi il
capitolo Gestione Utenti).
Dovrete utilizzare questo comando ogni volta che siete collegati e
volete rientrare con un altro nome utente.
Sintassi:
Logout
Valore restituito: Nessuno
Nota: Quando si riavvia il WebGate, non viene collegato
automaticamente nessun utente. Per prevenire l’accesso non
autorizzato, gli utenti vengono automaticamente scollegati dopo 5
minuti dall’ultimo input da consolle. Quando non ci sono utenti
collegati, la consolle può comunque essere utilizzata. Tuttavia,
l’accesso è limitato ai diritti dell’utente “anonymous” (vedi Utente
“anonymous”). Per default l’utente anonimo ha gli stessi diritti
dell’utente administrator. Di conseguenza, se non avete bisogno delle
funzioni di sicurezza, non servirà che usiate il comando “login”.
Esempio consolle:
> Logout ↵
> Login = JohnDoe ↵
> Passwd =↵
Welcome JohnDoe! Your access level is 249
(administrator)
> _
• Error message if the string is not a valid name;
• No message if the string seems to be a valid name.
Note: When WebGate reboots, no user is automatically logged in. To
prevent unauthorized access, users are automatically logged out after
5 minutes from the last console input. When no user is logged in, the
console can be used anyway. However, the access is restricted to the
same rights of the “anonymous” user (see “anonymous” User). By
default the anonymous user have administrator rights. Consequently, if
you don’t need any security capability, you won’t need to use “login”
command.
Console example:
> Logout ↵
> Login = JohnDoe ↵
> Passwd =↵
Welcome JohnDoe! Your access level is 249 (administrator)
> _
Logout
Description Read Write Saved
Logout the current user from the
console × Guest ×
This command logout the current user from the console, and return the
WebGate to the default “anonymous” access level (see chapter User
Management).
You must use this command each time you are logged in and you want
to re-enter with another user name.
Syntax:
Logout
Returned value: None
Note: When WebGate reboots, no user is automatically logged in. To
prevent unauthorized access, users are automatically logged out after
5 minutes from the last console input.
When no user is logged in, the console can be used anyway. However,
the access is restricted to the same rights of the “anonymous” user
(see “anonymous” User). By default the anonymous user have
administrator rights. Consequently, if you don’t need any security
capability, you won’t need to use “login” command.
Console example:
> Logout ↵
> Login = JohnDoe ↵
> Passwd =↵
Welcome JohnDoe! Your access level is 249 (administrator)
> _
63
Manuale WebGate - cod. +030220230 rel. 1.0 - 16.09.2003

MACAddress
Descrizione Lettura Scrittura Salvato
Restituisce l’indirizzo hardware
Ethernet del WebGate (MAC) √ ××
Questa funzione restituisce l’indirizzo hardware Ethernet del WebGate.
A volte, ciò può essere utile per la configurazione o a risolvere
problemi di rete.
L’indirizzo MAC è un numero unico in tutto il mondo, assegnato
unitamente da IEEE e Carel. Di conseguenza, l’indirizzo MAC è un
valore memorizzato permanentemente e non può essere modificato
dall’utente.
Sintassi:
Gateway
Valore restituito:
<MACa>:<MACb>:<MACc>:<MACd>:<MACe>:<MACf>
Dove <MACa>, < MACb>, <MACc>, <MACd>, <MACe> e <MACf>
sono i sei byte che identificano l’indirizzo espresso utilizzando ottetti
esadecimali.
Esempio consolle:
> MACAddress ↵
00:90:c2:80:16:5a
> _
MaxDevs
Descrizione Lettura Scrittura Salvato
Imposta il numero massimo di
dispositivi collegati al WebGate √ Administrator ×
Questa funzione è utilizzata per impostare (o ottenere) il numero
massimo di dispositivi che possono essere collegati attraverso
l’interfaccia RS485 Carel.
Più dettagliatamente, questo valore limita la gamma degli indirizzi delle
periferiche “scandite” dal WebGate:
Ad esempio, se il MaxDevs è impostato a “3”, solo i dispositivi con
l’indirizzo “1”, “2” e “3” verranno scanditi.
Se questo comando viene usato per informare il WebGate sul numero
esatto di dispositivi collegati, e i dispositivi sono numerati in maniera
sequenziale, otterete i seguenti benefici:
• Una scansione più veloce della rete
• Il led RS485 diventerà rosso solo quando il dispositivo è
effettivamente scollegato
Sintassi (lettura):
MaxDevs
Sintassi (scrittura): MaxDevs = <value>
Valori ammessi: Da 1 a 16
Se si immette un valore non valido, verrà restituita una stringa di errore.
Si noti che quando questo valore viene modificato, la rete è
immediatamente riscandita (vedi il comando ScanDevs)
Valore di default:
16 (è il numero massimo di dispositivi che possono essere collegati).
Esempio consolle:
> MaxDevs=4 ↵
> MaxDevs ↵
4
> _
MACAddress
Description Read Write Saved
Return the WebGate Ethernet
hardware address (MAC) √ ××
This function return the WebGate Ethernet hardware address.
Sometimes, this may be useful to configure or debug a network.
The MAC address is a worldwide unique number jointly assigned by
IEEE and Carel. Consequently, MAC address is a permanently stored
value that can’t be changed from the user.
Syntax:
Gateway
Returned value:
<MACa>:< MACb>:<MACc>:<MACd>:<MACe>:<MACf>
Where <MACa>, < MACb>, <MACc>, <MACd>, <MACe> and <MACf>
are the six bytes identifying the address expressed using hexadecimal
octects.
Console example:
> MACAddress ↵
00:90:c2:80:16:5a
> _
MaxDevs
Description Read Write Saved
Set the maximum number of devices
connected to WebGate √ Administrator √
This function is used to set (or obtain) the maximum number of devices
that can be connected through the RS485 Carel interface.
Specifically, this value limits the address range of peripherals “scanned”
from WebGate:
For example, if MaxDevs is set to “3”, only devices with address “1”, “2”
and “3” will be scanned.
If this command is used to inform WebGate of the right number of
devices connected, and the devices are sequentially numbered you will
get the following benefits:
• Faster network scan
• The RS485 Led will indicate “red” only when a device is effectively
disconnected
Syntax (read):
MaxDevs
Syntax (write): MaxDevs = <value>
Allowed values: 1 up to 16
If an invalid value is entered, an error string will be returned.
Please note that when this value is changed, the network is
immediately rescanned (see ScanDevs command)
Default Value:
16 (this is the maximum number of devices that can be interfaced).
Console example:
> MaxDevs=4 ↵
> MaxDevs ↵
4
> _
64
Manuale WebGate - cod. +030220230 rel. 1.0 - 16.09.2003

NetMask
Descrizione Lettura Scrittura Salvato
Ottiene/imposta il mask pattern di rete √ Administrator ×
Visualizza o modifica il mask pattern di rete (“netmask”).
Sintassi (lettura):
NetMask
Valore restituito in lettura: <IPx>.<IPy>.<IPz>.<IPw>
Dove <IPx>, <IPy>, <IPz> e <IPw> sono i quattro byte del mask
espressi con la stringa standard IP, in formato separato da punti.
Sintassi (scrittura):
NetMask = <IPx>.<IPy>.<IPz>.<IPw>
Dove <IPx>, <IPy>, <IPz> e <IPw> sono i quattro byte del mask
espressi con la stringa standard IP, in formato separato da punti.
Si consiglia di contattare l’amministratore di sistema per ottenere il
netmask corretto. Se non avete bisogno di usare un gateway, potete
disabilitarlo utilizzando i seguenti comandi:
Gateway = 255.255.255.255, e NetMask = 0.0.0.0
Valori ammessi: Qualsiasi combinazione di quattro numeri compresi
nell’intervallo 0…255
Nota: Quando si modifica il netmask, il WebGate memorizza
immediatamente il valore appena selezionato.Tuttavia continuerà ad
essere utilizzato il valore precedente finché ci sarà ancora una
connessione attiva (FTP, HTTP o SNMP). Di conseguenza, qualsiasi
tentativo di stabilire una connessione con la nuova impostazione,
durante questo intervallo di tempo, fallirà. Per evitare che ciò accada ed
espletare l’operazione più velocemente, suggeriamo di cambiare
l’indirizzo quando non sono attive richieste da parte di altri utenti.
Valore restituito in scrittura:
Può verificarsi una delle seguenti situazioni:
• Valore valido e nessuna connessione attiva: IP value updated!
• Valore valido e una o più connessioni attive:Valid for next connection!
• Valore non valido: stringa “bad value” o “syntax error”.
Valore di default: 0.0.0.0 (non è utilizzato nessun gateway)
Breve nota su IP routing
Sebbene una discussione approfondita sulle problematiche di
networking non sia lo scopo di questo manuale, vorremmo comunque
aggiungere una breve nota su netmask e IP routing. Oltre all’“Indirizzo
IP”, il netmask definisce anche la sottorete (“subnet”) in cui si trova un
dispositivo e istruisce il dispositivo stesso quando si vuole indirizzare
un messaggio ad un gateway. La sottorete è un gruppo di dispositivi
che comunicano e che sono in collegamento diretto tra loro. Quando si
deve accedere ad una destinazione remota, esterna alla sottorete,
dall’host, il messaggio deve passare attraverso un gateway che lo
indirizzerà verso la corretta destinazione (“IP routing”).
La sottorete è definita dalla combinazione dell’Indirizzo IP e
dell’indirizzo netmask.
Quando il valore ottenuto, combinando l’indirizzo di destinazione con
l’indirizzo netmask, è lo stesso ottenuto combinando l’indirizzo IP del
mittente con l’indirizzo netmask, il messaggio viene inviato
direttamente, altrimenti viene re-indirizzato al gateway.
Ad esempio, se l’Indirizzo IP del mittente è “192.168.0.250” e il
netmask è “255.255.0.0”, ogni messaggio per “192.168.X.X” viene
inviato direttamente, mentre un messaggio inviato a “192.20.0.0” passa
attraverso il gateway.
Esempio consolle:
> NetMask ↵
192.168.0.0
> NetMask=0.0.0.0 ↵
IP value updated!
> _
NetMask
Description Read Write Saved
Get/set the network mask pattern √ Administrator ×
Displays or changes the network mask pattern (“netmask”).
Syntax (read):
NetMask
Returned value for read: <IPx>.<IPy>.<IPz>.<IPw>
Where <IPx>, <IPy>, <IPz> and <IPw> are the four bytes of mask
expressed using the standard IP dotted format string.
Syntax (write):
NetMask = <IPx>.<IPy>.<IPz>.<IPw>
Where <IPx>, <IPy>, <IPz> and <IPw> are the four bytes of mask
expressed using the standard IP dotted decimal format string.
Please contact your system administrator to obtain the proper netmask.
If you don’t need to use a gateway, disable it using the following
commands: Gateway = 255.255.255.255, and NetMask = 0.0.0.0
Allowed values: Any combination of four numbers in the range 0…255
Note: When you change netmask, WebGate will immediately store the
value just selected. However, the old value will be used until a
connection (FTP, HTTP or SNMP) is still active. As a consequence, a
tentative to obtain a connection using the new setting during this time
interval will fail. To avoid this and to perform the operation faster, we
suggest to change it, if possible, when no other user’s requests are
active.
Returned value for write:
One of the following situations may occur:
• Valid value entered and no connections still active: IP value updated!
• Valid value entered and one or more connections still active:
Valid for next connection!
• Invalid value entered: “bad value” or “syntax error” string.
Default Value: 0.0.0.0 (no gateway is used)
A concise note about IP routing
Although a comprensive discussion of networking issues are out of the
scope of this document, we want to briefly add an additional comment
about netmask and IP routing. Together with the “IP address”, the
netmask defines a sub-network (“subnet”) where an appliance is, and
instruct the appliance itself when a message must be redirected to a
gateway. A subnet is a group of communicating appliances that are in
direct connection between them. When a remote destination, external
to the subnet, must be accessed from the host, the message must
pass through a gateway that will redirect it to the right location (“IP
routing”).
The subnet is defined performing a bitwise and-mask between the IP
address and the netmask.
When the value obtained “and-masking” a destination address with the
netmask is the same value obtained “and-masking” the IP address of
the sender with the netmask, the message is sent directly, otherwise it
is redirected to the Gateway.
For example, if the sender IP address is “192.168.0.250” and the
netmask is “255.255.0.0”, any message for “192.168.X.X” will be send
directly, but a message sent to “192.20.0.0” will pass through to
gateway.
Console example:
> NetMask ↵
192.168.0.0
> NetMask=0.0.0.0 ↵
IP value updated!
> _
65
Manuale WebGate - cod. +030220230 rel. 1.0 - 16.09.2003

NetStat
Descrizione Lettura Scrittura Salvato
Visualizza alcune statistiche di rete √ ××
Con questo comando si ottiene una lista di statistiche sulla rete
Ethernet.
Può essere utile ad utenti avanzati o ad amministratori di sistema per
la risoluzione di errori.
Sintassi:
NetStat
Valore restituito: Le righe restituite hanno i seguenti significati:
Riga Significato
ARP Packets Numero di pacchetti ARP ricevuti
1
. I pacchetti
ARP sono messaggi di trasmissione utilizzati
per “trovare” un host remoto.
TCP Packets Numero di pacchetti TCP ricevuti
1
. Generalmente
messaggi point-to-point utilizzati per HTTP e FTP.
UDP Packets Numero di pacchetti UDP ricevuti1. Generalmente
messaggi point-to-point utilizzati per SNMP.
ICMP Packets Numero di pacchetti ICMP ricevuti
1
. Questi
pacchetti vengono utilizzati per la gestione della
rete
Other IP Packets Numero di pacchetti IP non gestiti
1
.
Other Not IP Numero di pacchetti non gestiti diversi dagli IP 1.
Packets
IP Fragments Numero di pacchetti IP frammentati ricevuti
1
.
Generalmente i pachetti non sono fragmentati.
Malformed IP Numero di pacchetti IP malformati ricevuti1.Tra
Packets questi sono inclusi pacchetti troncati o con
errori di checksum.
Total Sent Packets Numero totale di pacchetti trasmessi dal
WebGate
1
.
Transmit Collisions Non disponibile
Failed
Transmissions Non disponibile
Last TX Carrier Non disponibile
Active FTP Numero di connessioni FTP attive al momento.
Connections
Active HTTP Numero di connessioni HTTP attive al momento.
Connections
Active SNMP Numero di connessioni SNMP attive al momento.
Connections
1
Si tratta di un conteggio cumulativo che riparte ad ogni riavvio del
WebGate.
Esempio consolle:
> NetStat ↵
Ethernet Statistics:
ARP Packets : 6
TCP Packets : 97
UDP Packets : 1
ICMP Packets : 0
Other IP Packets : 0
Other Not IP Packets : 0
IP Fragments : 0
Malformed IP Packets : 0
Total Sent Packets : 108
Transmit Collisions : N.A.
Failed Transmissions : N.A.
Last TX Carrier : N.A.
Active FTP Connections : 0
Active HTTP Connections : 0
Active SNMP Connections : 0
> _
NetStat
Description Read Write Saved
Display some network statistics √ ××
This command gets a list of Ethernet network statistics.
This may be useful to advanced users or system administrators for
debug purposes.
Syntax:
Help
Returned Value: The lines returned have the following meanings:
Line Meaning
ARP Packets Number of ARP packets received1. ARP packets
are broadcast messages used to “find” a remote
host.
TCP Packets Number of TCP packets received1. Generally
point-to-point messages used for HTTP and FTP.
UDP Packets Number of TCP packets received1. Generally
point-to-point messages used for SNMP.
ICMP Packets Number of ICMP packets received1. These
packets are used for network management
Other IP Packets Number of unhandled IP packets 1.
Other Not IP Number of unhandled packets other than IP 1.
Packets
IP Fragments Number of fragmented IP packets received1.
Generally, packets are not fragmented.
Malformed IP Number of malformed IP packets received
1
.This
Packets include runt packets and checksum errors.
Total Sent Packets Total number of packets transmitted from
WebGate
1
.
Transmit Collisions Not available
Failed
Transmissions Not available
Last TX Carrier Not available
Active FTP
Connections Number of currently active FTP connections.
Active HTTP
Connections Number of currently active HTTP connections.
Active SNMP
Connections Number of currently active SNMP connections.
1
This is a cumulative count that restarts at each WebGate reboot.
Console example:
> NetStat ↵
Ethernet Statistics:
ARP Packets : 6
TCP Packets : 97
UDP Packets : 1
ICMP Packets : 0
Other IP Packets : 0
Other Not IP Packets : 0
IP Fragments : 0
Malformed IP Packets : 0
Total Sent Packets : 108
Transmit Collisions : N.A.
Failed Transmissions : N.A.
Last TX Carrier : N.A.
Active FTP Connections : 0
Active HTTP Connections : 0
Active SNMP Connections : 0
> _
66
Manuale WebGate - cod. +030220230 rel. 1.0 - 16.09.2003

Passwd
Descrizione Lettura Scrittura Salvato
Immette la password utente per
la consolle × Guest ×
Immette la password per collegare un utente.
La consolle di interfaccia è conforme ai limiti imposti dal sistema di
gestione utenti, descritto al capitolo Gestione Utenti.
Per ottenere l’accesso al WebGate con la consolle, l’utente deve prima
effettuare due operazioni:
1. Immettere il proprio nome, utilizzando il comando Login
2. Immettere la propria password, utilizzando il comando Passwd
Se si immette una password errata, si verifica un errore e l’intera
procedura va ripetuta dall’inizio.
Inoltre, si noti che il comando login non genera un errore immediato se
il nome immesso non è definito nella tabella utenti. L’errore verrà
generato successivamente dal comando passwd.
Sintassi:
Passwd = <Password>
Dove <Password> rappresenta la password utente associata al
precedente comando Login.
Valore restituito:
• “User name not defined, you must use <Login> first (code -312)” se
è già collegato un’altro utente
• “Bad username or password (code -313)” se il nome o la password
utente non sono validi
• Stringa di benvenuto se la password è valida.
Nota: Quando si riavvia il WebGate, non viene automaticamente
collegato nessun utente. Per prevenire l’accesso non autorizzato, gli
utenti vengono automaticamente scollegati dopo 5 minuti dall’ultimo
input da consolle. Quando non ci sono utenti collegati, la consolle può
comunque essere utilizzata. Tuttavia, l’accesso è limitato ai diritti
dell’utente “anonymous” (vedi Utente “anonymous”). Per default,
l’utente anonimo ha gli stessi diritti dell’utente administrator. Di
conseguenza, se non avete bisogno di funzioni di sicurezza, non
dovrete mai usare il comando “login”.
Esempio consolle:
> Logout ↵
> Login = JohnDoe ↵
> Passwd =↵
Welcome JohnDoe! Your access level is 249
(administrator)
> _
Reboot
Descrizione Lettura Scrittura Salvato
Riavvia il WebGate × Administrator ×
Si attiva la procedura di chiusura forzata che chiude tutti i file e i
collegamenti, e il WebGate viene riavviato.
L’operazione può durare alcuni secondi.
Questo comando viene utilizzato principalmente per effettuare un
aggiornamento del firmware, poiché ad ogni riavvio del WebGate viene
controllata l’esistenza di un file di aggiornamento.
Sintassi:
Reboot
Esempio consolle:
> Reboot ↵
<… … … bootstrap message … … …>
Passwd
Description Read Write Saved
Enter the user password for the
console × Guest ×
Enter the password to login a user.
The console interface fully comply with the restrictions imposed from
the users management system, described in chapter User
Management.
To gain access to WebGate through the console interface, a user is
required to perform a two steps operation first:
1. Enter his/her name using the Login command
2. Enter his/her password using the Passwd command
When a wrong password is entered, an error is issued and the entire
process must be repeated from the beginning.
Moreover, please note that the login command will not issue any
immediate error if the entered name is not defined in the users table.
The error will be addressed from the next passwd command.
Syntax:
Passwd = <Password>
Where <Password> represents the user password associated to the
previous Login Command.
Returned value:
• “User name not defined, you must use <Login> first (code -312)” if
another user is already logged in
• “Bad username or password (code -313)” if the user name or
password are invalid
• Welcome string if the password match.
Note: When WebGate reboots, no user is automatically logged in.
To prevent unauthorized access, users are automatically logged out
after 5 minutes from the last console input.
When no user is logged in, the console can be used anyway. However,
the access is restricted to the same rights of the “anonymous” user
(see “anonymous” User). By default the anonymous user have
administrator rights. Consequently, if you don’t need any security
capability, you will never need to use “login” command.
Console example:
> Logout ↵
> Login = JohnDoe ↵
> Passwd =↵
Welcome JohnDoe! Your access level is 249 (administrator)
> _
Reboot
Description Read Write Saved
Restart the WebGate × Administrator ×
A shutdown procedure is initiated forcibly closing all files and
connections, and the WebGate is restarted.
Please note that this operation may take some seconds.
This command is used mainly to perform a firmware upgrade, since the
existence of an updated file is checked at each WebGate bootstrap.
Syntax:
Reboot
Console example:
> Reboot ↵
<… … … bootstrap message … … …>
67
Manuale WebGate - cod. +030220230 rel. 1.0 - 16.09.2003

Registers
Descrizione Lettura Scrittura Salvato
Visualizza una lista di tutti i registri
attualmente definiti √ ××
Questo comando elenca tutti i registri aritmetici definiti.
I registri aritmetici sono descritti al capitolo Espressioni, Registri e
Funzioni.
Si noti che alcuni dei registri elencati sono predefiniti e non modificabili.
Sintassi:
Registers
Esempio consolle:
> set(address)=7 ↵
> registers ↵
administrator: 200
developer: 250
guest: 0
supervisor: 150
user: 100
address: 7
> _
Nota: I registri evidenziati sono riservati. Essi identificano i livelli di
accesso minimi per ciascun tipo di utente e servono a semplificare le
operazioni
I registri evidenziati in blu sono riservati ed identificano i livelli di
accesso minimi per ciascun tipo di utente.
ROCommunity
Descrizione Lettura Scrittura Salvato
Ottiene/imposta il Read/Only
Community Name √ Administrator √
Visualizza o modifica l’SNMP Read/Only Community Name.
Si veda il capitolo Community per la descrizione delle community SNMP.
Sintassi (lettura):
ROCommunity
Valore restituito in lettura: <name>
Dove <name> è il community name
Sintassi (scrittura):
ROCommunity = <name>
Dove <name> è il community name.
Il nome deve essere una stringa composta esclusivamente da caratteri
alfanumerici (0…9, A…Z e a…z). Non sono ammessi spazi o segni di
punteggiatura. La lunghezza massima di un nome non deve superare i
10 caratteri.
Valore di default: “public”
Esempio consolle:
> ROCommunity = controls↵
> ROCommunity ↵
controls
> _
RWCommunity
Descrizione Lettura Scrittura Salvato
Ottiene/imposta il Read/Write
Community Name √ Administrator √
Visualizza o modifica l’SNMP Read/Write Community Name.
Si veda il capitolo Community per la descrizione delle community
SNMP.
Sintassi (lettura):
RWCommunity
Valore restituito in lettura: <name>
Dove <name> è il community name
Registers
Description Read Write Saved
Displays a list of all the currently
defined registers √ ××
This command lists all the defined arithmetic registers.
Arithmetic registers are explained in chapter About Expressions,
Registers and Functions.
Please note that some of the listed registers are predefined and not
modifiable.
Syntax:
Registers
Console example:
> set(address)=7 ↵
> registers ↵
administrator: 200
developer: 250
guest: 0
supervisor: 150
user: 100
address: 7
> _
Note: The registers highlighted are reserved. They identify minimum
access levels for any type of user and are provided to simplify operations
The registers highlighted in blue are reserved. They identify minimum
access levels for any type of user.
ROCommunity
Description Read Write Saved
Get/set the Read Only
Community Name √ Administrator √
Displays or changes the SNMP Read Only Community Name.
Please see chapter Communities for a description of SNMP communities.
Syntax (read):
ROCommunity
Returned value for read: <name>
Where <name> is the community name
Syntax (write):
ROCommunity = <name>
Where <name> is the community name.
The name must be a string composed from alphanumeric characters
only (0…9, A…Z and a…z). No spacing or punctuation characters are
allowed. The maximum name length must not exceed 10 characters.
Default Value: “public”
Console example:
> ROCommunity = controls↵
> ROCommunity ↵
controls
> _
RWCommunity
Description Read Write Saved
Get/set the Read/Write
Community Name √ Administrator √
Displays or changes the SNMP Read/Write Community Name.
Please see chapter Communities for a description of SNMP
communities.
Syntax (read):
RWCommunity
Returned value for read: <name>
Where <name> is the community name
68
Manuale WebGate - cod. +030220230 rel. 1.0 - 16.09.2003

Sintassi (scrittura): RWCommunity = <name>
Dove <name> è il community name.
Il nome deve essere una stringa composta esclusivamente da caratteri
alfanumerici (0…9, A…Z e a…z). Non sono ammessi spazi o segni di
punteggiatura. La lunghezza massima di un nome non deve superare i
10 caratteri.
Valore di default: “public”
Esempio consolle:
> RWCommunity = administ↵
> RWCommunity ↵
administ
> _
ScanDevs
Descrizione Lettura Scrittura Salvato
Scandisce tutti i dispositivi collegati
al WebGate × Administrator ×
Viene effettuata una scansione completa della rete Carel RS485.
Questo comando può risultare utile per aggiornare con immediatezza
le informazioni sui dispositivi collegati, ad esempio quando un’unità
viene sostituita con un’altra di tipo diverso, ma con lo stesso indirizzo
(per esempio l’unità con l’indirizzo “1” era un IR32 che viene sostituito
con un MPX).
Si noti che poiché l’interfaccia rete Carel è completamente reinizializzata,
un’unità non in linea verrà riconosciuta come “mai collegata”.
Sintassi:
ScanDevs
Valore restituito: “Scanning Devices” quando l’operazione è in corso
Stringa di errore in caso di errore
Esempio consolle
> ScanDevs ↵
Scanning devices!
> _
Set
Descrizione Lettura Scrittura Salvato
Assegna un valore numerico ad
un registro × Guest ×
Questa funzione crea un registro e gli assegna il risultato numerico di
un’espressione aritmetica.
Sintassi:
Set(<register>)=<expression>
<register> Nome registro.
<expression> Espressione aritmetica: può essere un numero, un
registro, o una combinazione di entrambi.
Avvertenza: non immettere spazi vuoti all’interno
dell’espressione aritmetica, poiché potrebbero condurre
a risultati erronei.
Si consiglia di leggere il capitolo Espressioni, Registri e Funzioni per
un’accurata descrizione dei registri e delle espressioni aritmetiche.
Esempio consolle:
> Set(Address)=7 ↵
> Eval(Address – 1) ↵
6
> Set(Index)=Address+2 ↵←NON Inserire spazi qui
> Eval(Index – Address + 1) ↵
3
> _
Syntax (write): RWCommunity = <name>
Where <name> is the community name.
The name must be a string composed from alphanumeric characters
only (0…9, A…Z and a…z). No spacing or punctuation characters are
allowed. The maximum name length must not exceed 10 characters.
Default Value: “public”
Console example:
> RWCommunity = administ↵
> RWCommunity ↵
administ
> _
ScanDevs
Description Read Write Saved
Rescan all the devices connected to
the WebGate × Administrator ×
A complete Carel RS485 network scan is performed.
This command may prove useful to update immediately the information
about the connected devices.
For example, when a unit is replace by another one of different type but
with the same address (e.g. the unit with address “1” was an IR32, and
it is replaced with a MPX).
Please note that since the Carel Network Interface is fully reinitialized,
an offline unit will be marked as “never connected”.
Syntax:
ScanDevs
Returned value: “Scanning Devices “ when operation is in progress
Error string if error occurred
Console example:
> ScanDevs ↵
Scanning devices!
> _
Set
Description Read Write Saved
Assigns a numeric value to a register × Guest ×
This function creates an register and assigns the numeric result of an
arithmetic expression to it.
Syntax:
Set(<register>)=<expression>
<register> Register name.
<expression> Arithmetic expression: it may be a number, register, or a
combination of the two.
Warning: do not insert blanks inside arithmetic
expressions, because they could cause wrong results.
Please see chapter About Expressions, Registers and Functions for an
accurate description of registers and arithmetic expressions.
Console example:
> Set(Address)=7 ↵
> Eval(Address – 1) ↵
6
> Set(Index)=Address+2 ↵←DO NOT insert blanks here
> Eval(Index – Address + 1) ↵
3
> _
69
Manuale WebGate - cod. +030220230 rel. 1.0 - 16.09.2003

SetMax
Descrizione Lettura Scrittura Salvato
Imposta il valore massimo consentito
per un registro × Guest ×
Questa funzione definisce il valore massimo di un registro.
Sintassi:
Setmax(<register>)=<expression>
<register> Nome del registro.
<expression> Espressione aritmetica: può essere un numero, un
registro, o una combinazione di entrambi.
Avvertenza: non immettere spazi vuoti all’interno
dell’espressione aritmetica, poiché potrebbero condurre
a risultati erronei.
Si consiglia di leggere il capitolo Espressioni, Registri e Funzioni per
un’accurata descrizione dei registri e delle espressioni aritmetiche.
Nota: Se il registro con il nome dato non è già stato definito prima
dell’esecuzione di “SetMax”, questo registro viene creato e ad esso
viene assegnato il valore più basso tra “0” e il massimo dato.
Esempio consolle:
> SetMax(Address)=10 ↵
> Set(Address)=200 ↵
> Eval(Address) ↵
10
> _
SetMin
Descrizione Lettura Scrittura Salvato
Imposta il valore minimo consentito
per un registro × Guest ×
Questa funzione definisce il valore minimo di un registro.
Sintassi:
Setmin(<register>)=<expression>
<register> Nome del registro.
<expression> Espressione aritmetica: può essere un numero, un
registro, o una combinazione di entrambi.
Avvertenza: non immettere spazi vuoti all’interno
dell’espressione aritmetica, poiché potrebbero condurre
a risultati erronei.
Si consiglia di leggere il capitolo Espressioni, Registri e Funzioni per
un’accurata descrizione dei registri e delle espressioni aritmetiche.
Nota: Se il registro con il nome dato non è già stato definito prima
dell’esecuzione di “SetMin”, questo registro viene creato e ad esso
viene assegnato il valore più alto tra “0” e il minimo dato.
Esempio consolle:
> SetMin(Address)=20 ↵
> Set(Address)=7 ↵
> Eval(Address) ↵
20
> _
SNMPSyscont
Descrizione Lettura Scrittura Salvato
Ottiene/imposta l’SNMP System Contact √ Administrator √
Visualizza o modifica l’SNMP System Contac Namet.
Si veda il capitolo Protocollo SNMP per WebGate per la descrizione
dell’SNMP.
Questa stringa viene utilizzata dai Manager SNMP.
Sintassi (lettura):
SNMPSyscont
Valore restituito in lettura: <name>
Dove <name> è il nome del system contact
SetMax
Description Read Write Saved
Set the maximum allowed value for
a register × Guest ×
This function defines a maximum value for a register.
Syntax: Setmax(<register>)=<expression>
<register> Register name.
<expression> Arithmetic expression: it may be a number, register, or
a combination of the two.
Warning: do not insert blanks inside arithmetic
expressions, because they could cause wrong results.
Please see chapter About Expressions, Registers and Functions for an
accurate description of registers and arithmetic expressions.
Note: If a register with the given name was not already defined when
“SetMax” is called the register itself is created, and the lowest value
between “0” and the given maximum is assigned to it.
Console example:
> SetMax(Address)=10 ↵
> Set(Address)=200 ↵
> Eval(Address) ↵
10
> _
SetMin
Description Read Write Saved
Set the minimum allowed value for
a register × Guest ×
This function defines a minimum value for a register.
Syntax:
Setmin(<register>)=<expression>
<register> Register name.
<expression> Arithmetic expression: it may be a number, register, or a
combination of the two.
Warning: do not insert blanks inside arithmetic
expressions, because they could cause wrong results.
Please see chapter About Expressions, Registers and Functions for an
accurate description of registers and arithmetic expressions.
Note: If a register with the given name was not already defined when
“SetMin” is called the register itself is created, and the greatest value
between “0” and the given minimum is assigned to it.
Console example:
> SetMin(Address)=20 ↵
> Set(Address)=7 ↵
> Eval(Address) ↵
20
> _
SNMPSyscont
Description Read Write Saved
Get/set the SNMP System Contact √ Administrator √
Displays or changes the SNMP System Contact Name.
Please see chapter WebGate SNMP Protocol for a description of
SNMP.
This string is used from SNMP Managers.
Syntax (read):
SNMPSyscont
Returned value for read: <name>
Where <name> is the system name
70
Manuale WebGate - cod. +030220230 rel. 1.0 - 16.09.2003

Sintassi (scrittura): SNMPSyscont = <name>
Dove <name> è il nome del system contact.
Il nome deve essere una stringa composta esclusivamente da caratteri
alfanumerici (0…9, A…Z e a…z). Non sono ammessi spazi o segni di
punteggiatura. La lunghezza massima di un nome non deve superare
gli 80 caratteri.
Valore di default: “Undefined”
Esempio consolle:
> SNMPSyscont = JohnSmith↵
> SNMPSyscont ↵
JohnSmith
> _
SNMPSysloc
Descrizione Lettura Scrittura Salvato
Ottiene/imposta l’SNMP System Location √ Administrator √
Visualizza o modifica la stringa dell’SNMP System Location. Si veda il
capitolo Protocollo SNMP per WebGate per la descrizione dell’SNMP.
Questa stringa viene utilizzata dai Manager SNMP.
Sintassi (lettura):
SNMPSysloc
Valore restituito in lettura: <location>
Dove <location> è il system location
Sintassi (scrittura):
SNMPSysloc = <location>
Dove <location> è il system location.
Il nome deve essere una stringa composta esclusivamente da caratteri
alfanumerici (0…9, A…Z e a…z). Non sono ammessi spazi o segni di
punteggiatura. La lunghezza massima di un nome non deve superare i
80 caratteri.
Valore di default: “Undefined”
Esempio consolle:
> SNMPSysloc = Roof↵
> SNMPSysloc ↵
Roof
> _
SNMPSysname
Descrizione Lettura Scrittura Salvato
Ottiene/imposta l’SNMP System Name √ Administrator √
Visualizza o modifica la stringa dell’SNMP System Name.
Si veda il capitolo Protocollo SNMP per WebGate per la descrizione
dell’SNMP.
Questa stringa viene utilizzata dal manager SNMP.
Sintassi (lettura):
SNMPSysloc
Valore restituito in lettura: <name>
Dove <name> è il system name
Sintassi (scrittura):
SNMPSysloc = <name>
Dove <name> è il system name.
Il nome deve essere una stringa composta esclusivamente da caratteri
alfanumerici (0…9, A…Z e a…z). Non sono ammessi spazi o segni di
punteggiatura. La lunghezza massima di un nome non deve superare i
40 caratteri.
Valore di default: “CarelWebgate”
Esempio consolle:
> SNMPSysname = PlantChillersSystem↵
> SNMPSysname ↵
PlantChillersSystem
> _
Syntax (write): SNMPSyscont = <name>
Where <name> is the system contact name.
The name must be a string composed from alphanumeric characters
only (0…9, A…Z and a…z). No spacing or punctuation characters are
allowed.
The maximum name length must not exceed 80 characters.
Default Value: “Undefined”
Console example:
> SNMPSyscont = JohnSmith↵
> SNMPSyscont ↵
JohnSmith
> _
SNMPSysloc
Description Read Write Saved
Get/set the SNMP System Location √ Administrator √
Displays or changes the SNMP System Location string.
Please see chapter SNMP for a description of SNMP.
This string is used from SNMP Managers.
Syntax (read):
SNMPSysloc
Returned value for read: <location>
Where <location> is the system location
Syntax (write):
SNMPSysloc = <location>
Where <location> is the system location.
The location must be a string composed from alphanumeric characters
only (0…9, A…Z and a…z). No spacing or punctuation characters are
allowed. The maximum string length must not exceed 80 characters.
Default Value: “Undefined”
Console example:
> SNMPSysloc = Roof↵
> SNMPSysloc ↵
Roof
> _
SNMPSysname
Description Read Write Saved
Get/set the SNMP System Name √ Administrator √
Displays or changes the SNMP System Name string.
Please see chapter WebGate SNMP Protocol for a description of
SNMP.
This string is used from SNMP Managers.
Syntax (read):
SNMPSysloc
Returned value for read: <name>
Where <name> is the system location
Syntax (write):
SNMPSysloc = <name>
Where <name> is the system name.
The name must be a string composed from alphanumeric characters
only (0…9, A…Z and a…z). No spacing or punctuation characters are
allowed. The maximum string length must not exceed 40 characters.
Default Value: “CarelWebgate”
Console example:
> SNMPSysname = PlantChillersSystem↵
> SNMPSysname ↵
PlantChillersSystem
> _
71
Manuale WebGate - cod. +030220230 rel. 1.0 - 16.09.2003
SNMPAgentRel
Descrizione Lettura Scrittura Salvato
Restituisce la versione software
dell’Agent SNMP √ ××
Questa funzione restituisce la versione software dell’SNMP Agent.
Sintassi:
SWVersion
Valore restituito: <Version>
<Version> identifica una modifica importante al software
Esempio consolle:
> SNMPAgentRel ↵
10
> _
Status
Descrizione Lettura Scrittura Salvato
Visualizza lo stato attuale del WebGate √ ××
Questo comando restituisce un breve rapporto sullo stato attuale del
WebGate.
L’utilizzo di questo comando è pensato principalmente ai fini della
risoluzione dei problemi da parte del personale Carel.
Sintassi:
Status
Esempio consolle:
> Status ↵
WebGate Status Summary:
Access Level: 250
root code begins at 00:0000, ends at 00:6993
root data begins at 92:cbff, ends at 92:7d32
xmem code begins at f9:e000, ends at 2c:eec4
stack begins at d000, ends at dfff
largest xalloc block available: 9656 bytes
LWM configurazione file valid.
number of open files: 0
free timers: 10
> _
Status485
Descrizione Lettura Scrittura Salvato
Ottiene informazioni sull’interfaccia
RS485 e rete Carel √ ××
Questo comando restituisce una breve riga di stato dell’interfaccia
RS485. Può essere utile quando si sospetta un problema di
configurazione dell’RS485.
Sintassi:
Status485
Valore restituito:
La stringa esplicativa potrebbe essere una delle seguenti:
• “RS485 settings are valid. Baudrate selected: xxx” quando non vi è
errore, oppure
• “Error during LWM Table compilation!” se il file di configurazione
(LWM) dei dispositivi di basso livello non è valido. Se questo è il
vostro caso, contattate Carel per farvi inviare un file di configurazione
aggiornato.
• Un’indicazione di errata selezione del baudrate
Esempio consolle:
> Status485 ↵
RS485 settings are valid.
Baudrate selected: 19200
> _
SNMPAgentRel
Description Read Write Saved
Return the Agent software release √ ××
This function returns the SNMP Agent software version.
Syntax:
SWVersion
Returned value: <Version>
<Version> is used to identify a major software change
Console example:
> SNMPAgentRel ↵
10
> _
Status
Description Read Write Saved
Displays the current WebGate status √ ××
This command return a brief WebGate status report.
The use of this command is intended mainly for Carel internal debug
purposes.
Syntax:
Status
Console example:
> Status ↵
WebGate Status Summary:
Access Level: 250
root code begins at 00:0000, ends at 00:6993
root data begins at 92:cbff, ends at 92:7d32
xmem code begins at f9:e000, ends at 2c:eec4
stack begins at d000, ends at dfff
largest xalloc block available: 9656 bytes
LWM configuration file valid.
number of open files: 0
free timers: 10
> _
Status485
Description Read Write Saved
Get information about the RS485 and
Carel Network interface √ ××
This command return a syntetic RS485 interface status line. It can be
useful when a RS485 configuration trouble is suspected.
Syntax: Status485
Returned value:
The explanatory string will be one of the following:
• “RS485 settings are valid. Baudrate selected: xxx” when no error
occurred, or
• “Error during LWM Table compilation!” if the low-level devices
configuration file (LWM) is not valid. If this is the case, contact Carel
for to obtain an updated configuration file.
• An indication of wrong baudrate selection
Console example:
> Status485 ↵
RS485 settings are valid.
Baudrate selected: 19200
> _
72
Manuale WebGate - cod. +030220230 rel. 1.0 - 16.09.2003

SWVersion
Descrizione Lettura Scrittura Salvato
Restituisce la versione software del
WebGate √ ××
Questa funzione restituisce l’ultima versione aggiornata del software
WebGate.
Si noti che vengono rintracciati solo gli aggiornamenti del firmware.
L’aggiornamento del File System non influisce su questo numero.
Sintassi:
SWVersion
Valore restituito: <Version>.<Release> (build <build>), created on <date>
<Version> identifica una modifica importante nel software
<Release> identifica una modifica minore nel software
<Build> indica il build del software
<Date> la data in cui è stato compilato il software
Esempio consolle:
> SWVersion ↵
0.8 (build 28), created on 18/06/2002 11:15:07
> _
TrapCommunity
Descrizione Lettura Scrittura Salvato
Ottiene/imposta il Trap
Community Name √ Administrator √
Visualizza o modifica l’SNMP Community Name per i trap inviati.
Si veda il capitolo Community per la descrizione delle community SNMP.
Sintassi (lettura):
TrapCommunity
Valore restituito in lettura: <name>
Dove <name> è il community name
Sintassi (scrittura):
TrapCommunity = <name>
Dove <name> è il community name. Il nome deve essere una stringa
composta esclusivamente da caratteri alfanumerici (0…9, A…Z e
a…z). Non sono ammessi spazi o segni di punteggiatura. La lunghezza
massima di un nome non deve superare i 10 caratteri.
Valore di default: “public”
Esempio consolle:
> TrapCommunity = trapcom↵
> TrapCommunity ↵
trapcom
> _
TrapIPAddress
Descrizione Lettura Scrittura Salvato
Ottiene/imposta l’indirizzo IP del
Trap Manager √ Administrator √
Visualizza o modifica l’indirizzo IP del Trap Manager SNMP.
Si veda il capitolo Community per la descrizione delle community SNMP.
Sintassi (lettura):
TrapIPAddress
Valore restituito in lettura: <IPx>.<IPy>.<IPz>.<IPw>
Dove <IPx>, <IPy>, <IPz> e <IPw> sono i quattro byte dell’indirizzo IP
espressi con la stringa standard, in formato separato da punti.
Sintassi (scrittura):
TrapIPAddress = <IPx>.<IPy>.<IPz>.<IPw>
Dove <IPx>, <IPy>, <IPz> e <IPw> sono i quattro byte dell’indirizzo IP
espressi con la stringa standard, in formato separato da punti.
Valori ammessi: Qualsiasi combinazione di quattro numeri compresi
tra 0 e 255.
Per disabilitare le trasmissioni trap dal WebGate, impostate questo
valore a 255.255.255.255
SWVersion
Description Read Write Saved
Return the WebGate software version √ ××
This function returns the latest WebGate software update version
(revision).
Please note that only firmware updates are tracked. File System
updates don’t change this number.
Syntax:
SWVersion
Returned value: <Version>.<Release> (build <build>), created on <date>
<Version> is used to identify a major software change
<Release> is used to identify a minor software change
<Build> indicates the software build.
<Date> the complete date when the software was put together
Console example:
> SWVersion ↵
0.8 (build 28), created on 18/06/2002 11:15:07
> _
TrapCommunity
Description Read Write Saved
Get/set the Trap Community Name √ Administrator √
Displays or changes the SNMP Community Name for traps sent.
Please see chapter Communities for a description of SNMP communities.
Syntax (read):
TrapCommunity
Returned value for read: <name>
Where <name> is the community name
Syntax (write):
TrapCommunity = <name>
Where <name> is the community name.
The name must be a string composed from alphanumeric characters
only (0…9, A…Z and a…z). No spacing or punctuation characters are
allowed. The maximum name length must not exceed 10 characters.
Default Value: “public”
Console example:
> TrapCommunity = trapcom↵
> TrapCommunity ↵
trapcom
> _
TrapIPAddress
Description Read Write Saved
Get/set the trap manager IP address √ Administrator √
Displays or changes the SNMP trap manager IP address.
Please see chapter Communities for a description of SNMP
communities.
Syntax (read):
TrapIPAddress
Returned value for read: <IPx>.<IPy>.<IPz>.<IPw>
Where <IPx>, <IPy>, <IPz> and <IPw> are the four bytes of IP
expressed using the standard dotted format string.
Syntax (write):
TrapIPAddress = <IPx>.<IPy>.<IPz>.<IPw>
Where <IPx>, <IPy>, <IPz> and <IPw> are the four bytes of IP
expressed using the standard dotted decimal format string.
Allowed values: Any combination of four numbers in the range
0…255.
To disable trap transmissions from WebGate, set this value to
255.255.255.255
73
Manuale WebGate - cod. +030220230 rel. 1.0 - 16.09.2003

Nota: Quando si modifica l’indirizzo IP del Trap, il WebGate
memorizzerà immediatamente il valore appena selezionato.Tuttavia il
vecchio valore continuerà ad essere utilizzato finché ci sarà una
connessione SNMP attiva.
Valore di ritormo in scrittura:
Potrà verificarsi una di queste situazioni:
• Valore valido e nessuna connessione attiva: IP value updated!
• Valore valido e una o più connessioni attive: Valid for next connection!
Valore non valido: stirnga “bad value” o “syntax error”.
Valore di default: 255.255.255.255 (disabled)
Esempio consolle:
> TrapIPAddress=192.168.0.25 ↵
IP value updated!
> TrapIPAddress ↵
192.168.0.25
> _
UpdateStatus
Descrizione Lettura Scrittura Salvato
Restituisce il codice di errore dell’ultimo
riavvio dopo un aggiornamento √ ××
Questo comando restituisce una stringa che specifica l’errore
eventualmente verificatosi con l’ultimo riavvio o con l’ultimo tentativo di
aggiornamento del firmware.
Si noti che l’esistenza di un file di aggiornamento viene controllata ad
ogni riavvio del WebGate e non durante il suo normale funzionamento.
La procedura di aggiornamento è descritta al capitolo Aggiornamento
del firmware.
Sintassi:
UpdateStatus
Valore restituito:
• “Update file not found” se non è stato trovato alcun file. Questo
messaggio è del tutto normale. Non si tratta di un errore ma
semplicemente di un avviso che non è stato trovato alcun file di
aggiornamento. Si noti che, dopo ciascun aggiornamento andato a
buon fine, il file di aggiornamento utilizzato viene cancellato per
liberare spazio per i nuovi file utente.
• “Not a valid WebGate update file” o “Incompatible update file” quando
il file sembra essere quello di aggiornamento ma si dimostra non
adatto al WebGate. E’ possibile che abbiate caricato un file di
aggiornamento per un dispositivo diverso da WebGate.
• “Update file corrupted” quando il file è danneggiato. Contattate Carel
per ottenere un file integro.
Esempio consolle:
> UpdateStatus ↵
Update file not found (code -900)
> _
UserLevel
Descrizione Lettura Scrittura Salvato
Ottiene/imposta il livello di accesso
di un utente √ Guest √
Visualizza o modifica il livello di accesso di un utente.
Si veda il capitolo Gestione Utenti per la descrizione del sistema di
gestione degli utenti.
Sintassi (lettura):
UserLevel(<index>)
Dove <index> rappresenta l’indice utente nella tabella utenti (0…5)
Valore restituito in lettura: <level>
Dove <level> è un numero compreso nell’intervallo 0…249 che
individua il livello di accesso di un utente dato.
Note: When you change Trap IP address, WebGate will immediately
store the value just selected. However, the old value will be used until a
SNMP connection is still active.
Returned value for write:
One of the following situations may occur:
• Valid value entered and no connections still active: IP value updated!
• Valid value entered and one or more connections still active:
Valid for next connection!
• Invalid value entered: “bad value” or “syntax error” string.
Default Value: 255.255.255.255 (disabled)
Console example:
> TrapIPAddress=192.168.0.25 ↵
IP value updated!
> TrapIPAddress ↵
192.168.0.25
> _
UpdateStatus
Description Read Write Saved
Return the last update error code √ ××
This command return a string specifying the error occurred (if any)
when the last reboot was performed and a firmware update was tried.
Please note that the existence of an updated file is checked at every
WebGate reboot, and not during normal operation. The update
procedure is described in chapter Firmware Upgrade.
Syntax:
UpdateStatus
Returned value:
• “Update file not found” if no file was found. This is the normal
behaviour and not an error, but simply an advise that no update file
was found. Furthermore, please note that after any successful
upgrade the used update file is deleted to free up some space for
new user files.
• “Not a valid WebGate update file” or “Incompatible update file” when
a file seems devised to upgrade but prove itself not adequate for
WebGate.You may have uploaded an update file for a different device
other than WebGate.
• “Update file corrupted” when the file is damaged. Contact Carel to
obtain a functional file.
Console example:
> UpdateStatus ↵
Update file not found (code -900)
> _
UserLevel
Description Read Write Saved
Get/set the given access level √ Guest √
Displays or changes the access level of the given user.
Please see chapter User Management for a description of user
management system.
Syntax (read):
UserLevel(<index>)
Where <index> represents the user index in the users table (0…5)
Returned value for read: <level>
Where <level> is a number in the range 0…249 indicating the access
level of the given user.
74
Manuale WebGate - cod. +030220230 rel. 1.0 - 16.09.2003

Sintassi (scrittura): UserLevel(<index>) = <level>
Dove <index> rappresenta l’indice utente nella tabella utenti (0…5), e
<level> è un numero compreso nell’intervallo 0…249 che individua il
livello di accesso di un utente dato.
Gli utenti possono modificare le informazioni di utenti con il loro stesso
livello di accesso o uno inferiore. Ad esempio, un administrator (livelli
da 200 a 249) può cambiare le informazioni dei supervisor (livelli da
150 a 199), ma un supervisor non può cambiare il livello di accesso di
un administrator.
Inoltre, il livello di accesso che si imposta per un utente non può
essere maggiore del livello di accesso dell’utente attuale, visualizzato
dal comando “accesslevel”. Questo è necessario al fine di evitare che
un utente aumenti arbitrariamente il proprio livello di accesso.
Valori suggeriti: Per semplificare la gestione degli utenti, usate solo i
valori suggeriti qui sotto:
Livello Valore suggerito
Guest 99
User 149
supervisor 199
administrator 249
Valore di default: “administrator” (249)
Esempio consolle:
> UserLevel(3) = 99↵
> UserLevel(3) ↵
99
> _
UserLevelString
Descrizione Lettura Scrittura Salvato
Restituisce la stringa descrittiva del
livello di accesso minimo per un
utente dato √ ××
Visualizza una stringa che descrive il livello di accesso di un utente dato.
Si veda il capitolo Gestione Utenti per la descrizione del sistema di
gestione utenti.
Sintassi:
UserLevelString(<index>)
Dove <index> rappresenta l’indice utente nella tabella utenti (0…5)
Valore restituito in lettura: <levelstring>
Dove <levelstring> è una stringa che indica il livello di accesso
dell’utente come indicato nella tabella qui sotto:
Livello utente Stringa descrittiva
Da 0 a 99 guest
Da 100 a 149 User
Da 150 a 199 supervisor
Da 200 a 249 administrator
Esempio consolle:
> UserLevel(3) = 99↵
> UserLevelString(3) ↵
guest
> _
Syntax (write): UserLevel(<index>) = <level>
Where <index> represents the user index in the users table (0…5), and
<level> is a number in the range 0…249 indicating the access level of
the given user.
Please note that operators are only allowed to change information of
users with their same or lower access level. For example, an
administrator (level 200…249) can change supervisors information
(level 150…199) , but a supervisor cannot change the access level of
any administrator.
Furthermore, the access level set for an user cannot be greater than
the current access level of the operator, stated from the “accesslevel”
command. This is necessary to avoid that an operator arbitrarily elevate
his proper access level.
Suggested Values: To simplify users management, please use only
the following suggested values:
Desired Level Suggested Value
guest 99
user 149
supervisor 199
administrator 249
Default Value: “administrator” (249)
Console example:
> UserLevel(3) = 99↵
> UserLevel(3) ↵
99
> _
UserLevelString
Description Read Write Saved
Return the minimum access level
descriptive string for a given user √ ××
Displays a string describing the access level of the given user.
Please see chapter User Management for a description of user
management system.
Syntax:
UserLevelString(<index>)
Where <index> represents the user index in the users table (0…5)
Returned value for read: <levelstring>
Where <levelstring> is a string indicating the access level of the given
user as indicated in the table below:
User Level Descriptive String
From 0 to 99 guest
From 100 to 149 user
From 150 to 199 supervisor
From 200 to 249 administrator
Console example:
> UserLevel(3) = 99↵
> UserLevelString(3) ↵
guest
> _
75
Manuale WebGate - cod. +030220230 rel. 1.0 - 16.09.2003

UserName
Descrizione Lettura Scrittura Salvato
Ottiene/imposta il nome utente dato √ Guest √
Visualizza o modifica il nome utente.
Si veda il capitolo Gestione Utenti per la descrizione del sistema di
gestione utenti.
Sintassi (lettura):
UserName(<index>)
Dove <index> rappresenta l’indice utente nella tabella utenti (0…5)
Valore restituito in lettura: <name>
Dove <name> è il nome utente.
Sintassi (scrittura):
UserName(<index>) = <name>
Dove <index> rappresenta l’indice utente nella tabella utenti (0…5), e
<name> è il nuovo nome utente.
Il nome deve essere una stringa composta esclusivamente da caratteri
alfanumerici (0…9, A…Z e a…z). Non sono ammessi spazi o segni di
punteggiatura. La lunghezza massima di un nome non deve superare i
20 caratteri.
Se il nome dato è “anonymous”, le regole di accesso di quel nome
verranno applicate a qualsiasi accesso anonimo (da HTTP, FTP o
consolle).
Se desiderate eliminare un utente e lasciate quella voce di tabella
vuota, potete semplicemente utilizzare una stringa vuota per il nome
(vedi l’esempio consolle qui sotto).
Gli utenti possono modificare le informazioni di utenti con il loro stesso
livello di acesso o uno inferiore. Ad esempio, un administrator (livelli da
200 a 249) può cambiare le informazioni dei supervisor (livelli da 150 a
199), ma un supervisor non può cambiare il livello di accesso di un
administrator.
Si noti anche che quando più di una voce nella tabella si riferisce allo
stesso nome utente, verrà utilizzata quella con l’indice più basso. Ad
esempio, se “UserName(2)=John” e “UserName(4)=John”, il livello di
accesso e la password verranno da “UserLevel(2)” e “UserPwd(2)”.
Valore di default: Stringa vuota (non utilizzata)
Esempio consolle:
> UserName(3) = John↵
> UserName(3) ↵
John
> UserName(4) = ↵←Stringa vuota: l’entrata
no 4 viene liberata
> UserName(4) ↵
> _
UserPwd
Descrizione Lettura Scrittura Salvato
Ottiene/imposta una password utente √ Guest √
Visualizza o modifica la password dell’utente.
Si veda il capitolo Gestione Utenti per la descrizione del sistema di
gestione degli utenti
Sintassi (lettura):
UserPwd(<index>)
Dove <index> rappresenta l’indice utente nella tabella utenti (0…5)
Valore restituito in lettura: <password>
Dove <password> è la password utente.
Gli utenti possono vedere le password di utenti con il loro stesso livello
di accesso o inferiore. Altrimenti viene visualizzata una riga di
asterischi.
Sintassi (scrittura):
UserPwd(<index>) = <password>
Dove <index> rappresenta l’indice utente nella tabella utenti (0…5), e
<password> è il nuovo nome utente.
UserName
Description Read Write Saved
Get/set the given user name √ Guest √
Displays or changes an user name.
Please see chapter User Management for a description of user
management system.
Syntax (read):
UserName(<index>)
Where <index> represents the user index in the users table (0…5)
Returned value for read: <name>
Where <name> is the user name.
Syntax (write):
UserName(<index>) = <name>
Where <index> represents the user index in the users table (0…5), and
<name> is the new user name.
The name must be a string composed from alphanumeric characters
only (0…9, A…Z and a…z). No spacing or punctuation characters are
allowed. The maximum name length must not exceed 20 characters.
If the given name is “anonymous”, the access rules of that table entry
will be applied to any anonymous access (from HTTP, FTP or console).
If you want to erase an user and left the table entry empty, simply use
an empty string for the name (see the console example below).
Please note that operators are only allowed to change information of
users with their same or lower access level. For example, an
administrator (level 200…249) can change supervisors information
(level 150…199), but a supervisor cannot change the user name of any
administrator.
Also note that when more than a table entry refers to the same user
name, the one with the lowest index will be used. For example, if
“UserName(2)=John” and “UserName(4)=John”, access level and
password will be bring from “UserLevel(2)” and “UserPwd(2)”.
Default Value: Empty string (unused)
Console example:
> UserName(3) = John↵
> UserName(3) ↵
John
> UserName(4) = ↵←Empty string: the entry no
4 is freed
> UserName(4) ↵
> _
UserPwd
Description Read Write Saved
Get/set the given user password √ Guest √
Displays or changes an user password.
Please see chapter User Management for a description of user
management system.
Syntax (read):
UserPwd(<index>)
Where <index> represents the user index in the users table (0…5)
Returned value for read: <password>
Where <password> is the user password.
Please note that operators are only allowed to view passwords of users
with their same or lower access level. If this is not the case, a line of
asterisks will be shown.
Syntax (write):
UserPwd(<index>) = <password>
Where <index> represents the user index in the users table (0…5), and
<password> is the new user name.
76
Manuale WebGate - cod. +030220230 rel. 1.0 - 16.09.2003

Il nome deve essere una stringa composta esclusivamente da caratteri
alfanumerici (0…9, A…Z e a…z). Non sono ammessi spazi o segni di
punteggiatura. La lunghezza massima di un nome non deve superare i
20 caratteri.
Se la password data è una stringa vuota, l’utente avrà accesso al
WebGate con qualsiasi stringa al posto della password (si noti che se
si utilizza la consolle, il comando “passwd=” va usato comunque).
Gli utenti possono modificare le informazioni di utenti che abbiano il
loro stesso livello di accesso o uno inferiore. Ad esempio, un
administrator (livelli da 200 a 249) può cambiare le informazioni dei
supervisor (livelli da 150 a 199), ma un supervisor non può cambiare
la password di un administrator.
Valore di default: Stringa vuota (nessuna password richiesta)
Esempio consolle:
> UserPwd(3) = Hello↵
> UserPwd(3) ↵
Hello
> UserPwd(4) = ↵←Stringa vuota: l’utente no
4 potrà accedere con qualsiasi password
> _
Var
Descrizione Lettura Scrittura Salvato
Ottiene/imposta il valore di una
variabile di un dispositivo √ Supervisor ×
Questa funzione visualizza o modifica una variabile di un’unità Carel
collegata all’interfaccia RS485.
Sintassi (lettura):
Var(<address>, <type>, <index>)
Dove <address> rappresenta l’indirizzo dell’unità (da “1” fino al valore
indicato dalla funzione “MaxDevs”),
<type> il tipo di variabile in lettura. Può essere uno dei
seguenti valori:
“1“: digitale
“2“: analogico
“3“: intero
<index> indice della variabile nell’unità
Valore restituito in lettura: Viene restituito uno dei seguenti valori:
- il valore della variabile richiesta, se disponibile e se non si verificano
errori
- un messaggio di avvertimento se il valore non è disponibile, ad
esempio:
"Please wait, checking status!" o "variable not yet updated." se la
variabile non è stata ancora acquisita, "Unit OFF-LINE: unreliable
value!" se il dispositivo non è in linea
- un messaggio di errore se viene immesso un parametro errato
Sintassi (scrittura):
Var(<address>, <type>, <index>, <min>, <max>) =
<value>
Dove <address> rappresenta l’indirizzo dell’unità (da “1” fino al valore
indicato dalla funzione “MaxDevs”),,
<type> tipo di variabile in scrittura. Può essere uno dei
seguenti valori:
“1“: digitale
“2“: analogico
“3“: intero
<index> indice della variabile nell’unità
<min> valore minimo ammesso. E’ richiesto per evitare una
configurazione errata del dispositivo quando si
utilizzano pagine HTML, dovuta ad errori involontari
dell’utente. Il valore minimo ammesso è indicato nel
manuale d’uso di ciascun dispositivo.Non utilizzate
mai un valore più basso, poiché potrebbe causare il
malfunzionamento dell’unità.
The password must be a string composed from alphanumeric characters
only (0…9, A…Z and a…z). No spacing or punctuation characters are
allowed. The maximum password length must not exceed 20 characters.
If the given password is an empty string, the user will access to
WebGate with any string in place of the password (is pointed out that
when using the console, the “passwd=” command must be used
anyway).
Please note that operators are only allowed to change information of
users with their same or lower access level. For example, an
administrator (level 200…249) can change supervisors information
(level 150…199), but a supervisor cannot change the password of any
administrator.
Default Value: Empty string (no password required)
Console example:
> UserPwd(3) = Hello↵
> UserPwd(3) ↵
Hello
> UserPwd(4) = ↵←Empty string: the user no 4
will enter with any password
> _
Var
Description Read Write Saved
Get/set a device variable value √ Supervisor ×
This function displays or changes a variable of a Carel unit connected
to the RS485 interface.
Syntax (read):
Var(<address>, <type>, <index>)
Where <address> represents the unit address (from “1” up to the
value indicated from the “MaxDevs” function),
<type> is the type of variable to read. It can be one of the
following values:
“1“: digital
“2“: analog
“3“: integer
<index> index of the variable in the unit
Returned value for read: One of the following values is returned:
- value of the required variable if ready and no error occurred
- warning message if the value is not available, for example:
"Please wait, checking status!" or "variable not yet updated." if the
variable was not acquired yet, "Unit OFF-LINE: unreliable value!" if
the device is not online
- an error message if a bad parameter value is entered
Syntax (write):
Var(<address>, <type>, <index>, <min>, <max>) =
<value>
Where <address> represents the unit address (from “1” up to the
value indicated from the “MaxDevs” function),
<type> is the type of variable to write. It can be one of the
following values:
“1“: digital
“2“: analog
“3“: integer
<index> index of the variable in the unit
<min> minimum value allowed. This is required, when
using HTML pages, to avoid device
misconfiguration of the device.The minimum value
allowed is indicated in the user manual of the
specific device. Don’t use a lower value, since this
may cause unit malfunction.
77
Manuale WebGate - cod. +030220230 rel. 1.0 - 16.09.2003

<max> valore massimo ammesso. E’ richiesto per evitare
una configurazione errata del dispositivo quando si
utilizzano pagine HTML, dovuta ad errori involontari
dell’utente. Il valore massimo ammesso è indicato
nel manuale d’uso di ciascun dispositivo.Non
utilizzate mai un valore più alto, poiché potrebbe
causare il malfunzionamento dell’unità.
<value> valore da assegnare alla variabile
Valore restituito in scrittura:
Viene restituito uno dei seguenti valori:
• “Write operation terminated!” se il valore è stato immediatamente
aggiornato o era lo stesso letto in precedenza.
• “Message sent. Read new value” se il valore è stato accettato e verrà
inviato all’unità. Dato che la trasmissione viene effettuata in background
per evitare rallentamenti nel sistema, utilizzando la consolle, l’utente
dovrebbe andare a leggere il valore dopo un po’ di tempo, per
assicurarsi che l’operazione sia andata a buon fine. Con l’HTTP, in
genere, la pagina non viene trasmessa per intero fino a che
l’operazione non è completa (vedi Uso di Text-Box e Button nei form).
• “Variable read only: write operation aborted!” se la variabile non è
accessibile in scrittura. (Potrebbe essere il caso, ad esempio, della
lettura di una sonda).
• Un ulteriore messaggio di errore appare se viene digitato un
parametro errato o assegnato un valore errato.
Esempio consolle:
> Var(1,2,3) ↵
33.0
> Var(1,2,3,0,50)=20 ↵
Message sent. Read new value
> _
WakeOn
Descrizione Lettura Scrittura Salvato
Visualizza il tempo trascorso
dall’ultimo riavvio del WebGate √ ××
Restituisce una stringa che indica il tempo trascorso dall’ultimo riavvio
del WebGate.
Sintassi: WakeOn
Valore restituito: Time elapsed from last reset: <days> day, <hr> hour,
<min> min, <sec> sec
Esempio consolle:
> WakeOn↵
Time elapsed from last reset: 0 day, 2 hour, 51
min, 33 sec
> _
<max> maximum value allowed. This is required, when
using HTML pages, to avoid device
misconfiguration of the device due to involuntary
user errors. The maximum value allowed is
indicated in the user manual of the specific device.
Don’t use a higher value, since this may cause
unit malfunction.
<value> value to assign to the variable
Returned value for write:
One of the following values is returned:
• “Write operation terminated!” if the value was immediately updated or
was the same value read before.
• “Message sent. Read new value” if the value is accepted and is going
to be sent to the unit. Since the transmission is performed in
background to avoid system slow-downs, using console the user
should read the value after a while to make sure the operation was
completed. When using HTTP, generally the page is not entirely
transmitted until the operation is completed (see Using Text-Boxes
and Buttons inside forms).
• “Variable read only: write operation aborted!” if the variable cannot be
accessed in writing. (This may be the case, for example, of a probe
readout).
• Another error message appears if a bad parameter or bad
assignment value is entered.
Console example:
> Var(1,2,3) ↵
33.0
> Var(1,2,3,0,50)=20 ↵
Message sent. Read new value
> _
WakeOn
Description Read Write Saved
Displays the time elapsed since the
last WebGate reboot √ ××
Return a string indicating the time elapsed since the last WebGate
reset.
Syntax:
WakeOn
Returned value: Time elapsed from last reset: <days> day, <hr> hour,
<min> min, <sec> sec
Console example:
> WakeOn↵
Time elapsed from last reset: 0 day, 2 hour, 51
min, 33 sec
> _
78
Manuale WebGate - cod. +030220230 rel. 1.0 - 16.09.2003
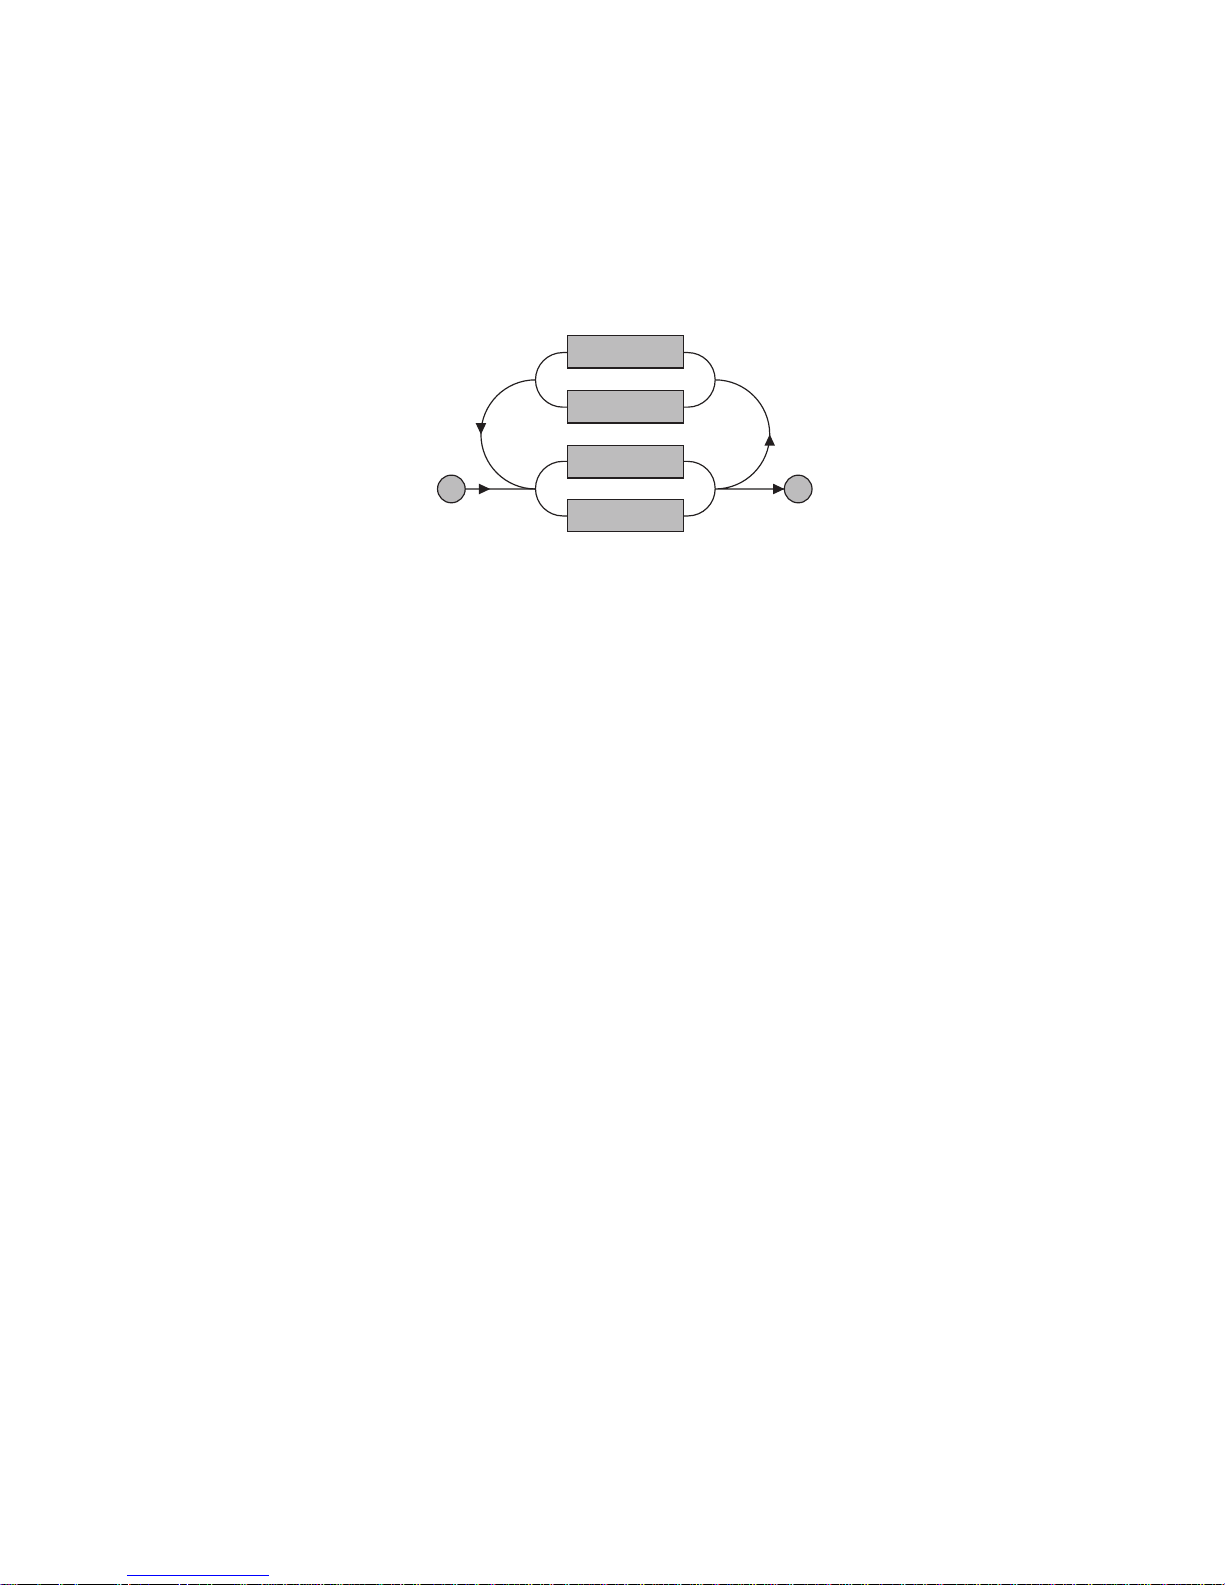
12. Expressioni, Registri e Funzioni
Per dare alle pagine HTML una maggiore flessibilità di programmazione,
alcune funzioni permettono l’utilizzo di semplici espressioni aritmetiche
con numeri interi nei loro parametri o nell’assegnazione di valori.
Le espressioni aritmetiche comprendono numeri, registri (vedi
paragrafo successivo), o una combinazione di entrambi:
Numero - esempio: Var(1, 1, 1)
Registro - esempio: Var(1, 1, Index)
Espressione complessa - esempio: Var(Address - 1, Type,
Index + 1)
Graficamente, un’espressione potrebbe avere questo aspetto:
Le funzioni principali che permettono l’utilizzo di espressioni nei loro
parametri sono:
• Var (per i parametri <address>, <type> e <index>)
• Eval
• UserLevel
• UserLevelString
• UserName
• UserPwd
Le funzioni principali che permettono l’utilizzo di espressioni
nell’assegnazione di valori sono:
• Set
• SetMin
• SetMax
• UserLevel
12.1 Registri
Un “registro” è una stringa alfabetica che non fa distinzione tra
maiuscole e minuscole, contiene un massimo di 16 caratteri e
rappresenta un numero intero compreso tra–2-31+1 e 231-1.
Per creare un registro, potete utilizzare le funzioni “Set”, “SetMin” o
“SetMax”.
Nell’utilizzo dei registri, sono da tenere in considerazione questi punti:
• Ai registri non è permesso assumere valori che superino i limiti
imposti dalle funzioni “SetMin” e “SetMax”. Se un’espressione ha
come risultato un valore più basso o più alto, questo verrà riportato
entri i limiti imposti.
• Oltre ai registri predefiniti di sola lettura, possono essere abilitati un
massimo di 8 registri utente nello stesso momento. Quando si crea il
9° registro, il più vecchio in ordine cronologico viene eliminato.
• I registri sono una risorsa condivisa e non protetta. Non è richiesto
un livello di accesso per leggerli o scriverli. Possono quindi venire
utilizzati o eliminati in qualsiasi momento, da qualsiasi pagina HTML
o da consolle.
Si noti che due o più utenti che accedono a pagine che contengono
gli stessi registri, possono interferire l’uno con l’altro. In genere, si
tratta di episodi rari, tuttavia, dal momento che non si possono
escludere del tutto, consigliamo di porre particolare attenzione
affinché non accadano (utilizzate i registri solo se necessario e solo
quando c’é un unico utente in possesso della password necessaria
per accedere a quelle pagine).
• I registri vengono azzerati in seguito ad un riavvio del WebGate.
12. About Expressions, Registers and Functions
To provide HTML pages with greater programming flexibility, some
functions allows the use of simple integer arithmetic expression in their
parameters or assignments.
Arithmetic expressions can consist of numbers, registers (explained in
the paragraph below), or a combination of the two in the following
manner:
Number - example: Var(1, 1, 1)
Register - example: Var(1, 1, Index)
Complex expression - example: Var(Address - 1, Type, Index + 1)
Graphically, an expression could be indicated as below:
The principal functions that allow the use of expressions in their
parameters are:
• Var (for <address>, <type> and <index> parameters)
• Eval
• UserLevel
• UserLevelString
• UserName
• UserPwd
The principal functions that allow the use of expressions for the
assignment are:
• Set
• SetMin
• SetMax
• UserLevel
12.1 Registers
A “register” is an alphabetic, non case-sensitive string of at most 16
characters, representing a signed integer number comprised between
–2-31+1 and 231-1.
To create a register use the “Set”, “SetMin” or “SetMax” functions.
When using registers, please consider the following points:
• Registers are never allowed to assume values exceeding the limits
imposed by “SetMin” and “SetMax” functions. If an expression results
in a value lower or greater it will be limited.
• In addition to the predefined read only registers, at most 8 user
defined registers are allowed at the same time. When the 9th register
is created, the oldest one is discarded.
• Registers are a shared and unprotected resource. No access level is
required to read or write to any of these. They can be accessed and
discarded at any time from any HTML page or from the console.
Moreover, care must be taken because two or more users accessing
to pages using the same registers may interfere each other. This may
occur only in rarely occasions but since inevitable, make sure to avoid
such situations (for example, use registers only when absolutely
necessary and only when a single user have the password to access
to those pages).
• Registers are reset after a WebGate reboot.
79
Manuale WebGate - cod. +030220230 rel. 1.0 - 16.09.2003
+
-
Number
Register
Fig. 12.1

12.2 Alcune note sulle espressioni aritmetiche:
• Sono permesse solo la somma “+” e la sottrazione “-“.
• I valori numerici al di fuori dell’intervallo –231+1… 231-1, risultanti da
una immissione dell’utente o da un calcolo, non vengono valutati
correttamente.
• L’utilizzo di un nome registro non definito genera un errore di sintassi.
Marchi utilizzati in questo documento: nel documento possono essere
stati usati marchi e nomi registrati in riferimento sia alle entità
proprietarie di tali marchi e nomi, sia ai loro prodotti. Carel S.p.A.
declina qualsiasi interesse proprietario in marchi o nomi registrati che
non siano i propri.
13. Caratteristiche Tecniche
Alimentazione: 18Vac -15/+10%, 50/60Hz o 24Vac -15/+10%,
50/60Hz
Potenza nominale: 3 W
• Installazione su tavolo: tramite presa AC mini, ø 5 mm. Utilizzare
ESCLUSIVAMENTE l’apposito adattatore di alimentazione fornibile
da Carel su richiesta cod. TRA1806ITA. L’utilizzo di adattatori diversi
può provocare danni all’hardware.
• Montaggio a pannello: tramite morsetti orizzontali removibili a 2
vie (passo 5,08 mm), sezione dei fili 0,5-1,5 mm
2
.
Caratteristiche del fusibile, obbligatorio, da installare tra l’ingresso di
alimentazione del Webgate ed il trasformatore di alimentazione:
500 mAT.
Utilizzare un trasformatore di sicurezza e di classe 2 dedicato di
almeno 6 VA. Avvertenza: non collegare il secondario a terra.
È consigliato l’uso del trasformatore TRA1810DIN fornibile da Carel.
Interfacce:
• seriale RS485, opto-isolata, morsetti orizzontali removibili a 3 vie
(passo 3,81 mm), sezione dei fili: 0,14/1,5 mm
2
.
Utilizzare un doppino ritorto schermato, AWG20-22, max. 1000 m,
capacità tra i cavi <90 pF/m.
• seriale RS232 DTE, connettore DB-9 maschio a 9 vie; 19200 baud
(configurabile), 8 bit di dati, 1 bit di stop, nessuna parità e nessun
controllo flusso.
Utilizzare un cavo null-modem schermato, max. 10 m, capacità del
cavo <2500pF.
• interfaccia Ethernet, connettore RJ-45 per Ethernet 10BaseT.
Utilizzare un cavo schermato, classe 5, max. 100 m.
Caratteristiche funzionali:
Protocolli standard supportati: SNMP v1, HTTP, FTP
Memoria: 128KB RAM, 1MB Flash
(400KB disponibili per pagine
web e dati utente).
File System: max. 100 file disponibili per
l’utente.
Spazio minimo occupato da ogni file: 1KB
12.2 Some additional notes about arithmetic expressions:
• Only the sum “+” and subtraction “-“ operators are allowed.
• Numeric values exceeding the range –231+1… 231-1 resulting from
user input or calculation are not evaluated correctly.
• The use of an undefined register name results in a syntax error.
Trademarks used in this text: some trademarks and trade names may
be used in this document to refer to either the entities claiming the
marks and names or their products. Carel S.p.A. disclaims any
proprietary interest in trademarks and trade names other than its own.
13. Technical Specifications
Power Supply: 18Vac -15/+10%, 50/60Hz or 24Vac -15/+10%,
50/60Hz
Rated Power: 3W
• For desktop installation: from mini AC power jack, dia. 5mm. Use
ONLY the power adapter supplied on request by Carel P.N.
TRA1806ITA. The use of different power adapters may damage
the hardware.
• For panel mounting: from 2-pole removable horizontal terminal
blocks (spacing 5.08mm), lead size 0.5-1.5mm
2
.
Characteristics of the fuse, obligatory, to be inserted between the
WebGate power supply input and the power supply transformer:
500mAT.
Use a class 2 dedicated safety transformer rated to at least 6VA.
Warning: do not earth the secondary winding.
The use of the power adapter TRA1810DIN supplied on request by
Carel is suggested.
Interfaces:
• Serial RS485 opto-insulated, 3-pole removable horizontal terminal
blocks (spacing 3.81mm), lead size: 0.14/1.5mm
2
.
Use a twisted pair shielded cable AWG20-22, max 1000m,
capacitance between the cables <90pF/m.
• Serial RS232 DTE interface, 9-pin male DB-9 connector; 19200 baud
(configurable), 8 data bits, 1 stop bit, no parity and no flow control.
Use a null-modem shielded cable, max. 10m, cable capacity <2500pF.
• Ethernet interface, RJ-45 connector for 10BaseT Ethernet.
Use a class 5 shielded cable, max. 100m.
Functional Characteristics:
Standard Internetworking Protocols: SNMP v1, HTTP, FTP
Memory: 128KB RAM, 1MB Flash
(400KB available for web
pages and user data).
File System: 100 files max. available to
the user.
Minimum size used from a file: 1KB
80
Manuale WebGate - cod. +030220230 rel. 1.0 - 16.09.2003

Caratteristiche generali:
Condizioni di funzionamento: 0T50°C, 0/90%
U.R. non condensante
Condizioni di immagazzinamento: -10T70°C, 0/90%
U.R. non condensante
Grado di Protezione (IP): IP20
Dimensioni (mm): 152 x 128 x 39
Inquinamento ambientale: normale
Categoria di resistenza al calore
e al fuoco: D
Classe e struttura del software: A
Smaltimento del prodotto
Il prodotto è composto da parti elettroniche, in metallo ed in plastica.
Tutte queste componenti vanno smaltite secondo le normative locali in
materia.
Carel si riserva la possibilità di apportare modifiche o cambiamenti ai
propri prodotti senza alcun preavviso.
Other:
Operating Conditions: 0T50°C, 0/90%
rH non condensing
Storage Conditions: -10T70°C, 0/90% rH
non condensing
Index of Protection (IP): IP20
Dimensions (mm): 152 x 128 x 39
Environmental pollution: normal
Category of resistance to fire and heat: D
Software class and structure: A
Disposal of the Product
The product is made of electronic, metal and plastic parts.
Such components must be disposed of in accordance with the laws in
force in each country.
Carel reserves the right to modify or change its products without prior
notice.
81
Manuale WebGate - cod. +030220230 rel. 1.0 - 16.09.2003


Cod. +030220230 rel. 1.0 - 16.09.2003
Agenzia / Agency:
CAREL S.p.A.
Via dell’Industria, 11 - 35020 Brugine - Padova (Italy)
Tel. (+39) 049.9716611 - Fax (+39) 049.9716600
e-mail: carel@carel.com - www.carel.com
 Loading...