


humiSteam
electrode steam humidifiers
Installation
Operation
User Manual
Read and save these instructions.
Models UE001 to UE065
Single Cylinder Units

CAREL
humiSteam
2

Installation, Operating & Maintenance Manual
IMPORTANT
BEFORE INSTALLING OR HANDLING THE HUMIDIFIER PLEASE CAREFULLY READ AND FOLLOW THE
INSTRUCTIONS AND SAFETY STANDARDS DESCRIBED IN THIS MANUAL AND ILLUS TRATED ON THE
LABELS ATTACHED TO THE MACHINE.
This humidifier produces non-pressurized steam by means of el ectrodes immersed in the water contai ned in
the cylinder-boiler (hereafter called the cylinder). The electrodes pass current through the water, whi ch also
provides resistance, heating the water into steam, which is used to humidify environments or industrial
processes, using special distributors.
The quality of the water used affects the process of evaporation, so the humidifier may be suppl ied wi th
untreated water, as long as this is drinkable and not softened or demineralized; the evaporated water is
automatically replaced using a fill val ve. This humidifier has been designed excl usi vely to directly humidify
room s or ducts, using a distribution system. T he installation, use and maintenance operations must be carried
out according to the instructions contained in this manual and on the labels applied internally and externally.
The conditions of the env ironment and the pow er supply v oltage must comply w ith the specified
values.
All other uses and modifications made to the humidifier that are not authorized by the manufacturer are
considered incorrect.
Liability for injury or damage caused by the incorrect use of the humidifier lies exclusively with the
user.
Please note that the humidifier contains pow ered electrical devices and hot surfaces.
All service and/or maintenance operations must be performed by specialist and qualified personnel
w ho are aware of the necessary precautions and are capable of performing the operations correctly.
Disconnect the humidifier from the main pow er supply before accessing any internal parts.
The humidifier must be installed in accordance with the local standards in force.
The local safety standards in force must be applied in all cases.
The humidifier is made up of metallic and plastic parts. All parts must be disposed of according to the
local standards on waste disposal.
Certification: the quality and safety of CAREL products are assured by CAREL's ISO 9001 certi fied design
and producti on system, as well as listi ngs from UL, cUL, CE, TUV, ET L and others.
WARNING: Your humidifi er requires water to operate. Do NOT mount it above materials or machinery that
could be damaged i f a l eak occurs. Carel assumes no responsi bility for consequential or inconsequenti al
damage as a result of any l eaks.
Copyright © 2005 by Carel USA, LLC. All rights reserved.
3

CAREL
humiSteam
Table of Contents
How The Humisteam Works.........................................................................................................................5
1 Installation ...............................................................................................................................................6
1.1 Positi oning........................................................................................................................................6
1.2.1 Removing the front cover ............................................................................................................7
1.2.2 Fastening to the wall...................................................................................................................7
1.3 Plumbing...........................................................................................................................................8
1.3.1 Water supply ..............................................................................................................................8
1.3.2 Water drai n ................................................................................................................................8
1.4 Steam distribution............................................................................................................................11
1.4.1A Duct i njection .........................................................................................................................11
1.5 Power wi ring ...................................................................................................................................15
1.6 Connect Control Wi ring....................................................................................................................17
1.6.1 Control s Placement...................................................................................................................17
1.7 Control wiring..................................................................................................................................17
ASWH / ASDH – ASDH / ASDC Wall – Duct Temperature/Humidity Sensors........................................20
HC-101 and HC-201 Wall and Duct Humidistats..................................................................................21
PC-301 Air Provi ng Switch.................................................................................................................22
2 Start-Up.................................................................................................................................................23
2.1 Startup Checklist .............................................................................................................................23
2.2 The HumiControl Controller..............................................................................................................24
2.3 Start-up Procedure..........................................................................................................................24
2.3.1 Starti ng with a new cylinder.......................................................................................................24
3 Operation...............................................................................................................................................25
3.1 Display Information..........................................................................................................................25
3.2 Changing The Set Point...................................................................................................................25
3.3 Acti vating Manual Drain...................................................................................................................25
3.4 Accessi ng/Changing Configuration Parameters.................................................................................25
3.5 Notes about special parameters.......................................................................................................28
STANDARD CONFIGURAT ION SETTINGS...........................................................................................29
3.6 Seasonal Shut Down .......................................................................................................................30
3.7 The Remote Control ........................................................................................................................30
3.8 Resetting the Hour Counter..............................................................................................................31
3.9 Alarms............................................................................................................................................31
3.10 Trouble-Shooting...........................................................................................................................35
3.11 Resetting Factory Defaults.............................................................................................................36
4 Maintenance..........................................................................................................................................37
4.1 Periodic checks...............................................................................................................................37
4.2 Cylinder maintenance......................................................................................................................37
4.2.1 Replacing the cylinder...............................................................................................................37
4.2.2 M aintenance of the other plumbing components.........................................................................39
4.3 Replacement Parts..........................................................................................................................40
4.3.1 Single Phase Humidifiers ..........................................................................................................40
4.3.2 T hree Phase Humidifi ers...........................................................................................................40
4.3.3 Replacement Steam Cylinders & Parts.......................................................................................41
5 Wiring Diagrams.....................................................................................................................................43
6 Techni cal Specificati ons .........................................................................................................................46
6.1 Model Numbers...............................................................................................................................47
IMPORTANT: BEFORE beginning installation:
• Check for shipping damage to cartons. Mark the shipping waybill accordingly
• Open cartons and check for any hidden damage. Mark the shi pping waybill accordingly.
• Check packing slip to ensure all items have been received. Notify Carel LLC of any shortages or
damaged parts. You must notify Carel LLC within 5 working days of any shortages.
4

Installation, Operating & Maintenance Manual
How The Humisteam Works
HumiSteam is an electrode humidifier. It produces steam for humidification by passing electrode current through the water i n the steam
generator cylin der between metal electr odes. There are no hea ter el em ents . Steam output is direc tly proportional to the conductivit y of the
water, and the amount of electrode immersed in the water.
On a call for humidity, the HumiSteam controller will open the water fill val ve
(1) and allow water to enter the s ystem. A flow restrictor (2) prevents the
unit from filling too quic kl y or with too much pressure. The water flo ws up
the fill tube (3) and i nto the fill cup (7), where it flows over the conductivit y
probes (6), which feed the water conductivity back to the controller for
anal ysis. Water then flows over the dam i n the fill cup (7), whic h creates a
1” air g ap t o pr event bac kflow of cont ami nated water into the feed lines, and
through the fill tube (4) and into the bottom of the steam cylinder (11).
As the water fills the c ylinder, it will reach the el ectrodes (10) and current
will begin to flow. As the wat er continues to fill the cylinder, the c urrent will
increase, and t his is monitore d by an amperage transformer pl aced on one
of t he power wires (9). When the desired current is reached, the fill valve
will close (1) and the water will then begin to warm and produce steam. If
the water reaches the cylinder full probes (8) prior to re aching t he desired
current level, the fill valve (1) will be cl osed to prevent overflow. If the
current rises too much as the water fills the cylinder, the drain valve or
pump (13) will b e activated to drain a way some water and reduce the
current flow.
Periodicall y, bas ed on the incoming water conducti vity, the unit will drain
some wat er to r educ e t he mineral concentration. A str ainer (1 2) in the c ylinder helps to preve nt mineral debris from jamming the drain
val ve (13) .
If th ere is no water in the cylinder, there will b e no current flow and no steam production. The electrodes do not burn out, but they will
even tuall y become compl etel y coated with mineral and the c ylinder will then need to be r eplaced or cleaned.
UE 001 through UE 015
No. Description
1 Stea m ge nerator cylinder
2 Wat er drain val ve
3 Power contac tor
4 Fuses
5 Power transfor mer
6 Relay board
7 On/Of f and Ma nual drai n switch
8 Wiring terminal bloc k
9 Wat er fill val ve
5
UE 025 through UE06 5
No. Description
1 Stea m ge nerator cylinder
2 Wat er drain pump
3 Wat er fill val ve
4 Amp erage tra nsformer
5 Power contac tor
6 Power transfor mer
7 Relay
8 Fuses
9 Wiring terminal bloc k
10 Cable raceway
11 On/Of f and Ma nual drai n switch

CAREL
Dimension
1 Installation
1.1 Positioning
The HumiSteam has been designed for wall mounting
(although it can be placed on a stand) and, since it is an
atmospheric steam humidifier, should be placed close to
the point where the steam wi ll be used, to minimi ze the
steam hose length (and condensate). Certain clearances
must be maintained around the unit:
Minimum
(inches)
With room blower units, other clearances are
needed:
Unit Dimensions:
Dimensions
(inches)
Weight
(lbs)
A B C D E F
12 8 8 16 28
001-008 009-015 025-045* 045**-065
A
B
C
packaged
empty
installed
15 15 22 26
11 11 15 18
25 28 35 38
36 44 86 113
30 38 75 97
42 60 134 207
<0.5°
VSDU0A
A B C D E F H
Minimum
dimension
(inches)
Model - UE
humiSteam
20 72 72 24 20 72 24
VRDXL
36 120 72 48 36 120 48
* = UE045 for 460-575/3 Vac
** = UE045 for 208-230/3 Vac
6

Installation, Operating & Maintenance Manual
1.2 Mounting
1.2.1 Removing the front cover
The front cover i s secured by a capture screw l ocated underneath the CAREL
logo. Twist the CAREL logo to reveal the screw, and use a phillips head
screwdriver to remove it. Then simpl y lift the front cover and pull out to remove
it. Return it i n reverse order.
1.2.2 Fastening to the wall
Using the screws and anchors supplied, fasten the mounti ng bracket to the wall.
Be sure that the screws anchor fi rm ly into studs or supports. Note the unit
installed weights from the Positioning section.
Once the mounti ng bracket is secured to the wall, hang the unit on the bracket. Fasten the remaining capture
screw s through the bottom holes in the unit to secure it to the wall.
X
Y
Z
Z’
001-008 009-015 025-045 065
8.67 8.67 12.21 15.75
19.69 23.23 28.55 30.91
4.53 1.5
4.41
Model UE
7
CAREL
0.7 gph
2.2 gph
3.7 gph
5.9 gph
humiSteam
1.3 Plumbing
1.3.1 Water supply
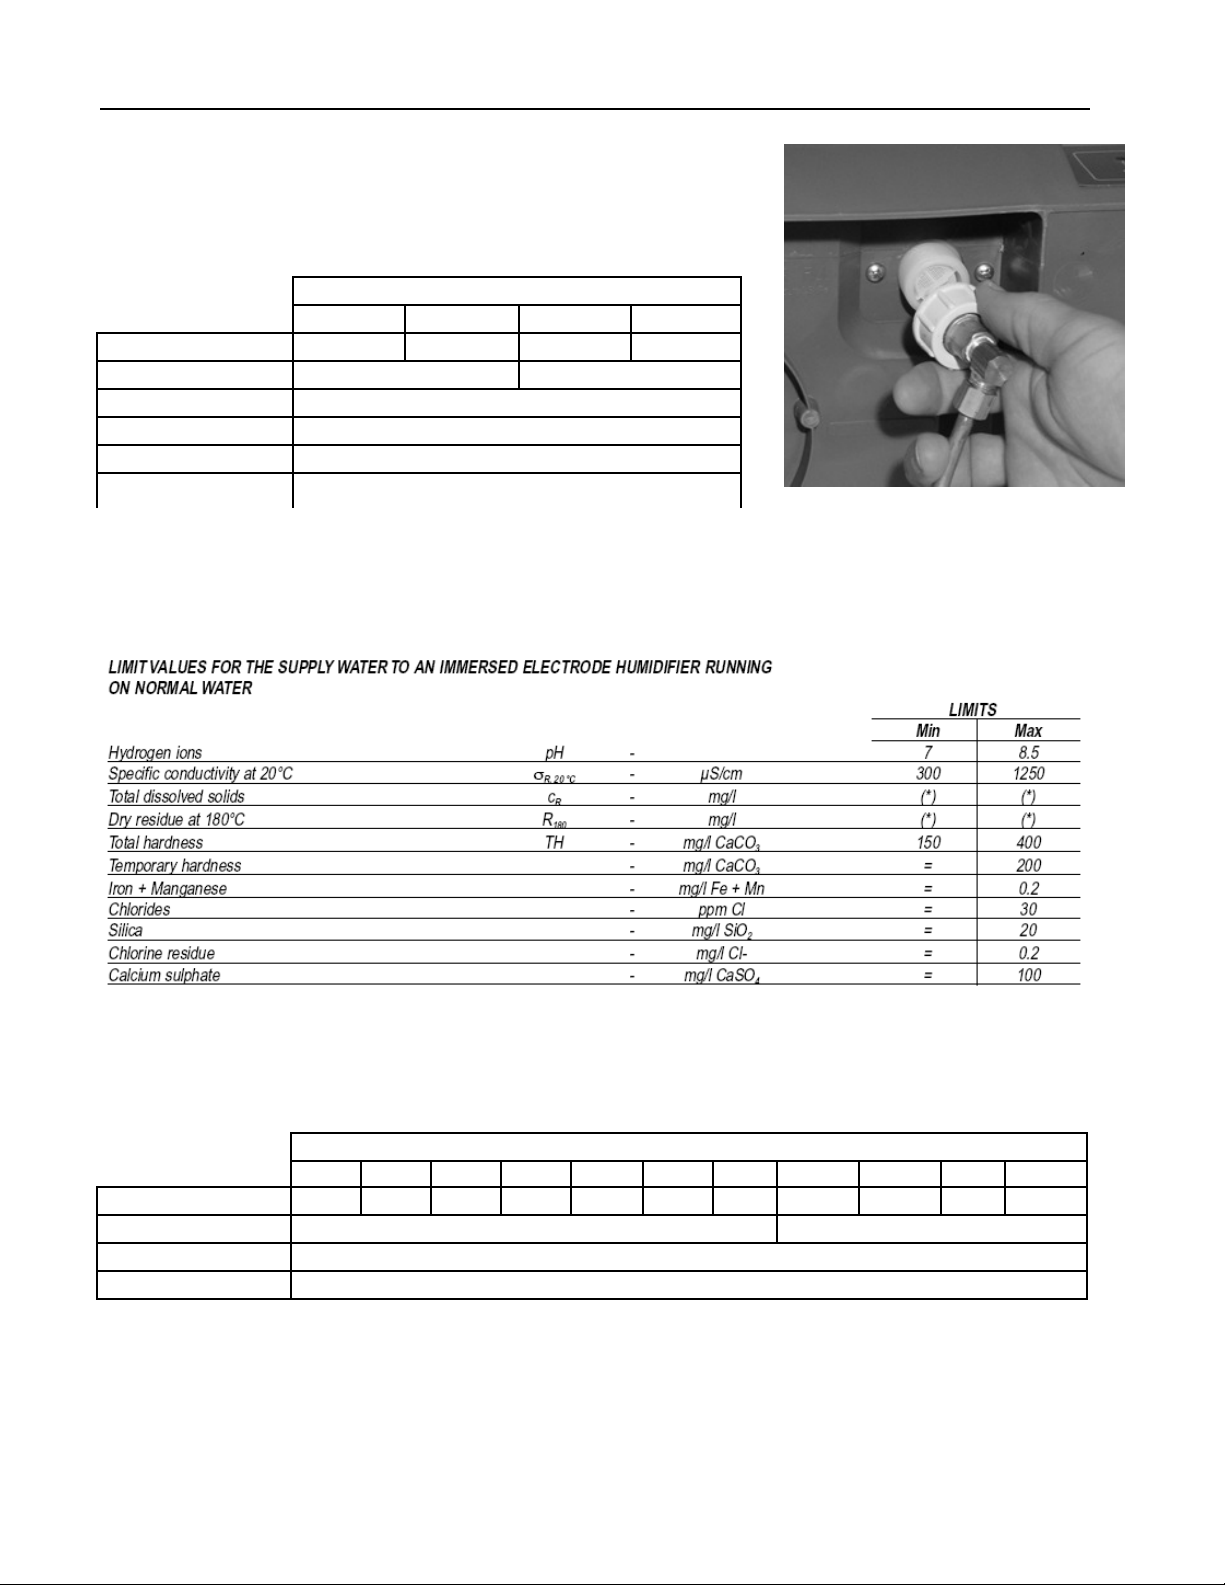
The HumiSteam must be supplied with water (not softened) havi ng the
following characteristi cs:
Instant flow rate
Connection
Temperature limits
Pressure limits
Hardness limits
Conductiv ity range
The water feed line should be 1/2” copper, PVC or poly tubing run to within 3 feet of the humidifier, then bushed
down to 1/4” O.D. or 3/8” O.D. copper or poly to make the final connection to the 1/4” O.D. or 3/8” O.D.
compression fitting underneath the humidifier. With poly tubing an i nsert should be used to support the tubing
and prevent leaks. This insert is not provided.
001-008 009-015 025-045 65
0.2 gpm 0.3 gpm 1 gpm 1.9 gpm
1/4" O.D. Compressi on 3/8" O.D. Compressi on
125 to 1250 µS/cm (micromhos)
Model UE
34 to 104°F
15 to 116 psi
<= 400 ppm CaCO3
NOTE: Softened w ater should NOT be used as it is generally corrossiv e to the electrode plating.
1.3.2 Water drain
The HumiSteam also requi res connection to a drain. T he drain water characteristics are:
Drain rate per hour
Instant drain rate
Connection
Typical temperature
The drain line can be 1-1/2” schedule 40 CPVC, 1-1/2” copper, or 1-1/2” Polypropylene. In all cases, the drai n
tube is slipped over the drain outlet on the bottom of the humidifier. It is not glued or otherwise attached to the
humidifier, so it must be supported by itself.
Drain line must be installed and plumbed to an open drain immediatel y after the unit.
For proper operation of the unit, the open drain should be installed before the trap (if allowed by local code).
8
001 003 005 008 009 010 015 025 035 045 065
6.6 gph 7.3 gph11 gph 18.3 gph 25.7 gph33 gph 47.7 gph
1.3 gpm 6 gpm
Model UE
1-1/2" nominal diameter
212°F

See the foll owing diagram for a drain line installation diagram
Note: If utilizing the optional drain tempering devices, the drain line needs to be increased to a 2"
minimum nominal size for the UE025 to UE065.
WARNING: Do NOT use PVC piping unless the unit has the optional drain tempering valve installed.
Installation, Operating & Maintenance Manual
9
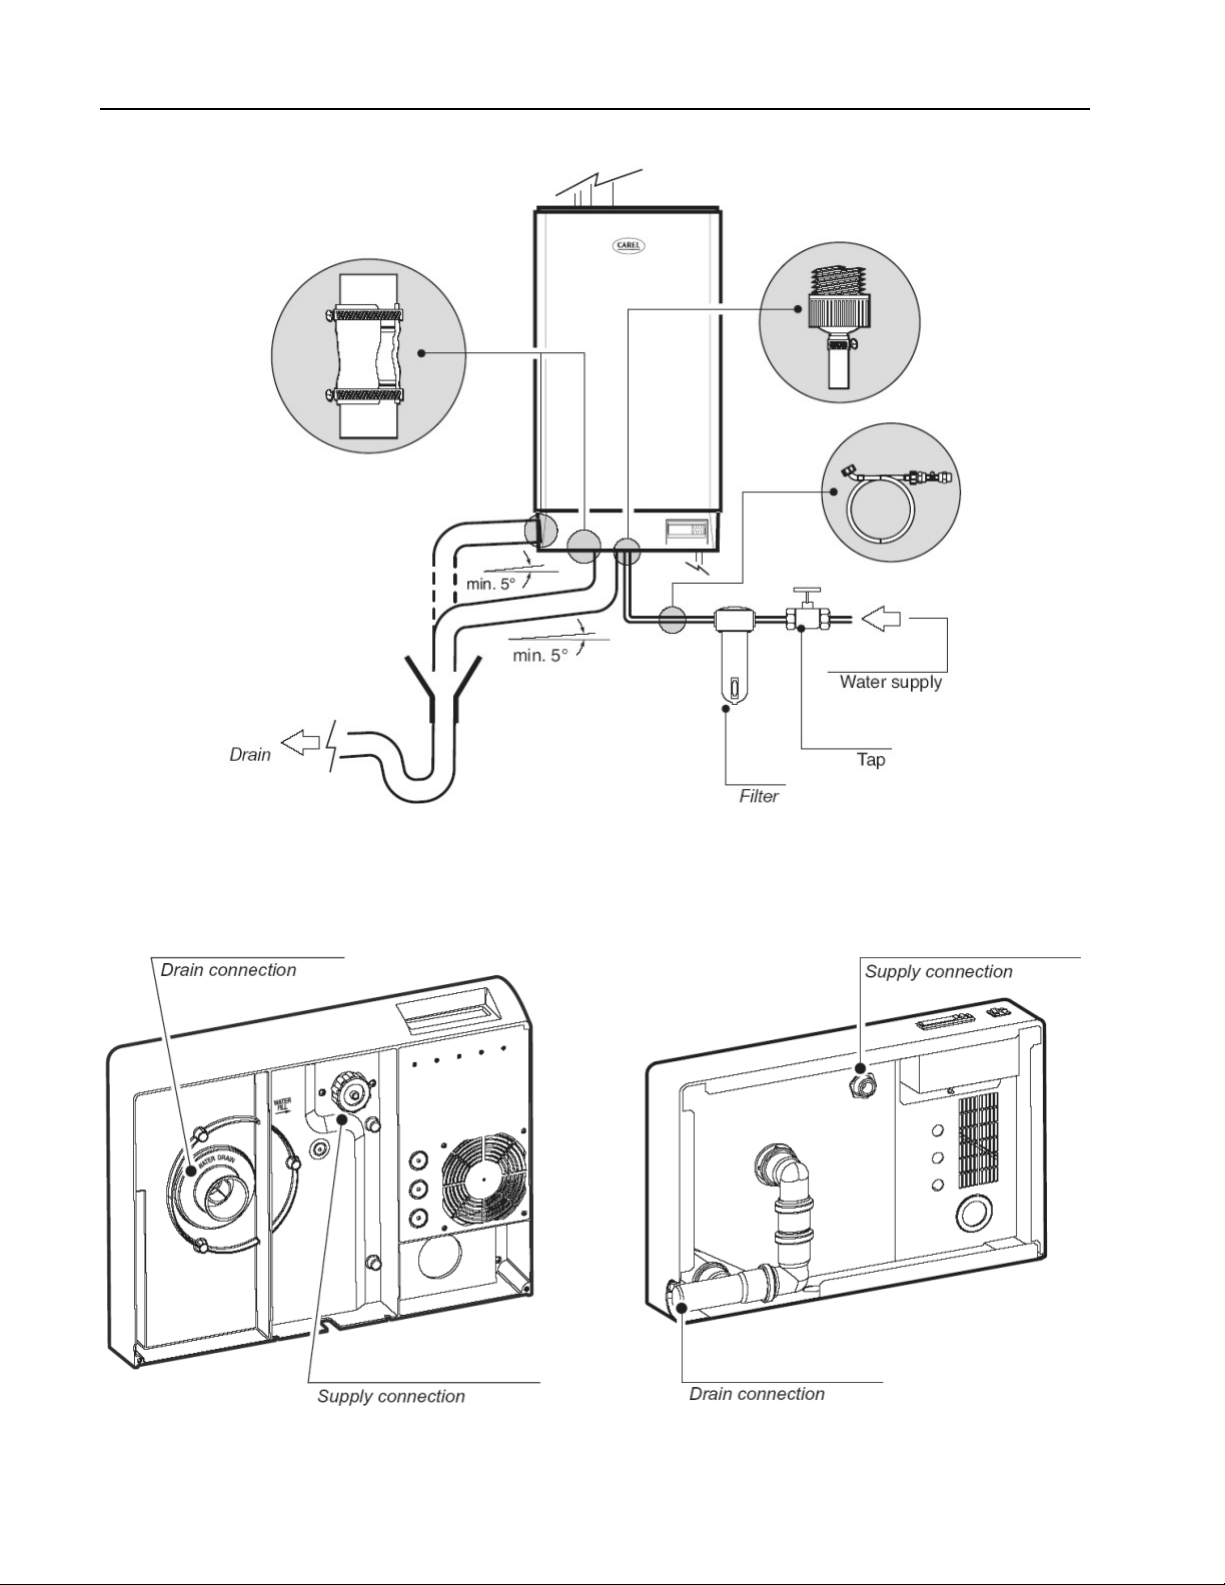
CAREL
Water supply and drain connections are made according to the following diagram.
humiSteam
Note: Drain line must be installed and plumbed to an open drain immediately after the unit. For proper
operation of the unit, the open drain should be installed before the trap (if allow ed by local code).
Physical locati on of the supply and drain connections are located as shown below.
UE 010-015 UE 025-065
NOTE: Carel can provide a drain tempering system which limits the water drai n to no more than 140°F.
10

Installation, Operating & Maintenance Manual
1.4 Steam distribution
1.4.1A Duct injection
NOTE: If the ventilated steam distributor is to be used, then go to section 1.4.1B.
Each unit has either 7/8” (22 mm), 1-1/4” (30 mm) diameter outlet or 1-5/8” (40 mm) diameter outlets. Som e
units have multiple outlets. The duct distributors and steam hose must be m atched i n size to the diameter of
the steam outlets for the units:
UNIT MODEL NUMBER
UE001 UE003 UE005 UE008 UE009 UE010 UE015 UE025 UE035 UE045 UE065
No.
Cyl inders 1
Steam
outlets 22mm x 1 30mm x 1 40mm x 1 40mm x 2
Duct steam distributors must also be matched to the duct si ze they will be i nserted into:
Quantity Required per Unit
Humidifier Steam Outlets, mm 22 30 40 2x4 0
Humidifier Steam Outlets, inches 7/ 8 1-1/4 1-5/8 2x1-5 /8
Ordering
Code
Nominal Duct Size, Inches
12 11.9 DP030D22RU
18 17.8 DP045D22R0
24 23.7 DP060D22R0
36 33.5 DP085D22R0
12 11.9 DP030D30RU
18 17.8 DP045D30RU
24 23.7 DP060D30RU
36 33.5 DP085D30R0
48 41.4 DP105D30R0
60 49.3 DP125D30R0
72 65 DP165D 30RU
24 23.7 DP060D40RU
36 33.5 DP085D40R0
48 41.4 DP105D40R0
60 49.3 DP125D40R0
72 65 DP165D 40R0
84 80.8 DP205D40R0
Distributor Length, Inches
22 mm Duct Distributors:
30 mm Duct Distributors:
40 mm Duct Distributors:
Description
Duct steam distributor, 22mm, 12'', 20 l bs/hr
Duct steam distributor, 22mm, 18'', 20 l bs/hr
Duct steam distributor, 22mm, 24'', 20 l bs/hr
Duct steam distributor, 22mm, 36'', 20 l bs/hr
Duct steam distributor, 30mm, 12'', 33 l bs/hr
Duct steam distributor, 30mm, 18'', 42 l bs/hr
Duct steam distributor, 30mm, 24'', 42 l bs/hr
Duct steam distributor, 30mm, 36'', 47 l bs/hr
Duct steam distributor, 30mm, 48'', 47 l bs/hr
Duct steam distributor, 30mm, 60'', 47 l bs/hr
Duct steam distributor, 30mm, 72'', 47 l bs/hr
Duct steam distributor, 40mm, 24'', 99 l bs/hr
Duct steam distributor, 40mm, 36'', 103 lbs/hr
Duct steam distributor, 40mm, 48'', 103 lbs/hr
Duct steam distributor, 40mm, 60'', 103 lbs/hr
Duct steam distributor, 40mm, 72'', 103 lbs/hr
Duct steam distributor, 40mm, 84'', 103 lbs/hr
UE 001,003
UE 005,008,009,010,015
1
1
1
1
1
1
1
1
1
1
1
1 2
1 2
1 2
1 2
1 2
1 2
UE 025,035,045HM,04 5HN
UE 045HW,045HK,065
11

CAREL
Distributor pipes should be mounted per the diagram s shown below, with a m inimum of 6” from the center of
the distributor pipe to the top of the duct and 3” mini mum to the bottom.
humiSteam
To install the distributor pipes:
1. Cut a key shaped hole in the side of the duct to match the steam pipe and condensate return.
2. Apply silicone sealant to the mounting plate and insert the pipe through the hole and secure it with 4 sheet
metal screws.
3. Connect the steam and condensate hoses using the hose clamps supplied.
(Note: end support bracked supplied only with 36” and longer distributors.)
IMPORTANT: Allow 2 feet of straight duct dow nstream of the distributor pipes when the air temperature
w ill be >55oF. Allow 3 feet of straight duct if the air temperature will be <50oF. Alw ays allow 2 feet
upstream. Turbulent air flow may require longer lengths.
12

Installation, Operating & Maintenance Manual
1.4.1B Room distribution blower units
Refer to the m anual supplied with the Room Distribution Units for specifics on the blower units themselves.
Clearances requi red are shown below.
VSDU0A
A B C D E F H
Minimum
dimension
(inches)
20 72 72 24 20 72 24
VRDXL
36 120 72 48 36 120 48
Model
UE001 UE003 UE005 UE008 UE009 UE010 UE015 UE025 UE035 UE045 UE065
Room Blower
Unit Model
Rated Power
Watts
Air Volume
CFM
Noise Level
dBA
Operati ng Temp/Humidity
(°F / %RH)
VSDU0A VRDXL
30 35
100 380
50 40
14 t o 104°F
/ 10 to 60%
14 t o 140°F
/ 10 to 80%
Cold rooms can be humidified using a Room Distribution Unit, making sure that this operates within its
operating limits. The room must have operating temperatures of between -10°C and +20°C, with a percentage
of rel ati ve humidity of no greater than 80% RH. If these limits are not possible, the steam can be distributed in
the cold room using a distributor pipe in duct work. In any case, the steam must not come into direct contact
with ai r discharge from the refrigeration unit in the cold room, to avoid possible condensati on.
13

CAREL
humiSteam
1.4.2 Steam Hoses
NINETY PERCENT (90%) OF ALL OPERATION PROBLEMS ARE CREATED BY IMPROPER STEAM
PIPING FROM THE HUMIDIFIER UNIT TO THE DUCT DIS TRIBUTOR PIPES. To avoid these problems,
remember one simple fact when running the steam hose: steam naturally flows up hill, and condensate
naturally flows down hill. Run the steam hose or piping to avoid any kinks, sharp elbows, or l ow spots that could
collect or restrict the fl ow of steam to the distributor pipe, or the flow of condensate back to the humidifier.
Support the hose adequately to avoid sags.
The following diagrams are to provide you with some guidelines. If you have a situation you are unsure of,
please contact the factory for i nstructions.
IMPORTANT: Maximum length of rubber steam hose is 20 feet. Insulated copper tubing may be up to 40
feet. In all cases, minimize sharp bends and elbows – use 2-45° elbows instead of 90°s.
Hose size for UE 001, 003 = 22 mm.
Hose size for UE 005, 008, 009 and 015 = 30 mm.
Hose size for UE 025, 035, 045, 065 = 40 mm.
UE045 208-230V & UE065 need 2 hoses and distributors.
14

Singl
e Phase Terminals
Three Phase Terminals
Installation, Operating & Maintenance Manual
1.5 Power wiring
Check that the power supply voltage to be
connected matches the value indicated on the
rating plate inside the electrical panel. Insert the
power and ground connection cables into the
electrical panel compartment using the strain
reliefs supplied, and connect to the terminals.
An external fused disconnect must be installed.
All wiring must be in accordance with local,
state and national electric codes.
NOTE: to avoid unwanted interference, the
power cabl es should be kept separate from any
control wi ring.
Per the table on the following page, make sure
that the unit has the proper number of turns
through the TAM (Torroid Amperage Monitor),
which is on the control board i n models UE001
through UE015, and separate i n models UE025
through UE065. Also make sure that the TA
Rate DIP switches on the control board are set
correctl y per the table.
In models UE001 - UE015 make sure that the TAM on the
circui t board has the proper number of power wire turns
through it, and that the TA Rate DIP switches on the
control board are set per the table on the followi ng page.
In models UE025 - UE065 the TAM is independent and the jumper must then be on the right terminals per the
tabl e on the following page.
15

CAREL
NOTE: Tolerance al lowed on main voltage = -15%, +10%
Nominal
Current
(Amps)
6
52 1 300
Model
UE001
UE003
UE005
UE008
UE009
UE010
UE015
UE025
UE035
UE045
UE065
Voltage
Code
U 208 - 1~N 5.4 1 20
D 230 - 1~N 4.9
U 208 - 1~N 10.8 2 60
D 230 - 1~N 9.8 1 20
W 208 - 3~ 6.2 1 20
K 230 - 3~ 5.6 1 20
M 460 - 3~ 2.8
U 208 - 1~N 18 1 40
D 230 - 1~N 16.3 1 40
W 208 - 3~ 10.4 1 20
K 230 - 3~ 9.4 1 20
M 460 - 3~ 4.7 2 20
N 575 - 3~ 3.8
W 208 - 3~ 16.7 1 40
K 230 - 3~ 15.1 2 60
M 460 - 3~ 7.5 1 20
N 575 - 3~
U 208 - 1~N 31.4 1 60
D 230 - 1~N 29.3
W 208 - 3~ 20.8 1 40
K 230 - 3~ 18.8 1 40
M 460 - 3~ 9.4 1 20
N 575 - 3~ 7.5
W 208 - 3~ 31.2 1 60
K 230 - 3~ 28.2 1 60
M 460 - 3~ 14.1 1 20
N 575 - 3~ 11.3
W 208 - 3~
K 230 - 3~ 47.1 1 300
M 460 - 3~ 23.5 1 300
N 575 - 3~ 18.8
W 208 - 3~ 72.9 1 500
K 230 - 3~ 65.9 1 500
M 460 - 3~ 32.9 1 500
N 575 - 3~ 26.4
W 208 - 3~ 93.68 1 500
K 230 - 3~ 84.72 1 500
M 460 - 3~ 42.4 1 500
N 575 - 3~ 33.9
M 460 - 3~ 61.19 1 300
N 575 - 3~ 48.95
Voltage
Phase
Power
(kW)
1.12 1.5 3.3
2.25 3 6.6
3.75 5 11
6 8 17.6
6.52 9 20
7.5 10 22
11.25 15 33
18.75 25 55
26.25 35 77
33.75 45 99
48.75 65 143
Output
(kg/hr)
Output
(lbs/hr)
Turns
Through
TAM
2 20
2 20
2 20
1 20
1 60
1 20
1 20
1 300
1 300
1 500
1 300
humiSteam
TA Rate
16

Installation, Operating & Maintenance Manual
1.6 Connect Control Wiring
A typical humidifi er control system includes a wall or return duct sensor or controller, a high limit duct humidistat
and an air-proving switch. Placement of these devices is critical to proper operati on of the overall system.
1.6.1 Controls Placement
(See following diagram)
The return air RH sensor must always be l ocated BEFORE any outside air intake, in order to insure accurate
sensing of the air from the space. Alternatively, a room RH sensor or humidistat can be used. Room sensors
should be located on an inside wall or post and should not be hit by any discharge air streams from ducts. In a
100% outside air system, the RH sensor may be placed in the supply duct, at least 10 feet down stream of the
di stributor pipe to act as both hi-limit and control.
The airflow sw itch must be positioned to accurately open on a loss of airflow, to prevent the humidifier from
running when there is no air to absorb the moisture.
The hi-limit humidistat must be positioned far enough down stream of the steam di stributor pipe(s) to prevent
it from getting wet, but still allow i t to accurately prevent over humidification of the duct that could result in
condensation.
1.7 Control wiring
The HumiSteam control system allows up to two sensors to be
connected, as well as various safety devi ces, remote on/off,
alarm and serial communications.
Generally, the control sensor or humidistat (HT ) is located in
the room or return air duct. In the case where the HumiSteam
uses a direct discharge blower unit, this is the only control
needed. In ducts or air handlers, a high limit humidistat or
sensor is usually added to act as a safety (CR), as well as an
ai r flow provi ng device. The remote terminal HumiVisor (MT)
may be added.
17

CAREL
Control wiring is made directly to the control
board term inals:
1. terminal block G (dehumidification
contact);
2. terminal block H (alarm contact);
3. terminal block K (on/off, manual drai n
switch);
4. terminal block I (control signals);
5. terminal block J (to remote terminal or
supervisory sy stem);
6. dip-swi tch for selecting TA RATE.
For On/Off Operation:
Connect any simple humi distat, high-limits, air
flow switch, and remote contacts in series from
termi nals 7I to 8I. DO NOT apply any v oltage
to 7I & 8I.
Circuits must be completed from 4I to 5I by a
jumper and from 7I to 8I for the unit to operate.
Use jumpers if devices are not connected.
Parameter A0 must be set to 0.
Remote Supervisor / Serial Communications:
This is a standard RS485 serial connection. It is recommended to keep
wiring under 3,200 feet. Request Carel ’s communicati ons documentation
for addi tional information on this option.
humiSteam
18

For Modulating Operation w ith External Controller:
Connect any external control ler (0-1 Vdc, 0-10 Vdc
Parameter A0 must be set to 1.
Parameter A2 must be set per the OUT signal from the
regulator:
• voltage: 0 to 1 Vdc; 0 to 10 Vdc; 2 to 10 Vdc;
• current: 0 to 20 mA; 4 to 20 mA.
NOTE: Safeties are high-limit humidistat, air fl ow switch,
and/or external enable. DO NOT apply any v oltage to
7I & 8I.
For Stand-Alone M odulating Operation:
Connect a hi gh limit sensor and control sensor per the
diagram at right. DO NOT apply any v oltage to 7I
& 8I.
Parameter A0 must be set to 2 if no high limit
sensor, 3 if a high lim it sensor is used.
Parameter A2 must be set per the OUT signal from
the sensor:
• voltage: 0 to 1 Vdc; 0 to 10 Vdc; 2 to 10
Vdc;
• current: 0 to 20 mA; 4 to 20 mA.
Term inal 4I (+(G)) = 12 Vdc
Term inals 2I & 6I (M) = common
For Steam Baths (Turkish Baths):
In this case a tem perature sensor is used to control
the humidifi er. Connect sensors per the diagrams below.
Installation, Operating & Maintenance Manual
Parameter A0 must be set to 4. Parameter A2 must be set to 0.
Alarm Output:
The H terminal s allows connection to an on-board SPDT alarm relay that
provides No and NC contacts for remote indicati on of alarms.
Dehumidify Output:
Dehumidify contacts are also provided whi ch can be used to control a dehumidifier
from the humidifier control system (stand-alone modulati ng mode only). The
contact is rated for 250 Vac, 8 Amp resistive and 2 Amp inducti ve l oads.
19

CAREL
humiSteam
ASWH / ASDH – ASDH / ASDC Wall – Duct Temperature/Humidity Sensors
Model Description
Humidity (0-1 VDC or 4-20 mADC)
ASWH1 00000 Wall Humidity s ensor (re places SHWOOP)
ASDH10000 0 Duct Humidit y se nsor (repl aces SSDOMH00/1)
Temperature & Humidity (NTC temp, 0-1 VDC or 4-20 mADC humidity)
ASWC1 11000 Wall Temp/hum sensor (replaces SWNTCTH0/1 & STHONTC0/1)
ASWC1 10000 Wall Temp/hum sensor (replaces STHOAP)
Temperature & Humidity (0-1 VDC or 4-20 Madc temp & humidity)
ASDC11100 0 Duct te mp/hum s ens or (replac es SDNTCTH0/1)
ASDC11000 0 Duct te mp/hum s ens or (replac es SSDOMHT0/1)
Temperature: NTC thermistor, 10 Kohm at 25°C (7 7°F)
(ASWC/ASDC only)
Accurac y: +- 0.25°C from 0 to 50°C (32 to 122°F)
Humidity: Thi n film capacitor
Linear 0-1 Vdc or 4-20 mAdc from 10 to 90%RH
Accurac y: +- 3%RH from 20 to 90%RH
calibrated at 55%RH and 25°C (7 7°F)
+- 5%RH above 90%RH and below 20%RH
Response time: 60 seconds
Power: 12 to 24 Vac/dc or +12 to –12 Vdc
Housing: Wall: ABS with glassfiber fill
Certifications: Calibrated to NIST traceable
humidit y/t emperature standar d, CE Approved
20

Installation, Operating & Maintenance Manual
HC-101 and HC-201 Wall and Duct Humidistats
Mounting the HC-101 room humidistat: Mount
the HC-101 humidistat to an insi de wall or post in
the area to be humidified. Positi on it so that no
drafts from registers or outl ets are blowing on it.
Be sure that i t is not placed over a device that
could generate heat or vapor ie: stove,
machinery, cleaning vat. The unit has three wire
leads, Orange, Brown and Red. Use the Orange
and Brown leads for control operation. Use the
Orange and Red leads for hi -limit operation.
Mounting the HC-201 duct humidistat: Cut a
hole in the si de of the duct and mount the HC-201 humidistat to the duct, using the screws provided, at least 6
feet down stream of any live steam or mist. T he unit has three wire leads, Orange, Brown and Red. Use the
Orange and Brown l eads for hi-limit operati on.
Wiring Diagram
TA BLE 1. SPECIFICATIONS
Part
No.
HC-101
HC-201
TA BLE 2. MAXIMUM ELECTRICAL RATI NGS
Part No. AC Volt
HC-101
HC-201
Type Scale
Wall 10 to 90 5 40 to 125
Duct 15 to 95 5 40 to 125
Red (N.C.)
Brown makes on Drop in R.H.
drop in humidity
Orange
Common
Range
%RH
50/60 Hz
24 - - 8 60
120 7.2 43.2 8 345
240 3.6 21.6 8 345
Brown (N.O.)
Diff.
%RH
Operating
Limits
°F (°C)
(4 to 2)
(4 to 2)
FLA LRA Resistive
Shipping
& Storage
°F (°C)
-40 to 140
(-40 to 60)
-40 to 140
(-40 to 60)
Connection Cover Dimensions
In. (mm)
6" (150 mm)
color coded
leads
Coded
screw
termi nals
Beige
plasti c
Metal 4-3/4 x 6-1/2 x 2-1/4
Amps
4-3/8 x 2-7/8 x 1-5/8
(111 x 73 x 41)
(121 x 165 x 57)
Pilot Duty
VA
21

CAREL
N.C.
humiSteam
PC-301 Air Proving Switch
Mounting the PC-301 air flow switch:
Mount the airflow switch in the supply or return duct using the
screw s suppli ed. Mount the device so that the diaphragm is i n
a verti cal position as shown at right.
If the airflow switch is to be mounted on the return duct
(vacuum), then mount i t in a vertical position by the small
plate. Drill a 7/16" hole in the si de of the duct and connect the
supplied tubing to the low pressure tap on the airflow switch
and then run i t through the drilled hole i n the duct. Put no more
than 2" of tubing into the duct. Caulk around the tubing where
it enters the duct. The high pressure tap i s left open to
atmosphere.
If the airflow switch i s to be mounted to the supply duct
(pressure), then simply drill a 7/16 hole in the side of the duct, apply caulking to the large pl ate, and mount the
devi ce with the large plate to the duct and the high pressure tap/tubing mated the hole. The low pressure tap is
left open to atmosphere.
MOUNTING DIAGRAMS
TA BLE 1. MAXIMUM ELECTRICAL SWI TCH RA TINGS
Vac Full Load
Amps
24V - - 60 10
120V 6.25 37.5 300 10
240V 3.1 18.6 300 10
277V 2.7 16.2 300 10
WIRING DIAGRAM
Common Increase
Pressure
N.O. makes on increase N.O.
in pressure.
Locked Rotor
Amps
Pilot Duty
(VA)
Inductiv e
Non-
Amps
22

Installation, Operating & Maintenance Manual
2 Start-Up
IMPORTANT WARNINGS:
1. Before starting, check that the humidifier i s in perfect condition, that there are no water leaks and that
the electrical parts are dry;
2. Do not connect power if the humidifi er is damaged or even partial ly wet!
When installation is completed, flush the supply pipe for around 30 minutes by piping water directly
into the drain, without sending it into the humidifier; this will el iminate any scale or residues that may
cause foam when boiling.
NOTE: for humidifiers with control H only, the same function can be performed automati cally after staring the
appliance (see par. 6.2.1).
UE: Installation Checklist
_____ 1. Water i s connected, the line has been flushed, and external valves are open.
_____ 2. Drain is connected, run to an open drain, and has a trap under the unit.
_____ 3. El ectrici ty is connected in accordance wi th instructions, local codes and data l abels in the unit.
_____ 4. The power fuses are installed and intact.
_____ 5. Al l control wiring is done and tested.
_____ 6. Ai rflow switch is wired to open on ai r flow loss.
_____ 7. Hi-limit humi distat is wired to open on humidity rise above set point.
_____ 8. Unit wires have been checked to make sure they and all connectors are tight from shi pping.
_____ 9. The steam hose(s) are run correctly wi th no sags or ki nks and sloped properly according to the
manual.
_____ 10. Condensate hoses are run correctly with no sags or ki nks and sloped properly according to the
manual.
NOTE: If you ordered a factory startup, this checkli st will be required. Failure to complete this checklist may
result in additional charges.
23

CAREL
2.2 The HumiControl Controller
1: PRG - Access to most frequently used parameters.
Also resets alarm rel ay.
2: SEL - Displ ays unit of measure. Press for 2 seconds
to access set point. Press with PRG for 5 seconds to
enter parameters.
3: - Displays control sensor value. In program ming
mode i ncreases value or moves to previous parameter.
4: - Displays high limit sensor value. In programming
mode decreases value or moves to followi ng parameter.
5: 2-1/2 di git display for values and parameters.
6: LED to i ndicate decimal point.
7: LED to i ndicate value must be multi plied by
1000.
8: LED to i ndicate dehumidify mode.
humiSteam
9: LED to i ndicate alarm.
10: LED to indicate humidifier is producing steam.
Flashing indicates lower than required production.
11: LED to indicate when unit is filling.
12: LED to indicate when unit is draining.
2.3 Start-up Procedure
After closing the external fused disconnect to put power to the humidifier, press the top (I)
part of the I/O switch on the side of the unit
Initial ly, all LEDs light - this lasts about 1-2 seconds.
Then the initi alization phase begins with 3 dashes. During this phase
diagnosti cs are conducted. This phase lasts about 4 seconds.
After running the di agnostics, the unit will start operation and displ ay either
the % of steam production (On/off and Modulating modes), the %RH (Stand-
Alone Modulati ng mode), or two dashes will light, indicating the humidifier is
di sabled or in alarm. The alarm code will flash.
2.3.1 Starting with a new cylinder
When starting with a new cylinder, you should activate the cylinder cleaning function by pressing the SEL and
buttons simultaneously for 2 seconds after the initialization phase. Thi s forces the unit to open both the drain
and fill valves for 10 minutes to flush the lines, then fills and drains the cylinder 3 times to wash out any mold
release or dirt. Once started, this function can be stopped by pressing the SEL and buttons simul taneously
for 2 seconds again.
When starting the unit with a new or empty cylinder, it may take a significant amount of time (hours) for the uni t
to build up enough mineral concentration to reach rated capaci ty. This time can be shortened by the additi on of
Alka-Seltzer or salt (teaspoon) through the steam outlet on top of the cylinder.
24

Default
%RH, °C
P2 (1)
P3 (1)
%RH, °C
Installation, Operating & Maintenance Manual
3 Operation
3.1 Display Information
Pressing the SEL button displays the unit of measure currently in use for the main display
Holding the button displays the value of the control sensor preceded by the unit of measure.
Holding the button displays the value of the hi gh-limit sensor preceded by the unit of measure.
3.2 Changing The Set Point
Press the SEL button for 2 seconds until “St” appears. On releasing the button, the unit of measure is
di splayed followed by the current set point value. T o change the set point, press the or button to increase
or decrease the value. Press SEL or PRG to lock i n the new set point. Waiting 5 seconds without pressing
SEL or PRG will revert to the old value.
3.3 Activating Manual Drain
In additi on to the manual drai n switch on the si de of the humidifier, pressi ng the and buttons
si multaneously for 2 seconds will force a manual drain which will completely empty the cylinder wi thout having
to hold the manual drain swi tch. This procedure can be stopped at any time by pressing the and buttons
si multaneously for 2 seconds again.
3.4 Accessing/Changing Configuration Parameters
The numerical, configuration and control parameters are grouped into three level s:
LEVEL 1 - set point parameters: the value of the humidifier's main set point “St”, accessible directly
via the keypad for both reading and modification. See “Changing The Set Point”.
LEVEL 2 - control parameters and measurements: the physical val ues measured and the operating
param eters involvi ng the control of the humidification process; these too can be accessed directly vi a
the keypad for reading and modificati on.
LEVEL 3 - configuration parameters: consi sting of the data needed to customize the controller’s
operation. T hese parameters can be accessed only by password.
To display the Lev el 2 Control Parameters:
• Press and hold the PRG button for 5 seconds until P0 is displayed;
• Press the and buttons to scroll through the Px and dx parameters;
• Press the SEL button to display the value of any parameter (the unit of measure will display fi rst for 1
second).
Code Range
P0 20 to 100
100 Maximum output for H controllers
100
Unit Description
%
Maximum output for P controllers
P1 2.0 to 19.9 5
P3 to 100 100 %RH
P3 to 60 60 °C
0 to P2 0
P4 0 to 100 1 min Alarm delay (0 = 30 seconds)
P5 2 to 100 10 %RH Dehumidification dead zone
P6 1.0 to 19.9 5 %RH Dehumidification differential
25
Humidifi cation proportional band
High humidity or high
temperature alarm set point
Low humidity/temp. alarm set
point
accessible only in stand-alone mode
(A0=2, 3 or 4)
accessible only wi th the dehumidi ficati on
function enabled
(b1 odd number) in stand-alone mode
(A0 = 2 or 3)

CAREL
Default
P7 (1)
A0 (1)
Type of room sensor; not
A3 (2)
%RH, ºC
A4 (2)
%RH, ºC
%RH, ºC
Code Range
Unit Description
humiSteam
St to 100 100 %RH Hi-limit set point
P8 2.0 to 19.9 5 %RH Hi-limit differential
P9 0 to 100 100 %RH Hi-limit alarm set point
Code Range Default Unit Description
d1 (2) 0.0 to 199
d2 0.0 to 199
d3 0.0 to 199
d4
d5 0 to 1555
d6 0.0 to 199
d9 0.0 to 199
(1): when accessing parameter A0, parameters P2, P3, P7 and St are automatically reset to the corresponding
default value.
(2): in proporti onal operation (A0=1), d1 displays the % of the control signal
To display the Lev el 3 Configuration Parameters:
Parameters for configuring standard operation:
Code Range Default Unit Description
A1
0.0 to
19999
• Press and hold the PRG and SEL buttons simultaneously for 5 seconds until 00 is displayed;
• Press the and buttons to enter the password value of 77;
• Press the SEL button and A0 should display;
• Press the and buttons to scroll through the configuration parameters;
• Press the SEL button to display the value of any parameter (the unit of measure will display fi rst for 1
second);
• Press the and buttons to change the value;
• Press SEL when the change is complete and then continue scrolling through the parameters;
• To leave the programming mode, press PRG at any time. NOTE: after more than 5 seconds without a
button press, the display will begin to blink. 60 seconds after a button press, the controller will erase all
changes and return to operating mode with the previ ous parameters.
0 to 4 2 Operating mode
0, 1 0 Unit of measure
read
only
%RH, °C, % Signal from external controller
or sensor
%RH
kg/h Steam output (actual)
h Run time hours
µS/cm Conductivity of the feed water
A Current (Amperage)
kg/h Rated steam output
Signal from hi-limit or
temperature sensor
0=ON/OFF control
1=modulati ng
2=humidity control
3=humidity control with hi-limit control
4=steam baths
0=°C, kg/h
1=°F, lbs/hr
Accessibl e only with hi-limit control
(A0=3)
Not accessible in on/off m ode (A0=0)
Accessibl e only with hi-limit control
(A0=3)
A2
A5 -10.0 to 10.0 0
26
0 to 4 0
0 to A4 0
A3 to 255 100
accessible in ON/OFF
mode (A0=0)
Room sensor minimum
Room sensor maxi mum
Room sensor offset
0=0 to 1V; 1=0 to 10V; 2=2 to 10V; 3=0 to 20mA;
4=4 to 20mA
Accessibl e only in control m ode (A0=2, 3 or 4)
Used for scaling sensors

limit sensor maxi mum
drain under power + disable drai ning
for inactivity of at l east 7 consecutive
µS/cm
, otherwise the unit uses the
µS/cm
0k2, …, 2k0
µS/cm
Days to wait to drain due to inactivity
A6
A7 0 to A8 0 %RH Hi-limit sensor minimum
A8 A7 to 100 100 %RH Hi-
A9 -10.0 to 10.0 0 %RH Hi-limit sensor offset
(1): when accessing parameter A0, parameters P2, P3, P7 and St are automatically reset to the corresponding
default value.
(2): see WARNING to the side of Fig. 7.1.
Parameters for configuring the operation of accessory devices:
Code Range Default Unit Description
b1 0 to 127 0
b2 0 to 120 0 s Shut-down delay ti me
b3 -10.0 to 10.0 0 % Current m easurement calibrati on
b4
b5
b6
0 to 4 0
0 to 199
0k2, ….2k0
0 to 199
0k2, ….2k0
0 to 199
0
1k5
2k0
Installation, Operating & Maintenance Manual
Type of outl et sensor;
accessible only in
humidity control with
outl et limiting (A0=3)
Special functions
To enable more than one, sum the 0= no function
corresponding values and assign 1= dehumidifier management active
them to b1; e.g.: b1=1+2+8=11 2= drain under power
dehumidifier management acti ve +
days (the other functions are
deactivated)
64= enable peri odic draining
Water conductivity (0=automatic measurement)
value as the conductivity to control drain cycles.
Conductivity pre-alarm set point
Conductivity alarm set point
0=0-1V; 1=0-10V; 2=2-10V; 3=0-20mA;
4=4-20mA
Accessibl e only in humidity control with outlet
limiting, (A0=3)
4= disable draining on set poi nt
reduction
8= disable draining for inacti vity
16= di sable cylinder being depleted
and cylinder depleted warnings
32= reverse the operation of the
alarm relay
b7 0 to 100 50 % Foam detection set point (0=no foam detect, 1=max sens., 100=min sens.)
b8 50 to 200 100 %
b9 50 to 200 100 % Adjust the duration of the drain for dilution
bE 1 to 120 24 h
bF 1 to 199 3 days
27
Internal conductivity reached by the cylinder in stable conditi ons against
rated val ue
Cylinder maintenance limit time (in hours)
0*= disable life alarm “Cy” and maintenance alarm “M n” bb 0* to 4000 1500 h
100 hour step if bb>199 hours, hour step if bb<199 hours
Time limit between two periodic
drain cycl es
Accessibl e only if periodic drai ning is
enabled (64 in "b1")
Not accessible if drai ning due to
inactivity is disabled, (8 in "b1")

CAREL
Parameters for setting the serial connections and remote control:
Code Range Unit Description
C0 1 to 6 1 Value normally displayed
C1 0 to 4 4
C2 0 to 99 0 Remote control enabling code (see paragraph 8.2)
C3 0 to 199 1 Serial address
C4 0 to 3 3 Supervisor: baud-rate 0=1200, 1=2400, 2=4800, 3=9600
C5 0 to 11 0
C6 0 to 199 0 Ms serial reply send delay
C7 0 to 3 0
Enable keypad and remote control - keypad: remote control:
0= read of all param., (modify C1 only) read and modify param. P, d and St
1= read and modifi y all parameters read and modify param. P, d and St
2= read of all param., (modify C1 only) read parameters P, d and St
3= read and modify all parameters read param eters P, d and St
4= read and modify all parameters read and modify all parameters
Supervisor: frame (character bits, parity, stop bits)
0=8,N.2 6=7,N.2
1=8,N,1 7=7,N,1
2=8,E.2 8=7,E.2
3=8,E,1 9=7,E,1
4=8,O.2 10=7,O,2
5=8,O,1 11=7,O,1
Graphic terminal configuration in cases 1,2,3
the OFF com mand is forced on start-up
humiSteam
1= room sensor measurement
2= outlet sensor measurement
3= steam output
4= hour counter
5= conductivity
6= current
0=terminal
1=terminal with ON/OFF control
2=term. with ON/OFF and room sensor
3=term. with ON/OFF and hi-lim it
sensor
3.5 Notes about special parameters
b1, setting 2 : Drain under power
If parameter b1 includes setting 2, the humidifier will continue to produce steam duri ng drain cycl es. If this
setti ng is turned off, the humidifier will open the power contactor during drain cycles.
b1, setting 4 : Draining due to a significant reduction in the demand
If parameter b1 includes setting 4, then the humidifier will not drai n if the demand for humi difi cation decreases.
This helps to conserve conductivity and is useful in low conductivity waters. If b1, setting 4 i s off, then the
humidifier will drai n to reduce the output if the demand is reduced by 33%.
b1, setting 8 : Automatic draining of the cylinder after period of non-use
If parameter b1 includes setting 8, parameter “bF” may be used to cause the humidifier to empty the steam
cylinder if there has been no demand for humidifi cation for an extended period of time. This helps prevent
premature corrosi on of the electrodes and/or contamination of the water i n the cylinder. T he default setting is
for 3 days. The unit will display “i dr” when this drain function occurs.
b1, setting 64 : Complete periodic draining
If parameter b1 includes setting 64, then parameter “bE” can be used to set the hours between total drains of
the cylinder. This i s useful if the water contains impurities that can cause erratic behavior.
28

Parameter
A0
A1
A2
A3
A4
A5
A6
A7
A8
A9
b1
b2
b3
b4
b5
b6
b7
b8
b9
bb
bE
bF
C0
C1
C2
C3
C4
C5
C6
C7
d1
d2
d3
d4
d5
d9
P0
P1
P2
P3
P4
P5
P6
P7
P8
P9
ST
N/A - Not Accessible
∗
- Read Only
Installation, Operating & Maintenance Manual
STANDARD CONFIGURATION SETTINGS
HumiSteam Parameters
H Controller
DDC
0-10 vdc
1 1 0 2 3
1 1 1 1 1
1 4 N/A 0 0
N/A N/A N/A 0 0
N/A N/A N/A 100 100
N/A N/A N/A 0 0
N/A N/A N/A N/A 0
N/A N/A N/A N/A 0
N/A N/A N/A N/A 100
N/A N/A N/A N/A 0
2 2 2 2 2
0 0 0 0 0
0.0 0.0 0.0 0.0 0.0
0 0 0 0 0
1.5 1.5 1.5 1.5 1.5
2.0 2.0 2.0 2.0 2.0
75 75 75 75 75
100 100 100 100 100
100 100 100 100 100
0 0 0 0 0
N/A N/A N/A N/A N/A
3 3 3 3 3
1 1 1 1 1
4 4 4 4 4
0 0 0 0 0
1 1 1 1 1
3 3 3 3 3
0 0 0 0 0
0 0 0 0 0
0 0 0 0 0
∗ ∗ ∗ ∗ ∗
∗ ∗ ∗ ∗ ∗
∗ ∗ ∗ ∗ ∗
∗ ∗ ∗ ∗ ∗
∗ ∗ ∗ ∗ ∗
∗ ∗ ∗ ∗ ∗
100 100 100 100 100
N/A N/A N/A 5 5
N/A N/A N/A 100 100
N/A N/A N/A 0 0
N/A N/A N/A 1 1
N/A N/A N/A N/A N/A
N/A N/A N/A N/A N/A
N/A N/A N/A N/A 100
N/A N/A N/A N/A 5
N/A N/A N/A N/A 100
N/A N/A N/A 50 50
DDC
4-20ma
ON / OF F
STAND
ALONE
STAND ALONE
WITH HIGH LIMIT
29

CAREL
humiSteam
3.6 Seasonal Shut Down
During seasonal shut-down or alternatively shut-down for maintenance of the electrical parts and/or the
plumbing, the humidifier should be placed out-of-service.
NOTE: the water cylinder should be emptied before shutting dow n the humidifier, to prevent corrosion
of the electrodes.
Follow these instructions:
• Press and hold the manual drai n switch until the
steam cylinder is empty, or use the Manual Drain
procedure listed under “Activating Manual Drain”;
• Turn off the On/Off (I/O) rocker switch on the side of
the humidifi er, and disconnect power from the
humidifier;
• Shut off the water to the hum idifier.
In the event of malfunction of the drain valve, the
cylinder can be emptied manually by lifting it out of the
drain manifold and pouring the water into the bottom
drain pan. For UE025 and larger humidifiers, use the
manual drain device on the manifold, pulling the manual
drain tab until it releases (see sketch at right).
3.7 The Remote Control
A hand-hel d infra-red remote control is availabl e for the HumiSteam. This device
permits programming the humidifier(s) from across the room and also makes
available buttons with specifi c functions.
NOTE: To use the remote control, parameter C2 must be set on each humidifier
to give it an access code so that the rem ote control can address it. If all
humidifiers i n range of the remote control have the same access code, then they
will respond simultaneously to commands from the rem ote control. Setti ng C2 to
0 on the humidifier will al low the rem ote control to be used without the need of a
code.
To use the remote control, aim it at the humidi fier and press ENABLE. All the
humidifiers i n range will display their acti vati on codes. If a humidifi er has its C2
param eter set to 0, i t will skip this step and display the fi rst parameter.
To program a humidifier, enter its access code into the remote control. If
successful, the humidifier will di splay the fi rst parameter.
To program main parameters, simply press the + or - button on the remote
control of the parameter you want to modify and the humidifier will di splay that
param eter code. Press the SEL button on the remote control and the value will
be displayed. Modify the value by usi ng the and buttons on the remote control. T hen press the next
param eter button and so on. Values are saved when you exit the programming phase.
To program other parameters, press any + or - button on a parameter, then use the SEL and and buttons
on the remote control in the same way as the buttons on the front of the humidifier controller.
To exi t the programmi ng phase and save the modifi cations made to the parameters, press the PRG button.
To exi t without saving the modifi cations, press the ESC button.
To exi t the programmi ng phase without confirming the modifications made:
• do not press any button for 60 seconds, if the parameter code is displayed;
• do not press any button for 120 seconds, if the value of the parameter is displayed.
30

Alarm
Excessive reduction in
Installation, Operating & Maintenance Manual
3.8 Resetting the Hour Counter
To reset the hour counter (parameter d4), proceed as follows:
• press the PRG button for 5 seconds, until the code P0 i s displayed, indicating the first modifiable
param eter; using the and buttons, scroll the parameters until d4 is di splayed;
• press the SEL button to display the value of the hour counter (preceded for 1 second by the unit of
measure);
• press the and buttons together for 5 seconds until the value is set to zero, preceded by a brief flash.
3.9 Alarms
In the event of an alarm, the alarm LED (9) will flash, the alarm relay will close, and the alarm code will fl ash i n
the displ ay. Multiple alarms wi ll flash in sequence, alternating with the m ain display. Pressing the PRG button
will reset the alarms, although still acti ve alarm s will continue to display.
Controller Action
EH
EL
EC
EP
Humivisor Causes Solution
H
Over-current at the
E102
E103
E105
E113
electrodes; probable
electrode malfunction
or water conducti vity
temporarily too high
(especi ally when
starting after a short
stop)
Power not available;
no steam production
when on
High supply water
conducti vity
output
1. Check the operation of the
drain valve
2. Check for fill valve l eakage
3. Drain part of the water and
re-start
1. With the machine off and
di sconnected from the main
power, check the internal
electrical connections
1. Check limit set for b6
2. T urn the m achine off and
clean the water conducti vity
probes
3. If the problem persi sts,
change the source of supply
water or install a suitable
treatm ent system
(demineralizati on, even
partial).
Note: the problem will not be
resolved by softeni ng the
supply water.
1. Cylinder completely spent
or water wi th excessi ve foam.
Perform maintenance on the
cylinder.
H
Shutdown
Shutdown
Shutdown
Shutdown
Reset
display
N/A Active N/A
N/A Active N/A
N/A Active N/A
Manual Acti ve Manual
relay
Reset
relay
31

CAREL
Alarm
blocked or bent and that there
3. Check that the steam outlet
4. Check that the steam outlet
Automatic
Acti ve
Automatic
nal
Acti ve
Acti ve
Signal
Signal
Acti ve
Signal
Acti ve
Signal
Acti ve
humiSteam
Controller Action
EF
EA
Ed
Ec
Humivisor Causes Solution
H
1. Check that the fill pipe from
the main to the humidifier and
the internal pipe are not
is suffi cient pressure (0.1-0.8
mpa, 1-8 bar)
2. Check the operation of the
E114 Lack of water
E115
E116 Drain malfunction
E131
Excessive foam i n the
cylinder during boiling
High water
conducti vity pre-alarm
fill valve
is not working against
excessive back-pressure,
preventing the fl ow of water
into the cylinder by gravity
pipe is not is kinked and that
there are no sags.
The formation of foam i s
general ly due to the presence
of surfactants in the water
(lubri cants, solvents,
detergents, water treatment
agents, softeners) or an
excessive concentration of
di ssolved salts:
1. Drain the water suppl y lines
2. Clean the cylinder
3. Check for the presence of
softeners (in thi s case, use
another type of water or
reduce the softening)
Check the drain ci rcuits and
the correct operation of the
drain valve
Check the conductivi ty of the
supply water if necessary,
install a suitable treatment
sy stem
Note: the problem will not be
resolved by softeni ng the
supply water.
H
Shutdown
Sig
only
Shutdown
only
Reset
display
when
water
returns
Manual
Manual
Auto
relay
Not
active
Reset
relay
when
water
returns
Manual
Manual
-
-
E121
E
E
-
=
E122
E124 High hi -limit humidity
E
32
High humidity in the
room (high tem p.for T
control)
Low humidity in the
room (low temp.for T
control)
Check the operation of the
probe and the limit set for
param eter P2
Check the operation of the
probe and the limit set for
param eter P3
Check the operation of the
outl et probe
only
only
only
Manual
Manual
Manual
Auto
Auto
Auto

Internal memory
Reprog.
Acti ve
Reprog.
Reprog.
Acti ve
Reprog.
Manual
Acti ve
Manual
Acti ve
Manual
available
Cylinder full with
Manual
Acti ve
Manual
e
Acti ve
Installation, Operating & Maintenance Manual
Controller Action
E0
EI
E2
E3
E4
Humivisor Causes Solution
H
1. Reset the default parameters
E101
E112
E130
E120
E123
error
Error in the user
param eters
Hour counter
error
Room sensor or
control si gnal
not connected
Hi-limit sensor
not connected
(see Chap. 7.5)
2. If the problem persi sts, contact
the CARE service center
1. With the machine off check that
there are no defective electrical
connecti ons or faults, then
reprogram the parameters
2. Reset the default parameters
(see Chap. 7.5)
3. If the problem persi sts, contact
the CARE service center
With the machine off check that
there are no defective electrical
connecti ons or faults, then reset the
hour counter (see par. 7.6)
Check the connection of the probe,
param eter A2 for the room probe
and the setting of parameter A0
(see page 23)
Check the connection of the probe,
param eter A6 for the outlet probe
and the setting of parameter A0
(see chap. 7)
H
Shut-
down
Shut-
down
Hour
counter
Shut-
down
Signal
only
Reset
display
By Carel
Params.
Reset
manual
Alarm
relay
Not
active
Reset
relay
By
Carel
Params.
N/A
Auto
Auto
CP
CL
EU
PC
Cy
Nn
E132
E133
E134
-
E135
E136
Cylinder being
depleted signal
Cylinder
depleted signal
cylinder
machine off
si gnal
Cleani ng
cylinder started
si gnal
Timeout si gnal
(see parameter
"bb") for
maintenance
exceeded
Reached final
limit (1.5xbb) of
cylinder
operating life
Perform maintenance and/or
replace the cylinder
Perform maintenance and/or
replace the onl y
With the machine off:
1. Check for any leaks from the fill
val ve or the condensate return pipe
2. Check that the level sensors are
clean total shut-down
You have activated the autom ati c
cylinder fl ushing sequence
Perform maintenance and/or
replace the cylinder
Replace the cylinder
Signal
only
Signal
only
Shut-
down
- - - -
Signal
only
Shut-
down
Not
Manual
reset
hour
counter
Manual
reset
hour
counter
Not
active
Not
active
Acti v
Auto
N/A
After
the
manual
reset
hour
counter
After
the
manual
reset
hour
counter
33

CAREL
drain sequence. Sequence ends on
use.
humiSteam
Controller Action
Dr
Idr
Dr
AF
Humivisor Causes Solution
H
Complete
draining of the
cylinder
activated
Complete
draining for
extended
inactivity
Complete
-
periodical
draining active
Anti -foam
algorithm active
You have activated the manual
its own.
The uni t is emptying the cylinder
after an extended period of non-
Sequence ends on its own.
The uni t has activated the periodic
drain to fl ush excessive mineral s.
Sequence ends on its own.
The uni t is working to eliminate
foaming.
H
- - - -
- - - -
- - - -
- - - -
Reset
display
Alarm
relay
Reset
relay
34

3.10 Trouble-Shooting
problem causes solutions
1. no electrical power
2. on/off switch of the humidifier in
posi tion 0 (open)
the humidifi er does not turn on
the humidifi er does not start
operation
3. control connectors i mproperly
connected
4. blown fuses
5. transformer failure
1. rem ote ON/OFF contact open
(relay/terminal s AB - AB or 7I - 8I)
2. the humidistat has not been
connected correctl y
3. humidi stat failure
4. control si gnal not compatible
with the type set
5. value m easured by the sensor/s
higher than the corresponding set
point
Installation, Operating & Maintenance Manual
1. check the safety devices upstream from
the humidifi er and the presence of power
2. cl ose the switch on the panel: posi tion I
3. check that the connectors are properly
inserted in the terminal block
4. check the condition of fuses F1/F2/F3
5. check that the voltage across the
secondary winding of the transformer is
24Vac
1. cl ose ON/OFF contacts (relay/terminals
7I - 8I)
2. check the external connection
3. replace the humidistat
4. set parameters A0, A2-A9 correctly
5. check the values of the set point St and
P7
the humidifi er fills with water
without producing steam
the thermal -magnetic overload
switch is activated
the humidifi er wets the duct
the humidifi er wets the floor
below
1. high steam back pressure
2. fil l valve strainer clogged
3. mineral in the fill cup
4. drain solenoid valve leaking
1. thermal-magnetic overload
switch is under-rated
2. over-current at the electrodes
1. the distributor i s not installed
correctl y (too near the top of the
duct or the condensate return is
blocked)
2.system over-si zed
3.humidifier active when the fan in
the duct is off
1. the humidifier drain is blocked
2. the suppl y water or overflow
circui t has leaks
3. the condensate drain pipe does
not bring the water back to the
drain pan
4. the steam hose is not properl y
fastened to the cylinder
1. check that the steam hose is not ki nked
or sagging, trapping condensate
2. cl ean the fi ll valve strainer
3. cl ean the fi ll cup
4. check for 24Vac at the drain solenoid
val ve and/or drain solenoid replacement
1. check that the thermal-magnetic
overload switch is rated for a current of at
least 1.5 times the rated current of the
humidifier
2. see description for alarm EH
1. check that the steam distributor is
installed correctly
2. decrease the steam production set on
the control
3. check the connection of the device (flow
switch or differential pressure switch)
sl aving the humidifi er to the ventilation in
the duct (terminals 7I - 8I)
1. cl ean the drain assembly and pan
2. check the entire water circui t
3. check the correct positi on of the
condensate drain hose i n the drain pan
4. check the fastening of the hose clamps
on the steam outlet
35

CAREL
Water in the cylinder turns black 1. minerals in the cylinder have
Heavy arci ng occurs within hours
of startup
Humidifi er continuously fills and
drains without producing steam
problem causes solutions
overconcentrated and are
deteriorati ng the electrodes.
1. T he feed water contains large
amounts of Iron, Copper or other
conducti ve contaminants.
1. Mineral has bridged between the
electrodes.
2. T here is back pressure from the
steam hoses or duct.
3. T he flow regulator in the fill valve
is broken or out of place.
4. Water conductivity is very high.
5. Water is foaming excessively.
humiSteam
1. Check for sags & kinks that
could trap condensate in the steam
hoses that could cause a back
pressure on the cylinder.
2. Check the duct static pressure.
3. Check the fill valve and inlet
strainer.
4. Check the drain valve operation.
5. Correct installation problems
and replace cylinder.
1. Contact the factory for an
opti onal drain timer to force
additional drai ns to control the
minerals.
2. If you are usi ng a softener,
check the salt being used. If i t
contains any additi ves, di scontinue
use, flush all lines and convert to
pure salt or unsoftened water.
3. Check the electrodes in the
cylinder to be sure they were not
damaged in shipping.
1. Clean or repl ace the cylinder.
2. Check the steam hoses for kinks
or gullys that might be trapping
condensate.
3. Replace the fill valve.
4. Consider usi ng a mix of
demineralized water with raw
water.
5. Check cylinder - replace if
exhausted. If feed water contains
si lica or ni trates, i nstall a 1 micron
water filter.
3.11 Resetting Factory Defaults
If errors have occurred when setting the parameters, the
controller m ay be reset to the factory defaul t values:
• in the first 5 seconds from start-up (whi le the three
dashes are displayed), press the PRG button (2) until
the upper dash in the center fl ashes (1);
• release the PRG button within 3 seconds to confirm
the permanent reset of the factory defaults; to confirm
the reset, the upper dash will stay on for 2 seconds;
• the factory reset i s not carried out i f the PRG button is
pressed for more than 3 seconds, until the upper dash disappears.
Recalling the default parameters does not change the parameter relating to the unit of measure (A1), and i t is
thus recommended to check and if necessary select and save the unit of measure as required, and then recall
the default parameters. In this way the default values will automatically be converted.
36

Installation, Operating & Maintenance Manual
4 Maintenance
4.1 Periodic checks
• After one hour of operation: For both disposable and cleanable cyl inders, check that there are no
si gnificant water leaks.
• Every fifteen days or no more than 300 operating hours: For both disposable and openable
cylinders check operation, that there are no signifi cant water l eaks and the general condi tion of the
cylinder. Check that during operation there is no arci ng between the electrodes.
• Every three months or no more than 1000 operating hours: For disposable cylinders, check
operation, that there are no signifi cant water leaks and, i f necessary, replace the cylinder; for cleanable
cylinders, check that there are no blackened parts of the cylinder. If there are blackened parts of the
cylinder, check the condition of the electrodes, and if necessary replace them together with the o-rings
and the cover gasket.
• Annually or no more than 2500 operating hours: For di sposable cylinders, replace the cylinder; for
cleanable cylinders check operation, that there are no significant water leaks, the general conditions of
the cylinder, check that there are no blackened parts of the cylinder: if thi s is the case, check the
condition of the electrodes, and if necessary repl ace them together with the o-rings and the cover
gasket.
• After five years or no more than 10,000 operating hours: For both disposable and openable
cylinders, replace the cylinder. After extended use or alternatively when using water with a high sal t
content, the solid deposits that naturally form on the electrodes may reach the stage where they also
stick to the inside wall of the cylinder; in the event of especially conductive deposi ts, the consequent
heat produced may overheat the plastic and mel t it, and, i n more severe cases, puncture the cylinder,
allowing water to l eak out. As a precaution, check the deposits and the bl ackening of the wall of the
cylinder, and replace the cylinder i f necessary.
CAUTION: always disconnect the main power before touching the cylinder in the event of leaks, as current may
flow through the water.
4.2 Cylinder maintenance
The life of the cylinder depends on a number of factors, i ncluding: the amount and type of mineral i n the water,
the correct use and sizing of the humi difi er, and the output, as well as careful and regular maintenance. Due to
the aging of the plastic and the consumption of the electrodes, even an openable steam cylinder has a limited
life, and i t i s therefore recommended to replace it after 5 years or 10,000 operating hours.
Important warnings
The humidifier and its cylinder contain live electrical components and hot surfaces, and therefore al l service
and/or maintenance operations must be performed by expert and qualified personnel, who are aware of the
necessary precautions. Before performing any operations on the cylinder, check that the humidifier is
di sconnected from the power supply. Remove the cylinder from the humidifier only after havi ng drained it
completely usi ng the manual drai n button or procedure. Check that the m odel and the power suppl y voltage of
the new cylinder correspond to the data on the rating label.
4.2.1 Replacing the cylinder
IMPORTANT WARNING: the cylinder may be hot. Allow it to cool before touching i t or use protective gloves.
To replace the cylinder:
• completely drai n the cylinder by pressi ng and holding the manual drain swi tch or by pressi ng the and
buttons simultaneously for 2 seconds to force a manual drain. This procedure can be stopped at
any time by again pressing the and buttons for 2 seconds;
• turn the humidifier off and disconnect the main power;
• open and remove the cover;
• remove the steam hose from the cylinder;
• di sconnect the electrical connections from the top of the cylinder;
• release the cylinder from its holding bracket and l ift i t up to remove it;
• install the new cylinder in the humidifier by performing the previous operations in reverse.
WARNING: Electrical connections to the cylinder must be tight or possible fire hazard may result.
Threaded nuts on power wires must be connected with 22 to 29 inch-pounds of torque.
37

CAREL
Note: Photo does not r epresent
Note: Photo does not
Wiring of cylinders for UE025, UE035, UE045, UE065 units and v oltages
all cylinder possibilities
Connection of single or three phase UE 001 to 015 models
Connection of three phase UE 025 to 065 models
represent all cylinder
possibilities
208 230 460 575
025
035
045
065
125/350 A A B B
350/1250 B B B B
125/350 A A B B
350/1250 A A B B
125/350 A A B B
350/1250 A A B B
125/350 / / B B
350/1250 / / B B
Power Supply (Vac) Model Conductiv ity
humiSteam
38

UE001-UE015
Installation, Operating & Maintenance Manual
4.2.2 Maintenance of the other plumbing components
IMPORTANT WARNINGS:
• When cleaning the pl asti c components do not use detergents
or solvents;
• Scale can removed using a sol ution of Lime-A-Way
or 5% phosphoric acid, then rinse with water.
• External power must always be disconnected when
performing any maintenance on the humidifier.
• Fill valve:
After havi ng disconnected the
cables and the hoses, remove the
val ve and check the condition of the
inlet filter; clean if necessary using
the same cleaning solution as for
the steam cylinder and a soft brush.
• Supply and drain manifold:
Check that there are no mineral
deposits in the cylinder attachment
and clean if necessary. Check that
the seal (o-ring) is not damaged or
cracked; replace if necessary.
• Drain valve /drain pump:
Remove the valve body or pump, clean i f necessary using the same cl eaning
solution as for the steam cylinder and a soft brush.
• Drain pan:
Clean the pan of any mineral deposits and check that the water flows freely from the pan to the drain at the
drain valve.
• Supply, fill, overflow pipes:
Check that these are cl ear and clean or replace i f necessary.
UE025, UE035 UE045, UE065
IMPORTANT
WARNING: after havi ng
replaced or checked the
plumbing, check that
components have been
reconnected correctl y
with the proper seals.
Re-start the humidifier
and perform a num ber
of supply and drai n
cycles (from 2 to 4),
then check for any water
leaks.
Item No.
1 fill/drain manifold
2 fill valve
3 drain valve
4 fill cup fill pipe
5 cylinder supply pipe
6 overfl ow pipe
7 fill cup
8 drain pan
9 drain column
10 drain pipe
11 drain pum p
12 conductivity meter
®
, CLR®,
Description
39

CAREL
UEH0000000U00
UEH0000000U00
0U00
0U00
Model
ctivity Meter
UEKV ASC000
UEKV ASC000
UEKV ASC000
UEKV ASC000
UEKV ASC000
UEKV ASC000
UEKV ASC000
KIT VC00006
13C499A 030
UEKT 00000L
UEKT 00000L
0203000AXX
0203009AXX(5)
0203007AXX(2)(3)
0606192AXX
0605319AXX
humiSteam
4.3 Replacement Parts
4.3.1 Single Phase Humidifiers
Standard spare parts Model
Water parts
f ill cup + conductivity meter UEKVASC000 UEKVASC000 U EKVASC000 UEKVASC000
f ill v alve kit KITVC00006 KITVC00006 KI TVC00006 KITVC00012
Drain v alve kit 13C499A030 13C499A030 13C499A030 13C499A030
internal pipe kit UEKT00000S UEKT00000S UEKT00000S UEKT00000M
Electrical parts
Contactor 0203000AXX 0203000AXX 0203001AXX 0203001AXX
power transf ormer: 208/230/460/575-24 Vac,
100 VA NEW (>1/1/06)
f use holder 0606192AXX 0606192AXX 0606192AXX 0606192AXX
f use 0605319AXX 0605319AXX 0605319AXX 0605319AXX
Electronic parts
LED display ver.C-P UEKDP00000 UEKDP00000 UEKDP00000 UEKDP00000
control module ver.H-T UEH0000000U00
control board v er.C-P ** UEP0000000U 00
control board v er.H-T 98C474C004 98C474C004 98C474C004 98C 474C004
f lat connection cable 59C460A003 59C460A003 59C460A003 59C460A003
remote control TELUE0E000 TELUE0E000 TELUE0E000 TELUE0E000
4.3.2 Three Phase Humidifiers
Standard Spare Parts
UE003 UE005 UE008 UE010 UE015 UE025 UE035 UE045 UE065
Water P arts
Fill Cup + Condu
Fill Valve Kit K ITV C00006 KITVC00006
Drain Valve Kit 13C499A030 13C499A030
Internal Pipe Kit UEKT 00000S UEKT 00000S UEKT 00000S UEKT00000M UEKT 00000M
Conduc tivity Probe:
208-230V 18C480A011
400-460-575V 18C480A011
Electrical Parts
Contac tors 0203000AXX 0203000AXX
Power T ransformers:
208/230/460/575-24 Vac,
100VA NEW (>1/1/06)
Fuse Hol ders 0606192AXX 0606192AXX
Fuses 1,2:
208-230V 0605319AXX 0605319AXX
400-460-575V 0605318AXX 0605318AXX 0605318AXX 0605318AXX
Fuse 3 0605319AXX 0605319AXX 0605319AXX 0605319AXX
Fuse 4 0605624AXX 0605624AXX 0605624AXX 0605624AXX
Pump Relay 0102001AXX 0102001AXX 0102001AXX 0102001AXX
Electrical Parts
09C565A 002 09C565A 002 09C565A 002 09C565A 002 09C565A 002 09C479A 062 09C479A062 09C479A062 09C479A 062
UE001 UE003 UE005 UE009
09C565A002 09C 565A002 09C565A002 09C565A002
UEH0000000U00
UEP0000000U 00 UEP000000
KIT VC00012 KITVC00012 KIT VC00040 K ITVC00040 KIT VC00040 KIT VC00070
13C499A 030 13C499A030 KITPS E0000 KITPSE0000 KITPSE0000 KIT PSE0000
0203001AXX 0203001AXX 0203001AXX 0203008A XX
0606192AXX 0606192AXX 0606193AXX 0606193A XX 0606193AXX 0606193AXX
0605319AXX 0605319AXX 0605319AXX 0605319A XX 0605319AXX 0605319AXX
UEP000000
UEKV ASC000
UEKT 00000L UEKT 0000XL
0203007AXX
(2,3,4)
40

Model
59C460A 003
TELUE0*000
Standard Spare Parts
Installation, Operating & Maintenance Manual
UE003 UE005 UE008 UE010 UE015 UE025 UE035 UE045 UE065
Control Module Ver. H-T UEH0000000U00
Control B oard Ver. C-P ** UEP0000000U00
Control B oard Ver. H-T 98C474C004 98C474C004 98C474C004 98C474C004 98C474C004 98C474C005 98C474C005 98C474C005 98C474C005
Flat Connection Cable 59C460A003 59C460A003
Remote Control TELUE0*000 TELUE0*000
59C460A 003 59C460A003 59C460A003 59C460A 003 59C460A 003 59C460A 003
TELUE0*000 T ELUE0*000 T ELUE0* 000 T ELUE0*000 T ELUE0*000 TELEUE*000
4.3.3 Replacement Steam Cylinders & Parts
Single Phase Humidifiers
Model UE001 UE003 UE005 UE009
Steam Cyli nders disposable
200-2 30/1 VAC
Standard co nductivity
200-2 30/1 VAC
Low conductivity
Steam Cyli nders cleanable
200-2 30/1 VAC
Standard co nductivity
200-2 30/1 VAC
Low conductivity
Replacem ent
Electrodes
elect rode kit 200-230/1 V
Standard co nductivity
elect rode kit 200-230/1 V
Low conductivity
elect rode gasket kit KITBLC2FG0 KI TBLC3FG0
BL0S1F 00H1 BL0S1F00 H1 BL0S2F 00H0 BL0S3F00 H0
BL0S1E0 0H1 BL0S1E0 0H1 BL0S2E00H0 BL0S3E00H0
BLCS2F00W0 BLCS3F 00W0
BLCS2E00W0 BLCS3E00W0
KITBLCS2F0 KIT BLCS3F 0
KITBLCS2E0 KITBLCS3E0
Three Phase Humidifiers
Model UE003 UE005 UE008 UE010 UE015 UE025 UE035 UE045
Steam Cyli nders disposable
200-2 30/3 VAC
Standard co nductivity
460/ 3 VAC
Standard co nductivity
575/ 3 VAC
Standard co nductivity
200-2 30/3 VAC
Low conductivity
460/ 3 VAC
Low conductivity
575/ 3 VAC
Low conductivity
Steam Cyli nders cleanable
200-2 30/3 VAC
Standard co nductivity
460/ 3 VAC
Standard co nductivity
575/ 3 VAC
Standard co nductivity
200-2 30/3 VAC
Low conductivity
460/ 3 VAC
Low conductivity
575/ 3 VAC
Low conductivity
Replacem ent
Electrodes
elect rode kit 200-230/3 V
Standard co nductivity
elect rode kit 460/3 VAC
Standard co nductivity
elect rode kit 575/3 VAC
Standard co nductivity
elect rode kit 200-230/3 V
Low conductivity
BL0T1B00 H1 BL0T2B00H0 BL0T2B00H0 BL0T3B00H0 BL0T3B00H0 BL0T4C00H0 BL0T4B00 H0 BL0T5A00H1
BL0T1D0 0H1 BL0T2D0 0H0 BL0T2D00H0 BL0T3D00H0 BL0T3D0 0H0 BL0T4D00H0 BL0T4D00H0 BL0T4D0 0H0 BL0T5D00H0
BL0T2D00H0 BL0T2D00H0 BL0T3D0 0H0 BL0T3D00H0 BL0T4D0 0H0 BL0T4D0 0H0 BL0T4D00H0 BL0T5D00H0
BL0T1A00 H1 BL0T2A00H0 BL0T2A00H0 BL0T3A00H0 BL0T3A00H0 BL0T4B00H0 BL0T4B00 H0 BL0T5A00H1
BL0T1B00 H1 BL0T2C00H0 BL0T2C00H0 BL0T3C00H0 BL0T3C0 0H0 BL0T4D00H0 BL0T4C0 0H0 BL0T4C00H0 BL0T5C00H0
BL0T2C00H0 BL0T2C00H0 BL0T3C0 0H0 BL0T3C00H0 BL0T4D0 0H0 BL0T4D0 0H0 BL0T4D00H0 BL0T5D00H0
BLCT2B00W0 BLCT2B00W0 BLCT3B00W0 BLCT3B00W0 BLCT4C00H0 BLCT 4B00 H0 BLCT5B00H0
BLCT2D00W0 BLCT2D00W0 BLCT3D0 0W0 BLCT 3D0 0W0 BLCT4D00H0 BLCT4D0 0H0 BLCT4D00H0 BLCT5D0 0H0
BLCT2D00W0 BLCT2D00W0 BLCT3D0 0W0 BLCT 3D0 0W0
BLCT2A00W0 BLCT2A00W0 BLCT3A00W0 BLCT3A00W0 BLCT4B00H0 BLCT4B00H0 BLCT5B00 H0
BLCT2C00W0 BLCT2C00W0 BLCT3C0 0W0 BLCT 3C0 0W0 BLCT4D00H0 BLCT4C0 0H0 BLCT4C00H0 BLCT5C0 0H0
BLCT2C00W0 BLCT2C00W0 BLCT3C0 0W0 BLCT 3C0 0W0 BLCT4D00H0 BLCT4D0 0H0 BLCT4D00H0 BLCT5D0 0H0
KIT BLCT2B0 KI TBLCT2B0 KIT BLCT 3B0 KIT BLCT3B0 KI TBLCT4C0 KITBLCT 4B0 KITBLCT 5B0
KIT BLCT2D0 KIT BLCT2D0 KIT BLCT3D0 KIT BLCT3D0 KITBLCT4D0 KIT BLCT 4D0 KI TBLCT4D0 KI TBLCT5D0
KIT BLCT2D0 KIT BLCT2D0 KIT BLCT3D0 KIT BLCT3D0 KITBLCT4D0 KIT BLCT 4D0 KI TBLCT4D0 KI TBLCT5D0
KIT BLCT2A0 KI TBLCT2A0 KIT BLCT 3A0 KIT BLCT3A0 KI TBLCT4B0 KITBLCT4B0 KI TBLCT5B0
BLCT4D0 0H0
BLCT4D0 0H0 BLCT4D0 0H0 BLCT5D0 0H0
UE065, 090,
130
41

CAREL
elect rode kit 460/3 VAC
Low conductivity
elect rode kit 575/3 VAC
Low conductivity
elect rode gasket kit KIT BLC2FG0 KIT BLC2FG 0 KI TBLC3F G0 KITBLC3FG0 KI TBLC4FG 0 KIT BLC4FG0
Low Conductiv it y cylind ers for water conditions b etween 125-350 µS/cm
Standard C onductivity cylinders for water conditions between 350-1250 µS/cm
KIT BLCT2C0 KIT BLCT2C0 KIT BLCT3C0 KIT BLCT3C0 KITBLCT4D0 KIT BLCT 4C0 KI TBLCT4C0 KI TBLCT5C0
KIT BLCT2C0 KIT BLCT2C0 KIT BLCT3C0 KIT BLCT3C0 KITBLCT4D0 KIT BLCT 4D0 KI TBLCT4D0 KI TBLCT5D0
humiSteam
KITBLC4FG 0
KITBLC5FG 0
KITBLC5FG 0
42

Installation, Operating & Maintenance Manual
5 Wiring Diagrams
UE001, UE003, UE005, UE009 Single Phase
43

CAREL
UE003, UE005, UE008, UE010, UE015 Three Phase
humiSteam
44

UE025, UE035, UE045, UE065 Three Phase
Installation, Operating & Maintenance Manual
45

CAREL
6 Technical Specifications
humiSteam
VAC/
Phase
208/1
(U)
230/1
(D)
208/3
(W)
230/3
(K)
460/3
(M)
575/3
(N)
Max. water feed 0.16 gpm (0.6 l/min) 0.32 gpm (1.2 l/min) 1.06 gpm (4.0 l/min)
Max. drain rate 1.32 gpm (5 l/min) 6.0 gpm (22.5 l/min)
Drain connection 1.6" hose (40mm)
Min. drain piping ¾” (19 mm) 1 ½” (38 mm)
No. cylinders 1 2
Steam outlet (No.x
Contr ol v oltage 24 V AC 50/60 Hz.
Ambient conditions 34-140°F (1-40°C), 0-80 % RH, up to 8 inches W.C. duct static pressure (200 mm W.C.)
Ventilated steam
Factor
Lbs/hr 3.3 6.6 11.0 19.1
kg/h 1.5 3 5 8.7
Amps 5.4 10.8 18.0 31.3
KW 1.12 2.25 3.75 6.52
Lbs/hr 3.3 6.6 11.0 19.8
kg/h 1.5 3 5 9
Amps 4.9 9.8 16.3 29.3
KW 1.12 2.25 3.75
Lbs/hr 6.6 11.0 17.6 22 33 55 77 99
kg/h 3 5 8 10 15 25 35 45
Amps 6.2 10.4 16.7 20.8 31.2 52.0 72.9 93.7
KW 2.25 3.75 6.00 7.50 11.25 18.75 26.25 33.75
Lbs/hr 6.6 11.0 17.6 22 33 55 77 99
kg/h 3 5 8 10 15 25 35 45
Amps 5.6 9.4 15.1 18.8 28.2 47.1 65.9 84.7
KW 2.25 3.75 6.00 7.50 11.25 18.75 26.25
Lbs/hr 6.6 11.0 17.6 22 33 55 77 99 132 198 286
kg/h 3 5 8 10 15 25 35 45 60 90 130
Amps 2.8 4.7 7.5 9.4 14.1 23.5 32.9 42.4 61.2 84.7 122.4
KW
Lbs/hr 11.0 17.6 22 33 55 77 99 132 198 286
kg/h 5 8 10 15 25 35 45 60 90 130
Amps 3.8 6.0 7.5 11.3 18.8 26.4 33.9 49.0 67.8 97.9
KW
Height 24.4” (620 mm) 28.0” (710 mm) 35.0” (890 mm) 37.2" (945mm) 37.2" (945mm)
Width 14.4” (365 mm) 14.4” (365 mm) 21.9” (555 mm) 25.6" (650mm)
Depth 10.8” (275 mm) 10.8” (275 mm) 14.2” (360 mm) 17.9" (455mm) 17.9" (455mm)
Dry weight 35.3 lbs (16 kg) 44.0 lbs (20 kg) 75.0 lbs (34 kg) 97.0 lbs (44 kg) 160 lbs (73 kg)
Wet weight 41.9 lbs (19 kg) 59.5 lbs (27 kg) 133.4 lbs (60.5 kg)
Water feed
connection
size)
Feed water
conditions
distributors
UE
001
1 x 22/30 mm 1 x 30 mm 1 x 40 mm 2 x 40 mm
UE
003
2.25 3.75 6.00 7.50 11.25 18.75 26.25 33.75 48.75 67.50 97.50
Height/Remote: 6.3/10.75” (160.273 mm) Height = 10.5” (267 mm)
UE
005
3.75 6.00
Power: 24 v olt powered by unit Power: 220/1/50-60, 35 Watts
Air v olume: 112 cfm (192 m3/h) Air v olume: 380 cfm (646 m3/h)
Weight: 13.2 lbs. (6 kg) Weight: 63 lbs. (24 kg)
Noise: 30 dBA (50) Noise: 40 dBA
UE
008
VSDU0A
UNIT MODE L NUMBER: Capacit y, Amperage, Kilowatts
UE
009
6.75
3/4” MP T (19 mm) bushed to 1/4” O.D. compression
15 – 116 psi (1-8 bar), 125-1250 MicroMhos co nductivity
UE
010
7.50 11.25 18.75 26.25 33.75
UE
015
UE
025
VRDXL (One (1) required for each steam outlet. i.e. four (4)
UE
035
UE
045
UE
045
33.75
207.2 lbs (94
kg)
1.85 gpm (7
l/min)
for UE130)
UE
065
48.75 67.50 97.50
UE
090
(1156mm)
330 lbs (150
4 gpm (15
12 gpm (45
UE
130
45.5"
kg)
l/min)
l/min)
4 x 40
mm
46

1 = Disposable
2 = Disposable
6.1 Model Numbers
Installation, Operating & Maintenance Manual
UE 025 H D 000
UE =
Electrode
Capacity H Control
001 = 3.3 lbs/hr For use with: U = 208/1
003 = 7 lb s/hr
005 = 11 lbs/hr or
008 = 18 lbs/hr Modulating
010 = 22 lbs/hr
015 = 33 lbs/hr DDC N = 575/3
025 = 55 lbs/hr
035 = 77 lbs/hr
045 = 99 lbs/hr
065 = 132 lbs/hr
On/off
or M = 460/3
Power
supply
D = 230/1
W = 208/3
K = 230/3
Version
number
Internal
use only
U 1 0
USA
Cylinder
Type
Standard
Conductivity
Low
Conductivity
Optional
Equipment
0 = St andard
B = Direct
Mount Blower
Limited Warranty
All products manufactured by Carel USA, LLC are warranted to the orig inal purch aser to be free from def ects in materials an d wor kmanship
in the course of nor mal and reasonable use for a period of 2 years and 1 month from the date of shipment (The OEM controls warranty is 2
ye ars from date of manufact ure), humi difier replacement parts warranty is 90 days from date of Invoice. Warranty re placement parts are
warranted f or remainder of original unit warranty or 90 da ys, whichever is longer, so long as the product has been installed and oper ated in
accor dance with all appropriate man uals and wiring diagra ms, and started up b y a qu alified C arel USA technician. Any product or part that
is found to be defective will, at the option of Carel USA, LLC be replaced or repaired. Carel USA, LLC reserves the right to i nspect any part
or installation b efore replacing or re pairing defecti ve p arts. After startup of the product, labor for r epairs or replac ement of parts is not
cover ed b y this warrant y. Products not included in this warranty are NTC and PTC probes, tra nsfor mers (TRA series), and ro utinely
replaceable parts suc h as steam cylinders and gas kets. Carel USA, LLC assumes no liabilit y f or consequential or inconsequen tial damage,
or damage due to neglig ence or impro per use. Under the terms o f this warranty, the original purchas er ma y have certain legal rights and
other rights, which may vary from state to state. The Warrant y will not b e c onsidered valid if a product is damag ed due to negligence,
misha ndling or misapplicati on, or if t he product l abel is missing. Carel U SA will attempt to repair or replace the pr oducts within t wo ( 2)
months of the receipt of the retur ned goods.
47

CAREL
Form: +030221907, Rev. 0.7
humiSteam
CAREL USA, LLC
385 S. Oak Street
Manheim, PA 17545
48
 Loading...