

Page 1
UI HydroCare. iss1 06/11
Class 1
Medical Device
Care
Flex
UI
FLEXIBILITY IN A WORLD
OF MIXED ABILITY
HydroCare™ User Instructions
These are the user instructions for the
CareFlex HydroCare chair. Please read
them carefully before setting up and using
the chair and keep them in a safe place for
future reference.
These instructions include details of
the performance of the chair. If the
chair should start behaving outside of
its intended performance, show signs of
damage or excessive wear, or otherwise
feel unsuitable, please take it out of service
and contact CareFlex or your CareFlex
Distributor immediately.
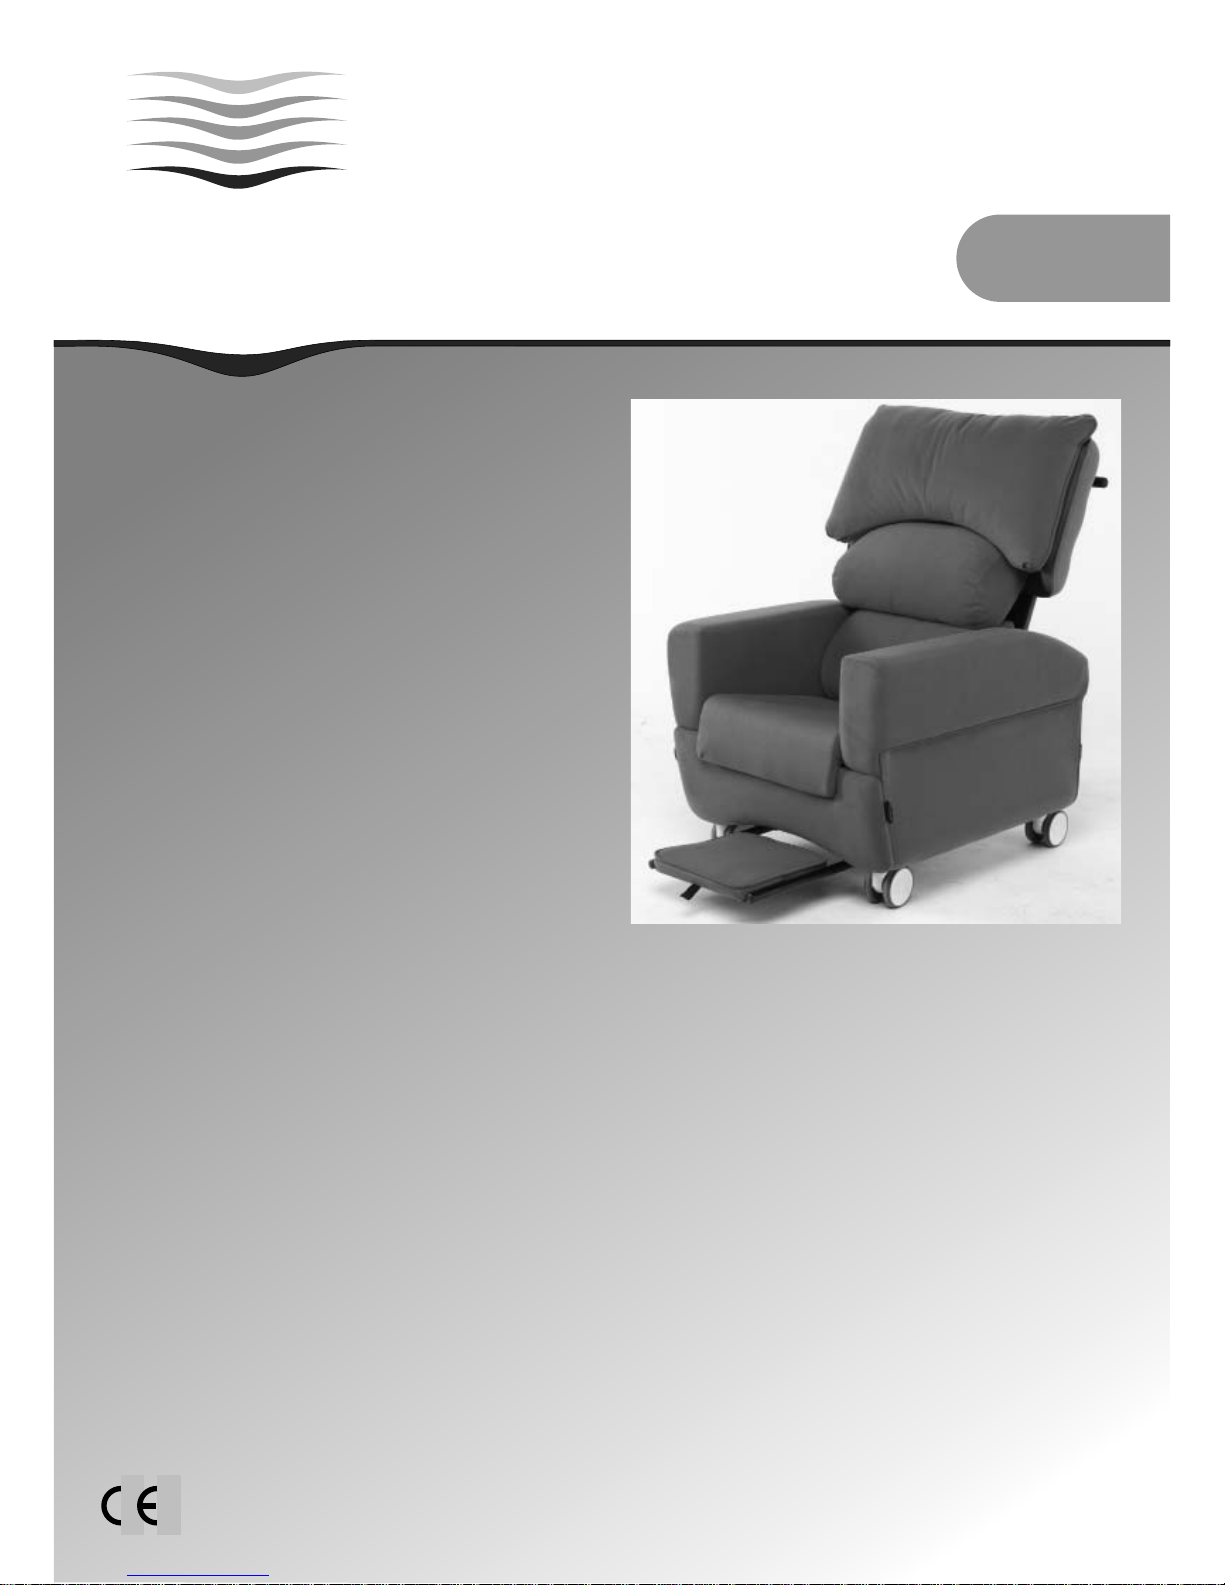
The HydroCare chair is designed for use
in nursing home environments, specifi cally
for those clients who are still ambulant but
who require a high level of security and
comfort. The chair has a built-in pressure
management system based on CareFlex’s
patented WaterCell Technology® in the
seat.
1
WARNING
A level of supervision appropriate to
the client’s abilities must be applied at all
times.
Page 2
UI HydroCare. iss1 06/11
The HydroCare Chair
2
Each HydroCare chair has a unique chair number which must be quoted during any correspondence with CareFlex
or your local CareFlex Distributor. This is on a silver foil label on the square tube of the back frame.
Identifi cation
Use a cloth tape measure to measure the client as you are setting up the chair. This will help limit the need for
any re-adjustment. Seat width, height and depth will have been factory set on the HydroCare according to dimensions
taken when the chair was assessed. Seat depth, which is critical for client comfort and safety, must be checked to
ensure it is correct and adjusted if necessary.
Regularly check the HydroForm set up to ensure it is working as intended and the client is benefi ting from the
pressure management solutions which are built into the chair.
Set-up and Adjustment
Max user weight = 160kg
The seat width and seat to fl oor height will be factory set as per the dimensions taken at the time of assessment/
prescription. These dimensions cannot be adjusted.
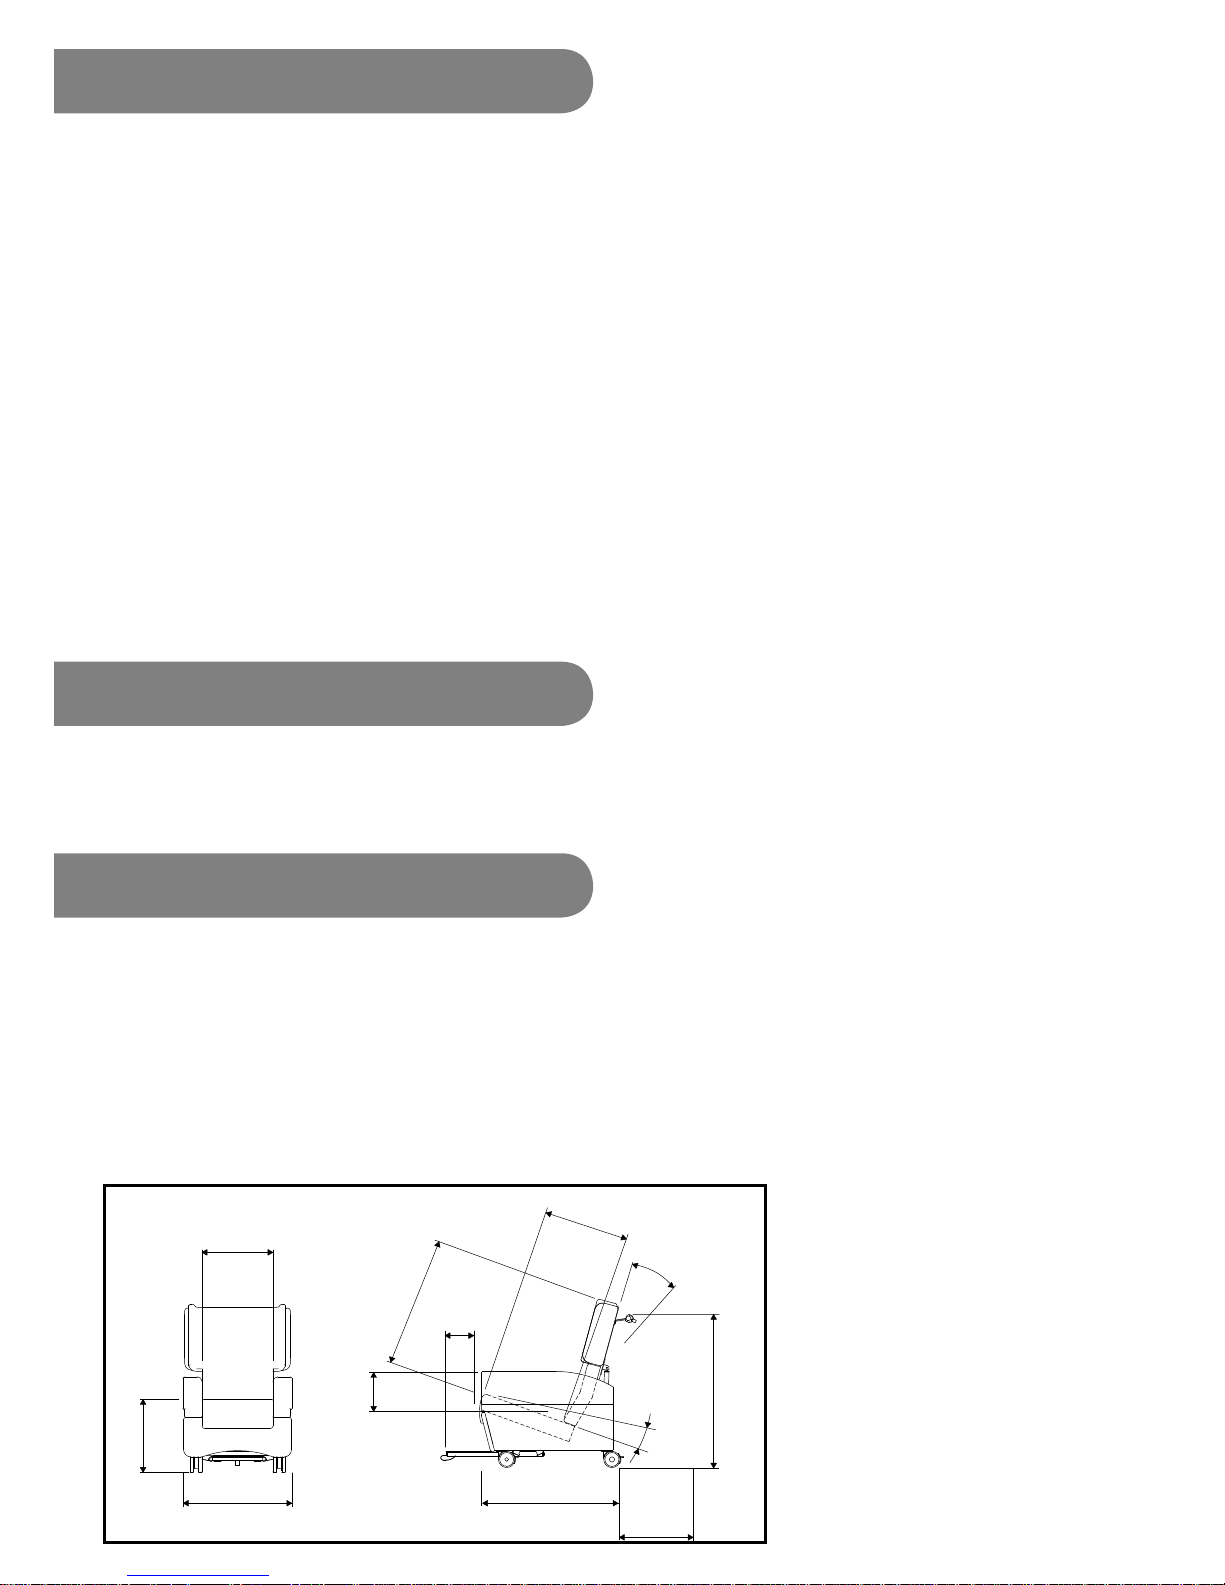
The HydroCare has three seat angle settings, 10°, 15° and 20°. The seat angle will be selected at assessment to suit
the client but it can be adjusted at a later date. Please see the further instructions.
Seat depth can be adjusted to suit the client between the ranges illustrated on the diagrams below. Seat depth will
have been measured during assessment and the chair delivered with the seat depth set accordingly. However, seat depth
must be checked to ensure the client is getting full support to the back and is not sacral sitting.
There is a back angle recline facility to provide different sitting positions for different activities. This is controlled by
a release lever activating an adjustable gas spring.
There are three back options for the chair. The fl at and contoured backs are made from shaped foam. The contoured
back has additional pads on the sides to give moderate lateral control. The waterfall back consists of three overlapping
fi bre fi lled pillows which provide soft, conforming support.
seat height
40, 44, 48
seat width
38, 43, 48
max width
62, 67, 72
seat depth
37-51
back length -80
push bar height
88, 92, 96
range of BAR
100° to 130°
seat
angle
10°, 15°, 20°
base length -81
clearance
for recline
38
average arm height -21
footplate
length -28
Page 3
UI HydroCare. iss1 06/11
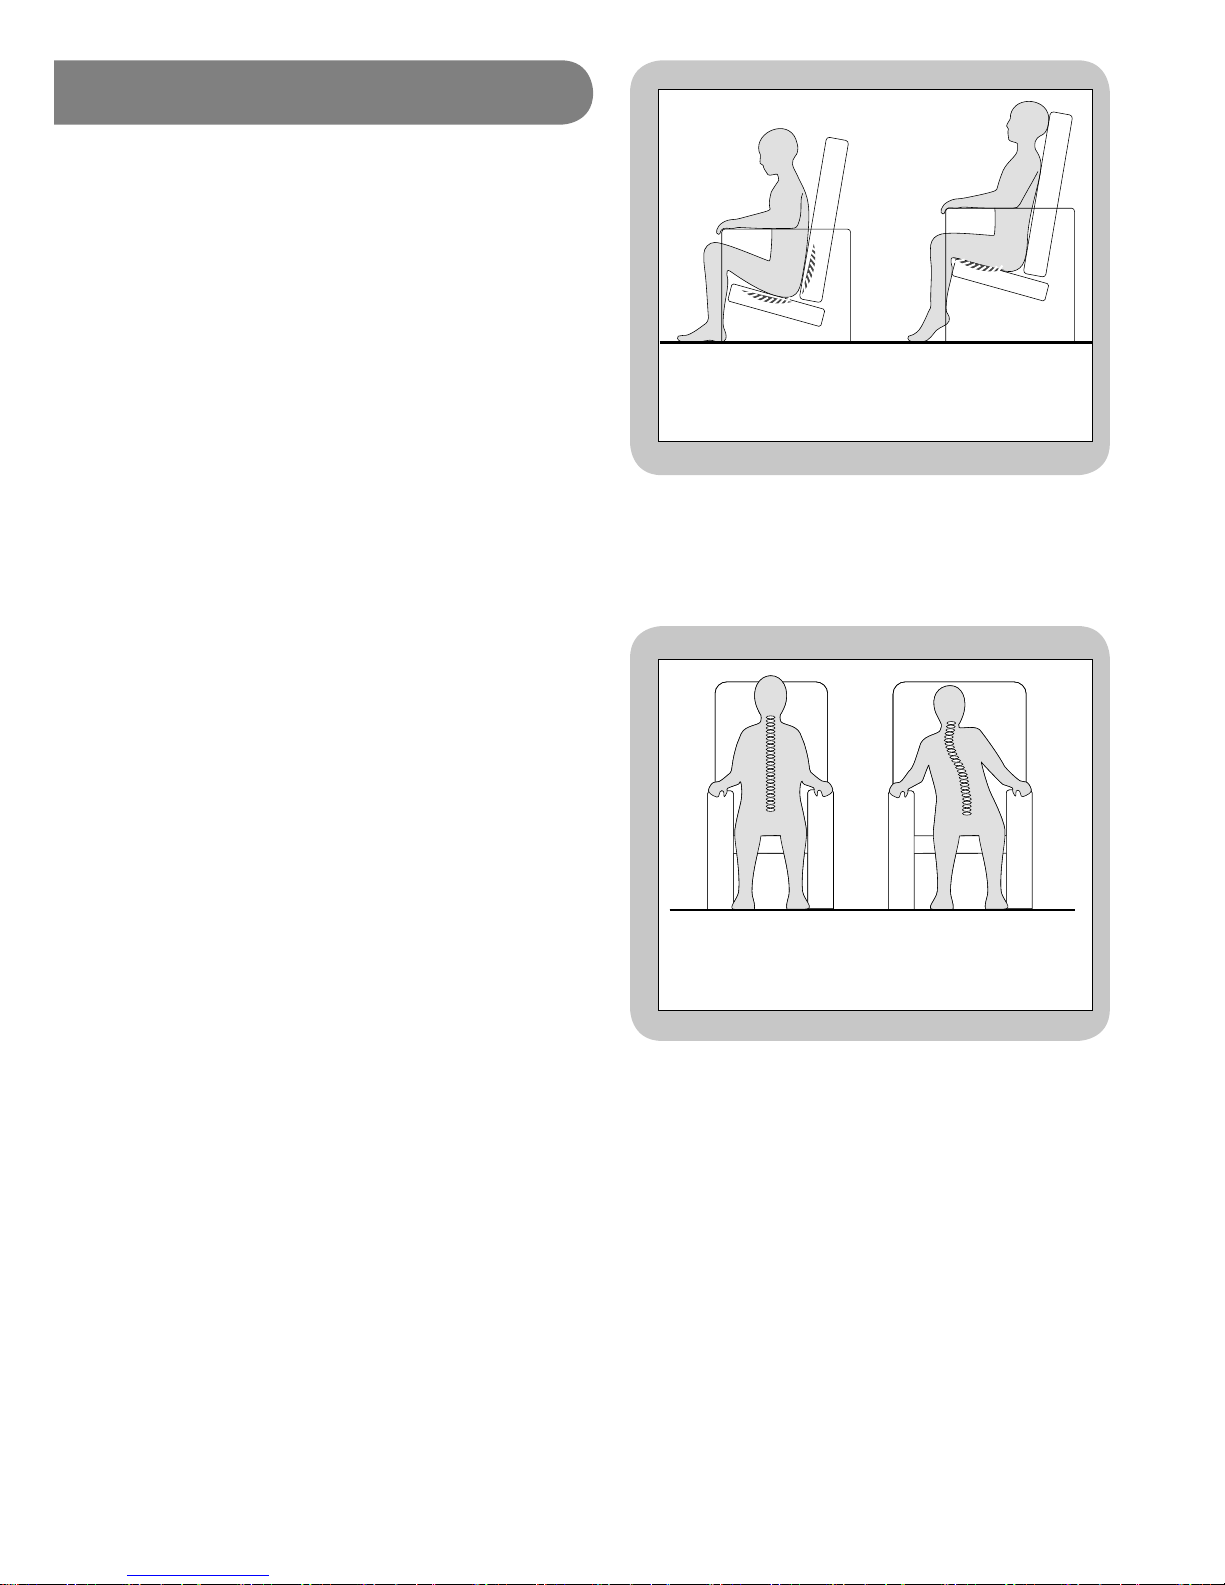
If the client can raise to standing themselves or with
minimal assistance, the seat height should be set so that
the client’s feet rest fl at on the fl oor and the underside
of their thighs are in contact with the full length of the
seat cushion. If the seat height is too high, the client’s
heels will be lifted off the fl oor and pressure will build
up along the underside of their thighs. If the seat is
too low, their knees will be raised and there will be no
contact between the back of their thighs and the seat
cushion. This will increase the pressure on their bottom
and sacrum and could cause discomfort at the hips.
If the client is less ambulant and is being regularly
portered then seat height can be set relative to the
sliding footplate. Again, ensuring the foot is fl at and
fully supported is important.
Seat width affects side-to-side pelvic stability. This is
important as the spine should line up centrally with the
pelvis. If the pelvis is free to move to one side then the
client’s spine will usually lean in the opposite direction.
As gravity pulls the client over, the spine will begin to
curve to compensate as the client tries to keep their
head level. The client will take on a characteristic ‘S’
shaped spine or scoliosis. The more upright the user’s
trunk is, the more critical pelvic stability becomes. It is,
therefore, important to use a chair with the correct seat
width in order to position the pelvis properly.
Seat width should always allow for a little bit of
movement as the client’s body weight and posture
naturally shifts throughout the day. If the client is held
in a rigid position they will quickly tire and experience
discomfort.
Seat height and width will have been measured at
assessment and the chair set up for the client prior
to delivery.
1. Seat Height and Width
3
Correct seat width; client
sits ‘midline’.
Seat Too Wide; client tends
to lean to one side.
Seat Too Low;
Increase in pressure on the
buttocks and lower back.
Seat Too High;
Increase in pressure
beneath thighs.
Page 4
UI HydroCare. iss1 06/11
2. Seat Depth
4
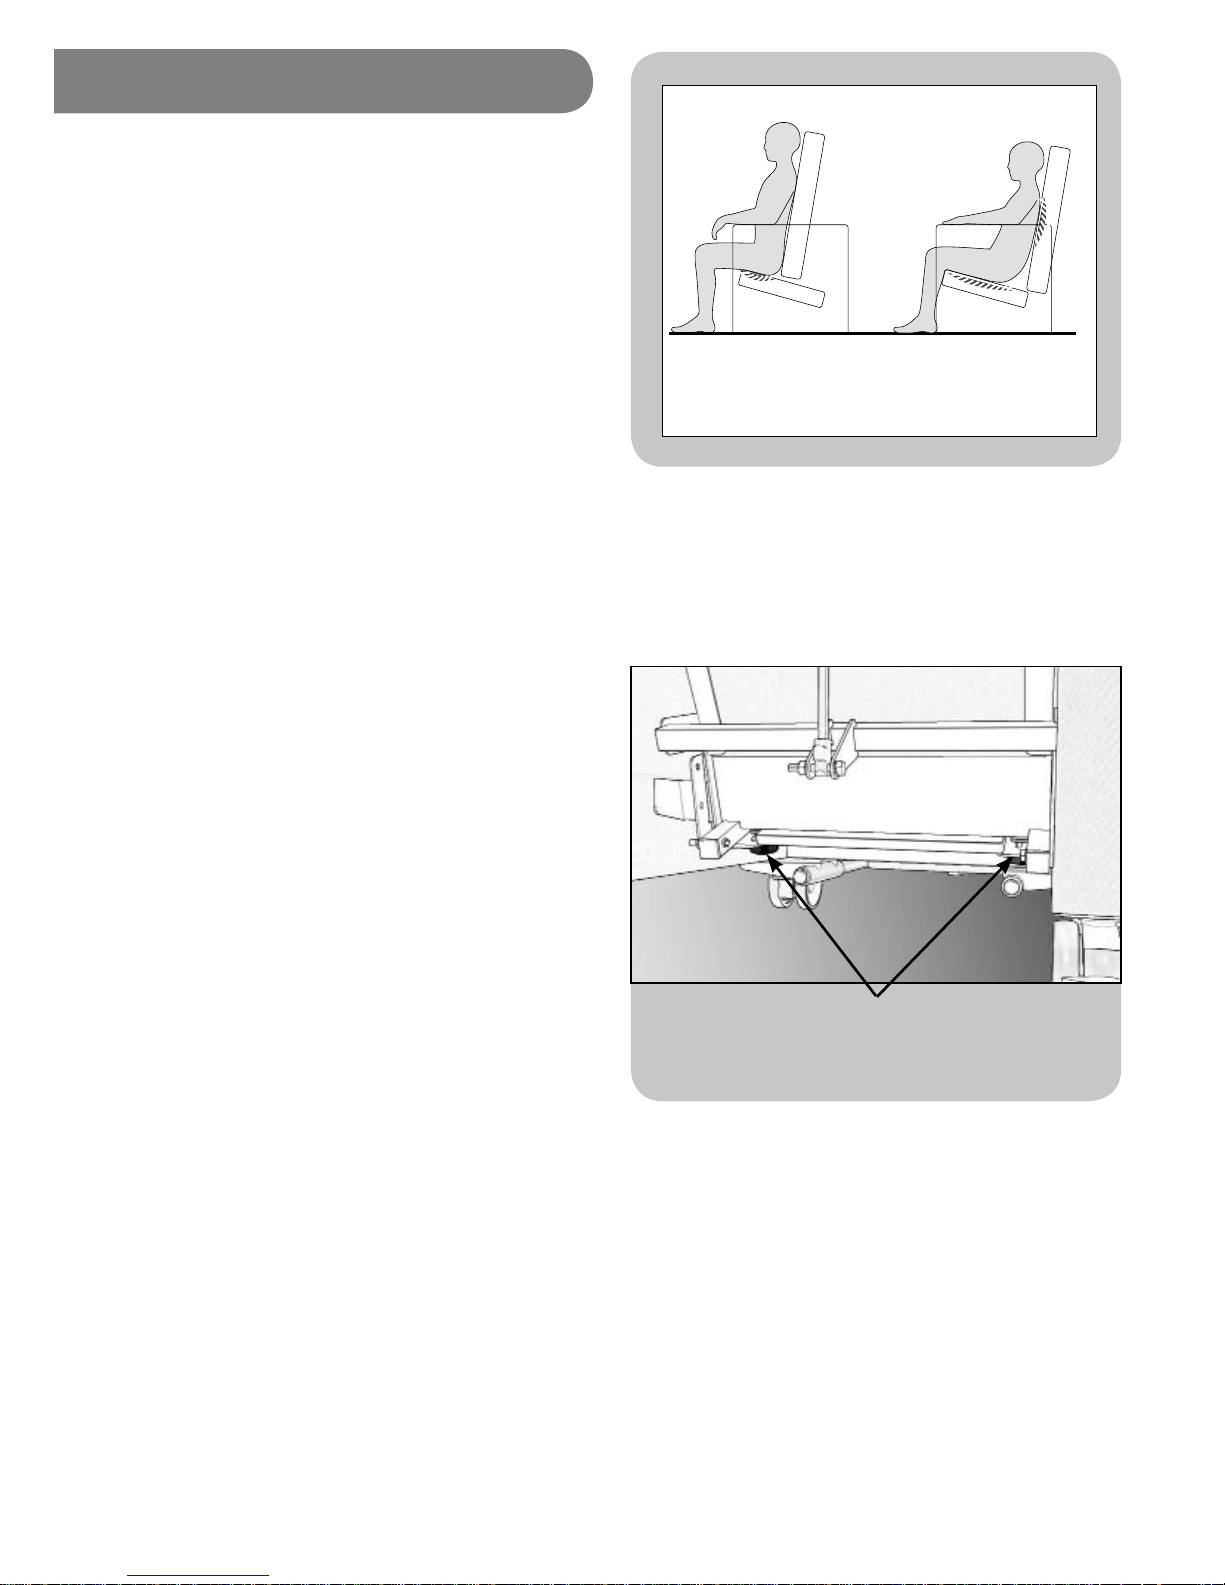
It is important to set seat depth correctly in order to
prevent ‘sacral sitting’ and to achieve the best distribution
of weight between the client and the chair. Sacral sitting
occurs when the pelvis tilts backwards so that the lower
back (sacrum), as well as the bottom, is resting on
the seat cushion. The sacral area can be susceptible to
pressure problems. Sacral sitting will occur if the seat
depth is too long. If the seat depth is too short then
the client’s body weight will be concentrated in too small
an area.
With the HydroCare seat depth also affects arm height.
The chair has been sized so that as the seat depth is
increased it is matched by a proportionately higher arm
height.
Seat depth should be set with the client’s bottom
positioned fi rmly at the back of the seat cushion so
that their lower back and lumbar is supported by the
back cushion. There needs to be a two or three fi nger
gap between the client’s calf and the front of the seat
cushion for comfort.
If the client already has a chair or wheelchair with the
correct seat depth, measure this size and use it to set
up the HydroCare
Seat depth is adjusted by moving the back of the chair
over the seat unit. The front edge of the seat will stay in
the same place. The seat depth mechanism is controlled
by two handwheels on the underside of the seat board,
one each side of the seat.
Before adjusting seat depth, apply the
brakes on all castors. Do not attempt to
adjust seat depth when someone is sitting
in the chair.
To adjust seat depth, loosen the
handwheels until they are felt to hang
freely from the underside of the seat.
They do not need to be removed.
Hold onto the square tube at the back of
the seat depth frame, each side of the gas
action and push/pull the seat back to the
desired position.
Once the back is in the correct position
ensure that it looks square and is not
twisted. Tighten the handwheels on the
underside of the seat board to lock the
back in place and therefore fi x the seat
depth.
Seat Too Short;
Increase in pressure
beneath the bottom.
Seat Too Long;
Increased pressure on bottom,
sacrum and shoulders.
Undo the handwheels on the underside, outer
edges of the seat board.
Page 5
UI HydroCare. iss1 06/11
The HydroCare is fi tted with castors which make them
suitable for portering clients on smooth, level ground.
When portering a client in a CareFlex chair, a pelvic
strap must be fastened around the client and correctly
adjusted.
The chair should not be pushed over large steps or
thresholds, or over rough or uneven ground. Suitable
surfaces for portering clients in the chair are level indoor
surfaces and outdoor surfaces such as smooth, even
asphalt and large paving slabs.
Deep pile carpet will require additional effort to move
the chair and should be avoided.
The HydroCare should not be used outdoors in damp or
wet weather. The chairs should not be used to porter
clients on slopes or inclines.
Before transferring in and out of the chair the brakes
on the castors should be applied. Always ensure that at
least two of the castor brakes are applied before a client
transfers in or out of the chair.
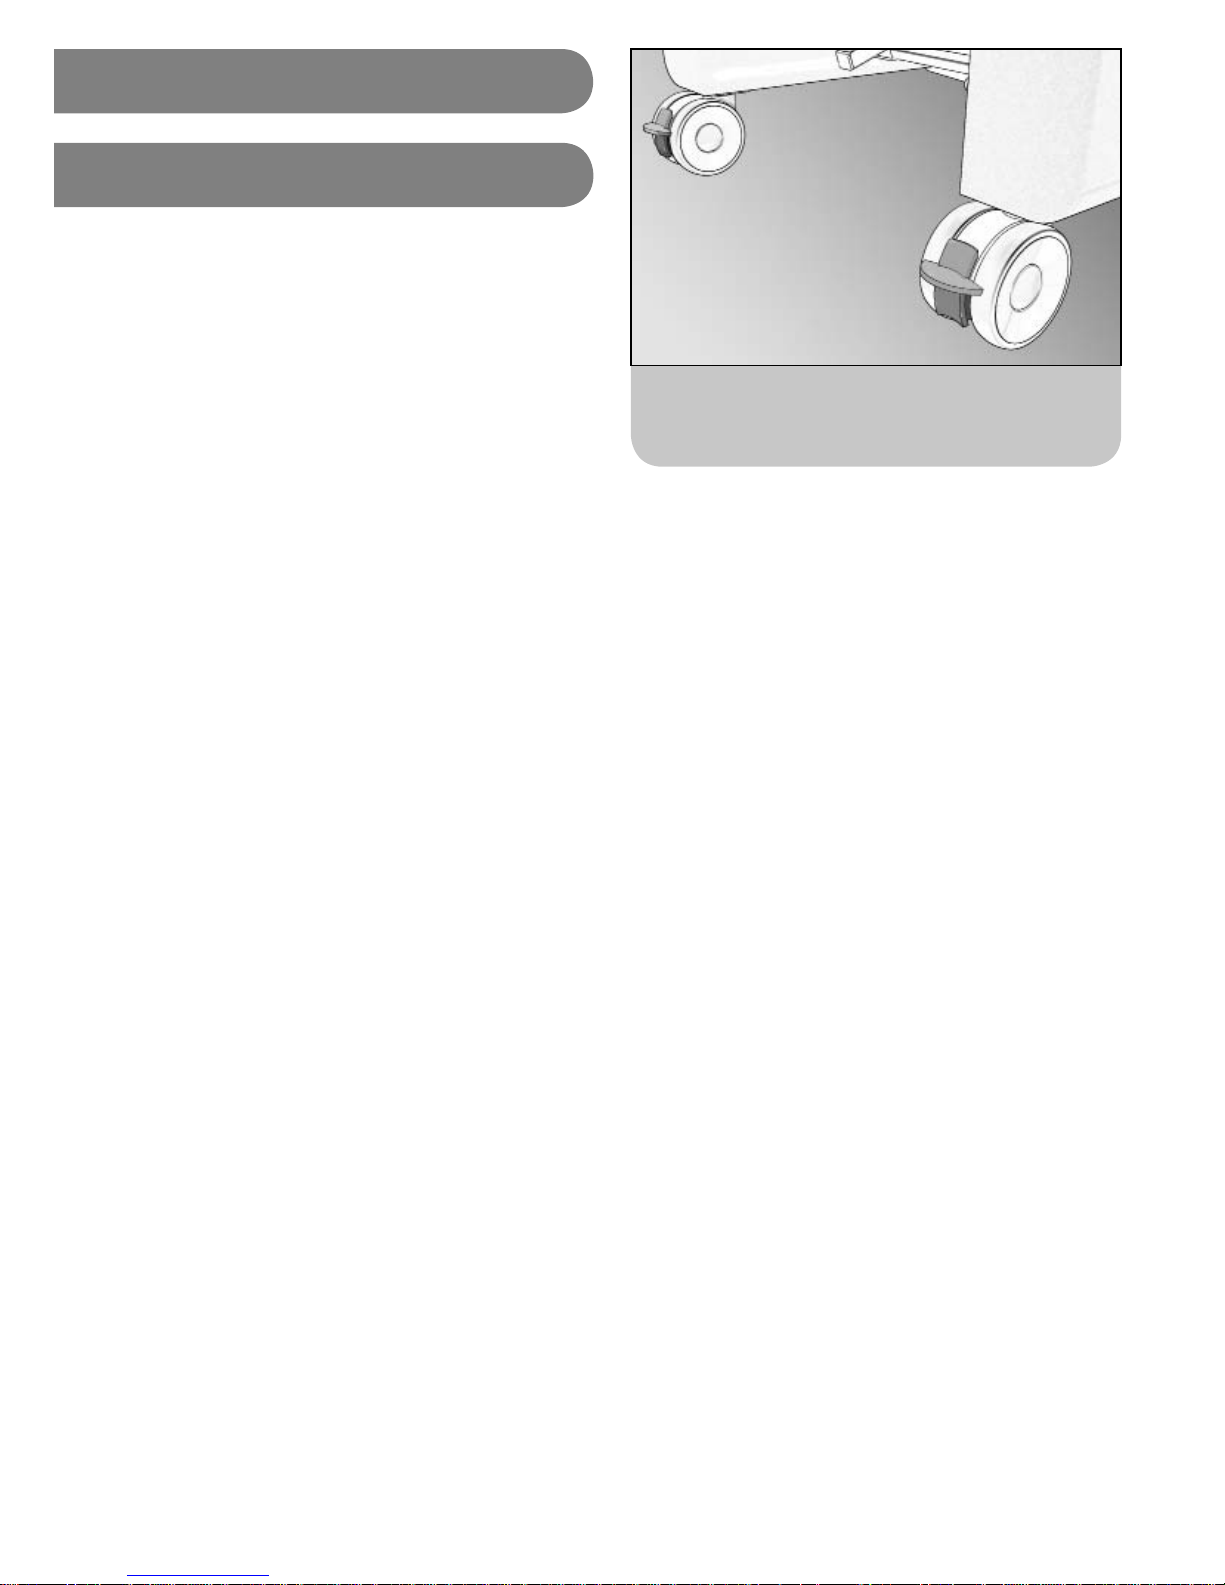
To apply the brakes begin by generally positioning the
chair. Once the chair is in the desired position push it
forward slightly. This will swing the rear castors around
to reveal the brake levers. Press down the end of the
levers to lock the brakes.
To release the brakes, gently kick the top of the brake
lever so that it clicks fl at.
Each castor has a brake. Apply at least two before
transfer.
5
3. Day to Day Use
3a. Brakes & Castors
Do not attempt to push the chair
with the brakes applied as this can
damage the castors and stress the
frame of the chair.
When portering a client;
• Bring the back of the chair to an upright position.
This will put the handle in a more appropriate
position and make the chair easier to push.
• Ensure the client’s feet are off the fl oor by placing
them on the sliding footplate.
• Use a pelvic strap to keep the client safely
positioned in the chair, especially if they are likely
to become agitated as they are being portered.
The chair should not be pushed over large steps or
thresholds, or over rough or uneven ground. Suitable
surfaces for portering clients in the chair are level
indoor surfaces and outdoor surfaces such as asphalt and
large paving slabs. CareFlex chairs should not be used
outdoors in damp or wet weather.
The chairs should not be used to porter clients on slopes
or inclines.
A risk assessment should be carried out for each client
and portering consideration, taking into account the
combined weight of the client and the chair and the
client’s condition, especially any agitated movement which
may de-stabilize the chair or lead to injury through
entrapment or impact with doorways, hand rails etc.
Page 6
UI HydroCare. iss1 06/11
6
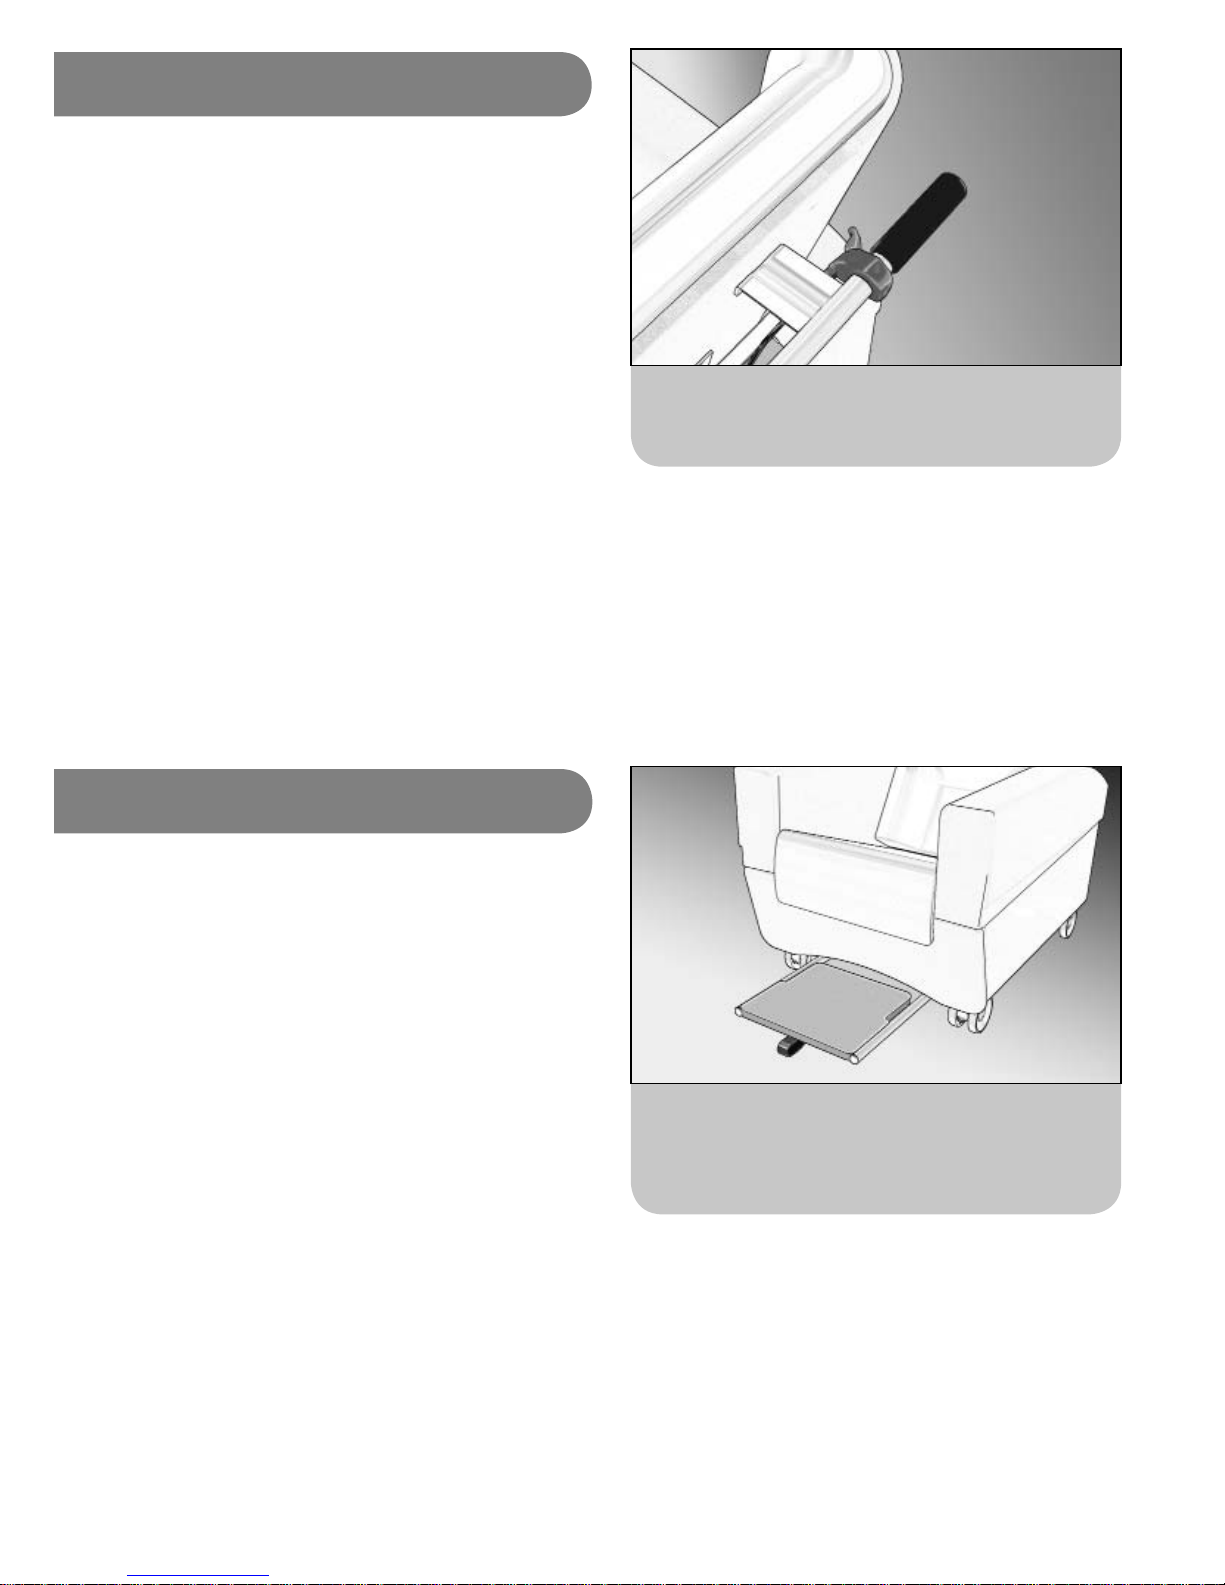
3c. Sliding Footplate
When pushing a client in the chair their feet must be
raised so that they do not drag on the fl oor. The sliding
footplate allows the feet to be raised off the fl oor for
portering. It can also be used to set seat height from if
the client has a very short lower leg length.
The sliding footplate is fi tted between the chair arms. It
can be pulled out for positioning the client’s feet when
the chair is being moved and pushed back under the
chair when the client wants to raise to standing.
The footplate has a padded top to provide a soft warm
surface if the client is not wearing shoes.
Pull the webbing loop on the front edge of the footplate
to bring it out for portering. Push the footplate back
under the chair before transfer.
Sliding Footplate.
SAFETY NOTE:
The footplate should not be stood
on during operation or transfer. Do
not leave a client unsupervised in
the chair with the footplate pulled
out if they are likely to try to stand
as they could slip off the board and
fall.
3b. Back Angle Recline
The HydroCare has an angle adjustable back. When the
back is fully upright, the angle at the client’s hips will be
approximately 100°. However, because of the contoured
profi le of the back, the client will fi nd this a comfortable
position for mealtimes, activities and for preparing to
raise to standing.
The back angle can be reclined to give a 130° angle
at the hips. This is a comfortable position for resting.
However, because of the fi xed seat angle the chair still
offers security for clients sitting for a long period of time.
To adjust the back angle recline, squeeze the lever on the
HydroCare push handle. This will unlock the gas action
and allow the back to be tilted to the required angle.
When the client is in a comfortable position, let go of the
lever and the back angle will lock in position.
Always warn the client before
adjusting the back angle recline
to ensure they do not become
distressed or agitated.
Back angle can be adjusted by squeezing the lever
on the push handle.
Page 7
UI HydroCare. iss1 06/11
7
4. Accessories
4a. Headrests
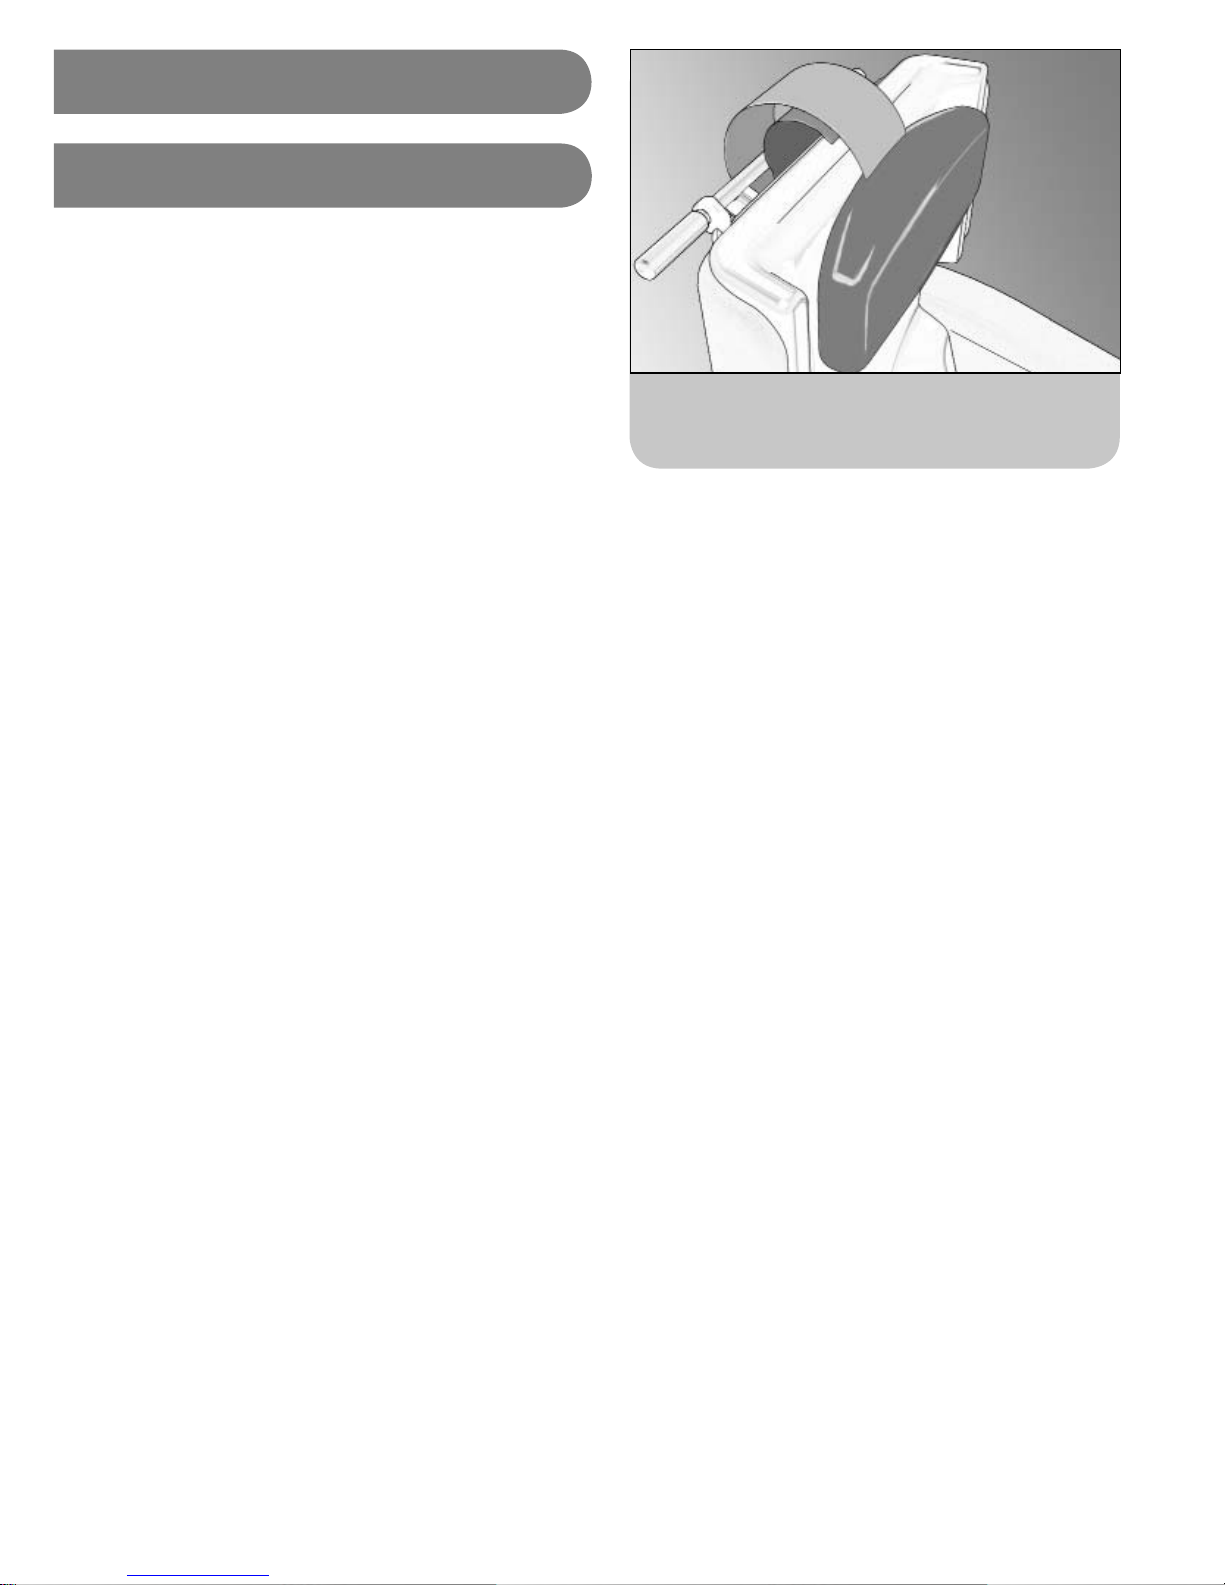
The straps on the headrest pillow fi t over the chair
back and velcro in place.
The HydroCare can be fi tted with a range of soft
headrests. These are;
• Shallow headrest for basic head support.
• Deep headrest for more support for those with a
kyphotic profi le.
• Profi led Soft headrest with semi-circular cut-out to
give conforming support around the head and neck.
Each headrest pillow is a soft, fi bre fi lled cushion to
support the back of the client’s head. A single strap on
the top edge of the headrest wraps around the centre
of the push handle to control the height of the headrest
and hold it in position on the chair.
Two thicknesses of pillow are available. Headrest choice
will depend on the client’s posture and the gap between
the client’s head and the chair back. Aim to use a
headrest which fi lls this gap but which does not push
the client’s head and shoulders forward.
Once the client is sat in the chair, move the headrest
to where they fi nd it to be the most comfortable and
supportive. As the client holds their position, undo the
Velcro tabs on the end of the strap. Take the slack out
of the strap and re-attach it around the push bar with
the velcro holding the strap securely in place.
Page 8
UI HydroCare. iss1 06/11
4b. Block Legrest
A block legrest accessory can be used witht he HydroCare
to elevate the client’s legs.
The block legrest incorporates Refl exions foam in the top
surface for pressure relief. The legrest consists of a solid
block which prevents the client trapping their legs under
the seat of the chair.
The block legrest comes in three heights to match seat
height.
The block legrest can be attached to the chair for
portering. Straps on the block legrest are fi tted through
the D rings attached to the sides of the front face panel
of the chair.
Open the velcro closure on the straps, fi t the straps
through the D rings and fold them back to join the
velcro closure.
Fit the velcro straps through the D rings and fold
them back on themself to hold the position.
8
NOTE: The block legrest must never
be positioned in front of the chair
to act as a restraint or to stop the
client getting out of the chair.
4c. Tray
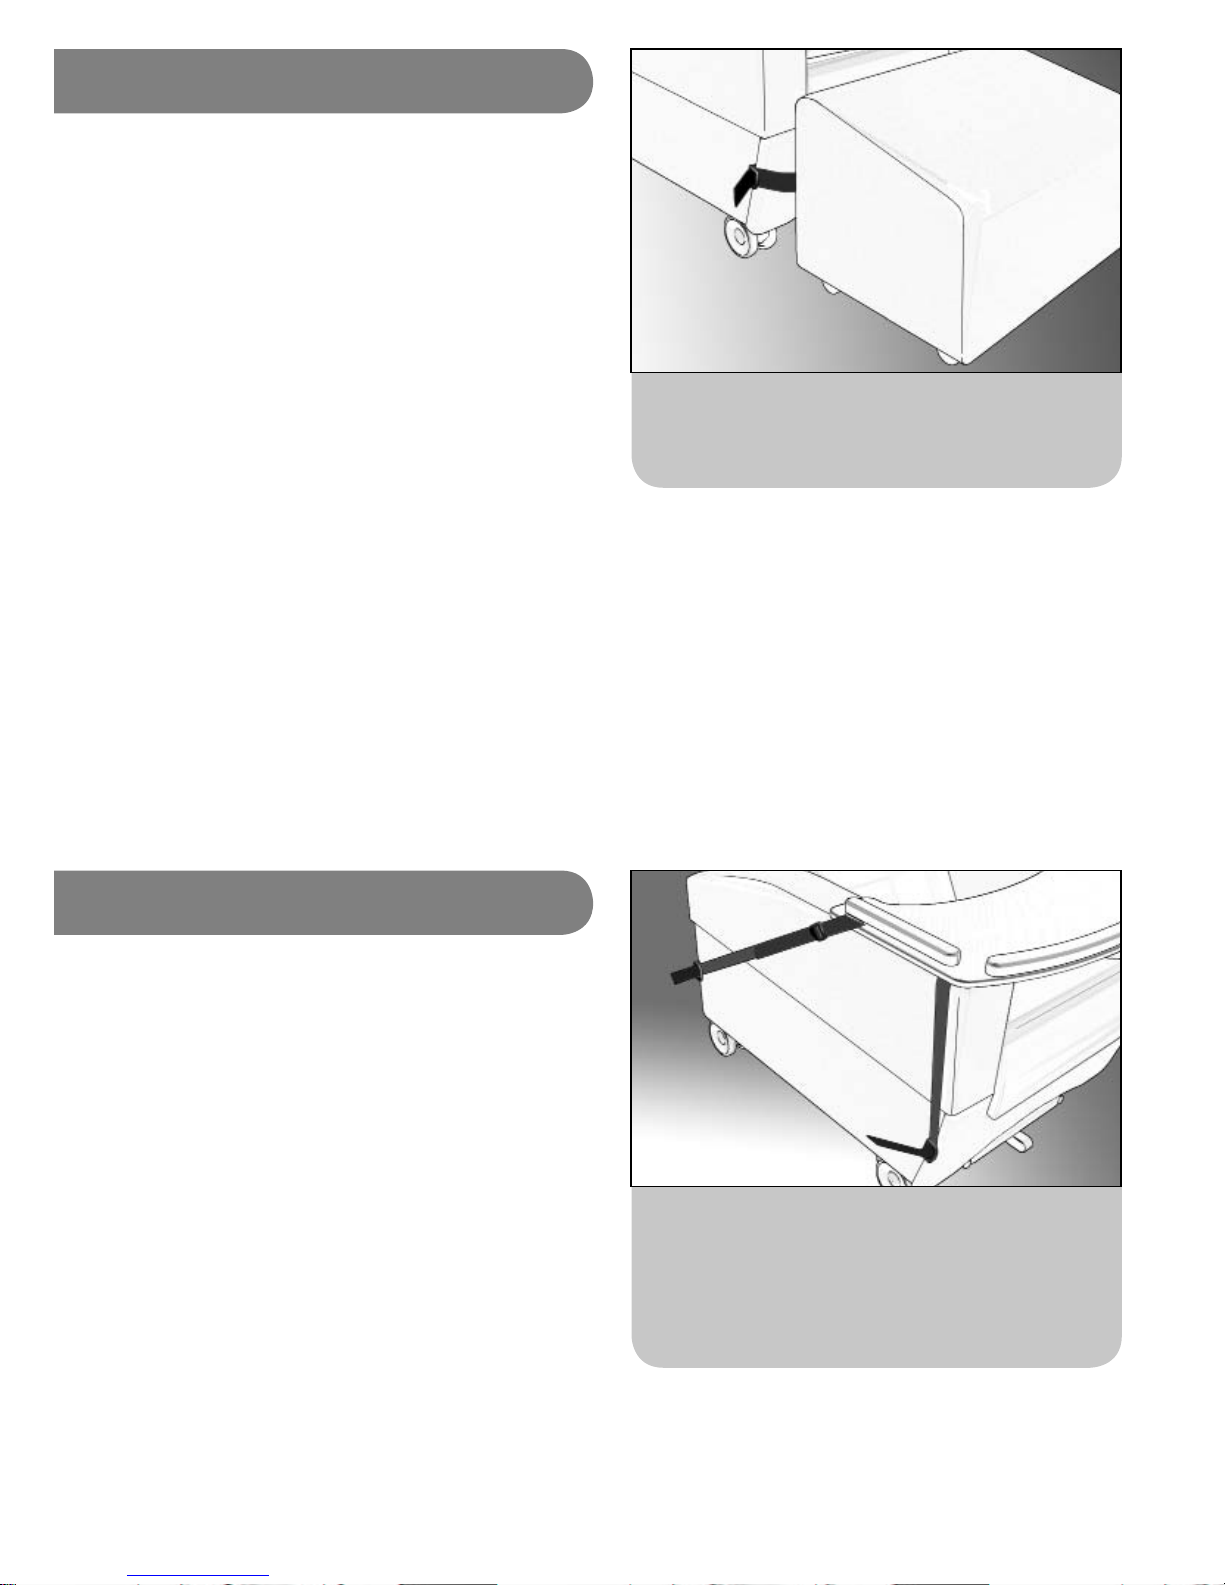
Fit the front and rear straps through the D rings
and fold them over to secure. Adjust the tension
in the rear strap to move the tray forwards and
backwards.
The tray accessory is a laminated wooden activity surface
which rests across the arms of the chair.
The tray is held in position with straps which fi t through
D rings mounted on the sides of the chair.
The rear straps are length adjustable. Shortening the
straps will position the tray closer to the client whilst
lengthening them will allow the tray to be moved away.
When positioning the tray, ensure the client cannot get
their arms trapped under the tray.
NOTE: The tray must never be
positioned in front of the chair to act
as a restraint or to stop the client
getting out of the chair.
Page 9
UI HydroCare. iss1 06/11
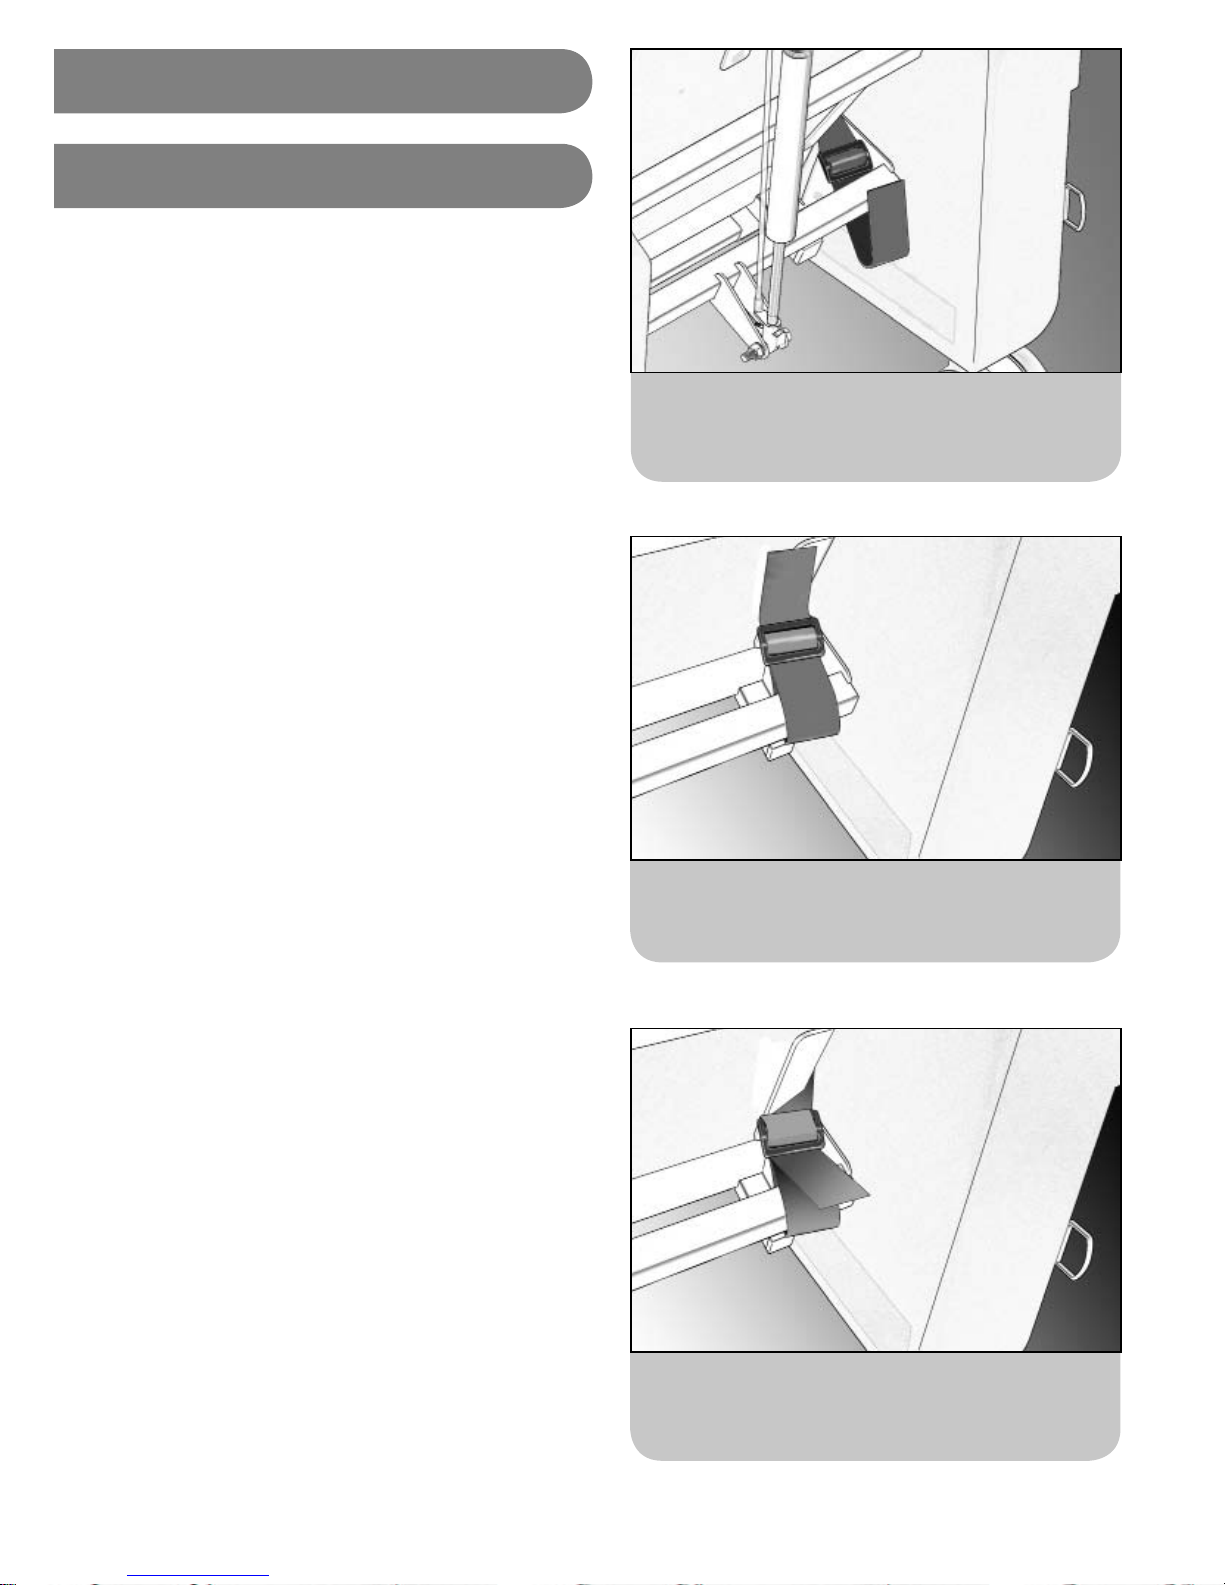
Feed the webbing strap back under the last bar of
the tri-glide to hold the strap in place.
Loop the strap around the square bar and back
through the tri-glide.
Pelvic strap with tri-glide on webbing strap.
9
4d. Pelvic Strap
Pelvic straps are intended to be used as positioning aids
to help keep the client stable in the chair with a vertical
pelvic posture, reducing the tendency to sacraly sit and
limiting soft tissue damage through the effect of shear.
The pelvic strap is attached to the square tube of the
seat depth adjustment frame. The mounting points for the
pelvic strap also control pelvic strap length adjustment.
Due to the nature of pelvic strap use, and in order to
prevent misuse, the length of the pelvic strap can be
adjusted and set by the healthcare professional to ensure
a regular and constant tension on the strap and prevent
it being adjusted to that it sits loose around the client,
which is potentially harmfull.
Adjust the pelvic strap so that there is 10 to 15cm of
loose webbing on each side of the buckle and join the
two halves of the side release buckle together.
Fit the straps between the chair back and arms and
position them close to the square bar running across the
back of the chair.
The tri-glide buckle needs to be slid along the webbing
so that it is behind the square bar. Loop the webbing
over the bar and feed it back through the buckle.
Adjust the tension on the strap to the desired length.
Once at the correct length, fold the loose end of the
webbing back over the majority of the buckle and feed it
under the last bar of the tri-glide. This will ensure that
the strap does not slowly loosen over time.
4e. Pelvic Strap Fitting
Page 10
UI HydroCare. iss1 06/11
10
4f. Pelvic Strap
Day to Day Use
SAFETY NOTE
A pelvic strap must never be used as
a restraint. Full supervision must be
provided when a pelvic strap is being
used.
The pelvic strap must be regularly
checked to ensure it has not worked
loose.
The pelvic strap must be correctly
tensioned so that it supports the
user but does not restrict breathing,
cause discomfort or interfere with
any abdominal implants.
If the strap is too loose there will be
a danger of the client sliding under
the strap and becoming trapped.
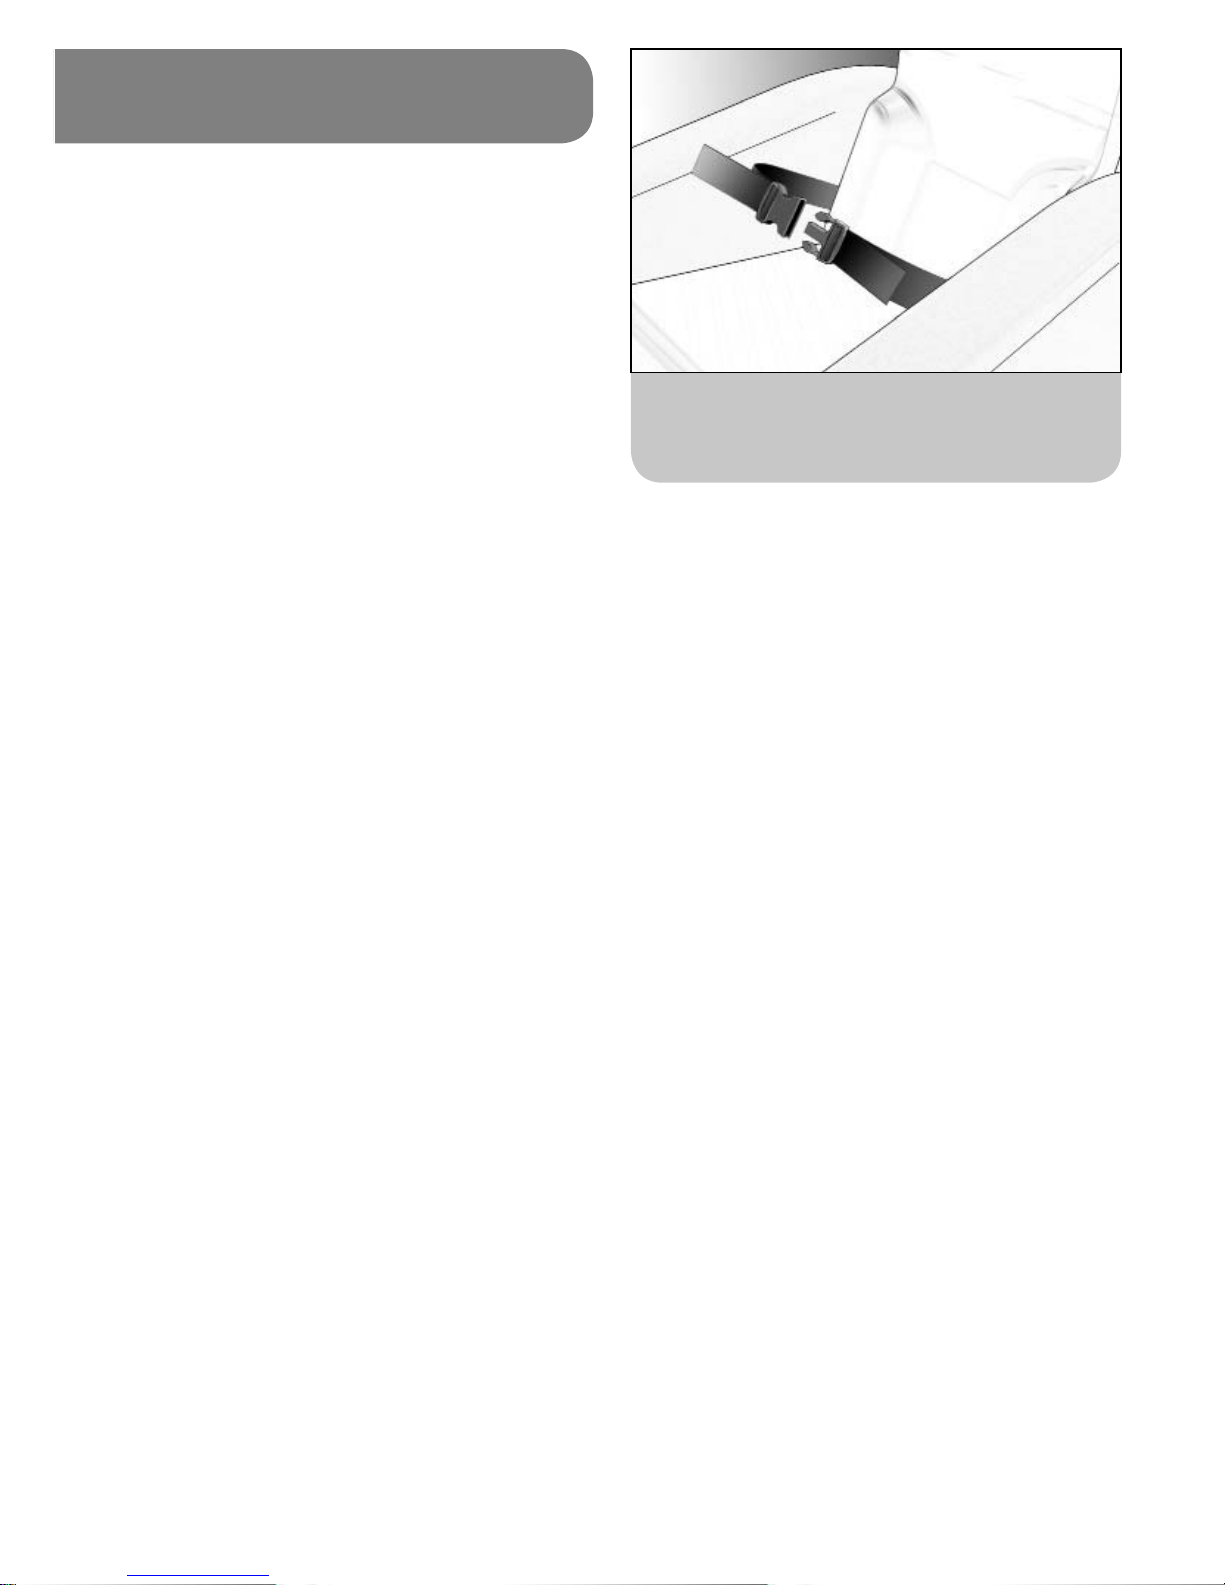
Dual adjustable buckle with adjustment on both
sides to keep buckle centraly located.
The pelvic strap has a side release buckle. The buckle
comes in two parts which slot together. Tabs on the side
of the buckle lock the two halves together. To open the
buckle, press the tabs on the sides at the same time. The
buckle should pop appart easily.
Before transfer into the chair drape the ends of the
pelvic strap over the arms of the chair to make them
easy to reach once the client is in the chair.
Once the client is in the chair, fi t the two halves of the
buckle together and ensure they click positively together.
If additional tension is required, pull the loose ends of
webbing on each side of the central side release buckle.
Page 11
UI HydroCare. iss1 06/11
11
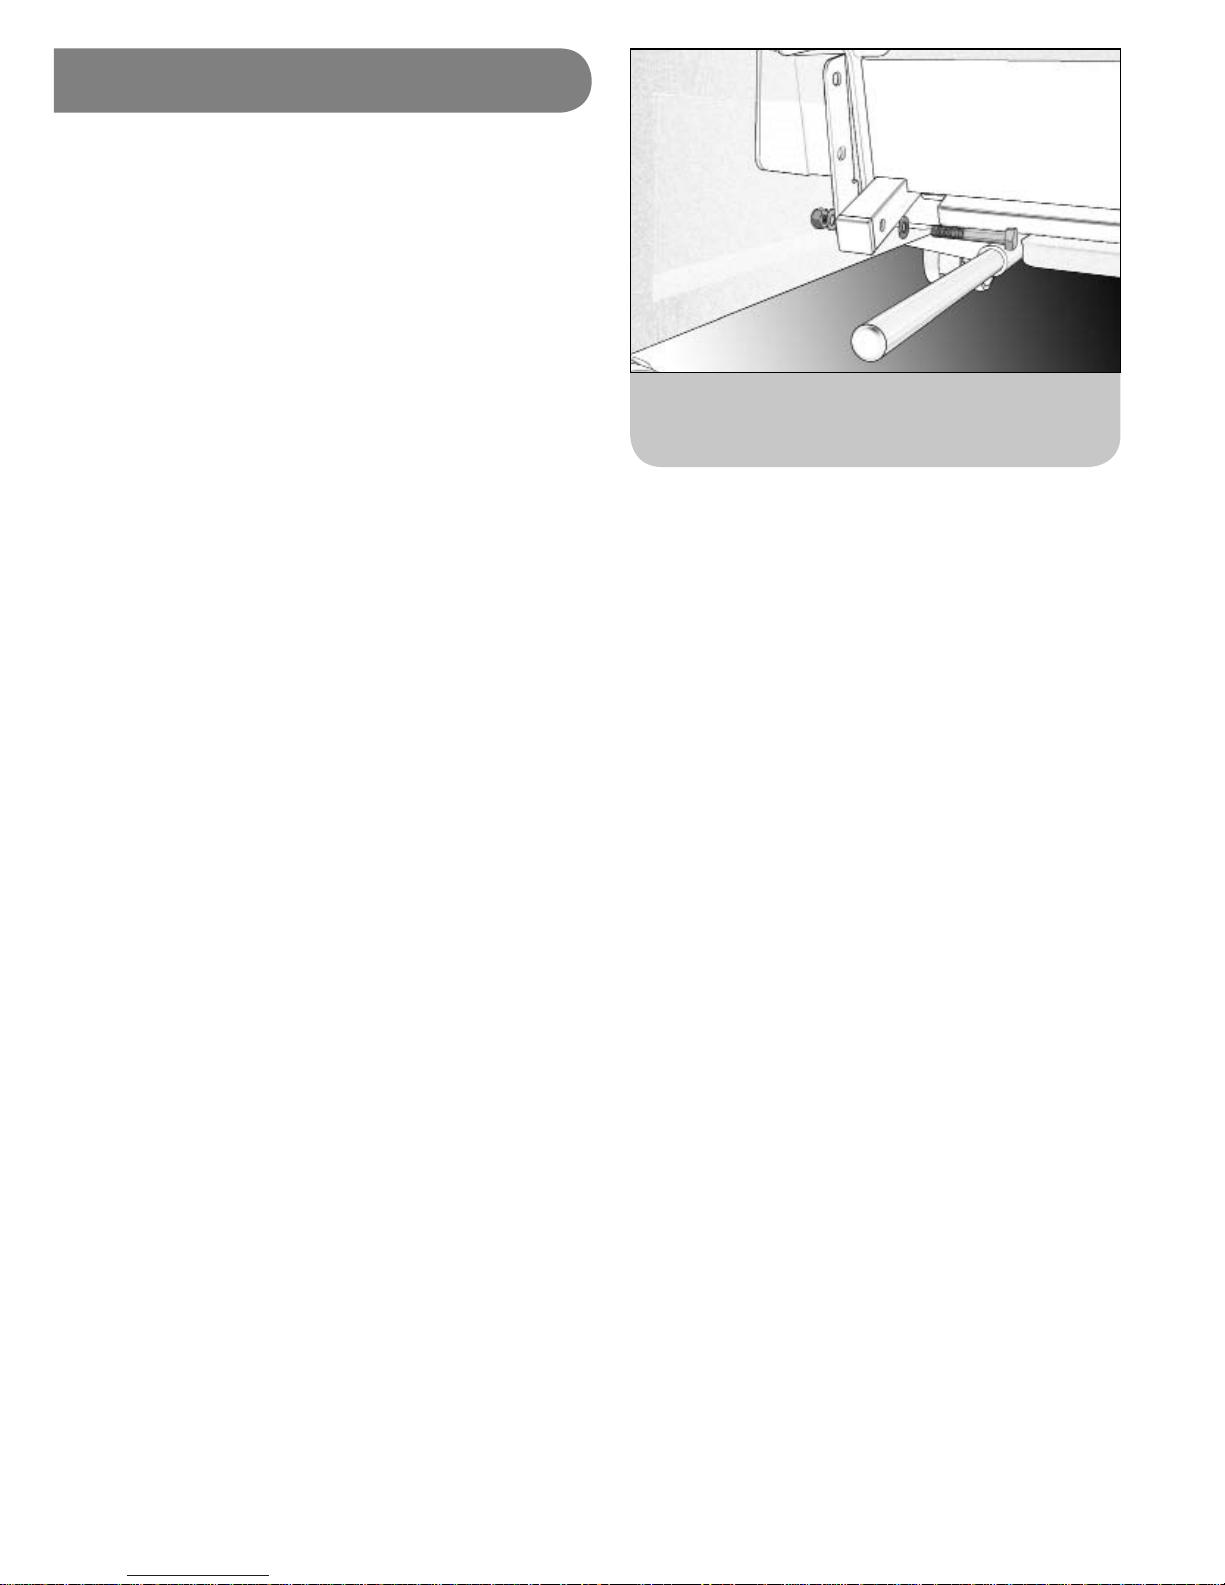
Use two 13mm spanners to undo the two bolts
controlling seat angle.
5. Seat Angle Adjustment
The angle of the seat unit of the HydroCare has three
settings; 10°, 15° and 20°.
Seat angle can be used to encourage greater pelvic
stability. Increasing the seat angle encourages the pelvis
back into the seat to encourage an upright position and
reduce sacral sitting and the effect of shear.
However, increasing seat angle can also make it
diffi cult for the client to get out of the chair, reducing
independence and functionality.
It is therefore important to select a seat angle which
is appropriate to the client’s needs, balancing sitting
stability with functionality and independence.
The Hydrocare will have been built according to the seat
angle selected at assessment. However, the seat angle can
be adjusted in the fi eld if necessary.
Adjusting seat angle is a two person operation and
requires two 13mm spanners.
Locate the bolts at the end of the seat side rails at the
back of the chair. The bolts pass through the rails and
into the seat angle adjustment brackets on the back
of the chair. Whilst someone supports the back of the
chair by holding on to the push handle, undo the bolts,
keeping hold of the nuts and washers.
Raise or lower the seat to the required angle and re-fi t
the bolts through the rails and the appropriate holes in
the seat angle brackets. The same hole must be selected
on both sides of the chair.
There must be washers between the rails and the brackets
and between the bolt heads and nuts and the metalwork.
Ensure the bolts are fully tightened with spanners before
the chair is used.
Page 12

UI HydroCare. iss1 06/11
Important Safety Information
• Please take the time to familiarise yourself with all the aspects of the chair and its functions before
using the chair.
• Do not ‘ride’ on the push handles or subject them to excessive loads
• Do not sit on the legrest or subject it to excessive loads
• Do not attempt to stand on the footplate.
• Do not tip the chair backwards to ascend steps or overcome thresholds, especially if a client is sat in
the chair.
• Always ensure that the client’s feet do not drag on the ground when the chair is moved by positioning
their feet on the sliding footplate.
• Always ensure that there are no obstructions under the chair and that there is plenty of space around
the chair before using the back angle recline facility.
• Always apply at least two brakes when the client is transferred to or from the chair.
• Always try to avoid storing or using the chair in areas where it may obstruct exits or passageways.
• The HydroCare must never be used in motor vehicles for client transportation.
12
Care & Maintenance
• Every time it is used, check the chair over for signs of damage or excessive wear. If the chair shows
signs of excessive wear, damage or incorrect performance, please take it out of service immediately
and contact CareFlex .
• If the client is experiencing severe discomfort, do not use the chair. Take it out of service immediately
and contact CareFlex or your local CareFlex Distributor.
• The chair is upholstered in high quality material which is waterproof and fi re retardant. However, do
not store or use the chair in damp or wet areas.
• Do not attempt to carry out any structural maintenance or adjustment of the chair or its accessories
without consulting CareFlex.
• Refer to the CareFlex Fabric Guide for the appropriate cleaning instructions for the material in which
the chair is upholstered.
CareFlex Ltd. Unit 1, Templer House, King Charles Business Park, Old Newton Road, Heathfi eld, Devon. TQ12 6UT.
Tel: 01626 831440 www.carefl ex.co.uk
 Loading...