

Page 1
WT-T4J II
ECLIPSE
Owner’s Manual
CareCo (UK) Ltd
Hubert Road
Brentwood
Essex
CM14 4JE
Page 2

1
Thank you for purchasing your CareCo Eclipse scooter. We are delighted you have chosen
CareCo (UK) Ltd for your mobility needs
Standard Packing List:
1 Owner’s Manual
1 Battery Pack
2 Keys
Battery Charger
DISCLAIMER
We ask that you read this manual completely before operating your new Eclipse scooter.
CareCo (UK) Ltd cannot be held responsible for any damage or injury incurred due to improper or unsafe use
of the CareCo Eclipse scooter.
CareCo (UK) Ltd specifically disclaims responsibility for any bodily injury or property damage that may occur
during any use that does not comply with applicable laws.
Page 3

2
Congratulations on the purchase of your new Eclipse scooter. The Eclipse combines cutting edge
technology with attractive design and practicality which is highly functional in today’s world. We at CareCo
(UK) Ltd know that you have chosen a scooter that will give you years of dependable operation and will also
enhance the quality of your life by providing you with the mobility to experience an active daily lifestyle.
Even though your new Eclipse is both user-friendly and designed for maximum manoeuvrability in the
tightest spaces, we ask that you please read, understand and follow all of the instructions and suggestions in
this manual before you operate your scooter for the first time. The safe use of your new scooter is very
important to us.
If you feel that you do not understand the instructions and suggestions presented in this Owner’s Manual, or
if, for any reason, you do not feel capable of performing the activities necessary to assemble, disassemble,
operate or maintain your Eclipse scooter, please contact CareCo Customer Services on 0845 611 8022.
CareCo (UK) Ltd cannot be held responsible for personal injury or property damage resulting from the unsafe
or the improper use of any of our broad range of health and personal mobility products. Also, CareCo (UK)
Ltd cannot be held responsible for personal injury or property damage resulting from attempts to follow
instructions, suggestions, and guidelines presented in this Owner’s Manual.
Our Research and Development Department, our Quality Control Department, and our Engineering
Departments have used the latest product specifications and the latest product design information to
manufacture your Eclipse scooter. CareCo (UK) Ltd reserves the right to implement changes into our product
lines when those changes become desirable or necessary. If such changes are implemented into our product
line, there may be minor differences between the product you purchased and the illustrations and
instructions in this Owner’s Manual.
We at CareCo (UK) Ltd would appreciate hearing about the dependability of your Eclipse scooter and about
the convenience of mobility it has provided for you. We would also appreciate hearing about the service you
received from our Company.
CareCo (UK) Ltd. Customer Services Phone: 0845 611 8022
Hubert Road Fax: 01277 204245
Brentwood
Essex
CM14 4JE
www.careco.co.uk
For more information about our products and services, or to send us your comments, please visit our website
at www.careco.co.uk or email: [email protected]
Page 4

3
1.
PREFACE AND INTRODUCTION ……..…………………………..
4
2.
SAFETY NOTICE……………………………………………………….
2.1 Before Driving
2.2 While Driving
2.3 Labelling
5
3.
4.
PARTS INTRODUCTION……………..……………….. ……………...
OPERATION……………………………………………………………….
4.1 Control Panel
4.2 How to Operate your Scooter
4.3 How to Set to Freewheel Mode
4.4 Tiller Adjustment
4.5 Disassembling the Scooter
7
8
5.
DRIVING ON THE ROAD………………………………………………
13
6.
BATTERY CHARGING AND CARE……………………………………
6.1 Charging the Batteries
6.2 Battery
6.3 Replacing Batteries
14
7.
INSPECTION AND MAINTENANCE……………………………….
7.1 Inspection
7.2 Regular Checking Record
7.3 Battery, Fuse and Tyres
7.4 Storage
7.5 Manually Moving the Scooter
7.6 Assembling the Scooter
18
8.
TROUBLESHOOTING ……………………………..…………………
21
9.
SPECIFICATION …………….…………………………………………
23
10.
WARRANTY………………………………………………………………
24
TABLE OF CONTENTS
Page 5

4
1 . PRE FA C E AND INTR O D U C T ION
Please carefully read this owner’s manual before using the vehicle to ensure that you get the
most from your scooter. Improper use of the vehicle could result in harm, injury or traffic
accidents. This owner’s manual includes operation instructions for every aspect of the vehicle,
together with assembly instructions.
The symbols used in this manual are explained below:-
Warning
Improper usage could result in serious injury or death
Attention
Improper usage could lead to injury and/or damage to your scooter.
Suggestion
Follow these instructions to keep your vehicle in a good operating
order.
This manual includes a copy of repair and maintenance record chart and warranty
information. Please keep it in a safe place or in the scooter.
If someone else uses the scooter, please make sure that you provide them with this owner’s
handbook for their information.
As designs change some illustrations and pictures in the manual may not correspond to
the vehicle that you purchased. We reserve the right to make design modifications.
Our Scooters have been designed and manufactured to provide a comfortable and secure, yet
affordable, solution for some mobility requirements.
Page 6

5
2 . S A F E T Y N OT I C E
2.1 BEFORE DRIVING
The user needs to be familiar with the operation of this vehicle before driving. Therefore,
please follow the recommendations in this safety notice.
■ The same traffic rules apply to the use of this vehicle as apply to pedestrians
For your safety, please follow and adhere to the same traffic laws as pedestrians.
Please do not drive your scooter after consuming alcohol or when you are tired.
Please be careful when driving your scooter in low light. It has not been designed for use
at night.
Be extremely cautious when driving your scooter in busy areas or in shopping malls.
Ride on the pavement, single carriage roads, or pedestrian areas only. Never ride on
motorways or dual carriageways.
Be aware of traffic when crossing or using roads.
■ Practice operating your vehicle
Before using the scooter, familiarise yourself with its operation. Practice in a wide open area
such as a park. In order to avoid accidents with your scooter whilst driving, please take care
when accelerating, stopping, turning, reversing and travelling up and down ramps.
Please turn the speed dial to minimum value for your initial practice.
Be sure someone accompanies you when driving on the roads for the first time.
Only use higher speed setting when you are confident that you can easily operate and
control your scooter.
■ The Scooter is only to be used by one person at a time
Do not carry passengers on your scooter (including children)
■ Do not use this vehicle to carry or haul goods
The maximum weight that can be carried is 113kg/250lbs (including occupant and any
goods). Refer to ‘MAX LOAD WEIGHT’ in ‘9. SPECIFICATION’
Page 7

6
2 . S A F E T Y N OT I C E
2.2 WHILE DRIVING
■ Do not use your vehicle under the following circumstances:-
On surfaces that are muddy, gravelly, bumpy, narrow, snowed over, icy, or canal towpaths
not guarded by any fence or hedge. Keep away from places where the wheels may
become stuck.
Do not drive at night or in rain, snow, fog or strong winds.
Do not drive your vehicle in an ‘S’ pattern or make erratic turns.
Do not take the scooter onto escalators.
UNDER NO CIRCUMSTANCES SHOULD THE SCOOTER BE USED AS A SEAT IN A MOTOR
VEHICLE (E.G. CARS, BUSES, TRAINS, ETC).
■ Mobile Phones and other electrical equipment
Do not use a mobile phone or other wireless communication devices while driving.
Always switch off the scooter and remove the ignition key before using a mobile phone.
Do not charge a mobile phone or any other electrical device from your scooter’s battery.
■ Automatic Power Shut Down
In order to avoid accidentally draining the batteries, your scooter is equipped with an
automatic power shut down facility. If the scooter is left switched on, after remaining
undisturbed for a period of thirty minutes, it will automatically turn off. When this happens,
simply switch your scooter off and back on and it will be ready to use once again.
■ Ramps, inclines and descents
Do not drive onto steep ramps greater than the specified gradient. Refer to the section
entitled ‘CLIMBING ANGLES’ in ‘9. SPECIFICATION’.
Always use a low speed setting when ascending or descending a gradient.
Do not drive on roads with uneven surfaces or potholes. Refer to the section entitled
‘MAX. GROUND CLEARANCE’ in ‘9. SPECIFICATION’.
Please slow down when driving uphill.
Do not make sudden turns when driving on gravel roads or ramps.
Always lean forward when climbing a steep hill.
2.3 Labelling
Please carefully read all the labels on the scooter before driving. Leave them affixed for
your future reference.
Page 8
7
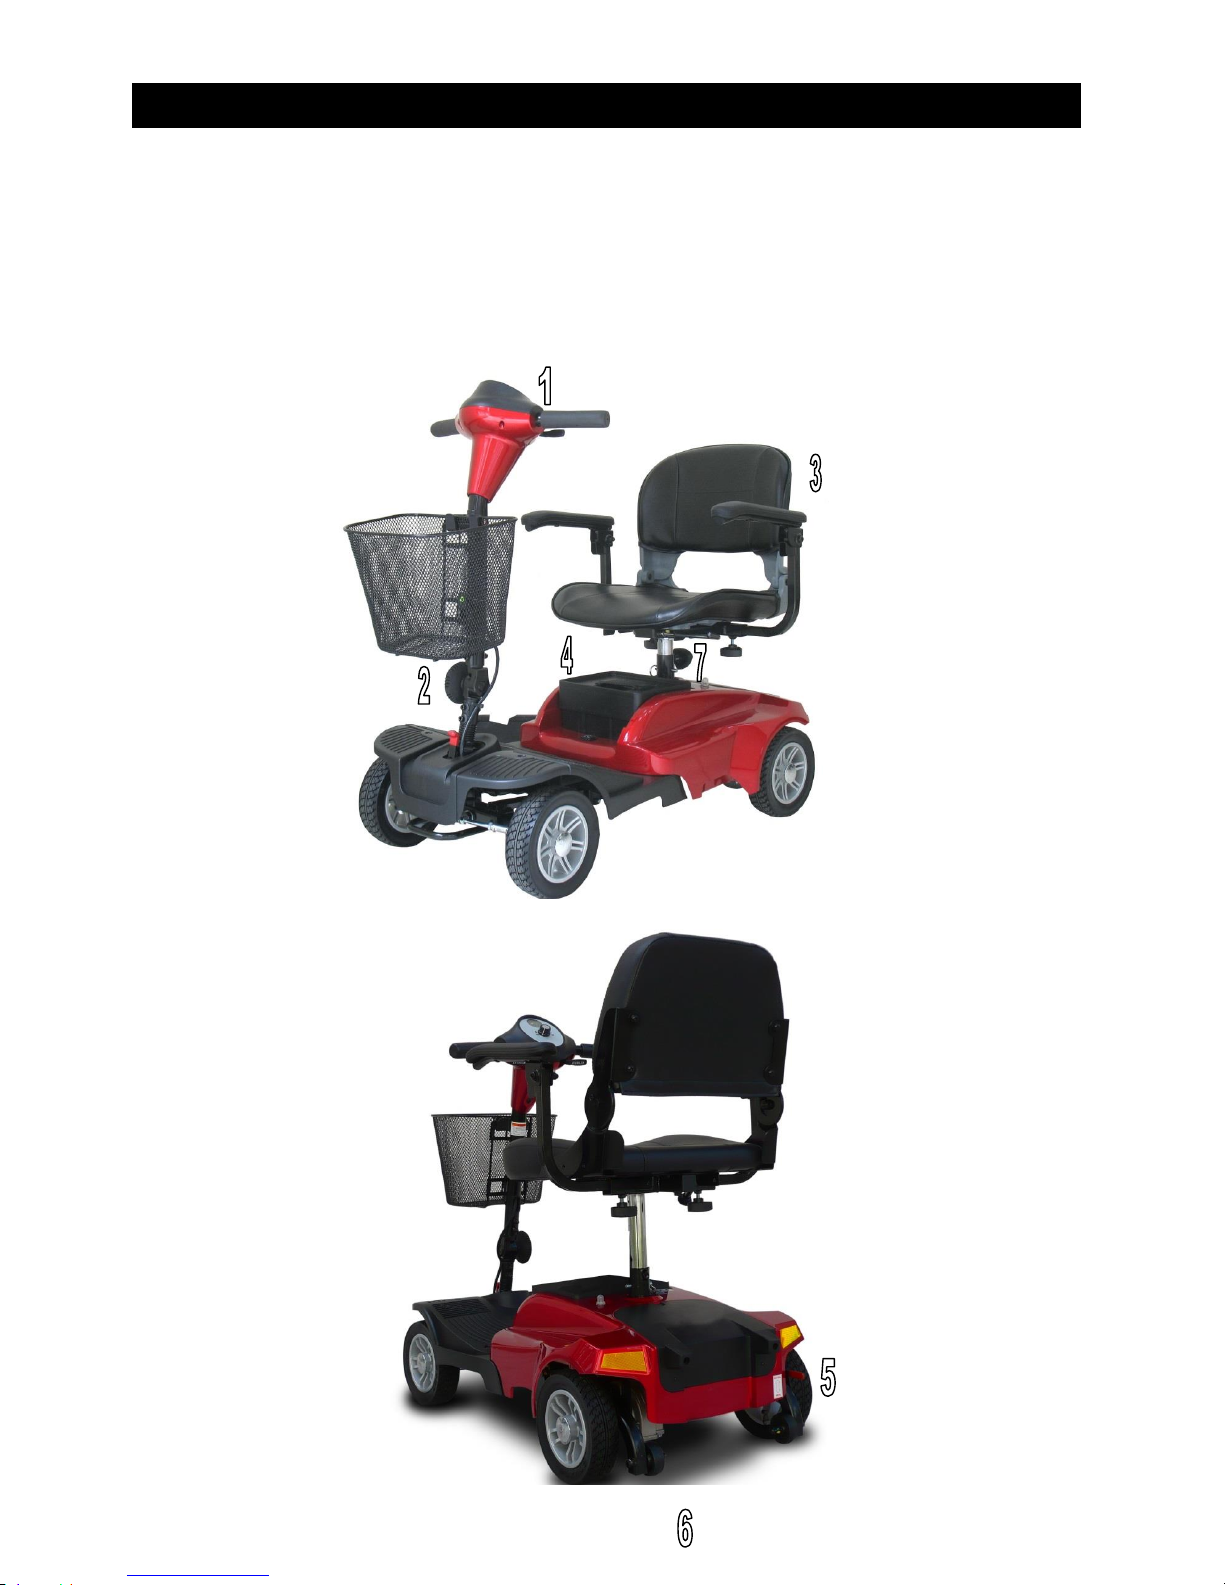
3 . PA R T S IN T R O D U C TIO N
PARTS DESCRIPTION
1. Control panel 2. Tiller Adjustment Knob
3. Seat 4. Battery Pack
5. Freewheel Lever 6. Anti-tip wheels
7. Seat Post Knob
Page 9
8
4 . O P E R AT I O N
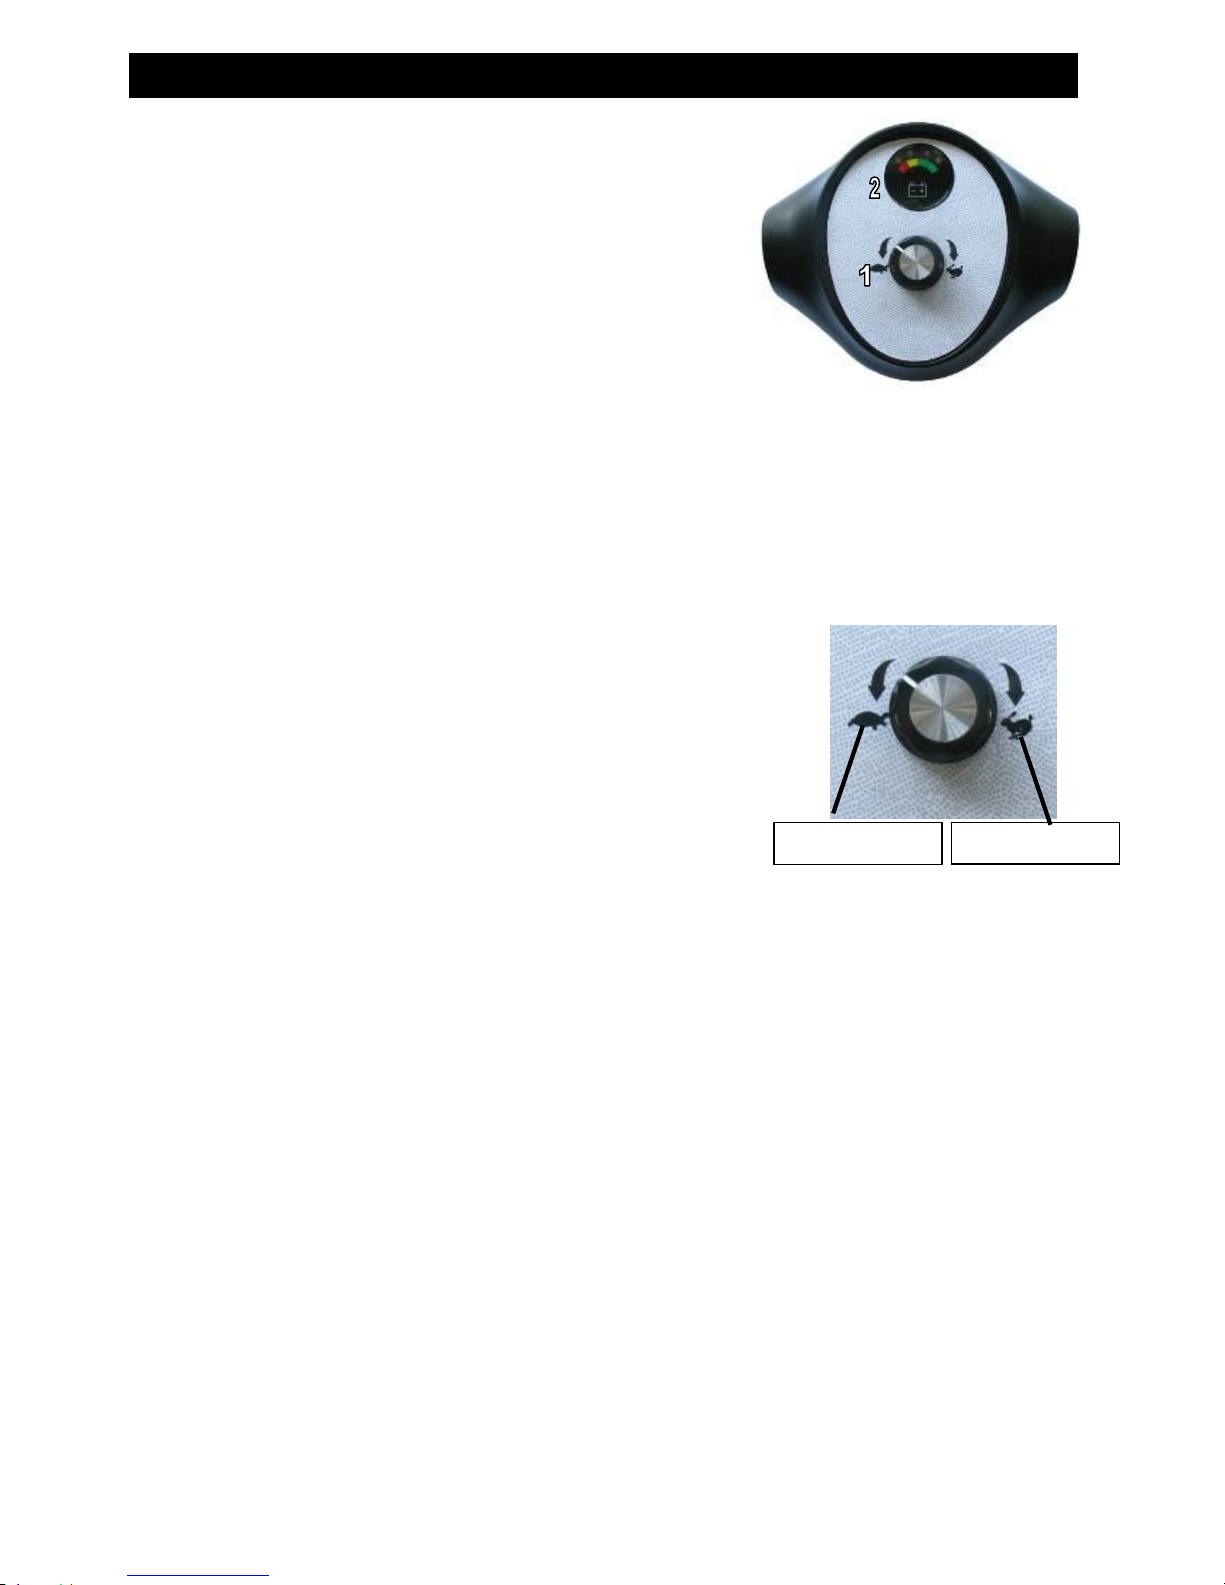
4.1 CONTROL PANEL
1. Speed Dial
2. Battery Indicator
4.2 HOW TO OPERATE YOUR SCOOTER
■ Power switch
To switch the power on, turn the key clockwise in the ignition. The power eye should
illuminate.
To switch the power off, turn the key anti-clockwise. The power eye should switch off
and the key can be removed if required.
■ Speed Dial
Turn the speed dial to choose the speed of the scooter.
Turn the dial clockwise to increase the speed and
anti-clockwise to decrease the speed setting.
■ Moving and Braking
Push the right-hand side speed control lever forwards with your right thumb and the
scooter will move forward.
Push the left-hand side speed control lever forwards with your left thumb and the
scooter will move backwards.
To brake, release the speed control lever which will return to neutral and activate the
electromagnetic brake automatically. This will bring the scooter to a prompt stop.
The speed control lever allows you to control the speed of the scooter up to a
maximum speed determined by the Speed Dial.
■ Braking
Electro-magnetic brake: Release the speed control lever completely (with either hand), and
the electromagnetic brake will be activated automatically, and the scooter will stop.
Slowest setting
Fastest setting
Page 10
9
4 . OP E R AT I O N
Warning
When on a hill or slope NEVER set the vehicle to the freewheel mode as the electromagnetic
brakes will not be applied – this could result in injury or damage.
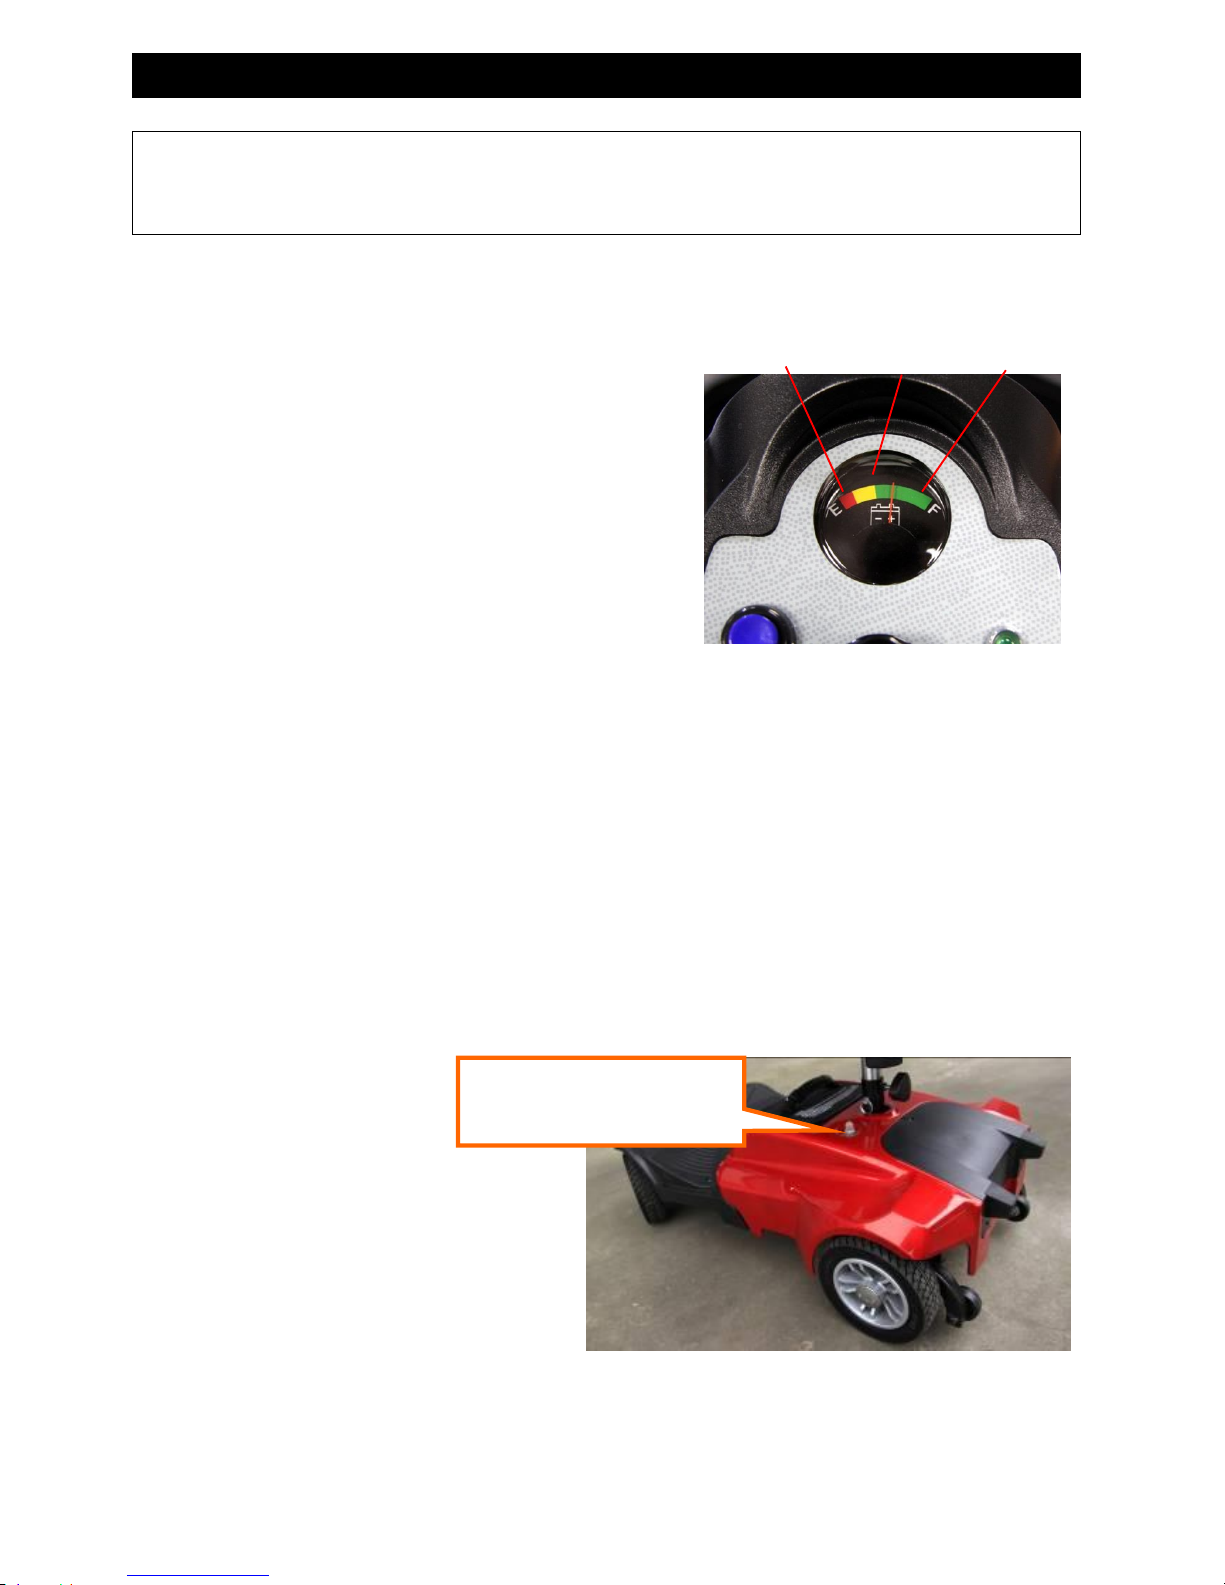
■ Battery Indicator
The battery indicator on the tiller console uses
a colour code to indicate the approximate power
remaining in your batteries. Green indicates 40~100%
capacity, yellow a low charge (10~ 30%), and red
indicates that an immediate recharge is necessary.
The remaining power shown on the battery
indicator will vary according to driving time and
how you drive. Repeated starting, stopping and
climbing will consume the power more quickly.
■ Main Circuit Breaker (Reset Button)
When the voltage in your scooter’s batteries becomes low or the scooter is heavily strained
because of excessive loads or steep inclines, the main circuit breaker may trip to protect the
motor and electronics from damage.
♦ The main circuit breaker reset button pops out when the breaker trips.
♦ When the breaker trips, the entire electrical system of your scooter shuts down.
♦ Allow a minute or two for your scooter’s electronics to ‘rest’.
♦ Push in the reset button to reset the main circuit breaker.
RED
YELLOW
GREEN
Main Circuit Breaker
Page 11
10
4 . O P E R AT I O N
Suggestion
1. You should recharge the batteries after each time the vehicle is used to ensure maximum
range. The batteries should be fully charged at least once a week even if the scooter is not
used.
2. After charging or replacing a new battery, drive the vehicle for 2-3 minutes to make sure the
battery capacity is sufficient.
3. In winter, the batteries may respond more slowly and the range may be reduced.
4. When driving on a slope or hill, the battery indicator light might move up and down. This is
normal and there is no need for concern.
5. Even if the batteries are used properly, their capacity will reduce in time and this results in
reduced range compared to brand new batteries. When the batteries’ range is approximately
50% of that when they were new, it is time to replace them. Please contact CareCo about
replacement batteries. If you continue to use old batteries when they should be replaced,
the performance of your scooter may be affected.
6. The battery range will be reduced when frequently driving uphill or on rough ground, as this
leads to greater consumption of power.
7. The batteries have a six-month warranty covering manufacturing defects. This warranty
does not cover faults due to incorrect battery recharging.
■ How to adjust the seat height
1. Remove the seat from your scooter.
2. Remove the lock bolt from the lower seat post.
3. Adjust the seat post to the desired seat height.
4. Move the upper seat post to show the hole to insert the lock bolt.
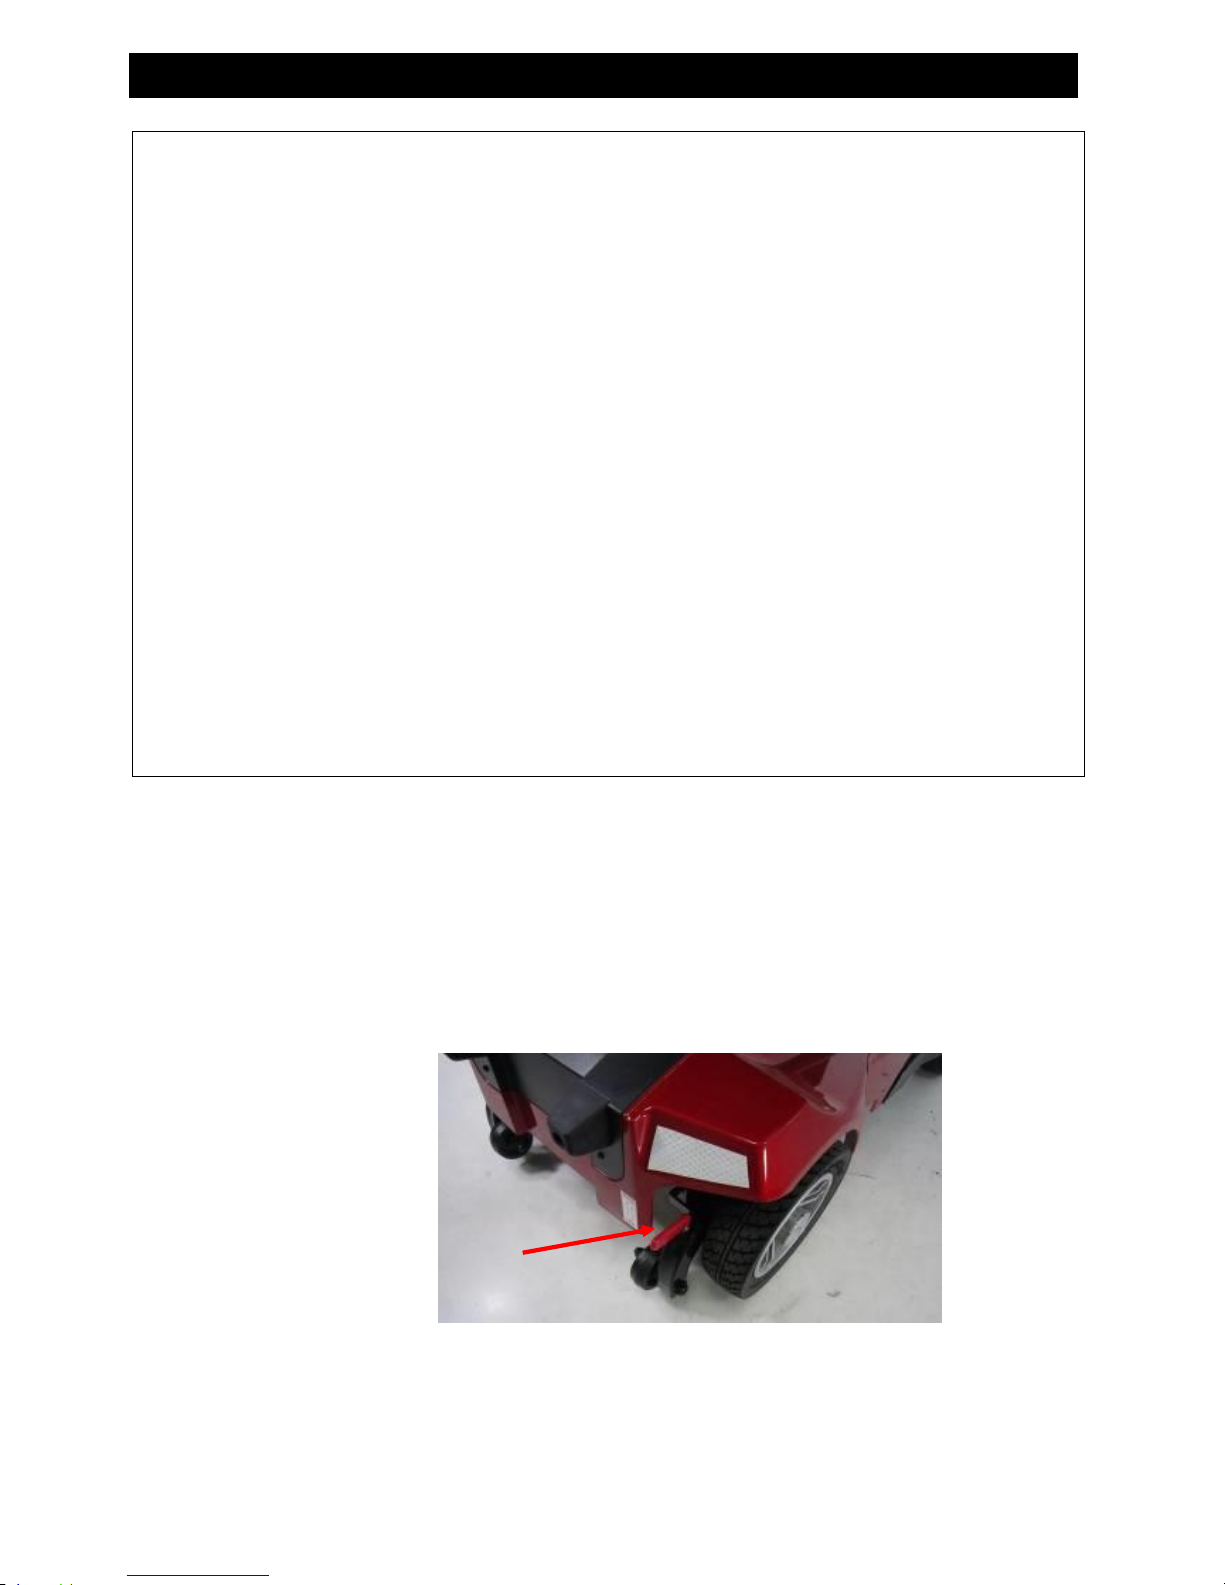
4.3 HOW TO SET TO FREEWHEEL MODE
◆ Engaged mode: Push the lever completely and the scooter can be driven by motor power.
◆ Freewheel Mode: Switch the scooter off. Pull the lever up and the scooter can be moved
manually.
Lever
Page 12
11
4 . O P E R AT I O N
Warning
Never operate the freewheel lever while seated on the scooter or on a slope or hill!
TO OPERATE THE FREEWHEEL LEVER:
‧ Always pull UP FIRMLY for freewheel mode
‧ Always push DOWN FIRMLY for drive mode
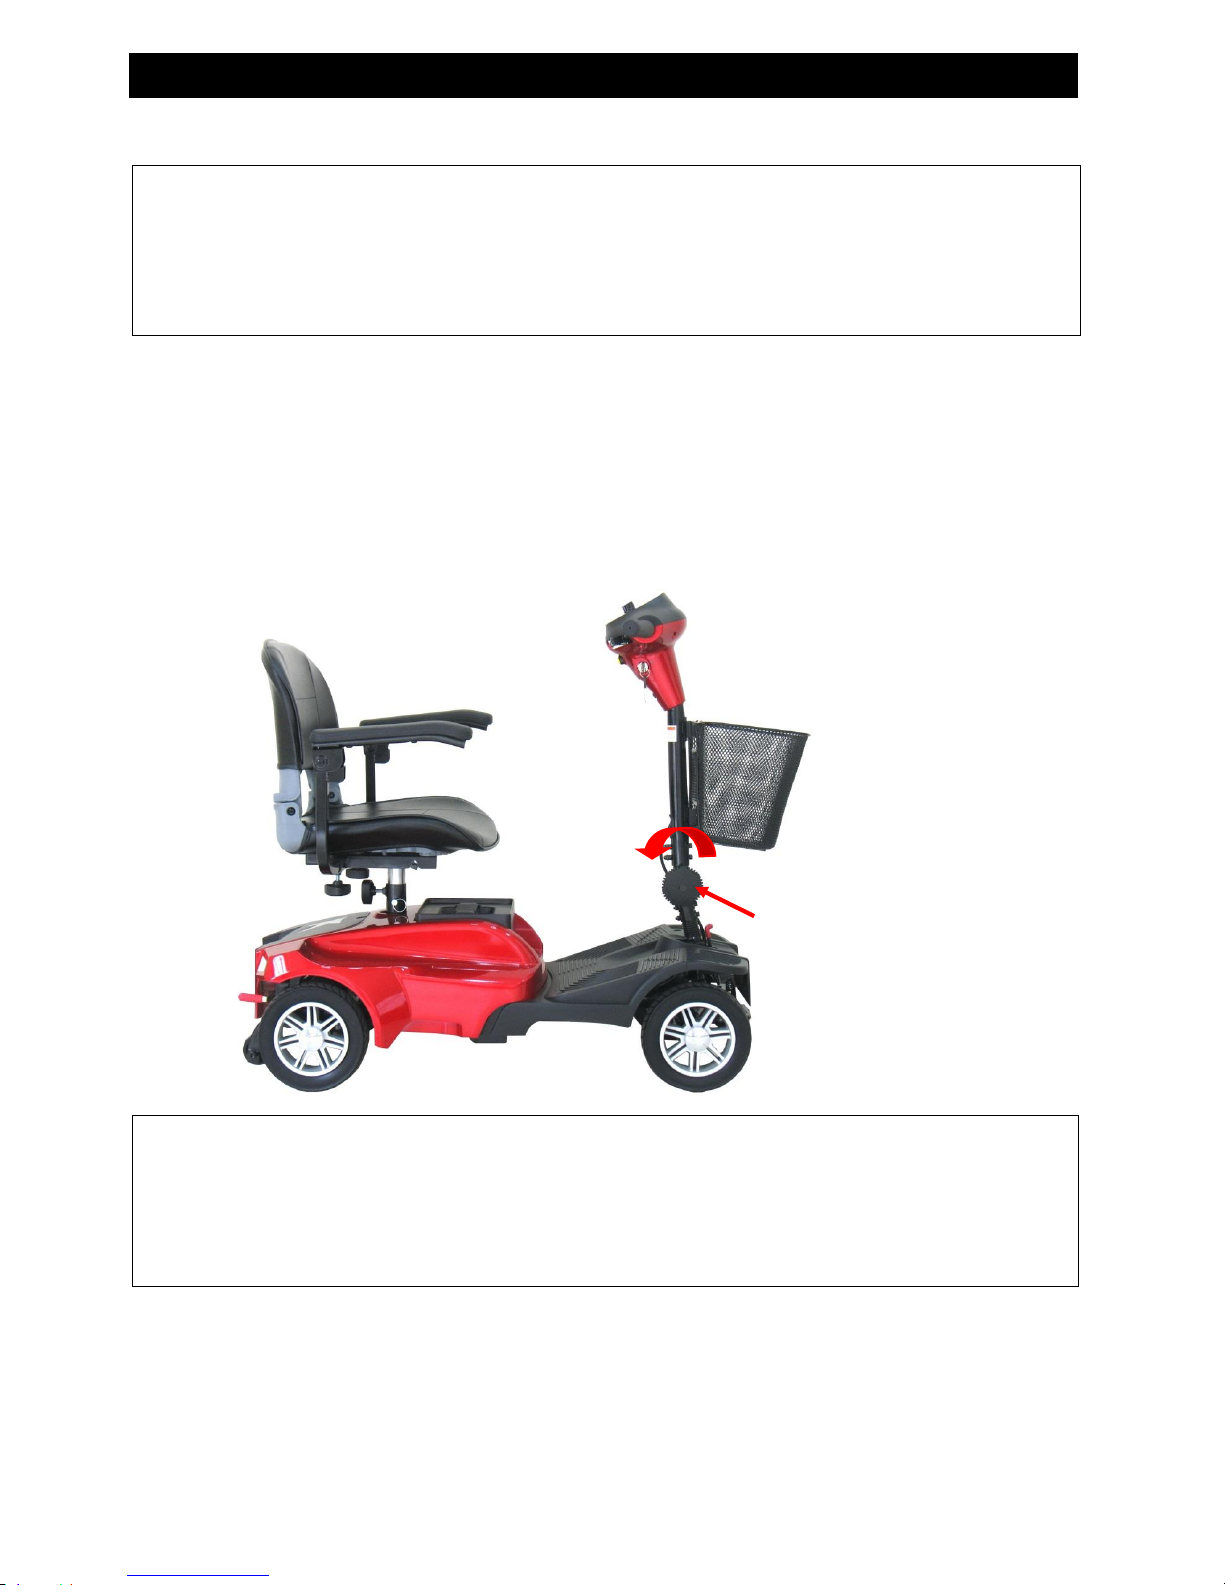
4.4 TILLER ADJUSTMENT
The tiller can be adjusted into many different positions to suit each driver.
1. Loosen the lever to adjust the tiller to a comfortable position.
2. Tighten the lever to secure the position.
Warning
♦ Please hold the tiller before loosening the tiller adjustment knob.
♦ Before lifting or driving the scooter make certain the tiller adjustment knob is fully
tightened.
♦ Never attempt to adjust the tiller while the scooter is motion.
Adjustment
lever
Page 13
12
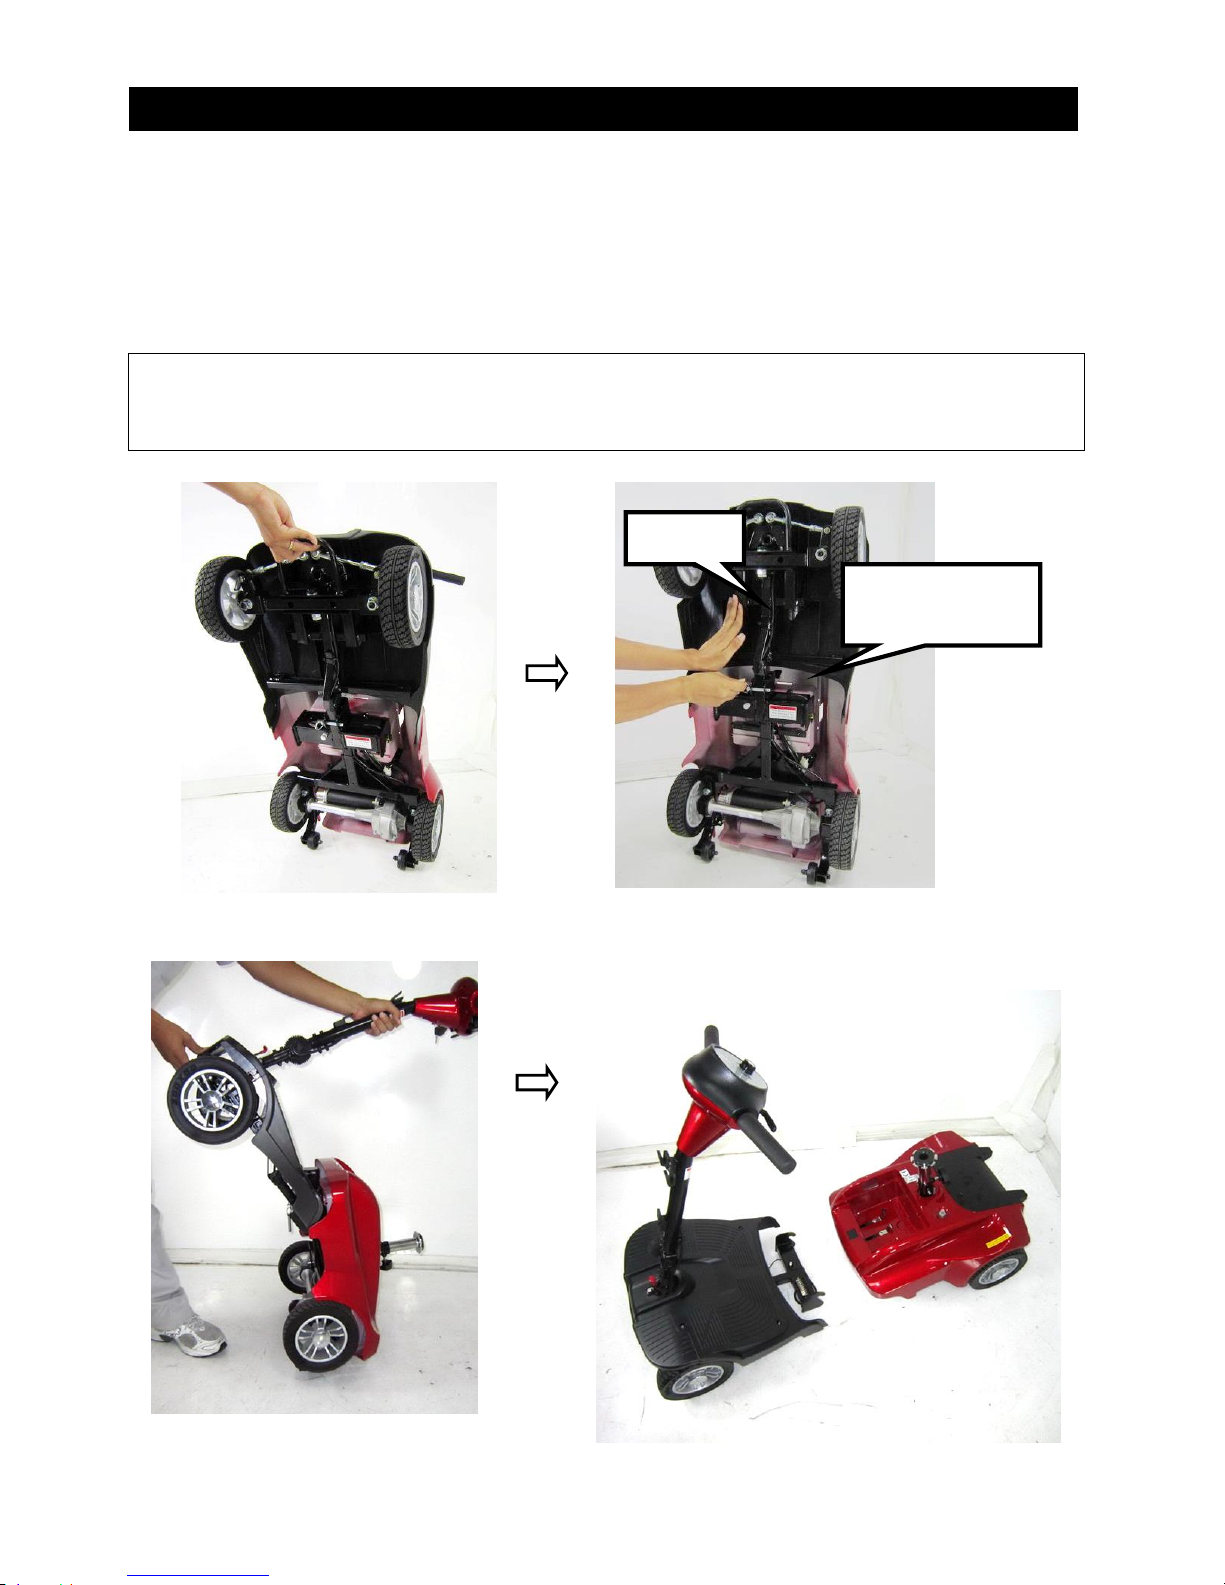
1. PUSH
2. Pull out the
frame connect pin
4 . O P E R AT I O N
4.5 DISASSEMBLING THE SCOOTER
1. Lift the tiller to stand the scooter in an upright position (Fig. 4.1)
2. Push the front frame and then pull out the connecting pin (Fig. 4.2)
3. Lean the front frame forward to 45 degree (Fig. 4.3)
4. Pull to separate the front frame from the rear frame (Fig. 4.4)
Warning
Always unplug the rear section electrical connector before separating the two sections.
Fig. 4.1 Fig. 4.2
Fig. 4.3 Fig. 4.4
Page 14

13
5 . DRI V I N G O N THE R O A D
■ Starting and Driving
1. Make sure the seat is installed properly.
2. Make sure the tiller has been secured properly.
3. Turn the power switch to ‘ON’.
4. Check the battery indicator to ensure there is enough power for your journey. If you have
any doubt about the remaining power, please recharge batteries before departure.
5. Set the speed dial to a position you feel safe and comfortable with.
6. Check the forward / reverse speed lever works correctly.
7. Make sure the electromagnetic brake works correctly.
8. Before driving, check your way is clear.
Attention
1. Do not push both RH & LH sides of the speed control lever simultaneously - control of your
scooter will be affected.
2. Do not turn the power switch to ‘OFF’ while driving as this will lead to an emergency stop
and possible risk of accident and injury.
3. Do not set to the highest speed whilst driving indoors.
4. Do not adjust the speed dial whilst driving as a sudden change in speed may cause danger
to you and others, and may cause damage to your scooter.
5. Do not place magnetic devices near the area of the operation handle as this could affect
the safe operation of your scooter.
6. Do be careful whilst driving in heavy traffic or crowded areas.
7. Whilst reversing the vehicle, be aware of people or objects behind you.
Stopping
1. Release the speed control lever completely. The vehicle will naturally brake and stop.
2. Turn the power off. Then remove the key.
Attention
1.The stopping distance will vary with your forward / reverse speed. Therefore please begin
braking as early as you can.
2.When parking your scooter, be sure to park on flat ground and then turn the power to ‘OFF’
before you dismount.
Page 15
14
6 . BAT T ERY C H A RG I N G A N D CAR E
6.1 CHARGING THE BATTERY
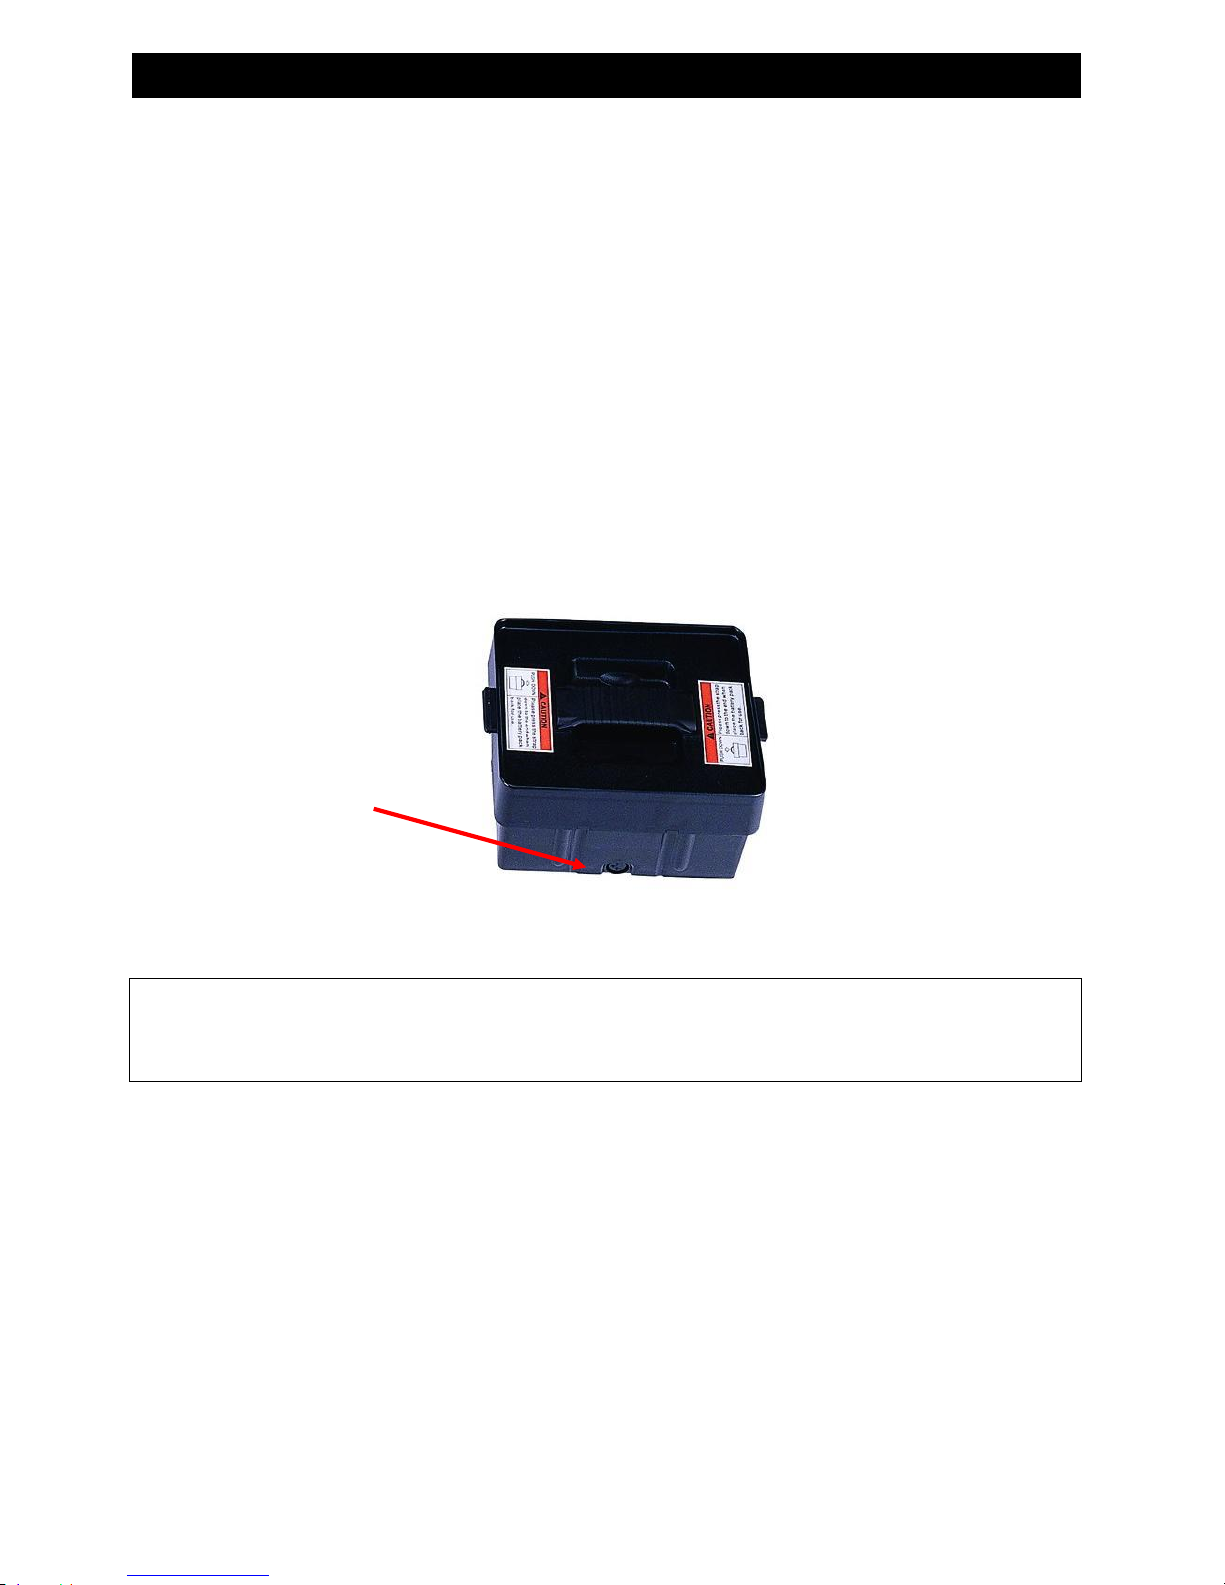
■ Off-board Charging (see photograph below)
1. Turn the power switch to ‘OFF’
2. Remove the battery pack by lifting out by the handle.
3. Plug the charger’s power cord into the mains.
4. Plug the charger’s round plug into the charger socket of the battery pack.
5. The charger’s orange LED will be lit when beginning to charge. The charging duration is
about 8 hours. To ensure optimum performance a 12-hour charge is recommended.
6. The charger’s LED will be lit during the charging process.
The orange LED may turn green after 1-4 hours but charging must continue for stated time.
7. Turn off the charger, disconnect the power cord and the round plug from charger socket on
the battery pack.
Attention
When returning the battery pack to the battery pack cavity of the shroud, beware of
trapping fingers or hands.
Note: If there is packing material under the battery pack please remove prior to
charging.
■ Charging Hours
The charging duration is about 6 hours. To ensure optimum performance a 10-hour charge is
recommended. We do not recommend charging more than 24 consecutive hours.
Charger socket
Page 16

15
6 . BAT T ERY C H A RG I N G A N D CAR E
■ Batteries (Inside the Pack)
1. The Scooter is powered by two sealed lead-acid deep-cycle batteries.
2. The batteries supplied with the scooter are 12 V 12AH batteries.
Warning
1. Keep away from flammable objects while charging due to danger of fire or explosion of
batteries.
2. Do not smoke while charging as the batteries may release hydrogen gas. Always charge
your battery in a well-ventilated area.
3. Never connect or disconnect the plug or cord with wet hands while charging. Do not
connect or disconnect the plug or cord when wet as this may cause an electric shock.
Attention - Please follow the rules below to avoid accidents while charging:-
1. Please use the certified charger only, and recharge the batteries to their full capacity
every time. You may damage the batteries and scooter if you use a charger which is not
to the correct specification.
2. Please charge in a well-ventilated area not directly exposed to the sunlight. Do not
charge in humid or wet surroundings.
3. Do not charge in temperatures less than -10°C or higher than +50°C as the charger may
not work well and the batteries may become damaged.
6.2 BATTERIES
Do not expose the batteries to temperatures below 10°C or above 50°C when charging or
storing the vehicle as this could damage the batteries and shorten their life.
The batteries are maintenance free and there is no need to refill with water.
You are required to recharge the batteries on a regular basis; even if the scooter is not used,
the batteries should be charged once a week.
The batteries carry a six-month manufacturer's warranty. This warranty only covers issues
relating to manufacturing faults, and not faults relating to failure to recharge the batteries as
instructed above.
Page 17

16
6 . BAT T ERY C H A RG I N G A N D CAR E
Suggestion – How to maximise the batteries’ efficiency and service life
1. Fully recharge your new batteries before their first time use.
2. Be sure to charge the batteries fully every time. The life of the batteries will be
shortened if the batteries are repeatedly used without being fully charged.
3. Always complete the charging until the orange LED light turns green. NEVER stop
charging before it is complete.
4. Keep your batteries fully charged whenever possible.
5. If you do not use your scooter for a long time, charge the batteries once a week to
keep them in a fully usable condition.
6. The ambient temperature will affect charging time. Charging time will be longer in
the winter.
7. After charging, do not leave the charger socket plugged into the scooter, as this will
cause a power drain and temporarily reduce the scooter’s range.
■ Cleaning the batteries
If the batteries are contaminated by water, battery acid, dust or other substances, they will
discharge quickly. The batteries supplied with the scooter are sealed and as such are
maintenance free with no risk of leakage. Please follow the steps below to clean the
batteries:-
1. Turn the scooter power switch to ‘OFF’.
2. Follow the procedure in the next section ‘Replacing the Batteries’.
3. Use a clean cloth to wipe the soiled area.
4. Take out the batteries.
5. Clean the batteries with a clean cloth. If the terminal is covered by white powder, please
wipe clean using warm water.
6.3 REPLACING BATTERIES
Follow the procedure below step by step to replace the batteries:-
1. Remove the battery pack from the scooter.
2. Open the battery pack then disconnect the cables from the four battery terminals.
3. Remove the batteries from the battery pack.
4. Place new batteries inside the pack.
5. Connect the red cable to the positive (+) battery terminal and black cable to the negative(-)
on the other battery.
6. Connect up the fused cable between the two batteries and close the battery pack.
Page 18

17
6 . BAT T ERY C H A RG I N G A N D CAR E
Warning
1. The wiring system and charger are placed correctly in the battery pack during
assembly by the manufacturer. Do not attempt to re-locate the wiring system by
yourself. The improper layout of the wiring system may result in the wires being
pinched by the battery box, which could result in an electronic system failure.
2. Be sure the battery wires are connected to their correct battery terminal.
Suggestions
1. Make sure the terminals are installed properly and replace the cover.
2. Do not use the battery to charge telecom equipment or other items.
3. Battery efficiency will vary with outside conditions; the driving distances will be
shorter in the winter. If the vehicle is not used for a long time, please charge the
battery at least every week.
4. Replace both batteries together.
If necessary, ask for help from CareCo for advice about maintaining and replacing the
batteries on 0845 611 8022 or email: [email protected]
Page 19

18
7 . IN S P E C T I O N AND M A I N T ENA N C E
7.1 INSPECTION
Clean the scooter with a damp cloth and dust down approximately once a week to preserve
the appearance of the scooter.
Adjust the tiller height and return to the original position and swivel the seat once a week to
ensure the parts adjust and remove smoothly and easily when required.
Check for signs of wear and tear on the tyres and the upholstery on a regular basis.
For optimum performance and to increase the lifespan of your scooter, it is recommended
that you have your scooter serviced once a year.
7.2 REGULAR CHECKING RECORD
To make sure your scooter is correctly serviced, contact CareCo regarding regular maintenance
checks. This should be at intervals of six months following an initial inspection after one month.
These checks may be chargeable.
YEAR
1 2 3 4 YEAR
1 2 3 4 Service Dates
Service Dates
Controller
Upholstery
On/off switch
Seat
Control Lever
Back
Braking
Armrests
Recharge point
Electrics
Batteries
Connections
condition
Levels
Harness
Connections
Test run
Discharge test
Forwards
Wheels and Tyres
Reverse
Wear
Emergency stop
Pressure
Left turn
Bearings
Right turn
Wheel nuts
Slope test
Motors
Over obstacles
Wiring
List Items repaired
Noise
Connections
Brake
Brushes
Chassis
Condition
Steering
Page 20

19
7 . IN S P E C T I O N AND M A I N T ENA N C E
7.3 BATTERIES, FUSE AND TYRES
■ Batteries
Refer to the section entitled ‘6. BATTERY CHARGING AND CARE’.
■ Fuse
If the battery charger is turned on and the LEDS are not lit, check the fuse.
Suggestion
Ask for help from CareCo to inspect or replace the fuse, as the tiller shroud has to be
removed before you can replace the fuse. Contact Customer Services on 0845 611 8022 or
email: [email protected]
■ Tyres
The condition of the tyres depends on how you drive and use your scooter.
Please check the tread depth regularly.
Replace the tyres when the tread depth is less than 0.5mm.
Attention
1. When tread depth is below 0.5mm the scooter may not grip well making braking
distances longer. Therefore replace the tyres as soon as they are found to have
insufficient tread depth.
2. The scooter comes with solid tyres, so there is no need to check tyre pressure.
7.4 STORAGE
When storing the scooter:-
- Ensure the scooter is switched off
- Ensure the charger is disconnected when not in use
Suggestion
Store the scooter out of direct sunlight, rain, and damp conditions. When storing for a
length of time, please charge the battery to full power and then disconnect the battery
terminal. If you have any queries call 0845 611 8022 or email: [email protected]
Page 21

20
7 . IN S P E C T I O N AND M A I N T ENA N C E
7.5 MANUALLY MOVING THE SCOOTER
Switch off the power with power key before moving the scooter.
Always dismount from the scooter before moving.
Lift the scooter by the chassis, and not by the shroud.
Lifting the scooter by the bumper could cause damage or injury.
For your safety, always ask for assistance. Two people will be required to move or lift the
scooter. If assistance is not available, please disassemble the scooter before lifting.
Refer to section ‘4.5. DISASSEMBLING THE SCOOTER’.
7.6 ASSEMBLING THE SCOOTER
Suggestion
The assembly process is essentially the disassembly process in reverse. First study the text
and photographs in ‘4.5 DISASSEMBLING THE SCOOTER’ before re-assembling the scooter.
1. Loosen tiller adjustment knob, raise the tiller to the desired position, and then tighten the
tiller adjustment knob.
2. Reinstall the upper seat post at the desired height. Secure with the locking pin and
tighten the seat post knob.
3. Reinstall the batteries by lowering the pack into place.
4. Replace the seat and rotate it until it locks into its correct position.
Warning
After assembling, make absolutely certain the tiller adjustment knob is fully tightened.
Page 22

21
8 . TR O U B L E S HOOT ING
■ TROUBLE SHOOTING
If you have problems with your scooter, check the information below.
If you cannot solve the issue, contact CareCo Customer Services on 0845 611 8022 or email:
[email protected]
Problem
Symptom
Remedy
The scooter will not switch
on
Batteries not connected
Rear and front sections not
connected
Circuit breaker has tripped
Check plastic has been removed
under battery compartment
Check batteries are connected
Check connection on front to
rear loom
Push circuit breaker button to
reset
The scooter switches on
but will not run
Flat batteries
Charger plugged in
Motor in freewheel mode
Check battery power
Unplug charger
Re-engage the freewheel lever
Scooter appears slow
Flat batteries
Speed setting slow
Check battery power and /or
recharge
Check the speed dial is not set
at low
The seat moves whilst in
use
Seat not locked in position
Slowly rotate the seat until it
drops into place and is secure
The tiller appears loose
Tiller adjustment knob
loose
Tighten the tiller adjustment
knob
Involuntary horn sounds
The scooter has a fault
Ensure the control lever is
released and switch the scooter
on and off / recharge batteries
Page 23

22
8 . TR O U B L E S HOOT ING
LED lights will appear if there is a problem with your Eclipse scooter. The list below should assist in identifying any
possible malfunction.
LED Lights
Explanation
Possible Cause
Possible Resolution
1 & 1
* *
Over / under
temperature cutback
1. Temperature +80º or -10º
2. Excessive load on vehicle.
3. Operation in extreme
environments.
4. Electromagnetic brake not
releasing.
Turn scooter off and allow to cool
down to normal operating
temperature.
1 & 2
* **
Wig-Wag Lever /
Mechanism faulty
1. Throttle input wire open or
shorted.
2. Throttle pot defective.
3. Not in centre at start-up.
Ensure the throttle lever is in the centre
position before turning the scooter on.
1 & 3
* ***
Speed Selection Dial
faulty
1. Speed limit pot wire(s) broken or
shorted.
2. Broken speed limit pot.
Try Speed Limit Dial in a different
position - either half speed or similar.
1 & 4
* ****
Battery voltage too low
1. Battery voltage under 17 volts.
2. Bad connection at battery or
controller.
RE-CHARGE
1 & 5
* *****
Battery voltage too high
1. Battery voltage over 31 volts.
2. Vehicle operating with charger
attached.
3. Intermittent battery connection.
Check that the charger is unplugged.
2 & 1
** *
Main contactor driver
off fault
Controller faulty
Contact CareCo ([email protected])
Tel: 0845 611 8022
2 & 2
** **
Motor blocked / stalled
Motor defective
Contact CareCo
2 & 3
** ***
Main contactor fault
Controller faulty
Contact CareCo
2 & 4
* ****
Main contact driver on
fault
Controller faulty
Contact CareCo
3 & 1
*** *
HPD fault present >10
sec
1. Misadjusted throttle.
2. Broken throttle pot or throttle
mechanism.
Check condition of throttle lever and
ensure that it is in the centre before
turning on.
3 & 2
*** **
Brake on fault
1. Electromagnetic brake driver
shorted.
2. Electromagnetic brake coil open.
Check the brake / freewheel lever is in
the 'Drive' position before turning on.
3 & 3
*** ***
Precharger fault
Controller faulty
Contact CareCo
3 & 4
*** ****
Brake off fault
1. Electromagnetic brake driver
open.
2. Electromagnetic brake coil
shorted.
Check the brake / freewheel lever is in
the 'Drive' position before turning on.
3 & 5
*** *****
HPD (High Pedal
Disable)
1. Improper sequence of throttle and
KSI, push, or inhibit inputs.
2. Misadjusted throttle pot.
Check condition of throttle lever and
ensure that it is in the centre before
turning on.
4 & 1
**** *
Current sense out of
range
1. Motor / wiring fault.
2. Controller faulty
Contact CareCo
4 & 2
**** **
Motor voltage out of
range
1. Motor voltage does not
correspond to throttle request.
2. Short in motor or in motor wiring.
3. Controller failure.
Contact CareCo
4 & 3
**** ***
EEPROM fault
EEPROM fault or failure
Contact CareCo
4 & 4
**** ****
Incorrect motor wiring
Motor defective
Contact CareCo
4 & 5
**** *****
Battery disconnected
1. Battery not connected.
2. Poor connection to battery
terminals.
Ensure battery box is placed securely in
the scooter and that all packaging has
been removed.
Page 24

23
9 . SP ECIF I C AT I O N
Model
CareCo Eclipse
Dimension (L x W x H mm)
(L x W x H ins)
940mm x 490mm x 900mm
37” x 19” x 35.5”
Base weight (without battery)
57.2lb / 26kg
Battery weight
22lb / 10kg
Seat weight
16.5lb / 7.5kg
Total weight
95lbs / 43.5kg
Battery
12AH x 2
Charger
2A
Charging time - hours
>6h
Front Wheel
8" x 2” / 200mm x 50mm
Rear Wheel
8" x 2” / 200mm x 50mm
Anti-tip Wheel
2" / 50mm
Driving System
Direct rear wheels (with differential gear)
Top Speed
4 mph / 6.4 kph
Turning radius
35.4” / 900mm
Climbing angle
6 - 8°
Cruising range
6 – 7.5 miles / 10 – 12 km
Max. User weight
250 lbs / 113kg
The manufacturer reserves the right to modify the specification if necessary. The final
specification is subject to the individual scooter you purchase from CareCo.
Note:
Maximum driving distance is based on an ambient temperature of 20C, a 75kg driver and
brand new fully charged batteries; with a constant driving speed of 4 mph on a flat surface.
Page 25

24
1 0 . W A R R AN T Y
WARRANTY
There is a comprehensive twelve-month warranty from the date on which your new CareCo Eclipse scooter is
delivered. The warranty covers the scooter for repairs or replacement during this period. For more detail,
please see the Warranty Conditions below.
Warranty Conditions:
1. Any work or replacement part installation must be carried out by an authorised service agent.
2. To apply the warranty should your scooter require attention, please contact Careco Customer Service ([email protected]).
3. Should any part of the scooter require repair or full or part replacement, as a result of a manufacturing or material defect within fourteen
months of delivery, repairs will be carried out free of charge.
a) Frame: 2 year limited warranty
b) Battery parts: 12 months limited warranty
Note: The warranty is not transferable
4. Any repaired or replaced parts will be covered by this warranty for the balance of the warranty period on the scooter.
5. Parts replaced after the original warranty has expired will by covered by a three months warranty.
6. Consumable items supplied will not generally be covered during the normal warranty period unless such items require repair or
replacement clearly as a direct result of a manufacturing or material defect.
Such items include (among others): upholstery, tyres and batteries.
7. The above warranty conditions apply to brand new scooters purchased at the full retail price. If you are unsure whether your scooter is
covered, check with CareCo Customer Services.
8. Under normal circumstances, no responsibility will be accepted where the scooter has failed as a direct result of:-
a) The scooter part not having been maintained in accordance with the manufacturer’s recommendations.
b) Failure to use the manufacturer’s specified parts
c) The scooter or part having been damaged due to neglect, accident or improper use
d) The scooter or part having been altered from the manufacturer’s specifications or repairs having been attempted before CareCo is
notified
Please note CareCo’s contact details in the box below. In the event of your scooter requiring attention, contact them and give all relevant
details so they can act quickly.
The manufacturer reserves the right to alter, without notice, any weights, measurements or other technical data shown in this manual. All
figures, measurements and capacities shown in this manual are approximate and do not constitute specifications.
Name
CareCo Customer
Services
Address
CareCo (UK) Ltd
Hubert Road
Brentwood, Essex
Tel
0845 611 8022
Postcode
CM14 4JE
Page 26
25
1 0 . W A R R AN T Y
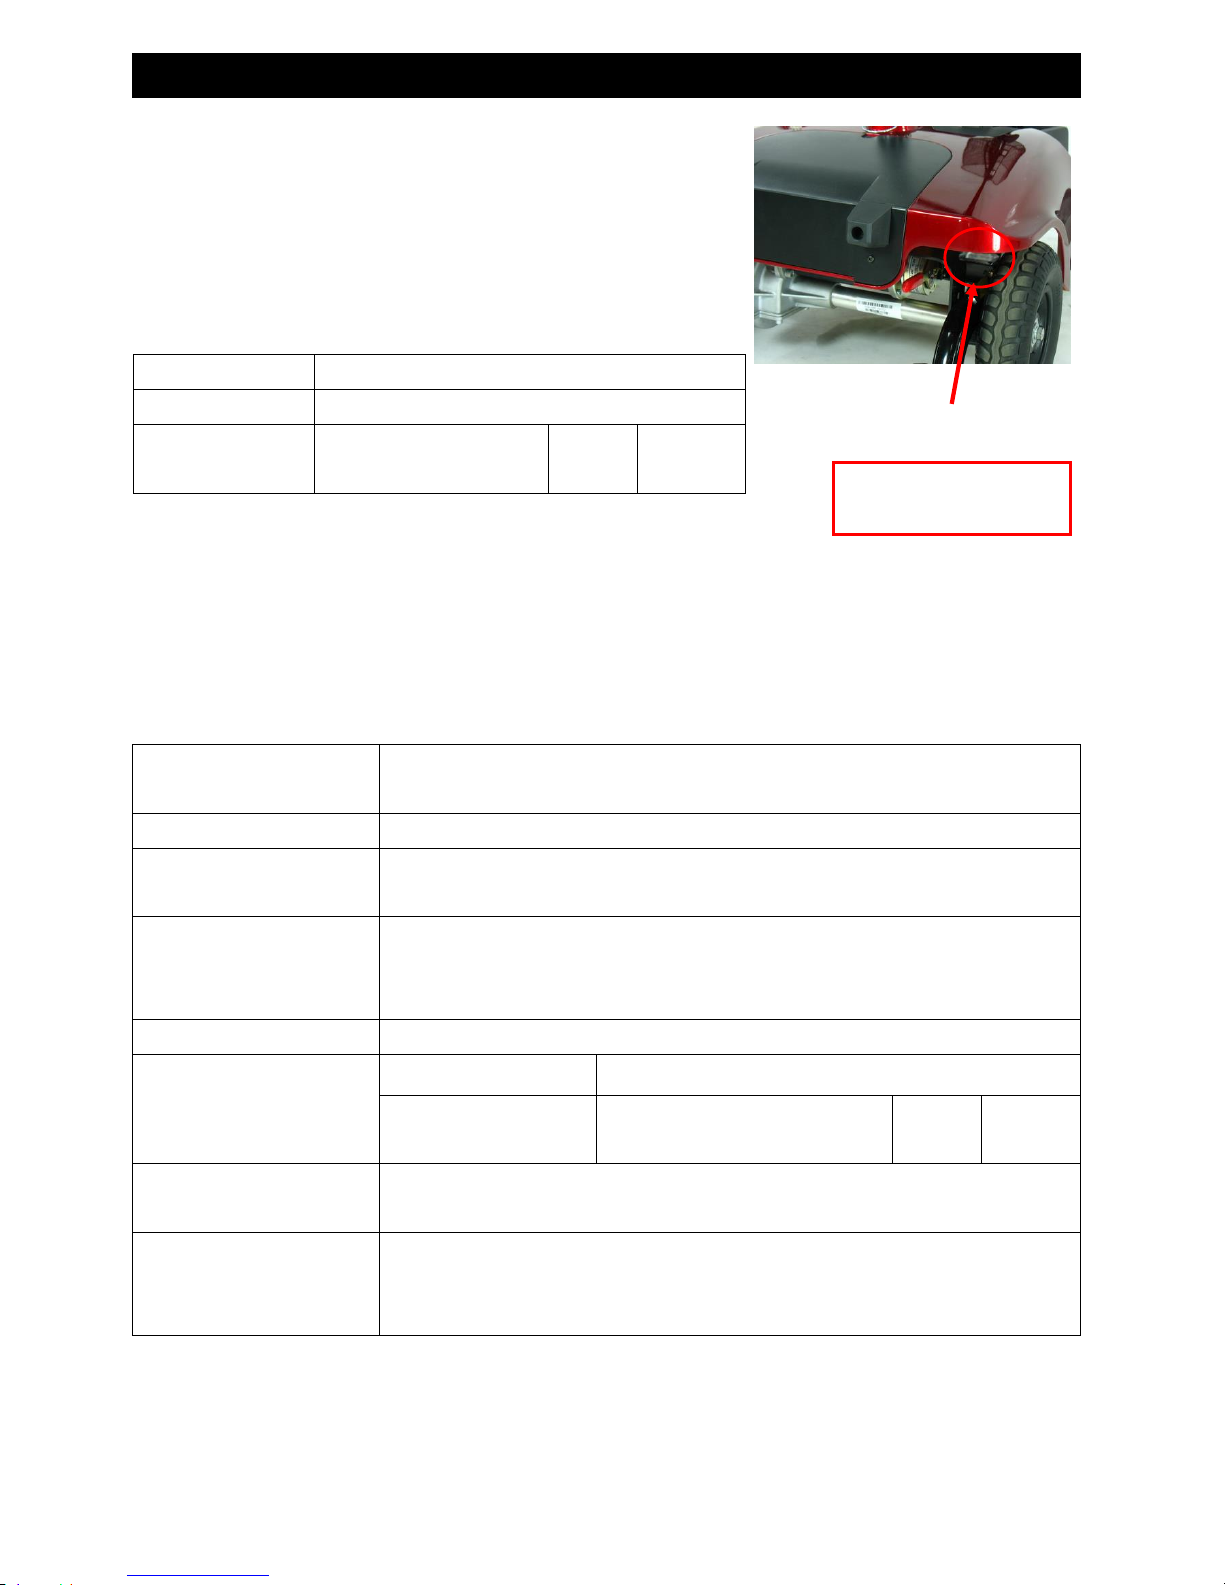
VIN (VEHICLE IDENTIFICATION NUMBER)
To ensure the correct after sales service and warranty service
support, please write down the vehicle identification number
that is affixed on the rear right side of the frame.
…………………………………………………………………………………………………………………………..
Warranty Application Form
Name
Sex
口 Male 口 Female
Date of Birth
Day: Month: Year:
Address
Model
口 CareCo Eclipse
VIN
Scooter VIN:
Motor Serial No:
Key
No:
Date of Purchase
Day: Month: Year:
Purchaser’s signature
Model
CareCo Eclipse
VIN
Motor serial
number:
Key
no:
Identification Number
 Loading...