

Page 1

CardScan Getting Started
Chapter
To transform business cards into an address book, follow these steps:
1
Check Requirements
• Windows 98 or later
• Pentium or later
•64 MB RAM
• 50 MB hard disk space
• CD-ROM drive
• USB Port
Set up Scanner
Start CardScan and follow
•
the Scanner Setup Wizard.
Use Calibration Card to
calibrate scanner;
follow instructions on
Calibration Card.
Install Software
• On Windows NT, 2000 or
XP: log in as Administrator.
• Insert CD-ROM.
• Click Install and
follow onscreen
installation instructions.
Scan Cards
• Insert cards into scanner,
printed side up.
• Click Process when
scanning is complete.
Connect Scanner
• Connect USB cable to
computer and scanner
USB ports. (If previously
connected, remove and
re-insert USB cable.)
Save Contacts
• Choose File→Save As, and
save the file.
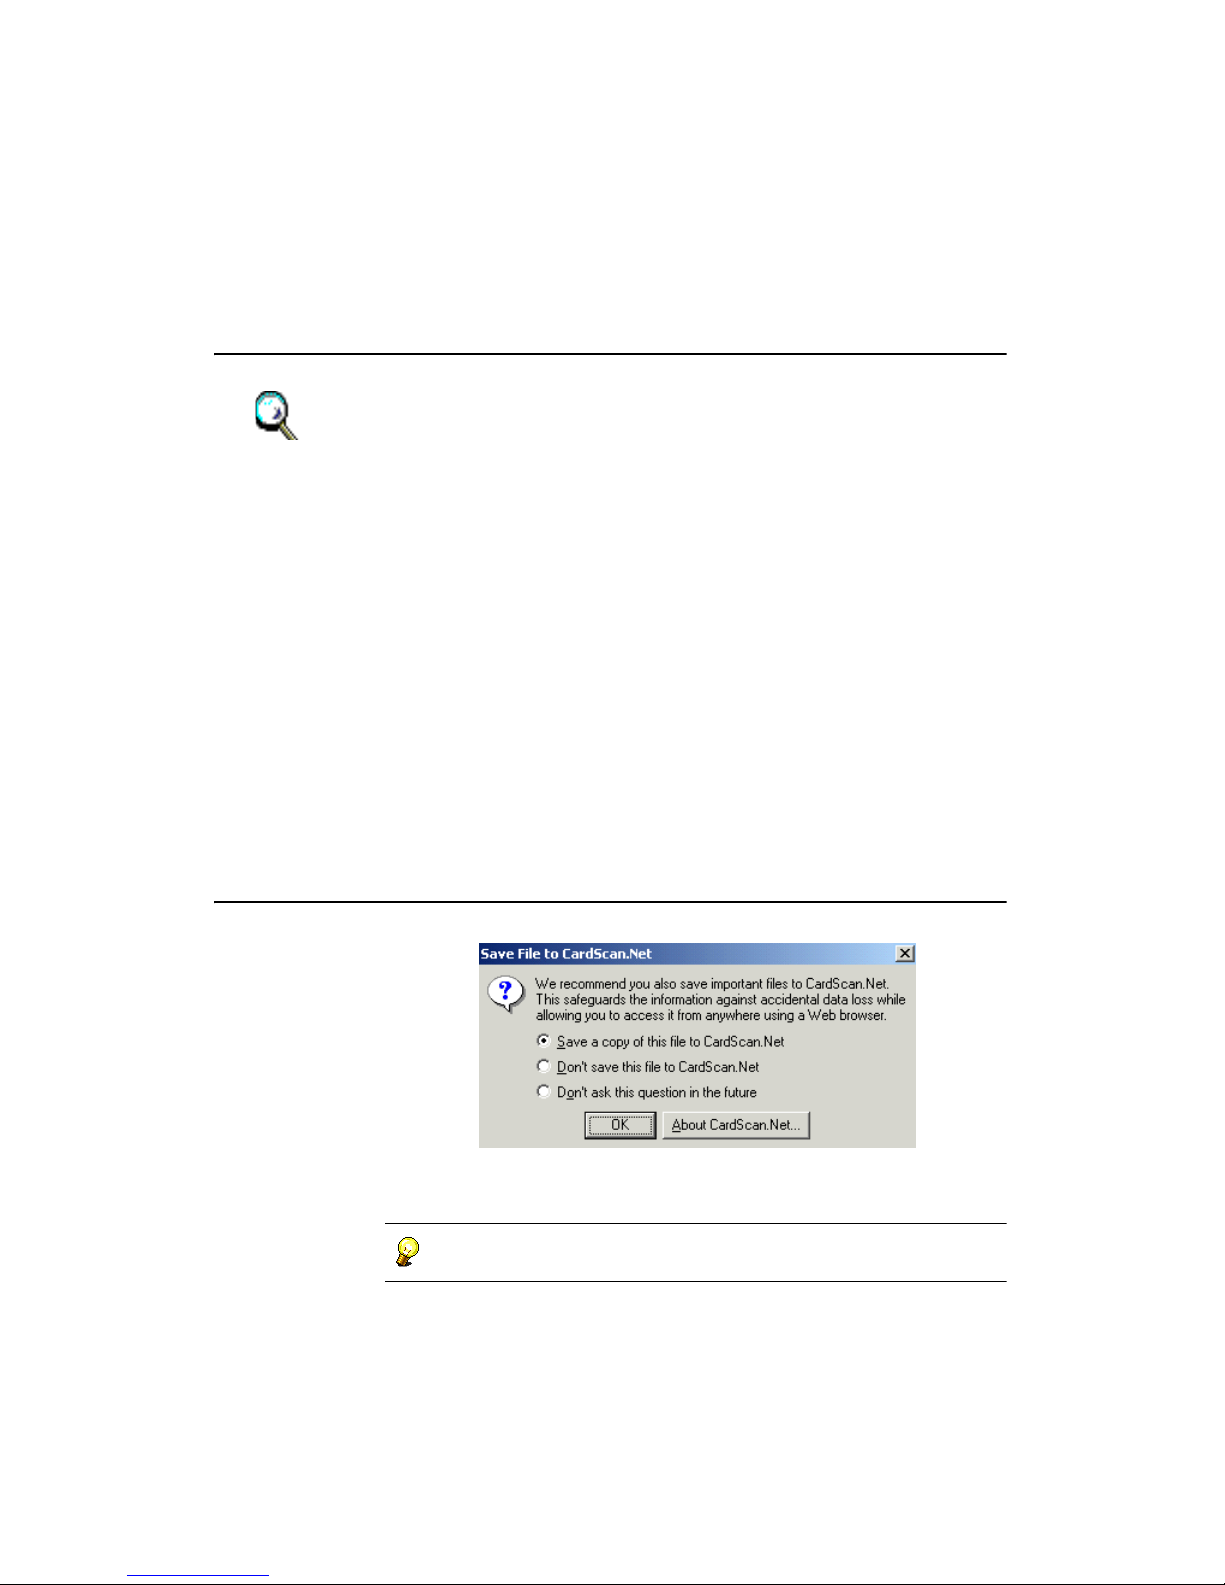
• When the dialog above
appears, click OK.
Page 2

1
Copyright © 2003 Corex Technologies Corp. All rights reserved worldwide.
This guide is protected by federal copyright law. No part of this guide may be
reproduced or distributed, transcribed, stored in a retrieval system, translated
into any spoken or computer language or transmitted in any form or by any
means whatsoever without the prior written consent of:
Corex Technologies Corporation
810 Memorial Drive
Cambridge, MA 02139
Tel: (617) 492-4200
Fax (617) 492-6659
Trademarks: CardScan and CardScan.Net are registered trademarks of Corex
Technologies Corp. Windows is a trademark of Microsoft Corporation. All
other trademarks are the property of their respective owners.
Disclaimer of Warranties: Corex Technologies Corp. makes no warranty,
representation or promise not expressly set forth in this agreement. Corex
Technologies Corp. disclaims and excludes any and all implied warranties of
merchantability, title, or fitness for a particular purpose. Corex Technologies
Corp. does not warrant that the software or documentation will satisfy your
requirements or that the software and documentation are without defect or
error or that the operation of the software will be uninterrupted.
LIMITATION OF LIABILITY: Corex Technologies Corp.’s aggregate
liability, as well as that of the authors of programs sold by Corex Technologies,
arising from or relating to this agreement or the software or documentation is
limited to the total of all payments made by or for you for the license. This
limited warranty gives you specific legal rights. You may have others which
vary from state to state. Some states do not allow the exclusion or limitation of
incidental or consequential damages, so the above limitation or exclusion may
not apply to you.
Page 3

Chapter 1 Welcome to CardScan!
CardScan Features ..................................................................... 1-1
Perform Basic Tasks ................................................................... 1-1
Manage Your Contacts as Suits You Best ....................................... 1-2
Safeguard and Access Your Contacts Remotely ............................... 1-2
Keep your contacts up-to-date ...................................................... 1-3
About This Guide and Other User Resources ........................................ 1-3
Other Sources of Information and Support ...................................... 1-4
Chapter 2 Installing CardScan
Before You Begin ....................................................................... 2-1
Installing and Setting Up CardScan ................................................... 2-2
Installing the Software ................................................................. 2-2
Connecting the Scanner .............................................................. 2-3
Setting Up CardScan for Your Scanner ........................................... 2-3
If a Previous Version is Installed ....................................................... 2-4
Uninstalling CardScan ................................................................ 2-4
Converting Files Created with Earlier Versions ................................. 2-4
Table of Contents
Chapter 3 Creating Your Address Book
Scanning Business Cards .............................................................. 3-1
Importing Contacts
from Contact Managers and PIMs
Creating Files and Contacts Manually ................................................. 3-7
Creating Contacts by Dragging and Dropping
Text from Emails and Electronic Documents
Saving Your Contacts................................................................... 3-8
..................................................... 3-4
.......................................... 3-7
Chapter 4 Verifying, Editing and Organizing
Your Contacts
Why and When to Verify Contacts ..................................................... 4-1
Features That Make Verifying Simple ................................................. 4-1
Using Edit View ......................................................................... 4-1
Editing Text ............................................................................... 4-3
Checking Details of Names and Addresses ..................................... 4-3
CardScan Getting Started i
Page 4

Table of Contents
Adding Information to Contacts
Adding Phone Numbers .............................................................. 4-4
Adding Email and Web Addresses ................................................. 4-5
Features to Organize Contacts Quickly ............................................... 4-6
Using Categories ....................................................................... 4-6
Adding Notes ............................................................................ 4-7
Assigning Categories and Notes to a Batch ..................................... 4-8
Deleting Contacts....................................................................... 4-8
........................................................ 4-4
Chapter 5 Managing Your CardScan Contacts
Manipulating Multiple Contacts in a File ............................................... 5-1
Reviewing the Status of Your Contacts ........................................... 5-1
Sorting Contacts ........................................................................ 5-2
Finding Contacts........................................................................ 5-2
Finding Contacts with QuickSearch ............................................... 5-2
Methods to Find Groups of Contacts .............................................. 5-3
Managing Duplicate Contacts.......................................................... 5-4
Finding Duplicate Contacts............................................................. 5-4
Safeguarding Your Contacts Against Loss ............................................ 5-5
Backing Up Your Contacts ........................................................... 5-5
Chapter 6 Maximizing Your Contact Potential
with CardScan.Net
Getting Started with CardScan.Net .................................................... 6-1
About CardScan.Net Synchronization ................................................. 6-3
Conflict Resolution...................................................................... 6-3
Manual Synchronization................................................................ 6-4
Synchronizing One File ............................................................... 6-4
Synchronizing All Files ................................................................ 6-4
Automatic Synchronization ............................................................. 6-5
About AccuCard Service Updates ..................................................... 6-6
ii Corex Technologies
Page 5

Table of Contents
Chapter 7 Exchanging Data with Other Applications
Data Exchange Wizard ................................................................. 7-1
CardScan Synchronization ............................................................. 7-2
Synchronizing Manually .............................................................. 7-4
Synchronizing Automatically ......................................................... 7-4
Chapter 8 Synchronizing with Palm OS™ Devices
First-Time Setup and Synchronization................................................. 8-1
Chapter 9 Synchronizing with Pocket PC® Devices
Setting up ActiveSync .................................................................. 9-1
Synchronizing Selected Files .......................................................... 9-3
Removing Corex CardScan ActiveSync Module ...................................... 9-3
Chapter 10 Communicating with Your Contacts
Reaching Your Contacts From Summary View ...................................... 10-1
Using Signature Card ................................................................. 10-2
Enabling Signature Card ............................................................10-2
Disabling Signature Card ............................................................10-2
Chapter 11 Printing
Selecting contacts to print ...........................................................11-1
Starting the Print Wizard .............................................................11-2
Chapter 12 Troubleshooting and Support
Troubleshooting Tips .................................................................. 12-1
General ...................................................................................12-1
Cards that are difficult to read ......................................................12-2
Error messages ........................................................................12-3
Technical Support ..................................................................... 12-3
CardScan Getting Started iii
Page 6

Table of Contents
Appendix A: CardScan Scanner Warranty
Appendix B: Compliance with FCC and EC
FCC Statement ......................................................................... B-1
EC Declaration of Conformity .......................................................... B-1
Index
iv Corex Technologies
Page 7

Chapter 1 Welcome to CardScan!
CardScan is an electronic address book that scans and stores business-card
information. After scanning a business cards, using a Corex or
TWAIN-compliant scanner, CardScan processes the image, and organizes the
information into the correct fields of an electronic contact. As you continue
scanning cards, your CardScan file is filled with contacts for you to save and
use as suits your needs. For example, you can:
• Create a CardScan address book, and manage your contact information
using CardScan. For an extensive introduction, see “Creating Your
Address Book” on page 3-1.
• Use the Data Exchange Wizard to help you get your contacts from
CardScan into your favorite contact manager, personal information
manager (PIM), or personal data assistant (PDA). For an extensive
introduction, see “Exchanging Data with Other Applications” on page 7-1.
• Save copies of your CardScan files to a secure, private account on
CardScan.Net—and have a guaranteed backup as well as access to your
contacts from anywhere, using your password and a web browser. For an
extensive introduction, see “Maximizing Your Contact Potential with
CardScan.Net” on page 6-1.
The following is a summary of CardScan features.
CardScan Features
CardScan Features
CardScan features are designed to suit the needs of both the novice and
experienced users. These features allow you to:
• Perform basic tasks.
• Manage your contacts as suits you best.
• Safeguard and access your contacts from anywhere.
• Keep your contacts up to date.
Perform Basic Tasks
• Create an address book by scanning business cards into CardScan and
saving the file.
• Verify and edit contacts.
• Add notes and assign categories to individual contacts or a group of
contacts.
• Scan the back of a card to include its image in the existing contact.
• Drag and drop contacts from one CardScan file to another or from
CardScan to another application—and vice versa.
• Find contacts with Categories and QuickSearch.
CardScan Getting Started 1-1
Page 8

1
Chapter 1 Welcome to CardScan!
• Email, dial contacts’ phone numbers, and visit their Web sites directly
from CardScan.
• Display a MapQuest-generated map of a contact’s address.
• Include your SignatureCard in your Microsoft Outlook email.
• Add new contacts by scanning, or typing, or dragging and dropping text
from emails and electronic documents, or by dragging and dropping
vCards.
Manage Your Contacts as Suits You Best
CardScan enables you to quickly get contacts into other applications, such as
your favorite contact manager, personal information manager (PIM), or
personal data assistant (PDA). The data-exchange features of CardScan
include:
• The CardScan Data Exchange Wizard to help you pick the method that
suits you best
• CardScan Synchronization to exchange contact information between
CardScan and your favorite, supported contact manager or PIM, and
keep consistent address books
• The Export Wizard to export contact information to a text file
• Transfer from CardScan to contact managers and PIMs, including Palm
OS Desktop
• Synchronization with PDAs, such as Palm OS™ handhelds and Pocket
®
devices
PC
Safeguard and Access Your Contacts Remotely
Save a copy of a CardScan file to a private, secure account on CardScan.Net.
With your CardScan.Net-enabled file, you can:
• Have a guaranteed backup in your CardScan.Net account.
• Access your contacts from anywhere, with a web browser and your
password.
• Make changes to the file on your PC or on CardScan.Net, and CardScan
will keep it synchronized, so the copies on your PC and in your
CardScan.Net Account are identical.
1-2 Corex Technologies
Page 9

About This Guide and Other User Resources
Keep your contacts up-to-date
If your file is CardScan.Net-enabled—in other words, has a copy on
CardScan.Net—you can keep your contacts up-to-date using the AccuCard
Service. The AccuCard Service automatically notifies you of any updates
available for your contacts. The symbols indicating the status of your contacts
appear in your desktop CardScan file. When it is convenient, you can review,
accept, or reject the changes automatically, with a few mouse clicks.
About This Guide and Other User Resources
This User’s Guide is intended to introduce CardScan’s features and to help
you locate:
• Features you might use the most and
• Detailed descriptions of each feature in the Online Help
Each section in this Guide includes keywords for you to use when searching
the Help Index for more information. To use keywords:
1. Look for the symbol
2. Choose Help→Search for Help on, and type one keyword at a time, or
scroll down the list in the Index and click the keyword.
If you would like to browse the help as you would a book, open it at the Table
of Contents. You can do this using any of the following methods:
• Press the F1 key on your keyboard.
• Click the button on CardScan’s Toolbar (see page 1-4).
• Choose Help→Contents in CardScan window.
.
The following are conventions used in this Guide:
“Attention! Read carefully.”
“Here is a TIP for you!”
“To find more information, choose Help→Search for
Help on, and use the following keywords.”
“NOTE:”
CardScan Getting Started 1-3
Page 10

1
Chapter 1 Welcome to CardScan!
Other Sources of Information and Support
There are several other sources of CardScan information and support, all
accessible from the CardScan Help menu.
Choose Help→View ReadMe to view important information unavailable at the
time the printed documentation was published.
Choose Help→View User’s Guide to view a printable version of this Guide, in
the PDF format.
Choose Help→Technical Support to contact our Technical Support. For more
directions to Corex Technical Support, see the cover of this book.
Balloon Help
Point at any feature in the CardScan window, and a balloon-help topic
appears, describing the usage of the feature. For example, point at any button
on CardScan’s Toolbar to get things done more quickly.
Glossary of Terms
The Glossary is included in the Online Help, listed at the top of the Table of
Contents.
Visit Corex Web site at www.cardscan.com
• Technical Support Knowledge Base, at www.cardscan.com/support/
• The PDF document “Using CardScan with Other Scanners”, containing
detailed guidelines for users of TWAIN-compliant scanners
• Product and compatibility information
• Software and other updates
1-4 Corex Technologies
for:
Page 11

Chapter 2 Installing CardScan
To begin using CardScan quickly, you should follow the installation and setup
sequences presented in this chapter. This chapter includes:
• Before you begin
• Installation and setup
• If upgrading from a previous version
Before You Begin
Before you begin to install the CardScan software, do the following:
1. Make sure you have the following:
• Windows 98 or later
• Pentium processor or later
• 64 MB of RAM
• 50 MB free hard disk space for a minimum installation and 110 MB for a
full installation
• CD-ROM drive
• USB port for scanner connection
• Modem for autodialing (optional)
• Windows-compatible network for multiple users
• Mouse, or other pointing device, recommended
Before You Begin
2. If running Windows 2000, Windows NT, Windows XP, or later, log on as
Administrator or to an account with Administrator privileges.
3. Locate your software serial number in the CD-ROM package.
4. To use CardScan with Palm
software for these devices before installing CardScan.
Keywords: “Palm”, “Pocket PC”
5. If upgrading from a previous version, see “If a Previous Version is
Installed” on page 2-4.
or Pocket PC devices, install the desktop
CardScan Getting Started 2-1
Page 12

1
Chapter 2 Installing CardScan
Installing and Setting Up CardScan
To install and set up CardScan, you must follow these steps:
1. Install the software.
2. Connect the scanner.
3. Set up CardScan to work with your scanner.
Installing the Software
To install the software:
1. Insert the CardScan CD-ROM. The Autorun screen appears.
2. Click Install CardScan. The CardScan InstallShield Wizard appears.
3. Follow the Wizard’s prompts to complete the installation. On the last
screen of the Wizard, check the box Launch CardScan After
Installation.
After a pause, the CardScan window opens, and the Scanner Set Up
Wizard appears.
Before proceeding with the setup, you must connect your scanner, as follows.
2-2 Corex Technologies
Page 13

Installing and Setting Up CardScan
Connecting the Scanner
The following procedure is for CardScan 600 scanners. For any other
scanners, see the scanner documentation. To connect a 600 scanner:
• With the included cable, connect the scanner’s USB port to the USB port
on your PC.
• If your scanner includes an AC adapter, connect the AC adapter to the
scanner and plug the adapter into a power outlet.
The scanner’s light comes on red, then changes to solid green. If the
light is not solid green, see “Troubleshooting Tips” on page 12-1.
Setting Up CardScan for Your Scanner
The Scanner Setup Wizard enables you to set up CardScan to work with your
scanner, to calibrate the scanner and to scan your first business card.
To start the Scanner Setup Wizard any time, choose
Tools→Scanner Setup Wizard.
1. On the Scanner Setup Wizard, choose the option Yes, my scanner is
connected and click Next.
2. On the Select Scanner Type screen, select your scanner, and follow the
Wizard to detect, calibrate, and test your scanner.
For guidelines on using TWAIN-compliant scanners with CardScan,
search the Online Help on “TWAIN”. Also, visit www.cardscan.com
obtain a PDF document “Using CardScan with Other Scanners”.
CardScan Getting Started 2-3
to
Page 14

1
Chapter 2 Installing CardScan
If a Previous Version is Installed
If you have a previous version of CardScan on your PC, you may have to do
the following:
1. Disconnect the scanner.
2. Uninstall the existing Cardscan software.
3. Install the new CardScan software (see page 2-2).
4. Reconnect the scanner (see page 2-3).
5. Set up CardScan to work with your scanner (page 2-3).
Uninstalling CardScan
The following procedure removes CardScan software from your hard
drive. It does not remove your contact files.
1. If running Windows 2000, Windows NT, Windows XP, or later, log on
with administrator privileges.
2. Choose Start→Settings→Control Panel. The Windows Control Panel
dialog appears.
3. Double-click Add/Remove Programs, select CardScan from the list of
programs, and click Remove. The InstallShield Wizard appears.
4. Follow the InstallShield Wizard to uninstall the CardScan software.
If you have been using a Palm device, you should exit and restart
HotSync Manager after uninstalling CardScan.
Converting Files Created with Earlier Versions
When you try to open an old CardScan file, you are prompted to convert it.
Once converted, a file cannot be opened by an earlier version of CardScan.
Therefore:
• CardScan saves a backup copy in the CardScan directory.
• If you choose to delete the backup files, make sure you are using a full
(not trial) version of CardScan.
2-4 Corex Technologies
Page 15

Scanning Business Cards
Chapter 3 Creating Your Address Book
CardScan’s features (see “CardScan Features” on page 1-1) represent all
essential attributes of an electronic address book, where information is
accurate, manageable, safe, and can be utilized with a few clicks of the mouse
(for example, the ability to email your contacts or display the
MapQuest-generated map of an address, or dial phone and FAX numbers). If
you keep your contacts in several files, CardScan’s ability consistently to
organize files allows you to use any number of files simply as specific sections
of the same address book.
Use informative names for your CardScan files, to simplify the use of
your CardScan address book and make it more efficient.
There are several ways to create and expand your address book. These
include:
• Scanning business cards (in this chapter)
• Importing files from other applications (in this chapter)
• Creating new files and contacts manually (in this chapter)
• Dragging and dropping text from emails and electronic documents (in this
chapter)
• Dragging and dropping vCards into CardScan ( Keywords: “drag”)
• Saving a file
Scanning Business Cards
Scanning is the quickest way to create a file in your address book.
The following describes how to scan business cards with
CardScan 600 scanners, using the default settings (color scanning and
automatic detection of cards). If you are using a different scanner, see your
scanner documentation. Also, you can change the scan preferences.
Keywords: “scanning”, “preferences”
CardScan Getting Started 3-1
Page 16

1
Chapter 3 Creating Your Address Book
To begin scanning business cards:
1. On the desktop, choose Start→Programs→CardScan to open
CardScan.
2. Insert a card in the scanner, with the front side facing up. The card is
pulled through, and the Scanning Options dialog appears.
3-2 Corex Technologies
When you open CardScan for the first time, it creates a file
named “Untitled-1”. Therefore, when you scan and process the
contact information, it is collected in “Untitled-1”, until you save
the file with an informative name.
Page 17

Scanning Business Cards
This dialog allows you to:
• Process the saved image(s) to transform them into contacts.
•Use Batch Options to assign the same notes and categories to all
cards scanned continually. When processed, all the contacts in the
batch contain identical notes and belong in the same category.
Keyword: “Batch.”
• Click Close to save the scanned images without transforming them
into contacts.
3. Scan a few more cards, and click Process.
CardScan processes the image(s), closes the Scanning Options dialog,
and displays the contact scanned last in Edit view—so you can verify and
edit your new contacts.
Alphabet Bar
To learn about the features of CardScan’s graphical interface,
point at any feature in CardScan’s window. A brief description of
the feature appears in the balloon help.
CardScan Getting Started 3-3
Page 18

1
Chapter 3 Creating Your Address Book
4. Click on the Alphabet Bar to display all contacts in the List view.
AccuCard
Service
Updates
Unverified
contact
All new contacts are marked with ?, which indicates that they have not
been verified (see “Why and When to Verify Contacts” on page 4-1). The
red flag next to the question mark is the AccuCard Service Updates
indicator. For more information on the AccuCard Service, see “About
AccuCard Service Updates” on page 6-6.
Importing Contacts
from Contact Managers and PIMs
You can import contacts into CardScan from any contact manager or PIM that
can export contacts as a text file with the fields delimited by tabs or commas.
To import contacts:
1. Open the file in the source application.
2. Follow the instructions provided with the application to save or export the
information to your hard disk as a text file delimited by tabs or commas.
3-4 Corex Technologies
Page 19

Importing Contacts from Contact Managers and PIMs
3. Start CardScan and choose File→Data Exchange→Import. This dialog
appears:
The Data Exchange Wizard is a feature to help you pick the best way to
copy data between CardScan and other applications.
For example, if you intend to import contacts from ACT! 4.0 or later,
GoldMine 5.0 or later, Lotus Notes 4.6 or later, or Microsoft Outlook
98 or later, the Data Exchange Wizard will guide you to the CardScan
Synchronization—a new feature that is more efficient than Import. See
“Exchanging Data with Other Applications” on page 7-1.
4. If you prefer to import your contacts, choose No, I want to Import. The
Import file dialog (the standard Window’s Open dialog) appears.
5. Select the text file saved in step 2 and click Open. After a pause, the
Import dialog appears:
Click to view the dropdown list of standard and
saved import templates.
Use the scroll bar to see additional columns.
CardScan Getting Started 3-5
Page 20

1
Chapter 3 Creating Your Address Book
In the Import dialog, each row represents a contact in the text file, and
each column represents a field.
If the file contains more than four columns, use the scroll bar to
see the additional information.
Initially, all contacts are selected. To import only certain contacts, select
them. Use Shift+click or Ctrl+click to select multiple contacts.
6. If the columns don't look aligned, change the DELIMIT BY option to TAB.
7. To import using a predefined template, choose it from the I
EMPLATES dropdown list and go to step 11.
T
To create your own import template, go to step 8.
8. For each column, use the dropdown list at the top of the column to
indicate the CardScan field into which to put the information.
MPORT
9. To omit a column, choose [ignore]. To import a column that does not have
10. Click Save As Template to save the import template you created or
11. Click Import to finish importing the text file. CardScan displays the
3-6 Corex Technologies
a corresponding CardScan field, choose Notes or Other (near the bottom
of the list).
modified.
imported contacts in List View.
Page 21

Creating Files and Contacts Manually
Creating Files and Contacts Manually
To create a file manually:
1. Choose File→New. An Untitled file opens.
2. Save the file as described in “Saving Your Contacts” on page 3-8.
To create a contact manually:
1. Click the button on the Toolbar. A blank contact appears in Edit view.
2. Type contact information in the appropriate fields. If the file has been
saved before, CardScan saves the new contact automatically. If the file
has not been saved before, save it as described in “Saving Your Contacts”
on page 3-8.
Creating Contacts by Dragging and Dropping
Text from Emails and Electronic Documents
You can create contacts in a CardScan file by selecting text in another
application then dragging and dropping it into List view. This is useful for
creating contacts from emails or electronic letters.
To add a contact to a CardScan file:
1. Open a CardScan file and display it in List view.
2. Open the other application, and size the windows to see both
simultaneously.
3. In the other application, highlight the text to copy.
4. Hold the mouse button down and drag the highlighted information to List
view in CardScan. Release the mouse button.
The new contact appears in CardScan.
If the selected text contains blank lines, CardScan creates multiple
contacts. To avoid this, remove the blank lines before dragging the text
into CardScan.
CardScan Getting Started 3-7
Page 22

1
Chapter 3 Creating Your Address Book
Saving Your Contacts
Before you can close your new file, you must save it.
You must save a CardScan file only once. When you use it again,
CardScan saves your contacts automatically!
To save your file for the first time:
1. Choose File→Save As. The Windows Save As dialog appears. Note that
the extension for your CardScan files is “.cdb”.
2. Type a name for your file and click OK. This dialog appears:
The default choice in this dialog offers you the benefits of a private,
secure account on CardScan.Net, which only you can access—from
anywhere—with a browser and unique password. This keeps your
contacts at your fingertips, with a guaranteed backup on CardScan.Net.
Click the button About CardScan.Net to open the topic in the Online
Help.
3. Click OK to save your contacts on CardScan.Net, and follow the
instructions in “Maximizing Your Contact Potential with CardScan.Net” on
page 6-1.
OR
Choose one of the two remaining options, and click OK to save the file
only locally (that is, on your PC).
3-8 Corex Technologies
Page 23

Why and When to Verify Contacts
Chapter 4 Verifying, Editing and Organizing Your
Contacts
This chapter describes:
• Why and when to verify contacts
• Features that simplify verifying and editing
• Adding information to contacts
• Features that organize contacts quickly
• Deleting contacts
Why and When to Verify Contacts
CardScan scans and processes contact information very accurately. However,
you should verify your contacts because certain inaccuracies can impair many
useful functions.
You can verify contact information at your convenience. As needed, CardScan
reminds you about unverified contacts; for example:
• Displays warnings when unverified contacts may cause problems.
• Marks unverified contacts in List view with question marks.
• When sorting lists by unverified contacts, moves all unverified contacts to
the top of the list.
Features That Make Verifying Simple
The features for verifying contact information are:
• Edit view
• Check Details of Names and Addresses
Using Edit View
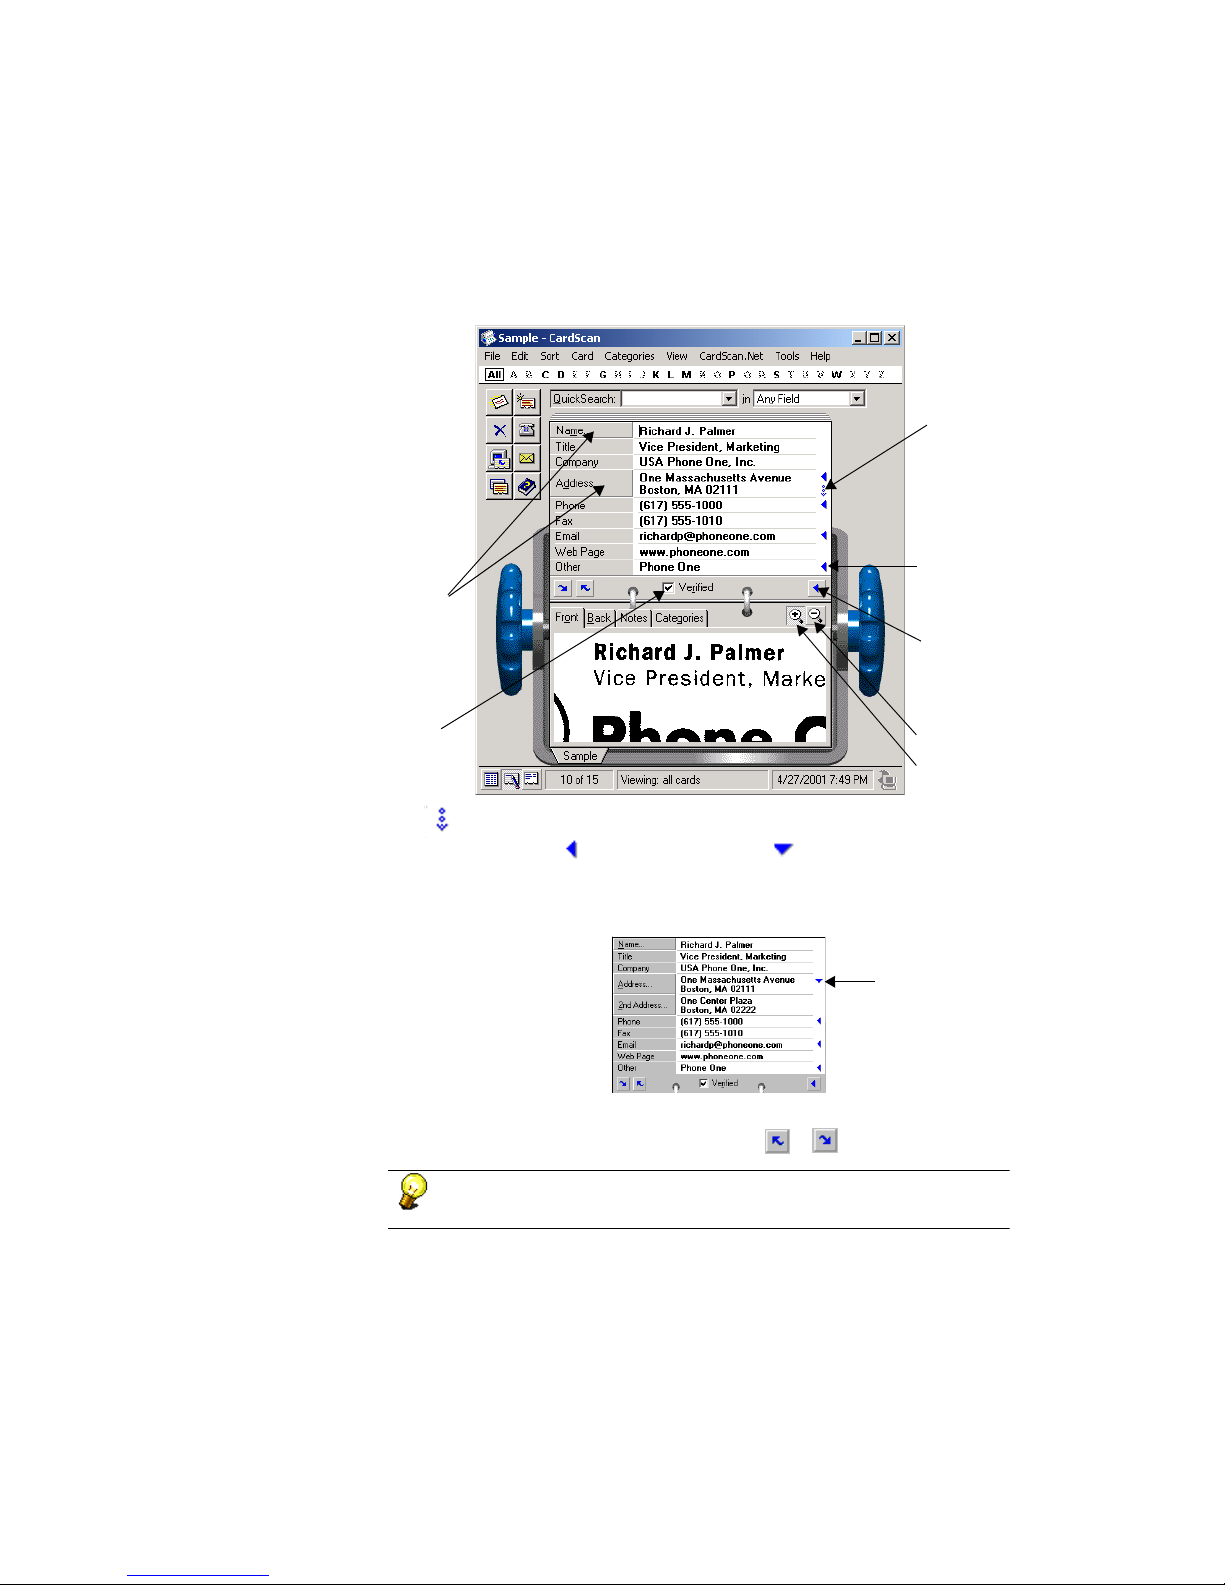
Use Edit view to compare text in the fields with the image of the business card.
• To display Edit view, click the button or double-click a contact in List
view.
• To switch to Edit view from Summary view, click on any blank space in
the contact summary or choose View
→Edit.
CardScan Getting Started 4-1
Page 24
1
Chapter 4 Verifying, Editing and Organizing Your Contacts
Pay attention to the symbols indicating hidden text and fields.
Click to check details of
name and address.
Hidden field
symbol
Click to see
more text. in
field.
View all
text.
Check this box when
done verifying.
The symbol indicates a hidden field.
To see the field, click . The arrow changes to , and the field opens. For
example, if you click this arrow in the A
opens.
To verify the previous or next contact, click the or button, respectively.
Click to zoom
out of image.
Click to zoom
in on image.
DDRESS field, the 2ND ADDRESS field
Click to hide
additional field.
You can also use the PageUp and PageDown keys to move from
contact to contact in Edit view and Summary view.
4-2 Corex Technologies
Page 25
Features That Make Verifying Simple
Editing Text
1. Click on incorrect information. CardScan’s SmartZoom automatically
zooms in on that part of the image to help you see the details.
2. Enter your changes.
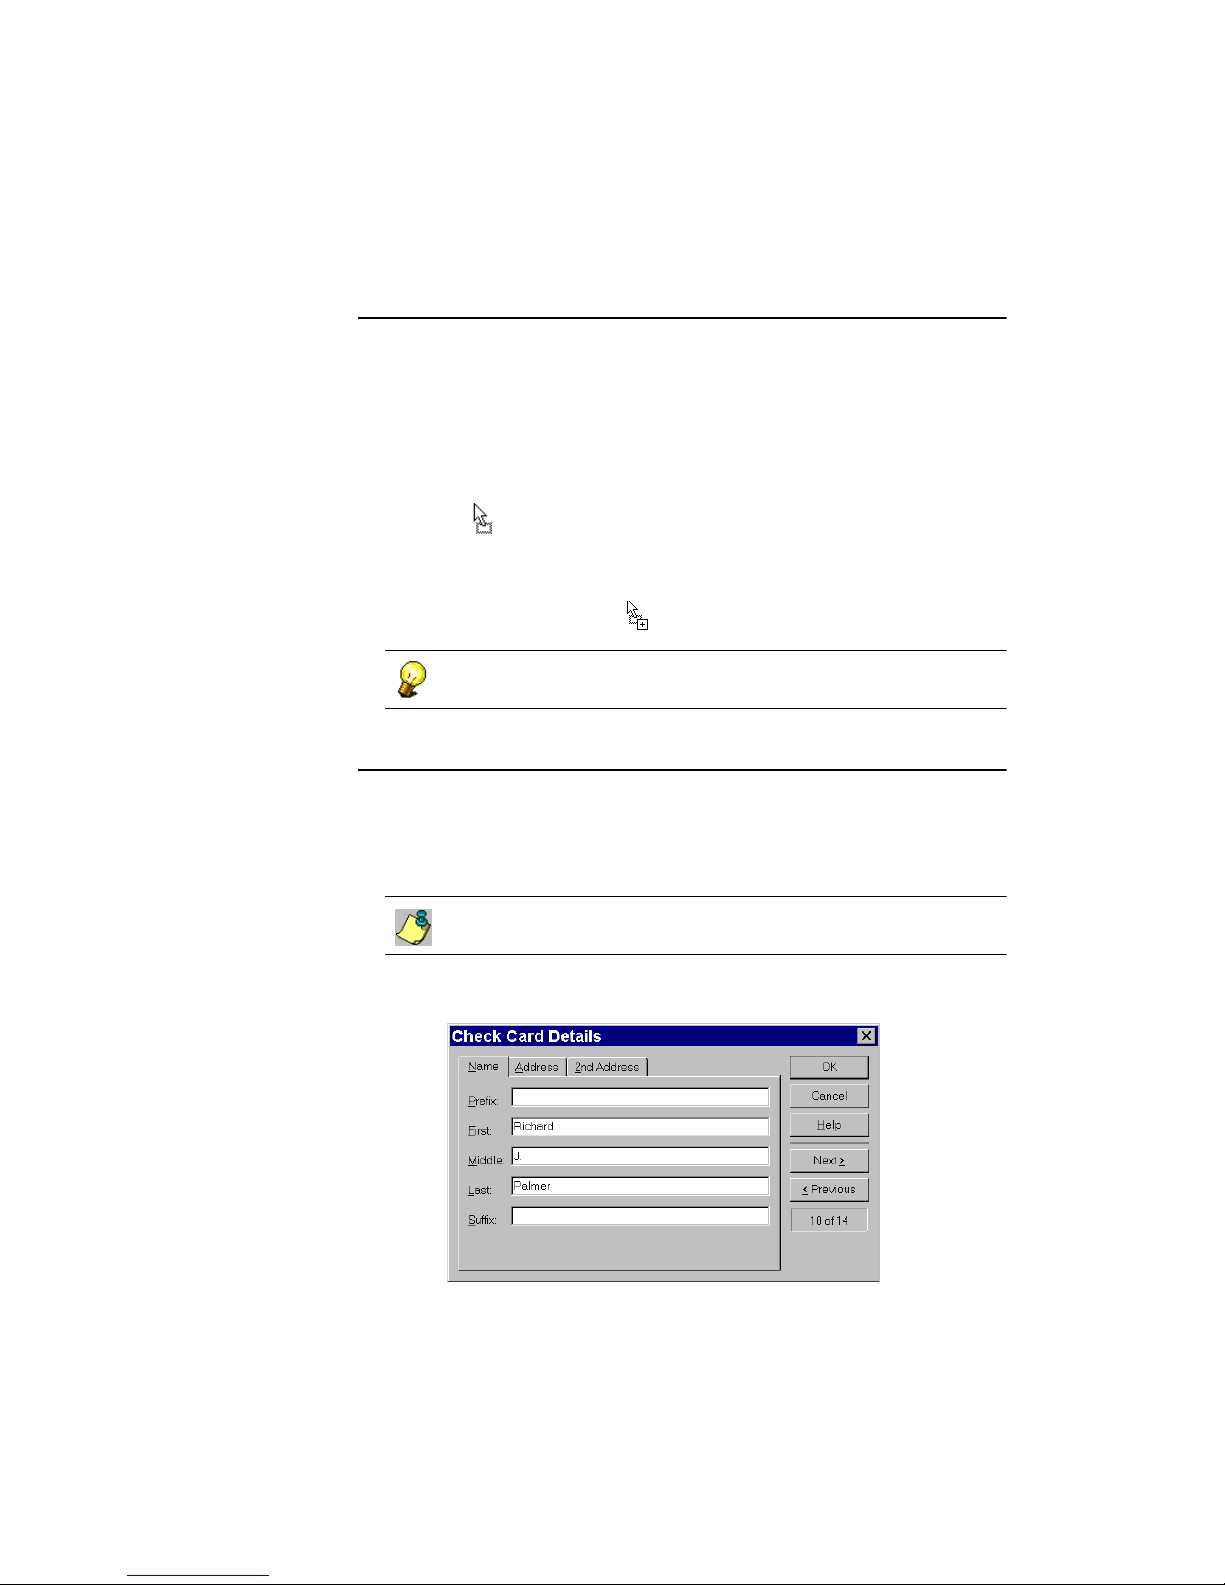
3. If the text is correct but in the wrong field:
• Highlight the text.
• Click and hold the mouse button down until the cursor changes to
.
• Drag the highlighted text to the new field, and release the mouse
button.
To copy highlighted text to another field, press the Ctrl key. The
cursor changes to while performing these actions.
You can also right-click on the information and choose a command from
the context-sensitive menu.
Checking Details of Names and Addresses
People’s names and addresses often involve complex details. For example,
some names contain titles or designations—such as Rev., Ph.D, and the like.
Such details must be placed correctly, especially for export, transfer, or
synchronization purposes. You can check them with the Check Details feature.
To take advantage of the Check Details feature, verify and edit contacts
before checking details.
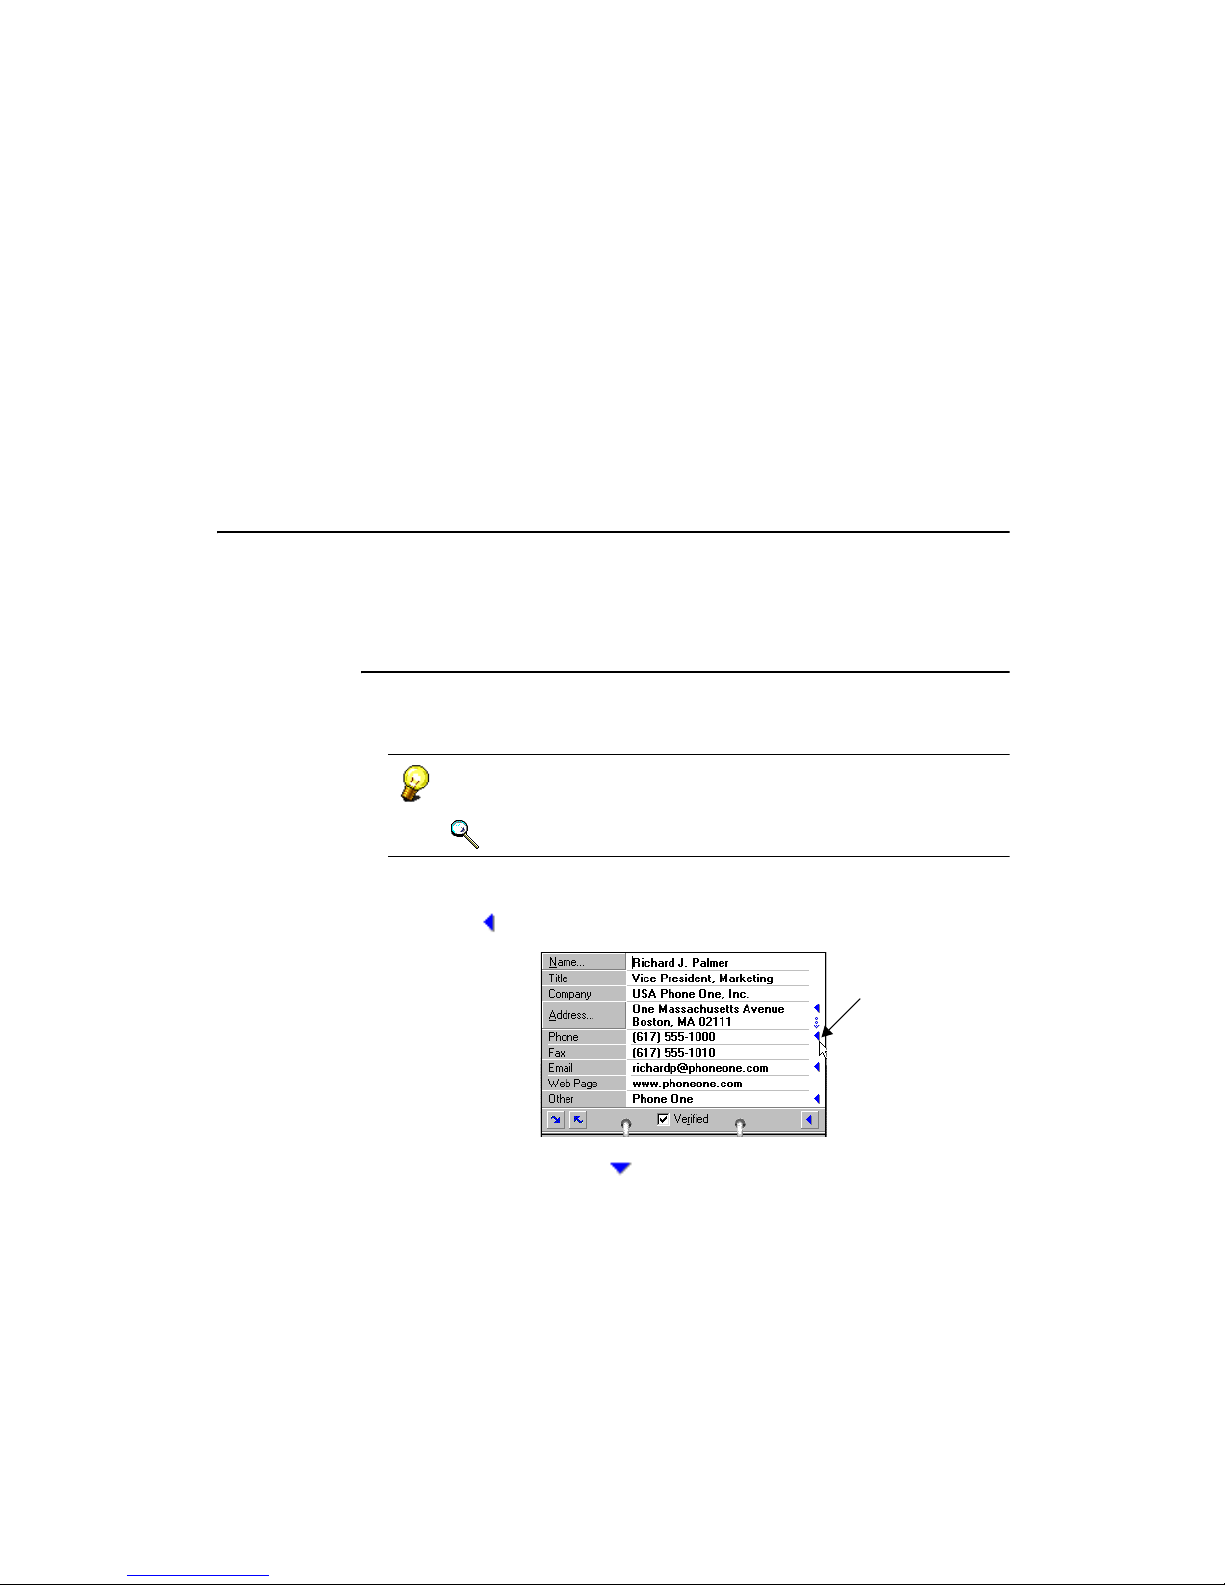
1. Choose Card→Check Details in any view or click the Name or Address
label in Edit view. The following dialog appears:
CardScan Getting Started 4-3
Page 26
1
Chapter 4 Verifying, Editing and Organizing Your Contacts
If you open this dialog using Card→Check Details, the Name tab is
displayed. Otherwise, the tab corresponds to the label you clicked in Edit
view.
2. Edit the details as needed. Changes are saved when you click OK,
Previous, or Next. Click Cancel to cancel changes to the last edited
record. Click Help if you need assistance.
3. To check more contacts, click Next or Previous.
4. Click OK to save changes and close the dialog.
Adding Information to Contacts
This section describes:
• Adding Phone Numbers, Email, and Web addresses
• Editing Phone and Email Labels
Adding Phone Numbers
In CardScan, each contact displays one phone and one fax number. You can
add and label six more phone and fax numbers.
You can label phone and fax numbers using CardScan’s list of labels.
You can also add, rename, and remove labels from the list.
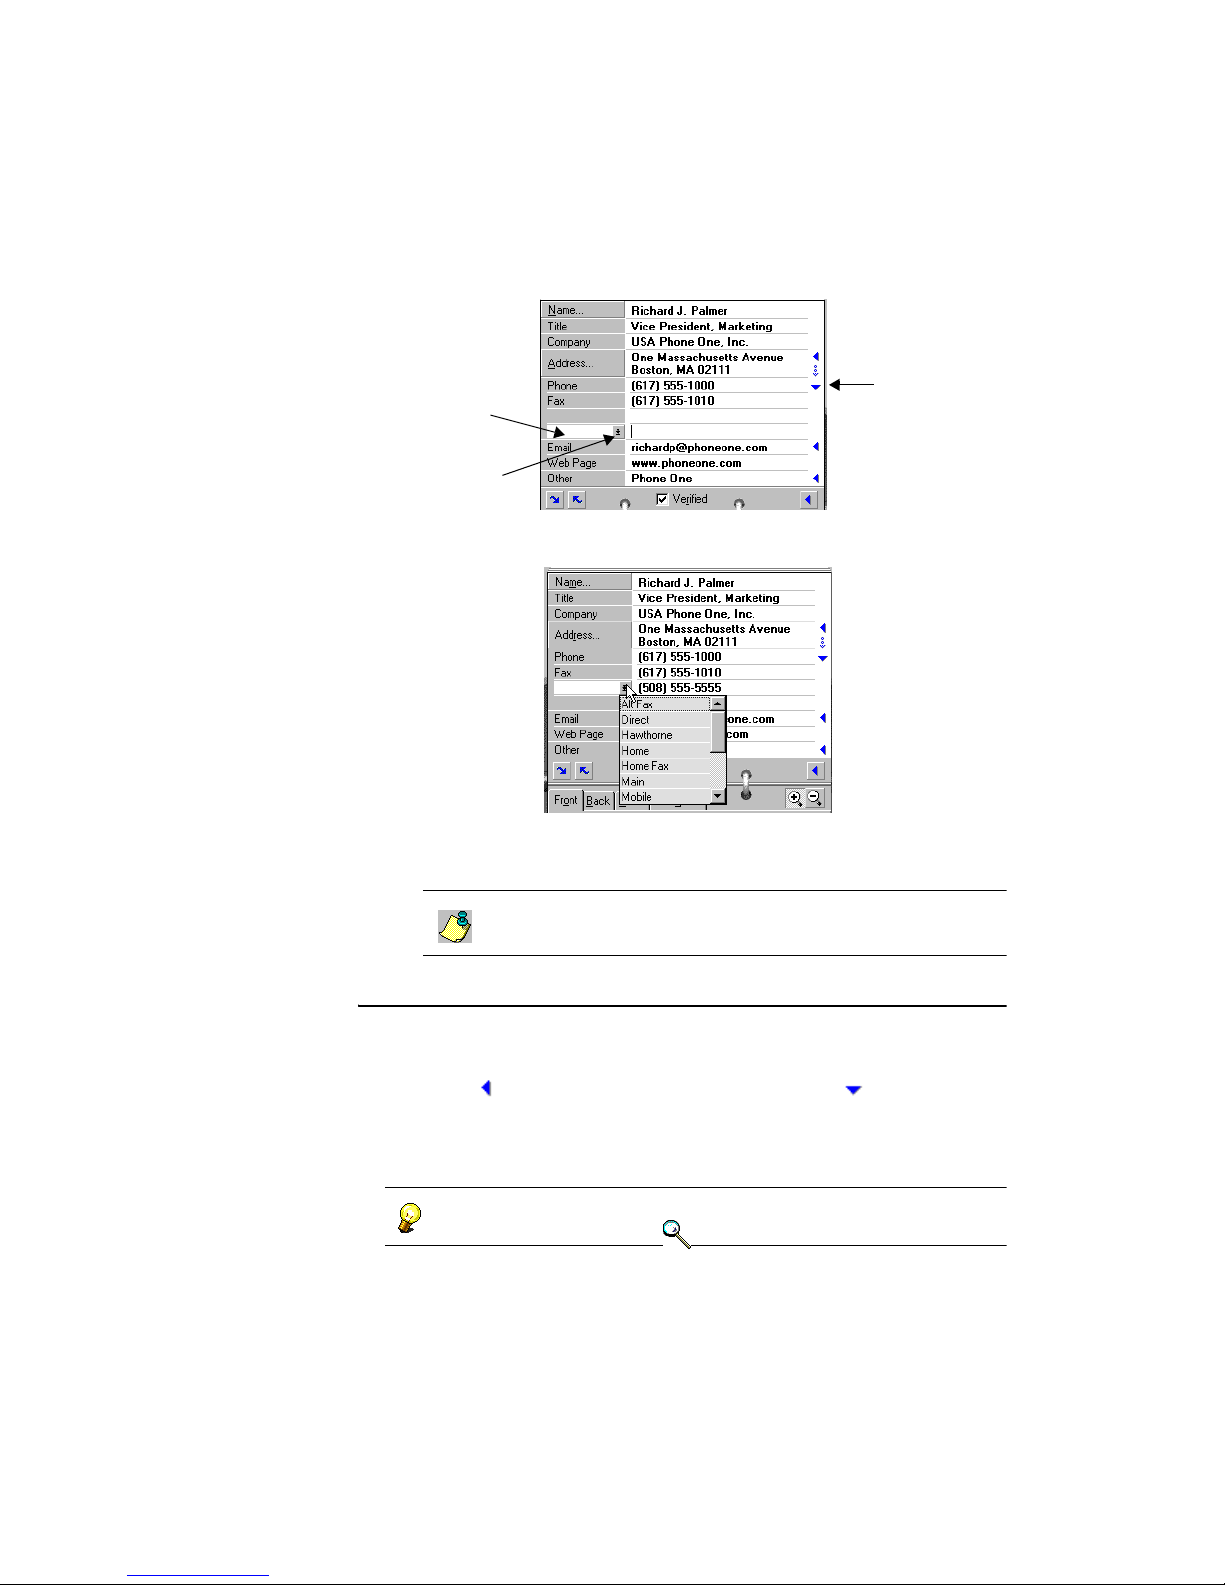
To add a phone number:
1. Click in the phone field.
The arrow changes to , and a blank field opens.
4-4 Corex Technologies
Keywords: “phone”, “fax”
Click to open
additional field.
Page 27
Adding Information to Contacts
Click to close
Blank field
Dropdown list
additional field.
2. Type the contact information, and click the arrow on the left to open the
label dropdown list.
3. Choose a label from the dropdown list or type your own label in the blank
field.
The dropdown list contains labels entered previously. If you
type a label, it is saved in the dropdown list for future use.
Adding Email and Web Addresses
Each contact displays one email and one Web address. You can add and label
up to six more email or Web addresses:
1. Click in the Email field. The arrow changes to , and a blank
field opens.
2. Follow step 2 through step 3 in “Adding Information to Contacts” on
page 4-4.
You can add, rename, or delete labels. Also, you can use the same label
for more than one number. Keywords: “email”, “fax”.
CardScan Getting Started 4-5
Page 28
1
Chapter 4 Verifying, Editing and Organizing Your Contacts
Features to Organize Contacts Quickly
This section introduces:
• Using Categories
• Adding notes to contacts
• Automatically categorizing and adding notes during scanning
Using Categories
Categorize your contacts to organize and find them quickly.
• Assign one or more categories to any contact.
• Assign categories to multiple contacts all at once.
Categorizing One
Contact
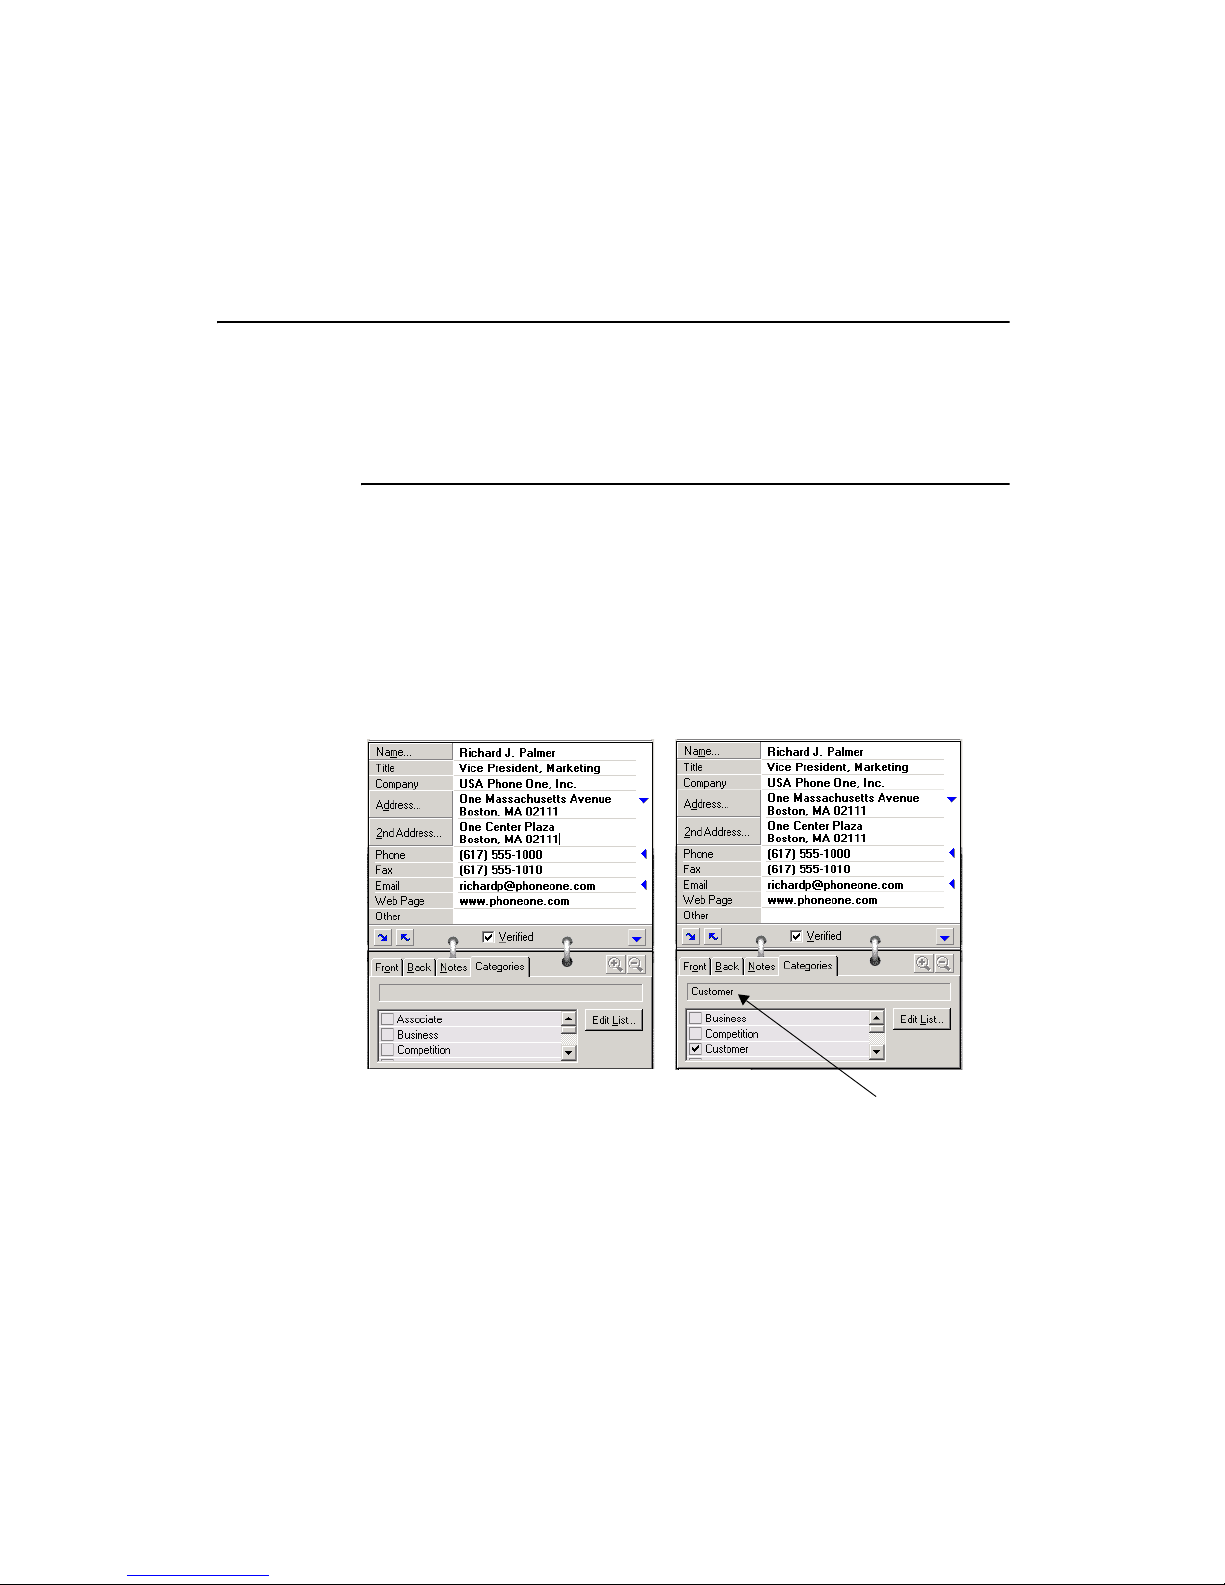
To categorize a contact:
1. Display the contact in Edit or Summary view.
2. Click the C
3. Click one or more checkboxes to assign categories. For example, click
the checkbox “Customer.”
ATEGORIES tab. The list of categories appears.
The category “Customer”
appears above the list
of categories.
4-6 Corex Technologies
Page 29
Features to Organize Contacts Quickly
Categorizing
Multiple Contacts
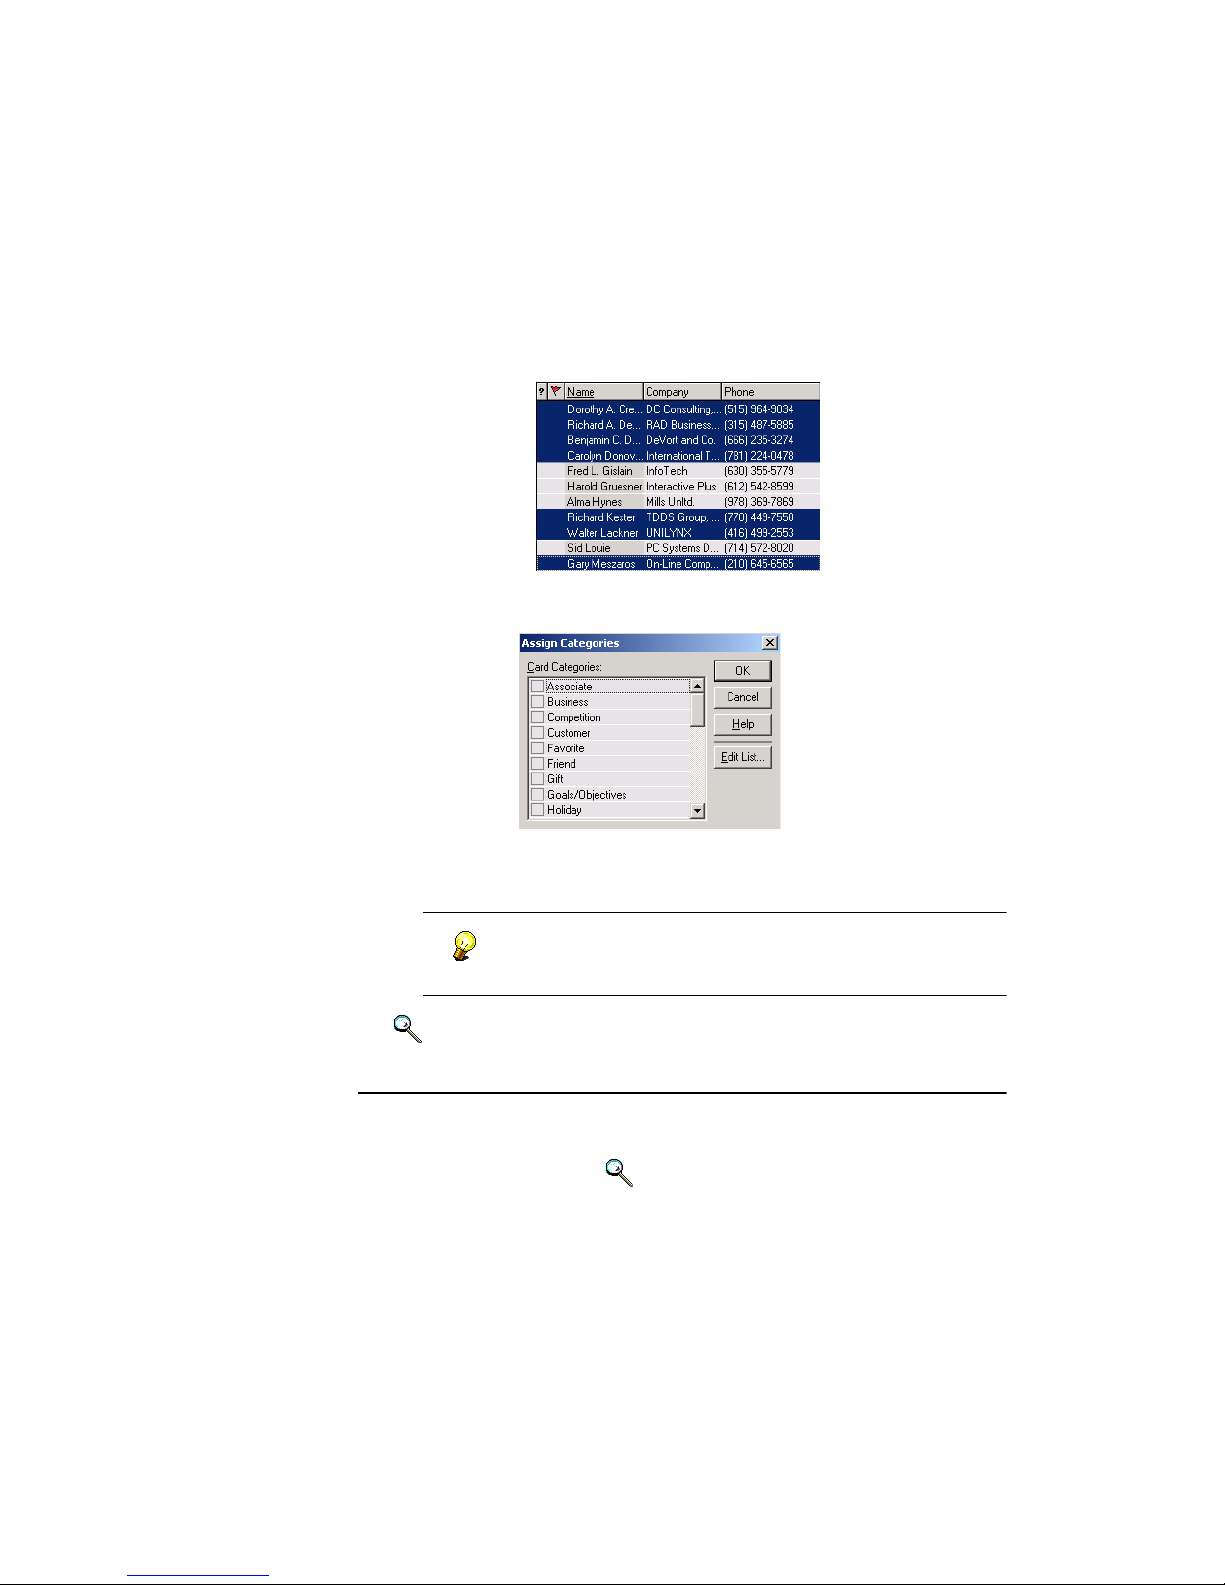
To assign the same category, or categories, to multiple contacts all at once:
1. In List view, select the contacts you want in the same category. Use
Shift+click to select adjacent contacts, Ctrl+click—nonadjacent.
2. Choose Categories→Assign or press Ctrl+R. The Assign Categories
dialog appears.
3. Click boxes for categories to assign and click OK. CardScan assigns
these categories to the selected contacts.
You can verify the results by searching on the assigned
categories. See “Methods to Find Groups of Contacts” on
page 5-3.
Keywords: “categories”.
Adding Notes
Adding Notes to your contacts allows you to store more information in a
contact; it also allows you to find contacts containing the same text in the
Notes, using QuickSearch. Keywords: “notes”.
CardScan Getting Started 4-7
Page 30

1
Chapter 4 Verifying, Editing and Organizing Your Contacts
Assigning Categories and Notes to a Batch
You can organize your new contacts automatically even as you scan business
cards, by assigning notes and categories to a batch. Keywords: “Batch”.
Deleting Contacts
To delete any contacts:
1. Display the contact to delete in Edit or Summary view, or select it in List
view. To delete multiple contacts, select them in List view using
Shift+click or Ctrl+click.
2. Choose Card→Delete or click on the Toolbar in the CardScan
window (see page 1-4).
3. Click Yes to delete the selected contact(s).
Keywords: “deleting”
4-8 Corex Technologies
Page 31
Manipulating Multiple Contacts in a File
Chapter 5 Managing Your CardScan Contacts
This chapter describes:
• Manipulating multiple contacts in a file
• Finding contacts
• Finding and removing duplicates
• Safeguarding contacts
Manipulating Multiple Contacts in a File
CardScan’s List view allows you to:
• View All contacts or groups of contacts in a file.
• Review the status of contacts in a file.
• Sort contacts by various criteria.
• Select multiple contacts to manipulate them at once.
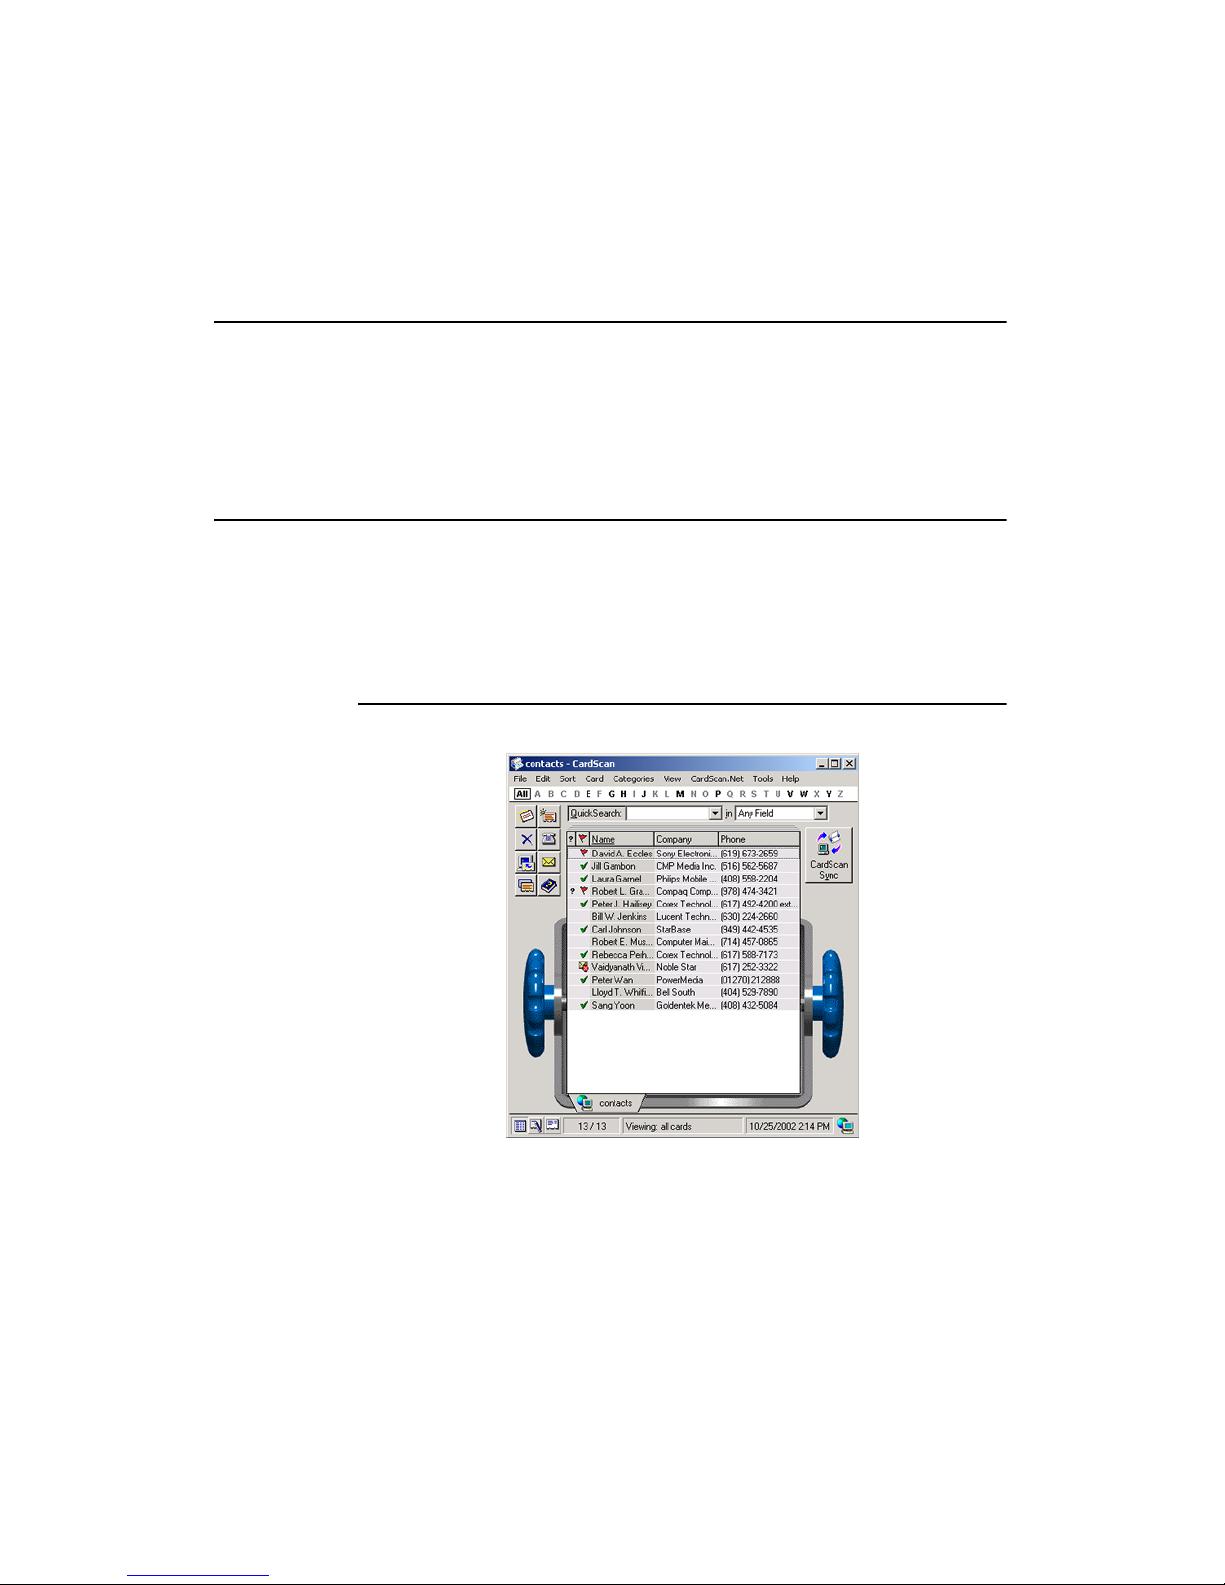
Reviewing the Status of Your Contacts
From List view you can learn a lot about the status of your contact information.
The symbols next to the contacts above tell you which contacts have not been
verified. Moreover, this is an example of a file that is CardScan.Net-enabled,
and uses the AccuCard Service to tell you which contacts are current, require
updating, or do not have a valid email address. For more information, see
“Maximizing Your Contact Potential with CardScan.Net” on page 6-1.
CardScan Getting Started 5-1
Page 32
1
Chapter 5 Managing Your CardScan Contacts
Sorting Contacts
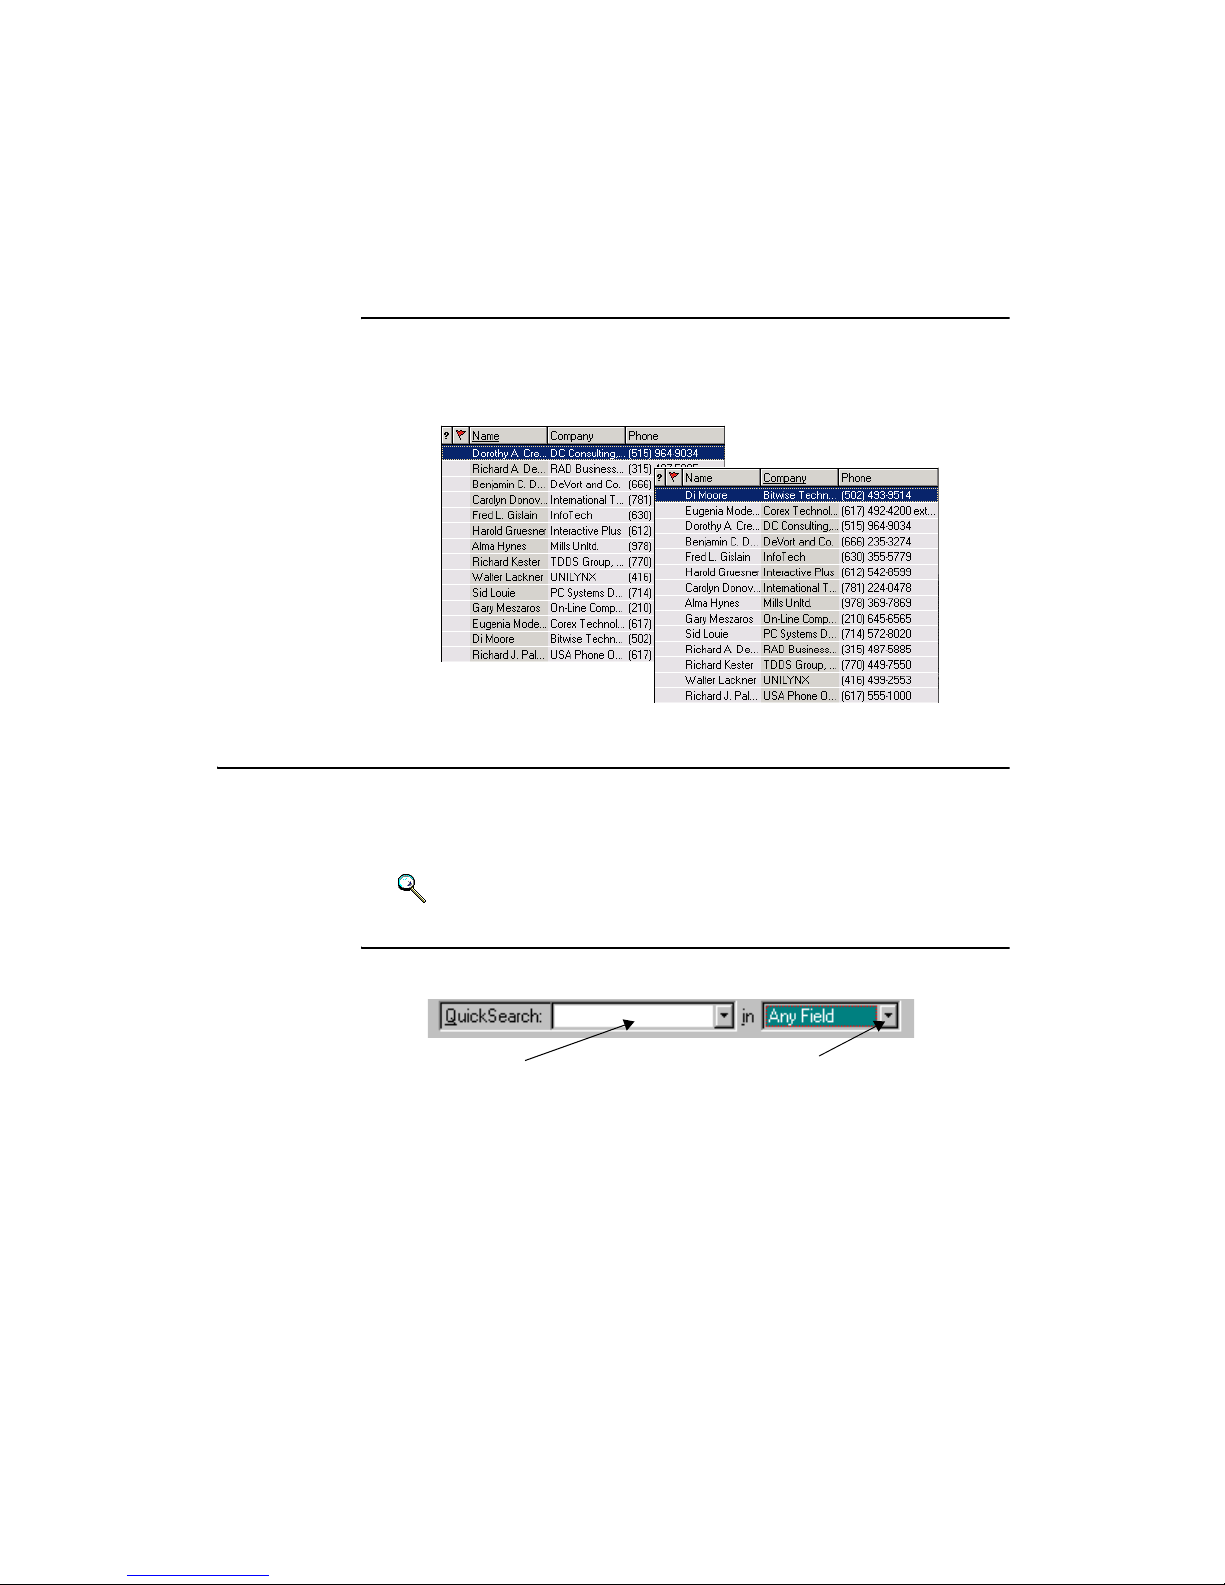
To sort contacts by name or company, or any other field displayed, click the
heading corresponding to the criterion to use. An example below shows the
same file, sorted by Name and by Company.
Finding Contacts
CardScan helps you find contacts quickly. This section introduces:
• Finding Contacts with QuickSearch
• Simple methods to Find Groups of Contacts
Keywords: “Finding”, “QuickSearch”
Finding Contacts with QuickSearch
QuickSearch has two components in CardScan’s user interface:
QuickSearch Box
• The QuickSearch box allows you to find contacts by typing any text
included in the contact. If contacts are displayed in List view, you can
start typing anywhere; the search text will appear in the QuickSearch
box.
Search text is saved in the QuickSearch dropdown list. To use it again,
select it from the list.
5-2 Corex Technologies
Fields Dropdown List
Page 33
Finding Contacts
• The Fields dropdown list allows you to select a specific field to search for
the text:
• You can search by any CardScan field, including Name Prefix
and Name Suffix fields (such as the title or designation; for
example, Sgt., Ph.D., and so forth).
• Selecting the Phone Numbers field searches all phone fields.
This makes searching easier, because you don’t have to
remember whether the number is stored as “Pager” or “Beeper”.
• Selecting Email Addresses searches all email and Web
addresses.
CardScan searches all open files. File tabs appear in bold face if contacts are
found in the file by a search.
CardScan locates contacts that include the search text and displays them in
List view. It narrows the list as you type.
You can also use various methods to search on multiple words.
Keyword: “QuickSearch”.
Methods to Find Groups of Contacts
There are several methods to find groups of contacts:
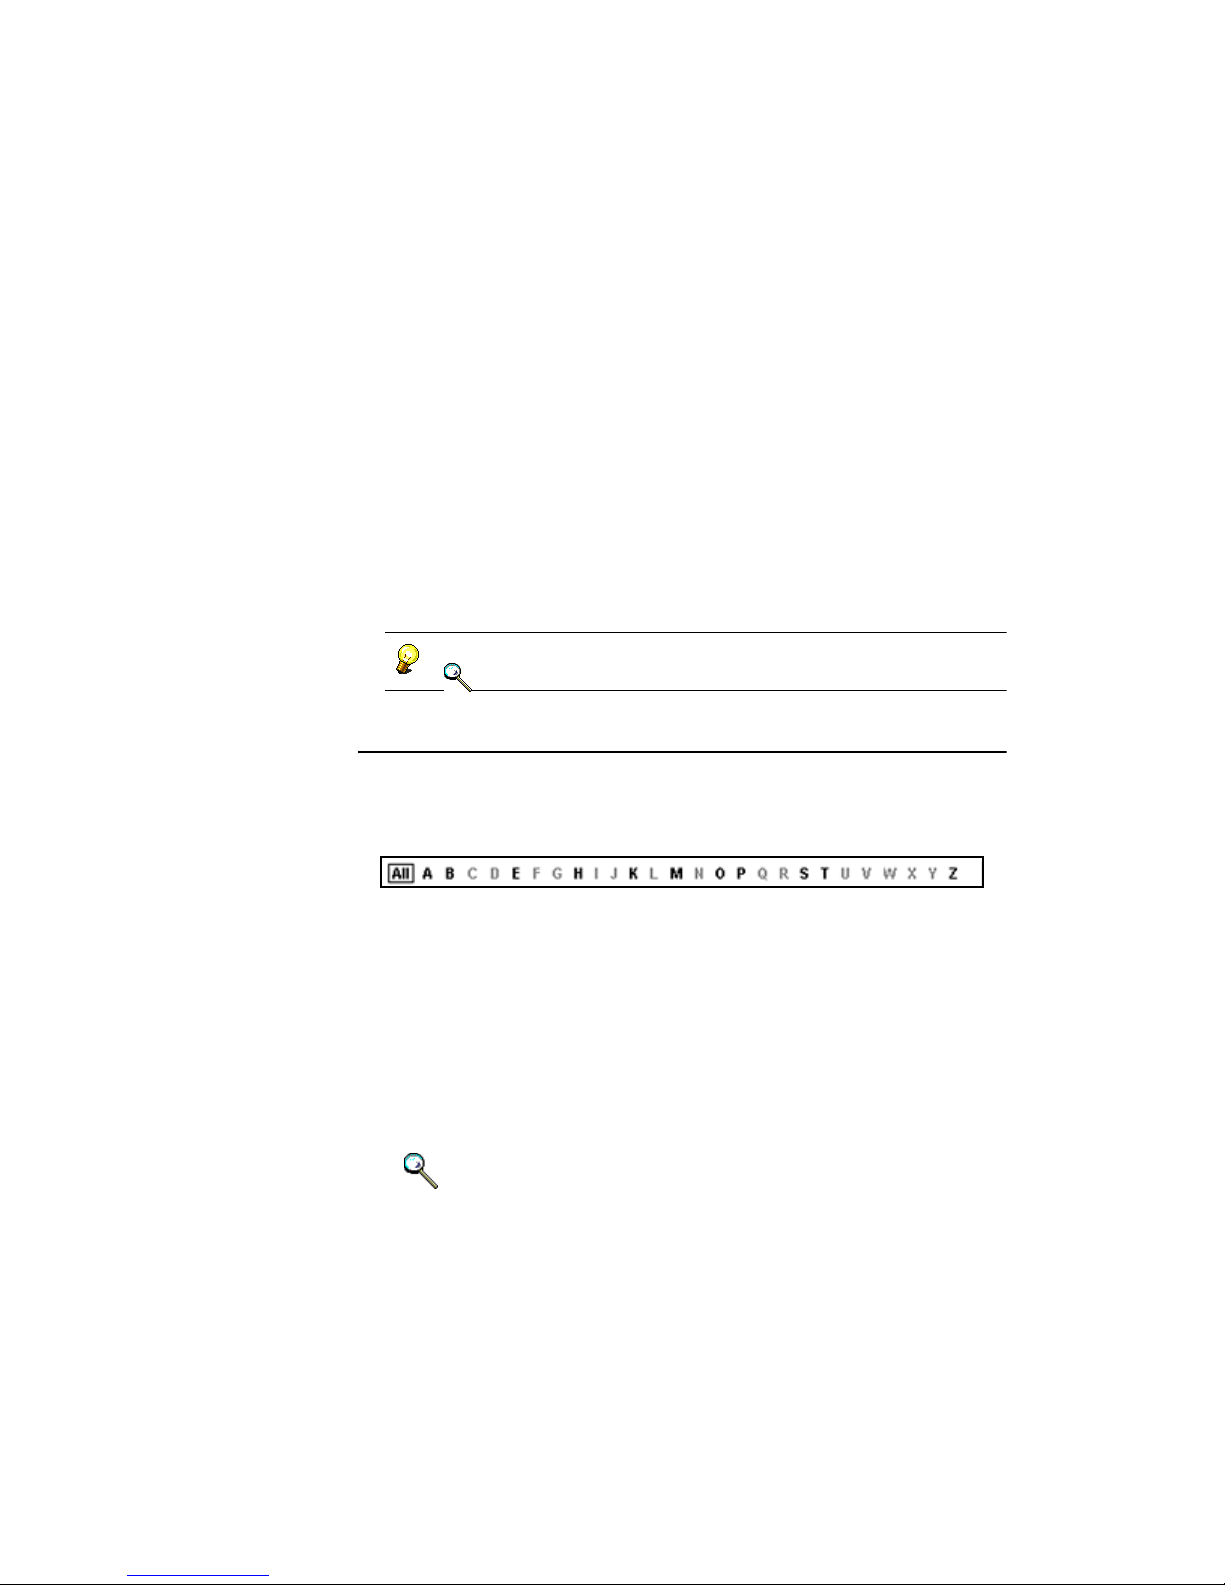
• To find contacts beginning with the same letter, click the letter on the
Alphabet Bar.
If multiple files are open, click the tabs at the bottom of List view to see
search results in other files.
• To find contacts containing the same text (for example, company name or
phone number), use QuickSearch (see the preceding section).
• To find duplicate contacts, choose Card→Find Duplicates. For more
information, see “Managing Duplicate Contacts” on page 5-4.
• To find unverified contacts, click the ? heading in List view. Unverified
contacts are listed at the top, sorted by date.
• To find contacts in the same category, choose Categories→Find, and
specify the category.
Keywords: “Finding” or “Searching”.
CardScan Getting Started 5-3
Page 34
1
Chapter 5 Managing Your CardScan Contacts
Managing Duplicate Contacts
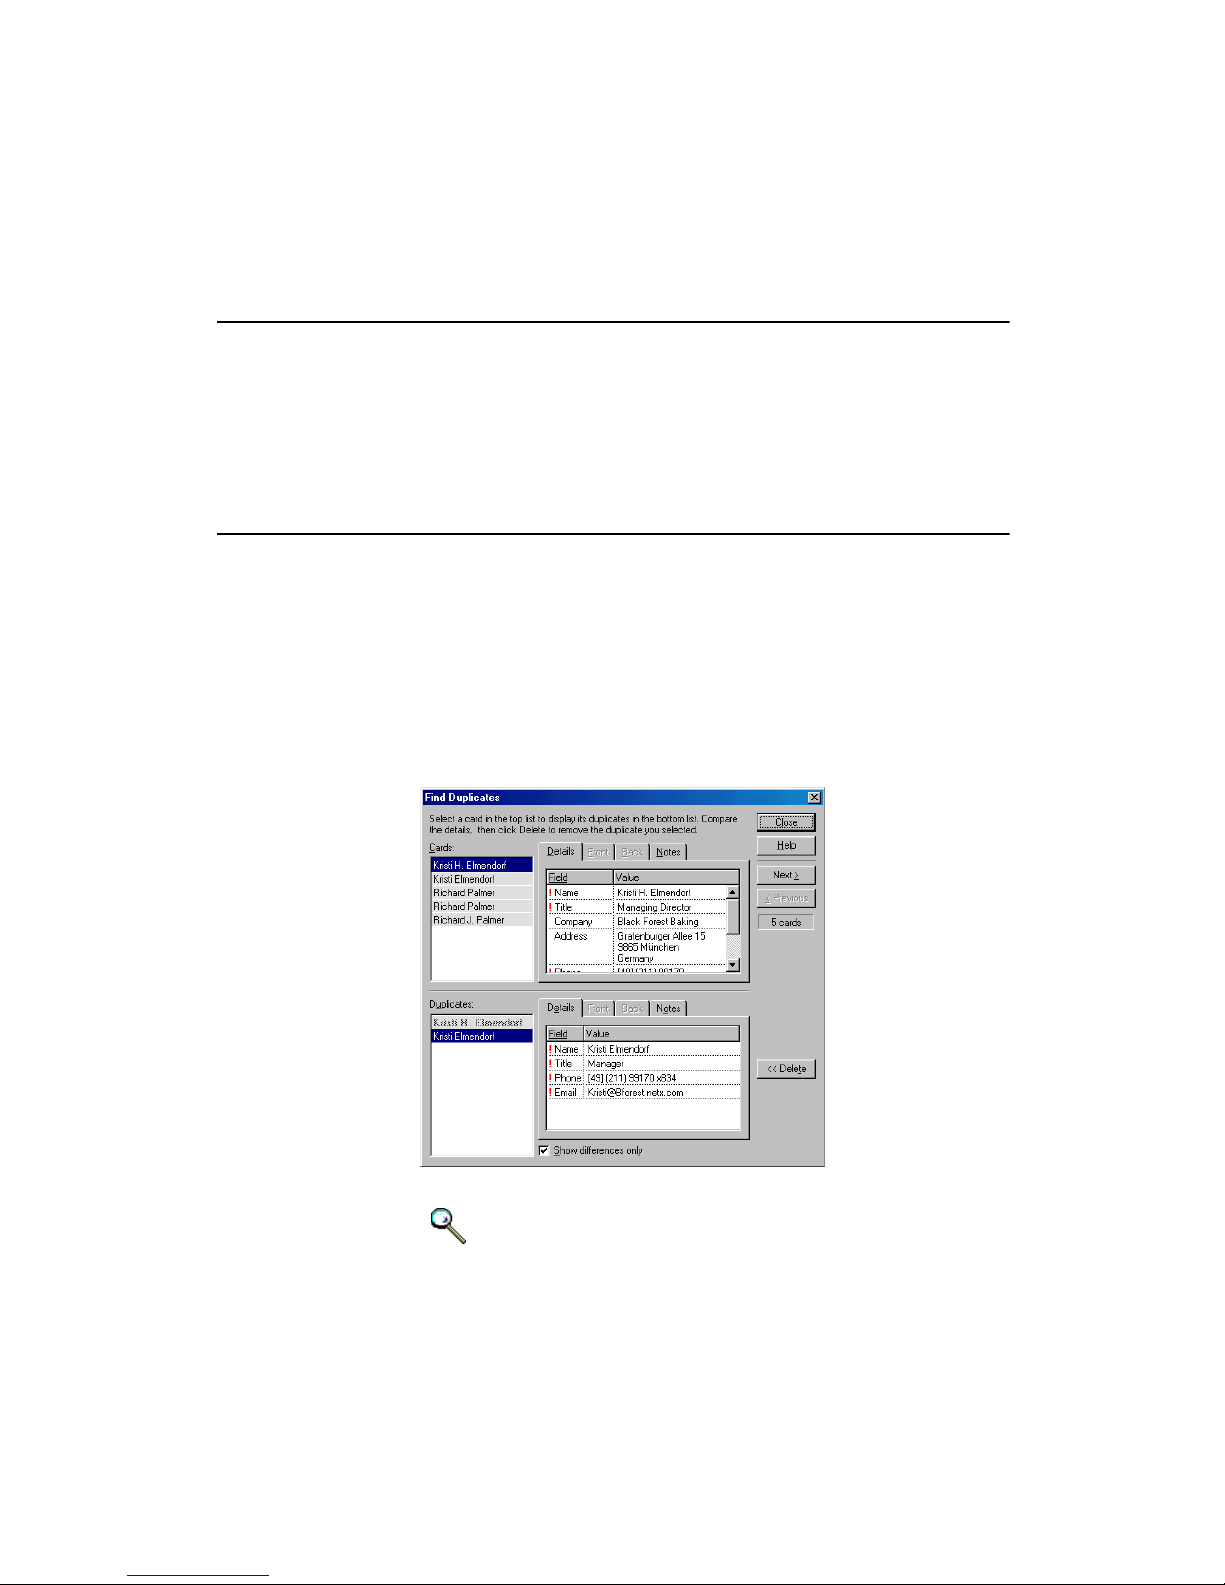
Your file may contain duplicate contacts: contacts with the same first and last
names (or with no first or last name, but the same company name). This can
occur, for example, if you:
• Scan more than one card for the same contact.
• Import contacts already in the file.
• Scan a contact’s card and enter the contact manually.
Finding Duplicate Contacts
Duplicates are contacts with the same first and last name or, in the absence of
first and last names, with the same company name. If all the information in
duplicate contacts is identical, they are called “exact duplicates”.
You can find, compare, and delete duplicate contacts, as follows:
1. Open the file to search for duplicates.
2. Choose Card→Find Duplicates.
If there are no duplicate contacts, the message “No duplicate cards
were found” appears. Click OK.
If there are duplicate contacts, the following dialog appears:
3. Compare pairs of duplicate contacts and decide which one to delete.
5-4 Corex Technologies
Keywords: “duplicate”.
Page 35
Safeguarding Your Contacts Against Loss
Safeguarding Your Contacts Against Loss
You CardScan address book contains very important data. To safeguard it
against loss, you must back up contacts regularly. With CardScan, you can
protect a file by:
• Saving the file to a private, secure account on CardScan.Net, which only
you can access—with your unique password
• Backing up locally, that is saving a copy of the file to a different medium
or, at least, a different drive on your computer
The first option is highly recommended, because it provides you with a
guaranteed backup.
Keywords: “backup”.
Backing Up Your Contacts
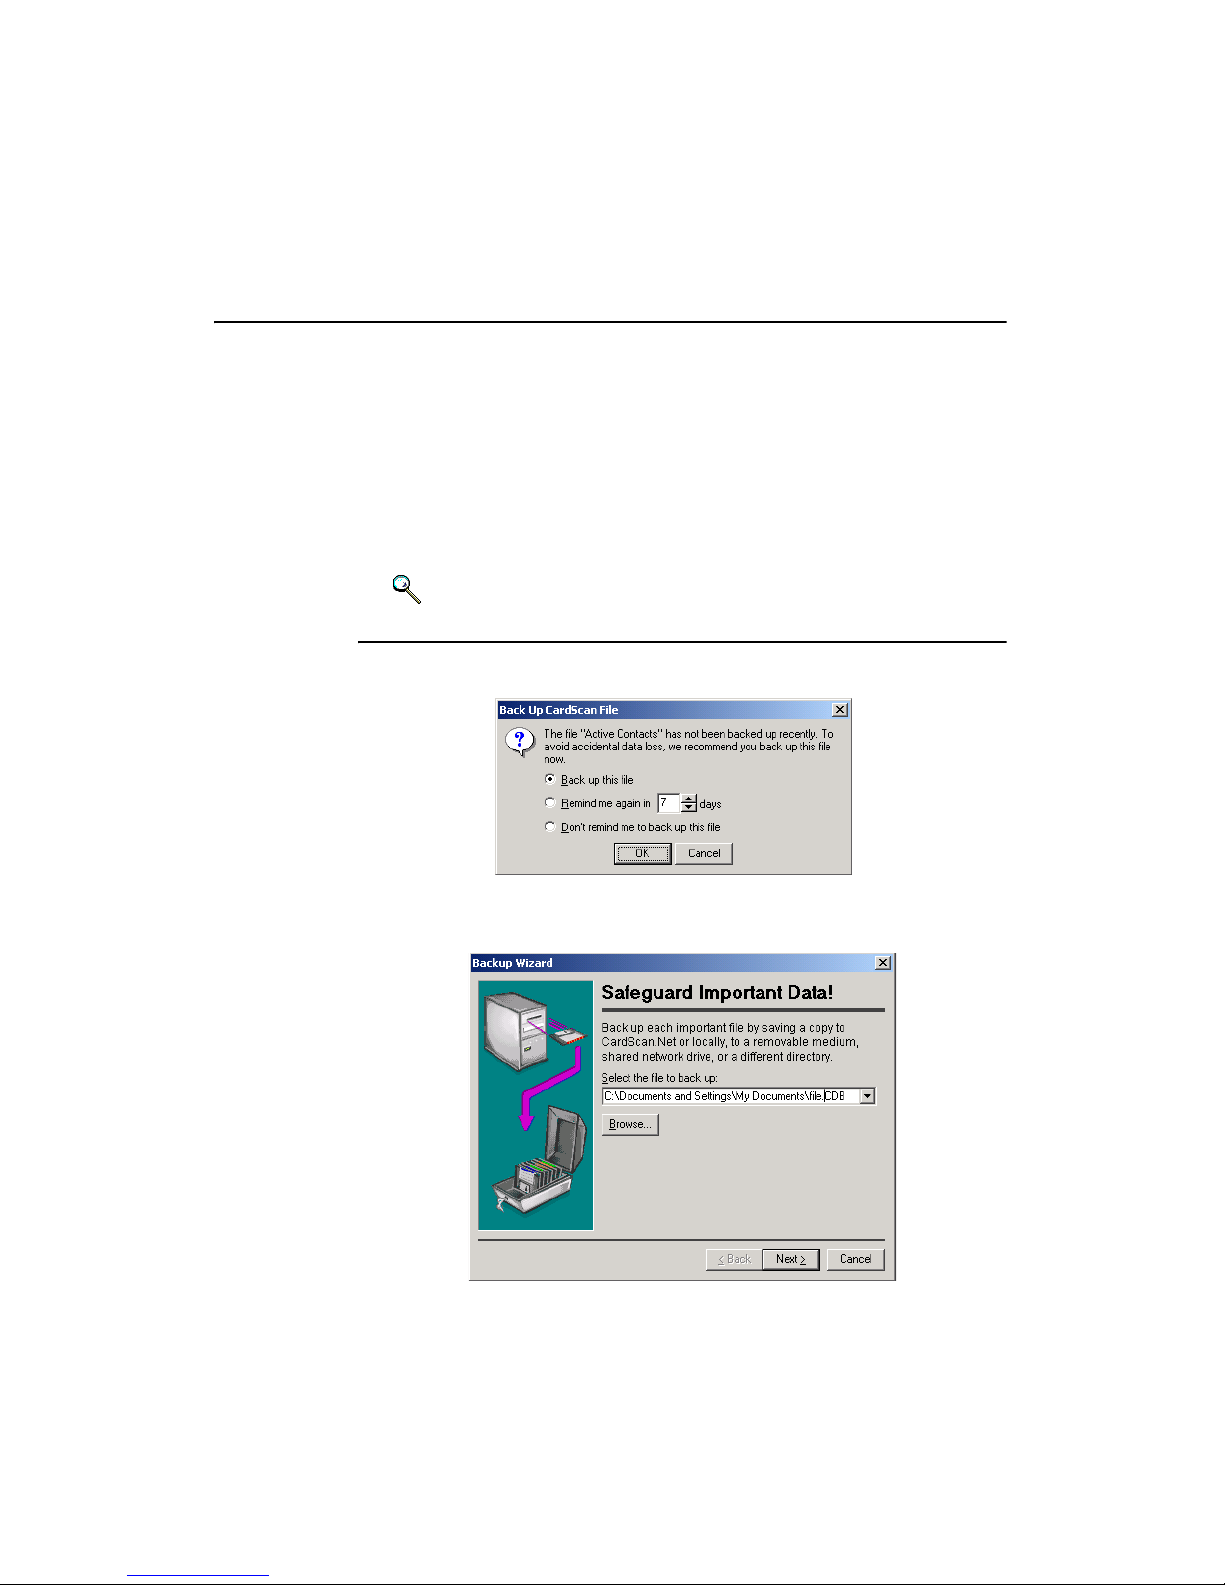
Periodically, when closing a file, you will receive a message like this one:
It is strongly recommended that you accept this prompt and back up your file:
1. Click OK. This dialog appears:
CardScan Getting Started 5-5
Page 36
1
Chapter 5 Managing Your CardScan Contacts
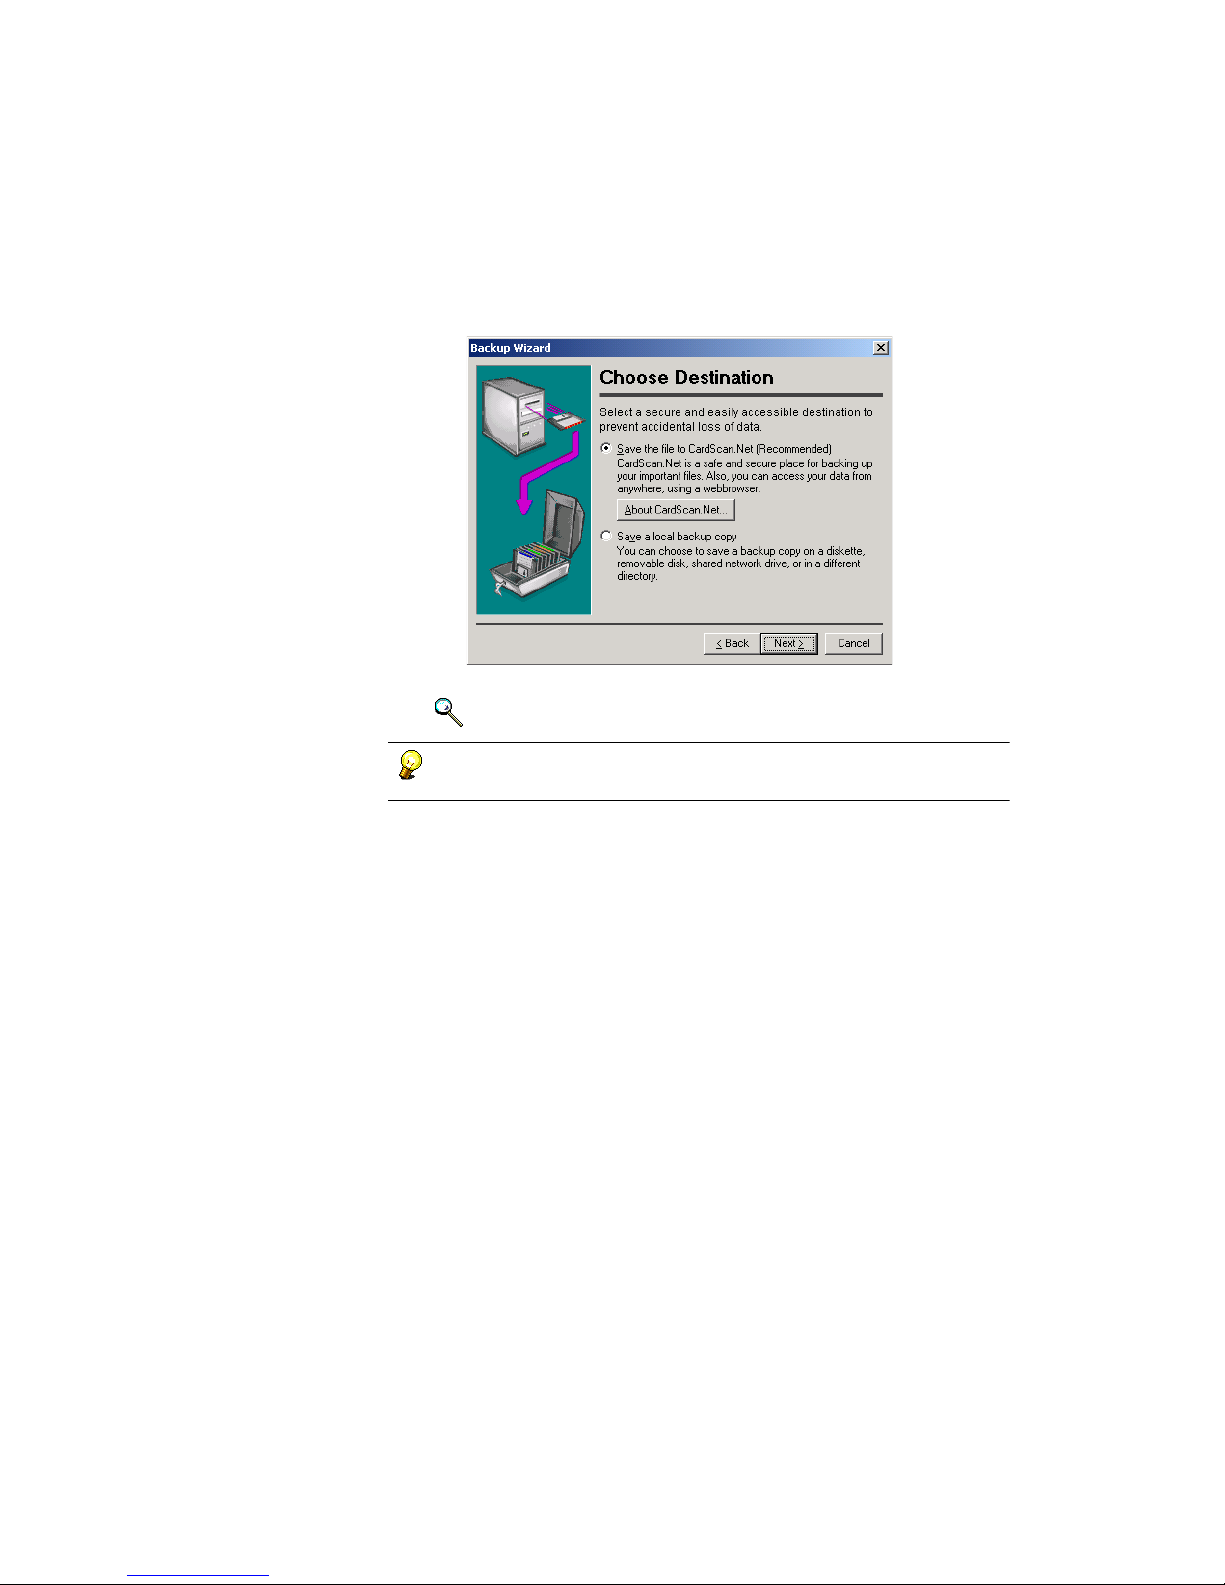
2. Accept the default location for the file (C:\...\My Documents\...) or browse
for a different one, and click Next. This dialog appears:
3. Use the Backup Wizard to safeguard your contacts the way you like.
Keywords: “backup”
You can always start the Backup Wizard by choosing
File→Maintenance→Backup.
5-6 Corex Technologies
Page 37
Getting Started with CardScan.Net
Chapter 6 Maximizing Your Contact Potential
with CardScan.Net
CardScan.Net is a powerful feature of CardScan enabling you to use your PCs
internet connection to enjoy:
Keywords:
“backup”
“CardScan.Net”
“AccuCard”
“privacy”
“security”
• Backup—Provides a secure backup for you valuable contact
information. In the event of a hard-disk crash, or other catastrophic
events, you can quickly recover your CardScan data from CardScan.Net.
• Remote Access from Anywhere—If you are traveling, you can quickly
and securely access your contact database using a web browser and
your password. Also, if you have a PC at work and at home, you can
install CardScan on both of them. Keep a local copy of your contacts in
both places. No matter where you make changes, Cardscan.Net keeps
both copies up to date with each other. Changes made in one place are
automatically reflected in the other copy.
• AccuCard Service—Your contacts are one of your most valuable assets,
but their information is always changing. They change titles, email
addresses, jobs, and their companies move. The AccuCard Service
helps you keep track of these changes painlessly.
Security for these features is provided by both password and the same
industry-standard technology that many financial institutions use for such
services as online banking and the like.
Getting Started with CardScan.Net
When you save a CardScan file, this dialog appears:
To take advantage of CardScan.Net immediately, follow the steps in this
section.
To create a CardScan.Net account at a different time, start CardScan
and choose CardScan.Net
→
Sign In.
CardScan Getting Started 6-1
Page 38
1
Chapter 6 Maximizing Your Contact Potential with CardScan.Net
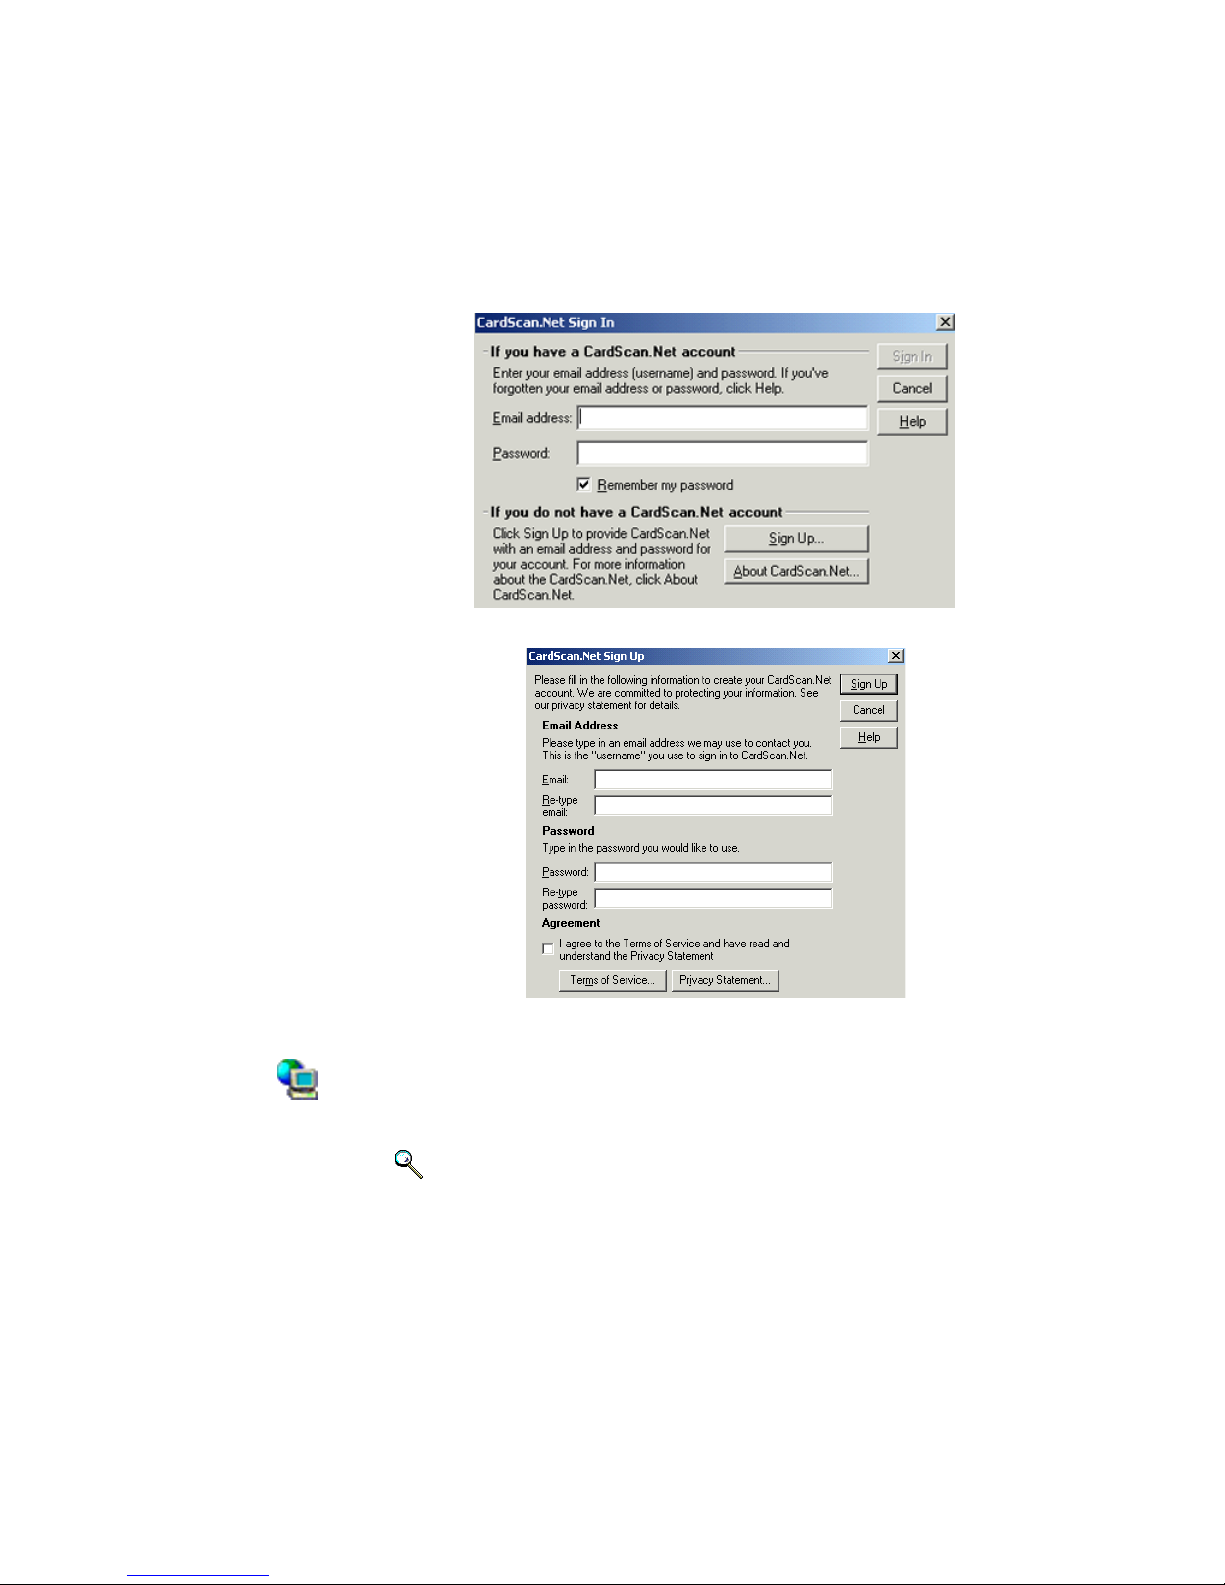
1. Click OK. This dialog appears:
2. Click Sign Up. This dialog appears:
3. Enter the required information, make sure to read the Terms of Service
CardScan.Net
Indicator
6-2 Corex Technologies
and Privacy Statement before you check the Agreement box, then click
Sign Up.
CardScan creates your account on CardScan.Net and signs you in to
the account. On the desktop, the CardScan.Net Indicator is
illuminated.
Keywords: “CardScan.Net”, “AccuCard”, “backup”, “privacy”, “security”.
Page 39
About CardScan.Net Synchronization
About CardScan.Net Synchronization
Synchronization keeps the CardScan.Net and local copies of a CardScan file
identical. It handles very large files as reliably as small ones. If you have an
account on CardScan.Net, the synchronization is turned on automatically
whenever your PC is connected to the Internet and CardScan is running.
The default settings for CardScan Synchronization are intended to help
prevent inaccuracies and loss of data in the event some conflicting changes
have been made to any contact in the local and CardScan.Net copies of the
file.
This section introduces the basic concepts of:
• Conflict Resolution
• Manual Synchronization
• Automatic Synchronization
This Guide and the Online Help use the term “CardScan.Net-enabled
file”. The term means: “CardScan file that has copies on CardScan.Net
and on the local PC”.
Conflict Resolution
When a CardScan.Net-enabled file is synchronized, conflicts may occur, for
example, if:
• A contact was edited in one copy and deleted in the other.
• Different changes were made to the same contact in the local and
CardScan.Net copy of the file.
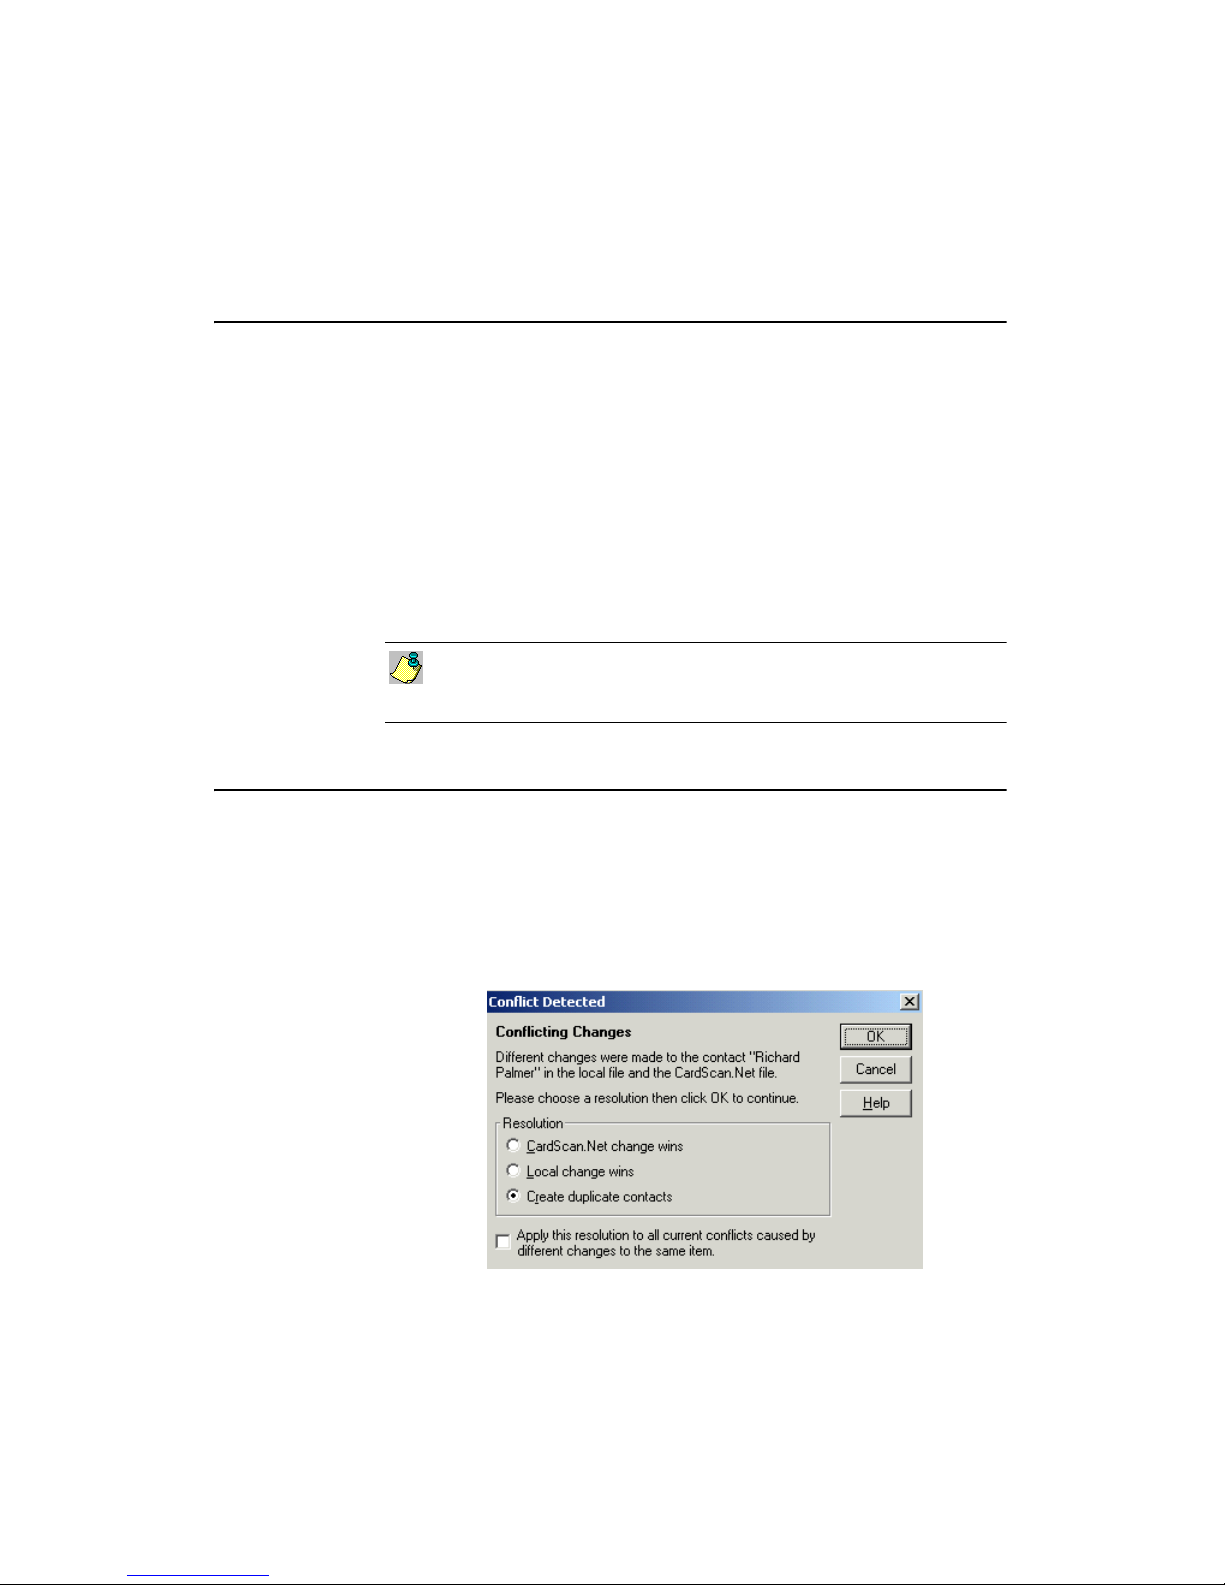
If a conflict occurs during manual synchronization, the appropriate Conflict
Detected dialog appears; for example:
CardScan Getting Started 6-3
Page 40

1
Chapter 6 Maximizing Your Contact Potential with CardScan.Net
The Conflict Detected dialog specifies the type of conflict, and asks you to
choose a resolution.To apply the chosen resolution to all conflicts of this type
during the current synchronization, choose the option at the bottom of the
dialog.
When a conflict involves a deleted contact, the option for creating
duplicates is unavailable. Therefore, if deleting a contact was
erroneous, choose the resolution that restores the contact.
If you use Automatic synchronization, it will always apply the resolution
specified in the settings (see page 6-5).
Manual Synchronization
Manual synchronization includes two options:
• Synchronize one file.
• Synchronize all files in the CardScan.Net account.
Synchronizing One File
To synchronize one file:
1. Open the file. (If more than one file is open, click on the file to
synchronize.)
2. Choose CardScan.Net→Synchronize “filename”.
Synchronizing All Files
If you use manual (rather than automatic) synchronization, you can
synchronize all CardScan.Net-enabled files. To synchronize all files:
1. Open CardScan.
2. Choose CardScan.Net→Synchronize All Files.
NOTE: You don’t have to open all your files to synchronize them
simultaneously.
If during synchronization a conflict occurs, resolve it as described in
Resolution
6-4 Corex Technologies
Conflict
on page 6-3.
Page 41
Automatic Synchronization
Automatic synchronization synchronizes changes to either copy of a
CardScan.Net-enabled file whenever CardScan is running and your PC is
connected to the Internet. Also, once enabled, automatic synchronization
signs you in to CardScan.Net whenever you open CardScan.
You can avoid being prompted to enter your password every time
automatic synchronization signs you in. To do so, choose Remember
my password on the Sign In dialog.
You can always disable or enable Automatic Synchronization, as follows:
1. Sign in to your account.
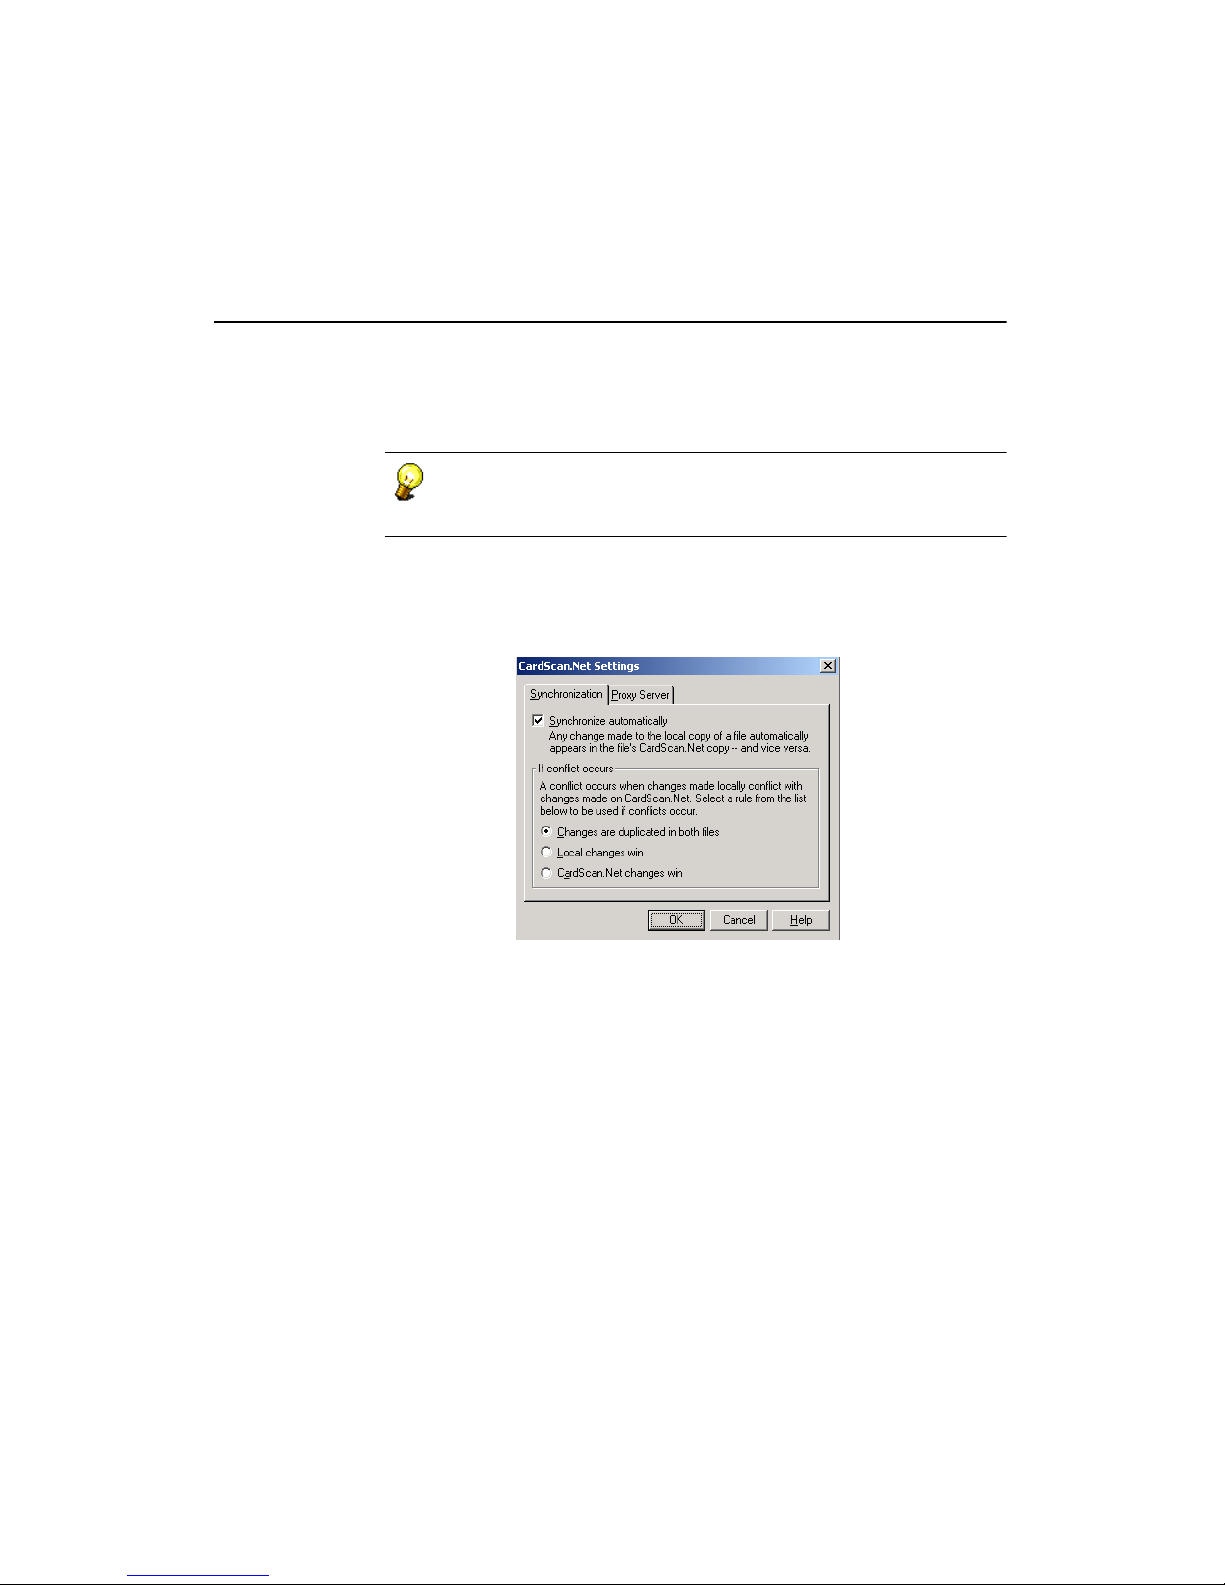
2. Choose CardScan.Net→Settings. This dialog appears:
Automatic Synchronization
3. Click the respective checkbox to disable or enable automatic
synchronization.
4. If Automatic Synchronization is enabled, you can choose a different
conflict-resolution option.
5. Click OK.
CardScan Getting Started 6-5
Page 42
1
Chapter 6 Maximizing Your Contact Potential with CardScan.Net
About AccuCard Service Updates
If you are using the AccuCard Service, the CardScan desktop software:
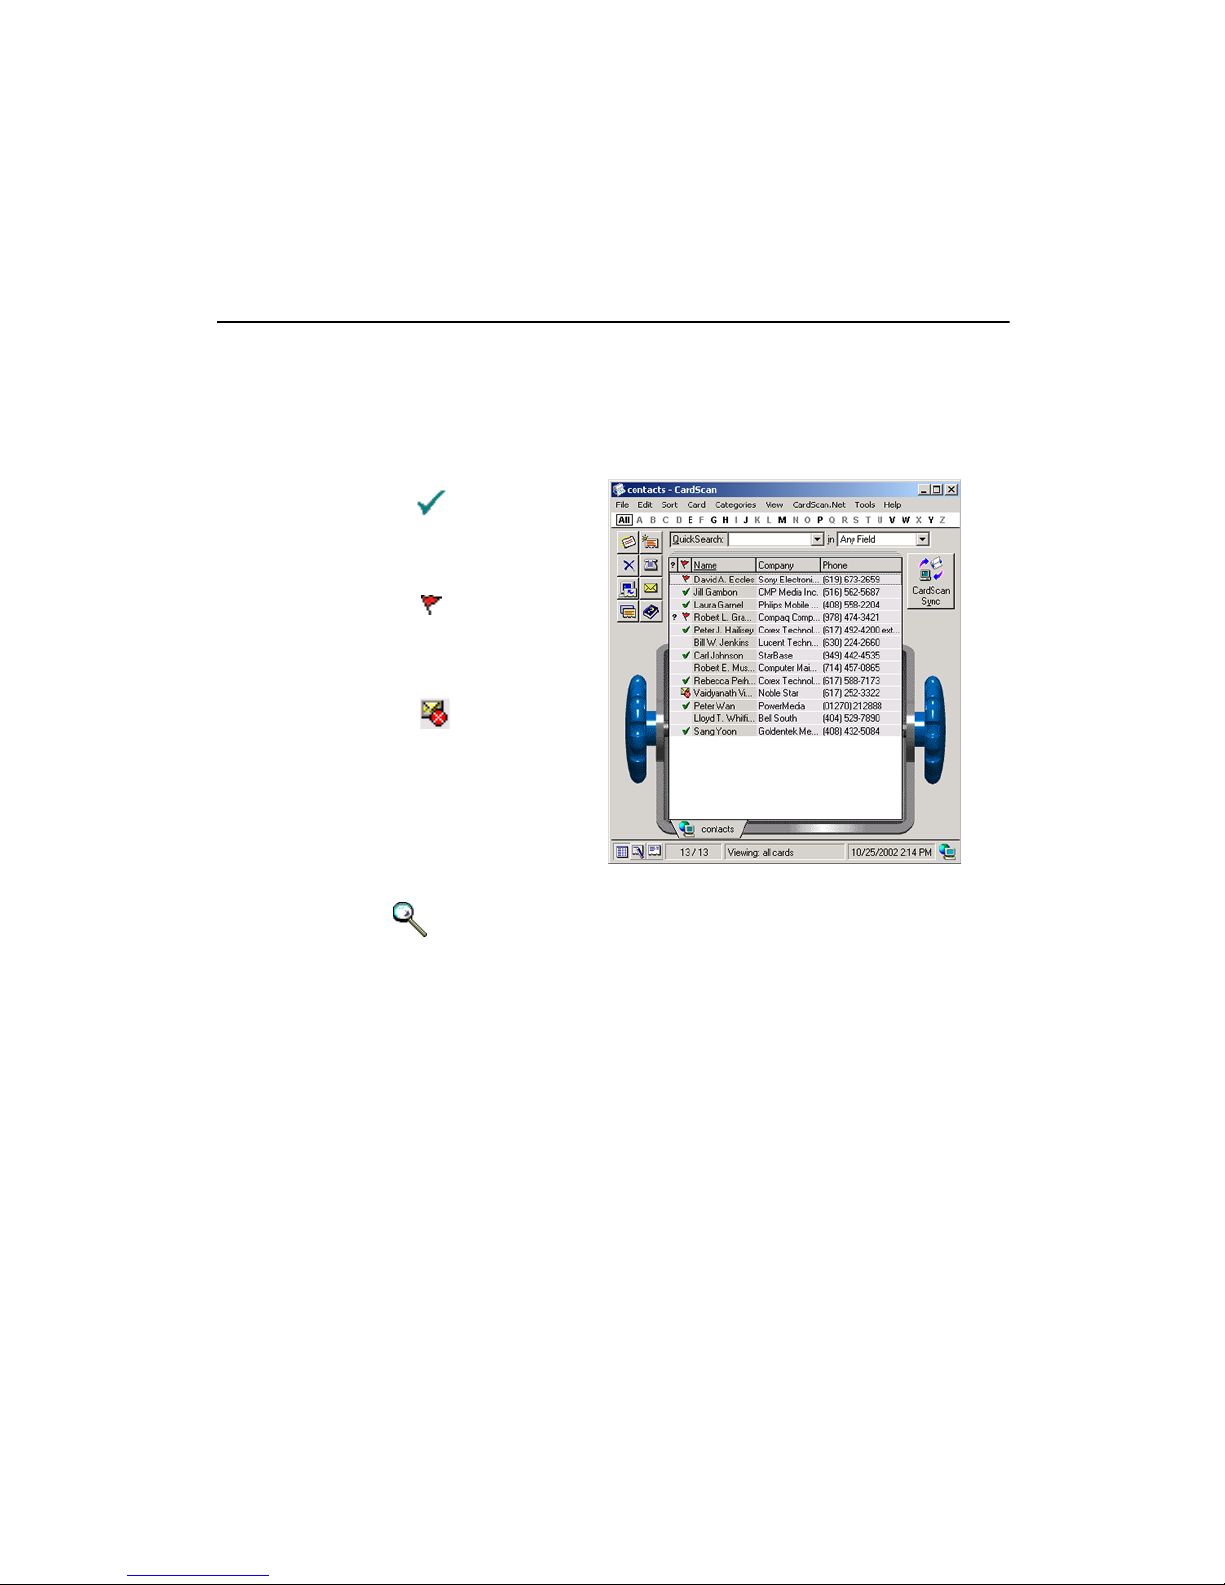
• Shows you the AccuCard status for your contacts (see an example
below).
• Notifies you when there are updates on CardScan.Net.
• Takes you directly to CardScan.Net to review the updates.
The contact has an
AccuCard, and the
information is
up to date.
The contact has an
AccuCard, and an
update is available
The contact’s email
address is not valid.
Blank
Keywords: “AccuCard”, “AccuCard Service”
6-6 Corex Technologies
The contact has
no AccuCard.
Page 43
Chapter 7 Exchanging Data with Other
Applications
A major benefit of CardScan is the ability to create an accurate and wellorganized address book quickly and then pass new contact information on to
your favorite contact manager, PIM, or PDA. The changes to your contacts at
either end are “synchronized”, so that the contact data is consistent in both
CardScan and the other application.
This chapter introduces two major data-exchange features:
• The Data Exchange Wizard
• CardScan Synchronization
Data Exchange Wizard
Whenever you need to get contacts from CardScan into another
application or from another application into CardScan, the Data
Exchange Wizard will help you pick the most efficient method to
accomplish your goal.
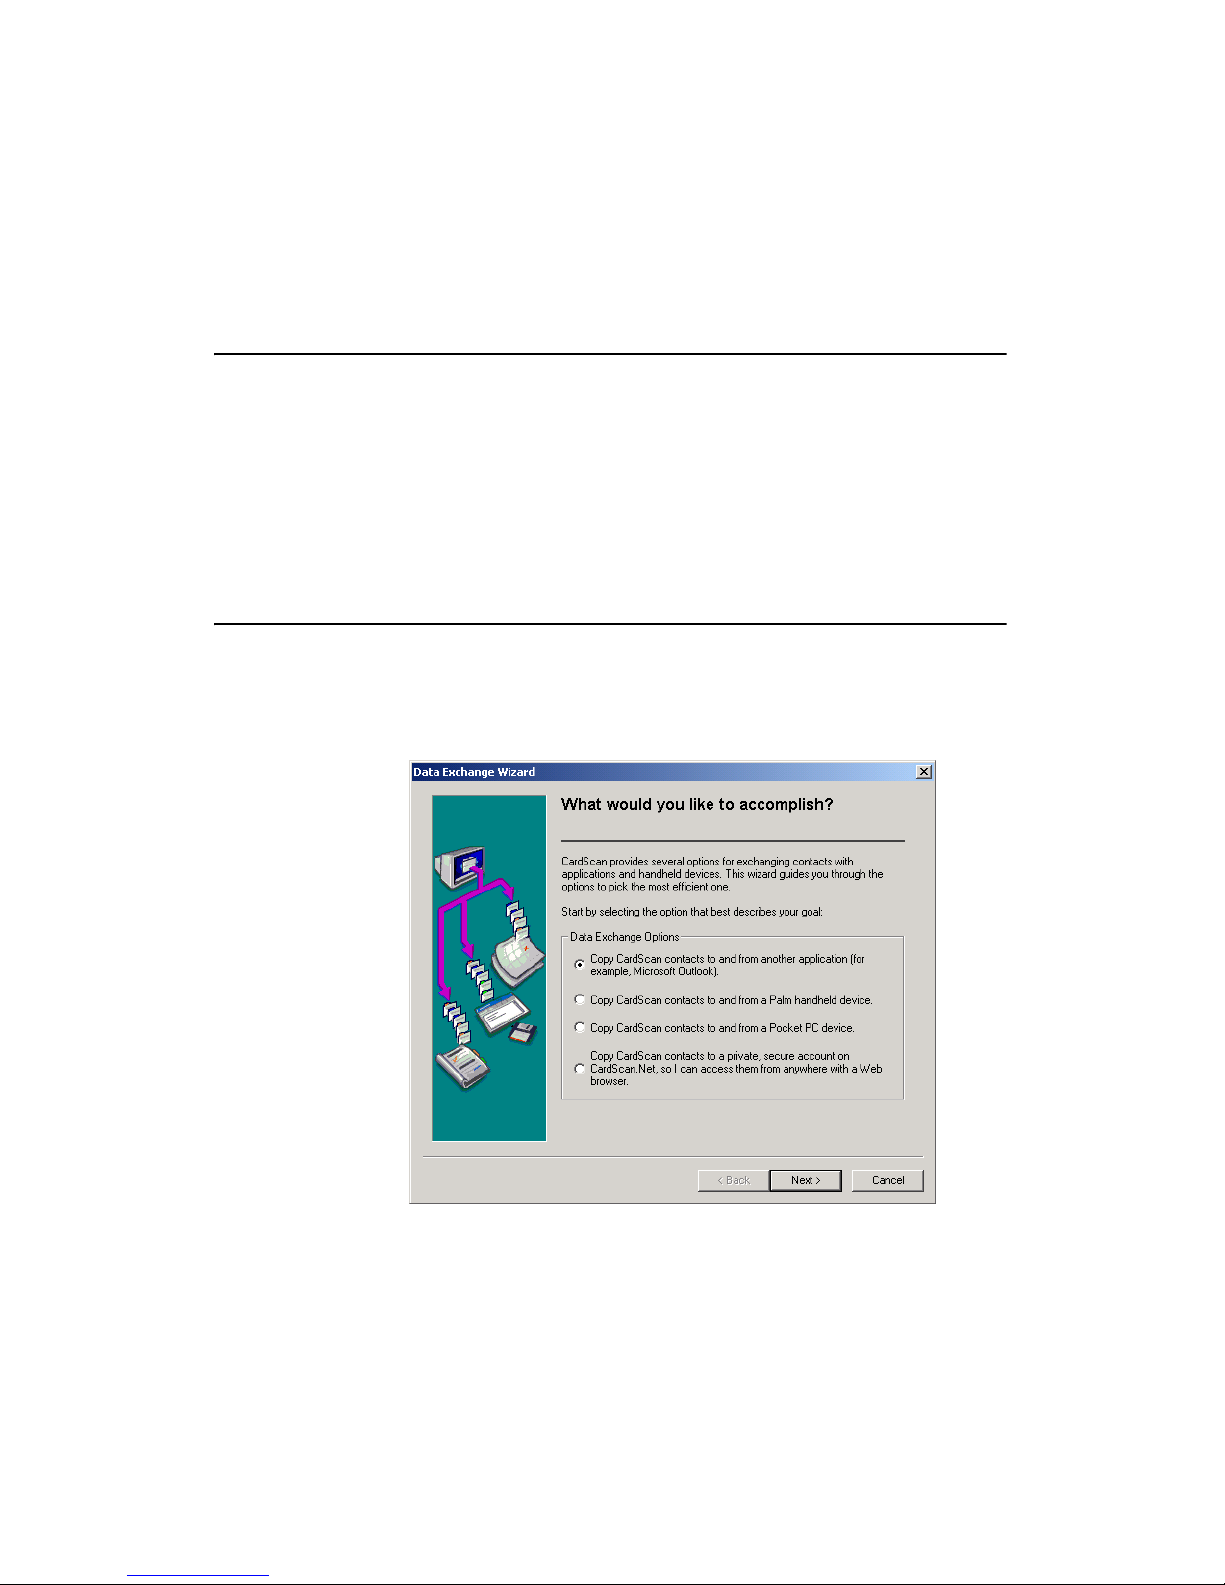
1. Choose File→Data Exchange Wizard, and this screen appears:
Data Exchange Wizard
2. Select the option that best describes what you want to do, and click Next.
Continue to do so, and you will arrive at the most suitable of all methods
available in CardScan.
CardScan Getting Started 7-1
Page 44
1
Chapter 7 Exchanging Data with Other Applications
These methods are:
• CardScan Synchronization (see the following section)
• CardScan Conduit for synchronizing with Palm OS handhelds (see
“Synchronizing with Palm OS™ Devices” on page 8-1)
• ActiveSync for synchronizing with Pocket PC devices (see
“Synchronizing with Pocket PC® Devices” on page 9-1)
• Transfer from CardScan ( Keywords: “transfer”)
• Export from CardScan ( Keywords: “export”)
• Import (see “Importing Contacts from Contact Managers and PIMs” on
page 3-4)
• CardScan.Net Synchronization (see “About CardScan.Net
Synchronization” on page 6-3)
CardScan Synchronization
Use CardScan Synchronization to maintain consistent contact data in
CardScan and supported contact managers and Personal Information
Managers (PIMs).
CardScan Synchronization copies the contact information from CardScan to
the other application and vice versa. The result is that both places contain the
same information. Afterwards, when contacts are added, edited or deleted in
either place, CardScan Synchronization copies just the changes, and does not
create duplicate contacts.
Currently, CardScan Synchronization supports:
• ACT! 4.0 or later
• GoldMine 5.0 or later
• Lotus Notes 4.6 or later
• Microsoft Outlook 98 or later
7-2 Corex Technologies
If you previously used Intellisync™ for CardScan to synchronize
CardScan files with these applications, use CardScan Synchronization
instead. Choose the same application and CardScan file that you used
with Intellisync™ for CardScan.
Page 45
CardScan Synchronization
You must configure the CardScan Synchronization to synchronize contacts
with a specific application.
• You can configure CardScan Synchronization only with an existing
CardScan file. If you do not have a CardScan file, create one by scanning
a card and saving the file with a name you will use for synchronization.
• Use the same CardScan file for all subsequent synchronizations with the
same application.
To configure the CardScan Synchronization:
1. Choose File→CardScan Synchronization. The Data Exchange Wizard
appears.
2. Select the option for CardScan Synchronization, and click OK. The
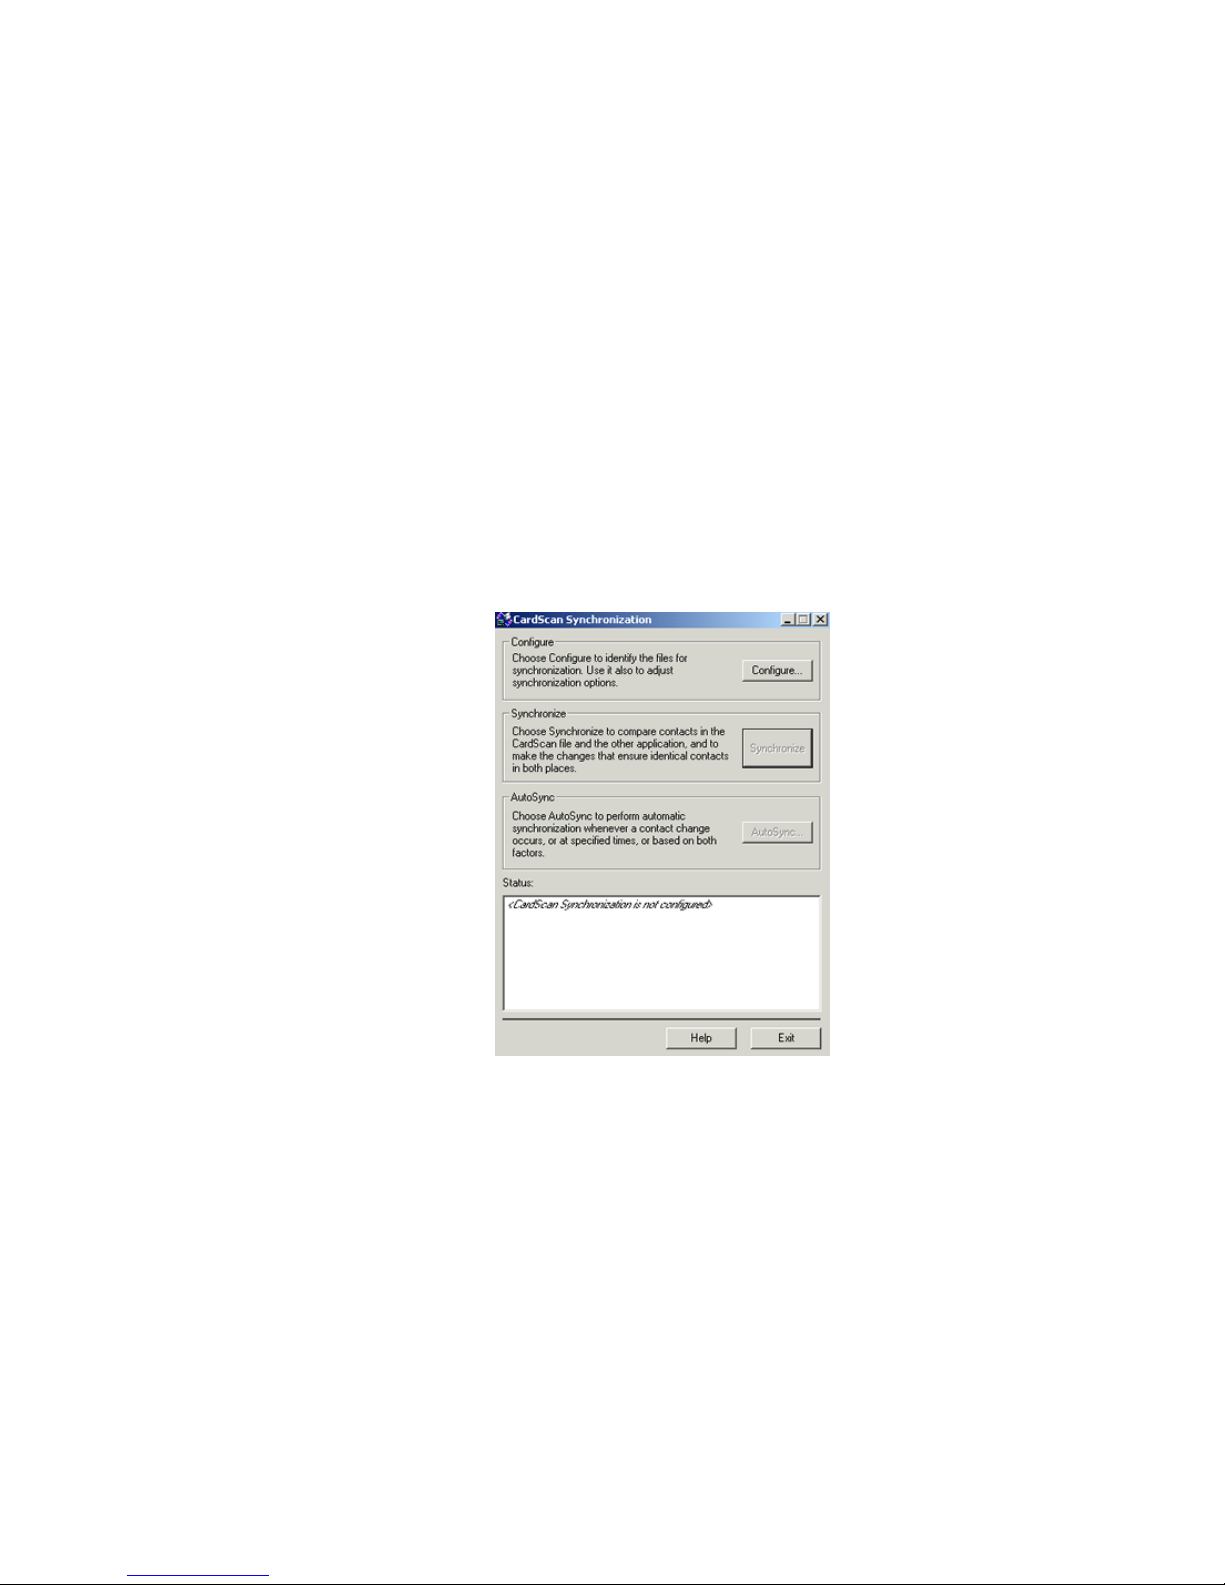
CardScan Synchronization dialog appears:
3. Click Configure, and refer to the Online Help for instructions specific to
each supported contact manager or PIM.
CardScan Getting Started 7-3
Page 46
1
Chapter 7 Exchanging Data with Other Applications
Synchronizing Manually
To synchronize CardScan with the selected contact manager or PIM:
1. In CardScan, select File→Data Exchange→CardScan
Synchronization. The CardScan Synchronization dialog appears.
If the Data Exchange Wizard appears, choose the option for
Cardscan Synchronization.
2. Review the information in the STATUS box. If CardScan Synchronization
has not been configured or the current configuration doesn't meet your
needs, configure synchronization as appropriate. For instructions, refer to
the Online Help.
3. Click Synchronize. The progress dialog appears. What happens next
depends on the data being synchronized.
Keywords: “CardScan Synchronization”, “Data Exchange”
Synchronizing Automatically
Use AutoSync™ to automatically synchronize a CardScan file with another
application when the data in the CardScan file changes, or on a predefined
schedule, or both. Automatic synchronization can take place when neither
CardScan or the other application is running.
Keywords: “AutoSync”
7-4 Corex Technologies
Page 47
First-Time Setup and Synchronization
Chapter 8 Synchronizing with Palm OS™ Devices
The Conduit for Palm (also referred to as “the Conduit”) enables you to
synchronize a CardScan file with the contacts on Palm handheld devices, to
make the contact data consistent. If you change information on the handheld,
your CardScan file is updated automatically—and vice versa.
The Conduit for Palm is installed automatically with CardScan—provided the
Palm Desktop Version 3, or later, already exists on your PC. When the Conduit
for Palm is enabled, it replaces the Address Box conduit in HotSync
Manager. As a result, synchronization occurs between the handheld and
CardScan—rather than between the handheld and the Palm Desktop.
Some applications may not support switching between conduits. Make
sure to consult their documentation.
You can synchronize:
• A Palm handheld Address Book and a CardScan file on one computer
(described in this chapter)
• Multiple handhelds and a CardScan file ( Keywords: “conduit”,
“Palm”)
• A Palm handheld with CardScan and another application
( Keywords: “conduit”, “Palm”)
®
Only one application at a time can synchronize with your Palm
handheld.
First-Time Setup and Synchronization
This section describes setting up the conduit and synchronizing for the first
time. Keywords: “conduit”, “Palm”.
The CardScan Conduit is enabled automatically during the installation of
the CardScan software. Therefore, make sure that the Palm Desktop
Version 3, or later, has been installed on your PC—prior to installing
CardScan.
CardScan Getting Started 8-1
Page 48
1
Chapter 8 Synchronizing with Palm OS™ Devices
To set up the Conduit for Palm, follow these steps:
1. If you don’t have a CardScan file to synchronize, create one and save
it.
Always synchronize with the same CardScan file. This prevents
CardScan from adding, deleting, or modifying cards
unintentionally.
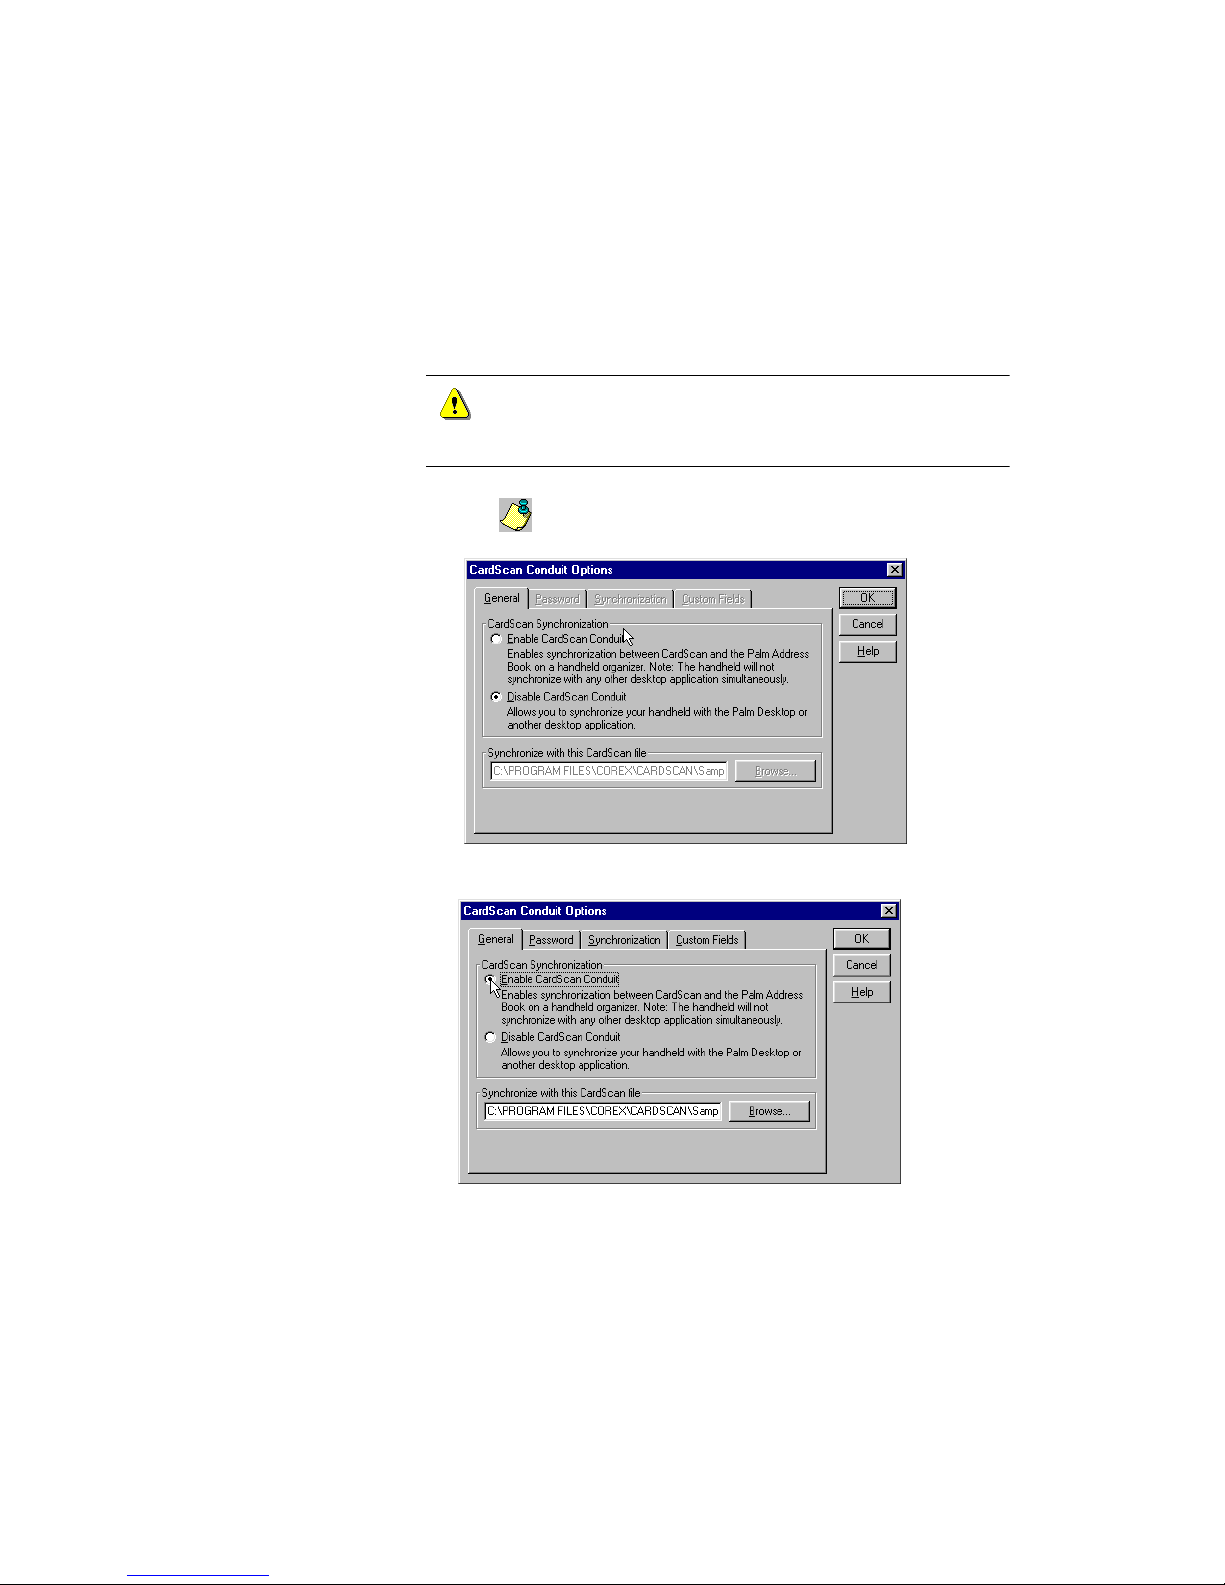
2. Choose File→Data Exchange→Conduit for Palm from the CardScan
window. If the Data Exchange Wizard appears, choose the option for
Conduit for Palm. The following dialog appears:
3. Choose E
The path to the CardScan file is activated.
8-2 Corex Technologies
NABLE CARDSCAN CONDUIT.
Page 49
First-Time Setup and Synchronization
4. If the path to the CardScan file in step 3 is not displayed or is incorrect,
type or browse for the path and name of the CardScan file with which to
synchronize.
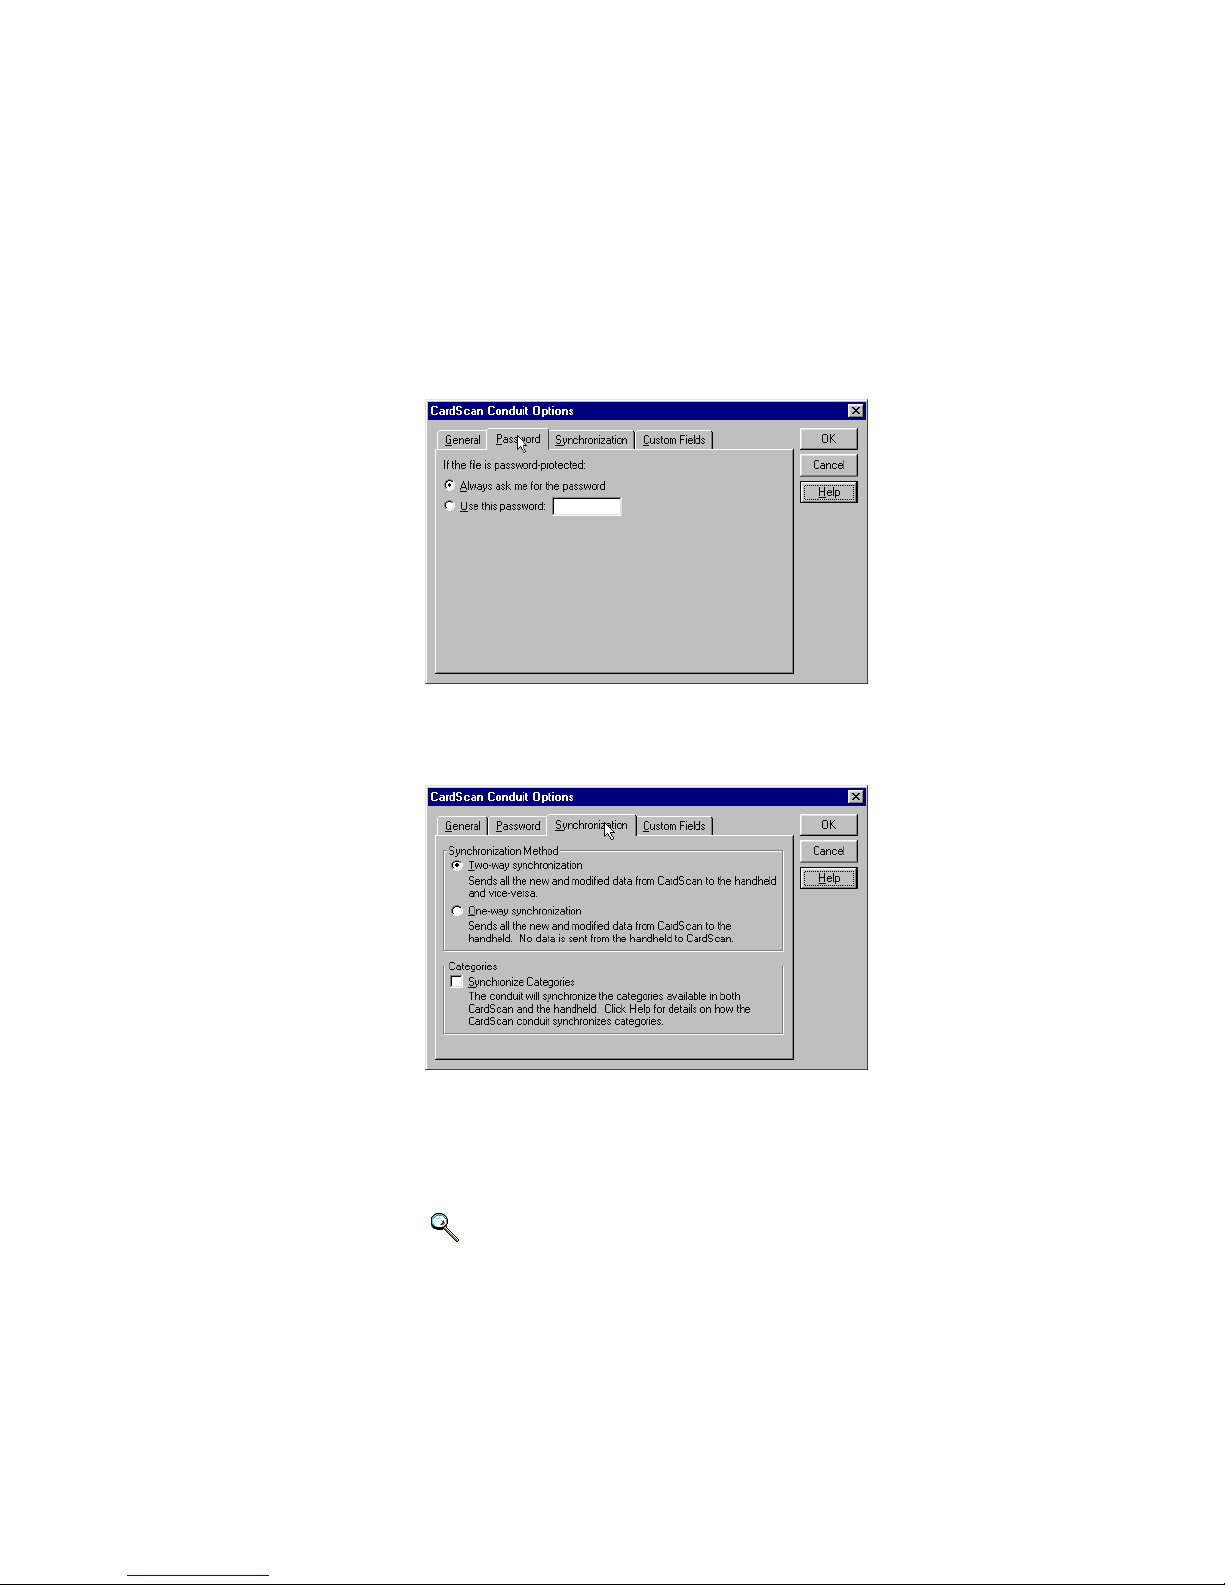
5. Click the P
ASSWORD tab.
If your CardScan file is password-protected, you may enter the
password here so you are not prompted for it during synchronization.
6. Click the SYNCHRONIZATION tab.
7. Choose the synchronization method.
8. (Optional) Choose the C
9. Click OK to save the settings and close the dialog.
ATEGORIES option to synchronize categories.
(Optional) Click the C
USTOM FIELDS tab if your CardScan file uses phone
and email labels different from those on the handheld.
Keywords: “conduit”
CardScan Getting Started 8-3
Page 50

1
Chapter 8 Synchronizing with Palm OS™ Devices
To synchronize:
Press the HotSync button on the cradle to start synchronization. The progress
dialog appears. When the synchronization completes successfully, the
progress dialog closes.
For information about controlling duplicate contacts and troubleshooting error
messages, Keywords: “troubleshooting duplicates”, “troubleshooting
error messages”
8-4 Corex Technologies
Page 51
Setting up ActiveSync
Chapter 9 Synchronizing with Pocket PC® Devices
The ActiveSync module enables you to synchronize a CardScan file and your
Pocket PC to make the files identical. If you change information in the PDA,
your CardScan file is updated automatically—and vice versa.
To synchronize with CardScan, your Pocket PC®must be running
Microsoft Windows CE 3.0 or later.
If Windows CE Services 3.0 or later has been installed on your computer, the
ActiveSync module is installed automatically with CardScan.
Keywords: “ActiveSync”, “Pocket PC”
You must have an existing CardScan file to set up synchronization.
Setting up ActiveSync
To set up ActiveSync:
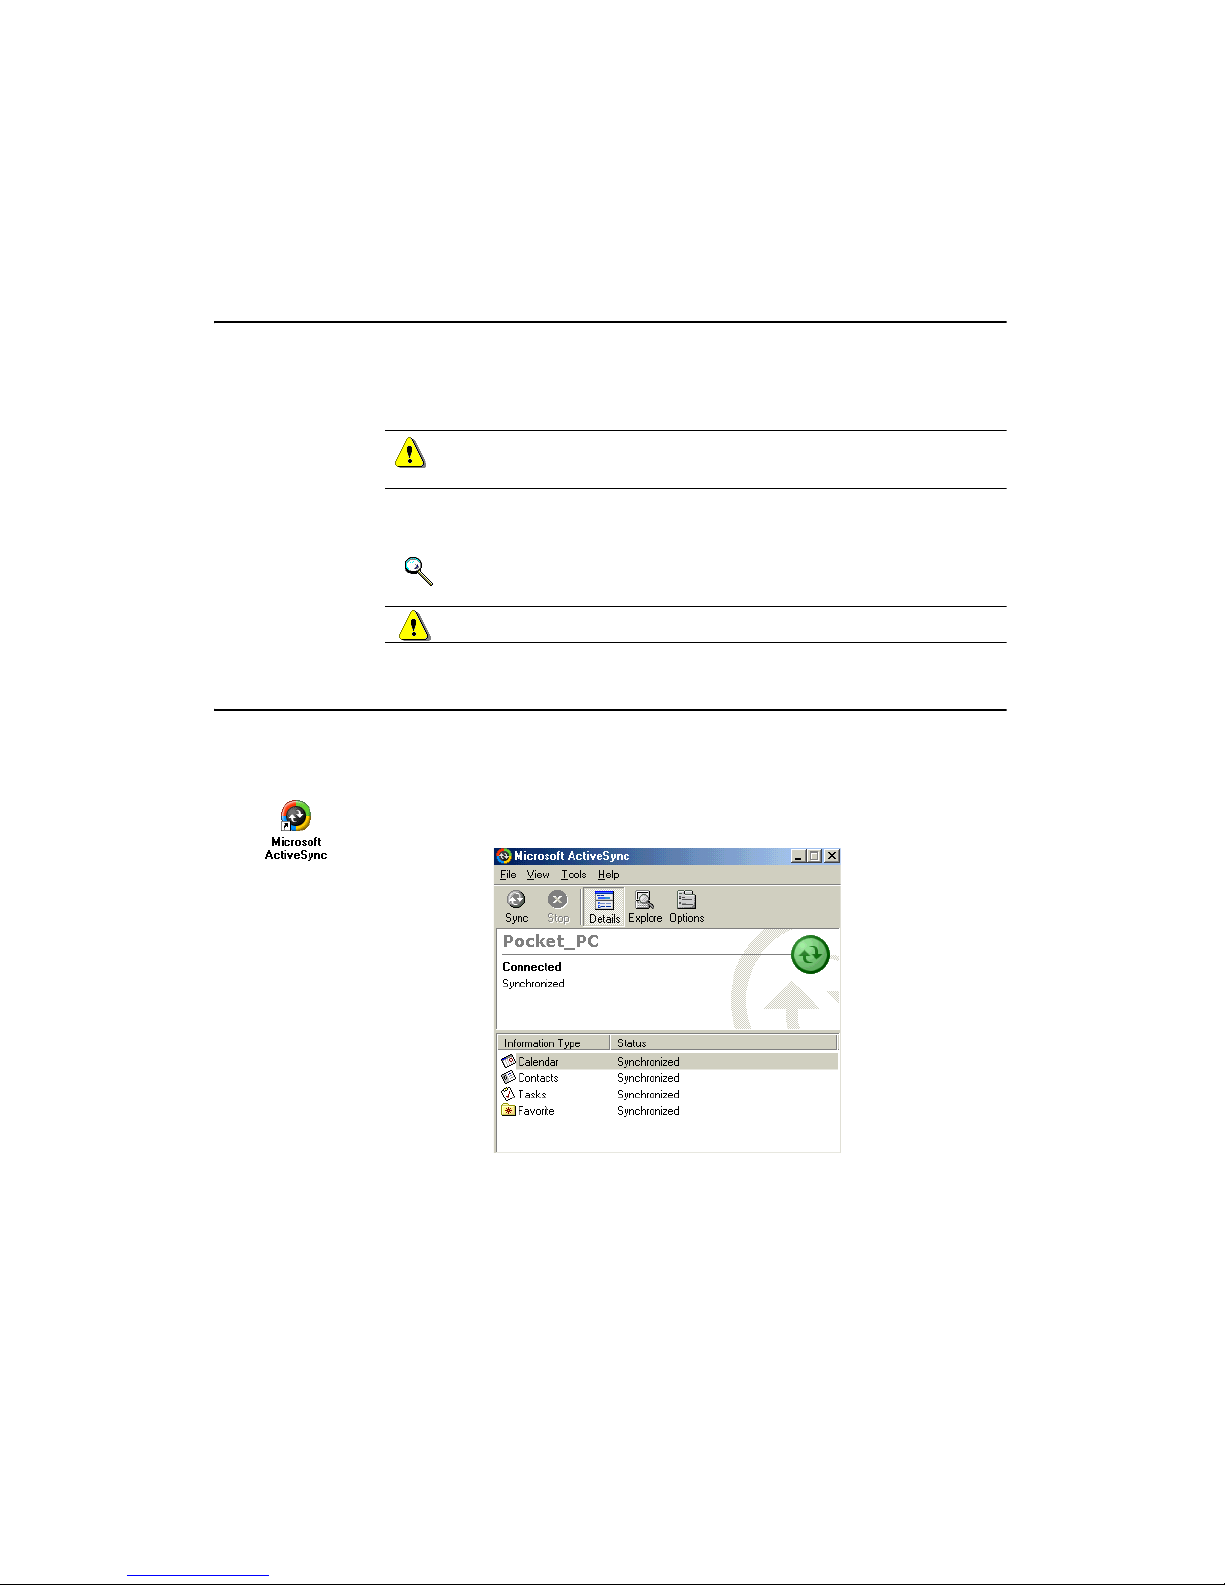
1. On your desktop, click the Microsoft ActiveSync icon or choose
→Programs→Microsoft ActiveSync. The Microsoft ActiveSync
Start
Window opens:
CardScan Getting Started 9-1
Page 52
1
Setting up ActiveSync
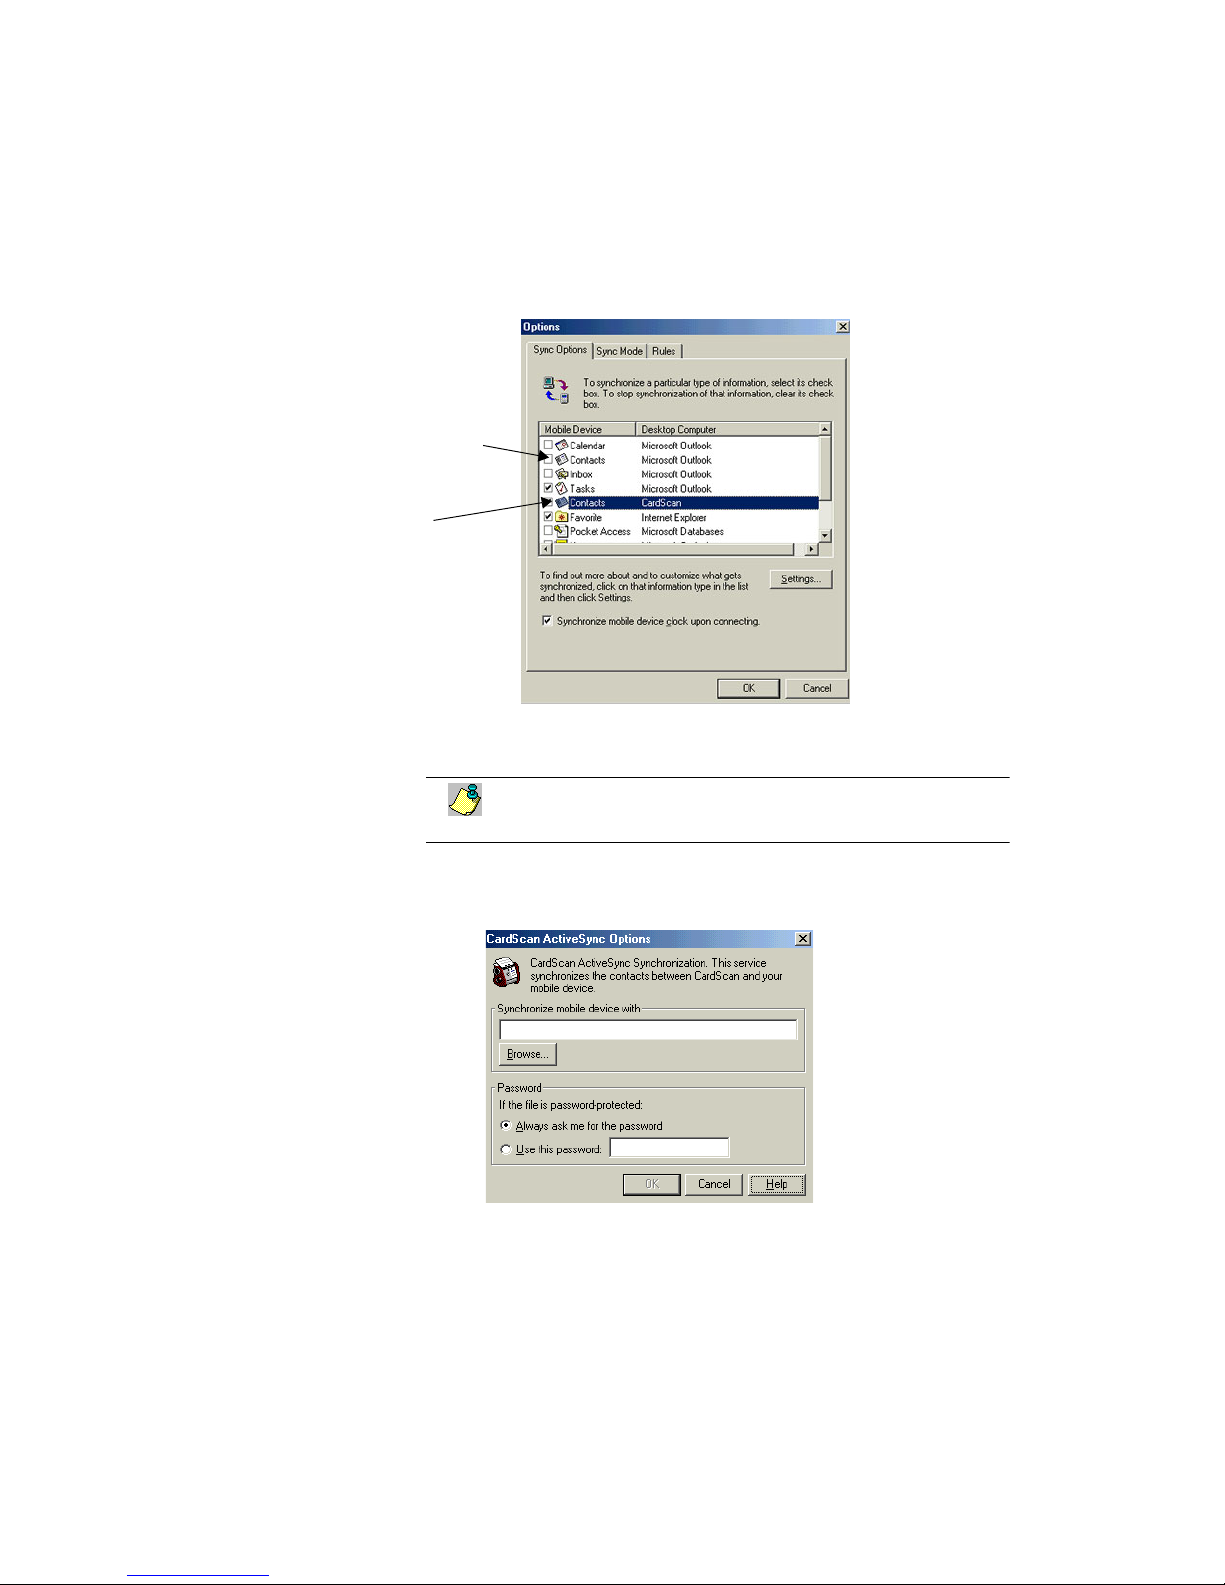
2. Choose Tools→Options. This dialog appears:
Disable any other
services that synchronize contacts
on the device.
Enable CardScan
service.
3. Enable CardScan service, and disable any other services that
synchronize the contacts on the device.
You can synchronize contact information with only one service at
a time.
4. On the Sync Mode tab, select when you want synchronization to occur.
5. On the Rules tab, specify the conflict-resolution and file-conversion rules.
6. Click Settings. The CardScan ActiveSync Options dialog appears.
7. Browse for the CardScan file with which to synchronize.
9-2 Corex Technologies
Page 53

Synchronizing Selected Files
Always synchronize with the same CardScan file.
This prevents CardScan from adding, deleting, or modifying
any contacts unintentionally.
8. If the selected file is protected by a password and you want CardScan to
open the file automatically every time you connect, click the password
options and type in the password. Otherwise, CardScan prompts you for
the password at every new connection for ActiveSync.
9. Click OK to close the CardScan ActiveSync Options dialog.
Synchronizing Selected Files
To synchronize
1. On the Microsoft ActiveSync Window, click the Sync button to
synchronize files.
2. Click OK to complete synchronization.
Removing Corex CardScan ActiveSync Module
To remove the Corex CardScan ActiveSync Module from a palm-size PC or a
pocket PC, follow these steps.
Palm-size
PC
1. Choose Start→Settings→Remove Programs
2. Choose “Corex CardScan ActiveSync Module”, then click Remove.
Pocket PC 1. Choose Start →Settings.
2. Click the System tab.
3. Click the Remove Program icon.
4. Select “Corex CardScan ActiveSync Module”, then click Remove.
CardScan Getting Started 9-3
Page 54

1
Removing Corex CardScan ActiveSync Module
THIS PAGE IS INTENTIONALLY LEFT BLANK.
9-4 Corex Technologies
Page 55
Reaching Your Contacts From Summary View
Chapter 10 Communicating with Your Contacts
This chapter introduces:
• Reaching your contacts from summary view
• Using Signature Card in your Microsoft Outlook emails
Keywords: “summary view”
Reaching Your Contacts From Summary View
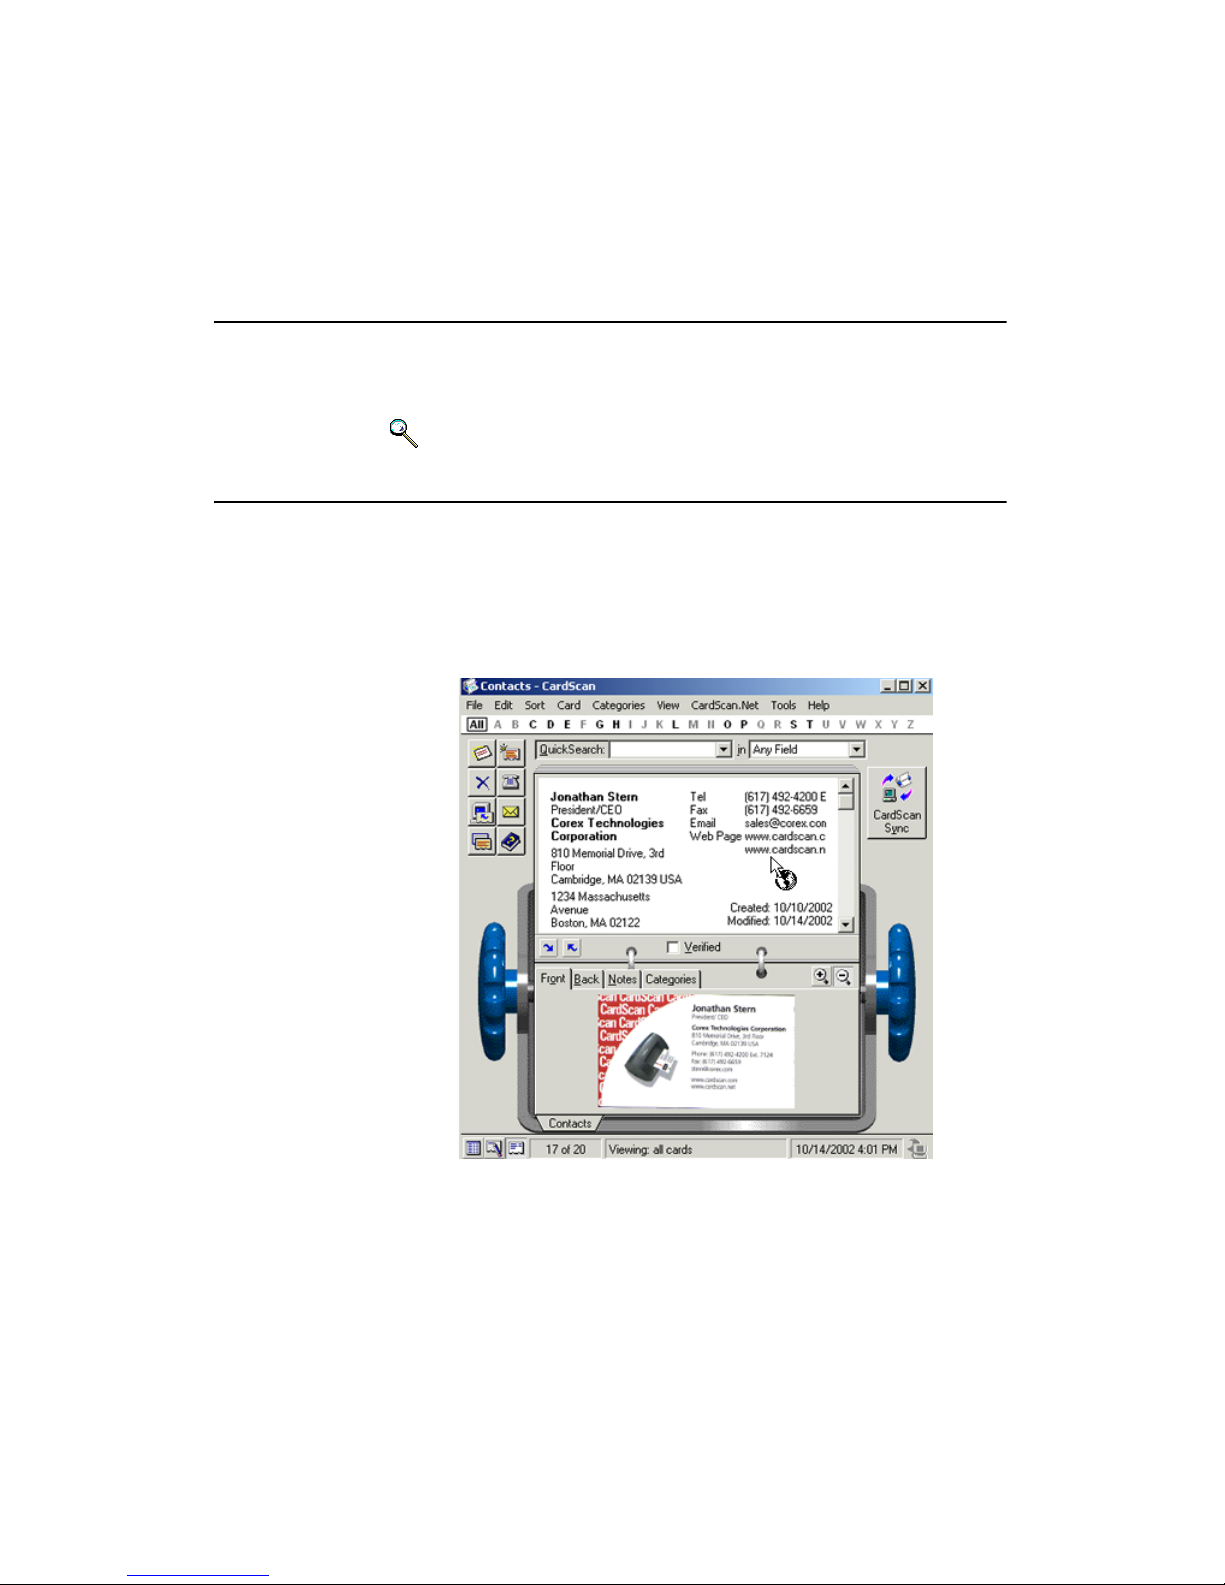
When a contact is displayed in CardScan’s Summary view, just a click of the
mouse will:
• Open a pre-addressed email message.
• Dial a phone number.
• Display a MapQuest-generated map of the primary street address.
• Launch your browser to a web address (as in the example below).
To do any of the above, point to the address or phone number, and click when
the cursor changes to the symbol of an envelope, telephone, or Web browser.
CardScan Getting Started 10-1
Page 56
1
Chapter 10 Communicating with Your Contacts
Using Signature Card
If you have Microsoft Outlook 98 or later, you can include an image of your
business card in all outgoing emails. To use this feature, make sure that:
• Microsoft Outlook is set to send messages in HTML format.
• Your email editor is not set to use Microsoft Word.
With most versions of Outlook, choose Tools→Options→Mail
Format, and verify the Message Format options.
Enabling Signature Card
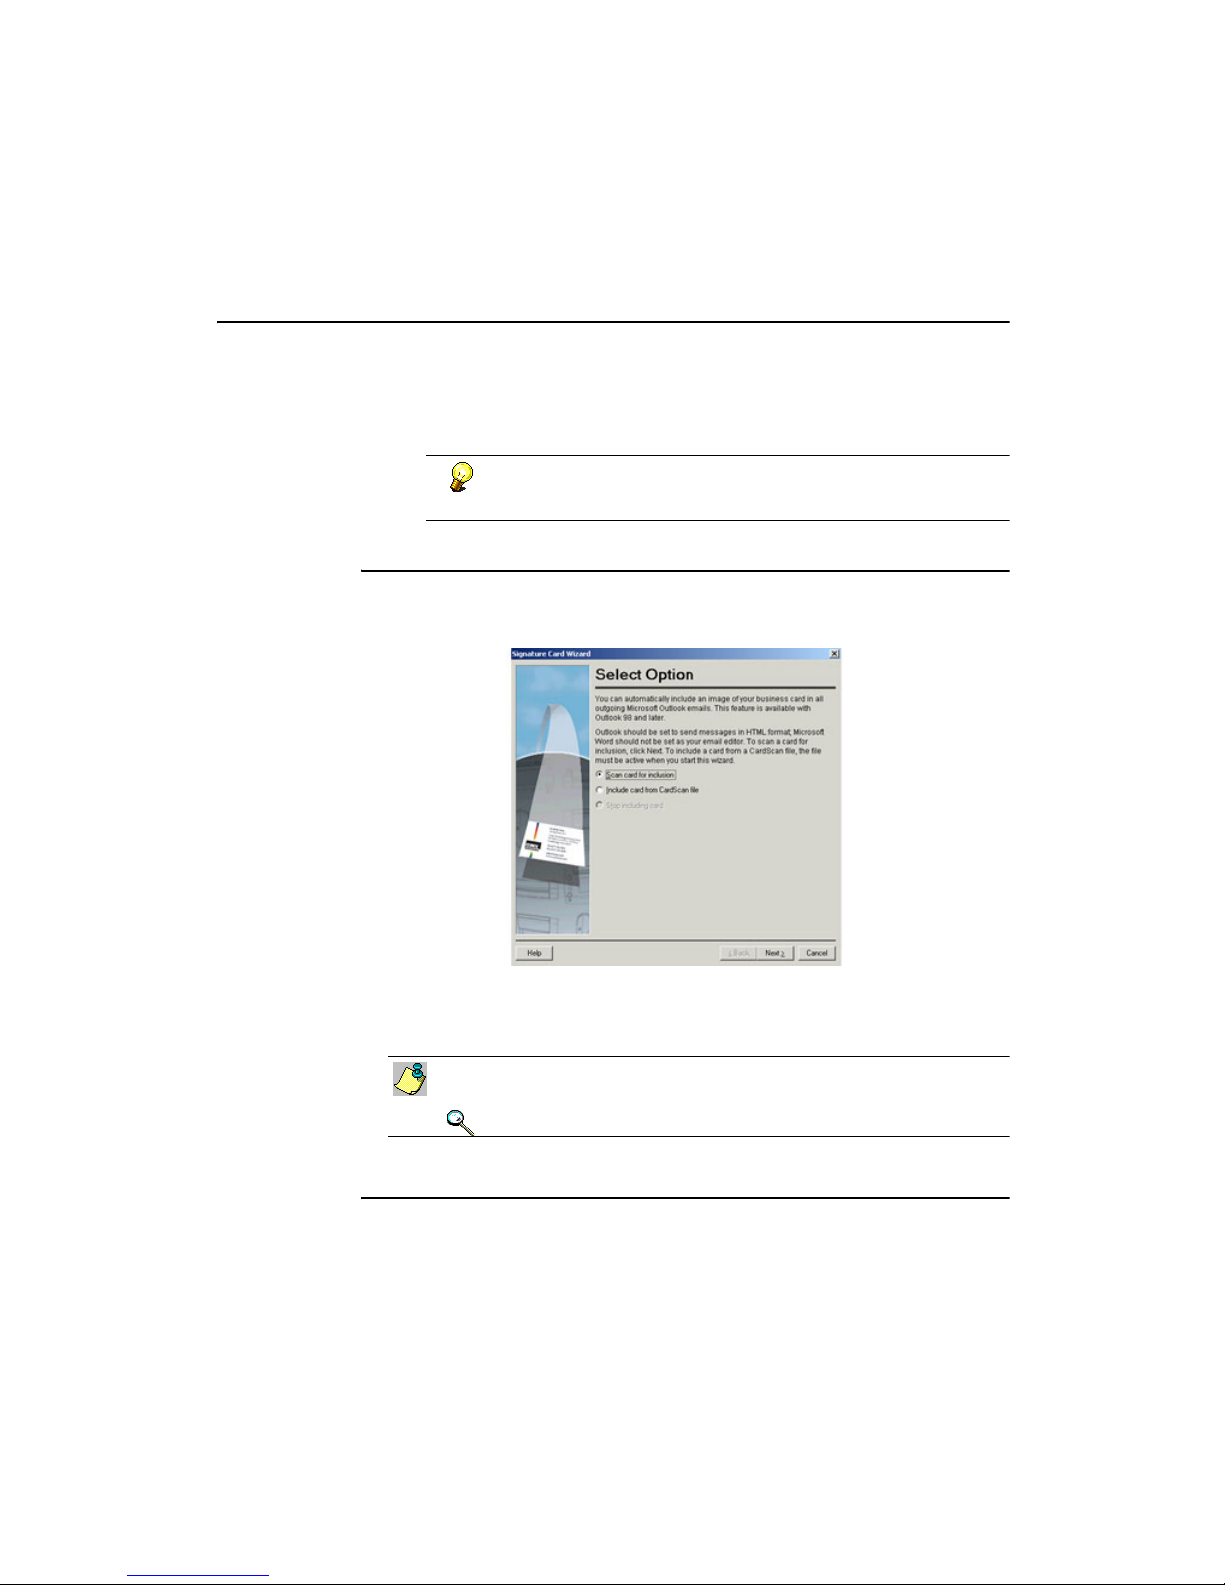
CardScan’s Signature Card Wizard helps you to enable this feature.
1. Choose Tools→Signature Card. This screen appears:
2. Choose to scan your business card or to include an existing image from a
CardScan file, click Next, and follow the Wizard to complete your
Signature Card.
The wizard can include an existing image only from an active CardScan
file. Therefore, activate the CardScan file first, and then start the wizard.
Disabling Signature Card
1. In CardScan, choose Tools→Signature Card. The Select Options
screen appears.
2. Choose Stop including card, and click Next.
10-2 Corex Technologies
Keywords: “signature”.
Page 57
Chapter 11 Printing
CardScan includes the Print Wizard to help you use various options for the
appearance of your printed information. For example, your printed pages can
look like the pages of specific personal organizers, address labels, etc. You
can also create your own formats for your special projects.
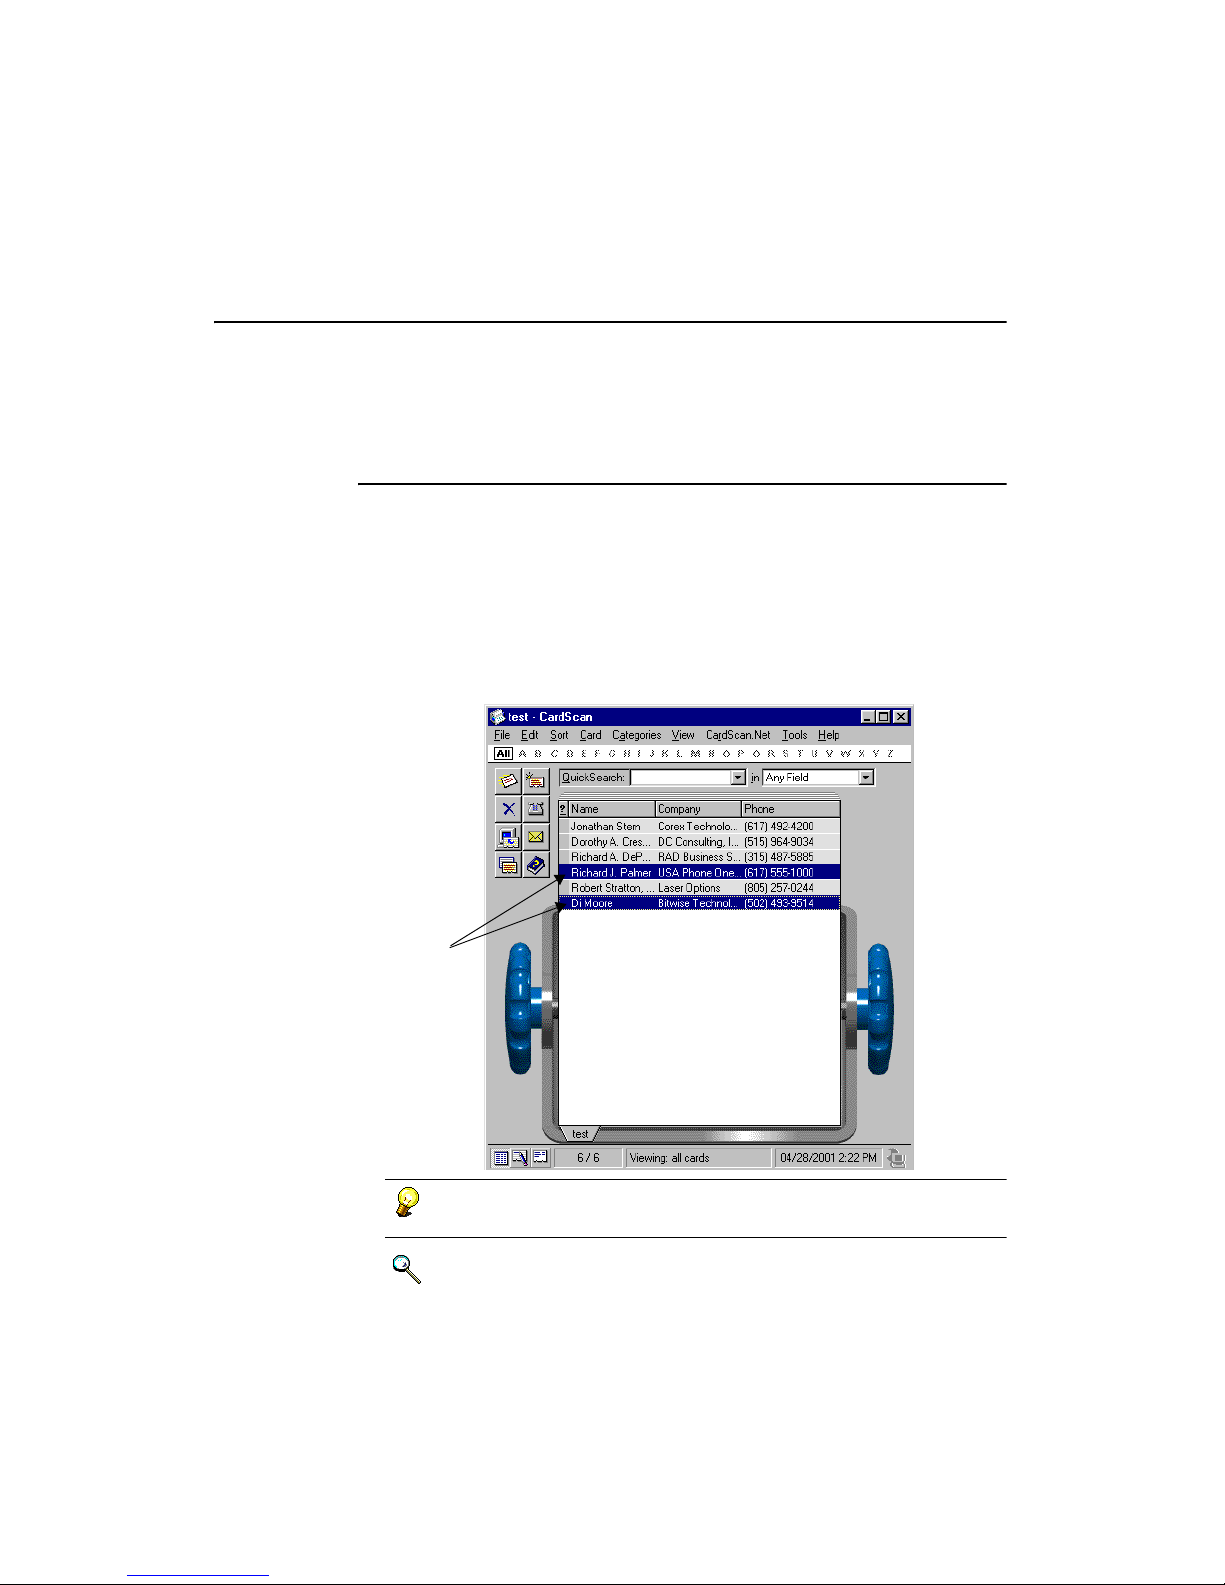
Selecting contacts to print
Before using the Print Wizard, choose the contacts to print:
• If you are printing a single contact, display it in Edit or Summary view, or
select it in List view.
• If you are printing several contacts, create a list with QuickSearch (see
“Finding Contacts with QuickSearch” on page 5-2) or with categories
(see “Methods to Find Groups of Contacts” on page 5-3), or select the
contacts from a file. (Use Ctrl+click to choose more than one contact.)
Selected
contacts
You can sort the contacts before printing (see “Sorting Contacts” on
page 5-2).
Keywords: “print”.
CardScan Getting Started 11-1
Page 58
1
Chapter 11 Printing
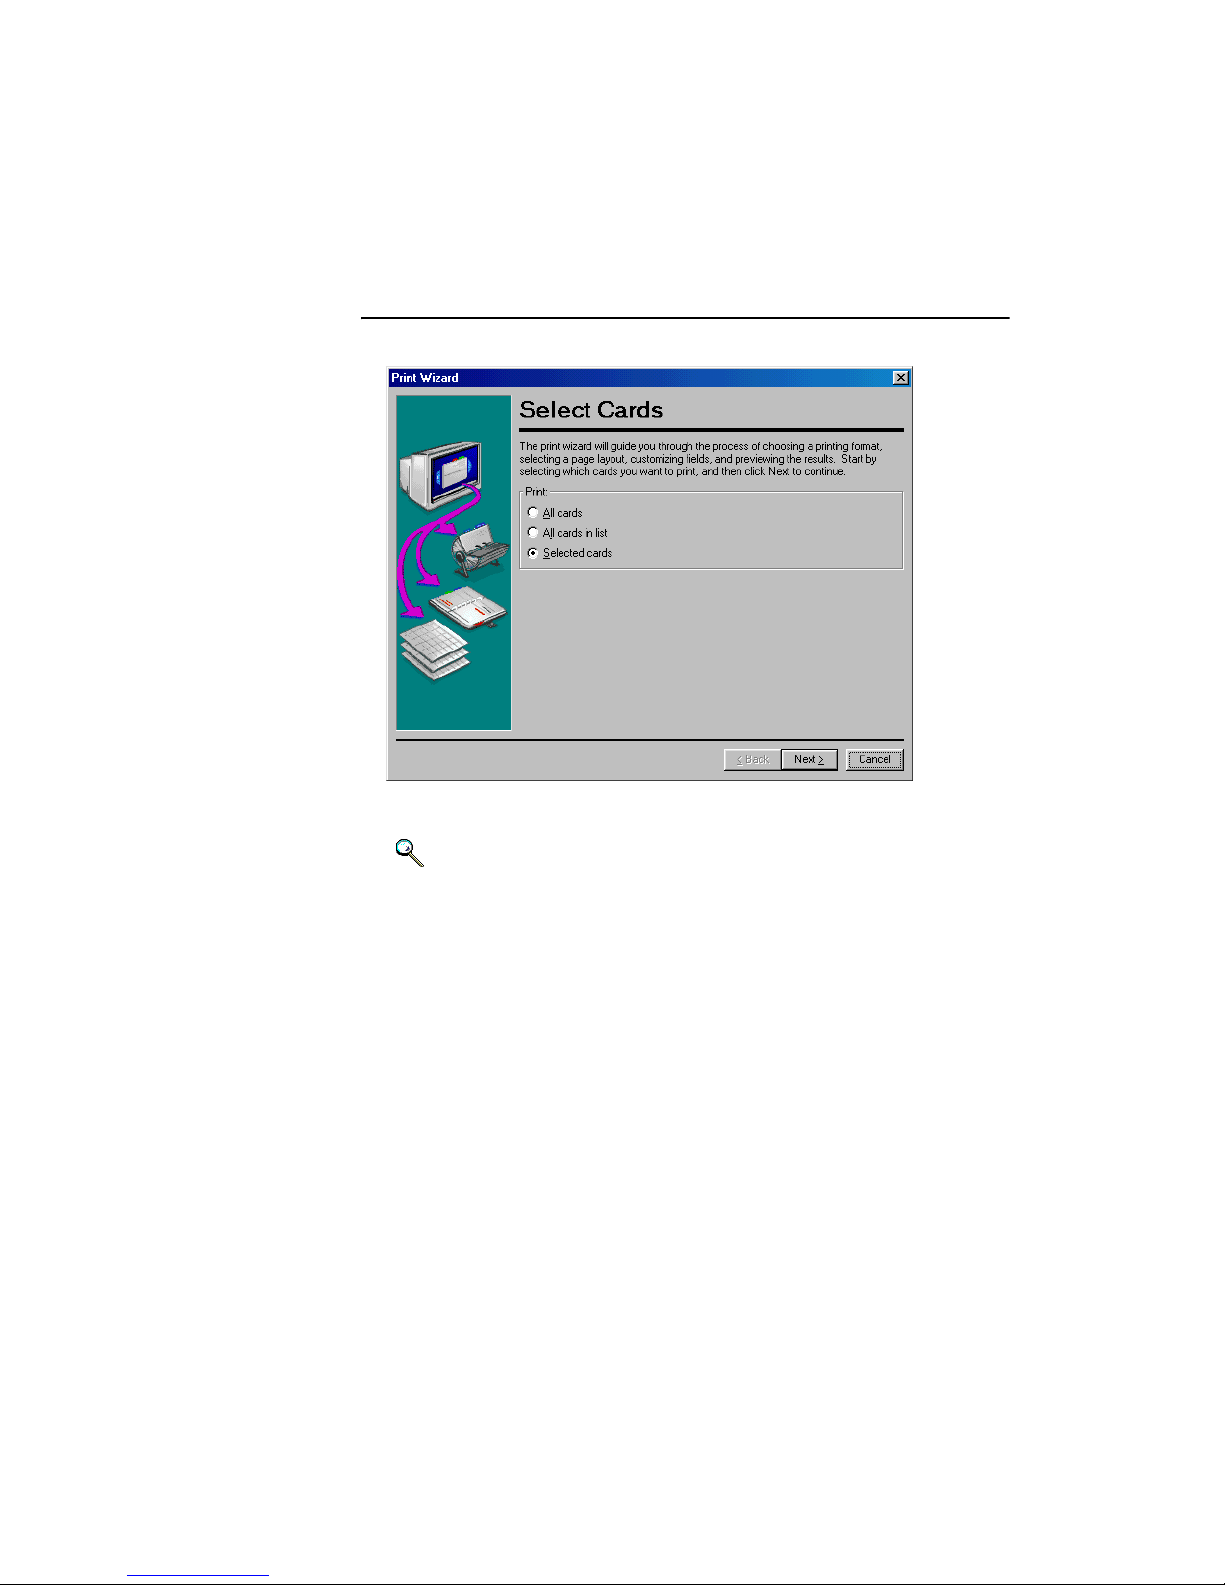
Starting the Print Wizard
1. Choose File→Print. The following dialog appears.
2. Select cards and follow the Wizard to print your contacts the way you
like.
Keywords: “print”.
11-2 Corex Technologies
Page 59

Troubleshooting Tips
Chapter 12 Troubleshooting and Support
If you are experiencing a problem, please do the following:
• Try troubleshooting tips in this section
• If the symptoms are not described in the tips, search the Online Help on
“trouble”.
• If the problem persists, contact our Technical Support (see page 12-3).
Safety Instructions: This unit contains no serviceable parts. Do NOT
open. When used as prescribed in this manual, this equipment is
unlikely to present a hazard to the user.
Troubleshooting Tips
This section presents the following types of tips:
• General
• Cards that are difficult to read
• Error messages
• Quick test
General
When connecting the scanner, its light does not turn on
The scanner may be defective. Please contact Technical Support (see
“Technical Support” on page 12-3).
When connecting the scanner, its light flashes and then turns off
Try the following actions:
• Make sure the USB cable is connected properly.
• If the problem persists, you may have connected the scanner
before installing the software. Follow these steps:
1) Disconnect the USB cable from the scanner port.
2) Install the software.
3) Connect the USB cable to the scanner port.
If the problem persists, the scanner may be defective. Please
contact Technical Support (see “Technical Support” on
page 12-3).
CardScan Getting Started 12-1
Page 60

1
Chapter 12 Troubleshooting and Support
Several errors in a scanned contact
Calibrate the scanner and scan the card again. There may have been
mechanical difficulties or the card may have been scanned at an angle. See
also “Cards that are difficult to read”.
Card image is skewed
Skewed images may impair accuracy, causing errors in the contacts. For
better results, place the card flush against the right edge of the scanner’s tray.
A technique that may work for you is to push the card gently into the scanner
using one or two fingers positioned near the center of the card.
Card jammed in the scanner
1. Choose Edit
2. Click Scan
3. Click Eject Card to eject the card.
Two or more cards scanned as one
If you scan cards in rapid succession, some may appear as a continuous
image, with distorted text. To prevent this problem, wait for the scanner’s light
to go on before inserting the next card.
Scanner’s light is blinking continuously
Disconnect and reconnect the USB cable at the scanner port.
→Preferences.
→Setup to display the Scanner Setup dialog.
Cards that are difficult to read
Processing a card usually takes only a few seconds. It may, however, take up
to half a minute if the card is difficult to read. The usual characteristics of such
cards are these:
• Dark or speckled paper
• Text printed in script or stylized typefaces
• Text in logos or graphics
• Text printed diagonally
• Text printed both horizontally and vertically
12-2 Corex Technologies
Page 61

Technical Support
Error messages
This section presents three error messages. For a complete list of error
messages, search the Online Help on “error”.
“Scanner not responding”
Try the following actions. After each action, try to scan again.
• Check the AC power and USB port connections.
• Choose Edit
correct port are chosen.
• If none of the above solves the problem, disconnect and
reconnect the scanner.
“Unknown device”
1. Disconnect the scanner from the port.
2. Restart Windows.
3. Install the CardScan software.
4. Connect the scanner again.
“Could not find the scanner”
This error message may be caused by two different problems. for detailed
problem-solving instructions, please visit www.cardscan.com/support.
→Preferences→Scan. Make sure the correct scanner and
Technical Support
North America
Tel: 617-492-4200
Fax: 617-492-6659
http://www.cardscan.com/nasupport
Europe
France
Tel: +49 (0) 2203 9113333
Fax: +49 (0) 2203 9113390
http://www.cardscan.com/wwsupport
CardScan Getting Started 12-3
Page 62

1
Chapter 12 Troubleshooting and Support
Germany
Tel: +49 (0) 2203 9113331
Fax: +49 (0) 2203 9113390
http://www.cardscan.com/wwsupport
United Kingdom
Tel: +49 (0) 2203 9113332
Fax: +49 (0) 2203 9113390
http://www.cardscan.com/wwsupport
Other Countries
Please contact your local reseller. To find your local reseller, visit
www.cardscan.com.
12-4 Corex Technologies
Page 63

Appendix A: CardScan Scanner Warranty
Warranty Period
Corex Technologies Corporation warrants to the first consumer purchaser the CardScan
Business Card Scanner to be free from malfunctions and defects in both materials and
workmanship for a period of 24 months from the date of purchase*.
Warranty Repair Coverage
If the scanner does not function properly within the warranty period due to defects in
materials or workmanship, Corex will replace the unit without charge, subject to the
conditions and limitations stated herein. Corex reserves the right to ship a remanufactured
scanner as a replacement. In no way will the customer be entitled to new software as part
of the warranty.
*Limitations
Warranty service will not be provided without dated proof of purchase.
This warranty becomes null and void if the consumer fails to package the scanner in a
manner consistent with the original product packaging, and damage occurs during
shipment.
This warranty does not cover the following: circumstances beyond Corex’s control,
damage to the scanner resulting from the use of attachments, accessories, or alterations
not marketed by Corex; damage as a result of unauthorized modifications or service;
misuse; abuse; or failure to use items supplied by Corex (such as adapters and cables).
COREX MAKES NO OTHER WARRANTIES, EXPRESSED, IMPLIED, OR OF
MERCHANTABILITY OR FITNESS FOR A PARTICULAR PURPOSE FOR
THIS EQUIPMENT OR SOFTWARE.
Replacement of the scanner is Corex’s only obligation under this warranty. COREX WILL
NOT BE RESPONSIBLE FOR ANY CONSEQUENTIAL OR INCIDENTAL DAMAGES
RESULTING FROM THE PURCHASE, USE, OR IMPROPER FUNCTIONING OF THE
BUSINESS CARD SCANNER REGARDLESS OF THE CAUSE. Such damages for which
Corex will not be responsible include, but are not limited to, loss of revenue or profit,
downtime costs, loss of use of equipment, cost of any substitute equipment, facilities or
services, or claims of your customers for such damage.
Obtaining Warranty Service
Continental United States
1. Call Corex Technical Support at 617-492-4200 (select option #2) to verify the
scanner is properly installed.
2. If the scanner is defective, contact Customer Service at 800-942-6739 for a Return
Material Authorization (RMA) number and specific return instructions.
3. A replacement unit will be shipped within five days after the defective product is
received by Corex.
4. All replacements will be shipped via UPS ground transport.
Outside the Continental United States
Visit our Web Site, at www.cardscan.com, for a reseller in your area.
RETURNS WILL NOT BE ACCEPTED WITHOUT AN “RMA” NUMBER
CLEARLY PRINTED ON THE OUTSIDE OF THE SHIPPING CARTON.
COREX IS NOT RESPONSIBLE FOR SHIPMENTS DELAYED OR LOST IN
TRANSIT.
Page 64

1
Appendix A: CardScan Scanner Warranty
THIS PAGE IS INTENTIONALLY LEFT BLANK.
Corex Technologies
Page 65

Appendix B: Compliance with FCC and EC
FCC Statement
This equipment has been tested and found to comply with the limits for a Class
B digital device, pursuant to Part 15 of FCC rules. These limits are designed to
provide reasonable protection against harmful interference in a residential
installation.
This equipment generates, uses and can radiate radio frequency energy and,
if not installed in accordance with the instructions, may cause harmful
interference to radio communications. However, there is no guarantee that
interference will not occur in any installation.
To comply with part 15 of FCC rules, you must use the cable provided with the
scanner. If this equipment does cause harmful interference to radio or
television reception, which can be determined by turning the equipment off and
on, the user is encouraged to correct the interference by one of the following
measures:
• Reposition the receiving antenna.
• Increase the distance between the equipment and the receiver.
• Connect the scanning and computer equipment to an outlet on a circuit
different from the receiver’s.
FCC Statement
EC Declaration of Conformity
CardScan
600cx
Equipment Description: Model CardScan 600cx
Information Technology Equipment
Card Scanner
5 V d.c., 500 mA
Year of Manufacture: 2003
Applicable Directives: 73/23/EEC, Low Voltage Directive
89/336/EEC, EMC Directive
Applicable Standards: EN 60950-1:2002
Information Technology Equipment - Safety
EN 55022: 1998 Information Technology
Equipment - Radio Disturbance Characteristics
EN 55024: 1998 Information Technology
Equipment - Radio Disturbance Characteristics
CardScan Getting Started B-1
Page 66

Appendix B: Compliance with FCC and EC
1
CardScan
600c
Equipment: CardScan 600c scanner and power supply.
Information Technology Equipment
100-240 VAC, 50-60 Hz, 30VAMAX
Year of Manufacture: 2001
Applicable Directives: 73/23/EEC & 93/68/EEC Low Voltage Directive
89/336/EEC, EMC Directive
Applicable Standards: EN60950
EN55022:1994 including A1:1995
and A2:1997 Class B
EN50082-1 (1992)
Type Examination
Certificate Scanner: Underwriters Laboratory, UL1950
Power Supply: TUV-GS
B-2 Corex Technologies
Page 67

Index
A
AccuCard Service
on CardScan.Net 1-3, 6-1
symbols in CardScan files 5-1
Updates 6-6
ActiveSync
see Pocket PC
Adding
email addresses 4-4
notes 4-7
phone numbers 4-4
web addresses 4-4
Address
adding 4-4
adding email and web 4-5
checking details 4-3
displaying map of 10-1
Address Book
creating 3-1
safeguarding 5-5
synchronizing with Palm 8-1
Alphabet Bar
for finding contacts 5-3
B
Backing up
contacts 5-5
Backup
guaranteed with CardScan.Net 1-1
Batch Options
to assign categories and notes 4-8
C
CardScan Synchronization
overview 7-2
using 7-4
CardScan.Net
access contacts remotely 1-2
account 1-2
AccuCard Service 1-3, 5-1
automatic synchronization 6-5
features 6-1
file synchronization 6-3
getting started with 6-1
guaranteed backup,remote access
to contacts 1-1
manual synchronization 6-4
password 1-1
safeguard contacts 1-2
saving contacts to 3-8
Categories
assigning to contacts 4-6
find contacts with 1-1
list of, in CardScan 4-6
synchronizing with Palm 8-3
Checking details
option for Names and
Addresses 4-3
Conduit
for Palm 8-1
Conflict during synchronization
causes and resolution 6-3
with CardScan.Net 6-3
with Pocket PC 9-2
Connecting
scanner 2-3
Contact Managers
CardScan Synchronization with 7-2
getting contacts into 1-2
Context-sensitive
cursors 10-1
menus 4-3
I
N
D
E
X
CardScan Getting Started Index-1
Page 68

Conventions
in this Guide 1-3
Copying
contact information from emails 3-7
data with Data Exchange
Wizard 3-5
earlier versions of converted
files 2-4
files to CardScan.Net 1-2
in Edit view, drag and drop 4-3
Creating
address book 3-1
contacts 3-1
contacts by dragging and
dropping 3-1
files and contacts manually 3-7
D
Data Exchange
with contact managers, PIMs,
PDA 1-2
with other applications 7-1
Wizard 3-5, 7-1, 7-4, 8-2
Wizard, to choose best method 1-2
Deleting
contacts 4-8
Dialing
from Summary view 10-1
Dragging and Dropping
text to create contacts 3-7
Dragging and dropping
text in Edit view 4-3
text to create contacts 3-1
vCards 3-1
Duplicates
causes 5-4
defined 5-4
finding 5-3, 5-4
preventing 5-4
E
EC
600cx Declaration of
Conformity B-1
Edit view
drag and drop text 4-3
moving text 4-3
Editing
and verifying contacts 4-1
drag and drop 4-3
text 4-3
text in fields 4-3
Email
adding addresses 4-4
addresses 4-5
addresses, adding 4-5
including Signature Card 10-2
Exchanging
data with other applications 7-1
Export
Wizard 1-2
F
FAX
labels 4-4
FCC
statement B-1
Features
summary of 1-1
Finding
and removing duplicate
contacts 5-4
contacts with Alphabet Bar 5-3
contacts with QuickSearch 5-2
duplicate contacts 5-3, 5-4
groups of contacts 5-3
Index-2 Corex Technologies
Page 69

G
Glossary
included in Online Help 1-4
H
Help
Online Help 1-3
M
MapQuest
displaying map of address 10-1
Menus
context-sensitive 4-3
right-click 4-3
Microsoft Outlook
including Signature Card 10-2
I
N
D
E
X
I
Import
dialog, displaying columns 3-6
Importing
from Contact Managers and
PIMs 3-4
templates for 3-6
Information
and support for users 1-4
Installing
CardScan 2-1
CardScan Software 2-2
if previous version is installed 2-4
system requirements 2-1
Intellisync
upgrading to CardScan
Synchronization 7-2
L
Labels
FAX 4 -4
phone 4-4
List view
features of 5-1
using QuickSearch in 5-2
N
Name
checking details 4-3
Notes
adding to contacts 4-7
P
Palm
CardScan Conduit for 8-1
categories and custom fields 8-3
installing before CardScan 2-1
synchronizing with CardScan 8-1
Palm organizers
HotSync Progress dialog 8-4
Passwords
options for ActiveSync
connection 9-3
setting in CardScan Conduit 8-3
to access account on
CardScan.Net 1-1
to access CardScan.Net
account 6-5
PDA
defined 1-1
getting contacts into 1-2
synchronizing 1-2
CardScan Getting Started Index-3
Page 70

Phone
adding numbers 4-4
dialing from Summary view 10-1
labels 4-4
Phone labels
adding new 4-5
drop-down list 4-5
saving new 4-5
typing 4-5
Phone numbers
adding 4-4
PIMs
CardScan synchronization with 1-2
defined 1-1
getting contacts into 1-2
Pocket PC
installing before CardScan 2-1
removing ActiveSync module 9-3
setting up ActiveSync module 9-1
software requirements 9-1
synchronizing CardScan with 9-1
Preferences
scan 3-1
use to eject jammed card 12-2
Printing
overview 11-1
with Print Wizard 11-1
Q
QuickSearch
feature 1-1
finding contacts 5-2
R
Remote Access
with CardScan.Net 6-1
S
Safeguarding
contacts against loss 5-5
Saving
contacts 3-8
Scanner
connecting 2-3
FCC statement and EC
compliance B-1
Setup Wizard 2-2
TWAIN-compliant 1-1
TWAIN-compliant, guidelines 2-3
warranty A-1
Scanning
back of card 1-1
preferences 3-1
with a CardScan 600c or 600cx 3-1
with TWAIN-compliant
scanners 1-1
Searching
for contacts 5-2
for duplicate contacts 5-3
for groups of contacts 5-3
secure 1-2
Setting Up
ActiveSync module 9-1
scanner 2-2
Shortcuts
to move between contacts 4-2
Signature Card
in Microsoft Outlook emails 10-2
Software
installing 2-2
uninstalling 2-4
Sorting
contacts in file 5-2
Summary view
dialing from 10-1
displaying map of address 10-1
visiting contacts web sites 10-1
Index-4 Corex Technologies
Page 71

Support
and user information 1-4
Synchronization
CardScan 7-2
CardScan Synchronization
supported applications 3-5
CardScan.Net-enabled files 6-3
conflict 6-3
of categories with Palm 8-3
set up with Palm 8-1
with Palm OS devices 8-1
with Pocket PC devices 9-1
Synchronizing
CardScan.Net-enabled files 6-3
with CardScan.Net 6-3
with Palm Address Book 8-1
with Palm OS devices 8-1
with Palm, setup 8-1
with PDA, Palm, and Pocket PC 1-2
with Pocket PC devices 9-1
T
Technical Support
in Europe 12-3
Tem pl at es
creating for Import 3-6
Troubleshooting
tips and support information 12-1
TWAIN-compliant scanners
guidelines for using 2-3
using with CardScan 1-1
V
Verifying
and editing contacts 4-1
checking details 4-3
Views
Edit view to verify and edit 4-1
List view 3-7, 5-1
W
Warranty
information for scanner A-1
Web
adding addresses 4-4, 4-5
addresses, adding 4-5
CardScan.Net account 1-1
visiting contacts sites 10-1
Windows
NT 2-1
XP 2-1
Windows CE
see Pocket PC 9-2
Z
Zooming
SmartZoom 4-3
I
N
D
E
X
U
Uninstalling
CardScan software 2-4
USB
port for scanner 2-1
CardScan Getting Started Index-5
 Loading...