

Page 1
Page 2

Copyright © 2001 Corex Technologies Corp. All rights reserved
worldwide. This guide is protected by federal copyright law. No part of
this guide may be reproduced or distributed, transcribed, stored in a
retrieval system, translated into any spoken or computer language or
transmitted in any form or by any means whatsoever without the prior
written consent of:
Corex Technologies Corporation
810 Memorial Drive
Cambridge, MA 02139
Tel: (617) 492-4200
Fax (617) 492-6659
Trademarks: CardScan and CardScan.Net are registered trademark of
Corex Technologies Corp. Windows is a trademark of Microsoft
Corporation. All other trademarks are the property of their respective
owners.
Disclaimer of Warranties: Corex Technologies Corp. makes no
warranty, representation or promise not expressly set forth in this
agreement. Corex Technologies Corp. disclaims and excludes any and
all implied warranties of merchantability, title, or fitness for a particular
purpose. Corex Technologies Corp. does not warrant that the software
or documentation will satisfy your requirements or that the software and
documentation are without defect or error or that the operation of the
software will be uninterrupted.
LIMITATION OF LIABILITY: Corex Technologies Corp.’s aggregate
liability, as well as that of the authors of programs sold by Corex
Technologies, arising from or relating to this agreement or the software
or documentation is limited
to the total of all payments made by or for you for the license. This
limited
warranty gives you specific legal rights. You may have others which
vary
from state to state. Some states do not allow the exclusion or limitation
of incidental or consequential damages, so the above limitation or
exclusion may not apply to you.
Page 3

Chapter 1 About CardScan
Introducing CardScan Features .................................................. 1-1
Scanning and Processing
Accuracy
Graphical User Interface
.............................................................................. 1-3
CardScan views ..................................................................... 1-3
Toolbar ................................................................................... 1-7
Alphabet Bar .......................................................................... 1-8
Status Line ............................................................................. 1-8
Big Picture ............................................................................. 1-9
......................................................... 1-2
........................................................... 1-3
Chapter 2 Installing, Starting
and Setting Up CardScan
System Requirements .............................................................. 2-1
Before Installing CardScan Software
Installing CardScan Software
Starting and Setting Up CardScan
Converting Files Created with Earlier Versions
..................................................... 2-2
Table of Contents
........................................... 2-1
............................................... 2-3
............................... 2-4
Chapter 3 Quick Start
Save Your First File ................................................................. 3-2
Scan and Process a Card
Review your scanner’s setup ................................................. 3-4
Scan a card ........................................................................... 3-5
Verify and Edit the Contact
Add Notes
Categorize Contact
Work with Multiple Contacts....................................................... 3-9
............................................................................. 3-7
................................................................. 3-8
Explore List view .................................................................... 3-9
Sort the list ...........................................................................3-11
......................................................... 3-3
........................................................ 3-6
CardScan User’s Guide i
Page 4

Table of Contents
Find Contacts ....................................................................... 3-12
Using QuickSearch ...............................................................3-12
Using Categories ..................................................................3-13
Work with Multiple Files
Create a new file ...................................................................3-14
Enter a contact manually .......................................................3-15
Copy contacts between files ..................................................3-16
Print a Contact
Send Email
...................................................................... 3-17
........................................................................... 3-18
Chapter 4 Scanning
Using CardScan 600c Scanner .................................................. 4-1
Using TWAIN-Compliant Scanners
Guidelines .............................................................................. 4-3
Scanning Options for TWAIN-compliant scanners .................. 4-4
Scanning multiple cards simultaneously ................................. 4-5
Using Batch Options
Scanning the Back of a Card
........................................................... 3-14
.............................................. 4-3
................................................................ 4-6
..................................................... 4-7
Chapter 5 Entering Contacts by Importing
and by Dragging and Dropping
Importing Files from Contact Managers and PIMs ........................... 5-1
Dragging and Dropping vCards
Dragging and Dropping Text from Emails and Electronic Letters
................................................. 5-3
Chapter 6 Verifying and Editing Contacts
Verifying Contact Information ..................................................... 6-1
Why you should verify ............................................................ 6-1
Verify at your convenience ..................................................... 6-1
Verifying hidden text and fields .............................................. 6-2
Checking details of names and addresses ............................. 6-3
ii Corex Technologies
......... 5-4
Page 5

Editing Text ........................................................................... 6-4
Adding Phone Numbers
Adding Email and Web Addresses
Editing Lists of Phone and Email Labels
Some label facts to keep in mind ........................................... 6-8
Adding Notes
Categorizing
Duplicating Contacts
Deleting Contacts and Images
......................................................................... 6-9
.......................................................................... 6-9
Deleting contacts ..................................................................6-10
Deleting images ....................................................................6-11
............................................................ 6-5
............................................................... 6-10
Chapter 7 Using Categories
Categorizing One Contact ......................................................... 7-1
Categorizing Multiple Contacts
Checkboxes in Assign Categories dialog ............................... 7-3
Adding, Renaming and Deleting Categories
Table of Contents
.............................................. 6-7
....................................... 6-7
.................................................. 6-10
................................................... 7-2
.................................. 7-4
Chapter 8 Finding Contacts
Finding Contacts with QuickSearch ........................................... 8-1
Searching on text and fields ................................................... 8-2
Searching for multiple words .................................................. 8-2
More examples of QuickSearch ............................................. 8-3
Setting QuickSearch preferences ........................................... 8-4
Finding Contacts by Category
Finding Contacts Starting with the Same Letter
.................................................... 8-5
.............................. 8-6
CardScan User’s Guide iii
Page 6

Table of Contents
Chapter 9 Working with Files
Sorting Contacts in a File.......................................................... 9-1
Customizing List View
Combining Two Files
Dragging and dropping contacts between files ....................... 9-4
Copying and pasting contacts between files ........................... 9-5
Splitting a File
Saving Files
Renaming Files
Moving Files
Reconciling Two CardScan Files
Backing Up Files
Restoring Backup Files
........................................................................ 9-6
.......................................................................... 9-6
.......................................................................... 9-7
.............................................................. 9-3
............................................................... 9-4
...................................................................... 9-7
..................................................................... 9-8
............................................................ 9-9
Chapter 10 CardScan.Net
About CardScan.Net............................................................... 10-1
Creating CardScan.Net Account and Address Book
Working With CardScan.Net Files
Working with address books on the Web ...............................10-8
Working with .Net Files in CardScan .....................................10-9
Understanding CardScan.Net Indicator ...............................10-12
About Synchronization
Conflict Resolution
Manual Synchronization
Synchronizing one address book ........................................10-14
Synchronizing all address books .........................................10-14
Automatic Synchronization
Enabling automatic synchronization ....................................10-15
.......................................................... 10-12
............................................................... 10-12
........................................................ 10-14
..................................................... 10-15
................................................ 9-7
....................... 10-3
.............................................. 10-8
iv Corex Technologies
Page 7

Managing CardScan.Net Files................................................. 10-16
Viewing status of your CardScan.Net files ...........................10-16
Deleting, renaming, and unlinking files ................................10-17
Accessing Your CardScan.Net Account
..................................... 10-17
Chapter 11 Copying CardScan Contacts
to Contact Managers and PIMs
Transferring Contacts.............................................................. 11-1
Exporting Contacts
Creating an Export file ..........................................................11-3
Importing the Export text file into the other application .......... 11-3
Dragging and Dropping vCards from CardScan
Copying and Pasting Contacts from CardScan
Using Copy Settings
................................................................. 11- 3
............................. 11-4
.............................. 11-4
............................................................... 11- 5
Chapter 12 Synchronizing with
Contact Managers and PIMs
Synchronizing Manually Using Intellisync™ for CardScan ............... 12-1
Configuring Intellisync ...........................................................12-1
Synchronizing .......................................................................12-6
Understanding data conflicts .................................................12-8
When to use Re-Sync .........................................................12-10
Setting Advanced Options ...................................................12-11
Synchronizing Automatically, Using AutoSync™
Setting up AutoSync ...........................................................12-15
Controlling AutoSync with the taskbar icon .........................12-17
Table of Contents
......................... 12-14
CardScan User’s Guide v
Page 8

Table of Contents
Chapter 13 Synchronizing with Palm
Computing™ Organizers
CardScan Conduit for Palm ...................................................... 13-1
Installing the CardScan Conduit
Setting up the CardScan Conduit
First-time setup .....................................................................13-4
Changing Conduit settings ....................................................13-7
Choosing one-way or two-way synchronization .....................13-8
First-Time Synchronization
Before synchronizing ............................................................13-9
To synchronize ......................................................................13-9
Synchronization Examples
Synchronizing a CardScan file with one handheld ...............13-10
Synchronizing a CardScanfile with multiple handhelds ........13-11
Synchronizing a handheld with
CardScan and another application ......................................13-13
Synchronization of Categories
Synchronization of Phone and Email Labels
Troubleshooting Tips
Duplicate records ................................................................13-17
Error messages ..................................................................13-18
............................................................ 13-17
................................................ 13-3
............................................... 13-4
....................................................... 13-9
..................................................... 13-10
................................................ 13-13
............................... 13-15
Chapter 14 Synchronizing with Windows® CE Devices
Installing the ActiveSync Module ............................................... 14-1
Setting up ActiveSync
Reviewing Synchronization Status
Changing ActiveSync Options
vi Corex Technologies
............................................................. 14-2
.............................................. 14-4
................................................... 14-4
Page 9

Table of Contents
Chapter 15 Synchronizing with Psion® Palmtops
Installing the CardScan Synchronization Module ........................... 15-1
Setting Up the Psion PsiWin Software
Defining synchronization tasks ..............................................15-3
Synchronizing CardScan and Psion
Synchronizing manually ........................................................15-6
Synchronizing automatically ..................................................15-9
Changing Settings
Changing filenames and locations .......................................15-10
Deleting tasks .....................................................................15-12
Creating tasks .....................................................................15-12
Troubleshooting Tips
Error messages ..................................................................15-13
Other problems ...................................................................15-14
................................................................ 15-10
............................................................ 15-13
......................................... 15-3
............................................ 15-6
Chapter 16 Controlling Duplicate Contacts
Finding Duplicate Contacts....................................................... 16-1
Comparing Duplicate Contacts
Deleting Duplicate Contacts
Copying Information from One Duplicate Contact to Another
.................................................. 16-3
..................................................... 16-6
............ 16-6
Chapter 17 Contacting People Directly from CardScan
Emailing, Dialing, and Browsing Web Sites .................................. 17-1
Emailing Contacts from CardScan
Supported Email applications ................................................17-1
Setting email preferences .....................................................17-2
Sending email .......................................................................17-4
Sending contacts via email ...................................................17-4
Addressing Faxes
Using CardScan with WinFax®Pro ........................................17-5
Using CardScan with FaxWorks®Pro ....................................17-5
.................................................................. 17-5
.............................................. 17-1
CardScan User’s Guide vii
Page 10

Table of Contents
Dialing Phone and Fax Numbers ............................................... 17-6
Dialing a phone number ........................................................17-6
Dialing an international number .............................................17-7
Dialing phone numbers with
extensions or special access codes ......................................17-7
Visiting Contacts’ Web Sites
Displaying Contact’s Address on Web-based Map
Including Your Business Card in Outgoing Emails
Enabling Signature Card .......................................................17-9
Disabling Signature Card ....................................................17-11
..................................................... 17-8
......................... 17-8
.......................... 17-9
Chapter 18 Sharing CardScan on a Network
Opening Files ....................................................................... 18-1
Sharing Files
Protecting Your Contact Information
........................................................................ 18-1
What you see is real .............................................................18-2
........................................... 18-3
Protecting files with passwords .............................................18-3
Changing and removing passwords ......................................18-3
Chapter 19 Setting Preferences
Selecting Scanner and Scanning Options .................................... 19-1
Setting Default Views for Contacts and Tabs
Setting Display Options for QuickSearch
Setting Email Preferences
Setting Display Options for Warnings
viii Corex Technologies
........................................................ 19-4
................................. 19-2
..................................... 19-3
.......................................... 19-5
Page 11

Table of Contents
Chapter 20 Getting CardScan Updates from the Web
Instructions .......................................................................... 20-1
Advanced Options
.................................................................. 20-4
Chapter 21 Printing
Instructions for Printing ........................................................... 21-2
Creating and Editing Page Layouts
............................................ 21-8
Appendix A: Registering CardScan
How to Register...................................................................... A-1
Appendix B: CardScan Information and Support
Documentation and Online Help ................................................. B-1
Corex Web Site
Product information ................................................................ B-2
Support Knowledge Base ....................................................... B-2
Compatibility information ........................................................ B-2
Software and other updates ................................................... B-3
Corex Technical Support
...................................................................... B-2
........................................................... B-3
Appendix C: About vCard
Appendix D: Uninstalling CardScan
Index
CardScan User’s Guide ix
Page 12

Table of Contents
x Corex Technologies
Page 13

Chapter 1 About CardScan
This chapter introduces CardScan’s features, the basics of its
scanning and processing functions, and the details of its
graphical user interface.
Introducing CardScan Features
CardScan enables you to:
New! • Transform your contact information into online address
books available to you anytime in your private account on
a secure Web site CardScan.Net, at www.cardscan.net.
New! • Display a Web-based map of a contact’s address.
New! • Automatically include an image of your business card in
all outgoing emails, if using Microsoft Outlook 98 or later.
New! • With the CardScan 600c color scanner, scan and process
business cards in color.
Introducing CardScan Features
• Process cards from Australia, Belgium, Canada, France,
Germany, Sweden, the UK, and the US.
• During scanning, automatically categorize batches of
cards and add notes to each card in the batch.
• For cards with information on both sides, capture and
include an image of the back of the card.
• Find any contact or group of contacts using QuickSearch
and categories.
• Synchronize CardScan files with Personal Digital
Assistants (PDAs):
- Palm OS
- Windows CE
- Psion
• Synchronize with contact managers and Personal
Information Managers (PIMs) supporting Intellisync.
®
connected organizers
®
®
palmtops
and Pocket PCs
CardScan User’s Guide 1-1
Page 14

1
Chapter 1 About CardScan
• Drag and drop contacts from CardScan to applications
supporting vCard. Drag and drop contacts from such
applications and Web sites into CardScan.
• Transfer and export contacts from CardScan to contact
managers and PIMs, and import contacts into CardScan.
• Work on CardScan files on a network simultaneously with
other CardScan users.
• Reach your contacts directly from CardScan by email,
phone and fax, and on their Web sites.
Scanning and Processing
When scanning a card, with a CardScan scanner or with a
TWAIN-compliant scanner, CardScan:
1. Communicates with the scanner and captures an image
of the card.
2. Saves the card image on the computer’s hard drive and
allows you to continue scanning or process the saved
image immediately, or use batch-scanning options.
When processing, CardScan uses the AccuCard
to:
• Read the digital image created by your scanner.
TM
technology
1-2 Corex Technologies
• Convert the information into text and place it into labeled
fields (such as Name, Company, Address, and so forth). It
places information not belonging to any particular field
into the field called Other.
The result appears in Edit view for review and editing as
needed. See CardScan views on page 1-3.
Page 15

Accuracy
Accuracy
CardScan accurately interprets the images captured by your
scanner. However, business cards with complex designs,
unusual fonts, and colors may cause occasional mistakes.
To maximize accuracy:
• Calibrate your scanner when prompted by the Scanner
Setup Wizard (described in the Scanner Setup Card) and
any time using CardScan’s Preferences (see Setting
Preferences on page 19-1).
• When scanning with a CardScan scanner, insert cards
flush with the right-hand side of the scanner tray.
• Verify processed information. CardScan makes it easier
to do. It marks newly scanned contacts as unverified, and
reminds you about unverified contacts whenever
accuracy is important (for example, when you try to print
or transfer contacts). See Verifying and Editing
Contacts on page 6-1.
Graphical User Interface
This section describes:
• CardScan views
•Toolbar
• Alphabet bar
•Status line
•Big Picture
CardScan views
You can display contacts in
•Edit view
• Summary view
•List view
CardScan User’s Guide 1-3
Page 16
1
Chapter 1 About CardScan
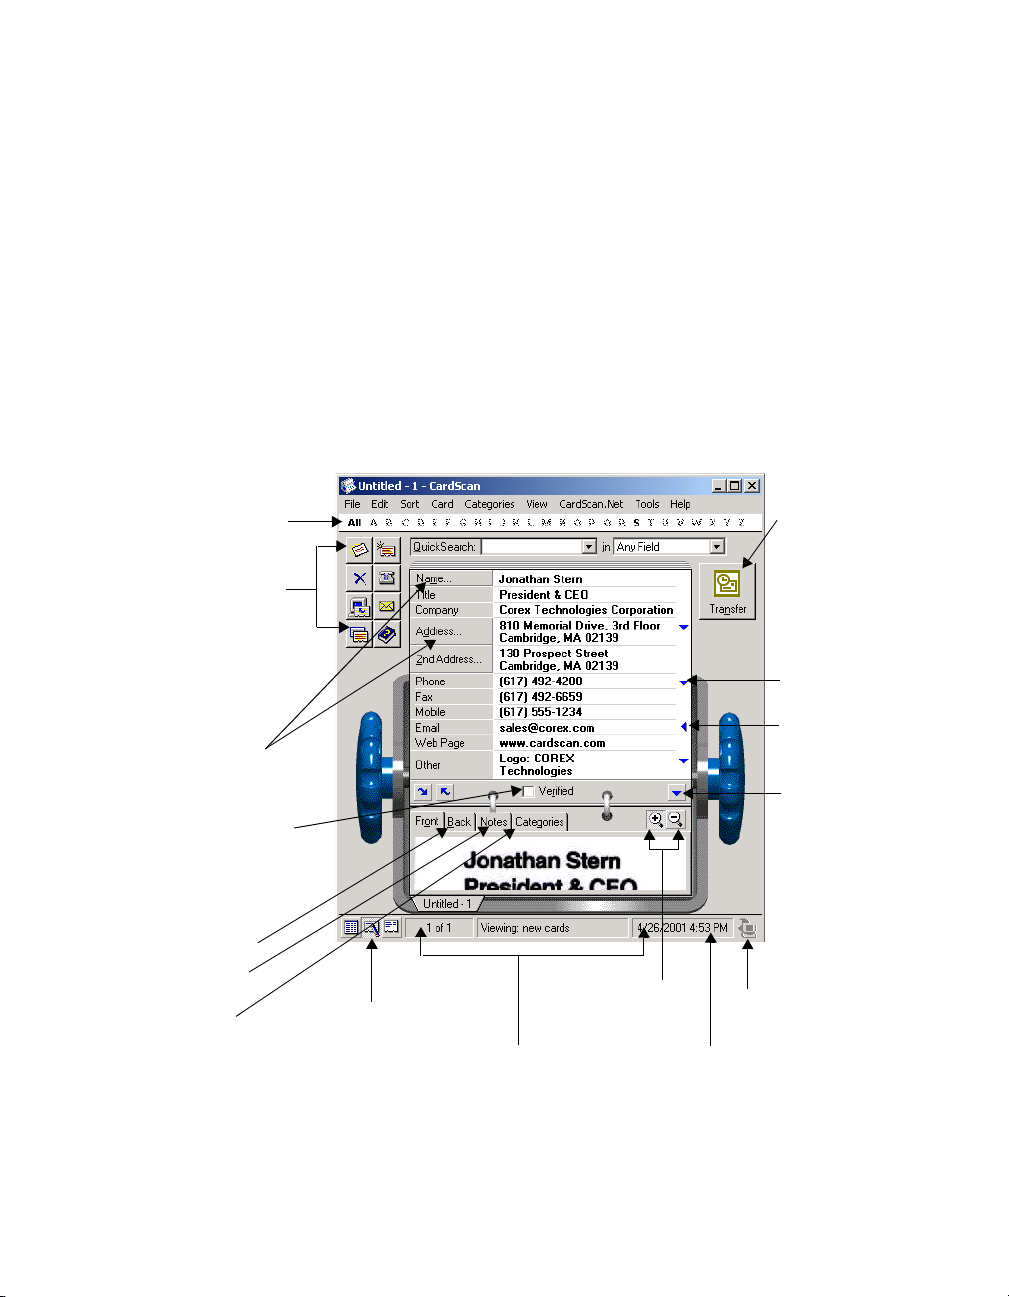
Edit View Use Edit view to:
Alphabet Bar (see
page 1-8)
Toolbar (see
page 1-7)
You can accomplish any task from any view. However,
choosing the most suitable view expedites the process.
• Verify and edit a contact
• Categorize a contact
• Add notes to a contact
The following figure illustrates frequently used features of Edit
view. For more information, see page 3-6 through page 3-8.
Click to transfer
contact to the
currently running
PIM.
Click to check
details of name
and address.
Check this box when
done verifying.
Click to display
back of card.
Click to add
or view notes.
Click to categorize.
Edit view displayed
1-4 Corex Technologies
Status line (see page 1-8)
Click to zoom in
or out of image.
Current date and time
Click to hide
additional field.
Click to open
additional field.
Click to hide all
additional fields.
CardScan.Net indicator
Page 17
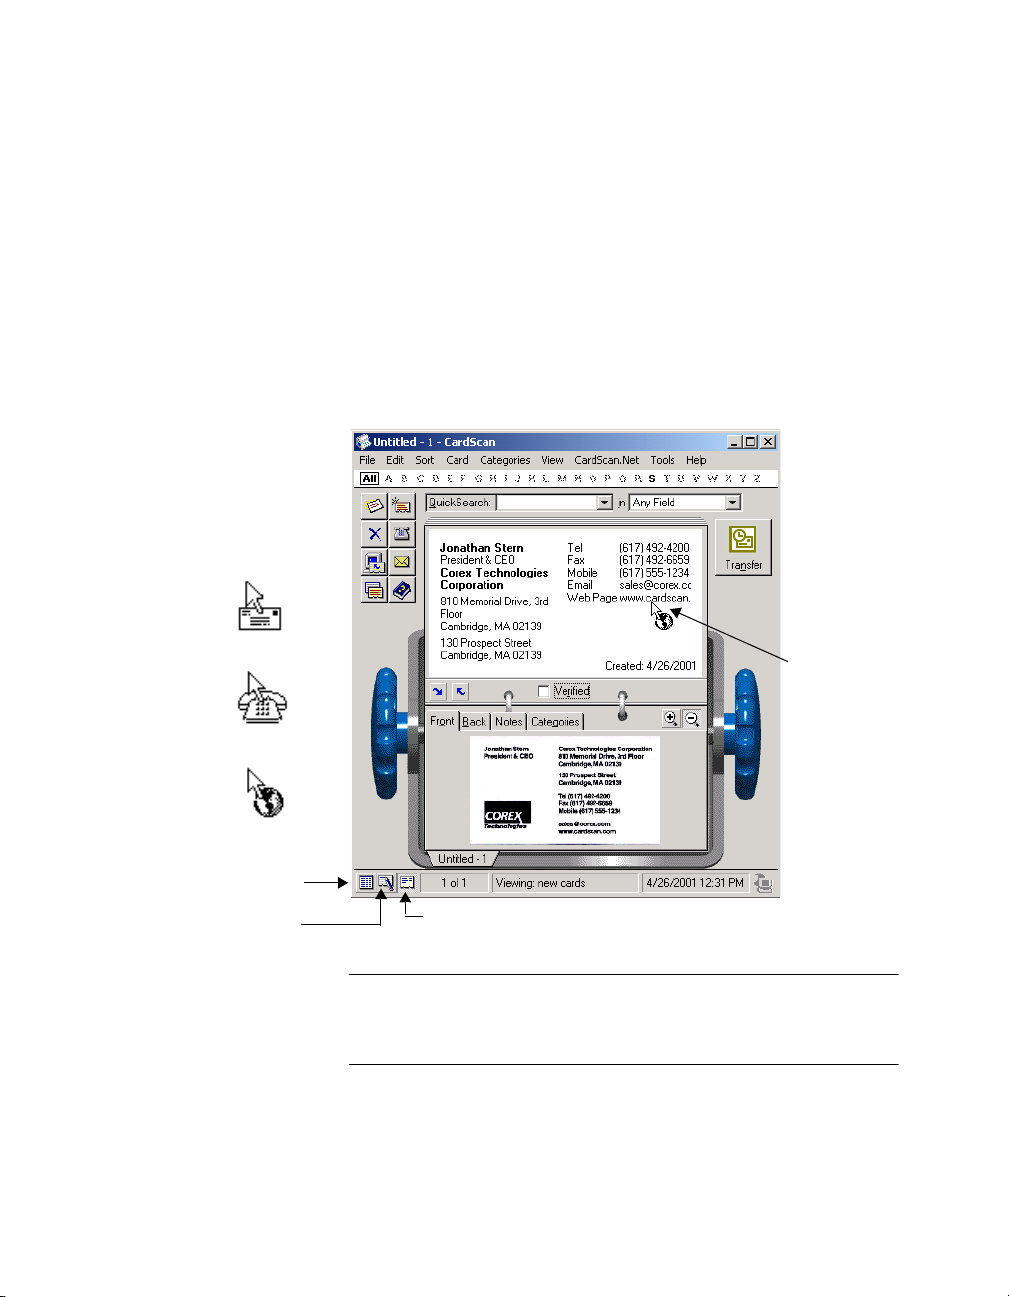
Summary View Use Summary view to:
• Look up a contact’s information
• Categorize and add notes to a contact
• Email and phone a contact, and visit a contact’s Web site
• Display a Web-based map of contact’s address
• See when the contact was created and modified
To use a phone number, email address, or a Web address,
point at it and click when the context-sensitive cursor takes the
appropriate shape. The following figure illustrates launching
your default browser to the Web address on the card.
Context-Sensitive
Cursors
Email Cursor
Graphical User Interface
Dial Cursor
Browse Cursor
Display List view.
Display Edit view.
Visit Web site.
Summary view displayed.
TIP: The Browse cursor also appears when you point to an
address in the Summary view. Click, and a Web-map of the
address displays!
For more information, see Contacting People Directly from
CardScan on page 17-1.
CardScan User’s Guide 1-5
Page 18

1
Chapter 1 About CardScan
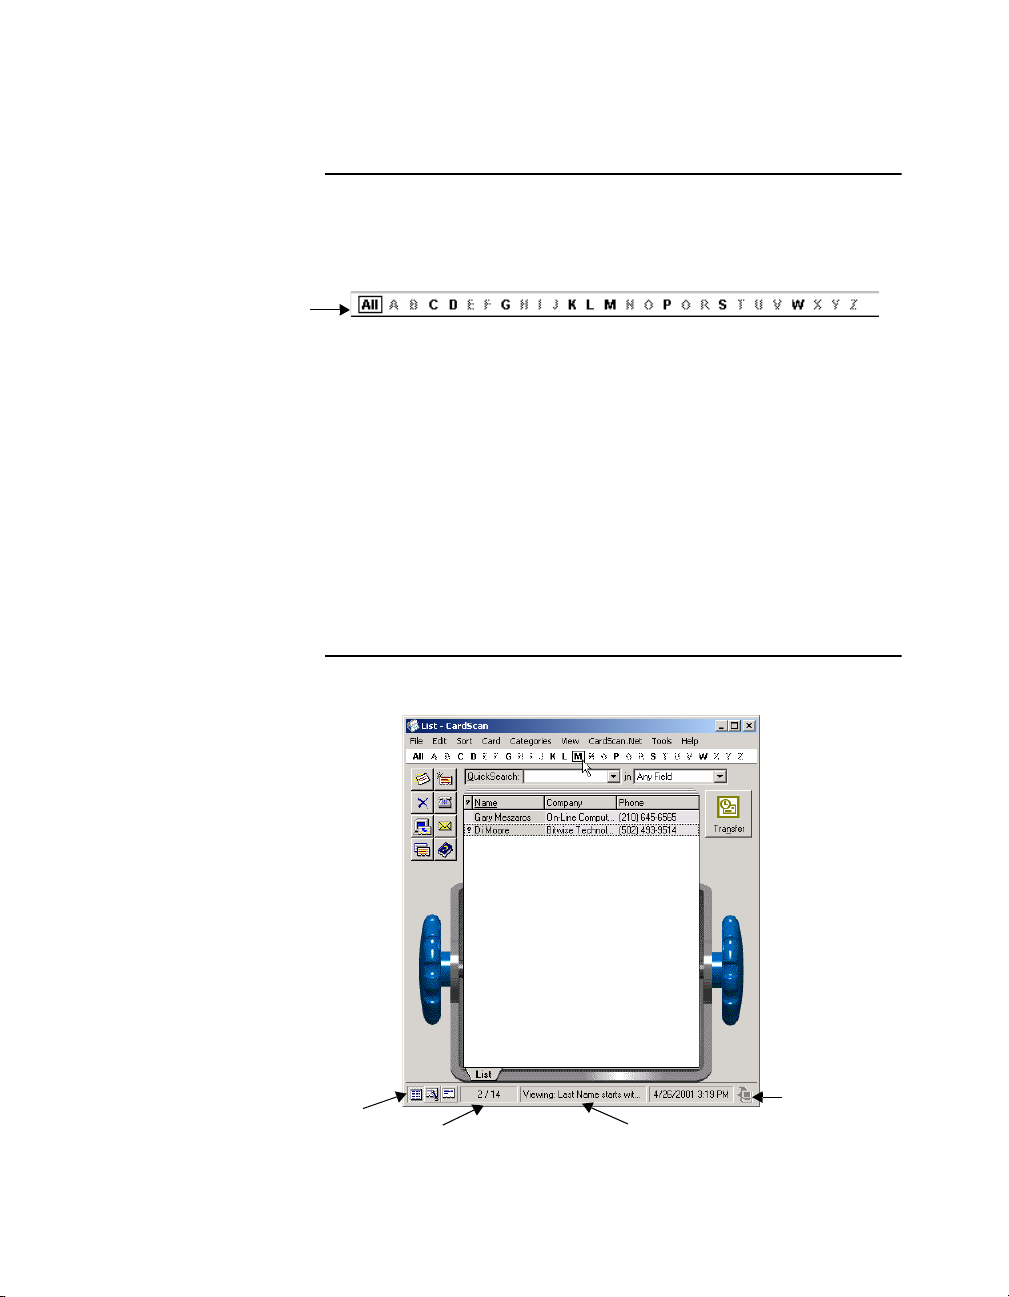
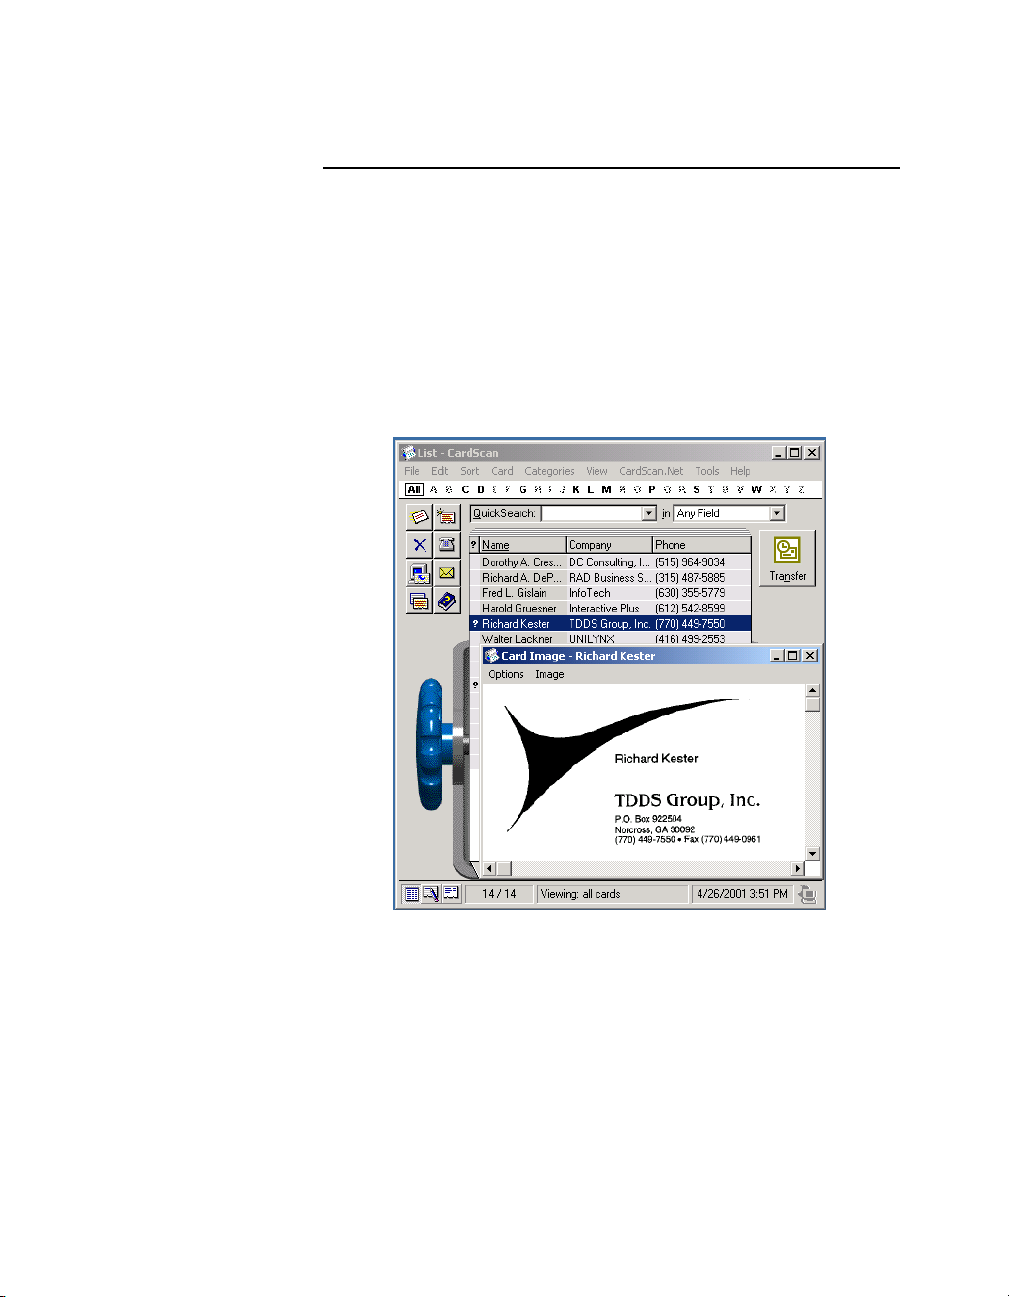
List View Use List view to view and manipulate multiple contacts. The
following figure illustrates some uses of List view.
Click to display all contacts.
Click to transfer selected
contacts to a PIM.
Click to send email to
selected contacts.
List view displayed.
Click to transfer
selected
contacts to the
currently running
PIM.
Right-click menu
In List view, you can display all contacts in a file or only some
contacts (for example, contacts found with QuickSearch).
In either case, the List button (in the lower-left corner) is
depressed, as illustrated above. To be sure you are viewing all
contacts, click on the Alphabet Bar.
1-6 Corex Technologies
List view is a table where each row represents a contact, each
column represents a field. By default, CardScan displays the
Name, Company, and Phone fields, respectively. The question
mark (?) indicates unverified contacts.
By default, CardScan sorts lists by the Name field, as shown in
the figure. Note that the column heading is underlined and the
entire column is shaded.
Page 19

Graphical User Interface
To sort by any other field, click the column heading.
Sorted
by name
Sorted by
company
NOTE: You can customize List view to display more or
fewer fields, and use any field for sorting. See Working with
Files on page 9-1.
Toolbar
The Toolbar contains buttons for quick access to features
used most often.
Scan a card.
Delete selected card(s).
Transfer card informatio n
to another application.
Copy card to Clipboard.
Enter new card by typing.
Dial phone number on card.
Send email to address on
selected card.
Display online help.
CardScan User’s Guide 1-7
Page 20
1
Chapter 1 About CardScan
Alphabet Bar
Use the Alphabet Bar, to find all contacts starting with the
same letter.
Click to display
all contacts.
Notice that some letters on the Alphabet Bar appear in
boldface. This indicates that the file contains contacts whose
last names start with that letter. When you click a boldface
letter on the Alphabet Bar, CardScan lists only the contacts
whose last names start with that letter, as illustrated in Status
Line, next section.
If you sort List view by company or city, the Alphabet Bar
identifies contacts based on that field. You can also customize
List view to sort by other fields, and then use the Alphabet Bar
to find contacts starting with the same letter. See Customizing
List View on page 9-3.
Status Line
Displaying
List view
1-8 Corex Technologies
The Status line comments on the current view. For example:
Signed out of
CardScan.Net
2 of 14 contacts displayed
Description of list displayed
Page 21
Graphical User Interface
Big Picture
While viewing contacts in any view, you can simultaneously
display a card’s image in a window called “Big Picture.” To do
so, choose View→Big Picture.
The Big Picture helps you to:
• Edit contacts more easily.
• Peruse specific contacts in List view, as illustrated next.
With the Big Picture displayed, click any contact in the list
to view its image.
The Options and Image menus in the Big Picture allow you
to:
• Change image size.
• Zoom in and out.
• Move and dock the Big Picture anywhere on the screen.
• Display the back of a card if included.
CardScan User’s Guide 1-9
Page 22

1
Chapter 1 About CardScan
1-10 Corex Technologies
Page 23

Chapter 2 Installing, Starting
and Setting Up CardScan
IMPORTANT: You must install the CardScan software
before connecting your scanner.
For instructions on connecting, setting up and calibrating your
CardScan scanner, see the Scanner Setup Card. For
instructions on connecting a TWAIN-compliant scanner, see
your scanner’s documentation.
System Requirements
• Windows 98 or later
• Pentium processor or higher
• 32 MB of RAM
• 35 MB free hard disk space for a minimum installation
and 50 MB for a full installation
• CD-ROM drive
• Modem for autodialing
• Windows-compatible network for multiple users
• Mouse recommended
• USB port for scanner connection
System Requirements
Before Installing CardScan Software
NOTE: If running Windows 2000, log on as Administrator or
to an account with Administrator privileges.
• Locate your software serial number in the
CD-ROM package.
• To use CardScan with Palm
and Pocket PC devices, install the desktop software for
these devices before installing CardScan.
®
, Psion®, or Windows CE®
CardScan User’s Guide 2-1
Page 24
1
Chapter 2 Installing, Starting and Setting Up CardScan
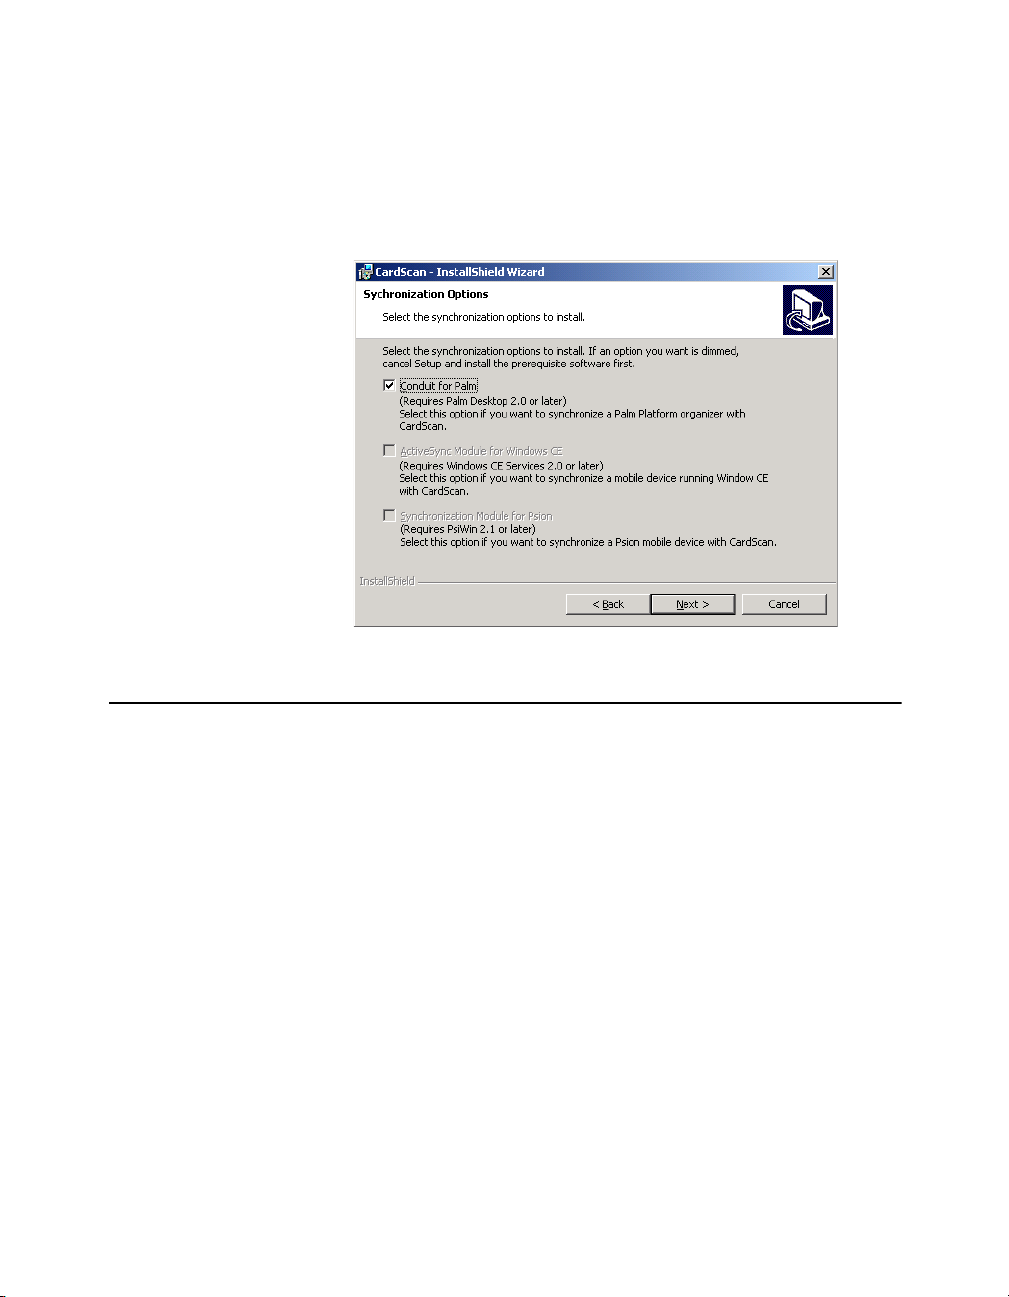
For example, if you install Palm Desktop on your computer
before installing CardScan, CardScan’s Installation Wizard
shows the Conduit for Palm enabled in the Synchronization
Options screen, as shown below:
Installing CardScan Software
To install CardScan for the first time or over an earlier version:
1. Insert the CardScan CD-ROM. The Autorun screen
appears.
2. Click Install CardScan. The CardScan InstallShield
Wizard appears.
3. Follow the InstallShield Wizard’s prompts.
2-2 Corex Technologies
Page 25
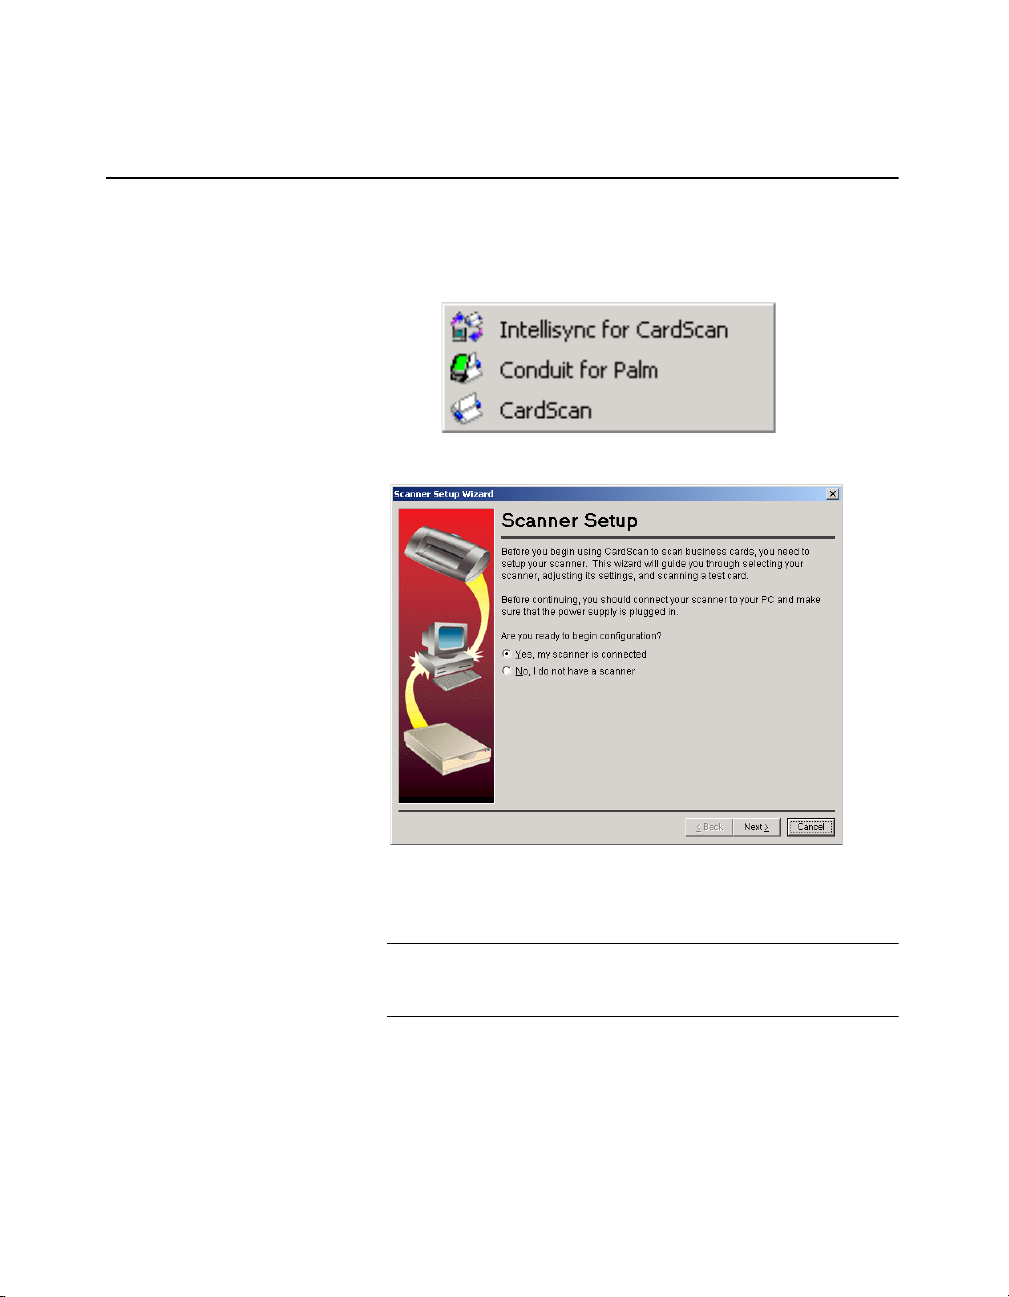
Starting and Setting Up CardScan
Starting and Setting Up CardScan
If you do not launch CardScan as part of the installation:
1. Choose Start→Programs→CardScan. The CardScan
program group is displayed:
2. Choose CardScan. The Scanner Setup wizard appears:
3. Follow the wizard’s prompts to set up your CardScan
scanner or a TWAIN-compliant scanner.
TIP: You can run the Scanner Setup Wizard any time.
Choose Tools→Scanner Setup Wizard.
For information about setting up a CardScan scanner, see the
Scanner Setup Card included with your scanner.
For information about setting up TWAIN-compliant scanners,
see Using TWAIN-Compliant Scanners on page 4-3.
CardScan User’s Guide 2-3
Page 26

1
Chapter 2 Installing, Starting and Setting Up CardScan
Converting Files Created
with Earlier Versions
If you install CardScan 6.0 over an earlier version, CardScan
prompts you to convert your old files the first time you open
them.
CAUTION
Once converted, a file cannot be opened by an earlier
version of CardScan. Therefore, prevent problems by
following the instructions below.
A. When prompted to convert your file, check the box
S
AVE A COPY OF THE ORIGINAL FILE. This saves a backup
copy in the Backup directory under CardScan.
B. Before deleting backup copies, make sure:
• Your converted file works correctly.
2-4 Corex Technologies
• You do not plan to use the previous version.
• You are using a full (not trial) version of CardScan.
• You have saved a recent backup of your file(s) on a
diskette, or CD-ROM, or Zip disk, or the like.
Page 27

Chapter 3 Quick Start
If you are new to CardScan, this chapter will help you start
using CardScan’s basic functions. Once familiar with the
basics, please refer to the other chapters to learn more about
the features introduced here and to explore CardScan’s
advanced features.
In this chapter you will learn to:
• Save your first file
• Scan and process a card
• Verify and edit a card
• Add Notes
• Categorize a contact
• Work with multiple cards
•Find cards
• Work with multiple files
• Print a card
Before you begin Please:
• Read About CardScan on page 1-1, especially
descriptions of CardScan’s graphical user interface.
• Install CardScan.
• Set up your scanner.
• If your scanner is not manufactured by Corex, make sure
you have your scanner’s documentation.
• Choose about 20 business cards for practicing. Choose
cards that include phone and fax numbers, email
addresses, and Web sites.
CardScan User’s Guide 3-1
Page 28
Chapter 3 Quick Start
Getting help If you have a question, try CardScan’s
online help.
If you have a question about CardScan’s
graphical user interface, place the cursor
over a feature to see its description
displayed.
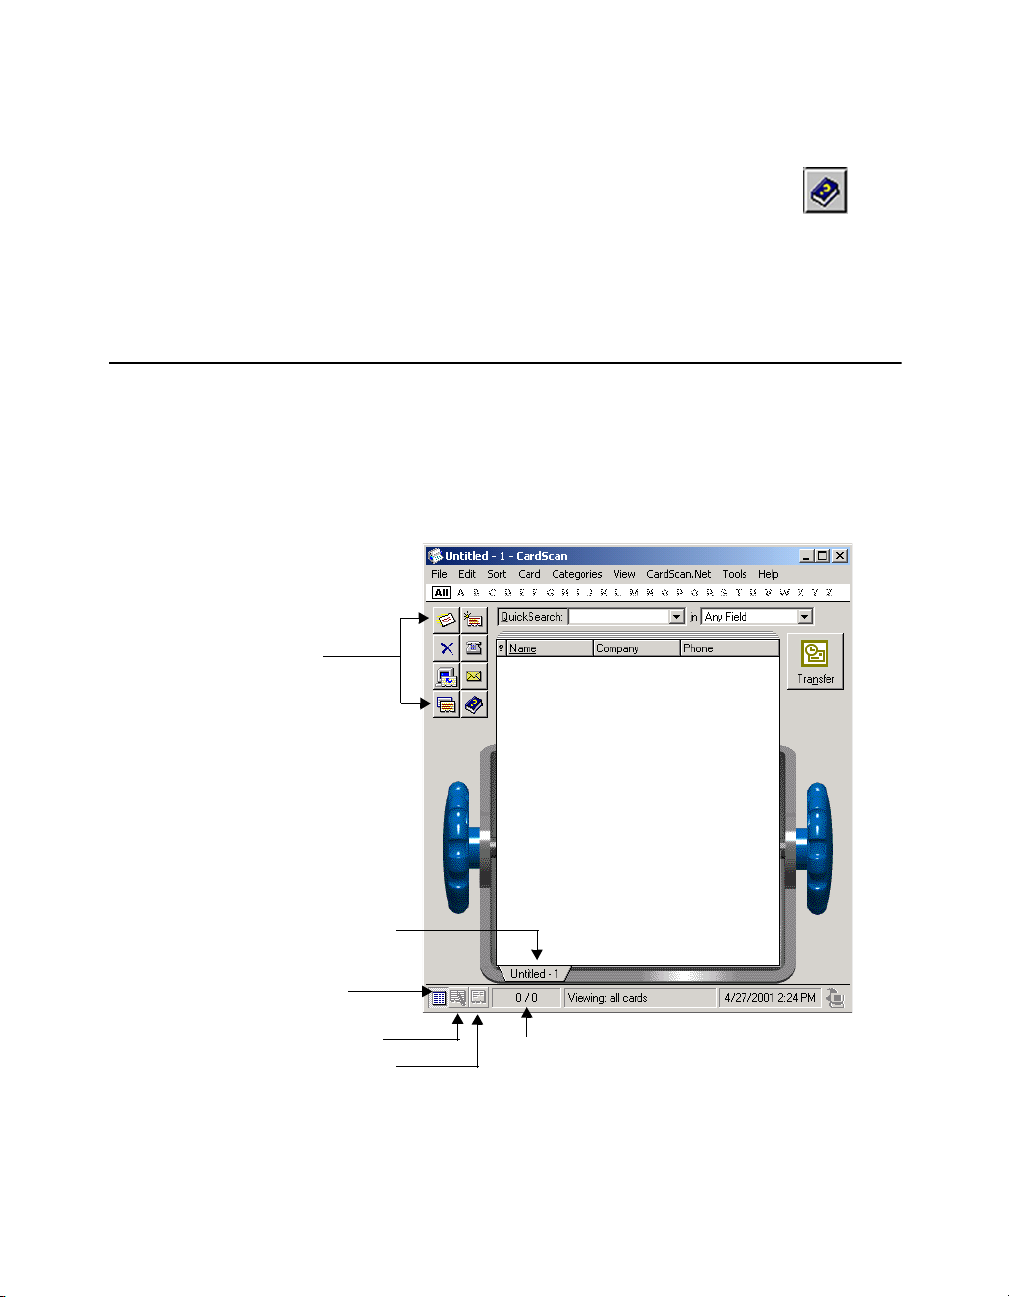
Save Your First File
When you start CardScan for the first time, it creates an empty
file and displays it in List view. The view is blank because the
file is empty. However, CardScan indicates that a new file is
open by displaying a tab with the filename Untitled-1 at the
bottom of List view.
T o o l b a r ( s e e p a g e 1 - 7 )
Click this icon for help.
File name
List view displayed
Click to switch to Edit view.
Click to switch to Summary view.
3-2 Corex Technologies
No cards in this file
Page 29

Scan and Process a Card
Before entering any contacts into this file, save it with a
descriptive name. CardScan accepts long file names, so use
any name you like:
1. Choose File→Save As. The Save As window appears,
indicating the default directory for the file. You can keep
all your CardScan files in this directory or choose a
different one.
2. Type the filename. For this tutorial, name it First File.
3. Click Save. The name First File replaces Untitled-1 on
the filename tab.
.cdb extension CardScan files use the extension .cdb. Therefore, all your
contact files will have this extension.
TIP: You can rename the file later, using the File→Rename
command.
Scan and Process a Card
Having saved your file, you can safely scan cards into it.
In this section you will:
• Review your scanner’s setup
• Scan and process a card
If you have a CardScan scanner, your scanning instructions
are in Using CardScan 600c Scanner on page 4-1. If you
have a TWAIN-compliant scanner, see Using
TWAIN-Compliant Scanners on page 4-3 for guidelines.
The following section explains how to review your scanner’s
setup. It addresses both CardScan scanners and
TWAIN-compliant scanners.
CardScan User’s Guide 3-3
Page 30
Chapter 3 Quick Start
Review your scanner’s setup
Your scanner may be able to scan cards automatically—one
after the other. All CardScan scanners do this by default.
Otherwise, you need to scan your cards one at a time—using
the button on the Toolbar or the Card→Scan command.
To check if your scanner can scan cards automatically:
1. Choose Edit→Preferences. The Preferences dialog
appears.
3-4 Corex Technologies
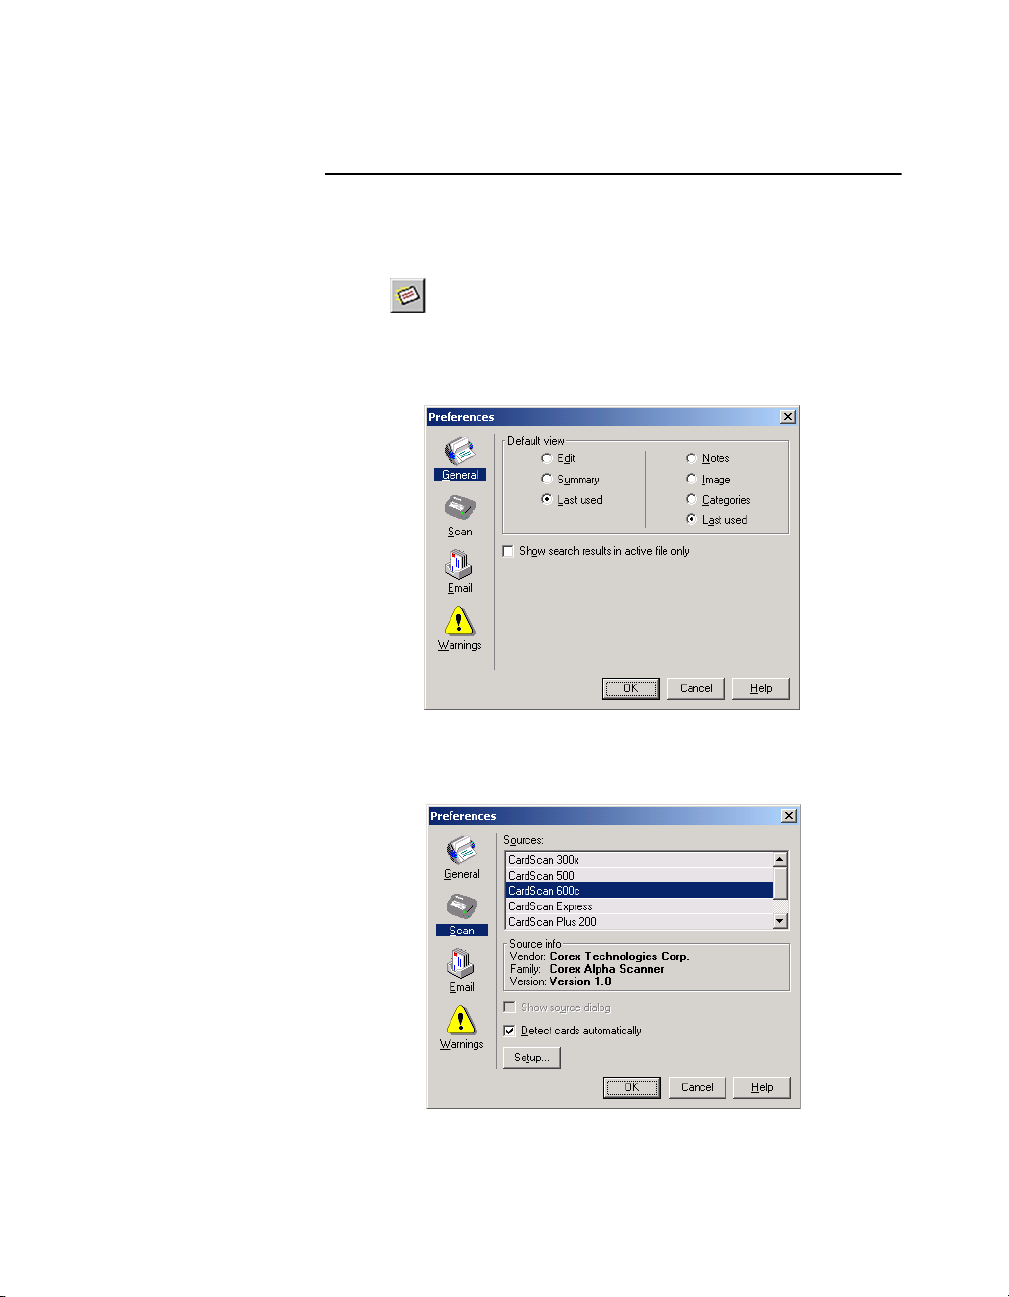
2. Select Scan to display your scanning options.
Page 31
Scan and Process a Card
3. Under SOURCES, click your scanner.
If the checkbox for D
ETECT CARDS AUTOMATICALLY
remains dimmed, this option is unavailable with your
scanner. If the option is available, click the checkbox to
be able to scan a batch of cards in succession.
Scan a card
1. Position a card in the scanner as described in
your scanner’s documentation. If your scanner
is set to scan automatically, scanning occurs
immediately. If your scanner cannot scan automatically,
choose Card→Scan or click on the Toolbar to
begin scanning.
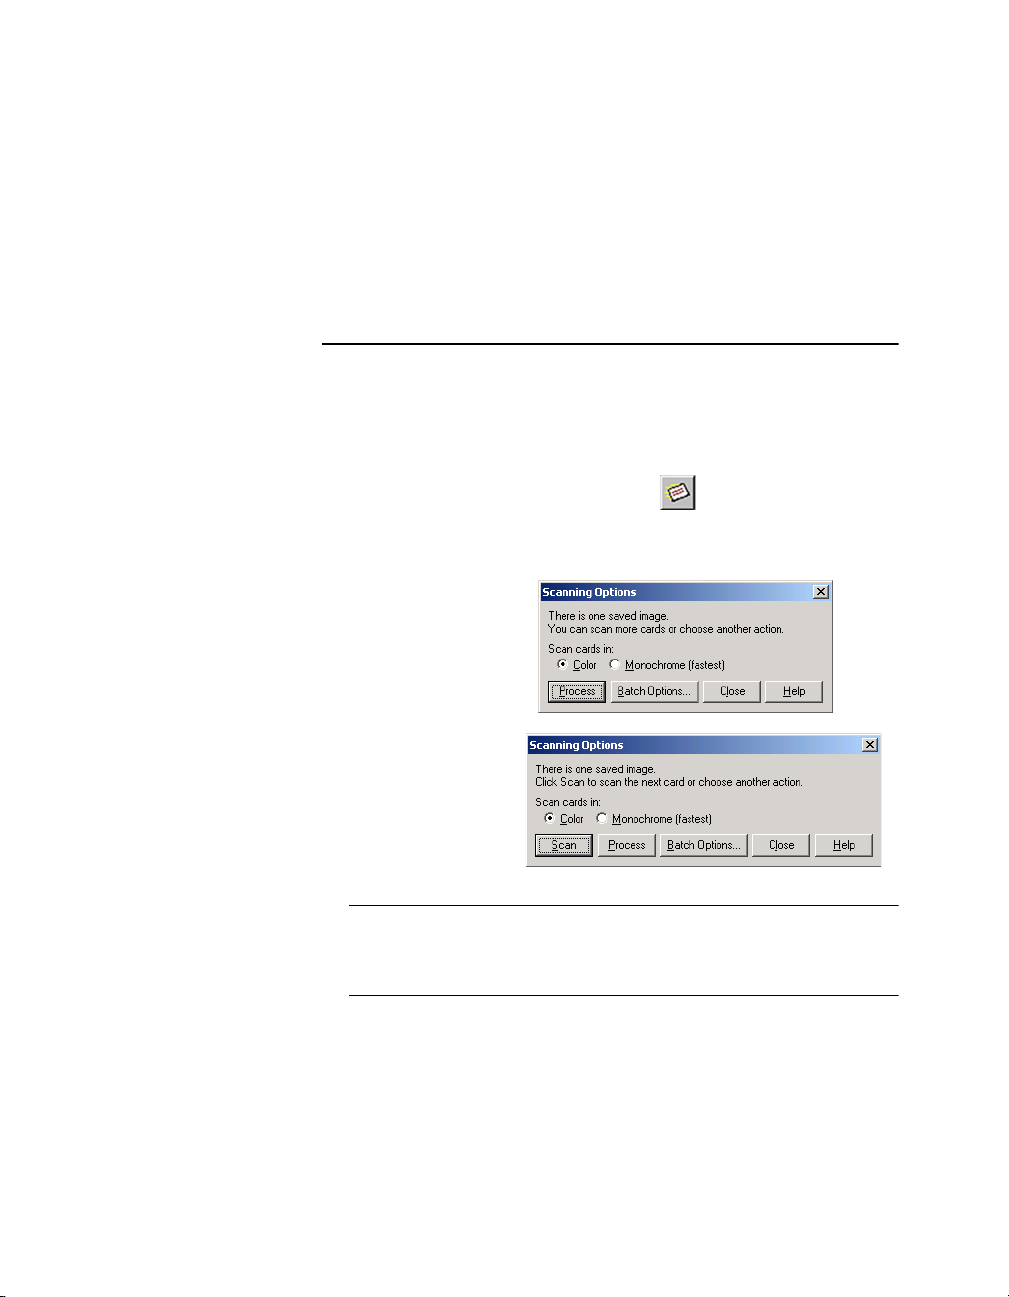
One of the following dialogs appears:
If scanning
automatically
If scanning
manually
NOTE: The options to scan in color or monochrome mode
appear on Scanning Options dialogs only if you scan with
the CardScan 600c scanner.
CardScan User’s Guide 3-5
Page 32

Chapter 3 Quick Start
TIP: Batch Options allows you to assign common
categories and notes to a batch of cards automatically,
during scanning. Later on, when ready to try Batch
Options, see Using Batch Options on page 4-6.
2. Click Process. CardScan processes the card and
displays it in Edit view, so you can verify accuracy.
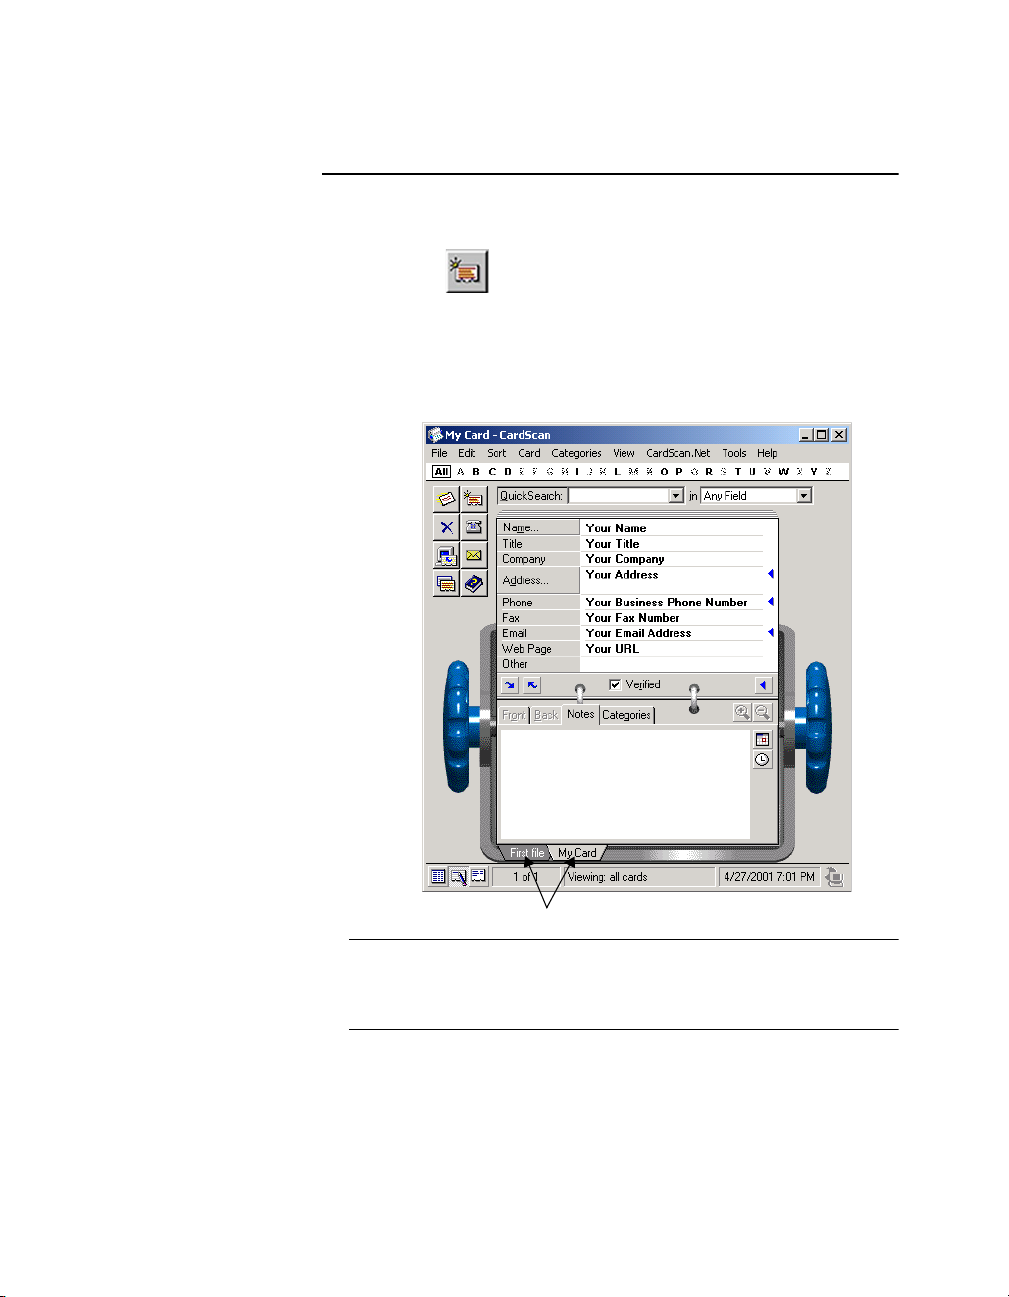
Verify and Edit the Contact
To verify the accuracy of contact information, compare it with
the image on the F
RONT tab in Edit view.
Click to hide
additional
fields.
Ellipses (...) indicate hidden
dialogs for checking details
(see page 6-3).
Check this
box when
done
verifying.
Display back of card.
Edit view displayed
3-6 Corex Technologies
Click to see
additional
fields.
Click to zoom out of
image.
Click to zoom in on
image.
TIP: If you use the Tab key or the mouse to move the cursor
from field to field, CardScan’s SmartZoom automatically
adjusts the image to show you where that text comes from.
Page 33

Add Notes
If necessary, edit the contact information. For help, click
on the Toolbar. For more information, seeVerifying and
Editing Contactson page 6-1.
Add Notes
When the information is correct, check the V
ERIFIED checkbox
in the middle of the window.
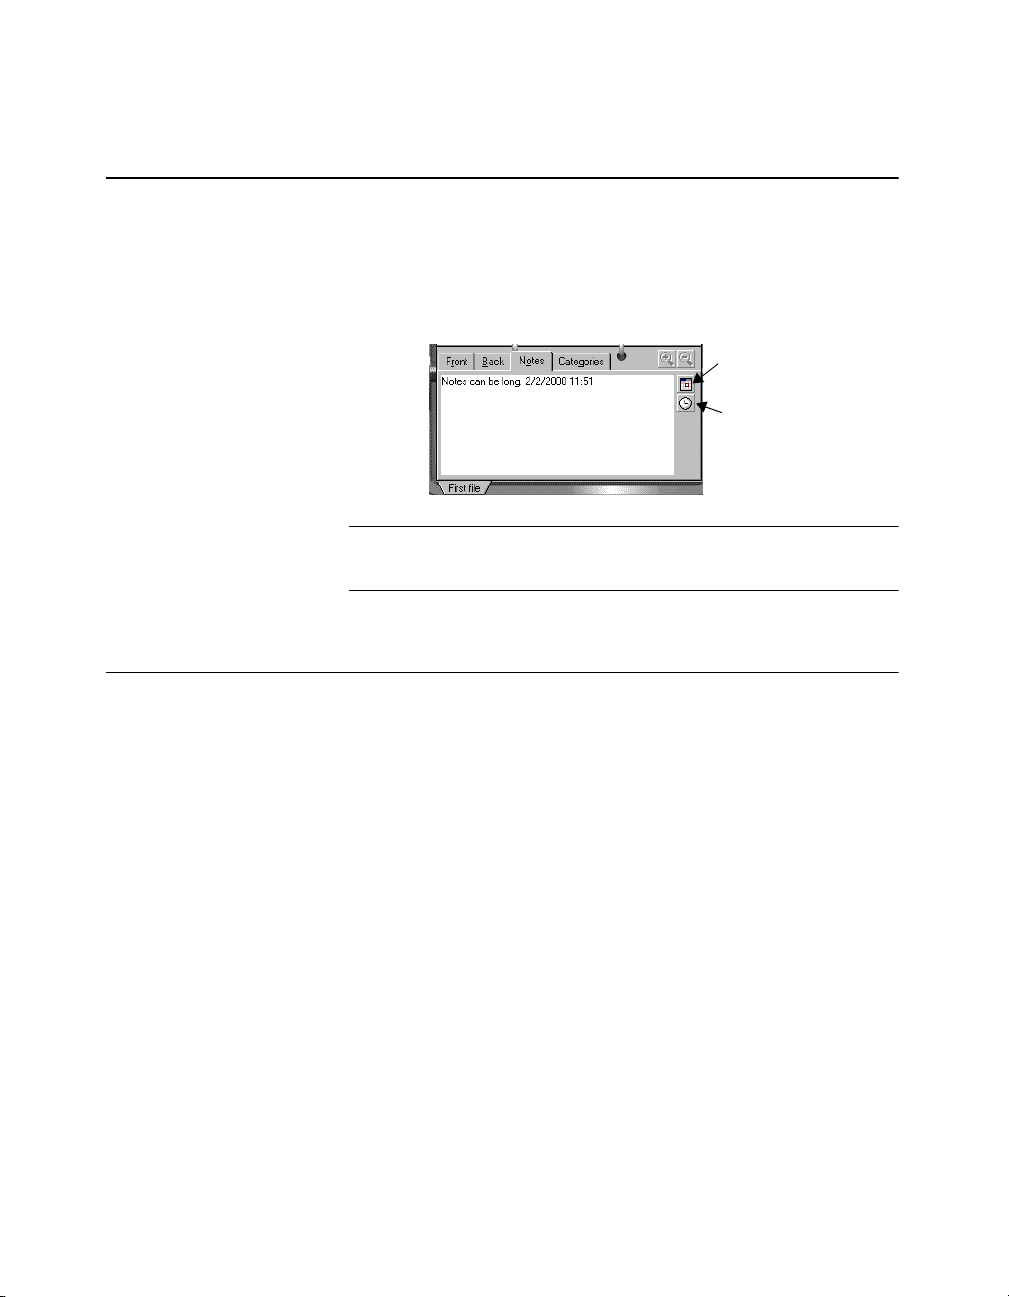
1. Click the NOTES tab and type your notes as shown next.
Click to enter
current date.
Click to enter
current time.
2. Click the Date and Time buttons to add the date and time.
TIP: You can also add notes in Summary view.
CardScan User’s Guide 3-7
Page 34

Chapter 3 Quick Start
Categorize Contact
Categorizing contacts helps you utilize them better. You can
find all the contacts in the same category with only a few
mouse clicks, as illustratedon page 3-13.
To categorize a contact:
1. Click the C
ATEGORIES tab. The tab displays a list of
categories.
2. Click a category to assign; for example, click H
C
ONTACT.
A checkmark appears in the checkbox, and the
assigned category appears above the list.
OT
Category assigned
to this contact
3-8 Corex Technologies
TIP: You can also categorize contacts in Summary view.
Page 35

Work with Multiple Contacts
In this section you will:
• Explore List view.
• Sort contacts in List view.
Explore List view
With your “First File” in Edit view, do the following:
1. Take about a dozen business cards.
2. Scan, process, and verify each card as described on page
3-3 through page 3-6.
3. Review the contacts by clicking the Next and
Previous buttons in either Edit view or Summary view.
TIP: You can also move between contacts in Edit view
by pressing the Page Up and Page Down keys.
Work with Multiple Contacts
4. Scan and process a few more cards and leave them
unverified.
CardScan User’s Guide 3-9
Page 36

Chapter 3 Quick Start
Click to
display all
contacts.
Unverified
contacts
5. Click on the Alphabet bar to display all contacts in
your file. List view appears:
List view
displayed
3-10 Corex Technologies
All contacts in file displayed
In List view, each row represents a contact and each column
represents a field.
Page 37

Work with Multiple Contacts
Sort the list
Note that the NAME heading in the preceding illustration is
underlined and the entire column is shaded. This indicates
that the list is sorted alphabetically by last name.
Click the C
alphabetically by company name. The C
OMPANY heading. CardScan sorts the contacts
OMPANY heading is
underlined and the column is shaded.
Sorted by name
Sorted by company
For more information, see Sorting Contacts in a Fileon page
9-1.
TIP: By default, CardScan puts the first name first. You can
reverse this order (see Customizing List View on page 9-3.)
CardScan User’s Guide 3-11
Page 38

Chapter 3 Quick Start
Find Contacts
Using QuickSearch
In this section you will find contacts with:
• QuickSearch
• Categories
While still in List view, type any word appearing in the list. The
text appears in the QuickSearch Text box, and only the
contacts containing this text are displayed. For example, type
“Corex.” If you have a contact containing this word, the search
result looks like this:
3-12 Corex Technologies
Text box
List view
displayed
1out of 15 cards in file
contains “Corex”
Information in Status line
You can search faster by typing text and choosing a field to
search (see Finding Contacts with QuickSearchon page
8-1).
To list all contacts again, click on the Alphabet bar.
Page 39

Find Contacts
Using Categories
In the section Categorize Contacton page 3-8, you assigned
the category “Hot Contact” to a contact in your “First File.”
Let’s find this contact now.
1. Choose Categories→Find. The following dialog
appears:
2. Select Hot Contact and click OK. List view displays the
contact.
3. Observe the Status line. It indicates that 1 contact out of
15 in the file belongs to the displayed category. It also
indicates that you are viewing the category H
CardScan User’s Guide 3-13
OT CONTACT.
Page 40

Chapter 3 Quick Start
Work with Multiple Files
In this section you will learn to:
• Create a new file
• Enter a contact manually
• Switch between open files
• Copy contacts between open files
Create a new file
1. Choose File→New. An empty file appears in List view
with the filename Untitled-2.
2. Choose File→Save As and name the file My Card.
3-14 Corex Technologies
Page 41
Work with Multiple Files
Enter a contact manually
CardScan allows you to enter contacts manually, by typing in
Edit view.
1. Click on the Toolbar. A blank contact appears in
Edit view. Note that the V
checked, because you are entering information
manually.
2. Enter information as if the new contact were you.
ERIFIED checkbox is already
Tabs for open files
NOTE: Since this file has been saved (see page 3-14),
CardScan will automatically save the new contact when you
close the file.
CardScan User’s Guide 3-15
Page 42

Chapter 3 Quick Start
Copy contacts between files
You can drag and drop contact information from one file to
another. For example, let’s copy the contact information from
My Card to First File.
1. Click on the alphabet bar to display all contacts in
My Card in List view. (Only your own information
appears.)
2. Click the contact and hold the mouse button down until
the cursor changes to .
3. Drag the cursor until it is over the tab of First File, then
release the mouse button.
3-16 Corex Technologies
CardScan copies the contact from My Card to First File
and activates First File. Your record is highlighted.
TIP: To activate the file My Card, click its tab.
Page 43

Print a Contact
Print a Contact
While your record is still selected, let’s print it:
1. Righ-click the selected contact.
CardScan displays a context-sensitive menu.
List view
displayed
2. Choose Print. The Print Wizard appears.
3. Follow the wizard’s prompts to print your record in the
format and layout of your choice. Experiment with your
choices. Nothing prints until you preview the output and
click Print on the Print Preview screen.
TIP: To print from Edit or Summary view, choose
File→Print.
To learn more about the Print Wizard, see online help or
Printingon page 10-1.
CardScan User’s Guide 3-17
Page 44

Chapter 3 Quick Start
Send Email
You can email, phone and visit your contacts’ Web sites
directly from CardScan. To explore emailing from CardScan,
send email to yourself:
1. Select your record in List view and click the Summary
view button. Summary view of your information is
displayed.
2. Move the cursor over your email addresses. When the
cursor changes to an envelope, click.
3-18 Corex Technologies
Summary view displayed
Page 45

The following dialog appears:
3. Select your email application and click OK.
CardScan starts your email application and opens a
pre-addressed message.
Send Email
NOTE: Some email applications require configuring
certain settings before you can use them to send email
from CardScan. See the documentation for your email
application.
For more information, see Contacting People Directly from
CardScanon page 17-1.
CardScan User’s Guide 3-19
Page 46

Chapter 3 Quick Start
3-20 Corex Technologies
Page 47

Chapter 4 Scanning
Using CardScan 600c Scanner
1. Start CardScan.
2. Insert a card in the scanner with the front side facing up.
If scanning automatically, the card is pulled through the
scanner. If scanning manually, click on the
Toolbar.
TIP: To enable automatic scanning, choose
Edit→Preferences→Scan and check the D
CARDS AUTOMATICALLY checkbox.
After each card is scanned, the following dialog appears:
Using CardScan 600c Scanner
ETECT
Automatic scanning
with CardScan 600c
NOTE: If scanning faster is more important to you than
scanning in color, choose monochrome mode. To change
scanning modes later on, use Scan Preferences (see
Selecting Scanner and Scanning Options on page 19-1).
Manual scanning
with CardScan600c
CardScan User’s Guide 4-1
Page 48

1
Chapter 4 Scanning
3. You can continue scanning or proceed to the next step:
•Click Batch Options to use CardScan’s options for
assigning notes and categories to the cards being
scanned.
NOTE: You can use Batch Options to assign
categories and notes to a batch of cards any time
before processing or closing the Scanning Options
dialog. See Using Batch Options on page 4-6.
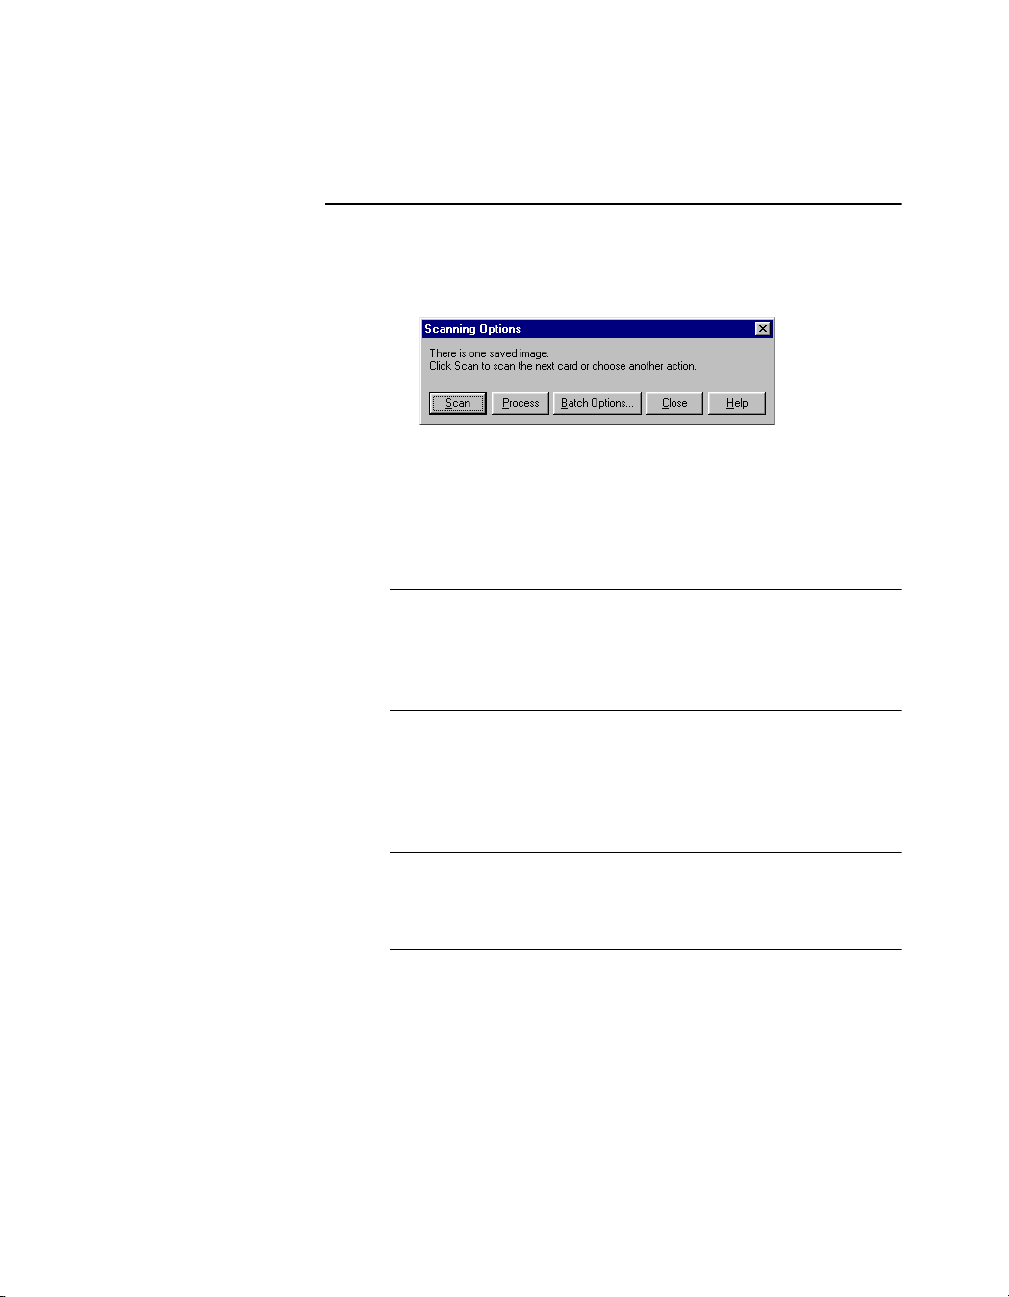
•Click Process. The Scanning Options dialog closes, and
CardScan processes the image(s).
•Click Close to postpone processing.
NOTE: You must process scanned cards to use the
information. You can always process saved images by
choosing Card→Process.
4-2 Corex Technologies
Page 49

Using TWAIN-Compliant Scanners
Using TWAIN-Compliant Scanners
Guidelines
NOTE: Please consult your scanner’s documentation for
scanner-specific instructions.
CardScan works with any TWAIN-compliant scanner that
scans in grayscale at 300 dots per inch (dpi) or higher.
For best results:
• Scan in grayscale (also called “256 gray levels” or “black
and white photo”).
Most scanners can produce either black and white (also
called bi-level, text or line art) or grayscale images. You
can often get acceptable results scanning in black and
white if you adjust the brightness and contrast manually
for each card. However, scanning in grayscale usually
produces better results.
• Scan at 400 dpi resolution, if available. Otherwise, use
300 dpi.
Below 300 dpi, CardScan can’t read small text or light
printing. Above 400 dpi, CardScan’s accuracy does not
improve but the images require significantly more
memory, disk space, and time to process.
For further information, visit our Web site, at
www.cardscan.com.
NOTE: For even more details and tips, see “Using
CardScan with Other Scanners” (English only), available in
PDF format at www.cardscan.com.
CardScan User’s Guide 4-3
Page 50
1
Chapter 4 Scanning
Scanning Options for TWAIN-compliant
scanners
When scanning with TWAIN-compliant scanners, CardScan
displays the following dialog:
You can continue scanning or proceed to the next step:
•Click Batch Options to use CardScan’s options for
assigning notes and categories to the cards being
scanned.
NOTE: You can use Batch Options to assign
categories and notes to a batch of cards any time
before processing images or closing the Scanning
Options dialog. See Using Batch Options on page 4-6.
4-4 Corex Technologies
•Click Process. The Scanning Options dialog closes, and
CardScan processes the image(s).
•Click Close to postpone processing.
NOTE: You must process scanned images to use the
information. You can always process saved images by
choosing Card→Process.
Page 51

Using TWAIN-Compliant Scanners
Scanning multiple cards simultaneously
The software-only version of CardScan includes a flexible
plastic cardholder that you can use with most scanners to
scan multiple cards simultaneously. To use the cardholder:
1. Starting at the top left corner, insert business cards into
the pockets face up, with the top of each card toward
the top of the pocket.
NOTE: The top row of the cardholder has slightly larger
pockets for oversized cards (for example, European
business cards).
You don't have to fill all the pockets in the holder.
TIP: If your cards are already in a transparent
cardholder, you can put a black piece of paper on the
back of the cardholder and scan the cards.
2. If using a flatbed scanner:
Place the cardholder face down on the scanner bed as
you would a sheet of paper. CardScan automatically
detects that you are using the cardholder.
If using a sheetfed scanner:
Feed the cardholder into the scanner as you would a
sheet of paper.
CardScan User’s Guide 4-5
Page 52

1
Chapter 4 Scanning
Using Batch Options
CardScan treats cards scanned in succession as a batch. This
allows you to automatically organize new cards during
scanning:
• Assign all cards in the batch to the same category or
categories.
• Add the same note to each card in the batch.
To use batch-scanning options:
1. Scan a card. The Scanning Options dialog appears.
2. Click Batch Options.
NOTE: You can use Batch Options any time before
choosing Process or Close.
The following dialog appears:
4-6 Corex Technologies
Click to insert
current date.
Click to insert
current time.
3. Click categories to assign them to all cards in the current
batch. Click Edit List to add, rename, or delete
categories. See Using Categories on page 7-1.
4. Type your notes in the N
time, click the Date and Time buttons.
OTES tab. To insert the date and
Page 53

5. Click OK. The Scanning Options dialog appears.
6. Scan the remainder of the batch.
7. Click Process. CardScan processes all cards, assigns
the selected categories, adds notes to each card, and
displays the first card of the batch in Edit view.
Scanning the Back of a Card
You can scan the back of a card and include it with the contact
any time after the front has been scanned and processed.
TIP: CardScan does not place text from the back of a card
into fields. If both sides of the card contain names,
addresses, and the like, decide which one to scan as the
back.
1. Select the contact in List view or display it in Edit or
Summary view.
Scanning the Back of a Card
2. Choose Card→Scan Back of Card. The following
dialog appears:
3. Insert the card and click OK. When scanning is
completed, CardScan displays the back of the card on the
Back tab.
CardScan User’s Guide 4-7
Page 54

1
Chapter 4 Scanning
4-8 Corex Technologies
Page 55

Importing Files from Contact Managers and PIMs
Chapter 5 Entering Contacts by Importing
and by Dragging and Dropping
Importing Files from
Contact Managers and PIMs
You can import files into CardScan from contact managers
and PIMs that can export the file as a text file with the fields
delimited by tabs or commas.
To import a file:
1. Open a file in the source application.
2. Follow the instructions provided with the application to
save or export the information to your hard disk as a text
file delimited by tabs or commas.
3. Start CardScan and choose File→Import. The Import file
dialog (a standard Window’s Open dialog) appears.
Click to view the dropdown list of standard and
saved import templates.
4. Select the text file saved in step 2 and click Open. After a
pause, the Import dialog appears:
Use the scroll bar to see additional columns.
CardScan User’s Guide 5-1
Page 56

1
Chapter 5 Entering Contacts by Importing and by Dragging and Dropping
Each row represents a contact in the text file, each
column represents a field.
TIP: If the file contains more than four columns, use the
scroll bar to see the additional information.
Initially, all contacts are selected. To import only certain
contacts, select them. Use Shift+click or Ctrl+click to
select multiple contacts.
5. If the columns don't look right, change the D
option to T
6. To import using a predefined template, choose it from the
I
MPORT TEMPLATES dropdown list and go to step 10.
To create your own import template, go to step 7.
7. For each column, use the dropdown list at the top of the
column to indicate the CardScan field into which to put the
information.
AB.
ELIMIT BY
5-2 Corex Technologies
Page 57

8. To omit a column, choose [ignore]. To import a column
that does not have a corresponding CardScan field,
choose Notes or Other (near the bottom of the list).
9. Click Save As Template to save the import template you
created or modified.
10. Click Import to finish importing the text file. CardScan
displays the imported contacts in List View.
Dragging and Dropping vCards
You can drag and drop vCards from other applications and
Web sites into CardScan’s List view. For information about
vCard, see Appendix C: About vCard.
To drag and drop vCards into CardScan, follow these steps:
1. Open CardScan and the other application and size the
windows to see both simultaneously.
2. Open a CardScan file and display it in List view.
Dragging and Dropping vCards
3. In the other application, click the contact to copy and hold
the button down until the cursor changes to .
4. Drag the contact to the CardScan’s List view and release
the mouse button. CardScan displays the copied contact.
NOTE: You can also drag and drop vCards from CardScan
into other applications and Web sites. See Dragging and
Dropping vCards from CardScan on page 11-4.
CardScan User’s Guide 5-3
Page 58

1
Chapter 5 Entering Contacts by Importing and by Dragging and Dropping
Dragging and Dropping Text
from Emails and Electronic Letters
You can create contacts in a CardScan file by selecting text in
another application then dragging and dropping it into List
view. This is useful for creating contacts from emails or
electronic letters.
To add a contact to a CardScan file:
1. Open a CardScan file and display it in List view.
2. Open the other application, and size the windows to see
both simultaneously.
3. In the other application, highlight the text to copy.
4. Hold the mouse button down and drag the highlighted
information to List view in CardScan. Release the mouse
button.
The new contact appears on CardScan’s list.
5-4 Corex Technologies
NOTE: If the selected text contains a blank line, CardScan
creates two contacts. To avoid this, remove the blank line
before dragging the text into CardScan.
Page 59

Verifying Contact Information
Chapter 6 Verifying and Editing Contacts
Verifying Contact Information
Why you should verify
You should verify contact information because inaccuracies,
especially in names and addresses, may interfere with:
• Sorting contacts by fields
• Finding contacts with QuickSearch
• Exporting and transferring contacts
• Emailing, dialing, and visiting Web sites
Verify at your convenience
You can verify contact information at your convenience. To
prevent problems, CardScan:
• Displays warnings when using unverified contacts may
cause problems.
• Marks unverified contacts in List view with question
marks.
• When sorting lists by unverified contacts, moves all
unverified contacts to the top of the list. See Sorting
Contacts in a File on page 9-1.
CardScan User’s Guide 6-1
Page 60

1
Chapter 6 Verifying and Editing Contacts
Verifying hidden text and fields
Pay attention to the symbols indicating hidden text and fields.
Click to check details of
name and address.
Hidden field
symbol
Click to see
more text. in
field.
View all
text.
Check this box when
done verifying.
6-2 Corex Technologies
Click to zoom
out of image.
Click to zoom
in on image.
The symbol indicates a hidden field.
To see the field, click . The arrow changes to , and the
field opens. For example, if you click in the A
the 2
ND ADDRESS field opens.
DDRESS field,
Click to hide
additional field.
Page 61

Verifying Contact Information
Checking details of names and addresses
People’s names and addresses often involve complex details.
For example, some names contain titles or designations—
such as Rev., Ph.D, and the like. Such details must be placed
correctly, especially for export, transfer, or synchronization
purposes. You can check them with the Check Details feature.
TIP: To take advantage of the Check Details feature, verify
and edit contacts before checking details.
1. Choose Card→Check Details in any view or click the
Name or Address label in Edit view. The following
dialog appears:
Click to save
changes and
close dialog.
Cancel current
changes.
Save and go
to next contact.
Save and go
to previous
contact.
If you open this dialog using Card→Check Details, the
Name tab is displayed. Otherwise, the tab corresponds
to the label you clicked in Edit view.
2. Edit the details as needed. Changes are saved when you
click OK, Previous, or Next. Click Cancel to cancel
changes to the last edited record. Click Help if you need
assistance.
3. To check more contacts, click Next or Previous.
4. Click OK to save changes and close the dialog.
CardScan User’s Guide 6-3
Page 62

1
Chapter 6 Verifying and Editing Contacts
Editing Text
1. Click on incorrect information. CardScan’s SmartZoom
automatically zooms in on that part of the image to help
you see the details.
2. Enter your changes.
3. If the text is correct but in the wrong field:
• Highlight the text.
• Click and hold the mouse button down until the
cursor changes to .
• Drag the highlighted text to the new field, and
release the mouse button.
NOTE: To copy highlighted text to another field,
press the Ctrl key. The cursor changes to
while performing these actions.
6-4 Corex Technologies
You can also right-click on the information and choose a
command from the context-sensitive menu.
Context-sensitive
menu
Page 63

Adding Phone Numbers
In CardScan, each contact displays one phone and one fax
number. You can add and label six more phone and fax
numbers.
TIP: You can label phone and fax numbers using
CardScan’s list of labels. You can also add, rename, and
remove labels from the list. See Editing Lists of Phone and
Email Labels on page 6-7.
To add a phone number:
1. Click in the phone field.
Adding Phone Numbers
Click to open
additional field.
Blank field
Dropdown list
The arrow changes to , and a blank field opens.
Click to close
additional field.
CardScan User’s Guide 6-5
Page 64

1
Chapter 6 Verifying and Editing Contacts
2. Type the contact information.
Type contact
information.
3. Click the arrow on the left to open the label dropdown list.
6-6 Corex Technologies
4. Choose a label from the dropdown list or type your own
label in the blank field.
NOTE: The dropdown list contains labels entered
previously. If you type a label, it is saved in the
dropdown list for future use.
5. To add another label, click on the blank gray area to
access the dropdown list. Repeat step 2 through step 4.
TIP: You can use the same label for more than one number.
Page 65

Adding Email and Web Addresses
Adding Email and Web Addresses
Each contact displays one email and one Web address. You
can add and label up to six more email or Web addresses:
1. Click in the Email field. The arrow changes to ,
and a blank field opens.
2. Follow step 2 through step 5 in Adding Phone Numbers
on page 6-5.
TIP: To add, rename, or delete labels, see Editing Lists of
Phone and Email Labels, next.
Editing Lists of Phone and Email Labels
1. Choose Edit→Labels or choose Edit list at the bottom
of the labels dropdown list. The following dialog
appears:
2. Click Phone or Email tab.
CardScan User’s Guide 6-7
Page 66

1
Chapter 6 Verifying and Editing Contacts
3. Edit the list:
• To add a label
OK.
: Click Add, type a label name, and click
• To rename a label
new label name, and click OK.
• To delete a label
Yes.
: Click the label, click Rename, type a
Click to rename
selected label.
Click to delete
selected label.
: Click the label, click Delete, and click
Some label facts to keep in mind
• Phone and email labels are kept on separate lists.
Therefore, you can use the same labels (for example,
“Home”) for phone numbers and email addresses.
• Editing a label changes it for all contacts in the active file,
but does not affect labels in other files.
6-8 Corex Technologies
• Labels may contain a maximum of 31 characters or
spaces. They cannot contain any special characters.
• When you type a new label, Cardscan remembers the
exact capitalization you use. Therefore, if later you try to
add the same label capitalized differently, CardScan does
not accept it. To change the capitalization of a label, use
the Rename option in the Edit Labels dialog.
• To prevent problems when exporting information,
CardScan disallows you to create labels with the same
names as CardScan’s predefined fields (for example,
Name, First Name, Title, Company, Address, etc.).
Page 67
Adding Notes
Categorizing
Adding Notes
1. Display the contact in Summary view or Edit view.
2. Click the NOTES tab.
3. Type your notes. To insert the date and time, click the
Date and Time buttons.
Click to insert current date.
Click to insert current time.
TIP: To review or edit notes, find them with QuickSearch (see
Searching on text and fields on page 8-2).
To categorize a contact:
1. Click the C
categories.
2. Assign a category by clicking it. A checkmark appears in
the checkbox, and the category is displayed above the
list.
For more information about categorizing contacts, see Using
Categories on page 7-1.
ATEGORIES tab. The tab displays a list of
CardScan User’s Guide 6-9
Page 68

1
Chapter 6 Verifying and Editing Contacts
Duplicating Contacts
Sometimes you may want to duplicate a contact for editing or
other purposes. For example, you may want to create
separate contacts for multiple individuals listed on one card.
To duplicate a contact:
1. Select or display the contact to duplicate.
2. Choose Card→Create Duplicate. CardScan displays the
duplicate contact in Edit view.
Deleting Contacts and Images
You can choose to delete an entire contact or its images only.
Deleting contacts
1. Display the contact to delete in Edit or Summary view,
or select it in List view. To delete multiple contacts,
select them in List View using Shift+click or Ctrl+click.
6-10 Corex Technologies
2. Choose Card→Delete or click on the Toolbar.
3. Click Yes.
Page 69

Deleting Contacts and Images
Deleting images
You can delete images of individual contacts as well as all
images in a file.
For an individual contact
1. Select the contact.
2. If the contact includes images of the front and back of the
card, choose either:
Card→Delete Image→Front and Back
or
Card→Delete Image→Back Only
NOTE: You cannot delete the front image only.
For all images in a file
1. Open the file.
2. Choose Card→Delete All Images.
Deleted images cannot be restored. If you are deleting
images to copy the file to a system with limited disk space,
use the Backup options instead (see Backing Up Files on
page 9-8).
:
:
CAUTION
CardScan User’s Guide 6-11
Page 70

1
Chapter 6 Verifying and Editing Contacts
6-12 Corex Technologies
Page 71

Chapter 7 Using Categories
Categorize your contacts to organize and find them quickly:
• Assign one or more categories to any contact.
For example, if a contact is your friend in a competing
business, you can categorize this contact as both “Friend”
and “Competition.” As a result, this contact will be listed
among your friends as well as among your competitors.
• Assign categories to multiple contacts all at once.
• Use CardScan’s list of categories or edit the list to add
your own and to rename or delete the existing categories.
Categorizing One Contact
1. Display the contact in Edit or Summary view.
2. Click the CATEGORIES tab. The list of categories appears.
Categorizing One Contact
3. Click one or more checkboxes to assign categories. For
example, click the checkbox “Customer.”
CardScan User’s Guide 7-1
Page 72

1
Chapter 7 Using Categories
The category “Customer” appears above the list.
4. To edit the list of categories, click Edit List. See Adding,
Renaming and Deleting Categories on page 7-4.
Categorizing Multiple Contacts
1. In List view, select the contacts you want in the same
category. Use Shift+click to select a block of contacts
in the list. Use Ctrl+click to select contacts in different
parts of the list, as shown.
TIP: To categorize one contact in List view, select it and
follow the steps below.
7-2 Corex Technologies
2. Choose Categories→Assign or press Ctrl+R. The
Assign Categories dialog appears.
Page 73
Categorizing Multiple Contacts
3. Assign categories by clicking them.
4. Click OK. CardScan assigns the selected categories and
returns to List view.
Checkboxes in Assign Categories dialog
When you assign categories to multiple contacts, the
checkboxes in the Assign Categories dialog may appear:
•Empty
• With solid checkmarks
• With dimmed checkmarks
Empty
checkbox
Solid
checkmark
This category is not assigned to any of the selected contacts.
Clicking it assigns it to all selected contacts, and a solid
checkmark appears in the checkbox.
This category is assigned to all selected contacts. Clicking it
removes all selected contacts from this category, and the
checkmark disappears.
CardScan User’s Guide 7-3
Page 74

Chapter 7 Using Categories
1
Dimmed
checkmark
This category is assigned to some of the selected contacts.
Clicking it removes the selected contacts from the category.
Clicking the category a second time assigns it to all selected
contacts, and a solid checkmark appears. Clicking it a third
time returns the assignment of this category to its original
state.
NOTE: If you work on a file on a network, the states of the
checkboxes may be affected by the actions of other users.
See Sharing Files on page 18-1.
Adding, Renaming and Deleting Categories
NOTE: Adding, renaming, and deleting categories in a file
affect information in this file only.
1. Choose Categories→Edit or click Edit List in the
Categories tab of Edit or Summary view. The following
dialog appears:
7-4 Corex Technologies
2. Then:
• To add a category
category name and click OK.
NOTE: Do not use commas or quotation marks in
categories’ names.
: Click Add; type the new
Page 75

Adding, Renaming and Deleting Categories
• To rename a category: Click the category, click
Rename and click OK.
• To delete a category
Delete and click Yes.
: Click the category, click
CardScan User’s Guide 7-5
Page 76

1
Chapter 7 Using Categories
7-6 Corex Technologies
Page 77

Finding Contacts with QuickSearch
Chapter 8 Finding Contacts
Finding Contacts with QuickSearch
CardScan’s QuickSearch has two components:
• Text box for typing search text
• Dropdown list of fields where CardScan should look for
the text
Text box
Dropdown list of previous entries
• To search by typing in Edit or Summary view, click in the
Text box or press the Esc key and start typing. In List
view, type anywhere; the text appears in the Text box.
CardScan locates contacts that include the search text
and displays them in List view. It narrows the list as you
type.
• Selecting a field to search before typing text saves search
time.
• You can search by any CardScan field, including Name
Prefix and Name Suffix fields (such as the title or
designation; for example, Sgt., Ph.D., and so forth).
• Selecting the Phone Numbers field searches all phone
fields. This makes searching easier, because you don’t
have to remember whether the number is stored as
“Pager” or “Beeper”.
• Selecting Email Addresses searches all email and Web
addresses.
• Search text is saved on the QuickSearch dropdown list.
To use it again, select it from the list.
Field dropdown list
• CardScan searches all open files. File tabs appear in bold
face if contacts are found in the file by a search.
CardScan User’s Guide 8-1
Page 78

1
Chapter 8 Finding Contacts
Searching on text and fields
1. Click in the Text box and enter the text.
Searching
for any words
2. Use the Tab key to move from the T
dropdown list. (To move back, use the Shift+Tab.)
3. In the F
TIP: You can choose a field by typing its name. Start
typing a field name, and CardScan selects it
automatically.
IELD dropdown list, click the field to search.
EXT box to the FIELD
Searching for multiple words
When you type multiple words, CardScan searches for cards
that contain at least one of the words. For example (see
below), if you type richard palmer (QuickSearch is not casesensitive), CardScan finds all contacts containing the word
Richard and all contacts containing the word Palmer.
8-2 Corex Technologies
Page 79

Finding Contacts with QuickSearch
Searching for
exact matches
Searching for
words
combinations
If you enclose the entire name in double quotation marks—
that is, if you type “richard palmer”—CardScan searches for
the entire, literal string, including the space between the
words. It locates and displays only the contacts containing the
entire string.
NOTE: Because CardScan searches for an exact match, it
does not display “Richard J. Palmer” as in the preceding
example.
You can limit the search results to contacts that contain
specific words plus any others. To do so, prefix the words with
a plus (+) sign. For example, to find all members of the Brady
family, type:
+brady mike jan marsha cindy bobby greg peter carol
CardScan lists every person whose information contains
brady plus at least one other word in the text. It discards all
“Mikes”, “Jans”, and so on if their contact information does not
include brady.
More examples of QuickSearch
QuickSearch performs fairly sophisticated searches. For
example:
• To search for all contacts at IBM:
- Select Company from the Field-names drop-down list.
- Type: IBM “International Business Machines”
• To search for all contacts in Connecticut:
- Select State from the Field-names drop-down list.
- Type: CT
• To search for all contacts in Zip code 02139:
- Select Zip Code from the Field-names drop-down list.
- Type: 02139
CardScan User’s Guide 8-3
Page 80

1
Chapter 8 Finding Contacts
Setting QuickSearch preferences
If you have more than one file open, you can choose how to
display the search results:
1. Choose Edit→Preferences. The Preferences dialog
appears, with the G
QuickSearch
preferences
option
ENERAL preferences selected.
8-4 Corex Technologies
2. Specify how you want QuickSearch to operate:
• To see search results in the active file only, check the
checkbox S
• Do not check this checkbox to allow QuickSearch to
activate the background files also containing search
results.
3. Click OK to exit and save this setting, or Cancel to exit
without saving the setting.
HOW SEARCH RESULTS IN ACTIVE FILE ONLY.
Page 81

Finding Contacts by Category
To find all contacts assigned to one or more categories:
1. Choose Categories→Find. The following dialog
appears:
Click to hide unused
categories.
2. Select categories to search; for example, select
“Business” and “Friend.” Click OK. Contacts assigned
these categories are displayed in List view.
Finding Contacts by Category
Contacts in category/
contacts in file
Categories displayed
To see all contacts in the file again, click .
CardScan User’s Guide 8-5
Page 82

1
Chapter 8 Finding Contacts
Finding Contacts Starting with the Same Letter
To find all contacts starting with the same letter, click that letter
on the Alphabet bar. For example, click the letter M. This
displays all the contacts whose names start with this letter.
NOTE: If the contacts were sorted by Company, CardScan
would display the contacts whose company names start
with the letter M.
8-6 Corex Technologies
Page 83

Chapter 9 Working with Files
Sorting Contacts in a File
In List view, each row represents a contact, each column
represents a field headed by a field name.
By default, CardScan displays the Verified, Name, Company,
and Phone fields. The list is sorted by Name.
Sorting Contacts in a File
By last name, this
contact is at the top.
CardScan shades the field by which the list is sorted, and
underlines the field name.
To sort the list by any other displayed field, click the column
heading. For example, to sort by Company name, click the
column heading Company.
CardScan User’s Guide 9-1
Page 84

1
Chapter 9 Working with Files
If you click the unverified contacts (?) heading, all unverified
contacts appear at the top of the list (sorted by date), as
shown:
9-2 Corex Technologies
Note also that if you scan new cards into an open file and sort
List view by unverified contacts, the new contacts are grouped
at the top of the list, separated from the rest by a dark line.
Newly
scanned
cards
Page 85

TIP: To see what fields you can currently sort by, click the
Sort menu on CardScan’s menu bar. To sort by a different
field, choose it from the menu. To add fields or delete fields
to sort by, see Customizing List View, next.
Customizing List View
By default, List view displays the fields:
•V
ERIFIED
•NAME
•C
OMPANY
•P
HONE
To add or delete fields from the display:
1. Choose View→Customize List. The Customize dialog
appears. It lists:
Customizing List View
• All fields (A
LL AVAILABLE COLUMNS)
• Fields currently displayed (S
HOW THE FOLLOWING)
CardScan User’s Guide 9-3
Page 86

1
Chapter 9 Working with Files
2. To add a field to List view, select it from AVAILABLE
C
OLUMNS and click Add—or double-click it.
To remove a field from List view, select it from S
THE FOLLOWING and click Remove—or double-click it.
HOW
3. If adding several fields, select A
COLUMNS TO FIT THE WINDOW. This ensures that all
columns appear in the window. You can resize the
columns later (see the tip in step 6).
TIP: Turn off this option if you prefer to scroll
through the columns.
4. Select S
5. Click Apply and move the Customize window aside to
preview your changes in the List view.
6. If satisfied, click OK to display the saved changes.
TIP: If columns become narrow to fit in the window,
resize any column by clicking the border line between
two headings and moving it.
Combining Two Files
UTOMATICALLY RESIZE LIST
HOW LAST NAMES FIRST, if desired.
Dragging and dropping contacts between files
9-4 Corex Technologies
This option works well for adding a smaller file to a large file,
or adding only some contacts from a file.
1. Open both files in List view and activate the source file.
2. With the mouse, select the contacts to copy and hold
the mouse button down until the cursor changes to .
Page 87

Combining Two Files
NOTE: If you select many contacts, it may take longer
for the cursor to change shape.
3. Drag the contacts until the cursor is over the tab of the
destination file. Release the mouse button.
The destination file becomes active. The new contacts
are sorted into it and highlighted in List view, so you can
evaluate the results.
Copying and pasting contacts between files
This option works well for combining large files.
1. Open both files in List view.
2. In the source file, select the contacts to copy. To select all
contacts, choose Edit→Select All.
3. Choose Edit→Copy. CardScan copies the contacts to the
clipboard.
4. Click the tab of the destination file to activate it.
5. Choose Edit→Paste. The copied contacts are sorted into
the destination file and highlighted in List view, so you can
evaluate the results.
CardScan User’s Guide 9-5
Page 88

1
Chapter 9 Working with Files
Splitting a File
You can split a file by copying contacts to a new file and
deleting them from the original.
1. Choose File→New. CardScan creates an untitled file.
2. Open the file to split.
3. In List view, select the contacts to copy. To select multiple
contacts that occur together, hold the Shift key and click
the first and last contacts you want. To select multiple
contacts, hold the Ctrl key down and click the contacts
one at a time.
4. Choose Edit→Copy. CardScan copies the contacts to the
clipboard.
5. Click the tab of the new file to activate it.
6. Choose Edit→Paste. The copied contacts appear in the
new file.
Saving Files
9-6 Corex Technologies
7. Choose File→Save As and save the file with a new
name.
8. Click the tab of the original file and choose Card→Delete
to delete the contacts you have copied.
To save a new file:
1. Choose File→Save As.
2. Type a name for the file and click OK.
If you quit CardScan without saving the file, a message asks if
you want to save changes. Click Save and enter a name and
location for the file.
TIP: If you work on an existing file, Cardscan saves your
work automatically.
Page 89

Renaming Files
1. Open the file to rename.
2. Choose File→Rename.
3. Enter the new name for the file.
4. Click OK. CardScan renames the file.
Moving Files
1. Open the file to move.
2. Choose File→Rename.
3. Enter the new location for the file.
4. Click OK. CardScan saves the file with the original name
in the new location.
Reconciling Two CardScan Files
Renaming Files
If you edit a CardScan file while travelling, you can later
reconcile it with the copy in your office.
1. Open one of the two files for reconciling.
2. Choose File→Maintenance→Reconcile Files. The
Reconcile Files Wizard appears.
3. Click Next. Specify the name and location of the file to
reconcile with.
CardScan User’s Guide 9-7
Page 90

1
Chapter 9 Working with Files
4. Click Next. If the files are different, the screen that follows
tells you so and offers these options:
5. Review the differences between the two files or click
Apply Changes. The Wizard completes the
synchronization.
6. Click Close. The two files are now identical.
Backing Up Files
Your CardScan files contain very important information. Back
them up regularly to be able to recover the information if a
disaster occurs.
With CardScan’s Backup Wizard, you can:
9-8 Corex Technologies
• Copy a large file onto multiple diskettes (for example, to
move it to another computer).
• Create a compact version of a file by excluding some or
all card images.
Page 91

To back up a file:
1. Choose File→Maintenance→Backup. The Backup
Wizard appears.
2. Follow the on-screen instructions to specify:
• The name and location for the original file.
• Whether and how to include card images in the
backup file.
• The name and location for the backup file. Be sure
to use the extension .CBK and save the file in a
location where you can find it easily.
3. Click OK to save the backup file. Since the file contents
are reorganized, the backup file may be smaller than the
original.
Restoring Backup Files
Restoring Backup Files
1. Choose File→Maintenance→Restore. The Restore
File dialog appears.
2. Locate the file (it has the extension .CBK) and click Open.
CardScan opens the restored file in List view, places it
in an untitled window, and prompts you to save.
3. Enter a filename and location, and click Save.
CardScan User’s Guide 9-9
Page 92

1
Chapter 9 Working with Files
9-10 Corex Technologies
Page 93

Chapter 10 CardScan.Net
This chapter includes:
• Overview of CardScan.Net
• Example of creating an account and address book
• Working with CardScan.Net files
• About synchronization
• Examples of automatic and manual synchronization
• Managing CardScan.Net files
• Accessing your CardScan.Net account
About CardScan.Net
Advantages CardScan.Net enables you to turn a CardScan file into an
online address book which you can access on the Worldwide
Web—at www.cardscan.net. While having your contact
information at hand anywhere, anytime, you take advantage of
CardScan’s features to expand, manipulate, and exchange
this information with contact managers, PIMs, and PDAs.
About CardScan.Net
Security Your address book will reside in your private account, on a
secure Web site, www.cardscan.net. To access your online
address book, you must sign in to your account with a
username and password. You choose your username and
password when you sign up for a CardScan.Net account.
(Signing up for an account is illustrated in Creating
CardScan.Net Account and Address Book on page 10-3.)
Simplicity The simplest way to turn a CardScan file (also referred to as
“local file”) into an online address book is to:
1. Open the local file in CardScan.
2. Choose a menu command that saves the local file to
CardScan.Net.
Manageability Saving a local file to CardScan.Net creates a link that
connects the two files. The link connects these files whenever
your PC is connected to CardScan.Net; in other words,
whenever you are signed in to your account.
CardScan User’s Guide 10-1
Page 94

1
Chapter 10 CardScan.Net
As a result, you can:
• Use the local file to take advantage of all CardScan
features (such as adding contacts by scanning,
exchanging information with other contact managers and
PIMs, and synchronizing CardScan with PDAs.
• Synchronize any changes you make to either of the
linked files—to keep your address book up to date (see
About Synchronization on page 10-12).
• Open Cardscan.Net files in CardScan (see Working with
.Net Files in CardScan on page 10-9).
• Manage CardScan.Net files from your desktop (see
Managing CardScan.Net Files on page 10-16).
NOTE: You can create as many online address books as
you need, each consisting of a local and .Net file linked
together over the Internet.
To find out more about CardScan.Net, visit the web site
www.cardscan.net.
The following section illustrates creating your CardScan.Net
account and your first address book.
10-2 Corex Technologies
Page 95
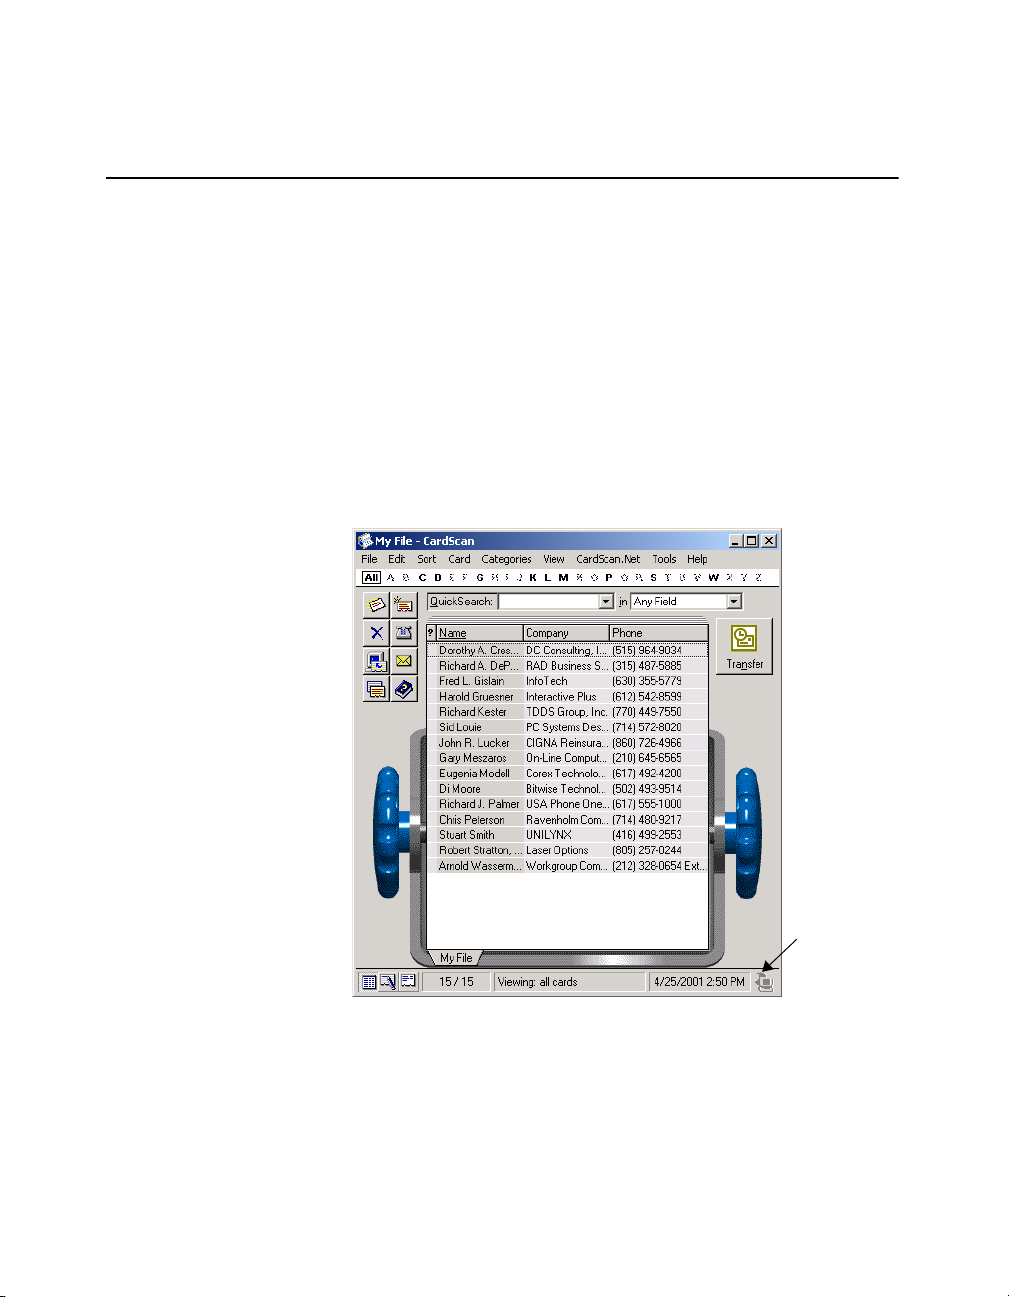
Creating CardScan.Net Account and Address Book
Creating CardScan.Net Account and Address Book
You can create your CardScan.Net account:
• Directly on the CardScan.Net web site, at
www.cardscan.net (see page 10-17).
• From CardScan on your desktop, as illustrated in the
following example.
This example assumes that you have used CardScan before
and have a saved CardScan file.
1. Make sure your PC is connected to the Internet.
2. Start CardScan and open a contacts file; for example:
CardScan.Net
Indicator
Note the CardScan.Net indicator, in the lower-right
corner of the window. The indicator is dimmed, because
you have not yet signed in. This and other states of the
CardScan.Net indicator are summarized in
Understanding CardScan.Net Indicator on page 10-12.
CardScan User’s Guide 10-3
Page 96

1
Chapter 10 CardScan.Net
3. On the menu bar, click CardScan.Net. The CardScan.Net
menu appears:
Click to sign in
10-4 Corex Technologies
4. Choose CardScan.Net→Sign In. This dialog appears:
Click to sign up
Page 97

5. Because you do not have an account yet, click Sign Up to
Click to read
Privacy Statement
Creating CardScan.Net Account and Address Book
create it. This dialog appears:
6. Make sure to read the Privacy Statement and then fill in
the form.
NOTE: A username can contain only alphanumeric
characters and the underscore. You may not use
multiple words separated by spaces. To use more than
one word, connect them with the underscore or type
them without spaces between. For example,
“peter_pan” and “peterpan” are acceptable usernames.
This rule applies to passwords also.
7. Click Sign Up. This creates your account and signs you in
at the same time. The Sign In dialog closes.
CardScan User’s Guide 10-5
Page 98

1
Chapter 10 CardScan.Net
8. On the menu bar, click CardScan.Net. The CardScan.Net
menu appears.
Click to
sign out.
CardScan.Net
Indicator
10-6 Corex Technologies
Note two changes in the window:
• On the CardScan.Net menu, the Sign In item has been
replaced with Sign Out, followed by your username. This
allows you to sign out anytime.
• In the lower-right corner, the CardScan.Net indicator,
previously dimmed, indicates a connection between
CardScan and CardScan.Net.
9. Choose CardScan.Net→Save “My File” to Net. This
dialog appears:
Page 99

Creating CardScan.Net Account and Address Book
10. Click Save. The progress dialog appears. When the
saving completes, the progress dialog closes, and the tab
of the file displays the CardScan.Net symbol.
The symbol on the tab means that the local file is linked to
the CardScan.Net file.
To view your file on the Web, go to www.cardscan.net,
and enter your username and password.
CardScan User’s Guide 10-7
Page 100

1
Chapter 10 CardScan.Net
Working With CardScan.Net Files
CardScan.Net allows you to look up your contact information
from wherever you are, whenever you need it. From your
online address book on the Web, you can email your contacts
and visit their Web sites. You can also work on your address
book, for example, type in new contacts, delete contacts, and
edit contact information. However, working on your address
book is more efficient if you open the .Net file in CardScan,
make any changes, and synchronize files—automatically or
manually.
An example of manual synchronization is included in Working
with .Net Files in CardScan on page 10-9. For details of
manual and automatic synchronization see About
Synchronization on page 10-12.
Working with address books on the Web
Just as CardScan, your address book on www.cardscan.net
displays the contacts in List view, Edit view, and Summary
view. The following example compares Summary views in
CardScan and CardScan.Net.
10-8 Corex Technologies
Summary
View in
CardScan
 Loading...