

Assembly and operating instructions
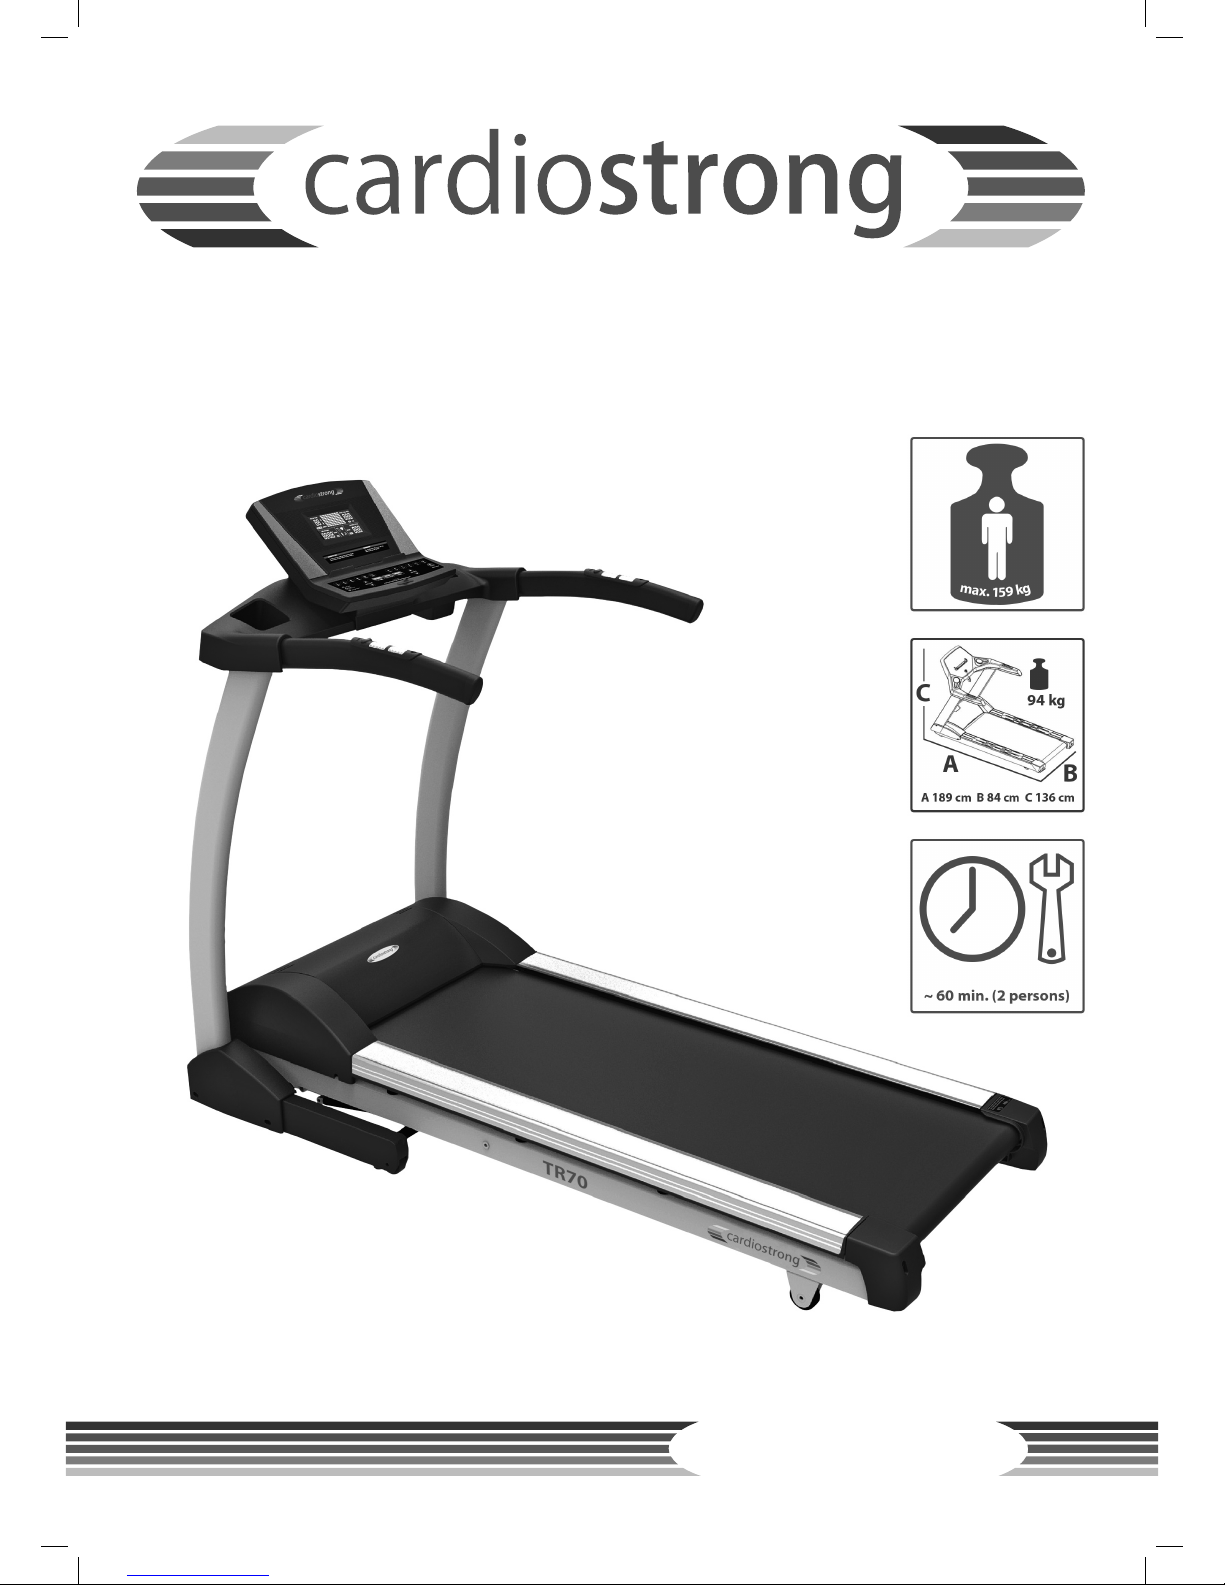
Treadmill TR70i
Art. No. CST-TR70-2

TR70i
2

3
Dear Customer,
Thank you for deciding for a high-quality training equipment of the brand
cardiostrong, the brand that makes athlete‘s hearts beat faster. cardiostrong oers a
wide range of home tness equipment like elliptical cross trainers, ergometers, treadmills and rowing machines. cardiostrong equipment is the optimal equipment for all
those who want to train at home independent of goals and tness level. For further
information please visit www.sport-tiedje.com or www.cardiostrong.de.
SAFETY NOTICE
Please read all of the instructions carefully before assembly and rst
use. These instructions are intended to ensure speedy assembly and
explain safe usage. Make sure that all people exercising with the equipment (in particular children and persons with limited physical, sensory, mental or motor capabilities) are informed about these instructions and its content in advance. In
case of doubt, a responsible person must supervise the use of the equipment.
This equipment has been manufactured according to the latest safety knowledge.
As far as possible, potential safety hazards which could cause injury have been eliminated. Make sure to follow the instructions carefully and that all parts are securely in
place. If required, read through the instructions again to correct any mistakes.
Please pay close attention to the safety and maintenance instructions given here. The
contract partner cannot be held liable for damage to health, accidents or damage to
the equipment when it is not used in accordance with these instructions.
The equipment is only suitable for use at home. The equipment is not suitable for
semi-professional (e. g., hospitals, clubs, hotels, schools, etc.) and commercial or professional use (e. g., health clubs).
Retain these instructions in a safe place for future reference, maintenance or when
ordering replacement parts.

TR70i
4
CONTENTS
1 GENERAL INFORMATION 6
1.1 Technical data 6
1.2 Personal safety 7
1.3 Electrical safety 8
1.4 Set-up place 9
2 ASSEMBLY INSTRUCTIONS, MAINTENANCE AND CARE 10
2.1 General instructions 10
2.2 Errors and error diagnosis 11
2.3 Error codes and troubleshooting 12
2.4 Care and maintenance 13
2.5 Maintenance and service calendar 16
3 ASSEMBLY 16
3.1 Package contents 16
3.2 Assembly instructions 18
4 OPERATING INSTRUCTIONS 25
4.1 Console display 25
4.2 Button functions 26
4.3 Programs 27
4.3.1 Pre-set programs 27
4.3.2 MAN. - manual program (pre-set and user-dened) 32
4.3.3 Heart-rate controlled training 33
4.4 Equipment settings 34
5 WORKOUT INSTRUCTIONS 35
5.1 Heart rate measuring 35
5.2 10 tips for eective running training 38
5.3 Designing a workout 39
5.4 Stretching exercises for leg & chest muscles 41
5.5 Workout journal 43
6 WARRANTY INFORMATION 44

5
7 DISPOSAL 46
8 ORDERING ACCESSORIES 47
9 ORDERING SPARE PARTS 48
9.1 Service hotline 48
9.2 Serial number and model name 48
9.3 Parts list 49
9.4 Exploded drawing 54

TR70i
6
1 GENERAL INFORMATION
1.1 Technical data
LED display of
+ speed in km/h
+ training time in min
+ training distance in km
+ calories burnt in kcal
+ heart rate (when using the hand sensors or a chest strap)
+ incline in %
Motor output: 3.5 HP continuous output (DC motor)
Speed range: 0.8 to 20 km/h
Speed hot keys: 6
Incline range: 0 - 12 %
Incline hot keys: 6
Total number of training programs: 22
Manual programs: 1
Pre-set programs: 17
Heart rate controlled programs: 2
User dened programs: 2
Running surface size (L x W): 152 x 51 cm
Weight and dimensions:
Article weight (gross, including packaging): 105 kg
Article weight (net, without packaging): 94 kg
Packaging dimensions (L x W x H): approximately 2000 mm x 870 mm x 370 mm
Set-up dimensions (L x W x H): approximately 1890 mm x 840 mm x 1370 mm
Folded dimensions (L x W x H): approximately 1070 mm x 840 mm x 1680 mm
Maximum user weight: 159 kg / 350 lbs

7
1.2 Personal safety
+ Before you start using the equipment, you should consult your physician that
this type of exercise is suitable for you from a health perspective. Particularly
aected are persons who: have a hereditary disposition to high blood pressure
or heart disease, are over the age of 45, smoke, have high cholesterol values, are
overweight and/or have not exercised regularly in the past year.
+ Please note that working out excessively can seriously damage your health. Please
also be aware that heart rate monitoring systems might be imprecise.
+ The equipment may only be used for its intended purpose; that means for running
training by adults.
+ Any other usage is prohibited and potentially dangerous. The contract partner
cannot be held liable for damage resulting from improper use.
+ The equipment is strictly for use by one person at a time.
+ Children should not be allowed unsupervised access to the equipment.
+ Before starting your training, make yourself familiar with all of the equipment‘s
functions and setting options. Have an expert explain the correct usage of the
product to you.
+ Make sure that nobody is in the range of motion of the equipment while exercising.
+ Keep your hands, feet and other body parts, hair, clothing, jewelry and other
objects well clear of moving parts.
+ During use, wear suitable sports clothing rather than loose or baggy clothing.
When selecting sports shoes, think about the suitability of the sole – preferably
this should be made of rubber or other non-slip materials. Shoes with heels,
leather soles, studs or spikes are not suitable. Never work out in bare feet.
+ It is also important to take note of the information given in the workout instructions
for creating a workout plan.
+ At the rst signs of weakness, nausea, dizziness, pain, diculty in breathing or
other abnormal symptoms, stop your workout immediately and, if necessary,
consult your physician.
+ Without prior agreement from your authorized contract partner, opening the
equipment is prohibited.
+ The equipment has stable steps on the sides that you can stand on in case of an
emergency and leave the equipment.
+ The safety key should be inserted during all training.
+ The safety key and the power cable should be removed when you are not present
in order to rule out improper usage by third parties.

TR70i
8
Safety Key
+ The equipment has an EMERGENCY STOP mechanism for your safety. The
equipment may only be operated when the safety key is properly attached to the
contact point of the cockpit. The equipment will automatically stop immediately if
the safety key is no longer on the contact point. That is why you should attach the
safety key string with the clip to your clothing before training. Remove the safety
key from the cockpit with the help of the string if you would like to quickly stop
the treadmill, you can no longer handle the speed or an emergency occurs.
+ In order for the safety key to be released from the cockpit contact point in the
event of a fall, the clip of the safety key must be attached (xed) to your clothing!
+ An uncontrolled usage of the equipment by third parties can be avoided by
removing and storing the safety key.
+ Prevent children from having access to the safety key.
1.3 Electrical safety
+ The equipment requires a 220 - 230V / 50 Hertz mains power supply.
+ The equipment should be connected directly to a grounded plug socket only by
means of the power cable supplied. The use of multi-socket adapters or similar
is not recommended. Extension leads must comply with local electrical safety
guidelines. Always fully unwind the power cable.
+ The outlet should be secured with a fuse with a minimum value of „16 amperes,
slow“.
+ In order to reduce the risk of an electric shock, always unplug the equipment from
the mains socket immediately after your workout, before assembly or dismantling,
and before maintenance or cleaning. Do not pull on the cable.
+ When plugged in, do not leave the equipment unattended at any time. To avoid
use by anyone unfamiliar with the usage instructions, the power cable should be
removed when the equipment is not in use.
+ Keep the power cable away from heat, oil and sharp edges. Do not route the power
cable underneath the equipment or under a carpet or rug, and do not place any
objects on top of it.
+ Make no modications to either the power cable or the mains plug.
+ If the power cable or the plug are damaged or defective, contact your authorized
contract partner. Do not use the equipment in the meantime.
+ Do not keep electrical devices (e. g., mobile phones) in close proximity to the
console or the control electronics, otherwise display values (e. g., pulse measuring)
could be inaccurate.
9
1.4 Set-up place
+ The equipment should only be used indoors, in a suciently heated and dry area
(ambient temperature between 10°C and 35°C). The equipment should not be
used outdoors or in rooms with high humidity (over 70%) like swimming pools. The
equipment should only be stored in surroundings with an ambient temperature
between 5°C and 45°C.
+ The training room should be well ventilated during training and not be exposed to
any draughts.
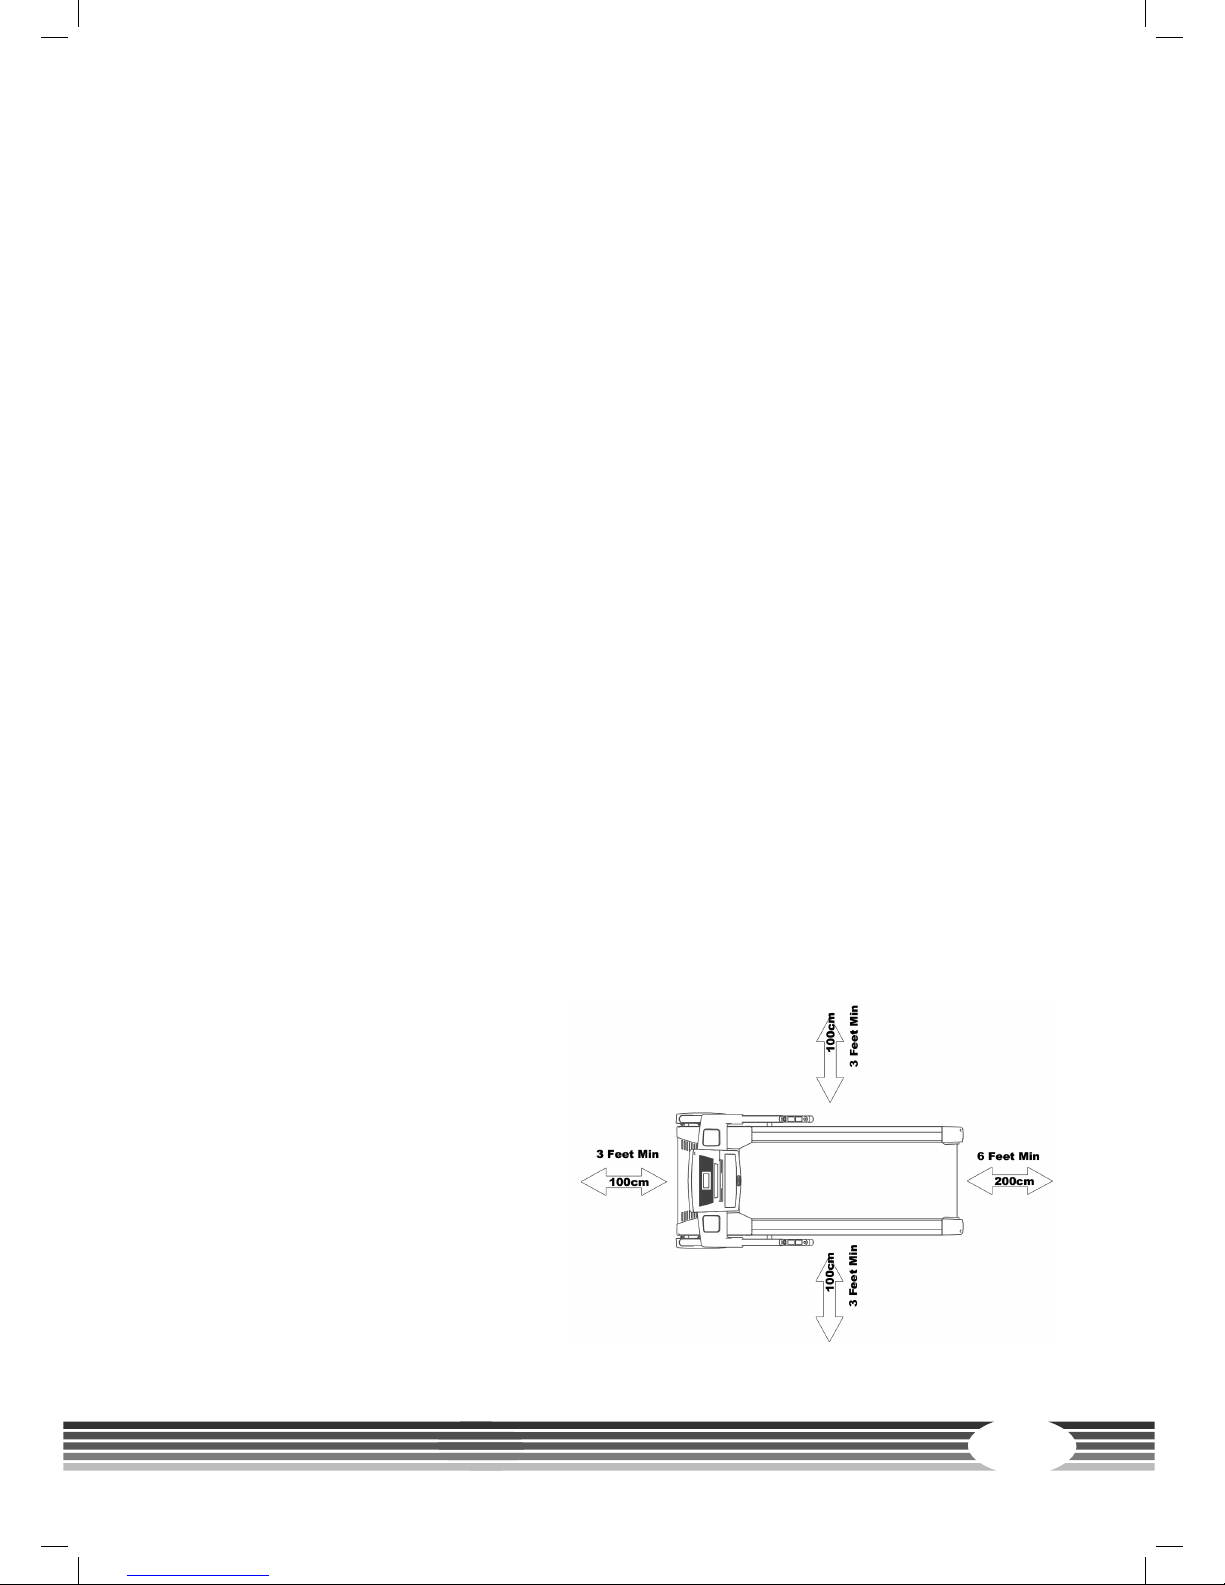
+ Choose a location in which to place the equipment such that there is enough free
space/clearance to the front, the rear and to the sides of the equipment (at least
1.50 m). Furthermore, the equipment should not be set up in main entrances or on
escape routes.
+ Always keep the power cable away from hot surfaces and grounds and make sure
that the cable is not stuck somewhere or becomes a „trip hazard“.
+ No objects of any type should be inserted into the openings of the equipment.
+ The equipment should be placed on a level and solid surface, any unevenness in
the oor should be leveled out.
+ A oor protective mat / equipment underlay can help to protect high-quality oor
coverings (parquet, laminate, cork, carpets) from dents and sweat and can help to
level out slight unevenness..
2

TR70i
10
2 ASSEMBLY INSTRUCTIONS, MAINTENANCE AND CARE
2.1 General instructions
+ Please check if all parts and tools belonging to the equipment are included in the
delivery and if there is any transport damage. If there are any complaints, please
contact your contract partner directly.
+ Some of the nuts and bolts to be used in assembly are already pre-mounted in
order to make set-up as easy as possible.
+ The equipment must be assembled by adults. In case of doubt, ask for assistance
from another person with technical skills.
+ Keep children away from the equipment during assembly, because small parts are
included in the delivery and may be swallowed.
+ Make sure that you have enough space (at least 1.50 m) in every direction during
assembly.
+ Do not leave any tools and packaging materials like plastic sheeting laying around
to avoid danger of suocation for children.
+ Assemble the equipment on an underlay mat or on the cardboard packaging in
order to avoid damage to the equipment and to the oor (scratches).
+ Before starting assembly, all individual parts should be placed on the oor next to
each other.
+ Read the assembly instructions carefully and assemble the equipment according
to the illustrations. Proceed carefully and cautiously.
+ First loosen all parts and check for their correct tting. Then tighten the screws
using a tool.
+ Modications to the design or improper repairs may pose a hazard to the user and
should not be carried out. The product warranty may be void as a result.
+ Only authorized service technicians are permitted to carry out all servicing and/or
repairs – it excludes maintenance and care.
+ Damaged or worn components may impair your safety and the lifespan of
the equipment. You should therefore immediately replace damaged or worn
components. Please contact your contract partner in such a case. The equipment
should no longer be used until it has been repaired. When needed, only use
original cardiostrong spare parts.
+ Check the tightness of all screw connections once a month.

11
+ In order to be able to guarantee the constructively dened safety level of this
equipment, we recommend having the equipment regularly maintained (at least
once a year) by specialists (contract partner service technicians).
+ The equipment may be cleaned of dust, dirt and sweat using a damp cloth. The
use of solvents should be strictly avoided. Also, make sure that no liquids (e. g.
sweat) get into the openings of the equipment (e. g. console).
2.2 Errors and error diagnosis
The equipment runs through regular quality controls during production. Nevertheless,
errors or malfunctions on the equipment may occur. Individual parts are often the
cause of faults and replacement is usually sucient. Please use the following overview
to see the six most common errors and how to repair them. If the equipment still does
not work properly, please contact your contract partner.
Error Cause Repair
Console only
shows lines
Safety key missing Check if the safety key is inserted
and place it in
Running belt tilted
Running belt not
aligned
Align running belt in accordance
with the instructions
Running belt slips
through/stops
Belt tension/lubrication
not ok
Check belt tension/lubrication in
accordance with the instructions
Scraping noises
Running belt scrapes,
because it is not aligned
Align running belt in accordance
with the instructions
Display does not
show anything
Check plug connections
(cables)
Mains switch on “on”, make sure
that the safety key is inserted
No pulse display
Sources of interference
in the room
With chest strap
Unsuitable chest strap
Position of the chest
strap incorrect
Batteries empty
Remove sources of interference (e.
g. mobile phone, speakers, etc.)
Use suitable chest strap (see
recommended accessories)
Reposition chest strap and/or
moisten electrodes
Change batteries

TR70i
12
2.3 Error codes and troubleshooting
The electronic system from the treadmill does tests continuously. If there are
deviations, an error code is displayed and the normal operation will be stopped for
your safety.
Please contact Sport-Tiedje for technical customer service.
Error codes description:
+ E1 - speed error
+ E2 - error reading memory
+ E6/E7 - incline error
+ E9 - disruption to the connection
Error
code
Troubleshooting
E1 If E1 appears, remove the safety key & insert it again to restart it. If E1 still appears,
check the following:
1. Check all cable connections.
2. The treadmill does not move after START was pressed & shows E1 - check if a part got
stuck.
3. Treadmill ran shortly after START was pressed, but then stopped.
4. Check all cables and the motor.
5. Please contact the customer service if E1 cannot be repaired.
E2 1. Check if the console IC chip is situated correctly. In order to solve the problem,
connect the console IC chip again.
2. Check if the console IC chip is bent or connected correctly. In order to solve the
problem, connect the console IC chip again.
3. Contact customer service.
E6 / E7 Remove & reinsert safety key to restart the treadmill.
1. Reset incline value:
(1) Hold speed & press START for 3 seconds until it beeps twice.
(2) If the incline position is lower than the middle, press MODE & INCLINE up. Hold both
buttons and the incline will increase. Release both buttons as soon as the incline position is
at the middle level.
(3) If the incline position is higher than the middle, press MODE & INCLINE down. Hold both
buttons and the incline will decrease. Release both buttons as son as the incline position is
at the middle level. Try it for a few minutes. If the incline does not move, contact the customer service. As soon as the incline position is in the middle position, turn o the machine
and restart. If E6/E7 is still shown, contact customer service.
2. Check if the red and white incline cables are correctly connected to the MCB.
3. If the steps above do not help, contact your customer service.

13
Error
code
Troubleshooting
N/A The LED on the start button glows faintly, other LEDs are not on: The machine is in power
saving mode. Hold the START button for one second.
N/A The console display is uctuating or does not light up: Check if the treadmill is correctly
connected to the power supply. Turn the power switch o and back on. Safety key is plugged in. Check all cable connections for correct connection. If the problem is still occurring,
please contact customer service.
N/A The belt does not run in the middle during usage:
First check if the treadmill has a stable position, then follow the operating manual in regards
to tension and adjusting the belt (the deck).
N/A The motor appears to be overloaded or E1 appears after a few minutes of training:
The silicone applied to the deck and belt has dried out and the deck must be lubricated
again with silicone spray.
N/A The running mat slips during usage. The belt must be tensioned after a certain amount
of usage. Follow the belt tensioning and alignment in this manual.
N/A Heart rate uctuates or is not recorded:
Check to see if your hands are moist, if all connections behind the console are correct and if
any cables are damaged. With a chest strap, check the battery status and make sure that all
electrodes are moist and correctly placed below the chest.
N/A Silicone symbol is illuminated on the console:
Lubricate the machine with 100% pure silicone. Then press speed down and START at the
same time until the symbol goes out.
2.4 Care and maintenance
The most important maintenance measure is taking care of the running belt. This
includes the adjustment, tensioning and lubrication of the running belt. Damage
caused due to a lack of care or negligence will not be covered by the warranty. Thus,
check for maintenance in regular intervals. Be extremely careful when adjusting and
tightening the belt, because a strong over or under tension may lead to damage. The
running mat is set properly in the factory before delivery. However, the running mat
may get out of place during transport.
TR70i
14
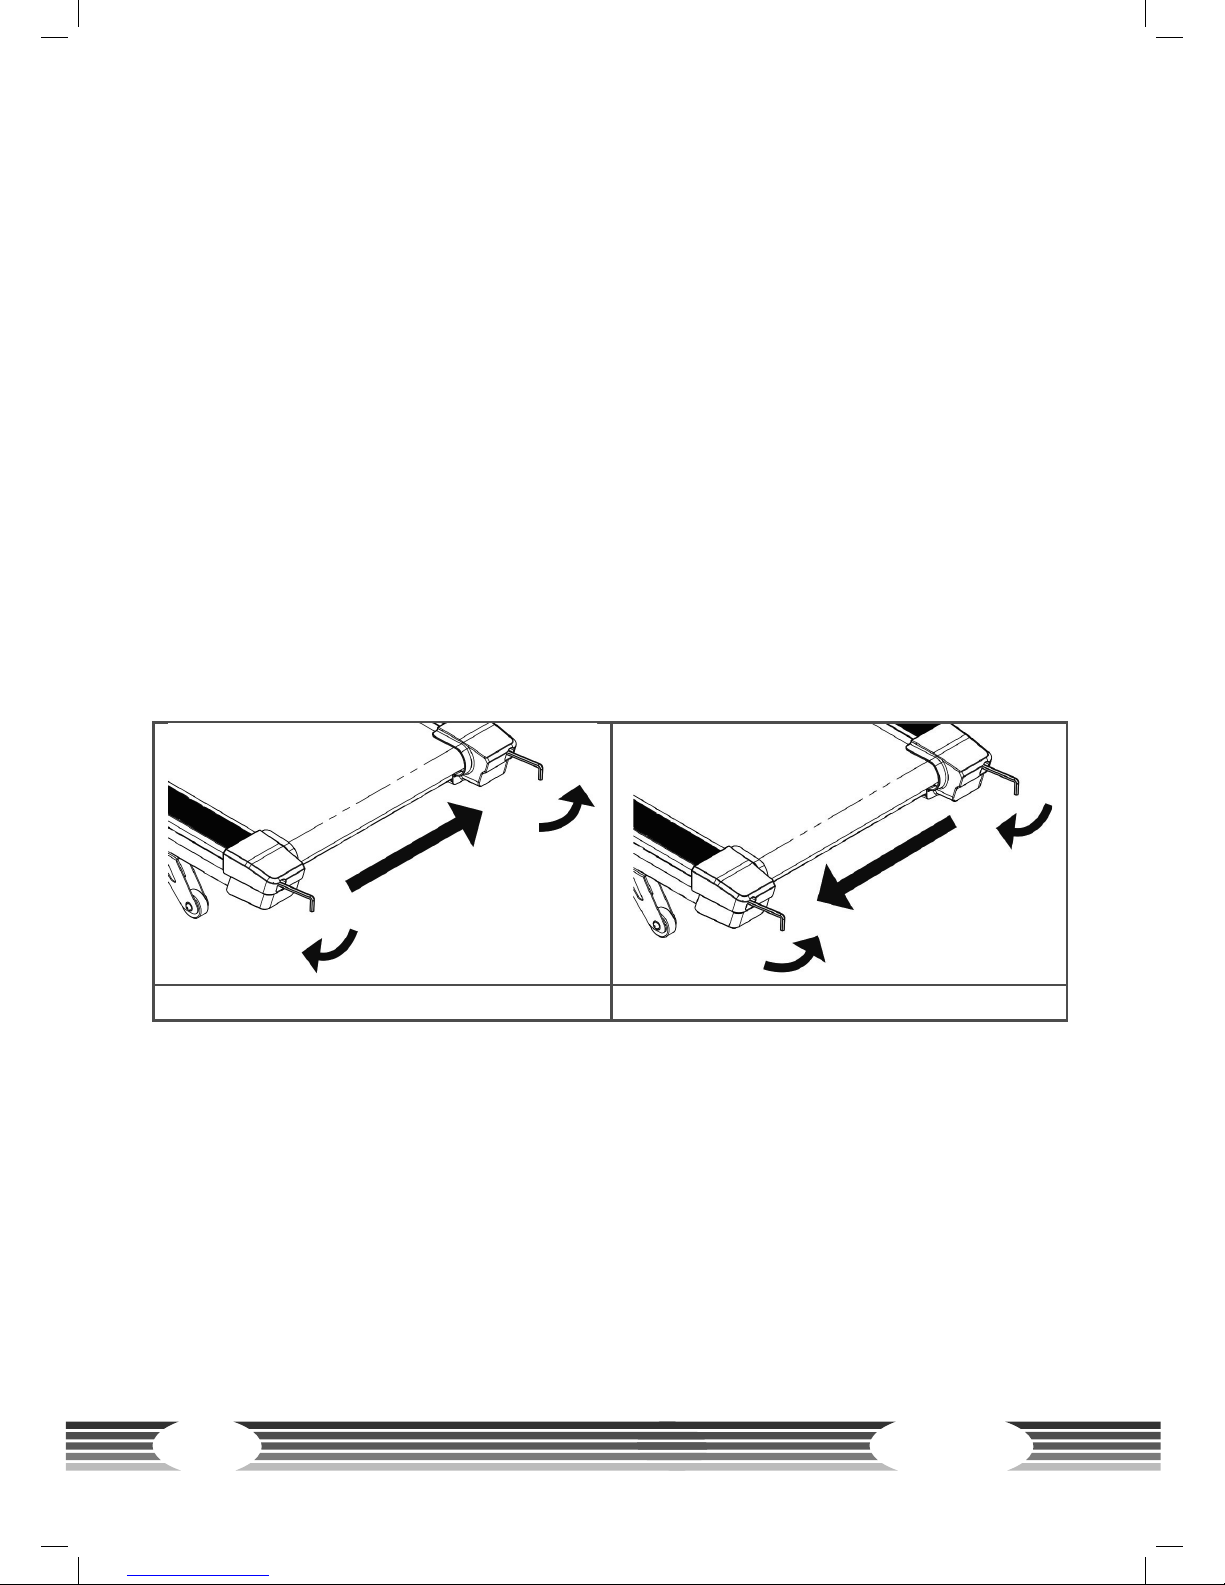
Adjustment of the running mat
+ During training, the running belt should run as centered and straight as possible.
The alignment of the running belt may change depending on the stress and load.
Another reason can be the positioning of the equipment on an uneven surface.
+ While adjusting the belt, let the equipment run with a speed of approximately
5km/h. Nobody may be on the equipment during this process.
+ If the running belt drifts o to the left, turn the left setting screw on the rear end of
the equipment at most 1/4 rotation clockwise and the right setting screw at most
1/4 rotation counterclockwise (g. C).
+ If the running belt drifts o to the right, turn the right setting screw on the rear
end of the equipment at most 1/4 rotation clockwise and the left setting screw at
most 1/4 rotation counterclockwise (g. D).
+ Then watch how the belt runs for approximately 30 seconds, because the change
will not be visible immediately.
+ Repeat the process until the running belt runs straight again. If the running mat
cannot be adjusted, please contact the contract partner.
+ If the running mat (belt) cannot be adjusted, please contact Sport-Tiedje.
Tensioning the running belt again
+ If the running belt slips over the rollers during operation (if this is the case, a
noticeable jerking will be noticed while running), the running belt must be
tensioned again. In most cases, the cause for the slipping is a straining of the belt
through usage. This is completely normal.
+ It can be tightened through the same setting screws that were used during
adjustment.
Move the belt to the right Move the belt to the left

15
+ While tightening the belt, let the equipment run at a speed of 5km/h.
+ Turn the left and right setting screws directly after each other a max. 1/4 clockwise
rotation.
+ Then check if the running belt is still slipping. If this is the case, you must repeat
the described process.
Lubrication of the running belt
+ If the running belt is inadequately lubricated, the friction will increase signicantly
and this leads to strong wear of the endless belt, running panel, motor and circuit
board.
+ If you feel an increase in friction from the running belt, this is an indicator that you
should lubricate the belt (however, a lubrication should be done at least every 3
months).
+ The treadmill has a reminder for lubricating the treadmill:
A symbol is displayed on the console every 100 operating
hours. The symbol appears on the display for 5 minutes
and then turns o. In order to turn o the symbol
prematurely, press the INCLINE up and INCLINE down
buttons at the same time.
+ In order to be able to optimally lubricate
the treadmill, the running belt must be
lifted slightly. Then apply some silicone
spray (free of grease) on the entire
running deck. It is easiest to lubricate
when the treadmill is folded up. Apply
three short (approximately 1 second)
sprays of silicone lubricant between the
belt and the running deck.

TR70i
16
3 ASSEMBLY
3.1 Package contents
The package contains the parts represented in the illustration, including a power
cable with mains plug. If one of the illustrated parts is missing, please contact your
contract partner.
+ The spraying tube should be held sideways in order to guarantee a moistening of
the entire underside of the belt. Continue to rotate the belt by hand so that the
entire area between the endless belt and running deck is lubricated. Wipe o the
excess lubricant.
+ This maintenance must also be done after the equipment has not been used for a
longer period of time.
2.5 Maintenance and service calendar
The cockpit, casing, handrails and entire frame must be
cleaned after every training session with a moist towel
(no solvent!) in order to avoid damage caused by sweat.
After 150 hours of operation, the maintenance symbol
reminds you to clean the treadmill. After you have
cleaned the treadmill and checked all components, turn
o the symbol by simultaneously pressing the INCLINE up and INCLINE down buttons.
The following routine work must be done in the specied time intervals:
Part Weekly Monthly 2x annually Annually
Display console C I
Belt tension
I
Belt lubrication
I
Plastic covers
C I
Screws & cable connections
I
Legends: C = cleaning; I = inspect
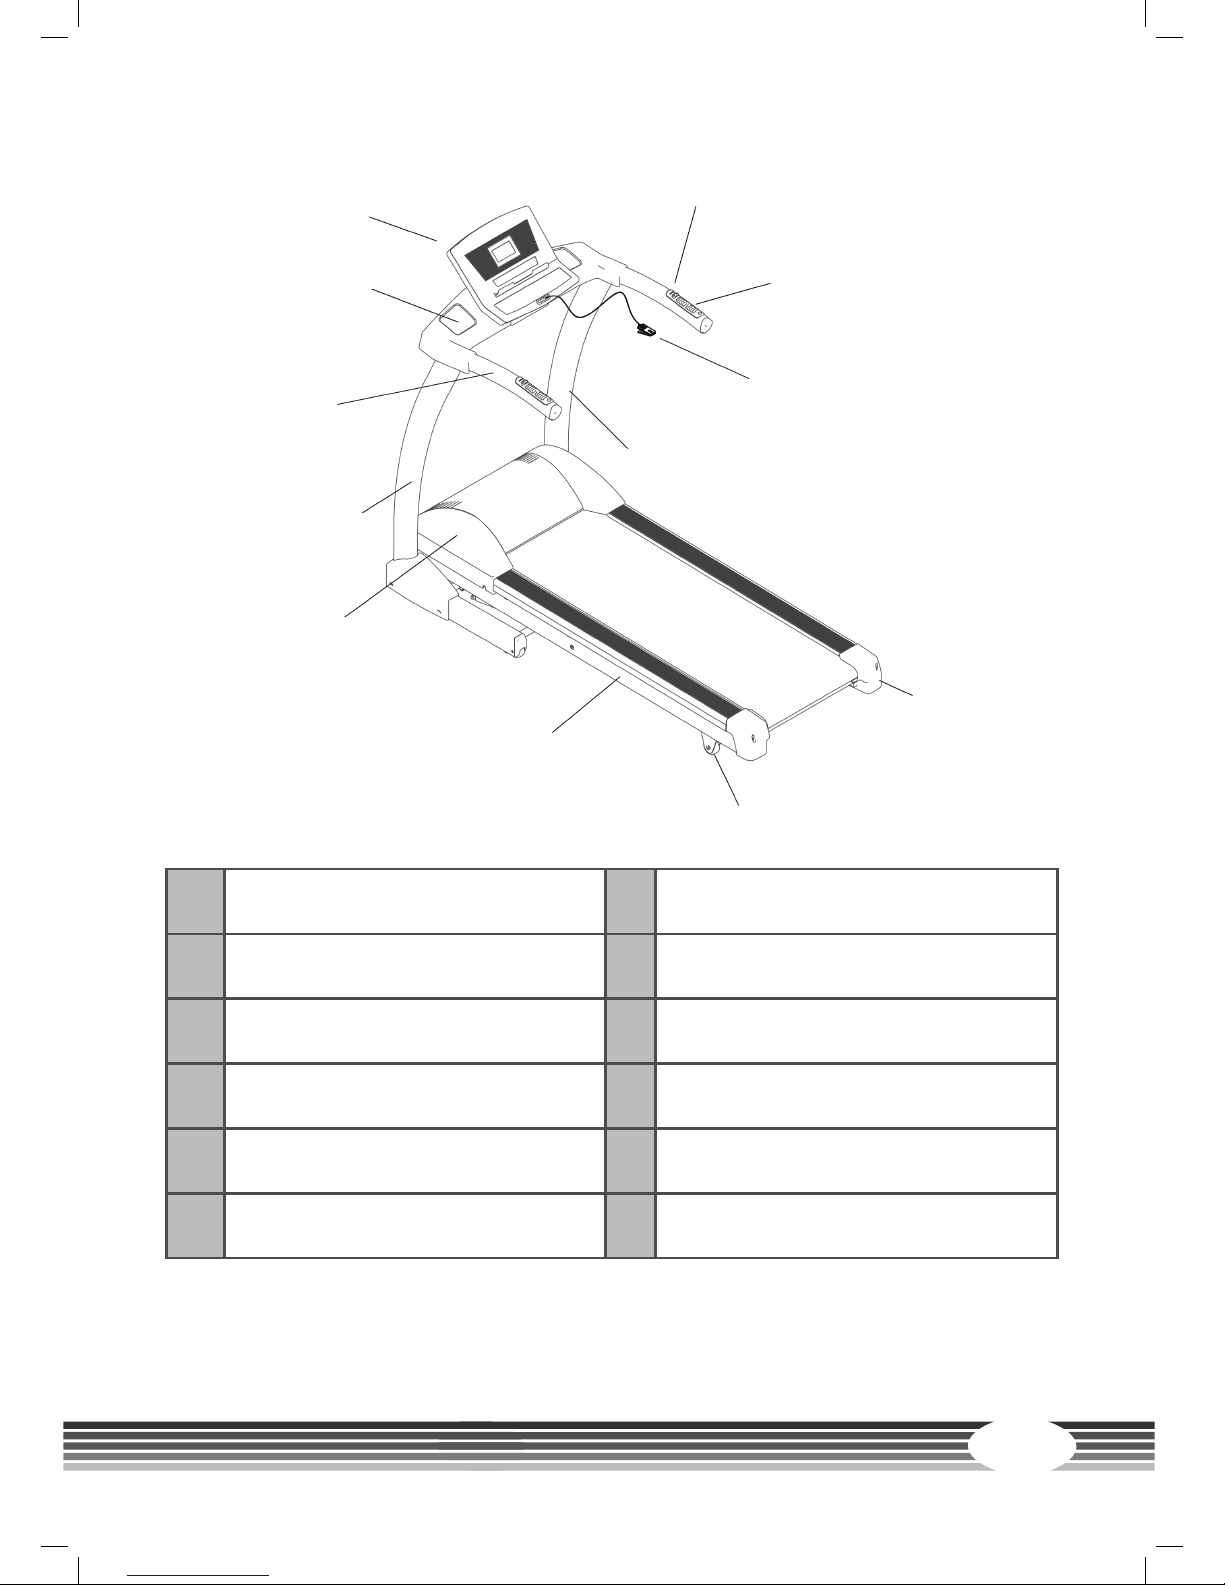
17
1 Console 7 Rear transport wheel
2 Bottle holder 8 Rear cover
3 Handle 9 Safety key
4 Console mast 10 Pulse handle
5 Motor cover 11 Hot key
6 Frame
(1) Console
(2) Bottle holder
(3) Handle
(4) Console mast left
(4) Console mast right
(5) Motor cover
(6) Frame
(7) Rear transport wheel
(8) Rear cover
(9) Safety key
(10) Pulse handle
(11) Hot key
TR70i
18
3.2 Assembly instructions
Check the equipment for possible damage after unpacking. If it is damaged or parts
are missing, please contact our customer service.
1. Since the treadmill is very heavy, we recommend initially removing the upper cover
of the packaging; fold the sides downward. Then you do not have to remove the
treadmill from the box.
2. Remove all parts from the box before you start the assembly. Remove the plastic
and place all parts in front of you on a surface. Keep the oor under the treadmill free
of objects. The rear part of the treadmill may have to be lifted in order to be able to
get under the parts better.
Before assembly, take an exact look at the individual illustrated assembly steps and
execute the assembly following the specied order.
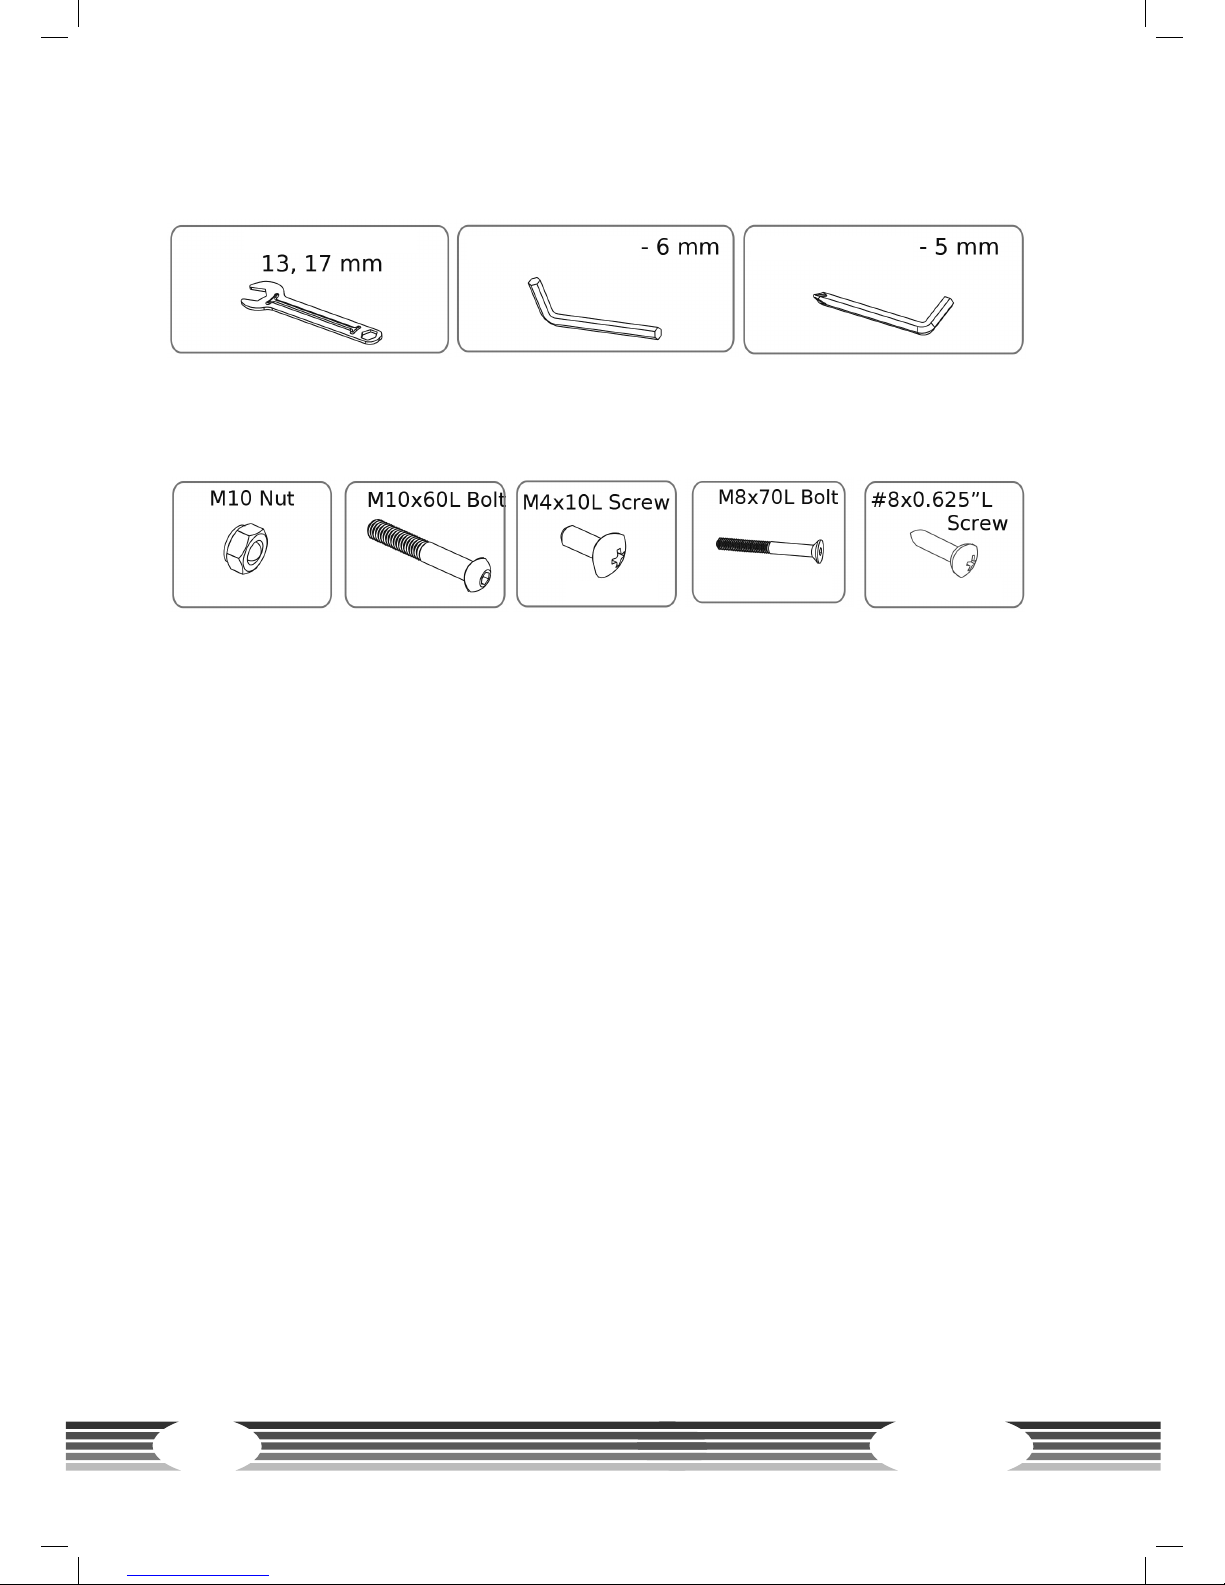
Tool and screw sets
Included in the hardware bag:
Preassembled screws:
(Screws must be removed & attached again during assembly.)
Multi key
4 pieces 4 pieces
8 pieces
2 pieces
6 pieces
Allen key Allen key

19
Step 1: Assembly of console masts
1. Fold up the console mast (1-1).
2. Mount the two M10x60L screws with nuts (1-2).
3. Mount the two M10x60L screws with nuts (1-3).
4. Place the cover on and mount it with four M4x10L screws (1-4).
Multi key
4 pieces 4 pieces
4 pieces
Allen key Allen key

TR70i
20
Step 2: Assembly of the handrails
1. Align the handrails.
2. Mount the handrails with two M8x70L screws.
2 pieces
Allen key

21
Step 3: Connect the console
1. Connect the plug from the console with those from the console mast.
2. Carefully place the excess cable in the crossbar from the console mast.
TR70i
22
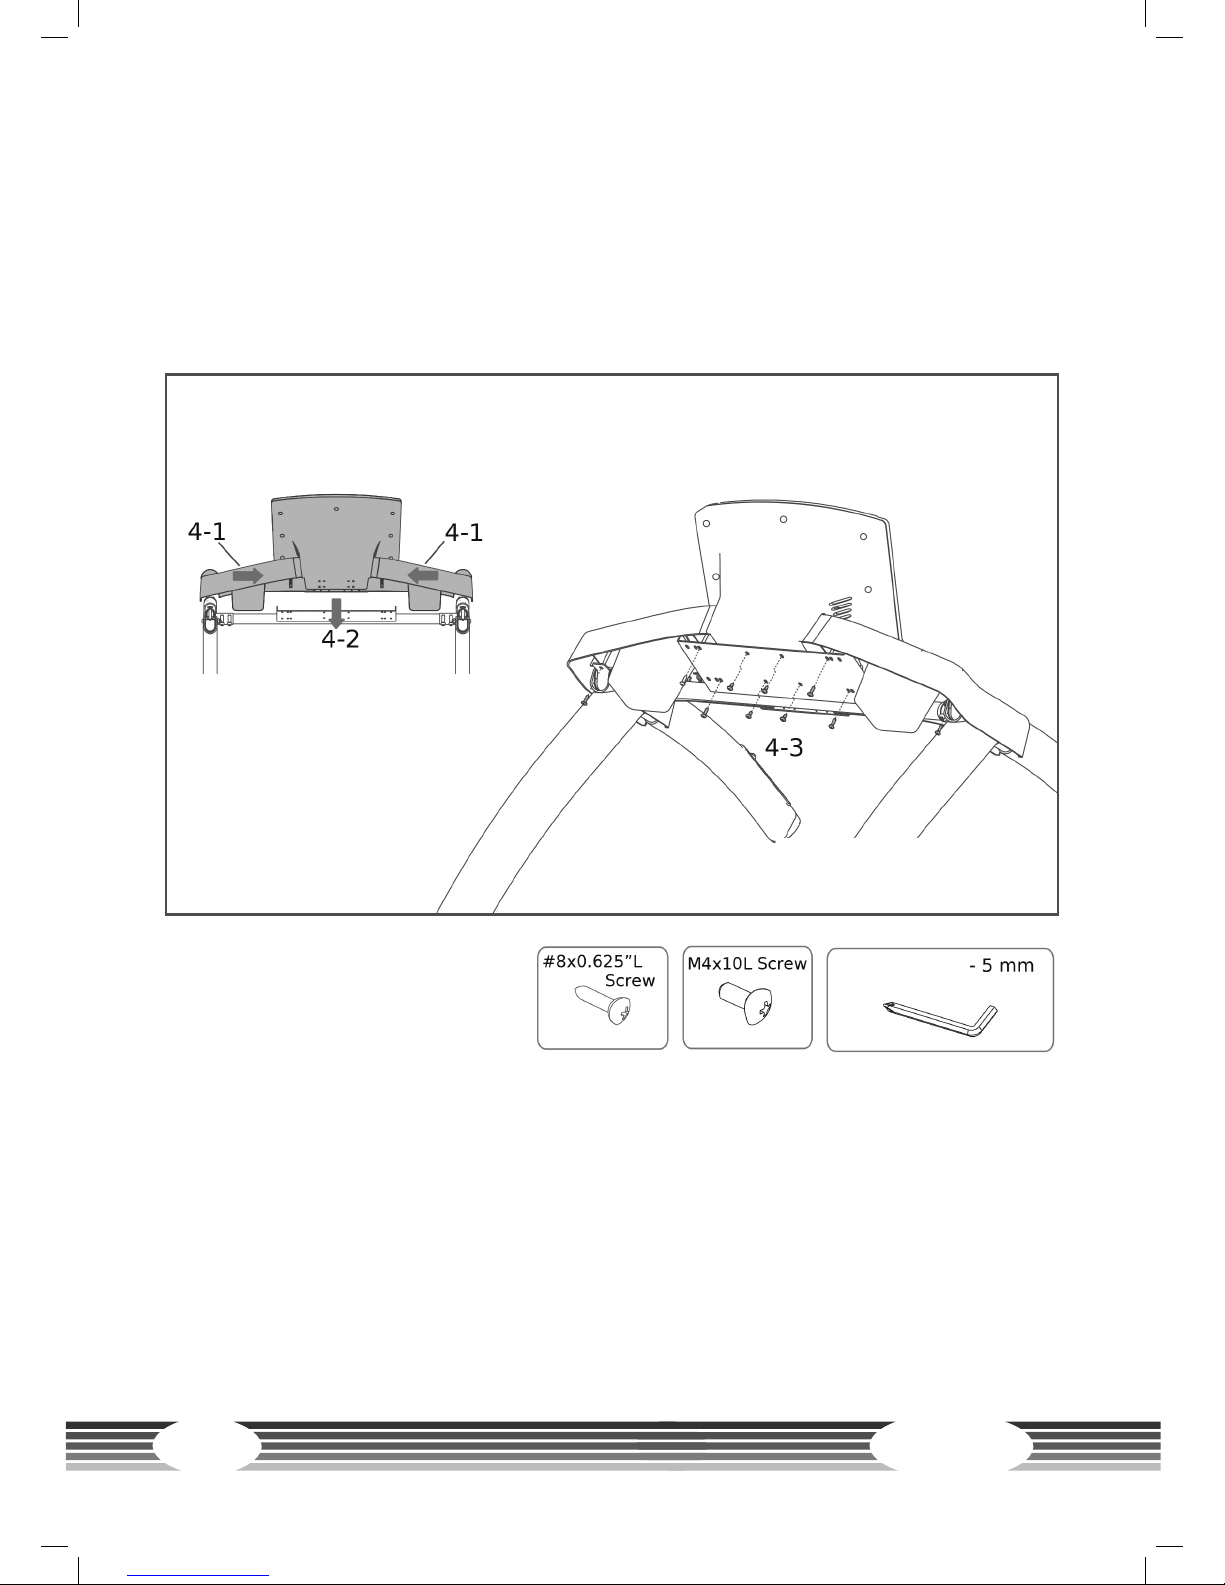
Step 4: Assembly of the consoles
1. Place the bottle holders on the main console (4-1).
2. Place the entire cockpit on the designated shelf, softly press the covering on the
sides so that it sits correctly (4-2).
3. Take the screws 6x #8x0.625‘‘L and 4x M4x10L and screw them into the designated
holes (4-3).
6 pieces 4 pieces
Allen key

23
Transport and storage
The treadmill is foldable and thus saves space when it is stored. It also makes it easier
to transport.
Folding up the treadmill
1. Turn o the on/o switch and remove the plug from the outlet.
2. Make sure that nothing is on or next to the equipment that can be spilled or knocked
over or that makes it impossible to fold up the treadmill.
3. (a.) Use both hands to grab the supportive bar directly under the rear part of the
running mat so that you have a stable lifting point.
(b.) Tilt the treadmill forward and make sure that the hydraulic brake is correctly
locked.
Warning: Observe the safety measures & lifting techniques while lifting. Bend
your knees & elbows, keep your back straight and lift up both arms.
(c.) Make sure that the locking mechanism is secure by pulling the equipment
backwards and it does not move. Make sure that you are standing safely if the
lock has not been engaged.
Warning:
• Do not lift the treadmill from
the running belt or the rear
transport wheels. These parts
do not lock and are dicult to
grab. This may cause personal
injury or damage to the
equipment.
• Do not lean on the equipment
when it is folded and do not
place anything on top of it
that may make the equipment
unstable or fall down. This may
result in personal injury.
• Do not connect the equipment
to the power supply when it is
folded up. Try not to operate the equipment when it is folded up.

TR70i
24
Unfolding the treadmill
1. Make sure there is enough
space to set up the treadmill:
at least 1 m on both sides and
to the front and at least 2 m
behind the equipment for
safety reasons. If the user starts
to fall, there is enough space to
leave the treadmill.
2. Make sure that nothing is
standing next to or on top
of the treadmill that can be
spilled or thrown or that makes
it impossible to unfold the
treadmill.
3. Stand behind the treadmill.
Press the equipment slightly forward towards the display and slightly press the upper
part of the hydraulic brake forward with your left foot until the lock releases and the
treadmill can be pulled backward.
4. The hydraulic brake will slowly lower independently. You should still hold on to the
treadmill until it has lowered 2/3 of the way. Pay attention to an appropriate lifting
technique, bend your knees and keep your back straight.

25
4 OPERATING INSTRUCTIONS
4.1 Console display
CALORIES Approximate calorie consumption since the beginning of training
TIME Training time
INCLINE Incline in %
PULSE Heart rate
SPEED Speed in km/h
DISTANCE Training distance in km
PROG. Indicates preset program on P01 to P17, U01 to U02, H01 toH02.
AGE Age for the HR programs
WEIGHT Weight for exact calorie calculation

TR70i
26
4.2 Button functions
MODE
With MODE/ENTER, you can select any value that
you need to set the program, e. g., program, level,
time and your weight (for more exact calculation of
burnt calories). MODE serves to change between the
training display.
START / STOP
· Press START in order to start manual training
without personal data. When the program starts, the
time will begin at 00:00 and the incline or speed can
be adjusted manually during training.
· When you wish to stop your training, press STOP.
Press START to restart the exercise. The console will
change to 0 after 90 seconds of inactivity. The Autoreset extends to 300 seconds in technical mode.
· If nothing is lit in the display, press the START button
for two seconds to turn the display on.
Speed
With the buttons for speed and incline, you can set
both values during training and adjust the values
during the program setting. If you use a pre-set
program, you can adjust the program prole with
these buttons (easier or more dicult). Example:
Incline program, increase the incline level from the
complete program by pressing the incline button.
Quick Selection
There are 4 to 6 hot keys for speed and incline. Then
you can directly make the desired setting and you do
not have to scroll through everything.
27
4.3 Programs
Advanced programs
Remember if you train daily with the same speed and duration, your physical tness
will only improve within this scope. In order to get the most out of your training time,
this treadmill has a wide selection of training programs. All programs are available
under “Speed” or “Incline” with three intensity levels, which you can choose from while
making settings. If you select the “Speed” mode, the belt speed varies and the incline
remains constant. In the “Incline” mode, the speed remains the same and the incline
adjusts to the program. In both modes, you have complete control over the input that
is not controlled by the program. You can also use one of the two heart rate programs
or create your own program in order to complete the pre-set programs.
4.3.1 Preset programs
P-01: Long, slow distance
(40-minute default)
This is a great training program for everyone. Beginners start with an easy training and
include this program in their weekly training in order to maximize their cardiovascular
endurance. Days that follow a hard, intense training make this program also ideal for
experienced users. Once the program is set, go to U-1 or U-2 and press START.
P-02: Short interval
(20-minute default)
Short intervals are ideal for beginners who would like to prot from the benets of
interval training, but are not yet prepared for interval training with longer intensity.
They are also ideal for experienced users in order to increase speed and anaerobic
tness. Make sure to vary the training intensity and duration in order to maximize
your overall tness level. Include a few interval exercises in your weekly training.

TR70i
28
P-03: Moderate interval
(30-minute default)
As soon as you train on a regular basis
and have an improved tness level, you are ready to train with moderate intensity in
intervals. Please note that this training includes a change between a simple recovery
and high intensity interval. Feel comfortable while training, because the next recovery
interval always follows. This training improves your general aerobic endurance and
simultaneously maximizes the development of your anaerobic tness level.
Advanced programs:
P-04: Long interval
(40-minute default)
These exercises are perfect to maximize calorie consumption and improve anaerobic
tness. Just as with moderate intervals, you have recovery intervals after every high
intensity - for constantly increasing training intensity.
P-05: Negative interval 1
(30-minute default)
This program oers all the advantages of training with an even speed and motivates
you to achieve a gradually higher, consistent training intensity and allows you to then
slowly decrease the training intensity. By improving your general health and tness,
you can slowly increase to a higher level of training intensity in this training.
P-06: Negative interval 2
(30-minute default)
This training begins with a slight increase in training intensity and ends with a gradual
reduction of the training intensity. Training with an increase and decrease of intensity
has an ideal eect on your aerobic, cardiovascular endurance. Training with a decrease
in intensity is also ideal to maximize the calorie consumption - however, over a longer
period of time, e. g., 40 or 50 minutes.

29
P-07: Fartlek
(30-minute default)
Varied training intensity with constantly changing interval training, that starts with
an easy speed & increases to a moderate/intense speed, oers variety and oers
great tness benets. Constantly varying intensities have a very positive eect on the
improvement of brain tness according to brain research.
P-08: Climbing uphill
(30-minute default)
Gradually increase the training intensity with this workout. The goal here is to
stimulate your body, to improve cardiovascular tness and to maximize the muscle
cell growth of the stressed muscles. The calorie consumption is maximized in the top
levels. Your body can train longer and also prot from the high intensity when slowing
down and returning to the initial level.
P-09: Pyramid increase
(30-minute default)
Gradually increasing intensity is ideal to improve cardiovascular tness and to
maximize the muscle cell growth of the stressed muscles. The calorie consumption is
maximized during peak intensity. Your body can train longer and prot from the high
intensities with gradual slowing down.
P-10: Plateau increase
(40-minute default)
This oers all of the benets of other consistent workouts, however, it motivates you
to maintain a higher intensity. You can improve your health and tness and bring
yourself to a higher intensity over a longer period of time.
TR70i
30
P-11: Ladder
(30-minute default)
Some of the best benets are the direct, positive eects on the heart and the
cardiovascular system. It is specically developed to supply your heart and
cardiovascular system with a series of increasingly dicult training intensities,
which improves your aerobic endurance and also stimulates anaerobic endurance.
Remember that it may be challenging for a few minutes, however, any success must
be carefully built up in order to oer recovery intervals as well - so that you can
motivate yourself to improve your cardiovascular tness.
P-12: Uphill interval
(20-minute default)
This training is unique, because the body enjoys the benets of interval training
& additionally those of the gradual increase in intensity. Start at a level that is
comfortable for you and gradually increase the intensity during every max. interval &
bring yourself to a higher intensity every time. During higher intensity intervals, you
burn the maximum amount of calories and simultaneously work on improving your
anaerobic tness.
P-13: Constant speed
(40-minute default)
Improve your tness and stimulate your body to burn more fat. It is ideal support
to improve your endurance. Most exercises of this type focus on maintaining load
during the entire training. Your goal is to train with a low, moderate to high, moderate
intensity throughout the entire workout.
P-14: Long, slow distance
(40-minute default)
A great workout for everyone! Beginners have an easy start and should do this training
at least once a week in order to maximize their cardiovascular endurance. It is also
ideal for experienced users who use this training on days that follow hard, intense
training.

31
P-15: Cardio run
(20-minute default)
Training with a constant speed, however, with higher intensity than with “long slow
distance”. It is an advanced training program to motivate you to achieve a challenging,
constant speed and to maintain your speed throughout the entire training. It is great
to prepare for a certain event.
P-16: Short interval
(20-minute default)
Studies prove that this training is ideal for users who would like to lose more weight
and improve their cardiovascular tness. The variation of intensity from moderately
slow to high through several intervals and their repetition maximize the total number
of burnt calories during training. Another benet is the personal decision about if
the high intensity should be maintained during training. The short recovery intervals
allow your body to do successful training with high intensity throughout a complete
training session.
P-17: Uphill running
(30-minute default)
Improve your tness and stimulate your body to burn more fat. It is ideal support
to improve your endurance. Most exercises of this type focus on maintaining load
during the entire training. Your goal is to train with a low, moderate to high, moderate
intensity throughout the entire workout.

TR70i
32
4.3.2 MAN. - Manual program
Press START to begin training as quickly as possible. To do this, select the manual
program & the time counts up from 00:00. You can also press ENTER in order to select
the manual program. With ENTER, set a certain duration and your weight (for more
exact calorie calculation).
Start pre-set program
1. Select program. Press the arrow buttons to select your desired program. Conrm
the setting with ENTER.
2. Select program mode. You can run any program in the incline and speed mode.
Press the speed button in order to select the speed mode (the same applies for
incline). Conrm with ENTER.
3. Select program level. There are three intensity levels for each pre-set program
(1 - the easiest, 3 - the most dicult). Make a selection with the arrow buttons and
conrm with ENTER.
4. Set time. Set the time with the arrow buttons and conrm with ENTER.
5. Enter weight. Enter the weight with the arrow buttons to better calculate the
calories and conrm with ENTER.
6. Press START to begin with the training.
User dened programs
User programs must be set before training. Steps as follows:
1. Select USER1 or USER2 program. Press U - 1 or U -2 and conrm with ENTER.
2. Set level. Set a level for each segment of the training program. Press ENTER and
execute this for all 20 segments.
3. Set time. Set the time with the arrow buttons and conrm with ENTER.
4. Enter weight. Enter the weight with the arrow buttons to better calculate the
calories and conrm with ENTER.
5. Start. Press START.
Once the program has been set, go to U-1 or U-2 and press START.

33
4.3.3 Heart rate controlled training
In this program, you have to set a heart rate that the console will maintain during
training. For the interval, you must enter a LOW and a HIGH heart rate. You either have
to hold on to the pulse handles with both hands or wear a chest strap during training.
HRC - constant
1. Select HRC1. Select H-1 with the arrow buttons and conrm with ENTER.
2. Select program mode. Press the speed or incline/arrow button up in order to
select the respective mode. Conrm with ENTER.
3. Set time. Set the time with the arrow buttons and conrm with ENTER. Remember
that the program includes a three-minute warm up.
4. Set age. Enter the age with the arrow buttons and conrm with ENTER.
5. Set target heart rate. Set with the arrow buttons and conrm with ENTER.
6. Enter weight. Enter the weight with the arrow buttons and conrm with ENTER.
7. Press START to begin with the training.
HRC - interval
1. Select HRC2. Select H-2 with the arrow buttons and conrm with ENTER.
2. Select program mode. Press the speed or incline/arrow button up in order to
select the respective mode. Conrm with ENTER.
3. Set time. Set the time with the arrow buttons and conrm with ENTER. Remember
that the program includes a three-minute warm up.
4. Set age. Enter the age with the arrow buttons and conrm with ENTER.
5. Enter HIGH target heart rate. Enter the HIGH interval frequency with the arrow
buttons and conrm with ENTER.
6. Enter LOW target heart rate. Enter the LOW interval frequency with the arrow
buttons and conrm with ENTER.
7. Enter weight. Enter the weight with the arrow buttons and conrm with ENTER.
8. Press START to begin with the training.
NOTES: The speed and incline can be changed with the arrow buttons while training.
Press START to stop the training program. You can reset the data with RESET (hold
STOP for three seconds).

TR70i
34
4.4 Equipment settings
Personal settings
Information on the
display
Hold MODE/ENTER and then press SPEED up in order to
get to the technical mode. The rst display shows the
software version. Then press MODE/ENTER to get to the
next display for personal settings or to show the factory
settings.
100 Eng
MODE
Metric (Si) or English (EN) measurements. Press SPEED
up or down in order to change. Press MODE/ENTER to
accept the setting and go to the next display.
En or Si
Set break times. Set the duration for which the treadmill
can be stopped until it is automatically reset. You can
choose between 90, 180 or 300 seconds before the
console resets. Press SPEED up or down to change this.
Press MODE/ENTER to accept the setting and go to the
next display.
PT
90 or 180 or 300
Turn on and o acoustic alarm WARNING: The acoustic
alarm was set by the manufacturer in order to warn
users when the treadmill starts or the speed changes.
The user may turn o the alarm at their own risk.
bz
ON or OFF
Set the beginning speed of the treadmill after the pause
button was pressed: 0 indicates that the treadmill will
start at the lowest speed. 1 indicates that the treadmill
will start at the speed at which the treadmill was set
before the pause button was pressed. Press SPEED up
or down to change this. Press MODE/ENTER to accept
the entry and go to the next display.
init
0 or 1

35
5 WORKOUT INSTRUCTIONS
5.1 Heart rate measuring
Pulse measurement through hand sensors
The hand sensors integrated in the handles allow you to determine your heart rate.
You can measure your heart rate by lightly grasping the sensors with both hands at the
same time. Blood pressure changes occur due to the heartbeat. The sensors measure
the changes to the electric skin resistance caused by it. These values are then used to
create an average and are displayed on the screen of the console as a heart rate.
Note:
For some people, the skin resistance change caused by the heart rate is so minimal
that the measurements do not allow for usable values. Strong callus or sweat on the
hands may also impair a correct measurement. In such cases, the heart rate will not be
shown at all or only incorrectly.
If the measurement is incorrect or not taken at all, please check if it happens to only
one person or to several people. If the pulse display only does not work in a single
case, the equipment is not defective. In this case, we recommend using a chest strap
to achieve a permanently correct heart rate display.
CAUTION: Your training equipment is not a medical device. Dierent factors
may inuence the accuracy of the heart rate display. The heart rate display only
serves as a training aid.
Telemetric heart rate measuring
Your treadmill is already equipped with a heart rate receiver as standard. Using a chest
strap makes it possible for you to have a wireless heart rate measuring. This optimal
and ECG-precise type of measuring reads the heart rate directly from the skin through
a transmitting chest strap. The chest strap then sends the impulse to the receiver
integrated in the console.
Positioning the chest strap and moistening the electrodes:
Place the belt directly below the chest, while the transmitter should be placed on the
middle of the chest. The chest strap should sit comfortably, but not too loose. If the
belt is too loose, the contact to the electrodes may be disrupted or the belt may slip
while exercising.

TR70i
36
while exercising. The transmitter turns on automatically once it is put on. In order to
allow for a precise measuring, you should moisten the rubber electrodes. This is best
done with a special chest strap contact gel, which is also used for ultrasound scans.
Note:
If you have not been active in doing sports for a longer period of time, you should
rst go to your physician in order to discuss your training with them. You should also
contact your physician in advance in the event of heart problems, high/low blood
pressure and obesity.
Training with heart rate orientation
Heart rate orientation guarantees an extremely eective and healthy training. Through
your age and the following table, you can quickly and easily read and determine the
optimal pulse for your training. An acoustic alarm will sound if your heart rate exceeds
the set target heart rate. Which target heart rate is important for which training goal
can be found out in the following.
Fat burning (weight management): The main goal here is to burn deposits of fat. In
order to achieve this training goal, a low training intensity (approximately 55% of the
maximum heart rate) and a longer training period are required.
Cardiovascular training (cardio training): The primary goal is to increase endurance
and tness through an improved provision of oxygen through the cardiovascular
system. In order to achieve this training goal, medium intensity (approximately 75%
of the maximum heart rate) with a medium training period is required.
Anaerobic (maximum) load training: The main goal of maximum load training is to
improve recovery after short, intense loads in order to be able to quickly return to the
aerobic zone. In order to achieve this training goal, a high intensity (approximately
90% of the maximum heart rate) with short, intense load is required, which is followed
by a recovery phase in order to prevent muscle fatigue.

37
20
80
100
120
140
160
180
200
220
65 7060555045403525 30
200
195
190
185
180
175
170
180
150
110
146
107
175
171
166
162
157
153
148
143
139
135
131
128
124
105
102
99
96
94
91
88
85
83
113
116
120
144
139
136
150
155
160
165
Heart rate diagram for training intensity
Maximum pulse (220-age)
90% of maximum pulse - anaerobic (maximum) intensity training
75% of maximum pulse - cardiovascular training (cardio training)
55% of maximum pulse - fat burning (weight control)
Heartbeats
Age
Example:
For a 45-year-old man or woman, the maximum heart rate is 175 (220 - 45 = 175).
• The fat burning target zone (55%) is at approximately 96 beats/min.
= (220 - age) x 0.55.
• The cardio target zone (75%) is at approximately 131 beats/min.
= (220 - age) x 0.75.
• The maximum heart rate for an anaerobic load training (90%) is at approximately
157 beats/min. = (220 - age) x 0.9.

TR70i
38
5.2 10 tips for eective running training
1. Set goals
What would you like to achieve with your training? Weight regulation, improved
endurance, prevent risk of disease, more mobility, cardiovascular training, etc. In order
to achieve your long-term training goal, set individual partial goals, e. g., weekly or
monthly goals.
2. Concentration on training
Try to only dedicate yourself to your training unit and do not be distracted.
3. Correct movement
When you do the movement, you should start at a moderate speed and hold on
the handles if needed. The speed can then be increased gradually. The adjustment
of your natural running style will occur relatively quickly. Beginners and overweight
people should start with a walking program in order to not overload their joints in the
beginning.
4. Correct breathing / appropriate resistance level
Do not overexert yourself physically and mentally by starting with resistance levels
that are too high. Start slowly and increase the resistance steadily. Aim for regular and
calm breathing.
5. Keep yourself properly hydrated
Drink, drink, drink! Have a drinking bottle close by during your workout.
6. Sucient recovery periods
Allow your body and your muscles enough time to recover after your workout. Only a
relaxed muscle will be fully operational again.
7. Choose a diversied program
Dierent program functions of your training console support you in doing this. For
example, you can complete an interval, incline or step counting training session.
8. Creating the right workout
Every training session should have a warm-up phase, a cool-down phase and a
targeted stretching. It increases physical and mental performance and prevents
injuries and sore muscles.

39
WEEK 1 + 2
Beginner Advanced
Days Duration Intensity Duration Intensity
Mon 20 min. Brisk walking 30 min. Running at a slow speed
Wed 20 min. Brisk walking 30 min. Running at a slow speed
Fri 20 min. Brisk walking 30 min. Running at a slow speed
Increased speed for two to three minutes
in between in the second week. Maintain
your heart rate.
Increase the speed in between in the
second week. Maintain your heart rate.
WEEK 3 + 4
Beginner Advanced
Days Duration Intensity Duration Intensity
Mon 25 min. After every 10 min. run
for 1 min.
35 min. Running at a moderate speed
Wed 25 min. After every 10 min. run
for 1 min.
35 min. Running at a moderate speed
9. Workout journal
Keep a record of your training sessions. Note the date, resting pulse, active pulse, recovery
pulse, resistance level, time, distance, calories burnt and tness level.
10. Reward yourself
Do something good for you and your body after training or after achieving a partial goal.
Go to the sauna or a swimming pool. Mix a protein shake or enjoy a delicious salad.
5.3 Designing a workout
We recommend two to three training sessions a week. There should be a ve-minute
warm-up phase before every training. The training ends with a cool-down and targeted
stretching.
Warm-Up approx. ve min. Dynamic movement of larger muscle groups at
low intensity. The body core temperature rises
and the metabolism process starts quicker.

TR70i
40
Fri 25 min. After every 10 min. run for
1 min.
35 min. Running at a moderate
speed
In the fourth week, run for two minutes after
every 10 minutes. Maintain your heart rate.
In the fourth week, increase the speed
for one minute each. Maintain your
heart rate.
WEEK 5 + 6
Beginner Advanced
Days Duration Intensity Duration Intensity
Mon 30 min. Alternate walking and
running
40 min. Running according to
heart rate
Wed 30 min. Alternate walking and
running
40 min. Running according to
heart rate
Fri 30 min. Alternate walking and
running
40 min. Running according to
heart rate
In the fth week, run for three minutes after
every eight minutes. In the sixth week, run for
three minutes after every six minutes. Maintain
your heart rate.
Pay attention to your heart rate.
WEEK 7 + 8
Beginner Advanced
Days Duration Intensity Duration Intensity
Mon 35 min. Walk 8 minutes, run 5
minutes
45 min. Running according to
heart rate
Wed 35 min. Walk 8 minutes, run 5
minutes
45 min. Running according to
heart rate
Fri 35 min. Walk 8 minutes, run 5
minutes
45 min. Running according to
heart rate
Increase in the eight week: Walk ve minutes,
run seven minutes. Maintain your heart rate.
If you feel comfortable, then include a
few steps or hills in your training.
Cool-down approximately ve minutes Finish your training at low resistance and at
slow speed. Allow your body to gently slow
back down.

41
5.4 Stretching exercises for leg & chest muscles
1. Exercise: Stretching of front thigh / leg extension (quadriceps)
• Stable position, grab arches of feet
• Pull heel towards buttocks, knee points downwards (no
abduction)
• Straight upper body, avoid tilting the pelvic forward
(hollow back) by tensing the abdominal muscles
• Change legs
2. Exercise: Stretching the back thigh / leg curl (hamstring)
• Pull thigh towards upper body with both
hands
• Stretch through increased stretching in the
knee joint
• The lower leg maintains contact with the
oor, keep hips bent
• Change legs

TR70i
42
3. Exercise: Stretching the calf muscles (gastrocnemius)
• Place feet parallel to each other pointing forward,
the heels touch the oor
• Support yourself on a chair coming from a lunge
• Move your body weight to the front leg, press
your heel from the rear leg towards the oor and
hold the contact
• Slowly stretch your knee of the rear leg until you
feel the stretch in your calves
• Change legs
4. Exercise: Stretching the chest muscles (pectoralis major)
• Stand parallel to a wall
• Place your forearm at 90° to the wall with the elbow
just above shoulder height
• Turn your head and upper body gradually to the
opposite sides until you feel a stretch in the front chest,
of the shoulder being leaned on
• Pay attention to tension in your abdominal and
gluteal muscles
• Your weight is on your front leg
• Change legs
All recommendations of these instructions apply solely to healthy persons and
are not suitable for those with heart or cardiovascular problems. All of the tips
are intended only as a guide to help you create a workout. Your physician can
oer appropriate advice for particular, personal requirements.
We hope you enjoy your workout and have a lot of success!

43
5.5 Workout journal
Date
Training weight
Time (min.)
Calories burnt Body weight
Distance
Ø Pulse
Resistance level
I feel ...
(Copy template)

TR70i
44
6 WARRANTY INFORMATION
cardiostrong‘s tness equipment is subject to strict quality controls. However, if a
tness equipment purchased from us does not work perfectly, we take it very seriously
and ask you to contact our customer service as indicated. We are happy to help you
by phone via our service hotline.
Error descriptions
Your tness equipment is developed for long-term, high-quality training. However,
should a problem arise, please rst read the operating instructions. For further
assistance, please contact your contract partner or call our service hotline. To ensure
your problem is solved as quickly as possible, please describe the defect as exactly as
possible.
In addition to the statutory warranty, we provide a warranty for every tness
equipment purchased from us according to the following provisions.
Your statutory rights are not aected.
Warrantee
The warrantee is the rst/original buyer and/or any person who received a newly
purchased product as a gift from the original buyer.
Warranty periods
The following warranty periods begin on delivery of the tness equipment.
Model Usage Full warranty Frame Motor
TR70i Home use 24 months 30 years 10 years
Repair costs
According to our choice, there will either be a repair, a replacement of individual
damaged parts or a complete replacement. Spare parts, that have to be mounted
while assembling the equipment, have to be replaced by the warrantee personally
and are not a part of repair. After the expiration of the warranty period for repair costs,
a pure parts warranty applies, which does not include the repair, installation and
delivery costs.

45
The terms of use are dened as follows:
• Home use: solely for private use in private households up to 3 hours per day
• Semi-professional use: up to 6 hours per day (e. g. rehabilitation centers, hotels,
clubs, company gyms)
• Professional use: more than 6 hours per day (e. g. commercial gyms)
Warranty service
Within the warranty period, equipment which develops faults as a result of material
or manufacturing defects, will be repaired or replaced at our discretion. Ownership
of equipment or parts of equipment which have been replaced is transferred to us.
The warranty period is not extended nor does a new warranty period begin following
repair or replacement under the warranty.
Warranty conditions
For the warranty to be valid, the following steps must be taken:
Please contact our customer service by email or phone. If the product under warranty
has to be sent in for repair, the seller bears costs. After expiry of the warranty, the buyer
bears the costs of transport and insurance. If the fault is covered by our warranty, you
will receive a new or repaired equipment in return.
Warranty claims are invalid in case of damage resulting from:
• misuse or improper handling
• environmental inuences (moisture, heat, electrical surge, dust, etc.)
• failure to follow the current safety measures for the equipment
• failure to follow the operating instructions
• use of force (e. g. hitting, kicking, falling)
• interventions which were not carried out by one of our authorized service centers
• unauthorized repair attempts
Proof of purchase and serial number
Please make sure that you are able to provide the appropriate receipt when claiming
on your warranty. So that we can clearly identify the model of your equipment, and
for the purposes of our quality control, you will need to give the serial number of
your equipment, when contacting the service team. Where possible please have your
serial number and your customer number ready when you call our service hotline. It
will help us to deal with your request swiftly.
If you cannot nd the serial number on your tness equipment, our service team is at
your disposal to oer further information.

TR70i
46
Service outside of the warranty period
We are also happy to issue an individual cost estimate if there is a problem with your
tness equipment after the warranty has expired, or in cases which do not fall under
the terms of the warranty, e. g. normal wear and tear. Please contact our customer
service team to nd a quick and cost-eective solution to your problem. In such a case
you will be responsible for the delivery costs.
Communication
Many problems can be solved just by speaking to us as your specialist supplier. We
know how important it is to you as a user of the tness equipment to have problems
solved quickly and simply, so you can enjoy working out with minimal interruption.
For that reason, we also want to resolve your queries quickly and in a straightforward
manner. Thus, please always keep your customer number and the serial number of
the faulty equipment handy.
7 DISPOSAL
At the end of its operational life, this equipment cannot be disposed
of in normal household waste. Instead, it must be disposed of via an
electricals recycling centre. Further information can be obtained from
your local authority‘s recycling service.
The materials can be recycled as per their symbols. Through the reuse, recycling of
materials or other forms of recovery of old equipment, you make an important contribution to the protection of the environment.

47
8 ORDERING ACCESSORIES
Sport-Tiedje oor mat size XXL
Art. No. ST-FM-XXL
Polar transmitter chest strap T34
non-coded
Art. No. T34
Togu Senso Walking Trainer
Art. No. TOGU-470501
Chest strap
contact gel
250ml
Art. No. BK-250
Sport-Tiedje
silicone spray
Art. No. ST-1003
Fitness equipment care set
Art. No. HF-500

TR70i
48
9 ORDERING SPARE PARTS
9.1 Service hotline
So that we can give you the best possible service, please have your model name, part
number, serial number, exploded drawing and parts list ready.
SERVICE-HOTLINE
9.2 Serial number and model name
Before assembling your equipment, nd the serial number on the white sticker and enter
it in the appropriate space.
Serial number:
Brand / category: Model name:
cardiostrong treadmill TR70i
+31 172 619961
info@tshop.nl
Mon - Thu 9 am - 5 pm
Fri 9 am - 9 pm
Sat 10 am - 5 pm
NL
+44 141 876 3972
orders@powerhousetness.co.uk
Mon - Fri 9 am - 5 pm
UK
+49 4621 4210 0
+49 4621 4210 699
service@sport-tiedje.de
Mon - Fri 8:00 am - 6:00 pm
Sat 9:00 am - 6:00 pm
DE

49
9.3 Parts list
No. Part number Description
(01) 81TB32500101A02 Main Frame
(02) 81TB32000201A21 Frame Base
(03) 80TA32000201A04 Incline Bracket Set
1 81TA32000030A04 Incline Bracket
2 511212006200134 Hexagonal socket screw
3 205112081806001 Sleeve
4 541113026200114 Washer
5 531212001200114 Nylon Nut
(04) 80TA32000301A04 Incline base set
1 81TA32000020A04 Incline Base
2 205112081806001 Sleeve
3 331410002003301 Pulley
4 530010001000112 Nut
5 511212003200134 Hexagonal socket screw
6 541113026200114 Washer
7 531212001200114 Nylon Nut
(05) 8000000991 Supporting post set
1 8000000992 Supporting post-L
2 8000000993 Supporting post-R
3 511410006000114 Socket Screw
4 531210001000114 Nylon Nut
(06) 8000001000 Handrail set
1 8000001001 Handrail-Left
2 8000001002 Handrail-Right'
3 83T061106004 Incline Set
4 83T061206004 Speed Set
5 7000000339 Foam
6
326213006001004 Handrail end cap
(07) 8000001003 Console bracket set
1
8000001004 Console bracket
2
511408001500114 Screw

TR70i
50
No. Part number Description
(08) 80TA32000602A07 Folding shock set
1 210130007132502 Folding Shock
2 201TA4175020A07 Folding xed tube
3 550140240390115 Twin Spring
4 511208009500114 Hexagonal socket screw
5 541108016150114 Washer
6 542108016150114 Wave washer
7 531208000800114 Nut
(09) 80TA32501101000 Running Deck Set
1 206225065313151 Running deck
2 511408003500114 Socket Screw
3 521205102500114 Screw
4 541108016150114 Washer
5 314TA2150010004 Bumper
6 511608003500114 Screw
7 531408000800111 T-nut
(10) 80TA32000802000 Incline motor set
1 401240101204401 Incline Motor-220V
2 511610004500114 Hexagonal cap screw
3 511610006200114 Hexagonal Cap Screw
4 541110020150114 Washer
5 531210001000114 Nylon Nut
(12) 80TA32000101004 Main frame attachment set
1 342008003002001 Rubber Cushion
2 342008003002501 Rubber cushion
3 341305202202001 Space Pad
4 521205501900114 Screw
5 331808205602301 Wheel
6 511408004000114 Screw
7 541108016150114 Washer
8 531208000800114 Nut
9 312TA2150011004 Incline Lower Cover
10 521204101000114 Socket

51
No. Part number Description
11 592400000000001 Power Cord Buckle
12 592200000000002 Wire clipper
13 362710002501000 Separate cover
(13) 80TA11109002004 Base Attachment Set
1 341306402601001 Space Pad
2 521205501200114 Screw
3 351706403001101 DESK BASE FOOT, ASJUSTABLE
4 325214008001004 End Cap
5 331808205603601 Wheel
6 511408005000114 Screw
7 541108016150114 Washer
8 531208000800114 Nut
(14) 80TA11109003000 Side Handrail Attachement
1 511908007000124 Socket Screw
2 511408005000114 Screw
3 522504115900114 Screw
4 521204105000114 Screw
5 541108016150114 Washer
6 531208000800114 Nut
(15) 80TB32501502000 Motor Set
1 204TB4200011A07 Motor Bracket
2 401122504703501 Motor-220V
3 591130350035011 One sided adhesive
4 205213828628501 Core
5 511810010000111 Carriage Screw
6 541210020200114 Rubber Washer
7 551350220450111 Tension spring
8 341001102500701 Washer
9 341001102501101 Washer
10 541110026200114 Washer
11 531210001000114 Nylon Nut
12 511208001500115 Hexagonal socket screw
13 544182016200115 Spring Washer

TR70i
52
No. Part number Description
14 512607913000111 Screw
15 541108016150114 Washer
16 532207900800111 Nylon Nut
(16) 80TA11101601000 Sensor Set
1 592400000000009 Speed sensor bracket
2 405503470210001 SENSOR
3 521204101000114 Socket
(17) 8000001350 MCB set
1 4000000323 MCB
2 407101250120001 Overload Switch
3 407302250160001 Switch-AC Power
4 407202250150001 POWER SOCKET
5 405301010201001 Black Cable
6 405301010201502 White Cable
7 405301010202502 White Cable
8 405301010201503 Cable-Yellow-Green
9 511505001500113 Screw
10 511505005000113 Screw
11 531205000500111 Nylon Nut
12 541105010100211 Flat Washer
13 531105000400111 Nut
14 543105010060111 Washer
15 4000000130 Choke
16 4000000129 Filter
17 511504001000113 Screw
18 541105010100111 Washer
19 531204000500111 Nylon Nut
(18) 8000001359 Console set
(19) 8000001044 overlay set
1 6000000493 console overlay
2 6000000495 keypad overy
(20) 83T200101007 Safety key
(21) 8000001296 Cable set

53
No. Part number Description
1 405117061324501 Cable
2 592400000000001 Power Cord Buckle
3 592200000000002 Wire clipper
4 205234620812701 Core
(22) 80TA32001001B05 Roller Set
1 207117063306001 Front Roller Set
2 207217050006001 Rear Roller Set
3 512207906400115 Hexagonal socket screw
4 541108014150114 Washer
(23) 206130500310131 Running Belt
(24) 213006021309102 Side rail
1 213006021309102 Side rail
(25) 80TB32002501003 Motor cover set
1 311TB3200031003 MOTOR COVER - LEFT
2 311TB3200021003 MOTOR COVER - RIGHT
3 311TB3200011003 MOTOR COVER - MIDDLE
4 521204112700114 Screw
5 512506401300114 Screw
(26) 80TA32001301003 Rear End Cap Set
1 311TA3200060003 Rear End Cap-Right
2 311TA3200050003 Rear End Cap-Left
3 521204115900114 Screw
(27) 80TB32002701003 Side Cover Set
1 311TB3200111003 Side Cover-Left
2 311TB3200101003 Side Cover-Right
3 511504001000114 Screw
(29) 8000001068 Bottle holder set
1 3000000373 Bottle holder-Left
2 3000000374 Bottle holder-Right
3 521204115900114 Screw
(31) 405405130318501 AC Power Cord
(32) 2000000488 Drive Belt

TR70i
54
9.4 Exploded drawing

55
TR70i
56
CONTACT
Company head oce
Sport-Tiedje GmbH
Flensburger Str. 55
24837 Schleswig
Germany
GENERAL INFORMATION:
DE +49 4621 4210 0
info@sport-tiedje.com
NL +31 172 619961
info@tshop.nl
UK +44 141 876 3972
orders@powerhousetness.co.uk
DISCLAIMER
©2010 cardiostrong is a registered brand of the company Sport-Tiedje
GmbH. All rights reserved. Any use of this trademark without the explicit
written permission of Sport-Tiedje is prohibited.
Product and manual are subject to change. Technical data can be changed without
advance notice.
Hotline for Technical Information
DE +49 4621 4210 0
+49 4621 4210 699
service@sport-tiedje.de
NL +31 172 619961
info@tshop.nl
UK +44 141 876 3986
support@powerhousetness.co.uk
www.sport-tiedje.com
www.cardiostrong.de
Please nd a detailed overview including address and opening hours for all specialist
tness stores of the Sport-Tiedje Group in Germany and abroad on the following
website.
www.sport-tiedje.com/en/stores

57
Note

TR70i
58
Note

59

Treadmill TR70i
 Loading...