

Page 1
Carcam.ie D4 Specifications & Instruction Manual
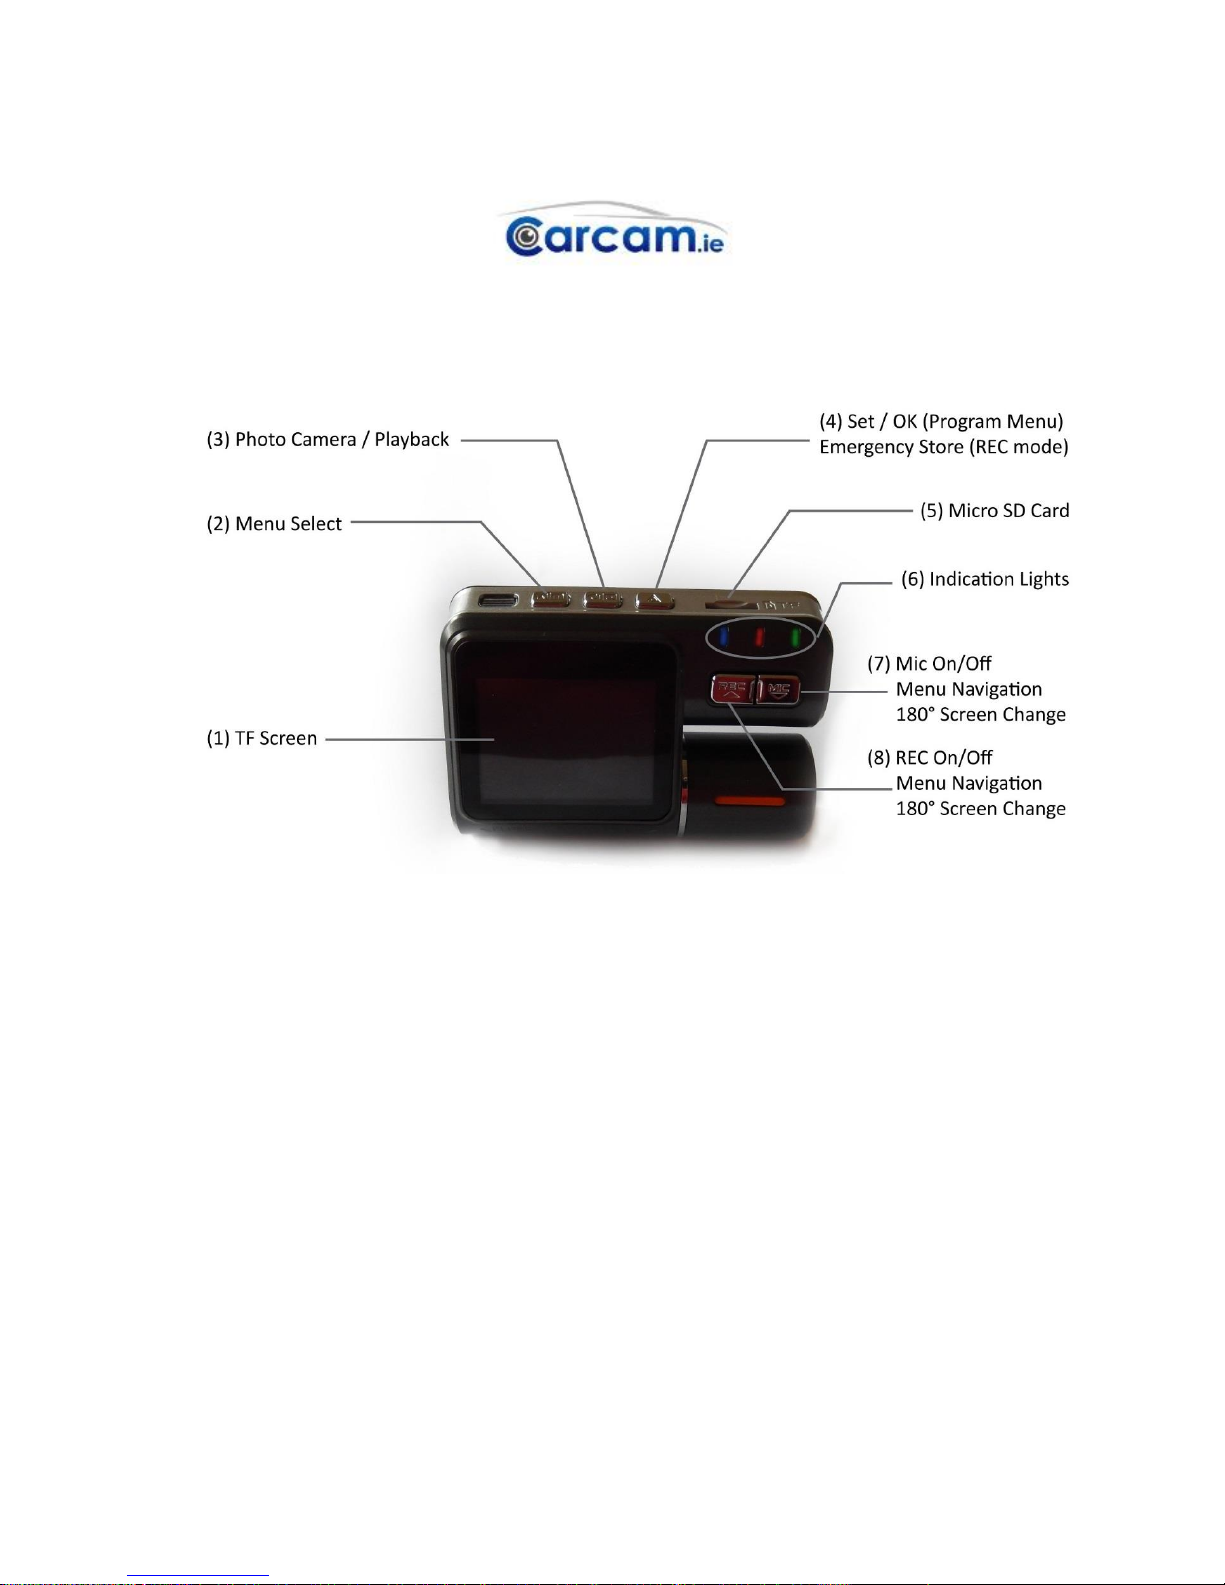
(1) TF Screen
(2) Menu Select (Programming / Playback Mode)
(3) Photo Camera / Playback Mode
(4) Set / OK in the Programme Menu & Emergency Store in Recording Mode.
(5) Micro SD Card Socket.
(6) Indication Lights;
BLUE Flashing: Battery Charging.
RED Flashing: Camera Recording / Playback.
GREEN LIGHT: Camera Start up.
(7) Microphone on/off in recording mode.
180° screen change (Fr Camera) in recording mode.
Menu navigation in programming mode.
(8) Record On / Off.
180° screen change (Fr Camera) in recording mode.
Menu Navigation in programming mode.
Page 2
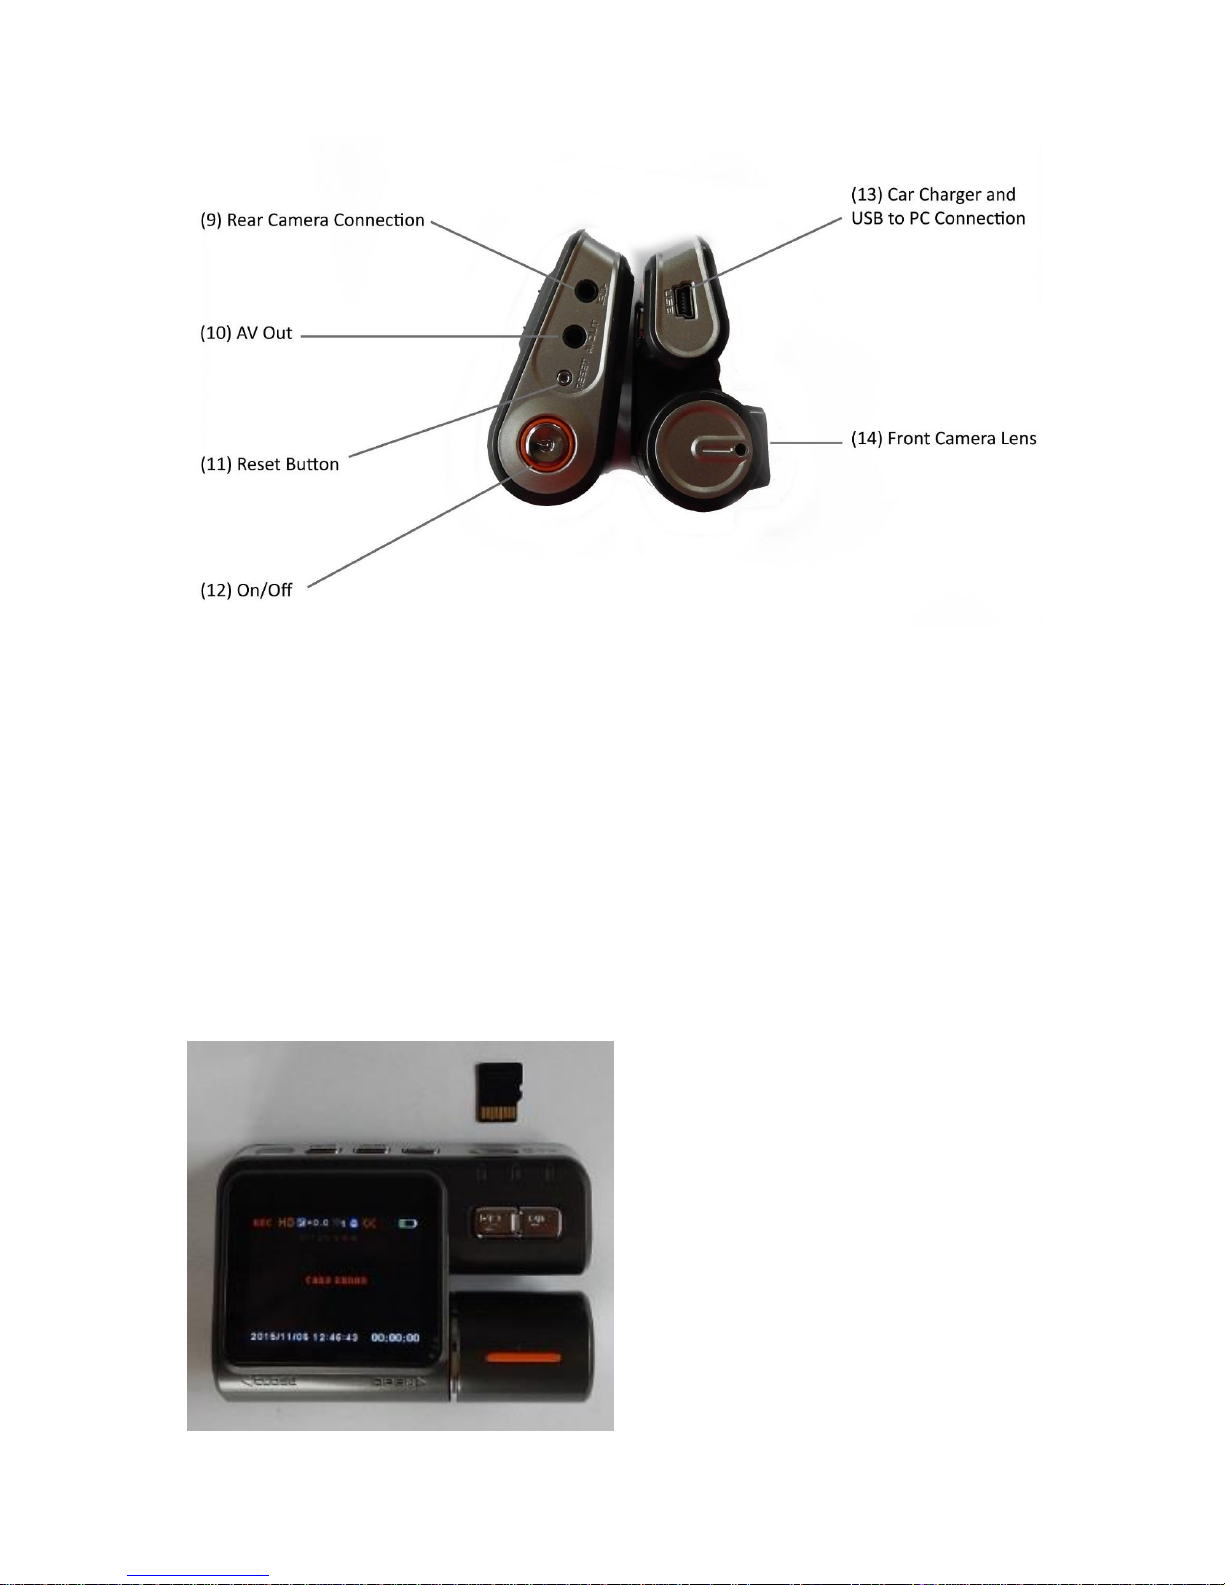
32 GB Class 10 Micro SD Card – Installation/Removal
Installation / removal of the SD Card is a
delicate process and to do so, use your
finger nail pressing down on the card until
it clicks (installation) or releases (removal).
Please view image attached for the
direction the SD card, as forcing it in the
wrong way will damage the camera & the
card. Carcam.ie has installed the Micro SD
Card
(9) Socket connection for rear camera.
(10) Socket for AV out
(11) Reset Button
(12) On / Off button
(13) Socket for 12V car charger
Also USB socket for connection to PC.
(14) Front Camera Lens
Page 3
Charging
The internal battery will begin charging once the power lead is connected to the camera. A small
battery display shows the level of charge in the battery. Please note that the battery will only power
the camera for a short time when the power lead is removed.
On/Off
The camera is set to switch on and off with the ignition through the 12V power lead. When the camera
is recording, it can be switched off at any time by pushing the on/off button (12). In such a scenario,
the camera will store the most recent recording in the DCIM folder. When the ignition is switched off,
the camera will power down within 5-10 seconds.
The programming menu is split between the Video Menu and the Set-Up Menu. You can only enter
the programming menu while the camera is not recording. Switch on the ignition and the camera will
power up and begin recording. Press the REC button (8) and recording will stop. Press the menu button
(2) once, to enter the programming menu in Video mode, or twice, to open the menu in Set-Up mode.
Note: if you are in either the Video, or Set-Up menus and you press the menu button (2), it will switch
to the other menu. Pressing button (4) opens the Video Menu.
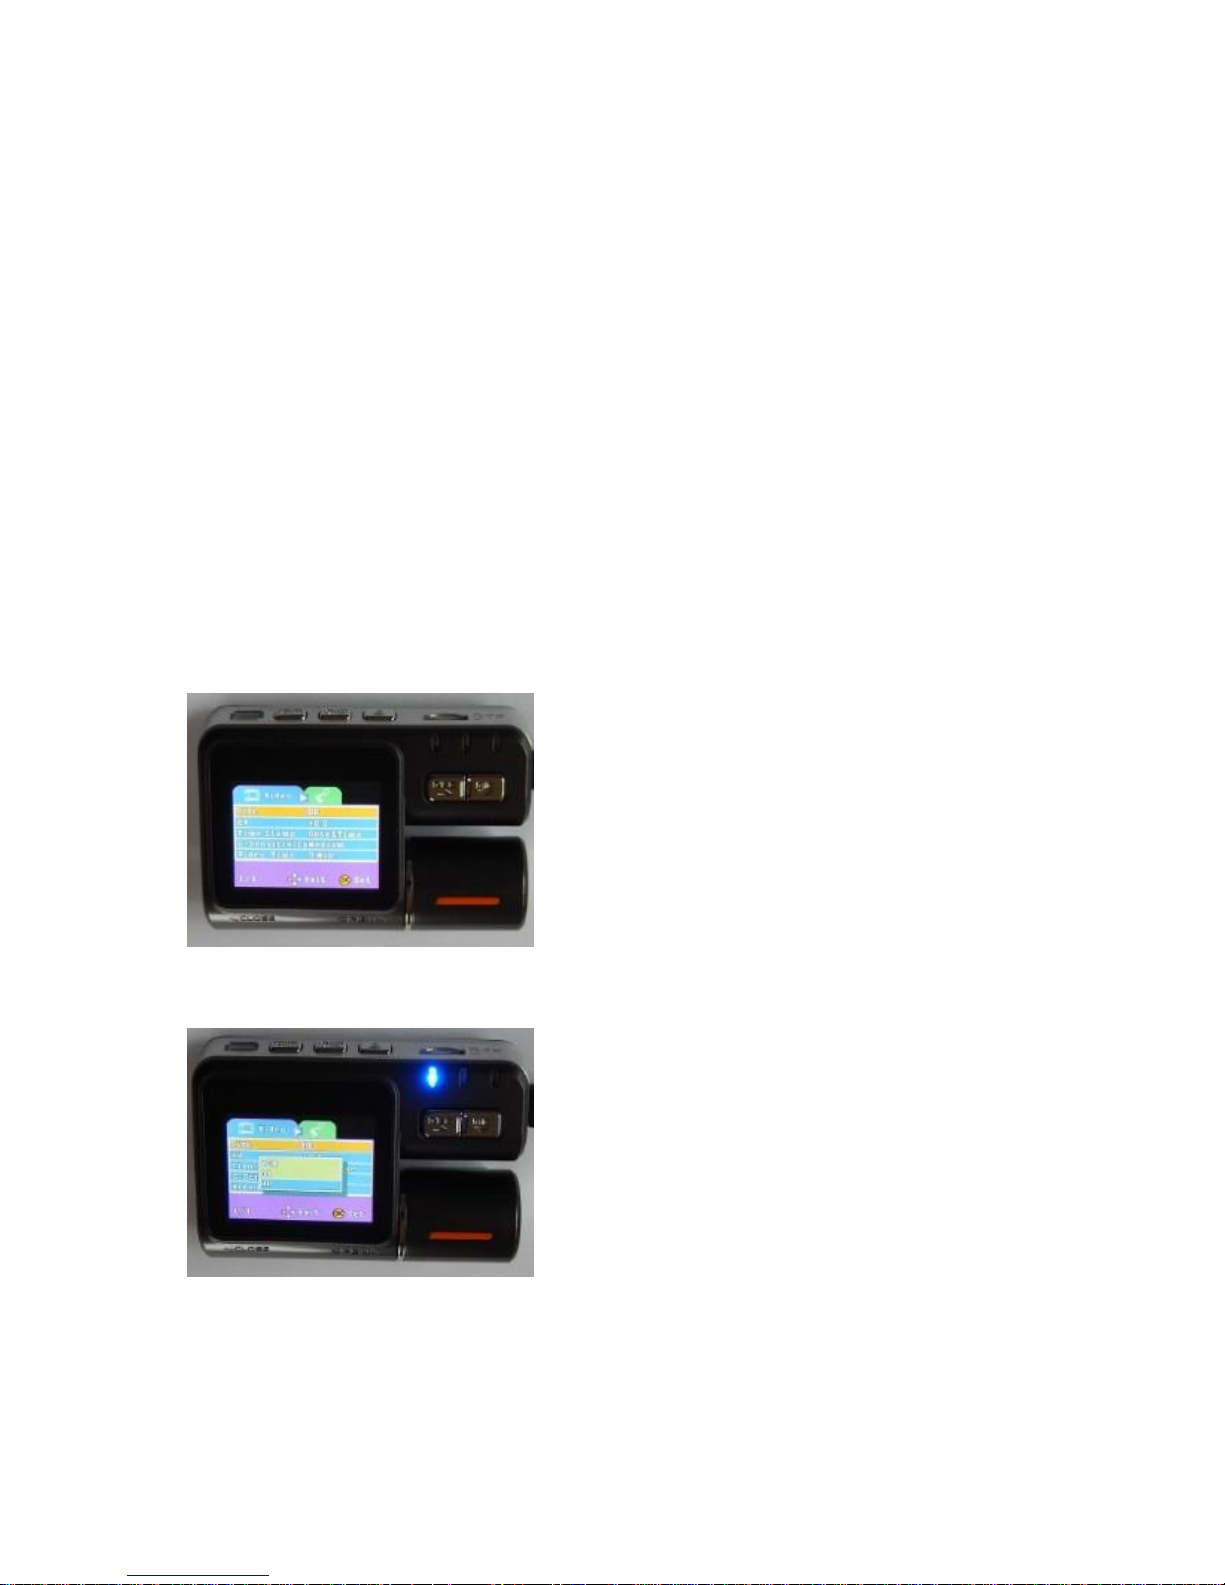
VIDEO MENU
SIZE
button (4). Once an option is selected, the menu will revert to the video menu page. Carcam.ie has set
the video format to HD.
Navigate the Video Menu using the up and down
buttons (7) & (8) and open the desired option by
pressing button (4).
The size menu determines the size and quality of the
Front camera recording with three options of: VGA, D1
& HD available. Remember the higher the quality of
recording the more space required on the memory
card, but HD is recommended and you should have circa
4 hours recording capacity on the memory card using
the HD setting. Press button (4) to see the options and
navigate these using buttons (7) & (8). Blue is the colour
which highlights an option and confirm the option using
Page 4

EV (Exposure Value)
You can only achieve the desired result on a trial and error basis as there are several + & - options
available, but in our experience, it is very rare for the need to adjust this setting. Press button (4) to
see the options and navigate these using buttons (7) & (8). Blue is the colour used to highlight an
option and confirm the option using button (4) and the menu will revert to the video menu page.
Carcam.ie has set the EV to 0.0.
TIME STAMP
G-SENSITIVITY
Carcam.ie has set the G-Sensor to medium. Please note that sometimes the G-Sensor may have to be
adjusted to the high setting. If you notice locked files on the memory card when you’re reviewing
footage, it means the G-Sensor has been triggered and this can happen if the vehicle is on rough terrain
or has sudden stops / change of direction. In such a scenario, set the G-Sensor to high.
The camera software allows the owner to adjust the
exposure value of the front camera lens. It is
recommended to use the default 0.0 setting, but if you
find the footage darker than you would like, which may
happen in the depths of winter, you can open the EV to
allow more light into the camera. The guide is if the
picture is dark to open the exposure using a plus (+)
settings, or if you think the footage is too bright,
possibly in the middle of summer, then close the EV
using a minus (–) setting.
The Time Stamp refers to the information displayed
on screen during playback. The three options are;
Off (no info), Date Only or Date and Time. Press
button (4) to see the options and navigate these
using buttons (7) & (8). Blue is the colour used to
highlight an option and confirm the option using
button (4) and the menu will revert to the video
menu page. Carcam.ie has set the camera to Date &
Time stamp as this information may be vital in the
event of the footage being required after an
accident.
There are 3 options here; Low, Medium & High. The
G - Sensor is triggered in an accident and will
automatically lock the footage from immediately
before the impact and in the aftermath of the
accident. This footage will be stored in a file on the
memory card which cannot be over written. Press
button (4) to see the options and navigate these
using buttons (7) & (8). Blue is the colour used to
highlight an option and confirm the setting using
button (4) and the menu will revert to the video
menu page.
Page 5

VIDEO TIME
SET UP MENU
Press button (2) twice, or once when in the Video Menu to enter the Set-Up Menu.
SET UP MENU
FORMAT: This is fixed and no adjustment options are available.
SYSTEM RESET
Camera footage is recorded onto video files of
either 1, 3 or 5 minutes lengths. Press button (4)
to see the options and navigate these using
buttons (7) & (8). Blue is the colour used to
highlight an option. Confirm the setting using
button (4) and the menu will revert to the video
navigation page. Carcam.ie has set the video
time to 5 minutes which we have found to be the
most convenient setting for playback.
This allows you to reset the software in the event
that the camera fails to function normally. Press
button (4) to see the options and navigate these
using buttons (7) & (8). Blue is the colour used to
highlight an option and confirm the setting using
button (4) and the menu will revert to the set-up
menu page. An easier way to reset the camera is to
press button (11) on the side of the camera.
Page 6

DATE INPUT
menu will then switch to month and repeat the process until the date and time is correct. Once the
last setting has been entered, the menu will revert to the set up menu page. Carcam.ie has set the
date and time on the camera.
SCREENSAVER
Navigate these using buttons (7) & (8). Blue is the colour used to highlight an option and once
highlighted, confirm the setting using button (4) and the menu will revert to the set up navigation
menu. Carcam.ie has set this option to 1 minute. This allows you to see that the camera is functioning
each time you start up, without it being a prolonged distraction when driving.
LANGUAGE
We have set the language to English, but there are a number of European Language options available
in this menu.
VERSION
This confirms the software edition in use in the camera.
PLAYBACK MODE
Please note that the easiest and best way to review the camera footage is to connect the camera to a
PC using the USB cable provided. Your PC should detect the camera after a few seconds which will
likely be described as a “Removal Disk”. Double Click this and a DCIM folder will open. Double Click
the DCIM folder and a “100 REC” folder will be displayed.
This allows you to switch the date off or to set the
date & time. If you select “Set” you can set the
format in which the date is displayed & then set the
date and time. Press button (4) to enter the
date/time menu. Starting with the date format which
is set to: DD/MM/YYYY and this will highlight in blue.
Press button (4) to confirm and the menu moves to
the actual date. Adjust the date using buttons (7) &
(8) and once correct press button (4) to confirm. The
Screensaver refers to the length of time the
screen displays the live camera footage when
the camera is operational. Press button (4) to
see the three options which are;
Open: The video screen is on all the time showing
the footage being recorded (not recommended).
1 minute: The video screen switches off after 1
minute.
5 minutes: The video screen switches off after 5
minutes.
Page 7

Open this folder and you will have access to all the recorded files which will be dated and timed.
Double click any recording to play the video and the front and rear camera will be displayed side by
side on the screen. Most video software on PC’s will play the video but if for any reason it won’t play,
download VLC player for free from the web and this will play the recorded footage.
Any static photos taken (see camera mode) will also be displayed here. Dual camera recorded files are
displayed as “REC” files and Emergency recordings will be displayed as “EVE” files. Copy the files to
your PC as required.
If for any reason your PC does not recognise the camera as a removable drive, you can remove the
Micro SD card from the camera, fit it into the adapter provided and connect this directly to the PC.
If you want to review the footage in the car or in the absence of a PC there are a number of ways of
doing this and here we describe the easiest way to access footage on the camera.
To playback the most recent video on the camera screen;
Video Playback Menu
We will go through this menu in sequence and be advised there are a number of options for playing
back files on the actual camera. The most convenient of these is to use the File List option as
explained on the next page.
Video Menu
Switch camera on and automatic recording will
begin. Press button (8) to stop the camera
recording. Long press button (3) (about 1 second)
to enter the playback function (see screen
attached). Note: Short press of button (3) enters
camera mode & if this happens press the button
again. Here the most recent file will display and
you can scroll through the Video & Photo files
using buttons (7) & (8). Press button (3) to play a
file and The camera will playback both camera
recordings side by side.
Switch camera on and automatic recording will
begin. Press button (8) to stop the camera
recording. Long press button (3) (about 1 second)
to enter the playback function (see screen
attached). Note: Short press of button (3) enters
camera mode & if this happens press the button
again. Now short press button (2) to enter the
video playback menu.
Page 8

Delete
Protect
Thumbnail
Note: the easiest and quickest way to delete files is
when the camera or SD Card is directly connected to
a PC using the cable provided. However, it is possible
to do this on the camera as follows; Press button (4)
to enter the Delete sub-menu attached. Here you can
delete a single file, all files or a selection of files.
Select the option using buttons (7) & (8) and confirm
using button (4). This will open the thumbnail page
and you can navigate the files using buttons (7) & (8)
and select them using button (4).
Press button (4) to enter the Protect sub-menu
attached. Here you can protect a single or multiple
files which you don’t want over-written in the loop
recording cycle. Select the option using buttons (7) &
(8) and confirm using button (4). This will open the
thumbnail page and you can navigate the files using
buttons (7) & (8) and select them using button (4).
Press button (4) to open the thumbnail menu where
all files are displayed in numerical order. Remember
the most recent files will be displayed as the highest
number and the oldest as the lowest number. You
can scroll the files using buttons (7) & (8) and select
one using button (4). To play this file, press (3) and to
stop playback use button (3).
Page 9

File List
Volume
This allows you adjust the volume for playback on the camera.
CAMERA MODE
The camera can also be used as a static camera for taking individual stills using the front camera lens.
To enter camera mode switch the unit on and recording will begin automatically. Press button (8) to
stop the unit recording and then quick press button (3) and the unit will enter static camera mode.
View the screen which will show you what the front camera lens is seeing.
To take photos press button (3) and the image will display on the screen and be saved to the SD Card.
You can take multiple photos and at any time return to recording by simply pressing button (8). The
photos are stored on the SD Card and can be viewed in the same way as video files explained above.
Highlight the File List option using buttons (7) & (8)
and select using button (4). This will open the
screen opposite where the file information is
displayed. This includes date and time which makes
it much easier for accessing the exact file you want.
Scroll through the files using buttons (7) & (8) and
select the desired file using button (4). To play the
file, press button (3) and you can pause the
playback and re-start using this button. To exit this
function when playback is complete, press button
(4) and then button (2) to return to the playback
menu page
 Loading...