

Page 1
Installation
R
and Operations
Manual
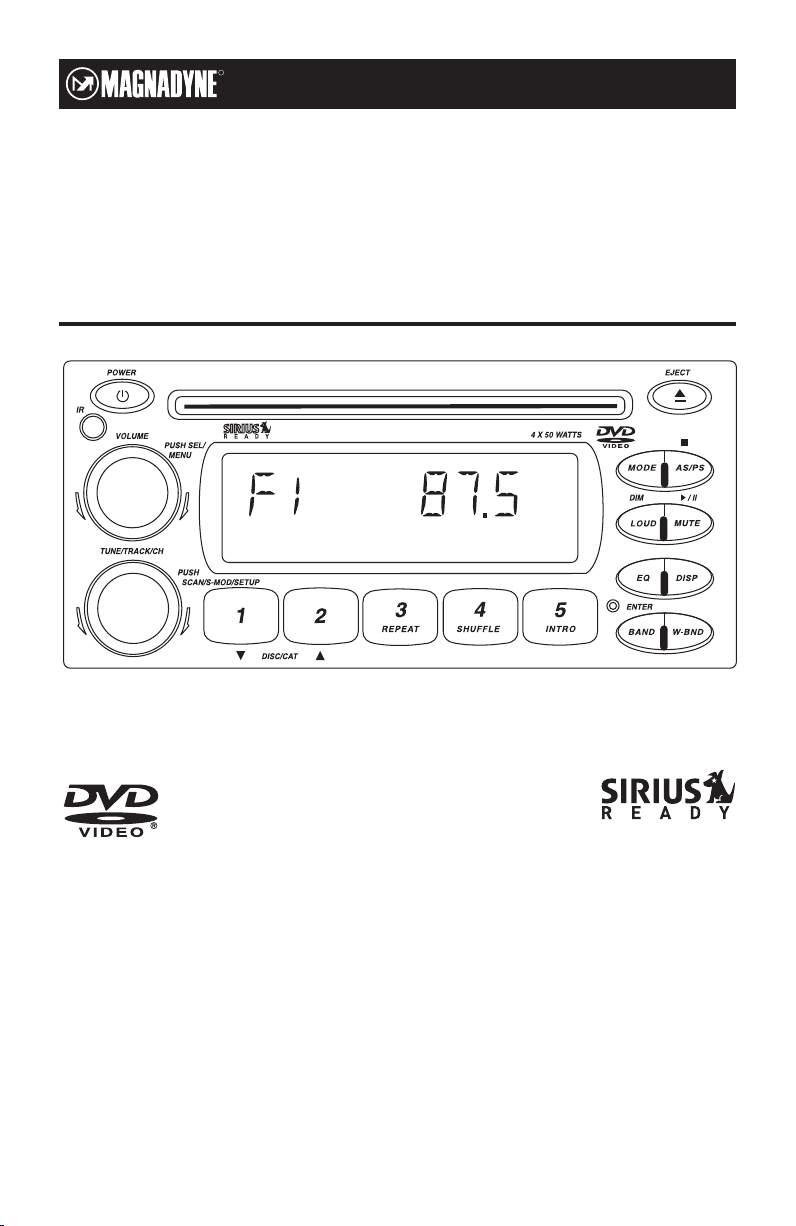
M9900DVDS
AM / FM / WB and DVD / CD Stereo Receiver
U.S. Patent No. D486,815
Page 2

Introduction
Your new Sirius ready in-dash entertainment system has been designed for many years of listening
pleasure. Take a moment to read through this manual and become familiar with the operations and features.
It is advisable to keep this manual in your vehicle ready for reference. We hope the experience with your new
mobile entertainment system is a pleasurable one. Be sure to fill out and send in your warranty card. In the
unlikely event that your system will need service during the warranty period, you will need to be registered
to receive the full benefits of warranty repair.
Features
• Compatible with PAL and NTSC Systems, this player can play discs recorded in either PAL or NTSC format.
• CD, DVD, CD-R, CD-RW, MP3 Compatible.
• L/R stereo analog audio outputs connection to existing head unit auxiliary inputs. Video output is composite video.
• Supplied Remote Features: multi-language audio-track/subtitle, multi-angle, plus all basic functions.
Safety Features
CAUTION:
MOBILE DVD PLAYER IS A CLASS I LASER PRODUCT. HOWEVER, THIS MOBILE DVD PLAYER USES A VISIBLE/INVISIBLE LASER BEAM WHICH COULD CAUSE HAZARDOUS RADIATION EXPOSURE IF DIRECTED.
BE SURE TO OPERATE THE MOBILE DVD PLAYER CORRECTLY AS INSTRUCTED. USE OF CONTROLS OR
ADJUSTMENTS OR PERFORMANCE OF PROCEDURES OTHER THAN THOSE SPECIFIED HEREIN MAY
RESULT IN HAZARDOUS RADIATION EXPOSURE. DO NOT OPEN COVERS AND DO NOT REPAIR YOURSELF. REFER SERVICING TO QUALIFIED PERSONNEL.
WARNING:
• TO REDUCE THE RISK OF FIRE OR ELECTRIC SHOCK, DO NOT EXPOSE THIS EQUIPMENT TO RAIN OR
MOISTURE.
• TO REDUCE THE RISK OF FIRE OR ELECTRIC SHOCK AND ANNOYING INTERFERENCE, USE ONLY THE
RECOMMENDED ACCESSORIES.
• THIS DEVICE IS INTENDED FOR CONTINUOUS OPERATION.
This product incorporates copyright protection technology that is protected by method claims of certain U.S.
patents and other intellectual property rights owned by Magnadyne Corporation and other rights owners.
Use of this copyright protection technology must be authorized by Magnadyne Corporation and is intended
for home and other limited viewing uses only unless otherwise authorized by Magnadyne Corporation.
Reverse engineering or disassembly is prohibited.
Region Management Information:
This Mobile DVD Player is designed and manufactured to respond to the Region Management Information
that is recorded on a DVD disc. If the region number described on the DVD disc does not correspond to the
region number of this Mobile DVD Player, this Mobile DVD Player cannot play this disc.
2
Page 3
V
I
D
E
O
Label side up
Do not touch
the underside
of the disc
Do not bend
Wipe the disc from center
toward the outside edge
Rough spots
on inside edge
Ball point pen
or pencil
Rough spots on
outside edge
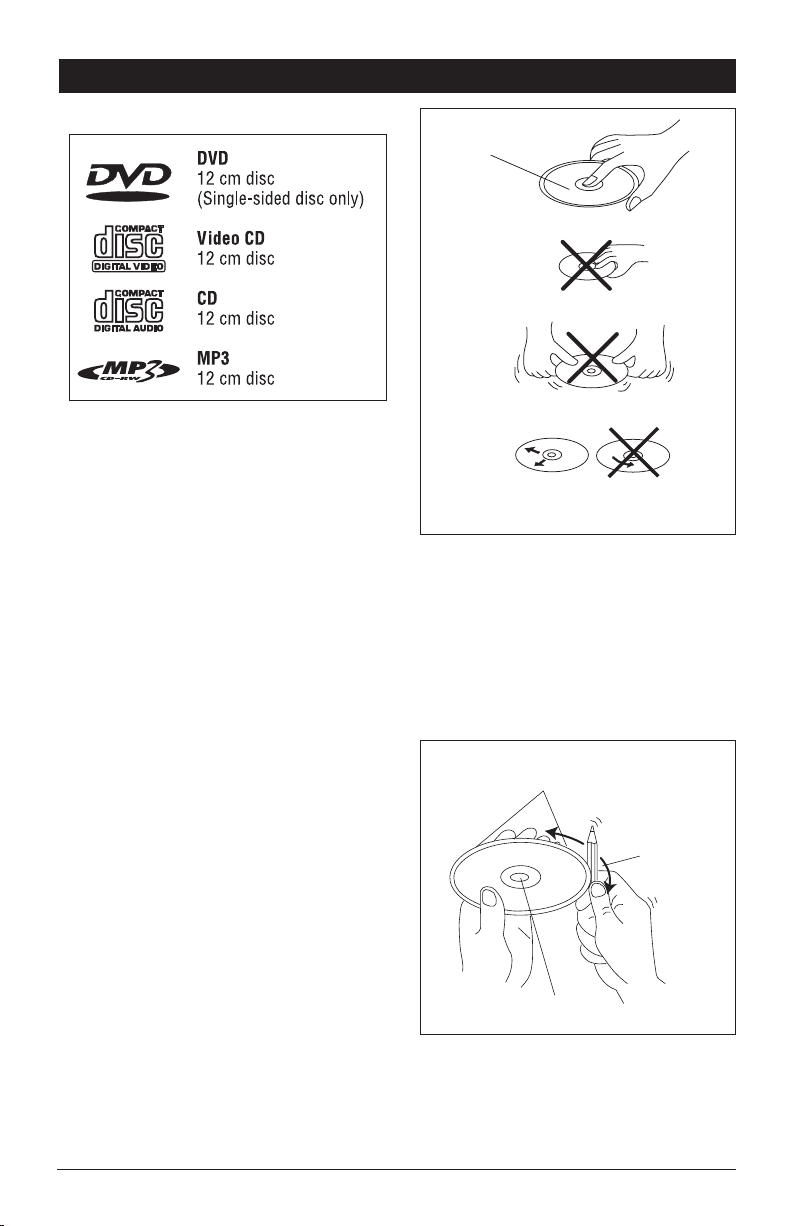
Disc Notes
Disc Formats Supported by this Player:
Discs which Cannot be Played with this Player
• DVD-ROM
• DVD-R/DVD-RAM
• CDV
• CD-G
Handling and Cleaning
• Dirt, dust, scratches and warping disc
will cause non operation.
• Do not place stickers on disc or
scratch disc.
• Do not warp discs.
• A disc should always be kept in its case when not
in use to prevent damage.
• Do not place discs in the following places:
1. Direct sunlight.
2. Dirty, dusty and damp areas.
3. Near car heaters.
4. Car seats or dashboard.
Preparing New Discs with Rough Spots
A new disc may have rough edges on its inside
and outside edges. If a disc with rough edges is
used, the proper setting will not be performed and
the player will not play the disc. Therefore, remove
the rough edges in advance by using a ball point
pen or pencil as shown. To do this, press the side
of the pen or pencil against the inside and outside
edges of the disc.
Disc Cleaning
Use a dry soft cloth to wipe the surface. If the disc
is quite dirty, use a soft cloth slightly moist with
isopropyl (rubbing) alcohol. Never use solvents
such as benzine, thinner or conventional record
cleaners as they may mar the surface of the disc.
Note:
A disc may become somewhat scratched
(although not enough to make it unusable)
depending on handling and conditions in the
usage environment.
3
Page 4
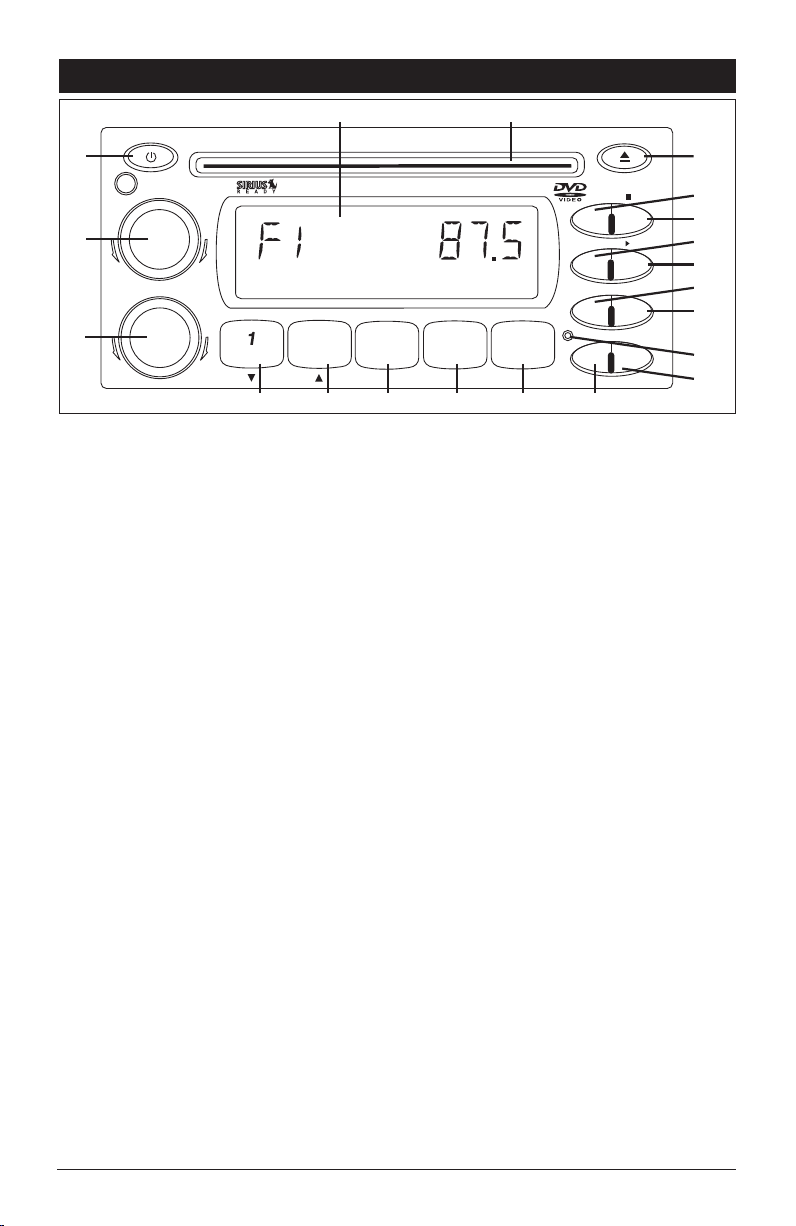
Radio Button Locations and Functions
2
3
4
5
REPEAT
SHUFFLE
INTRO
BAND W-BND
DISP
MODEAS/PS
LOUD
MUTE
EQ
TUNE/TRACK/CH
VOLUME
IR
POWER
4 X 50 WATTS
EJECT
ENTER
DISC/CAT
DIM / II
PUSH
SCAN/S-MOD/SETUP
PUSH SEL/
MENU
1
2
3
456 78
1920
9
10
11
12
13
15
17
14
16
18
1. Power On/Off: Push to turn the unit on or off.
2. Volume/Sound Controls: Rotate to increase or decrease the volume level. Push to scan between the
different sound controls (Volume, Bass, Treble, Balance and Fader).
3. Multi-Function Knob:
Radio Mode:
Manual Tuning: Rotate the TUNE knob to the left or right and hold until “MANUAL” appears in
the display then release knob. Rotate the TUNE knob again left or right until the desired
radio station appears in the display.
Scan Tuning: Push and release the TUNE knob. The tuner will scan up, pausing for 5 seconds at
each strong station. Push and release the TUNE knob again to cancel the scan function.
Seek Tuning: Rotate the TUNE knob to the left or right and release. The tuner will scan to the
next strong station and stop.
Sirius Satellite Radio Mode: Push to access Manual Tuning, Category Tuning and Direct Tuning in
Sirius mode. (See Sirius Radio Operation for more information, page 15)
DVD Mode: Push to enter DVD Setup Mode (See DVD Setup for more information, page 20)
CD and CD Changer Mode: Rotate the TUNE knob to the left or right to change the CD track on the disc
that is playing.
4. Multi-Function Button #1:
Radio Mode:
and release when recalling preset radio station #1.
Sirius Satellite Radio Mode: Push and hold until a beep is heard to memorize a radio station into
memory #1. Push and release when recalling preset radio station #1.
Push the TUNE button first until “CATEGORY” appears in the display then push button 1 to scroll
down through the Sirius Radio playback categories.
CD Changer Mode: Push to change to a lower number disc in the CD changer.
5. Multi-Function Button #2:
Radio Mode:
and release when recalling preset radio station #2.
Sirius Satellite Radio Mode: Push and hold until a beep is heard to memorize a radio station into memory
#2. Push and release when recalling preset radio station #2.
Push the TUNE button first until “CATEGORY” appear in the display then push button 2 to scroll up
through the Sirius Radio playback categories.
CD Changer Mode: Push to change to a higher number disc in the CD changer.
4
Push and hold until a beep is heard to memorize a radio station into memory #1. Push
Push and hold until a beep is heard to memorize a radio station into memory #2. Push
Page 5

Radio Button Locations and Functions
6. Multi-Function Button #3:
Radio and Sirius Satellite Radio Modes: Push and hold until a beep is heard to memorize a radio station
into memory #3. Push and release when recalling preset radio station #3.
DVD Mode: Push to select chapter repeat on, title repeat on or repeat off.
CD Mode: Push to repeat a CD track. Push again to cancel.
CD Changer Mode: Push to repeat a CD track. Push again to cancel.
7. Multi-Function Button #4:
Radio and Sirius Satellite Radio Modes: Push and hold until a beep is heard to memorize a radio station
into memory #4. Push and release when recalling preset radio station #4.
CD Mode: Push to play all the tracks on the CD in random order. Push again to cancel.
CD Changer Mode: Push to play all the tracks on the CD in random order. Push again to cancel.
8. Multi-Function Button #5:
Radio and Sirius Satellite Radio Modes: Push and hold until a beep is heard to memorize a radio station
into memory #5. Push and release when recalling preset radio station #5.
CD Mode: Push to preview each track on the CD for 10 seconds. Push again to cancel.
CD Changer Mode: Push to preview each track on the CD for 10 seconds. Push again to cancel.
9. Band Button:
Radio Mode: Push to select F1, F2, F3, AM1, AM2 or W (weather band).
Sirius Mode: Push to select SR1, SR2, SR3 or SR4.
10. Weather Band Radio Button: Push to instantly access the weather band radio. Push the MODE button
to return to previous source.
11. Reset Button: Push to restore last programmed settings.
12. Display Button: Push to display the frequency in radio mode, title/chapter in DVD mode or track in CD
mode. Push and hold to perform clock setting functions (See Clock Setting for more information,
page 12).
13. Equalizer Button: Push to choose between preset sound equalization settings.
14. Mute Button (DVD,CD Play/Pause) Button:
Radio and Sirius Satellite Radio Mode: Push to mute volume level. Push again to restore volume.
DVD, CD and CD Changer Mode: Push to pause disc play, push again to resume play.
15. Loud (Dim Button): Push and release to boost high and low tones at low volume levels. Push and hold
to dim or restore backlight of display.
Push and hold to repeat the entire disc. Push again to cancel.
Push and hold to play all the CDs in random order. Push again to cancel.
Push and hold to preview each track on every CD for 10 seconds. Push again to cancel.
16. AS/PS (DVD and CD Stop Button):
Radio Mode: Push for automatic memory storing and preset scan.
DVD and CD Mode: Push to stop the DVD or CD.
17. Mode Button: Push to change the play source: Radio, Sirius Satellite Radio, DVD/CD, CD Changer or
Auxiliary Sources.
18. Eject Button: Push to eject a DVD/CD.
19. DVD/CD Slot: To play a disc insert a DVD or CD into slot with label facing up.
20. Display Area: This area displays all function information for the radios, clock and DVD/CD players.
5
Page 6
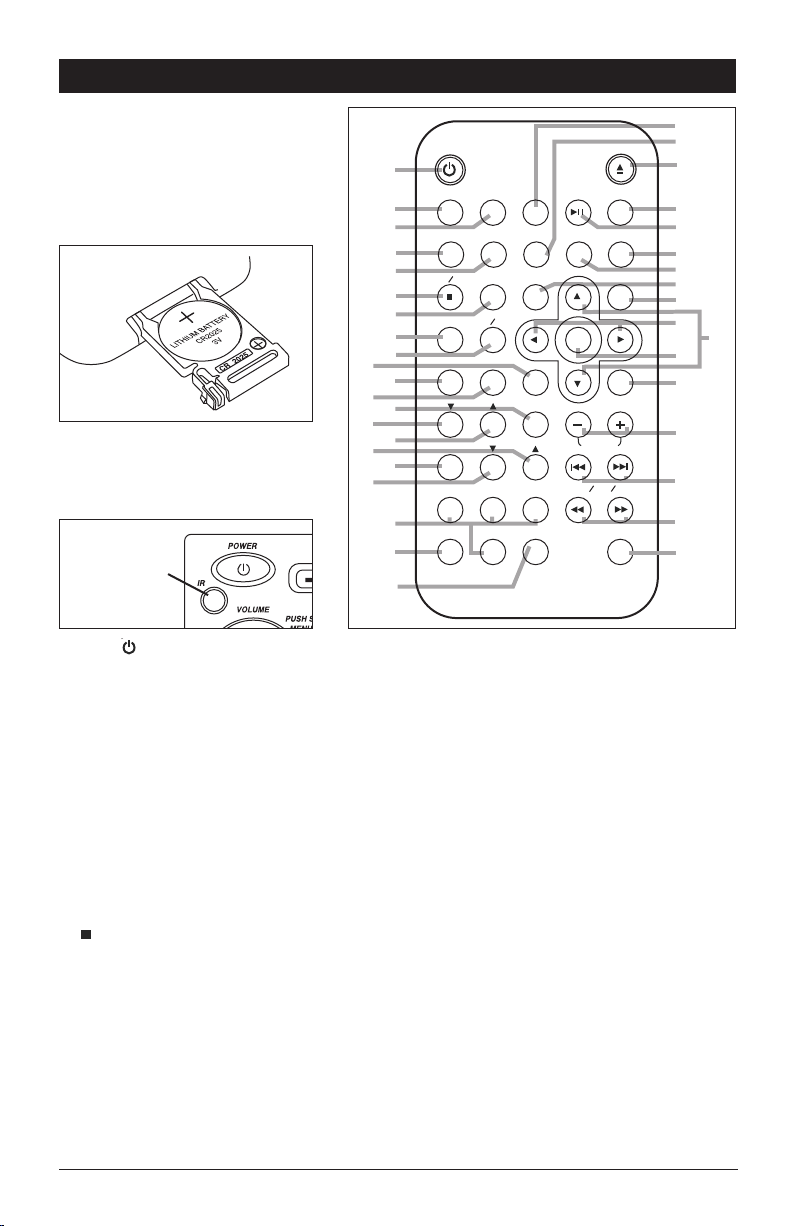
Remote Control Button Locations and Functions
37
36
11
12
10
1
OK
SEL
SLOW
DISC
CAT
AUDIO
RESUME
ZOOMSETUP
S-MODE
MENU
REPEATSHUFFLE SUBTITLE ANGLE
MODEMUTEPROGRAMDISPLAYW.BAND
POWER EJECT
A-B
AS PS
TITLE
PN
VOLUME
TUN TRK CH
PBC
GOTO
ST EQ
SCAN
BND
1
23
45
6
7809
2
3
25
26
22
4
5
6
7
24
27
28
30
34
35
32
31
33
29
14
15
13
17
18
16
19
20
21
23
8
9
38
Inserting the Remote Control Battery:
1. Open the battery compartment.
2. Insert the CR2025 battery. Make
sure that the positive (+) side of
the battery is oriented correctly.
3. Close the battery compartment.
Using the Remote Control:
Point the remote control towards the
remote infrared sensor (IR).
Infrared Sensor
1. Power Push to turn the unit on or off.
2. W.BAND
3. DISPLAY Push to display the frequency in radio mode, title/chapter in DVD mode or track in CD
4. SHUFFLE CD Mode: Push to play all the tracks on the CD in random order. Push again to cancel.
5. REPEAT CD Mode: Push to repeat a CD track. Push again to cancel.
6. (AS/PS) Radio Mode: Push and hold for automatic memory storing. Push and release to scan
7. BND (MENU) Radio Mode: Push to select F1, F2, F3, AM1, AM2 or W (weather band).
8. RESUME
9. P/N
10. EQ Push to choose between preset sound equalization settings.
6
Push to instantly access the weather band radio. Push the MODE button to return to
previous source.
mode. Push and hold to perform clock setting functions (See Clock Setting for more
information, page 12).
CD Changer Mode:
Push to play all the tracks on the CD in random order. Push again to cancel.
CD Changer Mode: Push to repeat a CD track. Push again to cancel.
DVD Mode: Push to select Chapter Repeat On, Title Repeat On or Repeat Off.
preset stations.
DVD Mode: Push to stop the DVD.
Sirius Satellite Radio Mode: Push to select SR1, SR2, SR3, and SR4.
DVD Mode: Push to access the root menu.
CD Mode: When in stop mode, press this button and play will resume from the stop
point.
DVD Mode:
Switches between PAL, NTSC and AUTO modes.
Page 7

Remote Control Button Locations and Functions
11. AUDIO
12. ST (TITLE) Radio Mode:
13. 3 Radio Mode: Push and hold until a beep is heard to memorize a radio station into
14. 1 (CAT ) Radio Mode: Push and hold until a beep is heard to memorize a radio station into
15. 2 (CAT ) Radio Mode: Push and hold until a beep is heard to memorize a radio station into
16. 6 (DISC ) CD Mode: Use in conjunction with other numbered buttons to input track number.
17. 4 Radio Mode: Push and hold until a beep is heard to memorize a radio station into
DVD Mode:
Mono/Stereo: You can sometimes improve reception of distant stations by selecting mono
Local/Distant:
DVD Mode: Push to display the Title menu that is stored in DVD disc (when available).
memory #3. Push and release when recalling preset radio station #3.
Sirius Satellite Radio Mode: Push and hold until a beep is heard to memorize a radio
station into memory #3. Push and release when recalling preset radio station #3.
DVD Mode: Push to select chapter repeat on, title repeat on or repeat off.
CD Mode: Use in conjunction with other numeric buttons to input track number.
CD Changer Mode: Push and release to repeat the track playing on the CD and “RPT” will
appear in the display. Push again to cancel. Push and hold until “DRT” appears in the
display to repeat the disc playing in the changer. Push again to cancel.
memory #1. Push and release when recalling preset radio station #1.
Sirius Satellite Radio Mode: Push and hold until a beep is heard to memorize a radio
station into memory #1. Push and release when recalling preset radio station #1.
Push the SCAN button (29) first until “CATEGORY” appears in the display then push
button 1 to scroll down through the Sirius Radio playback categories.
CD Mode: Use in conjunction with other numeric buttons to input track number.
memory #2. Push and release when recalling preset radio station #2.
Sirius Satellite Radio Mode: Push and hold until a beep is heard to memorize a radio
station into memory #2. Push and release when recalling preset radio station #2.
Push the SCAN button (29) first until “CATEGORY” appear in the display then push
button 2 to scroll up through the Sirius Radio playback categories.
CD Mode: Use in conjunction with other numeric buttons to input track number.
CD Changer Mode: Push and release to scan each track on the CD and “SCN” will
appear in the display. Push again to cancel. Push and hold until “DSN” appears in the
display to scan each track on each disc in the CD Changer. Push again to cancel.
CD Changer Mode: Push to change to a higher disc in the CD changer
memory #4. Push and release when recalling preset radio station #4.
Sirius Satellite Radio Mode: Push and hold until a beep is heard to memorize a radio
station into memory #4. Push and release when recalling preset radio station #4.
CD Mode: Use in conjunction with other numeric buttons to input track number.
CD Changer Mode: Push and release to play all the tracks on the CD in random order
and “SHF” will appear in the display. Push again to cancel. Push and hold until “DSF”
appears in the display to play all the discs in random order. Push again to cancel.
Changes the audio soundtrack on multi-audio soundtrack DVD disc.
operation. Press and release to select mono or stereo mode in FM band only. Stereo
mode is indicated by a ST in the display. Mono mode is indicated by a MON in the display
Local setting is for reception of strong stations, and distant setting is
reception of weaker stations. This function is in effect during Scan and Seek tuning.
for
Press and hold to select local or distance mode in FM band only. Local mode
is indicated by a LOC in the display. Distance mode is not indicated in the display.
.
.
7
Page 8

Remote Control Button Locations and Functions
18. 5 (DISC ) Radio Mode: Push and hold until a beep is heard to memorize a radio station into
19. 7, 8, 9, 0 Use in conjunction with other numeric buttons.
20. GO TO DVD Mode: Goes to bookmark function during DVD playback.
21. PBC Change between PBC On and PBC Off on VCD discs.
memory #5. Push and release when recalling preset radio station #5.
Sirius Satellite Radio Mode: Push and hold until a beep is heard to memorize a radio
station into memory #5. Push and release when recalling preset radio station #5.
CD Mode: Use in conjunction with other numeric buttons to input track number.
CD Changer Mode: Push to change to a lower disc in the CD changer
.
22. PROGRAM CD Mode: Allows the tracks to be played in the order you programmed (See
23. A-B
24. (EJECT) Push to eject a DVD/CD.
25. MODE Push to change the play source: Radio, Sirius Satellite Radio, DVD/CD, CD Changer or
26. (MUTE) Radio and Sirius Satellite Radio Mode: Push to mute volume level. Push again to
27. ANGLE
28. SUBTITLE
29.
SCAN
(SETUP)
30. ZOOM
31. /
Programming CD Tracks into Memory, page 13).
CD and DVD Modes: Allows a passage to be repeated continuously (CD and DVD).
Auxiliary Sources.
restore volume.
CD and CD Changer Mode: Push to pause disc play, push again to resume play.
DVD Mode: Push to pause movie play, push again to resume play.
DVD Mode:
DVD Mode:
Radio Mode:
pausing for 5 seconds at each strong station. Push and release the SCAN button again
to cancel the scan function.
DVD Mode: Push to enter DVD Setup Mode (See DVD Setup for more information, page 20)
Sirius Satellite Radio Mode: Push to access Manual Tuning, Category Tuning and Direct
DVD Mode:
Radio Mode: Manual Tuning: Push and hold one of the buttons until “MANUAL” appears in
the display then release button. Push the buttons again up or down until the desired radio
station appears in the display.
DVD Mode: When the menu is displayed these buttons work as navigational buttons.
Changes the view angle on multi-angle DVD disc.
Changes the Subtitle language on multi-subtitle language DVD disc.
Scan Tuning: Push and release the SCAN button. The tuner will scan up,
Tuning. (See Sirius Radio Operation for more information, page 15).
Enlarges or reduces size of picture.
When a movie is playing these buttons work as Chapter Skip buttons.
32. / Radio Mode: Seek Tuning: Push the left or right button and release. The tuner will scan
to the next strong station and stop.
DVD Mode: When the menu is displayed these buttons work as navigational buttons.
When a movie is playing these buttons work as Fast Forward (FF) and Fast Rewind (FR)
buttons.
8
Page 9

Remote Control Button Locations and Functions
33. OK
34. SEL Push to scan between the different sound controls (Volume, Bass, Treble, Balance and
35. -/+ Push to increase or decrease the volume level.
VOLUME
36. / Radio Mode:
TUN/TRK/CH strong station and stop.
37. / Radio: Push the left or right button until the desired radio station appears in display.
38. SLOW DVD Mode: Push to scroll through Slow Forward (SF 2 X, SF 4 X, SF 8 X) then Slow
DVD Mode:
Fader). Then push VOL +/
Sirius Satellite Radio Mode: Push the left or right button and release. The tuner will go
CD and CD Changer Mode: Push the left or right button and release to change the
DVD Mode: When a movie is playing these buttons work as Chapter Skip buttons.
CD and CD Changer Mode: Push and hold the left or right button to Fast Rewind or
DVD Mode: When a movie is playing push to scroll through Fast Forward (FF 2 X,
FF 4 X, FF 6 X, FF 8 X and PLAY to return to normal). Push to scroll through
Fast Reverse (FR 2 X, FR 4 X, FR 6 X, FR 8 X and PLAY to return to normal).
Confirm the Track/Chapter selected with the numeric buttons or selected
with the cursor buttons on screen display.
-
to change the setting.
Push the left or right button and release. The tuner will scan to the next
to the next station and stop.
track on the CD that is playing.
Fast Forward the track playing.
Reverse (SR 2 X, SR 4 X, SR 8 X) then normal (PLAY).
9
Page 10
Basic Operation
POWER
MODE AS/PS
LOUD MUTE
DIM / II
BAND W- BND
TUNE/TRACK/CH
PUSH
SCAN/S-MOD/SETUP
BAND W- BND
2
3
4
5
REPEAT
SHUFFLE
INTRO
BAND W- BND
MODE AS/PS
TUNE/TRACK/CH
PUSH
SCAN/S-MOD/SETUP
TUNE/TRACK/CH
PUSH
SCAN/S-MOD/SETUP
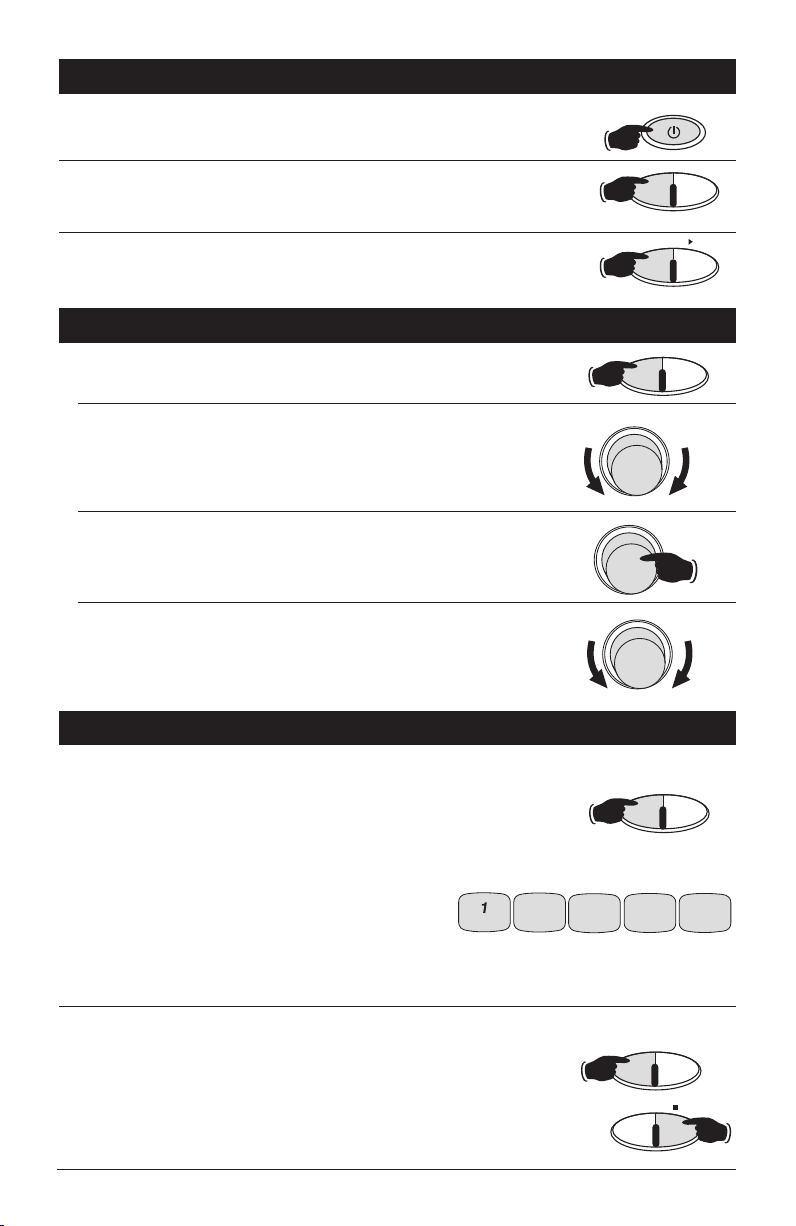
Turning the Unit On and Off: Push the Power button.
Selecting Play Source: Push the Mode button to choose a play source:
Radio, Sirius Satellite Radio (if equipped), CD/DVD, External CD Changer
(if equipped) or Auxiliary Sources (if equipped).
Dimming the Display: Push and hold the LOUD button to dim the backlight
of the display. Push and hold again to return to normal illumination.
AM/FM Radio Operation
AM/FM Bands: Push BAND button to select a radio band: F1, F2, F3, AM1,
AM2 or W (weather band).
Manual Tuning:
1. Rotate the
in the display, then release knob.
2. Rotate the TUNE knob again left or right until the desired radio
station appears in the display.
TUNE
knob left or right and hold until “MANUAL”
appears
Scan Tuning:
Push the
TUNE
knob to have the radio automatically scan
every 5 seconds for a different radio station. To stop scanning push the
TUNE
knob again.
Seek Tuning:
Rotate the
TUNE
knob left or right, then release to seek for a
different radio station.
Preset AM/FM Radio Stations
Programming AM/FM Radio Stations: You can program up to 15 FM radio
stations and 10 AM radio stations.
1. Select from F1, F2, F3, AM1 or AM2 by pushing the BAND button
repeatedly.
2. Tune to the desired radio station (see AM/FM Radio Operation above
for more details).
3. Push and hold one of the five STATION RECALL buttons
until a short "beep" is heard. The corresponding preset
button number now appears in the lower right hand
corner of the display.
4. To program additional preset stations, repeat this procedure using the
other STATION RECALL buttons.
Automatically Programming AM/FM Radio Stations: You can program up to
15 FM radio stations and 10 AM radio stations automatically.
1. Select from F1, F2, F3, AM1 or AM2 by pushing the BAND button
repeatedly.
2. Push and hold AS/PS button until the display starts scanning for a
radio station. The radio will automatically program the 5 strongest
station into preset memory.
10
Page 11

LOC
4 X 50 WATTS
Preset AM/FM Radio Stations
BAND W- BND
2
3
4
5
REPEAT
SHUFFLE
INTRO
BAND W- BND
ENTER
MODE AS/PS
BAND W-BND
TUNE/TRACK/CH
PUSH
SCAN/S-MOD/SETUP
VOLUME
PUSH SEL/
MENU
VOLUME
PUSH SEL/
MENU
VOLUME
PUSH SEL/
MENU
TUNE/TRACK/CH
PUSH
SCAN/S-MOD/SETUP
2
3
4
5
REPEAT
SHUFFLE
INTRO
(continued)
Recalling AM/FM Radio Stations:
1. Select from F1, F2, F3, AM1 or AM2 by pushing the BAND button
repeatedly.
2. Push button 1, 2, 3, 4 or 5 to recall a preprogrammed radio
station.
Automatically Recalling AM/FM Radio Stations:
1. Select from F1, F2, F3, AM1 or AM2 by pushing the BAND button
repeatedly.
2. Push the AS/PS button and release to automatically scan every 5 seconds
the through preprogrammed radio stations.
AS/PS
button again.
To stop scanning push the
Weather Band Radio Operation
Weather Band: Push the W-BND button to immediately access the weather
band. The radio will search for the strongest weather band signal in your area.
S
can Tuning: Push the TUNE knob to scan every 5 seconds through all 7
weather band stations. To stop scanning push the TUNE knob again.
Manual Tuning:
1. Rotate the
in the display, then release knob.
2. Rotate the TUNE knob again left or right until the desired weather
band radio station appears in the display.
Directly Recalling Weather Band Radio Stations:
1. Push button 1, 2, 3, 4 or 5 to directly recall weather
band station 1 thru 5.
TUNE
knob left or right and hold until “MANUAL”
appears
Sound Controls
Volume Control: Rotate the VOLUME knob to the right to increase levels or
left to decrease levels.
Bass, Treble, Balance and Fader Controls: Push and release the VOLUME knob
to scan between the different sound controls. Once the desired function is in
the display area rotate the knob left or right to achieve the desired level.
Bass Control: The bass control adjusts the amount of low frequency that
you hear.
Treble Control: The treble control adjusts the amount of high frequency
that you hear.
Balance Control: The balance control adjusts the amount of sound output
to the left and right speakers.
Fader Control: The fader control adjusts the amount of sound output to
the front and rear speakers.
11
Page 12

Sound Controls
DISP
EQ
LOUD
MUTE
DISP
EQ
TUNE/TRACK/CH
PUSH
SCAN/S-MOD/SETUP
TUNE/TRACK/CH
PUSH
SCAN/S-MOD/SETUP
LOUD
MUTE
DIM / II
EJECT
3
REPEAT
4
SHUFFLE
5
INTRO
LOUD
MUTE
DIM / II
(continued)
Equalizer: Push the EQ button to choose between preset equalizer settings:
Classic, Rock, DSP Off (digital sound processor off), Flat, Pop and Jazz,
as indicated in the display area.
Mute (DVD, CD Play/Pause) Button: Push the MUTE button to mute the
radio volume. If a DVD or CD is playing the MUTE button will pause the
disc. Push the MUTE button again to restore the volume or resume playing the disc.
Loudness: Push the LOUD button to boost high and low tones at low
volume levels.
Clock Setting
Display Button: Push and hold the DISP button until the clock is flashing in
the display.
Adjusting the Minutes: Rotate the TUNE knob to the Left to adjust the Minutes.
Adjusting the Hours: Rotate the TUNE knob to the Right to adjust the Hours.
Note: the AM/PM indicators.
When correct time displays wait a few seconds to allow the time to program.
CD Operation
Playing a CD: Insert a CD (label side up) into the CD slot. The CD will
auto-load and start playing.
Note:
If a CD does not auto-load
may already have a disc loaded.
CD Track Selection: Rotate the TUNE knob left or right to change the track.
The track number will appear in the display.
DO NOT FORCE IT into the slot, as you
Minutes Hours
Pausing a CD: Push the MUTE button to “Pause” the disc, push again to
resume play.
Ejecting a CD: Push the EJECT button to to eject a disc.
Repeating a CD Track:
Select the desired track to repeat then push the
REPEAT button until “S-RPT” appears in the display. That track will play
repeatedly. To cancel this feature push the REPEAT button until “S-RPT” disappears from the display.
Random CD Track Play Order: Push the SHUFFLE button until “S-SHF” appears
in the display. The tracks on the disc will play in a random order. To cancel this
feature push the
SHUFFLE button until “S-SHF” disappears from the display.
Preview CD Tracks: Push the INTRO button until “S-SCN” appears in the
display. Each track on the disc will play for 10 seconds. To cancel this
feature push the INTRO button until “S-SCN” disappears from the display.
12
Page 13

MODE AS/PS
CD Operation
AS PS
PROGRAM
DISC
CAT
1
23
45
6
7809
MUTE
AS PS
PROGRAM
MUTE
(continued)
Elapse Times: Push the AS/PS button to display running time of CD track,
push the button again to display the time remaining on the CD track, push
one more time to display time remaining on CD.
Programming CD Tracks into Memory (Using the Remote Control):
1.
In CD mode, push the
2.
Push the
PROGRAM button and P00-0000 will appear in the display.
3.
Push the
Numeric buttons to select the first track to be programmed
AS/PS button on the remote control
.
into memory. For example: push numeric button 4, “P01-004” appears
in the display indicating that track 4 will be played first.
4.
Repeat Step 3 to store up to 99 tracks into memory.
5.
Push the
MUTE button to play tracks in programmed order.
Canceling Programmed CD Tracks:
1.
Push the
2.
Push the
AS/PS button
PROGRAM button.
.
3.
Push the
MUTE button to resume normal play.
13
Page 14

CD Changer Operation
MODE AS/PS
DISC/CAT
TUNE/TRACK/CH
PUSH
SCAN/S-MOD/SETUP
3
REPEAT
4
SHUFFLE
5
INTRO
Loading CDs: Load CDs into the CD magazine and insert the magazine into
the external CD changer
Selecting the External CD Changer: Push the MODE button until “CDC”
appears in the display.
CD Selection: Push button 1 or 2 to scroll through the selection of CDs in the
CD changer. If a CD is not in one of the trays, the unit will continue until the
next CD is found.
CD Track Selection: Rotate the TUNE knob left or right to change the track.
The track number will appear in the display.
Repeating a CD Track: Select the desired track to repeat then push and
release the REPEAT button until “RPT” appears in the display. The track
on the disc will play repeatedly. To cancel this feature push the REPEAT
button until “RPT” disappears in the display.
Repeating a CD: Select the desired CD to repeat then push and hold the
REPEAT button until “DPT” appears in the display. The entire disc will
play repeatedly. To cancel this feature push the REPEAT button until
“DPT” disappears from the display.
Random CD Track Play Order: Push and release the SHUFFLE button until
“SHF” appears in the display. The tracks on the disc will play in a random
order. To cancel this feature push the SHUFFLE button until “SHF”
disappears from the display.
Random CD Play Order: Push and hold the SHUFFLE button until “DSF”
appears in the display. The discs will play in a random order. To cancel this
feature push the SHUFFLE button until “DSF” disappears from the display.
Preview CD Tracks: Push and release the INTRO button until “SCN” appears
in the display. Each track on the disc will play for 10 seconds. To cancel
this feature push the INTRO button until “SCN” disappears from the display.
Preview CDs: Push and hold the INTRO button until “DSN” appears in the
display. Each track on every disc will play for 10 seconds. To cancel this
feature push the INTRO button until “DSN” disappears from the display.
14
Page 15

Sirius Satellite Radio Setup
MODE AS/PS
TUNE/TRACK/CH
PUSH
SCAN/S-MOD/SETUP
BAND W- BND
DISP
EQ
TUNE/TRACK/CH
PUSH
SCAN/S-MOD/SETUP
MODE AS/PS
2
DISC/CAT
TUNE/TRACK/CH
PUSH
SCAN/S-MOD/SETUP
TUNE/TRACK/CH
PUSH
SCAN/S-MOD/SETUP
TUNE/TRACK/CH
PUSH
SCAN/S-MOD/SETUP
Note: If your Sirius tuner is not activated, call 1-888-539-SIRIUS to activate. The Sirius Tuner ID Number
(ESN) is required during the activation process. Following the instructions below to access the Sirius
Tuner ID Number (ESN):
Accessing you Sirius Tuner ID Number (ESN):
1.
Push the
2.
Push the
MODE button until “SIRIUS” appears in the display area.
TUNE button until “DIRECT” appears in the display area. Wait a
few seconds and “CH 000” will then appear in the display.
3.
Push the
BAND button and the first 4 digits of the 12 digit Sirius Tuner ID
Number (ESN) will be displayed.
4.
Push the
DISP button and the last 8 digits of your 12 digit Sirius Tuner
ID Number (ESN) will be displayed.
5.
Push the
TUNE button to exit.
Sirius Satellite Radio Operation
Please note that satellite radio signal may be blocked by trees, buildings, bridges or tunnels.
Selecting Sirius Satellite Radio: Push the MODE button until “SIRIUS”
appears in the display. Please be patient as it may take a minute to receive a
satellite signal.
Manual Tuning:
1. Push the
TUNE
knob until “NORMAL” appears in the display.
2. Rotate the TUNE knob to select a station from 01-182.
Category Tuning:
1. Push the
TUNE
knob until “CATEGORY” appears in the display.
2. Push button 1 or 2 to find the desired category.
3. Rotate the
TUNE
knob and select a station within the category.
15
Page 16

Sirius Satellite Radio Operation (Continued)
TUNE/TRACK/CH
PUSH
SCAN/S-MOD/SETUP
TUNE/TRACK/CH
PUSH
SCAN/S-MOD/SETUP
BAND W- BND
2
3
4
5
REPEAT
SHUFFLE
INTRO
BAND W- BND
2
3
4
5
REPEAT
SHUFFLE
INTRO
BAND W- BND
MODE AS/PS
Direct Tuning:
1. Push the
2. Rotate the
3. Push the
4. Rotate the
5. Push the
6. Rotate the
TUNE
knob until “DIRECT” appears in the display.
TUNE
knob and select the first digit (0 or 1).
TUNE
knob again.
TUNE
knob and select the second digit (1-8).
TUNE
knob again.
TUNE
knob and select the third digit (1-9). The tuner will
start playing the station you have selected when the third digit stops
flashing.
Preset Sirius Satellite Radio Stations
Programming Satellite Radio Stations: You can program up to 20 Sirius
Satellite radio stations.
1. Select from SR1, SR2, SR3 or SR4 by pushing the BAND button
repeatedly.
2. Tune to the desired radio station (see Sirius Satellite Radio Operation
for more details).
3. Push and hold one of the five STATION RECALL buttons
until a short "beep" is heard. The corresponding preset
button number now appears in the lower right hand
corner of the display.
4. To program additional preset stations, repeat this procedure using the
other STATION RECALL buttons as desired.
Recalling Satellite Radio Stations:
1. Select from SR1, SR2, SR3 or SR4 by pushing the BAND button
repeatedly.
2. Push button 1, 2, 3, 4 or 5 to recall a preprogrammed radio
station.
Automatically Recalling Satellite Radio Stations:
1. Select from SR1, SR2, SR3 or SR4 by pushing the BAND button
repeatedly.
2. Push AS/PS button and release
the pre-programmed radio stations.
to automatically scan every 5 seconds
To stop scanning push the
button again.
16
AS/PS
Page 17

Channel Skip Sirius Satellite Radio
BAND W- BND
ENTER
TUNE/TRACK/CH
PUSH
SCAN/S-MOD/SETUP
TUNE/TRACK/CH
PUSH
SCAN/S-MOD/SETUP
TUNE/TRACK/CH
PUSH
SCAN/S-MOD/SETUP
TUNE/TRACK/CH
PUSH
SCAN/S-MOD/SETUP
BAND W- BND
ENTER
MODE AS/PS
Programming Channel Skip for Satellite Radio Stations: You can program
the radio to skip channels which you do not want.
1. Tune to the station to be skipped (see Sirius Satellite Radio Operation
for more details).
2.
Push the
TUNE
knob until “SET SKIP” appears in the display.
3. Push the BAND button and “SKIP” will appear flashing in the bottom of
the display. When the “SKIP” stops flashing the channel has been programmed to skip.
Release Channel Skip for Satellite Radio Stations:
1. Push the
2. Rotate the
3. Push the
4. Rotate the
5. Push the
6. Rotate the
7.
TUNE
knob until “DIRECT” appears in the display.
TUNE
knob and select the first digit of the skipped channel
(0 or 1).
TUNE
knob again.
TUNE
knob and select the second digit of the skipped channel
(1-8).
TUNE
knob again.
TUNE
knob and select the third digit of the skipped channel
(1-9). The tuner will start playing the station you have selected when the
third digit stops flashing.
Push the
TUNE
knob until “SET SKIP” appears in the display.
After a few
seconds the radio channel will appear in the display with “SKIP”
flashing at the bottom.
8. Push the BAND button and “SKIP” will stop flashing in the bottom of the
display. When the “SKIP” disappears the channel has been released from
Channel Skip.
Auxiliary Input
Selecting Auxiliary Input: Push the MODE button until “AV IN1” or “AV IN2”
appears in the display which indicates that the auxiliary unit is playing
through the M9900DVDS.
Note: All sound controls (pages 11-12) are active when the Auxiliary
source is playing.
17
Page 18

DVD Operation
OK
/ , /
OK
AS PS
MUTE
EJECT
TUN TRK CH
Normal Playback
2X 4X 6X 8X
SLOW
Normal Playback
SF 2X SF 4X SF 8X
SR 2X SR 4X SR 8X
REPEAT
A-B
Chapter Repeat On
Title Repeat On
Repeat Off
Playing a DVD: Insert a DVD (label side up) into the DVD slot.
Note:
If a DVD does not auto-load
may already have a CD or DVD loaded.
1.
The DVD will start playback automatically and stop at the menu display.
2.
Use the
Navigation
highlighted bar in the menu.
3.
Press OKbutton on the remote to confirm selection.
DO NOT FORCE into the slot, as you
buttons on the remote to move the
Stopping a DVD: Push
the
AS/PS button to stop the unit playback, when the
MUTE button is pressed, normal playback will continue.
Push
the
AS/PS button twice to stop the playback and go back to initial
Chapter.
Pausing a DVD: Push the MUTE button to “Pause” the disc, push it again
to resume play.
Ejecting a DVD: Push the EJECT button to eject a disc.
Chapter Skip: Push the button to skip forward to the next chapter. Push
the button to skip backwards to the previous chapter.
Fast Reverse/Fast Forward: Push the or buttons to fast reverse or fast
forward during play. Each time the button is pressed the speed changes.
Slow Motion Forward/Reverse: Push the SLOW button to scroll through Slow
Forward (SF 2X, SF 4X, SF 8x) then Slow Reverse (SR 2X, SR 4X, SR 8x)
then normal (PLAY).
Repeat Play: Push the REPEAT button to scroll through Chapter Repeat On,
Title Repeat On and Repeat Off.
Previous Chapter Next Chapter
Fast Reverse Fast Forward
Passage Repeat: Allows a passage to be repeated continuously.
1. Push the A-B button at the start of the required passage.
2. Push the A-B button at the end of the passage. The unit will repeat playing
the passage set from A to B.
Cancelling Passage Repeat. To revert to normal play push the A-B button again.
18
Page 19

DVD Operation (continued)
DISC
CAT
1
23
45
6
7809
Off
TITLE/CHAPTER TITLE REMAIN
CHAPTER ELAPSE CHAPTER REMAIN
DISPLAY
PN
GOTO
GOTO
OK
OK
AUDIO
DISC
CAT
1
23
45
6
7809
SUBTITLE
GO TO Title/Chapter Select Function: To directly select a Title/Chapter follow
these directions:
1. Push the GO TO button and the screen will display the TITLE and
CHAPTER information.
2.
Use the
Numeric buttons to input the Title/Chapter number.
3.
Push the
OK button to execute the GO TO function.
GO TO Time Select Function: To directly select a time in the DVD follow these
directions:
1. Push the GO TO button TWICE and the screen will display the TITLE and
TIME information.
2.
Use the
Numeric buttons to input the Time.
3.
Push the
OK button to execute the GO TO function.
DVD Disc Information: Push the DISPLAY button to scroll through playback to
display the console information of the current disc onscreen.
PAL/NTSC System Selection: Press the P/N button to switch between PAL,
NTSC and AUTO modes.
Note: This function is only effective when the DVD logo is displayed or when
disc play is stopped.
Audio Languages Function: Push the AUDIO button during playback. Each
time the button is pressed, the audio soundtrack language changes in
sequential order.
Notes:
• The language number maybe different according to the disc.
• Some discs only contain one language soundtrack.
• When no different language soundtracks are recorded, will be displayed
in the top left corner of the screen.
X2
Subtitle Languages Function: Push the SUBTITLE button during playback. Each
time the button is pressed, the subtitle language changes in sequential order.
Notes:
• The language number maybe different according to the disc.
• Some discs only contain one subtitle language.
• When no different language soundtracks are recorded, will be displayed
in the top left corner of the screen.
19
Page 20

DVD Operation
ANGLE
ZOOM
Zoom Off
Zoom X 1.5 Zoom X 2 Zoom X 3
/ , /
SETUP MENU -- MAIN PAGE
GENERAL SETUP
AUDIO SETUP
PREFERENCES
EXIT SETUP
SETUP
SCAN
/ , /
OK
- - GENERAL PAGE - -
TV DISPLAY
PIC MODE
ANGLE MARK
MAIN PAGE
OSD LANG
CAPTIONS
SCREEN SAVER
NORMAL /PS
NORMAL /LB
WIDE
Angle Function:
is pressed, the angle changes in sequential order.
Notes:
• The angle number maybe different according to the disc.
• The function only works for discs having scenes recorded at different
angles.
• When no different angles are recorded, will be displayed in the top left
corner of the screen.
Push the ANGLE button during playback. Each time the button
Zoom Function:
Allows the picture to be increased in size. Push the ZOOM
button during playback. Each time the button is pressed, the zoom changes
in sequential order.
Note:
During ZOOM mode, press the buttons to move picture left,
right, up or down.
DVD Setup
Initial Setup
1. Press SCAN/SETUP and the Initial
Setup Menu is displayed.
2. Select the preferred item by using
the
buttons.
3. Push OK button to enter selected
menu.
Menus
General Setup: This setup page includes all the
items of TV display and Audio output features.
(See General Setup Menu for more information)
General Setup
TV DISPLAY Setup: This is to select the appropriate
TV aspect ratio (4:3 or 16:9) according to the
connected TV set.
NORMAL /PS (For 4:3 TV): Played back in PAN
and SCAN style (If connected to wide-screen
TV, the left and right edges are cut off).
NORMAL /LB (For 4:3 TV) Played back in letter
box style (If connected to wide-screen TV,
black bands appear at top and bottom of the
screen).
20
Audio Setup: This setup page includes all the
items for Audio.
(See Audio Setup Menu for
more information)
Preferences Setup: This setup page includes all
the support features.
Menu for more information)
(See Preferences Setup
WIDE (For 16:9 TV): Select when a wide-screen
TV set is connected.
Page 21

DVD Setup
- - GENERAL PAGE - -
TV DISPLAY
PIC MODE
ANGLE MARK
MAIN PAGE
OSD LANG
CAPTIONS
SCREEN SAVER
AUTO
HI-RES
NON-FLICKER
- - GENERAL PAGE - -
TV DISPLAY
PIC MODE
ANGLE MARK
MAIN PAGE
OSD LANG
CAPTIONS
SCREEN SAVER
ON
OFF
- - GENERAL PAGE - -
TV DISPLAY
PIC MODE
ANGLE MARK
MAIN PAGE
OSD LANG
CAPTIONS
SCREEN SAVER
SPANISH
ENGLISH
FRENCH
GERMAN
- - GENERAL PAGE - -
TV DISPLAY
PIC MODE
ANGLE MARK
MAIN PAGE
OSD LANG
CAPTIONS
SCREEN SAVER
ON
OFF
- - GENERAL PAGE - -
TV DISPLAY
PIC MODE
ANGLE MARK
MAIN PAGE
OSD LANG
CAPTIONS
SCREEN SAVER
ON
OFF
- - AUDIO PAGE - -
LPCM OUTPUT
MAIN PAGE
LPCM 48K
LPCM 96K
- - PREFERENCES - -
TV TYPE
AUDIO
SUBTITLE
DEFAULTS
DISC MENU
PAR ENTAL
PAS SWORD
AUTO
NTSC
PAL
MAIN PAGE
PIC Setup: Select AUTO, the player PIC mode will
depend on DVD disc. Select HI-RES format for
best image resolution. Select NON-FLICKER format
on image or picture with noise or distortion.
ANGLE MARK Display Setup: If it is set ON, when a
multi-angle DVD disc is playing, “ “ (the angle
mark) will appear on the screen. If it is set to
“OFF” the mark will not appear.
OSD LANG (On-Screen Language Display) Setup:
Select the preferred On-Screen Display language
by using the buttons.
SCREENSAVER Setup: Select the SCREENSAVER ON
or OFF.
Audio Setup
LPCM Setup: Select the LPCM (Line Pulse Code
Modulation) OUTPUT between LPCM 48K and
LPCM 96K. The higher the sampling frequency is,
the better the output audio quality will be. It is recommended to select LPCM 96K compression.
Preferences Setup
TV TYPE Setup: This play can play discs recorded in
either PAL or NTSC format. Select NTSC format,
when the unit is connected to a NTSC TV. Select
PAL format, when the unit is connected to a PAL
TV. Select AUTO format, the player TV output format will be according to the DVD disc format.
Captions Setup: When playing DVD disc, activate the
CAPTIONS feature by selecting ON and the captions (such as the actor dialogue) appear on the
screen. Deactivate this feature by selecting OFF
and the caption will appear.
21
Page 22

DVD Setup
- - PREFERENCES - -
TV TYPE
AUDIO
SUBTITLE
DEFAULTS
DISC MENU
PAR ENTAL
PAS SWORD
ENGLISH
FRENCH
SPANISH
MAIN PAGE
CHINESE
JAPANESE
GERMAN
- - PREFERENCES - -
TV TYPE
AUDIO
SUBTITLE
DEFAULTS
DISC MENU
PAR ENTAL
PAS SWORD
ENGLISH
FRENCH
SPANISH
MAIN PAGE
CHINESE
JAPANESE
GERMAN
OFF
- - PREFERENCES - -
TV TYPE
AUDIO
SUBTITLE
DEFAULTS
DISC MENU
PAR ENTAL
PAS SWORD
ENGLISH
FRENCH
SPANISH
MAIN PAGE
CHINESE
JAPANESE
GERMAN
- - PREFERENCES - -
TV TYPE
AUDIO
SUBTITLE
DEFAULTS
DISC MENU
PAR ENTAL
PAS SWORD
3 PG
4 PG13
5
MAIN PAGE
6 PG-R
7 NC-17
8 ADULT
1 G
2
- - PREFERENCES - -
TV TYPE
AUDIO
SUBTITLE
DEFAULTS
DISC MENU
PAR ENTAL
PAS SWORD
MAIN PAGE
CHANGE
- - PREFERENCES - -
TV TYPE
AUDIO
SUBTITLE
DEFAULTS
DISC MENU
PAR ENTAL
PAS SWORD
MAIN PAGE
RESET
Preferences Setup
AUDIO Setup: Select the preferred AUDIO language
by using the cursor buttons.
SUBTITLE Setup: Select the preferred SUBTITLE
language by using the cursor buttons.
PASSWORD Setup: Select CHANGE and press the OK
button. Type the old password (The initial factory
code is 3308) then key-in a new 4-character password. Then retype it again to confirm new password.
DEFAULTS: Select reset to revert to factory initial
settings.
DISC MENU Setup: Select the preferred DISC MENU
language by using the cursor buttons.
PARENTAL Setup: Select a suitable parental guidance
by the cursor buttons and confirm by pressing the
OK button.
22
DEFAULT SETTINGS
GENERAL SETUP TV DISPLAY NORMAL/PS
PIC MODE AUTO
ANGLE MARK ON
OSD LANGUAGE ENGLISH
CAPTIONS OFF
SCREENSAVER OFF
AUDIO SETUP LPCM OUTPUT LPCM 96K
PREFERENCES TV TYPE AUTO
AUDIO ENGLISH
SUBTITLE ENGLISH
DISC MENU ENGLISH
PARENTAL 6PG-R
PASSWORD 3308
DEFAULT RESET
Page 23

Speciality Features
DISP
EQ
BAND W- BND
ENTER
MODE AS/PS
Display Button: The factory default setting is clock display priority. Push the
DISPLAY button at any time to display the radio frequency, CD track, AUX
1 or AUX 2.
Note: In the Sirius mode the factory default setting is Sirius channel
display priority. Push the DISPLAY button at any time to display the
CN-NAME, SONG TITLE, ARTIST, CATEGORY and Clock. If clock is chosen the time will be displayed for approximately 5 seconds then revert to
displaying the Category.
Restoring Factory Default Setting: To restore the radio to the factory default
setting:
1. Press the
2. Push the BAND button and and hold until “EEP INIT” appears in the
display. All settings will be restored to the factory default.
MODE button to select the radio band
.
Reset Button:
The radio panel or LCD display may fail to function normally
due to the vehicle’s battery condition, and may require resetting the radio
microprocessor if:
• The vehicle has been “jump started” from a dead battery condition.
• The vehicle battery becomes very low and is quick-charged.
• The vehicle battery is removed and replaced.
Should this condition occur, simply press and release the RESET button
on the radio panel using the tip of a ball point pen. This will reset the
radio microprocessor to the original factory settings. After pressing the
RESET button you should recheck to see if the radio functions normally.
All station programming should remain, but you will have to reset the
clock. Should the LCD display area show any abnormal error code, please
refer to the trouble shooting guide and solution chart below.
Error Code Problem Description Possible Remedy
ERR 1 Mechanism Problem Unknown mechanical 1. Eject the disc and try another.
problem with the CD 2. Press the reset button.
mechanism. 3. Replace the unit.
ERR 2 TOC Reading Error Laser can not read the 1. Insert a different disc.
CD disc table of 2. Check disc for excessive scratches.
contents. 3. Check disc for dirt and fingerprints.
Clean disc and reinsert.
ERR 3 Error from High The temperature of the Reduce the temperature inside the vehicle
Ambient Temp. mechanism is too high and try to play a CD at a later time.
to play CDs without
damaging them.
ERR 4 DVD Error Error during playback 1. Insert a different disc.
of disc. 2. Check disc for excessive scratches.
3. Check disc for dirt and fingerprints.
Clean disc and reinsert.
4. Press the reset button.
ERR 5 Disc Error Error during eject 1. Push the reset button.
and loading disc. 2. Replace the unit.
23
Page 24

Changing the Default Settings
VOLUME
PUSH SEL/
MENU
VOLUME
PUSH SEL/
MENU
VOLUME
PUSH SEL/
MENU
VOLUME
PUSH SEL/
MENU
VOLUME
PUSH SEL/
MENU
The M9900DVDS has a small group of settings that can be changed to suit your personalized requirement.
Button Confirmation Beep: The factory default setting is BEEP ON (a
confirmation
off, push and hold the VOLUME knob until “BEEP ON” is in the display then
release. Rotate the VOLUME knob until “BEEP OFF” is in the display. Wait a
few seconds, the radio will return to last radio mode selected.
Power Up Volume Level: The factory default setting for initial power-up volume
level is 12. To change the initial volume level, push and hold the VOLUME
knob until “BEEP ON” is in the display then release. Push the VOLUME knob
until “P-VOL” is in the display. Rotate the VOLUME knob until the desired
initial volume is achieved. Wait a few seconds, the radio will return to last
radio mode selected.
Radio Frequency Display: The factory default setting is USA. Do not change this
setting.
Clock Display When the Radio is Off: When the ignition key is on and the radio
is off, “clock display on” is the default setting. To change the setting to “clock
display off”, push and hold the VOLUME knob until “BEEP ON” is in the
display then release. Push the VOLUME knob until “CLK ON” is in the display.
Rotate the VOLUME knob until “CLK OFF” is in the display. Wait a few
seconds, the radio will return to last radio mode selected.
Display Priority: The factory default setting for display priority is “CLOCK”
except in Sirius mode. To change the display priority (either radio frequency
priority or no priority), push and hold the VOLUME knob until “BEEP ON” is in
the display then release. Push the VOLUME knob until
display. Rotate the VOLUME knob until “FREQ” or “NO PRI”
Wait a few seconds, the radio will return to last radio mode selected.
beep every time a button or knob is pushed). To turn the beeps
“CLOCK” is in the
is in the display.
Clock Type, 12 hour or 24 hour: The factory default setting is 12 hour clock with
AM and PM indication. To change the clock type to 24 hour military time,
push and hold the VOLUME knob until “BEEP ON” is in the display then
release. Push the VOLUME knob until “12 HOUR” is in the display. Rotate the
VOLUME knob until “24 HOUR” is in the display. Wait a few seconds, the
radio will return to last radio mode selected.
24
Page 25

Installation
2
3
4
5
MEM
ORY
REPE
AT
PRO
G
RAM
S
H
U
FF
LE
SCA
N
BAND
W-B
AN
DIS
P
MOD
AS
/
PS
LOU
D
MUT
EQ
TUNE/TRACK
VOLUME
POWER
EJECT
ELAPSE
D
I
M
/ II
SCAN/SHIFT
PUSH SEL/
MENU
LOC
S
tep 1:
The radio chassis is designed to be “Sleeve
Mounted” through a opening in the dashboard panel.
The required opening size is 182mm (7-3/16") x
84mm (3-5/16"). Cut or engage an opening in the
dashboard to accommodate the mounting sleeve.
Step 2: Insert the mounting sleeve into the hole
in the dashboard. Bend the metal tabs on the
sleeve to secure the mounting sleeve to the dashboard.
Step 3
: Bring all wiring for the connection of the
unit (including the antenna) through the center of
the mounting sleeve. Connect the wiring as follows:
Yellow Wire (w/Fuse): Connect this wire to a
constant +12 volt power source (a power source
that is not controlled by the ignition key).
Red Wire: Connect this wire to a switched +12 volt
power source (a power source turned on and off
by the ignition key).
Blue Wire: Connect this wire to the (+) power
antenna activation circuit. If no power antenna
exists, tape-off the end of this wire to prevent
shorting out the unit.
Black Wire: Connect this wire to the frame of the
vehicle (ground). This wire is the chassis grounding
wire for the unit.
White Wire: Connect this wire to the Left Front
Speaker (+) positive terminal or wire.
White Wire with Black Stripe: Connect this wire to
the Left Front Speaker (-) negative terminal or wire.
Gre
en Wire with Black Stripe: Connect this wire to
the Left Rear Speaker (-) negative terminal or wire.
Green Wire: Connect this wire to the Left Rear
Speaker (+) positive terminal or wire.
Gray Wire: Connect this wire to the Right Front
Speaker (+) positive terminal or wire.
Gra
y Wire with Black Stripe: Connect this wire to the
Right Front Speaker (-) negative terminal or wire.
Purple
Wire with Black Stripe: Connect this wire to
the Right Rear Speaker (-) negative terminal or wire.
Purple Wire: Connect this wire to the Right Rear
Speaker (+) positive terminal or wire.
Note: This unit is designed to connect to (4) four
speakers. If the installation only requires (2) two
speakers, use the White and Gray wire sets to
connect the speakers.
WARNING! Any wires left unconnected must
be taped-off or capped off to prevent shorting.
DO NOT connect speaker ground wires together.
DO NOT connect speaker ground wires to the
chassis of the vehicle.
DO NOT connect front and rear speaker wires
together.
FAILURE TO FOLLOW ANY OF THESE WARNINGS
WILL RESULT IN DAMAGE TO THIS UNIT AND
VOIDS THE WARRANTY.
Sheet
Metal
Screw
Nut
Washer
Metal Strap
Mounting Sleeve
Dashboard
25
Page 26

Left
Front Speaker
Left
Rear Speaker
+
-
+
-
Blue Wire: Power Antenna
Yellow Wire: 12 VDC Constant
Black Wire: Ground
Green Wire: Rear Left Speaker (+)
Green/Black Wire: Rear Left Speaker (-)
Right
Rear Speaker
Right
Front Speaker
+
-
+
-
White Wire: Front Left Speaker (+)
Gray/Black Wire: Front Right Speaker (-)
White/Black Wire: Front Left Speaker (-)
Gray Wire: Front Right Speaker (+)
Red Wire: Ignition Switched 12 VDC
Purple/Black Wire: Rear Right Speaker (-)
Purple Wire: Rear Right Speaker (+)
1 AMP
Connection
VCR
Yel low (Video In)
TV
Video
Game
or
Audio/Video Output
Red (Audio In / Right)
White (Audio In / Left)
DVD
Auxiliary Input 1 (Yellow Cable)
or
Audio Amplifier
See Amplifier Instructions
for Proper Connections
Monitor
Yel low (Video In)
Red (Audio In / Right)
White (Audio In / Left)
or
Yel low (Video Out)
Red (Audio Out / Right)
White (Audio Out / Left)
Auxiliary Input 2 (Black Cable)
Audio/Video Output (Gray Cable)
M9900DVDS
26
Page 27

M9900DVDS
M9SIR
Male/Male Mini Din
(Supplied with Sirius Tuner)
Sirius Satellite Antenna
Sirius Tuner Connection (Optional)
M9900DVDS
Remote IR Sensor
(Mounted In-Dash)
M9900DVDS
External CD Changer
Male/Male
(Supplied with
External
CD Changer)
CD Changer Connection (Optional)
Remote IR Sensor Connection (Optional)
27
Page 28

M9900DVDS
Antenna
Antenna Connection
28
Page 29

Trouble Shooting
If it appears that your DVD unit is faulty, first consult
the checklist below. It may be that something simple
has been overlooked. Under no circumstance should
you try to repair the player yourself, as this will
invalidate the warranty. Only qualified service personnel should remove the cover or service this player.
No Power:
• If the power supply is connected to the car
accessory circuits, but the engine is not running, switch the ignition key to “ACC”.
• Check if the fuse is blown. If so, replace it with
a new fuse of the same value.
• Check if the Power On/Off button is set to on.
No Picture:
• Check if the monitor or TV is switched on.
• Check if DVD mode is selected.
• Check the video connection.
Distorted Picture:
• Check the disc for debris and clean with soft
cloth, wiping from the center to the edge.
• Sometimes a small amount of picture distortion
may appear. This is not a malfunction.
Completely Distorted Picture:
• The disc format is not set according to the TV
set used (PAL/NTSC).
The Player Does Not Respond to the Remote
Control:
• Aim the remote control directly at the infrared
sensor on the front of the player.
• Avoid all obstacles which may interfere with the
signal path.
• Inspect or replace the remote control battery.
Distorted or B/W Picture:
• The disc format is not set according to the TV
set used (PAL/NTSC).
Buttons Do Not Work:
• Press the RESET button on the front panel of
the radio.
The Radio Does Not Work:
• Check if the antenna cable is properly connected.
The Radio Station Automatic Selection Does Not
Work:
• The signals maybe too weak, select a station
manually.
No Color in Picture:
• The disc format is not set according to the TV
set used (PAL/NTSC).
Disc Does Not Play:
• Ensure that the disc was inserted label up.
• Clean the disc.
• Check if the disc is defective by trying another
disc.
29
Page 30

Order-By-Mail Replacement Parts
OK
SEL
SLOW
DISC
CAT
AUDI
O
RESUME
ZOOM
SETUP
S-MODE
MEN
U
REPEATSHUFFLE SUBTITLE ANGLE
MODE
MUTEPROGRAMDISPLAYW.BAND
POWER
EJECT
A-B
AS
PS
TITLE
P
N
VOLUME
TUN
TRK CH
PBC
GOTO
ST EQ
SCAN
BND
1
23
45
6
7809
DESCRIPTION MODEL # PRICE
M9900DVDS Remote Control RC9900DVD $39.95ea.
Specifications
General:
Power Supply Requirements: DC 12 Volts, Negative Ground
Chassis Dimensions: 180mm (W) x 160mm (D) x 80mm (H)
Tone Controls
Bass (at 100 Hz) ±10 dB
Treble (at 10 kHz) ±10 dB
Maximum Output Power 4 x 40 Watts
Current Drain 15 Ampere (max.)
CD Player:
Signal to Noise Ratio: More than 55 dB
Channel Separation: More than 45 dB
Frequency Response: 20Hz - 20kHz
Radio:
FM
Frequency Coverage: 87.5 to 107.9 MHz
IF 10.7MHz
Sensitivity (S/N = 30dB) 12 dBu
Stereo Separation > 25 dB
AM
Frequency Coverage: 530 to 1720 kHz
IF 450 kHz
Sensitivity (S/N = 20dB) 36 dBu
WB
Frequency Coverage: 162.40 to 162.55 MHz
IF 10.7MHz
Sensitivity (S/N = 30dB) 15 dBu
Note: Due to improvement in technology, specifications and design are subject to change without notice.
30
Page 31

Replacement Parts Order Form
Send Orders To: Magnadyne Corporation We Accept Checks, Money Orders, Visa and Master Card
ATTN: Consumer Parts Sales Make Checks Payable to: Magnadyne Corporation
P.O. Box 5365
Carson, CA 90749-5365
SHIP TO: (No P.O. Boxes)
LAST NAME FIRST NAME INITIAL
STREET ADDRESS (IF PAYING WITH A CREDIT CARD, YOUR BILLING ADDRESS IS REQUIRED)
CITY STATE ZIP CODE
DAY TIME PHONE NUMBER
CREDIT CARD INFORMATION:
CARD TYPE:
VISA MASTER CARD
CARD NUMBER EXP. MONTH YEAR
NAME - AS IT APPEARS
EXACTLY
ON YOUR CREDIT CARD
Part # Description Qty. Price Each TOTAL
RC9900DVD
Subtotal = ________ . ______
California Residents Add Sales Tax = ________ . ______
Shipping and Handling (See Chart) = ________ . ______
TOTAL = ________ . ______
No C.O.D.’s
On regular orders please allow 4-5 weeks for delivery. Please give a shipping address where this order
may be delivered between the hours of 9 a.m. and 5 p.m. weekdays. If UPS is unable to deliver, your order will be
returned and additional shipping charges will be required.
Shipping and Handling
Subtotal + Tax Add
Up to $20.00 $5.00
20.01 to 30.00 5.95
30.01 to 45.00 6.50
45.01 to 70.00 6.95
Over 70.01 7.95
Remote Control
$39.95
31
Page 32

Warranty
ONE (1) YEAR LIMITED WARRANTY
Magnadyne Corporation or its authorized agents will within 1 year from the date of sale to you,
repair, replace or refund the retail sales price of said product or any part thereof, at the option
of the Magnadyne Corporation or its authorized agents, if said product or part is found defective in materials or workmanship, when properly connected and operating on the correct power
requirements designated for the specific product. This warranty and Magnadyne Corporation or
its authorized agents obligations hereunder do not apply where the product was; damaged
while in the possession of the consumer, subjected to unreasonable or unintended use, not reasonably maintained, utilized in commercial or industrial operations, or serviced by anyone other
than Magnadyne Corporation or its authorized agents, or where the warning seal on the product is broken or the power and/or plugs are detached from the unit. Magnadyne Corporation or
any of its authorized agents will not assume any labor costs for the removal and re-installation
of any product found to be defective, or the cost of transportation to Magnadyne Corporation
or its authorized agents. Such cost are the sole responsibility of the purchaser.
This warranty does not cover the cabinet appearance items or accessories used in connection
with this product, or any damage to recording or recording tape, or any damage to the products resulting from improper installation, alteration, accident, misuse, abuse or acts of nature.
MAGNADYNE CORPORATION OR ITS AUTHORIZED AGENTS SHALL NOT BE LIABLE TO ANYONE FOR CONSEQUENTIAL OR INCIDENTAL DAMAGES OR CLAIMS EXCEPT THOSE ACCORDED BY LAW. NO EXPRESSED WARRANTY OR IMPLIED WARRANTY IS GIVEN EXCEPT THOSE
SET FORTH HEREIN. NO IMPLIED WARRANTY SHALL EXTEND BEYOND 1 YEAR FROM THE
DATE OF SALE.
This warranty extends only to the original purchaser of the product and is not transferable.
Some states do not allow limitations on how long an implied warranty lasts and some states do
not allow the exclusion or limitation of incidental or consequential damages, so the above limitations or exclusion may not apply to you. This warranty gives you specific legal rights and you
may have other rights that vary from state to state.
Defective merchandise should be returned to the original point of purchase or secondly, to
Magnadyne Corporation, 1111 W. Victoria Street, Compton CA 90220. Return Authorization
must be obtained before sending, or merchandise may be refused.
© Copyright 2006
Magnadyne Corporation
M9900DVDS-UM
Rev. C 4-26-06
 Loading...