

Page 1
TV-Freischaltung
Bildfreischaltung während der Fahrt
TF-CIC
Für BMW
Professional CCC/CIC
Navigationssysteme
Rechtlicher Hinweis
Der Fahrer darf weder direkt noch indirekt durch bewegte Bilder während der Fahrt
abgelenkt werden. In den meisten Ländern/Staaten ist dieses gesetzlich verboten. Wir
schließen daher jede Haftung für Sach- und Personenschäden aus, die mittelbar sowie
unmittelbar durch den Einbau sowie Betrieb dieses Produkts verursacht wurden. Dieses
Produkt ist, neben dem Betrieb im Stand, lediglich gedacht zur Darstellung stehender Menüs
(z.B. MP3 Menü von DVD-Playern) oder Bilder der Rückfahrkamera während der Fahrt.
Veränderungen/Updates der Fahrzeugsoftware können die Funktionsfähigkeit des Interface
beeinträchtigen. Softwareupdates für unsere Interfaces werden Kunden bis zu einem Jahr
nach Erwerb des Interface kostenlos gewährt. Zum Update muss das Interface frei
eingeschickt werden. Kosten für Ein- und Ausbau werden nicht erstattet.
Version 09.09.2010 TF-CIC
Page 2

Seite1
CAN-Box TV-401
HW_____ SW_____
Kabelsatz
TV-BMW01
SW-Stand und HW-Stand der Interface-Box notieren. Manual aufbewahren für
Support-Zwecke!
Inhaltsverzeichnis
1. Vor der Installation
1.1. Lieferumfang
1.2. Überprüfung der Kompatibilität mit Fahrzeug und Zubehör
1.3. Einstellen der Dip-Schalter der CAN-Box TV-401
1.4. Pin-Belegungen
2. Installation
3. Aktivierung der TV-Freischaltungsfunktion
4. Technische Daten
5. Technischer Support
1. Vor der Installation
Vor der Installation sollte dieses Manual durchgelesen werden. Für die Installation sind
Fachkenntnisse notwendig. Der Installationsort muss so gewählt werden, dass die Produkte
weder Feuchtigkeit noch Hitze ausgesetzt sind.
1.1. Lieferumfang
Version 09.09.2010 TF-CIC
Page 3
Seite2
Voraussetzungen
Fahrzeug 1er (E81/82/87/88), 3er (E90/91/92/93), 5er (E60/61), 6er (E63/64), X5
(E70), X6 (E71), Z4 (E89), Mini R56 ab ca. 10/2006
Navigation Professional Navigationssystem CCC (älteres 1/2-Tasten iDrive oder CIC
(neues 8-Tasten iDrive) mit 6.5 Zoll oder 8.8 Zoll Bordmonitor
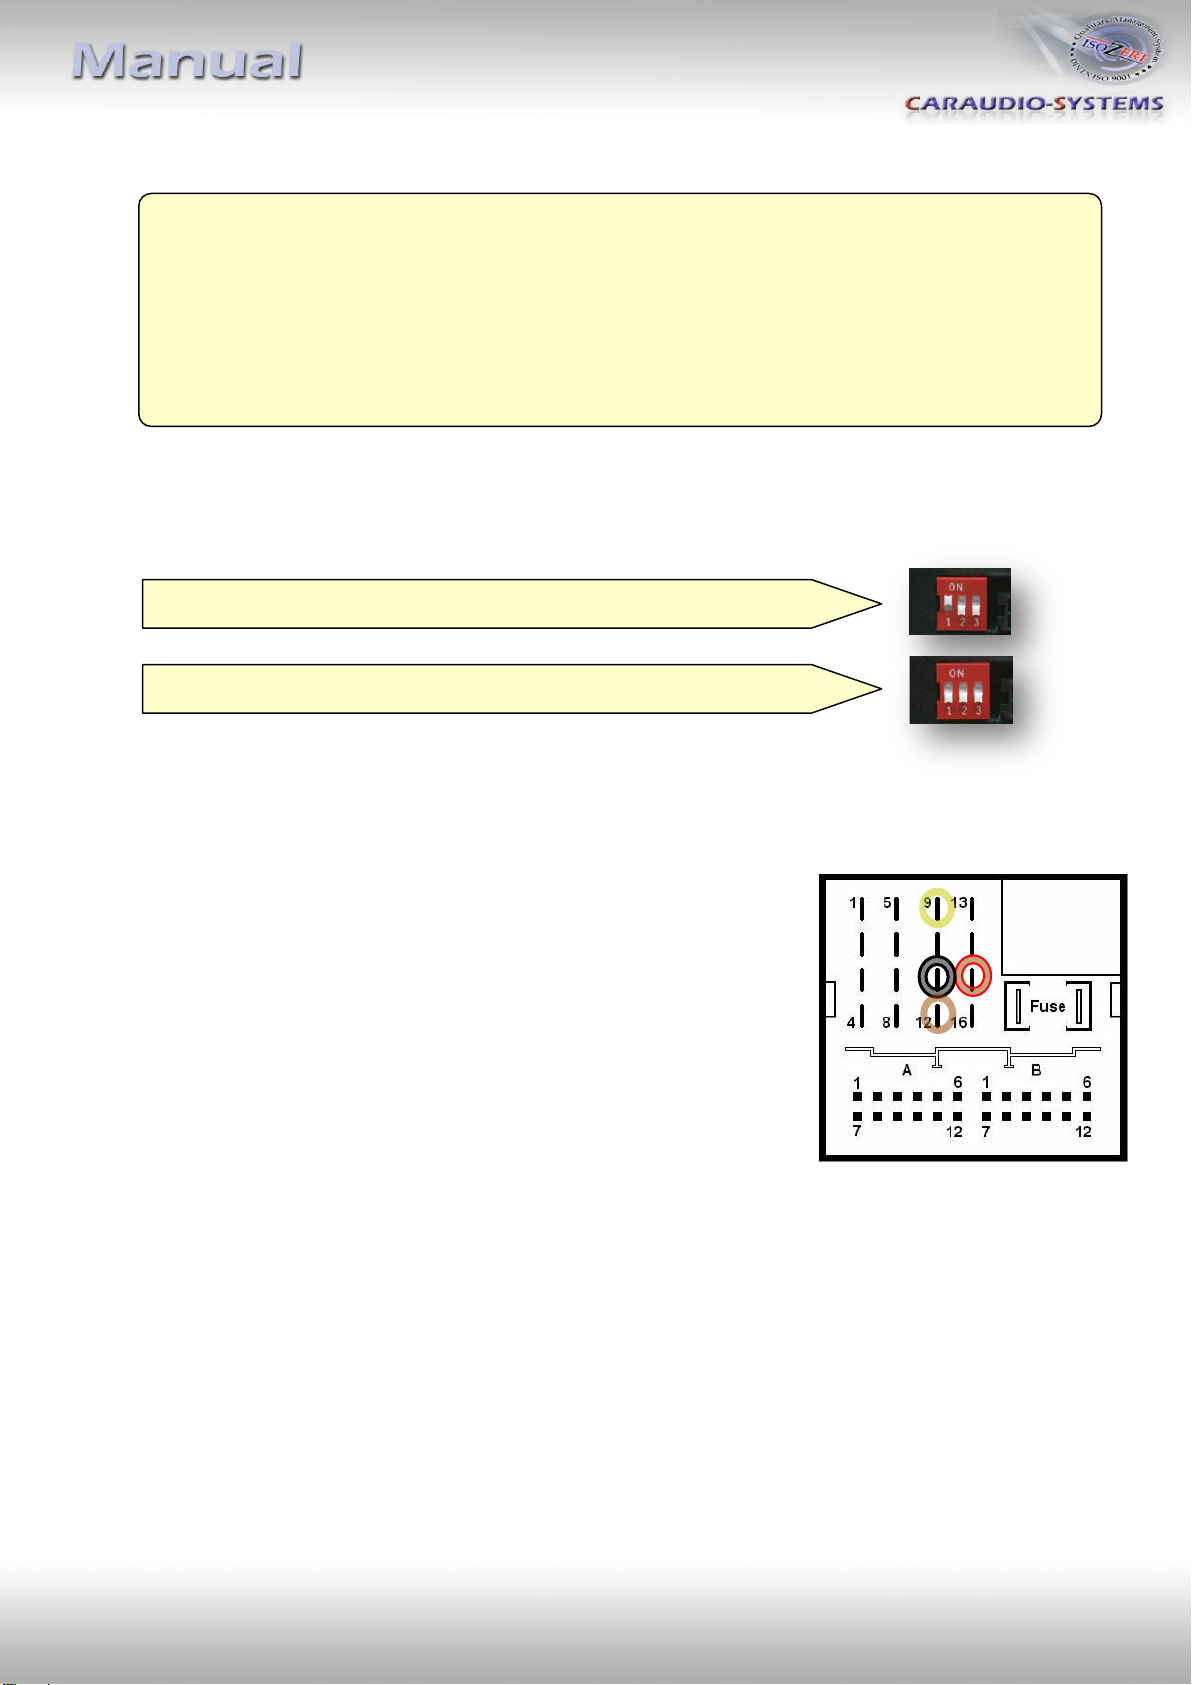
Fahrzeuge mit CCC Dip 1 OFF, Dip 2 OFF, Dip 3 OFF
Fahrzeuge mit CIC Dip 1 ON, Dip 2 OFF, Dip 3 OFF
1.2. Überprüfung der Kompatibilität mit Fahrzeug und Zubehör
1.3. Einstellen der Dip-Schalter der CAN-Box TV-401
1.4. Pin-Belegungen
Pin-Belegung Fahrzeugstecker
●● Braun/Rot +12V Dauerplus Pin 15
● Braun Masse Pin 12
● Gelb CAN Low Pin 9
● Schwarz CAN High Pin 11
Pin-Belegung der CAN-Box TV-401 (Molex 8-Pin)
● Rot +12V Dauerplus Pin 4
● Schwarz Masse Pin 8
● Gelb CAN High Navi Pin 1
● Blau CAN Low Navi Pin 2
●● Gelb/Schwarz CAN High Fahrzeug Pin 5
●● Blau/Schwarz CAN Low Fahrzeug Pin 6
Version 09.09.2010 TF-CIC
Page 4

Seite3
2. Installation
Zündung ausstellen und Fahrzeugbatterie nach Werksangaben abklemmen!
Darf gemäß Werksangaben die Fahrzeugbatterie nicht abgeklemmt werden,
reicht es in den meisten Fällen aus, das Fahrzeug in den Sleep-Modus zu
versetzen. Sollte dieses nicht funktionieren, kann die Fahrzeugbatterie mit
einer Widerstandsleitung abgeklemmt werden.
• Beispiel BMW E90/91/92:
1. Das gesteckte Bedienteil der Klimatronic nach vorne
herausziehen. Dazu zu ein geeignetes Werkzeug
verwenden.
2. Die ebenfalls gesteckte Blende des Navigationsrechner
entfernen.
3. Die 6 Schrauben des Navigationsrechners
lösen und diesen vorsichtig herausziehen.
4. Quadlockstecker des Navigationsrechners herausziehen
und diesen mit dem Kabelsatz TV-NTG2 verbinden
5. Die Lichtwellenleiter auf den TV-NTG2 Kabelsatz umstecken.
Dieser wird mit dem Navigationsrechner verbunden.
6. Den Navigationrechner wieder in die Mittelkonsole
einbauen.
Version 09.09.2010 TF-CIC
Page 5

Seite4
• Beispiel BMW E60/61:
1. Entfernen der Zierleiste durch Nutzung eines Plastikkeils
Stück für Stück. Nicht zu schnell vorgehen, um zu vermeiden,
dass Klemmen der Zierleiste brechen.
2. Die beiden Schrauben am oberen Teil des Klimatronic Bedienteils lösen. Das untere Teil ist nicht verschraubt,
sondern nur mit Halteklips befestigt. Nach Herausziehen
des Klimatronic Bedienteils, können zur Arbeitserleichterung
die Anschlusstecker dahinter getrennt werden.
3. Untere Plastikblende (nur gesteckt) entfernen und die dahinter
befindlichen 4 Schrauben des Navigationsrechners lösen und
diesen herausziehen.
4. Quadlockstecker des Navigationsrechners herausziehen
und diesen mit dem Kabelsatz TV-NTG2 verbinden
5. Die Lichtwellenleiter auf den TV-NTG2 Kabelsatz umstecken.
Dieser wird mit dem Navigationsrechner verbunden.
6. Den Navigationrechner wieder in die Mittelkonsole
einbauen.
Version 09.09.2010 TF-CIC
Page 6

Seite5
• Beispiel BMW E70:
1. Die mittlere Luftdüseneinheit vorsichtig entfernen.
Dazu ein geeignetes Werkzeug verwenden.
2. Die beiden Schrauben am oberen Teil des Klimatronic Bedienteils lösen. Das untere Teil ist nicht verschraubt,
sondern nur mit Halteklips befestigt. Nach Herausziehen
des Klimatronic Bedienteils, können zur Arbeitserleichterung
die Anschlusstecker dahinter getrennt werden.
3. Die in der rechten Abbildung markierten 4 TORX
Schrauben lösen und den Navigationsrechner herausziehen.
4. Quadlockstecker des Navigationsrechners herausziehen
und diesen mit dem Kabelsatz TV-NTG2 verbinden
5. Die Lichtwellenleiter auf den TV-NTG2 Kabelsatz umstecken.
Dieser wird mit dem Navigationsrechner verbunden.
6. Den Navigationrechner wieder in die Mittelkonsole
einbauen.
Version 09.09.2010 TF-CIC
Page 7

Seite6
3. Aktivierung der TV-Freischaltungsfunktion
Bei Fahrzeugen mit CIC ist die TV-Freischaltungsfunktion dauerhaft aktiviert, ohne die
Navigationsleistung zu beeinträchtigen.
Bei Fahrzeugen mit CCC zum Aktivieren/ Deaktivieren der TV-Freischaltungsfunktion die
Menü-Taste oder das iDrive Rad im Hauptmenü für 3 Sekunden drücken. Bei ausgeschalteter
Zündung wird die Freischaltung automatisch deaktiviert.
Alternativ kann bei CCC der Dip-Schalter 1 der CAN-Box TV-401 auf ON gestellt werden. Dann
funktioniert die Navigation allerdings erst nach einigen Kilometern.
4. Technische Daten
Spannungs-Arbeitsbereich 10.5 – 14.8V
Ruhestrom >1mA
Arbeitsstrom ~60mA
Leistungsaufnahme ~0,72W
Temperaturbereich -30°C bis +80°C
Gewicht 44g
Abmessungen (nur Box) B x H x T 70 x 20 x 47 mm
5. Technischer Support
Caraudio-Systems Vertriebs GmbH NavLinkz GmbH
Hersteller/Distribution Vertrieb/Techn. Support
Rheinhorststr. 22 Eurotec-Ring 45
D-67071 Ludwigshafen am Rhein D-47445 Moers
Tel +49 180 3 907050*
Email support@caraudio-systems.de
* 7,6cent/Minute aus dem dt. Festnetz, vom dt. Mobilfunk je nach Provider mehr.
Rechtlicher Hinweis: Hier genannte Firmen- und Markenzeichen sowie Produktnamen, sind eingetragene
Warenzeichen ® und somit Eigentum der jeweiligen Rechteinhaber.
Version 09.09.2010 TF-CIC
Page 8

TV-Free
Video-in-motion Interface
TF-CIC
For BMW
Professional CCC/CIC
navigation systems
Legal Information
By law, watching moving pictures while driving is prohibited, the driver must not be
distracted. We do not accept any liability for material damage or personal injury resulting,
directly or indirectly, from installation or operation of this product. This product should only
be used while standing or to display fixed menus or rear-view-camera video when the
vehicle is moving, for example the MP3 menu for DVD upgrades.
Changes/updates of the vehicle’s software can cause malfunctions of the interface. We
offer free software-updates for our interfaces for one year after purchase. To receive a free
update, the interface must be sent in at own cost. Labor cost for and other expenses
involved with the software-updates will not be refunded.
Version 09.09.2010 TF-CIC
Page 9

Page1
CAN-box TV-401
HW_____ SW_____
Harness
TV-BMW01
Take down the SW-version and HW-version of the interface-boxes, and store this
manual for support purposes!
Contents
1. Prior to installation
1.1. Delivery contents
1.2. Check compatibility of vehicle and accessories
1.3. Setting the Dip-switches of the CAN-Box TV-401
1.4. Pin-assignments
2. Installation
3. Activation of the video-in-motion function
4. Specifications
5. Technical support
1. Prior to installation
Read the manual prior to installation. Technical knowledge is necessary for installation. The
place of installation must be free of moisture and away from heat sources.
1.1. Delivery contents
Version 09.09.2010 TF-CIC
Page 10

Page2
Requirements
Vehicle BMW 1series (E81/82/87/88), 3series (E90/91/92/93), 5series (E60/61),
6series (E63/64), X5 (E70), X6 (E71), Z4 (E89) Mini R56 from about
10/2006
Navigation Navigation system Professional CCC (older 1/2-button iDrive
or CIC (newer 8-button iDrive) with 6.5” or 8.8” monitor
Vehicles with CCC Dip 1 OFF, Dip 2 OFF, Dip 3 OFF
Vehicles with CIC Dip 1 ON, Dip 2 OFF, Dip 3 OFF
1.2. Check compatibility of vehicle and accessories
1.3. Setting the Dip-switches of the Can-Box TV-401
1.4. Pin-assignments
Pin-assignment vehicle connector
●● Brown/Red +12V permanent Pin 15
● Brown Ground Pin 12
● Yellow CAN Low Pin 9
● Black CAN High Pin 11
Pin-assignment of the CAN-box TV-401 (Molex 8-Pin)
● Red +12V battery power Pin 4
● Black Ground Pin 8
● Yellow CAN High Navi Pin 1
● Blue CAN Low Navi Pin 2
●● Yellow/Black CAN High Vehicle Pin 5
●● Blue/Black CAN Low Vehicle Pin 6
Version 09.09.2010 TF-CIC
Page 11

Page3
2. Installation
Switch off ignition and disconnect the vehicle’s battery! If according to factory
rules disconnecting the battery has to be avoided, it is usually sufficient to put
the vehicle is sleep-mode. In case the sleep-mode does not show success,
disconnect the battery with a resistor lead.
• Example BMW E90/91/92:
1. Remove the plugged climate control panel with the
accordant tool kit.
2. Remove the trim (plugged too).
3. Remove the 6 screws from the navigation computer and
take it out.
4. RemoveQuadlock connector from the navigation computer
and connect it to Harness TV-NTG2.
5. Connect the optical leads to the Harness TV-NTG2 and
connect the TV-NTG2 to the navigation computer.
6. Fit the navigation computer back into the center console.
Version 09.09.2010 TF-CIC
Page 12

Page4
• Example BMW E60/61:
1. Remove trim strip step by step using a plastic wedge. Do not to
proceed to quickly to avoid breaking clamps of the trim strip.
2. Remove the two screws on the upper part of the climate
control panel. The lower part is not screwed but only fastened
with clamps. After removing the climate control panel in order
to facilitate you can disconnect the plugs behind.
3. Remove the lower trim (plugged too) and remove the 4 screws
of the navigation computer behind it. Take out the navigation
computer.
4. Disconnect Quadlock -connector from the navigation computer
and connect it to harness TV-NTG2.
5. Connect the optical leads to the Harness TV-NTG2 and
connect the TV-NTG2 to the navigation computer.
6. Fit the navigation computer back into the center console.
Version 09.09.2010 TF-CIC
Page 13

Page5
• Example BMW E70:
1. Remove the center air nozzle unit with the accordant
tool kit.
2. Remove the two screws on the upper part of the climate
control panel. The lower part is not screwed but only
fastened with clamps. After removing the climate control
panel in order to facilitate you can disconnect the plugs
behind.
3. Remove the 4 TORX screws (see picture) and take out the
navigation computer.
4. Remove Quadlock connector from the navigation computer
and connect it to harness TV-NTG2.
5. Connect the optical leads to the Harness TV-NTG2 and
connect the TV-NTG2 to the navigation computer.
6. Fit the navigation computer back into the center console.
Version 09.09.2010 TF-CIC
Page 14

Page6
3. Activation of the video-in-motion function
On vehicles with CIC the video-in-motion function is activated permanently without
disturbing the navigation performance.
On vehicles with CCC press the menu-button or the iDrive wheel for about 3 seconds while in
main menu to activate/deactivate the video-in-motion function. When the ignition is off, the
video-in-motion interface will be automatically disabled.
Alternatively for CCC it is possible to set dip-switch 1 of the CAN box TV-401 to ON. But then
the navigation performance is disturbed on the first few kilometres of driving.
4. Specifications
Operation voltage 10.5 – 14.8V
Stand-by power drain >1mA
Operation power drain ~60mA
Power consumption ~0,72W
Temperature range -30°C bis +80°C
Weight 44g
Measurements (box only) B x H x T 70 x 20 x 47 mm
5. Technical support
Caraudio-Systems Vertriebs GmbH NavLinkz GmbH
manufacturer/distribution corporate sales/tech support
Rheinhorststr. 22 Eurotec-Ring 45
D-67071 Ludwigshafen am Rhein D-47445 Moers
phone +49 180 3 907050
email support@caraudio-systems.de
Legal disclaimer: Mentioned company and trademarks, as well as product names/codes are registered
trademarks ® of their corresponding legal owners.
Version 09.09.2010 TF-CIC
 Loading...