

Page 1

Rear-view camera interface
RL-MIB2
Compatible to VAG MIB and MIB2 Infotainment
Standard & High
Rear-view camera input for connection of an NTSC rear-view camera
to the factory head-unit
Product features
• Plug and Play interface
• Integration to the factory infotainment
• Rear-view camera input (only for NTSC cameras)
• Automatic switching to after-market camera when reverse gear is engaged (coding of
vehicle is required)
• Power supply output for rear-view camera (max. 1A)
Version 05.04.2024
Page 2
purposes: ____________________
Table of contents
1. Prior to installation
1.1. Delivery contents
1.2. Checking the compatibility of vehicle and accessories
1.3. Coding of the vehicle
2. Installation
2.1. Place of installation
2.2. Connection scheme
3. Specifications
4. Technical support
1. Prior to installation
Read the manual prior to installation.
Technical knowledge is necessary for installation. The place of installation must be free of
moisture and away from heat sources.
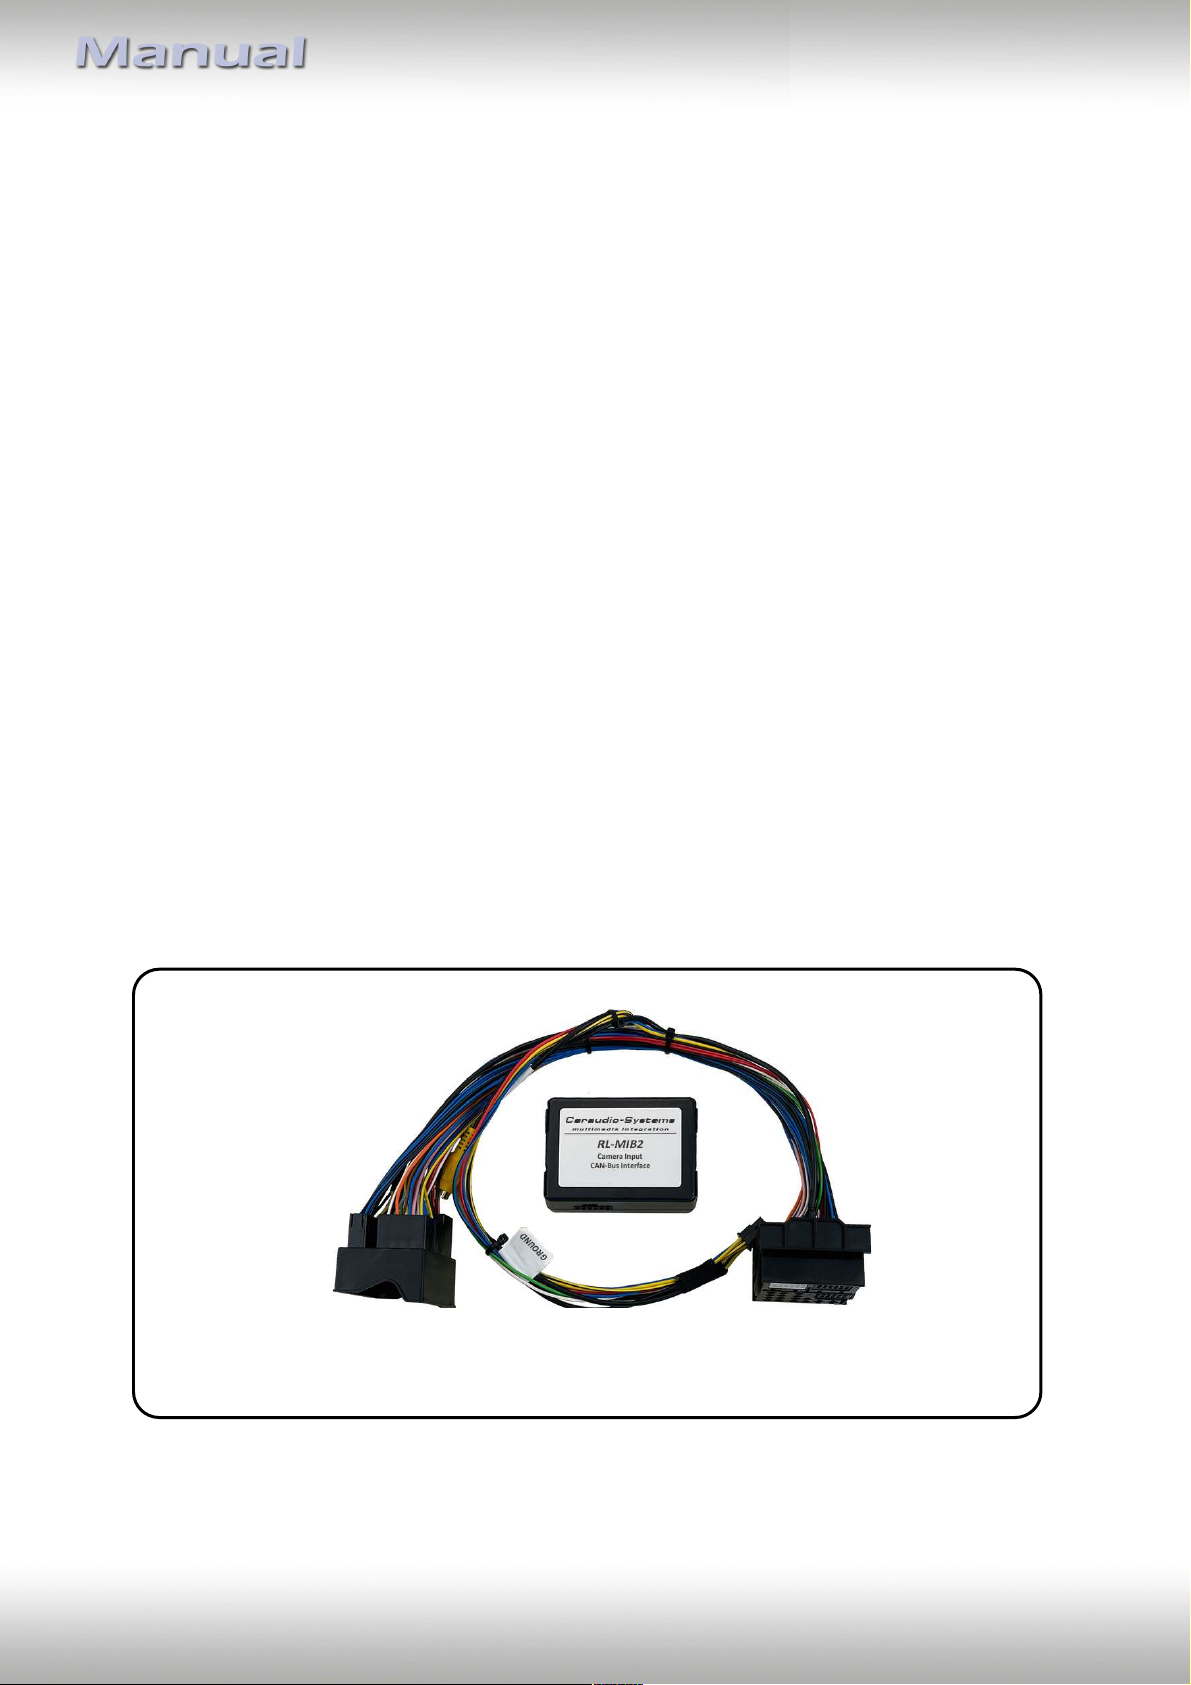
1.1. Delivery contents
Take down the serial number of the interface and store this manual for support
Seite2"
Version 05.04.2024 RL-MIB2
Page 3
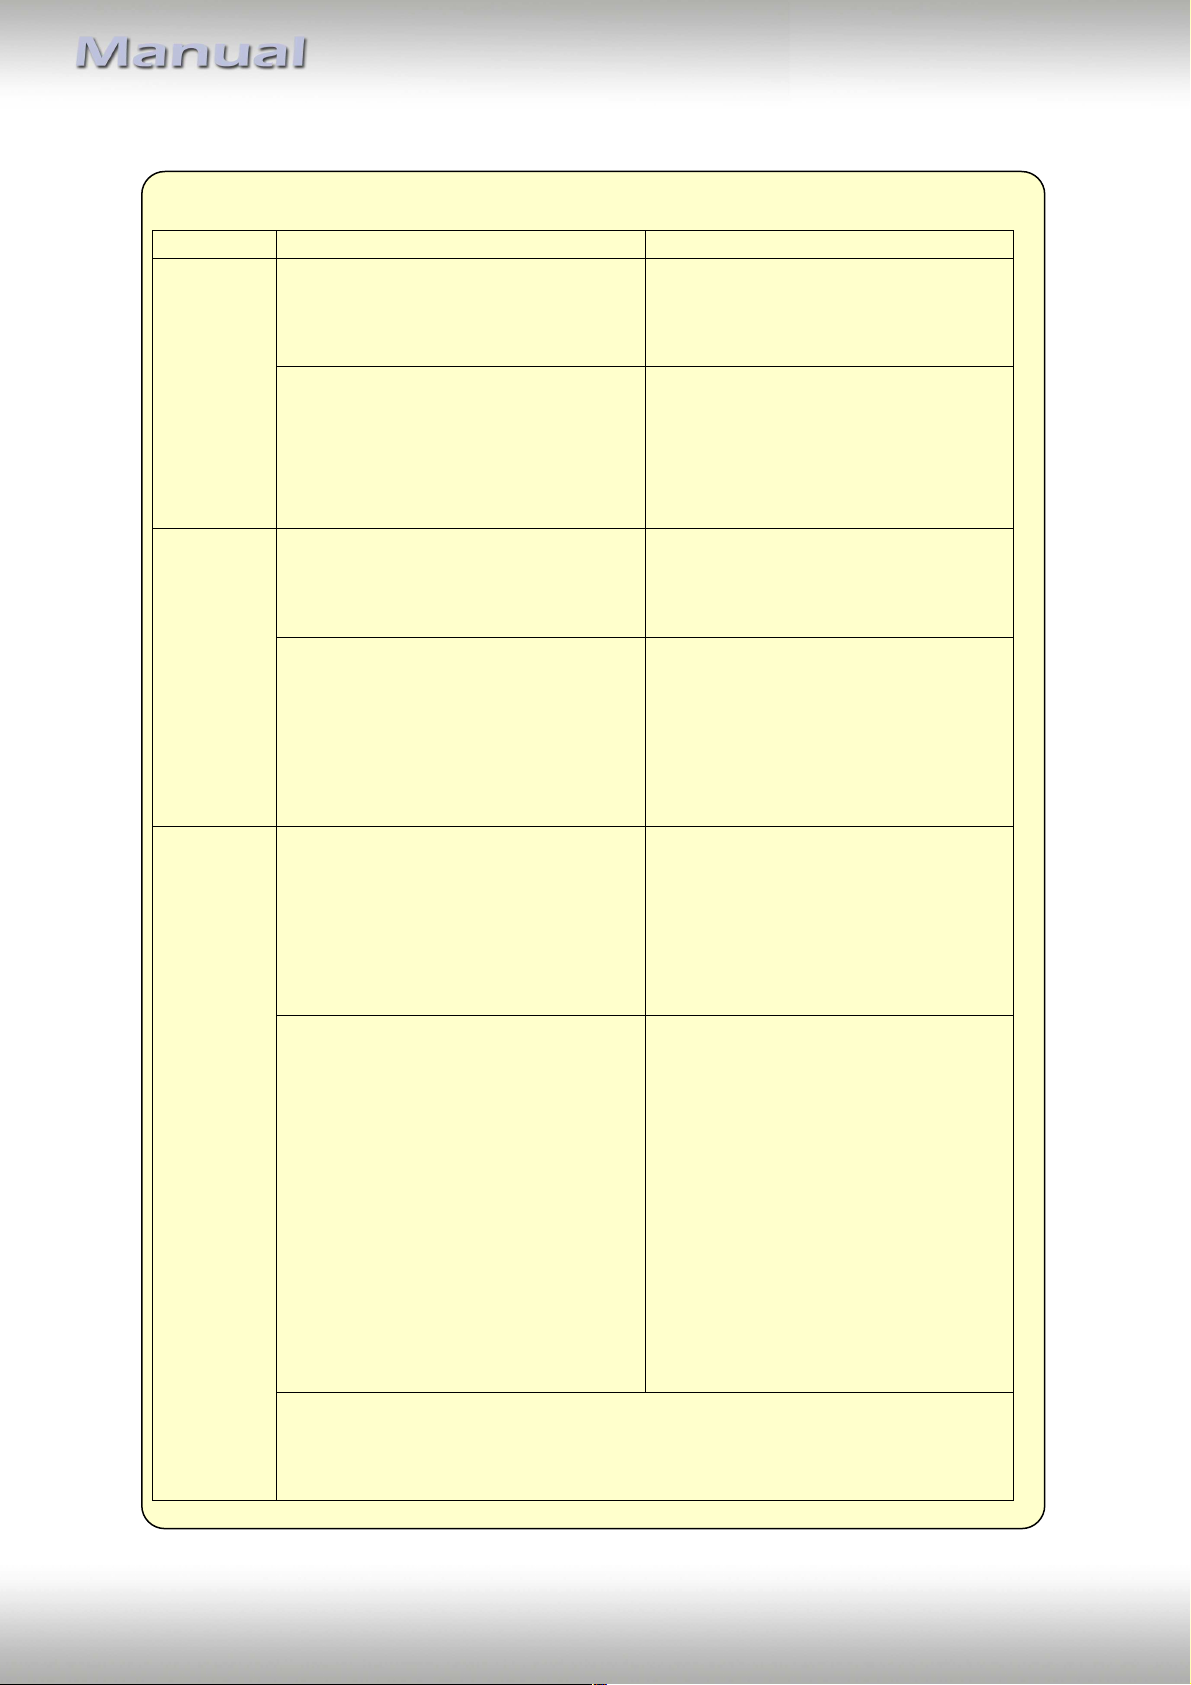
1.2. Checking the compatibility of vehicle and accessories
Requirements
Brand Model Infotainment
MIB STD2 PQ/+NAV
Media System Plus
1x SD vertical left or 2x SD vertical left
+ right of 6.33inch monitor
MIB/MIB2 High/Standard
Navigations System Plus or Media
System Plus
6.5inch or 8inch monitor
MIB STD2 PQ +/NAV
Bolero/Amundsen
1x SD vertical left or 2x SD vertical left
+ right of 6.33inch monitor
MIB/MIB2
High/Columbus and
Standard/Bolero/Amundsen
5.8inch, 6.5inch or 8inch monitor
MIB STD2 PQ /+NAV
Composition Media / Discover Media
1x SD vertical left or 2x SD vertical left
+ right and disc drive above 6.33inch
monitor
MIB/MIB2
High/Discovery Pro and
Standard/Composition Media*
5.8inch, 6.5inch or 8inch monitor
Seat
Skoda
VW
Alhambra2 (7N) MY 2016-
-- Only vehicles with factory OPS --
Arona MY 2018-,
Ateca (KH7) MY 2017-,
Ibiza (6P) MY 2016-,
Leon3 (5F) MY 2013-,
Toledo4 (KG) MY 2016-
-- Only vehicles with factory OPS --
Yeti (5L) MY 2015-2017
-- Only vehicles with factory OPS --
Fabia3 (NJ) MY 2014-,
Karoq (NU7) MY 2018-,
Kodiaq (NS7) MY 2017-,
Octavia3 (5E) MY 2012-,
Rapid (NH1) MY 2016-,
Superb3 (3V) MY 2015-
-- Only vehicles with factory OPS --
Amarok (2H) MY 2017-,
Beetle (5C) MY 2015-,
Caddy 4 (SA) MY 2016-2020,
Scirocco3 (13) MY 2016-,
Sharan (7N) MY 2016-,
Transporter T6 (SG) 07/2015-10/2019
-- Only vehicles with factory OPS --
Arteon (3H) MY 2018-,
Crafter (SZ/SY) MY 2017-,
Golf7 MY 2012-,
Golf7 Sportsvan MY 2014-,
Passat (B8) MY 2016-,
Polo5 (6C) MY 2014-2017,
Polo6 (AW1) MY 2018-,
T-Cross (C1) from 04/2019,
T-Roc (A11) MY 2018-,
Taigo (CS) 09/2021-,
Tiguan2 (AD1) MY 2016-,
Touran (5T) MY 2016-,
Transporter T6.1 (6H) 10/2019-
-- Only vehicles with factory OPS --
* NOT compatible to Composition Media with part numbers, as a full coding of
the head-unit is not possible on these:
see next page:
Seite3"
Version 05.04.2024 RL-MIB2
Page 4
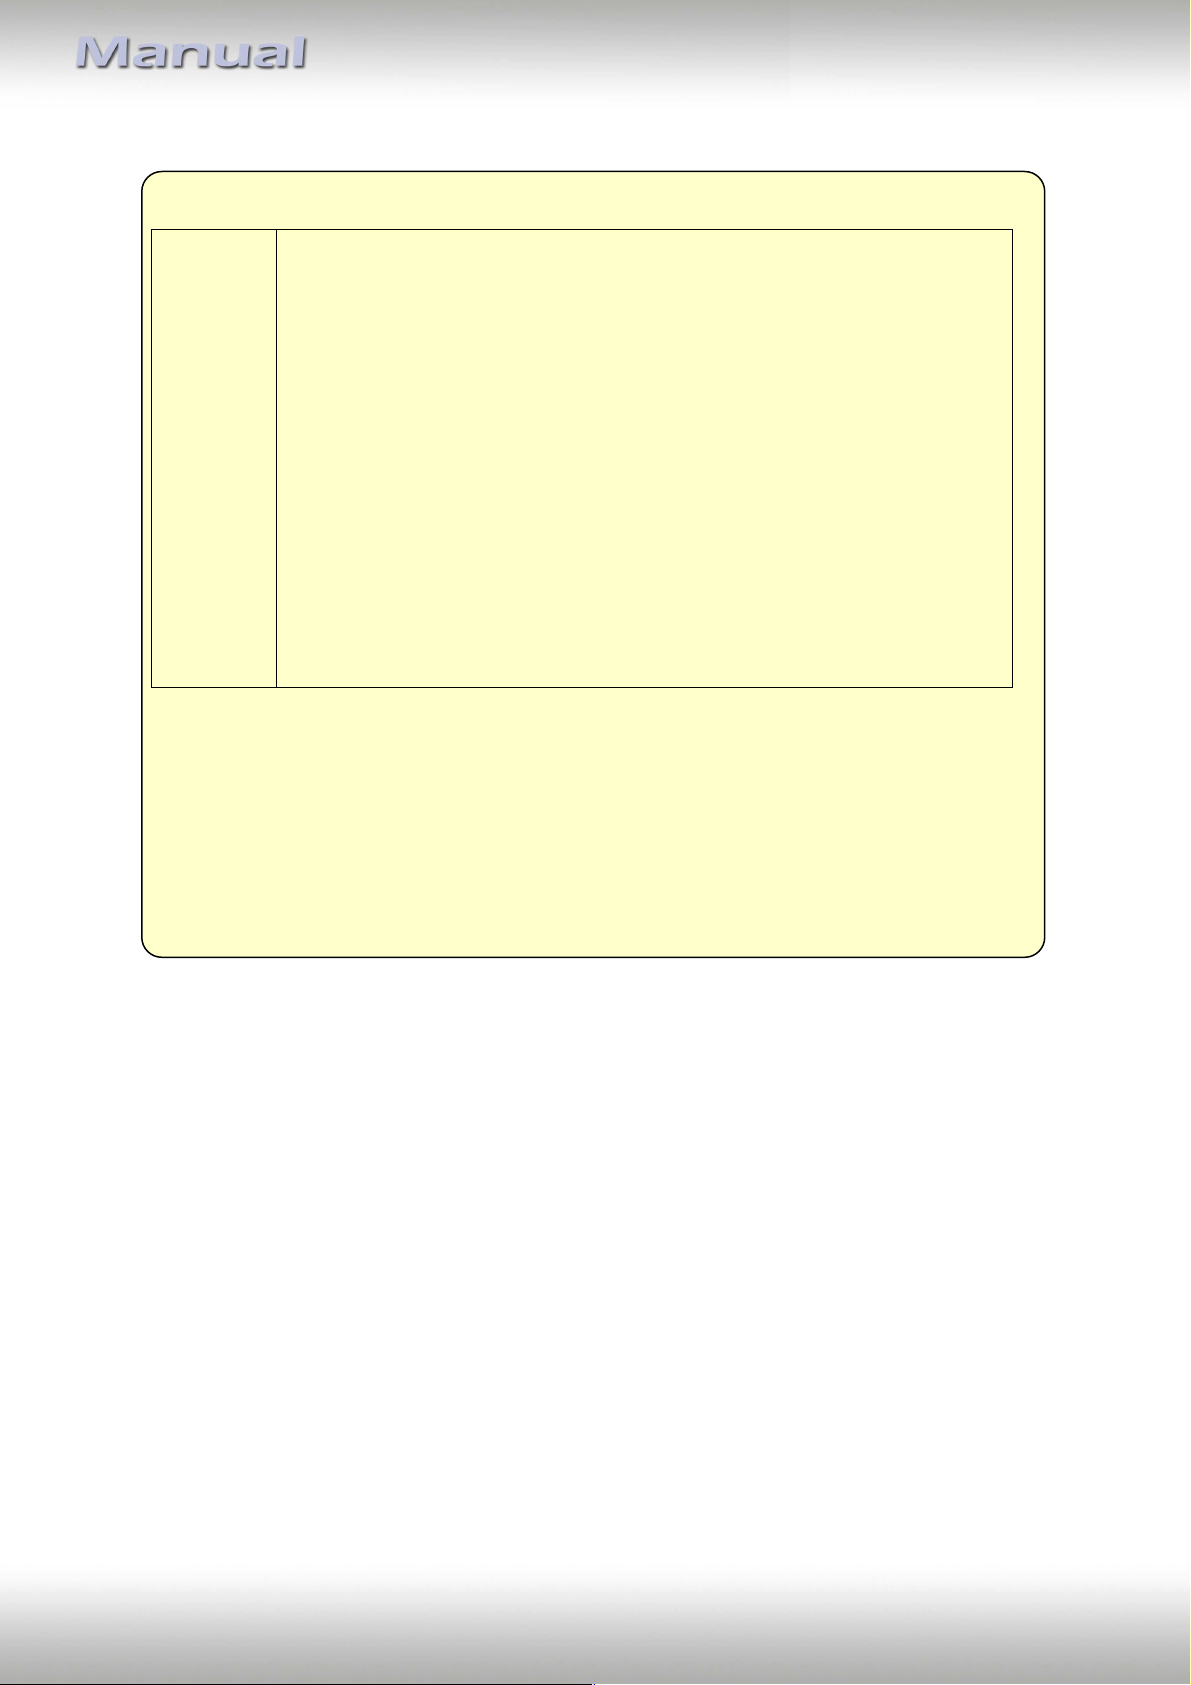
Limitations
* NOT compatible to Composition Media with part numbers, as a full coding of
the head-unit is not possible on these:
3Q0035812
3Q0035819, 3Q0035819A, 3Q0035819B, 3Q0035819C
3Q0035820, 3Q0035820A, 3Q0035820B, 3Q0035820C
5G0035812
5G0035819, 5G0035819A, 5G0035819B, 5G0035819C
VW
Coding Vehicle must be coded by diagnosis computer to rear-view camera. The
After-market Compatible only with NTSC cameras.
rear-view camera
Power supply output Maximum permitted current per output 1A
5G0035820, 5G0035820A, 5G0035820B, 5G0035820C
The letter at the end is merely the software version of the head-unit, newer
versions are likely to not be compatible as well! Only the last 6 digits/numbers
are relevant.
The part number of the head-unit can be displayed on the monitor:
Menu button->Setup->System-Information->part number device
vehicle can only be coded if it is equipped with a factory optical parking
distance system with graphical display on the monitor.
Seite4"
Version 05.04.2024 RL-MIB2
Page 5
1.3. Coding of the vehicle
Alternatively to the coding via VCDS software described here, the camera coding can be
done by the separately available coding dongle “OBD-301-R”.
In order for an MIB-based factory head-unit to switch to the rear-view camera input picture
when reverse gear is engaged, the vehicle needs to be coded correctly. This coding is not
part of the product RL-MIB2 and must be done with a diagnosis tool in combination with
coding software.
Below as example, coding with VCDS software – no liability for correctness!
Changes is vehicle or coding software are subject to changes which may lead to different
coding requirements. In this case contact the supplier of your coding software.
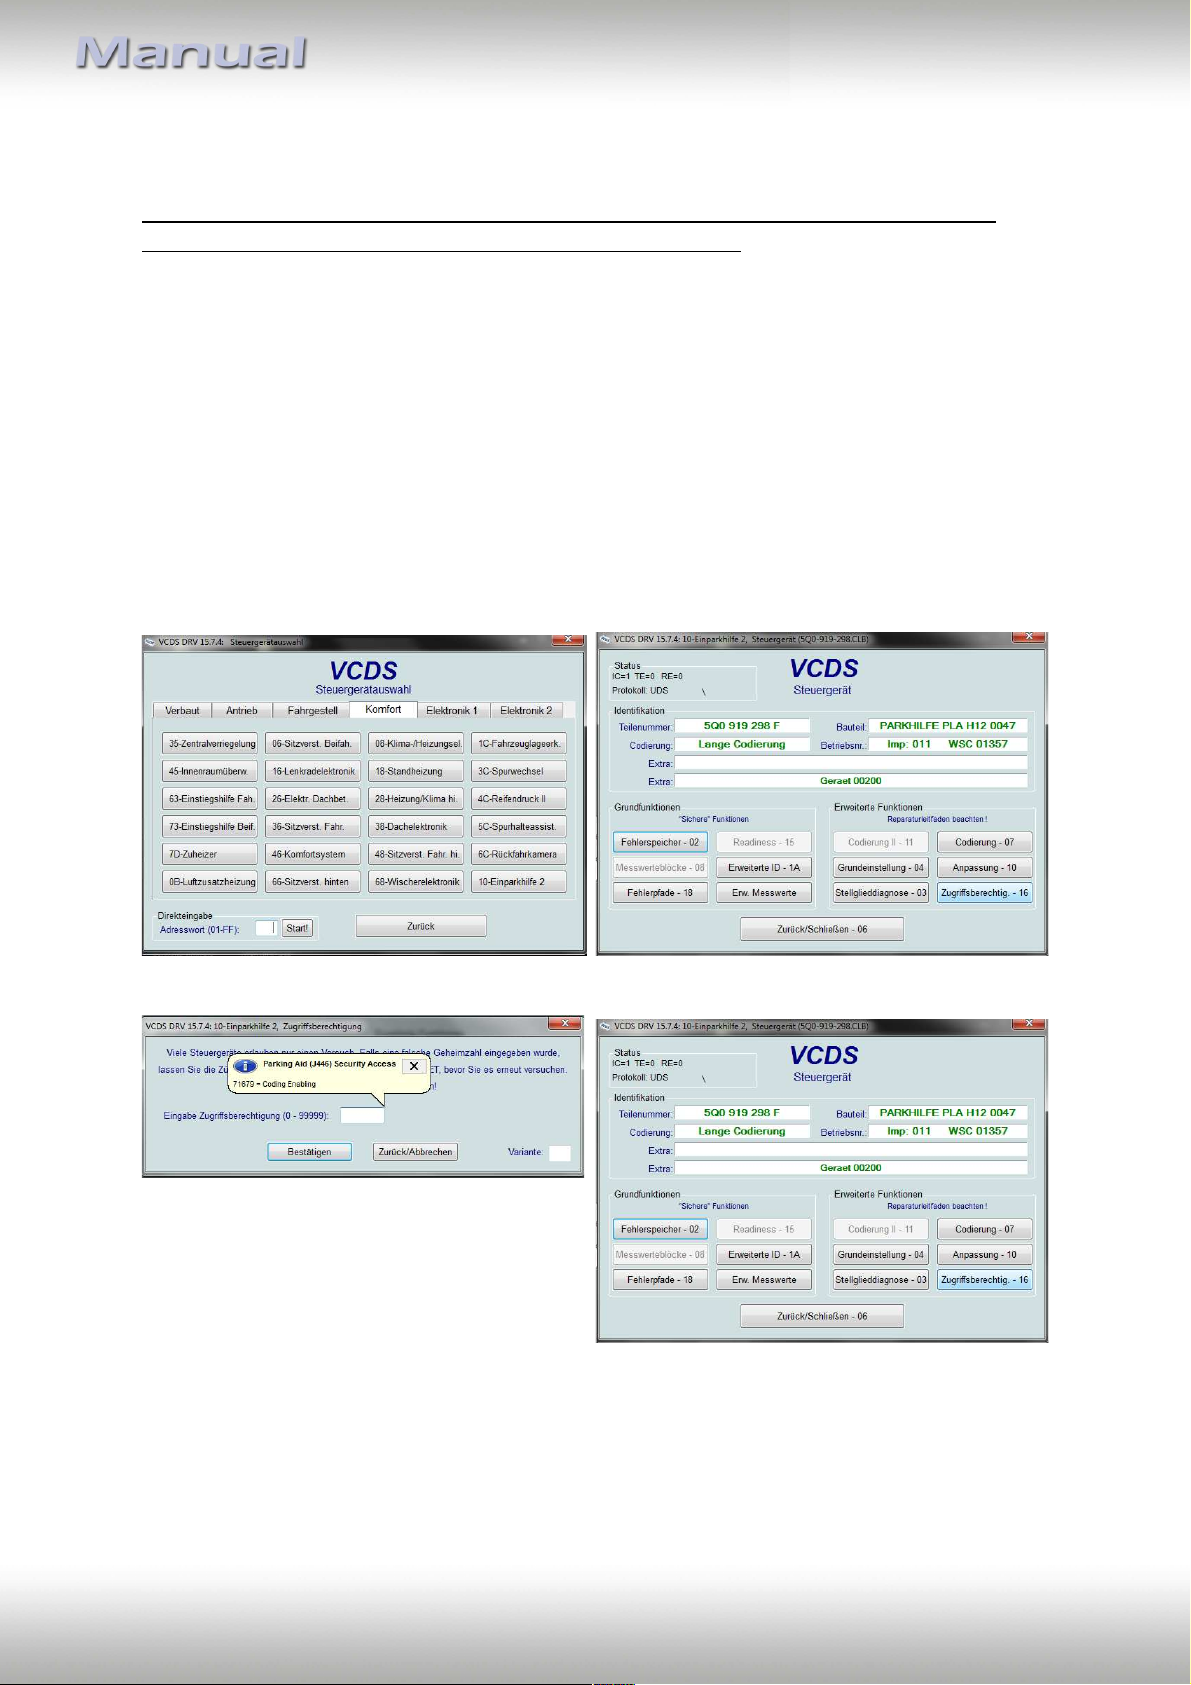
Coding example for a vehicle with opticaly park distance display (OPS) – German VCDS
Choose „10-Einparkhilfe 2“ Choose„Zugriffsberechtig 16“
Enter code „71679“ – no liability Choose „Codierung – 07“
Seite5"
Version 05.04.2024 RL-MIB2
Page 6
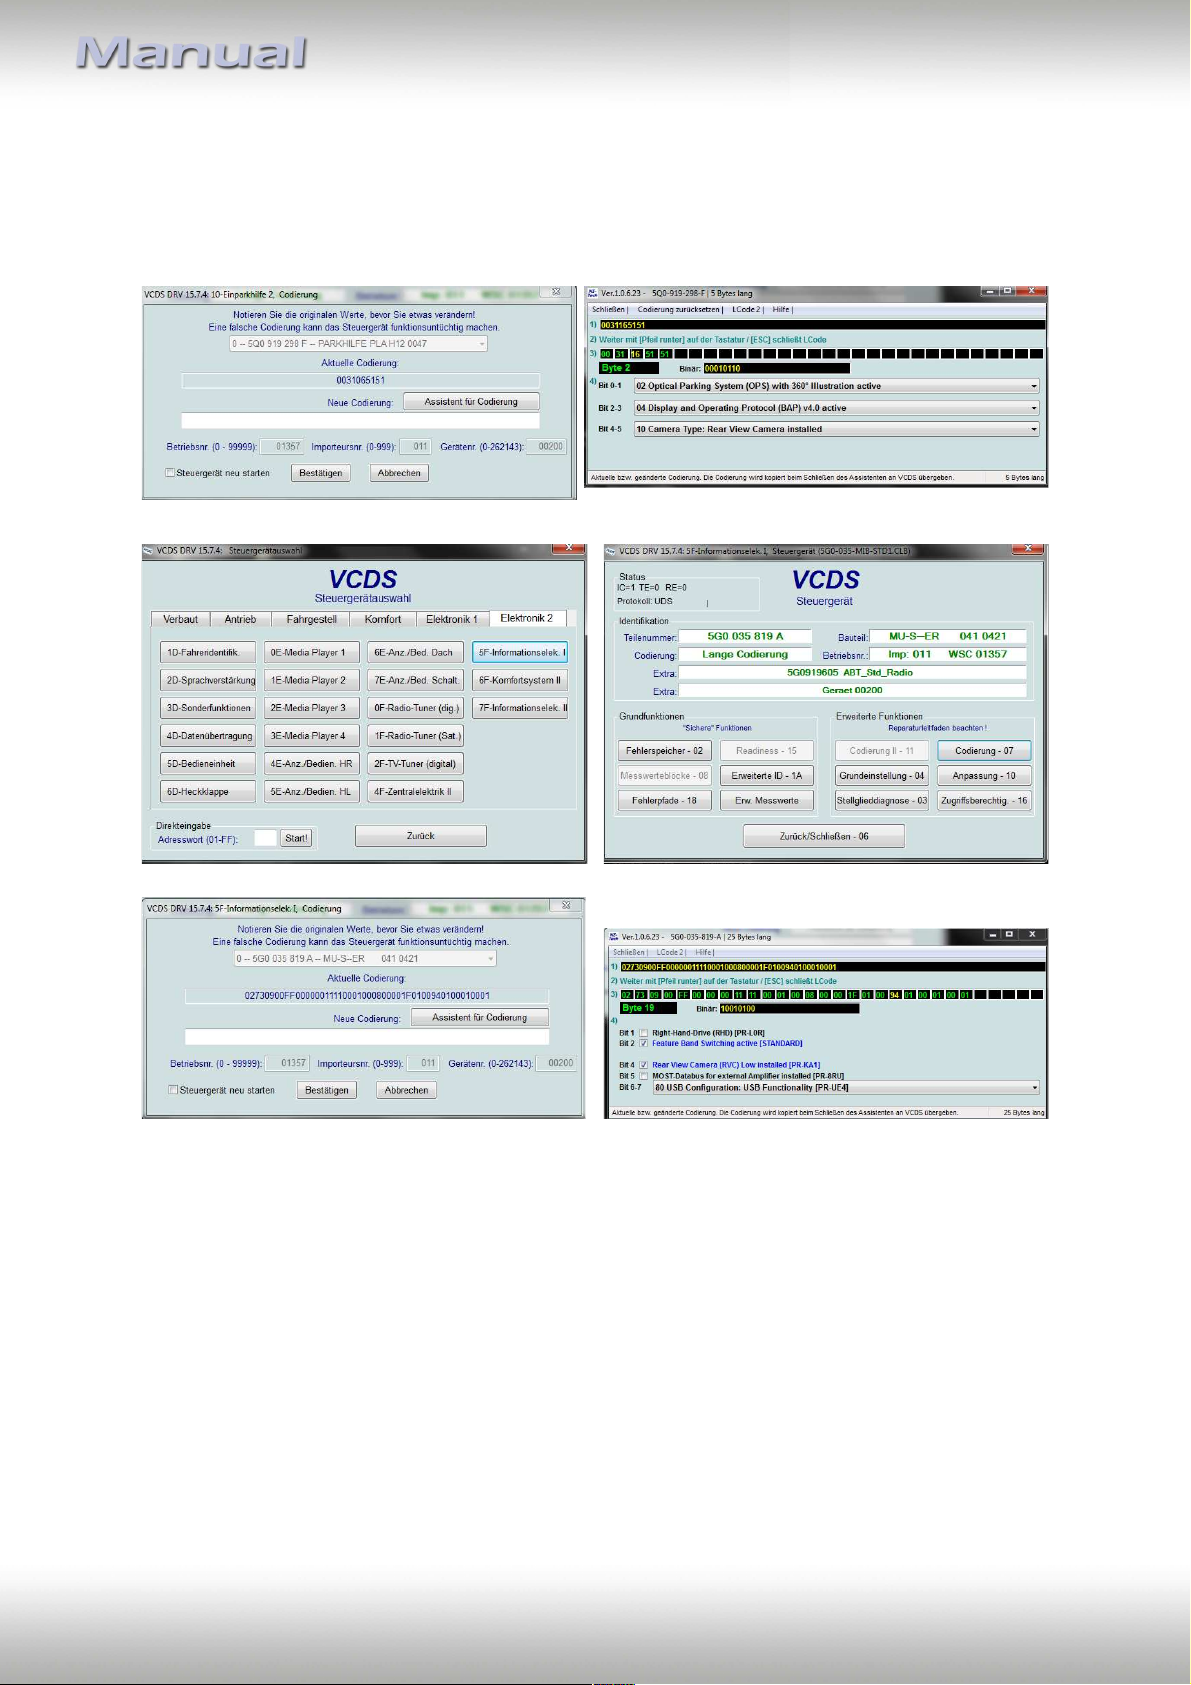
Choose „Assistent für Codierung“ Set bit 4 to „Rear View Camera Installed“
Choose „5F-Informationselek. I“ Choose „Codierung – 07“
Choose„Assistent für Codierung“ In Byte 19 set bit 4 to „Rear View Camera
Low installed“
After coding, head-unit must be reset. On most head-units by long-pressing (about 20
seconds) of the ON/OFF key.
Seite6"
Version 05.04.2024 RL-MIB2
Page 7

2. Installation
To install the interface, first switch off the ignition and disconnect the vehicle’s battery.
Please read the owner`s manual of the car, regarding the battery`s disconnection! If
required, enable the car`s Sleep-mode (hibernation mode)
In case the sleep-mode does not succeed, the disconnection of the battery can be done
with a resistor lead.
2.1. Place of installation
The interface is installed on the rear of the factory head-unit. At least 3 versions of headunits can be distinguished:
1. Radio/nav-computer with drive in the glove-box
2. Black-box separately behind the monitor
3. Integrated as all-in-one head-unit with monitor
Version 05.04.2024 RL-MIB2
Seite7"
Page 8
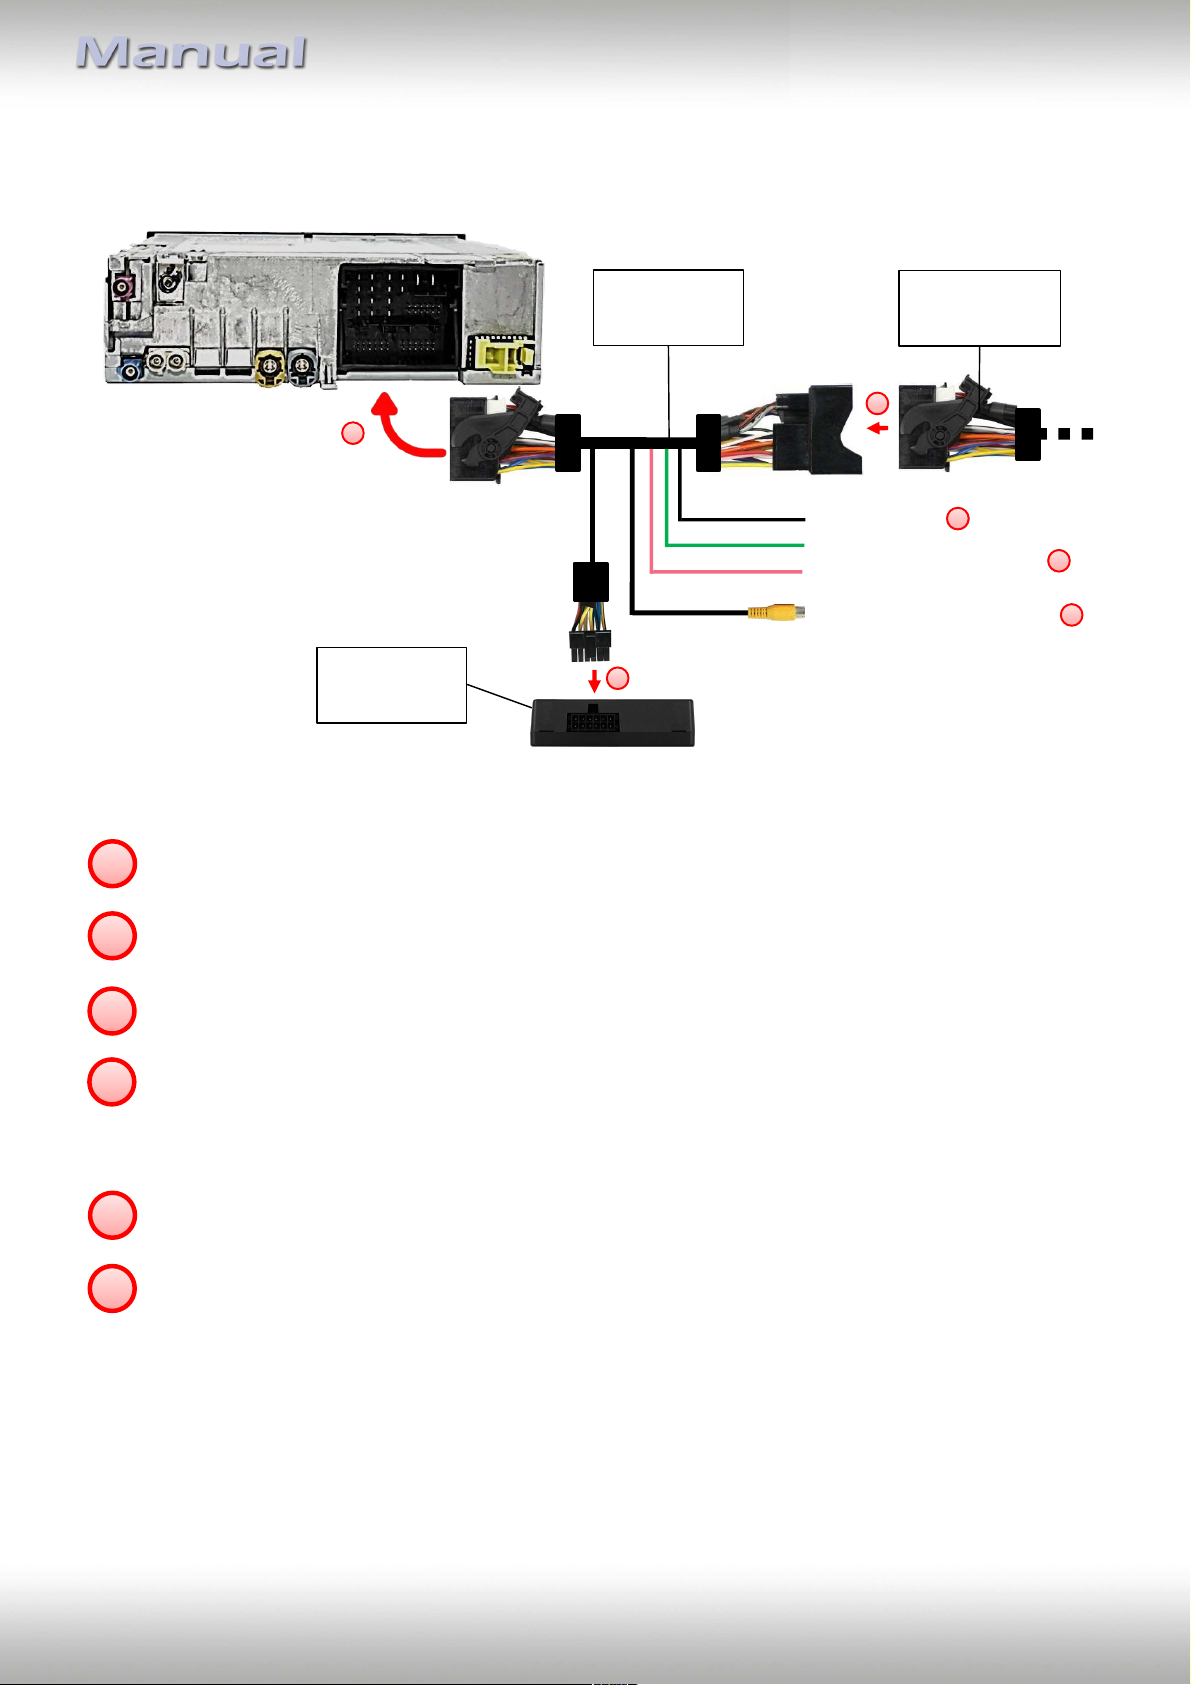
2.2. Connection scheme
Head-Unit
REAR
2
Interface-box
RLC-CX-400
Quadlock
harness
RLC-MIB2
Output: Ground
Output: +12V reverse signal
Output: +12V ACC
Video input rear-view camera
6
Female Quadlock
connector
vehicle harness
1
5
Disconnect the female Quadlock connector of the vehicle harness from the rear of the head
1
unit and connect it to the male Quadlock connector of the interface Quadlock harness.
2
Connect the female Quadlock connector of the interface Quadlock harness to the previously
released male Quadlock connector of the head unit.
Connect the male RCA connector of the after-market rear-view camera to the video input
3
(yellow female RCA connector) of the interface Quadlock harness.
4
The power supply for the after-market rear-view camera can be provided via the green cable
(+12V, max. 1A) of the interface Quadlock harness.
The pink cable can be used as an alternative or parallel power supply for another source
(+12V ACC, max 1A).
The ground supply for the after-market rear-view camera or for another source can be made
5
via the black cable of the interface Quadlock harness.
Connect female 12pin Molex connector of harness RLC-MIB2 to male 12pin Molex connector
6
of CAN-box RLC-CX-400.
4
3
Version 05.04.2024 RL-MIB2
Seite8"
Page 9
3. Specifications
Video input formats NTSC
Operation voltage 10.5 – 14.8V
Stand-by power drain <1mA
Temperature range -30°C till +80°C
Weight 38g
Measurements (box only) W x H x D 71 x 22 x 50 mm
4. Technical Support
Please note that direct technical support is only available for products purchased directly
from NavLinkz GmbH. For products bought from other sources, contact your vendor for
technical support.
CAS GmbH
manufacturer/distribution
In den Fuchslöchern 3
D-67240 Bobenheim-Roxheim
email [email protected]
Legal disclaimer: Mentioned company and trademarks, as well as product names/codes are registered
trademarks ® of their corresponding legal owners.
Made in Germany
Seite9"
Version 05.04.2024 RL-MIB2
 Loading...