

Page 1

CAQH ProView®
Provider User Guide
Page 2

CAQH ProView Provider User Guide v13
1 | P a g e
Table of Contents
CHAPTER 1: Introduction ................................................................................................................ 2
CAQH ProView Overview ............................................................................................................................ 2
Getting Started ................................................................................................................................................ 2
System Security............................................................................................................................................... 3
CHAPTER 2: Registration ................................................................................................................. 4
New Users ......................................................................................................................................................... 4
Existing UPD Providers ............................................................................................................................... 4
Self-Registration ............................................................................................................................................. 5
Creating a CAQH ProView Account ......................................................................................................... 7
Creating a CAQH ProView Username and Password ...................................................................... 8
Forgotten Username and/or Password ................................................................................................ 9
CHAPTER 3: Home Page ................................................................................................................. 23
Activity Log .................................................................................................................................................... 28
CHAPTER 4: Completing Your Profile Information ............................................................. 30
Personal Information ................................................................................................................................ 31
Professional IDs ........................................................................................................................................... 35
Education ........................................................................................................................................................ 37
Professional Training ................................................................................................................................ 39
Specialties ...................................................................................................................................................... 41
Practice Location ......................................................................................................................................... 45
Hospital Affiliation ...................................................................................................................................... 84
Credentialing Contact ............................................................................................................................. 101
Professional Liability Insurance ........................................................................................................ 102
Employment Information ..................................................................................................................... 117
Professional References ........................................................................................................................ 123
Disclosure .................................................................................................................................................... 124
Authorize ..................................................................................................................................................... 125
Update Authorization ............................................................................................................................. 126
CHAPTER 5: Review Your Data ................................................................................................. 127
Correct Errors ............................................................................................................................................ 128
View Documents ....................................................................................................................................... 129
Review Data Summary ........................................................................................................................... 129
Review State Replica............................................................................................................................... 130
CHAPTER 6: Uploading Supporting Documentation ......................................................... 131
Uploading Documents ............................................................................................................................ 131
Document Summary Page .................................................................................................................... 132
Authorization, Attestation, and Release Form ............................................................................. 132
CHAPTER 7: Importing Data from the Practice Manager Module ................................ 138
Drag & Drop Functionality ................................................................................................................... 138
CHAPTER 8: Completing Your Attestation ............................................................................ 139
Attesting ....................................................................................................................................................... 139
Re-Attesting ................................................................................................................................................ 141
APPENDIX ......................................................................................................................................... 145
Provider Status.......................................................................................................................................... 145
CAQH Provider Support Center Information ................................................................................ 146
Page 3

CAQH ProView Provider User Guide v13
2 | P a g e
CHAPTER 1: Introduction
The purpose of this document is to guide you as a provider through the process of entering
your profile information free of charge into CAQH ProView™ to meet a variety of data needs of
health plans, hospitals and other healthcare organizations. It also defines the steps to
authorize, attest and maintain your data profile through the re-attestation process.
CAQH ProView Overview
CAQH ProView is the healthcare industry’s premier resource for providers to self-report
professional and practice information to payers, hospitals, large provider groups and health
systems. CAQH ProView eliminates duplicative paperwork for these organizations that may
require provider profile information for claims administration, credentialing, directory services,
and more.
Through an intuitive, profile-based design, you can easily enter and maintain your information
for submission to your selected organizations. CAQH ProView can be accessed at
https://proview.caqh.org/pr.
The following steps provide you with a high-level overview of the process to complete your
data profile.
1. Register with the system.
2. Complete all application questions.
3. Review your data profile for accuracy.
4. Authorize participating organizations access to your data profile.
5. Attest to your data profile.
6. Upload your supporting documentation.
This document will provide additional information and helpful tips for each of these steps.
Getting Started
Completing the initial CAQH ProView profile may take up to two hours; however, preparing
yourself for the information requested will reduce the time required to complete your profile.
Additional time may be required depending upon several factors, including the number of
practice locations, amount of postgraduate training and work history, and overall familiarity
with online tools and systems.
While CAQH ProView was designed to be compatible with most Internet browsers, we
recommend upgrading to the most current version of Internet Explorer, Chrome or Safari, and
using one of these browsers for the best performance.
If your practice has an office manager or clinic administrator who assists with gathering
information for credentialing or other administrative purposes for multiple providers, the CAQH
Page 4

CAQH ProView Provider User Guide v13
3 | P a g e
ProView Practice Manager Module may facilitate your data entry process. Data that is the same
for multiple providers (e.g., clinic name, address and phone number) can be entered once by a
practice manager, rather than having to be entered repeatedly for each individual provider.
Please refer to Chapter 7: Importing Data from the Practice Manager Module for more
information regarding this functionality.
System Security
The confidentiality and security of provider information and the privacy of system users are
critical priorities for CAQH. CAQH has implemented information security policies, standards,
guidelines, processes, procedures, and best practices to strengthen its security program and to
protect its information assets. CAQH ProView is designed to be compliant with laws and
regulations relating to the privacy of individually identifiable information.
The CAQH ProView solution is housed in secure datacenters where multiple physical and
electronic safeguards are implemented. Secure Internet access to application screens, use of
passwords and certificates are used to help ensure only authorized use of the system. Powerful
Transport Layer Security (TLS) encrypts the data in transition; the database content is also
encrypted at rest and in backup to prevent unauthorized access to CAQH ProView. Only
authenticated users have access to their restricted data. Virus detection mechanisms are used
to help ensure that the database and the websites are free of viruses. Routine encrypted backups protect volatile system data and are secured in an off-site storage facility.
Page 5
CAQH ProView Provider User Guide v13
4 | P a g e
CHAPTER 2: Registration
Registration is required for all providers to obtain access to CAQH ProView.
New Users
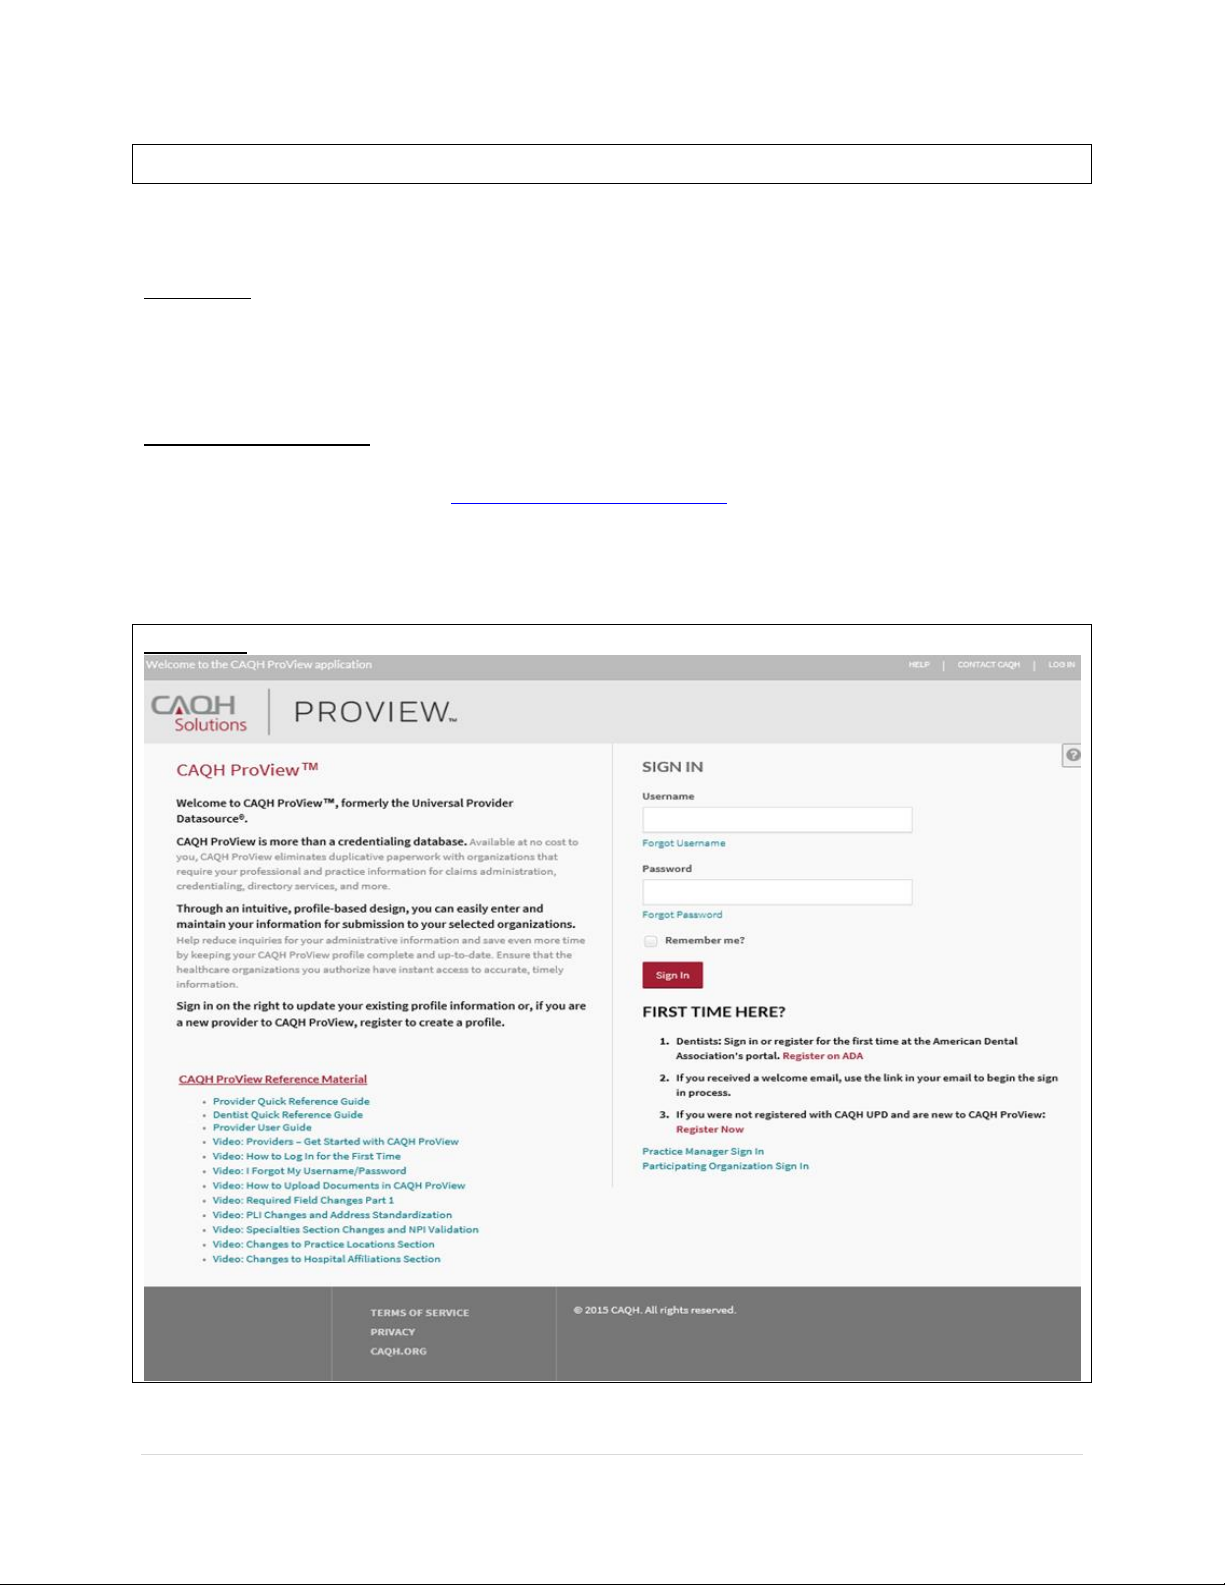
If you received an introductory email from CAQH ProView, select the link contained in the email
to begin the registration process using the CAQH ID provided. Refer to “Creating a CAQH ProView
Account” on page 6 of this guide for the next steps in the process.
Existing UPD Providers
For providers who were previously registered with the CAQH Universal Provider Datasource
(UPD), go to CAQH ProView at https://proview.caqh.org/pr. You can initially sign-in with CAQH
ProView by entering your existing UPD username and password and clicking “Sign in”. You may
be prompted to update your username and password at this time. Refer to “Creating a CAQH
ProView Username and Password” on page 7 of this guide for the next steps in the process.
FIGURE 01
Page 6
CAQH ProView Provider User Guide v13
5 | P a g e
Self-Registration
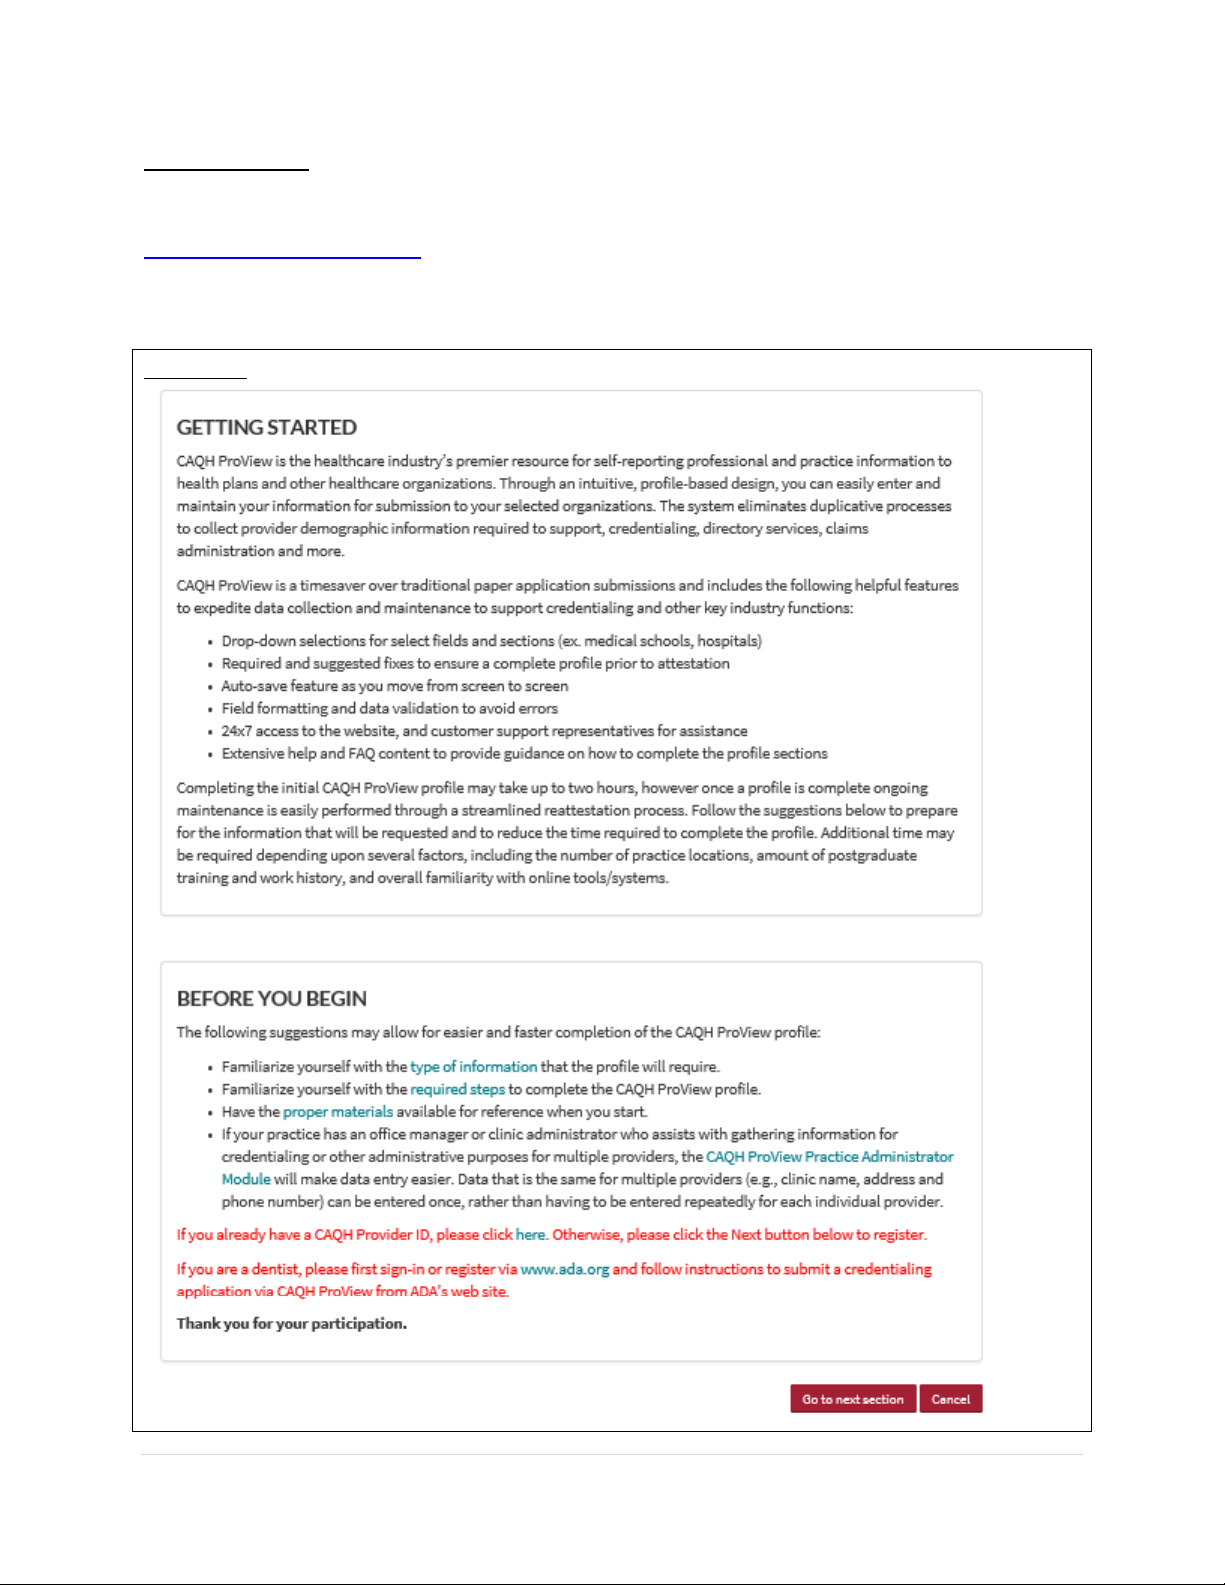
If you have not received a Welcome Letter or were not previously registered with the UPD, you
may begin the self-registration process by accessing CAQH ProView at
https://proview.caqh.org/pr and clicking on “Register”. The “Getting Started” page will display
and will provide you with additional tips on how to get started. Click on “Go to Next Section” to
continue with the registration process.
FIGURE 02
Page 7
CAQH ProView Provider User Guide v13
6 | P a g e
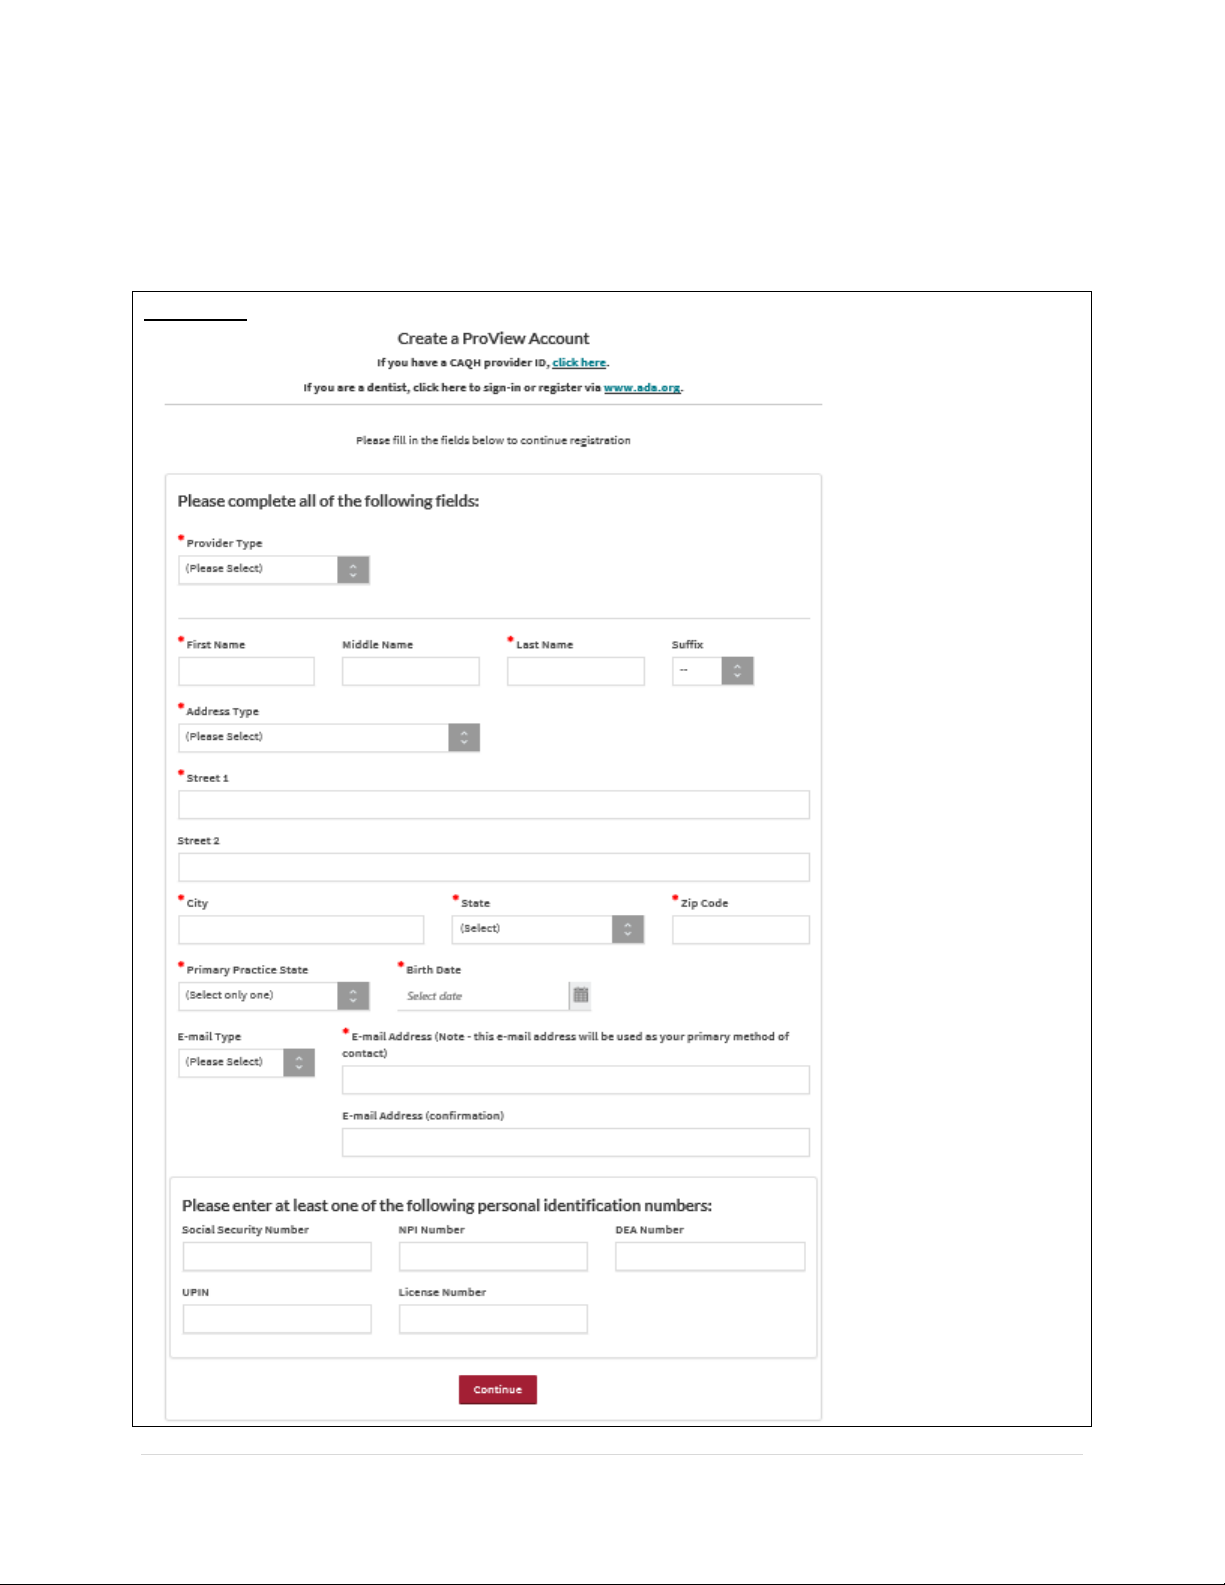
To establish a CAQH ProView account, you will be required to enter a name, provider type,
primary practice state, birthdate, email address, and at least one personal identification
number. You will then receive an email with your CAQH Provider ID and a link to complete your
provider registration.
FIGURE 03
Page 8
CAQH ProView Provider User Guide v13
7 | P a g e
Creating a CAQH ProView Account
New CAQH ProView users who either self-register with the system or who are added to the
system by an organization, will receive an email from CAQH ProView containing a CAQH Provider
ID and a link to create a CAQH ProView account.
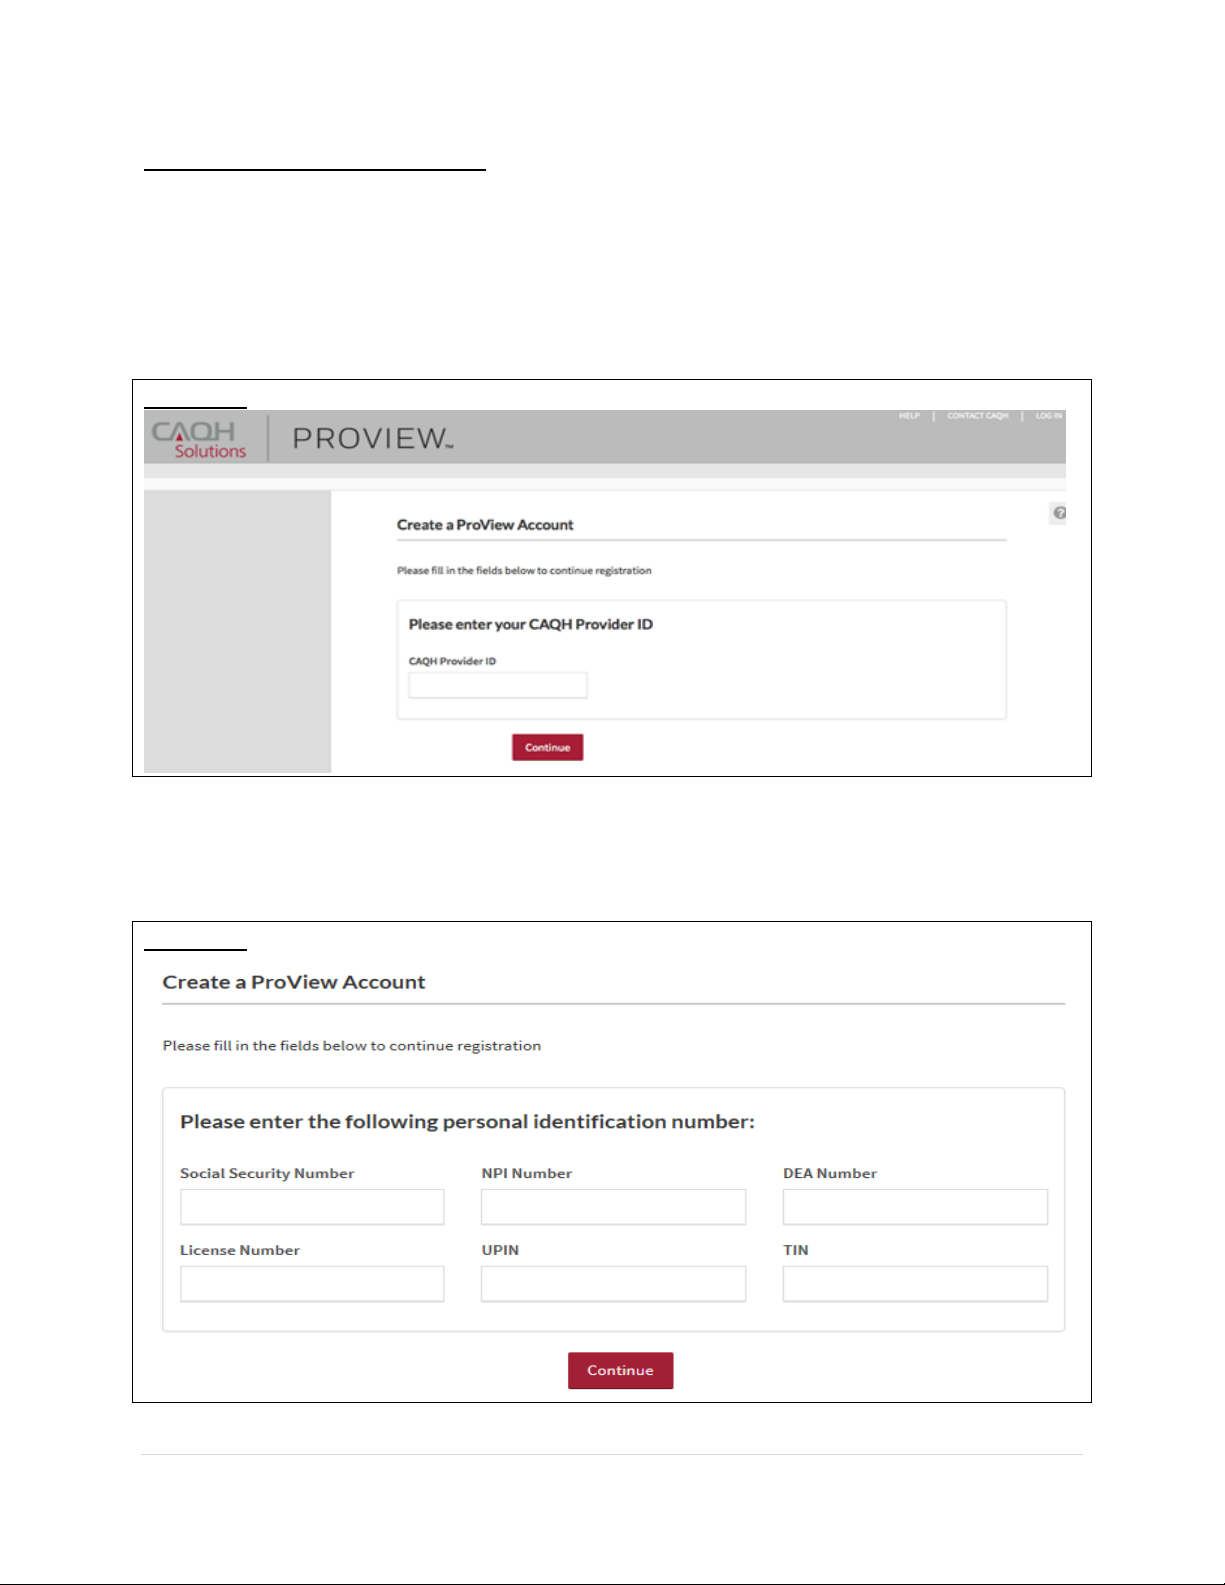
Upon selecting the link from the e-mail, you received, you will be directed to the page shown
below. Enter your CAQH Provider ID and select “Continue”.
FIGURE 04
At the next screen, enter your personal identification number(s) to proceed with creating your
ProView account. Select “Continue” to proceed.
FIGURE 05
Page 9
CAQH ProView Provider User Guide v13
8 | P a g e
Creating a CAQH ProView Username and Password
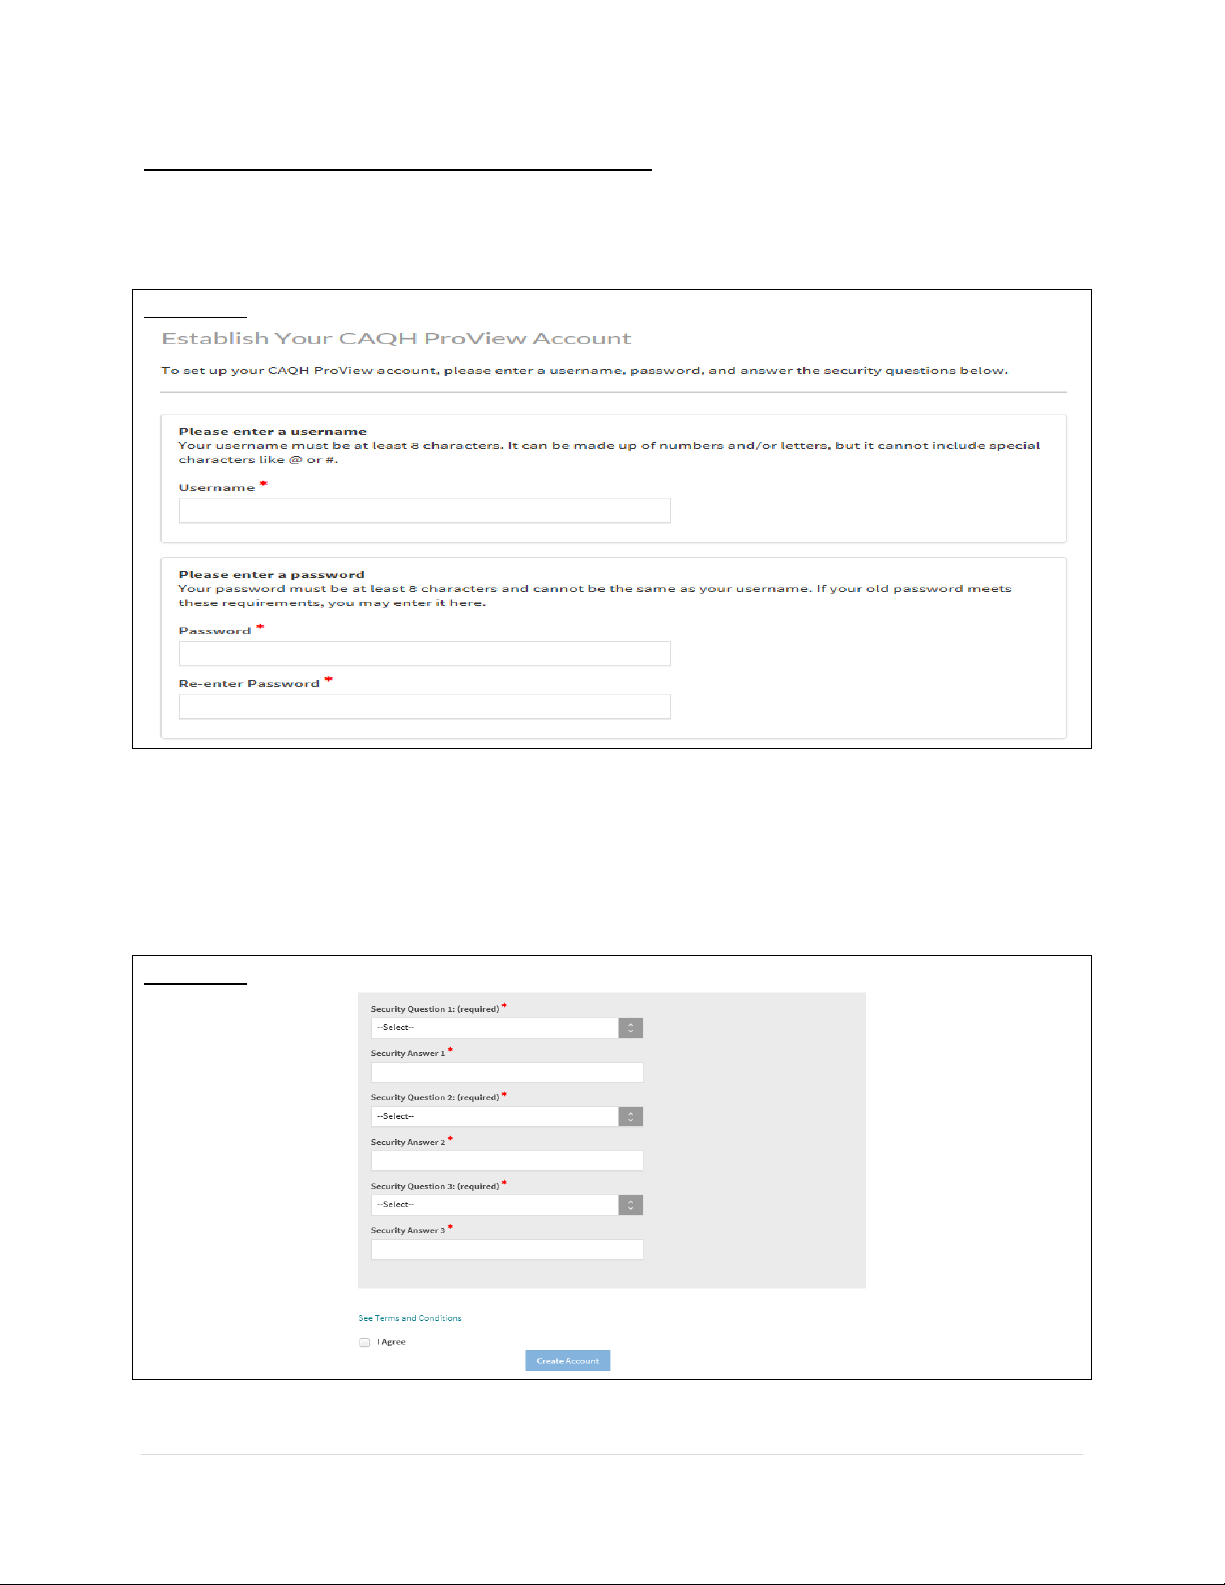
CAQH ProView users may be asked to create a new username and password to meet CAQH
ProView requirements. Usernames in CAQH ProView must consist of 8 characters and can be
any combination of numbers and/or letters. Special characters like # or @ are not allowed.
FIGURE 06
CAQH ProView users will also be asked security questions to faciliate account access in case of a
forgotten username and/or password. Select three security questions and provide unique
answers for each. By checking “I Agree” at the bottom of the page, you adhere to the terms
and conditions, which can be accessed by selecting the “See Terms and Conditions” hyperlink.
Then select “Create Account”.
FIGURE 07
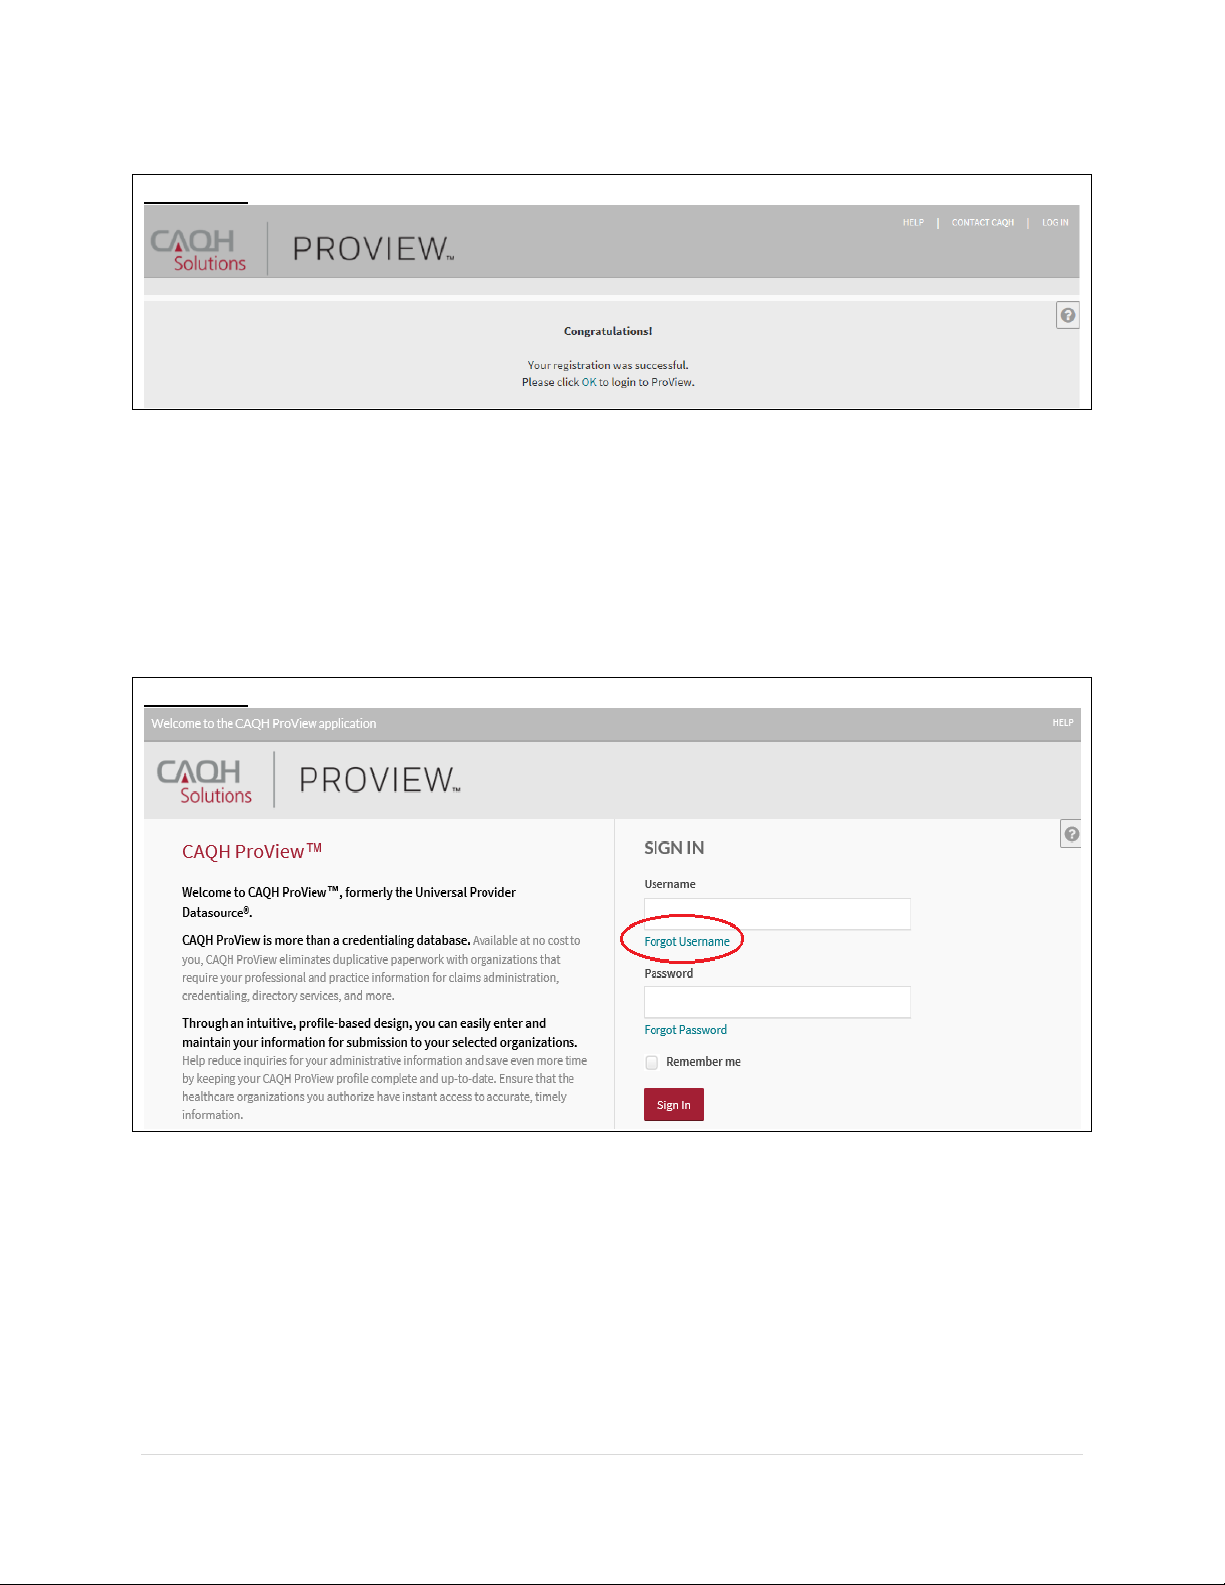
Click “Create Account” and you will receive confirmation that your CAQH ProView registration
was successful.
Page 10
CAQH ProView Provider User Guide v13
9 | P a g e
FIGURE 08
New!
Retrieve Username
1. If you have forgotten your username, go to CAQH ProView login page and click Forgot
Username.
FIGURE 09
Page 11
CAQH ProView Provider User Guide v13
10 | P a g e
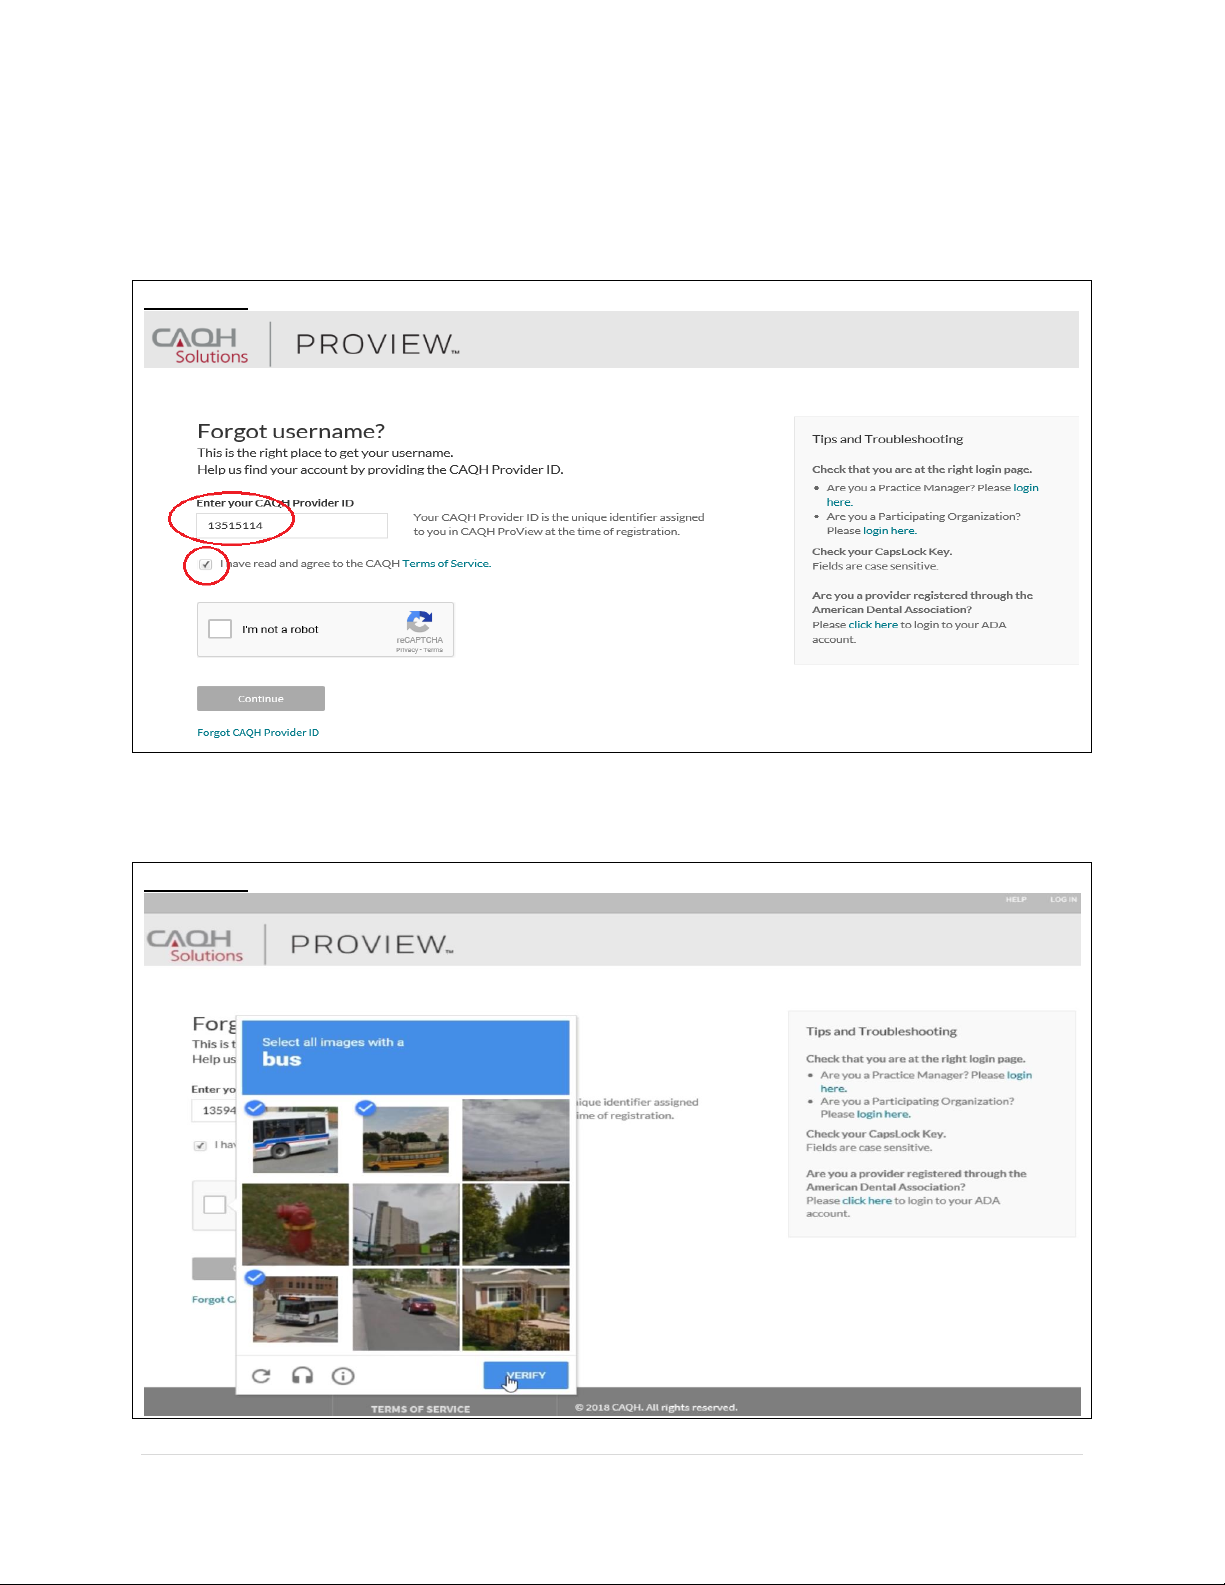
2. You will be prompted to enter your CAQH Provider ID number to retrieve your username. Your
CAQH Provider ID number is the unique identifier assigned to you in CAQH ProView at the time
of registration. Enter your CAQH Provider ID number. Click the checkbox indicating that you
have read and agree to the CAQH Terms of Service.
FIGURE 10
3. Click the checkbox to confirm you are not a robot. You’ll be asked to select images
based on the instructions shown on the page, then click Verify.
FIGURE 11
Page 12
CAQH ProView Provider User Guide v13
11 | P a g e
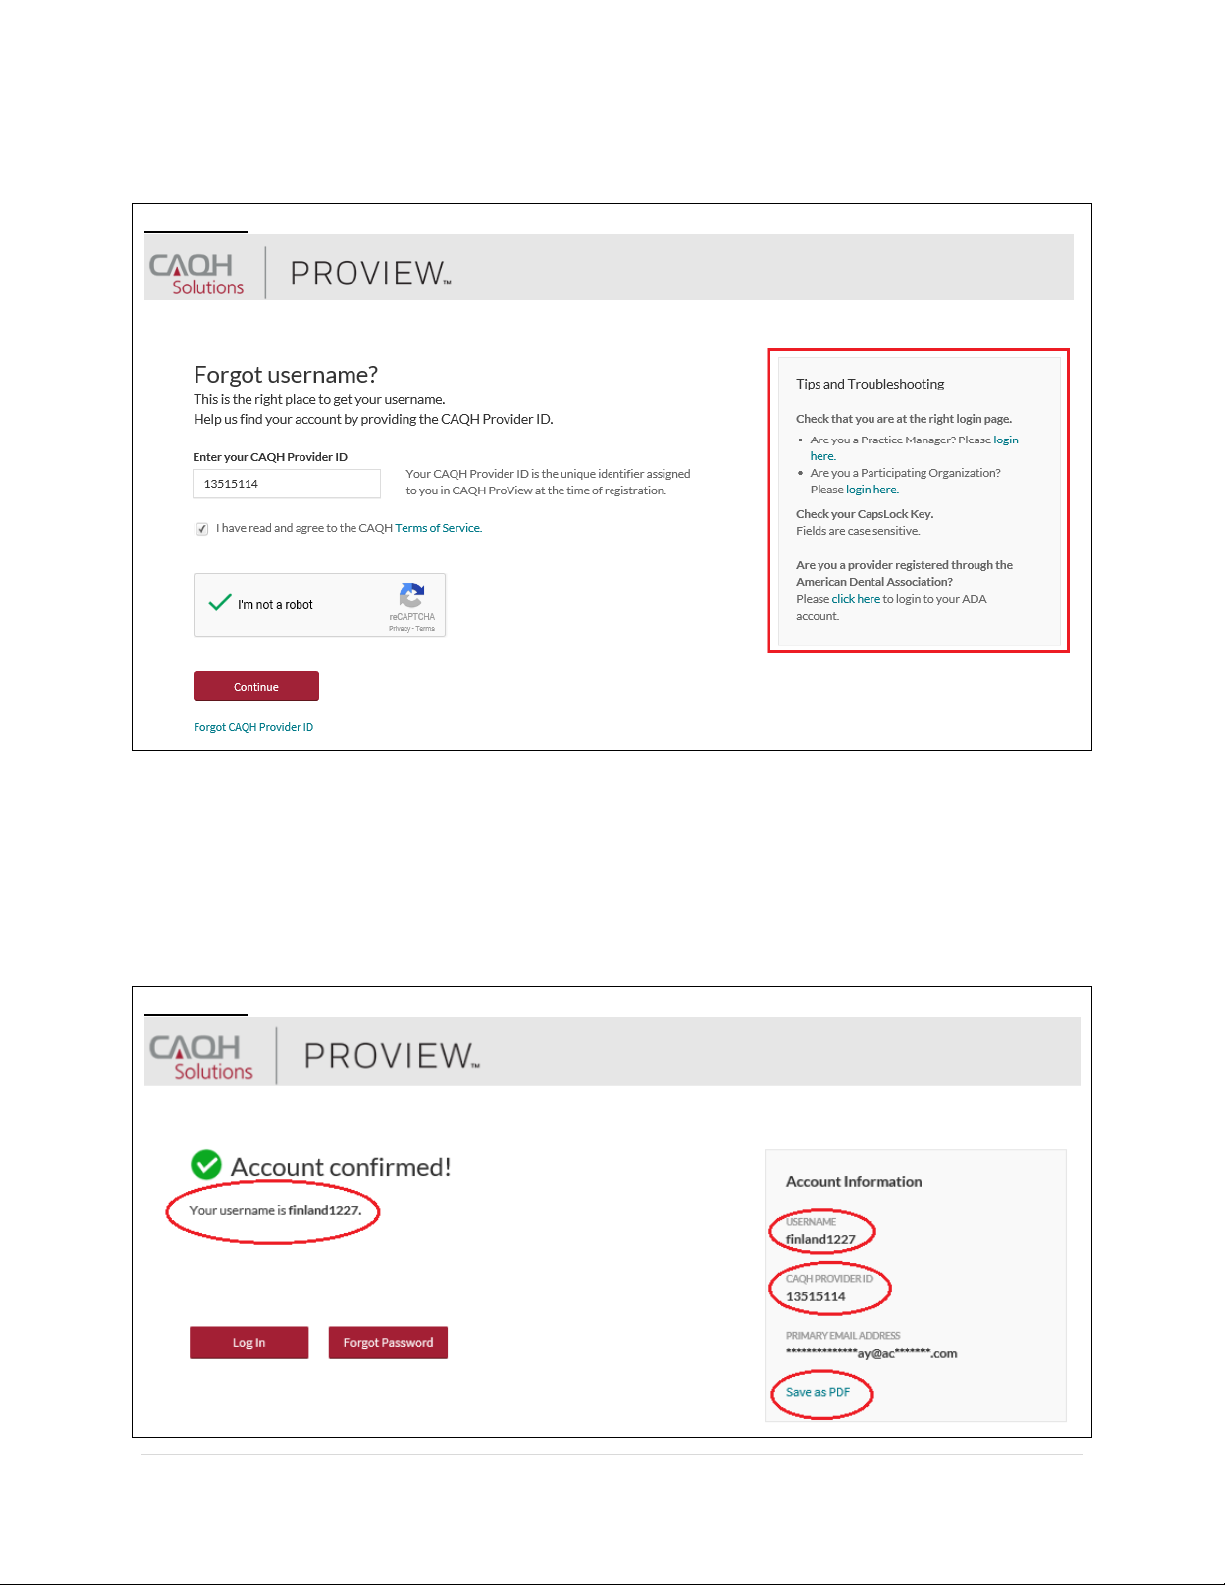
This page also shows some tips for troubleshooting.
FIGURE 12
4. Click Continue. Your username will be displayed on the screen together with your CAQH
Provider ID number and the primary e-mail address listed on your account. You have the
option to save it as a PDF file. If you know your password and you’d like to proceed to
the sign-in page, click “Log In”.
FIGURE 13
Page 13
CAQH ProView Provider User Guide v13
12 | P a g e
Reset Password
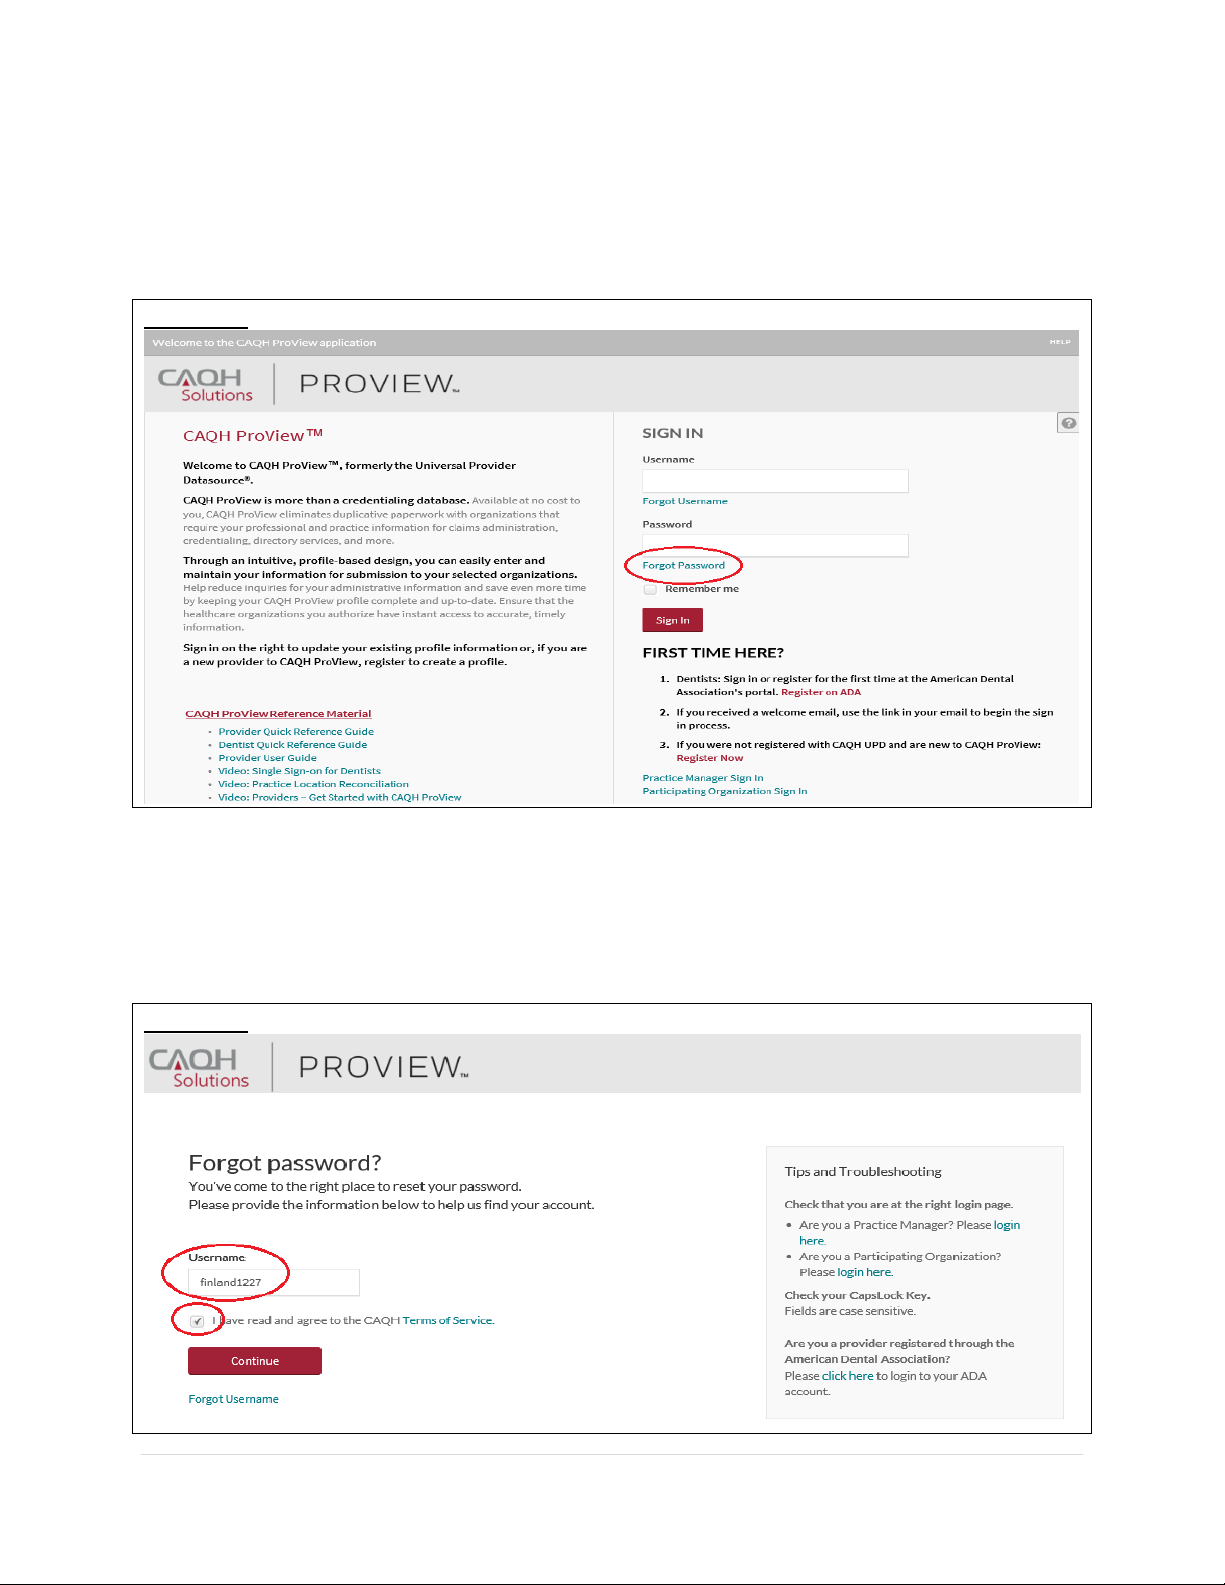
1. If you have forgotten your password and need to reset it, you may click the Forgot Password
button from the screen above or the Forgot Password link on the log-in page.
FIGURE 14
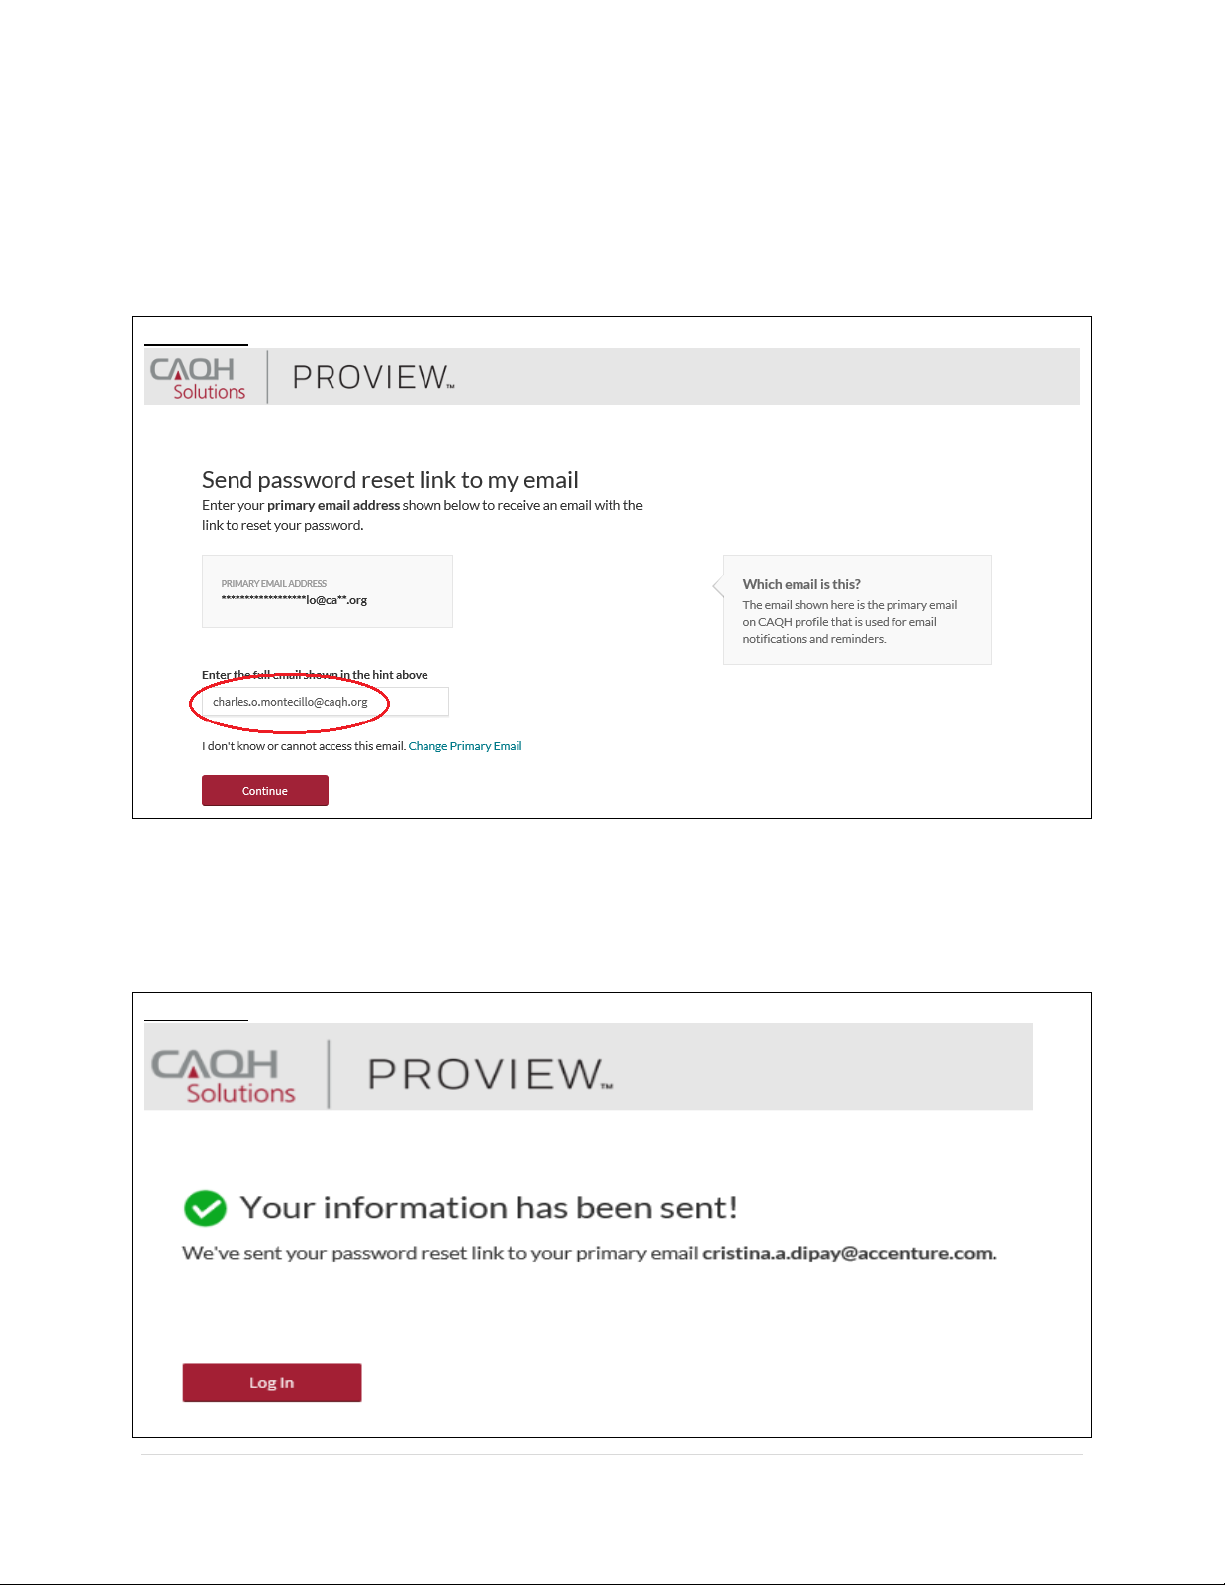
2. You will be prompted to enter your username to be able to proceed. Click the checkbox
indicating that you have read and agree to the CAQH Terms of Service, then click
Continue.
FIGURE 15
Page 14
CAQH ProView Provider User Guide v13
13 | P a g e
3. You will be directed to a page where you need to enter your full e-mail address based
on the hint shown on the screen. The e-mail shown here is the primary e-mail address
on your CAQH ProView profile where email notifications and reminders are sent. Click
Continue.
FIGURE 16
An e-mail containing a link which will allow you to reset your password will be sent to the
primary e-mail address we have on file.
FIGURE 17
Page 15
CAQH ProView Provider User Guide v13
14 | P a g e
Reset Password
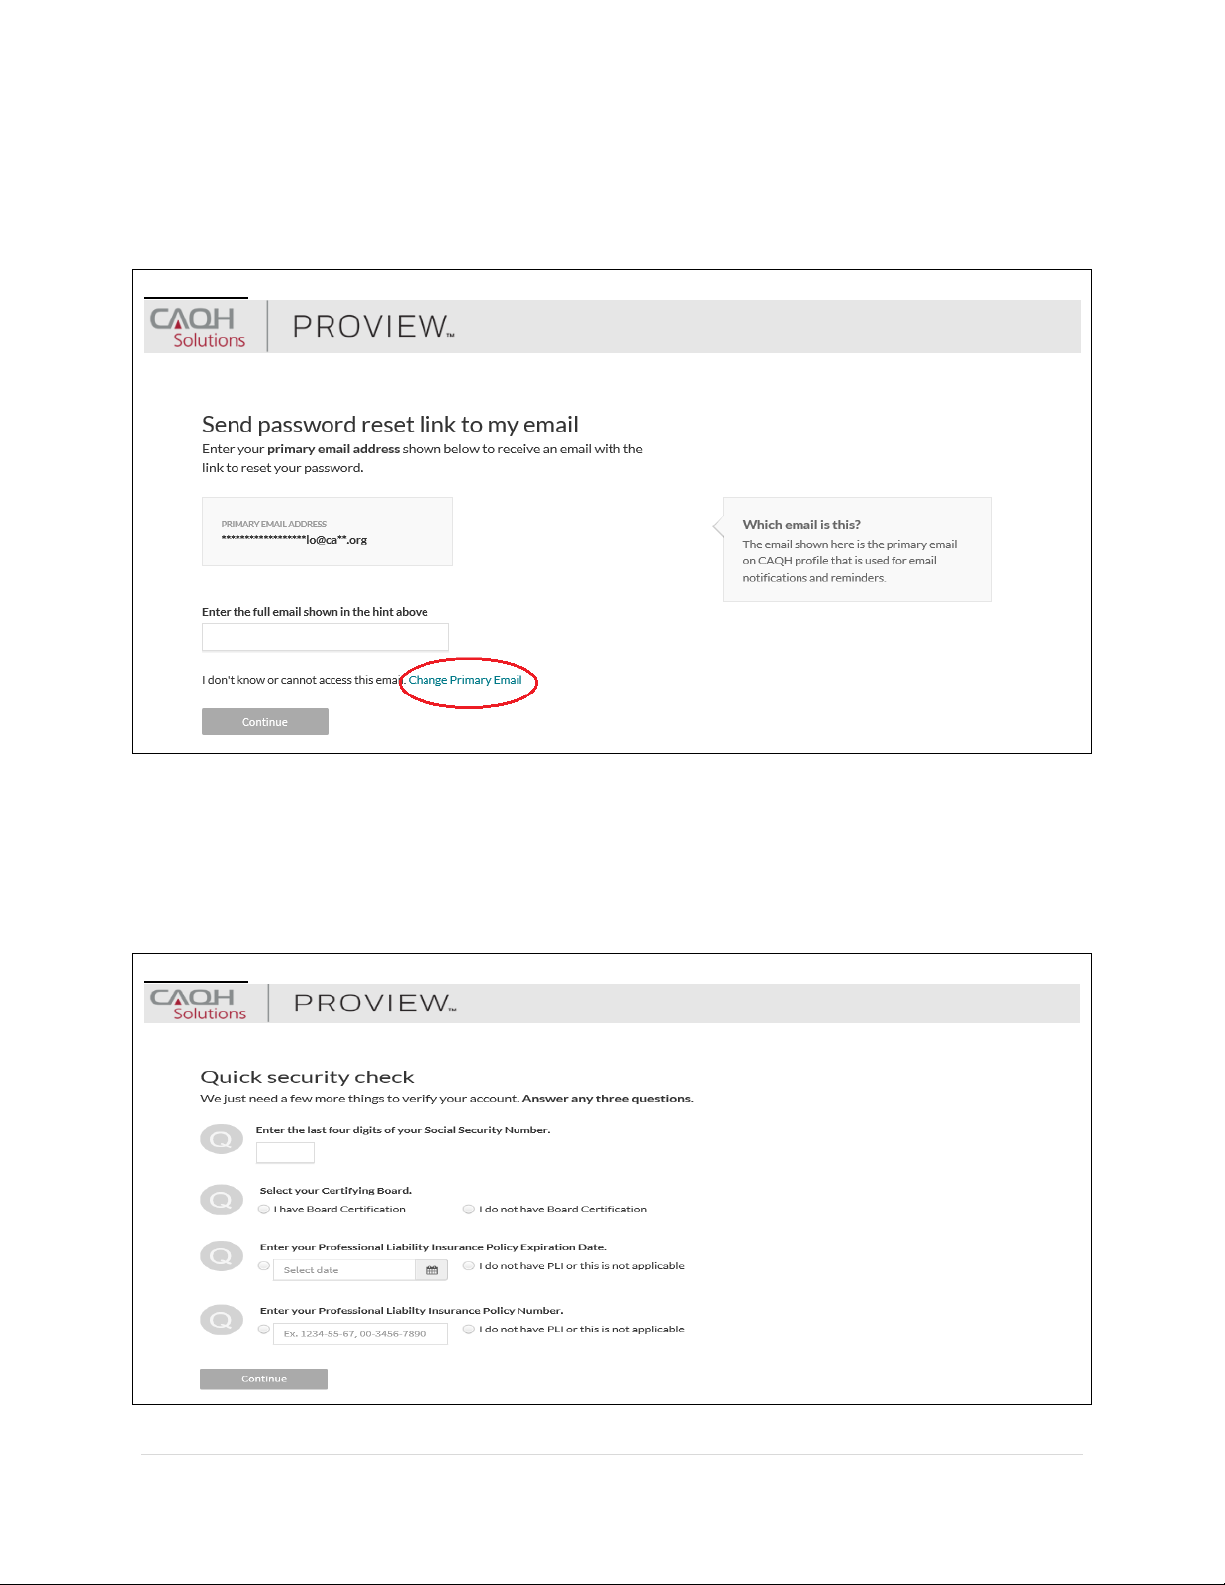
1. If you are trying to reset your password and you don’t know or don’t have access to the
primary e-mail address on file, click the Change Primary Email link.
FIGURE 18
2. You will be directed to a quick security check. Answer any three questions on the page.
You will be able to click the Continue button found at the bottom of the page only if
three questions were answered.
FIGURE 19
Page 16
CAQH ProView Provider User Guide v13
15 | P a g e
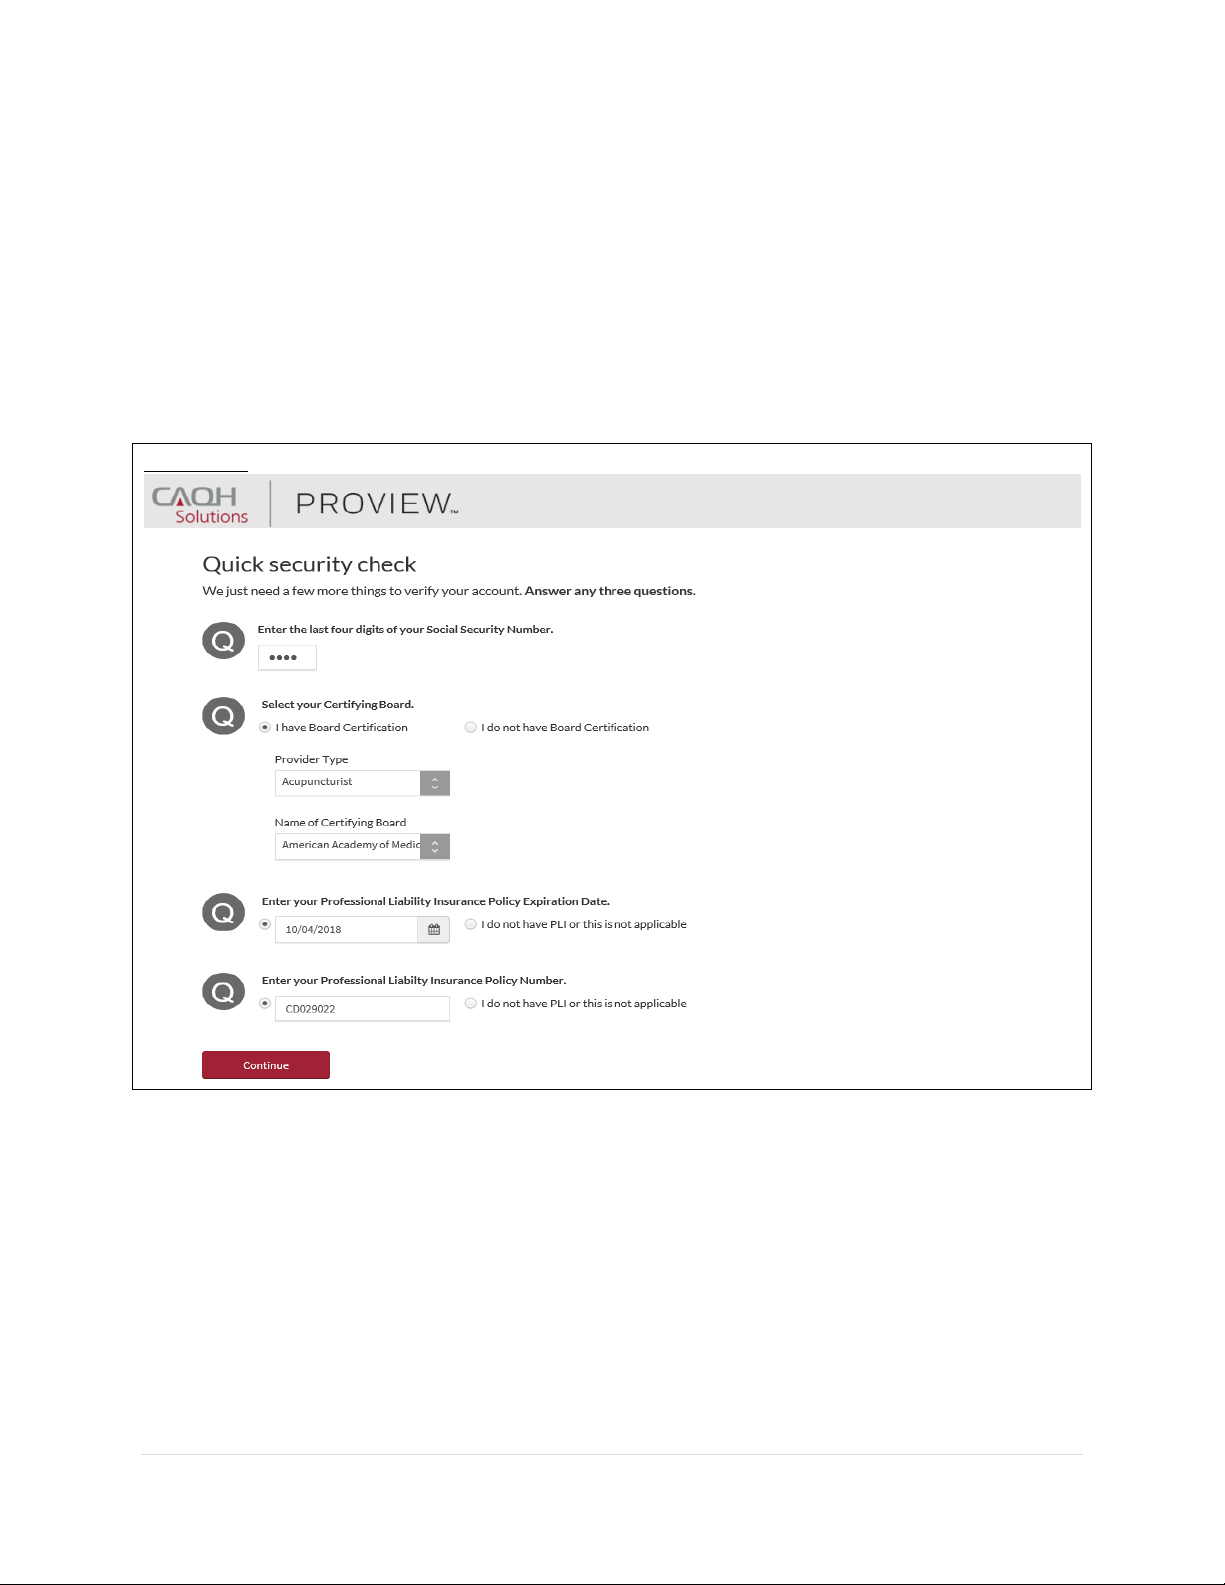
3. You may enter the last four digits of your Social Security Number. If you have a Board
Certification, click the radio button for “I have Board Certification”. You will be asked to
enter your Provider Type and the Name of Certifying Board. You may also enter your
Professional Liability Insurance Expiration Date and/or your Professional Liability
Insurance Policy Number. The policy number must be entered exactly as it is shown on
your policy face sheet. This may include alphabetical and special characters, as well as
leading zeros. Once any three questions were answered, the Continue button will turn
red and you will now be able to click it. Click Continue.
FIGURE 20
Page 17
CAQH ProView Provider User Guide v13
16 | P a g e
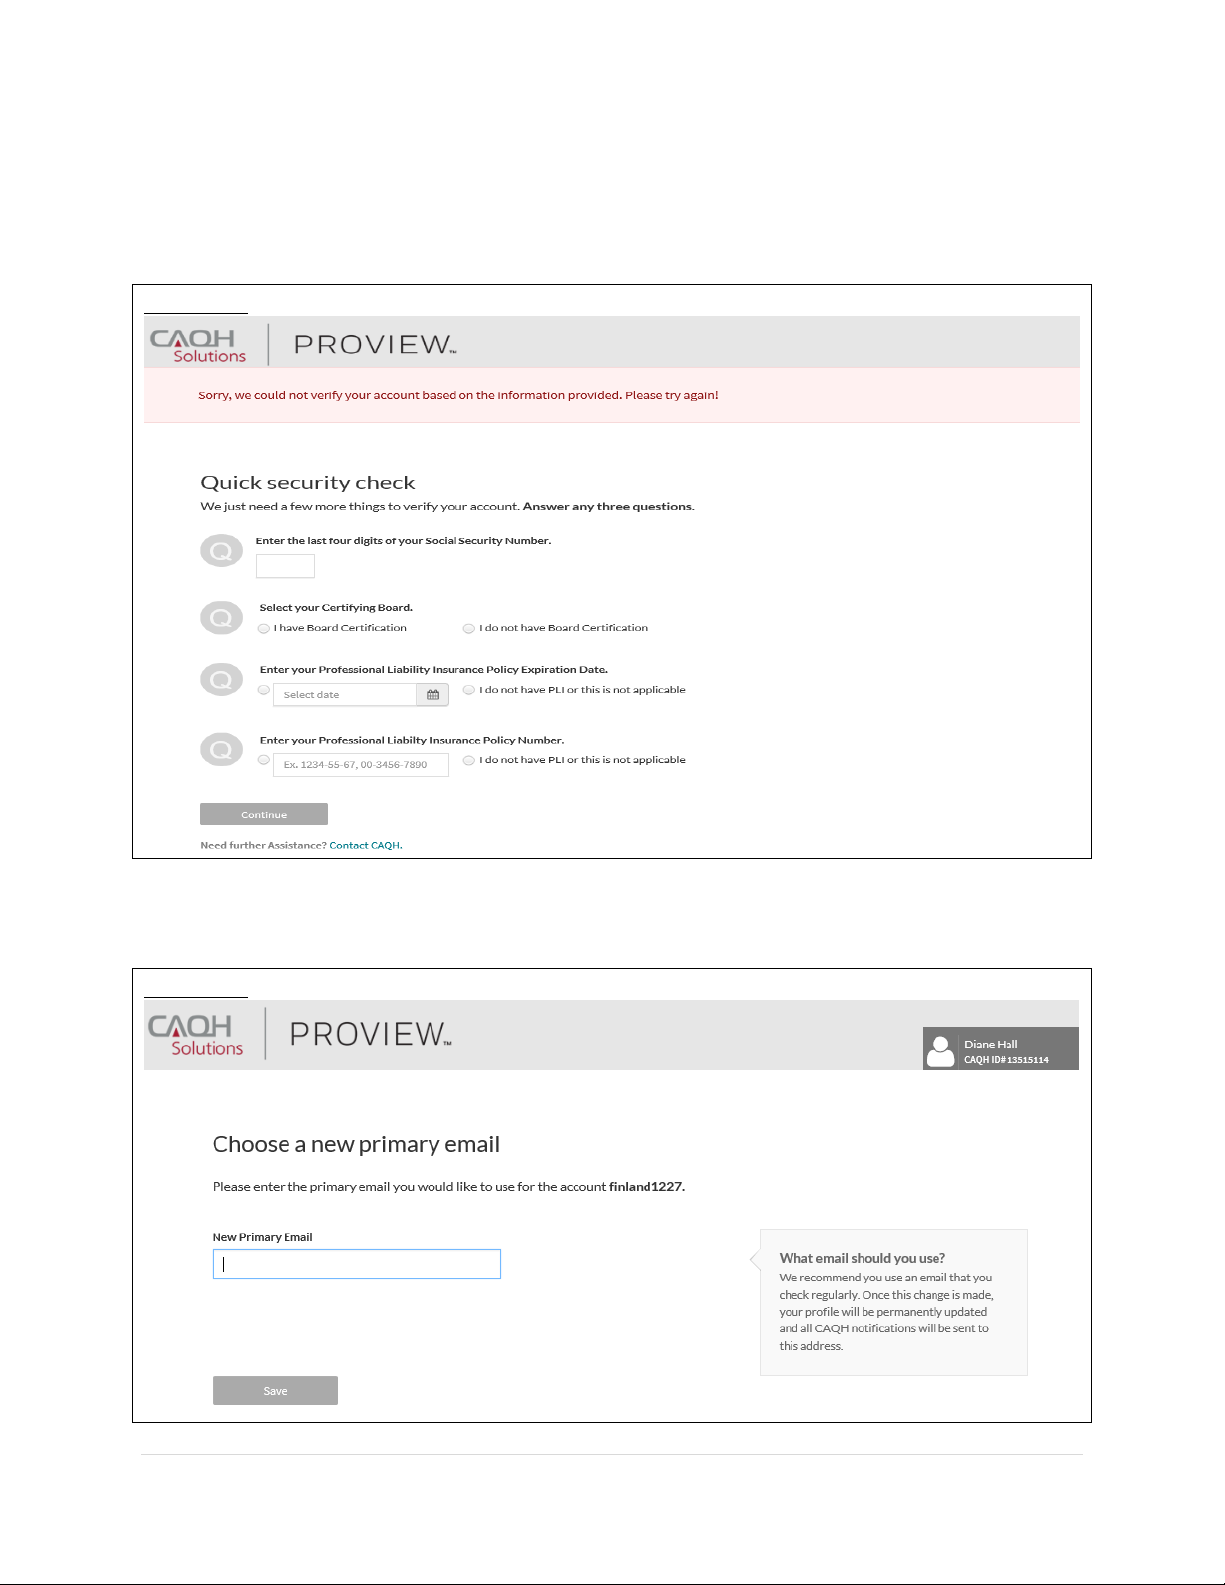
4. If the details that you have entered during the verification process do not match the
details on the profile, you will be prompted with a message that says “Sorry, we could
not verify your account based on the information provided. Please try again!”
FIGURE 21
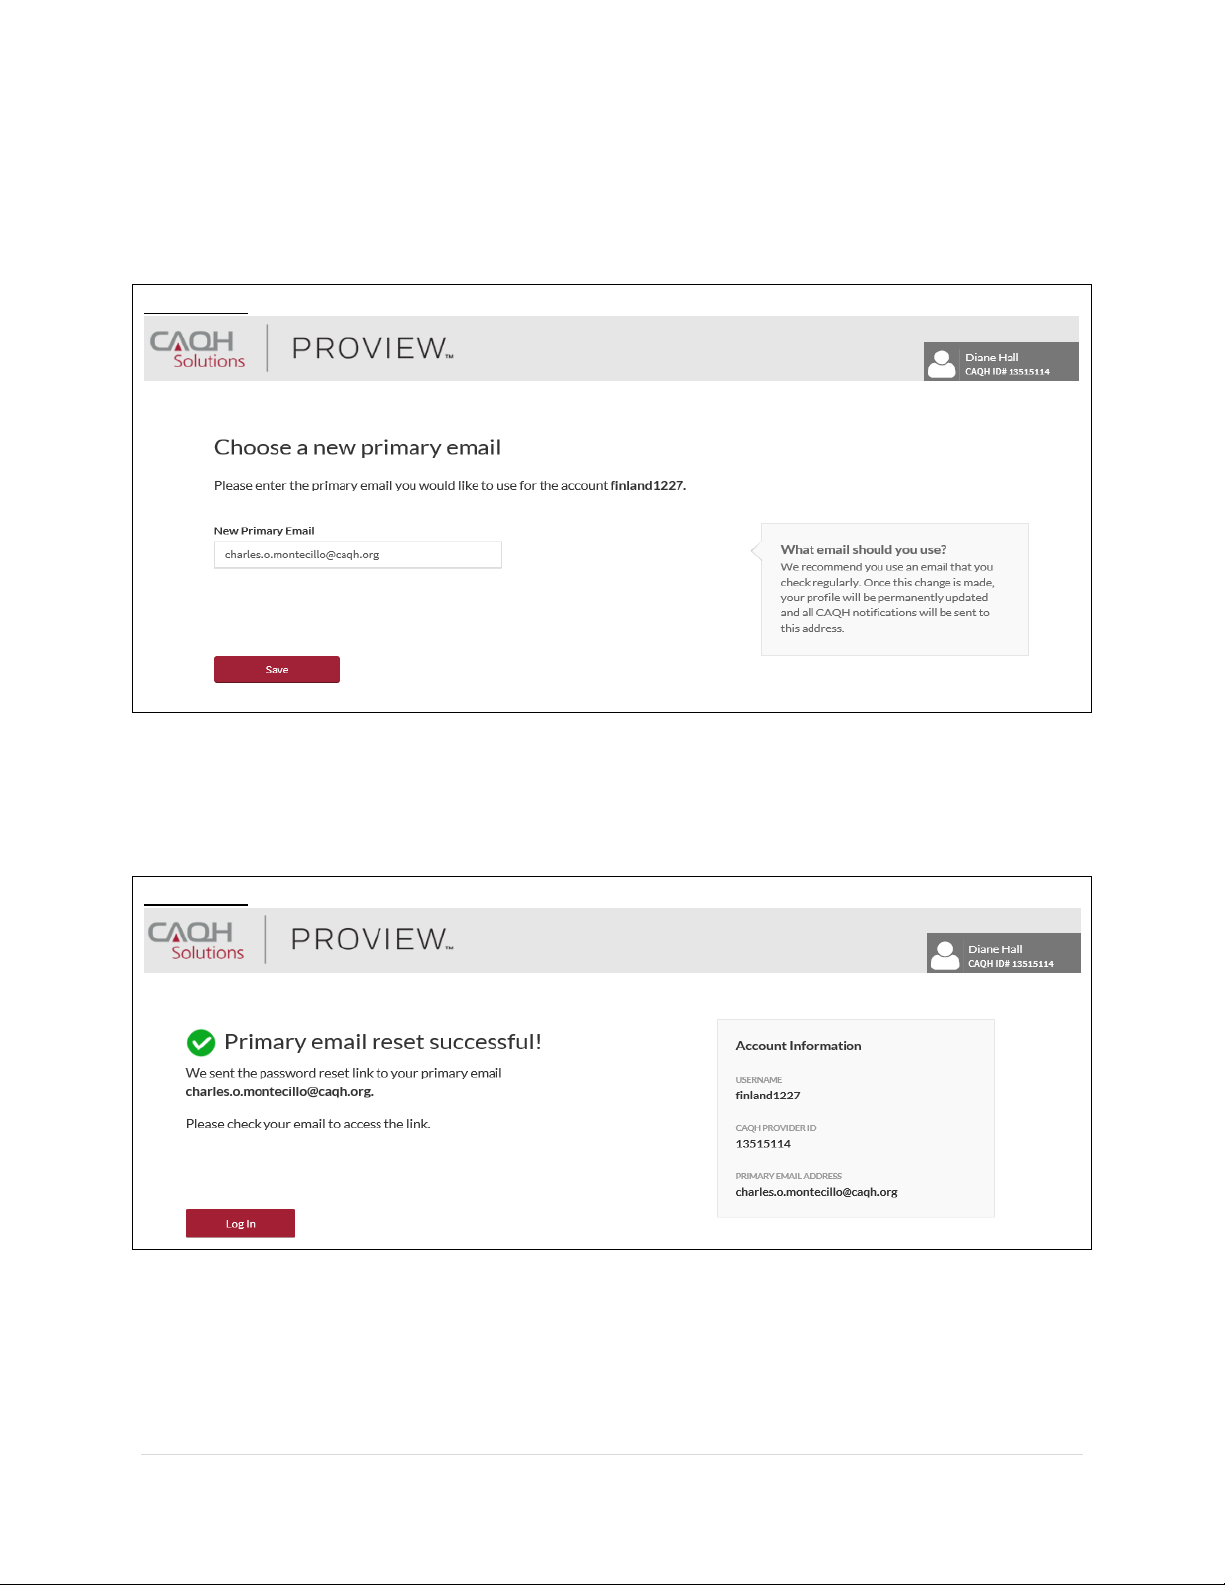
5. If you have passed the verification process, you will be directed to a page where you can
enter the new primary e-mail address you would like to use for your account.
FIGURE 22
Page 18
CAQH ProView Provider User Guide v13
17 | P a g e
6. We recommend that you use an e-mail that you check regularly. Please note that once
this change is made, your profile will be permanently updated and all CAQH
notifications will be sent to this new e-mail address. Click Save.
FIGURE 23
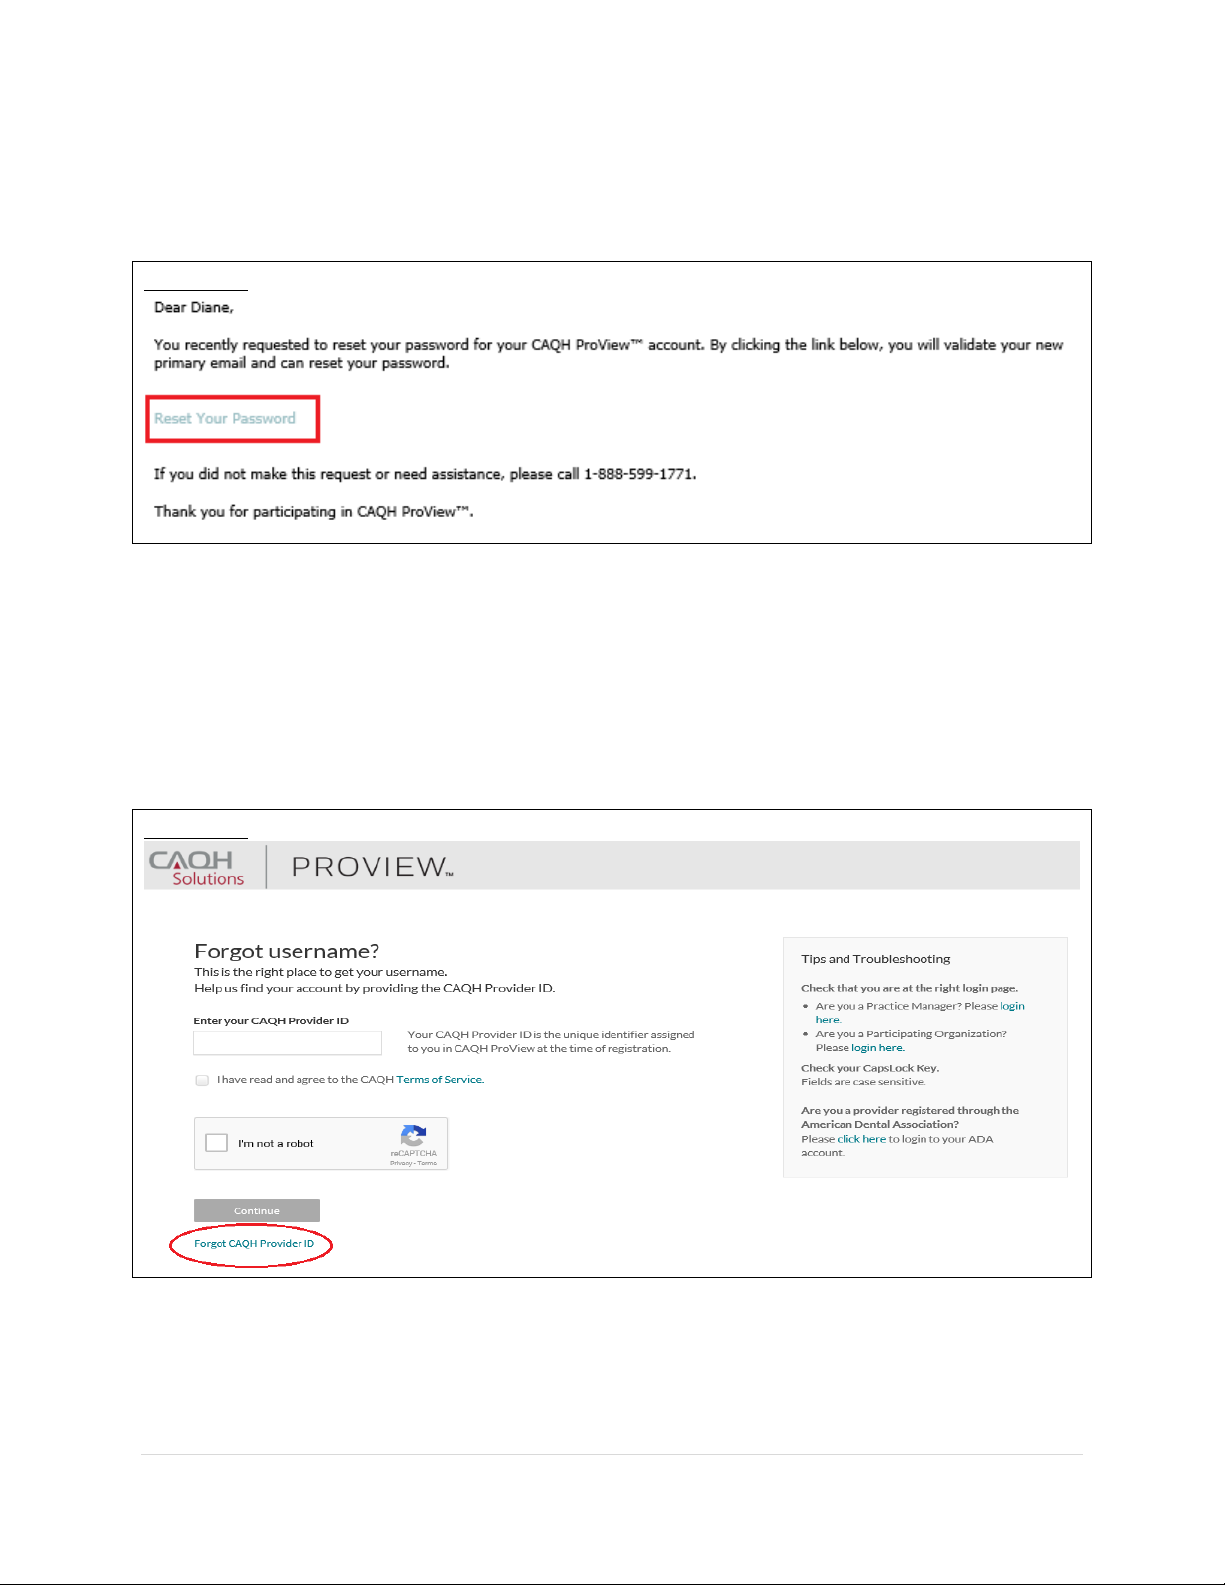
7. An e-mail containing a link which will allow you to reset your password will be sent to
the new primary e-mail address.
FIGURE 24
Page 19
CAQH ProView Provider User Guide v13
18 | P a g e
Note: The new e-mail address will be reflected on your profile only after you click the password
reset link sent to the new e-mail address.
FIGURE 25
Forgotten or Unknown CAQH ID Number
1. If you cannot proceed with the process of retrieving your username or resetting your password
because you do not know your CAQH Provider ID number, click the Forgot CAQH Provider ID link
found at the bottom of the Forgot Username page.
FIGURE 26
Page 20
CAQH ProView Provider User Guide v13
19 | P a g e
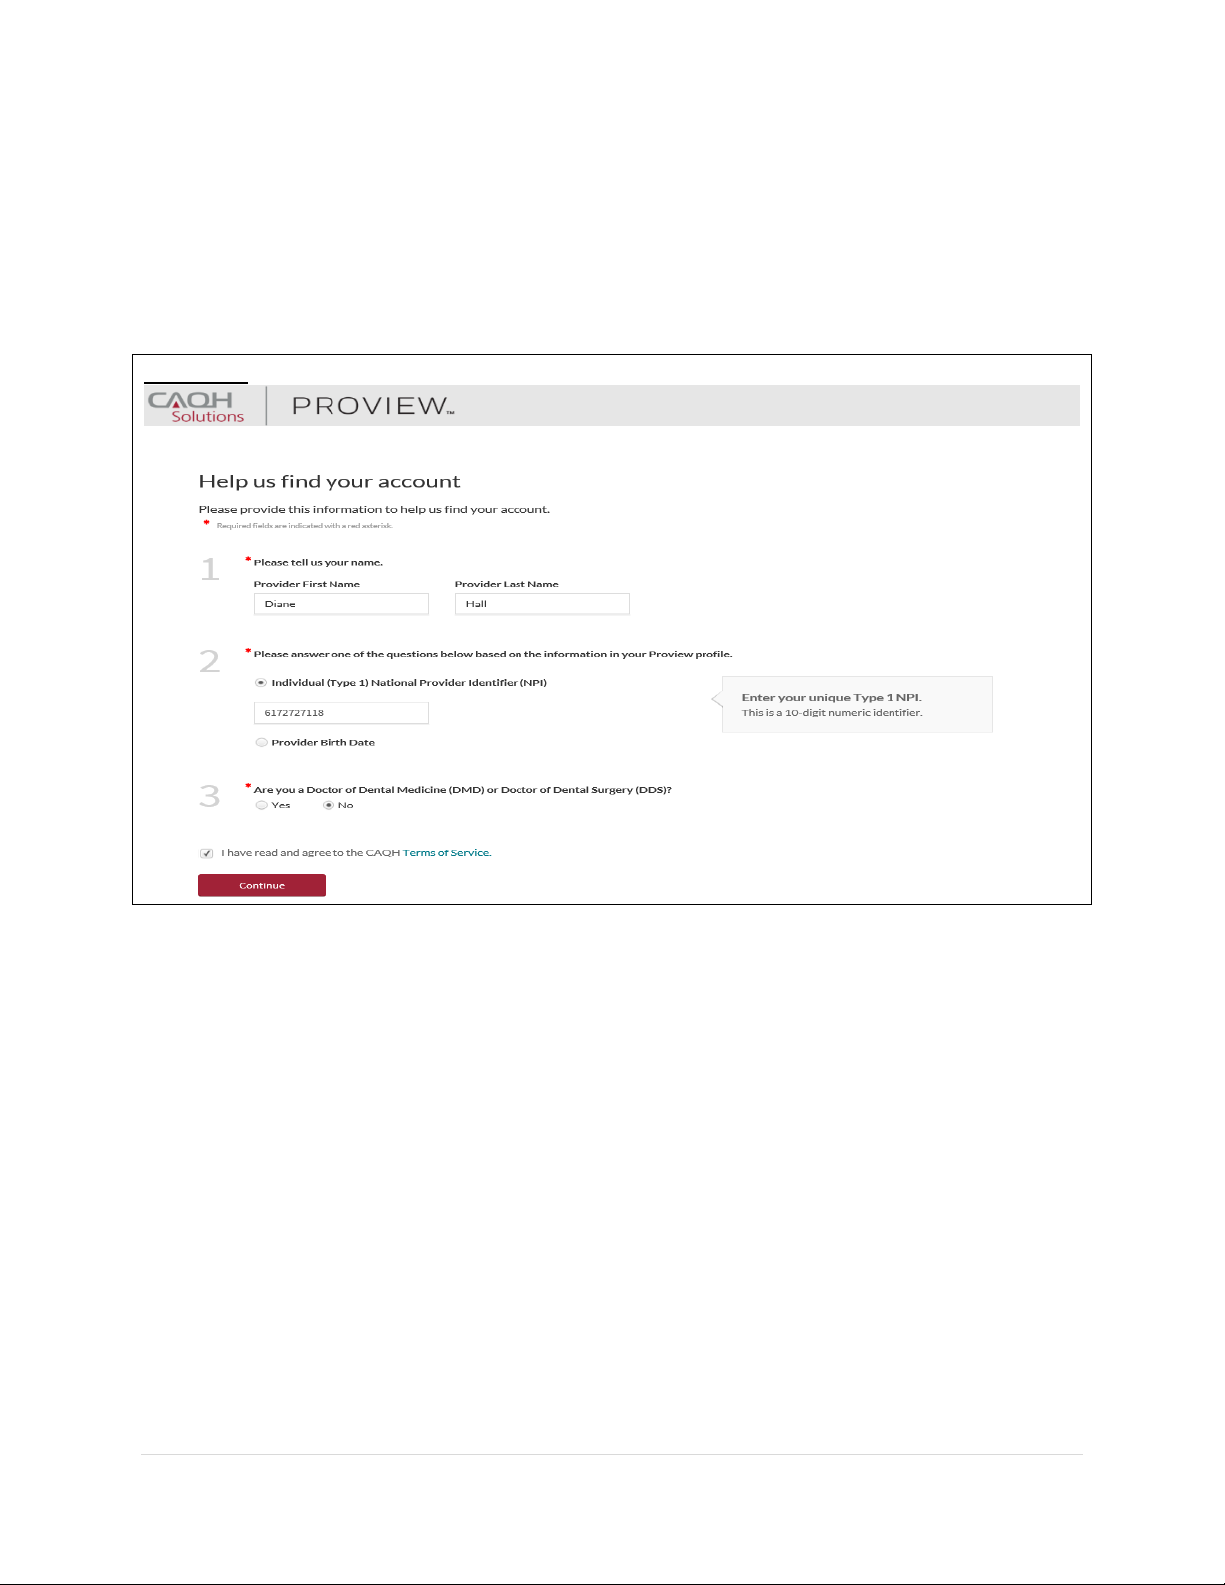
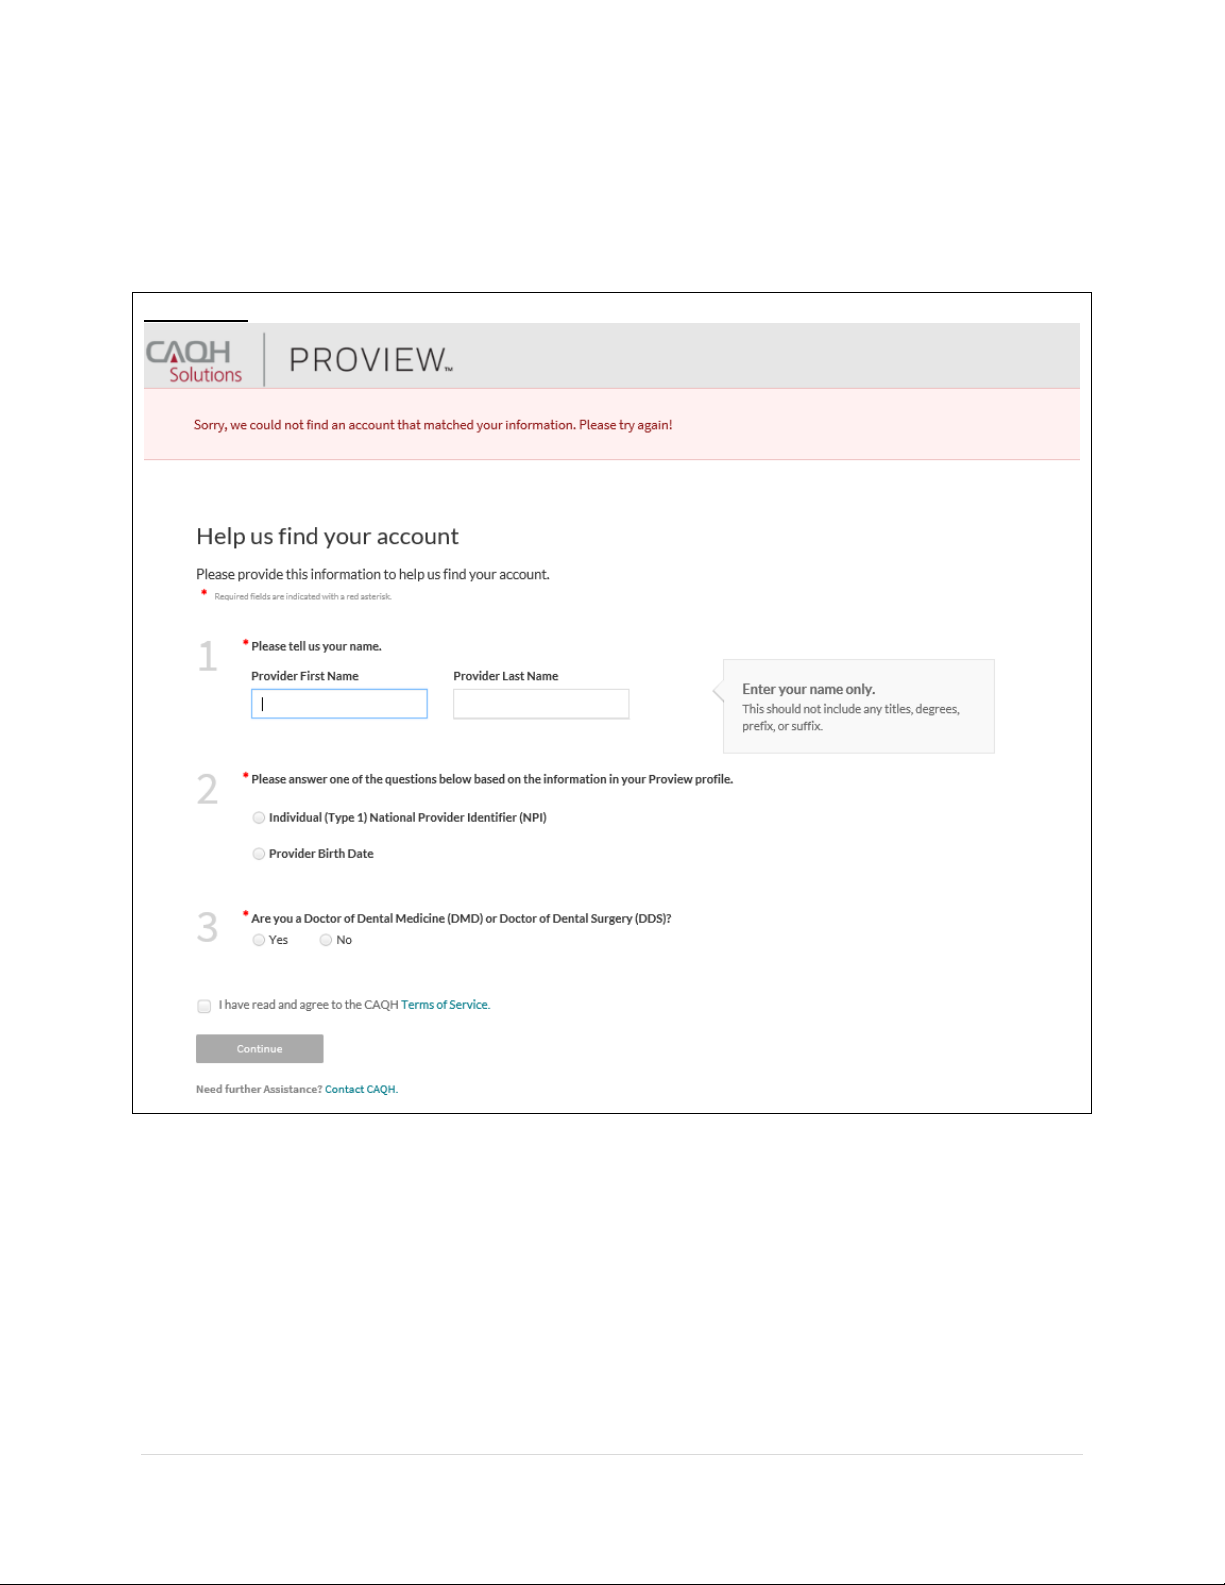
2. To help us find your account, enter your first and last name (do not include your title, degrees,
prefix or suffix). Enter your Individual or Type 1 NPI or your date of birth. Answer the question
“Are you a Doctor of Dental Medicine (DMD) or Doctor of Dental Surgery (DDS)?”. Click the
checkbox indicating that you have read and agree to the CAQH Terms of Service, then click
Continue.
FIGURE 27
Page 21
CAQH ProView Provider User Guide v13
20 | P a g e
If the information that you have entered does not match your account details, you will be prompted
with a message saying, “Sorry, we could not find an account that matched your information. Please try
again!”
FIGURE 28
Page 22
CAQH ProView Provider User Guide v13
21 | P a g e
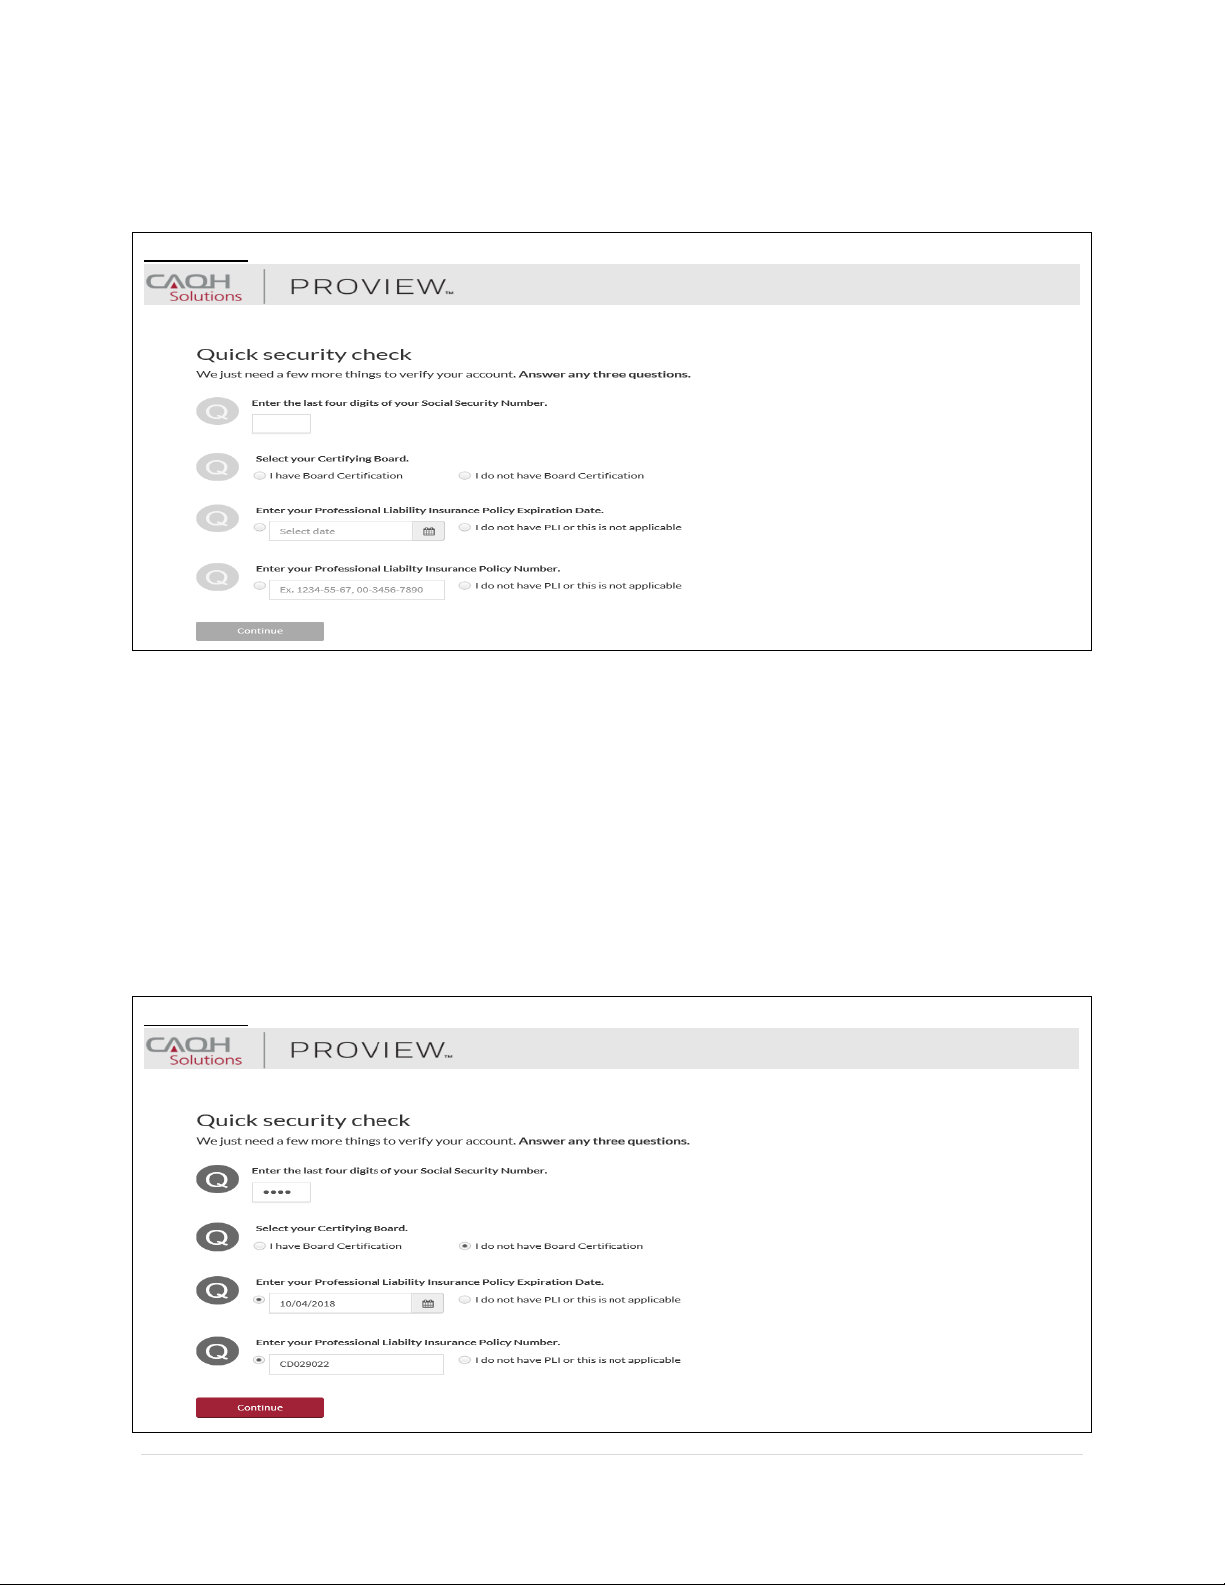
If your account matched the details that you have entered, you will be directed to a quick
security check.
FIGURE 29
3. Answer any three questions on the page. You will be able to click the Continue button found at
the bottom of the page only if three questions were answered. You may enter the last four
digits of your Social Security Number. If you have a Board Certification, click the radio button for
“I have Board Certification”. You will be asked to enter your Provider Type and the Name of
Certifying Board. You may also enter your Professional Liability Insurance Expiration Date and/or
your Professional Liability Insurance Policy Number. The policy number must be entered exactly
as it is shown on your policy face sheet. This may include alphabetical and special characters, as
well as leading zeros. Once any three questions were answered, the Continue button will turn
red and you will now be able to click it. Click Continue.
FIGURE 30
Page 23
CAQH ProView Provider User Guide v13
22 | P a g e
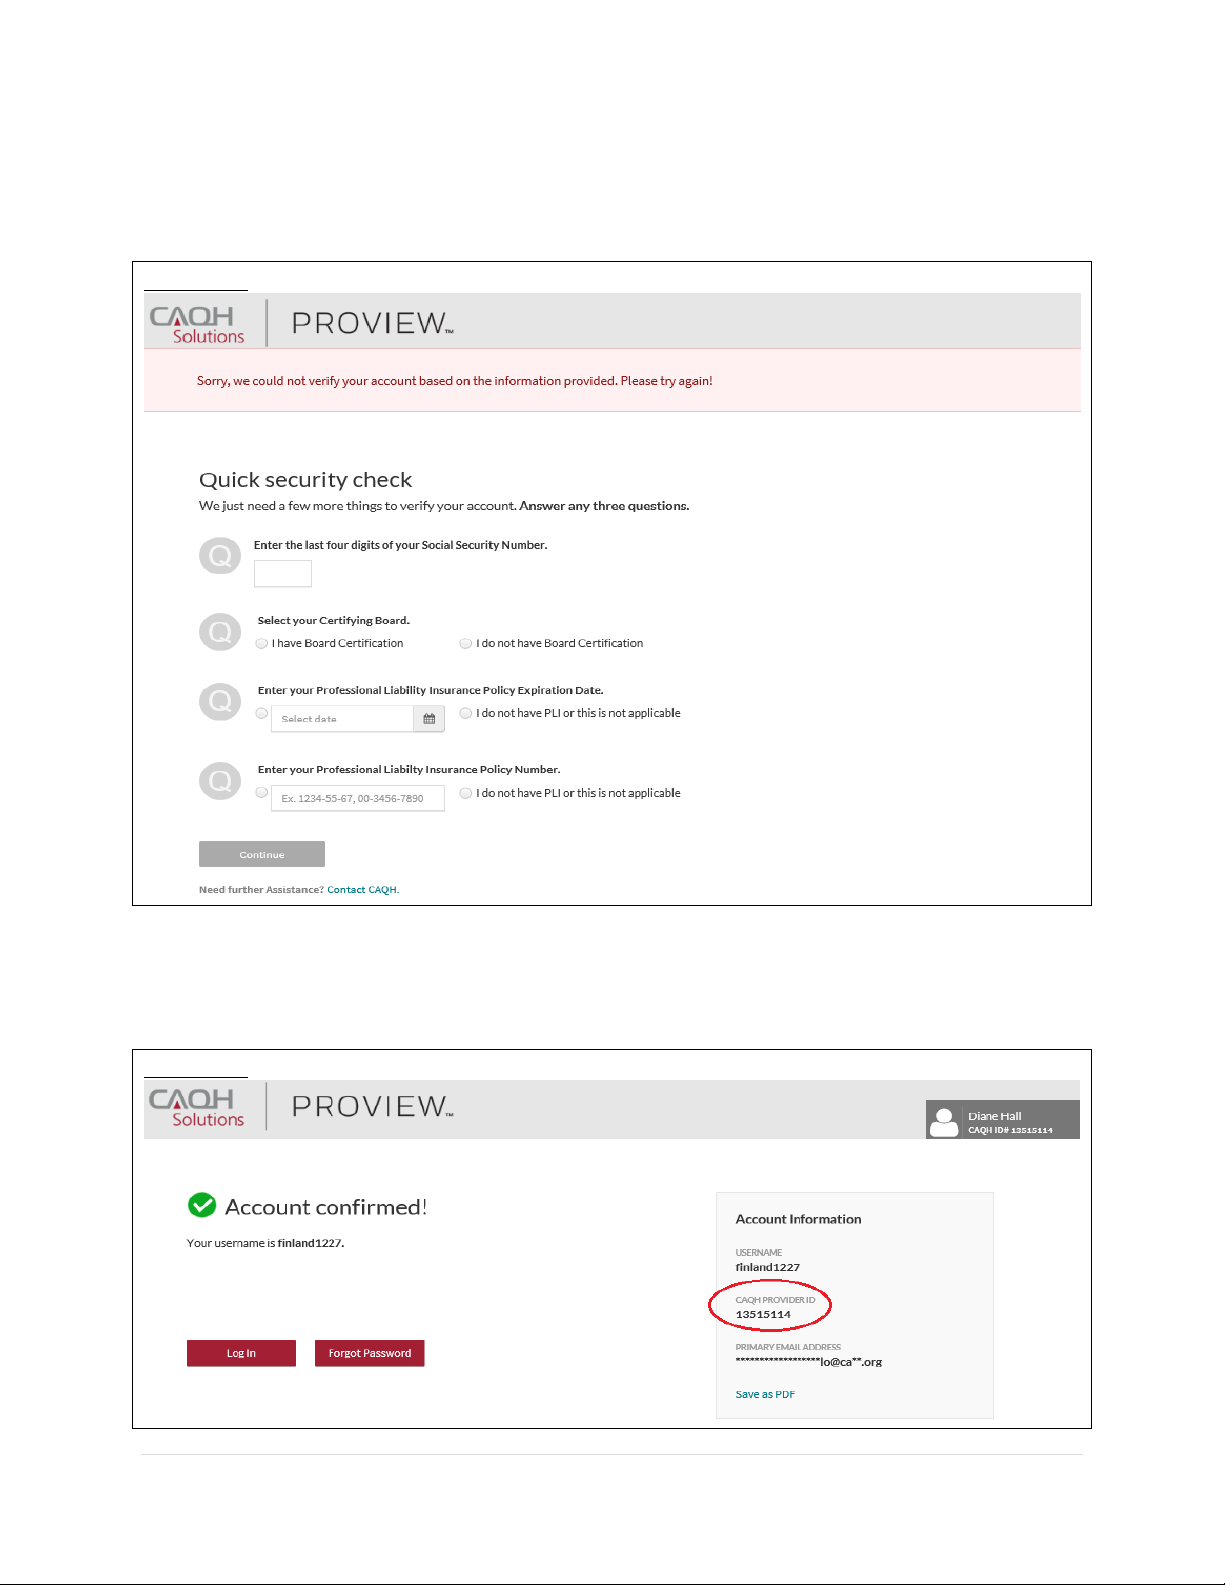
If the details that you have entered during the verification process do not match the details on
the profile, you will be prompted with a message that says “Sorry, we could not verify your
account based on the information provided. Please try again!”
FIGURE 31
If you have passed the verification process, your CAQH Provider ID number will be displayed on
the screen. You can now proceed with retrieving your username.
FIGURE 32
Page 24
CAQH ProView Provider User Guide v13
23 | P a g e
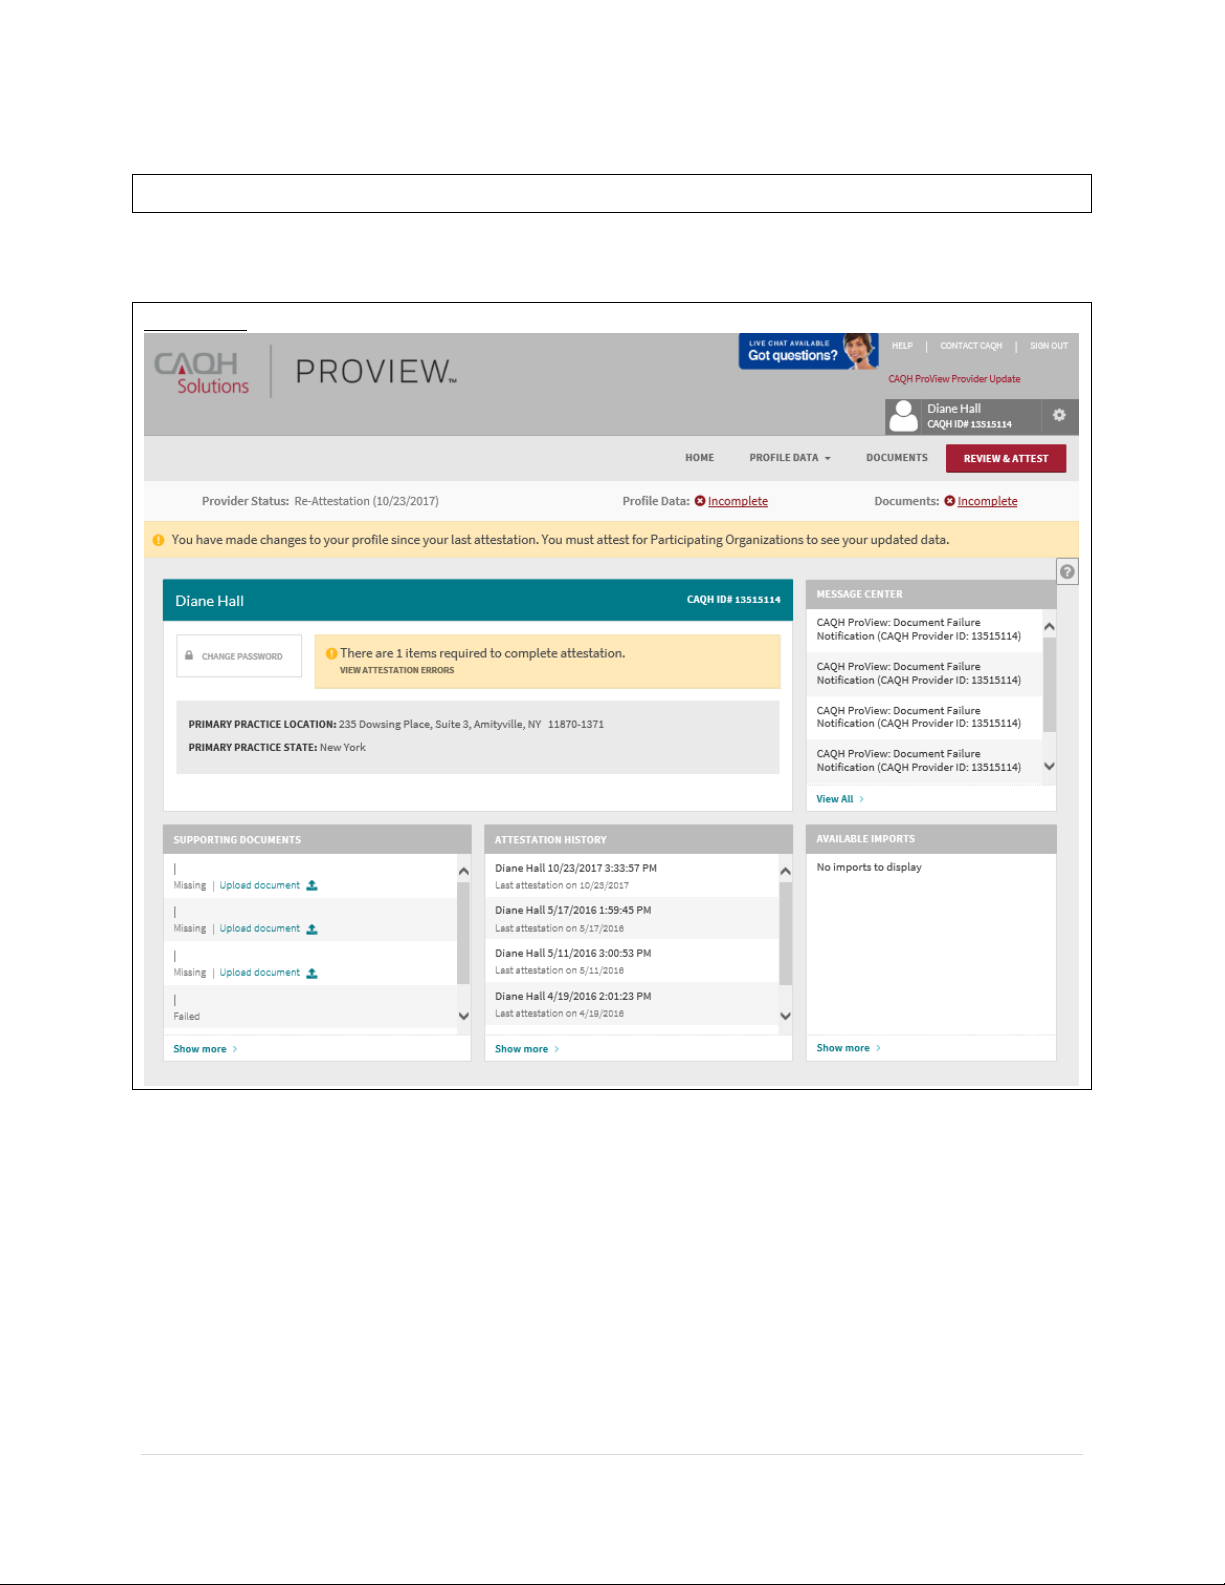
CHAPTER 3: Home Page
You will see the CAQH ProView Home page after a successful login.
FIGURE 33
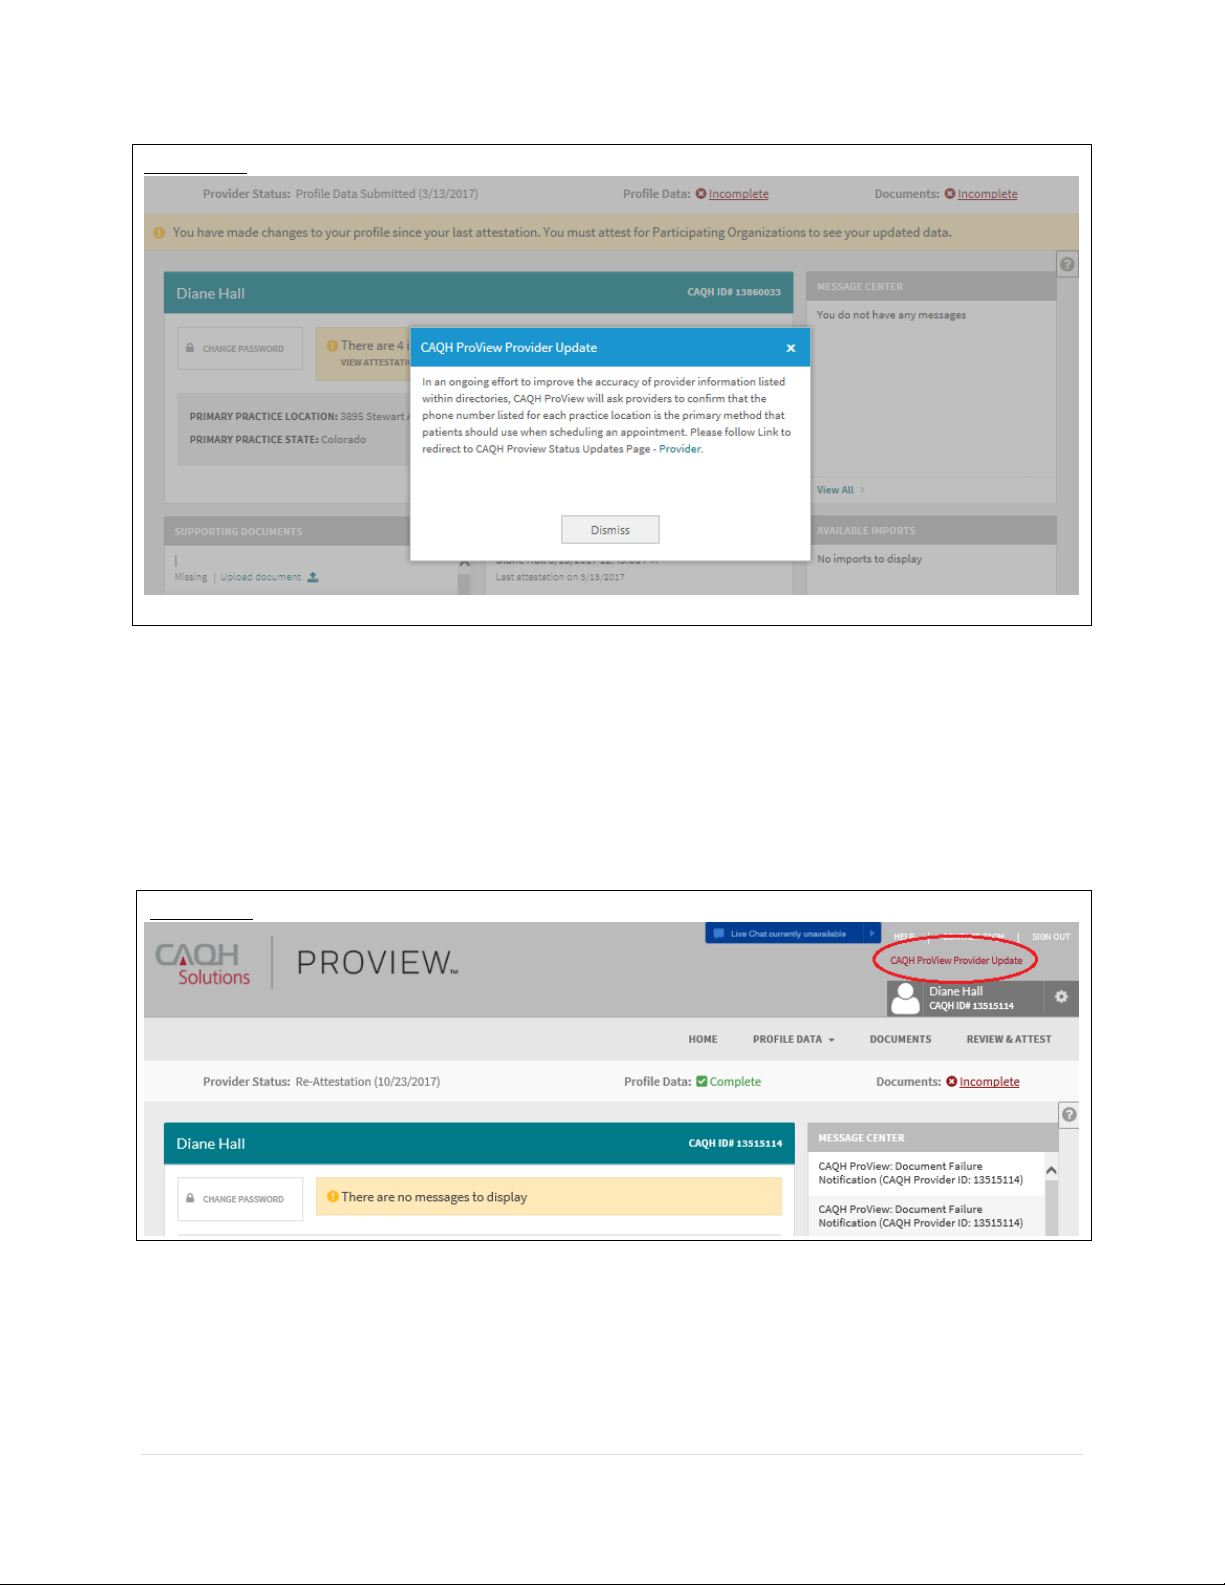
NEW: A new Broadcast Message feature has been added to the CAQH ProView Provider,
Practice Manager, and Participating Organization portal. Broadcast Messaging will allow CAQH
to communicate upcoming system updates and/or to report system-wide issues to all users.
Whenever there is a published broadcast message, a pop-up message will appear on your
screen when you log in to your CAQH ProView account.
Page 25
CAQH ProView Provider User Guide v13
24 | P a g e
FIGURE 34
If you click the ‘X’ located at the top, the pop-up message will close but will re-appear upon
your next log-in.
If you click the Dismiss button, the pop-up message will close and will NOT appear with future
log-ins. If you clicked the Dismiss button and would like to view the broadcast message again,
click on the CAQH ProView Provider Update link found above your name.
FIGURE 35
Note: The link to the CAQH ProView Status Updates will be found in the pop-up message.
Tip:
• If you need assistance on the Home Page, you can access the “Help” link that is
displayed in the top right-hand corner on the Home Page.
Page 26

CAQH ProView Provider User Guide v13
25 | P a g e
The Home page displays five components:
1. Profile Summary
• Provides a summary of your key profile information, such as your CAQH Provider ID, any
outstanding required fixes that need to be made to your data profile, and your primary
practice state. You can also easily access a “Change Password” button here to change
your password if necessary.
2. Message Center
• Displays information relevant to your account, information from CAQH and actions
required. This also displays any notifications from CAQH regarding missing or expired
documents.
3. Supporting Documents
• Provides links to any supporting documents that have been uploaded to your profile.
• Displays the approval status of your supporting documents.
• If you have questions on uploading your documentation, refer to Chapter 6: Uploading
Supporting Documentation.
4. Attestation History
• Provides a record of your attestation history.
• Attestation is the term used to show you certify that you have carefully reviewed all
information contained within your CAQH data profile and that all information provided
by you is true, correct and complete to the best of your knowledge. You also acknowledge
that your CAQH data profile will not be considered complete until supporting
documentation and signed Authorization, Attestation and Release Form are submitted.
5. Available Imports.
• Displays any sections containing data available for import into your data profile. With
CAQH ProView, practice managers have the capability to enter information on your behalf
and then export that information for your access and to ease your data entry
requirements. You will have the option to import any available data as a new set or
replace an existing set of data within the section. You also can compare your existing data
to the data entered by a practice manager before you choose to import the data.
In addition, to these components, across the top of the home page is a navigation menu, which
allows you to navigate to four sections to complete your profile information:
• Profile Data – Click here to enter your profile information (See Chapter 4)
• Documents – Click here to review your supporting documents (See Chapter 6)
• Review – Click here to review the information you have entered and correct any required
errors (See Chapter 5)
• Attest – Click here to attest to the accuracy of your information (See Chapter 8)
Page 27
CAQH ProView Provider User Guide v13
26 | P a g e
FIGURE 36
Status Bar
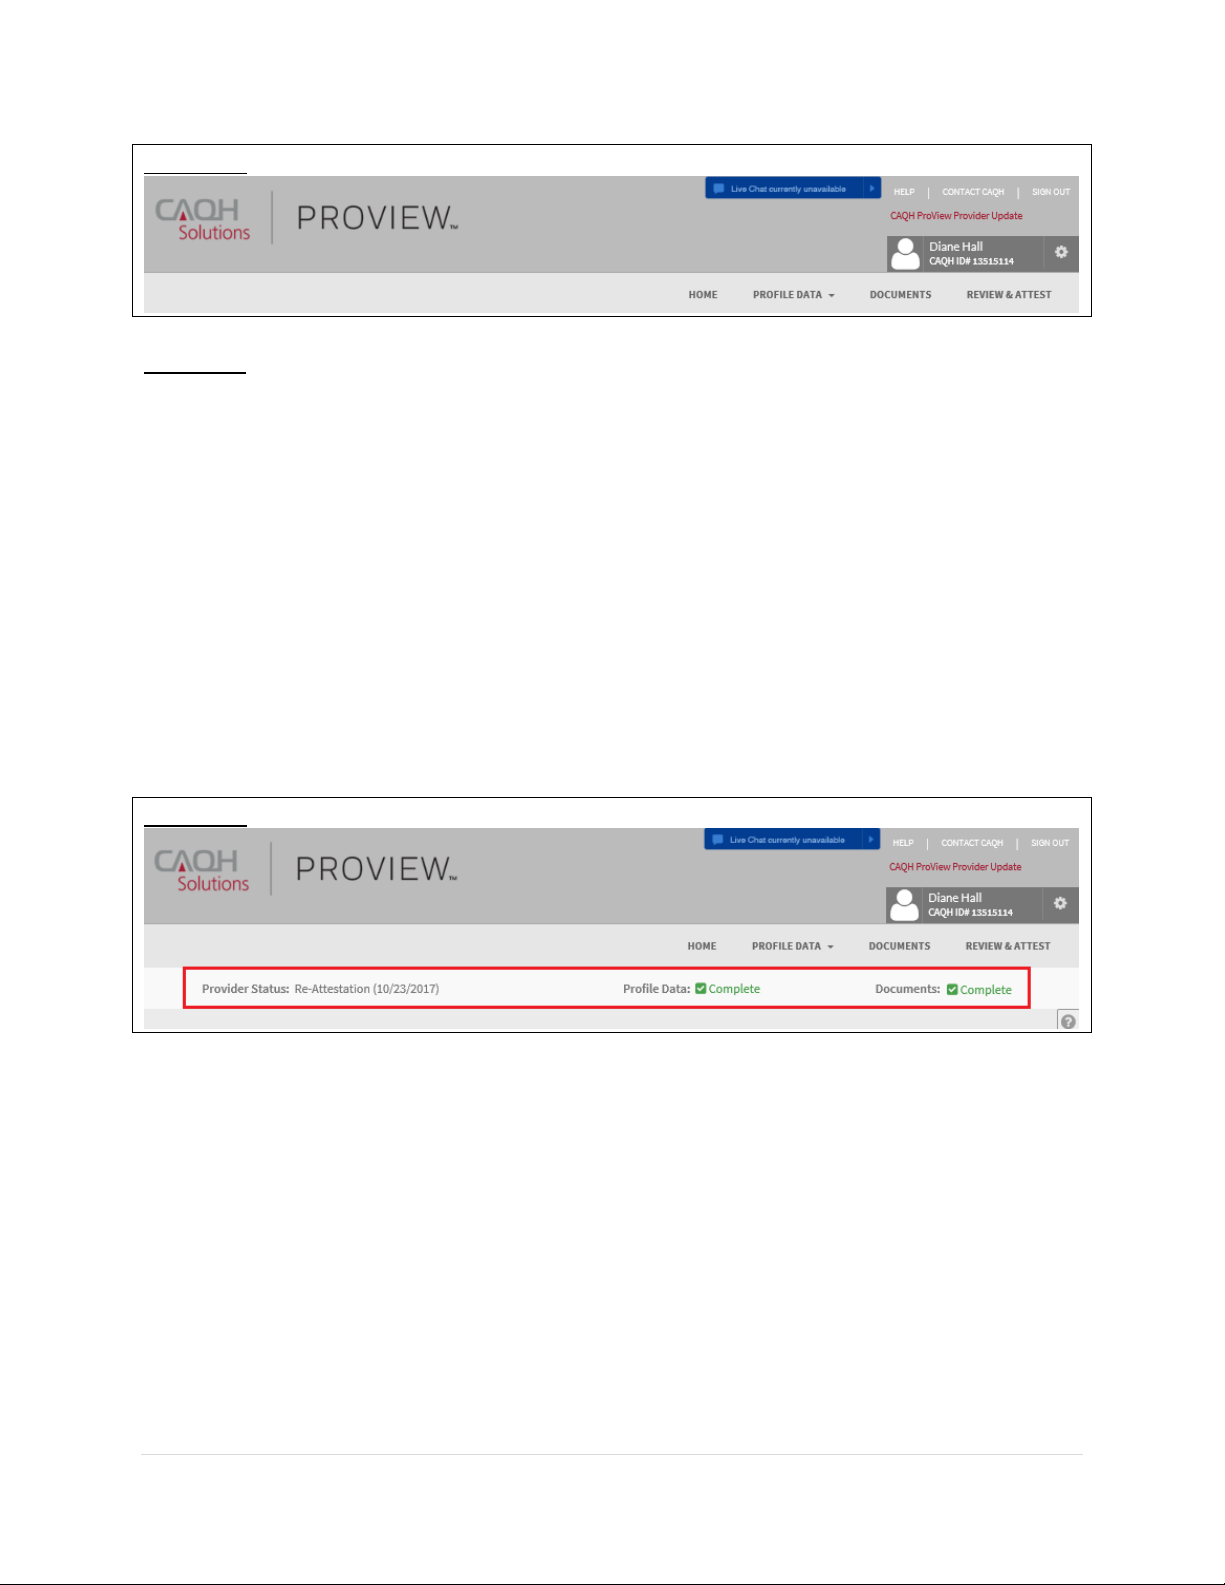
A status bar is also available at the top of the screen. The status bar will help you identify what
actions need to be taken on your profile for your authorized organizations to receive your upto-date information.
The Status Bar shows three elements:
• Provider Status with ‘as of’ date
• Profile Data: Complete/Incomplete
o The status ‘Complete’ is displayed if you have successfully completed all required
fields in the sections listed on the left-hand side navigation.
• Documents: Complete/Incomplete
o The status ‘Complete’ is displayed if ALL the required supporting documents
have been provided and are current according to requirement rules.
FIGURE 37
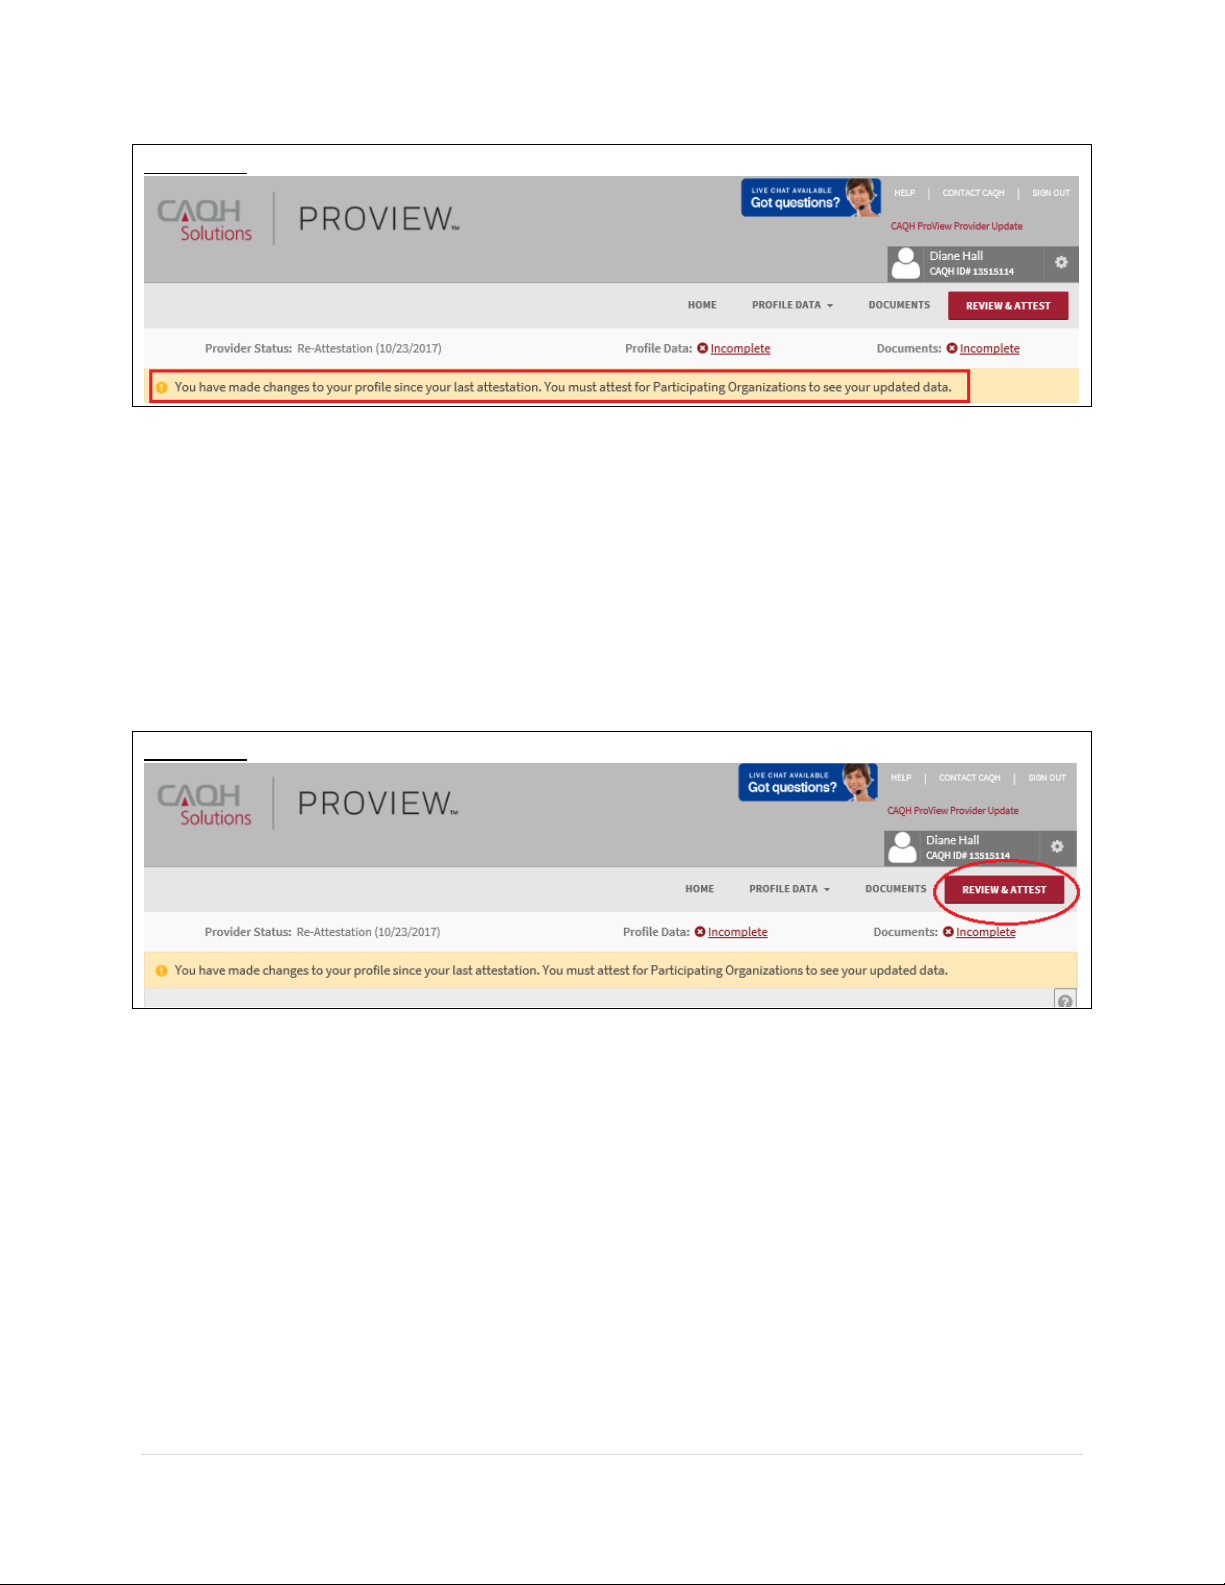
Attest Reminder Bar
• After you update any information in your profile, you must complete attestation so that
your authorized organizations can view your updated profile.
• A reminder message will appear across the top of the page on every page only after you
have changed one or more piece of data and have not attested to that change.
• This message will disappear only after you have attested but would re-appear if you
changed more data and did not re-attest.
• This message will also appear if CAQH has updated a relevant domain table value.
Page 28
CAQH ProView Provider User Guide v13
27 | P a g e
FIGURE 38
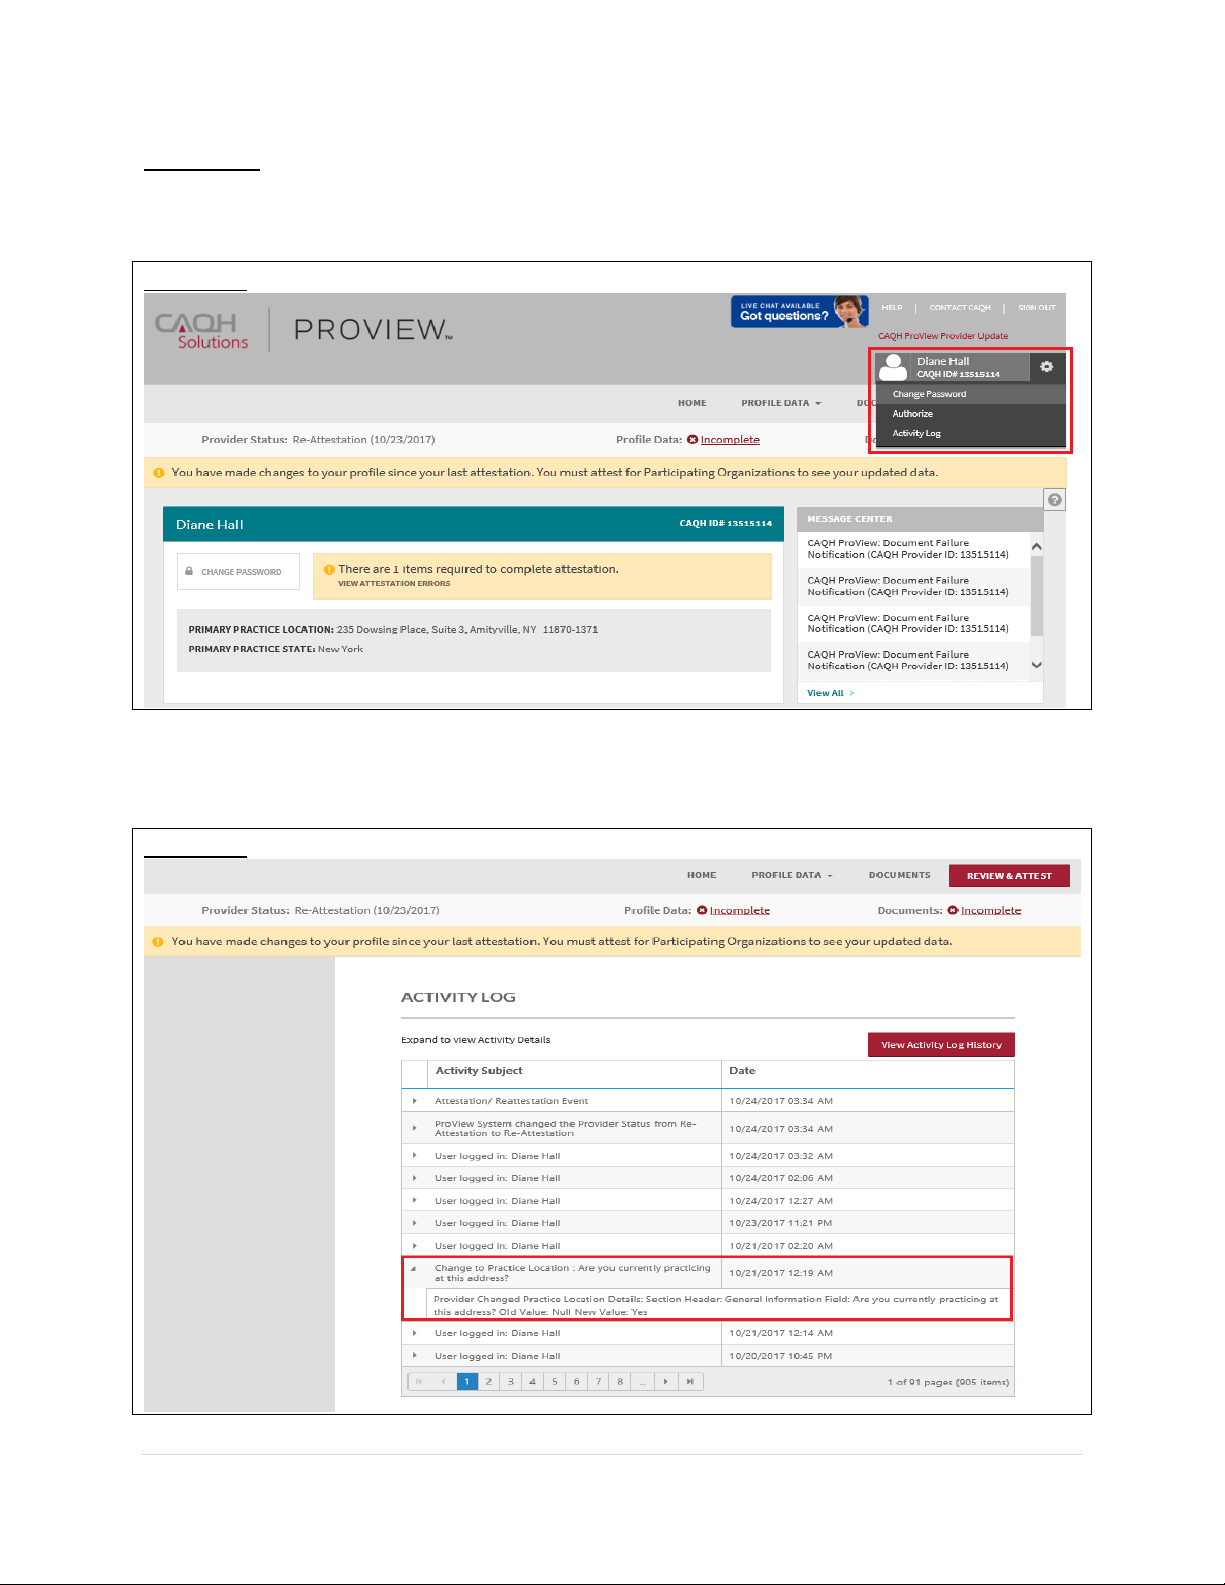
Attest Button in Navigation Bar
• The ‘Attest’ navigational element is now moved to the far-right position.
• If you have never attested or have previously attested and have unattested data, the
‘Attest’ navigational element will show as a red button.
• The ‘Attest’ navigational element will also show as a red button when you are NOT in
the following status:
o Initial Profile Complete
o Re-attestation
FIGURE 39
Page 29
CAQH ProView Provider User Guide v13
28 | P a g e
Activity Log
From the Home Page, you can access the “Activity Log” from the top right navigation dropdown menu.
FIGURE 40
The Activity Log lists all recent activity that has occurred in your account, including recent logins, re-attestations, and data updates.
FIGURE 41
Page 30

CAQH ProView Provider User Guide v13
29 | P a g e
Note:
• All changes on the profile will ONLY appear on the Activity Log after you have completed
the re-attestation.
• Any changes done after the re-attestation will not be reflected on the Activity Log unless
you complete the re-attestation again after making the additional changes.
• If after the re-attestation these changes are still not reflected on the Activity Log, sign
out from CAQH ProView and log in again and go to Activity Log. The details of the
changes should appear on this page of your profile.
• Changes on the Documents section and Authorization page will reflect on the Activity
Log even if you have not yet re-attested.
Page 31
CAQH ProView Provider User Guide v13
30 | P a g e
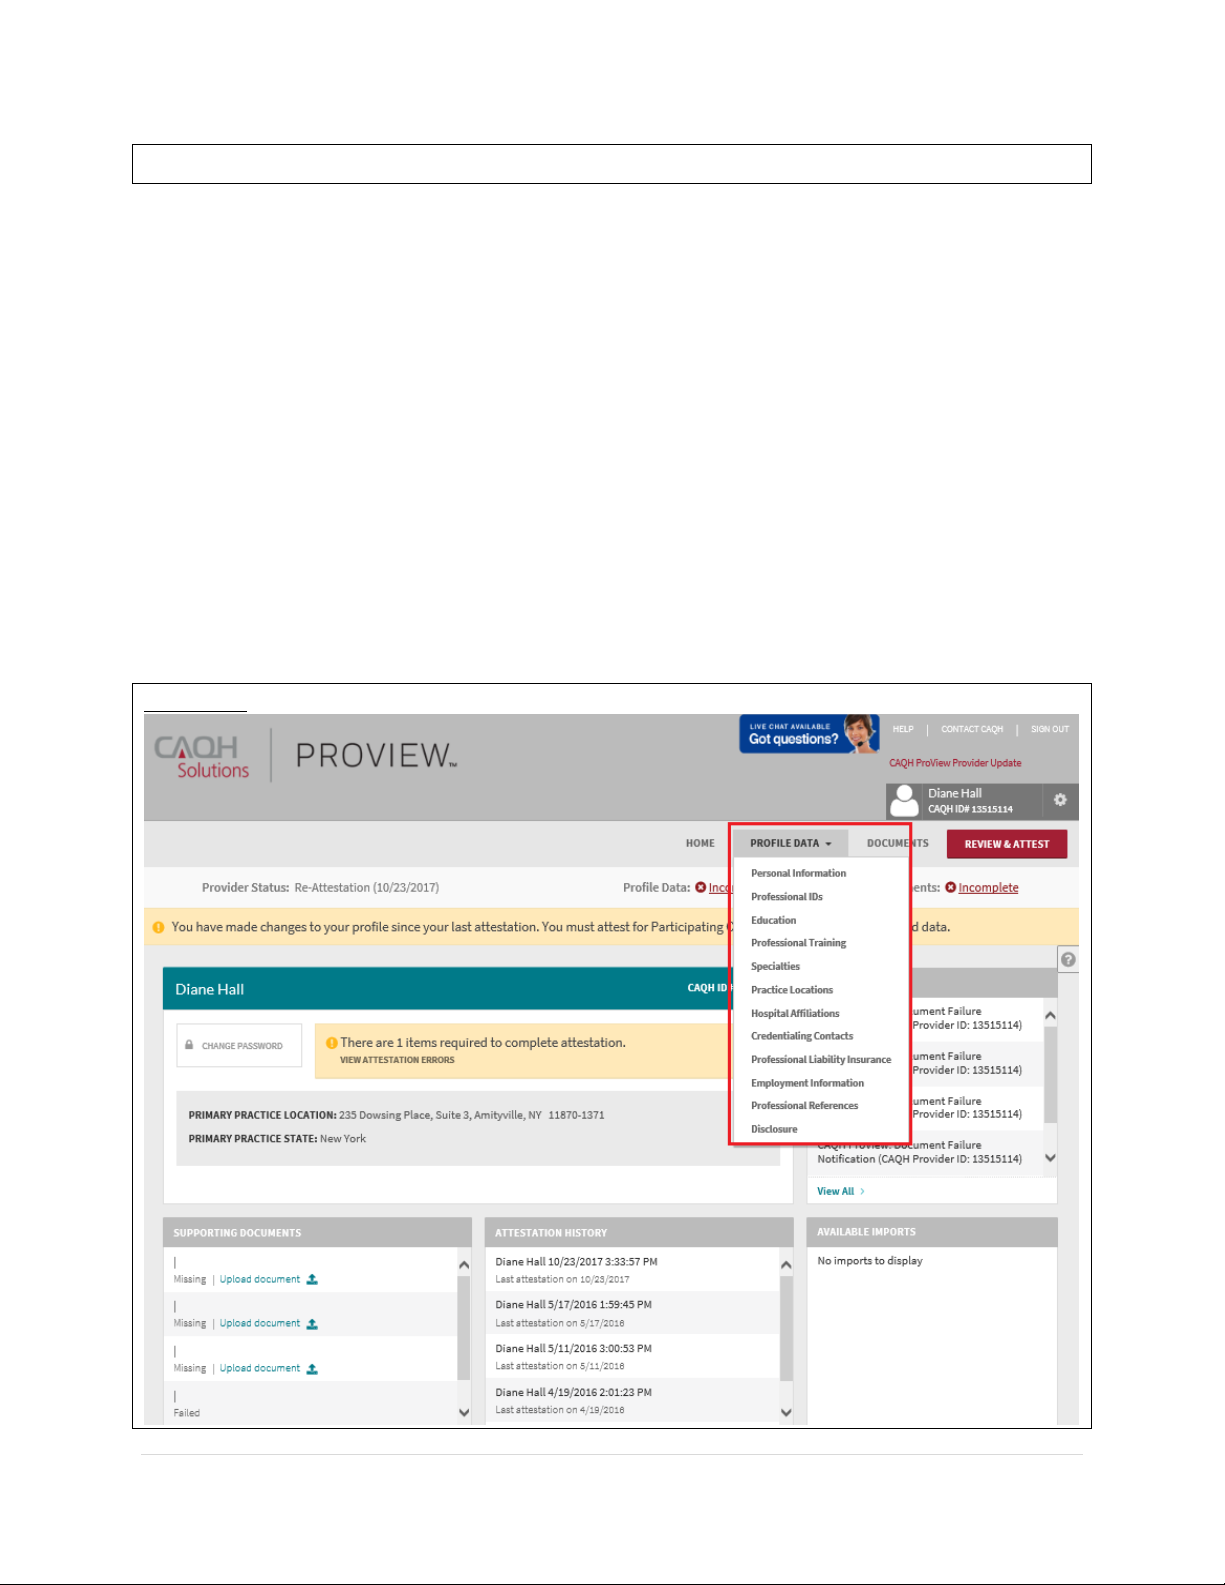
CHAPTER 4: Completing Your Profile Information
CAQH ProView will guide you through the process of completing your information and
managing your profile data and supporting documentation. From the Home Page, click on
“Profile Data” on the top navigation bar to begin the process.
Tips:
1. Throughout the system, required fields are indicated with a red asterisk (*).
2. If you need assistance, you can access the “?” link that is displayed on the right-hand
side of the screens.
3. Use “Save and Go Back” or “Save & Continue” to page backward or forward within
sections.
4. It is important to click on the “Save” button or the “Save & Continue” button to save
your information. If you close the browser or move to another screen via the left-hand
navigation screen without clicking “Save” or “Save & Continue”, you will lose your
information. Clicking on the back and forward arrows will not save your information
either.
FIGURE 42
Page 32
CAQH ProView Provider User Guide v13
31 | P a g e
Clicking on “Profile Data” shows a drop-down list of 12 Sections: Personal Information,
Professional IDs, Education, Professional Training, Specialties, Practice Locations, Hospital
Affiliations, Credential Contacts, Professional Liability Insurance, Employment Information,
Professional References, and Disclosure. They are described in further detail below. Questions
presented to you may vary based on your primary practice state.
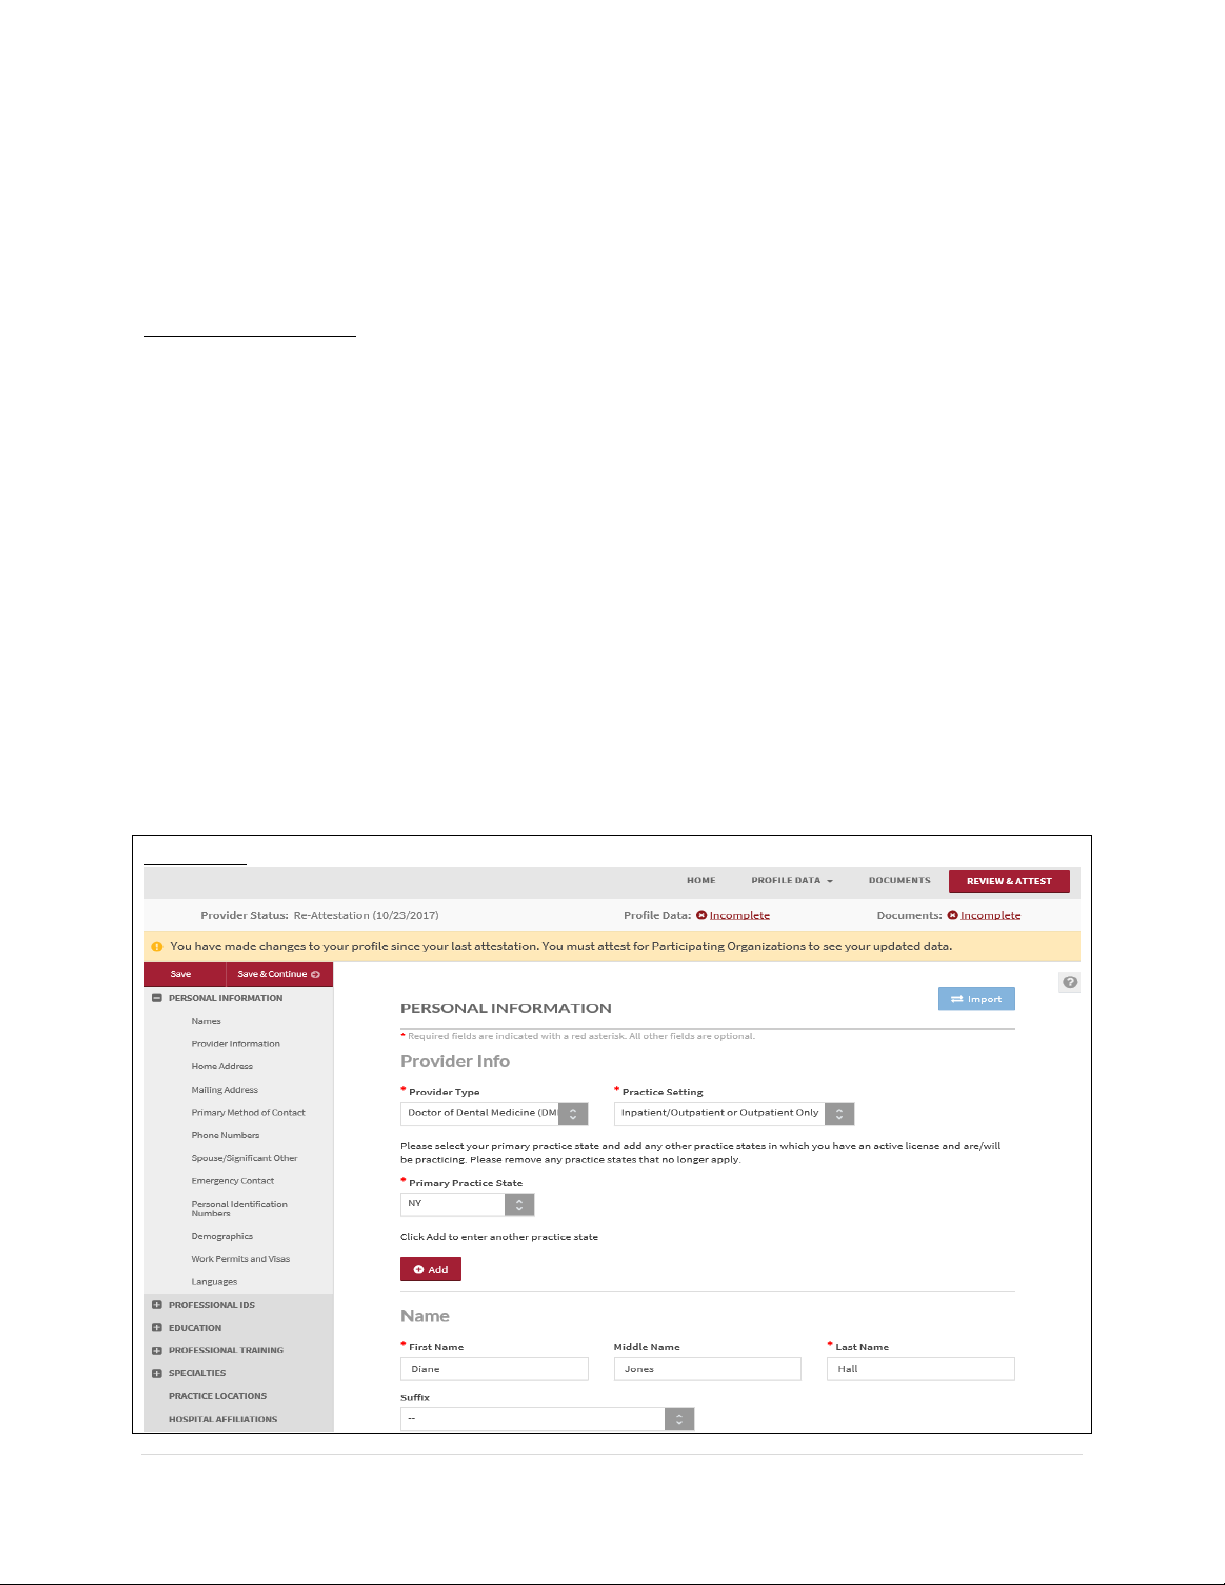
Personal Information
The Personal Information section requests basic information such as name, phone numbers,
and contact information. Some information on this screen may be pre-populated based on the
information you entered during the self-registration process. Additional information or tips are
provided below as applicable to assist you with completing these fields.
Tips:
1. If you need assistance, you can access the “?” link that is displayed on the right-hand
side of the screens.
2. Use “Save and Go Back” or “Save & Continue” to page backward or forward within
sections.
3. It is important to click on the “Save” button or the “Save & Continue” button to save
your information. If you close the browser or move to another screen via the left-hand
navigation screen without clicking “Save” or “Save & Continue”, you will lose your
information. Clicking on the back and forward arrows will not save your information
either.
FIGURE 43
Page 33

CAQH ProView Provider User Guide v13
32 | P a g e
▪ Provider Type, Practice Setting and Practice State
o You will first be asked to identify your provider type, practice setting and practice
states. The answers to these questions will drive the questions presented to you
throughout CAQH ProView’s profile sections. If you practice in multiple states and
one of those states includes a state specific credentialing application, the state
specific questions and the CAQH ProView standardized questions will be presented
to you in one integrated flow throughout the system. You will be required to
complete all required questions for both the CAQH ProView standardized profile
questions as well as any state specific questions.
▪ Home Address
o Not required to complete your application; however, hospitals have identified that
this information adds value in confirming your accessibility to the hospital.
▪ Mailing Address
o Enter the "Mailing Address” of the physical location of your practice. If you do not
have a physical practice location, you may enter a P.O. Box; however, it is important
to note that health plans intend to use this information for their directories. If you
would like to enter a P.O. Box for the billing address, please enter this information in
the Billing Contact section.
▪ Primary Method of Contact
o An email is required as a primary method of contact for CAQH ProView. This email
will be used for all system generated messages, such as reminders when it is time to
re-attest to your data profile.
o You also can enter two additional email addresses (PMOC CC1 and PMOC CC2) that
will be copied on the system generated messages.
▪ Personal Identification Numbers
o Your Social Security Number is required to complete the application.
o NPI – National Provider Identification Number
▪ This is a provider’s Type 1 National Provider Identifier. It is a unique, 10-digit
identification number issued to health care providers by the Centers for
Medicare and Medicaid Services (CMS).
Page 34
CAQH ProView Provider User Guide v13
33 | P a g e
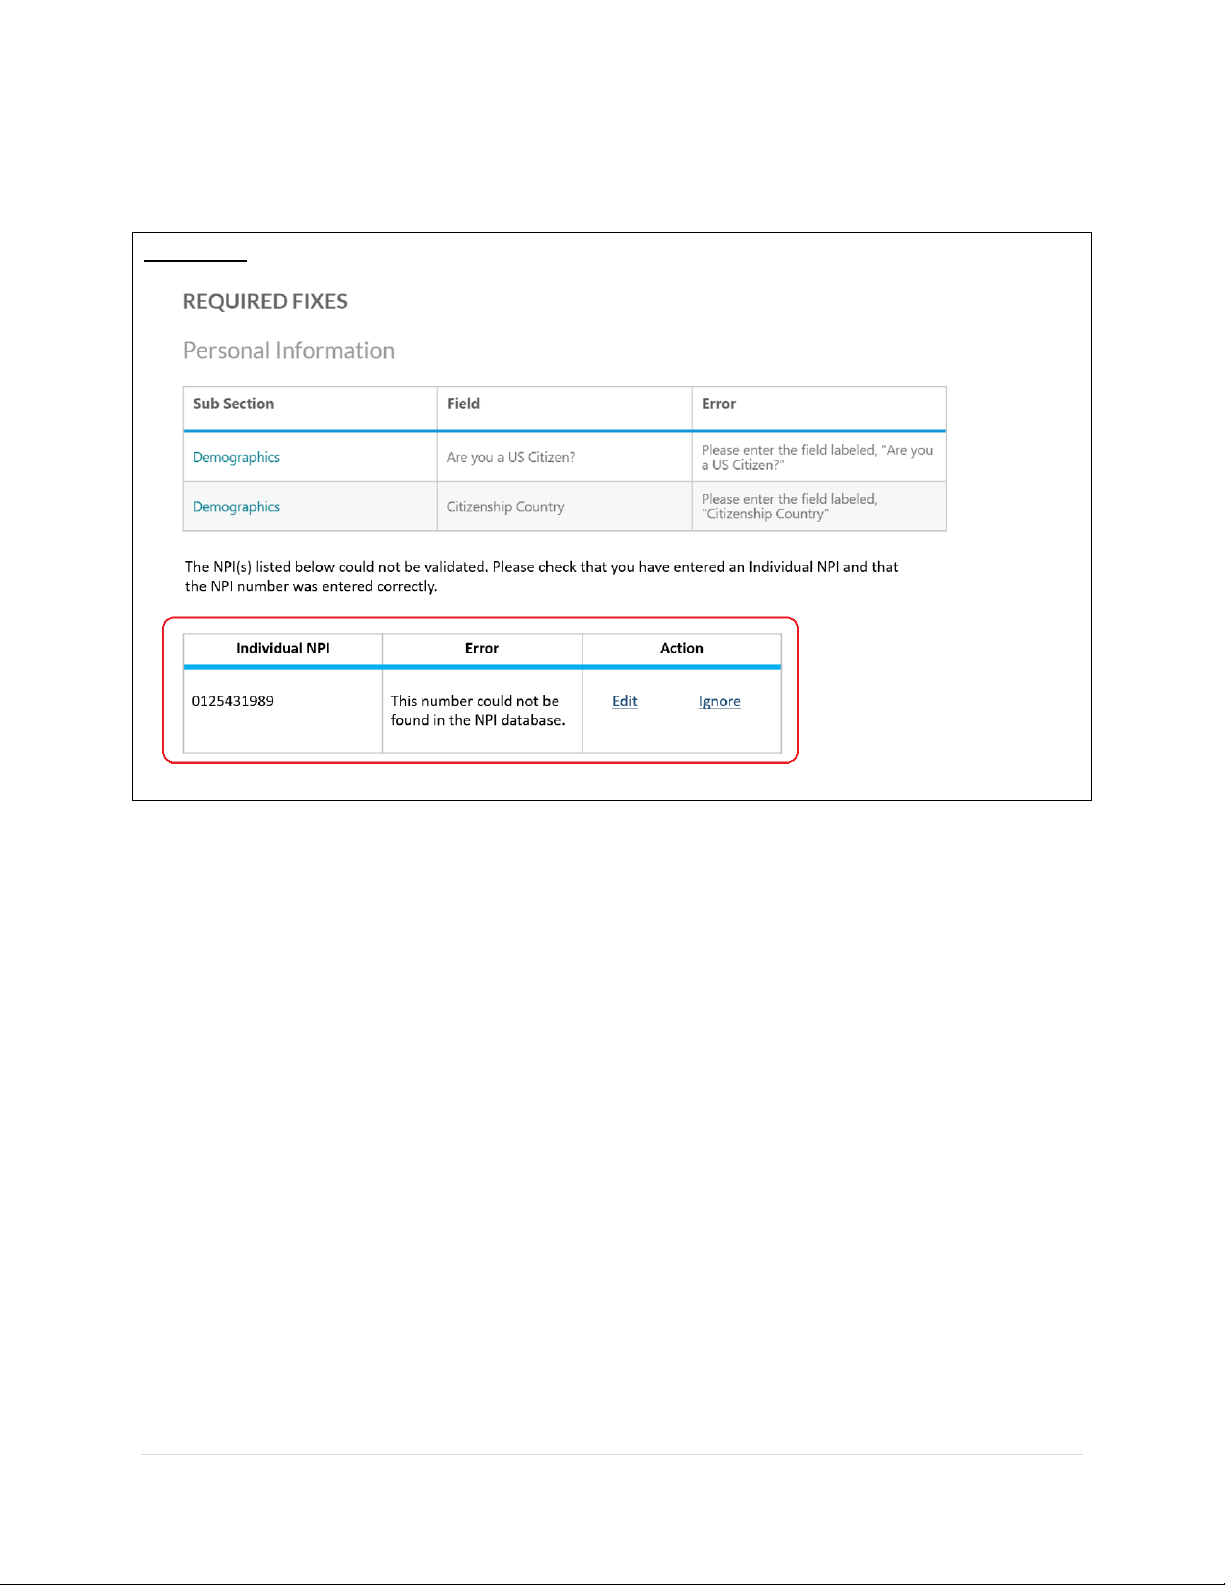
Note: All Type 1 NPIs will undergo a one-time validation. Validation failures will be displayed as
a required fix.
FIGURE 44
You may see the following errors on the Required Fixes page:
• This number could not be found in the NPI database. – This means that the Type 1 NPI
that you have entered is an invalid one. Please review for any possible typo error.
• This is not an Individual NPI. – You may have entered a Group NPI on the Individual NPI
field. Please review the value that you have entered on the Individual NPI field.
• This number does not match the name you provided in ProView, {ProView First Name}
{ProView Last Name}. – Please review the Individual NPI that you have entered. There
might be a typo error that has caused the mismatch.
Page 35
CAQH ProView Provider User Guide v13
34 | P a g e
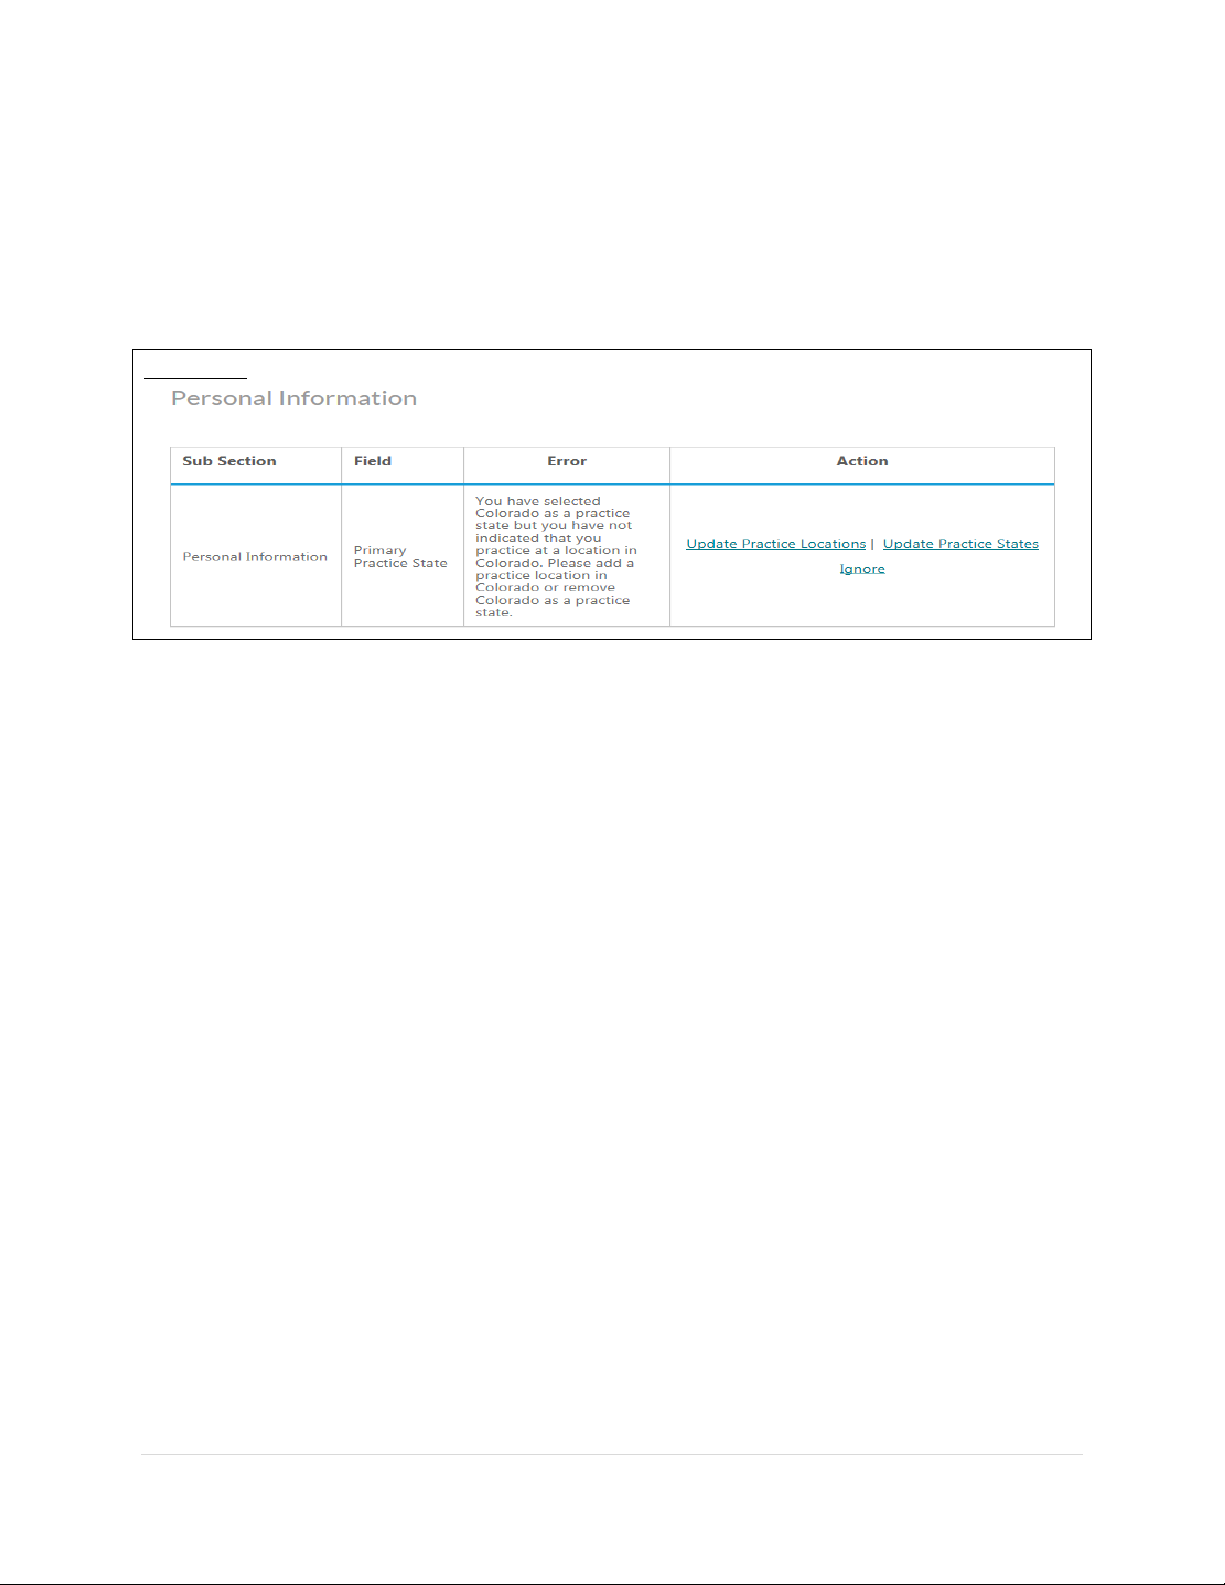
For Providers whose Provider Type is either MD, DO, NP, or DMD with Inpatient/Outpatient or
Outpatient Only as the Practice Setting, the Primary Practice State and each of the other Practice
States (in case of multi-state Providers) should have a matching value populated for the State
field in the General information section for any active Practice Location (where you answered Yes
to the question: Do you practice at this location?). There will be an error for each Practice State
that does not match an active Practice Location.
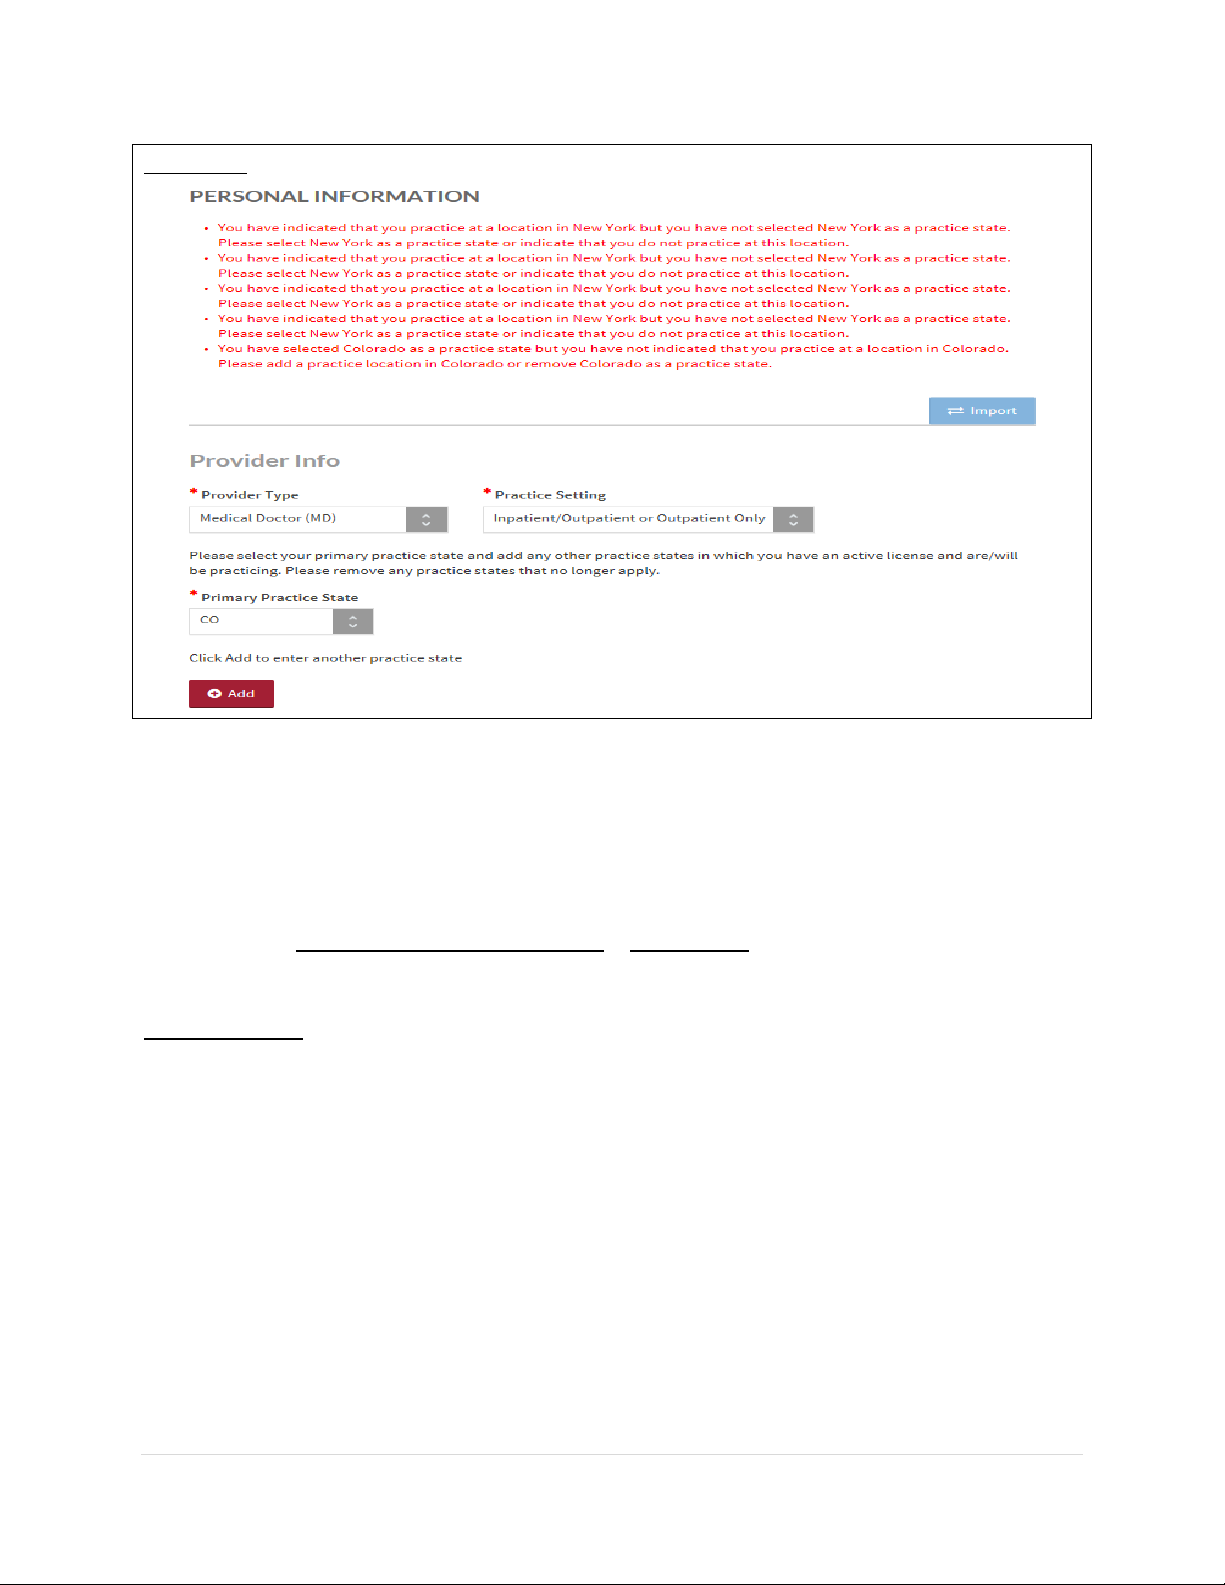
FIGURE 45
On the screenshot above, the practice state on the account is Colorado but there is no active
practice location in Colorado listed in the profile. The Provider is required to either add an active
practice location in Colorado or remove Colorado as a primary practice state, whichever is
applicable.
• The Update Practice States hyperlink in the error links to the Personal Information Page.
Once the user has clicked the hyperlink, the following error is displayed on the top of
the Personal Information Page, in red text:
You have selected {Primary Practice State or Practice State} as a practice state
but you have not indicated that you practice at a location in {Primary Practice State or
Practice State}. Please add a practice location in {Primary Practice State or Practice
State} or remove {Primary Practice State or Practice State} as a practice state.
Page 36
CAQH ProView Provider User Guide v13
35 | P a g e
FIGURE 46
• If you add a practice location to match the Practice State, and click "Save and
Continue", you will be redirected to the Correct Errors Page and will no longer see the
error.
• The Ignore hyperlink in the error links to the Ignore pop-up that already exists for
Address Standardization. The pop-up should have the same functionality, i.e., if the user
clicks the "Yes" button, the error is removed from the Correct Errors Page.
• You are required to either fix the error or click Ignore and then click "Yes" in the pop-up
so that the error disappears on the Correct Errors Page, and you will be able to attest.
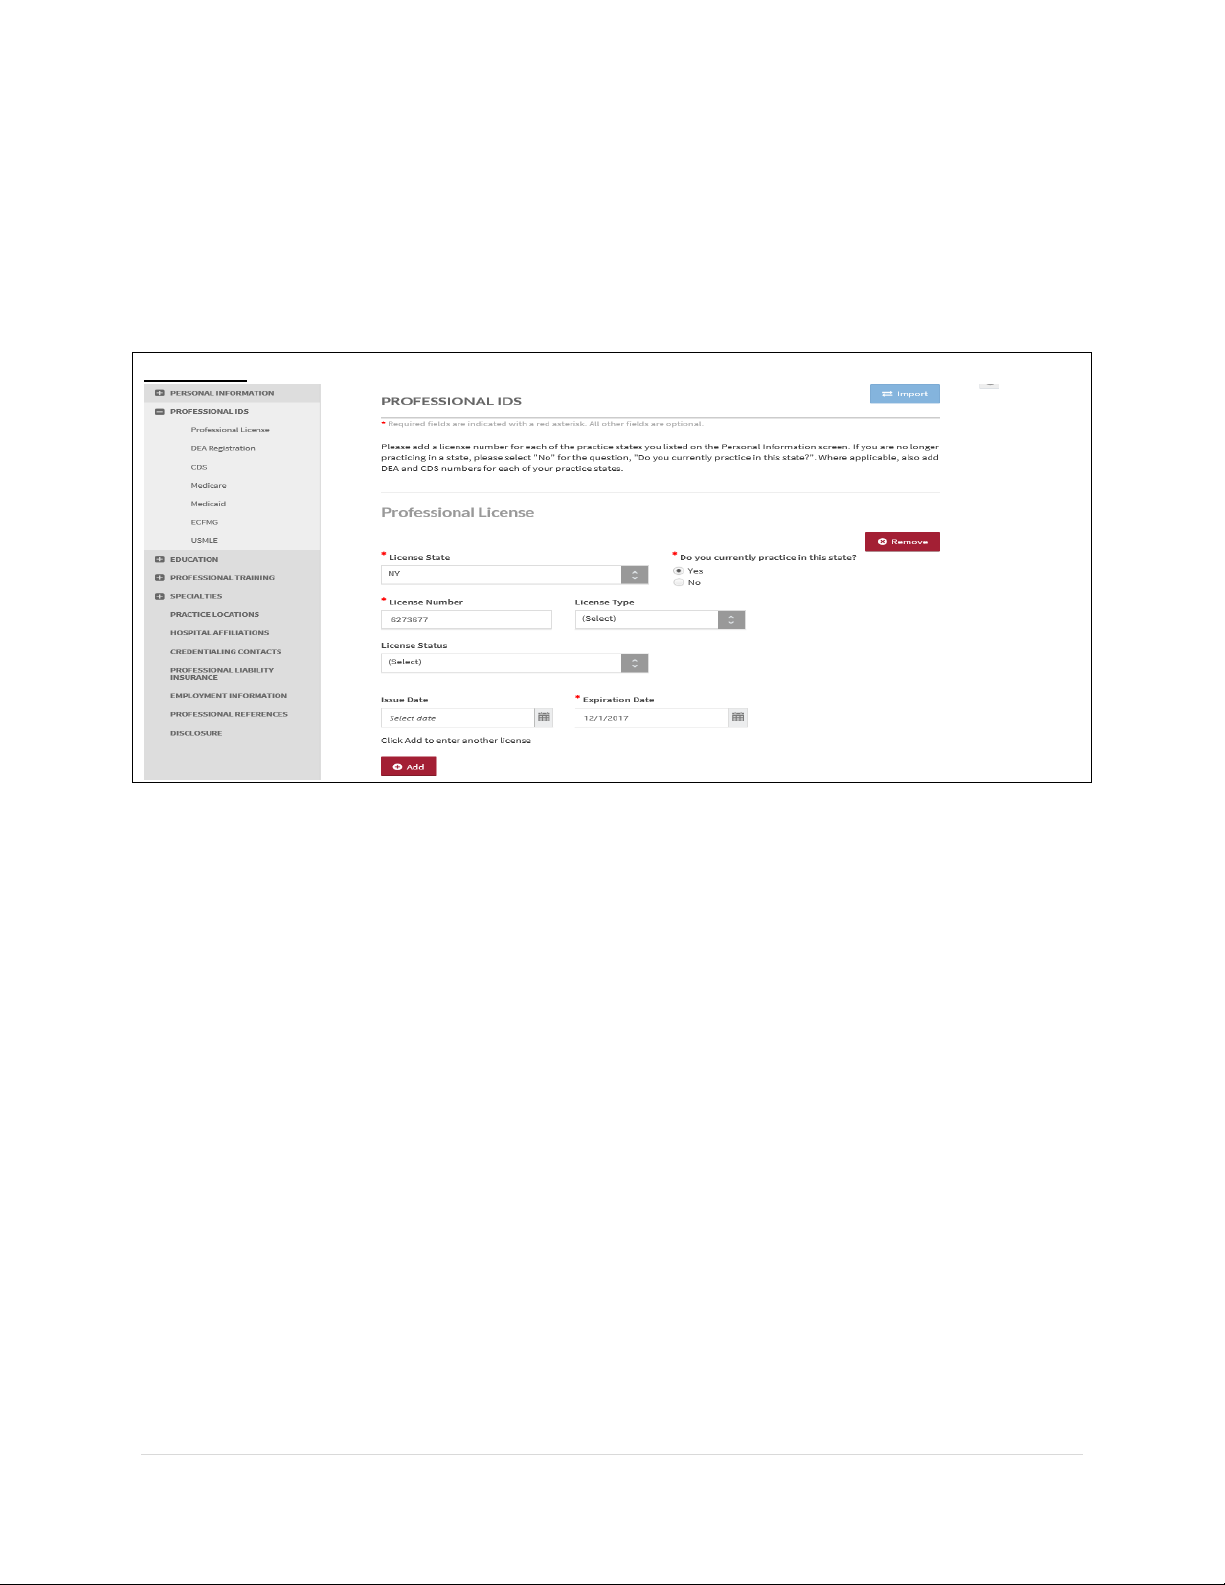
Professional IDs
The Professional ID section requests that you enter all professional identification numbers and
upload any applicable supporting documentation. If you have questions on uploading your
documentation, refer to Chapter 6: Uploading Supporting Documentation.
Tips:
• If you need assistance, you can access the “?” link that is displayed on the right-hand
side of the screens.
• Use “Save and Go Back” or “Save & Continue” to page backward or forward within
sections.
• It is important to click on the “Save” button or the “Save & Continue” button to save
your information. If you close the browser or move to another screen via the left-hand
navigation screen without clicking “Save” or “Save & Continue”, you will lose your
Page 37
CAQH ProView Provider User Guide v13
36 | P a g e
information. Clicking on the back and forward arrows will not save your information
either.
• Select “Add” to enter additional medical licenses or other professional identification
numbers.
• If the “Import” button is active, information already entered by a practice manager is
available for you to view and import if you choose to do so.
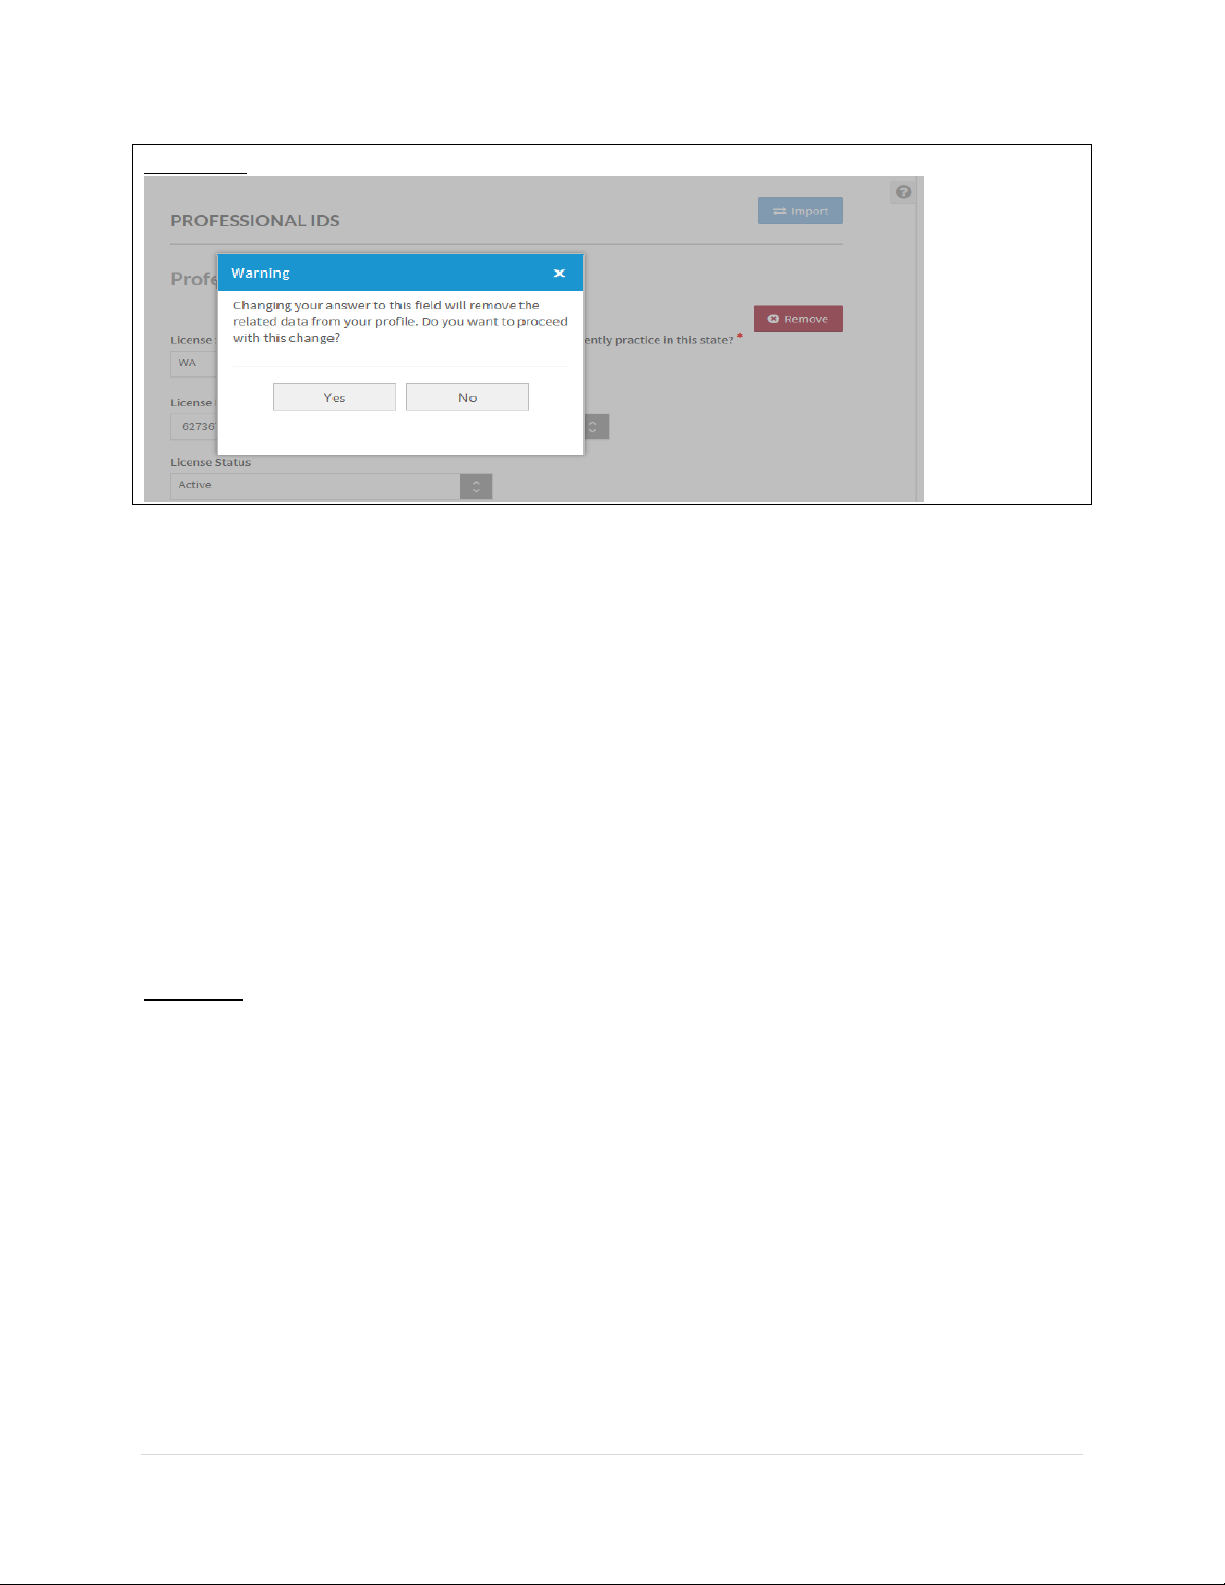
FIGURE 47
• A warning message will be displayed advising you that previously entered data will be
permanently removed from the system when you change the answer to a leading
question.
• A leading question is one that triggers different follow-on questions/responses depending
on the response provided.
• When the answer to a leading question is changed, follow-on questions may disappear
from the portal.
o For instance, if you previously answered 'Yes' to the question 'Do you have a DEA
certificate?' and now changed it to 'No', the data from the DEA Number, State,
Issue date, and Expiration Date are removed.
• Ensure no critical information will be deleted prior to selecting ‘Yes’ and saving the
changes on this page. Otherwise, you will have to re-enter deleted information.
• The same rule applies to fields on the Professional IDs section such as CDS registration
certificate, Medicare and Medicaid information, Educational Commission for Foreign
Medical Graduates (ECFMG) number, FLEX number, and DPS certification.
Page 38
CAQH ProView Provider User Guide v13
37 | P a g e
FIGURE 48
The following professional identification numbers are requested.
▪ Medical License
o You must enter all state medical licenses you currently hold or have held as issued
by a U.S. or Canadian licensing authority.
▪ DEA Registration – Drug Enforcement Administration
▪ CDS Registration – Controlled Dangerous Substance
▪ Medicare
▪ Medicaid
▪ ECFMG
o This is a certificate issued by the Education Commission for Foreign Medical
Graduates, and applies to US Citizens who graduated from a Medical School
outside the United States.
▪ USMLE – United Stated Medical Learning Examination
o The United States Medical Learning Examination is a physician assessment
required for physician licensing in the United States.
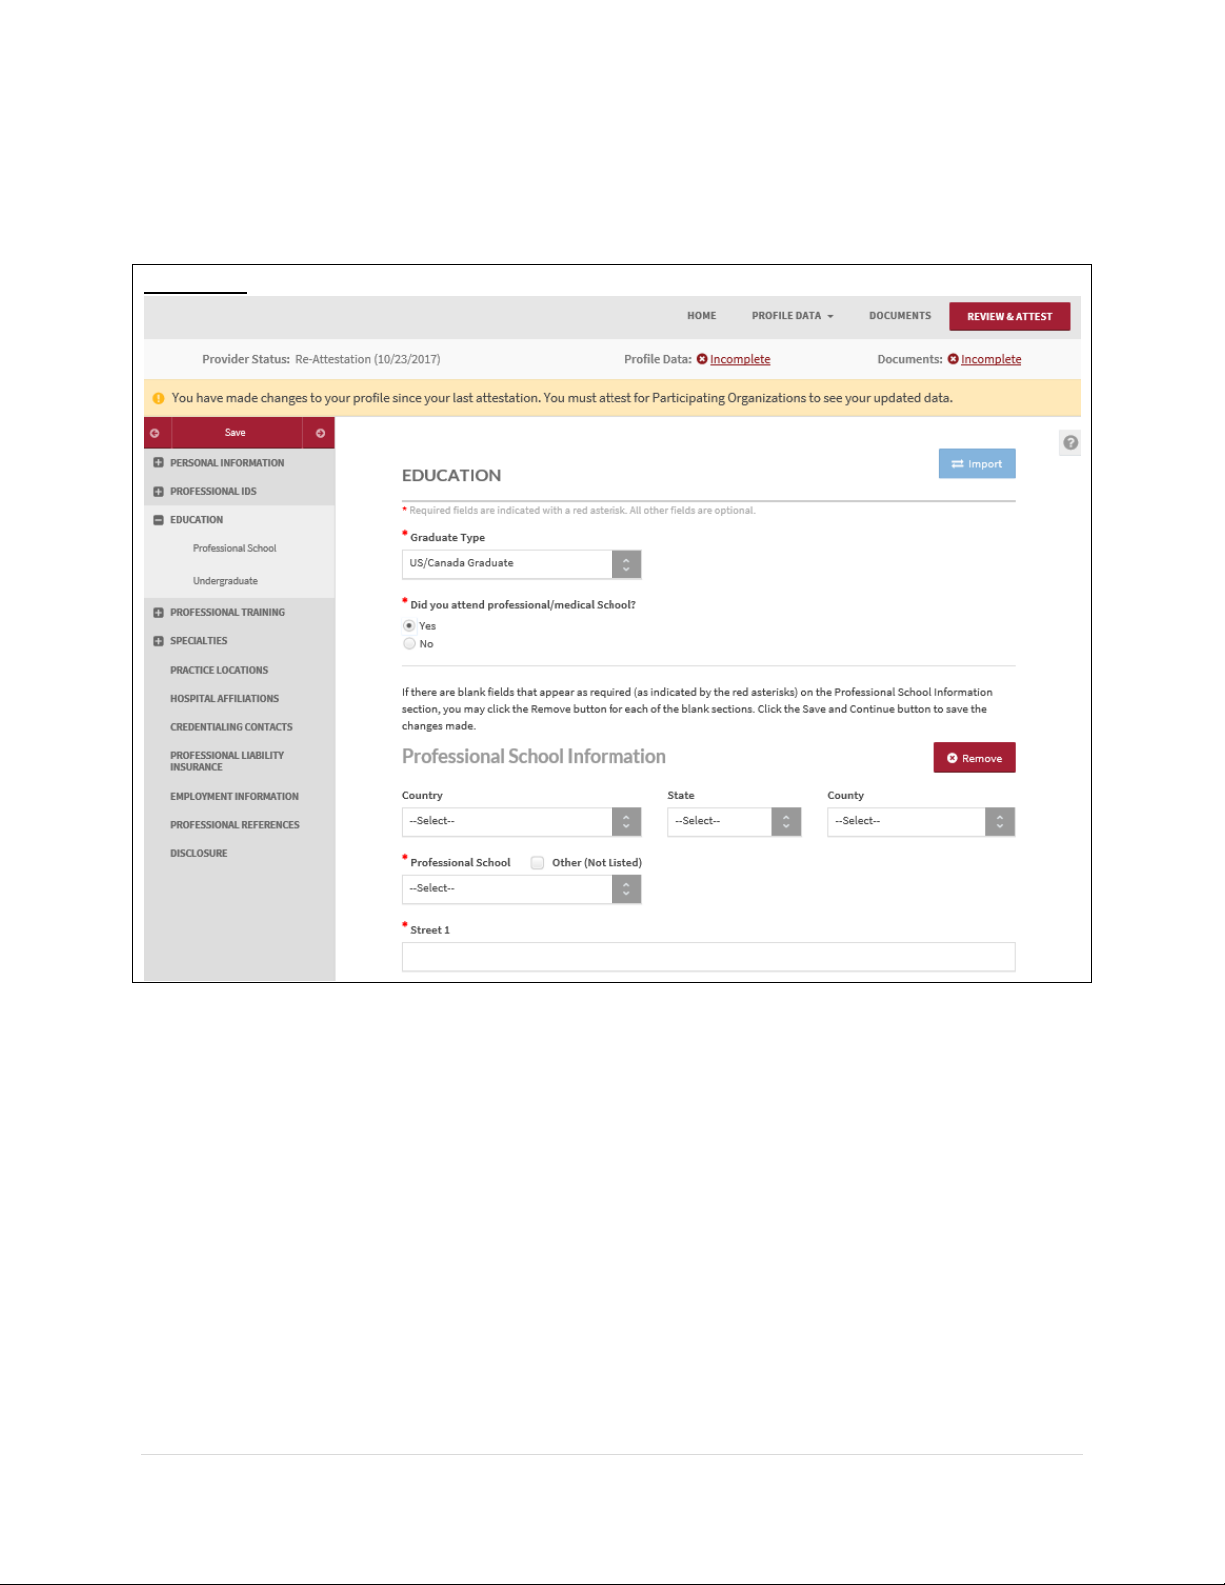
Education
The Education section requests information regarding your education history, including your
professional and undergraduate school information.
Tips:
• If you need assistance, you can access the “?” link that is displayed on the right-hand
side of the screens.
• Use “Save and Go Back” or “Save & Continue” to page backward or forward within
sections.
• It is important to click on the “Save” button or the “Save & Continue” button to save
your information. If you close the browser or move to another screen via the left-hand
navigation screen without clicking “Save” or “Save & Continue”, you will lose your
information. Clicking on the back and forward arrows will not save your information
either.
Page 39
CAQH ProView Provider User Guide v13
38 | P a g e
• Click on “Add” to add additional education as necessary.
• If the “Import” button is active, information already entered by a practice manager is
available for you to view and import if you choose to do so.
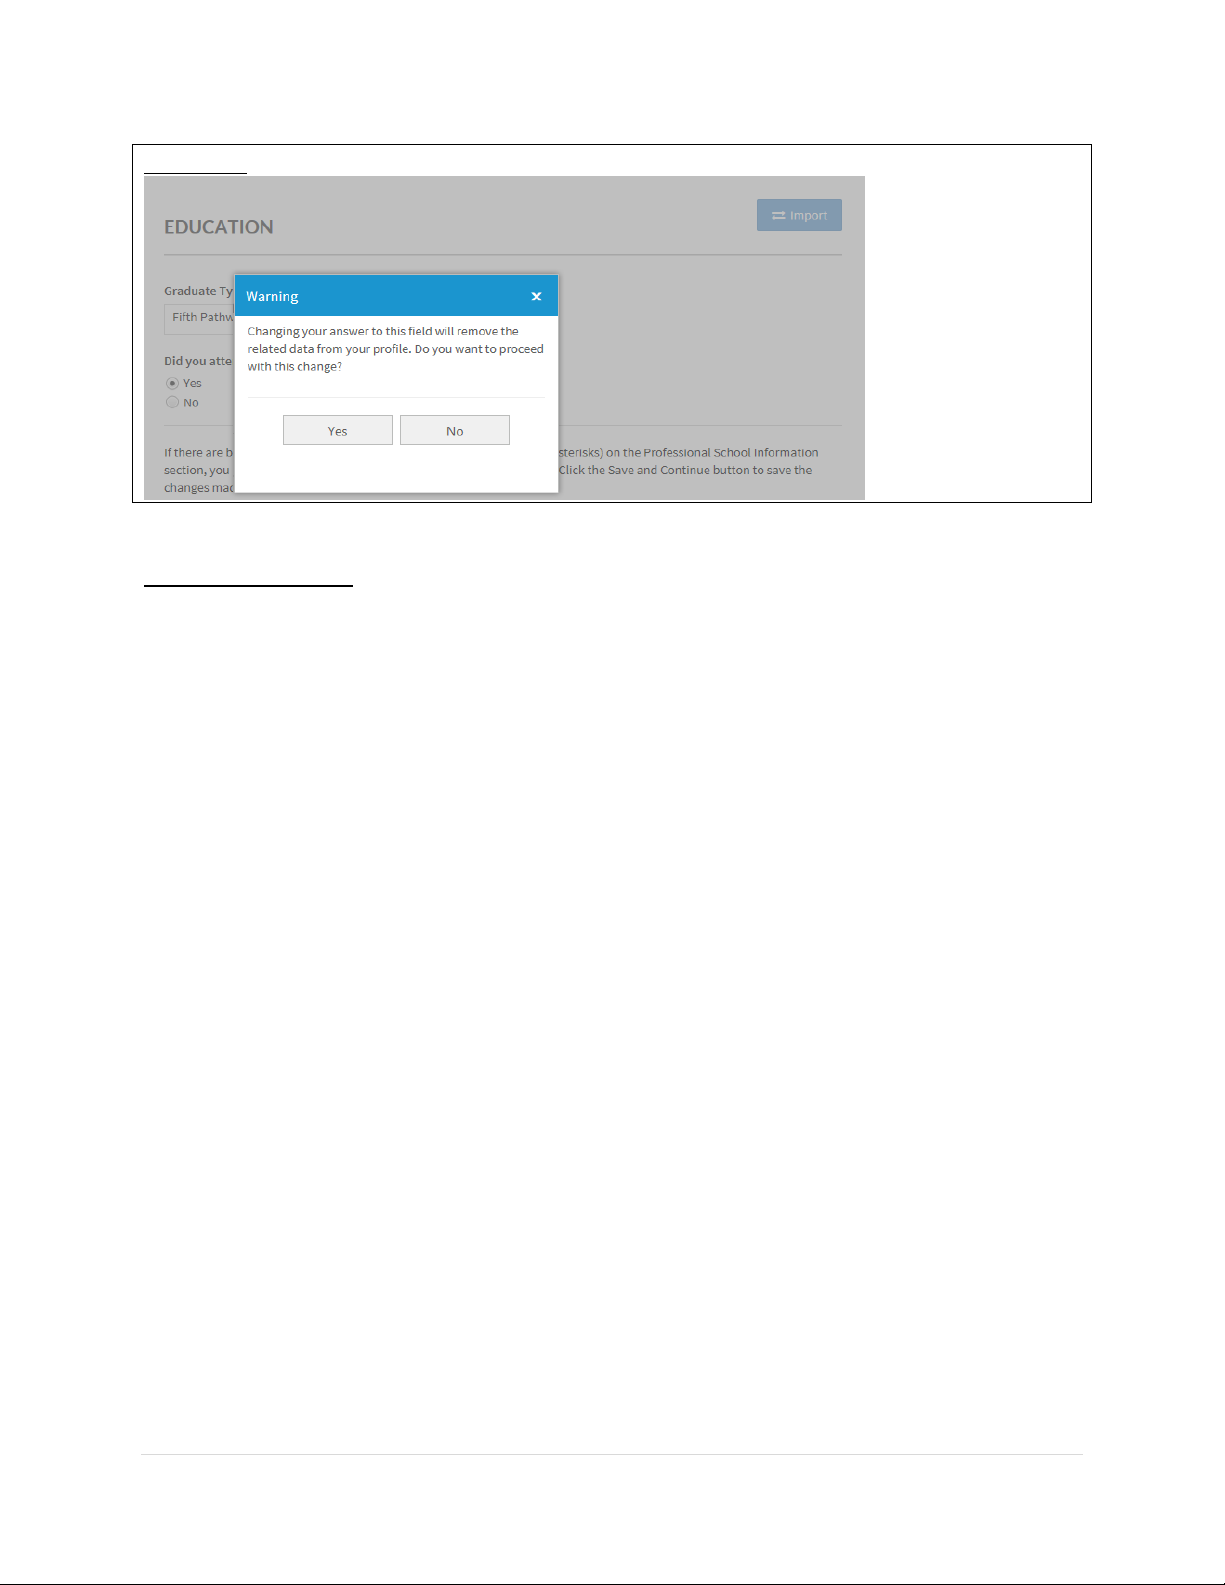
FIGURE 49
• A warning message will be displayed advising you that previously entered data will be
permanently removed from the system when you change the answer to a leading
question.
• A leading question is one that triggers different follow-on questions/responses depending
on the response provided.
• When the answer to a leading question is changed, follow-on questions may disappear
from the portal or if you change the selection from one value to another, all education
values are deleted. Therefore, ensure no critical information will be deleted prior to
selecting ‘Yes’ and saving the changes on this page. Otherwise, you will have to re-enter
deleted information.
Page 40
CAQH ProView Provider User Guide v13
39 | P a g e
FIGURE 50
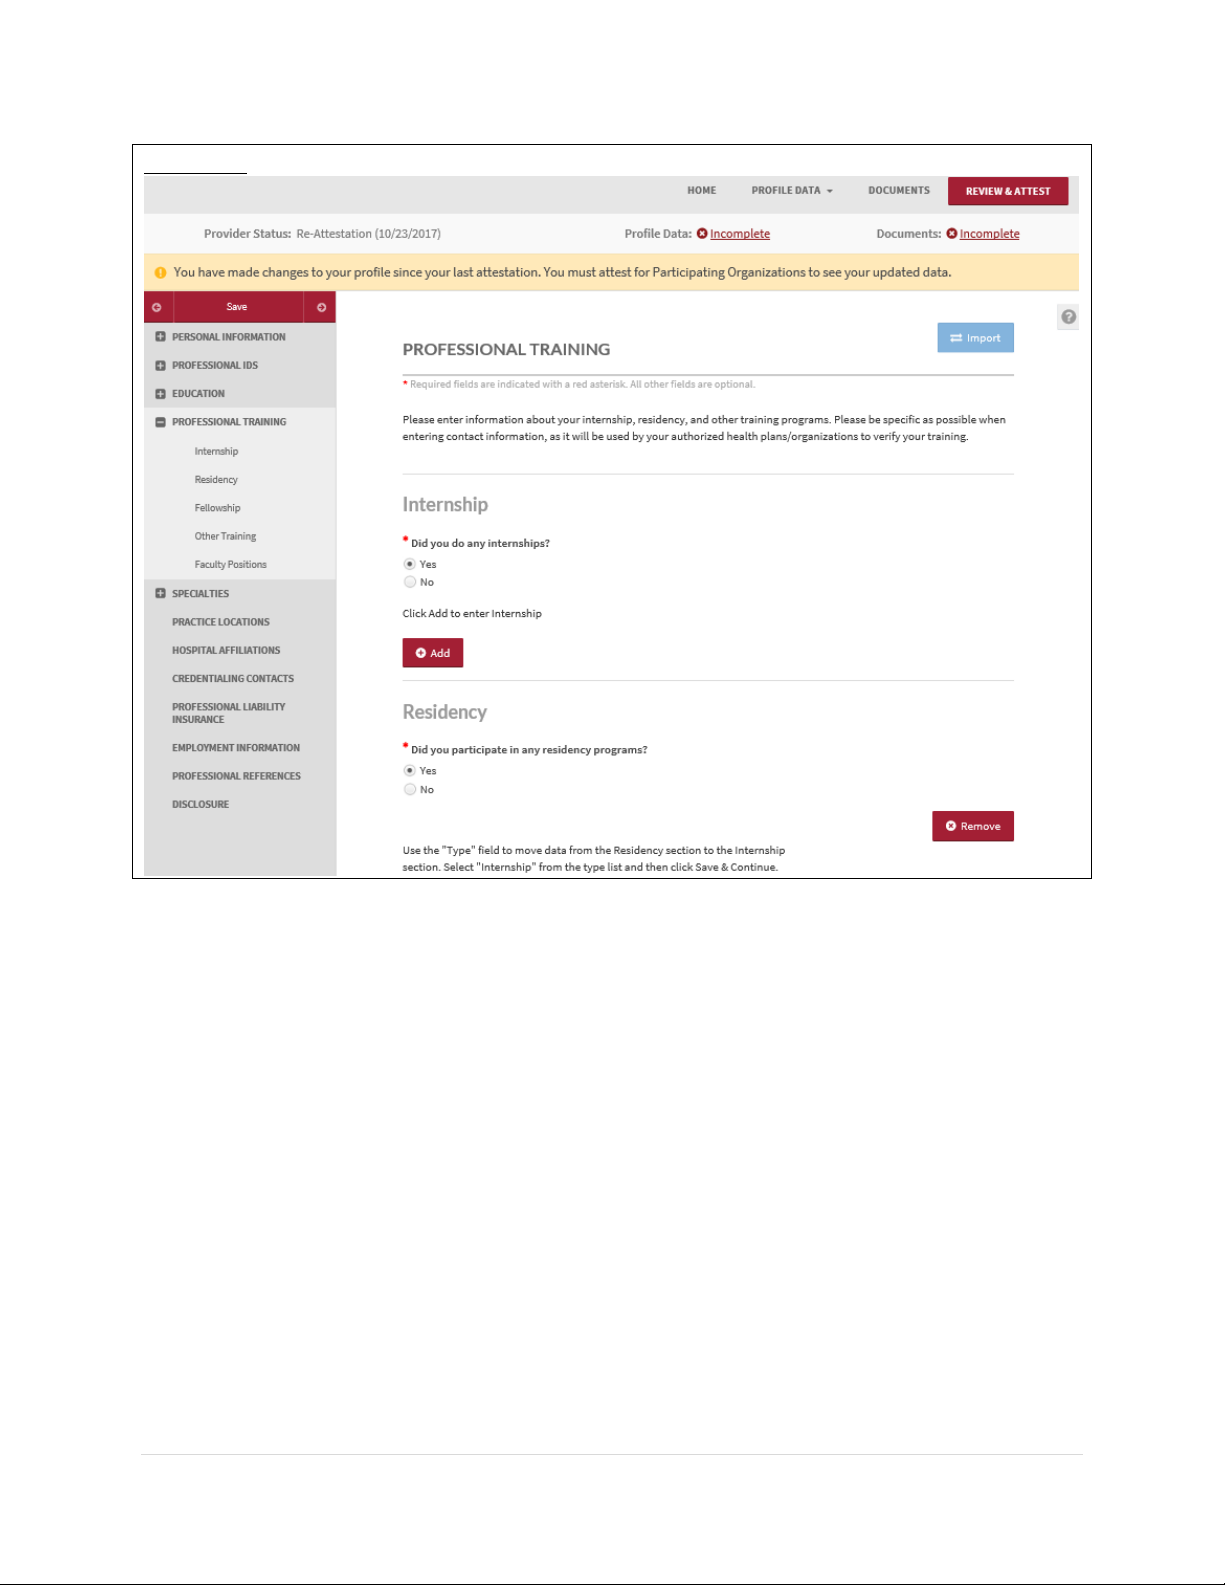
Professional Training
The Professional Training section requests information regarding your professional training, such
as your internship and residency information.
Tips:
• If you need assistance, you can access the “?” link that is displayed on the right-hand
side of the screens.
• Use “Save and Go Back” or “Save & Continue” to page backward or forward within
sections.
• It is important to click on the “Save” button or the “Save & Continue” button to save
your information. If you close the browser or move to another screen via the left-hand
navigation screen without clicking “Save” or “Save & Continue”, you will lose your
information. Clicking on the back and forward arrows will not save your information
either.
• Click on “Add” to add additional training as necessary.
• If the “Import” button is active, information already entered by a practice manager is
available for you to view and import if you choose to do so.
Page 41
CAQH ProView Provider User Guide v13
40 | P a g e
FIGURE 51
The Professional Training subsections are listed below:
• Internship
o Include any incomplete internship programs.
• Residency
o Include any incomplete residency programs.
o If your training program was Rotating or Transitional, please enter a separate
entry for each rotation. For credentialing, the health plans need to know the
specifics of each rotation including the specialty or department and the time
associated with each.
▪ Fellowship
o The period of medical training in the United States and Canada that
a physician or dentist may undertake after completing a specialty training
program (residency)
▪ Faculty Positions/Academic Appointments
Page 42
CAQH ProView Provider User Guide v13
41 | P a g e
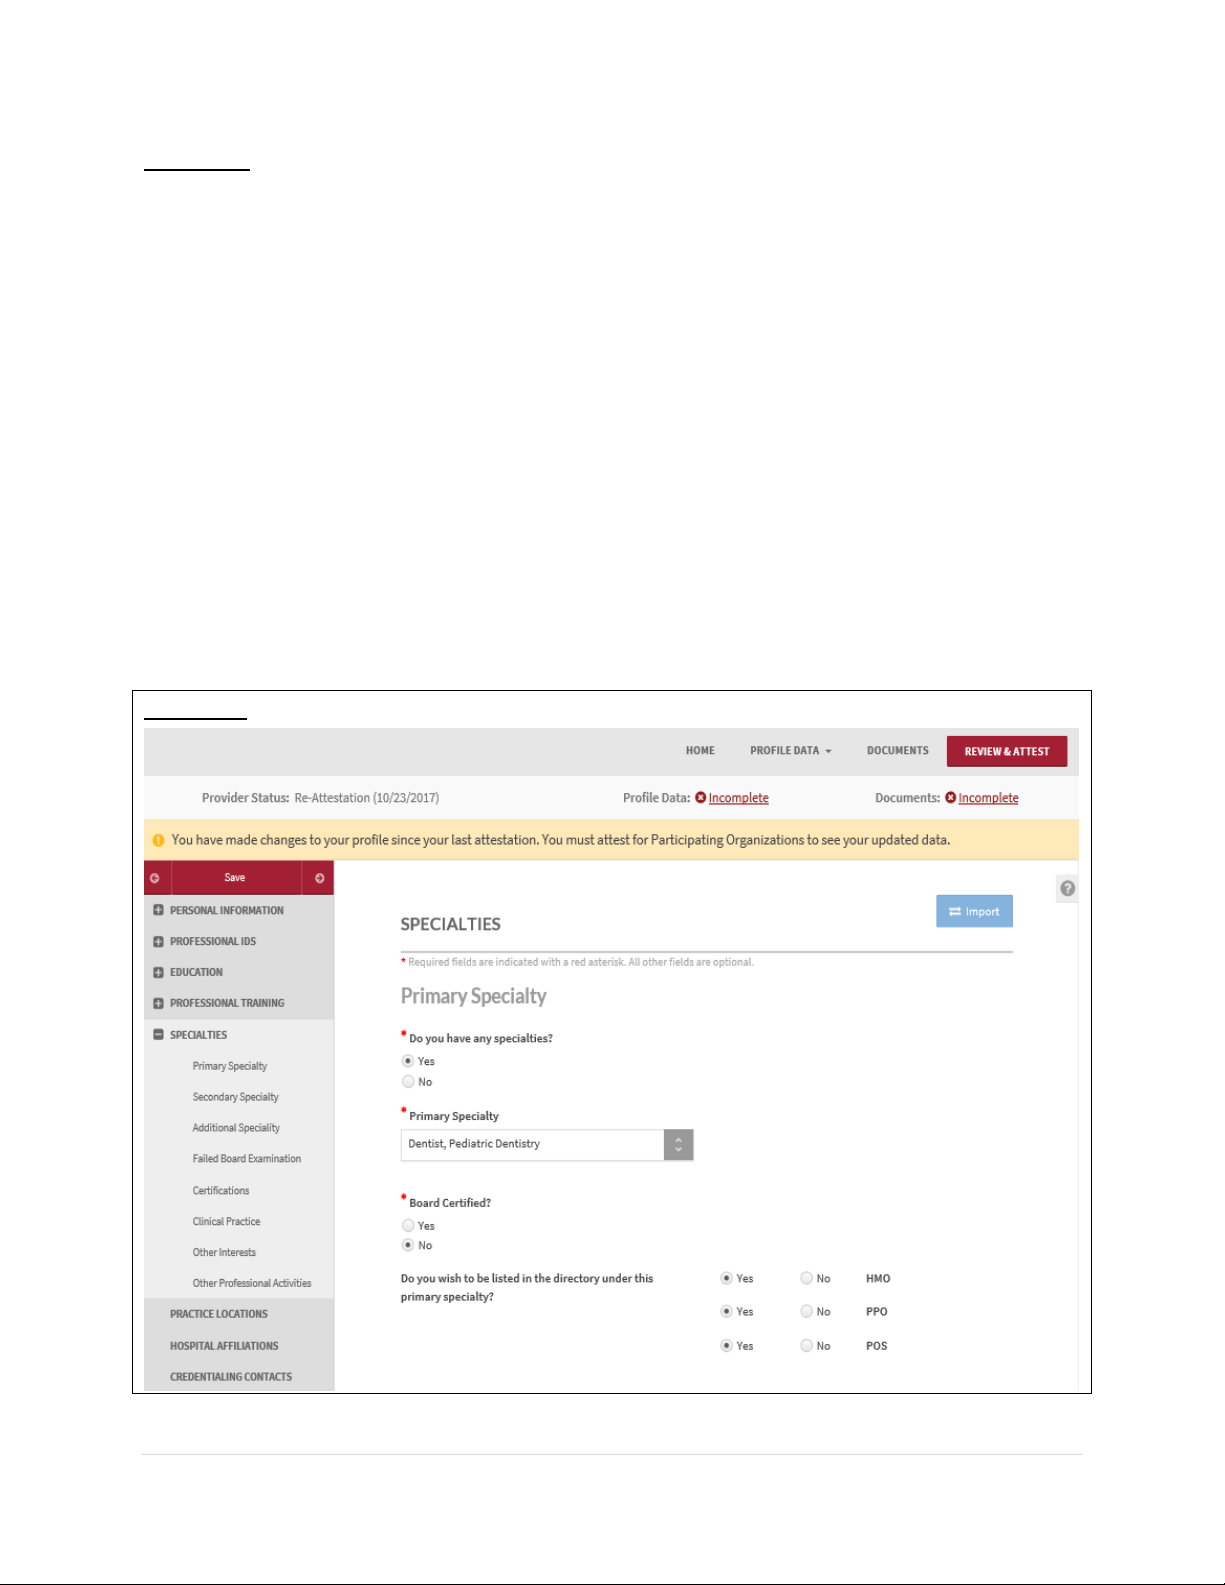
Specialties
The Specialties section requests information regarding your specialties and certification
information.
Tips:
• If you need assistance, you can access the “?” link that is displayed on the right-hand
side of the screens.
• Use “Save and Go Back” or “Save & Continue” to page backward or forward within
sections.
• It is important to click on the “Save” button or the “Save & Continue” button to save
your information. If you close the browser or move to another screen via the left-hand
navigation screen without clicking “Save” or “Save & Continue”, you will lose your
information. Clicking on the back and forward arrows will not save your information
either.
• Click on “Add” to add additional specialties as necessary.
• If the “Import” button is active, information already entered by a practice manager is
available for you to view and import if you choose to do so.
FIGURE 52
Page 43
CAQH ProView Provider User Guide v13
42 | P a g e
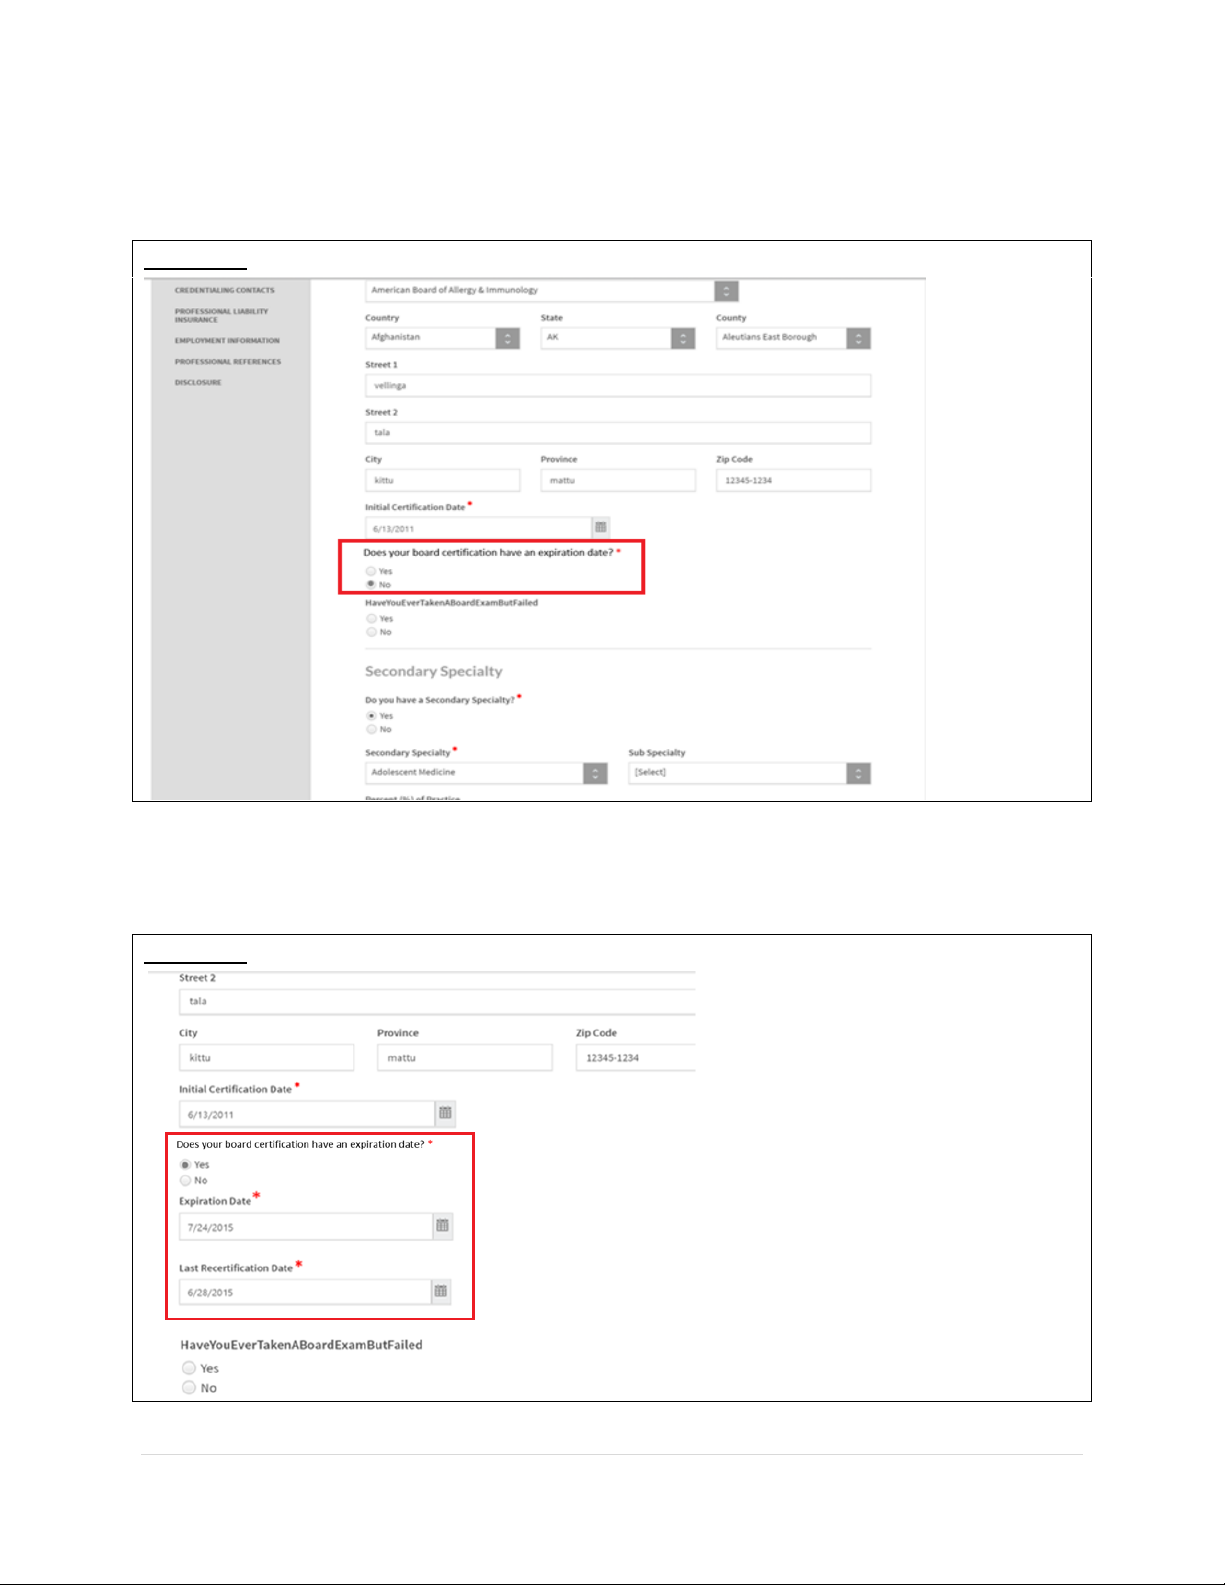
• You are now asked to respond to this question: Does your board certification have an
expiration date?
FIGURE 53
• If you responded with a Yes, the Expiration Date field and the last Recertification date
fields will be required.
FIGURE 54
Page 44

CAQH ProView Provider User Guide v13
43 | P a g e
The specialties that are included in the drop-down list are collected from the National Uniform
Claim Committee (www.nucc.org). If you cannot locate your specialty in this list, select the
specialty that is most appropriate for your practice. If your specialty is not listed, you may
enter it in the “Areas of Other Interest”, which is towards the bottom of the “Specialty” page.
The subsections are listed below and may vary based on your practice state.
▪ Primary Specialty
▪ Secondary Specialty
▪ Additional Specialty
▪ Board Examination – dynamically displayed/hidden based on your entries
▪ Certifications – The system will ask if you have received any of the following
certifications. Additional information regarding each certification is provided below for
your reference.
o CPR - Cardio-Pulmonary Resuscitation certification: Community level classes
concentrate on performing CPR on adults and older children. Some also include
AED training, which teaches how to use the electronic defibrillation unit on heart
attack victims. Professional level classes are designed for health care
professionals, ski patrol, police, firefighters and emergency medical technicians.
These classes teach all the skills previously mentioned, as well as removal of
airway obstructions for victims of all ages. Other skills are also included in these
classes, including inserting tubes to keep the airway open, using an oxygen tank,
artificial breathing apparatuses and techniques for performing two-person CPR.
o BLS - Basic Life Support Certification: Basic Life Support (BLS) certification is a
relatively short training course required of many health professionals to help
revive, resuscitate, or sustain a person who is experiencing cardiac arrest or
respiratory failure of some sort. This could include a drowning victim, heart attack
or stroke patient, or any scenario where breathing or heartbeats have been
compromised.
o ACLS - Advanced Cardiovascular Life Support Certification: ACLS is an acronym
for Advanced Cardiovascular Life Support. This certification is required of many
healthcare providers who will be interacting with patients. Like its name implies,
ACLS is usually required of more advanced medical professionals, as it does
include some invasive procedures, unlike Basic Life Support (BLS), which is
required of almost all healthcare professionals.
o ALSO - Advanced Life Support in OB Certification: Advanced Life Support in
Obstetrics (ALSO®) is an evidence-based multidisciplinary training program that
prepares maternity health care providers to better manage obstetric emergencies
when and wherever they occur. ALSO's evidence-based learning path bridges
knowledge gaps and boosts skill sets using a team-based approach, hands-on
training, and mnemonics to reduce errors and save lives.
Page 45

CAQH ProView Provider User Guide v13
44 | P a g e
o Health Care Provider (CoreC)
o ATLS - Advanced Trauma Life Support Certification: Advanced Trauma Life
Support (ATLS) is a training program for medical providers
(MD/DO/DPM/PA/NP/CO) in the management of acute trauma cases, developed
by the American College of Surgeons. Similar programs exist for nurses (ATCN) and
paramedics (PHTLS). The program has been adopted worldwide in over 60
countries, sometimes under the name of Early Management of Severe
Trauma (EMST), especially outside North America. Its goal is to teach a simplified
and standardized approach to trauma patients. Originally designed for emergency
situations where only one doctor and one nurse are present, ATLS is now widely
accepted as the standard of care for initial assessment and treatment in trauma
centers. The premise of the ATLS program is to treat the greatest threat to life
first. It also advocates that the lack of a definitive diagnosis and a detailed history
should not slow the application of indicated treatment for life-threatening injury,
with the most time-critical interventions performed early.
o NRP – Neonatal Resuscitation Program certification: NRP was developed and is
maintained by the American Academy of Pediatrics. This program focuses on basic
resuscitation skills for newly born infants.
o NALS - Neonatal Advanced Life Support certification: NALS training,
administered by the American Academy of Physician Assistants, delivers the same
syllabus as NRP, has similar flexibility in its format, and equips trainees with
identical knowledge and skills.
o PALS - Pediatric Advanced Life Support Certification: The PALS Course is for
healthcare providers who respond to emergencies in infants and children. These
include personnel in emergency response, emergency medicine, intensive care
and critical care units such as physicians, nurses, paramedics and others who need
a PALS course completion card for job or other requirements.
o Anesthesia Permit
▪ Other Interests
▪ Professional Associations: A professional association or professional society is usually an
organization seeking to further a particular profession and the interests of individuals
engaged in that profession. This is the section where you specify which Medical
Professional Associations and Societies you are affiliated to. You can add more than one
association to the list.
Page 46
CAQH ProView Provider User Guide v13
45 | P a g e
Practice Location
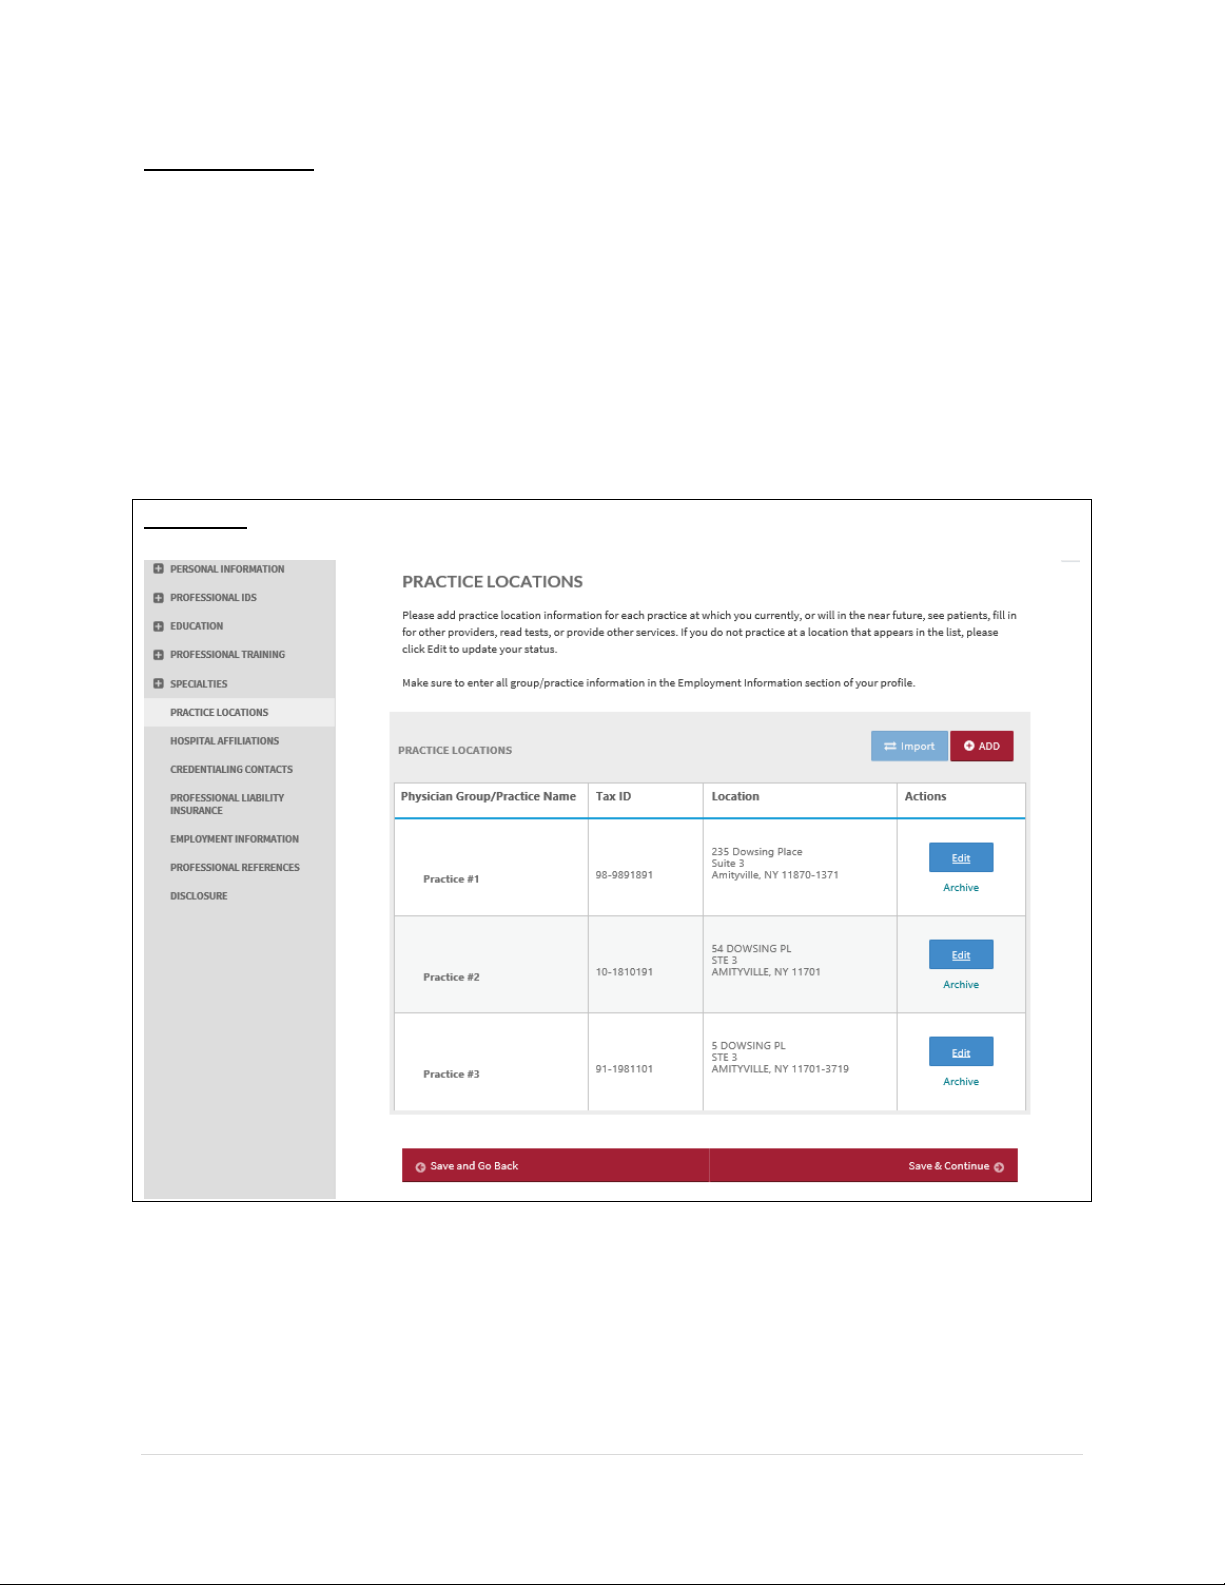
The Practice Location section asks for detailed information regarding your practice location(s).
A Practice Location summary table will be displayed on the Practice Locations start page.
o The table contains the following column headers:
▪ Physician Group/Practice Name
▪ Tax ID – All Tax IDs associated with the practice location will be displayed with a
line break.
▪ Location – displays the general address and phone number for the practice
location; Address 1 and Address 2, City, State ZIP, Phone
▪ Actions – Edit and Archive
FIGURE 55
Page 47
CAQH ProView Provider User Guide v13
46 | P a g e
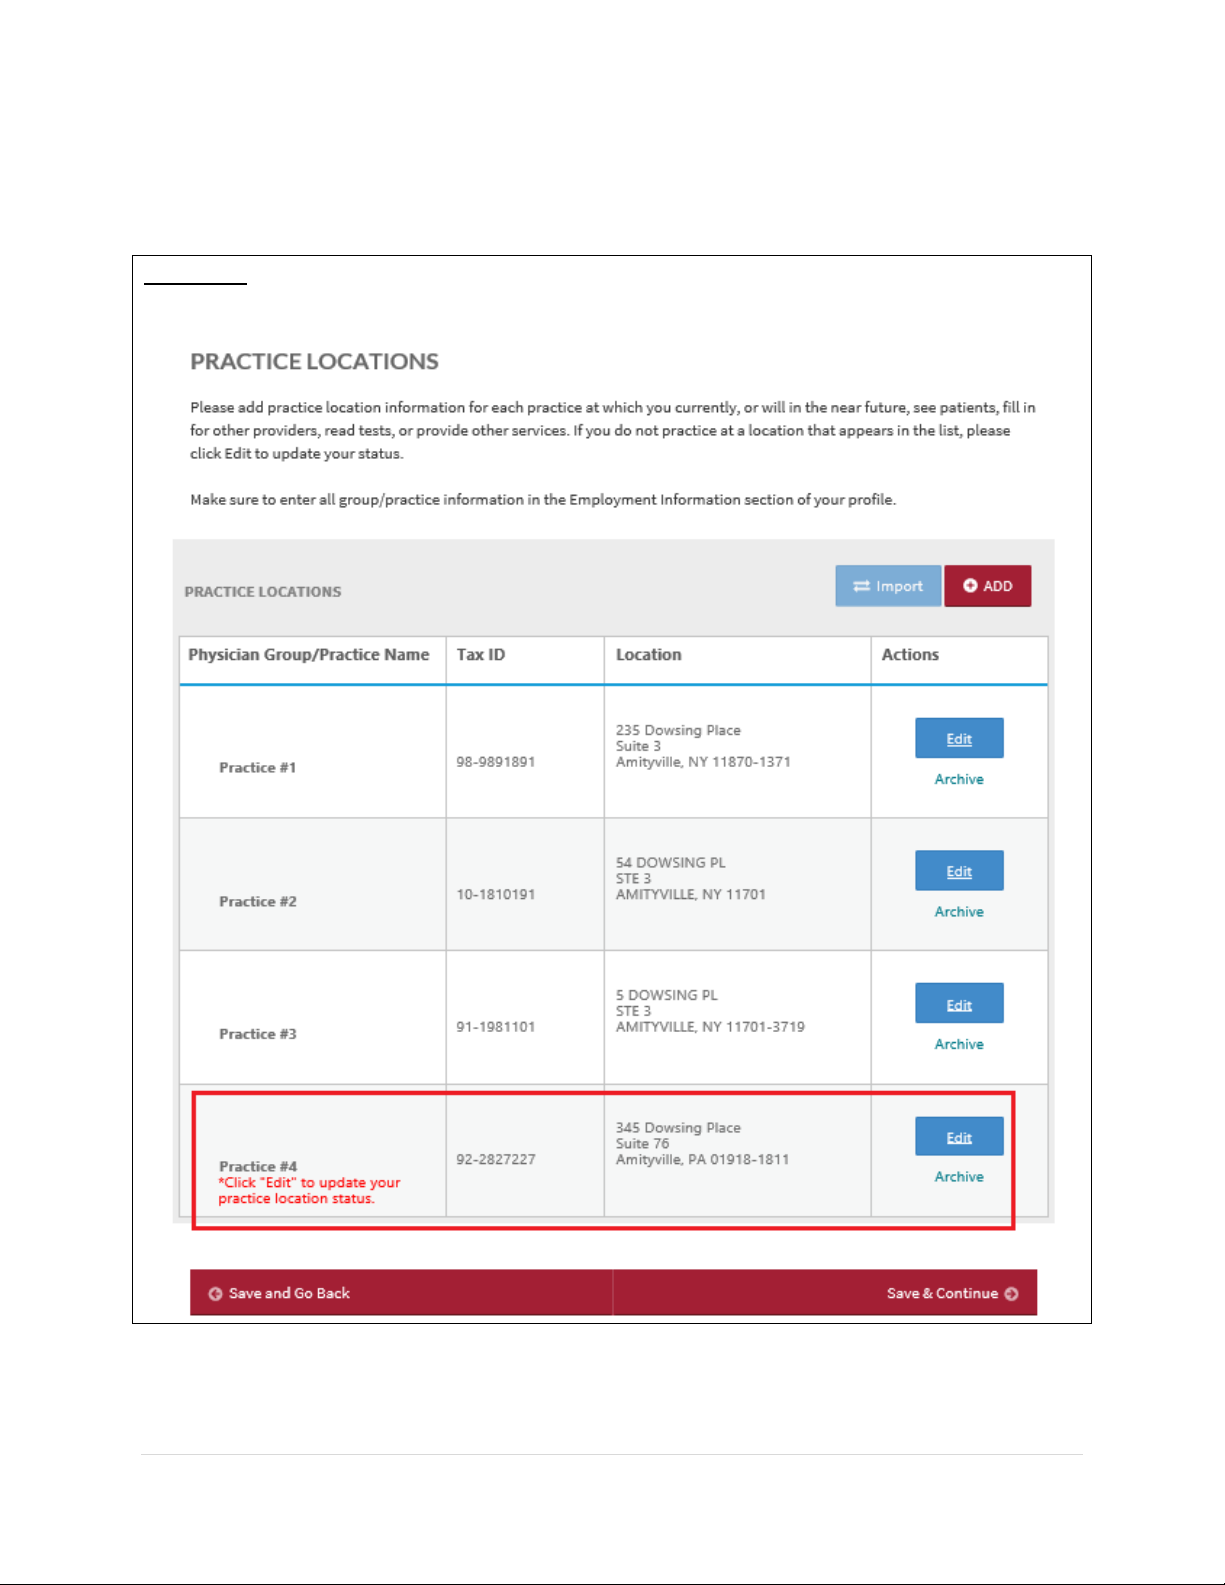
If you have not answered the question, “Currently practicing?” prior to these changes, the
following will appear in red font in the Physician Group/Practice Name column: “Click “Edit” to
update your practice location status.”
FIGURE 56
Page 48
CAQH ProView Provider User Guide v13
47 | P a g e
If you have selected Office Type = Primary Practice for one or more practice locations, that practice
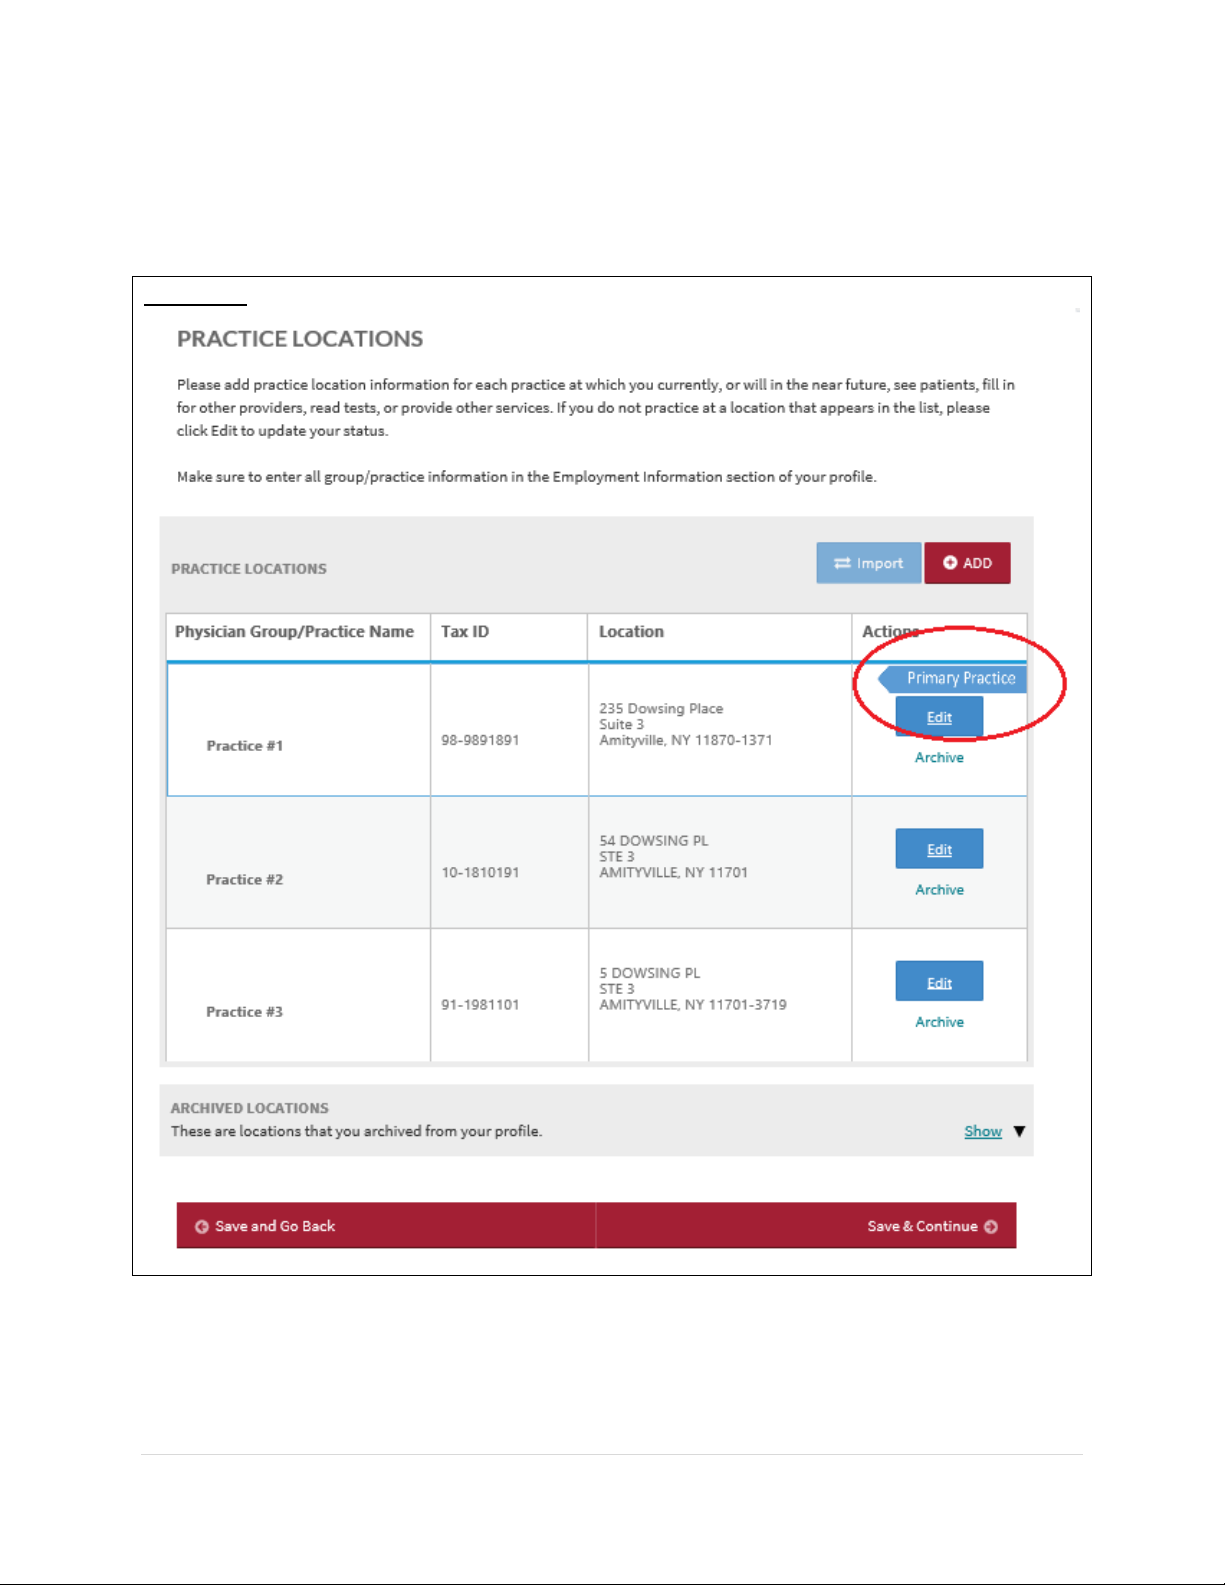
location/s will be outlined with a bright blue line. On the top right side of the row, a blue chevron that
says, “Primary Practice” will also be displayed. The practice location tagged as primary will appear first in
the list.
FIGURE 57
Page 49
CAQH ProView Provider User Guide v13
48 | P a g e
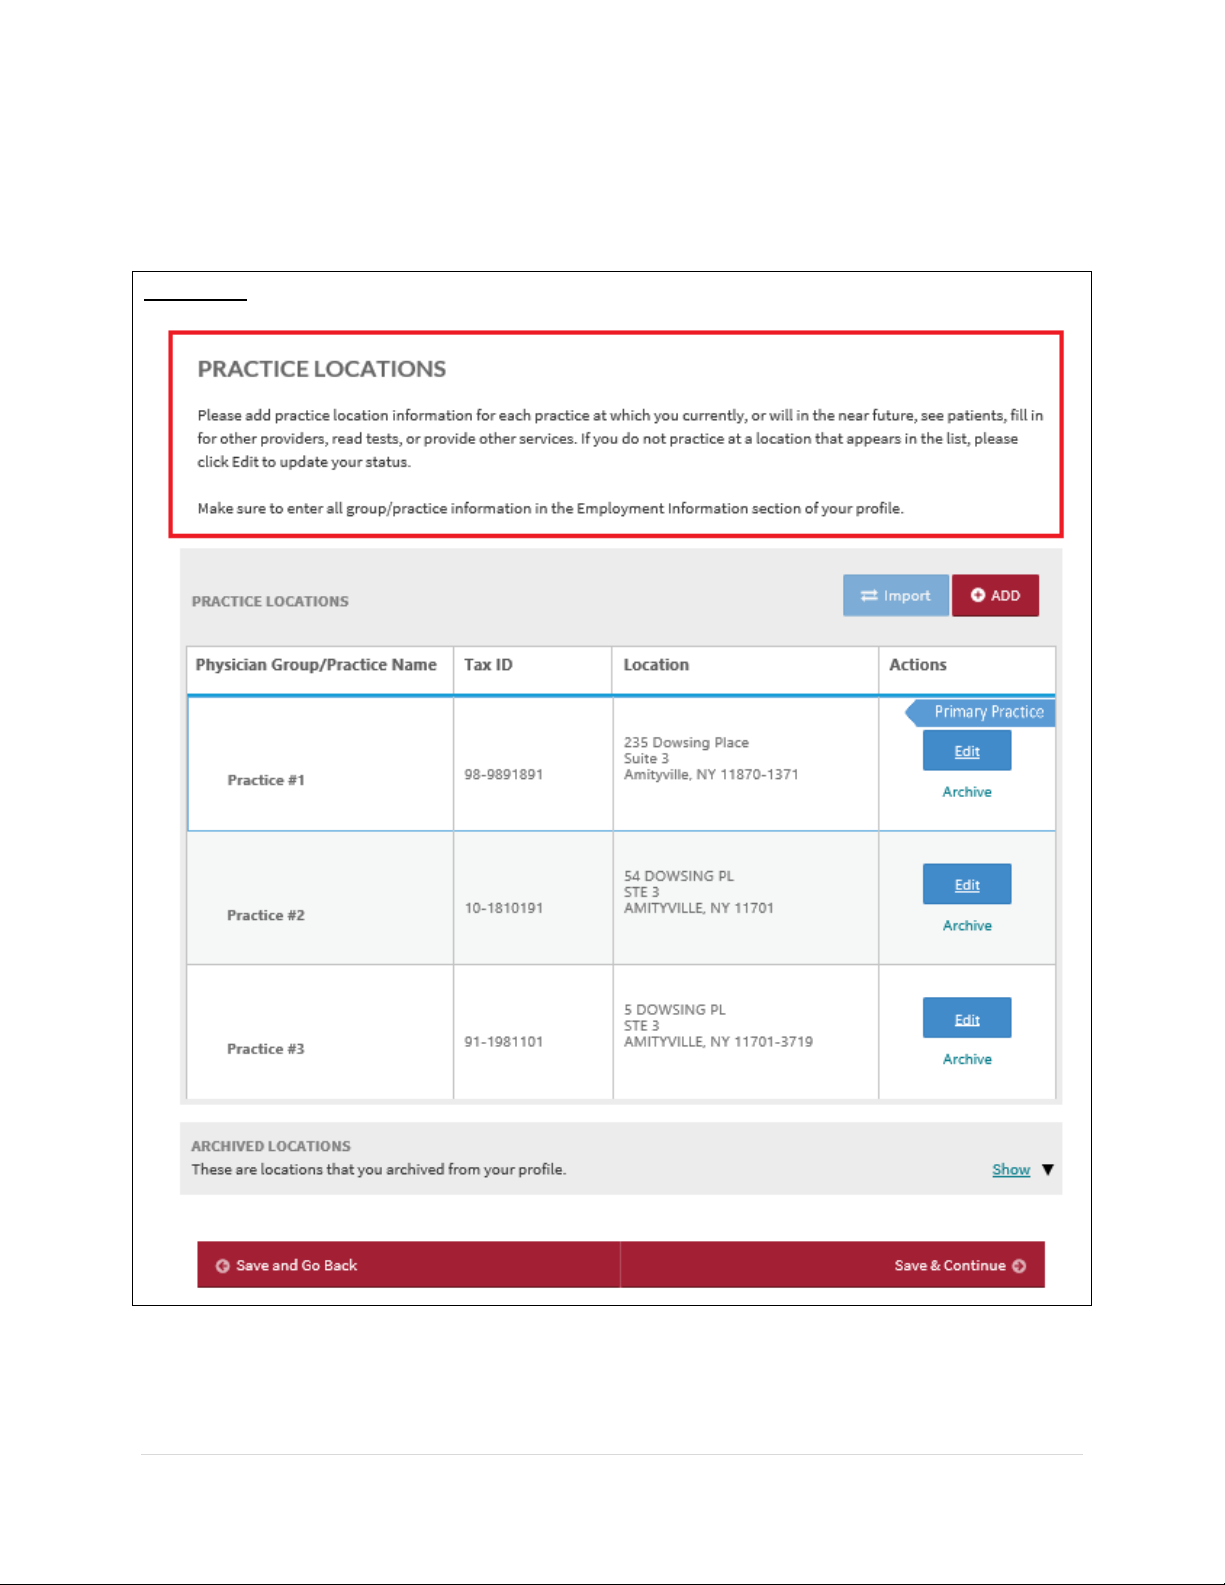
The Help text on the Practice Location start page will guide you through completing this section
of your application.
FIGURE 58
Page 50
CAQH ProView Provider User Guide v13
49 | P a g e
Tips:
• If you need assistance, you can access the “?” link that is displayed on the right-hand
side of the screens.
• Use “Save and Go Back” or “Save & Continue” to page backward or forward within
sections.
• It is important to click on the “Save” button or the “Save & Continue” button to save
your information. If you close the browser or move to another screen via the left-hand
navigation screen without clicking “Save” or “Save & Continue”, you will lose your
information. Clicking on the back and forward arrows will not save your information
either.
• Select “Add” to enter information for a practice location.
• Select “Edit” to edit the information within a practice location.
• If the “Import” button is active, information already entered by a practice manager is
available for you to view and import if you choose to do so.
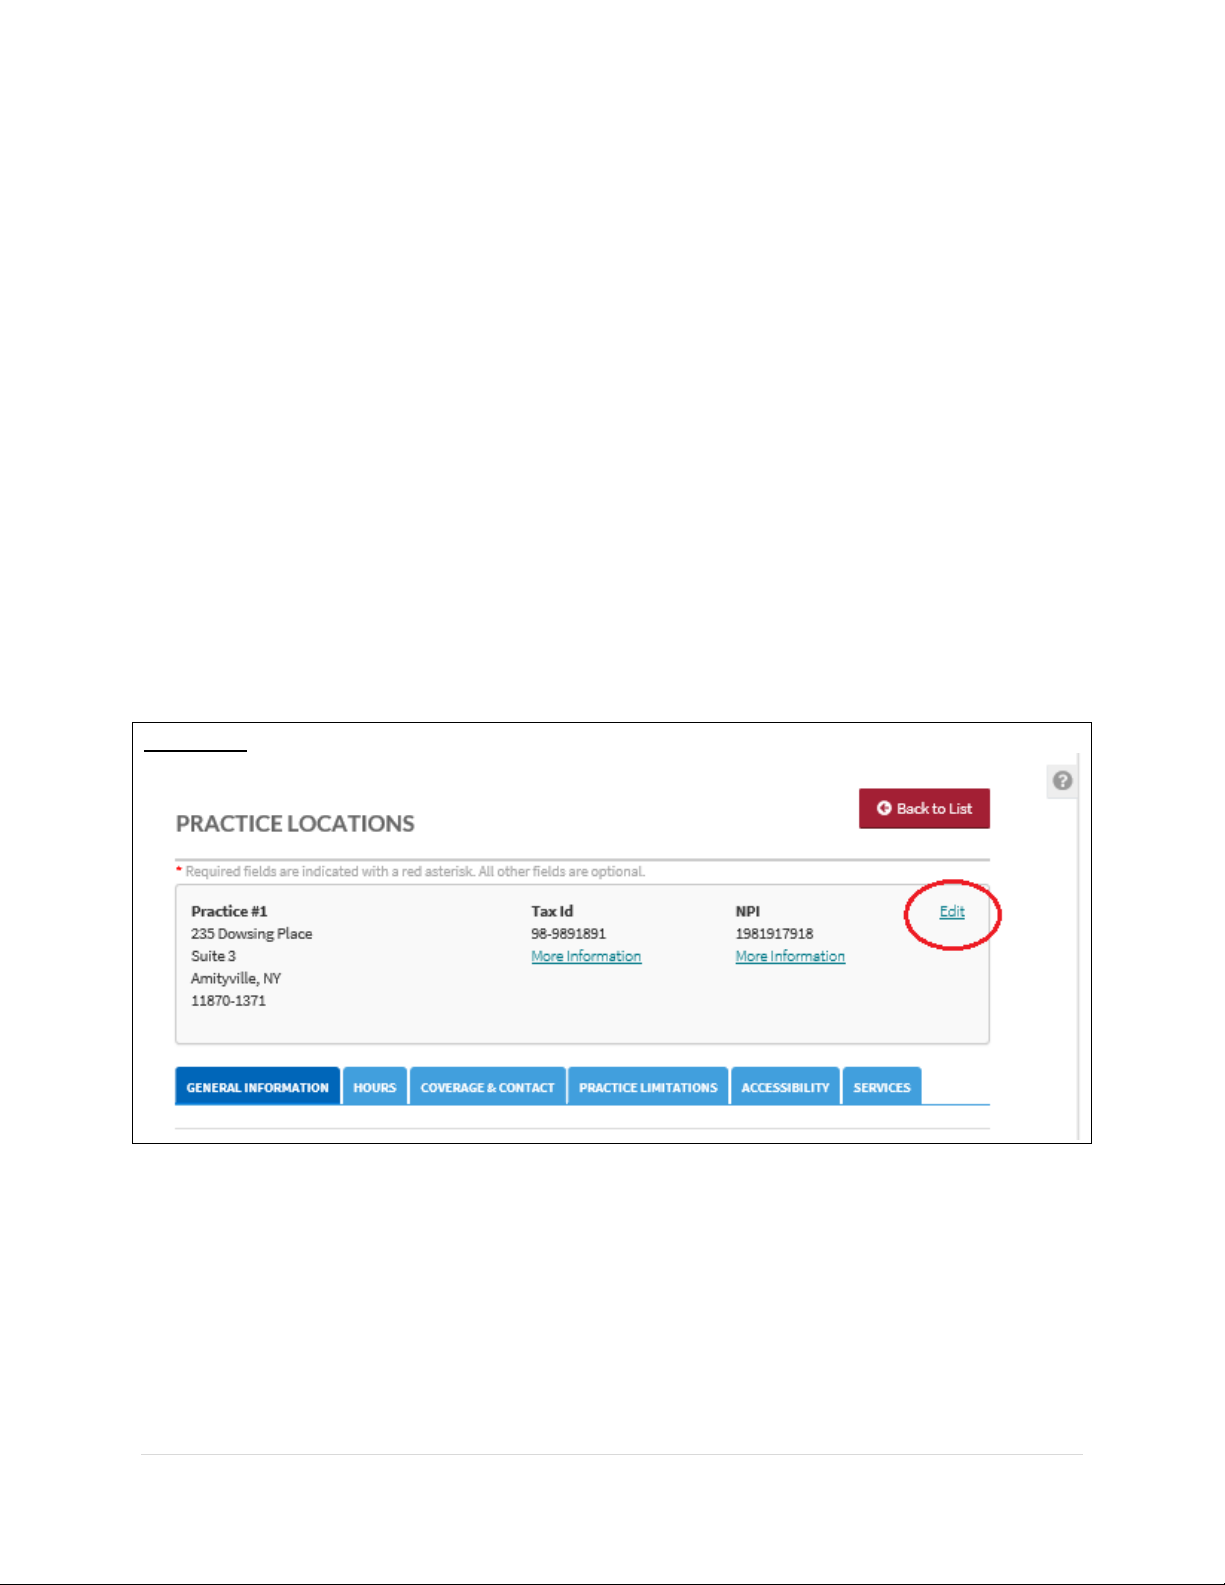
The following will be displayed at the top of the practice location record regardless of the
subsection the provider is in. Click the Edit link to update any of the following details:
FIGURE 59
Page 51
CAQH ProView Provider User Guide v13
50 | P a g e
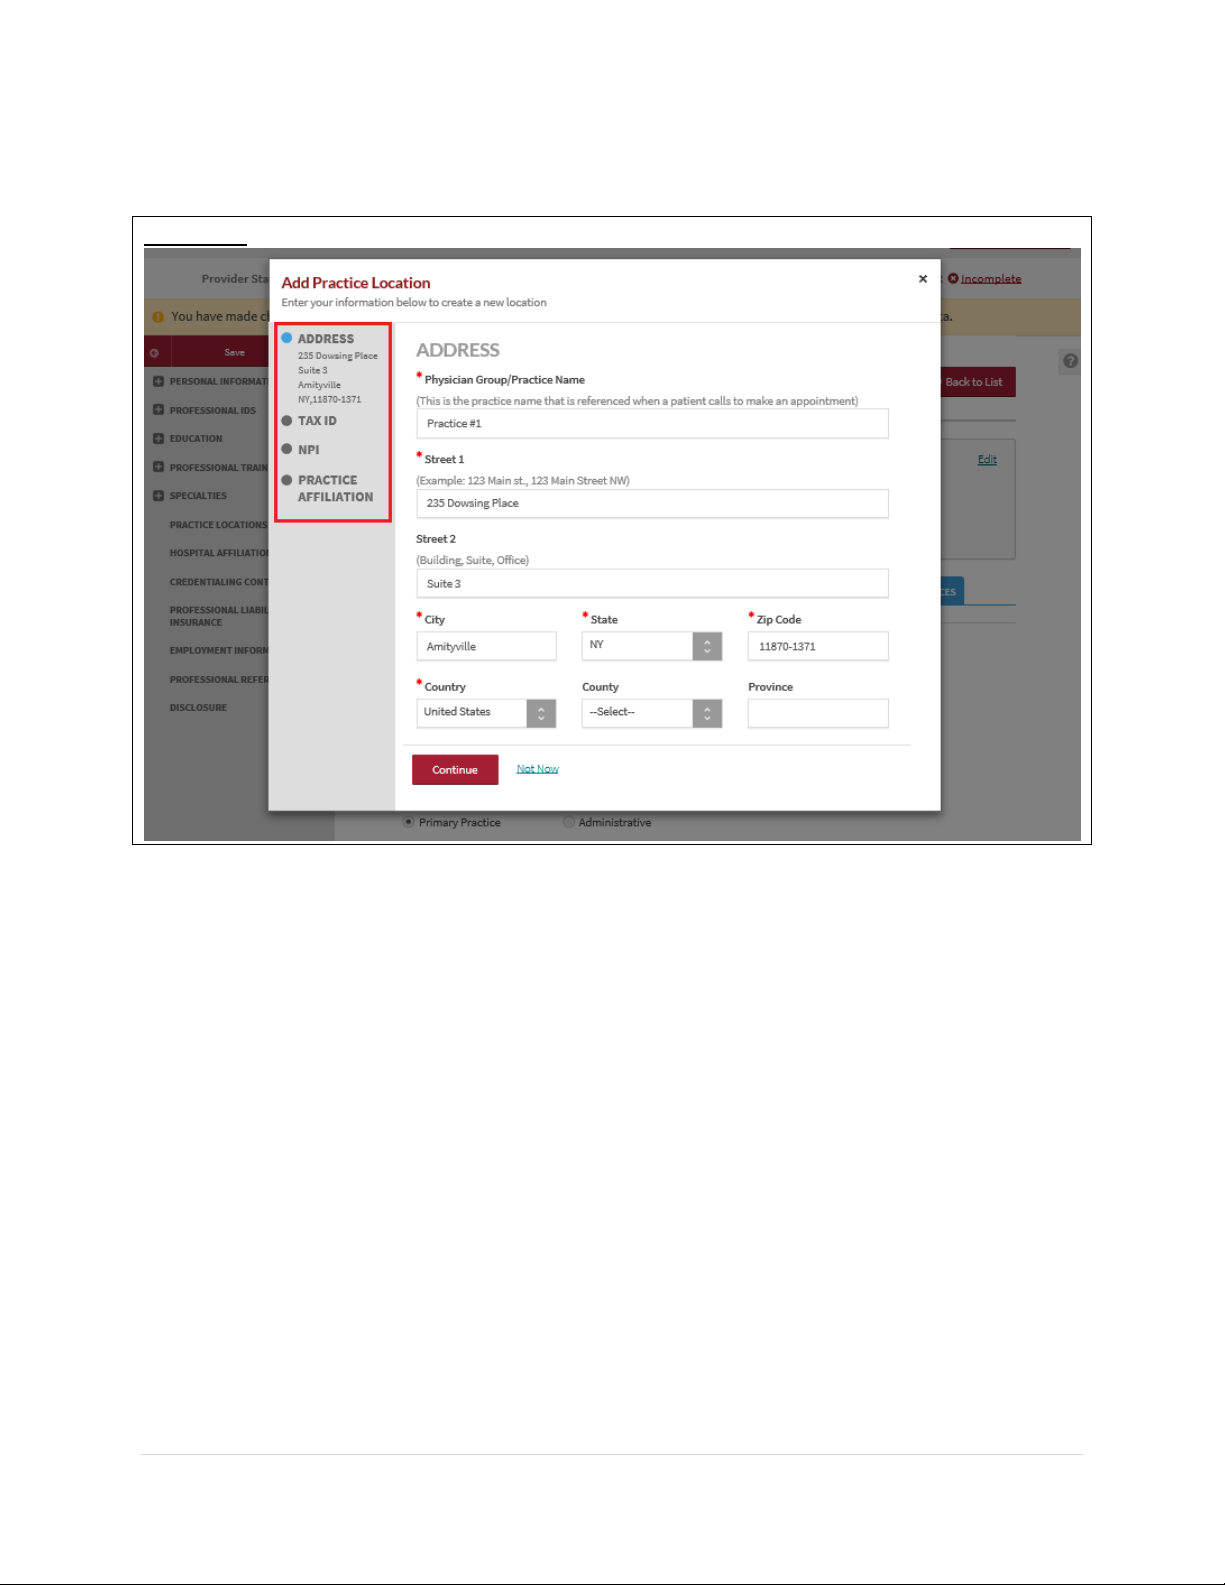
• Practice Address
FIGURE 60
o Physician Group/Practice Name
▪ Please enter the Practice Name as it appears on your claim submission
so it will match the name for the location that is known to participating
organizations with whom you contract. In most cases, this will not be
the practitioner’s name. In some cases, this may be the name as it
appears on the W9.
o Address
▪ CAQH requests that you enter the appropriate address for the actual
physical location of your practice. Do NOT enter a P.O. Box as the
practice address. Please note that health plans intend to use this
information for their directories.
▪ ALL practice location addresses in your profile will undergo USPS
address standardization. When you edit or add an address, you will be
asked to confirm whether the suggested address is correct.
• Tax ID
o Tax ID Number
o Type of Tax ID
Page 52
CAQH ProView Provider User Guide v13
51 | P a g e
• NPI
o Do you have an Organization (Type 2) NPI?
o Organization (Type 2) NPI
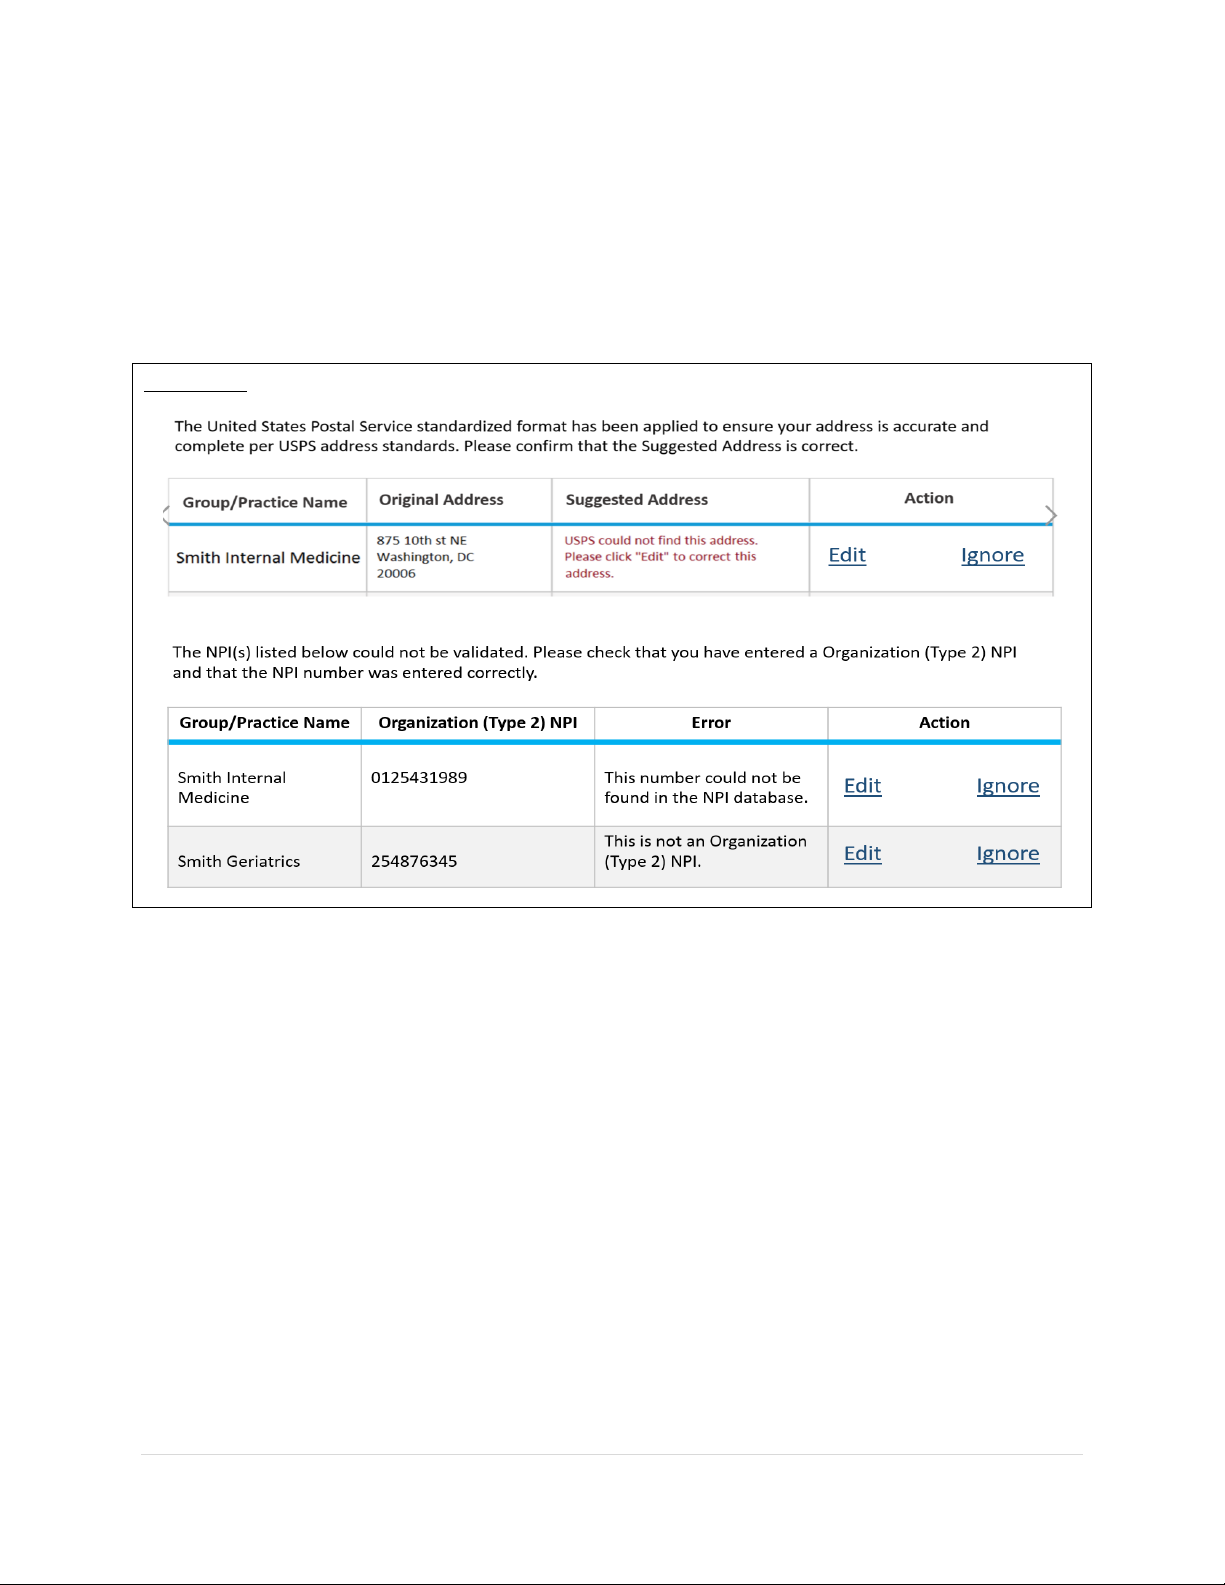
Note: All Type 2 NPIs will undergo a one-time validation. Validation failures will be displayed as
a required fix.
FIGURE 61
You may see the following errors on the Required Fixes page:
• This number could not be found in the NPI database. - This means that the Type 2 NPI
that you have entered is an invalid one. Please review for any possible typo error.
• This is not an Organization (Type 2) NPI. - You may have entered an Individual NPI on
the Group/Organization NPI field. Please review the value that you have entered on the
Group/Organization NPI field.
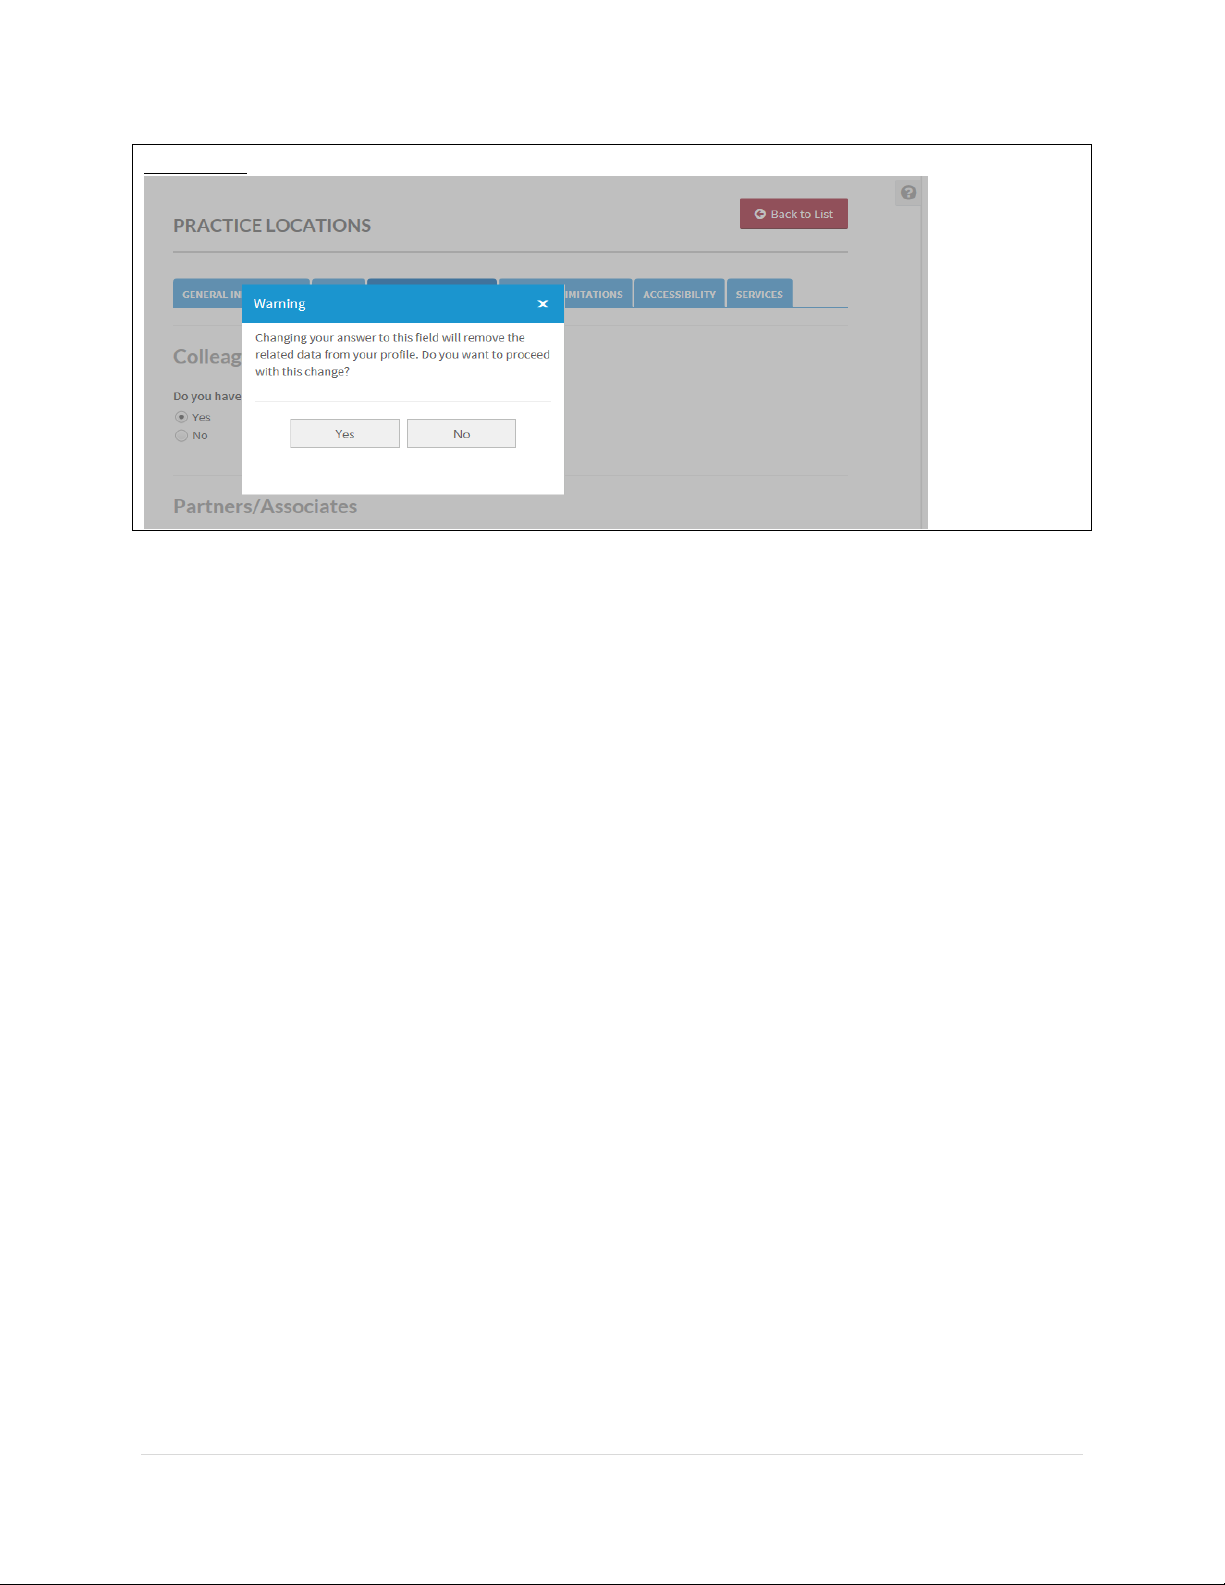
A warning message will be displayed advising you that previously entered data will be
permanently removed from the system when you change the answer to a leading question.
• A leading question is one that triggers different follow-on questions/responses depending
on the response provided.
• When the answer to a leading question is changed, follow-on questions may disappear
from the portal.
• Ensure no critical information will be deleted prior to selecting ‘Yes’ and saving the
changes on this page. Otherwise, you will have to re-enter deleted information.
Page 53
CAQH ProView Provider User Guide v13
52 | P a g e
FIGURE 62
• Practice Affiliation
o Do you practice at this location?
o Please describe your affiliation with this location.
The question "Do you practice at this location?” should be required for ALL
Inpatient/Outpatient or Outpatient Only Providers who practice in any of the states.
If your answer is either a Yes or a No to “Do you practice at this location?”, options will be
displayed in a single select dropdown list.
You should enter a Yes answer if there is a chance that you will submit a claim for this practice.
Whether you work at this practice every day, once a week, once a month, just to cover as
needed, or to read tests or provide other services, a Yes answer accurately answers the
question.
You should answer No to this question if you do not practice at this location and would never
(or no longer) submit claims for services rendered at this location. This option is generally used
to update existing practice locations. The absence of a practice location is difficult for a health
plan to understand so rather than delete a location at which you no longer practice, you should
enter a No answer to “Do you practice at this location?”.
Page 54
CAQH ProView Provider User Guide v13
53 | P a g e
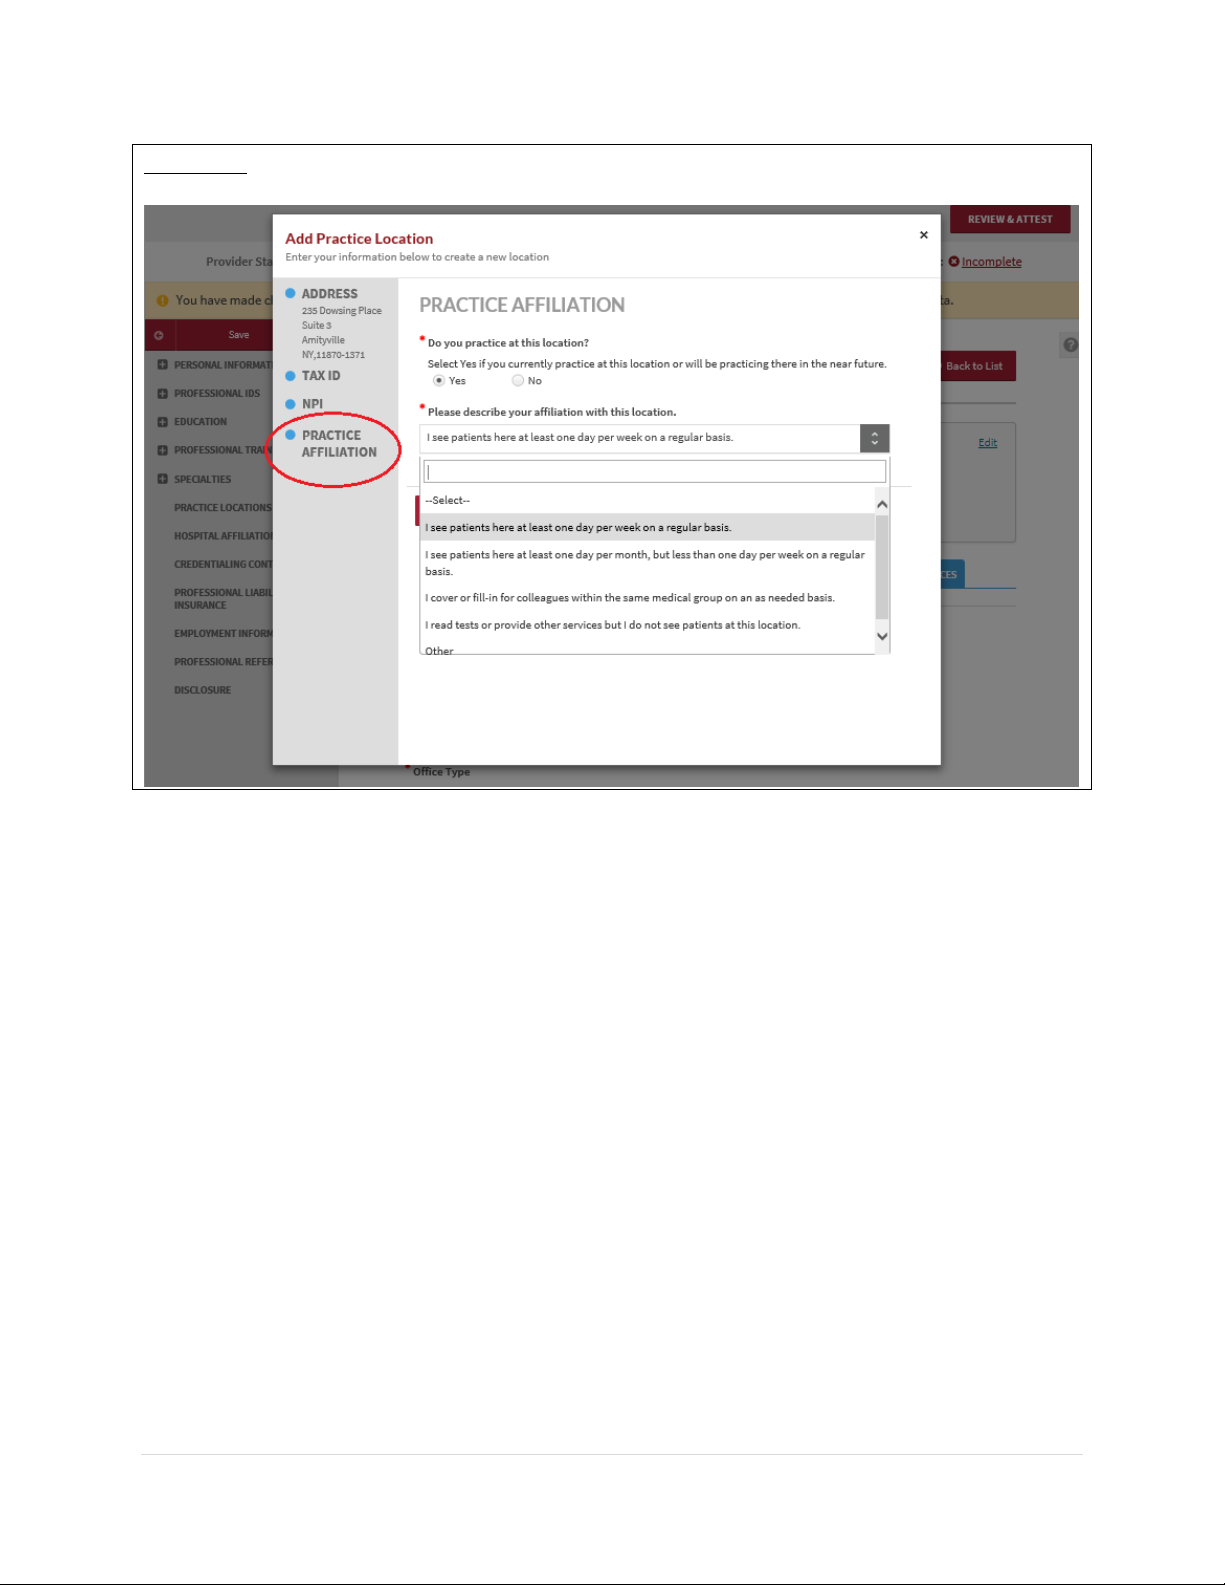
FIGURE 63
a. If you click Yes, a dropdown list with the following options will appear:
• I see patients here at least one day per week on a regular basis.
• I see patients here at least one day per month, but less than one day per week on a
regular basis.
• I cover or fill-in for colleagues within the same medical group on an as needed basis.
• I read tests or provide other services but I do not see patients at this location.
• Other.
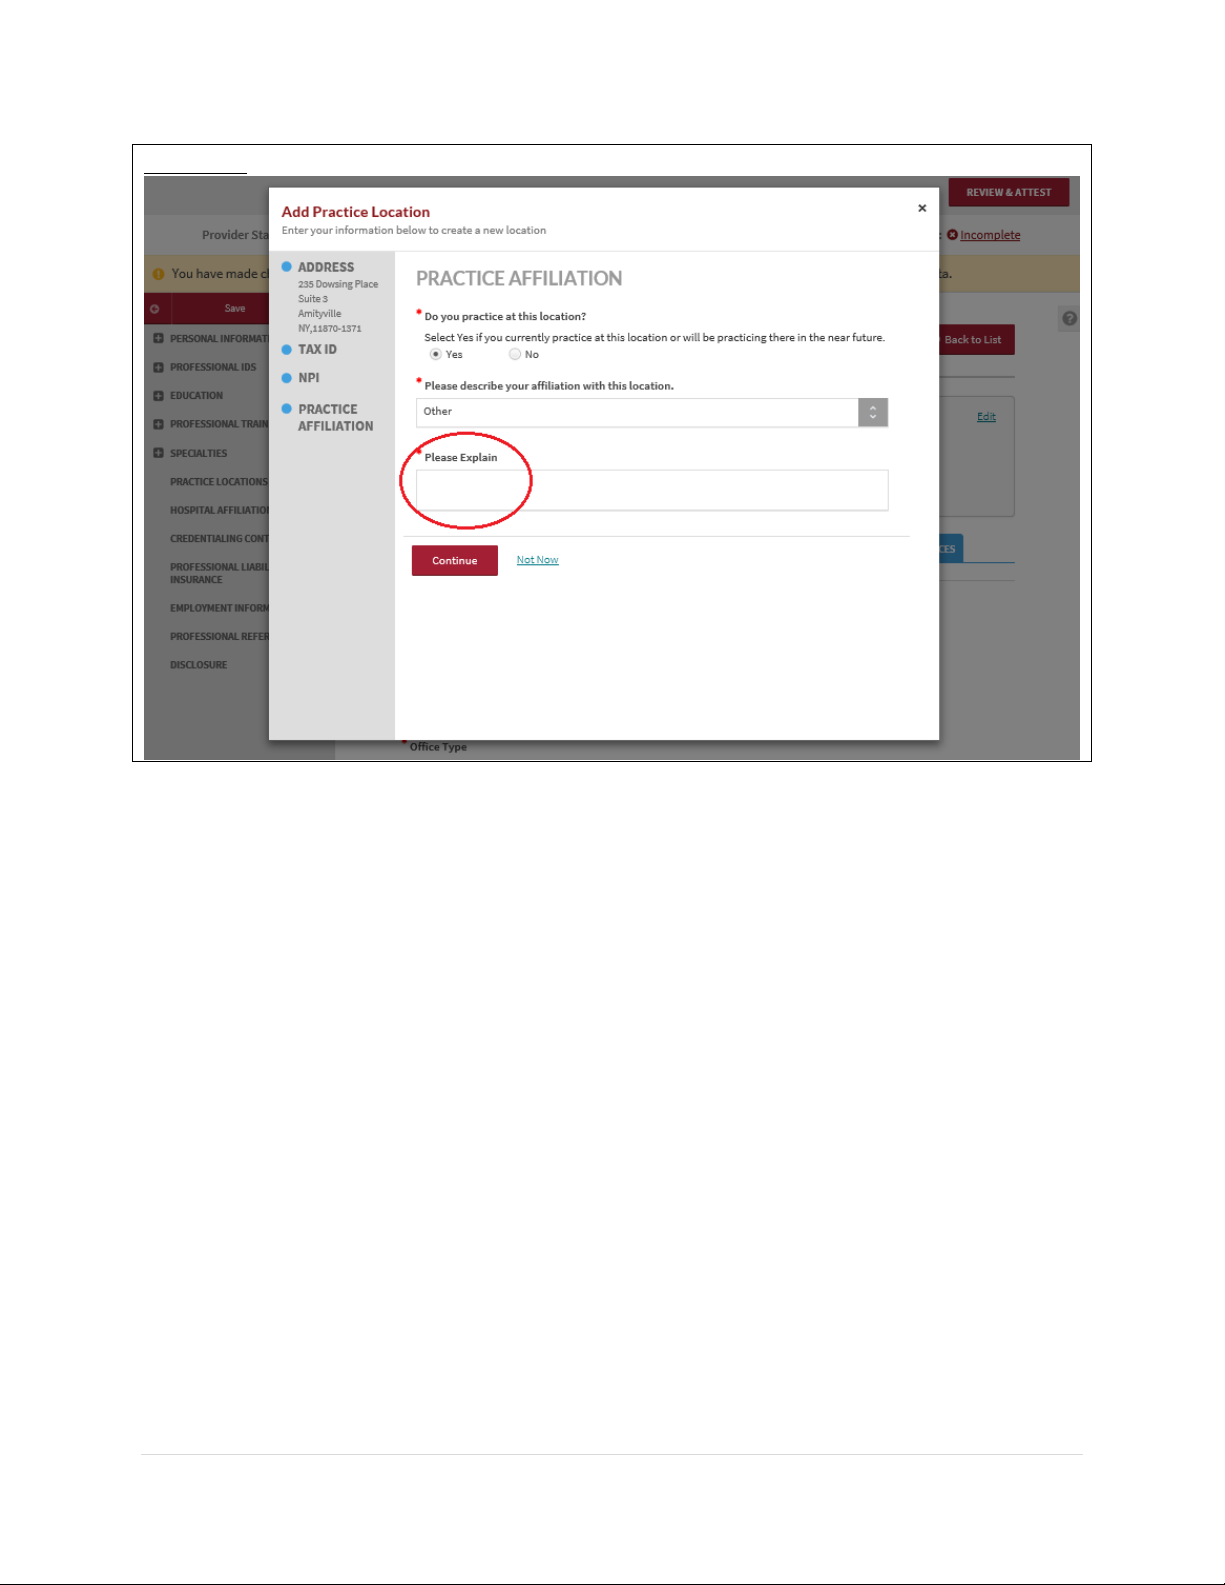
If you choose Other, a free form text box will appear for “Please explain” will be displayed.
Page 55
CAQH ProView Provider User Guide v13
54 | P a g e
FIGURE 64
Which value to choose from the options?
Option 1: I see patients here at least one day per week on a regular basis.
This option would be appropriate when:
• this is your primary practice;
• a patient can make an appointment to see you at this location;
• you practice regularly at this location; or
• you have been hired at this location and have a start date in the near future.
Option 2: I see patients here at least one day per month, but less than one day per week
on a regular basis.
This option would be appropriate when:
• you work at this location on a seasonal or monthly basis;
• you have a regular routine where you see patients at this location infrequently but
on a schedule; or
• you do not consider this your primary practice but you routinely see patients at
this location and patients can even make an appointment.
Page 56

CAQH ProView Provider User Guide v13
55 | P a g e
Option 3: I cover or fill-in for colleagues within the same medical group on an as needed
basis.
This option would be appropriate when:
• you see patients at this location on an on-call basis;
• you are part of a larger practice and usually practice at another location but might
need to fill-in for a provider at this one; or
• you serve in an urgent care capacity within a practice where you do not take
appointments at the location, but you deliver care.
Option 4: I read tests or provide other services but I do not see patients at this location.
This option would be appropriate when:
• you perform administrative tasks at this location but do not see patients; or
• you read tests for patients at this location but do not see patients.
Option 5: Other
This option would be appropriate when:
• your affiliation with the location is none of the values available.
Note: If you choose Other, a free form text box will appear to which you will be required to
enter an explanation. If you are going to use this option, please make sure that a detailed
explanation is entered. This information will be used to adjust our dropdown list values in
the future.
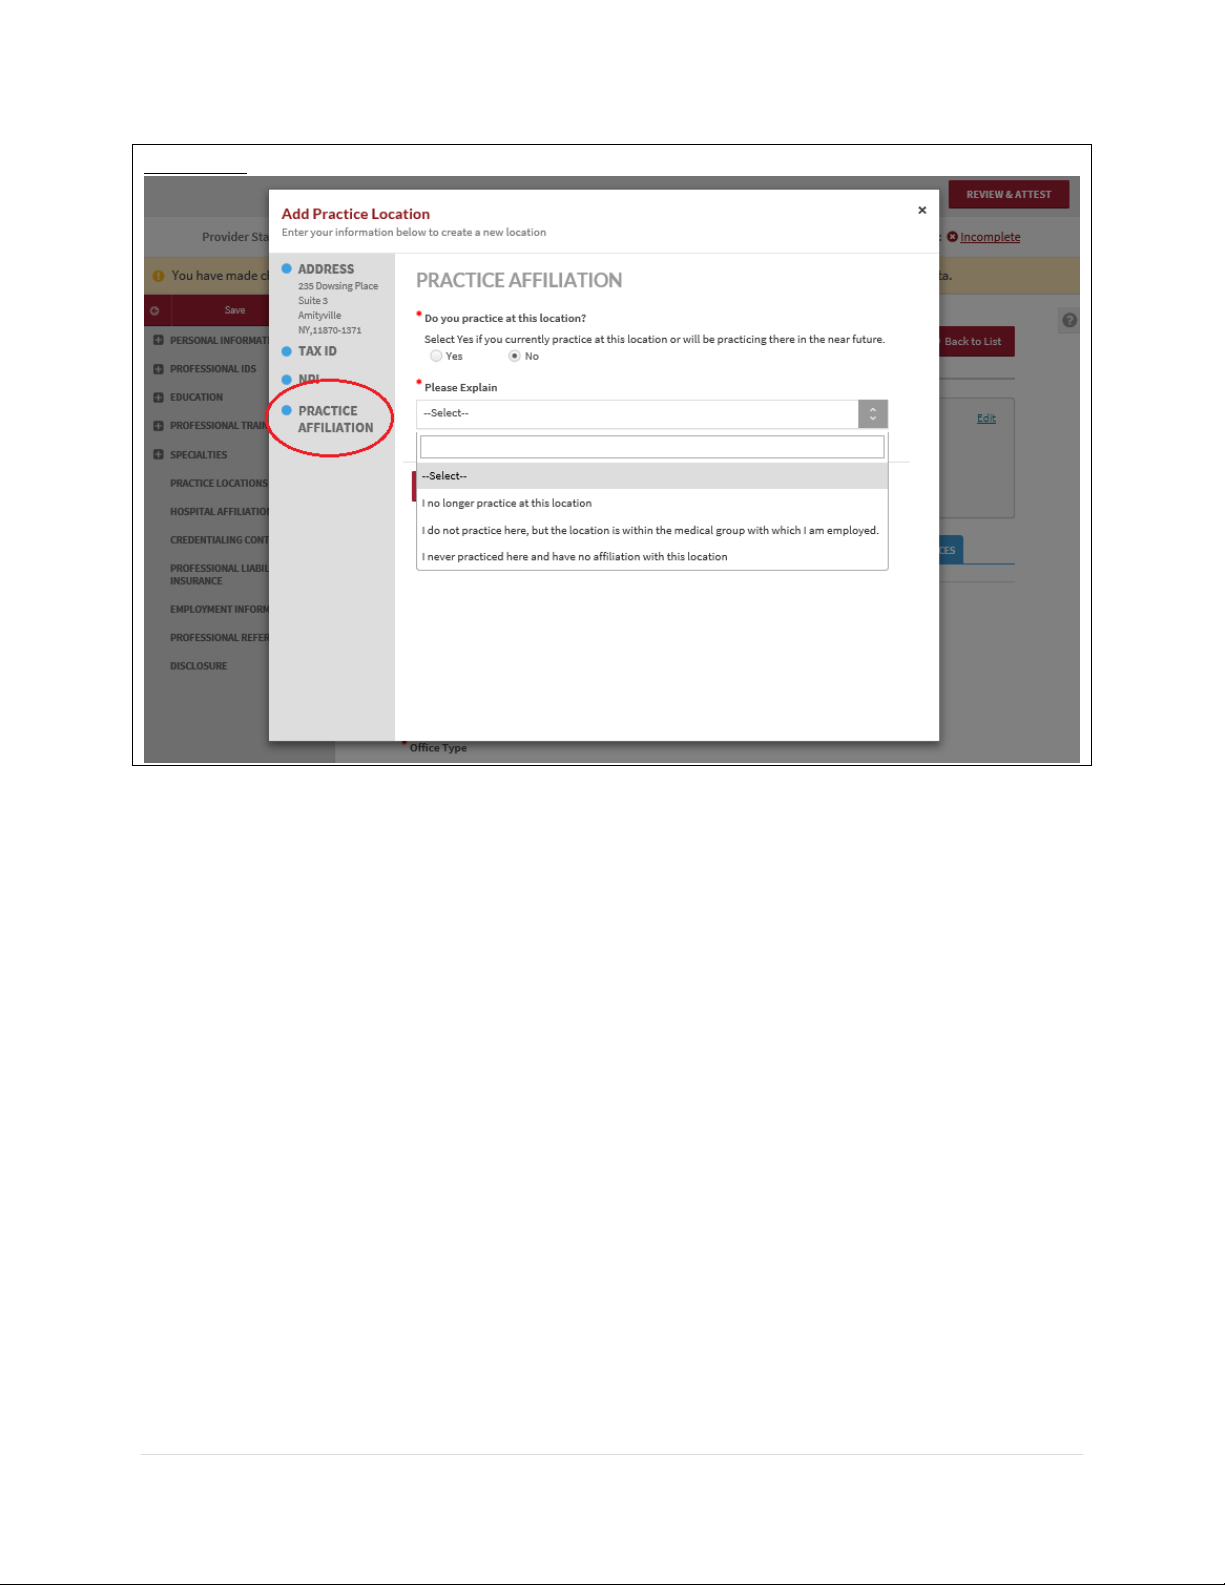
b. If you select No to question “Do you practice at this location?”, the following options will be
displayed:
• I no longer practice at this location.
• I do not practice here, but the location is within the medical group with which I am
employed.
• I never practiced here and have no affiliation with this location.
Page 57
CAQH ProView Provider User Guide v13
56 | P a g e
FIGURE 65
Which value to choose from the options?
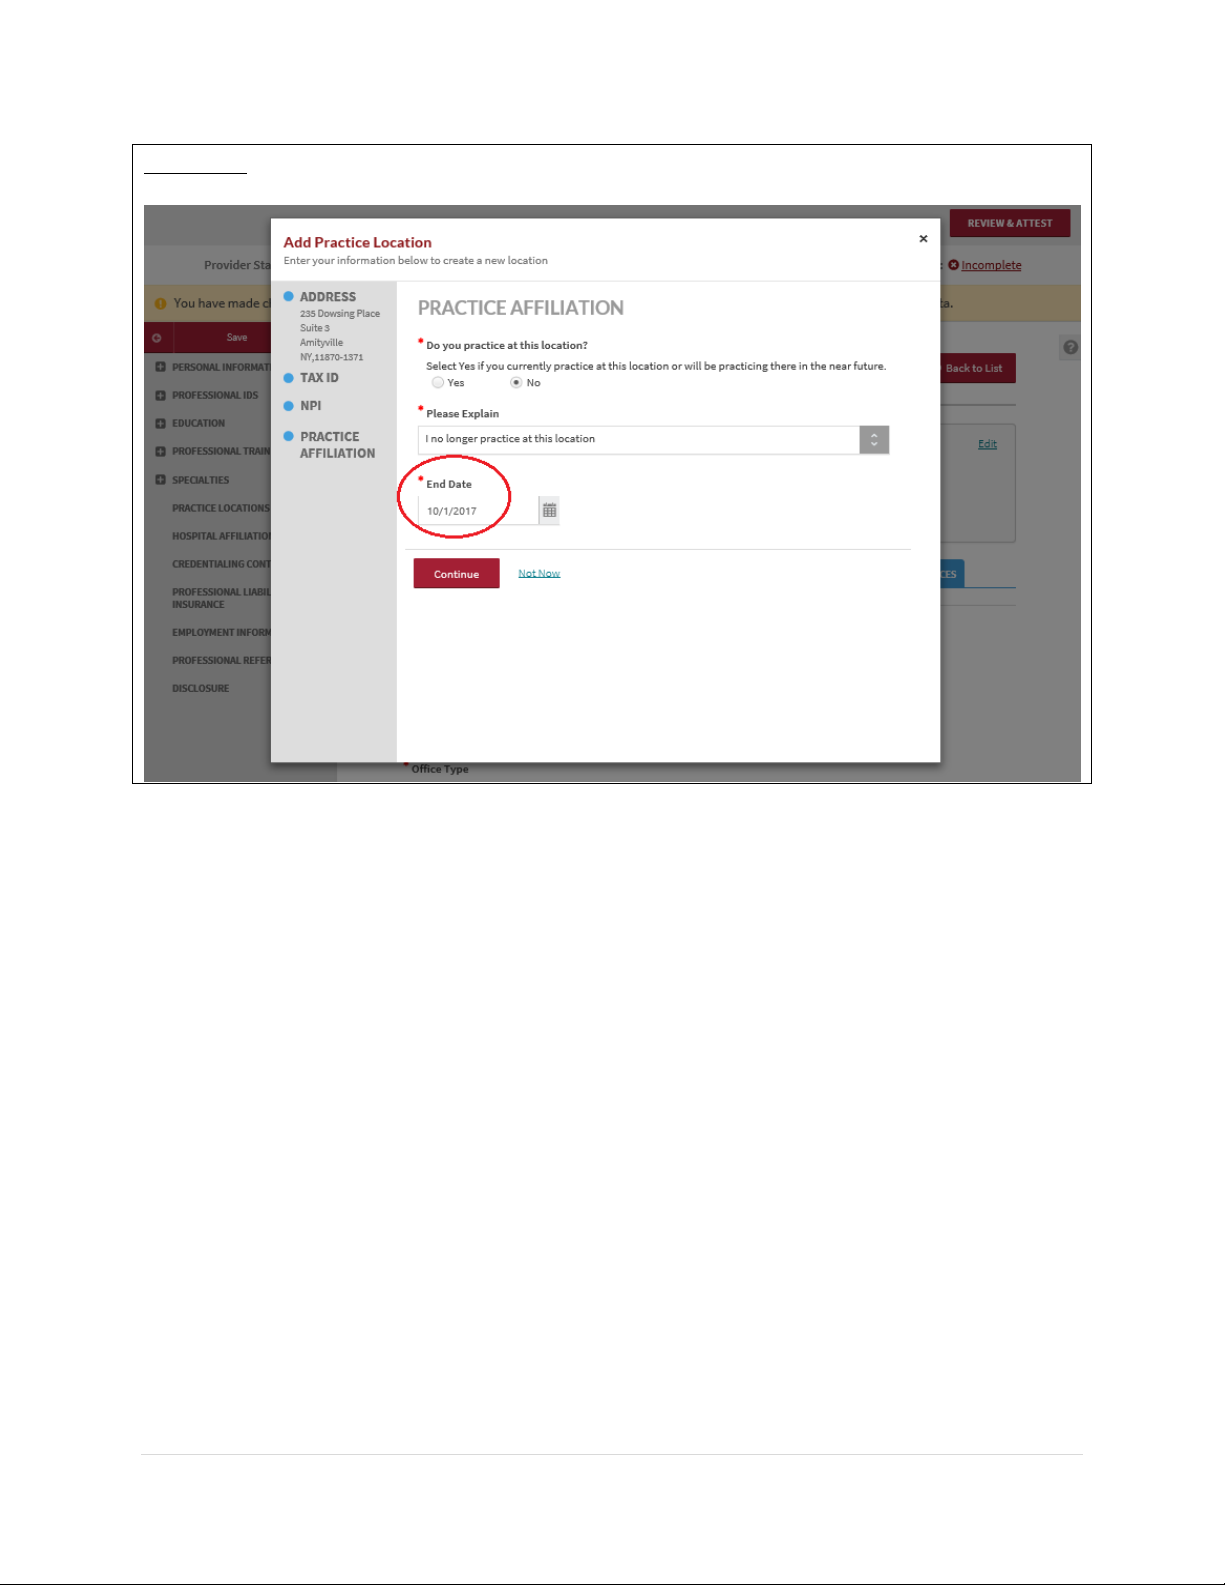
Option 1: I no longer practice at this location.
This option would be appropriate when:
• you left the practice all together and no longer practice at any locations affiliated
with the practice; or
• you are still employed with the practice but have switched to a different location
and will no longer submit claims for services rendered at this location
Note: If you choose "I no longer practice at this location." a new date selector field "End date"
will appear.
• The field format should be MM/DD/YYYY in the portal.
• The date entered on the "End Date" field must occur after the date entered in the field
"Provider's Start Date".
• You should remember to update the Employment Information section of your profile
with this information.
Page 58
CAQH ProView Provider User Guide v13
57 | P a g e
FIGURE 66
Option 2: I do not practice here, but the location is within the medical group with which I
am employed.
This option would be appropriate when:
• You are employed by a large group and the practice manager for the group lists
this location for you even though you would never submit claims to this location.
Option 3: I never practiced here and have no affiliation with this location.
This option would be appropriate when:
• The practice location was entered by mistake.
c. When adding a new practice location, the question "Do you practice at this location?" will
default to Yes and display the Select drop down value.
Page 59
CAQH ProView Provider User Guide v13
58 | P a g e
The subsections are listed below and may vary based on your practice state.
▪ General Information
o Provider’s Start Date
o Office Type
o Can general correspondence be sent to this location?
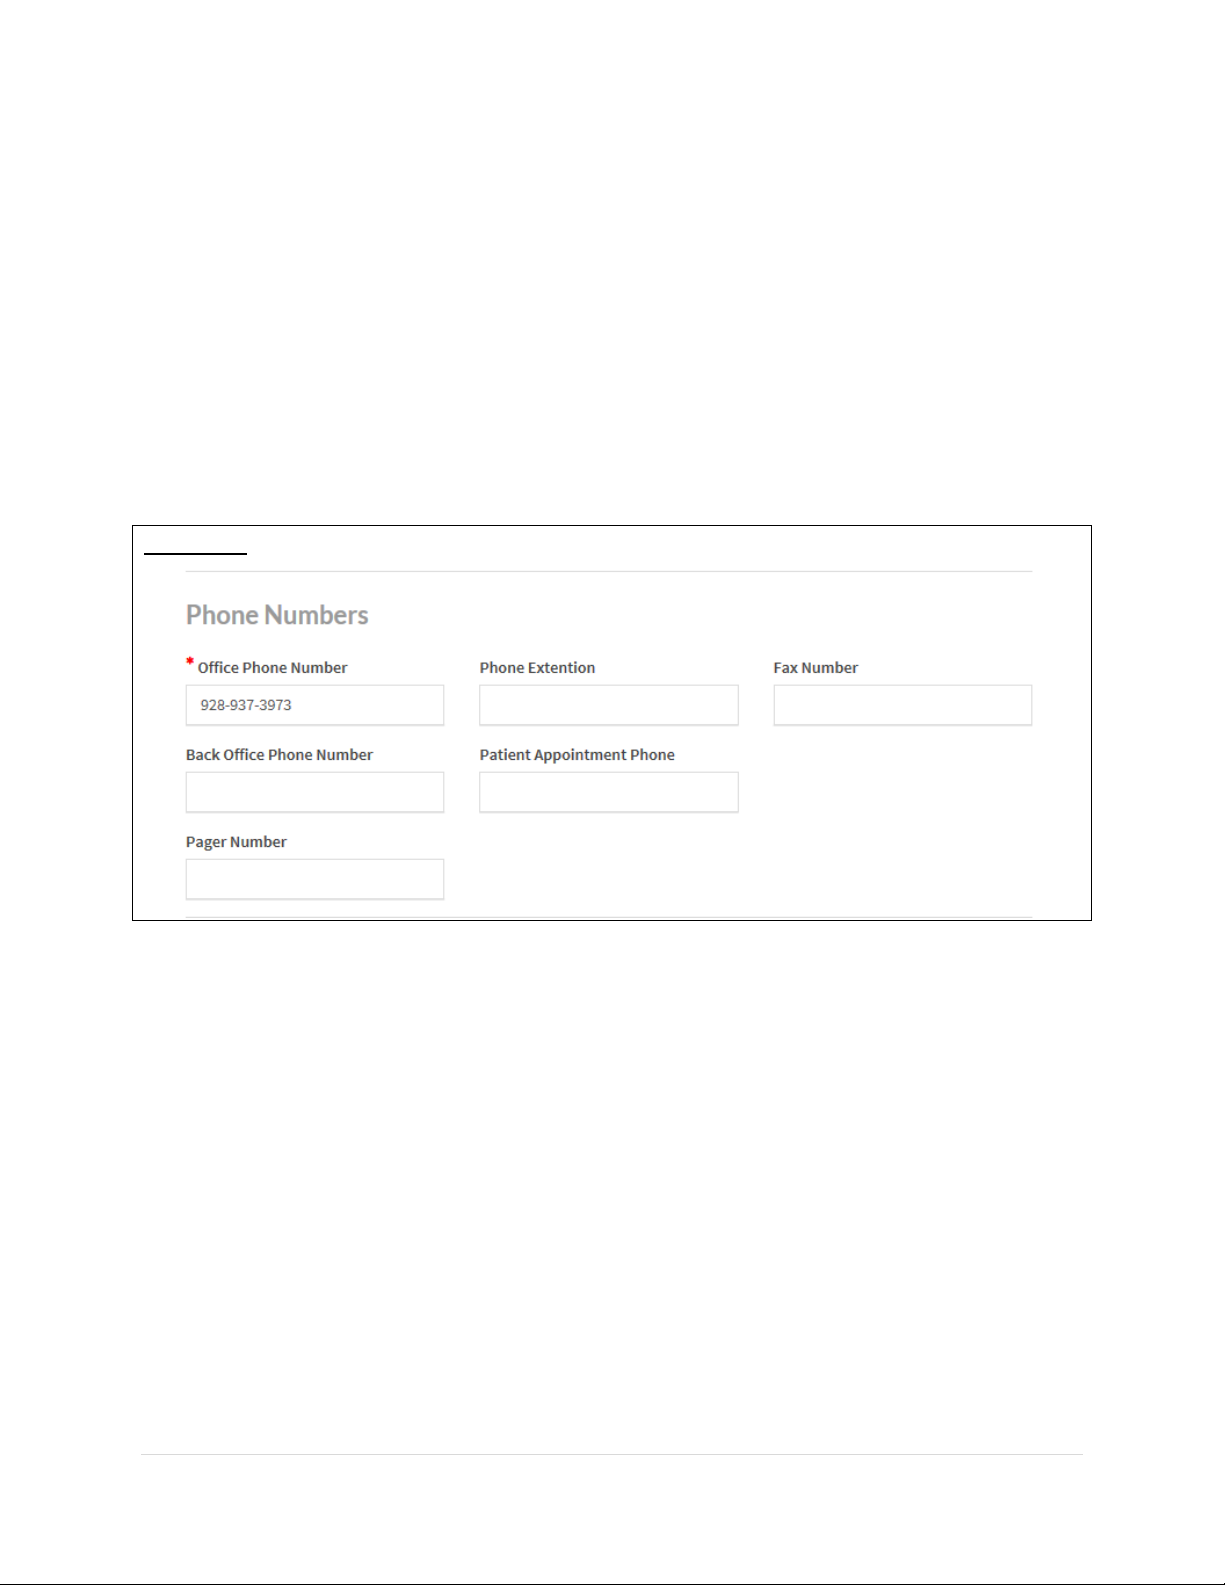
o Office Phone Number - Please ensure that the phone number listed is the one that
patients can use to schedule an appointment with the provider at that location.
Patients depend on the accuracy of provider directories when choosing a health plan and
physicians. Inaccurate directories pose significant challenges for patients, contributing to delays
in care, limiting choices of providers and masking problems with network adequacy.
FIGURE 67
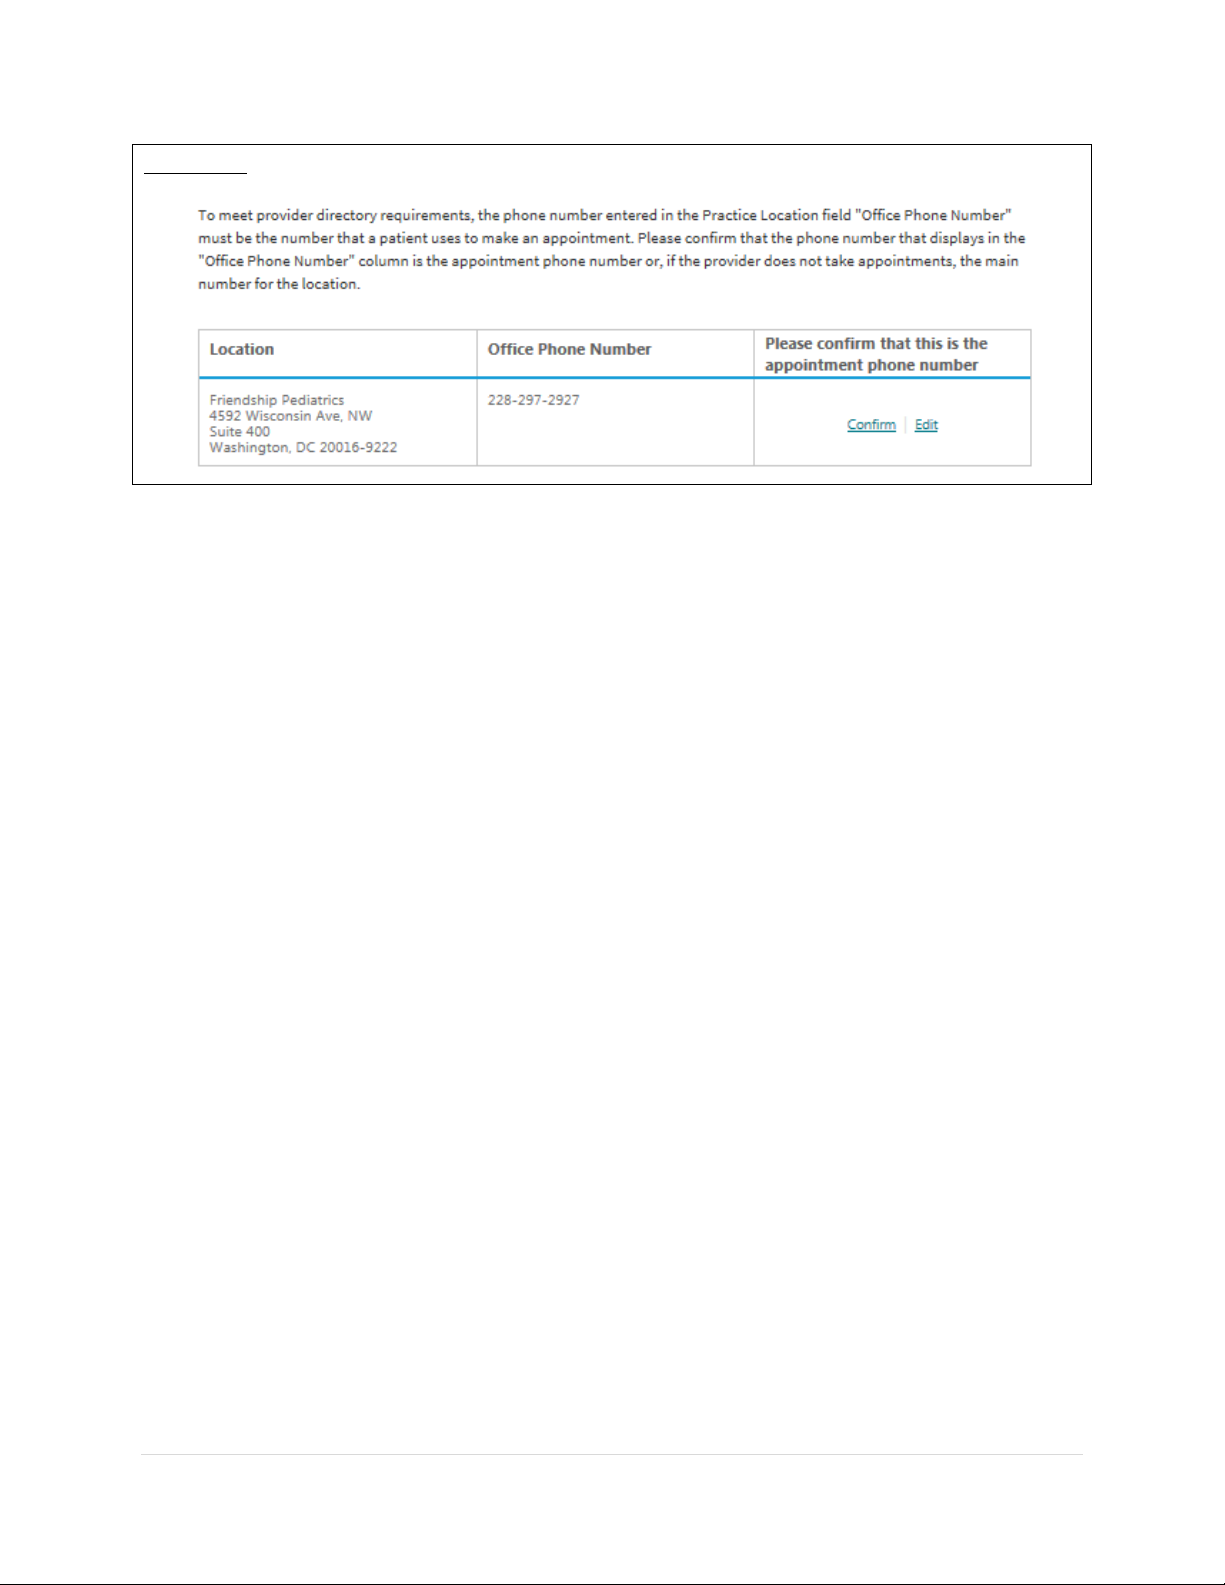
In an ongoing effort to improve the accuracy of provider information listed within directories,
CAQH ProView will ask providers to confirm that the phone number listed for each practice
location is the primary method that patients may use when scheduling an appointment. If you
do NOT take appointments, confirm that the phone number listed on the Practice Location
section Office Phone Number field is the main number for the location.
Page 60
CAQH ProView Provider User Guide v13
59 | P a g e
FIGURE 68
▪ If you click the Edit link, you will be taken to the General Information
screen for that Practice Location.
▪ At the top of the page, an error in red text will be displayed: "Please
confirm that the phone number entered in Office Phone Number is the
number that patients use to make appointments." The new phone number
will appear on the Correct Errors page. Click the Confirm link to confirm
that the new phone number entered is the one that patients can use to
make appointments.
▪ If you click the Confirm link for a Practice Location, that line item will
disappear from the Correct Errors page.
o Phone Coverage
▪ Hours
o Office Hours
o Patients
▪ Indicate the types of patients accepted into the practice
▪ Coverage & Contact
o Colleagues
o Covering Colleagues
o Mid-Level Practitioners
▪ Mid-level practitioners include: P.A. (physician's assistant), N.M.W (nurse
midwife), N.P (nurse practitioner), or R.N.F.A (registered nurse first
assistant).
o Office Manager or Business Staff Contact
o Billing Contact
o Payment and Remittance
▪ Practice Limitations
o Limitation
▪ A limitation is any restriction you have set on the gender or age of your
patient population.
o Gender Limitations
Page 61

CAQH ProView Provider User Guide v13
60 | P a g e
o Age Limitations - The value in the Age Maximum field must be greater than the
value in the Age Minimum field. Otherwise, it will appear on the Correct Errors
page.
o Other Limitation
▪ Accessibility
o ADA Accessibility
▪ The Americans with Disabilities Act (ADA) ensures access to the built
environment for people with disabilities. The ADA Standards establish
design requirements for the construction and alteration of facilities
subject to the law. These enforceable standards apply to places of public
accommodation, commercial facilities, and state and local government
facilities.
o Handicapped Accessibility
o Public Transportation Accessibility
o Other Accessibility Services
o Disabled Accessibility
▪ Services
o Services
▪ Please use this section to indicate what services are provided at your
practice location.
▪ Clinical Laboratory Improvement Amendments (CLIA) - Diagnostic testing
helps health care providers screen for or monitor specific diseases or
conditions. It also helps assess patient health to make clinical decisions for
patient care. The Clinical Laboratory Improvement Amendments (CLIA)
regulate laboratory testing and require clinical laboratories to be
certificated by their state as well as the Center for Medicare and Medicaid
Services (CMS) before they can accept human samples for diagnostic
testing. Laboratories can obtain multiple types of CLIA certificates, based
on the kinds of diagnostic tests they conduct.
o Interpretation Services
Page 62
CAQH ProView Provider User Guide v13
61 | P a g e
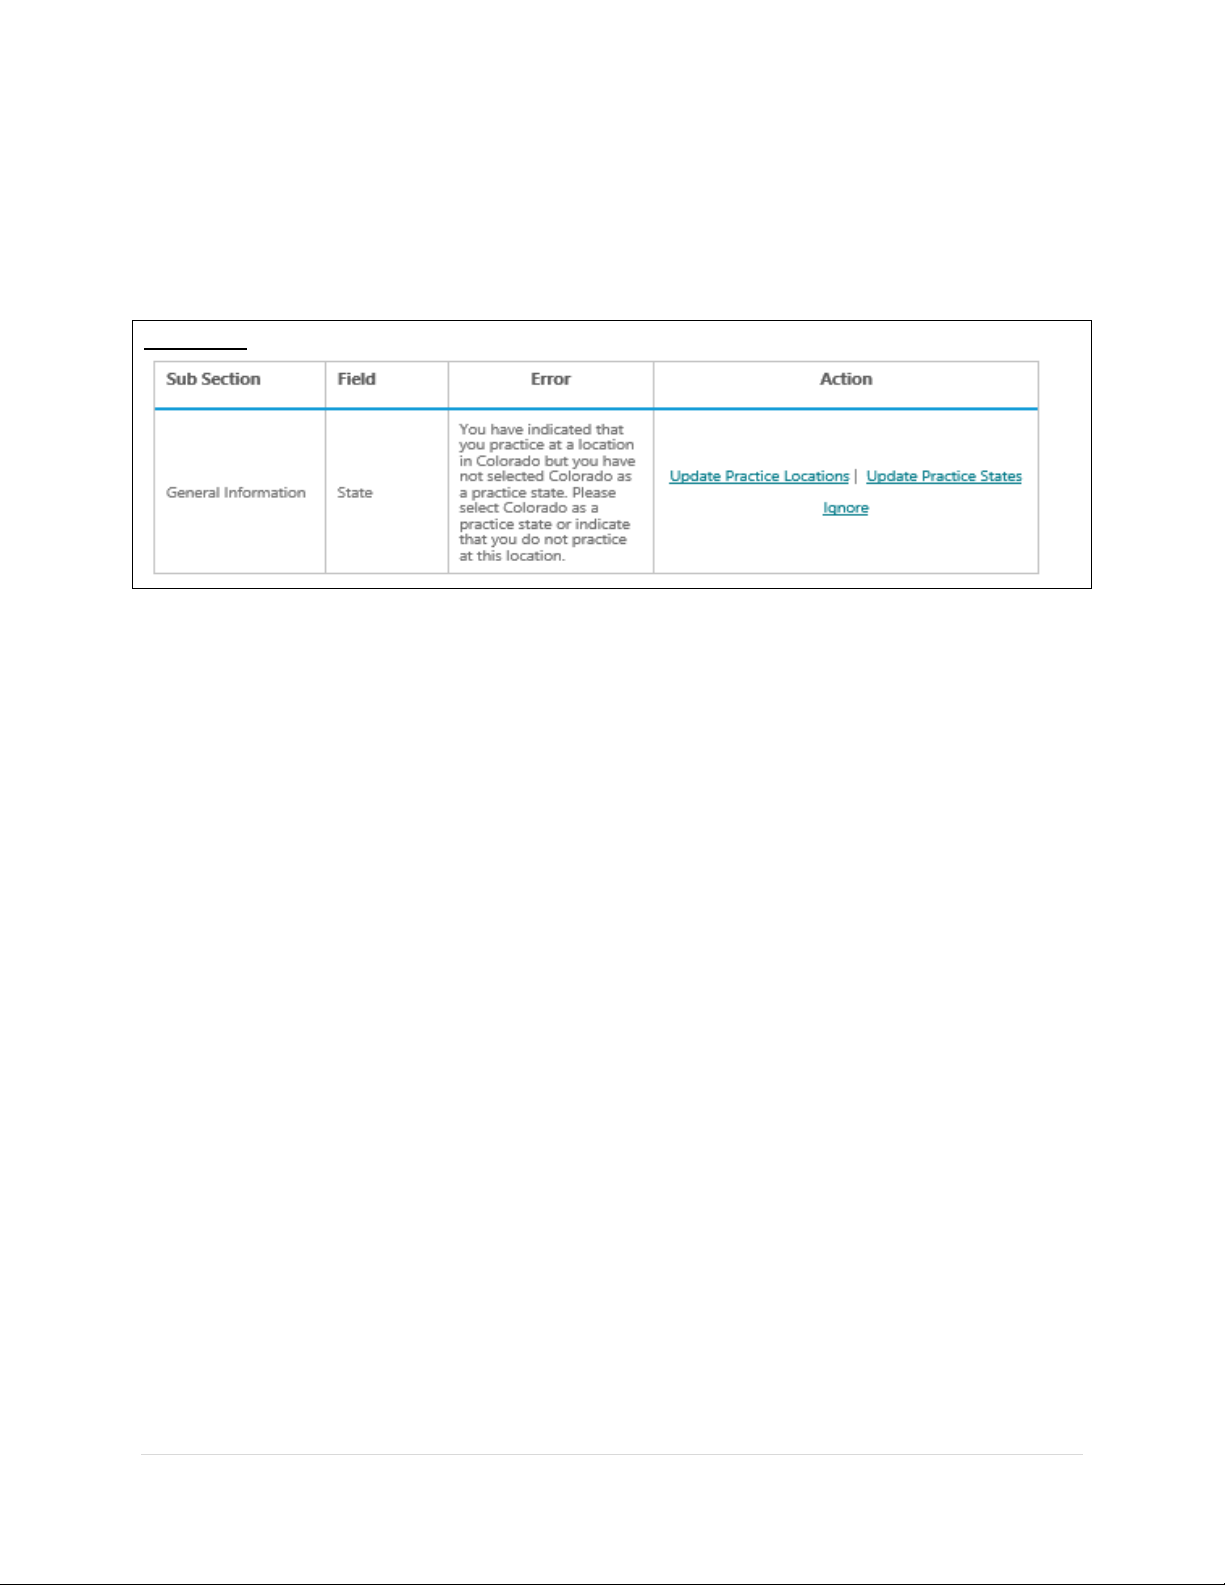
For Providers whose Provider Type is either MD, DO, NP, or DMD with Inpatient/Outpatient or
Outpatient Only as the Practice Setting, each active practice location (where you answered Yes
to the question: Do you practice at this location?) should have a matching Primary Practice State
or Practice State on the Personal Information section. There will be an error for each active
practice location that does not have a matching Practice State.
FIGURE 69
On the screenshot (Figure 53), the account has an active practice location in Colorado but
Colorado is not selected as a Practice State in the Personal Information section. The Provider is
required to either change the answer to the question “Do you practice at this location?” from Yes
to No for this practice location record or archive the practice location record, or add Colorado as
a Practice State.
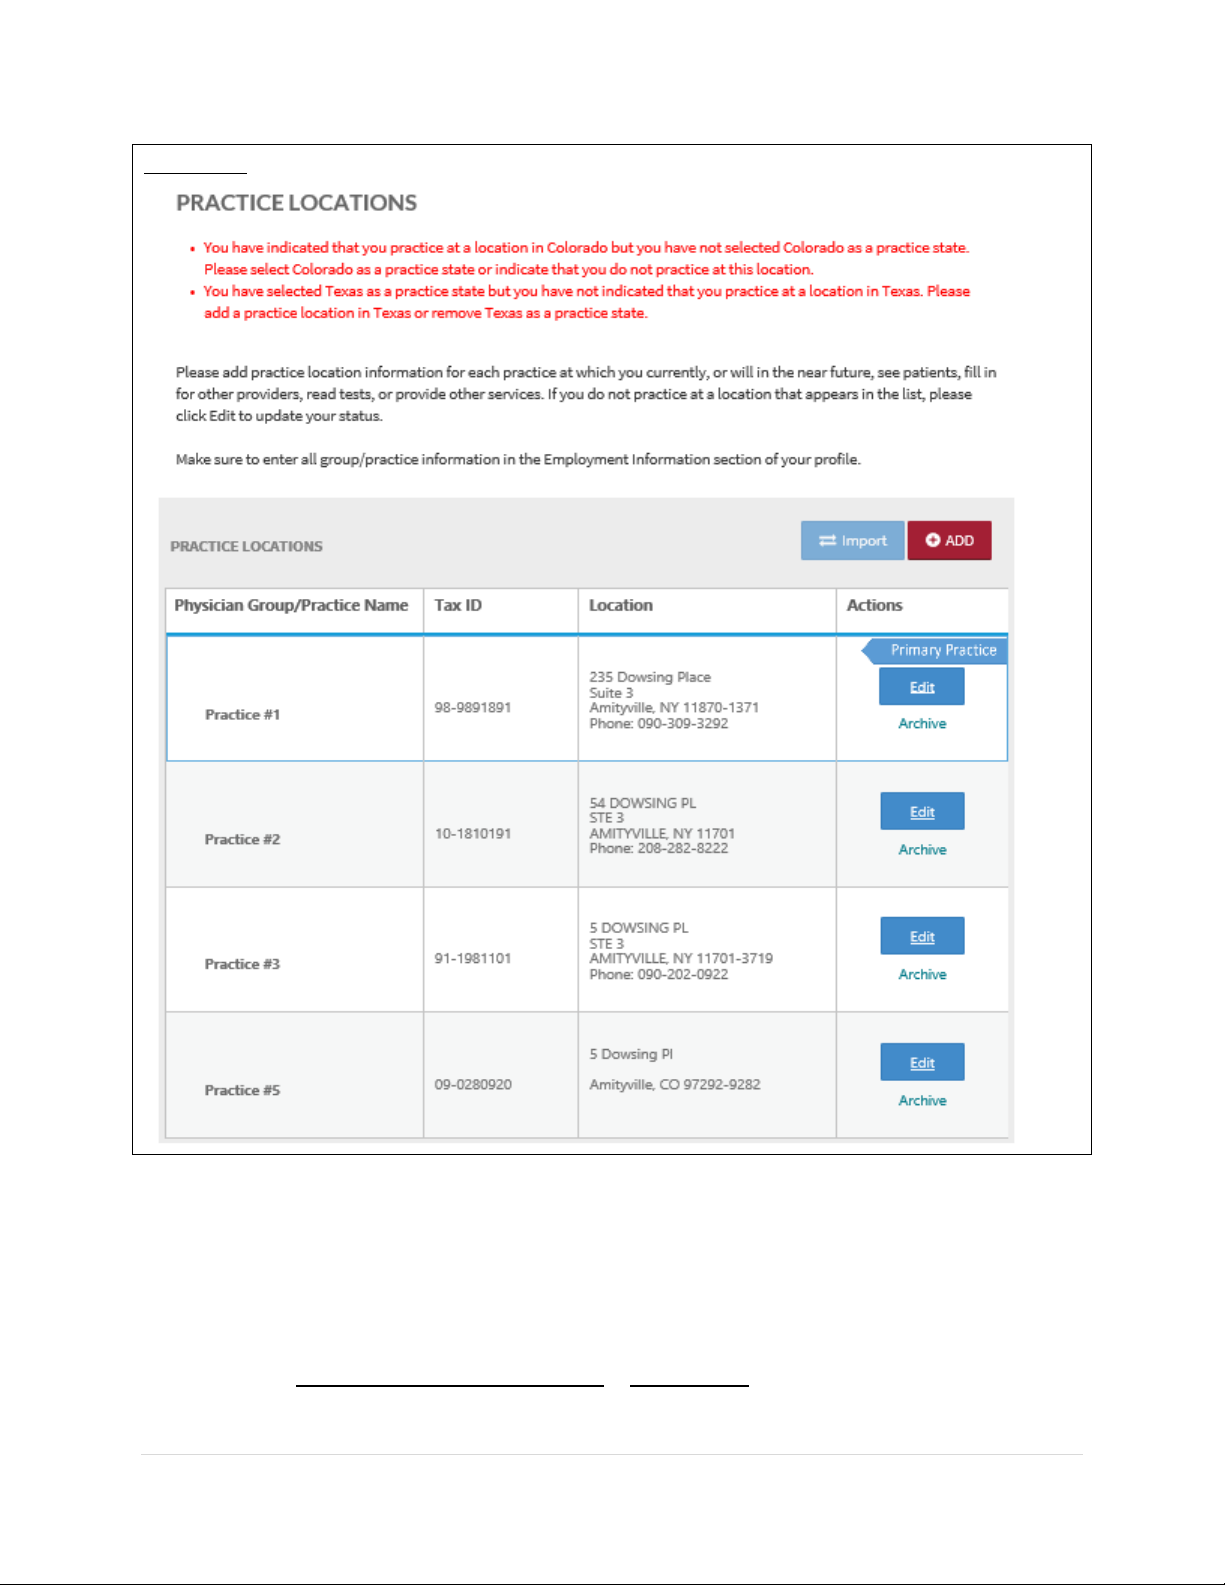
• The Update Practice Locations hyperlink in the error is a hyperlink to the Practice
Locations Home Page. Once the user has clicked the hyperlink, the following error is
displayed on the top of the Practice Locations Page, in red text:
You have selected {Primary Practice State or Practice State} as a practice state but
you have not indicated that you practice at a location in {Primary Practice State or Practice
State}. Please add a practice location in {Primary Practice State or Practice State} or
remove {Primary Practice State or Practice State} as a practice state.
Page 63
CAQH ProView Provider User Guide v13
62 | P a g e
FIGURE 70
• If you add the Practice State to match the active Practice Location, and click "Save and
Continue", you will be redirected to the Correct Errors Page and will no longer see the
error.
• The Ignore hyperlink in the error is a hyperlink to the Ignore pop-up that already exists
for Address Standardization. The pop-up should have the same functionality, i.e., if the
user clicks the "Yes" button, the error is removed from the Correct Errors Page.
• You are required to either fix the error or click Ignore and then click "Yes" in the pop-up
so that the error disappears on the Correct Errors Page, and you will be able to attest.
Page 64
CAQH ProView Provider User Guide v13
63 | P a g e
Enhanced: Adding a Practice Location!
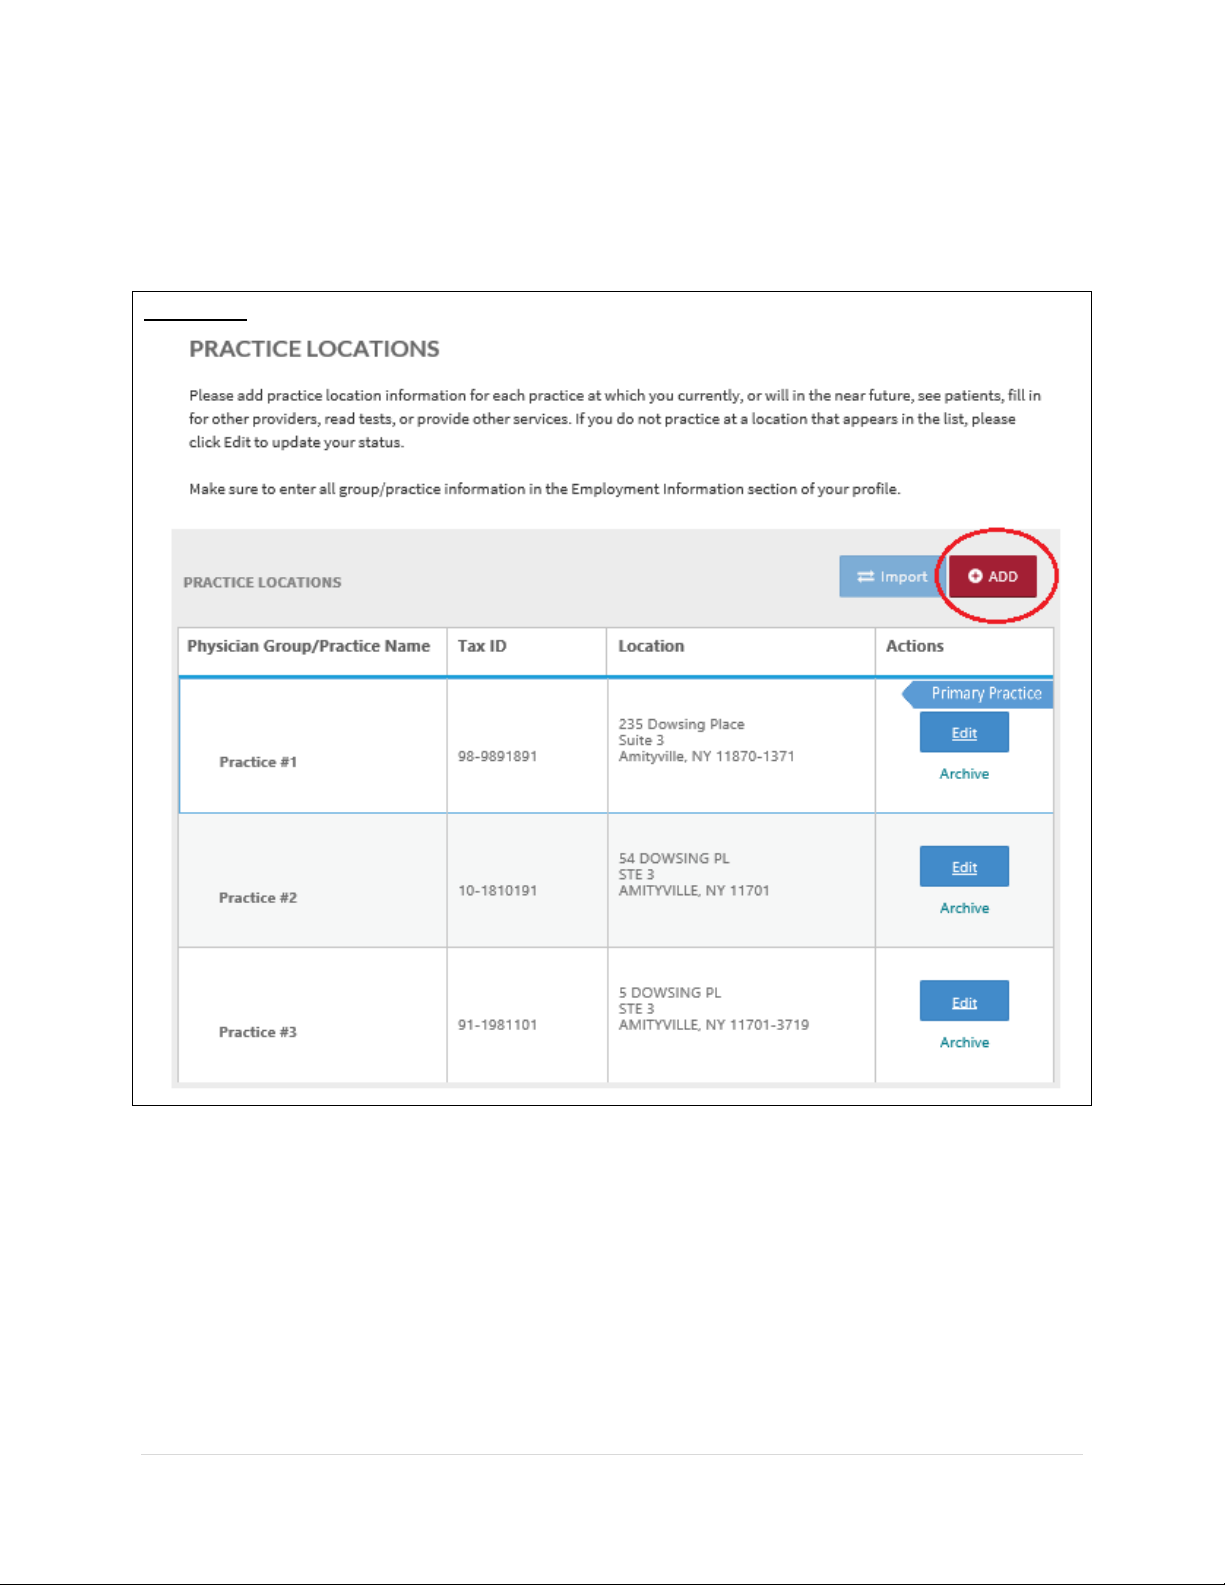
To add a practice location to your profile, go to the Practice Location section of your CAQH
ProView application. Click the Add button.
FIGURE 71
Page 65
CAQH ProView Provider User Guide v13
64 | P a g e
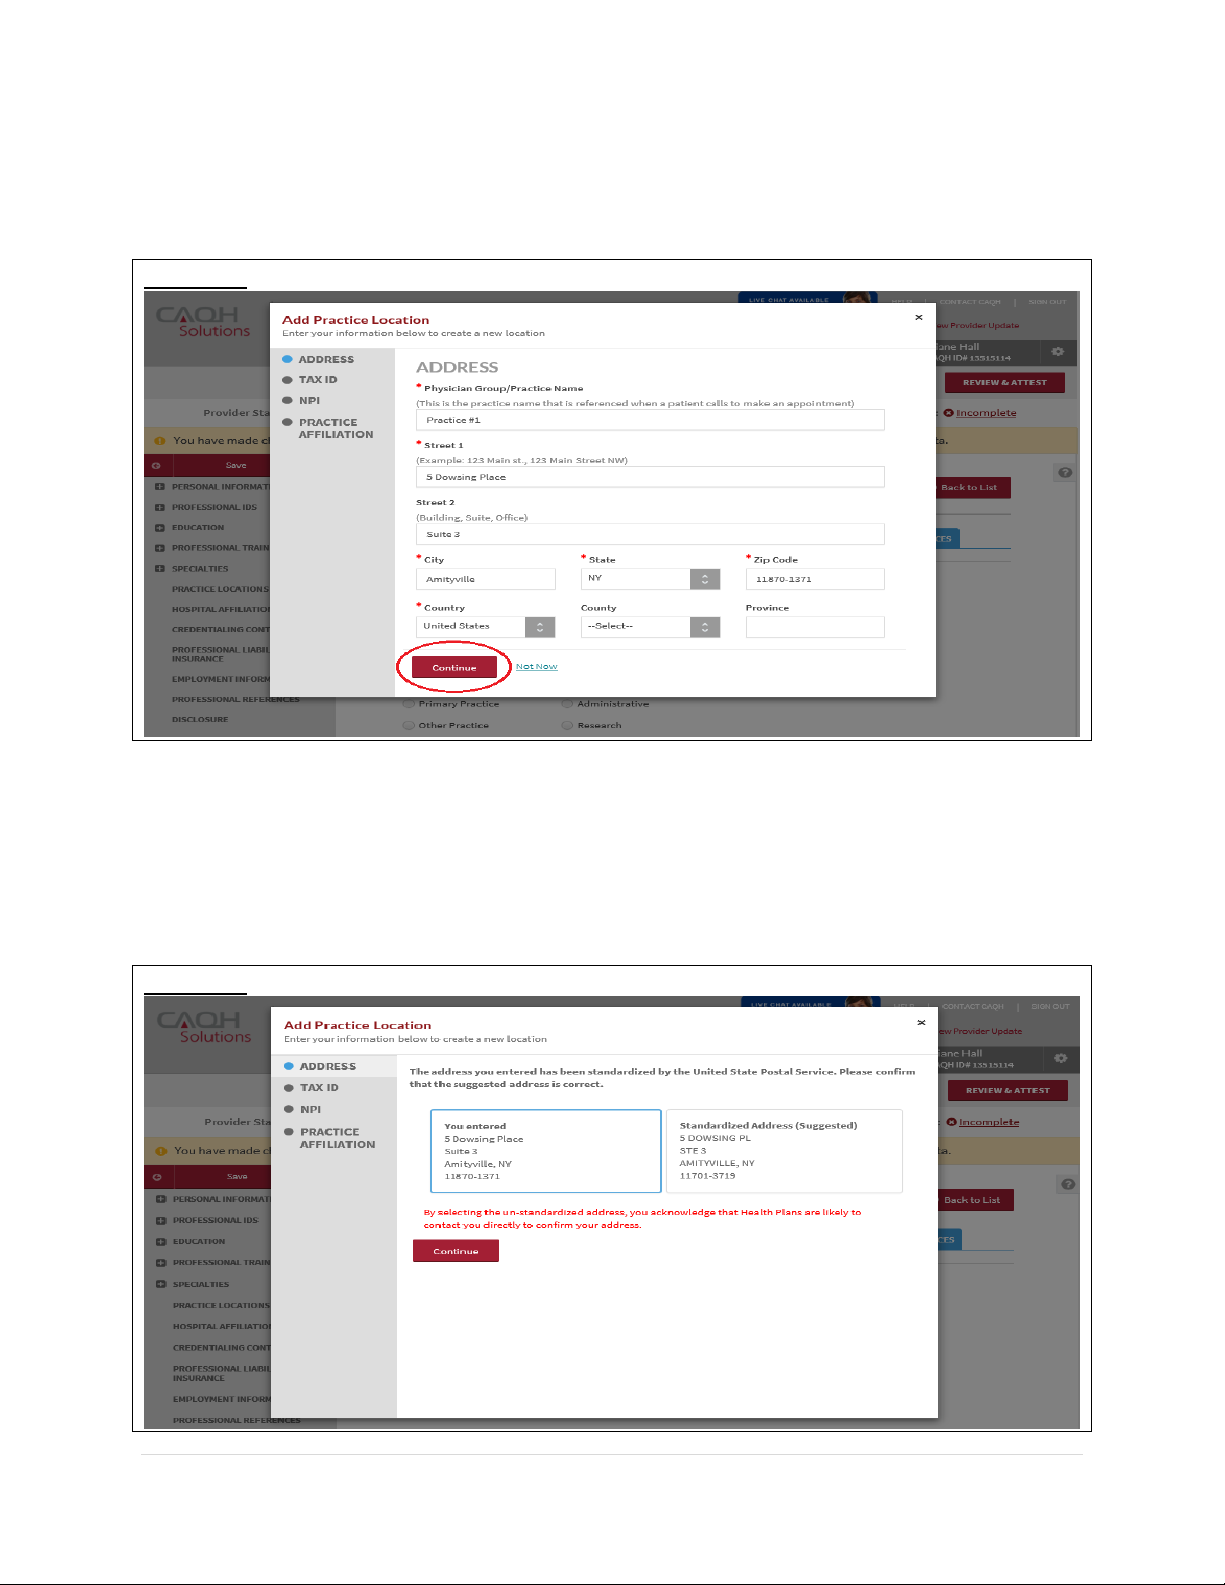
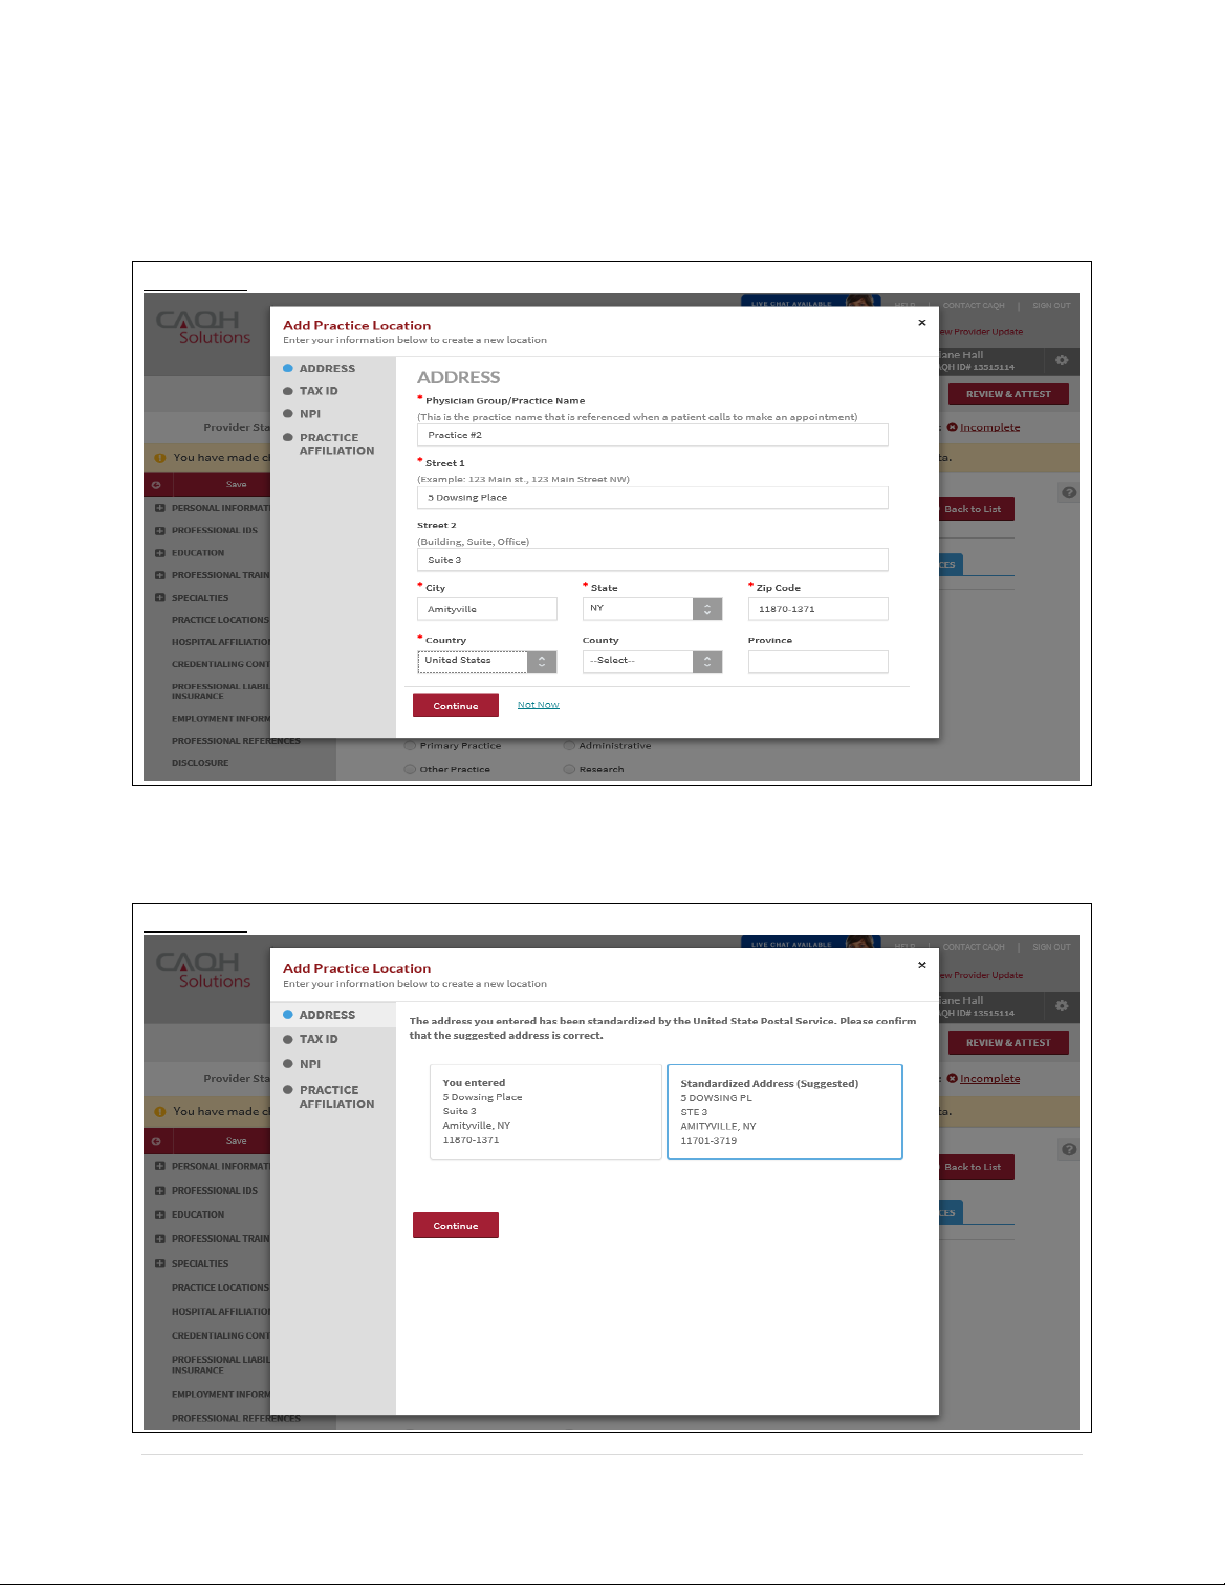
When adding a new practice location to your profile, a pop-up window will be displayed after
you clicked the Add button. Enter the Physician Group/Practice Name and the practice location
address. Click Continue.
FIGURE 72
The address will be standardized by the United State Postal Service (USPS). You need to confirm
that the suggested address is correct.
If you select the box for the address that you have just entered, you will be prompted with a
message that states: By selecting the un-standardized address, you acknowledge that Health
Plans are likely to contact you directly to confirm your address.
FIGURE 73
Page 66
CAQH ProView Provider User Guide v13
65 | P a g e
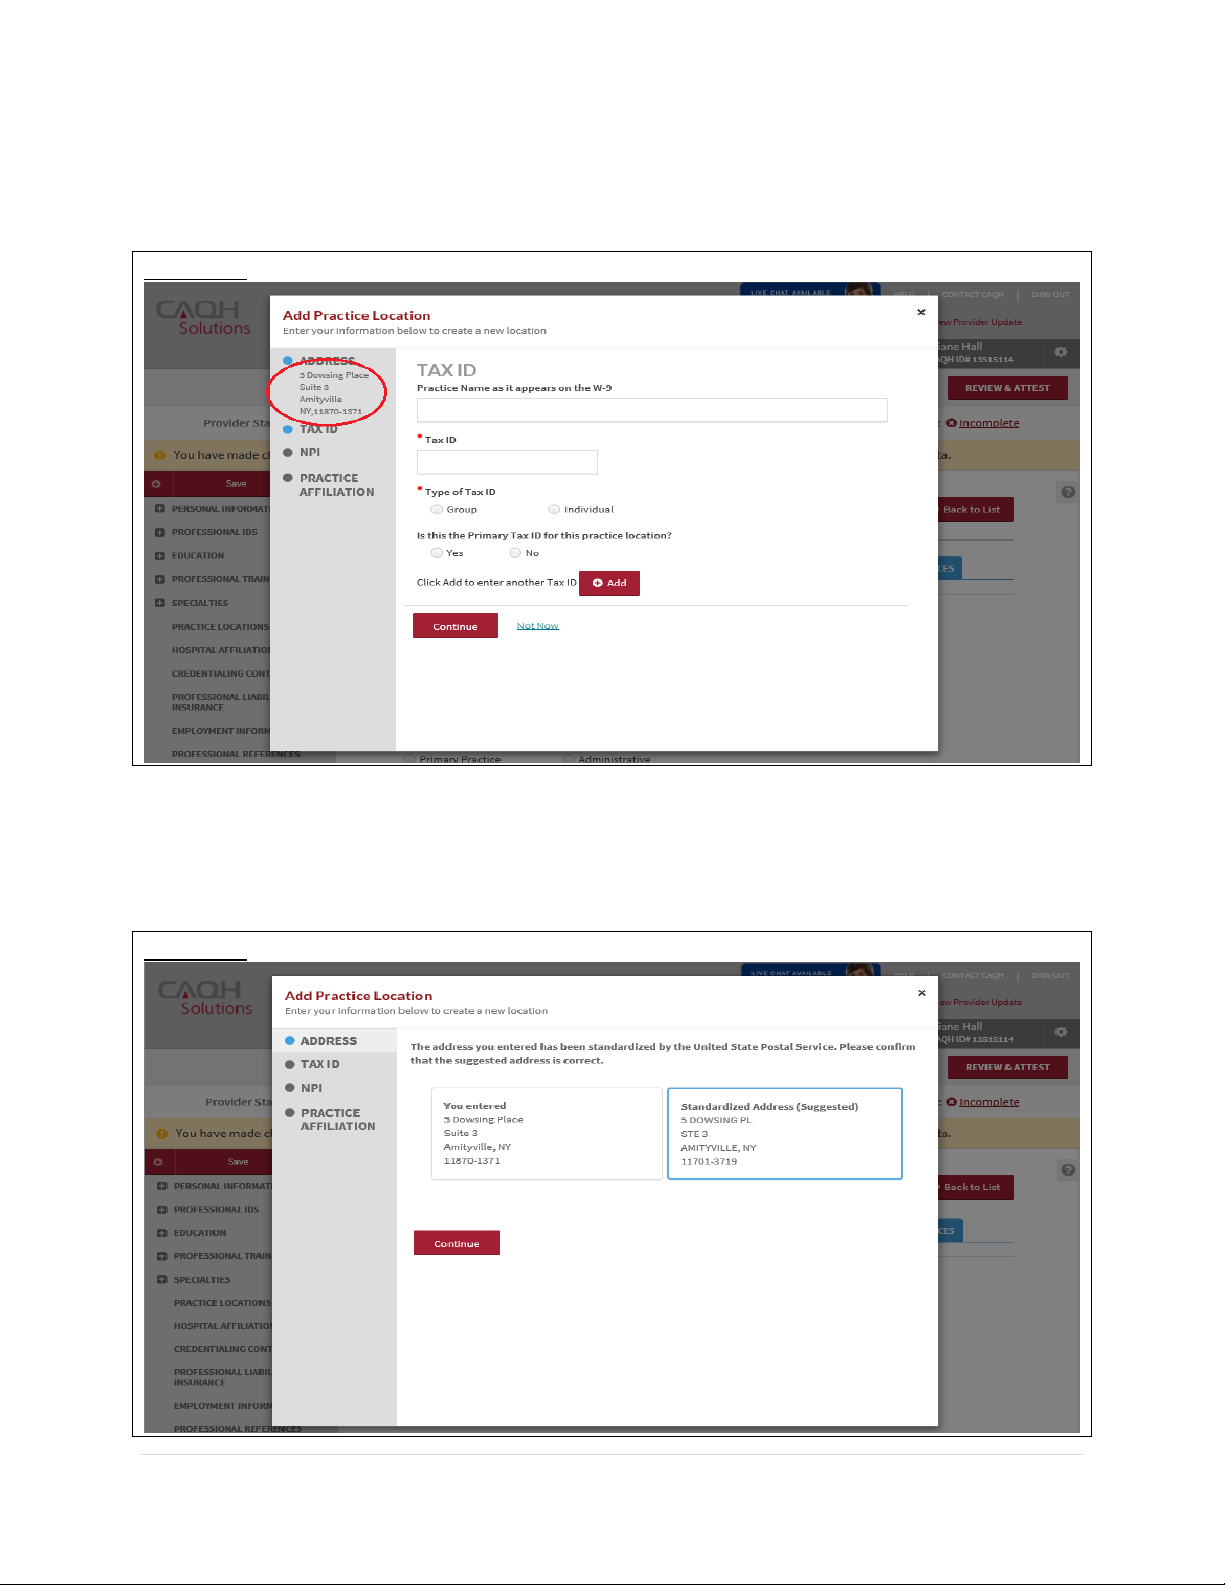
If you select Continue, the address that you have entered will be displayed at the left side of the
pop-up and you will be directed to the Tax ID information.
FIGURE 74
On the other hand, if you select the Standardized Address (Suggested) and click Continue, the
standardized address will be displayed on the left side of the pop-up and you will be directed to
the Tax ID screen.
FIGURE 75
Page 67
CAQH ProView Provider User Guide v13
66 | P a g e
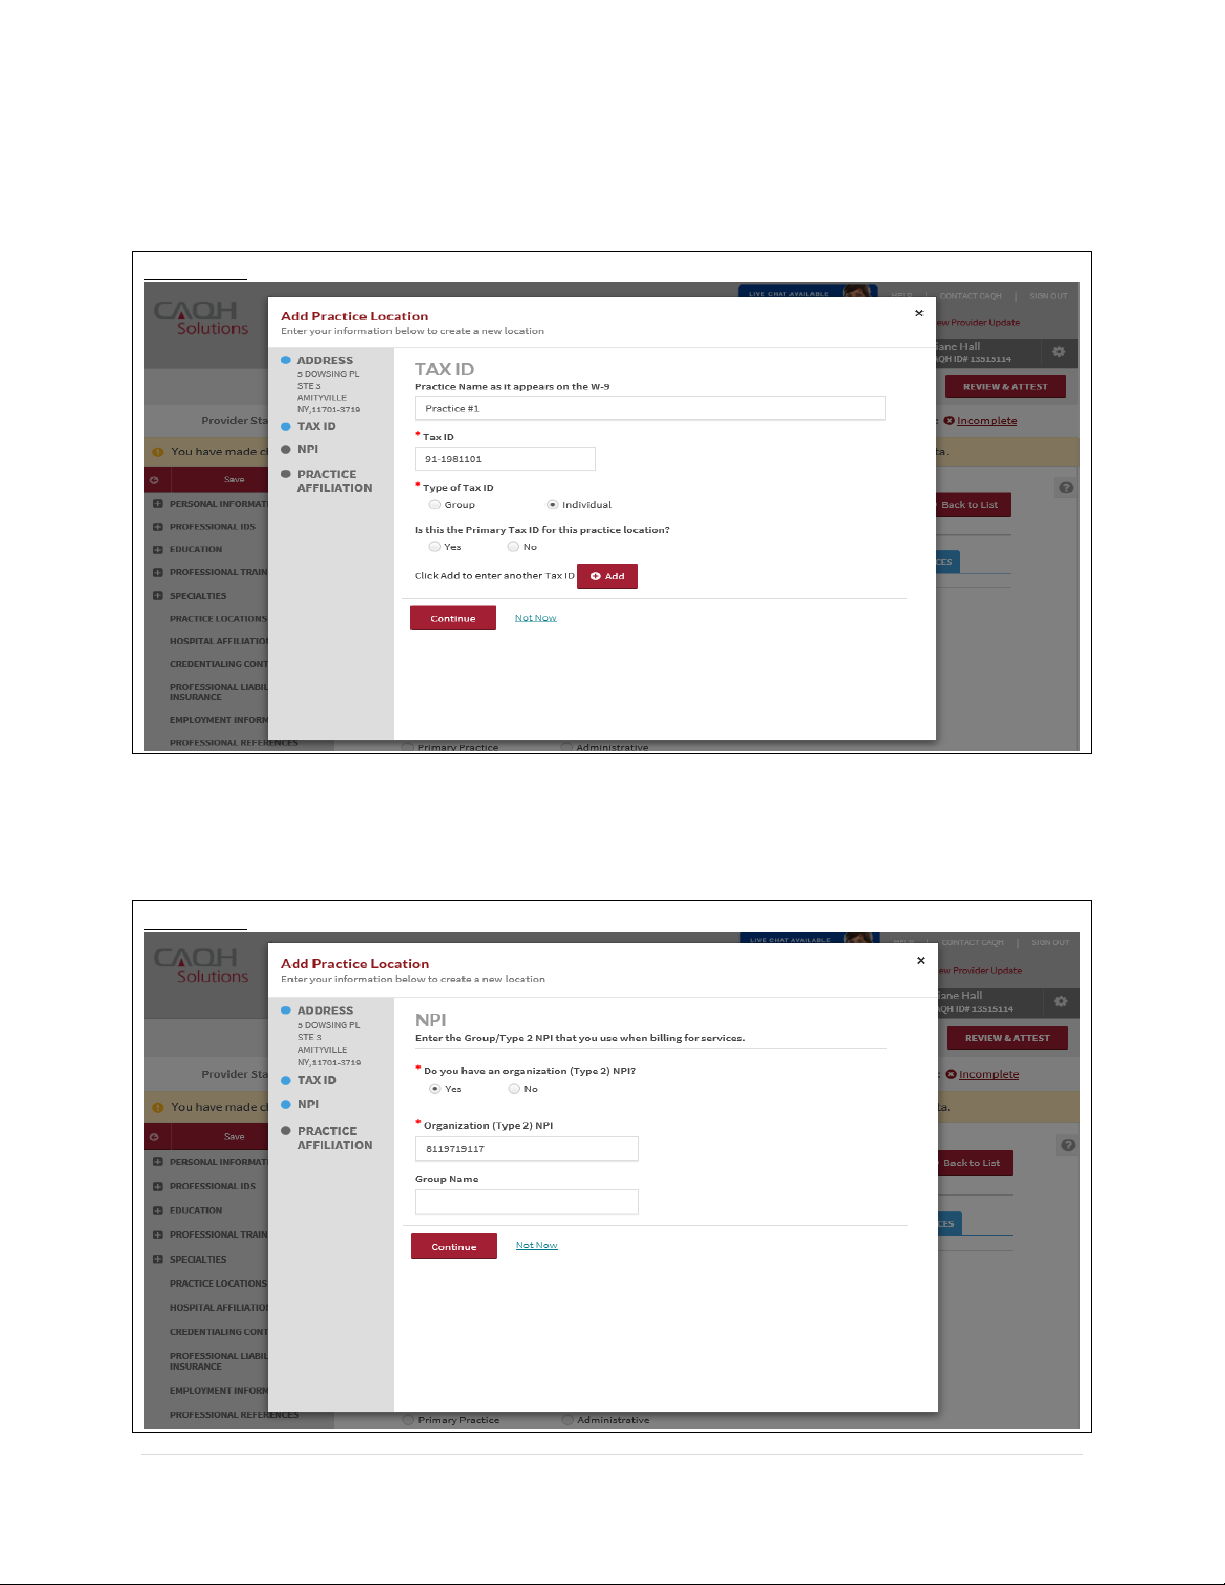
On the Tax ID screen, enter the Practice Name as it appears on the W-9, the Tax ID, and select
the Type of Tax ID. Click Continue.
FIGURE 76
The screen will display the NPI information. Answer the question “Do you have an organization
(Type 2) NPI?” If your answer is Yes, you will be required to enter the Organization (Type 2) NPI.
Click Continue.
FIGURE 77
Page 68
CAQH ProView Provider User Guide v13
67 | P a g e
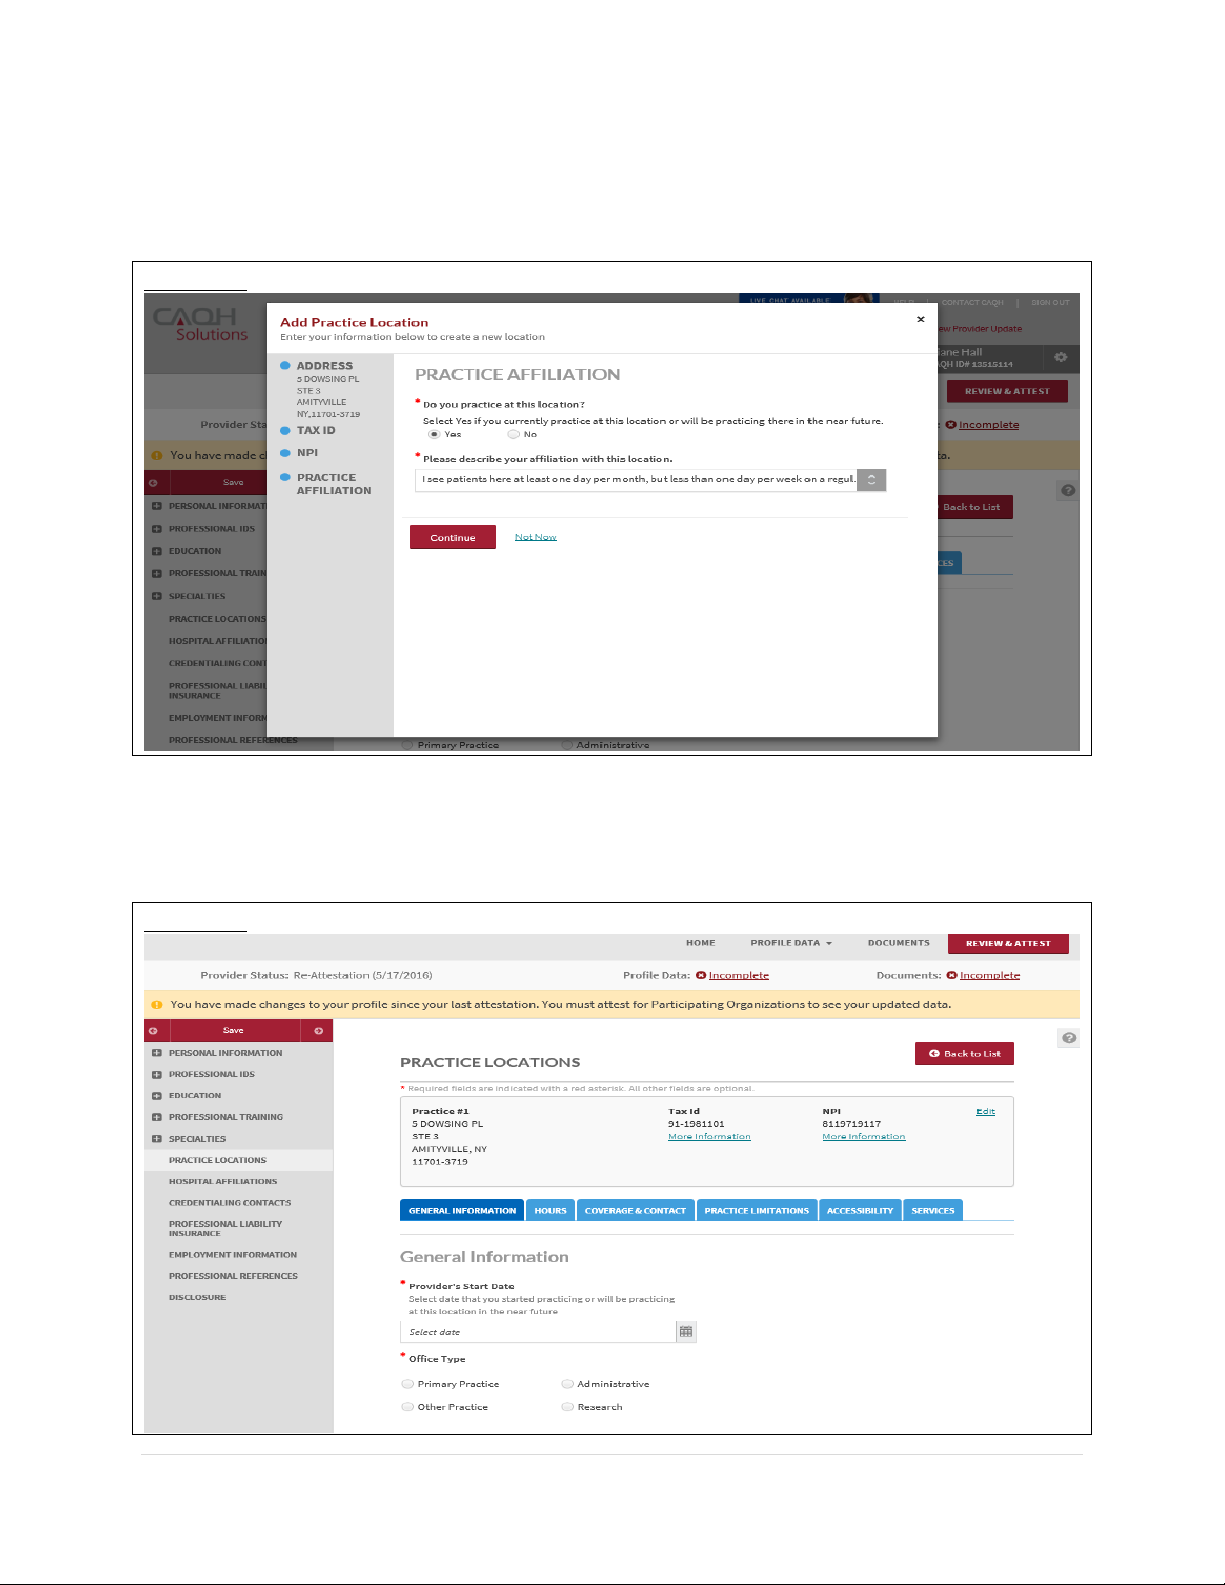
You will be directed to the Practice Affiliation page. Answer the question: “Do you practice at
this location?” Select Yes and describe your affiliation with this location. Options are available
on the dropdown. Click Continue.
FIGURE 78
The Practice Locations page will be displayed. At the top of the page, you will see the
information that you have entered. Navigate to each of the tabs to enter any other required
information.
FIGURE 79
Page 69
CAQH ProView Provider User Guide v13
68 | P a g e
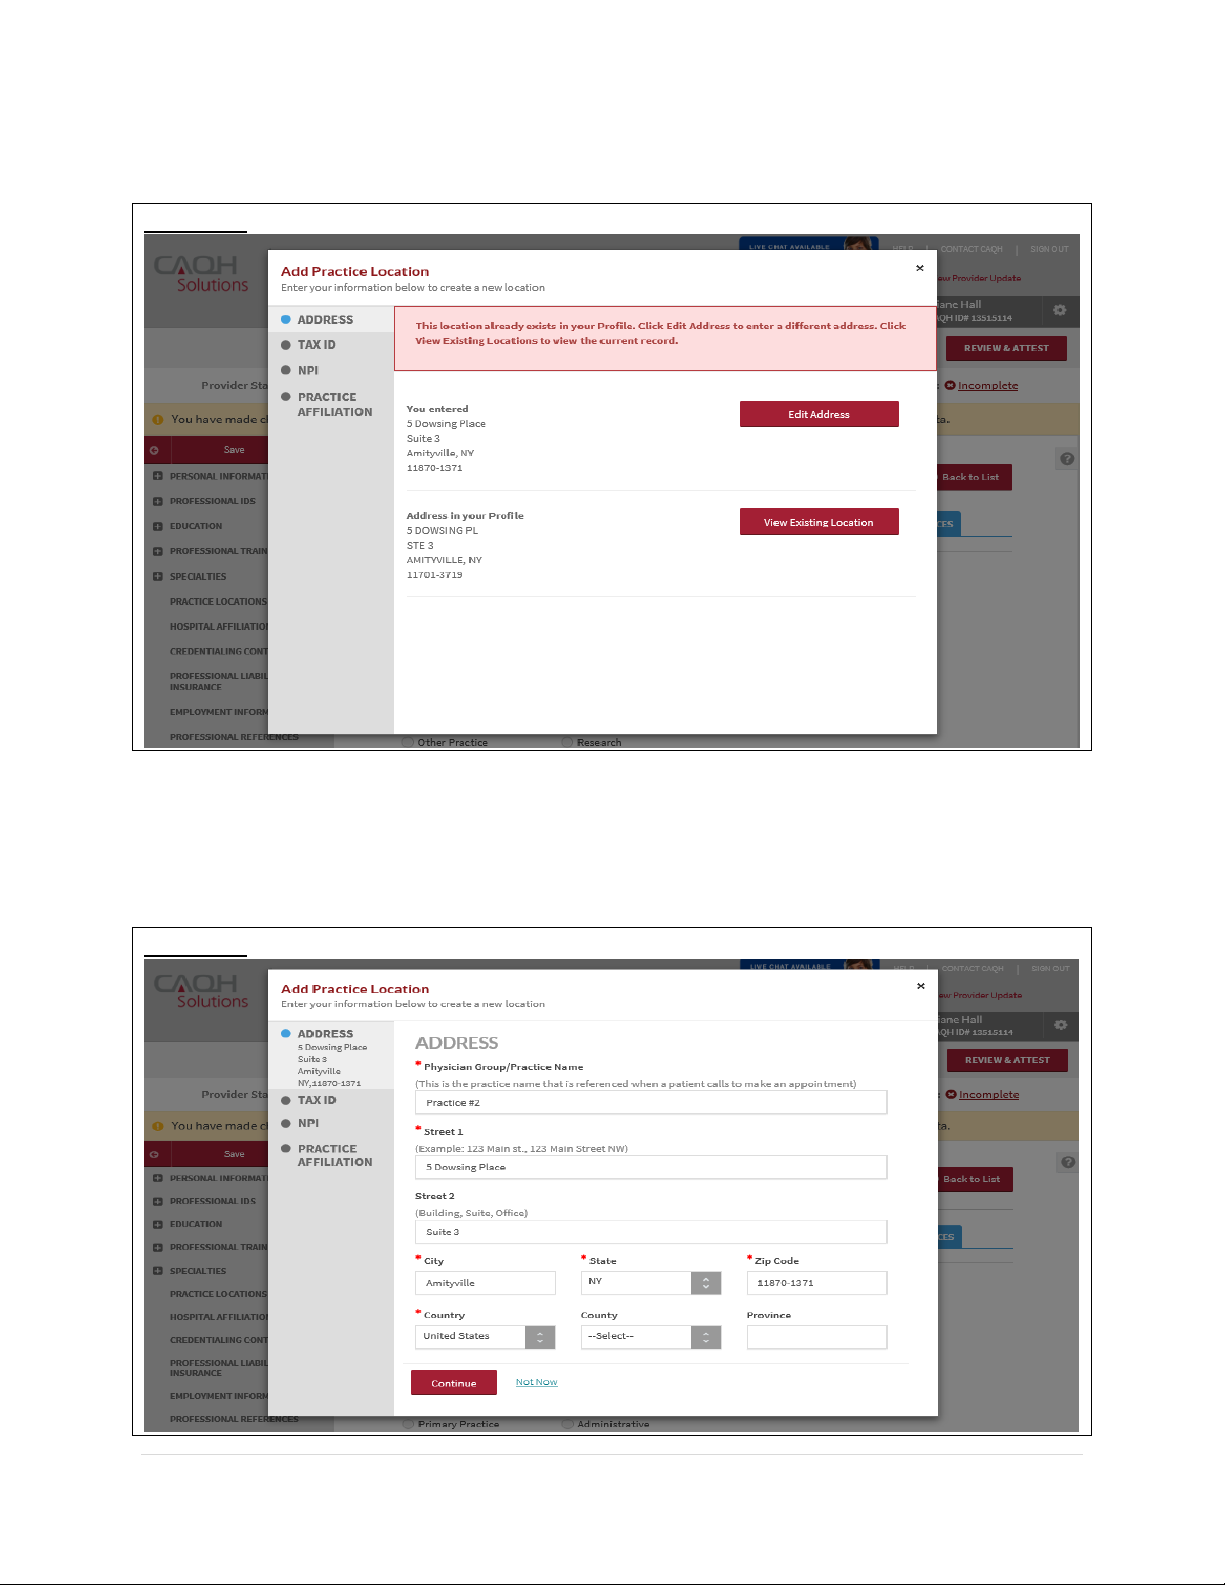
If you are adding a practice location that is active in your profile, you will be prompted with a
message that states: This location already exists in your Profile. Click Edit Address to enter a
different address. Click View Existing Locations to view the current record.
FIGURE 80
The address details will undergo standardization by the USPS. Confirm that the suggested
address is correct.
FIGURE 81
Page 70
CAQH ProView Provider User Guide v13
69 | P a g e
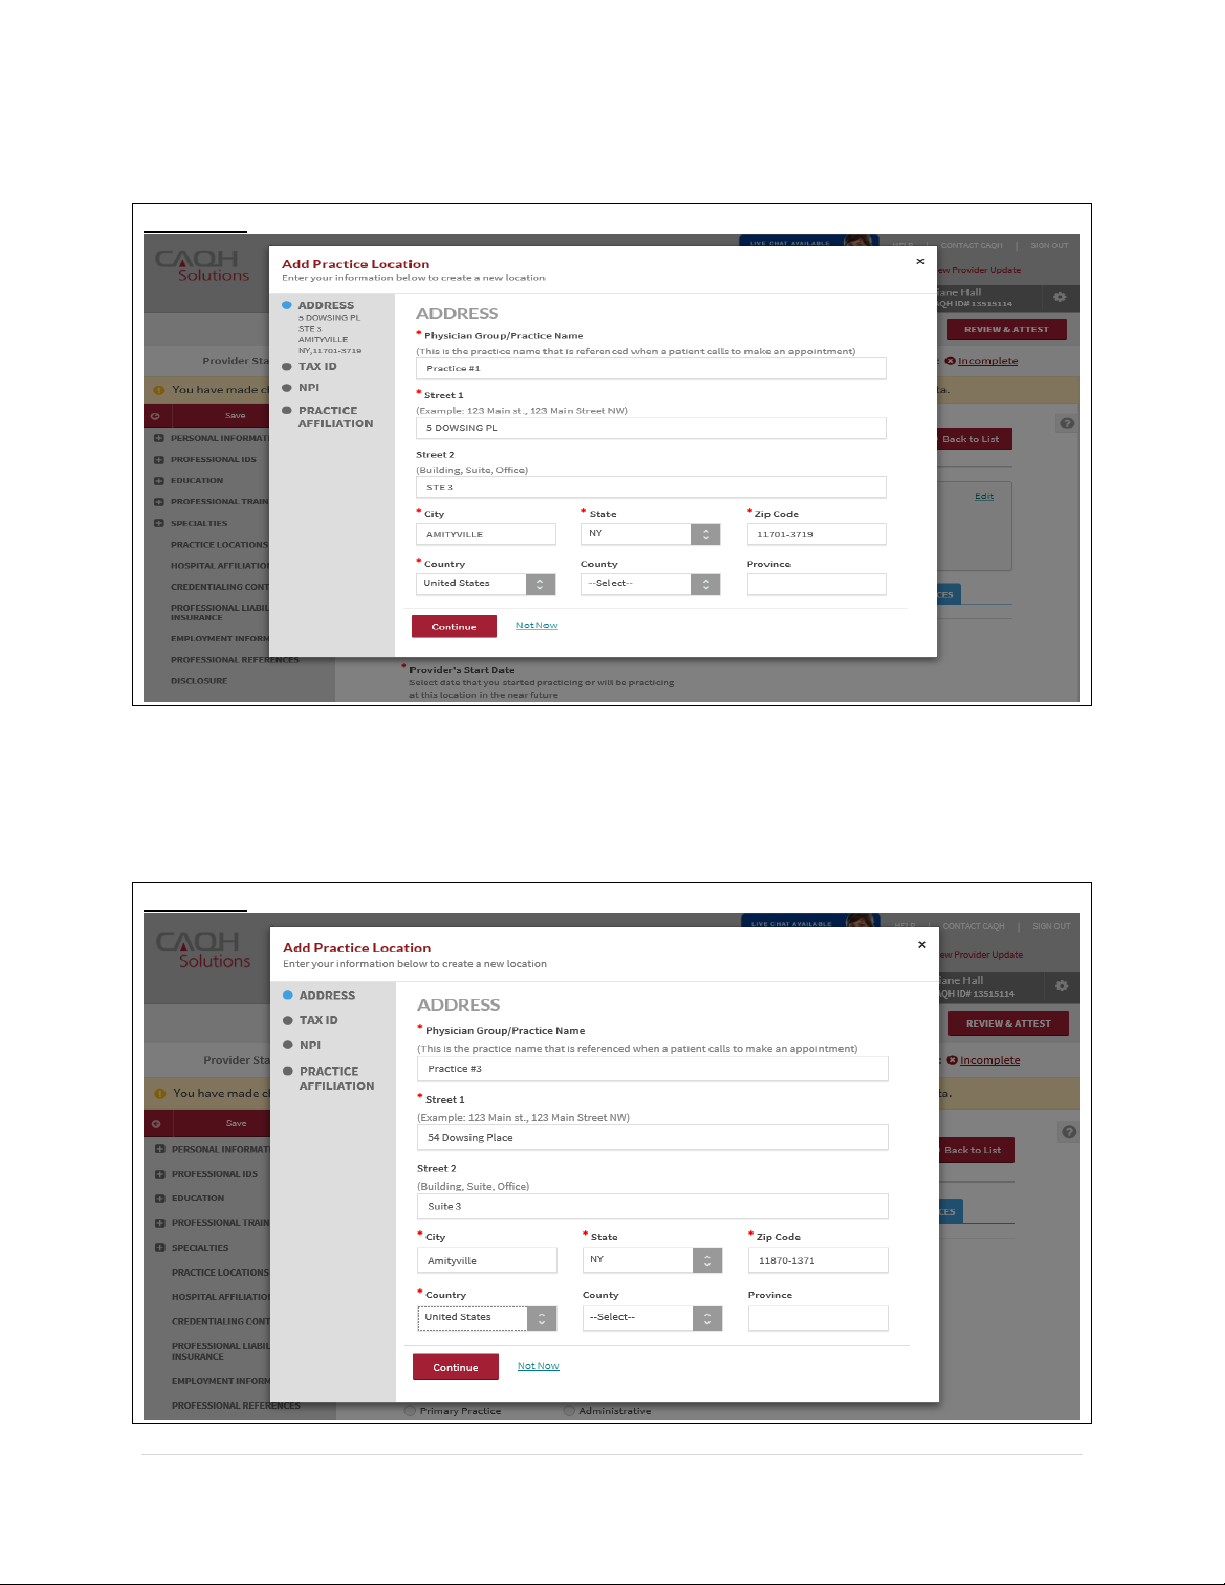
If you select Continue, you will ne prompted with this message.
FIGURE 82
Note: CAQH ProView will not allow you to add a practice location that is already in your profile.
If you click Edit Address, you will be navigated back to the screen where you can change the
address details.
FIGURE 83
Page 71
CAQH ProView Provider User Guide v13
70 | P a g e
If you click View Existing Location, the details of the existing location will be displayed.
FIGURE 84
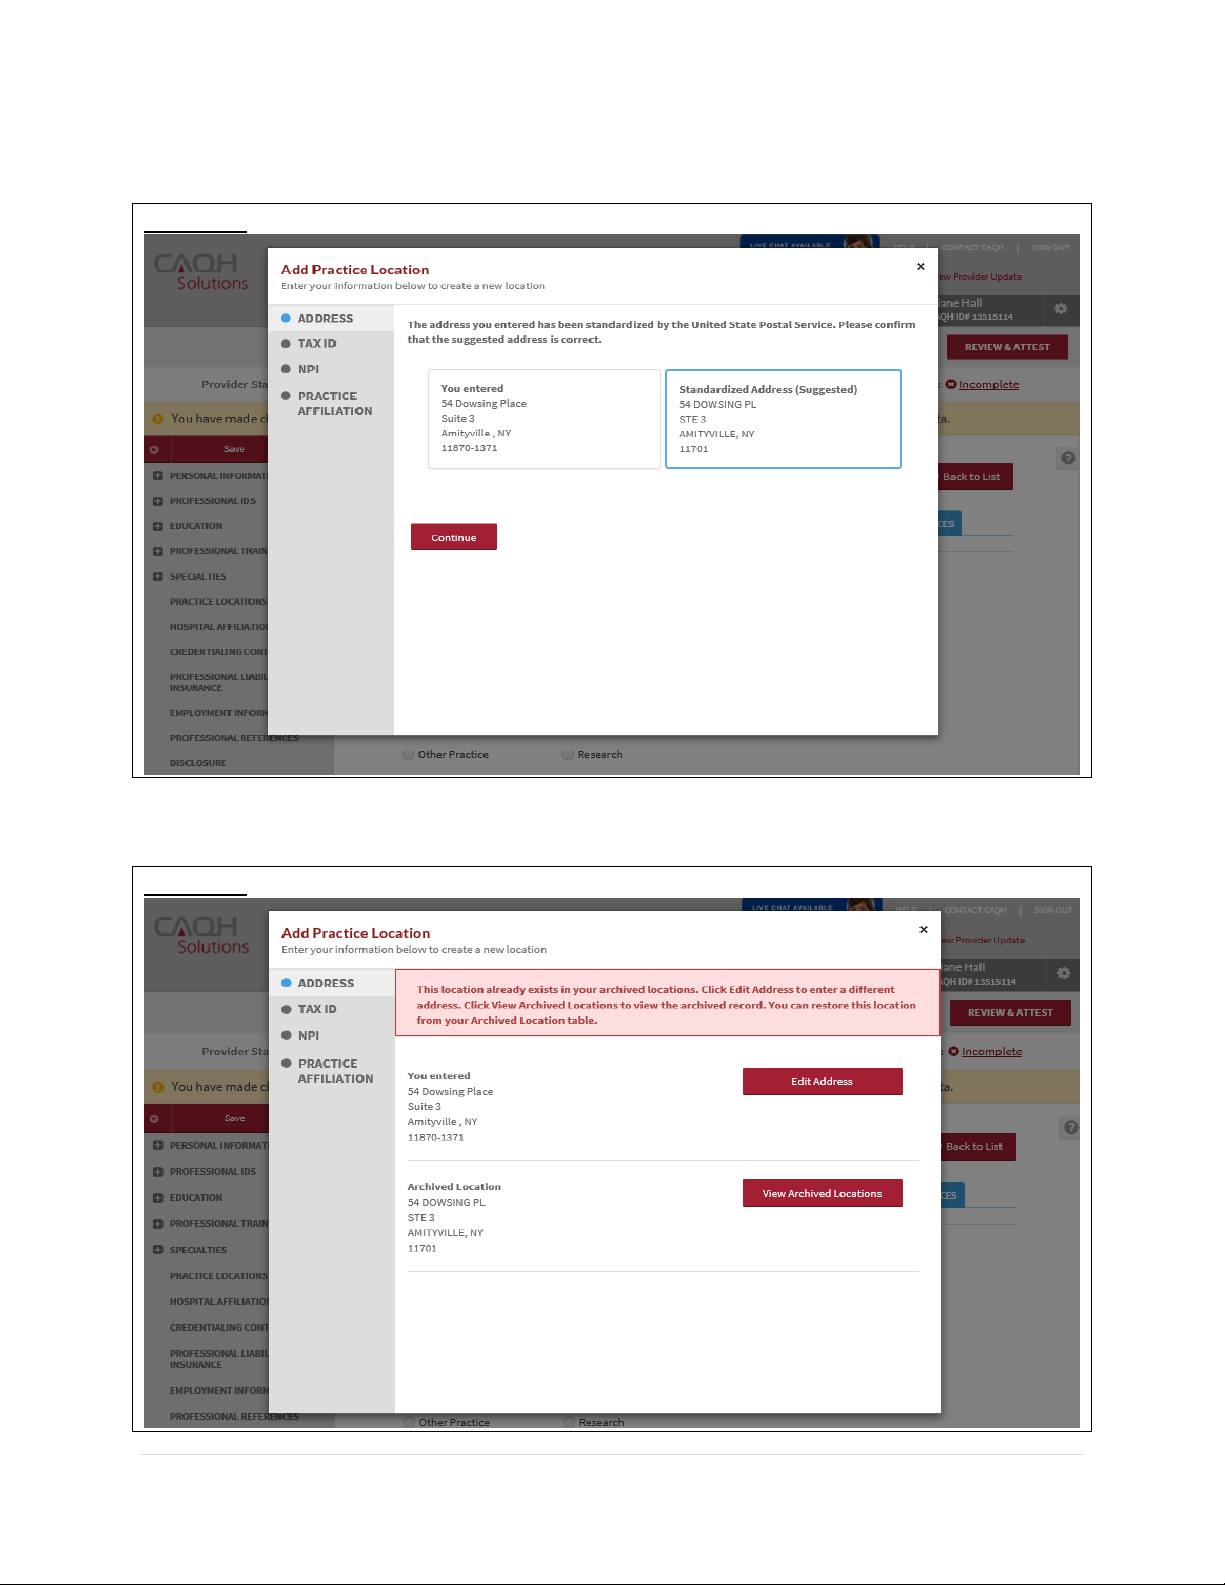
If you are adding a practice location that is already in your profile but is in your archived
locations, you will be prompted with a message that states: This location already exists in your
archived locations. Click Edit Address to enter a different address. Click View Archived Locations
to view the archived record. You can restore this location from your Archived Location table.
FIGURE 85
Page 72
CAQH ProView Provider User Guide v13
71 | P a g e
The address will undergo standardization by the USPS.
FIGURE 86
If you select Continue, you will be prompted with this message.
FIGURE 87
Page 73
CAQH ProView Provider User Guide v13
72 | P a g e
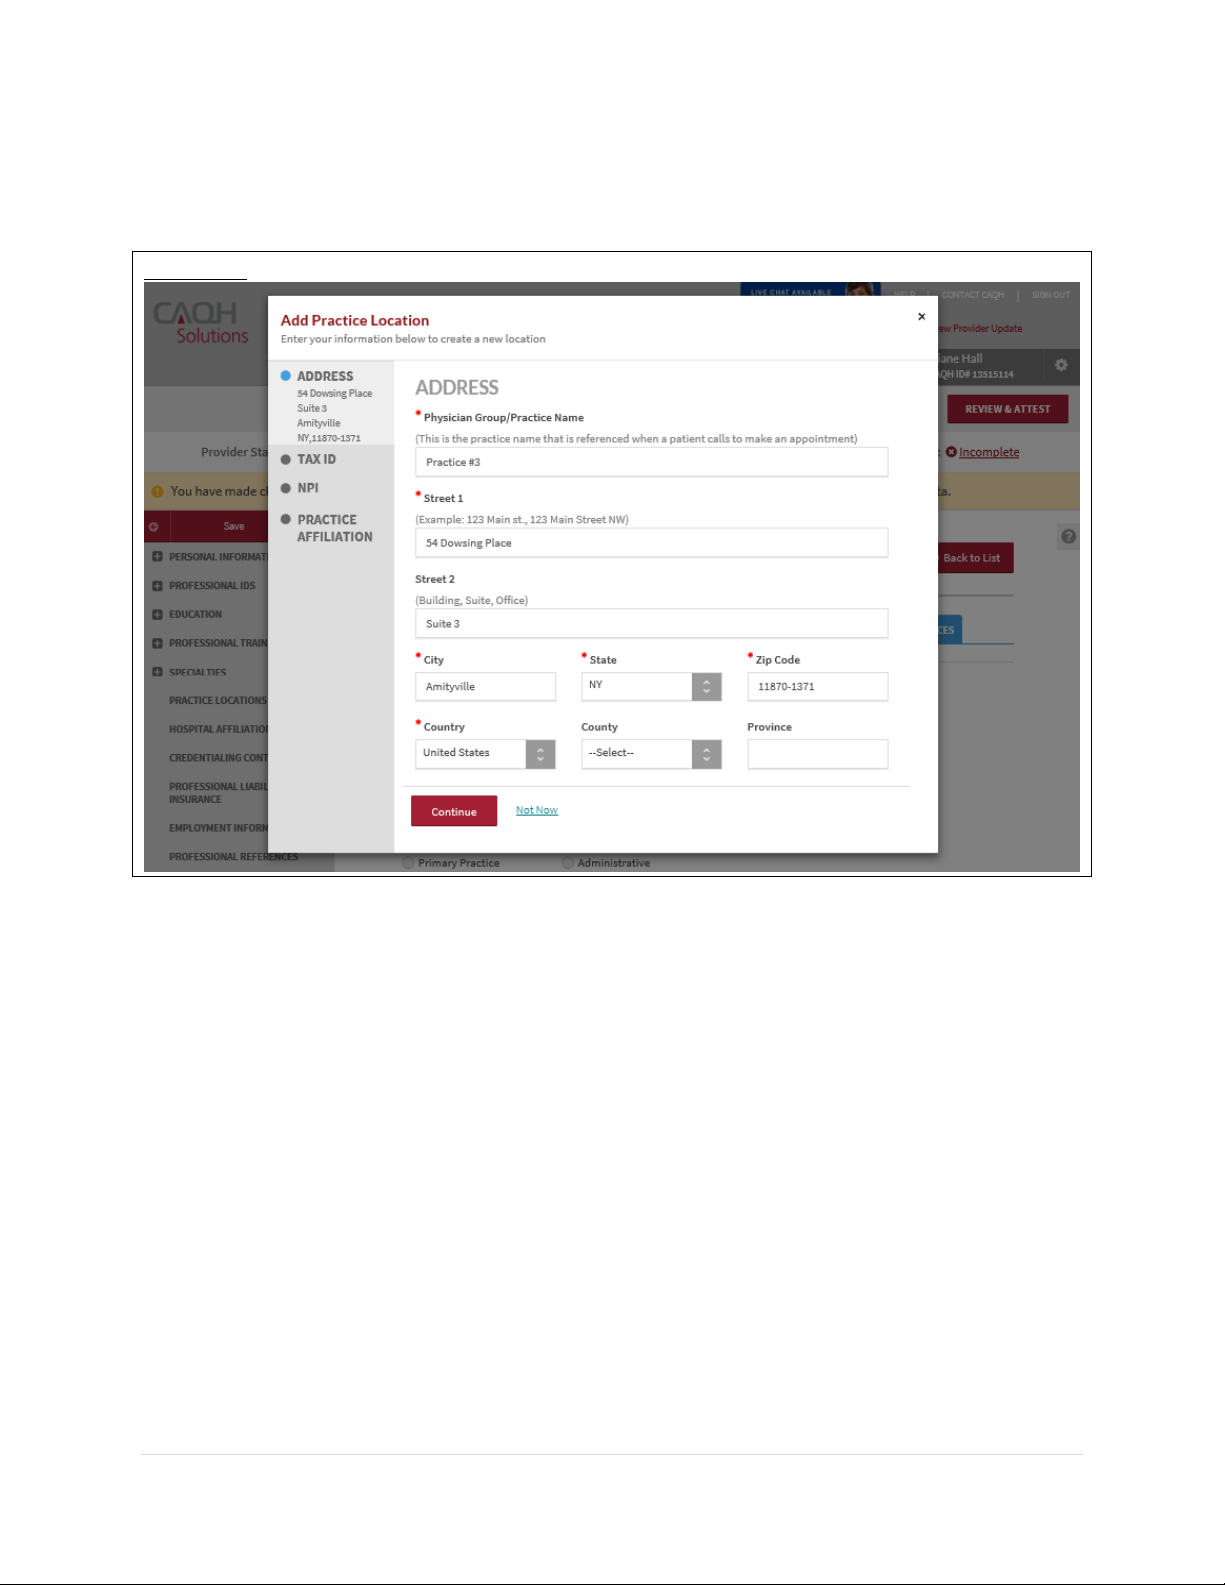
If you click Edit Address, you will be navigated to a screen where you can change the address
details.
FIGURE 88
Page 74
CAQH ProView Provider User Guide v13
73 | P a g e
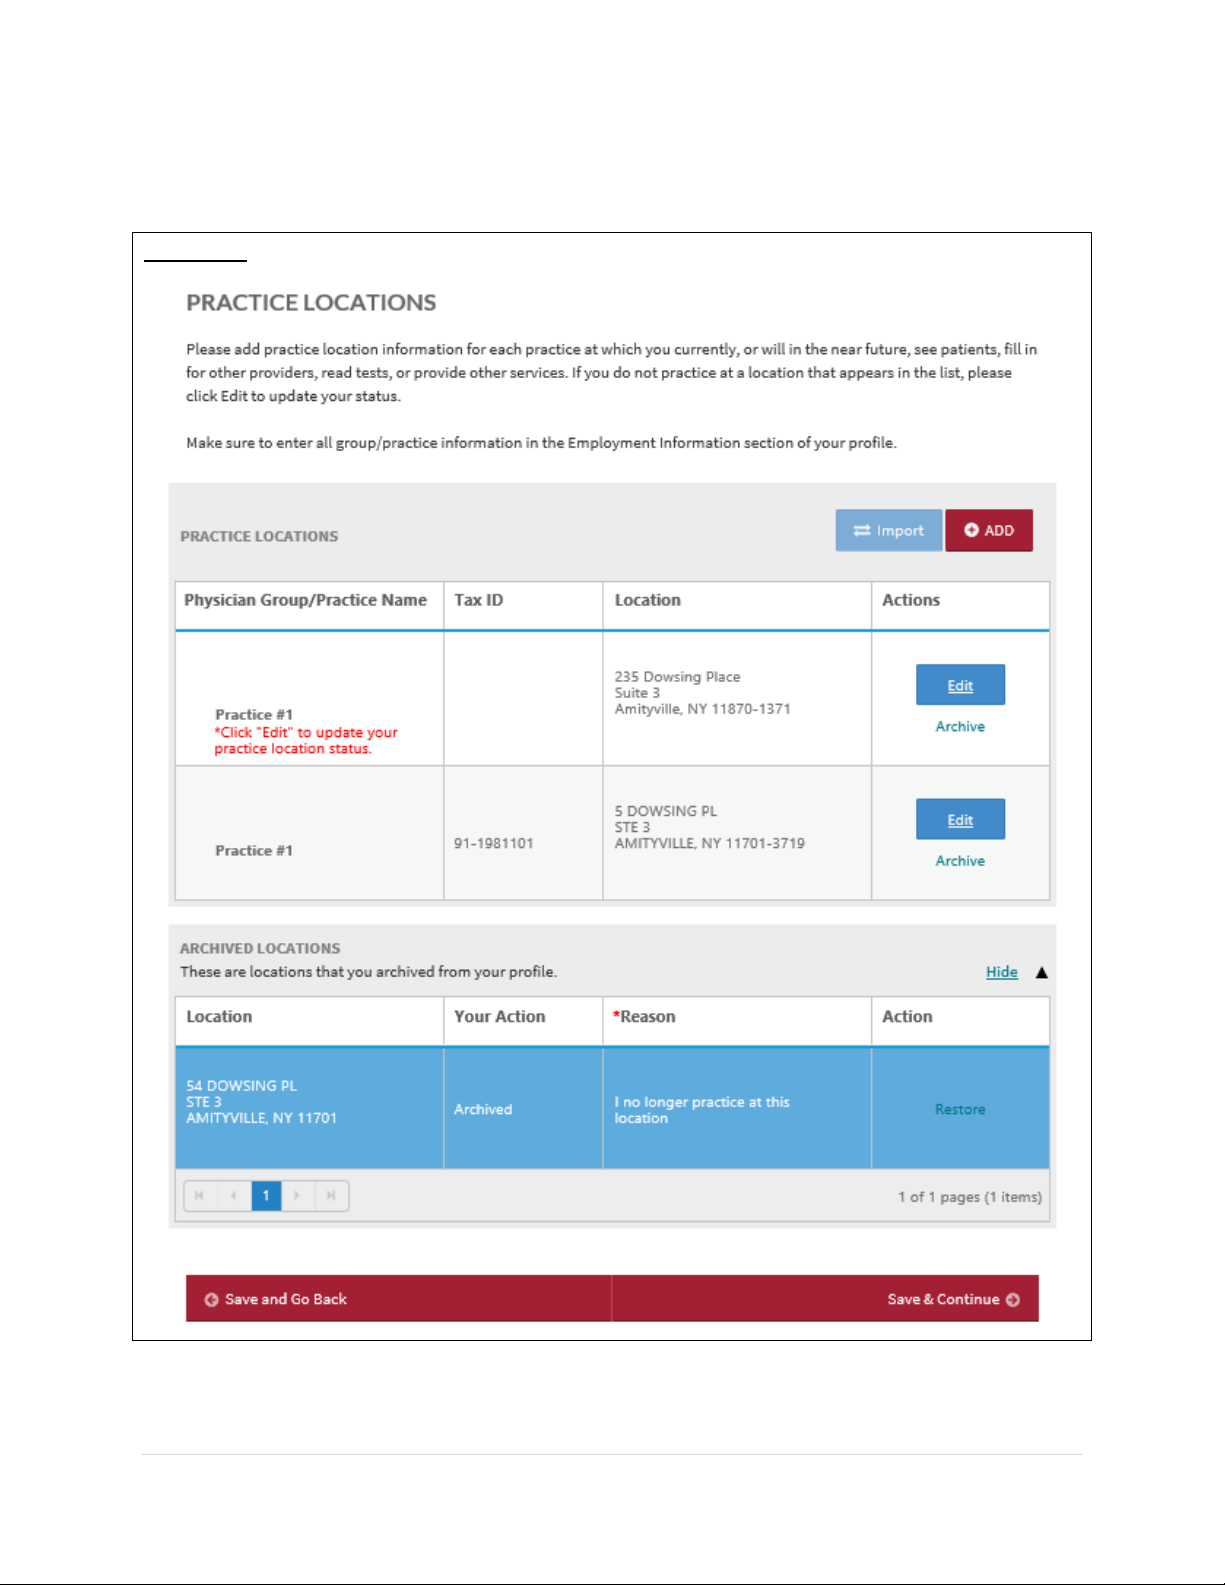
If you click View Archived Locations, you will be directed to the Practice Locations summary
page. The archived location will be displayed.
FIGURE 89
Page 75
CAQH ProView Provider User Guide v13
74 | P a g e
New: Archiving a Location/s
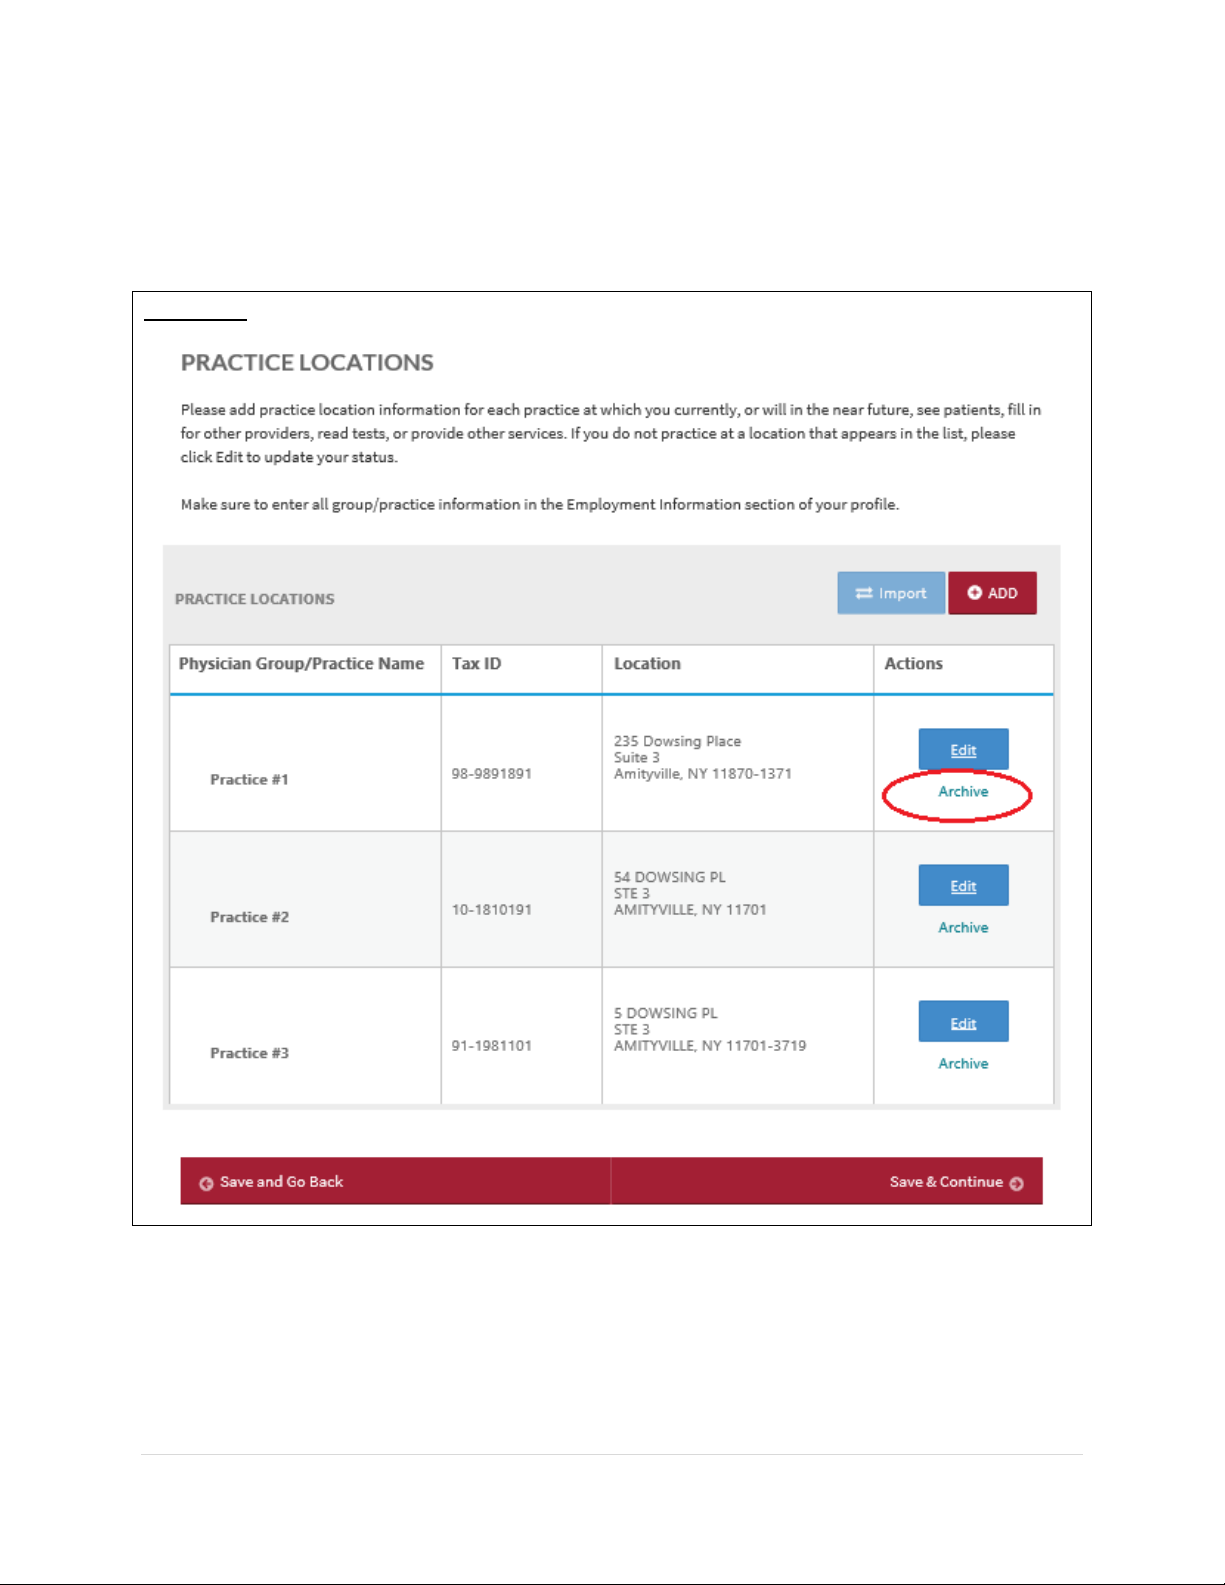
The “Delete” functionality has been replaced with the “Archive” functionality. Archive a
location where you do not practice. To archive a location, click the Archive link for that location.
FIGURE 90
Page 76
CAQH ProView Provider User Guide v13
75 | P a g e
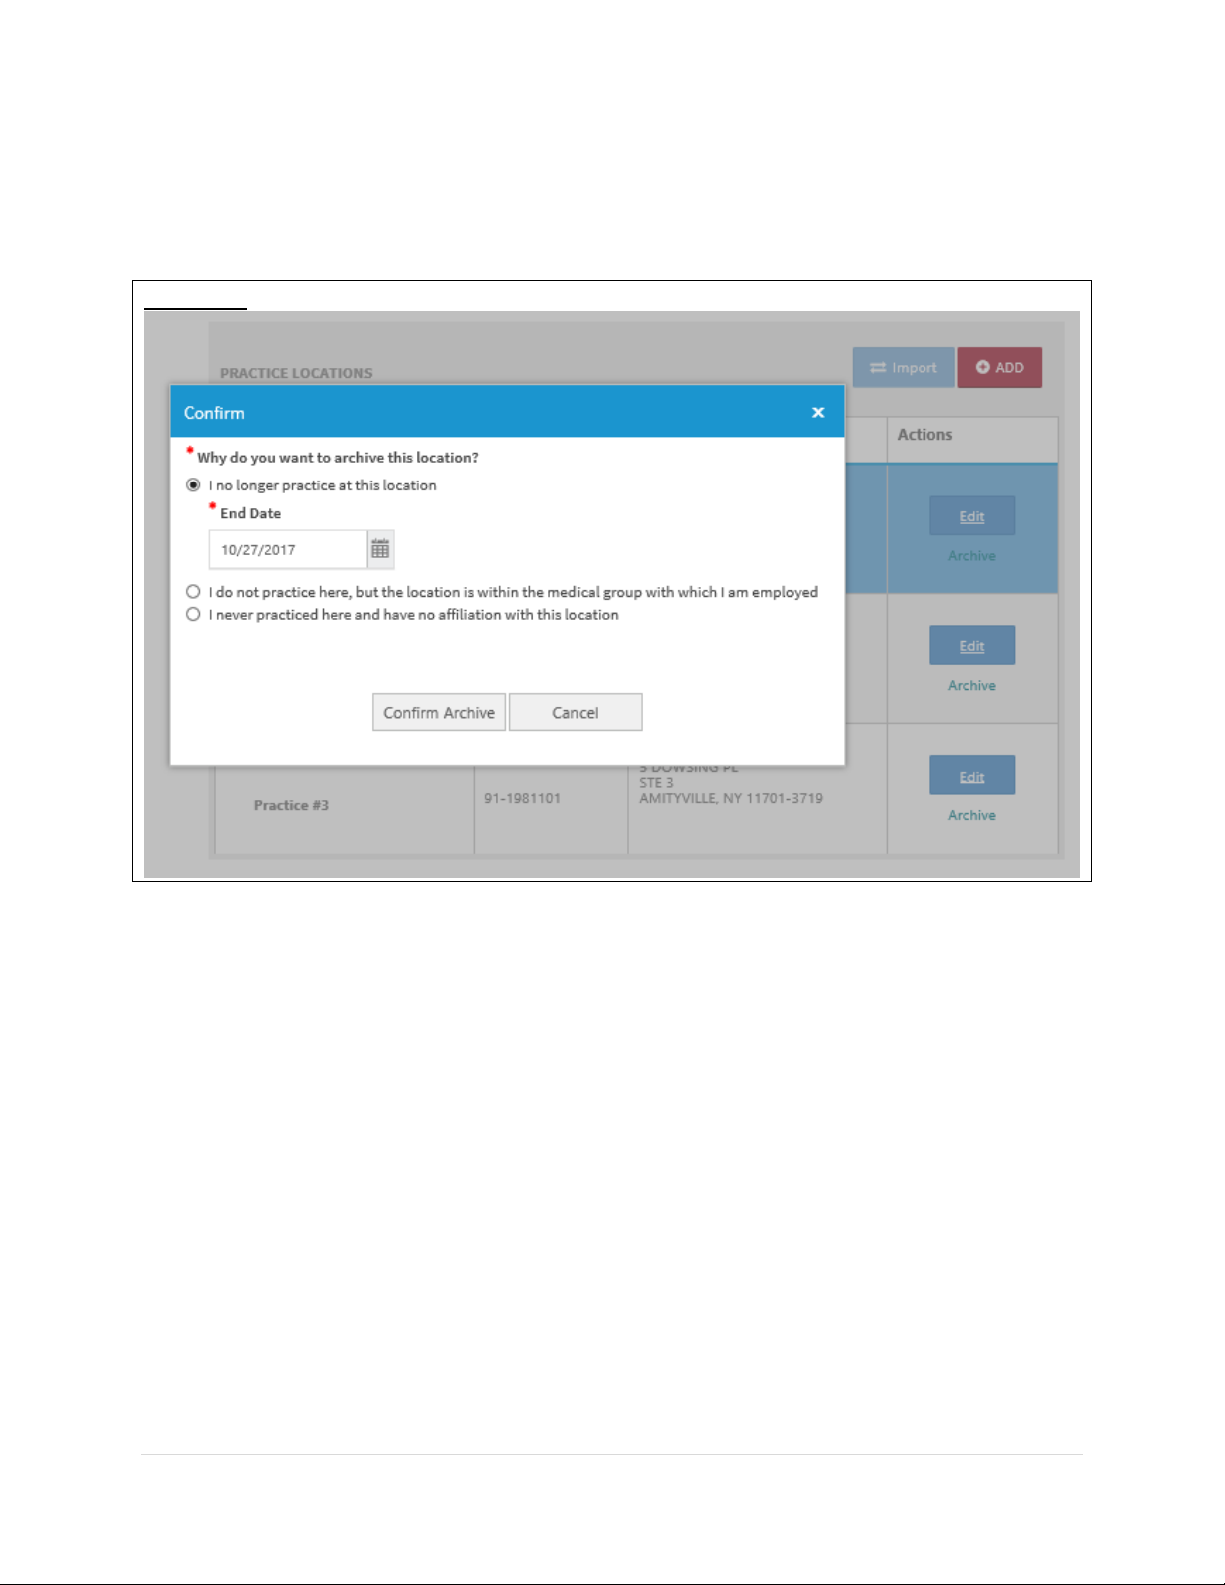
You will be prompted to select the reason for archiving the location. Click the radio button for
the reason. If you select “I no longer practice at this location”, you will be required to enter the
end date. Click Confirm Archive.
FIGURE 91
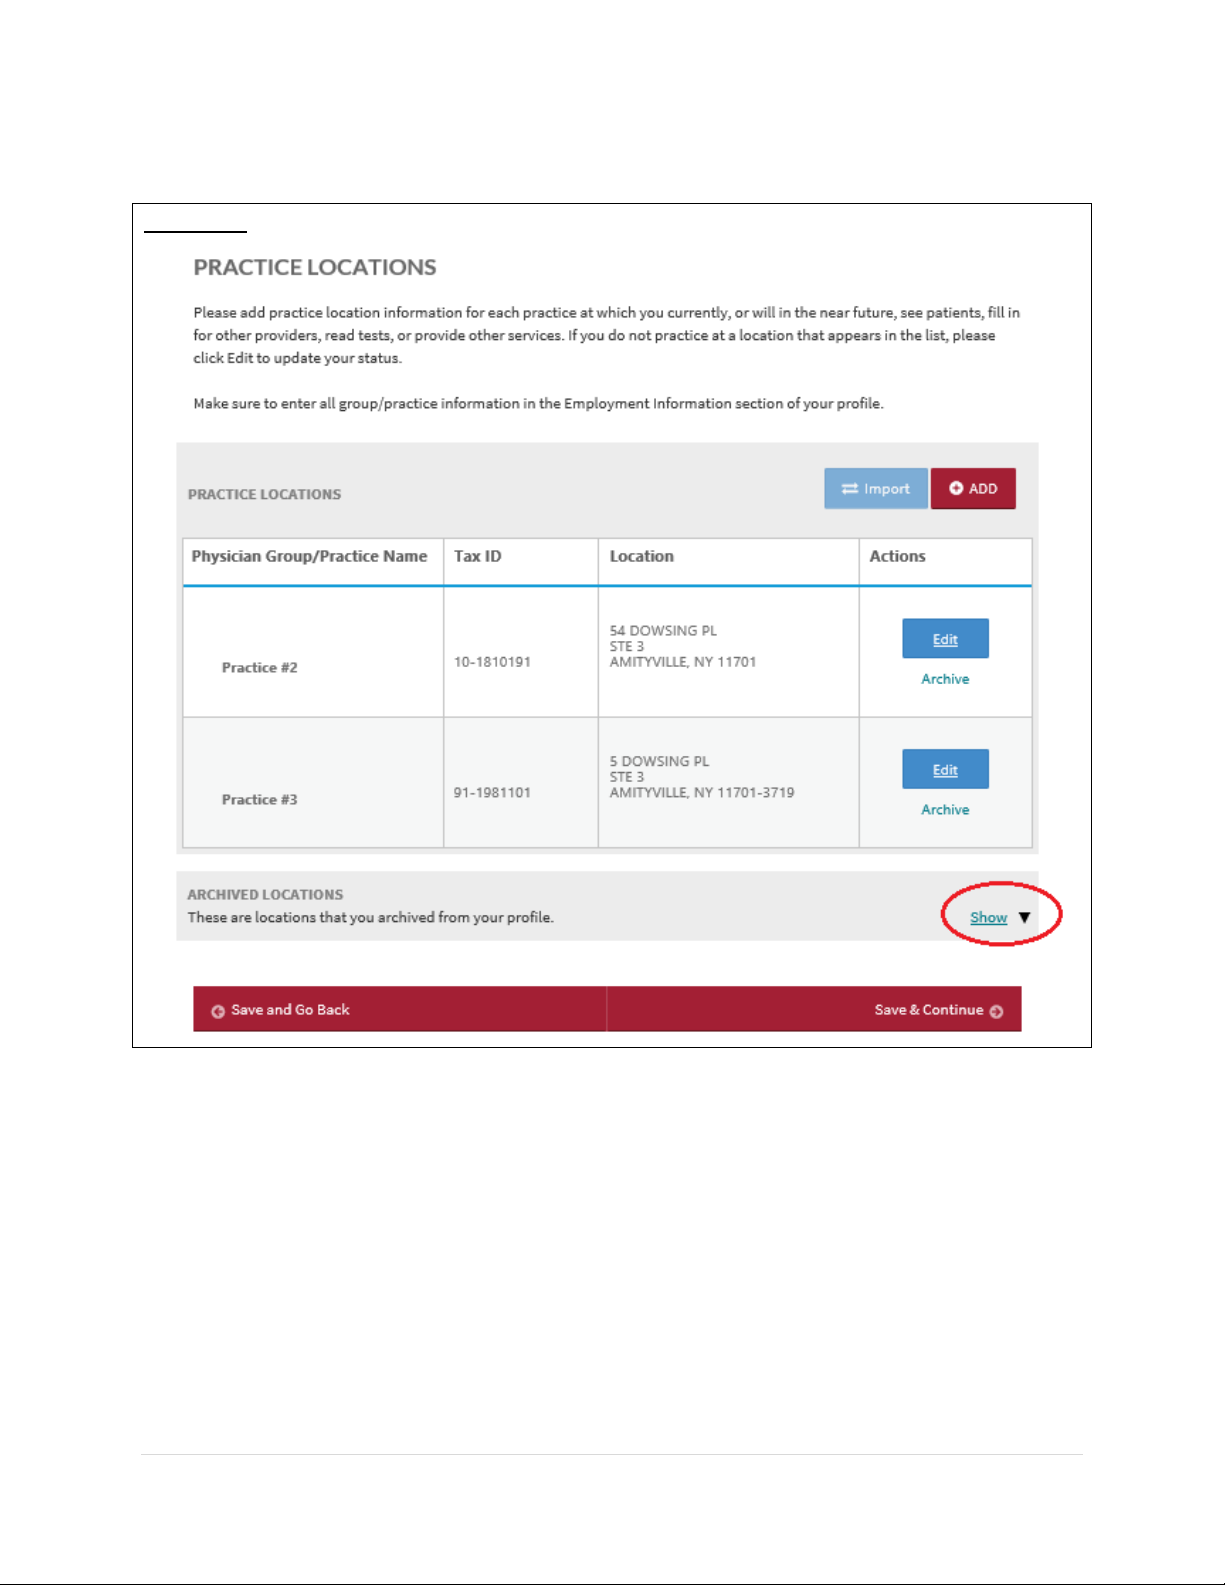
If you are archiving a location for the first time, a section for Archived Locations will be
displayed on the page.
Note: When you change your answer to the question “Do you practice at this location?” from
Yes to No, that practice location will be moved to the Archived Locations.
Page 77
CAQH ProView Provider User Guide v13
76 | P a g e
To view the archived location/s, click Show.
FIGURE 92
Page 78
CAQH ProView Provider User Guide v13
77 | P a g e
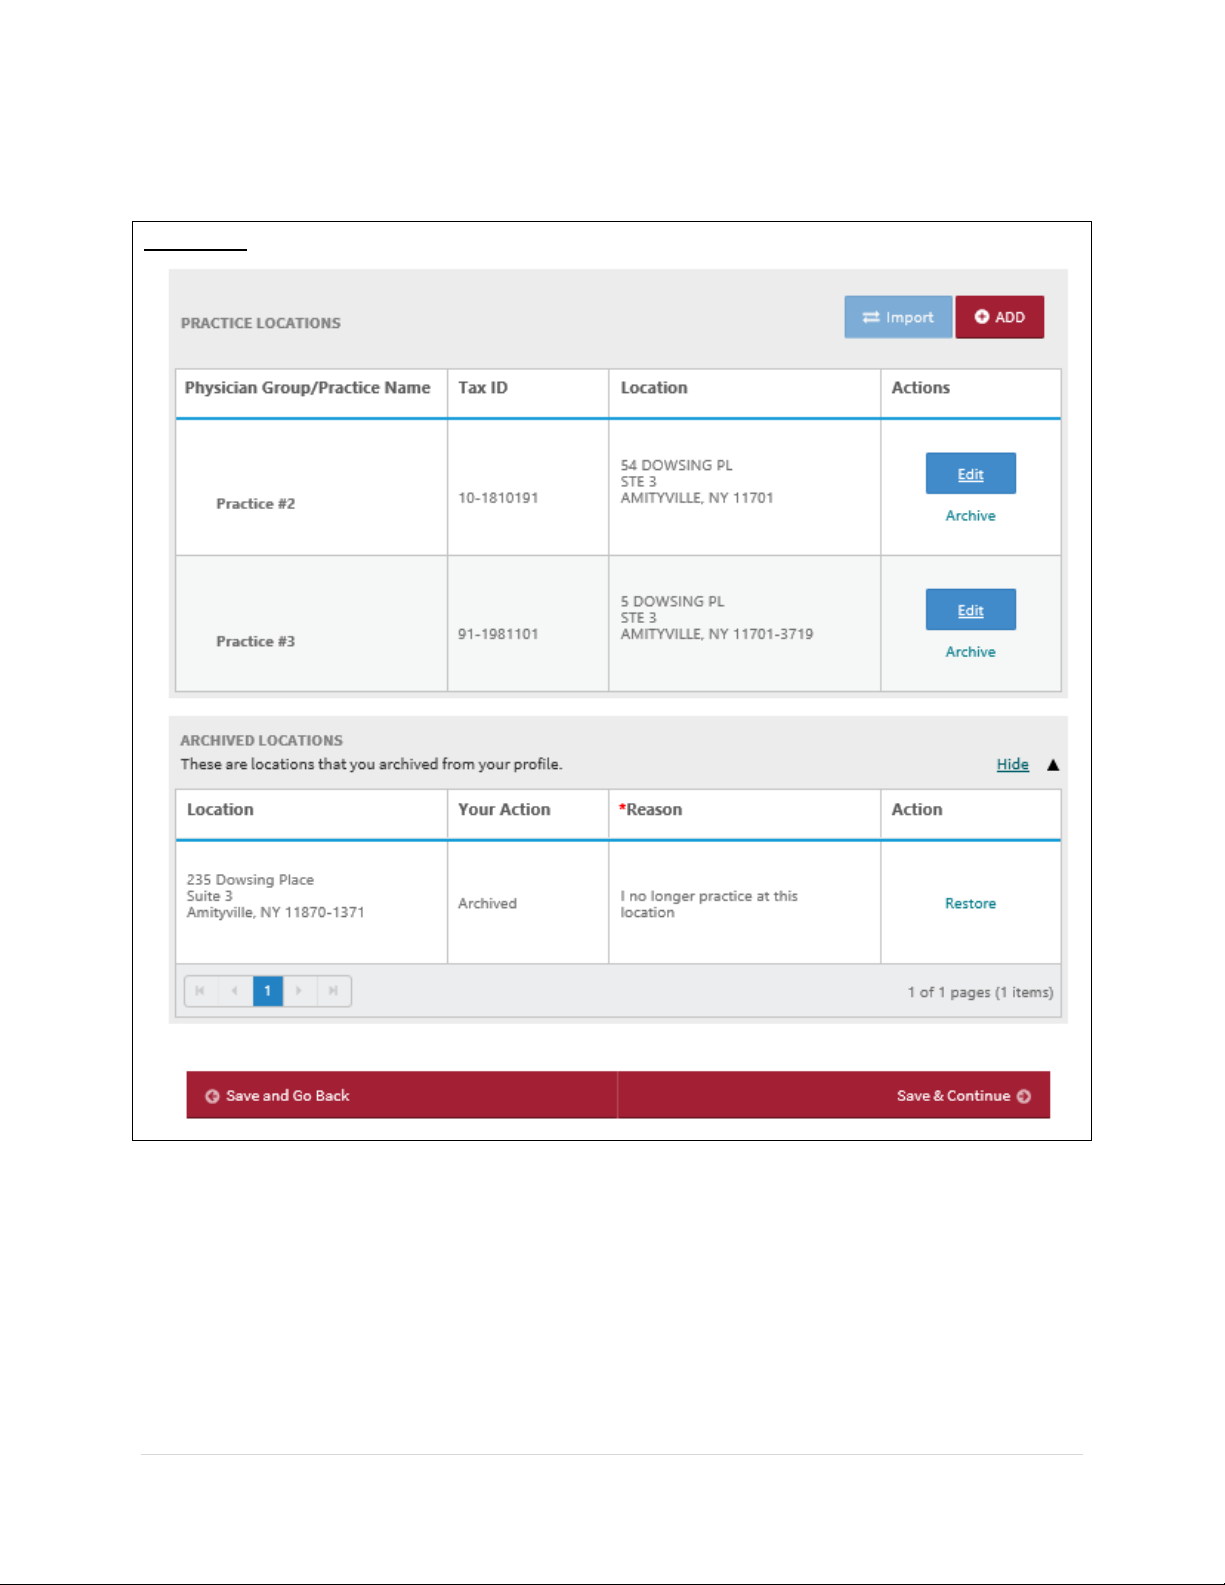
The page will display the archived location/s.
FIGURE 93
Page 79
CAQH ProView Provider User Guide v13
78 | P a g e
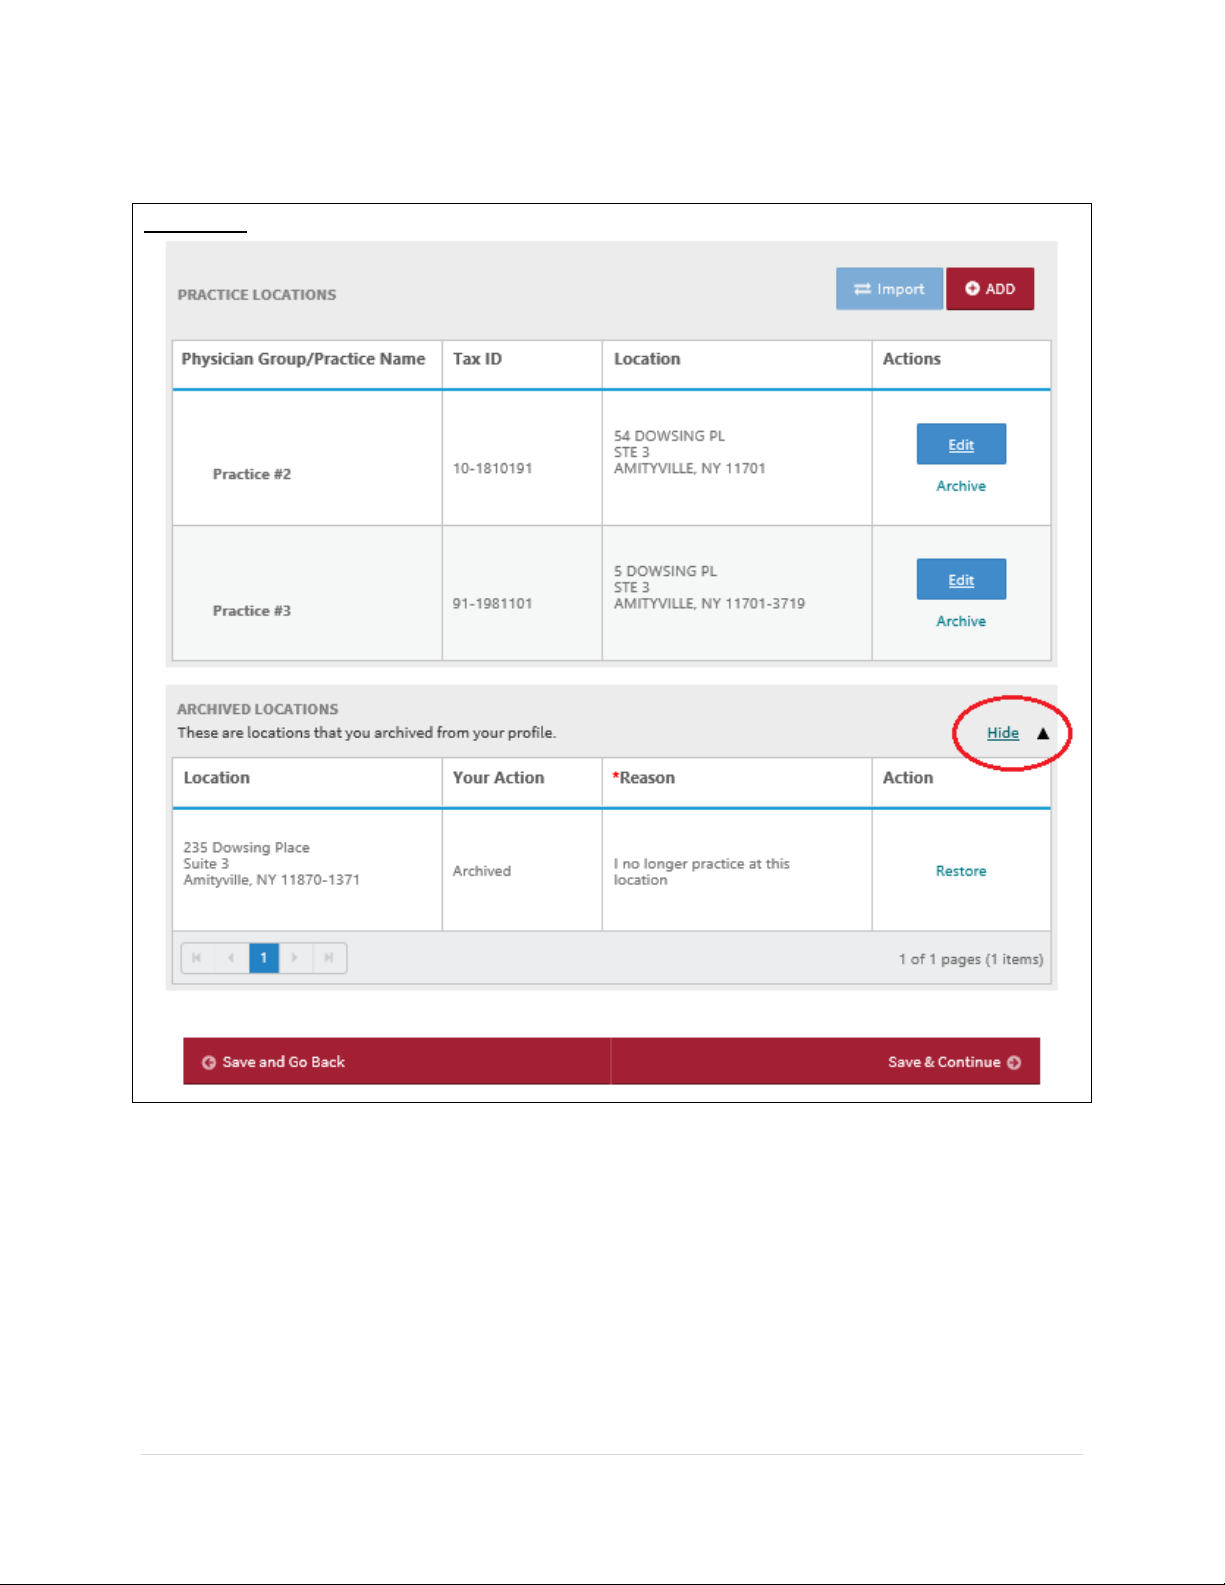
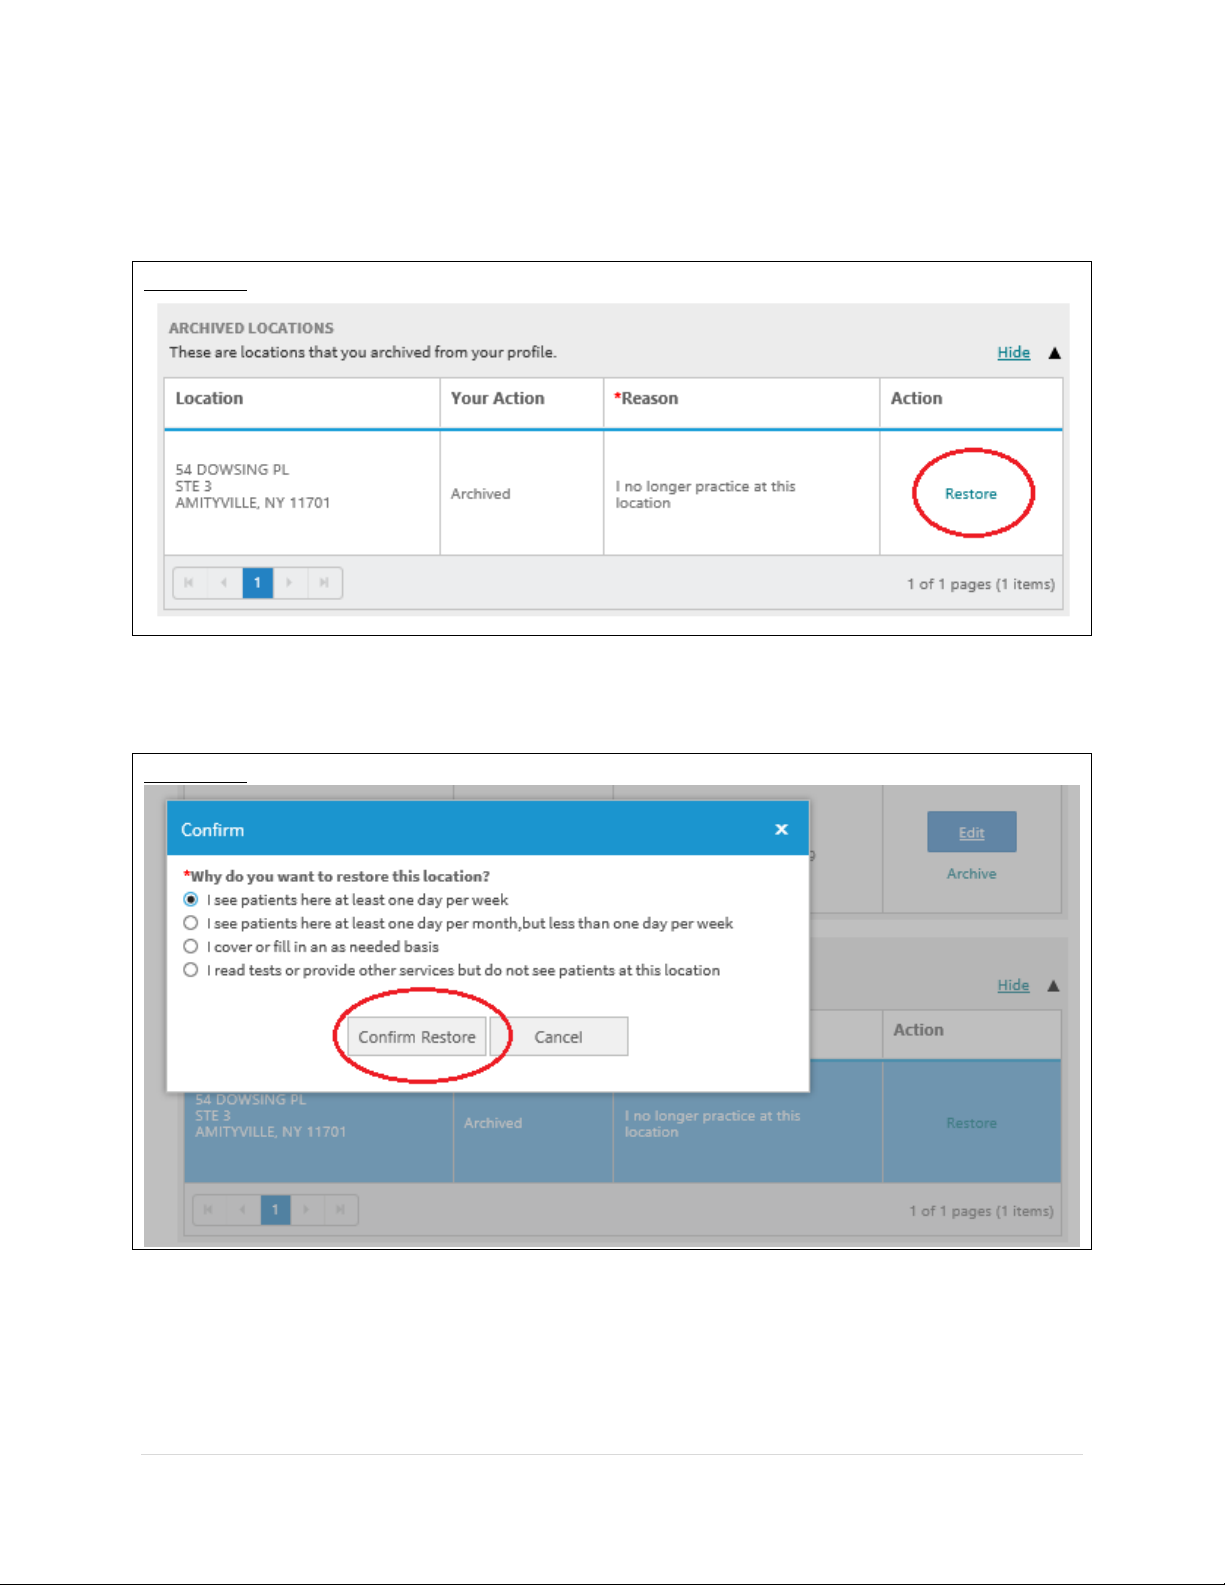
To hide the archived location/s, click Hide.
FIGURE 94
Page 80
CAQH ProView Provider User Guide v13
79 | P a g e
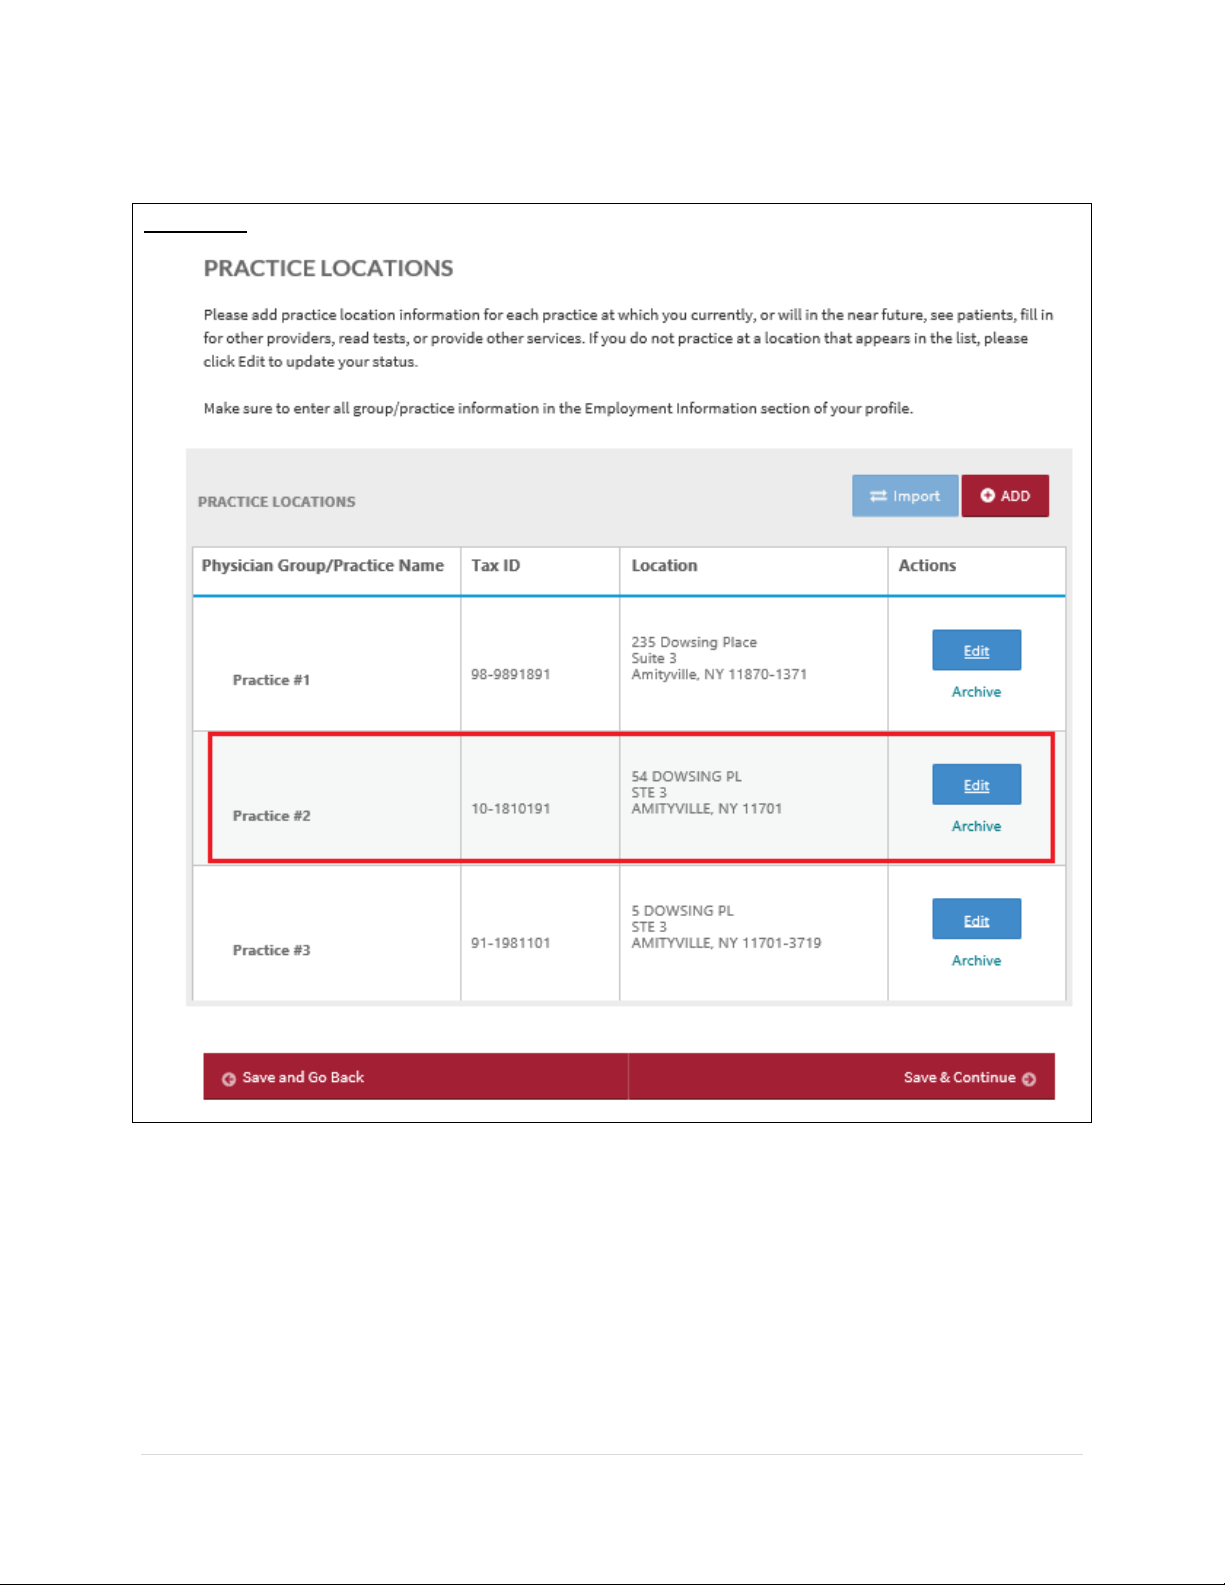
New: Restoring an Archived Location/s
If you wish to restore the location, click on the Restore link for that practice location.
FIGURE 95
You will be prompted to select the reason for restoring the location. Select one from the
options and click Confirm Restore.
FIGURE 96
Page 81
CAQH ProView Provider User Guide v13
80 | P a g e
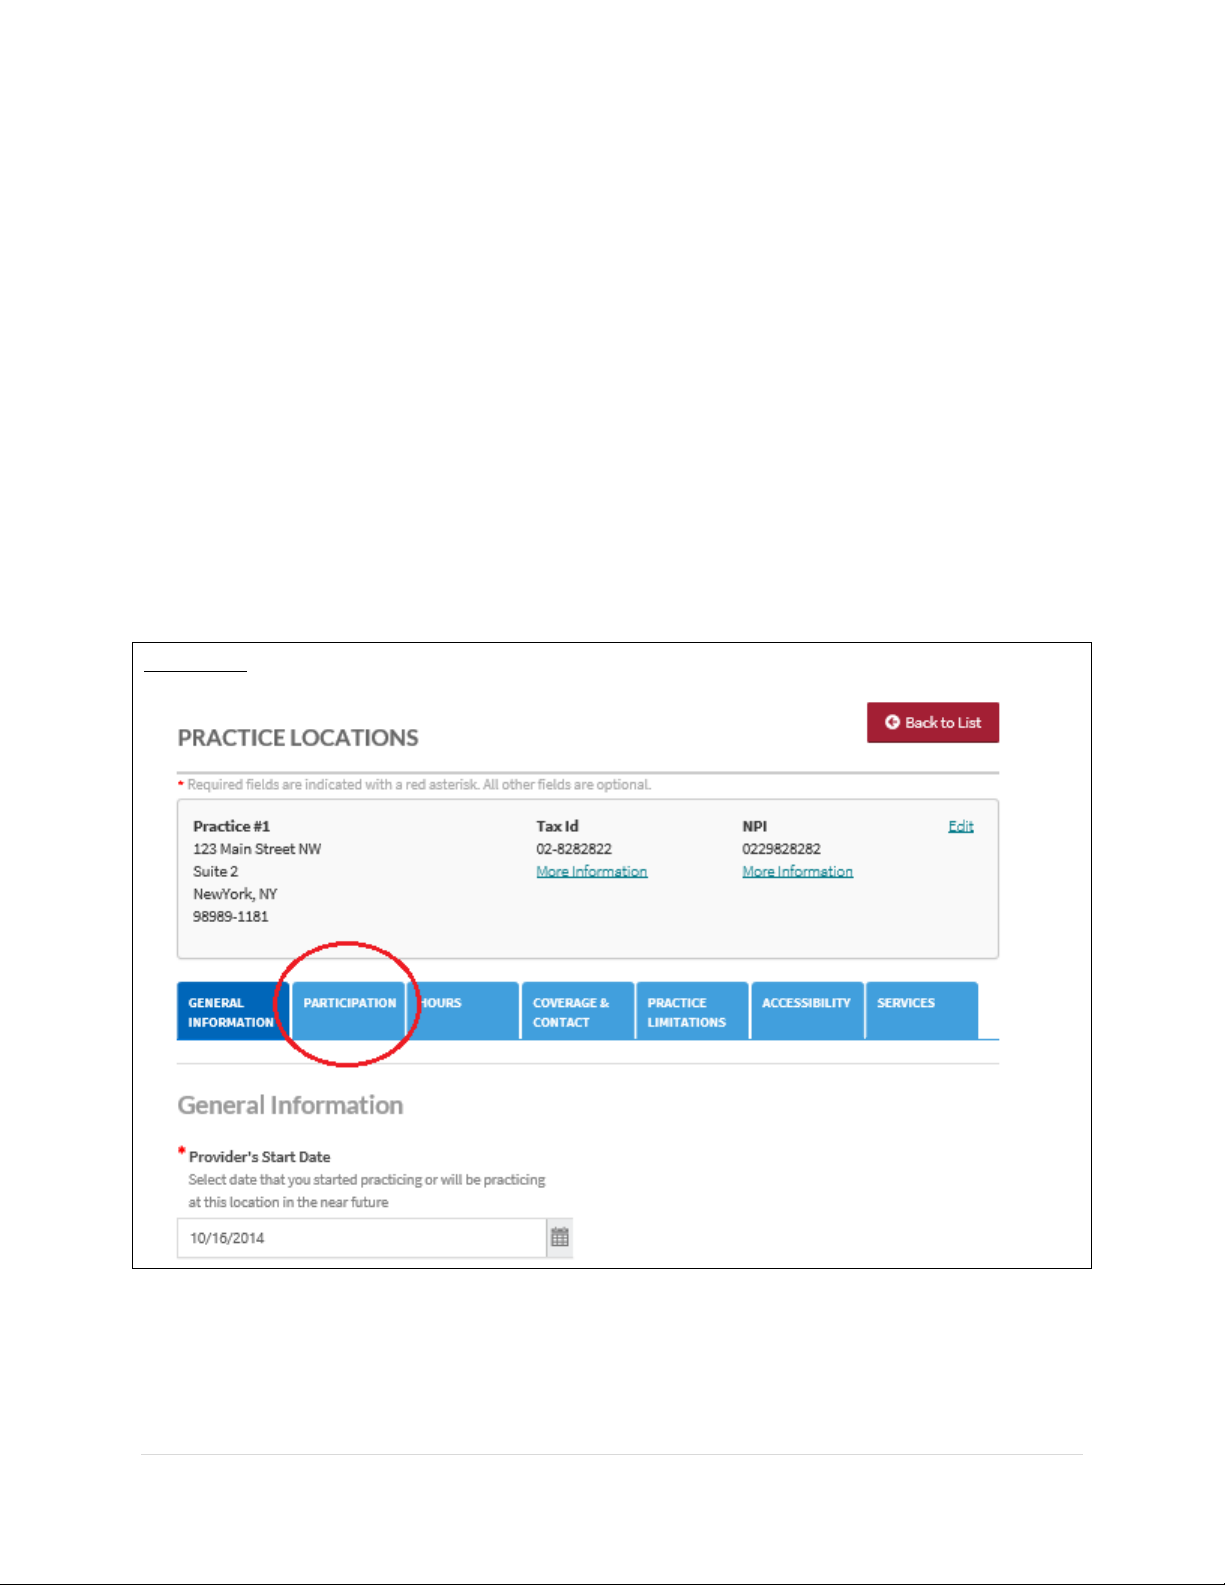
The location will now show as active.
FIGURE 97
Page 82
CAQH ProView Provider User Guide v13
81 | P a g e
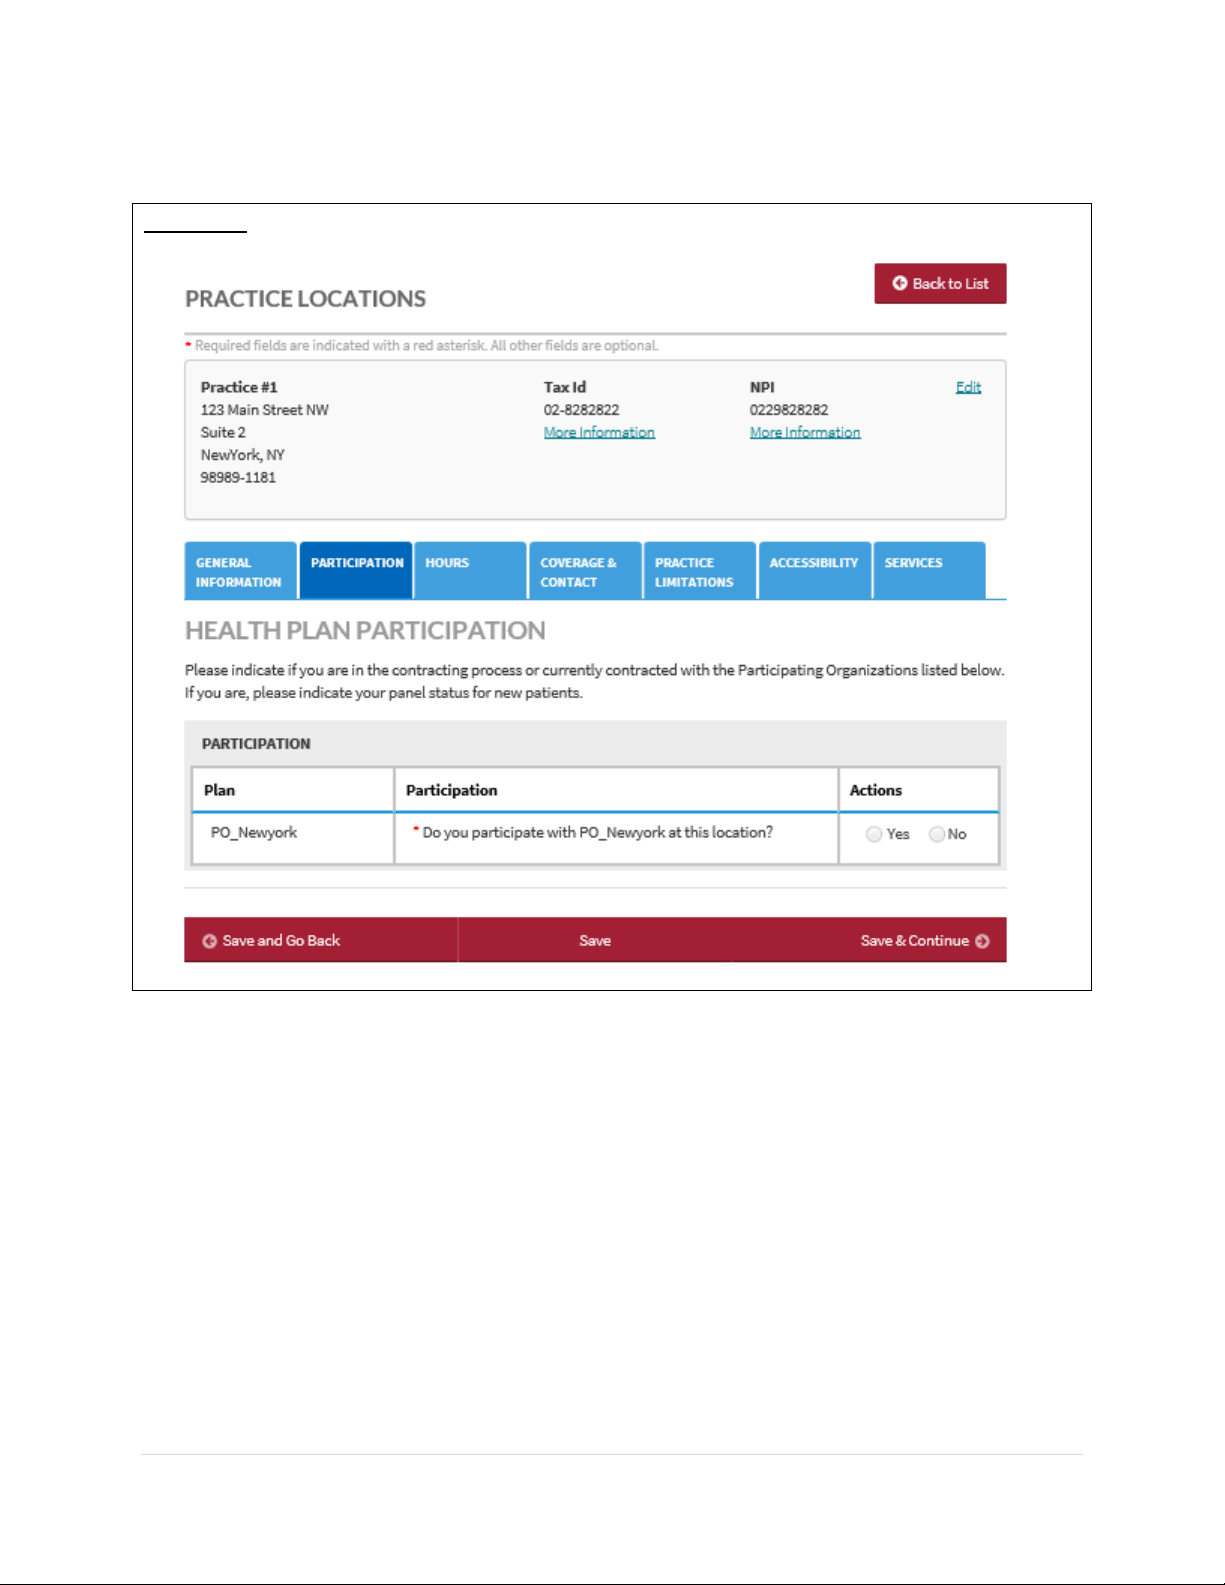
New: Participation Tab
Providers who fall into these criteria will see a new tab in the Practice Locations section:
▪ Rostered by a Participating Organization/s for Provider Directory
▪ The rostering Participating Organization is authorized (see authorization page of your
application)
▪ The following fields in the practice location record are populated:
o Physician Group/Practice Name
o State
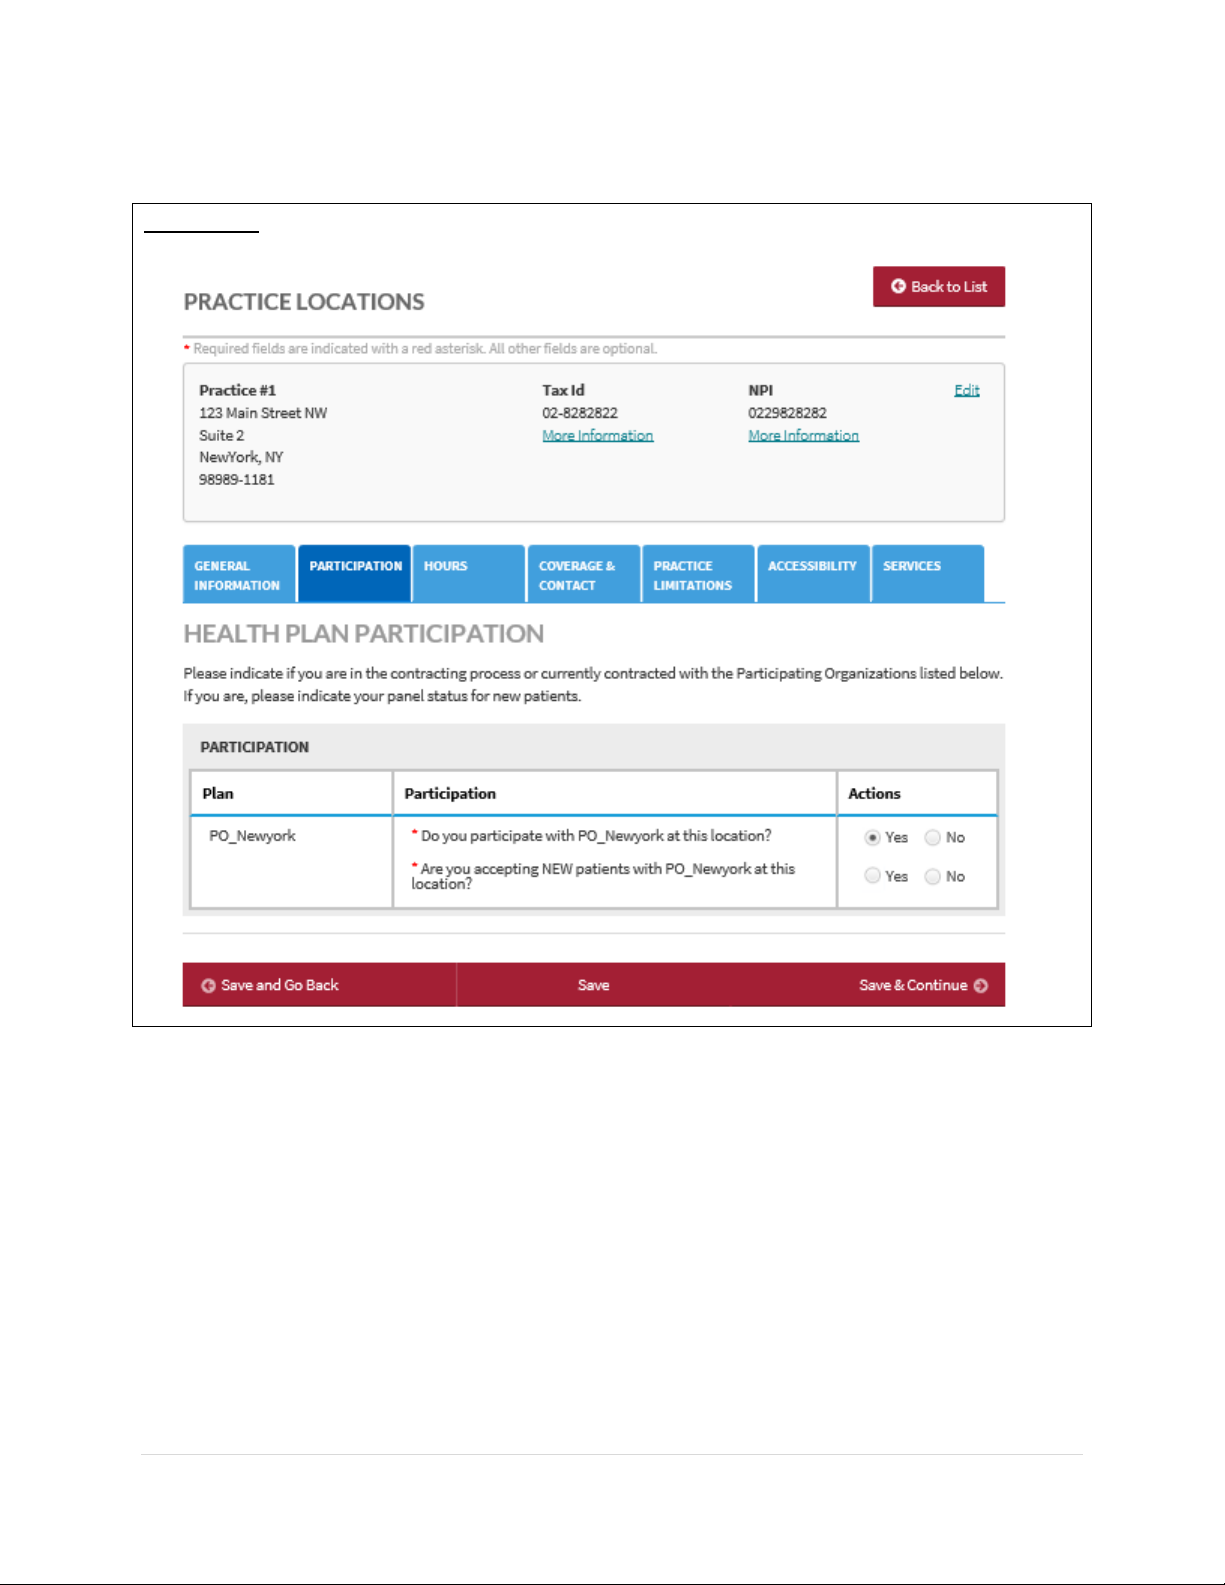
Please indicate if you are in the contracting process or currently contracted with the
Participating Organizations listed below. If you are, please indicate your panel status for new
patients.
The Participation tab will appear next to the General Information tab.
FIGURE 98
Page 83
CAQH ProView Provider User Guide v13
82 | P a g e
If you click the Participation tab, you will be directed to this page.
FIGURE 99
Page 84
CAQH ProView Provider User Guide v13
83 | P a g e
If you select Yes, another required question will be displayed.
FIGURE 100
Click Save and Continue to save your changes and navigate to the Hours and other tabs.
Page 85
CAQH ProView Provider User Guide v13
84 | P a g e
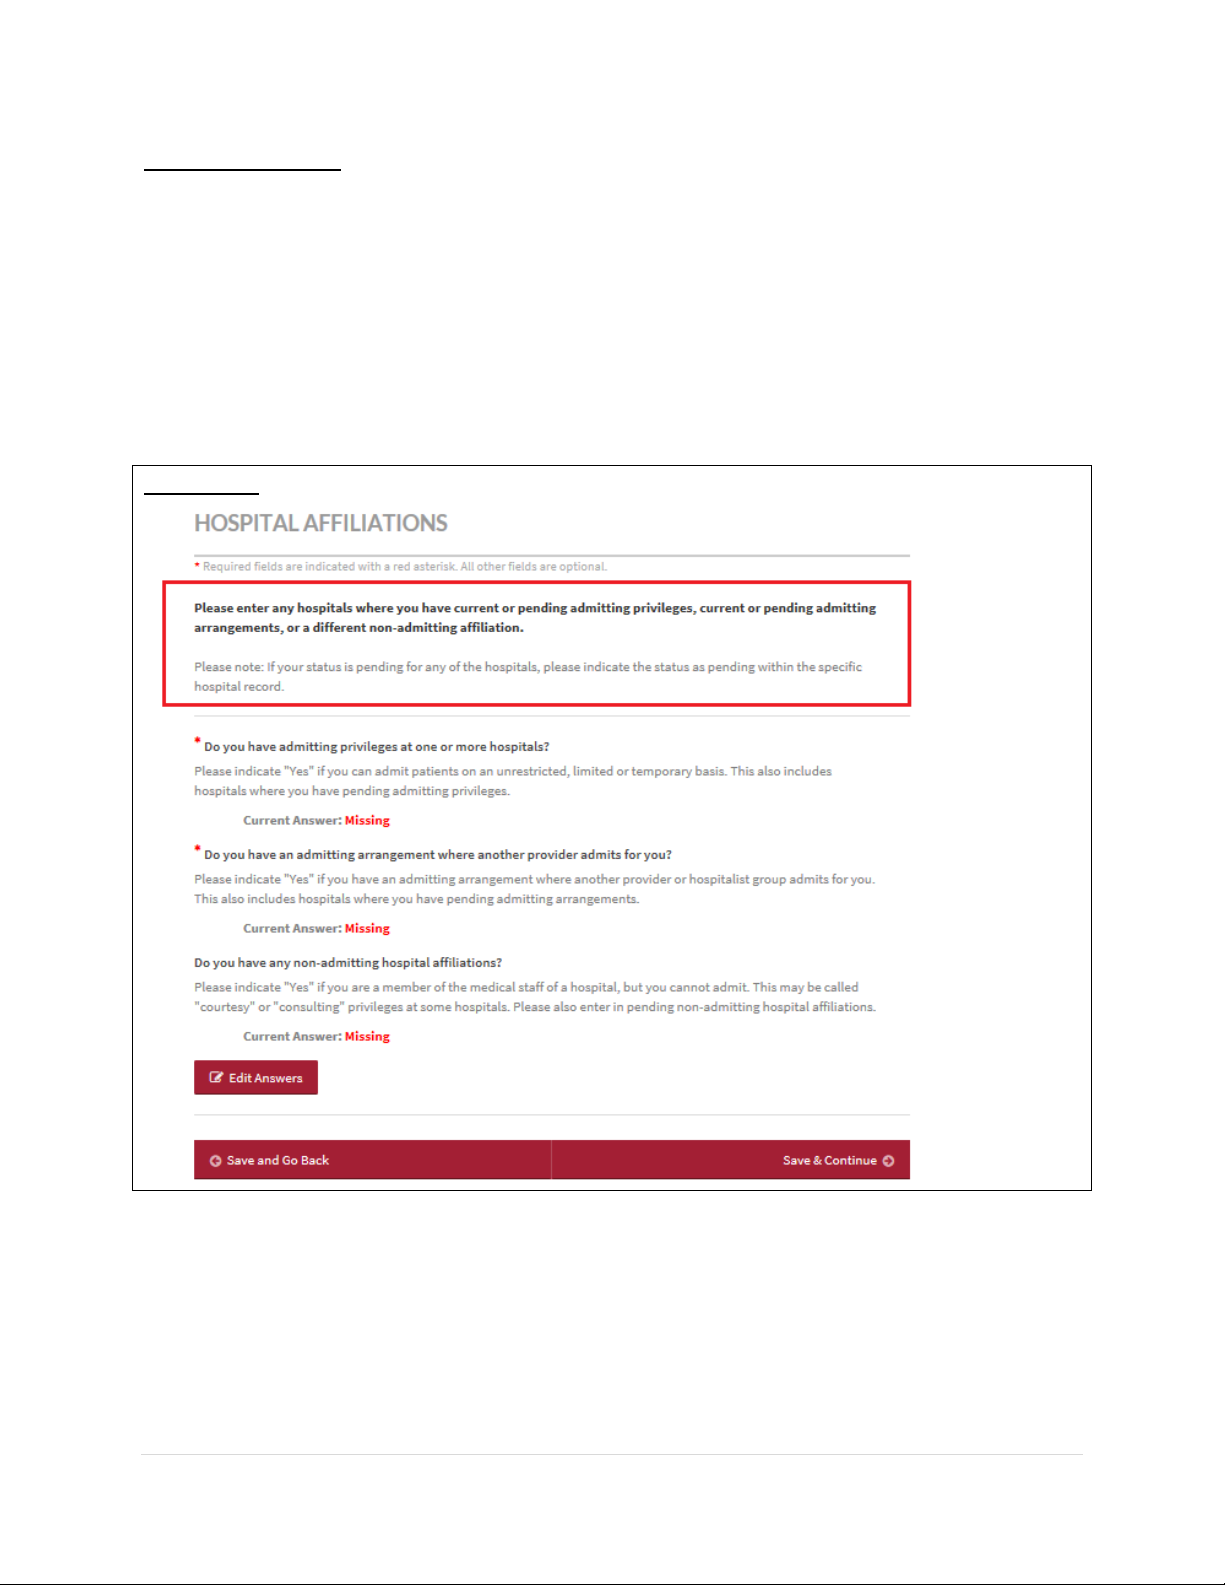
Hospital Affiliations
The new Hospital Affiliations section now requires you to:
• clarify admitting privileges status;
• explain why an admitting privilege is no longer active;
• declare admitting arrangements and non-admitting affiliations; and
• enter complete information for all hospitals you are affiliated with
Help text has been added to assist users in navigating the page.
FIGURE 101
Page 86
CAQH ProView Provider User Guide v13
85 | P a g e
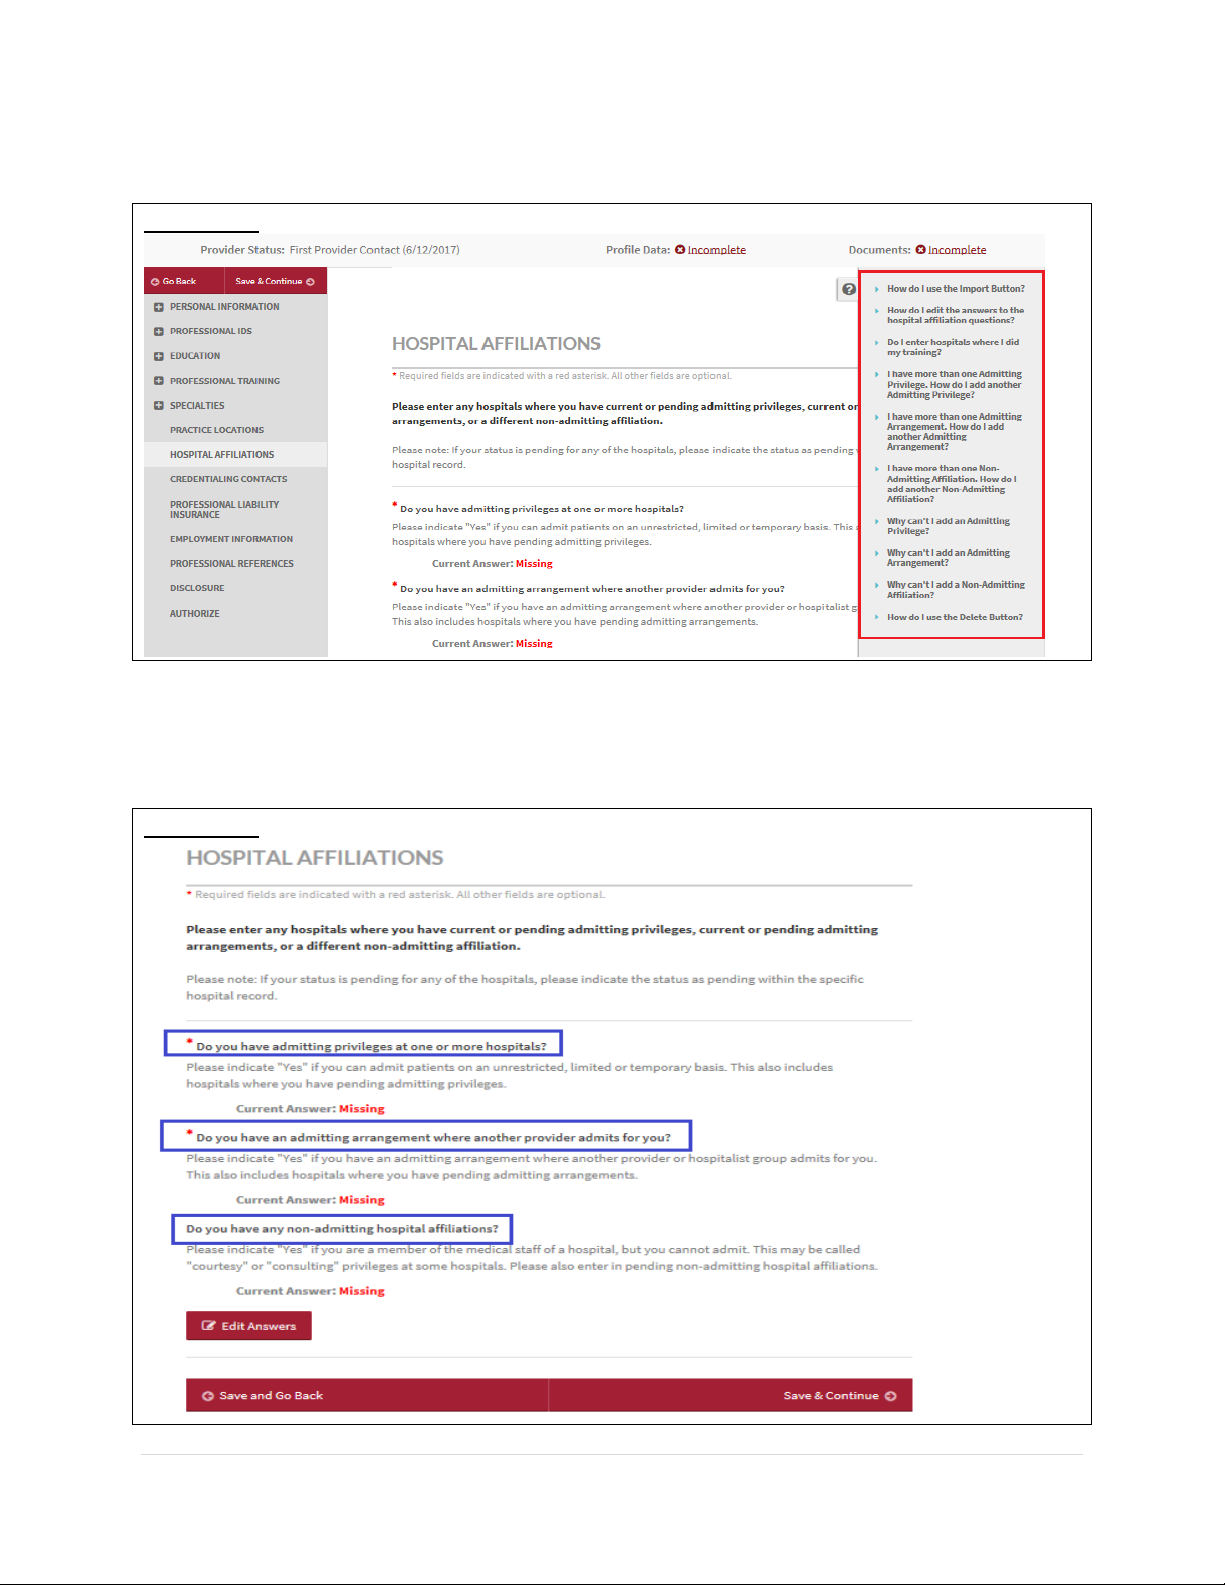
The content of the self-help option has also been updated with commonly asked questions.
FIGURE 102
There are two required questions: “Do you have admitting privileges at one or more hospitals?”
and “Do you have an admitting arrangement where another provider admits for you?” and one
optional question: “Do you have any non-admitting hospital affiliations?”
FIGURE 103
Page 87
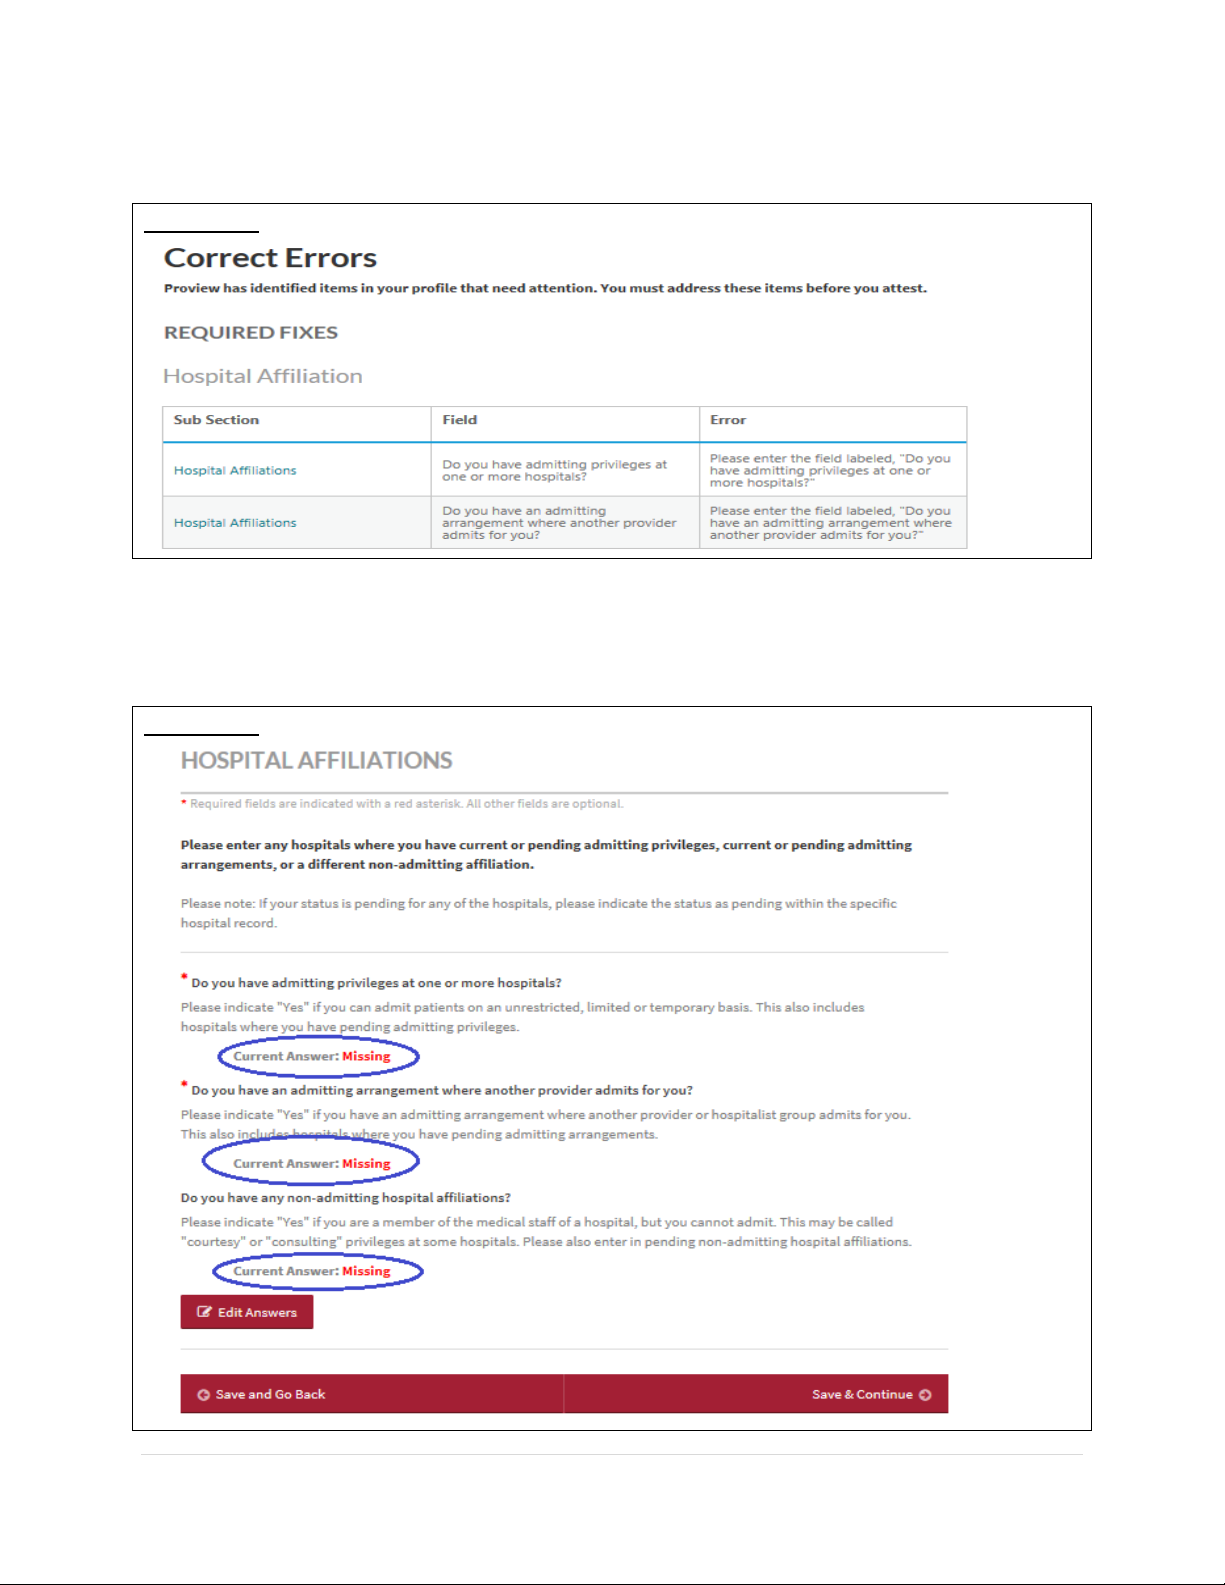
CAQH ProView Provider User Guide v13
86 | P a g e
The two required questions will appear on the Correct Errors page until you answer them.
FIGURE 104
Beneath each of the leading questions on the Hospital Affiliations page is the current answer
you have selected. "Missing" will be displayed in red text if you have not yet answered the
question.
FIGURE 105
Page 88
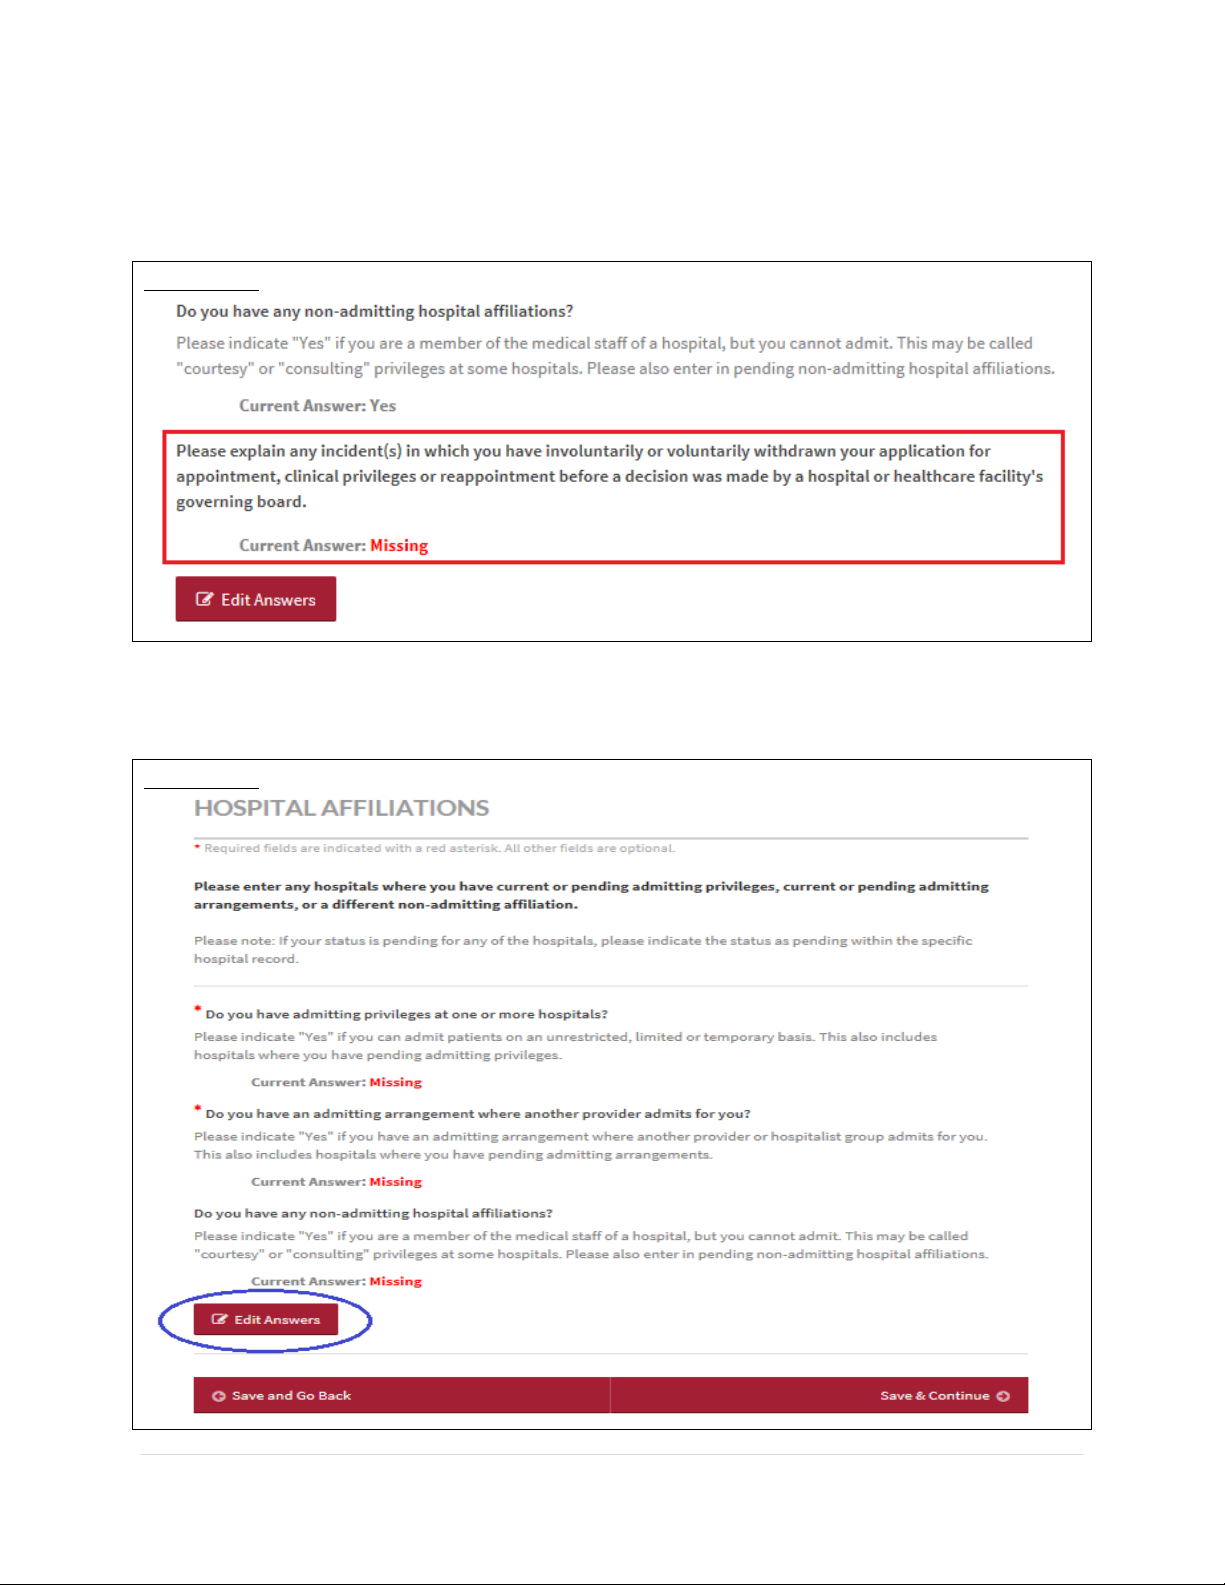
CAQH ProView Provider User Guide v13
87 | P a g e
Providers practicing in North Carolina will see an additional optional question which will be
displayed below the “Do you have any non-admitting hospital affiliations?” question on the
Hospital Affiliations Page.
FIGURE 106
If you need to edit an answer/s to any of these questions, you must click the “Edit Answers”
button.
FIGURE 107
Page 89
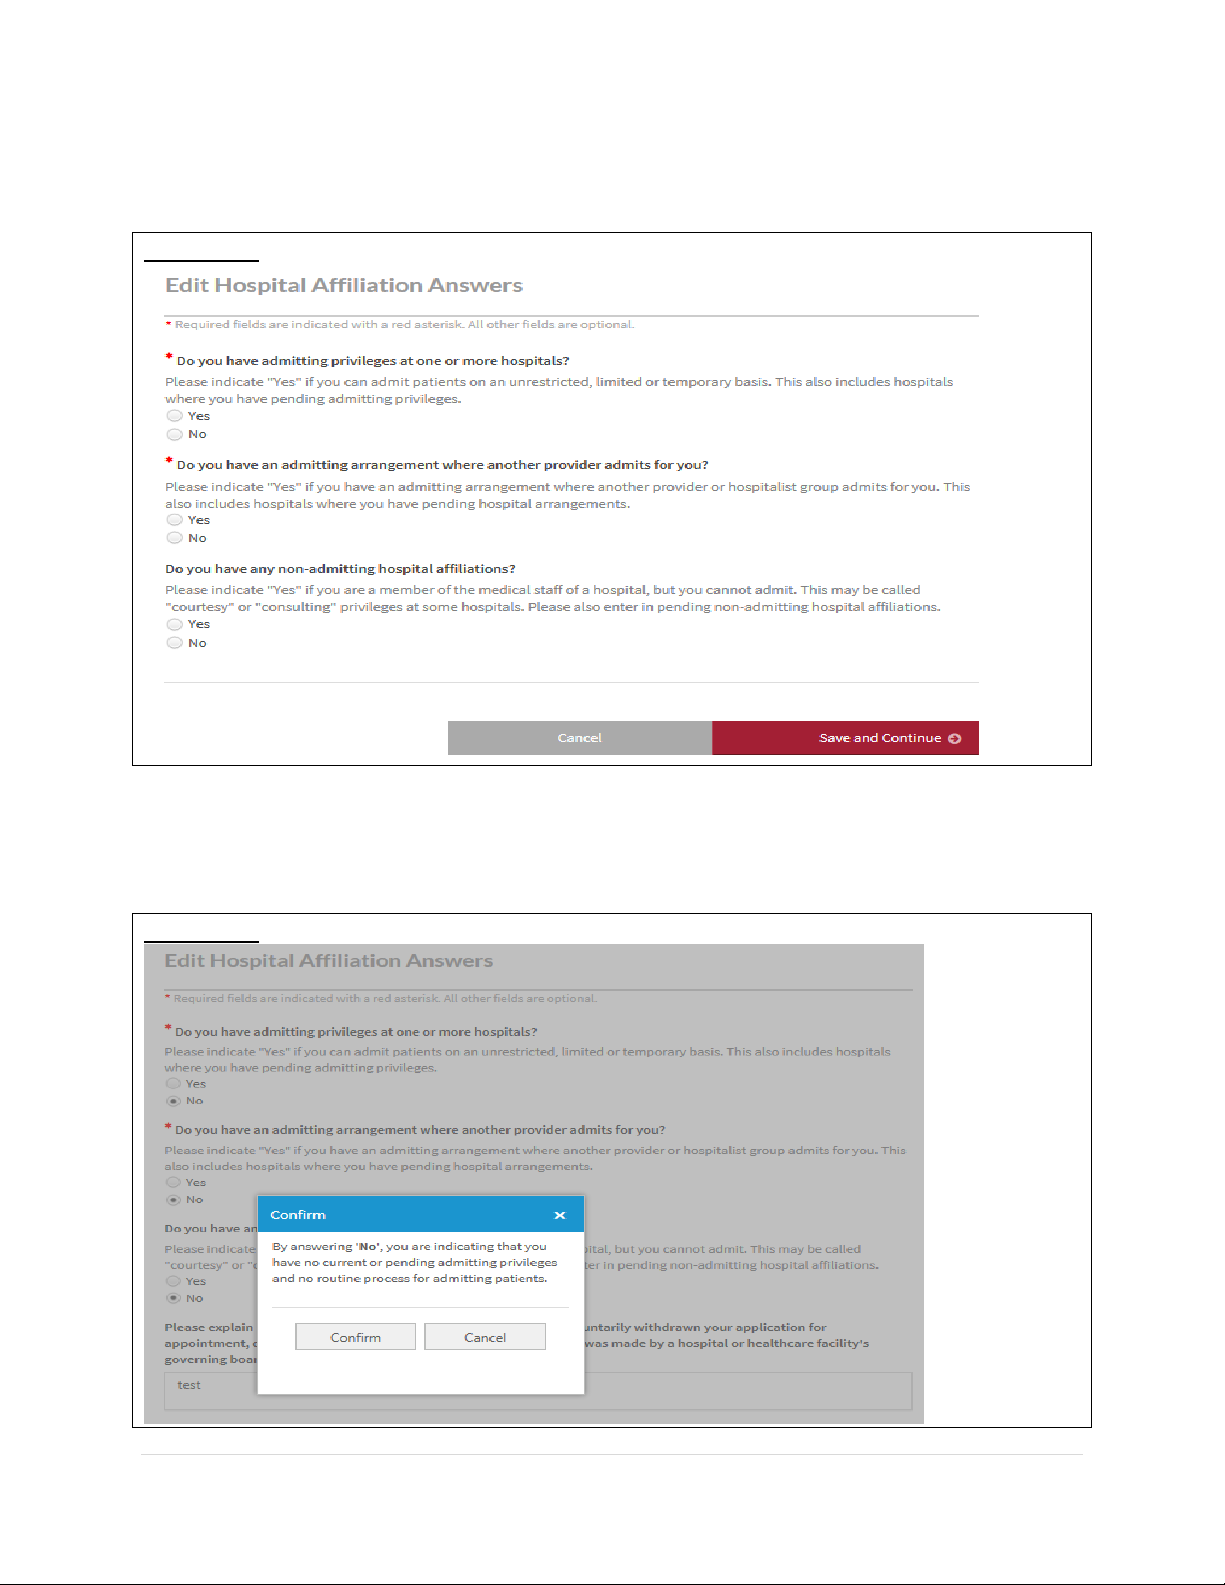
CAQH ProView Provider User Guide v13
88 | P a g e
You will be directed to a page displaying the leading questions, the help text, and the editable
Yes or No radio button. Click Save and Continue to save the answers.
FIGURE 108
If all the questions are answered No, a pop-up message will be displayed for you to confirm that
there are no current or pending admitting privileges and no routine process for admitting
patients.
FIGURE 109
Page 90
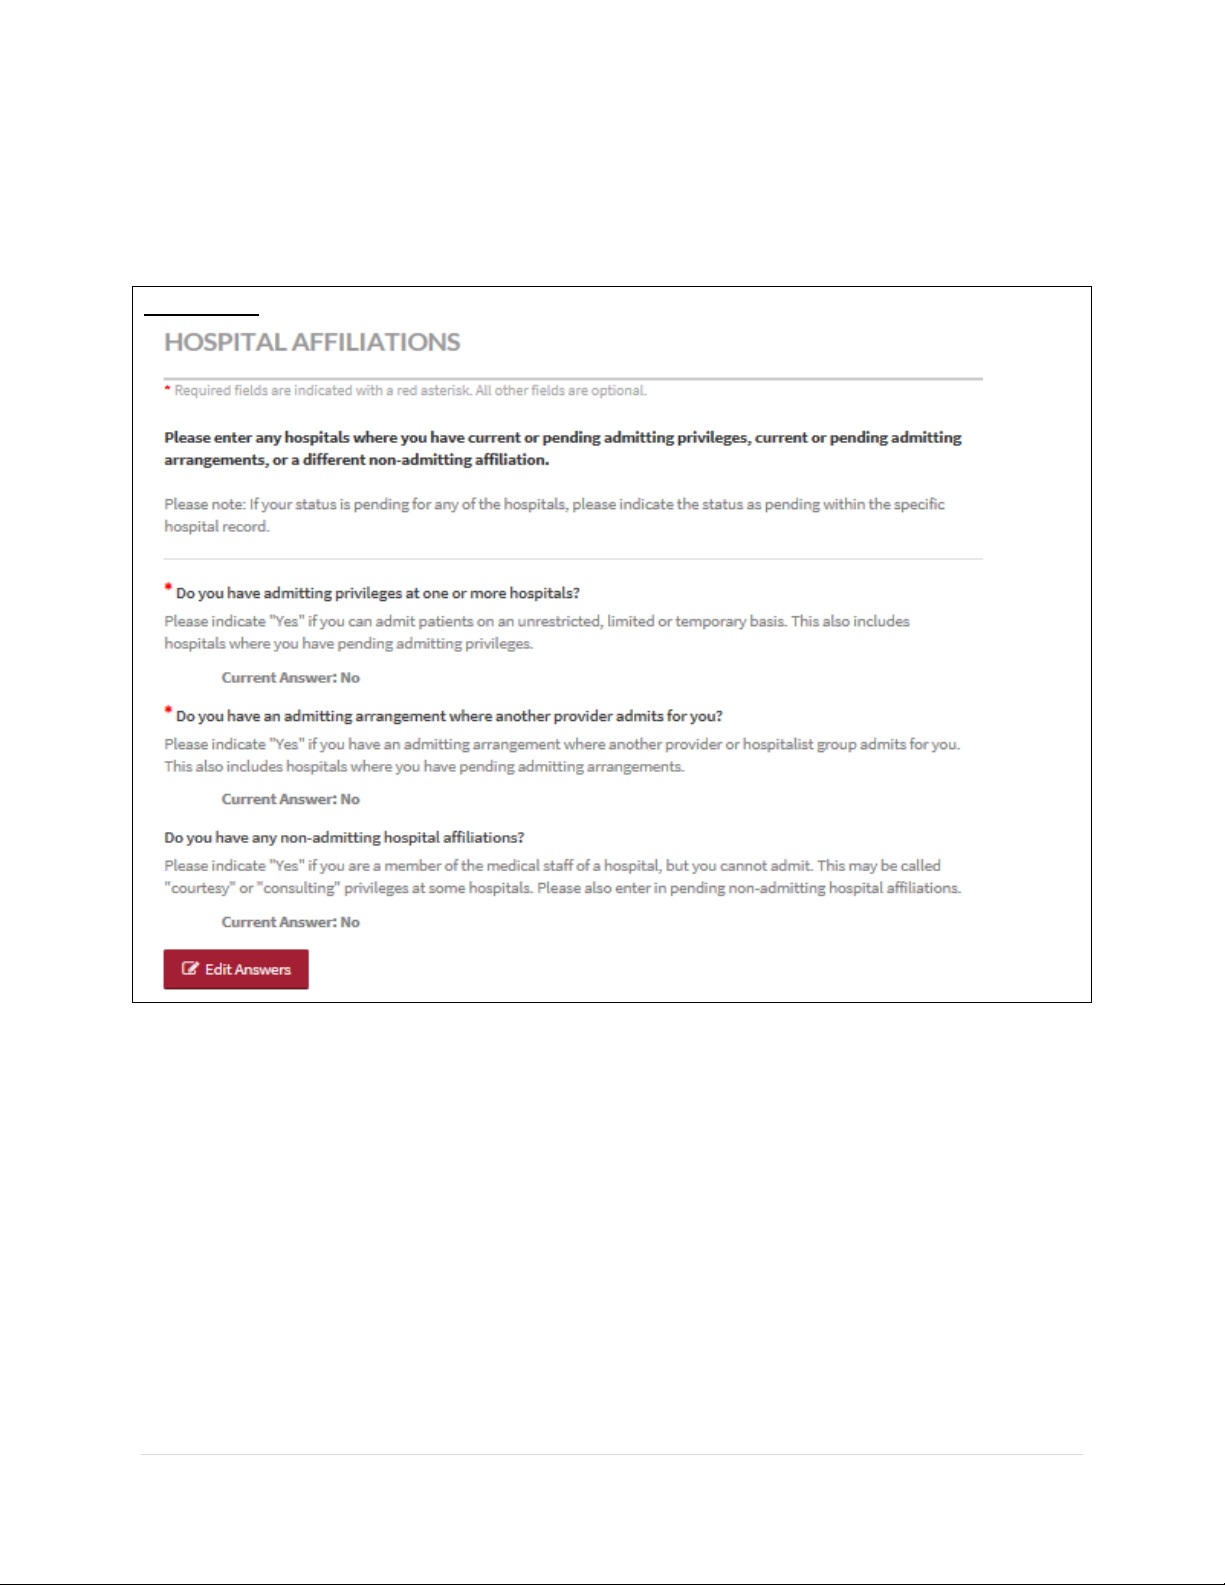
CAQH ProView Provider User Guide v13
89 | P a g e
• If you click "Confirm”, the pop-up will close, any changes to the answers will be
saved and the system will be re-directed back to the Hospital Affiliations Page
where the answers are reflected.
FIGURE 110
• Clicking "Cancel" will close the pop-up and you will remain on the Edit Answers
Page. The data on the page will not be saved.
• If you click the "X" button at the top corner of the pop-up, the pop-up will close,
you will remain on the Edit Answers Page, and the data on the page will not be
saved.
Page 91
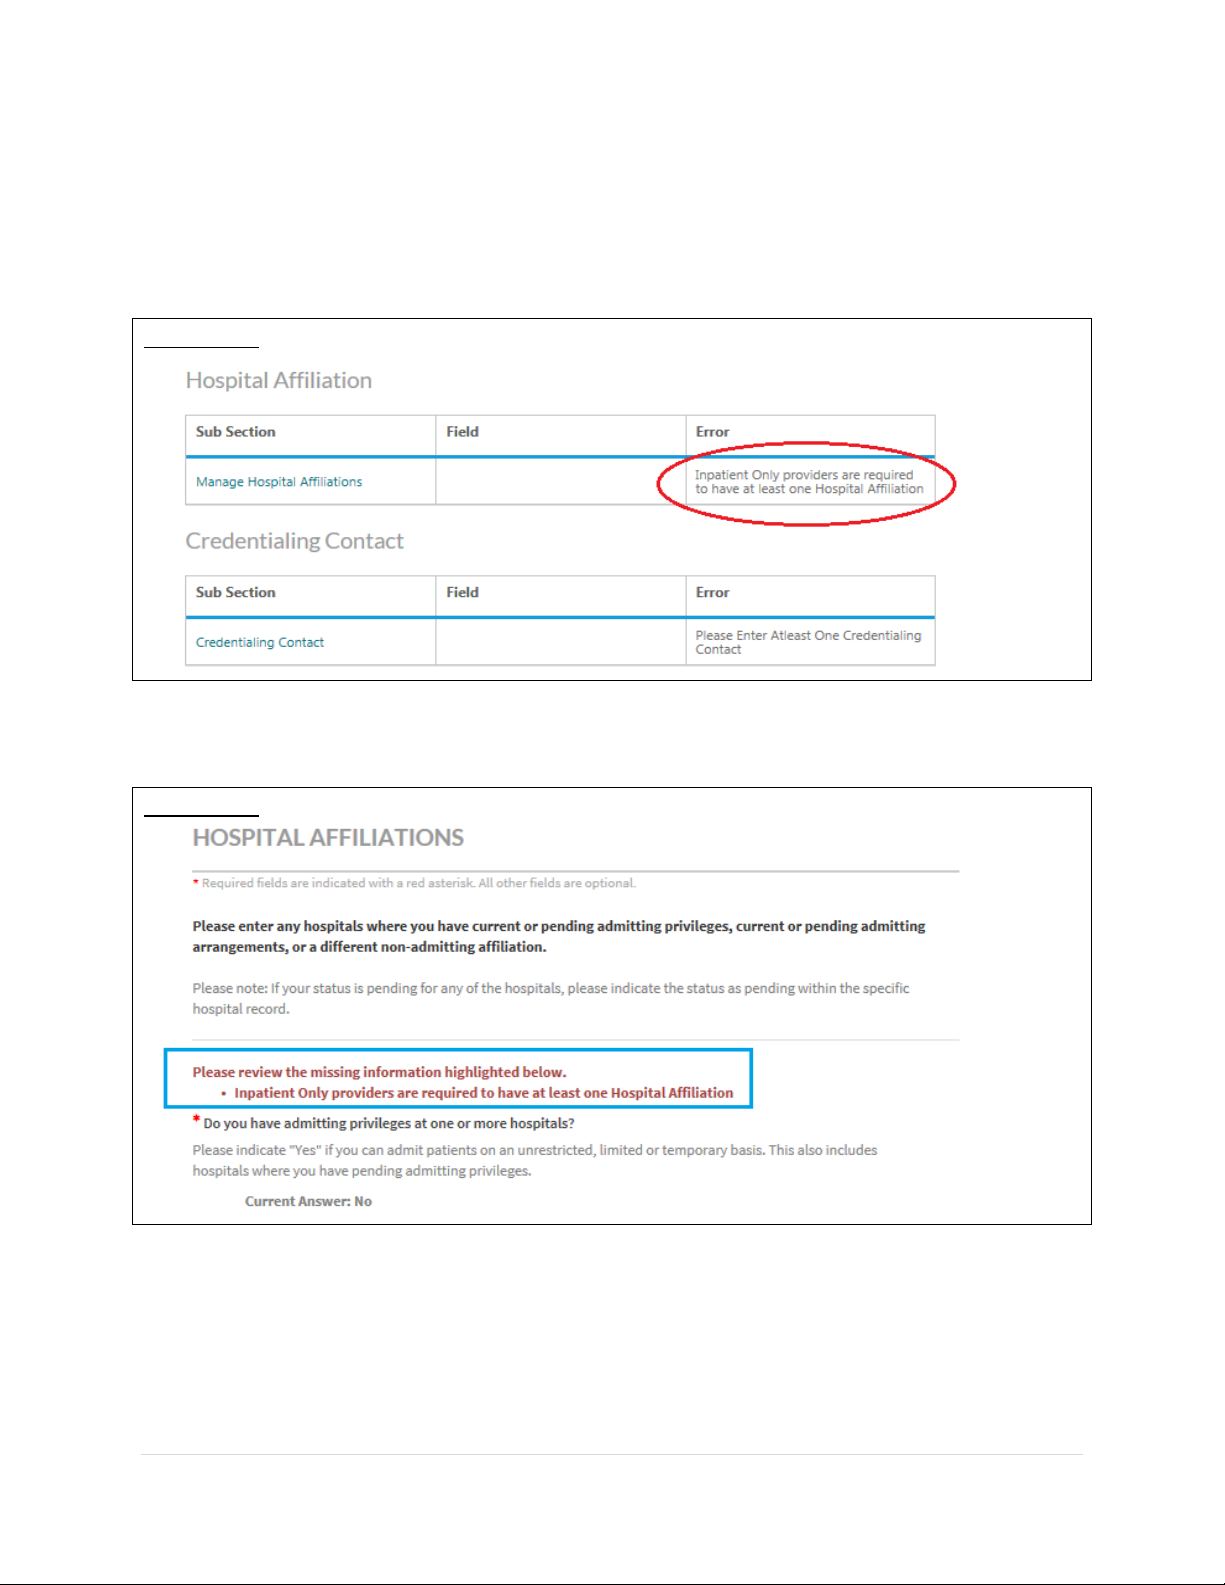
CAQH ProView Provider User Guide v13
90 | P a g e
If your practice setting is Inpatient Only and you answered No to “Do you have admitting
privileges at one or more hospitals?” AND “Do you have an admitting arrangement where
another provider admits for you?” AND “Do you have any non-admitting hospital affiliations?”,
an error will be displayed on the Required Fixes page.
FIGURE 111
This is how the error will appear on the Hospital Affiliations page.
FIGURE 112
Page 92
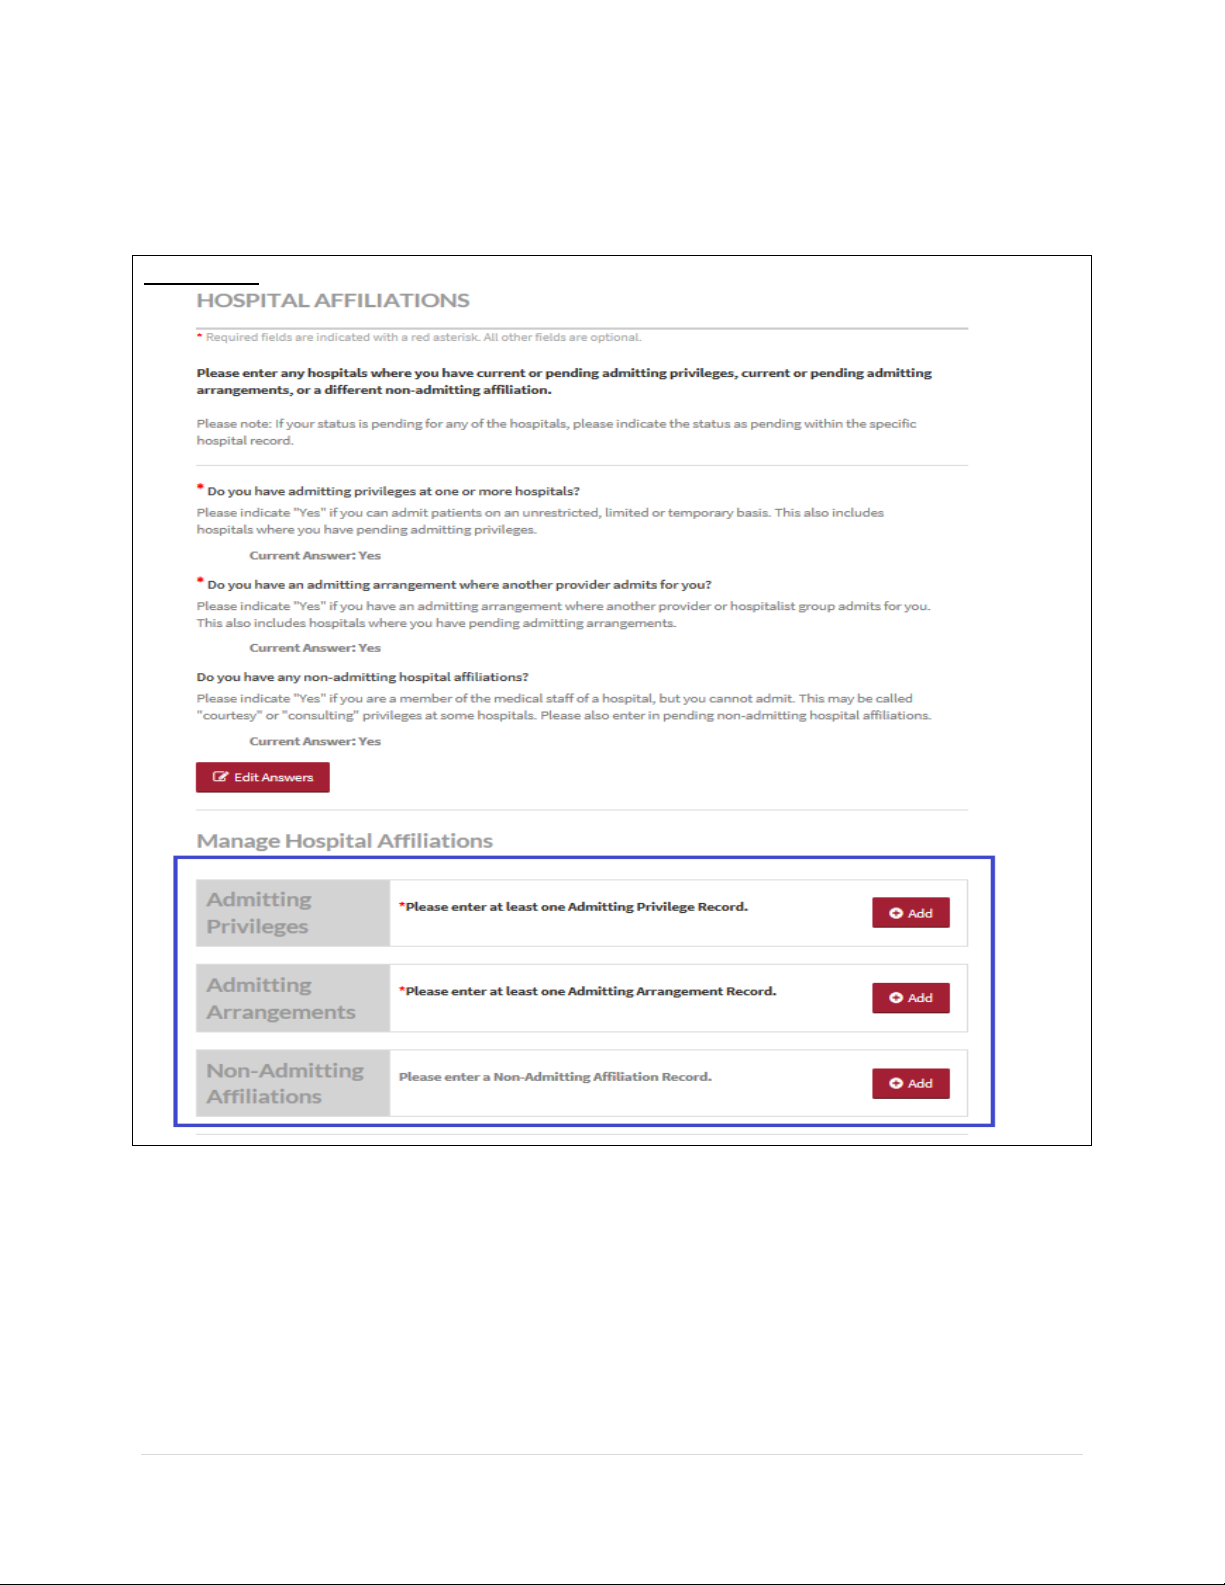
CAQH ProView Provider User Guide v13
91 | P a g e
CAQH ProView will create a block in the Manage Hospital Affiliations section with a red “Add”
button on the right for questions that were answered Yes. You will be required to enter at least
one admitting privilege record and/or at least one admitting arrangement record.
FIGURE 113
You can attest without a Non-Admitting Affiliation record even if the question “Do you have any
non-admitting hospital affiliations?” is answered Yes. This is an optional question.
Page 93
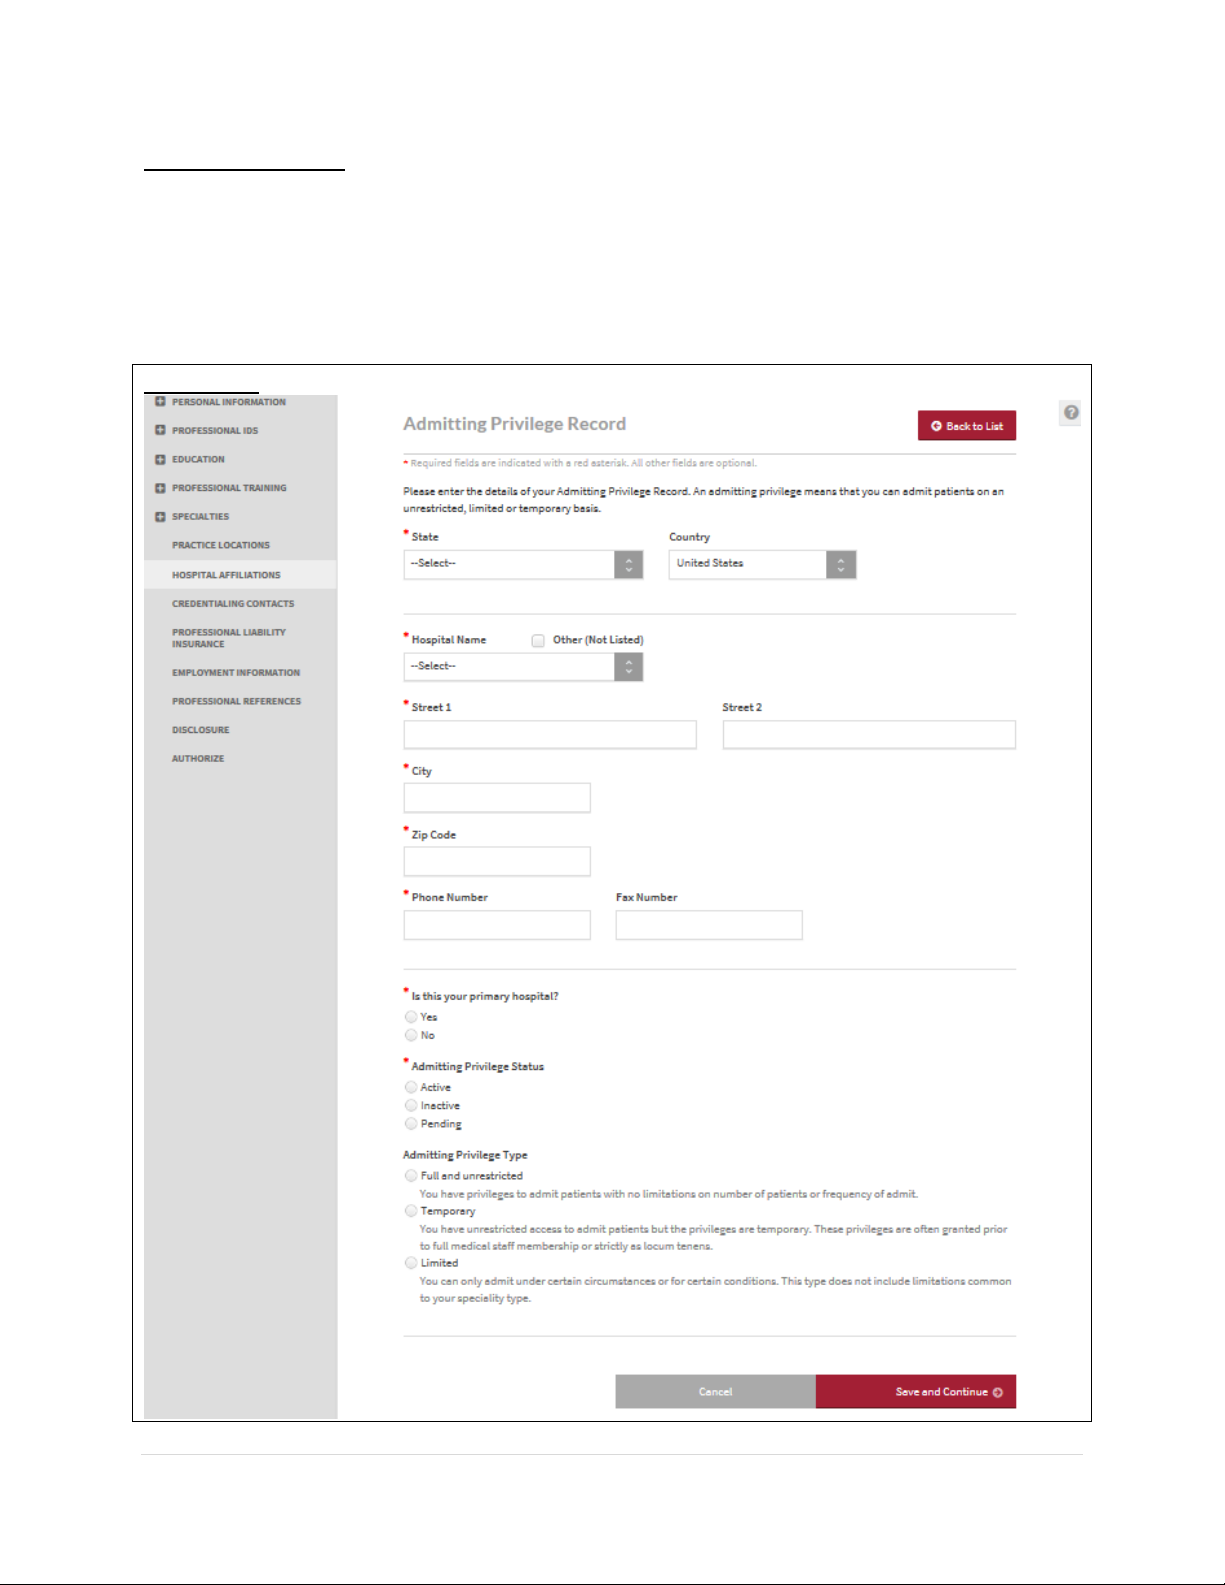
CAQH ProView Provider User Guide v13
92 | P a g e
Admitting Privileges
To add an admitting privilege record for the first time, click the “Add button” beside the
statement “Please enter at least one Admitting Privilege Record.” You will be directed to a page
where details of an admitting privilege record can be entered. Required fields are indicated
with a red asterisk. All other fields are optional.
FIGURE 114
Page 94
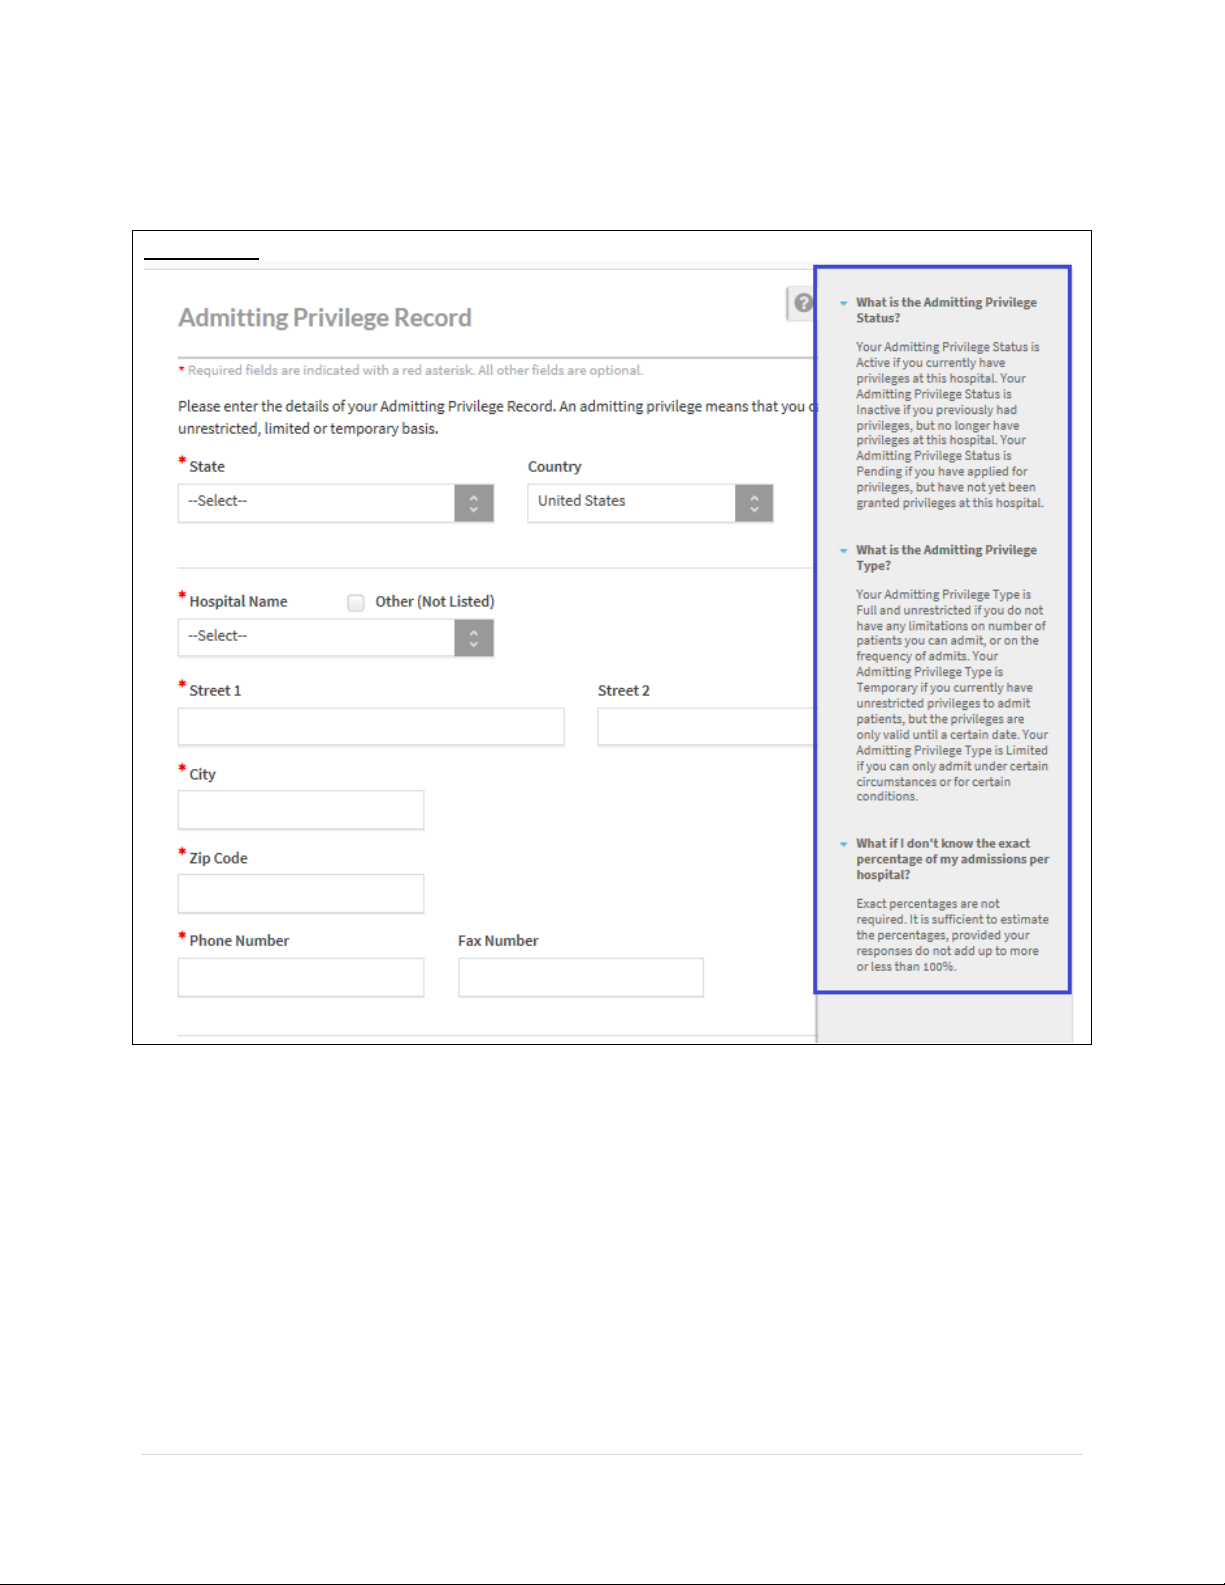
CAQH ProView Provider User Guide v13
93 | P a g e
The contents of the self-help option for the Admitting Privilege records page have also been
updated to answer the commonly asked questions.
FIGURE 115
Page 95
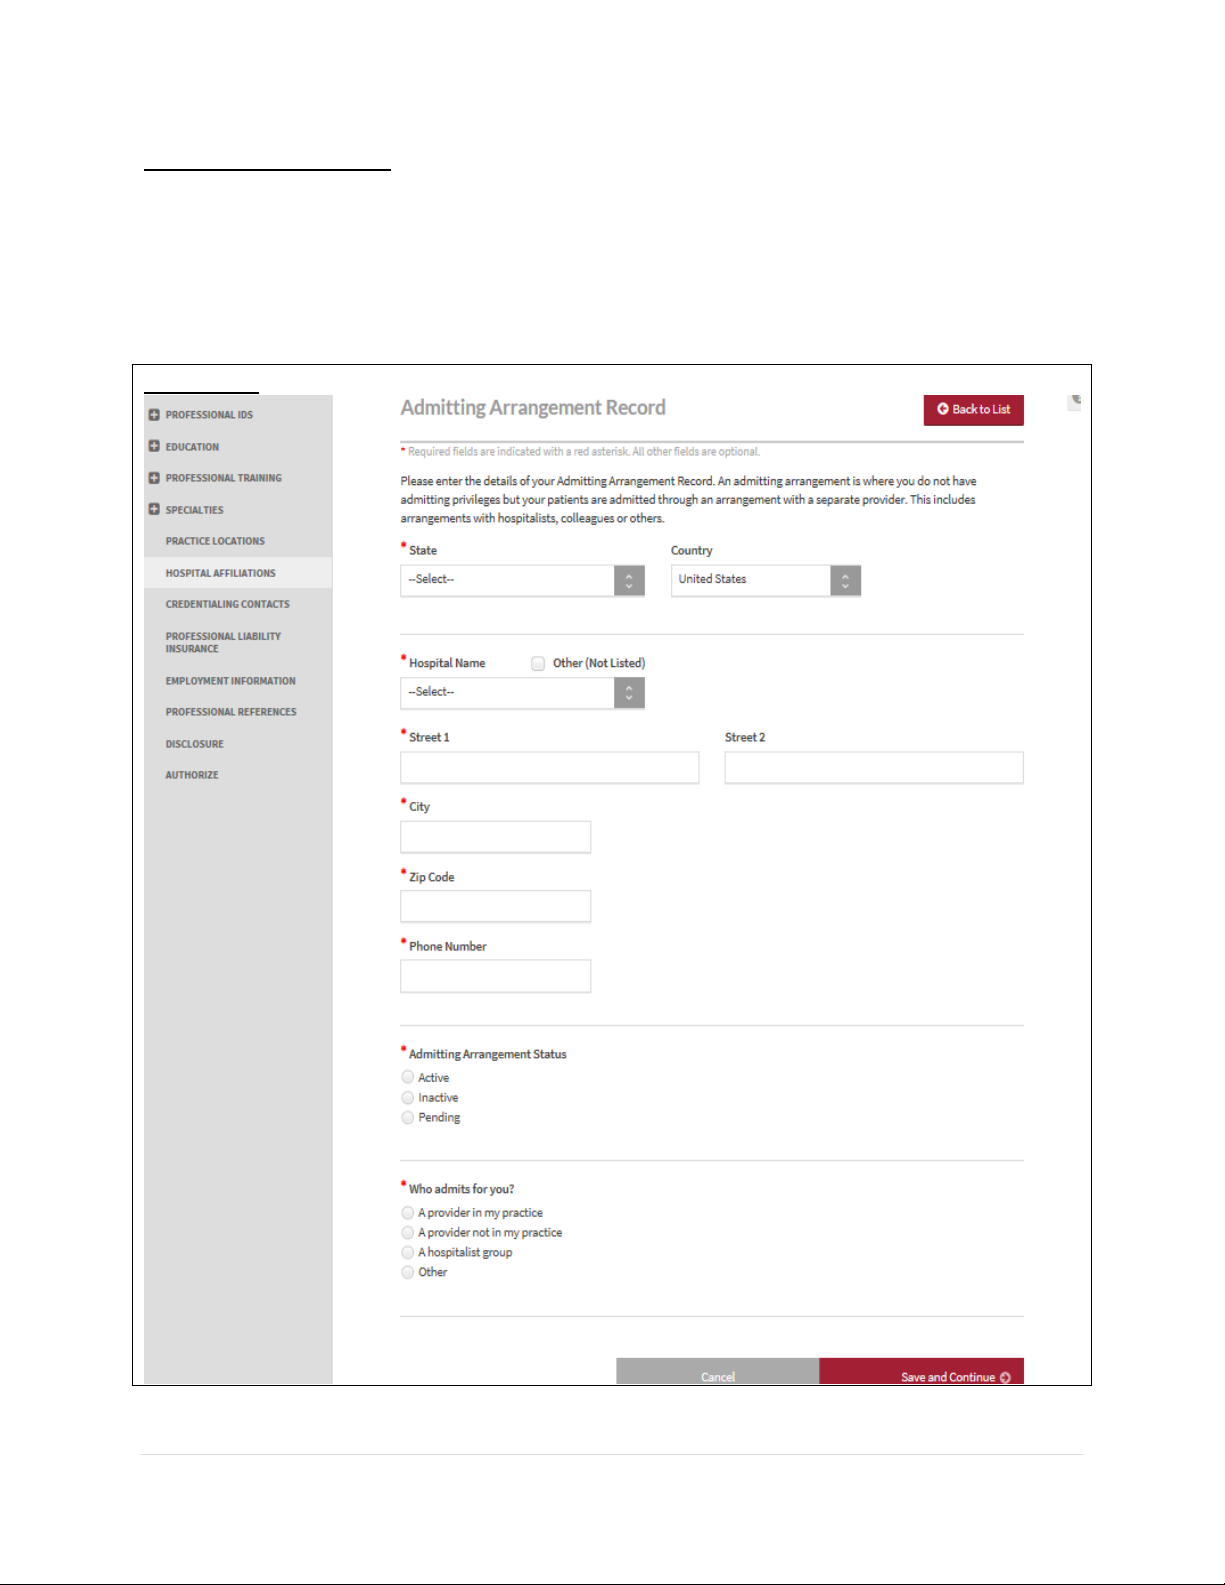
CAQH ProView Provider User Guide v13
94 | P a g e
Admitting Arrangements
To add an admitting arrangement, record for the first time, click the “Add button” beside the
statement “Please enter at least one Admitting Arrangement Record.” You will be directed to a
page where details of an admitting arrangement record can be entered. Required fields are
indicated with a red asterisk. All other fields are optional.
FIGURE 116
Page 96
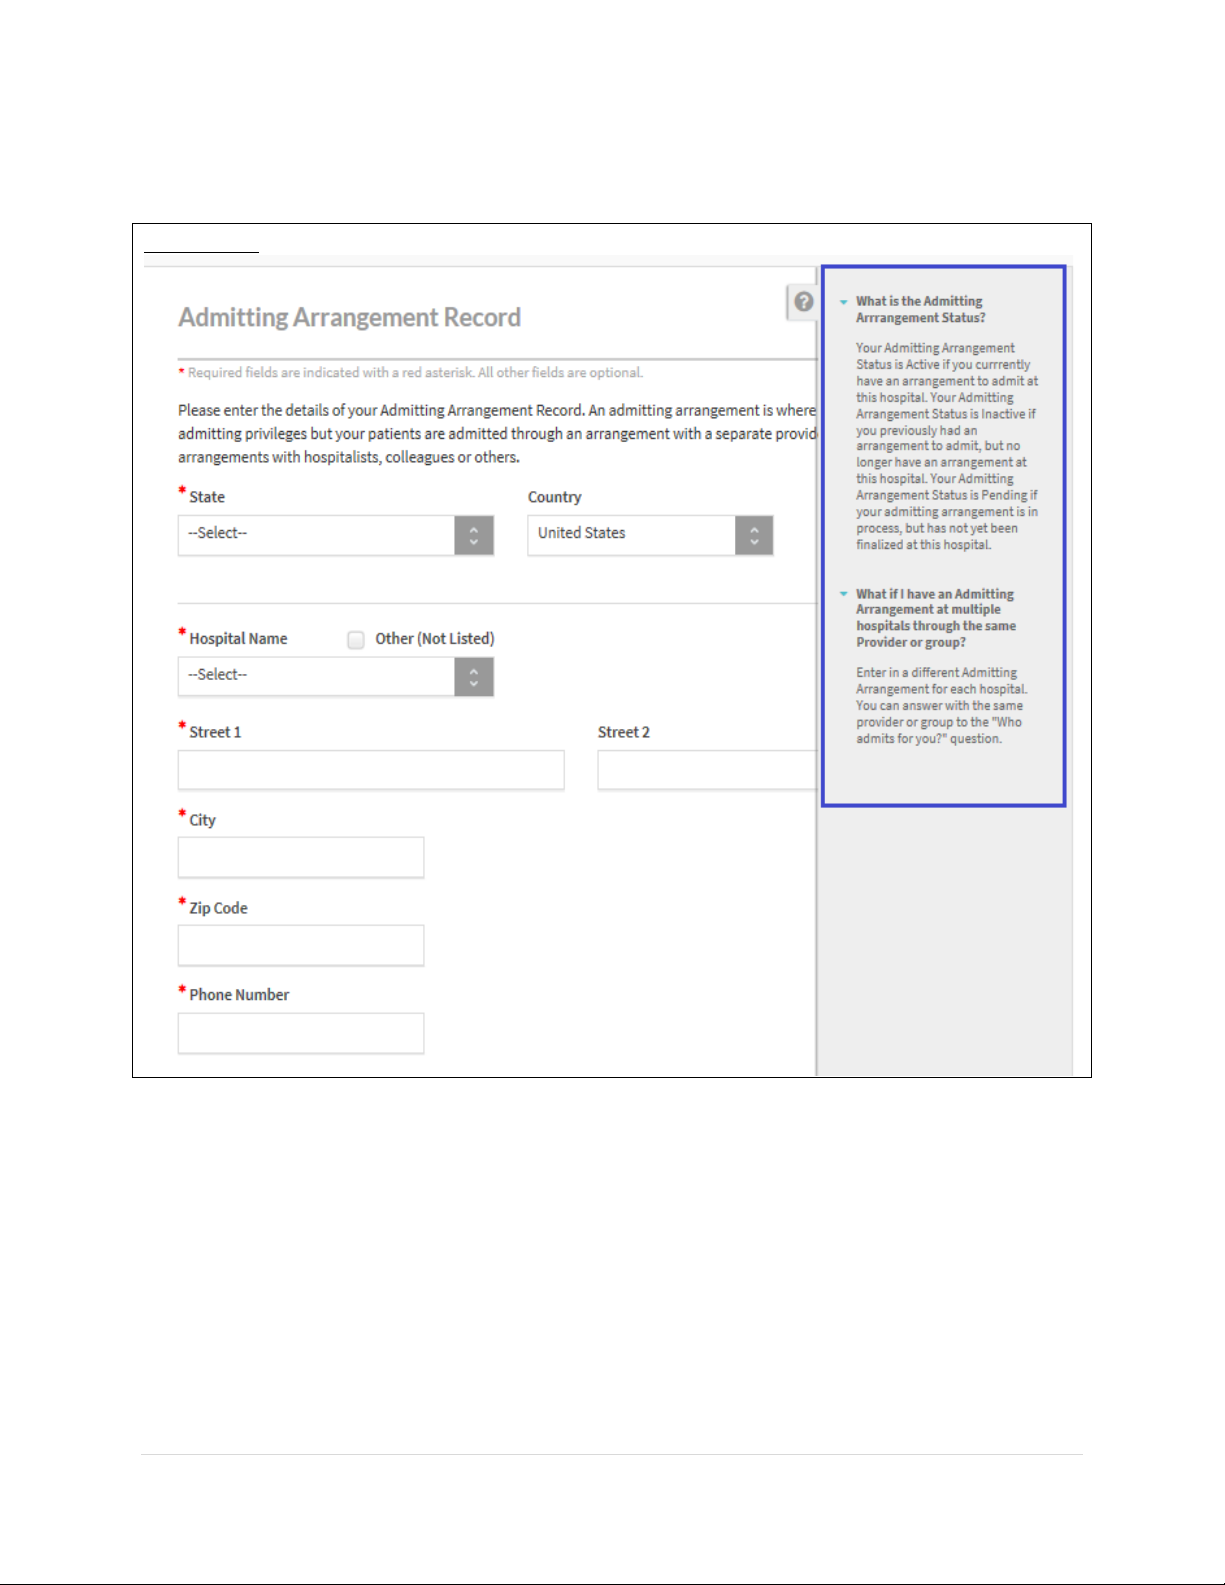
CAQH ProView Provider User Guide v13
95 | P a g e
The contents of the self-help option for the Admitting Arrangement records page have also
been updated to answer the commonly asked questions.
FIGURE 117
Page 97
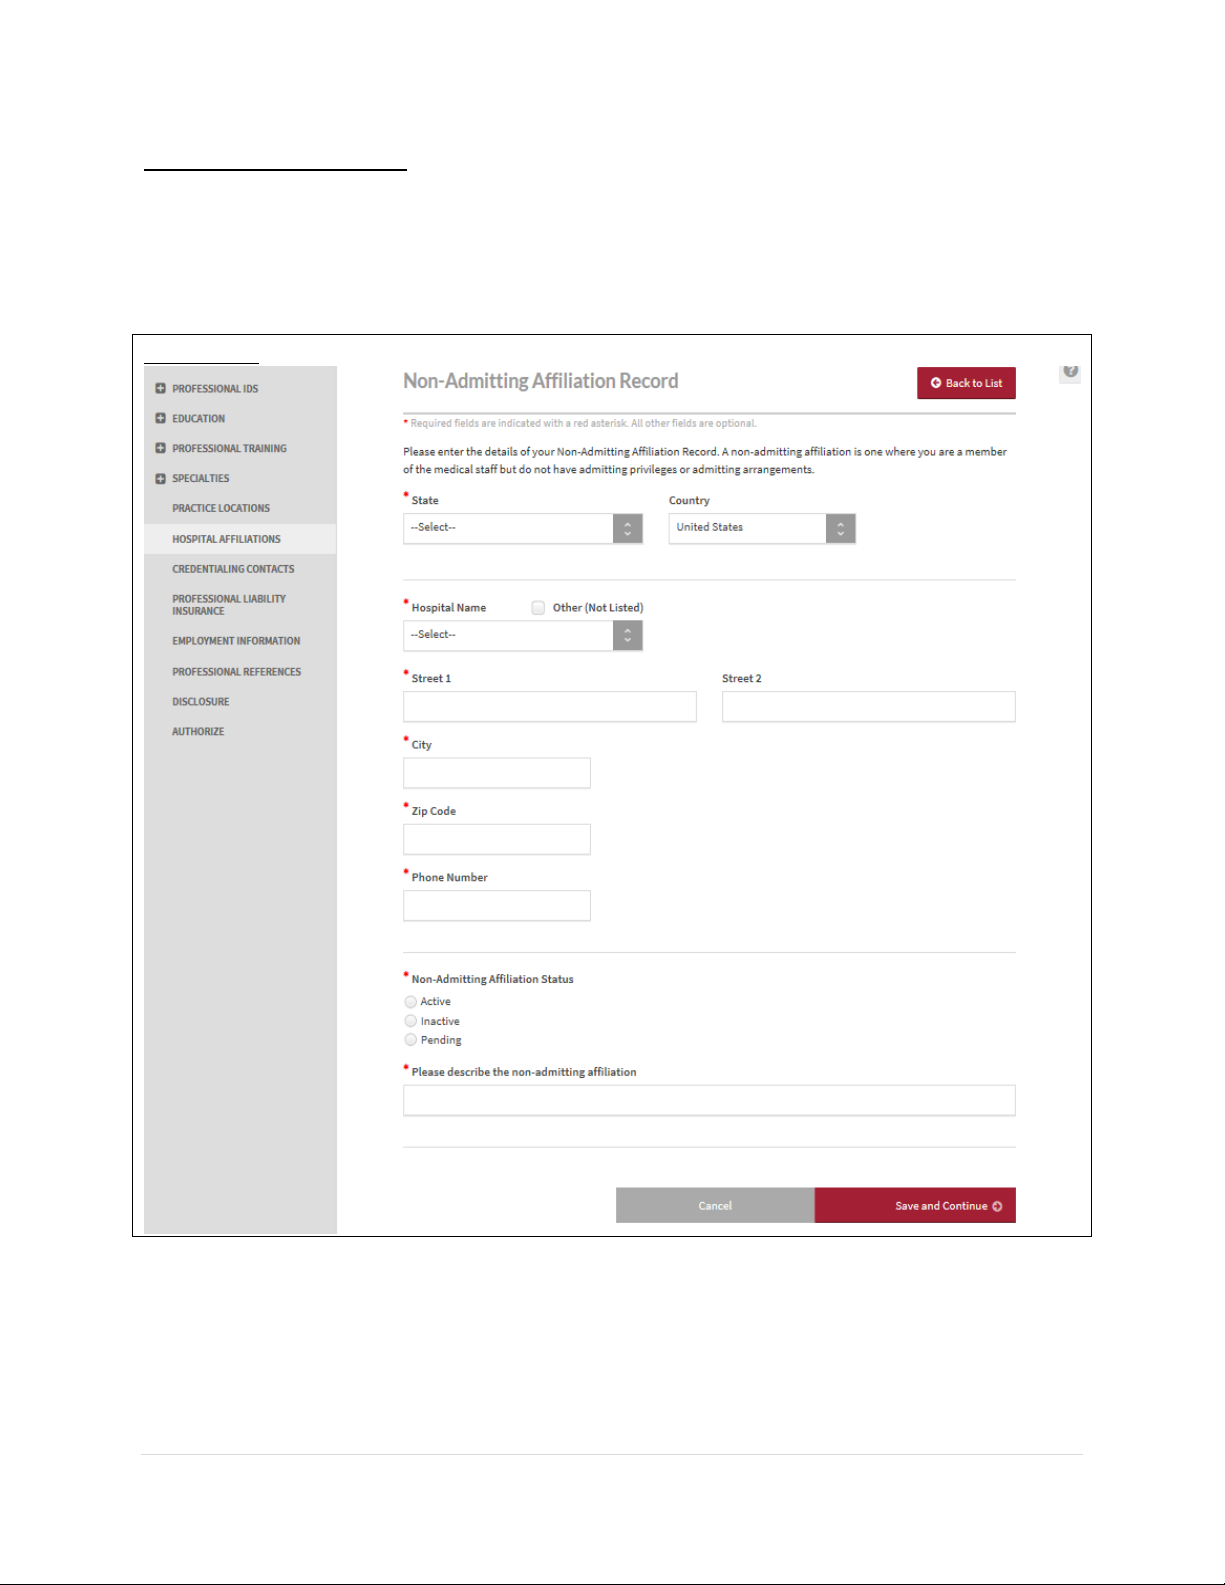
CAQH ProView Provider User Guide v13
96 | P a g e
Non-Admitting Affiliations
To add a non-admitting affiliation record for the first time, click the “Add button” beside the
statement “Please enter a Non-Admitting Affiliation Record.” You will be directed to a page
where details of a non-admitting affiliation record can be entered. Required fields are indicated
with a red asterisk. All other fields are optional.
FIGURE 118
Page 98
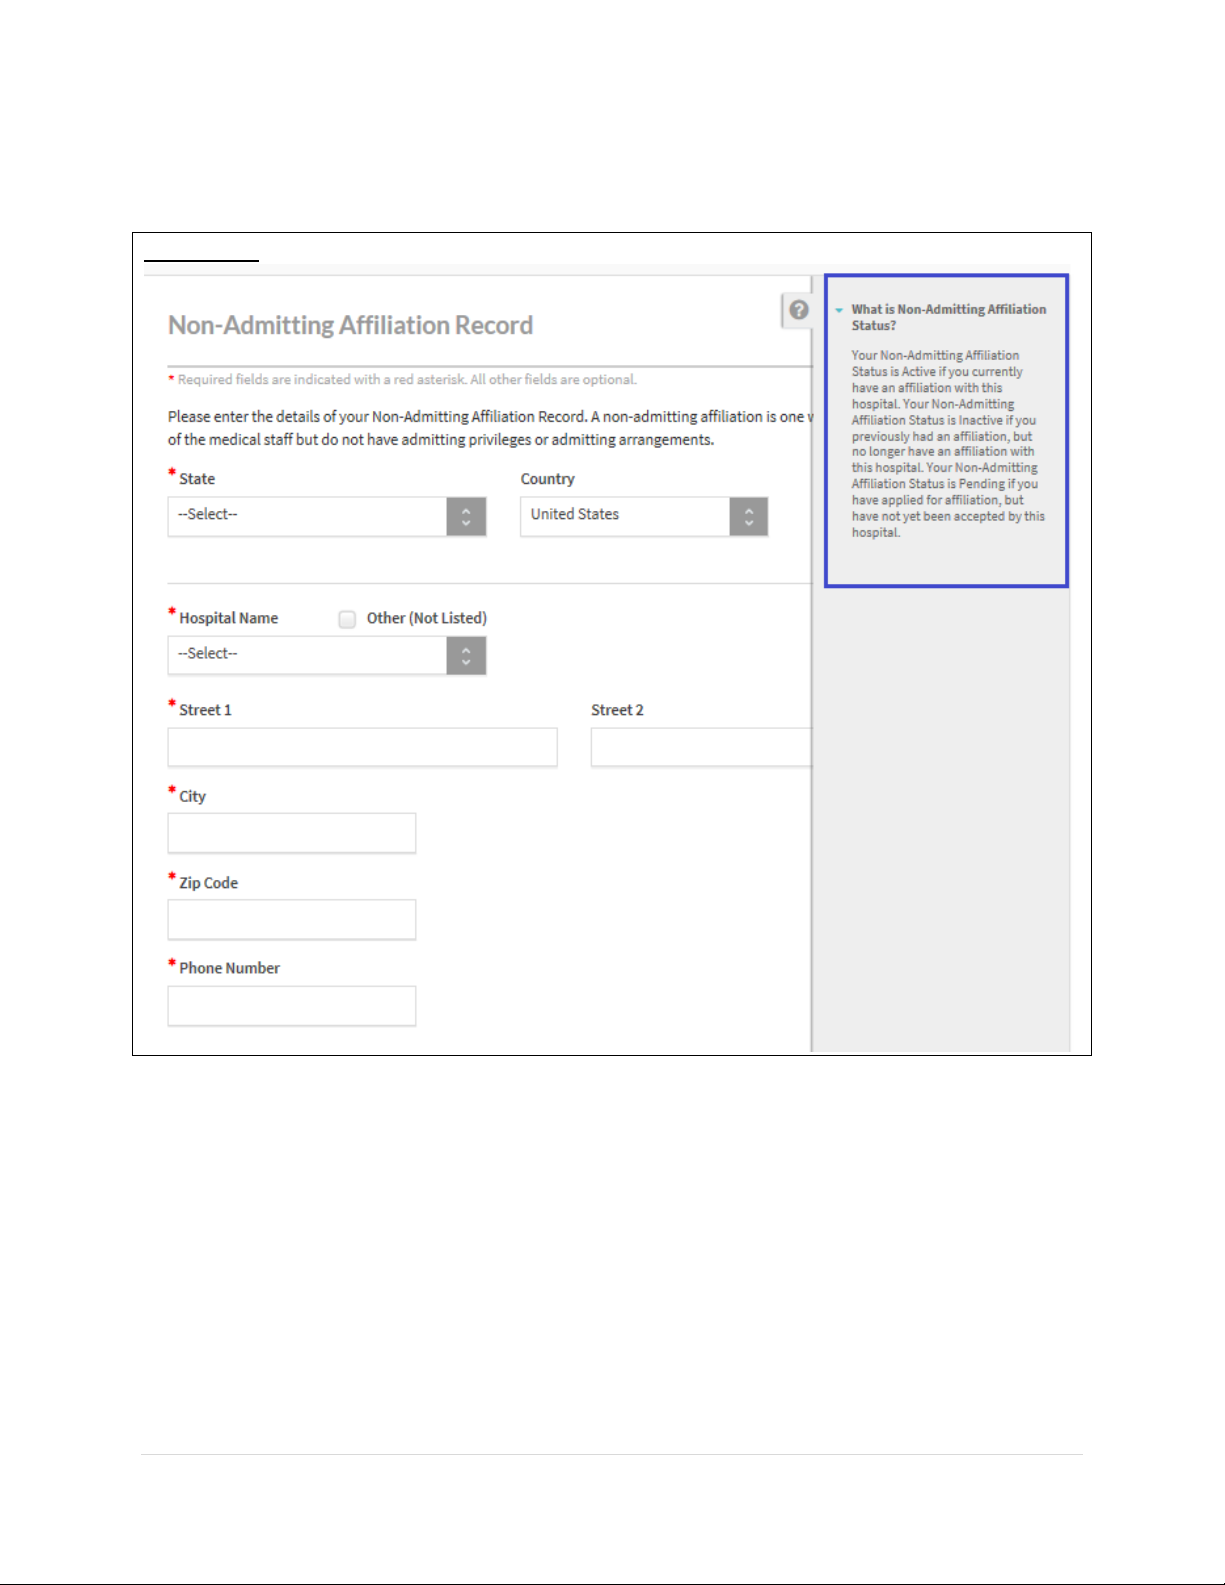
CAQH ProView Provider User Guide v13
97 | P a g e
The contents of the self-help option for the Non-Admitting Affiliation records page have also
been updated to answer the commonly asked questions.
FIGURE 119
Page 99
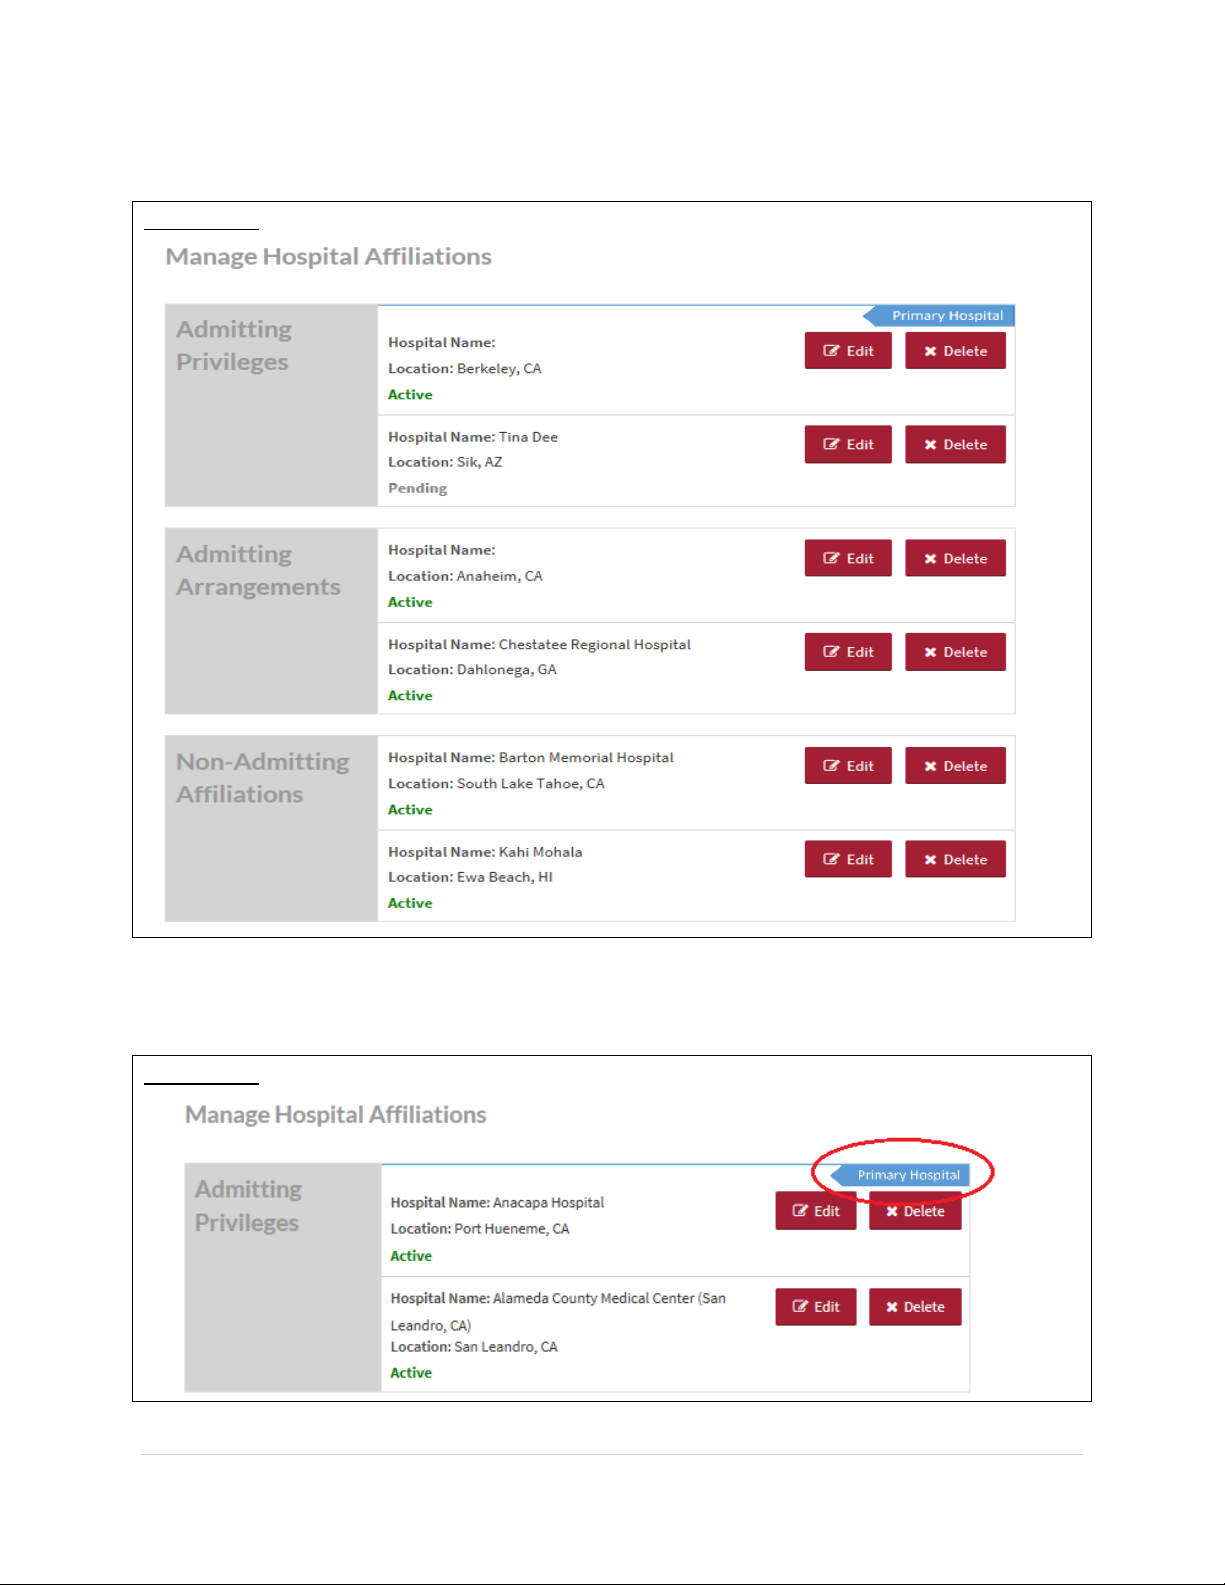
CAQH ProView Provider User Guide v13
98 | P a g e
A consolidated list of all the Hospital Affiliation records will be displayed in a summary table.
FIGURE 120
All admitting privilege records with “Is this your primary hospital?” = Yes are marked with a
backwards chevron with the white text “Primary Hospital” on the far right.
FIGURE 121
Page 100
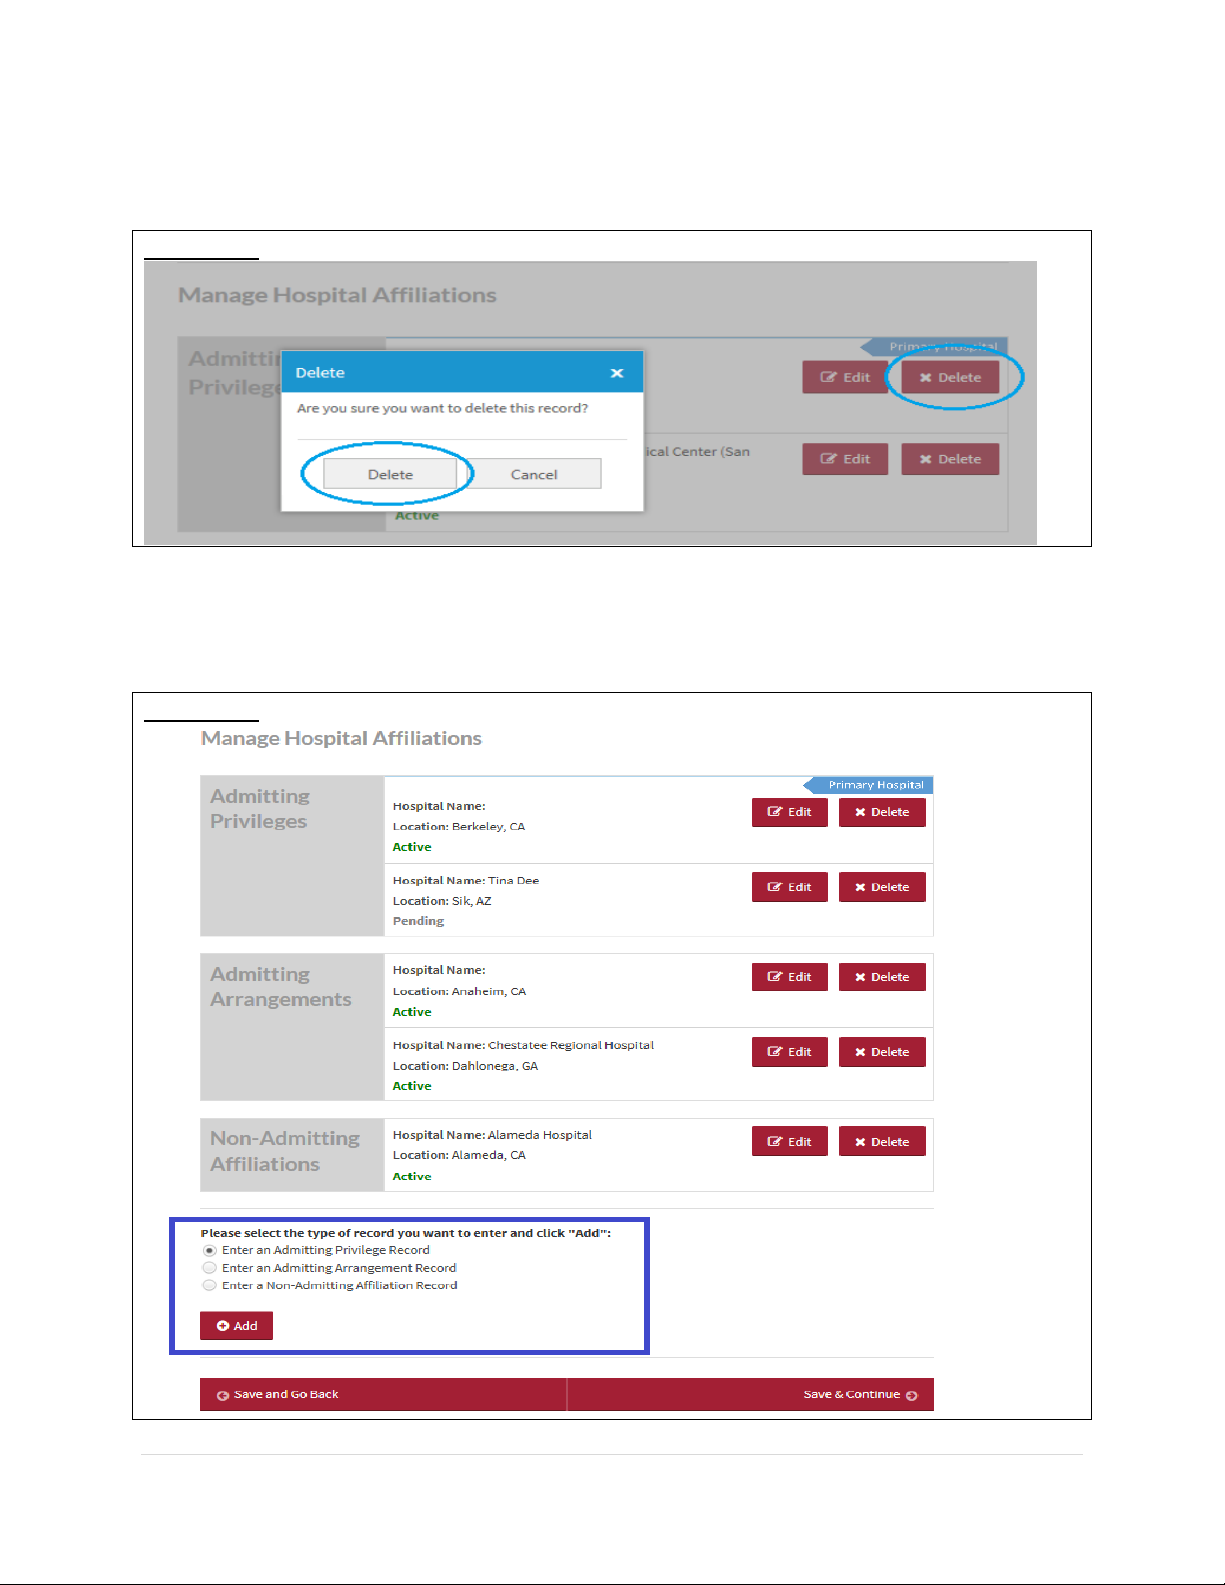
CAQH ProView Provider User Guide v13
99 | P a g e
Within each record in the summary table is a red “Delete” button which when clicked, will
display the Delete pop-up message.
FIGURE 122
If the Provider wishes to add more admitting privileges, admitting arrangements, and/or nonadmitting affiliation records this can be accomplished by scrolling to the bottom of the page
and selecting the type of record to be entered and clicking "Add".
FIGURE 123
 Loading...