


OPERATING INSTRUCTIONS FOR THE
CAPRICORN BENCH TOP CENTRIFUGE
MODEL NO. CEP 2000
FOR OTHER LANGUAGES, PLEASE VISIT OUR WEBSITE
CES INSTRUCTIONS SONT PRÉSENTES DANS D'AUTRES
LANGUES SUR NOTRE EMPLACEMENT DE WEB
DIESE ANWEISUNGEN SIND IN ANDEREN SPRACHEN IN
UNSERER WEB SITE VORHANDEN
ESTAS INSTRUCCIONES ESTÁN PRESENTES EN OTRAS
IDIOMAS EN NUESTRO WEB SITE
www.capricorn-labs.co.uk
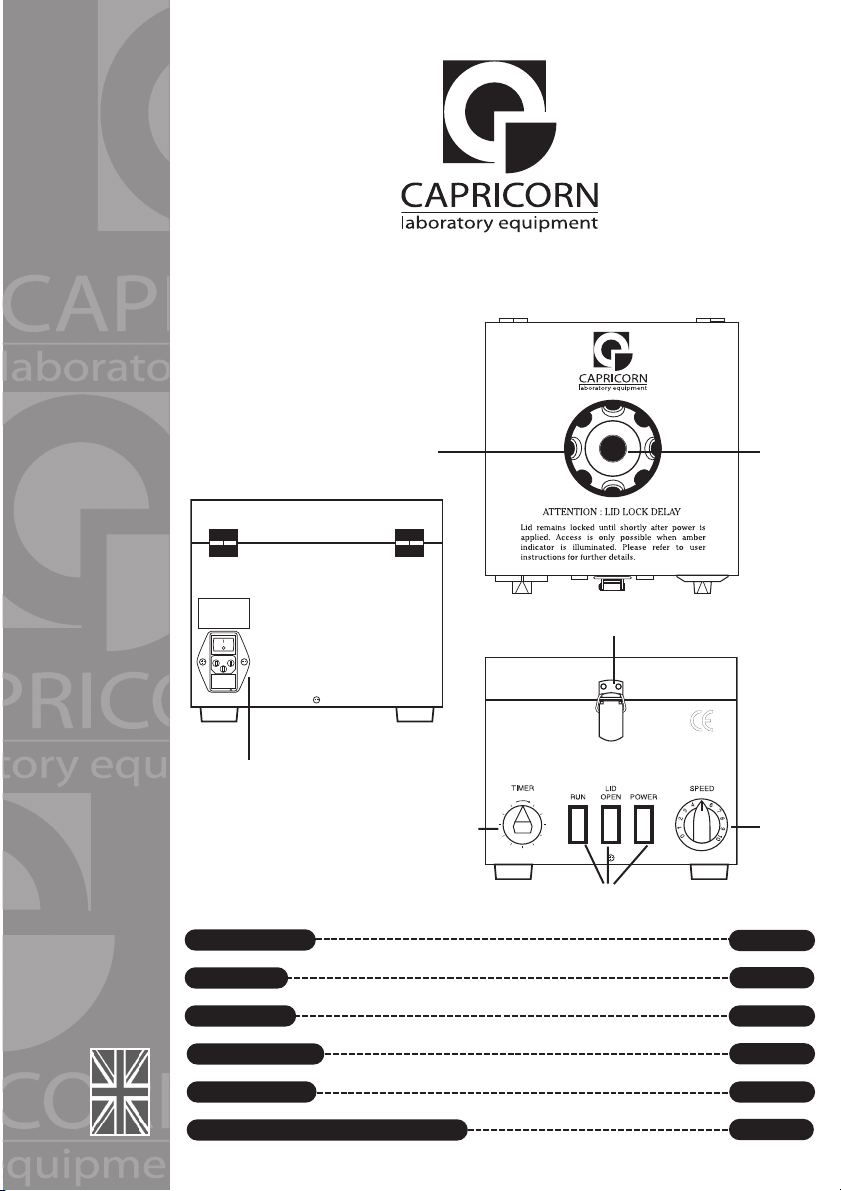
Knurled
Nut
Observation
Window
Speed
Control
Knob
IEC
Power Inlet
Catch
Neon Indicators
Timer
Knob
CAPRICORN BENCH TOP CENTRIFUGE
MODEL NO. CEP 2000
SETTING UP PAGE 1
LOADING PAGE 1
STARTING PAGE 2
COMPLETION PAGE 3
BREAKAGES PAGE 3
TECHNICAL SPECIFICATIONS PAGE 4
English
WARNING
THIS EQUIPMENT
MUST BE EARTHED
FUSE
30 0
27
24 6
15
3
921
1218
OPERATING INSTRUCTIONS FOR THE
CAPRICORN BENCH TOP CENTRIFUGE
MODEL NO. CEP 2000
SETTING UP
WARNING - THIS EQUIPMENT MUST BE EARTHED
1. Insert the mains lead into the IEC power inlet at the rear of the unit.
2. Plug the unit into a grounded power socket - DO NOT SWITCH ON
(OFF is indicated by ‘0’, ON is indicated by ‘1’).
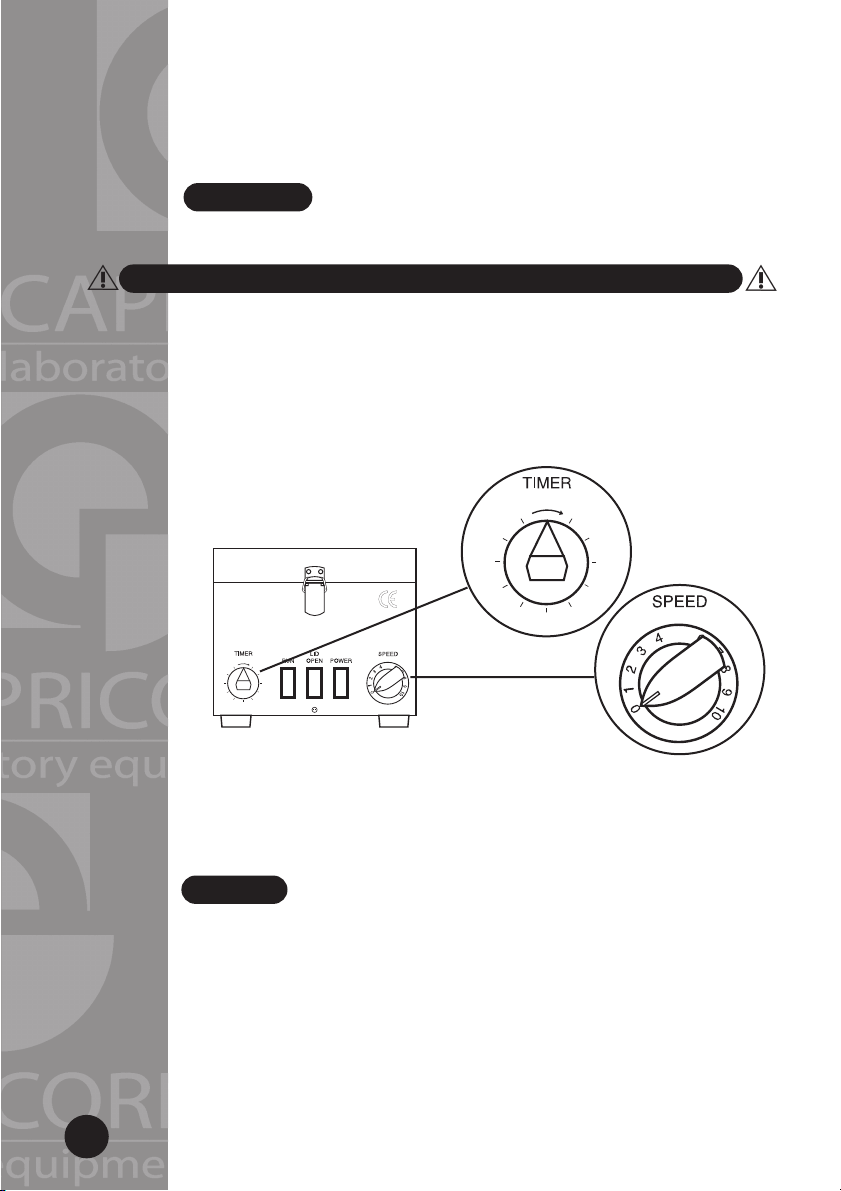
3. Ensure that the TIMER is in the OFF position, signified by the pointer
being in a vertical position, and that the SPEED control knob is set to ‘0’
(see Figure1).
4. Switch the power on at the rear of the unit. At this point the green ‘POWER’
neon indicator will come on and, after a short delay, the amber ‘LID OPEN’
neon indicator will also come on, indicating that the lid may be opened.
LOADING
1. Open the lid by undoing the catch on the front of the unit and lifting the lid.
2. Place the sample tubes in the rotor, ensuring that:
(a) The correct tubes are inserted into their corresponding places in the rotor,
if the rotor accommodates more than one size of tube.
(b) The rotor is loaded symmetrically, using tubes of equal size with contents
of equal weight. If you are unable to balance the rotor, due to an odd number
of tubes, fill an empty tube with water and use this as a balance. This water
filled tube can, if necessary, be used continually for this purpose.
(see Figure 2).
30 0
1218
24 6
15
921
27
3
5
(Figure 1)
1
30 0
27
24 6
15
3
921
1218
5

(Figure 2)
WARNING - DO NOT RUN THE CENTRIFUGE
OUT OF BALANCE!
3. Once the rotor is loaded, close the lid and secure the catch
WARNING - ALWAYS ENSURE THAT THE POWER IS ON
WHEN ATTEMPTING TO CLOSE THE LID
STARTING
1. Turn the “SPEED” control knob to the desired setting:-
SPEEDS AT ROTOR HEAD
SETTING R.P.M. RCF x g
0 1750 300
1 2000 400
2 2500 500
3 3350 1000
4 4000 1600
5 4700 2200
6 5250 2750
7 5850 3500
8 6300 4000
9 6700 4500
10 7000 5000
2. Turn the ‘TIMER’ knob in a clockwise direction to the required run time.
At this point the amber ‘LID OPEN’ neon indicator will go out, the red ‘RUN’
neon indicator will come on and the rotor will start to rotate.
PLEASE NOTE: if the required run time is less than 10 minutes,
turn the ‘TIMER’ knob up to 15 minutes or more and then back to
the desired setting. This will ensure that the timing is accurate.
✓
✓
✘
2
(Timer set to 15mins).
THE ABOVE FIGURES ARE APPROXIMATE AND INTENDED FOR GUIDANCE PURPOSES ONLY.

3. The centrifuge is now locked and it will not be possible to open the lid until the
rotor has stopped and the amber ‘LID OPEN’ neon indicator has come on.
4. The centrifuge may be subject to some vibration initially, while the rotor accelerates
through a critical stage, but this should cease once it has reached a reasonable
speed. However. if the vibration continues, it is most likely that the centrifuge is
unbalanced. If this is the case, the ‘TIMER’ knob must be turned OFF and the
rotor will slow down and come to a stop. Once the amber ‘LID OPEN’ neon
indicator has come on, the lid should be opened and the balance checked.
COMPLETION
1. Once the run has been completed, the timer will switch off and the rotor will
start to decelerate. The red ‘RUN’ neon indicator will go out and the green
‘POWER’ neon indicator will remain on. Once the rotor has stopped, the
amber ‘LID OPEN’ neon indicator will come on, after a short delay, indicating
that the lid may be opened.
2. Remove the sample tubes and close the lid, securing the catch on the front of the
unit. Once the lid has been closed, the power should be turned off at the rear of
the unit.
WARNING - ALWAYS ENSURE THAT THE POWER IS
ON WHEN ATTEMPTING TO CLOSE THE LID
BREAKAGES
1. In the event of tube breakage,the ‘TIMER’ should be turned OFF, by turning it
in an anti-clockwise direction back to the vertical position. Once the amber ‘LID
OPEN’ neon indicator has come on, the lid should be opened and the rotor
should be removed by unscrewing the knurled nut that secures it to the unit
(see
figure 3). The rotor should then be thoroughly cleaned and washed, being careful
not to allow any broken glass to cause injury.
2. After any breakages, the rotor must be completely free of any glass fragments or
other materials. If this is not the case, it will not be possible to successfully balance
the rotor on future operations.
3. Once the rotor has been successfully cleaned and the imbalance rectified, the
centrifuge may be re-loaded with samples and operated in line with the procedures
set out in the preceding sections.
(Figure 3)
Knurled
nut
3

In the event of any operational or technical problems,
please contact Capricorn Laboratory Equipment on
+44 (0)1425 65 00 88 and ask for Technical Support
TECHNICAL SPECIFICATION
Model No: CEP 2000
Motor: AC Series 1/15 HP
Max RCF: 4000g
Max Speed : 6000 rpm
Power Requirements: 220-240 VAC 50Hz, 3A Fused Supply (UK)
IEC Inlet 1.6A Quick Blow Fuse
FUSE
(Figure 4)
4
DECLARATION OF CONFORMITY
Manufacturers Name
: Capricorn Laboratory Equipment
Manufacturers Address: Glasshouse Studios, Fryern Court Road,Fordingbridge, Hants, SP6 1NG
Declares that the product:
Product Name: Bench Top Centrifuge
Model Number: CEP 2000
Conforms to the following Product Specifications:
EMC: EN61326-1 : 1997 Emissions & Immunity
EN55022 : 1998 Class B
EN61000-3-2 : 1995 Class A
EN61000-3-3 : 1995
Supplementary Information:
The product herewith complies with the requirements of the EMC Directive 89/336/EEC and carries
the CE marking accordingly. The product was tested in a typical configuration. This declaration only applies
to those centrifuges manufactured after the date shown below.
Fordingbridge, Hants. U.K. 01 November 2005
D J Prevett
Technical Manager
For sales or technical support, please contact Capricorn Laborator y Equipment:
Telephone: +44 (0)1425 65 00 88 Fax: +44 (0)1425 65 00 92
e-mail: info@capricorn-labs.co.uk
EN61000-4-2 : 1995
EN61000-4-3 : 1995
EN61000-4-4 : 1995
EN61000-4-5 : 1995
EN61000-4-6 : 1993
EN61000-4-11 : 1994
WARNING
THIS EQUIPMENT
MUST BE EARTHED
FUSE

Glasshouse Studios●Fr yern Court Road
Fordingbridge
●
Hants●SP6 1NG●UK
Tel: +44 (0)1425 65 00 88
●
Fax: +44 (0)1425 65 00 92
or 0700 CAPRICORN (0700 2277426)
e-mail: info@capricorn-labs.co.uk
●
www.capricorn-labs.co.uk
 Loading...