

Capresso CoffeeTEAM PRO Quick Reference Manual
Descaling the Machine
Capresso recommends descaling your coffee maker
every 1-3 months depending on local water hardness
or when brewing a full pot takes more than 15 minutes.
• Remove GoldTone filter from filter basket and
charcoal filter from water tank.
• Dissolve 1 oz. (28 g) of Capresso Cleaning Solution*
(or other descaling agent) with 32 oz. (1 L) of water and
pour mixture into water tank.
• Plac
e the empty carafe with the lid closed into the
machine.
• Press GROUND COFFEE button to turn grinder
off. Turn the machine on for 2 minutes by pressing
BREW.
• Turn the machine off by pressing BREW again and let
sit for 15 minutes.
• After 15 minutes, turn the machine on by pressing
BREW and let the remaining descaling solution pass
through.
• Turn the coffee maker off, remove the carafe, empty
an
d rinse a few times with fresh cold water.
• Rinse the filter insert thoroughly with fresh water and
place back into the machine.
• Rinse water tank and fill with fresh cold water and
brew through the machine to rinse out any remaining
descaling solution.
*Capresso Cleaning Solution
can be purchased through
www.capresso.com
For additional support, please contact
Customer Service: 1-800-767-3554
M-Th 8am-9p
m - F 8am-8pm - Sa 9am-5pm
Eastern Time Zone
Quick
Reference
Guide
CoffeeTEAM
Coffee Maker / Burr Grinder Combination
JURA Inc.
81 Ruckman Road
Closter, NJ 07624
www.capresso.com
contact@capresso.com
0115
Grinding with Extremely
Oily Roasts:
• There are some popular French Roasts that have
excess oils added during the roasting process.
These added oils stick to the inside of the grinder
and chute and must be cleaned out more frequently
when using these extremely oily beans.
• Even if severe clogging has occurred, the clog is
easily expelled using the angled brush to clean the
burrs and ground coffee c
hute. Once the clog is
removed, the machine performs normally.
• Simple steps can be taken to avoid severe clogging,
even when using French Roast or other extremely
oily beans.
1. Use the Grind & Clean Cycle more frequently when
dark, oily roasts are being used. Even if the machine
is not "clogged", this cycle will help keep any
leftover ground coffee or oily residues from building
up in the burrs a
nd the ground coffee chute.
2. Always use the “oily” setting when using beans
that have an oily shine, as this will extend the
grind time for these slower feeding beans.
3. If oily beans are having trouble feeding, make sure
to wipe down the inside of the bean container with a
dry paper towel.
4. Let dark, oily beans air out on a plate or paper
towel. If possible, let beans air out overnight but
even just 1-2 hours in open air will help reduce
sticky oils dramatically.
5. If airing out beans is not possible, spread beans
out on a paper towel, and use another paper towel
to pat down the beans to remove the added oils.
6. It is also helpful to mix a smaller amount of less
oily beans in with the oily beans. This will not only
help the beans feed more freely, but the drier
beans will actuall
y absorb some of the oils from
dark, shiny roasts.
Note: Grinder/Brewer combination machines require
some maintenance and upkeep in order to maintain
the best performance.
While using dark oily roasts is most certainly permitted,
it may require the user to adjust the frequency of
maintenance routines accordingly.
Situations & Solutions
Situation: There is no coffee coming out of the grinder. It
seems as though the coffee is completely clogged inside the
grinder. The grinder makes a loud, atypical noise.
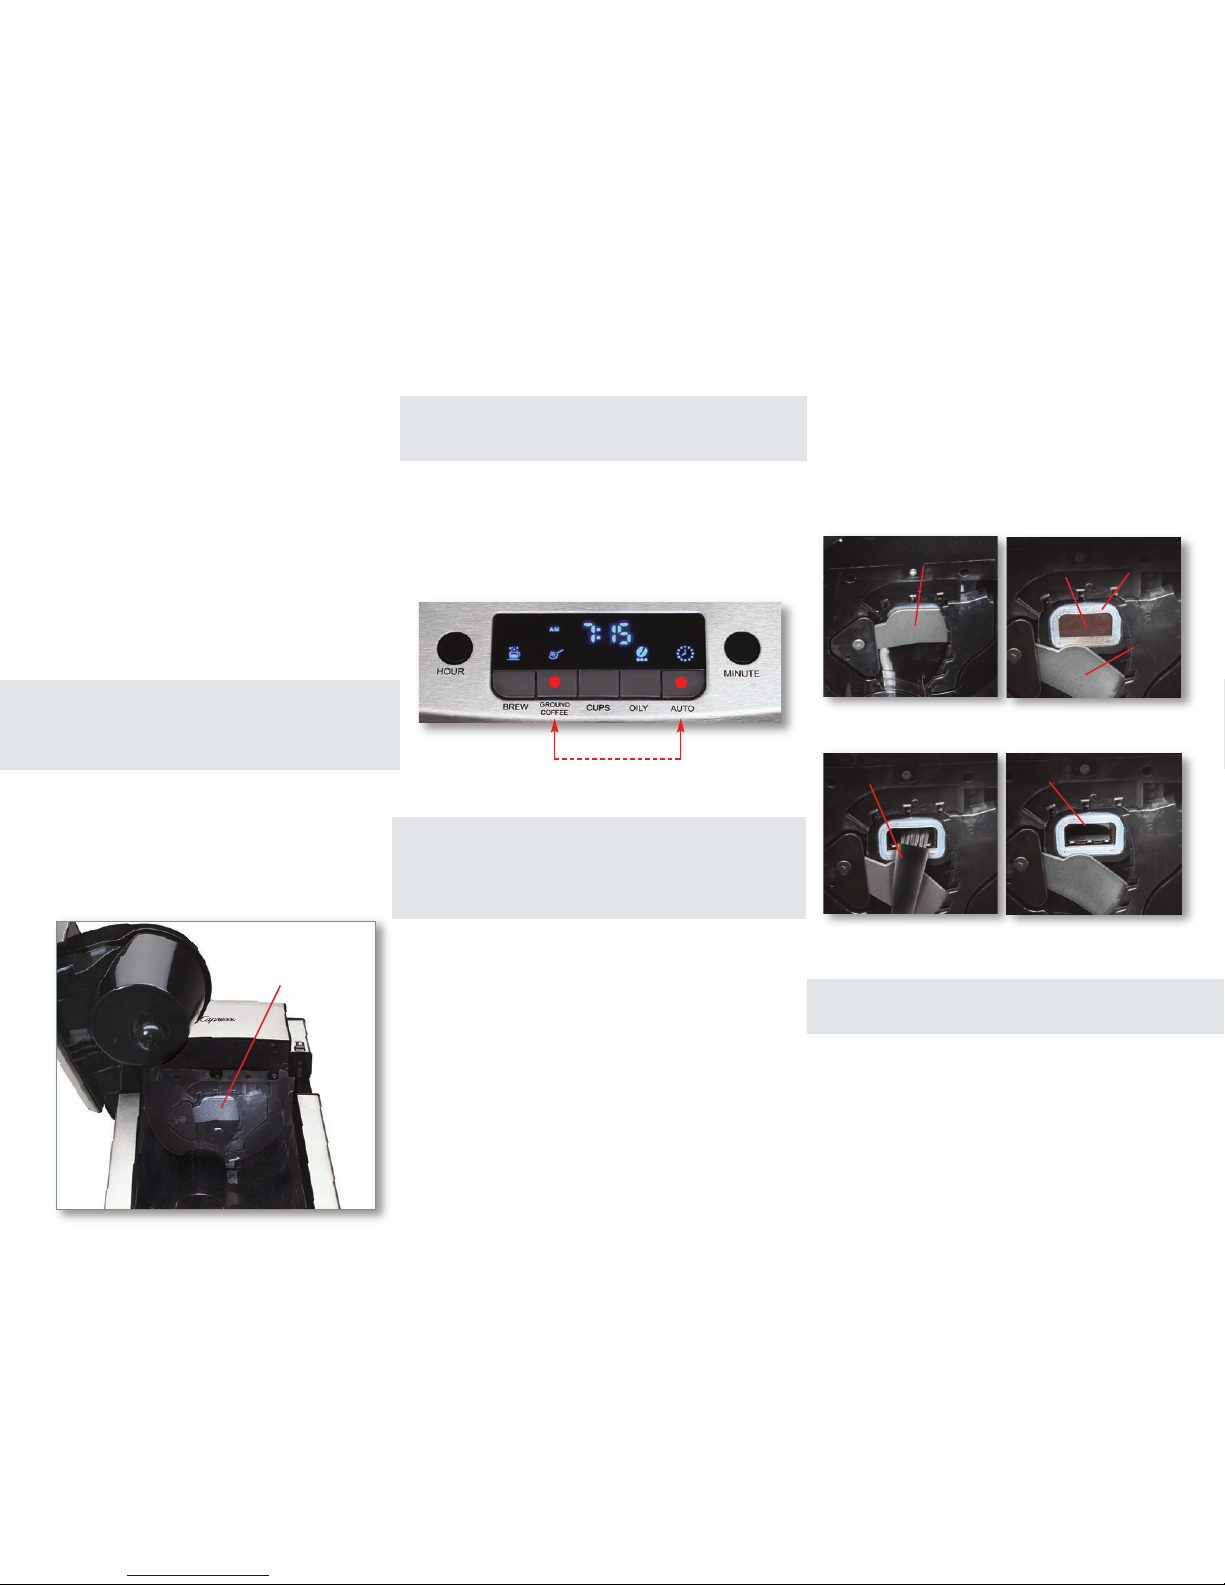
• Attempt to clear the clog by using the Grind & Clean Cycle.
Push and hold the "Ground Coffee" button, and the "Auto"
button at the same time. This will cut off the flow of the
coffee beans and engage only the grinder.
Any minor
clogging caused by grounds will be expelled into the
filter basket.
The Grind & Clean Cycle can be used at any time when
the machine is plugged into the wall outlet and will help
reduce any coffee residue left inside the grinder. We
recommend removing all wet grounds from the filter
basket prior to running the Grind & Clean Cycle.
For more severe clogs:
• Remove the lid of the bean co
ntainer.
The door to the
coffee chute will automatically open for cleaning and
maintenance purposes.
• Once the coffee chute door has been opened, unplug
the unit from the wall outlet.
• Place a paper towel under the coffee chute to catch any
ground coffee during cleaning. Use the angled cleaning
brush to remove any ground coffee that may be clogging
the ground coffee chute as shown in the following pictures.
• U
se a paper towel to clean the sealing gasket and area
around the chute door of any coffee residue.
• Once the coffee chute and sealing gasket are cleared of
ground coffee, plug the machine into the wall outlet.
• Run a Grind & Clean Cycle as described above to
remove any beans that may be resting on top of the
upper burr.
Simultaneously push and hold buttons for Grind & Clean Cycle
• Remove the bean container.
• Turn the fineness knob to "release" to remove the
upper burr. Clean coffee residue from upper burr.
• Using the angled cleaning brush, loosen any ground
coffee that may be impacted around the lower burr.
• Once the lower burr area is cleaned, replace the
upper burr and lock into place. Finally, replace and
lock t
he bean container back on to the machine.
Situation: The machine beeps twice when pressing the
BREW button. Grinder does not start.
Check the following:
• Make sure the bean container lid is on, pushed
down and fully engaged.
• Removable water tank is on, pushed down and
fully engaged.
• Ensure the upper burr and the bean container are
locked into place.
• Ensure that the fineness knob is adjusted correctly
as the machine will not start when knob is set to
"release".
Once bean container lid is removed, the coffee chute door will
open. This allows for easy access to the ground coffee chute.
Using the angled cleaning brush, remove any residue from the
ground coffee chute and sealing gasket.
Ground coffee chute
with door closed
Chute door closed
Clogged
coffee chute
Clean chute with brush Coffee chute cleaned
Chute
door
open
Inside view
Sealing
gasket
Maintenance Tips
In order to maintain the life of your product, please
follow the below care instructions:
Weekly:
• Ground coffee chute should be cleaned with the
included brush once per week or if ground coffee
chute door is not closing all the way.
• Use a cloth or paper towel to wipe out any
moisture build up or ground coffee residue around
the ground coffee chute door and sealing gasket
.
• Grinder should be cleaned once per week to
remove any ground coffee residue. First, run a
Grind & Clean Cycle as described in Situations
& Solutions. Remove the bean container and
upper burr to remove any leftover ground coffee
from the upper and lower burrs and the area
around the lower burr.
Note: If grinder, ground coffee chute and sealing
gasket are not properly cleaned,
ground coffee
residue can accumulate resulting i
n clogs or weak
tasting coffee.
Daily:
• Completely clean and dry all parts after every use.
• Discard wet grounds after use so that they are
not left inside of the filter basket overnight.
Emptying the basket immediately will reduce the
risk of grinding fresh coffee over the used
grounds which can cause clogging in the chute
and grin
de
r.
 Loading...