

Page 1

1a. Welcome and Thank You....................................................4
1b. How to reach Capresso......................................................4
2. Important information about coffee beans
and the built-in Burr Grinder ................................................4
2a. Storing coffee beans in the freezer?..............................4
2b. Finer or coarser grind? ..................................................4
2c. Dark beans versus light beans.......................................4
2d. Flavored beans, liquid flavorings, syrups ......................4
2e. Stones and beans ..........................................................5
3. PLEASE NEVER....................................................................5
USER COMPONENTS, Fig.1 and Fig. 2.................................6
4. Equipment ............................................................................7
5. Capresso Customer Service ................................................7
6. Features and benefits of the CoffeeTEAM Luxe ..................7
7. Preparing the machine .......................................................8
7.1 Before first use ...................................................................8
7.2 The display .........................................................................8
7.3 Setting the tme ...................................................................8
7.4 Grinder setting for current use ...........................................8
7.5 Programming the timer and grinder for later use...............8
7.6 Flashing LCD display..........................................................8
7.7 Filling the beans................................................................10
7.8 Water Filtration System ....................................................10
7.9 Filling the water container ................................................11
7.10 Filter holder insert...........................................................12
7.11 Cover Lid ........................................................................12
8. Grinding and brewing coffee now ......................................13
8a. Drip Stop / Stop-And-Serve.........................................14
8b. Using different beans at different times.......................15
8c. Using the Coffee Maker without the Grinder...............15
8d. Warmkeeping ...............................................................15
9. Grinding and Brewing Coffee Later....................................15
10. Cleaning............................................................................16
11. Decalcifying ......................................................................19
12. FAQ (Technical Questions)................................................20
13. FAQ (Coffee Questions)....................................................21
14. Limited Warranty...............................................................22
15. Product Registration.........................................................23
Manual Release Button ..........................................................19
CONTENTS Capresso CoffeeTEAM™Luxe
Page
Page
Page 2

ATTENTION: Traces of Coffee
In order to ensure proper functioning, your Capresso CoffeeTEAM
Luxe has been calibrated and tested with coffee beans. As a
result, some traces of coffee may remain in your machine.
1a. Welcome and Thank You
Thank you for choosing this unique CAPRESSO product.
Your new CoffeeTEAM Luxe works differently than individual
coffee makers and grinders. Please read through this book
before using your machine. Thank you.
These operating instructions contain all the information necessary for the correct use, operation, and maintenance of the
machine. Understanding and complying with the directions contained in these operating instructions are essential to ensure that
the machine is utilized without risk and to ensure safety during
operation and maintenance.
2. Important information about coffee beans and the built-in
burr grinder
2a. Storing Coffee Beans in the Freezer?
Coffee Stores do not store coffee beans in the freezer or refrigerator! Coffee will act like baking soda, absorbing all odors and
tastes surrounding it. Coffee beans will stay fresh for several
weeks as long as you keep them in a dry, dark container. (It’s the
ground coffee which will lose aroma rapidly!) If you must store
coffee beans in the freezer, take them out the day before use.
This way they will absorb less odors and have time to thaw. If you
fill beans from the freezer directly into the grinder, moisture will
seep into the burrs and the feeder channel. The moisture makes
the ground coffee stick in the feeder channel and will clog it up
over time.
2b. Finer Or Coarser Grind?
The four grind settings of your CoffeeTEAM Luxe are calibrated
for grinding drip coffee. Choose the coarser settings for darker,
oilier beans. Choose the finer settings for light or medium roasts.
In the coarser setting slightly more coffee will pass through the
burrs than in the finer settings.
2c. Dark Beans versus Light Beans
Your CoffeeTEAM Luxe burr grinder is calibrated to work with all
different kinds of roasts. Dark, oily beans will leave some oil
residue in the feeder channel. Over time this can slow down the
flow of ground coffee. For cleaning the feeder channel see
pages 17/18.
2d. Flavored beans, liquid flavorings, syrups
• Do not use sugar or powder coated beans in the grinder (e.g.
cinnamon, chocolate, vanilla etc). Coated beans can pit the
bean container. The coating might stick to the burrs and, over time,
will greatly reduce the performance of the grinding mechanism.
4
Page 3

• Do not add any liquid flavorings or syrups to the beans.
• If you like flavored beans we recommend buying liquid flavorings at your local coffee store. Add a few drops into the carafe
before or after brewing.
2e. Stones And Beans
Every coffee specialty store will tell you that occasionally small
stones can be found in between coffee beans. Very small stones
will be processed through the burr grinder without any harm (the
stone will end up in your filter - not in your brewed coffee).
However, larger stones can block the burr grinder permanently. If
this happens, the grinder will make a loud noise. Push the
On/Off button to stop grinding and call our customer service toll
free number: 1-800-767-3554. Here is how you can avoid stones
entering the bean container:
• Shake your bean bag thoroughly so that a stone will fall to the
bottom of the bag.
• Before emptying the bottom half of the bag of beans into the
bean container, check to see whether there are any particles
that look like stones, and remove them.
3. PLEASE, NEVER... (or you will void your warranty
protection):
• Never fill instant coffee into the bean container; it can damage
the functioning of the grinder and the machine.
• Never fill coated coffee beans into the bean container.
• Never fill water or any other liquid into the bean container.
• Never fill anything other than coffee beans into the bean container (no chocolate, no nuts, no spices).
• Never fill anything but fresh, cold clean water into the water
container.
• Never remove or attempt to disassemble the bean container.
• Never unplug your CoffeeTEAM Luxe in the middle of a
grinding/brewing cycle.
• Never open the water container lid during the brewing process.
• Never grind into the filter holder unless it is empty of previously
used coffee grounds.
• Never operate the machine when the feeder channel cover is
removed.
Page 4
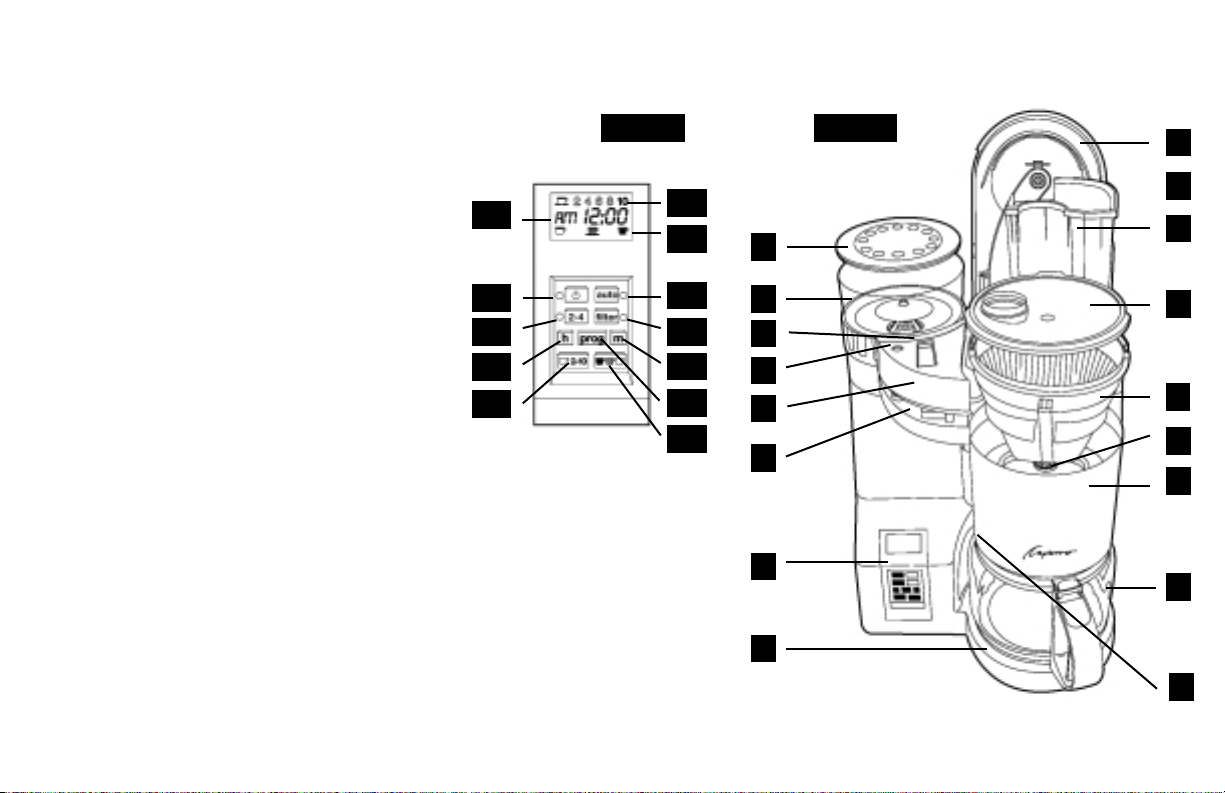
USER COMPONENTS
A Bean Container Lid
B Bean Container
C Fineness Selector Dots (not shown)
D Screw for Feeder Channel Cover
E Feeder Channel Cover with window
F Feeder Channel
G Operating Panel and Display
G1 Grind Amount Indicator
G2 Clock/Timer
G3 Strength Indicator
G4 On/Off Button with red light
G5 2–4 cup brew cycle selector with
green light
G6 “Auto” Button with green light
G7 Charcoal filter button with green light
G8 h-button to set hours
G9 m-button to set minutes
G10 Programming button
G11 “2-10” button = to set coffee amount to be ground;
changes bold number in the Grind Amount Indicator
G12 strength button: to set coffee strength; saucer
in the Strength Indicator jumps from cup to cup.
H Heating Plate
I Water Container Lid
J Hot Water Guard, not shown (see page 12)
K Water Filtration Container
L Cover Lid
M Filter Holder Insert
N Drip Stop
O Filter Holder
P Glass Carafe with snap-on lid
Q Manual filter holder release button (see page 19)
G1
G
F
E
D
C
B
A
H
P
O
N
M
L
K
J
I
G2
G3
G4
G6
G5 G7
G8
G9
G10
G11
G12
Operating Panel
and Display
Fig. 1Fig. 2
6
Q
Page 5

4. Equipment
The CoffeeTEAM Luxe (#453) comes with:
a. this instruction book (includes warranty and Capresso product
registration)
b. an order form for parts and accessories
c. one measuring scoop
d. one glass carafe with lid
e. one GoldTone filter, size 4
f. one cover lid for the filter holder insert
g. filter holder insert
h. water filtration container with detachable bottom
i. charcoal water filter cartridge
If any of these parts are missing, please call toll-free:
1-800-767-3554.
6. Features and benefits of the CoffeeTEAM Luxe
Cof
fee Maker Features
• After grinding, CoffeeTEAM Luxe automatically returns the
filter holder and starts the brewing process.
• In case the filter holder is moved inadvertently underneath the
grinder, a special release disengages the filter holder and
returns it to its original position.
• Cold water filtration system removes up to 82% chlorine and
improves the taste of the coffee.
• A flashing green indicator light shows when it is time to
replace the charcoal filter cartridge.
• Drip-stop function lets you pull out carafe and serve a cup or
two before brewing is finished.
• 900 watt heating system delivers 200º to 205º F contact/brew
temperature and 180º F in carafe after brewing.
• A special 2-4 cup cycle slows down the brewing process to
maintain flavor and aroma when brewing small batches.
• Illuminated LCD display with AM/PM clock and 24-hour
programming .
• Auto shut-off keeps coffee hot for two hours, then turns
machine off for additional safety.
• Machine can be used with or without the grinder to accommodate pre-ground coffee.
• GoldTone filter included.
• 10-cup (50 oz.) capacity.
Bur
r Grinder Features
• Heavy duty, commercial mill with burr/cone grinder delivers
slow, precise and no-heat grinding to preserve natural coffee
bean aroma.
• Built-in safety device prevents grinding if filter holder is not in
grinding position.
• Grinds directly into filter holder.
• 150g bean container holds beans for 20 to 30 cups of coffee.
• Set to grind for 2, 4, 6, 8 or 10 cups. (Indicator in LCD display.)
• Fine tune for mild, regular or strong coffee. (Cup/saucer
indicator in LCD display.)
• Turn the bean container from left to right to change the grind
settings from finer to coarser in four steps.
Page 6
7. Preparing the machine
7.1 Before First Use
a. After unpacking clean all
loose parts with warm water
and make yourself familiar with
the different functions.
b. After reading the instructions,
brew 3 cups of water to clean
all internal parts and to activate
the charcoal filter.
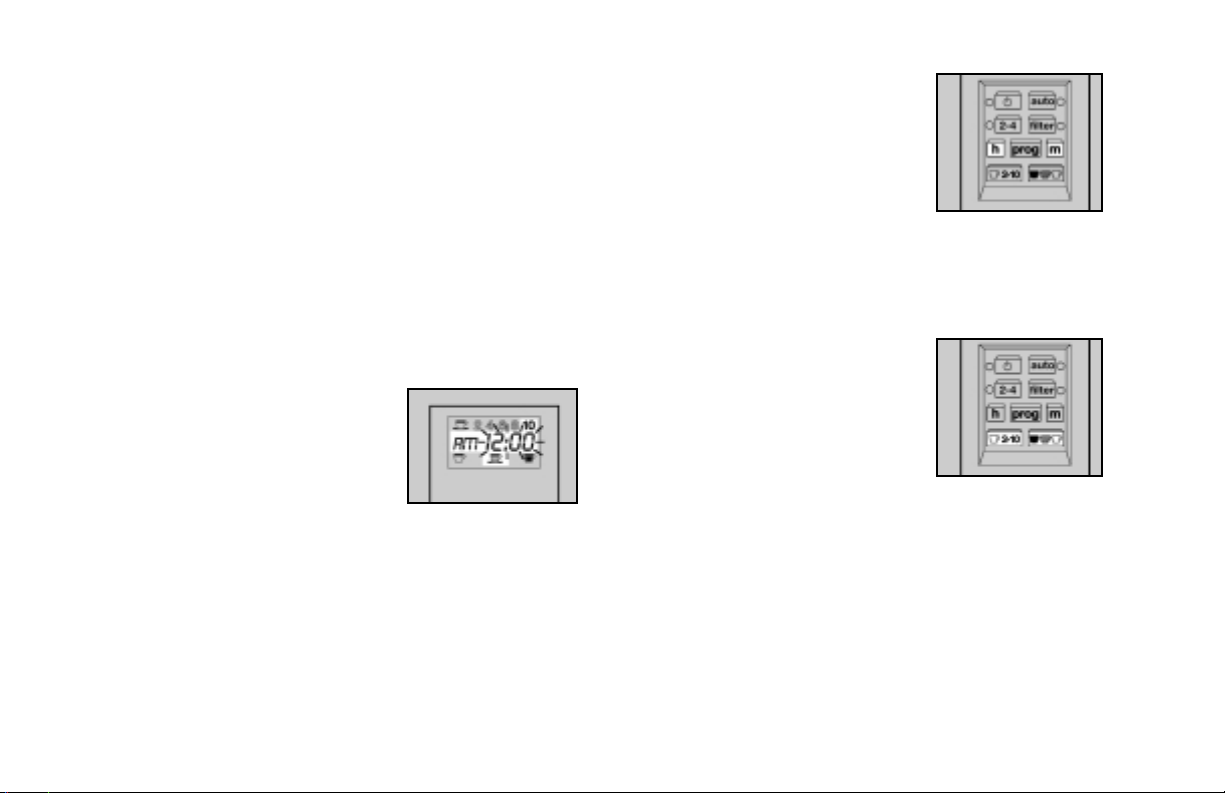
7.2 The Display
When you plug in the coffee
maker, the LCD displays AM and a
flashing “12:00.” The “Grind
Amount Indicator” (G1) shows the
number “10” bold and the numbers 2, 4, 6, 8 outlined. The
“Strength Indicator” (G3) shows
three cups, one outlined on the left
(stands for mild), one shaded in
the middle (stands for regular), and
one black on the right (stands for
strong). The saucer sits under the
middle cup (regular). The green
filter light is illuminated (G7). This
is the factory setting.
Note: The display is backlit. The
darker the room, the more you will
see the backlit effect.
7.3 Setting The Time
Push and hold the "h"-button (G8)
to set the hour. Then push and
hold the "m"-button (G9) to set the
minutes. Now the time is set. To
change the actual time, repeat
above steps.
7.4 Grinder Setting for Current Use
a. Push and hold the "2-10" button
(G11). The bold number in the
Grind Amount Indicator (G1) will
change. When the desired number is bold, release the button.
b. Push and hold the "strength"
button (G12). The saucer will
jump fromcup to cup. When the
saucer sits under the desired
cup, release the button.
c. To change any of these settings,
repeat above steps.
7.5 Programming The Timer And
Grinder For Later Use
To program the grinder and coffee
maker to start automatically at a
pre-set time proceed as follows:
a. Make sure the current time is set.
b. Push the "prog" button (G10).
8
Page 7

The saucer blinks. The display
will read "AM 12:00" and shows
the number "10" in bold.
c. Push and hold the”h”-button
(G8) to program the hour at
which you would like to make
coffee later. Push and hold the
“m”-button (G9) to program
the minutes at which you would
like to make coffee later. Now
the time to make coffee later is
programmed.
d. Push and hold the "2-10" button
(G11) until the desired number is
displayed in bold. Release this
button. Then push and hold the
"strength" button (G12) until the
saucer sits under the desired
cup. Release this button.
Note: Within 5 seconds the display will return to the current
mode and the current grinder
settings. To check if you are in
the programming mode or in the
current mode just look at the
saucer. If the saucer is not blinking you are in the current mode.
If the saucer is blinking you are
in the programming mode.
e. If you wish to check the pro-
grammed settings, push the
"prog" button (G10). The display
will show you the future time
and the future grinder settings.
Note: The settings for the grinder
can be different in the program
mode and in the regular (current)
mode.
Note: If you want your coffee
ready at 7:00 AM, set the timer to
6:45 AM.
See chapter 9, page 16 for
"Grinding and Brewing Coffee
Later".
Page 8

7.6 Flashing LCD Display
• If you unplug the machine for
more than 10 seconds and then
plug it in again, the LCD display
will flash.
• If you did not unplug the
machine and the LCD display
flashes, it indicates that the
electrical power was interrupted
for more than 10 seconds. You
have to set the clock and the
timer and grinder settings again
as described in chapters 7.3
through 7.5.
• If you unplug the machine for
less than 10 seconds all information will be maintained (time,
grinder settings, etc.).
Note: When you unplug the
machine, the display will discharge
for about 15 seconds. At this time
it will show random symbols and
then turn off.
7.7 Filling the Beans
Fill the bean container (B) with
beans. Make sure that the water
container lid is closed to prevent
beans from spilling into the water
container.
Caution: Check beans for foreign
objects (see page 5, chapter 2e).
The bean container will hold
approximately 6 oz. (1/3 lb.) of
beans (good for 20 to 30 cups of
coffee). Select the fineness setting
(C) by turning the bean container
until the line matches up with one
of the four dots in front of the
bean container. For first time use,
we recommend the coarsest setting - the largest dot.
Note: Never fill the bean container
with frozen or coated beans (see
chapters 2a and 2d, page 4).
7.8 Water Filtration System
Your CoffeeTEAM Luxe comes
with a cold water filtration kit. This
kit contains:
• one charcoal cartridge, and
• a filtration container with a
detachable bottom.
You can use your coffee maker
with or without the water filtration
system.
Note: If you use distilled, spring or
bottled water or if your water has
little or no chlorine you might not
find a difference in taste in your
10
Page 9

coffee when using the water filtration system. However, most tap
water is treated with chlorine. The
water filter cartridge removes up to
82% of the chlorine found in your
tap water.
Initial Preparation:
• Unscrew the bottom of the
filtration container (K) and place
the cartridge (flat side upwards)
inside. Replace the bottom of
the filtration container.
• Place the filtration container into
the water container.
• Fill two to three cups of water
into the filtration container and
let sit for two to three minutes.
Then turn the machine on and
let the water brew into the
carafe. Discard the water and
turn the machine off. This will
activate the charcoal filter.
• For best results always fill the
water through the filtration container.
When to replace the cartridge:
As long as the green Charcoal Filter
Light is on, the CoffeeTEAM Luxe
monitors time and the number of
brewings.
The green charcoal filter light will
start blinking either after 6 weeks
or after the On/Off Button has
been turned on 60 times whichever
comes first, reminding you to
replace the cartridge.
Attention: When you unplug the machine for more than 10 seconds or if you have a power failure, the electronic indicator loses
its memory. Then it is best to replace the filter 6 weeks after first
use.
Caution: Once the cartridge is activated you should never use it
for longer than six weeks. Harmful bacteria build-up may occur.
Unused cartridges can be stored indefinitely.
Replacement cartridges are available through your local
Capresso dealer or by using the enclosed mail order form or
through the website: www.capresso.com.
Replacing the Cartridge / Resetting the Filter Indicator
Remove the filtration container, unscrew the bottom, remove and
discard the used filter. Replace with new filter and activate filter.
While the green light is still blinking, push and hold the Charcoal
Filter Button for a three seconds until the light stops blinking and
is illuminated again. Now the indicator starts counting anew.
Page 10

7.9 Filling The Water Container
Open the water container lid (I)
and pour the desired amount of
fresh, cold water through the filtration container (K). Note: Using the
cup graduation on the glass carafe,
always pour approximately one
cup of water more into the water
container to compensate for water
lost during the brewing process.
Maximum amount of cold water:
approximately 1/4 inch above the
10-cup marking on the glass
carafe.
When you have filled the water
container, set the glass carafe
aside (do not set it on the heating plate (H) yet!).
7.10 Filter Holder Insert
Caution: If the filter holder insert
(M) is not completely locked into
the filter holder (O), the drip stop
(N) on the bottom of the filter holder
insert might not open during brewing. This can cause hot coffee to
overflow and can result in serious
injuries and damages. Here is how
to properly lock the filter holder
insert into the filter holder:
• Open the water container lid.
• Remove the cover lid.
• Remove the glass carafe from
the heating plate and then lower
the filter holder insert (M) with
the tab of the filter holder insert
pointing towards the water container. Push the handle of the
filter holder insert down towards
the water container and make
sure it sits completely flush with
the rim of the filter holder (O).
• Push with your finger against
the drip stop (N). If the filter
holder insert is in the proper
position, it will stay inside the
filter holder and not move
upwards.
12
Hot Water Guard
see page 21, question 10
Filter
holder
insert
Filter
holder
CAUTION: Messy / Dangerous!
If you forget to place the filter holder insert (M) in the filter holder
(O) and you slide the filter holder underneath the grinder, it will
start grinding and spread the ground coffee on your counter. It
will then return the filter holder underneath the water container lid
and the brewing process will start, splashing hot water onto
the heating plate. In this case, immediately push the On/Off
button to turn off the machine and wait until the water pumping stops!
Always move the filter holder
WITH the filter holder insert AND the
GoldTone filter underneath the grinder.
Page 11

7.11 Cover Lid
The cover lid (L) minimizes static
coffee particles clinging to the outside of the filter holder.
• Open the water container lid (I).
• Make sure that the filter holder
insert and the GoldTone filter (or
your filter paper) are inserted in
the filter holder (O).
• Place the cover lid on top of the
filter holder insert (M) so that the
large hole is on the left side.
Make sure that the front rim fits
snugly into the groove created
by the filter holder insert and the
outside filter holder.
• Close the water container lid.
Now you can swing the filter
holder underneath the grinder.
• Cleaning: Wipe the lid clean
after each use. Do not clean in
dishwasher!
Note: The lid has two parts: a soft,
removable collar and a hard disk.
If you accidentally remove the soft
collar, just replace it in its original
position (with the high rim pointing
upwards).
8. GRINDING AND BREWING
COFFEE NOW
• Select cup and strength setting
(see page 8, chapter 7.4).
• Fill beans into the bean container
(see page 10, chapter 7.7).
• Fill water into the machine (see
page 12, chapter 7.9).
• Make sure the filter holder
insert, GoldTone filter (or paper
filter) and cover lid are in place
(see page 12, chapter 7.10 and
7.11).
• Swing the filter holder to the left
until it locks itself underneath
the grinder.
• Place the glass carafe on the
heating plate (H). Note: Keep
the carafe handle pointed
straight outward during the
brewing process. If the handle
points to the right and the
pouring spout of the carafe sits
underneath the feeder channel,
moisture from the freshly brewed
coffee could flow upwards into
soft collar
Page 12

the feeder channel.
• Push the on/off button (G4) until
the red light turns on.
The grinder will start grinding
and the coffee will fall into the
filter. Through the window in the
feeder channel cover you can
actually see how the ground
coffee moves forward. After the
grinding is finished, the filter
holder will automatically swing
back and underneath the water
container lid and the brewing
process will begin.
• After brewing is finished, the
machine will keep the coffee hot
for two hours. Then the machine
will turn off automatically (red
indicator light turns off). If you
want to keep the coffee hot
longer, simply press the on/off
button (G4) again for an additional
two hours of warmkeeping.
• If coffee beans should get stuck
during grinding, lightly tap the
bean container lid.
CAUTION: As long as the grinder
is in operation, do not open the
bean container lid and do not
insert your finger or any other
object into the grinder.
FIRST TIME GRINDING: First use
of the grinder will yield a bit less
ground coffee (which is used to fill
the feeder channel). All further
grinding will yield the correct
amount of ground coffee.
CAUTION: Do not open the water
container lid during the brewing
process. Hot water could spill out,
causing serious injuries.
CAUTION: Before pouring water
into the water container again, turn
the coffee maker off and let it cool
down for two minutes.
8a. Drip Stop / Stop-And-Serve
• While the coffee is brewing you
can remove the carafe to pour a
cup or two. The drip stop in the
filter holder will close automatically. Replace the carafe within
20 seconds. Then the flow of
coffee continues.
CAUTION: The drip stop might not
close completely allowing coffee
to drip onto the heating plate. In
this case immediately replace
14
Page 13

carafe and let all the coffee flow
into the carafe. (This happens
when the mesh of the GoldTone
filter is clogged up causing coffee
grounds to over-flow. If you use
filter paper, use the correct size
(size 4), andcheck if there was a
hole in the bottom of the filter
paper). To clean the drip stop, see
page 17, chapter 10c.
8b. Using Different Beans At
Different Times
Some people like to drink different
types of coffee at different times.
In this case, only fill the amount of
coffee beans into the bean container that you need in order to
grind for your next pot of coffee.
For example, if you want to grind
for 8 cups of coffee, fill eight level
scoops of coffee into the bean
container.
8c. Using The Coffee Maker
Without The Grinder
You can use your CoffeeTEAM
Luxe like a regular drip coffee
maker (without using the grinder).
In this case, do not move the filter
holder underneath the grinder.
• Open the water container lid (I).
• Fill the desired amount of fresh,
cold water into the water container.
• Remove the cover lid (L) from
the filter holder.
• Fill the desired amount of
ground coffee into the GoldTone
filter (or paper filter).
• Close the water container lid.
• Make sure that the carafe (with
the lid) sits underneath the filter
holder on the heating plate (H).
• Push the on/off button (G4) until
the red light turns on. The brewing process starts immediately.
8d. Warmkeeping
After brewing is finished, the heating plate will stay on for 2 hours,
keeping the coffee hot. Then the
machine will tuyrn itself off (red
light off). You may also turn the
machine off manually by pushing
the On/Off button.
Page 14

9. Grinding and Brewing Coffee
Later
• Program the timer and grinder
setting as described in chapter
7.5, page 8.
• Fill beans into the bean container
(see page 10, chapter 7.7).
• Fill the desired amount of water
into the machine (see page 12,
chapter 7.9).
• Make sure the filter holder insert,
GoldTone filter (or paper filter)
and cover lid are in place.
• Caution: Before you swing the
filter holder underneath the
grinder, make sure there are no
grounds left over in the filter
holder insert from previous
grinding.
• Swing the filter holder to the left
until it locks itself underneath
the grinder.
• Now push the “auto” button (G6).
The green auto light will turn on
and the programmed grinder
setting will be displayed. At the
programmed time, the green
light will turn off, the red light
will turn on, and the grinding /
brewing process will start.
10. Cleaning
CAUTION: Make sure machine is
turned off and cooled down. Never
use scouring agents. Never
immerse the machine in any liquid.
Never clean machine under running
water.
Dishwasher safe (upper rack):
Glass carafe (remove snap-on lid
before placing in dishwasher) and
GoldTone filter.
Special Cleaning Tips:
10a. Cover Lid (L): Wipe the cover
lid clean after each use. Do not
clean in the dishwasher. If the
soft collar becomes separated
from the hard disk, simply replace
it with the high rim pointing
upwards.
10b. GoldTone Filter: Clean after
brewing. Do not let used coffee sit
for hours in the filter. Coffee oils
will clog the mesh, causing the
coffee to overflow the next time
you brew coffee.
soft collar
16
Page 15

10c. Filter Holder Insert (M)/Drip
Stop (N): Clean the filter holder
insert and the drip stop under running water. Check to make sure
that the drip stop closes completely under running water also.
10d. Bean Container (A): When
the bean container is empty, use a
dry cloth to wipe off any oil
deposits. Never pour any liquid
into the bean container. Never try
to disassemble the bean container.
10e. Burr Grinder/Burrs:
It is possible that small coffee particles might stick to the burrs.
Once every 2 months let the bean
container run out of beans.
Remove the glass carafe. Set the
grinder to 10 cups. Make sure the
GoldTone filter is inserted. Move
the filter holder underneath the
grinder. Set the fineness selector
to the largest dot. Push the on/off
button. While the machine is
grinding tilt the whole machine a
bit forward and pat it on the back.
This will loosen any coffee particles and transport them into the
filter holder. Repeat if necessary.
10f. Cleaning The Feeder
Channel
Periodically check the feeder
channel for oil and coffee build-up.
As long as you can see coffee
flowing freely through the feeder
channel window there is no need
to open the cover.
The feeder channel should be
cleaned in any of the following
situations:
• moisture or heavy oil build-up
has caused the ground coffee
to block the feeder channel, or
• you do not plan on using the
grinder for more than a week.
For cleaning, please follow this
sequence:
a. Lift the water container lid and
remove the cover lid. Make sure
the GoldTone filter or a paper
filter is inserted in the filter holder
insert.
loose coffee
packed coffee
Page 16

b. With a coin, turn the screw on
top of the feeder channel a
quarter turn counter clockwise
to the 12 o’clock position.
c. Firmly lift the feeder channel
cover upwards and to the right
as shown, and set aside.
Note: The feeder channel cover
will make a "snapping" sound
when it is lifted from the
machine.
d. Move the filter holder under-
neath the grinder until it locks.
e. Use the handle of the scoop to
scrape out blocked coffee or
leftover toast into the filter holder.
f. Wipe the inside clean with a dry
cloth.
closed
open
18
Page 17

g. Push the manual release button
upwards. The filter holder will
swing back to the right.
Manual Release Button
h. Wipe the inside of the feeder
channel cover with a dry cloth
(do not immerse in water).
i. Replace the feeder channel
cover and turn the screw a
quarter turn clockwise to the
3 o’clock position.
j. Empty the GoldTone filter or
paper filter.
11. DECALCIFYING
For prolonged use of your appliance it is necessary to decalcify
regularly. Calcium (limestone) found in drinking water will leave
deposits in the machine. We highly recommend that you decalcify your coffee maker at least every four months.
ATTENTION: Before decalcifying, remove the GoldTone filter, the
water filtration container and the charcoal filter. Do not place the
GoldTone filter or filter paper in the filter holder insert.
When to Decalcify:
A slowdown in brewing indicates calcium deposits are present in
the coffee maker.
How to Decalcify:
With DURGOL:
Capresso and many European companies recommend “DURGOL,”
a liquid decalcifying agent. Durgol removes any calcium deposits
up to 20 times faster than vinegar, without creating any unpleasant odors.
• Fill three cups of water into the glass carafe. Add one cup of
DURGOL. Pour this mixture into the water container. Turn the
machine on and operate. After all the water is brewed into the
glass carafe, turn the machine off and let it cool down for five
minutes. Then repeat with a full pot of fresh, cold water.
With Vinegar:
• Fill the water container with approximately 40 oz. (8-cups) of
water and 6 tablespoons of citric acid or white vinegar and
operate the appliance twice.
• After decalcifying, let the appliance run twice with plain water.
This will rinse away any remaining vinegar.
• Rinse the carafe with lukewarm water and clean the filter holder
and the water chamber in a warm water and mild liquid soap
solution.
closed
open
Page 18

You can also use any of the decalcifying agents available for
drip coffee makers from your local coffee store or supermarket.
Follow their enclosed instructions.
Note: Decalcifiers are acids and therefore must be handled
properly. Please check the information on the packaging of the
decalcifying agents before using.
12. FAQ (Technical Questions)
Q1. I accidentally locked the filter holder underneath the
grinder. What do I do?
A. Push the Manual Release Button upwards (see page 19).
Q2. There is no coffee coming out of the grinder. It seems as
though the coffee is completely clogged inside the grinder.
What do I do?
A. Please follow the steps outlined in chapter 10f, page 17.
Q3. Can the grinder run without beans in the bean container?
A. Yes.
Q4. Why do some buttons work with delay?
A. If you touch or push the wrong button accidentally, it will not
immediately change the settings. You have to hold down each
button for one second to activate/change the function (except
for turning the coffee maker off).
Q5. Can I have different grinding settings for the current
and the programmed mode?
A. Yes! See chapters 7.2 through 7.5.
Q6. How long does the machine keep the grinding and
brewing settings?
A. All settings are maintained as long as the machine is plugged
in. The programmed setting is activated only when you push the
auto button (G6) and the green auto light turns on.
Q7. How do I know if the display shows the current or the
programmed setting?
A. In the program mode, the saucer blinks. Three different
display modes are possible:
1.Current time and grinder settings.
2.Programmed setting: Immediately after you push the prog
button (G10), it shows the programmed time and grinder
settings.
3.Auto setting: After you push the auto button (G6), the display
shows the cur
rent
time but the programmed grinder settings.
Q8. Can I change any settings while the grinder is running?
A. No. The red On/Off light or the green Auto light have to be off
to change the grinder settings.
Q9. What happens if the filter holder does not return underneath the water container lid after grinding?
A. After the grinding process is completed, the swing-back
mechanism will try twice to return the filter holder (within 5 seconds). If it does not swing back sufficiently, the machine will
automatically turn itself off to prevent the coffee maker from
brewing. Please call us.
20
Page 19

Q10. What happens if the water container lid is open during
the brewing process?
A. The hot water will splash in spurts against the hot water
guard (see page 12) and will be guided back into the water container. Immediately close the water container lid.
Q11. Beans spilled into the water container. What do I do?
A. Unplug the machine, remove the carafe, empty the bean con-
tainer (as well as you can), remove the filter holder insert and
GoldTone filter, open the water container lid and turn the
machine upside down over a sink. You need to reset all settings.
Q12. When I unplug the machine, the display shows random
symbols for about 15 seconds, then turns off. Is that normal?
A. Yes. The condenser of the display discharges.
Q13. What happens in the auto setting (green light is on) if I
forget to push the filter holder underneath the grinder?
A. You will get hot water. At the pre-programmed time, the green
light will turn off and the red light will turn on. If the filter holder
is still underneath the water container lid, the machine assumes
you want to brew coffee only (without grinding). Since there is no
coffee in the filter holder, you will get hot water only in the
carafe.
13. FAQ (Coffee Questions)
Q1. How much coffee should I use?
A. The grinder grinds approximately between 4 seconds (setting
“2, mild”) and 30 seconds (setting “10, strong”). The maximum
amount of coffee will be ground in the setting “10, strong” with
the fineness selector in the coarsest position. This is equivalent
to 12 level portions with the enclosed measuring scoop.
EXAMPLE: for 10 cups of coffee: Fill the water container with
the maximum amount of water (see chapter 7.9, page 12). Set
the grind amount indicator (G1) to 10, the strength indicator (G3)
to mild, and the fineness selector (C) to fine.
• IF THE COFFEE IS TOO STRONG: change the grind amount
indicator to 8, the strength indicator to medium, and continue to
use the same amount of water.
• IF THE COFFEE IS NOT STRONG ENOUGH: leave the grind
amount indicator at 10, change the strength indicator to strong,
and set the fineness selector in the coarsest position (largest
dot). If the coffee is still not strong enough, use a little less water.
Q2. I want a full pot of coffee at 8:00 AM. What time should I
program the grinder to start?
A. Set the timer 15 minutes earlier (in this case at 7:45 AM).
Q3. Can I grind espresso beans for my espresso machine?
A. Before final assembly we manually calibrate each pair of burr
grinders (testing with beans!) to prevent clogging while grinding,
regardless which type of bean you use. The actual grinding,
however, is designed to work well with drip coffee brewing. As a
result, the grind might not be suitable for your espresso machine.
Q4. The grinder makes a loud noise? No coffee is processed.
A. A stone blocks the grinder. Please call 1-800-767-3554.
 Loading...