

Page 1
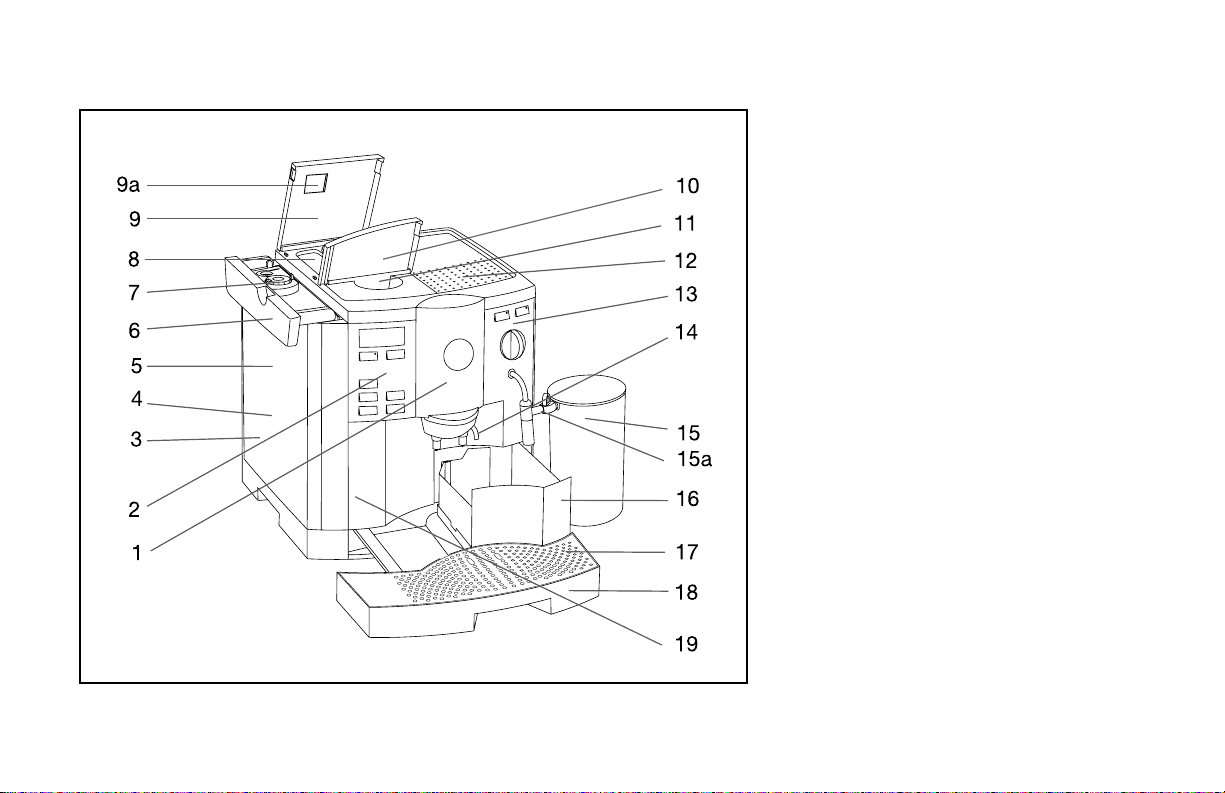
1. Height-Adjustable Coffee Spout
2. Operating Display (See Fig.2)
3. Removable Water Tank
4. Low Water Flotation Device(Inside)
5. Claris Water Care Cartridge
(Not Installed)
6. Lid for Water Tank
7. Holder for Claris Water Cartridge
8. Aroma Protection Lid
9. Cover for Bean Container
9a. 800 Number and Serial Number
10. Lid for Ground Coffee Funnel
11. Opening for Ground Coffee
12. Warming Plate
13. Steam System (See Fig.3)
14. Hot Water Release
15. Milk Container
15a. FrothXpress (See Fig.4)
16. Used Coffee Container
17. Removable Grid
18. Removable Drawer/Used Water Tray
19. Cover for Programming Buttons
(See Figure 3A)
FIG. 1
3.
Page 2
A.
B.
C.
D.
E.
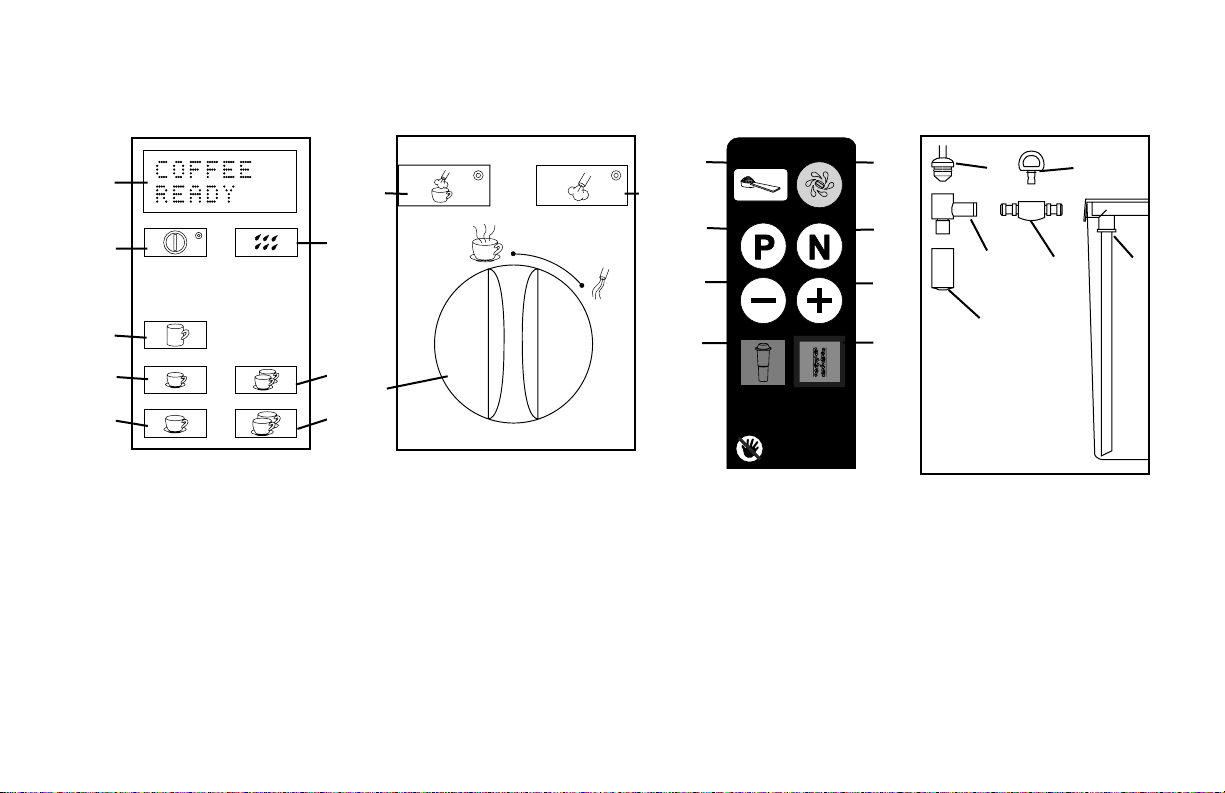
FIG. 2
FIG. 3
FIG. 3A
Display Dialog System
On/Off Button
Special Coffee Button
1-Cup Small Button
1-Cup Large Button
Rinse Button
2-Cup Small Button
2-Cup Large Button
Steam Portion Button
Selector Switch for
Coffee or Hot Water
Permanent Steam Button
K.
L.
M.
FIG. 4
U.
V.
W.
X.
Y.
Z.
Parts of FrothXpress
Steam Nozzle
Connector
Frothing Sleeve
Knob (for regulating
froth)
Joint
Milk Container Lid
with Siphoning Straw
4.
Ground Coffee Button
Program Button
Minus/Plus Buttons
Claris Button (for
replacements only)
Tablet Cleaning Button
N-Button to return to
COFFEE READY status
Decalcifying Button
N. S.
T.
Q+.
T1.
P.
Q-.
R.
F.
G.
H.
A.
B.
C.
D.
E.
F.
G.
H.
K.
L.
M.
N.
P.
Q-/Q+.
R.
S.
T.
T1.
U.
V.
W.
X.
Y.
Z.
Page 3
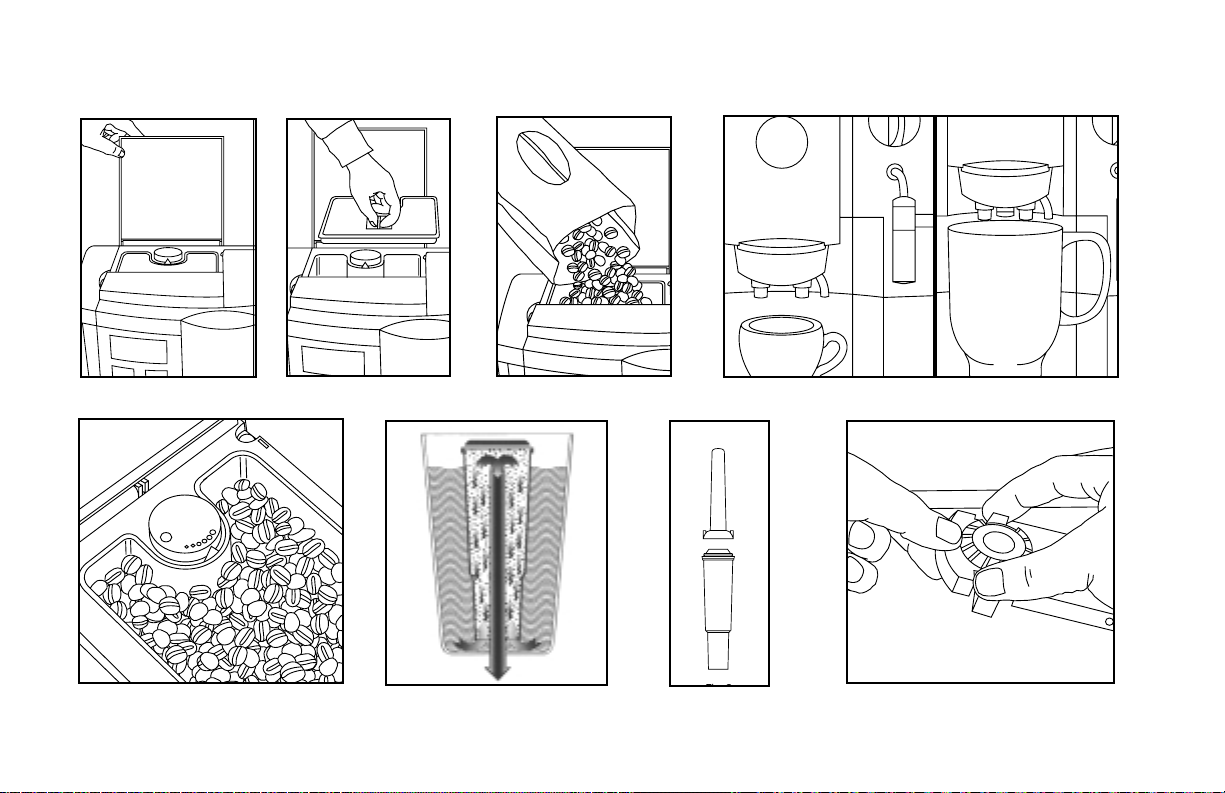
FIG. 5
FIG. 6
FIG. 7
FIG. 8a
FIG. 8b
FIG. 10
FIG. 11
FIG. 12
FIG. 9
5.
Page 4
6.
FIG. 17
FIG. 14
FIG. 18
FIG. 19
FIG. 20
FIG. 15
FIG. 16
Lid
Seal
Straw
• Maximum Milk
Flow and Milk Froth
• Milk Warm
• Reduced Milk
Flow and Milk Froth
• Milk Hot
• No Milk Flow
FIG. 13
Page 5
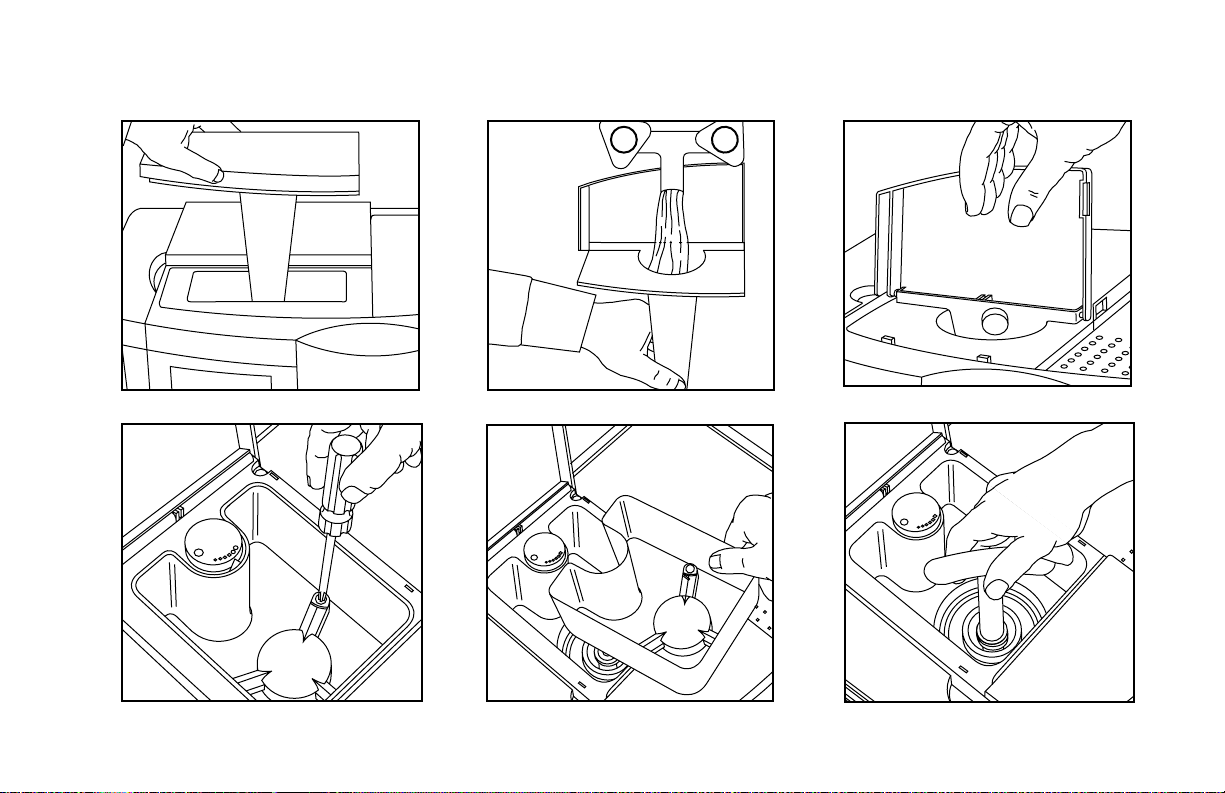
FIG. 21
FIG. 23
FIG. 25
FIG. 26
FIG. 24
FIG. 22
7.
Page 6

Important Safeguards........................................ 1
Drawings.........................................................3-7
1. Product Registration ......................................... 9
2. The C3000 ...................................................... 9
3. Welcome to the Capresso C3000........................ 9
4. A Word About “Crema Coffee” ........................... 9
5. Please Don’t/Please Do..................................... 10
6. Factory Settings ............................................... 10
7. Preparing the Machine for the First Time ............. 11
7a. Adding Coffee Beans ........................................ 11
7b. First Time Grinding/Brewing............................... 11
8. Adjusting the Grinder ........................................ 12
9. Rinsing the Machine ......................................... 12
10. Adjusting for Water Hardness............................. 12
11. Claris Water Cartridge....................................... 13
11a. Installing the Cartridge ...................................... 13
11b. Replacing the Claris Filter.................................. 14
12. Making Espresso and “Crema Coffee”................. 14
12a. Using Ground Coffee ........................................ 15
13. Processing Hot Water ....................................... 15
14. Frothing Milk ................................................... 15
14.1 Assembly of the FrothXpress System .................. 16
14.2 Adding Milk ..................................................... 16
14.3 Frothing Into a Cup .......................................... 16
14.4 Regulating Milk Froth & Temperature .................... 16
14.5 Frothing Milk Portions .................................................... 16
14.6 Hot Chocolate................................................................. 17
14.7 Cleaning the FrothXpress System ................................ 17
14.8 Cleaning the Milk Container........................................... 17
14.9 Using the Flexible Hose Frothing System ................... 17
15. Programming ................................................................. 17
15.1 Programming Powder Quantity .................................. 18
15.2 Programming Coffee Temperature ............................. 18
15.3 Programming Water Quantity..................................... 18
15.4 Programming Steam Portion .................................. 19
15.5 Programming Tea Portion........................................ 19
15.6 Programming Claris Filter Cartridge ...................... 20
15.7 Programming Water Hardness ............................... 20
15.8 Programming Economy Mode ................................ 20
15.9 Programming Timer Clock ...................................... 21
15.10 Programming Auto Turn-On Time .......................... 21
15.11 Programming Auto Shut-Off Time ......................... 21
15.12 Programming Cup Counter ..................................... 21
15.13 Programming Language Selection......................... 22
15.14 Re-install Factory Settings ...................................... 22
16. Care and Maintenance............................................. 22
16.1 Fill Water .................................................................... 22
16.2 Emptying the Used Coffee Container ................... 22
16.3 Emptying the Used Water Tray............................... 23
16.4 Fill Beans ................................................................... 23
16.5 Stones and Beans .................................................... 23
16.6 Removing Stones or Other Foreign Objects
from the Burr Grinder............................................... 23
16.7 Cleaning Metal Contacts ........................................... 24
16.8 Cleaning the Frother System .................................. 24
16.9 General Cleaning Instructions ................................ 24
16.10 Emptying System Before Transport .......................... 24
17. Cleaning ..................................................................... 24
17.1 Cleaning with Special Tablet................................... 24
17.2 Decalcifying ................................................................ 25
18. Disposal..................................................................... 27
19. Tips for Perfect Coffee ............................................ 27
20. Capresso C3000Customer Service........................ 27
20.1 Customer Service Address ..................................... 27
20.2 Supplies ..................................................................... 28
21. Warranty..................................................................... 28
22. Troubleshooting......................................................... 29
TABLE OF CONTENTS
8.
PAGE PAGE
Page 7

1. PRODUCT REGISTRATION
Please read the enclosed product registration card now. Fill it out
and mail or fax it to us within two weeks after purchasing your
C3000. Impor
tant: The product registration is part of your warranty.
2. THE C3000
The C3000 can prepare 1 or 2 cups of excellent, professional
quality espresso or coffee at a time. The unique pre-wetting
function ensures optimal coffee extraction. The C3000 functions
fully automatically at the touch of a button. You can program the
coffee amount, water, and temperature settings for all coffee
buttons. The integrated burr grinder grinds beans to the correct
fineness. A separate filler funnel lets you use ground coffee. You
can program your machine to shut-off automatically from
1
/2 hour
to 9 hours after last use, and you can also program the C3000 to
automatically turn on at a certain time every day. Additionally,
you can check how many cups of coffee you made for each of
the coffee buttons. The water level and the used coffee container are monitored automatically. Three computer controlled rinsing, cleaning and decalcifying programs facilitate care and maintenance of the machine. If you use the CLARIS water filter cartridge, you can turn off the decalcifying program (see chapter 10
“Adjusting for Water Hardness”).
3. WELCOME TO THE CAPRESSO C3000
Thank you for choosing this CAPRESSO product. Please study
these operating instructions carefully before using your new
C3000 and keep them in a safe place for easy reference in the
future. These instructions contain all the information necessary
for the correct use, operation and maintenance of the machine.
Understanding and complying with these directions is essential
to ensure that the machine is utilized without risk and to ensure
safety during operation and maintenance. These instructions,
however, cannot cover all the possible ways in which this
machine may be used. Should you require further information or
should particular problems occur that are not covered in this
manual, please contact your local dealer or call our special
C3000 TOLL FREE number: 1-800-220-5701 9AM to 4PM
Eastern Standard Time Monday through Friday. If you call at
any other time please leave a message with your telephone
number and when we can call you back. You can also send us a
fax at 201-767-9684, or email us at contact@capresso.com
4. A WORD ABOUT “CREMA COFFEE” (PRESSURE
BREWED COFFEE)
Grinding, tamping and brewing under high pressure in one
sequence is considered the ideal process to extract maximum
flavor and aroma by the majority of coffee experts. Your C3000
will always produce espresso and coffee with a thick, foamy
layer called "crema." The crema traps the fine aromatics and the
light gaseous flavors that register on the palate. It keeps the
flavors that would otherwise escape locked in. The high pressure
and the short brewing time prevent the extraction of bitter oils
and release less caffeine than other brewing methods. You will
always make the absolute freshest and most aromatic cup of
coffee. This is also the reason why many fine European
restaurants and hotels will serve you freshly pressure brewed
coffee only. Use the C3000 to make a cup of coffee! Experiment
with the size of cup and the amount of coffee!
9.
Page 8

Factoid 1
Caffeine is tasteless. A "strong" coffee or espresso is mostly the
result of the amount of coffee in relation to the amount of water.
The longer a bean is roasted, the less caffeine it has. "Arabica"
beans have less caffeine than "Robusta" beans. "Arabica” beans
have more flavor than "Robusta" beans, which are mostly used
in high-volume coffees and instant coffees.
Factoid 2
Espresso is the way the bean is roasted, not the bean itself. You
can use many different roasts to produce espresso coffee. You
can also use the espresso roasted coffee to make a larger cup
of coffee. In the U.S., espresso roasting results mostly in a darker roast than espresso roasting in Europe.
5. PLEASE, DON’T... (or you will void your warranty
protection):
• Never fill instant coffee into the grinder or ground coffee funnel; it can damage the functioning of the brewing chamber.
• Never fill sugar coated coffee beans into the bean container.
• Never fill frozen beans into the bean container. If you store
beans in the freezer, let them thaw for 3 to 4 hours before filling them into the bean container.
• Never fill anything other than coffee beans into the bean container (no chocolate, no rice, no nuts, no spices, nothing other
than coffee).
• Never fill anything but fresh, cold clean water into the water
container (exception: see chapter 17.2).
• Never use mineral or carbonated water. You can use tap
water, spring water, distilled water and reverse osmosis water.
• Never repair or open the machine yourself. All repairs should
be performed only by an authorized service center.
PLEASE, DO...
• Fill water tank with fresh, cold water only (no distilled water, no
mineral water, no carbonated water).
• Remove foreign particles from coffee beans, such as small stones
or pebbles.
• Let frozen beans thaw for 3 to 4 hours before filling them into the
bean container.
Please call 1-800-220-5701 with any questions.
6. FACTORY SETTINGS
The C3000 leaves the factory with the settings described below.
To change any of these settings, see the sub-chapters under
“Programming.”
• Special coffee button (Fig.2,C) brews approx. 8 oz. of coffee.
• 1-cup small button (Fig.2,D) brews approx. 2 oz. of coffee.
• 1-cup large button (Fig.2,E) brews approx. 5 oz. of coffee.
Other settings: Each of the three buttons above can be set
from approx
1
/2 oz. to 8 oz. of coffee. The 2-cup buttons (Fig.2;
G,H) will automatically produce twice as much coffee as the
setting of the corresponding 1-cup button.
• 5-hour auto shut-off. Other settings: manual shut off, auto
shut-off from
1
/2 hour to 9 hours after last use.
• Water hardness setting: level 1.
Other settings: --, 2, 3, 4
• Filter: no (Claris Water Care Cartridge: not installed)
Other Settings: Filter yes (see chapter 11.)
10.
Page 9

• Coffee temperature: high
Other setting: normal
• Steam portion: 14 seconds
Other settings: 3 to 250 seconds in 1 second intervals
• Language in : English.
Other settings: French, Portuguese, German, Italian,
Dutch, Spanish
• Economy Mode: Off
Other setting: Economy Mode: On
• Time:--.—(not set)
Other setting: Set a time
• Unit On: --.—(not set)
Other setting: Set a time that the unit turns on automatically.
(Requires that you first set a time.)
7. PREPARING THE MACHINE FOR THE FIRST TIME
The following procedure is only necessary when setting up the
machine for the first time and after “Emptying System Before
Transport” (see chapter 16.10).
• Plug-in machine.
• Do not fill water tank now.
• Switch your machine on by pressing ON/OFF button
(Fig. 2,B)
. The machine adjusts fully-automatically to the
starting position.
• PLEASE WAIT.
• FILL SYSTEM / PRESS STEAM.
• Place a container underneath the steam nozzle.
• Press the button (Fig.3,M).
• FILL WATER (machine beeps).
• Remove water tank and rinse well with clear tap water.
• Fill water tank and replace. Make sure that tank engages well.
• FILL SYSTEM / PRESS STEAM.
• PLEASE WAIT.
• RINSE UNIT.
• Place a container under the coffee-spout (Fig. 1,1) and press
the button(Fig. 2,F).
• UNIT RINSING.
• COFFEE READY.
Attention: You can only make coffee when the
reads COFFEE READY.
7a. Adding Coffee Beans
• Lift up cover of the bean container (Fig. 5) and remove aroma
protection lid (Fig. 6).
• Clean-out any dirt or foreign objects from the bean container.
• Fill the bean container with coffee beans (Fig.7), replace the
aroma protection lid (Fig.6), and close the cover.
IMPORTANT:
• D
O not fill anything else in the bean container but coffee beans.
• If you use frozen beans let them thaw for 3 to 4 hours
before filling them into the bean container. This will
prevent moisture from seeping into the grinder.
7b. First Time Grinding/Brewing
• Move the coffee spout up (Fig.8b).
• Put a large cup underneath the coffee spout.
• Make sure there is water in the tank.
DISPLAY
DISPLAY
DISPLAY
DISPLAY
DISPLAY
DISPLAY
DISPLAY
11.
DISPLAY
DISPLAY
DISPLAY
Page 10

• Push the special coffee button (Fig.2,C).
• The machine will start grinding. Then it will pre-brew, pause,
and continue brewing. It will brew approx. 8 oz. of coffee.
During the first brewing cycle the coffee will be extremely
weak since some of the ground coffee stays in the connector
channel between the grinder and the brewing chamber. Your
next cup of coffee will be fine.
8. ADJUSTING THE GRINDER
You can adjust the grinder to the roast of your coffee. We
recommend the following:
• for a light roast use a finer adjustment.
• for a dark roast use a coarser adjustment.
• Open the cover of the bean container (Fig.5).
• To adjust grinding turn the selector switch to the desired
position (Fig.9).
• You have the following possibilities:
• the smaller the dots, the finer the grinding.
• the bigger the dots, the coarser the grinding.
• CAUTION: The grinding grade should only be adjusted while
the grinder is working.
9. RINSING THE MACHINE
The C3000 will automatically complete a rinse cycle when the
machine is turned off (or when the machine turns off
automatically). When the machine is cold and you turn the
machine on it will warm up ( PLEASE WAIT).
•
will show RINSE UNIT.
• Place an empty cup under the coffee-spout (Fig.1,1).
• Press rinse button.
• You can always rinse in between. Just press the rinse button.
10. ADJUSTING FOR WATER HARDNESS
• The water is heated inside the machine. With use, this leads
to calcium deposits forming in the machine. This will be
automatically indicated on the display. For this reason, it is
necessary to adjust the machine to the hardness of your
local water before you use it for the first time.
• Ask your local water company for the “Water Hardness in
Grains.” You can also use the enclosed “AQUADUR” test
sticks to determine your water hardness. Follow the
instructions on the package. If all five fields of the test stick
turn reddish, set the water hardness to level 4. If four turn
red, set the water hardness level to 3. If three turn red set it
to two. If only one or two turn red, you can leave the setting
as it is. ATTENTION: If you use distilled water, turn the
water hardness function off (--).
• The symbols on the display mean:
HARDNESS LEVEL --: water hardness function is turned
off (see chapter 11)
HARDNESS LEVEL 1: grains 2-9
HARDNESS LEVEL 2: grains 10-19
HARDNESS LEVEL 3: grains 20-29
HARDNESS LEVEL 4: grains 30+
DISPLAY
DISPLAY
12.
Page 11

• The machine is adjusted to hardness level 1 before it leaves
the factory. You can alter this setting as follows:
• The machine is on and the shows COFFEE READY.
• Open cover for programming buttons (Fig.1,19) and press
and hold the button for approx. 3 seconds, until you hear
a beep.
• The
will show
PRESS KEY / POWDER QUANTITY
• Press the button several times until the following
message appears: HARDNESS LEVEL 1.
• Press the button. You will hear one beep.
• You can change the hardness level by pressing the or
button until the desired level is displayed.
• Press the button once again to confirm. Another beep
will be heard.
• Press the button. The will show COFFEE READY.
• IMPORTANT: If you use the Claris cartridge (see chapter 11)
you can turn off the water hardness by setting it to position
“--”.
11. CLARIS WATER CARTRIDGE
The C3000 comes with two free Claris water cartridges. The Claris
water cartridge is specially made for use with the Capresso C3000.
The Claris cartridge:
• Reduces the water hardness up to 75%.
• Removes (if present) up to 85% chlorine, up to 90% lead, up
to 95% copper and up to 67% aluminum.
• Cleans the water through an upward current principle (See Fig. 10)
just before the brewing cycle starts, ensuring freshly filtered water
every time you make coffee.
• Eliminates decalcifying the C3000. When using your Claris water
cartridge, you never need to decalcify your machine.
• Costs about 2¢ per cup. (Note: decalcifying costs about 1¢ - 3¢
per cup, depending on how hard your water is. The decalcifying
process takes about one hour.)
• Is available through your Capresso retailer or through Capresso
(mail order form or www.capresso.com, or call 1-800-220-5701).
11a. Installing the Cartridge
• Make sure the water tank is empty.
• Remove cartridge from its bag.
• Snap the Claris extension tube on top of the Claris cartridge (Fig. 11).
• Open water container lid and pull up the holder for Claris
cartridge (Fig.12).
• Insert the cartridge with its tapered end down and the
extension piece up. Make sure it fits snugly over the white
mesh piece inside the water container. Push down gently
(Fig.13).
• Close the holder for the cartridge so that it engages in the
water tank (Fig.12).
• Fill the water tank with fresh cold water and replace.
• shows COFFEE READY.
• Open cover for programming buttons (Fig.1,19).
DISPLAY
DISPLAY
N
P+P
DISPLAY
+
DISPLAY
P
DISPLAY
13.
Page 12

• Press the button until you hear a beep.
• PRESS KEY / POWDER QUANTITY.
• Press button several times until the following message
appears: FILTER NO
• By pressing the button you can hear a beep.
• NO flashes
• You can alter the setting by pressing key or .
• YES flashes.
• To confirm press the
button. A beep will be heard.
• RINSE FILTER / PRESS STEAM.
• Place a sufficiently large container (approx. 1 liter or at least
22 oz.) under the steam nozzle and press the button
(Fig.3,M); permanent steam button.
• PLEASE WAIT / FILTER RINSING. The water will
stop automatically.
• FILTER YES.
• Press the
button.
• COFFEE READY. The water might be slightly
discolored (this is not damaging to the health).
11b. Replacing the Claris Filter
The C3000 will now automatically monitor the filter. After approx.
50 liters (approx. 55 quarts) of water, the filter loses its effect.
• REPLACE FILTER.
Attention: The filter should be changed every 2 months if you
use less than 50 liters. In this case, no message will appear in
the display.
• Remove the old cartridge and snap the extension tube onto
the new cartridge and install new cartridge.
• Fill water tank with fresh water.
• Open front cover and press the cartridge button (Fig.3A,R).
for a few seconds until you hear a beep.
• RINSE FILTER / PRESS STEAM.
• Place a sufficiently large container (approx. 1 liter or at least
22 oz.) under the steam nozzle and then press button
(Fig.3,M); permanent steam.
• PLEASE WAIT / FILTER RINSING. The water will
stop automatically.
• When the cycle stops the machine will COFFEE READY.
12. MAKING ESPRESSO AND “CREMA COFFEE”
You can make any quantity of coffee from 1/2 oz. to 16 oz. The
process is always the same: the water is forced through the coffee in
a very short period of time, avoiding any over-extraction. With the
right pressure, the result will always have a foamy layer on top of
your coffee, called “crema.” That is the mark of a “pressure brewed
coffee.” Most people prefer pressure brewed coffee to drip coffee.
From small to large, here is the coffee terminology:
•
1
/2 oz. to 1 oz. of coffee is called a “Ristretto” (a short espresso).
• 1 oz. to 1.5 oz. of coffee is called an “Espresso.”
• Approximately 3 oz. of coffee is called a “Large or Double Shot of
Espresso.”
• 5 oz. to 8 oz. of coffee is called a “Crema Coffee.” Most
DISPLAY
DISPLAY
DISPLAY
DISPLAY
DISPLAY
N
DISPLAY
DISPLAY
DISPLAY
P
DISPLAY
+
DISPLAY
P
DISPLAY
+
DISPLAY
P
14.
Page 13

Ristretto or Espresso drinkers add a bit of sugar. Drink your Crema
Coffee black or add sugar and milk to taste.
Tip: If you add the sugar and milk to your cup before you brew
your coffee it will be more uniformly dissolved and you won’t need to
stir it later (stirring can cool down the coffee and might destroy
the crema layer).
Switch the machine on by pressing the ON/OFF button
button.
• PLEASE WAIT
• RINSE UNIT
Put an empty cup under the coffee-spout (Fig.1, 1) and press
the
button (Fig.2, F); rinsing.
• UNIT RINSING
• COFFEE READY
• Place 2 cups under the coffee-spout and press one of the cup
buttons (Fig.2;C,D,E,G,H). The pre-brew system moistens the
coffee powder, briefly interrupts the flow and then starts the
real brewing process.
• You can interrupt the flow of coffee at any time by simply
pressing any of the coffee buttons.
• To obtain a perfect layer of froth adjust the coffee-spout
(Fig.8a,8b) to the size of your cups.
12a. Using Ground Coffee
• Open cover (Fig.1, 19).
• Press the button (Fig. 3A; N); scoop button.
• FILL POWDER.
• Now put 1 or 2 level measuring spoons of pre-ground
coffee into the pre-ground funnel (Fig.1,11).
• Place 2 cups under the coffee-spout and press the required
cup button. Never use instant cof
fee or quick coffee. Only
use coffee powder from freshly ground beans or pre-ground
vacuum-packed coffee.
• Never fill the funnel with more than 2 portions of coffee
powder at a time. The powder funnel is not intended as a
storage container.
• If button (Fig. 3A,N) is pressed by mistake this can be
corrected by pressing one of the cup buttons. The rinsing
program is then activated.
13. PROCESSING HOT WATER
• Place a cup under the height-adjustable coffee spout
(Fig. 8a or 8b) and turn selector switch to the right (Fig.3,L)
to the water symbol. The machine will now deliver hot water.
• TEA PORTION.
• The hot water will stop automatically.
• CLOSE TAP.
• Turn selector switch for hot water back to the coffee symbol
(Fig.3,L).
The will show COFFEE READY.
14. FROTHING MILK
The Pump-Auto-Cappuccino System (FrothXpress) allows you
to heat and froth milk directly into your cup. Your C3000 comes
with the following utensils to froth milk:
DISPLAY
DISPLAY
DISPLAY
DISPLAY
DISPLAY
DISPLAY
DISPLAY
DISPLAY
15.
Page 14

• One milk container with lid and siphoning straw.
• The auto cappuccino attachments (Fig. 4). The steam nozzle
is already attached to the metal frothing tube coming out of
the machine.
• Extra flexible hose with one-sided joint (see chapter 14.9).
14.1 Assembly of the FrothXpress System
• Important: In order to siphon milk through the FrothXpress
System all parts must be tightly connected (Fig.4). If the parts
are loose (outside) air might be entering the process, making it
impossible to siphon the milk. Please check your “Welcome
Pack.” The parts V, W, X, Y (Fig.4) are already assembled.
• Attach the connector to the steam nozzle until the red seal of
the steam nozzle is no longer visible (Fig.4; U to V). Next,
attach the large hole of the frothing sleeve to the connector (W
to V). Insert the knob into the joint and make sure
it clicks in place and sits tight (X to Y), and then insert the joint
firmly into the connector (Y to V).
14.2 Adding Milk
Remove the lid of the milk container and fill with milk. Replace
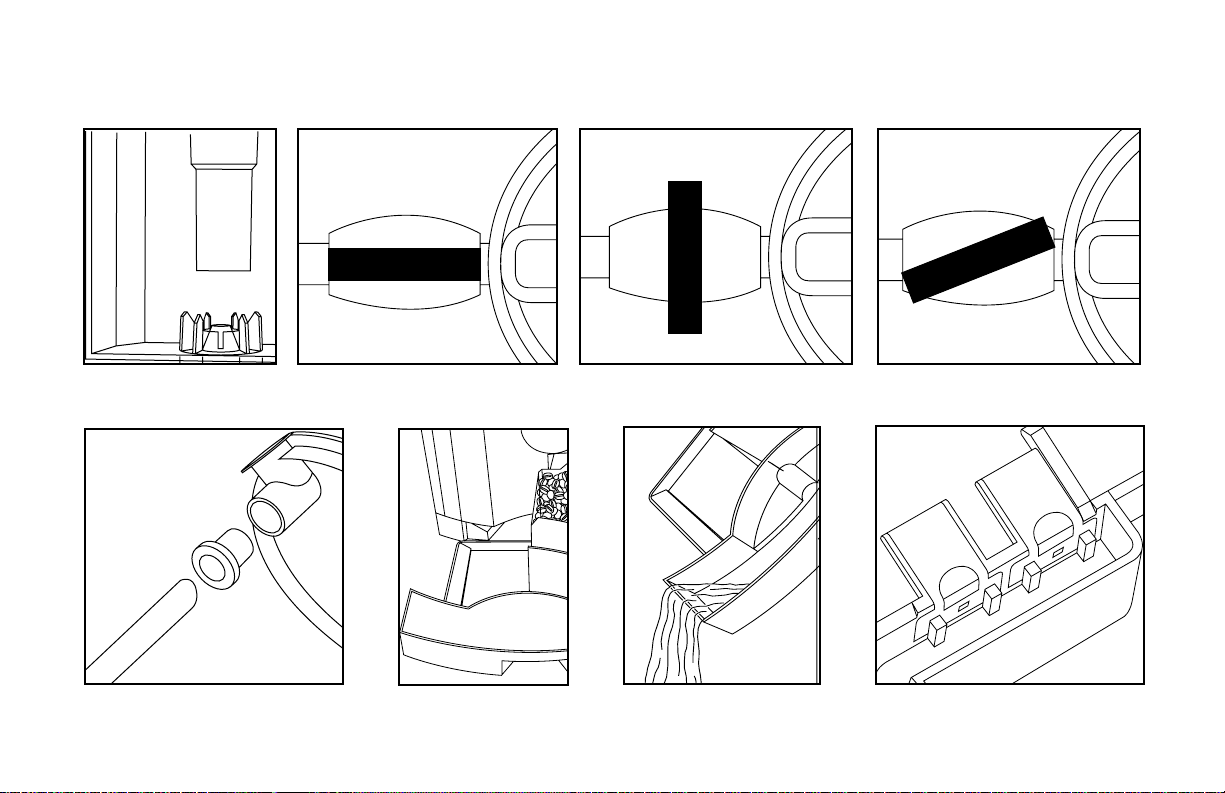
the milk container lid and connect with the joint (Fig. 4; Z to Y).
Make sure that the knob sits parallel to the joint (Fig. 14). (If it
sits perpendicular to the joint no milk can be siphoned through
the system; see Fig.15.)
14.3 Frothing Into a Cup
The C3000 is ready to froth as long as both green lights in the
steam buttons (Fig.3,K and M) are illuminated. If the lights are
off, just push either button. The two green lights will start
blinking for about 15 seconds and then they will stay illuminated.
• Place a cup underneath the installed FrothXpress system.
• Make sure the knob sits parallel to the joint (Fig.14).
• Push the permanent steam button (Fig.3, M).
• The FrothXpress System will immediately dispense warm
frothed milk into your cup. STEAM INTAKE.
• When you have enough frothed milk push the permanent
steam button again. Frothing will stop. COFFEE READY.
14.4 Regulating Milk Froth and Temperature
Maximum milk flow with maximum froth is achieved when the
knob sits parallel to the joint (Fig.14). By slightly turning the knob
towards the front or the back (approx. 20 to 40 degrees; Fig.16)
the flow of milk will be slowed down, increasing the milk temperature and decreasing the amount of froth. The temperature of
the milk can vary between 110˚ F and 175˚ F depending on the
position of the knob. Attention: If you turn the knob too much
the milk will splatter. If the knob sits perpendicular to the joint
(Fig.15), the flow of milk is totally blocked. Only hot steam will
pass through the FrothXpress system.
14.5 Frothing Milk Portions
If you use the same amount of milk froth all the time you can use
the steam portion button (Fig. 3,K) instead of the permanent
steam button. Steam will be dispensed for the programmed time
( STEAM PORTION) and then it will stop automatically.
DISPLAY
DISPLAY
DISPLAY
16.
Page 15

The factory setting is for 14 seconds. You can program the
steam portion button to froth from 3 to 250 seconds (see the relevant sub-chapter under “Programming”).
14.6 Hot Chocolate
Fill the milk container with cold chocolate milk. Then proceed as
described in chapter 14b and 14c.
14.7 Cleaning the FrothXpress System
If you do not clean the FrothXpress System, hardened milk will
deposit in the knob, joint, frothing sleeve and the connector.
Hardened milk deposits are very difficult to remove. Therefore,
we highly recommend cleaning the FrothXpress System after
each use as follows (it will take less than a minute):
• Disconnect the milk container from the joint (Fig. 4; Z from Y).
• Remove the four parts (knob, joint, connector, frothing sleeve)
and rinse all parts under warm running water (Fig.4; parts V,
W, X, Y).
• Place a large cup underneath the steam nozzle and push the
permanent steam button (Fig.3,M). Stop after a few seconds.
• Reassemble the system.
14.8 Cleaning the Milk Container
• Remove the lid of the milk container. (The milk container is
dishwasher safe; upper rack.)
• Hold the lid under warm running water and allow some water
to run through the straw. For a more thorough cleaning take
the lid assembly apart (lid, seal, straw).
• Important: When replacing the three parts, first insert the seal
into the receptacle on the underside of the lid, and then push
the straw inside the seal to ensure a tight fit (Fig.17).
14.9 Using the Flexible Hose Frothing System
Instead of using the milk container you can use the flexible hose
and the one-sided joint. Insert the round end of the flexible hose
into the hole of the joint. Then insert the other side of the onesided joint into the connector. Make sure that the knob for regulating the froth is tightly inserted into the joint. Immerse the flexible hose into any milk carton. Proceed as described in the chapters 14.3-14.5.
15. PROGRAMMING
Before leaving our factory, many of the functions of the C3000
are set to enable you to obtain coffee without any additional
programming (see chapter 6 “Factory Settings”). In order to
adapt the result to your personal taste, various settings can be
programmed individually. The programming buttons (Fig. 3A)
are located behind the cover for programming (Fig.1,19).
The following settings can be programmed:
• Powder quantity (amount of coffee)
• Coffee temperature
• Water quantity
• Steam portion
• Tea portion (amount of hot water)
• Claris filter cartridge
• Water hardness
17.
Page 16

• Economy mode
• Clock/time
• Automatic turn-on time
• Auto shut-off time
• Supplies and cup counter
• Language selection
For your information: you can go to a specific programming
section by pushing the or
buttons until the section is
shown in the .
15.1 Programming Powder Quantity
• COFFEE READY.
• Press the button for a few seconds until you hear a beep.
• POWDER QUANTITY / PRESS KEY.
• Now press the coffee button (Fig. 2; button D, E, F) that you
want to program. The corresponding coffee quantity for 2
cups is adjusted automatically by the machine after programming
is finished.
• POWDER ·········· II ·········· .
• The powder quantity can be selected by pressing the or
buttons briefly.
• To store the new coffee quantity in memory press the button.
• POWDER QUANTITY / PRESS KEY.
• You can go the next setting by pressing the button.
15.2 Programming Coffee Temperature
• COFFEE READY.
• Press button for a few seconds until you hear a beep.
• Press the button until you see TEMP. COFFEE
PRESS KEY.
• Now press the coffee button (Fig.2; button D,E,F) that you
want to program. The temperature for 2 cups is adjusted
automatically by the machine after programming is finished.
• Select the required temperature (high or normal) by pressing
the or buttons.
• To store the new coffee temperature in memory press the
button.
• TEMP. COFFEE / SELECT KEY
• You can call up the next setting by pressing the
button.
15.3 Programming Water Quantity
• Make sure you have coffee beans in the bean container.
• WATER QUANTITY/PRESS KEY
This program allows you to set the brew quantity for the
special coffee button, the 1-cup small and the 2-cup large
button (Fig.2;C,D,and E). When setting the quantities the
machine will automatically set the quantities for the
corresponding 2-cup buttons doubling the amount of water.
• Put a cup under the coffee spout (Fig. 8a or 8b) and press
the coffee button you want to program (ex. 1 small cup;
Fig.2,D).
• The C3000 will start grinding and the will show the
following information:
DISPLAY
DISPLAY
+
DISPLAY
P
+
DISPLAY
+
P
DISPLAY
+
DISPLAY
P
+
+
DISPLAY
DISPLAY
P
DISPLAY
DISPLAY
+
18.
Page 17

• Coffee button you selected (ex. “1 small cup”).
• Then it will Please Wait.
• When the actual brewing starts the will
show the following two messages alternately:
Enough Coffee? and Press Key .
• When you have enough coffee in your cup press the
button. The machine stops brewing and the display shows:
OK? ·········· II ··········
. At this time you have two
options:
• Option 1
: When you press the button, the machine will
save the amount of coffee you just programmed and the
will show PRESS KEY. You can now program
another coffee button.
• Option 2
: If you press the or buttons you can now
increase or decrease the amount of water slightly. The double
vertical bars in the display will move to the right or the left.
Put a cup underneath the coffee spout. Now press the coffee
button again. The machine will grind and brew again and
then it will stop automatically. The will show again
OK?...Press the button to confirm.
When you are finished programming the water quantities for
your coffee buttons press the button to go back to
COFFEE READY or press the button to go to the next
programming section.
15.4 Programming Steam Portion
If you want the same amount of frothed milk you can program
how long the frother should dispense steam. This is particularly
practical when using the machine in an office or commercial
environment. The advantage is that the frothing will stop
automatically after the programming frothing time has elapsed.
At the time of programming, the machine will not froth. It will
simply store the time (3 to 250 seconds). Test the actual
frothing amount (see chapter 14e and 14c). You can always go
back to programming and decrease or increase the frothing
time until the desired result is reached.
• STEAM PORTION.
• Press the button.
• PORTION /....20 SEC.
• By pressing the or buttons you can program time in
seconds (3-250 sec.)
• Press the button.
• STEAM PORTION
• Press the button to go to the next programming section
or press the button to return to COFFEE READY
.
15.5 Programming Tea Portion
You can program a certain amount of hot water. You can use
this feature for adding a certain amount of hot water to your
coffee drink (ex. cafe americano) or to use it for a quick cup of
tea.
• TEA PORTION.
• Place a cup under the hot water spout (Fig.8a or 8b).
• Press the
button
.
• OPEN TAP. Turn the selector switch to the water
symbol (Fig.3,L). Hot water will flow into your cup. The
DISPLAY
P
DISPLAY
DISPLAY
N
+
DISPLAY
P
+
DISPLAY
P
DISPLAY
+
N
P
DISPLAY
+
DISPLAY
P
+
P
P
P
DISPLAY
DISPLAY
19.
Page 18

will show ENOUGH TEA? / CLOSE TAP.
• When you have enough hot water in your cup turn the selector
switch back to the cup symbol (Fig. 3,L). The hot water flow
will stop.
• Go to the next programming section by pressing the
button or pressing the button to return to
COFFEE READY.
15.6 Programming Claris Filter Cartridge
The will either show: FILTER NO or FILTER YES.
• If the shows FILTER NO and you want to install the
Claris Filter Cartridge please see chapter 11a.
• If the shows FILTER NO and you press the button
the display will show the programmed water hardness
level. If you want to change the hardness level see chapter 10.
• If the shows FILTER YES and you want to change it
to FILTER NO push the button and then push the
button. The will now show FILTER NO. Press the
button to confirm. If you now press the button the
display will show the programmed water hardness level. To
change the water hardness level, see chapter 10.
• If the shows FILTER YES and you push the
button, the will show ECONOMY MODE OFF (in
this case the program does not stop at the water hardness
level.)
15.7 Programming Water Hardness
(This program will come up only if the program for the Claris
Filter Cartridge is set to FILTER NO.) To change the setting
for the water hardness see chapter 10.
15.8 Programming Economy Mode
• ECONOMY MODE OFF
• Press the
button.
• By briefly pressing the o r buttons you can program
the mode you desire.
• Then press the button to store the mode in memory.
• In the setting ECONOMY MODE ON the steam heating
system is switched off. The heating for the cup warming tray
is switched off too. If you want to make steam you need to
press the permanent steam button (Fig.3,M). The green lights
in the two buttons (Fig.3,K and N) will blink indicating that
the steam side is heating up. After 15 to 30 seconds the two
lights will stay illuminated. The steam side is now ready.
• After 10 minutes the steam heating system switches off
automatically. The warning lamps go out. By pressing the
steam key, you return to stand-by status for making steam.
• ECONOMY MODE OFF means that the stand-by status for
steam is set to 20 minutes and the heating for the cup
warming tray is on. After 10 minutes the warning lamp goes
out. By pressing the steam key, the machine returns
to stand-by status for making steam.
P+P
DISPLAY
DISPLAY
+
DISPLAY
+
P
DISPLAY
+
P
DISPLAY
+
DISPLAY
DISPLAY
DISPLAY
DISPLAY
N
+
DISPLAY
20.
Page 19

15.9 Programming Timer Clock
Programming the timer clock is necessary if an automatic turnon time is required.
• COFFEE READY.
• Press button for a few seconds until you hear a beep.
• Press the button until you see TIME —.—.
• Press the button.
• By pressing the or buttons you can set the hours and
then confirm by pressing the
button
.
• By pressing the or buttons you can set the minutes
and then confirm by pressing the
button
.
• Attention: The time is displayed in the 24h mode (not
AM/PM). Therefore if the actual time is 3:45 p.m. you must
set the time to 15:45.
• You can call up the next setting by pressing the
button.
15.10 Programming Auto Turn-On Time
A programming of the timer clock is necessary if an automatic
turn-on is desired (see chapter 15.9).
• COFFEE READY.
• Press button for a few seconds until you hear a beep.
• Press the button until you see UNIT ON —.—.
• Press the
button.
• By briefly pressing the or buttons, you can set the
hours and then confirm by pressing the button.
• By briefly pressing the or buttons you can set the
minutes and then confirm by pressing the button.
• The machine will turn itself on at the programmed time.
• To switch off the automatic timer proceed as follows:
• Press the
button.
• Press the
button.
• UNIT ON :—
15.11 Programming Auto Shut-Off Time
• COFFEE READY.
• Press
button
for a few seconds until you hear a beep.
• Press the button until you see OFF AFTER 5.0
HOURS
• Press the
button
.
• By briefly pressing the or buttons you can set the
hours and then confirm by pressing the
button (0.5 to 9.0
hours).
• You can call up the next setting by pressing the
button
.
15.12 Programming Cup Counter
The cup counter will show you the total number of coffee and
water uses. It will show for example “22 SUPPLIED.” If you
push any of the coffee buttons or the rinse button it will show
you how often these buttons have been used. This feature can
be useful in a commercial or office environment. By simply
checking the numbers once a day the machine will show you
how many cups for each button were prepared per day. (There
is no display for number of hot water or steam uses, sorry!)
When you are finished checking push the button to return to
N
P
P
+
P
DISPLAY
+
P
DISPLAY
DISPLAY
N
P
P
+
P
+
P
DISPLAY
+
P
DISPLAY
+
P
+
P+P
DISPLAY
+
P
DISPLAY
21.
Page 20

the COFFEE READY status. Or push the
button and the
will show LANGUAGE ENGLISH.
15.13 Programming Language Selection
The C3000 can display its messages in seven languages.
• Press the
button until you hear a beep.
• Press the button.
• The will show: LANGUAGE ENGLISH.
• To change to another language push the button and then
the or button.
• Push the
button again to confirm the new language.
• Push the
button to return to COFFEE READY.
15.14 Re-Install Factory Settings
You can re-install the factory settings for the following functions:
• coffee and water quantity and coffee temperature for all
coffee buttons,
• steam portion,
• tea portion.
Proceed as follows:
• COFFEE READY.
• Press and hold the button until you hear a beep. Now the
above functions are set according to chapter 6 (factory
settings).
16. CARE AND MAINTENANCE
16.1 Fill Water
• FILL WATER.
• If this message shows on the display no more coffee can be
made until you fill the water container.
• The water container will never be completely empty. The low
water floatation device (Fig.1;4) activates the “FILL WATER”
indicator when there are about 10 oz. of water left.
• The water tank should be rinsed and filled with fresh water
daily. Only use fresh, cold water. Never fill the water
container with milk, mineral water or any other liquid.
16.2 Emptying the Used Coffee Container
Coffee grounds are collected in the used coffee container
(Fig.1,16).
• EMPTY GROUNDS.
• If this message shows on the display no more coffee can be
made until you empty the used coffee container.
• Remove the used water tray carefully since there is water in
it (Fig.1, Fig.18, Fig.19)
• ATTENTION: Do not unplug the machine while you are
emptying the coffee grounds.
• Empty the used coffee container.
• Empty the used water tray.
• Make sure the two metallic contacts of the drawer are clean
and dry (Fig. 20).
DISPLAY
DISPLAY
N
DISPLAY
DISPLAY
N
P
+
P
DISPLAY
P
DISPLAY
+
22.
Page 21

• Replace the used coffee container and drawer.
• COFFEE READY.
16.3 Emptying the Used Water Tray
• EMPTY TRAY
• If this message shows on the display no more coffee can be
made until you empty the drip tray.
• See chapter 16.2 for details.
16.4 Fill Beans
• FILL BEANS
• Fill beans as described in chapter 7a.
• The message FILL BEANS will only disappear
after making
the next cup of coffee.
• We recommend cleaning the bean container from time to
time with a dry cloth before you refill beans (please make
sure the machine is turned off when cleaning.)
16.5 Stones and Beans
Every coffee specialty store will tell you that occasionally small
stones can be found in between coffee beans. Very small
stones will be processed through the burr grinder without any
harm (the stone will end up in the used coffee container).
However larger stones can block the burr grinder. The noise of
the grinder will become very loud and the grinder will block.
Before Filling Beans into the Bean Container:
• Shake your bean bag thoroughly so that a stone will fall to
the bottom of the bag.
• Before emptying the bean bag completely, check to see
whether there are any particles that look like stones and
remove them.
16.6 Removing Stones or Other Foreign Objects
from the Burr Grinder
If the burr grinder is blocked, proceed as follows:
a.) Turn off the machine by pushing the on/off button (Fig.2,B).
Wait until the machine has shut-down completely.
b.) Unplug the machine.
c.) Open the bean container and remove all
beans (scoop out
beans or use a hand-held vacuum cleaner).
d.) Loosen the two screws in the bean container (Fig.24) and
remove the bean container (Fig.25).
e.) If there are still beans left, remove them.
f.) Attach the burr grinder release tool to the upper burr (Fig.26).
g.) If you cannot find this tool call 1-800-220-5701 and we will
send out this tool free of charge.
h.) Turn the tool counter-clockwise slowly until the stone
becomes loose.
i.) Remove any ground coffee as much as possible (best with
a vacuum cleaner).
j.) Attention: Do not try to turn the tool clockwise.
k.) Replace the bean container, and tighten the two screws.
l.) Turn machine on and test the grinder without beans to see
if has blockage disappeared.
DISPLAY
DISPLAY
DISPLAY
23.
Page 22

16.7 Cleaning Metal Contacts
The
will show EMPTY TRAY/CLEAN CONTACTS.
• Remove used water tray (Fig.1, 18).
• Clean the metal contacts (Fig. 20) with hot water and dishwashing liquid. Use a household brush if necessary.
• Replace water tray. The should show COFFEE
READY.
16.8 Cleaning the Frother System
See chapters 14.7 and 14.8 for details.
16.9 General Cleaning Instructions
• Never use abrasive materials or chemicals to clean the
machine.
• Clean the housing with a soft, damp cloth.
• Rinse water tank daily and fill with fresh cold water.
16.10 Emptying System Before Transport
• The will show COFFEE READY. This procedure is
necessary to prevent water and frost damage in case you
intend to transport the machine.
• Remove the auto cappuccino system (Fig. 4, parts V, W, X,
Y). Leave the steam nozzle (Fig. 4, U) attached to the hose.
• Put a container under the steam nozzle.
• Press the permanent steam button (Fig. 3, M).
• The will show STEAM INTAKE.
• Remove the water tank. The machine will release some
steam. You will hear a knocking noise and the machine will
stop after approx. 30 seconds.The will show PRESS
STEAM/ FILL SYSTEM.
• Turn off the machine (Fig.2, B).
• The next time you turn on the machine proceed as
described in chapter 7.
17. CLEANING
17.1 Cleaning with Special Tablet
The C3000 monitors how many coffees are brewed and how
often the rinsing program is activated. After approx. 220
coffees or after approx.180 rinse cycles the
will show
CLEAN UNIT. You can still continue to make coffee. However
we highly recommend that you clean the machine as described
below within the next few days. This cleaning program will
remove oil build-ups in the brewing chamber. If the
shows CLEAN NOW (there will also be an audible sound) you
should clean the machine immediately.
This cleaning program takes about 15 minutes. Please use the
enclosed special cleaning tablets. The C3000 comes with a
pack of 6 tablets. You can re-order the tablets by using the
enclosed order form.
Important: Once the cleaning program has started do not
interrupt the procedure.
• The machine is on.
• Open the cover (Fig.1,19) and push and hold the tablet
DISPLAY
DISPLAY
DISPLAY
DISPLAY
DISPLAY
DISPLAY
DISPLAY
24.
Page 23

cleaning button (Fig. 3A,S) until you hear a beep.
•
will show EMPTY TRAY (FILL WATER might also
show).
• Make sure that the water container is at least half full.
• Remove and empty the tray and the used bean container
and replace. Attention: Even if the tray and the bean
container are empty already you still have to remove
the tray for approx. 30 seconds and then replace it.
• Place a large container (at least 24 oz.) underneath the
coffee spout (Fig.1, 1).
•
will show ADD TABLET/ PRESS CLEANING.
• Open the ground coffee funnel lid (Fig.1,10) and drop one
tablet into the opening (Fig.23).
• Push the tablet cleaning button (Fig.3A,S) again.
• The C3000 will start the automatic cleaning program by
dispensing water in intervals into the container underneath
the coffee spout.
• When finished the
will show
EMPTY TRAY and the
machine will beep.
• Remove the tray. There will be water in the tray and in the
used coffee container. Empty, clean and replace.
• The
will show
RINSE UNIT.
• Put a cup underneath the coffee spout and push the rinse
button (Fig.2,F).
• The
will show
COFFEE READY.
• Clean the ground coffee funnel after each cleaning cycle.
• Remove the funnel and rinse under hot water and dry.
• Replace funnel (Fig.21 and 22).
17.2 Decalcifying (Special Liquid Agent DURGOL Required)
Water is heated inside the C3000. With continued use, calcium will
deposit in the tubes leading to the coffee spout and frother. The
C3000 has an integrated decalcifying program. When the
shows UNIT CALCED it is time to decalcify the machine. You can
still make coffee. However, it is highly recommended that you decalcify the machine within the next 2 days.
Important: Never
use vinegar or any powder agent for decalcifica-
tion. This will damage inner parts of the machine. Only use DUR
-
GOL decalcifying agent.
DURGOL is available through your Capresso retailer or directly from
Capresso (use the enclosed mail order form that came with your
C3000 or call us at 1-800-220-5701 or order it via the Internet at
www.capresso.com).
Note: If you use the Claris water car
tridge, you do not need to
decalcify the machine. Make sure the water hardness indicator is
turned off (see chapter 10 “Adjusting for Water Hardness”).
• Run the decalcifying program only after the machine has
been turned off for at least 5 hours and has cooled down
completely. Attention: never interrupt the decalcifying
program.
• Attention: when using the Durgol decalcifying agent be
sure to immediately remove any splashes and drops from
delicate surfaces, especially natural stone and wooden
surfaces.
DISPLAY
DISPLAY
DISPLAY
DISPLAY
DISPLAY
DISPLAY
25.
Page 24

• Turn off your machine by pressing the ON/OFF button
and let it cool down for approx. 5 hours.
• Open cover for programming buttons (Fig.1,19).
• Press the button (Fig. 3A,T1) until you hear an acoustic sound.
• EMPTY TRAY.
• Remove drawer and empty. Attention: even if the drawer is
empty you must remove it for at least 20 seconds. Replace
drawer.
• AGENT IN TANK. Remove water tank. Pour approx.
14 oz. of water, then 8 oz. of Durgol into the water
tank and then replace the water tank.
• AGENT IN TANK/OPEN TAP/PRESS CALC.
• Remove the auto cappuccino assembly (Fig.4, parts V, W, X,
Y). Place a 12 oz. container under the nozzle (Fig.4, U).
• Turn selector switch (Fig.3,L) to the symbol and press
the button (Fig.3A,T1).
• The C3000 will pump the water/Durgol mixture in intervals
through the steam nozzle into the container underneath.
During this time the will show UNIT DECALC.
/PLEASE WAIT.
• After about 12 minutes the machine beeps. The
will show PRESS CALC.
• Empty the container underneath the steam nozzle and
place it underneath the hot water release (Fig.1,14).
• Now push the button again (Fig. 3A, T1). The C3000 will
now pump the water/Durgol mixture in intervals through the
tea spout, UNIT DECALC./PLEASE WAIT.
• After another six to eight minutes the machine will beep
again. The will show CLOSE TAP. Turn the
selector switch (fig. 3,L) back to the cup symbol.
• The C3000 will now pump the rest of the water/Durgol
mixture in intervals into the used water tray on the inside.
During this process the shows UNIT DECALC./
PLEASE WAIT.
• After another 20 to 30 minutes the machine beeps and the
shows EMPTY TRAY. At this time the water tank
should be empty. Carefully remove the used water tray (Fig.1,
18 ), empty it and rinse thoroughly and replace.
• The shows FILL WATER. Remove the water tank,
rinse thoroughly and fill it halfway with fresh water and then
replace.
• Place the 12 oz. container from before underneath the steam
nozzle. shows OPEN TAP and turn the selector
switch (Fig.3,L) to the water symbol.
• PRESS CALC. Push the button (Fig.3A,T1).
The C3000 will pump the fresh water in intervals through the
steam nozzle into the container underneath. During this time
the will show UNIT DECALC./PLEASE WAIT.
• When the machine beeps, empty the container
underneath the steam nozzle and place it underneath the
hot water release (Fig.1,14).
• Now push the button again (Fig.3A, T1). The C3000 will
now pump the fresh water in intervals through the tea
spout.
• UNIT DECALC./ PLEASE WAIT. The machine
beeps again. The shows CLOSE TAP. Turn the
DISPLAY
DISPLAY
DISPLAY
DISPLAY
DISPLAY
DISPLAY
DISPLAY
DISPLAY
DISPLAY
DISPLAY
DISPLAY
DISPLAY
DISPLAY
DISPLAY
DISPLAY
26.
Page 25

selector switch (Fig.3, L) back to the cup symbol.
• The C3000 will now pump fresh water in intervals into the
used water tray on the inside. During this process the
shows UNIT DECALC./PLEASE WAIT.
• The machine beeps and the shows CLEAN
CONTACTS/EMPTY TRAY. Empty the used water tray and
clean the contacts (see Fig. 19 and Fig. 20).
• PLEASE WAIT.
• RINSE UNIT. Push the button (Fig. 2,F)
• COFFEE READY.
Reminder: If you use the CLARIS Water Filter Cartridge the
above procedure is not necessary (see chapter 15.6
“Programming the Claris Filter Cartridge).
18. DISPOSAL OF CLARIS CARTRIDGE
The Claris cartridge is environmentally friendly. It can be
disposed with your regular household trash.
19. TIPS FOR PERFECT COFFEE
Height adjustable coffee-spout
You can adjust the height of the coffee-spout to the size of your cups.
Grinding
Please refer to chapter 8 “Adjusting the Grinder.”
Pre-warm cups
You should warm cups in advance with hot water or steam.
The smaller the quantity of coffee, the more important it is to
warm your cups.
Sugar and cream
Warmth is lost by stirring the contents of the cup. Adding milk
or cream from the refrigerator considerably lowers the
temperature of the coffee.
DISPLAY
DISPLAY
DISPLAY
DISPLAY
DISPLAY
27.
 Loading...