

Page 1
10
8
6
4
2
10
8
6
4
2
OFF ON
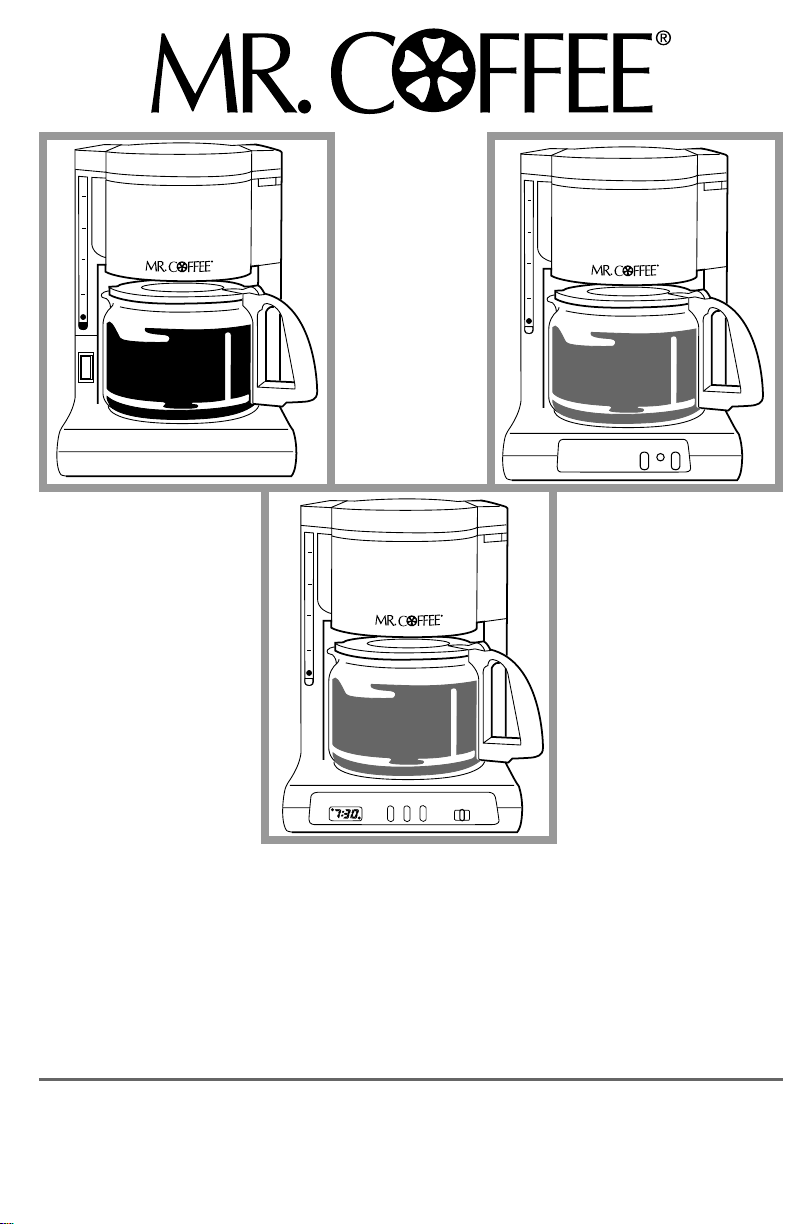
MODELS/MODELOS
AD10, AD10BLK
AD12, AD12BLK
10
8
6
4
2
PM
Off
Hour Min Brew
Off
On Auto
ADS10, ADS12
ADX13, ADX20, ADX23
Instruction Manual
MR. COFFEE® COFFEEMAKER
READ ALL INSTRUCTIONS BEFORE USING THIS APPLIANCE
Manual de Instrucciones
CAFETERA MR. COFFEE®
LEA TODAS LAS INSTRUCCIONES ANTES DE USAR ESTE APARATO
Page 2

IMPORTANT SAFEGUARDS
When using electrical appliances, basic safety precautions should always be followed to reduce
the risk of fire, electric shock and/or injury to persons, including the following:
1.
READ ALL INSTRUCTIONS BEFORE USING THE MACHINE.
2. Do not touch hot surfaces. Use handles or knobs.
3. To protect against electric shock, do not immerse cord, plugs or machine in water
or other liquids.
4. Close adult supervision is necessary when this appliance is used by or near children.
5. Unplug from outlet when Coffeemaker is not in use and before cleaning.
Allow to cool before putting on or taking off parts and before cleaning the appliance.
6. Do not operate any appliance with a damaged cord or plug or after the appliance malfunctions
or has been damaged in any manner. Return this appliance only to the nearest Authorized
Service Center for examination, repair or adjustment.
7.
The use of accessory attachments not recommended for MR. COFFEE®products may cause
hazards or injuries.
8. Do not use outdoors.
9.
Do not let cord hang over edge of table or countertop or to touch hot surfaces.
10. Do not place this appliance on or near a hot gas or electric burner or in a heated oven.
11. To disconnect, remove plug from wall outlet.
12. Do not use appliance for other than its intended use.
13. Use on a hard, flat level surface only, to avoid interruption of air flow underneath the appliance.
14. DECANTER USE AND CARE
Breakage may occur if the following instructions are not followed:
Use only decanters specifically designed for
MR. COFFEE®Coffeemakers.
a.
This decanter is designed for use with your
MR. COFFEE®Coffeemaker and therefore
must never be used on a rangetop or in any oven, INCLUDING A MICROWAVE.
b. Do not set a hot decanter on a wet or cold surface.
c. Do not use a cracked decanter or a decanter with a loose or weakened handle.
d. Do not clean the decanter with cleansers, steel wool pads or other abrasive materials.
e. Discard decanter immediately if it is ever boiled dry.
f. Avoid sharp blows, scratches or rough handling.
15. WARNING: To reduce the risk of fire or electric shock, do not remove any service
covers. No user serviceable parts inside. Repair should be done by authorized
personnel only. Opening the bottom service cover will void the warranty.
T
HISUNITIS FOR
H
OUSEHOLD
U
SEONLY
Page 3
S
PECIAL
1. A short power supply cord is provided to reduce the hazards resulting from becoming
entangled in or tripping over a longer cord.
2. An extension cord may be purchased and used if care is exercised in its use.
3. If an extension cord is used, the marked electrical rating of the extension cord must be
at least 10 amps and 120 volts. The resulting extended cord must be arranged so that
it will not drape over the countertop or tabletop where it can be pulled on by children
or tripped over accidentally.
This appliance has a polarized plug (one blade is wider than the other).
To reduce the risk of electric shock, this plug will fit in a polarized outlet only
one way. If the plug does not fit fully in the outlet, reverse the plug. If it still
does not fit, contact a qualified electrician. Do not modify the plug in any way.
IFS
ERVICEISREQUIRED
ERVICE, CALL 1-800-MR COFFEE (1-800-672-6333)
FOR S
ONDAY THROUGH FRIDAY, 9:00 A.M. TO 6:00 P.M. EASTERN STANDARD TIME
M
SATURDAY
A
SSISTUSINSERVINGYOU
T
O
C
ORDSETINSTRUCTIONS
, DONOTR
, 9:00 A.M. TO 3:00 P.M. EASTERN STANDARD TIME
, P
LEASEHAVE THEMODELNUMBER
ETURN TOYOURSTORE
(AD10, AD10BLK, AD12, AD12BLK, ADS10, ADS12,
ADX13, ADX20, ADX23)
All repairs must be made by an authorized Sunbeam Service Center.
Please call us for assistance or for the location of the nearest
authorized
ANDDATE OFPURCHASEAVAILABLE
Sunbeam
Service Center.
.
PLEASE DO NOT RETURN THIS APPLIANCE TO YOUR STORE.
We welcome your questions, comments or suggestions.
Please include your name, address and telephone number so
we can reach you if necessary. Do not send product to the address below.
PLEASE CALL USAT1-800-672-6333 OR WRITE USAT:
CONSUMER SERVICE DEPARTMENT
P.O. Box 948389
Maitland, Florida 32794-8389
e-mail: consumeraffairs@consumer.sunbeam.com
or
SAVE THESE INSTRUCTIONS
32
Page 4
INTRODUCTION
C
ONGRATULATIONS
! You are the owner of a MR. COFFEE®AD S
ERIESCOFFEEMAKER
.
Please read all
of the instructions in this manual carefully before you begin to use
this appliance.
Proper care and maintenance will ensure the long life of this appliance
and its trouble-free operation.
Save this Instruction Manual and refer to it often for
cleaning
and care tips.
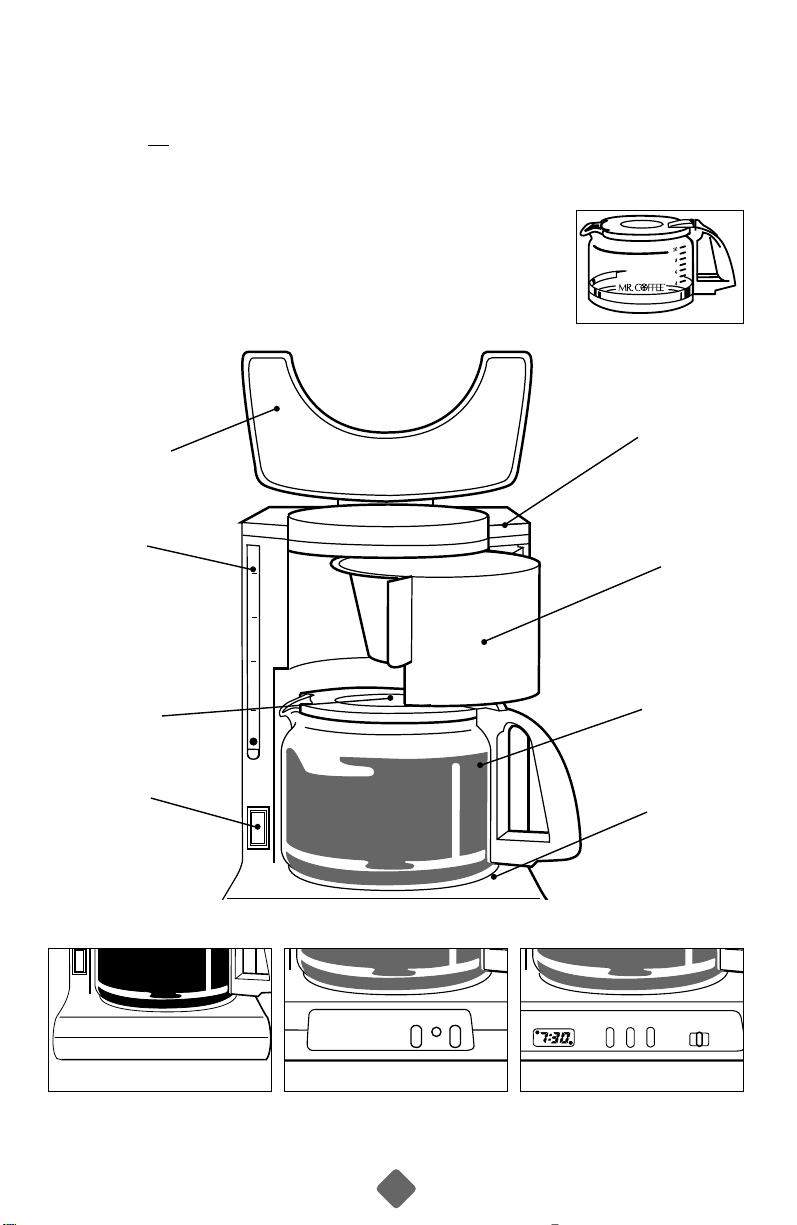
DECANTER
LID
ON/OFF
B
UTTON
ONE-PIECE
SWING-OUT
FILTER BASKET
DECANTER
WARMING
PLATE
2
10
4
6
8
DUST
COVER
W
ATER
LEVEL
INDICATOR
W
INDOW
WATER
RESERVOIR
AD10, AD10BLK
AD12, AD12BLK
ADS10
ADS12
ADX13, ADX20
ADX23
{
DIAGRAM OF
PARTS
REPLACEMENT DECANTER
PD12 (WHITE
) OR
PD13 (B
LACK)
OFF ON
PM
Off
Hour Min Brew
Off
On Auto
Page 5
OPERATION AND USE
BEFORE FIRST USE
Before using your Coffeemaker for the first time, wash decanter/lid and removable
brew basket using a mild, non-abrasive detergent and water. Rinse each thoroughly.
Follow steps 4-6 (Brewing Coffee) using water, to clean the inside.
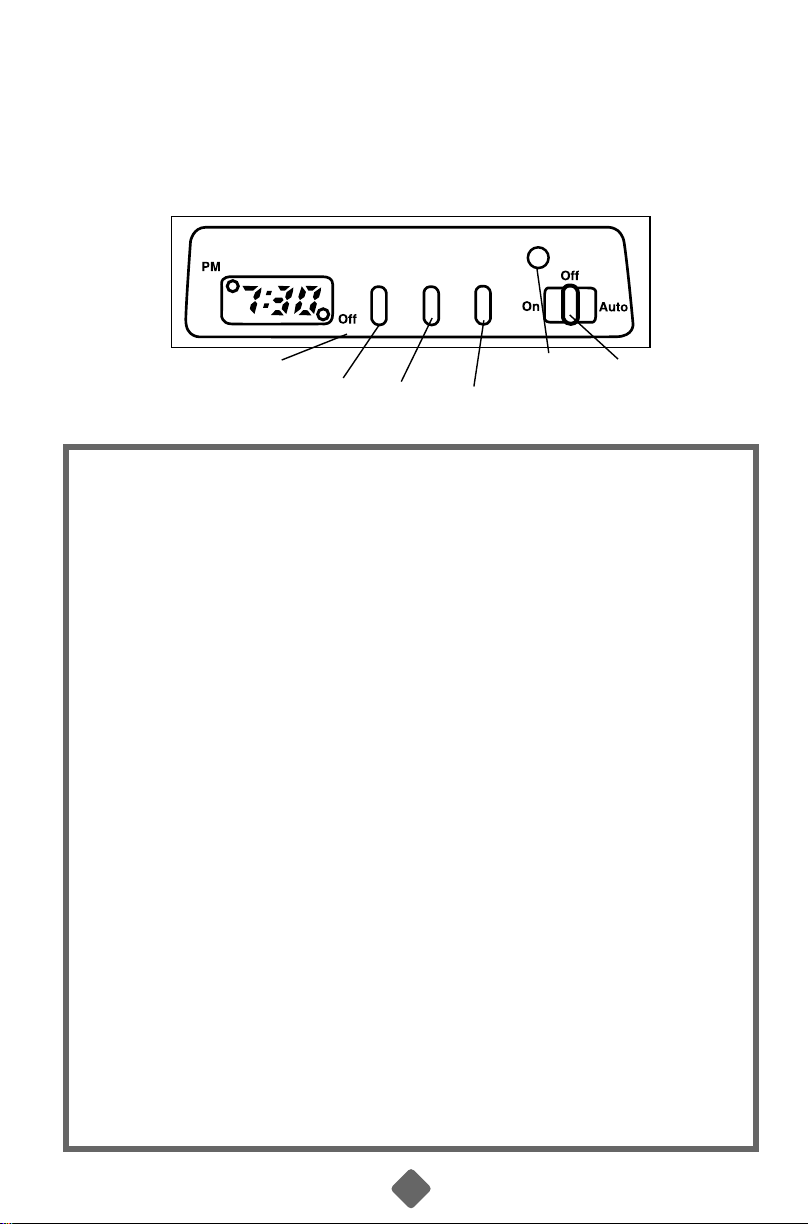
Hour Min Brew
AUTO ON/ CONTROL
HOUR MINUTE BREW OFF/ SWITCH
OFF
LIGHT
SET SET SET L
IGHT
/OFF/AUTO)
(ON
SETTING C
(ADX13, ADX20 AND
I
MPORTANT
set first, before the Coffeemaker will operate.
1. Slide the control switch to “OFF.”
2. Plug the power cord into your electrical outlet. The clock display will flash
until you set the time.
3. Alternately press and hold the “HOUR” and “MINUTE” buttons until you reach
the current time. The “PM” indicator light in the display will illuminate to
indicate PM time.
:
Please Read Before First Use. The clock on these models must be
SETTING THE
LOCK AND TIMER
ADX23 MODELS ONLY)
CLOCK
PRESETTING THE BREWING TIME
1. Press and hold the “BREW” button while setting the desired brew time with the
“HOUR” and “MINUTE” buttons. The “PM” indicator light in the display will
illuminate to indicate PM time.
BREWING AUTOMATICALLY AT THE PRESET TIME
1. Follow Steps 1 – 5 in the “Brewing” Section.
2. Always slide the control switch to “OFF” and then to “AUTO.”
3. Brewing will begin at the time you have preset. The coffee will remain hot in
the decanter for 2 hours. To keep your coffee hot for an additional 2 hours,
slide the switch from “AUTO” to “ON”.
54
Page 6

IMPORTANT:
The programmable timer will NOT automatically brew the next day if left in the “AUTO”
position after its last use. This is to prevent unanticipated operation. If the “AUTO OFF”
light in the lower right hand corner of the clock display is illuminated, reset “AUTO BREW”
by sliding the control switch to “OFF” and then to “AUTO.”
BREWING
If the clock display is flashing, refer to section (setting the clock) before continuing.
1. Open the swing-out brew basket to your right. Insert a MR. COFFEE
®
filter into
the brew basket.
2. Add desired amount of coffee, referring to the Coffee Measurement Chart.
Shake lightly to level coffee.
3. Be sure the paper filter is centered before closing the swing-out basket.
4. Fill the decanter with cold water to desired capacity as marked on the side of the
decanter. (1 cup = 5 oz).
5. Pour the water into the water reservoir. N
OTE: For easy and accurate filling, refer to
cup markings inside the reservoir. Place the empty decanter onto the warming plate.
6. Turn your Coffeemaker to “ON”. When the coffee stops flowing, the brewing cycle
is complete.
7. After the unit has cooled, remove the paper filter, then discard the used grounds
and filter.
N
OTE: The filter basket can be removed by swinging it open to the right, lifting the basket
up and pulling the bottom of the basket out. Rinse the basket and replace by inserting
the top post of the basket into the machine first.
W
ARNING: To avoid risk of personal injury or damage to property as a result of overflow,
be sure the decanter is squarely centered under the brew basket during the brewing cycle.
Brewed coffee and grounds, both in brew basket and decanter, are very hot. Handle with care
to avoid scalding. If brew basket overflows, or if brew basket fails to drain into decanter
during brew cycle, do not open or handle basket. Unplug Coffeemaker and wait for contents
to cool before handling.
A
UTOMATICBREWINGPAUSE‘NSERVE
Our Brewing Pause ‘n Serve feature allows you up to 30 SECONDS to pour a cup while
the coffee is still brewing. It also prevents any remaining coffee in the brew basket from
dripping onto the warmer plate once brew cycle is complete.
W
ARNING: To prevent injury from hot overflow, replace decanter within 30 seconds if
removed during brewing. If the decanter is not replaced within 30 seconds,
the filter basket will fill with water and overflow.
Page 7

C
OFFEE
FOR BEST RESULTS, USE DRIP GRIND RECOMMENDED FOR AUTOMATIC DRIP COFFEEMAKERS.
EVEL TBSP. = 1 LEVEL SCOOP 1 CUP = 5 OZ. BREWED COFFEE
2 L
M
EASUREMENT
Use more or less coffee to suit taste.
C
HART
CUPS GROUND COFFEE
12* 11 Tbsp. or 5-1/2 Scoops
10 9 Tbsp. or 4-1/2 Scoops
8 7 Tbsp. or 3-1/2 Scoops
6 6 Tbsp. or 3 Scoops
4 5 Tbsp. or 2-1/2 Scoops
2 3 Tbsp. or 1-1/2 Scoops
*Models AD12, AD12BLK, ADS12,
ADX20 and ADX23 only
AUTOMATIC SHUT-OFF
(MODELS
ADS10, ADS12, ADX13, ADX20 & ADX23 ONLY)
Your Coffeemaker will keep your coffee hot for 2 hours, then automatically shut off.
To keep
When your decanter is empty, turn Coffeemaker
your coffee hot for an additional 2 hours, turn the Coffeemaker “OFF” and then “ON”.
“OFF”
.
CLEANING
Your Coffeemaker
brewing time increases considerably. This condition is caused by a build-up of lime and
mineral deposits from your water. If the pumping action stops before all the water has
been pumped out of the machine, the appliance requires cleaning.
The frequency of cleaning depends on the hardness of water used.
The following table gives a suggested cleaning schedule.
must
be cleaned when you begin to notice excessive steaming or the
76
Page 8

S
UGGESTEDCLEANING
I
NTERVAL
Type of Water Cleaning Frequency
Soft Water Every 80 Brew Cycles
Hard Water Every 40 Brew Cycles
Your Coffeemaker may be cleaned by using MR. COFFEE®Cleaner or vinegar.
MR. COFFEE
®
Cleaner is available at many retail stores or by calling the
MR. COFFEE
®
Consumer Service Department at 1-800-MR COFFEE (1-800-672-6333).
U
SINGMR.COFFEE
®
C
LEANER
Read caution statement on side panel of box before use.
CLEANING
U
SING
V
INEGAR
1. Pour 1 quart of undiluted white household vinegar into Coffeemaker.
2. Place a paper filter into the brew basket and close the brew basket.
3. Place the empty decanter on the warming plate. Turn the Coffeemaker to “ON.” When
three cups have flowed through, turn the Coffeemaker to “OFF.” Let stand for 1/2 hour.
4. After 1/2 hour, pour vinegar back into the Coffeemaker. Place the empty decanter
on the warming plate.
5. Turn Coffeemaker to “ON” and let all of the vinegar run to completion.
6. Discard the vinegar and paper filter.
7. To flush out all traces of vinegar, pour decanter full of tap water into Coffeemaker,
slide switch to “ON.” Allow it to cycle through.
8. Discard water and turn Coffeemaker off. Repeat Steps 7 through 8.
D
ECANTER
D
ECANTER AND LID ARE TOP-RACK DISHWASHER SAFE
Hard water can leave a whitish mineral deposit inside the decanter. Coffee and tea discolor
these deposits, sometimes leaving a brownish stain inside the decanter. To remove these
stains, follow these easy steps.
1. Use a solution of equal parts white vinegar and hot water.
2. Let solution stand in decanter for about 20 minutes. Discard.
3. Wash and rinse decanter thoroughly using soft cloth. Do not use harsh abrasive
cleaners. These may cause scratches and can lead to breakage.
Page 9

1-YEAR LIMITED WARRANTY
Sunbeam Products, Inc. (“Sunbeam”) warrants that for a period of one year from the date of purchase,
this product will be free from defects in material and workmanship. Sunbeam, at its option, will repair or
replace this product or any component of the product found to be defective during the warranty period.
Replacement will be made with a new or remanufactured product or component. If the product is no
longer available, replacement may be made with a similar product of equal or greater value. This is
your exclusive warranty.
This warranty is valid for the original retail purchaser from the date of initial retail purchase and is not
transferable. Keep the original sales receipt. Proof of purchase is required to obtain warranty performance.
Sunbeam dealers, service centers, or retail stores selling Sunbeam products do not have the right to alter
modify or in any way change the terms or conditions of this warranty.
This warranty does not cover normal wear of parts or damage resulting from any of the following:
negligent use or misuse of the product, use on improper voltage or current, use contrary to the operating
instructions, disassembly, repair or alteration by anyone other than Sunbeam or an authorized service
center. Further, the warranty does not cover acts of nature, such as fire, flood, hurricanes and tornadoes.
Sunbeam shall not be liable for any incidental or consequential damages caused by the breach of any
express or implied warranty. Except to the extent prohibited by applicable law, any implied warranty of
merchantability or fitness for a particular purpose is limited in duration to the duration of the above
warranty. Some states, provinces or jurisdictions do not allow the exclusion or limitation of incidental
or consequential damages or limitation on how long an implied warranty lasts, so the above limitations
or exclusion may not apply to you. This warranty gives you specific legal rights, and you may also have
other rights that vary from state to state or province to province.
How to Obtain Warranty Service
Take the product to an authorized Sunbeam service center. You may obtain a list of service centers
and other repair/replacement instructions by calling 800 831-9678 or send an e-mail to
Consumeraffairs@consumer.sunbeam.com. Please include name, address, telephone number,
product model number and description of the problem.
DO NOT RETURN THIS PRODUCT TO THE PLACE OF PURCHASE
For product questions:
Sunbeam Consumer Service
P.O. Box 948389
Maitland, Florida 32794-8389
Do not send product to the above address
98
Page 10

PRECAUCIONES IMPORTANTES
Cuando use aparatos eléctricos, siempre se deben tomar precauciones básicas de seguridad para
reducir los riesgos de incendio, descarga eléctrica y/o lesiones personales, incluyendo lo siguiente:
1. LEA TODAS LAS INSTRUCCIONES ANTES DE USAR EL APARATO.
2. No toque las superficies calientes. Use las manijas o los botones.
3. Para protegerse contra descargas eléctricas, no sumerja el cordón, las clavijas ni el aparato
en el agua ni en otro líquido.
4.
Una supervisión cercana de un adulto es necesaria cuando este aparato se usa donde hay niños.
5. Desconecte la clavija del tomacorriente cuando la cafetera no esté en uso y antes de limpiarla.
Deje que se enfríe antes de poner o sacar las partes y antes de limpiar el aparato.
6. No opere ningún aparato que tenga la clavija o el cordón dañado, o después de que el aparato
haya funcionado mal, o que se haya descompuesto. Regrese el aparato al centro de servicio
autorizado más cercano para que lo examinen, reparen o ajusten.
7. El uso de accesorias no recomendada para los productos de
MR. COFFEE®puede ser peligroso
y ocasionar lesiones.
8. No la use a la intemperie.
9. No deje que el cordón cuelgue del borde de la mesa o del fregadero, ni que esté en contacto
con superficies calientes.
10. No coloque este aparato en o cerca de una hornilla caliente de gas o eléctrica ni de un horno
caliente.
11. Para desconectarla, desenchufe la clavija del tomacorriente de la pared.
12. No use el aparato para otro fin para el que fue diseñado.
13. Usela solamente en una superficie dura, horizontal para evitar la interrupción del flujo de aire
por debajo del aparato.
14.
USO Y CUIDADO DE LA GARRAFA
Se puede romper la garrafa si no se siguen las siguientes instrucciones:
Use solamente las garrafas diseñadas específicamente para las cafeteras
MR. COFFEE
.
®
a. Esta garrafa está diseñada para usarse con su cafetera
MR. COFFEE
,
®
por lo que nunca
se deberá usar en la hornilla de la estufa, el horno, ni el horno de microondas.
b. No ponga la garrafa caliente en una superficie mojada o fría.
c. No use una garrafa cuarteada ni que tenga una manija floja o débil.
d. No limpie la garrafa con limpiadores, fibras ni otros materiales abrasivos.
e. Deseche la garrafa inmediatamente si alguna vez se ha dejado hervir hasta quedar seca.
f. Evite golpearla, rayarla o tratarla con rudeza.
15.
ADVERTENCIA:
Para disminuir los riesgos de incendio o de descarga eléctrica,
no quite las cubiertas. El usuario no debe dar servicio a las partes de adentro.
Las reparaciones deben ser
hechas solamente por el personal autorizado.
El abrir la cubierta de la base invalidará la garantía.
E
STAAPARATOESPARAUSODOMÉSTICOSÓLAMENTE
Page 11

I
NSTRUCCIONESESPECIALES PARPONER ELCORDON
1. Se proporciona un cordón corto para el suministro de corriente que reduce los riesgos
de los cordones largos que pueden enredarse o que hacen que la gente se tropiece.
2. Se puede comprar y usar una extensión si se tiene cuidado.
3. Si se usa una extensión, la clasificación eléctrica que viene marcada en el cordón debe ser
de por lo menos 10 amperes y 120 volts. La extensión se debe arreglar de tal manera que
no cuelgue del fregadero ni de la mesa donde los niños puedan jalarlo o la gente se tropiece.
Este aparato tiene una clavija polarizada (una espiga más ancha que la otra).
Para disminuir el riesgo de descarga eléctrica, esta clavija se conectará a un
tomacorriente polarizado de una sola manera. Si la clavija no entra totalmente
en el tomacorriente, inviértala. Si todavía no entra, contacte a un electricista
calificado. No modifique la clavija de ninguna forma.
R
SIR
EQUIERE
S
ERVICIO, NO LA
EGRESE ASUTIENDA
LLAME AL
DE LUNES A VIERNES 9:00 A.M. A 6:00 P.M. HORA ESTÁNDAR DEL ESTE,
DE SÁBADO 9:00 A.M. TO 3:00 P.M. HORA ESTÁNDAR DEL ESTE.
1-800-MR COFFEE (1-800-672-6333),
PARA QUE NOS AYUDE A SERVIRLE,
S
ÍRVASE TENER A MANO EL NÚMERO DEL MODELO
(AD10, AD10BLK, AD12, AD12BLK,
ADS10, ADS12, ADX13, ADX20, ADX23)
YLAFECHA DE COMPRA.
Todas las reparaciones se deben hacer por un Centro de Servicio Autorizado
Sírvase llamarnos para asistirle o para informarle el lugar
S
del Centro de Servicio Autorizado
NO REGRESE EL APARATO A SU TIENDA
UNBEAM
más cercano.
S
UNBEAM
.
Nos complace recibir sus preguntas, comentarios o sugerencias.
Sírvase incluir su nombre, dirección, número telefónico así que podemos alcanzarle
en caso de necesidad. No envíe el producto al dirección postal abajo.
CONSUMER SERVICE DEPARTMENT
P.O. Box 948389
Maitland, Florida 32794-8389
o
e-mail: consumeraffairs@consumer.sunbeam.com
CONSERVE ESTAS INSTRUCCIONES
1110
Page 12

I
NTRODUCCIÓN
¡F
ELICITACIONES
!
Usted es el propietario de una Cafetera de
MR. COFFEE
.
®
Antes de usar este producto la primera vez, por favor tome un momento para leer estas
instrucciones y guárdelas para
futura referencia. Ponga particular atención a las Instrucciones
de Seguridad que se ofrecen.
Por favor lea los estatutos en la garantía del producto.
Hour Min Brew
CUBIERTA
BOTÓN
ON/OFF
S
OPORTE
GIRATORIO
DE LA
CANASTA
DE
FILTRO
GARRAFA
PLATO
TÉRMICO
2
10
4
6
8
CUBIERTA PARA
EL
POLVO
VANTANA DE
AGUA
TANQUE DE
AGUA
AD10, AD10BLK
AD12, AD12BLK
ADS10
ADS12
ADX13, ADX20
ADX23
{
DIAGRAMA DE LAS
P
ARTES
GARRAFA REPUESTA
PD12 (BLANCA
) O
PD13 (N
EGRA)
OFF ON
PM
Off
Hour Min Brew
Off
On Auto
Page 13

OPERACIÓN Y USO
Hour Min Brew
ANTES DE USARLA POR PRIMERA VEZ
Antes de usar su cafetera por primera vez, lave la garrafa, la tapa, y la canastilla de colado
removible con un detergente suave y agua. Enjuáguelas bien. Siga los pasos del 4 al 6
(Colado del Café) usando agua, para limpiar el interior de su cafetera.
AUTO ON/ INTERRUPTOR
CONTROL CONTROL OFF/ DE CONTROL
OFF
LUZ
HORAS MINUTOS COLADO L
UZ
/OFF/AUTO)
(ON
PUESTA DE
HORA Y DEL CONTADOR DE TIEMPO
(MODELOS ADX13, ADX20 Y ADX23 ÚNICAMENTE)
N
OTA
:
Favor Leer Antes de Usar. Es necesario poner en hora el reloj antes de
hacer funcionar la cafetera.
ARA PONER EN HORA EL RELOJ
P
1. Ponga el interruptor del reloj en “OFF”.
2. Enchufe el cordón de corriente en el tomacorriente. El reloj parpadeará hasta
que lo ponga en hora.
3. Oprima alternativamente los botones “HOUR” (de horas) y “MINUTE” (de
minutos) hasta que tenga la hora correcta. La luz del indicador “PM” se
iluminará para indicar las horas PM.
PARA PONER LA HORA DE COLADO
1. Oprima y mantenga apretado el botón de “BREW” mientras pone la hora de
colado deseada con los botones “HOUR” y “minute”. La luz del indicador “PM”
se iluminará para indicar las horas PM.
PARA COLAR AUTOMÁTICAMENTE A LA HORA PREFIJADA
1. Siga los pasos del 1 al 5 en la Sección de “Colado del Café”.
2. Ponga el interruptor de control en “OFF” y luego en “AUTO”.
3. El colado empezará a la hora que haya prefijado. El café permanecerá caliente
en la garrafa durante 2 horas. Para mantener su café caliente por otras 2 horas,
cambie el interruptor de “auto” a “ON”.
1312
Page 14

A
DVERTENCIA
:
El contador de tiempo programable no colará automáticamente el día siguiente si se deja
en la posición “auto” después de haberlo usado. Esta es una característica de seguridad.
Si la luz indicadora “off” en la esquina derecha inferior del reloj se ilumina, reactive el
colado automático “auto brew” poniendo el interruptor de control en “off,” luego en “auto.”
COLADO DEL CAFÉ
Si el reloj está parpadeando, consulte la sección (para poner en hora el reloj) antes
de continuar.
1. Abra la canastilla giratoria a su
derecha
. Inserte un filtro de marca MR. COFFEE
®
en la canastilla de colado negra interior.
2. Añada la cantidad deseada de café de acuerdo con la Tabla de Medidas de Café.
Golpee ligeramente para nivelar el café.
3. Asegúrese de que el filtro de papel esté apropiadamente centrado antes de cerrar
la canastilla de colado.
4. Llene la garrafa con agua del grifo a la medida deseada de acuerdo con las marcas
laterales. (1 taza es igual a 5 onzas)
5. Vacíe el agua dentro del tanque de agua.
N
OTA
:
Para un llenado fácil y aproximado,
las marcas del número de tazas también se encuentran dentro del tanque.
Coloque la garrafa vacía en la placa calentadora.
6. Ponga el interruptor de la cafetera en “ON”. Cuando el café deja de fluir,
se habrá completado el ciclo de colado.
7. Después de que la Cafetera se haya refrescado, saque con cuidado la canastilla
de colado interior negra y deseche el filtro con el café molido usado.
Enjuague la canastilla de colado y colóquela de nuevo.
N
OTA
:
La canasta del filtro puede quitarse abriendola hacia la derecha, levantando la canasta
hacia arriba y jalando la parte inferior de la canasta hacia afuera. Enjuague la canasta y colóquela
nuevamente, insertando primero el poste superior de la canasta dentro de la máquina.
A
DVERTENCIA
:
Para evitar el riesgo de una lesión o de daño a la propiedad por causa de
un derrame, asegúrese que la garrafa esté bien centrada debajo de la canastilla de colado
durante el ciclo de colado. El café colado y molido, tanto en la canastilla como en la
garrafa están muy calientes, manipule con cuidado para evitar quemarse. Si hay derrames
de la canastilla de colado, o si la misma no drena el café a la garrafa durante el ciclo de
colado, no abra ni toque la canastilla. Desenchufe la cafetera y espere que se enfríe el
contenido antes de manipularla.
VÁLVULA DE PAUSA DE GOTEO AUTOMÁTICA PAUSE ‘N SERVE
Nuestro dispositivo Pause ‘n Serve le da hasta 30 SEGUNDOS para servir una taza durante
el colado del café. Asimismo evita que el residuo que queda en la canastilla de colado
caiga a la placa calentadora, una vez que se ha completado el ciclo de colado.
A
DVERTENCIA
:
Para evitar quemaduras debidas al derrame de café caliente, vuelva a
colocar la garrafa en un lapso menor de 30 segundos cuando la quite durante el colado.
Si la garrafa no se vuelve a colocar en un lapso de 30 segundos, la canastilla de colado
podrá llenarse y derramarse.
Page 15

C
UADRO DEMEDICIÓN DECAFÉ
Para Mejores Resultados, Use Café Molido Recomendado para Cafeteras Automáticas de Goteo
2 Cucharadas a Ras = 1 Medida a Ras 1 Taza = 5 oz. de Café Preparado
Use más o menos granos de café dependiendo del gusto.
TAZAS CAFÉ MOLIDO
12* 11 Cucharadas o 5-1/2 Medidas
10 9 Cucharadas o 4-1/2 Medidas
8 7 Cucharadas o 3-1/2 Medidas
6 6 Cucharadas o 3 Medidas
4 5 Cucharadas o 2-1/2 Medidas
2 3 Cucharadas o 1-1/2 Medidas
*
*Modelos AD12, AD12BLK, ADS12,
ADX20 and ADX23 Únicamente
APAGADO AUTOMÁTICO
(MODELOS
Su cafetera mantendrá su café caliente por 2 horas, y luego se apagará automáticamente.
Para mantener su café caliente otras 2 horas, mueva el interruptor de control a “OFF”
y luego a “ON”. Cuando su garrafa esté vacía, apague la cafetera poniendo el interruptor
en “OFF”.
ADS10, ADS12, ADX13, ADX20 Y ADX23 ÚNICAMENT)
LIMPIEZA
Su cafetera deben limpiarse cuando comienza a notar que genera vapor excesivo o que el
tiempo de colado aumenta considerablemente. Esta condición es causada por acumulación
de depósitos calcáreos y minerales del agua. Si la acción bombeadora se interrumpe antes
de que se haya bombeado toda el agua de la cafetera, el aparato requerirá limpieza.
La frecuencia de limpieza depende de la dureza del agua empleada. La tabla siguiente
le da el programa sugerido de limpieza.
1514
Page 16

16
INTERVALOS DE LIMPIEZA SUGERIDOS
Tipos de Agua Frecuencia de Limpieza
Agua Suave Cada 80 Ciclos de Preparación
Agua Dura Cada 40 Ciclos de Preparación
Puede limpiar su Cafetera utilizando el limpiador MR. COFFEE
®
o vinagre.
El Limpiador MR. COFFEE
®
está disponible en las tiendas o llamando al Departamento
de Servicio al Cliente MR. COFFEE
®
al 1-800-MR-COFFEE (1-800-672-6333)
USANDO LIMPIADOR MR. COFFEE
®
Lea la información de cuidado en el panel lateral de la caja antes de usarlo
.
L
IMPIANDO
USANDO V
INAGRE
1. Vierta 1 cuarto de vinagre blanco de uso casero sin diluir dentro de su cafetera.
2. Coloque un filtro dentro de la canasta para filtro y cierre la canastilla de colado.
3. Coloque la jarra vacía sobre la placa de calentamiento. Gira el botón de “ON”. Cuando
tres tazas han atravesado, gira el botón a “ON”. Deje el soporte para la 1/2 hora.
4. Después de 1/2 hora, vierta el vinagre nuevamente dentro de la cafetera.
Coloque la jarra vacía sobre la placa de calentamiento.
5. Gira el Control a “ON” y permita que el modo de limpieza llegue a su fin.
6. Deseche el vinagre y el filtro de papel.
7. Para eliminar los remanentes de vinagre, vierta una jarra llena de agua dentro
de la cafetera, encienda la unidad en “ON”, y permita que se lleve a cabo un ciclo.
8. Deseche el agua y APAGUE la cafetera. Repita los Pasos del 7 al 8 .
LIMPIANDO LA JARRA
LA JARRA Y LA TAPADELAJARRA SE PUEDEN LAVARENLAREJILLA SUPERIOR
DE LA
VAVADORA DE PLATOS
El agua dura puede dejar residuos blancos de depósitos minerales en la jarra. El café
o el Te decoloran estos depósitos y algunas veces dejan manchas color café de residuos
dentro de la jarra. Para remover estas manchas, siga los siguientes pasos:
1. Use una solución de partes iguales de vinagre blanco y agua caliente.
2. Deje reposar la solución dentro de la jarra durante aproximadamente 20 minutos
y después deséchela.
3. Lave y enjuague la jarra muy bien usando un paño suave. No use limpiadores
abrasivos. Esto puede dañar la jarra o causar que se rompa.
Page 17

GARANTÍA LIMITADA DE 1 AÑO
Sunbeam Products Inc. (“Sunbeam”) garantiza que, por un período de un año a partir
de la fecha de compra, este producto estará libre de defectos en el material y en la mano
de obra. Sunbeam a su criterio, reparará o remplazará este producto o cualquiera de los
componentes del mismo que estén defectuosos durante el período de garantía. El remplazo
será hecho con un producto o componente nuevo o reconstruido. Si el producto ya no
se encuentra disponible, se remplazará con un producto similar de igual o mayor valor.
Esta es su garantía exclusiva.
Esta garantía es válida para el comprador original a partir de la fecha inicial de compra
y no es transferible. Conserve el recibo original de compra. La prueba de compra es
requerida para obtener la garantía. Los vendedores, centros de servicio de Sunbeam o
tiendas donde se vendan productos Sunbeam, no tienen el derecho de alterar, modificar
o cambiar de ninguna otra forma los términos o condiciones de esta garantía.
Esta garantía no cubre el desgaste por el uso normal de las partes o daños que resulten
de cualquiera de lo siguiente: negligencia o uso incorrecto del producto, uso bajo un
voltaje o corrientes inadecuados, uso contrario a las instrucciones de operación,
desensamble, reparaciones o alteraciones hechas por una persona que no pertenezca
a Sunbeam o a un centro de servicio autorizado. Además, la garantía no cubre los actos
de la naturaleza, tales como incendios, inundaciones, huracanes y tornados.
Sunbeam no será responsable de ningún daño incidental o consecuente causado por el
incumplimiento de cualquier garantía expresa o implícita. Excepto al alcance prohibido
por la ley que aplique, cualquier garantía implícita de comercialización o ajustes para
un propósito en particular, está limitada en duración al periodo de la garantía que arriba
se indica. En algunos estados, provincias o jurisdicciones, no se permite la exclusión
o limitación de daños incidentales o consecuentes o limitaciones en la duración de una
garantía implícita, así que las limitaciones o exclusiones que se indican anteriormente
pueden no ser aplicables a usted. Esta garantía le da a usted derechos legales específicos
y usted puede también tener otros derechos que varían de estado a estado y de provincia
a provincia.
Cómo Obtener el Servicio de la Garantía
Lleve el producto a un centro de Servicio Autorizado Sunbeam. Usted puede obtener
una lista de los centros de servicio e instrucciones acerca de la reparación o remplazo
del producto llamando al 800 831-9678 o envíe un e-mail o correo electrónico a:
Consumeraffairs@consumer.sunbeam.com Por favor incluya su nombre, dirección,
número telefónico, número de modelo del producto y descripción del problema.
NO ENVÍE ESTE PRODUCTO AL LUGAR DONDE FUE ADQUIRIDO.
Para preguntas relacionadas al productos póngase en contacto con:
Sunbeam Consumer Service
P.O. Box 948389
Maitland, Florida 32794-8389
No envíe el producto a esta dirección.
17
Page 18

NOTES NOTES
Page 19

1918
Page 20

©2001 Sunbeam Products, Inc. All rights reserved.
MR. C FFEE®is a registered trademark of Sunbeam Products, Inc.
Distributed by Sunbeam Products, Inc., Boca Raton, Florida 33431.
©2001 Sunbeam Products. Inc. Todos los derechos reservados.
MR. C FFEE®es una marca registrada de Sunbeam Products, Inc.
Distribuido por Sunbeam Products, Inc., Boca Raton, Florida 33431.
Printed in China P.N. 107641
 Loading...